BrewStation
®
Le invitamos a leer cuidadosamente este instructivo antes
de usar su aparato.
Read before use.
Lire avant utilisation.
Lea antes de usar.
In an effort to reduce paper waste, Hamilton Beach Brands,
Inc. has reduced the size of this Use and Care guide and
made it available online. We believe strongly in doing our
part to help care for the environment. To view Use and Care
guides, recipes, and tips, please visit:
USA : hamiltonbeach.com | 1.800.851.8900
Aidez-vous à protéger l’environnement
Dans le but de réduire la consommation de papier,
Hamilton Beach Brands, Inc. a réduit le format des manuels
d’utilisation et d’entretien et offre maintenant la version
complète en ligne. Nous croyons fermement que nous
contribuons à sauvegarder l’environnement. Pour voir les
manuels d’utilisation et d’entretien, les recettes et les
conseils, veuillez consulter le site :
Canada : hamiltonbeach.ca | 1.800.267.2826
Ayude a Hamilton Beach a Hacer la Diferencia
En un esfuerzo por reducir el papel de desecho, Hamilton
Beach Brands, Inc., ha reducido el tamaño de este
Uso y Cuidado y lo puso disponible en línea. Creemos
fuertemente en hacer nuestra parte para ayudar a cuidar
el medioambiente. Para ver guías de Uso y Cuidado,
recetas y consejos, por favor visite:
México: hamiltonbeach.com.mx | 800.71.16.100
IMPORTANT SAFEGUARDS
When using electrical appliances, basic safety precautions
should always be followed to reduce the risk of fire, electric
shock, and/or injury to persons, including the following:
1.
Read all instructions.
2.
This appliance is not intended for use by persons
(including children) with reduced physical, sensory,
or mental capabilities, or lack of experience and
knowledge, unless they are closely supervised and
instructed concerning use of the appliance by a person
responsible for their safety.
3.
Close supervision is necessary when any appliance is
used by or near children. Children should be supervised
to ensure that they do not play with the appliance.
4.
Do not touch hot surfaces. Use handles or knobs. Care
must be taken, as burns can occur from touching hot
parts or from spilled, hot liquid.
5.
To protect against electric shock, do not place cord,
plug, or BrewStation
®
in water or other liquid.
6.
Unplug from outlet when either the BrewStation
®
or clock is
not in use and before cleaning. Allow to cool before putting
on or taking off parts and before cleaning the appliance.
7.
Scalding may occur if the lid is lifted during the brewing cycle.
Do not open lid until coffeemaker has cooled completely.
8.
BrewStation
®
must be operated on a flat surface away
from the edge of counter to prevent accidental tipping.
9.
Do not operate any appliance with a damaged supply
cord or plug, or after the appliance malfunctions or
has been dropped or damaged in any manner. Supply
cord replacement and repairs must be conducted
by the manufacturer, its service agent, or similarly
qualified persons in order to avoid a hazard. Call the
provided customer service number for information on
examination, repair, or adjustment.
10.
The use of accessory attachments not recommended by
the appliance manufacturer may cause injuries.
11.
Do not use outdoors.
12.
Do not let cord hang over edge of table or counter or
touch hot surfaces, including stove.
13.
The coffee tank is designed for use with this
BrewStation
®
. It must never be used on a range top or
in a microwave oven.
14.
Do not place BrewStation
®
on or near a hot gas or
electric burner or in a heated oven.
15.
To disconnect BrewStation
®
, turn controls to OFF; then
remove plug from wall outlet.
16.
WARNING! To reduce the risk of fire or electric shock, do
not remove the bottom cover. No user-serviceable parts
are inside. Repair should be done by authorized service
personnel only.
17.
Do not use appliance for other than intended use.
18.
Do not place coffeemaker in a cabinet when in use.
SAVE THESE INSTRUCTIONS
Other Consumer Safety Information
This appliance is intended for household use only.
w WARNING
Shock Hazard: This appliance has a
polarized plug (one wide blade) that reduces the risk of electric
shock. The plug fits only one way into a polarized outlet. Do
not defeat the safety purpose of the plug by modifying the plug
in any way or by using an adapter. If the plug does not fit fully
into the outlet, reverse the plug. If it still does not fit, have an
electrician replace the outlet.
The length of the cord used on this appliance was selected
to reduce the hazards of becoming tangled in or tripping over
a longer cord. If a longer cord is necessary, an approved
extension cord may be used. The electrical rating of the
extension cord must be equal to or greater than the rating of the
appliance. Care must be taken to arrange the extension cord
so that it will not drape over the countertop or tabletop where it
can be pulled on by children or accidentally tripped over.
To avoid an electrical circuit overload, do not use another high-
wattage appliance on the same circuit with this appliance.
IMPORTANT: Never use coffee tank to pour hot coffee or carry
hot coffee. Handle coffee tank when it holds only cold water.
Additional Information
• If overflow occurs: Let unit, coffee, and grounds cool
completely before attempting any cleanup.
• Use only brand-name, high-quality filters.
• Use only 1 Tablespoon of ground coffee for each cup of
water.
• Use coffeemaker cleaner to prevent hard water deposits
that affect coffeemaker performance. Clean monthly.
• Do not clean coffee tank in dishwasher.
• Read instructions before using.
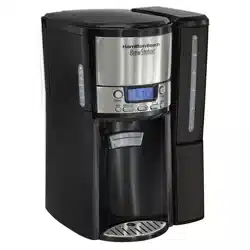
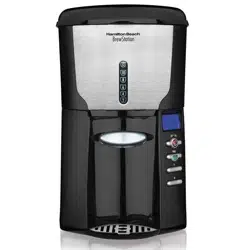
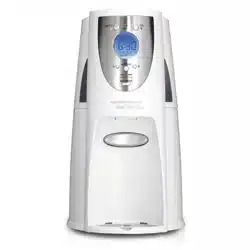
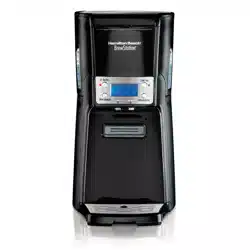
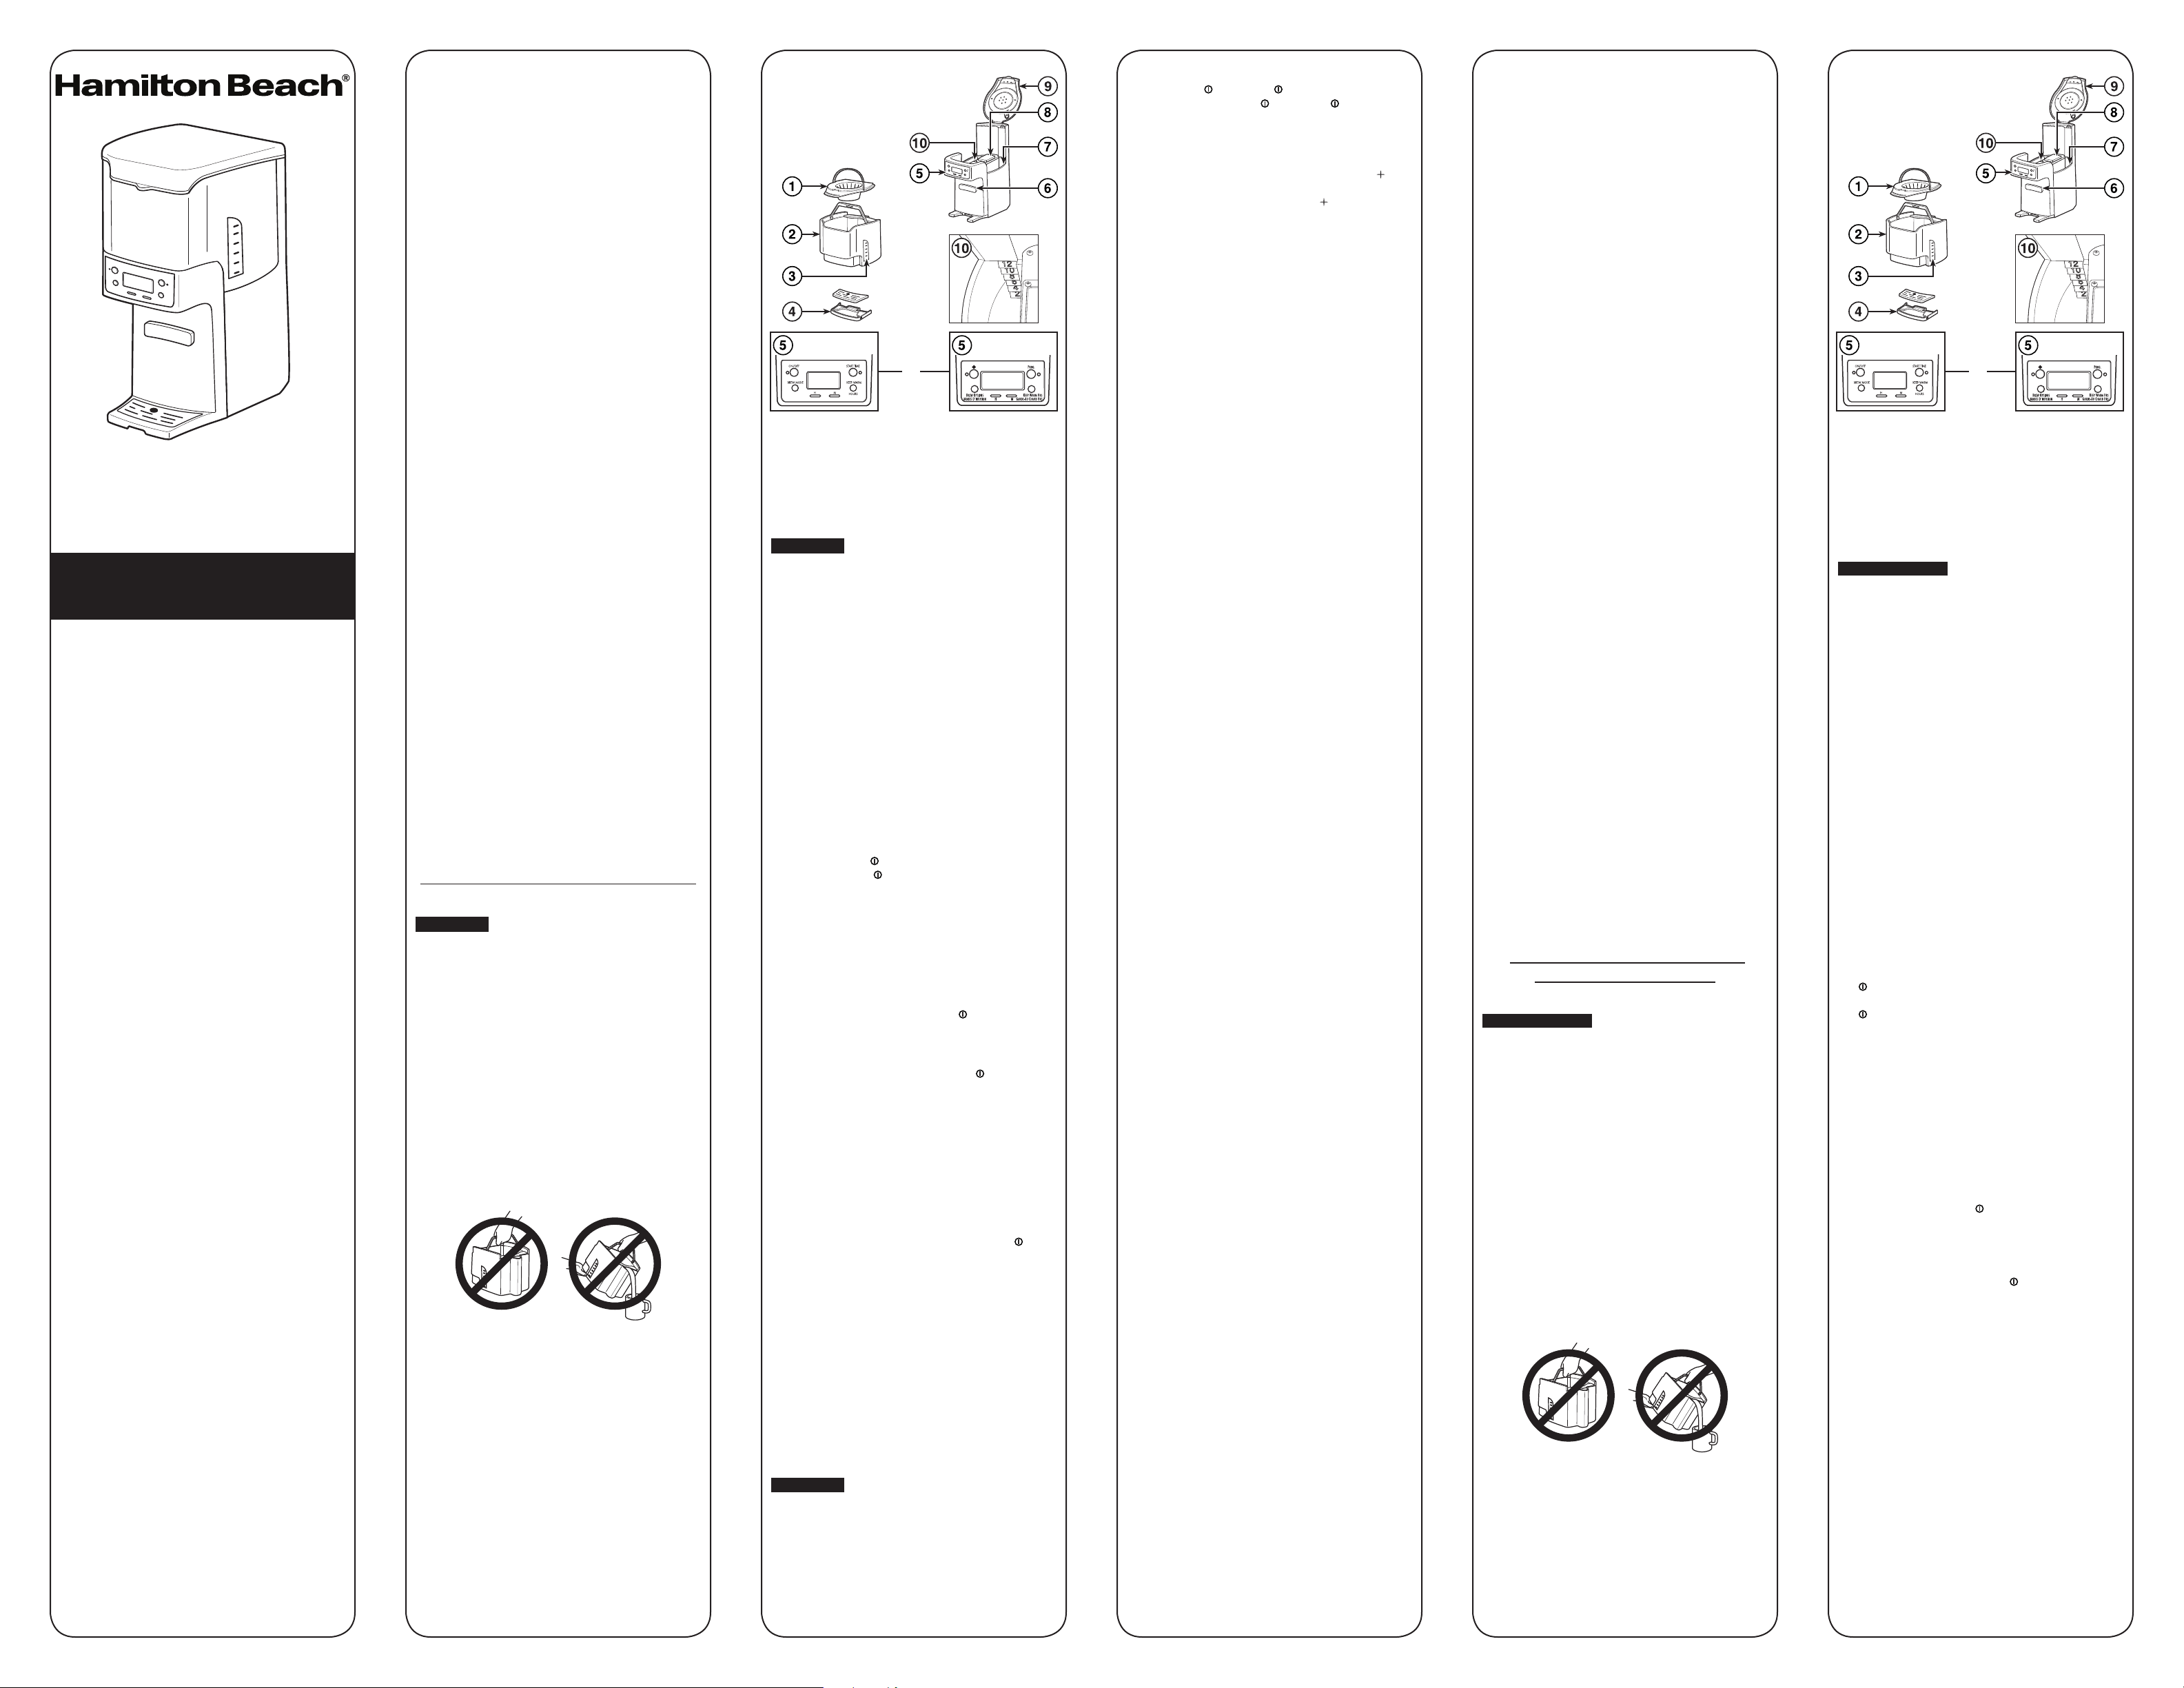
Parts and features
1. Filter Basket
2. Coffee Tank
3. Coffee Level Guide
4. Drip Tray
5. Control Panel and
Display
(on select models)
6. Coffee Dispenser Bar
7. Water Reservoir
8. Keep Warm Plate
9. Lid
10. Water Level Guide
NOTE: Picture references
major components for all
coffeemakers covered by
these instructions.
OR OU
How to make coffee
w WARNING
Burn Hazard.
• Never use coffee tank to pour or carry hot coffee.
• Handle coffee tank only when holding cold water for filling
water reservoir and to clean tank.
• If BrewStation
®
overflows, unplug unit. Allow unit, coffee,
and grounds to cool before cleaning unit, coffee, or grounds.
BEFORE FIRST USE: Wash coffee tank, filter basket,
and drip tray in hot, soapy water. NEVER put the coffee
tank in dishwasher. BrewStation
®
can be programmed to
automatically shut off in 0 (for Iced Coffee), 1, 2, 3, or 4 hours
as desired. Default is 4 hours for automatic shutoff.
1. Place a cupcake-style paper filter in filter basket. A
permanent filter may also be used.
2. For each cup of coffee being made, place one level
Tablespoon of coffee into filter. Avoid getting coffee
grounds in any other areas of the BrewStation
®
.
3. Fill coffee tank with the desired amount of cold tap water.
4. Lift lid and pour water from coffee tank into water
reservoir.
5. Set KEEP WARM HOURS to 1, 2, 3, or 4. The 0 setting is
for iced coffee.
6. Press ON/OFF or button to start. An illuminated red light
on the ON/OFF or button indicates coffeemaker is on.
7. Coffeemaker will beep one time when brewing is complete.
Press coffee dispensing bar with mug to dispense coffee.
BOLD: For enhanced full/strong-flavored coffee, press BREW
STRENGTH/BREW OPTIONS button until BOLD is displayed.
1–4 CUPS: When brewing 1–4 cups of coffee, press BREW
STRENGTH/BREW OPTIONS button until 1–4 CUPS is displayed.
NOTE: BOLD and 1–4 CUPS modes will require additional
time to complete a brewing cycle. A Brew Option must be
selected prior to pressing the ON/OFF or button. The setting
cannot be changed during/in brew mode. If a Brew Option is
not selected, the coffeemaker will automatically brew on the
regular/default setting.
TO REHEAT COFFEE: Press and hold ON/OFF or button for
3 seconds. This will reset the timer and keep coffee warm for
selected number of hours (1, 2, 3, or 4).
How to make iced coffee
1. Follow Steps 1 through 4 in “How to make coffee”
section. Do not fill coffee tank beyond the 6-cup line
when making iced coffee. NOTE: Brew double-strength
coffee for iced coffee. Add 2 scoops (optional accessory)
or 2 level Tablespoons of ground coffee per cup (up to 12
scoops).
2. Fill coffee tank with ice to the 10 CUP marking line.
3. Set KEEP WARM HOURS to 0. Press ON/OFF or .
4. Press coffee dispensing bar with glass full of ice to
dispense coffee.
Care and cleaning
3.
Press ON or . Turn OFF or after 20 seconds and wait
30 minutes. Press ON or . Turn OFF or when finished.
When cool, dispense several cups before emptying and
rinsing reservoir.
NOTE: Coffeemaker will remind you it is time for cleaning
in two ways:
• Built-in cycle timer—Every 30 cycles, CLEAN or will
flash in display and stay illuminated for 2 cycles.
• Built-in residue sensor—CLEAN or will appear in
display when unit senses residue buildup and remain
illuminated until the unit has been cleaned.
4. Run 2–3 more brew cycles with CLEAN WATER only. Allow
to cool between cycles.
Filter basket and coffee tank: Remove the filter basket and
coffee tank and wash by hand with warm, soapy water. Filter
basket may also be cleaned in top rack of dishwasher. Clean
filter basket often.
Outside of coffeemaker: Wipe outside with a soft cloth and
warm, soapy water. Do not use abrasive cleaners, since they
will scratch the finish of the product.
Troubleshooting
Coffee leaks from dispenser.
• Coffee grounds trapped in coffee tank dispensing mechanism
under seal in coffee tank. See “Care and cleaning: Inside of
coffeemaker.”
CLEAN appears in display.
• This is a reminder to clean coffeemaker. See “Care and
cleaning: Inside of coffeemaker.”
Coffee tastes bad.
• Coffeemaker needs cleaning.
• Coffee ground too coarsely or too finely. Set coffee grinder to
automatic drip grind.
• Coffee-to-water ratio unbalanced. Adjust for personal
preference.
• Poor water quality. Use water filter or bottled water to make
coffee.
Coffee not brewing or stops brewing/unit will not turn on.
• Mineral deposits have built up. Clean the coffeemaker
following “Care and cleaning: Inside of coffeemaker.”
• Water reservoir is empty.
• Unit is unplugged.
• Power outage or power surge. If surge, unplug; then plug
back in.
Coffee brews slowly.
• Coffeemaker needs cleaning. Clean at least every 30 days to
maintain proper performance.
• Coffeemaker is in the 1–4 CUPS or BOLD modes. Press Brew
Mode button until no lights appear.
Coffee overflows basket.
• Excessive amounts of coffee grounds.
• Coffee ground too finely. Set coffee grinder to automatic drip
grind.
• More than one paper filter in filter basket. Poor quality paper
filter or wrong size paper filter.
Unit beeps continuously/will not brew and/or POUR
WATER appears in display.
• No water in reservoir. Transfer water from coffee tank to
reservoir.
Coffee is cold when dispensed.
• Selected Keep Warm Hours have elapsed and coffeemaker
has automatically shut off. See “TO REHEAT COFFEE”
instructions, or brew new cycle.
PRÉCAUTIONS IMPORTANTES
Pour utiliser un appareil électroménager, vous devez toujours
prendre des mesures élémentaires de sécurité pour réduire le risque
d’incendie, d’électrocution et/ou de blessure corporelle, en particulier
les mesures suivantes :
1. Lire toutes les instructions.
2. Cet appareil n’est pas destiné à être utilisé par des personnes (y
compris les enfants) dont les capacités physiques, sensorielles
ou mentales sont réduites, ou manquant d’expérience et
de connaissance, sauf si elles sont étroitement surveillées
et instruites sur l’utilisation de l’appareil par une personne
responsable de leur sécurité.
3. Une surveillance étroite est requise pour tout appareil utilisé par
ou près des enfants. Surveiller que les enfants ne jouent pas
avec l’appareil.
4. Ne pas toucher aux surfaces chaudes. Utiliser les poignées
ou les boutons. Prendre toutes les précautions nécessaires
pour éviter les brûlures causées par les surfaces chaudes, les
déversements et le liquide chaud.
5. Pour éviter les risques d’électrocution, ne pas placer le cordon,
la fiche ou la cafetière BrewStation
®
dans l’eau ou tout autre
liquide.
6. Débrancher de la prise murale lorsque la cafetière
BrewStation
®
ou l’horloge n’est pas utilisée et avant le
nettoyage. Laisser refroidir la cafetière avant d’installer ou de
retirer des pièces et avant de la nettoyer.
7. Des éclaboussures peuvent survenir si le couvercle est soulevé
pendant le cycle d’infusion. Ne pas ouvrir le couvercle tant que
la cafetière n’est pas complètement refroidie.
8. La cafetière BrewStation
®
doit fonctionner sur une surface
plane, loin du rebord de comptoir pour éviter le basculement
accidentel.
9. Ne pas faire fonctionner un appareil électroménager avec un
cordon ou une fiche endommagée, ou lorsque l’appareil ne
fonctionne pas bien ou a été échappé ou endommagé d’une
manière quelconque. Le remplacement et la réparation du
cordon d’alimentation doivent être faits par le fabricant, son
agent de service ou toute personne qualifiée de façon à éviter
tout danger. Appeler le numéro de service à la clientèle fourni
pour des renseignements concernant l’examen, la réparation ou
l’ajustement.
10. L’utilisation de tout autre accessoire contre-indiqué par le
fabricant de l’appareil peut causer des blessures.
11. Ne pas utiliser à l’extérieur.
12. Ne pas laisser pendre le cordon de la table ou du comptoir
et éviter tout contact avec les surfaces chaudes incluant la
cuisinière.
13. Le réservoir de café est conçu pour être utilisé avec cette
cafetière BrewStation
®
. Elle ne doit jamais être utilisée sur une
table de cuisson ou dans un four à micro-ondes.
14. Ne pas placer la cafetière BrewStation
®
sur ou près d’un
brûleur à gaz ou électrique ou dans un four chaud.
15. Pour débrancher la cafetière BrewStation
®
, mettre la cafetière
hors tension en tournant les commandes à OFF (arrêt) puis
débrancher la fiche de la prise murale.
16. AVERTISSEMENT ! Pour éviter les risques d’incendie et
d’électrocution, ne pas enlever le couvercle inférieur de la
cafetière. Aucune pièce réparable à l’intérieur. Les réparations
doivent être faites par un technicien agréé seulement.
17. Ne pas utiliser l’appareil électroménager à une fin autre que
celle prévue.
18. Ne pas mettre la cafetière dans une armoire lors de l’utilisation.
Pièces et caractéristiques
1. Panier-filtre
2. Réservoir de café
3. Guide de niveau de café
4. Ramasse-gouttes
5. Panneau de commandes
et afficheur
(sur certains modèles)
6. Barre de la distributrice
de café
7. Réservoir d’eau
8. Réchaud
9. Couvercle
10. Guide de niveau d’eau
REMARQUE : Les illustrations
montrent les composantes
importantes de toutes les
cafetières relatives aux
présentes instructions.
Programming
1. To set clock: Press H and then M. NOTE: Clock time must
be set for programming function to work.
2. To program auto brew: Press and hold START TIME or
PROG until clock flashes. START TIME will appear in
display.
3. Continue holding START TIME or PROG; then press H
and M until the desired brewing start time is reached.
4. Press and release START TIME or PROG to activate
automatic brewing. A green light will signal that the unit
is in program mode.
This warranty applies to products purchased and used in the
U.S. and Canada. This is the only express warranty for this
product and is in lieu of any other warranty or condition.
This product is warranted to be free from defects in material
and workmanship for a period of one (1) year from the date of
original purchase. During this period, your exclusive remedy is
repair or replacement of this product or any component found
to be defective, at our option; however, you are responsible for
all costs associated with returning the product to us and our
returning a product or component under this warranty to you. If
the product or component is no longer available, we will replace
with a similar one of equal or greater value.
This warranty does not cover glass, filters, wear from normal
use, use not in conformity with the printed directions, or
damage to the product resulting from accident, alteration,
abuse, or misuse. This warranty extends only to the original
consumer purchaser or gift recipient. Keep the original sales
receipt, as proof of purchase is required to make a warranty
claim. This warranty is void if the product is used for other than
single-family household use or subjected to any voltage and
waveform other than as specified on the rating label
(e.g., 120V ~ 60 Hz).
We exclude all claims for special, incidental, and consequential
damages caused by breach of express or implied warranty. All
liability is limited to the amount of the purchase price. Every
implied warranty, including any statutory warranty or
condition of merchantability or fitness for a particular
purpose, is disclaimed except to the extent prohibited by
law, in which case such warranty or condition is limited
to the duration of this written warranty. This warranty gives
you specific legal rights. You may have other legal rights that
vary depending on where you live. Some states or provinces do
not allow limitations on implied warranties or special, incidental,
or consequential damages, so the foregoing limitations may not
apply to you.
To make a warranty claim, do not return this appliance to the
store. Please call 1.800.851.8900 in the U.S. or 1.800.267.2826
in Canada or visit hamiltonbeach.com in the U.S. or
hamiltonbeach.ca in Canada. For faster service, locate the
model, type, and series numbers on your appliance
.
Limited warranty
Care and cleaning
w WARNING
Burn Hazard.
Do not immerse cord, plug, or coffeemaker in any liquid.
Clean BrewStation
®
at least once a month (once a week for
areas with hard water).
Inside of coffeemaker:
1. Remove optional water filter.
2. Pour 1 pint (2 cups/500 ml) vinegar into water reservoir.
CONSERVER CES INSTRUCTIONS
Autres consignes de sécurité
pour le consommateur
Cet appareil est conçu pour une utilisation domestique
seulement.
w AVERTISSEMENT
Risque d’électrocution : Cet appareil
électroménager possède une fiche polarisée (une broche large)
qui réduit le risque d’électrocution. Cette fiche n’entre que dans
un seul sens dans une prise polarisée. Ne contrecarrez pas
l’objectif sécuritaire de cette fiche en la modifiant de quelque
manière que ce soit ou en utilisant un adaptateur. Si vous ne
pouvez pas insérer complètement la fiche dans la prise, inversez
la fiche. Si elle refuse toujours de s’insérer, faire remplacer la
prise par un électricien.
La longueur du cordon installé sur cet appareil a été sélectionnée
afin de réduire les risques d’enchevêtrement ou de faux pas
causés par un fil trop long. L’utilisation d’une rallonge approuvée
est permise si le cordon est trop court. Les caractéristiques
électriques de la rallonge doivent être équivalentes ou supérieures
aux caractéristiques de l’appareil. Prendre toutes les précautions
nécessaires pour installer la rallonge de manière à ne pas la faire
courir sur le comptoir ou sur une table pour éviter qu’un enfant ne
tire sur le cordon ou trébuche accidentellement.
Pour éviter la surcharge du circuit électrique, ne pas utiliser un
autre appareil à haute puissance sur le même circuit que cet
appareil.
IMPORTANT : Ne jamais utiliser le réservoir de café pour verser
ou transporter le café chaud. Ne manipuler le réservoir de café
que lorsqu’il ne contient que de l’eau froide.
Information additionnelle :
• Si un débordement survient : Laisser refroidir complètement la
cafetière et la mouture avant d’effectuer tout nettoyage.
• Utiliser uniquement les filtres de grande qualité et de marque.
• Utiliser uniquement 1 cuillère à soupe de café moulu pour
chaque tasse d’eau.
• Utiliser un nettoyant pour cafetière pour prévenir les dépôts
calcaires qui nuisent à la performance des cafetières. Nettoyer
tous les mois.
• Le réservoir de café n’est pas conçu pour aller au lave-vaisselle.
• Lire les instructions avant l’utilisation.
Préparation du café
w AVERTISSEMENT
Risque de brûlure.
• Ne jamais utiliser le réservoir de café pour verser ou
transporter le café chaud.
• Manipuler le réservoir à café uniquement lorsqu’il contient
de l’eau froide pour le remplissage du réservoir d’eau et pour
nettoyer le réservoir.
• Si la cafetière BrewStation
®
déborde, débrancher l’appareil.
Laisser refroidir complètement l’appareil, le café et la
mouture avant de nettoyer l’appareil, le café et la mouture.
AVANT LA PREMIÈRE UTILISATION : Laver le réservoir
de café, le panier-filtre et le ramasse-gouttes avec de l’eau
chaude savonneuse. NE JAMAIS mettre le réservoir de café
au lave-vaisselle. La cafetière BrewStation
®
est programmable
pour se mettre hors tension automatiquement en 0 (pour le
café glacé), 1, 2, 3 ou 4 heures selon votre besoin. La mise
hors tension automatique par défaut est réglée à 4 heures.
1. Placer un filtre panier en papier dans le panier-filtre. Un
filtre à café réutilisable peut être utilisé.
2. Déposer une cuillère à soupe rase de café par tasse de
café à préparer dans le filtre. Éviter la dispersion des
grains de café vers les autres parties de la cafetière.
3. Remplir le réservoir de café avec de l’eau froide du robinet
à la quantité désirée.
4. Soulever le couvercle et verser l’eau de le réservoir de café
dans le réservoir à eau.
5. Régler le temps de GARDE-AU CHAUD HRS (Keep Warm)
à 1, 2, 3 ou 4 heures. Le réglage « 0 » est utilisé pour le
café glacé.
6. Appuyer sur le bouton « ON/OFF » (marche/arrêt) ou
pour commencer l’infusion. L’affichage d’un témoin
lumineux rouge sur le bouton « ON/OFF » (marche/arrêt)ou
indique que la cafetière est en marche.
7. La cafetière émettra un bip à la fin du cycle d’infusion.
Appuyer la barre de la distributrice de café avec la tasse
de café à distribuer.
BOLD (CORSÉ) : Pour un café fort ou corsé, appuyer sur le
bouton de mode d’infusion jusqu’à ce que l’indication
« BOLD » s’affiche.
1–4 CUPS (1 À 4 TASSES) : Pour l’infusion de 1 à 4 tasses de
café, appuyer sur le bouton de mode d’infusion jusqu’à ce que
« 1 à 4 TASSES » s’affiche.
NOTE : Les modes CORSÉ (BOLD) et 1 à 4 TASSES (1–4
CUPS) nécessitent un cycle d’infusion plus long. Une option
d’infusion doit être sélectionnée avant d’appuyer sur le bouton
« ON/OFF » (marche/arrêt) ou de l’appareil. Le réglage ne
peut être modifié pendant/au cours du mode d’infusion. Si une
option d’infusion n’est pas sélectionnée, la cafetière infuse
automatiquement au mode de réglage par défaut/normal.
RÉCHAUFFAGE DU CAFÉ : Appuyer et maintenir enfoncé le
bouton « ON/OFF » (marche/arrêt) ou pendant 3 secondes.
Ceci réinitialisera la minuterie et gardera le café au chaud
selon le nombre d’heures sélectionné (1, 2, 3 ou 4).
Préparation café glacé
1. Suiver les étapes 1 à 4 de « Preparation du café »
section. Ne pas dépasser la ligne des 6 tasses en le
réservoir de café lorsque de la préparation de café glacé.
NOTE : Infuser du café très fort pour café glacé. Ajouter
deux cuillères ou 2 cuillères à soupe rases de café moulu
par tasse (jusqu’à 12 cuillères).
2. Remplir le réservoir de café avec de la glace jusqu’à la
marque « 10 CUP » (10 tasses).
3. Régler les GARDE-AU CHAUD HRS au chaud à 0.
Appuyer sur « ON/OFF » (marche/arrêt) ou .
4. Appuyer la barre de la distributrice de café en verre avec
de la glace de café à distribuer.
Programming
1. Réglage de l’horloge : Appuyer sur H (heure) puis sur M
(minute). NOTE : L’horloge doit être réglée pour pouvoir
utiliser la fonction de programmation.
2. Programmation de l’infusion automatique : Appuyer et
maintenir enfoncé le bouton du DÉBUT D’INFUSION
(START TIME) or PROG (programme) jusqu’à ce que
l’horloge clignote. La période de DÉBUT D’INFUSION
(START TIME) apparaîtra à l’écran.
3. Maintenir le bouton de DÉBUT D’INFUSION (START
TIME) ou PROG enfoncé; puis appuyer sur H et M pour
obtenir l’heure du début d’infusion désirée.
4. Appuyer et relâcher le bouton de DÉBUT D’INFUSION
(START TIME) or PROG pour activer l’infusion
automatique. Un témoin vert lumineux signalera que
l’appareil est activé au mode de programmation.
Entretien et nettoyage
w AVERTISSEMENT
Risque de brûlure.
Ne pas immerger le cordon, la fiche ou la cafetière dans aucun
liquide.
Nettoyer la cafetière BrewStation
®
une fois par mois (une fois
la semaine pour les zones à forte teneur en calcaire).
Intérieur de la cafetière :
1. Retirer le filtre à eau facultatif.
2. Verser 500 ml (2 tasses) de vinaigre dans le réservoir à
eau.
3. Appuyer sur ON (mise en marche) ou . Mettre hors
tension (OFF/ ) après 20 secondes et attendre 30
minutes. Appuyer sur ON (mise en marche) ou . Mettre
hors tension (OFF/ ) dès la fin de l’utilisation. Lorsque le
vinaigre est refroidi, distribuer plusieurs tasses avant de
vider et de rincer le réservoir.
NOTE : La cafetière signale la période de nettoyage de
deux manières :
• Minuterie de cycle intégrée — Tous les 30 cycles, le
témoin de CLEAN (nettoyage) ou clignotera à l’écran
et restera illuminé pendant 2 cycles.
• Capteur de résidus intégré — Le témoin de CLEAN
(nettoyage) ou s’affichera à l’écran lorsque l’appareil
capte des accumulations de résidus et restera illuminé
jusqu’au nettoyage de l’appareil.
4. Effectuer 2 ou 3 cycles d’infusion de plus avec de L’EAU
PROPRE seulement. Permettre le refroidissement entre
chaque cycle.
Panier-filtre et le réservoir de café : Retirer le panier-filtre et
laver à la main à l’eau chaude savonneuse ou dans le panier
supérieur du lave-vaisselle. Nettoyer le panier-filtre souvent.
Extérieur de la cafetière : Essuyer l’extérieur avec un linge
doux imbibé d’eau chaude savonneuse. Ne pas utiliser de
nettoyants abrasifs pour éviter d’égratigner le fini du produit.
Dépannage
Égouttement de café du distributeur.
• Des grains de café sont emprisonnés dans le mécanisme de
distribution du réservoir sous le joint d’étanchéité du réservoir
de café. Voir le chapitre « Entretien et nettoyage : Intérieur de
la cafetière ».
L’indicateur « CLEAN » apparaît à L’ÈCRAN.
• Ceci est un rappel de nettoyage de la cafetière. Voir le chapitre
« Entretien et nettoyage : Intérieur de la cafetière ».
Le café a mauvais goût.
• La cafetière doit être nettoyée.
• La mouture du café est trop grossière ou trop fine. Régler le
moulin à café à café moulu pour cafetière automatique.
• Portions de café et d’eau incorrecte. Ajuster les choix
personnels.
• Piètre qualité de l’eau. Utiliser un filtre à eau ou de l’eau
embouteillée pour faire le café.
Le café n’infuse pas/l’infusion de café s’arrête/l’appareil
refuse de démarrer.
• Des dépôts minéraux se sont accumulés. Nettoyer la cafetière
en suivant les instructions du chapitre « Entretien et nettoyage
: Intérieur de la cafetière ».
• Le réservoir d’eau est vide.
• L’appareil n’est pas branché.
• Coupure de courant ou surtension. Lors d’une surtension,
débrancher puis rebrancher l’appareil.
L’infusion du café est lente.
• La cafetière doit être nettoyée. Nettoyer au moins tous les 30
jours pour maintenir la performance adéquate.
• La cafetière est réglée aux modes « 1–4 CUPS » ou « BOLD ».
Appuyer sur le bouton du mode d’infusion jusqu’à ce que les
témoins s’éteignent.
Le café déborde du panier.
• Grande quantité de marc de café.
• La mouture du café est trop fine. Régler le moulin à café à
café moulu pour cafetière automatique.
• Il y a plus d’un filtre de papier dans le panier-filtre. Piètre
qualité des filtres de papier ou format inadéquat.
Dépannage (suite)
L’appareil émet un signal sonore continuel/l’infusion
ne se produit PAS OU l’indicateur de POUR WATER/
VERSER L’EAU apparaît à l’écran.
• Réservoir d’eau vide. Transférer l’eau du réservoir de café
vers le réservoir.
Le café distribué est froid.
• Les heures de garde au chaud sélectionnées sont périmées
et la cafetière s’est mise hors tension automatiquement.
Voir les instructions pour le « RÉCHAUFFAGE DU CAFÉ » ou
effectuer un nouveau cycle d’infusion.
Cette garantie s’applique aux produits achetés et utilisées
aux É.-U. et au Canada. C’est la seule garantie expresse
pour ce produit et est en lieu et place de tout autre garantie
ou condition.
Ce produit est garanti contre tout défaut de matériaux et de
main-d’oeuvre pour une période de un (1) an à compter de la
date d’achat d’origine. Au cours de cette période, votre seul
recours est la réparation ou le remplacement de ce produit
ou tout composant s’avérant défectueux, à notre gré, mais
vous êtes responsable de tous les coûts liés à l’expédition du
produit et le retour d’un produit ou d’un composant dans le
cadre de cette garantie. Si le produit ou un composant n’est
plus offert, nous le remplacerons par un produit similaire de
valeur égale ou supérieure.
Cette garantie ne couvre pas le verre, les filtres, l’usure
d’un usage normal, l’utilisation non conforme aux directives
imprimées, ou des dommages au produit résultant d’un
accident, modification, utilisation abusive ou incorrecte. Cette
garantie s’applique seulement à l’acheteur original ou à la
personne l’ayant reçu en cadeau. La présentation du reçu
de vente d’origine comme preuve d’achat est nécessaire
pour faire une réclamation au titre de cette garantie. Cette
garantie s’annule si le produit est utilisé autrement que
par une famille ou si l’appareil est soumis à toute tension
ou forme d’onde différente des caractéristiques nominales
précisées sur l’étiquette (par ex. : 120 V ~ 60 Hz).
Nous excluons toutes les réclamations au titre de cette
garantie pour les dommages spéciaux, consécutifs et
indirects causés par la violation de garantie expresse ou
implicite. Toute responsabilité est limitée au prix d’achat.
Chaque garantie implicite, y compris toute garantie
ou condition de qualité marchande ou d’adéquation
à un usage particulier, est exonérée, sauf dans la
mesure interdite par la loi, auquel cas la garantie ou
condition est limitée à la durée de cette garantie écrite.
Cette garantie vous donne des droits légaux précis. Vous
pouvez avoir d’autres droits qui varient selon l’endroit où
vous habitez. Certaines provinces ne permettent pas les
limitations sur les garanties implicites ou les dommages
spéciaux ou indirects de telle sorte que les limitations
ci-dessus ne s’appliquent peut-être pas à votre cas.
Ne pas retourner cet appareil au magasin lors d’une
réclamation au titre de cette garantie. Téléphoner au
1.800.851.8900 aux É.-U. ou au 1.800.267.2826 au Canada
ou visiter le site internet www.proctorsilex.com aux É.-U.
ou www.proctorsilex.ca au Canada. Pour un service plus
rapide, trouvez le numéro de modèle, le type d’appareil et les
numéros de série sur votre appareil.
Garantie limitée
SALVAGUARDIAS IMPORTANTES
Cuando utilice artefactos eléctricos, siempre deben seguirse
precauciones de seguridad básicas a fin de reducir el riesgo
de incendio, descarga eléctrica, y/o lesiones a personas,
incluyendo las siguientes:
1. Lea todas las instrucciones.
2. Este aparato no se destina para utilizarse por personas
(incluyendo niños) cuyas capacidades físicas, sensoriales o
mentales sean diferentes o estén reducidas, o carezcan de
experiencia o conocimiento, a menos que dichas personas
reciban una supervisión o capacitación para el funcionamiento
del aparato por una persona responsable de su seguridad.
3. Se requiere de una estrecha supervisión cuando el aparato se
use por o cerca de niños. Los niños deben supervisarse para
asegurar que ellos no empleen los aparatos como juguete.
4. Verifique que el voltaje de su instalación corresponda con el del
producto.
5. No toque superficies calientes. Use las manijas o perillas. Se
debe de tener cuidado, ya que pueden ocurrir quemaduras al
tocar partes calientes o por liquido caliente derramado.
6. Para protegerse contra una descarga eléctrica, no coloque el
cable, enchufe o la BrewStation
®
en agua u otro líquido.
7. Desconecte de la toma cuando la BrewStation
®
o el reloj no
esté en uso y antes de limpiar. Deje enfriar antes de poner o
quitar partes y antes de limpiar el aparato.
8. Se puede escaldar si la tapa es levantada durante el ciclo de
preparación. No abra la tapa hasta que la cafetera se haya
enfriado completamente.
9. La BrewStation
®
debe operar sobre una superficie plana
lejos del borde de una cubierta para prevenir que se caiga
accidentalmente.
10. No opere ningún aparato con cables o enchufe dañados o
después de que el aparato funcione mal o se caiga o dañe de
cualquier manera. El reemplazo del cable de suministro y las
reparaciones deben ser efectuadas por el fabricante, su agente
de servicio, o personas igualmente calificadas para poder evitar
un peligro. Llame al número de servicio al cliente proporcionado
para información sobre examinación, reparación o ajuste.
11. El uso de aditamentos de accesorio no recomendados por el
fabricante del aparato puede causar lesiones.
12. No use en exteriores.
13. No deje que el cable cuelgue del borde de la mesa o cubierta o
toque superficies calientes, incluyendo el horno.
14. El tanque de café está diseñado para usarse con esta
BrewStation
®
. No debe usarse sobre una estufa o en un horno
de microondas.
15. No coloque la BrewStation
®
sobre o cerca de un quemador de
gas o eléctrico caliente o sobre un horno caliente.
GUARDE ESTAS INSTRUCCIONES
Otra Información de Seguridad
para el Cliente
Este aparato está planeado para uso doméstico.
w ADVERTENCIA
Peligro de Descarga Eléctrica: Este
aparato cuenta con un enchufe polarizado (una pata más
ancha) que reduce el riesgo de una descarga eléctrica. El
enchufe embona únicamente en una dirección dentro de un
tomacorriente polarizado. No trate de obviar el propósito de
seguridad del enchufe modificándolo de alguna manera o
utilizando un adaptador. Si el enchufe no entra completamente
en la toma, invierta el enchufe. Si aún no entra, haga que un
electricista reemplace la toma.
El largo del cable que se usa en este aparato fue seleccionado
para reducir el peligro de que alguien se enganche o tropiece
con un cable más largo. Si es necesario usar un cable más
largo, se podrá usar un cable de extensión aprobado. La
clasificación eléctrica nominal del cable de extensión debe
ser igual o mayor que la clasificación nominal del aparato. Es
importante tener cuidado de colocar el cable de extensión para
que no se pliegue sobre el mostrador o la mesera en donde
niños puedan tirar del mismo o tropezarse accidentalmente.
Para evitar una sobrecarga eléctrica del circuito, no use otro
aparato de alto voltaje en el mismo circuito con este aparato.
IMPORTANTE: Nunca use el tanque de café para vaciar o
llevar café caliente. Maneje el tanque de café sólo cuando
tenga agua fría.
Información Adicional
• Si ocurre un desbordamiento: Deje que la unidad, café y el
molido se enfríen completamente antes de intentar cualquier
limpieza.
• Use sólo filtros de marca de alta calidad.
• Use sólo 1 cucharada de café molido por cada taza de agua.
• Use limpiador de cafeteras para prevenir depósitos de agua dura
que afecte el desempeño de la cafetera. Limpie mensualmente.
• No lave el tanque de café en el lavaplatos.
• Lea las instrucciones antes de usar.
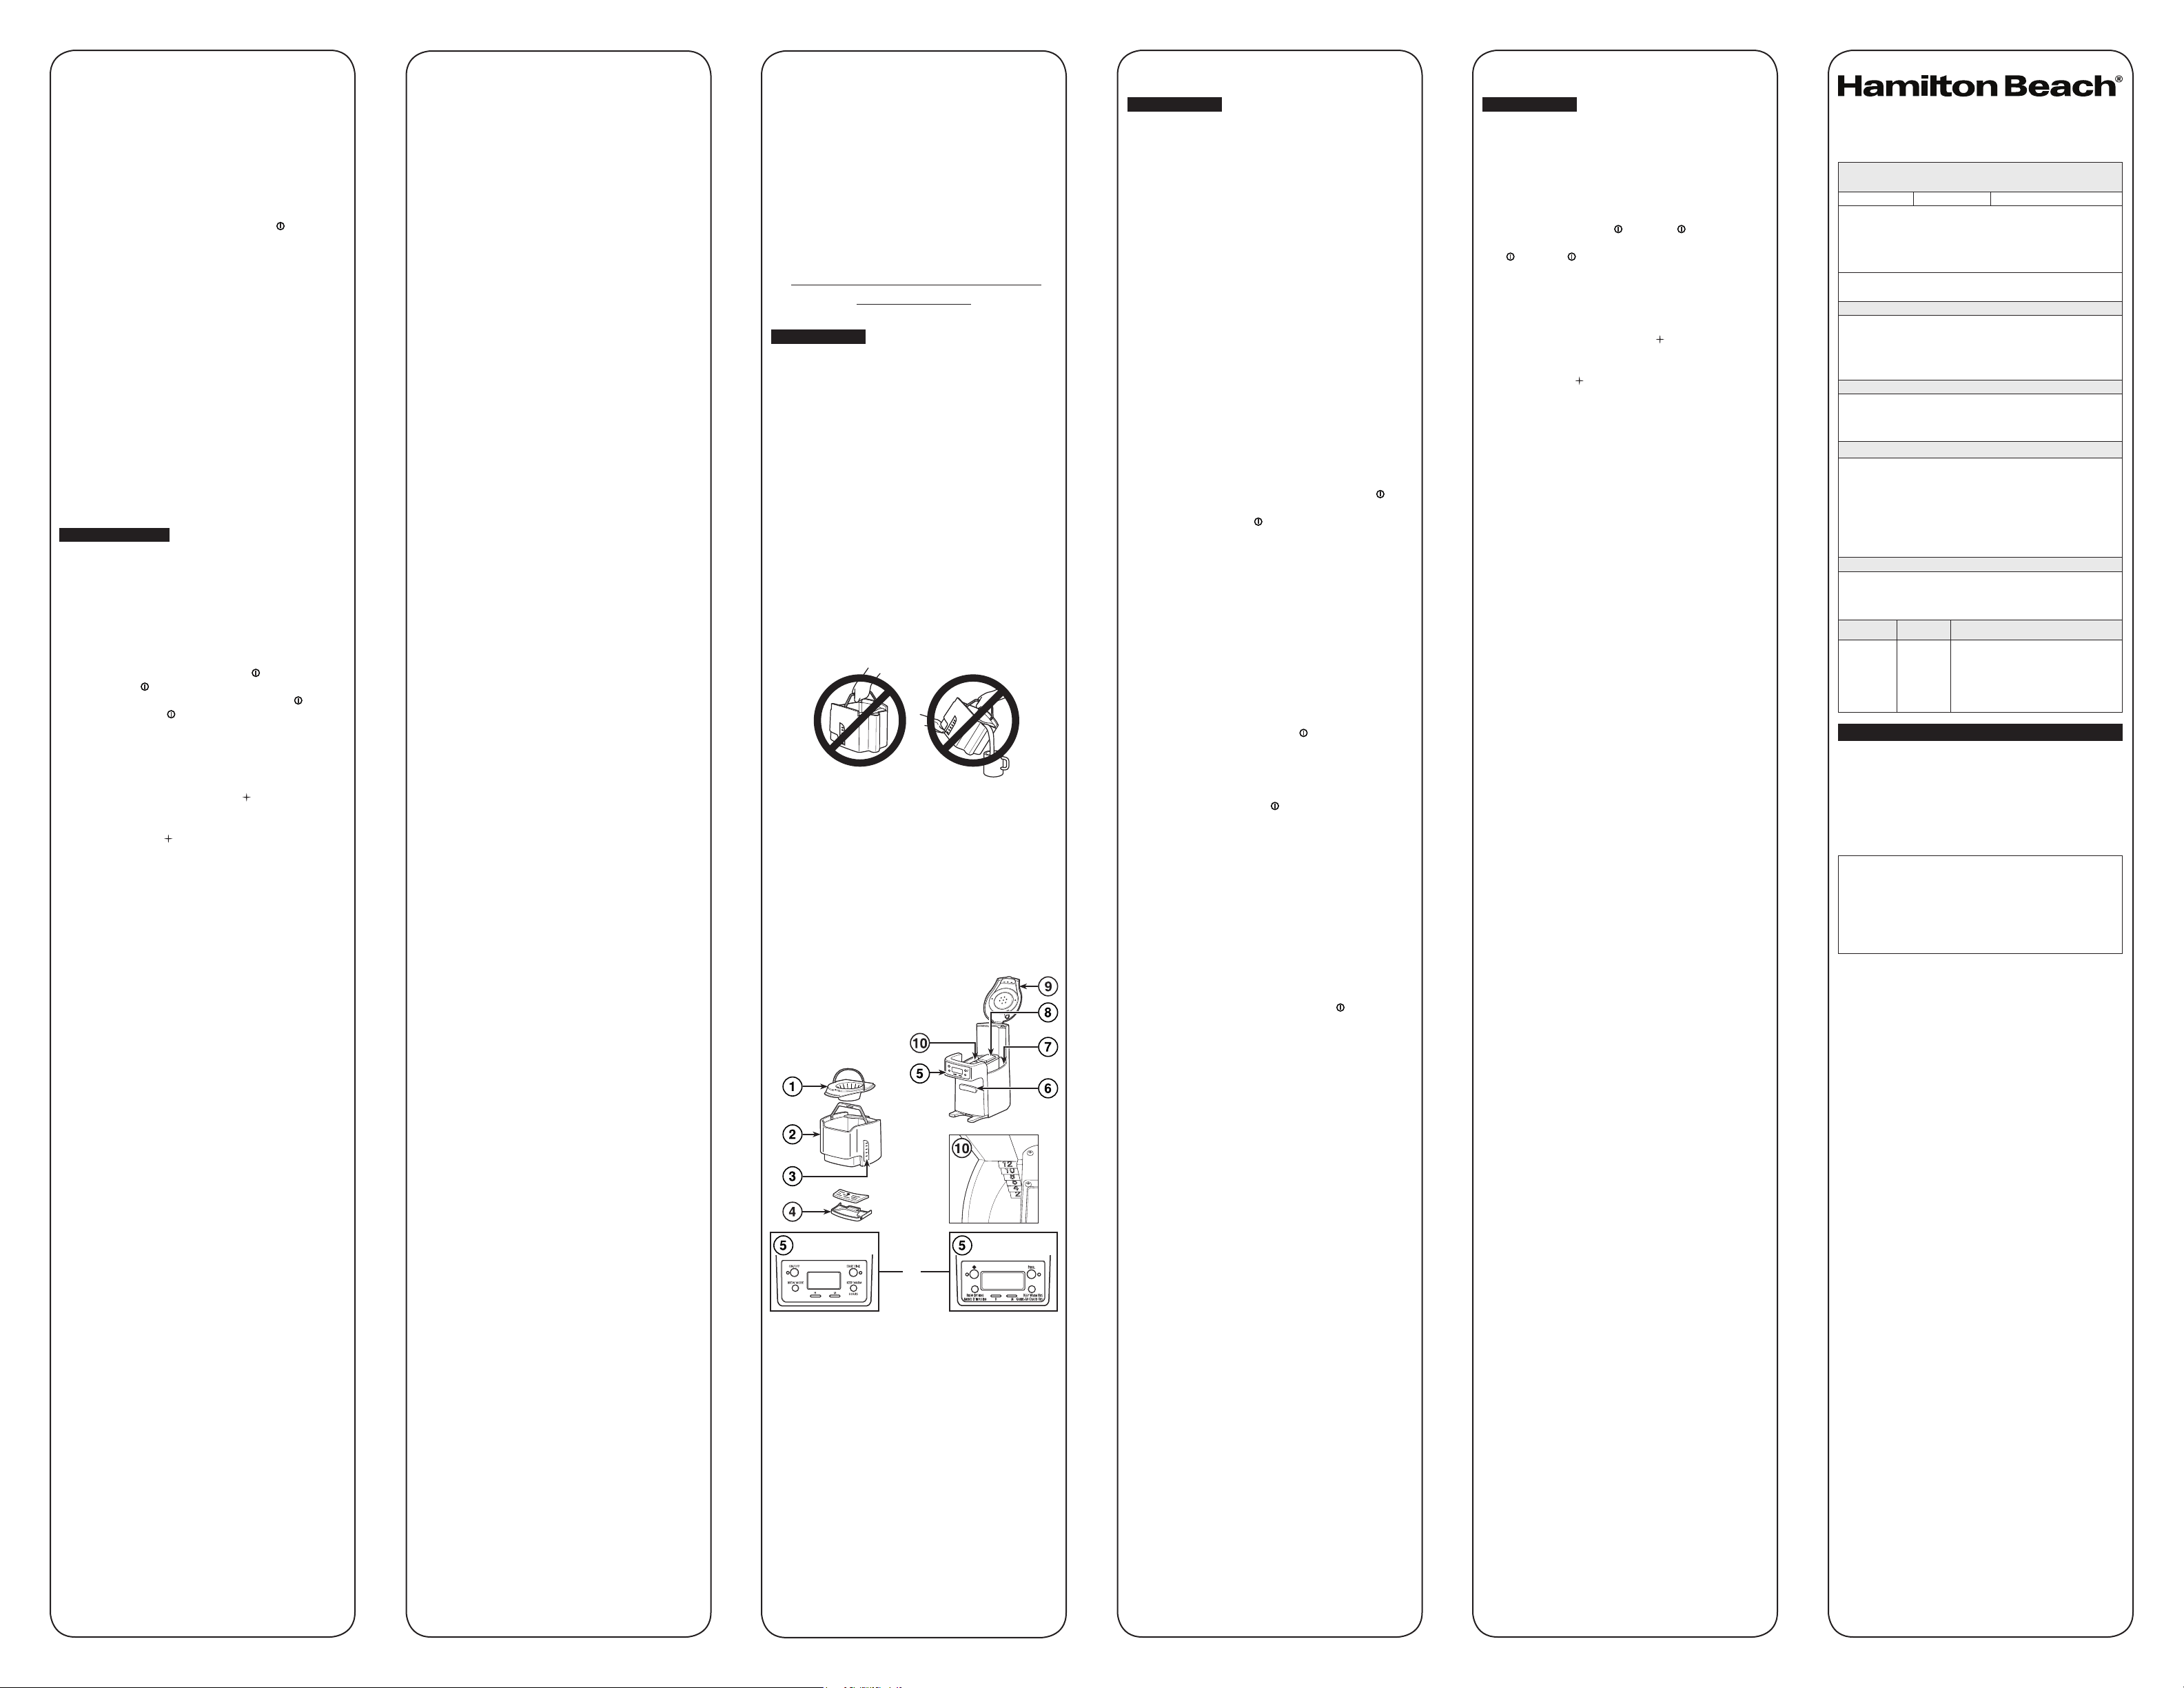
1.
Canasta del Filtro
2.
Depósito de Café
3.
Guía de Nivel de Café
4.
Charola de Goteo
5.
Panel de Control y
Pantalla (en modelos
selectos)
6.
Barra Dispensadora
de Café
7.
Depósito de Agua
8.
Placa para Mantener
Caliente
9.
Tapa
10.
Guía de Nivel de Agua
Como hacer café
w ADVERTENCIA
Peligro de Quemarse.
• Nunca use el tanque de café para vaciar o llevar café caliente.
• Maneje el tanque de café sólo cuando tenga agua fría para llenar
el depósito de agua y para limpiar el tanque.
• Si la BrewStation
®
se desborda, desconecte la unidad. Deje que
la unidad, café y el molido se enfríen completamente antes de
limpiar la unidad, café o molido.
ANTES DE USAR POR PRIMERA VEZ: Lave el tanque
de café, canasta del filtro, y charola de goteo en agua
caliente jabonosa. NUNCA ponga el tanque de café en el
lavavajillas. La BrewStation
®
puede ser programada para
apagarse automáticamente en 0 (para Café Helado), 1, 2,
3, o 4 horas según lo deseado. El apagado automático está
predeterminadamente en 4 horas.
1. Coloque un filtro de papel estilo pastelillo en la canastilla
del filtro. También se puede usar un filtro permanente.
2. Por cada taza de café a hacer, coloque una cuchara
nivelada de café en el filtro. Evite que entre café molido
en cualquier otra área de la BrewStation
®
.
3. Llene la déposito de café con la cantidad deseada de
agua fría de la llave.
4. Levante la tapa y vacíe el agua de la déposito de café en
el depósito de agua.
5. Ajuste HORAS PARA MANTENER CALIENTE (KEEP
WARM HOURS) en 1, 2, 3 o 4. El ajuste 0 es para café
helado.
6. Presione el botón ON/OFF (encendido/apagado) o
para comenzar. Una luz roja en el botón de ON/OFF
(encendido/apagado) o indicará que la cafetera está
encendida.
7. La cafetera emitirá un bip cuando la preparación esté
completa. Presione el barra dispensadora de café con
una taza de dispensar café.
BOLD (CARGADO): Para café con sabor completo, presione el
botón de Modo de fuerte mejorado Preparación hasta que se
muestre BOLD (CARGADO).
1–4 CUPS (1–4 TAZAS): Cuando prepare 1–4 tazas de café,
presione el botón de Modo Preparar hasta que se muestre
1–4 CUPS (1–4 TAZAS).
NOTA: Los modos CARGADO y 1–4 TAZAS requerirán tiempo
adicional para completar un ciclo de preparación. Una Opción
de Preparación debe ser seleccionada antes de presionar el
botón ON/OFF (encendido/apagado) o . El ajuste no puede
ser cambiado durante/en modo de preparación. Si una Opción
de Preparación no se selecciona, la cafetera preparará
automáticamente en el ajuste regular/ predeterminado.
PARA RECALENTAR EL CAFÉ: Presione y sostenga el botón
ON/OFF (encendido/apagado) o por 3 segundos. Esto
reajustará el contador y mantendrá el café caliente por un
número seleccionado de horas (1, 2, 3, o 4).
Para preparar café helado
1. Siga los pasos del 1 al 4 de “Cómo hacer café” sección.
No llene el depósito de café más allá de la línea de
6-tazas cuando haga café helado. NOTA: Prepare el café
doble aroma para café helado. Agregue 2 cucharones
o 2 cucharadas al ras de café molido por taza (hasta
12 cucharones).
2. Llene el tanque de café con hielo hasta la línea marcando
10 CUPS (10 TAZAS).
3. Ajuste HORAS PARA MANTENER CALIENTE en 0.
Presione ON/OFF (encendido/apagado) o .
4. Presione el barra dispensadora de café con un vaso lleno
de hielo para de dispensar café.
Programación
1. Paja Ajustar el Reloj: Presione H (hora) y luego M (minuto).
NOTA: La hora del reloj se debe ajustar para poder usar la
función de programación.
2. Para programar la auto preparación: Presione y sostenga
HORA DE INICIO (START TIME) o PROG (programa) hasta
que el reloj parpadee. La HORA DE INICIO (START TIME)
aparecerá en la pantalla.
3. Continúe presionando HORA DE INICIO (START TIME) o
PROG (programa), luego presione H y M hasta que la hora
de inicio se alcance.
4. Presione y libere HORA DE INICIO (START TIME) o
PROG (programa) para activar la preparación automática.
Una luz verde indicará que la unidad está en modo de
programación.
Cuidado y limpieza
w ADVERTENCIA
Peligro de Quemarse.
No sumerja el cable, enchufe o cafetera en ningún líquido.
Limpie la BrewStation
®
al menos una vez al mes (una vez a la
semana en áreas de agua dura).
Interior de la cafetera:
1. Remueva el filtro de agua opcional.
2. Vacíe medio litro (2 tazas/500 ml) de vinagre en el
depósito de agua.
3. Presione ENCENDIDO o . APAGUE ( ) después de 20
segundos y espere 30 minutos. Presione ENCENDIDO o
. APAGUE ( ) cuando termine. Cuando esté fresco,
dispense varias tazas antes de vaciar y enjuagar el
depósito.
NOTA: La cafetera le recordará que es tiempo para
limpieza en dos formas:
• Contador de ciclo integrado—Cada 30 ciclos, se
encenderá CLEAN (limpieza) o en la pantalla y
permanecerá iluminado por 2 ciclos.
• Sensor de residuos integrado—Aparecerá CLEAN
(limpieza) o en la pantalla cuando al unidad sienta que
hay acumulación de residuos y permanecerá iluminado
hasta que la unidad sea limpiada.
4. Haga 2–3 ciclos de preparación más con AGUA LIMPIA
solamente. Deje enfría entre ciclos.
Canastilla de filtro y déposito de café: Remueva la
canastilla de filtro y lave a mano con agua caliente jabonosa o
en el estante superior del lavavajillas. Limpie la canastilla de
filtro seguido.
Exterior de la cafetera: Limpie el exterior con un trapo suave
y agua jabonosa caliente. No use limpiadores abrasivos, ya
que tallarán el acabado del producto.
Resolviendo Problemas
El café gotea del despachador.
• Hay café molido atrapado en el mecanismo dispensador del
tanque del café debajo del anillo en el tanque de café. Vea
“Cuidado y limpieza: Interior de la cafetera.”
Aparece LIMPIEZA en la pantalla.
• Este es un recordatorio para limpiar la cafetera. Vea “Cuidado
y limpieza: Interior de la cafetera.”
El café sabe mal.
• La cafetera necesita limpieza.
• El café molido demasiado grueso o demasiado fino. Ajuste el
molino de café a molido por goteo automático.
• Relación de café a agua desbalanceada. Ajuste para
preferencias personales.
• Pobre calidad del agua. Use un filtro de agua o agua
embotellada para hacer café.
No se hace el café o deja de prepararse/la unidad no
enciende.
• Se han acumulado depósitos minerales. Limpie la cafetera
según “Cuidado y limpieza: Interior de la cafetera.”
• El depósito de agua está vacío.
• La unidad está desconectada.
• Baja energía o sobrecarga de energía. Si hay sobrecarga,
desconecte, luego conecte de nuevo.
El café se prepara lentamente.
• La cafetera necesita limpieza. Limpie por lo menos cada 30
días para mantener un desempeño adecuado.
• La cafetera está en los modos 1–4 CUPS o BOLD
(1–4 TAZAS o CARGADO). Presione el botón de Modo de
Preparación hasta que no aparezca ninguna luz.
El café se desborda de la canastilla.
• Cantidad excesiva de café molido.
• Café molido demasiado fino. Ajuste el molino de café a
molido por goteo automático.
• Hay más de un filtro de papel en la canastilla de filtro.
Pobre calidad del filtro de papel o filtro de papel de tamaño
equivocado.
La unidad hace bip continuamente/no hace café y/o
POUR WATER/VACÍE AGUA aparece en la pantalla.
• No hay agua en el depósito. Transfiera agua del tanque de
café al depósito.
El café está frío cuando se dispensa.
• Las Horas para Mantener Caliente seleccionadas han
pasado y la cafetera se ha apagado automáticamente. Vea
las instrucciones “PARA RECALENTAR CAFÉ”, o prepare un
nuevo ciclo.
Partes y características
NOTA: La imagen hace
referencia a los componentes
principales de todas las
cafeteras cubiertas por estas
instrucciones.
OU
16. Para desconectar la BrewStation
®
, gire los controles a OFF
(apagado), luego remueva el enchufe de la toma de la pared.
17. ¡ADVERTENCIA! Para reducir el riesgo de fuego o descarga
eléctrica, no remueva la cubierta inferior. No hay partes que
requieran servicio en el interior. La reparación debe hacerse por
personal de servicio autorizado únicamente.
18. No use el aparato para otro uso más que para el que fue
diseñado.
19. No coloque la cafetera en un gabinete cuando esté en uso.
Grupo HB PS, S.A. de C.V.
Monte Elbruz No. 124 - 401
Col. Polanco V Sección, Miguel Hidalgo
Ciudad de México, C.P. 11560
Ciudad de México
ELECTRODOMÉSTICOS
Av. Plutarco Elias Cailes No. 1499
Zacahuitzco, Benito Juárez,
Ciudad de México, C.P. 09490
Tel: 55 5235 2323
CASA GARCÍA
Av. Patriotismo No. 875-B
Mixcoac, Benito Juárez,
Ciudad de México, C.P. 03910
Tel: 55 5563 8723
Nuevo León
FERNANDO SEPÚLVEDA REFACCIONES
Ruperto Martínez No. 238 Ote.
Col. Centro Monterrey, N.L., CP 64000
Tel: 81 8343 6700
Jalisco
SERVICIOS DE MANTENIMIENTO CASTILLO
Garibaldi No. 1450 Ladrón de Guevara,
Guadalajara, Jalisco, C.P. 44660
Tel: 33 3825 3480
CENTROS DE SERVICIO AUTORIZADOS
GARANTÍA PARA PRODUCTOS
COMPRADOS EN MÉXICO
PRODUCTO: MARCA: MODELO:
Grupo HB PS, S.A. de C.V. cuenta con una Red de Centros de Servicio Autorizada,
por favor consulte en la lista anexa el nombre y dirección de los establecimientos
en la República Mexicana en donde usted podrá hacer efectiva la garantía, obtener
partes, componentes, consumibles y accesorios; así como también obtener servicio
para productos fuera de garantía. Para mayor información llame al:
Centro de Atención al consumidor: 800 71 16 100
Grupo HB PS, S.A. de C.V. le otorga a partir de la fecha de compra:
GARANTÍA DE 1 AÑO.
COBERTURA
• Esta garantía ampara, todas las piezas y componentes del producto que resulten
con defecto de fabricación incluyendo la mano de obra.
• Grupo HB PS, S.A. de C.V. se obliga a reemplazar, reparar o reponer, cualquier
pieza o componente defectuoso; proporcionar la mano de obra necesaria para su
diagnóstico y reparación, todo lo anterior sin costo adicional para el consumidor.
• Esta garantía incluye los gastos de transportación del producto que deriven de su
cumplimiento dentro de su red de servicio.
LIMITACIONES
• Esta garantía no ampara el reemplazo de piezas deterioradas por uso o por
desgaste normal, como son: cuchillas, vasos, jarras, filtros, etc.
• Grupo HB PS, S.A. de C.V. no se hace responsable por los accidentes producidos a
consecuencia de una instalación eléctrica defectuosa, ausencia de toma de tierra,
clavija o enchufe en mal estado, etc.
EXCEPCIONES
Esta garantía no será efectiva en los siguientes casos:
a) Cuando el producto se hubiese utlizado en condiciones distintas a las normales.
(Uso industrial, semi-industrial o comercial.)
b) Cuando el producto no hubiese sido operado de acuerdo con el instructivo de uso.
c) Cuando el producto hubiese sido alterado o reparado por personas no autorizadas
por Grupo HB PS, S.A. de C.V. el fabricante nacional, importador o comercializador
responsable respectivo.
El consumidor puede solicitar que se haga efectiva la garantía ante la propia casa
comercial donde adquirió su producto, siempre y cuando Grupo HB PS, S.A. de C.V.
no cuente con talleres de servicio.
PROCEDIMIENTO PARA HACER EFECTIVA LA GARANTÍA
• Para hacer efectiva la garantía, lleve su aparato al Centro de Servicio Autorizado
más cercano a su domicilio (consulte la lista anexa).
• Si no existe Centro de Servicio Autorizado en su localidad llame a nuestro Centro
de Atención al Consumidor para recibir instrucciones de como hacer efectiva su
garantía.
FECHA DE
ENTREGA
SELLO DEL
VENDEDOR
QUEJAS Y SUGERENCIAS
DÍA___
MES___
AÑO___
Si desea hacer comentarios o sugerencias con
respecto a nuestro servicio o tiene alguna queja
derivada de la atención recibida en alguno de
nuestros Centros de Servicio Autorizados, por favor
dirigirse a:
GERENCIA INTERNACIONAL DE SERVICIO
800 71 16 100
Email:
Modelo:
48463, 48464, 48465, 48466
Tipos
B47
Características Eléctricas:
120 V ~ 60 Hz 900 W
Los modelos incluídos en el instructivo de Uso y Cuidado pueden ir
seguidos o no por un sufijo correspondiente a una o varias letras del
alfabeto y sus combinaciones, separadas o no por un espacio, coma,
diagonal, o guión. Como ejemplos los sufijos pueden ser: “Y” y/o “MX”
y/o “MXY” y/o “Z”.
840177105 01/20