Loading ...
Loading ...
Loading ...
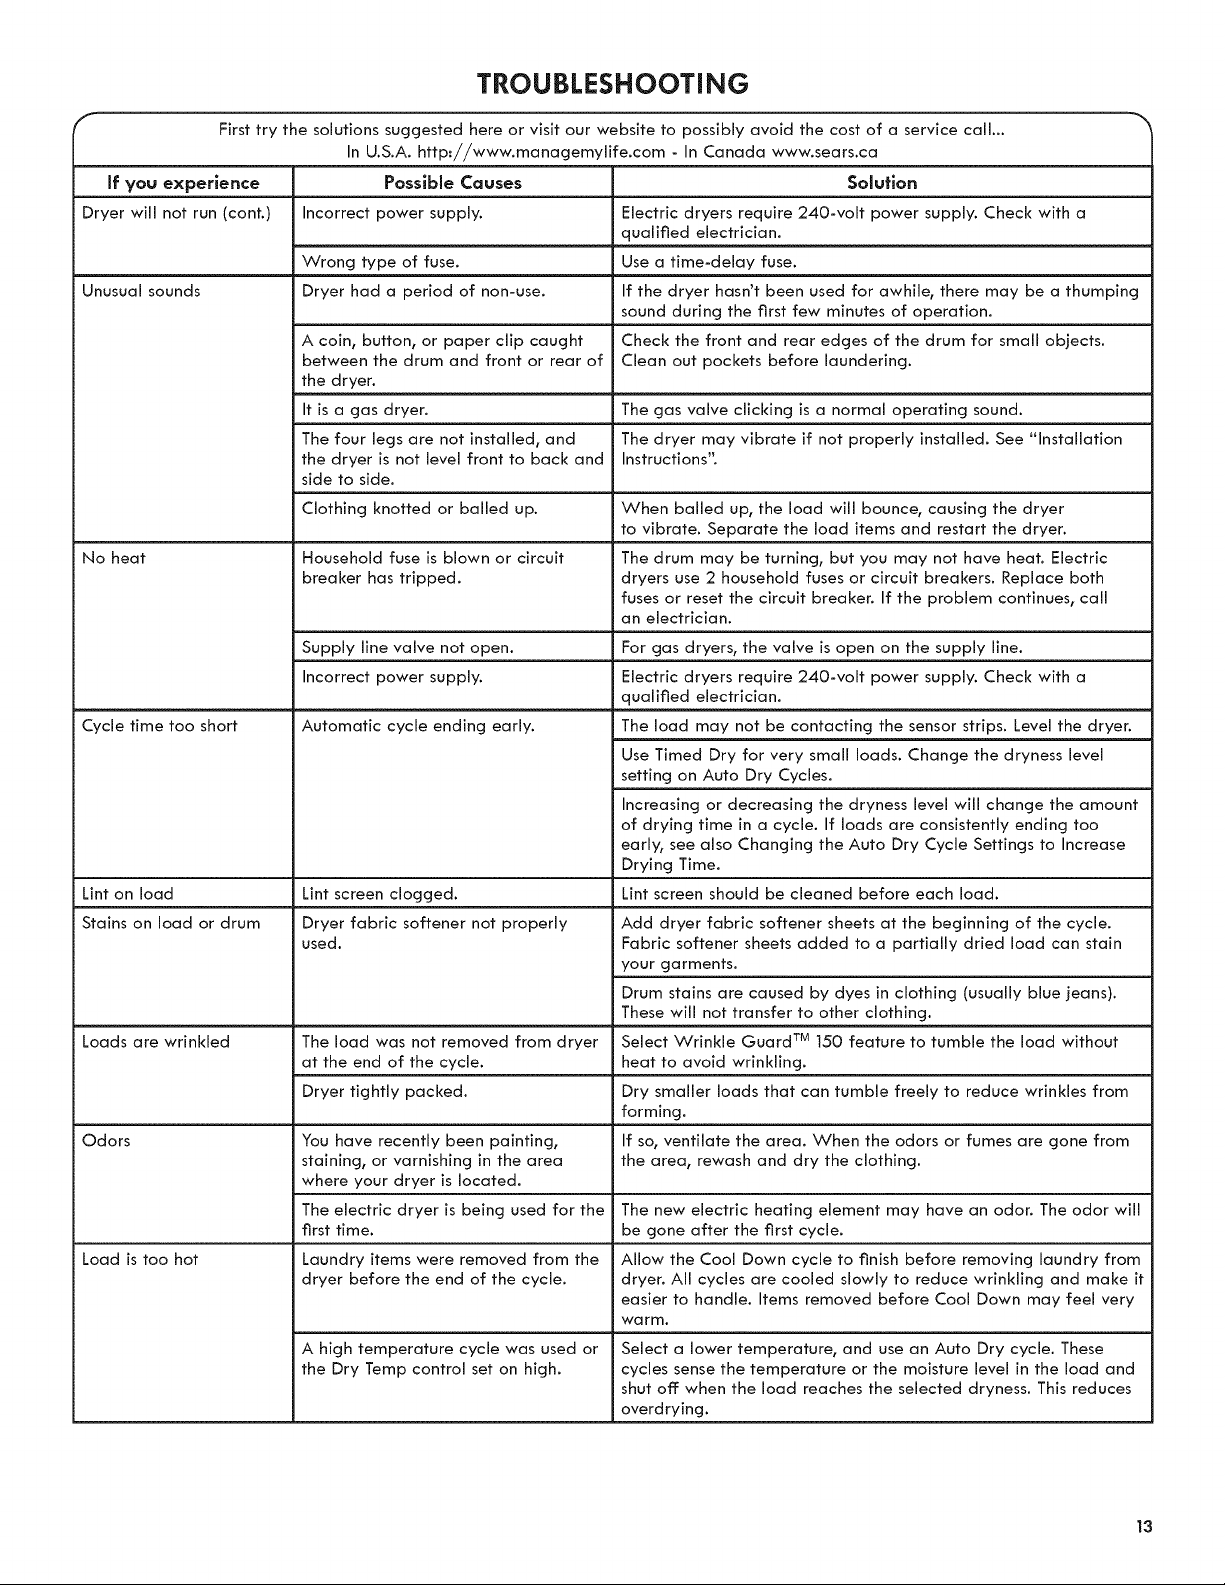
TROUBLESHOOTING
First try the solutions suggested here or visit our website to possibly avoid the cost of a service call...
In U.S.A. http..//www.managemylife.com - In Canada www.sears.ca
If you experience Posslble Causes Solutlon
Dryer will not run (cont.) Electric dryers require 240-volt power supply. Check with a
qualified electrician.
Use a time-delay fuse.
Unusual sounds If the dryer hasn't been used for awhile, there may be a thumping
sound during the first few minutes of operation.
Check the front and rear edges of the drum for small objects.
Clean out pockets before laundering.
The gas valve clicking is a normal operating sound.
The dryer may vibrate if not properly installed. See "Installation
Instructions".
When balled up, the load will bounce, causing the dryer
to vibrate. Separate the load items and restart the dryer.
No heat The drum may be turning, but you may not have heat. Electric
dryers use 2 household fuses or circuit breakers. Replace both
fuses or reset the circuit breaker. If the problem continues, call
an electrician.
Cycle time too short
Lint on load
Stains on load or drum
Loads are wrinkled
Odors
For gas dryers, the valve is open on the supply line.
Electric dryers require 240-volt power supply. Check with a
qualified electrician.
The load may not be contacting the sensor strips. Level the dryer.
Use Timed Dry for very small loads. Change the dryness level
setting on Auto Dry Cycles.
Increasing or decreasing the dryness level will change the amount
of drying time in a cycle. If loads are consistently ending too
early, see also Changing the Auto Dry Cycle Settings to Increase
Drying Time.
Lint screen should be cleaned before each load.
Incorrect power supply.
Wrong type of fuse.
Dryer had a period of non-use.
A coin, button, or paper clip caught
between the drum and front or rear of
the dryer.
It is a gas dryer.
The four legs are not installed, and
the dryer is not level front to back and
side to side.
Clothing knotted or balled up.
Household fuse is blown or circuit
breaker has tripped.
Supply line valve not open.
Incorrect power supply.
Automatic cycle ending early.
Lint screen clogged.
Dryer fabric softener not properly
used.
The load was not removed from dryer
at the end of the cycle.
Dryer tightly packed.
You have recently been painting,
staining, or varnishing in the area
where your dryer is located.
The electric dryer is being used for the
first time.
Laundry items were removed from the
dryer before the end of the cycle.
A high temperature cycle was used or
the Dry Temp control set on high.
Add dryer fabric softener sheets at the beginning of the cycle.
Fabric softener sheets added to a partially dried load can stain
your garments.
Drum stains are caused by dyes in clothing (usually blue ieans).
These will not transfer to other clothing.
Select Wrinkle Guard TM 150 feature to tumble the load without
heat to avoid wrinkling.
Dry smaller loads that can tumble freely to reduce wrinkles from
forming.
If so, ventilate the area. When the odors or fumes are gone from
the area, rewash and dry the clothing.
The new electric heating element may have an odor. The odor will
be gone after the first cycle.
Load is too hot Allow the Cool Down cycle to finish before removing laundry from
dryer. All cycles are cooled slowly to reduce wrinkling and make it
easier to handle. Items removed before Cool Down may feel very
warm.
Select a lower temperature, and use an Auto Dry cycle. These
cycles sense the temperature or the moisture level in the load and
shut off: when the load reaches the selected dryness. This reduces
overdrying.
13
Loading ...
Loading ...
Loading ...