INTELLIDRY DRYER MD-16
Save completemodel and serial number
identificationfor your dryer.This is located
on a data plate on the lowercenterof the
dooropening.Recordthesenumbersbelow
foreasyaccess.
ModelNumber
SerialNumber
1-2
EXHAUSTTIPS..............................Page3
__IP'ERATINGTIP5...........................................Page4
_ROLS .................................................Pages 5-6
iHG WiTH [)_Y_L ..............................Page 7
Dateof Purchase
Foradditionalquestions,pleasecontactus:
MaytagAppliancesSalesCompany
1-800-688-9900USA
1-800-688-2002CANADA
1-800-688-2080USATTY(fordeaf,
hearingimpairedor speechimpaired)
Mon.-Fri.,8am-8pmEasternTime
Internet:http://www.maytag.com
NOTE:In ourcontinuingeffortto improve
the qualityof our appliances,it may be
necessaryto makechangesto theappli-
ancewithoutrevisingthisguide.
IMPORTANT:Keep this guide and the
salesreceiptin a safeplacefor future ref-
erence.Proofoforiginalpurchasedateis
neededfor warrantyservice.
IMPORTANT:For serviceand warranty
information,seepage11.
i& (LEAHIHG.....................................Page 8
' (_L_.C_N_ DRUM [_il]" .........................Page 8
__Y_RflH6 TileDOOR...........................Page 8
E_IA[ LAUNDRY ]'IP_ ...........................Page 9
R RACK ..................................................Page 9
_[ORE YOUCALL......................................Page 10
RflAHTY..................................................Page11
IDEDEL'UTILISATEUR..........................Page 12
iADELUSUARIO...................................Page 24
A/03/02 Part No. 6 3719310
. , t _ http://www.maytag.com MCSNo. 33002582 JN Lithe U.S.A.
@2002 Maytag Appliances Sales Co.
For your safety,the informationin this
manual must be followed to minimize
the risk of fire or explosion or to pre-
vent propertydamage, personal injury
or death.
Do not store or use gasoline or
other flammable vapors and liquids
in the vicinity of this or any other
appliance.
WHAT TO DO IF YOU SMELL
GAS
• Do not try to lightany appliance.
• Do not touch any electrical
switch.
• Do not use any phone in your
building.
• Clear the room, building or area
of all occupants.
• Immediatelycall your gas suppli-
er from a neighbor's phone.
Follow the gas supplier's instruc-
tions.
If you cannot reach your gas
supplier, call the fire department.
Installation and service must be per-
formed by a qualified installer,service
agency or the gas supplier.
To reduce the risk of fire, electric shock or injury to personswhen using your appli-
ance, follow basic precautions, includingthe following:
1. Read all instructions before using the 5.
appliance.
2. To avoid the possibility of fire or explo- 6.
sion:
.
.
a,
Do not dry items that have been pre- 7.
viously cleaned in, washed in, 8.
soaked in, or spotted with gasoline,
dry-cleaning solvents, other flamma-
ble or explosive substances as they
give off vapors that could ignite or
explode. Any material on which you
have used a cleaning solvent, or
which is saturatedwith flammable liq- 9.
uids or solids, should not beplaced in
the dryer, until all traces of these
flammable liquids or solids and their
fumes have been removed.There are
many highly flammable items used in
homes, such as: acetone, denatured
11.
alcohol, gasoline, kerosene, some
liquid household cleaners, somespot
removers,turpentine,waxes and wax
removers. 12.
b,
Items containing foam rubber (may
be labeled latex foam) or similarly
textured rubber-like materials must
not be dried on a heat setting. Foam
rubber materials when heated, can
under certain circumstancesproduce
fire by spontaneous combustion.
Do not allow children to play on or in the
appliance.Close supervision of children
is necessarywhen the appliance is used
near children.
Before the appliance is removed from
service ordiscarded, removethe doorto
the drying compartment.
Do not reach into the appliance if the
drum is moving.
Do not install or store this appliance
where it will be exposed to the weather.
Do not tamper with controls.
Do not repair or replace any part of the
appliance or attempt any servicing
unless specifically recommended in
published user-repair instructions that
you understand and have the skills to
carry out.
Do not use fabric softeners or products
to eliminate static unless recommended
for dryer use by the manufacturerof the
fabric softener or product.
10. Clean the lint screen before or after
13.
eachload.
Keepthe area aroundthe exhaust open-
ing and surrounding areas free from lint
accumulation, dust and dirt.
The interior of the dryer and exhaust
duct should be cleaned periodically by
qualified service personnel.
This appliance must be properly ground-
ed. Neverplug the appliance cord into a
receptacle which is not grounded ade-
quately and in accordance with local
and national codes. See installation
instructions for groundingthis appliance.
14. Do not sit on top of the clothes dryer.
1
SAVETHESE INSTRUCTIONSFOR FUTUREREFERENCE
Do not place intoyour dryer itemsthat have beenspotted or soakedwith vegetable
oil or cooking oil. Even after being washed, these items may contain significant
amounts of these oils. The remaining oil can ignite spontaneously. The potential
for spontaneous ignition increases when the items containing vegetable oil or
cooking oil are exposed to heat. Heat sources, such as your clothes dryer, can
warm these items,allowingan oxidationreaction inthe oil to occur. Oxidation cre-
ates heat. If this heat cannot escape, the items can become hot enough to catch
fire. Piling,stacking or storing these kinds of items may prevent heat from escap-
ing and can create a fire hazard.
All washed and unwashedfabrics that containvegetable oil or cooking oil can be
dangerous. Washing these items in hotwater with extra detergentwill reduce, but
will not eliminate,the hazard. Always use the "cool down" cycle for these items to
reduce the items' temperature. Never removethese items from the clothes dryer
hot or interrupt the drying cycle until the items have run through the "cool down"
cycle. Never pile or stack these items when they are hot.
IMPORTANTSAFETYNOTICE
& WARNING
The California Safe Drinking Water and
Toxic EnforcementAct of 1986 (Proposition
65) requires the Governor of California to
publish a list of substances known to the
State of Californiato cause canceror repro-
ductive harm, and requires businesses to
warn customers of potential exposures to
such substances.
Users of this appliance are hereby warned
that the burning of gas can result in low-
level exposure to some of the listed sub-
stances, including benzene, formaldehyde
and soot, due primarily to the incomplete
combustion of natural gas or liquid petrole-
um (LP)fuels. Exhaust ducts should be kept
free of obstructions and properly exhausted
dryers will minimize exposure.
RECOGNIZESAFETYSYMBOLS,WORDS,LABELS
WARNING- HazardsorunsafepracticeswhichCOULDresultinseverepersonalinjuryor death.
CAUTION- Hazards or unsafe practiceswhich COULD result in minor personal injury.
2

DO
Readtheinstallation
instructionsand the
user'sguide.
DO
Letyourdryer
exhausttheair easily.
DO
Keepductruns
as straightas
possible.
I I '
ii
DO
Use4 inchdiameter
rigidmetalduct.Tapealljoints,
includingat the dryer.Neveruse
lint-trappingscrews.
DO
Cleanalloldducts
beforeinstallingyour
newdryer.Besurevent
flap opensandclosesfreely.
Inspectandcleanthe exhaust
systemannually.
}
Let a poor
exhaustsystem
causeslow drying.
Restrictyourdryerwitha poorexhaust
system.
Useplastic,thinfoil,or
non-metalflexibleduct.
Uselongerthannecessaryductruns
withmanyelbows.
DON'T
Allowcrushedor cloggedducts
andvent.
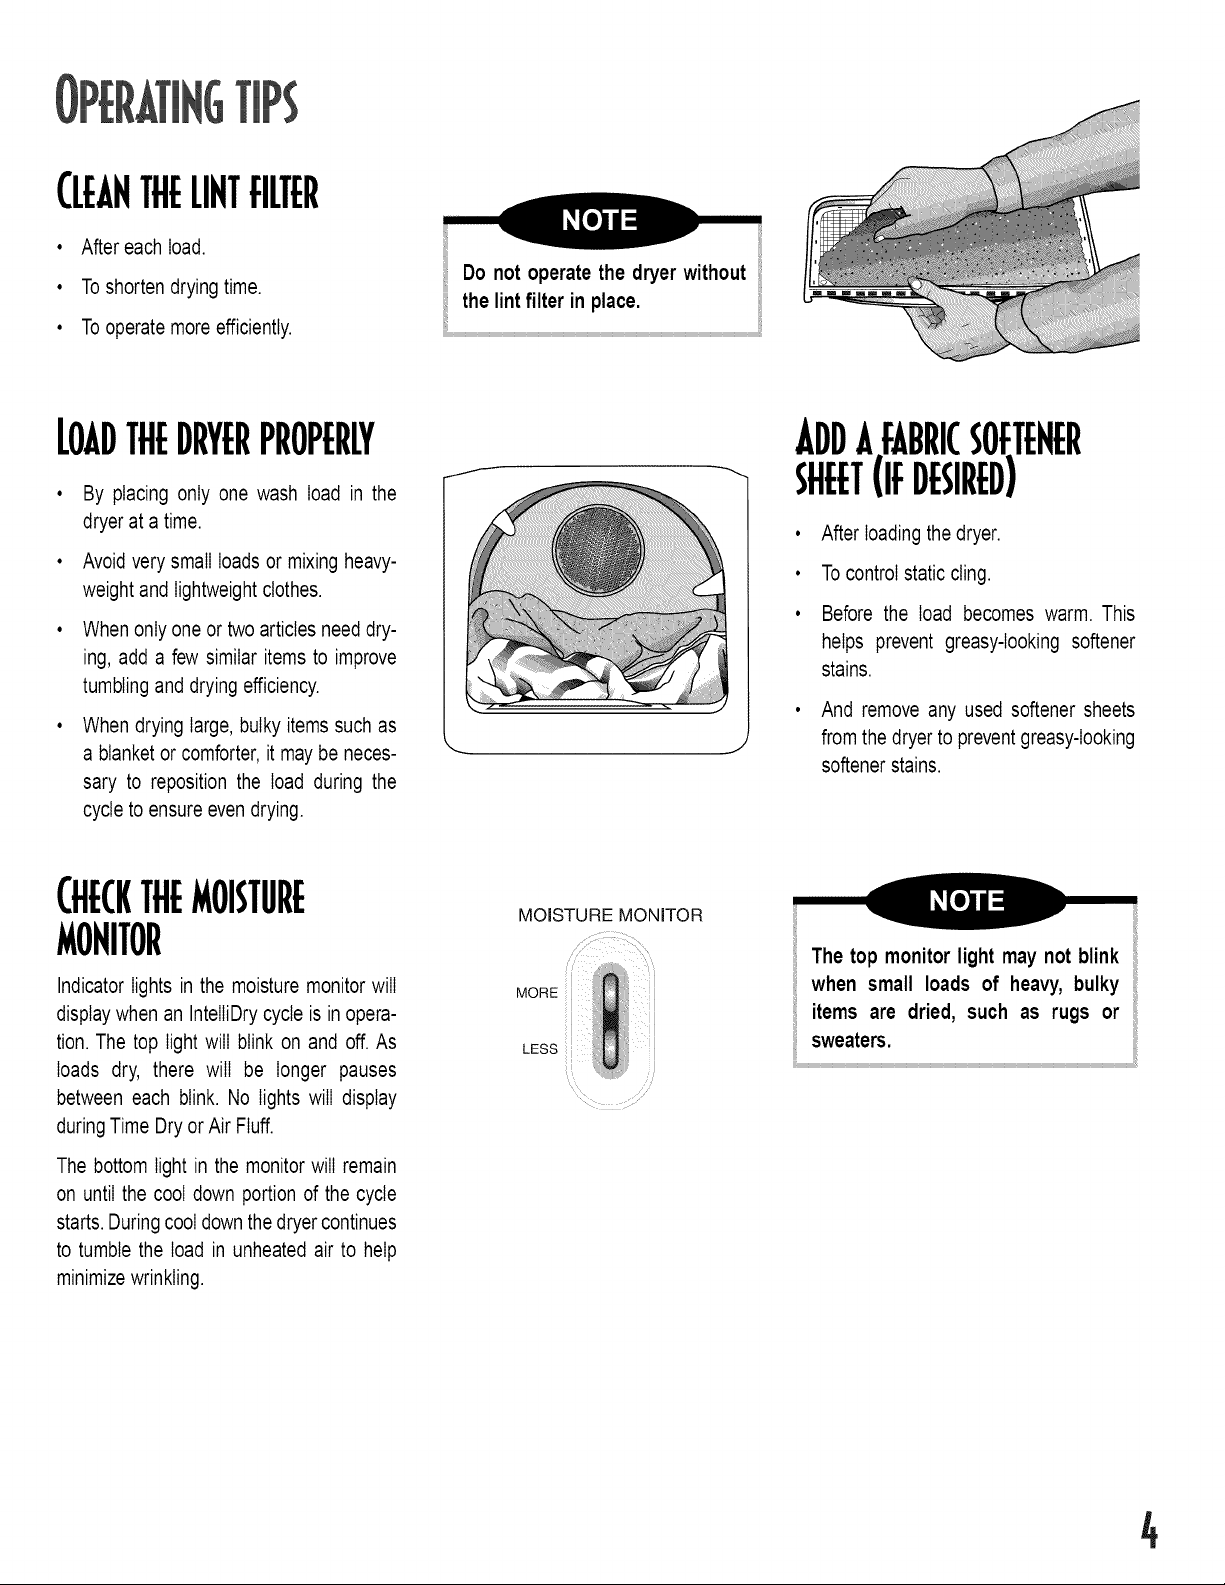
{LEAHTHELIHTFILTER
• After each load.
• To shorten drying time.
• To operate more efficiently.
i Do not operate the dryer without
i the lint filter in place.
LOADTHEDRYERPROPERLY
By placing only one wash load in the
dryer at a time.
Avoid very small loads or mixing heavy-
weight and lightweight clothes.
When only one or two articles need dry-
ing, add a few similar items to improve
tumbling and drying efficiency.
When drying large, bulky items such as
a blanket or comforter, it may be neces-
sary to reposition the load during the
cycle to ensure even drying.
ADDAFABRICSOFTEHER
SHEET(IfDESIRED)
• After loadingthe dryer.
• Tocontrol static cling.
• Before the load becomes warm. This
helps prevent greasy-looking softener
stains.
And remove any used softener sheets
from the dryer to prevent greasy-looking
softener stains.
CHECKTHEMOISTURE
MONITOR
Indicator lights in the moisture monitor will
displaywhen an InteIIiDrycycle is in opera-
tion. The top light will blink on and off. As
loads dry, there will be longer pauses
between each blink. No lights will display
duringTime Dry or Air Fluff.
The bottom light in the monitor will remain
on until the cool down portion of the cycle
starts. During cool down the dryer continues
to tumble the load in unheated air to help
minimize wrinkling.
MOISTURE MONITOR
MORE
LEss
i i
The top monitor light may not blink !i
when small loads of heavy, bulky
items are dried, such as rugs or
sweaters.
4
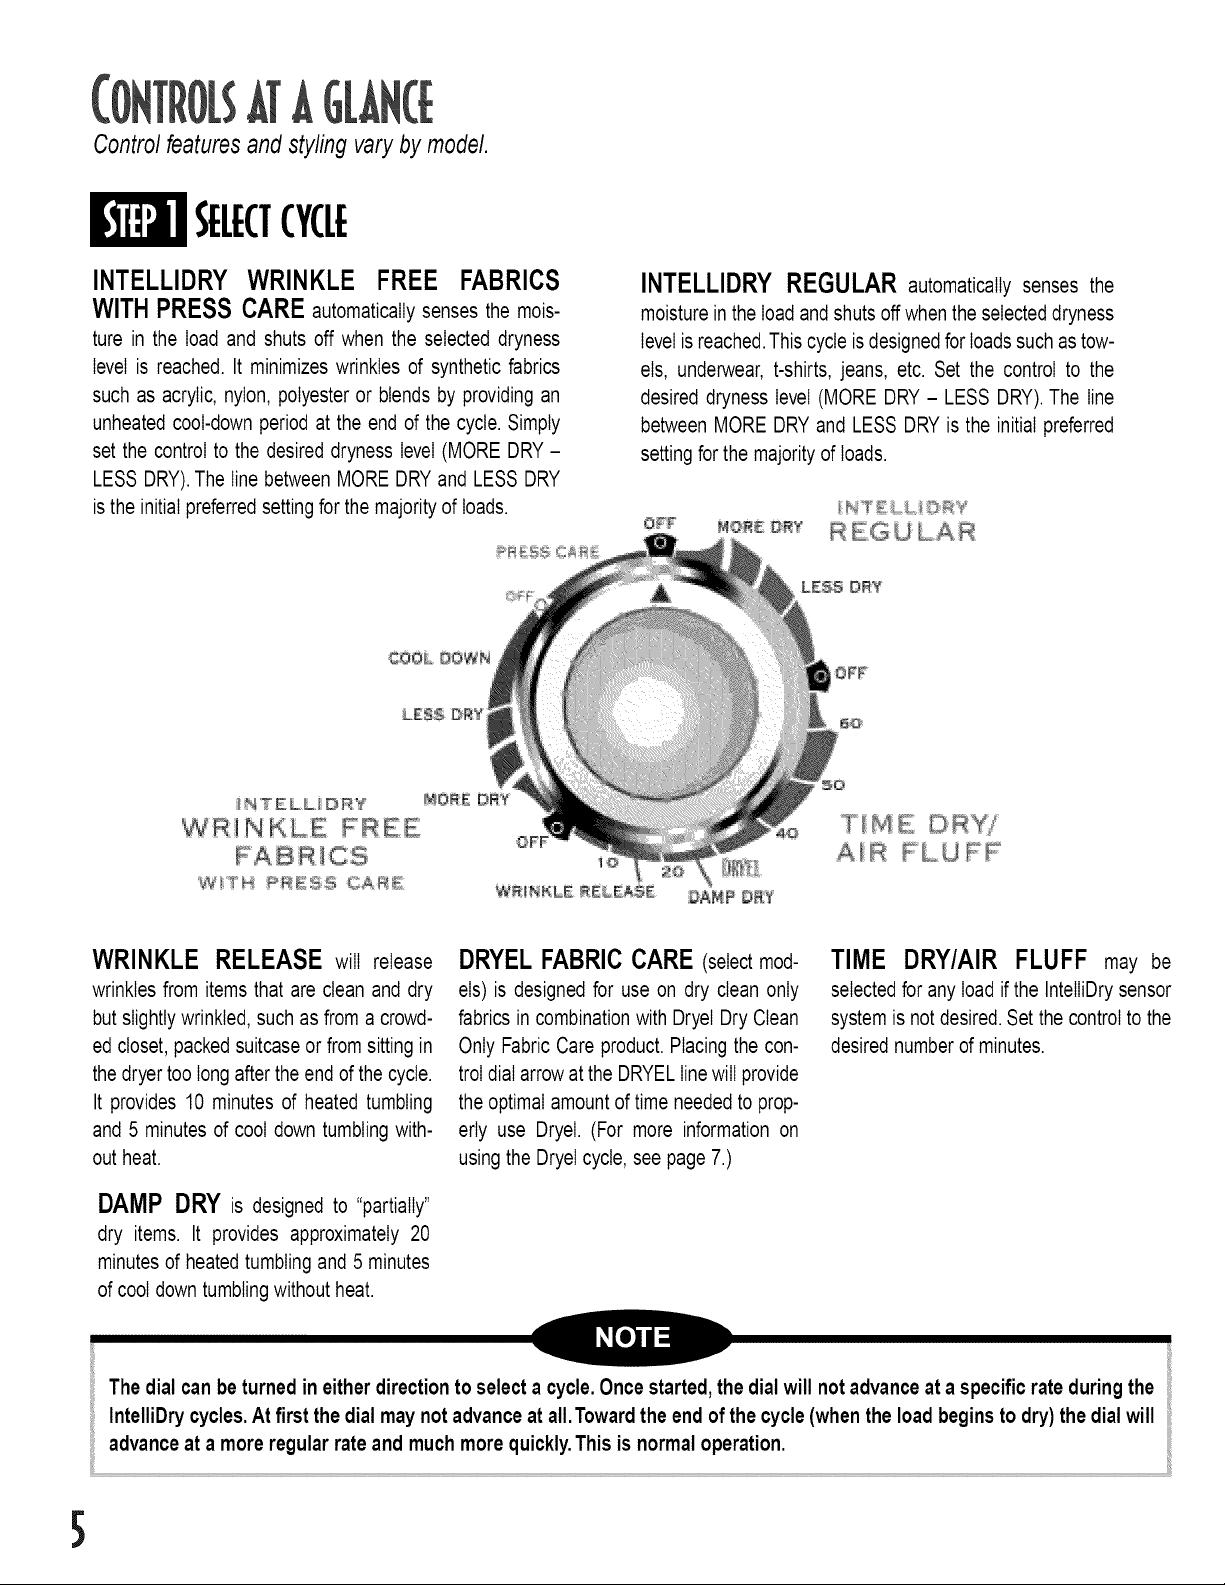
Controlfeaturesand styling varyby model.
SELECTCYCLE
INTELLIDRY WRINKLE FREE FABRICS
WITH PRESS CARE automatically senses the mois-
ture in the load and shuts off when the selected dryness
level is reached. It minimizes wrinkles of synthetic fabrics
such as acrylic, nylon, polyester or blends by providing an
unheated cool-down period at the end of the cycle. Simply
set the control to the desired dryness level (MORE DRY -
LESS DRY).The line between MORE DRYand LESS DRY
is the initial preferred setting for the majority of loads.
INTELLIDRY REGULAR automatically senses the
moisture inthe load and shuts off when the selected dryness
level is reached.This cycle isdesigned for loads such as tow-
els, underwear, t-shirts, jeans, etc. Set the control to the
desired dryness level (MORE DRY - LESS DRY). The line
between MORE DRY and LESS DRY is the initial preferred
setting for the majority of loads.
OF:F M@:R: _?RY
WRINKLE RELEASE will release
wrinkles from items that are clean and dry
but slightly wrinkled, such as from a crowd-
ed closet, packedsuitcase or from sitting in
the dryer too long after the end of the cycle.
It provides 10 minutes of heated tumbling
and 5 minutes of cool down tumbling with-
out heat.
DAMP DRY is designed to "partially"
dry items. It provides approximately 20
minutes of heated tumbling and 5 minutes
of cool down tumblingwithout heat.
DRYELFABRICCARE (selectmod-
els) is designed for use on dry clean only
fabrics in combination with DryeI Dry Clean
Only Fabric Care product. Placing the con-
trol dial arrow at the DRYELlinewill provide
the optimal amount of time needed to prop-
erly use DryeI. (For more information on
using the DryeI cycle, see page 7.)
TIME DRY/AIR FLUFF may be
selected for any load ifthe IntelIiDrysensor
system is not desired. Set the control to the
desired number of minutes.
The dial can be turned in either direction to select a cycle.Once started, the dial will not advance at a specific rate duringthe
IntelliDry cycles.At first the dial may not advanceat all.Toward the end of the cycle (when the load begins to dry) the dial will
advance at a more regular rate and much more quickly.This is normal operation.
5
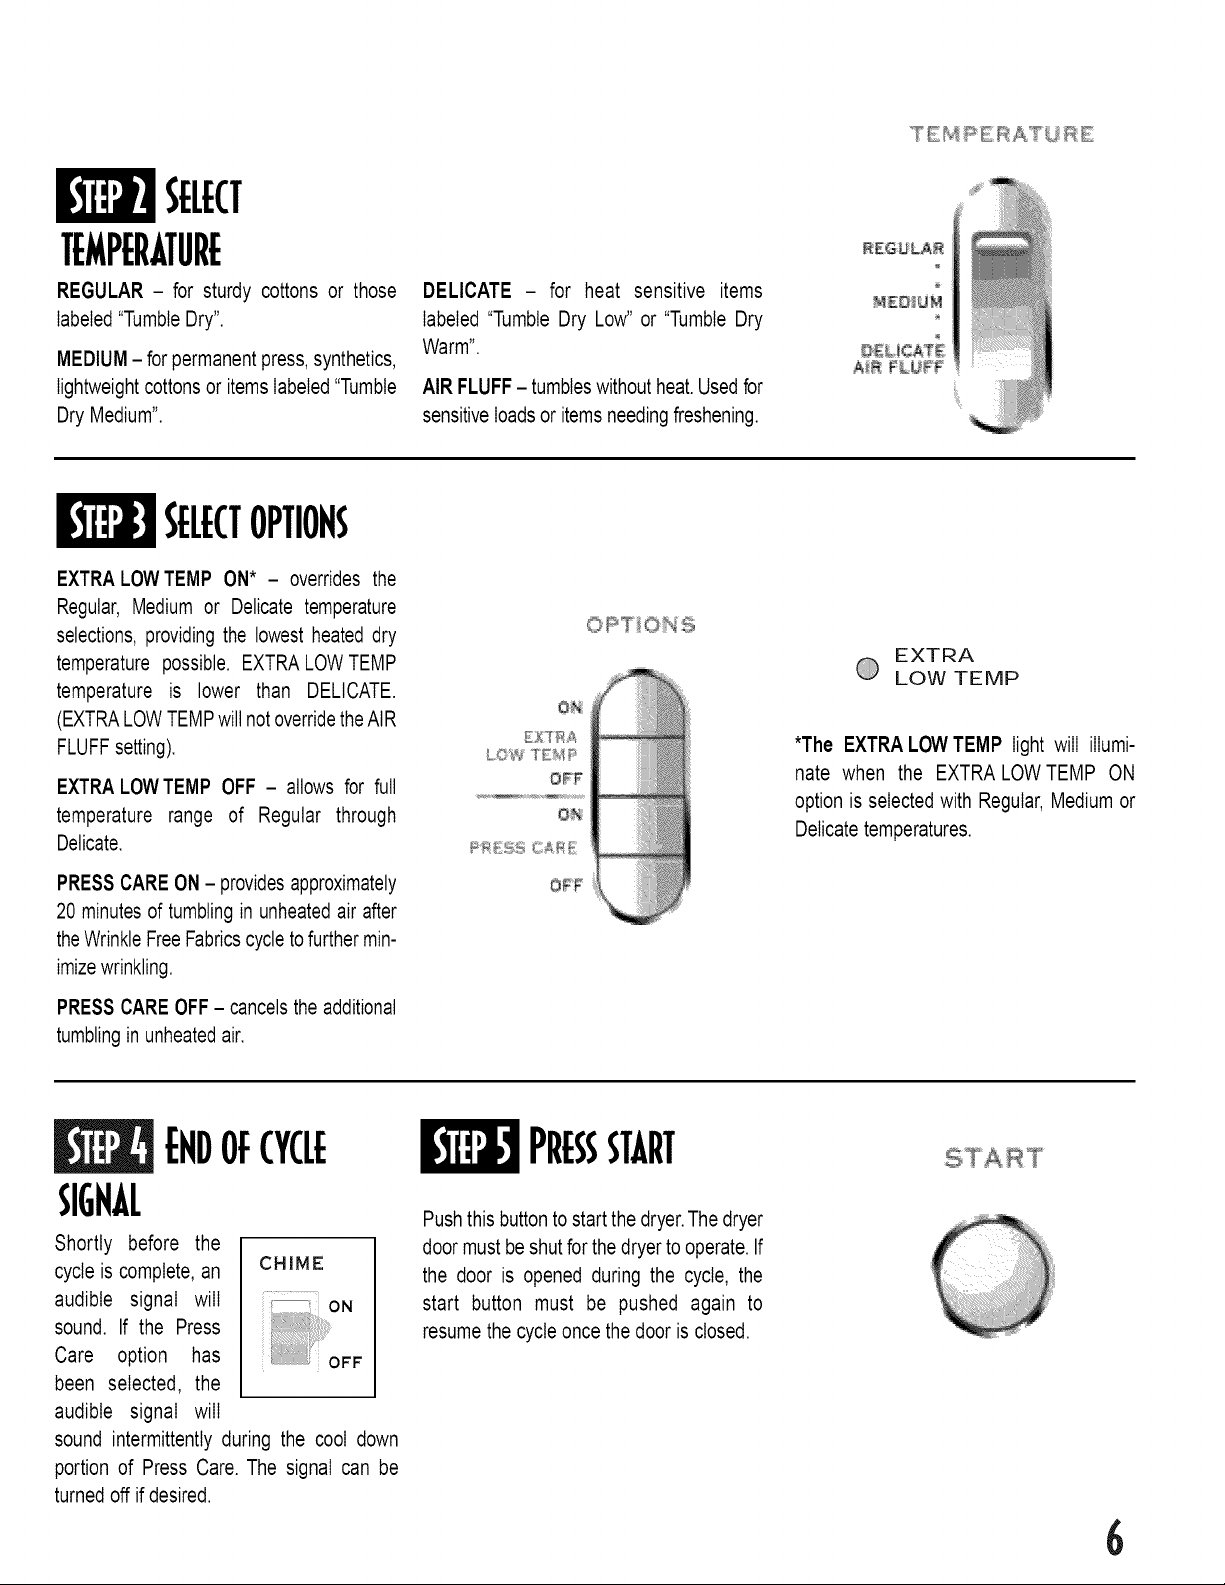
SELECT
TEMPERATURE
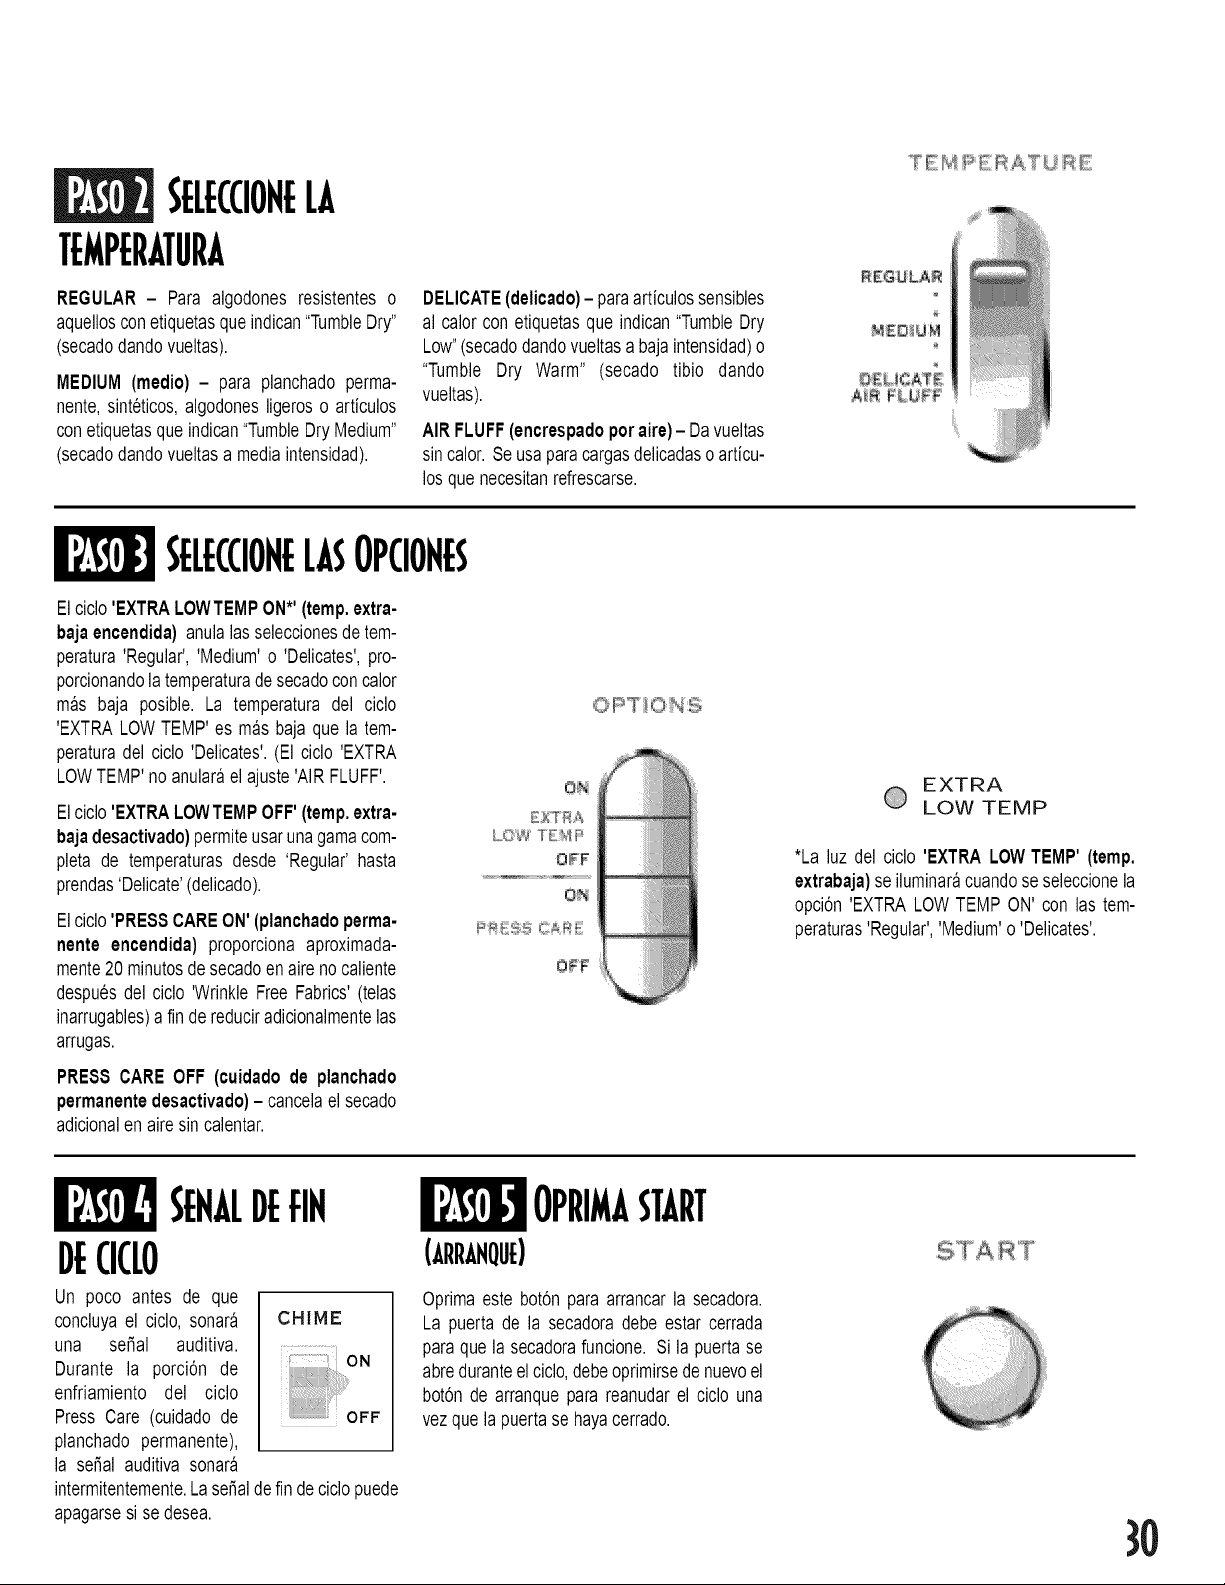
REGULAR - for sturdy cottons or those
labeled "TumbleDry".
MEDIUM - for permanentpress, synthetics,
lightweight cottonsor items labeled "Tumble
Dry Medium".
DELICATE - for heat sensitive items
labeled "Tumble Dry Low" or "Tumble Dry
Warm".
AIR FLUFF - tumbleswithout heat.Usedfor
sensitiveloads or items needingfreshening.
TE_4;PE RATUiR E
d# [{i!!i¸
REG U LAF_o i_ _
N:D_U_
AN FkUPF
:}
SELECTOPTIONS
EXTRA LOWTEMP ON* - overrides the
Regular, Medium or Delicate temperature
selections, providing the lowest heated dry
temperature possible. EXTRA LOW TEMP
temperature is lower than DELICATE.
(EXTRALOWTEMPwill not overridethe AIR
FLUFFsetting).
EXTRA LOWTEMP OFF - allows for full
temperature range of Regular through
Delicate.
PRESS CARE ON - providesapproximately
20 minutesof tumbling in unheated air after
the WrinkleFree Fabricscycle to further min-
imizewrinkling.
PRESS CARE OFF - cancels the additional
tumblingin unheatedair.
O_
D:_RA
I.CW TEk;_P
OFF
O_
_R L_f_ CA_ k
O@F
EXTRA
LOW TEMP
*The EXTRA LOW TEMP light will illumi-
nate when the EXTRA LOWTEMP ON
option is selected with Regular, Medium or
Delicate temperatures.
ENDOFCYCLE
SIGHAL
Shortly before the
cycle is complete, an
audible signal will
sound. If the Press
Care option has
been selected, the
audible signal will
sound intermittently during the cool down
portion of Press Care. The signal can be
turned off if desired.
CHIME
............................ON
OFF
PRESSSTART
Push this button to start the dryer.The dryer
door must be shut for the dryer to operate. If
the door is opened during the cycle, the
start button must be pushed again to
resume the cycle once the door is closed.
6

( (TMODELS}
Setting the Controls for Dryel Fabric Care:
Set the temperature for Regular heat.
DO NOTselect Air Fluff or the Extra
Low TempOn option.
I4EQ/U:_
[; [-:k._¢_TE
A_ F_kLJ_F
LI/
F
Set the control dial at the DryeI line.
Press Start Button
For Best Performance:
• Referto the DryeI instructionsfor proper use.
• Items in the bag must tumble. Place no more than 3
to 4 items in the bag at one time.
• Do not mix colors or fabrics when using DryeI.
• Immediately at the end of the cycle, remove
garments from the DryeI bag. Hang the garments
while still warm and slightly damp to minimize
wrinkles.
t
Control Panel - clean with a soft, damp
cloth. Do not use abrasivesubstances.
Tumbler- removeany stains such as cray-
on, ink pen or fabric dye (from new items
such as towels or jeans) with an all-purpose
cleaner.Then tumble old towels or rags to
remove any excess stain or cleaning sub-
stance. Once these steps are done, stains
maystill bevisible, but should not transferto
subsequent loads.
Cabinet - wipe offany marks with soap and
water.
Dryer Exhaust System - should be
inspected and cleaned once a year to main-
tain optimum performance. The outside
exhaust hood should be cleaned more fre-
quently to ensure proper operation. (Refer
to the Installation Instructionsfor more infor-
mation.)
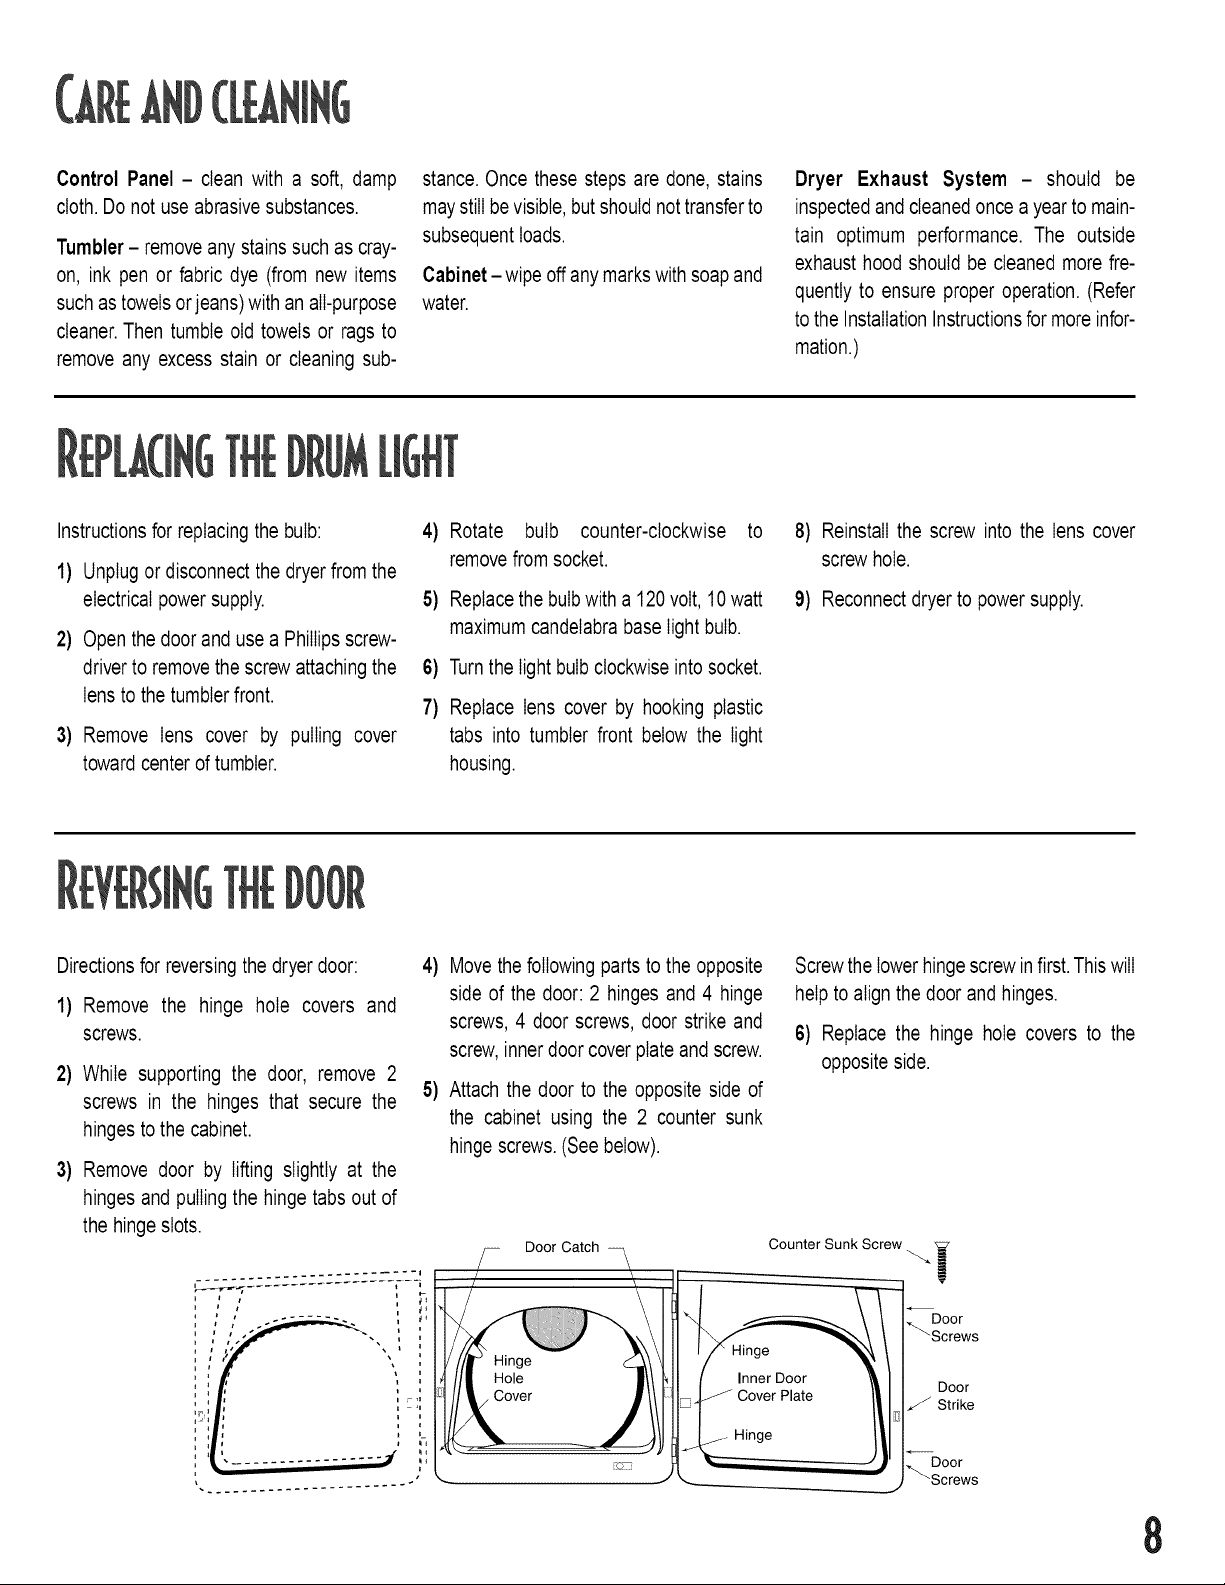
Instructionsfor replacing the bulb:
1) Unplug or disconnect the dryer from the
electrical power supply.
2) Open the door and use a Phillips screw-
driver to removethe screw attaching the
lens to the tumblerfront.
3) Remove lens cover by pulling cover
toward center of tumbler.
4) Rotate bulb counter-clockwise to
remove from socket.
s)
s)
7)
Replacethe bulbwith a 120volt, 10 watt
maximum candelabra base light bulb.
Turn the light bulbclockwise into socket.
Replace lens cover by hooking plastic
tabs into tumbler front below the light
housing.
s)
Reinstall the screw into the lens cover
screw hole.
9) Reconnect dryer to power supply.
Directionsfor reversingthe dryer door:
1) Remove the hinge hole covers and
screws.
2) While supporting the door, remove 2
screws in the hinges that secure the
hinges to the cabinet.
3) Remove door by lifting slightly at the
hinges and pulling the hinge tabs out of
the hinge slots.
4)
S)
Movethe following parts to the opposite
side of the door: 2 hinges and 4 hinge
screws, 4 door screws, door strike and
screw, innerdoor cover plate and screw.
Attach the door to the opposite side of
the cabinet using the 2 counter sunk
hinge screws. (See below).
Door Catch
Screwthe lower hingescrew infirst.Thiswill
help to align the door and hinges.
6) Replace the hinge hole covers to the
opposite side.
Counter Sunk Screw
i
t
i _I i i
i i
._.....Door
Screws
Door
Strike
Door
_Screws
Please follow the care label or manufacturer's instructions for drying special items. If care label instructions are not available, use the fol-
lowing information as a guide.
Bedspreads • Followthe care label instructions or dry on the Regular cycle.
& Comforters • Be sure the item is thoroughly dry before using or storing.
• May require repositioning to ensure even drying.
Blankets • Dry only one blanketat a time for best tumbling action.
• Be sure the item is thoroughly dry before using or storing.
Curtains • Use the Wrinkle Free Fabrics cycle to help minimize wrinkling.
& Draperies • Dry these in small loads for best results and remove as soon as possible.
Cloth Diapers • Use the Regular cycle for soft, fluffy diapers.
Down-filled Items • Use the Regular cycle and a delicate temperature setting.
(jackets, sleeping bags, • Place a clean pair of sneakers in the dryer with the item to fluff the down comforters,
comforters,etc.) etc. Adding a couple of dry towels shortens dry time and absorbs moisture.
Foam Rubber • DO NOT dry on a heat setting. Use the Time Dry/Air Fluff (no-heat) cycle.
(rug backs,stuffed toys, _ WARNING - Drying a rubber item with heat may damage it or pose a fire hazard.
certain shoulder pads, etc.)
Pillows • Use the Regular cycle.
• Add a couple of dry towels and a pair of clean sneakers to help the tumbling action and
to fluff the item.
• DO NOT dryer-dry kapok or foam pillows.
Plastics
• Use the Time Dry/Air Fluff cycle on a Delicateor Air Fluff temperature dependingon the
(showercurtains, outdoor care label instructions.
furniture covers, etc.)
9
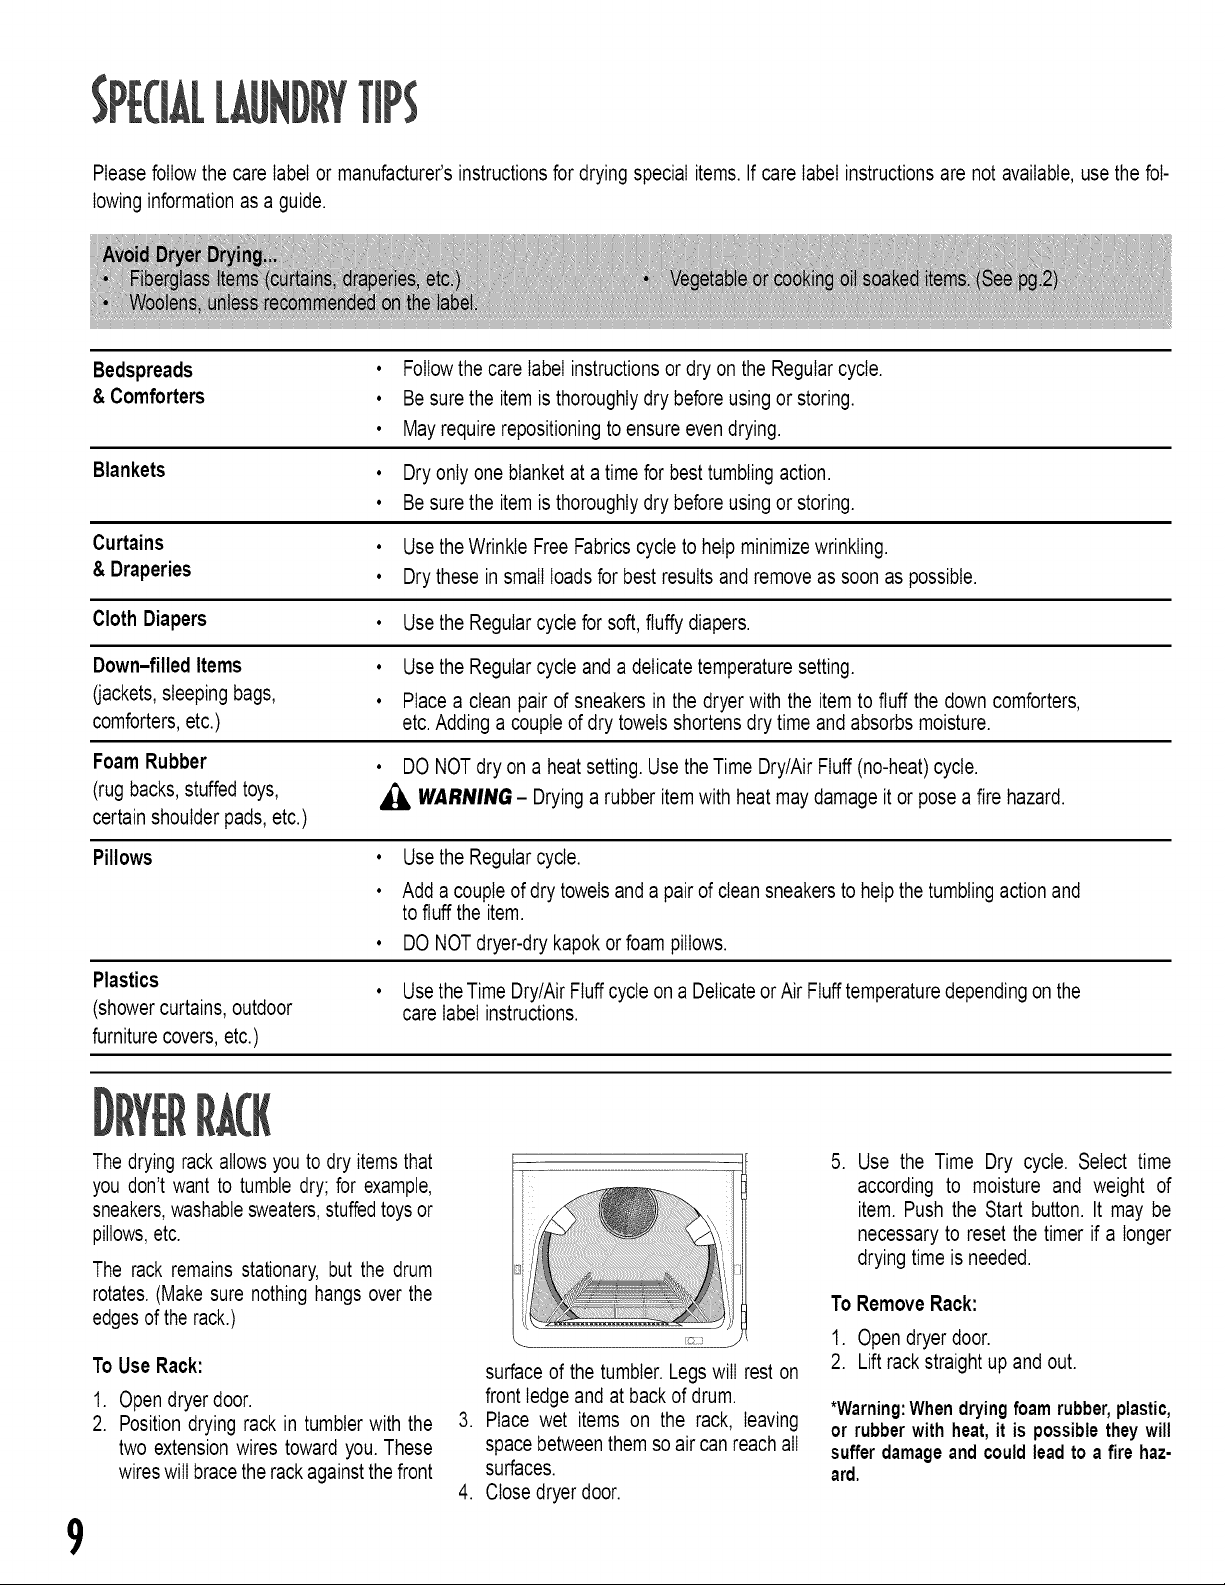
The drying rack allows you to dry items that
you don't want to tumble dry; for example,
sneakers,washablesweaters,stuffedtoys or
pillows,etc.
The rack remains stationary, but the drum
rotates. (Make sure nothing hangs over the
edges of the rack.)
To Use Rack:
.
2.
Open dryer door.
Position drying rack in tumbler with the
two extension wires toward you. These
wires will brace the rackagainst the front
surface of the tumbler. Legs will rest on
front ledge and at back of drum.
3. Place wet items on the rack, leaving
space between them so air can reach all
surfaces.
4. Close dryer door.
.
Use the Time Dry cycle. Select time
according to moisture and weight of
item. Push the Start button. It may be
necessary to reset the timer if a longer
drying time is needed.
To Remove Rack:
1. Open dryer door.
2. Lift rack straight up and out.
*Warning:When dryingfoam rubber, plastic,
or rubber with heat,it is possiblethey will
sufferdamageand could lead to a fire haz-
ard.

CHECKTHESEPOtNTS YOURCLOTHESDRYER,..
DOESN'T RUN
• Be sure the door is latched shut.
• Besure the powercord is plugged into a
live electrical outlet.
• Check the home's circuit breaker and
fuses.
• Press the Start button again if the door
is opened during the cycle.
DOESN'T HEAT
• Check the home's circuit breaker and
fuses.
• Selecta heat setting, not Air-Fluff.
• On a gas dryer, check that the gas sup-
ply is on.
• Clean the lint filter and exhaust duct.
• Dryer timer may have moved into the
cool-down portion of the cycle.
DOESN'T DRY
• Check all of the above, plus...
• Besure the exhaust hoodat the outside
of the home can open and close freely.
• Check exhaust system for lint build-up.
Ducting should be inspected and
cleaned annually.
• Use 4" rigid metal exhaust duct.
• Do not overload. 1 Wash load = 1 Dryer
load.
• Sort heavy items from lightweight items.
• Large, bulky items like blankets or com-
forters may require repositioning to
ensure even drying.
• Check that the washer is draining prop-
erly to extract adequate water from the
load.
• Clothes load is too small to tumbleprop-
erly.Add a few towels.
IS NOISY
• Check the load for objects such as
coins, loose buttons, nails, etc. Remove
promptly.
• Itis normal to hear the dryer gas valveor
heating element cycle on and off during
the drying cycle.
• Be sure the dryer is leveled properly as
outlined in the installation manual.
• Be sure the rubber feet are installed on
the leveling legs.
• A clicking noise may be the timer
advancing.
• It is normal for the dryer to hum due to
the high velocity of air moving through
the dryer drum and exhaust system.
CONTROL KNOB ADVANCES
SLOWLY
• This is normal operation for an IntelIiDry
cycle, especially at the beginning of the
cycle. Once the load begins to dry, the
control knob will start to advance. The
rate of advancement will be stow at the
beginning of the cycle because there is
more moisture in the load. As the load
becomes more dry,the control knob will
advance more quickly.
DRIES UNEVENLY
• Seams, pocketsand other similar heavy
areas may not be completely dry when
the rest of the load has reached the
selected dryness level. This is normal.
Select the "More Dry" setting if desired.
• If one heavy item is dried with a light-
weight load, such as one towel with
sheets, it is possible that the heavy item
will not be completely dry when the rest
of the load has reached the selected
dryness level. Sort heavy items from
lightweight items for best drying results.
HAS AN ODOR
• Householdodors such as from painting,
varnishing, strong cleaners, etc. may
enter the dryer with the surrounding
room air. This is normal as the dryer
draws the air from the room, heats it,
pulls it through the tumbler and exhausts
it to the outside. When these odors are
present in the air, ventilate the room
completely before using the dryer.
]!)
Full OneYearWarranty
For one (1) year from the date of original retail
purchase, any part which fails in normal home
use will be repairedor replaced free of charge.
Limited Warranty
After the first year from date of original retail
purchase,through the time periods listed below,
the parts designated below which fail in normal
home use will be repaired or replaced free of
charge for the part itself, with the owner paying
all other costs, including labor, mileage and
transportation.
Second Year - All parts.
Third through Fifth Year - Dryer tumbler.
Additional Limited Warranty Against Rust-
Through
Should an exterior cabinet, including the door,
rust through during the one year period starting
from the date of retail purchase, repair or
replacementwill be made free of charge. After
the first and through the tenth year, repair or
replacementwill be made free of charge for the
part itself,with the owner paying all other costs,
including labor, mileage and transportation.
Please Note: This full warranty and the limited
warranty apply when the dryer is located in the
United States or Canada. Dryers located else-
where are covered by the limited warranty only,
including parts which fail during the first two
years.
Canadian Residents
This warranty covers only those dryers installed
in Canada that have been listed with the
Canadian Standards Association unless the
dryers are brought into Canada due to transfer
of residencefrom the United States to Canada.
The specific warranties expressed above are
the ONLY warranties provided by the manufac-
turer. This warranty gives you specific legal
rights, and you may also have other rights that
vary from state to state.
TORKEIVEWARRANTYfl RVI(E
Tolocate an authorizedservice company in your area contact the Maytagdeal-
er from whom your appliance was purchased; or call MaytagAppliances Sales
Company, Maytag Customer Assistance at the number listed below. Should
you not receivesatisfactory warranty service, please call or write:
Maytag Appliances Sales Company
Attn: CAIR-_Center
RO. Box 2370
Cleveland,TN 37320-2370
U.S. 1-800-688-9900 Canada 1-800-688-2002
U.S. customers using TTY for deaf, hearing impaired or
speech impaired, call 1-800-688-2080.
When contacting Maytag Appliances Sales Company, Maytag Customer
Assistance about a service problem, please include the following:
a. Your name, address and telephone number;
b. Model number and serial number (found on the lower center of the
door opening) of your appliance;
c. Name and address of your dealer and the date the appliance was
purchased;
d. A clear description of the problem you are having.
e. Proof of purchase.
WHATISHOTCOVEREDBYTHESEW, RRAI,ITIE;:
1. Conditions and damages resulting from any of the following:
a. Improper installation, delivery,or maintenance.
b. Any repair, modification, alteration or adjustment not authorized by the
manufactureror an authorized servicer.
c. Misuse, abuse, accidents, or unreasonable use.
d. Incorrect electric current, voltage or supply.
e. Improper setting of any control.
2. Warranties are void if the original serial numbers have been removed,
altered, or cannot be readily determined.
3. Light bulb.
4. Products purchasedfor commercial or industrial use.
5. The cost of service or service call to:
a. Correct installation errors.
b. Instruct the user on proper use of the product.
c. Transport the appliance to the servicer.
6. Consequential or incidental damages sustained by any person as a result
of any breach of these warranties.
Some states do not allow the exclusion or limitation of consequentialor inci-
dental damages, so the above exclusion may not apply.
User's Guides, service manualsand parts catalogs are available from
Maytag Appliances Sales Company, MaytagCustomer Assistance.
11
MAYTAG • 403 \_: 4'" Street N. • P.O. Box 39 • Newton, Iowa 50208

Si=CHEUSE iNTELLiGENT MD-16
MAYI'AG
Conservezlesnumerosde modeleet de
seriecompletsdevotresecheuse.Ceux-ci
sontindiquessur une plaquesignaletique
situeesur la partieinferieurecentralede
rouverturede la porte.Veuillezrioterces
numeros ci-dessous pour les avoir
porteede main.
Numerodemodele
_SURESDE$ECURITE..............................Pages 13-14
tSEILSPOURL'EVACUATIOHDE 15• L'AIR.....Page
I,'1
DE FONCTIONNEMENT......................Page 16
Numerodeserie
Ladated'origine
EN BREE...............................Pages 17-18
_ILISATIOF!DELAR[:GLAGE
DEDflYEL.....................................................................Page19
Si vousavezdes questions,veuilleznous
ecrire (en nous indiquantle numerode
modeleainsi que votre numerode tel6-
phone)ouappelez-nous:
MaytagAppliancesSalesCompany
1-800-688-2002CANADA
(Dulundiau vendredi,8 h a 8 h,
heurederest)
Internet: http://www.maytag.com
NOTE:En raison de nos effortscon-
stants d'ameliorationde la qualitede
nos appareilselectro-menagers,il se
peutqu'unemachinea laversoitmodi-
fiee sansqueleguidesoitrevise.
IMPORTANT:Conservezce guide et le
couponde caissedansun endroits_r
pour referenceulterieure.Une preuve
de I'achat d'origine est exigee pour
toutesprestationsde garantie.
IMPORTANT: Pour tous renseigne-
mentsrelatifsau serviceapres-venteet
la garantie,veuillezvousref6rerau
page23.
2O
DEL'AMPOULE
TAMBOUR.............................................................Page 20
_SI,OF!,,,--:-__. DELAPORTE
DE[A SECHEUSE.......................................................Page20
_HSEILSDEBLAHCHISSAGE.............................Page 21
lUEDESECHAGE..............................................Page 21
.........................l D'APPELERLE
SERVICEDEDEPAFIFIAGE.......................................Page22
flAFITIE...................................................................Page23
iADELUSUAfllO..................................................Page 24
__:_http://www.maytag.com
Ne pas entreposer ni utiliser
d'essence ou autres produits et
vapeursinflammablesa proximitede
cet appareil ou de tout autreappareil
menager
QUE FAIRE S'IL Y A UNE ODEUR
DE GAZ :
• N'allumeraucun appareil
• N'actionneraucuncommutateur
electrique
• Nepasutiliserle telephonedarts
votremaisonoudartsvotre
immeuble
• Fairesortirtous lesoccupantsde
la piece,duIogementouimmeuble
oude la vicinit&
• Appelerimmediatementla com-
pagniedegazen utilisantle tele-
phoned'unvoisinSuivreles
instructionsde la compagniede
gaz
• Encas d'impossibilitede joindrela
compagniede gaz,appelerles
pompiers
L'installationet touteslesreparations
doivent_tre effectueesparuntechni-
cienqualifie,unprestatairede services
oula compagniedegaz
,
,
Pourreduirelesrisquesd'incendie,d'electrocutionou de blessuresIorsde I'utilisationde
cetappareil,suivreles precautionsd'usage,dontlessuivantes:
Liretoutesles instructionsavantd'utiliserla
secheuse.
Poureviter les risques d'incendieou d'ex-
plosion:
,
,
a. Ne passecherd'articlesquiont aupara-
vant 6te nettoyes ou laves a I'aide 6.
d'essence,de solvantsde nettoyage
sec ou d'autres produits explosifsou
7.
inflammables,ou qui en sont imbibesou
eclabousses,car ces substancespro-
duisent des vapeurs qui peuvent s'en- 8.
flammerou exploser.Touttissusurlequel
des solvantsdenettoyageontete utilises
ou quisont saturesde liquidesou solides
inflammablesnedoltpas_tremisdartsla
secheuseavantquetoute trace et toute
vapeur de ces liquides ou solides ne
9.
soientcompletementeliminees.De nom-
breux produitsextr_mementinflamma-
blessontcommunementutilisesala mai-
son, entre autres I'acetone, I'alcool
denature, ressence, le kerosene,cer-
tains produitsde nettoyagemenagers,
lesdetachants,laterebenthine,les cires
et lesdecapantsdecire.
Les articles contenantdu caoutchouc
mousse (l'etiquette indique parfois :
moussedelatex)outout materiaude tex-
ture similairenedoiventpas_tre seches
sur un cycle utilisant de rair chaud.
Lorsqu'ilssontexposesa la chaleur,ces
materiauxpeuvent,danscertainescondi-
tions,s'enflammerparunphenomenede
combustionspontanee.
Nepaslaisserles enfantsjouersuroudans
I'appareil.Une surveillanceconstanteest
necessairequandrappareil est utilise en
presenced'enfants.
Avantde mettrerappareilhors serviceou
aurebut,retirerla porteducompartimentde
sechage.
Nepas mettrela mainou le brasdansrap-
pareilsi letambouresten mouvement.
Ne pas installerou remiserrappareildans
un endroitoOil est exposeauxintemperies.
Ne pas modifierles mecanismesde com-
mande.
Ne pasr@arerou remplacerune piecede
rappareilouprocedera und@annage,sauf
si lesinstructionspublieesle recommandent
et que la personneeffectuantla reparation
les comprendet possedelesconnaissances
vouluespourlesexecuter.
Ne pas utiliserd'assouplissanttextileni de
produitvisanta reduireI'electricitestatique
sauf si le fabricantde cesproduitsrecom-
mandeleurusagedansla secheuse.
10. Nettoyerle filtre a charpieavantet apres
chaqueutilisation.
11. Eviter raccumulationde charpie,de pous-
siere et de salete directementautour du
conduitd'evacuationet dans toute la zone
12.
13.
environnante.
Fairenettoyerregulierementrinterieurde la
secheuseet du conduit d'@acuationpar
destechniciensqualifies.
Cetappareildolt _trecorrectementmisa la
terre.Nejamaisbrancherlec_bleelectrique
de rappareilsur uneprisemuralenonmise
laterreconformementauxcodesIocauxet
nationaux.Voirles instructionsd'installation
pourlamisea laterrede cetappareil.
14. Nepass'asseoirsur lasecheuse.
13
CONSERVERCES INSTRUb%ONS
Ne pas s_cher d'articles qui ont tremp_ dans de rhuile v_g_tale ou de rhuile de
cuisine ou en sont tach_s. M_me apr_s avoir _t_ laves, ces articles peuvent
encore contenir des quantit_s non n_gligeables de ces substances. Uhuile dont
ils sont encore imbibes peut prendre feu spontan_ment. Le risque de combustion
spontan_e de ces articles augmente quand ils sont exposes b la chaleur. Des
sources de chaleur, telles qu'une s_cheuse, peuvent chauffer ces articles et
entrainer une r_action d'oxydation de rhuile. L'oxydationproduit de la chaleur.
Si cette chaleur n'est pas dissip_e, les articles peuvent chauffer suffisamment
pour prendre feu. Le fait d'empiler ou d'entreposer ce type d'articles peut
emp_cher la dissipation de la chaleur et crier ainsi un risque d'incendie.
Tousles articles, laves ou non, qui contiennent de I'huile v_g_tale ou de rhuile de
cuisinesont un danger potentiel. Le fait de les laver_ I'eau chaude avec une plus
grande quantit_ de d_tergent que la normale r_duit les risques mais ne les _lim-
ine pas. Toujours utiliser le cycle <<cooldowm>(cycle de refroidissement) pour
r_duire la temperature de ce type d'article. Ne jamais retirer ces articles de la
s_cheuse alors qu'ils sont encore chauds ni interrompre le cycle de s_chage
avant que rappareil n'ait effectu_ un cycle de refroidissement. Ne jamais empiler
ou entreposer ces articles pendant qu'ils sont encore chauds.
MESURESDESf:CURITf:
IMPOflTAHTES
Enapplicationde la Ioi californienneconcernant
la salubritede reau et la protectioncontreles
substances chimiques (<{California Safe
DrinkingandToxicEnforcementAct>>)de1986
(Proposition65),le gouverneurde Californieest
tenudepublierunelistedessubstancesrecoil-
huespar retat de Californiecommeetant can-
cerigenesou pouvant_tre caused'infertilite,et
les commerceset industriessonttenusd'avertir
les consommateursdes risquespotentielsd'ex-
positiona de tellessubstances.
En consequence,les utilisateursde rappareil
sont avertis que la combustionde gaz peut
entrafnerune faibleexpositiona certainesdes
substances nomenclaturees par I'etat de
Californie,dont le benzene,le formaldehydeet
la suie,principalementen raisond'unecombus-
tionincompletede gaz naturelou de gazde pet-
roleliquefie(GPL).Lesconduitsd'evacuationne
doiventpas _tre obstrueset rexpositionaces
substancespeut _tre reduite en assurantune
evacuationd'air adequate.
RECOFIFIAISSEZLESiTIQUETTES,PHRASESOUSYMBOLESSURLASECUfllTE
AVERTISSEMENT- Risquesou pratiquesnon sores,qui POURRAIENTresulteren degraves
blessuresou m6mela mort.
ATTENTION- Risques ou pratiques non sores qui POURRAIENT resulter en blessures
mineures.
14
Lirelesinstructionsde
miseen serviceet le
guidede rutilisateur.
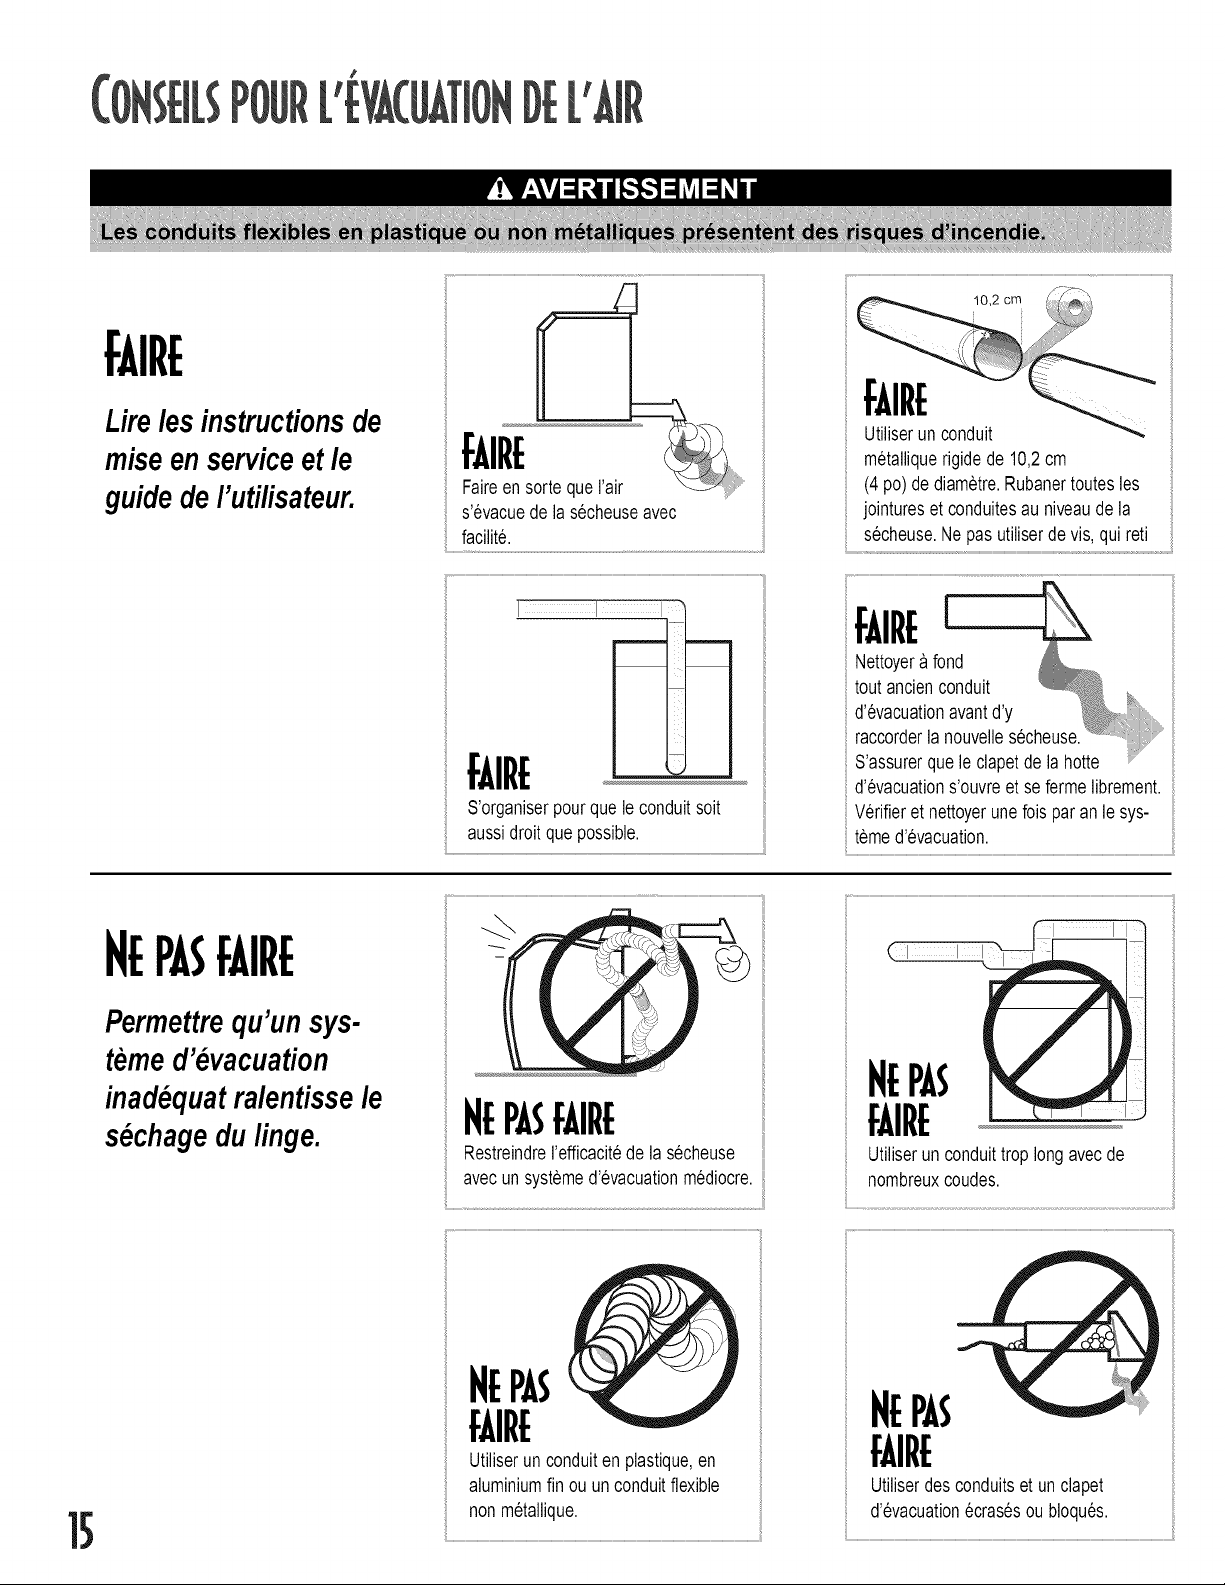
FAIRE
Faireenso
s'evacuede lasecheuseavec
facilit&
I I '
S'organiserpourque le conduitsoit
aussidroitquepossible.
fAIRE
Utiliserun conduit
metalliquerigidede 10,2cm
(4po)dediametre.Rubanertoutesles
jointureset conduitesau niveaude la
secheuse.Ne pasutiliserdevis, quireti
fAIRE!
Nettoyera fond
toutancienconduit
d'evacuationavantd'y
raccorderla nouvellesecheuse.
S'assurerqueleclapetde lahotte ....
d'evacuations'ouvreet se fermelibrement.
Verifieret nettoyerunefoisparan lesys-
temed'evacuation.
15
HEPA5fAIRE
Permettrequ'unsys-
temed'evacuation
inadequatralentissele
sechagedu linge.
NEPA5fAIRE
Restreindrerefficacitede la secheuse
avecunsysteme
d'evacuationmediocre.
HEPAS
fAIRE
Utiliserunconduiten plastique,en
aluminiumfin ouunconduitflexible
nonmetallique.
NEPA5
FAIRE
Utiliserun conduittroplongavecde
nombreuxcoudes.
Utiliserdesconduitset unclapet
d'evacuationecras6sou bloques.
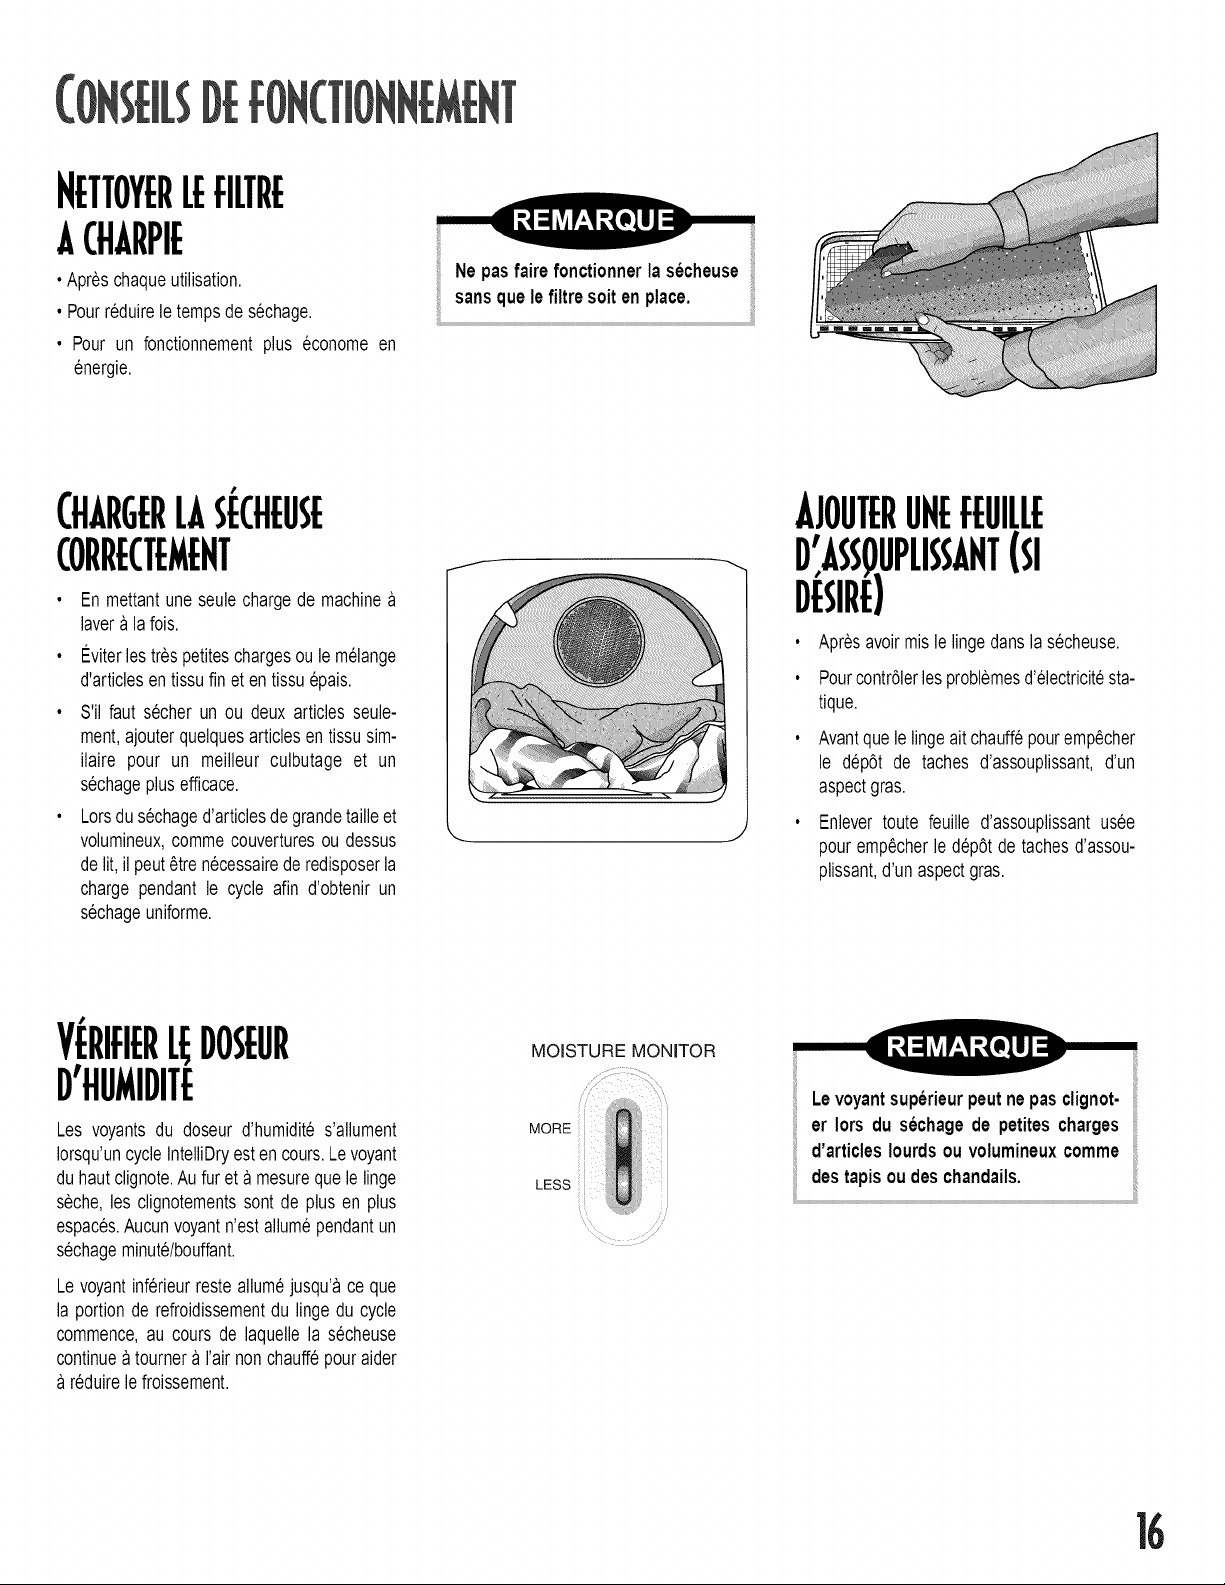
NETTOYERIEFIITRE
ACHARPIE
• Apreschaqueutilisation.
• Pourreduirele tempsde sechage.
• Pour un fonctionnementplus economeen
energie.
Ne pas faire fonctionner la secheuse
sansquelefiltre soiten place.
ii
t
CHARGERLASECHEUSE
COflflECTEMEFIT
• En mettantuneseulechargede machine
lavera lafois.
• Eviterlestrespetiteschargesou le melange
d'articlesentissufin et entissuepais.
• S'il faut secher un ou deux articles seule-
ment,ajouterquelquesarticlesen tissusim-
ilaire pour un meilleur culbutage et un
sechageplusefficace.
• Lorsdusechaged'articlesdegrandetailleet
volumineux,commecouverturesou dessus
delit,il peut_tre necessairede redisposerla
charge pendant le cycle afin d'obtenirun
sechageuniforme.
J
AJOUTEflUHEFEUILLE
D',ASS_)UPLISSAHT(SI
DESIRE)
Apresavoirmislelingedansla secheuse.
Pourcontr61erles problemesd'61ectricitesta-
tique.
Avantquele lingeait chauffepouremp_cher
le dep6t de taches d'assouplissant,d'un
aspectgras.
Enlever toute feuille d'assouplissantusee
pourempecherle dep6tde tachesd'assou-
plissant,d'un aspectgras.
V_:fltFtEflL_DOSEUfl
D'HUMIDITE
Les voyantsdu doseur d'humidite s'allument
Iorsqu'uncycleIntelliDryestencours.Levoyant
duhautclignote.Aufur eta mesurequelelinge
seche,les clignotementssont de plus en plus
espaces.Aucunvoyantn'est allumependantun
sechageminuWbouffant.
Le voyantinferieurresteallumejusqu'ace que
la portionde refroidissementdu lingedu cycle
commence,au cours de laquellela secheuse
continuea tournera I'airnonchauffepouraider
reduirelefroissement.
MOISTURE MONITOR
Levoyantsuperieurpeutnepasclignot-
er Iors du sechagede petitescharges
d'articlesIourdsouvolumineuxcomme
destapisoudeschandails.
ii
H
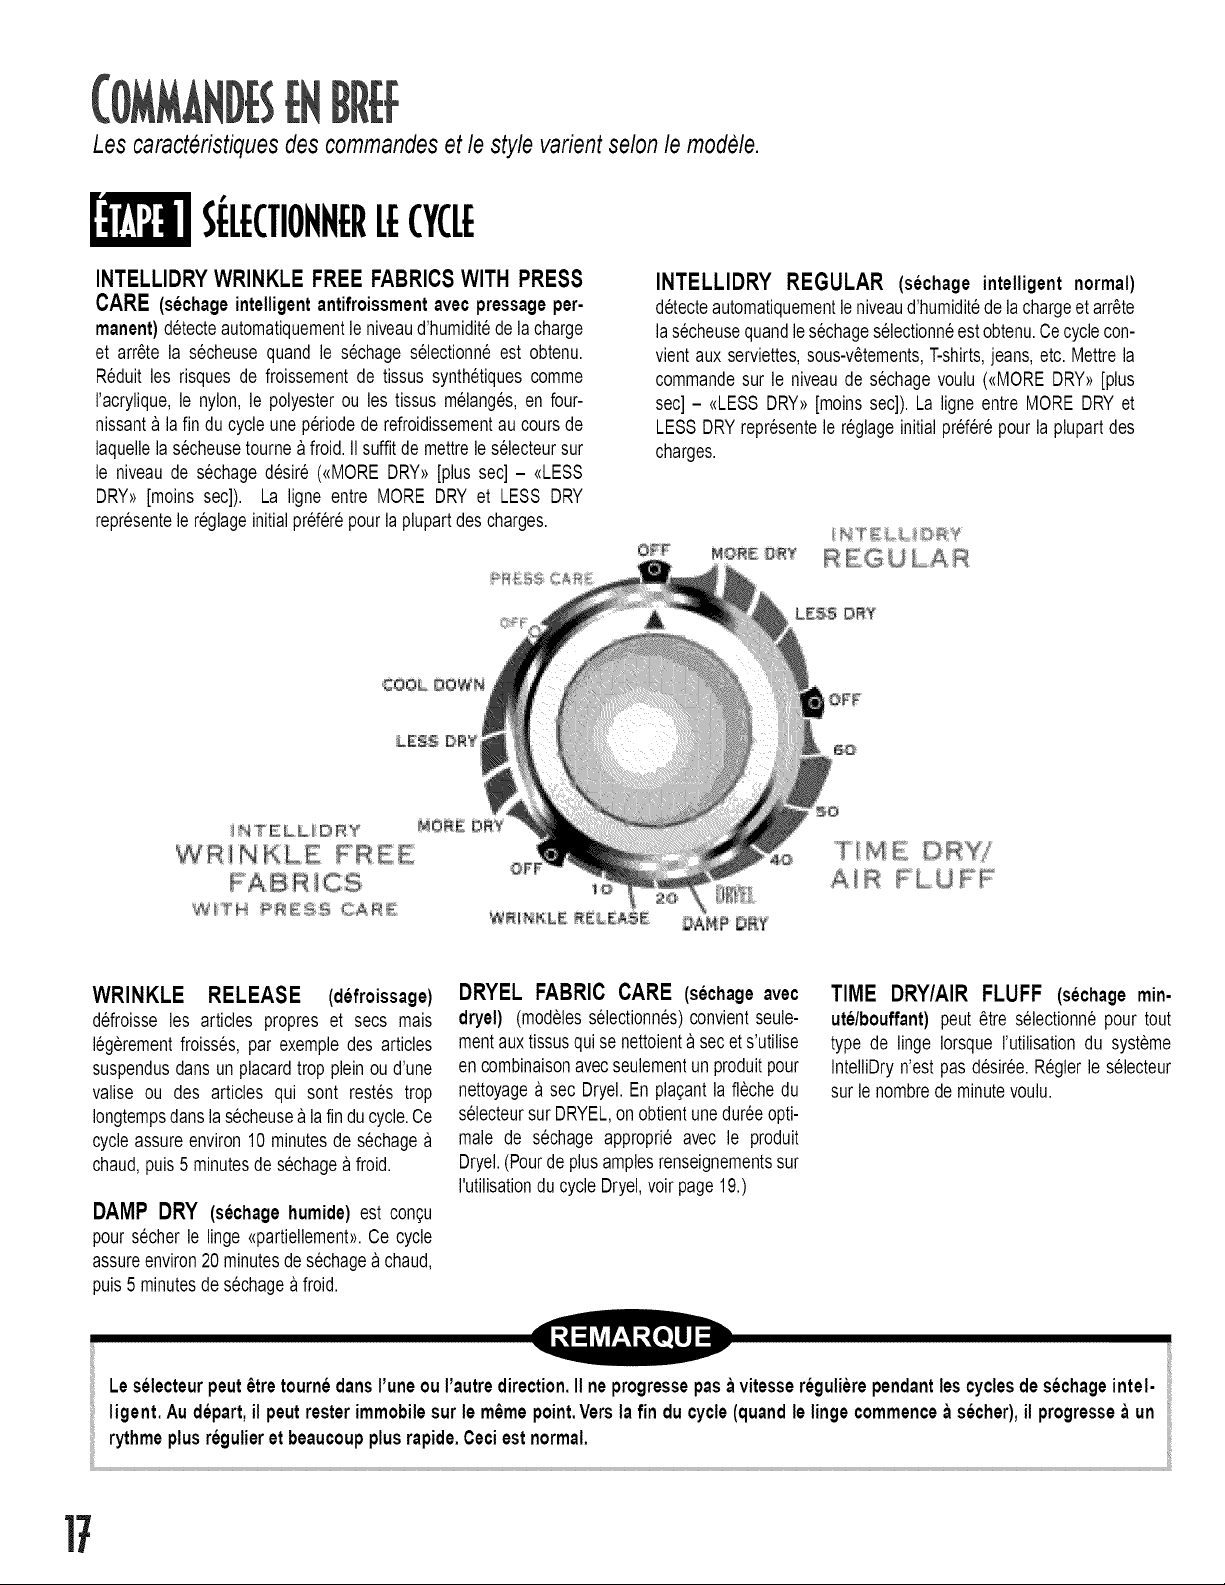
Les caracteristiquesdes commandeset le style varientselonle modele.
$[:LECTIOFIFIEflLECYCLE
INTELLIDRYWRINKLE FREE FABRICSWITH PRESS
CARE (sechageintelligentantifroissment avec pressageper-
manent)detecteautomatiquementle niveaud'humiditede la charge
et arr_te la s@heusequand le s@hageselectionn6est obtenu.
Reduitles risquesde froissementde tissus synthetiquescomme
racrylique,le nylon,le polyesterou les tissus melang6s,en four-
nissanta la fin du cycleuneperiodede refroidissementau coursde
laquellelas@heusetourneafroid. II suffitde mettrele selecteursur
le niveaude s@hagedesir6 (<<MOREDRY>>[plus sec] - <{LESS
DRY>>[moins sec]). La ligne entre MORE DRY et LESS DRY
representele reglageinitialpref6r6pourla plupartdescharges.
INTELLIDRY REGULAR (sechage intelligent normal)
detecteautomatiquementle niveaud'humiditede lachargeet arr_te
las@heusequandles@hages61ectionneestobtenu.Cecyclecon-
vientaux serviettes,sous-v6tements,T-shirts,jeans,etc. Mettrela
commandesur le niveaude s@hagevoulu (<<MOREDRY>>[plus
sec] - <<LESSDRY>>[moinssec]).La ligne entre MORE DRY et
LESSDRYrepresentele reglageinitialpref6r6pourla plupartdes
charges.
T f M E D RYi
PLU YY
WRINKLE RELEASE (defroissage)
d@oisse les articles propres et secs mais
16gerementfroisses,par exempledes articles
suspendusdans un placardtrop plein oud'une
valise ou des articles qui sont restes trop
Iongtempsdanslas@heusea lafin du cycle.Ce
cycleassureenviron10minutesde s@hage
chaud,puis 5 minutesde s@hagea froid.
DAMP DRY (sechage humide) est congu
pours@her le linge @artiellement>>.Ce cycle
assureenviron20 minutesde s@hagea chaud,
puis5 minutesdes@hagea froid.
DRYEL FABRIC CARE (sechageavec
dryel) (modelesselectionn6s)convientseule-
mentauxtissusquise nettoienta sec ets'utilise
encombinaisonavecseulementun produitpour
nettoyagea sec Dryel.En plagantla fBche du
selecteursurDRYELon obtientunedureeopti-
male de s@hage approprie avec le produit
Dryel.(Pourdeplusamplesrenseignementssur
I'utilisationdu cycleDryel,voir page19.)
TIME DRY/AIR FLUFF (sechagemin-
ute/bouffant)peut _tre selectionnepourtout
type de linge Iorsque rutilisationdu systeme
IntelliDryn'estpas desiree.Reglerle selecteur
sur lenombredeminutevoulu.
Le selecteur peut6tre tournedansI'une ouI'autre direction.II neprogressepasa vitessereguliere pendantles cyclesde sechageintel-
ligent. Audepart,il peutresterimmobilesur le m_mepoint.Versla fin ducycle(quandle lingecommencea secher),il progressea un
rythmeplusregulieret beaucoupplusrapide.Ceciestnormal.
ii
1t
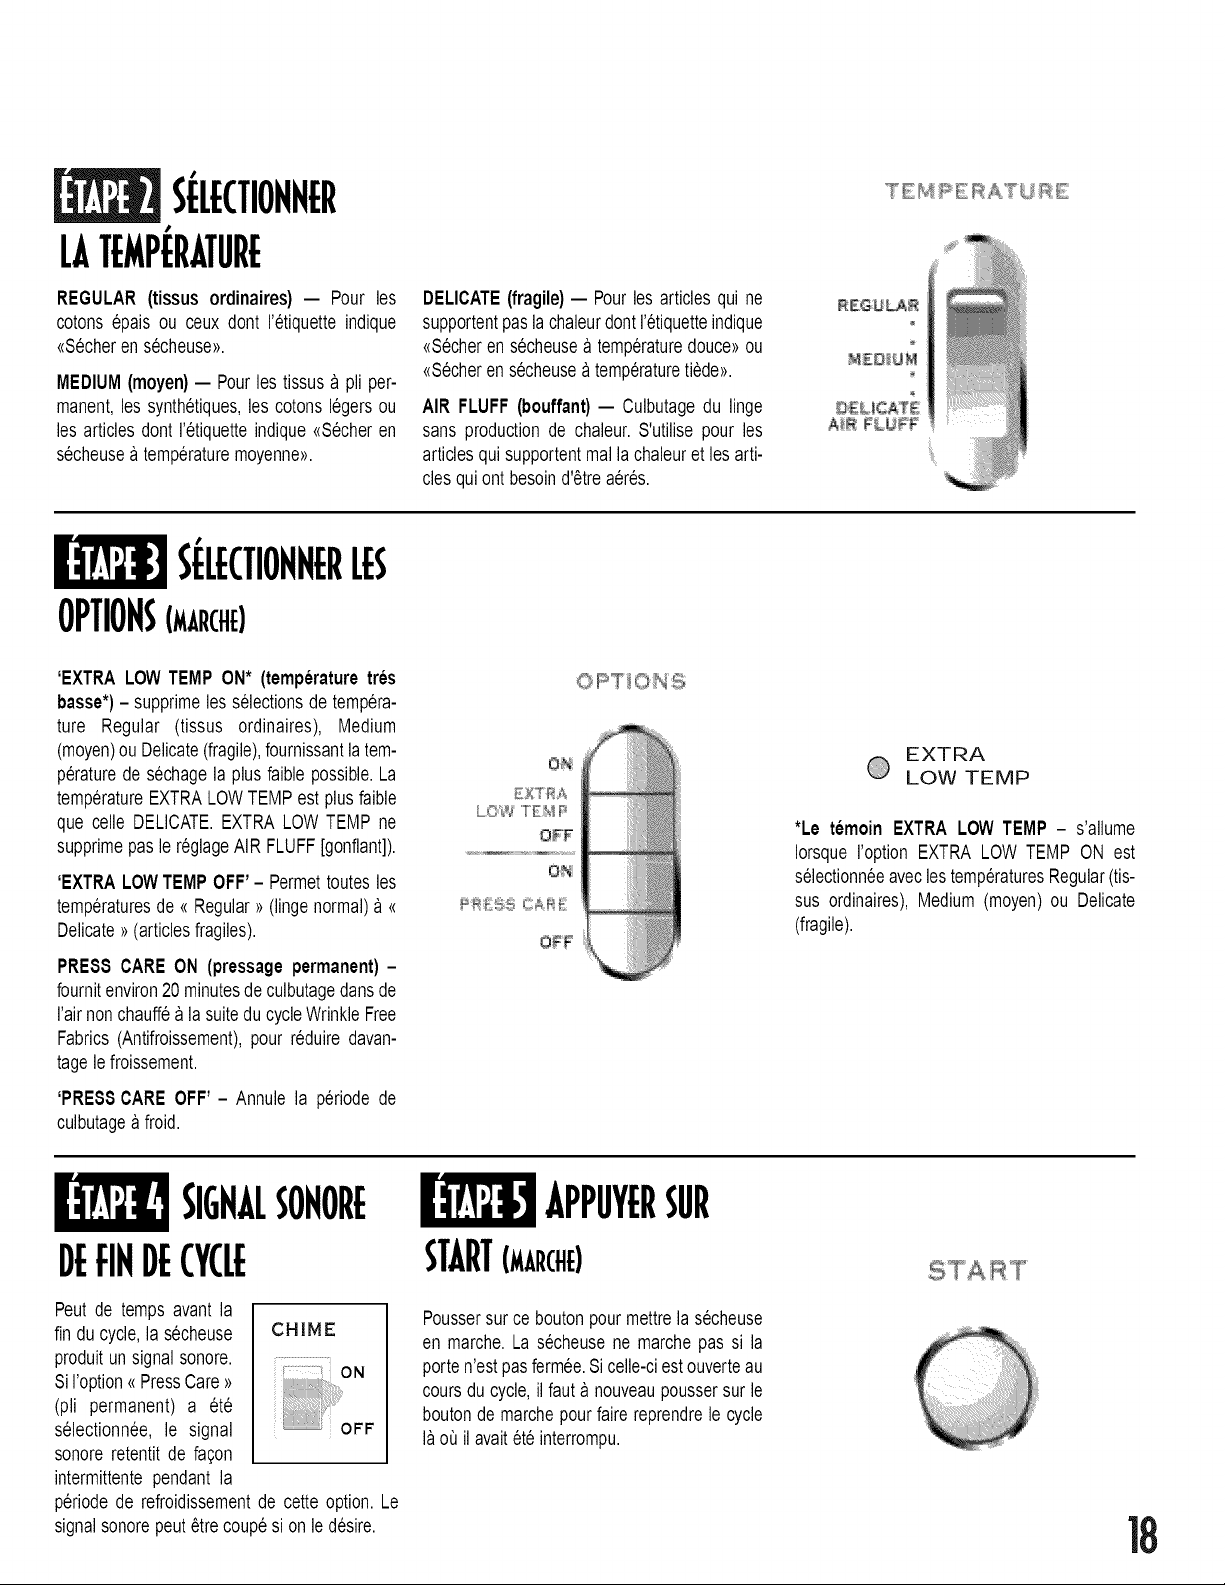
S{:LECTIOFIFIEfl
LATEMPERATURE
REGULAR (tissusordinaires) -- Pour les
cotons @ais ou ceux dont retiquetteindique
<{S@herens@heuse>>.
MEDIUM(moyen)-- Pourles tissusa pli per-
manent,les synthetiques,les cotonslegersou
les articlesdont I'etiquetteindique<<S@heren
s@heusea temperaturemoyenne>>.
DELICATE(fragile) -- Pourles articlesqui ne
supportentpaslachaleurdontI'etiquetteindique
_{S@herens@heusea temperaturedouce>>ou
<{S@herens@heusea temperaturetiede>>.
AIR FLUFF(bouffant) -- Culbutagedu linge
sans productionde chaleur.S'utilisepour les
articlesquisupportentmallachaleuret les arti-
clesquiont besoind'Gtreaeres.
F [_4PERA'TjRE
A_ FLUFF
S{:LECTIOFIFIERLES
OPTIONS(MARCHE)
'EXTRA LOWTEMPON* (temperature tres
basse*)- supprimeles selectionsde tempera-
ture Regular (tissus ordinaires), Medium
(moyen)ou Delicate(fragile),fournissantla tem-
peraturede s@hagela plusfaiblepossible.La
temperatureEXTRALOWTEMPest plusfaible
que celle DELICATE.EXTRALOWTEMP ne
supprimepasle re@ageAIR FLUFF[gonflant]).
'EXTRALOWTEMPOFF'- Permettoutesles
temperaturesde <<Regular>_(lingenormal)a <<
Delicate>_(articlesfragiles).
PRESSCARE ON (pressage permanent)-
fournitenviron20minutesdeculbutagedansde
Fairnonchauffea lasuiteducycleWrinkleFree
Fabrics(Antifroissement),pour re@ire davan-
tagelefroissement.
'PRESSCARE OFF'- Annule la periodede
culbutagea froid.
E;4T:RA
L_Z@ TE_d P
OTF
o_
P _}S_ CAR
O_r
© PT _0
EXTRA
LOW TEMP
*Le temoin EXTRA LOWTEMP - s'allume
IorsqueI'option EXTRALOW TEMP ON est
selectionneeaveclestemperaturesRegular(tis-
sus ordinaires),Medium(moyen)ou Delicate
(fragile).
SIGNALSOl,lORE
DEFINDECYCLE
Peut de temps avant la
fin ducycle,la s@heuse
produitun signalsonore.
SiI'option<_PressCare>_
(pli permanent) a ete
selectionnee, le signal
sonoreretentit de fagon
intermittentependant la
periodede refroidissementde cette option. Le
signalsonorepeut_trecoupesi onle desire.
CHIME
ON
APPUYEflSUfl
START(MARCHE)
Poussersur ce boutonpourmettrela s@heuse
en marche.La s@heusene marchepas si la
porten'estpasfermee.Sicelle-ciestouverteau
coursdu cycle,il fauta nouveaupoussersur le
boutonde marchepourfairereprendrele cycle
laot_il avaitete interrompu.
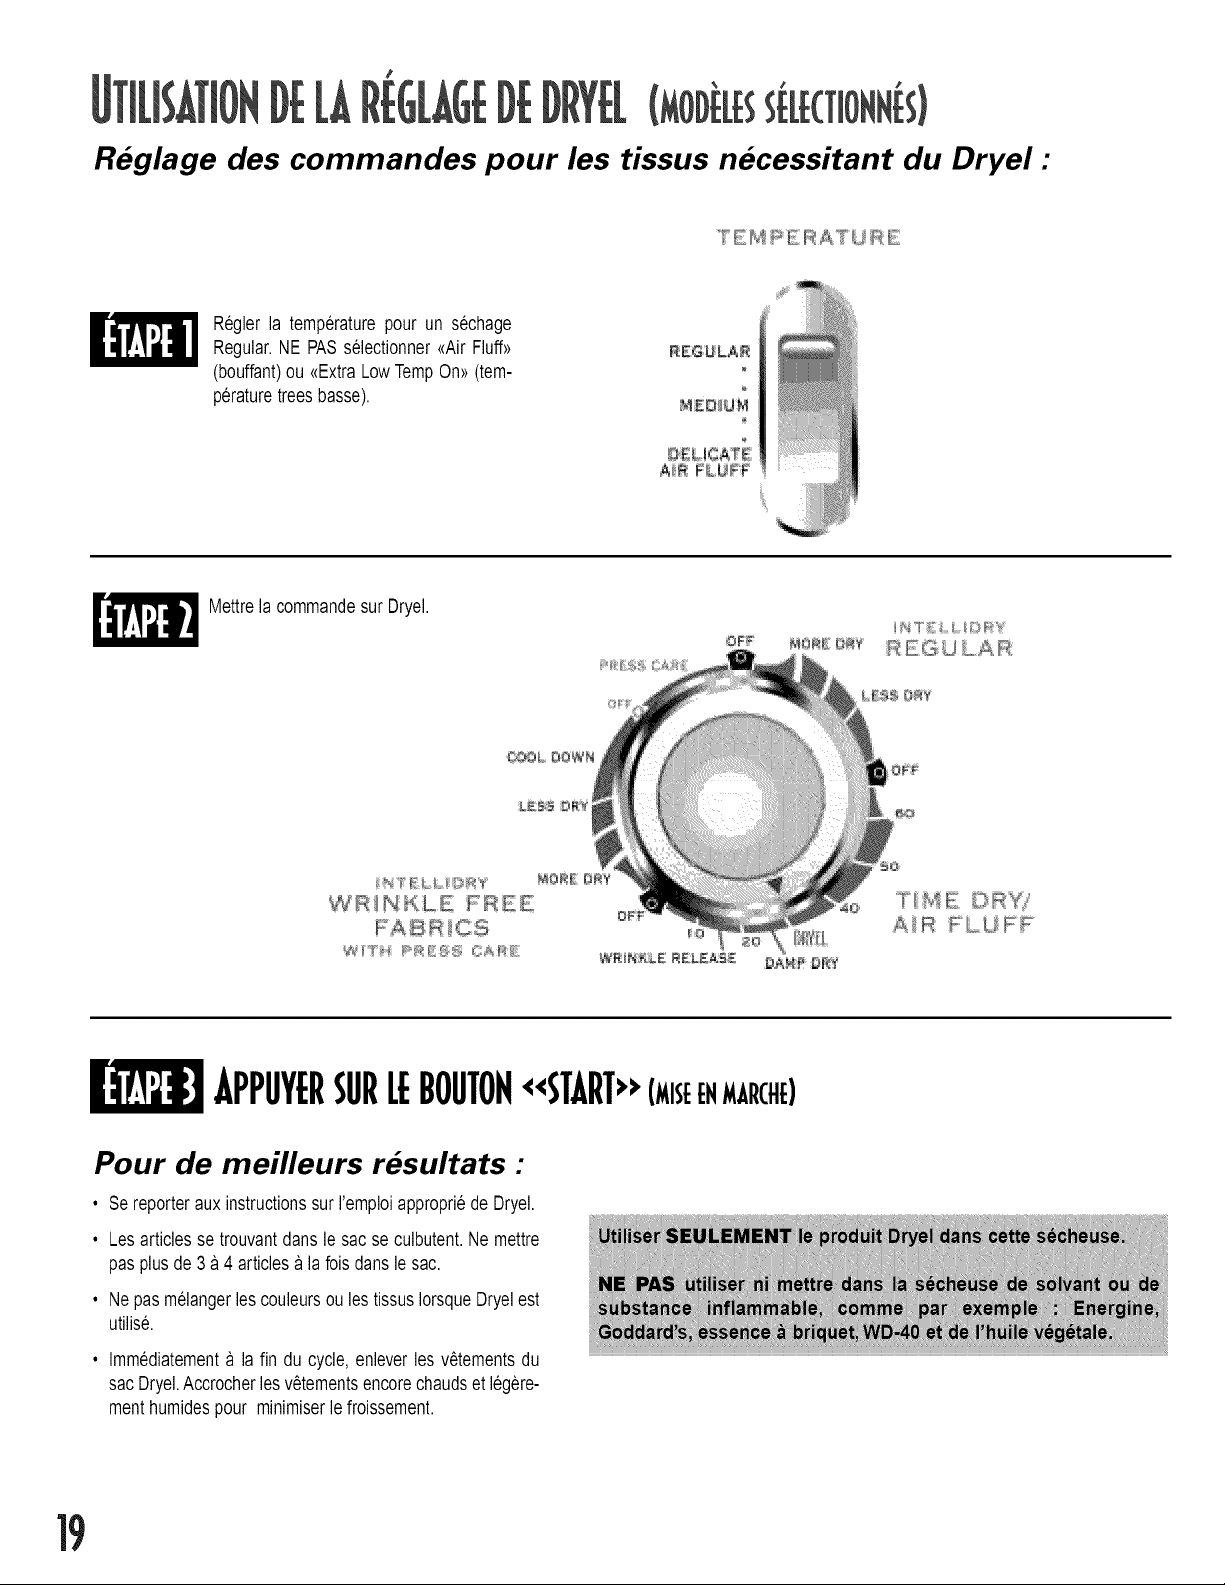
(MODiLES' "(TIO@I
Reglage des commandes pour les tissus necessitant du Dryel •
Reglerla temperaturepour un s@hage
Regular.NE PASselectionner<<AirFluff>>
(bouffant)ou <<ExtraLowTempOn>>(tem-
peraturetrees basse).
Mettrela commandesur Dryel.
APPUYERSIRE BOUTOF!<<START>>(MISEE,MARCHE)
Pour de meilleurs resultats •
• Sereporteraux instructionssur I'emploiappropriede Dryel.
• Les articlesse trouvantdansle sac se culbutent.Ne mettre
pas plusde 3 a4 articlesa lafoisdanslesac.
• Ne pasmelangerlescouleursou lestissusIorsqueDryelest
utilis&
• Immediatementa la fin du cycle,enleverles vStementsdu
sacDryel.Accrocherlesv£tementsencorechaudset legere-
merithumidespour minimiserlefroissement.
19
Tableaude commande -- Nettoyeravec un
lingedoux et humide.Ne pas utiliserde sub-
stancesabrasives.
Tambour -- Enlever toutes taches comme
cellesde crayon,de stylo ou de teinture(des
nouveauxarticlescommeserviettesou jeans)
avec un nettoyanttout usage. Ensuite,faire
secherparculbutageavecde vieillesserviettes
oudeschiffonspourenlevertoutexcesdetach-
es ou de substancede nettoyage._,la suite de
cesetapes,les tachespeuventencoreetrevisi-
blesmaisnedevraientpasaffecterlescharges
suivantes.
Carrosserie-- Nettoyertoutestracesde salete
reau et au savon.Si desir6, appliquerde la
cirepourappareilsmenagersunefoisparan.
Syst_me d'_vacuation de I'air -- Dolt _tre
inspecteet nettoyeentierementunelois par an
pourdonnerdesresultatsoptimums.Lahottese
trouvanta rexterieurde la residencedolt 6tre
nettoyeeplus frequemmentpour assurer son
bon fonctionnement.(Voir les instructionsde
raiseenservicepourplusde renseignements.)
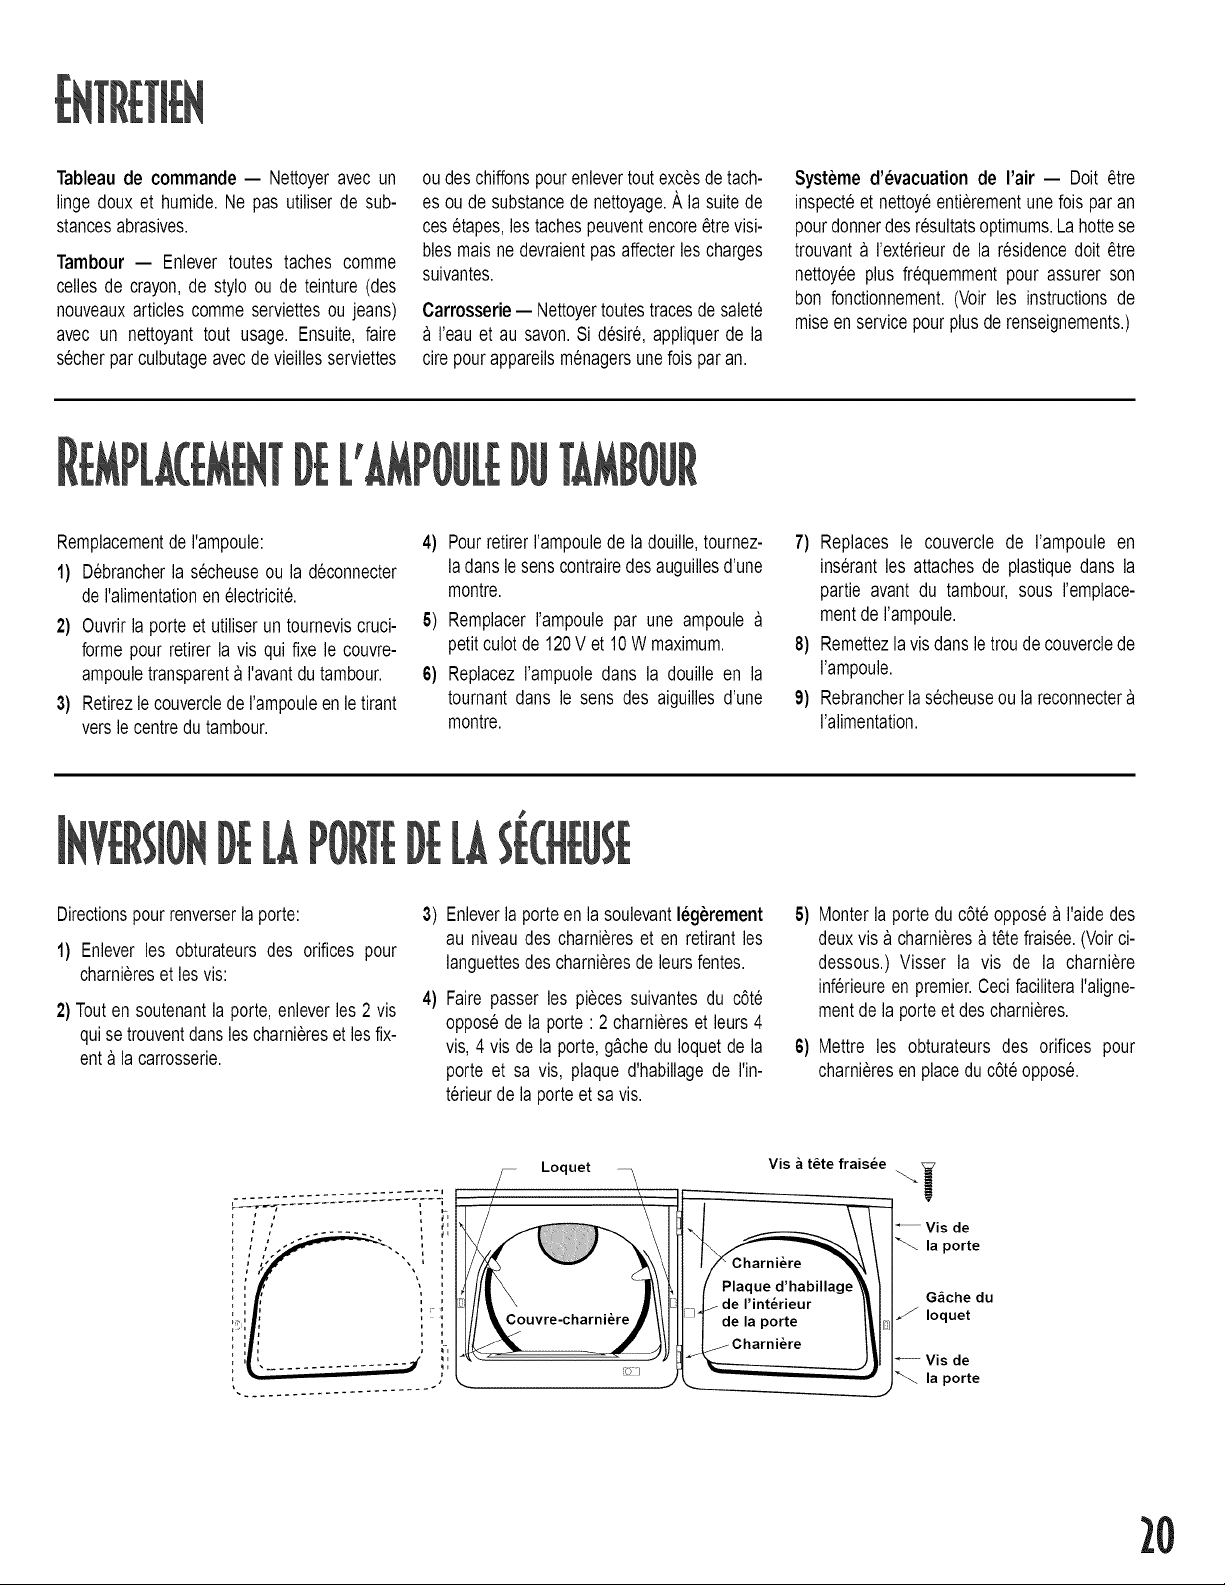
Remplacementde I'ampoule:
1) Debrancherla secheuseou la deconnecter
deI'alimentationenelectricit6.
2) Ouvrirlaporte et utiliserun tourneviscruci-
forme pour retirer la vis quifixe le couvre-
ampouletransparenta I'avantdu tambour.
3) Retirezle couverclederampouleenle tirant
verslecentredutambour.
4) Pourretirerrampoulede la douille,tournez-
ladanslesenscontrairedesauguillesd'une
montre.
5) Remplacerrampoule par une ampoule
petitculotde 120Vet 10W maximum.
6) Replacezrampuoledans la douille en la
tournantdarts le sens des aiguillesd'une
montre.
7) Replaces le couvercle de rampoule en
inserantles attachesde plastiquedans la
partie avant du tambour,sous remplace-
mentderampoule.
8) Remettezlavisdansletroude couverclede
rampoule.
9) Rebrancherla secheuseou la reconnecter
ralimentation.
Directionspourrenverserla porte:
1) Enleverles obturateursdes orifices pour
charniereset lesvis:
2)Touten soutenantla porte,enleverles2 vis
quise trouventdanslescharniereset lesfix-
enta la carrosserie.
3)
4)
Enleverla porteen la soulevantI_g_rement
au niveaudes charniereset en retirantles
languettesdescharnieresde leursfentes.
Faire passerles piecessuivantesdu c6te
opposede la porte: 2 charniereset leurs4
vis, 4 visde la porte,g_chedu Ioquetde la
porte et sa vis, plaqued'habillagede I'in-
terieurdela porteet sa vis.
5) Monterlaporte duc6teopposea I'aidedes
deuxvisa charnieresa t6tefraisee.(Voirci-
dessous.) Visser la vis de la charniere
inferieureen premier.Ceci faciliteraI'aligne-
mentdela porteet descharnieres.
6) Mettre les obturateurs des orifices pour
charnieresenplacedu c6teoppose.
.............. i
.......... r ............
Loquet
Vis _ t_te frais6e
i
Vis de
la porte
GAche du
/ Ioquet
Vis de
la porte
20

SuivrelesindicationsdeI'etiquetteou lesinstructionsdufabricantpoursechercertainsarticlesd'unsechageplusparticulier.Si retiquetted'entretienest
absente,se guidersur les renseignementssuivants.
Dessusde lit • Suivreles indicationsde retiquetted'entretienou secheren utilisantle cycleRegular.
etdouillettes • S'assurerqu'elleest parfaitementsecheavantde rutiliserou laranger.
• Peutexigeruneredispositionpourassurerunsechageuniforme.
Couvertures • Secheruneseulecouverturea lafoispourdes resultatsoptimums.
• S'assurerqu'elleest parfaitementsecheavantde rutiliseroude laranger.
Rideauxet tentures • Utiliserlecycle<{WrinkleFreeFabrics))pourlimiterle froissement.
• Pourdes resultatsoptimums,secherparpetitesquantiteset retirerde lasecheusedesquepossible.
Couchesen tissu • UtiliserlecycleRegularpourdescouchesdouceset gonflantes.
Articles en duvet (vestes,sacs • UtiliserlecycleRegularet unetemperaturepourtissusfragiles.
decouchage,douillettes,etc.) • Mettreunepairedechaussuresde tennispropresdansla secheuseaveccesarticlespour leurdonner
plusde gonflant.Ijajoutde 2 ou 3 serviettessechesreduitle tempsde sechageet absorberhumidit&
Moussede caoutchouc(tapis a • NE PASsechera rair chaud.Utiliserle cycle_{TimeDry/AirFluff))(sechageminuWbouffant),qui ne
dos en mousse,jouetsen peluche produitpasdechaleur.
ourembourres,certainesepaulettes,
etc.) _ AVERTISSEMENT ! Secherun article en caoutchouca la chaleurpeut rendommagerou creer
desrisquesd'incendie.
Oreillers • UtiliserlecycleRegular.
• Ajouter2 ou 3 serviettessecheset unepairede chaussuresdetennisproprespourunmeilleurculbu-
tageet donnerplusdegonflantaux oreillers.
• NE PASsecherles oreillersremplisde kapokou demousse.
Plastiques (rideaux de douche, • Utiliserle cycle<(TimeDry/AirFluff))(sechageminuWbouffant)et latemperaturecorrespondanta I'option
couvre-meublesd'exterieur,etc.) <(Delicate))(articlesfragiles)ou<(AirFluff))(bouffant),enfonctiondesindicationsfourniessur I'etiquette.
J
2]
La grillede sechagepermetde secherles arti-
cles que ron ne desire pas faire secher par
culbutage comme chaussures de tennis,
chandailslavables,peluchesou oreillers.
Lagrilledemeurestationnaire,maisletambour
tourne.(S'assurerde ne rienaccrochersur les
bordsde lagrille.)
Utilisation de la grille :
,
2.
Ouvrirla portedela secheuse.
Positionnerla grillede sechagedansle tam- 3.
bour, les deux prolongementsse dirigeant
verssol.Cesprolongementspermettentde
retenir la grille contrela surface avantdu
4.
tambour.Les pieds reposerontsur le bord
avantet lapartiearrieredu tambour. 5.
Placerles articleshumidessur la grille, en
laissantassezd'espaceentreeux pourune
bonnecirculationde rair.
Fermerla portedelasecheuse.
Utiliserle cycle <{TimeDry))(sechagemin-
ute)pourle sechageminut&Selectionnerla
dureeselonrhumiditeet lepoidsde rarticle.
Appuyersur le bouton<{Start))(marche).II
peut 6tre necessairede remettrela minut-
erie a zero si une duree de sechageplus
importanteestnecessaire.
Enl_vernentde la grille •
1. Ouvrirla portede la secheuse.
2. Souleverla grilleverslehautet la sortir.
*Avertissement: lots du sechage de
caoutchouc mousse, plastique ou
caoutchoucavecdela chaleur,il est possible
que ces matieres se retrouvent endom-
magees,cequi peutentrainerunincendie.
VERIFIERCES POINTSS! LA SECHEUSEooo
NESE METPASEN MARCHE
• Veillera ceque la portesoit bienfermee.
• Veillerace que la secheusesoit branchee
dansuneprisemuralesoustension.
• Verifierlefusibleou le disjoncteur.
• Appuyer sur la touche <<Start>>(marche)
nouveausi la portea et6ouverteaucoursdu
cycle.
NE PRODUITPA8DE CHALEUR
• Verifierlefusibleou le disjoncteur.
• Verifier que la secheuseest sur un reglage
utilisantde I'air chaud et non pas sur <<Air
Fluff>).
• S'il s'agit d'une secheusea gaz, verifierque
le robinetd'arriveedegazestouvert.
• Nettoyerle filtre a charpieet le conduitd'e-
vacuation.
• La minuteriede la secheuse peut s'6tre
deplac6e a la section refroidissementdu
cycle.
NE8ECHEPA8
• Verifierles pointsci-dessus.De plus...
• Verifierquele clapetde la hotted'evacuation
qui se trouve a I'exterieurs'ouvre et se
refermelibrement.
• Verifierle systemed'evacuationpour voirs'il
n'y a pasd'accumulationde charpie.La con-
duitedolt_treverifi6eet nettoyeeunefoispar
an.
• Utiliser un conduit d'evacuationrigide en
metalde 10,2cm (4 po)dediametre.
• Ne pastrop remplirla secheuse.Unecharge
de machine a laver = une charge de
secheuse.
• Separerlestissusepaisdestissuslegers.
• Verifierque la machinea laverse vidange
correctementet essorecorrectementle linge.
• Les articles de grande taille, volumineux,
commecouvertureset dessusde lit peuvent
exiger une redispositionafin d'assurer un
sechageuniforme.
• Chargesde lingetrop petitespourunculbu-
tagesatisfaisant.Ajouterquelquesserviettes.
ESTBRUYANTE
• Verifier qu'il n'y a pas, dans la secheuse,
d'objetstels quepieces,boutons,clous,etc.
Lesenleverimmediatement.
• II est normald'entendrele robineta gaz ou
I'el6mentchauffantde la secheusefonction-
ner par intermittencependant le cycle de
sechage.
• S'assurerque la secheuseestde niveau,tel
qu'expliquedansle manuelde miseen serv-
ice.
• Veillera ce que les emboutsen caoutchouc
soientsurles piedsreglables.
• Un petit declic peut provenir du fonction-
nementdela minuterie.
• II est normalque la secheusefasseun bruit
de ronronnementetant donnele mouvement
important d'air dans le tambour de la
secheuseet son systemed'evacuation.
LE8€=LECTEURAVANCELENTEMENT
• Ceci est normal avec un cycle IntelliDry,
surtout au debutdu cycle. Une lois que le
lingecommencea secher,le selecteurcom-
mence a avancer.II avance lentementau
debutdu cycleparcequ'il y a plusd'humidite
dansle linge.Leselecteuravanceplus rapi-
dementaufur eta mesurequele lingeseche.
NESECHEPASUNIFORMg=MENT
• Les coutures,les pocheset autresendroits
semblablesde forte epaisseur,peuventne
pas _tre completementsecs, alors que le
restea atteint le niveaude sechagechoisi.
Ceci est normal.Choisirle reglage<<More
Dry>>(plussec).
• Si unarticle@ais est mis a secheravec une
chargelegerecommeuneservietteavecdes
draps,il est possiblequ'il ne soit pas com-
pletementsec, alors que le reste est au
niveaude sechagechoisi. Pourobtenir de
meilleursresultats,mettrea secherles arti-
cleslegersa partdes articlesepais.
DEGAGEUNEODEUR
• Les odeurs domestiquescomme peinture,
vernis, nettoyantspuissants,etc., peuvent
atteindrela secheuseen provenancede I'air
ambiant alentour. Ceci est normal etant
donneque la secheuseextraitde I'airde la
piece,le rechauffe,puis apres un passage
par le tambour, I'evacue vers I'exterieur.
Lorsqueces odeurssont presentesdansI'air,
bien aerer la piece avant d'utiliser la
secheuse.
ll

l
Garantietotaled'unan
Pendantun (1) an & partirde la datede I'achatd'o-
rigine,toutepiecequivient&etre defectueusedans
des conditionsnormalesd'utilisationmenageresera
r@areeou remplaceegratuitement.
Garantielimitee despieces
Apres la premiereanneesuivantla date de I'achat
d'origine et pendant les periodes de temps
enumereesci-dessous, les pieces indiqueesci-
apres qui viennent& etre defectueusesdans des
conditionsnormalesd'utilisationmenagereseront
r@areesouremplaceesgratuitementen cequicon-
cerne la piece elle-meme,le client prenant a sa
chargeles autresfrais,y comprislesfraisde main-
d'oeuvre,ded@lacementet de transport.
Deuxi_meannee :Toutesles pieces.
De la troisiemea la cinquiemeannee :Vaso del
secador.
Garantielimiteeadditionnelle contrela rouille
Si la carrosserieexterieure,porte comprise,rouille
dans I'anneesuivantla date d'achat au detail, la
reparationoule remplacementseronteffectuesgra-
tuitement.Ensuite,jusqu'ala dixiemeanneeinclu-
sivement,la reparationou le remplacementseront
gratuitsuniquementen ce qui concernela piece,le
clientprenanta sachargeles autresfrais,y compris
les frais de main-d'oeuvre,de d@lacementet de
transport.
_, noter •Cettegarantietotale et les garantieslim-
iteess'appliquentquandla secheusese trouveaux
Etats-Unisou au Canada.Si elle se trouvedansune
autre partiedu monde,ellen'est couverteque par
lesgarantieslimitees,y comprisen ce quiconcerne
les piecesse revelantdefectueusesau cours de la
premieredeuxannees.
Residentscanadiens
Cette garantiene couvreque les appareilselec-
tromenagersmis en service au Canadaet homo-
Ioguespar des organismesde verificationappro-
pries ou certifies conformes aux directives de
rAssociationcanadiennede normalisation,sauf en
ce qui concernelesappareilstransferesau Canada
&lasuited'un changementde residencea partirdes
Etats-Unis.
Les garanties specifiques ci-dessus sont les
SEULESgarantiesaccordeesparle fabricant.Cette
garantie vous donne des droits juridiques speci-
fiqueset vous pouvezegalementbeneficierd'autres
droitsquivarientd'uneprovince&rautre.
POUROBTEHIRLESPRESTATIOHSDEGARAHTIE
PourIocaliseruneentreprisede serviceapres-venteagreeeMaytagdansvotreregion,
contacterle concessionnaireMAYTAGo0 lamachineaete acheteeouappelerMaytag
AppliancesSalesCompanyle service-clientsMaytag.Si les prestationsde garantie
obtenuesne vousdonnentpassatisfaction,contacterce servicepar courrierou par
tel@hone:
MaytagAppliancesSalesCompany
Attn:CAIR_Center
RO.Box2370
Cleveland,TN 37320Etats-Unis Canada1-800-688-2002
Quandvousecrivezau sujetd'unproblemenonresolu,veuillezinclureles renseigne-
mentssuivants:
a. Vosnom,adresseetnumerodetelephone;
b. Lenumerodemodeleet lenumerodeserie(setrouventsurla partieinferieure
centralede rouverturede la porte)de rappareil.
c. Lesnomet adressedu concessionnaireainsiqueladated'achatderappareil;
d. Unedescriptionclaireduproblemerencontre;
e. Datedela preuved'achat(bondecaisse).
IqESONTPASCOIJVEITSPAlC!3DEIJXG,&I ,&HTIES:
1. Lesproblemeset dommagesresultantdes situationssuivantes:
a. Installation,livraisonouentretiendefectueux.
b. Touter@aration,modification,alterationou ajustementnon autorisepar le
fabricantou un prestatairede serviceapres-venteagree.
c. Usageinapproprie,abusif,derasionnableou accidents.
d. Alimentationelectriqueou tensionincorrectes.
e. Reglageinappropriede toutecommande.
2. Les garantiessont annuleessi les numerosde seried'origineont ete enleves,
modifiesou ne peuvent_tredeterminesfacilement.
3. Ampoule.
4. Appareilsachetesa desfins commercialesou industrielles.
5. Lesfraisde d@annageou devisitepour:
a. Corrigerdes erreursd'installation.
b. Enseignerau consommateurcommentutiliserson appareilcorrectment.
c. Assurerle transportderappareiljusqu'aI'enterprisede serviceapres-vente.
6. Dommagesindirectsou accessoriessupportespartoutepersonnealasuited'une
quelconqueviolationde garantie.
CertainestasnepermettentpasI'exclusionou la limitationderesponsablilteence qui
concerneles dommagesindirects,et rexclusionci-dessuspeutne pas s'appliquer
votrecas.
Guidederutilisateur,manuelsded@annageet cataloguesdepiecesdetacheessont
disponiblesaupresMaytagAppliancesSalesCompany,du service-clientsMaytag.
13
MAYTAG • 403 \X. 4'" Street N. • P.O. Box 39 • Newton, Iowa 50208
SECADO INTELIGENTE MD-16
"AI3
Conserveel nQmerocompletode modeloy
deserieparaidentificaci6nde su secadora.
Seencuentranen una placade datosen la
secci6ncentralinferioren la aberturade la
puerta.AnoteestosnQmerosa continuaci6n
parasu facil acceso.
NQmerode Modelo
&..._SIRUCCIOF!ESIMPORTAFITESP_ginas25-26
EflEFICIASSOBflEELSISTEMA
DEDESCAflGADELALAVADORA.........P_gina27
EflEF!CIASPARALAOPEflAClON.....P_.gina28
NOmerode Serie
Dated'achat
ASIMPLEVISTAP_ginas 29-30
NDOELFUFICIOF!DELDRVEL....P_gina31
Si tiene preguntas,escribanos(incluyalos
nQmerosdemodeloy seriedesu lavadoray
su nQmerode telefono),o Ilameal telefono
quese indicaa continuaci6n:
Maytag Appliances Sales Company
1-800-688-9900EE.UU.
1-800-688-2002CANADA
(De lunesa viernes,de las8 a.m.alas
8 p.m.horadelEste)
Internet:http://www.maytag.com
NOTA: En nuestro esfuerzo continuo
para mejorar la calidad de nuestros
aparatos, puede ser necesario hacer
cambiosa la secadorasin corregiresta
guia.
IMPORTANTE:Mantengaesta guia y el
recibodeventaen unlugarseguropara
referenciafutura. 8e requierepruebade
la compraoriginalpara recibir servicio
bajola garantia.
IMPORTANTE:Para recibir servicio y
obtenerinformacionsobre la garantia,
veala _ltima pagina.
YLIMPIEZA..............................P_gina 32
SELALUZTAMBOR..........P_gina 32
_RSI6F! DELAPUEflTA......................p_gina32
SEIOSESPECIALESPAflA
L-['AVAIlLAROPA............................................P_gina33
!LLADESECADO...................................P_gina33
DELLAMAR......................................P_.gina34
BHTiA............................................01tima p_gina
.... !_ http://www.maytag,com
Por su seguridad, debe seguir las
instruccionesde este manualpara mini-
mizarel riesgode incendioo explosiono
para evitar dafios materiales,lesiones
personaleso la muerte.
No almaceneni use gasolinau otros
vaporesy liquidosinflamablescerca
de este o de cualquier otro elec-
trodomestico.
EN CASO DE QUE PERCIBA OLOR
A GAS
• Notratede encenderningunelec-
trodomestico.
• Notoqueninguninterruptorelectri-
CO,
• Nouseninguntelefonoen el edifi-
cio.
• Pidaatodoslos ocupantesde la
habitacion,el edificioo el areaque
se alejende ella.
• Llameinmediatamentea lacom-
pafiiaabastecedorade gasdesdeel
telefonode unvecino.Siga las
instruccionesde la compafiia.
• Si nopuedecomunicarsecon la
compafiiade gas,Ilameal departa-
mentode bomberos.
Lainstalacionyel serviciodeesteelec-
trodomesticodebenIlevarseacabopor
un instalador,centrode serviciocalifi-
cadoso porla compafiiade gas.
,
,
Parareducirel riesgode incendio,explosion,descargaelectricao lesionespersonalesal
usarsu secadora,siga las precaucionesb=_sicasde seguridad,entreelias lassiguientes:
Leatodaslas instruccionesantesde usarel
aparato.
Paraevitarla posibilidadde incendioo de
explosi6n:
a. Esteaparatono debeusarseparasecar
liquidossolventesni de lavadoen seco.
Esta secadoraesta dise_adas61opara
secarmaterialestextileslavadosen agua.
No seque articulosque han sido previa-
mentelavadoso sumergidosengasolina,
o limpiadoso desmanchadoscon ella,
solventesdelavadoenseco,u otrassub-
stanciasinflamableso explosivasy que
despidenvaporesque podrianencender-
se o explotar.Todomaterialenel queha
usadoun solventede limpieza,o el cual
se ha saturadocon liquidos o s61idos
inflamables,no debe colocarse en la
secadorahastaquetodo rastrode estos
liquidos o s61idosinflamables y sus
vaporesse hayanquitado. Haymuchos
articulos altamenteinflamablesque se
usan en los hogares,tales como: acet-
ona, alcohol desnaturalizado,gasolina,
parafina, algunos limpiadoresdomesti-
cos, algunos quitamanchas,aguarr_s,
cerasy quitacera.
b. Los articulosque contenganespumade
goma (puede estar marcado como
espumade I_tex)o materialesparecidos
a la goma de similartextura no deben
secarseen un ajustede calor. Losmate-
riales de espumade goma, cuandose
calientan, pueden producir fuego por
combusti6nespontaneabajo ciertas cir-
cunstancias.
No permitaque los nidosjueguensobre el
aparatoo dentrode 81.Es necesariosuper-
,
,
,
,
8.
visarde cercaa los nidoscuandose use el
aparatocercadeellos.
Antesde retirarel aparatode servicioo de
desechar.
Nointroduzcalas manosdentrodel aparato
si elcilindrose estamoviendo.
Noinstaleniguardeesteaparatodondeva a
estarexpuestoa la intemperie.
Noaltereloscontroles.
No repareni reemplaceningunapieza del
aparatoo intentedarle ningunaclasede ser-
vicio. Las reparacionesy el serviciodeben
Ilevarsea cabo por personalcalificadode
servicio.
9. No usesuavizantede telas ni otros produc-
tos para eliminarla estaticaa menosque el
fabricantedel suavizanteo del productoIo
recomiendeparausarseen secadoras.
10. Limpieel filtrode pelusaantesodespuesde
cadacarga.
11. Mantengael _reaalrededorde la abertura
delescapey las_reascircundanteslibresde
acumulacionesde pelusa,polvoy suciedad.
12. El interior de la secadoray del ducto de
escapedebe limpiarse peri6dicamentepor
personalcalificadode servicio.
13. Este aparato debe estar apropiadamente
conectado a tierra. Nunca conecte este
aparatoa unafuentede electricidadqueno
esteapropiadamenteconectadaatierray de
acuerdo a las regulaciones locales y
nacionales(vea las instruccionesde insta-
laci6n).
14. Nose sienteni se pareen la partesuperior
de la secadorade ropa.
25
CONSERVEESTASINSTRU,,.,C,,.,NES
No coloque dentro de la secadora articulos que se hayan manchado o empapado
con aceite vegetal o de cocina. A_n despu_s de lavarse, estos articulos pueden
contener cantidades significativas de estos aceites. El aceite restante puede
encenderseespont_neamente. El potencial de ignicion espontanea aumenta cuan-
do los articulos que contienen aceite vegetal o de cocina est_n expuestosal calor.
Las fuentes de calor,tales como su secadora de ropa, pueden calentar estos articu-
los, permitiendo que ocurra una reaccibn por oxidacibn en el aceite. La oxidacibn
crea calor. Si este calor no puede escapar, los articulos pueden Ilegar a calentarse
Io suficiente como para prenderse. El amontonar,apilar o guardar esta clase de
articulos puede impedir que el calor escape creando un peligro de incendio.
Todas las telas lavadas y sin lavar que contengan aceite vegetal o de cocina
puedenser peligrosas. El lavarestos articulos en agua caliente con detergente adi-
cional reducir_, pero no eliminara el peligro. Siempre use el ciclo de "enfriamien-
to" en estos articulos para reducir la temperatura de los mismos. Nunca retire
estos articulos de la secadora de ropa mientras esten calientes ni interrumpa el
ciclo de secado hasta que los articulos se hayan hecho pasar por el ciclo de "enfri-
amiento". Nunca amontone ni apile estos articulos cuando estan calientes.
t
RECOHOZCALOSSIMBOLOSDESEGURIDAD,ADVERTEHCIAS,ETIOUETAS
ADVERTENCIA- Peligroso pr_cticasno segurasque PODRIANcausarlesi6npersonalgraveo
mortal.
PRECAUCION- Peligroso pr_cticasno seguras que PODRIANcausar lesi6npersonalmenos
grave.
AYISOYADYEflTEHCIADE
SEGUflIDADIMPOflTAHTES
La Ley sobre Sustancias T6xicas y Agua
Potable Segura de California, de 1986
(Proposici6n65),estipulaque el gobernadorde
Californiadebepubtlcarunahstadesustancias
que el Estadode Californiasabe que pueden
causarc_ncero daSosen et sistemareproduc-
tor,y requlerequetasempresasadviertana sus
consumidoressobre las exposicionespoten-
ciatesatalessustancias
Los usuariosdeestedispositivoquedanadver=
tidospot mediode estedocumentoque la com-
busti6nde gas puede dar comoresultadouna
exposici6na bajo nivel de atgunasde las sub-
stanciashstadas,entreellasbenceno,formalde-
hidoy negrodehumo(ho]lin),debidoprincipat-
mentea la combusti6n_ncompletadel gasnatu-
ral o petr6teohquldo(LP) Los conductosde
descargadebenmantenersehbresde obstruc-
clones, y una secadoracon un sistema de
descargaadecuadamenteinstaladominimizar_
la exposici6na estassustancias
26
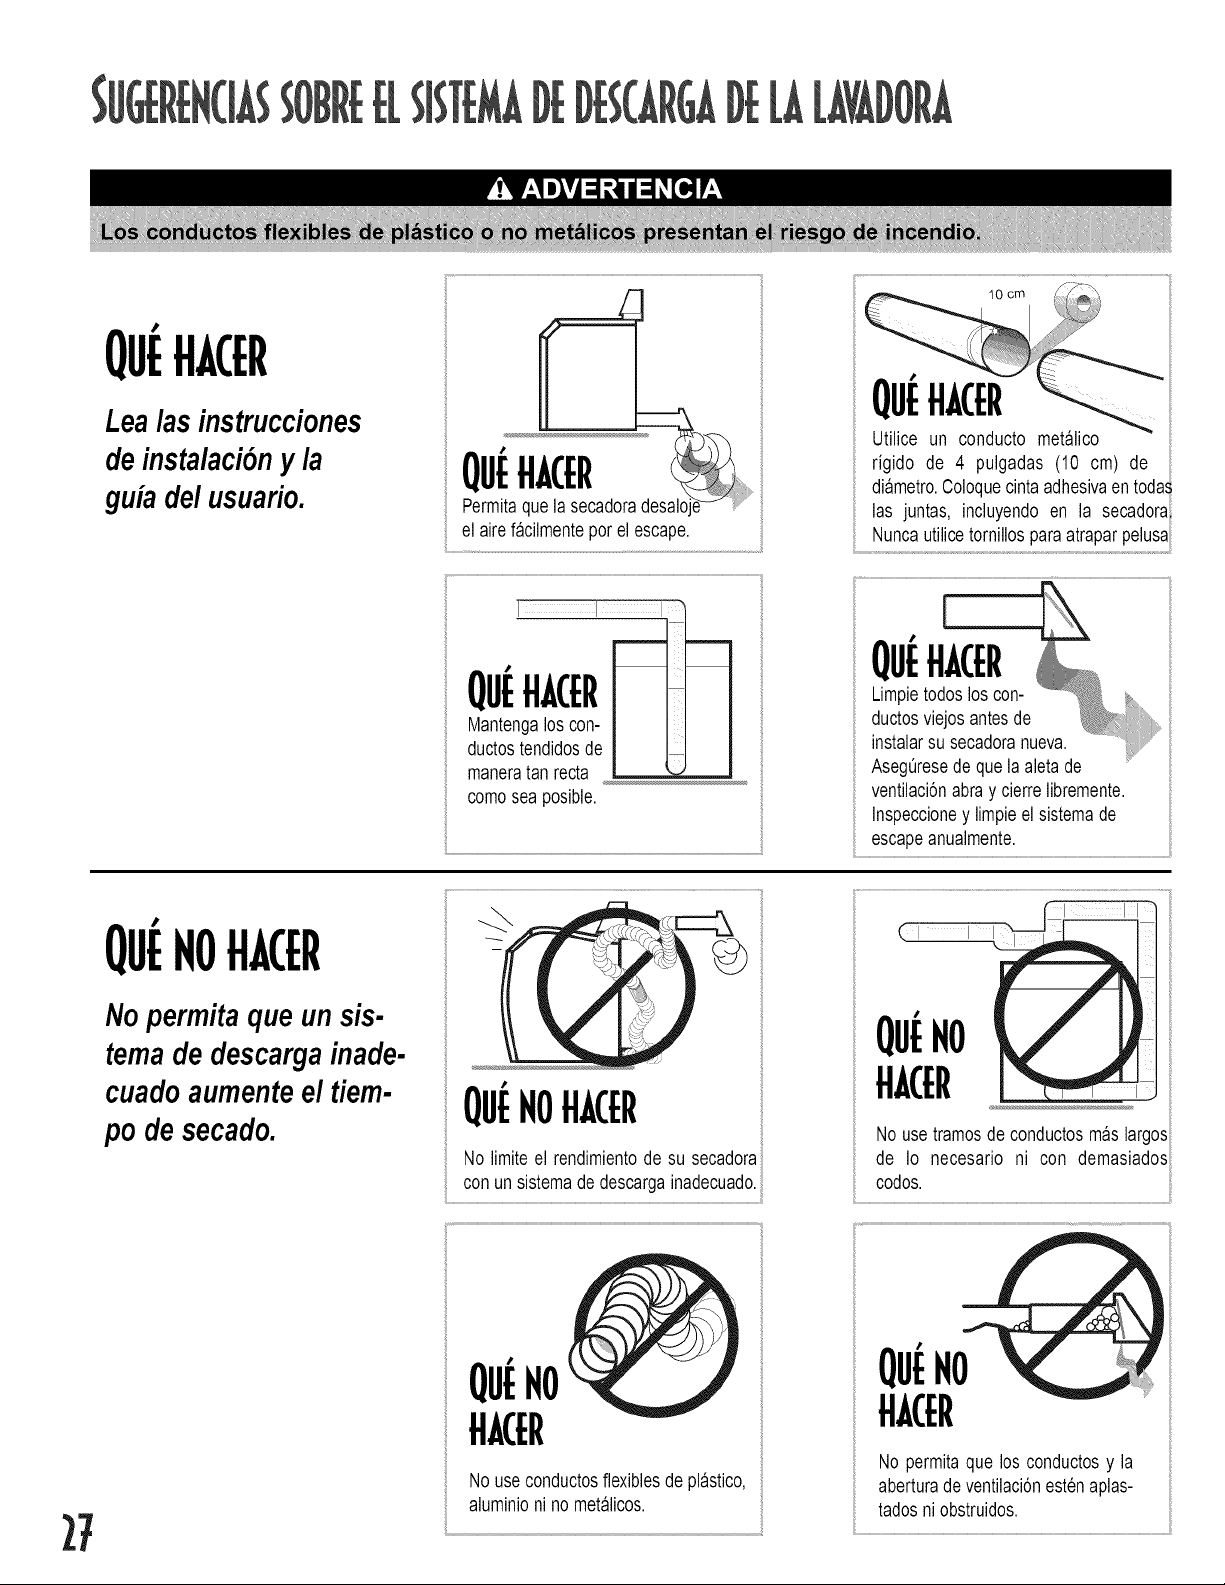
27
Lea lasinstrucciones
de instalaciony la
guiadel usuario.
Q
el aire facilmenteporel escape.
lo om JiL_
,:
QuEH CER
Utilice un conducto metalico
rigido de 4 pulgadas (10 cm) de
2
diametro.Coloquecintaadhesivaen toda_
las juntas, incluyendoen la secadora
Nuncautilicetornillosparaatraparpelusa
I ¸¸ I '
comosea posible.
Limpietodoslos con-
ductosviejosantesde
instalarsu secadoranueva.
AsegOresedequelaaletade
ventilaci6nabray cierrelibremente.
Inspeccioney limpieel sistemade
escapeanualmente.
NoHA(:ER
Nopermitaque un sis-
temade descargainade-
cuadoaumenteel tiem-
po desecado.
...................................................................................................................................................................ii
?
QUENOttACER
No limiteel rendimientode su secadora
con unsistemadedescargainadecuado.
(t i i
J
QuENo
HACER
Nouse tramosdeconductosmaslargos
de Io necesario ni con demasiados
codos.
J
QuENo
HACER
No useconductosflexiblesdeplastico,
aluminionino metalicos.
J
QuENo
HACER
No permitaque los conductosy la
aberturadeventilaci6nestenaplas-
tadosniobstruidos.
LA
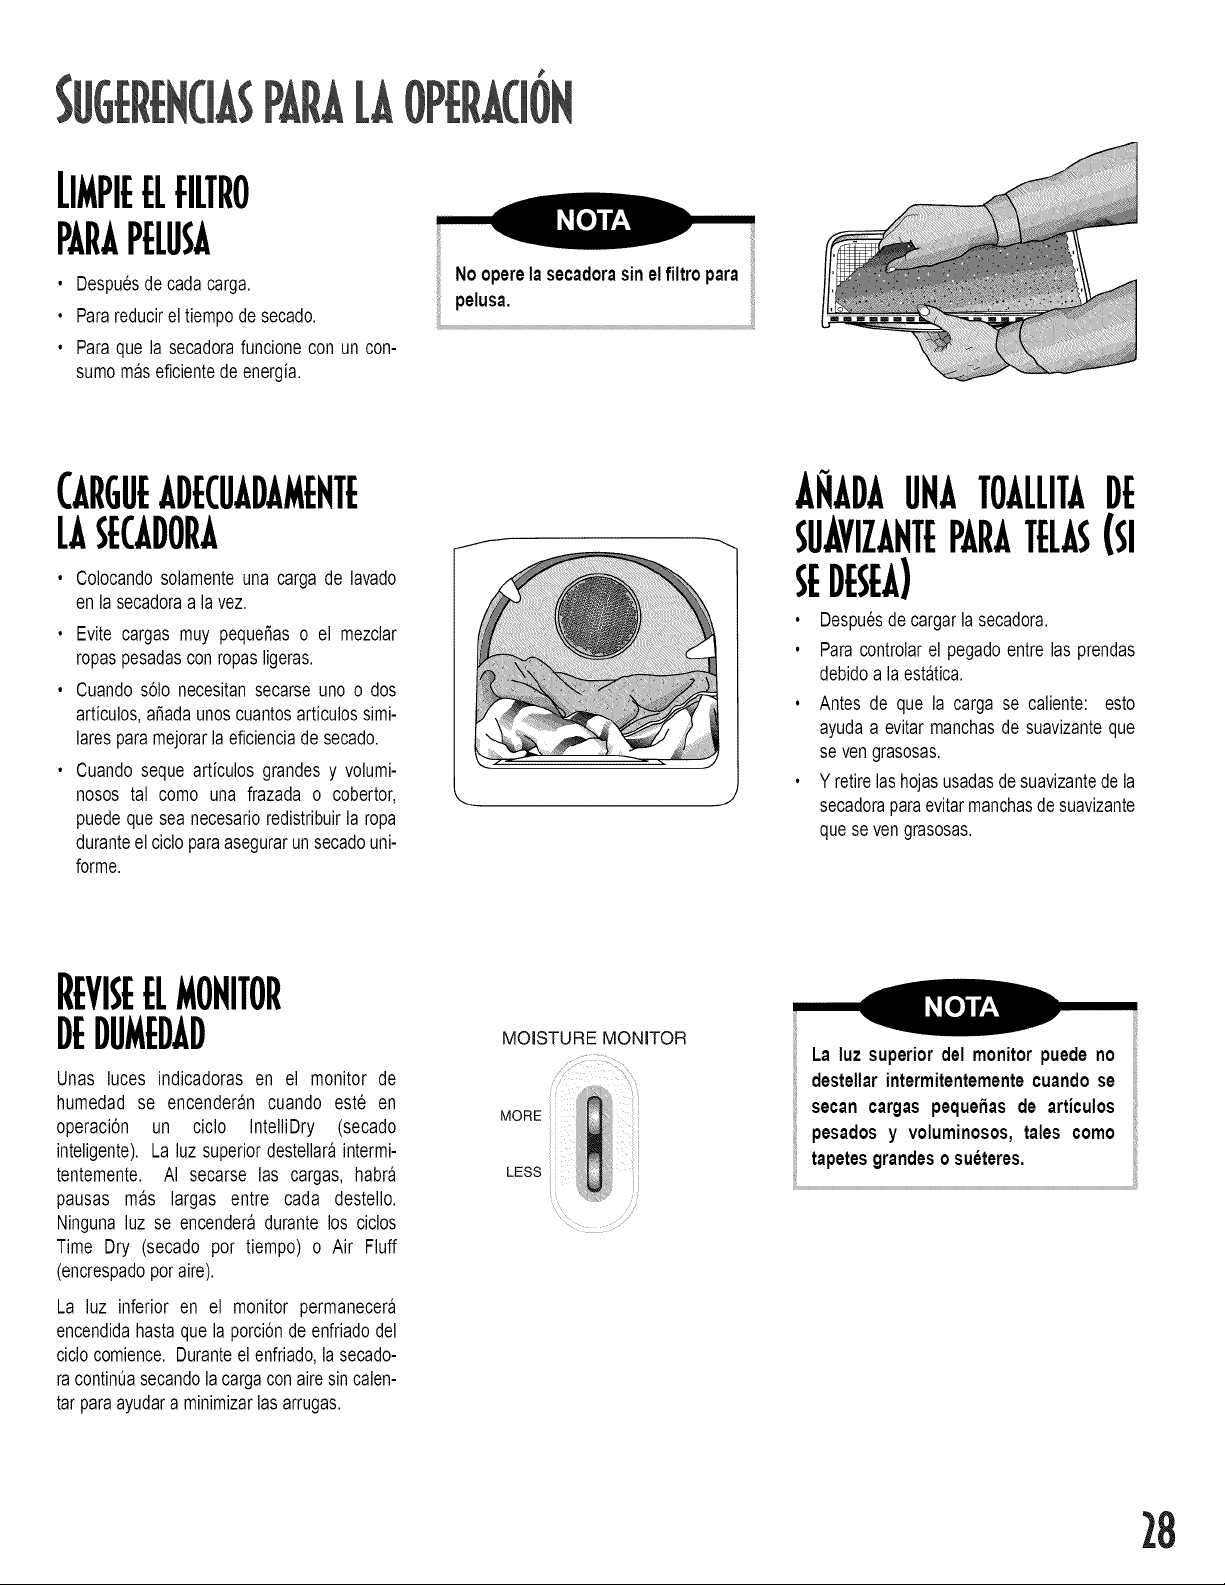
LIMPIEELFILTRO
PARAPELUSA
• Despuesdecadacarga.
• Parareducireltiempodesecado.
• Paraque la secadorafuncionecon un con-
sumomaseficientede energia.
Nooperela secadorasinelfiltro para
pelusa.
CAflGUEADECUADAMEFITE
LASECADOflA
• Colocandosolamenteuna carga de lavado
enla secadoraa la vez.
• Evite cargas muy peque_aso el mezclar
ropaspesadasconropasligeras.
• Cuandos61onecesitansecarseuno o dos
articulos,a_adaunoscuantosarticulossimi-
laresparamejorarlaeficienciadesecado.
• Cuandoseque articulos grandesy volumi-
nosos tal como una frazada o cobertor,
puedequesea necesarioredistribuirla ropa
duranteel cicloparaasegurarunsecadouni-
forme.
ANADAUFIATOALLITADE
SUAVIZAFITEPAflATELAS(SI
SEOESE ,)
• Despuesde cargarlasecadora.
• Paracontrolarel pegadoentre las prendas
debidoa la estatica.
Antes de que la carga se caliente: esto
ayudaa evitarmanchasde suavizanteque
seven grasosas.
Y retirelas hojasusadasdesuavizantedela
secadoraparaevitarmanchasdesuavizante
quese vengrasosas.
REVISEELMOF!ITOR
DEDUMEDAD
Unas luces indicadoras en el monitor de
humedad se encenderan cuando este en
operaci6n un ciclo IntelliDry (secado
inteligente). La luz superiordestellaraintermi-
tentemente. AI secarse las cargas, habra
pausas mas largas entre cada destello.
Ningunaluz se encenderadurantelos ciclos
Time Dry (secado por tiempo) o Air Fluff
(encrespadopor aire).
La luz inferior en el monitor permanecera
encendidahastaque la porci6nde enfriadodel
ciclocomience.Duranteel enfriado,la secado-
racontintJasecandola cargaconairesin calen-
tar paraayudara minimizarlas arrugas.
MOISTURE MONITOR
ii i!
MORE
LESS
La luz superiordel monitorpuedeno
destellarintermitentementecuando se
secan cargas pequefiasde articulos
pesados y voluminosos,tales como
tapetesgrandeso sueteres.
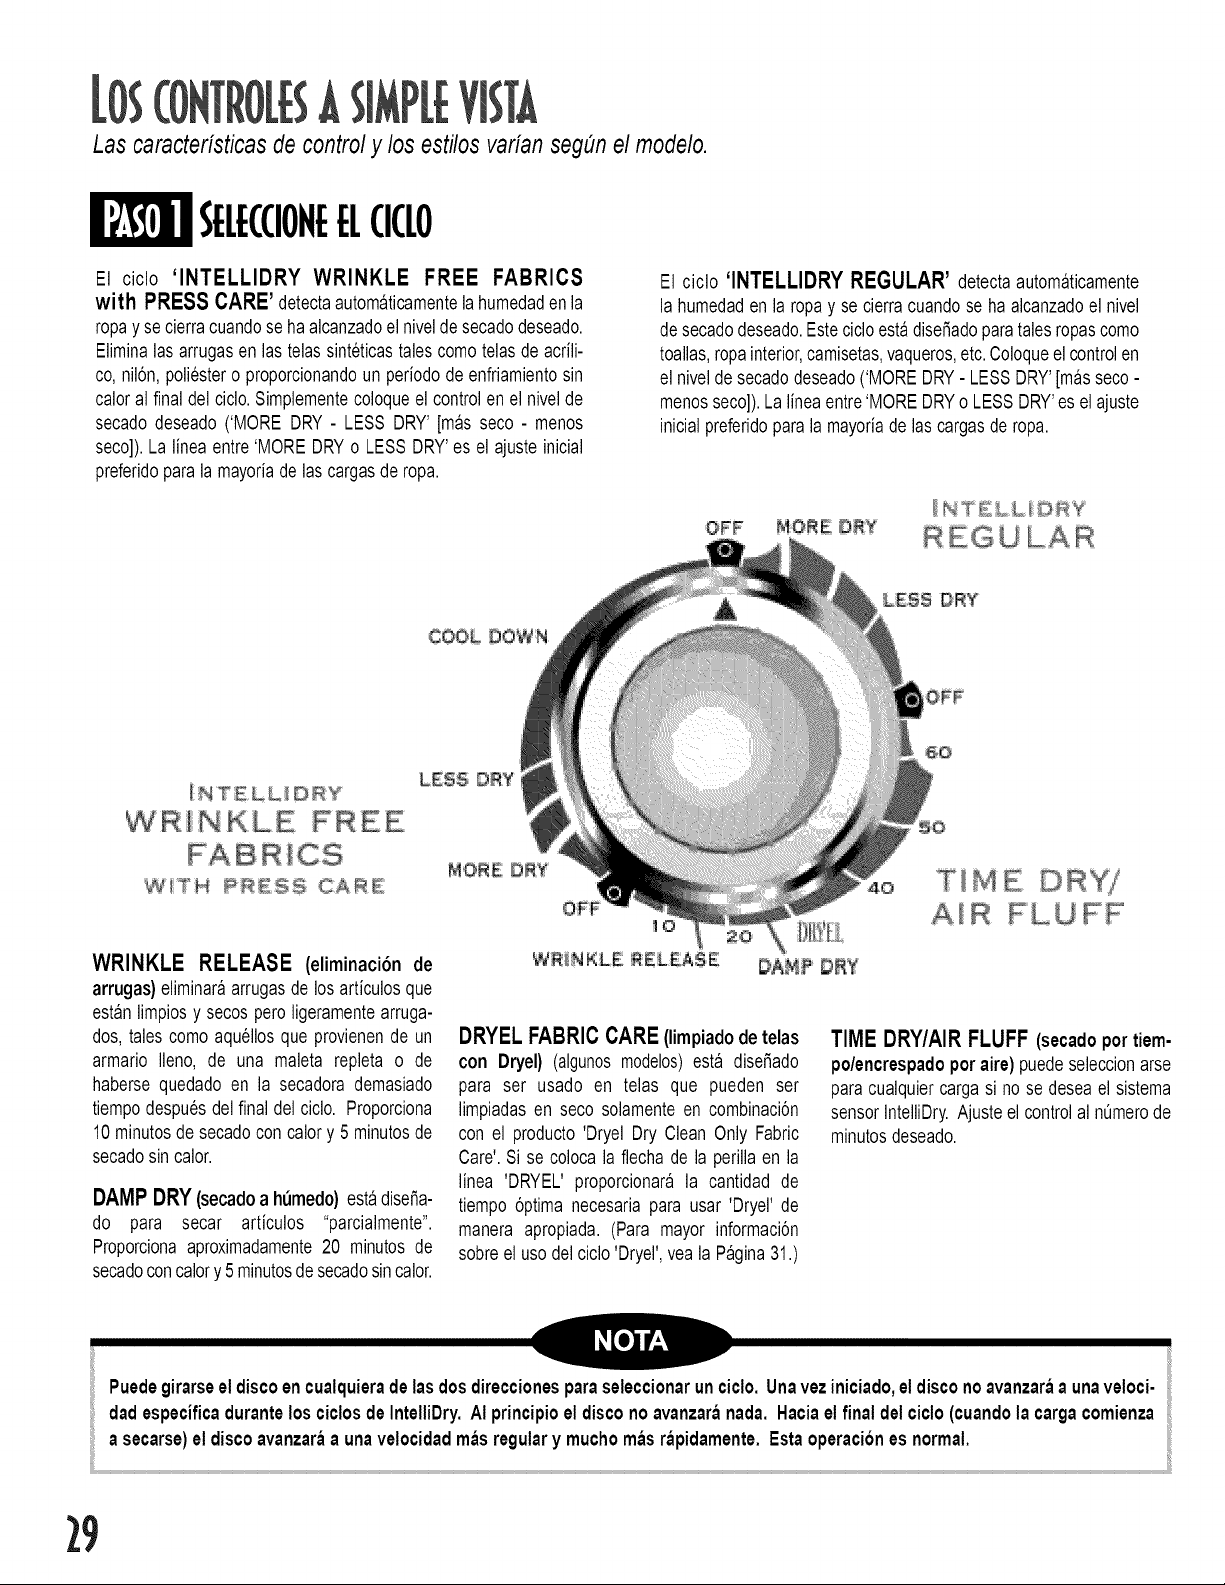
Las caracteristicasde controly los estilos varian segOnel modelo.
SELECCIOFIEELCICLO
El ciclo 'INTELLIDRY WRINKLE FREE FABRICS
with PRESSCARE' detectaautomaticamentela humedaden la
ropay secierracuandose haalcanzadoelniveldesecadodeseado.
Eliminalas arrugasen lastelassinteticastalescomotelasde acrili-
co, nil6n,poliestero proporcionandoun periodode enfriamientosin
caloral final delciclo.Simplementecoloqueel controlen el nivelde
secadodeseado('MORE DRY- LESS DRY'[mas seco - menos
seco]).La linea entre'MOREDRYo LESSDRY'es el ajusteinicial
preferidoparala mayoriade lascargasderopa.
El ciclo 'INTELLIDRY REGULAR' detectaautomaticamente
lahumedaden la ropay se cierracuandose ha alcanzadoel nivel
desecadodeseado.Estecicloestadisefiadoparatalesropascomo
toallas,ropainterior,camisetas,vaqueros,etc.Coloqueel controlen
el niveldesecadodeseado('MOREDRY- LESSDRY'[masseco-
menosseco]).Lalineaentre'MOREDRYo LESSDRY'es el ajuste
inicialpreferidoparala mayoriadelas cargasde ropa.
OFF NOR E !O_Y
R EG U LA R
COOL OOWN
LESS DRY
INTELL_DRY
W R 1N K L E F R E E
FABRICS
W l:T H P R _ :5S; C:A R E
WRINKLE RELEASE (eliminaci6n de
arrugas)eliminaraarrugasde losarticulosque
estanlimpiosy secosperoligeramentearruga-
dos,talescomoaquellosque provienende un
armario Ileno, de una maleta repleta o de
habersequedadoen la secadorademasiado
tiempodespuesdelfinaldel ciclo. Proporciona
10minutosdesecadocon calory 5 minutosde
secadosin calor.
DAMP DRY (secadoa h0medo) estadisefia-
do para secar articulos "parcialmente".
Proporcionaaproximadamente20 minutosde
secadoconcalory 5 minutosde secadosincalor.
4O
DRYELFABRICCARE(limpiadodetelas
con Dryel) (algunosmodelos)esta disefiado
para ser usado en telas que pueden ser
limpiadasen seco solamenteen combinaci6n
con el producto'Dryel Dry Clean Only Fabric
Care'.Si se colocala flechade la perillaen la
linea 'DRYEL' proporcionarala cantidad de
tiempo6ptimanecesariapara usar 'Dryel' de
manera apropiada.(Para mayor informaci6n
sobreel usodelciclo'Dryel',vea la Pagina31.)
TIME DRY/AIR FLUFF (secadopor tiem-
po/encrespadoporaire) puedeseleccionarse
paracualquiercargasi nose deseael sistema
sensorIntelliDry.Ajusteel controlal nOmerode
minutosdeseado.
Puedegirarseel discoencualquierade las dosdireccionesparaseleccionar unciclo. Unavez iniciado, eldisconoavanzar_la unaveloci-
dadespecificadurantelosciclosde IntelliDry.AI principioel disconoavanzar_lnada. Haciael final delciclo(cuandola cargacomienza
a secarse)el discoavanzar_la unavelocidadm_lsregulary mucho m_lsr_lpidamente.Estaoperaciones normal.
29
SELECCIOFIELA
TEMPERATURA
REGULAR- Para algodones resistenteso
aquellosconetiquetasqueindican"TumbleDry"
(secadodandovueltas).
MEDIUM (medic) - para planchado perma-
nente,sinteticos,algodonesligeroso articulos
conetiquetasque indican"TumbleDryMedium"
(secadodandovueltasa mediaintensidad).
DELICATE(delicado)- paraarticulossensibles
al calor con etiquetasqueindican"TumbleDry
Low"(secadodandovueltasa bajaintensidad)o
"Tumble Dry Warm" (secado tibio dando
vueltas).
AIR FLUFF(encrespadoporaire)- Davueltas
sincalor.Seusaparacargasdelicadaso articu-
losque necesitanrefrescarse.
_FE:f4 R ATU R E
REGULA_
NEDW:N
AR F'LUFT
!i{_ _,,_,_,,,,,,,,,,,,,,_,,,i
SELECCIOFIELASOPCIOFIES
Elciclo'EXTRALOWTEMPON*'(temp.extra-
bajaencendida)anulalas seleccionesde tem-
peratura'Regular','Medium'o 'Delicates',pro-
porcionandola temperaturadesecadoconcalor
mas baja posible.La temperaturadel ciclo
'EXTRALOWTEMP'es mas bajaque la tem-
peraturadel ciclo 'Delicates'.(El ciclo 'EXTRA
LOWTEMP'noanularael ajuste'AIR FLUFF'.
Elciclo'EXTRALOWTEMPOFF'(temp.extra-
bajadesactivado)permiteusarunagamacom-
pleta de temperaturasdesde 'Regular' hasta
prendas'Delicate'(delicado).
Elciclo'PRESSCAREON'(planchadoperma-
nente encendida) proporciona aproximada-
mente20 minutosde secadoen aireno caliente
despuesdel ciclo 'WrinkleFree Fabrics'(telas
inarrugables)a fin de reduciradicionalmentelas
arrugas.
PRESS CAREOFF (cuidado de planchado
permanentedesactivado)- cancelael secado
adicionalen aire sin calentar.
814"oT_A
LC'@ TEt_4P
OF"F
OFF
EXTRA
LOW TEMP
*La luz del ciclo 'EXTRA LOWTEMP'(temp.
extrabaja)seiluminaracuandose seleccionela
opci6n'EXTRALOWTEMPON' con las tem-
peraturas'Regular','Medium'o 'Delicates'.
SEFIALDEFIN
DECICLO
Un poco antes de que
concluyael ciclo, sonara
una sepal auditiva.
Durante la porci6n de
enfriamiento del ciclo
Press Care (cuidadode
planchado permanente),
la sepal auditivasonara
intermitentemente.Lasepaldefin deciclopuede
apagarsesi se desea.
CHIME
: ::: ON
FF
OPfllMASTART
(ARR, NQUE)
Optimaeste bot6npara arrancarla secadora.
La puerta de la secadoradebe estar cerrada
paraque la secadorafuncione. Si la puertase
abreduranteel ciclo,debeoprimirsedenuevoel
bot6nde arranqueparareanudarel ciclo una
vezquela puertase hayacerrado.
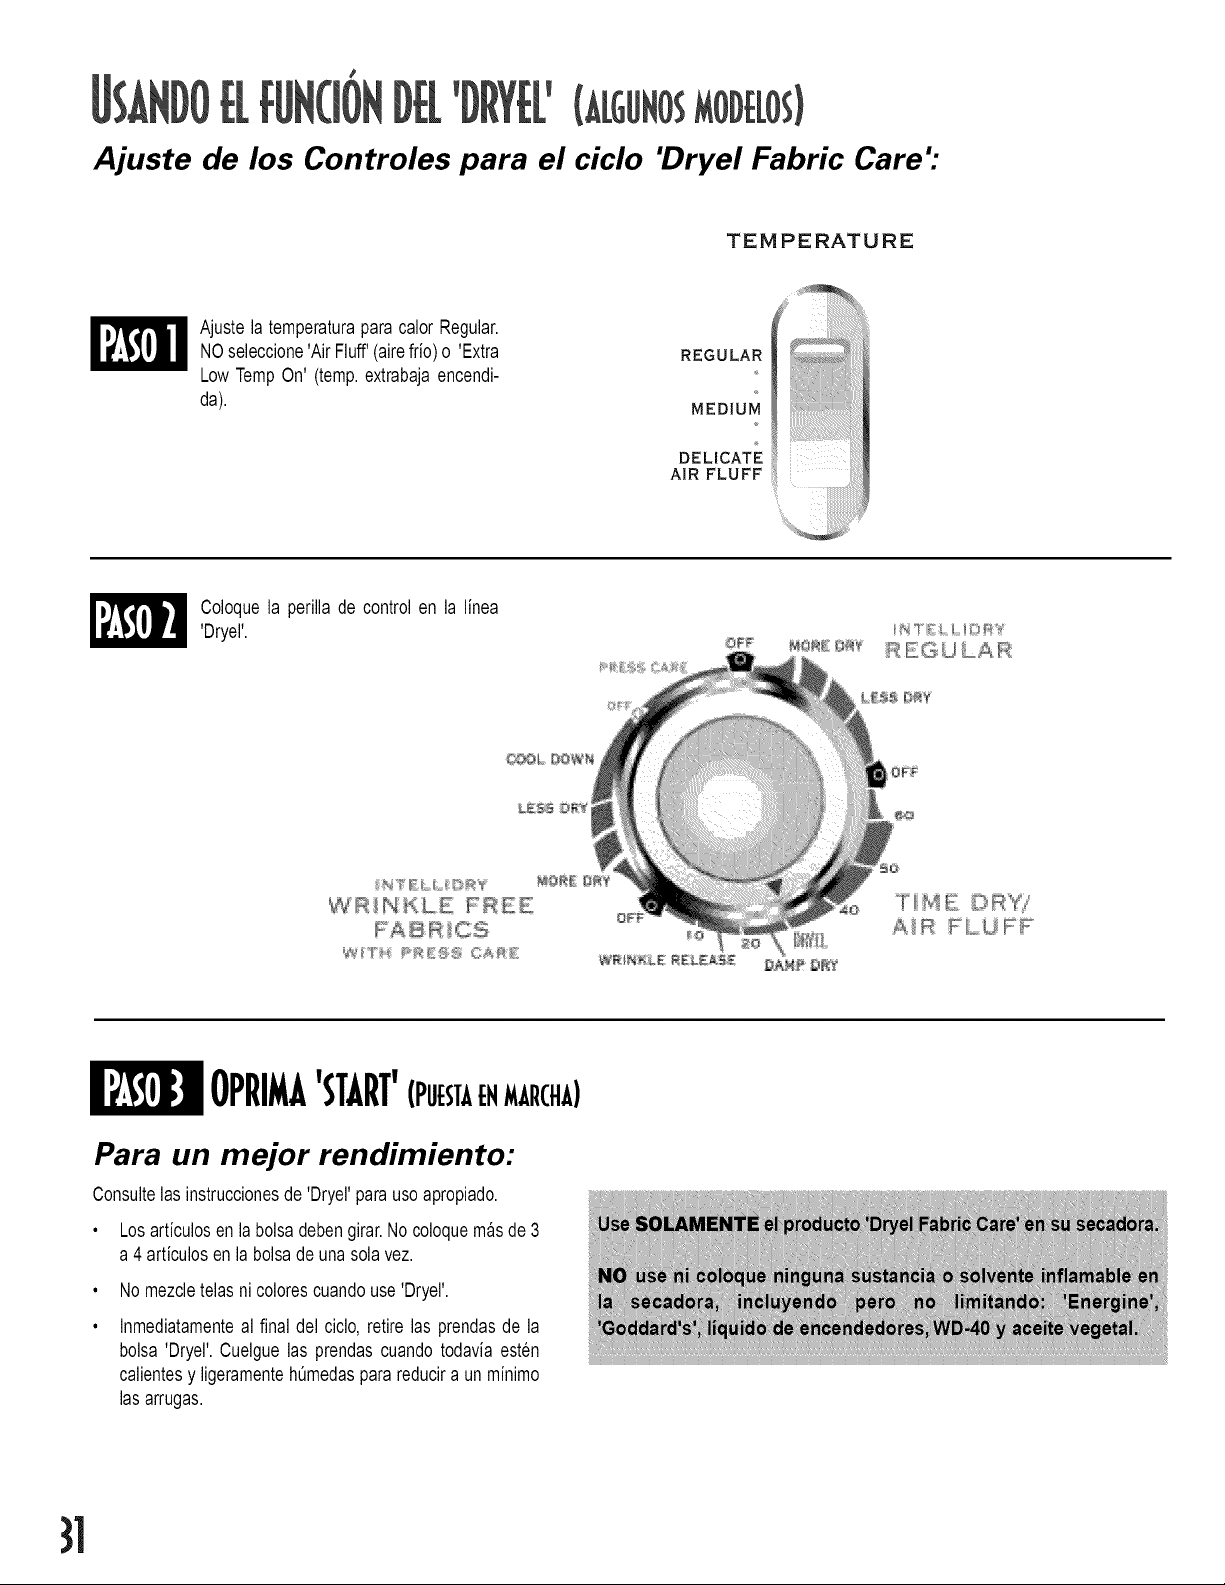
Ajuste de los Controles para el ciclo "Dryel Fabric Care"
TEMPERATURE
Ajustela temperaturaparacalor Regular.
NOseleccione'Air Fluff'(airefrio)o 'Extra
LowTempOn' (temp.extrabajaencendi-
da).
REGULAR
MEDIUM
DELICATE
AIR FLUFF
i_ii!i!ii!ii!ii!ii!ii!ii!i!i!ili_iiiiiiiiiiiiiiiii_ii{ill
ili_!i_iiiiii
:ii!i
Coloquela perillade controlen la linea
'Dryel'.
OPRIMA'START'(PUESTAEHMARCH_)
Para un mejor rendimiento:
Consultelas instruccionesde'Dryel'parausoapropiado.
• Losarticulosenla bolsadebengirar.No coloquemasde 3
a 4 articulosen la bolsadeunasolavez.
Nomezcletelasni colorescuandouse'Dryel'.
Inmediatamenteal final del ciclo,retire las prendasde la
bolsa'Dryel'.Cuelguelas prendascuandotodaviaesten
calientesy ligeramenteh0medasparareducira un minimo
lasarrugas.
}1
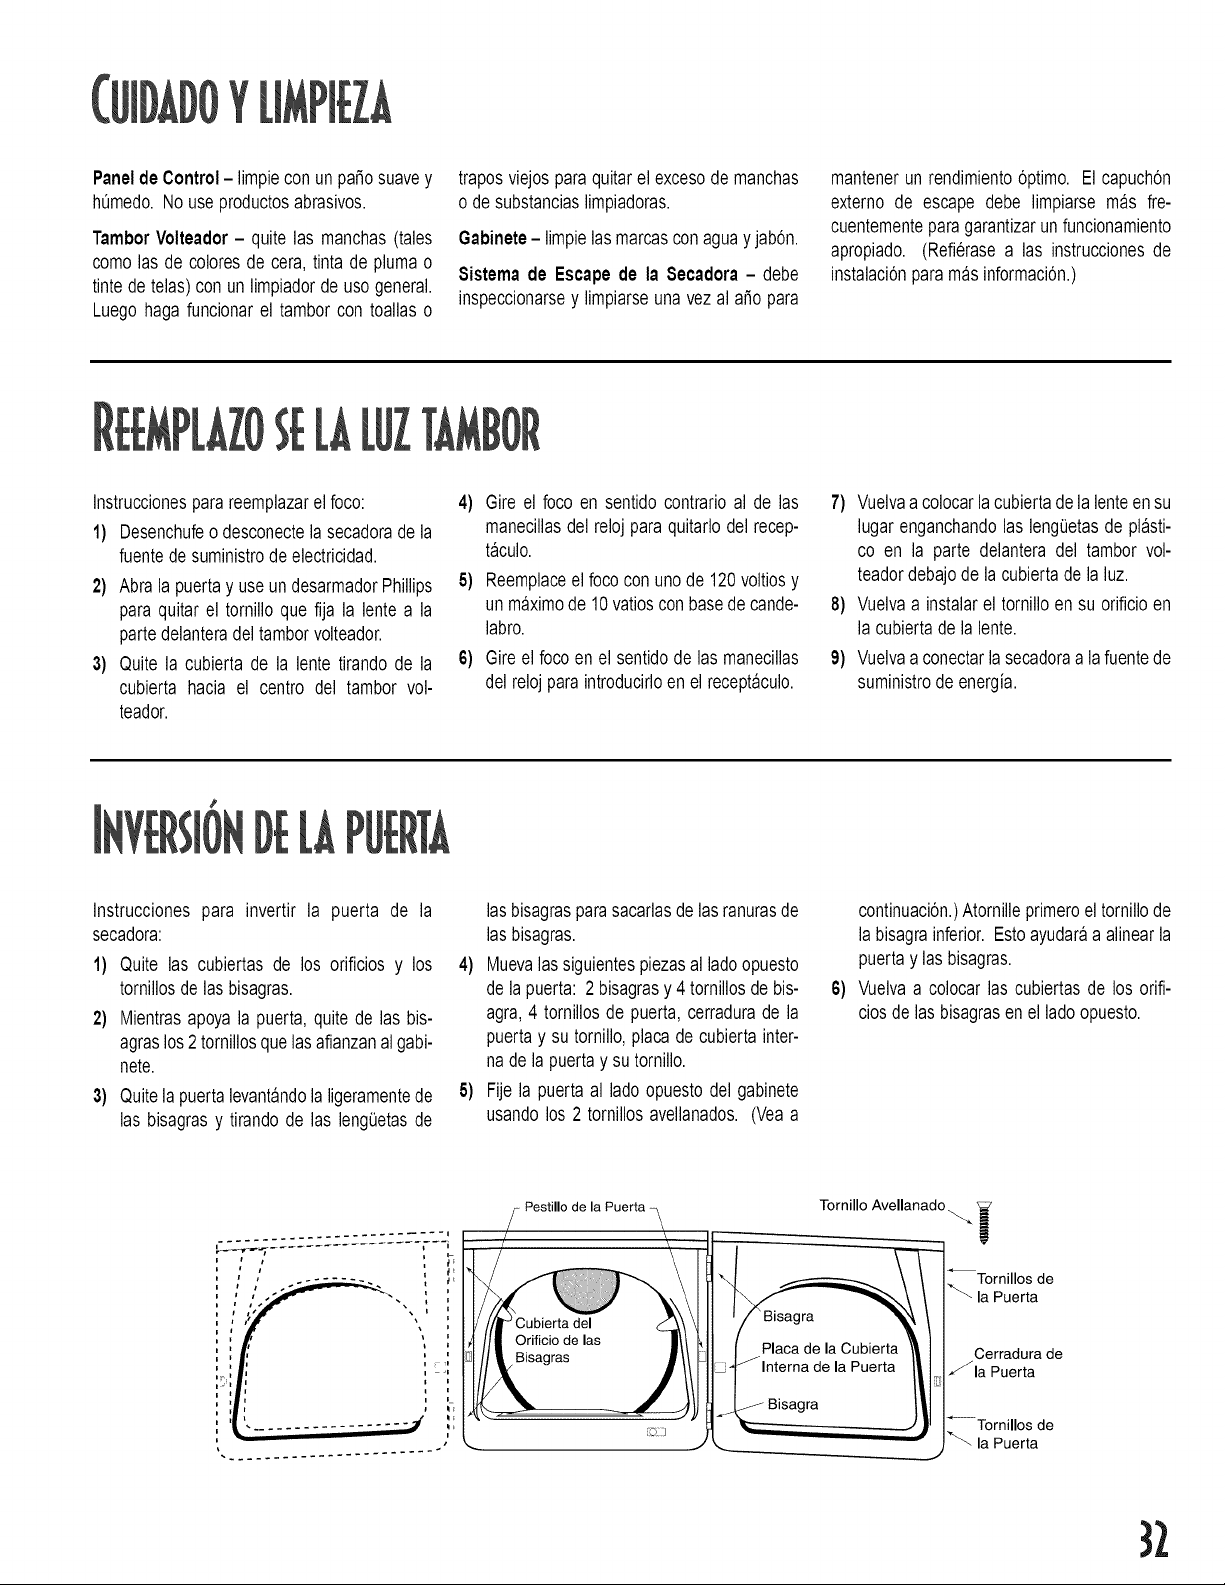
Panelde Control -limpie conunpatiosuavey
hQmedo.No useproductosabrasivos.
TamborVolteador - quite las manchas(tales
comolas de coloresde cera, tintade plumao
tintedetelas)con un limpiadorde usogeneral.
Luegohagafuncionarel tambor con toallaso
traposviejosparaquitarel excesodemanchas
o de substanciaslimpiadoras.
6abinete - limpielasmarcasconaguay jab6n.
Sistemade Escapede la Secadora- debe
inspeccionarsey limpiarseunavezal ato para
mantenerun rendimiento6ptimo. El capuch6n
externo de escape debe limpiarse mas fre-
cuentementeparagarantizarunfuncionamiento
apropiado. (Refierasea las instruccionesde
instalaci6nparamasinformaci6n.)
Instruccionesparareemplazarel foco:
1) Desenchufeo desconectela secadorade la
fuentedesuministrode electricidad.
2) Abralapuertay useundesarmadorPhillips
paraquitarel tornillo quefija la lentea la
partedelanteradeltamborvolteador.
3) Quite la cubiertade la lente tirandode la
cubierta hacia el centro del tambor vol-
teador.
4) Gire el focoen sentidocontrarioal de las
manecillasdel reloj paraquitarlodelrecep-
taculo.
5} Reemplaceel fococon unode 120voltiosy
un maximode 10 vatiosconbasedecande-
labro.
6} Gireel focoen el sentidode las manecillas
del relojpara introducirloen el receptaculo.
7) Vuelvaacolocarlacubiertadelalenteensu
lugarenganchandolas lengOetasde plasti-
co en la parte delanteradel tambor vol-
teadordebajode la cubiertade la luz.
8) Vuelvaa instalarel tornilloensu orificioen
la cubiertade lalente.
9) Vuelvaa conectarla secadoraa la fuentede
suministrode energia.
Instrucciones para invertir la puerta de la
secadora:
1) Quite las cubiertas de los orificios y los
tornillosdelas bisagras.
2} Mientrasapoya la puerta,quite de las bis-
agraslos2tornillosquelasafianzanalgabi-
nete.
3) Quitela puertalevantandola ligeramentede
las bisagrasy tirandode las lengOetasde
lasbisagrasparasacarlasde lasranurasde
lasbisagras.
4} Muevalassiguientespiezasal ladoopuesto
dela puerta:2 bisagrasy 4 tornillosdebis-
agra,4 tornillosde puerta,cerradurade la
puertay su tornillo,placade cubiertainter-
nadela puertay su tornillo.
5} Fije la puertaal ladoopuestodel gabinete
usandolos 2 tornillosavellanados.(Veaa
continuaci6n.)Atornilleprimeroel tornillode
labisagrainferior.Estoayudaraa alinearla
puertay lasbisagras.
Vuelvaa colocarlas cubiertasde los orifi-
ciosde lasbisagrasenel ladoopuesto.
.............. i
,,.::_._,_........... .......... -- ,
j _ iI i
J
i
i
'
i
- Pestillo de la Puerta
Tornillo Avellanado _ ]_
_Tornillos de
la Puerta
Cerradura de
/la Puerta
_Tornillos de
la Puerta
}2
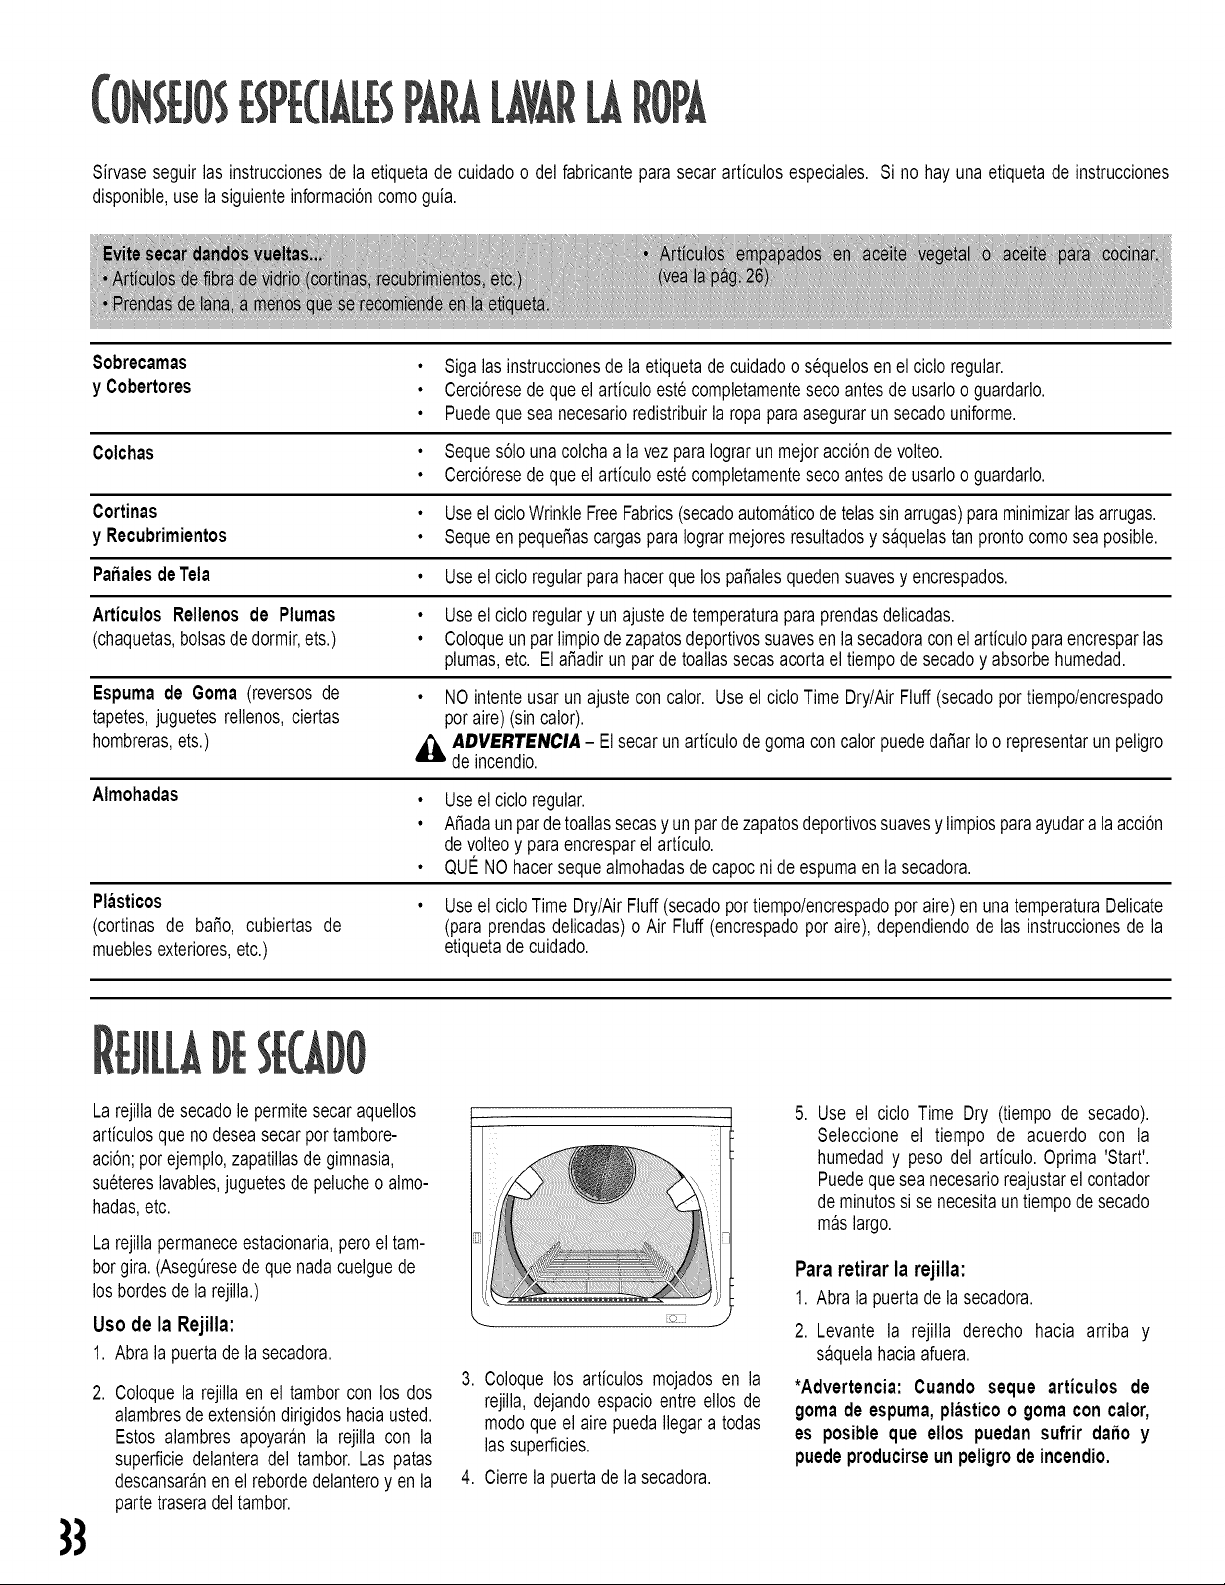
Sirvaseseguirlas instruccionesde la etiquetade cuidadoo del fabricantepara secararticulosespeciales. Si no hayuna etiquetade instrucciones
disponible,use la siguienteinformaci6ncomoguia.
Sobrecamas • Sigalas instruccionesde la etiquetade cuidadoo sequelosen el ciclo regular.
y Cobertores • Cerci6resedequeel articuloestecompletamentesecoantesde usarloo guardarlo.
• Puedequesea necesarioredistribuirlaropaparaasegurarunsecadouniforme.
Colchas • Seques61ounacolchaa la vezparaIograrun mejoracci6nde volteo.
• Cerci6resedequeel articuloestecompletamentesecoantesde usarloo guardarlo.
Cortinas • UseelcicloWrinkleFreeFabrics(secadoautomaticode telassinarrugas)paraminimizarlasarrugas.
y Recubrimientos • Sequeen peque_ascargasparaIograrmejoresresultadosy saquelastan prontocomosea posible.
Pa_alesdeTela • Useel cicloregularparahacerquelospa_alesquedensuavesy encrespados.
ArticulosRellenos de Plumas • Useel cicloregulary unajustede temperaturapara prendasdelicadas.
(chaquetas,bolsasde dormir,ets.) • Coloqueun parlimpiode zapatosdeportivossuavesen la secadoraconel articuloparaencresparlas
plumas,etc. El aSadirunpardetoallassecasacortael tiempode secadoy absorbehumedad.
Espumade Goma (reversosde • NO intenteusar unajustecon calor. Useel cicloTimeDry/AirFluff(secadopot tiempo/encrespado
tapetes,juguetesrellenos,ciertas pot aire)(sin calor).
hombreras,ets.) _lb ADVERTENClA - Elsecar un articulodegomacon calorpuededa_arIoo representarunpeligro
de incendio.
Almohadas • Useelciclo regular.
• A_adaunpardetoallassecasy unpardezapatosdeportivossuavesy limpiosparaayudara la acci6n
devolteoy paraencresparel articulo.
• QUENOhacersequealmohadasdecapocni deespumaen lasecadora.
Plasticos • Useel cicloTimeDry/AirFluff(secadoportiempo/encrespadoporaire)en unatemperaturaDelicate
(cortinas de ba_o, cubiertas de (paraprendasdelicadas)o Air Fluff(encrespadoporaire), dependiendode las instruccionesde la
mueblesexteriores,etc.) etiquetade cuidado.
}3
Larejillade secadole permitesecaraquellos
articulosquenodeseasecarportambore-
aci6n;porejemplo,zapatillasde gimnasia,
suetereslavables,juguetesde pelucheo almo-
hadas,etc.
Larejillapermaneceestacionaria,peroel tam-
borgira.(AsegQresede quenadacuelguede
los bordesde la rejilla.)
Uso de la Rejilla:
1. Abralapuertadela secadora.
Coloquela rejillaen el tamborcon los dos
alambresde extensi6ndirigidoshaciausted.
Estos alambres apoyaranla rejilla con la
superficiedelanteradel tambor. Las patas
descansaranen el rebordedelanteroyen la
partetraseradeltambor.
3. Coloquelos articulos mojadosen la
rejilla,dejandoespacioentre ellos de
modoque el airepuedaIlegara todas
lassuperficies.
4. Cierrela puertade lasecadora.
Use el ciclo Time Dry (tiempo de secado).
Seleccione el tiempo de acuerdo con la
humedady pesodel articulo.Oprima 'Start'.
Puedequeseanecesarioreajustarel contador
deminutossi se necesitaun tiempodesecado
maslargo.
Para retirar la rejilla:
1. Abrala puertade lasecadora.
2. Levante la rejilla derecho hacia arriba y
saquelahaciaafuera.
*Advertencia: Cuando seque articulos de
gomade espuma,plasticoo gomacon calor,
es posible que ellos puedan sufrir da_o y
puedeproducirseun peligrode incendio.

REVISELO SIGUIENTES! SU SECADORADE ROPA,..
NOFUNCIONA
• AsegOresede quela secadoratengala puer-
ta cerrada.
• &Estaenchufadoelcableelectrico?
• &Hayun fusiblefundidoo un disyuntordis-
parado?
• Si lapuertase abreduranteel ciclo,se debe
volver a pulsar el bot6n de inicio para
reanudarel ciclo,unavezquese hayacerra-
dola puerta.
NOCALIENTA
• _Hay un fusiblefundidoo un disyuntordis-
parado?
• Seleccioneunajustedecalor,noelajustede
esponjadoconaire.
• Verifiqueque el suministrode gas sea ade-
cuadoparasecadorasalimentadascon gas.
• Limpieelfiltrode retenci6ndefibrasy elcon-
ductodedescarga.
• El indicadordetiempode lasecadorapuede
haberpasadoa la porci6nde enfriamientodel
ciclo.
NO8ECA ADECUADAMENTE
• Revisetodo Ioanterior,y ademas...
• Reviselacampanade descargaen el exteri-
orde lacasa,_abrey cierralibremente?
• Verifiquesi se han acumuladopelusasen el
sistemadeescape.Losconductosdebenser
inspeccionadosy limpiadostodoslos a_os.
• Utiliceunconductodedescargametalicorigi-
dode4' (10cm).
• Nosobrecarguelasecadora.1cargadelava-
do= 1 cargade secado.
• Separelas prendaspesadasdelas ligeras.
• Losarticulosgrandesy voluminosostalcomo
frazadaso cobertorespuedeque sea nece-
sarioredistribuirla ropaduranteel ciclopara
asegurarun secadouniforme.
• Reviseque la lavadoraeste drenandoade-
cuadamenteparaextraerel aguade la carga.
• La cargade ropaes muypequefiay no hay
un movimientoadecuado,aSadaunascuan-
tastoallas.
PRODUCEMUCHORUIDO
• Revisequeen lacarganohayaobjetostales
comomonedas,clavos,etc.Silos haysaque-
los inmediatamentedela secadora.
• Es normal oir que la valvulade gas de la
secadoraoel ciclodelelementocalefactorse
enciendey se apaga durante el ciclo de
secado.
• La secadoradebeestarniveladae instalada
sobreun pisos61ido.
• Cerci6resede que las pies de goma esten
instaladasen laspatasde nivelaci6n.
• Un ruido de chasquidospuedeser el indi-
cadordetiempoavanzando.
• Es normal que la secadoraemita un ruido
sordocausadoporla alta velocidaddelaire
que se mueve a traves del tambor de la
secadoray del sistemadeescape.
LA PERILLADE CONTROLAVANZACON
LENTITUD
• Estefuncionamientoes normalparaun ciclo
IntelliDry,especialmenteal principiodel ciclo.
Unavezquelacargacomienzaa secarse,la
perillade controlcomenzaraa avanzar. La
velocidaddeavanceserabajaalprincipiodel
cicloporquehay mashumedaden la carga.
AI secarsemasla carga,la perillade control
avanzaramasrapidamente.
NO8ECAEN FORMAPAREJA
• Lascosturas,bolsillosy otrasareasgruesas
similarespuedequenoestencompletamente
secascuandoel restodela ropahayaalcan-
zado el gradode secadodeseado.Estoes
normal.Seleccioneel ajuste"MoreDry"(mas
seco)si Io desea.
• Sise secaunarticulopesadocon unacarga
de ropa liviana, tal como una toalla con
sabanas,es posiblequeel articulopesadono
estecompletamentesecocuandoel restode
la ropahayaalcanzadoel gradode secado
deseado.Separelosarticulospesadosdelos
maslivianosparaobtenerlos mejoresresul-
tadosdelsecado.
TIENEOLOR
• Losoloresdomesticos,talescomooloresde
pintura,varnices,limpiadoresfuertes, etc.,
puedenpenetrara la secadoracon el aire
ambiente.Esto es normal puesla secadora
extraeel aire de la habitaci6n,Io calienta,Io
circulaen eltambory Iohacesaliralexterior.
Cuando estos olores se encuentren pre-
sentesen el aire, ventilecompletamentela
habitaci6nantesdeusarla secadora.
}4
Unafiode garantiaen partesy manode obra
Duranteun(1)a_oa partirde lafechaoriginaldela
compra,cualquierpartequefalleduranteel usonor-
malen su hogarse repararao remplazarasin costo
alguno.
GarantiaLimitada
DespuesdelprimeraSoa partirdelafechadecom-
praoriginalal menudeo,o durantelos periodosque
se in@an a continuaci6n,las piezas designadas
quefallenen el uso domesticonormalde la unidad
seranreparadaso reemplazadasgratuitamente,y el
propietariodeberapagartodoslos demascargos,
inclusivemanodeobra,millajey transportaci6n.
8egundoAfio - Todaslaspiezas.
DelTerceroal QuintoAfio - Vasodel secador.
GarantiaLimitadaAdicionalcontraOxidacion
Siel gabineteexterior,incluyendola cubierta,la tapa
y el bastidorse oxidanduranteel primerafio a partir
de la fechade compraal por menor,se repararano
reemplazarangratuitamente.Despuesdel primer
afio y hastael d6cimoafio, la reparaci6ny el reem-
plazo seran efectuadosgratuitamenteen Io que
respectaa laspiezasmismasy el propietariodebera
pagartodos los otros costos,incluyendomanode
obra,kilometrajey transporte.
8e RuegaNota: Lagarantiatotaly la garantialimi-
tadaaplicancuandoelelectrodomesticoseencuen-
tre en Estados Unidos o en Canada. Los elec-
trodomesticosquese encuentrenen otrolugarsola-
menteestancubiertospor la garantialimitada,inclu-
sivelaspiezasquefallenduranteel primerdos afio.
Residentesde Canada
Las garantiasantes mencionadass61ocubren los
electrodomesticosinstaladosen Canadacertificados
o listadosporlas agenciasde pruebasapropiadas
para cumplir con el NationalStandardof Canada
(NormaNacionalde Canada),a menosque el elec-
trodomesticose Ilevea Canadadebidoa un cambio
de residenciadesde los Estados Unidos hacia
Canada.
Lasgarantiasespecificasexpresadasanteriormente
son las ONICASgarantiasqueofreceel fabricante.
Estasgarantiasleotorganderechoslegalesespeci-
ficos y puede tambi6n tener otros derechos los
cualesvarianentreestados.
PAR,&OBTEHERELSERVICIODE6ARAHTIA
Paraubicarun centrode servicioautorizadoen su area, comuniquesecon el dis-
tribuidorMaytagconel cualcompr6el electrodomestico;o Ilameal Departamentode
Asistenciaal Clientede MaytagAppliancesSalesCompany.Si no recibeun servicio
degarantiasatisfactorio,por favorIlameo escribaa:
MaytagAppliancesSalesCompany
Attn:CAIR Center
RO.Box2370
Cleveland,TN37320-2370
1-800-688-9900EE.UU. 1-800-688-2002CANADA
Cuandose comuniquecon el Departamentode Asistenciaal Clientede Maytag
AppliancesSalesCompanyconrelaci6na unproblemade servicio,porfavorincluya
la siguienteinformaci6n:
a. Su nombre,domicilioy n0merodetelefono;
b. El n0merode modeloy el n0merode serie (se encuentranen la parte
izquierdaposteriordel paneldecontrol)de su electrodomestico;
¢. El nombrey la direcci6nde su distribuidory la fecha de compradel elec-
trodomestico;
d. Unadescripci6nclaradelproblemaque experimenta;
e. Uncomprobantede compra.
[STASGARAFITIAS140CUBREF!LOSIGUIEFITE:
1. Condicionesy da_osresultantesdecualquieradelas siguientescondiciones:
a. Instalaci6n,entregao mantenimientoinadecuados.
b. Cualquierreparaci6n,modificaci6n,alteraci6noajustenoautorizadoporelfab-
ricanteo poruntecnicode servicioautorizado.
c. Usoinadecuado,abuso,accidenteso usoirrazonable.
d. Corriente,voltajeo suministroelectricoincorrecto.
e. Ajusteincorrectode unode loscontroles.
2. Lasgarantiasse anularansi los n0merosde serieoriginalesse quitan,alterano
no se puedendeterminarfacilmente.
3. Bombilla.
4. Productoscompradosparauso comercialo industrial.
5. Elcostodel servicioo de las Ilamadasde serviciopara:
a. Corregirerroresde instalaci6n.
b. Instruiral usuariosobreel uso correctodel producto.
c. Transportarel electrodomesticoal centrode servicio.
6. Da_osresultanteso incidentalessufridospor una personacomoresultadode la
violaci6ndealgunadeestasgarantias.
Algunosestadosnopermitenla exclusi6nni la limitaci6nde daSosresultantesni inci-
dentales,de maneraquees posibleque noapliquela exclusi6nanterior.
Las guias del usuario,los manualesde servicioy los catalogosde piezasestan
disponiblesen el Departamentode Asistenciaal Clientede MaytagAppliancesSales
Company.
A/03/02
MAYTAG • 403 \_: 4'"Street N. • P.O. Box 39 • Newton, Iowa 50208
PartNo 63719310 _ '" http /Iv/v/v/ maytag com MCSNo 33002582 JN LtthoUSA
@2002 Maytag Apphances Sales Co

