EASY EGG COOKER
MODEL: EGC314(A~Z)
INSTRUCTION MANUAL & RECIPE GUIDE

Questions? We’re here to help! Visit: shopelitegourmet.com for support on this product.
EASY EGG COOKER
IMPORTANT SAFEGUARDS ...........................................................................3
PARTS IDENTIFICATION ................................................................................ 6
BEFORE FIRST USE ........................................................................................9
DELAY TIMER .................................................................................................9
HOW TO USE YOUR EGG COOKER .............................................................. 10
CLEANING & MAINTENANCE TIPS ............................................................... 21
RECIPES ..........................................................................................................22
WARRANTY & CUSTOMER SERVICE .............................................................46

3
IMPORTANT SAFEGUARDS
The Elite Brand takes consumer safety very seriously. Products are designed
and manufactured with our valued consumers’ safety in mind. Additionally,
we ask that you exercise a level of caution when using any electrical
appliance by following all instructions and important safeguards.
When using electrical appliances, basic safety precautions should
always be followed, including the following:
1. READ ALL INSTRUCTIONS
CAREFULLY.
2. Remove all packaging and labels
from appliance prior to use.
3. To protect against risk of electrical
shock, do not put cords, plugs or the
appliance in or near water or any
other liquid.
4. Keep appliance away from children
when in use.
5. Only use approved ingredients
with this product – other food may
damage the appliance.
6. Unplug from outlet when not
in use, during assembly, during
disassembly and before cleaning.
7. Avoid contact with heating parts.
8. Do not operate this appliance with
a damaged cord, damaged plug,
after the appliance malfunctions, is
dropped, or damaged in any manner.
9. Use only Egg Cooker/Steamer
attachments recommended or sold
by Elite Gourmet. Others may result
10. Do not use outdoors.
11. Do not leave eggs in Egg Cooker/
prolonged period.
12. Do not let the cord hang over the
edge of a table, edge of a counter,
over the sink or touch any hot
surfaces.
13. Only use the Egg Cooker/Steamer on
a stable surface.
14. Do not put your hands or other
while it is in operation. If food spills
on the Heating Plate, make sure the

4
Questions? We’re here to help! Visit: shopelitegourmet.com for support on this product.
and cool before cleaning.
15. Keep hands and utensils away from
Heating Plate while cooking eggs to
damage to the Egg Cooker/Steamer.
16. Cooking plate and contents (water,
eggs & foods) of the Egg Cooker/
Steamer are hot when in use. Let
cool before handling or cleaning.
17. Do not place on or near a hot gas
burner, hot electric burner or in a
heated oven.
18. Use extreme caution when handling
the Measuring Cup, as it contains
a sharp Pin located on the bottom
19. When cleaning the egg cooker base,
do not submerse in any liquid.
Instead, use a soft, wet cloth to wipe
it down.
20. The Lid becomes very hot while in
use- do not touch while the eggs are
cooking. Let it cool before touching.
21. Be certain the Lid is securely in place
prior to turning Egg cooker on.
22. Do not open Lid when Egg Cooker/
Steamer is cooking.
23.
removing the cord from the wall
or the eggs from the Egg Cooker/
Steamer.
24. Do not put the appliance in the
refrigerator.
IMPORTANT SAFEGUARDS (cont.)
Do not use expired eggs,
expired egg whites, or
expired liquid eggs.
SAVE THESE INSTRUCTIONS
THIS PRODUCT IS FOR
HOUSEHOLD USE ONLY

5
SHORT CORD PURPOSE
POLARIZED PLUG
NOTE:
resulting from becoming entangled in or tripping over a longer cord.
Longer power-supply cords or extension cords may be used if care is
exercised in their use.
If an extension cord is used: (1) the marked electrical rating of the extension
cord should be at least as great as the electrical rating of the product;
(2) the extension cord should be arranged so that it will not drape over the
countertop or tabletop where it can unintentionally be pulled on or tripped
over by children or pets.
If this appliance is equipped with a polarized plug (one blade is wider than
the other), please follow the below instructions:
plug can be fully inserted into the extension cord. Do not alter the plug of the
product or any extension cord being used with this product. Do not attempt
to defeat the safety purpose of the polarized plug.

6
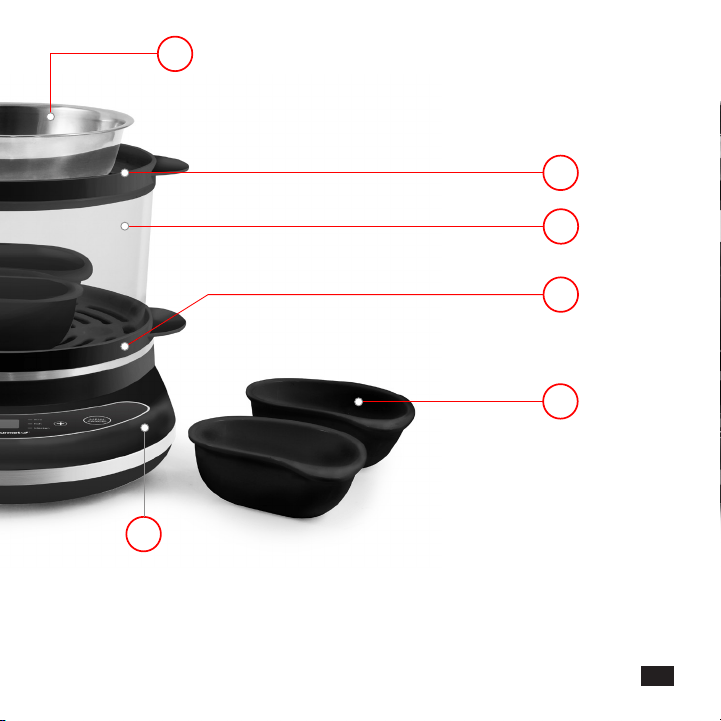
PARTS IDENTIFICATION
1
11
7
2
3
4
5
1. Lid Handle
2. Steam Vent
3. Lid
4. Measuring Cup
5. Piercing Pin
6. Egg Cooking Top Rack
7. Egg Cooking Rack Handle
7
9
10
6
12
13
8
8. Extension Ring
9. Egg Cooking Bottom Rack
10. Omelet Tray
11. Digital Control Panel
12. Poaching Tray (x4)
13. Base
8
Questions? We’re here to help! Visit: shopelitegourmet.com for support on this product.
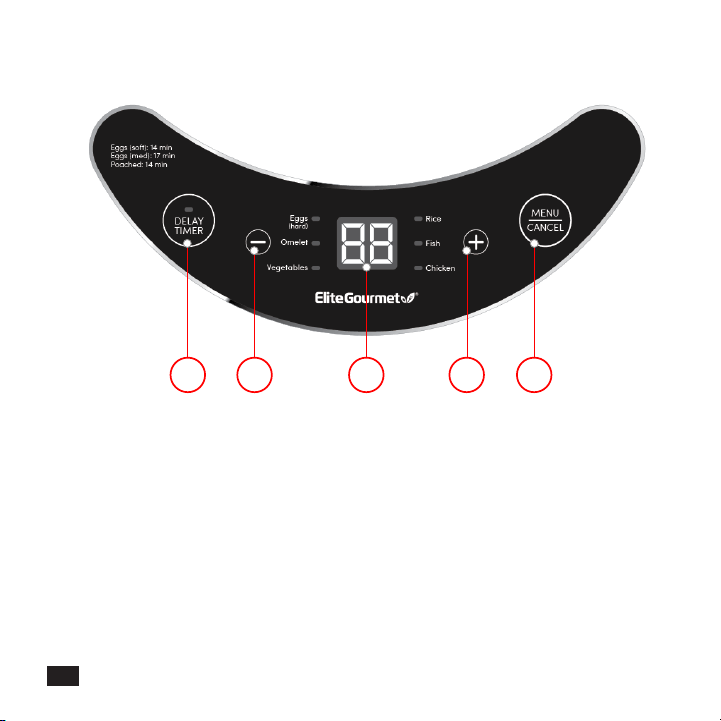
CONTROL PANEL
1 2 3 4 5
1. Delay Timer Button
2. Decrease Time Button
3. *Time Display
4. Increase Time Button
5. Menu/Cancel Button
*Time display has a decimal point between the 1st & 2nd digit (ex. 1.4
increments up to 9.5 hours total.

9
BEFORE FIRST USE
1. Wash and rinse all removable parts in hot, soapy water. DO NOT
submerge the base in any liquids. Base can be wiped clean with
a damp cloth. Please refer to the Cleaning Instructions for more
information.
2. Place poaching tray, measuring cup, omelet tray, lid and egg rack next
to the unit.
CAUTION: Piercing pin is on the base of the measuring cup and is
extremely sharp.
3. Position the egg rack over the base. The side handles should be facing
upward. Place lid over the egg rack.
NOTE: If using 2nd egg rack, place Extension Ring on base, place 2nd
egg rack on ring, then place lid on rack & extension ring.
(Refer to page 12 Fig. 5)
4. Plug in the power cord. Your egg cooker is now assembled for use.
DELAY TIMER
Your new digital egg cooker has a Delay Timer that allows you to delay
cooking for up to 9.5 hours.
timer in 1/2 hour increments by using the +/- buttons for up to 9.5 hour
cooking delay. After selecting the delay time, the egg cooker/steamer will
automatically begin counting down to point where cooking is initiated.
NOTE: Do not use this function when cooking foods that may spoil or that
are not intended for long periods without refrigeration.

10
Questions? We’re here to help! Visit: shopelitegourmet.com for support on this product.
NOTE: Provided measuring cup holds up to 3 ounces of water. It may be
foods.
SOFT, MEDIUM AND HARD-BOILED EGGS
1. Plug the unit into wall power source. The display screen
2. Fill measuring cup with cold water to level for desired
doneness and pour onto cooking plate. (Fig. 1)
TIP: For best results, use distilled water - tap water
contains minerals that can cause heating plate to
discolor.
The times listed below are guidelines so that you will know how long it will
automatically and a buzzer will sound when the eggs are done - no additional
timer is necessary. The following time guidelines are for cold large eggs. Extra
achieve desired results.
*Time display has a decimal point between the 1st & 2nd digit (ex. 1.4 = 14 minutes,
HOW TO USE YOUR EGG COOKER
DONENESS # OF EGGS COOK TIME
(MIN)
WATER ON
COOKING PLATE
SOFT-BOILED 1-7 8-14 11 14 3oz. 4oz.
MEDIUM-BOILED 1-7 8-14 14 17 3oz. 4oz.
HARD-BOILED 1-7 8-14 18 23 3oz. 4oz.
Fig. 1

11
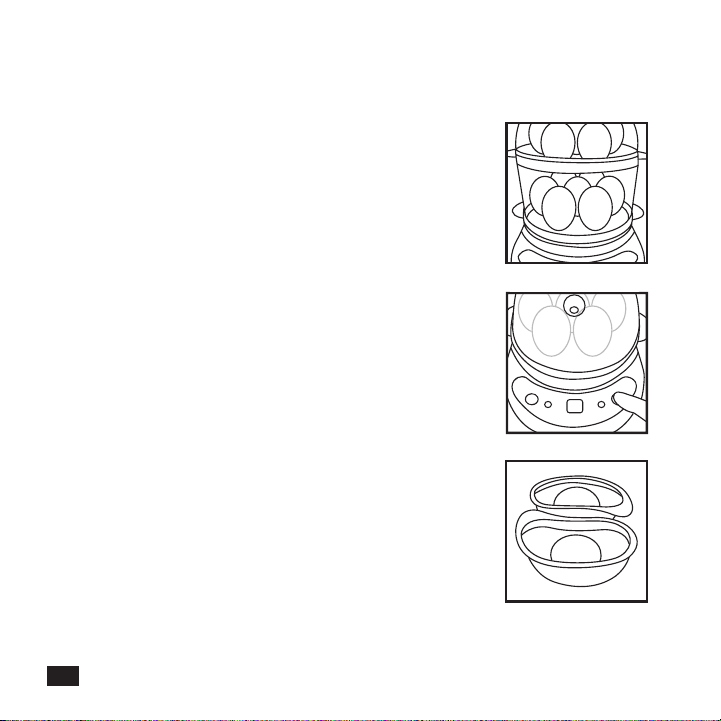
3. Place the Egg Cooking Rack over the Heating Plate.
The side handles should be facing upward. (Fig. 2)
4. *Optional: Pierce the larger end of each egg using
the Piercing Pin on the bottom of the Measuring Cup.
(Fig. 3)
5. Place an egg in each allotted spot on the Egg Cooking
Rack making sure the holes pierced in the eggs are
pointing upwards. Do not let the eggs touch the
Heating Plate. (Fig. 4)
NOTE: If using 2nd egg rack tier, refer to chart on
page #10, WATER ON COOKING PLATE. Place
Extension Ring on base, place 2nd rack on ring,
repeat steps 3 - 5 then place lid on rack & extension
ring. (Fig.5)
6. Place Lid on top of the unit and push the MENU
Button to turn ON. The Eggs (hard) Indicator Light
will illuminate. There is no need to press any other
buttons as the unit will pause and automatically
begin the cooking process. (Fig. 6)
7. When the Egg Cooker alarm sounds, the eggs will be
cooked. Actual cooking time depends on number of
eggs and desired doneness (See Cooking Time Chart
on Pg.10).
8. Remove eggs immediately and rinse under cold water
to prevent overcooking.
9. When cooking is complete, unplug the unit and allow
to cool before cleaning.
HOW TO USE YOUR EGG COOKER (cont.)
Fig. 2
Fig. 3
Fig. 4
12
Questions? We’re here to help! Visit: shopelitegourmet.com for support on this product.
HOW TO USE YOUR EGG COOKER (cont.)
POACHED EGGS
1. Fill the Measuring Cup with 3oz. of cold water and
pour onto Heating Plate.
2. Lightly butter or spray cooking oil in Poaching Tray(s).
3. Break one egg for each poaching section. (Fig. 7)
NOTES AND TIPS
• Refrigerate eggs until ready to use. Always use cold eggs
– do not bring them to room temperature before using or
the eggs will be slightly overcooked.
•
a bowl of salted, cool water. If they sink, they are fresh. If
• The recommended water levels are a guide, and water
consistency.
• To make cleaning easier and avoid discoloration or
mineral buildup on the cooking plate, we recommend
spreading a few drops of cooking oil onto the cooking
plate before each use. Note: Apply while the cooking plate
is not heated or in use.
Fig. 5
Fig. 6
Fig. 7
13
HOW TO USE YOUR EGG COOKER (cont.)
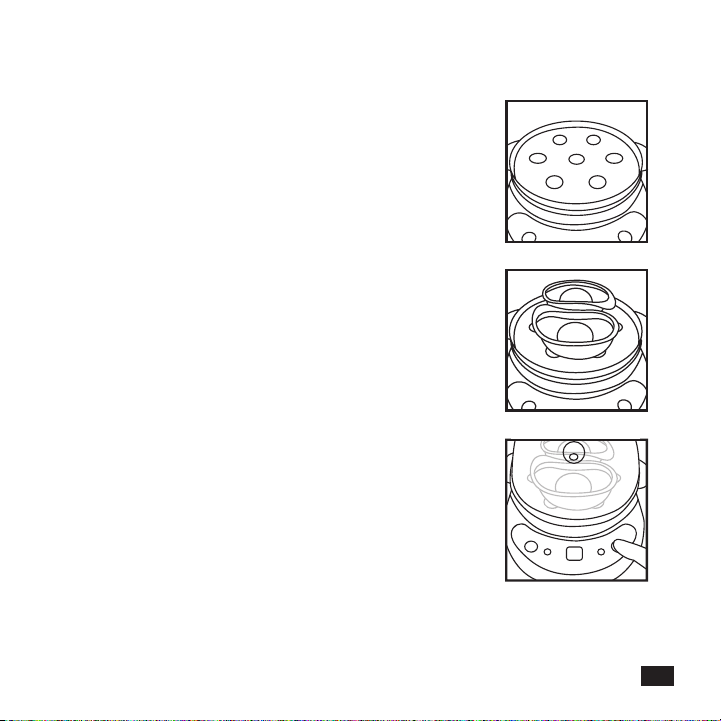
4. Place Egg Cooking Rack over the Heating Plate. (Fig. 8)
5. Place Poaching Tray on top of Egg Cooking Rack. (Fig. 9)
CAUTION: Never place Poaching Tray or Omelet Tray
directly onto Heating Plate as they will melt and damage
the Egg Cooker.
NOTE: If using 2nd egg rack tier, refer to chart on page
#10, WATER ON COOKING PLATE. Place Extension
Ring on base, place 2nd rack on ring, repeat steps 2-5
then place lid on rack & extension ring. (Fig.5)
6. Place Lid on top of the unit and press the MENU Button
to turn ON. Eggs (hard) Indicator Light will illuminate
and the countdown timer will show 23 minutes.
Reduce cooking time to 14 minutes by pressing the
Decrease Time Button. The unit will pause and them
automatically begin the cooking process. (Fig. 10)
7. When the alarm sounds, the eggs will be ready.
8. When cooking is complete, unplug the unit and allow
to cool before cleaning.
Fig. 8
Fig. 9
Fig. 10
14
Questions? We’re here to help! Visit: shopelitegourmet.com for support on this product.
HOW TO USE YOUR EGG COOKER (cont.)
OMELETS
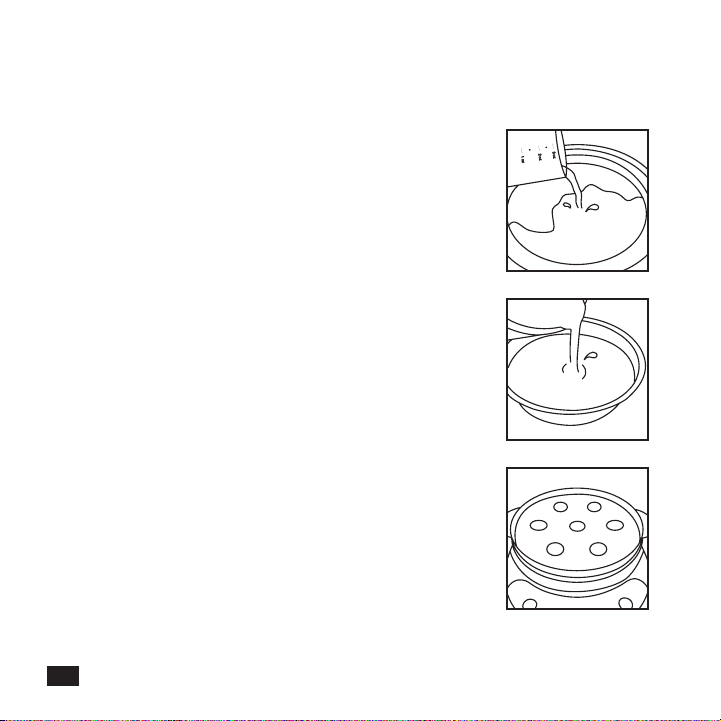
1. Fill the Measuring Cup with 4 ounces with cold water
and pour onto Heating Plate. (Fig. 11)
2. Lightly butter or spray vegetable oil on Omelet Tray.
3. Break up to 3 large eggs into a separate bowl and mix.
Add milk or water to desired omelet consistency. If
desired, add ingredients (i.e. chives, mushrooms,).
Pour beaten mixture into Omelet Tray. (Fig. 12)
4. Place Egg Cooking Rack over the Heating Plate. (Fig. 13)
5. Place Omelet Tray on top of Egg Cooking Rack. (Fig. 14)
CAUTION: Never place Poaching Tray or Omelet Tray
directly onto Heating Plate as they will melt and damage
the Egg Cooker.
NOTE: If using 2nd egg rack tier, refer to chart on page
#16, WATER ON COOKING PLATE. Place Extension
Ring on base, place 2nd rack on ring, repeat steps 3 & 4
then place lid on rack & extension ring. (Refer to page
12 Fig.5)
6. Place lid on top of the unit and press the MENU Button
to turn ON. Eggs (hard) Indicator Light will illuminate.
Press Menu button until the omelet indicator
illuminates. The unit will pause & then automatically
begin the cooking process. (Fig. 15)
Fig. 11
Fig. 12
Fig. 13

15
HOW TO USE YOUR EGG COOKER (cont.)
7. When the alarm sounds, the omelet will be ready.
8.
for a few extra minutes. It is normal for the omelet
to expand during cooking. Once the Lid is removed,
the omelet will shrink back down.
9. When cooking is complete, unplug and allow to cool
before cleaning.
Fig. 14
Fig. 15

16
Questions? We’re here to help! Visit: shopelitegourmet.com for support on this product.
HOW TO USE YOUR EGG COOKER (cont.)
NOTE: Provided measuring cup holds up to 3 ounces of water. It may be
foods.
NOTE: Your new egg cooker has pre-programmed cooking times for each
preferred doneness. Please refer to cooking chart below.
6 PRESET FUNCTIONS
FUNCTION TIME
(MIN)
WATER ON
COOKING PLATE
WATER/FOOD IF
APPLICABLE
Eggs (hard-boiled) 23 3oz. 1-7 eggs,
4oz. 8-14 eggs
Up to 14 eggs
Omelet 14 4oz. 2 eggs
Vegetables 16 4oz. 3.5oz.
Rice 23 5oz. 3oz.
Fish 10 4oz. 5oz.
Chicken 14 4oz. 6oz.
17
HOW TO USE YOUR EGG COOKER (cont.)
VEGETABLES
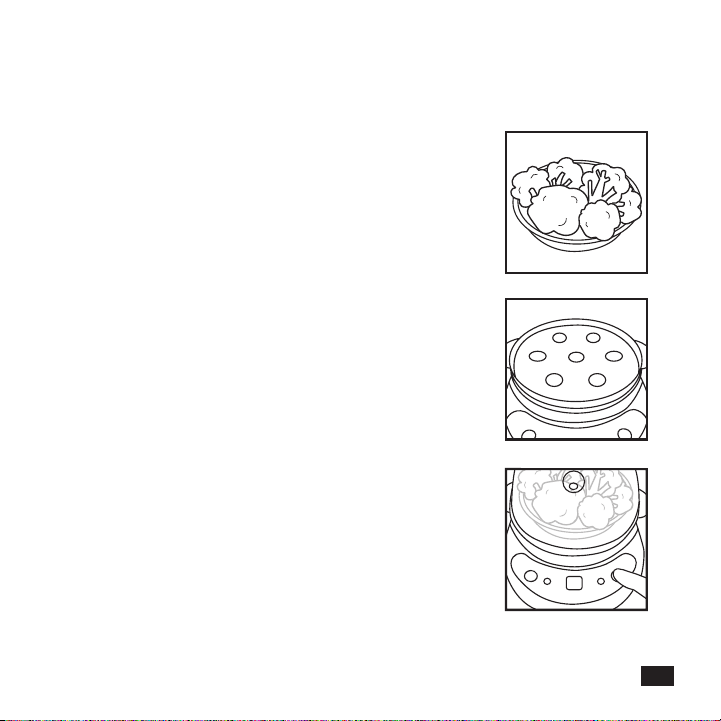
1. Use Measuring Cup to pour 4 ounces of water (cooks
3.5 oz of vegetables) onto Heating Plate.
2. Add up to 3.5 ounces of cut up vegetables to the
omelet tray. (Fig. 16)
3. Place Egg Cooking Rack over the Heating Plate. (Fig. 17)
4. Place Omelet Tray on top of Egg Cooking Rack.
CAUTION: Never place Omelet or Poaching Trays directly
onto Heating Plate as they will melt and damage the Egg
Cooker.
NOTE: If using 2nd tier, place Extension Ring on base,
place 2nd egg rack on ring, repeat steps 3 & 4. (Refer to
page 12 Fig. 5)
Additional water may be necessary (up to 6oz.)
depending on desired doneness, amount & type of
vegetables being steamed.
5. Place lid on top of the unit and press the MENU Button
to turn ON. Eggs (hard) Indicator Light will illuminate.
Press Menu button until the Vegetables indicator
illuminates. The unit will pause & then automatically
begin the cooking process. (Fig. 18)
6. When the alarm sounds, the vegetables will be ready.
7. For a softer vegetable, leave in the Egg Cooker/Steamer
for a few extra minutes.
8. When cooking is complete, unplug the unit and allow
to cool before cleaning.
Fig. 16
Fig. 17
Fig. 18
18
Questions? We’re here to help! Visit: shopelitegourmet.com for support on this product.
HOW TO USE YOUR EGG COOKER (cont.)
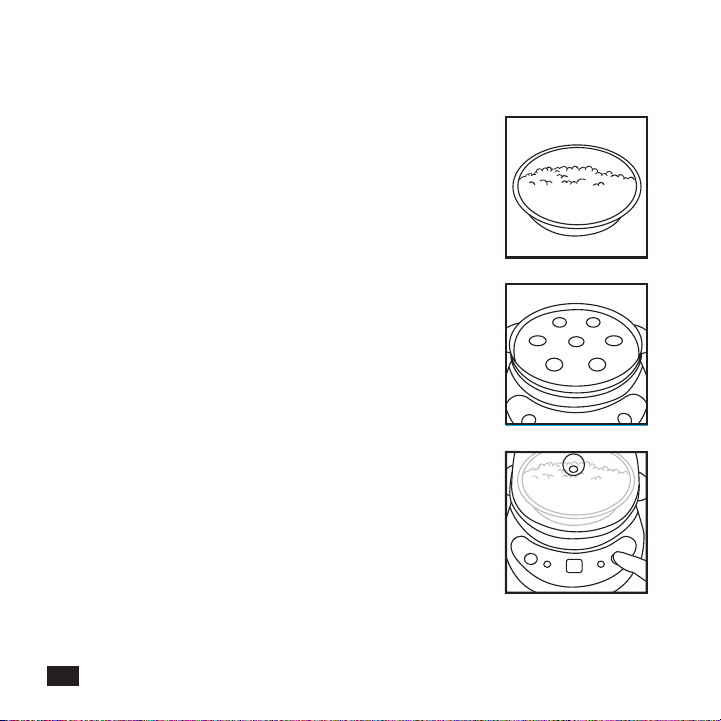
RICE
1. Fill Measuring Cup to the 3-ounce line with cold water and
pour onto Heating Plate, then add another 2 ounces of
water to cooking plate for total of 5 ounces.
2. Add up to 3 ounces of uncooked rice to the omelet tray
then add 4.5 ounces of water to the rice. (for the best
tasting rice, rinse rice multiple times to remove beta starch).
(Fig. 19)
3. Place Egg Cooking Rack over the Heating Plate. (Fig. 20)
4. Place Omelet Tray on top of Egg Cooking Rack.
CAUTION: Never place Poaching Tray or Omelet Tray directly
onto Heating Plate as they will melt and damage the Egg
Cooker.
NOTE: If using 2nd tier, place Extension Ring on base, place
2nd egg rack on ring, repeat steps 2 - 4.
(Refer to page 12 Fig. 5)
*We do not recommend using 2nd tier to cook additional
rice as the water capacity of the cooking plate cannot
exceed 6oz.. Other foods are okay to steam with rice.
5. Place lid on top of the unit and press the MENU Button to
turn ON. Eggs (hard) Indicator Light will illuminate. Press
Menu button until the Rice indicator illuminates. The unit
will pause & then automatically begin the cooking process.
(Fig. 21)
6. When the alarm sounds, the rice will be ready.
7. When cooking is complete, unplug and allow to cool before
cleaning.
Fig. 19
Fig. 20
Fig. 21
19
HOW TO USE YOUR EGG COOKER (cont.)
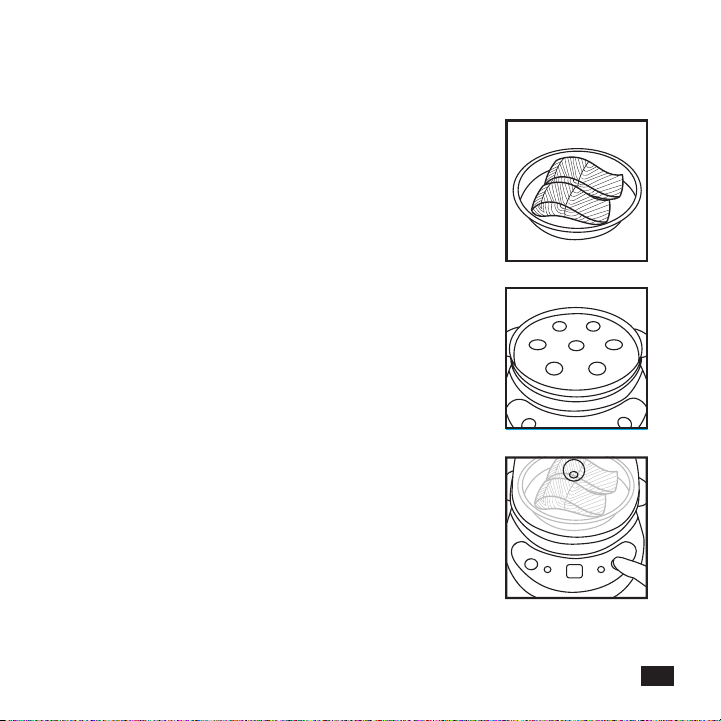
FISH
1. Fill Measuring Cup to the 3-ounce line with cold water
and pour onto Heating Plate, then add another 1
ounce of water to cooking plate for total of 4 ounces.
2. Lightly butter or spray vegetable oil on Omelet Tray.
3.
tray (seasoned to taste). (Fig. 22)
4. Place Egg Cooking Rack over the Heating Plate. (Fig. 23)
5.
Rack.
CAUTION: Never place Poaching Tray or Omelet Tray
directly onto Heating Plate as they will melt and damage
the Egg Cooker.
NOTE: If using 2nd tier, place Extension Ring on base,
place 2nd egg rack on ring, repeat steps 3 & 4. (Refer
to page 12 Fig. 5)
Additional water may be necessary (up to 6oz.)
being steamed.
6. Place Lid on top of the unit and press the press
the MENU Button to turn ON. Eggs (hard) Indicator
Light will illuminate. Press Menu button until the
Fish indicator illuminates. The unit will pause & then
automatically begin the cooking process. (Fig. 24)
7.
8. When cooking is complete, unplug and allow to cool
before cleaning.
Fig. 22
Fig. 23
Fig. 24
20
Questions? We’re here to help! Visit: shopelitegourmet.com for support on this product.
HOW TO USE YOUR EGG COOKER (cont.)
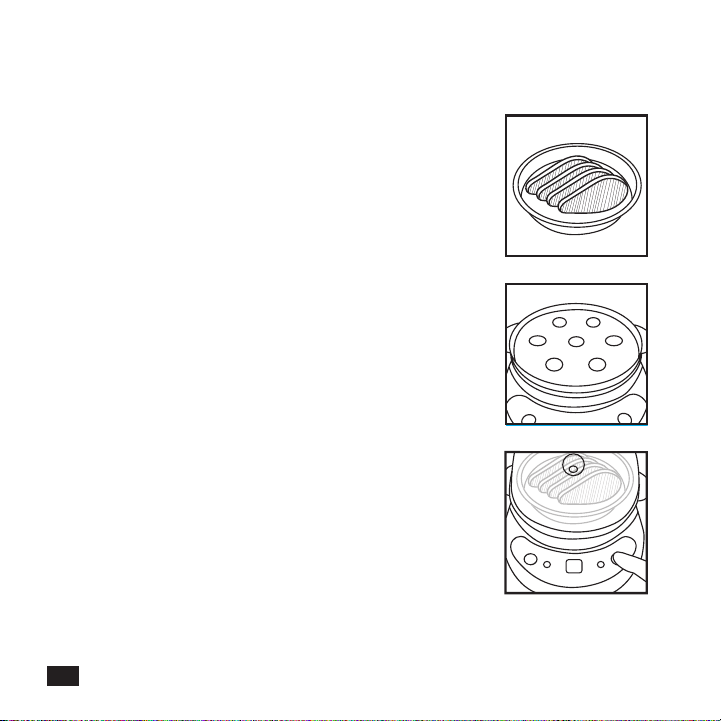
CHICKEN
1. Fill Measuring Cup to the 3-ounce line with cold water and
pour onto Heating Plate, then add another 1 ounce of
water to cooking plate for total of 4 ounces.
2. Lightly butter or spray vegetable oil on Omelet Tray.
3. Add up to 6 ounces of chicken (boneless) to the omelet
tray (seasoned to taste). (Fig. 25)
4. Place Egg Cooking Rack over the Heating Plate. (Fig. 26)
5. Place Omelet Tray with chicken on top of Egg Cooking
Rack.
CAUTION: Never place Poaching Tray or Omelet Tray directly
onto Heating Plate as they will melt and damage the Egg
Cooker.
NOTE: If using 2nd tier, place Extension Ring on base, place
2nd egg rack on ring, repeat steps 2 - 5.
(Refer to page 12 Fig. 5)
Additional water may be necessary (up to 6oz.) depending
on desired doneness & amount of chicken being steamed.
6. Place Lid on top of the unit press the MENU Button to turn
ON. Eggs (hard) Indicator Light will illuminate. Press Menu
button until the Chicken indicator illuminates. The unit will
pause & then automatically begin the cooking process.
(Fig. 27)
7. When the alarm sounds, the chicken will be ready.
8. When cooking is complete, unplug and allow to cool
before cleaning.
Fig. 25
Fig. 26
Fig. 27

21
CLEANING & MAINTENANCE
CAUTION: The base is extremely hot after use. Allow unit to cool before
handling or cleaning.
1. Always unplug your Egg Cooker appliance from the electrical outlet and
allow to cool completely before cleaning.
2. Wipe Heating Plate and Main Body with a wet cloth. DO NOT immerse
in water.
3. Wash the Accessories and Lid in the sink with warm, soapy water.
4. Place clean Egg Cooking Rack, Omelet and Poaching Trays, and
Measuring Cup inside the Egg Cooker body to store.
CLEANING THE HEATING PLATE
The stainless steel heating surface will not rust. After a few uses, there may
be discoloration to the surface left behind my minerals in your water. It is
NOT rust.
1. Remove any mineral deposits left behind from water by wiping the
Plate with a paper towel moistened with one tablespoon of white
vinegar.
2. You can also use a “magic-eraser” type scrubber and rub the Heating
Plate in a circular motion with warm water.
NOTE: If unit is not cleaned with white vinegar on a regular basis, minerals
naturally occurring in water will build up causing discoloration of eggshells.
However, this does not aect the taste of the eggs.
YOUR EGG COOKER IS NOT DISHWASHER SAFE

22
Questions? We’re here to help! Visit: shopelitegourmet.com for support on this product.
RECIPES
Simple, quick & easy eggs await.
Recipes included in this manual are courtesy of
www.recipezaar.com & www.fastcooking.ca
23

24
Questions? We’re here to help! Visit: shopelitegourmet.com for support on this product.
RECIPES
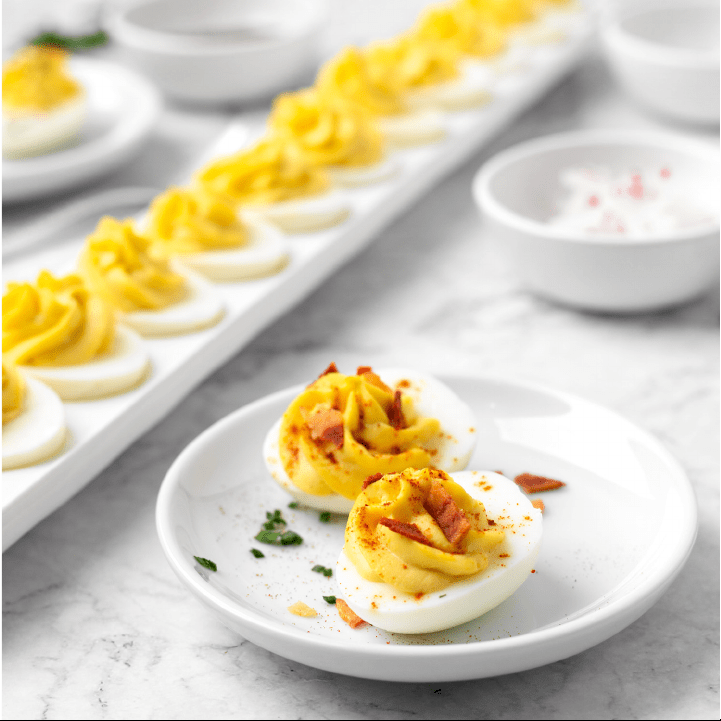
Deviled Eggs | Makes 20 servings
10 large hard-boiled eggs,
3 cup mayonnaise
1 ¼
1 ¼
1 ¼ teaspoons Worcestershire
sauce
2 ½ tablespoons capers, drained
½ teaspoon kosher salt
2 pinches freshly ground white
or black pepper
1. Peel the cooked eggs and carefully
slice in half lengthwise. Place the
egg white halves on a clean work
surface.
2. Put the yolks into the work bowl
the chopping blade; process until
no longer grainy, about 45 to 60
seconds.
3. Pulse in the remaining ingredients
and process until smooth, about
45 seconds to 1 minute. Taste and
4. You may either carefully scoop
bag with a small star tip. Fill the
pipe a large rosette onto each white
in place of the yolk. Sprinkle with
paprika before serving.
25

26
RECIPES
Egg Salad | Makes about 3 cups
10 hard cooked eggs,
completely cooled
1 stalk celery, about 4 inches,
cut into 1-inch pieces
½ cup mayonnaise
¼ teaspoon kosher salt
8 teaspoon freshly ground
white or black pepper
1. Remove shells from eggs and
discard. Cut eggs into quarters and
reserve.
2. Place the celery in the work bowl
metal chopping blade. Pulse to chop,
about 5 to 10 times; scrape into the
work bowl. Add the quartered eggs
to the work bowl; pulse 3 to 4 times
to roughly chop.
3. Add mayonnaise, mustard, salt and
pepper.
4. Pulse until mayonnaise and mustard
are completely mixed in and desired
texture is reached, 10 to 20 times.
FOR DICING INSTRUCTIONS:
5. Remove shells from eggs and
discard. First halve eggs, and then
cut each half into ¼ to ½ inch dice.
Reserve in a large mixing bowl.
6. Cut the celery into the same size as
the diced eggs, ¼ to ½-inch dice. Put
in the bowl with the eggs.
NOTE: The egg salad can be
made two ways, either pulsed in
a food processor for a creamier
version, or diced as traditionally
served in sandwiches. Both are
delicious – you decide which
way you prefer.

27
RECIPES
Eggs Benedict | Makes 4 servings
Eggs Florentine | Makes 4 servings
4 slices Canadian bacon
4 poached eggs
toasted
½ cup hollandaise sauce
4 cups spinach, packed
½ – 1 tablespoon olive oil
4 poached eggs
toasted
½ cup hollandaise sauce
1. Heat a large sauté pan over
medium- high heat. Sauté the
Canadian bacon, turning once, until
browned, about 2 to 4 minutes per
side. Keep warm.
2.
of the Canadian bacon. Top with a
tablespoons of hollandaise sauce.
1. In large sauté pan, heat the oil over
medium heat. Add the spinach, a
little bit at a time.
2.
Keep warm.
3.
distribute the spinach. Place one
the hollandaise sauce (about 2
tablespoons per serving).
4. Serve immediately.

28
Questions? We’re here to help! Visit: shopelitegourmet.com for support on this product.
Hollandaise Sauce | Makes about 1 cup
4 egg yolks
½ cup melted butter, kept warm
½ to ¾ teaspoon kosher salt
pinch ground white pepper
pinch cayenne
water, to thin if necessary
1. In a medium bowl, whisk yolks and
Place the bowl over a pot of
simmering, NOT boiling, water;
while whisking constantly, whisk
the mixture until it has increased in
volume and has thickened, about
8 to 10 minutes. The eggs must
not cook, so if it seems as though
the mixture is getting above body
of the heat a bit, and, then place
back onto the pot of water.
2. Once thickened, slowly whisk in
the melted butter until completely
combined. Stir in spices. If sauce
is too thick, thin out with some
immediately.
RECIPES

29
Hard Boiled Egg Casserole | Makes 8 servings
10 hard-boiled large eggs,
chopped
1-½ cups diced celery
²/3 cup mayonnaise
½ cup chopped pecans or
walnuts
2 tablespoons chopped green
pepper
onion
½ teaspoon salt
¼ teaspoon pepper
1 cup shredded cheddar cheese
½ cup crushed potato chips
1. In a bowl, combine eggs, celery,
mayonnaise, nuts, green pepper,
onion, salt and pepper; mix well.
2. Pour into a greased 11x7-in. baking
dish. Sprinkle with cheese and
potato chips.
3. Bake, uncovered, at 375° for 25
minutes or until heated through.
RECIPES

30
Questions? We’re here to help! Visit: shopelitegourmet.com for support on this product.
Pesto-Dijon Egg Salad Sandwiches | Makes 4 servings
½ cup mayonnaise
¼
¼ onion
mustard
4 teaspoons prepared pesto
1 garlic clove, minced
½ teaspoon salt
¼ teaspoon pepper
8 hard-boiled large eggs,
chopped
8 slices whole wheat bread,
toasted
4 romaine leaves
4 slices tomato
1.
in a small bowl. Gently stir in eggs.
2. Spread over four toast slices; top
with lettuce, tomato and remaining
toast.
RECIPES

31
English-Mun Egg Pizzas | Makes 4 servings
Smoked Salmon & Egg Toast | Makes 1 serving
4 English muffins
Olive oil
Tomato slices
2 hard-cooked eggs, sliced
Grated mozzarella
Oregano
Kosher salt
1 thick slice country white bread
1 tbsp. cream cheese, softened
1 thin slice smoked salmon
(1 ounce)
1 large hard-boiled egg, peeled,
sliced
1 tsp. chopped fresh dill
1 tsp. capers, drained
1.
place on a cookie sheet.
2. Drizzle each with olive oil, then layer
on tomato slices, hard-cooked egg
slices (½ an egg each), and a little
grated mozzarella. Sprinkle with
oregano and kosher salt.
3. Broil 5 minutes or until the cheese
melts.
1. Toast bread. Spread with cream
cheese.
2. Top bread with smoked salmon and
hard-boiled egg. Sprinkle with dill
and capers.
RECIPES

32
Questions? We’re here to help! Visit: shopelitegourmet.com for support on this product.
Mexican Street Corn Dip | Makes 6 servings
8 hard-boiled eggs, peeled and
coarsely chopped
1/4 cup plain Greek yogurt
3 tbsp. regular or light
mayonnaise
1 tsp. Tex-Mex seasoning
1/2 tsp. salt
1/4 tsp. pepper
1 cup corn kernels (thawed or
lightly cooked)
minced
1/2 cup diced red pepper
2 green onions, thinly sliced
1/4 cup chopped cilantro,
divided
1/2 cup queso blanco
1 bag tortilla chips
1. Combine eggs, Greek yogurt,
seasoning, salt and pepper.
2.
pepper, green onions and 2 tbsp.
cilantro. Transfer to serving bowl.
3. Sprinkle queso blanco and
remaining cilantro over dip; Serve
with tortilla chips.
RECIPES

33
Wild Mushroom Flatbread with Poached Eggs | Makes 2 servings
1 tbsp. olive oil
1 white onion, diced
4 cups mixed sliced wild
mushrooms (such as cremini,
shiitake, oyster)
2 cloves garlic, minced
1 tsp. each chopped fresh
thyme and rosemary
½ tsp. each salt and pepper,
divided
¼ tsp. hot pepper flakes
2 tbsp. balsamic vinegar
½ tsp. finely grated lemon zest
2 prepared flatbreads
1 tbsp. white vinegar
2 eggs
2 tbsp. chopped fresh chives
1. Heat olive oil in skillet set over
medium-high heat; Sauté onion for
about 5 minutes or until softened
but not browned.
2. Add mushrooms, garlic, thyme,
rosemary, half each of the salt and
for 5 to 7 minutes or until cooked
through.
3. Stir in balsamic vinegar and lemon
zest; Cook for 1 minute.
4.
400°F oven for about 5 minutes or
until golden and heated through.
mushrooms and poached eggs.
Sprinkle with remaining salt and
pepper. Garnish with chives.
RECIPES
34
Questions? We’re here to help! Visit: shopelitegourmet.com for support on this product.
34

35
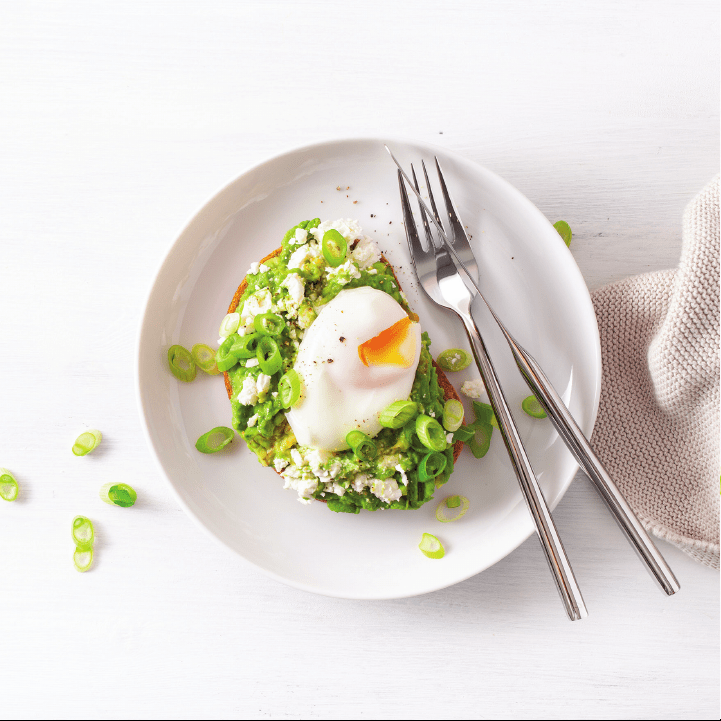
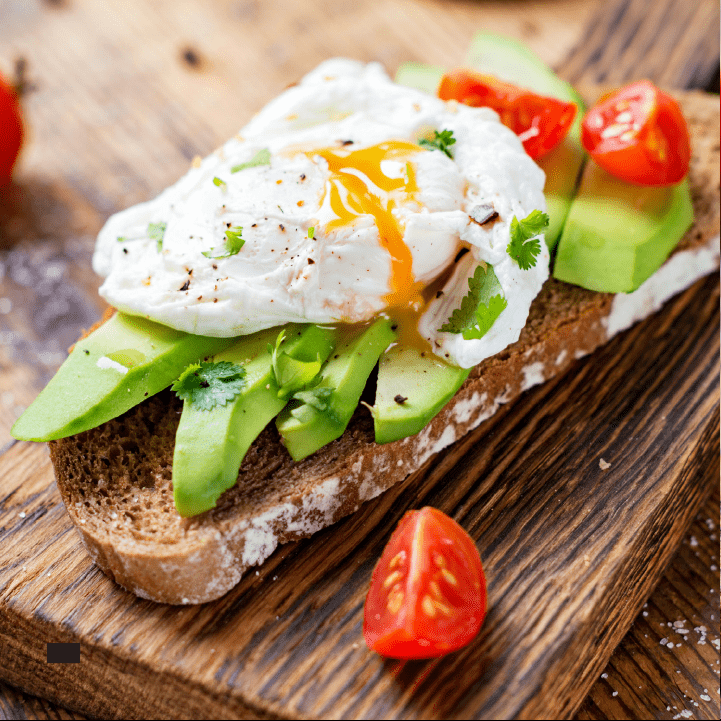
Avocado Toast & Egg | Makes 1 serving
Omelet with Greens & Cheese | Makes 1 serving
1 thick slice country white bread
2 tsp. unsalted butter
cooking spray
1 large egg
2 thin slices avocado
2 thin slices tomato
2 tsp. chopped fresh cilantro
salt and pepper optional
3 large eggs
Kosher salt, freshly ground
pepper
cup Muenster cheese,
shredded, divided
cup sautéed greens (such as
spinach, kale, or Swiss chard)
1. Toast bread. Spread with butter.
2. Top bread with avocado and tomato.
Sprinkle with cilantro. Place poached
egg on top. Sprinkle with salt and
pepper if desired.
1. Lightly butter omelet tray. Break
eggs into a separate bowl, add
kosher salt and pepper. Beaten
to blend. Pour egg mixture into
omelet tray and cook accordingly.
2. Place cooked omelet onto a plate,
top with Muenster and greens.
Using spatula, fold one side of
RECIPES

36
Questions? We’re here to help! Visit: shopelitegourmet.com for support on this product.
Soft-Boiled Scotch Eggs | Makes 6 servings
6 eggs, soft-boiled and peeled
1 pound sausage meat
1 tablespoon brown mustard
1 tablespoon chopped fresh
parsley
½ teaspoon nutmeg
½ cup lard or other cooking fat
1. Combine the sausage, mustard,
parsley and nutmeg, mixing together
by hand. Divide the sausage mixture
into 6 portions; spread each one out
into an oval shape.
2. Add an egg to the sausage, then
gently form the sausage around the
egg as evenly as possible.
3. Warm the cooking fat to 350°F in
a skillet, then add an egg or two.
roll them back and forth to allow the
sausage to cook evenly and retain a
round shape. Cook until the sausage
is cooked through, about 5 minutes
per egg.
4. Preheat oven to 170°F. Transfer the
cooked egg to a plate lined with a
paper towel, then place in the oven
other batches of eggs.
RECIPES

37
Whole Grain Salad with Soft Boiled Eggs & Shallot Yogurt
Makes 6 servings
½ cup whole rye berries, farro,
or wheat berries
Kosher salt
1 small shallot, finely chopped
³ cup whole-milk Greek yogurt
2 tablespoons chopped mint
1 lemon, halved
Freshly ground black pepper
6 cups mixed greens (such as
arugula, baby mustard, and/or
mizuna)
4 Soft-Boiled Eggs, halved
1. Cook rye berries in a large saucepan
of boiling salted water until tender,
60–80 minutes. Drain and let cool.
2. Meanwhile, mix shallot, yogurt, mint,
bowl; season with salt and pepper.
3. Toss greens with a squeeze of lemon
salt and pepper. Add rye berries and
toss to combine.
4. Scoop shallot yogurt onto plate and
top with a mess of salad and egg
halves.
RECIPES

38
Questions? We’re here to help! Visit: shopelitegourmet.com for support on this product.
Omelet with Mushrooms & Ricotta | Makes 3 serving
4 ounces button mushrooms
Kosher salt, freshly ground
pepper
4 ounces fresh ricotta or cream
cheese (about ½ cup)
¼ ounce Parmesan, finely
grated (about ¼ cup)
6 large eggs
1. Finely chop the mushrooms. Add
mushrooms to skillet, season with
salt and pepper, and increase
heat to medium-high. Cook until
browned, about
2. 5 minutes. Use a slotted spoon to
transfer to a small bowl. Add ricotta
and Parmesan to mushrooms and
stir well to combine; season with salt
and pepper.
3. Lightly butter omelet tray. Break
eggs into a separate bowl and blend.
Pour half of egg mixture into omelet
tray and cook accordingly. Cook the
remain half. Place cooked omelet
on to a plate, top with mushroom
mixture. Using spatula, fold one side
RECIPES

39

40
Questions? We’re here to help! Visit: shopelitegourmet.com for support on this product.
Chinese Chicken with Mushrooms | Makes 1 serving
6 ounces chicken breast
3 mushrooms, sliced
salt & pepper to taste
¼ tbsp soy sauce
¼ tbsp dry sherry
¼ tsp sugar
¼ tsp sesame oil
¼ tbsp cornstarch
¼ tbsp shredded fresh ginger
¼ green onion, sliced
1. Cut chicken into approximately 1"
pieces.
2. Add 4oz. water to heating plate.
3. Place the chicken in a bowl. Add
all of the other ingredients except
mushrooms, ginger, and green
onion.
4. Stir together and allow chicken to
marinade.
5. Pour chicken into the omelet tray.
Surround chicken with mushrooms.
Distribute shredded ginger and
green onion over all.
6. Set timer for 15 minutes. When the
alarm sounds, check the chicken. If
cooked, remove and serve.
RECIPES

41
3.5 ounces of broccoli florets
3/4 tbsp butter
1/2 tbsp flour
Pinch of ground pepper
3 tbsp of milk
2 tbsp grated sharp cheddar
Salt to taste
Broccoli with Cheddar Cheese Sauce | Makes 1 serving
1. Melt butter in a saucepan, and
remove from heat.
2.
Slowly add milk, stirring until mixed.
3. Cook over medium heat while
stirring, until thickened and smooth.
4. Cook for 3 to 5 minutes longer,
stirring, until smooth and then add
cheese & stirring until well blended.
Do not allow to overheat as the
bottom will scorch.
1. Add 4oz. water to heating plate.
2. Place broccoli pieces into the omelet
tray. Set timer to 16 minutes and
check for desired doneness.
Broccoli:
Cheddar Cheese Sauce:
RECIPES

42
Questions? We’re here to help! Visit: shopelitegourmet.com for support on this product.
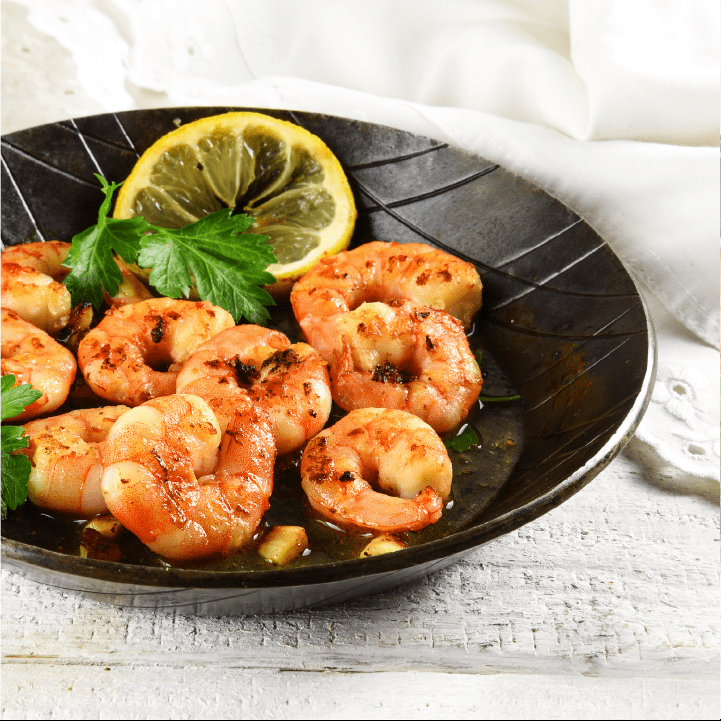
Louisiana Steamed Shrimp | Makes 1 serving
5 ounces of shrimp
Salt & pepper to taste
Pinch of paprika
Pinch of garlic powder
1/4 lemon, cut into slices
1/4 stalk celery, cut into pieces
1/4 carrot, cut into pieces
Cocktail sauce (optional)
1/5 onion, cut into pieces
1. Mix together pepper, paprika, salt,
and garlic powder in a small bowl to
make the Louisiana spice.
2. Add 4oz. water to heating plate.
3.
and lay in omelet tray. Sprinkle
Louisiana spice mixture to your
desired amount over shrimp.
4. Spread shrimp evenly in tray and
place lemon slices on top of shrimp.
5. Lay cut vegetable on top, place
the lid on unit and set timer for 12
minutes, stirring gently halfway
through the steaming time.
6. When alarm sounds check to see if
the food are cooked to your liking.
7. Serve with cocktail sauce (optional).
RECIPES
Questions? We’re here to help! Visit: shopelitegourmet.com for support on this product.

45
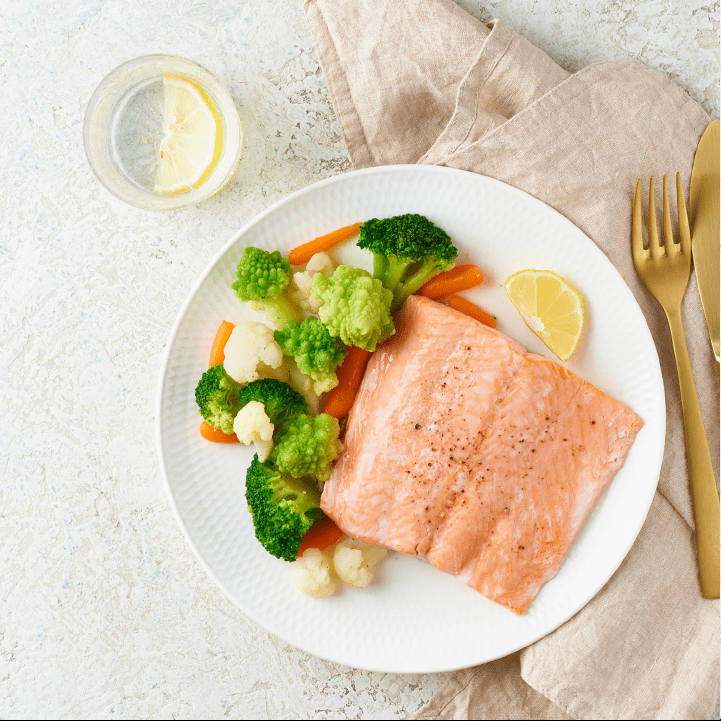
5-oz. skin on salmon fillet
1/4 tsp kosher salt
Pinch of black pepper
2 tbsp plain Greek yogurt
1/4 tbsp chopped fresh dill
1/4 tsp lemon zest
1/4 tbsp water
Steamed Salmon with Dill Yogurt Sauce | Makes 1 serving
1. Sprinkle salmon with salt and
pepper.
2. Add 4oz. water to heating plate.
3. Stir together yogurt, dill, lemon zest
Drizzle sauce over salmon and serve.
RECIPES

46
Questions? We’re here to help! Visit: shopelitegourmet.com for support on this product.
LIMITED WARRANTY* TWO (2) YEAR WARRANTY IS ONLY VALID WITH
PROOF OF PURCHASE FROM AN AUTHORIZED DEALER
PLEASE DO NOT RETURN TO STORE OF PURCHASE.
If you have any problems with this unit, contact Customer Service for
support.
1. Your small kitchen appliance is warranted to the original purchaser to be free
from any manufacturing defects under normal use and conditions for two (2)
year, cord excluded. This Warranty applies only to the original purchaser of this
product.
2. Retail stores/merchants selling this product do not have the right to alter, modify,
or in any way revise the terms and conditions of the warranty.
3. If you use your appliance for household use and according to instructions, it
should give you years of satisfactory service.
4. At its sole discretion, Maxi-Matic USA will either repair or replace the product
found to be defective during the warranty period.
5. The repaired or replacement product will be in warranty for the remaining
balance of the two-year warranty period and an additional one-month period.
6. Consumer’s remorse is not an acceptable reason to return a product to our
Service Center.
7. This limited warranty covers appliances purchased and used within the 50 U.S.
states plus the District of Columbia and does NOT cover normal wear of parts or:
- Damages caused by unreasonable use, neglect, normal wear and tear,
commercial use, improper assembly or installation of product.
- Damages caused in shipping.
- Damages caused by replacement or resetting of house fuses or circuit breakers.
- Defects other than manufacturing defects.

47
- Breakage caused by misuse, abuse, accident, alteration, lack of proper care and
maintenance, or incorrect current or voltage.
- Lost or missing parts of the product. Parts will need to be purchased separately.
- Damages of parts that are not electrical; i.e. cracked or broken plastic/glass,
scratched/dented inner pots.
- Damage from service or repair by unauthorized personnel.
- Extended warranties purchased via a separate company or reseller.
8. This warranty does not apply to re-manufactured merchandise.
Maxi-Matic, USA shall not be liable for any incidental or consequential damages
caused by the breach of any express or implied warranty. Apart from the extent
particular purpose is limited in time to the
duration of the warranty.
*Two Year Limited Warranty valid only in the 50 U.S. states plus the District of
Columbia, excluding Puerto Rico and the Virgin Islands.
product usage which is in violation of the written instructions provided with the unit
will void this warranty. For international warranty, please contact the local distributor.
This warranty gives you special legal rights and you may also have other rights to
**
time.
MAXI-MATIC, USA
18401 E. Arenth Ave. City of Industry, CA 91748
Visit: shopelitegourmet.com for Live Chat Support and Contact Us Form

48
Questions? We’re here to help! Visit: shopelitegourmet.com for support on this product.
A. Any return of defective merchandise to Maxi-Matic, USA must be
matic.com) to obtain an RA # (Return Authorization Number). We will not
accept any returns of merchandise without an applicable RA #.
B. IMPORTANT RETURN INSTRUCTIONS. Your Warranty depends on your
following these instructions if you are returning the unit to Maxi-Matic, USA:
1. Carefully pack the item in its original carton or other suitable box with
2. Before packing your unit for return, be sure to enclose:
a. Your name, full address with zip code, daytime telephone number,
and RA#,
b. A sales receipt or PROOF OF PURCHASE from an authorized dealer,
c. The model number of the unit and the problem you are having
(Enclose in an envelope and tape directly to the unit before the box is
sealed,) and
d. Any parts or accessories related to the problem.
RETURNS

49
3. Maxi-Matic, USA recommends that you ship the package via UPS ground
service for tracking purposes. We cannot assume responsibility for lost
or damaged products returned to us during incoming shipment. For your
protection, always carefully package the product for shipment and insure
it with the carrier. C.O.D shipments cannot be accepted.
4. All return shipping charges must be prepaid by you.
5. Once your return has been received by our warehouse, Maxi-Matic,
USA will repair or replace the product if it is defective in material or
6. Maxi-Matic will pay the shipping charges to ship the repaired or
replacement product back to you.

NOTES

NOTES

Elite Customer Service Center
Mail
Phone
Website
Maxi-Matic, USA
18401 E. Arenth Ave
City of Industry, CA
91748-1227
800-365-6133 ext. 120/105
shopelitegourmet.com
Visit our website for Live Chat Support
& Contact Us Form
Register your product online
Elite is a registered trademark of Maxi-Matic, USA.
Copyright Elite by Maxi-Matic.
Actual product may vary from the images/illustrations in this
manual due to continual product improvement.
Por favor visita shopelitegourmet.com para
descargar un manual de usuario en español.
elitebymaximatic @elite_by_maximatic