Loading ...
Loading ...
Loading ...
- 6 -
10/2019
Copyright © 2019, Fast ČR, a.s.
EN
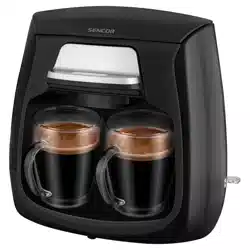
Coffeemaker
User'smanual
■
Prior to using this appliance, please read the user'smanual thoroughly, even in cases,
when one has already familiarised themselves with previous use of similar types of
appliances. Only use the appliance in the manner described in this user’smanual.
Keep this user'smanual in asafe place where it can be easily retrieved for future use.
■
We recommend saving the original cardboard box, packaging material, purchase
receipt and responsibility statement of the vendor or warranty card for at least the
duration of the legal liability for unsatisfactory performance or quality. In the event
of transportation, we recommend that you pack the appliance in the original box
from the manufacturer.
DESCRIPTION OF THE APPLIANCE
A1 Filter holder
A2 Coffeemaker unit
A3 Glass cups
A4 Coffeemaker base
A5 Water tank lid
A6 Water tank
A7 ON button
Not shown
A8 Ground coffee filter
BEFORE FIRST USE
■ Before first use, take the appliance and its accessories out of the packaging material
and remove all promotional labels and stickers. Check that neither the appliance nor
any of its parts is damaged.
■ Thoroughly wash the filter holder A1, ground coffee filter A8 and glass cups A3 in
warm water with asmall amount of neutral dishwashing detergent. Rinse under clean
running water and dry well. Put these parts back into the coffeemaker. Ensure that all
the accessories are completely dry.
■ Wipe the coffeemaker with asoft sponge lightly dipped in warm water. Then wipe
with adry wiping cloth.
Putting the coffeemaker into operation
Before first use or after an extended period of time when the coffeemaker was not used,
it is important to clean the coffeemaker with clean water without any ground coffee in
the filter. Proceed as follows:
1. Insert the power plug into apower socket.
2. Tilt open the lid A5 and pour cold fresh water into the water tank A6. Close the
water tank lid A5.
3. Ensure that the lter A8 without ground coee is inserted in the holder A1 and that
the holder A1 is correctly inserted in the coeemaker.
4. Insert acup into the base A4.
5. Press the ON button A7 and the process where water drips into the cup will start
within afew short moments.
6. Wait until all the water in the water tank ows through the lter into the cup.
7. If necessary, repeat this process two to three times.
Then the coffeemaker is clean, warm and ready for use.
Note:
During the cleaning and coffee brewing process, you will hear arattling
noise. This noise is made by the pump and this is normal.
OPERATING THE COFFEEMAKER
1. Open open the lid A5 and pour the necessary amount of cold fresh water into the
water tank A6. Ensure that the water level does not exceed the maximum water
level mark.
2. Slide out the holder A1 and pour asucient amount of ground coee into the
lter A8. Use ground coee specically intended for this type of appliance
exclusively. As arule, you will need afull tablespoon of ground coee for asingle
cup of coee. Nevertheless, the amount of ground coee can be modied to suit
one'spreferences. Slide the holder A1 back into the coeemaker.
3. Insert acup / cups A3 into the base A4. Check that they are correctly positioned.
4. Turn on the coeemaker by pressing the ON button A7.
5. After ashort moment the coee will start dripping into the cup.
6. As soon as the coee brewing process is complete, turn o the coeemaker and
wait approximately 1 minute before removing the cups.
Note:
Allow the coffeemaker to cool down for approx. 10 minutes before using
it again. Otherwise, there is arisk of it overheating and subsequent
damage.
7. When not using the coeemaker, disconnect the power plug from the power
socket. Allow the coeemaker to suciently cool down and then clean it according
to the instructions in chapter "Cleaning and maintenance".
CLEANING AND MAINTENANCE
Disconnect the power plug from the power socket and allow the appliance to cool
down before cleaning it.
For cleaning, do not use cleaning products with an abrasive effect, solvents, etc. that
could damage the appliance. No part of this appliance is intended for washing in
adishwasher.
Warning:
To prevent the risk of injury by electrical shock, do not submerge
the appliance, power cord or power plug in water or any another
liquid.
Cleaning the filters
Before removing the filter A8, check that it has cooled down completely. It may be
very hot during the coffee brewing process as well as afterwards. Remove the used
coffee from the filter A8. This can be thrown out with household waste or composted.
Carefully wash the filter A8, holder A1 in warm water with asmall amount of neutral
kitchen detergent. Rinse under clean running water and dry thoroughly.
Cleaning the outer surface of the coffeemaker
Before cleaning the outer surface, make sure that the coffeemaker has cooled down
completely. Wipe the external surface of the coffeemaker using sponge lightly dipped
in warm water. Wipe dry using aclean wiping cloth.
Removing limescale deposits
Over time, limescale deposits may form in the coffeemaker, which may negatively
affect the flavour of the brewed coffee and shorten the lifespan of the coffeemaker. It
is important to regularly remove limescale deposits.
1. Pour asolution of water and descaling agent into the water tank A6 up to the
maximum mark. Follow the instructions on the packaging of the agent.
Note:
The descaling agent can be purchased in standard retail chains. Always
use adescaling agent intended for home coffeemakers. Alternatively,
citric acid or an 8% white vinegar solution in the recommended 2:1 ratio.
2. Insert acup or bowl into the base A4.
3. Ensure that the lter A8 without ground coee is inserted in the holder A1 and that
the holder A1 is correctly inserted in the coeemaker.
4. Turn on the coeemaker by pressing the ON button A7.
5. After ashort moment the solution will start dripping through.
6. Wait until all the water in the water tank ows through the lter A8.
7. Once the water tank A6 is empty, pour out the solution.
8. Pour clean cold water into the water tank A6 up to the maximum mark and again
allow all the contents of the water tank to ow through the coeemaker.
Storage
When not using the appliance for an extended period of time, disconnect the power
plug from the power socket, allow the appliance to cool down and clean it according
to the instructions provided above.
Before storing it, check that the appliance and all its accessories are thoroughly clean
and dry.
Store the appliance in adry, clean and well-ventilated location not exposed to extreme
temperatures and out of children'sreach.
TECHNICAL SPECIFICATIONS
Rated voltage range ........................................................................................................220 – 240V~
Rated frequency........................................................................................................................50/60Hz
Rated power input ............................................................................................................. 420 – 500W
Noise level ....................................................................................................................................70 dB(A)
The declared noise emission level of the appliance is 70dB(A), which represents alevel
Aof acoustic power with respect to areference acoustic power of 1pW.
We reserve the right to change text and technical specifications.
INSTRUCTIONS AND INFORMATION REGARDING THE DISPOSAL OF
USED PACKAGING MATERIALS
Dispose of used packaging material at asite designated for waste in your municipality.
DISPOSAL OF USED ELECTRICAL AND ELECTRONIC EQUIPMENT
This symbol on products or original documents means that used electric
or electronic products must not be added to ordinary municipal waste.
For proper disposal, renewal and recycling hand over these appliances
to determined collection points. Alternatively, in some European Union
states or other European countries you may return your appliances to
the local retailer when buying an equivalent new appliance.
Correct disposal of this product helps save valuable natural resources
and prevents potential negative effects on the environment and human
health, which could result from improper waste disposal. Ask your local authorities or
collection facility for more details.
In accordance with national regulations penalties may be imposed for the incorrect
disposal of this type of waste.
For business entities in European Union states
If you want to dispose of electric or electronic appliances, ask your retailer or supplier
for the necessary information.
Disposal in other countries outside the European Union.
This symbol is valid in the European Union. If you wish to dispose of this product,
request the necessary information about the correct disposal method from the local
council or from your retailer.
This product meets all the basic requirements of EU directives related to
it.