
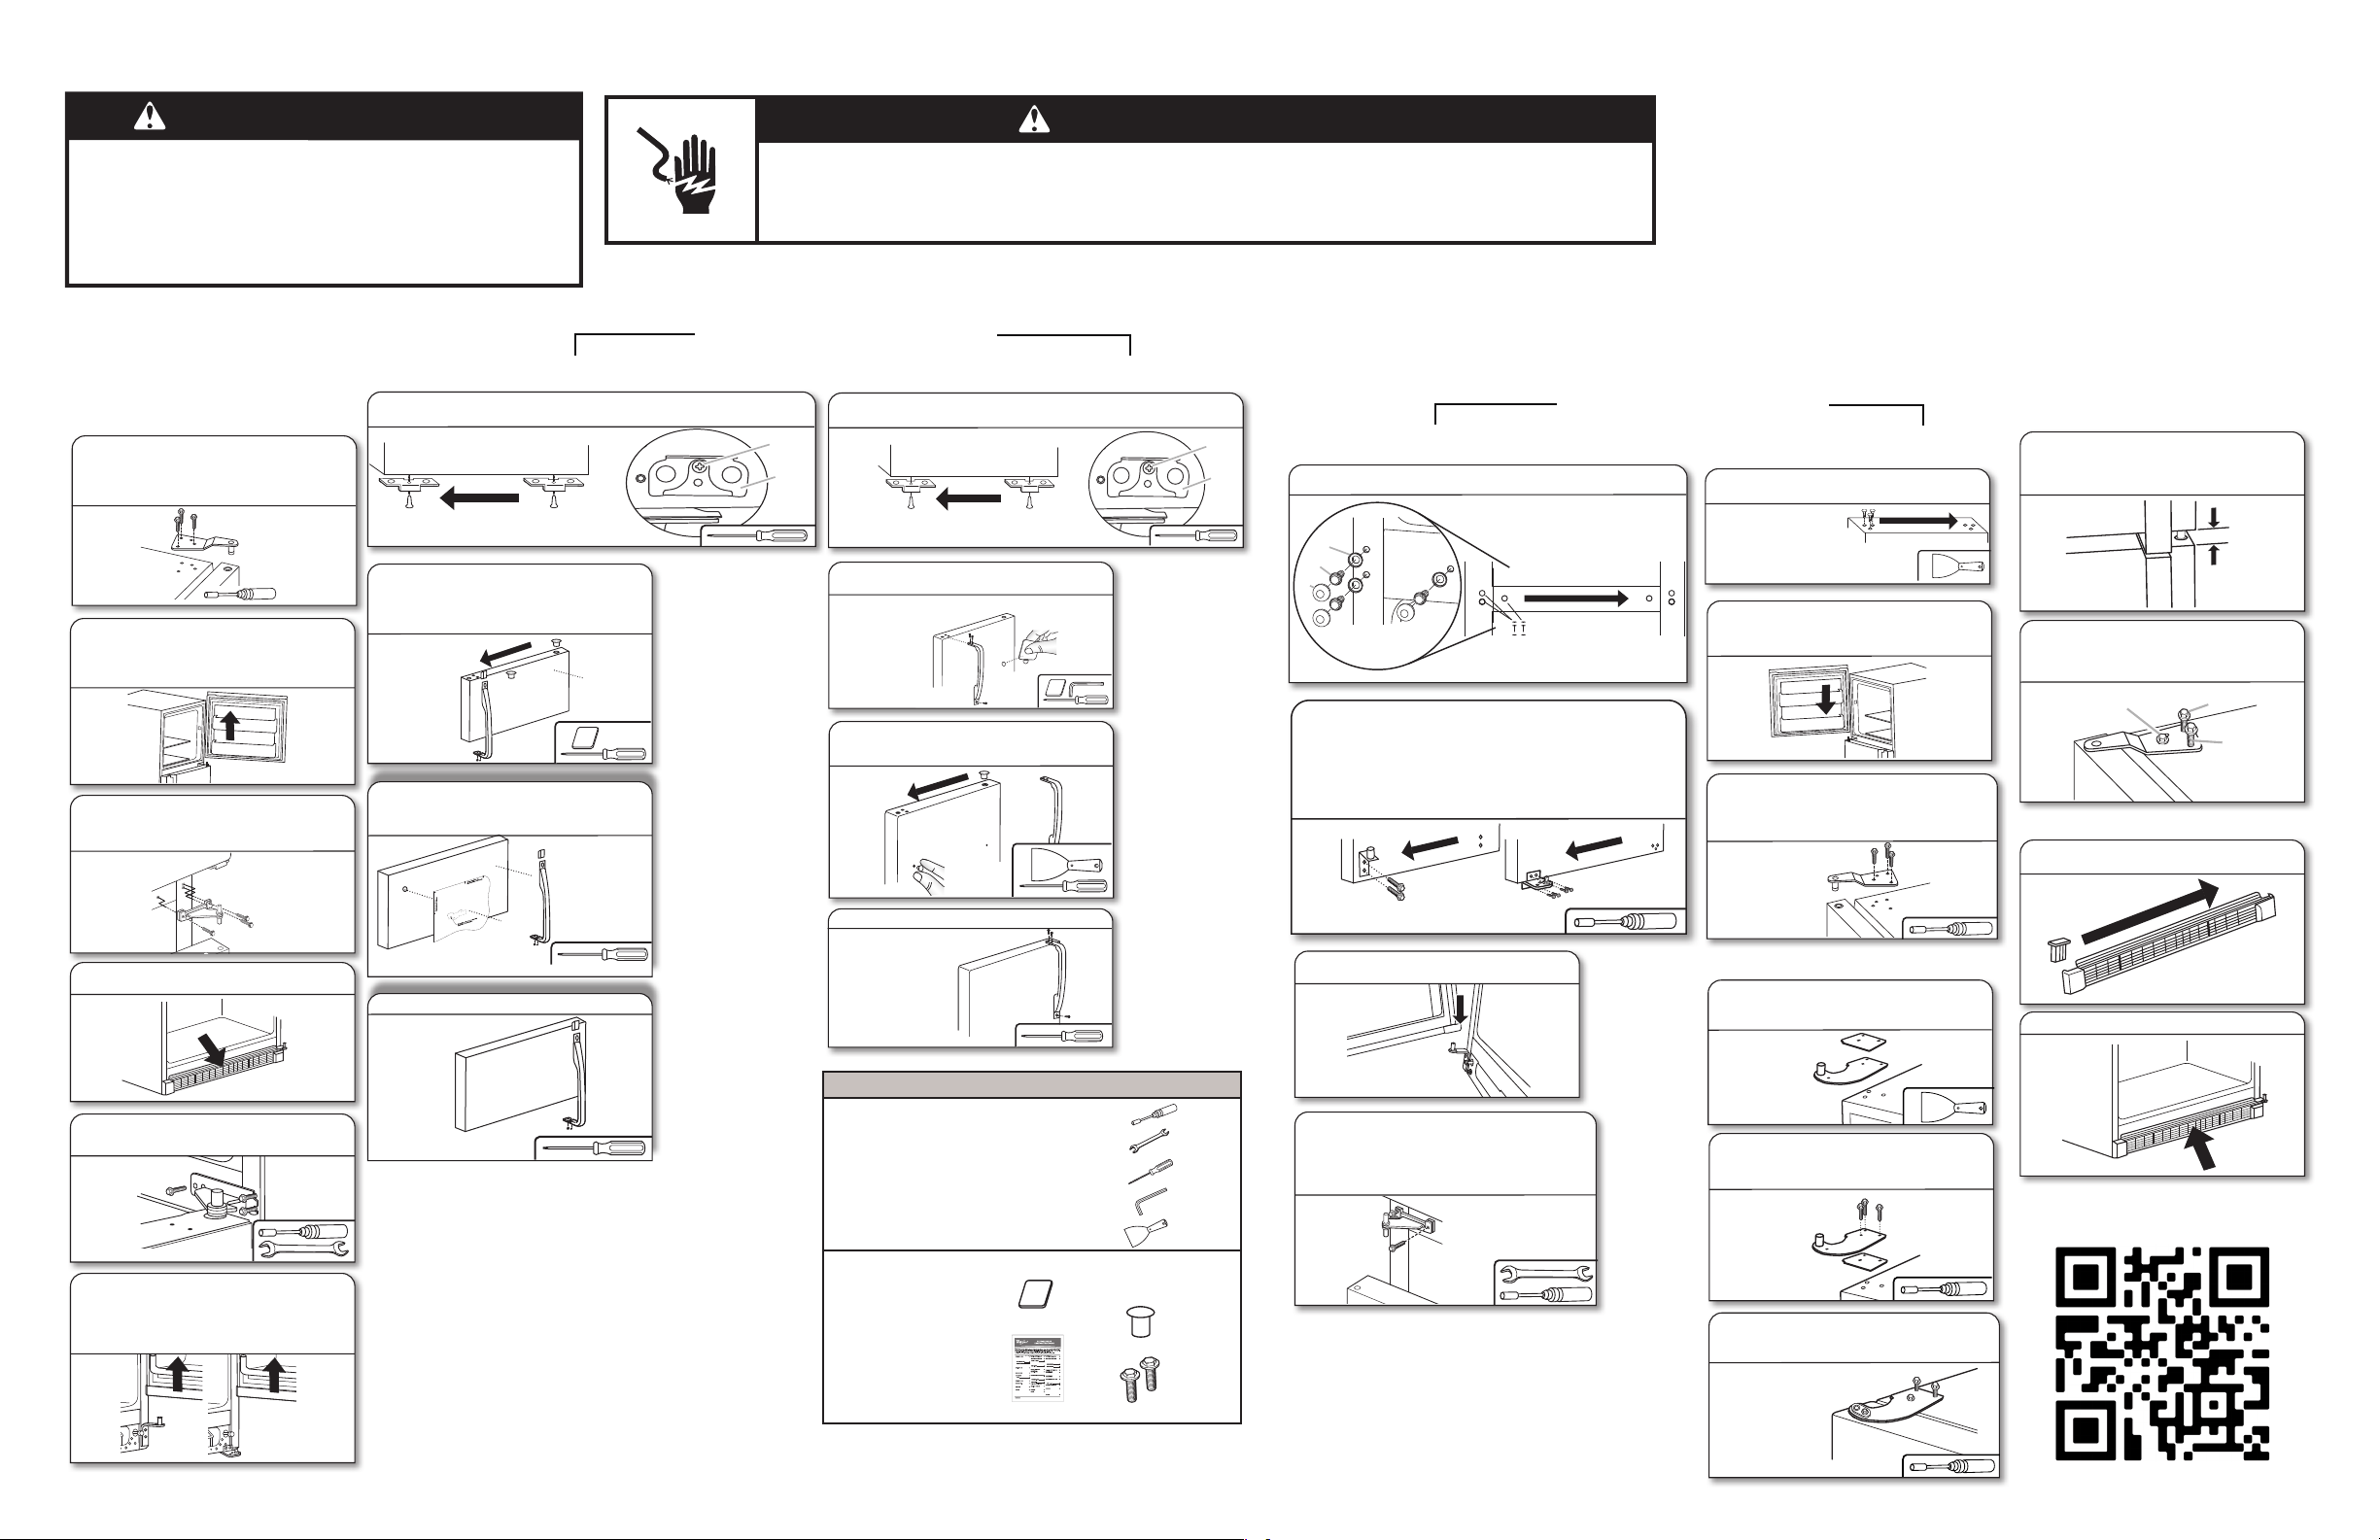
DOOR SWING AND HANDLE REVERSAL INSTRUCTIONS (OPTIONAL)
WARNING
Electrical Shock Hazard
Disconnect power before removing doors.
Failure to do so can result in death or electrical shock.
WARNING
Excessive Weight Hazard
Use two or more people to lift the refrigerator door.
Failure to do so can result in back or other injury.
Remove Freezer and
Refrigerator Doors
NOTE: After removing the doors, place
them on a soft surface to avoid damaging
the nish.
Refrigerator Door
Freezer Door
Align Doors
1. While holding the door, remove 3 hex head
screws and the hinge pin.(Recommendation:
Before removing the screws, secure the
Freezer door with tape to avoid door falling).
2. Remove tape from the cabinet- door and
lift freezer door from the center hinge pin.
IMPORTANT: Place door on a soft surface
to avoid door dents and scratches.
3. Remove hole plugs on the lefthand side.
Center Hinge - Loosen the 2 screws (6 turns)
on the left-hand side and remove the screw
from the right-hand side.
4. For models with base grilles, rmly pull the
grille toward you to remove.
5. Center Hinge - While holding the door, loosen
the 2 screws on the right-hand side and
remove the screw from the left-hand side.
6. Lift refrigerator door from bottom hinge.
IMPORTANT: Place door on a soft surface to
avoid door dents and scratches.
NOTE: The hinge style will vary depending
on the model.
or
Refrigerator Door
Freezer Door
Reverse Doors
1. Move the door stop, located on the bottom of the door, to the opposite
side.
A
B
A. Door Stop Screw
B. Door Stop
1. Move the door stop, located on the bottom of the door, to the
opposite side.
A
B
A. Door Stop Screw
B. Door Stop
2. Remove the handle and brand badge from
the door and move the hole plug to the
opposite side of the door. NOTE: Handles
are not factory-installed on some models.
Brand Badge
3. Place the badge (using the template
provided on the last page of the manual),
and the handle on the opposite sides of the
door.
Brand
Badge
4. Tighten the handle screws.
2. Remove the door handle, the screw and the
decal or hole plug from the door.
3. Move the decal or hole plug and the handle
screw to the opposite sides of the door.
4. Tighten the handle screws.
Install Doors
2. In some models with plastic base, tilt the unit until the hinge
is able to be removed (Optional: Remove both plastic bases).
Move the bottom hinge and shim to the opposite side of the
cabinet.
IMPORTANT: Make sure the washer remains on the hinge
pin and place plastic or metalic shim in the same position
between cabinet and hinge and return product to standard
position.
NOTE: The hinge style will vary depending on the model.
3. Set the Refrigerator door onto the bottom
hinge pin.
4. Tighten the screws (previously loosened),
and reinstall and tighten the Center Hinge
screw. IMPORTANT: Make sure washers are
on both the top and bottom pins of the center
hinge. Make sure plastic shim remains between
cabinet and center hinge on some models.
1. Move the screws and washers to the opposite side and install
the dome caps (3 screws in the Bottom and 3 in the center).
A
B
C
B. Hex-head hinge screws
C. Dome capsA. Dome cap washers
1. Move the 3 cabinet hole plugs to the
opposite side.
2. Set the freezer door onto the Center Hinge.
Do not forget to install the washer in center
hinge pin.
3. Insert the 3 Top Hinge screws so they
are halfway into the Top Hinge and the top
of the cabinet.IMPORTANT: Some top hinges
have a shim. Make sure the shim is placed.
1. Align the Freezer and Refrigerator doors.
NOTE: Make sure to allow a 3/4" (19 mm)
gap between the doors and make sure there
are no visible gaps in the gasket.
3/4" (19 mm)
2. Completely tighten the 3 Top Hinge screws.
Screw Sequence: Screw 1 Half way. Screw 2
Fully seated. Screw 3 Fully seated. Complete
Screw 1.
1
3
2
3. Move the base grille cover to the opposite
side.
4. Reinstall the base grille.
Steps 3 & 4 apply only to certain models
Tools Required
5/16" Hex head socket
wrench
5/16" Open-end wrench
Phillips screwdriver
1/8" Hex key
Flat 2" putty knife
Reversibility Kit
(a) Removal tool (a) (b) Brand Badge
(b) Brand badge (d)
(c) Instructions (c)
(d) Hole plug (e)
(e) Two screws
Applies only for countour door products
1. Move the plastic spacer from above the top
hinge to below the hinge, and place the
hinge on opposite side of cabinet.
2. Insert the 3 Top Hinge screws so they are
halfway into the Top Hinge, plastic spacer
and the top of the cabinet.
3. Remove the screw fastening the pin, turn
hinge, install top pin and tighten all 4 screws
after aligning door.
Door Reversal
Instruction Videos
Remove food and any adjustable bins from the doors.
IMPORTANT: Unplug refrigerator or disconnect power. Provide additional support for the
doors while the hinges are being moved. Do not depend on the door magnets to hold the
doors in place while you are working.
When removing the door, keep the screws and hinges. You will need them to reinstall the
door. For more detailed door reversing instructions, see the User Instructions.
W11550093B
W11550094B-SP
01/22
INSTRUCTIONS POUR L’INVERSION DU SENS D’OUVERTURE DE LA PORTE ET DE LA POIGNÉE (FACULTATIF)
AVERTISSEMENT
Risque de choc électrique
Déconnecter la source de courant électrique avant d'enlever les portes.
Le non-respect de cette instruction peut causer un décès ou un choc électrique.
AVERTISSEMENT
Risque du poids excessif
Utiliser deux ou plus de personnes pour soulever la
porte du réfrigérateur.
Le non-respect de cette instruction peut causer
une blessure au dos ou d'autre blessure.
Démontage des
portes du réfrigérateur
et du congélateur
REMARQUE: Une fois les portes
démontées, les placer sur une surface
souple pour éviter d’endommager la nition.
Porte du réfrigérateur
Porte du congélateur
Aligner les portes
1. Tout en retenant la porte, enlever les 3 vis
à tête hexagonale et l’axe de la charnière.
(Recommandation: Avant de retirer les vis,
xez la porte du congélateur à l’aide de ruban
adhésif pour éviter que la porte tombe.)
2. Retirez le ruban adhésif de la porte et soulevez
la porte du congélateur de l’axe de la charnière
centrale. IMPORTANT: Placer la porte sur une
surface douce pour éviter de l’endommager et
de la rayer.
3. Retirer les bouchons obturateurs de trous
ducôté gauche. Charnière centrale–
desserrer les 2 vis (6 tours) à gauche
etôterlavis du côté droit.
4.
Pour les modèles équipés d’une grille de base,
déposer cette dernière en la tirant fermement vers soi.
5. Charnière centrale – tout en retenant la porte,
desserrer
les 2 vis à droite et ôter la vis du
côté gauche.
6. Soulever la porte du réfrigérateur de la
charnière inférieure. IMPORTANT: Placer
la porte sur une surface douce pour éviter
del’endommager et de la rayer.
REMARQUE: Le style de charnière peut
varier selon le modèle.
or
Porte du réfrigérateur
Porte du congélateur
Inversion de la porte
1. Retirer la butée en bas de la porte et la placer de l’autre côté.
A
B
A. Vis de butée de porte
B. Butée de porte
1. Retirer la butée en bas de la porte et la placer de l’autre côté.
A
B
A. Vis de butée de porte
B. Butée de porte
2. Retirer la poignée et l’insigne de la marque
de la porte et déplacer les bouchons
obturateurs de trou du côté opposé de la
porte. REMARQUE: Sur certains modèles,
lespoignées ne sont pas montées en usine.
Insigne de
la marque
3. Placer l’insigne de la marque (à l’aide du
gabarit fourni à la dernière page du manuel)
et la poignée de l’autre côté de la porte.
Insigne
de la
marque
4. Serrer les vis de la poignée.
2. Retirer la poignée de porte, la vis et le
cache-orice de la porte.
3. Placer l’autocollant ou le bouchon obturateur
de trou et la vis de la poignée de l’autre côté
de la porte.
4. Serrer les vis de la poignée.
Installer les portes
2. Sur certains modèles avec base en plastique, inclinez
l’appareil jusqu’à ce qu’il soit possible de retirer la charnière
(option: Retirer les deux bases en plastique). Placer la
charnière inférieure et la cale de l’autre côté de la caisse.
IMPORTANT: S’assurer que la rondelle reste sur l’axe de la
charnière et placer la cale en plastique ou en métal dans la
même position entre la caisse et la charnière, puis remettre
leproduit dans sa position normale.
REMARQUE: Le style de charnière peut varier selon le modèle.
3. Placer la porte du réfrigérateur sur l’axe de
charnière inférieure.
4.
Serrer les vis desserrées plus haut, puis poser la vis
de la charnière centrale et la serrer. IMPORTANT:
S’assurer que les rondelles sont bien installées sur
les axes supérieur et inférieur de la charnière centrale.
Sur certains modèles, s’assurer que la cale en
plastique reste entre la caisse et la charnière centrale.
1. Déplacer les vis et rondelles du côté opposé et installer les
chapeaux bombés (3 vis au bas et 3 vis au centre).
A
B
C
B. Vis de charnière à tête hexagonale
C. Chapeaux
bombés
A. Rondelles de
chapeaux bombés
1. Déplacer les 3 bouchons obturateurs de
trous sur l’autre côté.
2. Placer la porte du réfrigérateur sur la
charnière centrale. Ne pas oublier d’installer
la rondelle sur l’axe de la charnière centrale.
3. Introduire les 3 vis de la charnière supérieure
à la moitié de leur longueur dans la charnière
supérieure et le haut de la caisse. IMPORTANT:
Certaines charnières supérieures possèdent une
cale. S’assurer que la cale est en place.
1. Aligner les portes du réfrigérateur et du
congélateur. REMARQUE: S’assurer de laisser
un espace de 3/4po (19mm) entre les portes
etqu’il n’y a pas d’espace visible dans le joint.
3/4po (19mm)
2. Serrer à fond les 3 vis de la charnière
supérieure. Séquence de vissage: Vis1 à
moitié. Vis2 entièrement. Vis3 entièrement.
Terminer la vis1.
1
3
2
3. Placer le bouchon de la grille de base du
côté opposé.
4. Réinstaller la grille de la base.
Les étapes3 et 4 ne s’appliquent qu’à certains
modèles
Outils requis
Clé à douille à tête hexagonale de 5/16 po
Clé plate de 5/16 po
Tournevis à tête cruciforme
Clé hexagonale de 1/8 po
Couteau à mastic plat de 2po
Ensemble d’inversion du sens d’ouverture
(a) Outil de démontage (a)
(b) Insigne de la marque
(b) Insigne de la marque (d)
(c) Instructions (c)
(d) Bouchon obturateur
de trou
(e)
(e) Deux vis
Ne s’applique qu’aux produits avec
porte à contour
1.
Déplacer la cale en plastique du dessus de la
charnière supérieure au-dessous de la charnière,
puis placer la charnière du côté opposé de la caisse.
2. Introduire les 3 vis de la charnière supérieure
à la moitié de leur longueur dans la charnière
supérieure, la cale en plastique et le haut de
la caisse.
3. Retirer la vis xant l’axe, tourner la charnière,
installer l’axe supérieur et serrer les 4 vis
après avoir aligné la porte.
Vidéos d’instructions pour
l’inversion de la porte
Enlever les aliments et tous les balconnets réglables des portes.
IMPORTANT: Débrancher le réfrigérateur ou déconnecter la source de courant électrique.
Prévoir un support supplémentaire des portes pendant le changement de côté des
charnières. La force d’attraction des aimants des portes ne suft pas à les maintenir en place.
Lors du démontage de la porte, conserver les vis et les charnières. Elles sont nécessaires
pour réinstaller la porte. Pour des instructions plus détaillées sur l’inversion du sens
d’ouverture de la porte, consulter les instructions d’utilisation.
W11550093B
W11550094B-SP
®
/™ ©202
2 All rights reserved.
Tous droits réservés.
01/22