
Modelo:
AW-12DR3RYFU20
AW-18CW3RXFUE20
AW-18DR3RXFU20
AW-24CW3RDFUE20
AW-24DR3RDFU20
INSTRUCCIONES DE INSTALACIÓN Y USO
Model
/
Para consultas sobre las características, funcionamiento/
rendimiento,
piezas o servicio, llame al: 1-877-465-3566

TABLEOFCONTENTS
4
3
5
6
4
7
6
10
10
14
Annual Maintenance
AIR CONDITIONER SAFETY
2
INSTALLATION REQUIREMENTS
3
Tools and Parts
Electrical Requirements
Location Requirements
INSTALLATION INSTRUCTIONS
Unpack the Air Conditioner
Prepare Air Conditioner for Installation
Window Air Conditioner Installation
Complete Installation
Starting Your Air Conditioner
AIR CONDITIONER USE
Using the Remote Control
Changing Air Direction
Exhaust Air Vent
NormalSounds
AIR CONDITIONER CARE
14
14
Cleaning the Front Panel
14
Repairing Paint Damage
14
TROUBLESHOOTING
15
11
Cleaning the Air Filter
14
REMOVING AC FROM WINDOW
14
12
13
13
2
AIR CONDITIONER SAFETY
We have provided many important safety messages in this manual and on your appliance. Always read and obey all safety
messages.
This is the safety alert symbol .
This symbol alerts you to potential hazards that can kill or hurt you and others .
All safety messages will follow the safety alert symbol and either the wordDANGERorWARNING "" "."
These words mean :
IMPORTANT SAFETY INSTRUCTIONS
WARNING:
To reducetherisk offireelectricalshock orinjurywhenusing yourairconditionerfollowthese basicprecautions , , :
SAVETHESEINSTRUCTIONS
Unplug air conditioner before servicing .
Use two or more people to move and install air conditioner.
Plug into a groundedprong outlet 3 .
Do not remove groundprong .
Do not use an adapter.
Do not use an extension cord .
You safety and the safety of others are very important.
Before throwing the device, it is necessary to pull back the battery cells and get rid of them safety for recycling reasons.
When you need to disposal of the unit consult our dealer. If pipes are removed incorrectly, refrigerant may blow out and
please recycle or dispose of the packaging material for product in an environmentally responsible manner.
Never store or ship the air conditioner upside down or sideways to avoid damage to the compressor .
The wiring diagram is shown at nameplate on the air conditioner.
This appliance is not intended for use by persons (including children) with reduced physical, sensory or mental capabilities,
or lack of experience and knowledge
,
unless they have been given supervision or instruction concerning use of the appliance
by a person responsible for their safety
.
Children should be su
p
ervised to ensure that the
y
do not
p
la
y
with the a
pp
liance
.
DISPOSING OF THE UNIT
come into contact with your skin, causing injury. Releasing refrigerant into the atmosphere also damages the environments.
Do not use means to accelerate the defrosting process
or to clean, other than those recommended by the
manufacturer.
The appliance shall be stored in a room without
continuously operating ignition sources(for example:
open flames, an operating gas appliance or an
operating electric heater.
Do not pierce or bum refrigerant tubing. Be aware that
refrigerants may not contain an odor.
Keep ventilation openings clear of obstruction.
The maximum refrigerant charge amount is shown at
nameplate on the air conditioner.
Do not drill holes in the unit.
When handling, installing, and operating the appliance,
care should be taken to avoid damage to the
refrigerant tubing.
Maintenance, cleaning, and service should only be
performed by technicians properly trained and qualified
in the use of flammable refrigerants.
Dispose of air conditioner in accordance with Federal
and Local Regulations. Flammable refrigerants require
special disposal procedures. Contact your local authorities
for the environmentally safe disposal of your air conditioner.
The appliance shall be stored so as to prevent mechanical
damage from occurring.
DANGER
WARNING
All
safety
messages
will
tell
you
what
the
potential
hazard
is,
tell
you
how
to
reduce
the
chance
of
injury,
and
tell
you
what
can
You can be killed or seriously
injured
if you
don't
immediately
follow instructions.
You can be killed
or
seriously
injured
if
you
don't
follow
instructions.
Wiring requirement
Electrical Shock Hazard
Plug into a grounded 3 prong outlet.
Do not remove ground prong.
Do not use an adapter.
Do not use an extension cord.
Failure to follow these instructions can result in death,
WARNING
fire, or electrical shock.
Recommended Grounding Method
To contact a qualified .electrical installer
It is the customer’s responsibility:
To assure that the electrical installation is
adequate and conforms to the Nation Electrical
Code,ANSI/NFPA 70-last edition,and all local
codes and ordinances.
Copies of the standards listed may be obtained from:
Nation Fire Protection Association
1 Batterymarch Park
Quincy,Ma 02169-7471
www.nfpa.org
This
conditioner is equipped with a power supply cord with a
three-prong grounding plug. The cord must be plugged
into a mating, grounded three-prong outlet, grounded in
accordance with all local codes and ordinances. If a
mating outlet is not available, it is the customer's
responsibility to have a properly grounded three-prong
outlet installed by a qualified electrical installer.
air conditioner must be grounded. This air
NOTE:
Your air conditioner’s device may differ from the one shown.
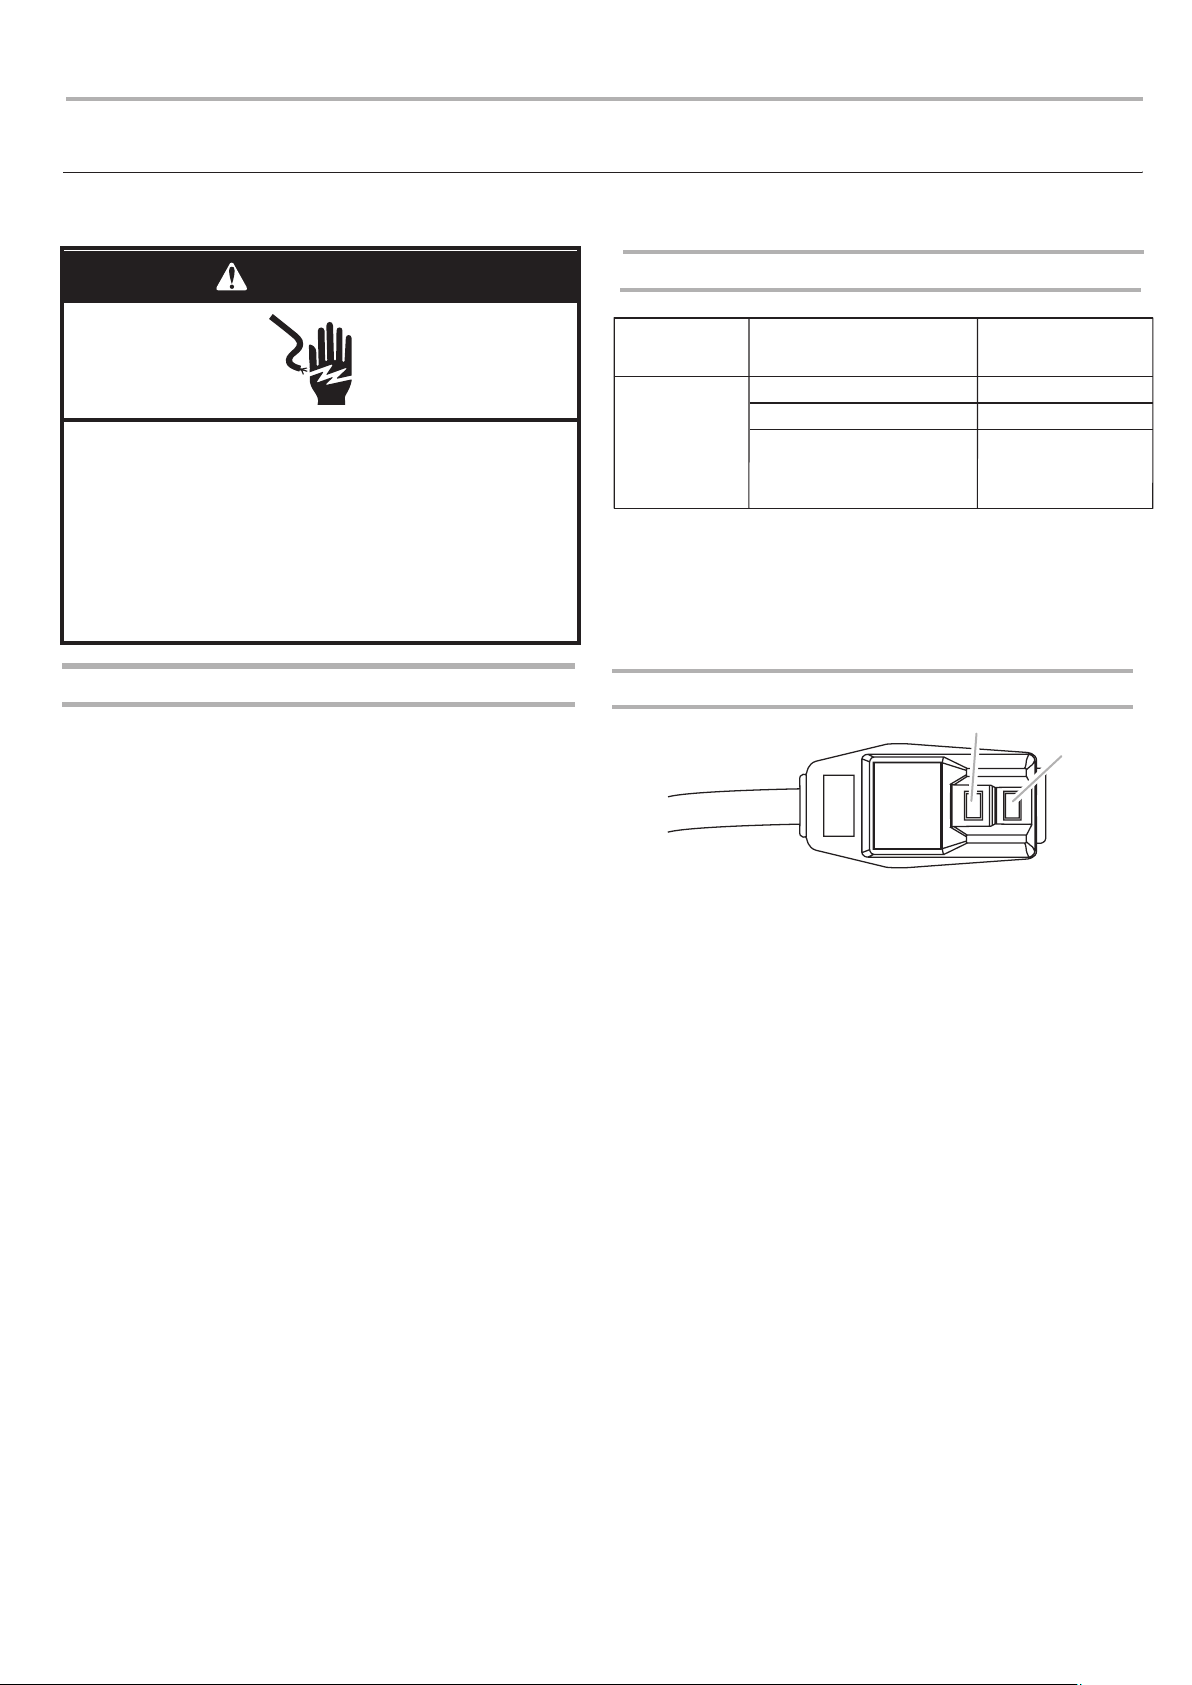
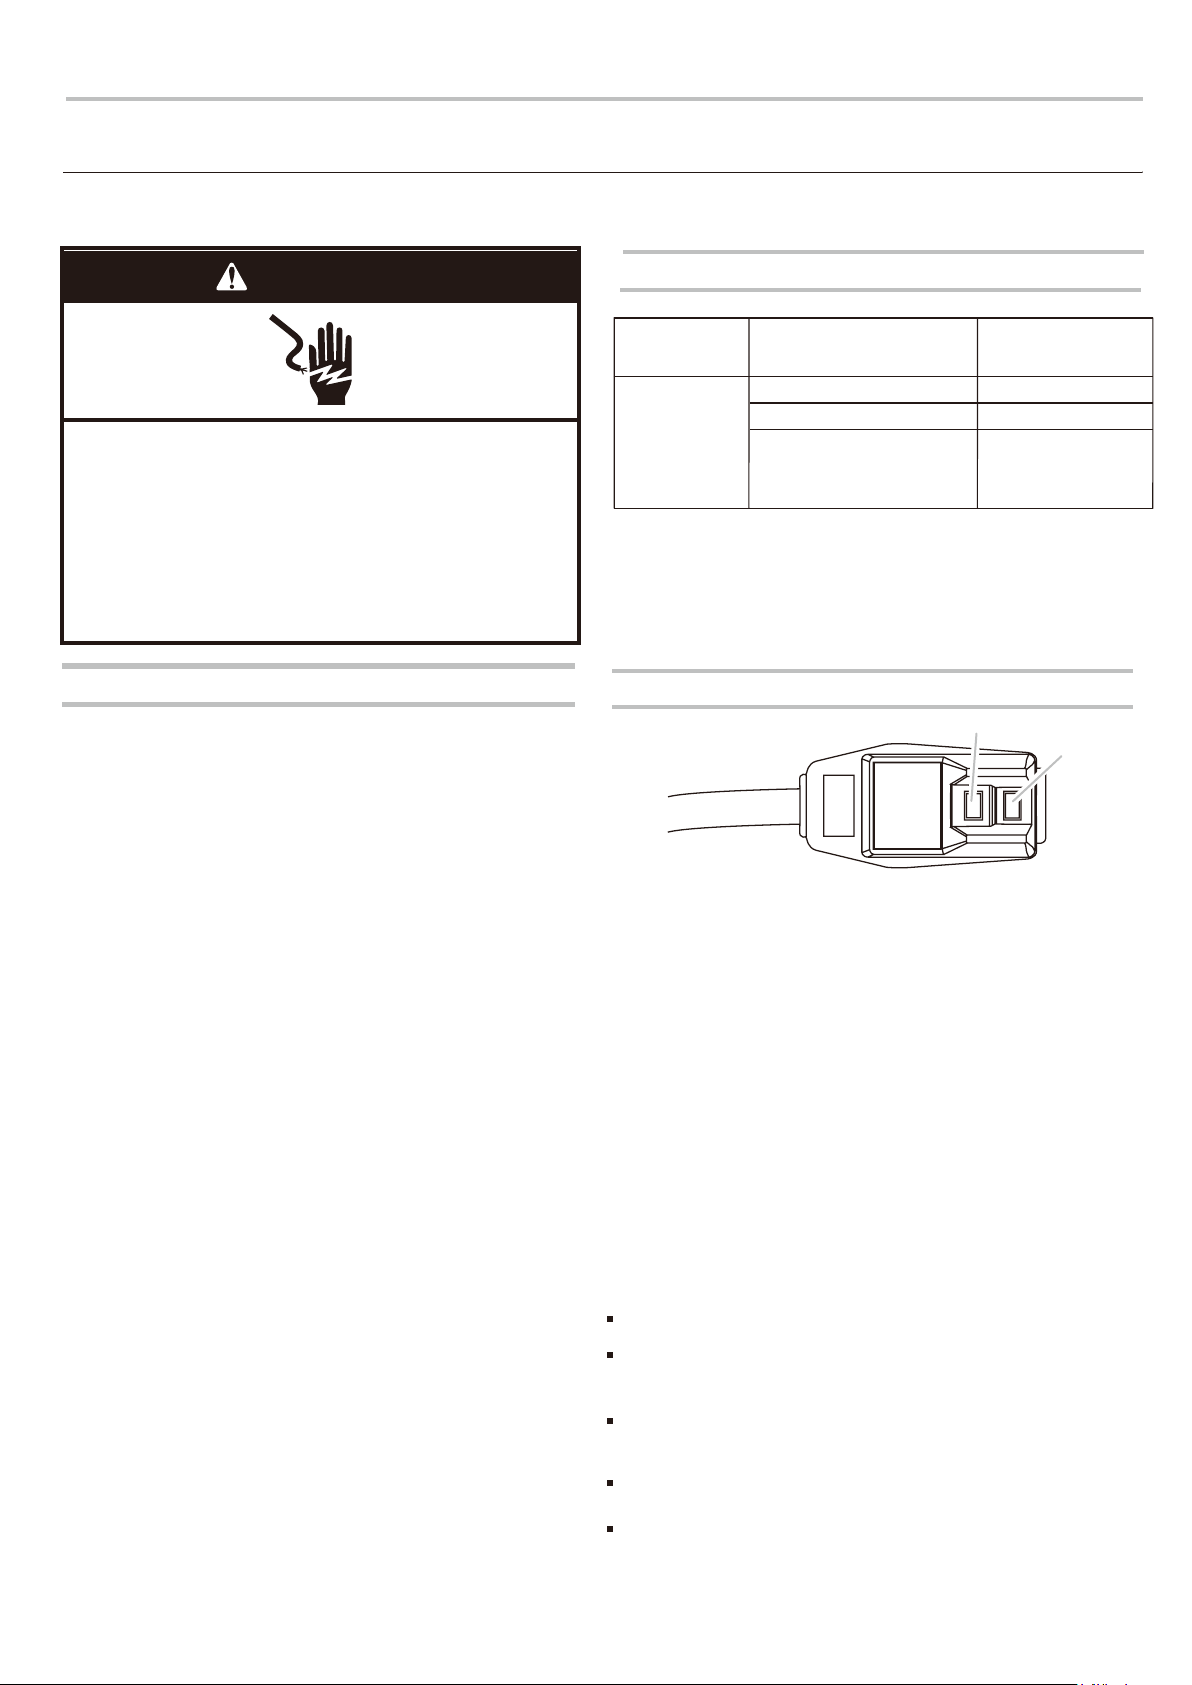
To test your power supply cord:
1.Plug power supply cord into a grounded 3prong outlet.
2.Press RESET (on some devices, a green light will turn on).
3.Press TEST (listen for click; Reset button will trip, and on
some devices, a green light will turn off).
4.Press and release RESET (listen for click; Reset button will
latch, and on some devices, a green light will turn on). The
power supply cord is ready for operation.
NOTE:
■The Reset button must be pushed in for proper operation.
■The power supply cord must be replaced if it fails to trip when
the test button is pressed or fails to reset.
■Do not use the power supply cord as an off/on switch. The
power supply cord is designed as a protective device.
■A damaged power supply cord must be replaced with a new
power supply cord obtained from the product manufacturer
and must not be repaired.
■The power supply cord contains no user serviceable parts.
Opening the tamper-resistant case voids all warranty and
performance claims.
A.Test button
B.Reset button
TEST
RESET
A
B
This room air conditioner is equipped with a power supply cord
required
by UL. This power supply cord contains state-of-the-art
electronics that sense leakage current. If the cord is crushed, the
electronics detect leakage current and power will be
disconnected in a fraction of a
second.
Power Supply Cord
Electrical Requirements
INSTALLATION REQUIREMENTS
3
Power supply
Model
Time-delay fuse
(or circuit breaker)
208/230V
187.2V min.
253
V m
ax.
12K BTU cooling&heating
18A
18K BTU cooling only
15A
20A
18K BTU cooling&heating
24K
BTU
cooling only
24K BTU cooling&heating
4
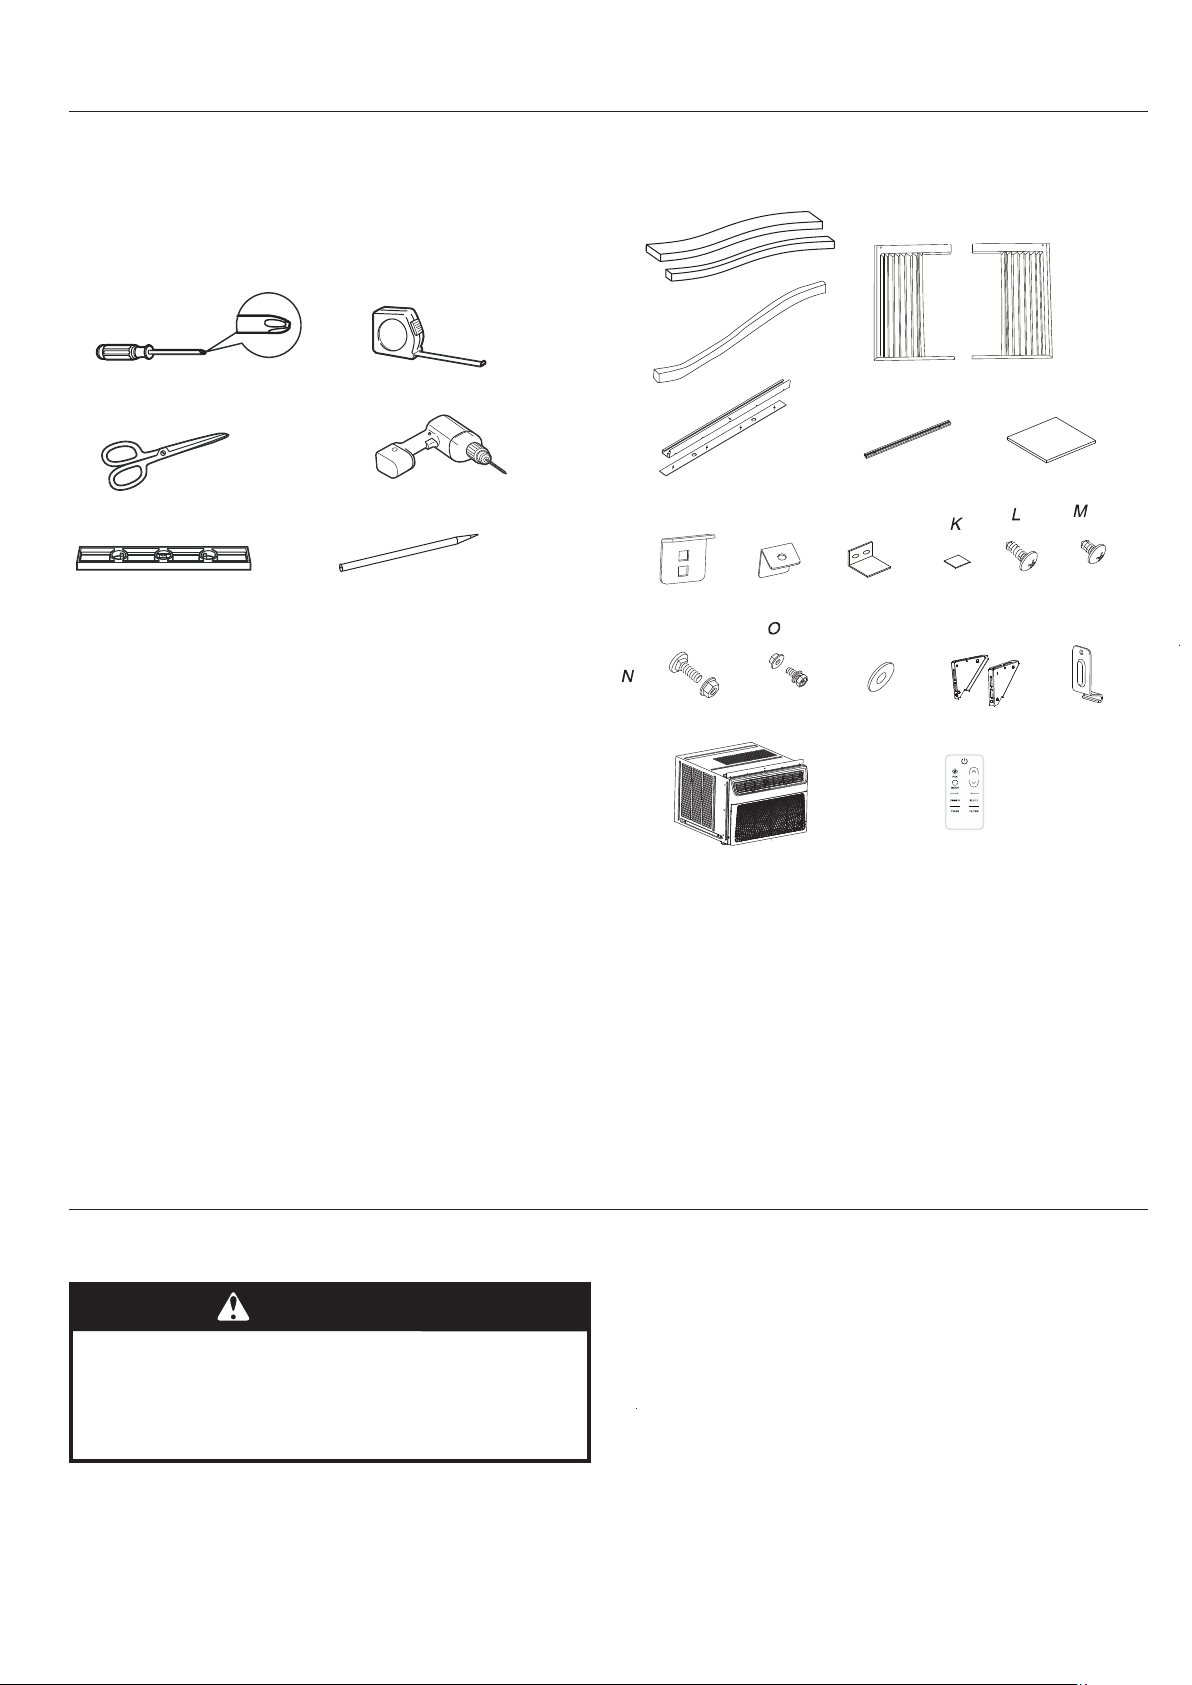
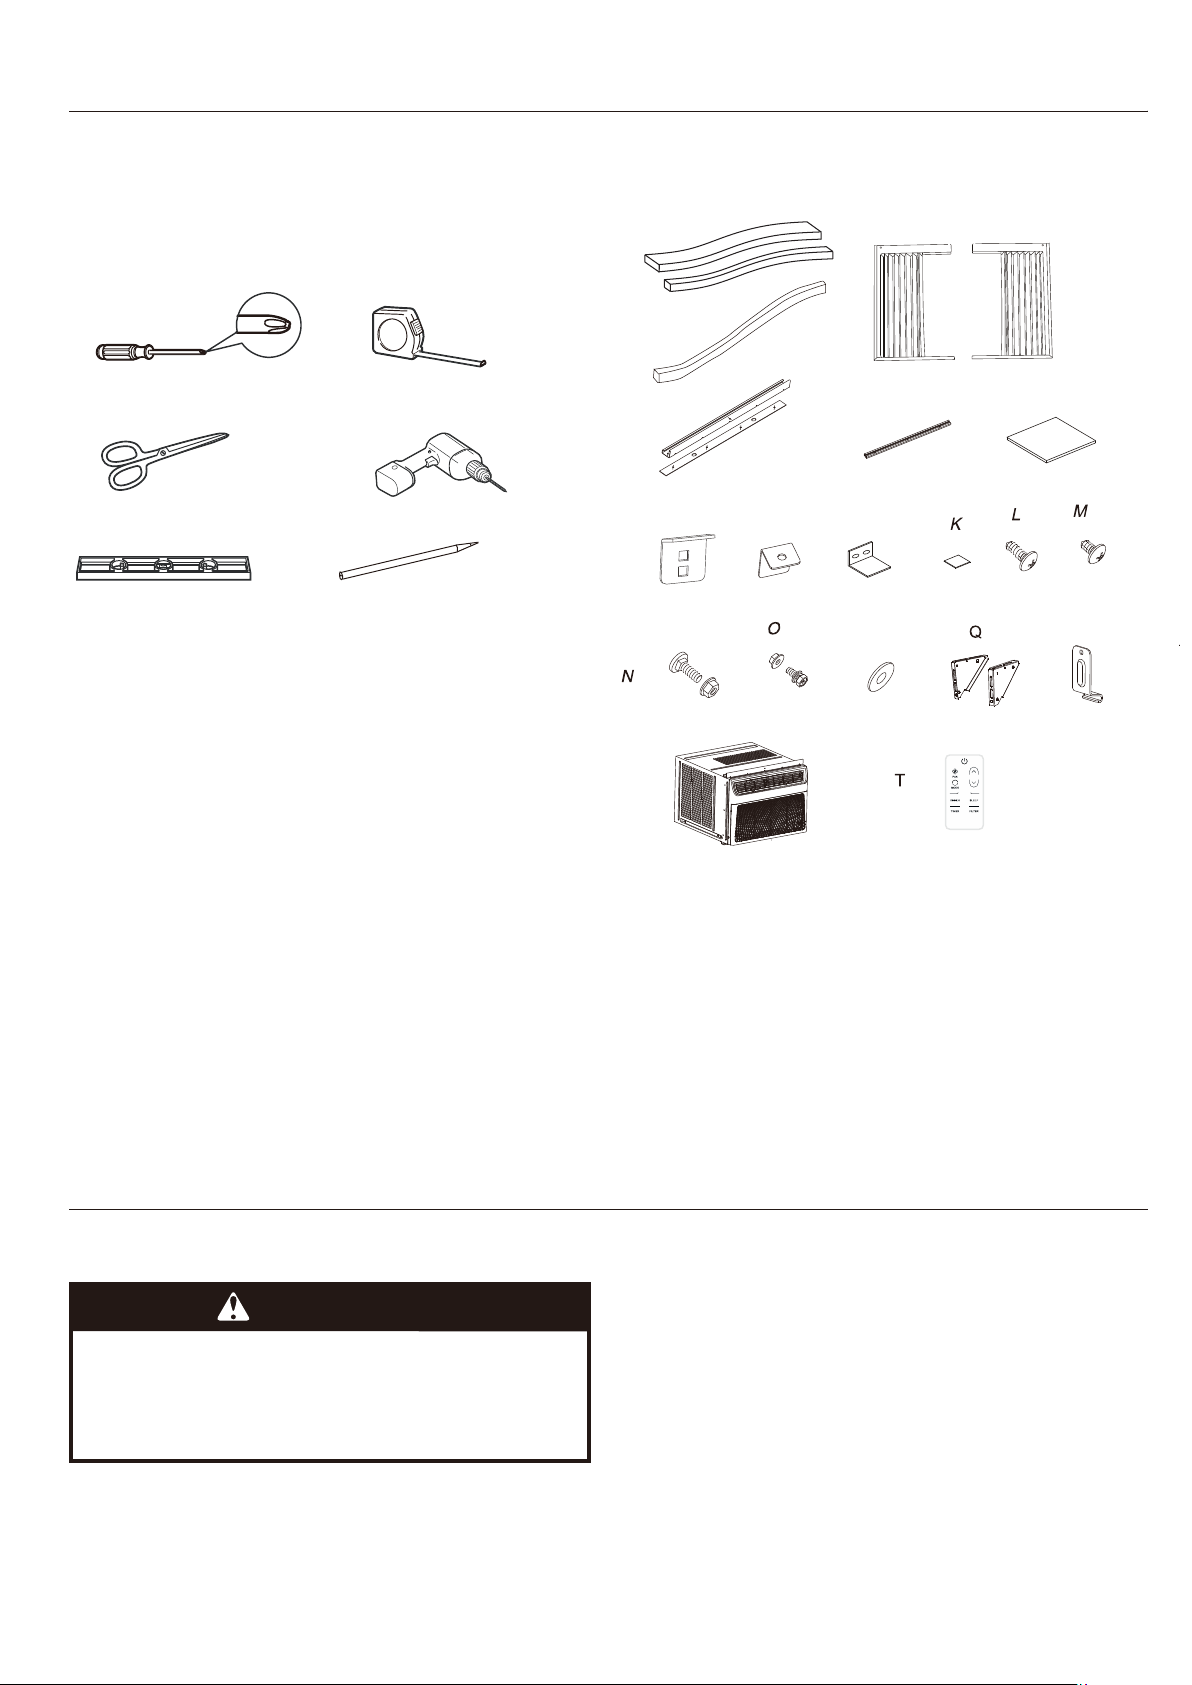
Tools and Parts
Gather the required tools and parts before starting installation.
Read and follow the instructions provided with any tools listed
here.
Tools needed
■Phillips screwdriver
■Scissors
■Level
■Tape measure
■Cordless drill and bit
■Pencil
1 /8"
Parts supplied
Check that all parts are included in parts package.
AAdhesive
seal
.
BFoam seal.
H.
Angle Brackets (2)
B
C
D
H
G
I
J
Q
F
P
R
Remove packaging materials
■
Remove and dispose of/recycle packaging materials.
Remove tape and glue residue from surfaces before turning
on the air conditioner. Rub a small amount of liquid dish soap
over the adhesive with your fingers. Wipe with warm water
and dry.
Unpack the Air Conditioner
■Do not use sharp instruments, rubbing alcohol, flammable
fluids, or abrasive cleaners to remove tape or glue. These
products can damage the surface of your air conditioner.
■
■
Handle the air conditioner gently.
WARNING
Excessive Weight Hazard
Use twoor morepeople tomove andinstall
air conditioner .
Failure todo socan resultin backor otherinjury .
Remove top rail from the packaging material.
S
T
NOTE:
The
F.
Baffle (2)
is not provided for
12K BTU cooling and heating model.
The
R.Lock frame
is only provided for
12K BTU cooling and heating model.
The G.EVA Foam(2) is only provided for E-star models,with
E-star LOGO on the control panel.
PE
foam
seal
E.Adhesive
seal
F.
Baffle (2)
G.
EVA Foam(2)
I. Lock
frame(2)
(for
Vinyl-Clad
windows)
J.
Sash lock
K.
EPDM
foam sesl(2)
L.
3/4"
screws
(8)
M. 1/4
"
screws
(10)
N. 3/4"
Long
Flat
Head
Bolt
and
Locknut
(2)
C
.
Side
curtains
(2)
D.Top
rail
and
O. 1/2"
Long
Bolt
and
Locknut
(4)
P. Washer(2)
Q. Left and Right Support
Brackets (2)
R.
Lock frame
S. Air conditioner
T.Remote control
A
E
5
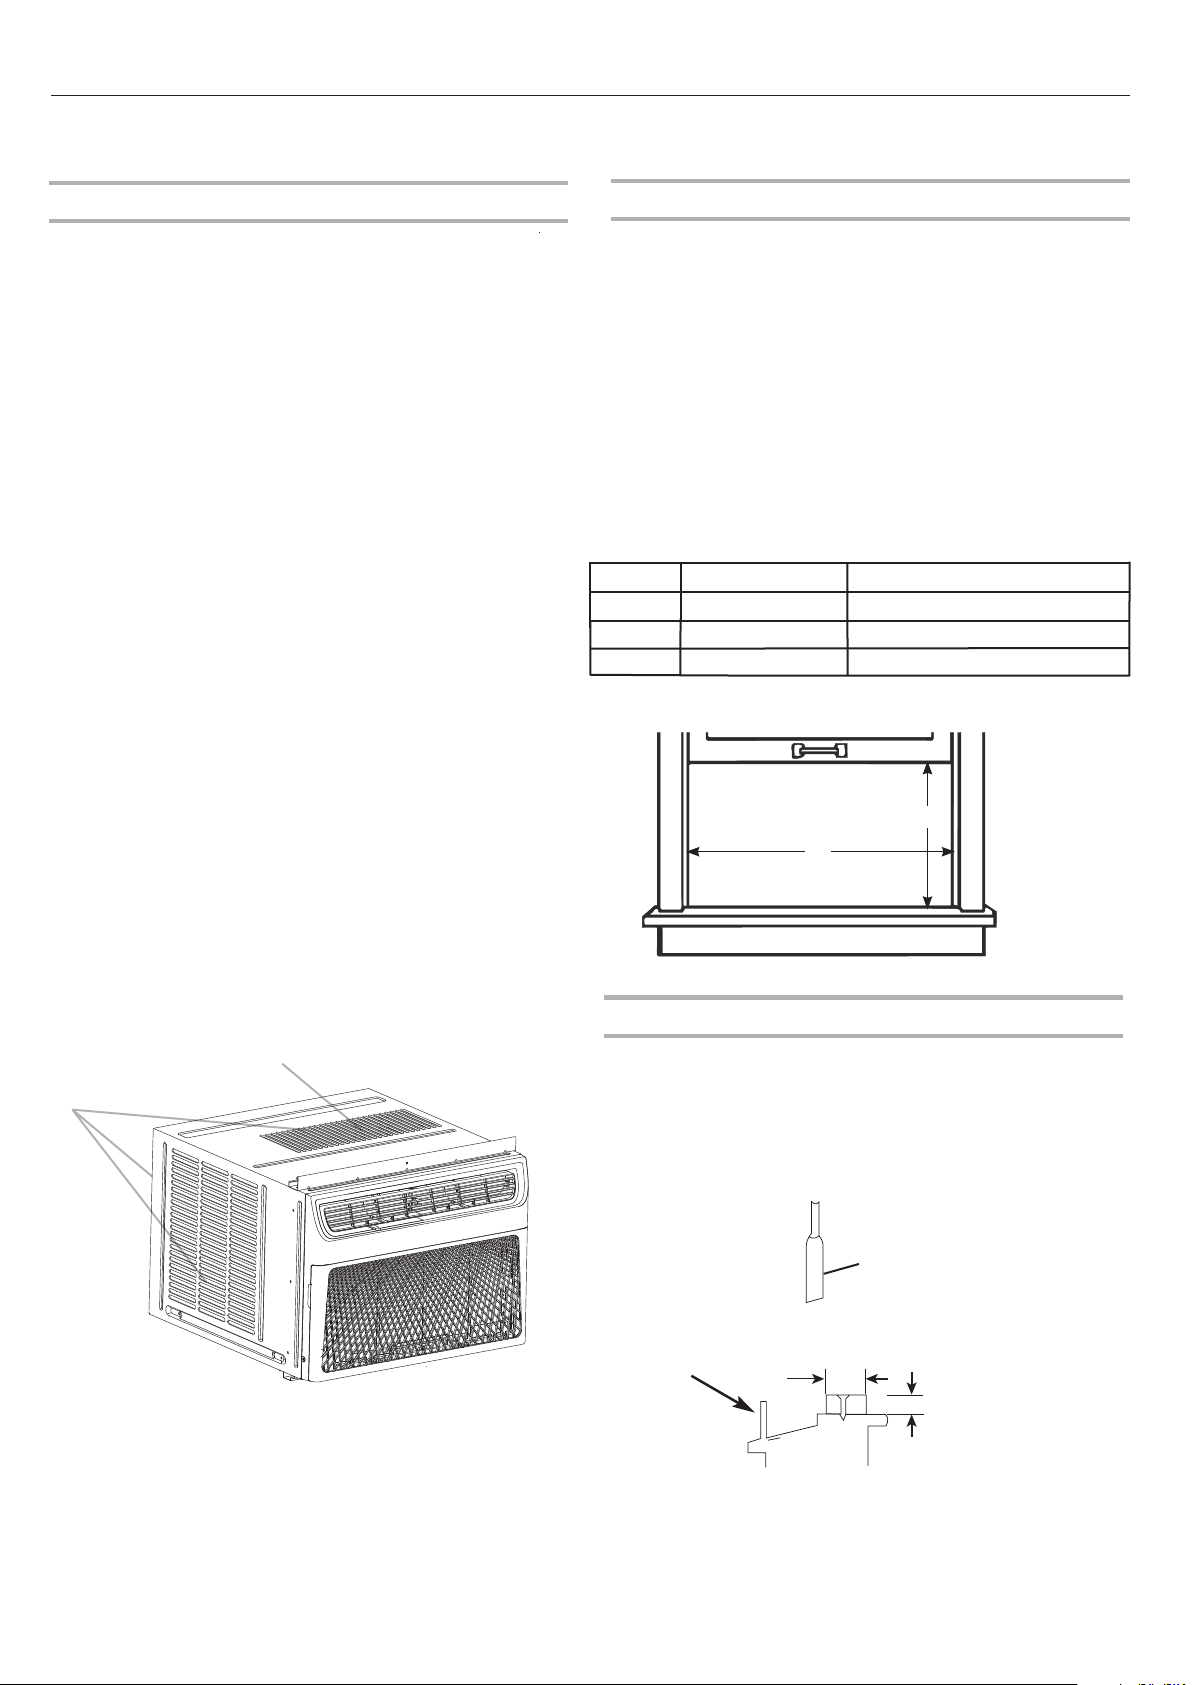
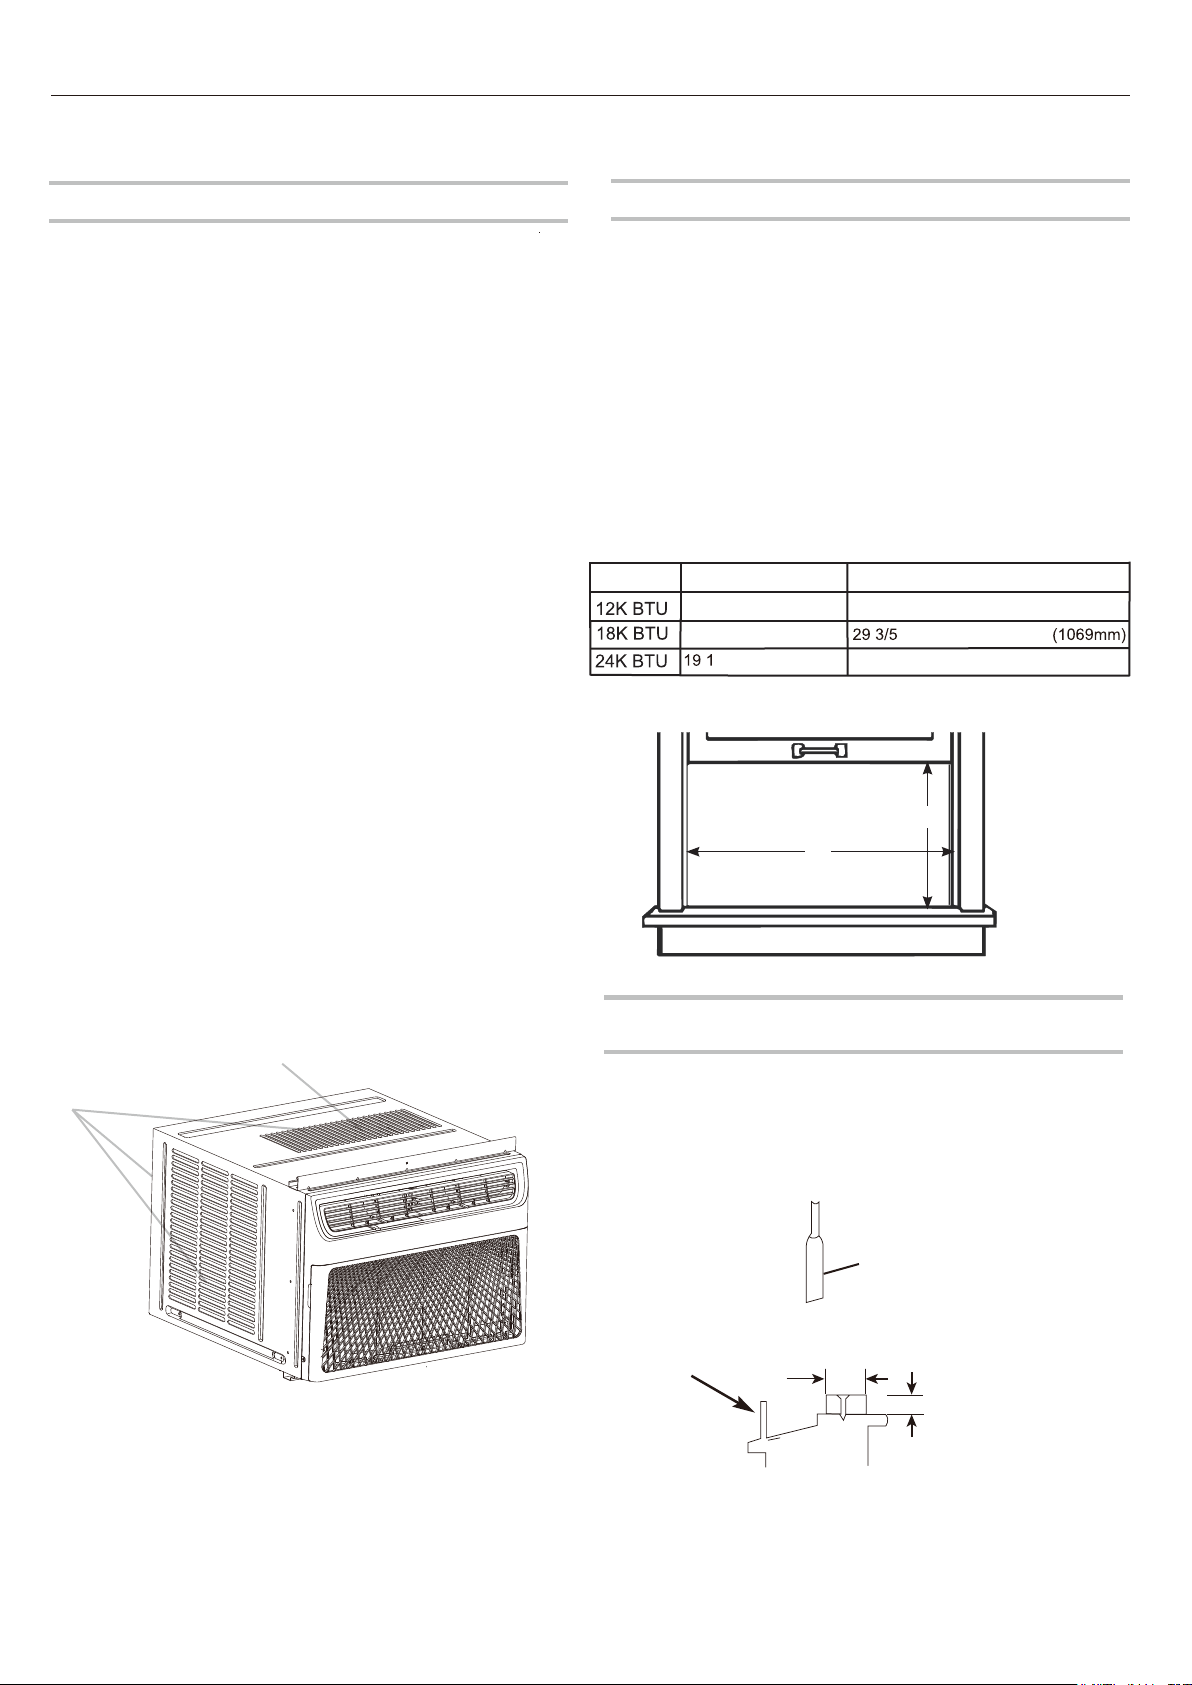
Location Requirements
■
■
■
■
■
■
■
■
■
■
Window Installation
If AC is Blocked by Storm Window
Before You Begin
Window opening
measurements:
Add wood as shown, or remove storm window before air.
conditioner is installed.
If storm window frame must remain, be sure the drain holes
or slots are not caulked or painted shut. Accumulated rain
water or condensation must be allowed to drain out.
IMPORTANT:
IMPORTANT:
A
(With side curtain panels)
B
ModelsA B
12K BTU
24K BTU
17(432mm) min "
19 1
min
/10" (485mm)
18 1 (470mm) min /2"
27- 41 " " (686mm) (1041mm)
32 2 5- 4
/" " (823mm) 4(1118mm)
29 3/5- 42 1 " /10" (752mm) (1069mm)
Read these instructions completely and carefully.
Save these instructions for local inspector’s use.
Observe all governing
codes and ordinances.
18K BTU
ACabinet louvers.
A
Board
thickness
as required,
for proper
pitch to rear,
along entire
sill. Fasten
with nails or
screws.
Storm window
frame or other
obstruction.
sash
1-1/2"min
(38 mm)
Cooling and Heating models
without Cabinet louvers on top
IMPORTANT:
Observe
all
governing
codes
and
ordinances.
Check
the
location
where
air
conditioner
will
be
installed.
Proper
installation
is
your
responsibility.
Make
sure
you
have
everything
necessary
for
correct
installation.
The
location
should
provide:
■
Do
not
use
an
extension
cord
.
The appliance shall be installed in accordance with
national wiring regulations.
■
Free
movement
of
air
in
room
to
be
cooled.
■
A
large
enough
opening
for
the
air
conditioner.
NOTE:
Cabinet
louvers
must
not
be
obstructed.
Air
must
be
able
to
pass
through
the
cabinet
louvers freely.
Note
to
Installer:
Be
sure
to
leave
these
instructions
with
the
consumer.
Note
to
Consumer:
Keep
these
instructions
for
future
reference.
Skill
level:
Installation
of
this
appliance
requires
basic
mechanical
skills.
Completion
time:
Approximately
1
hour.
We
recommend
that
two
people
install
this
product.
Proper
installation
is
the
responsibility
of
the
installer.
Product
failure
due
to
improper
installation
is
not
covered
under
the
Warranty.
You
MUST
use
all
supplied
parts
and
use
proper
installation
procedures
as
described
in
these
instructions
when
installing
this
air
conditioner.
These
instructions
are
for
a
standard
double-hung
window.
You
will
need
to
modify
them
for
other
types
of
windows.
The
air
conditioner
can
be
installed
without
the
side
curtain
panels
if
needed
to
fit
in
a
narrow
window.
See
the
window
opening
dimensions.
All
supporting
parts
must
be
secured
to
firm
wood,
masonry
or
metal.
The
electrical
outlet
must
be
within
reach
of
the
power
cord.
Follow
the
dimensions
in
the
table
and
illustration
for
your
model
.
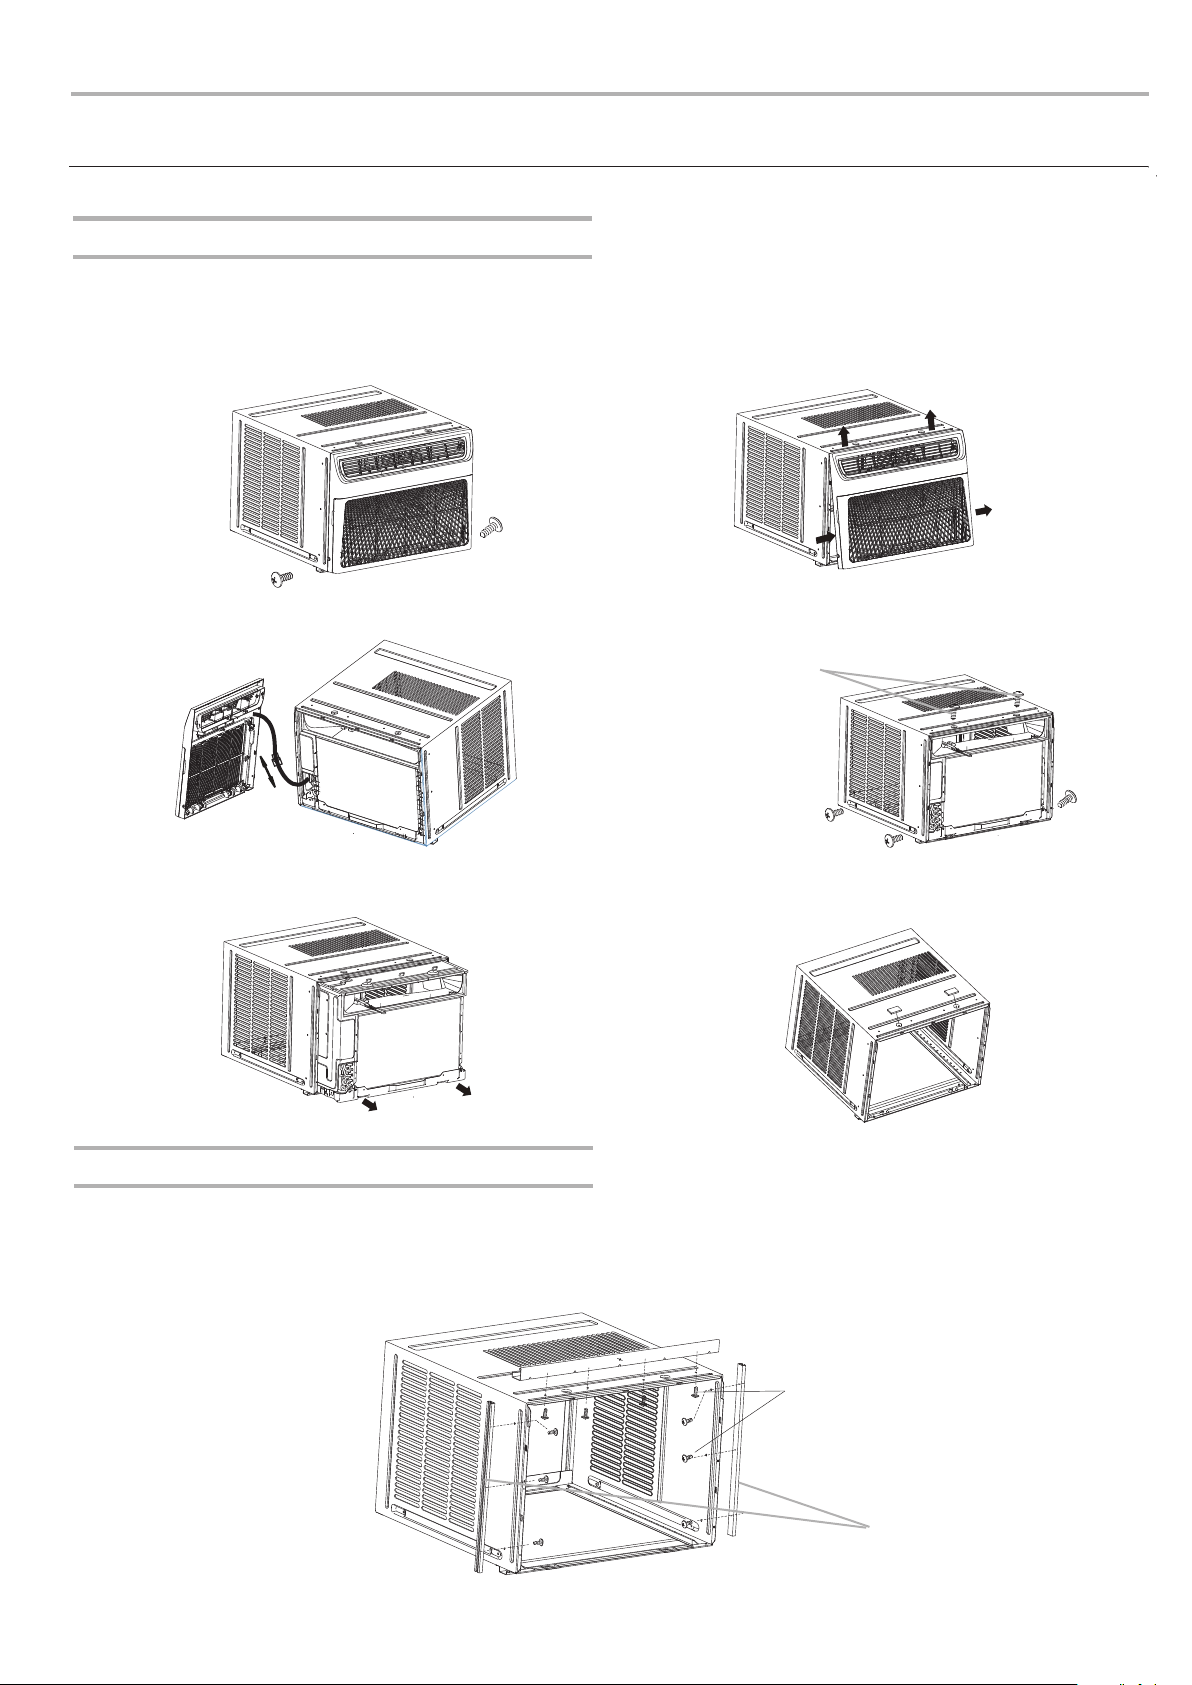
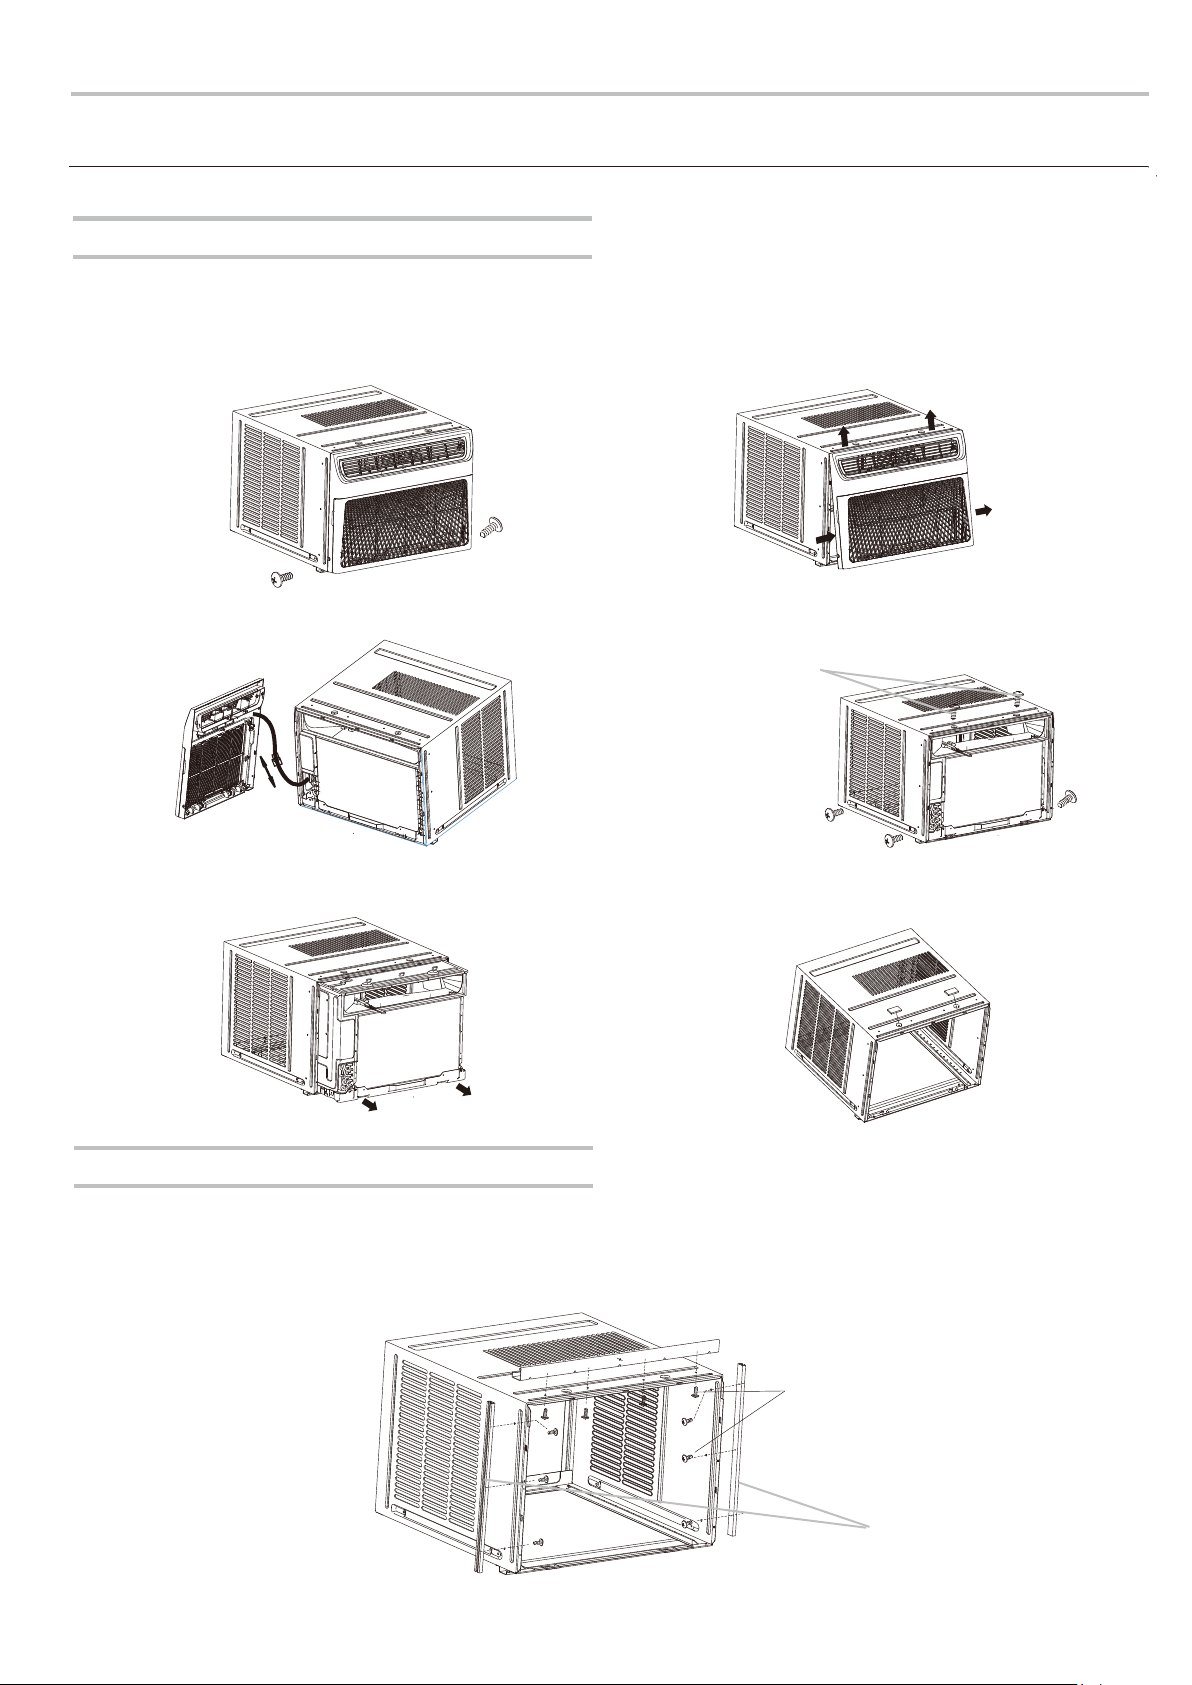
Install Top Angle Rail and Side Retainers
Remove Air Conditioner from Cabinet
NOTE: Remove any packaging material from cabinet exterior.
6
INSTALLATION INSTRUCTIONS
Prepare Air Conditioner for Installation
12K model do not need
to attach the two screws
1/4" screws
12K model do not need
to attach two
baffles
1. Locate the two Front Panel screws and remove.
These screws will be needed to re-install the
Front Panel later.
2. Push metal cabinet side inward to release plastic tabs
on each side of Front Panel.
4. Remove shipping screws from top of unit and also on
both sides by the base if installed.
6. Add two foam inserts to holes in top of cabinet where
shipping screws were removed from.
1. Remove adhesive strip coating from foam gasket.Attach adhesive side of gasket to bottom of top angle rail.
Insert 4 screws from inside of cabinet and secure to top angle rail.
2. From inside of cabinet insert 3 screws to attach each side baffle as shown.
Attach side baffles with flat side
against cabinet and angled edge toward rear of cabinet.
3. Remove Front Panel from the unit.
5. Remove the air conditioner from cabinet carefully.
7
C
B
A
3/4″ long
HEX-HEAD
SCREW
Place Cabinet in Window
A. 3/4" screws
B. Safety Lock (Only for Vinly-Clad Window)
C. Bottom Rail Foam Seal
Side retainer
window
inner sill
cabinet
Angle of cabinet
bracket securely seated
on edge of inner sill.
Bracket
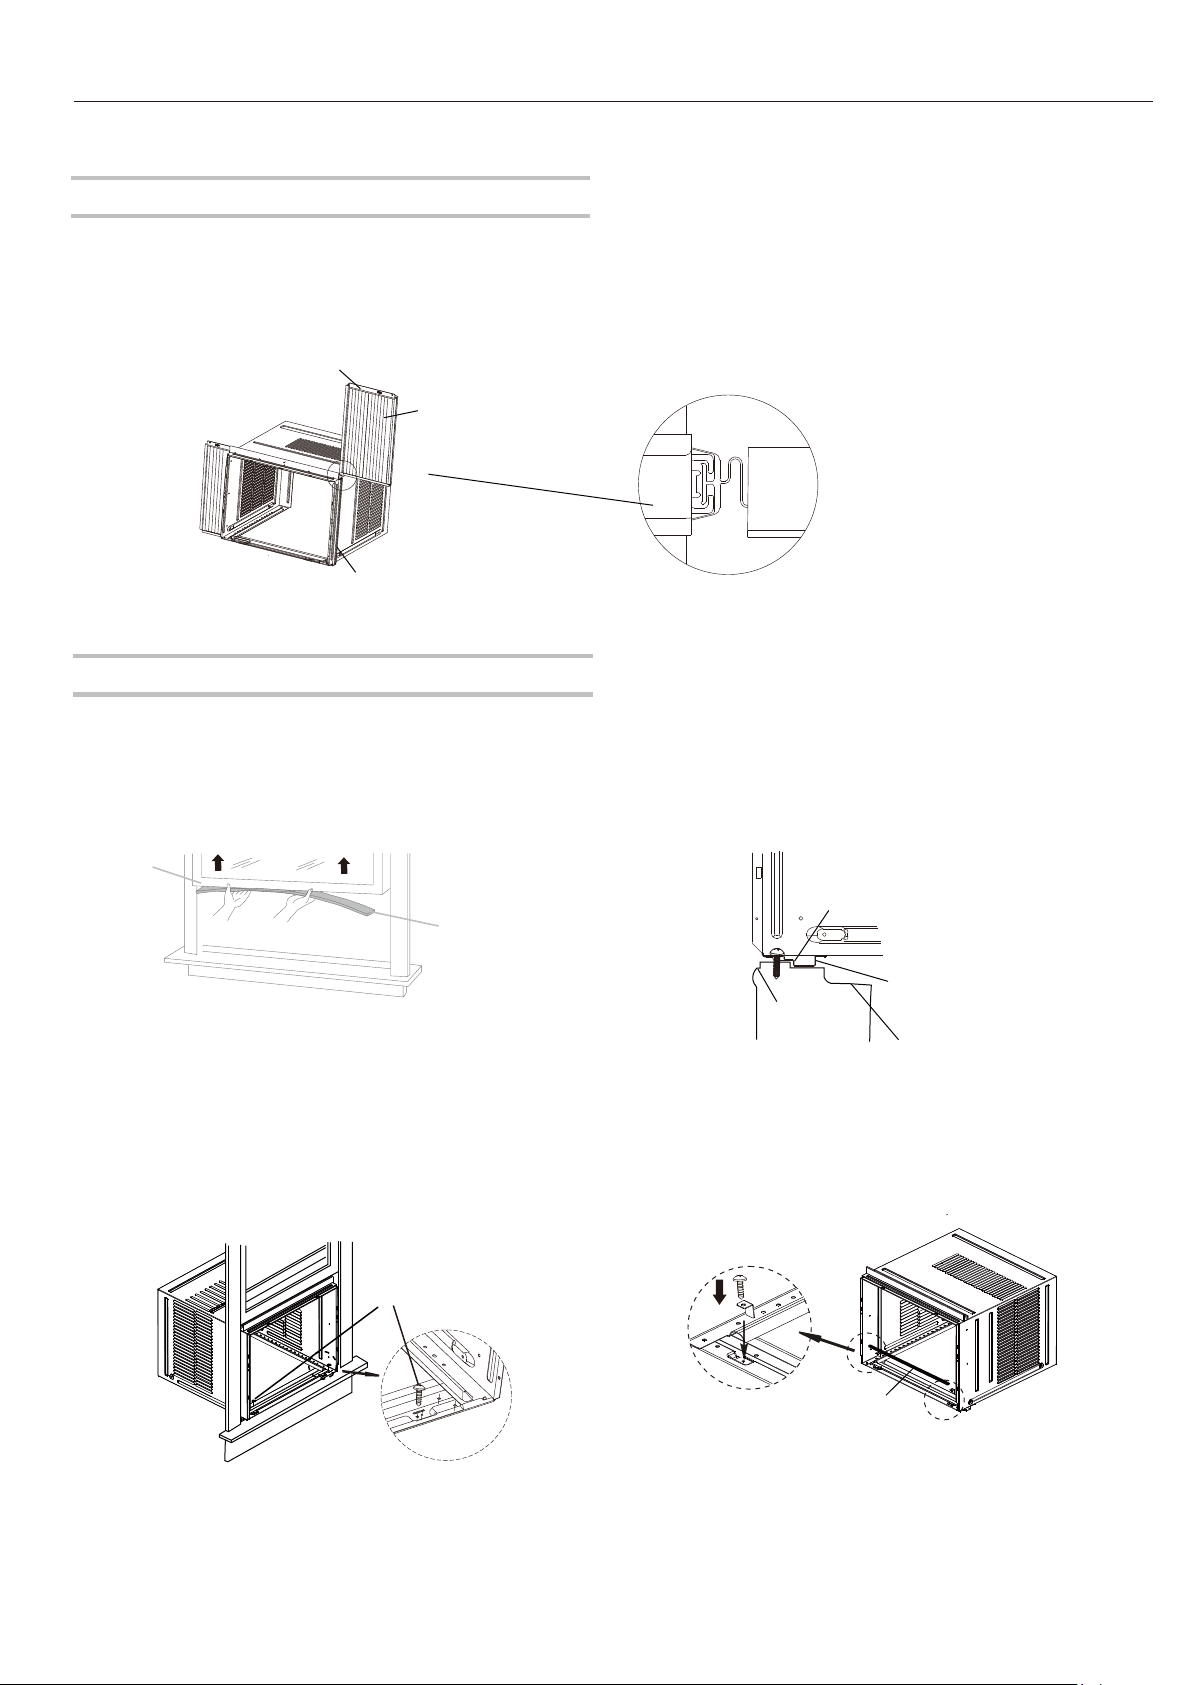
Window Air Conditioner Installation
5. Remove protective strip from adhesive side of
Bottom Rail Foam Seal
Apply Seal over screws
fastening bottom rail to window inner sill.
2. Place cabinet in window with cabinet bracket
securely seated over the edge of inner sill as
shown in . Bring window down temporarily
behind top angle rail to hold cabinet in place.
window
outer
sill
4. For Vinyl-Clad window:
Place two safety locks
into the holes located in the bottom of the cabinet
and drive two 3/4" pan-head Phillips locking
screws
through the safety locks into the cabinet
as shown.
Install
Side Curtains
Side curtain
Curtain housing
A
B
A
.
Lower
window
sash
B.
Adhesive
seal
1.
Open the window and mark the center of window
inner
sill as shown
.
Cut
the
adhesive
seal
to
the
width
of
the
lower
window
sash.
Rem ove the
backing from
the seal
and
attach the seal
to
the
bottom
of
the
lower window sash.
3. Shift cabinet left or right as needed to line up center
of cabinet on center line marked on inner sill.
For
wooden
window:
Fasten cabinet to window inner
sill with two 3/4" long hex head screws into holes
(You may wish to pre-drill pilot holes).
1. Place cabinet on the floor, a bench, or a table.
2.
Slide
"Ⅰ"
section
at the
end
of
side curtain
into
side
retainer
on
each
side
of
the cabinet.
3. On each side of cabinet, insert the curtain housing into channel in the top
and bottom angle rails.
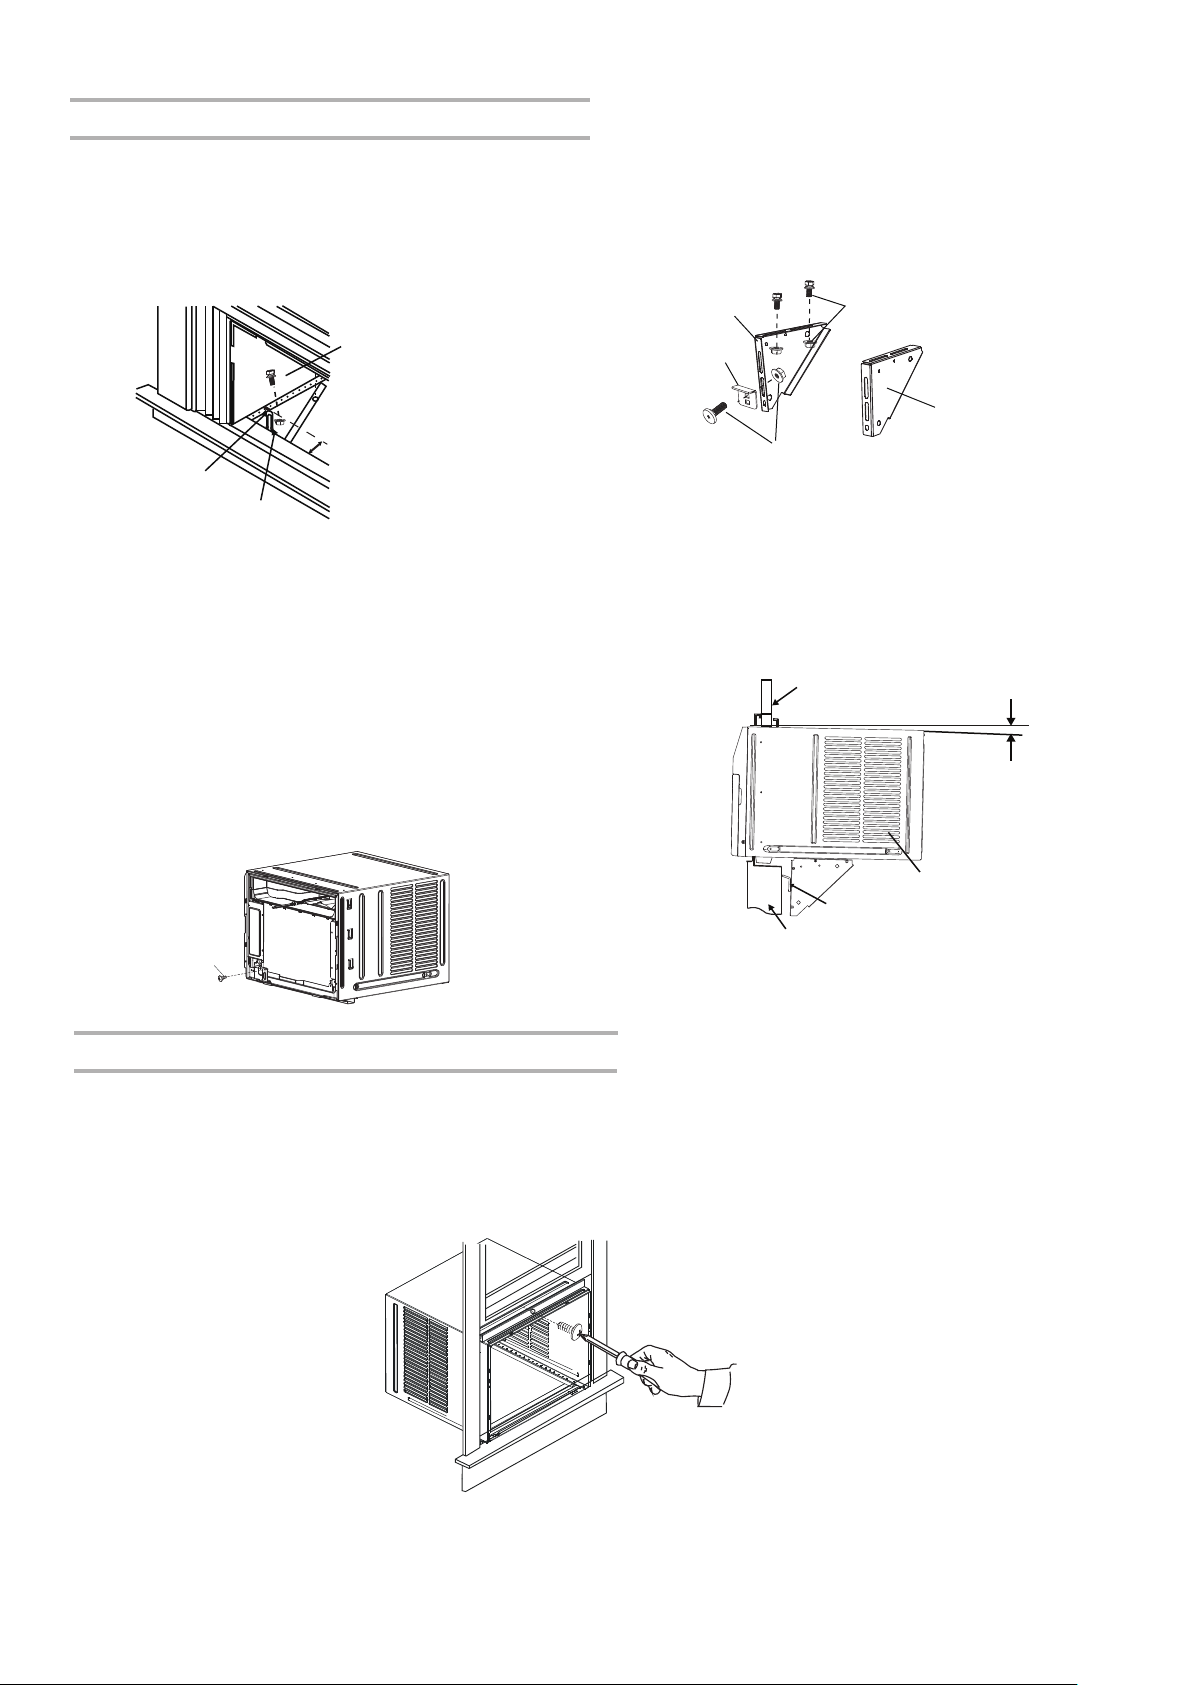
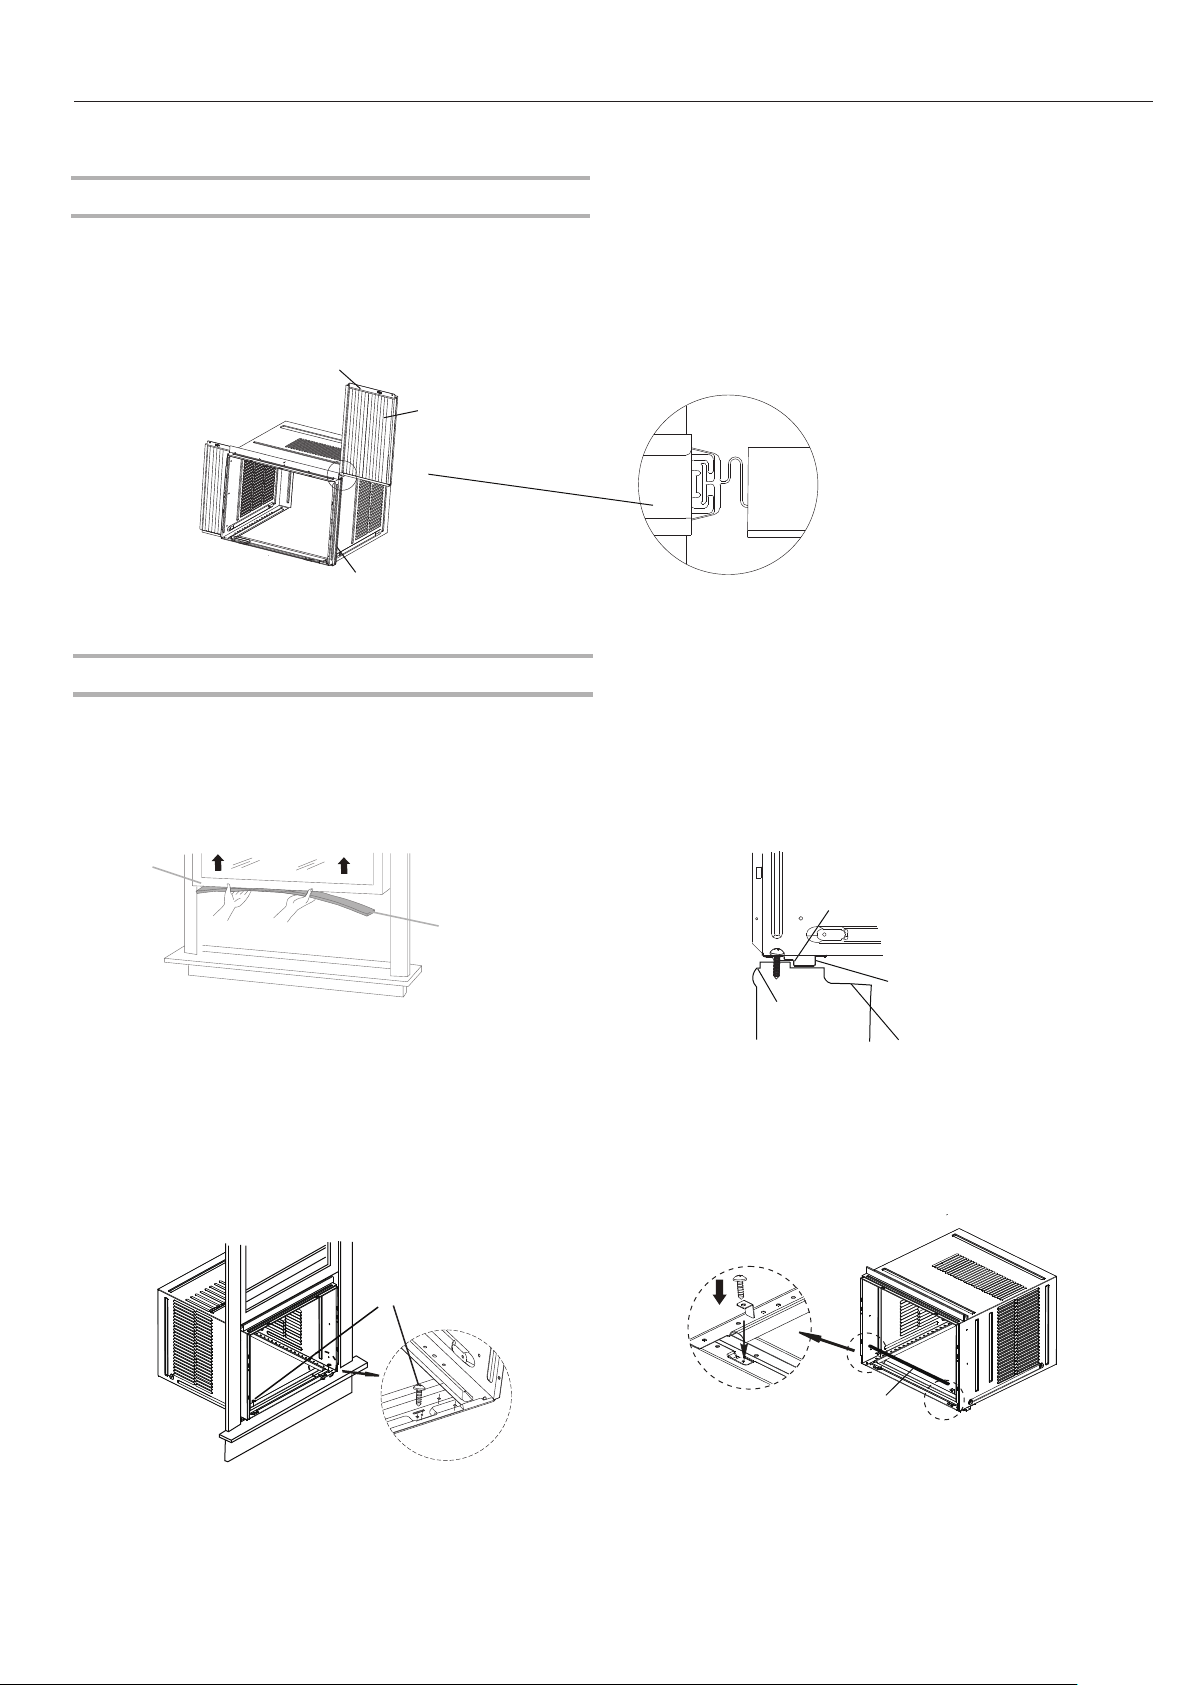
Install Support Bracket
MARK
MARK
" Long Bolt
and Locknut (4)
1⁄2
2. Attach sill angle brackets to support brackets at
marked positions with flat head bolts and nuts.
Hand tighten only at this point.
RIGHT
LEFT
Angle Brackets
" Long Flat Head
Bolt and Locknut
3⁄4
" Long Bolt
and Locknut
1⁄2
4.
Adjust height of sill angle bracket so that bracket
rests securely on edge of sill, and so that cabinet
has the correct downward tilt for proper water
drainage. Tighten nuts securely.
3°
Si
de L
ouver
s
Window
Sash
Sill A
ngle Bracket
Wind
ow S
ill
tabou 3°
8
1/4"screws
1. Hold each support bracket flush against outside
of sill and tight to bottom of cabinet. Mark
brackets
at top level of sill. Mark cabinet bottom
at distance
of sill width. Remove support brackets.
3. Insert 1/2" long bolts through appropriate holes in
cabinet bottom given the sill width distance.
Thread
the bolts into the
slots
of
the
support
brackets.
Tighten
lock
washer
nuts
onto
bolts.
5. Place the frame lock between the base and the
cabinet
sill with 1/4" (6,5mm) screw as shown.
NOTE:This lock frame
is only provided for 12K BTU model.
Attach The Top Rail To Window
1. Close window behind top angle rail.
2. Attach the top angle rail to window frame: Use a drill bit to drill one hole through the hole in the middle of top
angle rail into the window frame,and drive one 3/4" locking screw through the hole in the middle of top angle
rail into the window frame as shown.
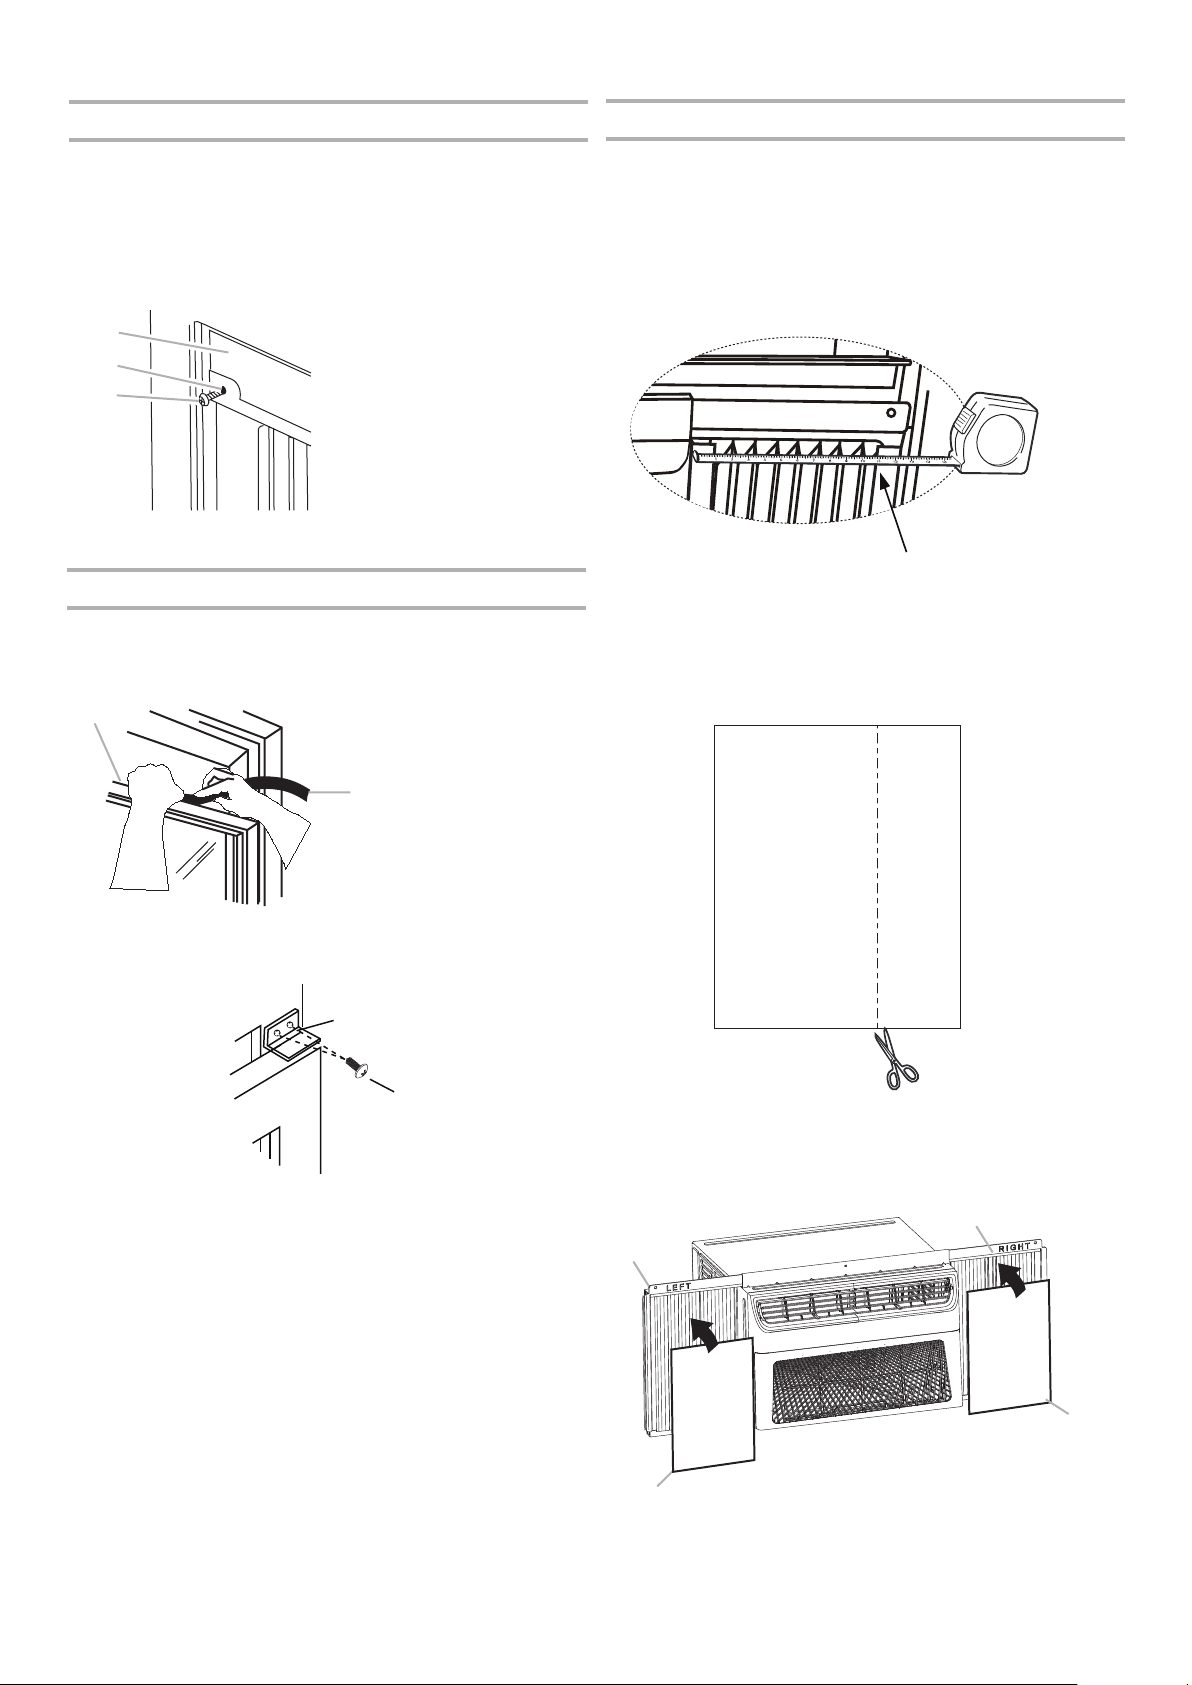
3. If necessary, trim weather seals to needed length,
peel off protective backing, and use to plug any gaps.
A
B
C
AWindow sash .
B.Hole in side curtain
C.
3/4" screw
3/4" screw
2.Use a 1drill bit to drill a starter hole through the /8"(3mm)
hole in the top rail.
1.Pull the left-hand curtain out until it fits into the window channel.
3.Insert one of the 3/4"(20mm) screws through the left-hand
curtain and into the window sash.
9
Measure the inner width
of the side curtain
2. Remark a line on the EVA Foam according to less 1/8
(3mm) than the measured width in, then cut the EVA
Foam along the line.
B
A
A
A.Top of lower window sash
BFoam seal.
A
B
3. Remove the backing from the EVA
Foam.
Attach one EVA
Foam on the Curtain housing, the side
with
adhesive
should facing the
Curtain housing.
4. Repeat
for
the
right-hand
curtain.
2.
Attach right angle safety lock to top window sash
as shown .
safety lock
Install Window Sash Seal and Safety Lock
1.
Insert
foam
seal
behind
the
top
of
the
lower
window
sash
and
against
the
glass
of
the
upper
window.
1. Put one EVA
Foam on the Curtain housing.In
order
to
minimize
air
leaks
and
ensure
optimal
insulation,
it
is
necessary
to
install
the
EVA
Foam
on
the
Curtain
housing.
After the unit is installed to the window, measure
the inner width of the side curtain as shown.
Attach
Side Curtains
to Window
Attach the EVA
Foam
(only applicable for E-star models)
B
A
.
Curtain
housing
B. EVA Foam
10
CompleteInstallation
AIR CONDITIONER USE
Operating your air conditioner properly helps you to obtain the
best possible results.
This section explains proper air conditioner operation.
IMPORTANT:
■
If you turn off the air conditioner, wait at leastminutes 3
before turning it back on. This prevents the air conditioner
from blowing a fuse or tripping a circuit breaker.
■
■
NOTE: In the
event of a power failure, your air conditioner
will
operate at the previous settings when
the power is restored.
1.Plug into a grounded 3 prong outlet.
2.Press RESET on the power supply cord. See "Electrical
Requirements".
Electrical ShockHazard
Plug intoa groundedprong outlet 3 .
Do notremove groundprong .
Do notuse anadapter .
Do notuse anextension cord .
Failure tofollow theseinstructions canresult indeath ,
fireorelectrical shock, .
WARNING
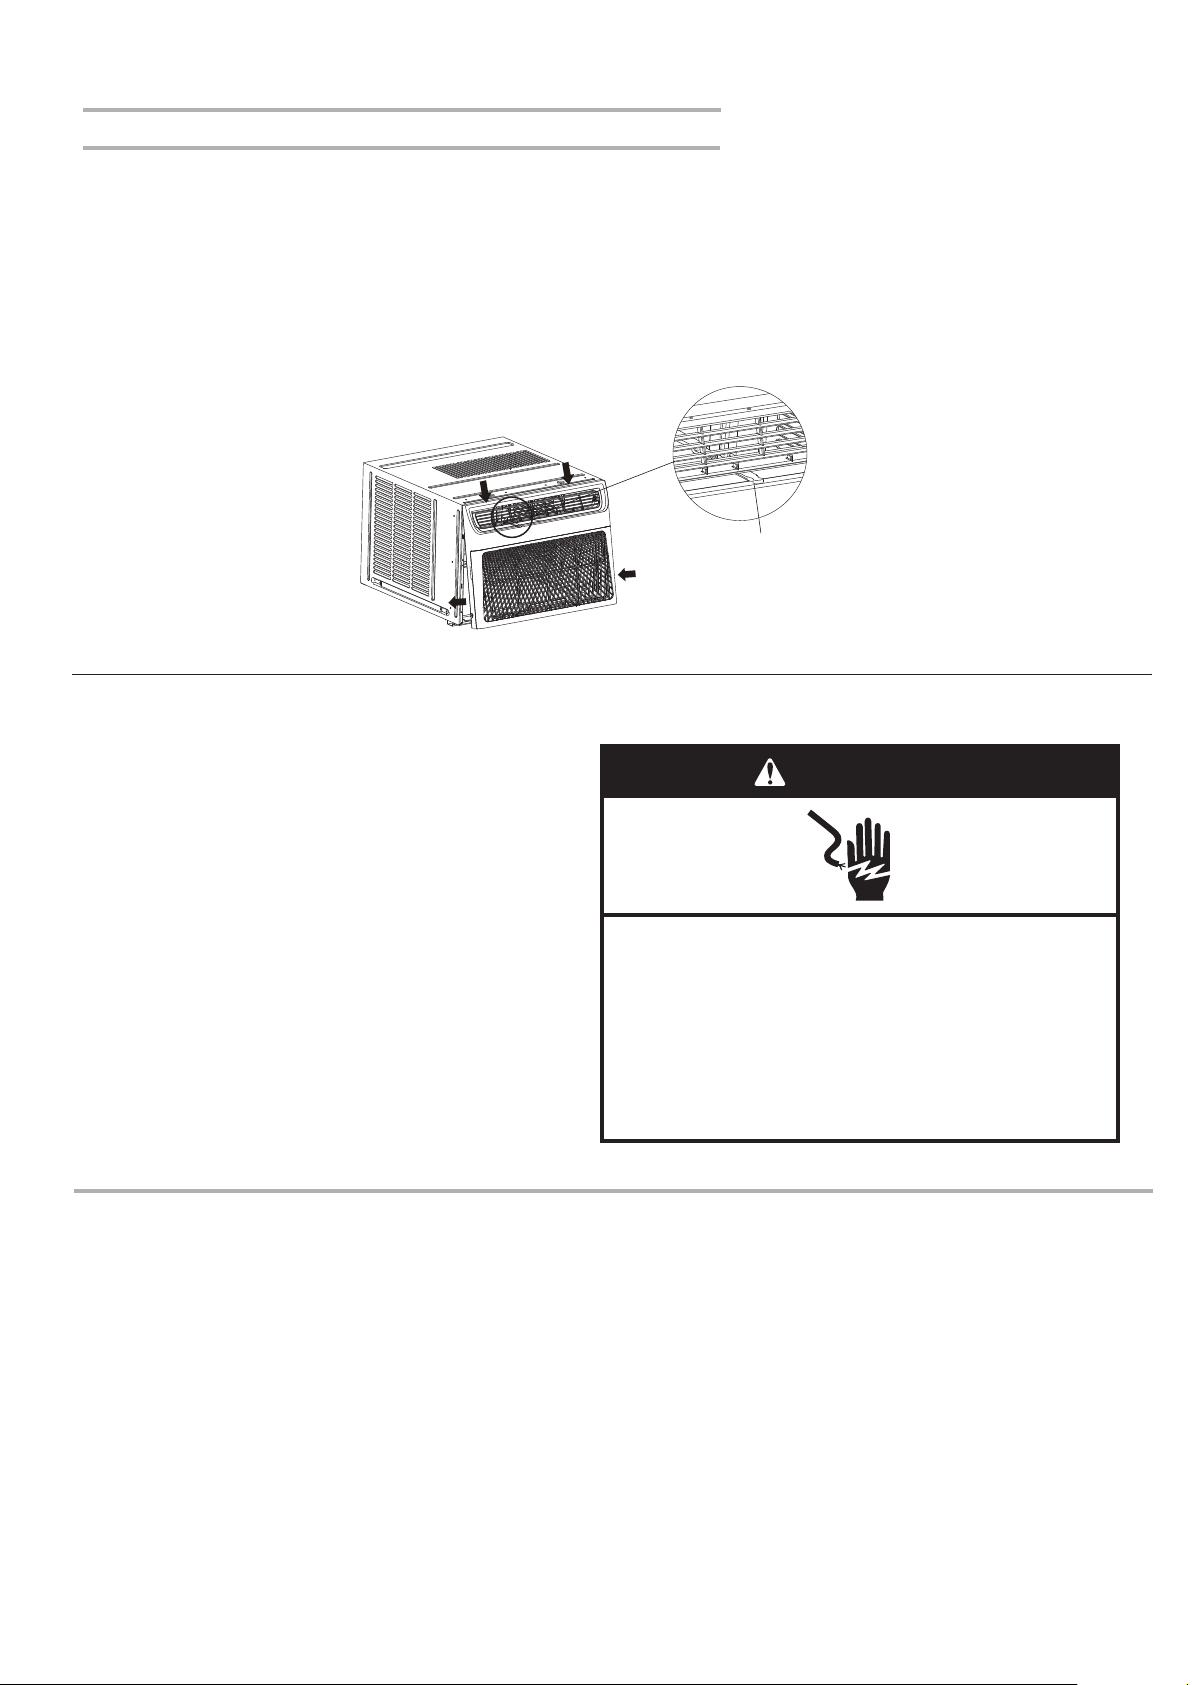
Install Air Conditioner into Cabinet and Install Front Panel to Unit
Vent control
correct location
Air
conditioner
in
the
Cool
mode operation the better limits:
Outdoor side 64.4~109.4°F (18~43 °C),
≤80%RH;
indoor side 62.6~89.6°F (17~32°C),
≤80%RH.
Air
conditioner
in
the
Heat mode operation the better limits:
Outdoor side 19.4~75.2°F (-7~24 °C),
≤80%RH;
indoor side
32~80.6°F (0~27°C),
≤80%RH.
1.
Lift air conditioner and slide into cabinet carefully.
2
.
CAUTION: Do not push on controls or finned coils.
3
.
Be sure air conditioner is firmly seated towards rear of cabinet.
4.
Reconnect electronics plug if present. Position vent
control lever so that it will thread into its channel in
the front panel.Hook front panel top tabs into slots
on cabinet top, and rotate front panel down so that
side
tabs snap into place on cabinet. Insert 4 previously removed screws through front panel and into
air
conditioner.
5. Insert air conditioner filter. Reinstall the front grille by hooking bottom tabs into slots on Front Panelbottom,
then rotate grille up to snap into place.
11
Starting Your Air Conditioner
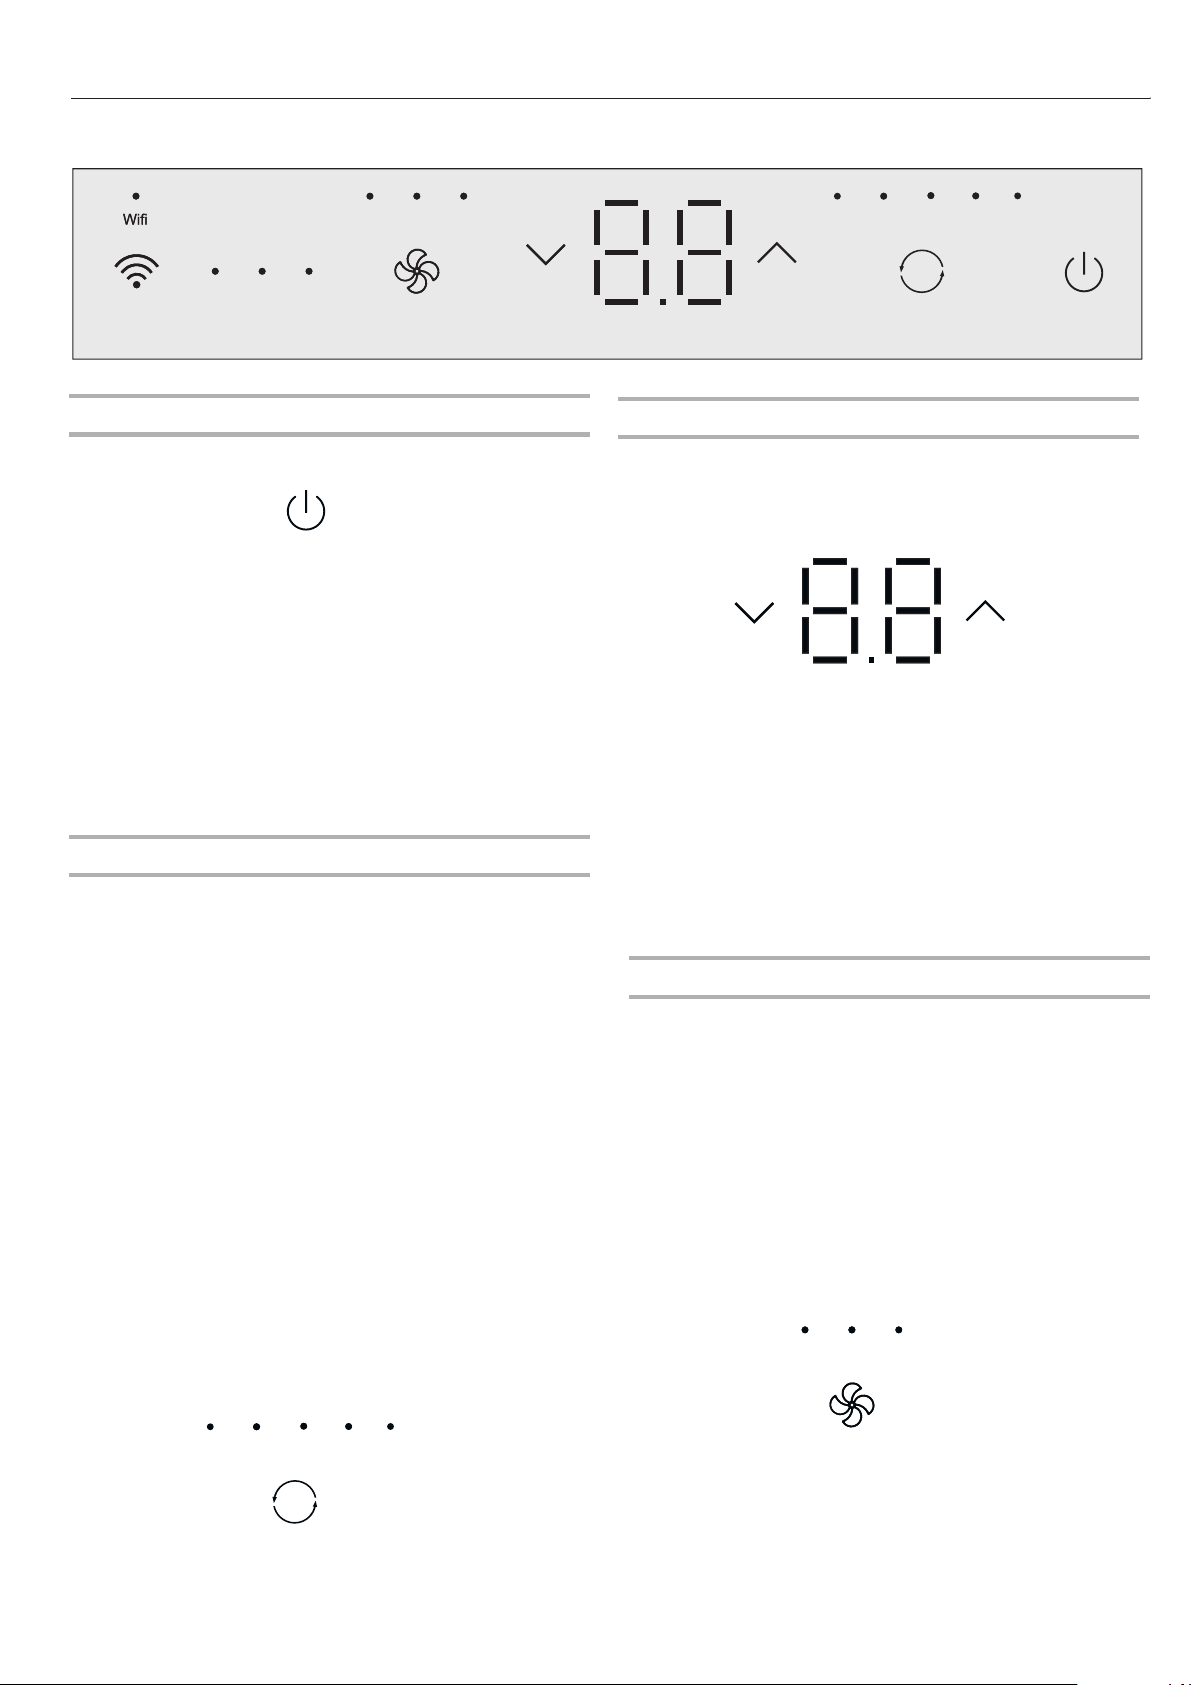
1.Press the power button to turn on the air conditioner.
NOTE: When the air conditioner is turned on for the first time
after itis plugged in, the display will show the current set
temperature and will run in the ECO control .
ON/OFF
1.Press MODE repeatedly until you see the indicator light glow
for the desired setting.
2.Choose Fan, Dry, Cool, Eco, or Heat.
■
■
■
■
Cool -
Eco -
Heat - Heats the room.
Cools the room.
■
ON/OFF
ON/OFF
TimerSleepFilterTimerSleepFilter
FAN FAN
MODE
LowMed
High
LowMed
High
FAN FAN
LowMed
High
LowMed
High
Dry
Fan
Cool
Eco
Dry
Fan
Cool
Eco
MODE
Heat
MODE
Dry
Fan
Cool
Eco
Dry
Fan
Cool
Eco
MODE
Heat
CONNECTCONNECT
■
■
Temperature
Press the plus UP button to raise the temperature. Each (∧)
time you press or hold the plus button, the UP (∧)
temperature will go up 1°F (1°C) until it reaches 86°F (30°C).
Cools the room and save energy.
FAN - To
select
Fan
Only
mode.
Press
the
minus
DOWN
(∨)
button
to
lower
the
temperature.
Each
time
you
press
or
hold
the
DOWN
(∨)
button,
the temperature
will
go
down
1°F
(1°C)
until
it
reaches
61°F
(16°C).
To
change
the
temperature
display
from
°F
to
°C:
Press
both
the
MODE
and
DOWN
(∨)
buttons
at
the
same
time for 5 seconds to switch the display from
°F to
°C.
Fan
NOTE:
The
Fan
button
will
operate
only
when
the
Cool,Fan,ECO
or heat mode
has
been
selected.
1.Press
FAN
until
you
see
the
indicator
light
glow
for
the
desired
setting.
2.Choose
High,
Med,
Low.
■
High -
for
maximum
cooling
■
Med -
for
normal
cooling
■
Low -
for
quieter
cooling
NOTE
:
In
ECO
mode,the Fan will run at low
speed when compressor turn off.
After cleaning and replacing the filter, press the POWER
button for resetting and the FILTER light will go off.
2.
Select
mode.
See
"Mode".
3.
Select
fan
speed.
See
"Fan".
4.
Set
temperature.
See
"Temperature".
Mode
■
Dry - Dries
the
room.
The
air
conditioner
automatically
selects
the
temperature.
Fan
runs
at
Low
speed
only.
NOTE:
Heat is available only for heating models.
NOTE:
Dry
mode
should
not
be
used
to
cool
the
room.
NOTE:
Select ECO mode to initiate this
function.
For
E-star models,t
he
fan will continue to
run after
the
compressor shuts off
for 2 minutes(4minutes
for
the
first time)
,then
the
fan
will shuts
off for
10
minutes .The fan then
cycles
run for 2
minutes
and 10 minutes off
intervals
until the room
temperature is above the
set
temperature
,
at
which
time the compressor
turns
back on and
Cooling
resumes.
Filtre
Sleep
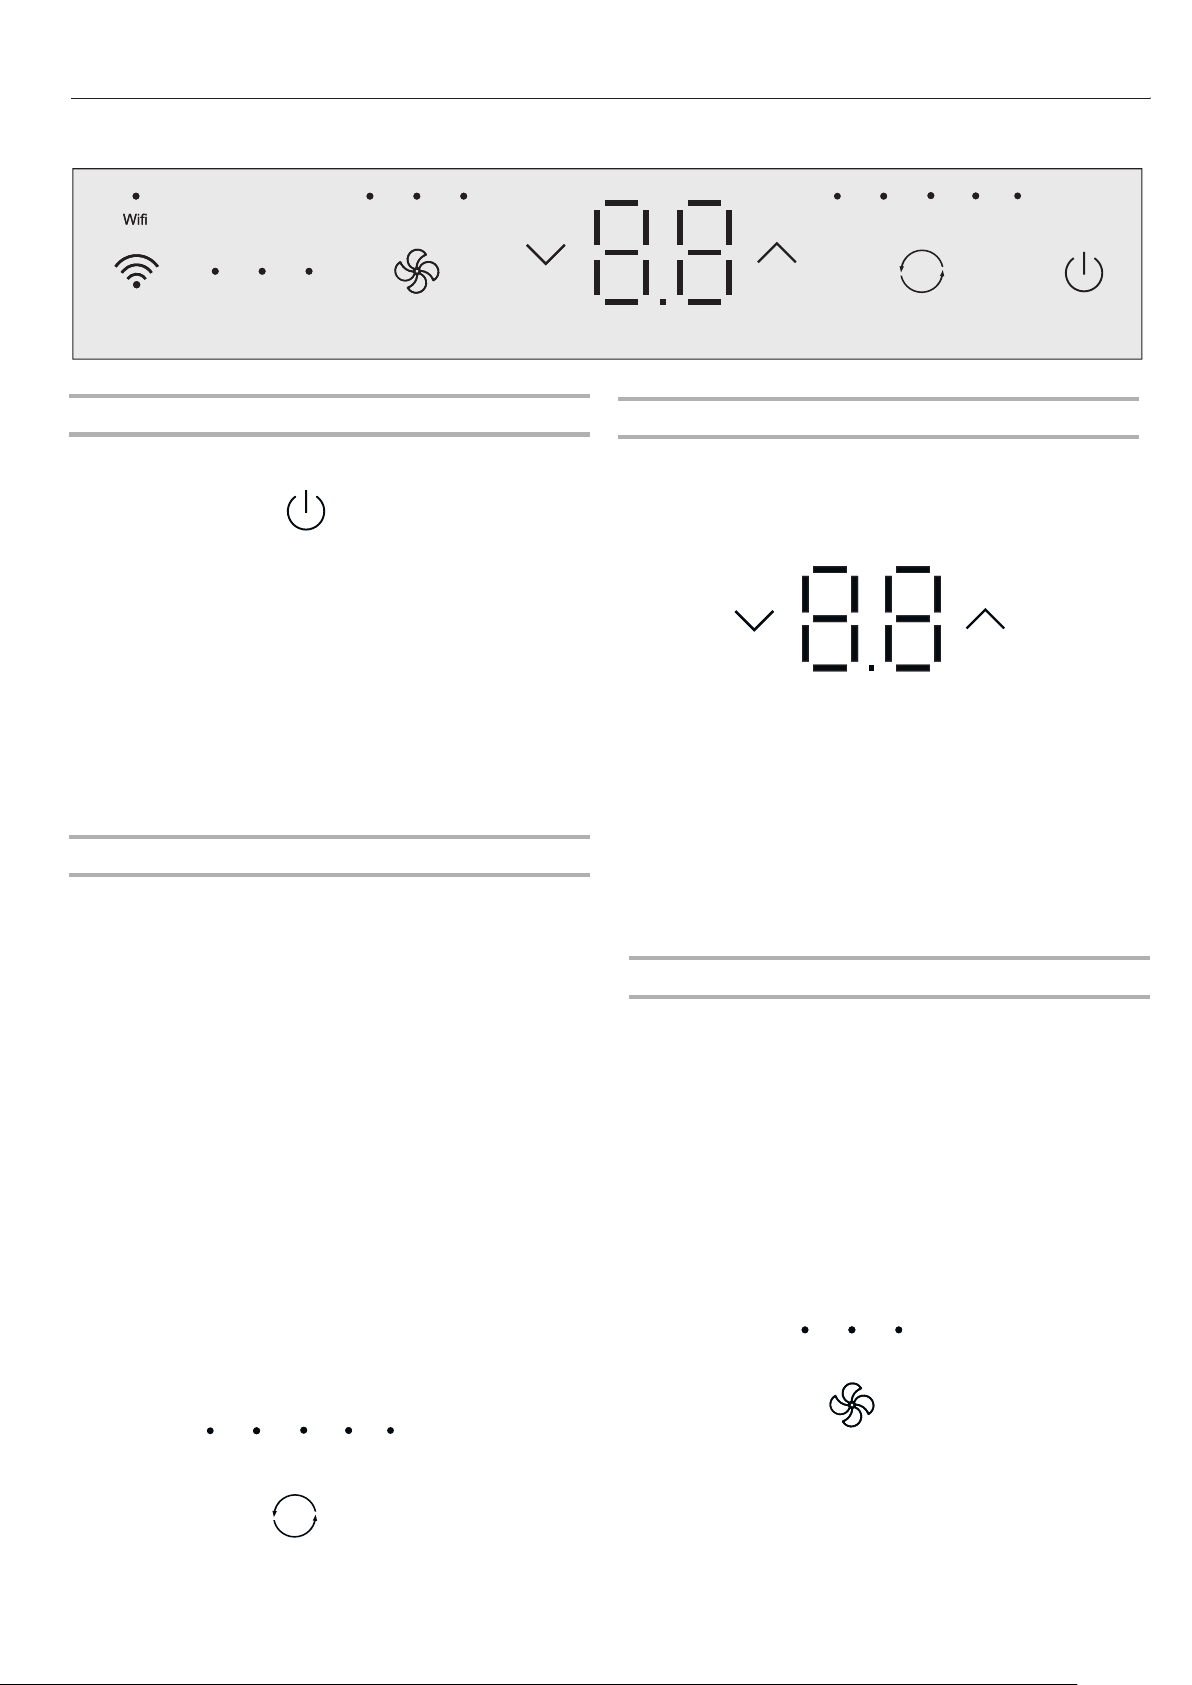
1.The LED light on for Timer、Sleep、Filter. control panel
Timer
WIFI
WIF
I
control is
ava
il
able
for
connected mode
l
s w
i
th
th
i
s
l
ogo on control
panel.
TimerSleepFilterTimerSleepFilter
2.
The
function introduction
see “using the remote control”.
CONNECT
1.Press the CONNECT
button for 5s,the LED starts to flash.
2.
After the WIFI module connecting the router,the LED
keeps on.Or the LED keeps off.
NOTE:
WIFI control
is available only for
WIFI control
models.
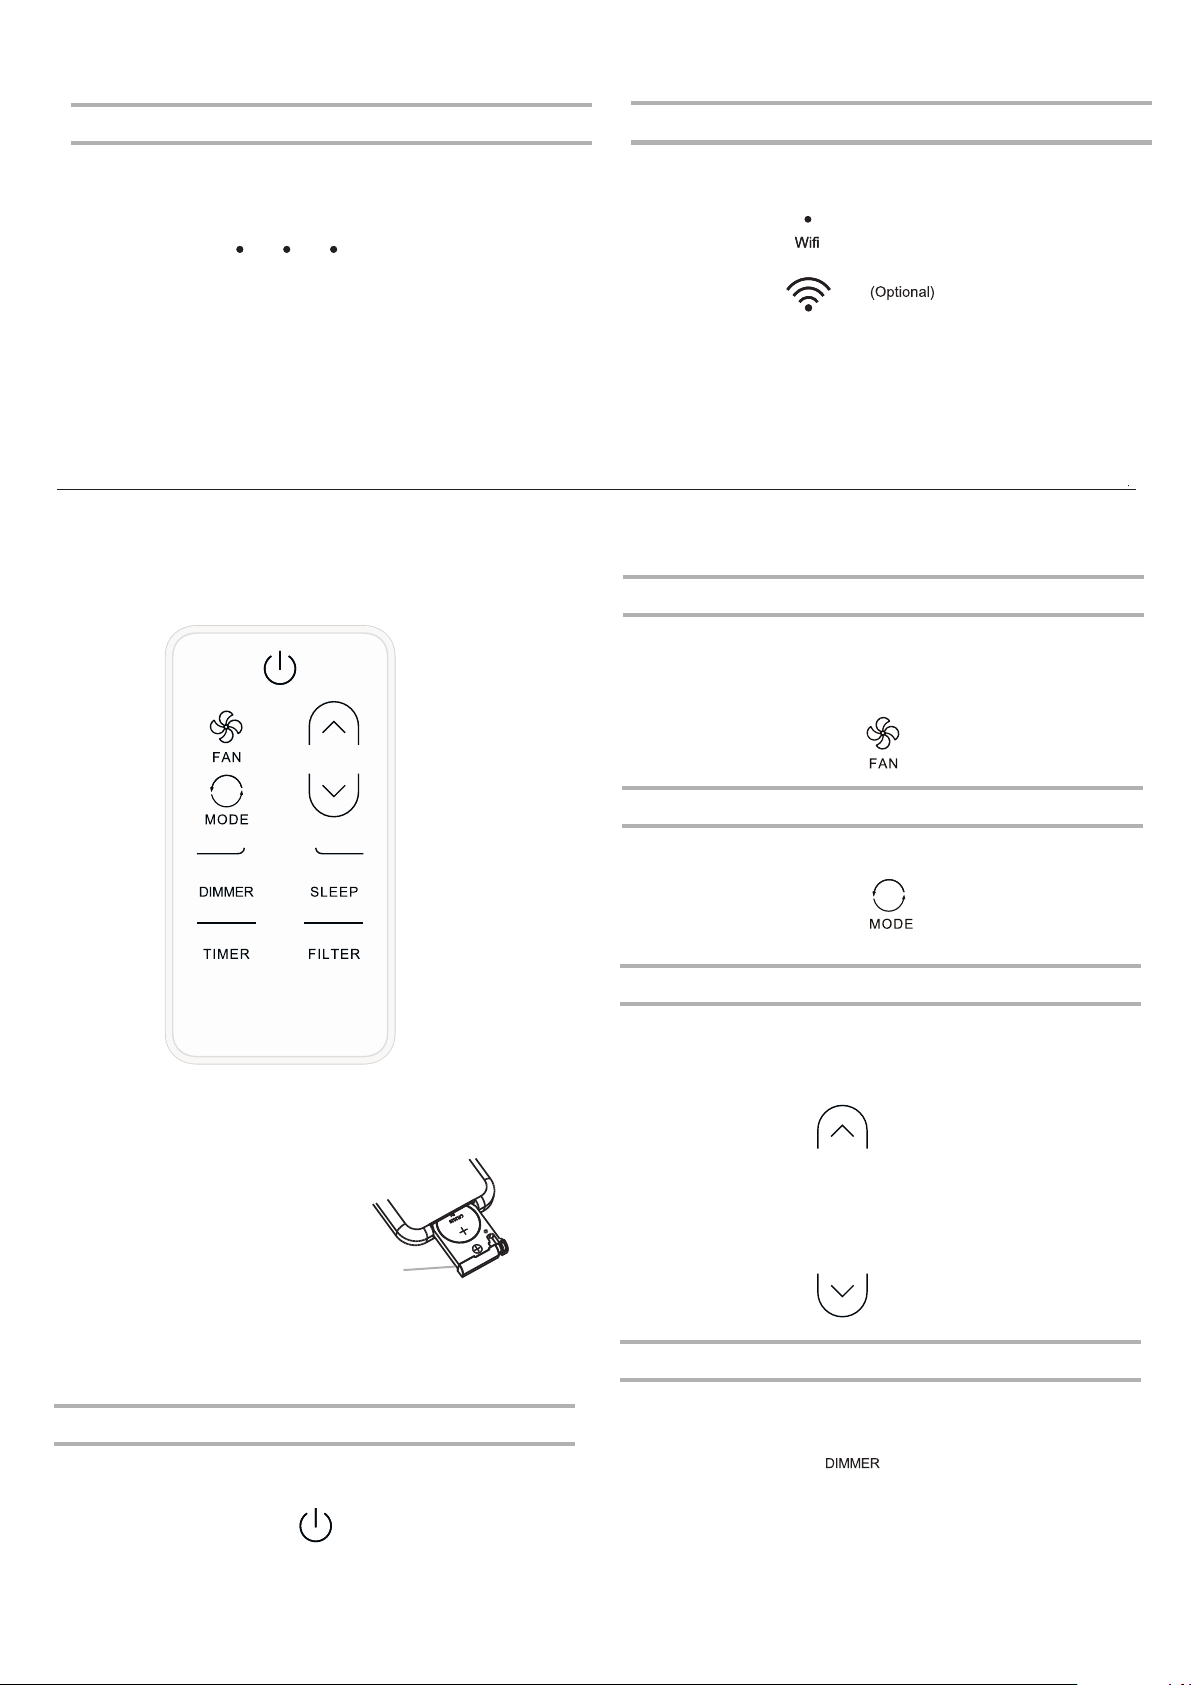
Using the Remote Control
N
O
TE
:
R
emote
con
tr
o
l may
d
if
fe
r
i
n
a
pp
earance.
NOTE:
Disposal of battery old batteries must be removed and
disposed of in accordance with current legislation as they
are harmful to the environment.
■
Please ensure the correct direction
for polar
i
ty of the cell same as the
in d
i
cator on the bracket.
A
A.Bracket
■
■
■
When the first use,please remove the insulated
plastic patch.
One
CR2025
battery
(included)
powers the
remote
control.
Replace
battery after
6 months of
use,
or
when
the remote
control starts
to
lose
power.
Power
Press
power button
to
turn
on/off air
conditioner.
Moed
Press
MODE to
select
Cool, ECO.Fan, Dry,
Fan
Press
FAN
to
select
High, Med, Low.
NOTE:
In Dry modeFan speed cannot be set.,
■Press the
plus UP
button
to raise the
temperature. Each
(∧)
time
you
press
or
hold the plus
button, the
UP (∧)
temperature
will
go up 1°F (1°C) until it reaches
86°F (30°C).
Temperature
■
Press
the
minus
DOWN
(∨)
button
to
lower
the
temperature.
Each time
you
press
or
hold
the
DOWN
(∨)
button,
the
temperature will
go
down
1°F
(1°C)
until
it
reaches
61°F
(16°C).
Press the DIMMER button to turn off the control panel display.
DIMMER
NOTE:
When in DIMMER mode, new control inputs will return
display
to normal.
12

13
Sleep
■
■
5.To
turn
off
Slee
p
contro
l
,
p
ress
SLEEP
aga
i
n.
or wait 8 hours
for the
air
conditioner
to
turn
off
automatically.
NOTE:
The
air
conditioner wil
l
return to previous
settings after
Sleep
control is
turned
off.
In
the
Cooling
mode,Dry
mode, ECO mode,
temperature will increase by 4°F(2°C)at most, during 2hours,
and continues runnin
g a
t that tem
p
erature until auto shut off
.
the set
In Heating mode, the set temperature will decrease by 4°F(2°C)
at most, during 2hours, and continues running at that
temperature until auto shut off.
NOTES:
When you press sleep button
1.Press MODE toselect Cool,Dry or ECO
2.Press FAN to selectHigh, Med orLow.
3.Press theup ordown arrow buttonto setthe temperature.
4.Press SLEEP. After 10 seconds, thelights onthe control
panel display willdim.
NOTE: The modeand temperaturemaybeadjustedduring
Sleep control. Fan speedis automatically set to LOW.
2. Press up or down arrow button to change the delay time from
1 hour to 24 hours.
3. Press TIMER on remote control again for TIMER
confirmation and TIMER indicator light on the air
conditioner control will be on.
4. To cancel the TIMER, press the TIMER on remote and
the TIMER indicator light will be off.
Timer
To
set
timer
for
a
1-24
hour
delay
on-off
operation:
1.Press
TIMER
on
remote
control,
LED
display
on
the
air
conditioner
control
panel
will
flash.
When the light is on, it will remain on for 180
hours or until you press Clean Filter button.
NOTE:
Filter
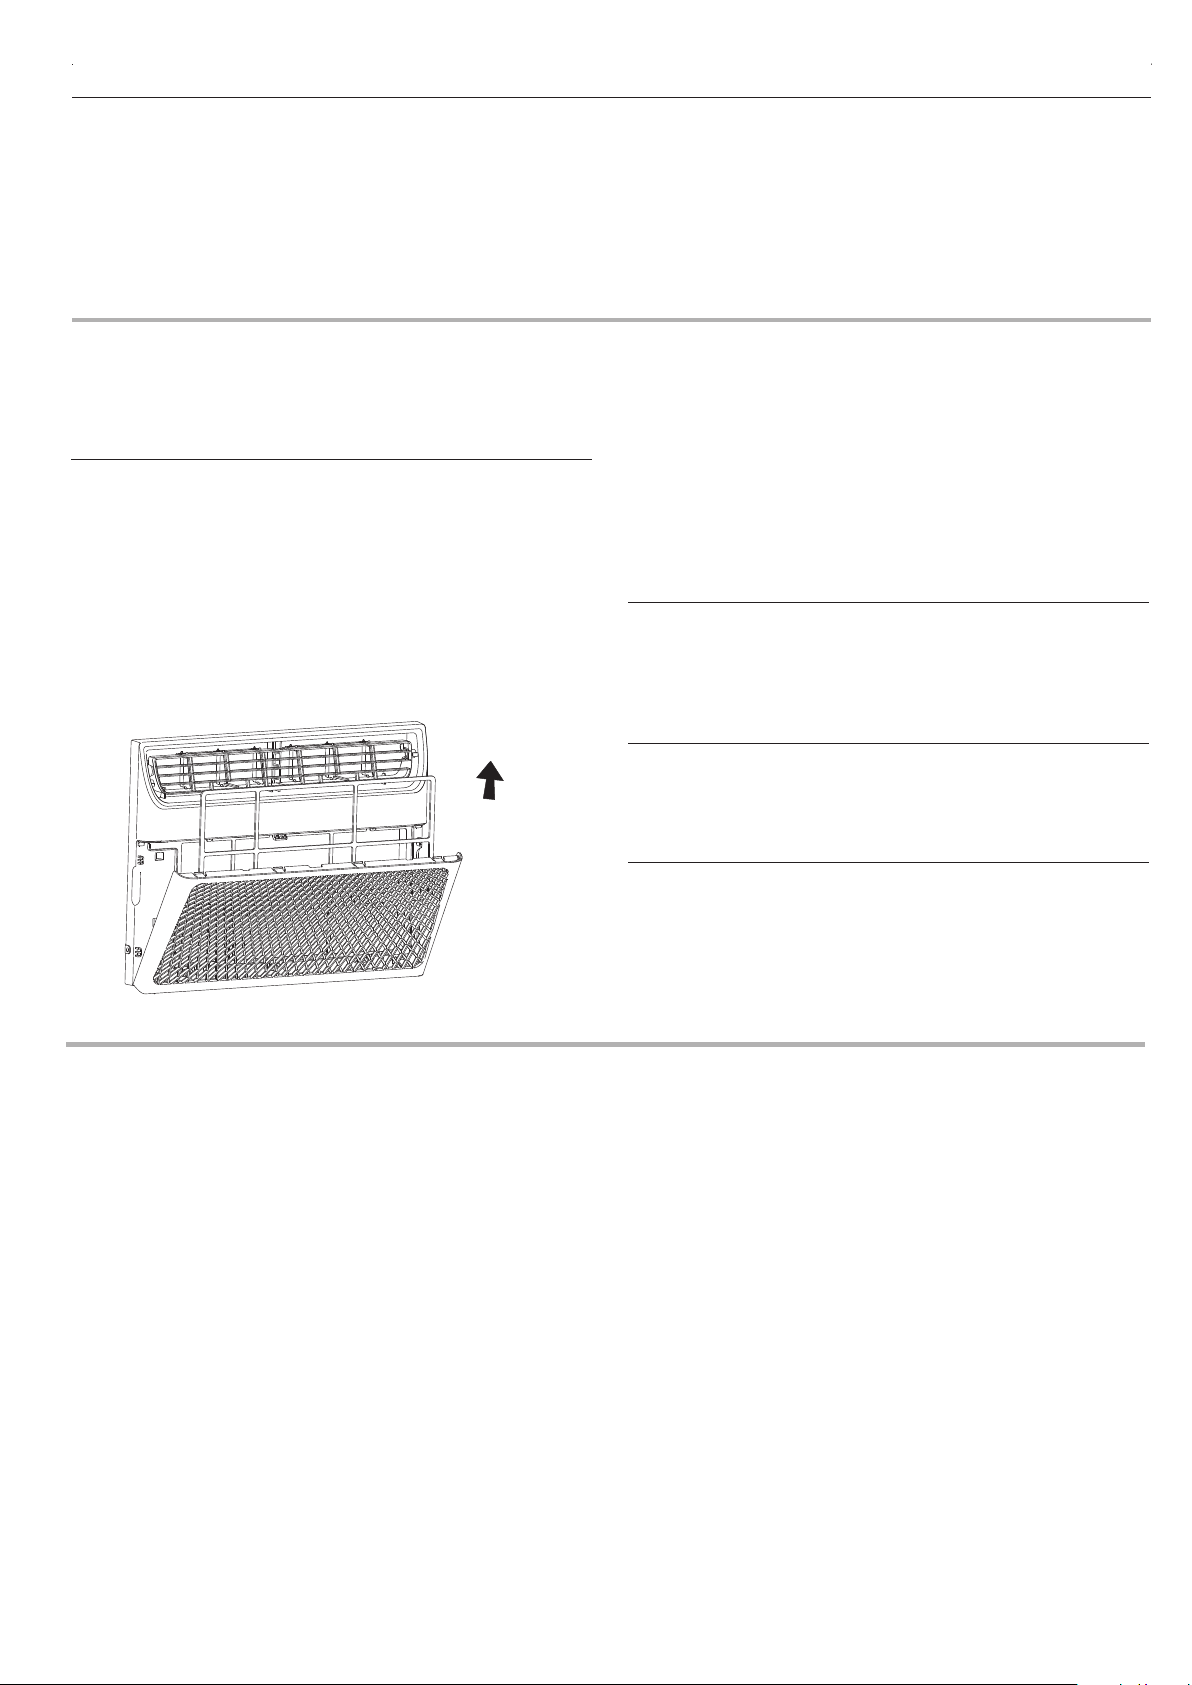
1. When the Filter indicator light is lit, remove, clean and
replace the air filter. See “Cleaning the
Air Filter”.
2. Press Power
button
on the machine, or FILTER button
on remote to
reset
the
filter,
after
cleaning and replacing
the
air
filter.
Changing
Air
Direction
Use the Vertical Level Vane to direct the air right or left. Use the whole cartridge to direct air up, down or straight ahead.
A
B
■Pull out the exhaust air vent control to Open the exhaust air
vent and draw stale or smoky air from the room.
■Push in the exhaust air vent control to close the exhaust air
vent for maximum continuous cooling.
The exhaust air vent control will function only when the
A.Exhaust air vent control
A
fan is running.
NOTE:
A.
Vertical Level Vane
B. Cartridge
Exhaust
Air
Vent
When your air conditioner is operating normally, you may hear
sounds
such
as:
■
Droplets of water hitting the condenser, causing a pinging or
clicking sound. The water droplets help cool the condenser.
■
Airmovement from the fan.
■Clicks from thethermostat cycle.
■Vibrations or noise due to poor wall or window construction.
■Ahi
gh
-pitched hum or pulsatin
g
noise caused
by
the modern
hi
gh-
efficienc
y
compr
essor
cy
cli
ng
on and off.
Normal
Sounds
AIR CONDITIONER CARE
Your new air conditioner is designed to give you many years of dependable service. This section tells you how to clean and care for your
air conditioner properly. Call your local authorized dealer for an annual checkup. Remember the cost of this service call is your
responsibility.
3.Use
a
vacuum
cleaner
to
clean
the
air
filter.
If
the
air
filter
is
very
dirty,
wash
it
in
warm
water
with
a
mild
detergent.
Do
not
wash
the
air
filter
in
the
dishwasher
or
use
any
chemical
cleaners.
Air
dry
the
filter
completely
before
replacing
to
ensure
maximum
efficiency.
4.Replace
the
air
filter
back
and
close
the front panel.
Cleaning
the
Front
Panel
1.Turn
off
the
air
conditioner.
2.Clean
the
front
panel
with
a
soft,
damp
cloth.
3.Air
dry
the
front
panel
completely.
Repairing
Paint
Damage
Check
once
or
twice
a
year
for
paint
damage.
This
is
very
important,
especially
in
areas
near
oceans
or
where
rust
is a
problem.
If
needed,
touch
up
with
a
good
grade
enamel
paint.
Annual
Maintenance
Your
air
conditioner
needs
annual
maintenance
to
help
ensure
steady,
top
performance
throughout
the
year.
Call
your
local
authorized
dealer
to
schedule
an
annual
checkup.
The
expense
of
an
annual
inspection
is
your
responsibility.
Cleaning
the
Air
Filter
The
air
filter
is
removable
for
easy
cleaning.
A
clean
filter
helps
remove
dust,
lint,
and
other
particles
from
the
air
and
is
important
for
best
cooling
and
operating
efficiency.
Check
the
filter
every2
weeks
to
see
whether
it
needs
cleaning.
NOTE:
Do
not
operate
the
air
conditioner
without
the
filter
in
place.
1.
Turn
off
the
air
conditioner.
2.
Open
the
front
panel.
Grasp
the
filter
by
the
handle
and
pull it out.
4. Remove sash seal from between windows,and unscrew
safety lock.
5. Remove screws installed through frame and frame lock.
6. Remove the EVA foam(E-star models only).
9. Lift cabinet from window and slide the unit into it .
10. Assemble the front panel back.Store parts with the AC.
REMOVING AC FROM WINDOW
1. Turn AC off,and disconnect power cord.
7
. Close the curtain housing.
2. Remove the Front Panel.
3. Slide the unit out from cabinet and put the unit down.
8. Keeping a firm grip on cabinet,raise sash and carefully
remove.
14

TRLESHOOTINGOUB
Beforecalling for servicetry the sugge , stions below to see whether you can solve your problem without outside help.
■
The power supply cord is unplugged. Plug into grounded
3prong outlet. See "Electrical Requirements”.
■The power supply cord has tripped (Reset button has
popped out). Pressand release RESET (listen for click; Reset
button will latch and on some devices, a green light will turn
on) to resume operation.
■A householdfuse has blownor circuit breaker has ,
tripped. Replace the fuse or reset the circuit breaker. If the
problem continues, call an electrician. See "Electrical
Requirements”.
■The Power button has not been pressed. Press the Power
button.
■The local power has failed. Wait for power to be restored.
Air conditioner blows fuses or trips circuit breakers
■Too many appliances are being used on the same circuit.
Unplug or relocate appliances that share the same circuit.
■Timedelay fuse or circuit breaker of the wrong capacity -
is being used. Replace with a time-delay fuse or circuit
breaker of the correct capacity. See "Electrical
Requirements”.
■An extension cord is being used. Do not use an extension
cord with this orany other appliance.
■You are trying to restart the air conditioner too soon after
turning off the air conditioner. Wait at least minutes after 3
turning off the air conditioner before trying to restart the air
conditioner.
Air conditioner power supply cord trips Reset button (
pops out)
■Disturbances in your electrical current can trip (Reset
button will pop out) the power supply cord.
release RESET (listen for click; Reset button will latch and on
some devices, a green light will turn on) to resume operation.
■Electrical overloading, overheating, cord pinching or
aging can trip (Reset button will pop out) the power
supply cord.
RESET (listen for click; Reset button will latch and on some
devices, a green light will turn on) to resume operation.
NOTE: Adamaged power supply cord must be replaced with a
new power supply cord obtained from the product manufacturer
and must not be repaired.
Air conditioner seems to run too much
■The current air conditioner replaced an older model. The
use ofmore efficient components may cause the air
conditioner to run longer than an older model, but the total
energy consumption will be less. Newer air conditioners do
not emit the "blast” of cold air you may be accustomed to
from older air conditioners, but this is not an indication of
lesser cooling capacity or efficiency. Refer to the efficiency
rating (EER) and capacity rating (in Btu/h) marked on the air
conditioner.
■The air conditioner is in a heavily occupied room, or heat-
producing appliances are in use in the room. Use exhaust
vent fans while cooking or bathing and try not to use heat-
producing appliances during the hottest part of the day. A
higher capacity air conditioner may be required, depending
on the sizeof theroom being cooled.
Air conditioner cycles on and off too much or does not
cool
■The air conditioner is not properly sized for your room.
Check the cooling capabilities of your room air conditioner.
Room air conditionersare not designed to cool multiple
rooms.
■The filter is dirty or obstructed by debris. Clean the filter.
■The inside evaporator and outside condenser coils are
dirty or obstructed by debris. See Annual Maintenance.
■There is excessive heat or moisture (open container
cooking, showers, etc.) in the room. Use a fan to exhaust
heat or moisture from the room. Try not to use heat-
producing appliances during the hottest part of the day.
■The louvers are blocked. Install the air conditioner in a
location where the louvers are free from curtains, blinds,
furniture, etc.
Electrical ShockHazard
Plug intoa groundedprong outlet 3 .
Do notremove groundprong .
Do notuse anadapter .
Do notuse anextension cord .
Failure tofollow theseinstructions canresult indeath ,
fireorelectrical shock, .
WARNING
After correcting the problem, press and release
Press and
Air
conditioner
does
not
operate
15

■
You see water dripping from the rear of the unit.
Water may be collected in the base pan in highly humid
conditions or on rainy days.This water overflows and
drips from the rear of the unit.
Water
drips
from
the rear of the unit
Water
drips
from
cabinet
into
your
house
■
The
air
conditioner
is
not
properly
leveled.The
air
conditioner
should
slope
slightly
downward
toward
the
outside.
Level
the
air
conditioner
to
provide
a
downward
slope
toward
the
outside
to
ensure
proper
drainage.
See
the
Installation
Instructions.
NOTE:
Do
not
drill
a
hole
in
the
bottom
of
the
metal
base
and
condensate
pan.
■
The
temperature
of
the
room
you
are
trying
to
cool
is
extremely
hot.
Allow
extra
time
for
the
air
conditioner
to
cool
off
a
very
hot
room.
■
Windows
or
doors
to
the
outside
are
open.
Close
all
windows
and
doors.
■
The
Temp
control
is
not
at
a
cool
enough
setting.
Adjust
the
Temp
control
to
a
cooler
setting
by
pressing
the
minus
button
to
reduce
the
temperature.
Set
the
Fan
Speed
control
to
the
highest
setting
.
16

TABLA DE CONTENIDOS
SEGURIDAD DEL CLIMATIZADOR - - - - - - - - - - - - - - - - - - 18
REQUISITOS DE INSTALACIÓN - - - - - - - - - - - - - - - - - - - - 19
INSTRUCCIONES DE INSTALACIÓN - - - - - - - - - - - - - - - - - 22
USO DEL AIRE ACONDICIONADO- - - - - - - - - - - - - - - - - - - 26
Requisitos eléctricos - - - - - - - - - - - - - - - - - - - - - - - - - - - - - - 19
Herramientas y piezas - - - - - - - - - - - - - - - - - - - - - - - - - - - - - 20
Desempaquete el climatizador - - - - - - - - - - - - - - - - - - - - - - - 20
Prepare el aire acondicionado para realizar la instalación - - - - 22
Instalación del aire acondicionado en una ventana - - - - - - - - - 23
Complete la instalación - - - - - - - - - - - - - - - - - - - - - - - - - - - - 26
Requisitos de ubicación - - - - - - - - - - - - - - - - - - - - - - - - - - - - 21
Inicio del aire acondicionado - - - - - - - - - - - - - - - - - - - - - - - - - 27
Uso del mando a distancia - - - - - - - - - - - - - - - - - - - - - - - - - - 28
Cambio en la dirección del aire - - - - - - - - - - - - - - - - - - - - - - - 29
Ventilación del aire de escape - - - - - - - - - - - - - - - - - - - - - - - 29
CUIDADO DEL AIRE ACONDICIONADO- - - - - - - - - - - - - - - 30
EXTRACCIÓN DEL AIRE ACONDICIONADO DE LA
VENTANA - - - - - - - - - - - - - - - - - - - - - - - - - - - - - - - - - - - - - 30
RESOLUCIÓN DE PROBLEMAS - - - - - - - - - - - - - - - - - - - - 31
Limpiar el filtro de aire - - - - - - - - - - - - - - - - - - - - - - - - - - - - - 30
Limpieza del panel frontal - - - - - - - - - - - - - - - - - - - - - - - - - - - 30
Reparación de la pintura dañada - - - - - - - - - - - - - - - - - - - - - 30
Mantenimiento anual - - - - - - - - - - - - - - - - - - - - - - - - - - - - - - 30
Sonidos normales - - - - - - - - - - - - - - - - - - - - - - - - - - - - - - - - 30
17
SEGURIDAD DEL CLIMATIZADOR
INSTRUCCIONES IMPORTANTES DE SEGURIDAD
GUARDE ESTAS INSTRUCCIONES
ELIMINAR LA UNIDAD
Su seguridad y la seguridad de los demás es muy importante.
PELIGRO
ADVERTENCIA
Hemos incluido muchos mensajes de seguridad importantes en este manual y en el aparato. Lea y siga siempre todos los
mensajes de seguridad.
Todos los mensajes de seguridad le dirán qué peligro es, cómo reducir las probabilidades de una lesión y qué sucederá si
no sigue las instrucciones.
Antes de desechar el dispositivo, es necesario retirar las celdas de la batería y reciclarlas.
Cuando deba eliminar la unidad, consulte con nuestro distribuidor. Si las tuberías se retiran incorrectamente, podría soplar
refrigerante que entre en contacto con su piel, provocándole lesiones. El refrigerante liberado a la atmósfera también
dañará el medio ambiente.
Recicle o elimine el material de embalaje del producto de forma responsable con el medio ambiente.
Nunca almacene ni envíe el climatizador boca abajo ni de lado para evitar daños en el compresor.
Este aparato no ha sido diseñado para que lo utilicen personas (incluidos niños) con capacidades físicas, sensoriales o
mentales reducidas, o con falta de experiencia o conocimientos, a menos que estén supervisados o reciban instrucciones
acerca del uso del aparato por parte de una persona responsable de su seguridad.
Los niños deben estar supervisados para garantizar que no jueguen con el aparato.
En la placa del aire acondicionado se muestra el diagrama de cableado.
No utilice medios para acelerar el proceso de descongelación o de
limpieza que no sean los recomendados por el fabricante.No utilice
medios para acelerar el proceso de descongelación o de limpieza
que no sean los recomendados por el fabricante.
Debe tener mucho cuidado para evitar dañar la tubería
refrigerante al manipular, instalar y operar el electrodoméstico.
No perfore orificios en la unidad.
El mantenimiento, la limpieza y el servicio deben ser realizados
solo por técnicos capacitados y calificados en el uso de
refrigerantes inflamables.
Deshágase del aire acondicionado siguiendo las normas
federales y locales. Los refrigerantes inflamables requieren de
procedimientos de eliminación especiales. Contacte a las
autoridades locales para eliminar el aire acondicionado de forma
segura.
Para evitar que ocurran daños mecánicos, se debe guardar el
electrodoméstico.
Se debe almacenar el aparato en una sala sin fuentes de ignición en
funcionamiento continuo (por ejemplo: llamas vivas, aparatos de gas
o calentadores eléctricos en funcionamiento).
No perfore ni golpee la tubería del refrigerante. Tenga en cuenta
que es posible que los refrigerantes no tengan olor.
Mantenga los orificios de ventilación libres de obstrucciones.
La cantidad máxima de carga del refrigerante se muestra en la
placa del aire acondicionado.
ADVERTENCIA: Para reducir el riesgo de incendio, descarga eléctrica o lesiones al usar el climatizador, siga estas
precauciones básicas:
Este es el símbolo de alerta de seguridad.
Este símbolo lo alerta sobre un peligro potencial que puede matarlo o herirlo a usted y a otros.
Todos los mensajes de seguridad irán detrás del símbolo de alerta de seguridad y de la palabra
“PELIGRO” o “ADVERTENCIA”. Estas palabras significan:
Podría resultar en muerte o lesión grave si no se siguen
inmediatamente las instrucciones.
Podría resultar en muerte o lesión grave si no se siguen
las instrucciones.
Enchufe a una toma con 3 clavijas y conexión a tierra.
No retire la clavija de conexión a tierra.
No utilice adaptadores.
No utilice cables alargadores.
Desenchufe el climatizador antes de revisarlo.
Dos o más personas deben trasladar e instalar el climatizador.
ADVERTENCIA
Riesgo de incendio o explosión. Esta unidad contiene refrigerante inflamable.
Debe seguir las medidas de precaución adicionales.
18
Requisitos para el cableado
Peligro de descarga eléctrica
ADVERTENCIA
Método de conexión a tierra recomendado
Es responsabilidad del cliente:
NOTA:
Para probar su cable de alimentación:
NOTA:
A. Botón de prueba
B. Botón de reinicio
TEST
RESET
A
B
Cable de alimentación
Requisitos eléctricos
REQUISITOS DE INSTALACIÓN
19
Fuente de
alimentación
Modelo
Fusible de acción retardada
(o disyuntor)
12K BTU frío y calor
18A
18K BTU solo frío18K BTU solo frío
15A
20A
18K BTU frío y calor
24K BTU solo frío24K BTU solo frío
24K BTU frío y calor
Enchufe a una toma con 3 clavijas y conexión a tierra.
No retire la clavija de conexión a tierra.
No utilice adaptadores.
No utilice cables alargadores.
No seguir estas instrucciones puede resultar en muerte,
incendio o descarga eléctrica.
Este aire acondicionado debe estar conectado a tierra. El aire
acondicionado está equipado con un cable de alimentación y
un tomacorriente de tres patas con conexión a tierra. El cable
debe estar enchufado a una toma compatible de tres clavijas
con conexión a tierra y debe tener una conexión a tierra de
conformidad con todos los códigos y ordenanzas locales. En
caso de no disponer de un tomacorriente, es responsabilidad
del cliente tener un tomacorriente de tres patas con conexión
a tierra instalado por un electricista calificado.
Contactar a un electricista calificado.
Garantizar que la instalación eléctrica sea adecuada y
conforme al código eléctrico nacional, la última edición de
ANSI/NFPA 70 y todos los códigos y ordenanzas locales.
Su aire acondicionado puede diferir del que se muestra aquí.
Este aire acondicionado está equipado con un cable de
alimentación por UL. Este cable de alimentación contiene
electrónica avanzada que detecta la corriente residual. Si el
cable está aplastado, la electrónica detecta la corriente residual
y la energía se desconectará en una fracción de segundos.
Para un funcionamiento correcto, debe presionar el botón de
reinicio.
Se debe reemplazar el cable de alimentación si falla o se
activa al momento de presionar el botón de prueba o si falla al
reiniciar.
No utilice un cable de alimentación como un interruptor de
encendido/apagado. El cable de alimentación está diseñado
como un dispositivo de protección.
Se debe reemplazar el cable de alimentación dañado por un
cable nuevo que se obtiene del fabricante; no se debe reparar.
El cable de alimentación contiene piezas que el usuario no
puede reparar. Si abre la caja a aprueba de alteraciones,
anulará todas las garantías y demandas de rendimiento.
1. Conecte el cable de alimentación a un tomacorriente de 3 patas
con conexión a tierra.
2. Presione RESET (en algunos dispositivos se enciende una luz
verde).
3. Presione TEST (escuche un clic; el botón de reinicio se activará y,
en algunos dispositivos, se apagará una luz verde).
4. Presione RESET y suéltelo (escuche un clic; el botón de reinicio se
detendrá y, en algunos dispositivos, se encenderá una luz verde).
El cable de alimentación está listo para funcionar.
Las copias de las normas mencionadas se pueden
obtener de:
Asociación Nacional de Protección contra el Fuego,
1 Batterymarch Park
Quincy, Ma 02169-7471
www.nfpa.org
208/230V
187,2V mín.
253V máx.
Herramientas necesarias
■
Destornillador Phillips
■
Tijeras
■
Nivel
■
Cinta métrica
■
Taladro inalámbrico y broca
de 1/8" mm
■
Lápize
Piezas suministradas
Verifique que todas las piezas estén incluidas en el empaque.
B
C
D
H
G
I
J
F
P
R
Retire los materiales de embalaje.
■
■
■
■
De lo contrario, podría resultar en lesiones en la espalda o
de otro tipo.
Dos o más personas deben trasladar e instalar el
climatizador.
S
NOTA:
Herramientas y piezas
Desempaquete el climatizador
ADVERTENCIA
Reúna las herramientas y piezas necesarias antes de empezar la
instalación. Lea y siga las instrucciones proporcionadas con las
herramientas aquí descritas.
A. Cinta adhesiva
B. Sello de espuma
C. Cortina lateral (2)
D. Guía superior y espuma
aislante de polietileno
E. Cinta adhesiva
F. Deflector (2)
G. Goma EVA (2)
H. Soporte en ángulo (2)
I. Soporte de esquina (2) (para
ventanas con revestimiento
de vinilo)
J. Seguro de la guillotina
K. Espuma aislante EPDM (2)
L. Tornillos de 3/4" (8)
M. Tornillos de 1/4" (10)
N. Tornillo largo de cabeza
plana de 3/4" y tuerca de
seguridad (2)
O. Tornillo largo de
1/2" y tuerca de
seguridad (4)
P. Arandela (2)
Q. Soportes izquierdo
y derecho (2)
R. Grampa
S. Aire acondicionado
T. Control remoto
El F. Deflector (2) no viene suministrado para los modelos de frío y calor de
12K BTU.
La R. Grampa solo viene para los modelos de frío y calor de 12K BTU.
La G. Goma EVA (2) solo viene para los modelos E-star, con el LOGO E-star
en el panel de control.
Retire y elimine/recicle los materiales de embalaje. Retire la cinta
y los residuos de pegamento de las superficies antes de encender
el climatizador. Frote una pequeña cantidad de jabón líquido para
lavar platos en el adhesivo con los dedos. Limpie con agua
templada y seque.
No utilice instrumentos afilados, ni frote alcohol, líquidos
inflamables o limpiadores abrasivos para eliminar la cinta o el
pegamento. Estos productos pueden dañar la superficie del
climatizador.
Manipule suavemetne el climatizador.
Quite la guía superior del material de empaque.
Peligro por exceso de peso
20
A
E
■
■
■
■
■
■
■
■
■
■
Antes de comenzar Instalación en ventana
Si el aire acondicionado está bloqueado por una ventana
de tormenta
A
(Con paneles de cortinas laterales)
B
Modelos A B
17 (432mm) min "
min
/10" (485mm)
18 1 (470mm) min /2"
27 - 41 " " (686mm) (1041mm)
32 2 5 - 4
/ " " (823mm) 4 (1118mm)
- 42 1" /10" (752mm)
Lea completa y cuidadosamente estas instrucciones.
Medidas de la abertura de la ventana:
A. Lamas del gabinete
A
Marco de la ventana
de tormenta u otra
obstrucción.
1-1/2"min
(38 mm)
■
■
■
Requisitos de ubicación
IMPORTANTE: Guarde estas instrucciones para uso local.
Estas instrucciones son para una ventana con doble
guillotina. Tendrá que modificarlas para otro tipo de ventanas.
Si es necesario instalarlo en una ventana estrecha, el aire
acondicionado se puede instalar sin los paneles de las
cortinas laterales. Refiérase a las dimensiones de la abertura
de la ventana.
Todas las piezas de soporte deben estar aseguradas a una
madera firme, mampostería o metal.
El tomacorriente debe estar dentro del alcance del cable de
alimentación.
Siga las dimensiones de la tabla y las ilustraciones para su
modelo
Añada madera como se muestra aquí o quite la ventana
antes de instalar el aire acondicionado.
Si tiene que dejar el marco de la ventana de tormenta,
asegúrese de que los orificios o las ranuras no estén
enmasillados o pintados.
IMPORTANTE: Siga todas las normas y ordenanzas.
IMPORTANTE: Siga todas las normas y ordenanzas.
NOTA: No se deben obstruir las lamas del gabinete. El aire
debe pasar libremente por las lamas del gabinete.
Nota para el instalador: Asegúrese de dejarle estas
instrucciones al consumidor.
Nota para el consumidor: Guarde estas instrucciones para
futuras referencias.
Nivel de habilidad: La instalación de este electrodoméstico
requiere de habilidades mecánicas básicas.
Tiempo de ejecución: Aproximadamente 1 hora.
Le recomendamos que dos personas instalen el producto.
La instalación correcta es responsabilidad de la persona que
lo instala.
La falla del producto debido a la instalación incorrecta no está
cubierta por la Garantía.
Al momento de instalar este aire acondicionado, usted DEBE
utilizar todas las piezas suministradas y seguir correctamente
los procedimientos de instalación como se describen en estas
instrucciones.
No utilice cables alargadores.
El aparato debe instalarse de acuerdo con la normativa
nacional de cableado.
Libre movimiento del aire en la habitación a ser enfriada.
Una abertura lo suficientemente grande para el aire
acondicionado.
Modelos de frío y calor sin
lamas en el gabinete superior
Compruebe el lugar donde instalará el aire acondicionado. Es su
responsabilidad que la instalación sea correcta. Asegúrese de
tener todo lo necesario para realizar una instalación correcta.
La ubicación debe brindar:
guillotina
El espesor del panel
requerido para una
inclinación correcta
hacia atrás por el
alféizar. Asegurar
con clavos o
tornillos.
21
Instale la guía superior y los sujetadores laterales
Extracción del aire acondicionado del gabinete
NOTA: Quite todo el material de empaque del gabinete exterior.
INSTRUCCIONES DE INSTALACIÓN
Prepare el aire acondicionado para realizar la instalación
El modelo 12K no
necesita de estos
dos tornillos
Tornillos de 1/4"
El modelo 12K no necesita
de los dos deflectores
1. Busque los dos tornillos del panel frontal y quítelos.
Estos tornillos serán necesarios para volver a instalar
el panel frontal más adelante.
2. Presione el lateral del gabinete de metal para liberar
las solapas plásticas en cada lado del panel frontal.
4. Quite los tornillos de envío de la parte superior de
la unidad y de los laterales de la base si están
colocados.
6. Añada dos aislantes en los orificios de la parte
superior del gabinete, en el lugar donde se quitaron
los tornillos de envío.
1. Quite el revestimiento de la cinta adhesiva de la junta de espuma. Añada la cinta adhesiva a la junta inferior de
la guía superior. Coloque 4 tornillos dentro del gabinete y asegure la guía superior.
2. Desde la parte interior del gabinete, coloque 3 tornillos para añadir cada deflector lateral como se muestra a
continuación. Añada los deflectores laterales con el lado plano contra el gabinete y el borde angular trasero del
gabinete.
3. Quite el panel frontal de la unidad.
5. Quite cuidadosamente el aire acondicionado
del gabinete.
22
C
B
A
TORNILLO LARGO DE
CABEZA HEXAGONAL
de 3/4"
Coloque el gabinete en la ventana
A. Tornillos de 3/4"
B. Cierre de seguridad (Solo para ventanas con
revestimiento en vinilo)
C. Espuma aislante de la guía inferior
Soporte lateral
alféizar interior
de la ventana
alféizar exterior
de la ventana
soporte del
gabinete
Ángulo del soporte del gabinete
colocado de forma segura en el
borde del alféizar interior.
Instalación del aire acondicionado en una ventana
5. Quite la cinta protectora del lado adhesivo de la espuma
aislante de la guía inferior.
2. Coloque el gabinete en la ventana con el soporte del
gabinete colocado de forma segura sobre el borde del
alféizar interior como se muestra aquí. Baje la ventana
temporalmente por detrás de la guía angular superior
para mantener el gabinete en el lugar.
4. Para ventanas con revestimiento de vinilo: Coloque dos
cierres de seguridad en los orificios ubicados en la parte
inferior del gabinete y pase los tornillos Phillips de cabeza
plana de 3/4" a través de los cierres de seguridad en el
gabinete como se muestra aquí.
Instale las cortinas laterales
Cortina lateral
Carcasa de la cortina
A
B
A
.
Guillotina inferior de la ventana
Cinta adhesiva
B.
1. Abra la ventana y marque el centro del alféizar interior de la
ventana como se muestra aquí.
Corte la cinta adhesiva al ancho de la guillotina inferior de la
ventana. Quite el reverso de la cinta y pegue la cinta a la
parte de abajo de la guillotina inferior de la ventana.
3. Mueva el gabinete a la izquierda o derecha como sea
necesario para alinear el centro del gabinete con la línea
central marcada en el alféizar interior.
1. Coloque el gabinete en el piso, un banco o la mesa.
2.
Deslice la sección “I” al final de la cortina lateral en el soporte lateral de cada lado del gabinete.
3. Coloque la carcasa de la cortina dentro del canal en la parte superior e inferior de la guía en cada lado del gabinete.
Para ventanas de madera: Sujete el gabinete al alféizar
interior de la ventana con dos tornillos largos de cabeza
hexagonal de 3/4" en los orificios (quizás prefiera perforar
previamente los orificios de guía).
23

Instale los soportes
MARCA
MARCA
Tornillo largo de 1/2" y
tuerca de seguridad (4)
2.
Añada el soporte en ángulo del alféizar al soporte
en ángulo en la posición marcada con los tornillos
de cabeza plana y las tuercas. En este punto, solo
ajuste con la mano.
DERECHO
IZQUIERDA
Soporte en ángulo
Tornillo largo de cabeza plana
de 3/4" y tuerca de seguridad
Tornillo largo de 1/2" y
tuerca de seguridad
4.
Modifique la altura del soporte en ángulo del alféizar
para que los soportes queden de forma segura en el
borde del alféizar y para que el gabinete tenga la
inclinación correcta de 3º para que el agua drene de
forma correcta. Ajuste las tuercas de forma segura.
Lama lateral
Soporte en ángulo del alféizar
Marco de la
ventana
aproximadamente 3º
Tornillos de 1/4"
Sostenga cada soporte contra la parte exterior del alféizar
y sujete a la parte inferior del gabinete. Marque los
soportes en la parte superior del alféizar. Marque la parte
inferior del gabinete a la distancia del ancho del alféizar.
Quite los soportes.
3.
Inserte los tornillos largos de 1/2" a través de los orificios
correctos en la parte inferior del gabinete dada la distancia
del ancho del alféizar. Enrosque los tornillos en las ranuras
de los soportes en ángulo. Ajuste las arandelas en los
tornillos.
5.
Añada la guía superior a la ventana
1. Cierra la ventana por detrás de la guía.
2. Añada la guía angular superior al marco de la ventana: Utilice una broca para perforar un orificio a través del orificio
en el medio de la guía angular superior en el marco de la ventana y pase los tornillos de fijación de 3/4" a través del
orificio en el medio de la guía angular superior en el marco de la ventana como se muestra aquí.
1.
Alféizar de la ventana
Coloque el soporte de esquina entre la base y el alféizar
del gabinete utilizando los tornillos de 1/4" (6,5 mm) como
se muestra a continuación.
NOTA: Este seguro está disponible solo para el modelo
12K BTU.
24

1. Coloque la espuma detrás de la parte superior del marco
inferior de la ventana y contra el vidrio de la ventana superior.
cierre de seguridad
3.
Si es necesario, corte el sello a la longitud necesaria,
quite el reverso protector y utilícelo para tapar cualquier
espacio.
A
B
C
A. Marco de la ventana
B. Orificio en la cortina lateral
C. Tornillos de 3/4"
tornillo de 3/4"
2.
Utilice la broca de 1/8" (3 mm) para perforar un orificio a
través del orificio de la guía superior.
1.
Saque la cortina de la izquierda de la unidad y adáptela al
canal de la ventana.
3.
Coloque uno de los tornillos de 3/4" (20 mm) en la cortina
izquierda y en el marco de la ventana.
Mida el ancho interno
de la cortina lateral
2.
Remarque la línea en la goma EVA a 1/8 (3 mm)
menos que el ancho medido; luego, corte la goma
EVA por la línea.
B
A
A. Carcasa de la cortina
B. Goma EVA
B
A
A. Parte superior de la
banda inferior de la ventana
B. Sello de espuma
A
B
3. Quite el reverso de la goma EVA.
Añada la goma EVA a la carcasa de la cortina, el lado con
el adhesivo debería estar frente a la carcasa de la cortina.
4.
Repita con la cortina de la derecha.
2. Añada el cierre de seguridad en ángulo recto a la parte
superior del marco de la ventana como se muestra aquí.
Instale el sello del marco de la ventana y el cierre de seguridad
1.
Añada un trozo de goma EVA en la carcasa de la
cortina. Para minimizar las fugas de aire y
garantizar un aislamiento óptimo, si es necesario,
instale la goma EVA en la carcasa de la cortina.
Después de instalar la unidad en la ventana, mida
el ancho interno de la cortina lateral como se
muestra aquí.
Añada las cortinas laterales a la ventana
Añada goma EVA (solo para modelos E-star)
25

Complete la instalación
USO DEL AIRE ACONDICIONADO
Al operar el aire acondicionado de forma correcta, lo
ayuda a obtener los mejores resultados.
Esta sección explica el uso adecuado del climatizador.
IMPORTANTE:
■
Si apaga el aire acondicionado, espere al menos 3
minutos antes de volver a encenderlo. Esto evita que el
aire acondicionado queme un fusible o haga saltar el
disyuntor.
■
■
NOTA: En caso de fallo de alimentación, el climatizador
funcionará con los ajustes previos cuando se restaure la
alimentación.
1.
Enchufe a una toma con 3 clavijas y conexión a tierra.
2.
Presione RESET en el cable de alimentación. Consulte
"Requisitos eléctricos".
Peligro de descarga eléctrica
Enchufe a una toma con 3 clavijas y conexión a tierra.
No retire la clavija de conexión a tierra.
No utilice adaptadores.
No utilice cables alargadores.
No seguir estas instrucciones puede resultar en muerte,
incendio o descarga eléctrica.
Instale el aire acondicionado en el gabinete e instale el panel frontal en la unidad
Ubicación correcta
del control de
ventilación
Los mejores límites para el aire acondicionado en el modo
de funcionamiento de refrigeración:
Lado exterior 64,4~109,4° F (18~43° C), ≤80%RH;
Lado interior 62,6~89,6° F (17~32° C), ≤80%RH.
Los mejores límites para el aire acondicionado en el modo
de funcionamiento de calefacción:
Lado exterior 19,4~75,2° F (-7~24° C), ≤80%RH;
Lado interior 32~80,6° F (0~27° C), ≤80%RH.
1. Incline el aire acondicionado y deslice el gabinete cuidadosamente.
2. PRECAUCIÓN: No presione los controles ni las bobinas.
3. Asegúrese de que el aire acondicionado esté firmemente colocado hacia la parte trasera del gabinete.
4. Vuelva a conectar el conector, si es que hay uno. Posicione la palanca de control de ventilación para que pase por su
canal en el panel frontal. Enganche las pestañas superiores del panel frontal en las ranuras de la parte superior del
gabinete y gire hacia abajo el panel frontal para que las pestañas laterales se enganchen en su lugar en el gabinete.
Coloque los 4 tornillos previamente extraídos en el panel frontal y en el aire acondicionado.
5.
Coloque el filtro del aire acondicionado. Vuelva a instalar la parrilla frontal enganchando las pestañas inferiores en
las ranuras de la parte inferior del panel frontal y mueva la parrilla hacia arriba para que quede en su lugar.
26
Inicio del aire acondicionado
1.
Presione el botón de encendido para encender el aire
acondicionado.
NOTA: El botón del ventilador funcionará solo cuando se hayan
elegido los modos Cool, Fan, ECO o Heat.
NOTA: Cuando se enciende el aire acondicionado por
primera vez después de conectarlo, la pantalla mostrará la
temperatura establecida actual y funcionará en ECO.
Modo
ON/OFF
1.
Presione MODE repetidamente hasta que vea que la luz
indicadora brille en la configuración deseada.
2.
Seleccione Fan [Ventilador], Dry [Seco], Cool [Frío], Eco,
o Heat [Calor].
■
■
■
■
DRY - Seca el ambiente. El climatizador selecciona
automáticamente la temperatura. El ventilador
funciona sólo a baja velocidad.
Cool - Enfría la habitación.
Eco - Enfría la habitación y ahorra energía.
Heat - Calienta la habitación.
■
ON/OFF
ON/OFF
TimerSleepFilterTimerSleepFilter
FAN FAN
MODE
MedLow
High
MedLow
High
FAN FAN
MedLow
High
MedLow
High
Dry
Fan
Cool
Eco
Dry
Fan
Cool
Eco
MODE
Heat
Dry
Fan
Cool
Eco
Dry
Fan
Cool
EcoHeat
CONNECTCONNECT
■
■
Temperatura
Pulse el botón más "UP" (∧) para subir la temperatura.
Cada vez que presione o mantenga presionado el botón
más "UP" (∧), la temperatura aumentará de a un 1º F
(1º C) hasta llegar a los 86º F (30º C).
Presione el botón menos "DOWN" (v) para disminuir la
temperatura. Cada vez que presione o mantenga presionado el
botón menos "DOWN" ( v ), la temperatura disminuirá de a un 1º
F (1º C) hasta llegar a los 61º F (16º C).
Después de realizar la limpieza y volver a conectar el filtro,
presione el botón POWER para reiniciar; la luz del FILTRO
se apagará.
FAN - Para seleccionar el modo de Solo ventilador.
Para cambiar la pantalla de la temperatura de ºF a ºC:
Presione los botones MODE y DOWN (v) al mismo tiempo
durante 5 segundos para cambiar la pantalla de ºF a ºC.
Ventilador
1.
Presione FAN hasta que vea que la luz indicadora
brille en la configuración deseada.
2.
Seleccione Alta, Media, Baja.
■
Alta - para una máxima refrigeración
■
Media - para una refrigeración normal
■
Baja- para una refrigeración leve
NOTA: En el modo ECO, el ventilador funcionará a una
baja velocidad cuando el compresor de apague.
2. Seleccionar modo Aparecerá "Modo".
3. Seleccione la velocidad del ventilador. Aparecerá "Ventilador".
4. Temperatura establecida Aparecerá "Temperatura".
■
NOTA: Heat solo está disponible para los modos de calefacción.
NOTA: El modo de Secado no debe utilizarse para enfriar la
sala.
NOTA: Seleccione el modo ECO para iniciar esta función.
Para los modelos E-star, el ventilador continuará
funcionando después de que el compresor se pague por 2
minutos (4 minutos la primera vez), luego, el ventilador se
apagará por 10 minutos. El ciclo del ventilador funcionará
por 2 minutos y se apagará 10 minutos en intervalos hasta
que la temperatura ambiente sea superior a la temperatura
establecida, cuando el compresor se vuelva a encender y
se reanude la refrigeración.
MODE
27
1.
La luz LED en el panel de control para Temporizador,
Reposo, Filtro.
Temporizador, Reposo, Filtro
WIFI
El control WiFi está disponible para los modelos
conectados con este logo en el panel de control.
TimerSleepFilterTimerSleepFilter
2.
Para una introducción sobre la función refiérase a "uso del
control remoto".
CONNECT
1.
Presione el botón CONNECT durante 5 segundos, la luz LED
comenzará a parpadear.
2.
Después de que el módulo WiFi se conecta en el router, la luz
LED permanecerá encendida. O la luz LED se apagará.
NOTA: El control WiFi está disponible solo para los modelos con
control WiFi.
Uso del mando a distancia
NOTA: El control remoto puede diferir en la apariencia.
NOTA:
Una pila CR2025 (incluida) energiza el
control remoto. Cambie la pila después
de 6 meses de uso o cuando el
control remoto pierda potencia.
Descarte de la pila Las pilas viejas deben ser eliminadas
y desechadas acorde a las normas vigentes ya que son
nocivas para el medio ambiente.
■
Asegúrese de que la dirección
correcta de la polaridad de la célula
sea la misma que el indicador en el
soporte.
A
A. Soporte
Quite el parche de plástico aislante en el primer uso.
■
■
■
Alimentación
Presione el botón de encendido para encender/apagar el aire
acondicionado.
Modo
Presione MODE para seleccionar Fan, Dry, Cool, ECO.
Ventilador
Presione FAN para seleccionar Alta, Media o Baja.
NOTA:
En el modo DRY no se puede seleccionar la velocidad del
ventilador.
■
Pulse el botón más "UP" (
∧) para subir la temperatura.
Cada vez que presione o mantenga presionado el botón más
"UP" (∧
), la
temperatura aumentará de a un 1º F (1º C) hasta
llegar a los 86º F (30º C).
Temperatura
■
Presione el botón menos "DOWN" (v) para disminuir la
temperatura.
Cada vez que presione o mantenga presionado el botón menos
"DOWN" (v), la temperatura disminuirá de a un 1º F (1º C) hasta
llegar a los 61º F (16º C).
Presione el botón DIMMER para apagar la pantalla del panel
de control.
NOTA:
En el modo DIMMER, los nuevos ingresos del control
volverán la pantalla a normal.
DIMMER [Atenuador]
28
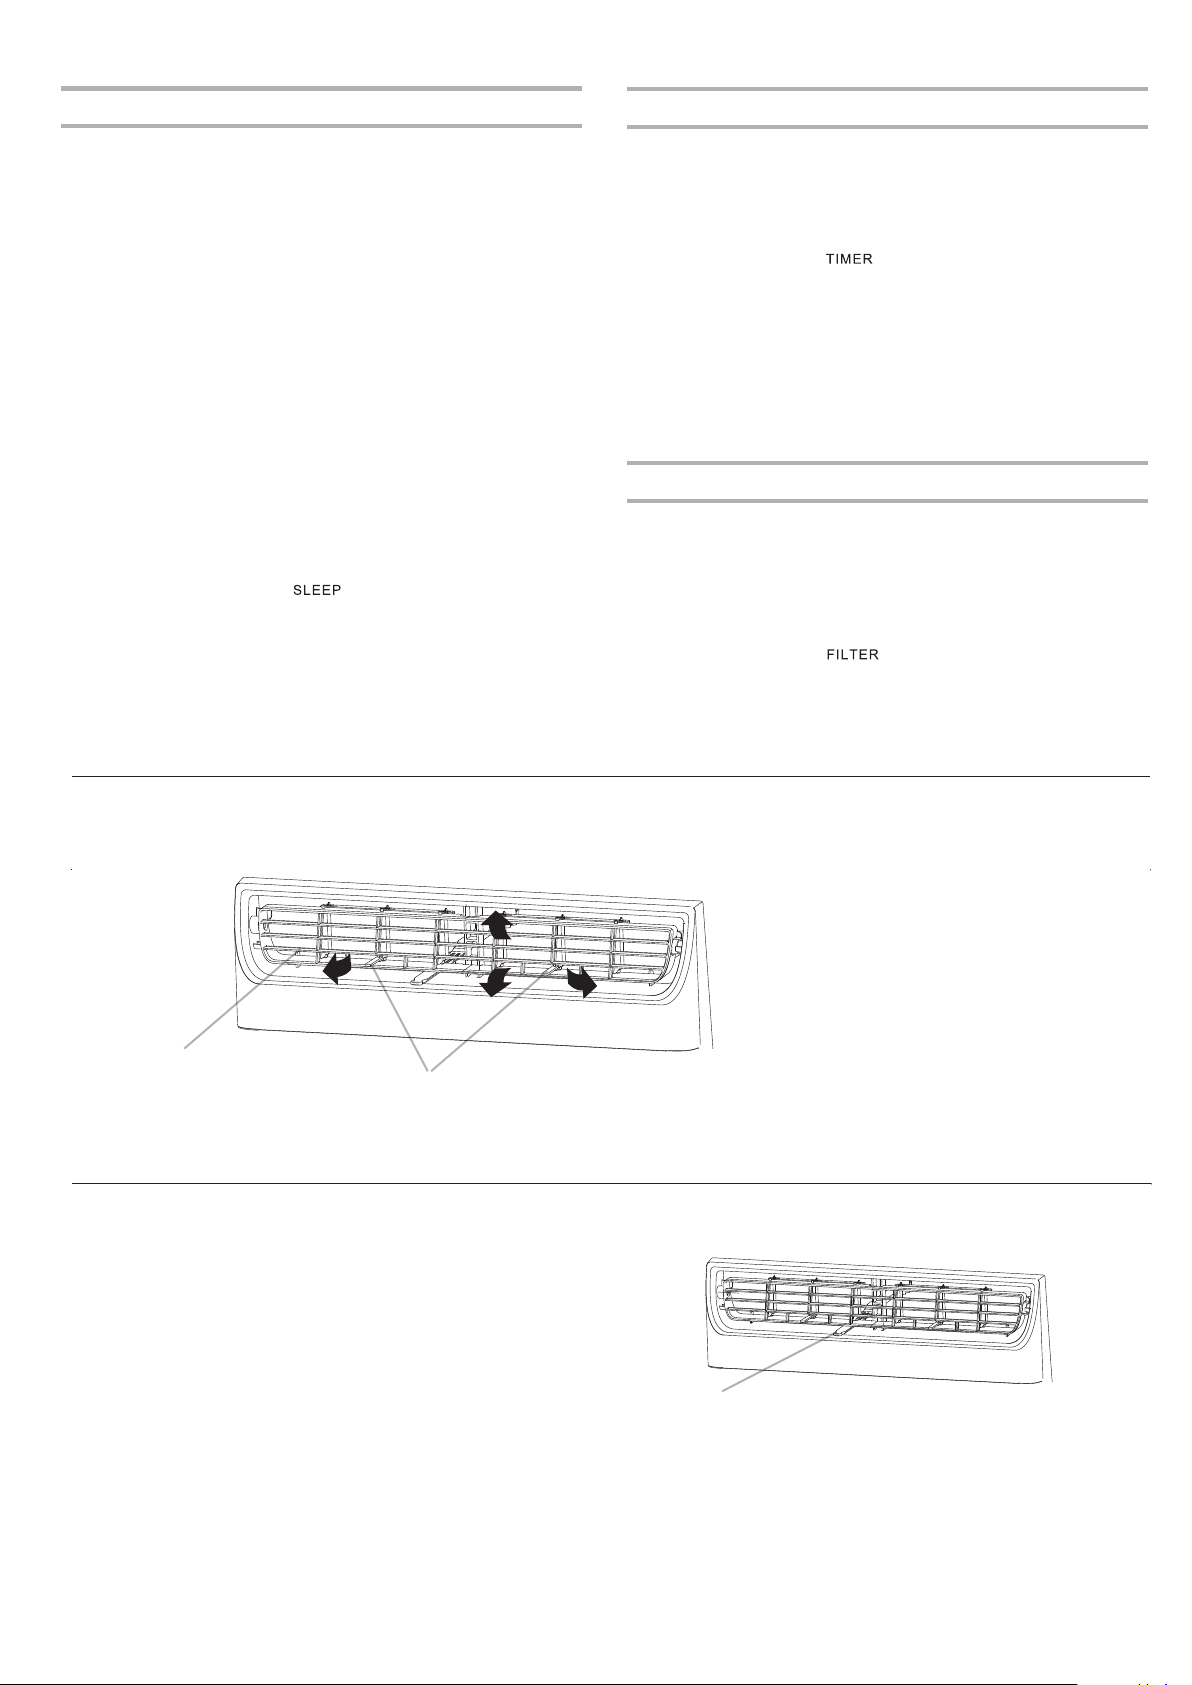
Suspender
■
■
NOTA: El modo y la temperatura se pueden modificar
durante el modo de reposo. La velocidad del ventilador
se establece automáticamente a velocidad BAJA.
5.
Para desactivar el modo de reposo, presione nuevamente
SLEEP o espere 8 horas para que el aire acondicionado se
apague automáticamente.
NOTA: El climatizador volverá a los ajustes previos después
de desactivar el control de suspensión.
En el modo Cooling, Dry, ECO, la temperatura establecida
aumentará a 4º F (2º C) como máximo durante 2 horas y
continuará funcionando a esa temperatura hasta que el
automático se apague.
En el modo Heating, la temperatura disminuirá a 4º F (2º C)
como máximo durante 2 horas y continuará funcionando a esa
temperatura hasta que el automático se apague.
NOTAS: Cuando presiona el botón de reposo:
1.
Presione MODE para seleccionar Cool, Dry o ECO.
2.
Pulse VENTILADOR para seleccionar Alta, Med o Baja.
3.
Presione el botón arriba o abajo para establecer la temperatura.
4.
Pulse SUSPENSIÓN. Al cabo de 10 segundos, las luces del
panel de control se atenuarán.
2.
Presione el botón arriba o abajo para cambiar el tiempo de
retardo desde 1 hora hasta 24 horas.
3.
Presione TIMER en el control remoto nuevamente para
confirmar TIMER, su indicador se encenderá y se
encenderá en control del aire acondicionado.
4.Para cancelar TIMER, presione TIMER en el control
remoto y la luz del indicador TIMER se apagará.
Temporizador
Para establecer el temporizador para el funcionamiento de
encendido/apagado con un retraso de 1-24 horas:
1.
Presione TIMER en el control remoto, la pantalla LED en
el panel de control del aire acondicionado parpadeará.
NOTA:
Cuando la luz está encendida, permanecerá encendida
por 180 horas o hasta que usted presione el botón Limpiar
el Filtro.
Filtro
1.
Cuando la luz del indicador del filtro está encendida, quite,
limpie y reemplace el filtro. Consulte "Limpiar el filtro de
aire".
2.
Presione el botón de encendido en la máquina o el botón
FILTER en el control remoto para reiniciar el filtro después
de realizar la limpieza y el cambio del filtro del aire.
Cambio en la dirección del aire
Utilice el aspa de nivel vertical para dirigir el aire hacia la izquierda o la derecha. Utilice todo el cartucho para dirigir el aire
hacia arriba, abajo o adelante.
A. Aspa de nivel vertical
B. Cartucho
A
B
Ventilación del aire de escape
■
Abra el control de la ventilación del aire de escape para abrir
la ventilación de escape y sacar el aire viciado o el humo de
la habitación.
■
Presione el control de la ventilación del aire de escape para
cerrar la ventilación de escape para una máxima y continua
refrigeración.
A
A. Control de ventilación del aire de escape
NOTA: El control de ventilación del aire de escape funciona
solamente cuando el ventilador está funcionando.
29
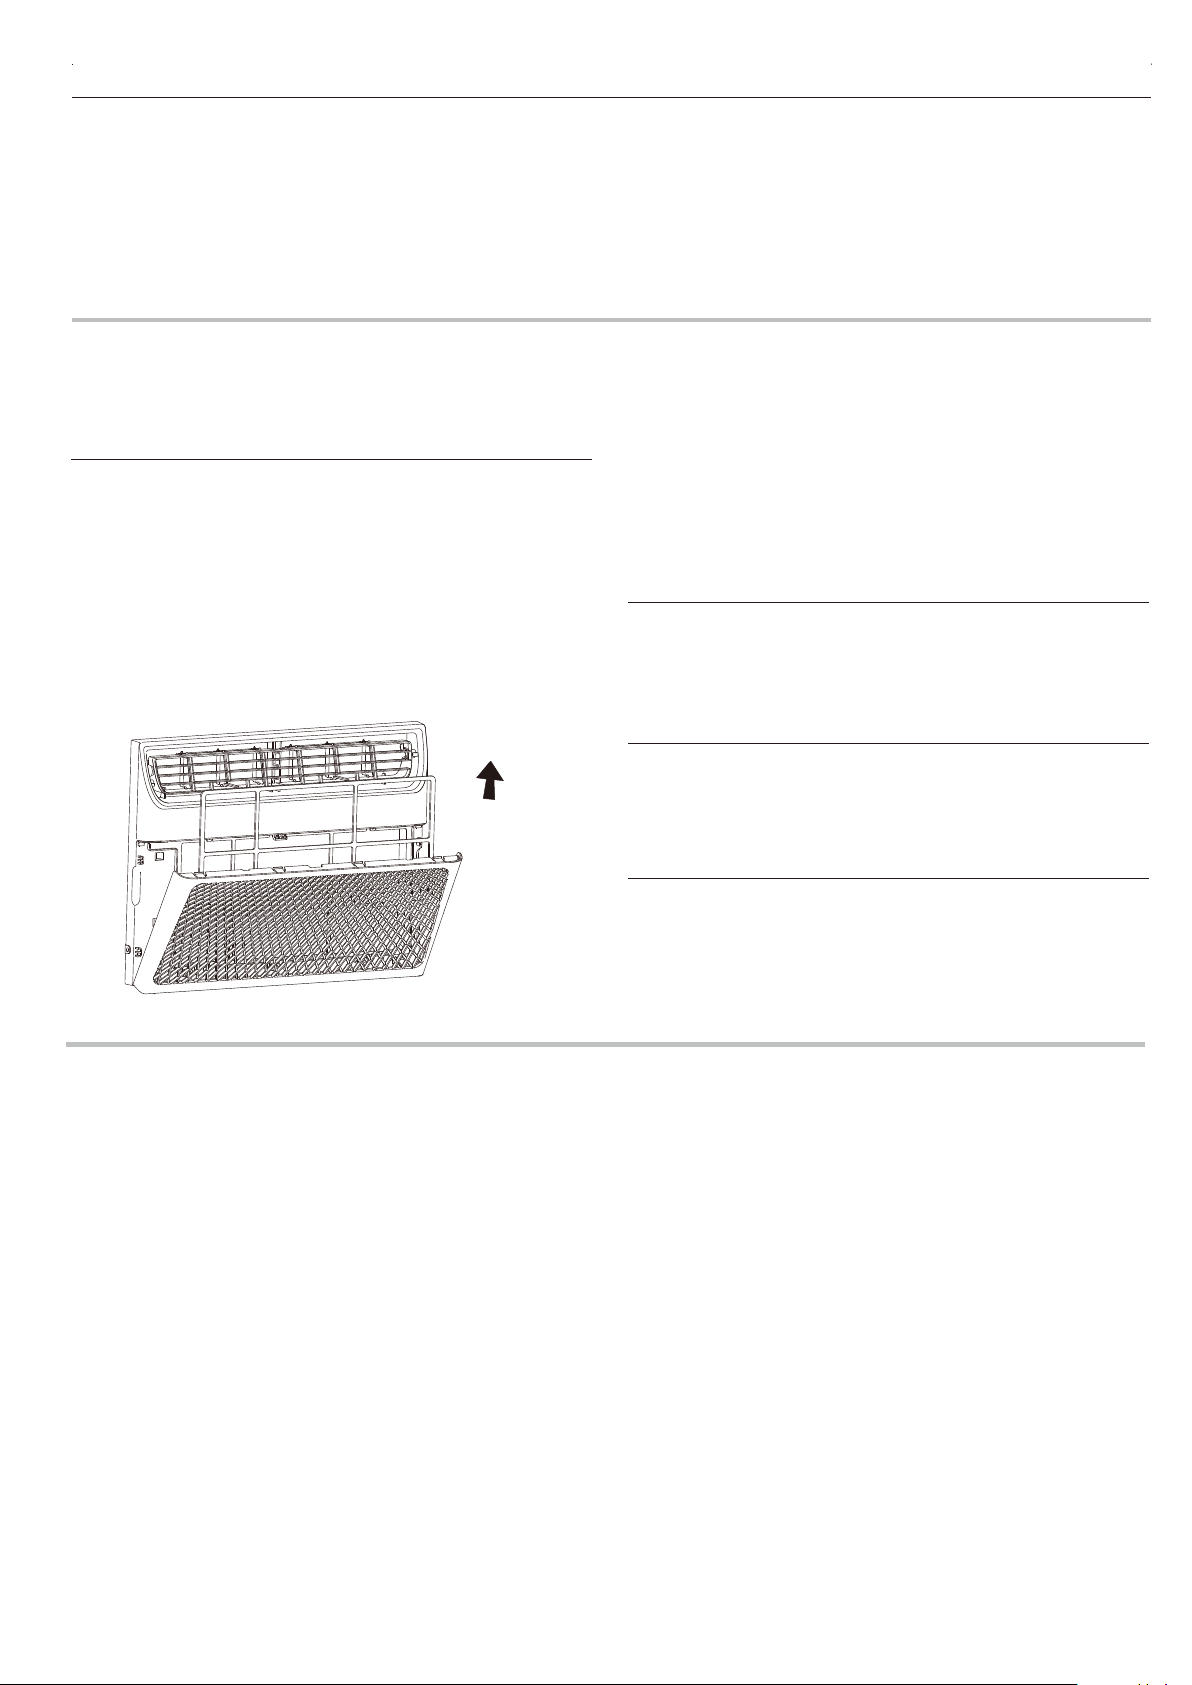
Cuando el climatizador funcione con normalidad, es posible
que escuche sonidos como:
■
Las gotas o el agua que golpean el condensador causan un
sonido de click o un tintineo. Las gotas de agua ayudan a
enfriar el condensador.
■
El movimiento del aire desde el ventilador.
■
Chasquidos del ciclo del termostato.
■
Vibraciones o ruido por una mala construcción de la pared o
la ventana.
■
Un zumbido agudo o un ruido pulsando debido al encendido
y apagado cíclico del compresor.
Sonidos normales
CUIDADO DEL AIRE ACONDICIONADO
Su aire acondicionado nuevo está diseñado para brindarle muchos años de servicio confiable. Esta sección le dice cómo limpiar
y cuidar su aire acondicionado correctamente. Llame a su vendedor local autorizado para realizar el control anual. Recuerde que
el costo de la llamada del servicio corre por su cuenta.
Limpiar el filtro de aire
Es posible extraer el filtro de aire para limpiarlo fácilmente. Un
filtro limpio ayuda a remover el polvo, las pelusas y otras
partículas del aire y es importante para una mejor refrigeración
y funcionamiento eficiente. Compruebe el filtro cada 2
semanas para ver si necesita una limpieza.
3.
Utilice una aspiradora para limpiar el filtro del aire. Si el filtro
está muy sucio, lávelo con agua tibia y detergente suave. No
lave el filtro del aire con detergente para vajillas ni utilice
limpiadores químicos. Deje que el filtro se seque
completamente al aire antes de volver a colocarlo para
garantizar la máxima eficacia.
4.
Vuelva a colocar el filtro y cierre el panel frontal.
Limpieza del panel frontal
1.
Apague el aire acondicionado.
2.
Limpie el panel frontal con un paño húmedo y suave.
3.
Deje secar completamente el panel frontal.
Reparación de la pintura dañada
Mantenimiento anual
Su aire acondicionado necesita mantenimiento anual para
garantizar un rendimiento estable y superior durante el año.
Llame a su vendedor local autorizado para programar el control
anual. El costo de la inspección anual corre por su cuenta.
NOTA: No opere el aire acondicionado sin el filtro en su lugar.
1.
Apague el aire acondicionado.
2.
Abra el panel frontal. Agarre el filtro por la manija
y quítelo.
Apague el aire acondicionado y desconecte el cable de
alimentación.
Quite el panel frontal
Deslice la unidad fuera del gabinete y quítela.
Quite el sello de la guillotina entre las ventanas y
desatornille el seguro.
Quite los tornillos instalados en el marco y en el seguro.
4.
5.
6. Quite la goma EVA (solo en los modelos E-star).
9. Levante el gabinete de la ventana y deslice la unidad.
10. Vuelva a colocar el panel frontal. Guarde las piezas junto
1.
7
. Cierre la carcasa de la cortina.
2.
3.
8. Sostenga firmemente el gabinete, levante la guillotina
y retírela cuidadosamente.
con el aire acondicionado.
Compruebe una o dos veces al año si hay daños en la pintura.
Esto es muy importante, especialmente en áreas cerca de
océanos o donde haya problemas de oxidación. Si es necesario,
retoque con una pintura de esmalte de buena calidad.
EXTRACCIÓN DEL AIRE ACONDICIONADO DE LA VENTANA
30
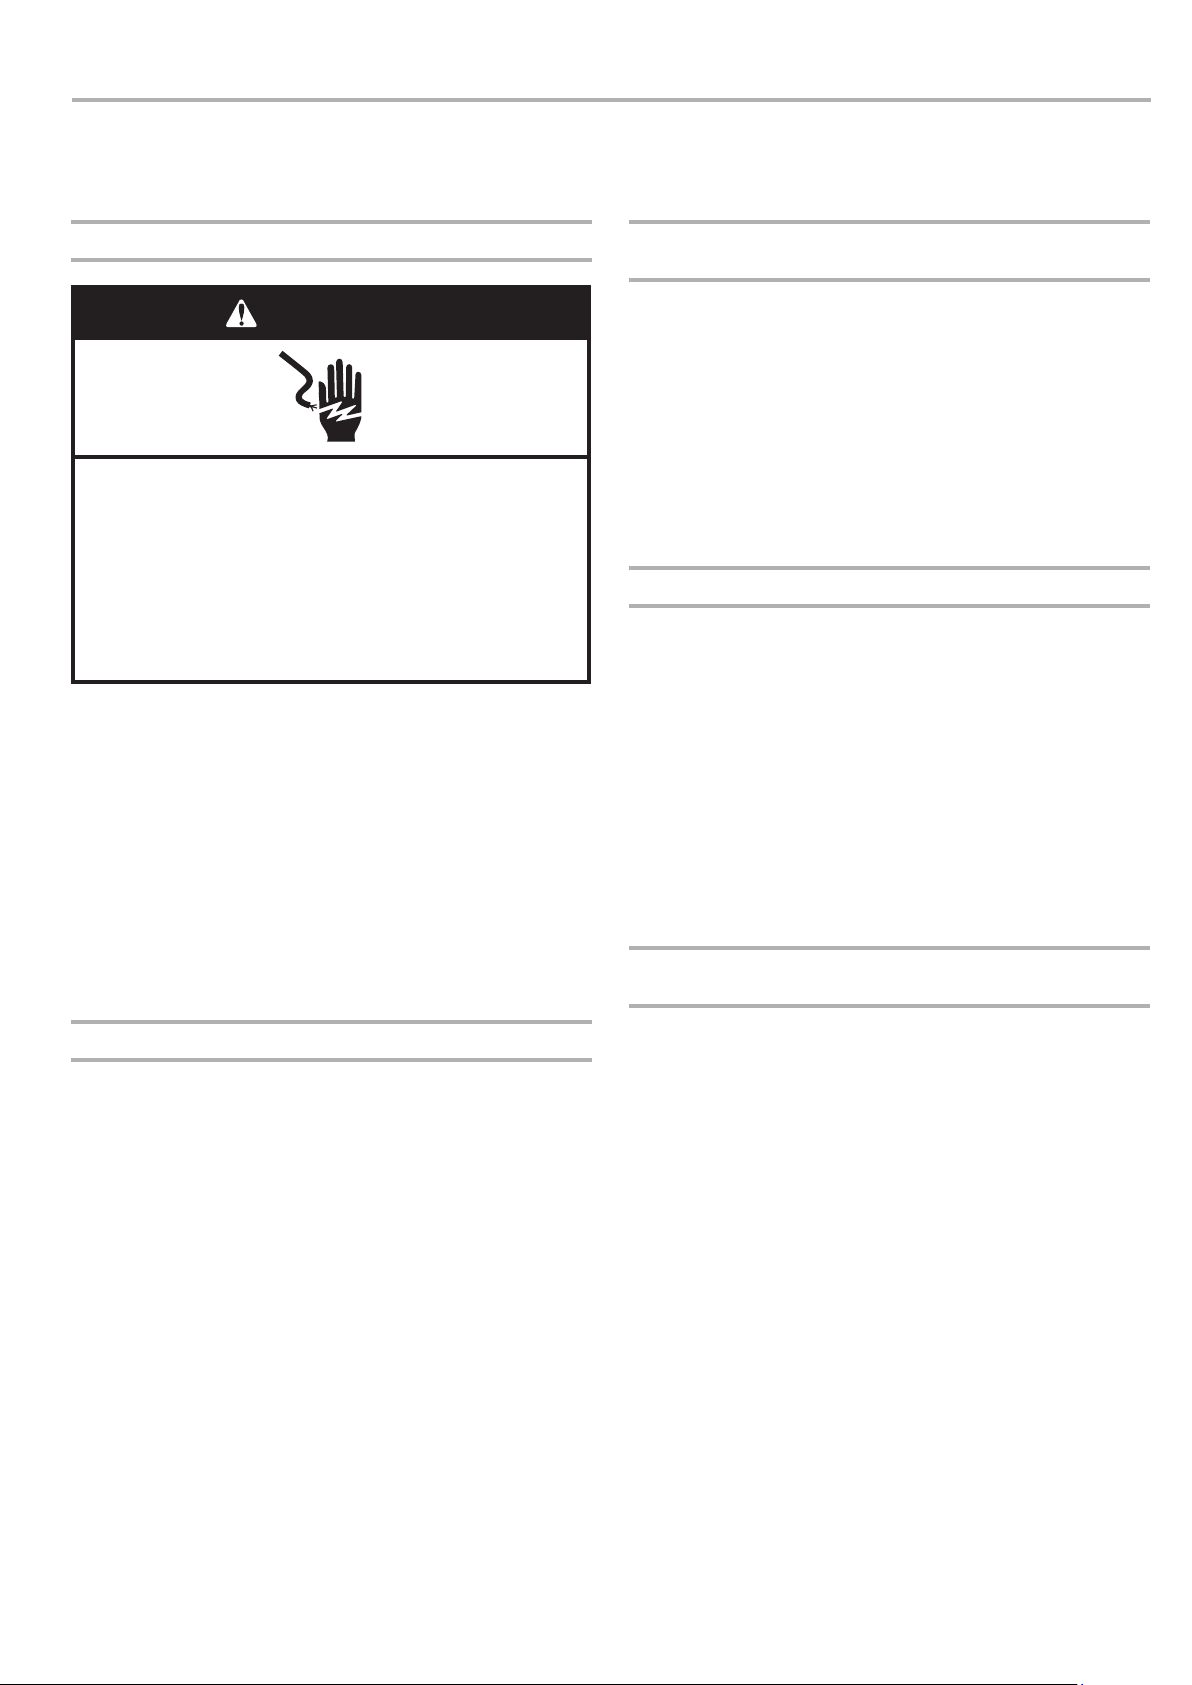
RESOLUCIÓN DE PROBLEMAS
Antes de llamar al servicio de mantenimiento, pruebe las siguientes recomendaciones para ver si puede
resolver el problema sin ayuda.
■
El cable eléctrico está desenchufado. Conéctelo a un
tomacorriente de 3 patas con conexión a tierra. Refiérase a
"Requisitos eléctricos".
■
El cable de alimentación salta (el botón de reinicio salta).
Presione RESET y suéltelo (escuche un clic; el botón de
reinicio se detendrá y, en algunos dispositivos, se encenderá
una luz verde) para volver al funcionamiento.
■
Se quemó un fusible o el disyuntor saltó. Sustituya el
fusible o restablezca el interruptor. Si el problema persiste,
llame a un electricista. Refiérase a "Requisitos eléctricos".
■
No se presionó el botón encendido. Presione el botón de
encendido.
■
Ha habido un fallo eléctrico local. Espere a que se
restaure la alimentación.
El climatizador hace que salten los fusibles o se dispare el interruptor.
■
Se están utilizando demasiados aparatos en el mismo
circuito. Desenchufe o reubique los aparatos que compartan
el mismo circuito.
■
Se utiliza un fusible de retardo o el interruptor de una
capacidad incorrecta. Sustitúyalo por un fusible de retardo
o el interruptor de la capacidad correcta. Refiérase a
"Requisitos eléctricos".
■
Se utiliza un cable de extensión. No utilice un cable de
extensión con este u otro electrodoméstico.
■
Está tratando de reiniciar el aire acondicionado
demasiado rápido después de haberlo apagado. Espere
al menos 3 minutos después de apagar el aire acondicionado
antes de intentar reiniciarlo.
El cable de alimentación del aire acondicionado
salta (el botón de reinicio salta)
■
Las alteraciones en la corriente eléctrica pueden hacer
saltar (el botón de reinicio saltará) el cable de
alimentación. Presione RESET y suéltelo (escuche un clic;
el botón de reinicio se detendrá y, en algunos dispositivos, se
encenderá una luz verde) para volver al funcionamiento.
■
La sobrecarga eléctrica, el sobrecalentamiento, el cable
apretado o uno viejo pueden hacer saltar (el botón de
reinicio saltará) el cable de alimentación. Después de corregir
el problema, presione RESET y suéltelo (escuche un clic; el
botón de reinicio se detendrá y, en algunos dispositivos, se
encenderá una luz verde) para volver al funcionamiento.
NOTA: Se debe reemplazar el cable de alimentación dañado por
un cable nuevo que se obtiene del fabricante; no se debe reparar.
El climatizador parece funcionar demasiado.
■
El climatizador actual ha sustituido un modelo antiguo. El
uso de componentes más eficientes podría provocar que el
climatizador funcione más tiempo que un modelo antiguo, pero
que el consumo energético total sea inferior. Los aires
acondicionados más nuevos no emiten la "ráfaga" de aire frío a
la que puede estar acostumbrado por los aires acondicionados
viejos, pero esto no indica menos capacidad de enfriado o
eficiencia. Consulte el coeficiente de eficiencia energética (EER)
y la calificación de capacidad (en Btu/h) marcados en el
climatizador.
■
El aire acondicionado está en una habitación muy ocupada o
se están utilizando electrodomésticos que emiten calor en la
habitación. Utilice ventiladores mientras cocina o se baña y trate
de no utilizar electrodomésticos que emitan calor durante la parte
más calurosa del día. Es posible que sea necesaria una mayor
capacidad del climatizador, según el tamaño de la sala a enfriar.
El aire acondicionado se apaga y se prende con
frecuencia o no enfría
■
El climatizador no tiene un tamaño adecuado para la
sala. Verifique las capacidades de enfriado de su aire
acondicionado. Los aires acondicionados no están
diseñados para refrigerar múltiples habitaciones.
■
El filtro está sucio u obstruido por restos. Limpie el filtro.
■
Las bobinas del evaporador interno y del condensador
externo están sucias u obstruidas por residuos.
Refiérase al mantenimiento anual.
■
Hay calor o humedad excesiva (cocinas abiertas,
duchas, etc.) en la habitación. Utilice un ventilador para
extraer el calor o la humedad de la sala. Trate de no utilizar
electrodomésticos que emitan calor durante la parte más
calurosa del día.
■
Las rejillas están bloqueadas. Instale el climatizador
en un lugar donde las rejillas no estén obstruidas por
cortinas, persianas, muebles, etc.
Peligro de descarga eléctrica
Enchufe a una toma con 3 clavijas y conexión a tierra.
No retire la clavija de conexión a tierra.
No utilice adaptadores.
No utilice cables alargadores.
No seguir estas instrucciones puede resultar en muerte,
incendio o descarga eléctrica.
El aire acondicionado no funciona
31

■
Cae agua desde la parte trasera de la unidad.
Caen gotas de agua desde el gabinete en su hogar
■
El aire acondicionado no está correctamente nivelado.
El aire acondicionado debería inclinarse un poco hacia
afuera. Nivele el aire acondicionado para brindar la
inclinación hacia afuera y garantizar un drenaje correcto.
Refiérase a "Instrucciones para la instalación".
NOTA: No perfore la parte inferior de la base de metal ni
la bandeja de condensado.
■
La temperatura de la habitación que está intentando
enfriar es extremadamente calurosa. Permita más tiempo
para que el aire acondicionado enfríe la habitación calurosa.
■
Las ventanas o las puertas están abiertas. Cierre las
ventanas y las puertas.
■
El control de temperatura no está en una configuración
lo suficientemente fría. Modifique el control de temperatura
a un ajuste más frío al presionar el botón menos para reducir
la temperatura. Establezca el control de la velocidad del
ventilador a un ajuste más alto.
Puede ver que el agua cae desde la parte trasera de la
unidad. El agua se puede recolectar con la bandeja de la
base cuando hay mucha humedad o en días lluviosos. El
agua fluye y gotea en la parte trasera de la unidad.
32

Version NO:2212161-01
Versión No. 2212161-01