INSTRUCTION MANUAL
Please read this manual carefully before using, and keep it for future reference.
80L ELECTRIC OVEN
GEO80CP


CONTENTS
General Safety 4
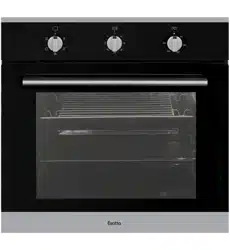
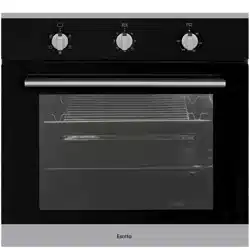
Product Overview 8
Installation 10
Getting Started 16
Cleaning and Maintenance 21
FAQs 24
Specifications 25
Customer Helpline Last Page
4
Read this manual thoroughly before you start using the Electric Oven.
The safety precautions instructions reduces the risk of fire, electric shock and injury when
correctly complied to.
Please follow all instructions and take notice of all warnings.
Pay close attention to messages that follow this safety alert symbol or the words
DANGER, WARNING or CAUTION. These words will be used to alert you of potential
hazards that and injure you and others. Following these instruction will tell you how to
reduce the chance of injury and the possible dangers if
instructions aren’t followed.
This symbol indicates when there is a serious risk of
injury if you do not pay attention to the warnings.
WARNING
CAUTION
This symbol indicates when to be careful to
avoid a serious risk of injury to oneself or
damage to property.
IMPORTANT INFORMATION
GENERAL SAFETY

5
THE INSTALLATION OF THIS PRODUCT CAN ONLY EVER BE INSTALLED BY A LICENCED
ELECTRICIAN. DO NOT IN ANY WAY TRY TO INSTALL THIS PRODUCT YOURSELF.
WARNING!
GENERAL SAFETY INSTRUCTIONS (Cont.)
To reduce risk of fire, electric shock or injury, always follow these basic precautions and
accident prevention measures when using this appliance, including the below:
NOTE: This appliance should be installed by an authorised electrician else warranty will
be void.
IMPORTANT INSTALLATION ADVICE
• Were you are installing the oven, make sure that furniture and housing are able to
withstand high temperatures from the use of the oven.
• Vinyl and laminate kitchen furniture are prone to heat damage or being
discoloured from the heat. We assume no liability from any damaged cause by
this appliance being installed in close proximity to the materials or furniture that
cannot handle the heat.
• Make sure the room has plenty of ventilation as heat, steam and moisture will be
produced from the oven while in use. If the oven will be used for long periods of
time, extra ventilation is needed.
• Make sure that no cables come into contact with were the oven can get hot.
• Do not install oven next to soft furnishings or curtains.
• If power cord is damaged, it must be replaced immediately from the
manufacturer or a qualified electrician/technician to avoid hazard.

6
USAGE CONDITIONS AND RESTRICTIONS
• Supervision over children is to ensure that they do not play with the
appliance. Never allow them to use, play with or crawl inside the appliance.
Cleaning and maintenance must not be done by children.
• This appliance is not to be used by persons (including children) with reduced
physical, sensory or mental capabilities, or lack of experience and knowledge,
unless they are being supervised or been given instructions on how to use of the
appliance in a safe way and understand the hazards with using this
appliance incorrectly.
• Never leave the oven unattended while in use, oils and fats may catch fire
while cooking.
• Only for indoor domestic use only. It is not to be used for industrial or
commercial use.
• Do not use this product for anything other than its intended purpose, and only
use it as described in this manual. Do not attempt to alter or modify
this appliance.
• In use, the door window may become hot. Make sure not to touch it or that no
children or pets come into contact with the door window.
• Damage or malfunction caused from foreign objects is not covered by your
warranty to the appliance.
• This oven is not to be used by an external timer or a complete seperate
control system.
• Make sure you turn o the oven before you commence cleaning.
• Do not use the oven for heating an area or drying clothes.
• Make sure you do not use the oven if any part has been damaged or does not
work correctly. It must only be repaired by a qualified technician. An incorrect
repair could expose you to risk of electric shock, fire or injury. If you continue to
use the product in such a condition it could cause a fire or electrocution.
• Incorrect use can result in property damage, injury or death. We assume no
liability for misuse of the appliance or noncompliance with these instructions.
GENERAL SAFETY INSTRUCTIONS (Cont.)

7
GENERAL SAFETY INSTRUCTIONS (Cont.)
OVEN SAFETY
• Oven door must stay closed when using the grill function
• While cooking, dont place pans or cookware on the base of your oven.
Make sure to always place items on shelves provided.
• Make sure when removing anything from the oven, always use an oven mitt.
• Do not use aluminium anywhere within the oven or to cover the grill pan or
wrap heated items under the grill. Aluminium foil is highly reflective and can
cause damage to the grill element.
• Do not lift or move appliance by the oven door or handle, this may cause
damage to the appliance or injure the person attempting to lift appliance.
• Clean the oven on a regular basis so oils and fats do not build up, as this
can cause a fire risk. Do not use harsh cleaners or metal scapers to clean door
glass. Do not steam clean anything thats part of the oven, when cleaning oven
make sure no part of it is immersed in water or other liquid.
• CAUTION: Do not touch hot surfaces, The heating element and other parts
inside the oven become extremely hot. Make sure you take care when handling
food and to always use oven mitts. Keep children well away from the oven.
• When opening the oven door, make sure to avoid contact with hot parts of the
oven and steam.
• There is a danger of fire when you leave items inside the oven for too long,
especially if an item is left for the next time use.
8
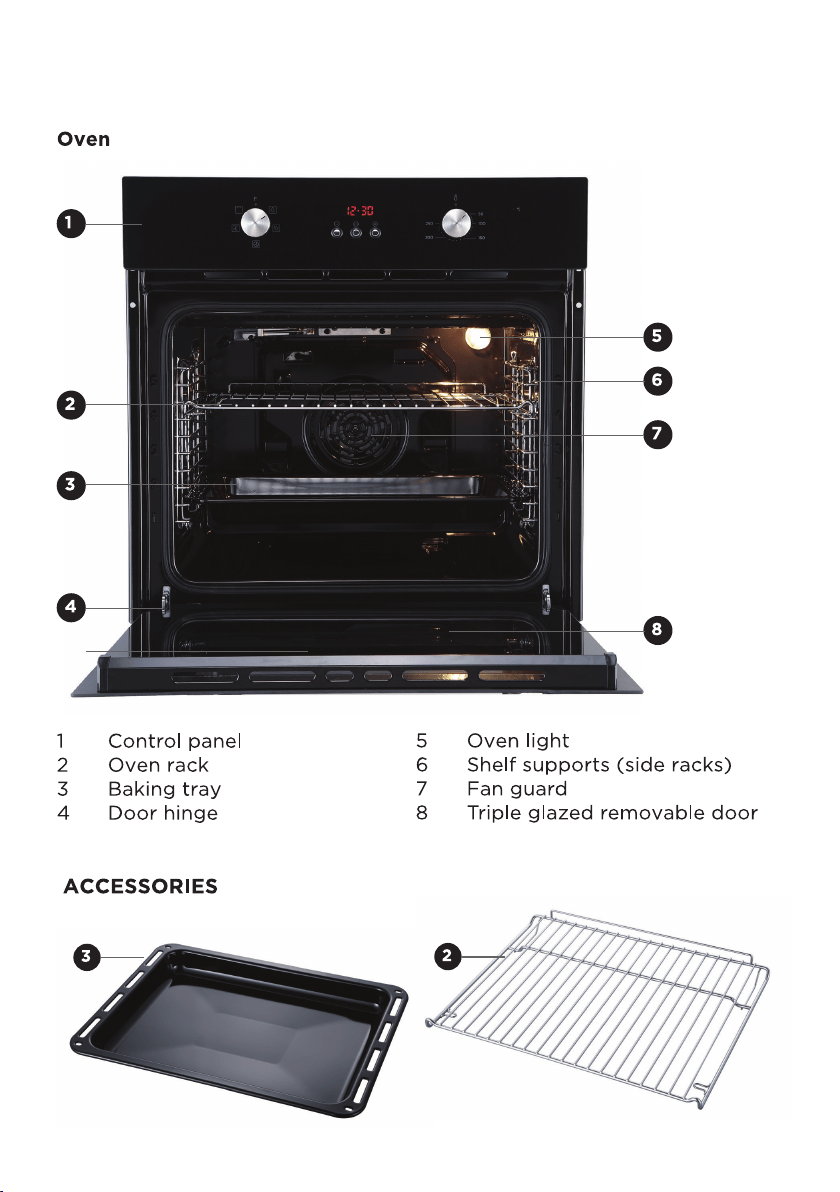
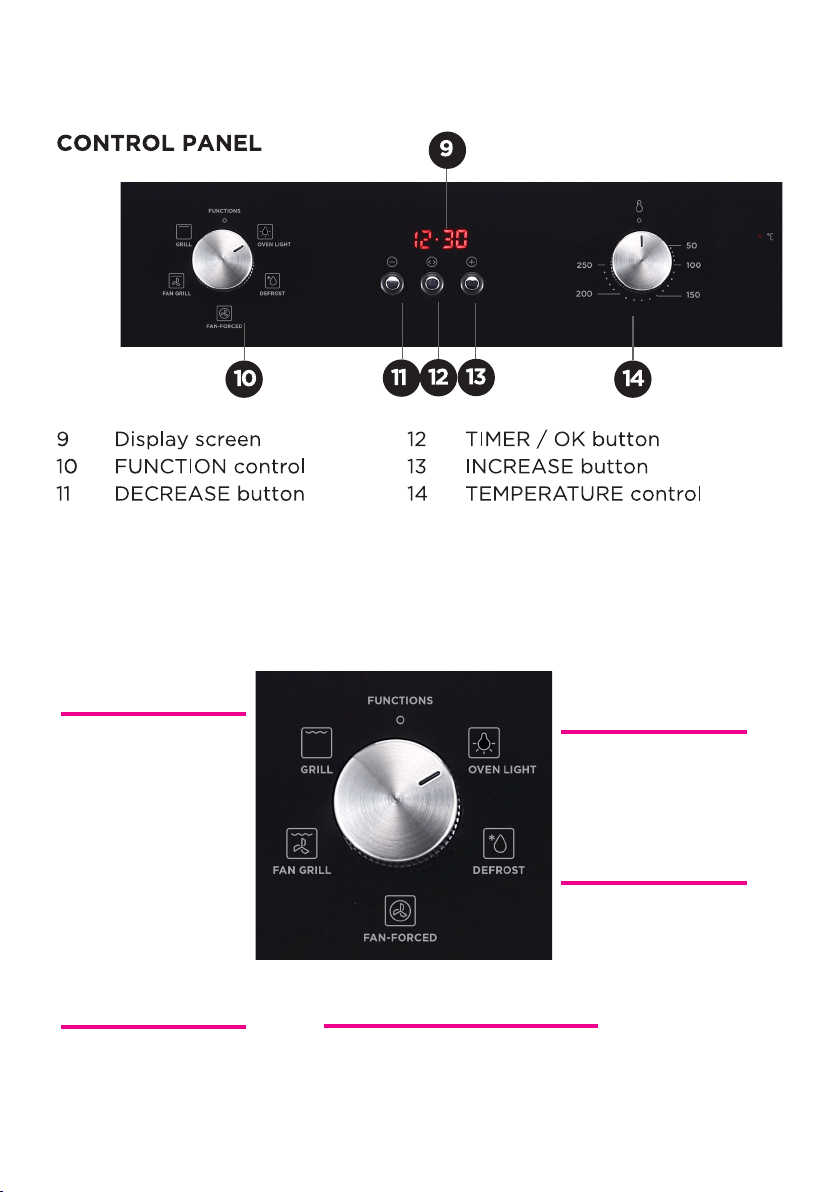
PRODUCT OVERVIEW
9
PRODUCT OVERVIEW (Cont.)
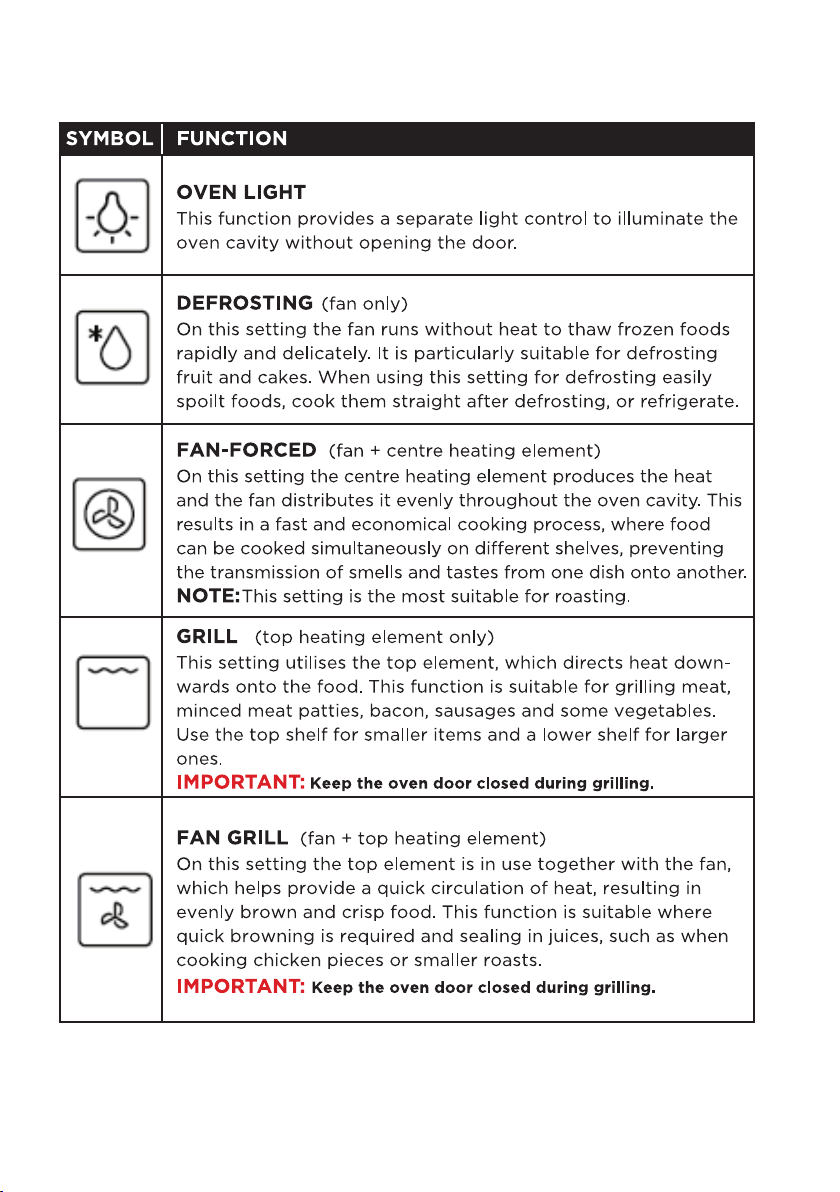
FUNCTION SELECTOR
There are 4 options when deciding what to use:
This mode turns on a
seperate light. Useful when
cleaning out the oven.
Excellent combination
for cooking spit roasted
chicken or a variaty
of roasts.
Defrost function allowing
frozen foods to be defrosted.
This function is used
for grilling, use the
full width baking tray
as this can easily be
positioned at the right
level away from the
grill depending on
what food you are
grilling.
Even heat distribution inside the oven, cooking multiple
items of food on different levels at the same time.
OVEN LIGHT
DEFROST
FAN GRILL
GRILL
FANNED FORCED

10
Before installing your appliance, read all safety instructions in this manual,
especially the sections on electrical safety and installation.
INSTALLATION
UNPACKING
• When unpacking the appliance, be sure to keep all the packaging materials
until you have made sure your new appliance is undamaged and in good
working order.
• Be sure to remove all packaging materials around the oven and inside the oven.
• CAUTION: Plastic wrapping can be a suffocation hazard for babies and young
children. Make sure all packaging materials are out of reach for children and that
they are disposed of correctly.
TRANSPORTATION
• CAUTION: VERY HEAVY! Be sure to team lift the appliance with someone or
mechanical aid is required when moving the appliance. Keep the appliance
upright as possible when moving the appliance.
Make sure you do not try to install the oven yourself, doing will expose you to
danger and void the warranty. Incorrect installation, adjustment, alteration or
service can cause injury or damage. We do not assume responsibility for injury
or damage to a person or persons or property as a result of incorrect
use or installation.
• Risk of electric shock, short circuit or fire by damage of the mains lead.
The mains lead must not be clamped, bent, trapped or come into contact
with hot parts of the appliance. If the mains lead is damaged, it must be
replaced by a qualified electrician.
• The mains supply must correspond to the data specified on the rating
plate of the appliance. The appliance mains cable must correspond to the
specifications and the power consumption.
• The appliance must not be installed behind a decorative door in order to
avoid overheating.
THE INSTALLATION OF THIS PRODUCT CAN ONLY EVER BE INSTALLED BY A LICENCED
ELECTRICIAN IN ACCORDANCE WITH RULES AND REGULATIONS AND FOLLOWING
INSTRUCTIONS IN THIS MANUAL.
WARNING!
11
IMPORTANT INSTALLAER ADVICE
• Before connecting oven, make sure supply voltage corresponds with your
mains supply voltage.
WARNING!: This appliance must be earthed.
INSTALLATION (Cont.)
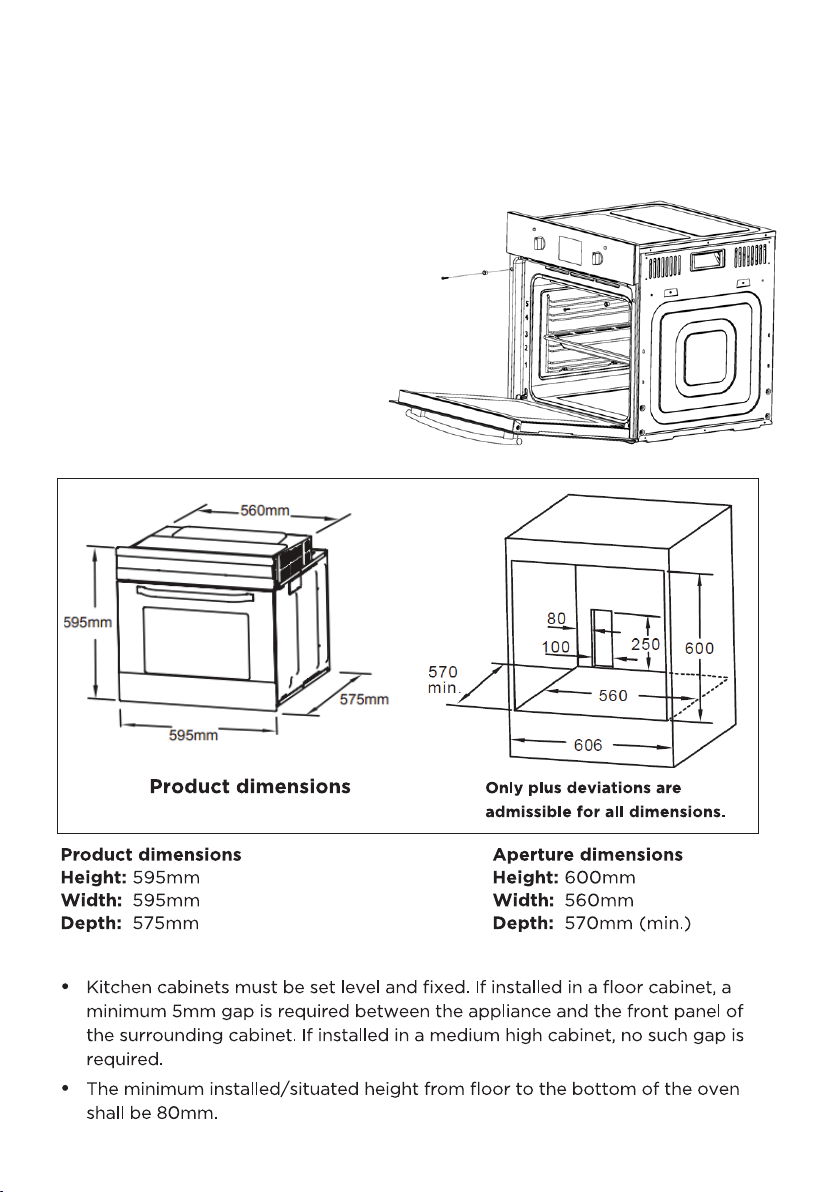
INSTALLATION
1 Slide the oven through the
cabinet aperture, align
and secure.
2 Fix your oven with the 2
screws and washers as
indicated in the figure to
the right.
12
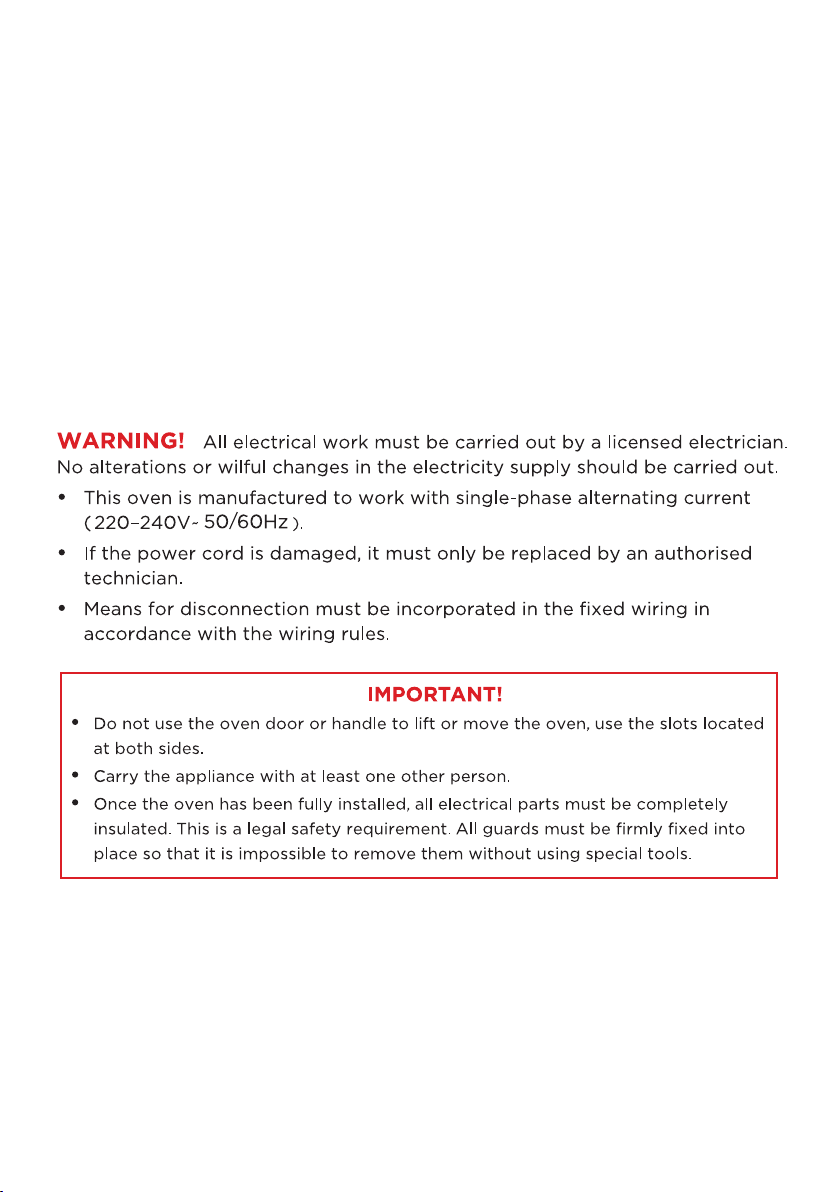
ELECTRICAL CONNECTION
• Before connecting oven, make sure supply voltage corresponds with your
mains supply voltage.
WARNING!: This appliance must be earthed.
• This appliance comes pre-terminated with supply cord and plug.
Below connection information is for reference only.
• Means for disconnection must be incorporated in the fixed wiring in accordance
with the wiring rules.
• Allow disconnection of the appliance after installation, by accessible plug or a
switch in the fixed wiring.
INSTALLATION (Cont.)

13
14
INSTRUCTIONS
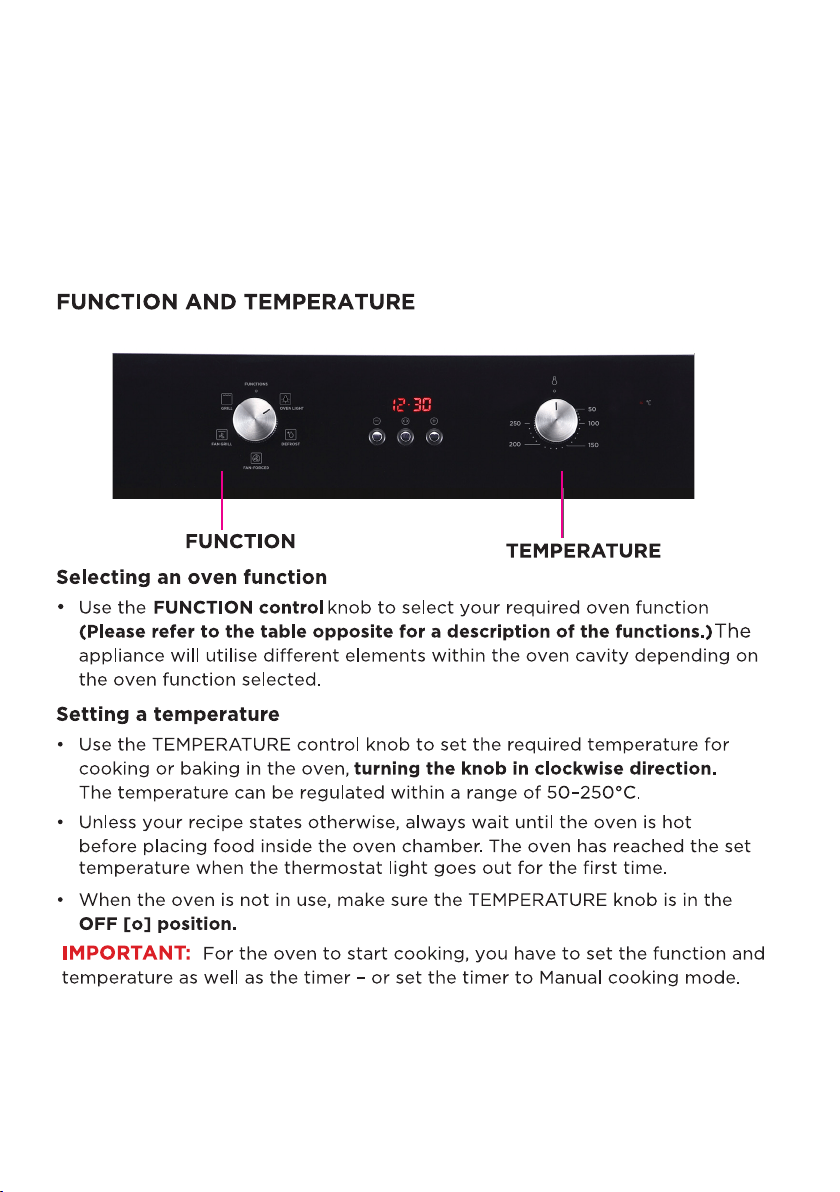
SWITCHING OFF/ON
• To switch on the oven you need to set the required oven function and cooking
temperature (or manual) mode.
• To switch off the oven, set both FUNCTION and TEMPERATURE control knobs to
the [o] position for OFF.
15
INSTRUCTIONS (cont.)
16
GETTING STARTED (Cont.)

17
• To cancel a setting and enter manual cooking mode:
Press the button and hold it for more than 3 seconds.
• To cancel the setting and return the time to standby mode:
Press the and + buttons at the same time and hold for 3 seconds.
• If there is no operation for five minutes during the timer setting, it will return to
manual cooking mode.
MANUAL COOKING MODE
• Place the food to be cooked in the oven, close the door and set the
cooking function and oven temperature.
• Press and hold the button for more than three seconds to enter MANUAL
cooking mode. The display shows the clock time and the cooking icon.
• To start the oven, set the oven function and temperature.
• When you finished cooking, turn the FUNCTION and TEMPERATURE controls to
the ( o ) position for OFF.
• The oven is now in MANUAL cooking mode. To return the timer to standby
mode, press the and the + buttons at the same time and hold for 3 seconds.
NOTE: To ensure the oven is not left on accidentally in MANUAL cooking mode,
when no button has been pressed for 5 hours, the time will flash once per second
to warn you the oven will enter standby mode. After a total of 10 hours the timer
will enter standby mode.
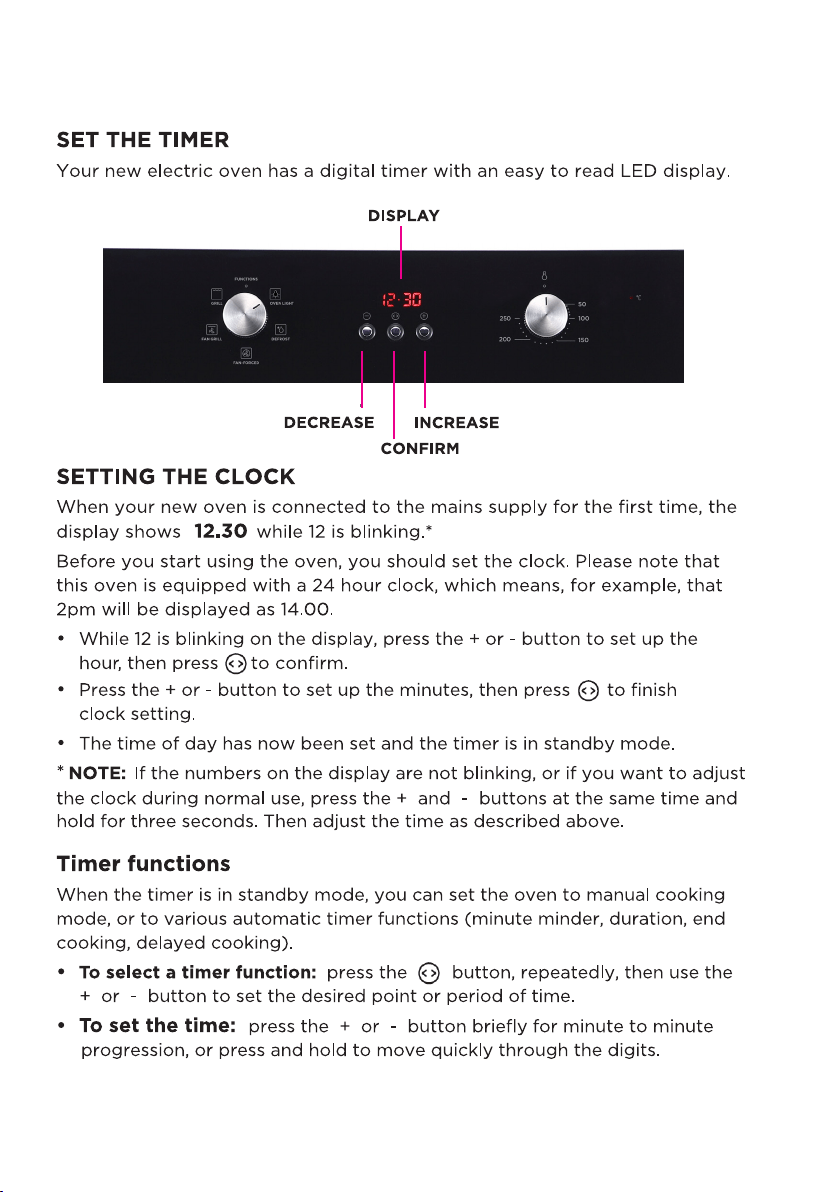
SETTING THE MINUTE MINDER
You can set a period of time using the minute minder function and an alarm will
sound when that period of time has elapsed. You can set the minute minder at any
time, regardless of whether you are using the oven to cook.
• Press and hold the button for more than three seconds until is shown.
• Press the button again, briefly to enter the MINUTE MINDER mode. The
display shows the clock at the current time and the minute minder icon.
• Use the + and - buttons to set the desired time period, then press the
button to confirm. An alarm will sound when the countdown time has ended.
Press any button briefly to silence the Alarm.
• This function will NOT switch off the oven. To switch off the oven you must turn
the FUNCTION and Temperature control to ( o ) positions for OFF.
• Press the and + buttons at the same time and hold for 3 seconds to
return the timer to STANDBY mode.
GETTING STARTED (Cont.)

18
GETTING STARTED (Cont.)
SET COOKING DURATION (dur)
This function allows you to set a countdown time (max. 10 hours) after which
the oven turns off automatically.
• Place the food to be cooked in the oven, close the door and set the
cooking function and oven temperature.
• Press and hold the Fbutton for more than three seconds until is shown.
• Briefly press the button again, twice, to enter Duration mode. The
display shows the duration [ dur ] and cooking icons.
• Use the [ + ] and [ – ] buttons to set the desired cooking period, then press
to confirm. The oven will start operating and the display shows the
clock at the current time, the cooking icon and [ A ].
• When the cooking time has elapsed, the oven will stop heating, the symbol
[ A ] will start blinking on the display and an alarm will sound. Press any
button briefly to silence the alarm.
• Turn the FUNCTION and TEMPERATURE controls to the OFF [ o ] positions.
SETTING THE END COOKING TIME [ END ]
This function is similar to the cooking duration function. However, instead of
setting the period of time that you wish the oven to switch off after, you select
the point of time (the time of day) at which you want the oven to switch off.
• Place the food to be cooked in the oven, close the door and set the
cooking function and oven temperature.
• Press and hold the button for more than three seconds until is shown.
• Briefly press the button, repeatedly, until [ End ] is displayed on the
screen, together with the cooking icon.
• Use the [ + ] and [ – ] buttons to set the desired end cooking time (time
of day), then press to confirm. The oven will start operating and the
display shows the clock at the current time, the cooking icon and [ A ].
• When the end of the cooking time has been reached, the oven will stop
heating, the symbol [ A ] will start blinking on the display and an alarm will
sound. Press any button briefly to silence the alarm.
• Turn the FUNCTION and TEMPERATURE controls to the ( o ) positions for OFF.
19
GETTING STARTED (Cont.)
SETTING FULLY AUTOMATIC DELAYED COOKING
The delayed cooking function is a convenient feature you can use when you
are at home and want to set the oven to come on at a time in the future and
switch off after a set cooking duration. It only works after you have set the
cooking duration function.
• Place the food to be cooked in the oven, close the door and set the cooking
function and oven temperature.
• Press and hold the button for more than three seconds until is shown.
• First, briefly press the button again, twice, to enter Duration mode. The
display shows the duration [ dur ] and cooking icons. Use the [ + ] and [ – ]
buttons to set the desired cooking period, then press to confirm. The
display shows [ A ] and the cooking icon.
• Second, keep pressing the button until [ End ] is displayed on the
screen. Use the [ + ] and [ – ] buttons to set the desired end cooking time, then
press to confirm. The display shows the clock at the current time and the
symbol and [ A ]. The cooking icon will disappear until the time when the
oven starts operating.
• The oven will start operating at the time calculated by deducting the cooking
period from the set finishing time, and will stop at the set finishing time. The
symbol [ A ] will begin to flash and an alarm will sound. Press any button briefly
to silence the alarm.
• Turn the FUNCTION and TEMPERATURE controls to the OFF [ o ] positions.
• Press the and [ + ] buttons simultaneously and hold for three seconds to
return the timer to standby mode.
• NOTE: Once delayed cooking has been set, times cannot be changed. To
change a setting, you have to cancel the program first and then reset it.
• To cancel a setting, press and hold the button for more than three seconds.
20
GETTING STARTED
BEFORE FIRST TIME USE
• The best way is to make sure you are familiar with everything about the oven
first before using this. Pay attention to everything in this manual in particular the
safety instructions and cautions.
• After the appliance is installed be sure to properly clean the oven before first
use with a soft dampened cloth to remove any dust from transport.
• Remove and wash all the oven racks and baking/drip tray with warm water
a little washing up liquid, dry and return it to the oven. Make sure to leave
the oven door open for it to completely dry.
INSERTING ACCESSORIES
You can insert the accessories into the oven at 5 different level. Always insert them
as far as they go so that the accessories do not touch the door panel when door is
being closed.
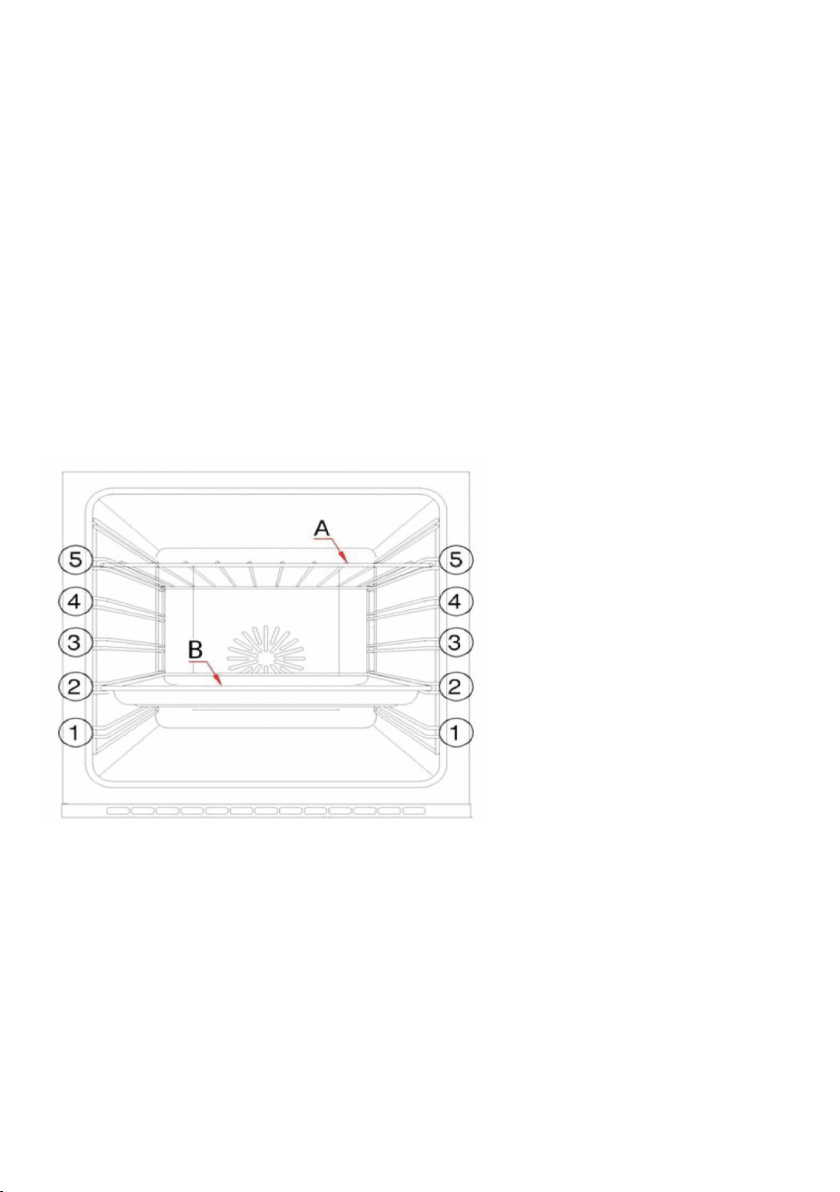
SHELF POSITIONS
Your oven will come
supplied with the following:
(A) Oven Shelf
(B) Baking Tray.
• The numbers 1 - 5, indicate
the different shelf positions
that you can utilise within
the oven.
• The sides of the cavity are moulded to provide positions for the shelves or
enamelled baking tray to rest on. Ensure that you select a shelf position at the
same height on both sides of the cavity. The oven shelf has safety stops to
prevent accidental withdraw. After engaging the oven shelf inthe the side racks,
as you push the oven shelf into the oven, lift the front of the shelf slightly to by
pass the stops and allow the oven shelf to slide fully into the racks.
• To remove the oven shelf, gently pull the oven shelf outwards. When the shelf
stops, lift the front slightly to bypass the safety stops and then completely
withdraw the oven shelf from the oven.
• When installed correctly, the shelf and tray should be horizontal and not on
an angle.

21
CLEANING THE OVEN
• After each use, make sure to clean the oven thoroughly. This will prevent residual
food stuffs becoming baked on the oven chamber surfaces, which will make the
residues more difficult to remove.
• Remove the oven rack and baking/drip tray from the oven before cleaning. Clean
the oven cavity only with warm, soapy water, using either a sponge or soft cloth,
then dry with a dry cloth. Do not use any abrasive cleaners, harsh detergents and
hard or metal brushes on any oven surface.
• Any stains that may appear on the bottom of the oven are probably due to
spilled food or food splashes, which will have occurred during the cooking
process. These spills and splashes could possibly be a result of the food being
cooked at an excessively high temperature, or being placed in cookware that is
too small. To avoid such stains, make sure to select a cooking temperature and
function that is appropriate for the food you are cooking. Also make sure to
place the food in an adequately sized dish and to use the drip tray
where appropriate.
• Clean the oven exterior with a wrung out soft cloth or sponge, dampened with
warm soapy water. Do not any abrasive cleaners. Never leave acidic substances
(lemon juice, vinegar) or stainless steel parts.
• If the glass oven door is splattered with fat or other food residues, remove them
with a cloth dampened in warm, soapy water. Then use a dry, lintfree cloth to
remove any streaks. Do not use harsh or abrasive cleaners or sharp metal
scrapers to clean the oven door glass since they can scratch the surface,
which may result in shattering. You may remove the door for thorough cleaning,
if required; please refer to the next pages for instructions.
• If you use any form of oven cleaner on your appliance, you must check with the
manufacturer of the cleaner that it is suitable for use on your appliance. Any
damage caused to the appliance by a cleaning product will not be covered under
your warranty. We recommend using an appropriate stainless steel cleaner and
polish regularly on the stainless steel surfaces.
CLEANING & MAINTENANCE

22
REMOVING THE OVEN DOOR FOR CLEANING
Removing the oven door and the glass panel inside the door enables full access
to the entire oven cavity for easier cleaning and maintenance.
• Before you start, place some soft, padded material on the floor or benchtop.
• Clean the oven glass door only with a damp cloth and a small amount of mild
detergent. Make sure the cloth is clean and does not contain residues of other
cleaning products.
• If you want to remove the inner glass panel for cleaning while you have taken
the door off the oven, please refer to the next page for instructions.
• To refit the door, carefully slide the hinges back into their slots and open the
door fully. IMPORTANT: The movable latches (B) must be closed back into their
original positions before closing the door.
• Open the oven door completely and have a
look at the door hinges (1). The hinges
(A) have two movable latches (B) on them.
If you raise both these latches, the hinges
are released from the oven housing.
• Close the door to an angle
approximately 15°.
• With both hands, grip the sides of the
door at the centre and then incline it
slightly towards the oven cavity and then
pull the door gently away from the oven
cavity (2).
IMPORTANT: Make sure that the door is
supported at all times and that you place it
on some padded material while cleaning it.
• Place the door flat on the prepared soft
material for cleaning.
CLEANING & MAINTENANCE (cont.)
1
2
23
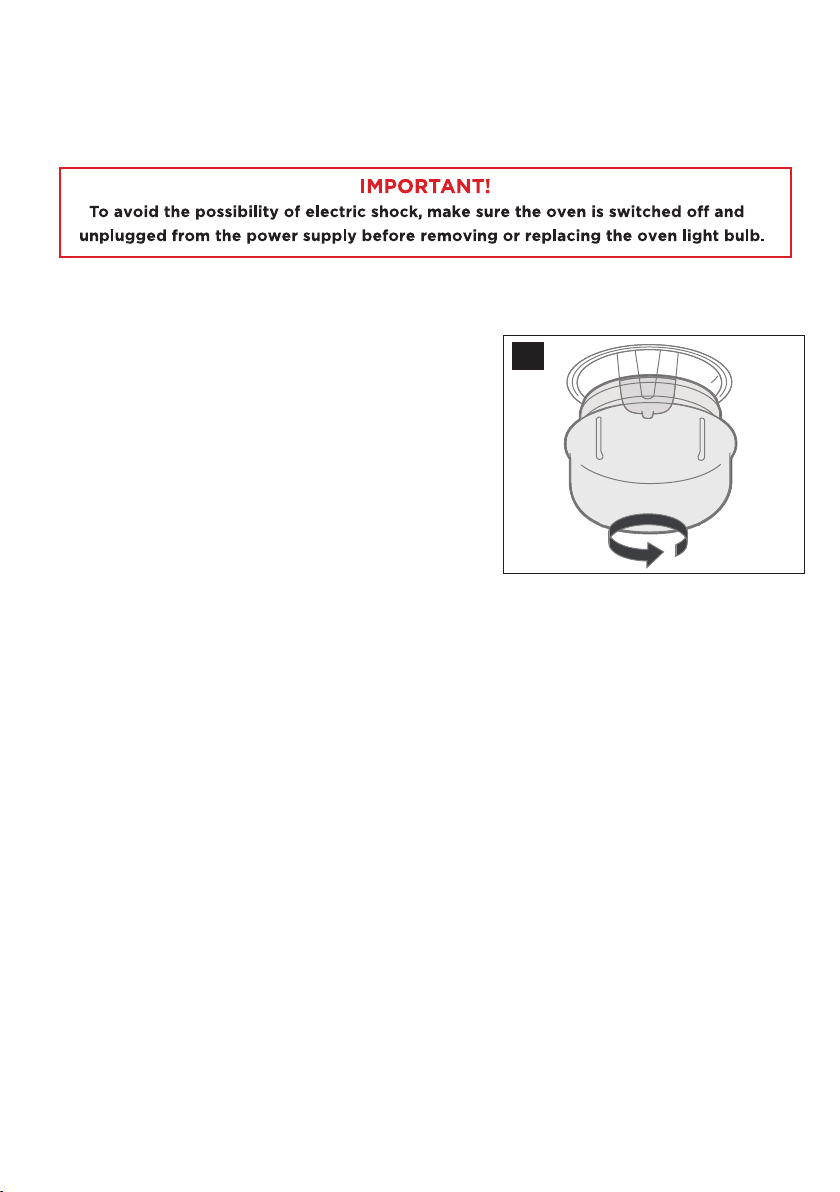
When the lamp in the oven fails and needs replacement, proceed as follows.
(Bulb replacement is not covered by warranty.)
• Unscrew and remove the glass lamp cover
by turning it anticlockwise (3).
Washthe lamp cover and wipe it dry.
• Unplug the light bulb and carefully remove it
from the socket. Replace the bulb with a new
high-temperature bulb of the same size and
wattage (G9, T300°C halogen, 230V, 25W).
Do not use any other type of bulb.
• Screw the bulb back in, making sure it is
properly inserted into the ceramic socket.
• Screw the glass lamp cover back into place.
REPLACING THE OVEN LIGHT BULB
CLEANING & MAINTENANCE (cont.)
3
24
If experiencing issues with your oven and isn’t operating correctly please
check the following pages for solutions to the problems. If none of the solutions
offered help solve the problem with your appliance then please contact our
call centre at info@ayonz.com
DO NOT ATTEMPT TO REPAIR THE APPLIANCE YOURSELF.
FAQS
Problem Solution
Oven isnt turning on
• Check to see if the oven is in “Manual Operation”
• Check that a cooking function and temperature has
been selected.
No power to the oven
and grill
• Check the appliance has been connected properly
to an eletrical mains supply.
• Check household fuse box.
The grill function
works but the main
oven doesnt
• Check that you have selected correct
cooking function.
The grill and top oven
element is not working,
or cuts out for long
periods of time
during use.
• Allow oven to cool for 2 hours. once cool check
whether appliance is working properly.
Food not
cooking properly
• Make sure that you have selected correct cooking
temperature and cooking function.
Food not cooking evenly
• Make sure oven has been installed correctly
and is level
• Make sure dishes are placed correctly on oven racks.
Oven light not working
• Make sure light bulb is not loose, if so tighten it.
• If the bulb isnt working still, replace it with same
size and wattage.
Condensation in the
oven
• If you dish has high water content then you will
get steam and condensation from this dish.
• Carefully wipe oven door after use.
• Dont leave food in oven after finished cooking
and the oven has been switched off.
Fan keeps running when
oven is switched o
• A cooling fan is fitted inside the appliance to help
stablise the ovens internal temperature and external
surface temperature.
25
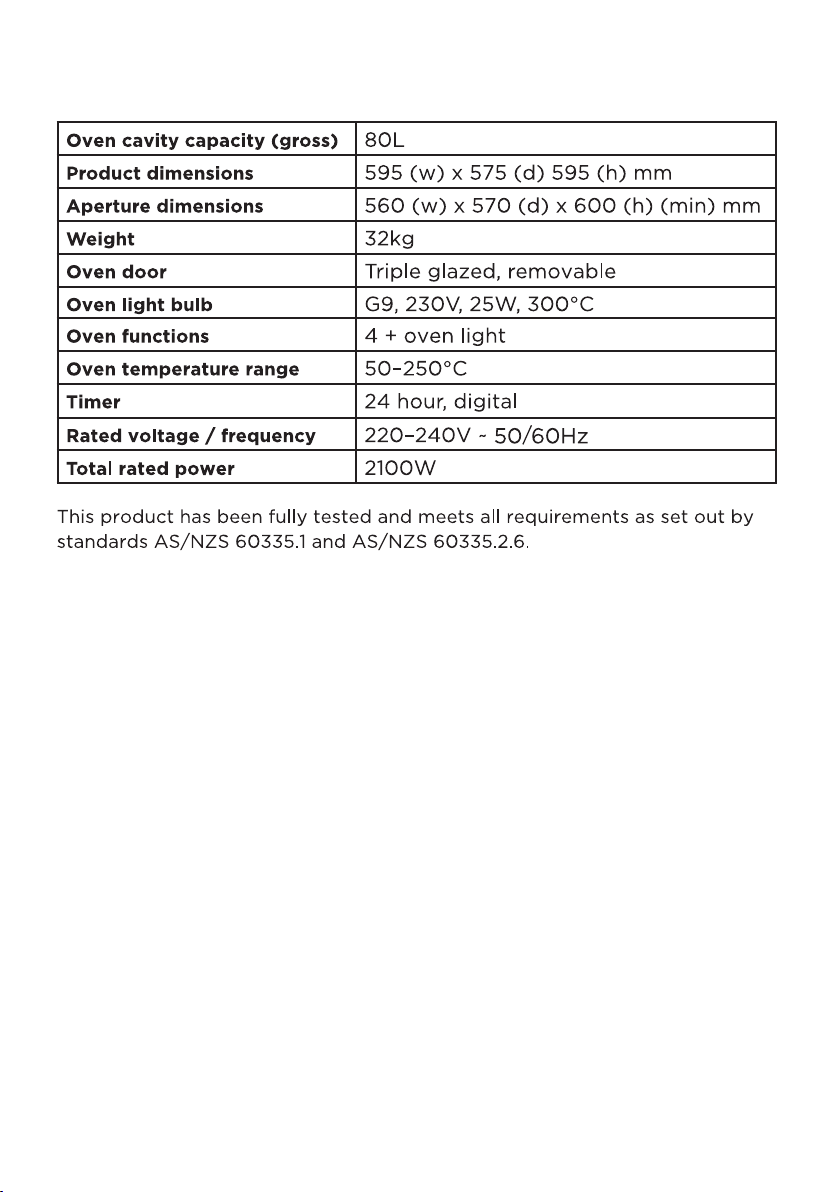
SPECIFICATIONS

26

27

CUSTOMER HELPLINE:
info@ayonz.com
DISTRIBUTED BY:
Ayonz Pty Ltd