
Loading ...
Loading ...
Loading ...
E-55
How does the altimeter work?
Generally, air pressure decreases as altitude increases. This watch bases its altitude readings on
International Standard Atmosphere (ISA) values stipulated by the International Civil Aviation Organization
(ICAO). These values defi ne relationships between altitude and air pressure.
• Note that the following conditions will prevent you from obtaining accurate readings:
When air pressure changes because of changes in the weather
Extreme temperature changes
When the watch itself is subjected to strong impact
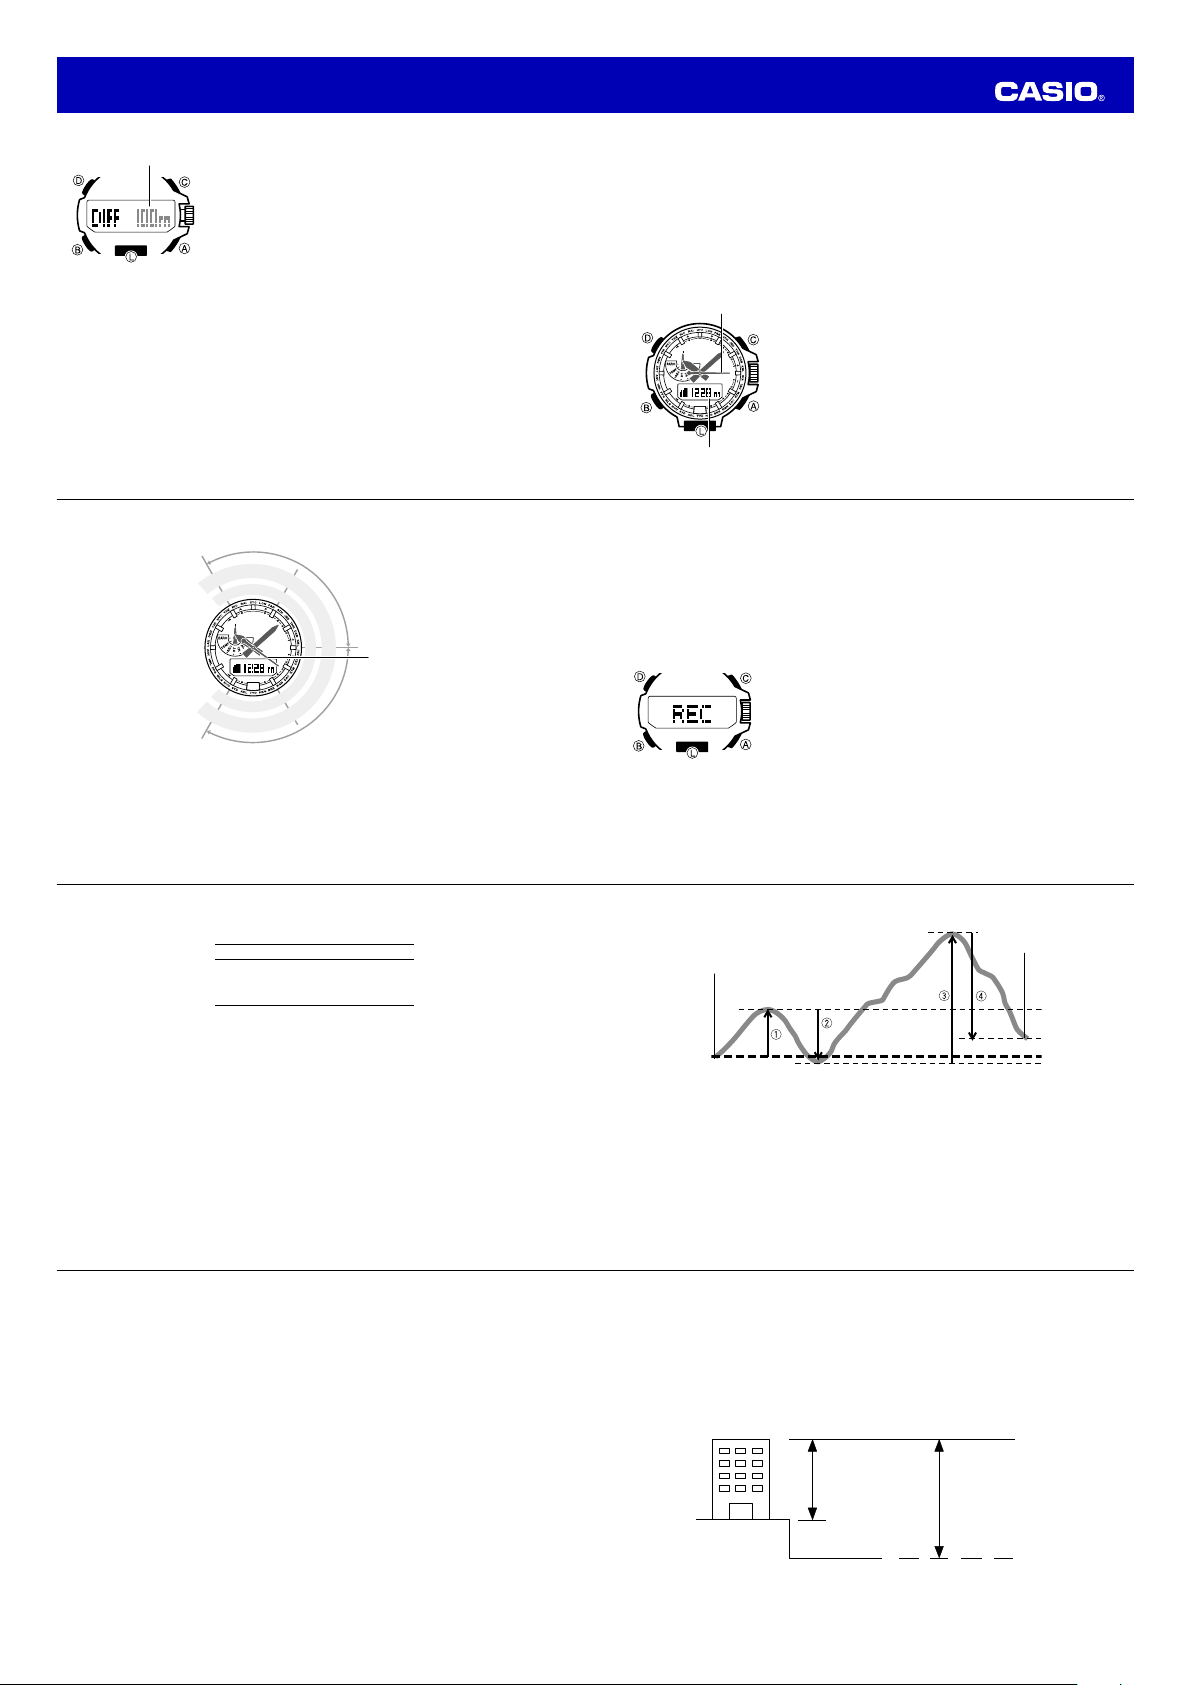
There are two standard methods of expressing altitude: absolute altitude, which expresses an absolute
height above sea level, and relative altitude, which expresses the difference between the altitudes of two
different places. This watch expresses altitudes as relative altitude.
Sea Level
Rooftop at an altitude of
230 m above sea level
(absolute altitude)
Height of building 130 m
(relative altitude)
Regular calibration of the watch in accordance with values provided by local altitude (elevation) indications
is recommended before taking readings in order to maximize reading accuracy (page E-45).
E-54
• Entering the Altimeter Mode starts a new altitude auto reading session, but it does not reset the current
ASC
and
DSC
values or change them in any way. This means that the starting
ASC
and
DSC
values for
a new Altimeter Mode auto reading session are the values that currently are in memory. Each time you
complete an altitude auto reading session by exiting the Altimeter Mode, the total ascent value of the
current session (920 meters in the above example) is added to the session’s starting
ASC
value. Also,
the total descent value of the current auto reading session (–820 meters in the above example) is
added to the session’s starting
DSC
value.
Note
• The high altitude, low altitude, total ascent, and total descent values are retained in memory when you
exit the Altimeter Mode. To clear values, perform the procedure under “To delete a specifi
c record”
(page E-73).
E-53
How Cumulative Ascent and Cumulative Descent Values Are Updated
620 m
20 m
Session end point
320 m
120 m
0 m
Session start point
The total ascent and total descent values produced by an Altimeter Mode reading operation session
during the example climb illustrated above are calculated as follows.
Total Ascent:
q
(300 m) +
e
(620 m) = 920 m
Total Descent:
w
(320 m) +
r
(500 m) = 820 m
E-52
Auto Save Values
Auto save values are one type of data stored in the memory of your watch.
Auto Save Values
High Altitude (
MAX
)
Low Altitude (
MIN
)
Total Ascent (
ASC
)
Total Descent (
DSC
)
• These values are checked and updated automatically by the watch as altitude auto measurements are
taken.
• Auto save is performed only while the watch is in the Altimeter Mode.
• Cumulative ascent and cumulative descent values are updated whenever there is a difference of at
least ±15 meters (±49 feet) from one reading to the next.
• Auto save values also include the date and time each value was recorded.
How High and Low Altitude Values are Updated
With each auto save reading, the watch compares the current reading against the
MAX
(high altitude) and
MIN
(low altitude) values. It will replace the
MAX
value if the current reading is at least 15 meters (±49
feet) greater than
MAX
, or the
MIN
value if the current reading is at least 15 meters (±49 feet) less than
MIN
.
E-51
Types of Altitude Data
Your watch can record two types of altitude data in its memory: manually saved data and auto save
values.
• Use the Data Recall Mode to view data stored in memory. See “Viewing Altitude Records” (page E-70) for
details.
Manually Saved Records
Any time you perform the procedure below in the Altimeter Mode, the watch will create and store a record
with the currently displayed altitude reading, along with the date and time the reading was taken. There is
enough memory to store up to 30 manually saved records, which are numbered from
-01-
through
-30-
.
To save a reading manually
1. In the Altimeter Mode, check to make sure that an altitude reading is
on the display.
• If an altitude reading is not displayed, press
A
to take one. See “To
take altitude readings” (page E-44) for details.
2. Hold down
A
until
REC
fl ashes and then stops fl ashing.
• This will save the currently displayed altitude reading in a manually
saved record, along with the time and date of the reading.
• The watch will return to the Altimeter Mode screen automatically
a
fter the save operation is complete.
• There is enough memory to store up to 30 manually saved records.
I
f there are already 30 manually saved records in memory, the
above operation will cause the oldest record to be deleted
automatically to make room for the new one.
E-50
The altitude differential with the reference location is indicated by the second hand (altitude differential
indicator) as shown in the illustration below.
l
l
l
l
l
l
l
l
l
l
Unit: Meters
Unit: 50m (164ft)
1000m (3280ft)
100m (328ft)
−100m (−328ft)
−1000m (−3280ft)
00
Unit: 5m (16ft)
Example: Altitude differential
of −30 (300) meters
Indication range: ±100 (1000) meters
E-49
To use the altitude differential value
1. In the Altimeter Mode, check to make sure that an altitude reading is on the display.
• If an altitude reading is not displayed, press
A
to t
ake one. See “To take altitude readings” (page E-44)
for details.
2. Use the contour lines on your map to determine the difference in altitude between your current location
and your destination.
3. In the Altimeter Mode, hold down
D
for at least two seconds to specify your current location as the
altitude differential start point.
• DI
FF RESET and then RESET will appear. The watch will take an altitude reading, and the
second hand will indicate the altitude differential. ±0 (±0 meters) will be displayed as the altitude
differential at the reference point.
4. While comparing the altitude difference you determined on the map
and the watch’s altitude differential value, advance towards your
destination.
• If the map shows that the difference in altitude between your
l
ocation and your destination is +80 meters for example, you know
you will be nearing your destination when the displayed altitude
differential value shows +80 meters.
l
l
l
l
l
l
l
l
l
l
Altitude Differential (Reference
location, so ±0 m is indicated.)
Current altitude
E-48
Specifying the Altitude Differential Measurement Range
You can use the procedure below to select either ±100 meters or ±1,000
meters as the altitude differential measurement range.
Relative Altitude Measurement Range Display Unit
±100 meters (±328 feet) 5 meters (16 feet)
±1000 meters (±3280 feet) 50 meters (164 feet)
To specify the altitude differential measurement range
1. In the Altimeter Mode, pull out the crown.
• This will cause the current altitude reading value to appear.
2. Press
B
twice.
• This will cause DI
FF to appear on the digital display, along with the
fl ashing current altitude differential measurement range setting.
3. Rotate the crown to select either 100 meters (
100m
) or 1,000 meters
(
1000m
) as the altitude differential measurement range.
4. After the setting is the way you want, push the crown back in to exit the
setting screen.
Using the Altitude Differential Value While Mountain Climbing or Hiking
After you specify the altitude differential start point while mountain climbing or hiking, you can easily
measure the change in the altitude between that point and other points along the way.
l
l
l
l
l
l
l
l
l
l
l
l
l
l
l
l
Altitude differential
Operation Guide 5497
Loading ...
Loading ...
Loading ...