Loading ...
INSTRUCTIONS FOR USE:
1. Remove heater from the carton and remove any
transit protection material. The appliance must be
placed on level ground.
a. The appliance area must be kept clear and
free of combustible materials, gasoline
and other flammable vapours and liquids.
b. Gas orifices and burner must be kept clear
of dirt and cobwebs. Flow of combustion and
ventilation air through the perforated portions of
the appliance must not be obstructed.
c. Any cleaning agent used on the appliance
should be of a non-combustible and
non-corrosive nature.
2. Proper clearance from combustible materials must
be maintained at all times.
Minimum Clearance from Combustibles:
Side 600mm Top 600mm
Combustible materials are considered to be wood,
compressed paper, plant fibres, plastic, plexiglas
or other materials capable of being ignited and
burned. Such materials shall be considered
combustible even though flame proofed, fire-
retardant treated or plastered. Additional clearance
may be required for glass, painted surfaces and
other materials which may be damaged by radiant
or convection heat.
3. Check that the seals between the appliance
and the gas cartridge are in place and in good
condition before connecting the gas container.
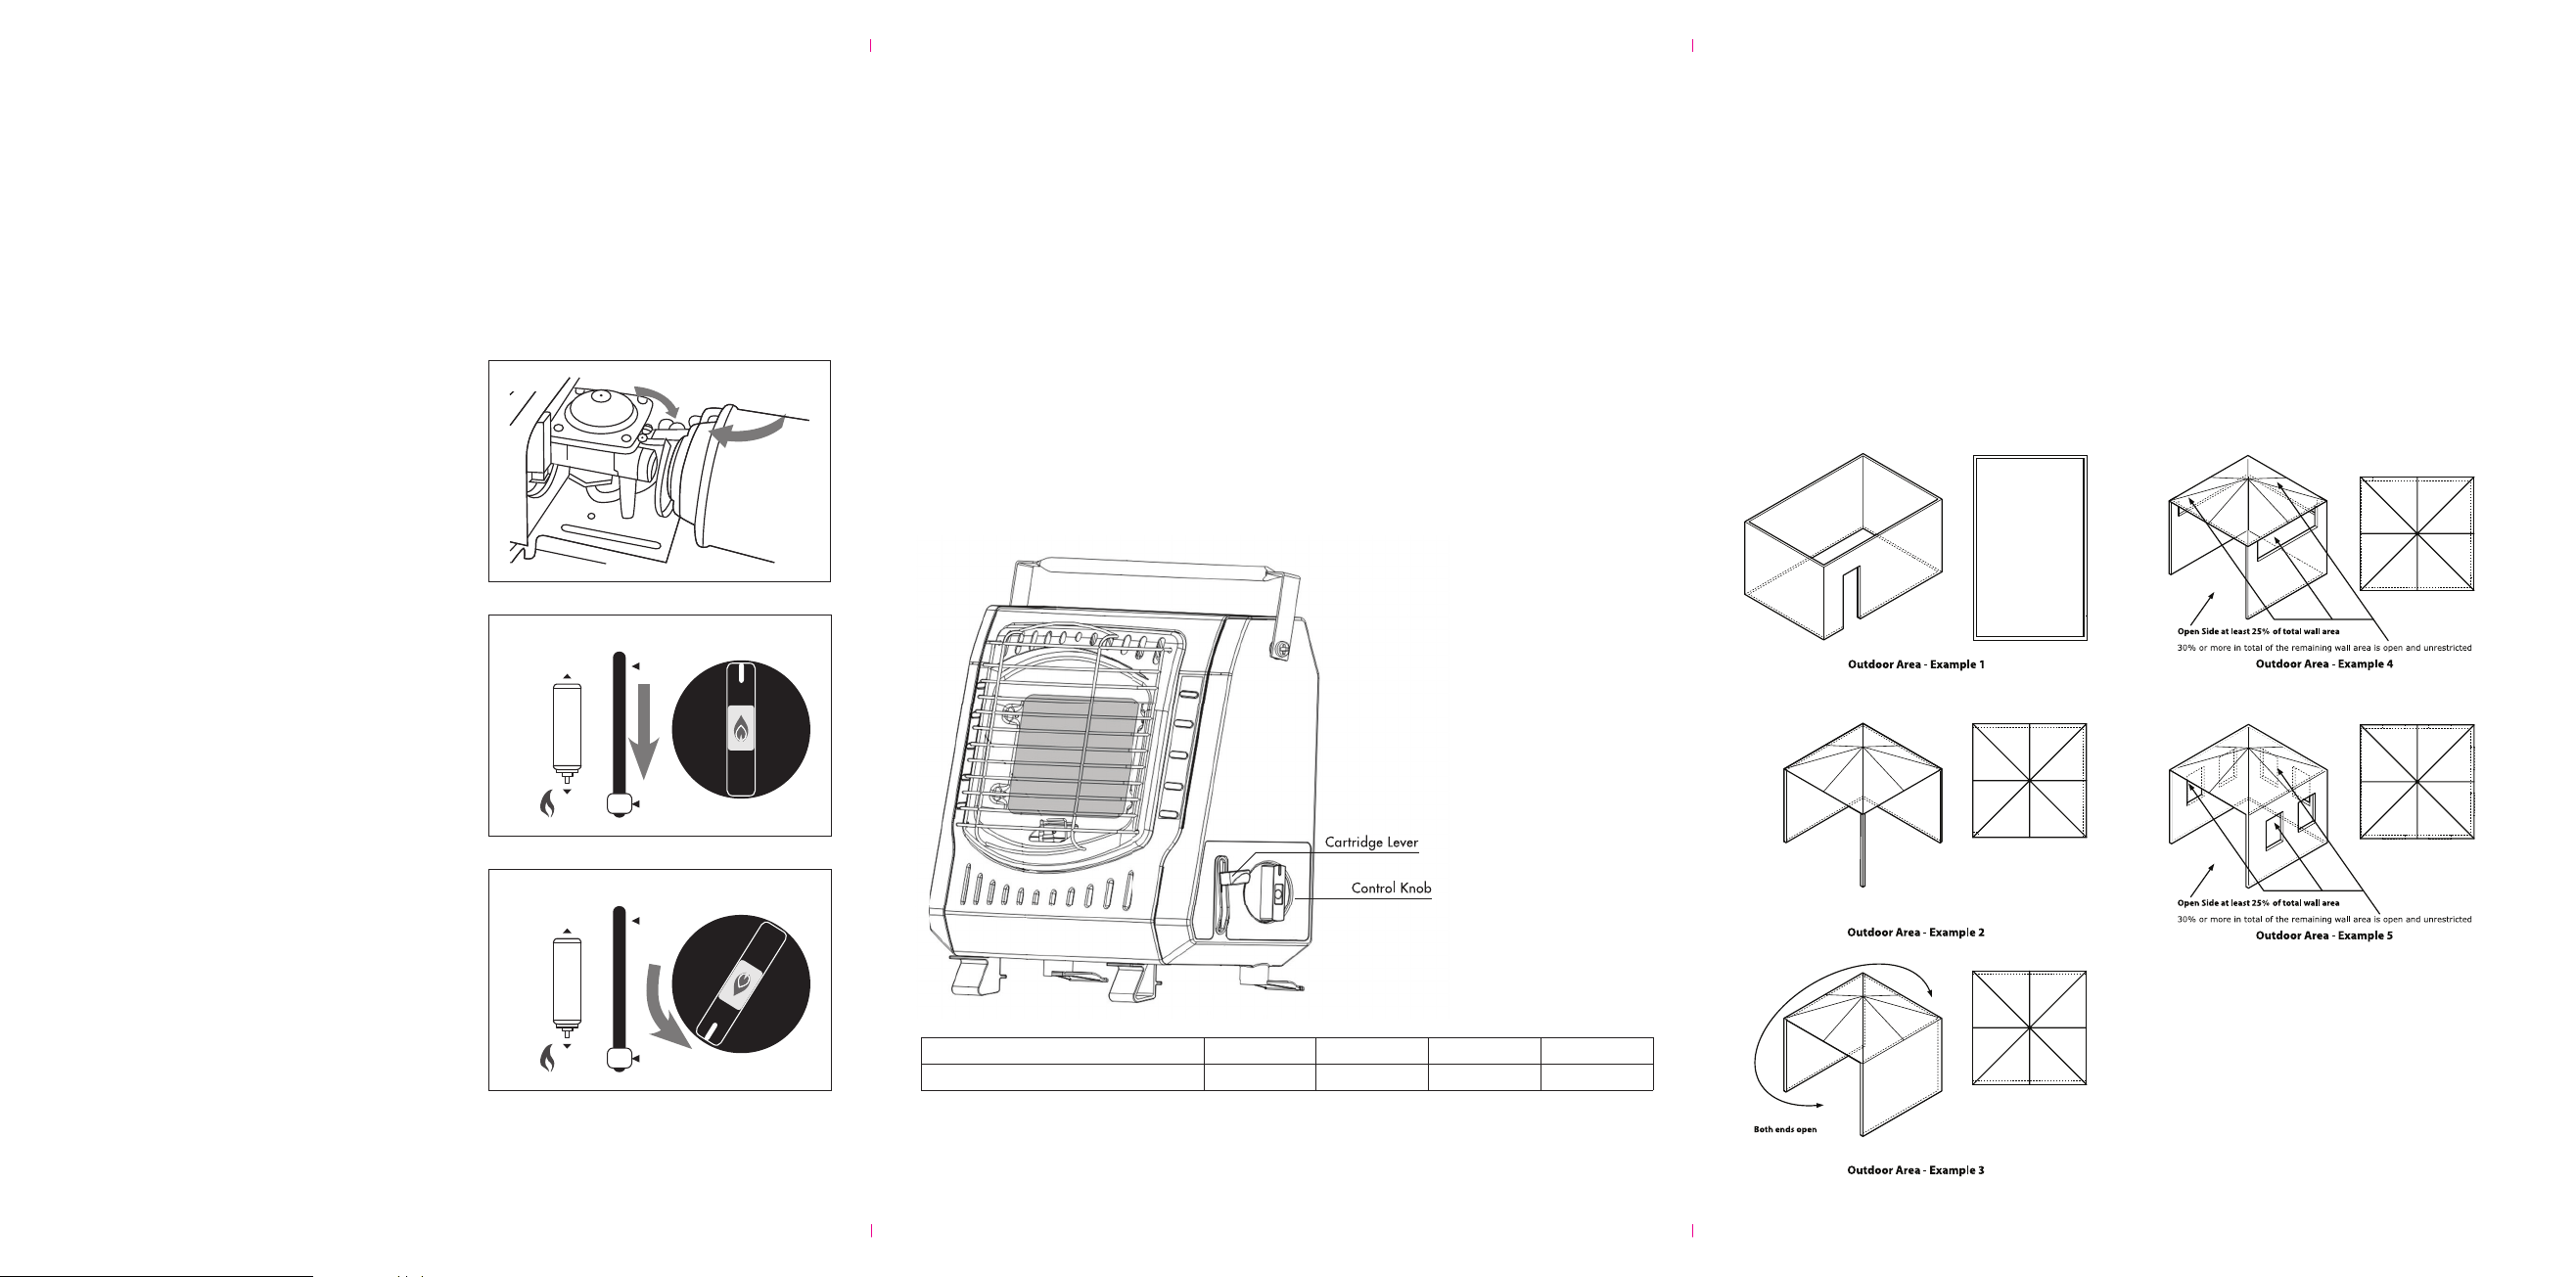
4. Ensure the cartridge lever is in its uppermost
position (OFF).
5. Close the control valve by turning knob clockwise.
6. Remove the cap from the gas cartridge. Open the
cartridge cover on the rear of the heater, check the
sealing washer is in position and in good condition.
7. Insert the cartridge, valve first, so that the slot in
the cartridge aligns with the valve tab (see fig.1).
Close the cartridge cover.
8. Engage the cartridge by pressing the cartridge
lever downwards (See fig.2). DO NOT force this
lever. If you hear “hissing” noise the cartridge has
not been correctly fitted and you should repeat the
connection procedure.
9. Turn the control valve fully anti-clockwise until the
ignition device “clicks” (See fig.3). If ignition does
not occur, repeat this process.
10. Extinguish by turning control knob fully clockwise
and releasing (pushing up) the cartridge lever.
Check that heater is fully extinguished before
leaving unattended.
GENERAL INFORMATION
GAS CONSUMPTION g/h MJ/h BTU Injector
BH80
140 g/h 7 MJ/h 6,800 BTU 0.54mm
This appliance shall only be used in an above ground
open-air situation with natural ventilation, without
stagnant areas, where gas leakage and products of
combustion are rapidly dispersed by wind and natural
convection.
Any enclosure in which the appliance is used shall
comply with the following:
An enclosure with walls on all sides, but at least one
permanent opening at ground level and no overhead
cover (see Example 1).
Within a partial enclosure that includes an overhead cover
and no more than two walls
(see Example 2 & 3).
Within a partial enclosure that includes an overhead cover
and more than two walls, the following will apply:
at least 25% of the total wall area is completely open,
and at least 30% of the remaining wall area is open and
unrestricted (see Example 4 & 5).
In the case of balconies, at least 20% of the total wall
area shall be and remain open
and unrestricted.
DIAGRAMMATIC REPRESENTATIONS OF OUTDOOR AREAS
The following figures are diagrammatic representations of outdoor areas. Rectangular areas have been used in these
figures – the same principles apply to any other shaped area.
SAFETY DEVICES
This heater is equipped with a safety device that will
stop the flow of gas if the pressure in the cartridge
becomes to high. This may be as a result of
overheating. This device will automatically reset and
will allow continued use once the pressure in the gas
cartridge returns to normal.
WARNING: NEVER force the cartridge lever as this
will result in permanent damage.
AFTER USE
Turn the control knob to the ‘OFF’ position (fully
clockwise) and push the cartridge lever up to its off
position.
In an emergency the heater can be switched off by
pushing the cartridge lever upwards.
For your own safety, always remove the gas cartridge
after use.
Fit the cartridge with its protective cap and store in a
cool well ventilated place.
REMOVING THE CARTRIDGE
Check that the heater is off by turning control knob fully
clockwise, releasing the cartridge lever (push up) and
checking that the heater has fully extinguished.
Only change the gas cartridge in a well ventilated
location, preferably outside, away from people and
away from any sources of ignition; such as naked
flames, pilot flames, electric heaters/equipment.
STORAGE
Once fully cooled, disconnect the heater from the
cartridge and store both in a cool,
well-ventilated place.
MAINTENANCE
DO NOT MODIFY THIS APPLIANCE. If there is a leak
on your appliance (smell of gas) and you cannot stop
the gas flow, remove the appliance to a well-ventilated
location away from any ignition source. Only check
for leaks outdoors using soapy water. DO NOT try to
detect leaks using a flame.
This appliance must only be serviced by an authorised
person. Keep the heater clean by wiping with a damp
cloth. Avoid dust and other debris entering the heater.
If the heater fails to operate contact your dealer or our
service department. If the appliance cannot be adjusted
to perform correctly it should not be used until serviced
or repaired.
SAFE APPLIANCE LOCATIONS
OFF
IGNITE
RELEASE
LOAD
LOAD
GAS
RELEASE
OFF
IGNITE
RELEASE
LOAD
LOAD
GAS
RELEASE
FIG. 2
FIG. 3
FIG. 1