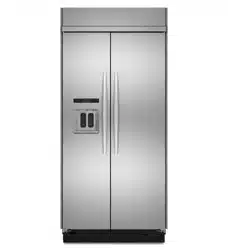
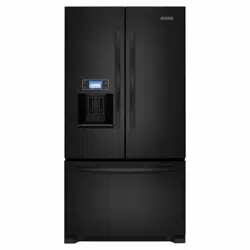
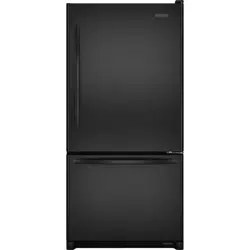
User Gudie KitchenAid KSSC42QTS00 Refrigerator
BEFORE USE
Remove the Packaging Clean Before Using
- If the ice storage bin is located on the door, remove the temporary shield from underneath the ice storage bin. See
Ice Maker and Storage Bin."
- Remove tape and glue residue from surfaces before turning on the refrigerator. Rub a small amount of liquid dish soap over the adhesive with your fingers. Wipe with warm water and dry.
- Do not use sharp instruments, rubbing alcohol, flammable fluids, or abrasive cleaners to remove tape or glue. These products can damage the surface of your refrigerator. For more information, see "Refrigerator Safety."
- Dispose of/recycle all packaging materials.
- After you remove all of the packaging materials, clean the inside of your refrigerator before using it. See the cleaning instructions in "Refrigerator Care."
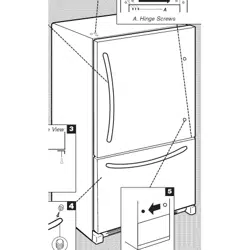
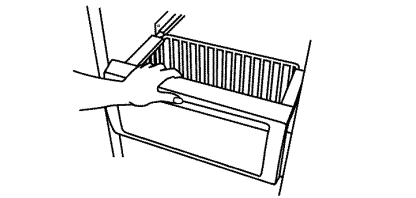
To Remove Top Grille:
- Grasp both ends of the top grille.
- Push the top grille straight up, then pull straight out. Lay the grille on a soft surface.
Explosion Hazard
Keep flammable materials and vapors, such as gasoline, away from refrigerator.
Failure to do so can result in death, explosion, or fire.
A. Top grille
B. Cabinet side trims
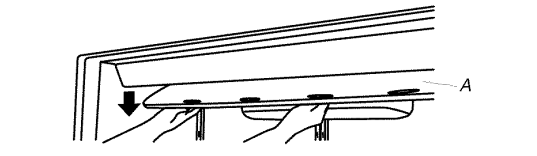
To Replace Top Grille:
- Insert top grille hooks (located on the back of the top grille) onto mounting bolts on the side trim.
- Pull grille down slightly to lock into place.
REFRIGERATOR USE
Water Pressure
- A cold water supply with water pressure between 30 and 120 psi and 827 kPa) is required to operate the water dispenser and ice maker. If you have questions about your water pressure, see
- Troubleshooting" or call a licensed, qualified plumber.
Reverse Osmosis Water Supply
- The pressure of the water supply coming out of a reverse osmosis system going to the water inlet valve of the refrigerator needs to be between 30 and 120 psi (207 and kPa).
- If a reverse osmosis water filtration system is connected to your cold water supply, the water pressure to the reverse osmosis system needs to be a minimum of 40 psi (276 kPa).
- If the water pressure to the reverse osmosis system is less than psi (276 kPa):
- Check to see whether the sediment filter in the reverse osmosis system is blocked. Replace the filter if necessary.
- Allow the storage tank on the reverse osmosis system to refill after heavy usage.
- If your refrigerator has a water filter, it may further reduce the water pressure when used in conjunction with a reverse osmosis system. Remove the water filter. See "Water
Filtration System."
- If you have questions about your water pressure, call a licensed, qualified plumber.
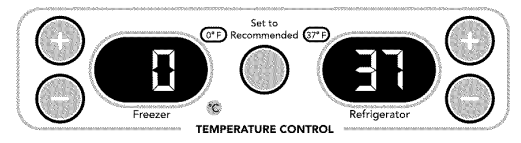
- Turning Refrigerator On and Viewing Set Points
- Press the Cooling (ON/OFF) touch pad. COOLING
NOTE:
- After the refrigerator is turned on, the Over Temperature audio alarm and indicator light may activate every 11/2hours until the refrigerator and freezer temperatures are below 48°F (9°C) and 15°F (-9°C), respectively, or until the alarm is turned off.
- To turn off the audio alarm and indicator light, see "Master Alarm Reset." The ON/OFF touch pad on the control panel shuts down refrigerator functions such as cooling, lighting, fans and compressors.
- To turn the power off completely, use the power ON/OFF switch located behind the top grille. See "Power On/Off Switch."
To Adjust Set Point Temperatures:
- Press the refrigerator or freezer PLUS (+) or MINUS (-) touch pad until the desired temperature is reached.
Over Temperature
- Over Temperature Alarm activates, your food may spoil. See the "Power Interruptions." Minimize door openings until temperatures return to normal.
- The Over Temperature feature is designed to let you know when either the refrigerator temperature rises above 48°F (9°C) or the freezer temperature rises above 15°F (-9°C) for longer than hours.
- The audio alarm will shut off automatically when the temperature returns to normal, but the indicator light will continue to flash until the Alarm is pressed to let you know that an over temperature condition has occurred.
- If the over temperature condition is still present when an Over
- Temperature Reset is performed, the indicator light will continue to reactivate every 11/2hours until refrigerator and freezer temperatures are below 48°F (9°C) and 15°F (-9°C), respectively.
NOTE:
- To deactivate the audio alarm and indicator light, see
Master Alarm Reset."
- Call Service
- If the Call Service indicator light is flashing, call for service. See the "Assistance or Service" section for information on calling for service.
NOTE:
- o deactivate the audio alarm and indicator light, see
Master Alarm Reset."
- The Ice Dispenser Ice dispenses from the ice maker storage bin in the freezer when the dispenser pad is pressed. The dispensing system will not operate when the freezer door is open. To turn off the ice maker, see "Ice Maker & Storage Bin."
- Your ice maker can produce both crushed and cubed ice. The display screen reads "CRUSHED" or "CUBED", indicating which type is selected. To change the setting, press the ICE button before dispensing ice. For crushed ice, cubes are crushed before being dispensed.
- This may cause a slight delay when dispensing crushed ice. Noise from the ice crusher is normal, and pieces of ice may vary in size. When changing from crushed to cubed, a few ounces of crushed ice will be dispensed along with the first cubes.
If the filter is new:
- You must press FILTER to view the filter's status. For a few seconds, the status light will be blue and the display screen will show what percentage of your filter's life remains.
If it is almost time to change the filter:
- The status light will automatically illuminate and will remain on, appearing yellow. The words "ORDER FILTER" will appear on the display screen.
- Press FILTER to see what percentage of your filter's life remains. You should order the appropriate replacement filter. See "Accessories."
If it is time to change the filter:
- The status light will remain on, changing to red. The words
- REPLACE FILTER" and "HOLD BUTTON TO RESET" will appear on the display screen until the filter has been changed and the status light has been reset.
To reset the water filter status light:
- After changing the filter, reset the status light by pressing and holding the FILTER button for 3 seconds. The status light will blink red and change to blue, then turn off when the system is reset.
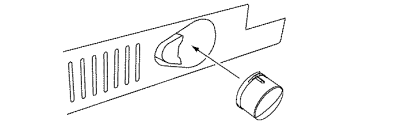
Using the Ice Maker Without a Water Filter
You can operate the ice maker without a water filter. Your ice will not be filtered
1. Remove the filter by pressing the eject button and pulling on the cap. See "Changing the Water Filter" earlier in this section.
2. Remove the cap by turning it counterclockwise until it stops.
IMPORTANT: Do not discard the cap. It is part of your refrigerator. Keep the cap to use with the replacement filter.
3. With the cap in a horizontal position, insert the cap into the base grille until it stops.
@ Turn the cap counterclockwise until the cap slips into the attachment slot. Then, turn the cap clockwise until it is in a horizontal position. NOTE: The cap will not be even with the base grille.
REFRIGERATO R FEATURES
To remove and replace a shelf/frame:
1. Remove the shelf/frame by tilting it up at the front and lifting it out of the shelf supports. Pull shelf straight out.
2. Replace the shelf/frame by guiding the rear shelf hooks into the shelf supports. Tilt the front of the shelf up until the rear shelf hooks drop into the shelf supports.
3. Lower the front of the shelf and check to make sure that the shelf is securely in position.
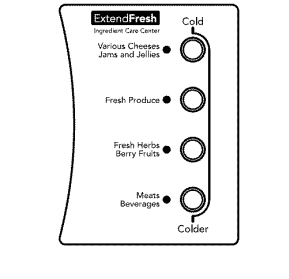
To Adjust the Ingredient Care Center
- Choose a setting based on the item to be stored in the pan.
- Push the button that corresponds to that setting. The indicator light for that setting will illuminate to verify that the pan is ready to be loaded.
FREEZER FEATURES
Frozen Food Storage
- Guide Storage times will vary according to the quality and type of food, the type of packaging or wrap used (should be airtight and moisture-proof), and the storage temperature. Ice crystals inside a sealed package are normal.
- This simply means that moisture in the food and air inside the package have condensed, creating ice crystals. Put no more unfrozen food into the freezer than will freeze within 24 hours (no more than 2 to 3 Ibs of food per cubic foot [907 to 1,350 g per 28 L] of freezer space).
- Leave enough space in the freezer for air to circulate around packages. Be sure to leave enough room for the door to close tightly. For more information on preparing food for freezing, check a freezer guide or reliable cookbook.
To remove and replace the freezer basket:
1. Pull the basket straight out to the stop.
2. Lift the front of the basket and slide it out the rest of the way.
REFRIGERATOR CARE
To Clean Your Refrigerator:
- Remove the top grille. See "Power On/Off Switch."
- Press power switch to OFR
- Remove all removable parts from inside, such as shelves, crispers, etc.
- Hand wash, rinse, and dry removable parts and interior surfaces thoroughly. Use a clean sponge or soft cloth and a mild detergent in warm water.
- Do not use abrasive or harsh cleaners such as window sprays, scouring cleansers, flammable fluids, cleaning waxes, concentrated detergents, bleaches or cleansers containing petroleum products on plastic parts, interior and door liners or gaskets. Do not use paper towels, scouring pads, or other harsh cleaning tools. These can scratch or damage materials.
- To help remove odors, you can wash interior walls with a mixture of warm water and baking soda (2 tbs to 1 qt g to 0.95 L] of water).
- Wash stainless steel and painted metal exteriors with a clean sponge or soft cloth and a mild detergent in warm water.
- Do not use abrasive or harsh cleaners, or cleaners containing chlorine. Dry thoroughly with a soft cloth. For additional protection against damage to painted metal exteriors, apply appliance wax (or auto paste wax) with a clean, soft cloth. Do not wax plastic parts.
NOTE:
- To keep your Stainless Steel refrigerator looking like new and to remove minor scuffs or marks, it is suggested that you use the manufacturer's approved Stainless Steel Cleaner
Polish.
IMPORTANT: This cleaner is for Stainless Steel parts only!
Do not allow the Stainles
- Steel Cleaner & Polish to come into contact with any plastic parts such as the trim pieces, dispenser covers or door gaskets. If unintentional contact does occur, clean plastic part with a sponge and mild detergent in warm water. Dry thoroughly with a soft cloth. To order the cleaner, see "Accessories."
- Press the power switch to ON.
- Replace the top grille. See "Power On/Off Switch."
Refrigerator Control Panel Lights
- There are two or three light bulbs located in the top front of the refrigerator compartment behind a light shield. • Open the light shield. Grasp the light shield by the openings. Gently push back and pull down, as shown, to access the light bulbs.
- Remove the light bulb and replace it with one of the same size, shape and wattage. Close the light shield by raising it up into place. NOTE: If needed, clean the light shield with a damp soft cloth.
Freezer and Crisper Lights
• Remove the light shield by grasping the sides and squeezing in toward the center. Once the side hooks of the shield are free from the freezer or crisper lining, pull down the shield. Replace the light shield by squeezing the top and bottom toward the center and inserting the hooks into the slotted holes. Once the hooks are in place, snap the front tab into the slotted hole.
TROUBLESHOOTING
The lights do not work
- See "Holiday Mode." Is a light bulb loose in the socket or burned out? See "Changing the Light Bulb(s)."
- Has the door been open more than 10 minutes? When the door is held open for more than 10 minutes, the "Door Open" indicator light will flash and the interior lights will shut off. See "Door Open" in "Using the Control(s)."
- The motor seems to run too much is the room temperature hotter than normal? The motor will run longer under warm conditions.
- At normal room temperatures, expect your motor to run about 80% of the time. Under warmer conditions, it will run even more. Has a large amount of food just been added to the refrigerator? Adding a large amount of food warms the refrigerator.
- The motor normally will run longer to cool the refrigerator back down. Are the doors opened often? The motor will run longer when this occurs. Conserve energy by getting all items out at one time, keeping food organized, and closing the door as soon as possible.
- Are the controls not set correctly for the surrounding conditions? See "Using the Control(s)."
The ice maker is not producing ice or not enough ice
- Has the ice maker just been installed? The ice bin holds to 17 Ibs (6.4 to 7,7 kg) of ice, The ice bin can take three to four days to completely fill, if no ice is used during this time.
- Is the freezer temperature cold enough to produce ice?
- Wait 24 hours after ice maker hookup for ice production. See
- Using the Control(s)."
- Is the ice maker wire shutoff arm in the OFF (arm up) position (on some models)? Lower the wire shutoff arm to the ON (arm down) position. See "Ice Maker and Storage
- Bin."
- Is the ice maker switch in the OFF (right) position (on some models)? Move ice maker switch to the ON (left) position. See "Ice Maker and Storage Bin."
- Is the water line shutoff valve to the refrigerator turned on? Turn on the water valve, See "Connect Water Line to
- Refrigerator" in the Installation Instructions,
- Does the ice maker mold have water in it or has no ice been produced? Make sure your refrigerator has been connected to a water supply and the supply shutoff valve is turned on. See "Connect Water Line to Refrigerator" in the
Installation Instructions.
- Is an ice cube jammed in the ice maker ejector arm?
- For models with an interior ice bin, remove the ice from the ejector arm with a plastic utensil. For models with an ice bin located on the freezer door, access the ice maker by depressing the ice sensor door on the upper left side of the freezer interior. While depressing the sensor door, lift the ice maker service door and remove the ice from the ejector with a plastic utensil. See "Ice Maker and Storage Bin."
- Has a large amount of ice just been removed? Allow three to four days for an empty ice bin to completely fill, if no ice is used during this time.
- Are the controls set correctly? See "Using the Control(s)."
- Is there a water filter installed on the refrigerator? The filter may be clogged or installed incorrectly. Check the filter installation instructions to ensure that the filter was installed correctly and is not clogged. If installation or clogging is not a problem, call a technician or other qualified person,
NOTE:
- If not due to any of the above, there may be a problem with the water line, Call for service.
The ice dispenser will not operate properly
- If the ice storage bin is located on the door, remove the temporary shield from underneath the ice storage bin. See
- Ice Maker and Storage Bin."
- Is the freezer door closed completely? Push the door firmly shut. If it will not shut all the way, see "The doors will not close completely" later in this section.
- Is the ice bin installed correctly? For models with an interior ice bin, push the ice bin in all the way. If the ice bin does not go in all the way, it may not be put in straight.
- Pull it out and try again. For models with an ice bin located on the freezer door, the bin should sit level. To remove the bin, press the release button on the right side of the bin and lift straight up.
- Replace the bin in the door making sure it is properly aligned and snapped securely into place. See "Ice Maker and
Storage Bin."
- Has the wrong ice been added to the bin? Use only cubes produced by the current ice maker. If other cubes have been added, remove all cubes and check to see that none have become stuck in the delivery chute,
- Has the ice frozen in the ice bin? Shake the ice bin to separate cubes. If cubes do not separate, empty bin and wait hours for ice to restock.
- Has the ice melted around the auger (metal spiral) in the ice bin? Empty the ice container, Use warm water to melt the ice if necessary.
- Is ice stuck in the delivery chute? Clear the ice from the delivery chute with a plastic utensil, Do not use anything sharp to remove the ice. You could cause damage.
Water is leaking from the dispenser
- Glass not being held under the dispenser long enough? Hold the glass under the dispenser 2 to 3 seconds after releasing the dispenser pad. Is there a water filter installed on the refrigerator?
- The water filtration system may have air inthe lines, causing water to drip. Additional flushing may help clear air from the lines. Normal dispenser use should flush air from the lines within 24 to 72 hours,
Water flow from the dispenser decreases noticeably
- Is there a water filter installed on the refrigerator? The filter may be full or incorrectly installed. Remove the water filter cartridge.
- See "Water Filtration System." Operate the dispenser. If the water flow increases noticeably, replace the filter.
The dispenser water is not cool enough
- Has the refrigerator been newly installed? Allow 24 hours for the refrigerator to cool completely.
- Has a large amount of water been recently dispensed?
- Allow 24 hours for the water to cool completely.
- Has water not been recently dispensed? The first glass of water may not be cool. Discard the first glass of water.
The water dispenser will not operate properly
- Has the water system not filled? The water system needs to be filled the first time it is used. Use a sturdy container to depress the water dispenser bar until the water begins to flow. Flush the water system by dispensing and discarding qt (5,7 L) of water.
- Cleaning the system will take approximately 3 to 4 minutes and will help clear air from the line. Additional flushing may be required in some households.
- See "Water and Ice Dispensers."
- Is the water shutoff valve not turned on or the water line connected at the source? Make sure the water shutoff valve is turned on and the water source is connected to the refrigerator. See "Connect Water Line to Refrigerator" in the
- Installation Instructions.
- Is the water shutoff valve clogged or incorrectly installed?
- See "Connect Water Line to Refrigerator" in the Installation
- Instructions. If clogging or installation is not a problem, call for service or contact a plumber.
- Is there a kink in the home water source line? If you find or suspect a kink in the water line, call for service.
- Is there a water filter installed on the refrigerator? The filter may be clogged or incorrectly installed. First, check the filter installation instructions to ensure that the filter was installed correctly and is not clogged. If installation or clogging is not a problem, call for service.
Temperature is too warm
- Are the air vents blocked in either compartment? This obstructs cold air movement between the compartments.
- Remove any objects from in front of the air vents, See
- Ensuring Proper Air Circulation" for the location of air vents.
- Are the door(s) opened often? The refrigerator will warm when this occurs. Keep the refrigerator cool by getting all items out at one time, keeping food organized, and closing the door as soon as possible.
- Has a large amount of food just been added to the refrigerator or freezer? Adding a large amount of food warms the refrigerator. It can take several hours for the refrigerator to return to the normal temperature.
- Are the controls set correctly for the surrounding conditions? See "Using the Control(s)."
- Is the refrigerator not cooling? For models with digital controls, turn the unit OFF then ON again to reset. See "Using the Control(s)." If this does not correct the problem, call for service.
There is interior moisture buildup
- Are the air vents blocked in the refrigerator? Remove any objects from in front of the air vents, See "Ensuring Proper Air
- Circulation" for the location of air vents.
- Are the door(s) opened often? Avoid humidity buildup by getting all items out at one time, keeping food organized, and closing the door as soon as possible.
- Is the room humid? It is normal for moisture to build up inside the refrigerator when the room air is humid,
- Is the food packaged correctly? Check that all food is securely wrapped, Wipe off damp food containers before placing in the refrigerator.
- Are the controls set correctly for the surrounding conditions? See "Using the Control(s)."
- Was a self-defrost cycle completed? It is normal for droplets to form after the refrigerator self-defrosts.
The doors will not close completely
- Are food packages blocking the door open? Rearrange containers so that they fit more tightly and take up less space, Is the ice bin out of position?
- For models with an interior ice bin, push the ice bin in all the way.
- If the ice bin does not go in all the way, it may net be put in straight. Pull it out and try again. For models with an ice bin located on the freezer door, the bin should sit level.
- To remove the bin, press the release button on the right side of the bin and lift straight up. Replace the bin in the door making sure it is properly aligned and snapped securely into place, See "Ice Maker and Storage Bin."