Towels (_)
Heavy Duty
Normal
Perm Press
Delicates (_
Touch Up
Timed Dry (_
DRYER OPERATING INSTRUCTIONS
Before Operating Your Dryer
Read your dryer Owner's Guide. Ithas important safety and warranty
information. It also has many suggestions for best drying results.
To reduce the risk of fire, electric shock or injury to
persons, read the IMPORTANT SAFETY INSTRUCTIONS inyour dryer
Owner's Guide before operating this appliance.
Operating Steps
Read 'Owing Procedures" in your Owner's Guide. It explains these
operating steps in detail.
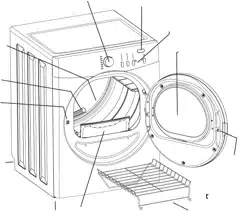
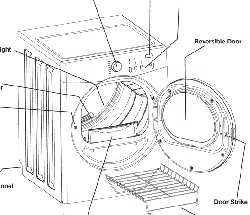
1. Prepare items for drying.
2. Check that tint filter is clean and in place.
3. Load the dwer. If desired, add a dwer fabric softener sheet. Close
the door.
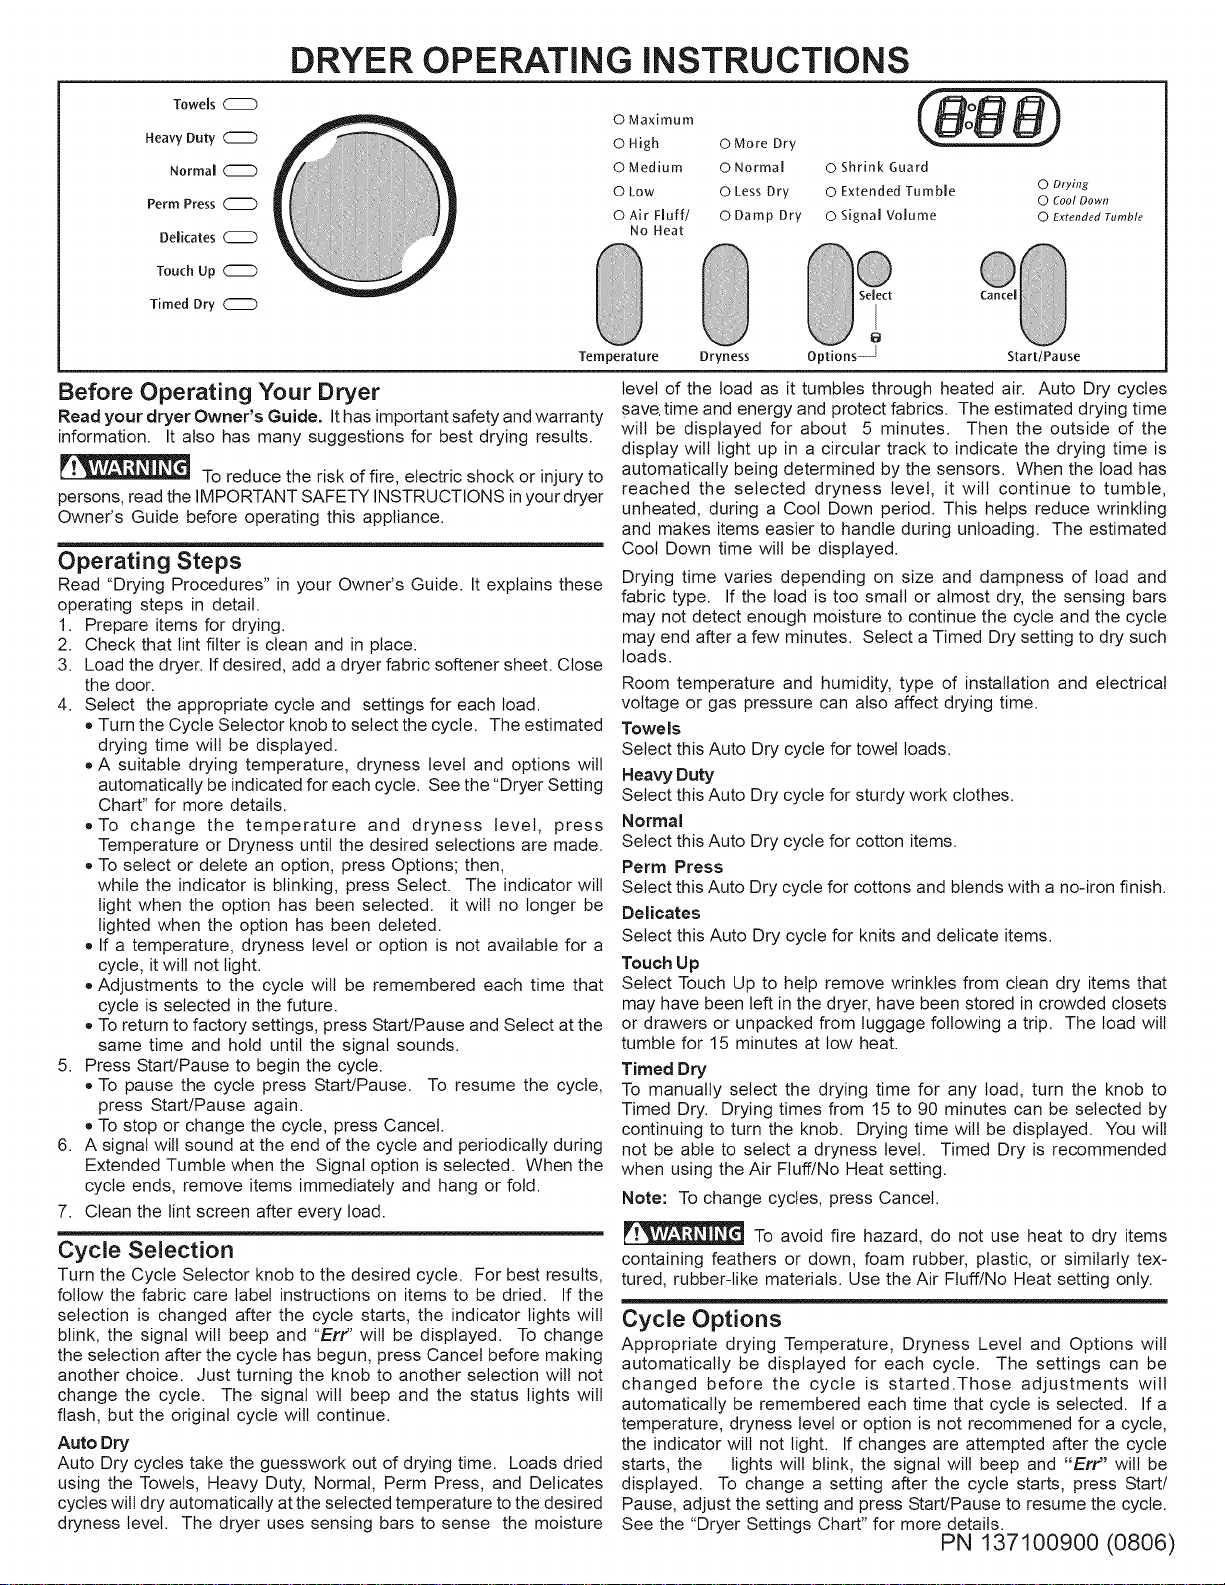
4. Select the appropriate cycle and settings for each toad.
, Turn the Cycle Selector knob to select the cycle. The estimated
drying time wilt be displayed.
, A suitable drying temperature, dryness level and options will
automatically be indicated for each cycle. See the "Dryer Setting
Chart" for more details.
,To change the temperature and dryness level, press
Temperature or Dryness until the desired selections are made.
, To select or delete an option, press Options; then,
while the indicator is blinking, press Select. The indicator will
light when the option has been selected, it wilt no longer be
lighted when the option has been deleted.
, If a temperature, dryness level or option is not available for a
cycle, it will not light.
, Adjustments to the cycle will be remembered each time that
cycle is selected in the future.
, To return to factory settings, press Start/Pause and Select at the
same time and hold until the signal sounds.
5. Press Start/Pause to begin the cycle.
, To pause the cycle press Start/Pause. To resume the cycle,
press Start/Pause again.
, To stop or change the cycle, press Cancel.
6. A signal will sound at the end of the cycle and periodically during
Extended Tumble when the Signal option is selected. When the
cycle ends, remove items immediately and hang or fold.
7. Clean the lint screen after every load.
Cycle Selection
Turn the Cycle Selector knob to the desired cycle. For best results,
follow the fabric care label instructions on items to be dried. If the
selection is changed after the cycle starts, the indicator lights wilt
blink, the signal wilt beep and "Err' will be displayed. To change
the selection after the cycle has begun, press Cancel before making
another choice. Just turning the knob to another selection will not
change the cycle. The signal will beep and the status lights wilt
flash, but the original cycle will continue.
Auto Dry
Auto Dry cycles take the guesswork out of drying time. Loads dried
using the Towels, Heavy Duty, Normal, Perm Press, and Deticates
cycles wilt dry automatically at the selected temperature to the desired
dryness level. The dryer uses sensing bars to sense the moisture
O Maximum
O High O More Dry
O Medium O Normal
O Low O Less Dry
O Air Fluff/ O Damp Dry
No Heat
O Shrink Guard
O Extended Tumble 0 Drying
0 dool Down
O Signal Volume 0 ExtendedTumble
Select Cancel
Temperature Options j Start/Pause
level of the toad as it tumbles through heated air. Auto Dry cycles
save. time and energy and protect fabrics. The estimated drying time
will be displayed for about 5 minutes. Then the outside of the
display wilt light up in a circular track to indicate the drying time is
automatically being determined by the sensors. When the load has
reached the selected dryness level, it wilt continue to tumble,
unheated, during a Cool Down period. This helps reduce wrinkling
and makes items easier to handle during unloading. The estimated
Cool Down time will be displayed.
Drying time varies depending on size and dampness of load and
fabric type. If the load is too small or almost dry, the sensing bars
may not detect enough moisture to continue the cycle and the cycle
may end after a few minutes. Select a Timed Dry setting to dry such
loads.
Room temperature and humidity, type of installation and electrical
voltage or gas pressure can also affect drying time.
"rowe Is
Select this Auto Dry cycle for towel loads.
Heavy Duty
Select this Auto Dry cycle for sturdy work clothes.
Normal
Select this Auto Dry cycle for cotton items.
Perm Press
Select this Auto Dry cycle for cottons and blends with a no-iron finish.
Delicates
Select this Auto Dry cycle for knits and delicate items.
Touch Up
Select Touch Up to help remove wrinkles from clean dry items that
may have been left in the dryer, have been stored in crowded closets
or drawers or unpacked from luggage following a trip. The load will
tumble for 15 minutes at low heat.
Timed Dry
To manually select the drying time for any toad, turn the knob to
Timed Dry. Drying times from 15 to 90 minutes can be selected by
continuing to turn the knob. Drying time will be displayed. You will
not be able to select a dryness level. Timed Dry is recommended
when using the Air Fluff/No Heat setting.
Note: To change cycles, press Cancel.
To avoid fire hazard, do not use heat to dry items
containing feathers or down, foam rubber, plastic, or similarly tex-
tured, rubber-like materials. Use the Air Fluff/No Heat setting only.
Cycle Options
Appropriate drying Temperature, Dryness Level and Options will
automatically be displayed for each cycle. The settings can be
changed before the cycle is started.Those adjustments wilt
automatically be remembered each time that cycle is selected. If a
temperature, dryness level or option is not recommened for a cycle,
the indicator wilt not light. If changes are attempted after the cycle
starts, the lights will blink, the signal will beep and "Err" will be
displayed. To change a setting after the cycle starts, press Start/
Pause, adjust the setting and press Start/Pause to resume the cycle.
See the "Dryer Settings Chart" for more details.
PN 137100900 (0806)
Dryness
Cycle Options (con't)
Drying Temperature
For best results, follow the fabric care label instructions on items to
be dried. To change the drying temperature, press Temperature to
scroll to the desired heat. To protect your wardrobe, not all
temperatures are available with every cycle.
Maximim heat is recommended for sturdy fabrics.
High heat is recommended for most cotton fabrics.
Medium heat is recommended for wrinkle free, permanent press
and lightweight fabrics.
Low heat is recommended for delicate fabrics.
Air Fuff/No Heat should only be used with a Timed Dry setting to dry
items containing feathers, down, foam rubber, plastics or rubber-
like materials; to freshen clothing, pillows or blankets; or to dust
draperies.
Note: Using Air Ftuff/No Heat in any Auto Dry
cycle will result in tong drying times and/or
J
wet loads at the end of the cycle.
Dryness Level
To change the dryness level, press Dryness until the desired selection
is made. Select Normal for most loads.
Occasionally a load may seem too damp or over-dried at the end of
the cycle. To increase drying time for similar loads in the future,
select More Dry. For loads requiring less drying time, select Less
Dry.
Select Damp Dry for items you wish to partially dry before hanging or
ironing.
Note: To prevent over-drying, not every drynesslevel is available with every cycle.
1
Options
To select an option, press Options until the indicator for the desired
option flashes, then press Select. If an option is not available for a
cycle, the indicator will not light. Follow the same steps to delete an
option.
A Signal will sound at the end of the cycle and periodically during
Extended Tumble. The signal has an adjustable volume level or can
be turned off.
Select Shrink Guard to lower the initial drying temperature to protect
fabrics from overdrying.
Select Extended Tumble if the dried load might not be removed
promptly at the end of the cycle. The dry load wilt continue tumbling
without heat for 30 minutes to help reduce wrinkling. When the
Signal is selected, a beep will be heard periodically. The load may
be removed any time during Extended Tumble.
Dryer Features
O Control Lock
To avoid having someone accidentally start or stop the dryer, press
Options and Select at the same time and hold for 10 seconds. "LOC"
will be displayed. To remove the control lock, press Options and
Select again.
StartlPause
Press Start/Pause to start, pause or restart a cycle. "PAU" will be
displayed alternately with the estimated time remaining when the
cycle is paused.
Cancel
Press Cancel to stop the cycle.
Status Lights
The following indicators may be lighted during the cycle:
o Drying
o Cool Down
= Extended Tumble
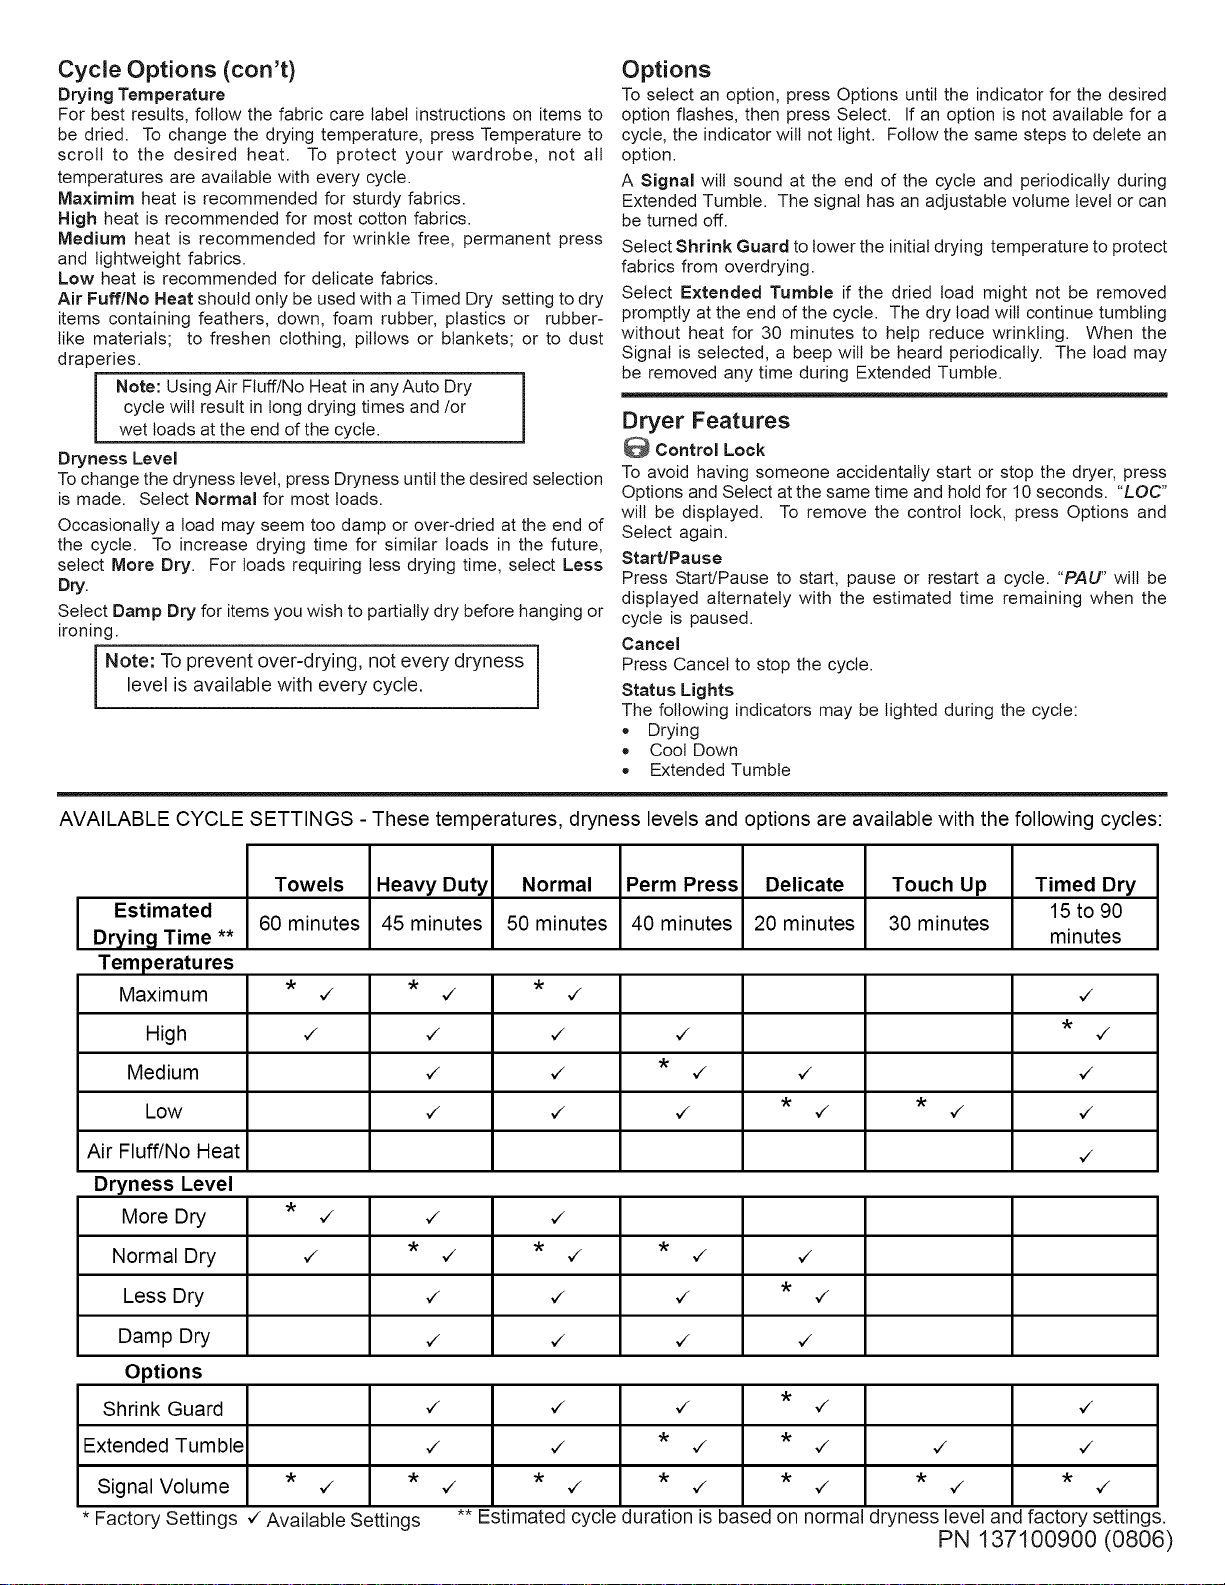
AVAILABLE CYCLE SETTINGS - These temperatures, dryness levels and options are available with the following cycles:
Towels Heavy Duty Normal Perm Press Delicate Touch Up Timed Dry
Estimated 15 to 90
60 minutes 45 minutes 50 minutes 40 minutes 20 minutes 30 minutes
Drying Time ** minutes
Temperatures
Maximum ,,/ ,,/ ,,/ ,,/
High ,/ ,/ ,/ ,/ * ,/
Medium ,,/ ,,/ * ,,/ ,,/ ,,/
Low v" v" v" * ,,/ * ,,/ ,,/
Air Fluff/No Heat ,/
Dryness Level
More Dry * ,/ ,/ ,/
Normal Dry ,/ * ,/ * ,/ * ,/ ,/
Less Dry v" v" v" * ,,/
Damp Dry v" v" v" v"
Options
Shrink Guard ,/ ,/ ,/ ,/ ,/
Extended Tumble ,/ ,/ * ,/ * ,/ ,/ ,/
Signal Volume * ,/ * ,/ * ,/ * ,/ * ,/ * ,/ * ,/
• Factory Settings ,/Available Settings
** Estimated cycle duration is based on normal dryness level and factory settings.
PN 137100900 (0806)
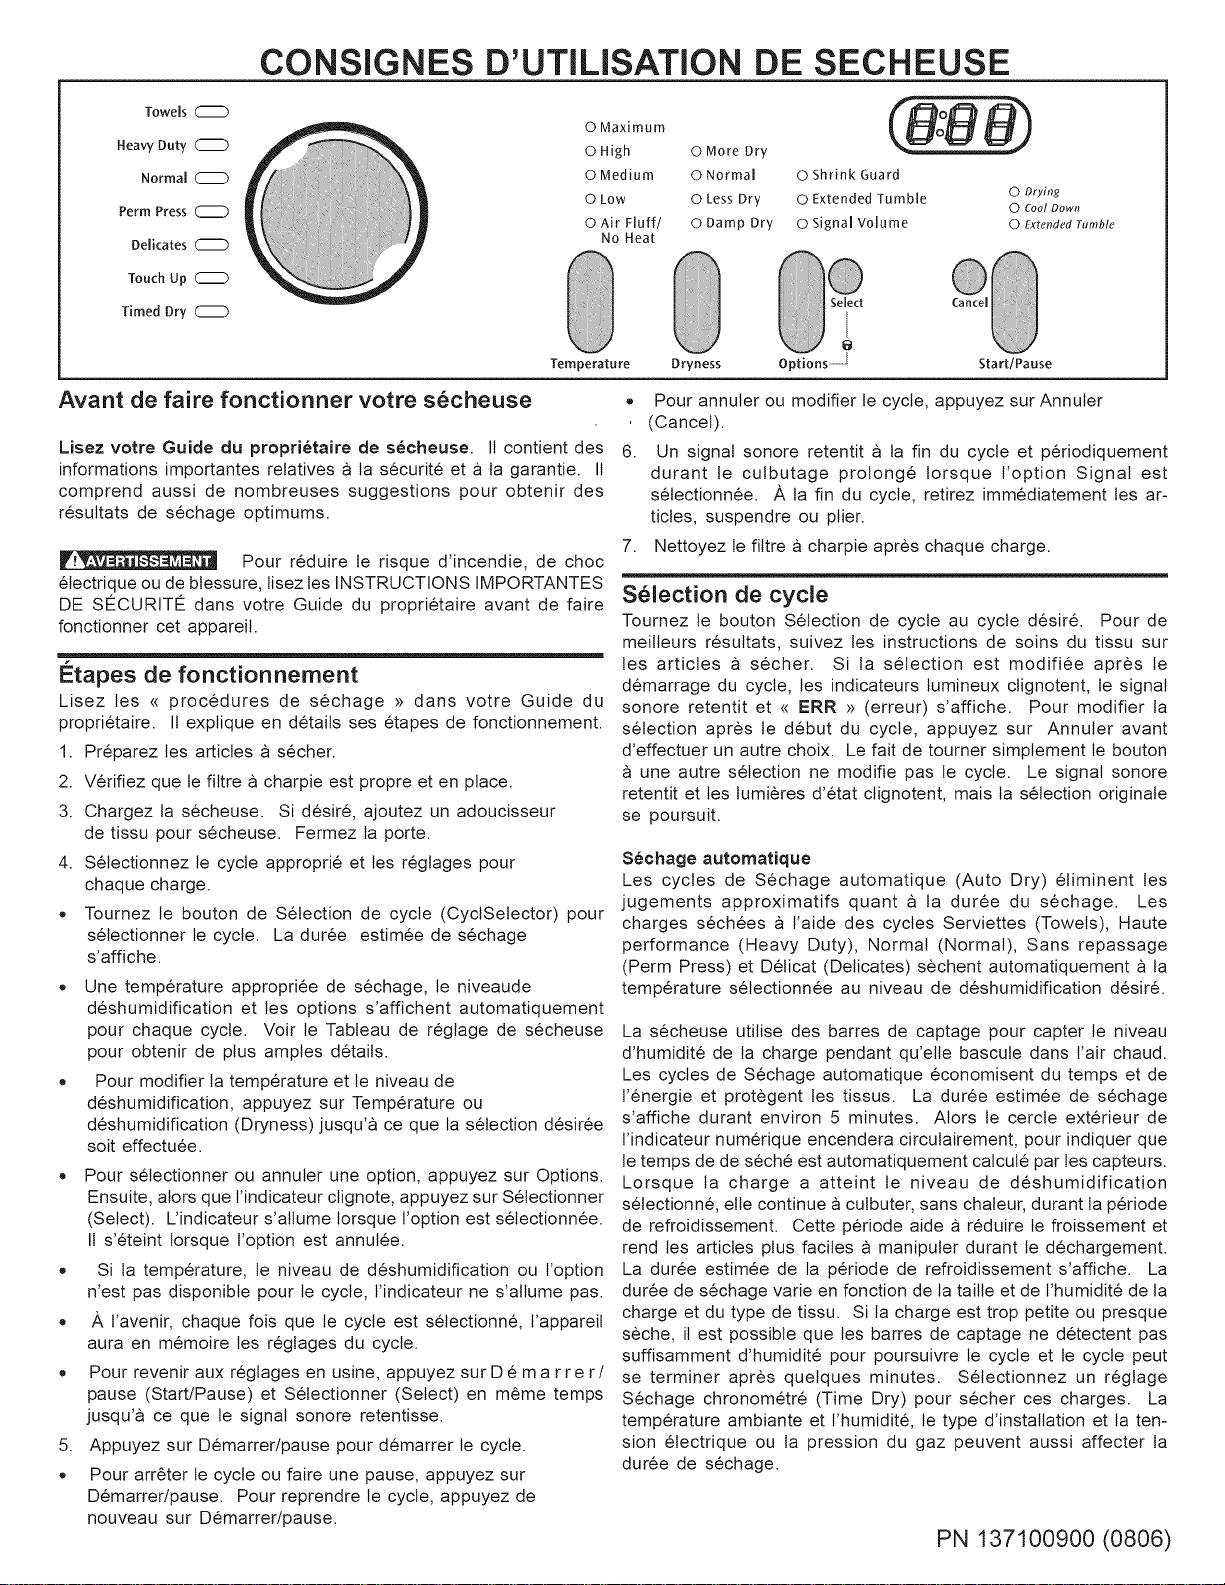
CONSIGNES D'UTILISATION DE SECHEUSE
Towels C_)
Heavy Duty (_ _
Normal ([_)
Perm Press (_
Delicates ([_D
Touch Up C_)
Timed Dry ([_)
0 Maximum
0 High 0 More Dry
0 Medium 0 Normal 0 Shrink Guard
0 Low 0 Less Dry 0 Extended Tumble
0 Air Fluff/ 0 Damp Dry 0 Signal Volume
No Heat
Cancel
O Drying
0 Coot Down
0 Extended Tumble
Select
Options j
Temperature Dryness Start/Pause
Avant de faire fonctionner votre s6cheuse
Lisez votre Guide du propri6taire de s6cheuse. It contient des
informations importantes relatives a ta securit6 et a la garantie. It
comprend aussi de nombreuses suggestions pour obtenir des
resultats de sechage optimums.
Pour reduire te risque d'incendie, de choc
etectrique ou de btessure, tisez les INSTRUCTIONS IMPORTANTES
DE S¢:CURIT¢: dans votre Guide du proprietaire avant de faire
fonctionner cet appareit.
Etapes de fonctionnement
Lisez les <<procedures de sechage >>dans votre Guide du
proprietaire. I1explique en detaits ses etapes de fonctionnement.
1. Preparez les articles a secher.
2. Verifiez que le fittre a charpie est propre et en place.
3. Chargez la secheuse. Si desir6, ajoutez un adoucisseur
de tissu pour secheuse. Fermez la porte.
4. Selectionnez le cycle approprie et les reglages pour
chaque charge.
, Tournez le bouton de Selection de cycle (CyclSetector) pour
selectionner le cycle. La duree estimee de sechage
s'affiche.
, Une temperature appropriee de sechage, le niveaude
deshumidification et les options s'affichent automatiquement
pour chaque cycle. Voir le Tableau de reglage de secheuse
pour obtenir de plus amples details.
, Pour modifier la temperature et le niveau de
deshumidification, appuyez sur Temperature ou
deshumidification (Dryness) jusqu'a ce que la selection desir6e
soit effectuee.
, Pour selectionner ou annulet une option, appuyez sur Options.
Ensuite, alors que t'indicateur clignote, appuyez sur Selectionner
(Select). Uindicateur s'allume lorsque t'option est setectionn6e.
I1s'eteint lorsque t'option est annulee.
, Si la temperature, te niveau de deshumidification ou t'option
n'est pas disponible pour le cycle, t'indicateur ne s'altume pas.
/_,t'avenir, chaque fois que te cycle est setectionn6, l'appareit
aura en memoire les regtages du cycle.
Pour revenir aux regtages en usine, appuyez sur D 6 m a r re r/
pause (Start/Pause) et Selectionner (Select) en m6me temps
jusqu'a ce que le signal sonore retentisse.
5. Appuyez sur D6marrer/pause pour demarrer le cycle.
Pour arr6ter te cycle ou faire une pause, appuyez sur
D6marrer/pause. Pour reprendre le cycle, appuyez de
nouveau sur D6marrer/pause.
, Pour annulet ou modifier le cycle, appuyez sur Annuler
(Cancel).
6. Un signal sonore retentit a ta fin du cycle et periodiquement
durant le culbutage prolonge lorsque t'option Signal est
selectionn6e. ,ik la fin du cycle, retirez immediatement les ar-
ticles, suspendre ou plier.
7. Nettoyez le fittre a charpie apres chaque charge.
S61ection de cycle
Tournez le bouton Selection de cycle au cycle desir6. Pour de
meitteurs resultats, suivez les instructions de soins du tissu sur
les articles a secher. Si la selection est modifiee apres le
demarrage du cycle, les indicateurs lumineux clignotent, te signal
sonore retentit et <<ERR >>(erreur) s'affiche. Pour modifier la
selection apres te debut du cycle, appuyez sur Annuler avant
d'effectuer un autre choix. Le fait de tourner simplement te bouton
une autre selection ne modifie pas le cycle. Le signal sonore
retentit et tes tumieres d'etat ctignotent, mais ta selection originate
se poursuit.
S6ehage automatique
Les cycles de Sechage automatique (Auto Dry) eliminent tes
jugements approximatifs quant a ta duree du sechage. Les
charges s6chees a t'aide des cycles Serviettes (Towels), Haute
performance (Heavy Duty), Normal (Normal), Sans repassage
(Perm Press) et Deticat (Deticates) sechent automatiquement a la
temperature setectionn6e au niveau de deshumidification desir6.
La secheuse utitise des barres de captage pour capter le niveau
d'humidite de ta charge pendant qu'etle bascule dans Fair chaud.
Les cycles de Sechage automatique economisent du temps et de
l'energie et protegent les tissus. La duree estimee de sechage
s'affiche durant environ 5 minutes. Alors te cercle exterieur de
l'indicateur numerique encendera circulairement, pour indiquer que
le temps de de s6che est automatiquement catcule par tes capteurs.
Lorsque ta charge a atteint le niveau de deshumidification
selectionn6, elle continue a culbuter, sans chaleur, durant la periode
de refroidissement. Cette periode aide a reduire te froissement et
rend les articles plus facites a manipuler durant te dechargement.
La duree estimee de la periode de refroidissement s'affiche. La
duree de sechage varie en fonction de la tailte et de t'humidite de la
charge et du type de tissu. Si la charge est trop petite ou presque
seche, it est possible que tes barres de captage ne detectent pas
suffisamment d'humidite pour poursuivre te cycle et te cycle peut
se terminer apres quetques minutes. Selectionnez un reglage
Sechage chronom6tre (Time Dry) pour secher ces charges. La
temperature ambiante et l'humidite, te type d'installation et la ten-
sion etectrique ou la pression du gaz peuvent aussi affecter la
duree de sechage.
PN 137100900 (0806)
S61ection de cycle (suite)
Serviettes
Selectionnez ce cycle de Sechage automatique pour les charges
de serviettes ou ratines.
Haute performance
Selectionnez ce cycle de Sechage automatique pour les v6tements
de travail resistants.
Normal
Setectionnez te cycle Auto Dry pour les articles en coton.
Sans repassage
Selectionnez ce cycle de Sechage automatique pour les articles en
coton et les melanges repassage inutite. D61icat
Selectionner ce cycle de Sechage automatique pour les articles
deticats.
Retouche
Setectionnez Retouche (Touch Up) pour retirer le froissement
d'articles secs propres qui ont pu 6tre laisses dans la secheuse,
entreposes dans des garde-robes ou tiroirs surcharges ou retires
des bagages apres un voyage. La charge bascule durant 15 min-
utes a faibte chaleur.
Sechage chronom6tre
Pour selectionner manuettement la duree de sechage pour toute
charge, tournez le bouton a Sechage chronometr6 (Time Dry). Une
duree de sechage de 15, 30, 60 ou 90 minutes peut 6tre
s61ectionnee en continuant a tourner te bouton. La duree de
sechage s'affiche. I1est impossible de selectionner le niveau de
deshumidification. Le Sechage chronometr6 est recommande lors
de l'utitisation du reglage Air froid/sans chaleur (Air Fluff/No Heat).
Nota: Pour modifier le cycle, appuyez surAnnuler.
=' "" Pour eviter tes risques d'incendie,
n'utitisez pasta chateur pour secher des articles contenant du cuir
ou du duvet, du caoutchouc mousse, du plastique ou des matieres
sembtabtes ou des matieres ressembtant au caoutchouc. Utitisez
uniquement le regtage Air froid/Sans chaleur.
R6glage de cycles
La temperature de sechage, le niveau de deshumidification et tes
options s'affichent automatiquement pour chaque cycle. Les
regtages peuvent 6tre modifies avant le debut du cycle. A t'avenir,
chaque fois que le cycle sera setectionn6, l'appareit aura en
memoire les regtages du cycle. Si une temperature, un niveau de
deshumidification ou une option n'est pas recommande pour un
cycle, t'indicateur ne s'allume pas.
Si vous essayez de faire des modifications apres le demarrage d'un
cycle, tes lumieres ctignotent, le signal sonore retentit et <<Err >>
s'affiche. Pour modifier un regtage apres le demarrage du cycle,
appuyez sur Demarrer/pause, setectionnez te regtage d6sire et
appuyez sur Demarrer/pause pour reprendre le cycle.
Temperature de sechage
Pour obtenir de meitteurs resultats, suivez tes etiquettes
d'instructions de soins de tissu sur tes articles a secher. Pour
modifier la temperature de sechage, appuyez sur Temperature pour
derouler jusqu'a la chaleur d6siree. Pour proteger votre garde-
robe, toutes les temperatures ne sont pas disponibles pour chaque
cycle.
Maximum Temperature recommandee pour tes tissus resistants.
Haute Temperature recommandee pour la plupart des tissus en
coton.
Moyenne Temperature recommandee pour les tissus anti-
froissement, sans repassage et legers.
Base Temperature recommandee pour les tissus deticats.
Air froid/sans chaleur Ce r6glage ne devrait 6tre utitise qu'avec te
regtage de Sechage chronom6tre pour secher des articles contenant
des plumes, du duvet, du caoutchouc mousse, du ptastique ou
des matieres ressembtant au caoutchouc ; pour rafrafchir les
v6tements, les oreitlers ou couvertures ; ou
depoussi6rer les draperies.
Nora " L'utitisation de t'option Air froid/sans chaleur avec un
cycle Sechage automatique entrafne une duree de sechage
plus longue et/ou une charge humide a la fin du cycle.
Niveau de d6shumidification
Pour modifier le niveau de deshumidification, appuyez sur
Deshumidification jusqu'a ce que ta selection d6siree soit effectuee.
Setectionnez Normal pour la plupart des charges. It arrive qu'une
charge apparaisse trop humide ou trop seche a ta fin du cycle.
Pour augmenter la duree de sechage pour des charges semblabtes
t'avenir, setectionnez Plus sec (More Dry). Pour tes charges de-
mandant une plus courte duree de sechage, selectionnez Moins
see (Less Dry). Selectionnez Sec humide (Damp Dry) pour faire
secher les articles que vous desirez secher partieltement avant de
les suspendre ou de les repasser.
Nora : Afin de prevenir un niveau de deshumidification excessif,
tousles niveaux de deshumidification ne sont pas disponibles
pour chaque cycle.
Options
Pour selectionner une option, appuyez sur Options jusqu'a ce que
l'indicateur de t'option d6siree clignote, ensuite appuyez sur
Setectionner. Si une option n'est pas disponible pour un cycle,
l'indicateur ne s'allume pas. Suivez les m6mes etapes pour an-
nuler une option.
Un signal sonore retentit a tafin d'un cycle et periodiquement durant
le Basculage prolong& Le signal possede un volume regtable ou
peut 6tre ferm&
Selectionnez Proteger du froissement (Shrink Guard) afin
d'abaisser la temperature initiale de sechage pour proteger les
tissus d'un sechage excessif.
Selectionnez Basculage prolonge (Extended Tumble) si ta charge
s6chee ne peut 6tre retiree rapidement a ta fin du cycle. La charge
continue a basculer sans chaleur durant 30 minutes afin d'aider
reduire le froissement. Lorsque te signal sonore est s61ectionne,
it retentit periodiquement. La charge peut 6tre retiree en tout temps
durant le basculage prolong&
Caract6ristiques de la s6cheuse
Verrouillage des commandes
Pour eviter que quetqu'un demarre ou arr6te accidentettement ta
secheuse, appuyez sur Options et Setectionner en m6me temps
durant 10 secondes jusqu'a ce que <<LOC >>(verrouitle) s'affiche.
Pour deverrouitter tes commandes, appuyez sur Options et
Setectionner de nouveau.
D6marrer/pause
Appuyez sur D6marredpause pour demarrer, faire une pause ou
redemarrer un cycle. <<PAU >>(pause) s'affiche en altemance avec
la duree estimee restante lorsque le cycle est en pause.
Annuler
Appuyez sur Annuler pour arr6ter le cycle.
Lumieres d'6tat
Les indicateurs suivants peuvent s'altumer durant le cycle :
o Sechage (Drying)
Refroidissement (Cool Down)
Basculage prolonge (Extended Tumble)
PN 137100900 (0806)
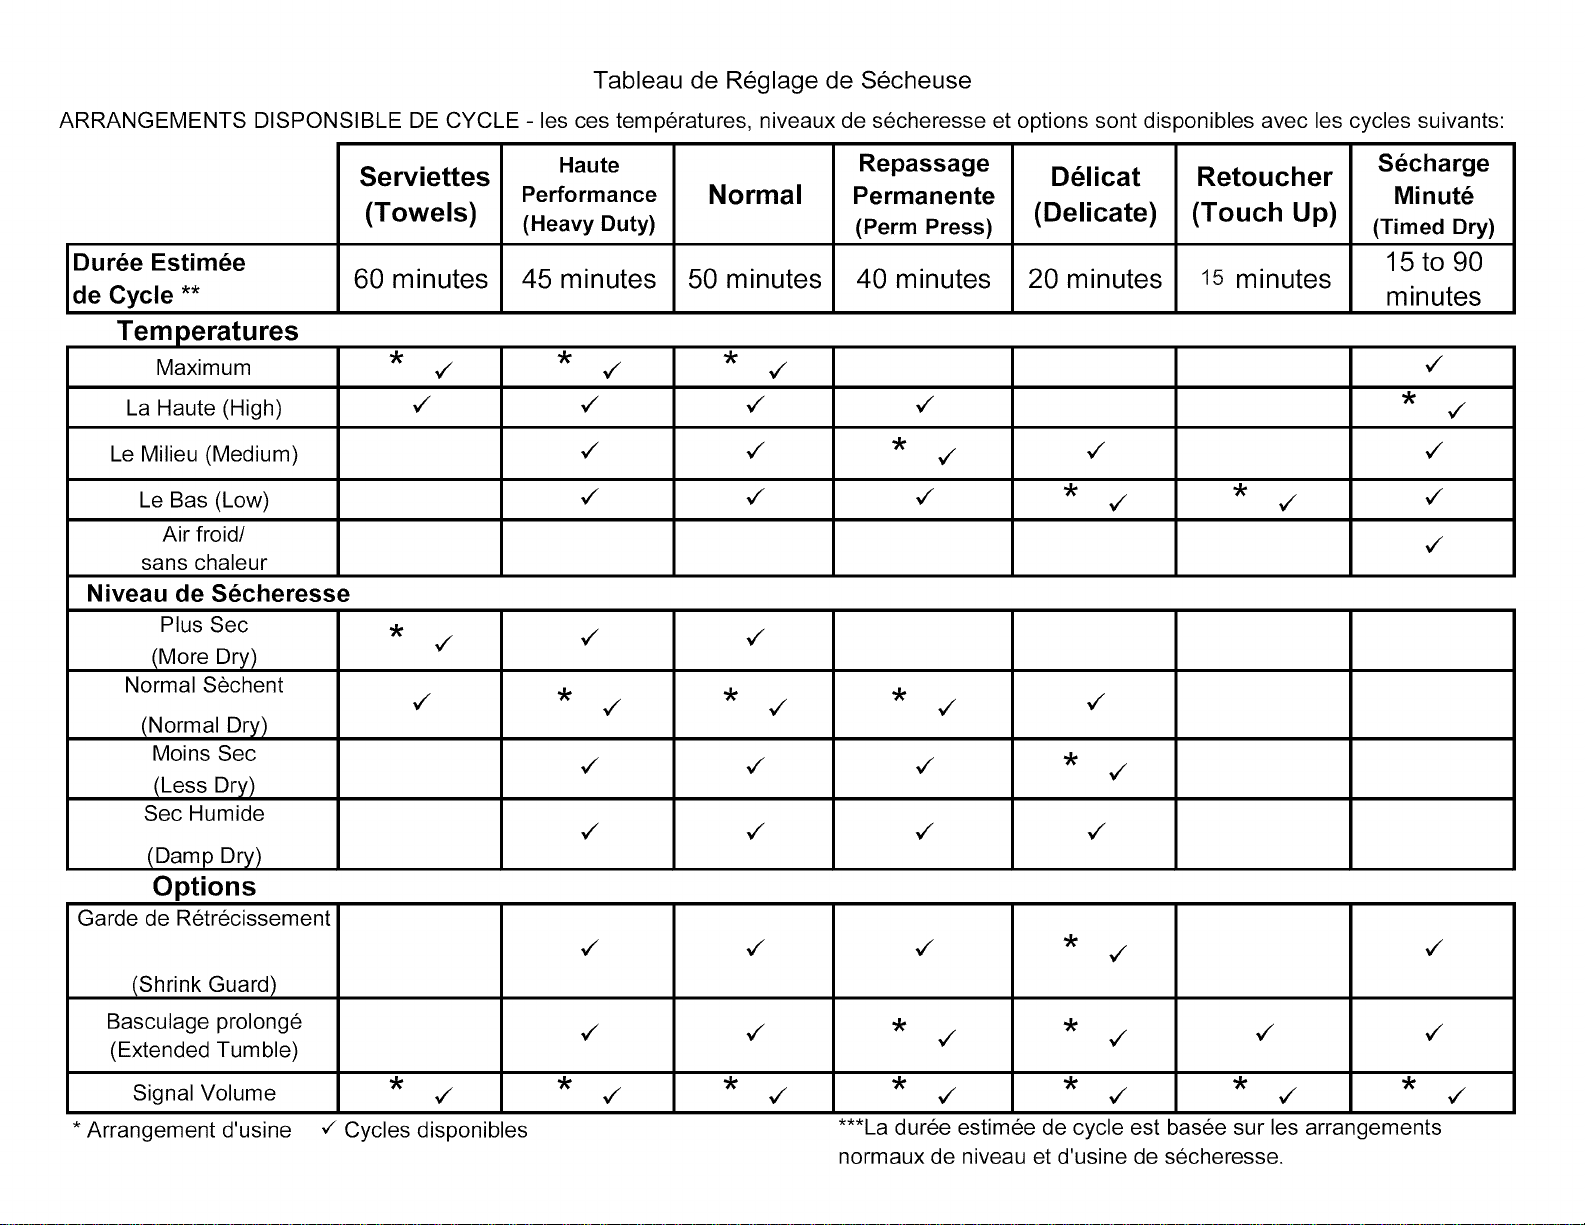
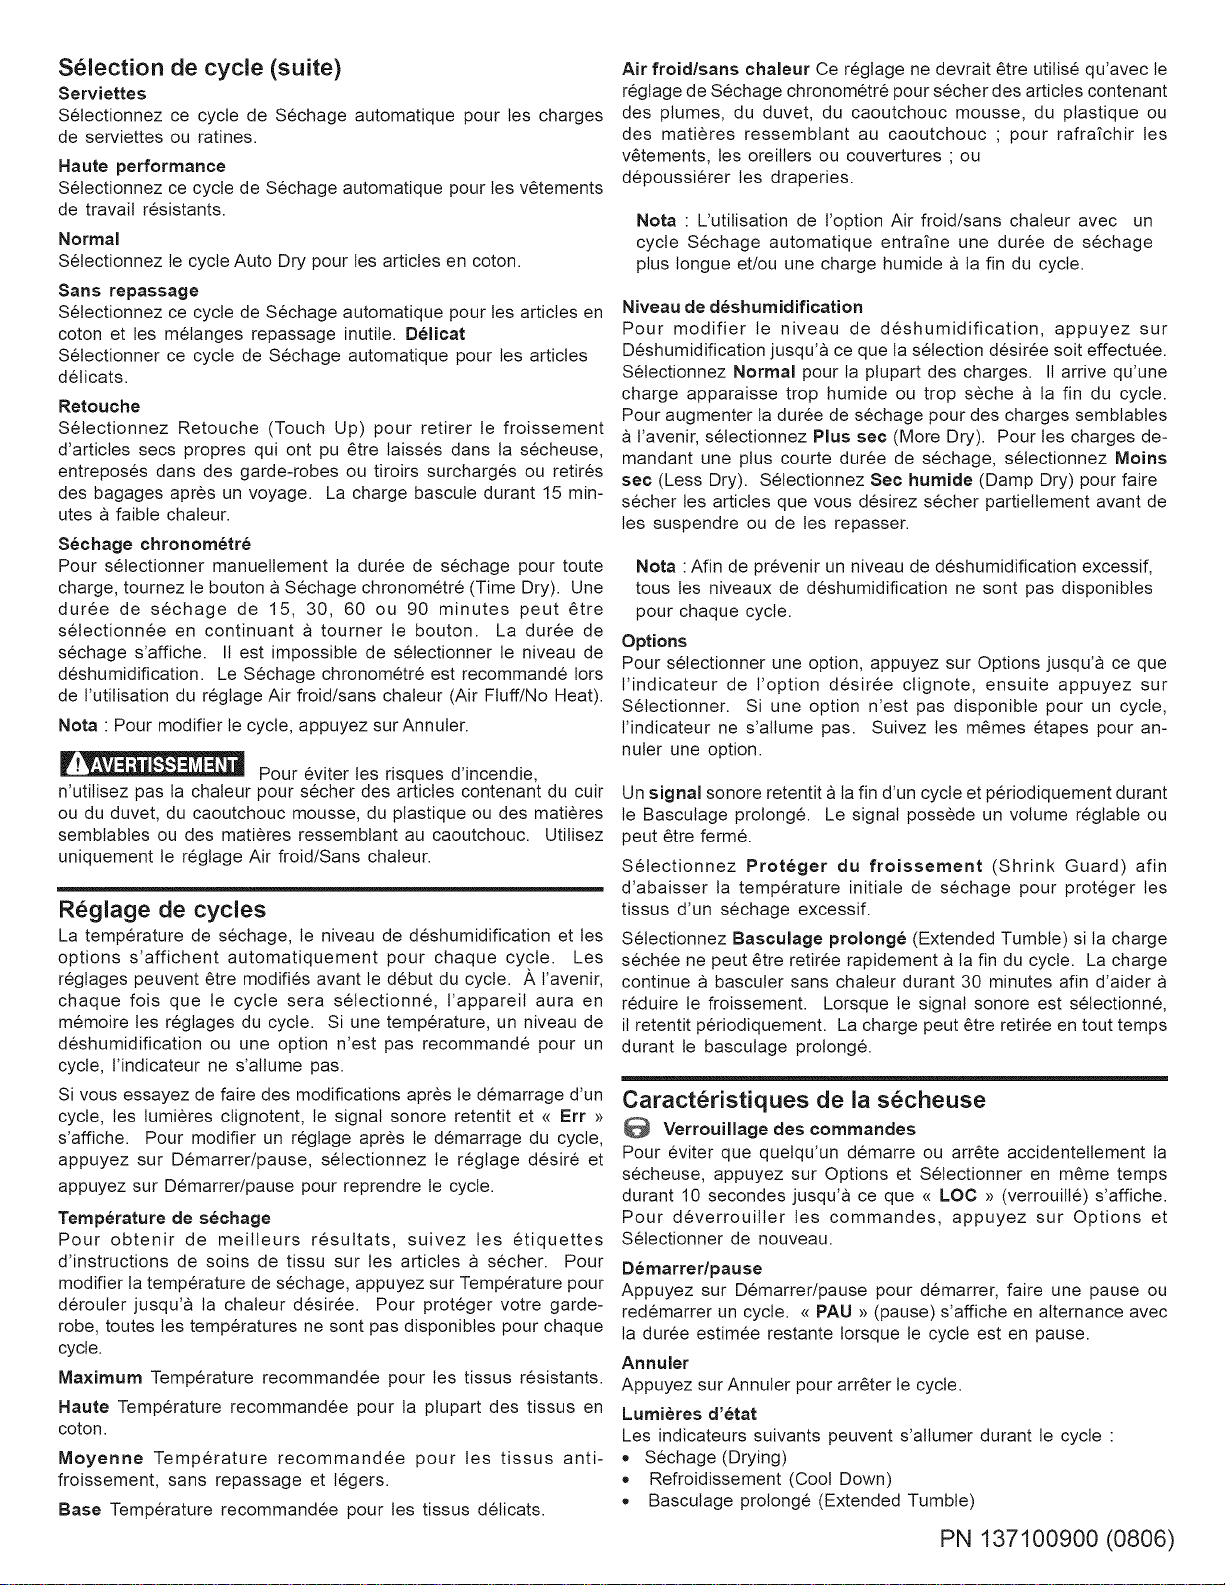
Tableau de Reglage de Secheuse
ARRANGEMENTSDISPONSlBLEDECYCLE- lescestemperatures,niveauxde secheresseetoptionssontdis
Duree Estimee
de Cycle **
Tem peratu res
Maximum
La Haute (High)
Le Milieu (Medium)
Le Bas (Low)
Air froid/
sans chaleur
Niveau de Secheresse
Plus Sec
(More Dry)
Normal Sechent
(Normal Dr)/)
Moins Sec
(Less Dr)/)
Sec Humide
(Damp Dr)/)
Options
Garde de Retr6cissement
(Shrink Guard)
Basculage prolonge
(Extended Tumble)
Signal Volume
* Arrangement d'usine
3onibles avec les cycles suivants:
Serviettes
(Towels)
60 minutes
Haute
Performance
(Heavy Duty)
45 minutes
Normal
50 minutes
Repassage
Permanente
(Perm Press)
40 minutes
D_licat
(Delicate)
20 minutes
Retoucher
(Touch Up)
15 minutes
Secharge
Minute
(Timed Dry)
15 to 90
minutes
,/
,/
,/
,/
,/
,/
,/
,/
,/
,/
,/
,/ ,/
,/
,/
,/
,/
,/
,/
,/
,/
,/
,/
,/ ,/
,/
,/
,/
,/
,/
,/
,/
,/ ,/ ,/
,/Cycles disponibles
,/ ,/
,/ ,/ ,/
"k "k "k "k
,/ ,/ ,/ ,/
***La duree estimee de cycle est basee sur les arrangements
normaux de niveau et d'usine de secheresse.
Instrucciones de Funcionamiento Del Secador
Towels
Heavy Duty
Normal
Perm Press
Delkates
Touch Up
Timed Dry
0 Maximum
0 High 0 More Dry
0 Medium 0 Normal 0 Shrink Guard
0 Low 0 Less Dry 0 Extended Tumble
0 Air Fluff/ 0 Damp Dry 0 Signal Volume
No Heat
0 Drying
0 Coo! Down
0 Extended Tumble
Select
Options ]
Temperature Dryness Start/Pause
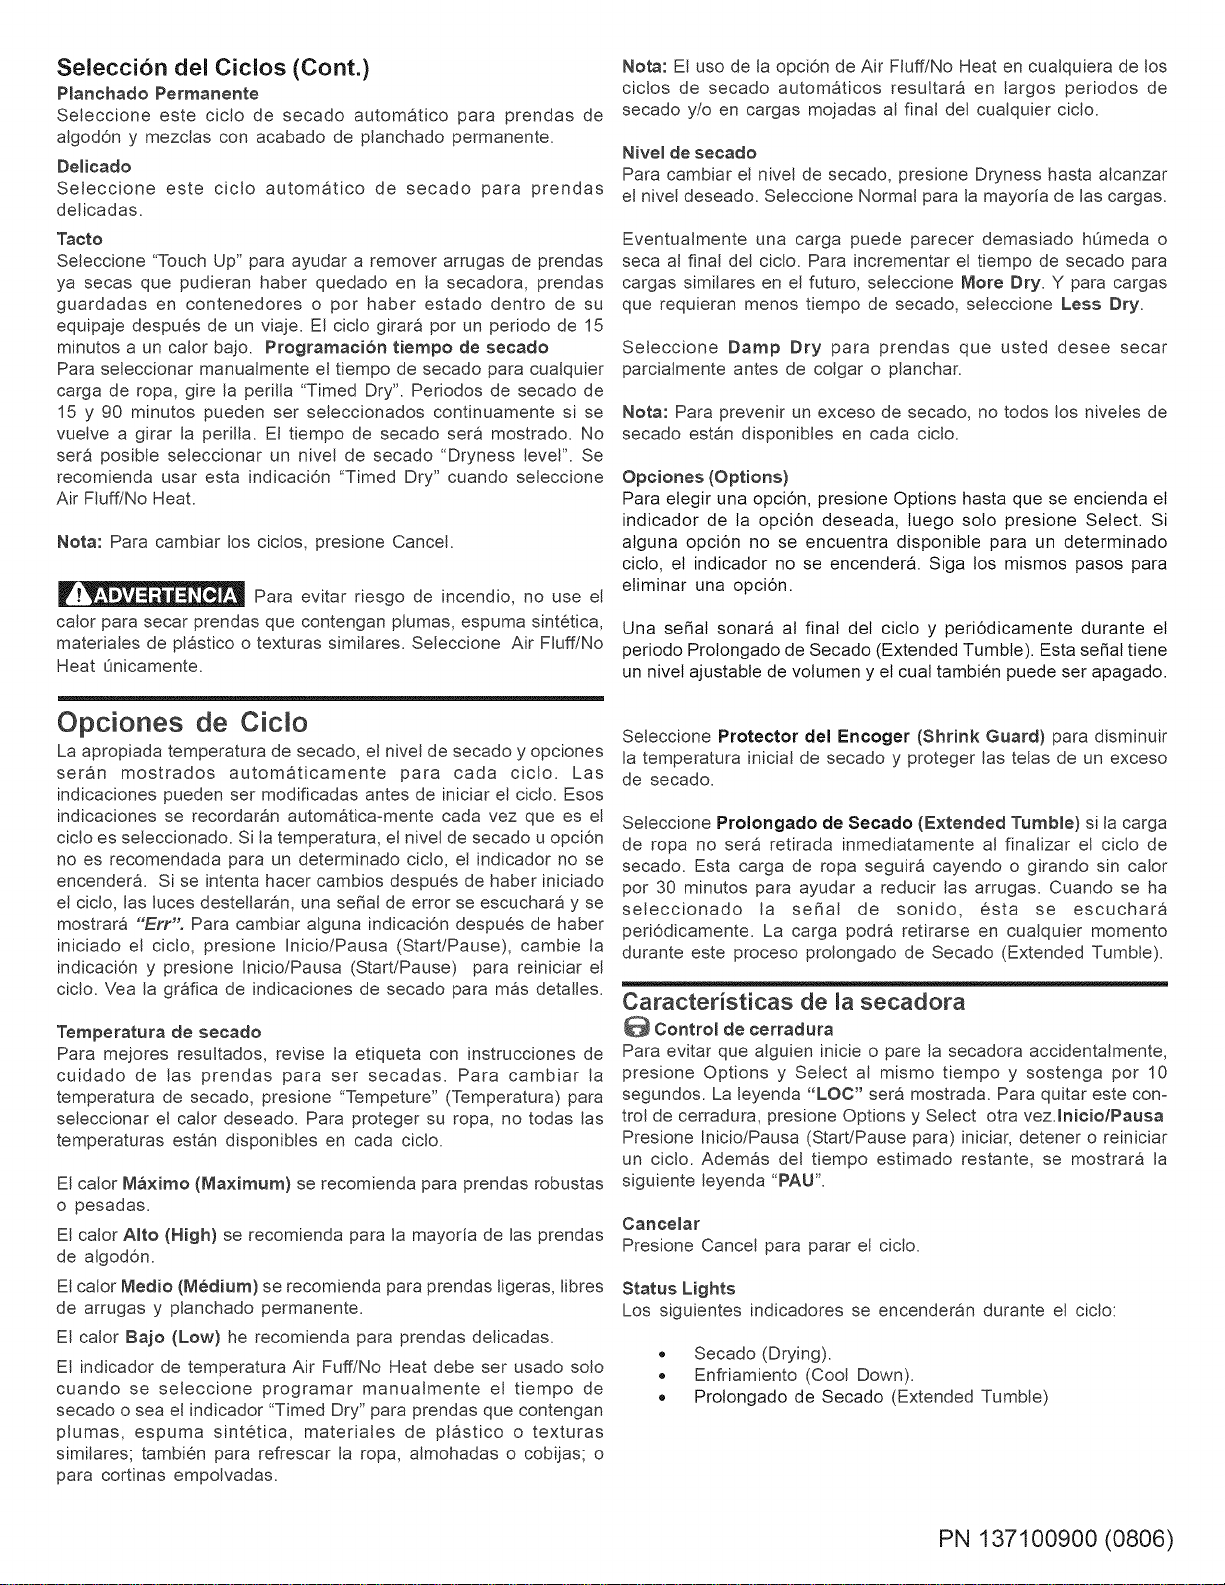
Antes de usar su secadora
Lea su manual de instrueeiones. Cuenta con informaci6n
importante de medidas de seguridad y garantia. Como tambien,
sugerencias para los mejores resultados de secado.
Para reducir e! riesgo de incendio, descargas
electricas o lesiones, lea las [MPORTANTES INSTRUCCIONES DE
SEGURIDAD de su instructivo antes de utilizar este
electrodomestico.
Instrucciones de Uso
Lea Procedimientos de secado (Drying Procedures) en su
instructivo de uso. En el cual se explican las instrucciones de uso
detalladamente.
1. Prepare las prendas para secado.
2. Verifique que el filtro de la pelusa este [impio y en su lugar.
3. Haga una carga de ropa. Si Io desea, agregue una hoja de
suavizante. Cierre la puerta.
4. Seleccione el adecuado ciclo e indicaciones para cada carga de
ropa.
o Gire la perilla de cic[o para seleccionar el tipo de cic[o. El
tiempo de secado estimado ser& mostrado.
Una adecuada temperatura de secado, nivel de secado y opciones
autom&ticamente ser&n indicadas para cada cic[o. Vea la gr&fica
de indicaciones para [a secadora" para mayores detalles.
Para cambiar [a temperatura y el nive[ de secado, presione
Temperatura (Temperature) o Secado Dryness) hasta donde
usted lo desee seleccionar.
Para seteccionar o eliminar una opci6n, presione Opciones
(Options); tuego, mientras et indicador se muestra de manera
intermitente, presione ta opci6n de Seteccionar (Select).
Si una temperatura, nivel de secado u opci6n no se encuentra
disponible para un ciclo, esta no se encender&
Se recordar&n ajustes para el ciclo cada vez que el ciclo sea
seleccionado en el futuro.
o Para regresar a [as indicac[ones de la f&bdca, presione [nic[o
Pausa (Start/Pause) y Seleccionar (Select) a[ mismo tiempo y
sostengalo presionado hasta escuchar una serial.
5. Presione [nicioiPausa (Start/Pause) para iniciar el ciclo.
. Para interrumpir el ciclo, presione InicioiPausa (Start/Pause).
Para reiniciar el ciclo, presione Start/Pause ([nicioiPausa) otra
vez,
Para terminar o cambiar el ciclo, presione Cancel.
6. Una serial sonar& al final det cicto de secado y peri6dicamente
durante et proceso Protongado de Secado (Extended Tumble)
cuando este se ha seteccionado. Cuando et cicto termine, retire
las prendas inmediatamente para cotgarlas o doblarlas.
7. Limpie et fittro de petusa despues de cada carga.
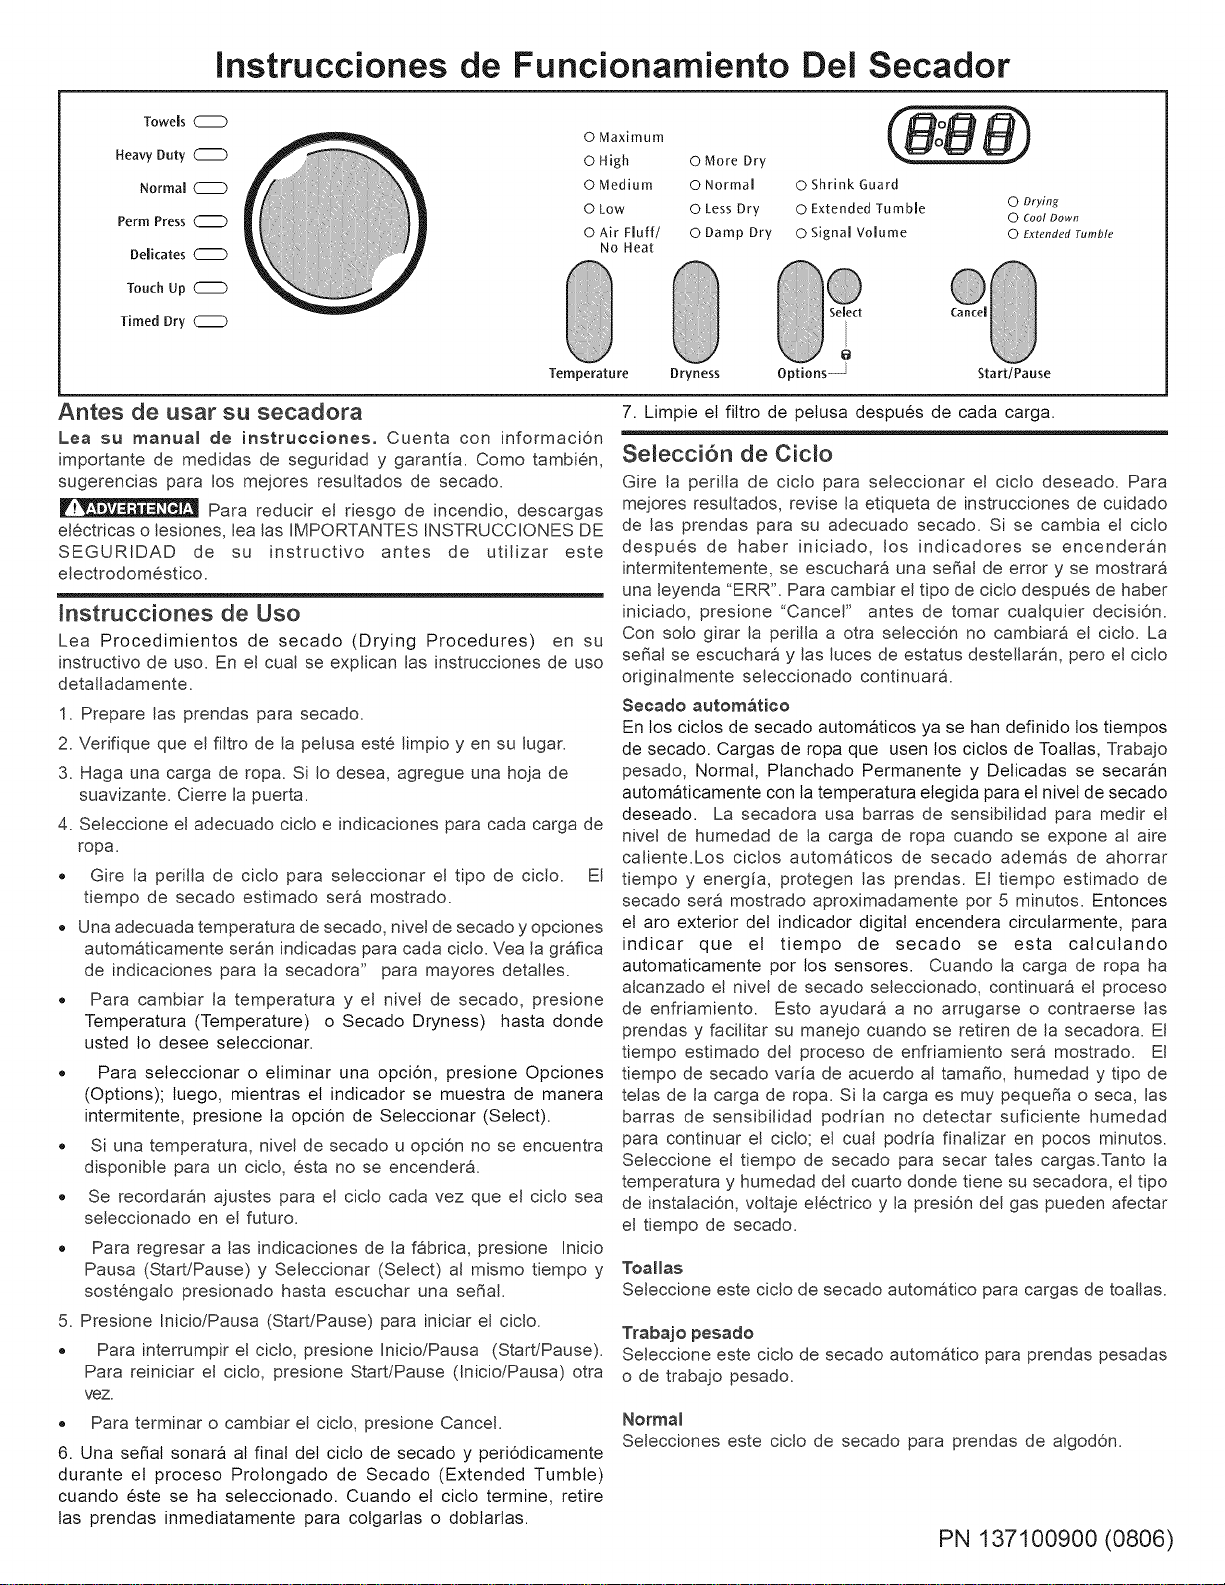
Seiecci6n de Cicio
Gire la peri[Ia de cicio para seleccionar el cic[o deseado. Para
mejores resultados, revise la etiqueta de instrucciones de cuidado
de [as prendas para su adecuado secado. S[ se cambia e[ ciclo
despues de haber iniciado, los indicadores se encender&n
intermitentemente, se escuchar& una serial de error y se mostrar&
una leyenda "ERR". Para cambiar e[ tipo de ciclo despues de haber
iniciado, presione "Cancel" antes de tomar cuaiquier decisi6n.
Con solo girar la periila a otra selecci6n no cambiar& el ciclo. La
serial se escuchar& y las luces de estatus desteIiar&n, pero el ciclo
originalmente seleccionado continuar&.
Seeado automatieo
En los cictos de secado autom&ticos ya se han definido los tiempos
de secado. Cargas de ropa que usen los cictos de Toatlas, Trabajo
pesado, Normal, Planchado Permanente y Delicadas se secar&n
autom&ticamente con ta temperatura etegida para et nivet de secado
deseado. La secadora usa barras de sensibilidad para medir el
nivel de humedad de [a carga de ropa cuando se expone al aire
caliente.Los ciclos autom&ticos de secado adem&s de ahorrar
tiempo y energia, protegen [as prendas. El tiempo estimado de
secado set& mostrado aproximadamente por 5 minutos. Entonces
et aro exterior det indicador digital encendera circularmente, para
indicar que el tiempo de secado se esta calcutando
automaticamente por los sensores. Cuando la carga de ropa ha
alcanzado el nivel de secado seleccionado, continuar& el proceso
de enfriamiento. Esto ayudar& a no arrugarse o contraerse [as
prendas y facilitar su manejo cuando se retiren de la secadora. El
tiempo estimado del proceso de enfriamiento set& mostrado. El
tiempo de secado varia de acuerdo al tamafio, humedad y tipo de
telas de [a carga de ropa. S[ la carga es muy pequefia o seca, las
barras de sensibilidad podrian no detectar suficiente humedad
para continuar el ciclo; el cua[ podda finalizar en pocos minutos.
Seleccione el tiempo de secado para secar tales cargas.Tanto [a
temperatura y humedad del cuarto donde tiene su secadora, el tipo
de instalaci6n, voltaje electrico y la presi6n del gas pueden afectar
el tiempo de secado.
Toalias
Seleccione este ciclo de secado autom&tico para cargas de toallas.
Trabajo pesado
Seleccione este ciclo de secado autom&tico para prendas pesadas
o de trabajo pesado.
Normal
Selecciones este ciclo de secado para prendas de algod6n.
PN 137100900 (0806)
Selecci6n del Ciclos (Cont.)
Planchado Permanente
Seleccione este ciclo de secado autom&tico para prendas de
algod6n y mezclas con acabado de planchado permanente.
Deiicado
Seleccione este ciclo autom&tico de secado para prendas
delicadas.
Taeto
Seleccione "Touch Up" para ayudar a remover arrugas de prendas
ya secas que pudieran haber quedado en la secadora, prendas
guardadas en contenedores o por haber estado dentro de su
equipaje despues de un viaje. El ciclo girar& pot un periodo de 15
minutos a un calor bajo. Programaei6n tiempo de seeado
Para seleccionar manualmente el tiempo de secado para cualquier
carga de ropa, gire la perilJa "Timed Dry". Periodos de secado de
15 y 90 minutos pueden ser seleccionados continuamente si se
vuelve a girar la perilla. El tiempo de secado sera mostrado. No
ser& posible seleccionar un nivel de secado "Dryness level". Se
recomienda usar esta indicaci6n "Timed Dry" cuando seleccione
Air Fluff/No Heat.
Nora: Para cambiar los ciclos, presione Cancel.
Para evitar riesgo de incendio, no use eJ
calor para secar prendas que contengan plumas, espuma sintetica,
matedales de plastico o texturas similares. Seleccione Air Fluff/No
Heat Onicamente.
Opciones de Ciclo
La apropiada temperatura de secado, el nivel de secado y opciones
ser&n mostrados autom&ficamente para cada ciclo. Las
indicaciones pueden ser modificadas antes de iniciar el ciclo. Esos
indicaciones se recordar&n autom&tica-mente cada vez que es el
ciclo es seleccionado. Si la temperatura, el nivel de secado u opci6n
no es recomendada para un determinado ciclo, el indicador no se
encender&. Si se intenta hacer cambios despues de haber iniciado
el ciclo, las luces destellar&n, una seBal de error se escuchara y se
mostrar& "Err". Para cambiar alguna indicaci6n despues de haber
iniciado el ciclo, presione Inicio/Pausa (Start/Pause), cambie la
indicaci6n y presione InicioiPausa (Start/Pause) para reiniciar el
ciclo. Vea la gr&fica de indicaciones de secado para m&s detalles.
Temperatura de seeado
Para mejores resultados, revise la etiqueta con instrucciones de
cuidado de las prendas para set secadas. Para cambiar la
temperatura de secado, presione "Tempeture" (Temperatura) para
seleccionar el ca!or deseado. Para proteger su ropa, no todas las
temperaturas est&n disponibles en cada ciclo.
El calor M_ximo (Maximum) se recomienda para prendas robustas
o pesadas.
El calor Alto (High) se recomienda para la mayoria de las prendas
de algod6n.
El caJor Medio (Medium) se recomienda para prendas ligeras, libres
de arrugas y planchado permanente.
El calor gajo (Low) he recomienda para prendas deJicadas.
El indicador de temperatura Air FuffiNo Heat debe ser usado solo
cuando se seleccione programar manuaimente el tiempo de
secado o sea el indicador "Timed Dry" para prendas que contengan
plumas, espuma sintetica, materiales de pl&stico o texturas
similares; tambien para refrescar la ropa, almohadas o cobijas; o
para cortinas empolvadas.
Nora: El uso de Jaopci6n de Air Fluff/No Heat en cuaiquiera de los
ciclos de secado autom&ticos resultar& en largos periodos de
secado yio en cargas mojadas al final del cualquier ciclo.
Nivei de secado
Para cambiar el nivel de secado, presione Dryness hasta alcanzar
el nivel deseado. Seleccione Normal para la mayoria de las cargas.
Eventualmente una carga puede parecer demasiado hOmeda o
seca al final del ciclo. Para incrementar el tiempo de secado para
cargas similares en el futuro, seleccione More Dry. Y para cargas
que requieran menos tiempo de secado, seleccione Less Dry.
Seleccione Damp Dry para prendas que usted desee secar
parcialmente antes de colgar o planchar.
Nora: Para prevenir un exceso de secado, no todos los niveles de
secado est&n disponibles en cada ciclo.
Opciones (Options)
Para etegir una opci6n, presione Options hasta que se encienda el
indicador de la opci6n deseada, tuego solo presione Select. Si
alguna opci6n no se encuentra disponible para un determinado
cicto, et indicador no se encendera. Siga los mismos pasos para
etiminar una opci6n.
Una sepal sonara al final det cicto y peri6dicamente durante et
periodo Prolongado de Secado (Extended Tumble). Esta sepal tiene
un nivel ajustable de volumen y et cual tambien puede ser apagado.
Seleccione Protector del Eneoger (Shrink Guard) para disminuir
la temperatura inicial de secado y proteger las telas de un exceso
de secado.
Seleccione Prolongado de Secado (Extended Tumble) si la carga
de ropa no sera retirada inmediatamente al finalizar el ciclo de
secado. Esta carga de ropa seguira cayendo o girando sin calor
por 30 minutos para ayudar a reducir las arrugas. Cuando se ha
seJeccionado la seBal de sonido, esta se escuchara
peri6dicamente. La carga podra retirarse en cualquier momento
durante este proceso prolongado de Secado (Extended Tumble).
Caractedsticas de la secadora
O ControJ de eerradura
Para evitar que alguien inicie o pare la secadora accidentaimente,
presione Options y Select al mismo tiempo y sostenga por 10
segundos. La leyenda "LOC" sera mostrada. Para quitar este con-
trol de cerradura, presione Options y Select otra vezJnieio/Pausa
Presione InicioiPausa (StarttPause para) iniciar, detener o reiniciar
un ciclo. Ademas del tiempo estimado restante, se mostrara la
siguiente leyenda "PAU'.
Caneeiar
Presione Cancel para parar el ciclo.
Status Lights
Los siguientes indicadores se encenderan durante el ciclo:
, Secado (Drying).
, Enfriamiento (Cool Down).
o Prolongado de Secado (Extended Tumble)
PN 137100900 (0806)
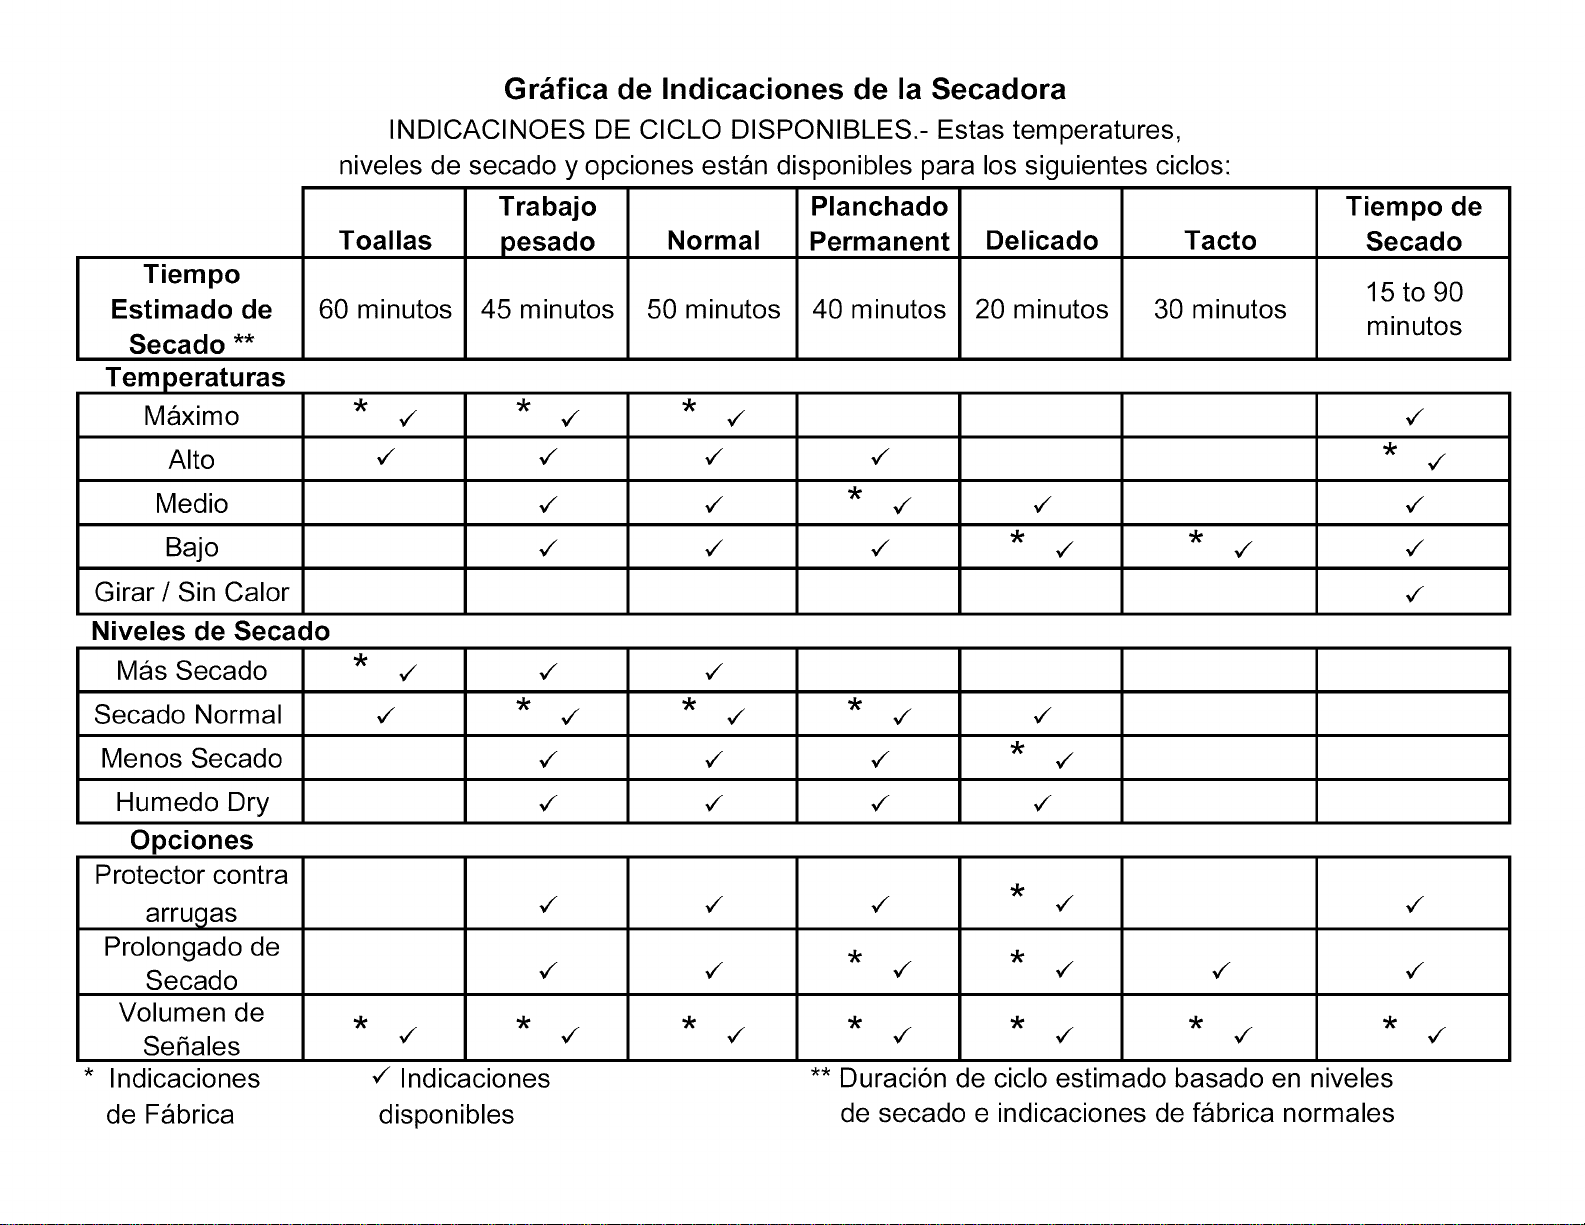
Gr&fica de Indicaciones de la Secadora
Tiempo
Estimado de
Secado **
Temperaturas
Maximo
Alto
Medio
Bajo
Girar ! Sin Calor
Niveles de Secado
Mas Secado
Secado Normal
Menos Secado
Humedo Dry
Opciones
Protector contra
arrugas
Prolongado de
Secado
Volumen de
Se_ales
* Indicaciones
de Fabrica
INDICACINOES DE CICLO DISPONIBLES.- Estas temperatures,
niveles de secado y opciones estan disponibles para los siguientes ciclos:
Trabajo Planchado Tiempo de
Toallas pesado Normal Permanent Delicado Tacto Secado
15 to 90
60 minutos 45 minutos 50 minutos 40 minutos 20 minutos 30 minutos
minutos
,,,/ ,,,/ ,,,/ ,,,/
,,,/
,/ ,/ ,,,/ ,/ ,/
,/ ,/ ,/ ,/ ,/ ,/
,,,/
,/ ,/ ,/
,/ ,/ ,/ ,/ ,/
,,,/ ,,,/ ,,,/ ,/
,,,/ ,,,/ ,,,/ ,,,/
,,,/ ,,,/ ,,,/ ,,,/ ,,,/
,,,/ ,,,/ ,,,/ ,,,/ ,,,/ ,,,/
"k "k "k "k "k "k "k
,,'/ ,,'/ ,,'/ ,,'/ ,,'/ ,,'/ ,,'/
,/ Indicaciones ** Duraci6n de ciclo estimado basado en niveles
disponibles de secado e indicaciones de fabrica normales