Bottom Freezer Refrigerators
Owner’s Manual
and Installation
Instructions
Models: XNE25J, XFE26J
49-1000107 Rev. 0 08-18 GEA
Write the model and serial numbers here:
Model # _______________________________
Serial # _______________________________
Find these numbers on a label on the left side, near
the middle of the refrigerator compartment.
Español
Para consultar una version
en español de este manual
de instrucciones,visite sitio
de internet crosley.com.
Contents
Safety Information .................3
Using the Refrigerator
Features ........................5
Controls ........................6
Dispenser .......................8
Water Filter - XWF ................9
Shelves and Bins ................10
Pans ..........................11
Freezer Drawer .................12
Automatic Icemaker ..............13
Care And Cleaning ...............14
Replacing the Lights .............15
Installation Instructions
Preparing to Install the
Refrigerator ...................16
Appliance Dimensions ............17
Installing the Refrigerator ..........18
Installing the Water Line ..........28
Troubleshooting Tips .............31
Limited Warranty .................35
Consumer Support
Water Filter Warranty ............36
Performance Data Sheets .........37
Consumer Support ...............40
2 49-1000107 Rev. 0
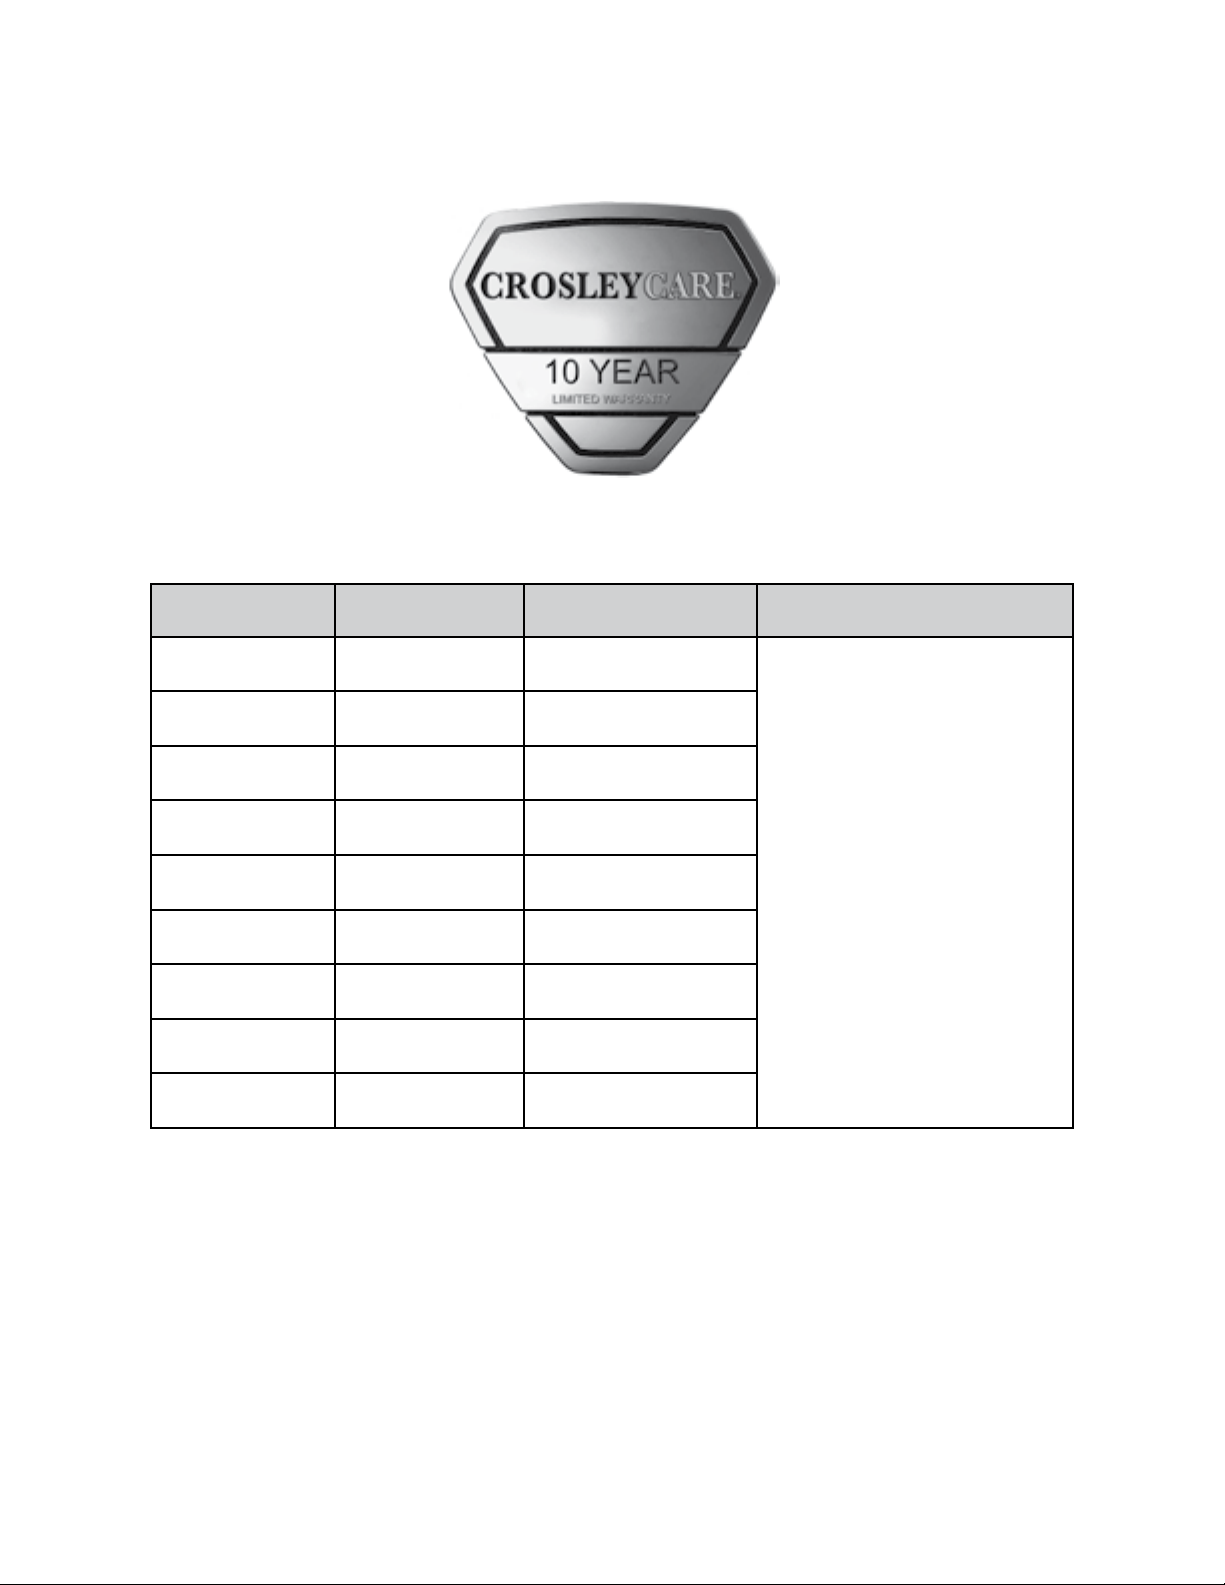
America's iconic brand, backed by America's best appliance warranty!
10 Year Limited Warranty FREE on all Crosley Appliances!
Visit Crosley.com/mycrosley to register the extended limited warranty.
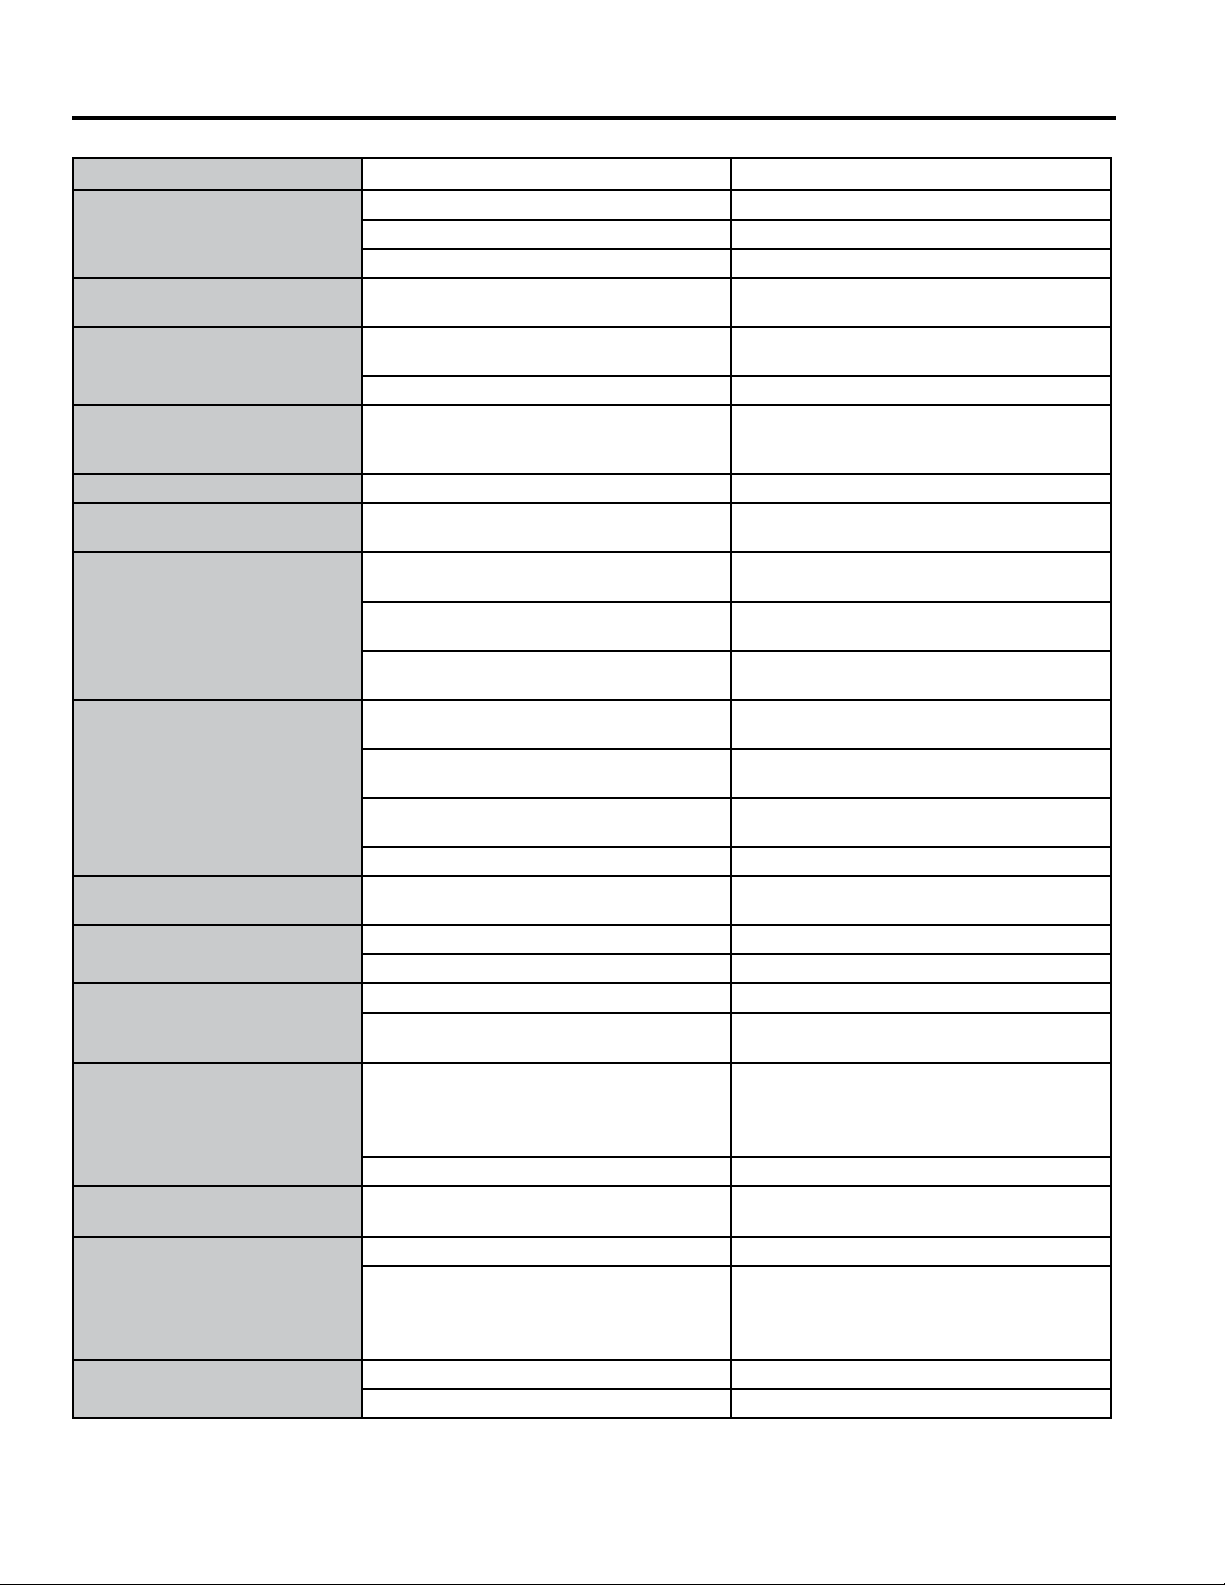
APPLIANCE COMPONENT
MANUFACTURER'S
LIMITED WARRANTY
CROSLEY'S EXTENDED
LIMITED WARRANTY
Refrigerator or
Freezer
Compressor 1 Year
10 Years
Including 1 year Manufacturer's
Coverage
Top-Load Washer
Gearcase/
Transmission
1 Year
Front-Load
Washer
Motor 1 Year
Compact Washer Motor 1 Year
Washer/Dryer
Stack Unit
Motor/Heating
Element
1 Year
Dishwasher Motor 1 Year
Gas/Electric Dryer
Motor/Heating
Element
1 Year
Electric Range
Bake/Broil/Surface
Elements
1 Year
Gas Range
Ignitors and Spark
Modules
1 Year

49-1000107 Rev. 0 3
SAFETY INFORMATION
IMPORTANT SAFETY INFORMATION
READ ALL INSTRUCTIONS BEFORE USING THE APPLIANCE
CAUTION
To reduce the risk of injury when using your refrigerator, follow these basic safety precautions.
■ Donotcleanglassshelvesorcoverswithwarm
water when they are cold. Glass shelves and
covers may break if exposed to sudden temperature
changes or impact, such as bumping or dropping.
Tempered glass is designed to shatter into many
small pieces if it breaks.
■ Keepfingersoutofthe“pinchpoint”areas;
clearances between the doors and between the
doors and cabinet are necessarily small. Be careful
closing doors when children are in the area.
■ Donottouchthecoldsurfacesinthefreezer
compartment when hands are damp or wet, skin
may stick to these extremely cold surfaces.
■ Donotrefreezefrozenfoodswhichhavethawed
completely.
■ Inrefrigeratorswithautomaticicemakers,avoid
contact with the moving parts of the ejector
mechanism, or with the heating element that
releases the cubes. Do not place fingers or hands
on the automatic ice making mechanism while the
refrigerator is plugged in.
■Use a sturdy glass when dispensing ice (on models with
ice dispenser
READ AND SAVE THESE INSTRUCTIONS
WARNING
To reduce the risk of fire, explosion, electric shock, or injury when using your refrigerator, follow
these basic safety precautions:
■ Thisrefrigeratormustbeproperlyinstalled
and located in accordance with the Installation
Instructions before it is used.
■ Unplugtherefrigeratorbeforemakingrepairsor
cleaning.
NOTE: Power to the refrigerator cannot be
disconnected by any setting on the control panel.
NOTE: Repairs must be performed by a qualified
Service Professional.
■ Replaceallpartsandpanelsbeforeoperating.
■ Donotuseanextensioncord.
■ Donotstoreorusegasolineorotherflammable
vapors and liquids in the vicinity of this or any other
appliance.
■ Donotstoreexplosivesubstancessuchasaerosol
cans with a flammable propellant in this appliance.
■ Topreventsuffocationandentrapmenthazards
to children, remove the fresh food and freezer
doors from any refrigerator before disposing of it or
discontinuing its use.
■ Toavoidseriousinjuryordeath,childrenshouldnot
stand on, or play in or with the appliance.
■ Childrenandpersonswithreducedphysical,sensory
or mental capabilities or lack of experience and
knowledge can use this appliance only if they are
supervised or have been given instructions on safe
use and understand the hazards involved.
■ Thisapplianceisintendedtobeusedinhousehold
and similar applications such as: staff kitchen areas
inshops,officesandotherworkingenvironments;
farmhouses;byclientsinhotels,motels,bed
&breakfastandotherresidentialenvironments;
catering and similar non-retail applications.
■ Connecttopotablewatersupplyonly.Acoldwater
supply is required for automatic icemaker operation.
The water pressure must be between 40 and 120 psi
(275-827 kilopascals).
INSTALLATION
WARNING
EXPLOSION HAZARD
Keepflammablematerialsandvapors,suchasgasoline,awayfromrefrigerator.Failuretodosocanresultinfire,
explosion, or death.

4 49-1000107 Rev. 0
SAFETY INFORMATION
IMPORTANT SAFETY INFORMATION
READ ALL INSTRUCTIONS BEFORE USING THE APPLIANCE
READ AND SAVE THESE INSTRUCTIONS
PROPER DISPOSAL OF YOUR OLD REFRIGERATOR
Do not, under any circumstances, cut or remove the third (ground) prong from the power cord. For
personal safety, this appliance must be properly grounded.
The power cord of this appliance is equipped with a
3-prong (grounding) plug which mates with a standard
3-prong (grounding) wall outlet to minimize the
possibility of electric shock hazard from this appliance.
Have the wall outlet and circuit checked by a qualified
electrician to make sure the outlet is properly
grounded.
Where a standard 2-prong wall outlet is encountered, it
is your personal responsibility and obligation to have it
replaced with a properly grounded 3-prong wall outlet.
Do not use an adapter.
The refrigerator should always be plugged into its own
individual electrical outlet which has a voltage rating
that matches the rating plate.
A 115 Volt AC, 60 Hz, 15- or 20-amp fused, grounded
electrical supply is required. This provides the best
performance and also prevents overloading house
wiring circuits which could cause a fire hazard from
overheated wires.
Never unplug your refrigerator by pulling on the power
cord. Always grip plug firmly and pull straight out from
the outlet.
Immediately discontinue use of a damaged supply
cord. If the supply cord is damaged, it must be
replaced by a qualified service professional with an
authorized service part from the manufacturer.
When moving the refrigerator away from the wall, be
careful not to roll over or damage the power cord.
CONNECTING ELECTRICITY
WARNING
ELECTRICAL SHOCK HAZARD
Plug into a grounded 3-prong outlet
Do not remove the ground prong
Do not use an adapter
Do not use an extension cord.
Failure to follow these instructions can result in death, fire, or electrical shock.
WARNING
SUFFOCATION AND ENTRAPMENT HAZARD
Failure to follow these disposal instructions can result in death or serious injury
IMPORTANT: Child entrapment and suffocation
are not problems of the past. Junked or abandoned
refrigerators are still dangerous even if they will sit
for“justafewdays.”Ifyouaregettingridofyourold
refrigerator, please follow the instructions below to help
prevent accidents.
Before You Throw Away Your Old Appliance
■Takeoffthefreshfoodandfreezerdoors.
■ Leave the shelves in place so that children may not
easily climb inside.
Refrigerant and Foam Disposal:
Dispose of appliance in accordance with Federal and Local Regulations. Flammable insulation material used
requires special disposal of your appliance. Contact your local authorities for the environmentally safe disposal of
your appliance.
49-1000107 Rev. 0 5
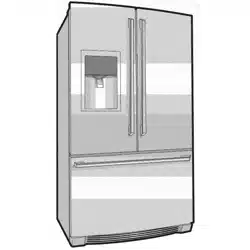
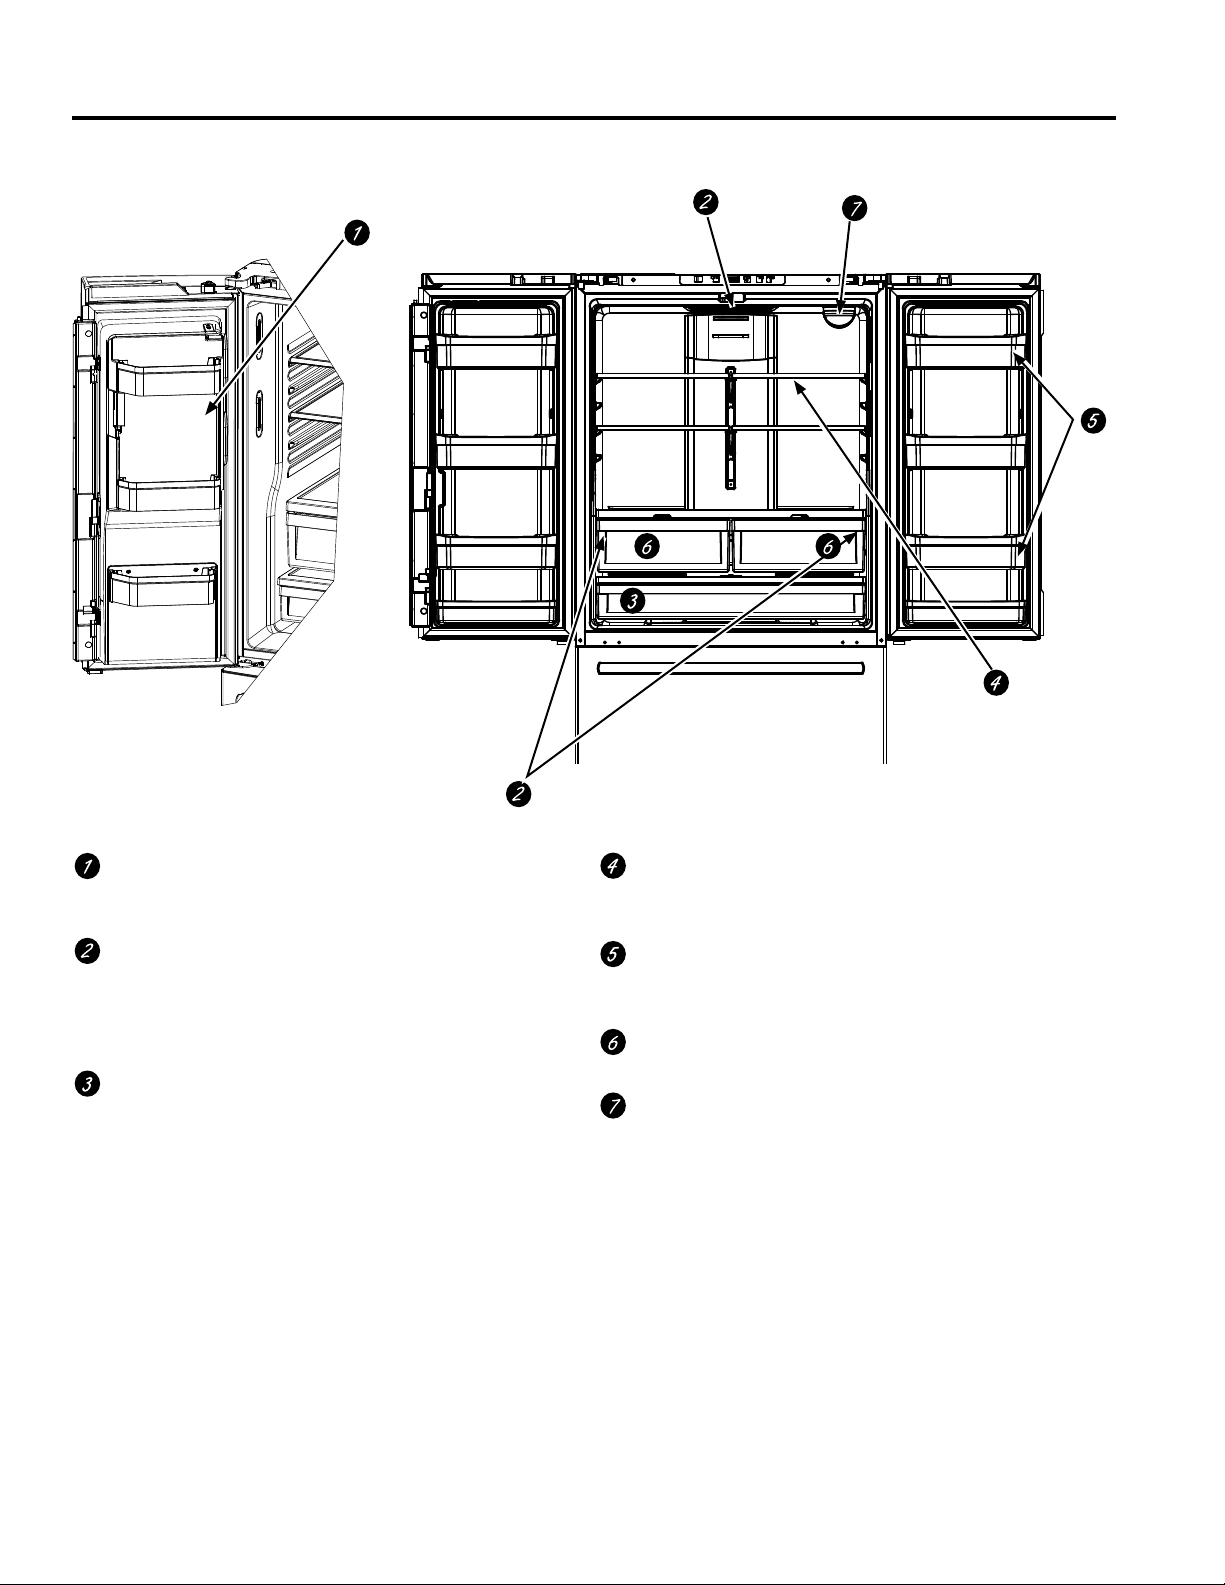
Features
USING THE REFRIGERATOR: Features
Space-saving icemaker (on some models)
Icemaker and bin are located on the door creating
more usable storage space.
LED lighting
LED lights in the fresh food compartment are
located at the top center and on the left and right
sides of climate zone pans. LED lights are also
locatedinthefreezer;seepage15.
Full-width drawer
A full-width drawer that can accommodate larger
items is located at the bottom of the fresh food
compartment.
QuickSpace™ shelf (on some models)
Functions as a normal full-sized shelf when needed
and easily slides back to store tall items below.
Removable/adjustable door bins
Can be moved up or down to accommodate your
needs.
Climate zone drawers
Separate pans for produce storage.
Water filter
Accessible for easy replacement.
French Door Models

6 49-1000107 Rev. 0
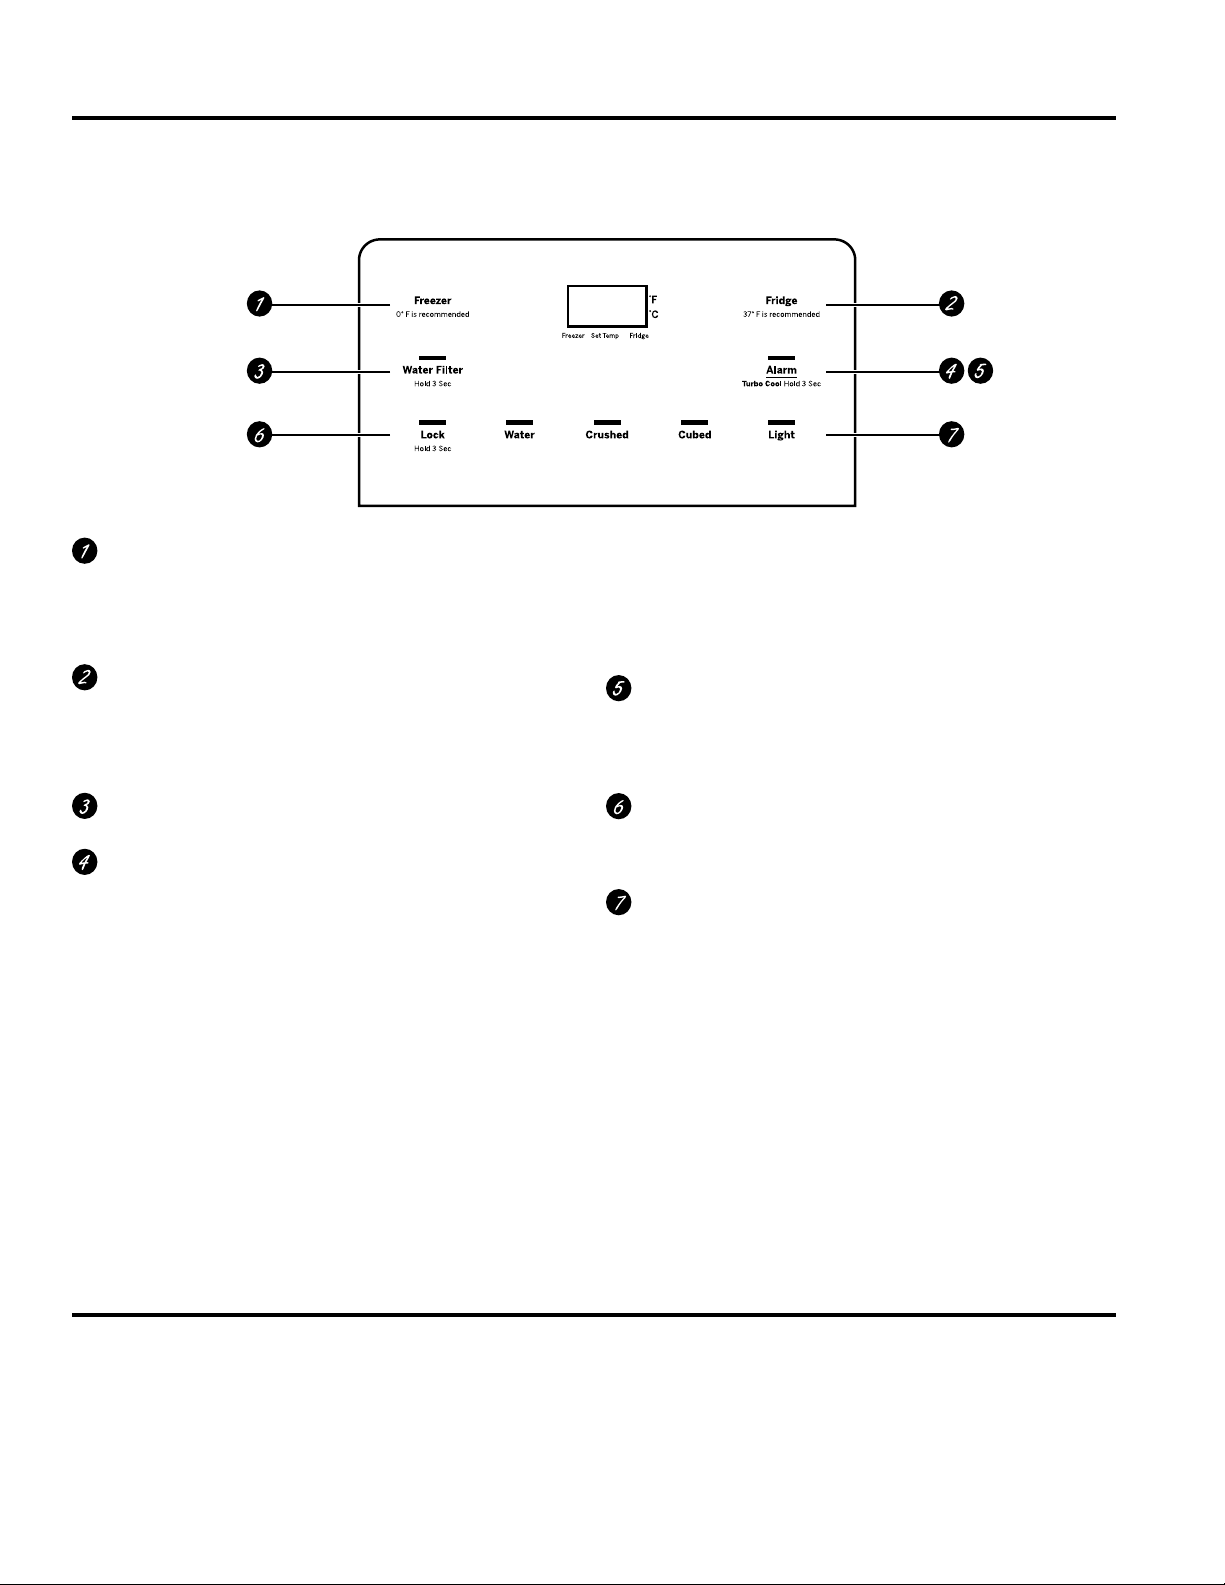
USING THE REFRIGERATOR: Controls
Controls
Freezer Compartment Temperature Control
Adjust freezer compartment temperature. The
freezer temperature is preset in the factory at 0°F
(-17.8°C). Allow 24 hours for temperature to stabilize
to the preset recommended setting.
Fresh Food Compartment Temperature Control
Adjust fresh food compartment temperature. The
fresh food temperature is preset in the factory at
37°F (2.8°C). Allow 24 hours for temperature to
stabilize to the preset recommended setting.
Water Filter
Press and hold 3 seconds to reset the Water Filter.
Turbo Cool
To set the TurboCool™, press the Turbo Cool pad
for 3 seconds. The display will show tc.
TurboCool™ rapidly cools the refrigerator
compartment in order to more quickly cool foods.
Use TurboCool™ when adding a large amount of
the food to the refrigerator compartment, putting
away foods after they have been sitting out at room
temperature, or when putting away warm leftovers. It
can also be used if the refrigerator has been without
power for an extended period.
NOTE: The refrigerator temperature cannot
be changed during TurboCool™. The freezer
temperature is not affected during Turbo Cool.
When opening the refrigerator door during
TurboCool™, the fans will continue to run if they
have cycled on.
Door Alarm
To set the alarm, press the Door Alarm pad. This
alarm will sound if either door is open for more than
2 minutes. The beeping stops when you close the
door.
NOTE: To put the refrigerator control in the OFF position,
simultaneously touch the words Freezer and Fridge
for 3 seconds. Power to the refrigerator cannot be
disconnected by any setting on the control panel.
Changing °F to °C or °C to °F: Press and hold the
"DOOR ALARM" and "FREEZER" buttons simultaneously
for 5 seconds to set °C to °F or °F to °C.
XNE25J Top Control Models
49-1000107 Rev. 0 7
USING THE REFRIGERATOR: Controls/Sabbath Modes
Controls
Sabbath Modes (on some models)
NOTE: The refrigerator is shipped with protective film covering the temperature controls.
If this film was not removed during installation, remove it now.
Freezer Compartment Temperature Control
Adjust freezer compartment temperature. The
freezer temperature is preset in the factory at 0°F
(-17.8°C). Allow 24 hours for temperature to stabilize
to the preset recommended setting.
Fresh Food Compartment Temperature Control
Adjust fresh food compartment temperature. The
fresh food temperature is preset in the factory at
37°F (2.8°C). Allow 24 hours for temperature to
stabilize to the preset recommended setting.
Water Filter
Press and hold 3 seconds to reset the Water Filter.
Turbo Cool
To set the Turbo Cool™, press the Alarm pad for 3
seconds. The display will show tc.
Turbo Cool™ rapidly cools the refrigerator
compartment in order to more quickly cool foods.
Use Turbo Cool™ when adding a large amount of
the food to the refrigerator compartment, putting
away foods after they have been sitting out at room
temperature, or when putting away warm leftovers. It
can also be used if the refrigerator has been without
power for an extended period.
NOTE: The refrigerator temperature cannot
be changed during Turbo Cool™. The freezer
temperature is not affected during Turbo Cool.
When opening the refrigerator door during Turbo
Cool™, the fans will continue to run if they have
cycled on.
Alarm
Press the Alarm pad to toggle the door alarm
between off and on. The alarm will sound if either
door is left open for more than 2 minutes. The
beeping stops when you close the door.
Lock
Press and hold the Lock pad for 3 seconds to lock
out ice and water dispenser and all other controls.
Press and hold to unlock the controls.
LED dispenser Light
Press the Light pad to turn your dispenser light on
and off.
NOTE: To put the refrigerator control in the OFF
position, simultaneously touch the words Freezer
and Fridge for 3 seconds. Power to the refrigerator
cannot be disconnected by any setting on the control
panel.
Changing °F to °C or °C to °F: Press and hold the
"FREEZER" and "ALARM" buttons simultaneously for 5
seconds to set °C to °F or °F to °C.
XFE26J External Control Model
Models XNE25J controls
■Pressandholdthe"DOORALARM"and"WATERFILTER"buttonssimultaneouslyfor5secondstoenter/exit
Sabbath Mode.
Model XFE26J controls
■Pressandholdthe"LOCK"and"LIGHT"buttonssimultaneouslyfor5secondstoenter/exitSabbathMode.

8 49-1000107 Rev. 0
USING THE REFRIGERATOR: Dispenser
Dispenser (on some models)
Water & Ice Dispenser
(See Controls)
Press the glass gently against the dispenser cradle.
The spill shelf is not self-draining. To reduce water
spotting, the shelf should be cleaned regularly.
If no water is dispensed when the refrigerator is first
installed, there may be air in the water line system.
Press the dispenser paddle for at least five minutes to
remove trapped air from the water line and to fill the
water system. To flush out impurities in the water line,
throw away the first six full glasses of water.
CAUTION
Laceration Hazard
■Neverputfingersoranyotherobjectintoicecrusher
discharge opening. Doing so can result in contacting
the ice crushing blades and lead to serious injury or
amputation
■Useasturdyglasswhendispensingice.Adelicate
glass may break and result in personal injury.
To remove Dispenser Tray
■PullDispenserTrayout.
To reinstall Dispenser Tray
■Pushinuntilitisfirmlyinplace.
Door Ice Bin
1. Open left fresh food door.
2. Pull down latch to release bin
door.
3. Using handhold, lift ice bucket
up and out to clear locators in
bottom of bin.
4. To replace the ice bucket, set
it on the guide brackets and
push until the ice bucket seats
properly.
5. If bucket cannot be replaced,
rotate the Ice Bucket Fork 1/4 turn clockwise.
Internal Water Dispenser
(on some models)
The water dispenser is located on the left wall inside the
refrigerator compartment.
To dispense water:
1. Hold the glass against the recess.
2. Push the water dispenser button.
3. Hold the glass underneath the
dispenser for 2–3 seconds after
releasing the dispenser button.
Water may continue to dispense
after the button is released.
If no water is dispensed when the refrigerator is first
installed, there may be air in the water line system. Press
the dispenser button for at least 5 minutes to remove
trapped air from the water line and to fill the water
system. During this process, the dispenser noise may be
loud as the air is purged from the water line system. To
flush out impurities in the water line, throw away the first
6 glassfuls of water.
NOTE: To avoid water deposits, the dispenser should
be cleaned periodically by wiping with a clean cloth or
sponge.
Important Facts About Your Dispensers
■Donotaddicefromtraysorbagstothedooricemaker
bucket. It may not crush or dispense.
■Avoidoverfillingglasswithiceanduseofnarrow
glasses. Backed-up ice can jam the chute or cause the
door in the chute to freeze shut. If ice is blocking the
chute remove the ice bucket, poke it through with a
wooden spoon.
■Beveragesandfoodsshouldnotbequick-chilledinthe
door icemaker bin. Cans, bottles or food packages in
the storage drawer may cause the icemaker or auger
to jam.
■Tokeepdispensedicefrommissingtheglass,putthe
glass close to, but not touching, the dispenser opening.
■Somecrushedicemaybedispensedeventhoughyou
selected CUBED ICE. This happens occasionally when
a few cubes accidentally get directed to the crusher.
■Aftercrushediceisdispensed,somewatermaydrip
from the chute.
■Sometimesasmallmoundoffrostwillformonthe
door in the ice chute. This condition is normal and
usually occurs when you have dispensed crushed ice
repeatedly.
Dispenser
Tray
Ice bucket
fork
Latch
Ice bucket
49-1000107 Rev. 0 9
Water Filter Cartridge - XWF (on some models)
USING THE REFRIGERATOR: Water Filter Cartridge - XWF
Water Filter Cartridge
The water filter cartridge holder is located in the
back upper-right corner of the fresh food refrigerator
compartment.
When to Replace the Filter
If there is a replacement indicator light for the water filter
cartridge on the dispenser, the red filter light will start
blinking to tell you that you need to replace the filter soon.
- For external control models, the filter light will blink
while you are dispensing until the filter is replaced.
- For top control models, the filter light will blink while
the door is open until the filter is replaced.
For models that don’t have the indicator light, the filter
cartridge should be replaced every six months, or earlier
if the flow of water to the dispenser or icemaker
decreases.
Removing the Filter
If you are replacing the filter, first remove the previous
one:
1. Open the filter cartridge housing by squeezing the 2
front tabs and gently pulling down.
2. Rotate the filter down.
3. Gently grasp the filter and slowly turn it
counterclockwise about a ¼ turn. The filter should
automatically release itself when you have rotated it far
enough to the left. A small amount of water may drip
down.
CAUTION
If air has been trapped in the system,
the filter cartridge may be ejected as it is removed. Use
caution when removing.
Filter Bypass Plug
To reduce the risk of property damage due to water
leakage, you MUST use the filter bypass plug when a
replacement filter cartridge is not available. Some models
do not come equipped with the filter bypass plug. To
obtain a free bypass plug, call 800-GECARES. The
dispenser and icemaker will not operate without either the
filter or bypass plug installed. The bypass plug is installed
in the same way as a filter cartridge
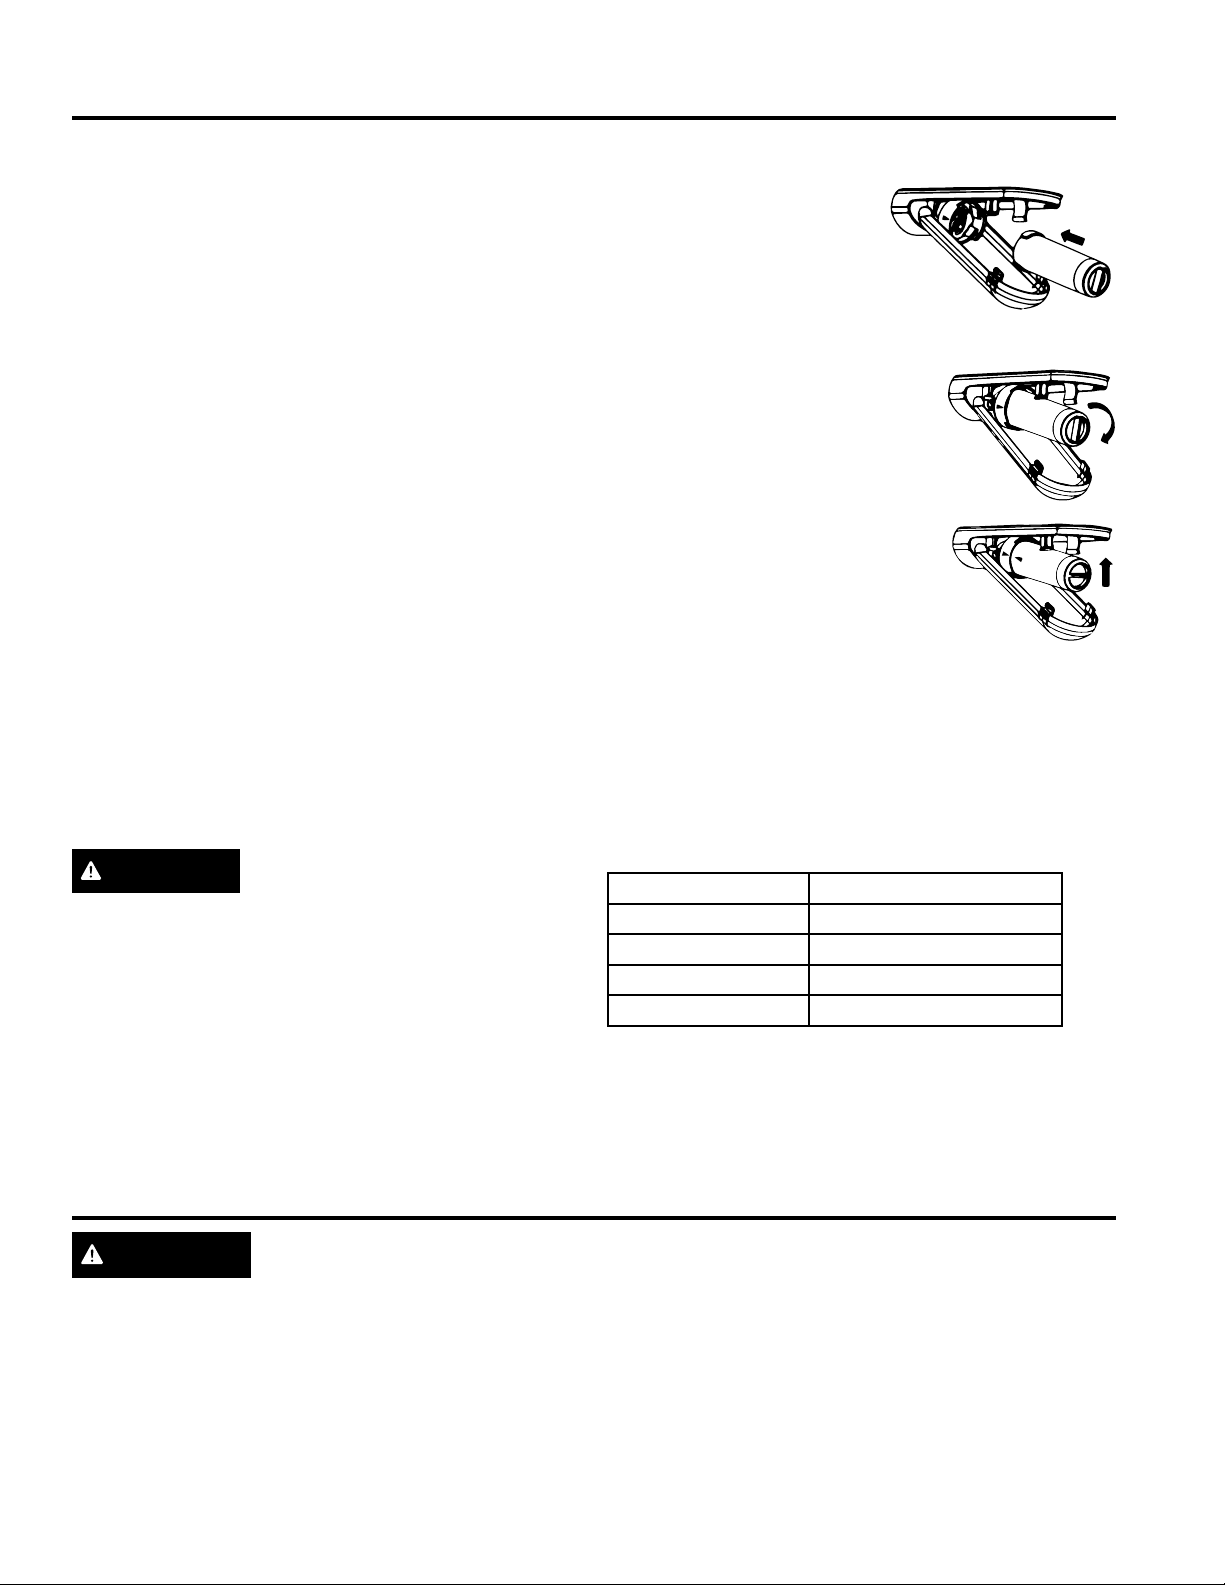
Installing the Filter in a Bottom Freezer
Refrigerator
1. Open the filter cartridge
housing by squeezing the 2
front tabs and gently pulling
down.
2. Line up the ports on the filter
with the ports on the filter
cartridge holder, and gently insert the filter.
3. Slowly turn the filter to the
right until it stops. DO NOT
OVERTIGHTEN. As you turn the
filter, it will automatically adjust
itself into position. The filter
will move about a ¼ turn or 90
degrees, until the arrow on the
filter aligns with the arrow on the
filter cartridge holder.
4.
Slowly push the filter up into the clips.
5. Close the filter cartridge housing by
gently pushing the lid upwards until
the tabs lock into place.
6. Run water from the dispenser for 2 gallons (7.6 liters)
or approximately 5 minutes to clear the system. Water
may spurt out and air bubbles may be visible during
this process. If water is not flowing, check to make
sure the filter has been fully rotated to the right.
7. Press and hold the WATER FILTER pad (only on select
models) on the dispenser for three seconds.
Swing
Service Flow 0.5 gpm (1.89 lpm)
Water Supply Potable Water
Water Pressure 25-120 psi (172-827 kPa)
Water Temperature 33°F-100°F (0.6°C-38°C)
Capacity 170 gallons (643.5 liters)
Sign-up for TEXT REMINDERS by texting REPLACE
to 70543.
WARNING
To reduce the risk associated with choking, do not allow children under 3 years of age
to have access to small parts during the installation of this product. The disposable filter cartridge should be
replaced every 6 months at the rated capacity, or sooner if a noticeable reduction in flow rate occurs.
For the maximum benefit of your filtration system, Crosley recommends the use of GE Appliances-branded filters
only. Using GE Appliances-branded filters in Crosley refrigerators provides optimal performance and reliability. GE
Appliances filters meet rigorous industry standards for safety and quality that are important for products that are
filtering your water. Crosley has not qualified non-GE Appliances-branded filters for use in Crosley refrigerators and
there is no assurance that non-GE Appliances branded filters meet Crosley standards for quality, performance and
reliability.
If you have questions, or to order additional filter cartridges, visit our website at gewaterfilters.com or call GE
Appliances Parts and Accessories, 877.959.8688.
Application Guidelines/Water Supply
10 49-1000107 Rev. 0
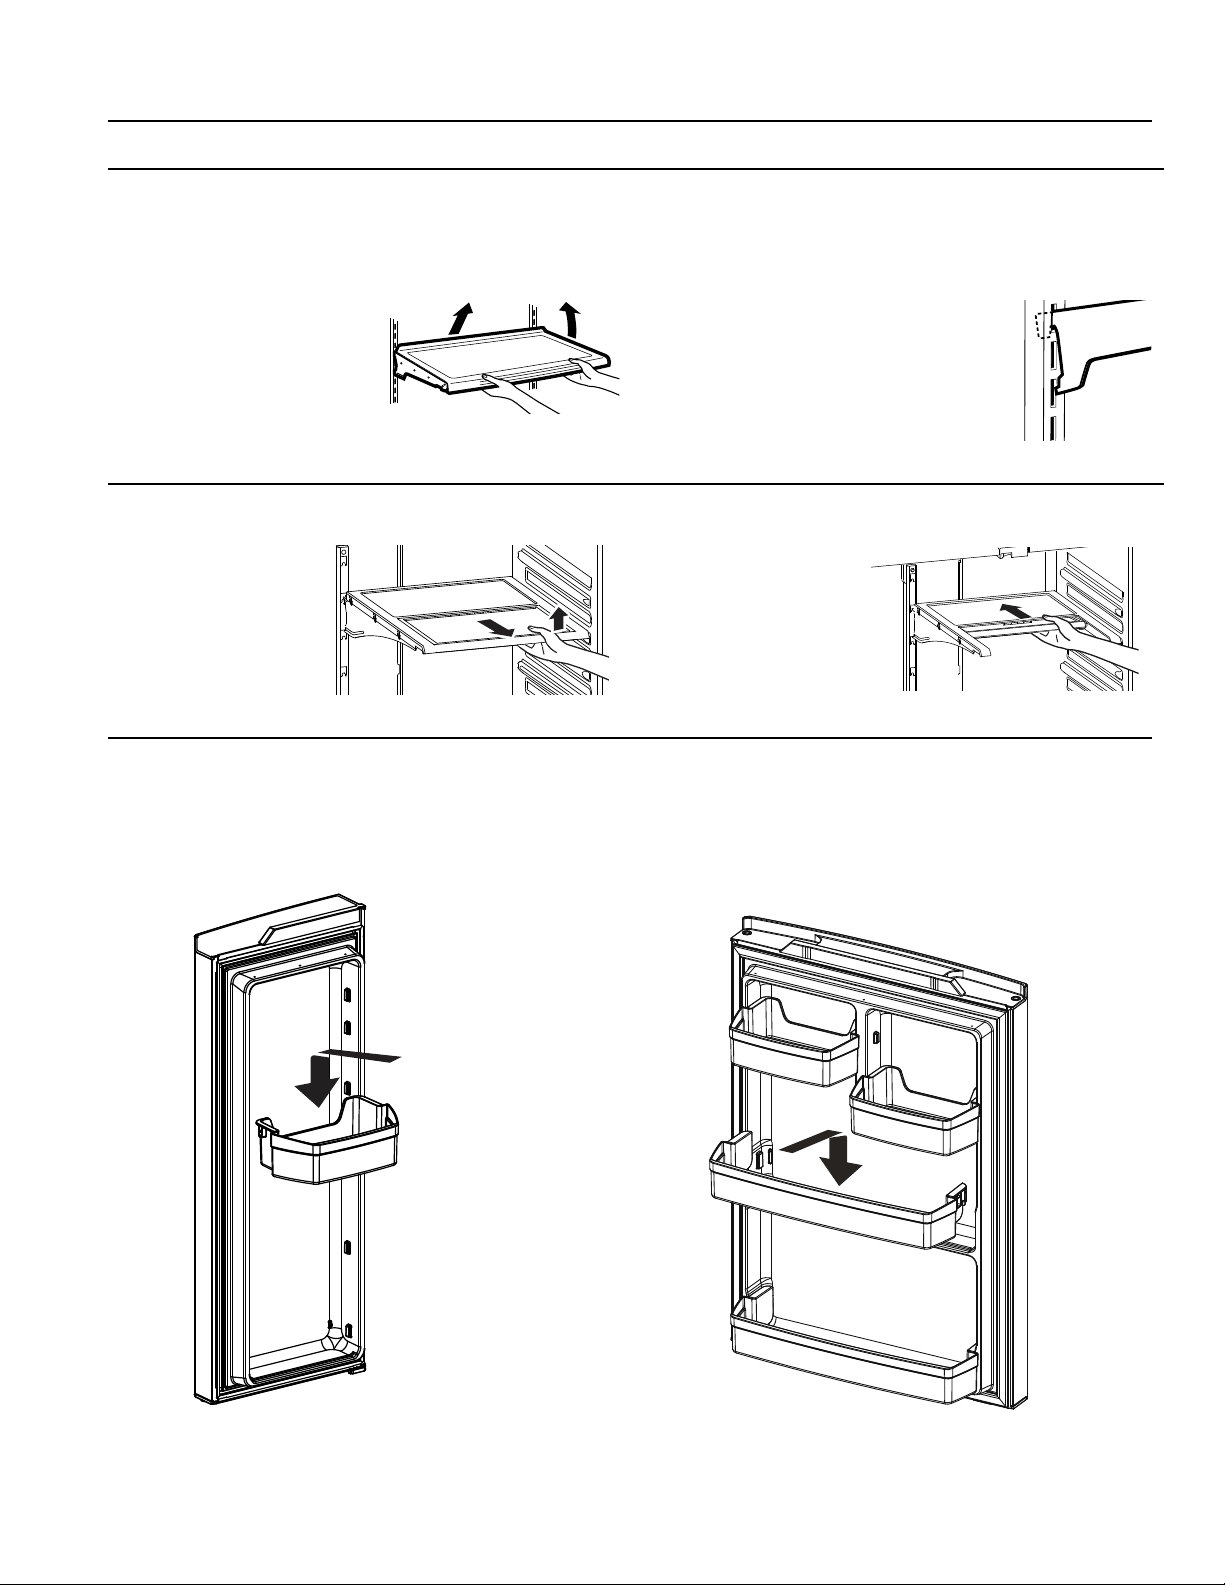
Shelves and Bins
Rearranging the Refrigerator Shelves
Shelves in the refrigerator compartment are adjustable.
To remove the shelves:
1. Remove all items from the
shelf.
2. Tilt the shelf up at the
front.
3. Lift the shelf up at the back
and bring the shelf out.
To replace the shelves:
1. While tilting the shelf up, insert the
top hook at the back of the shelf in
a slot on the track.
2. Lower the front of the shelf until
the bottom of the shelf locks into
place.
Adjustable Door Bins (on some models)
To remove: Liftthebinstraightup;thenpullout.
To replace: Engage the bin in the molded supports on
the door and push down to lock in place.
Non-Adjustable Gallon Door Bins (on some
models)
To remove: Liftthebinstraightup;thenpullout.
To replace: Engage the bin in the molded supports on
the door and push down to lock in place.
Not all features are on all models.
Quick Space Shelf (on some models)
This shelf splits in half
and slides under itself
for storage of tall items
on the shelf below.
This shelf can be
removed and replaced
or relocated.
NOTE: The back half of
the Quick Space Shelf is
not adjustable.
USING THE REFRIGERATOR: Shelves and Bins
49-1000107 Rev. 0 11
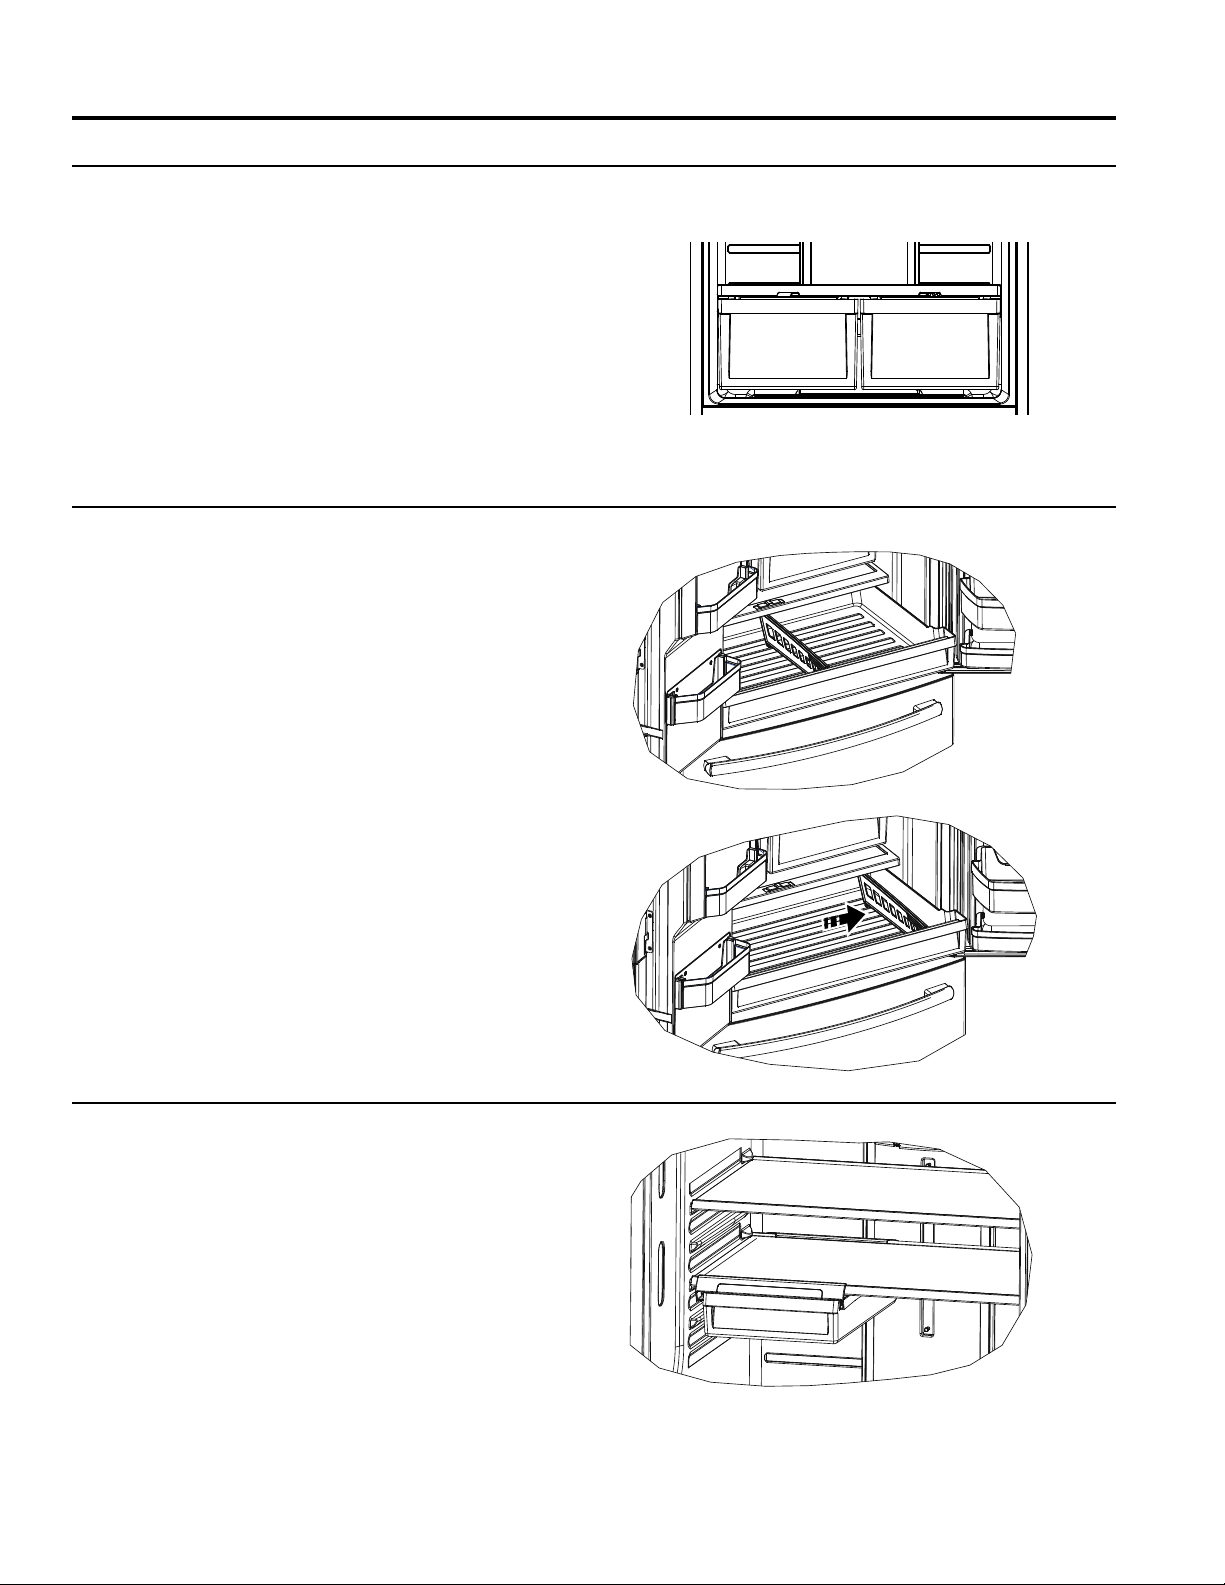
USING THE REFRIGERATOR: Pans
Pans
Climate Zone Pans
Keepfruitsandvegetablesorganizedinseparate
compartments for easy access. Excess water that may
accumulate in the bottom of the drawers or under the
drawers should be wiped dry.
To remove pan:
Slide the pan out to the stop position, lift the pan up and
past the stop position and pull forward.
Floating Snack Pan (on some models)
This pan can be moved to the most useful location for
your family’s needs.
To remove, slide the pan out to the stop position, lift the
pan up and past the stop position and lift it out.
Full -Width Pan (on some models)
To remove pan:
1. Pull the pan out to the stop position.
2. Lift the front of the drawer up and out.
To replace pan:
1. Place back of the drawer in first and rotate drawer
front down to seat it on the slides.
2. Push the drawer in to the closed position.
How to Remove and Replace Drawer Divider
To remove:
1. Pull the drawer out to the stop position.
2. Slide pan divider to right to release it from pan.
To replace:
Reverse steps 1 and 2 to replace drawer divider.
Not all features are on all models.
12 49-1000107 Rev. 0
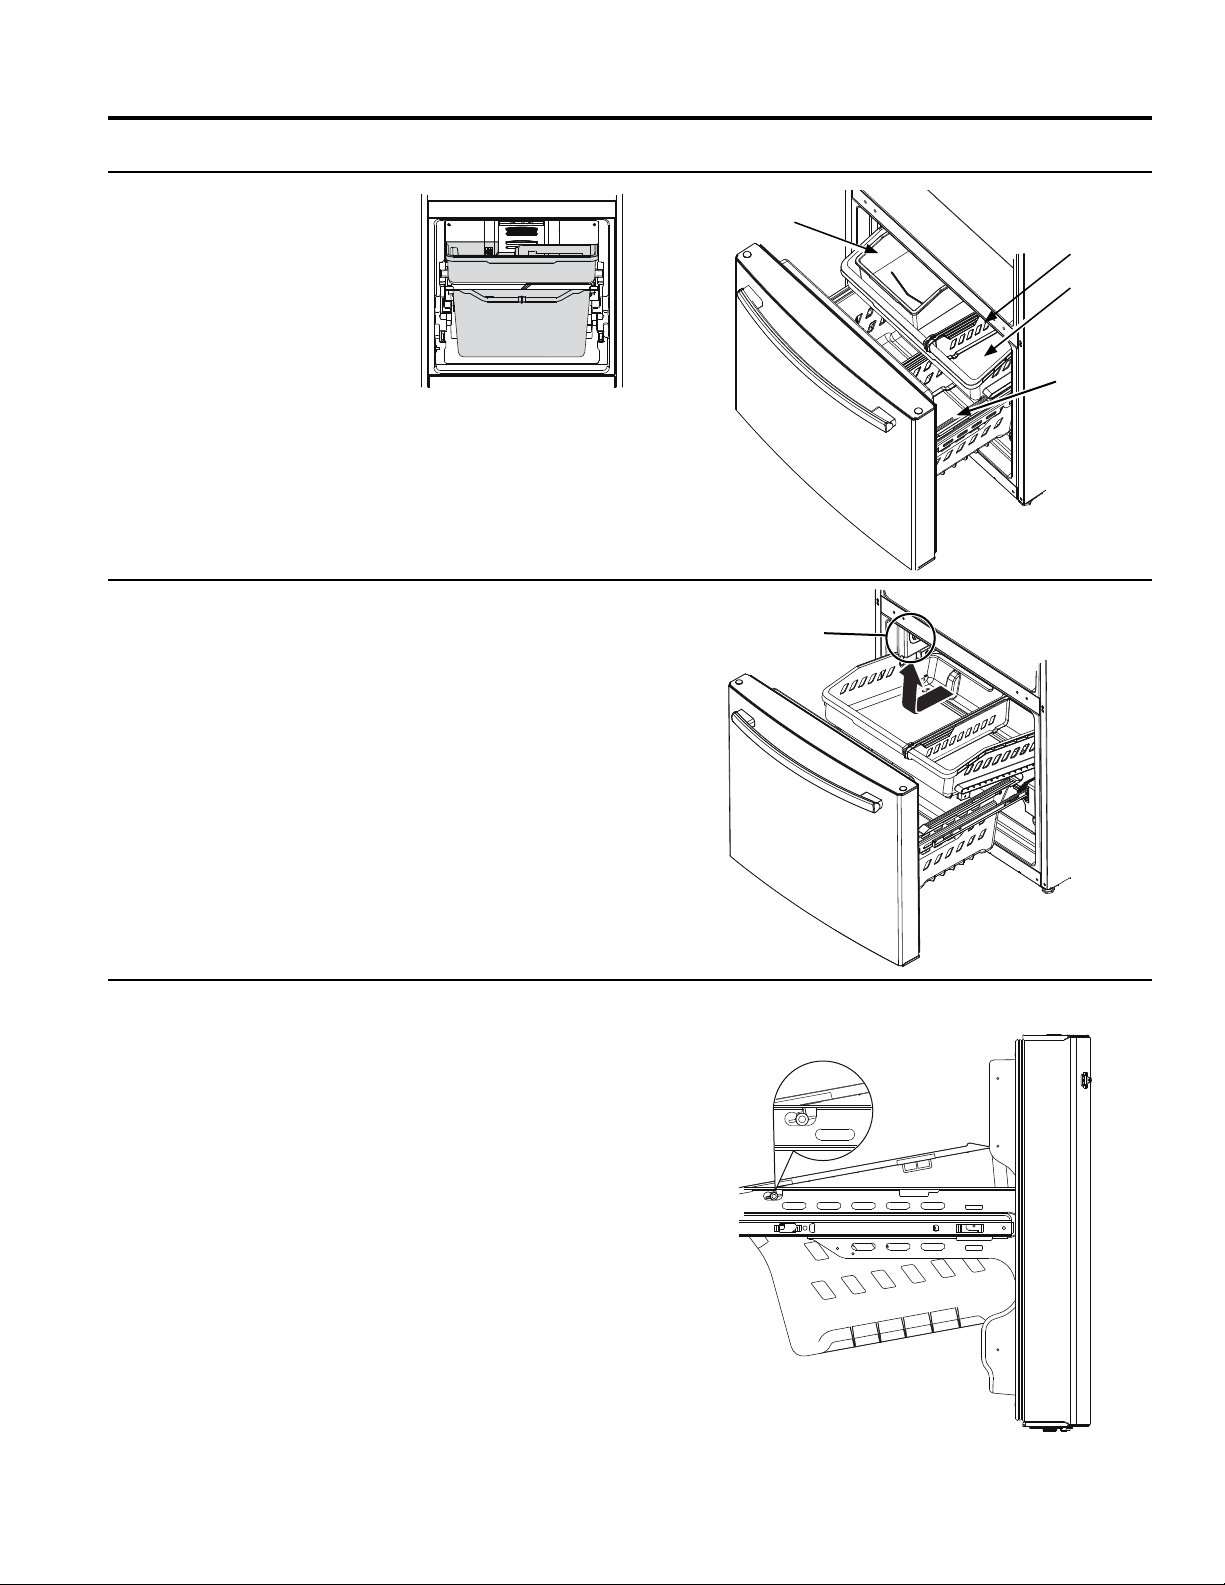
USING THE REFRIGERATOR: Freezer Drawer
Freezer Drawer (on some models)
FREEZER BASKETS
1. An ice bucket in the top basket
(on some models).
2. A top full-width basket.
3. A bottom full-width basket (with
divider - in some models).
NOTE: Do not fill baskets higher
than the rim of the basket. This
may cause baskets to stick or jam
when opening or closing.
Top Basket Removal
To remove the top full-width basket on freezer
drawer models:
1. Pull the basket out to the stop location.
2. Lift basket up to release it from the slides.
When replacing the basket, make sure that the basket
remains mounted on the side rails and over the slides of
the bottom basket.
NOTE: Always be sure to fully close this basket.
Bottom Basket Removal
To remove the bottom full-width basket on freezer
drawer models:
1. Open the bottom freezer drawer until it stops.
2. Remove the top freezer basket.
3. The bottom freezer basket rests on the inside tabs on
the drawer slides.
4. Lift the front of the basket and pull forward.
5. Release the pin from the slot to remove the basket.
When replacing the bottom full-width basket, tilt the
basket back and lower it into the drawer. Rotate the
basket to a horizontal position and press down. Make
sure to place the pin back into the slot.
NOTE: Always be sure that the basket is seated on
the bracket tabs before sliding the drawer back into the
freezer.
Not all features are on all models.
Appearance and features
may vary
1
2
3
Ice Bucket
(on some models)
LED lights are located on
both sides of the freezer
Top Basket
Top Basket
Divider
Bottom
Basket
49-1000107 Rev. 0 13
USING THE REFRIGERATOR: Automatic Icemaker
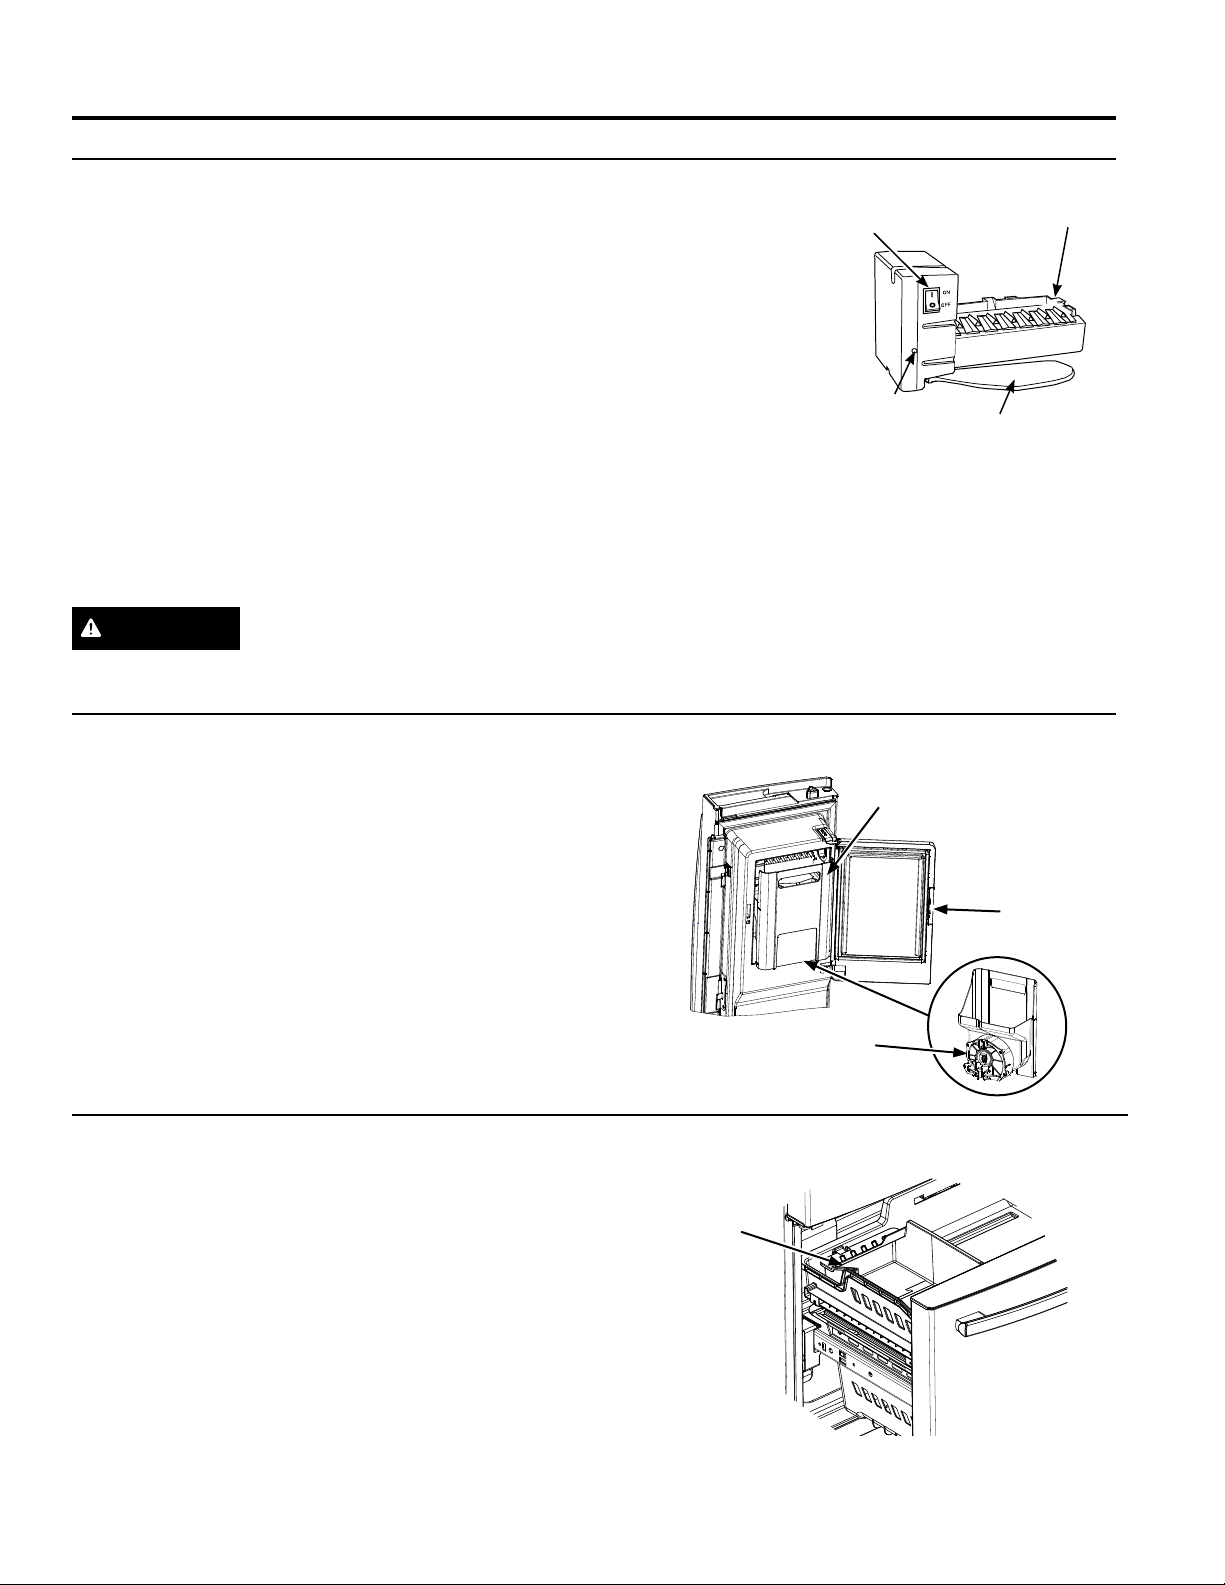
Automatic Icemaker
A newly installed refrigerator may take 12 to 24 hours to begin making ice.
Automatic Icemaker (on some models)
The icemaker will produce seven cubes per cycle
approximately 100–130 cubes in a 24-hour period,
depending on freezer compartment temperature, room
temperature, number of door openings and other use
conditions.
If the refrigerator is operated before the water connection
is made to the icemaker, set the power switch in the
OFF position.
When the refrigerator has been connected to the water
supply, set the power switch to the ON position.
The icemaker will fill with water when it cools to 15°F
(–10°C). A newly installed refrigerator may take 12 to 24
hours to begin making ice cubes.
You may hear a buzzing sound each time the icemaker
fills with water.
Throw away the first few
batches of ice to allow the
water line to clear.
Be sure nothing interferes
with the sweep of the
feeler arm.
When the bin fills to the
level of the feeler arm,
the icemaker will stop
producing ice. It is normal
for several cubes to be joined together.
If ice is not used frequently, old ice cubes will become
cloudy, taste stale and shrink.
NOTE: In homes with lower-than-average water
pressure, you may hear the icemaker cycle multiple
times when making one batch of ice.
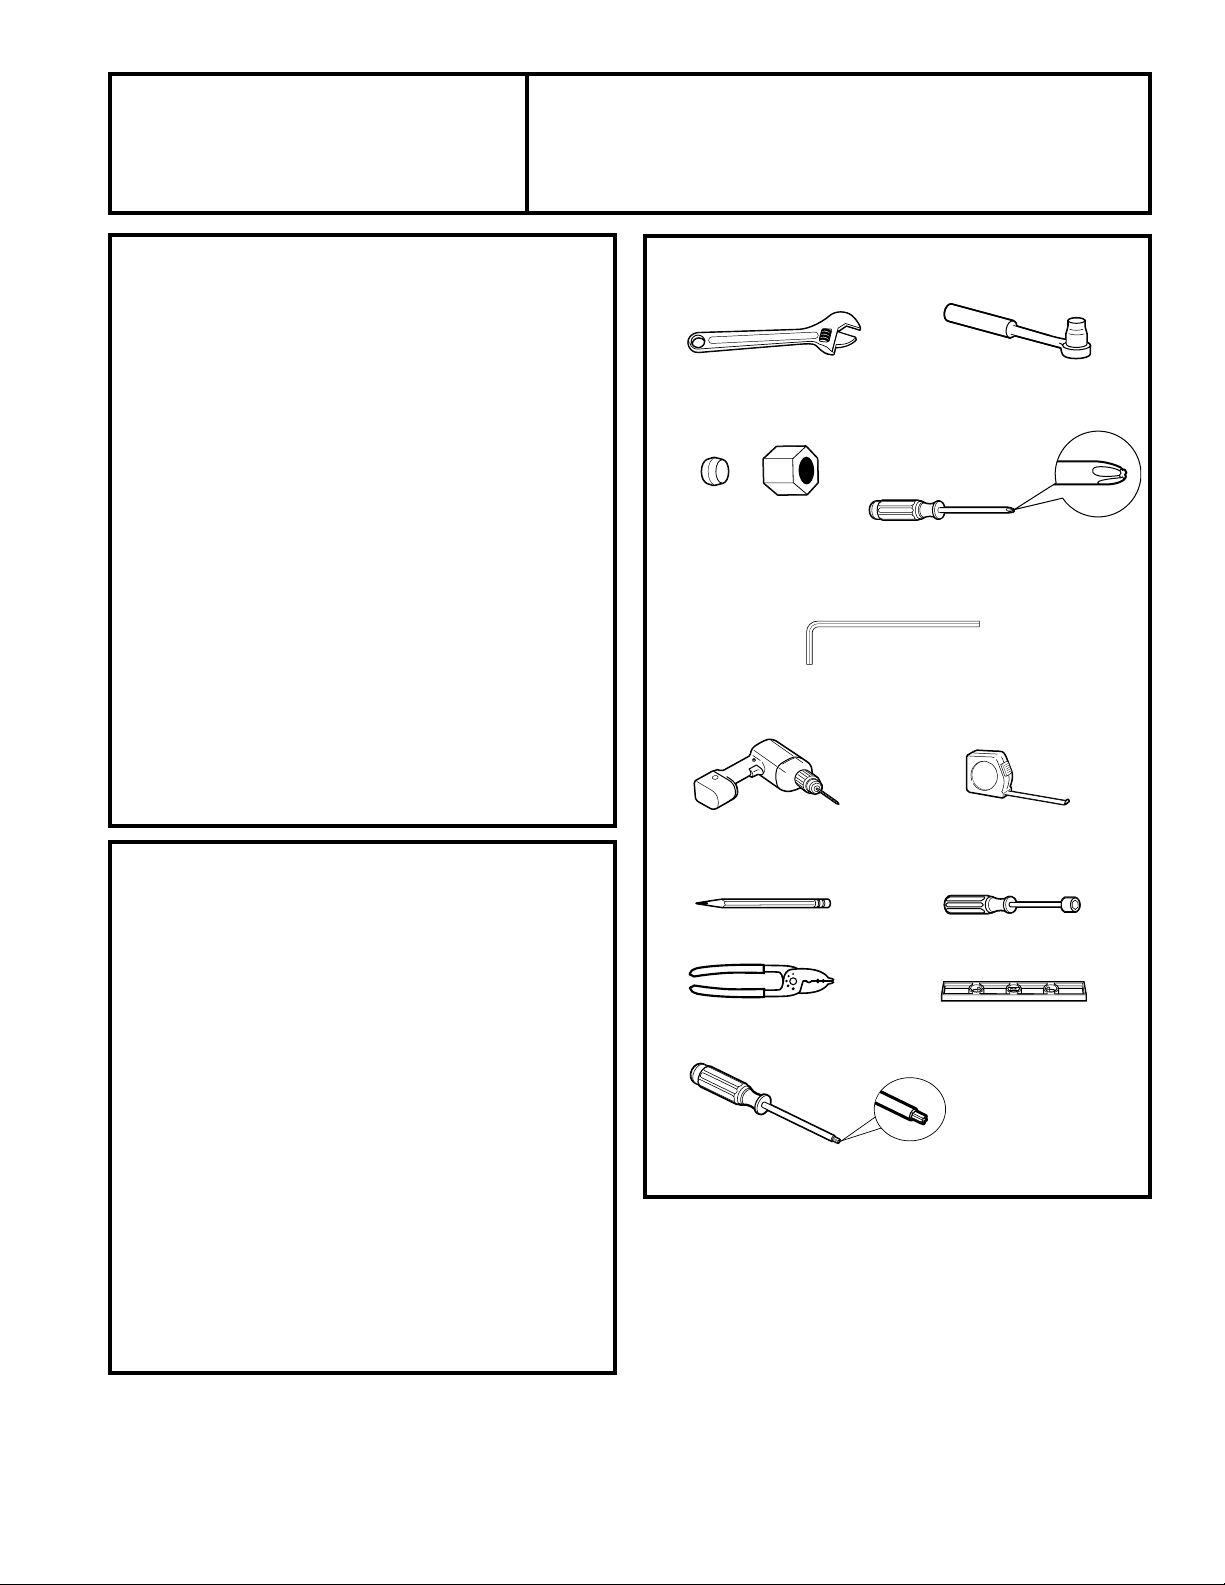
For Refrigerator Models with Icemaker in the Door
Ice Bucket and Dispenser
• Open the ice box door on inside of the left door.
• Pull up and out on the ice bucket in the left hand door
to remove it from the compartment .
• To replace the ice bucket, set it on the guide brackets
and push until the ice bucket seats properly.
• If bucket cannot be replaced, rotate the ice bucket fork
1/4 turn clockwise.
• Icemaker can be turned on and off using this display
(see Controls on pages 6 and 7.)
For Refrigerator Models with Icemaker in the Freezer Compartment
Some models come with an icemaker installed in the
freezer compartment. For those models that come
ice-makerready,youcanpurchaseKitIM4D.Visit our
website at GEAppliances.com or call GE Appliances
Parts and Accessories, 877.959.8688
There is ice storage in the freezer compartment located
on the left side of the upper basket. Pull the upper basket
forward to remove the ice bucket.
CAUTION
To minimize the risk of personal injury, avoid contact with the moving parts of the ejector
mechanism, or with the heating element that releases the cubes. Do not place fingers or hands on the automatic ice
making mechanism while the refrigerator is plugged in.
Ice bucket fork
Latch
Ice bucket
Icemaker
Feeler Arm
Power
Switch
Green
Power Light
Ice bucket

14 49-1000107 Rev. 0
Care and Cleaning
Cleaning the Outside
The stainless steel panels, door handles and
trim.
Do not use appliance wax, polish, bleach, or other
products containing chlorine on stainless steel.
Stainless steel can be cleaned with a commercially
available stainless steel cleaner. A spray-on stainless
steel cleaner works best.
Silver-accented plastic parts.
Wash parts with soap or other mild detergents. Wipe
clean with a sponge, damp cloth or paper towel.
Do not use scouring pads, powdered cleaners, bleach or
cleaners containing bleach because these products can
scratch and weaken the paint finish.
Should spill tray need cleaning use lime remover.
Cleaning the Inside
Unplug the refrigerator before cleaning.
If this is not practical, wring excess moisture out of
sponge or cloth when cleaning around switches, lights or
controls.
Use an appliance wax polish on the inside surface
between the doors.
Use warm water and baking soda solution—about a
tablespoon (15 ml) of baking soda to a quart (1 liter) of
water. This both cleans and neutralizes odors. Rinse and
wipe dry.
Behind the Refrigerator
Be careful when moving the refrigerator away from
the wall. All types of floor coverings can be damaged,
particularly cushioned coverings and those with
embossed surfaces.
Raise the leveling legs located at the bottom front of the
refrigerator.
Pull the refrigerator straight out and return it to position
by pushing it straight in. Moving the refrigerator in a side
direction may result in damage to the floor covering or
refrigerator.
Lower the leveling legs until they touch the floor.
When pushing the refrigerator back, make sure you
don’t roll over the power cord or water supply line.
For long vacations or absences, remove food and
unplug the refrigerator. Clean the interior with a baking
soda solution of one tablespoon (15 ml) of baking soda
to one quart (1 liter) of water. Leave the doors open.
If the temperature can drop below freezing, have a
qualified service technician drain the water supply
system to prevent serious property damage due to
flooding.
1) Turn refrigerator off (pages 6 and 7) or unplug the
refrigerator.
2) Empty ice bucket
3) Turn water supply off
If you cut the water supply off, turn off the icemaker
(pg. 13).
Upon returning from vacation:
1) Replace the water filter.
2) Run 2 gallons of water through the cold water
dispenser (about 5 minutes) to flush the system.
Preparing for Vacation
Preparing to Move
Secure all loose items such as shelves and drawers by
taping them securely in place to prevent damage.
When using a hand truck to move the refrigerator, do not
rest the front or back of the refrigerator against the hand
truck. This could damage the refrigerator.
Handle only from the sides of the refrigerator.
Be sure the refrigerator stays in an upright position
during moving.
CAUTION
Do not clean glass shelves or covers
with warm water when they are cold. Glass shelves and
covers may break if exposed to sudden temperature
changes or impact such as bumping or dropping.
Tempered glass is designed to shatter into many small
pieces if it breaks.
CARE AND CLEANING

49-1000107 Rev. 0 15
CARE AND CLEANING
Care and Cleaning
Replacing the Lights
There is LED lighting in the fresh food compartment
at the top center and on the left and right sides above
the climate zone pans on the french door models.
LED lighting is located at the top of the fresh food
compartment on the single door models.
LED lights are also located at the top of the left and right
sides of the freezer in all models.
An authorized technician will need to replace the LED
light.
If this assembly needs to be replaced, call for service at
800.544.4780.
LEDs (locations
may vary by
model)
16 49-1000107 Rev. 0
Installation
Instructions
Refrigerator
TOOLS YOU MAY NEED
BEFORE YOU BEGIN
Read these instructions completely and
carefully.
•
IMPORTANT — Observe all
governing codes and ordinances. Save these
instructions for local inspector’s use.
•
Note to Installer – Be sure to leave these
instructions with the Consumer.
• Note to Consumer –Keeptheseinstructions
for future reference.
• Skill level – Installation of this appliance
requires basic mechanical skills.
• Completion time – Refrigerator Installation
20 minutes
Water Line Installation
30 minutes
• Proper installation is the responsibility of the
installer.
• Product failure due to improper installation is
not covered under the Warranty.
PREPARATION
MOVING THE REFRIGERATOR INDOORS
If the refrigerator will not fit through a
doorway, the refrigerator door and freezer
drawer or door can be removed.
• To remove the refrigerator doors, see
Removing French Doors section.
• To remove the freezer drawer, see the
Removing the Freezer Drawer section.
WATER SUPPLY TO THE ICEMAKER AND
DISPENSER
If the refrigerator has an icemaker, it will
have to be connected to a cold water line. A
GE Appliances water supply kit (containing
tubing, shutoff valve, fittings and instructions)
is available at extra cost from your dealer, by
visiting GEAppliances.com or from Parts and
Accessories, 877.959.8688.
Adjustable Wrench
1/4”OuterDiameter
Compression Nut
and Ferrule (sleeve)
(icemaker models only)
Phillips-Head Screwdriver
⅜” and ⅝”Socket
Ratchet/Driver
3/32”,1/8”& 3/16”Allen
Wrenches
Pencil
1/8”DrillBitand
Electric or Hand Drill
Tape Measure
1/4”NutDriver
Wire Cutters
Level
Torx T20, Driver
INSTALLATION INSTRUCTIONS
49-1000107 Rev. 0 17
INSTALLATION INSTRUCTIONS
Installation Instructions
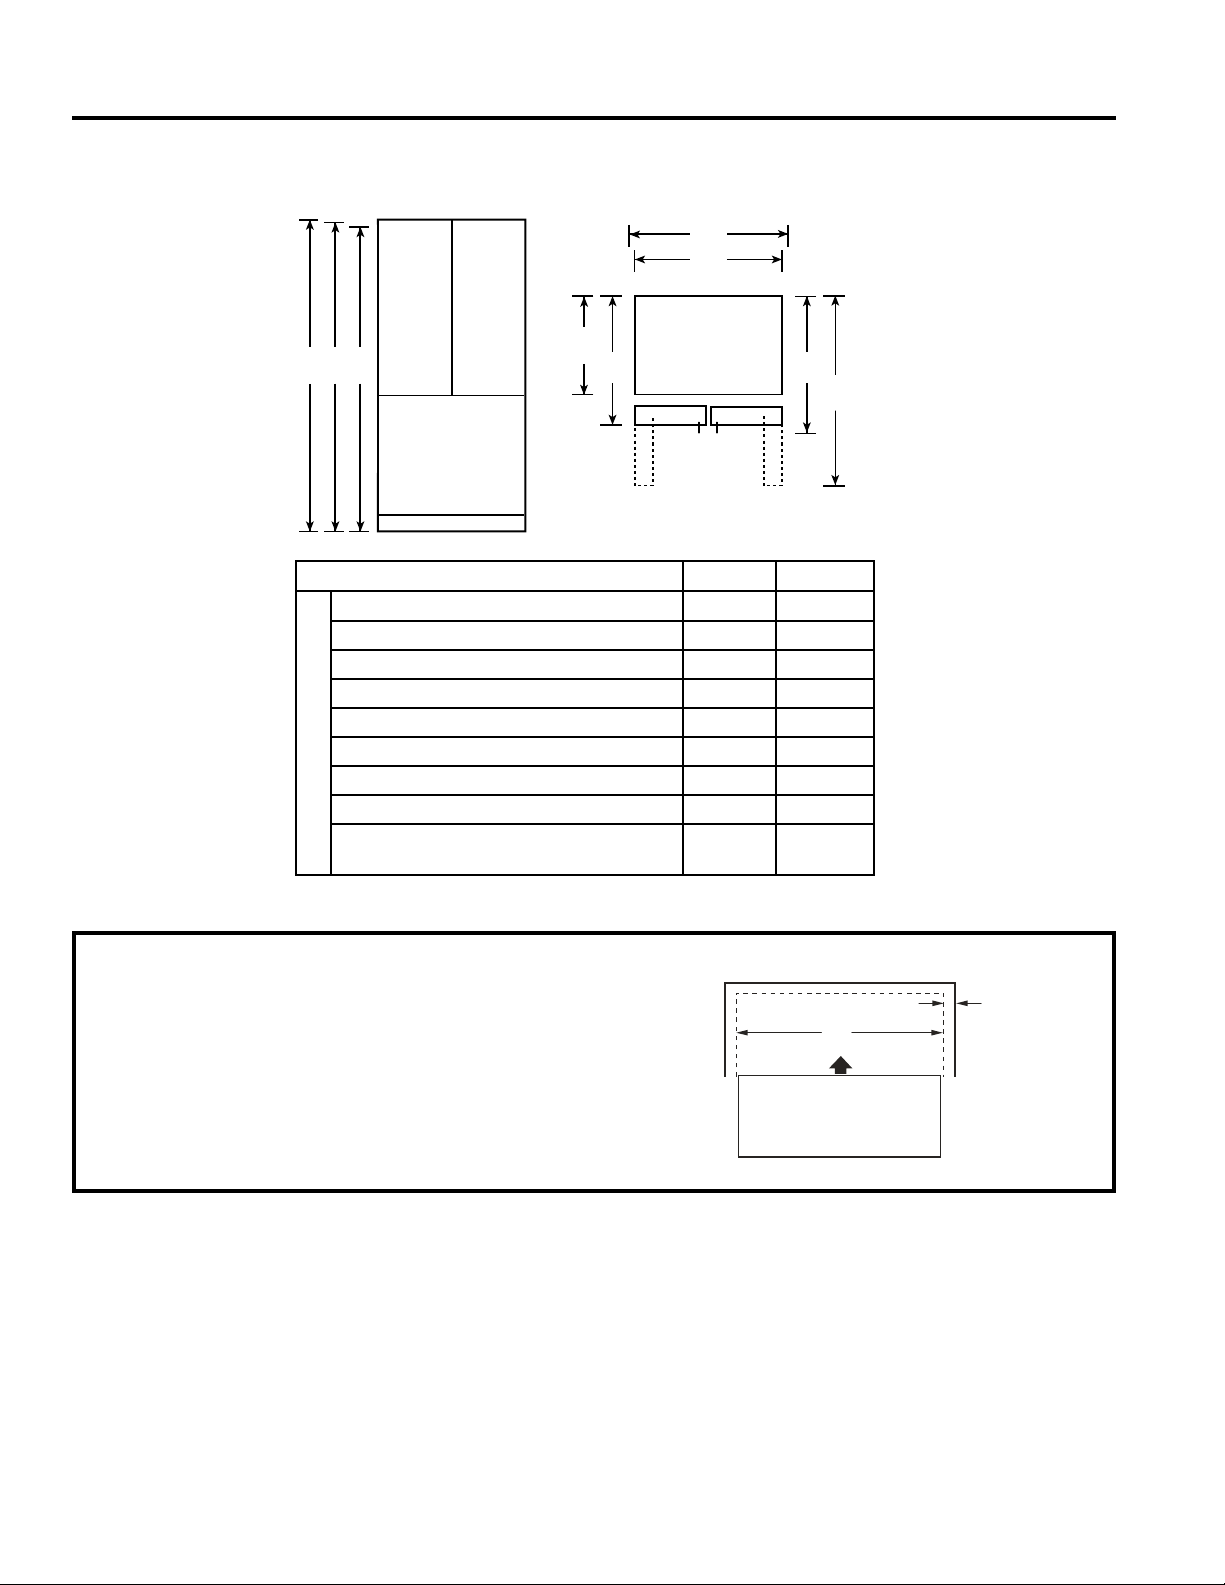
MEASURE THE CABINET OPENING
ACCORDING TO THE WIDTH OF THE
REFRIGERATOR
Measure width of cabinet opening where refrigerator will be placed, B.
Be sure to account for any countertop overhang, baseboard thickness
andanyclearancedesired.Width,B,shouldnotbelessthan33”-36”
(83.3 cm - 91.4 cm) (depending on model). The refrigerator will be
placed approximately in the middle of this opening.
Back Wall
Front
Right
Side
REFRIGERATOR
B
Baseboard
Thickness or
Countertop
Overhang
(Whichever is
Larger) Plus
Any Desired
Clearance
APPLIANCE DIMENSIONS
H
E
D
G
F
I
A
B C
XNE25J XFE26J
Height to top of door (in.) A 69-7/8 69-7/8
Height to top of hinge (in.) B 69-3/4 69-3/4
Height to top of case (in.) C 68-5/8 68-5/8
Case depth without door (in.) D 30-5/8 29
Case depth less door handle (in.) E 35 33-7/8
Case depth with door handle (in.) F 37-1/2 36-3/8
Depth with fresh food door pen 90° (in.) G 47-3/4 48-3/4
Width (in.) H 32-3/4 35-5/8
Width with door open 90 inc. door handle
(in.) I
40-7/8 38-5/8
OVERALL DIMENSIONS
18 49-1000107 Rev. 0
REFRIGERATOR LOCATION
■ Do not install the refrigerator where the
temperature will go below 60°F (16°C) because
it will not run often enough to maintain proper
temperatures.
■ Do not install the refrigerator where the
temperature will go above 100°F (37°C) because it
will not perform properly.
■ Do not install the refrigerator in a location exposed
to water (rain, etc.) or direct sunlight.
■ Install it on a floor strong enough to support it fully
loaded.
CLEARANCES
Allow the following clearances for ease of installation,
proper air circulation and plumbing and electrical
connections.
Sides 1/8”(3mm)
Top 1”(25mm)Cabinet/HingeCover
Back 2”(50mm)
Installation Instructions
INSTALLING THE REFRIGERATOR
IMPORTANT NOTES
This refrigerator without the handles ranges from
33-7/8”to35-1/4”(86cm-89cm)dependingonyour
model (see dimension E on the previous page). Doors
and passageways leading to the installation location
mustbeatleast36”(91.4cm)inordertoleavethe
doors attached to the refrigerator while transporting
it into the installation location. If passageways are
less than 36” (91.4 cm), the refrigerator doors can
easily be scratched and damaged. The doors can be
removed to allow the refrigerator to be safely moved
indoors.
• If you need to remove the door, see Removing
French Doors.
• To remove the freezer door, see Removing
Freezer Drawer.
• If it is NOT necessary to remove doors, leave tape
and all packaging on doors until the refrigerator
is in the final location. Once in place, install door
handles (see Steps 1 and 2).
• SKID REMOVAL: Tilt refrigerator to each side to
remove skid.
• NOTE: Use a padded hand truck to move this
refrigerator. Place the refrigerator on the hand
truck with a side against the truck. We strongly
recommend that TWO PEOPLE move and
complete this installation.
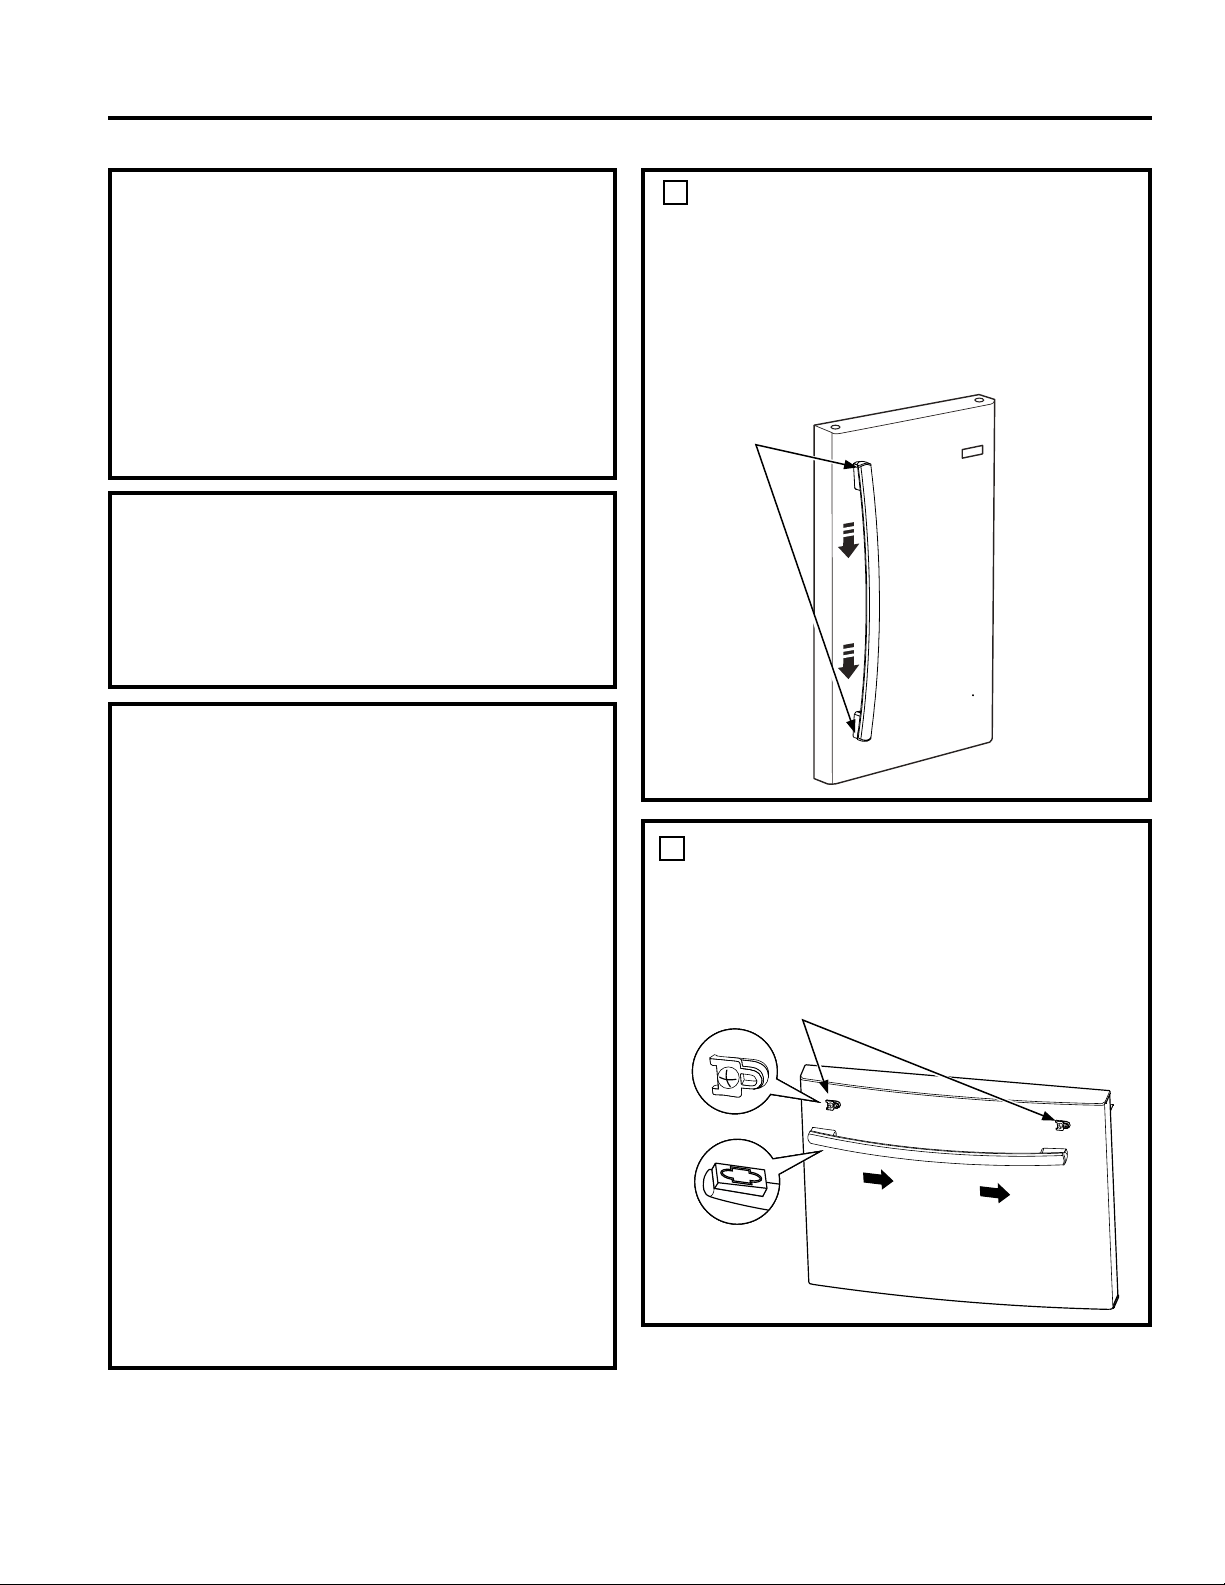
ATTACH FRESH FOOD
HANDLES
Attach the handle to the mounting fasteners
by aligning the slots on the handle with the
mounting fasteners. Slide the handle down until
youheara“click”.
Follow the same procedure for both doors.
1
ATTACH FREEZER HANDLE
Attach the handle to the mounting fasteners by
aligning the slots on the handle with the mounting
fasteners. Slide the handle to the right until you
heara“click”.
2
Mounting
Fasteners
Mounting
Fasteners
INSTALLATION INSTRUCTIONS
49-1000107 Rev. 0 19
INSTALLATION INSTRUCTIONS
Installation Instructions
REMOVING FRENCH DOORS
INSTALLING THE REFRIGERATOR (Cont.)
IMPORTANT NOTES
When removing french doors:
• Read the instructions all the way through before
starting.
• Handles are included inside the refrigerator.
• Place the screws by their related parts to avoid
using them in the wrong places.
• Provide a non-scratching work surface for the
doors.
CAUTION
Lifting Hazard.
Single person lift can cause injury. Use assistance
when handling, moving or lifting the refrigerator
doors.
NOTE: When moving door, to prevent damage to
door and electronics carefully place the door in a
proper location.
WARNING
To eliminate the risk of electric shock or injury
during installation, you must first unplug the
refrigerator before proceeding. Failure to follow
these instructions can result in electrical shock.
Tape the doors shut with adhesive tape.
1
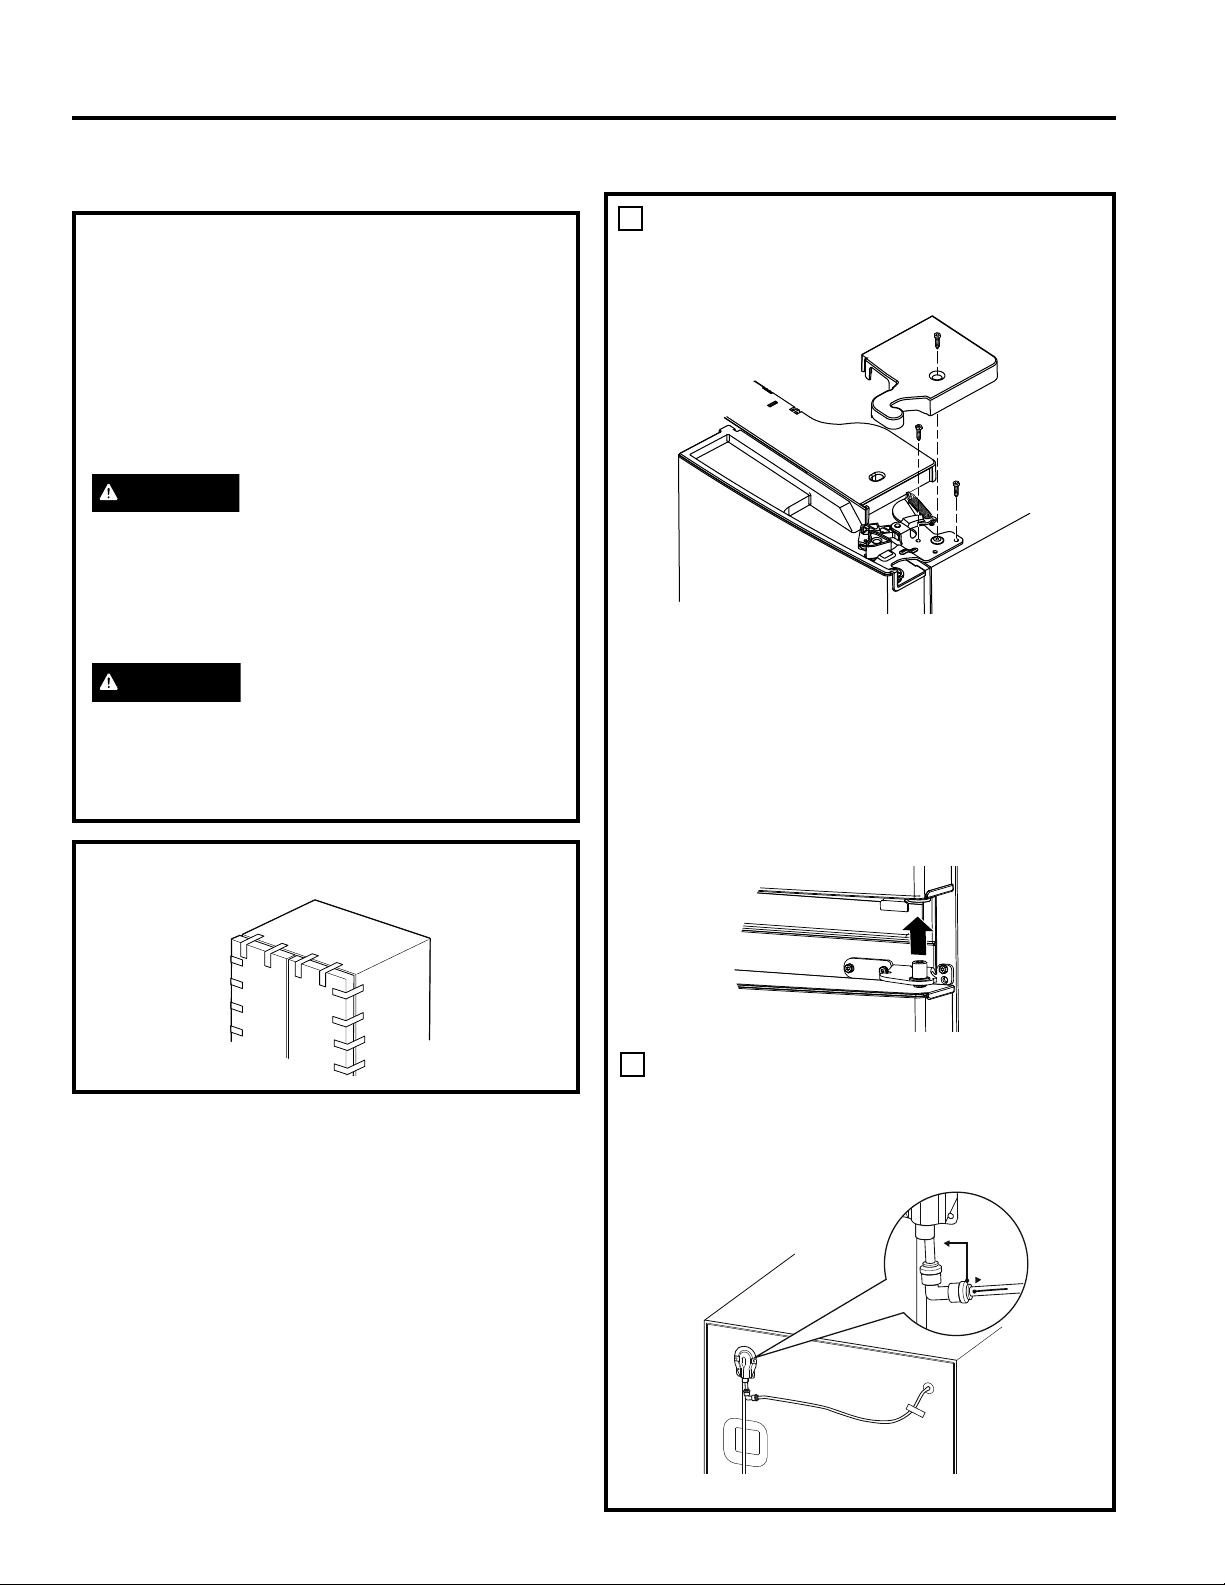
REMOVING RIGHT DOOR
A. Remove the hinge cover on top of the right
fresh food door by removing the screw using
a Phillips screwdriver.
B Usinga5/16”socketratchet/driver,removethe
bolts securing the top hinge to the cabinet. Lift
the hinge support straight up to free the hinge
pin from the socket in the top of the door.
C. Remove the tape from the right door and tilt
the door away from the cabinet. Lift the door
off the center hinge pin.
D. Set the door on a non-scratching surface with
the inside up.
2
REMOVING LEFT DOOR
A. For Ice and Water Models Only: Unplug the
water line from the back of the refrigerator
and remove all tape that fixes the water line
to the refrigerator.

20 49-1000107 Rev. 0
Installation Instructions
3
REMOVING CENTER HINGES AND
BRACKETS
A. Usinga1/4”Allenwrench,removethe2hinge
pins from the hinge brackets.
B.Usinga5/16”socket/ratchetdriver,removethe
bolts securing the center hinge brackets to the
cabinet.
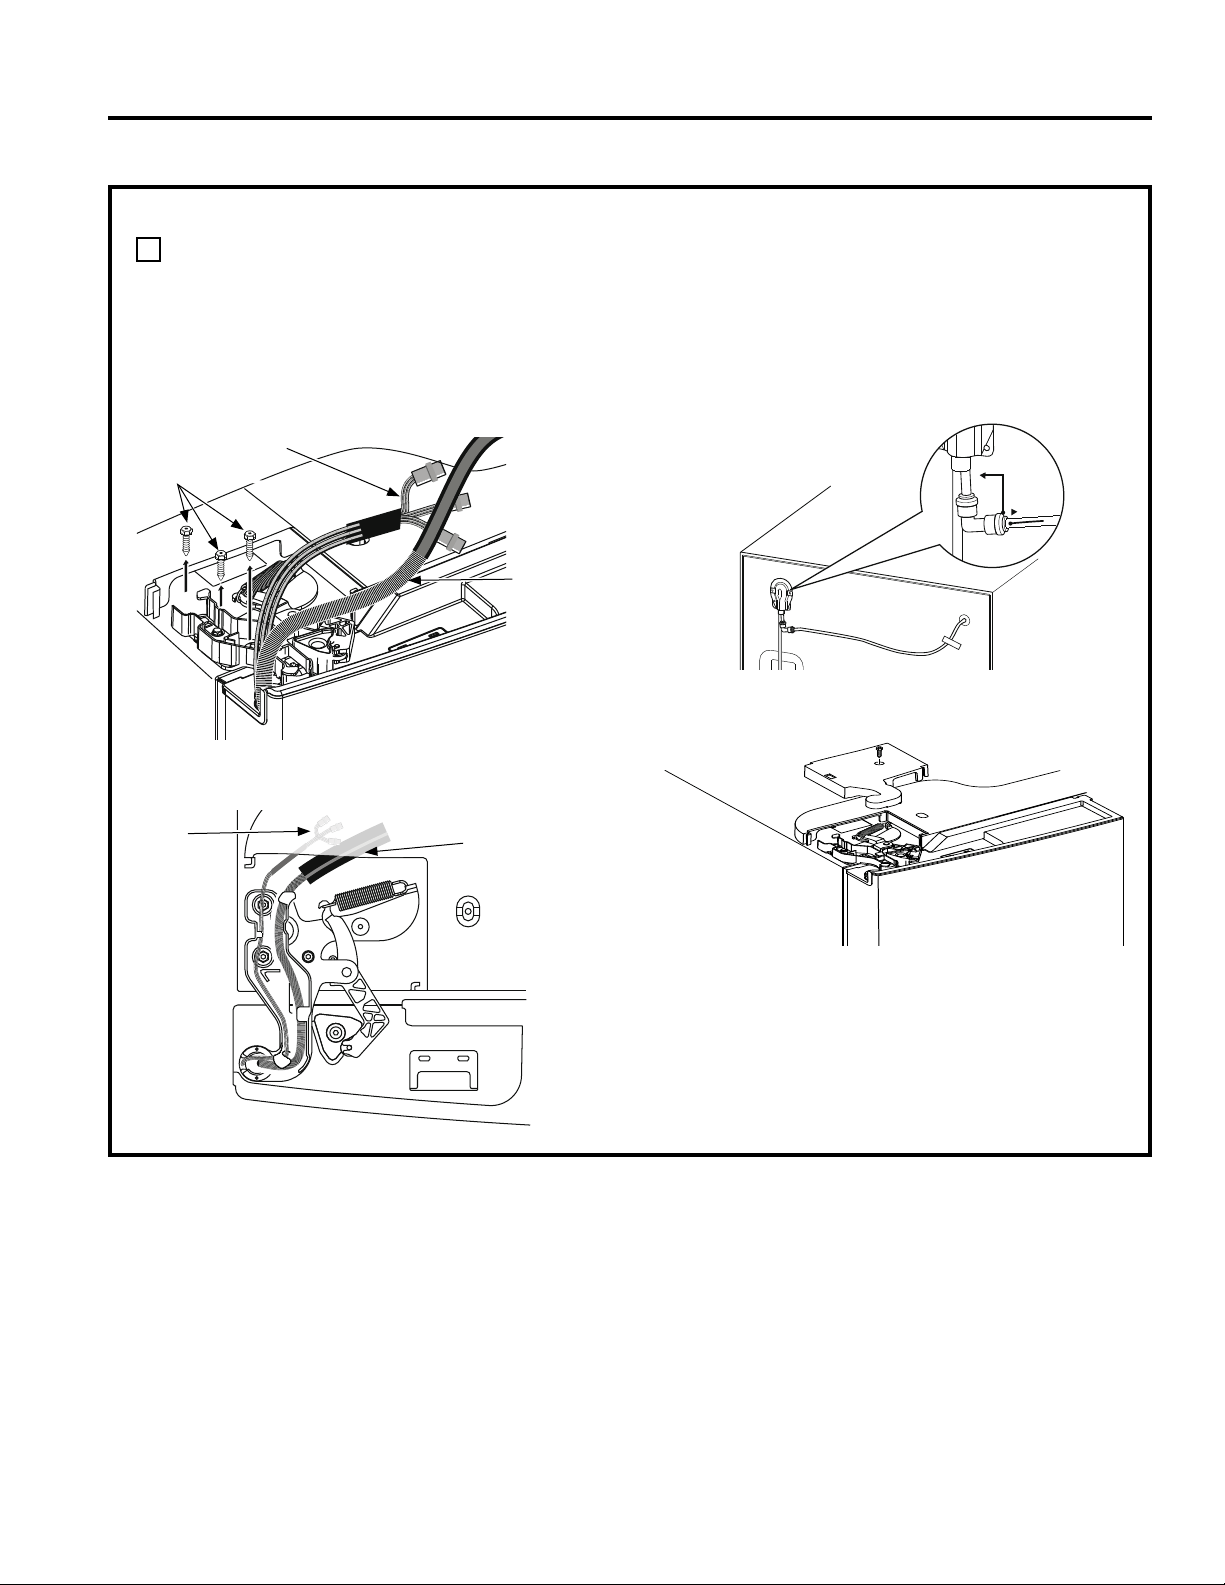
2
REMOVING LEFT DOOR (cont.)
B. Remove the hinge cover on top of the left
fresh food door by removing the screw using
a Phillips screwdriver.
C. Unplug the 3 wire connectors and move the
wires until you can see the screws holding
the hinge.
For Ice and Water Models Only: Pull the
water line very carefully.
D.Usinga5/16”socket/ratchetdriver,remove
the bolts securing the top hinge to the
cabinet.
Wire
Connectors
Water Line
(Ice and Water
Models Only)
Wire Connectors
Bolts
Water Line
(Ice and
Water
Models
Only)
For NON Ice and Water Models Only: Lift the
hinge straight up to free the hinge pin from the
socket in the top of the door and pass the wire
through the slot in the hinge. For Ice and Water
Models Only: Do not remove hinge from the
door.
E. Remove the tape from the door, open the
door 90 degrees and tilt the door away from
the cabinet. Lift the door off the center hinge
pin.
F. Set the door on a non-scratching surface with
the inside up.
INSTALLING THE REFRIGERATOR (Cont.)
INSTALLATION INSTRUCTIONS
49-1000107 Rev. 0 21
INSTALLATION INSTRUCTIONS
REINSTALLING FRENCH DOORS
Installation Instructions
IMPORTANT NOTES
When replacing the french doors:
• Read the instructions all the way through before
starting.
CAUTION
Lifting Hazard.
Single person lift can cause injury. Use assistance
when handling, moving or lifting the refrigerator
doors.
NOTE: When moving door, to prevent damage to
door and electronics carefully place the door in a
proper location.
WARNING
To eliminate the risk of electric shock or injury
during installation, you must first unplug the
refrigerator before proceeding. Failure to follow
these instructions can result in electrical shock.
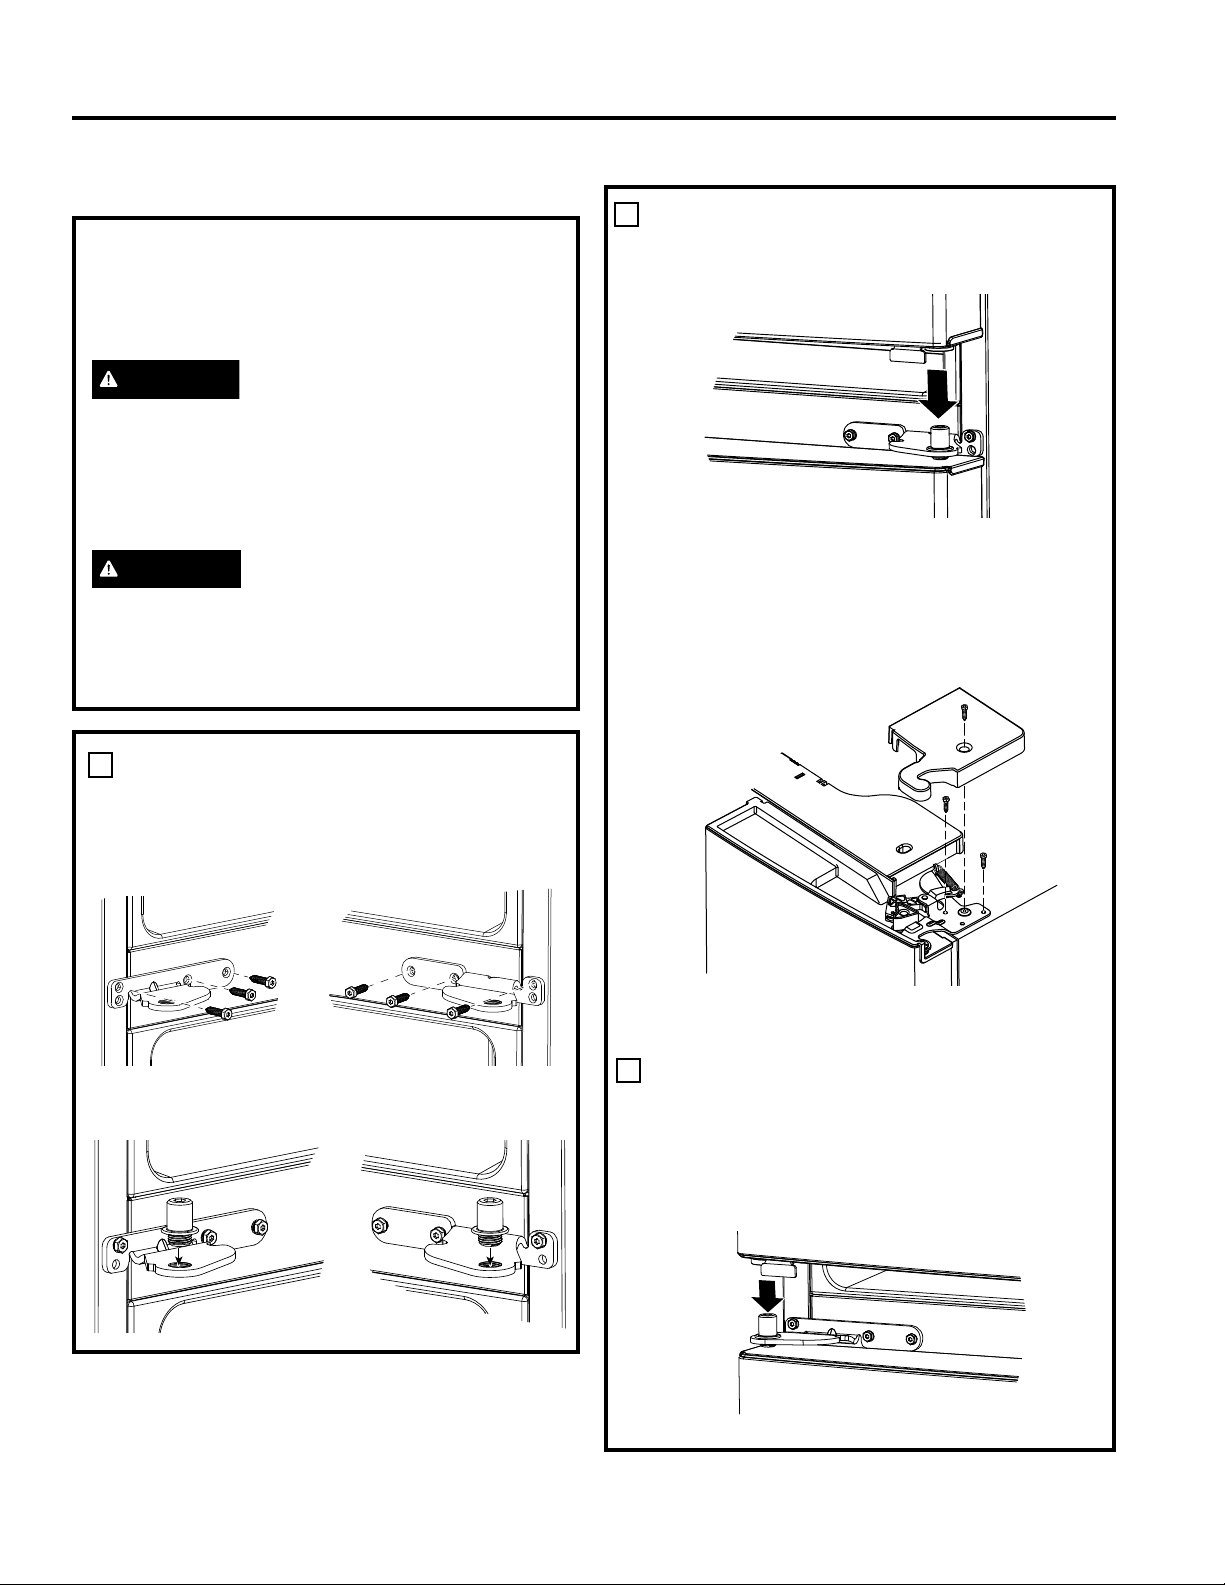
1
REINSTALLING CENTER HINGE
BRACKETS AND HINGES
A.Usinga5/16”socket/ratchetdriver,reinstall
the bolts and center hinge brackets to the
cabinet.
B. Usinga1/4”Allenwrench,reinstallthe2
hinge pins into the hinge brackets.
2
REHANGING THE RIGHT DOOR
A. Lower the refrigerator door onto the right
hinge pin.
B. Make sure the door is aligned with the
cabinet. Attach the hinge to the top of the
cabinet loosely with bolts removed earlier.
C. Make sure the gasket on the door is flush
against the cabinet and is not folded. Tighten
the bolts to 60 lb/in.(6.78 Nm).
D. Replace the right hinge cover on top of the
refrigerator using a Phillips screwdriver.
3
REHANGING THE LEFT DOOR
A. For NON Ice and Water Models Only: Pass
the wire through the slot in the hinge. Place
the hinge pin into the top of the door.
B. Lower the refrigerator door onto the left
hinge pin.
INSTALLING THE REFRIGERATOR (Cont.)
22 49-1000107 Rev. 0
Installation Instructions
REINSTALLING FRENCH DOORS (Cont.)
3
REHANGING THE LEFT DOOR (Cont.)
C. Make sure the door is aligned with the
cabinet. Attach the hinge to the top of the
cabinet loosely with bolts removed earlier.
D. Make sure the gasket on the door is flush
against the cabinet and is not folded. Tighten
the bolts to 60 lb/in. (6.78 Nm).
E. Plug the wire connectors together and rout the
wire inside the plastic port.
F. For Ice and Water Models Only: Put the
water line into the hole and pass through the
plastic port to the back of the refrigerator.
Plug the water line back into the fixture on
back of the refrigerator. Tape water line to
the refrigerator.
G. Replace the left hinge cover on top of the
refrigerator using a Phillips screwdriver.
Wire
Connectors
Water Line
(Ice and Water
Models Only)
Wire Connectors
Bolts
Water Line
(Ice and
Water
Models
Only)
INSTALLING THE REFRIGERATOR (Cont.)
INSTALLATION INSTRUCTIONS
49-1000107 Rev. 0 23
INSTALLATION INSTRUCTIONS
REMOVING FREEZER DRAWER
Installation Instructions
IMPORTANT NOTES
When removing freezer drawer:
• Read the instructions all the way through before
starting.
• Provide a non-scratching work surface for the
doors.
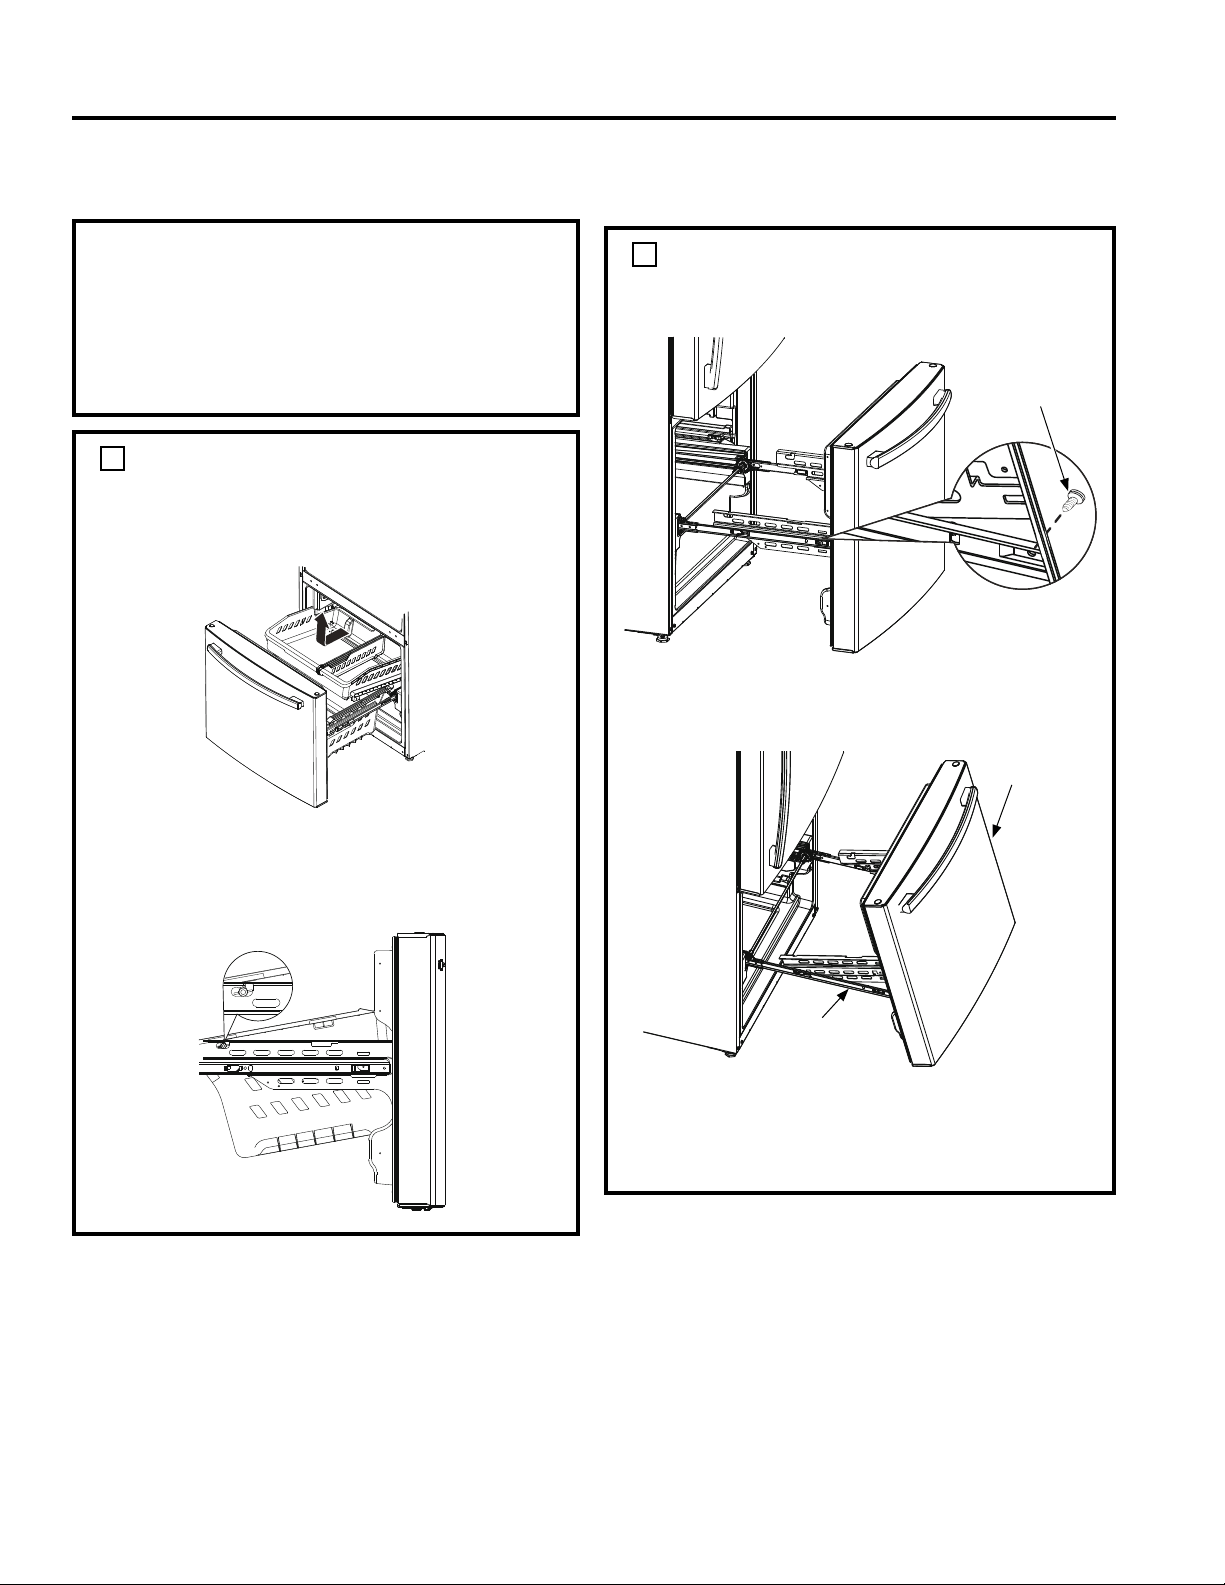
1
REMOVE THE BASKETS
A. Open the freezer drawer until it stops.
B. Pull the top basket out until it stops. Lift the
basket up on the front and out to remove.
C. The lower basket rests on a frame inside the
freezer drawer. Lift the front of the basket
and pull it forward. Release the pins from the
slots on the frame to remove the basket.
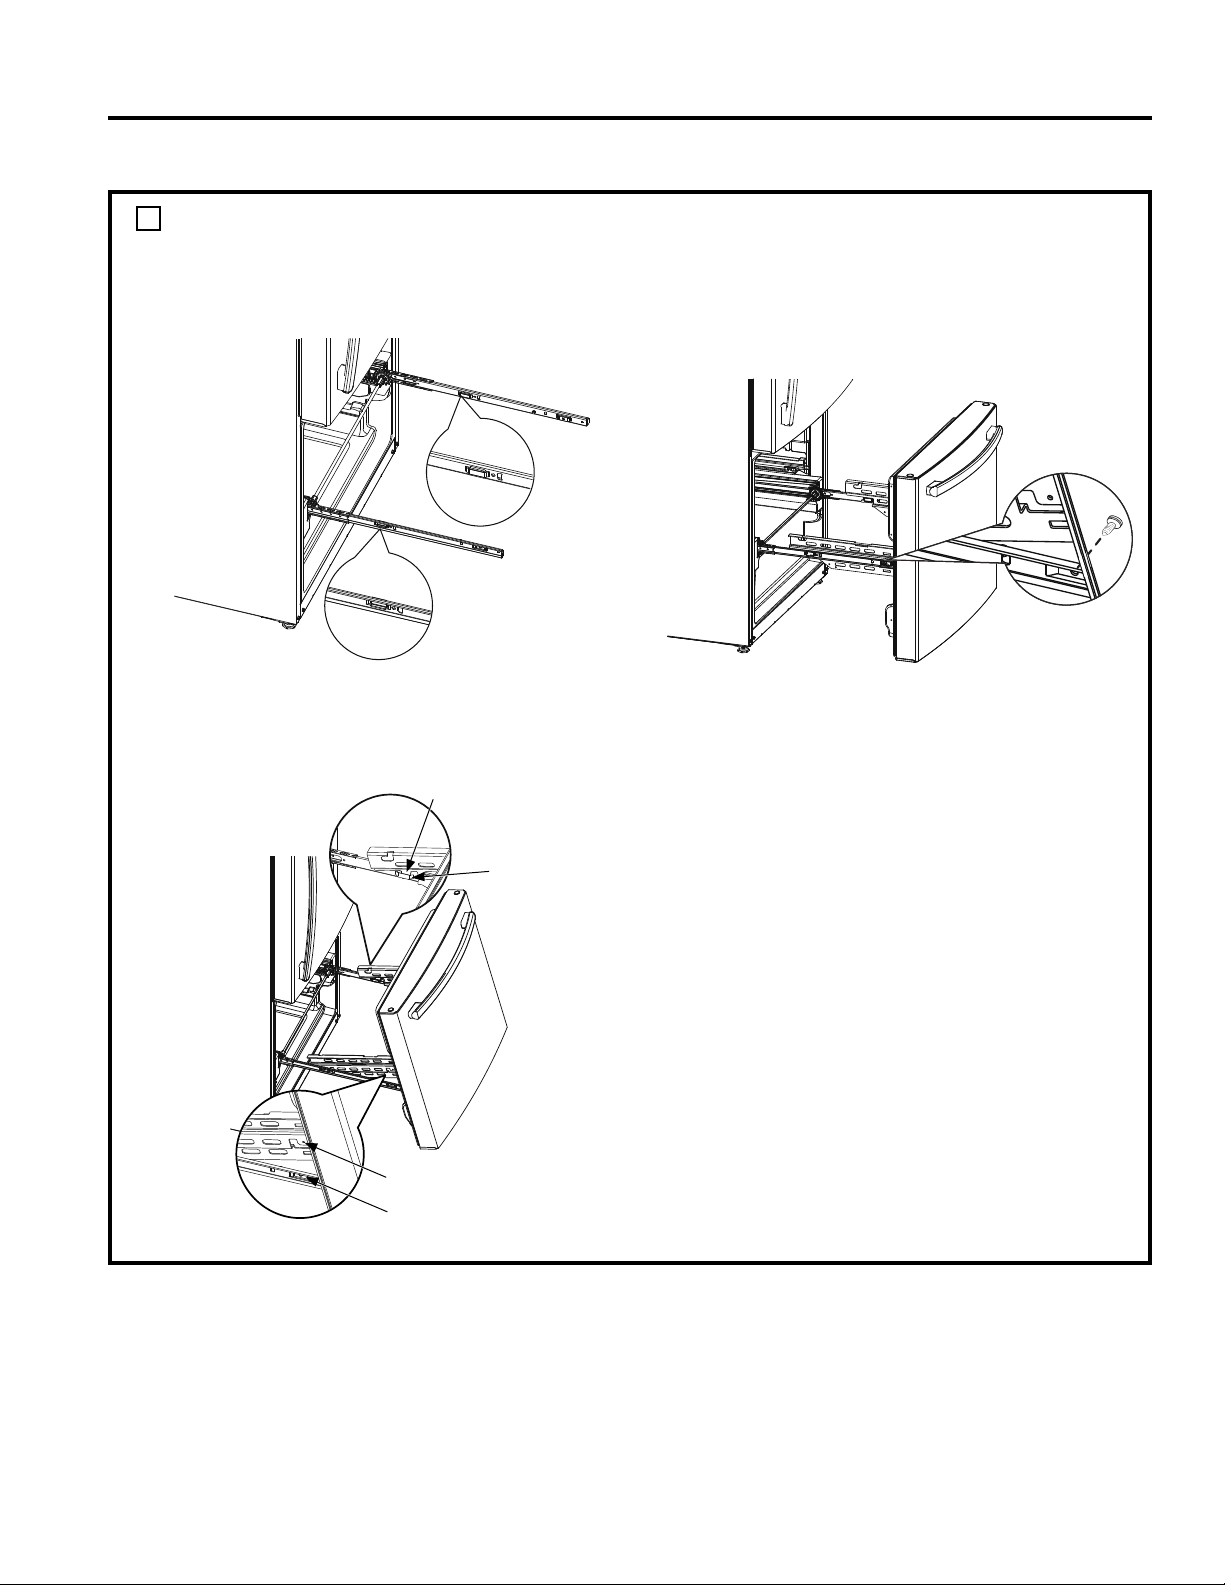
2
REMOVE THE DRAWER FRONT
A. Remove the screw on each side of the
railing.
B. Lift up on both sides of the freezer drawer
handle to separate the drawer railings from
the rail assemblies.
C. Set the drawer front on a non-scratching
surface.
D. Push the rail assemblies back into locking
position.
Screw
Drawer
Assembly
Rail
Assembly
INSTALLING THE REFRIGERATOR (Cont.)
24 49-1000107 Rev. 0
Installation Instructions
3
REINSTALL FREEZER DRAWER FRONT
A. Pull the rail assemblies to the maximum
extension.
B. Locate the slots on the inside of each slide.
C. I nsert the hooks on the ends of the drawer
assembly extensions into the slots near the
back of the slides.
D. Lower the front end of the freezer drawer
assembly so the side tabs fit into the front slots
on the rail assemblies.
E. Replace the safety screws in both sides of the
slide assemblies.
F. Replace lower and upper baskets (see About
freezer drawer, page 12).
Hook
Slot
Side Tab
Front Slot
INSTALLING THE REFRIGERATOR (Cont.)
INSTALLATION INSTRUCTIONS
49-1000107 Rev. 0 25
INSTALLATION INSTRUCTIONS
Installation Instructions
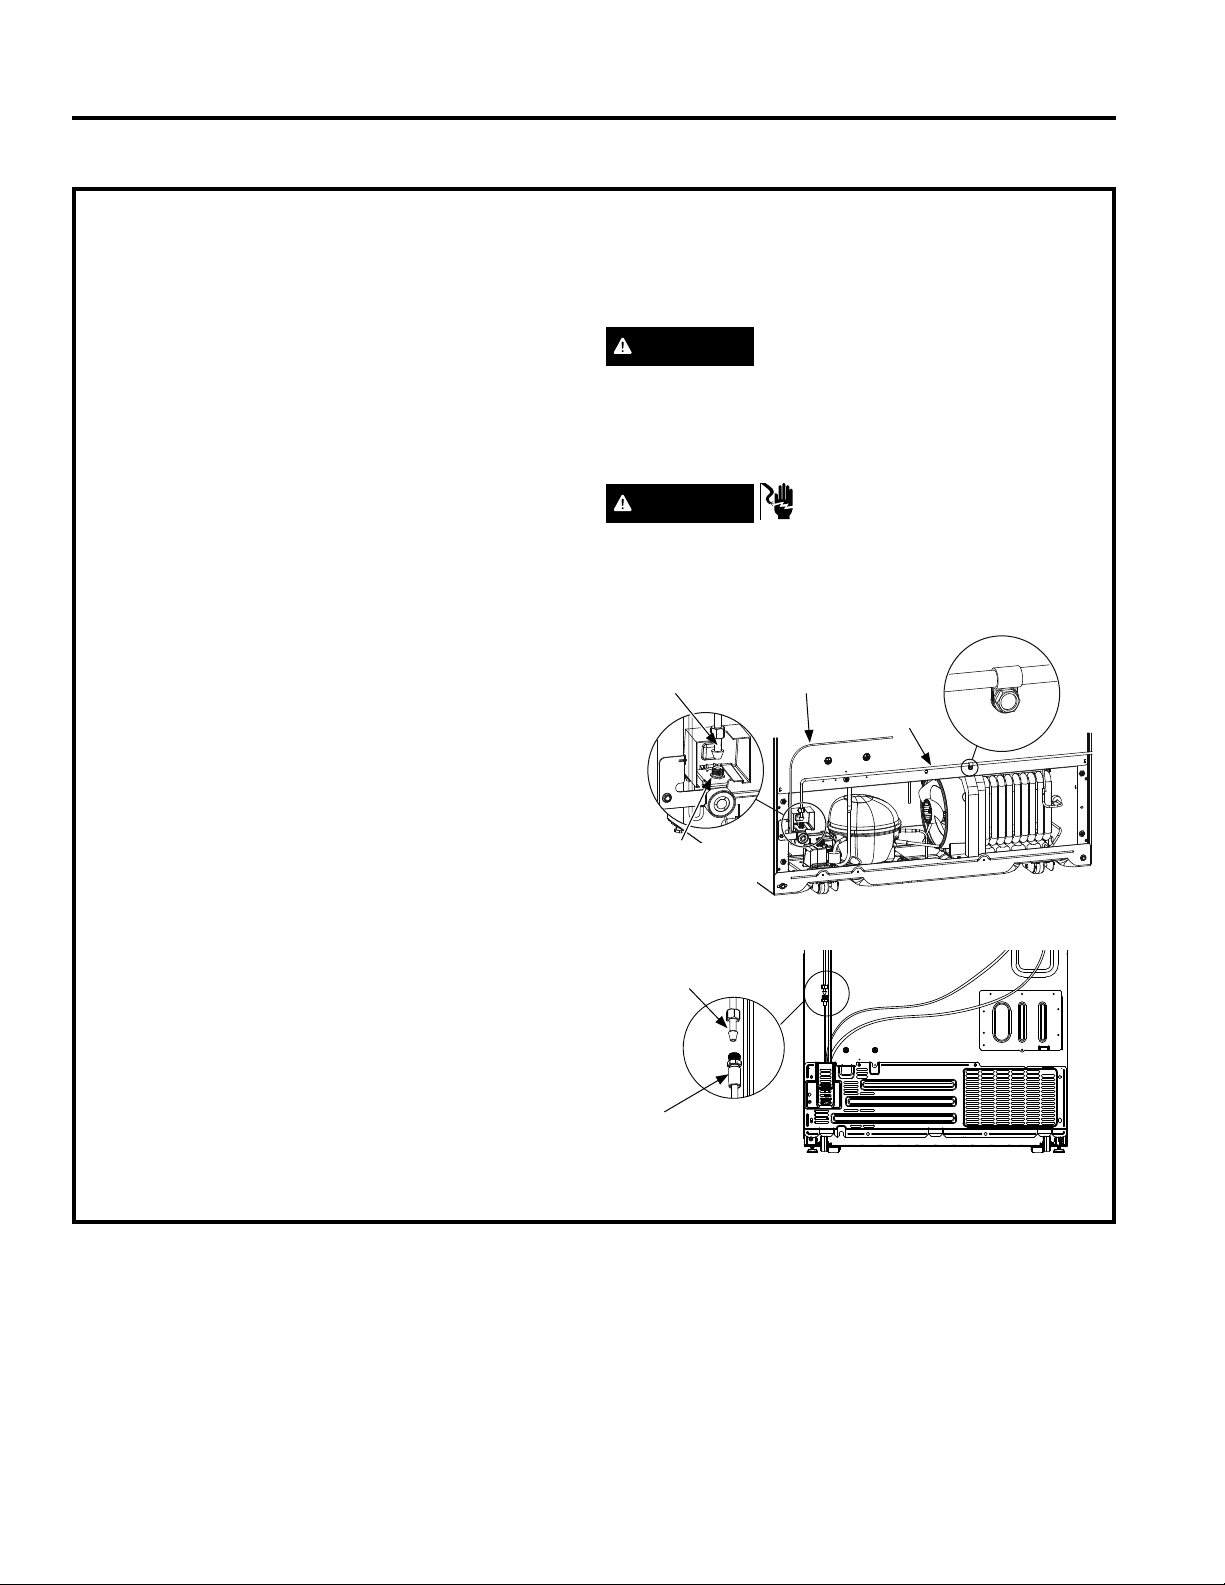
INSTALLING THE REFRIGERATOR (Cont.)
CONNECTING TO THE HOUSE WATER LINE
(Icemaker models only)
A cold water supply is required for automatic icemaker
operation. If there is not a cold water supply, you will
need to provide one. See Installing the Water Line
section.
NOTES:
• Before making the connection to the refrigerator, be
sure the refrigerator power cord is not plugged into
the wall outlet.
• If your refrigerator does not have a water filter,
we recommend installing one if your water supply
has sand or particles that could clog the screen of
the refrigerator’s water valve. Install it in the water
line near the refrigerator. If using SmartConnect™
RefrigeratorTubingKit,youwillneedanadditional
tube (WX08X10002) to connect the filter. Do not cut
plastic tube to install filter.
• Before connecting the water line to the house, purge
the house line for at least 2 minutes.
A. If you are using copper tubing, place a
compression nut and ferrule (sleeve) onto the end
of the tubing coming from the house cold water
supply.
If you are using the SmartConnect™ tubing,
the nuts are already assembled to the tubing.
B. If you are using copper tubing, insert the end of
the tubing into the refrigerator connection, at the
back of the refrigerator, as far as possible. While
holding the tubing, tighten the fitting.
If you are using SmartConnect™ tubing, insert
the molded end of the tubing into the refrigerator
connection, at the back of the refrigerator, and
tighten the compression nut until it is hand tight.
Then tighten one additional turn with a wrench.
Over tightening may cause leaks.
C. Fasten the tubing into the clamp provided to hold it
in position. You may need to pry open the clamp.
One of the illustrations below will look like the
connection on your refrigerator.
WARNING
Connect to potable water supply only.
A cold water supply is required for automatic icemaker
operation. The water pressure must be between 40
and 120 psi (275-827 kilopascals).
WARNING
ELECTRIC SHOCK HAZARD
Attach tubing clamp using existing hole only. DO NOT
drill into the refrigerator.
Refrigerator
connection
SmartConnect™
tubing
Icemaker fill
tubing
Tubing
clamp
1/4”Copper
tubing
Icemaker-Ready Models
Icemaker-Installed Models
SmartConnect™
tubing
Refrigerator
connection

26 49-1000107 Rev. 0
TURN ON THE WATER SUPPLY
(Icemaker models only)
Turn the water on at the
shutoff valve (house water
supply) and check for any
leaks.
PLUG IN THE REFRIGERATOR
On models with an icemaker,
before plugging in the
refrigerator, make sure the
icemaker power switch is set to
the 0 (off) position.
See the grounding information
attached to the power cord.
Installation Instructions
INSTALLING THE REFRIGERATOR (Cont.)
PUT THE REFRIGERATOR IN
PLACE
Move the refrigerator to its final location.
LEVEL THE REFRIGERATOR
Adjustable legs at the front corners of the
refrigerator should be set so the refrigerator is firmly
positioned on the floor, and the front is raised just
enough that the door closes easily when opened
about halfway.
To adjust the leveling legs, turn the
legs clockwise to raise the refrigerator,
counterclockwise to lower it.
LEVEL THE REFRIGERATOR
DOORS
(on some models)
Remember a level refrigerator is necessary for
getting the doors perfectly even. If you need
help, review the previous section on leveling the
refrigerator.
If the doors remain uneven, turn the adjustable pin
toraisethelowestdoorusinga1/4”allenwrenchto
turn the pin.
When
the left
door is
lower than
the right
door.
When
the left
door is
higher
than
the right
door.
Adjustment point
INSTALLATION INSTRUCTIONS
49-1000107 Rev. 0 27
INSTALLATION INSTRUCTIONS
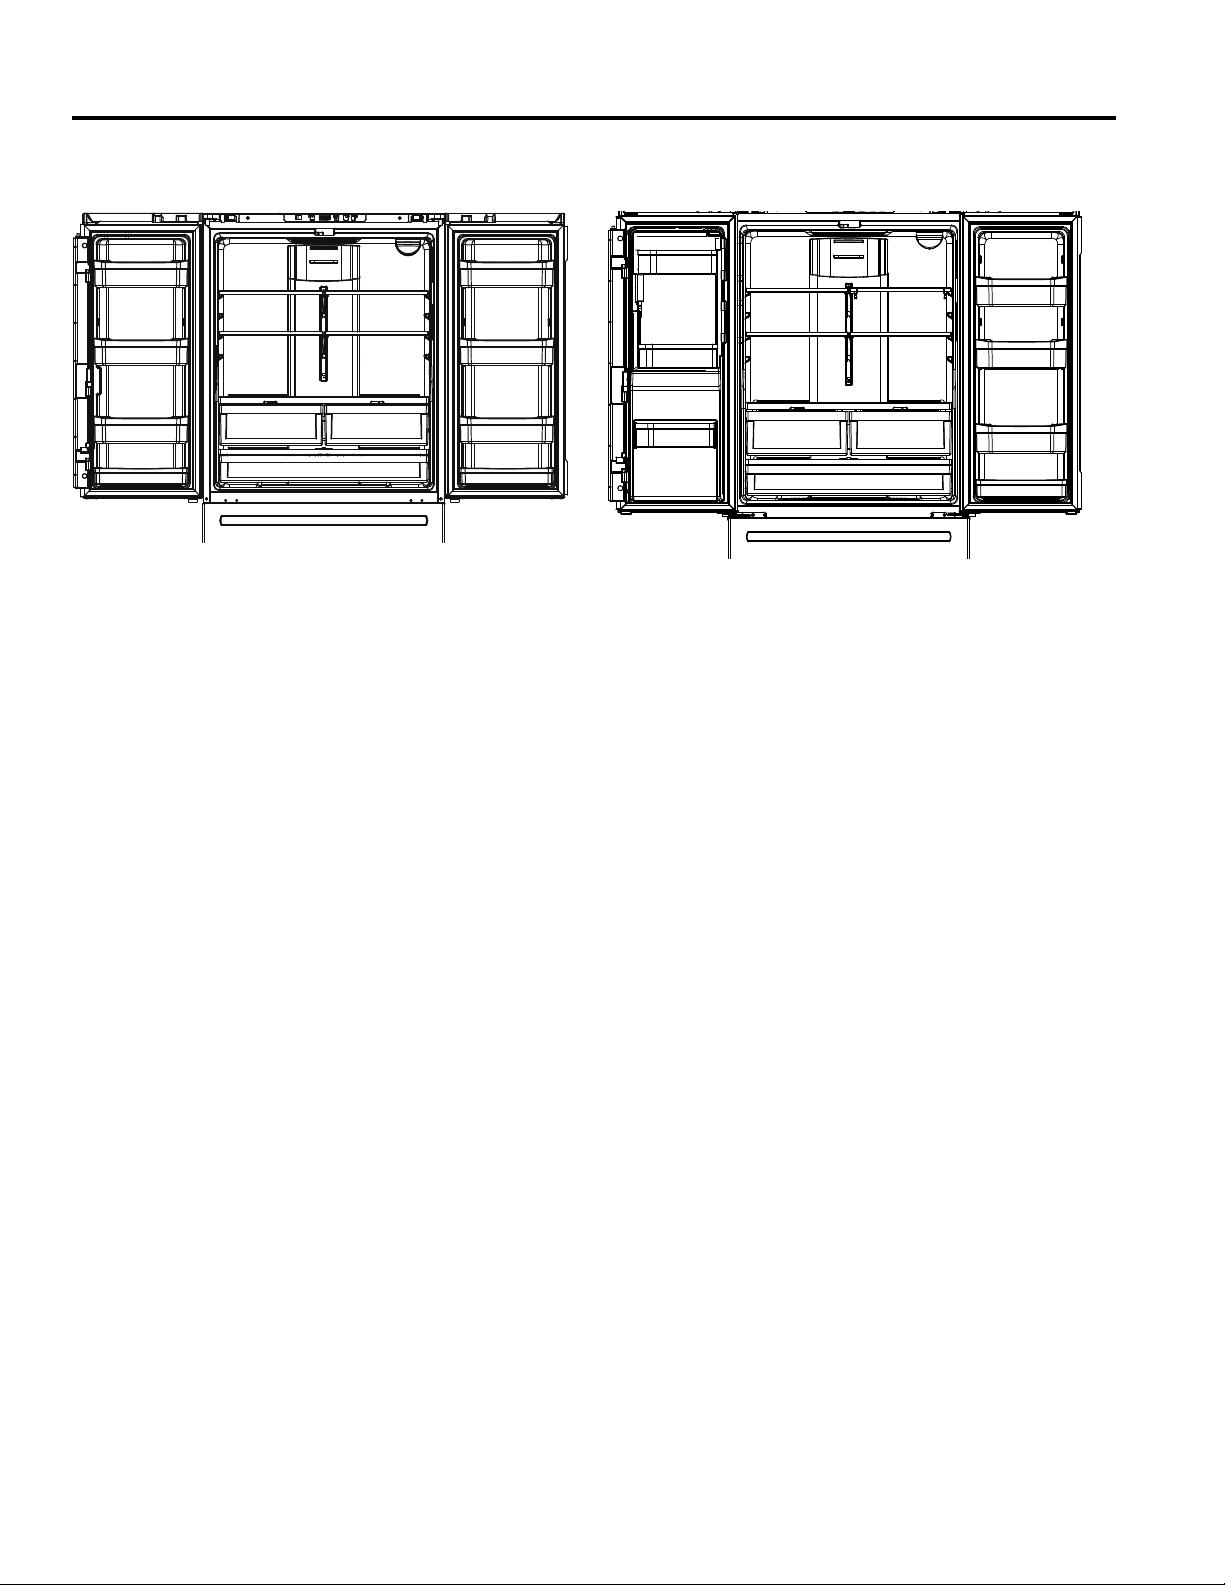
Installation Instructions
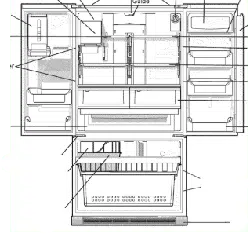
Refrigerator suggested assembly
Shelves shown in the location for best energy efficiency.
NOTE: Do not block air outlet by placing food items directly against it. Erratic temperatures may result.
XNE25J 25 cuft. Models
French Door with Freezer Drawer
XFE26J 26 cuft. Models
French Door with Freezer Drawer
28 49-1000107 Rev. 0
Installation Instructions
INSTALLING THE WATER LINE
BEFORE YOU BEGIN
If the water supply to the refrigerator is from a
Reverse Osmosis Water Filtration System (RO)
AND the refrigerator also has a water filter, use
the refrigerator’s filter bypass plug. Using the
refrigerator’s water filtration cartridge in conjunction
with an RO water filter can result in hollow ice cubes.
Some models do not come equipped with the filter
bypass plug. To obtain a free bypass plug, call 800-
GECARES.
This water line installation is not warranted by the
refrigerator or icemaker manufacturer. Follow these
instructions carefully to minimize the risk of expensive
water damage.
Water hammer (water banging in the pipes) in house
plumbing can cause damage to refrigerator parts and
lead to water leakage or flooding. Call a qualified
plumber to correct water hammer before installing the
water supply line to the refrigerator.
To prevent burns and product damage, do not hook
up the water line to the hot water line.
Do not install the icemaker tubing in areas where
temperatures fall below freezing.
When using any electrical device (such as a power
drill) during installation, be sure the device is double
insulated or grounded in a manner to prevent the
hazard of electric shock, or is battery powered.
All installations must be in accordance with local
plumbing code requirements.
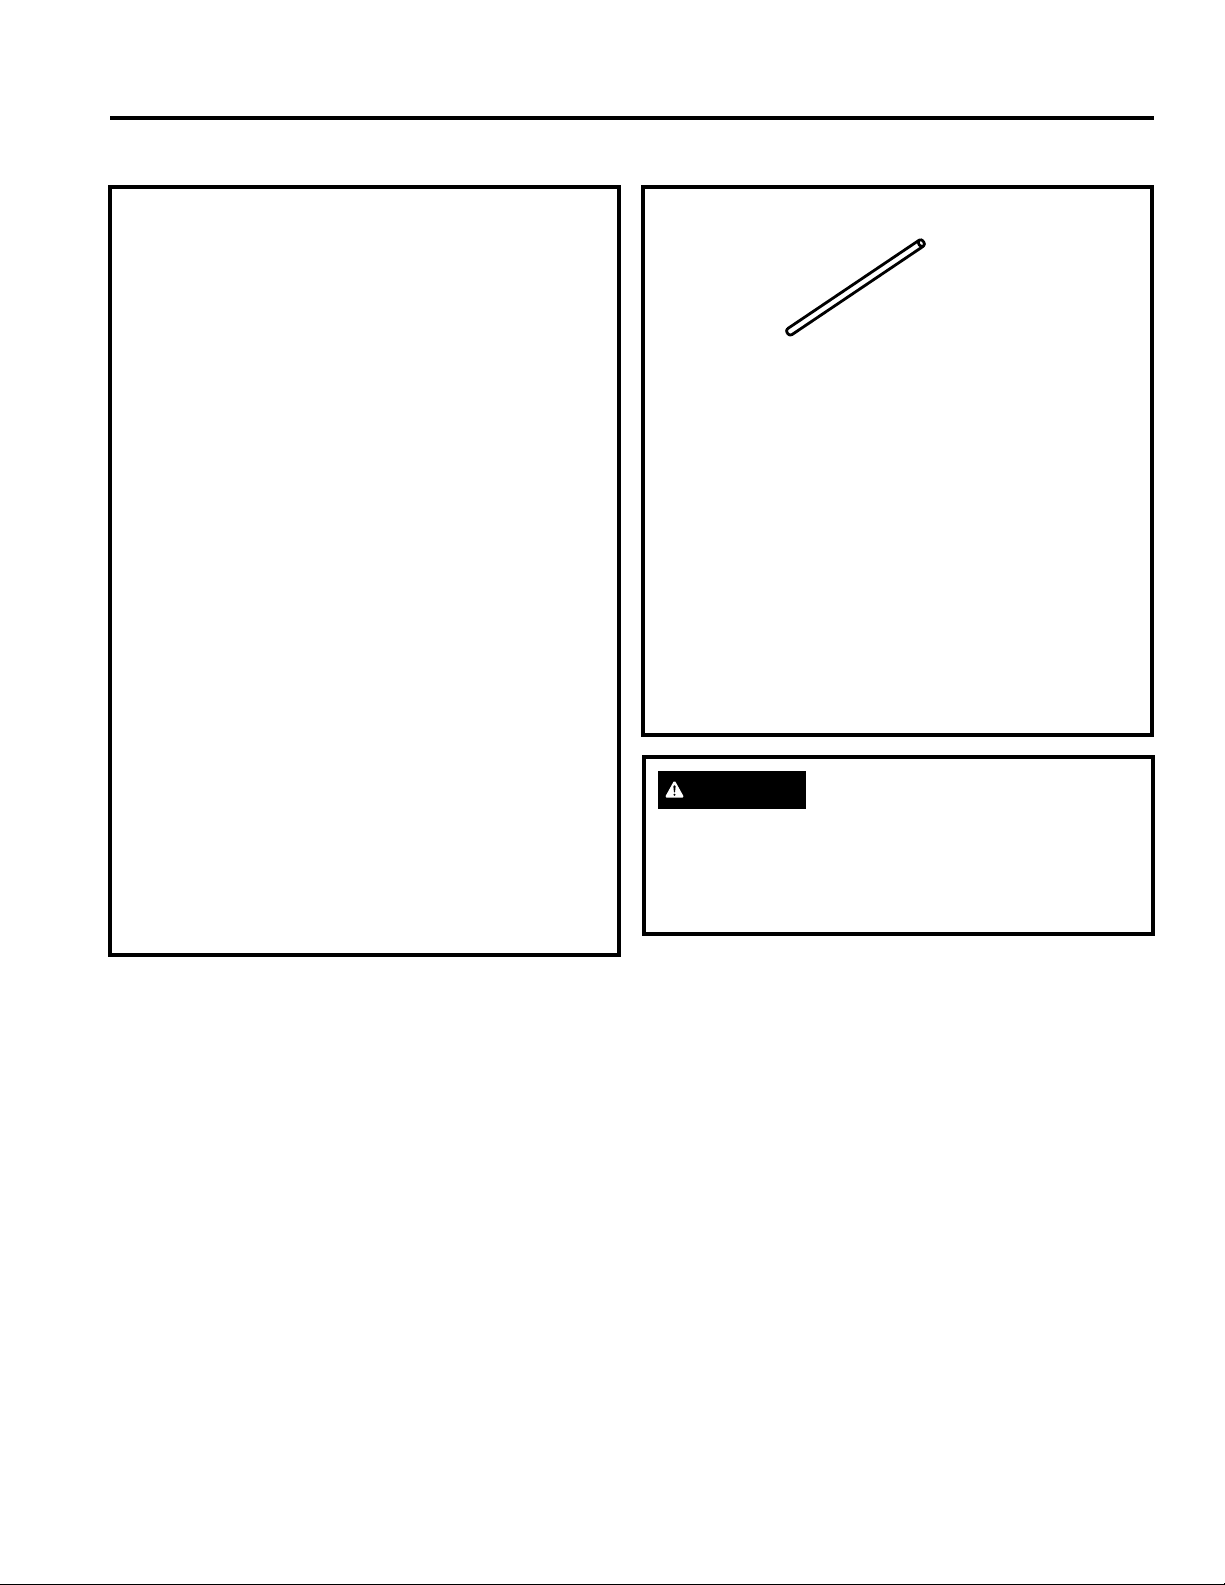
WHAT YOU WILL NEED
• Copper or SmartConnect™ Refrigerator Tubing kit,
1/4”outerdiametertoconnecttherefrigeratortothe
water supply. If using copper, be sure both ends of
the tubing are cut square.
To determine how much tubing you need: measure
the distance from the water valve on the back of the
refrigerator to the water supply pipe. Be sure there is
sufficient extra tubing to allow the refrigerator to move
out from the wall after installation.
SmartConnect™RefrigeratorTubingKitsare
available in the following lengths:
6’ (1.8 m) – WX08X10006
15’ (4.6 m) – WX08X10015
25’ (7.6 m) – WX08X10025
WARNING
Connect to potable water supply only.
A cold water supply is required for automatic
icemaker operation. The water pressure must be
between 40 and 120 psi (275-827 kilopascals)
INSTALLATION INSTRUCTIONS
49-1000107 Rev. 0 29
INSTALLATION INSTRUCTIONS
INSTALLING THE WATER LINE (Cont.)
WHAT YOU WILL NEED (Cont.)
NOTE: The only Crosley approved plastic tubing is
that supplied in SmartConnect™ Refrigerator Tubing
kits. Do not use any other plastic water supply line
because the line is under pressure at all times.
Certain types of plastic will crack or rupture with age
and cause water damage to your home.
• A GE Appliances water supply kit (containing
tubing, shutoff valve and fittings listed below) is
available at extra cost from your dealer or from
Parts and Accessories, 877.959.8688 (in Canada
1.800.661.1616).
• A cold water supply. The water pressure must be
between 20 and 120 p.s.i. (138-827 kPa).
• Power drill.
•1/2”oradjustablewrench.
• Straight and Phillips blade screwdriver.
•Two1/4”outerdiametercompressionnutsand2
ferrules (sleeves)—to connect the copper tubing to
the shutoff valve and the refrigerator water valve.
OR
• If you are using a SmartConnect™ Refrigerator
Tubing kit, the necessary fittings are preassembled
to the tubing.
• If your existing copper water line has a flared fitting
at the end, you will need an adapter (available at
plumbing supply stores) to connect the water line to
the refrigerator OR you can cut off the flared fitting
with a tube cutter and then use a compression
fitting. Do not cut formed end from SmartConnect™
Refrigerator tubing.
• Shutoff valve to connect to the cold water line.
The shutoff valve should have a water inlet with a
minimuminsidediameterof5/32”atthepointof
connection to the COLD WATER LINE. Saddle-type
shutoff valves are included in many water supply
kits. Before purchasing, make sure a saddle-type
valve complies with your local plumbing codes.
Installation Instructions
Install the shutoff valve on the nearest frequently used
drinking water line.
2
CHOOSE THE VALVE LOCATION
Choose a location for the valve that is easily
accessible. It is best to connect into the side of
a vertical water pipe. When it is necessary to
connect into a horizontal water pipe, make the
connection to the top or side, rather than at the
bottom, to avoid drawing off any sediment from
the water pipe.
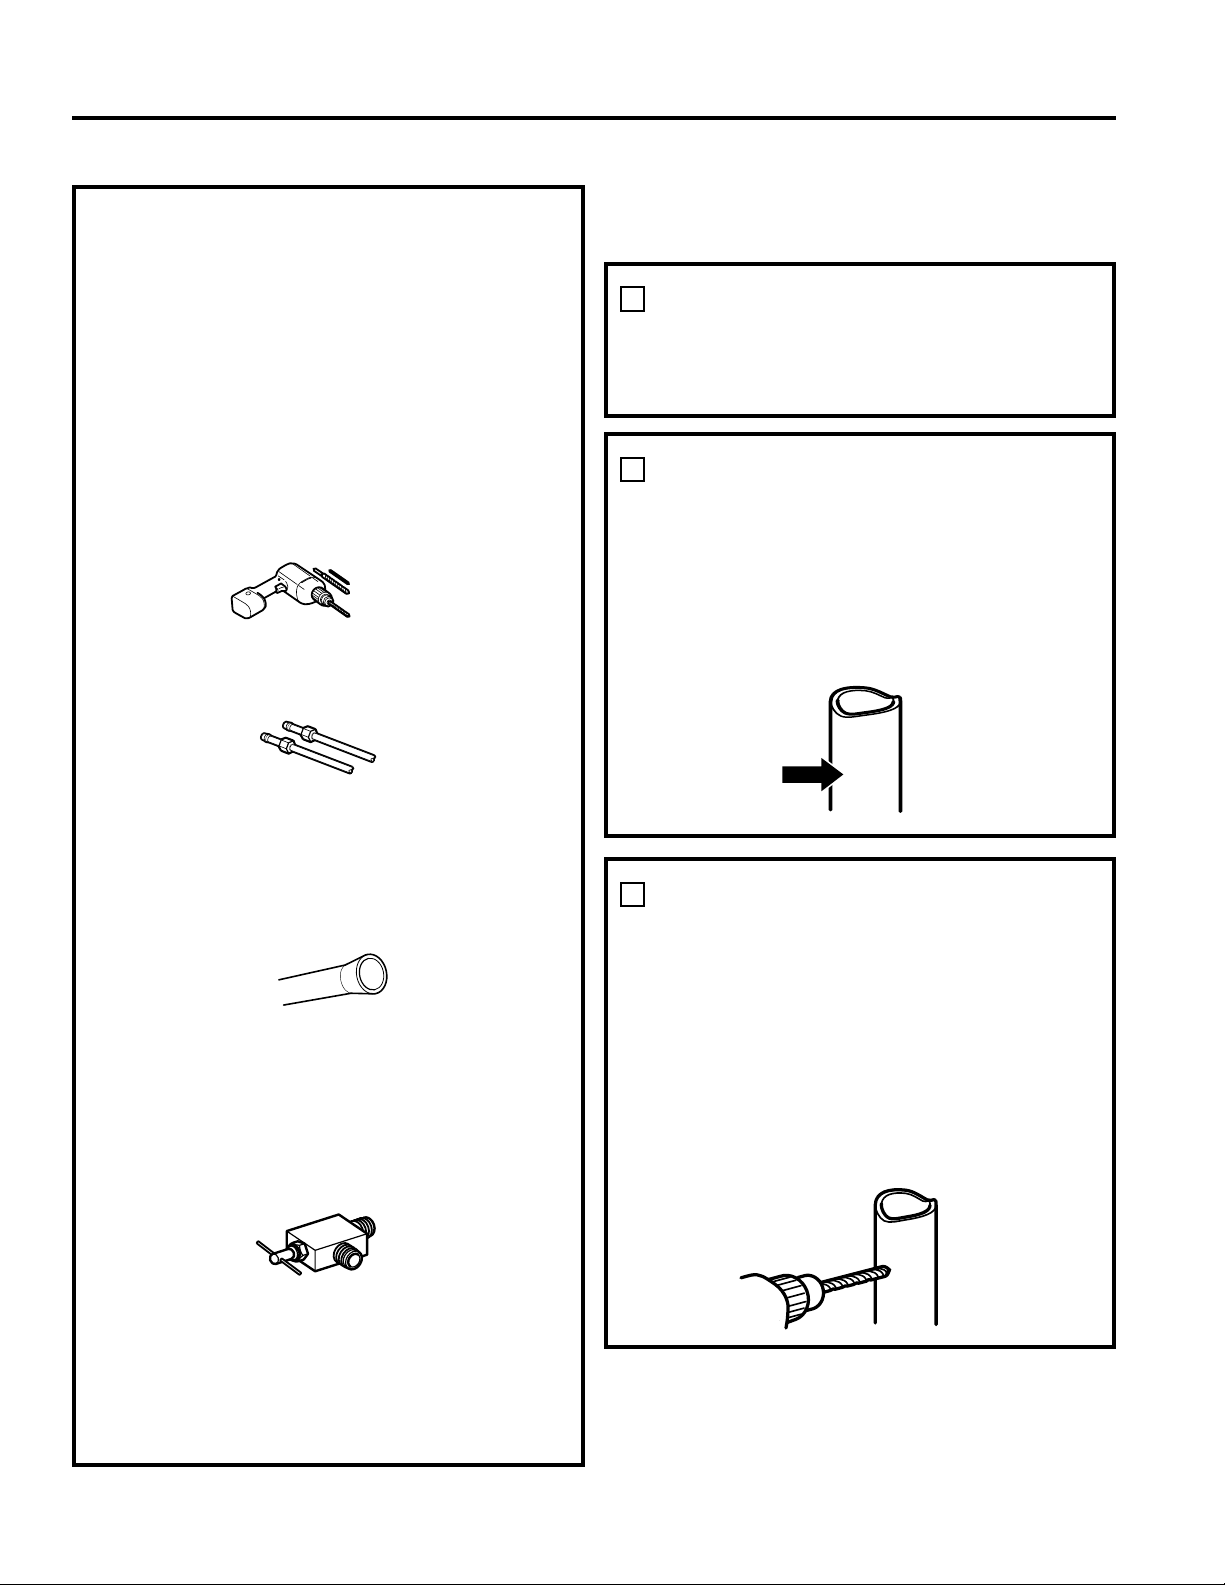
1
SHUT OFF THE MAIN WATER
SUPPLY
Turn on the nearest faucet long enough to clear
the line of water.
3
DRILL THE HOLE FOR THE
VALVE
Drilla1/4”holeinthewaterpipe(evenifusing
a self-piercing valve), using a sharp bit. Remove
any burrs resulting from drilling the hole in the
pipe.
Take care not to allow water to drain into
the drill.
Failuretodrilla1/4”holemayresultinreduced
ice production or smaller cubes.
30 49-1000107 Rev. 0
Installation Instructions
INSTALLING THE WATER LINE (Cont.)
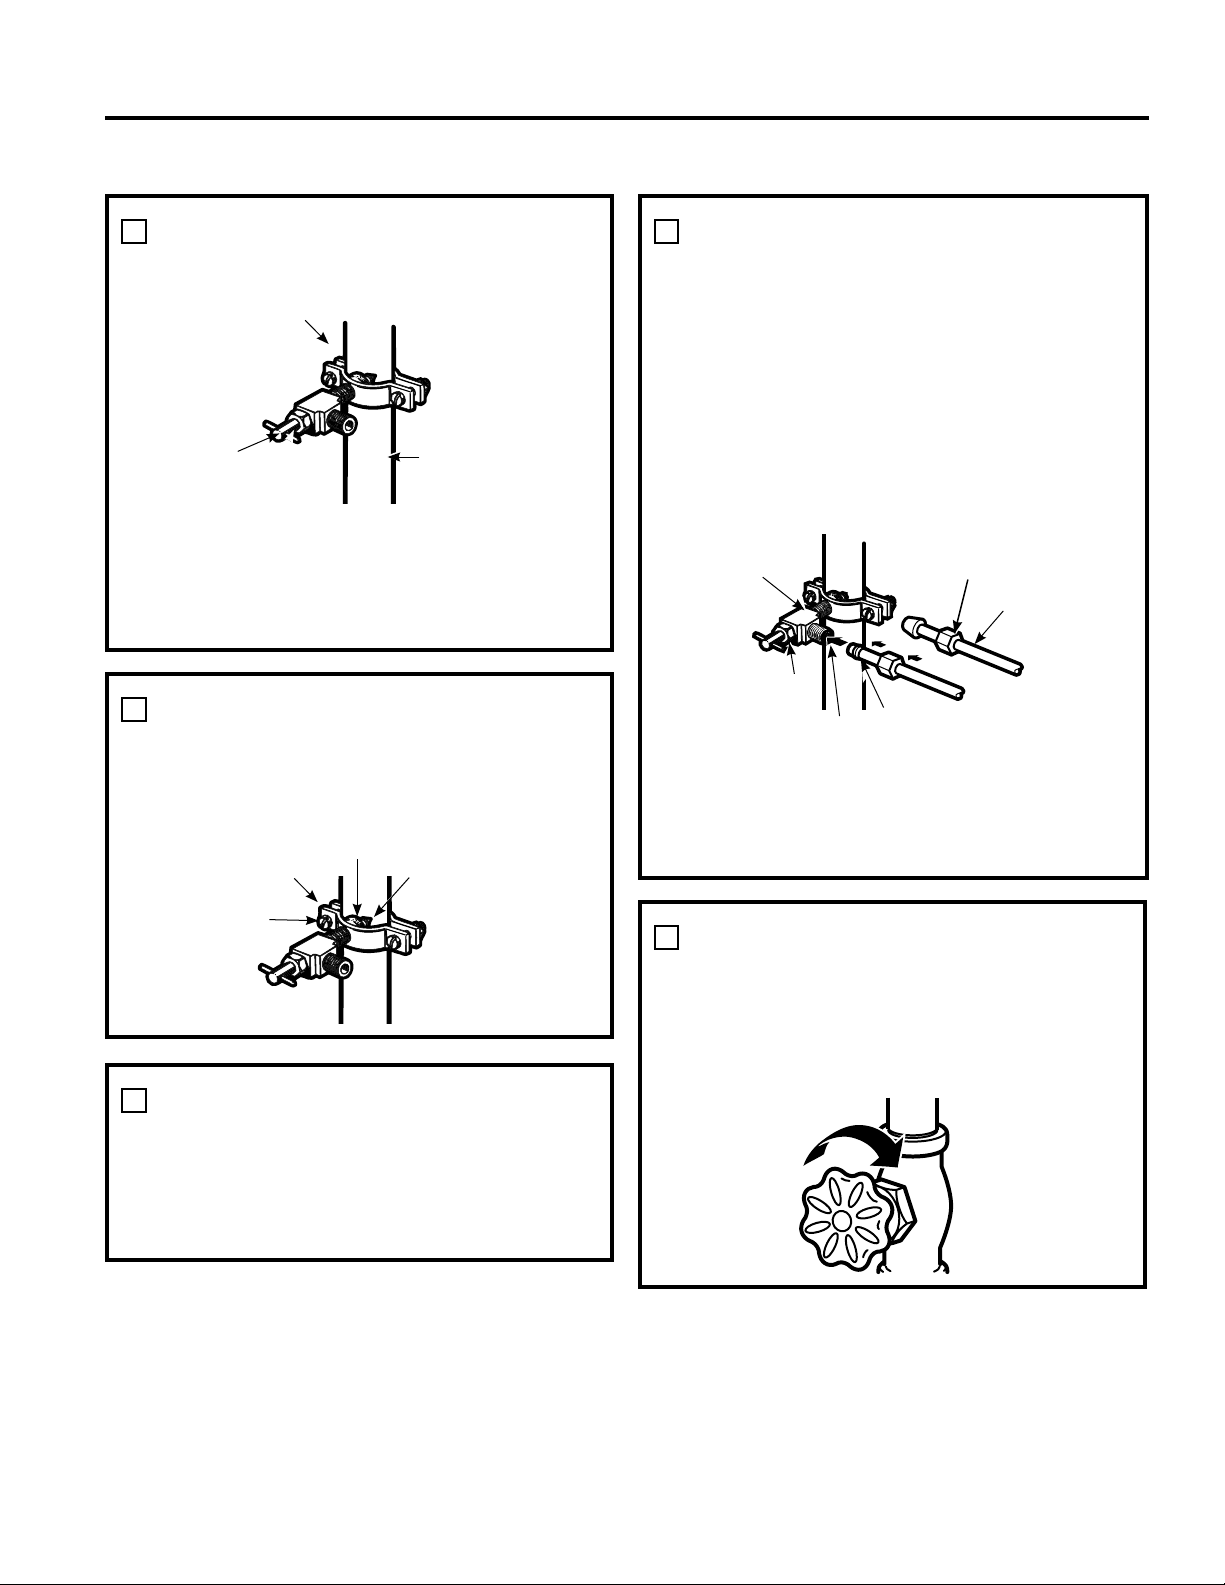
4
FASTEN THE SHUTOFF VALVE
Fasten the shutoff valve to the cold water pipe
with the pipe clamp.
NOTE: Commonwealth of Massachusetts
Plumbing Codes 248CMR shall be adhered
to. Saddle valves are illegal and use is not
permitted in Massachusetts. Consult with your
licensed plumber.
7
FASTEN THE SHUTOFF VALVE
Place the compression nut and ferrule (sleeve)
for copper tubing onto the end of the tubing
and connect it to the shutoff valve.
Make sure the tubing is fully inserted into
the valve. Tighten the compression nut securely.
For plastic tubing from a SmartConnect™
Refrigerator Tubing kit, insert the molded end
of the tubing into the shutoff valve and tighten
compression nut until it is hand tight, then
tighten one additional turn with a wrench. Over
tightening may cause leaks.
NOTE: Commonwealth of Massachusetts
Plumbing Codes 248CMR shall be adhered
to. Saddle valves are illegal and use is not
permitted in Massachusetts. Consult with your
licensed plumber.
5
TIGHTEN THE PIPE CLAMP
Tighten the clamp screws until the sealing
washer begins to swell.
NOTE: Do not over tighten or you may crush
the tubing.
8
FLUSH OUT THE TUBING
Turn the main water supply on and flush out
the tubing until the water is clear.
Shut the water off at the water valve after about
one quart (1 liter), or 2 minutes, of water has
been flushed through the tubing.
6
ROUTE THE TUBING
Route the tubing between the cold water line
and the refrigerator.
Route the tubing through a hole drilled in the
wall or floor (behind the refrigerator or adjacent
base cabinet) as close to the wall as possible.
Pipe Clamp
Vertical Cold
Water Pipe
Saddle-Type
Shutoff Valve
Washer
Inlet End
Pipe Clamp
Clamp
Screw
Saddle-Type
Shutoff Valve
Compression Nut
Packing Nut
Outlet Valve
Ferrule (sleeve)
SmartConnect
™
Tubing
INSTALLATION INSTRUCTIONS
49-1000107 Rev. 0 31
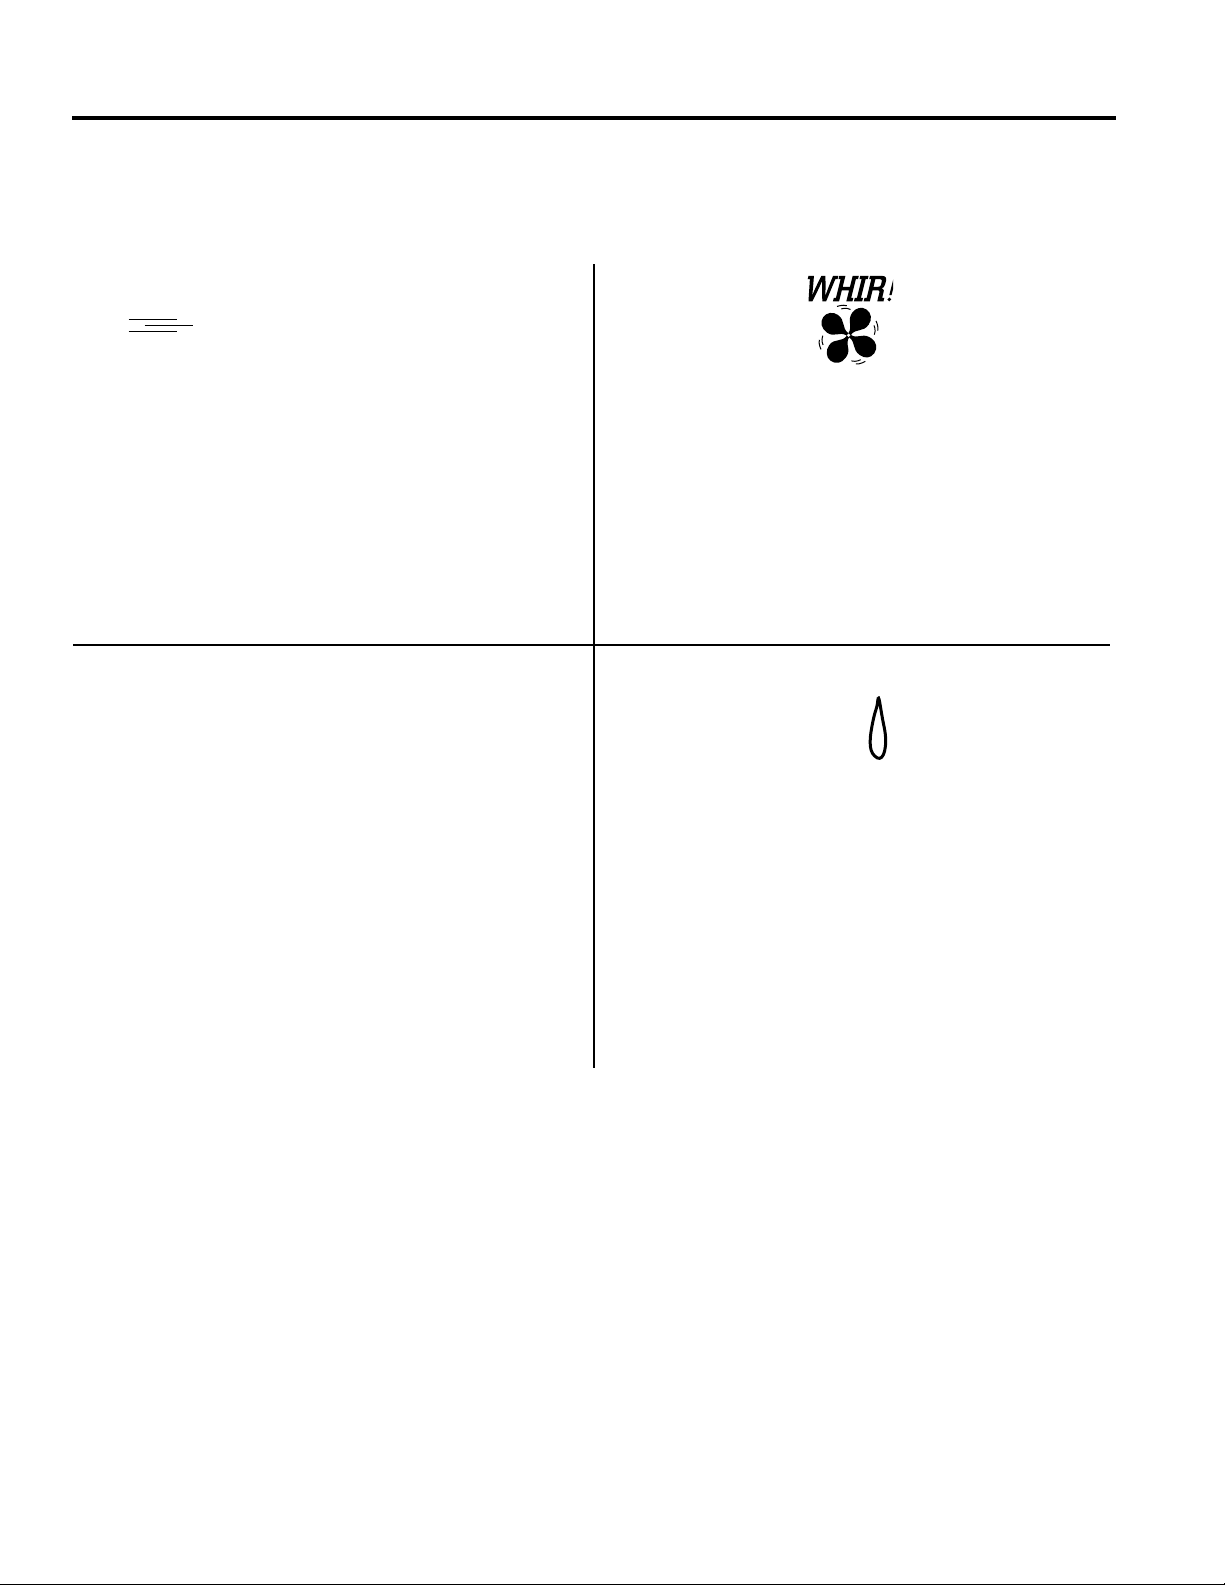
TROUBLESHOOTING TIPS: Normal Operating Conditions
Newer refrigerators sound different from older refrigerators.
Modern refrigerators have more features and use newer technology.
HUMMM...
WHOOSH...
■ The new high efficiency compressor may run faster
and longer than your old refrigerator and you may
hear a high-pitched hum or pulsating sound while it
is operating.
■ Youmayhearawhooshingsoundwhenthedoors
close. This is due to pressure equalizing within the
refrigerator.
■
You may hear the fans spinning at high speeds.
This happens when the refrigerator is first plugged
in, when the doors are opened frequently or when
a large amount of food is added to the refrigerator
or freezer compartments. The fans are helping to
maintain the correct temperatures.
■
The fans change speeds in order to provide optimal
cooling and energy savings.
CLICKS, POPS,
CRACKS and SNAPS
■ You may hear cracking or popping sounds when
the refrigerator is first plugged in. This happens as
the refrigerator cools to the correct temperature.
■ Expansion and contraction of cooling coils during
and after defrost can cause a cracking or popping
sound.
■ On models with an icemaker, after an ice making
cycle, you may hear the ice cubes dropping into the
ice bucket.
■ On models with a dispenser, during water dispense,
you may hear the water lines move at initial
dispense and after dispenser button is released.
WATER SOUNDS
■ The flow of refrigerant through the cooling coils may
make a gurgling noise like boiling water.
■ Water dropping on the defrost heater can cause
a sizzling, popping or buzzing sound during the
defrost cycle.
■ A water dripping noise may occur during the defrost
cycle as ice melts from the evaporator and flows
into the drain pan.
■ Closing the door may cause a gurgling sound due to
pressure equalization.
Do you hear what I hear? These conditions are normal.
Normal Operating Conditions.
32 49-1000107 Rev. 0
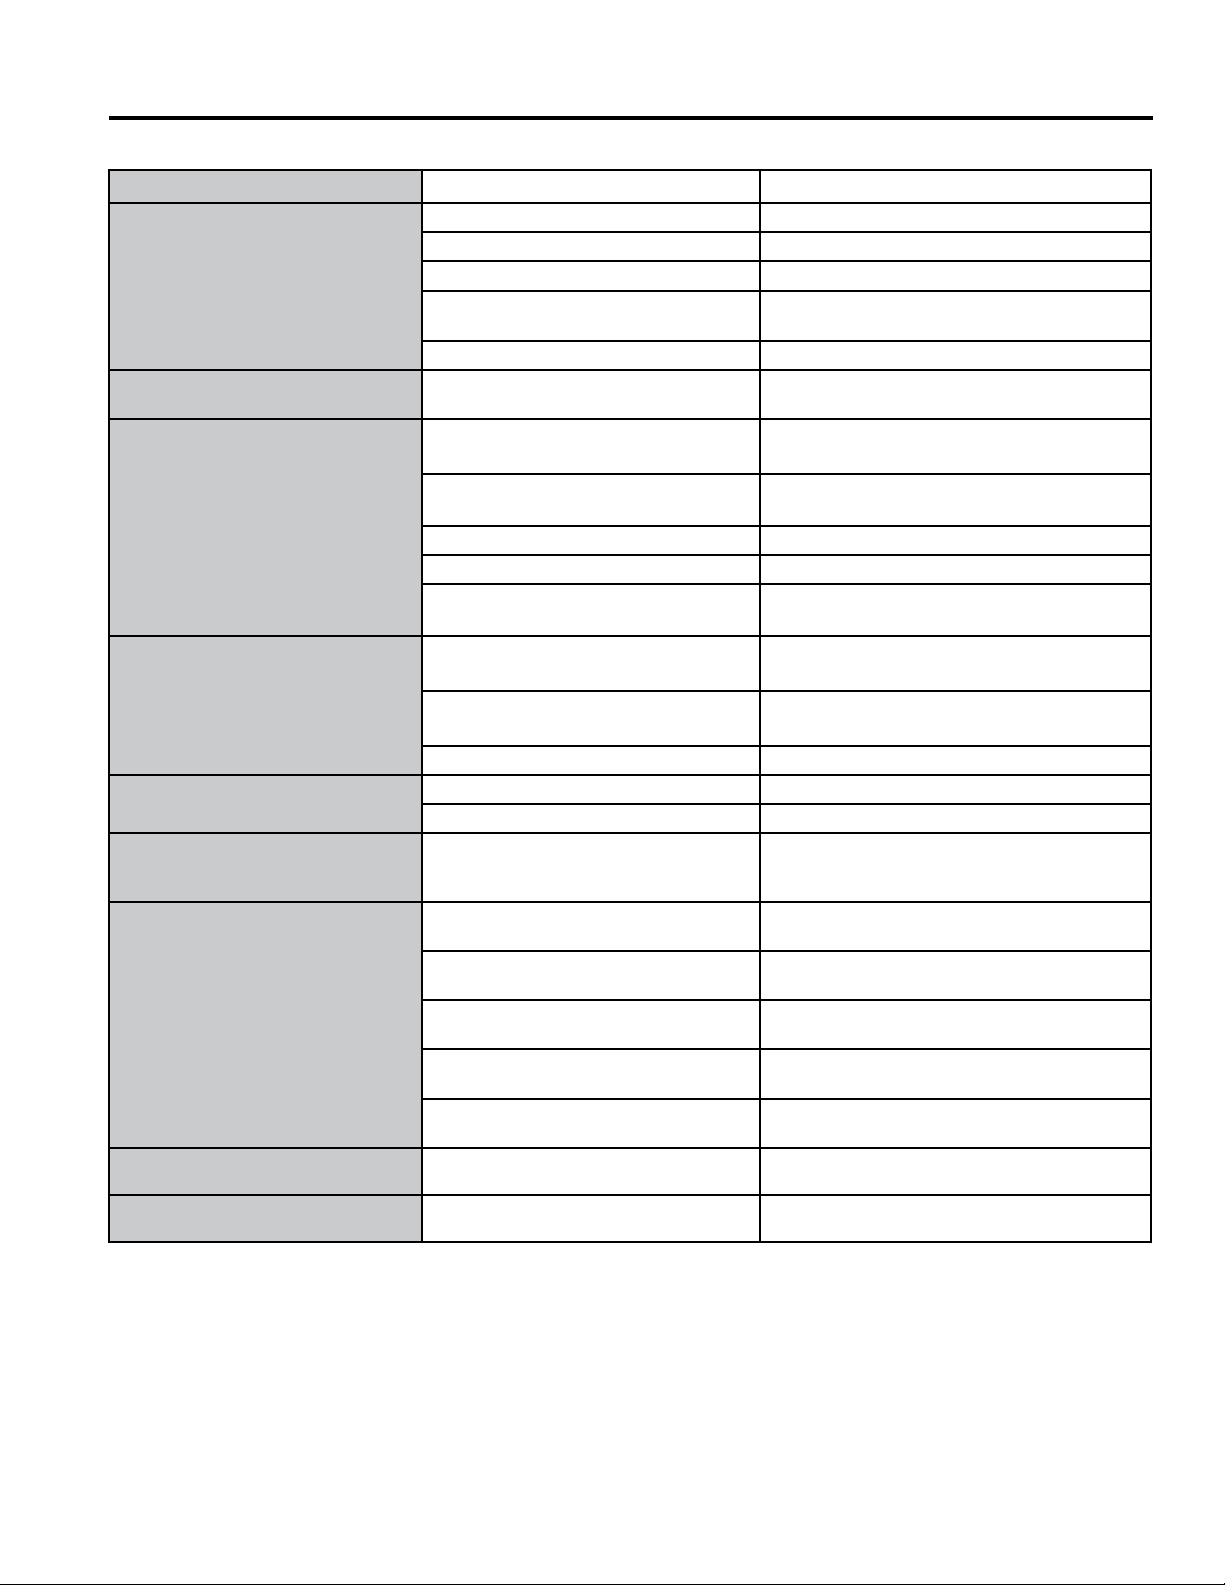
Troubleshooting Tips... Before you call for service
Save time and money! Review the charts on the following pages first and you may not need to call for service.
Problem Possible Causes What to Do
Refrigerator does not operate Refrigeratorin defrost cycle. Wait about 30 minutes for defrost cycle to end.
Either or both controls set to OFF. Set the controls to a lower temperature setting.
Refrigeratoris unplugged. Push the plug completely into the outlet.
The fuse is blown/circuit breaker is
tripped.
Replace fuse or reset the breaker.
Refrigerator is in showroom mode. Unplug the refrigerator and plug it back in.
Vibration or rattling (slight vibration is
normal)
Leveling legs need adjusting. See Level the refrigerator.
Motor operates for long periods
or cycles on and off frequently.
(Modern refrigerators with more
storage space and a larger freezer
require more operating time. They
start and stop often to maintain even
temperatures.)
Normal when refrigerator is first plugged
in.
Wait 24 hours for the refrigerator to completely
cool down.
Often occurs when large amounts of
food are placed in refrigerator.
This is normal.
Door left open. Check to see if package is holding door open.
Hot weather or frequent door openings. This is normal.
Temperature controls set at the coldest
setting.
See Controls section
Refrigerator or freezer compartment
too warm
Temperature control not set cold
enough.
See Controls section
Warm weather or frequent door
openings.
Set the temperature control one step colder.
See Controls section
Door left open. Check to see if package is holding door open.
Frost or ice crystals on frozen food
(frost within package is normal)
Door left open. Check to see if package is holding door open.
Too frequent or too long door openings. This is normal.
Divider between refrigerator and
freezer compartments feels warm
Automatic energy saver system
circulates warm liquid around front edge
of freezer compartment.
This helps prevent condensation on the
outside.
Automatic icemaker does not work Icemaker power switch is in the OFF
position.
Set the power switch to the ON position.
Water supply turned off or not
connected.
See Installing the Water Line section
Freezer compartment too warm. Wait 24 hours for the refrigerator to completely
cool down.
Piled up cubes in the storage bin cause
the icemaker to shut off.
Level cubes by hand.
Ice cubes stuck in icemaker. Turn off the icemaker, remove cubes, and turn
the icemaker back on.
Freezer cooling, fresh food not
cooling
Normal, when refrigerator first plugged
in or after extended power outage
Wait 24 hours for temperature in both
compartments to reach selected temperatures.
Ice dispenser opens after closing
freezer drawer
Normal The ice dispenser door may open after closing
freezer door to allow access.
TROUBLESHOOTING TIPS
49-1000107 Rev. 0 33
TROUBLESHOOTING TIPS
Troubleshooting Tips... Before you call for service
Problem Possible Causes What to Do
Ice cubes have odor/taste Ice storage bin needs cleaning. Empty and wash bin. Discard old cubes.
Food transmitting odor/taste to ice cubes. Wrap foods well.
Interior of refrigerator needs cleaning. See Care and Cleaning section.
Small or hollow cubes Water filter clogged. Replace filter cartridge with new cartridge or
with plug.
Slow ice cube freezing Door left open. Check to see if package is holding door
open.
Temperature control not set cold enough. See Controls section
Frequent‘buzzingsound” Icemaker power switch is in the I (on)
position, but the water supply to the
refrigerator has not been connected.
Set the power switch to the 0 (off) position.
KeepingitintheI(on)positionwilldamage
the water valve.
Orange glow in the freezer Defrost heater is on. This is normal.
Water has poor taste/odor Water dispenser has not been used for a
long time.
Dispense water until all water in system is
replenished.
Water in first glass is warm Normal when refrigerator is first installed. Wait 24 hours for the refrigerator to
completely cool down.
Water dispenser has not been used for a
long time.
Dispense water until all water in system is
replenished.
Water system has been drained. Allow several hours for replenished supply to
chill.
Water dispenser does not work Water supply line turned off or not
connected.
See Installing the water line section
Water filter clogged. Replace filter cartridge or remove filter and
install plug.
Air may be trapped in the water system. Press the dispenser arm for at least two
minutes.
DispenserisLOCKED. PressandholdtheLOCKpadfor3seconds.
Water spurting from dispenser Newly-installed filter cartridge. Run water from the dispenser for 3 minutes
(about one and a half gallons).
Water is not dispensed but
icemaker is working
Water in reservoir is frozen. Call for service.
Refrigerator control setting is too cold. Set to a warmer setting.
No water or ice cube production Supply line or shutoff valve is clogged. Call a plumber.
Water filter clogged. Replace filter cartridge or remove filter and
install plug.
Refrigerator has odor Foods transmitting odor to refrigerator. Foods with strong odors should be tightly
wrapped.Keepanopenboxofbaking
sodaintherefrigerator;replaceeverythree
months.
Interior needs cleaning. See Care and Cleaning section
Moisture forms on outside of
refrigerator
Not unusual during periods of high humidity. Wipe surface dry.
Moisture collects inside (in humid
weather, air carries moisture
into refrigerator when doors are
opened)
Too frequent or too long door openings. This is normal.
Due to the higher humidity in the
refrigerator, you may on occasion
experience fog or small amounts of
moisture in the refrigerator compartment.
This is normal and may come and go as
different food loads and environmental
conditions change. Wipe dry with a paper
towel if desired.
Interior light does not work No power at outlet. Replace fuse or reset the breaker.
LED lights are out Call Service - see Replacing the Lights

34 49-1000107 Rev. 0
Troubleshooting Tips... Before you call for service
Save time and money! Review the charts on the following pages first and you may not need to call for service.
Problem Possible Causes What to Do
Hot air from bottom of
refrigerator
Normal air flow cooling motor. In the
refrigeration process, it is normal that
heat be expelled in the area under
the refrigerator. Some floor coverings
are sensitive and will discolor at these
normal and safe temperatures.
This is normal.
Refrigerator never shuts off but
thetemperaturesareOK
Adaptive defrost keeps compressor
running during door openings.
This is normal. The refrigerator will cycle off after
the door remains closed for 2 hours.
Refrigerator is beeping Door is open. Close door.
Door not closing properly Door gasket on hinge side sticking or
folding over.
Apply paraffin wax to the face of the gasket.
Actual temperature not equal to
Set temperature
Unit just plugged in. Allow 24 hours for system to stabilize.
Door open for too long. Allow 24 hours for system to stabilize.
Warm food added to refrigerator. Allow 24 hours for system to stabilize.
Defrost cycle is in process. Allow 24 hours for system to stabilize.
Door/drawer does not close by
itself
Leveling legs need adjusting. See Level the refrigerator
Freezer drawer pops open when
refrigerator door is closed
This is normal if, after popping open, the
freezer drawer closed on its own.
This indicates that there is a good seal on the
freezer drawer. If the freezer drawer does not
automatically close after popping open, then see
the Problem: Door/ drawer does not close by itself,
above.
Food freezing in the refrigerator Food too close to the air vent at the
back of the refrigerator.
Move the food away from the air vent.
Refrigerator control is set too cold. Move the refrigerator control to a warmer
temperature setting one increment at a time.
Water is leaking from dispenser Glass not being held under the
dispenser long enough after button is
released.
Hold the glass underneath the dispenser for 2–3
seconds after releasing the dispenser button.
Water may continue to dispense after the button is
released
Air may be present in the water line
system, causing water to drip after
being dispensed.
Dispense water for at least 2 minutes to remove air
from system.
My display is showing tc Turbo Cool function is activated. See Controls section
Water filter indicator light
changed color
This is normal. See Water Filter Cartridge - XWF section
Water filter indicator light
remains red even after replacing
the water filter
Water filter indicator must be reset. Press and hold the WATER FILTER pad for 3
seconds. See Water Filter Cartridge - XWF section.
Water filter indicator light is not
lit
This is normal. The filter cartridge
should be replaced when the
replacement indicator light turns red.
See Water Filter Cartridge - XWF section
Handle is loose / handle has a
gap
Handle needs adjusting. See Attach the Fresh Food Handle and Attach the
Freezer Handle sections
Refrigerator doors are not even Doors need realigning. See Level the Refrigerator Doors section.
Baskets stick or jam when
opening or closing
Baskets are too full. To open: remove some of the products from the
basket when opened as far as possible. Readjust
the products left in the basket and try to open the
basket again. To close: readjust products in the
basket or remove any product that is above the rim
of the basket and close the basket.
TROUBLESHOOTING TIPS
49-1000107 Rev. 0 35
Staple your receipt here. Proof of the original purchase
date is needed to obtain service under the warranty.
LIMITED WARRANTY
■ Service trips to your home to teach you how to use
the product.
■Improperinstallation,deliveryormaintenance.
■Failureoftheproductifitisabused,misused,or
used for other than the intended purpose or used
commercially.
■Lossoffoodduetospoilage.
■Replacementofhousefusesorresettingofcircuit
breakers.
■Damagetofinish,suchassurfacerust,tarnish,or
small blemishes not reported within 48 hours of
delivery.
■Replacementofthewaterfiltercartridge,if
included, due to water pressure that is outside
the specified operating range or due to excessive
sediment in the water supply.
■Replacementofthelightbulbs,ifincluded,or
water filter cartridge, if included, other than as
noted above.
■Damagetotheproductcausedbyaccident,fire,
floods or acts of God.
■Incidentalorconsequentialdamagecausedby
possible defects with this appliance.
■Productnotaccessibletoproviderequiredservice.
■Damagecausedbyanon-GEAppliancesBrand
water filter.
This warranty will not cover:
For the Period of: GE Appliances Will Replace
One Year
From the date of the original
purchase
Any part of the refrigerator which fails due to a defect in materials or workmanship.
During the limited one-year warranty, GE Appliances will also provide, free of
charge, all labor and related service to replace the defective part.
Thirty Days
(Water filter, if included)
From the original purchase
date of the refrigerator
Any part of the water filter cartridge which fails due to a defect in materials or
workmanship. During this limited thirty-day warranty, GE Appliances will also
provide, free of charge, a replacement water filter cartridge.
Crosley.com
Your appliance is covered by a limited warranty, as listed below, by GE Appliances. All warranty service is provided by
our GE Appliances Factory Service Centers, or an authorized service technician. To schedule service, call Crosley at
800.544.4780. Please have your serial number and your model number available when calling for service.
Crosley
®
Corporation Refrigerator Limited Warranty
EXCLUSION OF IMPLIED WARRANTIES
Your sole and exclusive remedy is product repair as provided in this Limited Warranty. Any implied warranties,
including the implied warranties of merchantability or fitness for a particular purpose, are limited to one year or the
shortest period allowed by law.
This limited warranty is extended to the original purchaser and any succeeding owner for products purchased for
home use within the USA. If the product is located in an area where service by a GE Appliances Authorized Servicer
is not available, you may be responsible for a trip charge or you may be required to bring the product to an Authorized
GE Appliances Service location for service. In Alaska, the limited warranty excludes the cost of shipping or service
calls to your home.
Some states do not allow the exclusion or limitation of incidental or consequential damages. This limited warranty
gives you specific legal rights, and you may also have other rights which vary from state to state. To know what your
legal rights are, consult your local or state consumer affairs office or your state’s Attorney General.
Warrantor: GE Appliances, a Haier company
Louisville, KY 40225
Crosley
®
Extended Warranty
In addition to the warranty shown above, ask your dealer or visit us at Crosley.com/warranty regarding the
Crosley 10-Year Extended Limited Warranty that comes to you at no extra charge. This warranty will cover
your product after the initial manufacturer’s warranty expires up through 10 years. Please contact Crosley at
Crosley.com or call Crosley at 800.356.5268 for specific details.
36 49-1000107 Rev. 0
* If your GE Appliances part fails because of a manufacturing defect within thirty days from the date of original purchase for use, we will give you
a new or, at our option, a rebuilt part without charge. Return the defective part to the parts supplier from whom it was purchased together with a
copyofthe“proofofpurchase”forthepart.Ifthepartisdefectiveandshowsnosignsofabuse,itwillbeexchanged.Thewarrantydoesnot
cover the failure of parts which are damaged while in your possession, are abused, or have been installed improperly. It does not cover the cost
of returning the part to the supplier from whom it was purchased nor does it cover the cost of labor to remove or install it to diagnose the fault. It
does not cover parts used in products in commercial use except in the case of air conditioning equipment. In no event shall GE Appliances be
liable for consequential damages.
Warrantor: GE Appliances, a Haier company
Louisville, KY 40225
Seller:
Name
Address
City State Zip
Signature Date
Buyer:
Name
Address
City State Zip
Signature Date
What GE Appliances will not cover:
■ Service trips to your home to teach you how to use the product.
■ Improper installation.
■ Failure of the product if it is abused, misused, used for other than the intended purpose or used commercially.
■ Replacement of house fuses or resetting of circuit breakers.
■ Damage to the product caused by accident, fire, floods, or acts of God.
■ Incidental or consequential damage caused by possible defects with this appliance.
Water Filter Cartridge Limited Warranty
This warranty is extended to the original purchaser and any succeeding owner for products purchased for home use
within the USA. In Alaska, the warranty excludes the cost of shipping or service calls to your home.
Some states do not allow the exclusion or limitation of incidental or consequential damages. This warranty gives you
specific legal rights, and you may also have other rights which vary from state to state. To know what your legal rights
are, consult your local or state consumer affairs office or your state’s Attorney General.
For Purchases Made In Iowa: This form must be signed and dated by the buyer and seller prior to the
consummation of this sale.
This form should be retained on file by the seller for a minimum of two years.
For the period of GE Appliances will replace
Thirty Days
From the date
of the original
purchase
Any part of the water filter cartridge which fails due to a defect in materials
or workmanship during this limited thirty-day warranty.*
Contact us at geapplianceparts.com, or call 800.GE.CARES.
EXCLUSION OF IMPLIED WARRANTIES
Your sole and exclusive remedy is part exchange as provided in this Limited Warranty. Any implied warranties,
including the implied warranties of merchantability or fitness for a particular purpose, are limited to six months or
the shortest period allowed by law.
WATER FILTER WARRANTY
Staple your receipt here. Proof of the original purchase
date is needed to obtain service under the warranty.
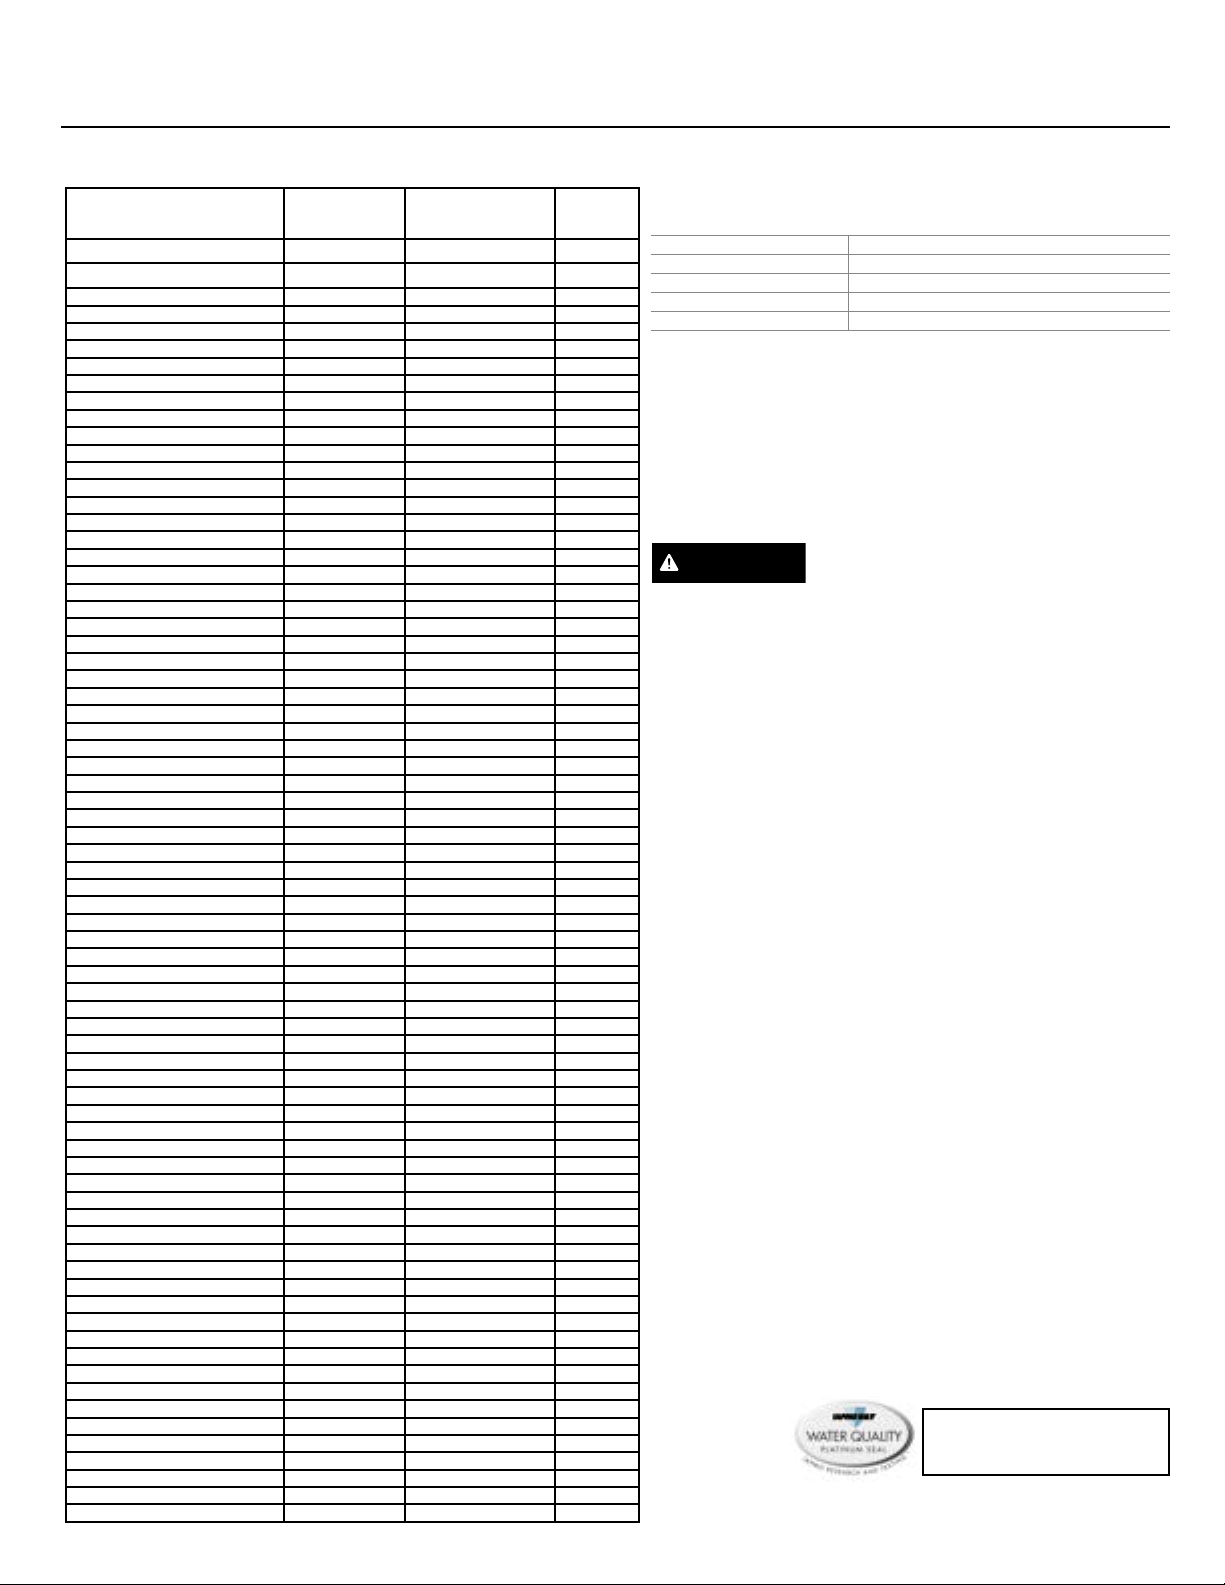
49-1000107 Rev. 0 37
Performance Data Sheet
Model: GE Appliances XWF
■SystemcertifiedbyIAPMOR&TagainstNSF/ANSIStandards42,53,401forthereductionofclaimsspecifiedontheperformancedatasheet
and at iapmort.org.
■Actualperformancemayvarywithlocalwaterconditions.
It is essential that the manufacturer’s recommended installation,
maintenance and filter replacement requirements be carried out for the
product to perform as advertised. See Installation Manual for Warranty
information.
Application Guidelines/Water Supply Parameters
Service Flow 0.5 gpm (1.89 lpm)
Water Supply Potable Water
Water Pressure 25-120 psi (172-827 kPa)
Water Temperature 33°F-100°F (0.6°C-38°C)
Capacity 170 gallons (643.5 liters)
Substance Tested for Reduction
Influent challenge
concentration
(mg/L)
Maximum permissible
product water
concentration (mg/L)
Avg %
Reduction
Chlorine Taste and Odor 2.0 mg/L +/- 10% N/A 96.9
Chloramine Taste and Odor 3.0 mg/L +/- 10% 0.5 96.9
Particulate, Class I At least 10,000/mL N/A 91.4
Cysts 50,000/L N/A >99.99
Lead 0.15 0.01 98.85
Mercury 0.006 0.002 96.3
Asbestos 107 to 108 fibers/ L N/A >99
Toxaphene 0.015 +/- 10% 0.003 86.95
VOC (Chloroform surrogate chemical) 0.300 0.015 99.7
Alachlor 0.050 0.001 > 98
Atrazine 0.100 0.003 > 97
Benzene 0.081 0.001 > 99
Carbofuran 0.190 0.001 > 99
carbon tetrachloride 0.078 0.0018 98
chlorobenzene 0.077 0.001 > 99
chloropicrin 0.015 0.0002 99
2,4-D 0.110 0.0017 98
dibromochloropropane (DBCP) 0.052 0.00002 > 99
o-Dichlorobenzene 0.08 0.001 > 99
p-Dichlorobenzene 0.040 0.001 > 98
1,2-dichloroethane 0.088 0.0048 95
1,1-dichloroethylene 0.083 0.001 > 99
cis-1,2-dichloroethylene 0.170 0.0005 > 99
trans-1,2-dichloroethylene 0.086 0.001 > 99
1,2-dichloropropane 0.080 0.001 > 99
cis-1,3-dichloropropylene 0.079 0.001 > 99
dinoseb 0.170 0.0002 99
Endrin 0.053 0.00059 99
Ethylbenzene 0.088 0.001 > 99
ethylene dibromide (EDB) 0.044 0.00002 > 99
bromochloroacetonitrile 0.022 0.0005 98
dibromoacetonitrile 0.024 0.0006 98
dichloroacetonitrile 0.0096 0.0002 98
trichloroacetonitrile 0.015 0.0003 98
1,1-dichloro-2-propanone 0.0072 0.0001 99
1,1,1-trichloro-2-propanone 0.0082 0.0003 96
heptachlor (H-34, Heptox) 0.025 0.00001 >99
heptachlor epoxide 0.0107 0.0002 98
hexachlorobutadiene 0.044 0.001 > 98
hexachlorocyclopentadiene 0.060 0.000002 > 99
Lindane 0.055 0.00001 > 99
methoxychlor 0.050 0.0001 > 99
pentachlorophenol 0.096 0.001 > 99
simazine 0.120 0.004 > 97
Styrene 0.150 0.0005 > 99
1,1,2,2-tetrachloroethane 0.081 0.001 > 99
Tetrachloroethylene 0.081 0.001 > 99
Toluene 0.078 0.001 > 99
2,4,5-TP (silvex) 0.270 0.0016 99
tribromoacetic acid 0.042 0.001 > 98
1,2,4-Trichlorobenzene 0.160 0.0005 > 99
1,1,1-trichloroethane 0.084 0.0046 95
1,1,2-trichloroethane 0.150 0.0005 > 99
trichloroethylene 0.180 0.0010 > 99
bromoform 0.300 0.015 95
bromodichloromethane 0.300 0.015 95
chlorodibromomethane 0.300 0.015 95
xylenes 0.070 0.001 >99
Meprobamate 400 +/- 20% 60 95.5
Atenolol 200 +/- 20% 30 95.9
Carbamazepine 1400 +/- 20% 200 98.6
DEET 1400 +/- 20% 200 98.6
Metolachlor 1400 +/- 20% 200 98.7
Trimethoprim 140 +/- 20% 20 96.1
Linuron 140 +/- 20% 20 96.6
TCEP 5000 +/- 20% 700 98.1
TCPP 5000 +/- 20% 700 98.1
Phenytoin 200 +/- 20% 30 96
Ibuprofen 400 +/- 20% 60 95.9
Naproxen 140 +/- 20% 20 96.5
Estrone 140 +/- 20% 20 97.1
Bisphenol A 2000 +/- 20% 300 99.1
Nonyl phenol 1400 +/- 20% 200 97.3
Note: While the testing was performed under standard laboratory
conditions, actual performance may vary.
Replacement Cartridge: XWF. For estimated costs of
replacement elements please call 1.877.959.8688 or visit our
website at gewaterfilters.com.
WARNING
To reduce the risk associated with
ingestion of contaminants:
• Do not use with water that is microbiologically unsafe or of
unknown quality without adequate disinfection before and
after the system. Systems certified for cyst reduction may be
used on disinfected water that may contain filterable cysts.
NOTICE
To reduce the risk of water leakage or flooding, and to
ensure optimal filter performance:
• Read and follow use instructions before installation and use of
this system.
• Installation and use MUST comply with all state and local
plumbing codes.
• Do not install if water pressure exceeds 120 psi (827 kPa). If
your water pressure exceeds 80 psi (552 kPa), you must install
a pressure-limiting valve. Contact a plumbing professional if you
are uncertain how to check your water pressure.
• Do not install where water hammer conditions may occur. If
water hammer conditions exist you must install a water hammer
arrester. Contact a plumbing professional if you are uncertain
how to check for this condition.
• Do not install on hot water supply lines. The maximum
operating water temperature of this filter system is 100º F (38º
C).
• Protect filter from freezing. Drain filter when temperatures
drop below 33ºF (0.6ºC).
• Change the disposable filter cartridge every six months or
sooner if you observe a noticeable reduction in water flow rate.
• Failure to replace the disposable filter cartridge at
recommended intervals may lead to reduced filter performance
and cracks in the filter housing, causing water leakage or
flooding.
• This System has been tested according to NSF/ANSI 42, 53
and 401 for the reduction of the substances listed below. The
concentration of the indicated substances in water entering the
system was reduced to a concentration less than or equal to the
permissible limit for water leaving the system, as specified in
NSF/ANSI 42, 53 and 401.
XWF System is certified by IAPMO R&T
against NSF/ANSI Standards 42,53, and 401
for the reduction of claims specified on the
performance data sheet and at iapmort.org.

38 49-1000107 Rev. 0
Notes

49-1000107 Rev. 0 39
Notes

40 49-1000107 Rev. 0
CONSUMER SUPPORT
Printed in United States
Consumer Support
Crosley Website
Have a question or need assistance with your appliance? Try the Crosley Website 24 hours a day, any day of the year at
Crosley.com. You can also shop for more great Crosley products on our website.
Register Your Appliance
Register your new appliance on-line at your convenience at crosley.com/mycrosley. Timely product registration will allow for
enhanced communication and prompt service under the terms of your warranty, should the need arise. You may also mail in the
pre-printed registration card included in the packing material.
Schedule Service
Crosley repair service is only one step away from your door. Call 800.544.4780 during normal business hours to schedule service.
CROSLEYCARE
®
10 Year Limited Warranty
When you buy a Crosley appliance, you receive one of the best warranties available in the appliance industry. For more
information, visit Crosley.com/warranty. Visit Crosley.com/mycrosley to register the extended limited warranty.
Parts and Accessories
Individuals qualified to service their own appliances can have parts or accessories sent directly to their homes (VISA, MasterCard
and Discover cards are accepted). Order on-line today 24 hours every day.
Visit GEApplianceparts.com or by phone at 877.959.8688 during normal business hours.
Instructions contained in this manual cover procedures to be performed by any user. Other servicing generally should
be referred to qualified service personnel. Caution must be exercised, since improper servicing may cause unsafe
operation.
Refrigerador Con Congelador
Inferior
Manual del
Propietario
e Instrucciones
de Instalación
Contenido
Instrucciones de Seguridad .........3
Uso del Refrigerador
Funciones ......................5
Controles .......................6
Dispensador .....................8
Filtro de Agua - XWF ..............9
Estantes y Recipientes ...........10
Puertas ........................11
Cajón del congelador .............12
Fabrica de hielo Automática .......13
Cuidado y Limpieza ...............14
Reemplazo de las Luces ..........15
Instrucciones de Instalación
Preparación para Instalar
el Refrigerador ................16
Dimensiones del Electrodoméstico ..17
Instalación del Refrigerador ........18
Instalación del Suministro
de Agua .....................28
Consejos para la Solución
de Problemas .................31
Garantía Limitada ................35
Soporte al Consumidor
Garantía Filtro de Agua ..........36
Ficha Técnica de Rendimiento .....37
Soporte al Consumidor ...........40
Modelos: XNE25J, XFE26J
49-1000107 Rev. 0 08-18 GEA
Español
Escriba los números de modelo y de serie aquí:
Número de modelo : ____________________
Número de serie: _______________________
Busque estos números en una etiqueta del
lado izquierdo, cerca de la parte intermedia del
compartimiento del refrigerador.
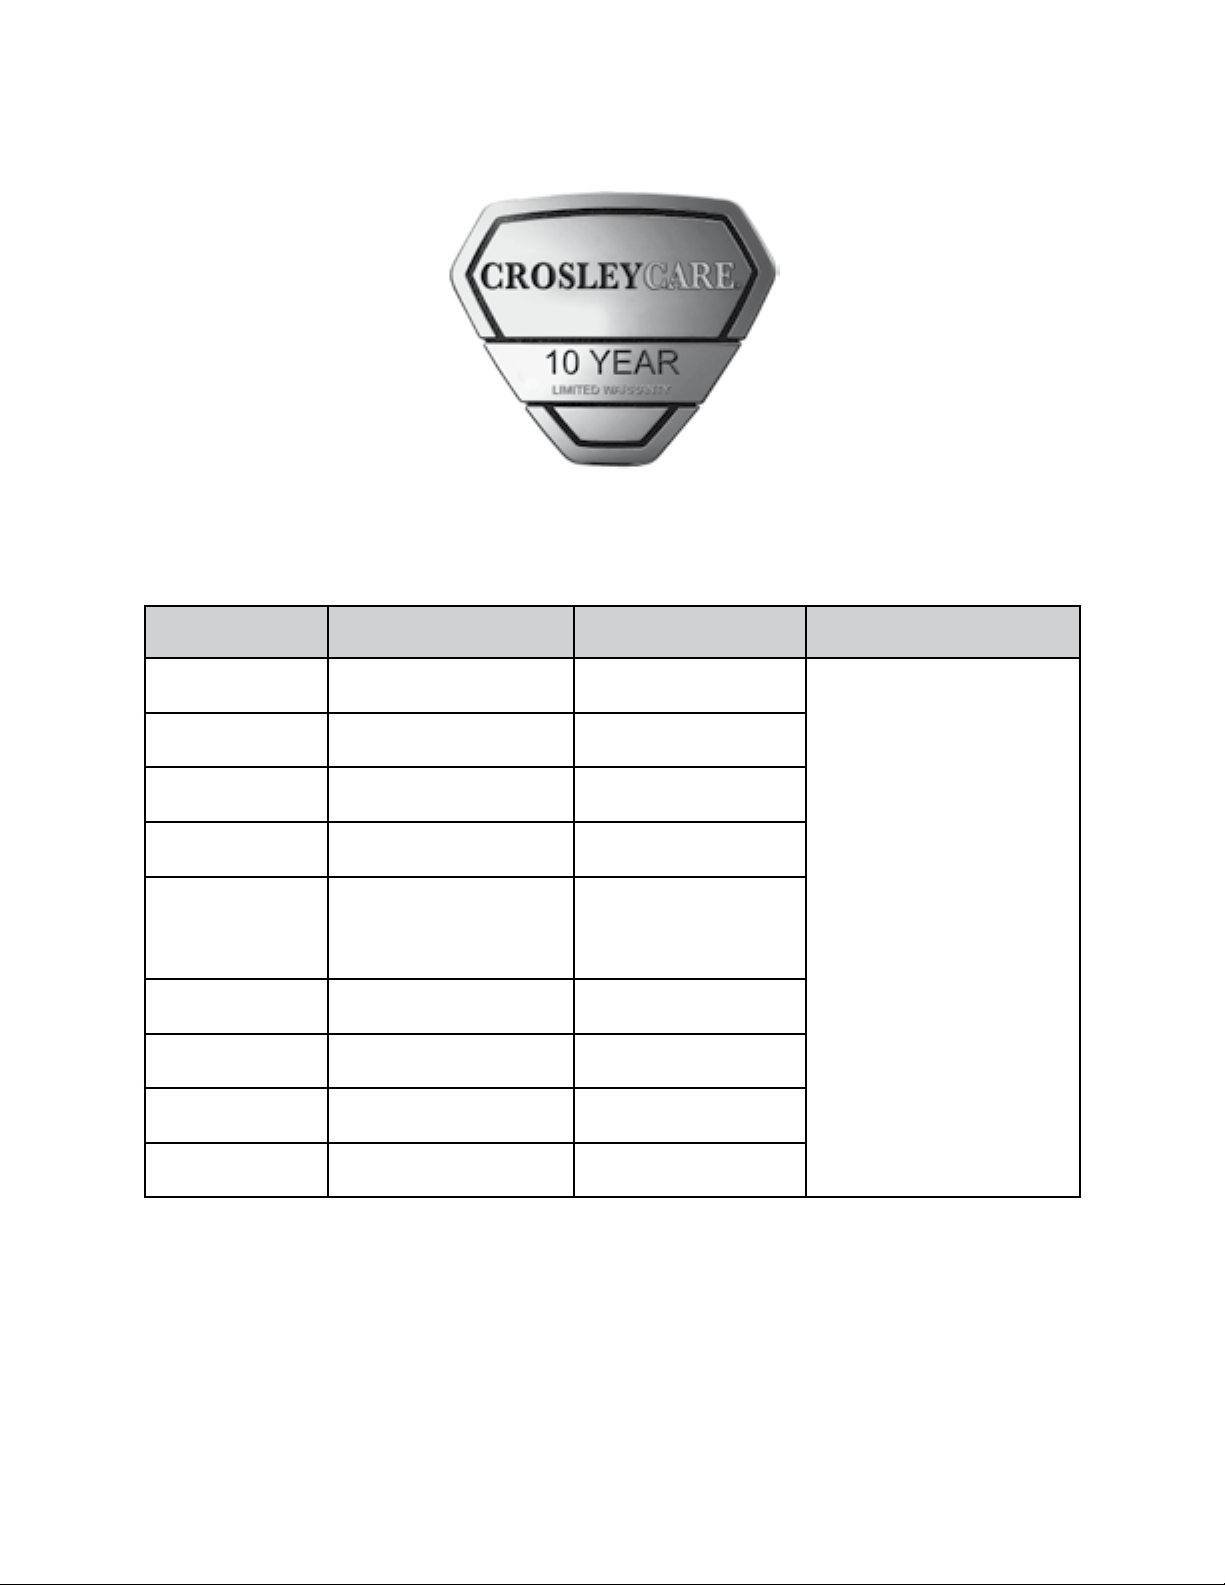
2 49-1000107 Rev. 0
¡La icónica marca estadounidense apoyada por la mejor garantía de electrodomésticos estadounidense!
¡Garantía Limitada por 10 Años GRATUITA en todos los Electrodomésticos Crosley!
Visite Crosley.com/mycrosley y registre la garantía limitada extendida.
ELECTRODO-
MÉSTICO
COMPONENTE
GARANTÍA LIMITADA
DEL FABRICANTE
GARANTÍA LIMITADA
EXTENDIDA DE CROSLEY
Refrigerador o
Congelador
Compresor 1 Año
10 años
Incluyendo Cobertura del
Fabricante por 1 Año
Lavadora de
Carga Superior
Caja de engranajes/
Transmisión
1 Año
Lavadora de
Carga Frontal
Motor 1 Año
Lavadora
Compacta
Motor 1 Año
Unidad de
Almacenamiento
de Lavadora/
Secadora
Motor/Elemento de
Calefacción
1 Año
Lavavajillas Motor 1 Año
Secadora a Gas/
Eléctrica
Motor/Elemento de
Calefacción
1 Año
Estufa Eléctrica
Elementos para Hornear/
Asar/ de la Superficie
1 Año
Estufa de Gas
Modulos de encendido
y de chispa
1 Año
49-1000107 Rev. 0 3
ADVERTENCIAS DE LA PROPOSICIÓN 65 DEL ESTADO DE CALIFORNIA
ADVERTENCIA
Este producto contiene uno o más químicos que el Estado de California entiende que producen
cáncer y defectos en el nacimiento u otros daños reproductivos.
PRECAUCIÓN
A fin de reducir el riesgo de lesiones al usar el refrigerador, siga estas precauciones
básicas.
■ Nolimpieestantesdevidrionitapasconaguacaliente
cuando estén fríos. Los estantes de vidrio y las tapas
se pueden romper si son expuestos a cambios de
temperatura repentinos o impactos, tales como golpes o
caídas. El vidrio templado está diseñado para destruirse
en pequeñas piezas en caso de rotura.
■ Mantengalosdedosfueradelosespaciosde“riesgode
lesión”; los espacios entre las puertas y entre las puertas
y el gabinete son necesariamente pequeños. Tenga
el cuidado de cerrar las puertas cuando los niños se
encuentren en el área.
■ Notoquelassuperficiesfríasdelcompartimientodel
congelador cuando las manos estén húmedas o mojadas,
ya que la piel se podrá adherir a estas superficies
extremadamente frías.
■ Novuelvaacongelarcomidasquehayanestado
totalmente congeladas en forma previa.
■ Enrefrigeradoresconmáquinasdehacerhielo
automáticas, evite el contacto con las partes móviles del
mecanismo eyector o con el elemento de calefacción que
libera los cubos. No coloque los dedos ni las manos en el
mecanismo de la máquina de hielo automática mientras el
refrigerador esté enchufado.
■ Useunvasorobustoaldispensarhielo(enmodeloscon
dispensador de hielo).
INFORMACIÓN DE SEGURIDAD
LEA Y GUARDE ESTAS INSTRUCCIONES
INFORMACIÓN IMPORTANTE DE SEGURIDAD
LEA TODAS LAS INSTRUCCIONES ANTES DE USAR
INSTALACIÓN
ADVERTENCIA
RIESGO DE EXPLOSIÓN
Mantenga cualquier material y vapores inflamables, tales como gasolina, alejados del refrigerador. Si no se cumple con esto
se podrá producir una explosión, incendio o la muerte.
ADVERTENCIA
A fin de reducir el riesgo de incendio, explosión, descargas eléctricas o lesiones al usar su
refrigerador, siga estas precauciones básicas de seguridad:
■ Esterefrigeradorsedeberáinstalaryubicar
adecuadamente de acuerdo con las Instrucciones de
Instalación antes de ser usado.
■ Desenchufeelrefrigeradorantesdehacerreparacioneso
hacer una limpieza.
Nota: La corriente que va al refrigerador no puede ser
desconectada por ninguna configuración del panel de
control.
Nota: Las reparaciones deberán ser realizadas por un
Profesional del Servicio Técnico calificado.
■ Reemplacetodaslaspiezasypanelesantesdeluso.
■ Nouseextensioneseléctricasparaconectarsuaparato.
■ Noguardeniusegasolinauotrosvaporesylíquidos
inflamables cerca de este ni de otro electrodoméstico.
■ Noguardesustanciasexplosivastalescomolatas
de aerosoles con propelentes inflamables en este
electrodoméstico.
■ Afindeevitarriesgosdequelosniñosquedenatrapados
y sufran asfixia, retire las puertas de alimentos frescos
y del congelador de cualquier refrigerador antes de
deshacerse o dejar de usar el mismo.
■ Losniñosylaspersonasconcapacidadfísica,
sensorial o mental reducida o con falta de experiencia y
conocimiento podrán usar este electrodoméstico sólo si
son supervisados o les fueron dadas instrucciones sobre
un uso seguro y entienden los riesgos involucrados.
■ Esteelectrodomésticofuediseñadoparausohogareñoy
para aplicaciones similares tales como: áreas de personal
de cocina en tiendas, oficinas y otros espacios laborales;
casas de campo; por clientes en hoteles, moteles,
hostales y otros espacios residenciales, servicio de
comidas.
■ Realicelaconexiónaunsuministrodeaguapotable
únicamente. Se requiere un suministro de agua fría para
el funcionamiento de la máquina de hielos automática. La
presióndelaguadeberáestarentre40y120psi(275-827
kilopascales)..

4 49-1000107 Rev. 0
INFORMACIÓN DE SEGURIDAD
INFORMACIÓN IMPORTANTE DE SEGURIDAD
LEA TODAS LAS INSTRUCCIONES ANTES DE USAR
LEA Y GUARDE ESTAS INSTRUCCIONES
CONEXIÓN DE LA ELECTRICIDAD
Nunca, bajo ninguna circunstancia, corte o elimine el tercer cable (tierra) del cable de corriente. Para su seguridad
personal, este electrodoméstico debe estar adecuadamente conectado a tierra.
El cable de corriente de este electrodoméstico contiene un
enchufede3cables(conexiónatierra)queseconectaaun
tomacorrientedeparedestándarde3cables(conexióna
tierra) para minimizar la posibilidad de riesgos de descargas
eléctricas por parte del mismo.
Contrate a un electricista calificado para que controle el
tomacorriente y el circuito eléctrico, a fin de asegurar que el
enchufe esté correctamente conectado a tierra.
En caso de contar con un tomacorriente de pared de 2
cables, es su responsabilidad y obligación reemplazarlo
por un tomacorriente de pared de 3 cables correctamente
conectado a tierra. No use un adaptador.
El refrigerador debería estar siempre conectado a un enchufe
específico con un índice de voltaje equivalente al que figura
en su etiqueta de características técnicas.
Se requiere un suministro eléctrico con fusible y conexión
a tierra de 115 voltios de CA, 60 Hz, 15 o 20 amperes.
Esto garantiza el mejor funcionamiento y además previene
la sobrecarga de los circuitos del hogar, lo cual podría
ocasionar riesgos de incendio debido al recalentamiento de
cables.
Nunca desenchufe el refrigerador tirando del cable de
corriente. Siempre tome su enchufe firmemente y empuje el
mismo hacia afuera para retirarlo.
Repare o reemplace de inmediato todos los cables de
corriente pelados o con cualquier tipo de daño. No use
un cable con cortaduras o abrasión sobre su extensión o
extremos.
Al alejar el refrigerador de la pared, se deberá tener cuidado
de que no ruede sobre ni dañe el cable de corriente.
ADVERTENCIA
RIESGO DE DESCARGA ELÉCTRICA
Enchufe en un tomacorriente con conexión a tierra de 3 cables.
No elimine el cable de conexión a tierra.
No use un adaptador.
No use extensión eléctrica.
Si no se siguen estas instrucciones se podrá producir a muerte, incendios o descargas eléctricas.
ADVERTENCIA
PELIGRO DE ATRAPADOS Y ASFIXIA
El incumplimiento de estas instrucciones de eliminación puede causar la muerte o lesiones graves.
IMPORTANTE: Que un niño quede atrapado o que sufra
una asfixia no son problemas del pasado. Los refrigeradores
antiguos o abandonados aún son peligrosos, incluso aunque
seconservenpor“sólounospocosdías”.Sisedesharádesu
antiguo refrigerador, siga las siguientes instrucciones a fin de
evitar accidentes.
Antes de Descartar su Antiguo Aparato:
■ Retire las puertas de alimentos frescos y del congelador.
■ Deje los estantes en su lugar de modo que los niños no
puedan trepar dentro con facilidad.
Cómo Eliminar Refrigerantes y Espuma Aislante:
Descarte el electrodoméstico de acuerdo con las Regulaciones Federales y Locales. El material aislante inflamable usado
requiere procedimientos de descarte especiales. Comuníquese con las autoridades locales para descartar su electrodoméstico
de forma ambientalmente segura.
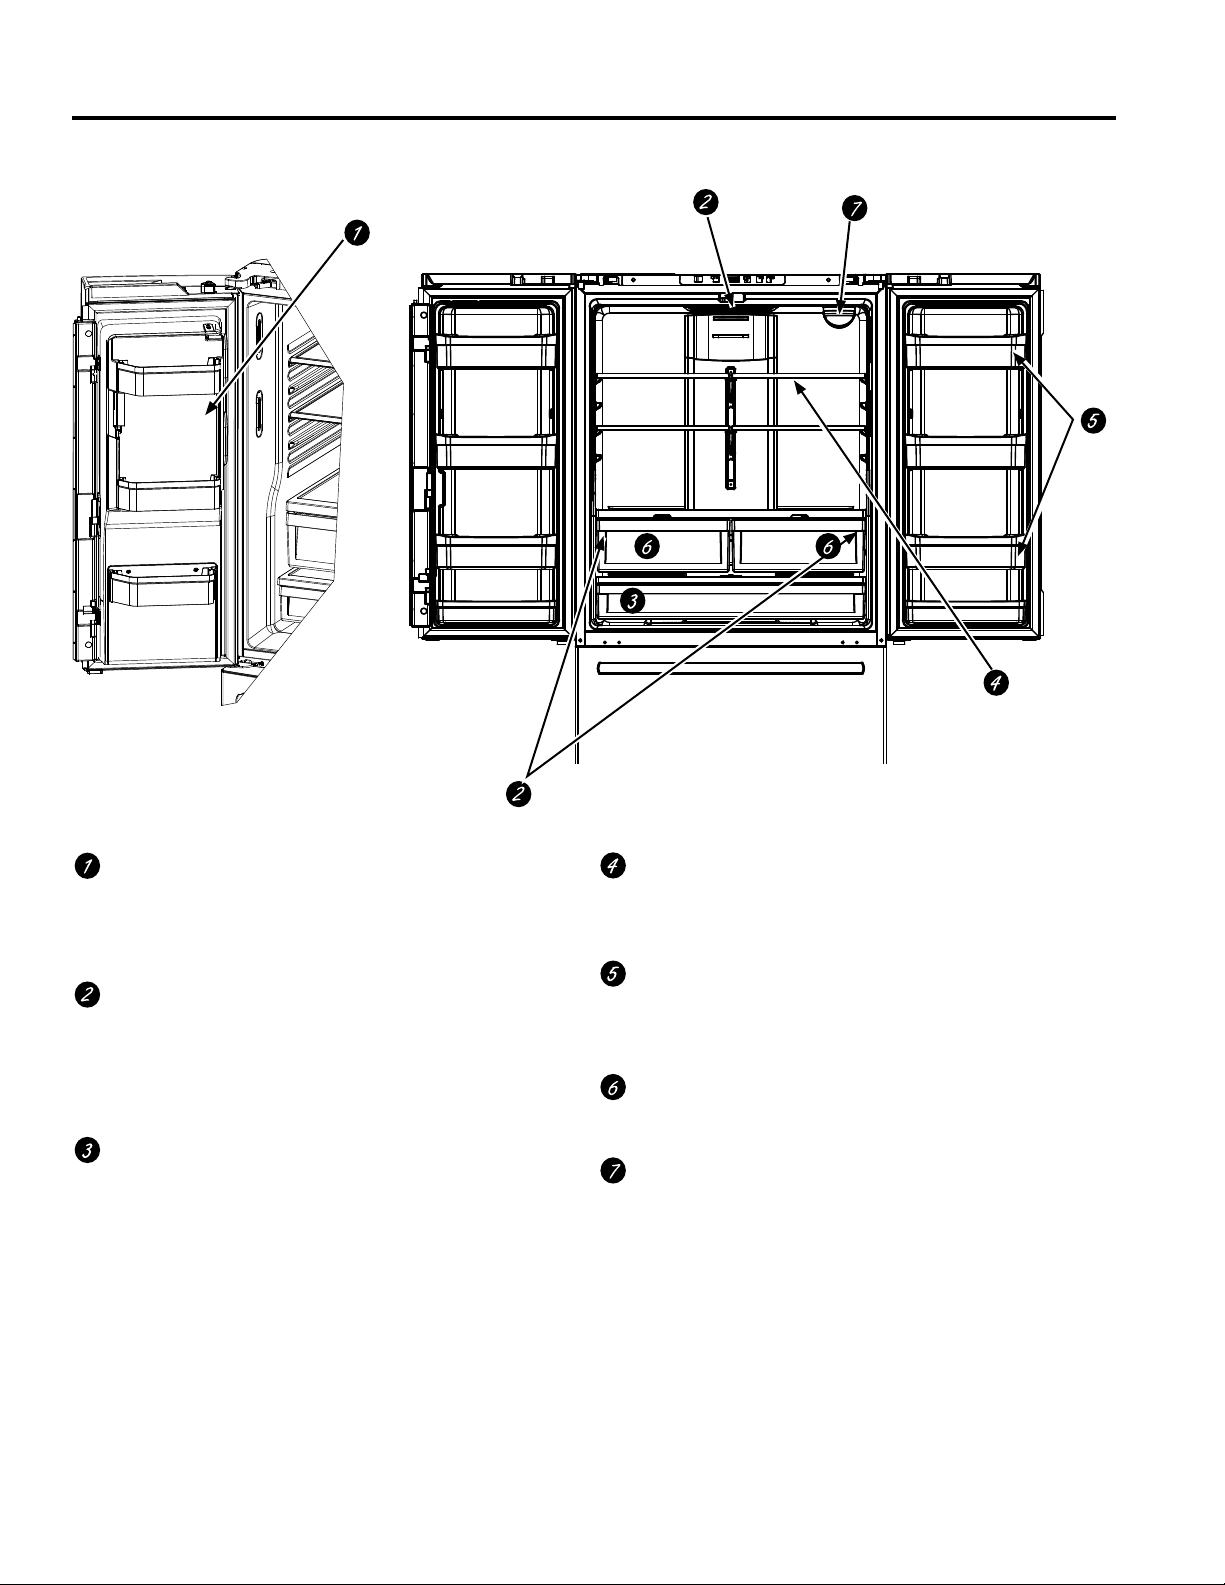
49-1000107 Rev. 0 5
Funciones
USO DEL REFRIGERADOR: Funciones
Modelos de Puerta Francesa
Máquina de hielos con ahorro de espacio (en
algunos modelos)
La máquina de hielos y el anaquel están ubicados en
la puerta, creando un espacio de almacenamiento con
mayor uso.
Iluminación LED
Las luces LED del compartimiento de refrigerador están
ubicadas en la parte central superior y los costados
izquierdo y derecho sobre las cajones del área con clima
regulado.
Las luces LED también están ubicadas en el
congelador; consulte las página 15.
Cajón con ancho completo
El cajón con ancho completo, donde se pueden colocar
productos más grandes, está ubicado en la parte inferior
del compartimiento de refrigerador
Estante QuickSpace™ (en algunos modelos)
Funciona como una repisa normal de tamaño completo
cuando lo necesite y se desliza fácilmente hacia adentro
para guardar artículos altos en la parte inferior.
Anaqueles para puertas desmontables/
ajustables
Se puede mover hacia arriba o abajo de acuerdo a sus
necesidades.
Cajones con clima regulado
Cajones separadas para almacenar productos
comestibles.
Filtro de agua
Accesible para un fácil reemplazo.

6 49-1000107 Rev. 0
Controles
OPERACIÓN DEL REFRIGERADOR: Controles
Control Superior de XNE25J
Control de Temperatura del Compartimiento del
Congelador
Ajuste la temperatura del compartimiento del congelador.
La temperatura del congelador está preconfigurada de
fábrica en 0º F (-17.8º C). Espere 24 horas hasta que la
temperatura se estabilice en los ajustes de configuración
previa recomendados.
Control de Temperatura del Compartimiento de
Refrigerador
Ajuste la temperatura del compartimiento de refrigerador.
La temperatura para las refrigerador está preconfigurada
de fábrica en 37º F (2.8º C). Espere 24 horas hasta que la
temperatura se estabilice en los ajustes de configuración
previa recomendados.
Filtro de Agua
Mantenga presionada esta función durante 3 segundos
para reiniciar el Filtro de Agua.
Turbo Cool (Frío Turbo)
Para configurar la función TurboCool™, presione la tecla
Turbo Cool (FríoTurbo)durante3segundos.Lapantalla
mostrará tc.
TurboCool™ rápidamente enfría el compartimiento del
refrigerador a fin de que la comida se enfríe de forma más
rápida. Use TurboCool
TM
al agregar una gran cantidad
de comida al compartimiento del refrigerador, guardando
las comidas que estuvieron a temperatura ambiente o
al guardar restos de comida caliente. También se puede
usar si el refrigerador estuvo sin corriente por un período
prolongado.
NOTA: La temperatura del refrigerador no podrá
ser modificada durante el uso de TurboCool™. La
temperatura del congelador no se verá afectada al usar
la función TurboCool™ Al abrir la puerta del refrigerador
durante el uso de TurboCool™, los ventiladores
continuarán funcionando si estuvieron activados.
Alarma de la Puerta
Para configurar la alarma, presione la tecla Door Alarm
(AlarmadelaPuerta).Estaalarmasonarásiunadelas
puertas permanece abierta por más de 2 minutos. El pitido
se detiene cuando se cierra la puerta
NOTA: Para pasar el control del refrigerador a la posición
OFF(Apagado),deformasimultáneapresionelaspalabras
Congelador (Congelador)yFridge(Refrigerador)durante3
segundos. La corriente que va al refrigerador no puede ser
desconectada por ninguna configuración del panel de control.
Cómo pasar de °F a °C o de °C a °F: Mantenga presionados
losbotones“DOORALARM”(AlarmadelaPuerta)y
"FREEZER”(Congelador)deformasimultáneadurante5
segundos para configurar el paso de °C a °F o de °F a °C.

49-1000107 Rev. 0 7
Controles
OPERACIÓN DEL REFRIGERADOR: Controles/Modos Sabáticos
Modos Sabáticos (enalgunosmodelos)
NOTA: El refrigerador se envía con una envoltura que protege los controles de temperatura. Si esta envoltura no fue
retirada durante la instalación, retire la misma ahora.
Control Externo de XFE26J
Para modelos XNE25J con Control Superior
■Mantengapresionadoslosbotones“DOORALARM”(AlarmadelaPuerta)y“WATERFILTER”(FiltrodeAgua)deforma
simultáneadurante5segundosparaingresar/salirdeSabbathMode(ModoSabático).
Para modelos XFE26J con Control Externo
■Mantengapresionadoslosbotones“LOCK”(Bloquea)y“LIGHT”(LUZ)deformasimultáneadurante5segundosparaingresar/
salirdeSabbathMode(ModoSabático).
Control de Temperatura del Compartimiento del
Congelador
Ajuste la temperatura del compartimiento del congelador.
La temperatura del congelador está configurada
previamente de fábrica en 0º F (-17.8º C). Espere 24 horas
hasta que la temperatura se estabilice en los ajustes de
configuración previa recomendados.
Control de Temperatura del Compartimiento de
Refrigerador
Ajuste la temperatura del compartimiento de refrigerador.
La temperatura para las refrigerador posee una
configuración previa de fábrica en 37º F (2.8º C). Espere
24 horas hasta que la temperatura se estabilice en los
ajustes de configuración previa recomendados.
Filtro de Agua
Mantenga presionada esta función durante 3 segundos
para reiniciar el Filtro de Agua.
Turbo Cool™ (Frío Turbo)
Para configurar la función TurboCool™, presione la tecla
Alarm(Alarma)durante3segundos.Lapantallamostrará
tc.
TurboCool™ rápidamente enfría el compartimiento del
refrigerador, a fin de enfriar las comidas de forma más
rápida. Use TurboCool™ al agregar una gran cantidad
de comida al compartimiento del refrigerador, al guardar
las comidas que estuvieron a temperatura ambiente o
al guardar restos de comida caliente. También se puede
usar si el refrigerador estuvo sin corriente por un período
prolongado.
NOTA: La temperatura del refrigerador no podrá
ser modificada durante el uso de TurboCool™. La
temperatura del congelador no se verá afectada al usar
la función TurboCool. Al abrir la puerta del refrigerador
durante el uso de TurboCool™, los ventiladores
continuarán funcionando si estuvieron activados.
Alarma
Presione la tecla Alarm(Alarma)paraactivarodesactivar
la alarma de la puerta. La alarma sonará si una de las
puertas permanece abierta por más de 2 minutos. El pitido
se detiene cuando se cierra la puerta.
Bloquear
Mantenga presionada la tecla Lock(Bloquear)durante3
segundos para bloquear el hielo y el dispensador de agua
y todos los demás controles. Mantenga presionada esta
tecla para desbloquear los controles
Luz LED del dispensador
PresionelateclaLight(Luz)paraencenderoapagarlaluz
del dispensador.
NOTA: Para pasar el control del refrigerador a la posición
OFF(Apagado),deformasimultáneapresionelas
palabras Freezer(Congelador)yFridge(Refrigerador)
durante 3 segundos. La corriente que va al refrigerador
no puede ser desconectada por ninguna configuración del
panel de control.
Cómo pasar de °F a °C o de °C a °F: Mantenga presionados
losbotones“DOORALARM”(AlarmadelaPuerta)y
"FREEZER”(Congelador)deformasimultáneadurante5
segundos para configurar el paso de °C a °F o de °F a °C.

8 49-1000107 Rev. 0
Dispensador (enalgunosmodelos)
OPERACIÓN DEL REFRIGERADOR: Dispensador
Dispensador de Agua y Hielo
(ConsultelasecciónControles)
Presione el vaso de forma suave contra el soporte del
dispensador.
El estante antiderrame no se vacía de forma automática. Para
reducir las manchas de agua, el estante se deberá limpiar de
forma regular.
Si no se dispensa agua cuando el refrigerador se instala por
primera vez, es posible que la tubería de agua posea aire.
Presione la paleta dispensadora durante por lo menos cinco
minutos para eliminar el aire atrapado de la tubería de agua y
para llenar el sistema de agua. A fin de limpiar las impurezas
en la tubería de agua, descarte los primeros seis vasos de
agua.
PRECAUCIÓN
Riesgo de Laceración
■Nunca coloque los dedos o cualquier otro objeto en la
abertura de descarga de la trituradora de hielo. Hacer esto
puede resultar en el contacto entre los filos de la trituradora
de hielo y ocasionar lesiones graves o una amputación.
■Use un vaso resistente al dispensar hielo. Un vaso frágil se
podría romper y ocasionar lesiones personales.
Para retirar el estante antiderrame del Dispensador
■EmpujeelestanteantiderramedelDispensadorhacia
afuera.
Para reinstalar el estante antiderrame del
Dispensador
■Empujehaciaadentrohastaquequedeafirmadaensu
posición.
Recipiente de hielo en la puerta
1. Abra la puerta izquierda de
refrigerador.
2. Baje la traba para abrir la puerta
del recipiente.
3. Usando un asidero, levante la
hielera hacia arriba y afuera para
despejar los localizado res en la
parte inferior del recipiente.
4. Para reemplazar la hielera,
ajuste la misma a los soportes
de la guía y empuje hasta que la
hielera se ubique correctamente.
5. Si la hielera no se puede reemplazar, gire la Horquilla de la
Hielera 1/4 en dirección de las agujas del reloj.
Dispensador de Agua Interno
(enalgunosmodelos)
El dispensador de agua está ubicado en la pared izquierda
dentro del compartimiento del refrigerador.
Para dispensar agua:
1. Sostenga el vaso contra el hueco.
2. Presione el botón dispensador de agua.
3. Sostenga el vaso debajo del
dispensador entre 2 y 3 segundos luego
de liberar el botón del dispensador.
Es posible que continúe dispensando
agua luego de que el botón haya sido
liberado.
Si no se dispensa agua cuando el refrigerador se instala por
primera vez, es posible que la tubería de agua posea aire.
Presione el botón dispensador durante por lo menos 5 minutos
para eliminar el aire atrapado de la tubería de agua y para
llenar el sistema de agua. Durante este proceso, es posible
que el dispensador produzca un ruido fuerte a medida que
se elimina el aire de la tubería de agua. A fin de limpiar las
impurezas en la tubería de agua, descarte los primeros seis
vasos de agua.
NOTA:Afindeevitardepósitosdeagua,eldispensadordebe
ser limpiado de forma periódica con un paño limpio o una
esponja..
Hechos Importantes sobre sus
Dispensadores
■Noagreguehielodebandejasobolsasalahieleradela
máquina de hielos de la puerta. Es posible que no lo pique o
que no lo vierta correctamente.
■Evitellenarelvasodehielodeformaexcesivaynouse
vasos angostos. El hielo estancado puede trabar el vertedor
o hacer que la puerta del vertedor quede cerrada por
congelación. Si el hielo bloquea el vertedor, retire la hielera y
desbloquee el mismo con una cuchara de madera.
■Lasbebidasylascomidasnosedeberánenfriarde
forma rápida en el cajón de almacenamiento de hielo.
Las latas, botellas o paquetes de comida en el cajón de
almacenamiento pueden hacer que la máquina de hielos o el
husillo se bloqueen.
■Paraqueelhielodispensadonocaigaafueradelvaso,
coloque el vaso cerca de, pero sin que tenga contacto con,
la abertura del dispensador.
■Esposiblequeciertacantidaddehielopicadosea
dispensada incluso aunque haya seleccionado CUBED
ICE(HieloenCubos).Estosucedeocasionalmentecuando
algunos cubos son dirigidos accidentalmente a la trituradora.
■Unavezqueelhielopicadoesdispensado,esposibleque
parte del agua gotee del vertedor.
■A veces se formará una pequeña cantidad de escarcha en
la puerta del vertedor de hielo.
Esta condición es normal y
generalmente sucede cuando se dispensó hielo picado en
forma repetida.
Estante
antiderrame
Horquilla de
la Hielera
Traba
Hielera
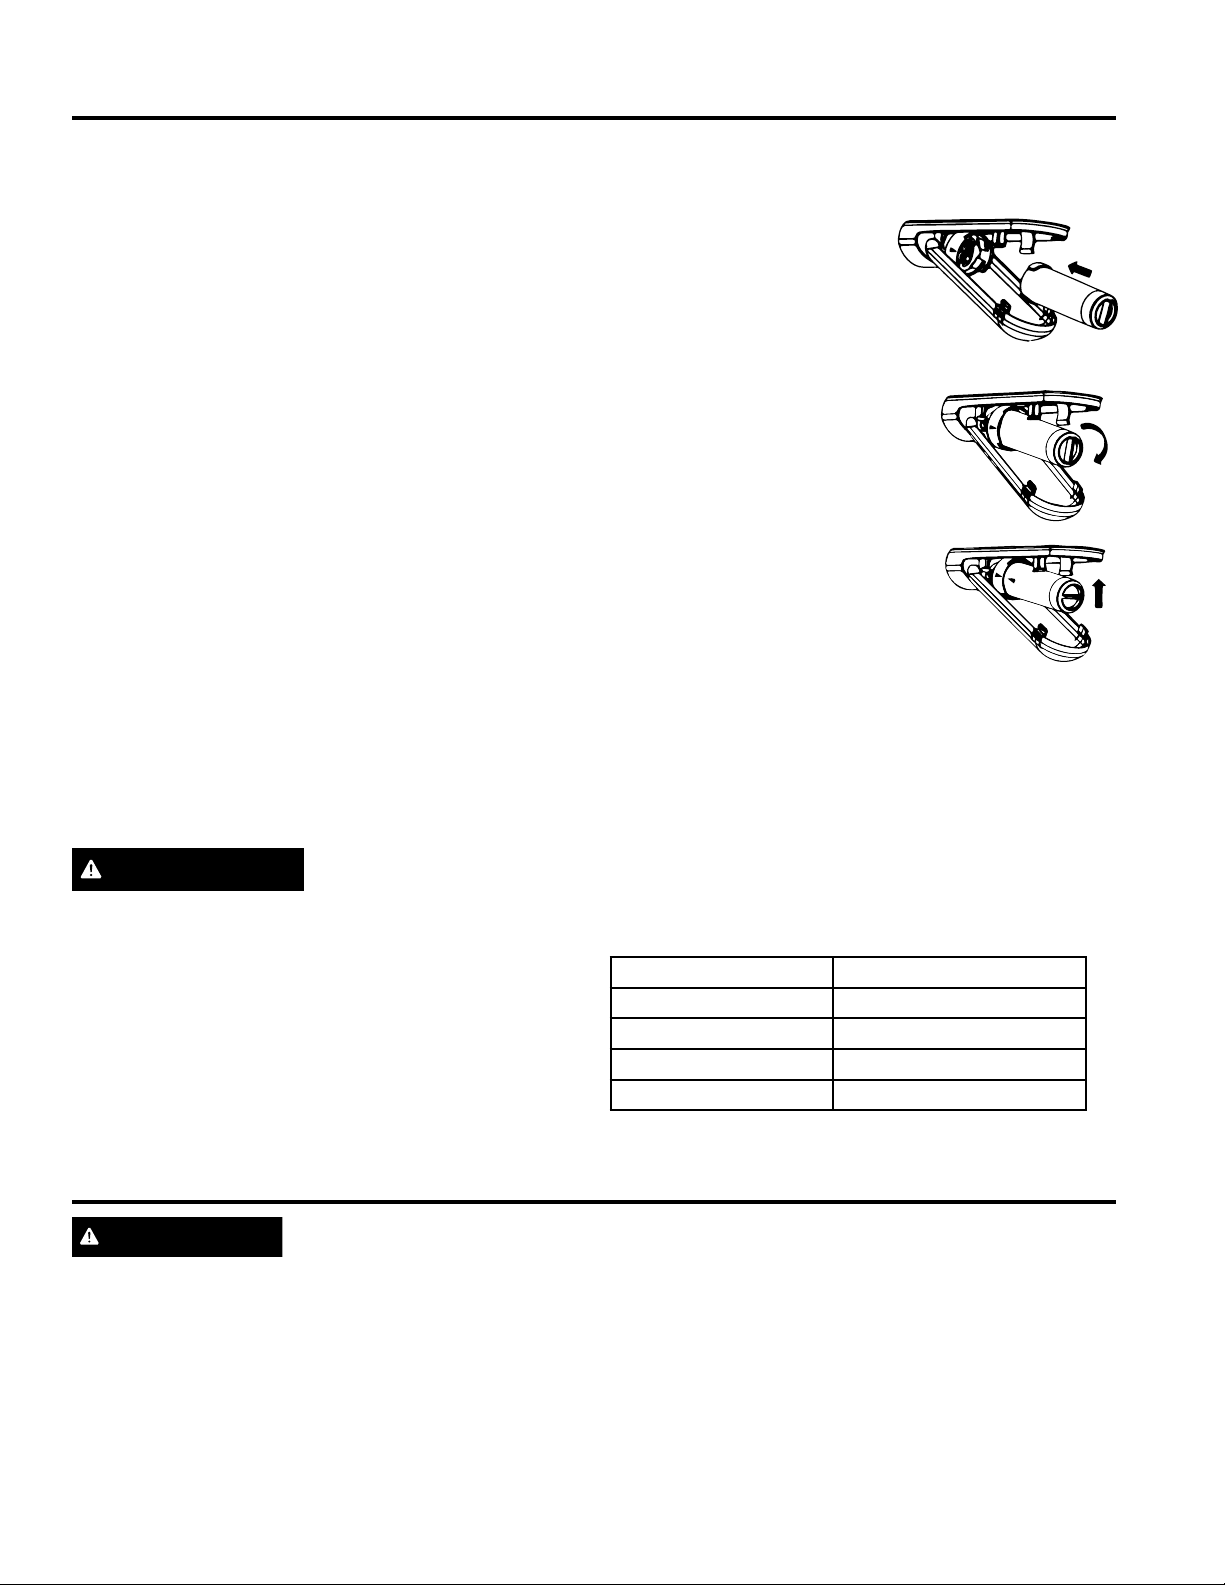
49-1000107 Rev. 0 9
OPERACIÓN DEL REFRIGERADOR:
Acerca del cartucho del filtro de agua XWF
Acerca del cartucho del filtro de agua XWF (enalgunosmodelos)
CARTUCHO DEL FILTRO DE AGUA
El cartucho del filtro de agua está ubicado en el extremo
superior trasero derecho del compartimiento de comida fresca
del refrigerador.
CUÁNDO REEMPLAZAR EL FILTRO
Si existe una luz indicadora de reemplazo del cartucho del
filtro de agua en el dispensador, una luz roja del filtro
comenzará a parpadear a fin de indicar que es necesario
reemplazar el filtro pronto.
- En los modelos con control externo, la luz del filtro
parpadeará mientras se está dispensando hasta que el filtro
sea reemplazado.
- En los modelos con control superior, la luz del filtro
parpadeará mientras la puerta se encuentre abierta hasta
que el filtro sea reemplazado.
En los modelos que no cuentan con una luz indicadora, el
cartucho del filtro deberá ser reemplazado cada seis meses, o
antes si se observa una reducción en el flujo de agua hacia el
dispensador o la máquina de hielos.
RETIRO DEL FILTRO
Si reemplazará el filtro, primero retire el anterior:
1. Abra la carcasa del cartucho del filtro presionando las 2
lengüetas frontales y empujando de forma suave hacia
abajo.
2. Gire el filtro hacia abajo.
3. De forma suave, tome el filtro y lentamente dé al mismo
aproximadamente ¼ de giro en sentido antihorario.El filtro
deberá liberarse de forma automática cuando lo haya rotado
lo suficiente hacia la izquierda. Es posible que gotee una
pequeña cantidad de agua.
PRECAUCIÓN
Si quedó aire atrapado en el
sistema, es posible que el cartucho sea eyectado en el
momento en que se retire. Tenga cuidado al retirar el mismo.
TAPÓN DE BYPASS DEL FILTRO
A fin de reducir el riesgo de daños sobre la propiedad debido a
pérdidas de agua, usted DEBERÁ usar el tapón del bypass del
filtro cuando no se disponga de un reemplazo del cartucho del
filtro. Algunos modelos no vienen equipados con el tapón del
filtro del bypass. A fin de obtener un tapón del filtro del bypass,
comuníquese al 800-GECARES. El dispensador y la máquina
de hielos no funcionarán si el filtro o el tapón del bypass del
filtro no están instalados. El tapón del bypass se instala del
mismo modo que un cartucho del filtro.
INSTALACIÓN DEL FILTRO EN UN
REFRIGERADOR CON CONGELADOR EN
LA PARTE INFERIOR
1. Abra la carcasa del cartucho del
filtro presionando las 2 lengüetas
frontales y empujando de forma
suave hacia abajo.
2. Alinee los puertos del filtro con
los puertos de la carcasa del
cartucho del filtro, e inserte el filtro de forma suave.
3. Lentamente, gire el filtro hacia la
derechahastaquesedetenga.NO
LOAJUSTEENEXCESO.Mientras
gira el filtro, el mismo se ajustará
automáticamente en su posición. El
filtro girará aproximadamente ¼” o 90
grados, hasta que la flecha del mismo
quede alineada con la flecha de la
carcasa del cartucho del filtro.
4. Lentamente empuje el filtro hacia
arriba sobre los sujetadores.
5. Cierre la carcasa del cartucho del
filtro presionando la tapa de forma
suave hacia arriba, hasta que las
lengüetas queden bloqueadas en su posición.
6. Deje correr una cantidad de agua desde el dispensador
de2galones(7.6litros)oduranteaproximadamente5
minutos para limpiar el sistema. Es posible que el agua
salga a chorros o se podrán visualizar burbujas de agua
durante el proceso. Si no fluye agua, realice un control para
asegurarse de que el filtro haya sido girado completamente
hacia la derecha.
7.MantengapresionadalateclaWATERFILTER(Filtrode
Agua)(sóloenmodelosespecíficos)sobreeldispensador
durante tres segundos.
Swing
Flujo del Servicio 0.5gpm(1.89lpm)
Suministro de Agua Agua Potable
Presión del Agua 25-120psi(172-827kPa)
Temperatura del agua 33°F-100°F(0.6°C-38°C)
Capacidad 170galones(643.5litros)
Regístrese para RECORDATORIOS DE TEXTO,
enviados REPLACE (Reemplazar) por mensaje de
texto al 70543.
ADVERTENCIA
A fin de reducir el riesgo asociado con asfixia, no permita que los niños menores de 3 años
tengan acceso a las partes pequeñas durante la instalación de este producto. El cartucho del filtro descartable deberá
ser reemplazado cada 6 meses luego de agotar su capacidad, o antes si se produce una reducción notoria en el caudal.
Para obtener el máximo beneficio de su sistema de filtrado, Crosley recomienda el uso de los filtros de la marca GE Appliances
únicamente. El uso de filtros de la marca GE Appliances en refrigeradores Crosley brinda un óptimo funcionamiento y
confiabilidad. Los filtros GE Appliances cumplen con rigurosos estándares NSF de la industria sobre seguridad y calidad, que son
importantes para los productos que están filtrando su agua. Crosley no posee filtros de la marca GE Appliances que no estén
calificados para su uso en refrigeradores Crosley, y no existe seguridad de que los filtros que no son de la marca GE Appliances
cumplan con los estándares de Crosley en relación a calidad, funcionamiento y confiabilidad.
Ante cualquier consulta, o para ordenar cartuchos de filtros adicionales, visite nuestro sitio Web
en gewaterfilters.com, o llame a GE Appliances Parts and Accessories (Piezas y Accesorios de GE Appliances),
al 877.959.8688.
Pautas de Aplicación/ Suministro de Agua
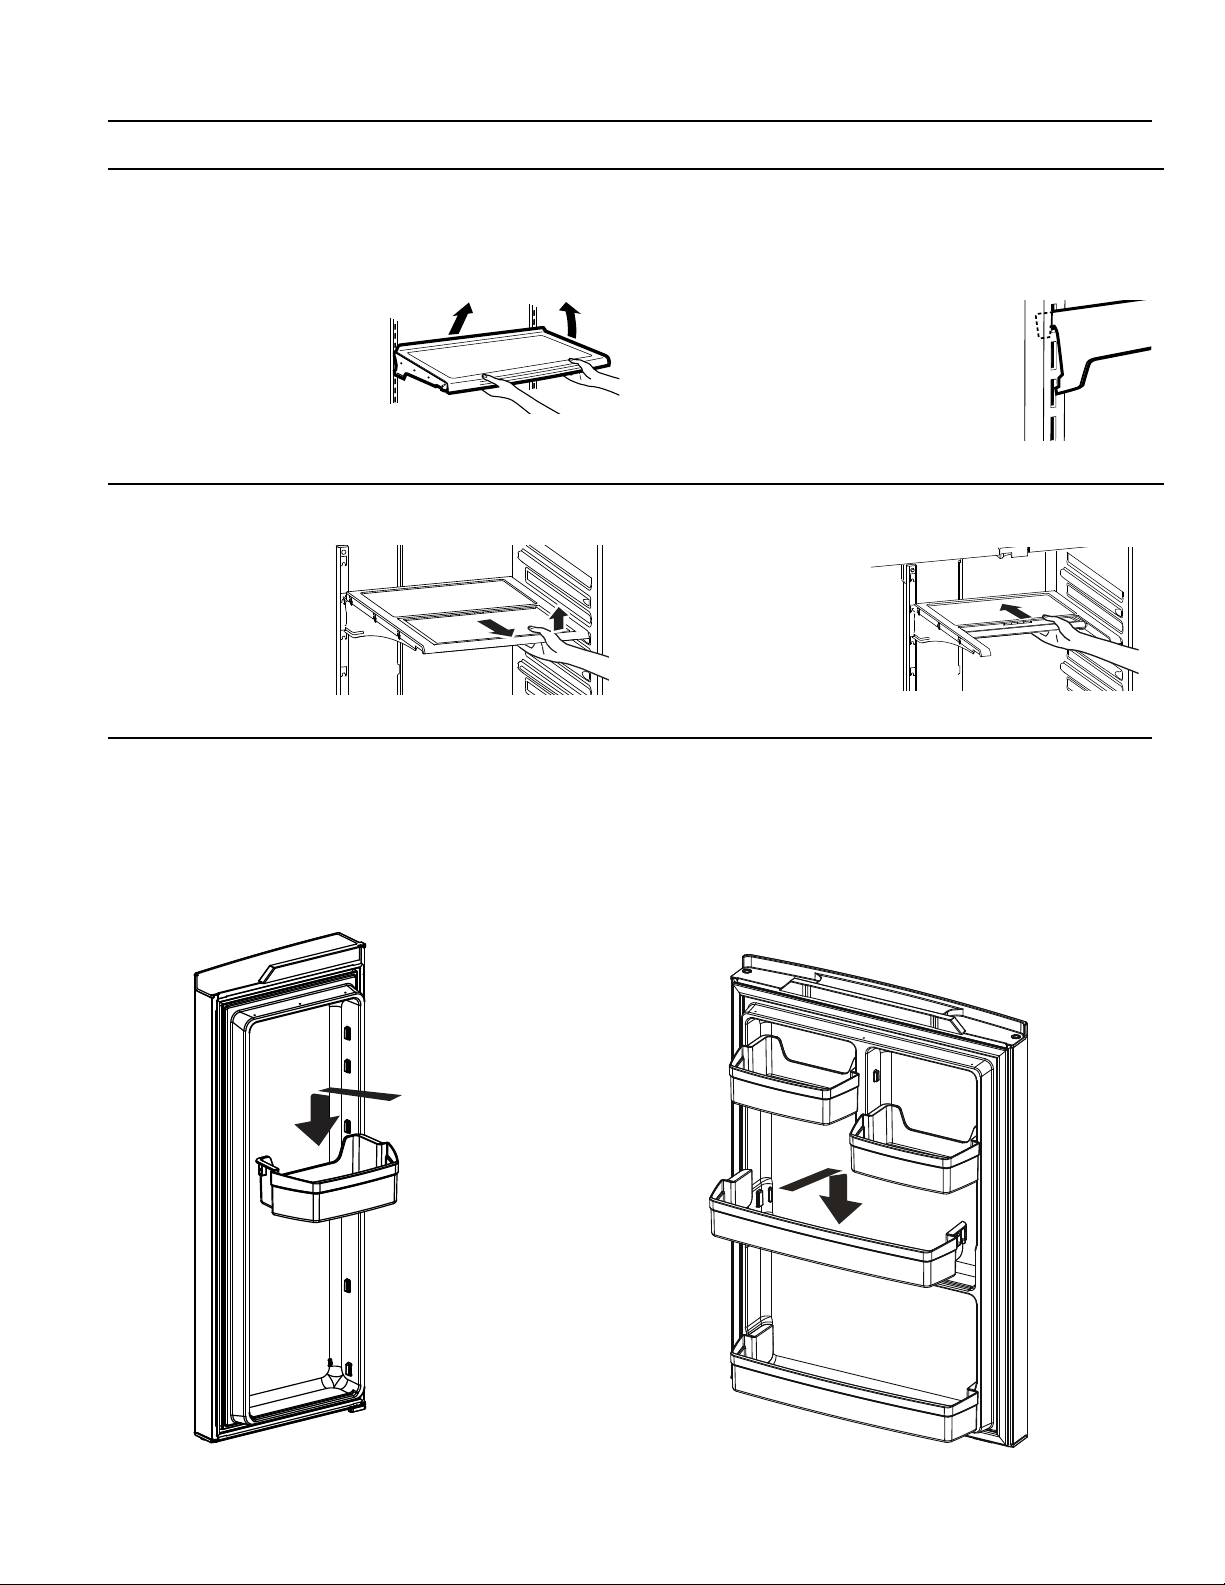
10 49-1000107 Rev. 0
OPERACIÓN DEL REFRIGERADOR: Estantes y Recipientes
Estantes y Recipientes
Reorganización de Los Estantes del Refrigerador
Los estantes del compartimiento del refrigerador son ajustables.
Para retirar los estantes:
1. Retire todos los productos del
estante.
2. Incline el estante hacia arriba
en la parte frontal.
3. Levante el estante desde
la parte trasera y retire el
mismo.
Para reinstalar los estantes:
1. Al inclinar el estante hacia arriba,
inserte el gancho superior en la parte
trasera del estante en una ranura del
soporte.
2. Incline la parte frontal del estante
hasta que la parte inferior del mismo
quede bloqueado.
Anaqueles de Puertas Ajustables(enalgunos
modelos)
Para su retiro: levante el anaqueles de forma recta y luego
empuje hacia afuera.
Para su reinstalación: adhiera el anaquel a los soportes
moldeados de la puerta y empuje hacia abajo hasta que quede
bloqueado.
Anaqueles de Puertas de un Galón No
Ajustables(enalgunosmodelos)
Para su retiro: Levante el anaqueles de forma recta y luego
empuje hacia afuera.
Para su reinstalación: ubicar el anaquel a los soportes
moldeados de la puerta y empuje hacia abajo hasta que quede
bloqueado.
No todas las funciones corresponden a todos los modelos.
Estante Quick Shelf (enalgunosmodelos)
Este estante se divide a
la mitad y se desliza por
debajo de sí mismo para
almacenar productos altos
en el estante de abajo.
Este estante puede ser
retirado y reemplazado o
reubicado.
NOTA: La mitad trasera del
Estante Quick Space no es
ajustable.

49-1000107 Rev. 0 11
OPERACIÓN DEL REFRIGERADOR: Cajones
Cajones
Cajones con Clima Regulado
Mantenga las frutas y verduras organizadas en
compartimientos separados para un fácil acceso. El exceso de
agua que se puede acumular en la parte inferior de los cajones
o debajo de los mismos se deberá limpiar.
Para retirar el cajón:
Deslice el cajon hacia fuera de la posición de detención,
levante el mismo hasta la posición de detención y empuje
hacia delante.
Cajón de Refrigerios Flotante (enalgunosmodelos)
Esta cajón se podrá mover a la ubicación más útil para las
necesidades de su familia.
Para retirar el cajón, deslice la misma hacia fuera hasta la
posición de detención, levante la misma hasta la posición de
detención y retírela.
Cajón de Ancho Completo(enalgunosmodelos)
Para retirar el cajon:
1. Empuje el cajón hacia fuera hasta su posición de detención.
2. Levante la parte frontal del cajón hacia arriba y hacia
afuera.
Para reinstalar el cajón:
1. Primero coloque la parte trasera del cajón y gire el
frente del mismo hacia abajo para que se apoye en las
correderas.
2. Empuje el cajón hacia adentro hasta la posición correcta.
Retiro y Reinstalacion del Divisor del Cajón
Para su retiro:
1. Empuje el cajón hacia fuera hasta la posición de detención.
2. Deslice el divisor de cajones hacia la derecha para liberar el
mismo de la cajón.
Para su Reinstalacion:
Invierta los pasos 1 y 2 para reinstalar el divisor del cajón.
No todas las funciones corresponden a todos los modelos.
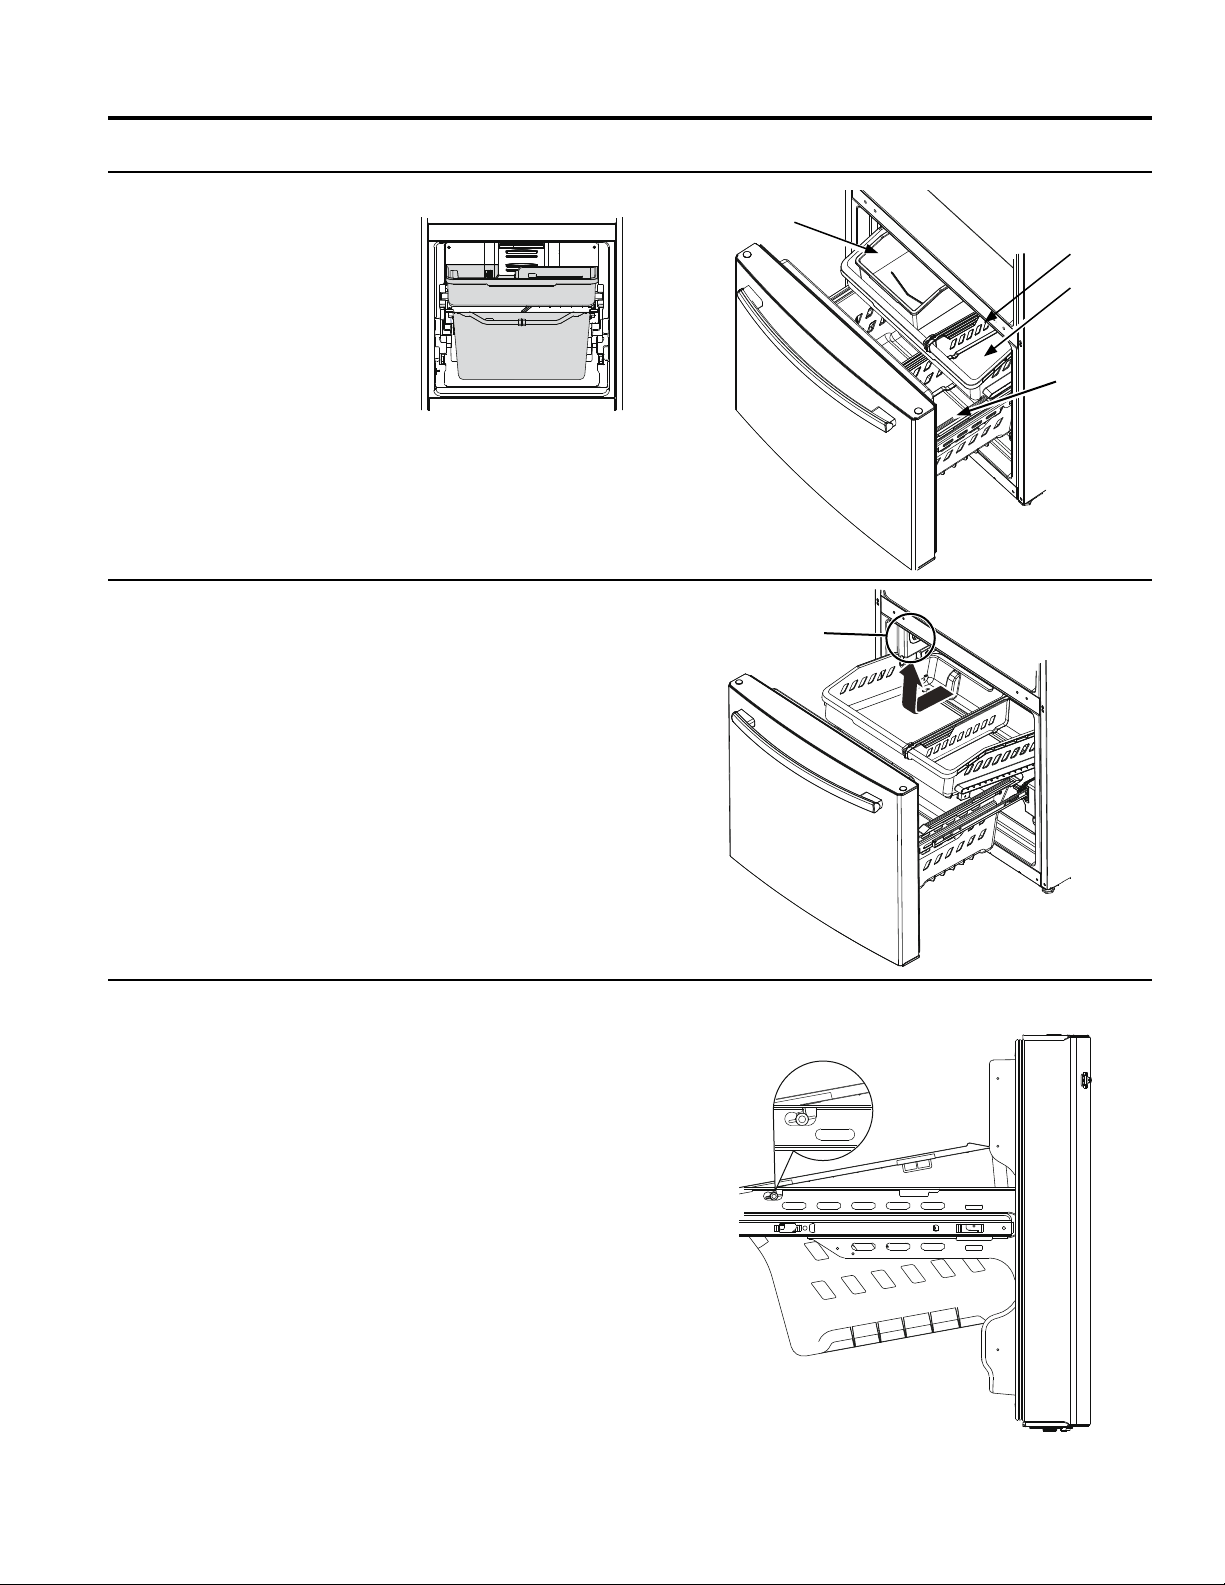
12 49-1000107 Rev. 0
OPERACIÓN DEL REFRIGERADOR: Cajón del congelador
Cajón del congelador (enalgunosmodelos)
CANASTAS DEL CONGELADOR
1. Una cubeta en la canasta superior
(enalgunosmodelos)
2. Una canasta superior.
3.Unacanastainferior(condivisor–
en algunos modelos)
NOTA: No supere el borde al llenar
las canastas. Esto podrá hacer que
las canastas se inclinen o atasquen al
abrirlas o cerrarlas.
Retiro de la Canasta Superior
Para retirar la canasta superior en los modelos con cajón
de congelador:
1. Empuje el cajón hacia fuera hasta su posición de detención.
2. Levante la canasta para liberarla de las correderas.
Al reubicar la canasta, asegúrese de que quede montada
sobre los rieles laterales y sobre las correderas de la canasta
inferior.
NOTA: Siempre asegúrese de cerrar totalmente esta canasta.
Retiro de la Canasta Inferior
Para retirar la canasta inferior en los modelos con cajón
de congelador:
1. Abra el cajón inferior del congelador hasta que se detenga.
2. Retire la canasta superior del congelador.
3. La canasta inferior del congelador se apoya sobre las
lengüetas internas de las correderas del cajón.
4. Levante el frente de la canasta y empuje hacia delante.
5. Libere el perno de la ranura para retirar la canasta.
Al reinstalar la canasta inferior, inclínela hacia atrás y
asegure que los pernos entren en las ranuras de los soportes,
deslice hacia atrás y dejarla en posición horizontal.
NOTA: Siempre asegúrese de que la canasta quede apoyada
en las lengüetas de los soportes, antes de volver a deslizar el
cajón en el congelador.
No todas las funciones corresponden a todos los modelos.
Las funciones y
apariencia pueden variar.
1
2
3
Hielera(en
algunos modelos)
Las luces LED están
ubicadas sobre ambos
lados del congelador.
Canasta
Superior
Divisor de
la Canasta
Superior
Canasta
Inferior
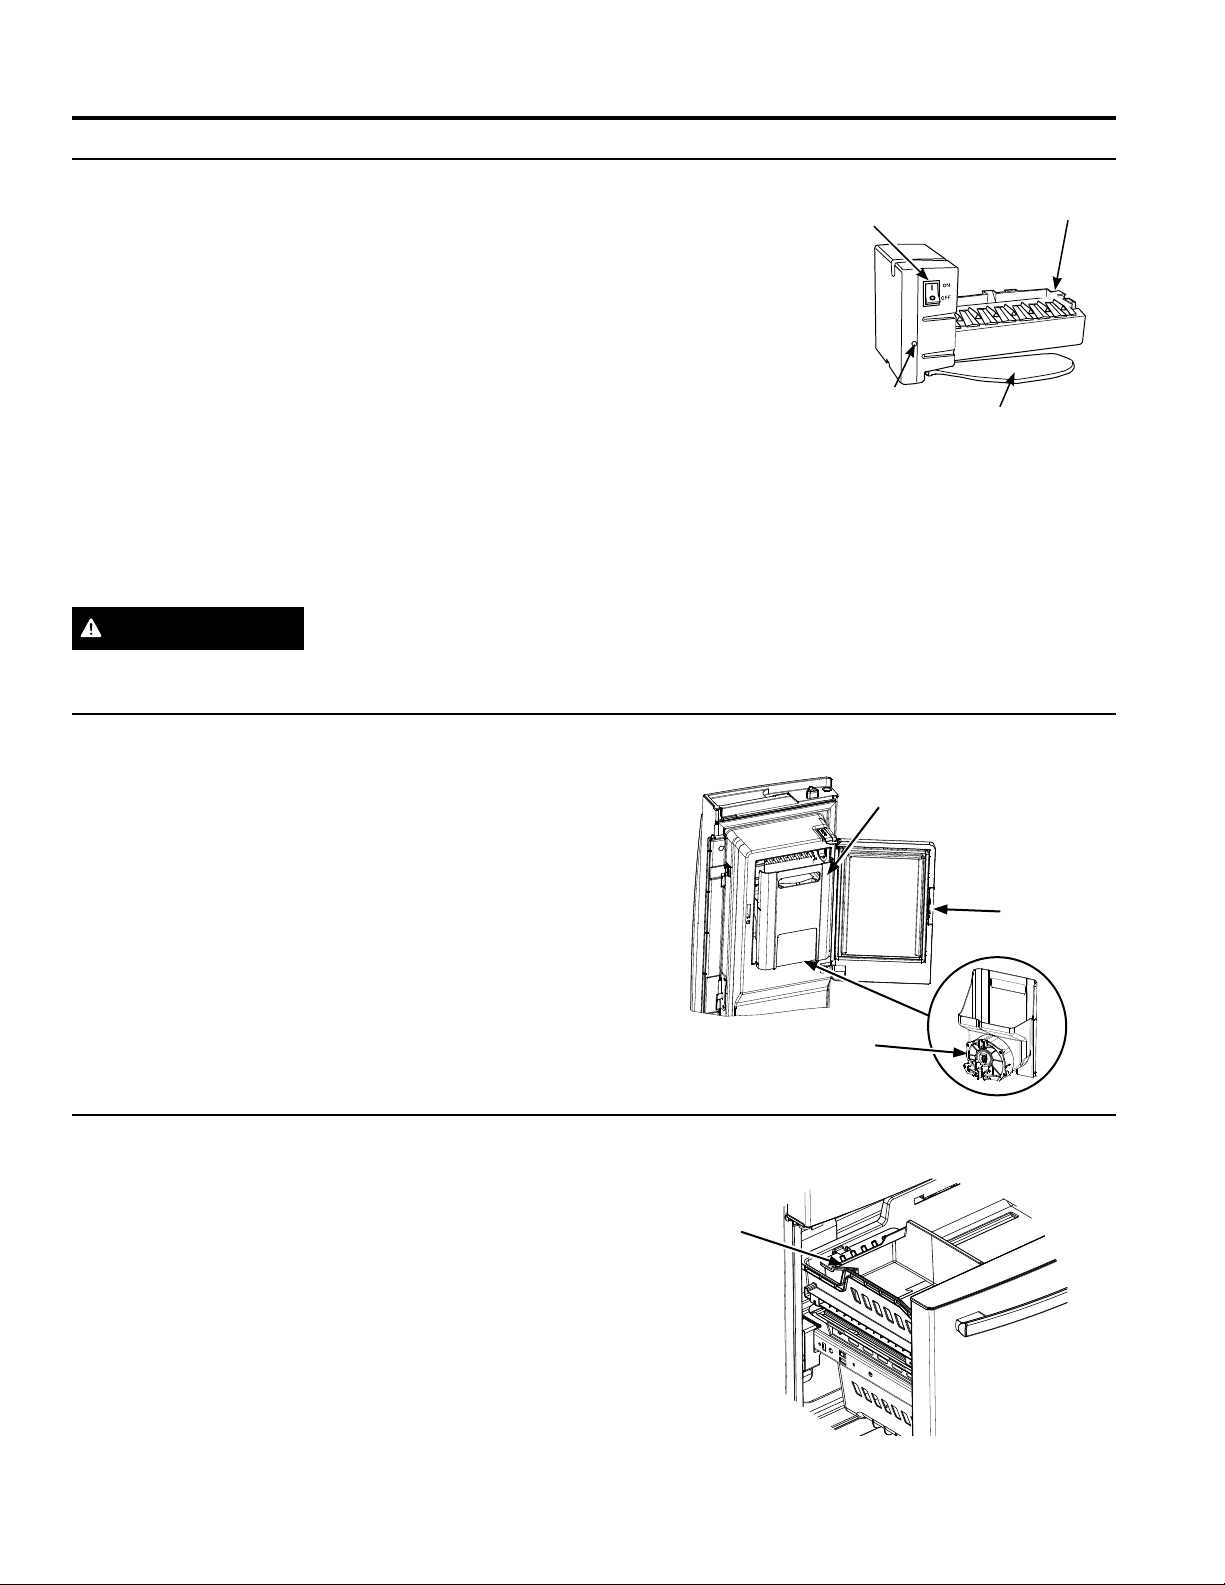
49-1000107 Rev. 0 13
OPERACIÓN DEL REFRIGERADOR: Fabrica de Hielos Automática
Fabrica de Hielos Automática
Puede llevar entre 12 y 24 horas que un refrigerador recién instalado comience a fabricar hielo.
Fabrica de hielos automática (enalgunosmodelos)
La máquina de hielos producirá siete cubos por ciclo, y
aproximadamente entre 100 y 130 cubos en un período de 24
horas, dependiendo de la temperatura del compartimiento del
congelador, la temperatura ambiente, la cantidad de veces que
se abra la puerta y otras condiciones de uso.
Si el refrigerador se utiliza antes de realizar la conexión del
agua a la máquina de hielos, configure el interruptor en la
posiciónOFF(Apagado).
Cuando el refrigerador haya sido conectado al suministro
deagua,ajusteelinterruptordecorrienteenlaposiciónON
(Encendido).
La máquina de hielos se llenará de agua cuando se enfríe y
lleguealos15°F(–10°C).Puedellevarentre12y24horas
que un refrigerador recién instalado comience a fabricar hielo.
Es posible que escuche un zumbido cada vez que la máquina
de hielos se llene de agua.
Descarte las primeras cantidades de hielo para permitir que
el suministro de agua se
despeje.
Asegúrese de que nada
interfiera con la extensión del
interruptor de energía.
Cuando la cubeta de hielos
se llene hasta el nivel del
interruptor de energía, la
máquina de hielos dejará de
producir hielo. Es normal que
varios cubos queden juntos.
Si el hielo no se usa con frecuencia, los cubos de hielo viejos
se volverán turbios, con sabor rancio y su tamaño se reducirá.
NOTA: En hogares con un nivel de presión inferior a la normal,
es posible que escuche que la válvula de agua de la máquina
de hielos realice varios ciclos para producir una cantidad de
hielo.
Para los Modelos de Refrigeradores con Máquina de Hielos en la Puerta
Hielera y Dispensador
• Abra la puerta de la caja de hielos que está dentro de la
puerta izquierda.
• Empuje hacia arriba y afuera la hielera en la puerta del lado
izquierdo para retirar la misma del compartimiento.
• Para reinstalar la hielera, ajuste la misma a los soportes de la
guía y empuje hasta que la hielera se ubique correctamente.
• Si la hielera no se puede reinstalar, dé 1/4 de giro a la
horquilla de la hielera en dirección de las manecilas del reloj
• La máquina de hielos puede ser encendida y apagada
usandolapantalla(consultelasecciónControlesenlas
páginas 6 y 7).
Para los Modelos de Refrigeradores con Máquina de Hielos en el Compartimiento del
Congelador
Algunos modelos poseen una máquina de hielos instalada
en el compartimiento del congelador. Para aquellos modelos
preparados para uso con máquina de hielos, puede adquirir
elKitIM4D.VisitenuestrositiowebenGEAppliances.com
ollameaGEAppliancesPartsandAccessories(Piezasy
Accesorios de GE Appliances) al 877.959.8688.
Hay acumulación de hielos en el compartimiento del
congelador, ubicado del lado izquierdo de la canasta superior.
Empuje la canasta superior hacia adelante para retirar la
hielera.
PRECAUCIÓN
Para minimizar el riesgo de lesiones personales, evite el contacto con las partes móviles del
mecanismo eyector o con el elemento de calefacción que libera los cubos. No coloque los dedos ni las manos en el mecanismo
de la máquina de hielos automática mientras el refrigerador esté enchufado.
Horquilla de la hielera
Traba
Hielera
Máquina de
hielos
Interruptor de
Energía
Interruptor del
Encendido
Luz Verde
de Corriente
Hielera

14 49-1000107 Rev. 0
Cuidado y limpieza
Limpieza de la Parte Externa
Los paneles de acero inoxidable, manijas de las
puertas y componentes.
No use cera, limpiametales, blanqueadores para
electrodomésticos ni productos que contengan cloro sobre
partes de acero inoxidable.
El acero inoxidable se puede limpiar con un limpiador de acero
inoxidable disponible comercialmente. Un limpiador de acero
inoxidable con rociador funciona mejor.
Partes plásticas con acentos de plata.
Lave las partes con jabón u otros detergentes suaves. Limpie
con una esponja, una tela húmeda o toallas de papel.
No use estropajos, limpiadores en polvo, blanqueadores
ni limpiadores que contengan blanqueador, ya que estos
productos pueden rayar y debilitar el acabado de la pintura.
Si es necesario limpiar la bandeja antiderrames, use un
eliminador de sarro.
Limpieza de la Parte Interna
Desenchufe el refrigerador antes de limpiar.
Si esto no resulta práctico, exprima el exceso de humedad
para eliminarlo de la esponja o tela al limpiar alrededor de los
interruptores, luces o controles.
Use un pulidor de cera para electrodomésticos en la superficie
interna entre las puertas.
Use agua caliente y solución de bicarbonato de sodio —
aproximadamenteunacucharasopera(15ml.)debicarbonato
desodioparauncuartodegalón(1litro)deagua.Estolimpiay
neutraliza los olores. Enjuague y seque.
Detrás del Refrigerador
Tenga cuidado al alejar el refrigerador de la pared. Cualquier
tipo de recubrimiento o acabado de piso puede ser dañado,
particularmente los recubrimientos acolchados y aquellas con
superficies con relieves.
Levante las patas niveladoras ubicadas en la parte frontal
inferior del refrigerador.
Empuje el refrigerador hacia afuera de forma recta y regrese
el mismo a su posición empujándolo hacia dentro. Mover el
refrigerador hacia una ubicación lateral podrá ocasionar daños
sobre el recubrimiento del piso o el refrigerador.
Baje las patas niveladoras hasta que toquen el piso
Al volver a empujar el refrigerador, asegúrese de que no
atraviese el cable de corriente ni la tubería de suministro
de agua.
Si estará de vacaciones o ausente por tiempo prolongado,
retire la comida y desenchufe el refrigerador. Limpie la parte
interna con una solución de bicarbonato de sodio de una
cucharasopera(15ml)debicarbonatodesodioparauncuarto
degalón(1litro)deagua.Dejelaspuertasabiertas.
Si la temperatura puede llegar a estar por debajo del límite
de congelación, solicite a un técnico calificado que drene el
sistema de suministro de agua a fin de prevenir daños graves
sobre la propiedad debido a una inundación.
1)Apagueelrefrigerador(pág.6y7)odesenchufeel
refrigerador.
2) Vacíe la hielera
3) Cierre el suministro de agua
Si cierra el suministro de agua, apague la máquina de
hielos (pg. 13).
Al regresar de sus vacaciones:
1) Reemplace el filtro de agua.
2) Deje correr 2 galones de agua a través del dispensador de
aguafría(aproximadamente5minutos)afindeeliminarel
aire del sistema.
Preparación para las Vacaciones
Preparación para la Mudanza
Asegure todos los artículos tales como estantes y cajones,
pegando los mismos de forma segura en sus respectivos
lugares a fin de evitar daños.
Al usar un carro manual para mover el refrigerador, no deje
que la parte frontal ni la parte trasera descansen contra el
carro manual. Esto podría dañar el refrigerador.
Lleve el mismo sólo sobre los costados del refrigerador.
Asegúrese de que el refrigerador permanezca en una posición
erguida durante el movimiento.
PRECAUCIÓN
No limpie estantes de vidrio ni
tapas con agua caliente cuando estén fríos. Los estantes de
vidrio y las tapas se pueden romper si son expuestos a cambios
de temperatura repentinos o impactos tales como golpes o
caídas. El vidrio templado está diseñado para destruirse en
pequeñas piezas en caso de rotura.
CUIDADO Y LIMPIEZA
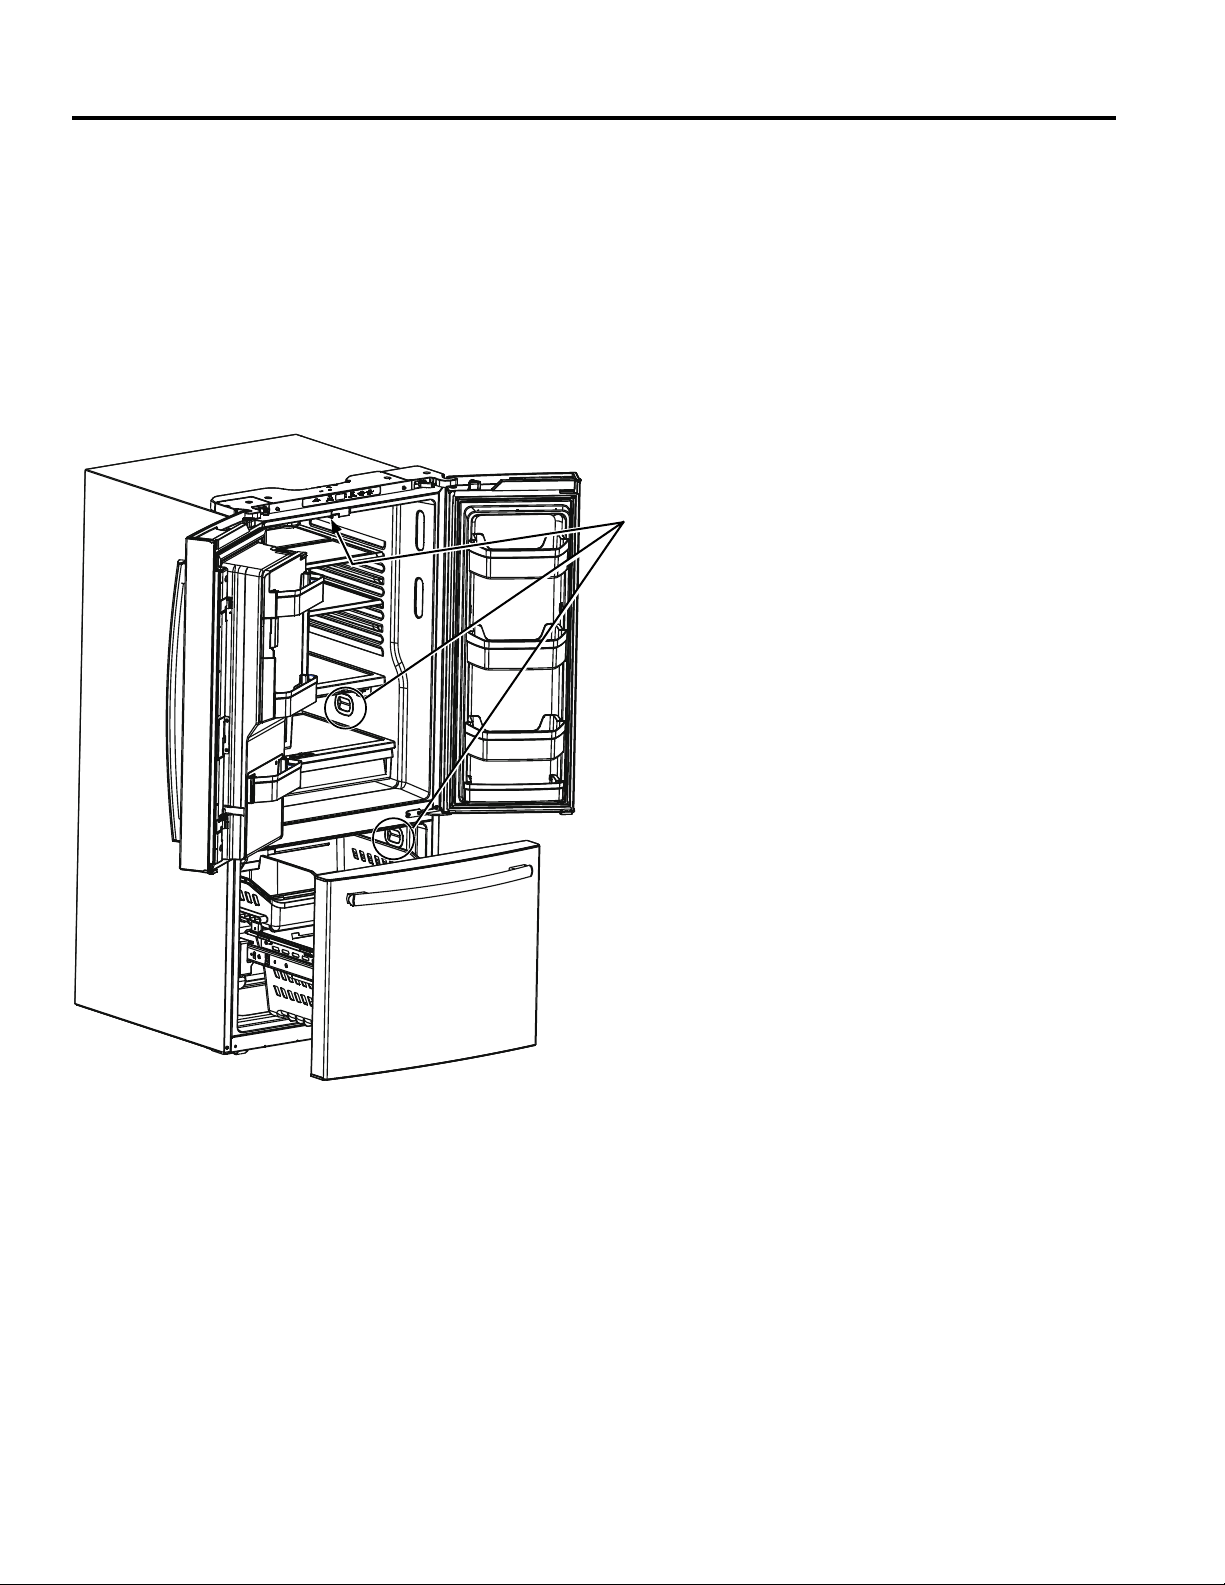
49-1000107 Rev. 0 15
CUIDADO Y LIMPIEZA
Cuidado y limpieza
Reemplazo de las Luces
El compartimiento de refrigerador cuenta con iluminación LED
en la parte superior central y del lado izquierdo y derecho
sobre las cajones con clima regulado en los modelos con
puerta francesa. La iluminación LED está ubicada en la parte
superior del compartimiento de refrigerador de los modelos con
una sola puerta.
Las luces LED también están ubicadas en la parte superior de
los costados izquierdo y derecho del congelador en todos los
modelos. Será necesario que un técnico autorizado reemplace
la luz LED.
Si es necesario reemplazar el ensamble, comuníquese al
servicio técnico al 800.544.4780.
LucesLED(las
ubicaciones
pueden variar por
modelo)
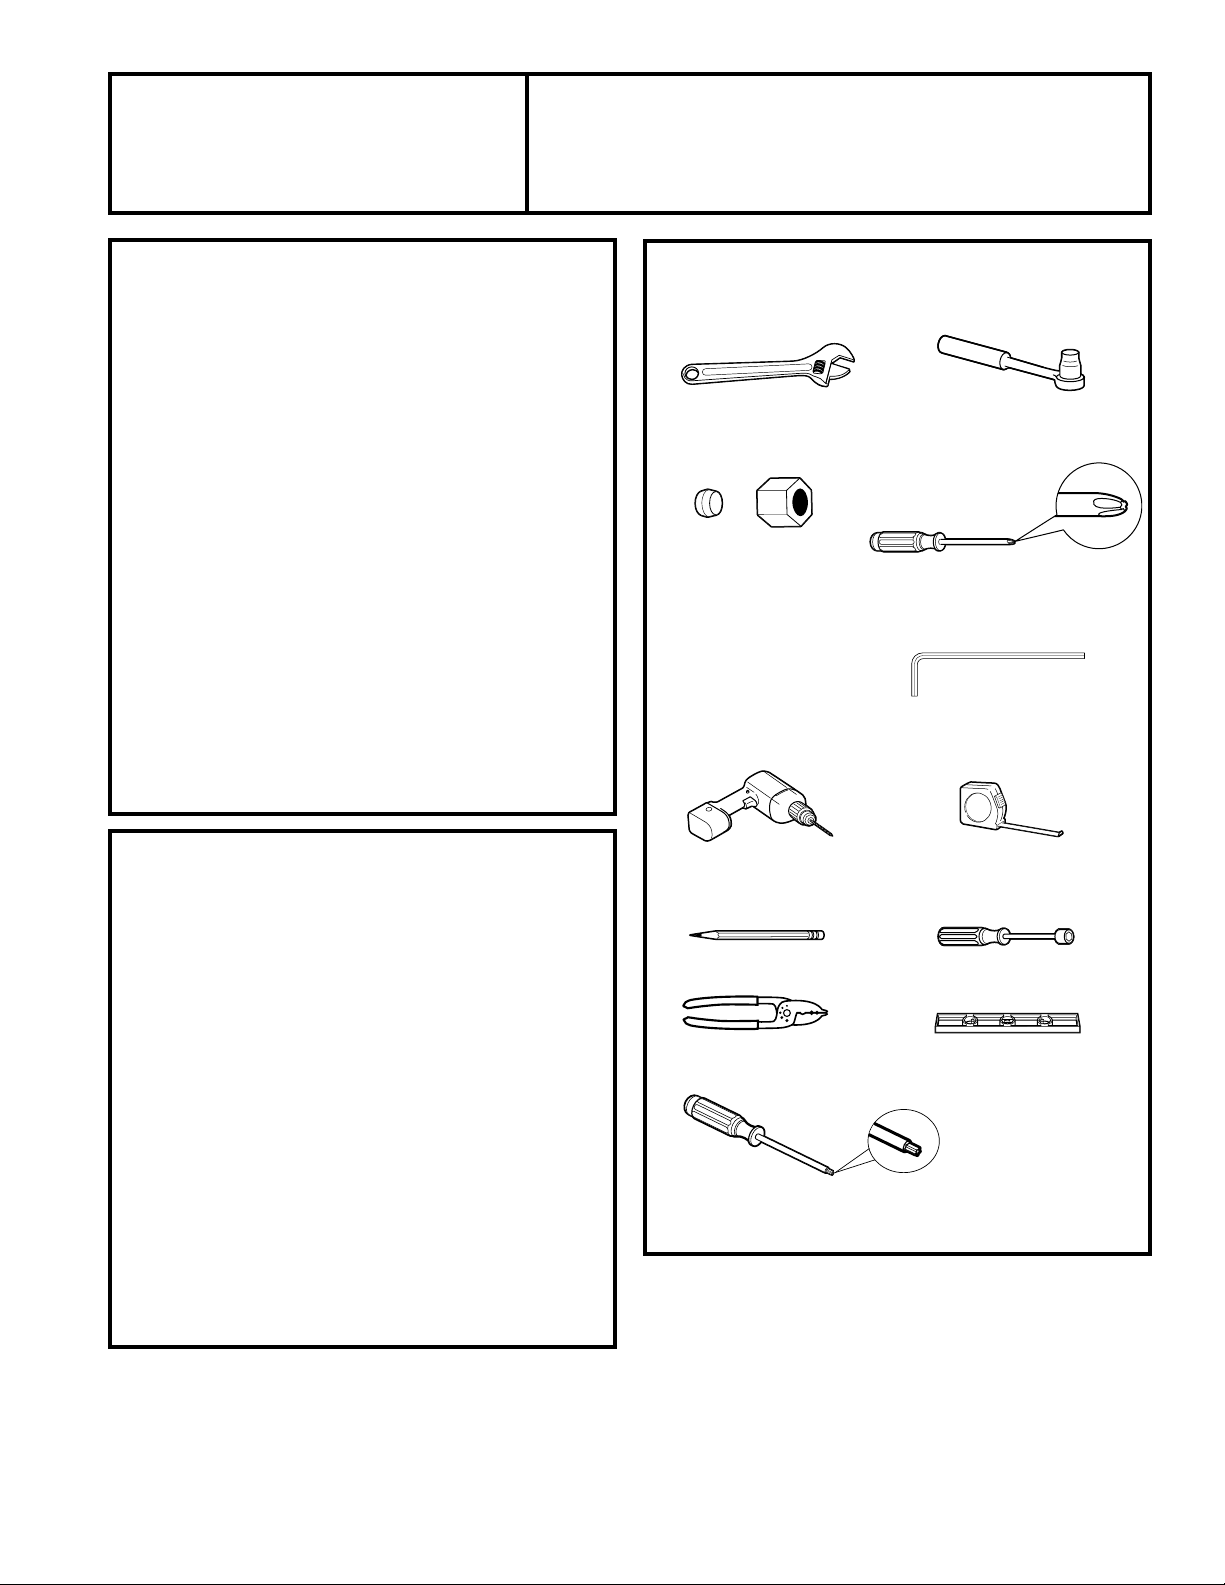
16 49-1000107 Rev. 0
INSTRUCCIONES DE INSTALACIÓN
Instrucciones
de Instalación
Refrigerador
HERRAMIENTAS QUE PUEDE
NECESITAR
ANTES DE COMENZAR
Lea estas instrucciones en su totalidad y
atentamente
•
IMPORTANTE — Cumpla con todos los
códigos y ordenanzas gubernamentales. Guarde estas
instrucciones para uso del inspector local.
• NotaparaelInstalador–Asegúresedequeel
Comprador guarde estas instrucciones.
• NotaparaelConsumidor–Guardeestasinstrucciones
para referencia futura.
• Niveldehabilidad–Lainstalacióndeestedispositivo
requiere un nivel básico de habilidades mecánicas.
• TiempodeInstalación–InstalacióndelRefrigerador
20 minutos
Instalación del Suministro de
Agua - 30 minutos
• Es responsabilidad del instalador realizar una
instalación adecuada.
• Si se producen fallas en el producto debido a una
instalación inadecuada, la Garantía no cubrirá las
mismas.
PREPARACIÓN
CÓMO MOVER EL REFRIGERADOR EN UN
ESPACIO INTERNO
Si el refrigerador no pasa por una puerta, la puerta
del refrigerador y el cajón del congelador podrán ser
retirados.
• Para retirar la puerta del refrigerador, consulte el Paso
1enlasecciónretirodelaspuertasfrancesas(pag.
19).
• Para retirar el cajón del congelador, consulte la sección
sobre Cómo Retirar el Cajón del Congelador.
SUMINISTRO DE AGUA A LA MAQUINA DE
HIELOS Y AL DISPENSADOR
Si el refrigerador cuenta con una máquina de hielos,
deberá ser conectada al suministro de agua fría. Un kit
desuministrodeaguadeGEAppliances(contubería,
válvula de cierre, uniones e instrucciones) está disponible
por un costo adicional a nivel minorista, visitando
nuestrositiowebenGEAppliances.com o en Parts and
Accessories(PiezasyAccesorios),877.959.8688.
Llave Ajustable
Tuerca de Compresión
de Diámetro Externo de
1/4” y Abrazadera de
Refuerzo(manga)
Sólo en modelos con
máquina de hielos
Destornillador con Cabeza
Phillips
Llave de Tubo /
Destornillador de 3/8” y
5/8”
Llaves Allen de 3/32”,
1/8” y 3/16”
Lápiz
Broca de 1/8” y Taladro
Eléctrico o Manual
Cinta métrica
Llave de Tuercas de 1/4”
Cortacables
Nivel
Llave Torx T20
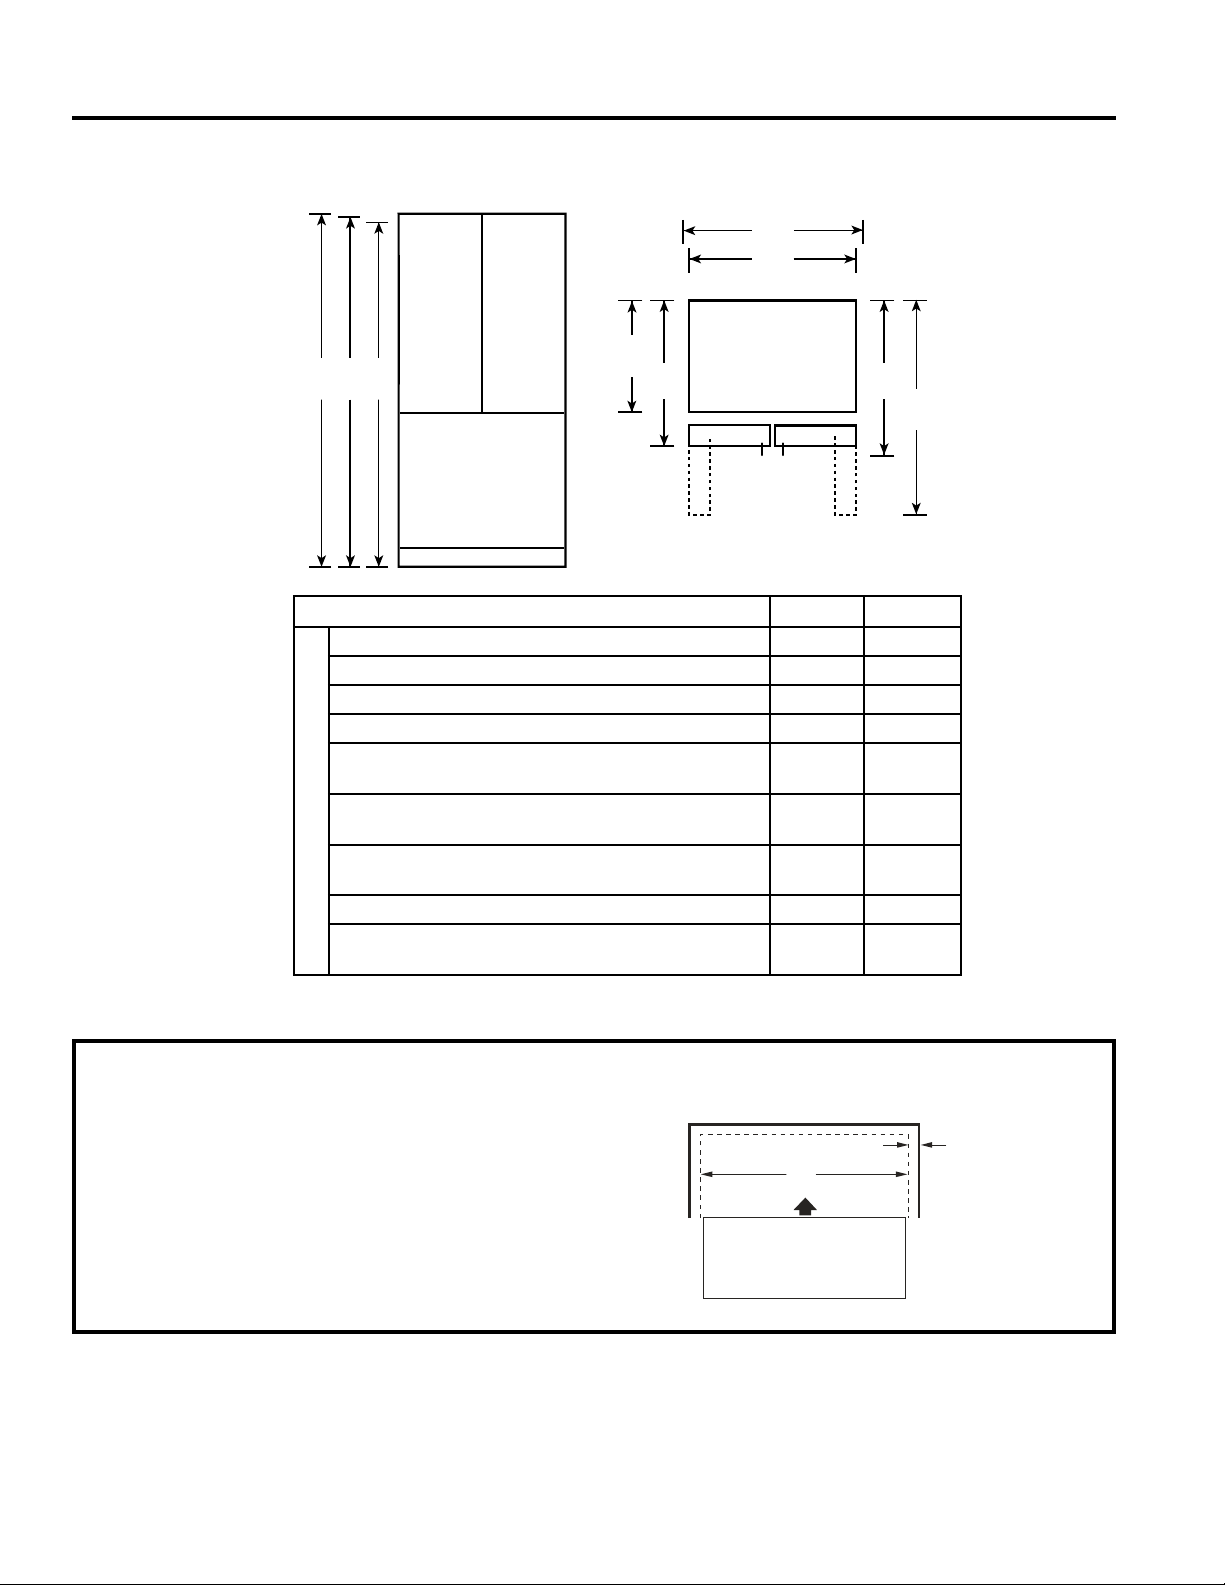
49-1000107 Rev. 0 17
INSTRUCCIONES DE INSTALACIÓN
Instrucciones de Instalación
MIDA LA ABERTURA DEL GABINETE DE ACUERDO CON EL ANCHO
DEL REFRIGERADOR
Mida el ancho de la abertura del gabinete donde el refrigerador será
colocado,“B”.Asegúresedetenerencuentacualquierpartesaliente
de la mesada, el grosor del rodapié y cualquier claro deseado.
Elancho,“B”,nodeberíaserinferioraentre33”y36”(83.3cm-
91.4cm)(dependiendodelmodelo).Elrefrigeradorseráubicado
aproximadamente en el medio de esta abertura.
El Grosor
del Rodapié
o el Espacio
Saliente de
la Mesada
(CualquieraSea
Más Grande)
Además de
Cualquier Claro
Deseado
DIMENSIONES DEL ELECTRODOMÉSTICO
H
E
D
G
F
I
A
B C
Back Wall
Front
Right
Side
REFRIGERATOR
B
Pared Trasera
Lado
Derecho
REFRIGERADOR
Frente
XNE25J XFE26J
Alturahastalapartesuperiordelapuerta(pulg.)A 69-7/8 69-7/8
Alturahastalapartesuperiordelabisagra(pulg.)B 69-3/4 69-3/4
Alturahastalapartesuperiordelgabinete(pulg.)C 68-5/8 68-5/8
Profundidaddelgabinetesinpuerta(pulg.)D 30-5/8 29
Profundidad del gabinete sin la manija de la puerta
(pulg.)E
35 33-7/8
Profundidad del gabinete con la manija de la puerta
(pulg.)F
37-1/2 36-3/8
Profundidad con la puerta de limentos frescos
abiertaa90°(pulg.)G
47-3/4 48-3/4
Ancho(pulg.)H 32-3/4 35-5/8
Ancho con la puerta abierta a 90° con la manija de la
puerta(in.)I
40-7/8 38-5/8
DIMENSIONES TOTALES
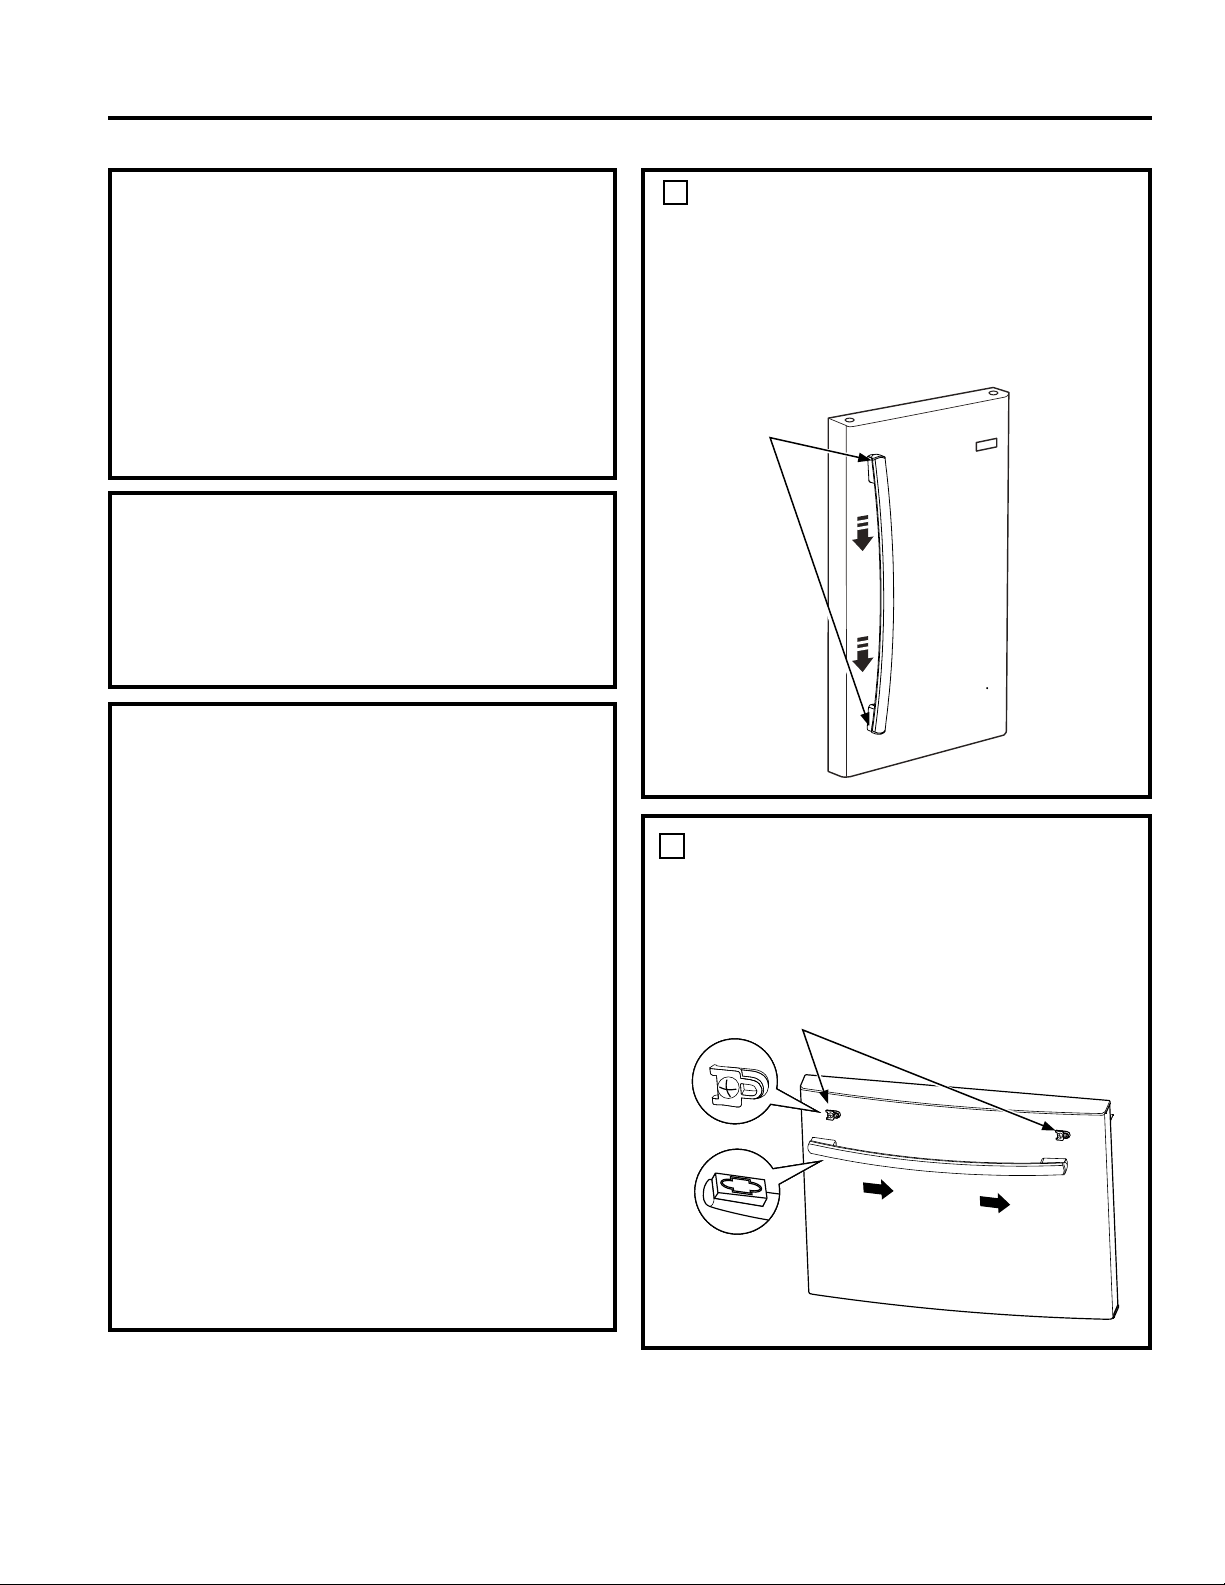
18 49-1000107 Rev. 0
INSTRUCCIONES DE INSTALACIÓN
UBICACIÓN DEL REFRIGERADOR
• No instale el refrigerador donde la temperatura llegue a
serinferioralos60ºF(16ºC),yaquenoseactivarácon
la frecuencia necesaria para mantener las temperaturas
apropiadas.
• No instale el refrigerador donde la temperatura sea
superioralos100ºF(37ºC),yaquenofuncionaráde
forma correcta.
• No instale el refrigerador en una ubicación expuesta al
agua(lluvia,etc.)oencontactodirectoconlaluzsolar.
• Instale el mismo en un piso lo suficientemente fuerte
como para soportarlo completamente cargado.
ESPACIO NECESARIO
Deje el siguiente espacio para facilitar la instalación, una
adecuada circulación de aire y plomería y conexiones
eléctricas.
Costados 1/8”(3mm)
Partesuperior1”(25mm)Gabinete/TapadelaBisagra
ParteTrasera 2”(50mm)
Instrucciones de Instalación
INSTALACIÓN DEL REFRIGERADOR
NOTAS IMPORTANTES
Este refrigerador sin las manijas varía entre 33-7/8” y
35-1/4”(86cm-89cm),dependiendodesumodelo
(consulteladimensiónEenlapáginaanterior).Laspuertas
y pasillos que aparecen en el camino hasta la ubicación
delainstalacióndebentenerporlomenos36”(91.4cm),
para poder dejar las puertas adheridas al refrigerador
mientras lo transporta hasta la ubicación de la instalación.
Silospasillostienenmenosde36”(91.4cm),laspuertas
del refrigerador se podrán rayar y dañar fácilmente. Las
puertas pueden ser retiradas para que el refrigerador se
pueda mover de forma segura en áreas internas.
• Si es necesario retirar la puertas, consulte la sección de
Retiro de las Puertas Francesas.
• Si es necesario retirar la puerta del congelador, consulte
la sección de Retiro del Cajón del Congelador.
• Si NO es necesario retirar las manijas ni la puerta, deje
la cinta y todo el embalaje en las puertas hasta que el
refrigerador se encuentre en su ubicación final. Una vez
ensulugar,instalelasmanijasdelapuerta(consulteel
Paso 1 y 2).
• RETIRO DE LA PLATAFORMA: Incline el refrigerador
hacia cada lado para retirar la plataforma.
• NOTA: Use un carro manual para transportar el
refrigerador. Coloque el refrigerador en el carro
manual, apoyando un costado contra este último.
RecomendamosenfáticamentequeDOSPERSONAS
realicen el traslado y completen la instalación.
INSTALE LA MANIJA(S) DE
ALIMENTOS FRESCOS
Adhiera la manija a los tensores de montaje,
alineando las ranuras de la manija con los tensores
de montaje. Deslice la manija hacia abajo, hasta que
escucheelsonidodel“clic”.
Siga el mismo procedimiento para ambas puertas.
1
INSTALE LA MANIJA DEL
CONGELADOR
Adhiera la manija a los tensores de montaje, alineando
las ranuras de la manija con los tensores de montaje.
Deslice la manija hacia la derecha, hasta que escuche
elsonidodel“clic”.
2
Tensores
de Montaje
Tensores
de Montaje
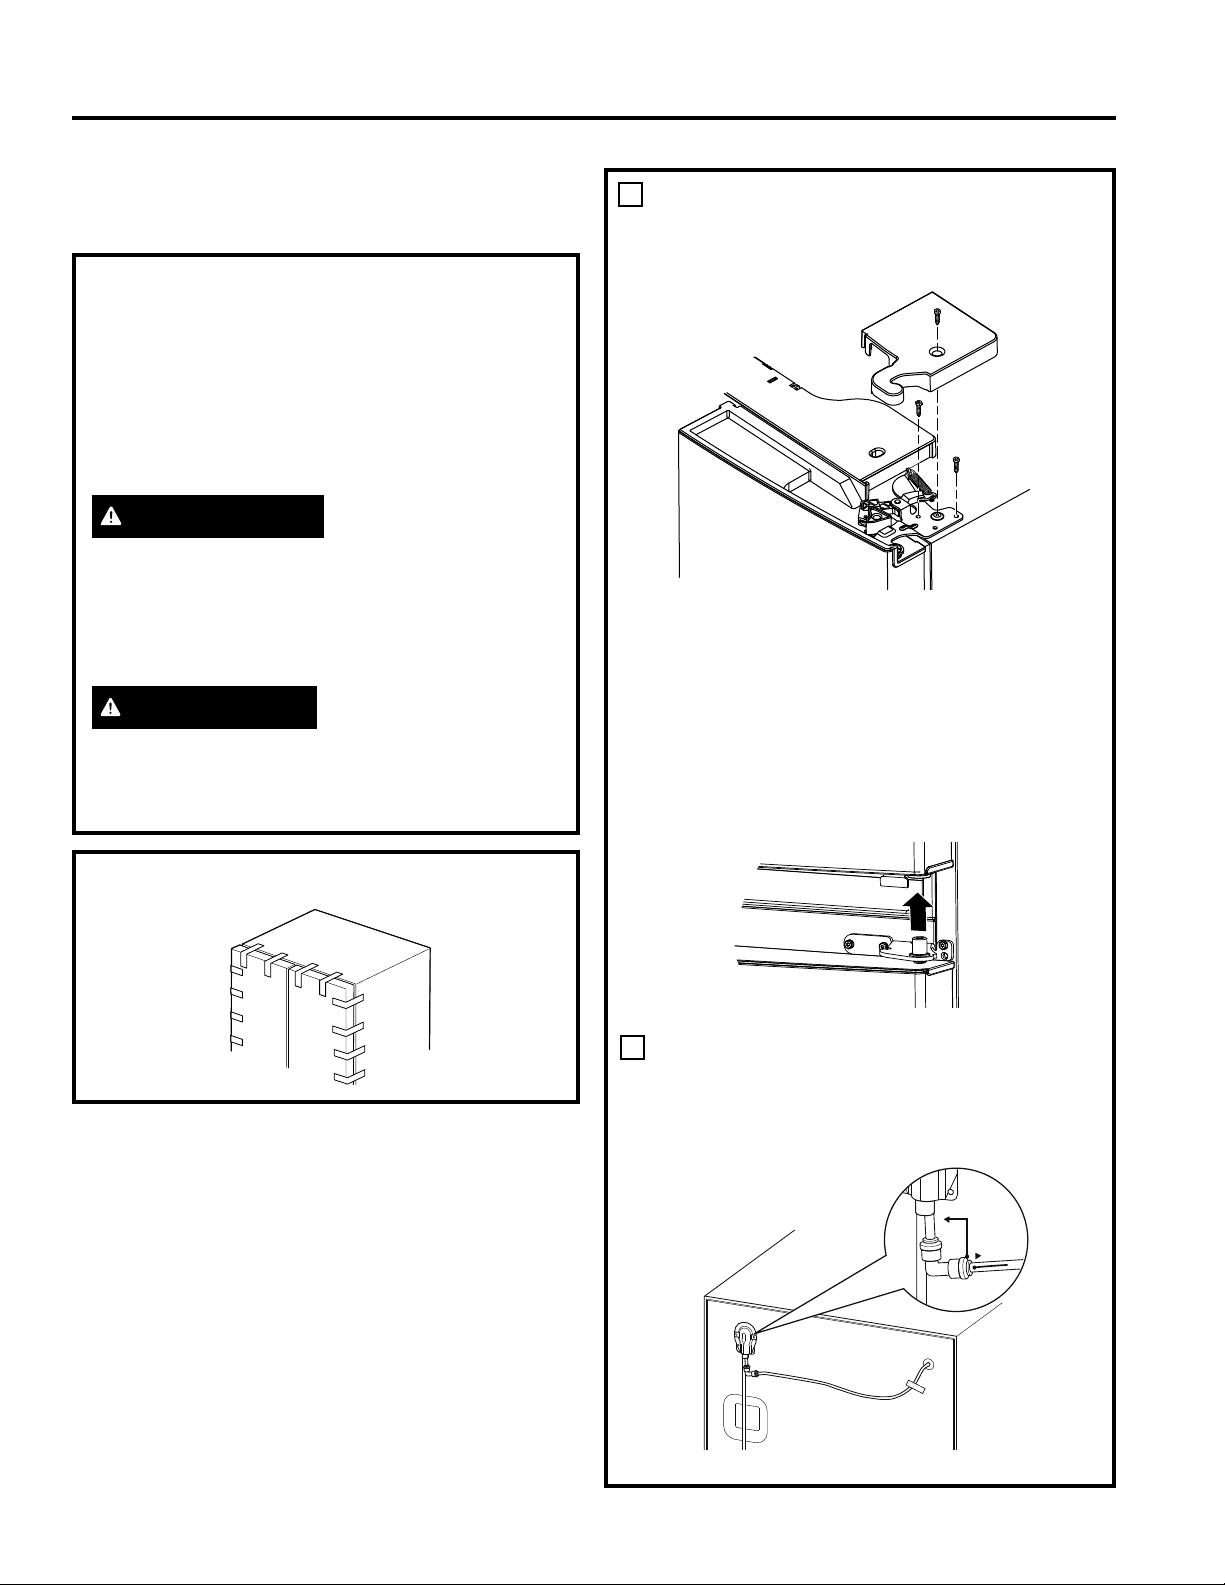
49-1000107 Rev. 0 19
INSTRUCCIONES DE INSTALACIÓN
Instrucciones de Instalación
RETIRO DE LAS PUERTAS
FRANCESAS
INSTALACIÓN DEL REFRIGERADOR (Cont.)
NOTAS IMPORTANTES
Al retirar las puertas francesas:
• Lea las instrucciones completamente antes de
comenzar.
• Las manijas están incluidas dentro del refrigerador.
• Coloque los tornillos en sus partes relacionadas, a fin
de evitar su uso en los lugares equivocados.
• Cuente con una superficie de trabajo donde las puertas
no se rayen.
PRECAUCIÓN
Riesgo al levantar la
puerta. Si es levantada por una sola persona, podrían
ocasionarse lesiones. Solicite ayuda al sostener, mover o
levantar las puertas del refrigerador.
NOTA: Al retirar la puerta, a fin de evitar daños sobre
la misma y la parte electrónica, coloque con cuidado la
puerta en una ubicación adecuada.
ADVERTENCIA
A fin de eliminar el riesgo de descarga eléctrica o lesión
durante la instalación, primero deberá desenchufar el
refrigerador antes de proceder. Si no se siguen estas
instrucciones, se podrá producir una descarga eléctrica.
Mantenga las puertas cerradas con cinta adhesiva.
1
RETIRO DE LA PUERTA DERECHA
A. Retire la tapa de la bisagra en la parte superior
de la puerta de refrigerador derecha, retirando el
tornillo y usando un destornillador Phillips.
B. Usando una llave de tubo/ destornillador de 5/16”,
retire los tornillos que aseguran la bisagra superior
del gabinete. Levante el soporte de la bisagra
hacia arriba para liberar el perno de la bisagra del
encaje en la parte superior de la puerta.
C. Retire la cinta de la puerta derecha e incline la
puerta lejos del gabinete. Levante la puerta y retire
la misma del perno de la bisagra central.
D. Ajuste la puerta en una superficie antirayaduras
con la parte interna hacia arriba.
2
RETIRO DE LA PUERTA IZQUIERDA
A. Para Modelos con Hielo y Agua Únicamente:
Desenchufe la conexión del agua desde la parte
trasera del refrigerador y retire toda la cinta que
une la tubería de agua con el refrigerador.
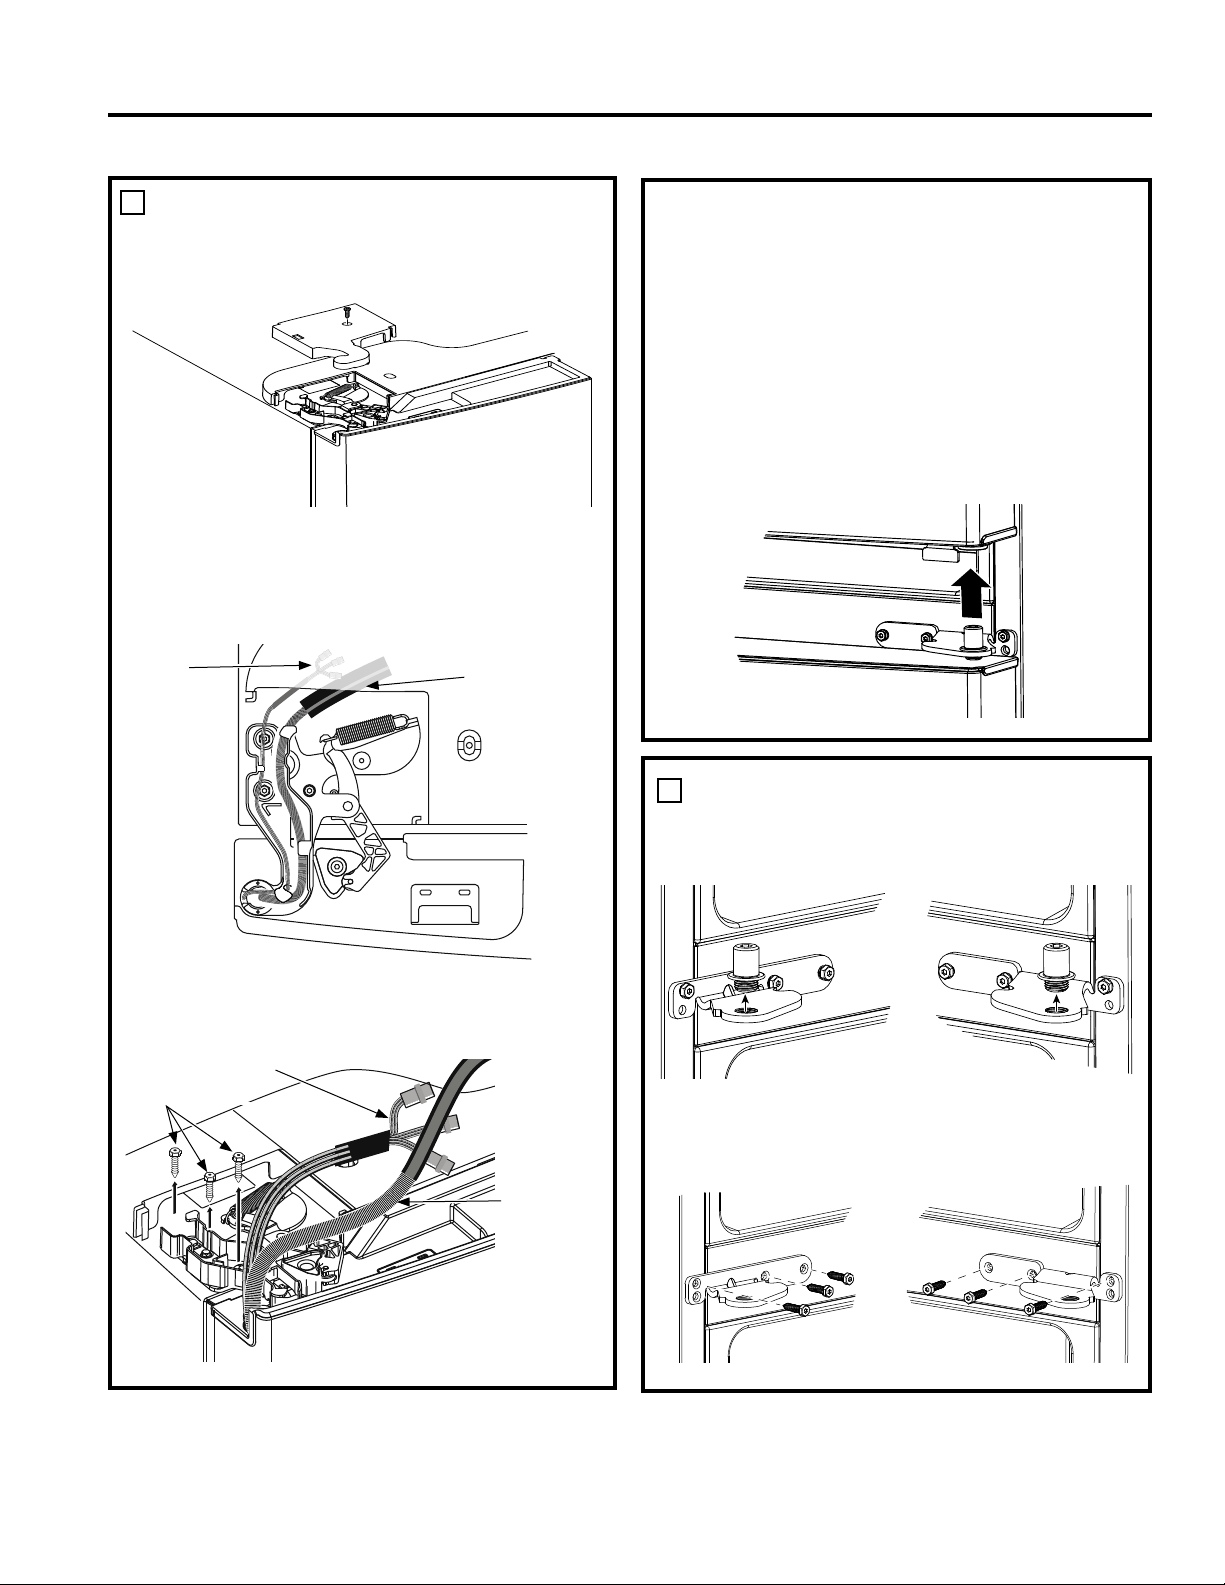
20 49-1000107 Rev. 0
INSTRUCCIONES DE INSTALACIÓN
3
RETIRO DE LAS BISAGRAS CENTRALES
Y DE LOS SOPORTES
A. Usando una llave Allen de 1/4”, retire los 2 pernos
de la bisagra desde los soportes de la bisagra
B. Usando una llave de tubo/ destornillador de 5/16”,
retire los tornillos que aseguran los soportes de la
bisagra central al gabinete.
2
RETIRO DE LA PUERTA IZQUIERDA (cont.)
B. Retire la tapa de la bisagra en la parte superior
de la puerta de refrigerador izquierda, retirando el
tornillo con un destornillador Phillips.
C. Desenchufe los conectores de 3 cables y mueva
estos últimos, hasta que pueda ver los tornillos
que sostienen la bisagra. Para Modelos con Hielo
y Agua Únicamente: empuje la tubería de agua
con mucho cuidado
D. Usando una llave de tubo/ destornillador de 5/16”,
retire los tornillos que aseguran
Conectores
de los
Cables
Tubería de Agua
(Modeloscon
Hielo y Agua
Únicamente)
Conectores
de los cables
Tornillos
Tubería
de agua
(Modelos
con Hielo
y Agua
Únicamente)
Para Modelos que NO son con Hielo y Agua
Únicamente: levante la bisagra de forma recta hacia
arriba para liberar el perno de la bisagra desde el
anclaje en la parte superior de la puerta, y pase
el cable a través de la ranura de la bisagra.. Para
Modelos con Hielo y Agua Únicamente: no retire
la bisagra de la puerta.
E. Retire la cinta de la puerta, abra la puerta a 90
grados e incline la puerta lejos del gabinete.
Levante la puerta y retire la misma del perno de la
bisagra central.
F. Ajuste la puerta en una superficie antirayaduras con
la parte interna hacia arriba.
INSTALACIÓN DEL REFRIGERADOR (Cont.)
Instrucciones de Instalación

49-1000107 Rev. 0 21
INSTRUCCIONES DE INSTALACIÓN
REINSTALACIÓN DE LAS PUERTAS
FRANCESAS (en algunos modelos)
1
REINSTALACIÓN DE LOS SOPORTES
DE LA BISAGRA CENTRAL Y LOS
PERNOS DE LA BISAGRA
A. Usando una llave de tubo/ destornillador de 5/16”,
retire los tornillos que aseguran los soportes de la
bisagra central al gabinete.
B. Usando una llave Allen de ¼”, reinstale los 2
pernos de la bisagra en los soportes de la bisagra.
2
REINSTALACIÓN DE LA PUERTA DERECHA
A. Baje la puerta del refrigerador sobre el perno de la
bisagra derecha.
B. Asegúrese de que la puerta esté alineada con el
gabinete. Adhiera la bisagra a la parte superior del
gabinete sin apretar, habiendo retirado los tornillos
antes.
C. Asegúrese de que la junta de la puerta esté
nivelada contra el gabinete y que no esté doblada.
Ajustelostornillosa60lb/pulg(6.78Nm).
D. Reinstale la tapa de la bisagra derecha en la parte
superior del refrigerador usando un destornillador
Phillips.
3
REINSTALACIÓN DE LA PUERTA
IZQUIERDA
A. Para Modelos que NO son con Hielo y Agua
Únicamente: pase el cable a través de la ranura
de la bisagra. Coloque el perno de la bisagra en la
parte superior de la puerta.
B. Baje la puerta del refrigerador sobre el perno de la
bisagra izquierda.
Instrucciones de Instalación
INSTALACIÓN DEL REFRIGERADOR (Cont.)
NOTAS IMPORTANTES
Al retirar las puertas francesas:
• Lea las instrucciones completamente antes de
comenzar.
• Las manijas están incluidas dentro del refrigerador.
• Coloque los tornillos en sus partes relacionadas, a fin
de evitar su uso en los lugares equivocados.
• Cuente con una superficie de trabajo donde las puertas
no se rayen.
PRECAUCIÓN
Riesgo al levantar la
puerta. Si es levantada por una sola persona, podrían
ocasionarse lesiones. Solicite ayuda al sostener, mover o
levantar las puertas del refrigerador.
NOTA: Al retirar la puerta, a fin de evitar daños sobre
la misma y la parte electrónica, coloque con cuidado la
puerta en una ubicación adecuada.
ADVERTENCIA
A fin de eliminar el riesgo de descarga eléctrica o lesión
durante la instalación, primero deberá desenchufar el
refrigerador antes de proceder. Si no se siguen estas
instrucciones, se podrá producir una descarga eléctrica.
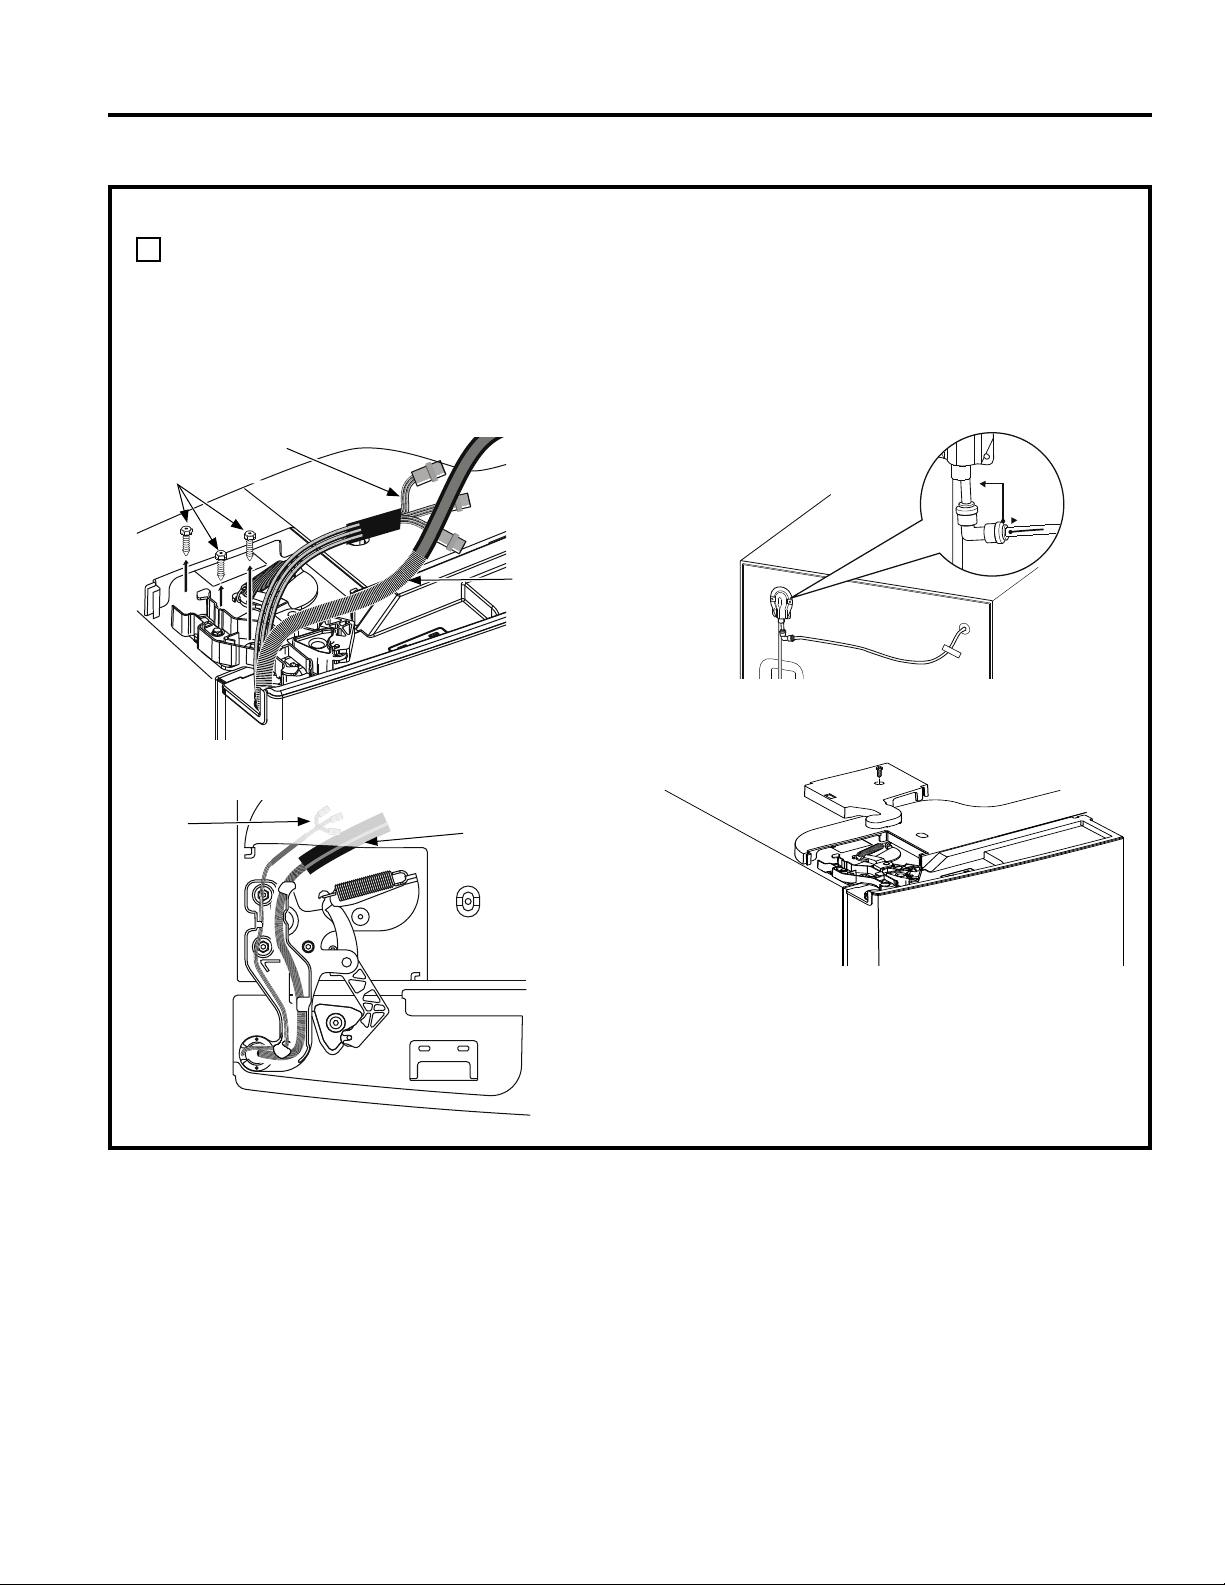
22 49-1000107 Rev. 0
INSTRUCCIONES DE INSTALACIÓN
REINSTALACIÓN DE LAS PUERTAS FRANCESAS (en algunos modelos) (Cont.)
3
REINSTALACIÓN DE LA PUERTA IZQUIERDA (Cont.)
C. Asegúrese de que la puerta esté alineada con el
gabinete. Adhiera la bisagra a la parte superior del
gabinete sin apretar, habiendo retirado los tornillos
antes.
D. Asegúrese de que la junta de la puerta esté
nivelada contra el gabinete y que no esté doblada.
Ajustelostornillosa60lb/pulg(6.78Nm).
E. Enchufe los conectores de los cables juntos y dirija
el cable dentro del puerto de plástico.
F. Para Modelos con Hielo y Agua Únicamente:
coloque la tubería de agua en el agujero y pase
la misma a través del puerto de plástico hasta la
parte trasera del refrigerador..
Vuelva a enchufar la tubería de agua en la unión,
en la parte trasera del refrigerador. Una con cinta
la tubería de agua al refrigerador.
G. Reinstale la tapa de la bisagra izquierda en
la parte superior del refrigerador usando un
destornillador Phillips.
Conectores de
los Cables
Tubería de Agua
(ModelosconHielo
y Agua Únicamente)
Conectores de
los Cables
Tornillos
Tubería
de Agua
(Modeloscon
Hielo y Agua
Únicamente)
INSTALACIÓN DEL REFRIGERADOR (Cont.)
Instrucciones de Instalación
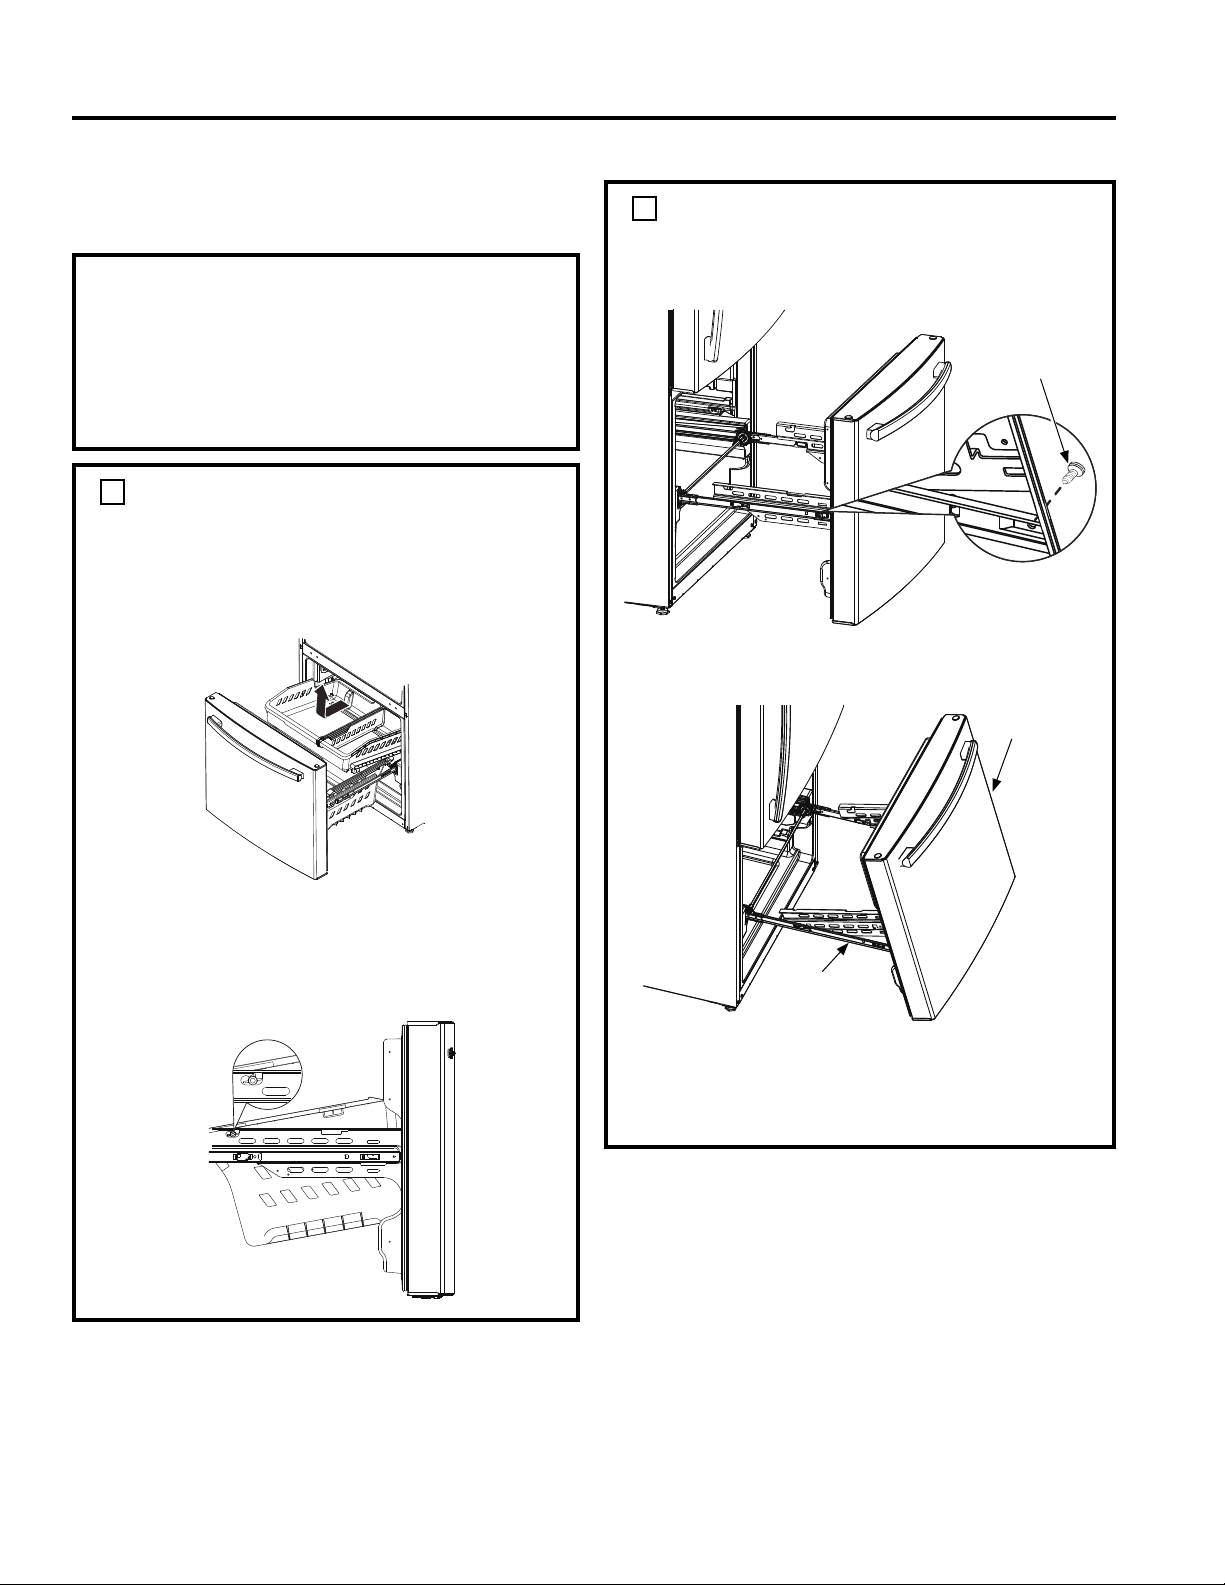
49-1000107 Rev. 0 23
INSTRUCCIONES DE INSTALACIÓN
RETIRO DEL CAJÓN DEL
CONGELADOR (enalgunosmodelos)
NOTAS IMPORTANTES
Al retirar el cajón del congelador:
• Lea las instrucciones completamente antes de
comenzar.
• Cuente con una superficie de trabajo donde las puertas
no se rayen.
1
RETIRE LAS CANASTAS
A. Abra el cajón del congelador hasta que se
detenga.
B. Empuje la canasta superior hacia fuera hasta que
se detenga. Levante la canasta hacia arriba sobre
el frente y hacia fuera para retirar la misma.
C. La canasta inferior se apoya sobre una estructura
dentro del cajón del congelador. Levante el
frente de la canasta y empuje la misma hacia
delante. Libere los pernos de las ranuras de las
estructuras para retirar la canasta.
2
RETIRE EL FRENTE DEL
CAJÓN
A. Retire el tornillo que está a cada lado de los rieles.
B. Levante sobre ambos lados de la manija del cajón
del congelador para separar los rieles del cajón de
los ensambles de los rieles.
C. Coloque el frente del cajón en una superficie
antirayaduras.
D. Vuelva a empujar los ensambles de los rieles
hasta su posición de bloqueo.
tornillo
Ensamble del
Cajón
Ensamble
de los Rieles
Instrucciones de Instalación
INSTALACIÓN DEL REFRIGERADOR (Cont.)
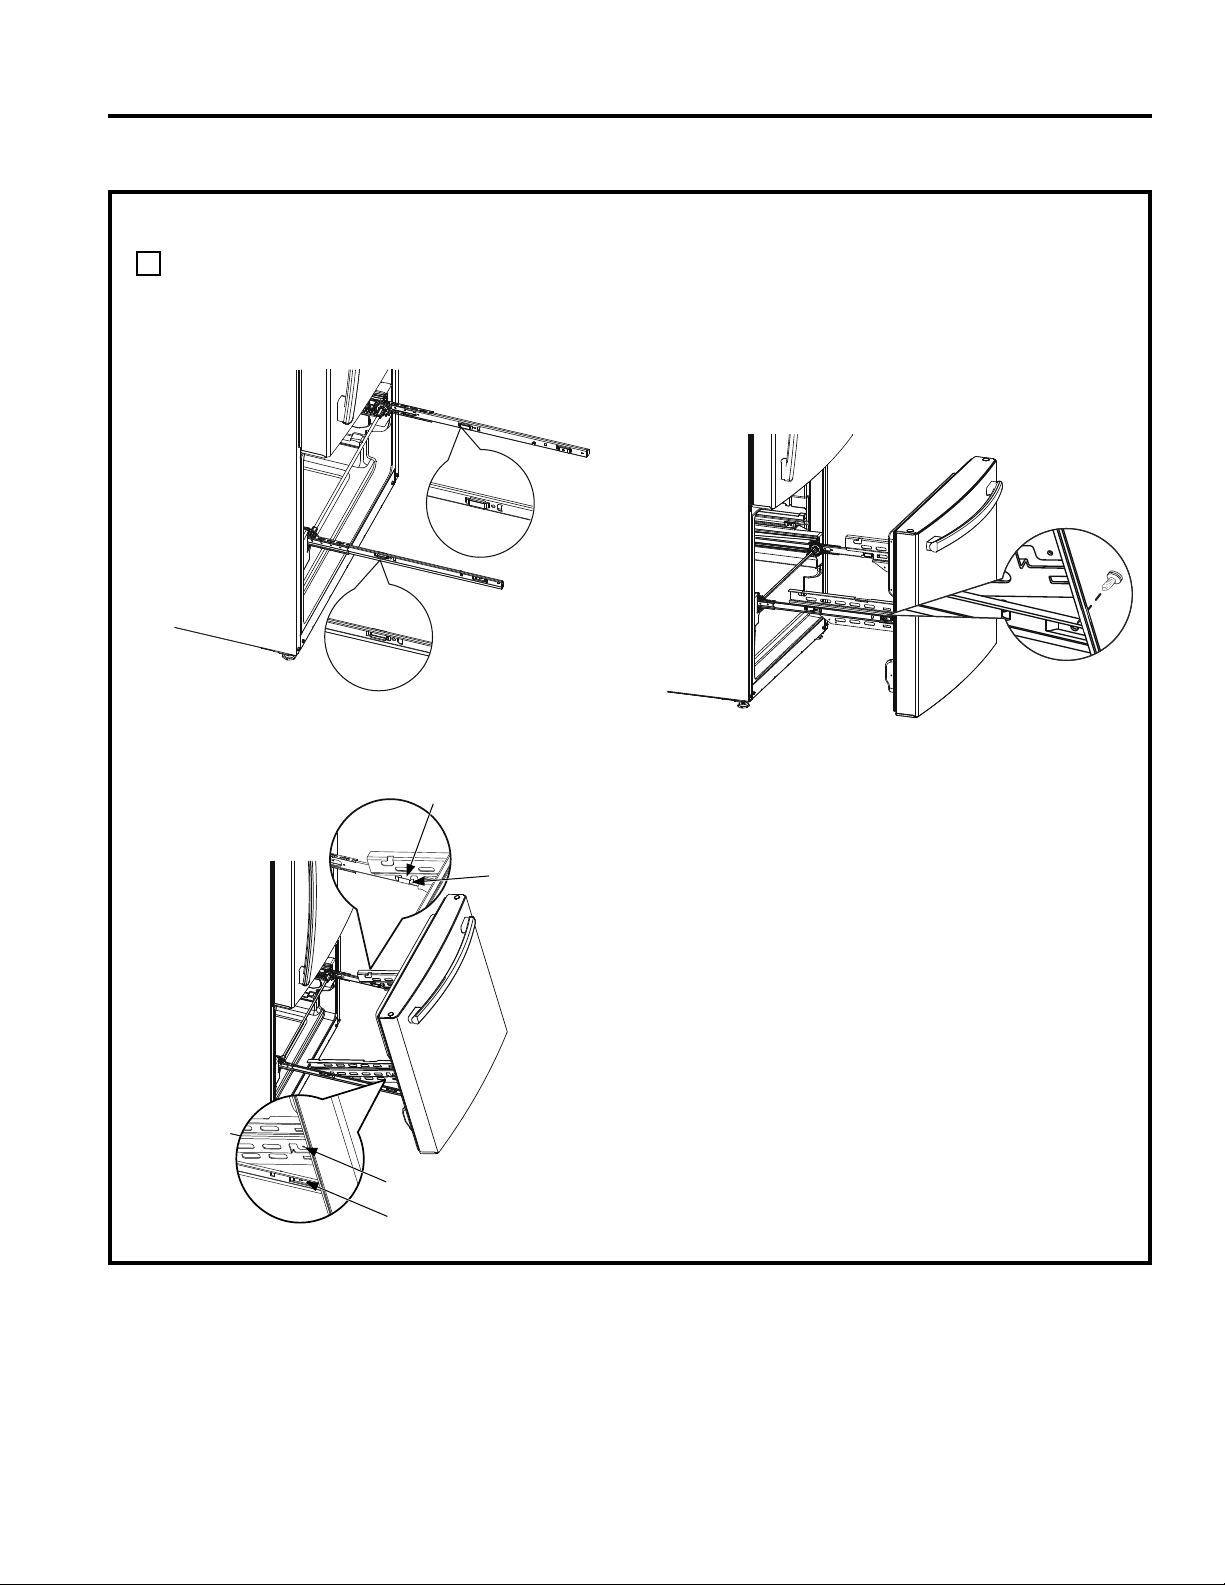
24 49-1000107 Rev. 0
INSTRUCCIONES DE INSTALACIÓN
RETIRO DEL CAJÓN DEL CONGELADOR(enalgunosmodelos)(Cont.)
3
REINSTALACIÓN DEL FRENTE DEL CAJÓN DEL CONGELADOR
A. Halar los ensambles de los rieles hasta la extensión
máxima.
B. Ubique las ranuras en la parte interna de cada riel.
C. Inserte los ganchos sobre los extremos de las
extensiones de los ensambles del cajón en las ranuras
cercanas a la parte trasera de las correderas.
D. Baje el extremo frontal del ensamble del cajón
del congelador, de modo que las lengüetas
laterales coincidan con las ranuras frontales de los
ensambles de las correderas.
E. Reinstale los tornillos de seguridad a ambos lados
de los ensambles de las correderas.
F. Reinstalelascanastasinferiorysuperior(consulte
la sección Cajón del congelador, página 12).
Gancho
Ranura
Lengüeta Lateral
Ranura Frontal
INSTALACIÓN DEL REFRIGERADOR (Cont.)
Instrucciones de Instalación

49-1000107 Rev. 0 25
INSTRUCCIONES DE INSTALACIÓN
CONEXIÓN DEL REFRIGERADOR AL SUMINISTRO DE AGUA DEL HOGAR
(Modelos con máquina de hielo únicamente)
Se requiere un suministro de agua fría para el
funcionamiento de la máquina de hielos automática. Si no
se cuenta con un suministro de agua fría, se deberá proveer
uno. Consulte la sección de Instalación del Suministro de
Agua.
NOTAS:
• Antes de realizar la conexión al refrigerador, asegúrese
de que el cable de corriente del mismo no se encuentre
enchufado al tomacorriente.
• Si su refrigerador no cuenta con un filtro de agua, le
recomendamos que instale uno si el suministro de agua
posee arena o partículas que podrían atascar la rejilla de
la válvula de agua del refrigerador. Instale el mismo en la
tubería de agua más cercana al refrigerador. Si usará el
KitdeTuberíasparaRefrigeradoresdeSmartConnectTM,
necesitaráunatuberíaadicional(WX08X10002)para
realizar la conexión al filtro. No corte la tubería de plástico
para instalar el filtro.
• Antes de conectar la tubería de agua al hogar, purgue la
tubería del hogar durante por lo menos 2 minutos.
A. Si usará una tubería de cobre, coloque una tuerca de
compresiónyunaabrazaderaderefuerzo(manga)en
el extremo de la tubería proveniente del suministro de
agua fría del hogar.
Si usará tuberías de SmartConnect
TM
, las tuercas ya
se encontrarán ensambladas en la tubería.
B. Si usará tuberías de cobre, inserte el extremo de
la tubería en la conexión del refrigerador, en la parte
trasera del refrigerador, lo más lejos posible. Al sostener
la tubería, ajuste la unión.
Si usará tuberías de SmartConnect
TM
, inserte el
extremo moldeado de la tubería en la conexión del
refrigerador, en la parte trasera del refrigerador, y
ajuste la tuerca de compresión hasta que quede
ajustada manualmente. Luego realice un ajuste
adicional con un giro de llave. Un ajuste excesivo
puede ocasionar pérdidas.
C. Ajuste la tubería en la abrazadera provista para sostener
la misma en la posición correcta. Será necesario que
abra la abrazadera haciendo palanca.
Una de las siguientes ilustraciones se verá como la conexión
de su refrigerador.
ADVERTENCIA
Realice la conexión a un suministro de agua potable
únicamente.
Se requiere un suministro de agua fría para el
funcionamiento de la máquina de hielos automática. La
presióndelaguadeberáestarentre40y120psi(275-827
kilopascales).
ADVERTENCIA
PELIGRO DE DESCARGA
ELÉCTRICA
Adhiera la abrazadera de la tubería usando el agujero
existenteúnicamente.NOperforeelrefrigerador.
Conexión del
refrigerador
Tubería
SmartConnect™
Tubería de
llenado de la
máquina de hielos
Abrazadera de
la tubería
Tubería de
cobre de 1/4”
Modelos Preparados para Máquina de Hielos
Modelos con Máquina de Hielos Instalada
Instrucciones de Instalación
INSTALACIÓN DEL REFRIGERADOR (Cont.)
Tubería
SmartConnect™
Conexión del
refrigerador
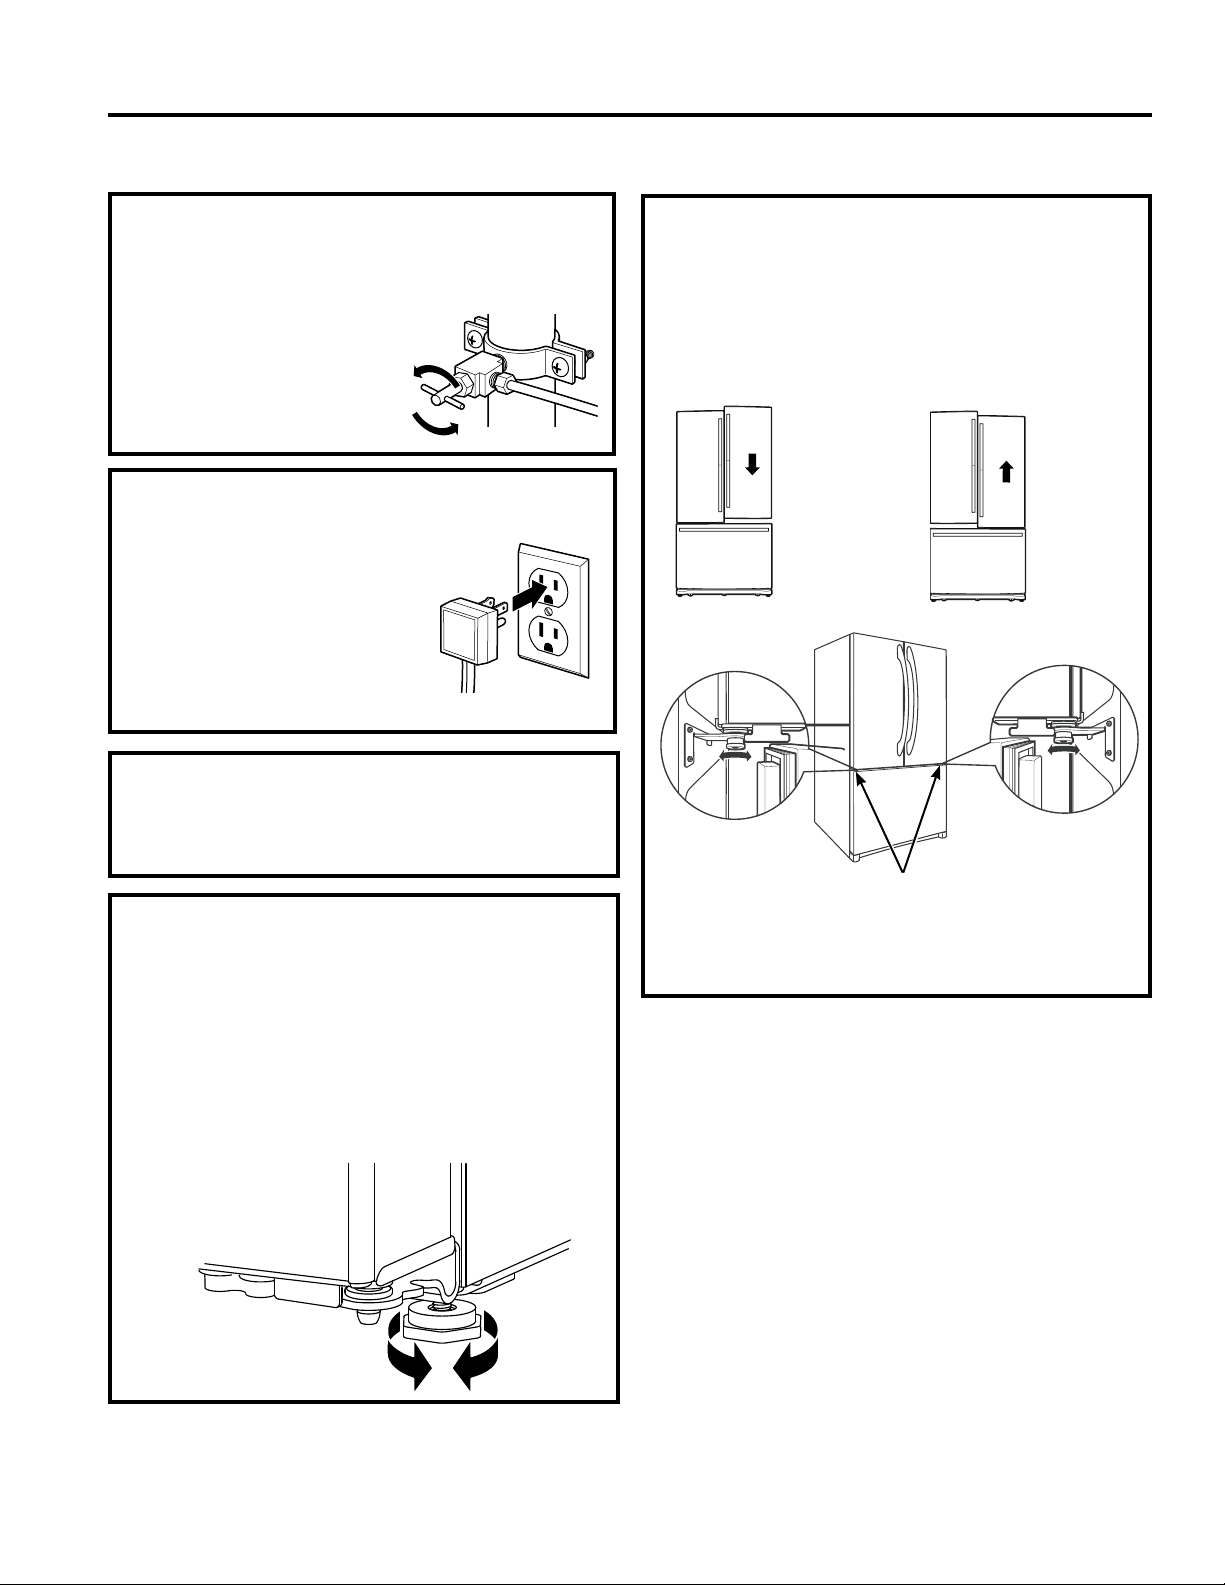
26 49-1000107 Rev. 0
ABRA EL SUMINISTRO DE AGUA
(Modelos con máquina de hielo)
Abra el suministro de agua usando la válvula de cierre
(suministrodeaguadel
hogar) y controle que no haya
pérdidas.
ENCHUFE EL REFRIGERADOR
En modelos con máquina de
hielos, antes de enchufar el
refrigerador, asegúrese de que
el interruptor de corriente de la
máquina de hielos esté ajustado en
laposición0(apagado).
Consulte la información de
conexión a tierra adjunta al cable
de corriente.
INSTRUCCIONES DE INSTALACIÓN
COLOQUE EL REFRIGERADOR EN
SU POSICIÓN
Mueva el refrigerador hasta su posición final.
NIVELE EL REFRIGERADOR
Las patas niveladoras en las esquinas frontales del
refrigerador se deben ajustar de modo que el refrigerador
quede posicionado de manera firme sobre el piso, y
que el frente quede elevado lo suficiente como para
que la puerta se cierre con facilidad cuando se abra
aproximadamente hasta la mitad.
Para ajustar las patas niveladoras, gire las patas
en dirección de las agujas del reloj para elevar el
refrigerador, y en dirección contraria de las manecillas del
reloj para bajarlas.
NIVELACIÓN DE LAS PUERTAS
DEL REFRIGERADOR
(en algunos
modelos)
Recuerde que es necesario que el refrigerador esté
nivelado para que las puertas estén perfectamente
apoyadas. Si necesita ayuda, revise la sección previa
sobre la nivelación del refrigerador.
Si las puertas continúan desniveladas, gire el perno
ajustable para elevar la puerta inferior usando una llave
Allen de 1/4” para girar el perno.
Cuando
la puerta
izquierda
está más
baja que
la puerta
derecha.
Cuando
la puerta
izquierda
está más
alta que
la puerta
derecha.
Punto de ajuste
INSTALACIÓN DEL REFRIGERADOR (Cont.)
Instrucciones de Instalación
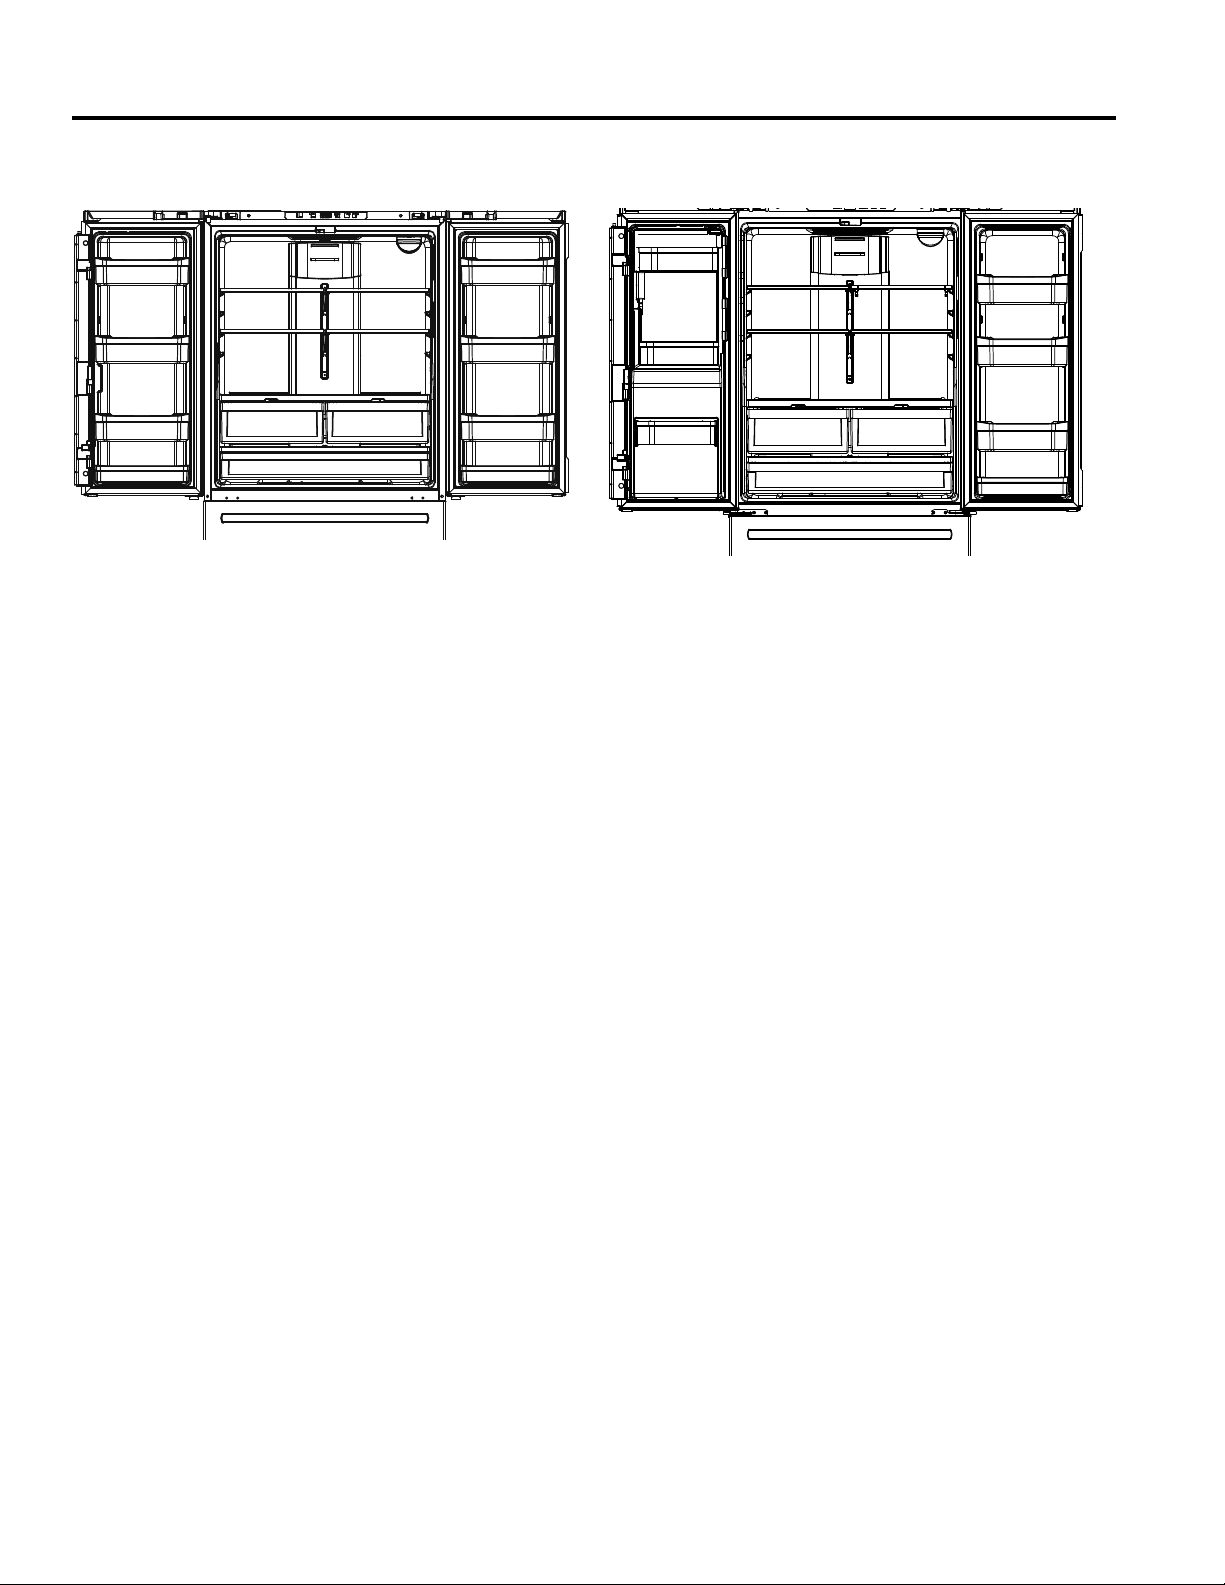
49-1000107 Rev. 0 27
INSTRUCCIONES DE INSTALACIÓN
Ensamble sugerido del refrigerador (cont.)
Se muestran los estantes en la ubicación para una mayor eficiencia energética.
Instrucciones de Instalación
Modelos XNE25J 25 cuft.
Puerta Francesa con Cajón del
Congelador
Modelos XFE26J 26 cuft.
Puerta Francesa con Cajón del
Congelador
NOTA: No bloquee la salida de aire colocando artículos de comida directamente contra ésta. Se podrán producir
temperaturas erráticas.
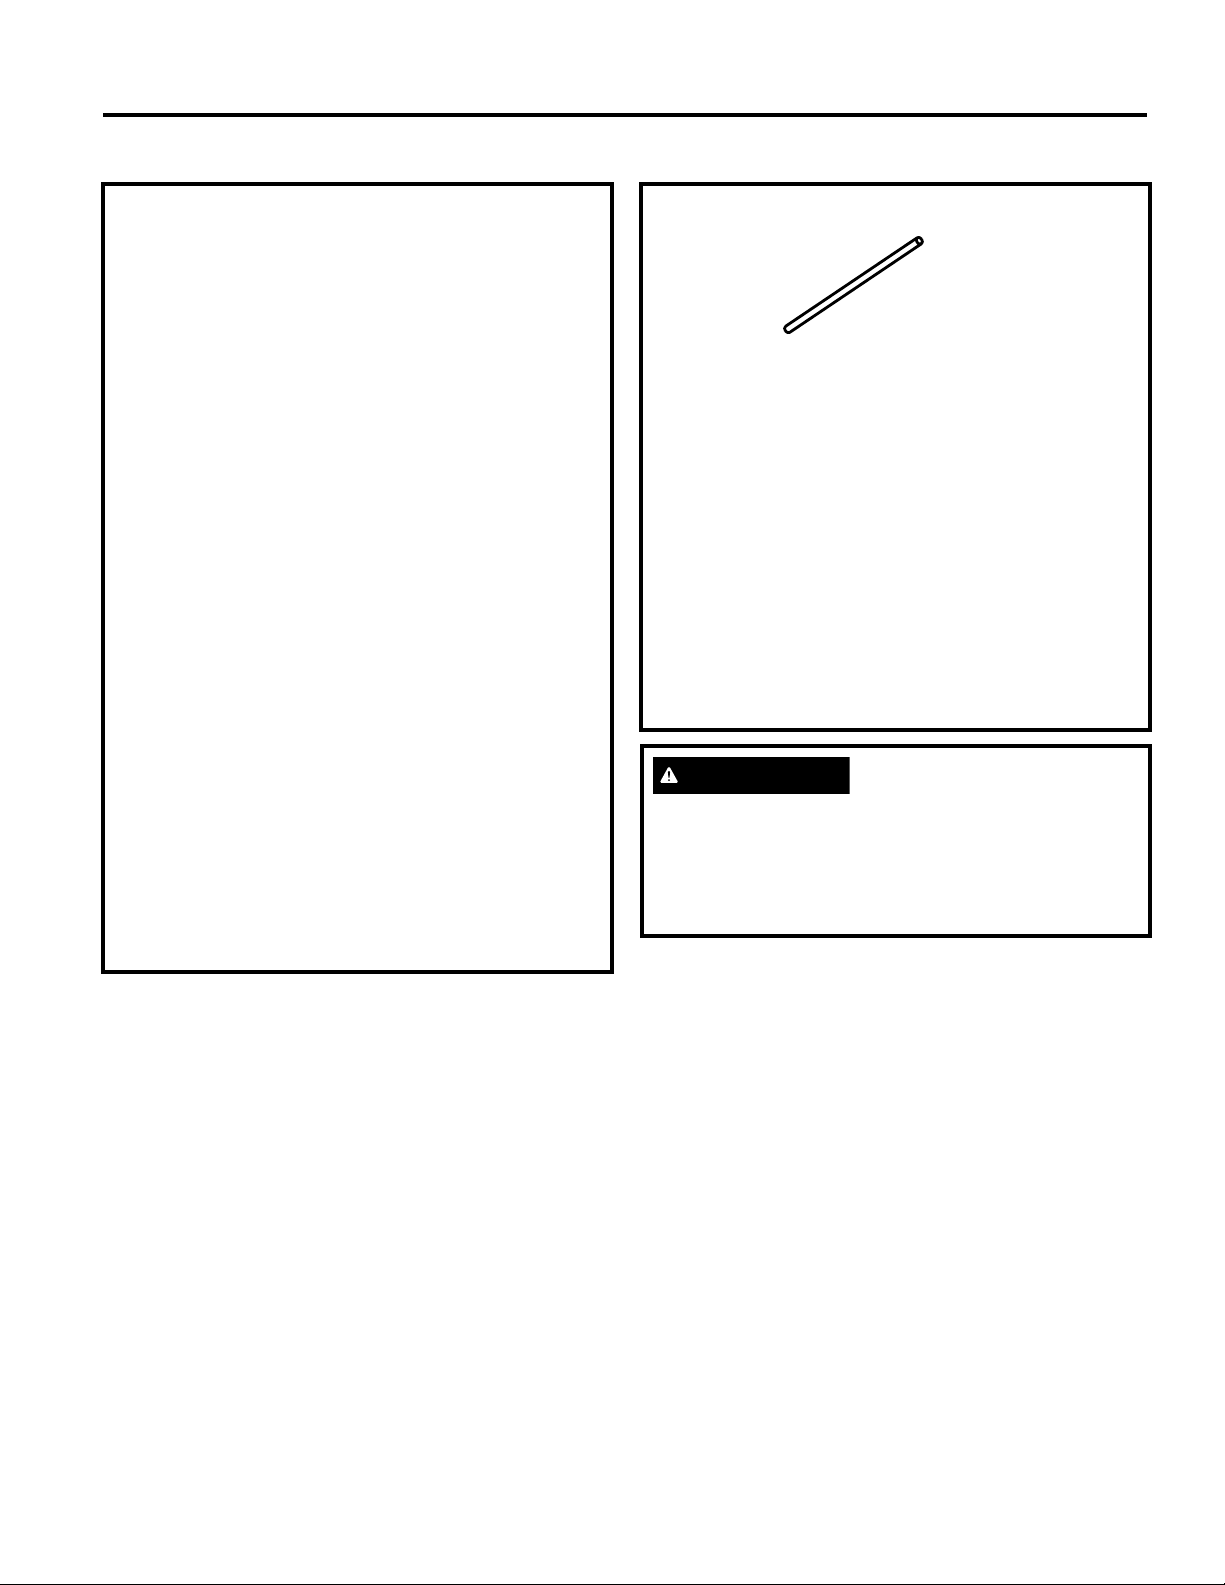
28 49-1000107 Rev. 0
INSTRUCCIONES DE INSTALACIÓN
INSTALACIÓN DE LA TUBERÍA DE AGUA
ANTES DE COMENZAR
Si el suministro de agua al refrigerador es de un Sistema
deFiltracióndeAguaporÓsmosisInversa(RO)Yel
refrigerador también cuenta con un filtro de agua, use
el tapon del bypass del filtro del refrigerador. El uso del
cartucho de filtración de agua del refrigerador junto con un
filtrodeaguaROpodráproducircubosdehielohuecos.
Algunos modelos no están equipados con el tapón del
bypass del filtro. Para obtener un tapón del bypass del
filtro, llame al 800-GECARES.
Esta instalación de la tubería de agua no posee garantía
del fabricante del refrigerador o de la máquina de hielos.
Siga estas instrucciones con cuidado, a fin de minimizar el
riesgo de daños costosos a causa del agua.
Losgolpesdeariete(aguaquegolpealastuberías)en
la plomería del hogar pueden ocasionar daños sobre
las piezas del refrigerador y generar fugas de agua o
inundación. Llame a un plomero calificado para corregir los
golpes de ariete antes de instalar la tubería de suministro
de agua al refrigerador.
A fin de evitar quemaduras y daños sobre los productos, no
adhiera la tubería de agua a la tubería de agua caliente.
No instale la tuberia de la máquina de hielos en
áreas donde las temperaturas sean inferiores a las de
congelación.
Alusarcualquierdispositivoeléctrico(talcomountaladro
eléctrico) durante la instalación, asegúrese de que el
mismo posea un doble aislante o que esté conectado a
tierra de modo que se prevenga el riesgo de descargas
eléctricas, o que esté alimentado por medio de una batería.
Todas las instalaciones deberán ser acordes con los
requisitos del código de plomería local.
LO QUE NECESITARÁ
•KitdeTuberíaparaRefrigeradordeCobreo
SmartConnectTM de ¼” de diámetro externo para
conectar el refrigerador al suministro de agua. Si usará
cobre, asegúrese de que ambos extremos de la tubería
hayan sido cortados de forma recta.
A fin de determinar cuánta tubería es necesaria: mida
la distancia desde la válvula de agua en la parte trasera
del refrigerador hasta la tubería del suministro de agua.
Asegúrese de que haya suficiente tubería adicional para
permitir que el refrigerador pueda ser retirado de la pared
luego de la instalación.
Los kits SmartConnect™ de tubería de refrigerador están
disponibles en las longitudes siguientes:
8’(2,4m) –WX08X10006
15’(4,6m) –WX08X10015
25’(7,6m) –WX08X10025
Instrucciones de Instalación
ADVERTENCIA
Realice la conexión a un suministro de agua potable
únicamente.
Se requiere un suministro de agua fría para el
funcionamiento de la máquina de hielos automática. La
presióndelaguadeberáestarentre40y120psi(275-827
kilopascales).
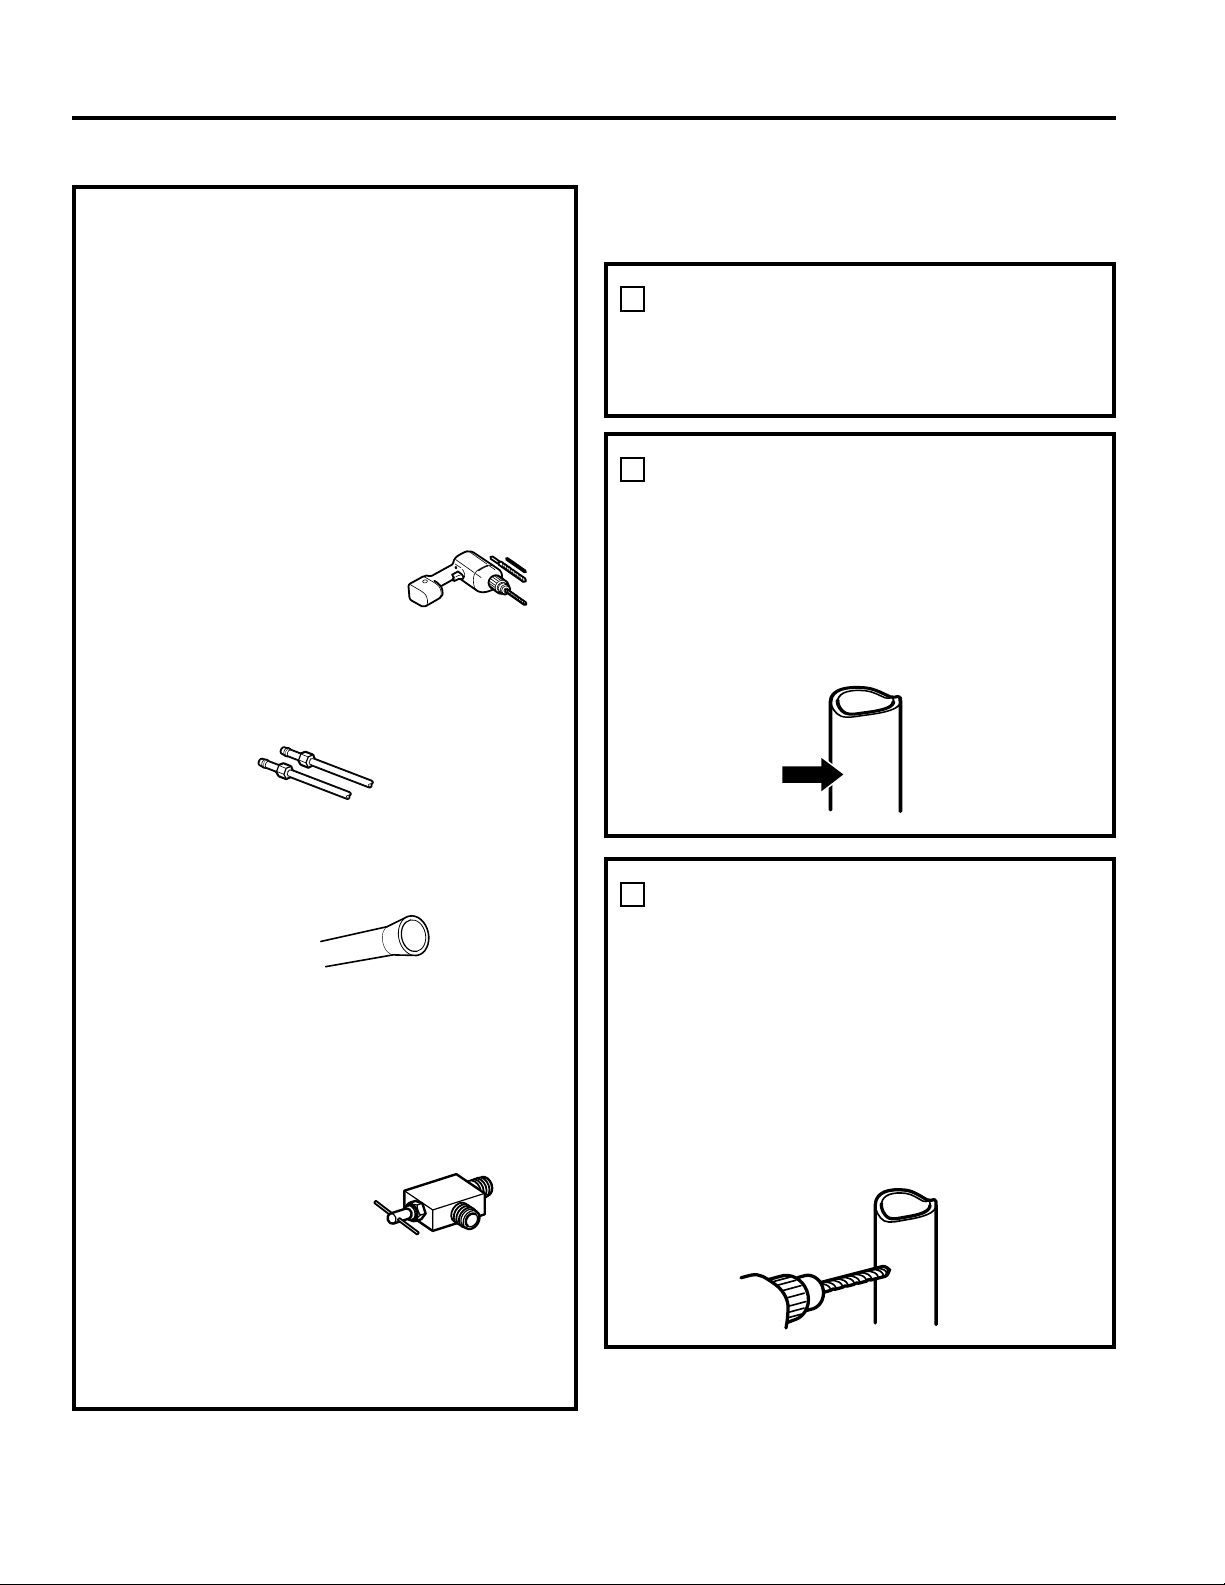
49-1000107 Rev. 0 29
INSTRUCCIONES DE INSTALACIÓN
INSTALACIÓN DE LA TUBERÍA DE AGUA (Cont.)
LO QUE NECESITARÁ(cont.)
NOTA: La única tubería plástica de Crosley aprobada es
aquellaprovistaconlosKitsdeTuberíasparaRefrigerador
de SmartConnect
TM
. No use ningún otro suministro de
agua plástico, ya que el suministro se encuentra bajo
presión en todo momento. Ciertos tipos de plásticos
podrán sufrir fisuras o roturas con el paso del tiempo y
ocasionar problemas con el agua en su hogar.
•UnkitdesuministrodeaguadeGEAppliances(elcual
cuenta con tubería, válvula de cierre y uniones que
figuran en la siguiente lista) está disponible por un costo
adicional a través de su vendedor minorista o de Parts
andAccessories(PiezasyAccesorios),877.959.8688.
• Un suministro de agua fría. La presión del agua deberá
estarentre20y120p.s.i.(138-827kPa).
• Taladro eléctrico.
• Llave de 1/2” o ajustable.
• Destornillador de punta plana o Phillips.
• 2 tuercas de compresión de diámetro externo de 1/4” y 2
abrazaderasdecompresión(mangas)–paraconectarla
tubería de cobre a la válvula de cierre y a la válvula de
agua del refrigerador.
O
• Si usará un kit de Tuberías para Refrigerador de
SmartConnectTM, las uniones necesarias están
preensambladas a la tubería.
• Si su tubería de agua de cobre existente posee una
unión con avellanado en su extremo, necesitará un
adaptador(disponibleenlastiendasdesuministrosde
plomería) para conectar la tubería de agua al refrigerador
Opuedecortarlauniónconavellanadoconuncortador
de tubos y luego usar una unión de compresión. No corte
los extremos con forma de la tubería para refrigerador de
SmartConnect
TM
.
• Válvula de cierre para
conectar a la tubería de
agua fría. La válvula de
cierre debe tener una
entrada de agua con un diámetro interno mínimo de
5/32” en el punto de conexión a la TUBERÍA DE AGUA
FRÍA. Las válvulas de cierre tipo montura están incluidas
en muchos kits de suministro de agua. Antes de su
adquisición, asegúrese de que la válvula tipo montura
cumpla con los códigos de plomería locales.
Instale la válvula de cierre en la tubería de agua potable de
uso frecuente más cercana.
2
ELIJA LA UBICACIÓN DE LA
VÁLVULA
Elija una ubicación para la válvula que sea de fácil
acceso. Es mejor conectar la misma en el lateral de
una tubería de agua vertical. Cuando sea necesario
hacer la conexión en una tubería de agua horizontal,
realice la conexión a la parte superior o lateral, en
vez de la parte inferior, a fin de evitar el drenaje de
cualquier sedimento de la tubería de agua.
1
CIERRE EL SUMINISTRO DE
AGUA PRINCIPAL
Abra el grifo más cercano que sea lo suficientemente
largo como para despejar la tubería de agua.
3
TALADRE EL AGUJERO DE LA
VÁLVULA
Taladre un agujero de 1/4” en la tubería de agua
(inclusosiusaráunaválvulaautoperforante),usando
una punta afilada. Elimine cualquier zumbido que
resulte de haber taladrado el agujero en la tubería.
Tenga cuidado de no permitir que el agua se drene en
el taladro.
Si no se taladra un agujero de 1/4”, se podrá ver
reducida la producción de hielo o cubos de hielo más
pequeños.
Instrucciones de Instalación
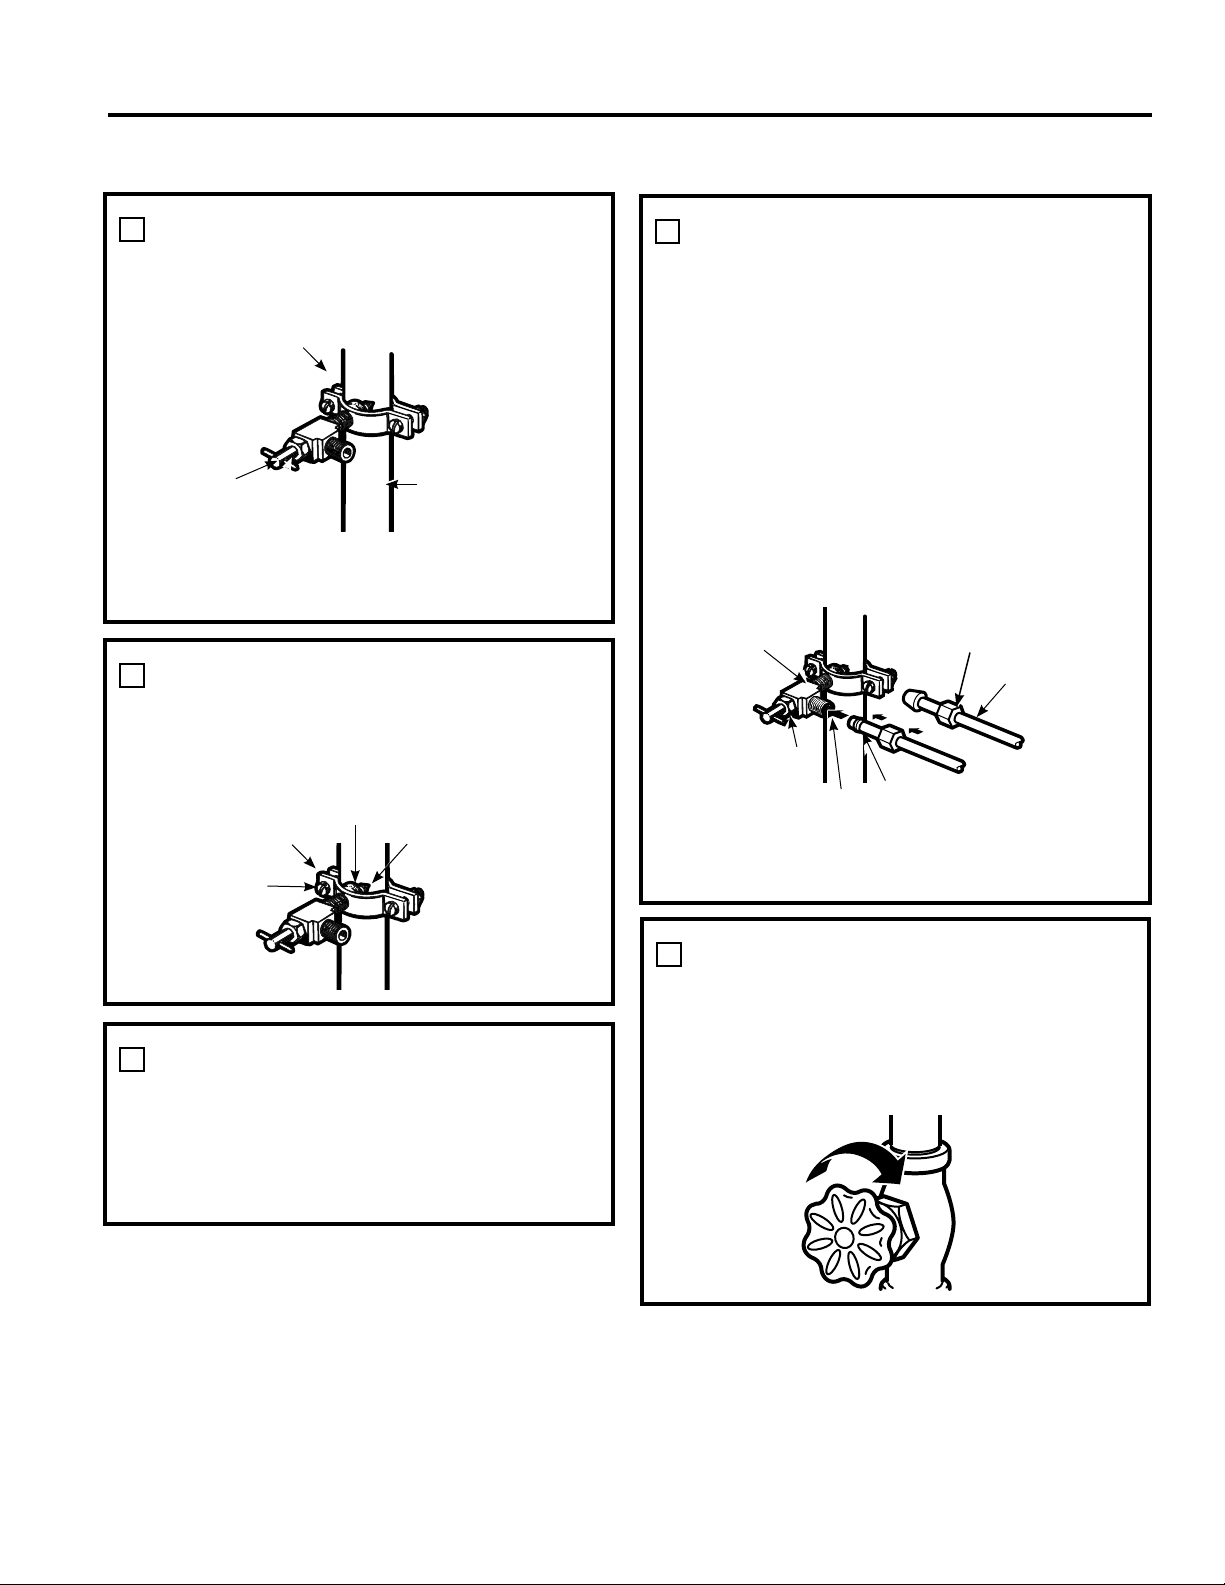
30 49-1000107 Rev. 0
INSTRUCCIONES DE INSTALACIÓN
INSTALACIÓN DE LA TUBERÍA DE AGUA (Cont.)
4
AJUSTE LA VÁLVULA DE
CIERRE
Ajuste la válvula de cierre de la tubería de agua fría
con la abrazadera de la tubería
NOTA: Las válvulas de montura son ilegales y su
uso no está permitido en Massachusetts. Consulte
a un plomero profesional.
7
CONECTE LA TUBERÍA A LA
VÁLVULA
Coloque la tuerca de compresión y la abrazadera de
refuerzo(manga)paracolocarlatuberíadecobre
en el extremo de la tubería y conecte la misma a la
válvula de cierre.
Asegúrese de que la tubería esté completamente
insertada en la válvula. Ajuste la tuerca de
compresión de forma segura.
Para usar una tubería de plástico del kit de Tuberías
para Refrigeradores SmartConnect
TM
, inserte el
extremo moldeado de la tubería en la válvula de cierre
y ajuste la tuerca de compresión hasta que quede
ajustada manualmente, y luego dé un giro de ajuste
adicional con una llave. Un ajuste excesivo puede
ocasionar pérdidas.
NOTA: Las válvulas de montura son ilegales y su
uso no está permitido en Massachusetts. Consulte
a un plomero profesional.
5
AJUSTE LA ABRAZADERA DE
LA TUBERÍA
Ajuste los tornillos de la abrazadera hasta que la
arandela de sellado comience a hincharse.
NOTA: No ajuste en exceso o se podrá romper la
tubería.
8
LIMPIEZA DE LA TUBERÍA
Abra el suministro de agua principal y purgar la
tubería hasta que el agua esté limpia.
Cierre el agua usando la válvula de agua luego de
haberdejadocorreraproximadamenteungalón(1
litro), o 2 minutos, de agua a través de la tubería.
6
ENRUTE LA TUBERÍA
Conduzca la tubería entre la entrada de agua fría y el
refrigerador.
Conduzca la tubería a través de un agujero perforado
enlaparedoelpiso(detrásdelrefrigeradorodel
gabinete con base adyacente) tan cerca a la pared
como sea posible.
Abrazadera de
la tubería
Tubería de Agua
Fría Vertical
Válvula de Cierre
Tipo Montura
Arandela
Extremo de
la Entrada
Abrazadera de la
Tubería
Tornillos con
Abrazadera
Válvula de Cierre
Tipo Montura
Tuerca de Compresión
Tuerca de
Embalaje
Válvula de Salida
Abrazadera de Refuerzo
(manga)
Tubería
SmartConnect™:
Instrucciones de Instalación
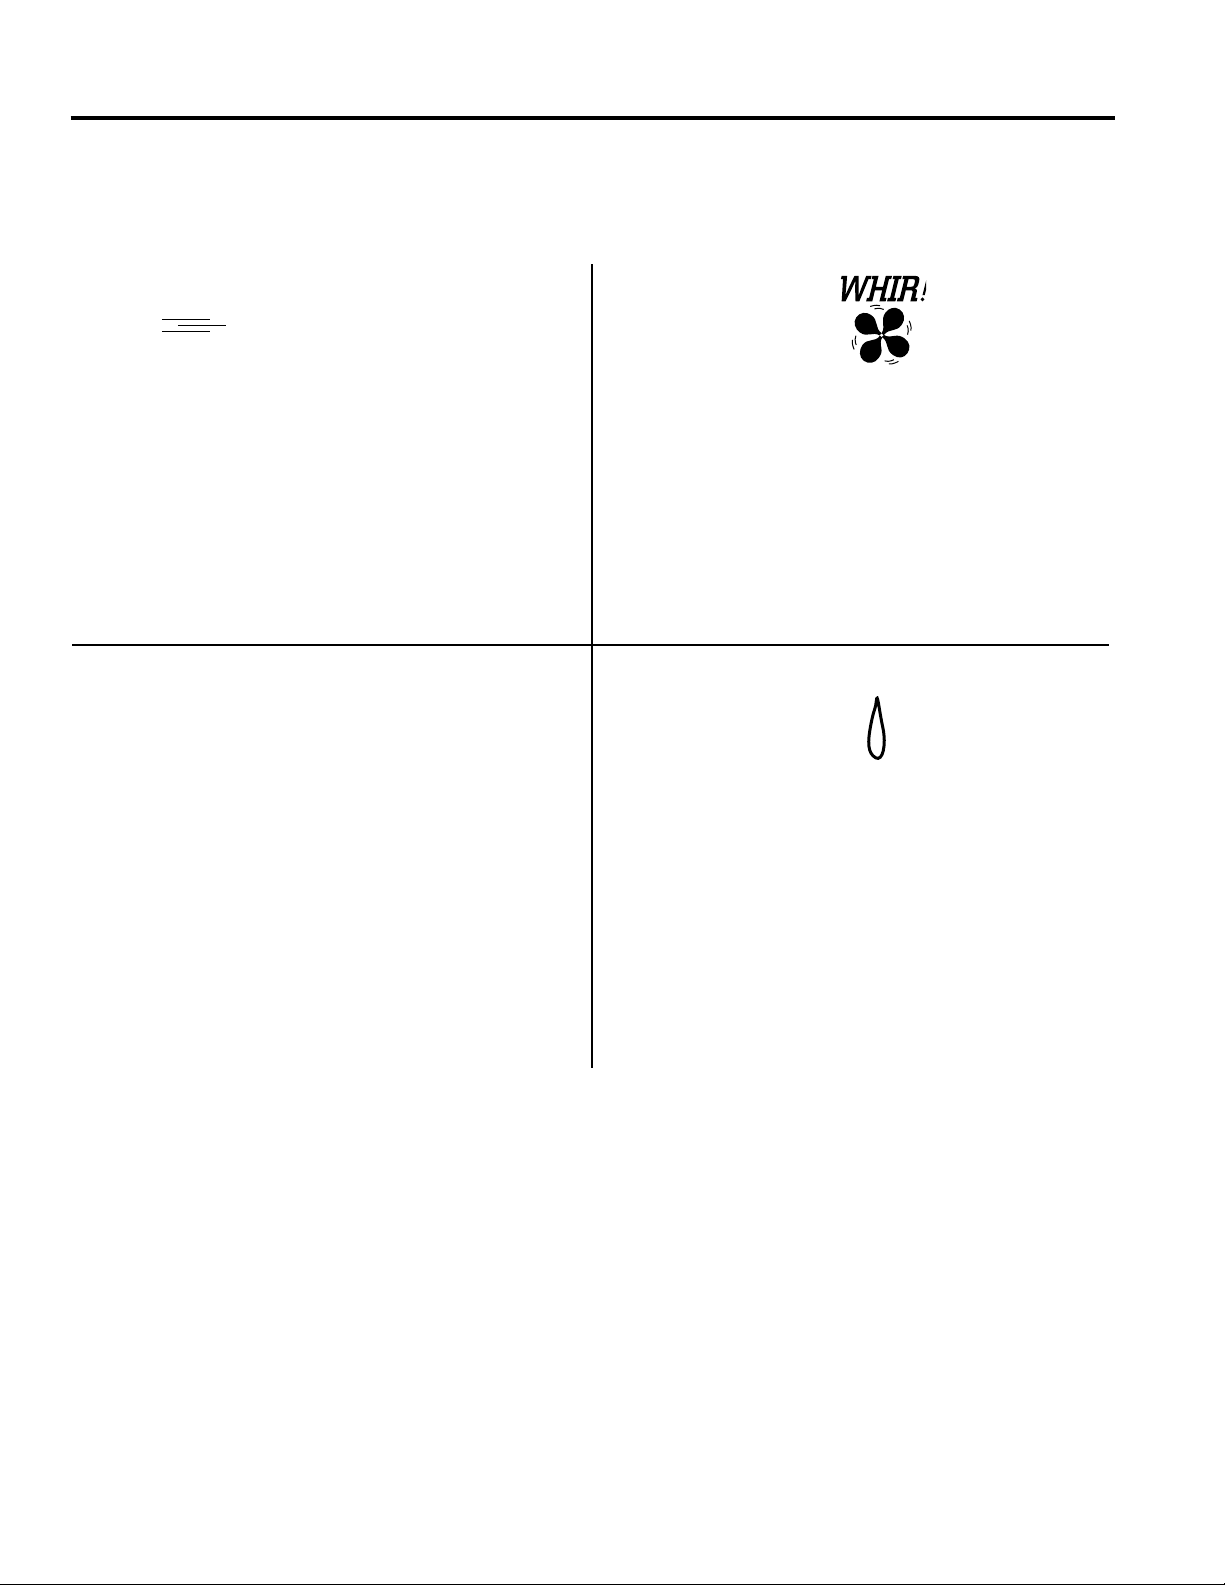
49-1000107 Rev. 0 31
El sonido de los refrigeradores nuevos es diferente al de aquellos más antiguos.
Los refrigeradores modernos cuentan con más funciones y utilizan una tecnología más nueva.
HUMMM...
WHOOSH...
■ Es posible que el nuevo compresor de alta efectividad
funcione más rápido y por más tiempo que aquel de
su refrigerador antiguo, y es posible que escuche
un zumbido o sonido de pulsación mientras está
funcionando.
■ Es posible que escuche sonidos de gorgoteos al cerrar
las puertas. Esto se debe al equilibrio de la presión
dentro del refrigerador.
■
Es posible que escuche los ventiladores girar en altas
velocidades. Esto sucede cuando el refrigerador se
enchufa por primera vez, cuando las puertas se abren
con frecuencia o cuando una gran cantidad de comida
es agregada a los compartimientos del refrigerador o del
congelador. Los ventiladores están ayudando a mantener
las temperaturas correctas.
■
Los ventiladores cambian de velocidad a fin de brindar un
enfriamiento óptimo y ahorros de energía.
SONIDOS DE CLIC, ESTALLIDOS,
CRUJIDOS y CHASQUIDOS
■ Es posible que escuche sonidos de crujidos o estallidos
cuando se enchufe el refrigerador por primera vez.
Esto sucede mientras el refrigerador se enfría hasta la
temperatura correcta.
■ La expansión y contracción de las bobinas de
enfriamiento durante y después de la descongelación
pueden producir sonidos de crujidos o estallidos.
■ En los modelos con máquina de hielos, luego de un
ciclo de producción de hielo, es posible que escuche los
cubos de hielo caer a la hielera.
■ En los modelos con dispensador, cuando se dispense
el agua, es posible que escuche el movimiento de las
tuberías de agua al iniciar el proceso y luego de que el
botón del dispensador sea liberado.
SONIDOS DEL AGUA
■ Es posible que el flujo de refrigerante a través de las
bobinas de enfriamiento produzca un gorgoteo similar al
agua hirviendo.
■ El agua que cae sobre el calentador de descongelamiento
puede producir un sonido de chisporroteo, estallido o
zumbido durante el ciclo de descongelamiento.
■ Es posible que se escuche un sonido de goteo durante el
ciclo de descongelación, a medida que el hielo se derrite
desde el evaporador y fluye hasta la cajon de drenaje.
■ Cerrar la puerta podrá provocar un sonido de burbujeo
debido a la igualación de la presión.
¿Escuchas lo que yo escucho? Estos sonidos son normales.
Condiciones de funcionamiento normal
CONSEJOS PARA LA SOLUCIÓN DE PROBLEMAS:
Condiciones de funcionamiento normal
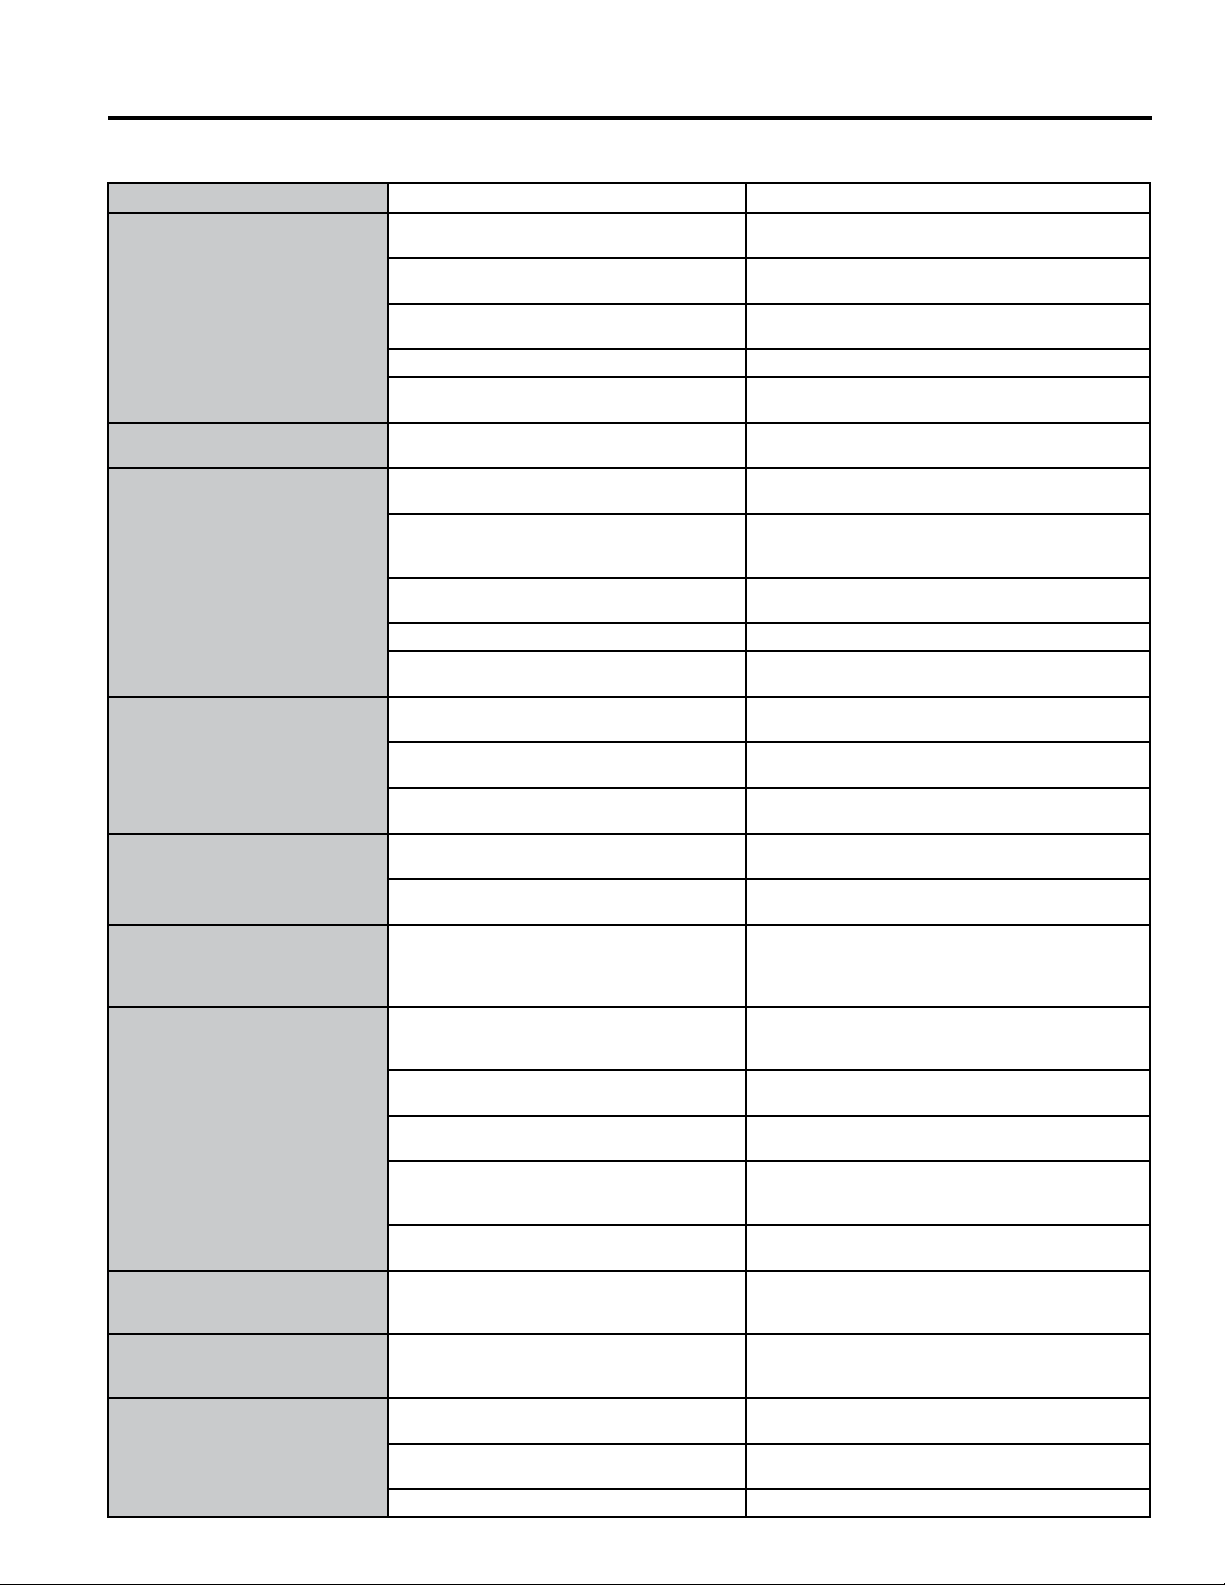
32 49-1000107 Rev. 0
Problema Posibles causas Qué hacer
El refrigerador no funciona El refrigerador se encuentra en el ciclo de
descongelamiento
Espere unos 30 minutos hasta que el ciclo de
descongelamiento finalice.
Uno o ambos controles se encuentran
configuradosenOFF(Apagado).
Ajuste los controles en una configuración de
temperatura inferior.
El refrigerador está desenchufado. Presione el enchufe completamente dentro del
tomacorriente.
Se quemó el fusible/ el disyuntor está activado Reemplace el fusible o reinicie el disyuntor.
El refrigerador se encuentra en el modo de sala
de exposición.
Desenchufe el refrigerador y vuelva a enchufarlo.
Vibraciónnormaloruidosa(una
vibración leve es normal).
Las patas niveladoras deben ser ajustadas. Consulte la sección de Nivelación del refrigerador.
El motor funciona durante períodos
prolongados o realiza ciclos de
encendido y apagado de forma
frecuente.(Losrefrigeradores
modernos con mayor espacio de
almacenamiento y un congelador
más grande requieren más tiempo
de funcionamiento. Se activan y
se detienen con frecuencia para
mantener temperaturas parejas).
Es normal cuando el refrigerador se enchufa
por primera vez.
Espere 24 horas hasta que el refrigerador se enfríe
completamente.
Sucede con frecuencia cuando se colocan
grandes cantidades de comida en el
refrigerador.
Esto es normal.
Se dejó la puerta abierta. Controle que no haya paquetes que impidan que la
puerta se cierre.
Clima cálido o apertura frecuente de la puerta. Esto es normal.
Los controles de temperatura están
configurados en la posición más fría.
Consulte la sección de Controles.
Compartimiento del refrigerador o
del congelador demasiado caliente
El control de temperatura no se configuró en un
nivel lo suficientemente frío.
Consulte la sección de Controles.
Clima cálido o se abre la puerta con frecuencia. Configure el control de temperatura un paso más frío.
Consulte la sección de Controles.
Se dejó la puerta abierta. Controle que no haya paquetes que impidan que la
puerta se cierre.
Cristales de escarcha o hielo en
alimentoscongelados(laescarcha
dentro de paquetes es normal)
Se dejó la puerta abierta. Controle que no haya paquetes que impidan que la
puerta se cierre.
Se abre la puerta de forma muy frecuente o por
períodos demasiado largos.
Esto es normal.
El divisor de los compartimientos
del refrigerador y del congelador se
siente caliente
El sistema de ahorro de energía automático
hace circular líquido caliente alrededor
del extremo frontal del compartimiento del
congelador.
Esto ayuda a evitar la condensación en la parte
exterior.
La máquina de hielos automática no
funciona
El interruptor de corriente de la máquina
dehielosseencuentraenlaposiciónOFF
(Apagado).
ConfigureelinterruptordecorrienteenlaposiciónON
(Encendido).
El suministro de agua está apagado o no está
conectado.
Consulte la sección sobre Instalación de la tubería de
Agua.
El compartimiento del congelador está
demasiado caliente.
Espere 24 horas hasta que el refrigerador se enfríe
completamente.
Los cubos apilados en el estante de
almacenamiento hacen que la máquina de
hielos se apague.
Nivele los cubos en forma manual.
Los cubos de hielo quedan atorados en la
máquina de hacer hielo.
Apague la máquina de hielos, retire los cubos, y
vuelva a encender la máquina de hielos.
Al enfriarse el congelador, la comida
fresca no se enfría
Es normal, cuando el refrigerador se enchufa
por primera vez o luego de un corte de corriente
prolongado
Espere 24 horas para que en ambos compartimientos
se alcancen las temperaturas seleccionadas.
El dispensador de hielo se abre
luego de cerrar el cajón del
congelador(enalgunosmodelos)
Normal La puerta del dispensador de hielo se podrá abrir
luego de cerrar la puerta del congelador para permitir
el acceso.
Los cubos de hielo tienen olor/sabor Es necesario limpiar los estantes de
almacenamiento de hielo.
Vacíe y lave el estante. Descarte los cubos viejos.
La comida transmite olor/ sabor a los cubos de
hielo.
Envuelva bien las comidas.
Es necesario limpiar el interior del refrigerador. Consute la sección de Cuidado y Limpieza.
¡Ahorre tiempo y dinero! Primero revise los cuadros que aparecen en las siguientes páginas y es posible que no necesite solicitar
reparaciones.
Consejos para la Solución de Problemas... Antes de solicitar el servicio técnico
CONSEJOS PARA LA SOLUCIÓN DE PROBLEMAS
49-1000107 Rev. 0 33
CONSEJOS PARA LA SOLUCIÓN DE PROBLEMAS: Condiciones de funcionamiento normal
Consejos para la Solución de Problemas... Antes de solicitar el servicio técnico
Problema Posibles causas Qué hacer
Cubos pequeños o huecos Filtro de agua obstruido. Reemplace el cartucho del filtro por un cartucho
nuevo con el enchufe.
Congelamiento lento de los cubos de
hielo
Se dejó la puerta abierta. Controle que no haya paquetes que impidan que la
puerta se cierre.
Controle que no haya paquetes que impidan que
la puerta se cierre.
Consulte la sección de Controles.
“Sonidodezumbido”frecuente El interruptor de la máquina de hielos se
encuentraenlaposiciónI(Encendido),pero
el suministro de agua al refrigerador no fue
conectado.
Configureelinterruptorenlaposición0(Apagado).
MantenerloenlaposiciónI(Encendido)dañarála
válvula de agua.
Brillo anaranjado en el congelador El calentador de descongelamiento se encuentra
encendido.
Esto es normal.
El agua tiene mal sabor/ olor El dispensador de agua no fue usado durante un
tiempo prolongado.
Dispense agua hasta que toda el agua en el
sistema sea repuesta.
El agua del primer vaso está caliente Es normal cuando el refrigerador es instalado por
primera vez.
Espere 24 horas hasta que el refrigerador se enfríe
completamente.
El dispensador de agua no fue usado durante un
período de tiempo prolongado.
Dispense agua hasta que toda el agua del sistema
sea repuesta.
El sistema de agua fue drenado. Espere varias horas hasta que el suministro
repuesto se haya enfriado.
El dispensador de agua no funciona Suministro de agua apagado o no conectado. Lea la sección de Instalación de la tuberia de agua
Filtro de agua tapado. Reemplace el cartucho del filtro o remueva el filtro
e instale el tapón de derivación.
Aire atrapado en el sistema del agua. Presione el brazo del dispensador por un par de
minutos.
EldispensadorestáenLOCKED(Bloqueado). MantengapresionadalateclaLOCK(Bloqueo)
durante 3 segundos.
El agua chorrea del dispensador Cartucho del filtro recién instalado. Deje correr agua del dispensador durante 3
minutos(aproximadamenteungalónymedio).
El agua no es dispensada pero la
máquina de hielo está funcionando
El agua de la reserva está congelada. Llame al servicio técnico.
La configuración del control del refrigerador está
graduada demasiado fría.
Modifique la configuración a una posición más
caliente.
No sale agua y la máquina de hielo no
funciona
Está tapada la línea de agua o la llave de paso. Llame a un plomero.
Filtro de agua tapado. Reemplace el cartucho del filtro o remueva el filtro
e instale el tapón de derivación.
El refrigerador huele Alimentos transmitiendo olores al refrigerador. Alimentos con olores fuertes deben estar tapados.
Guarde una caja de bicarbonato de sodio en el
refrigerador; cámbiela cada tres meses.
El interior requiere limpieza. Lea la sección de Cuidado y limpieza
Se forma humedad en la superficie
del refrigerador
No es extraño durante periodos de alta humedad. Seque la superficie
Humedadseformaalinterior(en
clima húmedo, el aire lleva la
humedad al refrigerador cuando las
puertas se abren)
Aperturas de puerta frecuentes o por mucho
tiempo.
Esto es normal.
Debido al alto nivel de humedad en el
refrigerador, es posible que ocasionalmente
se empañe o que se produzcan pequeñas
cantidades de humedad en el compartimiento del
refrigerador.
Esto es normal y puede variar dependiendo de las
cantidades de comida y condiciones climáticas.
Seque con una toalla de papel si lo desea.
La luz interna no funciona No hay corriente en el tomacorriente. Reemplace el fusible o reinicie el interruptor de
protección.
Para luces LED Llame al servicio técnico - ver Reemplazo de las
Luces
34 49-1000107 Rev. 0
¡Ahorre tiempo y dinero! Primero revise los cuadros que aparecen en las siguientes páginas y es posible que no necesite solicitar
reparaciones.
Problema Posibles causas Qué hacer
Aire caliente de la parte de abajo
del refrigerador
Flujo de aire que está enfriando al motor.
En el proceso de refrigeración, es normal
que salga calor de la parte inferior del
refrigerador. Algunas cubiertas de piso
son sensibles y se decolorarán ante estas
temperaturas normales y seguras.
Esto es normal.
El refrigerador nunca se apaga
pero las temperaturas están bien
La descongelación adaptable mantiene
el compresor funcionando durante las
aperturas de la puerta.
Esto es normal. El refrigerador concluirá su ciclo
cuando la puerta permanezca cerrada durante 2 horas
El refrigerador emite un sonido La puerta está abierta. Cierre la puerta.
La puerta no cierra correctamente La junta de la puerta del lado de la bisagra
se está adhiriendo o doblando.
Aplique parafina sobre la cara de la junta.
La temperatura real no es
equivalente a la temperatura
configurada
La unidad se acaba de enchufar. Espere 24 horas hasta que el sistema se estabilice.
La puerta se mantuvo abierta durante
demasiado tiempo.
Espere 24 horas hasta que el sistema se estabilice.
Se agregó comida caliente al refrigerador. Espere 24 horas hasta que el sistema se estabilice.
El ciclo de descongelamiento está en
proceso.
Espere 24 horas hasta que el sistema se estabilice.
La puerta/gaveta no se cierra sola Las patas niveladoras necesitan ajuste.
Consulte la seccion nivelacion de las puertas del
refrigerador
La gaveta del congelador se abre
cuando la puerta del refrigerador
está cerrada
Esto es normal si después de abrirse, la
gaveta del congelador se cierra sola.
Esto indica que hay un buen sellante en la gaveta
del congelador. Si la gaveta del congelador no se
cierra automáticamente después de abrirse, entonces
consulte la sección anterior, Problema: La puerta/
gaveta del refrigerador no se cierra sola.
La comida se congela en el
refrigerador
La comida está demasiado cerca de la
ventilación de aire, en la parte trasera del
refrigerador.
Aleje la comida de la ventilación de aire.
El control del refrigerador está ajustado
demasiado frío.
Mueva el control del refrigerador a una configuración
de temperatura más alta, realizando un incremento a
la vez.
El agua se está fugando del
dispensador
El vaso no está siendo sostenido debajo
del dispensador por suficiente tiempo
después de que el botón es liberado.
Sostenga el vaso debajo del dispensador por 2 ó 3
segundos después de liberar el botón del dispensador.
El agua podría continuar dispensándose después de
que el botón sea liberado.
Puede haber aire presente en el sistema
de la tubería del agua que causa que el
agua gotee después de que el agua se
haya dispensado.
Dispense agua por al menos 2 minutos para retirar el
aire del sistema.
La pantalla muestra tc La función TurboCool se encuentra
activada.
Ver las secciones Controles
La luz del indicador del filtro de
agua cambió de color
Esto es normal. Ver Acerca del cartucho del filtro de agua XWF
La luz del indicador del filtro de
agua continúa roja aún después
de haber cambiado el filtro de
agua
El indicador de filtro de agua debe
resetearse.
Presione y sostenga por 3 segundos la tecla WATER
FILTER. Ver Acerca del cartucho del filtro de agua
XWF.
La luz del indicador del filtro de
agua no está encendida
Esto es normal. Cuando la luz se vuelva
roja, deberá de hacer el cambio de filtro.
Ver Acerca del cartucho del filtro de agua XWF
La manija está floja / la manija
tiene una brecha
La manija debe ajustarse. Ver las secciones Cómo sujetar la manija del
compartimento de alimentos frescos y Cómo sujetar la
manija del congelador
Las puertas del refrigerador no
estánparejas(enmodelosde
Puerta Francesa únicamente)
Es necesario realinear las puertas. Consulte la sección de Nivelación de las Puertas del
Refrigerador.
Consulte la sección de Nivelación
de las Puertas del Refrigerador.
Las canastas están demasiado llenas. Para abrir: retire algunos de los productos desde
la canasta cuando se abra tanto como sea posible.
Vuelva a ajustar los productos que quedaron en la
canasta e intente abrir esta última nuevamente. Para
cerrar: Vuelva a ajustar los productos de la canasta
o retire cualquier producto que se encuentre sobre el
borde de la canasta y cierre la misma.
Consejos para la Solución de Problemas... Antes de solicitar el servicio técnico
CONSEJOS PARA LA SOLUCIÓN DE PROBLEMAS
49-1000107 Rev. 0 35
Abroche su recibo aquí. Para acceder al servicio técnico de acuerdo con
la garantía deberá contar con la prueba de la fecha original de compra.
GARANTÍA LIMITADA
Por el Período de: GE Appliances Reemplazará
Un Año
Desde la fecha de la
compra original
Cualquier parte del refrigerador que falle debido a defectos en los materiales o en la fabricación.
Durante esta garantía limitada de un año, GE Appliances también proporcionará, sin costo
alguno, toda la mano de obra y el servicio relacionado para reemplazar partes defectuosas.
Treinta Días
(FiltrodeAgua,siestá
incluido) Desde la fecha
de la compra original del
refrigerador
Cualquier parte del cartucho del filtro de Agua que falle debido a un defecto en los materiales o la
fabricación. Durante la garantía limitada por treinta días, GE Appliances también le brindará, sin costo,
el reemplazo de un cartucho del filtro de agua.
■ Viajesdeservicioasuhogarparaenseñarlecómousar
el producto.
■ Instalaciónoentregainapropiada,omantenimiento
impropio.
■ Fallasdelproductosihayabuso,maluso,ousopara
otros propósitos que los propuestos, o uso para fines
comerciales.
■ Pérdidadealimentosporaverías.
■ Reemplazodefusiblesdesuhogaroreajustede
interruptores de circuito.
■ Dañossobreelacabado,talescomoóxidosobre
la superficie, deslustres o manchas pequeñas no
informadas dentro de las 48 horas luego de la entrega.
■ Reemplazodelcartuchodelfiltrodeagua,siincluido,
debido a presión de agua afuera de las limites de
operación especificados o sedimento excesivo en el
suministro de agua.
■ ReemplazodelasluzLED,siincluidas,odelcartucho
de filtro de agua, si incluido, diferente a como se
especifica anteriormente.
■ Dañoalproductocausadoporaccidente,fuego,
inundaciones o actos de Dios.
■ Dañosconsecuentesoincidentalescausadospor
posibles defectos de este producto.
■ Productonoaccesibleparafacilitarelservicio
requerido.
■ LosdañoscausadosporunfiltrodeaguaMarcanoGE
Appliances.
Esta garantía no cubre:
Crosley.com
Su electrodoméstico está cubierto por una garantía limitada, como figura a continuación, de GE Appliances. Todo
el servicio de garantía es provisto por nuestros Centros de Servicio de Fabricación de Electrodomésticos GE
Appliances, o por un técnico autorizado del servicio técnico. Para programar el servicio técnico, comuníquese con
Crosley al 800.544.4780. Cuando llame para solicitar el servicio técnico, tenga los números de serie y modelo
disponibles.
Garantía limitada del refrigerador de Crosley
®
Corporation
EXCLUSIÓN DE GARANTÍAS IMPLÍCITAS
Su única y exclusiva alternativa es la reparación del producto, como se indica en la Garantía Limitada. Las
garantías implícitas, incluyendo garantías implícitas de comerciabilidad o conveniencia sobre un propósito
particular, se limitan a un año o al período más corto permitido por la ley.
Esta garantía se extiende al comprador original y a cualquier dueño subsiguiente de productos comprados para uso hogareño
dentro de EE.UU. Si el producto está en un área donde no se encuentra disponible un Proveedor Autorizado del Servicio Técnico
de GE Appliances, usted será responsable por el costo de un viaje o se podrá requerir que traiga el producto a una ubicación del
Servicio Técnico de GE Appliances Autorizado para recibir el servicio. En Alaska, la garantía excluye el costo de envío o llamadas
del servicio a su hogar.
Algunos estados no permiten la exclusión o limitación de daños fortuitos o consecuentes. Esta garantía le da derechos legales
específicos y es posible que tenga otros derechos legales que varían entre un estado y otro. Para conocer cuáles son sus
derechos legales, consulte a la oficina de asuntos del consumidor local o estatal o al Fiscal de su estado.
Garante: GE Appliances, a Haier company
Louisville, KY 40225
Garantía Extendida de Crosley
®
Además de la garantía que figura más arriba, solicítele a su vendedor minorista o en Crosley.com/warranty la
Garantía Limitada Extendida por 10 Años de Crosley, la cual es provista sin costo adicional. Esta garantía
cubrirá su producto cuando la garantía inicial del fabricante caduque luego de 10 años. Para conocer detalles
específicos, por favor comuníquese con Crosley a través de Crosley.com o llame a Crosley al 800.356.5268.
36 49-1000107 Rev. 0
GARANTÍA DEL FILTRO DE AGUA
Abroche su recibo aquí. Para acceder al servicio técnico de acuerdo con
la garantía deberá contar con la prueba de la fecha original de compra.
* Si su pieza de GE Appliances falla debido a un defecto en la fabricación dentro de los treinta días desde la fecha de compra original, le
entregaremos una pieza nueva o, a su elección, una pieza reconstruida sin cargo. Devuelva la pieza defectuosa al proveedor de piezas a quien
lerealizólacompra,juntoconunacopiadela“pruebadecompra”delapieza.Silapiezaesdefectuosaynomuestrasignosdeabuso,será
cambiada. La garantía no cubre la falla de las piezas que están dañadas mientras están en su posesión, si son abusadas, o si fueron instaladas
de forma incorrecta. No cubre el costo de regresar la pieza al proveedor a quien le realizó la compra ni cubre el costo del trabajo para retirar o
instalar la misma a fin de diagnosticar la falla. No cubre las piezas usadas en productos de uso comercial, excepto en el caso de equipos
acondicionadores de aire. En ningún caso GE Appliances será responsable por daños consecue ntes.
Garante: GE Appliances, a Haier company
Louisville, KY 40225
Vendedor:
Nombre
Domicilio
Ciudad Estado Código
Postal
Firma Date
Comprador:
Nombre
Domicilio
Ciudad Estado Código
Postal
Firma Fecha
Qué No Está Cubierto:
• Viajes del técnico del servicio a su hogar para enseñarle sobre cómo usar el producto.
• Instalación inadecuada.
• Fallas del producto en caso de abuso, mal uso, o uso para propósitos diferentes a l original o uso comercial
• Reemplazo de fusibles de la casa o reinicio de disyuntores.
• Reemplazo del cartucho del filtro de agua debido a la presión del agua que está fuera del rango de funcionamiento específico o
debido a exceso de sedimentos en el suministro de agua.
• Daños ocasionados sobre el producto por accidente, incendio, inundaciones o catástrofes naturales.
• D años consecuentes o incidentales causados por posibles defectos de este producto.
Garantía Limitada del Cartucho del Filtro de Agua
Esta garantía se extiende al comprador original y a cualquier dueño subsiguiente de productos adquiridos para uso hogareño
dentro de EE.UU. En Alaska, la garantía excluye el costo de envío o llamadas al servicio técnico desde su hogar.
Algunos estados no permiten la exclusión o limitación de daños fortuitos o consecuentes. Esta garantía le da derechos legales
específicos y es posible que tenga otros derechos legales que varían entre un estado y otro. Para conocer cuáles son sus
derechos legales, consulte a la oficina de asuntos del consumidor local o estatal o al Fiscal de su estado.
ParaAdquisicionesRealizadasenIowa:Esteformulariodebeposeerlafirmayfechadelcompradorydelvendedor
antes de la consumación de esta venta.
Este formulario debería ser retenido por el vendedor en un archivo durante un mínimo de dos años.
Por el Período de: Reemplazaremos, Sin Costo:
Treinta Días Desde
la fecha de compra
original.
Cualquier parte del cartucho del filtro de agua que falle debido a un defecto en los materiales
o la fabricación durante esta garantía limitada de treinta días.*
Comuníquese con nosotros en geapplianceparts.com, o llame al 800.GE.CARES.
EXCLUSIÓN DE GARANTÍAS IMPLÍCITAS:
Su única y exclusiva alternativa es el cambio de la pieza, como se indica en esta Garantía Limitada. Las garantías implícitas,
incluyendo garantías implícitas de comerciabilidad o conveniencia sobre un propósito particular, se limitan a seis meses o al
período más corto permitido por la ley.

49-1000107 Rev. 0 3737
Ficha Técnica de Funcionamiento
del Modelo: GE Appliances XWF
■SistemacertificadoporIAPMOR&TcontralosEstándares42,53,401deNSF/ANSIparalareduccióndedemandasespecificadasenlafichatécnicade
rendimiento y en iapmort.org.
■Elrendimientorealpodrávariarenrelaciónalascondicioneslocalesdelagua.
Es esencial que se cumpla con los requisitos de instalación, mantenimiento
y reemplazo de filtros recomendados por el fabrican te, a fin de que el
producto funcione de acuerdo a como fue promocionado. Para acceder a
información sobre la Garantía, consulte el Manual de Instalación.
Pautas de Aplicación/ Parámetros de Suministro de Agua
Flujo de Servicio 0.5gpm(1.89lpm)
Suministro de Agua Agua Potable
Presión del Agua 25-120psi(172-827kPa)
Temperatura del agua 33°F-100°F(0.6°C-38°C)
Capacidad 170galones(643.5litros)
Sustancia Evaluada
para la Reducción
Concentración del
peligro de intrusión
(mg/L)
Concentración de
aguas máximas
permitidas sobre el
producto(mg/L)
%
Promedio
de
Reducción
GustoyOloraCloro 2.0 mg/L +/- 10% N/A 96.9
GustoyOloraCloramina 3.0 mg/L +/- 10% 0.5 96.9
Partícula, Clase I Por lo menos 10,000
partículas/mL
N/A 91.4
Partícula, Clase I 50,000/L N/A >99.99
Plomo 0.15 0.01 98.85
Mercurio 0.006 0.002 96.3
Mercurio 107 to 108 fibras/ L N/A >99
Toxafeno 0.015 +/- 10% 0.003 86.95
VOC(químicosustitutodel
cloroformo)
0.300 0.015 99.7
Alacloro 0.050 0.001 > 98
Atrazina 0.100 0.003 > 97
Benceno 0.081 0.001 > 99
Carbofurano 0.190 0.001 > 99
Tetracloruro de carbono 0.078 0.0018 98
Clorobenceno 0.077 0.001 > 99
Cloropincrina 0.015 0.0002 99
2,4-D 0.110 0.0017 98
Dibromocloropropano(DBCP) 0.052 0.00002 > 99
o-Diclorobenceno 0.08 0.001 > 99
P-Diclorobenceno 0.040 0.001 > 98
1,2-dicloroetano 0.088 0.0048 95
1,2-dicloroetano 0.083 0.001 > 99
Cis-1,2-dicloroetileno 0.170 0.0005 > 99
Trans-1,2-dicloroetileno 0.086 0.001 > 99
1,2-dicloropropano 0.080 0.001 > 99
cis-1,3-dicloropropileno 0.079 0.001 > 99
Dinoseb 0.170 0.0002 99
Endrina 0.053 0.00059 99
Etilbenceno 0.088 0.001 > 99
Dibromurodeetileno(EDB) 0.044 0.00002 > 99
Bromocloroacetonitrilo 0.022 0.0005 98
Dibromoacetonitrilo 0.024 0.0006 98
dichloroacetonitrile 0.0096 0.0002 98
Dicloroacetonitrilo 0.015 0.0003 98
1,2-dicloro-2-propanona 0.0072 0.0001 99
1,1,1-trichloro-2-propanona 0.0082 0.0003 96
Heptacloro(H-34,Heptox) 0.025 0.00001 >99
Epóxido de heptacloro 0.0107 0.0002 98
Hexaclorociclopentadieno 0.044 0.001 > 98
Hexaclorociclopentadieno 0.060 0.000002 > 99
Lindano 0.055 0.00001 > 99
Metoxicloro 0.050 0.0001 > 99
Pentaclorofenol 0.096 0.001 > 99
Simazina 0.120 0.004 > 97
Tetracloroetileno 0.150 0.0005 > 99
1,1,2,2-Tetracloroetileno 0.081 0.001 > 99
Tetracloroetileno 0.081 0.001 > 99
Tolueno 0.078 0.001 > 99
2,4,5-TP(silvex) 0.270 0.0016 99
Ácido tribromoacético 0.042 0.001 > 98
1,2,4-Triclorobenceno 0.160 0.0005 > 99
1,1,1-tricloroetano 0.084 0.0046 95
1,1,2-tricloroetano 0.150 0.0005 > 99
Tricloroetileno 0.180 0.0010 > 99
Bromoformo 0.300 0.015 95
Bromodiclorometano 0.300 0.015 95
clorodibromometano 0.300 0.015 95
Xileno 0.070 0.001 >99
Meprobamato 400 +/- 20% 60 95.5
Atenolol 200 +/- 20% 30 95.9
carbamazepina 1400 +/- 20% 200 98.6
DEET 1400 +/- 20% 200 98.6
Metolacloro 1400 +/- 20% 200 98.7
Trimetoprima 140 +/- 20% 20 96.1
Linuron 140 +/- 20% 20 96.6
TCEP 5000 +/- 20% 700 98.1
TCPP 5000 +/- 20% 700 98.1
Fenitoína 200 +/- 20% 30 96
Naproxeno 400 +/- 20% 60 95.9
Naproxeno 140 +/- 20% 20 96.5
Estrona 140 +/- 20% 20 97.1
Bisfenol A 2000 +/- 20% 300 99.1
Nonyl phenol 1400 +/- 20% 200 97.3
Nota:Observequeaunquelaevaluaciónserealizódeacuerdo
con condiciones estándares de laboratorio, el desempeño
puede variar. Reemplazo del Cartucho: XWF. Para conocer
costos estimados de elementos de reemplazo, comuníquese al
1.877.959.8688 o visite nuestro sitio Web en
geapplianceparts.com
ADVERTENCIA
A fin de reducir el riesgo asociado con
la ingestión de contaminantes:
• No se deben usar con agua que no sea microbiológicamente
segura o de calidad desconocida sin una desinfección adecuada,
antes o después, del sistema. Los sistemas certificados para la
reducción de quistes se podrían usar en aguas desinfectadas
que puedan contener quistes filtrables.
AVISO
A fin de reducir el riesgo de pérdidas de agua o inundación, y
para asegurar un rendimiento óptimo del filtro:
• Lea y siga las Instrucciones de uso antes de la instalación y uso
de este sistema.
• La instalación y uso DEBERÁN cumplir con todos los códigos
estatales y locales de plomería.
• No se deberá instalar si la presión del agua supera los 120
psi(827kPa).Silapresióndelaguaessuperioralos80psi
(552kPa),deberáinstalarunaválvulalimitadoradepresión.
Si no está seguro sobre cómo controlar la presión del agua,
comuníquese con un plomero profesional.
• No instale cuando se puedan producir condiciones de golpe de
ariete. Si existen condiciones de golpe de ariete deberá instalar
un suspensor de golpes de ariete.
• Si no está seguro sobre cómo controlar esta condición,
comuníquese con un plomero profesional.
• No instale en líneas de suministro de agua caliente. La
temperatura máxima de funcionamiento del agua para este
sistemadefiltroesde100°F(37.8°C).
• Proteja el filtro de heladas. Drene el filtro cuando las
temperaturasseaninferioresa33ºF(0.6ºC).
• Cambie el cartucho del filtro descartable cada seis meses o
antes, si observa una reducción notoria en el promedio del flujo
de agua.
• Si no se reemplaza el cartucho del filtro descartable en
intervalos recomendados, se podrá producir un rendimiento
inferior del filtro y quebraduras en el espacio de colocación del
filtro, ocasionando pérdidas de agua o inundación.
•
Este sistema fue evaluado de acuerdo con NSF/ANSI 42, 53 y 401
para la reducción de las sustancias que figuran a continuación. La
concentración de las sustancias indicadas en agua que ingresa
al sistema fue reducida a una concentración inferior o igual al
límite permitido de agua que deja el sistema, de acuerdo con lo
especificado en NSF/ANSI 42, 53 y 401.
Sistema XWF certificado por IAPMO R&T
contra los Estándares 42,53 y 401 de NSF/
ANSI para la reducción de demandas
especificadas en la ficha técnica de
rendimiento en iapmort.org.

38 49-1000107 Rev. 0
Notas

49-1000107 Rev. 0 39
Notas
40 49-1000107 Rev. 0
Impreso en Estados Unidos
SOPORTE PARA EL CONSUMIDOR
Soporte para el Consumidor
Crosley Website
¿Desea realizar una consulta o necesita ayuda con su electrodoméstico? Visite el sitio Web de Crosly durante las 24 horas,
cualquier día del año en Crosley.com. Usted también puede comprar otros grandes productos de Crosley en nuestro sitio Web.
Registre su Electrodoméstico
¡Registre su electrodoméstico nuevo a través de Internet, según su convenienciaen crosley.com/mycrosley. Un registro puntual
de su producto permitirá una mejor comunicación y un servicio más puntual de acuerdo con los términos de su garantía, en caso
de surgir la necesidad. También puede enviar una carta en la tarjeta de inscripción preimpresa que se incluye con el material
embalado.
Servicio Programado
El servicio de reparación de Crosley está a sólo un paso de su puerta. Para programar el servicio técnico, comuníquese al
800.544.4780 durante el horario de atención comercial.
Garantía Limitada de 10 Años de CROSLEYCARE
®
Cuando compre un electrodoméstico Crosley, recibirá una de las mejores garantías disponibles en la industria de
electrodomésticos. Para más información, visite Crosley.com/warranty. Visite Crosley.com/mycrosley y registre la garantía
limitada extendida.
Piezas y Accesorios
Aquellos individuos calificados para realizar el servicio técnico de sus propios electrodomésticos podrán solicitar el envío de
piezasoaccesoriosdirectamenteasushogares(seaceptanlastarjetasVISA,MasterCardyDiscover).Ordenehoyatravésde
Internet durante las 24 horas, todos los días. Visita GEApplianceparts.com o de forma telefónica al 877.959.8688 durante el
horario de atención comercial.
Las instrucciones que figuran en este manual cubren los procedimientos que serán realizados por cualquier usuario.
Otros servicios técnicos generalmente deben ser derivados a personal calificado del servicio. Se deberá tener cuidado,
ya que una reparación indebida podrá hacer que el funcionamiento no sea seguro.