
®
SENS-A-CLEAN TMSelf-Cleaning Electric Range
Cocina de el_dca deatdx)lin_ie_ SE_S-A-CLEAN TM
Models, Modelos 665.95822
665.95824
665.95829
J
Super Capacity with ULTPJ_BAKE TM System
Capacidad extra con el Sistema ULTRABAKE TM
8272844B Sears, Roebuck and Co., Hoffman Estates, IL 60179 U.S.A. www.sears.com
rableofContents A Noteto You
A Note to You...............................................................2
Warranty ===== ==== ==== ===== ==== ==== ==== ===== ==== ==== ===== ==== ==== ==== ===== ==== ===3
Range Safety ................................................................4
Parts and Features .....................................................7
Using Your Range ......................................................8
Using the Surface Cooking Zones .......................8
Characterislcs of Cookware Materials..............11
Using the Oven ......................................................12
Bakeware Choices ................................................13
Using Aluminum Foil.............................................13
The ElectronicOven Control ................................14
Settingthe Clock ...............................................15
Usingthe Oven Lockout..................................15
Usingthe Cooktop Lockout............................16
Tones ...................................................................16
Using the 12-Hour Shut-Off ...........................16
Using the Electronic Kitchen -Rmer................17
Staring/Canceling a Fun_on ........................18
UL_ TM Baking/Roasting ...................18
Readju_ng the Oven Temperature Coned ...20
Broiling .................................................................21
Using RECIPE RECALL TM ..............................24
Using Serve Warm ............................................26
Using the-Smed Oven Control .......................30
Using the Warm & Ready
Warming Drawer ...............................................35
The Oven Vent ..................................................36
Using the SENS-A-CLEAN TM
Serf-Cleaning Cycle .................................................37
Before You Start ................................................37
Now the Cycle Works ......................................38
Setting the Controls ..........................................38
Caring for Your Range ............................................41
Cleaning Chart ..................................................41
Cleaning the Radiant Glass Cooktop ............42
Removing the Oven Door ................................43
The Oven Ught .................................................44
The Console Night Ught ..................................45
Troubleshooting ........................................................46
Range Does Not Work .....................................46
When Self-CleaningYour Oven ..........................46
Cooking Results ...............................................47
Display Messages ............................................47
Index .............................................................................49
Service ......................................................Back Cover
£ Ki{II£OlI
Your KENMORE electric range takes on a new value
when you discover that Sears has service centers
around the country. Trained Sears Service
Professionals use fully-equipped trucks and Sears-
approved methods for expert repairs backing up all
Sears guarantees.
Whenever you call to request service for your
appliance, you need to know your complete model
number and serial number. You can find this
information on the model and serial number plate
(see diagram in the "Parts and Features," p. 7).
Please also record the purchase date of your
appliance and your store's name and telephone
number.
Model Number 665.
Serial Number R
Purchase Date
Keep this book and the sales slip together in
a safe place for future reference.
RadiantFree-StandingRange
Warranty
FULLONEYEARWARRANTYONALLPARTS
If. within one year from the date of installation, any part fails to function properly due to a defect in
material or workmanship, Sears will repair or replace it. at our option, free of charge.
LIMITEDWARRANTYONRADIANTGLASSCOOKTOPANDCOOKTOPCOOKING
ELEMENTS
For the second through fifth year from the date of installation, Sears will at our option repair or replace
parts with defects as listed below. You pay for labor.
• Cracking of the radiant glass cooktop due to thermal shock
• Wear-off of the pattern on the radiant glass cooktop
• Cracking of the rubber seal between the radiant glass cooktop and the porcelain edge
• Bum-out of any of the radiant g_ass cooktop cooking elements
If this product is used for other than private family purposes, the above warranty is effective for only
90 days.
WARRANTY SERVICE IS AVAILABLE BY CONTACTING THE NEAREST SEARS SERVICE CENTER IN
THE UNITED STATES.
This warranty gives you specific legal rights and you may also have other rights which vary from state
to state.
Sears Roebuck and Co. Dept. 817WA Hoffman Estates, IL 60179
ToFurtherAddToTheValueOfYourRange,
Buya SearsMaintenanceAgreement.
Years of Ownership Covera_le 1st Year 2nd Year 3rd Year
1. Replacement of Defective Parts other
than Radiant Glass and Radiant W MA MA
Surface Units
2. Radiant Glass and Radiant Surface W W W
Unit Parts
3. Labor W MA MA
4. Annual Preventive Maintenance MA MA MA
Check at Your Request
W = Warranty MA = Maintenance Agreement
Your Kenmore appliance is designed, manufactured and tested to provide years of dependable operation. Yet any major
appliance may require service from time to time. The Sears Maintenance Agreement offers you an outstanding service
program, affordably priced.
The table above shows the additional benefits a Sears Maintenance Agreement provides beyond the Sears Warranty.
Contact your Sears Sales Associate or call 1-800-827-6655 to purchase a Sears Maintenance Agreement.
Range Safety
Your safety and the safety of others are very important.
We have provided many important safety messages in this manual and on your appliance. Always read and
obey all safety messages.
This is the safety alert symbol.
This symbol alerts you to potential hazards that can kiltor hurt you and others.
All safety messages will follow the safety alert symbol and either the word "DANGER" or
"WARNING." These words mean:
You can be killed or seriously injured if you don't
immediately follow instructions.
You can be killed or seriously injured if you don't
follow instructions.
All safety messages will tell you what the potential hazard is, tell you how to reduce the chance of injury,
and tell you what can happen if the instructions are not followed.
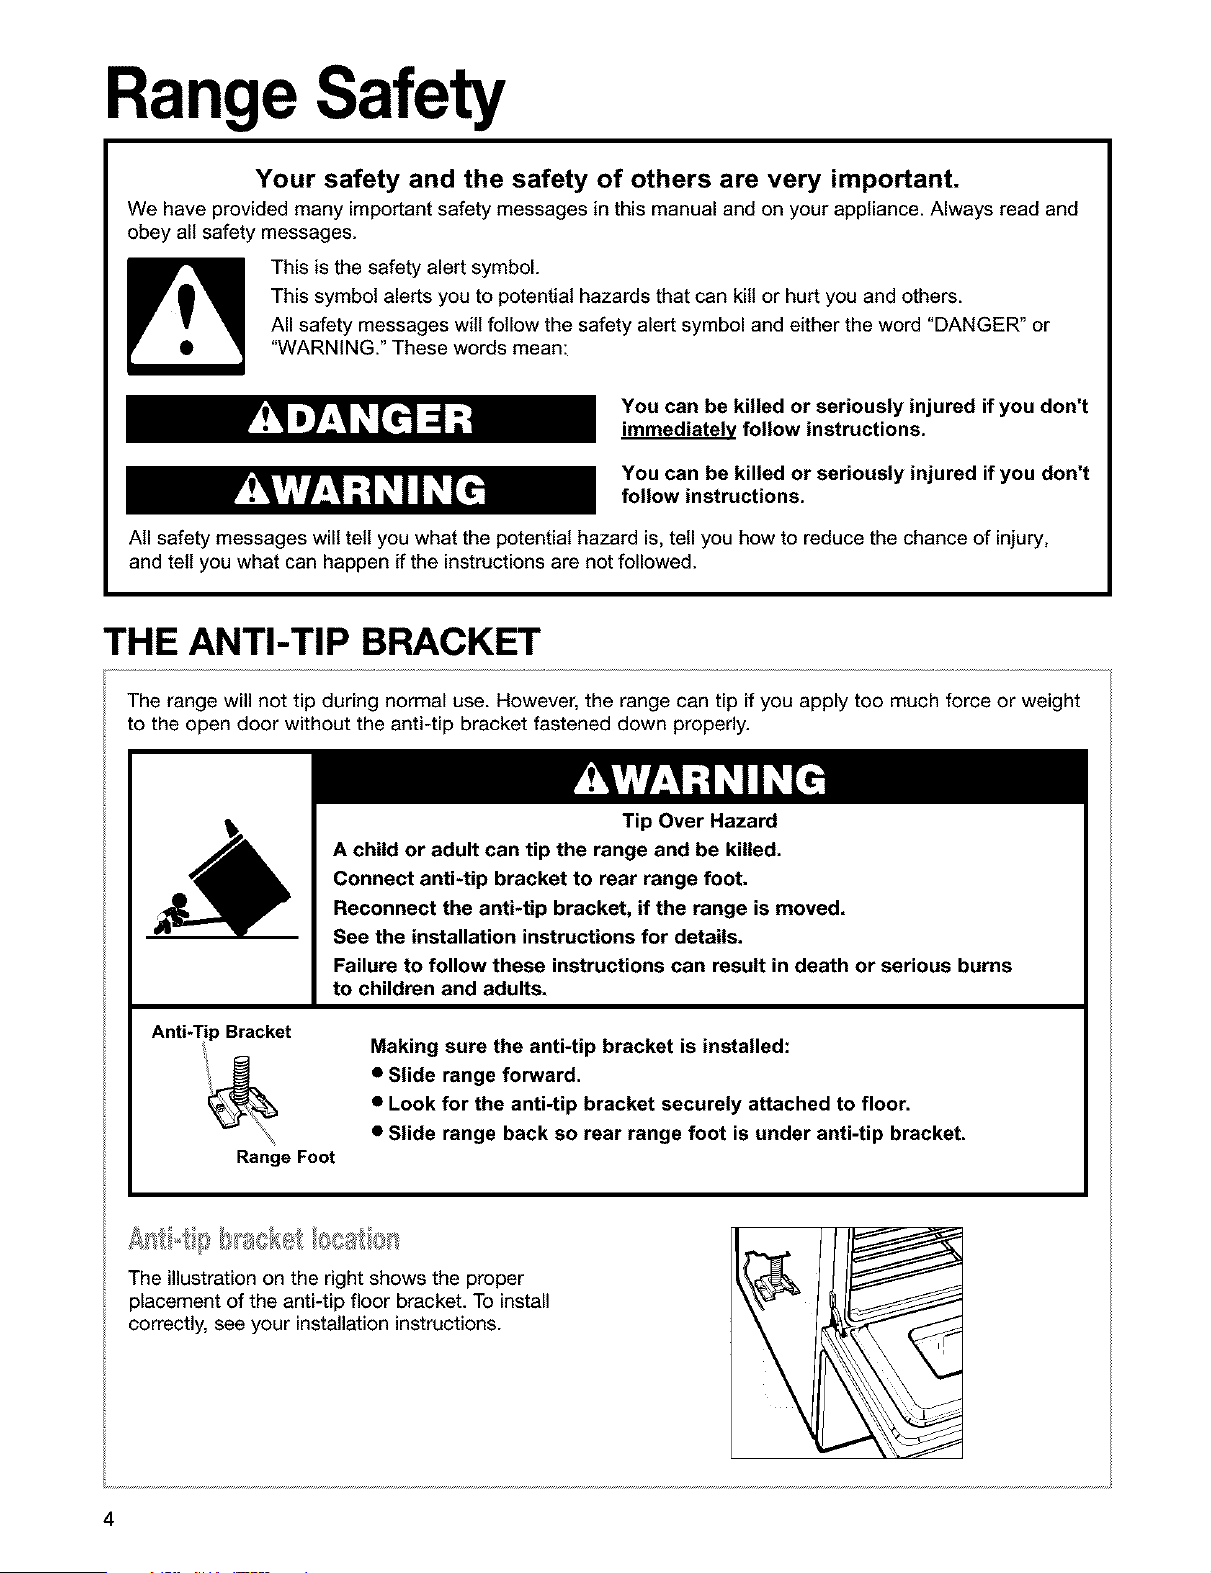
THE ANTI-TIP BRACKET
The range will not tip during normal use. However, the range can tip if you apply too much force or weight
to the open door without the anti-tip bracket fastened down properly.
Anti-Tip Bracket
Range Foot
Tip Over Hazard
A child or adult can tip the range and be killed.
Connect anti-tip bracket to rear range foot.
Reconnect the anti-tip bracket, if the range is moved.
See the installation instructions for details.
Failure to follow these instructions can result in death or serious burns
to children and adults.
Making sure the anti-tip bracket is installed:
• Slide range forward.
• Look for the anti-tip bracket securely attached to floor.
• Slide range back so rear range foot is under anti-tip bracket.
The illustration on the right shows the proper
placement of the anti-tip floor bracket. To install
correctly, see your installation instructions.
\
4

IMPORTANT SAFETY INSTRUCTIONS
WARNING: To reduce the risk of fire. electrical
shock, injury to persons, or damage when ustng
the range, follow basic precautions, including the
following:
• WARNING: TO reduce the risk of tipping
of the range, the range must be secured by
properly installed anti-tip devices, To check if
the devices are installed properly, slide range
forward, look for anti-tip bracket securely
attached to floor, and slide range back so rear
range foot is under anti-tip bracket,
• CAUTION: Do not store items of interest to
children in cabinets above a range or on the
backguard of a range - children climbing on the
range to reach items could be seriously injured.
• Proper Installation - Be sure the range is properly
installed and grounded by a qualified technician.
• Never Use the Range for Warming or Heating
the Room.
• Do Not Leave Children Alone - Children should
not be left alone or unattended in area where the
range is in use. They should never be allowed to
sit or stand on any part of the range.
• Wear Proper Apparel - Loose-fitting or hanging
garments should never be worn while using
the range.
• User Servicing - Do not repair or replace any part
of the range unless specifically recommended in
the manual. All other servicing should be referred
to a qualified technician.
• Storage in or on the Range - Flammable
materials should not be stored in an oven or
near surface cooking zones.
• Do Not Use Water on Grease Fires - Smother
fire or flame or use dry chemical or foam-type
extinguisher.
• Use Only Dry Potholders - Moist or damp
potholders on hot surfaces may result in burns
from steam. Do not let potholder touch hot
heating elements. Do not use a towel or other
bulky cloth.
• DO NOT TOUCH SURFACE COOKING ZONES
OR AREAS NEAR THEM - Surface Cooking Zones
may be hot even though they are dark in color.
Areas near surface cooking zones may become
hot enough to cause bums. During and after use.
do not touch, or let clothing or other flammable
materials contact surface cooking zones or areas
near them until they have had sufficient time to
cool. Among those areas are the cooktop and
surfaces facing the cooktop.
• Use Proper Pan Size -The range is equipped
with one or more surface cooking zones of
different size. Select utensils having flat bottoms
large enough to cover the surface cooking zone
heating element. The use of undersized utensils
will expose a portion of the heating element to
direct contact and may result in ignition of clothing.
Proper relationship of utensil to burner will also
irr 0rove efficiency.
• Never Leave Surface Cooking Zones Unattended
at High Heat Settings - Boilover causes smoking
and greasy spillovers that may ignite.
• Protective Liners - Do not use aluminum foil to
line oven bottom, except as suggested in the
manual. Improper installation of these liners may
result in a risk of electric shock, or fire.
• Glazed Cooking Utensils - Only certain types of
glass, glass/ceramic, ceramic, earthenware, or
other glazed utensils are suitable for range-top
service without breaking due to the sudden
change in temperature.
• Utensil Handles Should Be Turned Inward and
Not Extend Over Adjacent Surface Cooking
Zones - To reduce the risk of bums. ignition of
flammable materials, and spillage due to
unintentional contact with the utensil, the handle
of a utensil should be positioned so that it is
turned inward, and does not extend over adjacent
surface cooking zones.
SAVE THESE INSTRUCTIONS
continued on next page
IMPORTANT SAFETY INSTRUCTIONS
• Do Not Cook on Broken Cooktop - If cooktop
should break, cleaning solutions and spillovers
may penetrate the broken cooktop and create a
risk of electric shock. Contact a qualified
technician immediately.
• Clean Cooktop With Caution - If a wet sponge or
cloth is used to wipe spills on a hot cooking
area, be careful to avoid steam burn. Some
cleaners can produce noxious fumes if applied
to a hot surface.
• Use Care When Opening Door- Let hot air or
steam escape before removing or replacing food.
• Do Not Heat Unopened Food Containers -
Build-up of pressure may cause container to
burst and result in injury.
• Keep Oven Vent Ducts Unobstructed.
• Placement of Oven Racks - Always place oven
racks in desired location while oven is cool. If
rack must be moved while oven is hot. do not let
potholder contact hot heating element in oven.
• DO NOT TOUCH HEATING ELEMENTS OR
INTERIOR SURFACES OF OVEN - Heating
elements may be hot even though they are dark
For self-cleaning ranges -
• Do Not Clean Door Gasket - The door gasket is
essential for a good seal. Care should be taken not
to rub. damage, or move the gasket.
• Do Not Use Oven Cleaners - No commercial oven
cleaner or oven liner protective coating of any kind
should be used in or around any part of the oven.
• Clean Only Parts Listed in Manual.
• Before Self-Cleaning the Oven - Remove broiler
pan and other utensils.
For units with ventilating hood -
• Clean Ventilating Hoods Frequently - Grease
should not be allowed to accumulate on hooc
or filter.
• When flaming foods under the hood. turn the
fan o_
in color. Interior surfaces of an oven become hot
enough to cause burns. During and after use. do
not touch, or let clothing or other flammable
materials contact heating elements or interior
surfaces of oven until they have had sufficient
time to cool. Other surfaces of the appliance may
become hot enough to cause burns - among
these surfaces are oven vent openings ant
surfaces near these openings, oven doors, and
windows of oven doors.
SAVE THESE INSTRUCTIONS
The California Safe Drinking Water and Toxic Enforcement Act requires the Governor of California to
publish a list of substances known to the State of California to cause cancer, birth defects, or other
reproductive harm, and requires businesses to warn of potential exposure to such substances.
WARNING: This product contains a chemical known to the State of California to cause cancer, birth
defects, or other reproductive harm.
This appliance can cause low-level exposure to some of the substances listed, including benzene,
formaldehyde, carbon monoxide, and toluene.
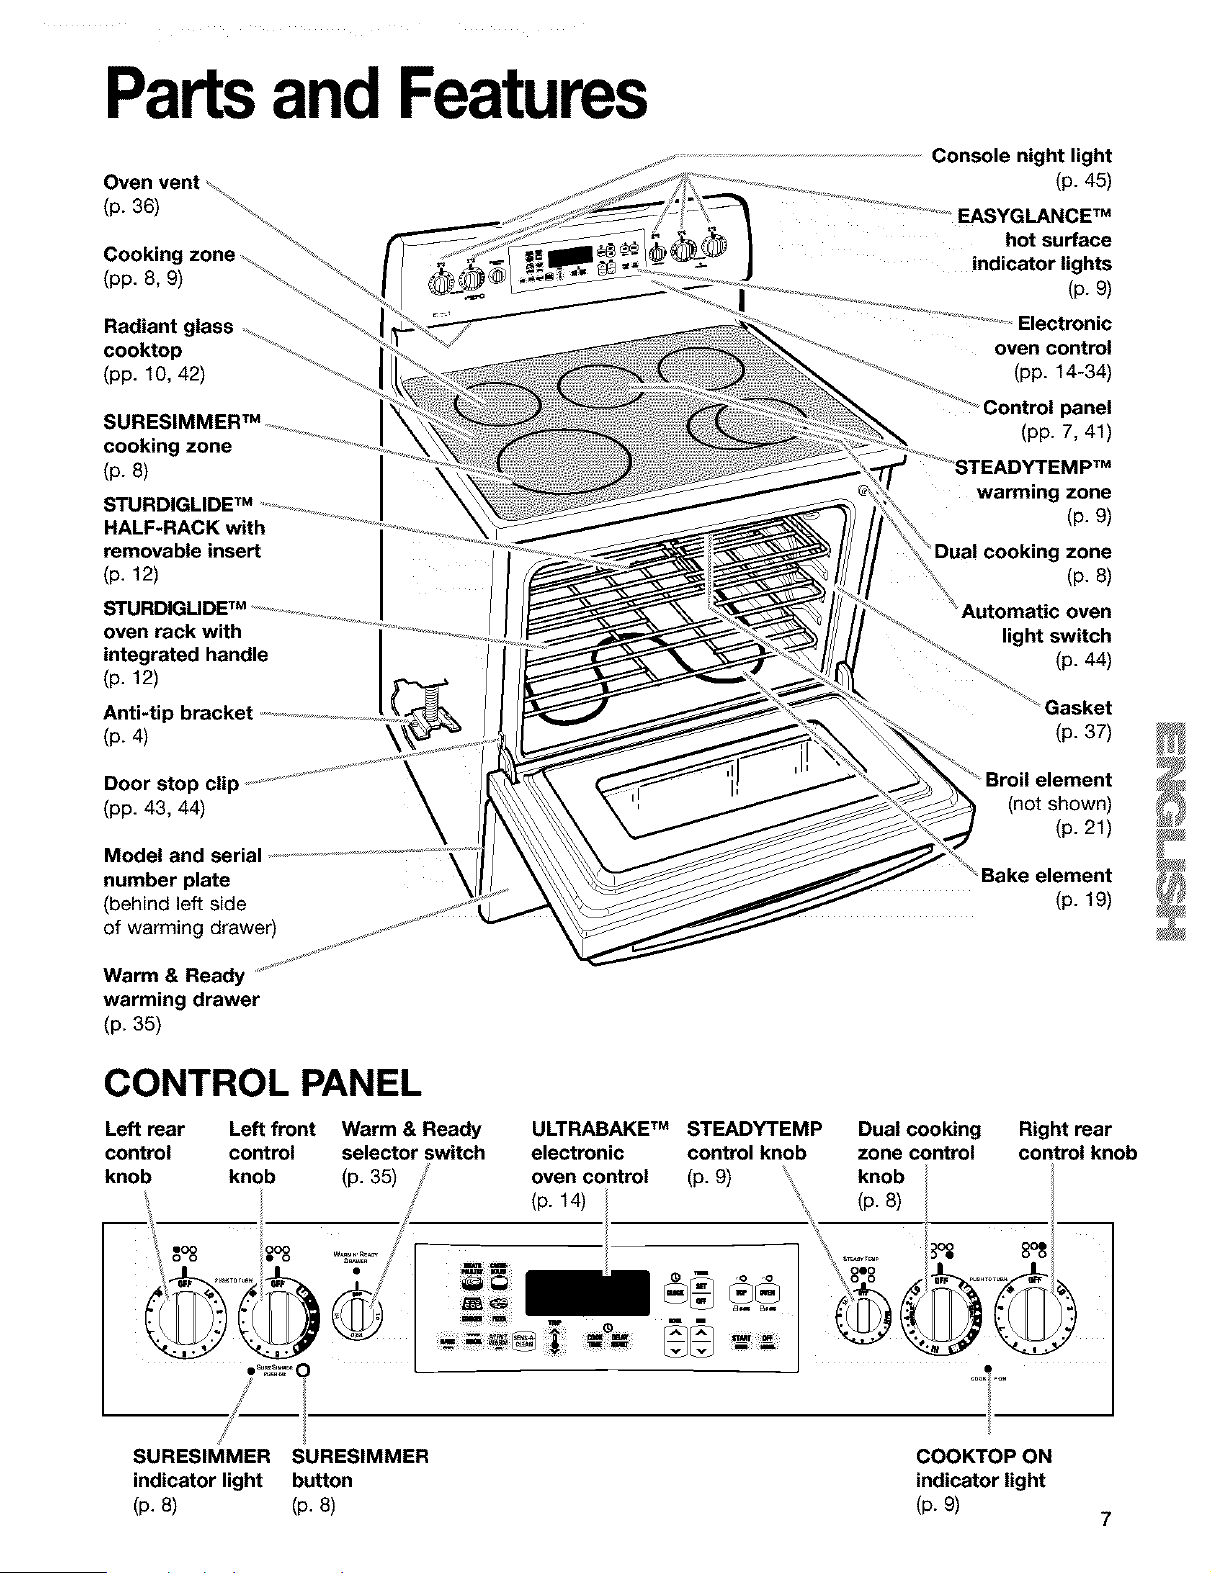
Partsand Features
(p. 36)
Cooking zone
(pp. 8, 9)
Radiant glass
cooktop
(pp. 10, 42)
SURE_
cooking zone
(p.8)
STURDIGLIDE TM
HALF-RACK with
removable insert
(p. 12)
oven rack with
integrated handle
(p. 12)
Anti-tip bracket
(p. 4)
Console night light
(p. 45)
EASYGLANCE TM
hot surface
indicator lights
(p. 9)
Electronic
oven control
(pp. 14-34)
Control panel
(pp. 7, 41)
warming zone
(p. 9)
"Dua! cooking zone
(p. 8)
Automatic oven
light switch
(p. 44)
(p. 37)
Door stop clip
(pp. 43, 44)
Model and seria
number plate
(behind left side
of warming drawer)
\
(not shown)
(p. 21)
Bake element
(p. 19)
Warm & Ready
warming drawer
(p. 35)
CONTROL PANEL
Left rear
control
knob
Left front Warm & Ready ULTRABAKE TM STEADYTEMP Dual cooking Right rear
control selector switch electronic control knob zone control control knob
knob (p. 35) oven control (p. g) knob
(p. 14) ' (p. 8)
.......°_ .I
SURESIMMER SURESIMMER COOKTOP ON
indicator light button indicator light
(p. 8) (p. 8) (p. 9)
UsingYourRange
USING THE SURFACE COOKING ZONES
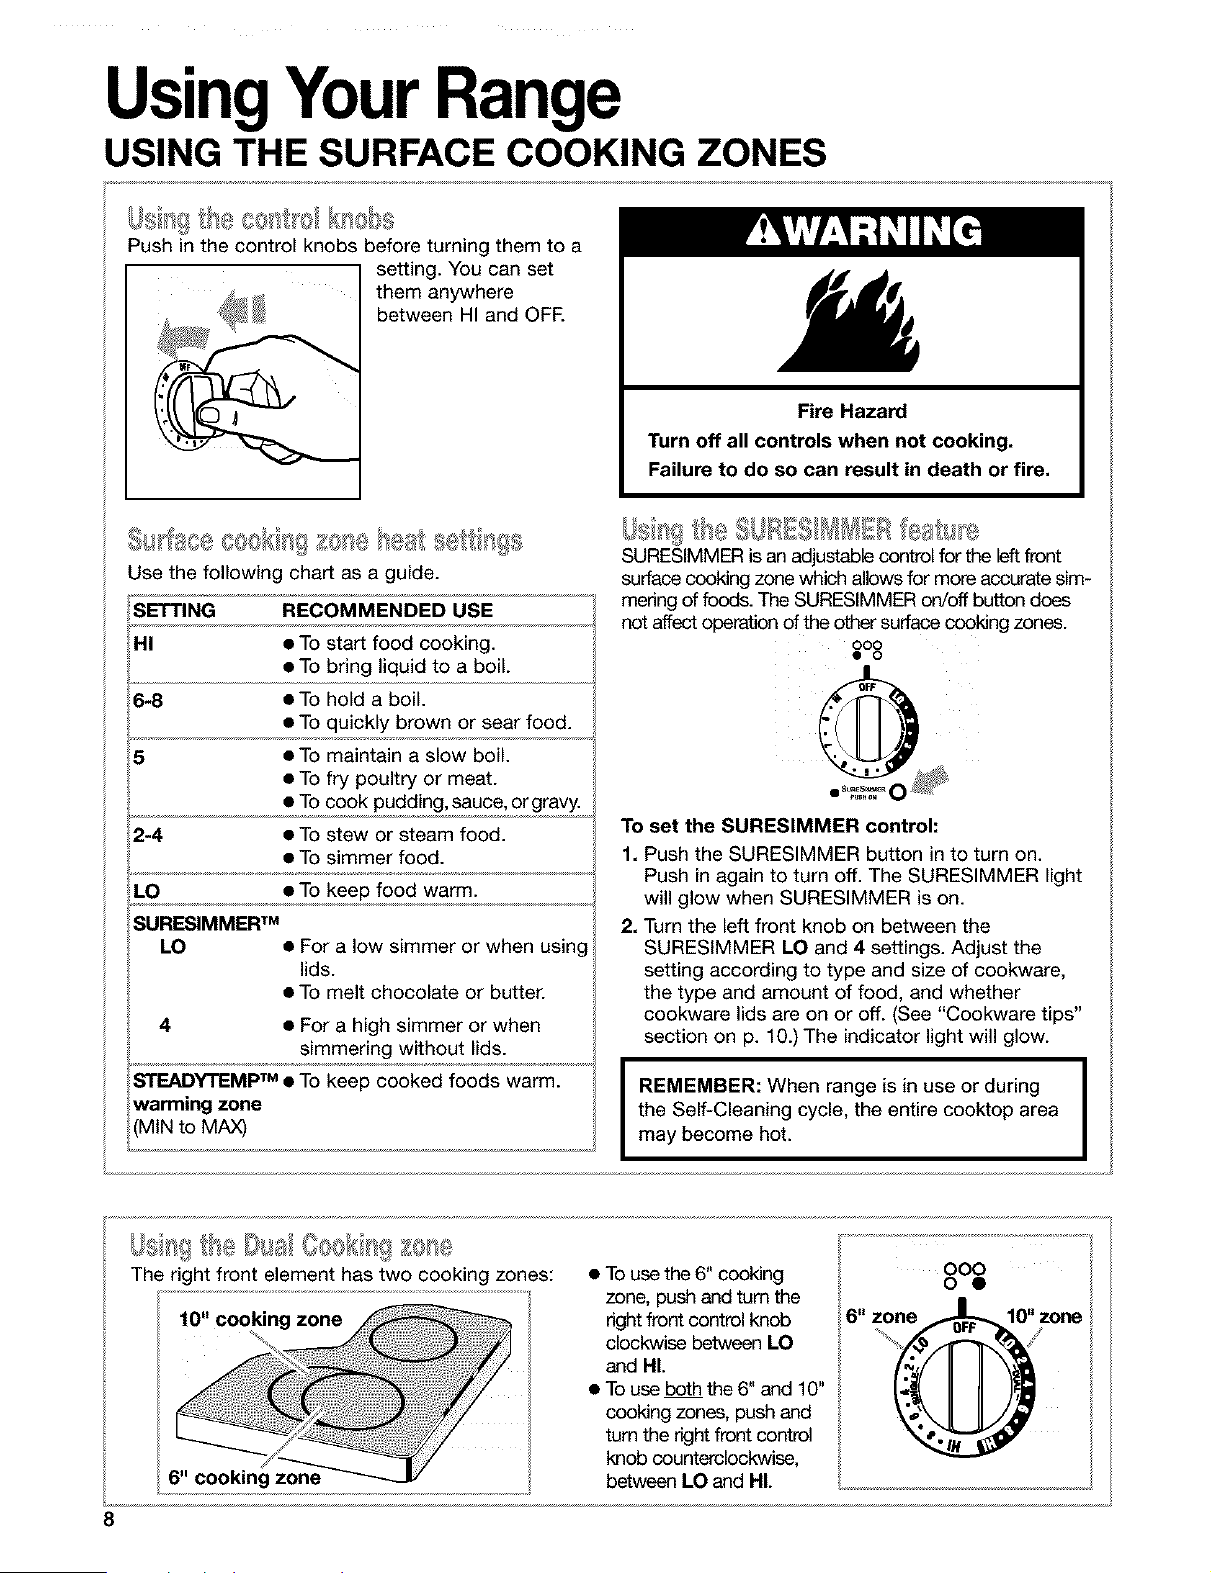
I}]_=,iII<; @_*,,,=Oe I[01 II@%_
Push in the control knobs before turning them to a
setting. You can set
them anywhere
between HI and OFE
Fire Hazard
Turn off all controls when not cooking.
Failure to do so can result in death or fire.
seal sel',l( s£,,
@ll_t_ee O,_OlIIII 10 e " =
Use the following chart as a guide.
SETTING RECOMMENDED USE
HI • To start food cooking.
• To bring liquid to a boil.
6-8 • To hold a boil.
• To quickly brown or sear food.
5 • To maintain a slow boil.
• To fry poultry or meat.
• To cook pudding, sauce, or gravy.
2-4 • To stew or steam food.
• To simmer food.
LO • To keep food warm.
SURESIMMER TM
LO • For a low simmer or when using
lids.
• To melt chocolate or butter.
4 • For a high simmer or when
simmering without lids.
SURESIMMER is an adjustable control for the leftfront
surface cooking zone which allows for more accurate sim-
mering of foods. The SURESIMMER on/off button does
not affect operation of the other surface cooking zones.
ooo
• o
To set the SURESIMMER control:
1. Push the SURESIMMER button in to turn on.
Push in again to turn off. The SURESIMMER light
will glow when SURESIMMER is on.
2. Turn the left front knob on between the
SURESIMMER LO and 4 settings. Adjust the
setting according to type and size of cookware,
the type and amount of food, and whether
cookware lids are on or off. (See "Cookware tips"
section on p. 10.) The indicator light will glow.
I REMEMBER: When range is in use or during I
I
the Self-Cleaning cycle, the entire cooktop area
I
may become hot.
IJs tt' e[Xsa/@sek
The right front element has two cooking zones:
10" cooking zone
• To use the 6" cooking
zone, push and turn the
right front control knob
clockwise between LO
and HI.
• To use both the 6" and 10"
cooking zones, push and
turn the right front control
knob counterclockwise,
between LO and HI.
8
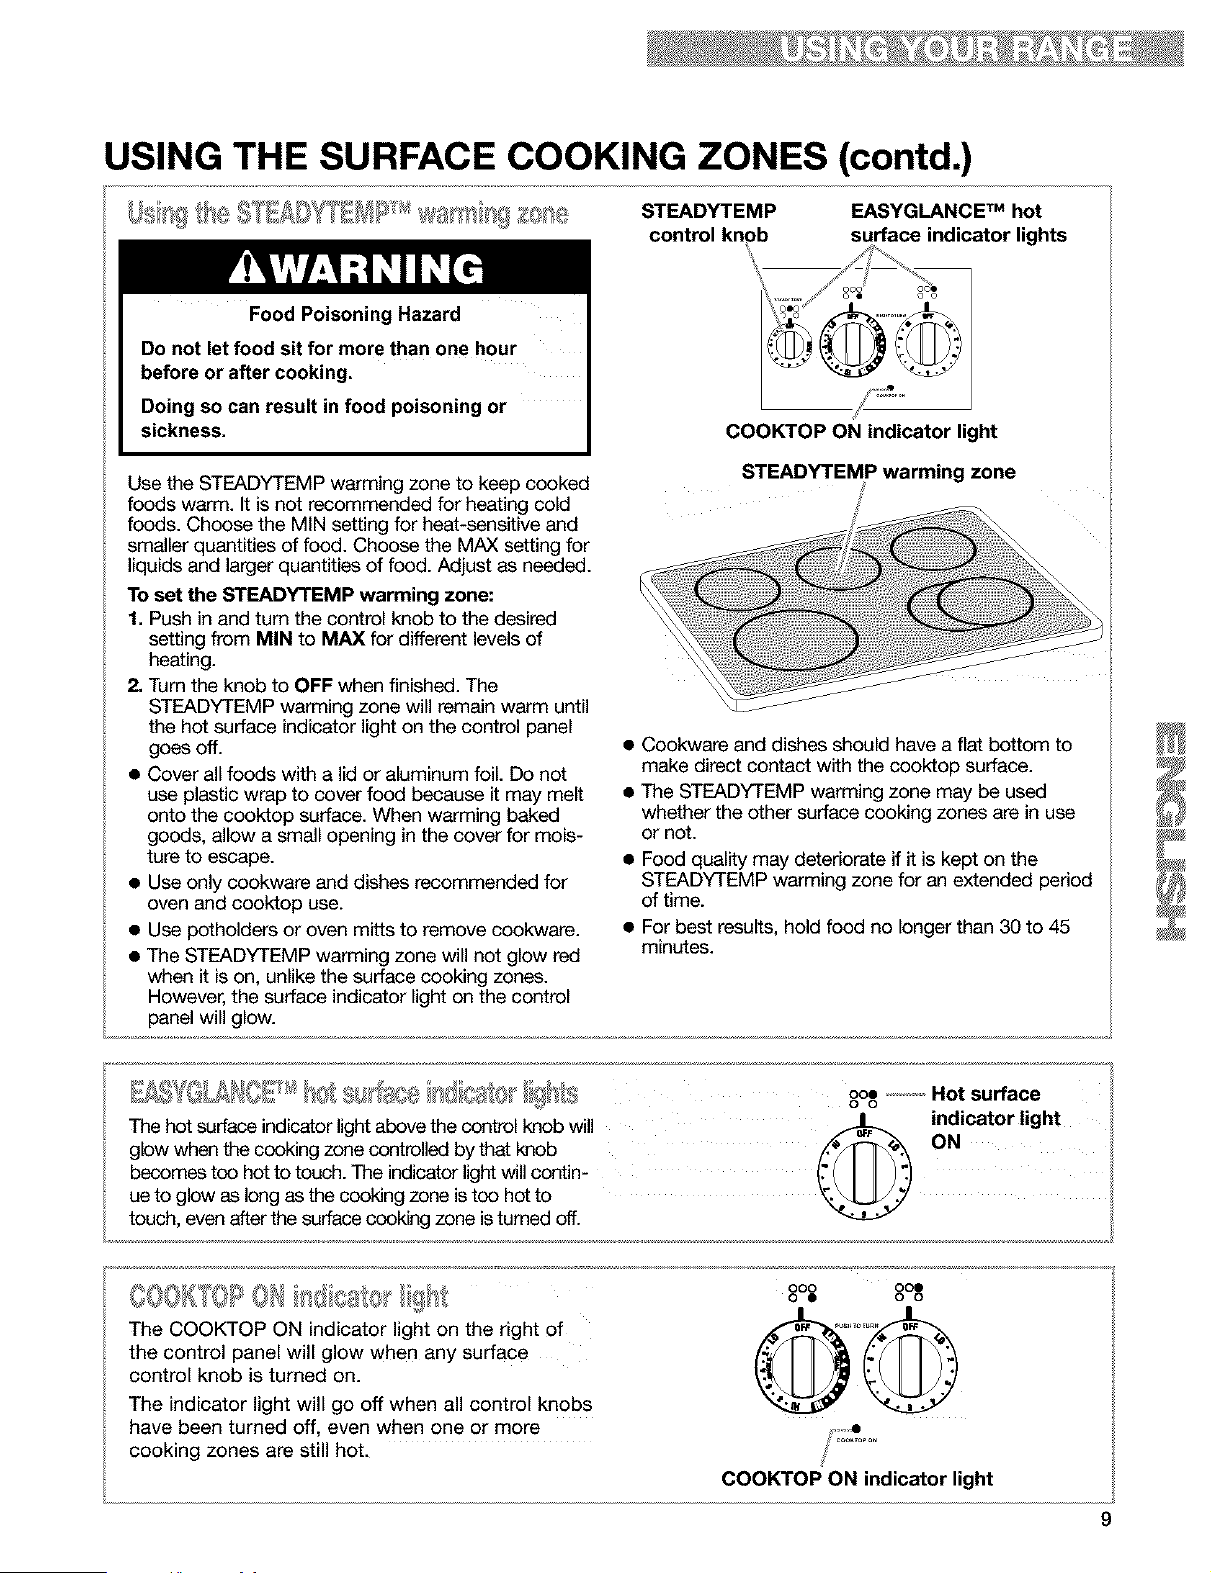
USING THE SURFACE COOKING ZONES (contd.)
Food Poisoning Hazard
Do not let food sit for more than one hour
before or after cooking.
Doing so can result in food poisoning or
sickness.
STEADYTEMP EASYGLANCE TM hot
control knob surface indicator lights
/J
oeo
COOKTOP ON indicator light
Use the STEADYTEMP warming zone to keep cooked
foods warm. It is not recommended for heating cold
foods. Choose the MIN setting for heat-sensitive end
smaller quantities of food. Choose the MAX setting for
liquids and larger quantities of food. Adjust as needed.
To set the STEADYTEMP warming zone:
1. Push in and turn the control knob to the desired
setting from MIN to MAX for different levels of
heating.
2, Turn the knob to OFF when finished. The
STEADYTEMP warming zone will remain warm until
the hot surface indicator light on the control panel
goes off.
• Cover all foods with a lid or aluminum foil. Do not
use plastic wrap to cover food because it may melt
onto the cooktop surface. When warming baked
goods, allow a small opening in the cover for mois-
ture to escape.
• Use only cookware end dishes recommended for
oven end cooktop use.
• Use potholders or oven mitts to remove cookware.
• The STEADYTEMP warming zone will not glow red
when it is on, unlike the surface cooking zones.
However, the surface indicator light on the control
panel will glow.
STEADYTEMP warming zone
• Cookware and dishes should have a flat bottom to
make direct contact with the cooktop surface.
• The STEADYTEMP warming zone may be used
whether the other surface cooking zones are in use
or not.
Food quality may deteriorate if it is kept on the
STEADYTEMP warming zone for an extended period
of time.
For best results, hold food no longer than 30 to 45
minutes.
The hot surface indicator light above the control knob will
glow when the cooking zone controlled by that knob
becomes too hot to touch. The indicator light will contin-
ue to glow as long as the cooking zone is too hot to
touch, even after the surface cooking zone is turned off.
ooe ...............Hot surface
O O
_ indicator light
@ !"
The COOKTOP ON indicator light on the right of
the control panel will glow when any surface
control knob is turned on.
The indicator light will go off when all control knobs
have been turned off, even when one or more
cooking zones are still hot.
000 000
0 • 0 0
®@
COOKTOP ON indicator light
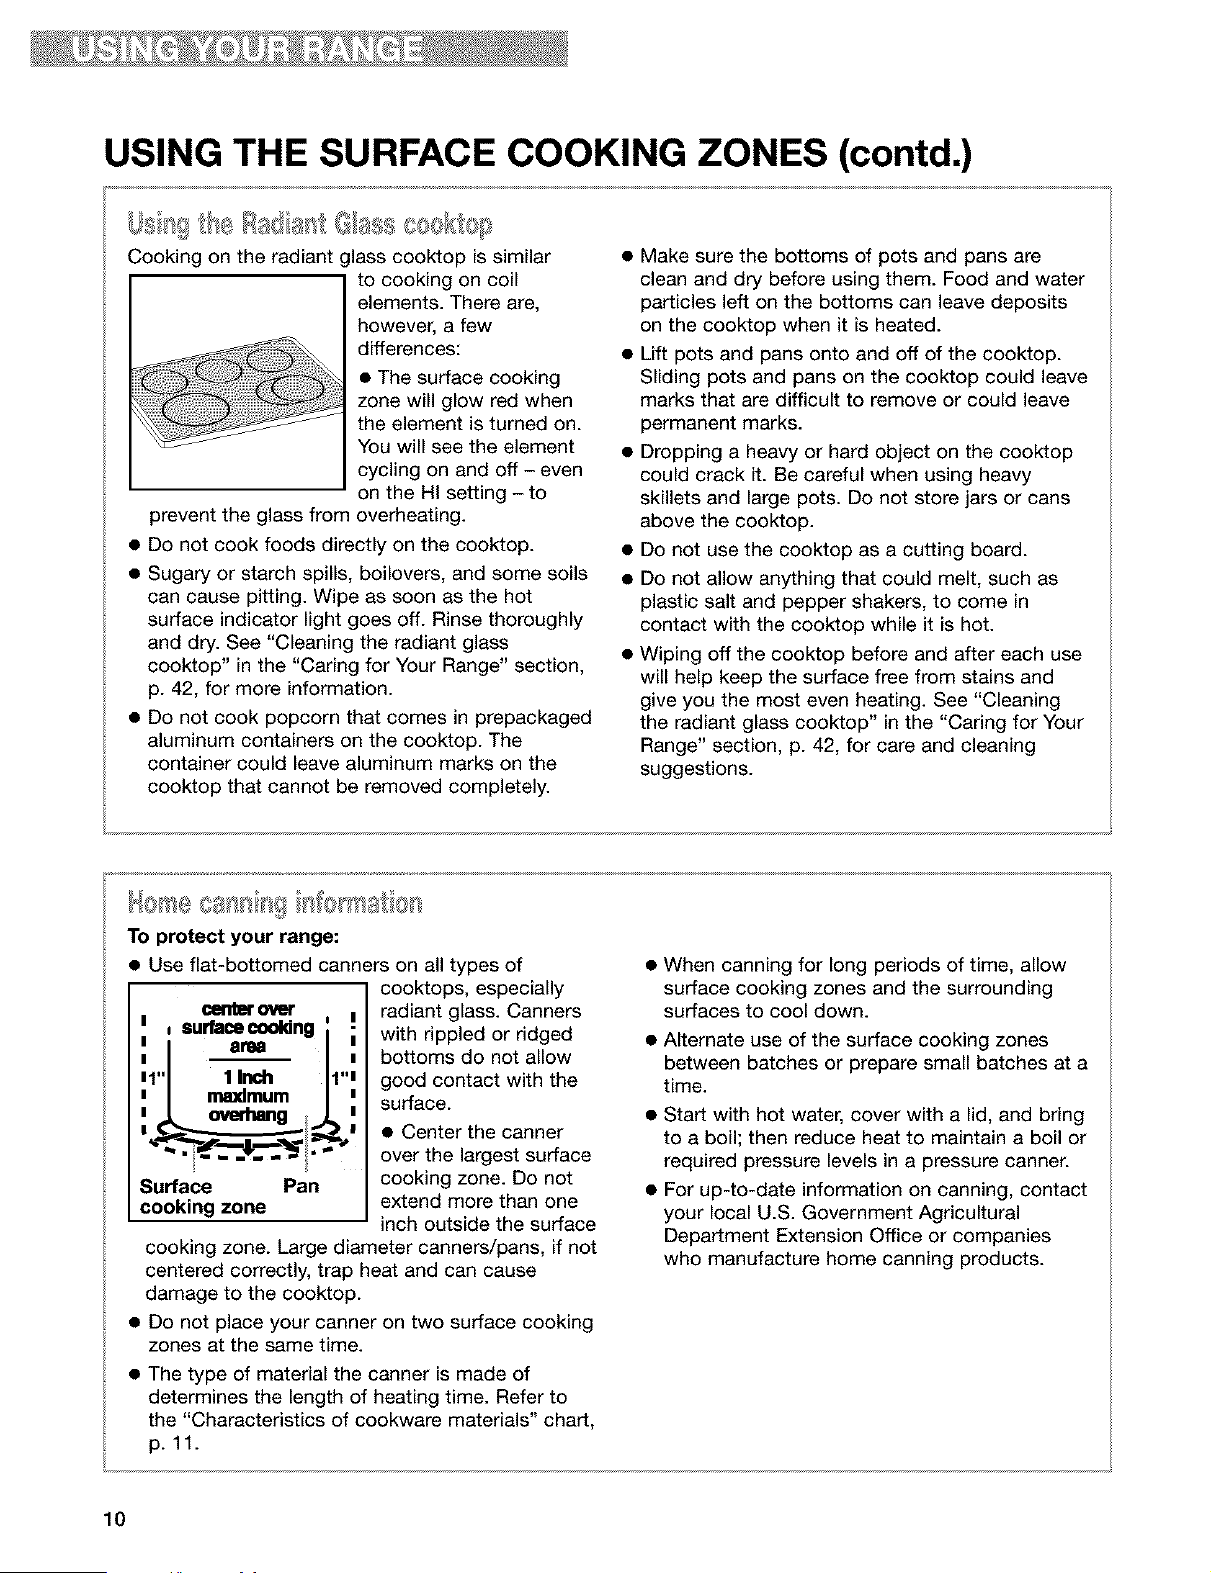
USING THE SURFACE COOKING ZONES (contd.)
Cooking on the radiant lass cooktop is similar
to cooking on coil
elements. There are,
however, a few
differences:
• The surface cooking
zone will glow red when
the element is turned on.
You will see the element
cycling on and off - even
on the HI setting - to
prevent the glass from overheating.
• Do not cook foods directly on the cooktop.
• Sugary or starch spills, boilovers, and some soils
can cause pitting. Wipe as soon as the hot
surface indicator light goes off. Rinse thoroughly
and dry. See "Cleaning the radiant glass
cooktop" in the "Caring for Your Range" section,
p. 42, for more information.
• Do not cook popcorn that comes in prepackaged
aluminum containers on the cooktop. The
container could leave aluminum marks on the
cooktop that cannot be removed completely.
• Make sure the bottoms of pots and pans are
clean and dry before using them. Food and water
particles left on the bottoms can leave deposits
on the cooktop when it is heated.
• Lift pots and pans onto and off of the cooktop.
Sliding pots and pans on the cooktop could leave
marks that are difficult to remove or could leave
permanent marks.
• Dropping a heavy or hard object on the cooktop
could crack it. Be careful when using heavy
skillets and large pots. Do not store jars or cans
above the cooktop.
• Do not use the cooktop as a cutting board.
• Do not allow anything that could melt, such as
plastic salt and pepper shakers, to come in
contact with the cooktop while it is hot.
Wiping off the cooktop before and after each use
will help keep the surface free from stains and
give you the most even heating. See "Cleaning
the radiant glass cooktop" in the "Caring for Your
Range" section, p. 42, for care and cleaning
suggestions.
To protect your range:
• Use fiat-bottomed canners on all types of
cooktops, especially
(_rltmt ovQt
I = surfacecooldng
1,,I
n I maxlmum nn
Surface Pan
cooking zone
I radiant glass. Canners
i with rippled or ridged
bottoms do not allow
good contact with the
surface.
• Center the canner
over the largest surface
cooking zone. Do not
extend more than one
inch outside the surface
cooking zone. Large diameter canners/pans, if not
centered correctly, trap heat and can cause
damage to the cooktop.
• Do not place your canner on two surface cooking
zones at the same time.
• The type of material the canner is made of
determines the length of heating time. Refer to
the "Characteristics of cookware materials" chart,
p. 11.
When canning for long periods of time, allow
surface cooking zones and the surrounding
surfaces to cool down.
Alternate use of the surface cooking zones
between batches or prepare small batches at a
time.
• Start with hot water, cover with a lid, and bring
to a boil; then reduce heat to maintain a boil or
required pressure levels in a pressure canner.
• For up-to-date information on canning, contact
your local U.S. Government Agricultural
Department Extension Office or companies
who manufacture home canning products.
10
USING THE SURFACE COOKING ZONES (contd.)
• Select a pan that is about the same size as the
surface cooking zone. Cookware should not
extend more than 1 inch (2.5 cm) outside the zone.
• For best results and greater energy
efficiency, use only flat-bottomed cookware that
makes good contact with the surface cooking
zone. Cookware with rounded, warped, fibbed
(such as some porcelain enamelware), or dented
bottoms could cause uneven heating and poor
cooking results.
• Cookware designed with slightly indented bot-
toms or small expansion channels can be used.
• Cookware with a non-stick finish has heating
characteristics of the base material.
• Check for rough spots on the bottom of metal or
glass cookware which will scratch the radiant glass
surface.
• Use fiat-bottomed cookware for best heat
conduction from the surface cooking zone to the
cookware. Determine flatness with the ruler test.
Place the edge of a ruler across the bottom of the
cookware. Hold it up to the light. No light should be
visible under the ruler. Rotate the ruler in all
directions and look for any light.
• Do not leave empty cookware, or cookware which
has boiled dry, on a hot surface cooking zone. The
cookware could overheat, causing damage to the
cookware or the surface cooking zone.
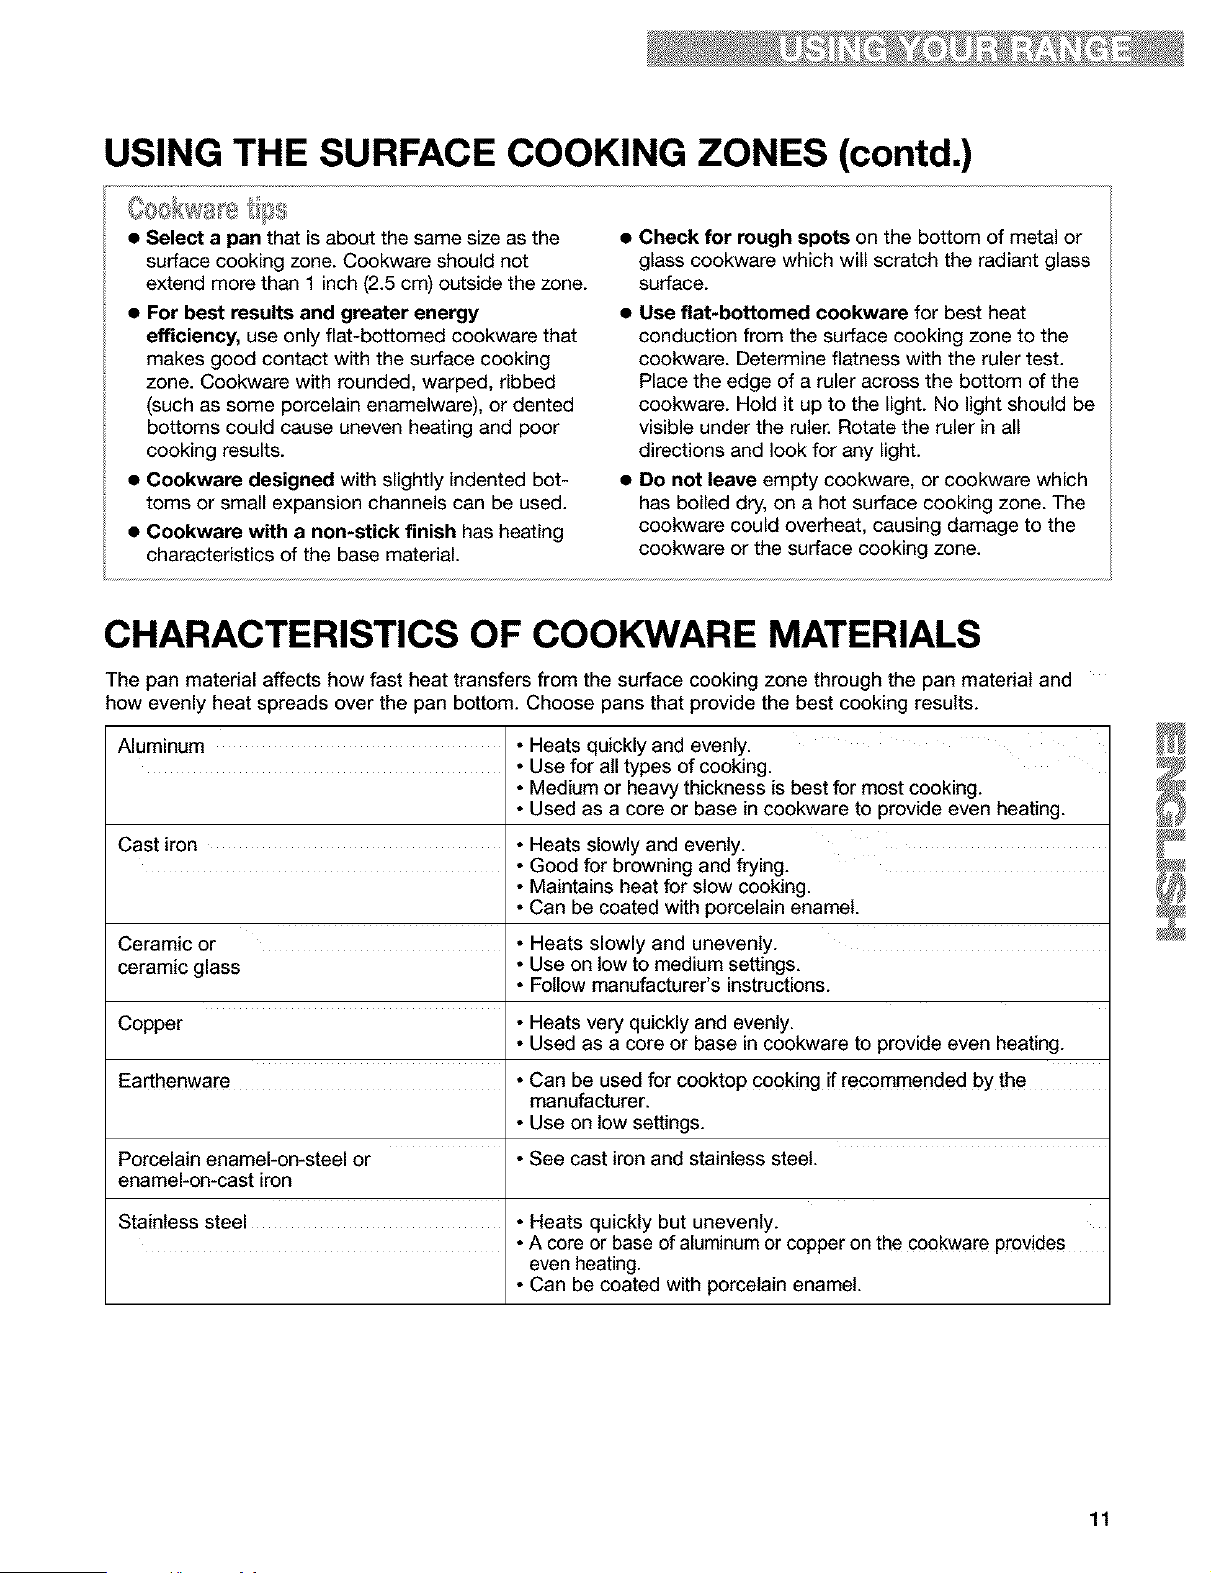
CHARACTERISTICS OF COOKWARE MATERIALS
The pan material affects how fast heat transfers from the surface cooking zone through the pan material and
how evenly heat spreads over the pan bottom. Choose pans that provide the best cooking results.
Aluminum • Heats quickly and evenly.
• Use for all types of cooking.
• Medium or heavy thickness is best for most cooking.
• Used as a core or base in cookware to provide even heating.
Cast iron • Heats slowly and evenly.
• Good for browning and frying.
• Maintains heat for slow cooking.
• Can be coated with porcelain enamel.
Ceramic or • Heats slowly and unevenly.
ceramic glass • Use on tow to medium settings.
• Follow manufacturer's instructions.
Copper • Heats very quickly and evenly.
• Used as a core or base in cookware to provide even heating.
Earthenware • Can be used for cooktop cooking if recommended by the
manufacturer.
• Use on tow settings.
Porcelain enamel-on-steel or • See cast iron and stainless steel.
enamel-on-cast iron
Stainless steel • Heats quickly but unevenly.
• A core or base of aluminum or copper on the cookware provides
even heating.
• Can be coated with porcelain enamel.
11
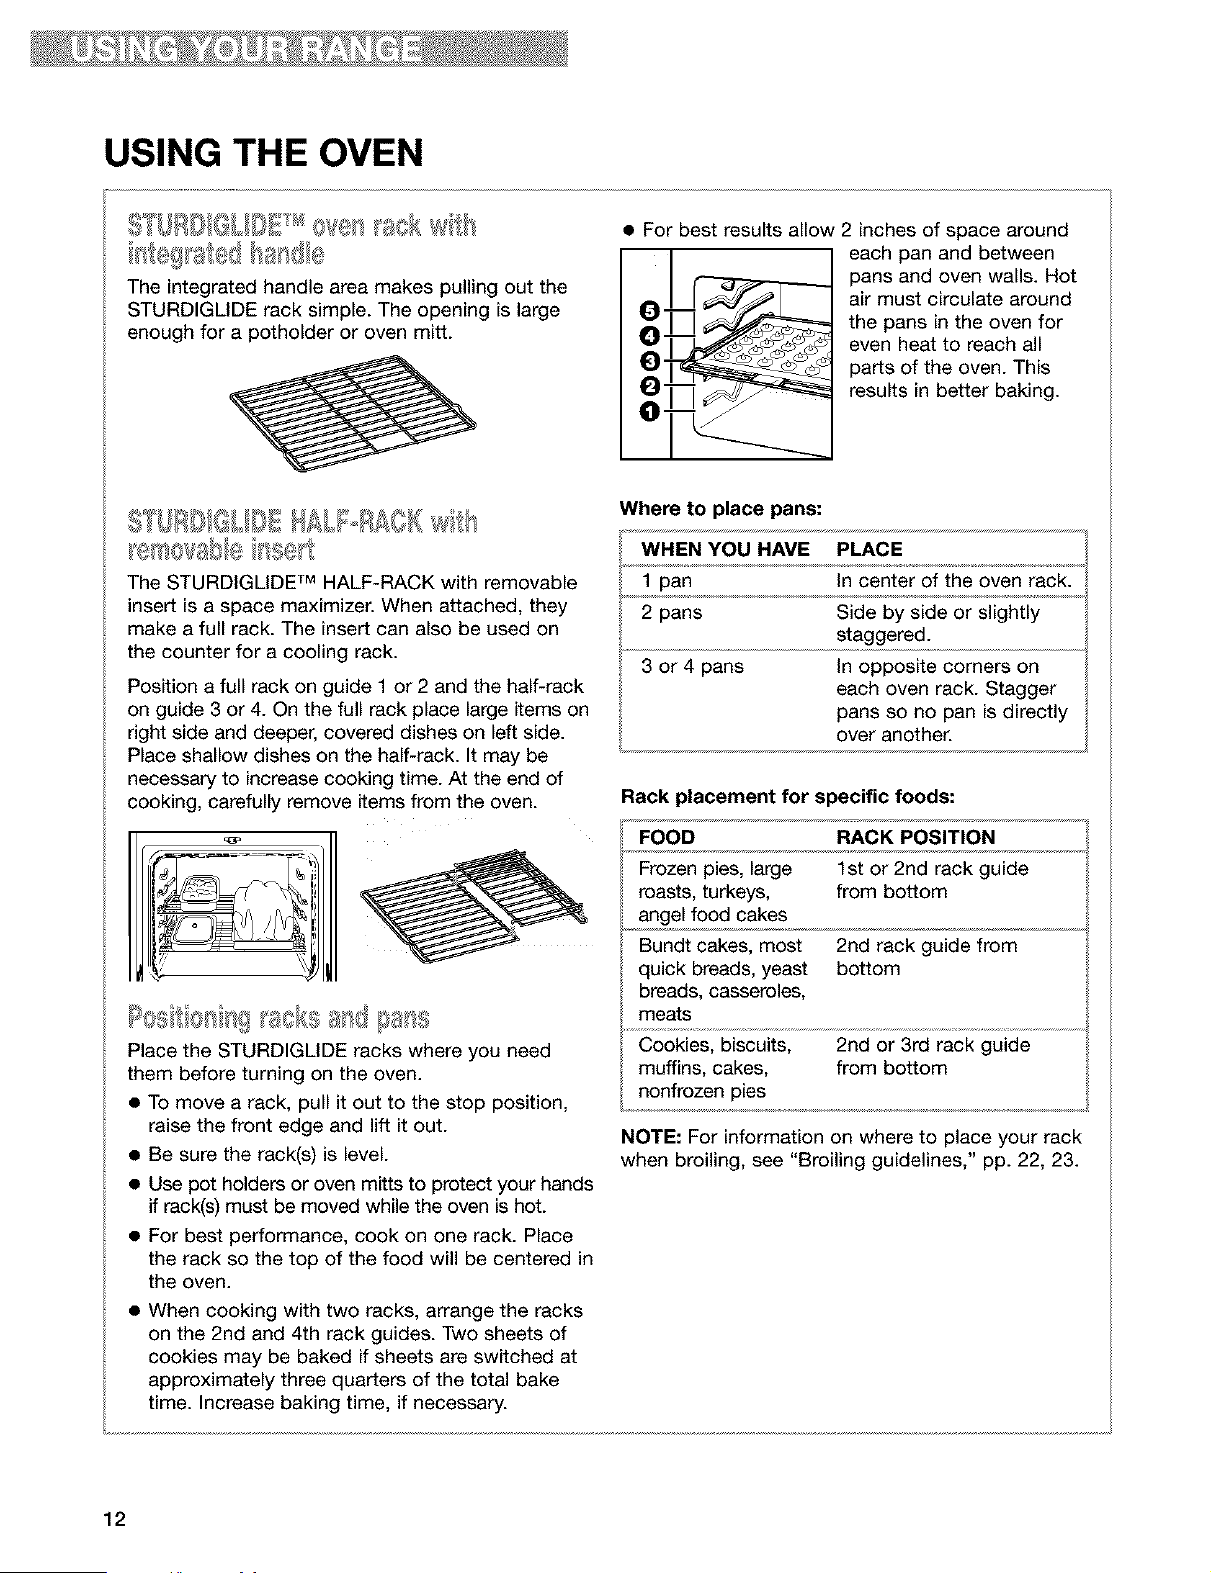
USING THE OVEN
5 [IJR[I'IOILItI {sck wi N
The integrated handle area makes pulling out the
STURDIGLIDE rack simple. The opening is large
enough for a potholder or oven mitt.
• For best results allow 2 inches of space around
-J__ each pan and between
pans and oven walls. Hot
__ air must circulate around
the pans in the oven for
even heat to reach all
parts of the oven. This
results in better baking.
S [IJRBIQLIQIHALI°RAOR tls
The STURDIGLiDE TM HALF-RACK with removable
insert is a space maximizer. When attached, they
make a full rack. The insert can also be used on
the counter for a cooling rack.
Position a full rack on guide 1 or 2 and the half-rack
on guide 3 or 4. On the full rack place large items on
right side and deeper, covered dishes on left side.
Place shallow dishes on the half-rack. It may be
necessary to increase cooking time. At the end of
cooking, carefully remove items from the oven.
Place the STURDIGLiDE racks where you need
them before turning on the oven.
• To move a rack, pull it out to the stop position,
raise the front edge and lift it out.
• Be sure the rack(s) is level.
• Use pot holders or oven mitts to protect your hands
if rack(s) must be moved while the oven is hot.
• For best performance, cook on one rack. Place
the rack so the top of the food will be centered in
the oven.
• When cooking with two racks, arrange the racks
on the 2nd and 4th rack guides. Two sheets of
cookies may be baked if sheets are switched at
approximately three quarters of the total bake
time. Increase baking time, if necessary.
Where to place pans:
WHEN YOU HAVE PLACE
1 pan in center of the oven rack.
2 pans Side by side or slightly
staggered.
3 or 4 pans In opposite corners on
each oven rack. Stagger
pans so no pan is directly
over another.
Rack placement for specific foods:
FOOD RACK POSITION
Frozen pies, large 1st or 2nd rack guide
roasts, turkeys, from bottom
angel food cakes
Bundt cakes, most 2nd rack guide from
quick breads, yeast bottom
breads, casseroles,
meats
Cookies, biscuits, 2nd or 3rd rack guide
muffins, cakes, from bottom
nonfrozen pies
NOTE: For information on where to place your rack
when broiling, see "Broiling guidelines," pp. 22, 23.
12
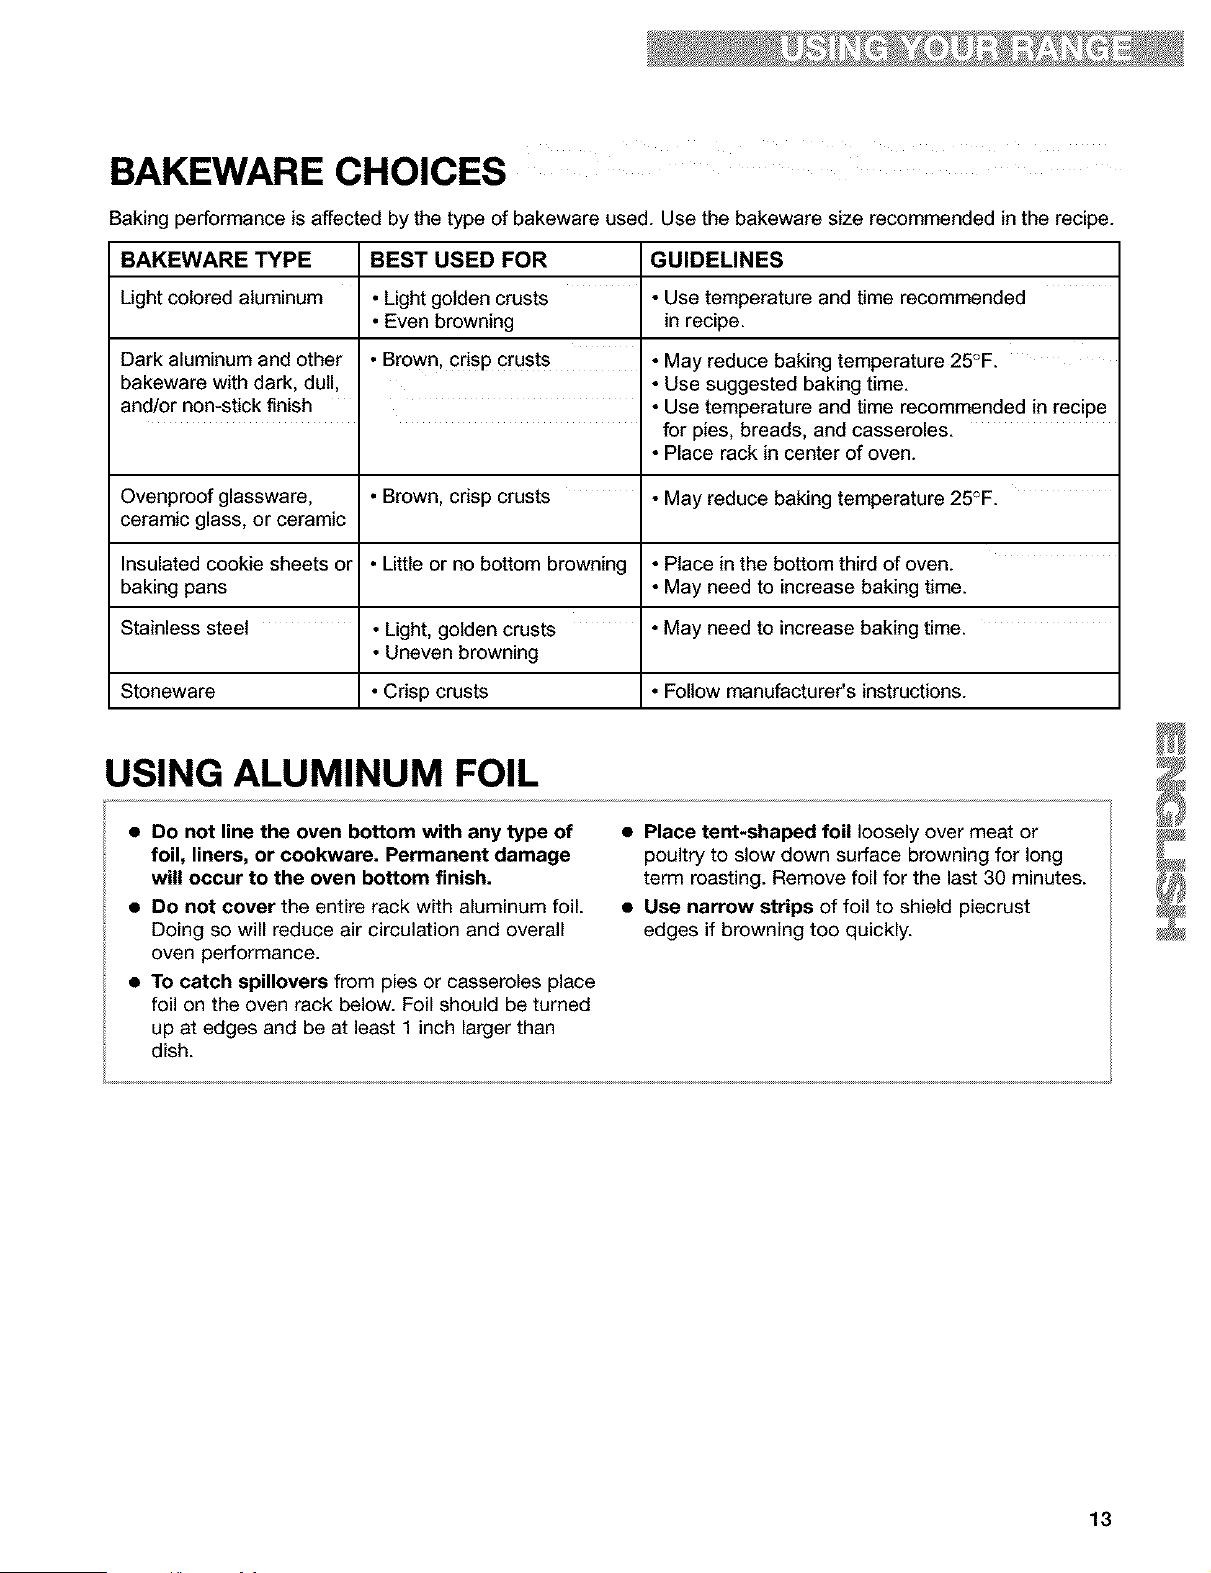
BAKEWARE CHOICES
Baking performance is affected by the type of bakeware used. Use the bakeware size recommended in the recipe.
BAKEWARE TYPE BEST USED FOR GUIDELINES
Light colored aluminum • Light golden crusts • Use temperature and time recommended
• Even browning in recipe.
Dark aluminum and other • Brown, crisp crust s • May reduce baking temperature 25°F.
bakeware with dark, dull, • Use suggested baking time.
and/or non-stick finish • Use temperature and time recommended in recipe
for pies, breads, and casseroles.
• Place rack in center of oven.
Ovenproof glassware, • Brown, crisp crusts • May reduce baking temperature 25°F.
ceramic glass, or ceramic
Insulated cookie sheets or • Little or no bottom browning • Place in the bottom third of oven.
baking pans • May need to increase baking time.
Stainless steel • Light, golden crusts • May need to increase baking time.
• Uneven browning
Stoneware • Crisp crusts • Follow manufacturer's instructions.
USING ALUMINUM FOIL
• Do not line the oven bottom with any type of
foil, liners, or cookware. Permanent damage
will occur to the oven bottom finish.
• Do not cover the entire rack with aluminum foil.
Doing so will reduce air circulation and overall
oven performance.
• To catch spillovers from pies or casseroles place
foil on the oven rack below. Foil should be turned
up at edges and be at least 1 inch larger than
dish.
• Place tent-shaped foil loosely over meat or
poultry to slow down surface browning for long
term roasting. Remove foil for the last 30 minutes.
• Use narrow strips of foil to shield piecrust
edges if browning too quickly.
13
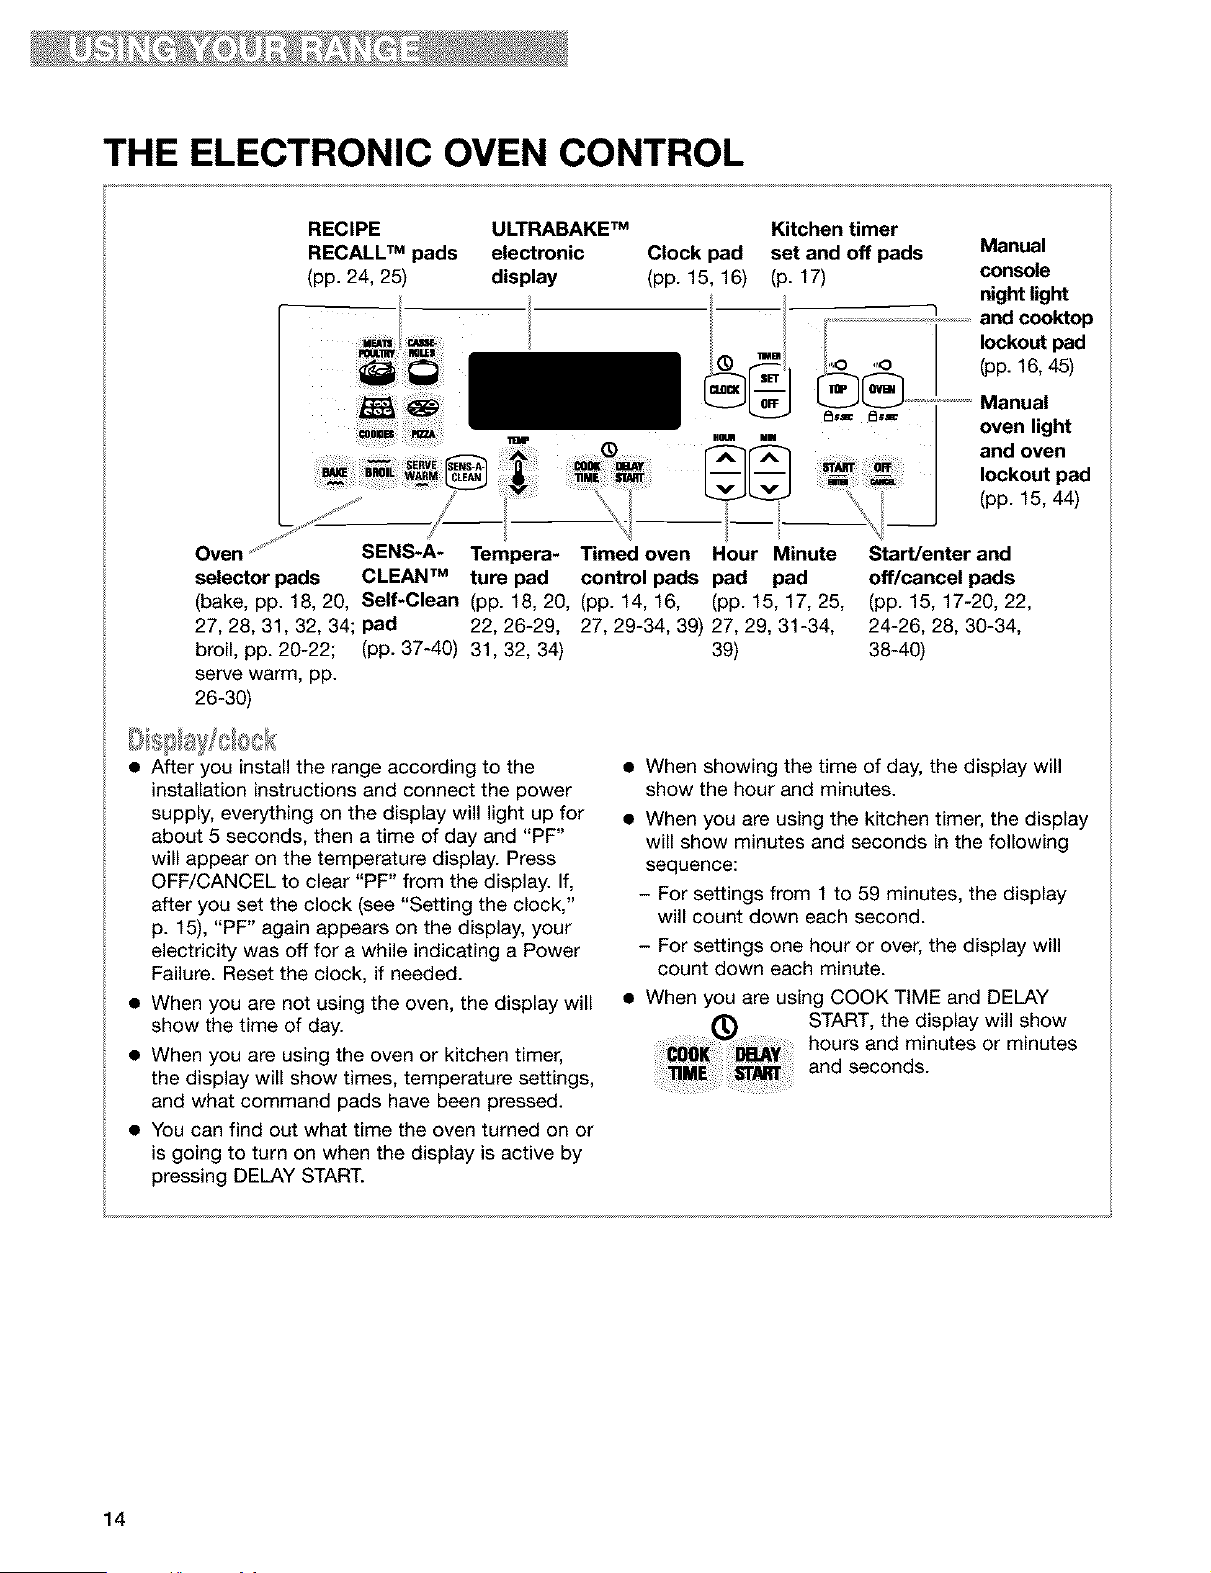
THE ELECTRONIC OVEN CONTROL
RECIPE ULTRABAKE TM Kitchen timer
RECALL TM pads electronic Clock pad set and off pads
(pp. 24, 25) display (pp. 15, 16) (p. 17)
!
,o
I I o.-o=
Oven ...... SENS-A- Tempera- Timed oven Hour Minute
selector pads CLEAN TM ture pad control pads pad pad
(bake, pp. 18, 20, Self-Clean (pp. 18, 20, (pp. 14, 16, (pp. 15, 17, 25,
27, 28, 31, 32, 34; pad 22, 26-29, 27, 29-34, 39) 27, 29, 31-34,
broil, pp. 20-22; (pp. 37-40) 31,32, 34) 39)
serve warm, pp.
26-30)
Manual
console
night light
and cooktop
lockout pad
(pp. 16, 45)
_'_ Manual
oven light
and oven
lockout pad
(pp. 15, 44)
Start/enter and
off/cancel pads
(pp. 15, 17-20, 22,
24-26, 28, 30-34,
38-40)
• After you install the range according to the
installation instructions and connect the power
supply, everything on the display will light up for
about 5 seconds, then a time of day and "PF"
will appear on the temperature display. Press
OFF/CANCEL to clear "PF" from the display. If,
after you set the clock (see "Setting the clock,"
p. 15), "PF" again appears on the display, your
electricity was off for a while indicating a Power
Failure. Reset the clock, if needed.
• When you are not using the oven, the display will
show the time of day.
• When you are using the oven or kitchen timer,
the display will show times, temperature settings,
and what command pads have been pressed.
• You can find out what time the oven turned on or
is going to turn on when the display is active by
pressing DELAY START.
• When showing the time of day, the display will
show the hour and minutes.
• When you are using the kitchen timer, the display
will show minutes and seconds in the following
sequence:
- For settings from 1 to 59 minutes, the display
will count down each second.
- For settings one hour or over, the display will
count down each minute.
• When you are using COOK TIME and DELAY
START, the display will show
hours and minutes or minutes
and seconds.
14
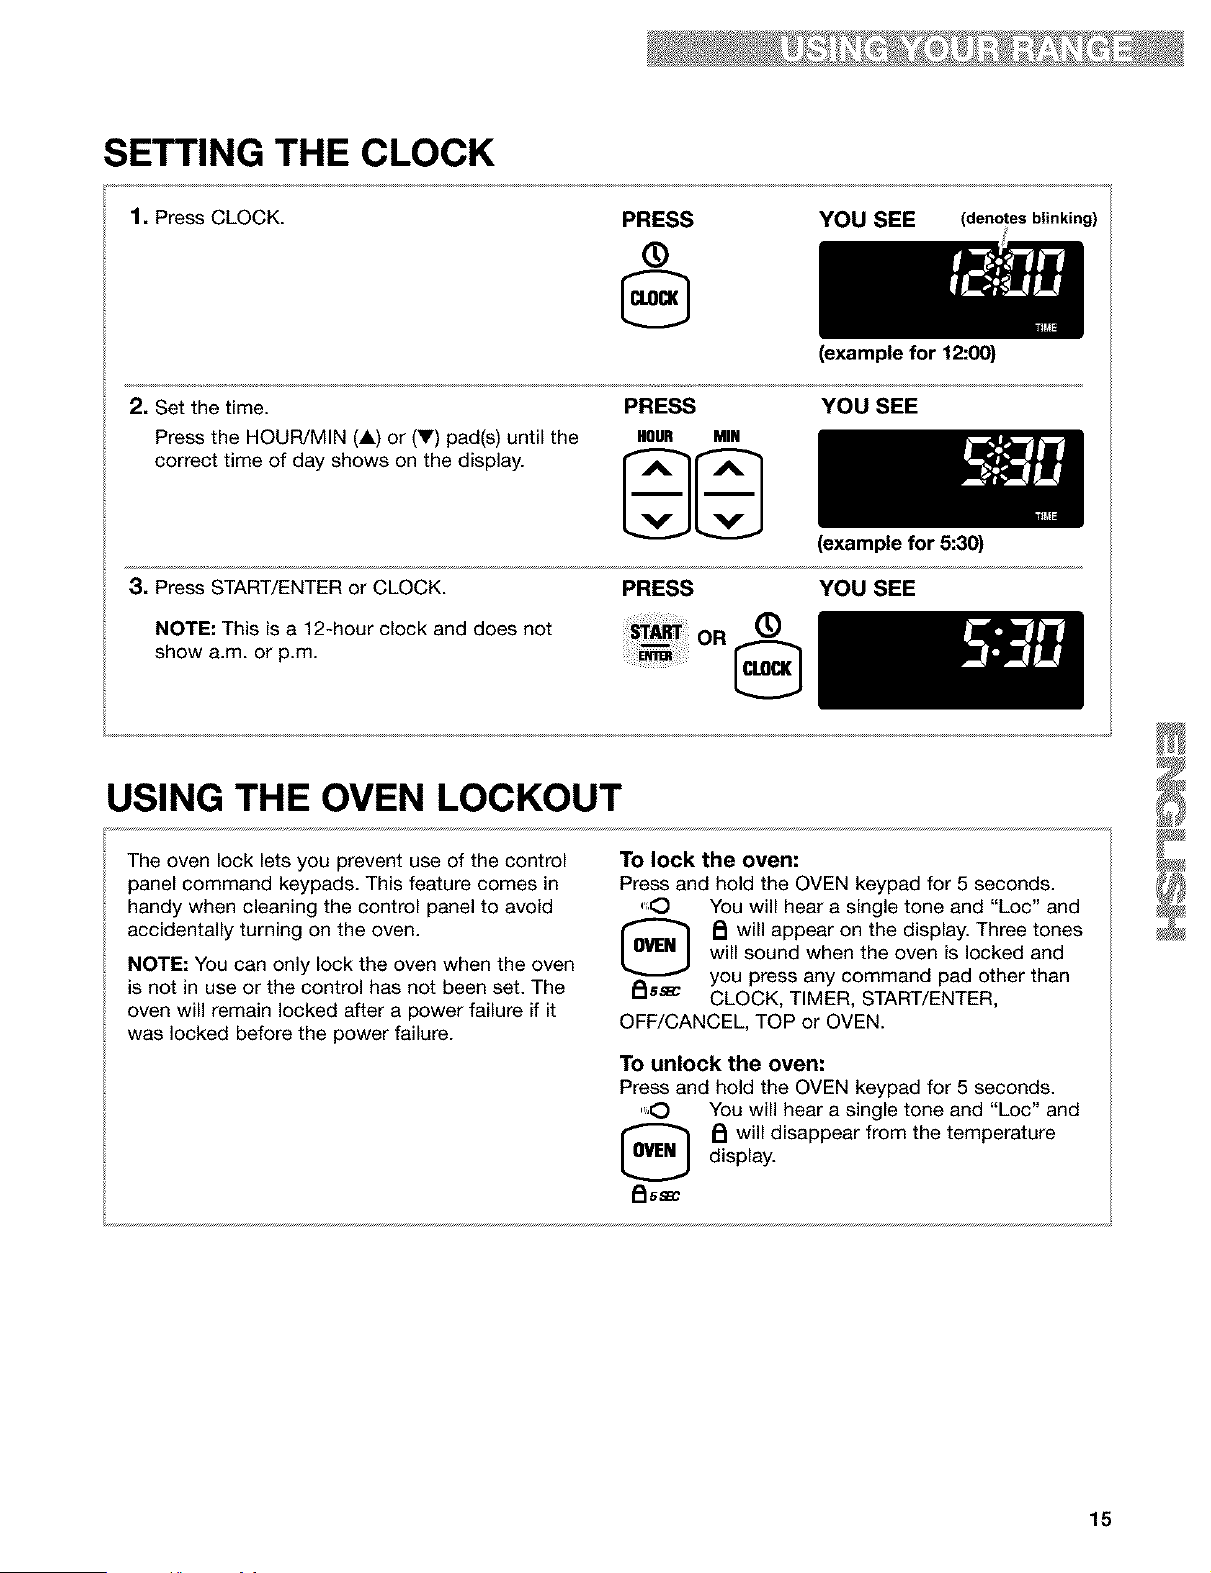
SETTING THE CLOCK
1. Press CLOCK.
PRESS
®
YOU (denotes blinking)
2, Set the time.
Press the HOUR/MIN (A) or (V) pad(s) until the
correct time of day shows on the display.
PRESS
HOUR MIN
(example for 12:00)
YOU SEE
3, Press START/ENTER or CLOCK.
NOTE: This is a 12-hour clock and does not
show a.m. or p.m.
PRESS
OR
®
(example for 5:30)
YOU SEE
USING THE OVEN LOCKOUT
The oven lock lets you prevent use of the control
panel command keypads. This feature comes in
handy when cleaning the control panel to avoid
accidentally turning on the oven.
NOTE: You can only lock the oven when the oven
is not in use or the control has not been set. The
oven will remain locked after a power failure if it
was locked before the power failure.
To lock the oven:
Press and hold the OVEN keypad for 5 seconds.
.'_O You will hear a single tone and "Loc" and
[_ _ will appear on the display. Three tones
will sound when the oven is locked and
_lSS_ you press any command pad other than
CLOCK, TIMER, START/ENTER,
OFF/CANCEL, TOP or OVEN.
To unlock the oven:
Press and hold the OVEN keypad for 5 seconds.
....,O You will hear a single tone and "Loc" and
_ will disappear from the temperature
display.
i_l 5 SBC
15
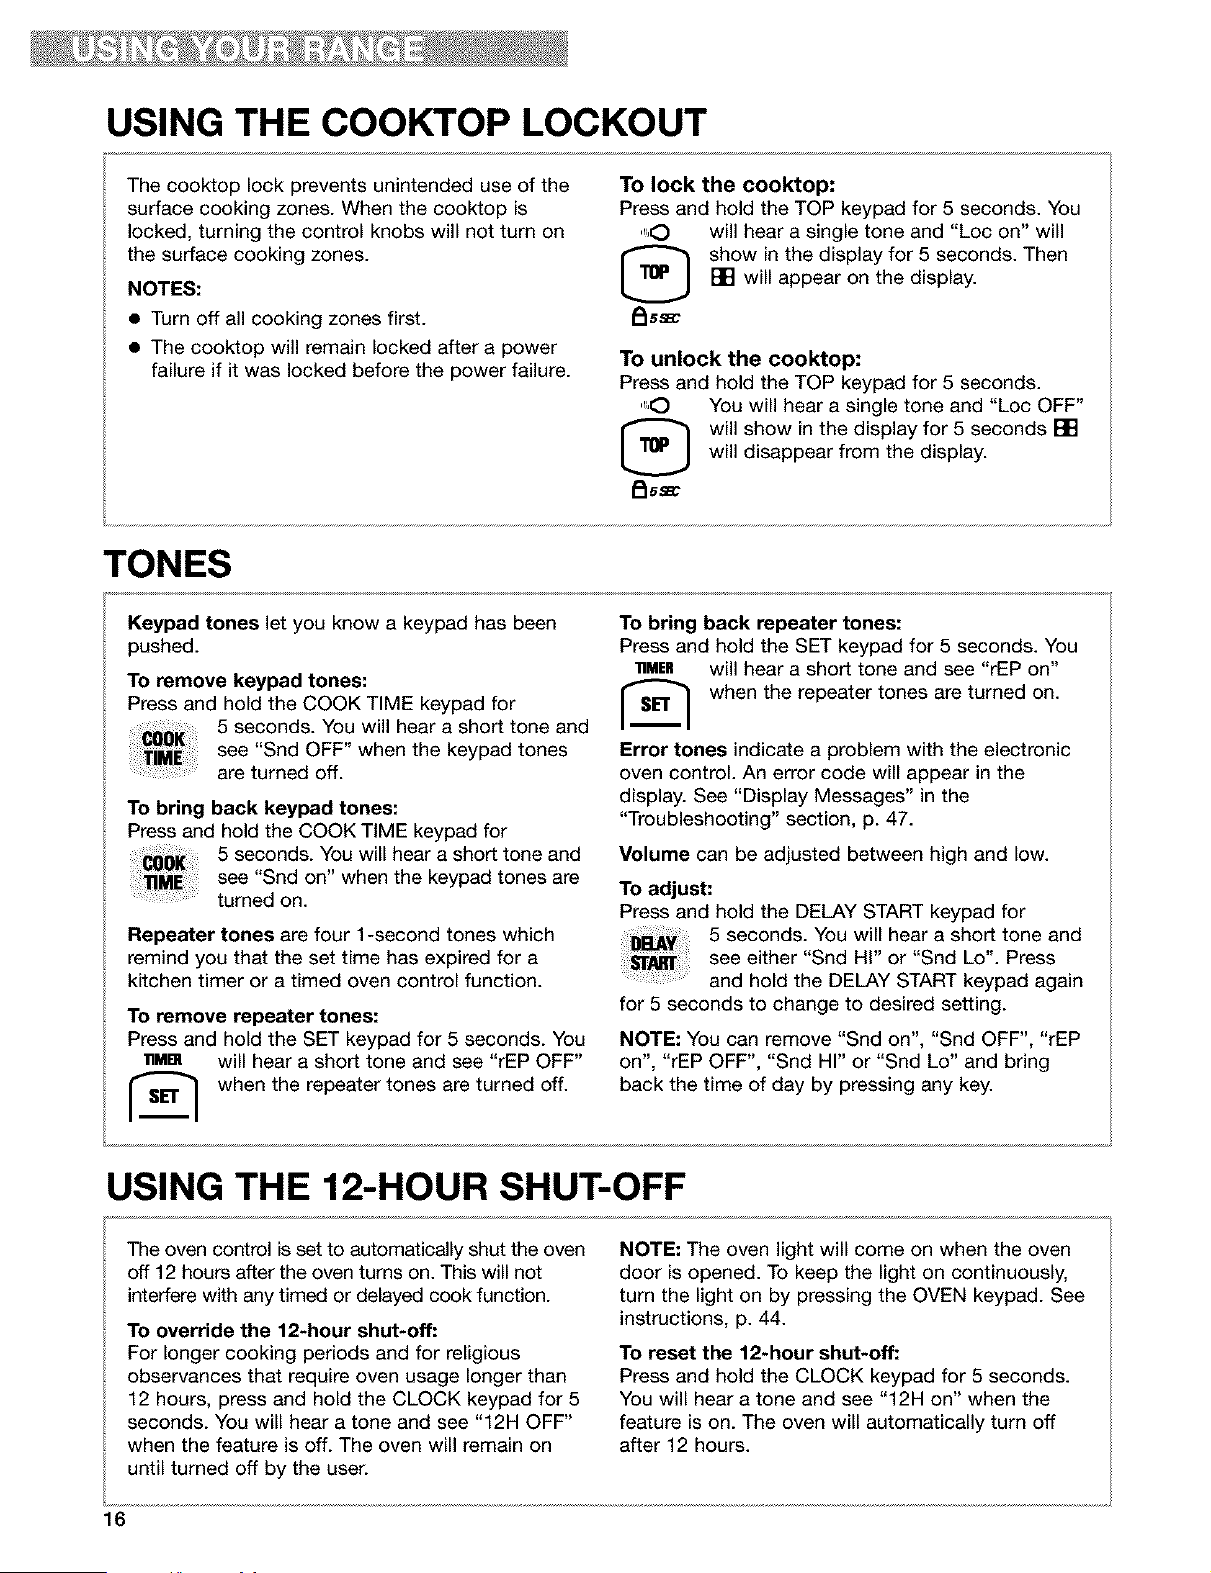
USING THE COOKTOP LOCKOUT
The cooktop lock prevents unintended use of the
surface cooking zones. When the cooktop is
locked, turning the control knobs will not turn on
the surface cooking zones.
NOTES:
• Turn off all cooking zones first.
• The cooktop will remain locked after a power
failure if it was locked before the power failure.
To lock the cooktop:
Press and hold the TOP keypad for 5 seconds. You
",O will hear a single tone and "Loc on" will
[_ show in the display for 5 seconds. Then
[] will appear on the display.
I_ss_
To unlock the cooktop:
Press and hold the TOP keypad for 5 seconds.
",O You will hear a single tone and "Loc OFF"
[_ will show in the display for 5 seconds []
will disappear from the display.
_ss_c
TONES
Keypad tones let you know a keypad has been
pushed.
To remove keypad tones:
Press and hold the COOK TIME keypad for
5 seconds. You will hear a short tone and
see "Snd OFF" when the keypad tones
are turned off.
To bring back keypad tones:
Press and hold the COOK TIME keypad for
5 seconds. You will hear a short tone and
see "Snd on" when the keypad tones are
turned on.
Repeater tones are four 1-second tones which
remind you that the set time has expired for a
kitchen timer or a timed oven control function.
To remove repeater tones:
Press and hold the SET keypad for 5 seconds. You
lgMBI will hear a short tone and see "rEP OFF"
r_ when the repeater tones are turned off.
To bring back repeater tones:
Press and hold the SET keypad for 5 seconds. You
• MER will hear a short tone and see "rEP on"
[_ when the repeater tones are turned on.
Error tones indicate a problem with the electronic
oven control. An error code will appear in the
display. See "Display Messages" in the
"Troubleshooting" section, p. 47.
Volume can be adjusted between high and low.
To adjust:
Press and hold the DELAY START keypad for
5 seconds. You will hear a short tone and
see either "Snd Hi" or "Snd Lo'. Press
and hold the DELAY START keypad again
for 5 seconds to change to desired setting.
NOTE: You can remove "Snd on", "Snd OFF", "rEP
on", "rEP OFF", "Snd HI" or "Snd Lo" and bring
back the time of day by pressing any key.
USING THE 12-HOUR SHUT-OFF
The oven control is set to automatically shut the oven
off 12 hours after the oven turns on. This will not
interfere with any timed or delayed cook function.
To override the 12-hour shut-off:
For longer cooking periods and for religious
observances that require oven usage longer than
12 hours, press and hold the CLOCK keypad for 5
seconds. You will hear a tone and see "12H OFF"
when the feature is off. The oven will remain on
until turned off by the user.
NOTE: The oven light will come on when the oven
door is opened. To keep the light on continuously,
turn the light on by pressing the OVEN keypad. See
instructions, p. 44.
To reset the 12-hour shut-off:
Press and hold the CLOCK keypad for 5 seconds.
You will hear a tone and see "12H on" when the
feature is on. The oven will automatically turn off
after 12 hours.
16
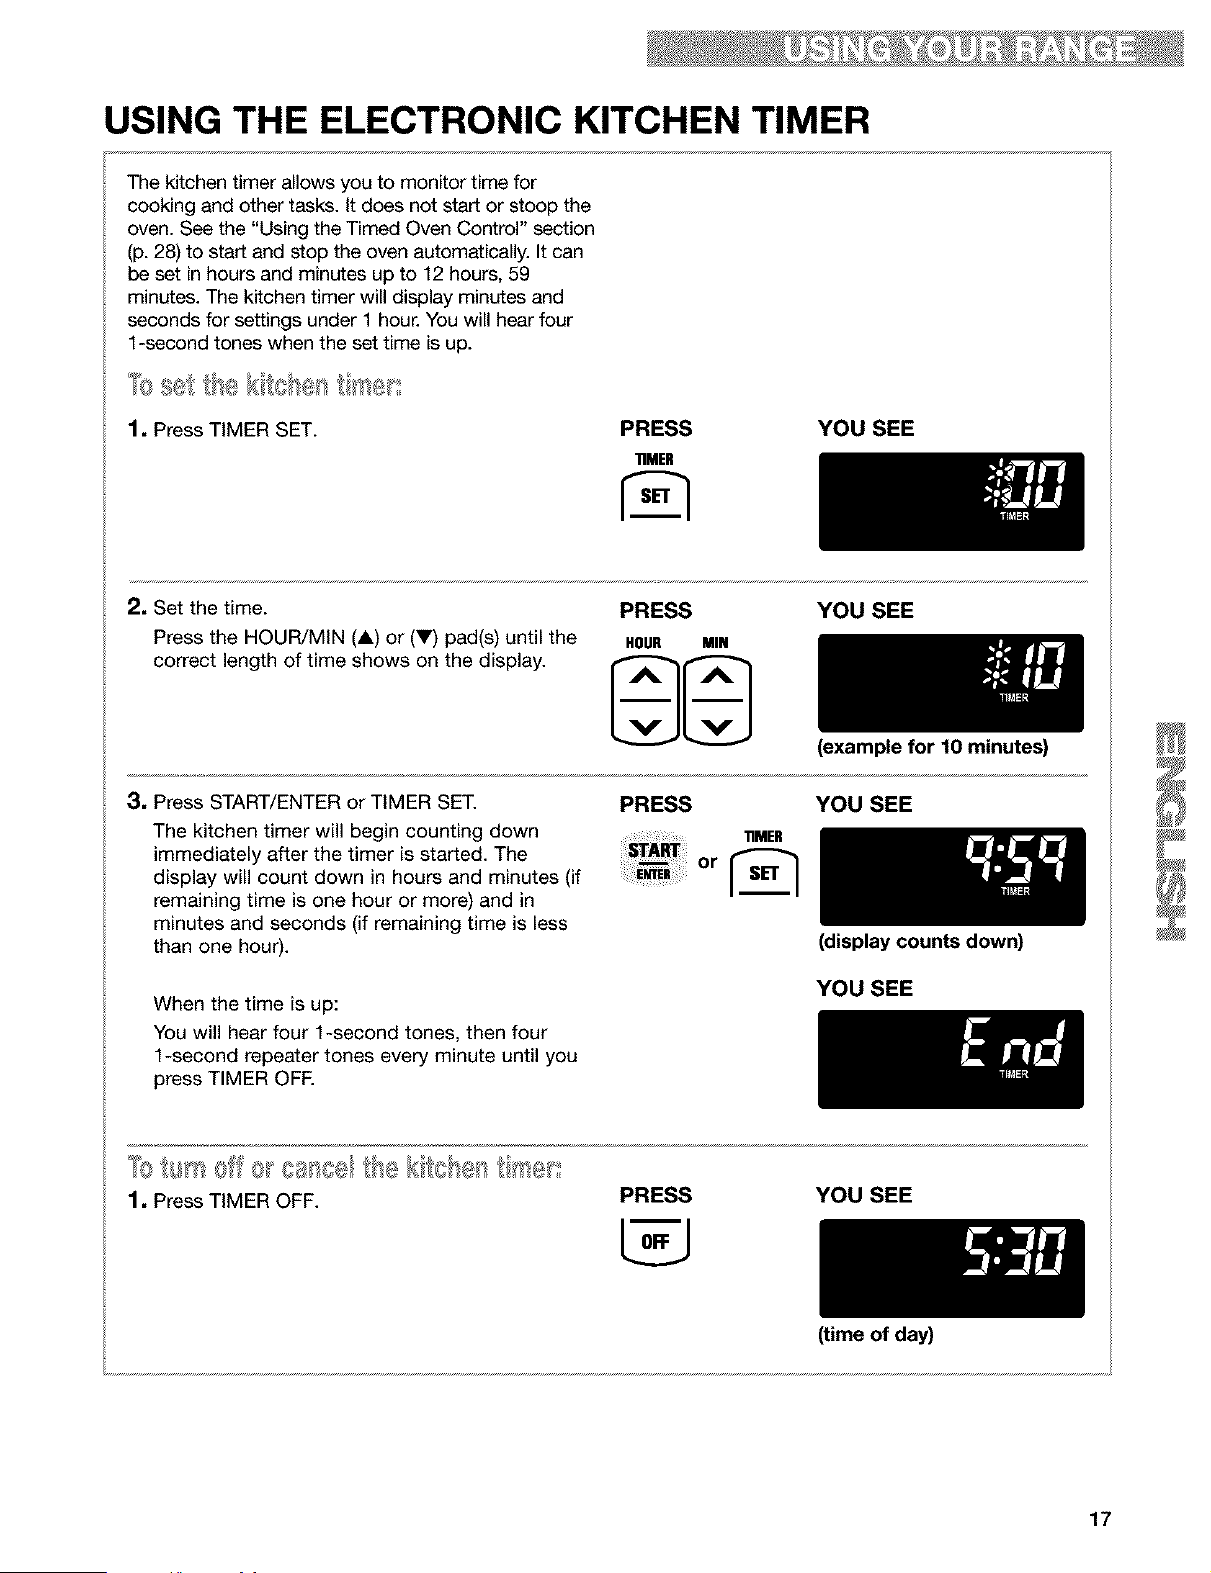
USING THE ELECTRONIC KITCHEN TIMER
The kitchen timer allows you to monitor time for
cooking and other tasks. It does not start or stoop the
oven. See the "Using the Timed Oven Control" section
(p. 28) to start and stop the oven automatically. It can
be set in hours and minutes up to 12 hours, 59
min_es. The kitchen timer will display min_es and
seconds for settings under 1 hour. You will hear four
1-second tones when the set time is up.
1, Press TIMER SET. PRESS YOU SEE
"riMER
2, Set the time.
Press the HOUR/MIN (A) or (V) pad(s) until the
correct length of time shows on the display.
PRESS YOU SEE
HOUR MIN
3, Press START/ENTER or TIMER SET.
The kitchen timer will begin counting down
immediately after the timer is started. The
display will count down in hours and minutes (if
remaining time is one hour or more) and in
minutes and seconds (if remaining time is less
than one hour).
When the time is up:
You will hear four 1-second tones, then four
1-second repeater tones every minute until you
press TIMER OFE
(example for 10 minutes)
PRESS YOU SEE
11MER
(display counts down)
YOU SEE
1. Press TIMER OFF.
PRESS YOU SEE
(time of day)
17
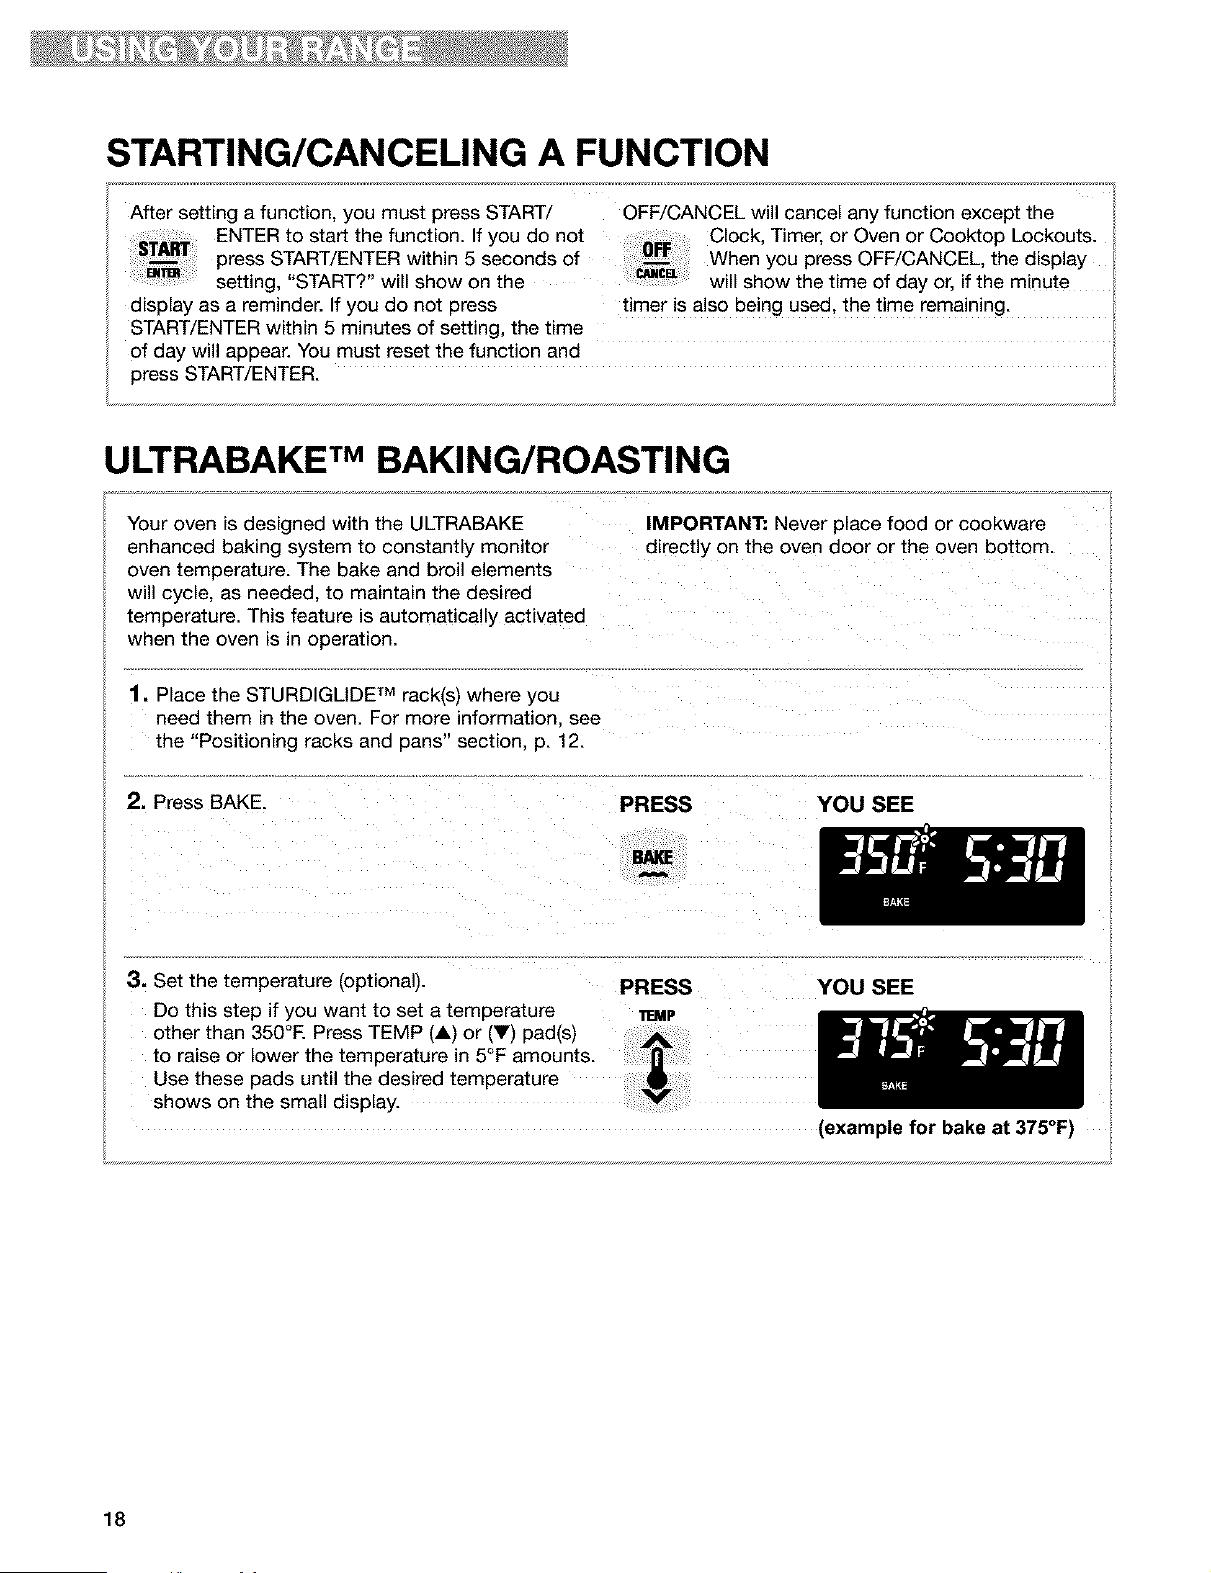
STARTING/CANCELING A FUNCTION
After setting a function, you must press START/ OFF/CANCEL will cancel any function except the
ENTER to start the function. If you do not Clock Timer, or Oven or Cooktop Lockouts.
press START/ENTER within 5 seconds of When you press OFF/CANCEL the display
setting, "START?" will show on the will show the time of day or, if the minute
display as a reminder. If you do not press timer is also being used, the time remaining.
START/ENTER within 5 minutes of setting, the time
of day will appear. You must reset the function and
press START/ENTER.
ULTRABAKE rMBAKING/ROASTING
Your oven _sdesigned with the U LTRABAKE
enhanced baking system to constantly monitor
oven temperature. The bake and broil elements
will cycle, as needec to maintain the desired
temperature. This feature is automatically activated
when the oven is _noperation.
1. Place the STURDIGLIDE TM rack(s) where you
need them in the oven. For more information, see
the "Positioning racks and pans" section, p. 12.
2. Press BAKE.
3. Set the temperature (optional).
Do this step if you want to set a temperature
other than 350°E Press TEMP (A) or (Y) pad(s)
to raise or lower the temperature in 5°F amounts.
Use these pads until the desired temperature
shows on the small display.
IMPORTANT: Never place food or cookware
directly on the oven door or the oven bottom.
PRESS YOU SEE
PRESS YOU SEE
11EMP
(example for bake at 375°F)
18
iiiiiiiiiiiiiiiiiiiiiiiiiiiiiiiiiiiiiiiiiiiiiiii_ii_ii_q_T_iiiii_q_i_ii_ii_iiii_ii_ii_v_T_i_iiiiiiiiiiiiiiiii
ULTRABAKE TM BAKING/ROASTING (contd.)
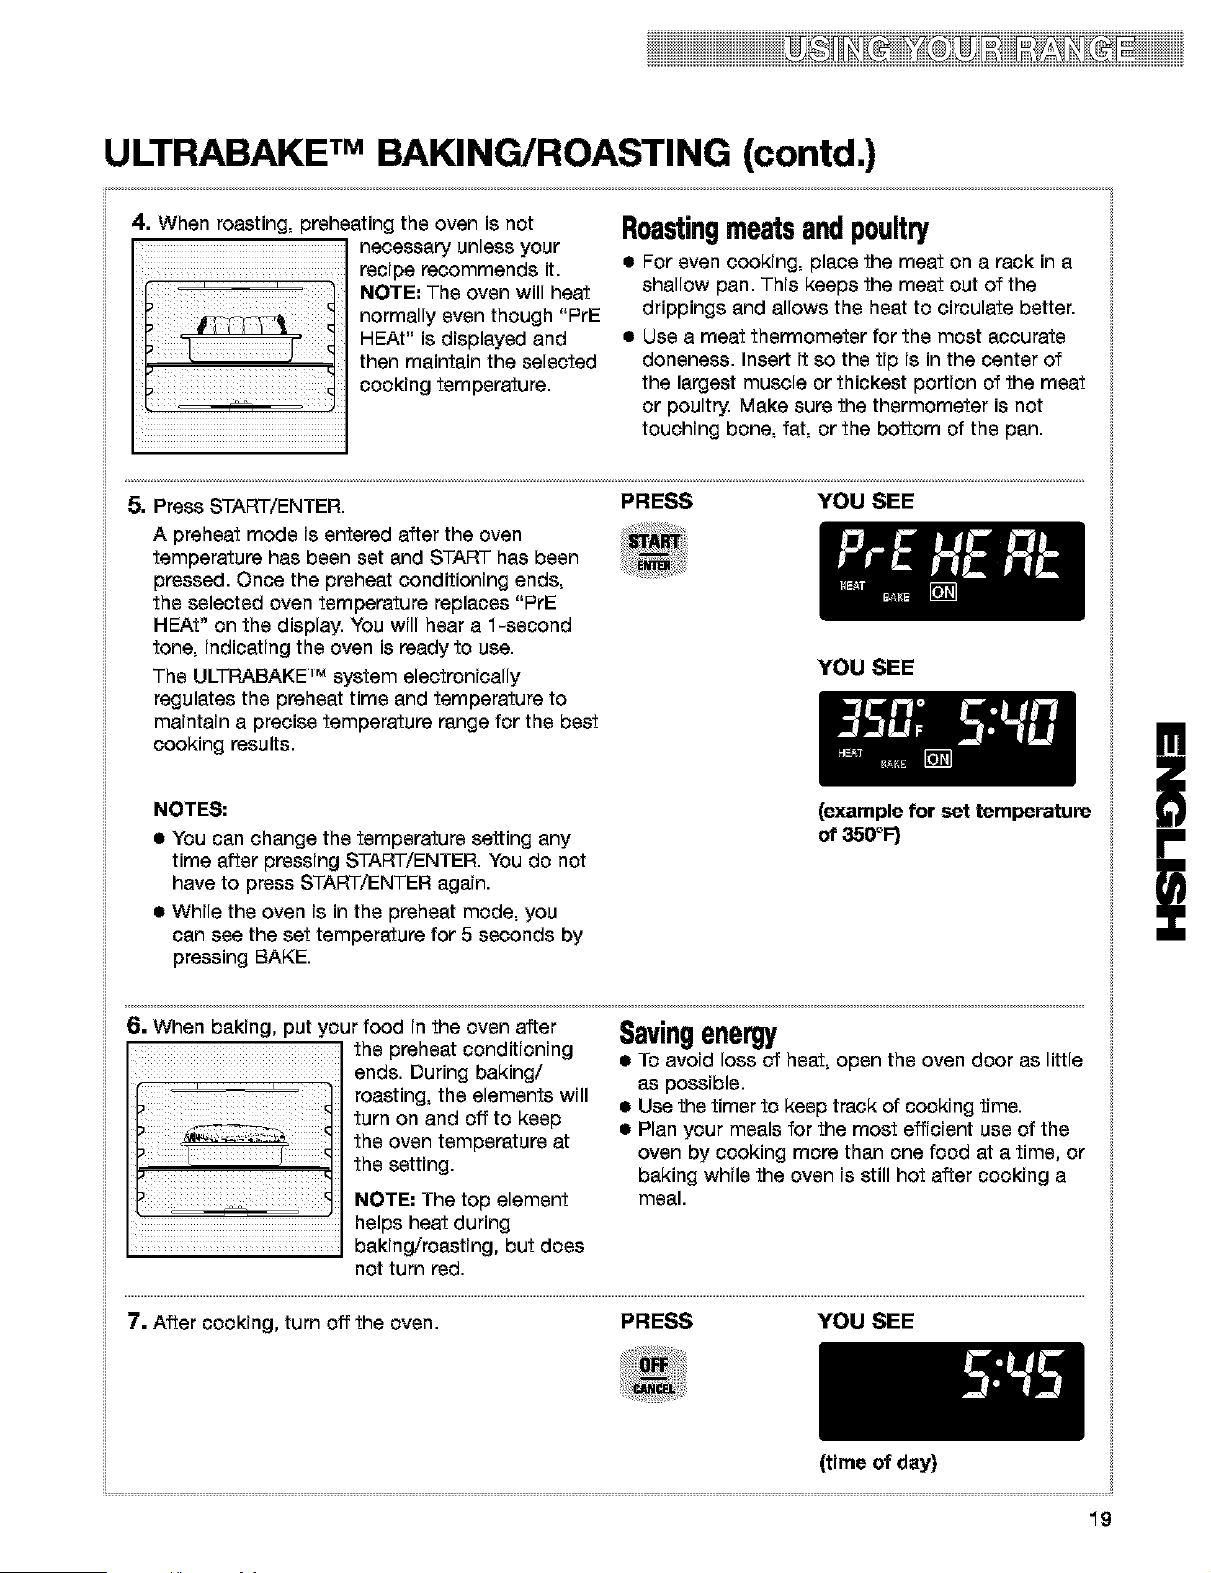
4. When roasting, preheating the oven ie not
' necessary unless your
' .............................. recipe recommends it.
NOTE: The oven will heat
normally even though "PrE
HEAt" is displayed and
then maintain the selected
cooking temperature.
Roastingmeatsandpoultry
• For even cooking, place the meat on a rack in a
shallow pan. This keeps the meat out of the
drippings and allows the heat to circulate better.
• Use a meat thermometer for the most accurate
donenees. Insert it so the tip is in the center of
the largest muscle or thickest portion of the meat
or poultry. Make sure the thermometer is not
touching bone, fat, or the bottom of the pan.
5. Press START/ENTER. PRESS YOU SEE
A preheat mode is entered after the oven
temperature has been set and START has been
pressed. Once the preheat conditioning ends,
the selected oven temperature replaces "PrE
HEAt" on the display. You will hear a 1-second
tone, indicating the oven is ready to use.
The ULTRABAKE "_ system electronically
regulates the preheat time and temperature to
maintain a precise temperature range for the best
cooking results.
YOU SEE
NOTES:
• You can change the temperature setting any
time after pressing START/ENTER. You do not
have to press START/ENTER again.
• While the oven is in the preheat mode, you
can see the set temperature for 5 seconds by
pressing BAKE.
(example for set temperature
of 350°F)
6. When baking, put four food in the oven after
the preheat conditioning
ends. During baking/
roasting, the elements will
turn on and off to keep
the oven temperature at
the setting.
NOTE: The top element
=.... helps heat during
.................................... baking/roasting, but does
not turn red.
Savingenergy
• To avoid loss of heat, open the oven door as little
as possible.
• Use the timer to keep track of cooking time.
• Plan your meals for the most efficient use of the
oven by cooking more than one food at a time, or
baking while the oven is still hot after cooking a
meal.
7. After cooking, turn off the oven. PRESS YOU SEE
(time of day)
!
i
19
iiiiDiiiiiiii iiiiiiiiiiiiii
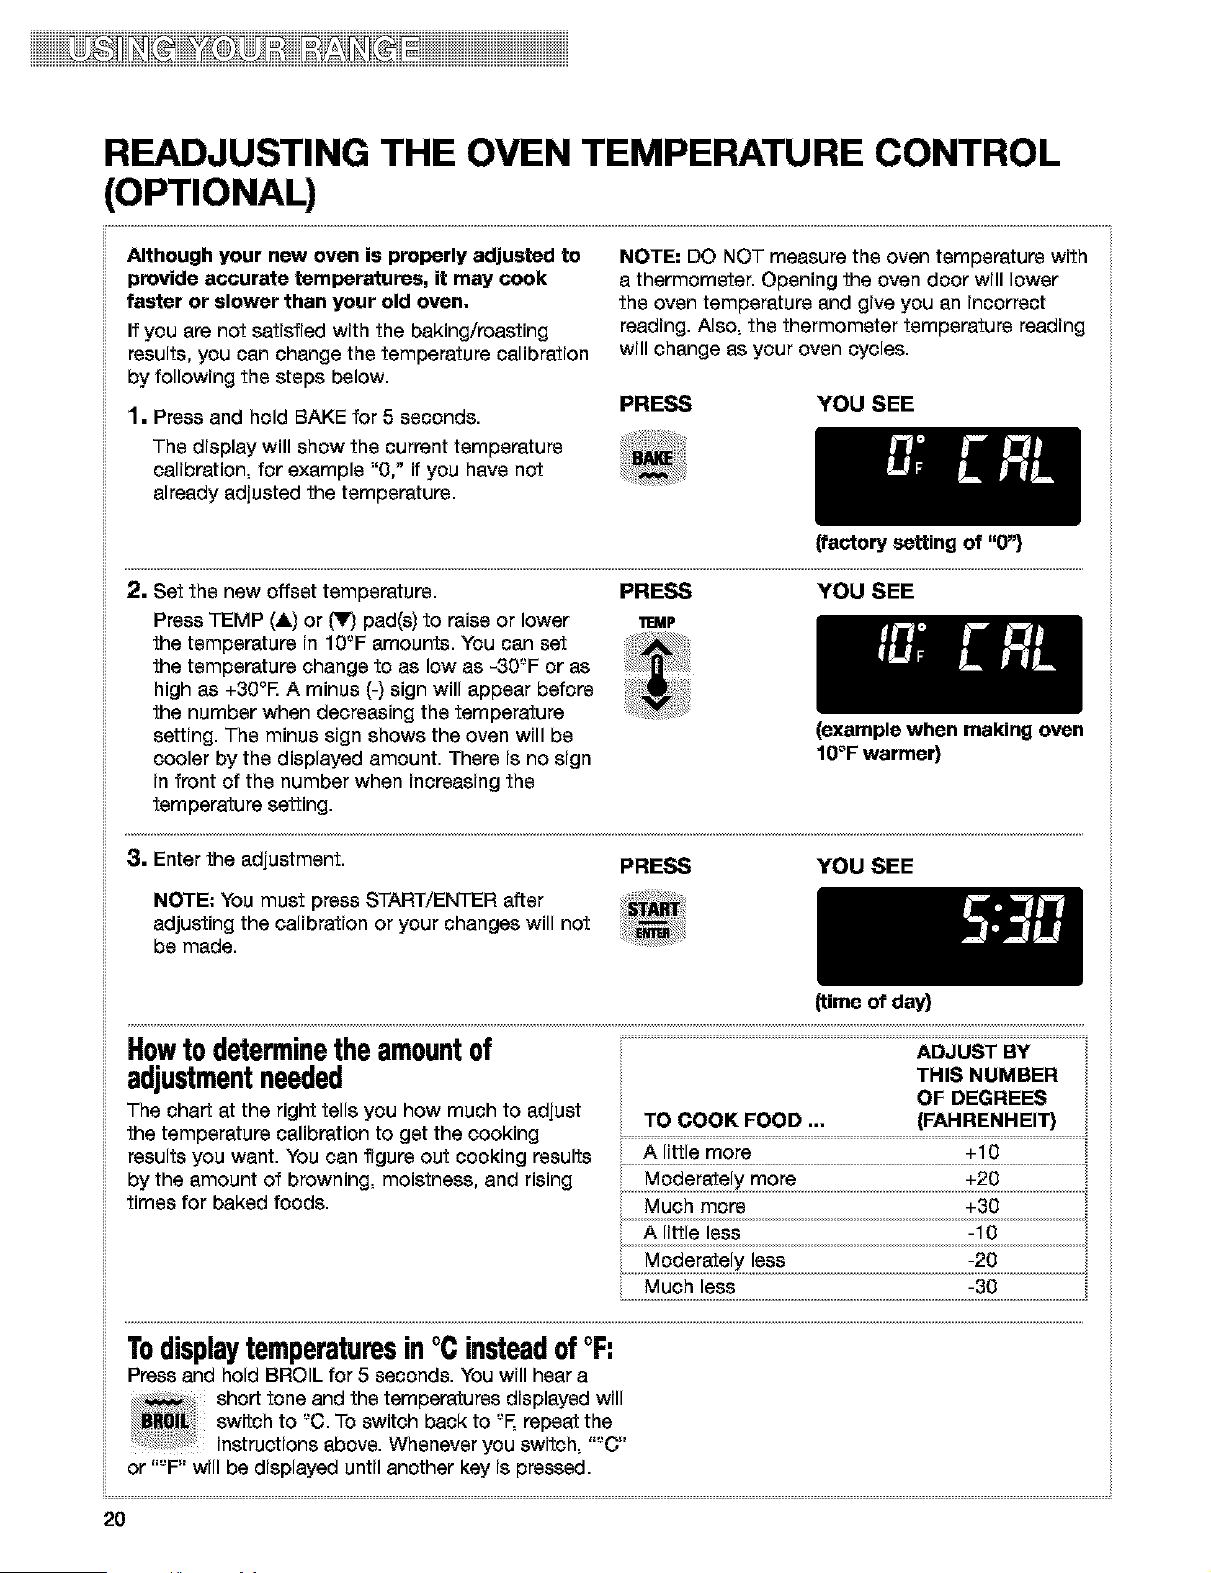
READJUSTING THE OVEN TEMPERATURE CONTROL
(OPTIONAL)
Although your new oven is properly adjusted to
provide accurate temperatures, it may cook
faster or slower than your old oven.
If you are not satisfied with the baking/roasting
results, you can change the temperature calibration
by following the steps below.
1. Press and hold BAKE for 5 seconds.
The display will show the current temperature
calibration, for example "0," if you have not
already adjusted the temperature.
NOTE: DO NOT measure the oven temperature with
a thermometer. Opening the oven door will lower
the oven temperature and give you an incorrect
reading. Also, the thermometer temperature reading
will change as your oven cycles.
PRESS YOU SEE
{factory setting of "O"}
2, Set the new offset temperature.
Press TEMP (&) or _ pad(s) to raise or lower
the temperature in 10'-'F amounts. You can set
the temperature change to as low as -30'-'F or as
high as +30°R A minus (-) sign will appear before
the number when decreasing the temperature
setting. The minus sign shows the oven will be
cooler by the displayed amount. There is no sign
in front of the number when increasing the
temperature setting.
PRESS YOU SEE
11EMP
(example when making oven
10°F warmer}
8. Enter the adjustment. PRESS YOU SEE
NOTE: You must press START/ENTER after
adjusting the calibration or your changes will not
be made.
(time of day}
Howtodeterminetheamountof
adjustmentneeded
The chart at the right tells you how much to adjust
the temperature calibration to get the cooking
results you want. You can figure out cooking results
by the amount of browning, moistness, and rising
times for baked foods.
THIS NUMBER
OF DEGREES
TO COOK FOOD ... (FAHRENHEIT} ',
A little more
A little less
Much less
Todisplaytemperaturesin°Cinsteadof°F:
Press and hold BROIL for 5 seconds. You will hear a
.....,,,, short tone and the temperatures displayed will
_R0[!_I switch to '-'C.To switch back to °F, repeat the
instructions above. Whenever you switch,
or "°F" will be displayed until another key is pressed.
2O
iDiiii_iiiiiiiii
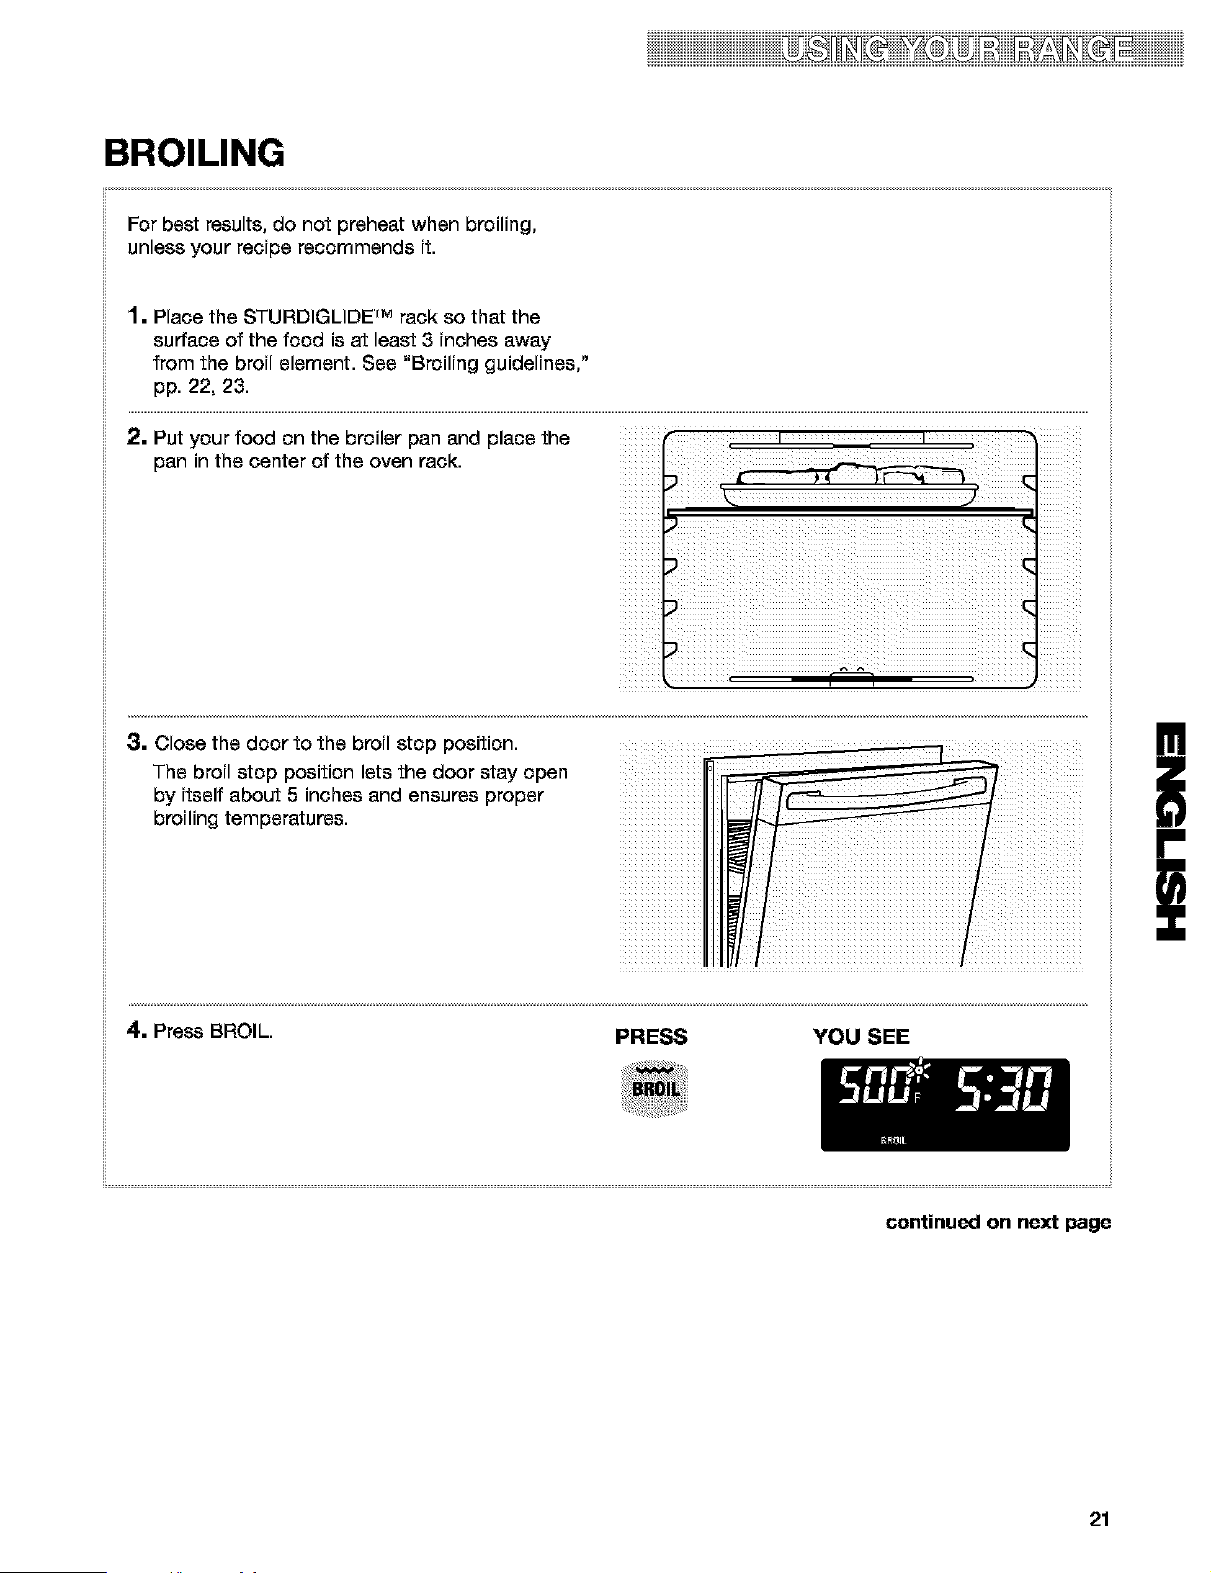
BROILING
For best results, do not preheat when broiling,
unless your recipe recommends it.
1• Place the STURDIGLIDE rM rack so that the
surface of the food i8 at least 3 inches away
from the broil element. See "Broiling guidelines,"
pp. 22, 23.
2. Put your food on the broiler pan and place the t t
pan in the center of the oven rack.
3. Close the door to the broil stop position.
The broil stop position lets the door stay open
by itself about 5 inches and ensures proper
broiling temperatures.
i _X_i_iiiiiiiiiiiiii_iiiii iiiiii
!
i
4. Press BROIL. PRESS YOU SEE
continued on next page
21
iiiiD@2iiii iiiiii
BROILING (contd.)
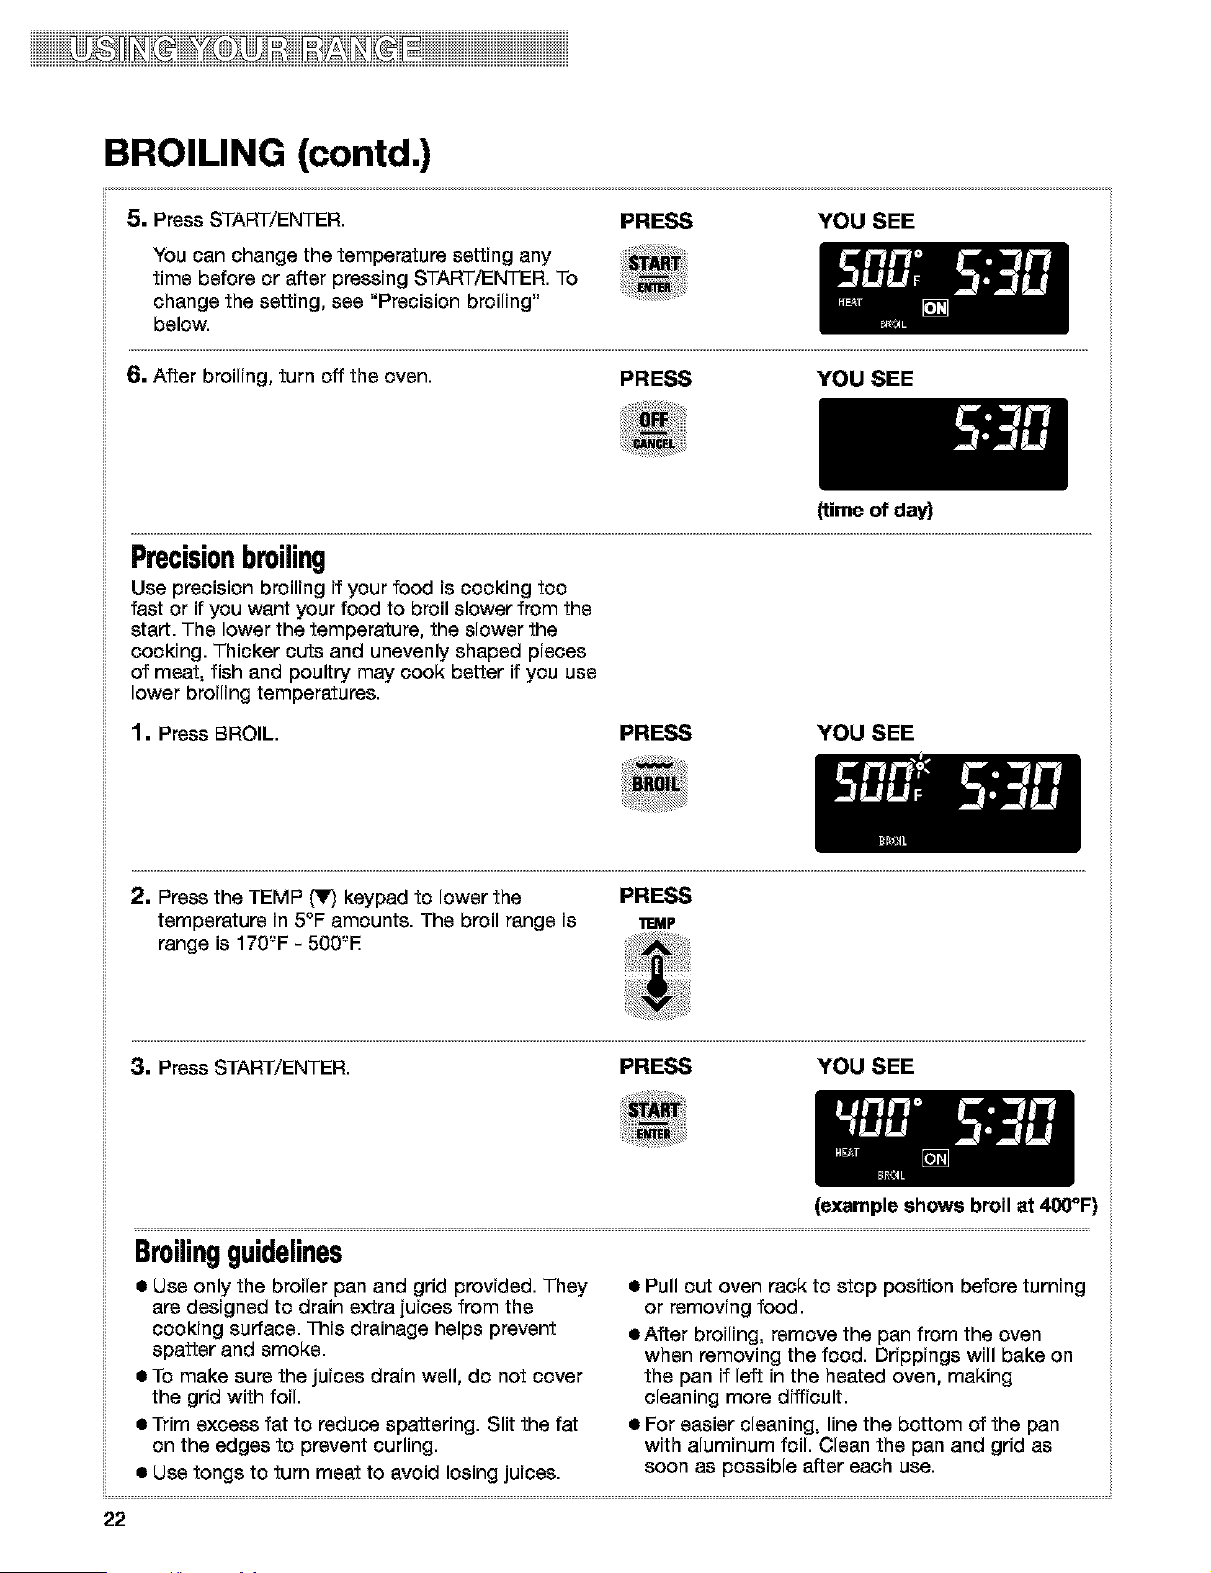
5. Press START/ENTER.
PRESS YOU SEE
You can change the temperature setting any
time before or after pressing START/ENTER. To
change the setting, see "Precision broiling"
below.
6. After broiling, turn off the oven. PRESS YOU SEE
(time of day)
Precisionbroiling
Use precision broiling if your food is cooking too
fast or if you went your food to broil slower from the
start. The lower the temperature, the slower the
cooking. Thicker cuts and unevenly shaped pieces
of meat, fish and poultry may cook better if you use
lower broiling temperatures.
1. Press BROIL. PRESS YOU SEE
2. Press the TEMP t_lF)keypad to lower the PRESS
temperature in 5°F amounts. The broil range is m_P
range is 170'-'F - 500'-'E
3. Press START/ENTER. PRESS YOU SEE
(example shows broil at 400°F)
Broilingguidelines
• Use only the broiler pan and grid provided. They
are designed to drain extra juices from the
cooking surface. This drainage helps prevent
spatter and smoke.
• To make sure the juices drain well, do not cover
the grid with foil.
• Trim excess fat to reduce spattering. Slit the fat
on the edges to prevent curling.
• Use tongs to turn meat to avoid losing juices.
• Pull out oven rack to stop position before turning
or removing food.
eAffer broiling, remove the pan from the oven
when removing the food. Drippings will bake on
the pan if left in the heated oven, making
cleaning more difficult.
• For easier cleaning, line the bottom of the pan
with aluminum foil. Clean the pan and grid as
soon as possible after each use.
22
iiiiiiiiiiiiiiiiiiiiiiiiiiiiiiiiiiiiiiiiiiiiiiii_ii_ii_i_T_iiiii_i_si_ii_ii_iiii_ii_ii_T_T_iiiiiiiiiiiiiiiii
BROILING (contd.)
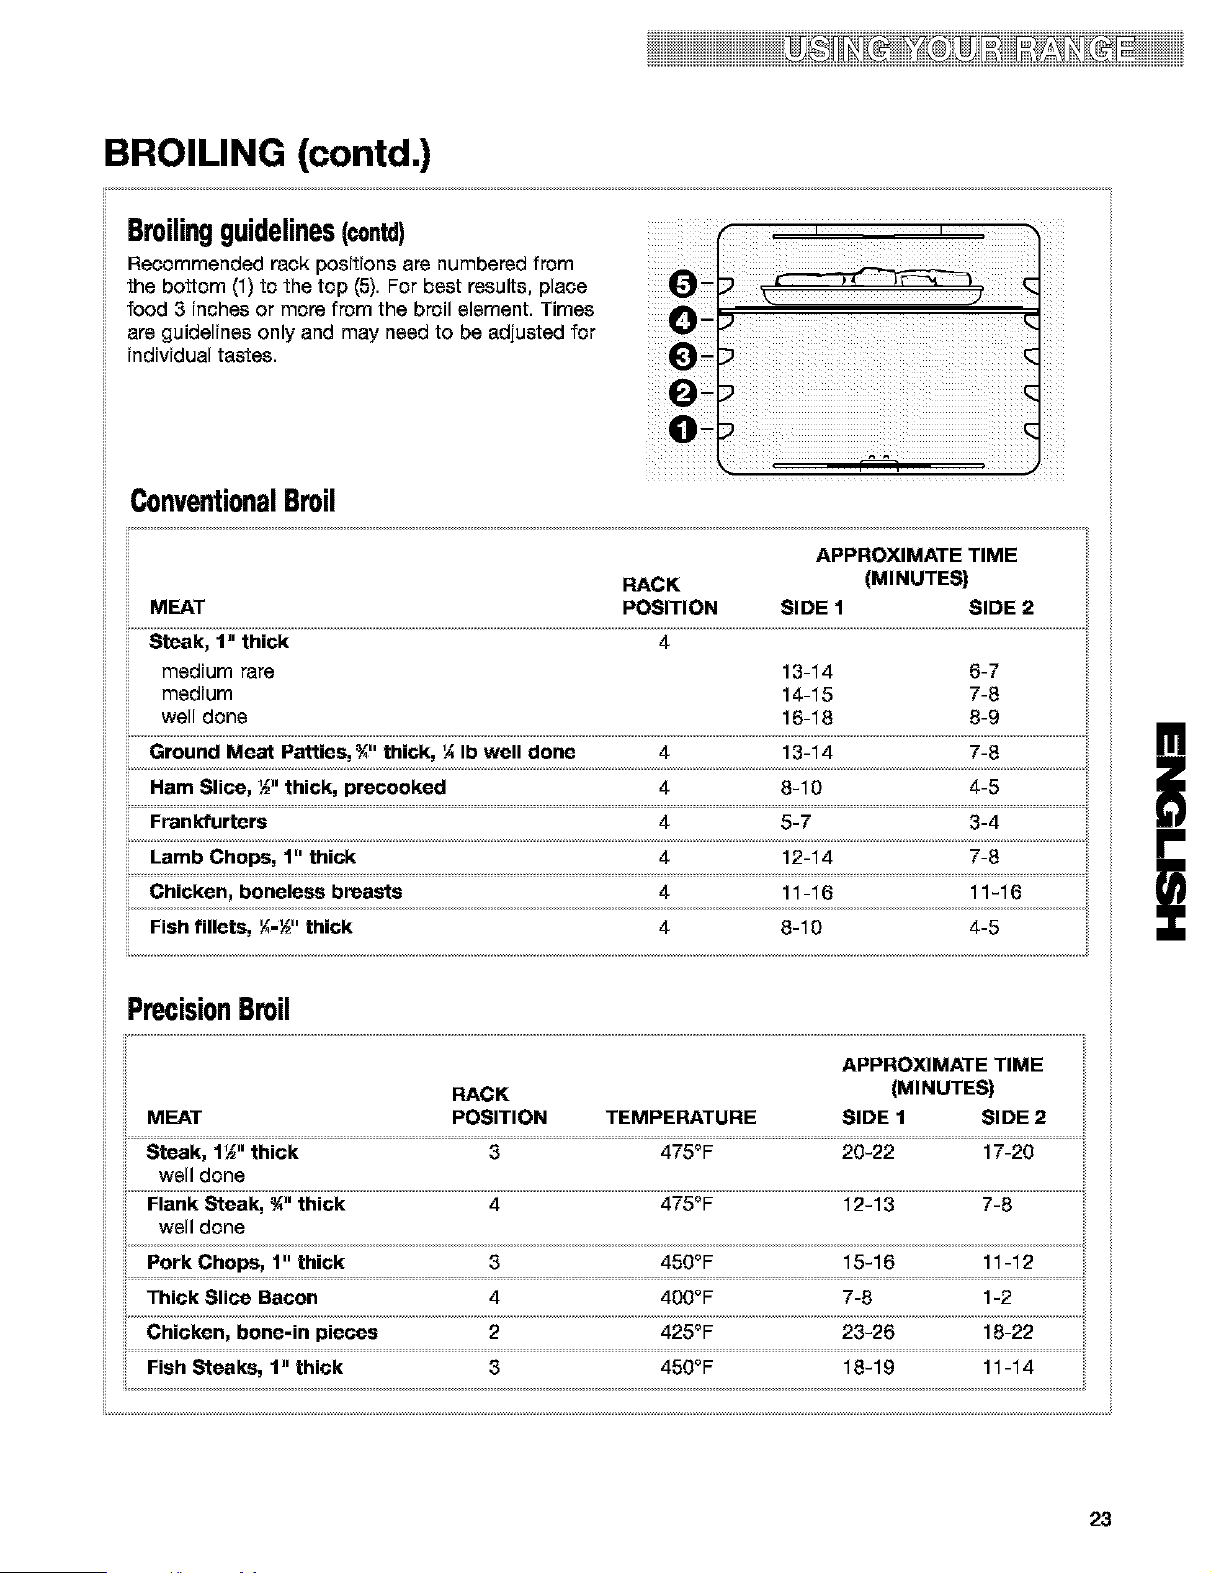
Broilingguidelines(contd)
Recommended rack positions are numbered from
the bottom (1) to the top (5). For best results, place
food 3 inches or more from the broil element. Times
are guidelines only and may need to be adjusted for
individual tastes.
ConventionalBroil
POSITION SIDE 1
14-15 7-8
PrecisionBroil
POSITION TEMPERATURE SIDE 1 SIDE 2
well done
well done
Thick Slice Bacon 4 400oF; 7-8 1-2
23
iiiiD@2iiii iiiiii
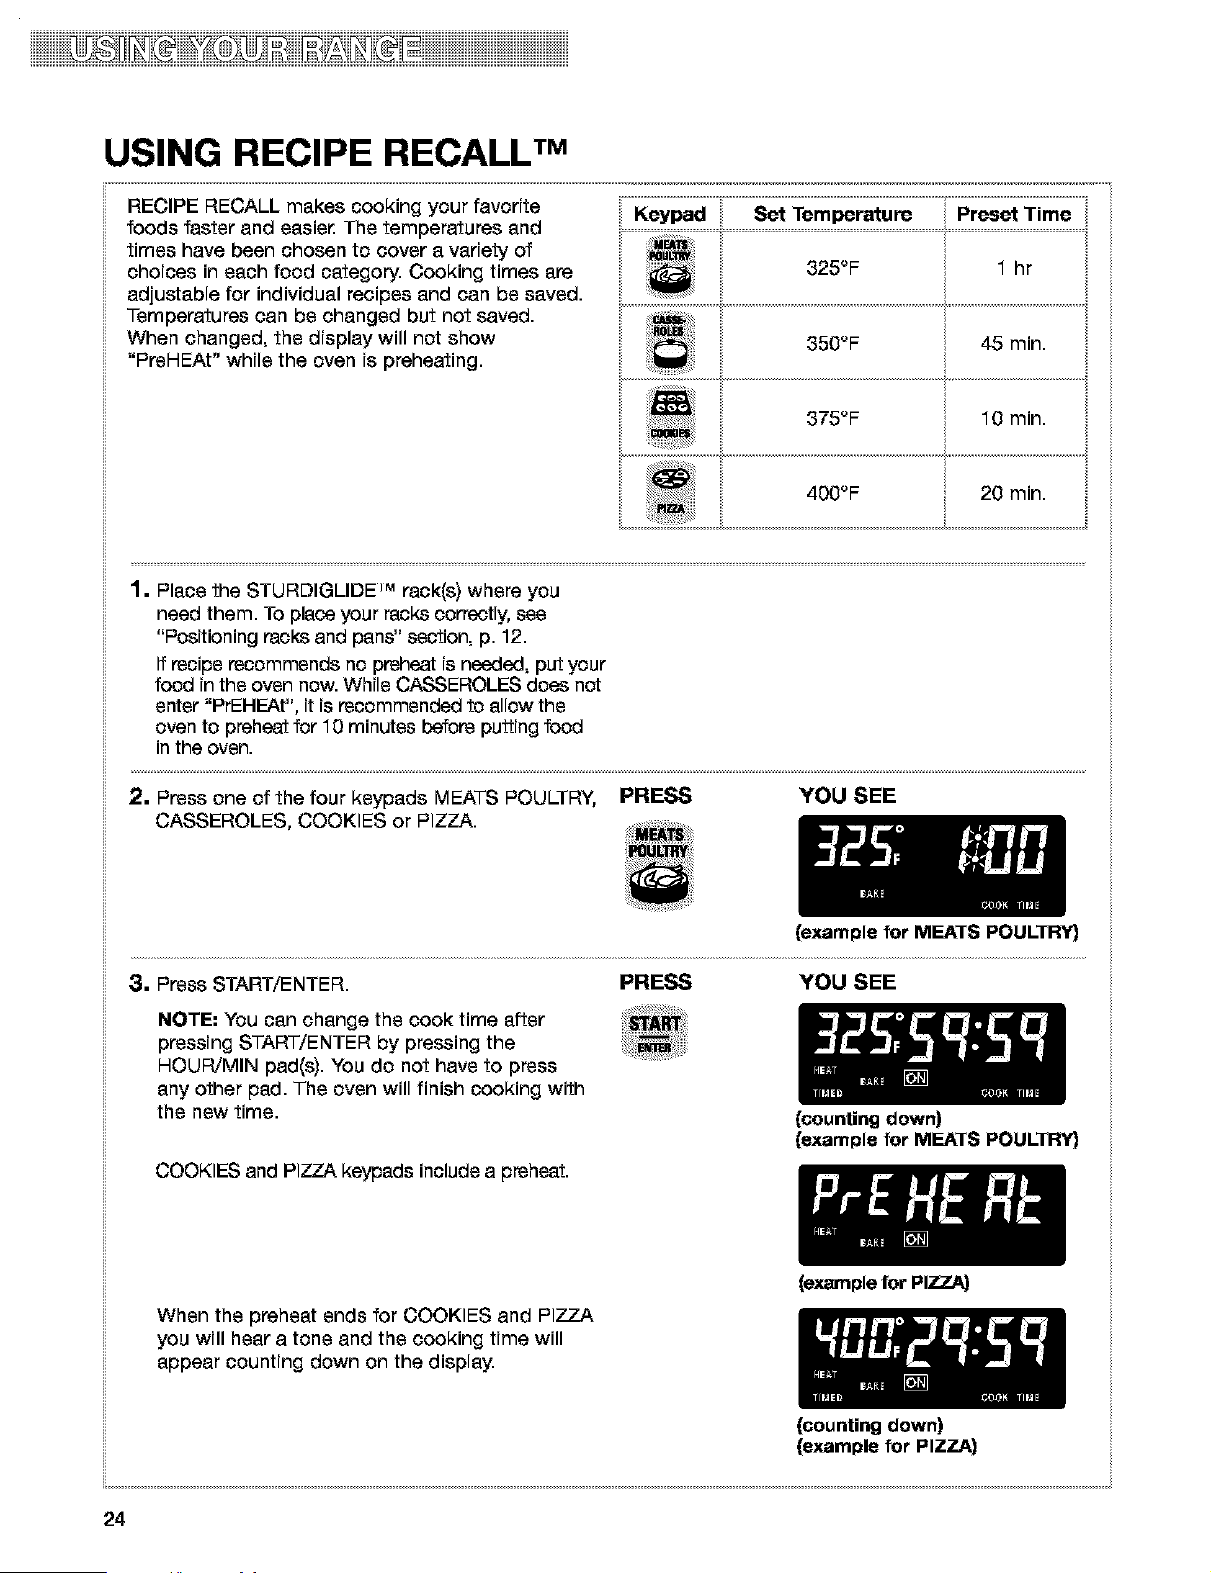
USING RECIPE RECALL TM
............................................................................................................................................................................................................................................................................................. i
RECIPE RECALL makes cooking your favorite
foods faster and easie_ The temperatures and
times have been chosen to cover a variety of
choices in each food category. Cooking times are
adjustable for individual recipes and can be saved.
Temperatures can be changed but not saved.
When changed, the display will not show
"PreHEAt" while the oven is preheating.
Keypad Set Temperature Preset Time
400 F 20 mln.
1. Place the STURDIGLIDE _'_rack(s) where you
need them. To place your racks correctly, see
"Pceitioning recks and pans" section, p. 12.
If recipe recommends no preheat is needed, put your
food in the oven now. While CASSEROLES does not
enter "PrEHEAt", it is recommended to allow the
oven to preheat for 10 minutes before putting food
in the oven.
2. Press one of the four keypads MEATS POULTRY, PRESS
CASSEROLES, COOKIES or PIZZA.
YOU SEE
(example for MEATS POULTRY}
3. Press START/ENTER. PRESS YOU SEE
NOTE: You can change the cook time after
pressing START/ENTER by pressing the
HOUR/MIN pad(s). You do not have to press
any other pad. The oven will finish cooking with
the new time.
(counting down)
(example for MEATS POULTRY}
COOKIES and PIZZA keypads include a preheat.
When the preheat ends for COOKIES and PIZZA
you will hear a tone and the cooking time will
appear counting down on the display.
(example for PIZZA)
(counting down)
(example for PIZZA)
24
iiiiiiiiiiiiiiiiiiiiiiiiiiiiiiiiiiiiiiiiiiiiiiii_if_if_q_r_T_iiiif_q_i_if_if_iiif_ii_if_r_T_f_iiiiiiiiiiiiiiiii
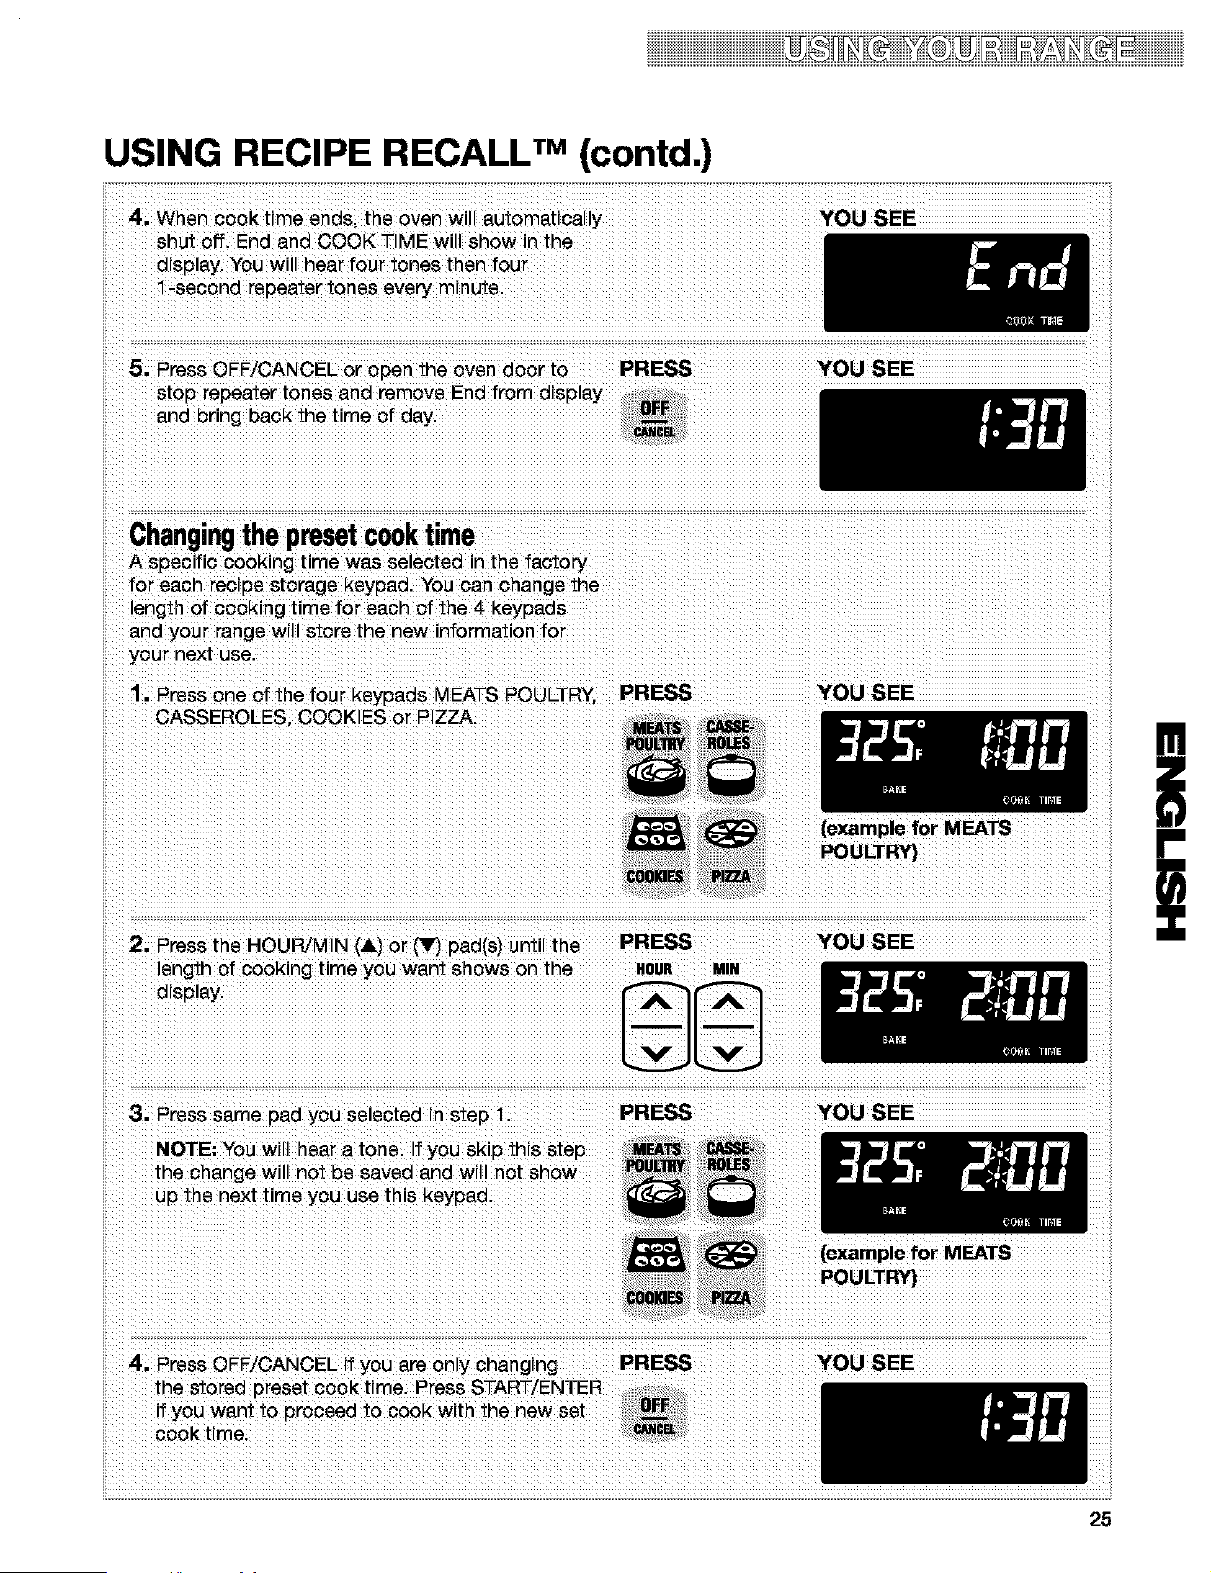
USING RECIPE RECALL TM (contd.)
4, When cook time ends, the oven will automatically
shut off. End and COOK TIME will show in the
display, You will hear four tones then four
1-second repeater tones every minute.
5. Press OFF/CANCEL or open the oven door to PRESS
stop repeater tones and remove End from display
and bring back the time of day.
Changingthepresetcooktime
A specific cooking time was selected in the factory
for each recipe storage keypad. You can change the
length of cooking time for each of the 4 keypads
and your range will store the new information for
your next use.
YOU SEE
YOU SEE
iil
1. Press one of the four keypads MEATS POULTRY PRESS YOU SEE
CASSEROLES. COOKIES or PIZZA.
(example for MEATS
POULTR',3
ii
2. Press the HOUR/MIN (&) or _ pad(s) until the PRESS
length of cooking time you want shows on the HOUR Mm
d_splay.
YOU SEE
!
i
3. Press same pad you selected in step 1. PRESS
NOTE: You will hear a tone. If you skip this step
the change will not be saved and will not show
up the next time you use this keypao.
4. Press OFF/CANCEL if you are only changing
the stored preset cook time. Press START/ENTER
if you want to proceed to cook with the new set
cook time.
PRESS
YOU SEE
(example for MEATS
POULTRY)
YOU SEE
25
iiiiiiiiiiiiii_ii_ii_i_T_iiiii_i_i_ii_ii_iiii_ii_ii_T_T_iiiiiiiiiiiiiiiiiiiiiiiiiiiiiiiiiiiiiiiiiiiiiiiiiii
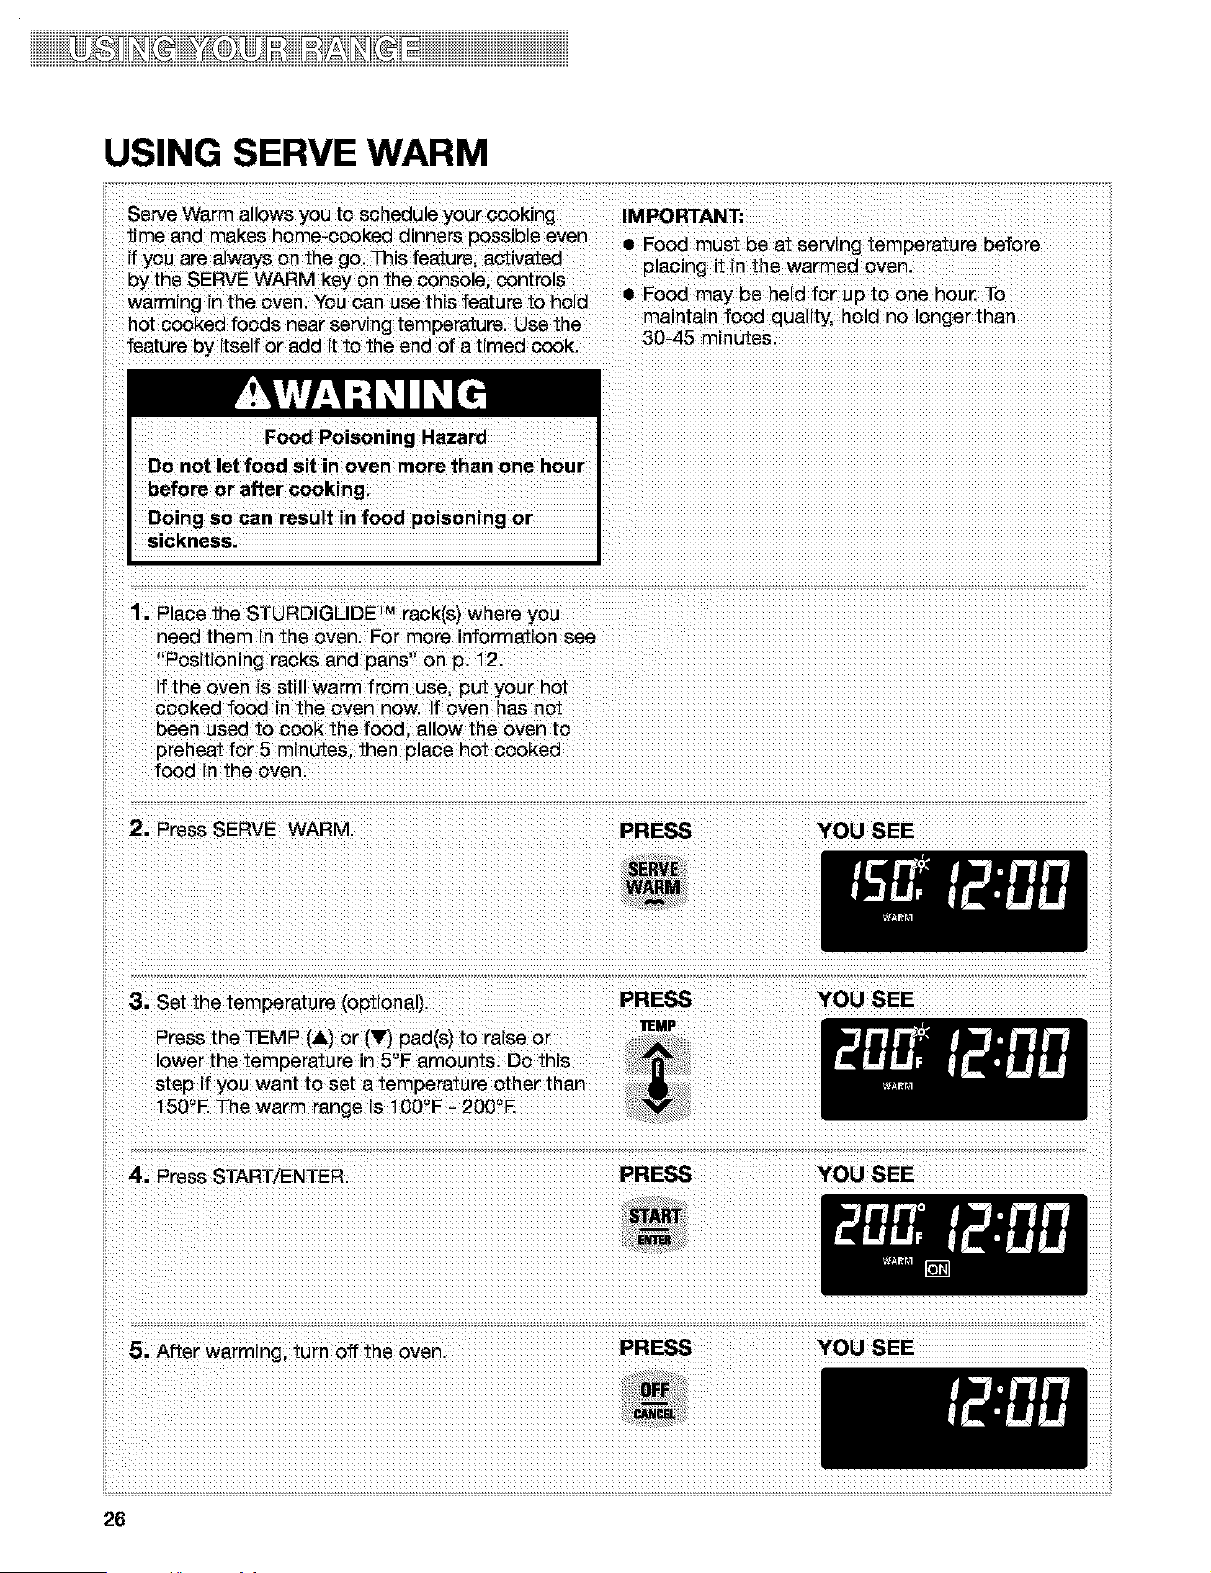
USING SERVE WARM
Serve Warm allows you to schedule your cooking IMPORTANT;
time and makes home-cooked dinners possible even • Food must be at serving temperature before
if _'cu are atways on the go. This feature, activated placing it in the warmed oven.
oy the SERVE WARM key on the console, controls
warming inthe oven, You can use this feature to hold • Food may be held for up to one hou_ To
h^t c^ok^d f^o"" n^ar -ervin- tem-^--t ' re .... the maintain food quality, hold no longer than
feature by itselfor add it to the end of a timed cook. 30-45 mrnutes.
Food Poisoning Hazard
Do not let food sit in oven more than one hour
before or after cooking.
Doing so can result in food poisoning or
sickness.
1. Place the STURDIGLIDE _Mreck(s) where you
need them in the oven. For more information see
"Positioning racks and pans" on p. 12.
f the oven is still warm from use, put your hot
cooked food in the oven now. If oven has not
been used to cook the food, allow the oven to
preheat for 5 minutes, then place hot cooked
food in the oven.
2. Press SERVE WARM PRESS YOU SEE
3. Set the temperature (optional).
Press the TEMP (&) or (_lr,_pad(s) to raise or
lower the temperature in 5'-'F amounts. Do this
step if you want to set a temperature other than
150'-'E The warm range is 100'-'F - 20O'-'E
PRESS YOU SEE
I1EMP
4. Press START/ENTER. PRESS YOU SEE
5. After warming, turn off the oven PRESS
YOU SEE
iDiiii iiiiiiiiiii
USING SERVE WARM (contd.)
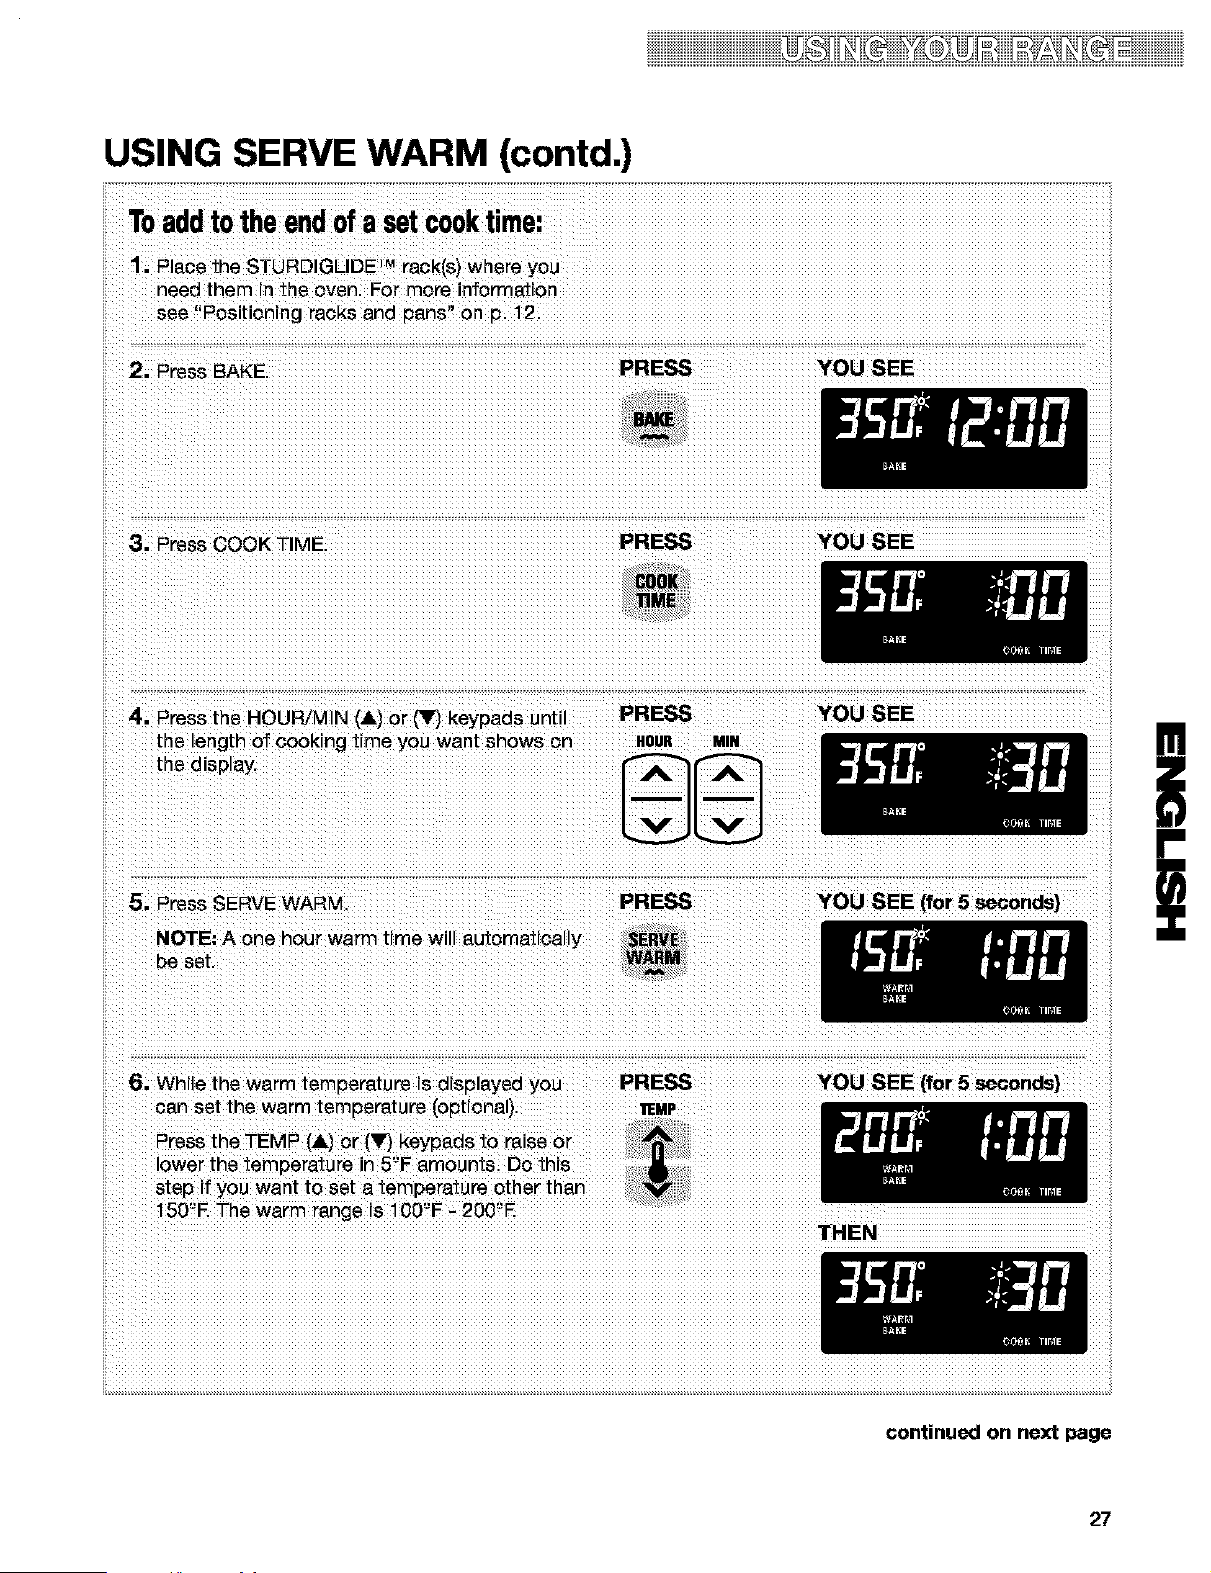
Toaddtothe endofa setcooktime:
1. Place the STURDIGLIDE ]r'_rack(s) where you
need them in the oven. For more information
see "Positioning racks and pans" on p. 12.
2. Press BAKE. PRESS YOU SEE
3. Press COOK TIME.
PRESS YOU SEE
4. Press the HOUR/MIN (&) or (_ keypads until PRESS
the length of cooking time you want shows on HOUR MtR
the display.
5. Press SERVE WARM, PRESS
NOTE: A one hour warm time will automaticahy SERV_
be set. WARM
YOU SEE
YOU SEE (for 5 seconds}
!
i
6. While the warm temperature is displayed you PRESS YOU SEE [for 5 seconds}
can set the warm temperature (optional). _E_P
Press the TEMP (&) or (_r} keypads to raise or
lower the temperature in 5'-'Famounts. Do this
step if you want to set a temperature other than
150'-'E The warm range is 100'-'F - 200'-'E
THEN
27

USING SERVE WARM (contd.)
...........................:YOU SEE :..................
9! When waging time andS; tile oven will
wil ShOw n the display. You wi
{C0unting down warm t me)
10; Press OFF/OANOEL or open the 0Yen do0_ t0 :: PRESS ............................:YeLl SEE
.............st0p repeater tOneS and rem0ve E
disptay _nd br n_ back the t me _ day:
. ' 12
....racks and pans se0t!on p ....
28
iDiiii iiiiiiiiiii
USING SERVE WARM (contd.)
ii
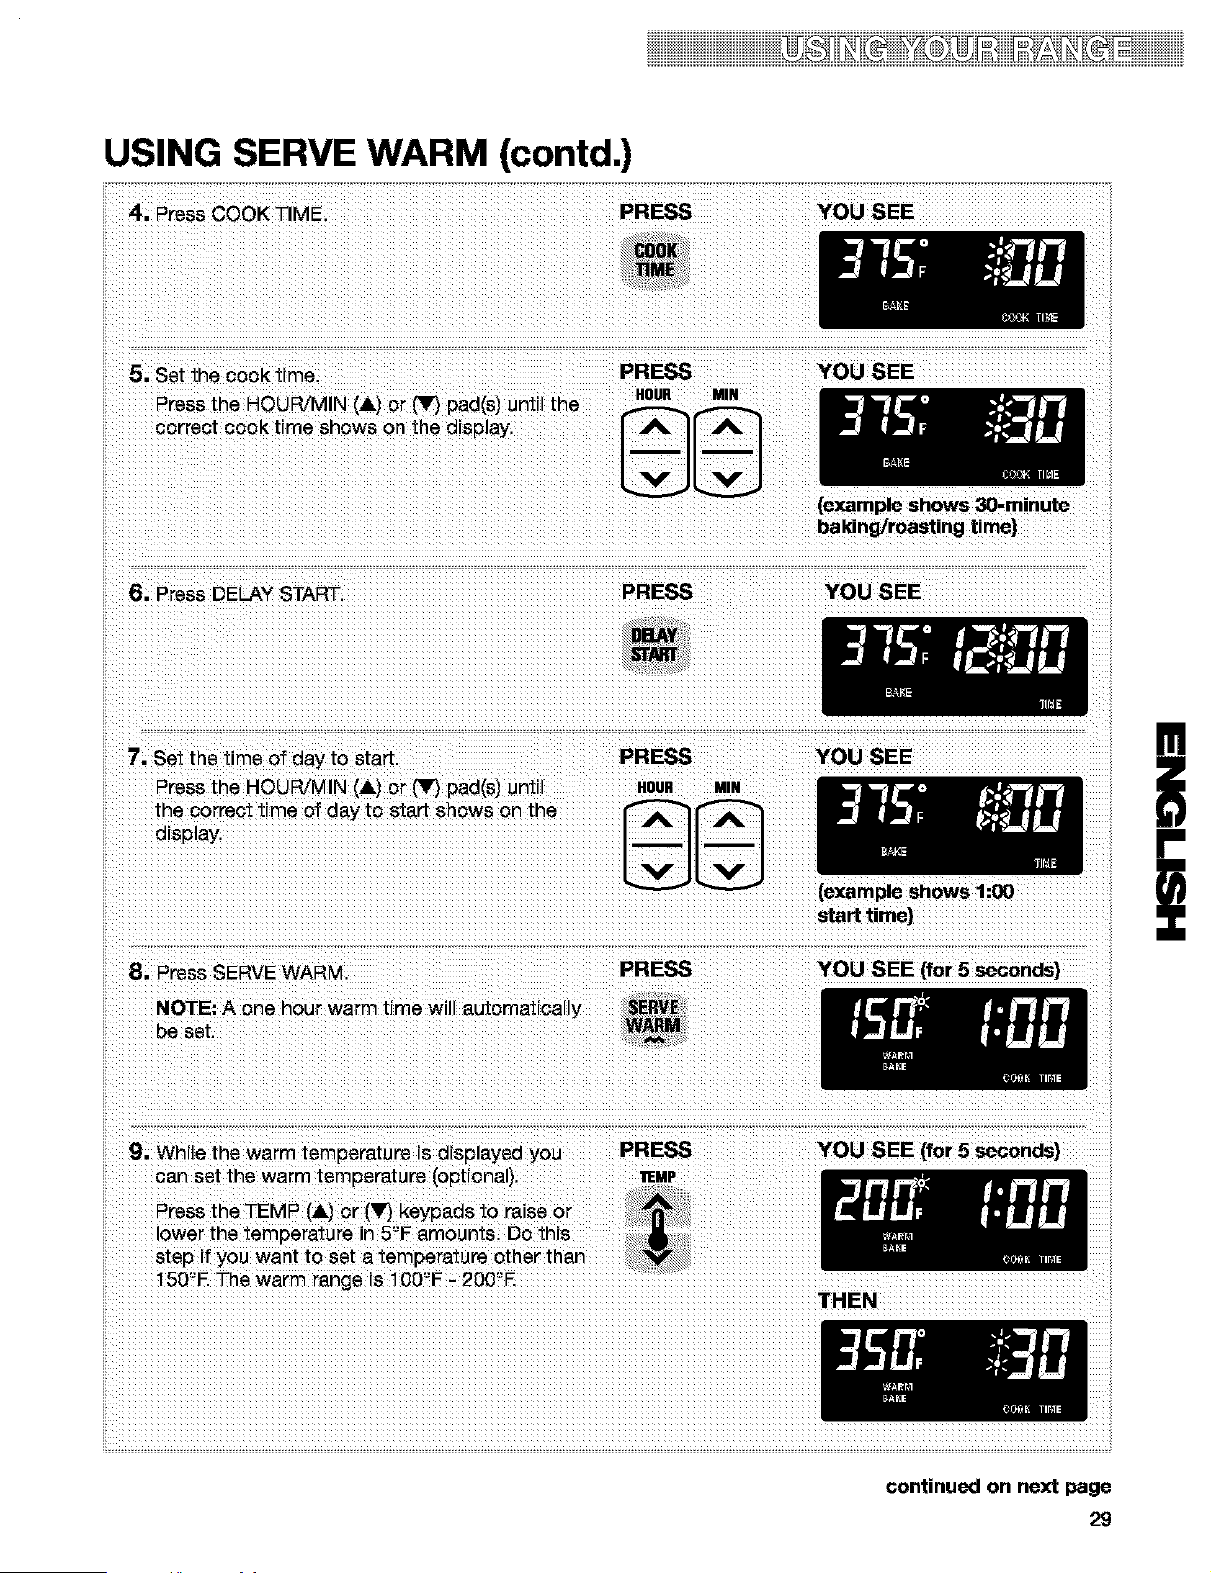
4. Press COOK TIME. PRESS YOU SEE
5, Set the cook time. PRESS
Press the HOUR/MIN (,ilk) or (It) pad(s) until the noun Mm
correct cook time shows on the display.
YOU ,SEE
(example shows 30-minute
baking/roasting time)
6. Press DELAY START. PRESS YOU SEE
7, Set the time of day to start. PRESS YOU SEE
Press the HOUR/MIN (&) or (_r,_pad(s) until noun mN
the correct time of day to start shows on the
d_splay.
(example shows 1:00
start time}
8. Press SERVE WARM. PRESS YOU ,SEE [for 5 seconds}
NOTE: A one hour warm time will automatical y
be set.
9. While the warm temperature is displayed you PRESS YOU SEE [for 5 seconds}
can set the warm temperature (optional), _EMP
Press the TEMP (,ik) or (Y) keypads to raise or
lower the temperature in 5'-'Eamounts. Do this
step if you want to set a temperature other than
150'-'E The warm range is 100'-'F - 200'-'E
THEN
!
i
continued on next page
29
iiiiiDHiiiiiiiii
USING SERVE WARM (contd.)
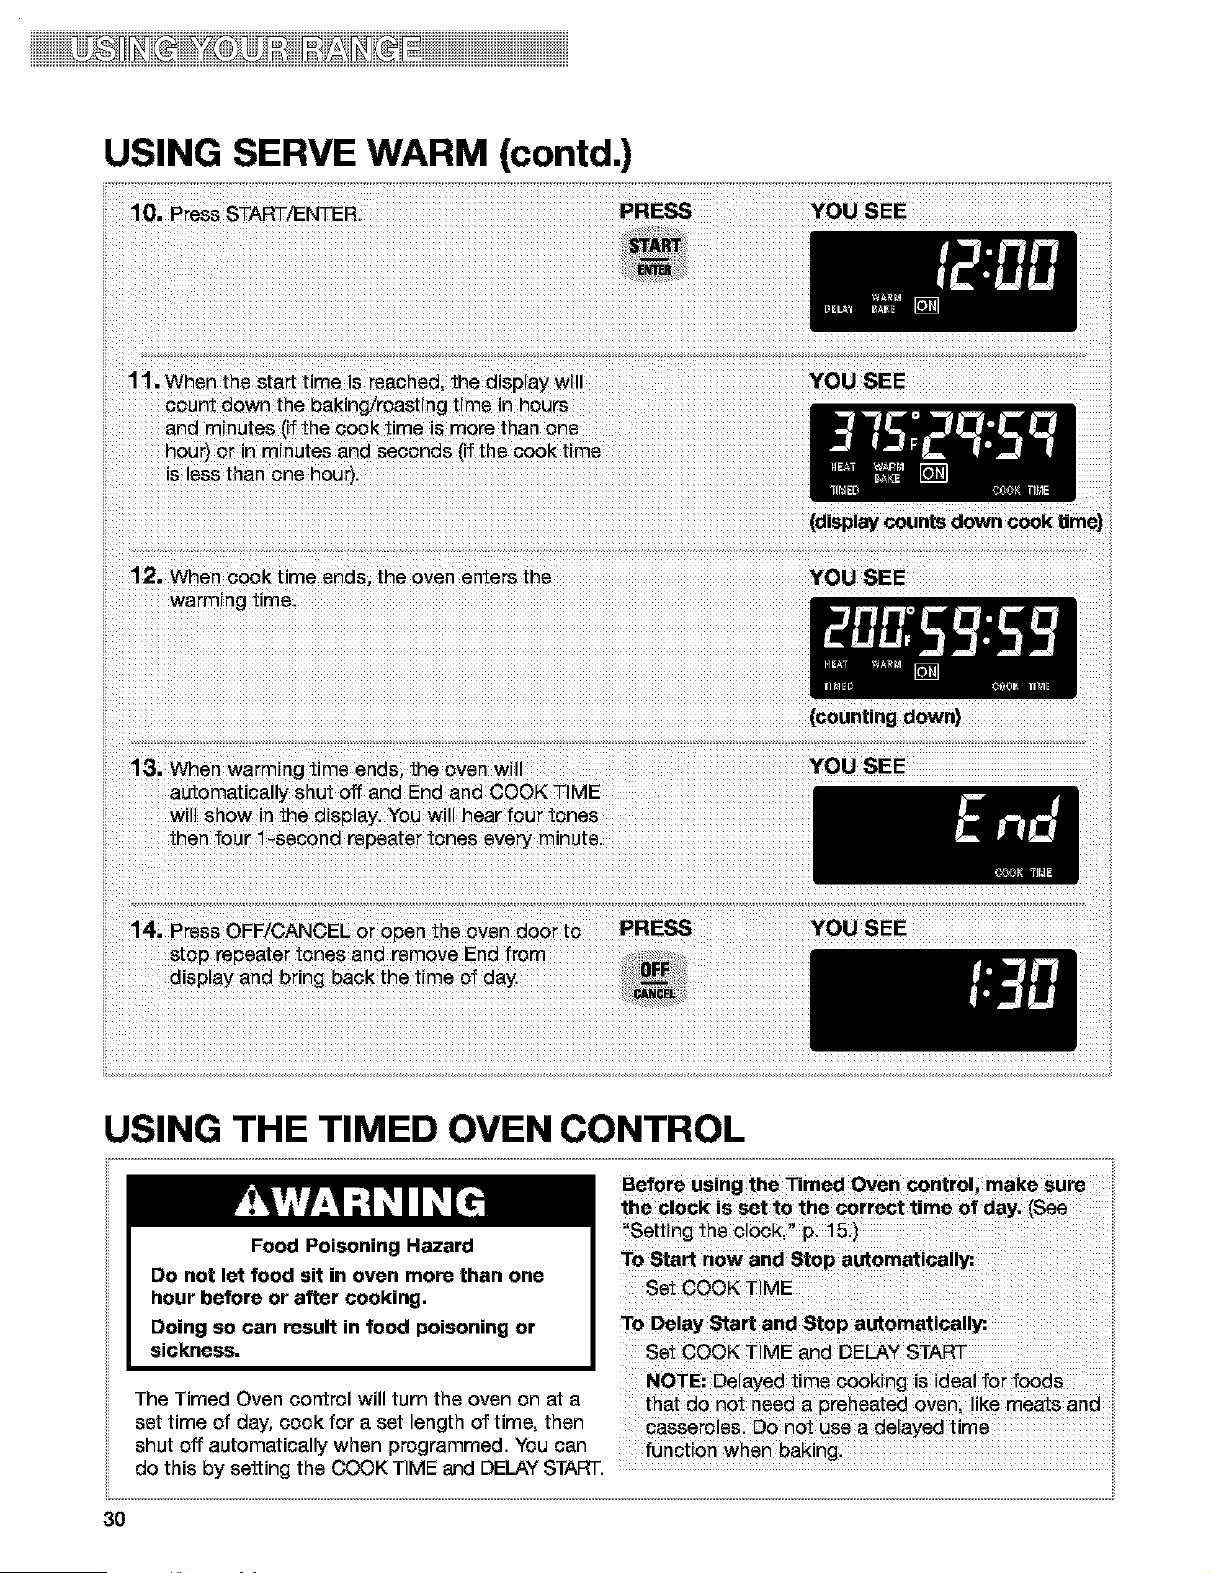
10. Press STAF_/I--NTEI& PRESS YOU SEE
11. When the start time is reached, the display will YOU SEE
sount down the baking/roasting
and minutes [ff the cook time is more than one
hour) or in minutes and seconds (if the cook time
is less than one hour}.
(display counts down cook t|me}
12. When cook time ends, the oven enters the YOU SEE
warming time.
(counting down}
13. When warming time ends, the oven will YOU SEE
automatically shut off and End and COOK TIME
will show in the display. You will hear four tones
then four 1-second repeater tones every minute.
stop repeater tones and remove End from
display and bring back the time of day.
USING THE TIMED OVEN CONTROL
............................................................................................................................................................................................................................................................................................................................................................. ii
Food Poisoning Hazard
Do not let food sit in oven more than one
hour before or after cooking,
Doing SOcan result in food poisoning or
sickness. Set COOK Ti
The Timed Oven control will turn the oven on at a
set time of day, cook for a set length of time, then Casse_0!es D0 n0t use a de!ayed time
shut off automatically when programmed. You can
do this by setting the COOK TIME and DELAY START. ....................................................................................
3O
iiiiiiiiiiiiiiiiiiiiiiiiiiiiiiiiiiiiiiiiiiiiiiii_ii_ii_i_T_iiiii_i_i_ii_ii_iiii_ii_ii_T_T_iiiiiiiiiiiiiiiii
USING THE TIMED OVEN CONTROL (contd.)
Tostartnowandstopautomatically:
To use this fur_ctior_, it is necessary to program the
COOK TIME.
1. Place the STURDIGLIDE rMrack(s) where you
need them and put your food in the oven. To
place your racks correctly, see "Positioning racks
and pans" section, p. 12.
2. Press BAKE. PRESS YOU SEE
3. Set the temperature (optional). PRESS YOU SEE
Do this step if you want to set a temperature TEMP
other than 350'-'E Press TEMP (&) or (T) pad(s)
to raise or lower the temperature in 5°F amounts.
Use these pads until the desired temperature
shows on the small display.
(example shows bake at 375_F)
4. Press COOK TIME PRESS YOU SEE
5. Set the cook time. PRESS YOU SEE
Press the HOUR/MIN (,it=)or ('_r,)pad(s) until the HOUR MIH
correct cook time shows on the display.
(example shows 30-minute
baking/roasting time)
!
i
6. Press START/ENTER. PRESS YOU SEE
NOTES:
a You can change the temperature or time
settings any time after pressing START/ENTER
by repeating Steps 3 or 5. You do not have to
press START/ENTER again.
• The display will count down the baking/
roasting time in hours and minutes (if cook
time is more than 1 hour) or in minutes and
seconds (if cook time is less than 1 hour).
(display counts down
cook time)
continued on next page
31
iiiiiiiiiiiiii_ii_ii_i_T_iiiii_i_i_ii_ii_iiii_i?_%_T_i_iiiiiiiiiiiiiiiiiiiiiiiiiiiiiiiiiiiiiiiiiiiiiiiiiii
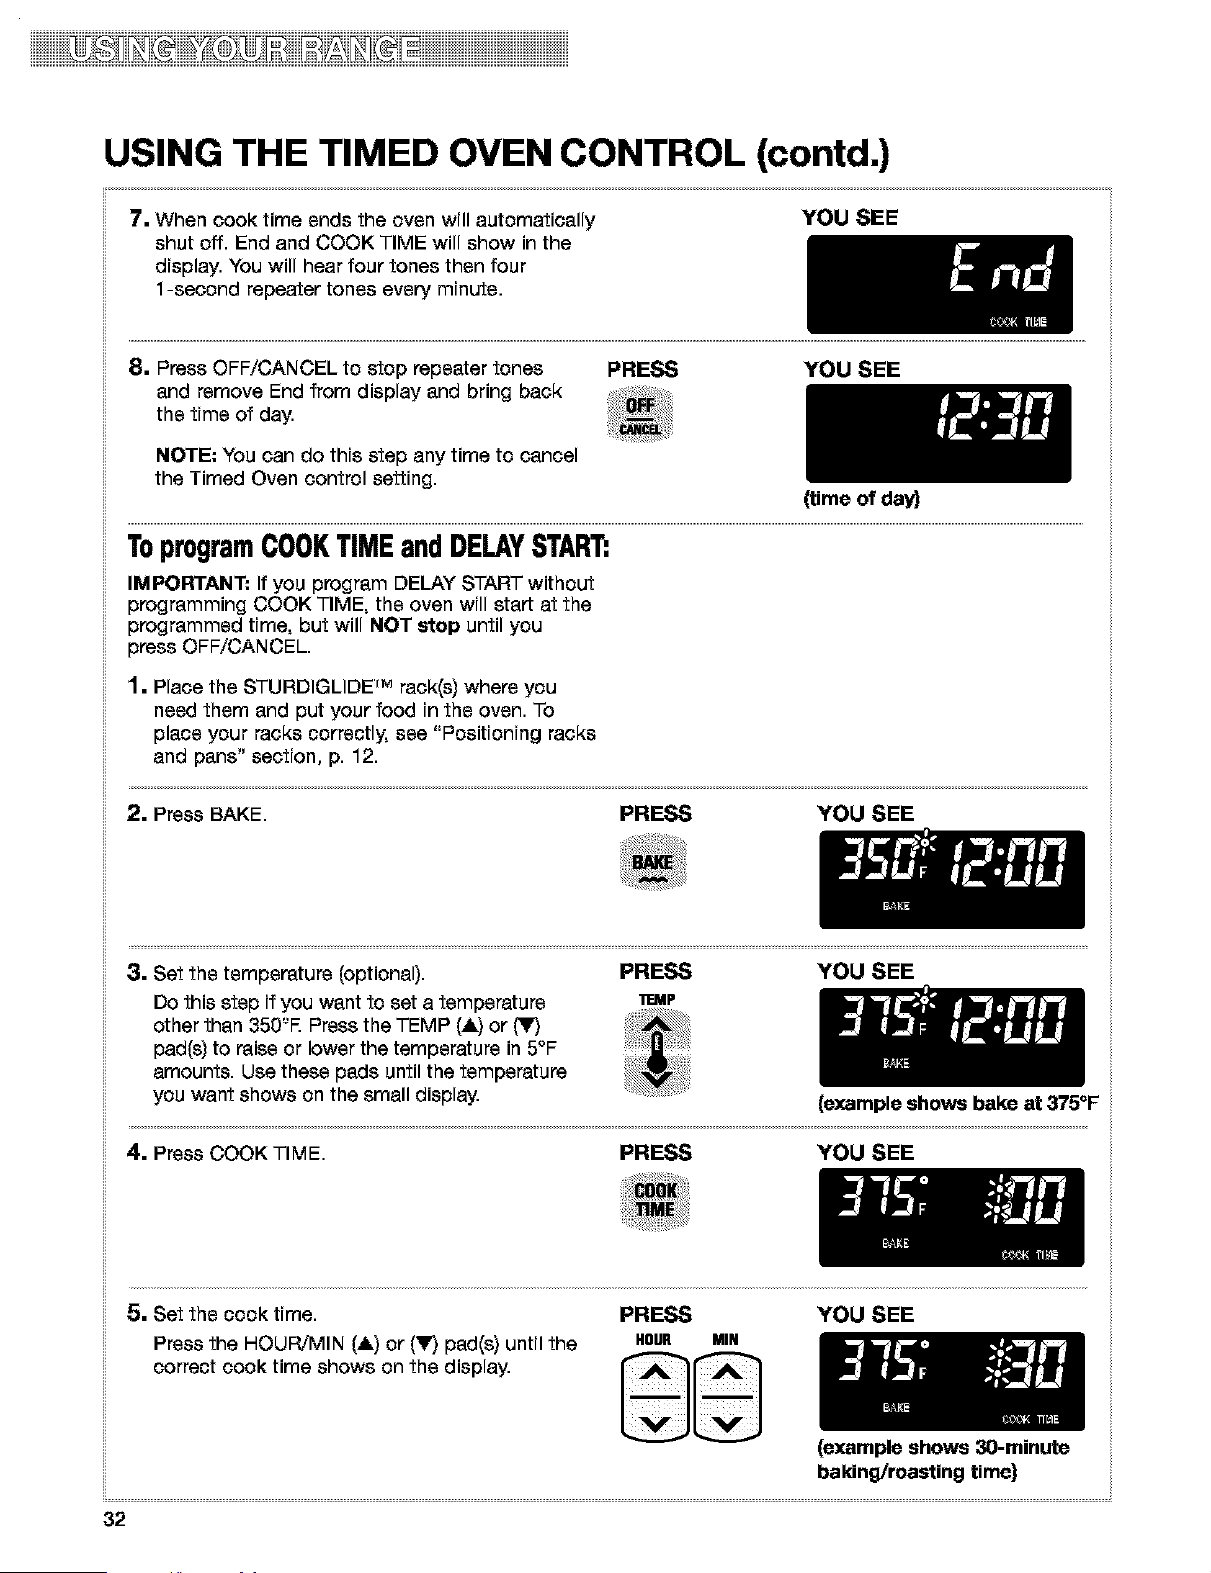
USING THE TIMED OVEN CONTROL (contd.)
7. When cook time ends the oven will automatically
shut off. End and COOK TIME will show in the
display. You will hear four tones then four
1-second repeater tones every minute.
YOU SEE
8. Press OFF/CANCEL to stop repeater tones
and remove End from display and bring back
the time of day.
PRESS YOU SEE
NOTE: You can do this step any time to cancel
the Timed Oven control setting.
(time of day)
ToprogramCOOKTIMEandDELAYSTART:
IMPORTANT: If you program DELAY START without
programming COOK TIME, the oven will start at the
programmed time, but will NOT stop until you
press OFF/CANCEL.
1. Place the STURDIGLIDE rM rack(s) where you
need them and put your food in the oven. To
place your racks correctly, see "Positioning racks
and pans" section, p. 12.
2. Press BAKE. PRESS YOU SEE
3. Set the temperature (optional). PRESS YOU SEE
Do this step if you want to set a temperature _ddP
other than 350'-'E Press the TEMP (A) or (_r,_
pad(s) to raise or lower the temperature in 5°F
amounts. Use these pads until the temperature
you want shows on the small display.
(example shows bake at 375=F
4. Press COOK TIME. PRESS YOU SEE
5. Set the cook time. PRESS YOU SEE
Press the HOUR/MIN (&) or (Y,_pad(s) until the HOUR MIN
correct cook time shows on the display.
(example shows 30-minute
baking/roasting time)
32
iiiiiiiiiiiiiiiiiiiiiiiiiiiiiiiiiiiiiiiiiiiiiiii_ii_ii_q_r_T_iiiii_q_i_ii_ii_iiii_ii_ii_T_T_iiiiiiiiiiiiiiiii
USING THE TIMED OVEN CONTROL (contd.)
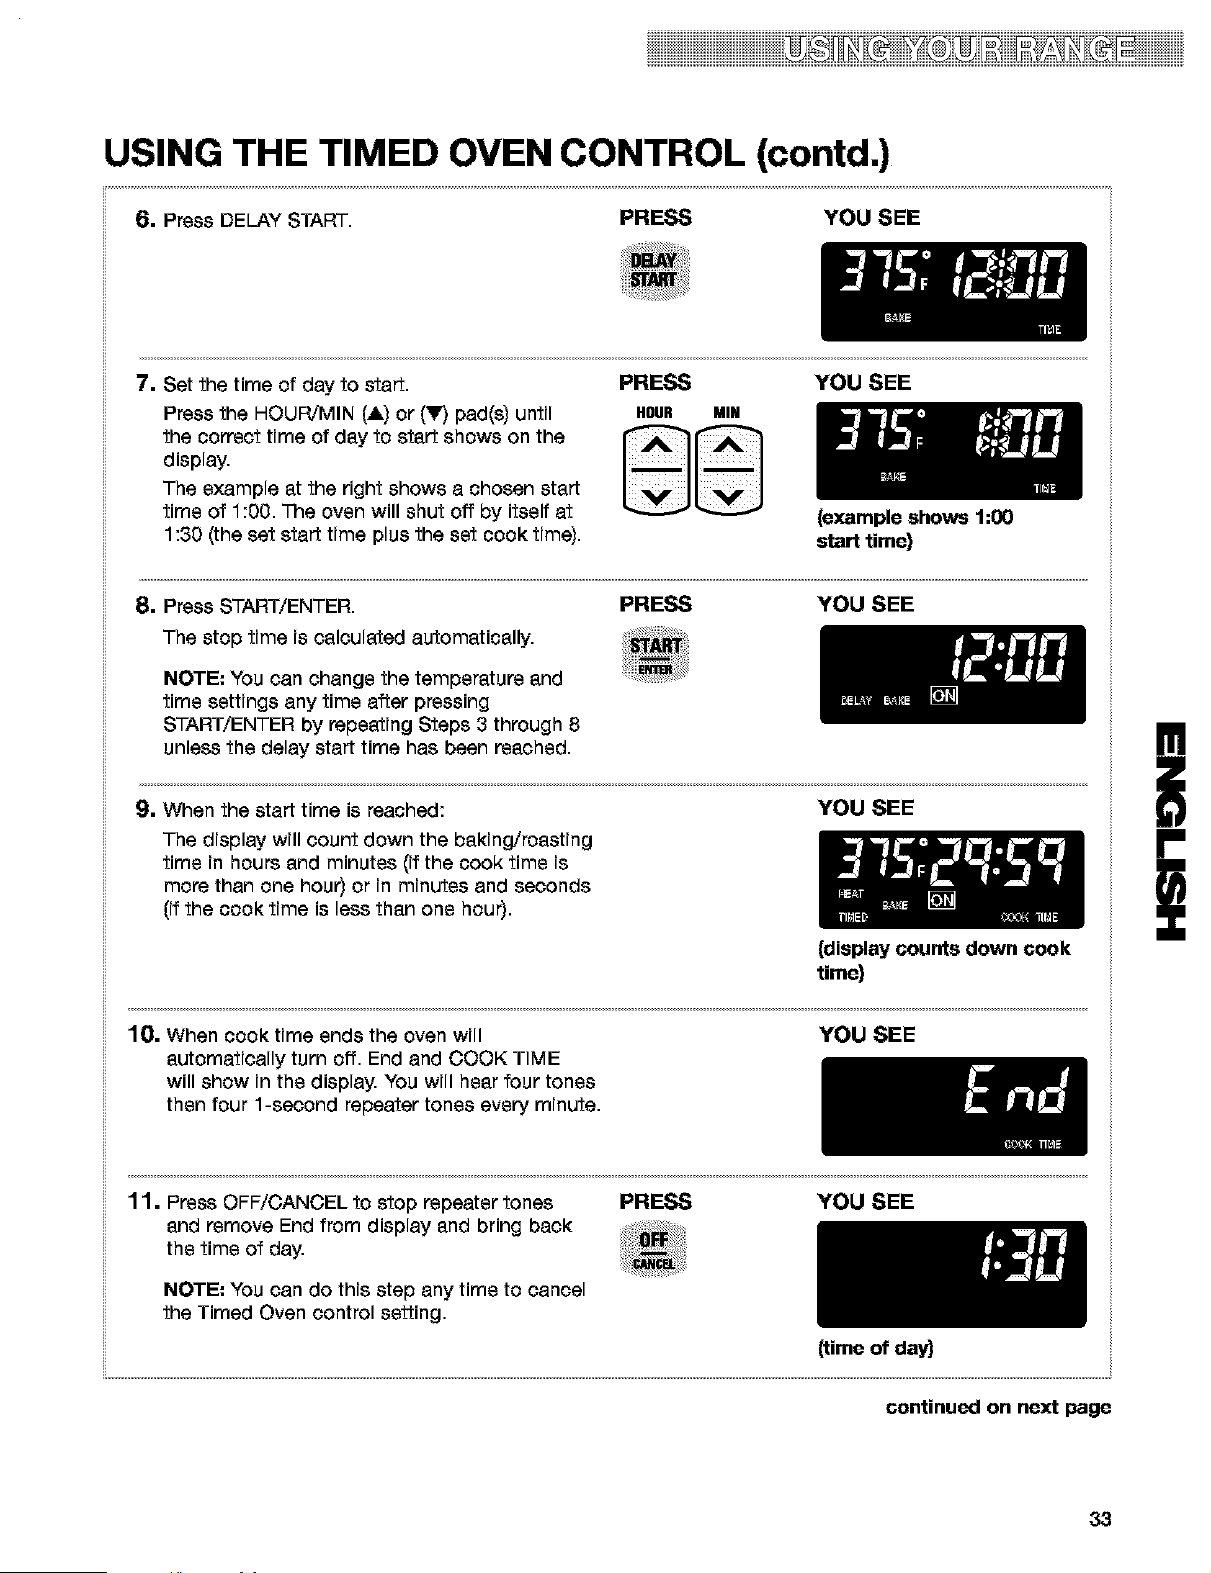
61 Press DELAY START PRESS YOU SEE
7. Set the time of day to start.
Press the HOUR/MIN (&) or (Y) pad(s) until
the correct time of day to start shows on the
display.
The example at the right shows a chosen start
time of 1:00. The oven will shut off by itself at
1:30 (the set start time plus the set cook time).
PRESS YOU SEE
HOUR MIN
{example shows 1:00
start time}
8. Press START/ENTER. PRESS YOU SEE
The stop time is calculated automatically.
NOTE: You can change the temperature and
time settings any time after pressing
START/ENTER by repeating Steps 3 through 8
unless the delay start time has been reached.
9. When the start time is reached: YOU SEE
The display will count down the baking/roasting
time in hours and minutes (if the cook time is
more than one hour) or in minutes and seconds
(if the cook time is less than one hour).
{display counts down cook
time}
10. When cook time ends the oven will
automatically turn off. End and COOK TIME
will show in the display. You will hear four tones
then four 1-second repeater tones every minute.
YOU SEE
11. Press OFF/CANCEL to stop repeater tones
and remove End from display and bring back
the time of day.
PRESS YOU SEE
NOTE: You can do this step any time to cancel
the Timed Oven control setting.
{time of day)
!
i
continued on next page
33
iiiiiDiiiiiiii iiiiiiiiiiiii
USING THE TIMED OVEN CONTROL (contd.)
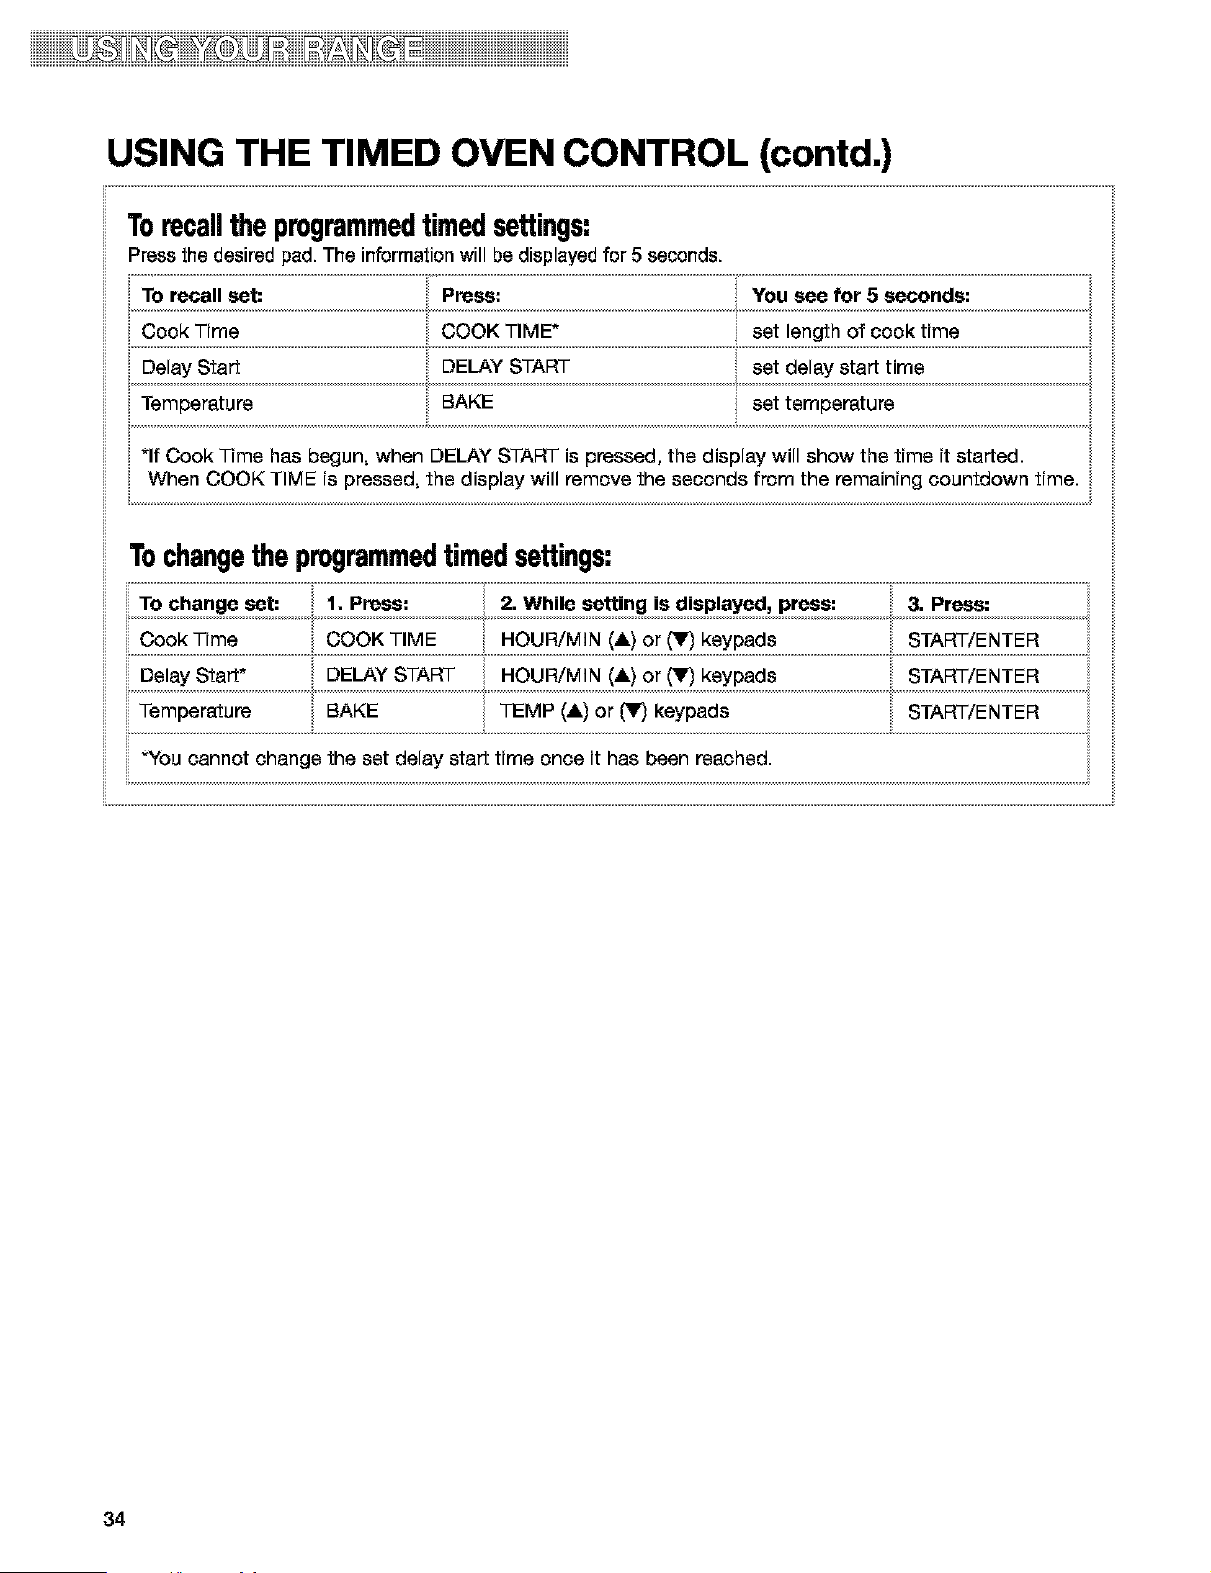
Torecallthe programmedtimedsettings:
Press the desired pad. The information will be displayed for 5 seconds.
TO recall set: Press: You see for 5 seconds:
Cook Time COOK TIME" set length of cook time
Delay Start DELAY START set delay start time •
Temperature E_AKE set temperature
i
*If Cook Time has begun• when DELAY START is pressed, the display will show the time it started.
Cook Time COOK TIME HOUR/MIN (&) or (V) keypads START/ENTER
START/ENTER
DelayStart" . DELAYSTART, .OUR/MIN!*)O_(_')_ypads ,
Temperatu_ ....................BAKE TEMP (& i or m keypads START/ENTER
"You cannot change the set delay start time once it has been reached•
[
34
iDiiii iiiiiiiii
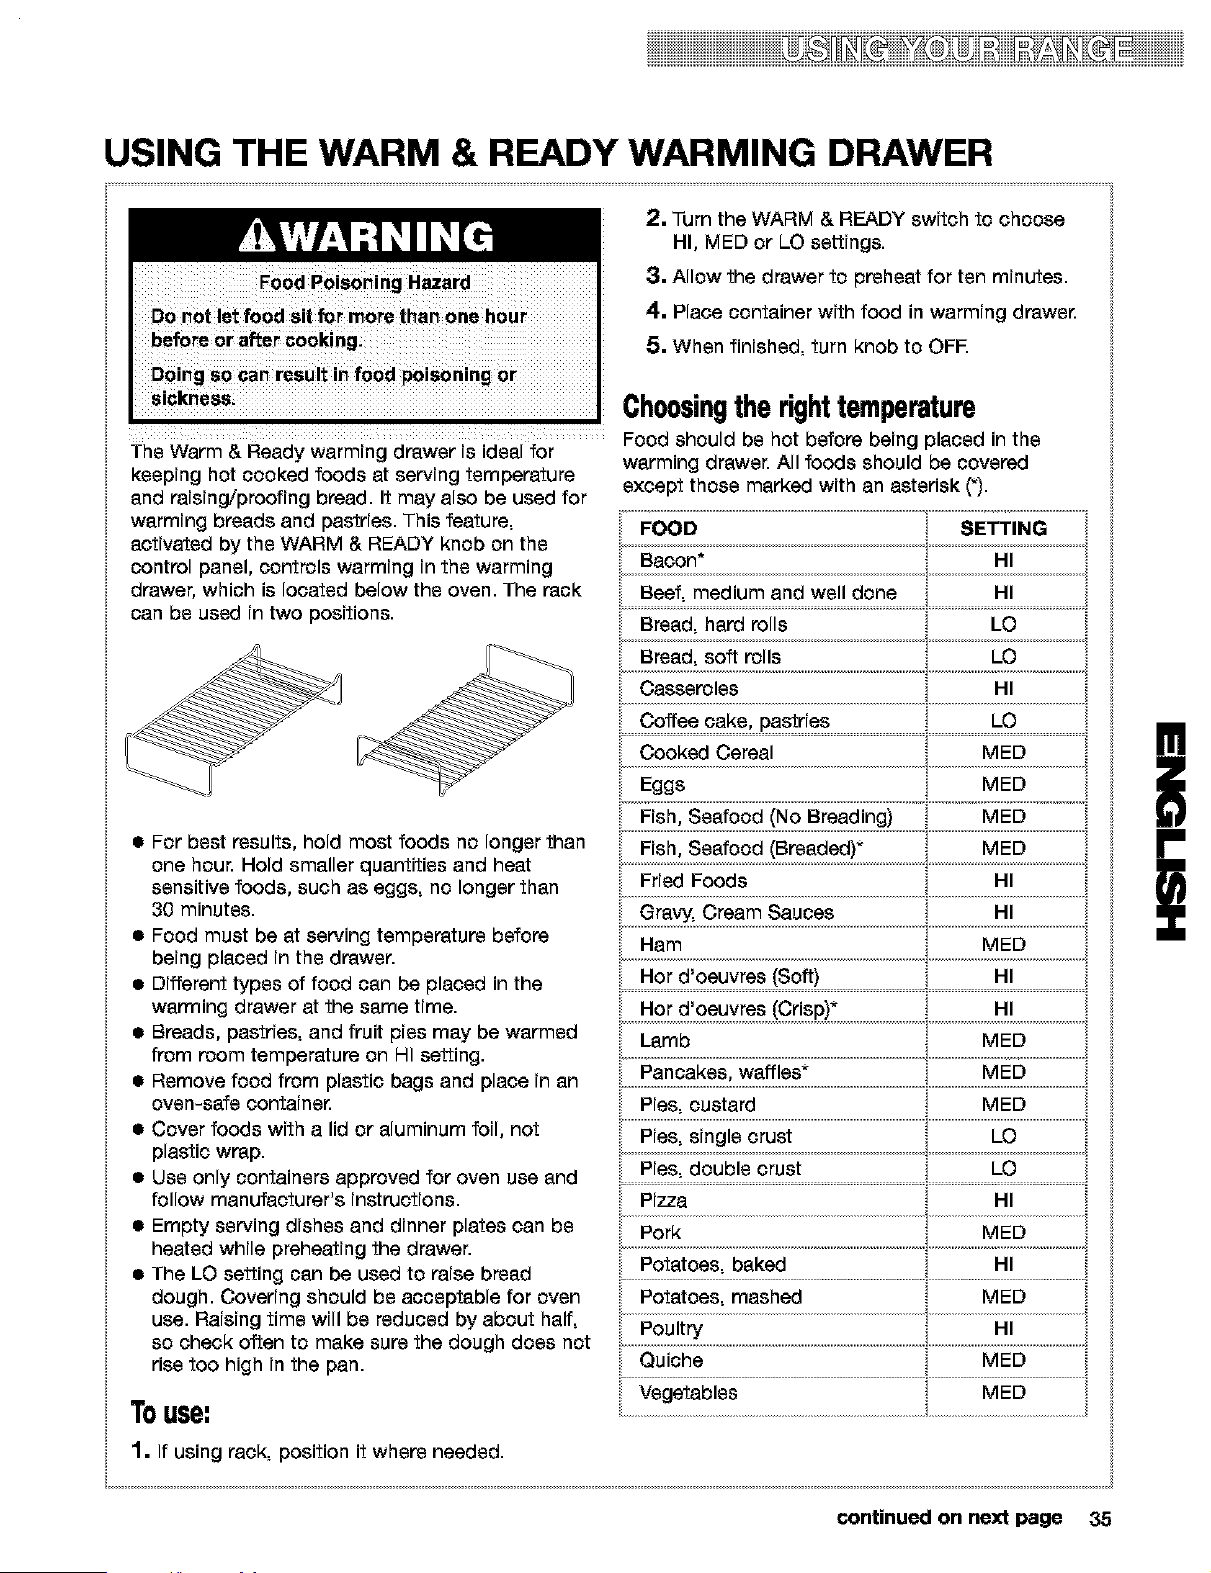
USING THE WARM & READY WARMING DRAWER
. before or after cookingi
i liiiiiiiiiiiigliiiiiiiiiiiiiiiii_iiiiiii_iiiiiiiiiii_ib_i___3_ii_ii_iiiiiiiii_iii_iii_iii_i_uii_iiiiii!iiiiiii_!iiiiiiiiiiiiiiiiiiiiiiii
D0ing S0 can result in f00d poisoning or
• S
I
2. Turn the WARM & READY switch to choose
HI, MED or LO settings.
3. Allow the drawer to preheat for ten minutes•
4. Place container with food in warming drawe_
5. When finished, turn knob to OFE
Choosingtherighttemperature
Food should be hot before being placed in the
The Warm & Ready warming drawer is ideal for warming drawer• All foods should be covered
except those marked with an asterisk (_).
keeping hot cooked foods at serving temperature
and raising/proofing bread. It may also be used for
warming breads and pastries• This feature,
activated by the WARM & READY knob on the
control panel, controls warming in the warming
drawer, which is located below the oven• The rack
can be used in two positions•
a For best results, hold most foods no longer than
one hour. Hold smaller quantities and heat
sensitive foods, such as eggs, no longer than
30 minutes•
a Food must be at serving temperature before
being placed in the drawer.
a Different types of food can be placed in the
warming drawer at the same time.
a Breads, pastries, and fruit pies may be warmed
from room temperature on HI setting.
a Remove food from plastic bags and place in an
oven-safe containe_
a Cover foods with a lid or aluminum foil, not
plastic wrap.
a Use only containers approved for oven use and
follow manufacturer's instructions.
a Empty serving dishes and dinner plates can be
heated while preheating the drawer•
a The LO setting can be used to raise bread
dough• Covering should be acceptable for oven
use. Raising time will be reduced by about half,
so check often to make sure the dough does not
rise too high in the pan.
Touse:
Bacon* HI '_
Beef, medium and well done HI '_
Bread• hard rolls LO _,
Bread, soft rolls LO _,
• • _i !
Casseroles HI _,
Coffee cake, pastries
Cooked Cereal MED
Eggs MED
ried oods i
Gravy, Cream Sauces HI
Ham MED
Hot d'oeuvres (Soft) HI ,,
• • ii
Hot d'oeuvres (Crisp)* HI
Lamb
Pancakes, waffles" MED
Pies, custard MED
Pies, single crust LO
LOPies double crust
Pizza HI ,
Pork MED
Potatoes• baked HI ;
Potatoes, mashed MED _,
Poultry HI _,
Quiche MED _,
Vegetables MED _
1. If using rack, position it where needed•
continued on next page 35
iiiiDiiiiiiii iiiiiiiiiiiiii
USING THE WARM & READY WARMING DRAWER
(contd,)
Toremovethewarmingdrawer:
Remove all items from inside the warming drawer
and allow the unit to cool completely before
attempting to remove the drawer.
1. Pull drawer to its full open position.
2. Locate the black triangle tabs on each side of
the drawer.
Tab \ :
Toreplacethewanningdrawer:
1. Align the drawer glides with the receiving
guides.
;2. Push drawer in completely.
3. Gently open and close drawer to ensure it is
seated properly on the slides.
3. Press the tab DOWN on the RIGHT side and lift
the tab UP on the LEFT side at the same time.
Then pull drawer out another inch.
4. Carefully pull the drawer all the way out holding
on to the sides, not the drawer front.
THE OVEN VENT
Hot air and moisture escape from the oven through
a vent on the backguard below the control panel. The
vent lets air circulate properly. Be careful not to
block the vent, or you will get poor baking/roasting
results.
NOTE: Never store plastics, paper, or other items
that could melt or burn near the oven vent, or any
of the surface cooking zones.
36
Usingthe SENS-A-CLEANT"
Self-CleaningCycle
Burn Hazard
Do not touch the oven during the Self-Cleaning cycle,
Keep children away from oven during Self-Cleaning cycle,
Do not use commercial oven cleaners in your oven.
Failure to follow these instructions can result in burns, or illness from inhaling
dangerous fumes
BEFORE YOU START
NOTES:
a Heat and odors are normal during the Self-
Cleaning cycle. Keep the kitchen well ventilated
by opening a window or by turning on a vent
hood or other kitchen vent during the cycle.
a DO NOT clean, move, or bend the gasket. You
may get poor cleaning, baking, and roasting.
a The oven light will not work during the Self-
Cleaning cycle.
a The console night light will not work during the
Self-Cleaning cycle.
Before you start the Self-Cleaning cycle, make
sure you:
a Hand-clean the areas shown. They do not get
hot enough during the Self-Cleaning cycle for
soil to burn away. Use hot water and detergent
or a soapy, steel-wool pad for cleaning.
a Do not let water, cleaner, etc., enter slots on
door and frame.
• Remove the broiler pan and grid and any
cookwara/bakewars being stored in the oven.
a Wipe out any loose soil or grease. This will help
reduce smoke during the Self-Cleaning cycle.
• Wipe up food spills containing sugar and/or milk
as soon as possible after the oven cools down.
When sugar is heated to a high temperature in
the Self-Cleaning cycle, the high temperature
can cause the sugar to burn and react with the
porcelain. This can cause staining and etching or
pitting.
a Remove the oven racks from the oven if you want
them to remain shiny. You can clean the oven
racks inthe Self-Cleaning cycle, but they will
become harder to slide. (See the "Cleaning chart"
in the "Caring for Your Range" section, p. 41 .) If
you clean the racks inthe Self-Cleaning cycle,
place them on the 2rid and 4th rack guides. (The
guides are counted from bottom to top.)
DO NOT
hand-clean
gasket
Hand-clean
frame
IMPORTANT: The health of some birds is extremely
sensitive to the fumes given off during the Self-
Cleaning cycle. Exposure to the fumes may result in
death to certain birds. Always move birds to another
closed and well ventilated room.
TIPS:
a Keep the kitchen well ventilated during the
Self-Cleaning cycle to help get rid of heat, odors,
and smoke.
a
a
a
a
Clear_ the oven before it gets heavily soiled.
Cleaning a very soiled oven takes longer and
results in more smoke than usual.
Do not block the vent during the Self-Cleaning
cycle. Air must move freely for best cleaning results.
Do not leave plastic utensils on the cooktop. They
may melt.
Do not leave any foil in the oven during the
Self-Cleaning cycle. Foil could burn or melt and
damage the oven surface.
!
i
37
HOW THE CYCLE WORKS
The SENS-A-CLEAN rMSelf-Cleaning cycle uses
temperatures much hotter than normal oven use to
break up and bum away soil and grease. The oven is
equipped with a sophisticated electronic sensor that
continuously monitors the by-products released from
burning off the baked-on foods inside the oven and
adjusts the cleaning time accordingly. There is no
guessing on how long to set the time because all
steps are taken care of by the senso_ The oven will
automatically shut off once it senses it is clean. As
another option, the soil level can be manually set to
light, average or heavy soil levels.
The door must be closed completely for it to lock and
the cycle to begin. If properly closed, the door will
lock approximately 6 seconds after START/ENTER is
pressed. The cycle time includes an approximate 30
minute cool down time. To see the time of day during
the cycle, press CLOCK for 5 seconds.
SETTING THE CONTROLS
TostartSENS-A-CLEANSelf-Cleaningimmediately:
1. Press SENS-A-CLEAN. PRESS YOU SEE
SEnS setting will automatically determine the
length of cleaning time. Maximum clean time is
4,6 hours and minimum is 2 hours.
2. If you would prefer to manually set the soil level
yourself, you can choose, Light, Average, or
Heavy.
For light soils, press SENS-A-CLEAN twice, SoiL
will appear in the display. Cycle duration is
2-2'6 hours.
PRESS YOU SEE
For average soils, press SENS-A-OLEAN three
times, SoilA will appear in the display. Cycle
duration is 3-3t hours.
For heavy soils, press SENS-A-CLEAN four
times, SoilH will appear on the display. Cycle
duration is 4-4t hours.
(example shows light soil
setting)
3. Press START/ENTER. PRESS YOU SEE
4. After the SENS-A-CLEAN Self-Cleaning cycle ends: YOU SEE
LOCKED goes off and the door unlocks.
38
SETTING THE CONTROLS (contd.)
5. Press any pad or open the door to remove "End" YOU SEE
and bring back time of day.
6. After the oven is cool, wipe off any residue or ash
with a damp cloth or sponge. If needed, touch up
spots with a mild abrasive cleanser or cleaning
sponge.
TodelaystarttheSENS-A-CLEAN
Self-Cleaningcycle:
NOTE: Make sure the clock is set to the correct
time of day. (See "Setting the clock" in the "Using
Your Range" section, p. 15.)
1. Press SENS-A-CLEAN.
PRESS
SEnS setting will automatically determine the
length of cleaning time. Maximum clean time is
4½ hours and minimum is 2 hours.
YOU SEE
(example shows light soil
setting)
2. If you would prefer to manually set the soil level PRESS YOU SEE
yourself, you can choose, Light, Average, or
Heavy.
For light soils, press SENS-A-CLEAN twice, SoilL
will appear in the display. Cycle duration is
2-2_ hours.
For average soils, press SENS-A-CLEAN three
times, SoilA will appear in the display. Cycle
duration is 3-3_ hours.
For heavy soils, press SENS-A-CLEAN four
times, SoilH will appear on the display. Cycle
duration is 4-4_ hours.
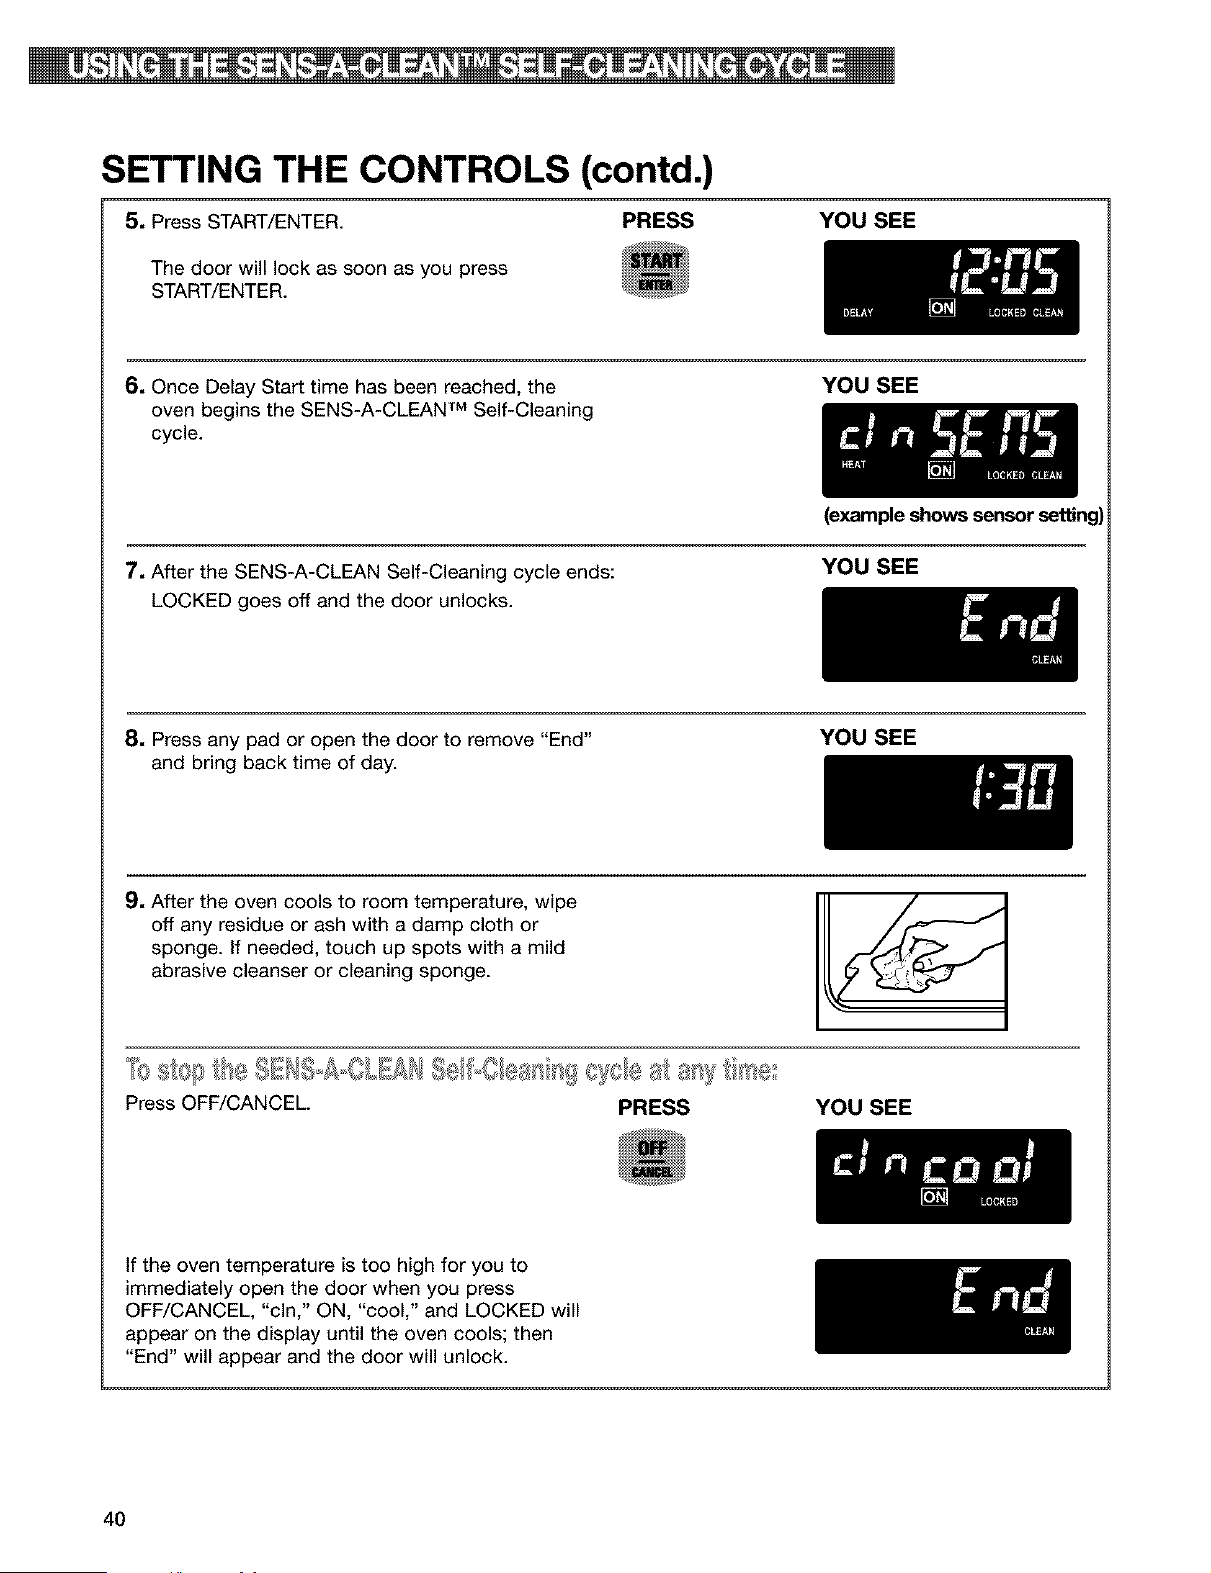
3. Press DELAY START. PRESS YOU SEE
4. Set the start time. PRESS YOU SEE
Press the HOUR/MIN (&) or (_lr,_pad(s) until the H0UR MIN
desired time of day to start the SENS-A-CLEAN
Self-Cleaning cycle shows on the display.
(example for 12:30 start time)
continued on next page
39
!
SETTING THE CONTROLS (contd.)
5, Press START/ENTER. PRESS YOU SEE
The door will lock as soon as you press
START/ENTER.
6, Once Delay Start time has been reached, the YOU SEE
oven begins the SENS-A-CLEAN TM Self-Cleaning
cycle.
7. After the SENS-A-CLEAN Self-Cleaning cycle ends:
LOCKED goes off and the door unlocks.
(example shows sensor setting)
YOU SEE
8, Press any pad or open the door to remove "End"
and bring back time of day.
YOU SEE
9. After the oven cools to room temperature, wipe
off any residue or ash with a damp cloth or
sponge. If needed, touch up spots with a mild
abrasive cleanser or cleaning sponge.
Press OFF/CANCEL PRESS YOU SEE
If the oven temperature is too high for you to
immediately open the door when you press
OFF/CANCEL, "cln," ON, "cool," and LOCKED will
appear on the display until the oven cools; then
"End" will appear and the door will unlock.
4O
CaringforYourRange
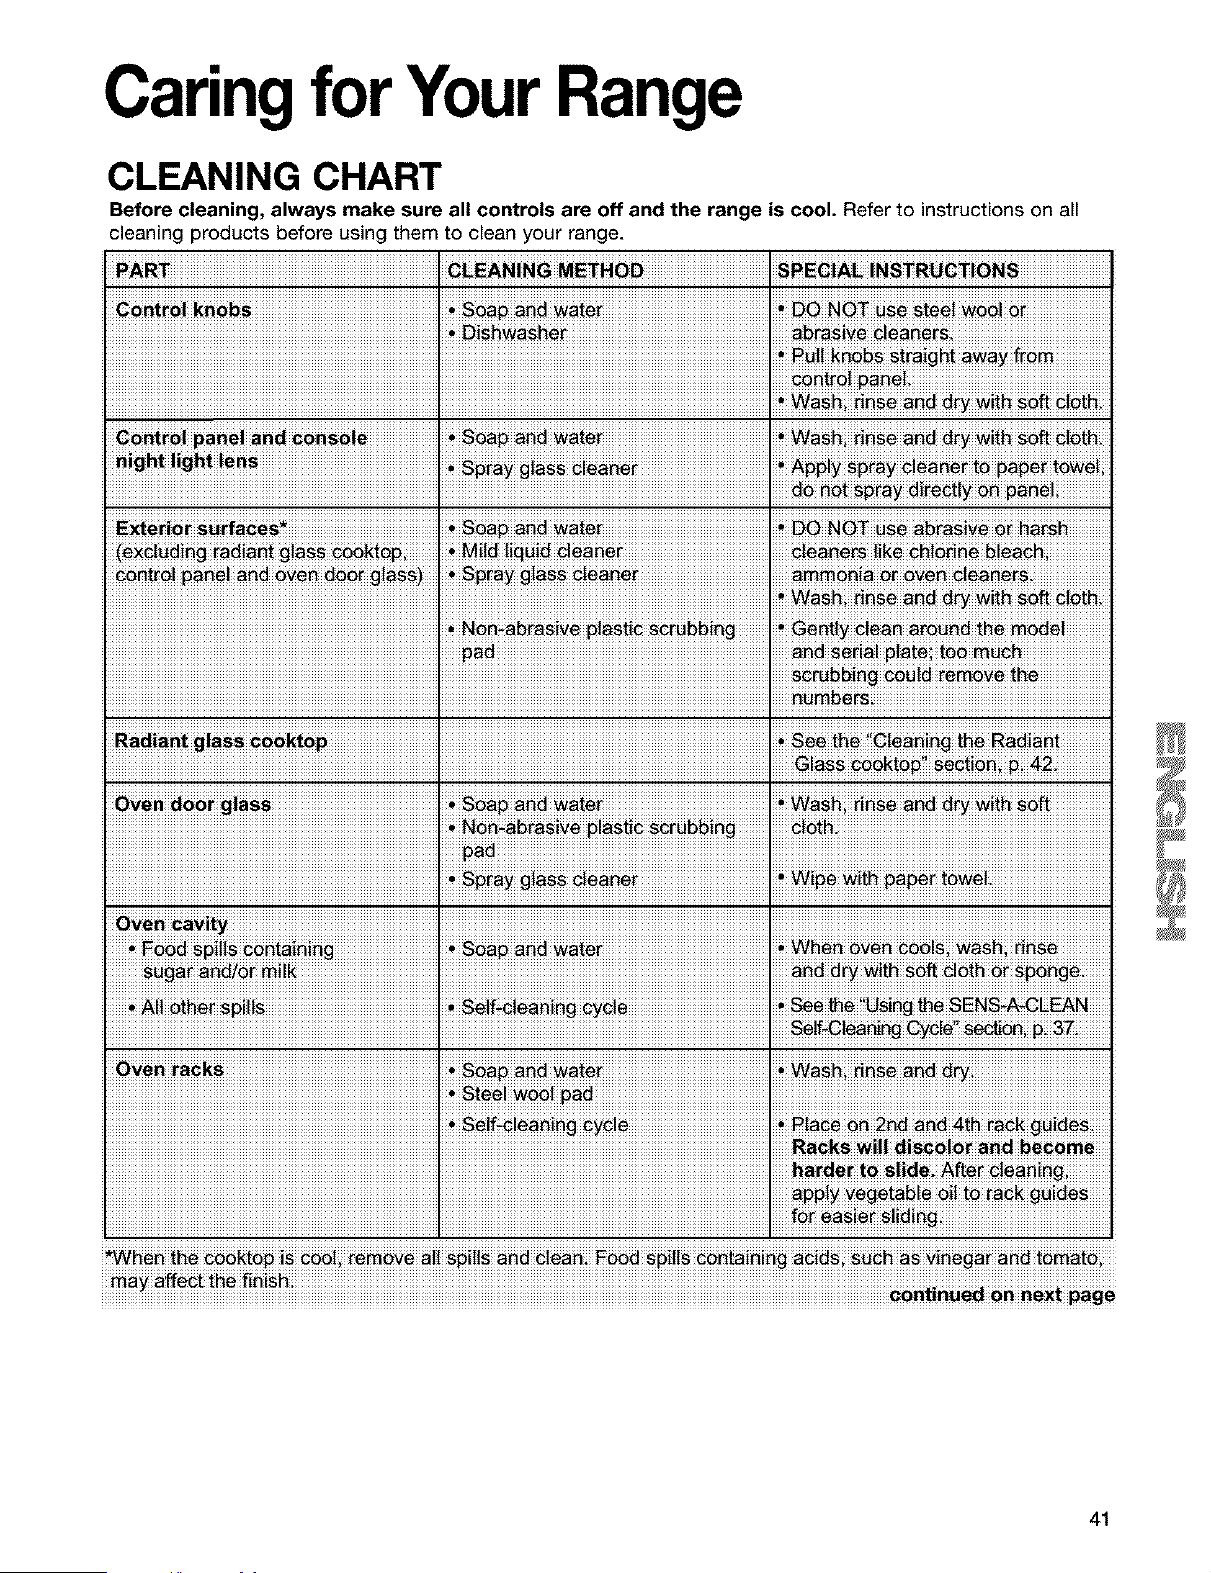
CLEANING CHART
Before cleaning, always make sure all controls are off and the range is cool. Refer to instructions on all
cleaning products before using them to clean your range.
_i _ I _a_ a_ _a_e_ I _OT use steei _i
I I _t_ipa_ei
_i_ _rfa_ _ _ _i_i i _ _OT_ _ra_i__i_i_
i !!
_!"! !"a!! "!_! _!!! _ape
Ove_ ra_s _ _ _tei _s_ ii_s_
I I R_ks _iii _i_i_ _d b_
I I _P!_"_g_b!e to_a__!d_s
ay affect _he finish ..
iiiiiiiiiiiiiiiiiiiiiiiiiiiiiiiiiiiiiiiiiiiiiiiiiiiiiiiiiiiiiiiiiiiiiiiiiiiiiiiiiiiiiiiiiiiiiiiiiiiiiiiiiiiiiiiiiiiiiiiiiiiiiiiiiiiiiiiiiiiiiiiiiiiiiiiiiiiiiiiiiiiiiiiiiiiiiiiiiiiiiiiiiiiiiiiiiiiiiiiiiiiiiiiiiiiiiiiiiiiiiiiiiiiiiiiiiiiiiiiiiiiiiiiiiiiiiiiiiiiiiiiiiiiiiiiiii_n_n_ii_niinex_ii_g_
41
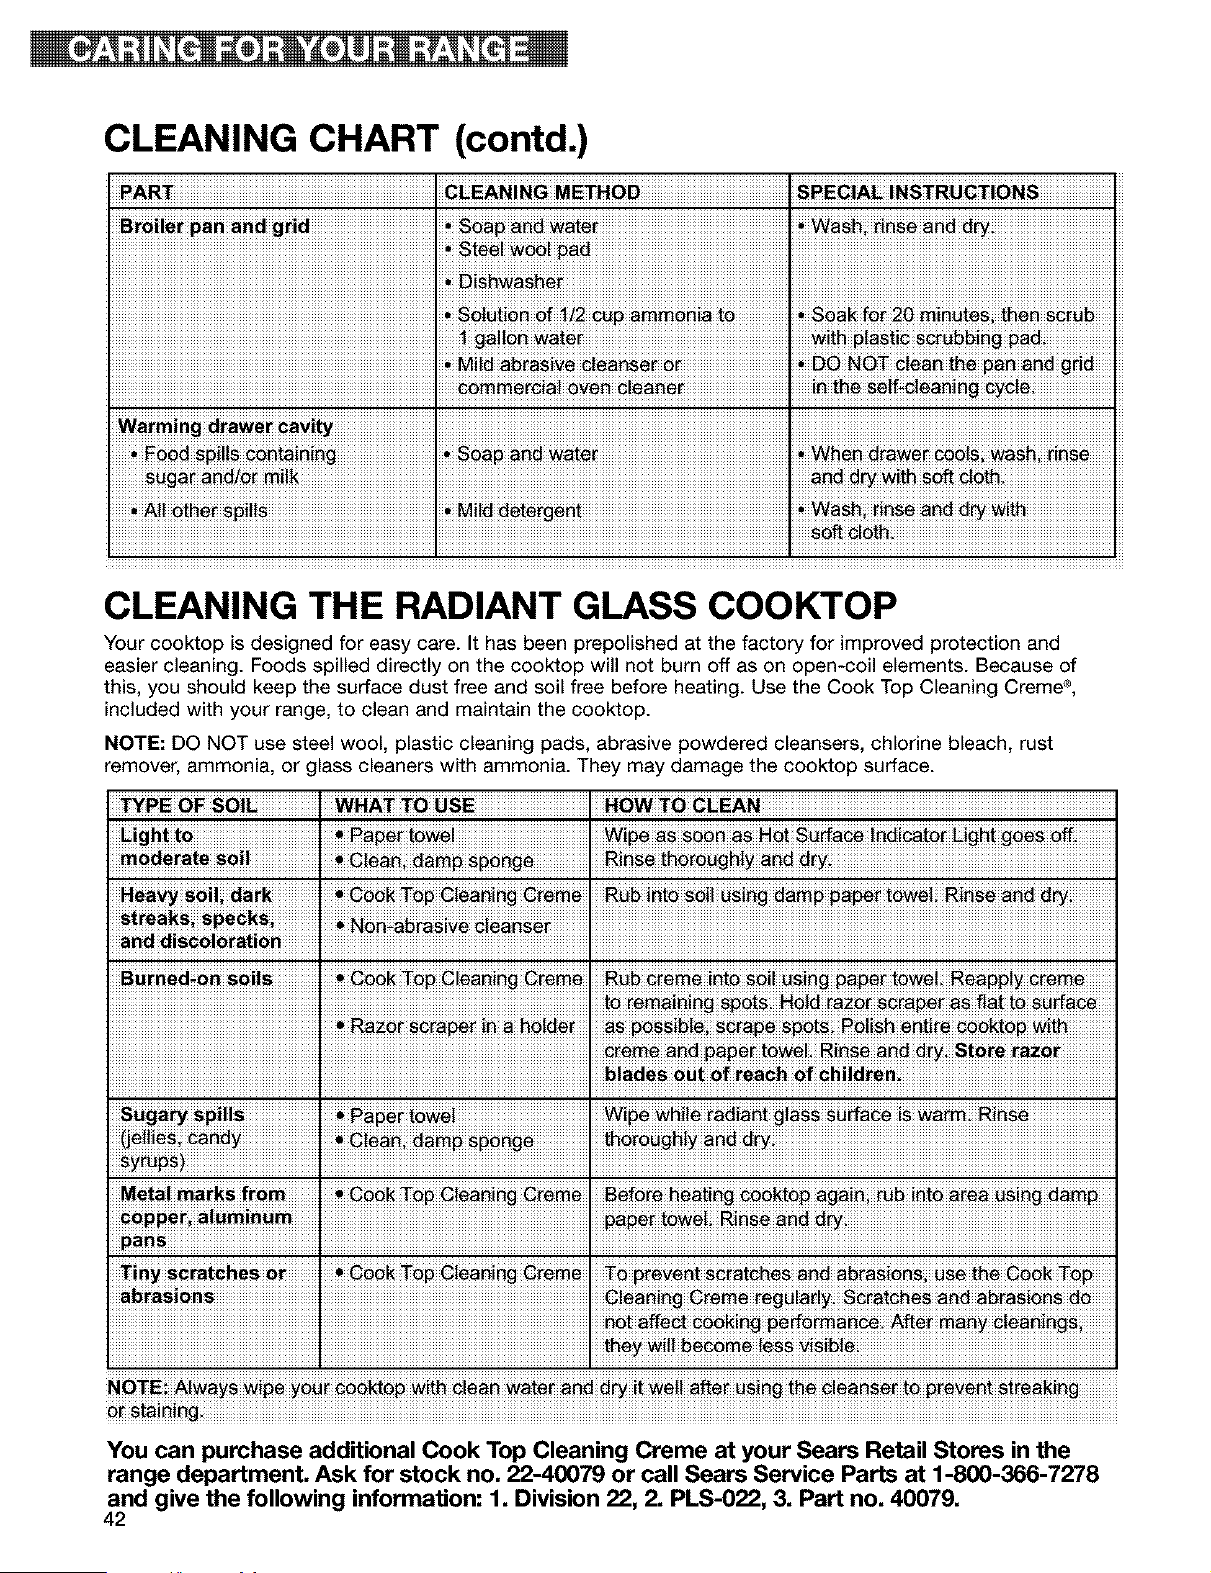
CLEANING CHART (contd.)
PART. G_EAN!NG ME_HOD. SPEC!AL !NS_RUC_!ONS
Broi!e_ p_n _nd g_id
Warm in g a_aw, i _a_ty ! !
CLEANING THE RADIANT GLASS COOKTOP
Your cooktop isdesigned for easy care. It has been prepolished at the factory for improved protection and
easier cleaning. Foods spilled directly on the cooktop will not burn off as on open-coil elements. Because of
this, you should keep the surface dust free and soil free before heating. Use the Cook Top Cleaning Creme ®,
included with your range, to clean and maintain the cooktop.
NOTE: DO NOT use steel wool, plastic cleaning pads, abrasive powdered cleansers, chlorine bleach, rust
remover, ammonia, or lass cleaners with ammonia. They may damage the cooktop surface.
Ei_ to. _ _ _ow#i I #6 _#_ #_a#i SS_#_i_aicato_ Light _ off
RI_ _ro_
.
Befo_ _e_ti_ coo_to# Ag_i_ _b into area OSi_ dam#
ans 1 I
You can purchase additional Cook Top Cleaning Creme at your Sears Retail Stores in the
range department, Ask for stock no, 22-40079 or call Sears Service Parts at 1-800-366-7278
and give the following information: 1, Division 22, 2, PLS-022, 3, Part no, 40079,
42
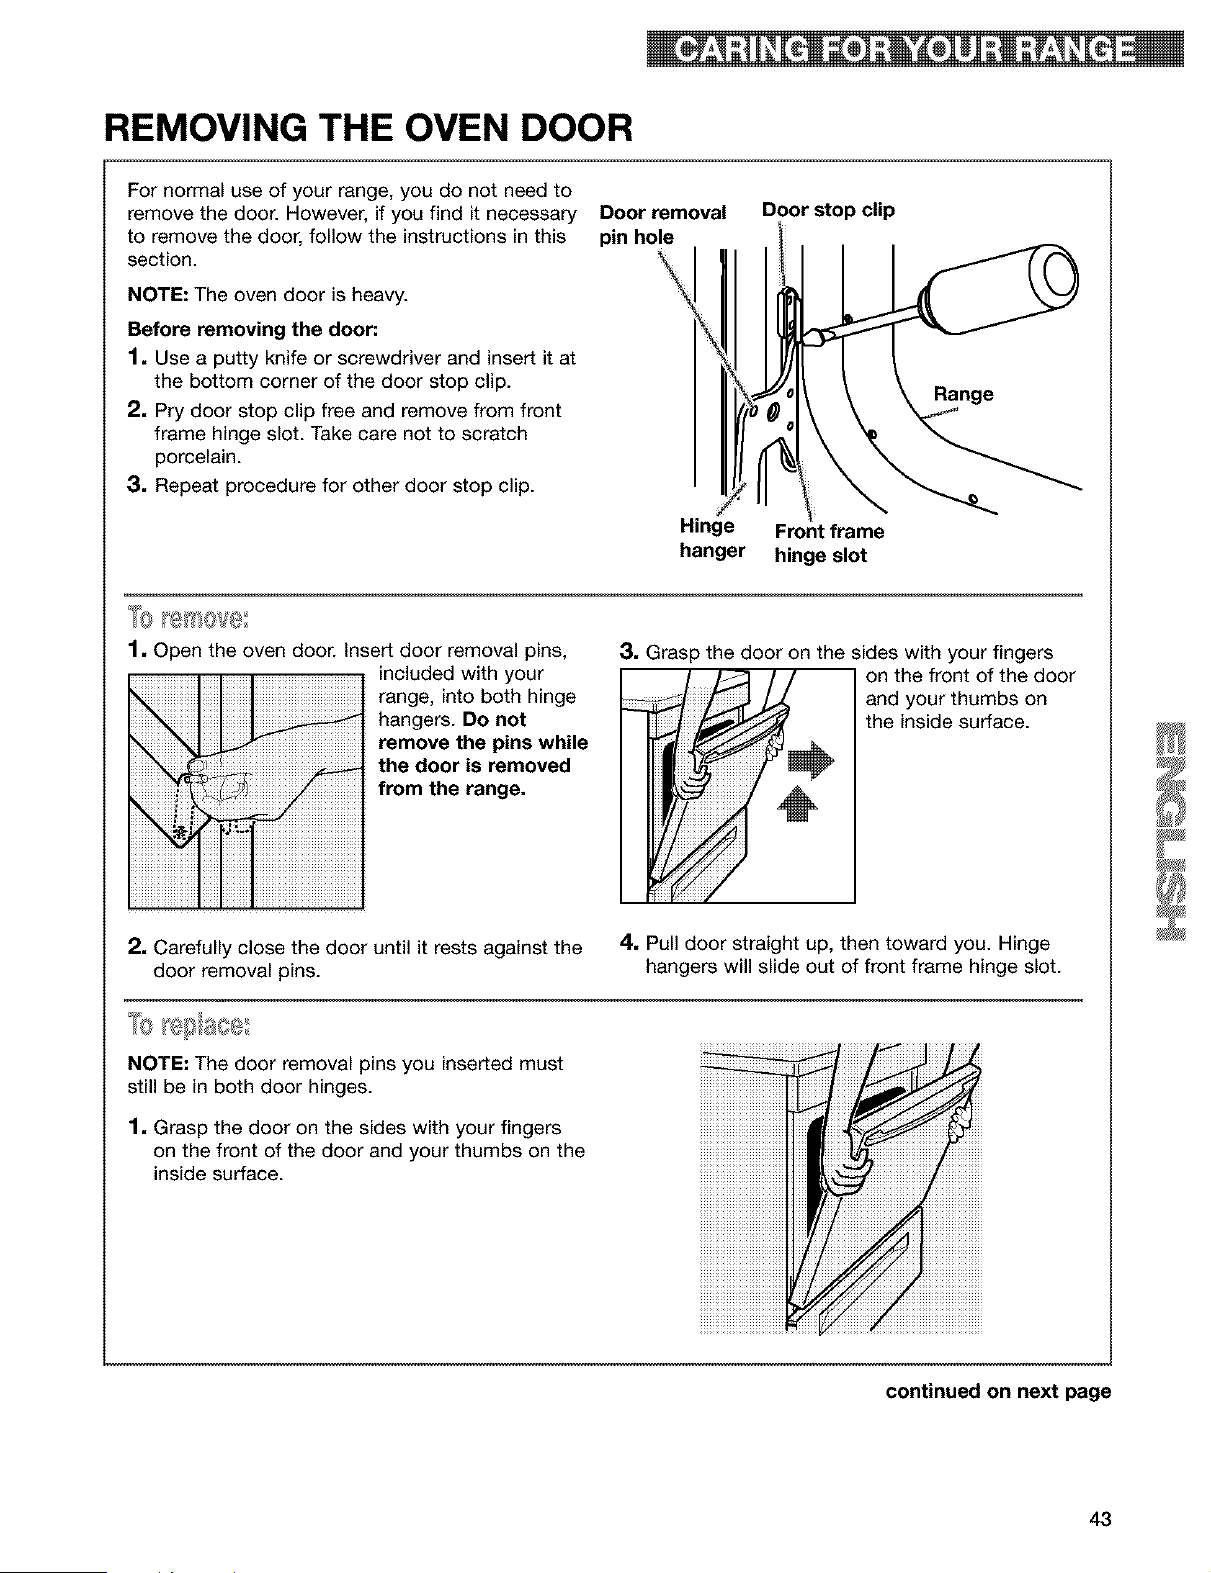
REMOVING THE OVEN DOOR
For normal use of your range, you do not need to
remove the door. However, if you find it necessary
to remove the door, follow the instructions in this
section.
NOTE: The oven door is heavy.
Before removing the door."
1, Use a putty knife or screwdriver and insert it at
the bottom corner of the door stop clip.
2, Pry door stop clip free and remove from front
frame hinge slot. Take care not to scratch
porcelain.
3, Repeat procedure for other door stop clip.
Door removal
pin hole
Hinge
hanger
Door stop clip
\
\
Front frame
hinge slot
'_0 ['1!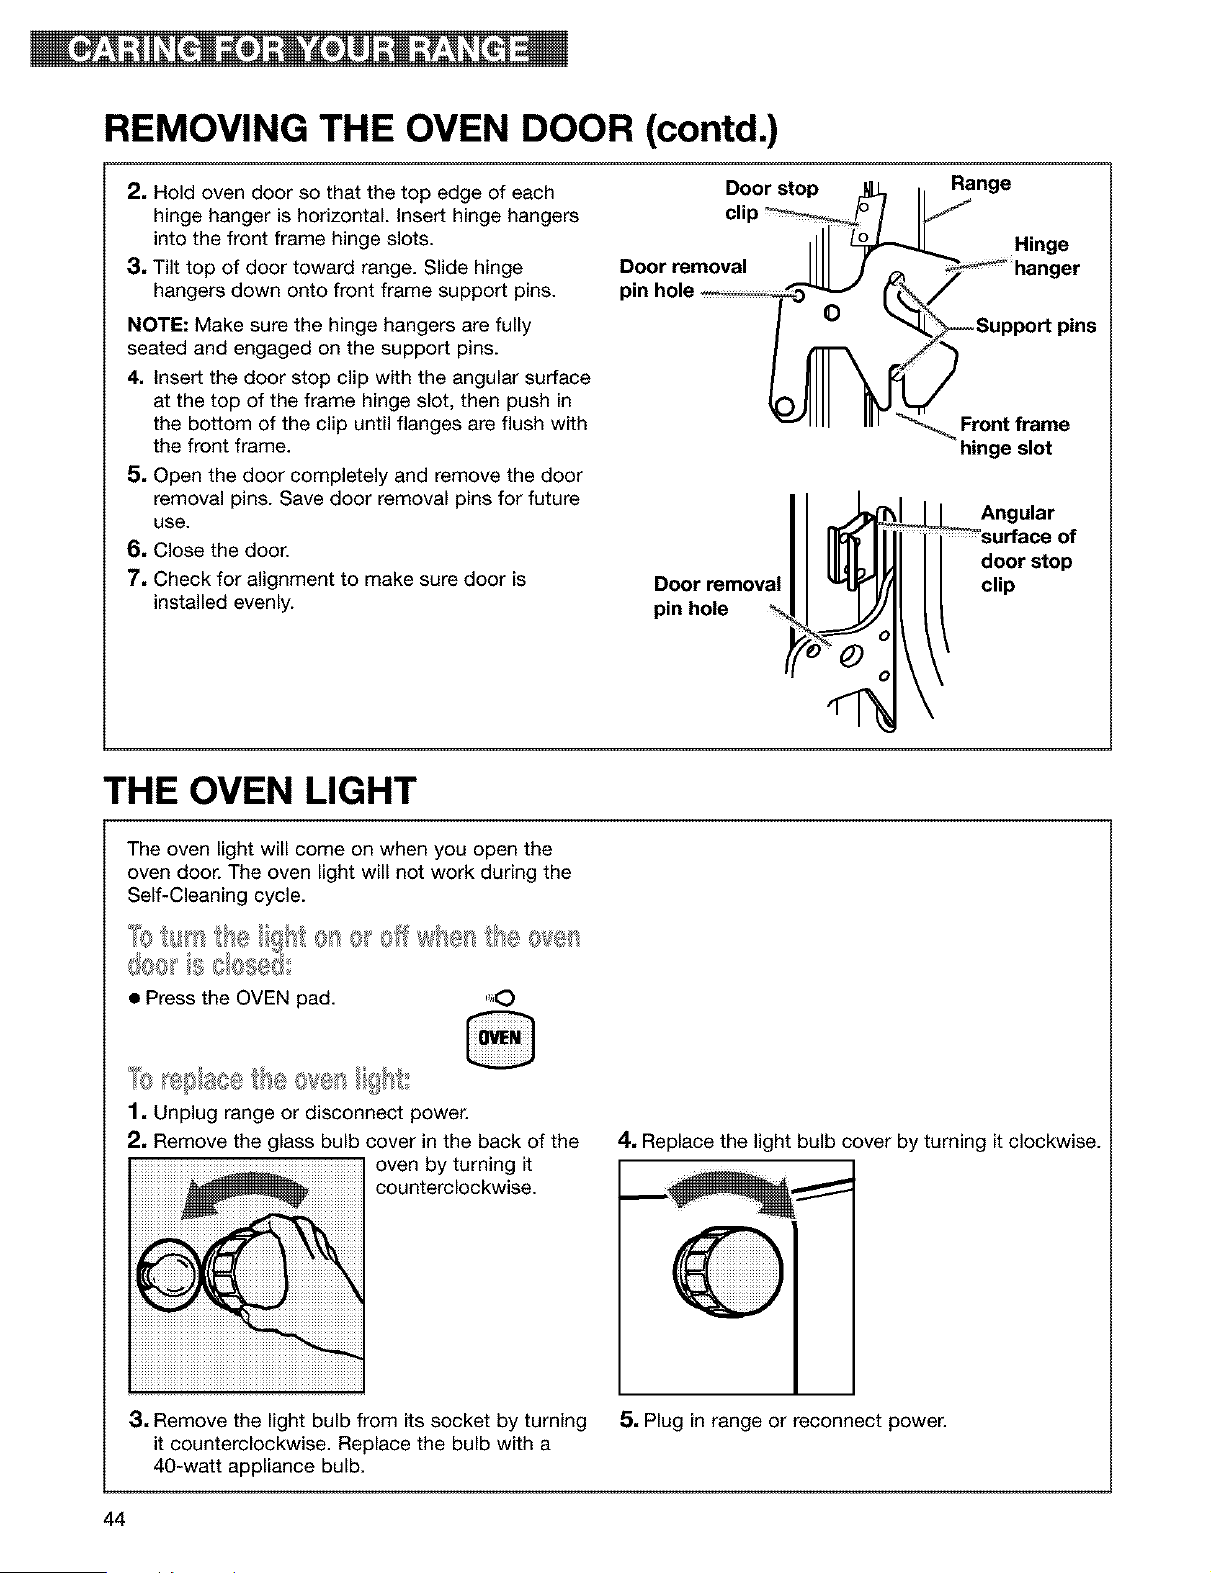
REMOVING THE OVEN DOOR (contd.)
2, Hold oven door so that the top edge of each
hinge hanger is horizontal, insert hinge hangers
into the front frame hinge slots.
3, Tilt top of door toward range. Slide hinge
hangers down onto front frame support pins.
NOTE: Make sure the hinge hangers are fully
seated and engaged on the support pins.
4, Insert the door stop clip with the angular surface
at the top of the frame hinge slot, then push in
the bottom of the clip until flanges are flush with
the front frame.
5, Open the door completely and remove the door
removal pins. Save door removal pins for future
use.
6, Close the door.
7, Check for alignment to make sure door is
installed evenly.
Door stop ilL, h Range
clip _/b /
=11 Hinge
Doorremoval IIII J _ _hanger
pin hole _'_" r_/
_1111 IIII _ Front frame
hinge slot
Door removal
pin hole
Angular
door stop
clip
THE OVEN LIGHT
The oven light will come on when you open the
oven door. The oven light will not work during the
Self-Cleaning cycle.
@e_,} ebs_x,,
• Press the OVEN pad. "_,O
1. Unplug range or disconnect power.
2, Remove the glass bulb cover in the back of the
oven by turning it
counterclockwise.
4. Replace the light bulb cover by turning it clockwise.
3, Remove the light bulb from its socket by turning
it counterclockwise. Replace the bulb with a
40-watt appliance bulb.
5, Plug in range or reconnect power.
44
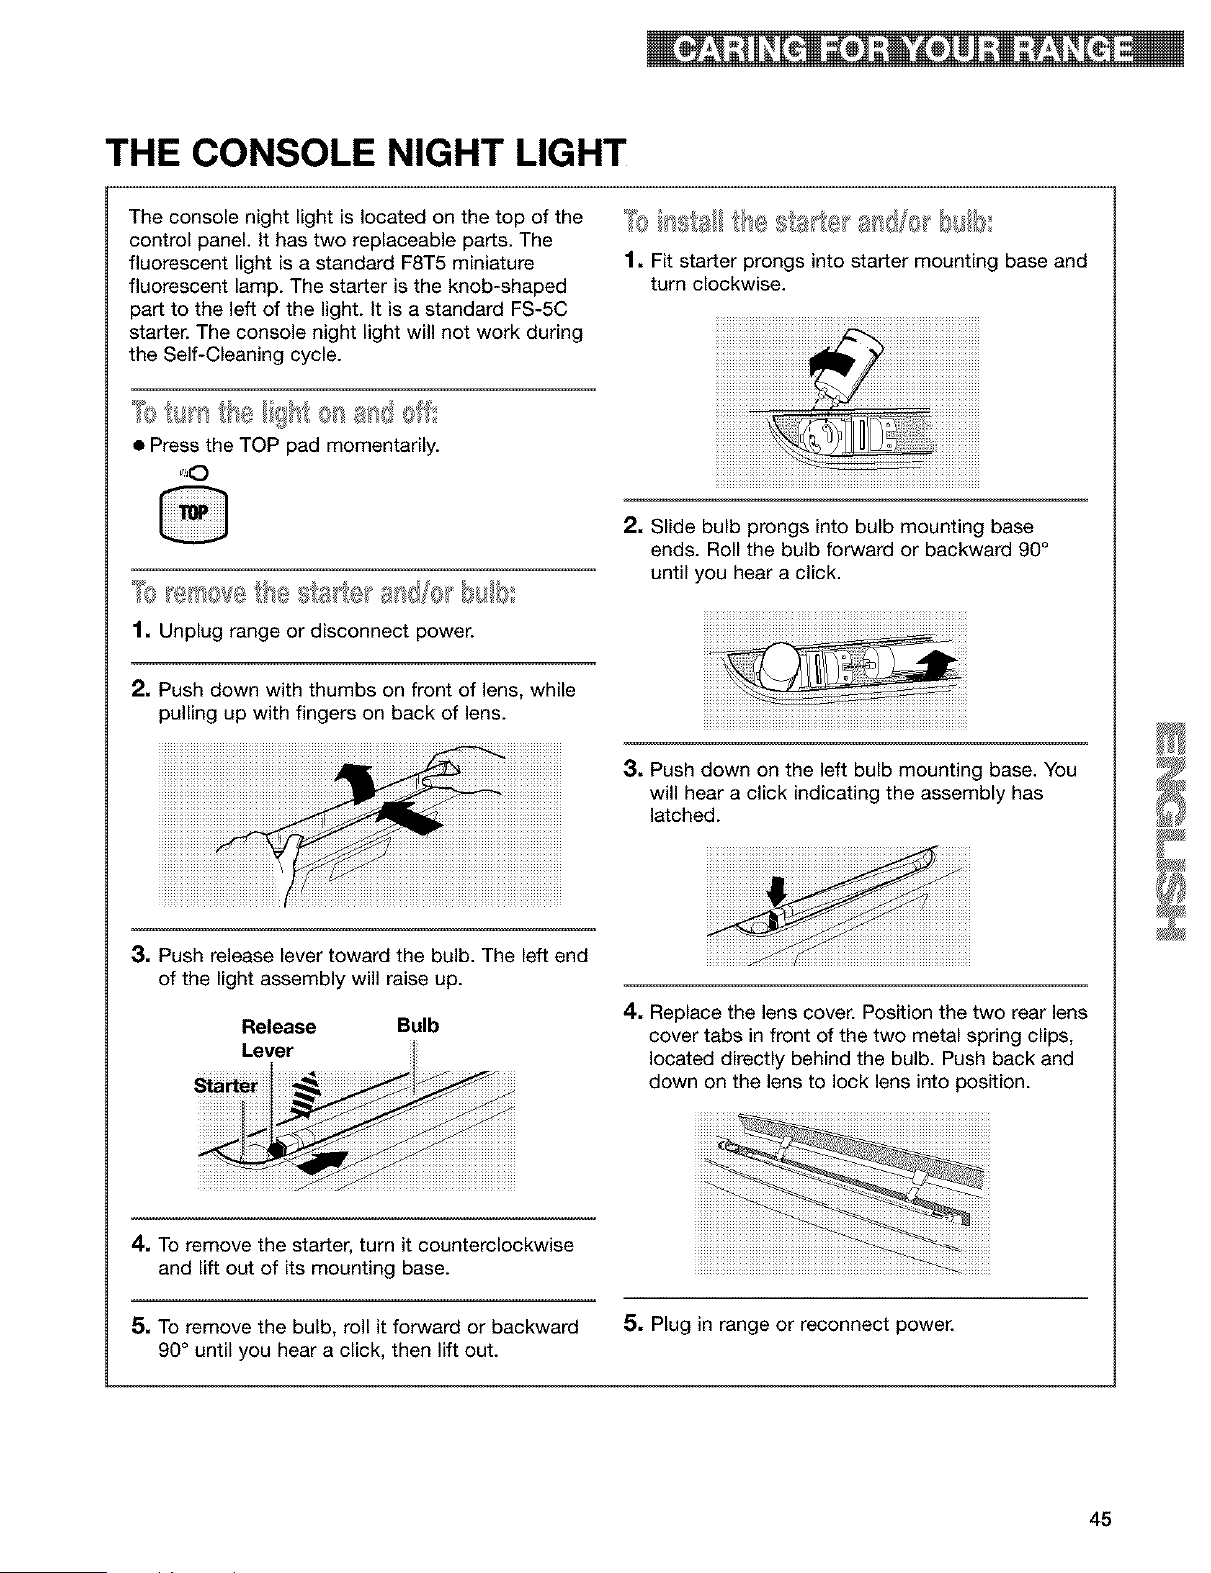
THE CONSOLE NIGHT LIGHT
The console night light is located on the top of the
control panel. It has two replaceable parts. The
fluorescent light is a standard F8T5 miniature
fluorescent lamp. The starter is the knob-shaped
part to the left of the light. It is a standard FS-5C
starter. The console night light will not work during
the Self-Cleaning cycle.
• Press the TOP pad momentarily.
1, Unplug range or disconnect power.
2, Push down with thumbs on front of lens, while
p@ling up with fingers on back of lens.
1. Fit starter prongs into starter mounting base and
turn clockwise.
iiiiiiiiiiiiiiiii iiiiiiiiiiiiiiii
2. Slide bulb prongs into bulb mounting base
ends. Roll the bulb forward or backward 90°
until you hear a click.
3, Push down on the left bulb mounting base. You
will hear a click indicating the assembly has
latched.
3, Push release lever toward the bulb. The left end
of the light assembly will raise up.
Release Bulb
Lever
4. Replace the lens cover. Position the two rear lens
cover tabs in front of the two metal spring clips,
located directly behind the bulb. Push back and
down on the lens to lock lens into position.
4. To remove the starter, turn it counterclockwise
and lift out of its mounting base.
5, To remove the bulb, roll it forward or backward
90° until you hear a click, then lift out.
5, Plug in range or reconnect power.
45
Most cooking problems are caused by little things you can find and fix without tools of any kind. Check the lists
below and on the next page before calling for assistance or service.
RANGE DOES NOT WORK
PROBLEM CAUSE/SOLUTION
Nothing works
• The range is not plugged into a properly grounded live outlet with the proper
voltage. (See Installation Instructions.)
• A household fuse has blown or a circuit breaker has been tripped.
• The control knob is not set correctly. Push in the control knobs before
turning them.
• The Oven and Cooktop Lockouts have been set.
The oven does not work
• The electronic control is not set correctly. Refer to setting the electronic
oven control section. (See pp. 14-34.)
• A delay start has been set. Wait for the start time to be reached or cancel
and reset the control.
• The Oven Lockout has been set.
The surface cooking
zones will not work
• A household fuse has blown or a circuit breaker has been tripped.
• The control knobs have not been set correctly. Push the control knobs in
before turning them to a setting.
• The cooking element is burned out. Call a Sears Service Center for
replacement or repair.
• The Cooktop Lockout has been set.
Cannot boil on left front • Press the SURESlMMER button to OFR
surface cooking zone/ • Turn left front control knob to HI for a rapid boil.
SURESlMMER TM feature
SURESlMMER will not • Turn left front control knob on between the SURESlMMER LO and 4 settings,
simmer along with pressing the SURESlMMER button on.
SURESlMMER surface • Turn left front control knob to "4", along with pressing the SURESlMMER
cooking zone does not button on.
get hot enough
WHEN SELF-CLEANING YOUR OVEN
PROBLEM CAUSE/SOLUTION
The Self-Cleaning cycle • START/ENTER has not been pressed.
will not work • A delayed start has been set. Wait for the start time to be reached or cancel
and reset the control.
• The door is not closed all the way.
46
COOKING RESULTS
cAus so u !o.
5_ _55A_# • Use _kware _itB A flat b_m
_re !__! !_ _ kwar_)
iiiiiiiiiiiiiiiiiiiiiiiiiiiiiiiiiiiiiiiiiiiiiiiiiiiiiiiiiiiiiiiiiiiiiiiiiiiiiiiiiiiiiiiiiiiiiiiiiiiiiiiiii!_iiii_!P_!!!!!!!!!!!!!!!!!!!!!!!!!!!!!!!!!!!!!!!!!!!!!!!!i!!i!!i!!i!!i!!i!!i!!i!!i!!i!!i!!i!!i!!i!!i!!i!!i!!i!!i!!i!!i!!i!!i!!i!!iiiiiiiiiiiiiiiiiiiiiiiiiiiiiiiiiiiiiiiiiiiiiiiiiiiiiiiiiiiiiiiiiiiiiiiiiiiiiiiiiiiiiiiiiiiiiiiiiiiiiiiiiiiiiiiiiiiiiiiiiiiiiiiiiiiiiiiiiiiiiiiiiiiiiiiiiiiiiiiiiiiiiiiiiiiiiiii
O_re_se _#_# t_#_rat#re to 2_E
DISPLAY MESSAGES
PROBLEM CAUSE/SOLUTION
The display is showing • There has been a power failure. Press OFF/CANCEL to clear the display,
"PF" then reset the clock. (See p. 15.)
"F" followed by a • Press OFF/CANCEL to clear the display. If an "F" code appears again, call
number shows on for service.
the display
"EO F5" appears on • Press OFF/CANCEL to clear display.
the display (The oven • Depress and hold the door switch plunger (located on the oven front
door will not close frame). Latch mechanism will unlock in about 6 seconds.
because the self-clean
latch mechanism
interferes.)
47

48
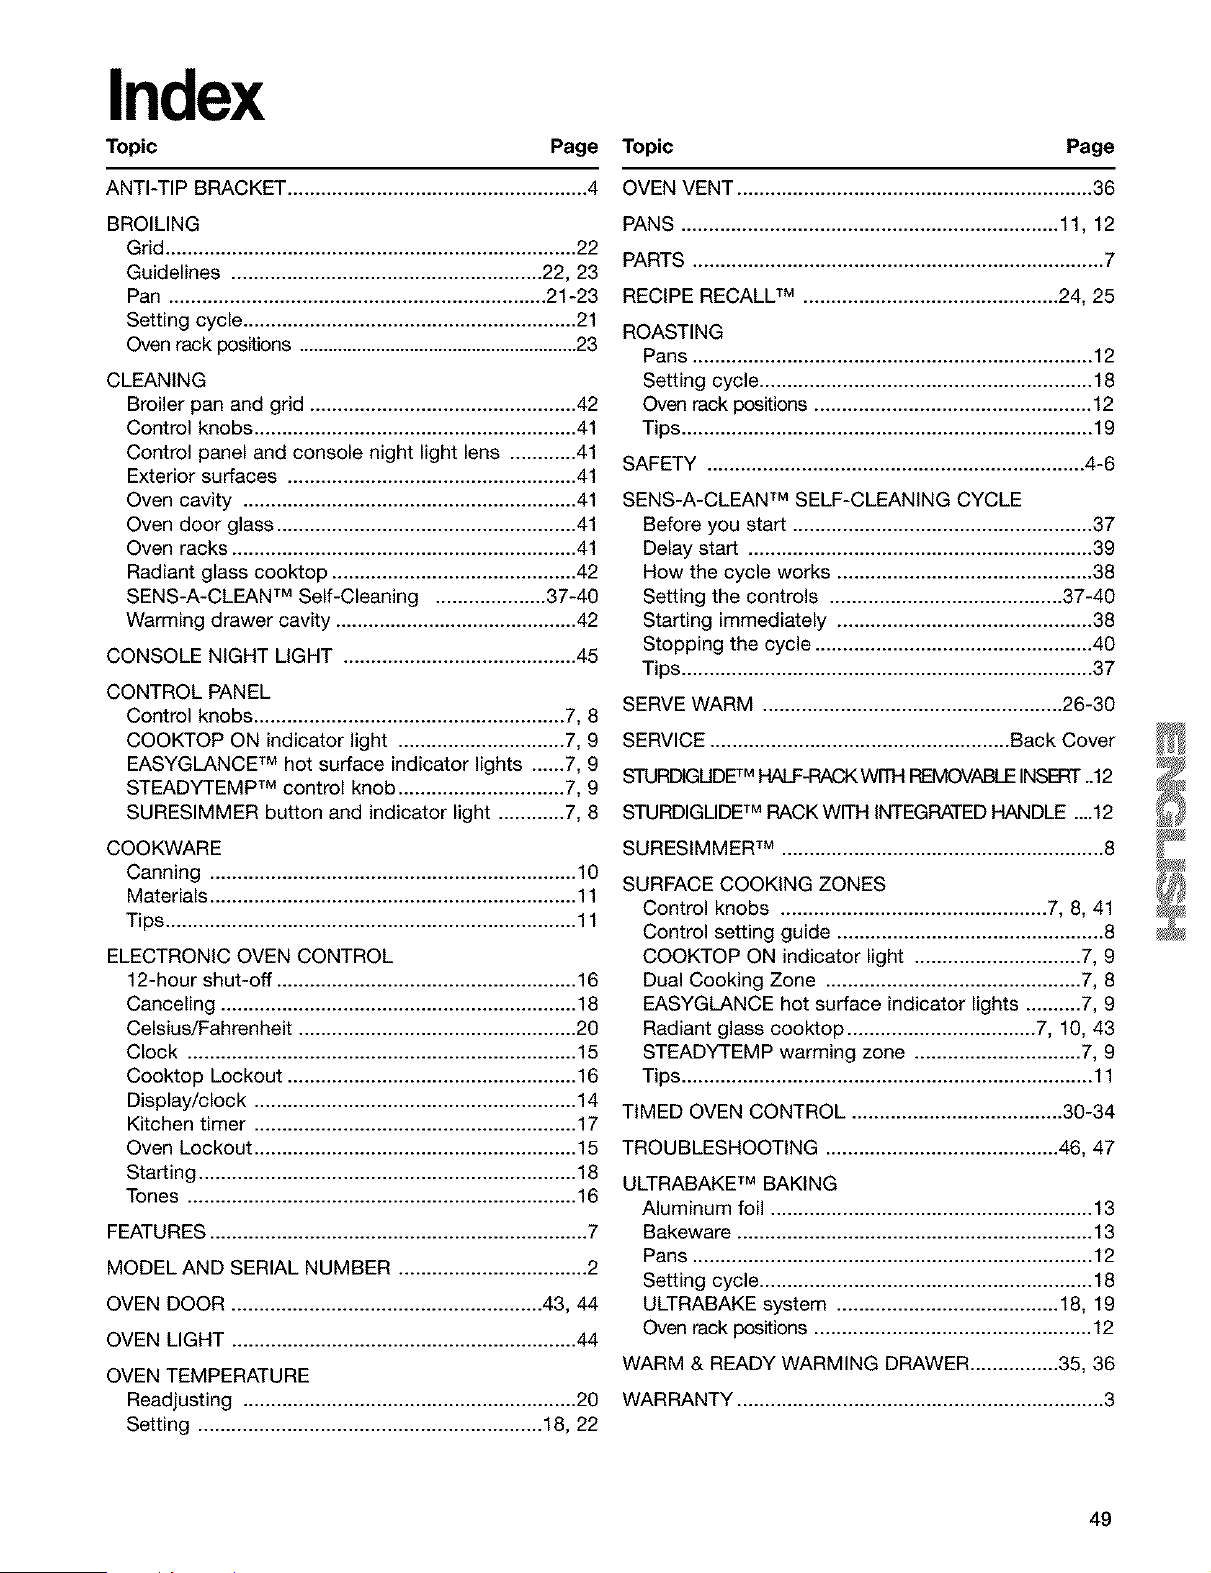
Index
Topic Page Topic Page
ANTI-TIP BRACKET ....................................... 4
BROIUNG
Grid ..................................................... .22
Guidelines ........................................ .22, 23
Pan .................................................................. .21-23
Setting cycle. ........................................... 21
Oven rack positions ................................... .23
CLEANING
Broiler pan and grid ............................................... .42
Control knobs .......................................................... 41
Control panel and console night light lens .......... .41
Exterior surfaces ................................................... .41
Oven cavity ........................................... .41
Oven door glass ....................................... 41
Oven racks .............................................................. 41
Radiant glass cooktop ........................................... .42
SENS-A-CLEAN TM Self-Cleaning ................... .37-40
Warming drawer cavity ............................................ 42
CONSOLE NIGHT UGHT ......................................... .45
CONTROL PANEL
Control knobs. ....................................... .7, 8
COOKTOP ON indicator light ..................... .7, 9
EASYGLANCE TM hot surface indicator lights .... 7, 9
STEADYTEMP TM control knob ............................. 7, 9
SURESIMMER button and indicator light ............ 7, 8
COOKWARE
Canning ..................................... 10
Materials ................................................ 11
Tips .......................................................................... 11
ELECTRONIC OVEN CONTROL
12-hour shut-off ....................................... 16
Canceling ............................................... 18
Celsius/Fahrenheit ................................................. .20
Clock ....................................... 15
Cooktop Lockout ............................. 16
Display/clock ................................ 14
Kitchen timer ................................ 17
Oven Lockout ..................................................... 15
Starting .................................................................... 18
Tones ....................................... 16
FEATURES ................................................. 7
MODEL AND SERIAL NUMBER ................................ .2
OVEN DOOR ....................................................... .43, 44
OVEN UGHT ............................................................. .44
OVEN TEMPERATURE
Readjusting .......................................................... .20
Setting ............................................. 18, 22
OVEN VENT ............................................................... 36
PANS ................................................. 11, 12
PARTS ..................................................... .7
RECIPE RECALL TM ............................................. 24, 25
ROASTING
Pans ....................................................................... .12
Setting cycle. .......................................... 18
Oven rack positions ............................ 12
Tips. ........................................................................ .19
SAFETY .................................................................. .4-6
SENS-A-CLEAN TM SELF-CLEANING CYCLE
Before you start ....................................... 37
Delay start ................................... 39
How the cycle works .......................... 38
Setting the controls ........................................ .37-40
Starting immediately .......................... 38
Stopping the cycle ................................................ 40
Tips. ........................................................................ .37
SERVE WARM ..................................................... .26-30
SERVICE ....................................... .Back Cover
STURDIGUDE TM _-_ WITH F_MOVABLE INSERT -12
STURDIGUDETM RACK WITH iNTEGRATEDHANDLE ....12
SURESIMMER TM ......................................................... .8
SURFACE COOKING ZONES
Control knobs ............................................. .7, 8, 41
Control setting guide ............................................... .8
COOKTOP ON indicator light ..................... .7, 9
Dual Cooking Zone ............................................. 7, 8
EASYGLANCE hot surface indicator lights ......._.7, 9
Radiant glass cooktop ................................. .7, 10, 43
STEADYTEMP warming zone ..................... .7, 9
Tips. ........................................................................ .11
TIMED OVEN CONTROL ..................................... .30-34
TROUBLESHOOTING ......................................... 46, 47
ULTRABAKE TM BAKING
Aluminum foil ........................................................ 13
Bakeware .................................... 13
Pans ...................................................................... .12
Setting cycle. .......................................... 18
ULTRABAKE system ...................................... 18, 19
Oven rack positions ............................ 12
WARM & READY WARMING DRAWER. ........... 35, 36
WARRANTY ............................................... .3
49
Contenido
Un mensaje para usted .......................................... 50
Garantia .................................................................... 51
Seguridad de la cocina ........................................... 52
Componentes y Caracteristicas ............................ 55
C6mo usar su cocina .............................................. 56
C6mo usar las _reas de cocci6n exteriores ........ 56
Caracteristicas de los materiales
de los utensilios de cocina ................................... 30
C6mo usar el homo ............................................. 31
Selecci6n de utensilios para hornear ................... 32
C6mo usar el papel de aluminio .......................... 32
El control electr6nico del horno ........................... 33
C6mo poner el reloj a la hora .......................... 34
C6mo usar el bloqueo del homo ..................... 34
C6mo usar el bloqueo de la
superficie de cocci6n ....................................... 65
Se_ales audibles .............................................. 65
C6mo usar el interruptor de 12 horas ............. 66
C6mo usar el temporizador electr6nico
de la cocina ...................................................... 66
C6mo comenzar/cancelar una funci6n ............ 68
C6mo hornear/asar con ULTRABAKE TM .......... 68
C6mo regular el control de
temperatura del homo ..................................... 70
C6mo asar a la parrilla ..................................... 71
C6mo usar RECIPE RECALL TM ....................... 74
C6mo usar Serve Warm ................................... 76
C6mo usar el control del homo
con tiempo programado .................................. 80
C6mo usar la gaveta calentadora Warm & Ready..85
El conducto de ventilaci6n del homo .................. 86
C6mo usar el ciclo de auto limpieza
SENS-A-CLEAN TM ................................................... 87
Antes de comenzar .............................................. 87
C6mo funciona el ciclo ........................................ 88
C6mo programar los controles ............................ 88
El cuidado de su cocina ......................................... 92
Cuadro de limpieza .............................................. 92
La limpieza de la superficie de cocci6n
de cristal radiante ................................................. 94
C6mo quitar la puerta del homo .......................... 95
La luz del homo .................................................... 96
La luz nocturna de la consola .............................. 97
Diagnbstico y soluci6n de problemas .................. 98
La cocina no funciona .......................................... 98
Cuando se usa el ciclo de auto limpieza del homo...99
Resultados de cocci6n ......................................... 99
Mensajes en la pantalla luminosa ...................... 100
indice ...................................................................... 103
Servicio .................................................. Forro trasero
Unmensajepara
Su cocina de gas KENMORE adquiere un nuevo valor
cuando usted descubre que Sears tiene centros de
servicio por todo el pals. Los competentes
profesionales de servicio t6cnico de Sears usan
camiones totalmente equipados y metodos aprobados
por Sears para respaldar las garantfas de Sears
mediante reparaciones expertas.
I1011_I0=--
Siempre que Ilame para solicitar servicio tecnico para
su artefacto, tenga a la mano el n0mero de modelo y
de serie completos. Usted puede encontrar esta
informaci6n en la placa de n0mero de modeto y serie
(vea el diagrama "Componentes y Caracteristicas," en
lap. 55).
Sirvase asimismo registrar la fecha de compra de su
artefacto electrodomestico y el hombre y n0mero tete-
f6nico de la tienda donde Io compr6.
Modelo NQmero 665.
NQmero de Serie R
Fecha de Compra
Guarde este manual y el comprobante de compra
juntos en un lugar seguro para referencia futura.
5O

Los artefactos electrodomdsticos Kenmore est_n diseSados, fabricados y comprobados para aSos de operacidn confiable. No
obstante, cualquier artefacto modemo puede requerir servicio de vez en cuando. El Contrato de Mantenimiento de Sears le
ofrece un programa de servicio excepciona], a un precio muy razonable.
El cuadro de arriba le muestra a usted los beneficios adicionales que un Contrato de Mantenimiento de Sears le ofrece sobre la
garantia de Sears.
Pdngase en contacto con su vendedor de Sears o name al 1-888-784-6427 y compre un Contrato de Mantenimiento de Sears
51
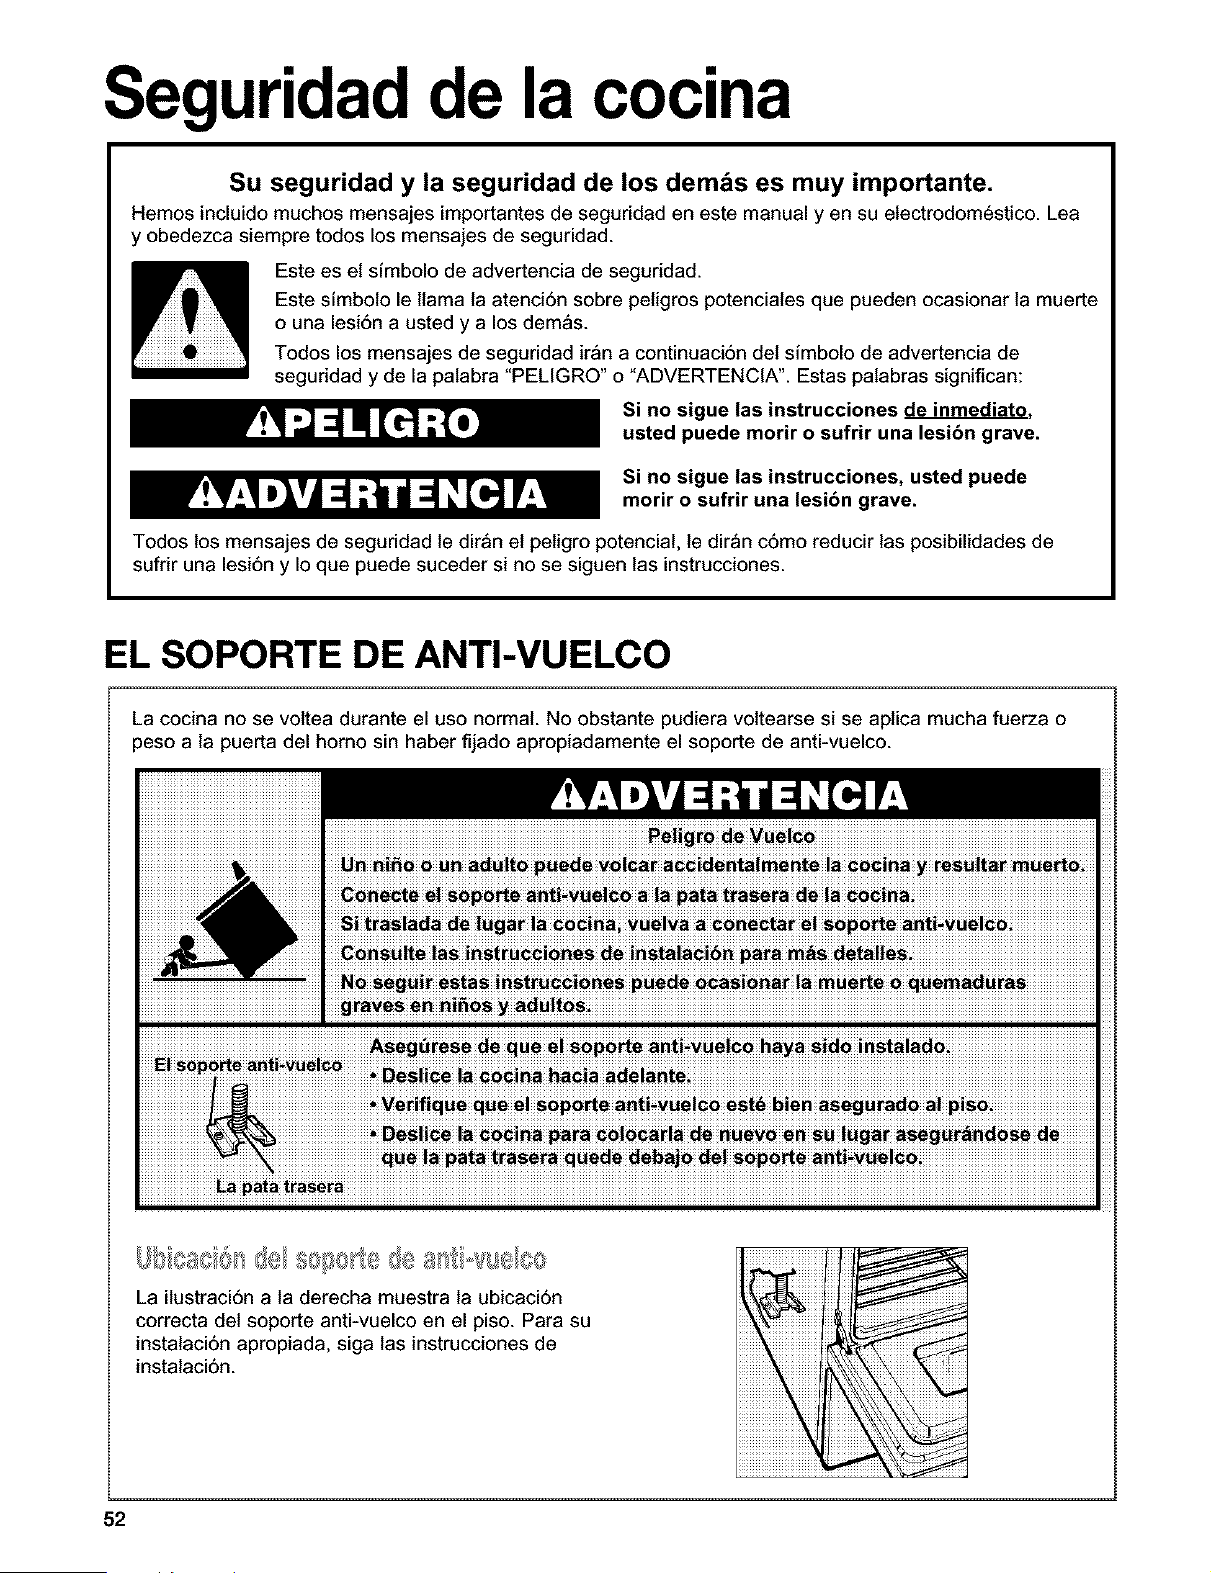
Seguridad de la cocina
Su seguridad y la seguridad de los demos es muy importante.
Hemos incluido muchos mensajes importantes de seguridad en este manual yen su electrodomestico. Lea
y obedezca siempre todos los mensajes de seguridad.
Este es et sfmbolo de advertencia de seguddad.
Este sfmboto le llama la atenci6n sobre pelgros potenciales que pueden ocasionar la muerte
o una lesi6n a usted y a los demas.
Todos los mensajes de seguridad iron a continuaci6n det simbolo de advertencia de
seguddad y de la palabra "PELIGRO" o "ADVERTENCIA". Estas palabras significan:
Si no sigue las instrucciones de inmediato.
usted puede morir o sufrir una lesibn grave.
Si no sigue las instrucciones, usted puede
motif o sufrir una lesibn grave.
Todos los mensajes de seguridad le dir_n el petgro potencial, le dir_n c6mo reducir las posibilidades de
sufdr una lesi6n y Io que puede suceder si no se siguen las instrucciones.
EL SOPORTE DE ANTI-VUELCO
La cocina no se voltea durante el uso normal. No obstante pudiera vottearse si se aplica mucha fuerza o
peso a la puerta del homo sin haber fijado apropiadamente el soporte de anti-vuelco.
-o-! ........ II, llI,O/
La ilustraci6n a la derecha muestra la ubicaci6n
correcta del soporte anti-vuelco en el piso. Para su
instalaci6n apropiada, siga las instrucciones de
instalaci6n.
52
INSTRUCCIONES IMPORTANTES DE SEGURIDAD
ADVERTENCIA: Para reducir el desgo de
incendio, electrocuci6n, daSos a personas o perjuicios
al usar la cocina, siga precauciones b_sicas,
incluyendo las siguientes:
• ADVERTENCIA: Para reducir el riesgo de
volteo de la cocina, la cocina debe asegurarse
en el piso mediante la instalacibn de
dispositivos de anti-vuelco. Para verificar si los
dispositivos est_n instalados adecuadamente,
deslice la cocina hacia adelante, cercibrese que
el soporte anti-vuelco est_ bien fijo en el piso, y
deslice la cocina hacia atr_s de manera que la
pata trasera de la cocina quede flja debajo del
soporte anti-vuelco.
• AVISO: No almacene artfcutos que interesen a
los ni5os en los armarios que estan encima de la
cocina o en el respaldo de protecci6n de una cocina
- cuando los niSos suben encima de la cocina para
poder coger objetos pueden lastimarse seriamente.
• Instalaci6n apropiada - Cerci6rese que la insta-
laci6n y puesta a tierra de la cocina sean efectuadas
adecuadamente por un tecnico competente.
• Nunca use la cocina para calentar el cuarto.
• No deje a los niSos solos - No se debe dejar a los
ni5os solos en el area donde la cocina est_ en uso.
Nunca se les debe permitir que se sienten o se
paren en ninguna parte de la cocina.
• Use ropa apropiada - Ropa holgada o que se este
colgando no debe usarse mientras la cocina esta en
USO.
• Servicio del usuado - No repare o reemplace
ninguna pieza de la cocina a menos que se
recomiende especfficamente en el manual.
Cualquier otro servicio se debe dejar en las manos
de un tecnico competente.
• Almacenaje dentro o encima de la cocina -
Matedales inflamables no deben almacenarse ni en
el homo ni cerca de las zonas de cocci6n extedores.
• No use agua en incendios provocados por grasa -
Contenga el incendio o llama o use un extinguidor
de tipo espuma o qufmico seco.
• Use 6nicamente agarraderas secas -Agarraderas
mojadas o h6medas en las superficies pueden dar
como resultado en quemaduras per vapor. No deje
que la agarradera toque los elementos caloriferos
calientes. No use una toalta o paso voluminoso.
• NO TOQUE LAS ZONAS DE COCCION EXTERIO-
RES O AREAS CERCANAS ALAS ZONAS DE
COCCION - No obstante su color oscuro, es posible
que las zonas de cocci6n extedores esten calientes.
Las _reas cercanas alas zonas de cocci6n
extedores pueden calentarse Io suficientemente
come para causar quemaduras. Durante y despues
de usar, no toque, ni deje que ropa u otros
materiales inflamables toquen las zonas de cocci6n
extedores o las _reas cercanas a las zonas de
cocci6n hasta que haya pasado suficiente tiempo
para que se enfrfen. Entre esas _reas est_n la
superfide de cocci6n y las superficies que estan
frente a la superficie de cocci6n.
• Use cacerolas de tamaSo apropiado - La cocina
viene equipada con una o mas zonas de cocci6n
extedores de tamaSo diferente. Seleccione utensilios
que tengan el asiento liso Io suficientemente
grandes para cubrir el elemento calorifero de la zona
de cocci6n exterior. El uso de utensilios de menor
tamaSo expondra una porci6n del elemento
calorifero a contacto directo y puede dar como
resuttado que la ropa se incendie. La relaci6n
apropiada entre el utensilio y el quemador podra
igualmente mejorar la eficiencia.
• Nunca deje las zonas de cocci6n extedores a calor
alto, sin supervisi6n. Derrames por ebullici6n causan
salpicaduras grasosas y humeantes que pueden
incendiarse.
• Forros protectores - No use papel de aluminio para
forrar el fondo del homo, excepto come lo sugiera el
manual. La instalaci6n inapropiada de estos forros
puede dar como resultado riesgos de electrocuci6n,
o incendio.
• Utensilios de codna con viddo - S61o algunos tipos
de utensilios de vidrio, cer_mica vitrificada, cer_mi-
ca, Ioza de barro u otros utensilios con vidrio son
adecuados para uso en la cocina sin que se rompan
debido a cambios repentinos de temperatura.
• Los mangos del utensilio deben colocarse hacia
adentro y no deben exceder las zonas de cocci6n
extedores adyacentes - Para reducir el riesgo de
quemaduras, el incendio de materiales inflamables y
satpicaduras debido a contacto accidental con el
utensilio, el mango del utensilio debe colocarse
hacia adentro y que no se extienda encima de las
zonas de cocci6n extedores adyacentes.
GUARDE ESTAS INSTRUCCIONES
contint_a en la pdgina siguiente
53
INSTRUCCIONES IMPORTANTES DE SEGURIDAD
• No cocine encima de una superficie de cocci6n
quebrada - De quebrarse la superficie de cocci6n,
las soluciones de limpieza y derrames pueden
penetrar la superficie de cocci6n que est& que-
brada y crear un riesgo de electrocuci6n. P6ngase
en contacto con un t_cnico competente de
inmediato.
• Limpie la superficie de cocci6n con cuidado - Si
usa un pa_o o estropajo mojado para limpiar
derrames en una Area de cocci6n caliente, tenga
cuidado de evitar quemaduras par vapor. AIgunos
productos de limpieza pueden emitir gases
nocivos al ser aplicados en superficies calientes.
• Tenga cuidado al abrir la puerta - Deje que el aire
caliente o el vapor salga antes de retirar o
reemplazar la comida.
• No caliente recipientes cerrados de comida - La
acumulaci6n de presi6n puede causar que el
recipiente estalle y ocasione dados/lesiones.
• Mantenga los ductos de ventilaci6n del homo sin
obstrucci6n.
• Ubicaci6n de las parrillas del homo - Siempre
coloque las parrillas del homo en la ubicaci6n
deseada mientras el homo est6 fr[o. Si tiene que
mover una parrilla mientras el homo est& caliente,
no deje que la agarradera toque el elemento
calorffero caliente en el homo.
• NO TOQUE LOS ELEMENTOS CALORiFEROS O
LAS SUPERFICIES INTERIORES DEL HORNO -
No obstante su color oscuro, los elementos
calorfferos podrian estar calientes. Las superficies
interiores de un homo se calientan Io suficiente
coma para causar quemaduras. Durante y
despu6s del usa, no toque, o deje que ropas u
otro material inflamable toquen los elementos
calorfferos o las superficies internas del homo
hasta que haya pasado suficiente tiempo para
enfriarse. Otras superficies del artefacto
electrodom6stico pueden calentarse Io suficiente
coma para causar quemaduras - entre estas
superficies est&n los orificios del conducto de
ventilaci6n del homo y las superficies cercanas a
estos orificios, puertas de hornos y ventanas de
las puertas de hornos.
Para cocinas de autolimpieza -
• No limpie la junta de la puerta - La junta de la
puerta es esencial para un buen cierre. Debe ten-
erse cuidado de no frotar, dadar o mover la junta
de la puerta.
• No use productos de limpieza para hornos - No
se debe usar productos comerciales de limpieza
para hornos o revestimientos protectores del forro
del homo de ninguna clase dentro o alrededor de
cualquier parle del horno.
• Limpie s61o las piezas mencionadas en el manual.
• Antes de efectuar la autolimpieza del homo -
quite la charola para asar y otros utensilios.
Para unidades con campana de ventilacibn -
• Limpie las campanas de ventilaci6n
frecuentemente - No se debe dejar que la grasa
se acumule en la campana o el filtro.
• Encienda el ventilador cuando cocine comidas
fiameadas debajo de la campana.
GUARDE ESTAS INSTRUCCIONES
_iifo_0i_ S_fe D60_i#g wai_ _# Tox_ E_rce_0_ _#i (El re gi_#_i_ i_ #_i_i_ i_ ##i_ _iii#_# I
_i agua ia eii_in aci6n de _ustaneias t6xi_s _e Cai_fomia)exige _e e! ga bet nade_de C aiifornia __bii_u e"
,ha iista de aq,eiias sustaacias iden_ficadas _r ei e sta#o de Caiiforniacome _ausantes de _nce_; _efectos.
_te Ute__i!i# #0 diera #rodo#i U_ _expos i#i_ de ba_ hi#e! a a!g 0_a de !as susta_#ias _ m eta d_s _m 0 I
54
Y
Conducto de ventilacibn
del horno
(p. 86)
Zona de cocci6n
(pp. 56-58)
Superficie de coccibn
de cristal radiante
(pp. 59, 94)
SURESIMMER TM
(p. 56)
MEDIA
STURDIGLIDE TM con
inserto desmontable
(p. 61)
Parrillasdel
STURDIGUDE TM
conagarradera integrada
(p. 61)
El soporte de anti-vuelcoo
(p. 52)
Gancho de tope
de la puerta
(pp. 95, 96)
Placa de nt_mero de
modelo y serie
(detras del lado izquierdo
de la gaveta calentadora)
Gaveta calentadora
Warm & Ready
(p. 85, 86)
TABLERO DE CONTROLES
Perilla de Perilla de Interruptor Control
control control selector de electrbnico
izquierda de izquierda Warm & Ready del homo
trasera delantera (p. 85) (p. 63)
Luz nocturna de la
consola
(p. 97)
Luces indicadoras de
perficie caliente
EASYGLANCE TM
(p.58)
del homo
(pp. 63-84)
de controles
(pp. 55, 92)
para cocinar
(p. 57)
dela luz del horno
(p. 96)
iiiiiiiiiiiiiiiiii_iZonade coccibn
iiiiiiiiiiiiiiiiiSTEADYTEMPTM
(p. 57)
de la puerta
(p. 87)
para asar
(no ilustrado)
(p. 71, 73)
para
hornear
(p. 69)
Perilla de Perilla de control Perilla de
control de la zona dual control
STEADY'rEMP TM para cocinar derecha
(p. 57) (p. 57) trasera
Luces indicadoras Bot6n
SURESIMMER SURESIMMER
(p. 56) (p. 56)
Luces indicadoras
COOKTOP ON
(p. 58)
55
m
usarsucoclna
COMO USAR LAS AREAS DE COCClON EXTERIORES
Empuje hacia adentro las perillas de control antes
de girarlas hacia la
posici6n a programar.
Usted puede progra-
marlas en cualquier
posici6n entre HI y OFE
USO RECOMENDADO
• Para comenzar a cocinar la comida.
• Para hacer hervir Iquidos.
6-8 • Para mantener el hervor.
• Para dorar rapidamente la comida.
5 • Para mantener un hervor lento.
• Para freJrcame de res o de ave.
• Para hacer pudfn, salsas o cremas.
2-4 • Para estofar o cocer a vapor.
• Para cocer comida a fuego lento.
LO • Para mantener la comida calente.
SURESIMIVERTM
LO • Para una cocci6n a fuego bien lento
o cuando se usan tapas.
• Para derretir chocolate o mantequila.
4 • Para un cocido a fuego lento de
mayor temperatura o cuando se
cuece a fuego lento sin tapas.
Zona de • Para mantener las comidas cocidas
cocci6n calientes.
_TEADYTE_/Ip TM
MIN to MAX)
Use la siguiente tabla como gula.
SELECCI_N
HI
Peligro de Incendio
Apague todos los controles cuando no estd
cocinando.
No seguir esta instrucci6n puede ocasionar
la muerte o incendio.
IUREIIMMEI es una funciin regulable para el
quemador delantero izquierdo que permite una cocci6n
m_s precisa de aimentos a temperaturas bajas. La
perilla on/off de SURESIMMER no afecta el
funcionamiento de las dem4_ssupertides de cocci6n.
iiiiiiiiiiiiiiiiiiiiiiiiiiiiiiiiii _O_iiiiiiiiiiiiiiiiiiiiiiiiiiiiiiiiiii
i iiiiiiiiiiiiiiiiiiiiiiiiiiiiiiiiiiiiJ @iiiiiiiiiiiiiiiiiiiiiiiiiiiiiiiiiii
i8iTM ¸ii8ii8ii¸ii
Para programar el control SURESIMMER:
1. Presione et bot6n SURESIMMER para activar la
funci6n. Presione nuevamente para desactivarla.
La luz SUPERSIMMER se encender_ cada vez
que SURESIMMER est_ activado.
2. Gire la perilta det quemador detantero izquierdo
hacia las posiciones SURESIMMER entre LO y
4. Regule la programaci6n de acuerdo al tipo y
tama5o del utensilio de cocina, et tipo y la canti-
dad de comida y dependiendo si se ponen las
tapas de los utensilios o no. (Vea la secci6n "El
use de utenslios de cocina apropiados" en lap.
59.) Se encender_ la luz de aviso.
I
RECUERDE: Cuando se est_ usando la cocina
o durante el ciclo de auto limpieza, toda la
superficie de cocci6n se calienta. I
56
COMO USAR LAS AREAS DE COCClON EXTERIORES (contd,
isis- la £ola i@#08801 llal
El elemento delantero derecho tiene dos zonas
de cocci6n:
• Para usar la superfide de
cocd6n de 6", presioney gire
ta penla del quemador
delanteroderecho en sentdo
a tas manedlas del reloj
entre las posiciones LO y HI.
• Para usar tantota superfide
de cocd6n de 6" como la de
10",presioney gire lapenlta
del quemadordelantero
derecho en senldo contrario
a tas manedlas del reloj
entre las posicionesLO y HL
Perilla de control Luces indicadoras de superficie
STEADYTEMP caliente EASYGLANCE TM
Use la zona de cocci6n STEADYTEMP para mantener
comidas cocidas calientes. No se recomienda para
calentar comidas frias. Elija la posici6n MIN para
comidas sensibles al calor o cantidades m&s
pequefias de comida. Elija la posici6n MAX para liqui-
dos y cantidades mayores de comida. Regule como
sea necesario.
Para programar la zona de coccibn STEADYTEMP:
1. Empuje hacia adentro y gire la perila de control a la
posici6n deseada entre MIN a MAX para obtener
diferentes niveles de calor.
2- Gire la perilla a OFF cuando haya terminado. La
zona de cocci6n STEADYTEMP permanecer&
caliente hasta que la luz indicadora de la superficie
en la superficie de cocci6n se apague.
• Cubra todas las comidas con una tapa o papel de
aluminio. No use envoltura pl&stica para cubrir la
comida ya que podria derretirse en la superficie de
cocci6n. Cuando caliente productos preparados al
homo, deje una pequefia abertura en la cubierta
para que salga la humedad.
• Use Qnicamente utensilios y platos recomendados
para uso en el homo y encima de la cocina.
• Use agarraderas o guantes de hornear para quitar la
comida.
Luz indicadora COOKTOP ON
(la superficie de coccibn estd encendida)
Zona de coccibn STEADYTEMP
color rojo cuando est6 funcionando, a
diferencia de los elementos exteriores. Sin embargo,
la luz indicadora exterior en el tablero de control se
encender&
• Los utensilos de cocina y los platos deben tener un
asiento Iiso que haga contacto directo con la superfi-
cie de cocci6n.
• La zona de cocci6n STEADYTEMP puede ser usada
ya sea que los otros elementos est_n en uso o no.
• La calidad de la comida puede deteriorarse si se deja
en la zona de cocci6n STEADYTEMP por un perlodo
prolongado de tiempo.
• Para obtener resultados 6ptimos, no conserve los ali-
mentos por mas de 30 a 45 minutos.
57
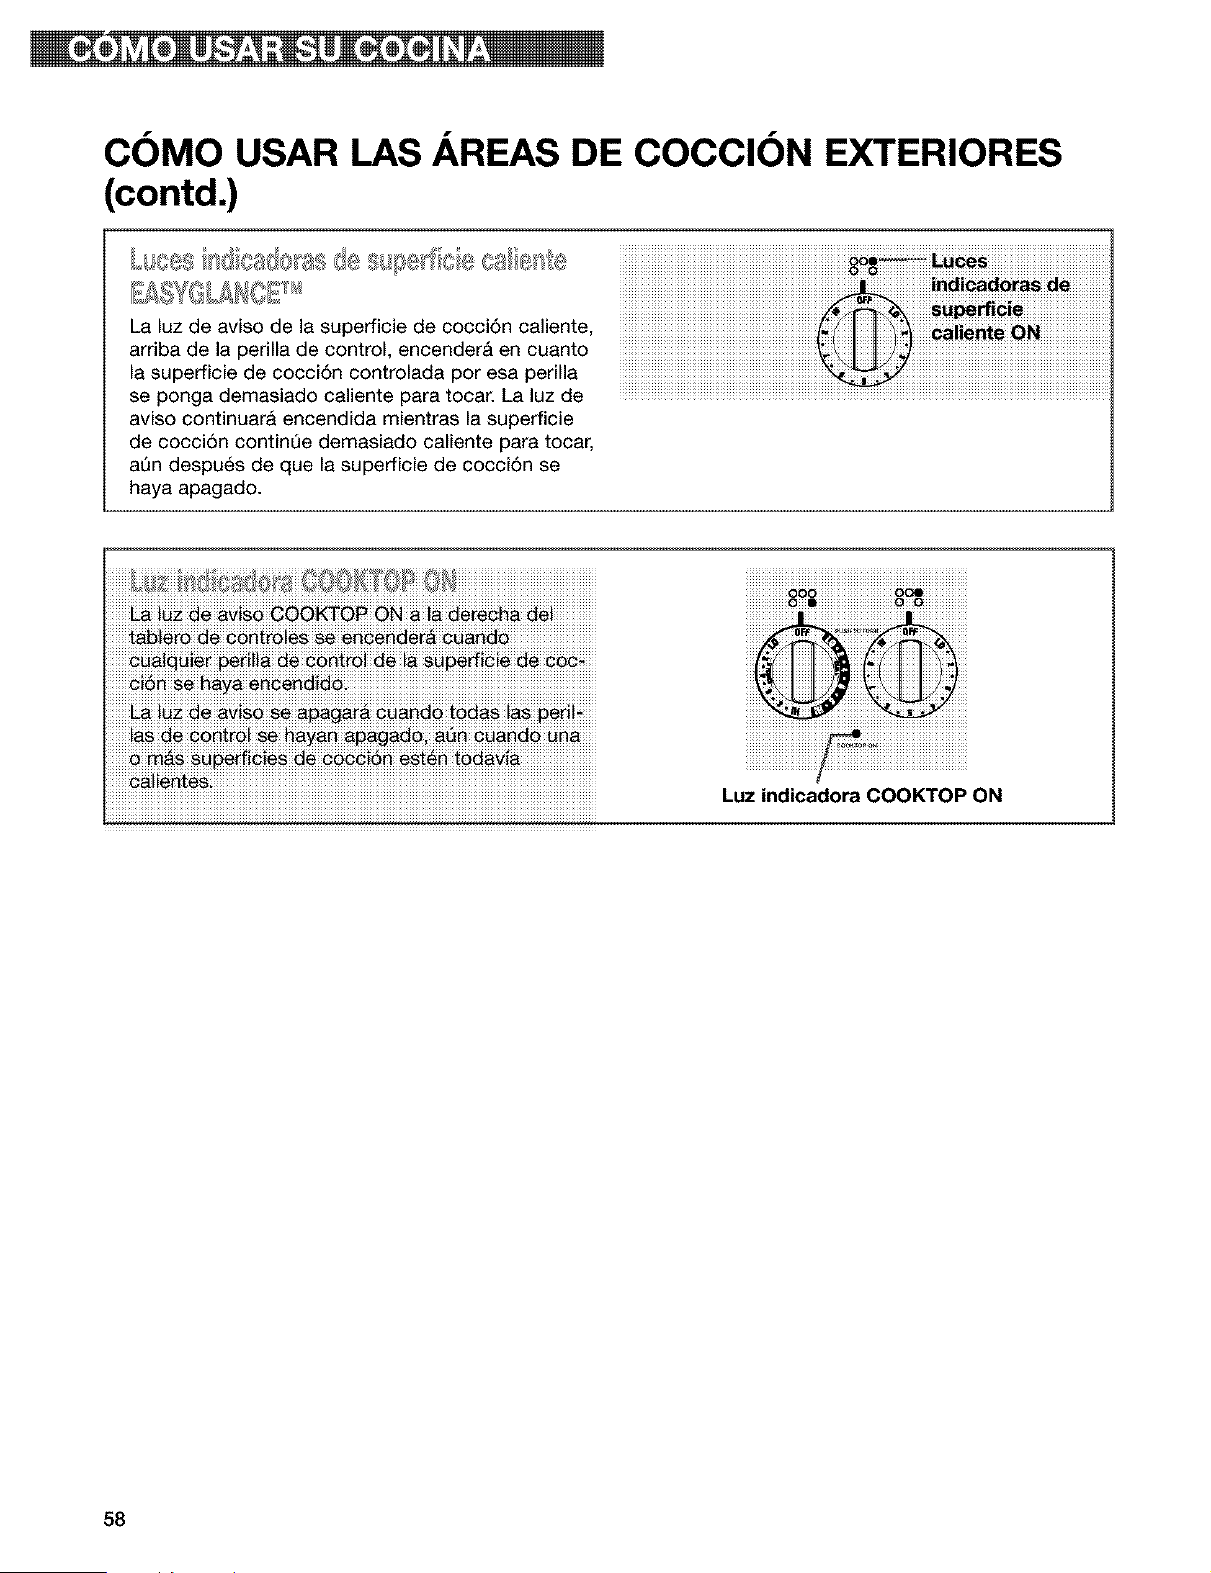
COMO USAR LAS AREAS DE COCCION EXTERIORES
(contd.)
La luz de aviso de la superficie de cocci6n caliente,
arriba de la perilla de control, encender& en cuanto
la superficie de cocci6n controlada por esa perilla
se ponga demasiado caliente para tocar. La luz de
aviso continuara encendida mientras la superficie
de cocci6n continQe demasiado caliente para tocar,
at3n despu6s de que la superficie de cocci6n se
haya apagado.
iiiiiii_iii'ii'iiii_i'_i" t_i _i_ i" :'" iii £ _ i_i _liii. > iiiiiiiiiiiiiiiiiiiiiiiiiiiiiiiiiiiiiiiiiiiiiiiii
iiiiiiiiiiiiiiiiiiiiiiiiiiiiiiiiiiiiiiiiiiiiiiiiiiiiiiiiiiiiiiiiiiiiiiiiiiiiiiiiiiiiiiiiiiiiiiiiiiiiiiiiiiiiiiiiiiiiiiiiiiiiiiiiiiiiiiiiiiiiiiiiiiiiiiiiiiiiiiiiiiiiiiiii
Luz indicadora COOKTOP ON
58
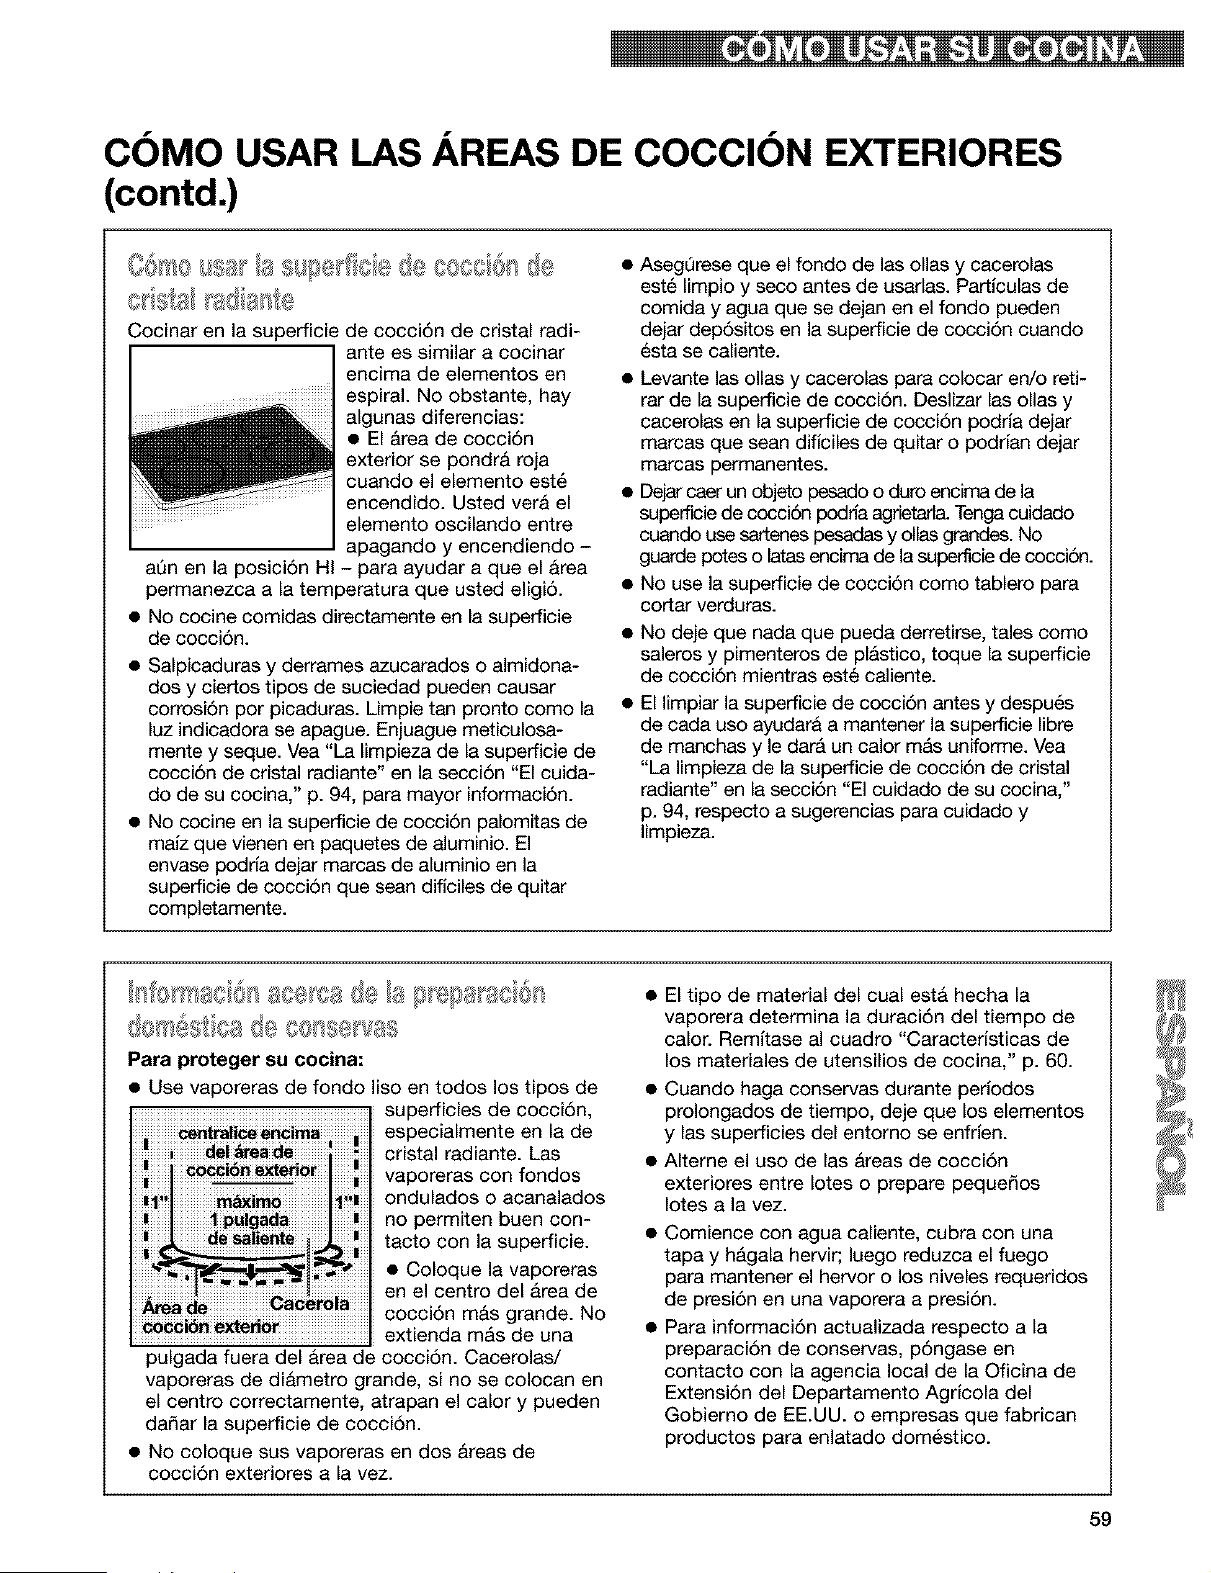
COMO USAR LAS AREAS DE COCCION EXTERIORES
(contd.)
©r®Sl FS;@;}F'_:@
Cocinar en la superficie de cocci6n de cristal radi-
ante es similar a cocinar
encima de elementos en
espiral. No obstante, hay
algunas diferencias:
• El Area de cocci6n
exterior se pondrA roja
cuando el elemento est6
encendido. Usted vera el
elemento oscilando entre
apagando y encendiendo -
aAn en la posiciAn HI - para ayudar a que el Area
permanezca a la temperatura que usted eligi6.
• No cocine comidas directamente en la superficie
de cocci6n.
• Salpicaduras y derrames azucarados o almidona-
dos y ciertos tipos de suciedad pueden causar
corrosi6n por picaduras. Limpie tan pronto como la
luz indicadora se apague. Enjuague meticulosa-
mente y seque. Vea "La limpieza de la superficie de
cocci6n de cristal radiante" en la secci6n "El cuida-
do de su cocina," p. 94, para mayor informaci6n.
• No cocine en la superficie de cocci6n palomitas de
malz que vienen en paquetes de aluminio. El
envase podrfa dejar marcas de aluminio en la
superficie de cocci6n que sean diflciles de quitar
completamente.
AsegQrese que el fondo de las ollas y cacerolas
estA limpio y seco antes de usarlas. Particulas de
comida y agua que se dejan en el fondo pueden
dejar depAsitos en la superficie de cocciAn cuando
esta se caliente.
• Levante las ollas y cacerolas para colocar en/o reti-
rar de la superficie de cocciAn. Deslizar las ollas y
cacerolas en la superficie de cocciAn podria dejar
marcas que sean diffciles de quitar o podrfan dejar
marcas permanentes.
• Dejar caer un objeto pesado o duro encima de la
supefficie de cocciAn podrla agrietari& Tenga cuidado
cuando use sartenes pesadas y ollas grandes. No
guarde potes o latas encima de la superficie de cocci6n.
No use la superficie de cocci6n como tablero para
cortar verduras.
No deje que nada que pueda derretirse, tales como
saleros y pimenteros de plastico, toque la superficie
de cocci6n mientras est6 caliente.
El limpiar la superficie de cocci6n antes y despuAs
de cada uso ayudara a mantener la superficie libre
de manchas y le darA un calor mAs uniforme. Vea
"La limpieza de la superficie de cocci6n de cristal
radiante" en la secciAn "El cuidado de su cocina,"
p. 94, respecto a sugerencias para cuidado y
limpieza.
e < ,_ @ o
Para proteger su cocina:
• Use vaporeras de fondo liso en todos los tipos de
superficies de cocci6n,
especialmente en la de
cristal radiante. Las
vaporeras con fondos
ondulados o acanalados
no permiten buen con-
tacto con la superficie.
• Coloque la vaporeras
en el centro del Area de
cocciAn mAs grande. No
extienda mAs de una
pulgada fuera del Area de cocci6n. Cacerolas/
vaporeras de diametro grande, si no se colocan en
el centro correctamente, atrapan el calory pueden
da_ar la superficie de cocci6n.
• No coloque sus vaporeras en dos Areas de
cocciAn exteriores a la vez.
• El tipo de material del cual esta hecha la
vaporera determina la duraci6n del tiempo de
calor. Remltase al cuadro "Caracteristicas de
los materiales de utensilios de cocina," p. 60.
• Cuando haga conservas durante perlodos
prolongados de tiempo, deje que los elementos
y las superficies del entorno se enfrlen.
• Alterne el uso de las Areas de cocci6n
exteriores entre Iotes o prepare peque_os
Iotes a la vez.
Comience con agua caliente, cubra con una
tapa y hAgala hervir; luego reduzca el fuego
para mantener el hervor o los niveles requeridos
de presi6n en una vaporera a presi6n.
Para informaci6n actualizada respecto a la
preparaci6n de conservas, p6ngase en
contacto con la agencia local de la Oficina de
Extensi6n del Departamento Agricola del
Gobierno de EE.UU. o empresas que fabrican
productos para enlatado dom6stico.
59
COMa USAR LAS AREAS DE COCCION EXTERIORES
(contd.)
GO S@OS888 q, > d8 a @SS OSd@C08
• Seleccione una cacerola que sea aproximada-
mente del mismo tama_o que el Area de cocci6n
exterior. El utensilio de cocina no se debe exten-
der mas de 1 pulgada (2.5 cm) fuera del Area.
• Para 6ptimos resultados y una mayor
eficiencia de energJa, use _nicamente utensilios
con fondo lisa que hagan buen contacto con el
Area de cocci6n exterior. Utensilios con fondo
redondeado, alabeado, rayado (tales coma
algunos utensilios de porcelana esmaltada) o
abollado podrlan causar calor desigual y
resultados de cocci6n insatisfactorios.
• Utensilios dise_ados con fondos ligeramente
accidentados o peque_os canales de expansi6n
pueden usarse.
• Utensilios con acabado antiadherente tienen
las caracterJsticas calorfferas del material b&sico.
• Verifique puntos dsperos en el fondo de
utensilios de metal o vidrio, los cuales aradan la
superficie de vidrio radiante.
• Use utensilios de fondo liso para la 6ptima
conducci6n de calor desde el Area de cocci6n
exterior al utensilio. Determine Io aplanado con
una prueba de regla. Coloque el borde de una
regla a traves del fondo del utensilio. Levantelo
hacia la luz. Ninguna luz debe ser visible debajo de
la regla. Gire la regla en todas las direcciones y
busque alguna luz.
• No deje utensilios vacJos, o utensilios que han
hervido hasta secarse, en el Area de cocci6n
exterior caliente. El utensilio podria sabre-
calentarse, causando dados al utensilio o al Area
de cocci6n exterior.
CARACTER|STICAS DE LOS MATERIALES DE LOS
UTENSILIOS DE COCINA
El material de la cacerola afecta tanto la rapidez con que et calor se transfiere desde el Area superficial de
cocci6n a trav6s del material de la cacerola y c6mo el calor se extiende en todo et asiento de la cacerola. Elija
cacerolas que proporcionen 6ptimos resultados de cocci6n.
Aluminio • Calienta con rapidez y uniformidad.
• Use para todo tipo de cocci6n.
• Espesor mediano o grueso es mejor para casi todo tipo de cocci6n.
• Usado come nQcleo o base en utensilios de cocina para proporcionar
calor uniforme.
Hierro fundido • Calienta lenta y uniformemente.
• Bueno para dorar y freir.
• Mantiene el calor para cocci6n lenta.
• Puede ser revestido con esmalte de porcelana.
• Calienta lentamente y sin uniformidad.
• Use en intensidades de fuego lento a mediano.
• Siga las instrucciones del fabricante.
• Calienta muy r_pida y uniformemente.
• Usado come nQcleo o base en utensilios de cocina para proporcionar
calor uniforme.
• Puede usarse para cocci6n en la superficie de cocci6n si asi Io recomienda
el fabricante.
• Use en intensidades de calor bajo.
• Vea hierro fundido y acero inoxidable.
• Calienta rapidamente pero sin uniformidad.
• Un nQcleo o base de aluminio o cobre en el utensitio de cocina proporciona
uniformidad del calor.
• Puede revestirse con esmalte de porcelana.
Cer_mica o ceramica vitrificada
Cobre
Loza de barro
Acero con esmalte de
porcelana o hierro fundido con
esmalte de porcelana
Acero inoxidable
6O
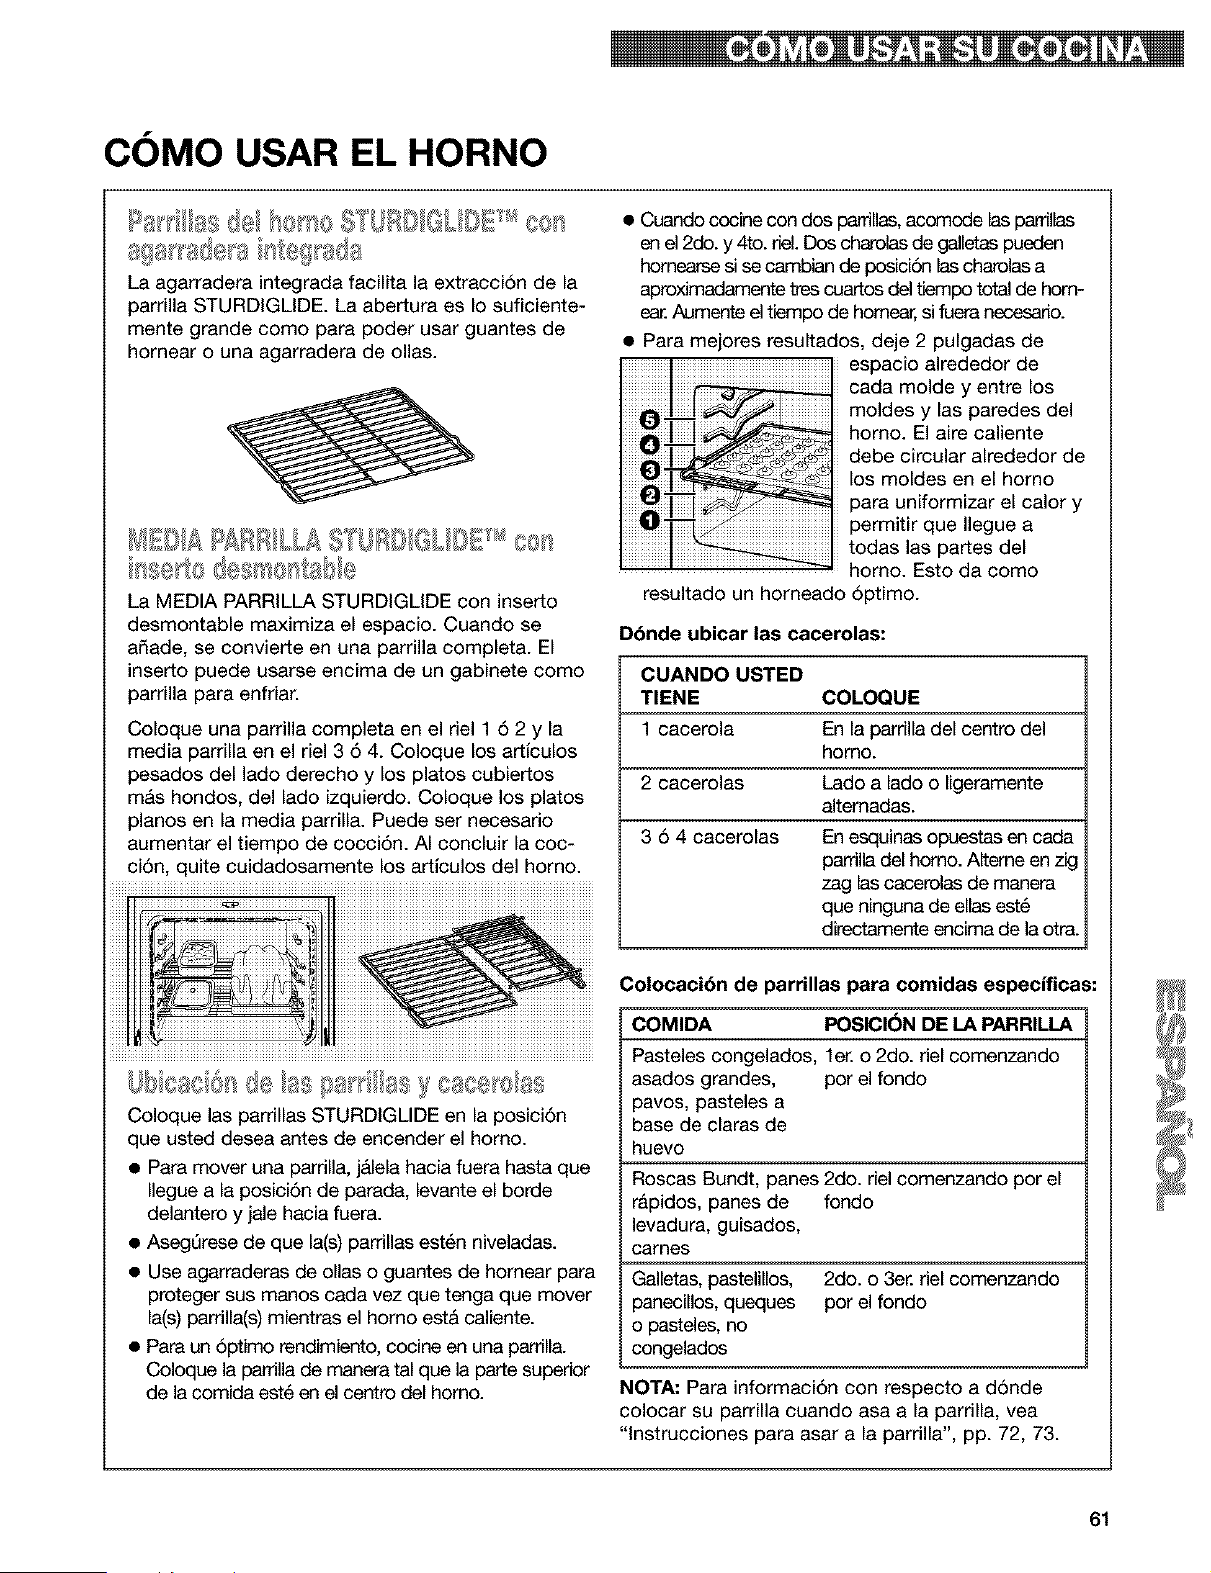
COMO USAR EL HORNO
5X @d DE cos
8{ SF se 8 F e{ sd8
La agarradera integrada facilita la extracci6n de la
parrilla STURDIOLIDE La abertura es Io suficiente-
mente grande como para poder usar guantes de
hornear o una agarradera de ollas.
bse to despiserssbb
La MEDIA PARRILLA STURDIGLIDE con inserto
desmontable maximiza el espacio. Cuando se
afiade, se convierte en una parrilla completa. El
inserto puede usarse encima de un gabinete como
parrilla para enfriar.
Coloque una parrilla completa en el riel 1 6 2 y la
media parrilla en el riel 3 6 4. Coloque los articulos
pesados del lado derecho y los platos cubiertos
mAs hondos, del lado izquierdo. Coloque los platos
pianos en la media parrilla. Puede ser necesario
aumentar el tiempo de cocci6n. AI concluir la coc-
ci6n, quite cuidadosamente los artlculos del horno.
F@ aS csse e
Coloque las parrillas STURDIGLIDE en la posici6n
que usted desea antes de encender el homo.
• Para mover una parrilla, jAlela hacia fuera hasta que
Ilegue a la posici6n de parada, levante el borde
delantero y jale hacia fuera.
AsegQrese de que la(s) parrillas est6n niveladas.
Use agarraderas de ollas o guantes de homear para
proteger sus manos cada vez que tenga que mover
la(s) parrilla(s) mientras el homo est& caliente.
Para un 6ptimo rendimiento, cocine en una parrilla.
Coloque la parrilla de manera tal que la parte superior
de la comida est6 en el centro del homo.
Cuando cocine con dos parrillas,acomode las parrillas
en el 2do. y 4to. riel. Dos charolasde galletas pueden
hornearse si se cambian de posici6n las charolas a
aproximadamente tres cuartos del tiempo total de hom-
Aumente el tiempo de homear,si fuera necesario.
Para mejores resultados, deje 2 pulgadas de
espacio alrededor de
cada molde y entre los
moldes y las paredes del
homo. El aire caliente
debe circular alrededor de
los moldes en el homo
para uniformizar el calory
permitir que Ilegue a
todas las partes del
homo. Esto da como
resultado un horneado 6ptimo.
Dbnde ubicar las cacerolas:
CUANDO USTED
TIENE COLOQUE
1 cacerola En la parrilla del centro del
homo.
2 cacerolas Lado a lado o ligeramente
altemadas.
3 6 4 cacerolas En esquinas opuestas en cada
papilla del homo. Alterne en zig
zag las cacerolas de manera
que ninguna de elias est6
directamente encima de la otra.
Colocaci6n de parrUlas para comidas especificas:
COMIDA POSICI(_N DE LA PARRILLA
Pasteles congelados, let. o 2do. del comenzando
asados grandes, por el fondo
pavos, pasteles a
base de claras de
huevo
Roscas Bundt, panes 2do. riel comenzando por el
r&pidos, panes de fondo
levadura, guisados,
carnes
Galletas, pastelillos, 2do. o 3er. riel comenzando
panecillos, queques por el fondo
o pasteles, no
congelados
NOTA: Para informaci6n con respecto a d6nde
colocar su parrilla cuando asa a la parrilla, vea
"lnstrucciones para asar a la parrilla", pp. 72, 73.
61
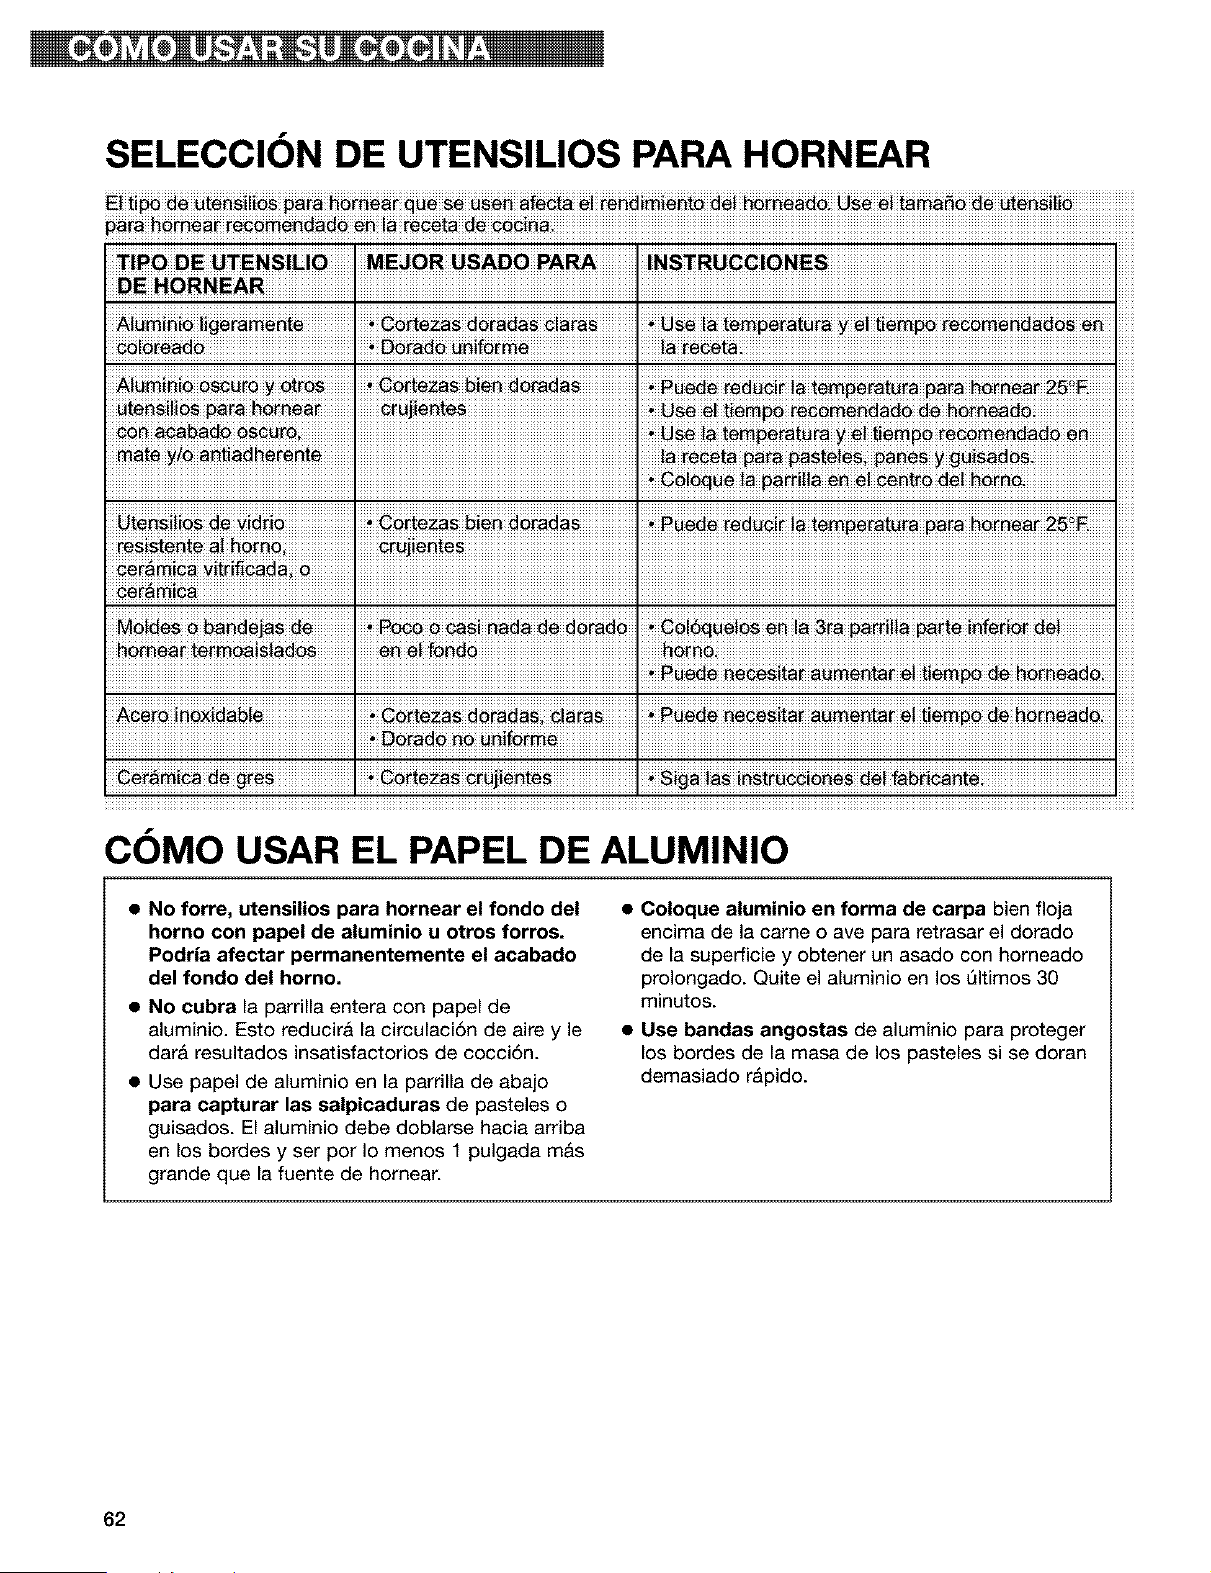
SELECCION DE UTENSILIOS PARA HORNEAR
_!_ _te_! _ra h_i_ __ _ _ _fe_t_ _! re_d!m!_t_ _! _a_ _ _! t_a_ de _t_i!i_
p_ra__e_##d# M__eoe_ #_!_
TIPO DE UTENSlUO
E.ORNEAR ! !
ii_[_d_iiiiiiiiiiiiiiiiiiiiiiiiiiiiiiiiiiiiiiiiiiiiiiiiiiii_iiii_iiD_d_ii_i_!_[_!!!!!!!!!!!!!!!!!!!!!!!!!!!!!!!!!!!!'!!!!!!!!_!!_iiiiiiiiiiiiiiiiiiiiiiiiiiiiiiiiiiiiiiiiiiiiiiiiiiiiiiiiiiiiiiiiiiiiiiiiiiiiiiiiiiiiiiiiiiiiiiiiiiiiiiiiiiiiiiiiiiiiiiiiiiiiiiiiii
iiiiiiiiiiiiiiiiiiiiiiiiiiiiiiiiiiiiiiiiiiiiiiiiiiiiiiiiiiiiiiiiiiiiiiiiiiiiiiiiiiiiiiiiiiiiiiiiiiiiiiiiiiiiiiiiiiiiiiiiiiiiiiiiiiiiiiiiiiiiiiiiiiiiiiiiiiiiiiiiiiiiiiiiiiiiiiiiiiiiii_=iii_ii_!!!_!!_!!!_!!_!!_!!!_!_!!!_!_!!!!!!!!!!!!!!!!!!!!!!!!!!!!!!!
resist_i_ _i _
,,
COMO USAR EL PAPEL DE ALUMINIO
• No forre, utensilios para hornear el rondo del
horno con papel de aluminio u otros forros.
Podria afectar permanentemente el acabado
del rondo del homo.
• No cubra la parrilla entera con papel de
aluminio. Esto reducira la circulaci6n de aire y le
dar& resultados insatisfactorios de cocci6n.
• Use papel de aluminio en la parrilla de abajo
para capturar las salpicaduras de pasteles o
guisados. El aluminio debe doblarse hacia arriba
en los bordes y ser por Io menos 1 pulgada m&s
grande que la fuente de homear.
• Coloque aluminio en forma de carpa bien floja
encima de la came o ave para retrasar el dorado
de la superficie y obtener un asado con horneado
prolongado. Quite el aluminio en los Qltimos 30
minutos.
• Use bandas angostas de aluminio para proteger
los bordes de la masa de los pasteles si se doran
demasiado rApido.
62
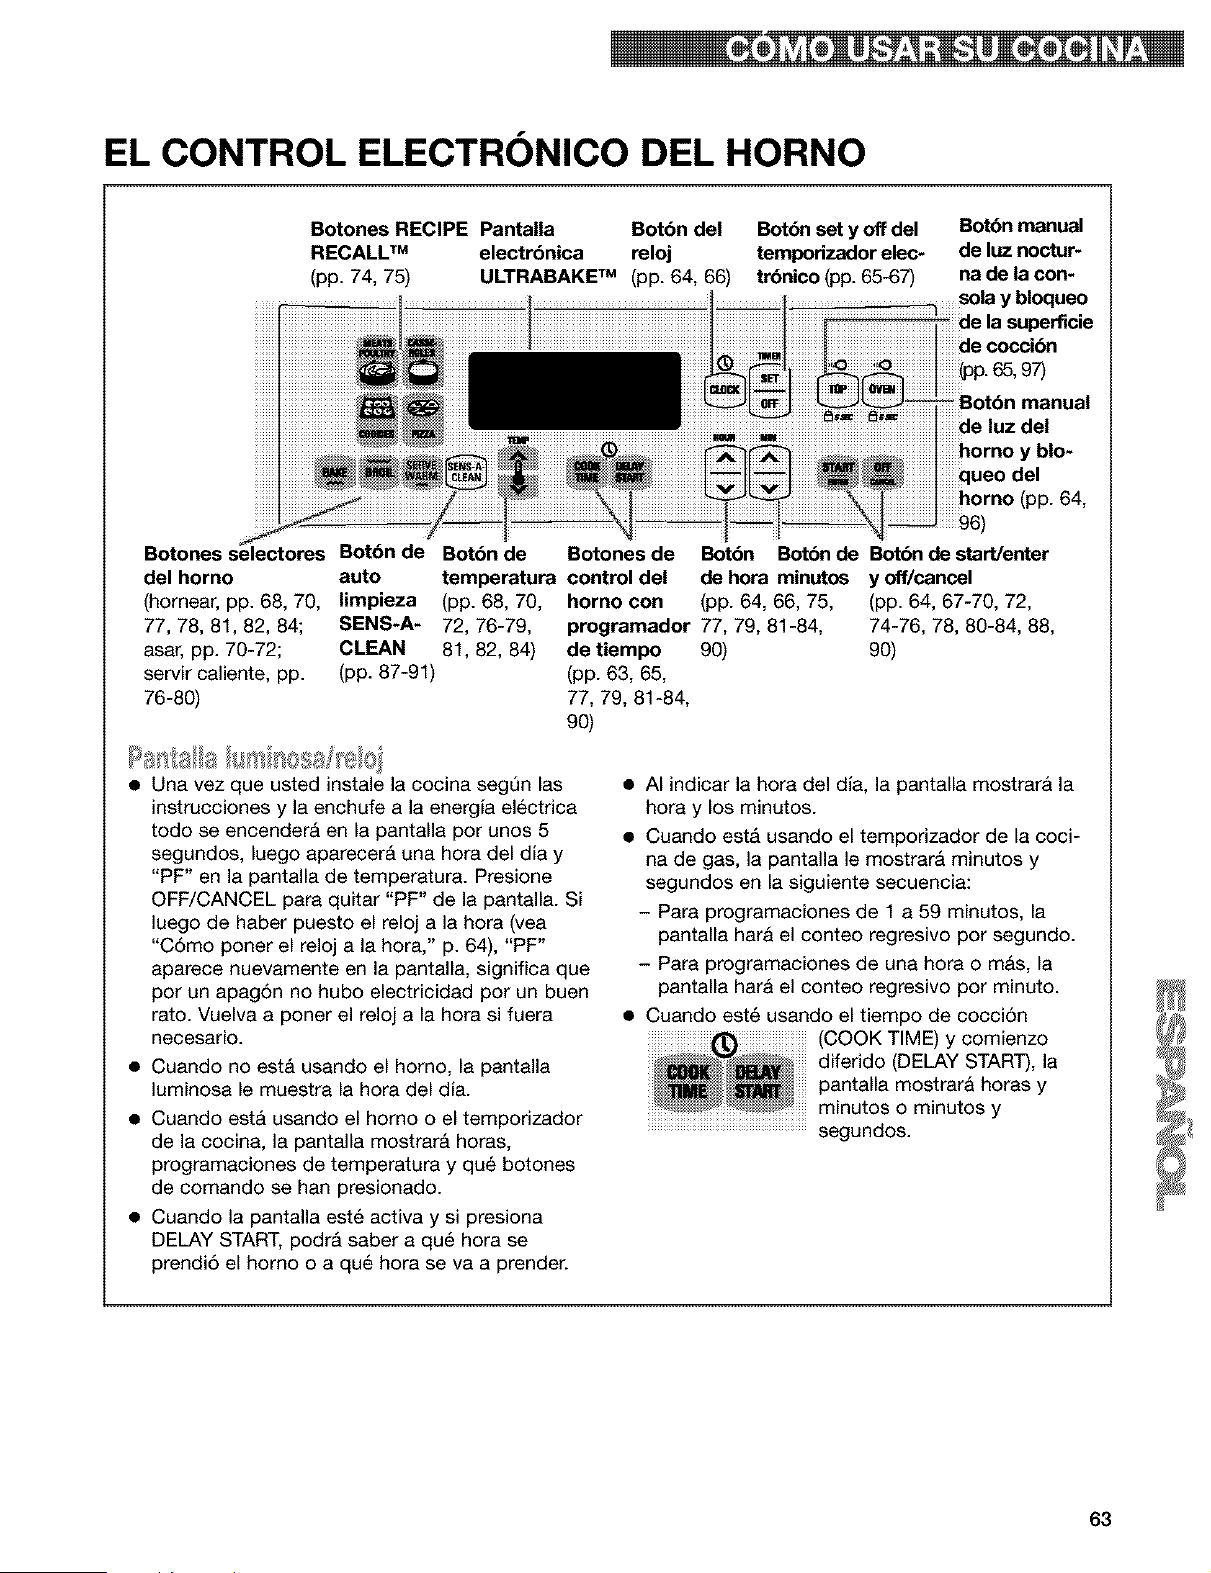
EL CONTROL ELECTRONICO DEL HORNO
Botones RECIPE Pantalla Botbn del
RECALL TM electrbnica reloj
(pp. 74, 75) ULTRABAKE TM (pp. 64, 66)
Bot6n set y off del
temporizador elec-
trbnico (pp. 65-67)
Bot6n manual
de luz noctur-
na de la con-
..........sÜÁay bloqueo
de la superficie
de cocci6n
Botones selectores Bot6n de Botbn de Botones de
del horno auto temperatura control del
(homear, pp. 68, 70, limpieza (pp. 68, 70, homo con
77, 78, 81, 82, 84; SENS-A- 72, 76-79,
asar, pp. 70-72; CLEAN 81, 82, 84)
servir caliente, pp. (pp. 87-91)
76-80)
manual
iiiiiiiiideluzdel
iiiiiiiiiihornoyblo-
iiiiiiiiiiqueodel
iiiiiiiiiihorno(pp. 64,
iiiiiiiiii96)
Botbn Botbn de Botbn de start/enter
de hora minutos y off/cancel
(pp. 64, 66, 75, (pp. 64, 67-70, 72,
programador 77, 79, 81-84, 74-76, 78, 80-84, 88,
de tiempo 90) 90)
(pp. 63, 65,
77, 79, 81-84,
90)
• Una vez que usted instale la cocina segQn las
instrucciones y la enchufe a la energia electrica
todo se encenderA en la pantalla por unos 5
segundos, luego aparecer& una hora del dfa y
"PF" en la pantalla de temperatura. Presione
OFF/CANCEL para quitar "PF" de la pantalla. Si
luego de haber puesto el reloj a la hora (vea
"C6mo poner el reloj a la hora," p. 64), "PF"
aparece nuevamente en la pantalla, significa que
por un apag6n no hubo electricidad por un buen
rato. Vuelva a poner el reloj a la hora si fuera
necesario.
• Cuando no est& usando el homo, la pantalla
luminosa le muestra la hora del dfa.
• Cuando est& usando el homo o el temporizador
de la cocina, la pantalla mostrar& horas,
programaciones de temperatura y qua botones
de comando se hart presionado.
• Cuando la pantalla est6 activa y si presiona
DELAY START, podr& saber a qu6 hora se
prendi5 el homo o a qu6 hora se va a prender.
• AI indicar la hora del dla, la pantalla mostrarA la
hora y los minutos.
• Cuando est& usando el temporizador de la coci-
na de gas, la pantalla le mostrara minutos y
segundos en la siguiente secuencia:
- Para programaciones de 1 a 59 minutos, la
pantalla hara el conteo regresivo por segundo.
- Para programaciones de una hora o m&s, la
pantalla har& el conteo regresivo por minuto.
• Cuando est6 usando el tiempo de cocciSn
(COOK TIME) y comienzo
diferido (DELAY START), la
pantalla mostrara horas y
.......................................................minutos o minutos y
.......................................................segundos.
63
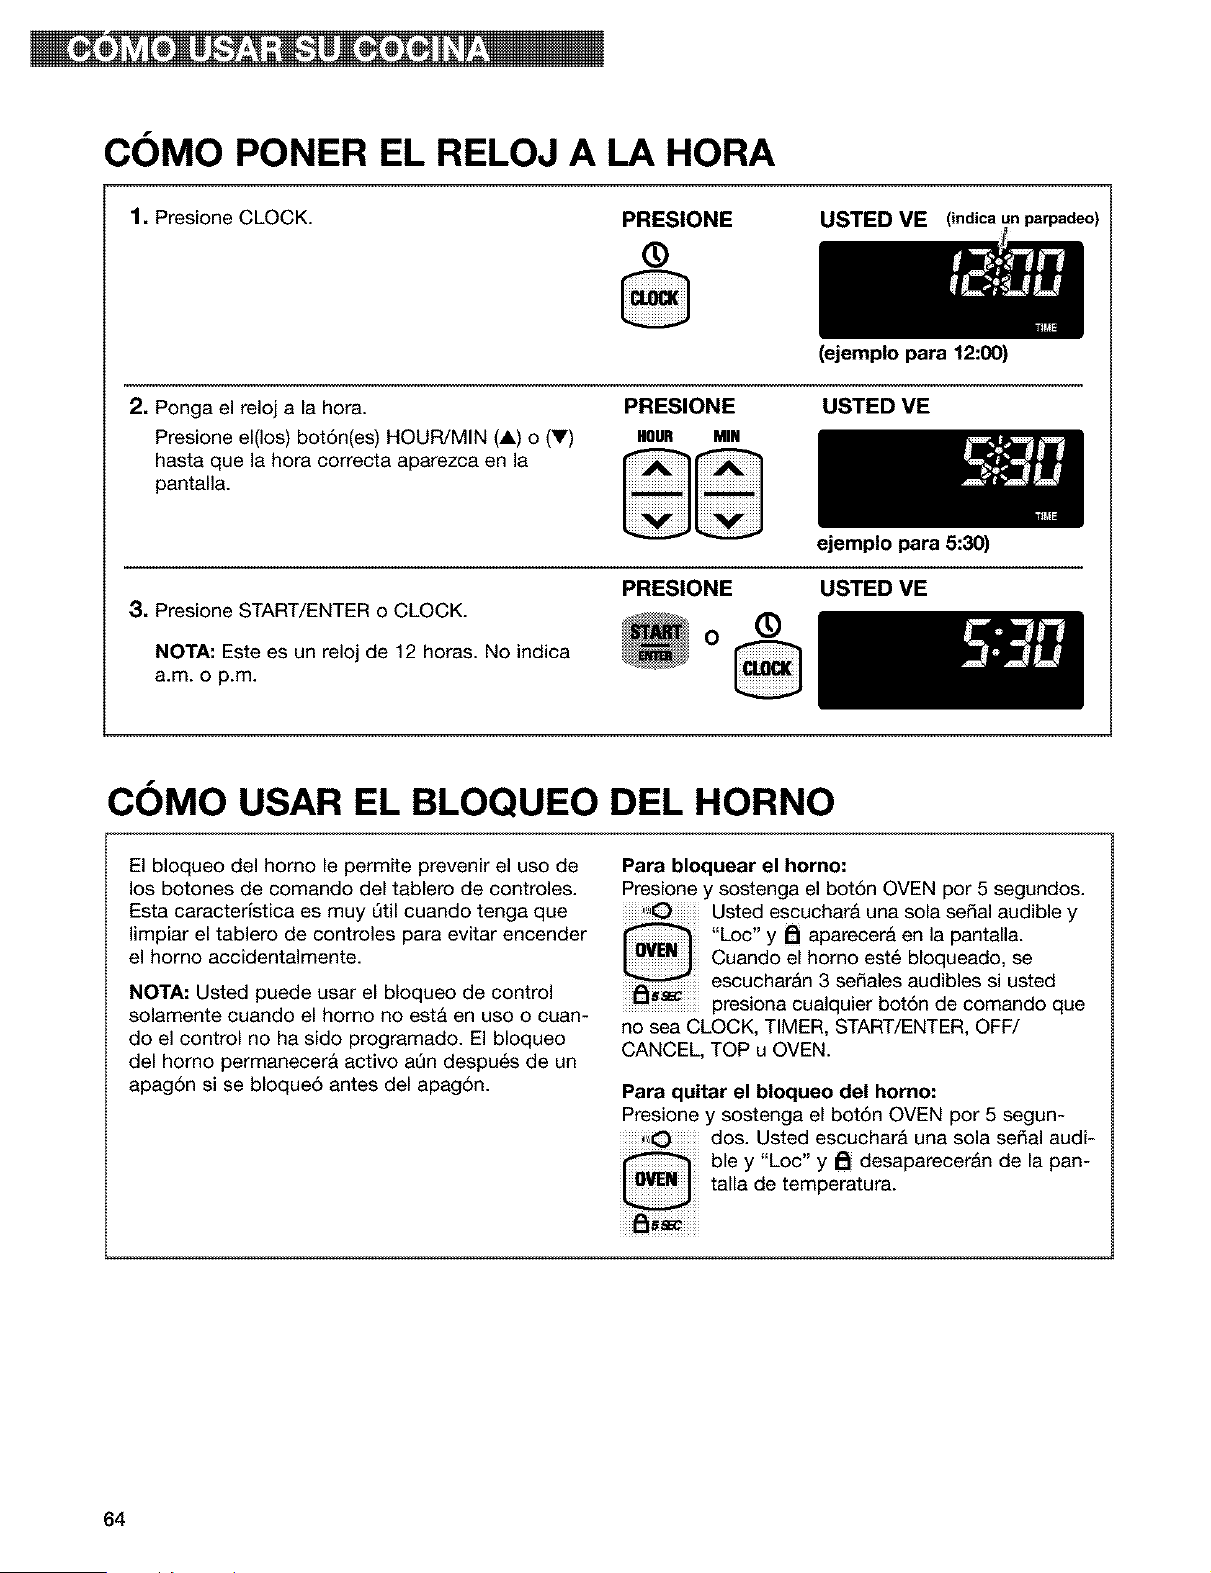
COMO PONER EL RELOJ A LA HORA
1, Presione CLOCK.
PRESIONE
®
VE (indica I
2. Ponga el reloj a la hora.
Presione el(los) bot6n(es) HOUR/MIN (A) o (V)
hasta que la hora correcta aparezca en la
pantalla.
PRESIONE
HOUR MIN
(ejemplo para 12:00)
USTED ME
3, Presione START/ENTER o CLOCK.
NOTA: Este es un reloj de 12 horas. No indica
a.m. o p.m.
PRESIONE
O
ejemplo para 5:30)
USTED VE
®
COMO USAR EL BLOQUEO DEL HORNO
El bloqueo del homo le permite prevenir el uso de
los botones de comando del tablero de controles.
Esta caracterlstica es muy Qtil cuando tenga que
limpiar el tablero de controles para evitar encender
el homo accidentalmente.
NOTA: Usted puede usar el bloqueo de control
solamente cuando el homo no esta en uso o cuan-
do el control no ha sido programado. El bloqueo
del homo permanecer& activo aQn despu_s de un
apag6n si se bloque6 antes del apag6n.
Para bloquear el homo:
Presione y sostenga el bot6n OVEN por 5 segundos.
Usted escuchar& una sola serial audible y
"Loc" y _ aparecera en la pantalla.
Cuando el homo est6 bloqueado, se
escuchar&n 3 sefiales audibles si usted
...........................presiona cualquier bot6n de comando que
no sea CLOCK, TIMER, START/ENTER, OFF/
CANCEL, TOP u OVEN.
Para quitar el bloqueo del horno:
Presione y sostenga el bot6n OVEN por 5 segun-
dos. Usted escuchar& una sola serial audi-
ble y "Loc" y _ desaparecer&n de la pan-
talla de temperatura.
64
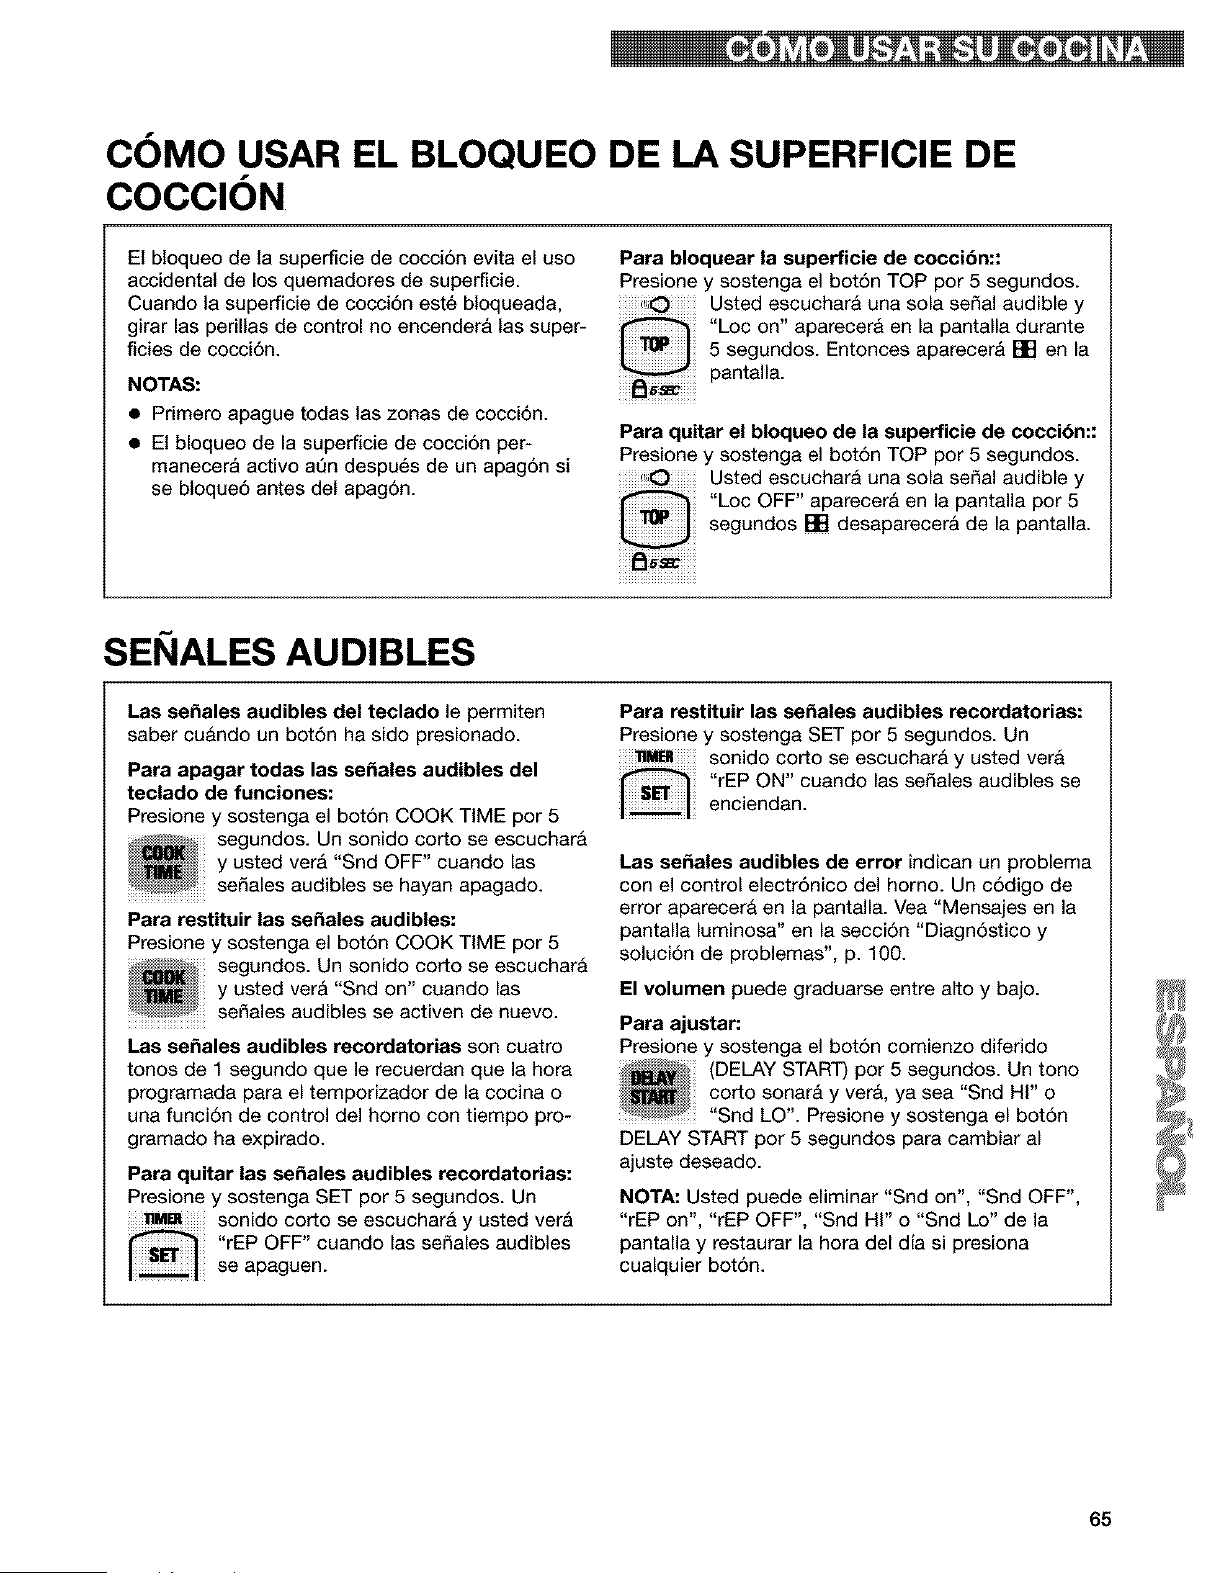
COMO USAR EL BLOQUEO DE LA SUPERFICIE DE
COCClON
El bloqueo de la supenScie de cocci6n evita el uso
accidental de los quemadores de superficie.
Cuando la superficie de cocci6n este bloqueada,
girar las perillas de control no encendera las super-
ficies de cocci6n.
NOTAS:
• Primero apague todas las zonas de cocci6n.
• El bloqueo de la superficie de cocci6n per-
manecera activo aQn despues de un apag6n si
se bloque6 antes del apag6n.
Para bloquear la superficie de cocci6n::
Presione y sostenga el bot6n TOP por 5 segundos.
Usted escuchar& una sola sepal audible y
"Loc on" aparecer& en la pantalla durante
5 segundos. Entonces aparecer& [] en la
pantalla.
Para quitar el bloqueo de la superficie de cocci6n::
Presione y sostenga el bot6n TOP por 5 segundos.
Usted escuchar& una sola sepal audible y
"Loc OFF" aparecer& en la pantalla por 5
segundos [] desaparecerA de la pantalla.
SEI IALES AUDIBLES
Las se_ales audibles del teclado le permiten
saber cu&ndo un bot6n ha sido presionado.
Para apagar todas las se_ales audibles del
teclado de funciones:
Presione y sostenga el bot6n COOK TiME por 5
segundos. Un sonido corto se escuchar&
y usted ver& "Snd OFF" cuando las
...........................se_ales audibles se hayan apagado.
Para restituir las se_ales audibles:
Presione y sostenga el bot6n COOK TiME por 5
segundos. Un sonido corto se escuchar&
y usted ver& "Snd on" cuando las
seSales audibles se activen de nuevo.
Las se_ales audibles recordatorias son cuatro
tonos de 1 segundo que le recuerdan que la hora
programada para el temporizador de la cocina o
una funci6n de control del homo con tiempo pro-
gramado ha expirado.
Para quitar las se_ales audibles recordatodas:
Presione y sostenga SET por 5 segundos. Un
sonido corto se escuchar& y usted vet&
"rEP OFF" cuando las se_ales audibles
se apaguen.
Para restituir las se_ales audibles recordatorias:
Presione y sostenga SET por 5 segundos. Un
sonido corto se escuchar& y usted vera
"rEP ON" cuando las sedales audibles se
enciendan.
Las se_ales audibles de error indican un problema
con el control electr6nico del horno. Un c6digo de
error aparecer& en la pantalla. Vea "Mensajes en la
pantalla luminosa" en la secci6n "Diagn6stico y
soluci6n de problemas", p. 100.
El volumen puede graduarse entre alto y bajo.
Para ajustar:
Presione y sostenga el bot6n comienzo diferido
(DELAY START) por 5 segundos. Un tono
corto sonar& y vera, ya sea "Snd HI" o
..........................."Snd LO". Presione y sostenga el bot6n
DELAY START por 5 segundos para cambiar al
ajuste deseado.
NOTA: Usted puede eliminar "Snd on", "Snd OFF",
"rEP on", "rEP OFF", "Snd Hi" o "Snd Lo" de la
pantalla y restaurar la hora del dJa si presiona
cualquier bot6n.
65
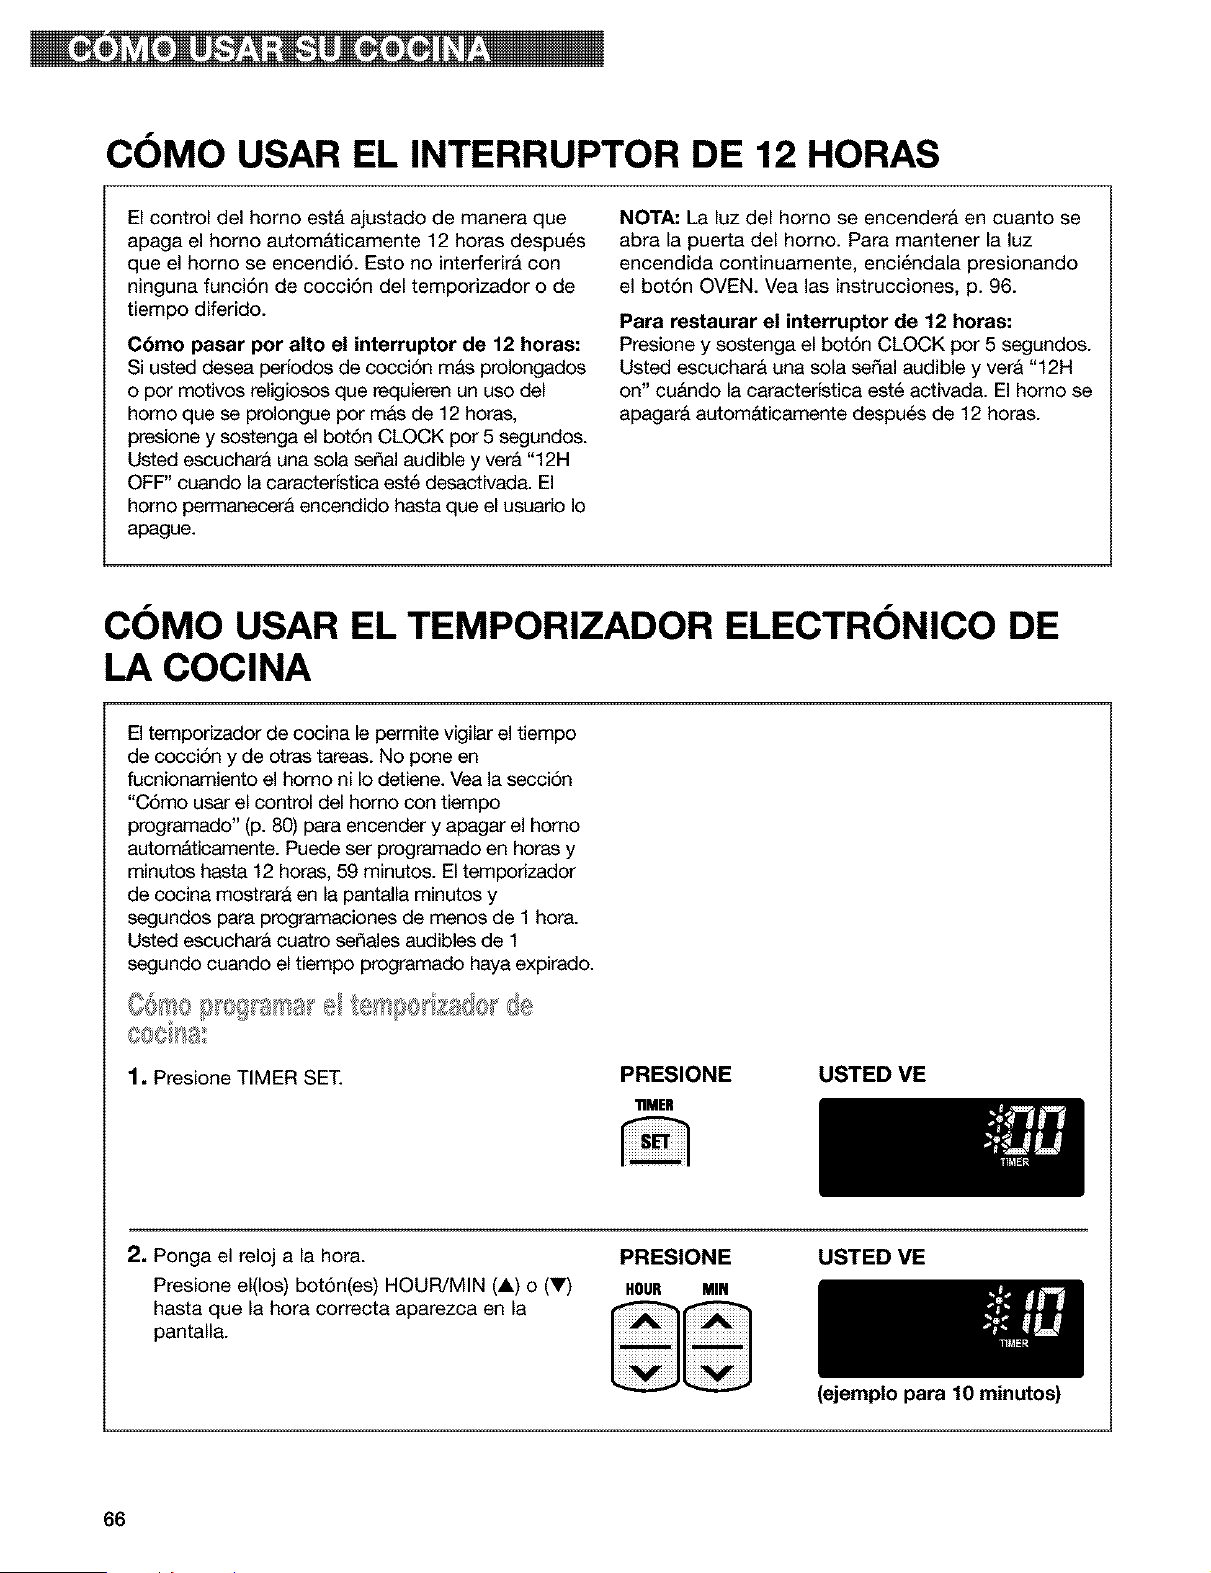
COMO USAR EL INTERRUPTOR DE 12 HORAS
El control del homo est& ajustado de manera que
apaga el homo autom&ticamente 12 horas despu_s
que el homo se encendi6. Esto no interferir& con
ninguna funci6n de cocci6n del temporizador o de
tiempo diferido.
C6mo pasar por alto el interruptor de 12 horas:
Si usted desea perfodos de cocci6n m&s prolongados
o por motivos religiosos que requieren un uso del
homo que se prolongue por mas de 12 horas,
presione y sostenga el bot6n CLOCK por 5 segundos.
Usted escuchara una sola serial audible y ver& "12H
OFF" cuando la caracterfstica est6 desactivada. El
homo permanecerA encendido hasta que el usuario Io
apague.
NOTA: La luz del homo se encenderA en cuanto se
abra la puerta del homo. Para mantener la luz
encendida continuamente, enci_ndala presionando
el bot6n OVEN. Vea las instrucciones, p. 96.
Para restaurar el interruptor de 12 horas:
Presione y sostenga el bot6n CLOCK por 5 segundos.
Usted escuchara una sola serial audible y ver& "12H
on" cu&ndo la caracterfstica est6 activada. El homo se
apagar& autom&ticamente despu6s de 12 horas.
COMO USAR EL TEMPORIZADOR ELECTRONICO DE
LA COCINA
El temporizador de cocina le permite vigilar el tiempo
de cocci6n y de otras tareas. No pone en
fucnionamiento el homo ni Io detiene. Vea la secci6n
"CSmo usar el control del homo con tiempo
programado" (p. 80) para encender y apagar el homo
automAticamente. Puede ser programado en horas y
minutos hasta 12 horas, 59 min_os. El temporizador
de cocina mostrara en la pantalla minutos y
segundos para programaciones de menos de 1 hora.
Usted escucharA cuatro sefiales audibles de 1
segundo cuando el tiempo programado haya expirado.
1. Presione TIMER SET.
PRESIONE USTED ME
"RMEH
2. Ponga el reloj a la hora.
Presione el(los) bot6n(es) HOUR/MIN (A) o (V)
hasta que la hora correcta aparezca en la
pantalla.
PRESIONE USTED VE
HOUR MIN
66
(ejemplo para 10 minutos)
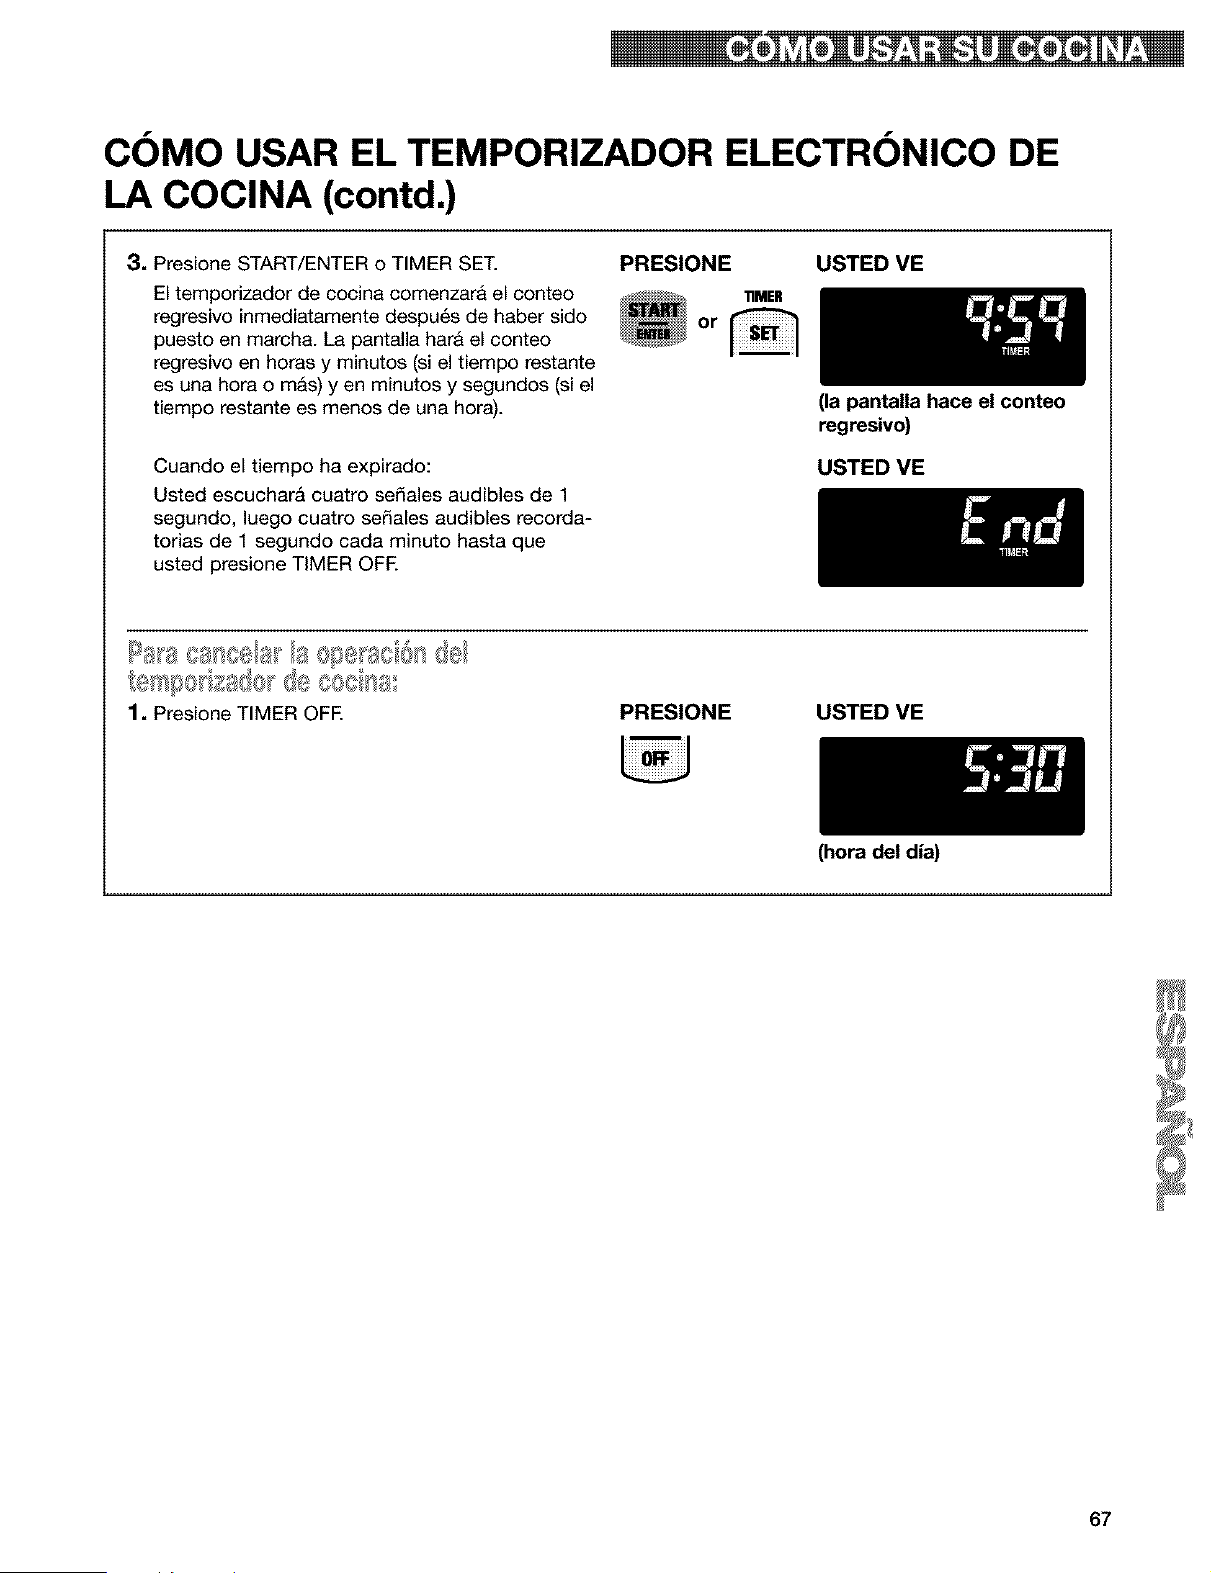
COMO USAR EL TEMPORIZADOR ELECTRONICO DE
LA COCINA (contd.)
3, Presione START/ENTER o TIMER SET.
El temporizador de cocina comenzara el conteo
regresivo inmediatamente despu6s de haber sido
puesto en march& La pantalla hara el conteo
regresivo en horas y minutos (si el tiempo restante
es una hora o m&s) yen minutos y segundos (si el
tiempo restante es menos de una hora).
PRESIONE USTED VE
11MER
Or
Cuando el tiempo ha expirado:
Usted escuchar& cuatro sefiales audibles de 1
segundo, luego cuatro sefiales audibles recorda-
torias de 1 segundo cada minuto hasta que
usted presione TIMER OFE
(la pantalla hace el conteo
regresivo)
USTED ME
_esl_8 za@r@
1, Presione TIMER OFF. PRESIONE USTED VE
(hora del dia)
67
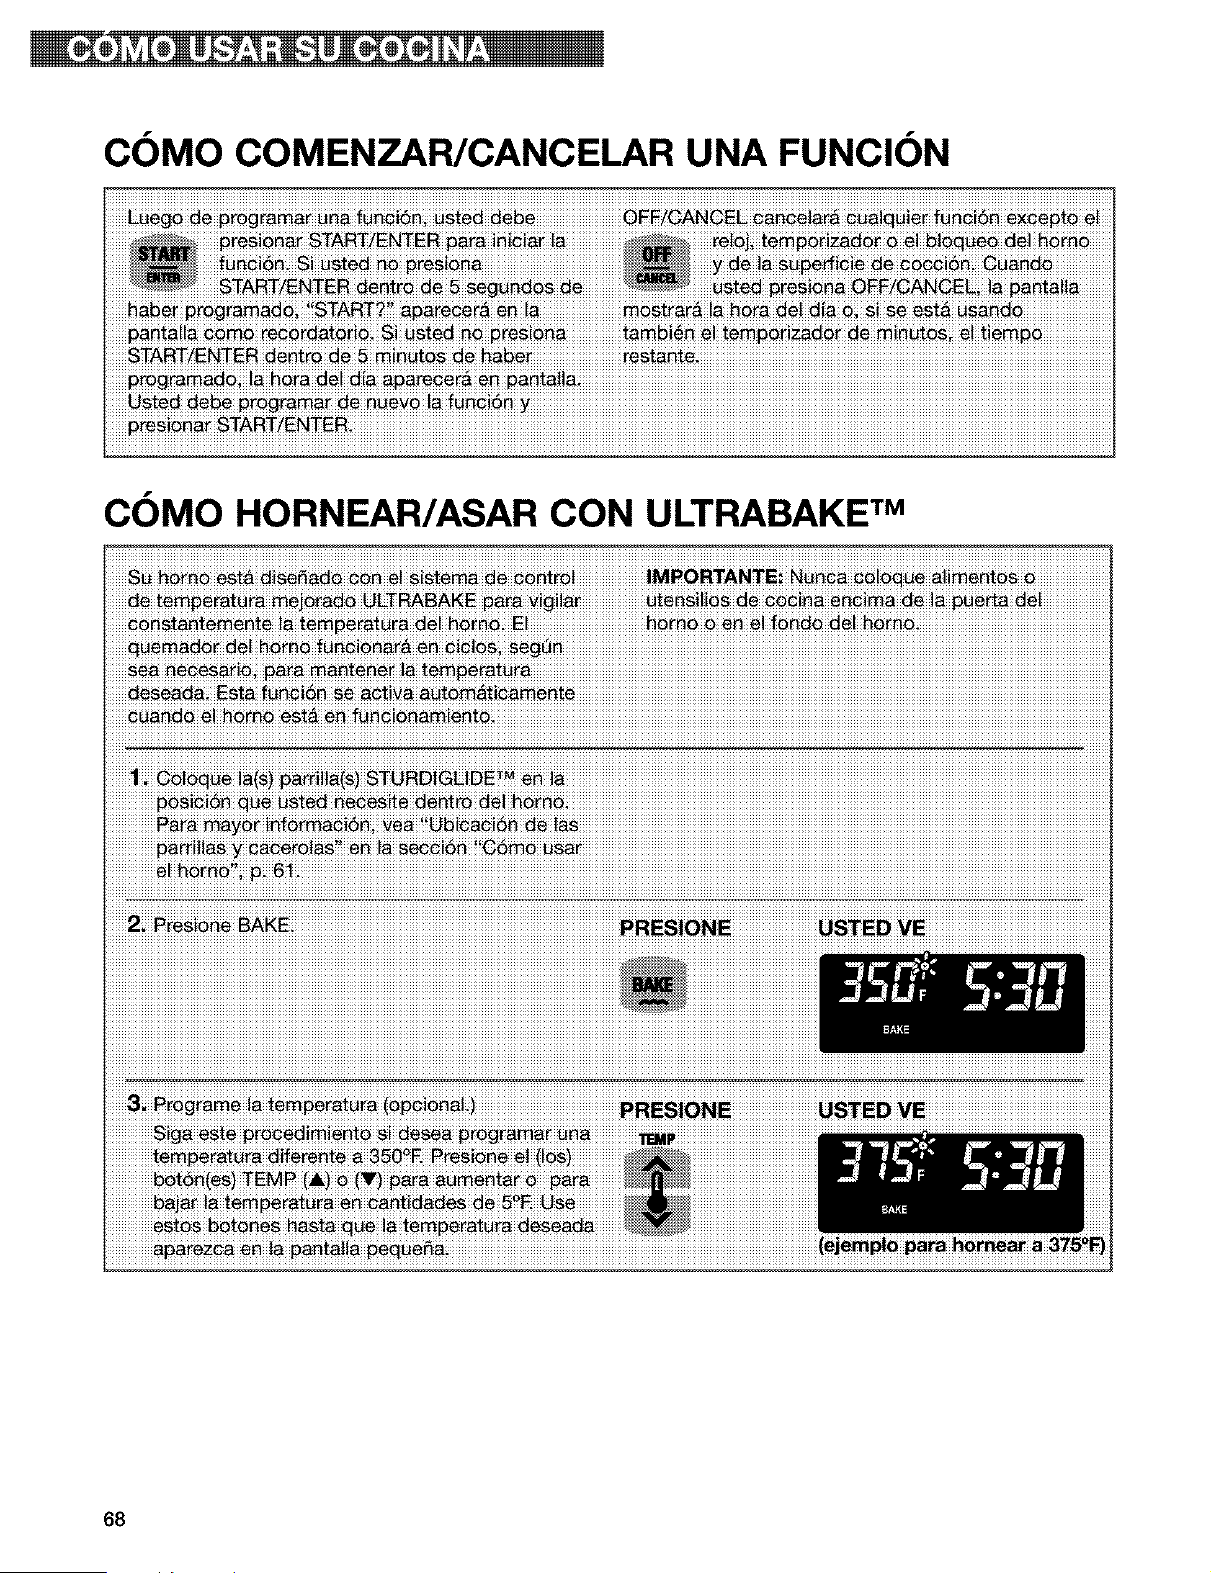
COMO COMENZAR/CANCELAR UNA FUNCION
COMO HORNEAR/ASAR CON ULTRABAKE TM
_ _rn_ est_ fun_!_ _i_ni_
iiiiiiiiiiiiiiiiiiiiiiiiiii_iiiiiiiii_iiiiiiiiiiiiiiiiiiiiiiiiiiiiiiiiiiiiiiiiiiiiiiiiiiiiiiiiiiiiiiiiiiiiiiiiiiiiiiiiiiiiiiiiiiiiiiiiiiiiiiiiiiiiiiiiiiiiiiiiiiiiiiiiiiiiiiiiiiiiiiiiiiiiiiiiiiiiiiiiiiiiiiiiiiiiiiiiiiiiiiiiiiiiiiiiiiiiiiiiiiiiiiiiiiiiiiiiiiiiiiiiiiiiiiiiiiiiiiiiiiiiiiiiiiiiiiiiiiiiiiiiiiiiiiiiiiiiiiiiiiiiiiiiiiiiiiii
68
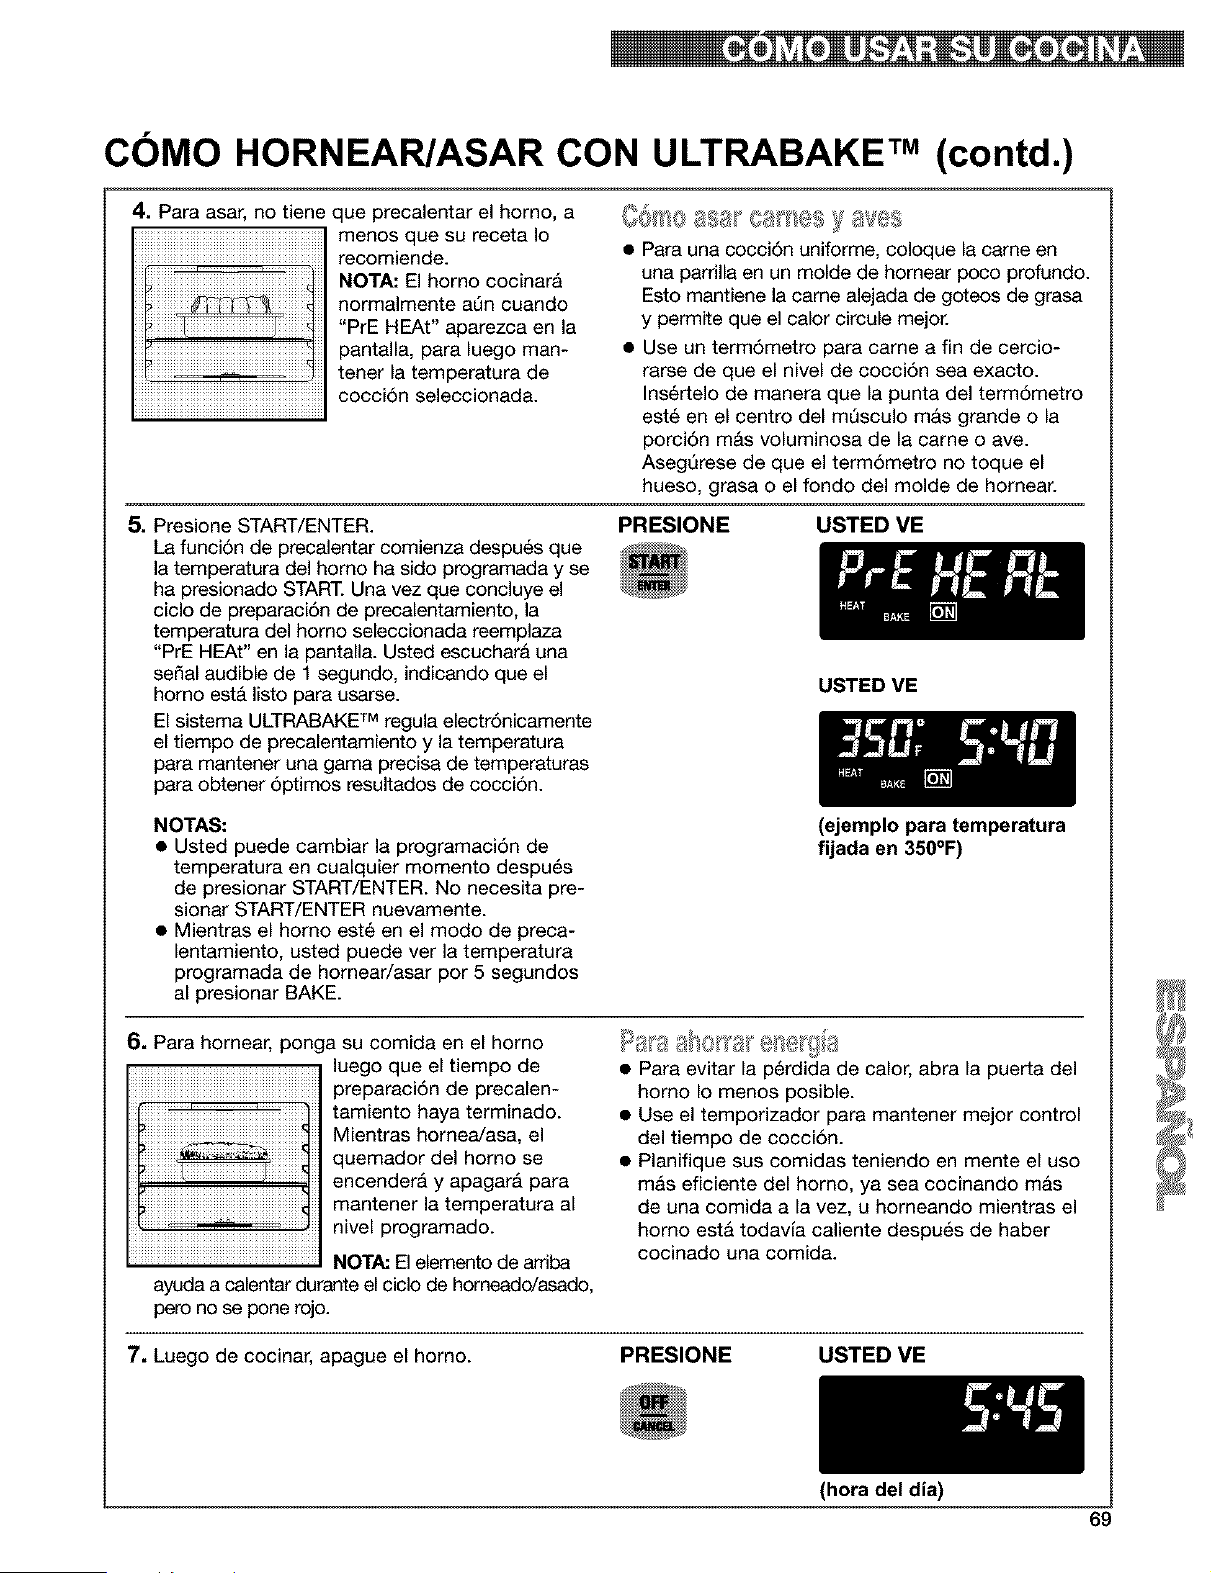
COMO HORNEAR/ASAR CON ULTRABAKE TM (contd.)
4. Para asar, no tiene que precalentar el homo, a
menos que su receta Io
recomiende.
NOTA: El homo cocinara
normalmente aQn cuando
"PrE HEAt" aparezca en la
pantalla, para luego man-
tener la temperatura de
cocci6n seleccionada.
• Para una oo¢¢i6n uniforme, ¢oloque la oame en
una parrilla en un molde de homear po¢o profundo.
Esto mantiene la came alejada de goteos de grasa
y permite que el calor circule mejor.
• Use un term6metro para came a fin de cercio-
rarse de que el nivel de cocci6n sea exacto.
Ins6rtelo de manera que la punta del term6metro
est6 en el centro del mQsculo m&s grande o la
porci6n mAs voluminosa de la came o ave.
AsegQrese de que el term6metro no toque el
hueso, grasa o el fondo del molde de homear.
5. Presione START/ENTER.
La funci6n de precalentar comienza despu6s que
la temperatura del homo ha sido programada y se
ha presionado START. Una vez que concluye el
ciclo de preparaci6n de precalentamiento, la
temperatura del homo seleccionada reemplaza
"PrE HEAt" en la pantalla. Usted escuchar& una
sepal audible de 1 segundo, indicando que el
homo estA listo para usarse.
El sistema ULTRABAKE TM regula electr6nicamente
el tiempo de precalentamiento y la temperatura
para mantener una gama precisa de temperaturas
para obtener 6ptimos resultados de cocci6n.
PRESIONE USTED VE
USTED VE
NOTAS:
• Usted puede cambiar la programaci6n de
temperatura en cualquier momento despu6s
de presionar START/ENTER. No necesita pre-
sionar START/ENTER nuevamente.
• Mientras el homo est6 en el modo de preca-
lentamiento, usted puede ver la temperatura
programada de homear/asar por 5 segundos
al presionar BAKE.
(ejemplo para temperatura
fijada en 350°F)
6= Para homear, ponga su comida en el homo
luego que el tiempo de
preparaci6n de precalen-
tamiento haya terminado.
Mientras homea/asa, el
quemador del homo se
encenderA y apagarA para
mantener la temperatura al
nivel programado.
NOTA: El elemento de arriba
ayuda a calentar durante el ciclo de horneado/asado,
pero no se pone rojo.
• Para evitar la p_rdida de calor, abra la puerta del
homo Io menos posible.
• Use el temporizador para mantener mejor control
del tiempo de ¢o¢ci6n.
• Planifique sus eomidas teniendo en mente el uso
mas eficiente del homo, ya sea cocinando mas
de una oomida a la vez, u horneando mientras el
homo esta todavia caliente despu_s de haber
oooinado una ¢omida.
7, Luego de cocinar, apague el horno.
PRESIONE USTED VE
(hora del dia)
69
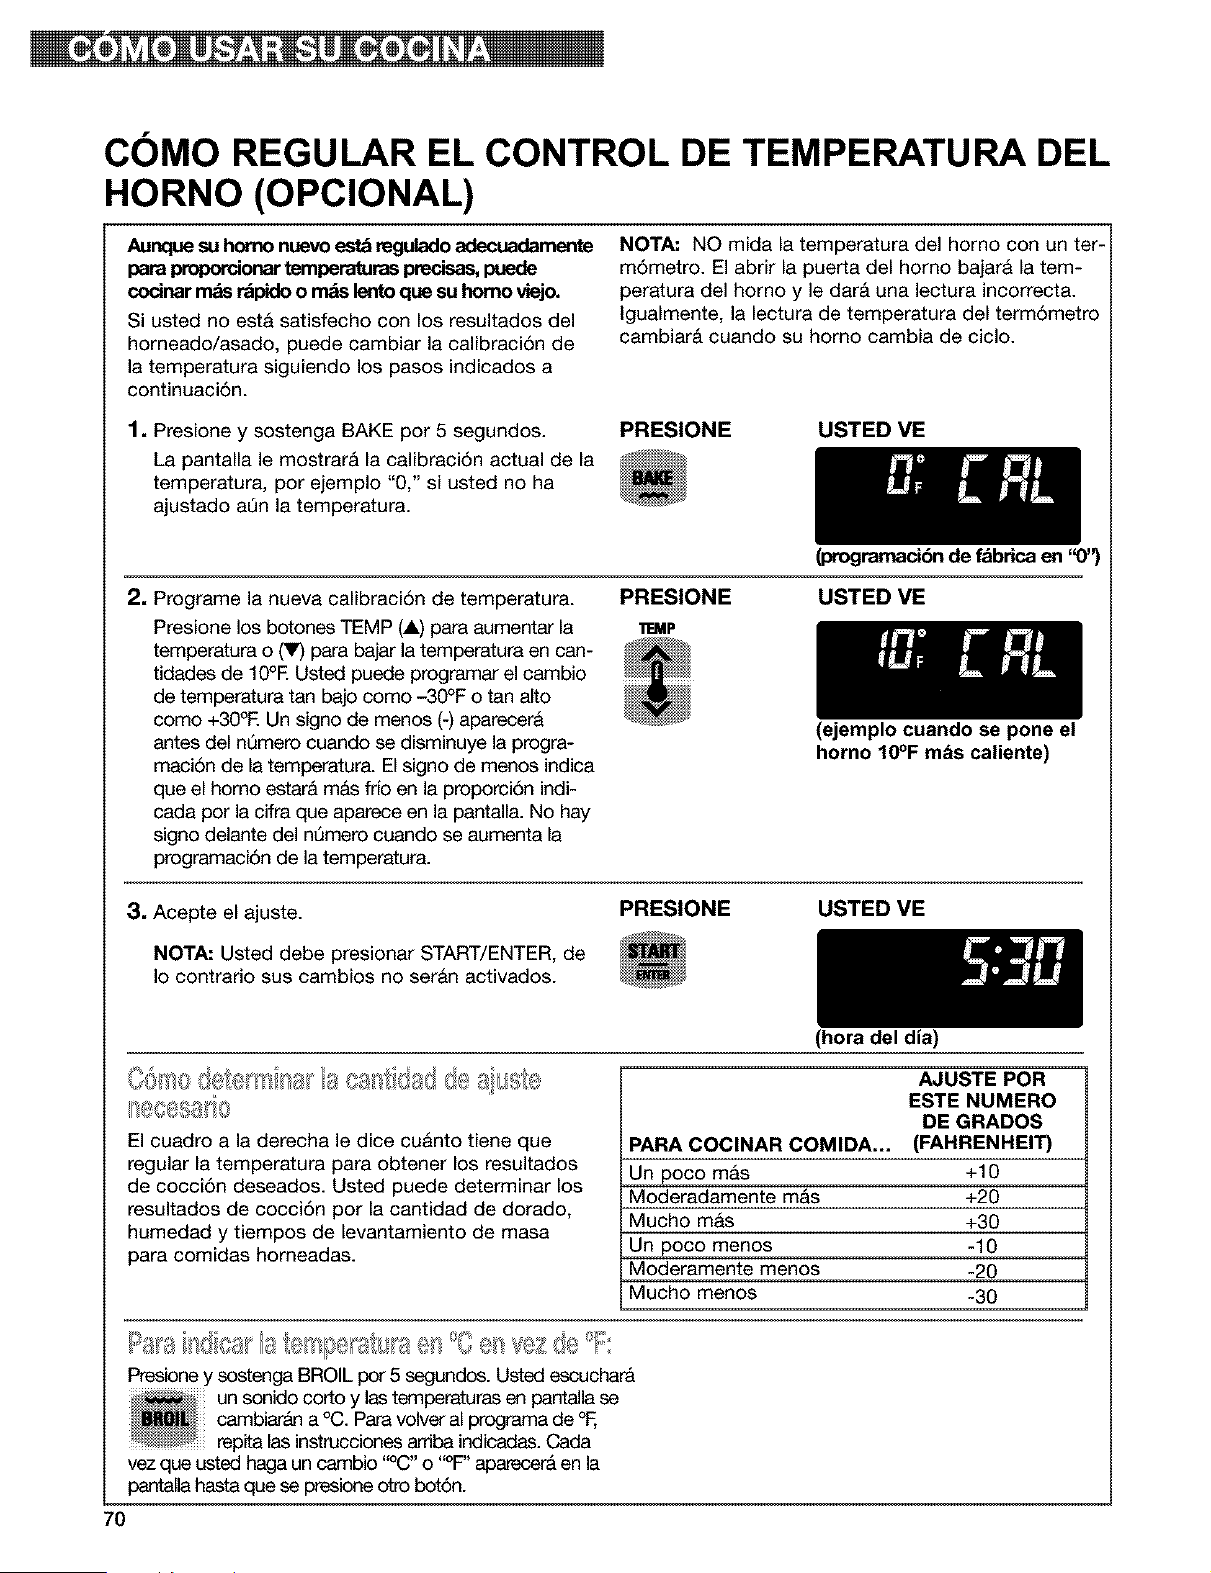
COMO REGULAR EL CONTROL DE TEMPERATURA DEL
HORNO (OPClONAL)
Aunque su homo nuevo est_ regulado adecuadarnente
para proporcionartemperaturas precisas,puede
codnar mas r_pido o rods lento que su homo viejo.
Si usted no est& satisfecho con los resultados del
horneado/asado, puede cambiar la calibraci6n de
la temperatura siguiendo los pasos indicados a
continuaci6n.
NOTA: NO mida la temperatura del horno con un ter-
m6metro. El abrir la puerta del homo bajarA la tem-
peratura del horno y le dar& una lectura incorrecta.
Igualmente, la lectura de temperatura del term6metro
cambiarA cuando su homo cambia de ciclo.
1. Presione y sostenga BAKE por 5 segundos.
La pantalla le mostrar& la calibraci6n actual de la
temperatura, por ejemplo "0," si usted no ha
ajustado aQn la temperatura.
PRESIONE USTED VE
(progmmacibn de fabrica en "0")
2, Programe la nueva calibraci6n de temperatura.
Presione los botones TEMP (4,) para aumentar la
temperatura o _ para bajar la temperatura en can-
tidades de 10°E Usted puede programar el cambio
de temperatura tan bajo como -30°F o tan alto
como +30°E Un signo de menos (-) aparecer&
antes del nQmero cuando se disminuye la progra-
maci6n de la temperatura. El signo de menos indica
que el homo estarA mAs frJoen la proporci6n indi-
cada por la cifra que aparece en la pantalla. No hay
signo delante del nQmero cuando se aumenta la
programaci6n de la temperatura.
PRESIONE USTED VE
11EMP
3, Acepte el ajuste. PRESIONE
NOTA: Usted debe presionar START/ENTER, de
Io contrario sus cambios no ser&n activados.
(ejemplo cuando se pone el
horno 10°F m_s caliente)
USTED VE
El cuadro a la derecha le dice cu&nto tiene que
regular la temperatura para obtener los resultados
de cocci6n deseados. Usted puede determinar los
resultados de cocci6n por la cantidad de dorado,
humedad y tiempos de levantamiento de masa
para comidas horneadas.
(hora del dia)
AJUSTE POR
ESTE NUMERO
DE GRADOS
PARA COCINAR COMIDA... (FAHRENHEIT)
Un poco mas +10
Moderadamente m&s +20
Mucho mas +30
Un poco menos -10
Moderamente menos -20
Mucho menos -30
Presione y sostenga BROIL por 5 segundos. Usted essuchar&
un sonido cotto y las temperaturas en pantalla se
cambiar_ln a 0(3.Para volver al programa de
repita las instrucciones an'iba indicadas. Oada
vez que usted haga un cambio "°C" o "°F" aparecer_ en la
pantalla hasta que se presione otto bot6n.
7O
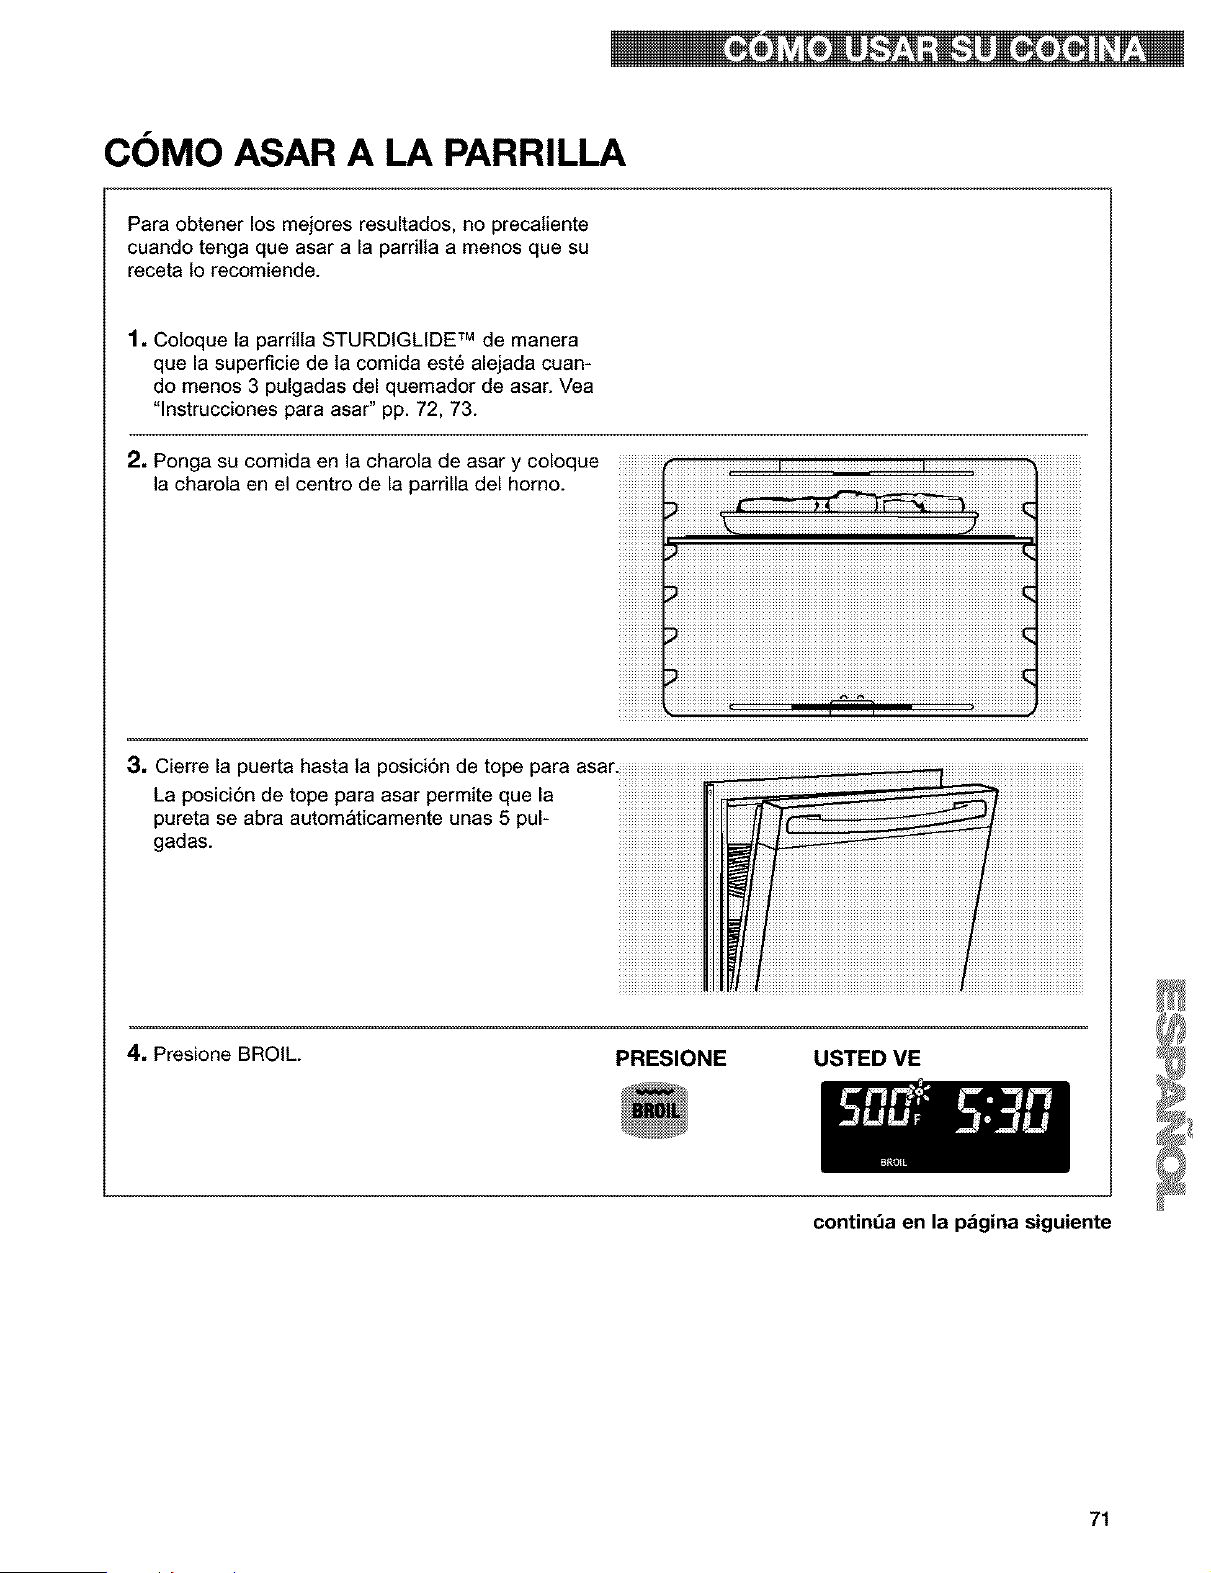
COMO ASAR A LA PARRILLA
Para obtener los mejores resultados, no precaliente
cuando tenga que asar a la pardtla a menos que su
receta 1o recomiende.
1. Coloque la parritla STURDIGLIDE TM de manera
que la superficie de la comida este alejada cuan-
do menos 3 pulgadas del quemador de asar. Vea
"lnstrucciones para asar" pp. 72, 73.
2, Ponga su comida en la charola de asar y coloque
la charola en el centro de la parrilla del homo.
3, Cierre la puerta hasta la posici6n de tope para asai
La posici6n de tope para asar permite que la
pureta se abra autom_ticamente unas 5 pul-
gadas.
4. Presione BROIL.
PRESIONE USTED ME
continda en la pdgina siguiente
71
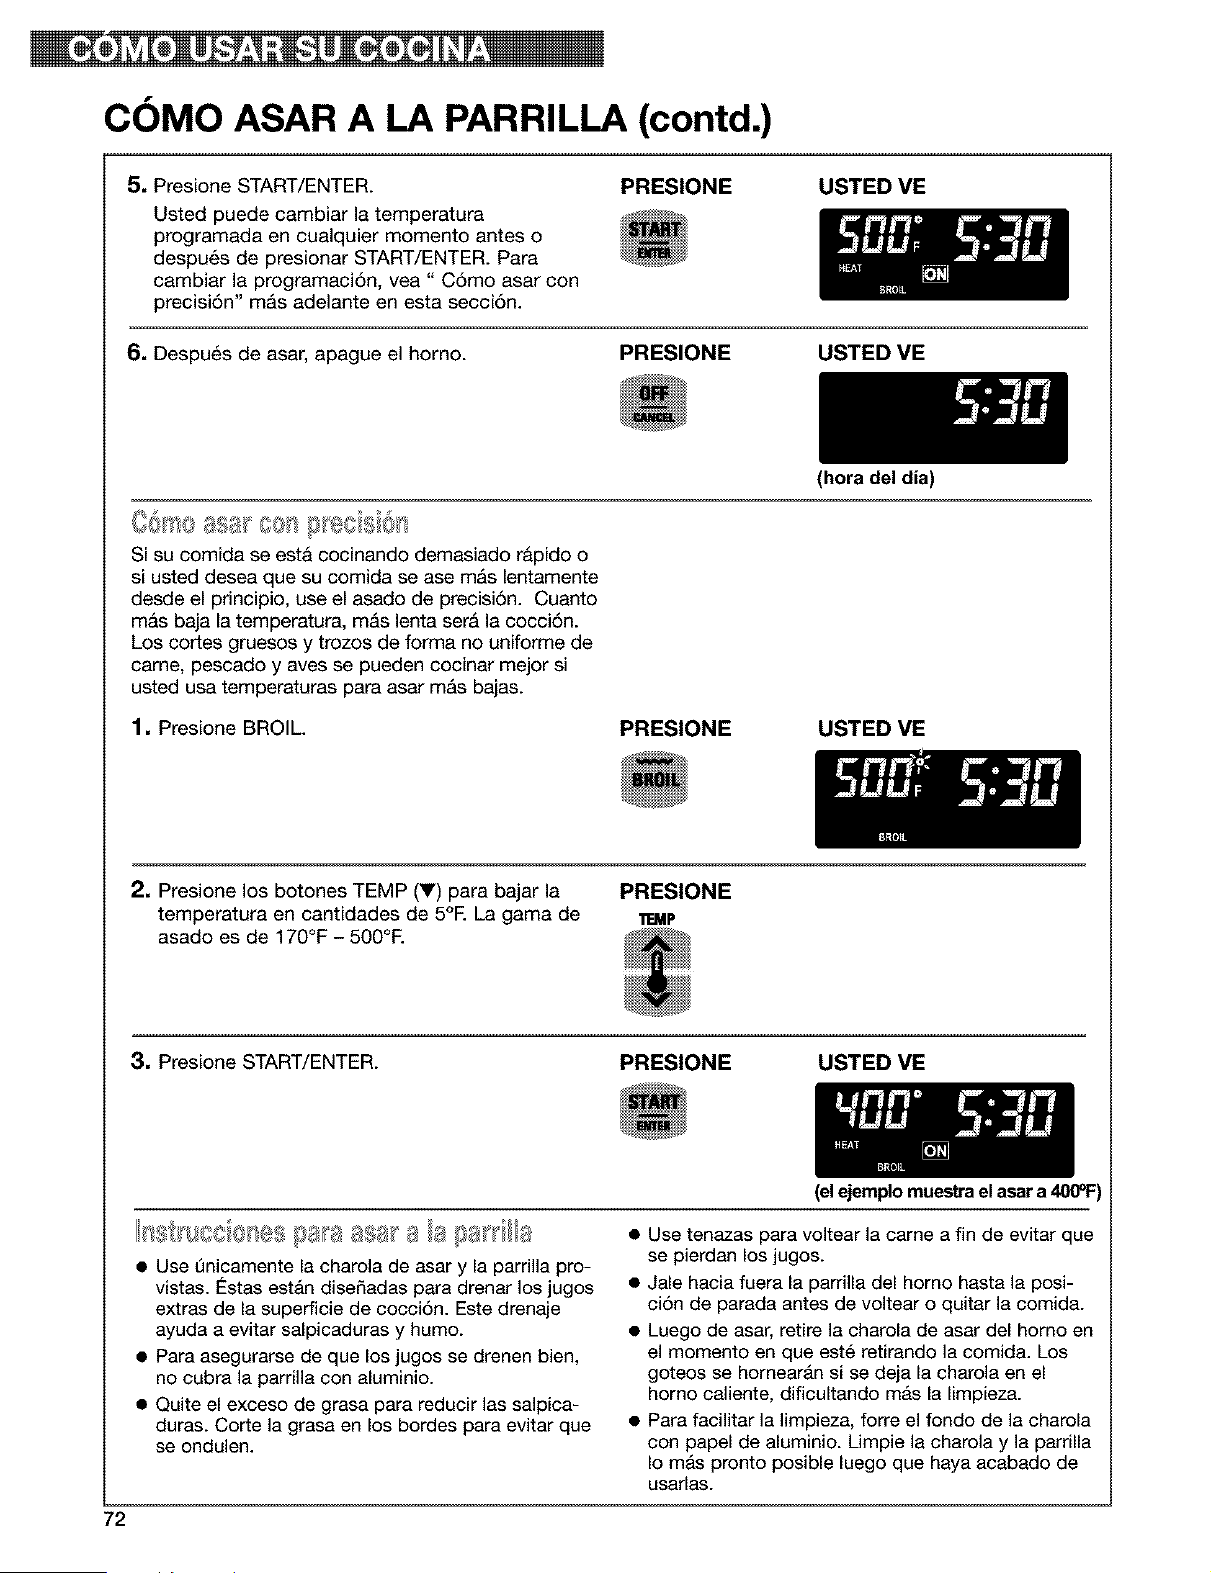
COMO ASAR A LA PARRILLA (contd.)
5, Presione START/ENTER.
Usted puede cambiar la temperatura
programada en cualquier momento antes o
despu6s de presionar START/ENTER. Para
cambiar la programaci6n, vea" C6mo asar con
precisi6n" m&s adelante en esta secci6n.
PRESIONE USTED ME
6. Despu_s de asar, apague el horno.
PRESIONE USTED VE
(hora del dia)
Si su comida se esta cocinando demasiado rapido o
si usted desea que su ¢omida se ase m_s lentamente
desde el prin¢ipio, use el asado de precisi6n. Ouanto
m&s baja la temperatura, m_s lenta ser_ la cocci6n.
Los cortes gruesos y trozos de forma no uniforme de
came, pescado y aves se pueden cocinar mejor si
usted usa temperaturas para asar mAs bajas.
1. Presione BROIL.
PRESIONE USTED VE
2, Presione los botones TEMP (V) para bajar la PRESIONE
temperatura en cantidades de 5°E La gama de 11EMP
asado es de 170°F - 500°E
3, Presione START/ENTER.
PRESIONE USTED VE
72
(elejemplomuestrael asar a400°1=)
0 ' es saa asa a
• Use t)nicamente la charola de asar y la parrilla pro-
vistas. Estas estAn diseSadas para drenar los jugos
extras de la superficie de cocci6n. Este drenaje
ayuda a evitar salpicaduras y humo.
• Para asegurarse de que los jugos se drenen bien,
no cubra la parrilla con aluminio.
• Quite el exceso de grasa para reducir las salpica-
duras. Corte la grasa en los bordes para evitar que
se ondulen.
• Use tenazas para voltear la came a fin de evitar que
se pierdan los jugos.
• Jale hacia fuera la parrilla del homo hasta la posi-
ci6n de parada antes de voltear o quitar la comida.
• Luego de asar, retire la charola de asar del homo en
el momento en que est_ retirando la comida. Los
goteos se hornearAn si se deja la charola en el
homo caliente, dificultando mas la limpieza.
• Para facilitar la limpieza, forre el fondo de la charola
con papel de aluminio. Limpie la charola y la parrilla
Io mAs pronto posible luego que haya acabado de
usarlas.
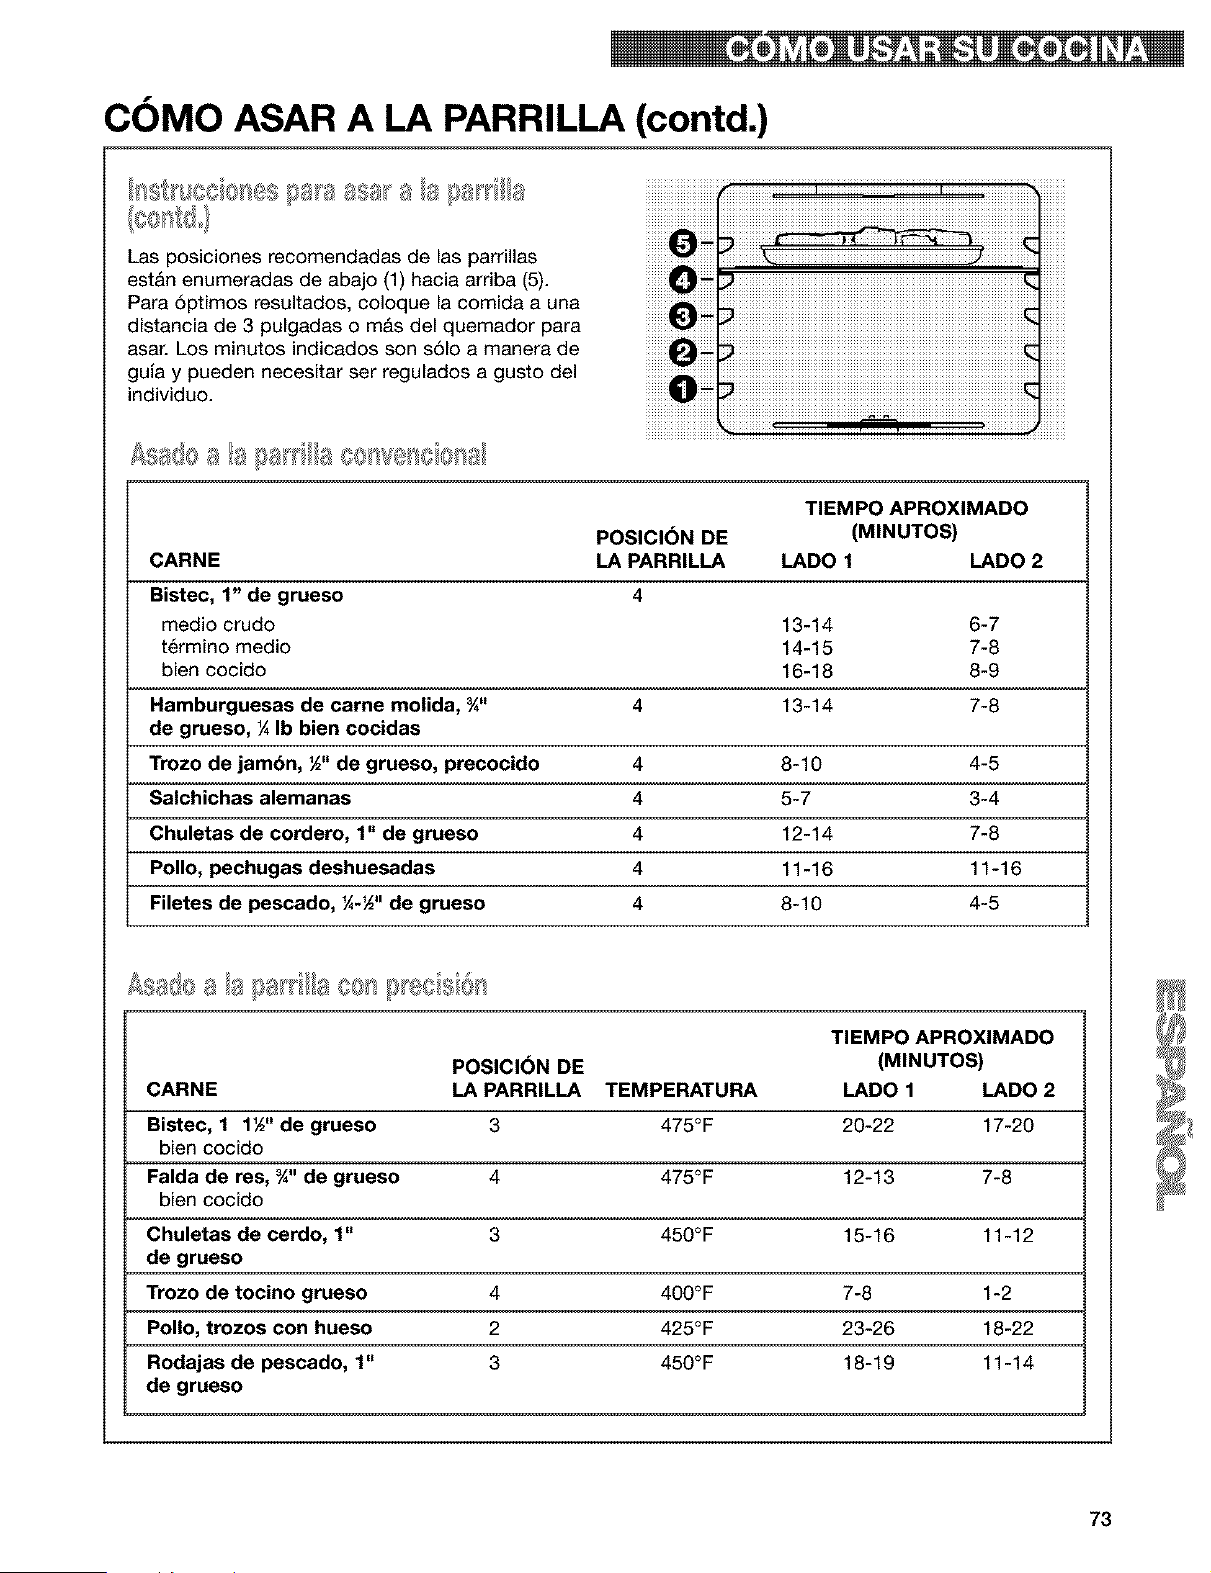
COMO ASAR A LA PARRILLA (contd.)
Las posiciones recomendadas de las parrillas
est&n enumeradas de abajo (1) hacia arriba (5).
Para 6ptimos resultados, coloque la comida a una
distancia de 3 pulgadas o m&s del quemador para
asar. Los minutos indicados son s61o a manera de
guia y pueden necesitar ser regulados a gusto del
individuo.
¢sa@a a ti a a ce 've A
TIEMPO APROXIMADO
POSICI6N DE (MINUTOS)
CARNE LA PARRILLA LADO 1 LADO 2
Bistec, 1" de grueso 4
medio crudo 13-14 6-7
t6rmino medio 14-1 5 7-8
bien cocido 16-18 8-9
Hamburguesas de carne molida, ¾" 4 13-14 7-8
de grueso, ¼ Ib bien cocidas
Trozo de jambn, ½" de grueso, precocido 4 8-10 4-5
Salchichas alemanas 4 5-7 3-4
Chuletas de cordero, 1" de grueso 4 12-14 7-8
Polio, pechugas deshuesadas 4 11-16 11-16
Filetes de pescado, ¼-½" de grueso 4 8-10 4-5
TIEMPO APROXIMADO
POSICI_)N DE (MINUTOS)
CARNE LA PARRILLA TEMPERATURA LADO 1 LADO 2
Bistec, 1 1½" de grueso 3 475°F 20-22 17-20
bien cocido
Falda de res, _" de grueso 4 475°F 12-13 7-8
bien cocido
Chuletas de cerdo, 1" 3 456°F 15-16 11-12
de grueso
Trozo de tocino grueso 4 400°F 7-8 1-2
Polio, trozos con hueso 2 425°F 23-26 18-22
Rodajas de pescado, 1" 3 450°F 18-19 11-14
de grueso
73
COMO USAR RECIPE RECALL TM
RECIPE RECALL le permite cocinar sus alimentos
favoritos m&s r&pida y f&cilmente. Las temperat-
uras han sido seleccionadas para cumplir una var-
iedad de opciones para cada clase de alimento. El
tiempo de cocci6n se puede ajustar alas recetas
individuales y guardarse. La temperatura puede
cambiarse mas no guardarse. Cuando se ejecuta
un cambio, la pantalla no mostrara "PreHEAt"
mientras el homo est_ precalentando.
Bot6n Temperatura Tiempo do
programada programa
325°F 1 hr
350°F 45 min.
375°F 10 min.
400°F 20 min.
1. Coloque la(s) parrilla(s) STURDIGLIDE TM en donde
Io necesite. Para ubicar sus parrillas correctamente,
vea la secci6n "Ubicaci6n de las parrillas y
cacerolas', p. 61.
Si su receta recomienda que no use el
precalentamiento, ponga su comida en el homo
ahora. A pesar de que CASSEROLES no ingresa
"PreHEAt", se recomienda que se deje precalentar
el homo durante 10 minutos antes de colocar la
comida en el homo.
2, Presione uno de los botones MEATS POULTRY,
CASSEROLES, COOKIES o PIZZA.
PRESIONE USTED VE
(ejemplo para MEATS POULTRY)
3. Presione START/ENTER.
NOTA: usted puede cambiar el tiempo de
cocci6n despu6s de presionar START/ENTER
oprimiendo los botones de HOUR/MIN. No
necesita oprimir ningQn otto bot6n. El homo
terminar& de cocinar con la nueva hora.
Los botones COOKIES y PIZZA incluyen un
precalentamiento.
PRESIONE USTED VE
Iconteo regresivo)
ejemplo para MEATS POULTRY)
Cuando termine le precalentamiento para
COOKIES y PIZZA, se escuchar& una sepal y
aparecer& el conteo regresivo del tiempo de
cocci6n en la pantalla.
74
(ejemplo para PIZZA)
(conteo regresivo)
(ejemplo para PIZZA)

COMO USAR RECIPE RECALL TM (contd.)
75

COMO USAR SERVE WARM
iiiiiiiiiii_iii;iii_i_i_iiii_i_iiiii_iii_i_iiii_uBDij_i_i_E_iii_i_iiiiiiiiiiiiiiiiiiiiiiiiiiiiiiiiiiiiiiiiiiiiiiiiiiiiiiiiiiiiiiiiiiiiiiiiiiiiiiiiiiiiiiiiiiiiiiiiiiiiiiiiiiiiiiiiiiiiiiiiiiiiiiiiiiiiiiiiiiiiiiiiiiiiiiiiiiiiiiiiiiiiiiiiiiiiiiiiiiiiiiiiiiiiiiiiiiiiiiiiiiiiiiiiiiiiiiiiiiiiiiiiiiiiiiiiiiiiiiiiiiiiiiiiiiiiiiiiiiiiiiiiiiiiiiiiiiiiiiiiiiiiiiiiiiiii
76
COMO USAR SERVE WARM (contd.)
iiiiiii_i iiiiiiiiiiiiiiiiiii_iiiii _iiiiiiii_iiiiiii ¸iiiiiiiiiiiiiiiil+iii _i i iiiii i iiiii iii¸_i i ii i'iii i iiii i'i i i_i iii i ii ii" iii i i iiiiiiiiiiiiiiiiiiiiiiiiiiiiiiiiiiiiiiiiiiiiiiiiiiiiiiiiiiiiiiiiiiiiiiiiiiiiiiiiiiiiii
contint_a en la p_gina siguiente
77
COMO USAR SERVE WARM (contd.)
iiiiiiiiiiiiiiiiiiiiiiia_iiii_iii_i_i_ii{_iiiiip_iii_b_iii_i_iii_i_i_iiiiiiiiiiiiiiiiiiiiiiiiiiiiiiiiiiiiiiiiiiiiiiiiiiiiiiiiiiiiiiiiiiiiiiiiiiiiiiiiiiiiiiiiiiiiiiiiiiiiiiiiiiiiiiiiiiiiiiiiiiiiiiiiiiiiiiiiiiiiiiiiiiiiiiiiiiiiiiiiiiiiiiiiiiiiiiiiiiiiiiiiiiiiiiiiiiiiiiiiiiiiiiiiiiiiiiiiiiiiiiiiiiiiiiiiiiiiiiiiiiiiiiiiiiiiiiiiiiiiiiiiiiiiiiiiiiiiiiiiiiiiiiiiiiii
_re_i_e B_KE PRES|ONE USTED
78
COMO USAR SERVE WARM (contd.)
_M+_r. ......................................................................................................................................HOUR MIN
iiiiiiiiiiiiiiiNOTAiiiSei
contint_a en la p_gina siguiente
79
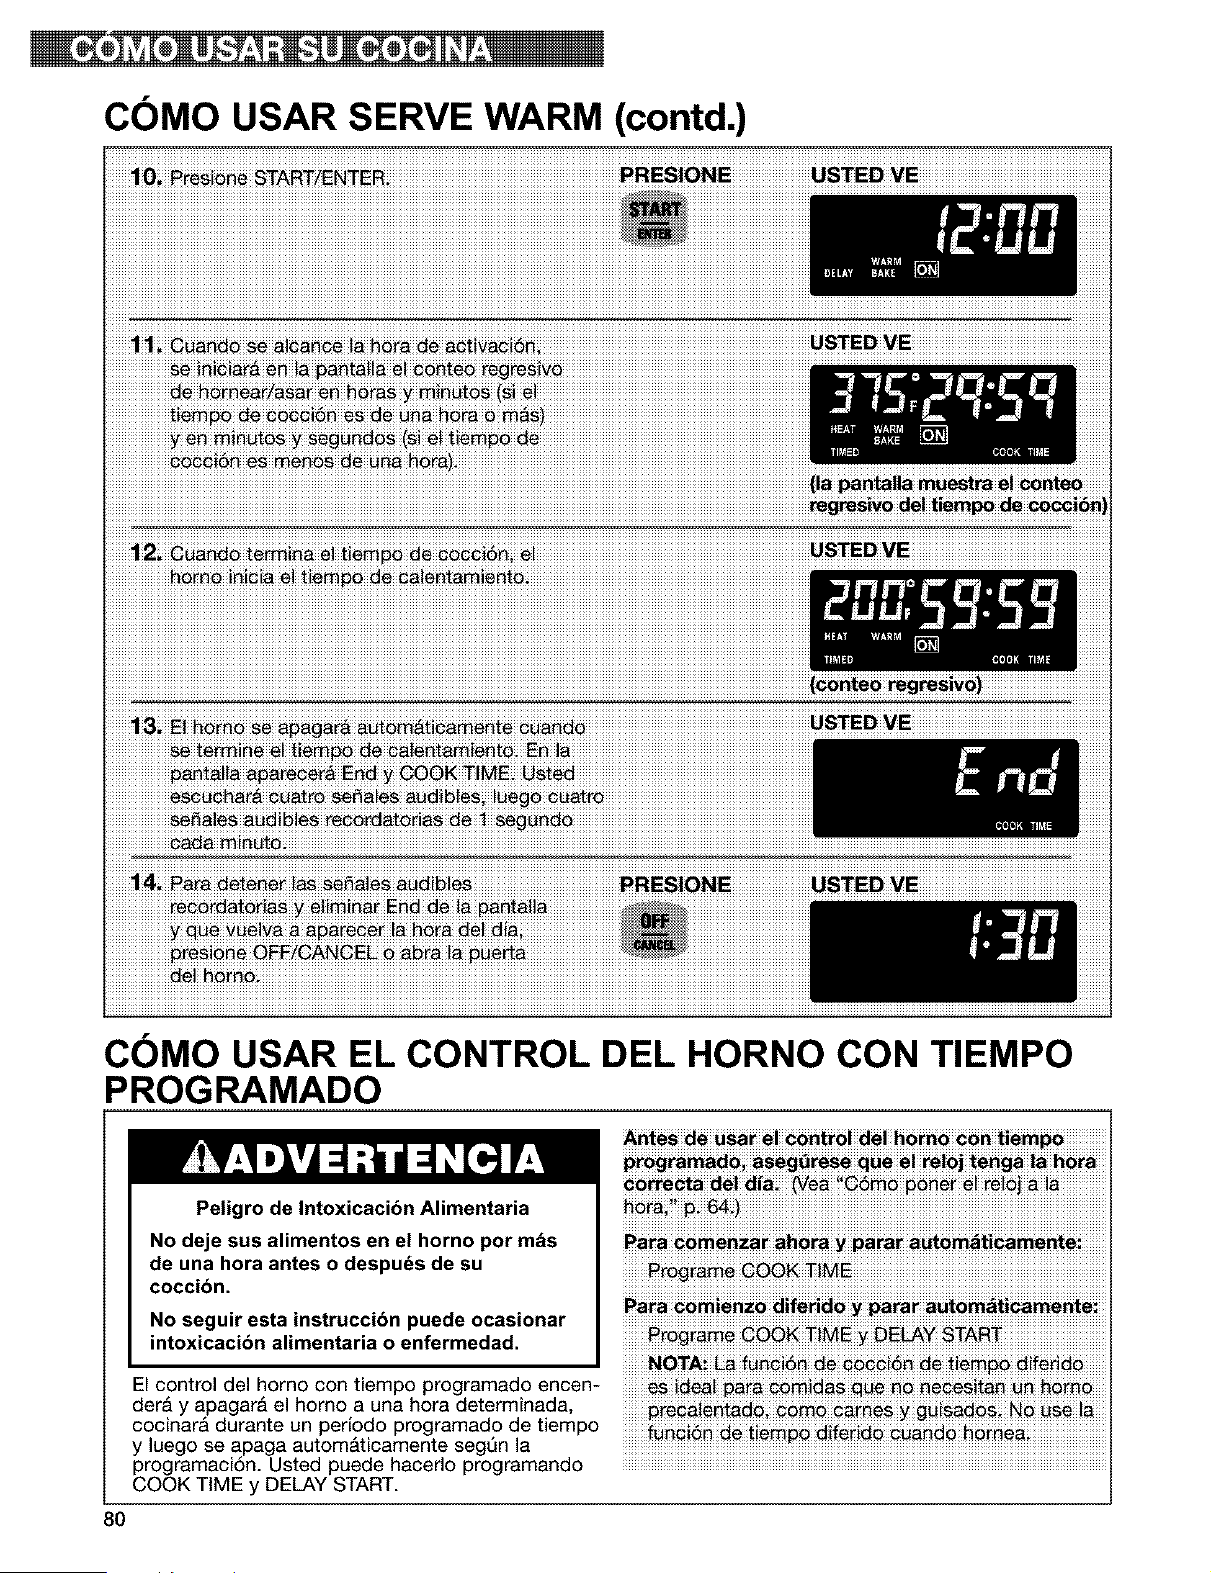
COMO USAR SERVE WARM (contd.)
COMO USAR EL CONTROL DEL HORNO CON TIEMPO
PROGRAMADO
Peligro de Intoxicacibn Alimentaria
No deje sus alimentos en el horno por m&s
de una hora antes o despuds de su
coccibn.
No seguir esta instrucci6n puede ocasionar
intoxicacibn alimentaria o enfermedad.
El control del horno con tiempo programado encen-
der& y apagar& el homo a una hora determinada,
cocinar& durante un periodo programado de tiempo
y luego se apaga autom&ticamente segQn la
programaci6n. Usted puede hacerlo programando
COOK TIME y DELAY START.
progra_i _g_re_ que e! re!oj _eng_ !_ h_ra
PaPa_m_nza_ ah_ra _ _ara_ a_om_icamemei
_rog_A_ 6_K _!ME 2 DELAY START
80
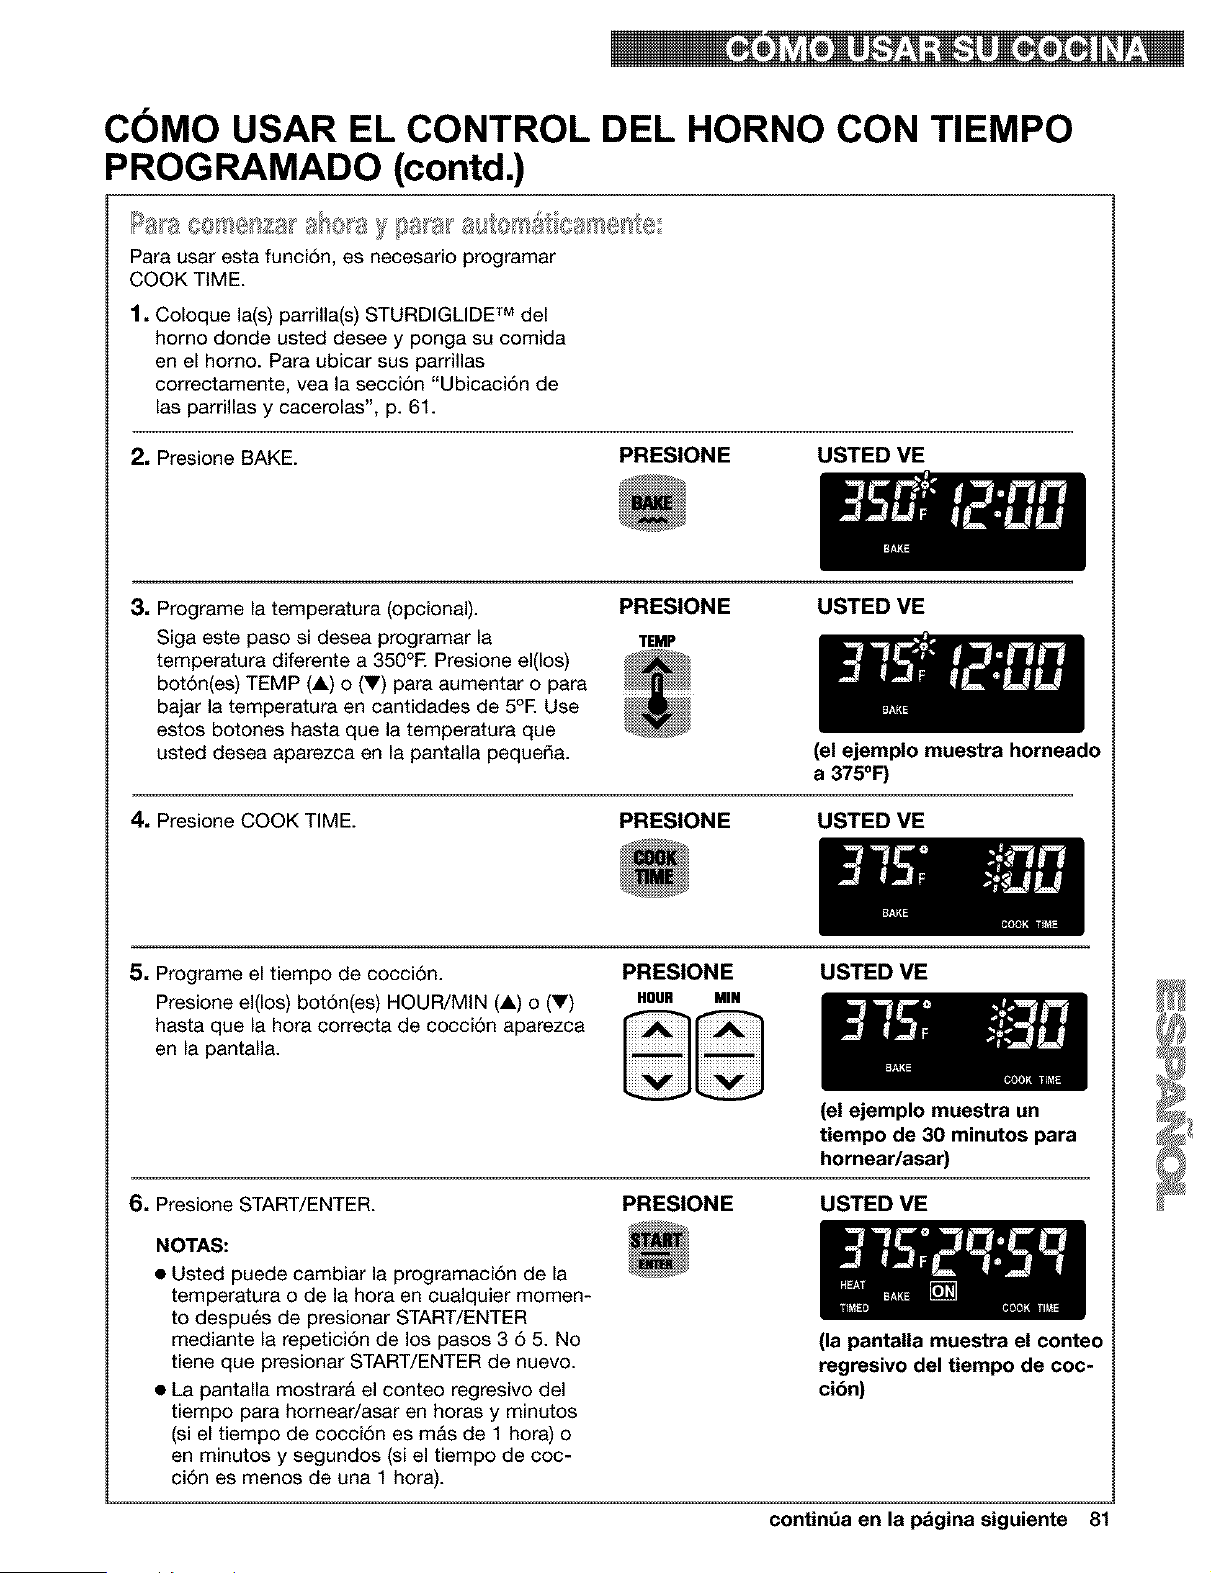
COMO USAR EL CONTROL DEL HORNO CON TIEMPO
PROGRAMADO (contd.)
S.... _ _' _ , -_4_i_ ' _@o_
Para usar esta funoi6n, es neoesario programar
COOK TIME.
1, Coloque la(s) parrilla(s) STURDIGLIDE TM del
homo donde usted desee y ponga su comida
en el homo. Para ubicar sus parrillas
correctamente, vea la secci6n "Ubicaci6n de
las parrillas y cacerolas", p. 61.
2, Presione BAKE.
PRESIONE USTED VE
3. Programe la temperatura (opcional).
Siga este paso si desea programar la
temperatura diferente a 350°E Presione el(los)
bot6n(es) TEMP (1) o (V) para aumentar o para
bajar la temperatura en cantidades de 5°E Use
estos botones hasta que la temperatura que
usted desea aparezca en la pantalla pequeda.
PRESIONE
TEMP
USTED VE
(el ejemplo muestra horneado
a 375°F)
4. Presione COOK TIME. PRESIONE USTED VE
5, Programe el tiempo de cocci6n.
Presione el(los) bot6n(es) HOUR/MIN (i) o (V)
hasta que la hora correcta de cocci6n aparezca
en la pantalla.
PRESIONE
HOUR MIN
USTED ME
6, Presione START/ENTER.
NOTAS:
• Usted puede cambiar la programaci6n de la
temperatura o de la hora en cualquier momen-
to despu6s de presionar START/ENTER
mediante la repetici6n de los pasos 3 6 5. No
tiene que presionar START/ENTER de nuevo.
• La pantalla mostrarA el conteo regresivo del
tiempo para homear/asar en horas y minutos
(si el tiempo de cocci6n es mAs de 1 hora) o
en minutos y segundos (si el tiempo de coc-
ci6n es menos de una 1 hora).
(el ejemplo muestra un
tiempo de 30 minutos para
hornear/asar)
PRESIONE USTED ME
(la pantalla muestra el conteo
regresivo del tiempo de coc-
cibn)
contint_a en la pagina siguiente 81
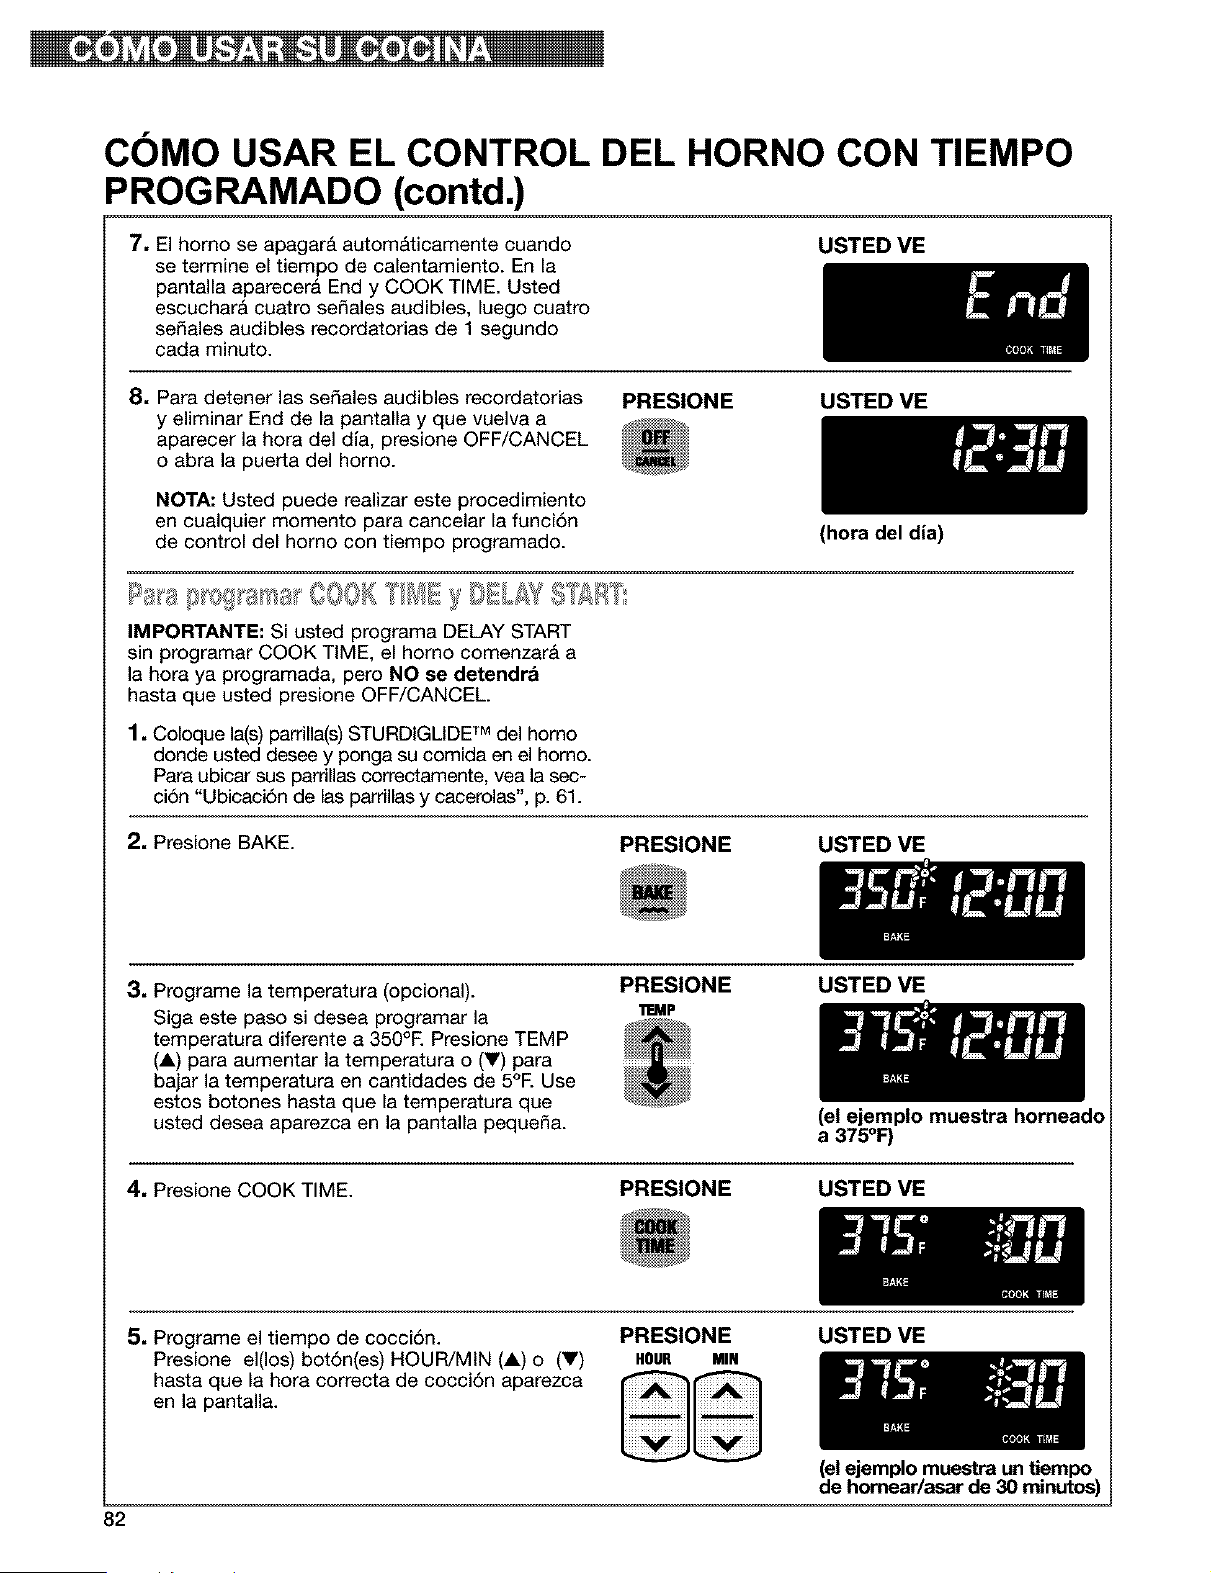
COMO USAR EL CONTROL DEL HORNO CON TIEMPO
PROG RAMADO (contd.)
7, El homo se apagar& autom&ticamente cuando
se termine el tiempo de calentamiento. En la
pantalla aparecera End y COOK TIME. Usted
escuchar& cuatro se_ales audibles, luego cuatro
sedales audibles recordatorias de 1 segundo
cada minuto.
USTED ME
8, Para detener las sedales audibles recordatorias
y eliminar End de la pantalla y que vuelva a
aparecer la hora del dla, presione OFF/CANCEL
o abra la puerta del homo.
NOTA: Usted puede realizar este procedimiento
en cualquier momento para cancelar la funci6n
de control del homo con tiempo programado.
PRESIONE USTED ME
IMPORTANTE: Si usted programa DELAY START
sin programar COOK TIME, el homo comenzar& a
la hora ya programada, pero NO se detendra
hasta que usted presione OFF/CANCEL
1, Coloque la(s) parrilla(s) STURDIGLIDE TM del homo
donde usted desee y ponga su comida en el horno.
Para ubicar sus pardllas correctamente, vea la sec-
ci6n "Ubicaci6n de las parrillas y cacerolas', p. 61.
2, Presione BAKE.
PRESIONE
(hora del dia)
USTED VE
3, Programe la temperatura (opcional).
Siga este paso si desea programar la
temperatura diferente a 350°E Presione TEMP
(A) para aumentar la temperatura o (V) para
bajar la temperatura en cantidades de 5°E Use
estos botones hasta que la temperatura que
usted desea aparezca en la pantalla peque_a.
PRESIONE
11EMP
USTED VE
(el ejemplo muestra horneado
a 375°1:)
4, Presione COOK TIME. PRESIONE USTED VE
5, Programe el tiempo de cocci6n.
Presione el(los) bot6n(es) HOUR/MIN (A) o (V)
hasta que la hora correcta de cocci6n aparezca
en la pantalla.
PRESIONE
HOUR MIN
USTED VE
82
(el ejemplo muestra un tiempo
de homear/asar de 30 minutos)
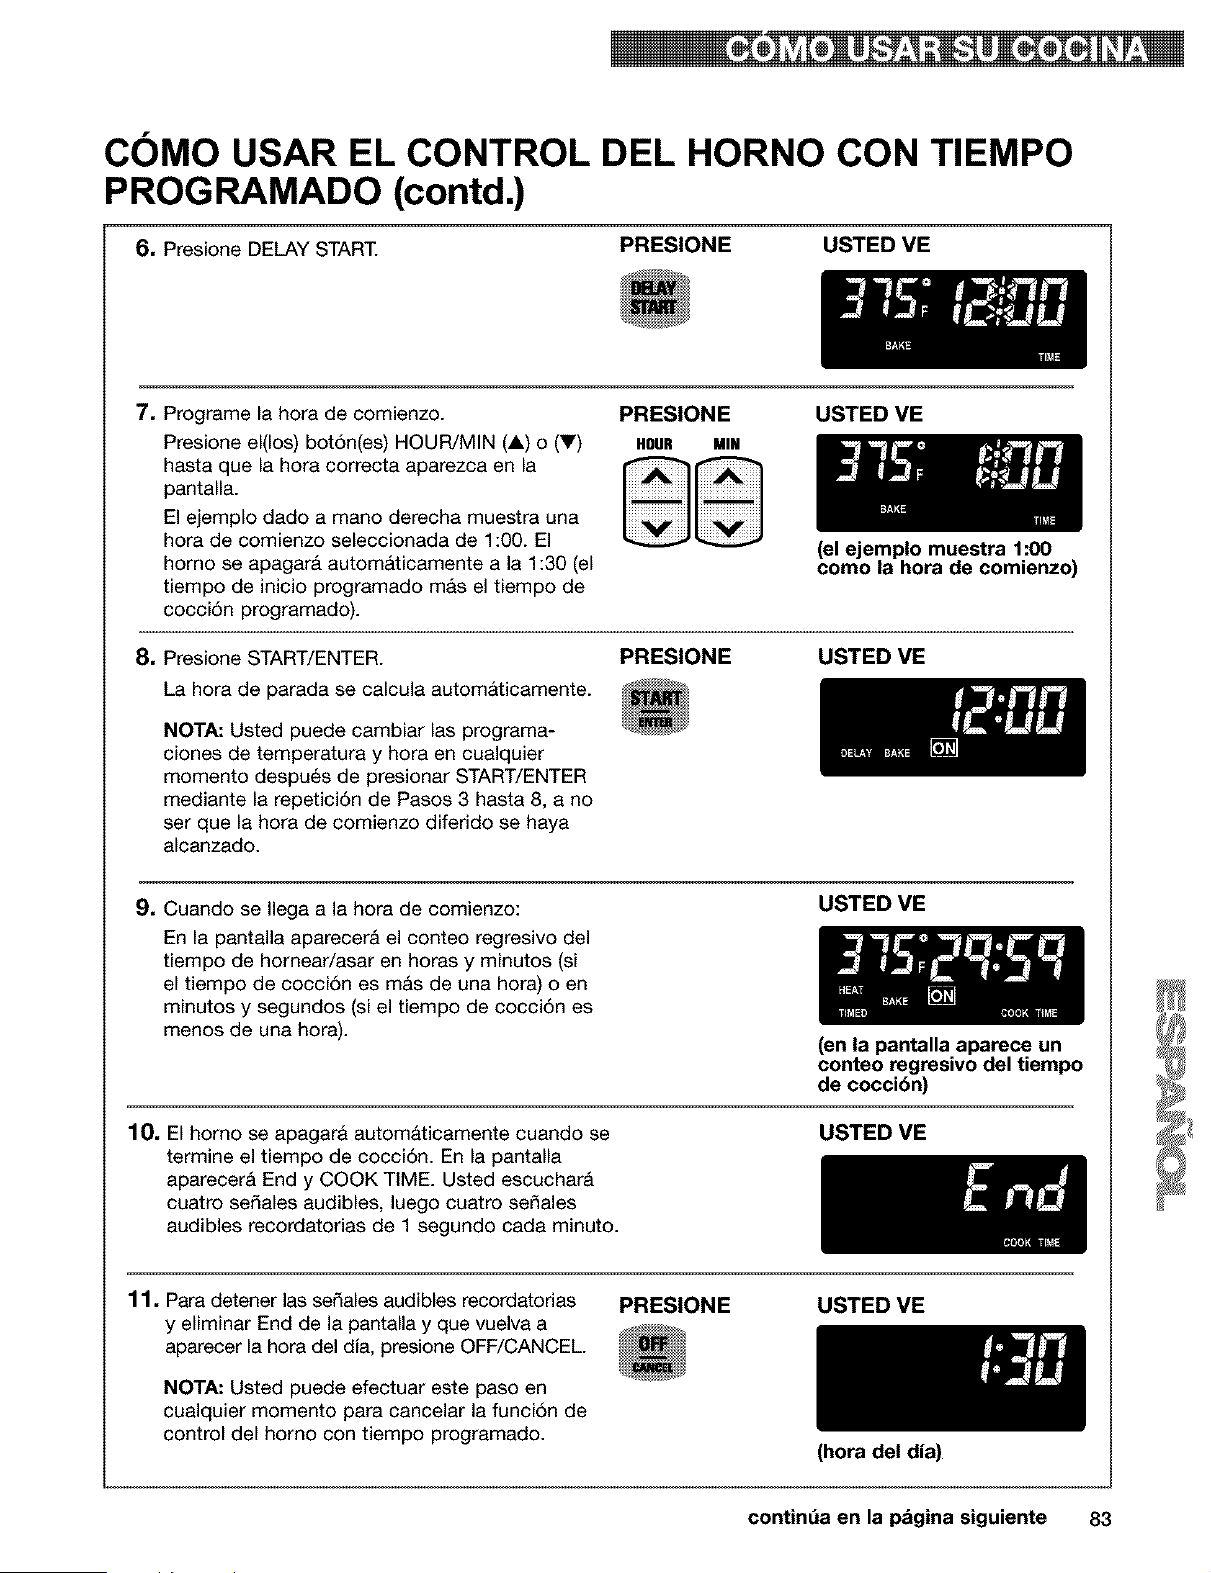
COMO USAR EL CONTROL DEL HORNO CON TIEMPO
PROG RAMADO (contd.)
6, Presione DELAY START.
PRESIONE USTED VE
7, Programe la hora de comienzo.
Presione el(los) bot6n(es) HOUR/MIN (A) o (V)
hasta que la hora correcta aparezca en la
pantalla.
El ejemplo dado a mano derecha muestra una
hora de comienzo seleccionada de 1:00. El
homo se apagar& autom&ticamente a la 1:30 (el
tiempo de inicio programado mas el tiempo de
cocci6n programado).
PRESIONE USTED VE
HOUR MIN
8, Presione START/ENTER.
La hora de parada se calcula automAticamente.
NOTA: Usted puede cambiar las programa-
clones de temperatura y hora en cualquier
momento despu6s de presionar START/ENTER
mediante la repetici6n de Pasos 3 hasta 8, a no
ser que la hora de comienzo diferido se haya
alcanzado.
PRESIONE
(el ejemplo muestra 1:00
como la hora de comienzo)
USTED VE
9, Cuando se Ilega a la hora de comienzo:
En la pantalla aparecer& el conteo regresivo del
tiempo de hornear/asar en horas y minutos (si
el tiempo de cocci6n es mAs de una hora) o en
minutos y segundos (si el tiempo de cocci6n es
menos de una hora).
USTED VE
(en la pantalla aparece un
conteo regresivo del tiempo
de cocci6n)
10, El homo se apagarA automaticamente cuando se
termine el tiempo de cocci6n. En la pantalla
aparecer& End y COOK TIME. Usted escuchar&
cuatro sedales audibles, luego cuatro se_ales
audibles recordatorias de 1 segundo cada minuto.
USTED VE
11, Para detener las sedales audibles recordatorias
y eliminar End de la pantalla y que vuelva a
aparecer la hora del dia, presione OFF/CANCEL.
NOTA: Usted puede efectuar este paso en
cualquier momento para cancelar la funci6n de
control del homo con tiempo programado.
PRESIONE USTED ME
(hora del dia)
contint_a en la pagina siguiente 83
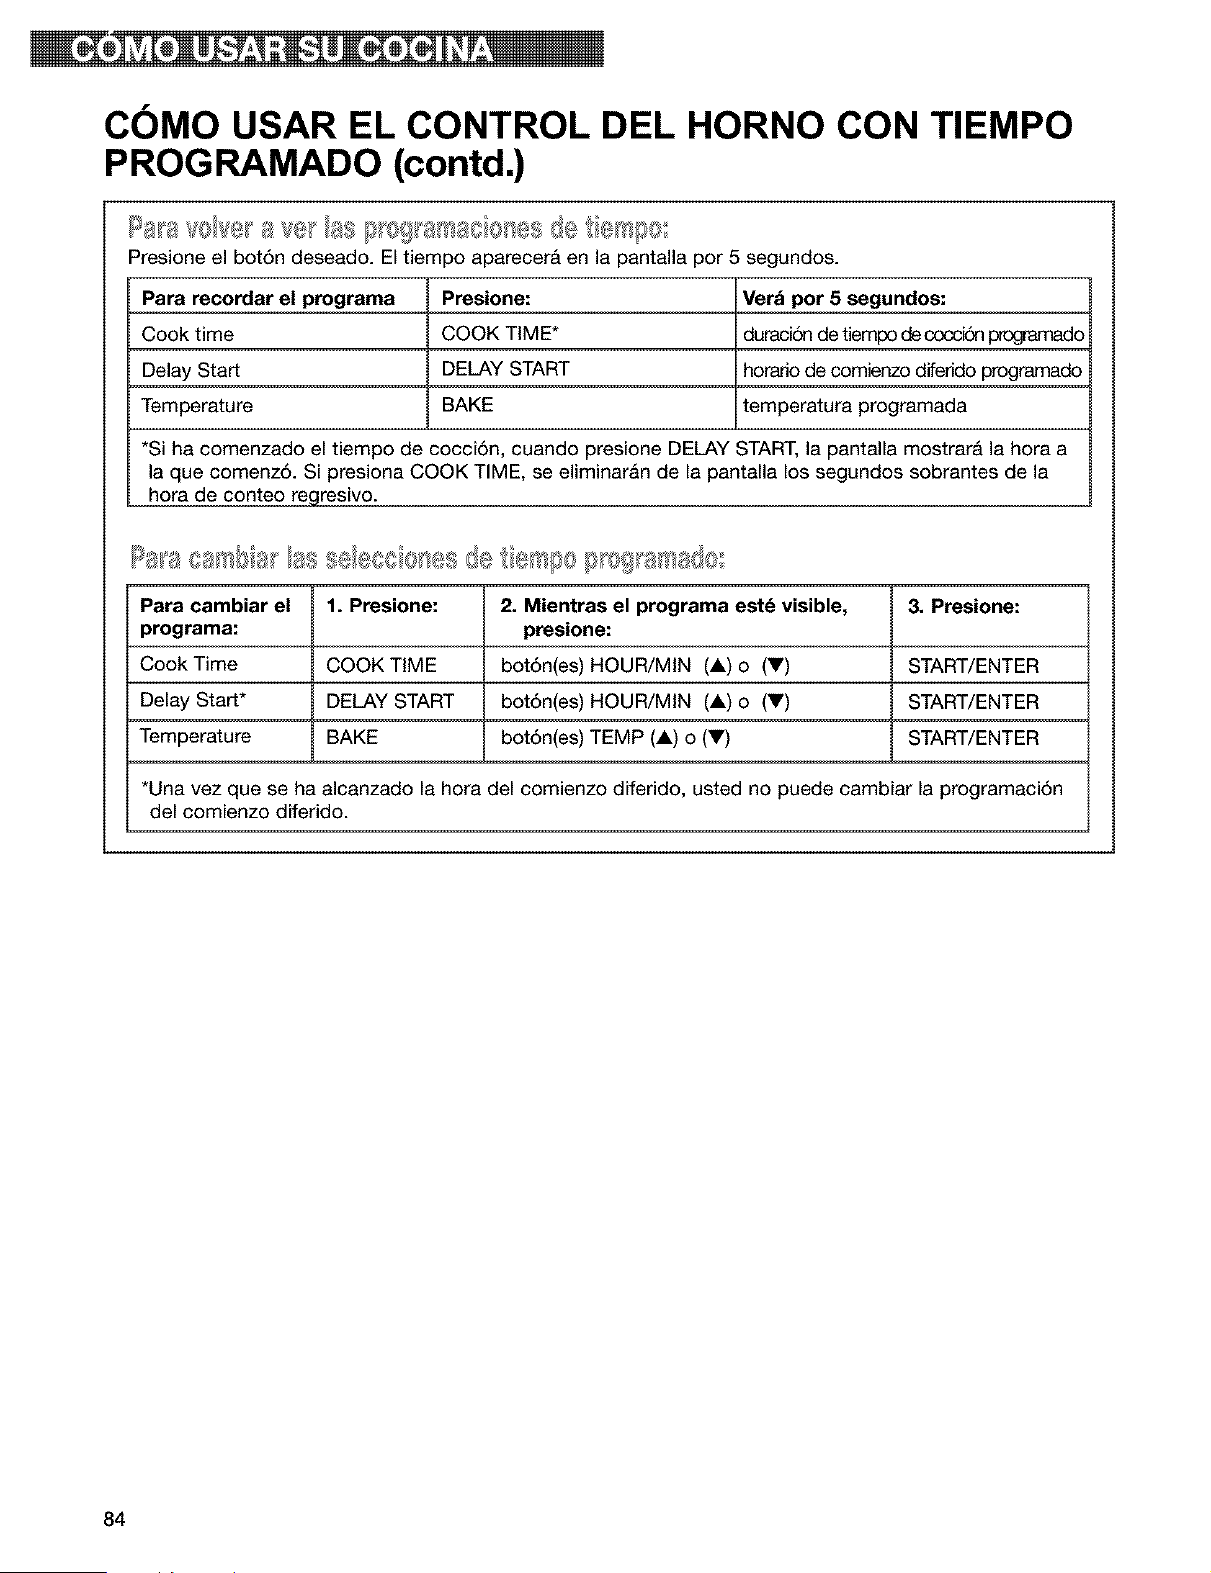
COMO USAR EL CONTROL DEL HORNO CON TIEMPO
PROGRAMADO (contd.)
s,. [} 0!_8/_a8 8Ies de I/e Is00
Presione el bot6n deseado. El tiempo apareceri en la pantalla por 5 segundos.
Para recordar el programa Presione: Ver_ pot 5 segundos:
Cook time COOK TIME* duraci6n de tiempo decoccid_ _ado
Delay Start DELAY START horado de comienzo diferido programado
Temperature BAKE temperatura programada
*Si ha comenzado el tiempo de cocci6n, cuando presione DELAY START, la pantalla mostrar& la hora a
la que comenz6. Si presiona COOK TIME, se eliminaran de la pantalla los segundos sobrantes de la
hora de conteo regresivo.
Para cambiar el 1. Presione: 2. Mientras el programa est_ visible, 3. Presione:
programa: presione:
Cook Time COOK TIME bot6n(es) HOUR/MIN (A) o (Y) START/ENTER
Delay Start* DELAY START bot6n(es) HOUR/MIN (A) o (Y) START/ENTER
Temperature BAKE bot6n(es) TEMP (A) o (V) START/ENTER
*Una vez que se ha alcanzado la hora del comienzo diferido, usted no puede cambiar la programaci6n
del comienzo diferido.
84
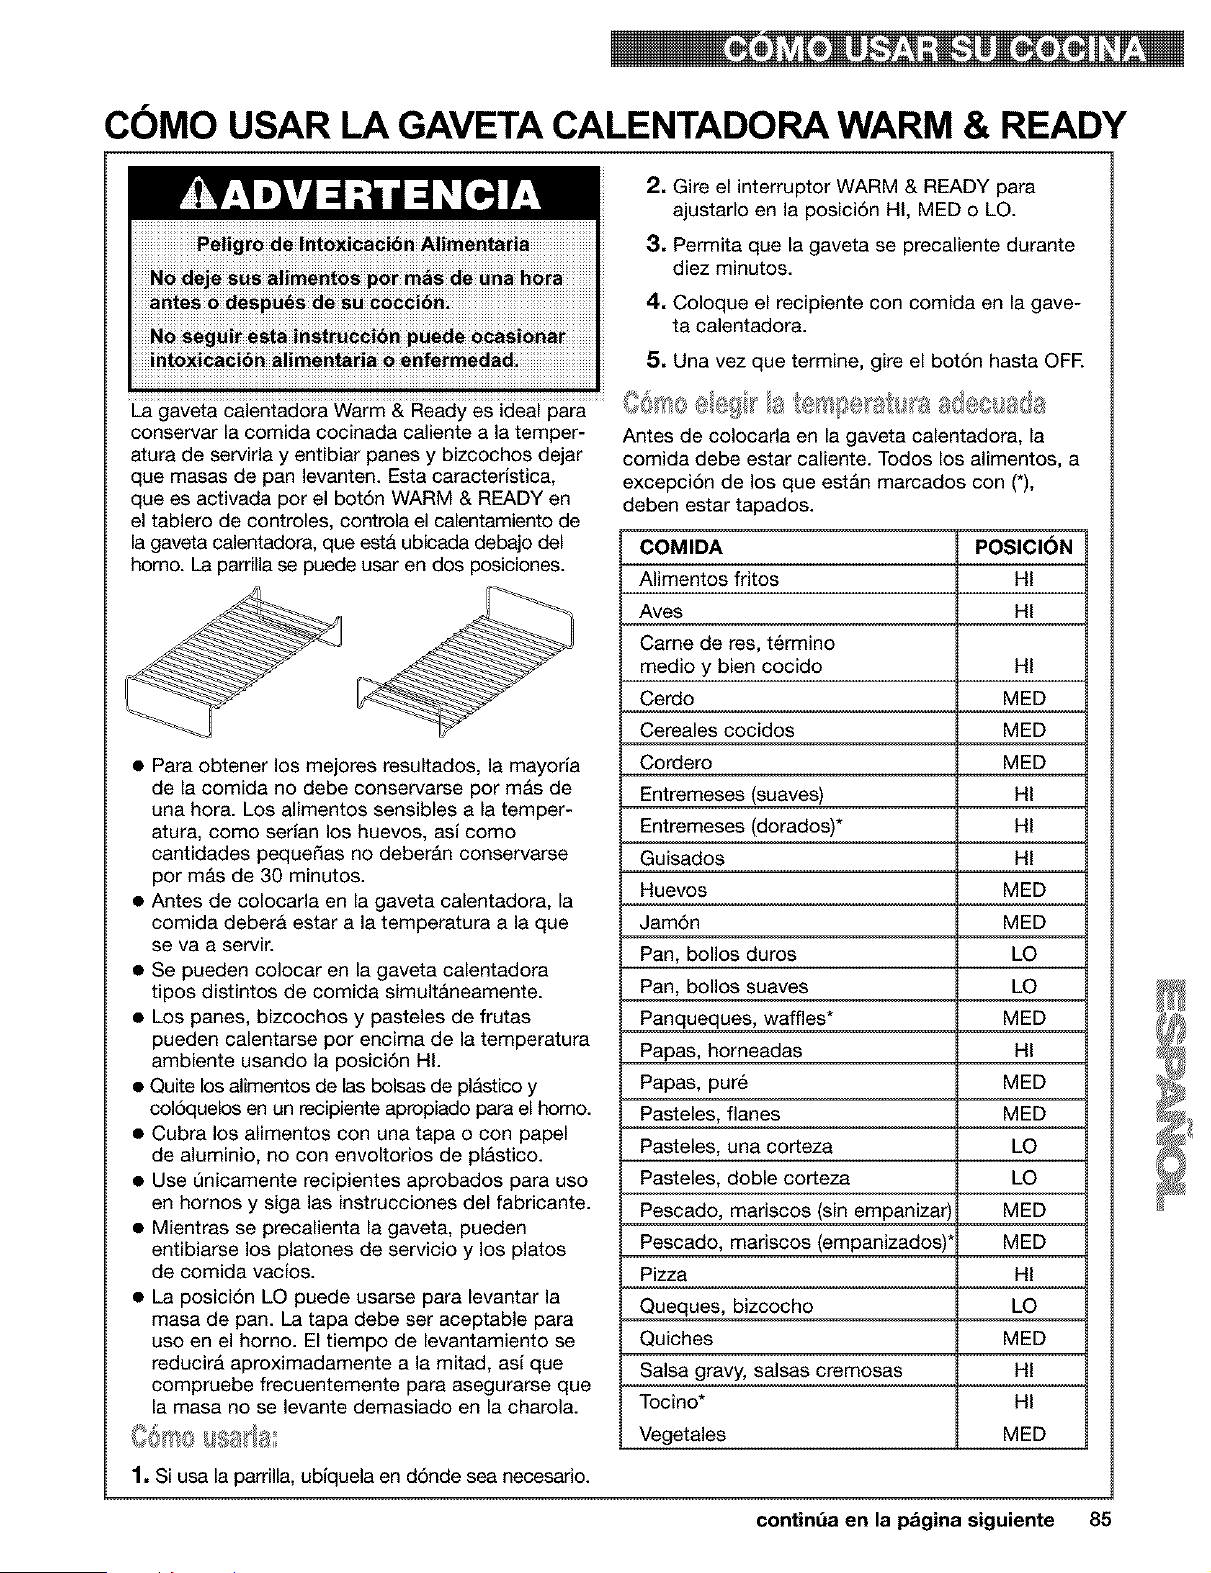
COMO USAR LA GAVETA CALENTADORA WARM & READY
La gaveta calentadora Warm & Ready es ideal para
conservar la comida cocinada caliente a la temper-
atura de servirla y entibiar panes y bizcochos dejar
que masas de pan levanten. Esta caracterJstica,
que es activada por el bot6n WARM & READY en
el tablero de controles, controla el calentamiento de
la gaveta calentadora, que esta ubicada debajo del
homo. La parrilla se puede usar en dos posiciones.
• Para obtener los mejores resultados, la mayorla
de la comida no debe conservarse por m&s de
una hora. Los alimentos sensibles a la temper-
atura, como serlan los huevos, asl como
cantidades peque_as no deberAn conservarse
por m&s de 30 minutos.
• Antes de colocarla en la gaveta calentadora, la
comida deberA estar a la temperatura a la que
se va a servir.
• Se pueden colocar en la gaveta calentadora
tipos distintos de comida simultAneamente.
• Los panes, bizcochos y pasteles de frutas
2. Gire el interruptor WARM & READY para
ajustarlo en la posici6n HI, MED o LO.
3. Permita que la gaveta se precaliente durante
diez minutos.
4. Coloque el recipiente con comida en la gave-
ta calentadora.
5. Una vez que termine, gire el bot6n hasta OFE
Antes de colocada en la gaveta calentadora, la
comida debe estar caliente. Todos los alimentos, a
excepci6n de los que estAn marcados con (*),
deben estar tapados.
COMIDA POSICI_N
Alimentos fritos HI
Aves HI
Came de res, t_rmino
medio y bien cocido HI
Cerdo MED
Cereales cocidos MED
Cordero MED
Entremeses (suaves) HI
Entremeses (dorados)* HI
Guisados HI
Huevos MED
Jam6n MED
Pan, bollos duros LO
Pan, bollos suaves LO
Panqueques, waffles* MED
pueden calentarse por encima de la temperatura Papas, horneadas HI
ambiente usando la posici6n HI.
• Quite los alimentos de las bolsas de plAstico y
col6quelos en un recipiente apropiado para el homo.
• Cubra los alimentos con una tapa o con papel
de aluminio, no con envoltorios de plAstico.
• Use Qnicamente recipientes aprobados para uso
en hornos y siga las instrucciones del fabricante.
• Mientras se precalienta la gaveta, pueden
entibiarse los platones de servicio y los platos
de comida vacJos.
• La posici6n LO puede usarse para levantar la
masa de pan. La tapa debe ser aceptable para
uso en el horno. El tiempo de levantamiento se
reducirA aproximadamente a la mitad, asi que
Papas, put6 MED
Pasteles, flanes MED
Pasteles, una corteza LO
Pasteles, doble corteza LO
Pescado, mariscos (sin empanizar) MED
Pescado, mariscos (empanizados)' MED
Pizza HI
Queques, bizcocho LO
Quiches MED
Salsa gravy, salsas cremosas HI
compruebe frecuentemente para asegurarse que
la masa no se levante demasiado en la charola. Tocino* HI
_',_@_"_@%/__ _t_: Vegetales MED
1. Si usa la pardlla, ubiquela en d6nde sea necesario.
contint_a en la pagina siguiente 85
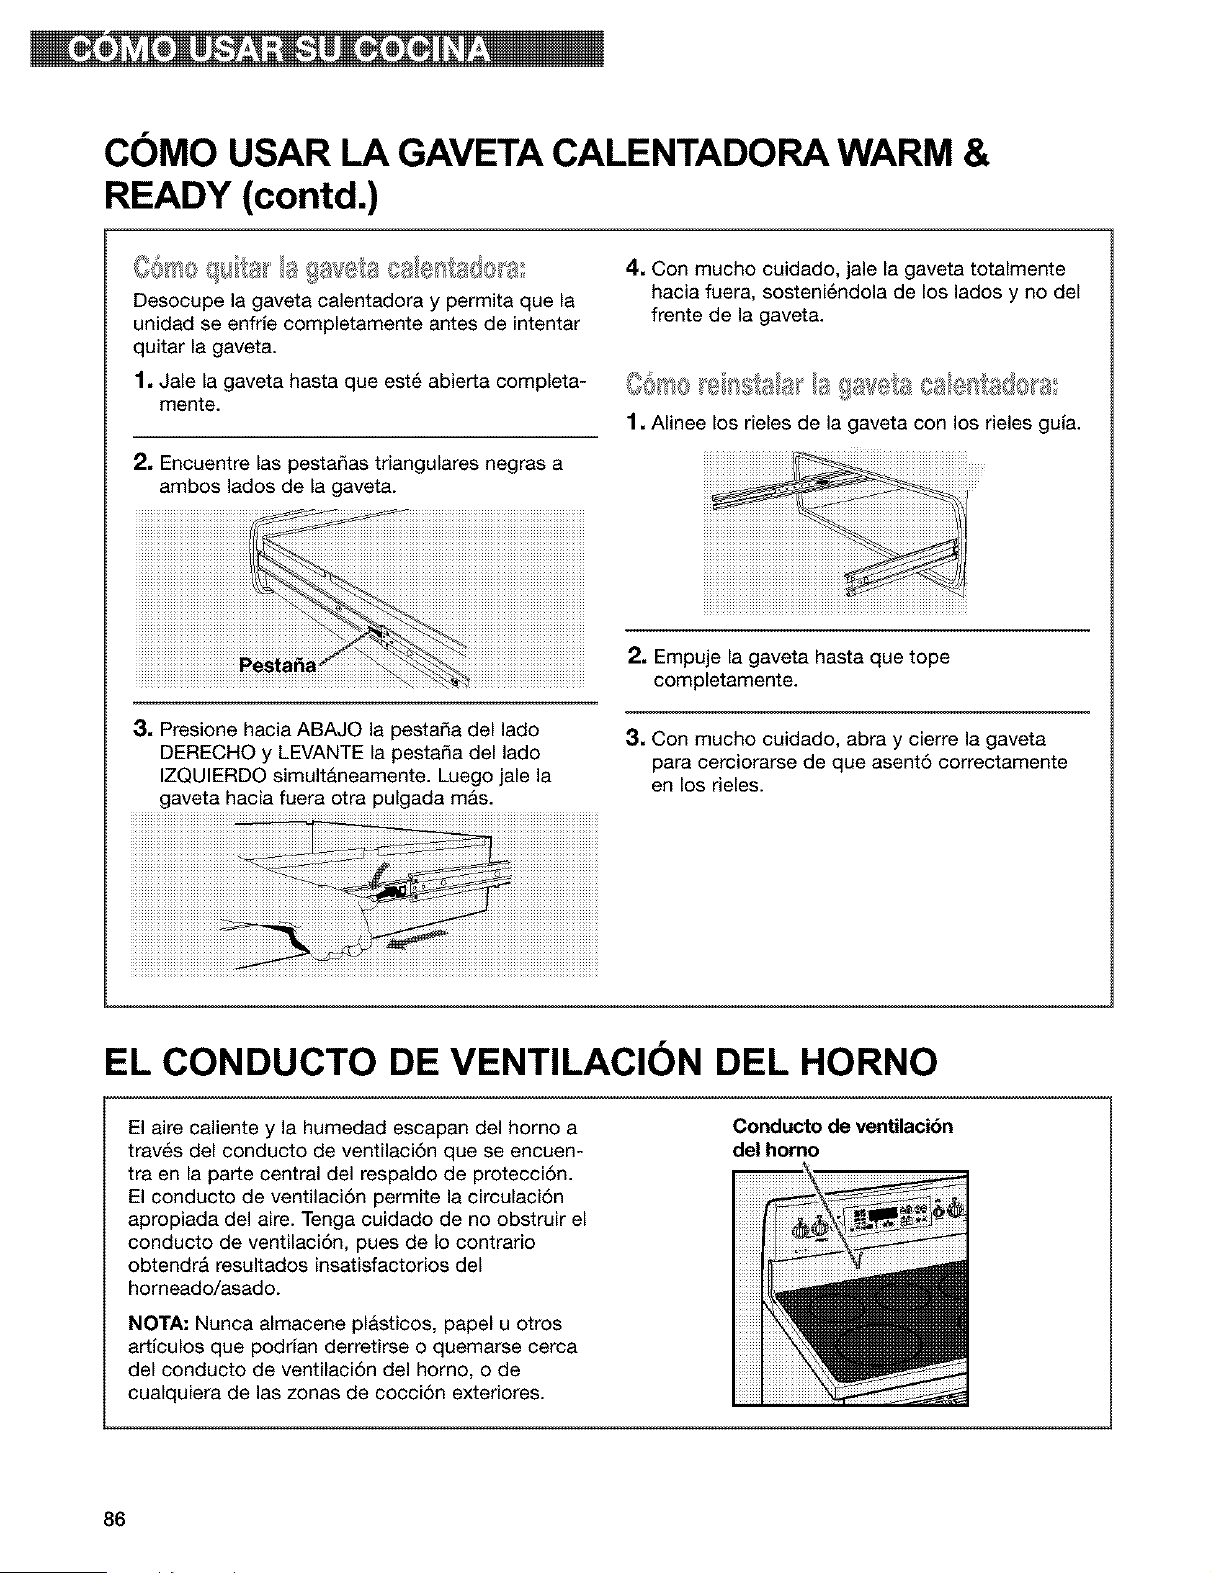
COMO USAR LA GAVETACALENTADORA WARM &
READY (contd.)
Co,to q,,f,a_la gav<A:a,,ales,s@a°
Desocupe la gaveta calentadora y permita que la
unidad se enfHe completamente antes de intentar
quitar la gaveta.
1. Jale la gaveta hasta que est_ abierta completa-
mente.
2. Encuentre las pesta_as triangulares negras a
ambos lados de la gaveta.
4. Con mucho cuidado, jale la gaveta totalmente
hacia fuera, sosteni6ndola de los lados y no del
frente de la gaveta.
1. Alinee los rieles de la gaveta con los rieles gula.
3, Presione hacia ABAJO la pestada del lado
DERECHO y LEVANTE la pesta_a del lado
IZQUIERDO simult&neamente. Luego jale la
gaveta hacia fuera otra pulgada mAs.
2. Empuje la gaveta hasta que tope
completamente.
3. Con mucho cuidado, abra y cierre la gaveta
para cerciorarse de que asent6 correctamente
en los rieles.
EL CONDUCTO DE VENTILACION DEL HORNO
Conducto de ventilaci6n
del homo
El aire caliente y la humedad escapan del homo a
trav_s del conducto de ventilaci6n que se encuen-
tra en la parte central del respaldo de protecci6n.
El conducto de ventilaci6n permite la circulaci6n
apropiada del aire. Tenga cuidado de no obstruir el
conducto de ventilaci6n, pues de Io contrario
obtendr& resultados insatisfactorios del
horneado/asado.
NOTA."Nunca almacene plasticos, papel u otros
artlculos que podrian derretirse o quemarse cerca
del conducto de ventilaci6n del homo, o de
cualquiera de las zonas de cocci6n exteriores.
86
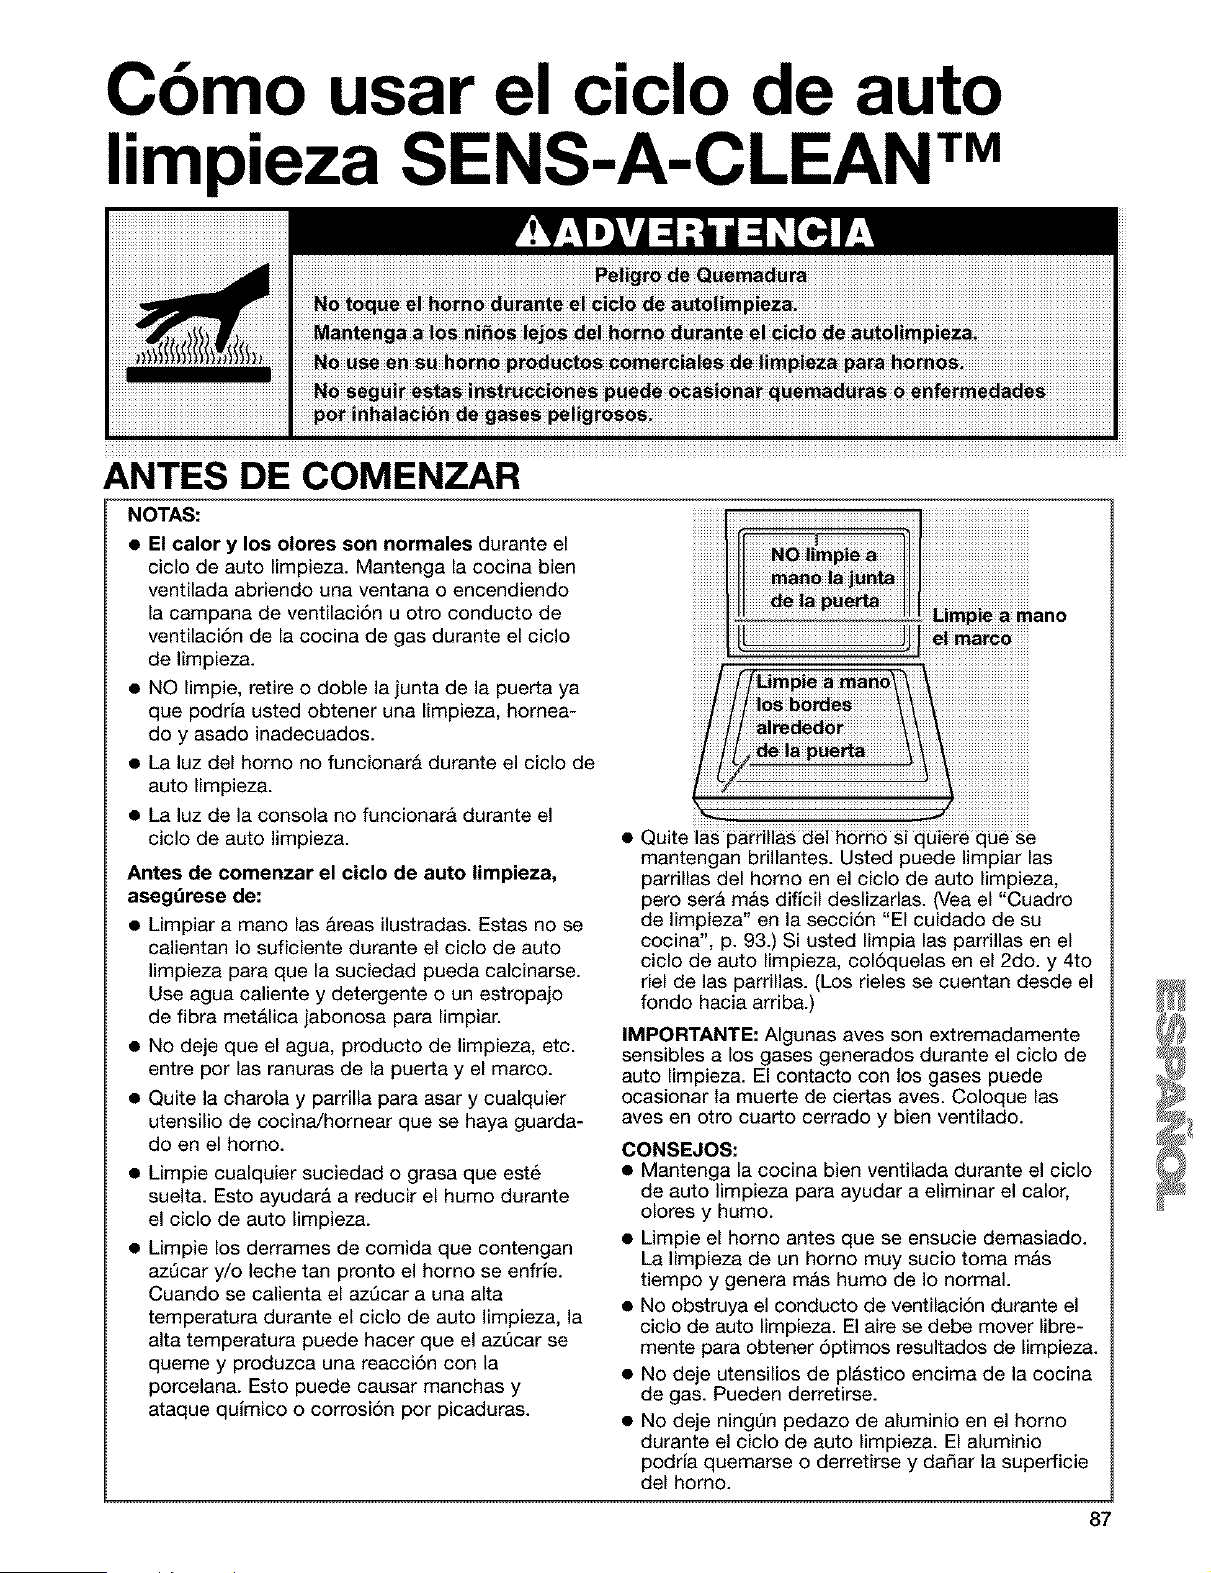
Cbmo usar el ciclo de auto
limpieza SENS-A-CLEAN TM
ANTES DE COMENZAR
NOTAS:
• El calor y los olores son normales durante el
ciclo de auto limpieza. Mantenga la cocina bien
ventilada abriendo una ventana o encendiendo
la campana de ventilaci6n u otro conducto de
ventilaciSn de la cocina de gas durante el ciclo
de limpieza.
• NO limpie, retire o doble la junta de la puerta ya
que podria usted obtener una limpieza, homea-
do y asado inadecuados.
• La luz del homo no funcionarA durante el ciclo de
auto limpieza.
• La luz de la consola no funcionarA durante el
ciclo de auto limpieza.
Antes de comenzar el ciclo de auto limpieza,
aseg_rese de:
• Limpiar a mano las areas ilustradas. Estas no se
calientan Io suficiente durante el ciclo de auto
limpieza para que la suciedad pueda calcinarse.
Use agua caliente y detergente o un estropajo
de fibra met&lica jabonosa para limpiar.
• No deje que el agua, producto de limpieza, etc.
entre por las ranuras de la puerta y el marco.
• Quite la charola y parrilla para asar y cualquier
utensilio de cocinaJhornear que se haya guarda-
do en el homo.
• Limpie cualquier suciedad o grasa que est_
suelta. Esto ayudara a reducir el humo durante
el ciclo de auto limpieza.
• Limpie los derrames de comida que contengan
azQcar y/o leche tan pronto el homo se enfHe.
Cuando se calienta el azQcar a una alta
temperatura durante el ciclo de auto limpieza, la
alta temperatura puede hacer que el azQcar se
queme y produzca una reacci6n con la
porcelana. Esto puede causar manchas y
ataque qulmico o corrosiSn por picaduras.
bimpje a mano
Quite las parrillas del horn6 si quiere que se
mantengan brillantes. Usted puede limpiar las
parrillas del homo en el ciclo de auto limpieza,
pero serA m&s dificil deslizarlas. (Vea el "Cuadro
de limpieza" en la secciSn "El cuidado de su
cocina", p. 93.) Si usted limpia las parrillas en el
ciclo de auto limpieza, colSquelas en el 2do. y 4to
riel de las parrillas. (Los rieles se cuentan desde el
fondo hacia arriba.)
IMPORTANTE: AIgunas aves son extremadamente
sensibles a los gases generados durante el ciclo de
auto limpieza. El contacto con los gases puede
ocasionar la muerte de ciertas aves. Coloque las
aves en otto cuarto cerrado y bien ventilado.
CONSEJOS:
• Mantenga la cocina bien ventilada durante el ciclo
de auto limpieza para ayudar a eliminar el calor,
olores y humo.
• Limpie el homo antes que se ensucie demasiado.
La limpieza de un homo muy sucio toma mAs
tiempo y genera mAs humo de Io normal.
• No obstruya el conducto de ventilaciSn durante el
ciclo de auto limpieza. El aire se debe mover libre-
mente para obtener 5ptimos resultados de limpieza.
• No deje utensilios de plAstico encima de la cocina
de gas. Pueden derretirse.
• No deje ning_n pedazo de aluminio en el homo
durante el ciclo de auto limpieza. El aluminio
podria quemarse o derretirse y da_ar la superficie
del homo.
87
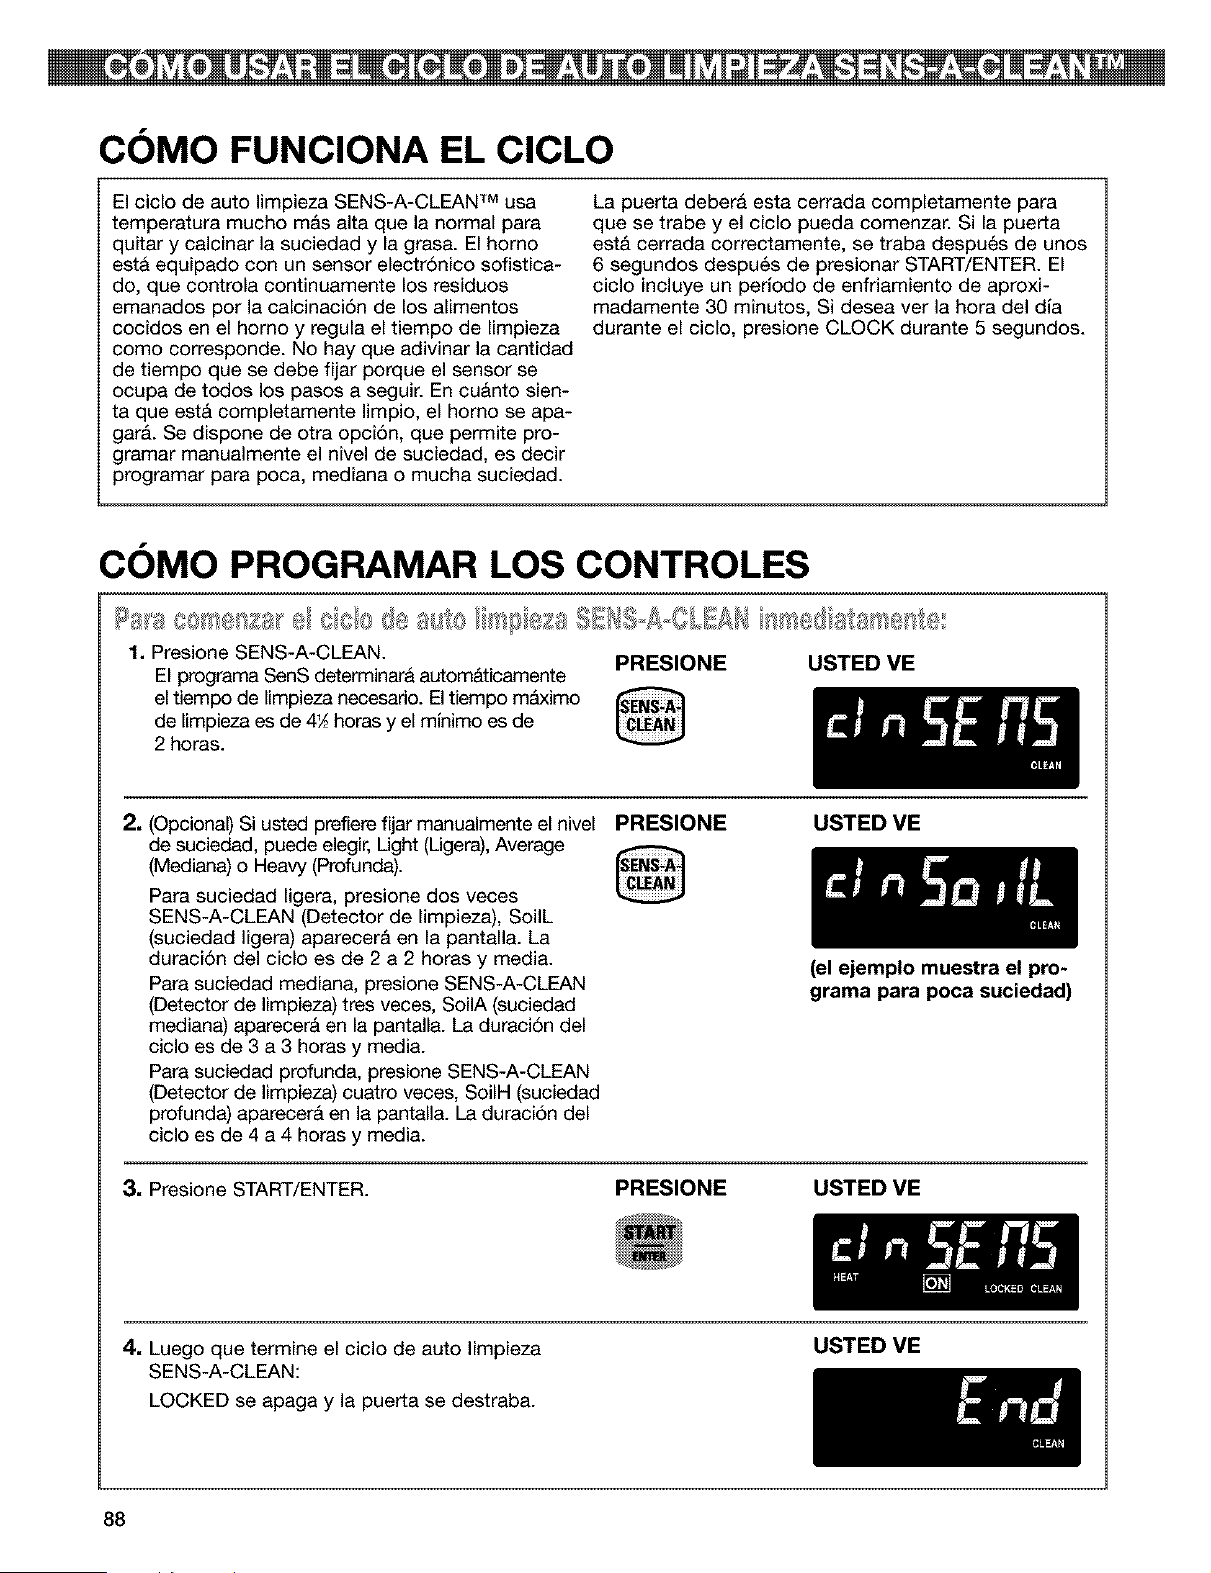
COMO FUNCIONA EL CICLO
El ciclo de auto limpieza SENS-A-CLEAN TM usa
temperatura mucho m&s alta que la normal para
quitar y calcinar la suciedad y la grasa. El homo
est& equipado con un sensor electr6nico sofistica-
do, que controla continuamente los residuos
emanados por la calcinaci6n de los alimentos
cocidos en el homo y regula el tiempo de limpieza
como corresponde. No hay que adivinar la cantidad
de tiempo que se debe fijar porque el sensor se
ocupa de todos los pasos a seguir. En cuanto sien-
ta que est& completamente limpio, el homo se apa-
gar&. Se dispone de otra opci6n, que permite pro-
gramar manualmente el nivel de suciedad, es decir
programar para poca, mediana o mucha suciedad.
La puerta debera esta cerrada completamente para
que se trabe y el ciclo pueda comenzar. Si la puerta
est& cerrada correctamente, se traba despu6s de unos
6 segundos despu6s de presionar START/ENTER. El
ciclo incluye un periodo de enfriamiento de aproxi-
madamente 30 minutos, Si desea ver la hora del dia
durante el ciclo, presione CLOCK durante 5 segundos.
COMO PROGRAMAR LOS CONTROLES
1. Presione SENS-A-CLEAN. PRESIONE USTED VE
El programa SenS determinara autom&ticamente
el tiempo de limpieza necesario. El tiempo mAximo
de limpieza es de 4_ horas y el minimo es de
2 horas.
2, (Opcional) Si usted prefiere fijar manualmente el nivel PRESIONE
de suciedad, puede elegir, Light (Ligera), Average
(Mediana) o Heaw (Profunda).
Para suciedad ligera, presione dos veces
SENS-A-CLEAN (Detector de limpieza), SoilL
(suciedad ligera) aparecer& en la pantalla. La
duraci6n del ciclo es de 2 a 2 horas y media.
Para suciedad mediana, presione SENS-A-CLEAN
(Detector de limpieza) tres veces, SoilA (suciedad
mediana) aparecer& en la pantalla. La duraci6n del
ciclo es de 3 a 3 horas y media.
Para suciedad profunda, presione SENS-A-CLEAN
(Detector de limpieza) cuatro veces, SoilH (suciedad
profunda) aparecer& en la pantalla. La duraci6n del
ciclo es de 4 a 4 horas y media.
USTED VE
3, Presione START/ENTER. PRESIONE
(el ejemplo muestra el pro-
grama para poca suciedad)
USTED VE
4. Luegoquetermineelciclodeautolimpieza
SENS-A-CLEAN:
LOCKED se apaga y la puerta se destraba.
USTED VE
88
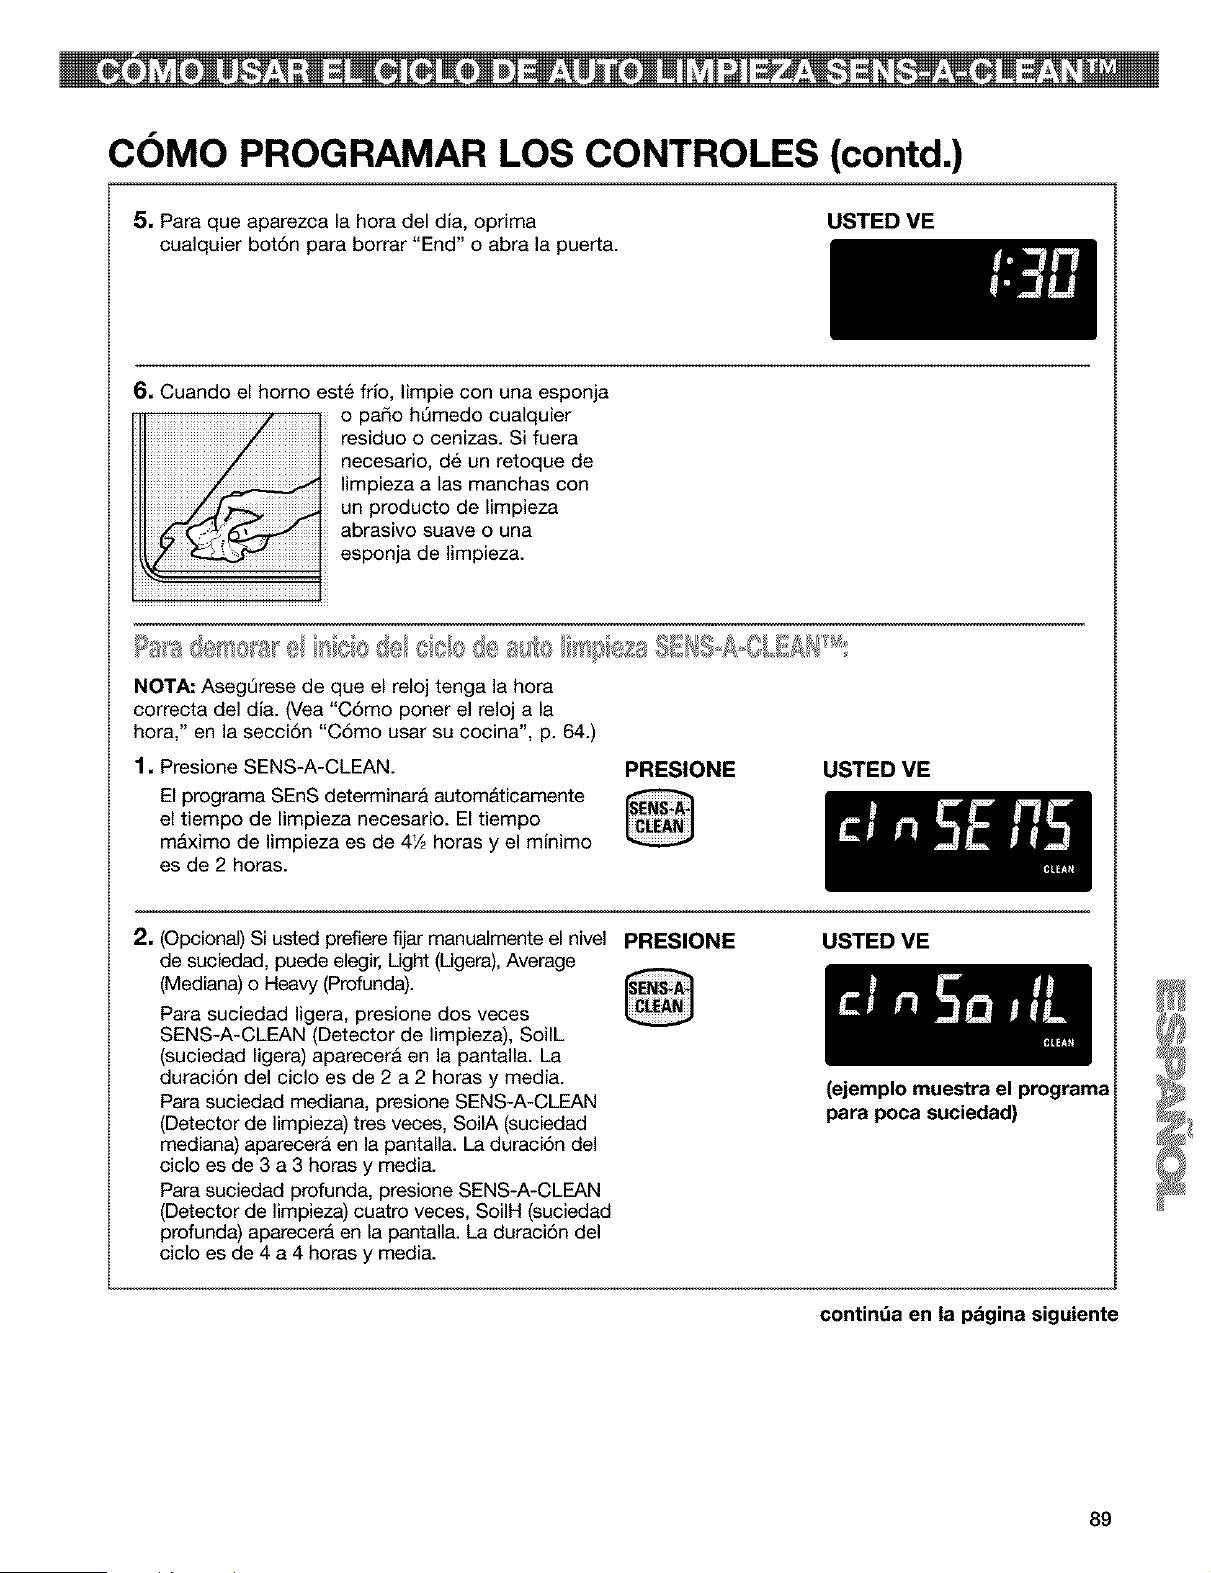
COMO PROGRAMAR LOS CONTROLES (contd.)
5, Para que aparezca la hora del dla, oprima
cualquier bot6n para borrar "End" o abra la puerta.
USTED VE
6, Cuando el homo est_ frfo, Iimpie con una esponja
o pado hQmedo cualquier
residuo o cenizas. Si fuera
necesario, d6 un retoque de
limpieza alas manchas con
un producto de Iimpieza
abrasivo suave o una
esponja de limpieza.
NOTA: AsegQrese de que el reloj tenga la hora
correcta del dfa. (Vea "C6mo poner el reloj a la
hora," en la secci6n "C6mo usar su cocina", p. 64.)
1, Presione SENS-A-CLEAN.
El programa SEnS determinara autom&ticamente
el tiempo de limpieza necesario. El tiempo
m&ximo de limpieza es de 4½ horas y el mlnimo
es de 2 horas.
PRESIONE
@
USTED VE
2, (Opcional) Si usted prefiere fijar manualmente el nivel
de suciedad, puede elegir, Light (Ligera), Average
(Mediana) o Heavy (Profunda).
Para suciedad ligera, presione dos veces
SENS-A-CLEAN (Detector de limpieza), SoilL
(suciedad ligera) aparecer& en la pantalla. La
duraci6n del ciclo es de 2 a 2 horas y media.
Para suciedad mediana, presione SENS-A-CLEAN
(Detector de limpieza) tres veces, SoilA (suciedad
mediana) aparecer& en la pantalla. La duraci6n del
ciclo es de 3 a 3 horas y media.
Para suciedad profunda, presione SENS-A-CLEAN
(Detector de limpieza) cuatro veces, SoilH (suciedad
profunda) aparecerA en la pantalla. La duraci6n del
ciclo es de 4 a 4 horas y media.
PRESIONE
@
USTED VE
(ejemplo muestra el programa
para poca suciedad)
contint_a en la pdgina siguiente
89
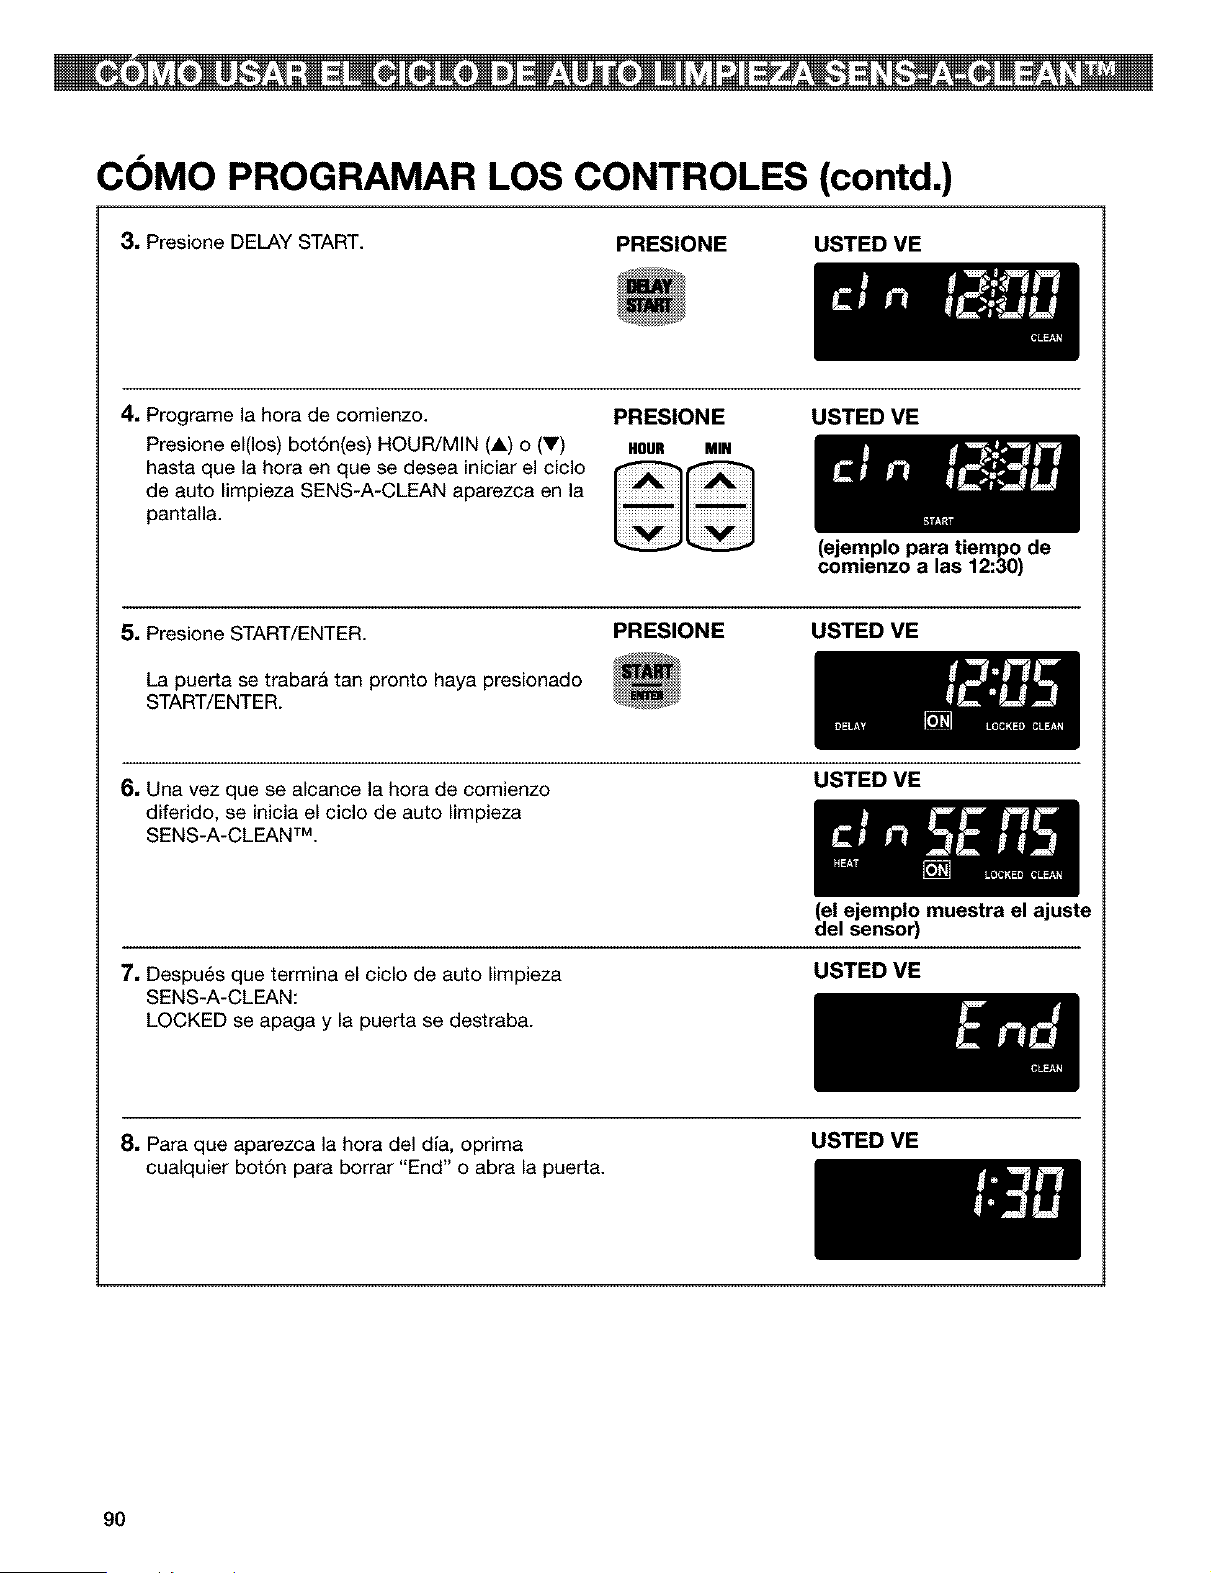
COMO PROGRAMAR LOS CONTROLES (contd.)
3, Presione DELAY START.
PRESIONE USTED VE
4. Programe la hora de comienzo.
Presione el(los) bot6n(es) HOUR/MIN (A) o (V)
hasta que la hora en que se desea iniciar el ciclo
de auto limpieza SENS-A-CLEAN aparezca en la
pantalla.
PRESIONE USTED VE
HOUR MIN
(ejemplo para tiempo de
comienzo a las 12:30)
5. Presione START/ENTER. PRESIONE
La puerta se trabara tan pronto haya presionado
START/ENTER.
USTED VE
6. Una vez que se alcance la hora de comienzo
diferido, se inicia el ciclo de auto Iimpieza
SENS-A-CLEAN TM.
USTED VE
(el ejemplo muestra el ajuste
del sensor)
7. Despu6s que termina el ciclo de auto Iimpieza
SENS-A-CLEAN:
LOCKED se apaga y la puerta se destraba.
USTED VE
8. Para que aparezca la hora del dia, optima
cualquier botSn para borrar "End" o abra la puerta.
USTED VE
90
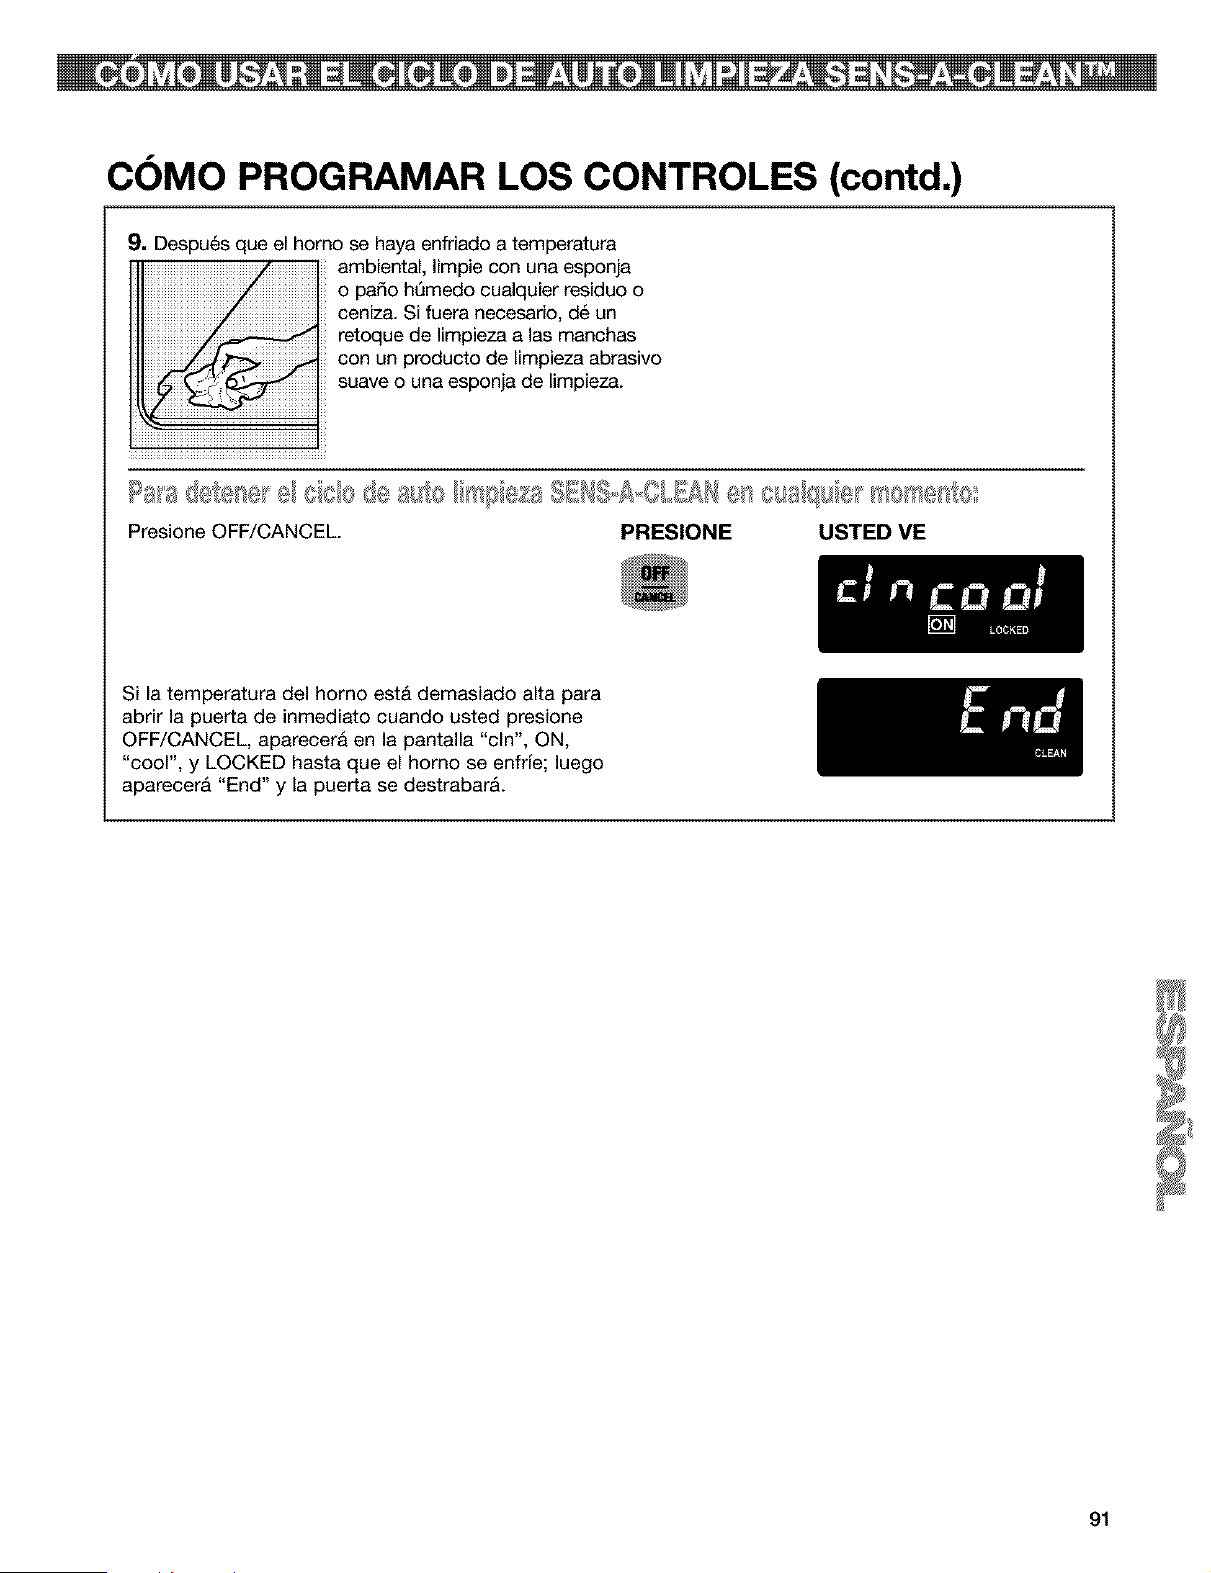
COMO PROGRAMAR LOS CONTROLES (contd.)
9. Despu6s que el horno se haya enfriado a temperatura
ambiental, Iimpie con una esponja
o pado hSmedo cualquier residuo o
ceniza. Si fuera necesario, d6 un
reteque de Iimpieza alas manchas
con un producto de Iimpieza abrasivo
suave o una esponja de limpieza.
la_'ad(.${.,_se_e/cole de a_o I s_pe£s SEHI-A=OLIAHe8_osa/q_;e _se_y_esb
Presione OFF/CANCEL PRESIONE USTED ME
Si la temperatura del horno est& demasiado alta para
abrir la puerta de inmediato cuando usted presione
OFF/CANCEL, aparecera en la pantalla "cln", ON,
"cool", y LOCKED hasta que el homo se enfrfe; luego
aparecer& "End" y la puerta se destrabar&.
91
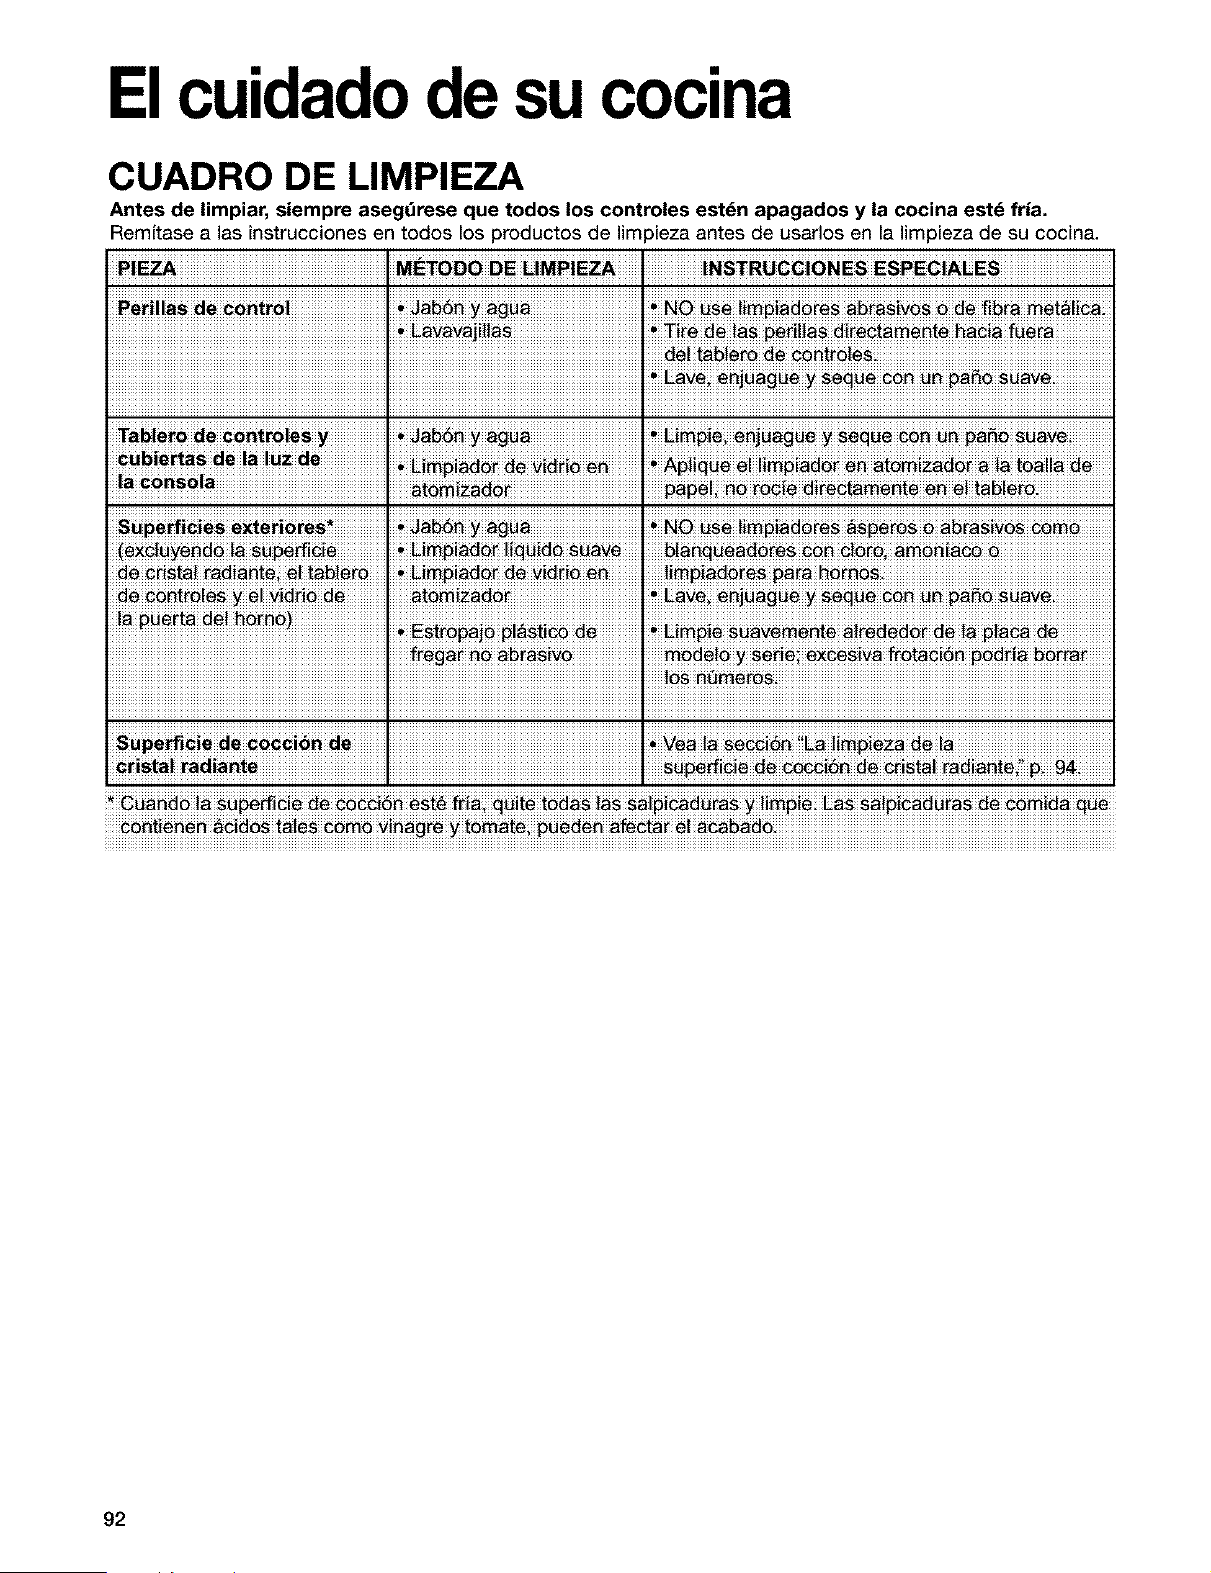
Elcuidadode su cocina
CUADRO DE LIMPIEZA
Antes de limpiar, siempre asegOrese que todos los controles est_n apagados y la cocina estd fria.
Remffase a las instrucciones en todos los productos de lira 3ieza antes de usarlos en la limpieza de su cocina.
• L_vavaji!!_, _! #_ !_ #e_i!!_ _!(e#t_nte #a_!_ fu_(_
E_ve _nj_g_ _ _ pa_
(_!_ye _d_ !_ _ _ _i_ I _!_ia_ !ig _!d_ _av_ I bl_ _ead_e_ _ _ _!_ __ __i_
92
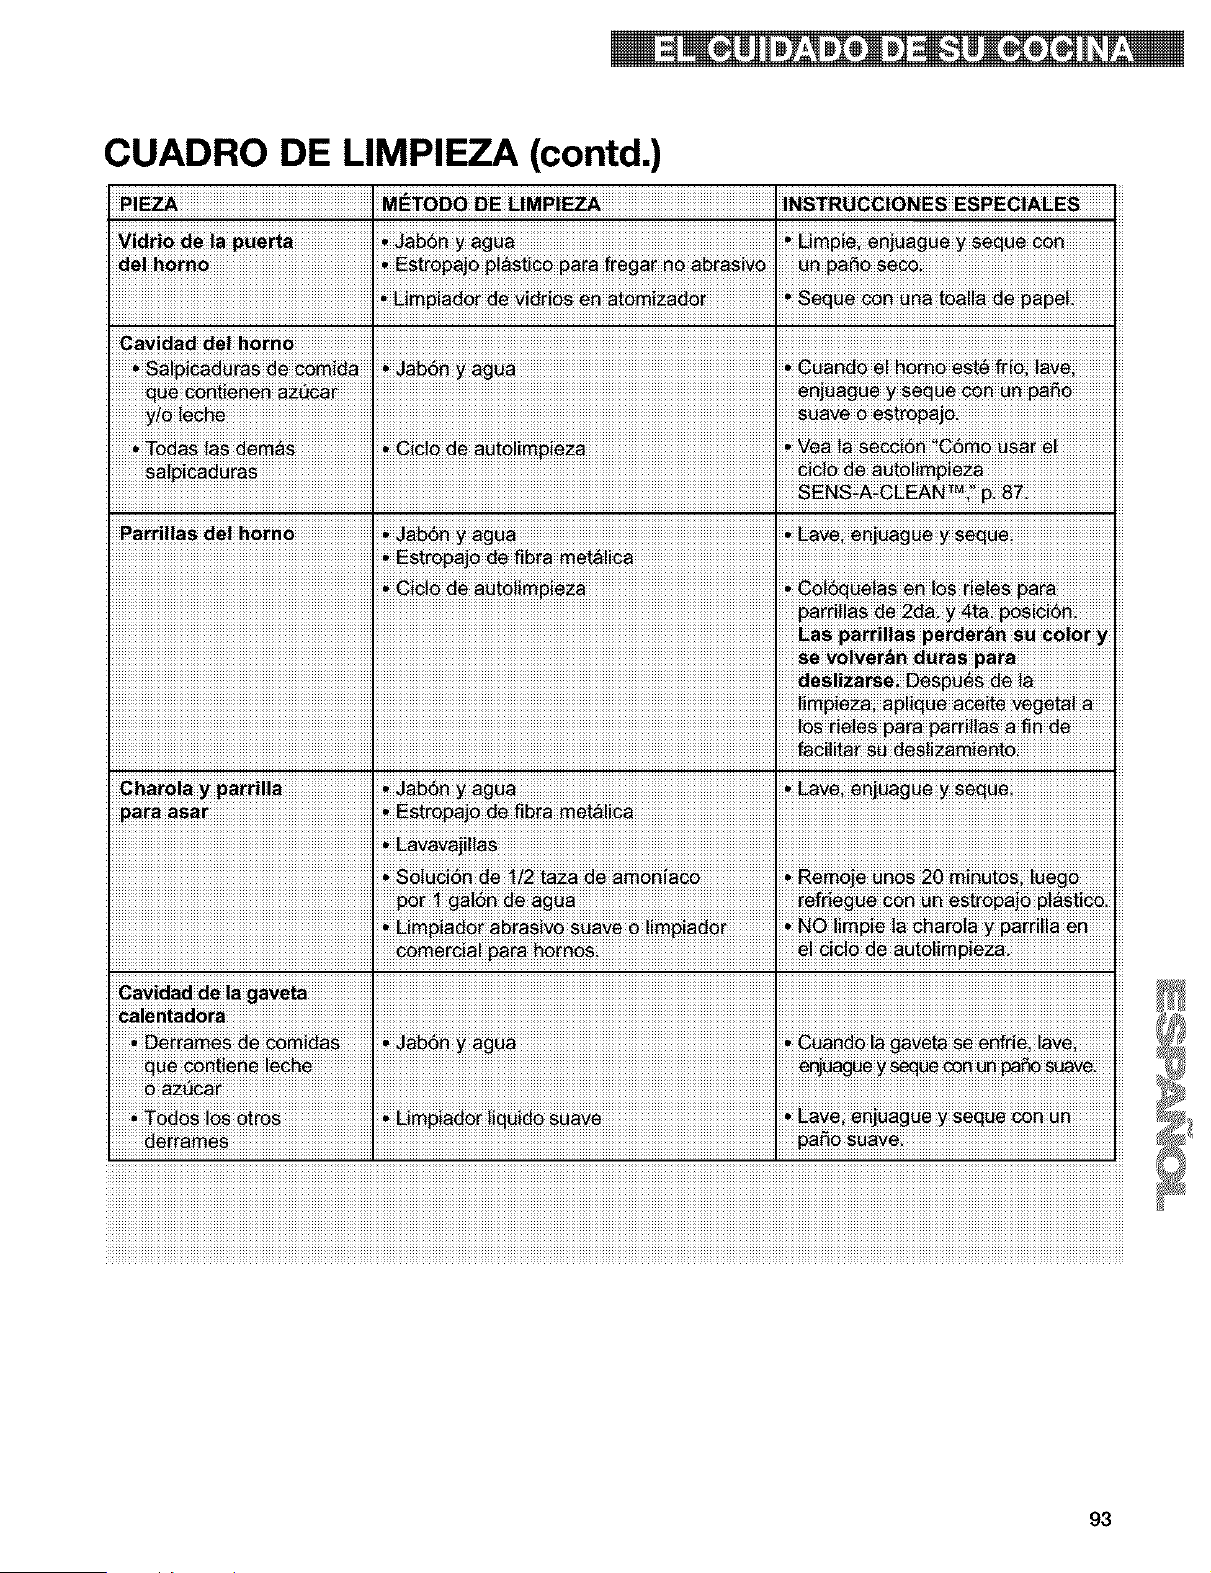
CUADRO DE LIMPIEZA (contd.)
iii_iii_ini_iiiiiiiiiiiiiiiiiiiiiiiiiiiiiiiiiiiiiiiiiiiiiiiiiiiiiii_iiiii_!_ii_!_ii_ii_i_ii!i_iii_ii_i_iii_iiiiiii_ii_i_ii_iiiiiiiiiiiiiiiiiiiiiiiiiiiiiiiiiiiiiiiiiiiiiiiiiiiiiiiiiiiiiiiiiii
!_!!_!!_!!_!!_!!_!!_!!_!!_!!_!!_!!_!!_!!_!!_!!_!!_!!_!!_!!_!!_!!_!!_!!_!!_!!_!!_!!_!!_!!_!!_!!_!!_!!_!!_!!_!!_!!_!!_!!_!!_!!_!!_!!_!!_!!!!_ii_ii_ii_ii_ii_ii_ii_ii_ii_ii_ii_ii_ii_ii_ii_ii_ii_ii_ii_ii_ii_ii_ii_ii_ii_ii_ii_ii_ii_ii_ii_ii_ii_ii_ii_ii_ii_ii_ii_ii_ii_ii_ii_ii_ii_ii_ii_ii_ii_ii_ii_ii_ii_ii_ii_ii_ii_ii_ii_ii_ii_ii_ii_ii_ii_ii_ii_ii_i_=i_ii_ii_ii_sENsi_i_Ni_!!_!!_!8!_!!_!!_!!_!!_!!_!!_!!_!!_!!_!!_!!_!!_!!_!!_!!_!
i_ii_i_ii_i_i_i_ii_ii_ii_ii_ii_ii_ii_ii_ii_ii_ii_ii_ii_ii_ii_ii_ii_ii_ii_ii_ii_ii_ii_ii_ii_ii_ii_ii!i_iii_ii_iE_i_i_ii_i_i_i_i_!_ii_ii__i_ii_ii_ii_ii_ii_ii_ii_ii_ii_ii_ii_ii_ii_ii_ii_ii_ii_ii_ii_ii_ii_ii_ii_ii!i_ii_ii_ii_ii_ii_ii_ii_ii_ii_ii_ii_ii_ii_ii_ii_ii_ii_ii_ii_ii_ii_ii_ii_ii_ii_ii_ii_ii_ii_ii_ii_ii_ii_ii_ii_ii_ii_ii_ii_ii_ii_ii_ii_ii_ii_ii_ii_ii_ii_ii_ii_ii_ii_ii_ii_ii_ii_i
ntad_ra, _
p_ _ I,
93
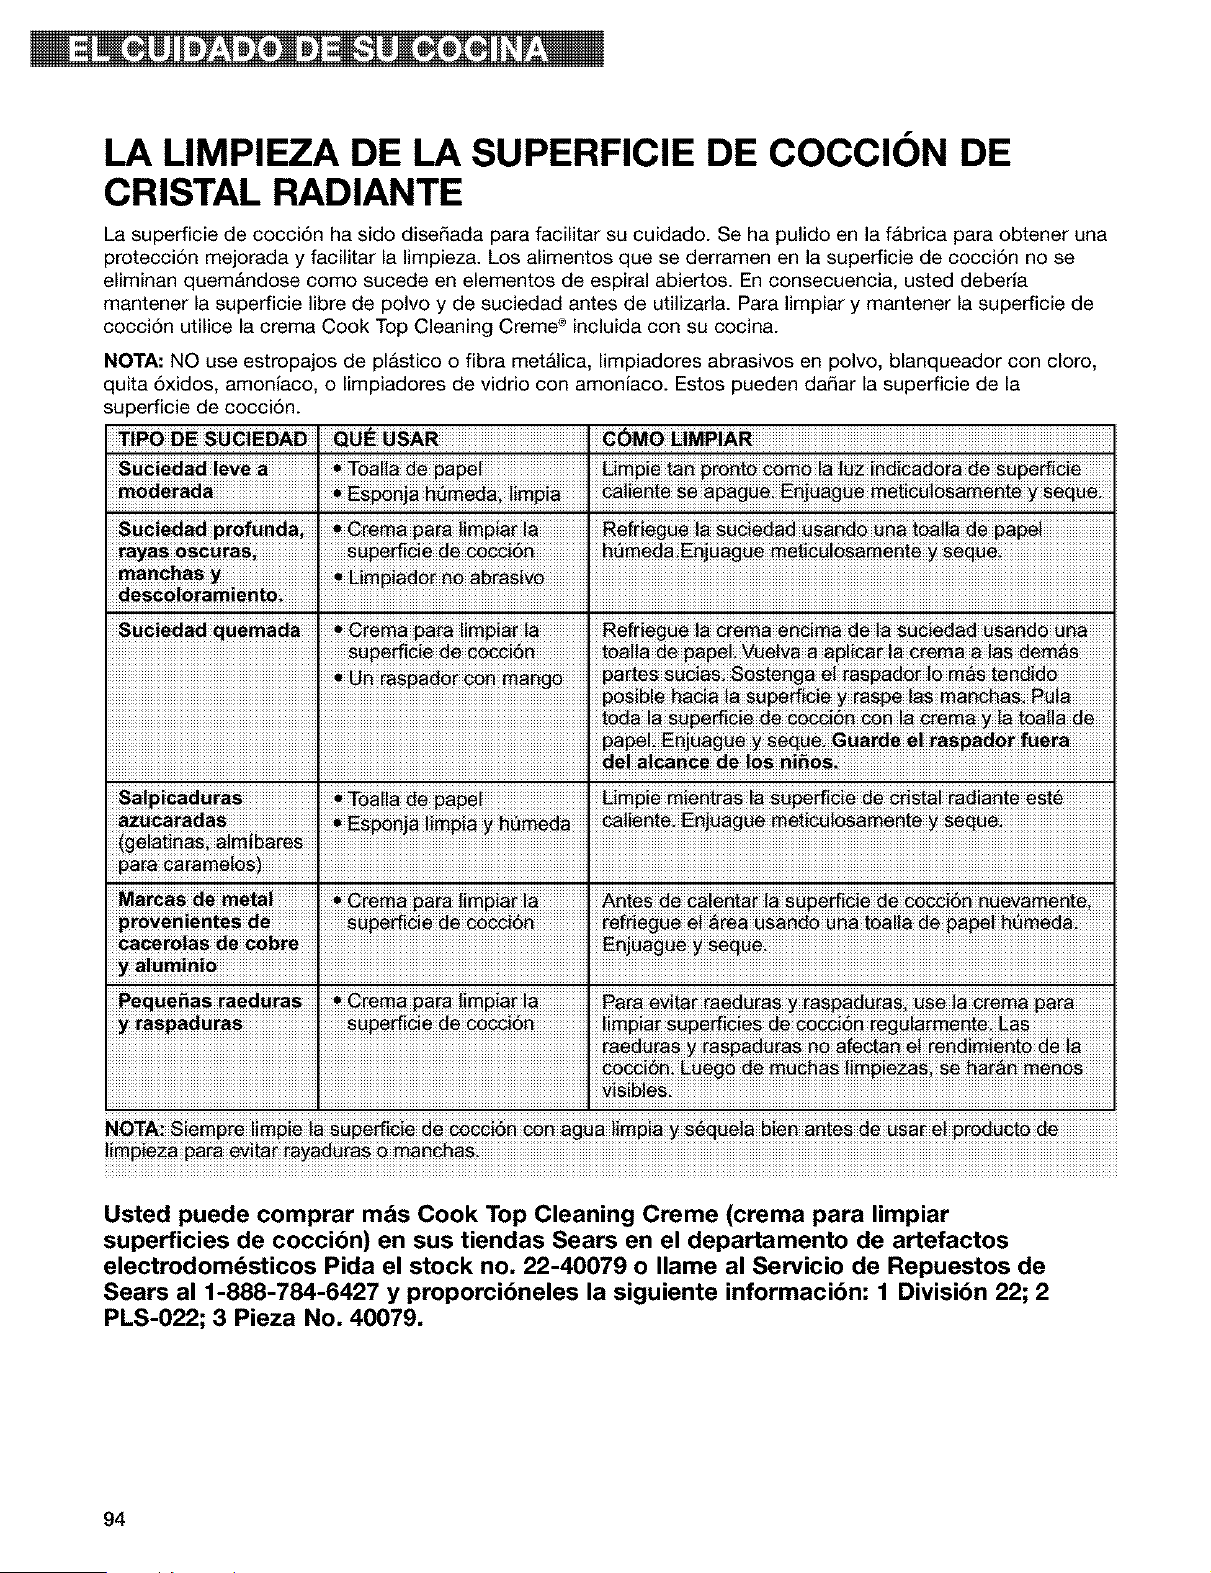
LA LIMPIEZA DE LA SUPERFICIE DE COCCION DE
CRISTAL RADIANTE
La superficie de cocci6n ha sido dise_ada para facilitar su cuidado. Se ha pulido en la fAbrica para obtener una
protecci6n mejorada y facilitar la limpieza. Los alimentos que se derramen en la superficie de cocci6n no se
eliminan quem&ndose como sucede en elementos de espiral abiertos. En consecuencia, usted deberia
mantener la superficie libre de polvo y de suciedad antes de utilizarla. Para limpiar y mantener la superficie de
cocci6n utilice la crema Cook Top Cleaning Creme ® incluida con su cocina.
NOTA: NO use estropajos de plastico o fibra met&lica, limpiadores abrasivos en polvo, blanqueador con cloro,
quita 6xidos, amoniaco, o limpiadores de vidrio con amoniaco. Estos pueden da_ar la superficie de la
superficie de cocci6n.
_i_O DE SUCiEDAD [ QUE _SAR,
Sg_!ed_d !eve a
a_s_!_ amie"to .
S_!_i_d_ ra_. _To_i!_ pap_ i _!_ Pie_i_tra_ !_ _!#ie #(!_a! mdi_# !_ _ _t6
Usted puede comprar mds Cook Top Cleaning Creme (crema para limpiar
superficies de coccibn) en sus tiendas Sears en el departamento de artefactos
electrodomdsticos Pida el stock no, 22-40079 o Ilame al Servicio de Repuestos de
Sears al 1-888-784-6427 y proporcibneles la siguiente informacibn: 1 Divisibn 22; 2
PLS-022; 3 Pieza No, 40079.
94
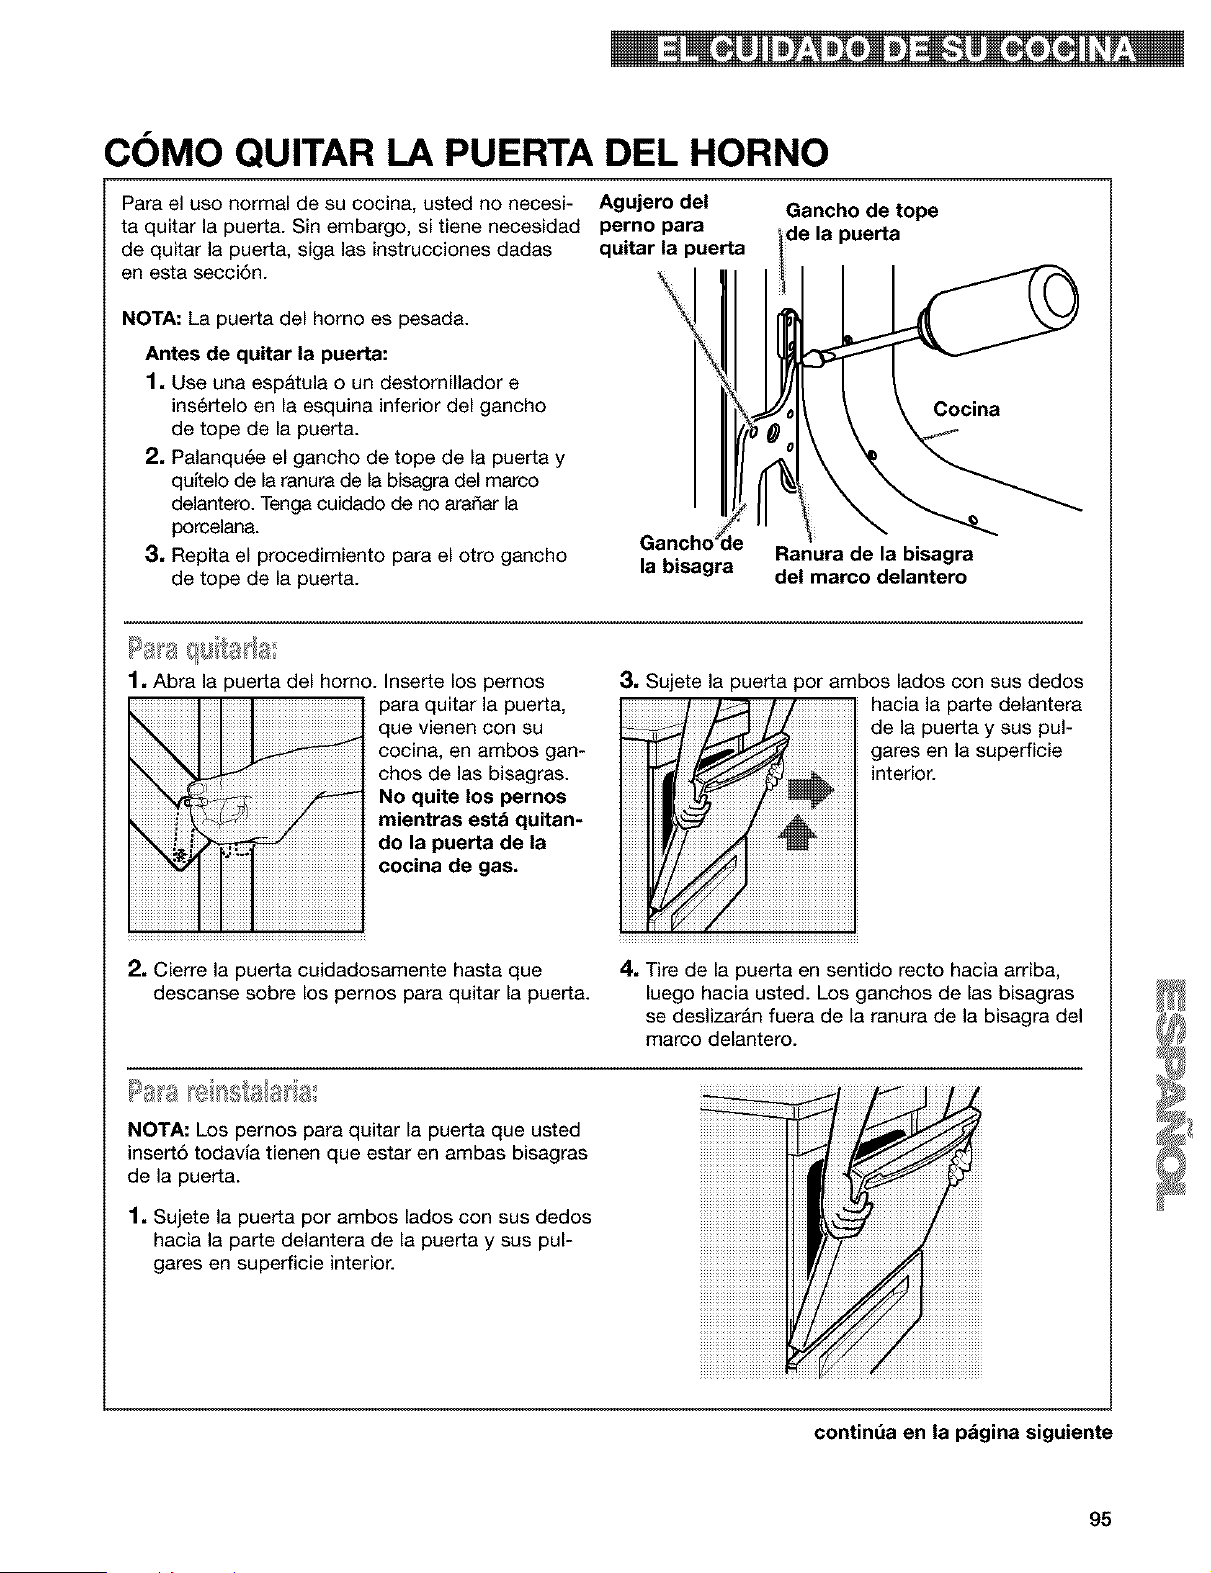
COMO QUITAR LA PUERTA DEL HORNO
Para el uso normal de su cocina, usted no necesi-
ta quitar la puerta. Sin embargo, si tiene necesidad
de quitar la puerta, siga las instrucciones dadas
en esta secci6n.
NOTA: La puerta del homo es pesada.
Antes de quitar la puerta:
1. Use una espatula o un destornillador e
ins6rtelo en la esquina inferior del gancho
de tope de la puerta.
2. Palanqu6e el gancho de tope de la puerta y
qultelo de la ranura de la bisagra del marco
delantero. Tenga cuidado de no aradar la
porcelana.
3. Repita el procedimiento para el otro gancho
de tope de la puerta.
Agujero del
perno para
quitar la puerta
Gancho _le
la bisagra
Gancho de tope
de la puerta
Cocina
Ranura de la bisagra
del marco delantero
1, Abra la puerta del horno. Inserte los pernos
para quitar la puerta,
que vienen con su
cocina, en ambos gan-
chos de las bisagras.
No quite los pernos
mientras estd quitan-
do la puerta de la
cocina de gas.
3, Sujete la puerta por ambos lados con sus dedos
hacia la parte delantera
de la puerta y sus pul-
gates en la superficie
interior.
2, Cierre la puerta cuidadosamente hasta que
descanse sobre los pernos para quitar la puerta.
4, Tire de la puerta en sentido recto hacia arriba,
luego hacia usted. Los ganchos de las bisagras
se deslizar&n fuera de la ranura de la bisagra del
marco delantero.
Pas a
NOTA: Los pernos para quitar la puerta que usted
insert6 todavla tienen que estar en ambas bisagras
de la puerta.
1, Sujete la puerta por ambos lados con sus dedos
hacia la parte delantera de la puerta y sus pul-
gares en superficie interior.
continda en la pdgina siguiente
95
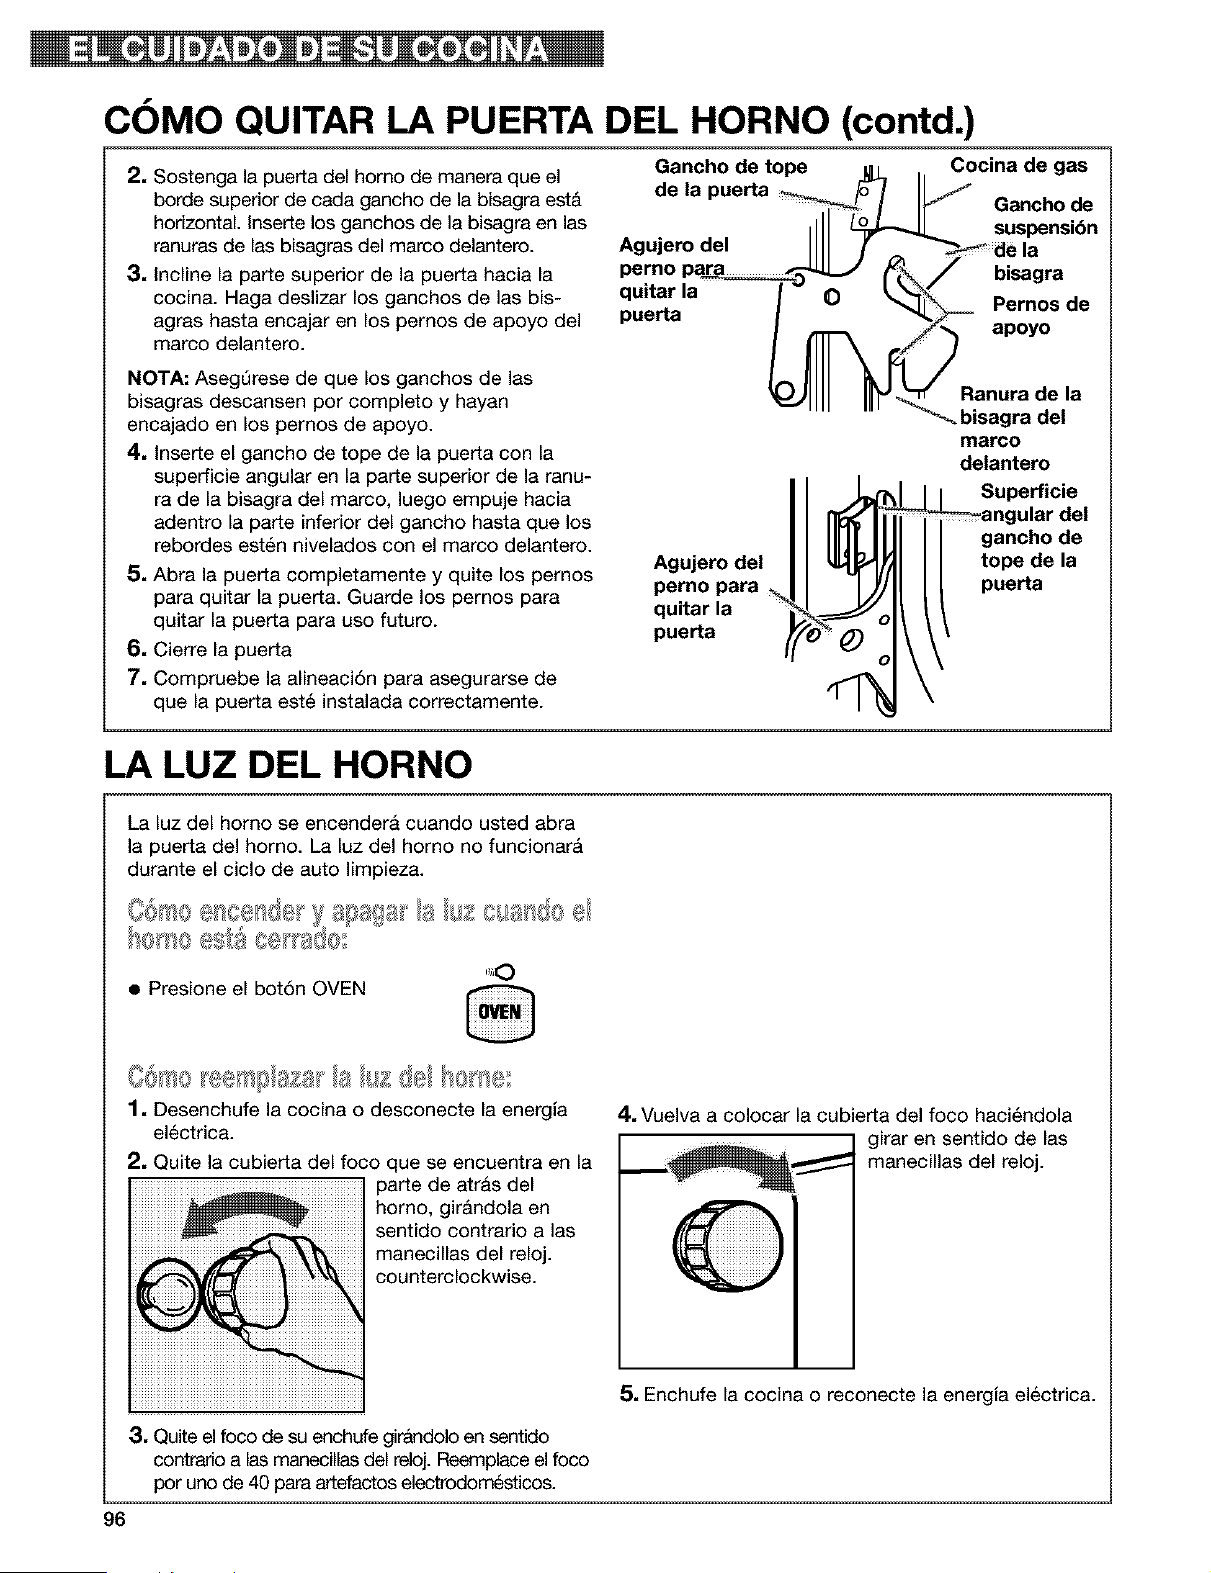
COMO QUITAR LA PUERTA DEL HORNO (contd.)
2. Sostenga la puerta del homo de manera que el
borde superior de cada gancho de la bisagra est&
horizontal. Inserte los ganchos de la bisagra en las
ranuras de las bisagras del marco delantero.
3. Incline la parte superior de la puerta hacia la
cocina. Haga deslizar los ganchos de las bis-
agras hasta encajar en los pernos de apoyo del
marco delantero.
NOTA: AsegQrese de que los ganchos de las
bisagras descansen por completo y hayan
encajado en los pernos de apoyo.
4. Inserte el gancho de tope de la puerta con la
superficie angular en la parte superior de la ranu-
ra de la bisagra del marco, luego empuje hacia
adentro la parte inferior del gancho hasta que los
rebordes est6n nivelados con el marco delantero.
5. Abra la puerta completamente y quite los pernos
para quitar la puerta. Guarde los pernos para
quitar la puerta para uso futuro.
6. Cierre la puerta
7. Compruebe la alineaci6n para asegurarse de
que la puerta est6 instalada correctamente.
Gancho de tope u _ . Cocina de gas
de la puerta _ _ IIJ _ .
_-_ uancno ae
,ill s.s nai6n
Agujerodel IIII f _ _iaela
qur[ar ta 0
puerta / _1_ Pernos de
V-)Ill IIIY Ranura de la
- - _-_ bisagra del
marco
delantero
Superficie
Jlar del
gancho de
tope de la
puerta
Agujero del
perno para
quitar la
puerta
LA LUZ DEL HORNO
La luz del homo se encendera cuando usted abra
la puerta del horno. La luz del horno no funcionar&
durante el ciclo de auto limpieza.
• Presione el bot6n OVEN
1, Desenchufe la cocina o desconecte la energia
el@ctrica.
2, Quite la cubierta del foco que se encuentra en la
parte de atras del
homo, girAndola en
sentido contrario alas
manecillas del reloj.
counterclockwise.
4, Vuelva a colocar la cubierta del foco haci6ndola
girar en sentido de las
manecillas del reloj.
5. Enchufe la cocina o reconecte la energia electrica.
3, Quite el foco de su enchufe girandolo en sentido
contrario alas manecilas del reloj. Reemplace el foco
por uno de 40 para artefactos electrodom_sticos.
96
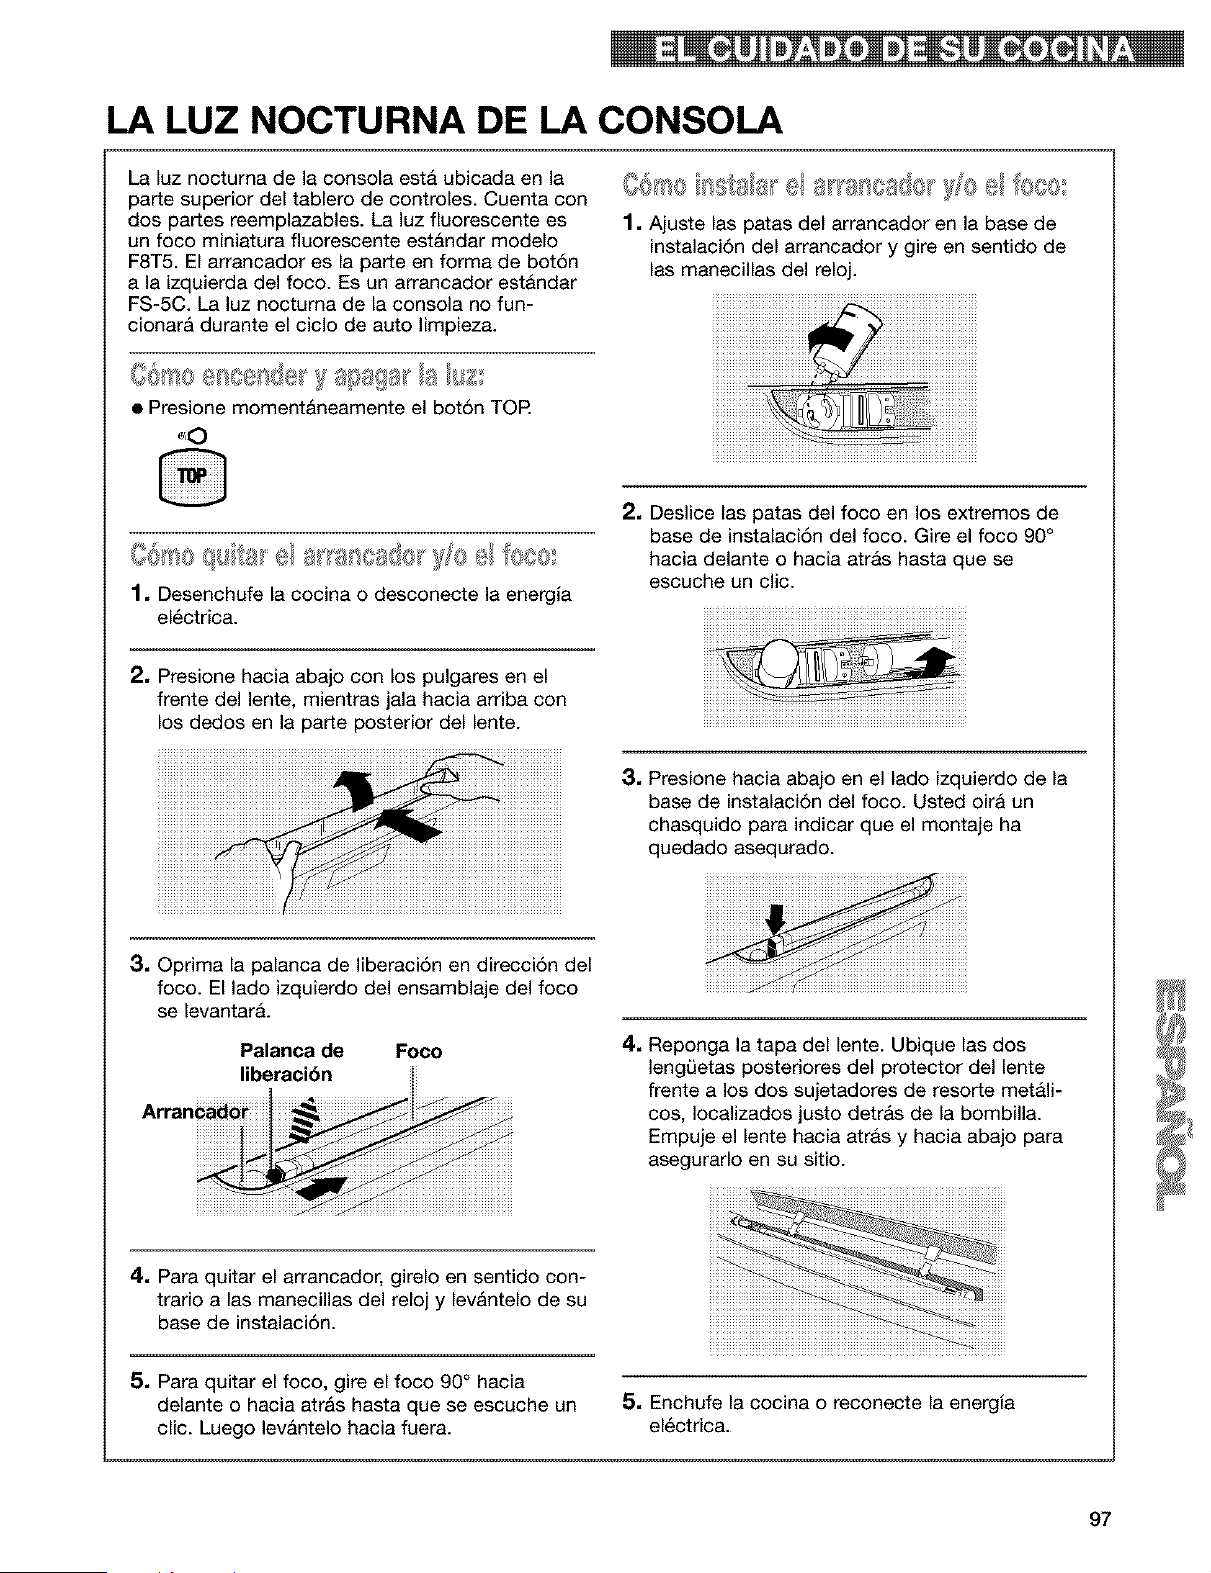
LA LUZ NOCTURNA DE LA CONSOLA
La luz nocturna de la consola esta ubicada en la
parte superior del tablero de controles. Cuenta con
dos partes reemplazables. La luz fiuorescente es
un foco miniatura fluorescente estAndar modelo
F8T5. El arrancador es la parte en forma de bot6n
a la izquierda del foco. Es un arrancador est&ndar
FS-5C. La luz noctuma de la consola no fun-
cionar& durante el ciclo de auto limpieza.
O@ssee_ e_de y s_sags__a R££
• Presione moment_neamente el bot6n TOP.
61 0
_ss ala_ el _} ca{v 10 el l[eco
1, Ajuste las )atas del arrancador en la base de
instalaci6n del arrancador y gire en sentido de
las manecillas del reloj.
00@0 qu _'a_'el ==__'"- 'a ancase_' )Yoel fe®es
1, Desenchufe la cocina o desconecte la energla
el6ctrica.
2, Deslice las patas del foco en los extremos de
base de instalaci6n del foco. Gire el foco 90 °
hacia delante o hacia atrAs hasta que se
escuche un clic.
2, Presione hacia abajo con los pulgares en el
frente del lente, mientras jala hacia arriba con
los dedos en la parte posterior del lente.
3, Presione hacia abajo en el lado izquierdo de la
base de instalaci6n del foco. Usted oira un
chasquido para indicar que el montaje ha
quedado asequrado.
3, Oprima la palanca de liberaci6n en direcci6n del
foco. El lado izquierdo del ensamblaje del foco
se levantarA.
Palanca de Foco
liberacibn
4. Para quitar el arrancador, girelo en sentido con-
trario alas manecillas del reloj y levAntelo de su
base de instalaci6n.
5, Para quitar el foco, gire el foco 90° hacia
delante o hacia atrAs hasta que se escuche un
clic. Luego levantelo hacia fuera.
4. Reponga la tapa del lente. Ubique las dos
lengLietas posteriores del protector del lente
frente a los dos sujetadores de resorte met&l-
cos, Iocalizados justo detrAs de la bombilla.
Empuje el lente hacia atrAs y hacia abajo para
asegurarlo en su sitio.
5, Enchufe la cocina o reconecte la energia
el6ctrica.
97
Diagnbsticoy solucibnde
problemas
La mayorla de los problemas en la cocina son a menudo causados por peque_as cosas que usted puede
encontrar y resolver sin herramientas de ninguna especie. Verifique las listas abajo indicadas yen la p&gina
siguiente antes de solicitar ayuda o sen/icio t6cnico.
LA COClNA NO FUNCIONA
Problema Causa/Solucibn
Nada funciona
• La cocina no estA enchufada a un tomacorriente adecuadamente puesto a
tierra con el voltaje apropiado. (Vea instrucciones para instalaci6n.)
• Tiene un fusible quemado en casa o un interruptor automAtico desconectado.
• La perilla de control no estA en la posici6n correcta. Empuje hacia adentro
las perillas de control antes de hacerlas girar.
• Est&n activados los bloqueos del horno y de la superficie de cocci6n.
El homo no funciona
• Usted no ha programado el control electrSnico correctamente. Remltase a la
secci6n de c6mo programar el control electr6nico del homo. (Vea pp. 63-84.)
• Usted ha programado un tiempo de comienzo diferido. Espere a que Ilegue
la hora de comienzo o cancele y reprograme el control.
• EstA activado el bloqueo del horno.
Las zonas de cocci6n
exteriores no funcionan
• Tiene un fusible quemado en casa o un interruptor autom&tico desconectado.
• Usted no ha colocado las perillas de control en posici6n correcta. Empuje
hacia adentro las perillas de control antes de hacerlas girar a una
determinada posici6n.
• El elemento de cocci6n estA quemado. Llame al Centro de Sen/icios de
Sears para repararlo o reemplazarlo.
• AsegOrese de que se desactiv6 el bloqueo e la superficie de cocci6n.
No puede hen/ir en el • Presione el bot6n SURESIMMER a OFF.
elemento delantero
• Para un hen/or rApido gire la perilla de control delantero izquierdo a HI.
izquierdo/funci6n
SURESIMMER TM
SURESIMMER no cocina • Gire la perilla de control delantero izquierdo a cualquier posici6n entre
a fuego lento SURESIMMER LO y 4, apretando simult&neamente la perilla de encendido
del SURESIMMER.
El elemento • Gire la perilla de control delantero izquierdo a la posici6n 4, apretando
SURESIMMER no se simultAneamente la perilla de encendido del SURESIMMER.
calienta suficientemente
98

CUANDO USA EL CICLO DE AUTO LIMPIEZA DE SU
HORNO
Problema Causa/Solucibn
El ciclo de auto limpieza • Usted no presion6 START/ENTER.
no funciona • Usted ha programado un tiempo de comienzo diferido. Espere a que
Ilegue la hora de comienzo o cancele y vuelva a programar el control.
• La puerta no est& bien cerrada.
RESULTADOS DE COCCION
ROB_EMA GAUS_SO_U_i_N
cero!_)
iiiiiiiiiiiiiiiiiiiiiiiiiiiiiiiiiiiiiiiiiiiiiiiiiiiiiiiiiiiiiiiiiiiiiiiiiiiiiiiiiiiiiiiiiiiiiiiiiiiiiiiiiiiiiiiiiiiiiiiiiiiiiiiiiiiiiiiiiiiiiiiiiiiiiiiiiiiiiiiiiiiiiiiiiiiiiiiiii_iiiiiE!_iii_i!i_iiia_iii_i_ii_iiii#i_!t_i_iii2iii#_!ig_i_iii_iii_##iii_iiiiiiiii
99
MENSAJES EN LA PANTALLA LUMINOSA
PROBLEMA Causa/Soluci6n
La pantalla muestra "PF" • Hubo un apag6n. Presione OFF/CANCEL para despejar la
pantalla, luego vuelva a poner el reloj a la hora. (Vea p. 64.)
La pantalla muestra una "F" • Presione OFF/CANCEL para despejar la pantalla. Si el c6digo "F"
seguida de un nQmero aparece nuevamente, Ilame al servicio t_cnico.
La pantalla muestra "EO F5 • Presione OFF/CANCEL para despejar la pantalla
(La puerta del homo no cierra • Presione y retenga el impulsor del interruptor de la puerta (ubicado
porque le estorba el en el marco delantero del homo.) El mecanismo de traba se destra-
mecanismo de traba del ciclo bar& en unos 6 segundos.
de auto limpieza).
100

101

102
indice
Tbpico Pagina Tbpico Pdgina
,&,REASDE COCCI6N EXTERIORES
Perillas de control ...................................... 55, 56, 92
Gula para programaci6n del control ...................... 56
Luz indicadora COOKTOP ON ........................ 55, 58
Zona dual para cocinar .................................... 55, 57
Luces indicadoras de
superficie caliente EASYGLANCE TM ................ 55, 58
Superficie de cocci6n de cdstal radiante ........ 55, 59, 93
Zona de cocci6n STEADYTEMP TM .................. 55, 57
Consejos ................................................................ 60
ASADO
Cacerolas ................................................................ 61
Consejos ................................................................ 69
Posiciones de las parrillas del horno ...................... 61
Programaci6n del ciclo .......................................... 68
ASAR A LA PARRILLA
Charola .............................................................. 71-73
Instrucciones .................................................... 72, 73
Parrilla ................................................................ 71-73
Posiciones recomendadas de las parrillas
en el homo .............................................................. 73
Programaci6n del ciclo .......................................... 71
CACEROLAS ........................................................ 60, 61
CARACTERiSTICAS .................................................. 55
CICLO DE AUTO LIMPIEZA SENS-A-CLEAN TM
Antes de comenzar ................................................ 87
Comienzo diferido .................................................. 89
C6mo funciona el ciclo .......................................... 88
Consejos ................................................................ 87
Comienzo inmediato .............................................. 88
C6mo parar el ciclo ................................................ 91
Programaci6n de los controles .......................... 88-91
COMPONENTES ........................................................ 55
CONDUCTO DE VENTILACION DEL HORNO .......... 86
CONTROL DEL HORNO
CON TIEMPO PROGRAMADO ............................ 80-84
CONTROL ELECTR6NICO DEL HORNO
BIoqueo de la superfice de cocci6n ...................... 65
Bloqueo del homo .................................................. 64
Centigrados/Fahrenheit .......................................... 70
Interruptor de 12 horas .......................................... 36
Pantalla luminosa/reloj ............................................ 33
Para cancelar .......................................................... 38
Para comenzar ........................................................ 38
Reloj ........................................................................ 34
Sedales audibles .................................................... 35
Temporizador electr6nico ........................................ 36
DIAGN6STICO Y SOLUCI6N DE PROBLEMAS....98-100
FUNCION SURESIMMER TM ...................................... 56
GARANTiA .................................................................. 51
GAVETA CALENTADORA WARM & READY ........ 85, 86
HORNEO CON ULTRABAKE TM
Cacerolas ................................................................ 61
Papel aluminio ........................................................ 62
Posiciones recomendadas de
las parrillas en el homo .......................................... 61
Programaci6n del ciclo .......................................... 68
Sistema ULTRABAKE TM .................................... 68, 69
Utensilios para hornear .......................................... 62
LIMPtEZA
Cavidad de la gaveta calentadora .......................... 93
Cavidad del homo .................................................. 93
Charola y parrilla para asar .................................... 93
Auto limpieza SENS-A-CLEAN .......................... 87-91
Parrillas del homo .................................................. 93
Perillas de control .................................................. 92
Tablero de controles y lente de la luz .................... 92
Superficie de cocci6n de cristal radiante .............. 94
Superficies exteriores .............................................. 92
Vidrio de la puerta del homo .................................. 93
LUZ DEL HORNO ...................................................... 96
LUZ NOCTURNA DE LA CONSOLA .......................... 97
MEDIA PARRILLA STURDIGLIDE TM
CON INSERTO DESMONTABLE ................................ 61
NOMERO DE MODELO Y SERIE .............................. 50
PARRILLAS DE HORNO STURDIGLIDE TM
CON AGARRADERA INTEGRADA .............................. 61
PUERTA DEL HORNO .......................................... 95, 96
RECIPE RECALL TM .............................................. 74, 75
SEGURIDAD .......................................................... 52-54
SERVE WARM ...................................................... 76-80
SERVICIO .................................................. Forro trasera
SOPORTE ANTI-VUELCO .......................................... 52
TABLERO DE CONTROLES
Luz indicadora COOKTOP ON ........................ 55, 58
Luces indicadoras de
superficie caliente EASYGLANCE TM ................ 55, 58
Luz indicadora SURESIMMER .......................... 55, 56
Perillas de control ............................................ 55, 56
Pedlla de control del elemento STEADYTEMpTM....55, 57
Selector SURESIMMER .................................... 55, 56
TEMPERATURA DEL HORNO
Ajustes .............................................................. 68, 72
Calibracion .............................................................. 70
UTENSILIOS DE COCINA
Conservas .............................................................. 59
Materiales ................................................................ 60
Consejos ................................................................ 60
103

82_2_B 5/00
_ Se_ Ft_u_ _ ® R_t_d Tradern_rk/TM Trademark of Sears, Roebuck and Co. Printed in the U.S.A.
® Marca Registrada/TM marca de f_brica de Sears, Roebuck and Co. Impreso en EE.UU.


