CountertopMicrowaveOven
Contents
Adapter Plugs 25 Light Bulb Replacement 24
Aluminum Foil 4 Microwave (:nok'_rare Guide 12
Appliance Registration 2 Microwaving Tips 3
(;are and (;leaning 24 Minute/Second Timer 7
ConstLmer Services 27 Model and Serial Numbers 2
(;ontrol Panel 6 P0pc0m" 9
Conking Complete Reminder 5 Power l,evels 7-10
Cooking Guide 17-23 l'recautions 2-4
Defrosting Guide 15, 16 Problem Solver 26
Delayed (:()()king 7 Quick Reheat 9
Extension Cords 25 Safety Instructions 2-5
Features 5 Time Cook 8
Glnssary of Microwave Terms 11 Time Deti'ost 10
Grounding Instructions 25 Warranty Back Cover
Heatingor Reheating Guide lb, 14 GE Answer Center_
Hold Time 7 800,626.2000
Model JEI425KO 2,
q Microwave power output
of this oven is 800 watts.
(IEC-705TestProcedure)
GE Appliances
Help us help you...
Before using your oven,
read this book carefully.
It is intended to help you operate
and maintain your new microwave
oven properly.
Keep it handy for answers to your
questions.
If you don't understand something
or need more help, write (include
your phone number):
Consumer Affairs
GE Appliances
Appliance Park
Louisville, KY 40225
Write down the model and
serial numbers.
You' II find them on a label inside
the oven.
These numbers are also on the
Consumer Product Ownership
Registration Card that came with
your microwave oven. Before
sending in this card, please write
these numbers here:
Model Number
Serial Number
Use these numbers in any
correspondence or service calls
concerning your microwave oven
Be sure your microwave
oven is registered.
Itis important that we know the
location of your microwave oven
should a need occur for
adjustments.
Your supplier is responsible tbr
registering you as the owner.
Please check with your supplier to
be sure he has done so; also send
in your Consumer Product
Ownership Registration Card. If
you move, or if you are not the
original purchaser, please write to
us, stating model and serial
numbers.
2
This appliance must be registered,
Please be certain that it is.
Write to:
GE Appliances
Range Product Service
Appliance Park
1.ouisville, KY 40225
If you received a
damaged oven...
Immediately contact the dealer (or
builder) that sold you the oven.
Save time and money.
Before you request service...
Check the Problem Solver in the
back of this book. It lists causes of
minor operating problems that you
can correct yourself.
All these things are normal
with your microwave oven.
•Steam or vapor escaping from
around the door.
.Light reflection around dtmr or
outer case.
•Dimming oven Iight and change
in blower sound may occur while
operating at power levels other
than high.
•Dull thumping sound wh i le oven
is operating.
•Some TV-Radio interference
might be noticed while using your
microwave oven. It's similar to the
interference caused by other small
appliances and does not indicate a
problem with your oven.
If you need service...
To obtain service, see the
Consumer Services page in the
back of this book.
We' re proudof our service and
want you to be pleased. If for some
reason you are not happy with the
service you receive, here are three
steps to tbllow for further help.
FIRST, contact the people who
serviced your appliance. Explain
why 3iou are not pleased. In most
cases, this will solve the problem.
NEXT, if you are still not pleased,
write all the details-including
your phone number--tn:
_ n_;_iC°nsumer Relati°ns
Appliance Park
Louisville, KY 40225
FINALLY, if' your problem is still
not resolved, write:
M;[jor Appliance Consumer
Action Panel
20 North Wacker Drive
Chicago, IL 60606
PRECAUTIONS
TO AVOID
POSSIBLE
EXPOSURE TO
EXCESSIVE
MICROWAVE
ENERGY
(a) Do Not Attempt to operate this
oven with the door open since
open-door operation can result in
harmful exposure to microwave
energy. It is important not to defeat
or tamper with the safety
interlocks.
(b) Do Not Place any object
between the oven front face and
the door or allow soil or cleaner
residue to accumulate on sealing
surfaces.
(c) Do Not Operate the oven if it
is damaged. It is particularly
important that the oven door close
properly and that there is no
damage to the:
( I) door (bent)
(2) hinges and latches (broken or
loosened)
(3) door seals and sealing surfaces.
(d) The Oven Should Not be
adjusted or repaired by anyone
except properly qualified service
personnel.
Microwaving Tips
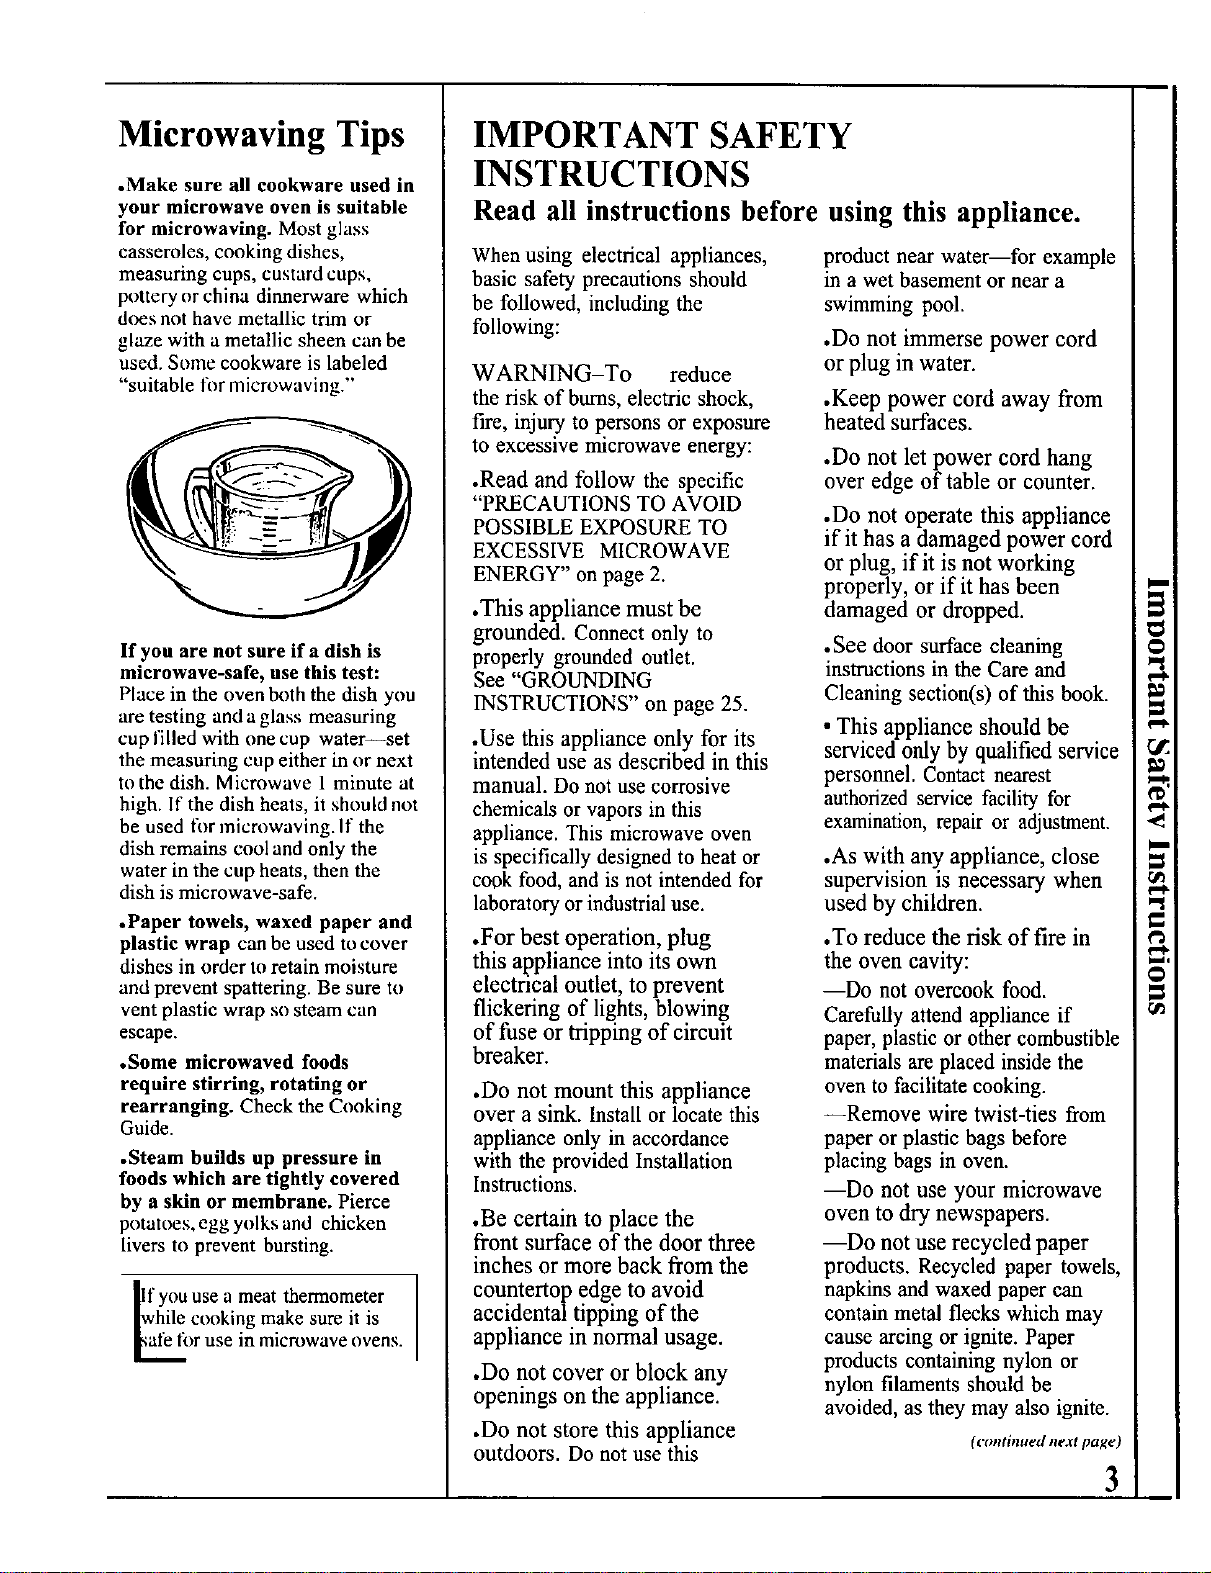
•Make sure all cookware used in
your microwave oven is suitable
for microwaving. Most glass
casseroles, cooking dishes,
measuring cups, custard cups,
pottery or china dinnerware which
does not have metallic trim or
glaze with a metallic sheen can be
used. Some cookware is labeled
"suitable fi)rmicrowaving."
If you are not sure if a dish is
microwave-safe, use this test:
Place in the oven both the dish you
are testing and a glass measuring
cup filled with one cup water--set
the measuring cup either in or next
to the dish. Microwave 1 minute at
high. If the dish heats, it should not
be used fl>rmicrowaving.lf the
dish remains cool and only the
water in the cup heats, then the
dish is microwave-safe.
•Paper towels, waxed paper and
plastic wrap can be used to cover
dishes in order to retain moisture
and prevent spattering. Be sure to
vent plastic wrap so steam can
escape.
• Some microwaved foods
require stirring, rotating or
rearranging. Check the Cooking
Guide.
.Steam builds up pressure in
foods which are tightly covered
by a skin or membrane. Pierce
potatoes, egg yolks and chicken
livers to prevent bursting.
you use a meat thermometer
hile ct×)king make sure it is
_)r use in microwave ovens.
IMPORTANT SAFETY
INSTRUCTIONS
Read all instructions before using this appliance.
When using electrical appliances,
basic safety precautions should
be followed, including the
following:
WARNING-To reduce
the risk of burns, electric shock,
fire, inju .ry to persons or exposure
to excessive microwave energy:
.Read and follow the specific
"PRECAUTIONS TO AVOID
POSSIBLE EXPOSURE TO
EXCESSIVE MICROWAVE
ENERGY" on page 2.
.This appliance must be
grounded. Connect only to
properly grounded outlet.
See "GROUNDING
INSTRUCTIONS" on page 25.
.Use this appliance only for its
intended use as described in this
manual. Do not use corrosive
chemicals or vapors in this
appliance. This microwave oven
is specifically designed to heat or
cook food, and is not intended for
laboratory or industrial use.
.For best operation, plug
this appliance into its own
electrical outlet, to prevent
flickering of lights, blowing
of fuse or tripping of circuit
breaker.
.Do not mount this appliance
over a sink. Install orlocate this
appliance only in accordance
with the provided Installation
Instructions.
.Be certain to place the
front surface of the door three
inches or more back from the
countertop edge to avoid
accidental tipping of the
appliance in normal usage.
.Do not cover or block any
openings on the appliance.
.Do not store this appliance
outdoors. Do not use this
product near water--for example
in a wet basement or near a
swimming pool.
.Do not immerse power cord
or plug in water.
.Keep power cord away from
heated surfaces.
.Do not let power cord hang
over edge of table or counter.
.Do not operate this appliance
if it has a damaged power cord
or plug, if it is not working
properly, or if it has been
damaged or dropped.
.See door surface cleaning
instructions in the Care and
Cleaning section(s) of this book.
• This appliance should be
serviced only by qualified service
personnel. Contact nearest
authorized service facility for
examination, repair or adjustment.
.As win any.appliance, close
supervision is necessary when
used by children.
.To reduce the risk of fire in
the oven cavity:
--Do not overcook food.
Carefully attend appliance if
paper, plastic or other combustible
materials are placed inside the
oven to facilitate cooking.
--Remove wire twist-ties from
paper or plastic bags before
placing bags in oven.
--Do not use your microwave
oven to dry newspapers.
--Do not use recycled paper
products. Recycled paper towels,
napkins and waxed paper can
contain metal flecks which may
cause arcing or ignite. Paper
products containing nylon or
nylon filaments should be
avoided, as they may also ignite.
(continued next page)
3
IMPORTANT SAFETY INSTRUCTIONS (continued)
--Do not pop popcorn in your
microwave oven unless in a
special microwave popcom
accessory or unless you use
popcorn labeled for use in
microwave ovens.
--Do not operate the oven
while empty to avoid damage to
the oven and the danger of fire.
If by accident the oven should
run empty a minute or two, no
harm is done. However, try to
avoid operating the oven empty
at all times--it saves energy and
prolongs the life of the oven.
--Do not overtook potatoes.
They could dehydrate and catch
fire, causing damage to your oven.
.Do not use the oven for storage
purposes. Do not leave paper
products, cooking utensils or food
in the oven when not in use.
•If materials inside oven
should ignite, keep oven door
closed, turn oven off, and
disconnect power cord, or shut
offpower at the fuse or circuit
breaker panel.
.Some products such as whole
eggs and sealed containers--
for example, closed jars--will
explode and should not be heated
in this microwave oven. Such use
of the microwave oven could
result in injury.
.Avoid heating baby food in
glass jars, even without their lids;
especially meat and egg mixtures.
• Don't defrost frozen
beverages in narrow necked
bottles (especially carbonated
beverages)• Even if the container
is opened, pressure can build up.
This can cause the container to
burst, possibly resulting in injury.
•Use metal only as directed in
this book. TV dinners maybe
microwaved in foil trays less than
3/4" high; remove top foil cover
and return tray to box. When
4
using metal in the microwave
oven, keep metal at least 1 inch
away from sides of oven.
.Cookware may become hot
because of heat transferred from
the heated food. Pot holders may
be needed to handle the cookware
• Sometimes, the oven tray can
become too hot to touch. Be
careful touching the tray during
and after cooking.
•Foods cooked in liquids (such
as pasta) may tend to boil over
more rapidly than foods
containing less moisture. Should
this occur, refer to page 24 for
instmctions on how to clean the
inside of the oven.
.Thermometer--Do not use a
thermometer in food you are
mierowaving unless the
thermometer is designed or
recommended for use in the
microwave oven.
.Plastic cookware--Plastic
cookware designed for
microwave cooking is very
useful, but should be used
carefully. Even microwave-safe
plastic may not be as tolerant of
overcooking conditions as are
glass or ceramic materials and
may soften or char if subjected to
short periods of overcooking. In
longer exposures to overcooking,
the food and cookware could
ignite. For these reasons: 1 ) Use
microwave-safe plastics only and
use them in strict compliance with
the cookware manufacturer's
recommendations. 2) Do not
subject empty cookware to
microwaving. 3) Do not permit
children to use plastic cookware
without complete supervision.
.When cooking pork, follow
the directions exactly and always
cook the meat to an internal
temperature of at least 170°E
This assures that, in the remote
possibility that trichina may be
present in the meat, it will be
killed and meat will be safe to eat.
.Do not boil eggs in a
microwave oven. Pressure will
build up inside egg yolk and will
cause it to burst, possibly
resulting in injury.
.Foods with unbroken outer
"skin" such as potatoes, sausages,
tomatoes, apples, chicken livers
and other giblets, and egg yolks
(see previous caution) should be
pierced to allow steam to escape
during cooking.
.Not all plastic wrap is suitable
for use in microwave ovens.
Check the package for proper use.
• Spontaneous boiling--Under
certain special circumstances,
liquids may start to boil during or
shortly after removal from the
microwave oven. To prevent
bums from splashing liquid, stir
the liquid briefly before
removing the container from the
microwave oven.
."Bailable" cooking pouches
and tightly closed plastic bags
should be slit, pierced or vented
as directed on package. If they
are not, plastic could burst during
or immediately after cooking,
possibly resulting in injury. Also,
plastic storage containers should
beat least partially uncovered
because they form a tight seal.
When cooking with containers
tightly covered with plastic wrap,
remove covering carefully and
direct steam away from hands
and face.
.Hot foods and steam can
cause bums. Be careful when
opening any containers of hot
food, including popcom bags,
cooking pouches and boxes. To
prevent possible injury, direct
steam away from hands and face.
SAVE THESE
INSTRUCTIONS

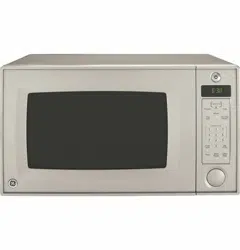
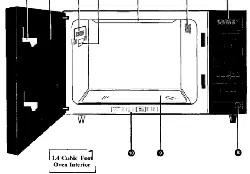
Features of Your Oven
Cooking Complete Reminder
(For all cooking and reheating features.)
To remind you that you have food in the
oven. the oven will beep once a minute until
you either open the riven dooror touch the
CLEAR!OFF pad.
W
1.4 Cubic Foo_
Oven Interior
1
1. Door Latches.
2. Door Screen. Metalscreeu
pcrmits viewing of foods and keeps
microwuves confined inside oven.
3. Oven Vent.
4. Model and Serial Numbers.
5. Mode Stirrer Cover. Protects
the micrnwave energy distributing
system. Do not remove this covet'.
You will damage the oven.
6. Oven Interior Light. Turns on
when the door is opened or when
the oven is opcratiug.
7. Touch Control Panel and
Display. See nexl page for
instructions.
8. Door Open Button. Push to
open door.
9. Glass Cooking Tray. Tray must
be in place when using the oven.
Cooking performance will be
unsatisfactory without the tray in
place. The tray may be removed
for cleaning.
10. Automatic Cooking Guide.
Quick relerence codes fi>rmany
frequently prepared lbods.
5
pi_I
t,-_l
m
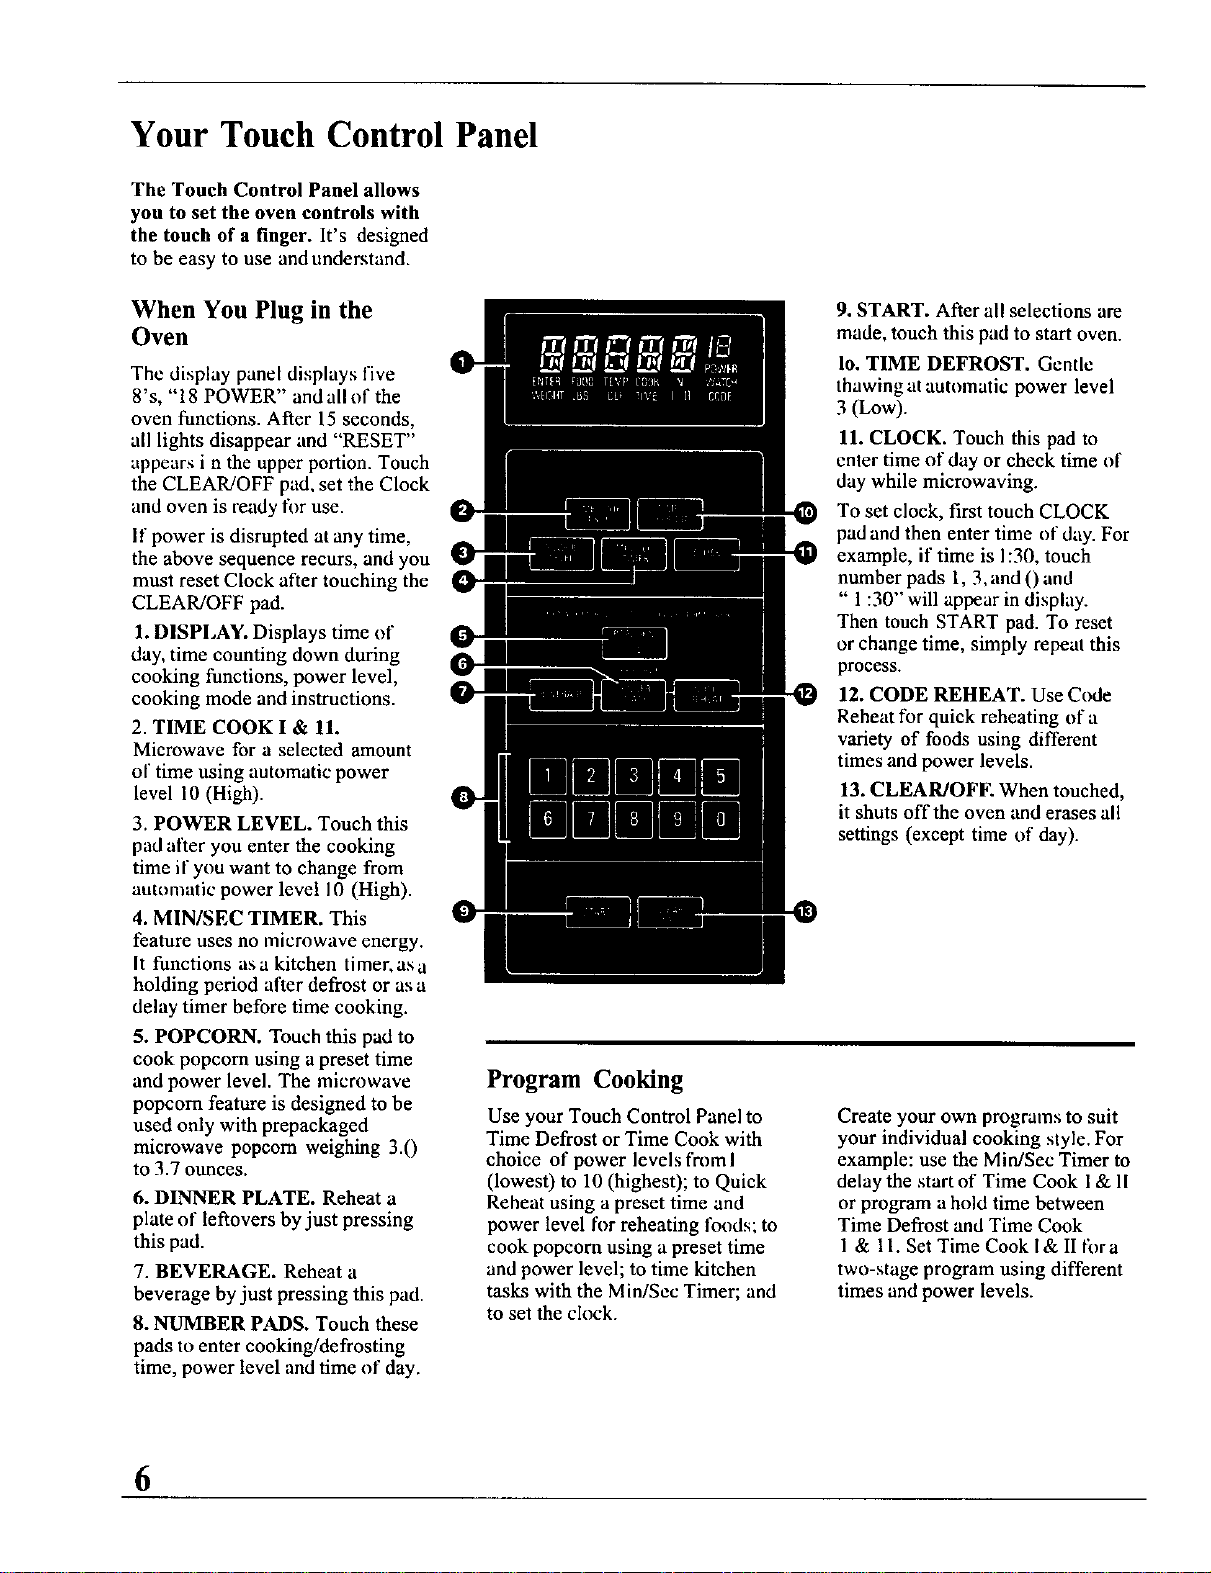
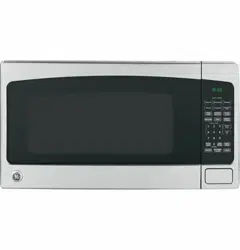
Your Touch Control Panel
The Touch Control Panel allows
you to set the oven controls with
the touch of a finger. It's designed
to be easy to use and understand.
When You Plug in the
Oven
The display panel displays five
8's, "18 POWER" and all of the
oven functions. After 15 seconds,
all lights disappear and "RESET"
appears i n the upper portion. Touch
the CLEAR/OFF pad, set the Clock
and oven is ready for use.
If power is disrupted at any time,
the above sequence recurs, and you
must reset Clock alter touching the
CLEAR/OFF pad.
1. DISPLAY. Displays time of
day, time counting down during
cooking functions, power level,
cooking mode and instructions.
2. TIME COOK I & 11.
Microwave for a selected amount
of time using automatic power
level 10 (High).
3. POWER LEVEL. Touch this
pad after you enter the cooking
time if you want to change from
automatic power level 10 (High).
4. M1N/SEC TIMER. This
feature uses no microwave energy.
It functions as a kitchen timet, as a
holding period after defrost or as a
delay timer before time cooking.
5. POPCORN, Touch this pad to
cook popcorn using a preset time
and power level. The microwave
popcorn feature is designed to be
used only with prepackaged
microwave popcorn weighing 3.0
to 3.7 ounces.
6. DINNER PLATE. Reheat a
plate of leftovers by just pressing
this pad.
7. BEVERAGE. Reheat a
beverage by just pressing this pad.
8. NUMBER PADS. Touch these
pads to enter cooking/defrosting
time, power level and time of day.
9. START. After all selections are
made, touch this pad to start oven.
1o. TIME DEFROST. Gentle
thawing at autnmatic power level
3 (Low).
11. CLOCK. Touch this pad to
enter time of day or check time of
day while microwaving.
To set clock, first touch CLOCK
pad and then enter time nf day. For
example, if time is 1:30, touch
number pads 1, 3, and 0 and
" 1:30" will appear in display.
Then touch START pad. To reset
or change time, simply repeat this
process.
12. CODE REHEAT. Use Code
Reheat for quick reheating of a
variety of foods using different
times and power levels.
13. CLEAR/OFF. When touched,
it shuts off the oven and erases all
settings (except time of day).
Program Cooking
Use your Touch Control Panel to
Time Defrost or Time Cook with
choice of power levels froml
(lowest) to 10 (highest); to Quick
Reheat using a preset time and
power level fi)r reheating lbods; to
cook popcorn using a preset time
and power level; to time kitchen
tasks with the Min/Sec Timer; and
to set the clock.
Create your own programs to suit
your individual cooking style. For
example: use the MirgSec Timer to
delay the start of Time Cook 1& 11
or program a hold time between
Time Defrost and Time Cook
1 & 11. Set Time Cook l& II fora
two-stage program using different
times and power levels.
6
How to Use the Minute/Second Timer
The MIN/SEC TIMER has three
timing functions:
• It operates as a minute timer.
.It can be set to delay cooking.
•It can be used as a hold setting
after defrosting.
The MI N/SEC TIMER operates
without microwave energy.
How to Time a 3-Minute
Phone Call
1. Touch MI N/SEC TIMER pad.
2. Touch number pads 3, 0 and 0
(for 3 minutes and no seconds).
3. Touch START. Display shows
time counting down. The timer
signals when time is up.
Using a Holding Time
The Minute/Second Timer can
also be used to program a "holding
time" between microwave cooking
functions. The time can range from
one second to 99 minutes and 99
seconds. A holding or standing
time may be found in some of your
own recipes or in the Cooking
Guide.
Programming Delayed
Cooking
To delay cooking up to 99 minutes
and 99 seconds, touch TIME
COOK I & 11 and enter cook time.
Touch MI N/SEC TIMER and enter
number of minutes to delay
cooking. Touch START. Timer will
count down to zero and cooking
will begin.
How to Defrost, Hold and
Time Cook
Let's say you want to defrost a
frozen casserole for 15 minutes,
hold for I 0 minutes and then Time
Cook for 25 minutes. Here's how
to do it:
Step 1: Take the casserole from
the freezer and place it in the oven.
Step 2: Touch TIME DEFROST.
Step 3: Touch pads 1,5,0 and 0
for 15 minutes defrosting time.
(Defrosting is automatically set on
power level 3 but can be changed
by touching the POWER LEVEL
pad and the desired power level.)
Step 4: Set standing or hold time
by touching MIN/SEC TIMER.
Step 5: Touch I, 0, 0 and 0 to hold
for ten minutes.
IIII1[11[OlOlOl'd
IIgIH
Step 6: Touch TIME COOK I & II
pad.
Step 7: Touch 2, 5, 0 and 0 for 25
minutes of cooking time.
Step 8: Touch START. As each
function is automatically
performed, oven display shows
instructions entered and the
function. When time is up, the
oven signals and flashes "End."
Questions and Answers
Q. What will happen if I
accidentally reverse my defrost,
hold and cook instructions?
A. The oven will automatically
rearrange your program.
Defrosting will always come first,
then hold, and then the cooking
function.
Q. Can I defrost and hold only?
A. Yes. Sometimes you may only
want to defrost a food, hold it, and
cook it later.All you need to do is
program in defrost and amount of
time. Then program the hold time.
Be sure to put the thawed dish in
the refrigerator promptly.
NOTE: Foods that are highly
perishable, such as milk, eggs,
fish, stuffings, poultry and pork
should not be allowed to sit out
for more than one hour after
defrosting. Room temperature
promotes the growth of harmful
bacteria.
Q. I programmed my oven for a
specific defrosting time but it
defrosted longer than necessary.
What happened?
A. When instructions conflict,
the oven carries out the last
instruction. You may have set the
oven to defrost for 4 minutes, hold
for 2 minutes, and then defrost for
6 minutes. In this case, the oven
would defrost for 6 minutes and
hold for 2 minutes.
7
nl
ml
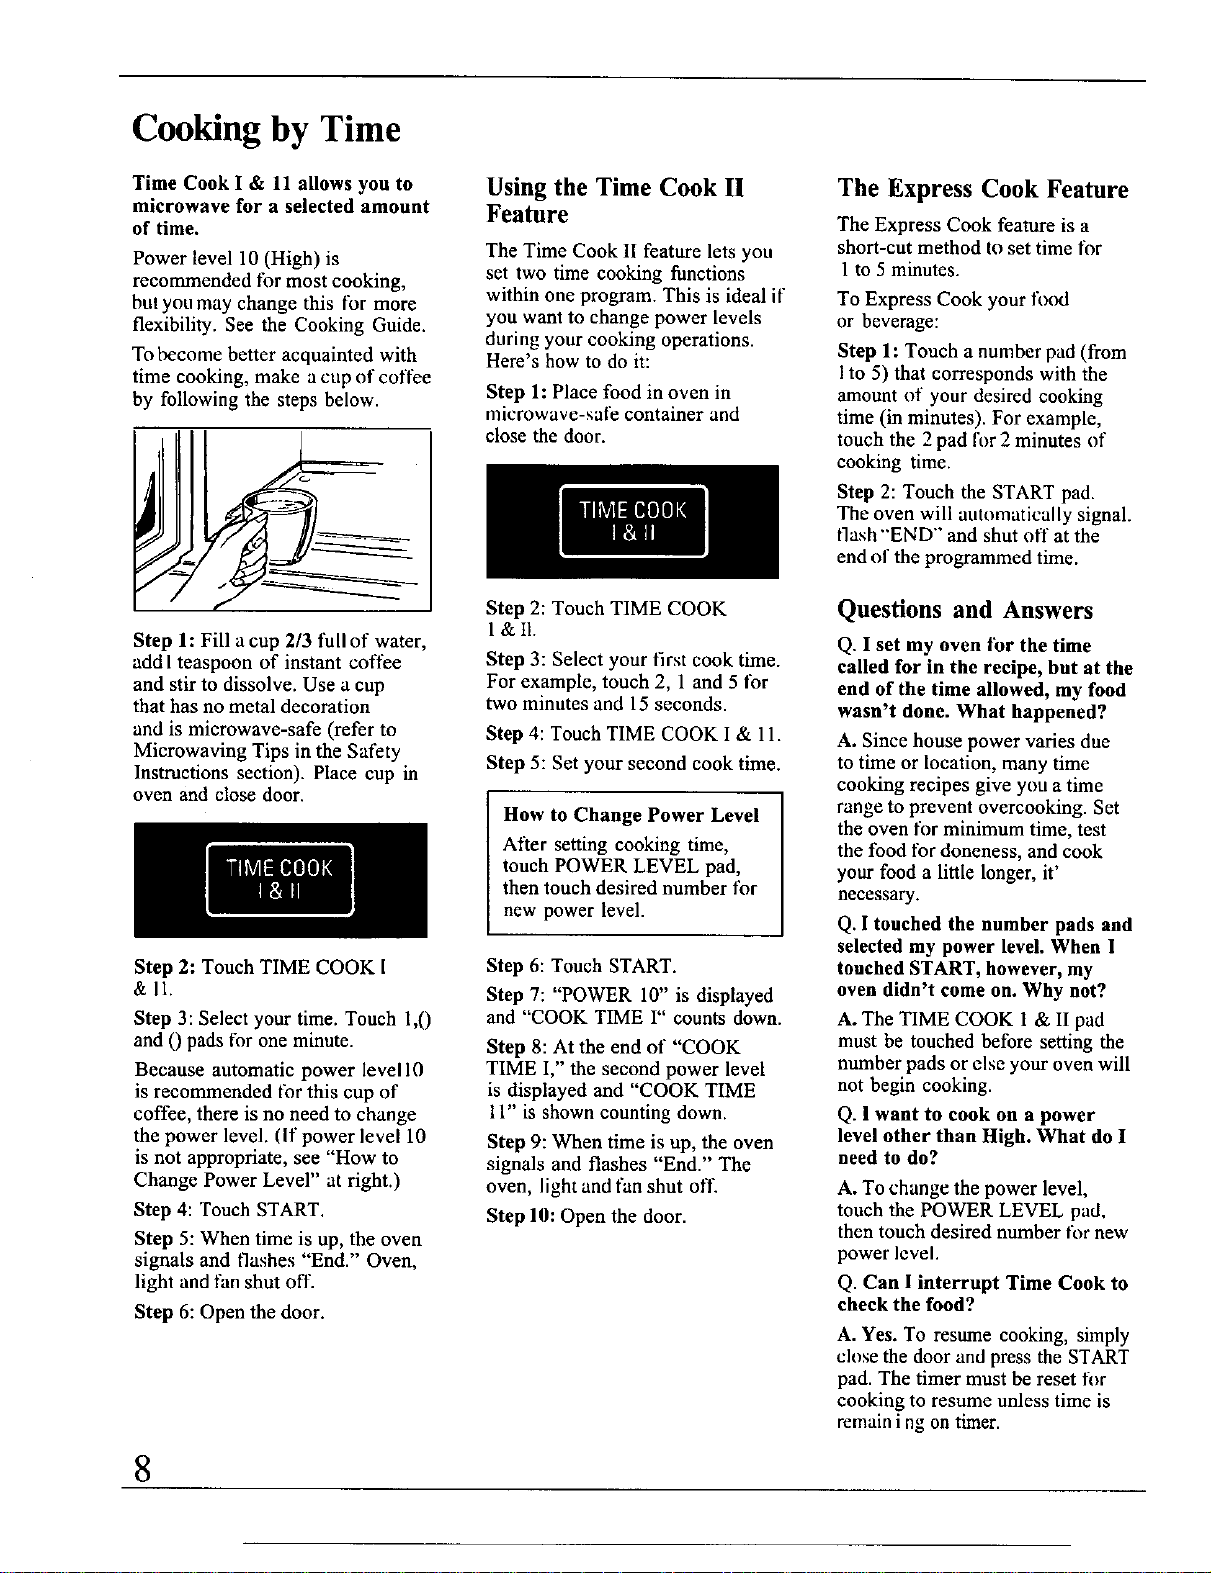
Cooking by Time
Time Cook I & 11 allows you to
microwave for a selected amount
of time.
Power level 10 (High) is
recommended tbr most cooking,
bul you may change this for more
flexibility. See the Cooking Guide.
To become better acquainted with
time cooking, make a cup of coffee
by following the steps below.
Using the Time Cook II
Feature
The Time Cook II feature lets you
set two time cooking functions
within one program. This is ideal if
you want to change power levels
during your cooking operations.
Here's bow to do it:
Step 1: Place food in oven in
microwave-safe container and
close the door.
The Express Cook Feature
The Express Cook feature is a
short-cut method to set time t_)r
1 to 5 minutes.
To Express Cook your fi)_xl
or beverage:
Step 1: Touch a number pad (from
I to 5) that corresponds with the
amount of your desired cooking
time (in minutes). For example,
touch the 2 pad for 2 minutes of
cooking time.
Step 2: Touch the START pad.
The oven will automatically signal.
flash "'END" and shut off at the
end of the programmed time.
Step 1: Fill a cup 2/3 lull of water,
add I teaspoon of instant coffee
and stir to dissolve. Use a cup
that has no metal decoration
and is microwave-safe (refer to
Microwaving Tips in the Safety
Instructions section). Place cup in
oven and close door.
Step 2: Touch TIME COOK I
&ll.
Step 3: Select your time. Touch 1,0
and 0 pads for one minute.
Because automatic power level 10
is recommended tbr this cup of
coffee, there is no need to change
the power level. (If power level 10
is not appropriate, see "How to
Change Power Level" at right.)
Step 4: Touch START.
Step 5: When time is up, the oven
signals and flashes "End." Oven,
light and tan shut off.
Step 6: Open the door.
Step 2: Touch TIME COOK
1&lh
Step 3: Select your first cook time.
For example, touch 2, 1 and 5 for
two minutes and 15 seconds.
Step 4: Touch TIME COOK I & 11.
Step 5: Set your second cook time.
How to Change Power Level
After setting cooking time,
touch POWER LEVEL pad,
then touch desired number tbr
new power level.
Step 6: Touch START.
Step 7: "POWER 10" is displayed
and "COOK TIME I" counts down.
Step 8: At the end of "COOK
TIME I," the second power level
is displayed and "COOK TIME
11" is shown counting down.
Step 9: When time is up, the oven
signals and flashes "End." The
oven, light and fan shut off
Step Ill: Open the door.
Questions and Answers
Q. I set my oven tbr the time
called for in the recipe, but at the
end of the time allowed, my food
wasn't done. What happened?
A. Since house power varies due
to time or location, many time
cooking recipes give you a time
range to prevent overcooking. Set
the oven for minimum time, test
the food for doneness, and cook
your food a little longer, it'
necessary.
Q. I touched the number pads and
selected my power level. When 1
touched START, however, my
oven didn't come on. Why not?
A. The TIME COOK 1& II pad
must be touched before setting the
number pads or else your oven will
not begin cooking.
Q. ! want to cook on a power
level other than High. What do I
need to do?
A. To change the power level,
touch the POWER LEVEL pad,
then touch desired number for new
power level.
Q. Can I interrupt Time Cook to
check the food?
A. Yes. To resume cooking, simply
close the door and press the START
pad. The timer must be reset tot
cooking to resume unless time is
remain i ng on timer.
8

Quick Reheat
The Quick Reheat feature is a
short.term progranl to utltonlati tally
reheat a beverage or previously
cooked food. The oven turns off
automatical ly a|ler a preset amotlnt
of time.
Touch just 3 pads to use Code
Reheat codes I to 6 to reheat many
popular Ioods. Scc the guide at
bottom" ol"page. Or touch just 2
pads to use the BEVERAGE or
DINNER PLATE programs with
the oven automatically setting the
cude [01 you.
Beverage
The Beverage program makes
it simple to reheat acup of hot
chocolate or other beverage. Use a
cup that has no metal decoration
and is m icruwave-safe (refer to
Microwaving Tips in theSafety
Instructions section),
Step 1: Touch BEVERAGE pad.
Step 2: Touch START pad. Oven
wiI 1signaland displayrcmaining
time counting down shortly before
shut ()IT.
Step 2: Touch START pad, Oven
will signal and display remaining
time counting down shortly belbre
shut off.
Code Reheat
The Code Reheat program makes
it a snap to reheat many popular
foods. Choose a code number from
I to 6 (see Code Reheat Guide
below).
Step 1: Touch CODE REHEAT pad.
Step 2: Touch a number pad from
Ito 6 to select a lood group.
Step 3: Touch START pad. Oven
will signal and display remaining
time counting down shortly betbre
shut off.
To Reheat More Than
One Serving
Quick Reheat codes t through 5
and Beverage let you heat up to
three servings. To add more than
ono _rving. just touch number pad
2or 3 right before touching START.
II II
Dinner Plate
The Dinner Plate program makes it
easy to reheat a plate uf leftovers
or rchcat a previously prepared
meal 101.21 guestwho arrivedlate
for dinner.
Step 1: Touch DINNER PLATE.
Code Reheat Guide
The serving size may even be
added after touching START. Just
touch number pad 2 or3."SERV"
and a number w i IIbe displayed
briefly to show that serving size
has been changed.
Time
Code Display per serving Foods Recommended
I BREAD 20 sec. Breuds, pastries, pies, bakery goods
2 MEATS 1 rain. Meats, casseroles, pizza, solid foods
3 VEGS 1% min. Fruits & vegetables
4 BEV 1V_,rain. Beverages
5 SAUCE 2V,min. Soups, stews, sauces
6 PLATE 4 min. total 2 to 3fnuds; 4 oz. each
Popcorn
Regular Microwave Popcorn
Step 1: Touch POPCORN pad.
Step 2: Touch START pad. Oven
will signal and display remaining
time counting down shortly before
shut off.
Light Microwave Popcorn
Step 1: Touch POPCORN pad.
Step 2: Touch number pad 2.
Step 3: Touch START pad.
Adjust for Shorter or
Longer Cook Time
If your favorite popcorn is
undercooked, try this:
Touch the POPCORN pad. Touch
number pad 1 lbr regular microwave
popcorn or touch number pad 2 lbr
light microwave popcorn. Touch
number pad 9. A plus sign is
displayed. The plus sign indicates 20
seconds is added to cooking time.
If your favorite popcorn is
overcooked, try this:
Touch the POPCORN pad. Touch
number pad 1 fi)rregular microwave
popcorn or touch number pad 2 lbr
light microwave popcorn. Touch
number pad t. A minus sign is
displayed. The minus sign indicates
20 seconds less cooking time is
being provided.
9
I
n
m
,o
il
Defrosting
Time Defrost is designed for
speedy thawing of frozen food
and is one of the great advantages
of a microwave oven.
.Power level 3 is automatically set
for defrosting, but you may change
this for more flexibility.
•See the Defrosting Guide for
defrosting help.
To become better acquainted with
the defrost function, defrost frozen
pork chops by following the steps
below.
Step 1: Place a package of frozen
chops in the oven and close the
door. Be sure the package contains
no metal.
Step 2: Touch TIME DEFROST.
Step 3: Select one half of the total
defrosting time recommended in
the Defrosting Guide. For example,
touch 4, 0 and O for 4 minutes.
How to Change Power Level
After setting defrosting time,
touch POWER LEVEL pad,
then touch desired number for
new power level.
Step 4: Touch START. When
the cycle is completed, the oven
signals and flashes "End," then
automatically shuts off.
Step 5: Turn the package over,
close the door and repeat Steps 2
and 3 to set the remaining half of
defrosting time and touch START.
Step 6: When the oven signals and
flashes "End," open the door,
remove the package and separate
chops to finish defrosting.
Defrosting Tips
.Foods frozen in paper or plastic
can be defrosted in the package.
•For even defrosting, some foods
need to be broken up or separated
part of the way through the
defrosting time.
,Family-size, pre-packaged frozen
dinners can be defrosted and
microwaved. If the food is in a
foil container, transfer it to a
microwave-safe dish.
•Check the Defrosting Guide for
other defrosting tips.
Questions and Answers
Q. When I press START, 1 hear a
dull, thumping noise. What is it?
A. This sound is normal. It is
letting you know the oven is using
a power level lower than 10 (High).
Q. Can I defrost small items in a
hurry?
A. Yes, but they will need more
frequent attention than usual. Raise
the power level after entering the
time by touching the desired power
level pad. Power level 7 cuts the
total defrosting time in about 1/2;
Power level 10 cuts the total
defrosting time to approximately
1/3. During either, rotate or stir
food frequently.
Q. Why don't the defrosting
times in the Defrosting Guide
seem right for my food?
A. These times are averages.
Defrosting time can vary according
to the temperature in your freezer.
Set your oven for the time
indicated in the Defrosting Guide.
If your food is still not completely
thawed at the end of that time,
reset your oven and adjust the time
accordingly.
Q. Should all foods be completely
thawed before cooking?
A. Some foods should not be
completely thawed before cooking.
For example, fish cooks so quickly
it is better to begin cooking while
it is still slightly frozen.
Q. Can I open the door during
defrosting to check on the
progress of my food?
A. Yes. You may open the door at
any time during microwaving. To
resume defrosting, close the door
and press START. The oven begins
operating if time is left on timer. If
not. reset timer.
10
Glossary of Microwave Terms
When adapting recipes for the microwave, it is best
to start with a familiar recipe. Knowing how the
food should look and taste will help when adapting
recipes for microwaving. Foods that require
browning or crisp, dry surfaces will cook better
conventionally.
•Moist foods, such as vegetables, fruits, poultry and
seafood, microwave well.
• Rich foods, such as bar cookies, moist cakes and
candies, are suitable tbr microwaving because of their
high fat and sugar content.
.Reduce conventional cooking time by one-half to one-
third. Check tbcxl after minimum time to avoid
overcooking.
•Small amounts of butter or oil can be used for
flavoring, but are not needed to prevent sticking.
•Seasonings may need to be reduced. Salt meats and
vegetables after cooking.
Covering. In both conventional and microwave
cooking, covers hold in moisture,allowformore even
heating and reduce cooking time. Conventionally,
partial covering allows excess steam to escape. Venting
plastic wrap or covering with wax paper serves the
same purpose when microwaving.
Venting. After covering a dish with plastic wrap, you
vent the plastic wrap by turning back one corner so
excess steam can escape.
Arranging Food in Oven. In conventional baking, you
position foods, such as cake layers or potatoes, so hot
air can flow around them. When microwaving, you
arrange foods in a ring, so that all sides are exposed to
microwave energy.
Stirring. Inrange-top cooking, you stir foods up from
the bottom to heat them evenly. When microwaving,
you stir cooked portions from the outside to the center.
Foods that require constant stirring conventionally will
need only occasional stirring when microwaving.
Turning Over. Inrange-top cooking, you turn over
foods, such as hamburgers, so both sides can directly
contact the hot pan. When microwaving, turning is
often needed during defrosting or when cooking certain
foods, such as frozen hamburgers.
Standing Time. In conventional cooking, roods such as
roasts or cakes are allowed to stand to finish cooking or
to set. Standing time is especially important in
microwave cooking. Note that a microwaved cake is
not placed on a cooling rack.
Shielding. Ina conventional oven, you shield chicken
breasts or baked foods to prevent over-browning. When
microwaving, you use small strips of foil to shield thin
parts, such as the tips of wings and legs on poultry,
which would cook before larger parts.
Arcing. Sparks caused by too much metal in the
microwave oven or metal touching the side of the oven
or foil that is not molded to food.
Prick Foods to Release Pressure. Steam builds up
pressure in foods that are tightly covered by a skin or
membrane. Prick foods, such as potatoes (as you do
conventionally), egg yolks and chicken livers, to
prevent bursting.
Rotating. Occasionally, repositioning a dish in the oven
helpsfood cook more evenly. To rotate 1/2 rum, tam
the dish until the side that was to the back of the oven is
to the front. To rotate 1/4 turn, turn the dish until the
side that was to the back of the oven is to the side.
Basic Microwave Guidelines
Density of Food. In both conventional and microwave
cooking, dense foods, such as potatoes, take longer to
cook than light, porous foods, such as roils, bread or
pieces of cake.
Round Shapes. Since microwaves penetrate foods to
about one inch from top, bottom and sides, round
shapes and rings cook more evenly. Comers receive
more energy and may overcook. This may also happen
when cooking conventionally.
Delicacy. Foods with a delicate texture, such as
custards, are best cooked at lower power settings to
avoid toughening.
Natural Moisture of food affects how it cooks. Very
moist foods cook evenly because microwave energy is
attracted to water molecules. Food that is uneven in
moisture should be covered or allowed to stand so heat
can disperse evenly.
Piece Size. Small pieces cook faster than large ones.
Pieces that are similar in size and shape cook more
evenly. With large pieces of food, reduce the power
setting for even cooking.
Shape of Food. In both types of cooking, thin areas
cook faster than thick areas. This can be controlled in
microwaving by placing thick pieces near the outside
edge and thin pieces in the center.
/l
Starting Temperature. Foods taken from the freezer or
refrigerator take longer to cook than foods at room
temperature. Timings in our recipes are based on the
temperatures at which you normally store the foods.
Quantity of Food. In both types of cooking, small
amounts usually take less time than large amounts. This
is most apparent in microwave cooking, where time is
directly related to the number of servings.
Shelf (on models so equipped). Use the shelf to heat
more than one dish at one time. Take the shelf out when
you are not using it.
11
Microwave Cookware Guide & Microwave Adapting
Type of Cookware Microwave Uses
Foil-lined paper bags and boxes
Foil baking trays
Aluminum foil
Metal or partially metal pots, pans,
thermometers, skewers and twist ties
Glass jars and bottles
Microwave plastics
Paper or Styrofoam plates and cups
Oven glass and ceramic
Dinnerware
Papertowels, paper napkins and
wax paper
Plastic wrap, cooking bags, boil-in
bags and storage bags
Paperboard trays used forfrozen
entrees and dinners
Plastic trays and plates used for frozen
entrees and dinners
Avoid using.
Youcan use toil trays that areno higher than 3/4-in. (Foil or metal will
reflect microwaves and cause uneven heating. ) Arcing can occur i f fi)il
is closer than I inch to oven walls.
Use for shielding.
Do not use. Microwave-sal_ therlnnmetcrs and skewers are available.
Generally, glass jars can be used to warm food. However, do not heat
baby food in jars, even without lids. because tbod will heat unevenly.
Do not warm |oods in narrow-necked bottles because pressure can
build up.
Cooking and heating.
Heating and serving of foods and beverages. Styrofoam will men if
food is too hot or if Ibod is cooked for a long time.
Cooking and heating.
Heating and some cooking.Follow dinnerware manul_acturer's
recommendations. Aw_id using dishes with metal trim.
Absorbing moisture, and preventing spatters. Heating and serving of
sandwiches or appetizers. Light covering to hold in steam. Do not use
paper towels that have synthetic fibers, such as nyhm, woven into them.
Synthetic fibers may cause the towel to ignite. Avoid using recycled
paper.
Covering to hold in steam (wrap). Cooking (cooking and boil-in bags).
Heating (storage bags ).
Cooking and heating.
Ccu)king and heating.
Straw, wicker and wood Warming.
Cookware Tips
oAlways check the cookware manufacturer's
recommendations before using any cookware
in the oven.
•Before purchasing cookware or preparing food in
cookware, check its size to make sure it will fit
in the oven.
1'3
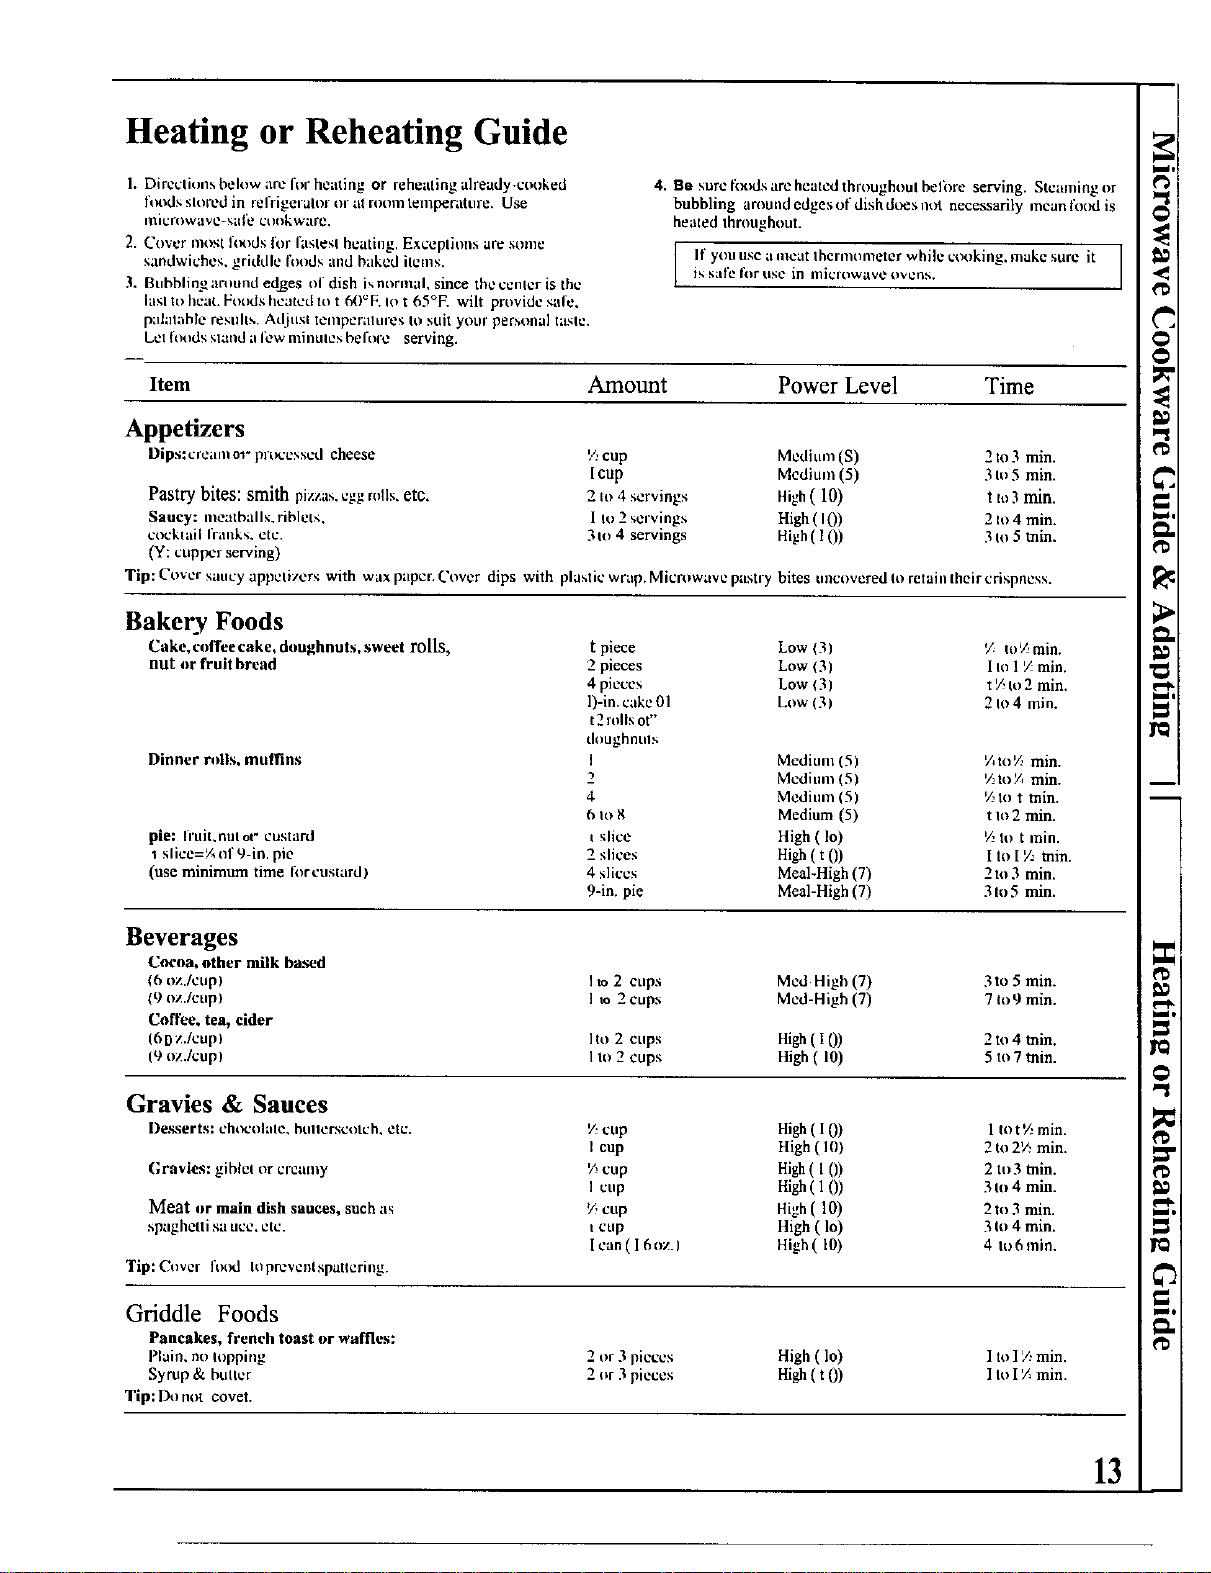
Heating or Reheating Guide
1. Direr:lions below arc for heating or reheating already-cooked
lt_ds slol_2d in relYigeralor or at morn tetnpe_ture. Use
i_lh:rowave-sale ct)okware.
2. Curer nlosl hx>ds for faslesl heating. Exccplhms arc some
_.andwichc_. griddle hm+ds and baked ilems.
21. BLibblim2amund edjges of dish i_m)rn_al, since thecentcr is the
lasl to heat. Foods heated to t 60_E Iot 65°E wilt provide safe.
puhllahle results. Adjust tdlnper;llUles tu suit yotlr personal taslc.
Let loods slatld a I_w minules before serving.
4. Be sure fixuJs are heated throughoul befi)re serving. Steaming or
bubbling around edges of dish dries m)t necessarily mean lk>culis
heated Ihrnughout.
If you use a mcat Ihermonleter while ct×)king, make sure itis sale I_lr USe ill microwave ovt;iis,
I
Item Amount Power Level Time
Appetizers
Dips:crealn o_"pl't_cessetl cheese
Pastry bites: smith pizzas,eggmils,etc.
Saucy: meatballs, riblcts,
cocktail rrallkS, etc.
(Y: cuppcr serving)
V.,cup Medium (S) 2 to 3 min.
Icup Medium (5) 3 to 5 min.
2 to 4 servings High(10) t tu 3 min.
1 to 2 servings High (10) 2 to 4 min.
3 to 4 servings High ( 10) 3 to 5 thin.
Tip: Cover saucy appetizers with wax paper. Cover dips with plastic wrap. Microwave pastry
bites uncovered It) retain their crispness.
Bakery Foods
Cake, coffee cake, doughnuls, sweet rolls,
nut or fruit bread
Dinner mils. muffins
pie: h'uit,nutof custard
1 slice=¼ td'9-in, pie
(use minimum time fi_rcustard)
t piece Low (3) '/. toV,min.
2 pieces Low 13) I to 1/. min.
4 pieces Low (3 ) t/, to 2 min.
l)-in, cake 01 Low (31 2 It) 4 rain.
t 2 mils or"
doughnuls
I Medium 15/ '/.to'/,. min.
2 Medium (51 Y_to¼ min.
4 Medium 15) 'kto t thin.
6 It) 8 Medium (5) t m 2 min.
t slice High (Io) V.Iot min.
2 slices High ( t 0) I tn I V-.tnin.
4 slices Meal-High (7) 2 m 3 min.
9-in. pie Meal-High (7) 3 m 5 min.
Beverages
Cocoa, other milk based
(6 nz./cup)
(9 oz./cup)
Coffee, tea, cider
16DZ./cup)
(9 oz./cup)
I to 2 cups Med High (7) 3to 5 min.
I to 2 cups Med-High (7) 7 to 9 min.
Ito 2 cups High(I 0) 2 to 4 thin.
Ito 2 cups High (10) 5 to 7 tnin.
Gravies & Sauces
Desserts: chocohlle, htlllersctltch, etc.
Gravies: giblet or creamy
Meat or main dish sauces, such as
spaghetti saucc, etc.
']rip:Cqwer fi)txl h_prevcntspattcring.
V,cup High ( 1 0) 1 m t V.,min.
I cup High ( I0/ 2 to 2'/: min.
V,cup High ( I 0) 2 to 3 tnin.
I cup High( 1 0) 3 to 4 min.
V,cup High (10) 2 to 3 min.
t cup High (1o) 3to 4 min.
Ican(l 6oz.I High(10) 4 It_6min.
Griddle Foods
Pancakes, french toast or waffles:
Plain, no lopping 2 or 3 pieces High (lo) I to ] ,4 min.
Syrup & buacr 2 or 3 pieces High ( t 0) I to 1¼ min.
Tip: Do rn)t covet.
13
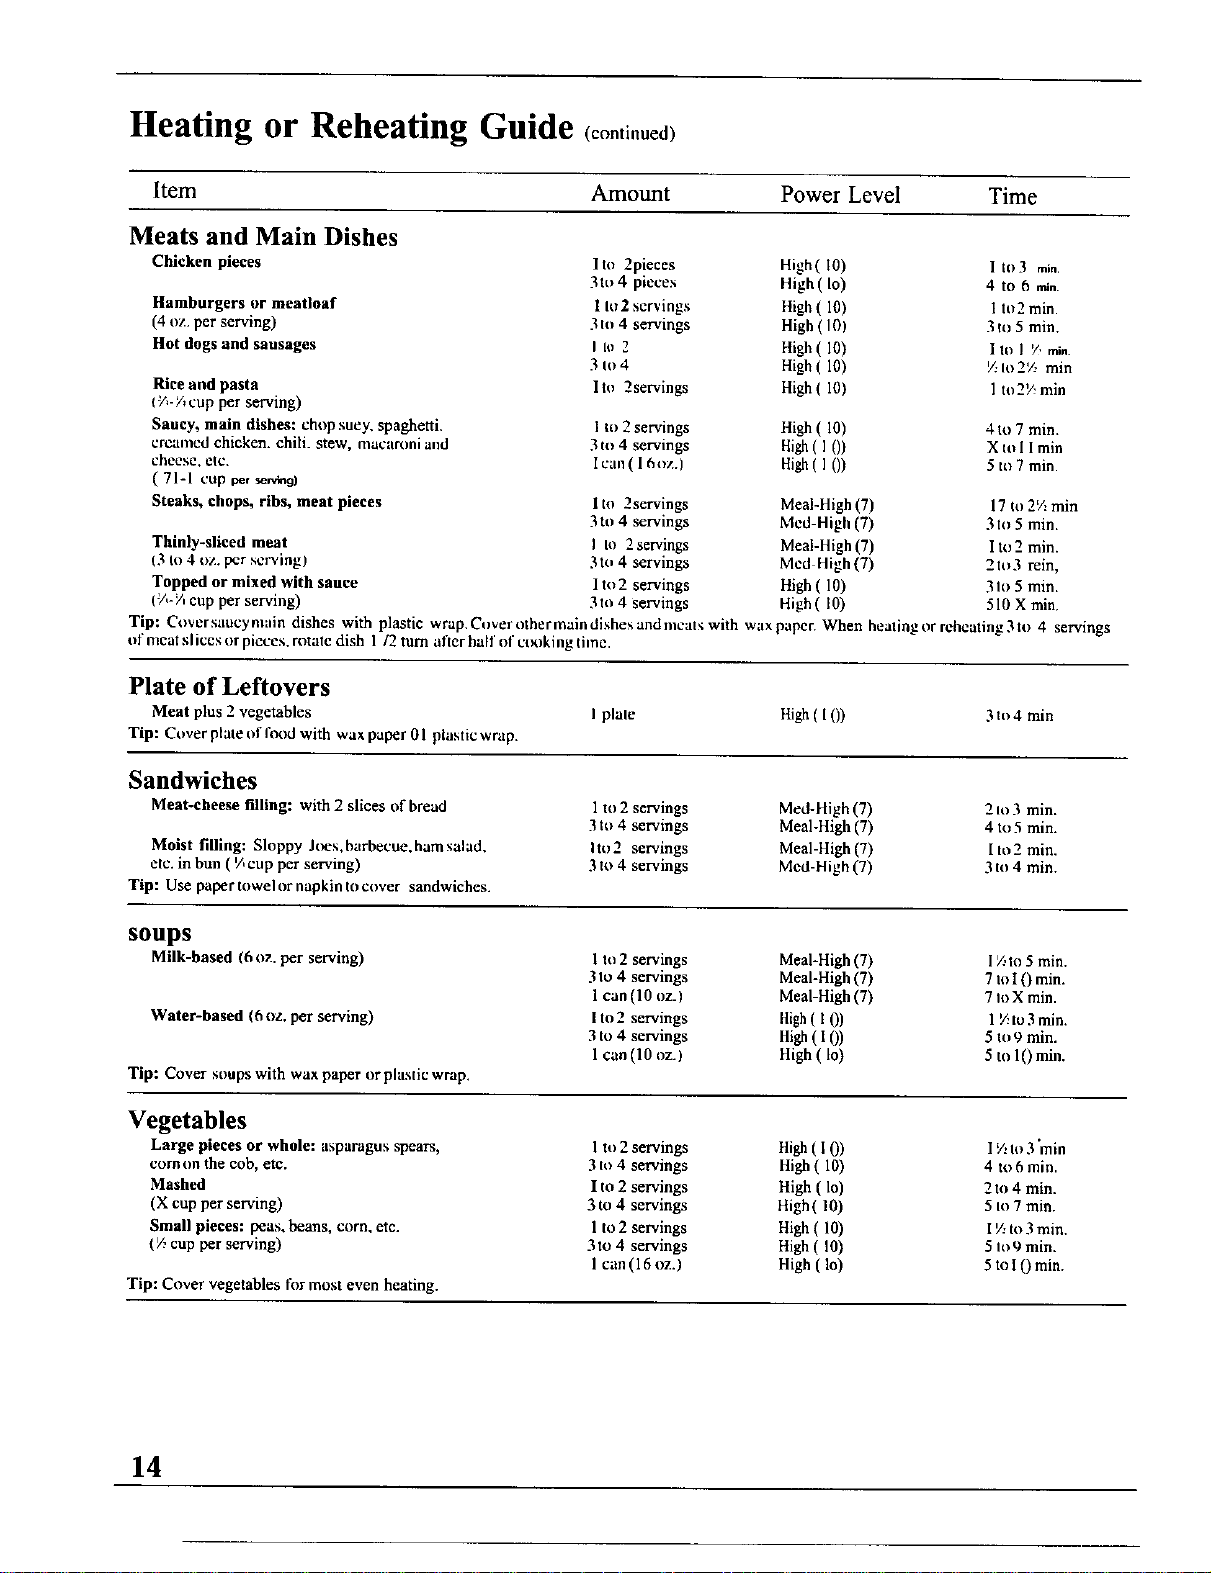
Heating or Reheating Guide <ront .ued)
Item Amount Power Level Time
Meats and Main Dishes
Chicken pieces I to 2pieces High (I0)
3to 4 pieces High (Io)
Hamburgers or meatloaf 1 It)2 servings High (10)
(4 oz. per serving) 3 Io 4 servings High ( I0)
Hot dogs and sausages I to 2 High (10)
3 to 4 High (10)
Rice and pasta I to 2servings High (10)
t_',-Y, cup per serving)
Saucy, main dishes: chop sue)', spaghetti.
creamed chicken, chili, stew, inacaroni and
cheese, elc.
( 71-1 cup _f sa_.ng)
Steaks, chops, ribs, meat pieces
Thinly-sliced meat
13 to 4 oz. per serving)
Topped or mixed with sauce
1%-Y,cup per serving)
1 |O 3 rain,
4 to 6 ran.
1 IO2 rain.
3 t(I 5 min.
1 to I V, ran.
/:1o2'/, rain
1 to 2V,min
1 tl) 2 servings High (10) 4 to 7 rain.
3 to 4 servings High ( ] ()) X to I I min
I call ( 16_z.] High ( ] ()) 5 to 7 min.
Ito 2servings Meal-High (7) 17 to 2% min
3to 4 servings Med-High (7) 3to 5 min.
I IO 2 servings Meal-High (7) I to 2 min.
3 to 4 servings Med High (7) 2 to 3 rein,
I to2 servings High (10) 31o 5 min.
3to 4 servings High (10) 510 X min.
Tip: Cover saucy main dishes with plastic wrap. Cover other main dishes and meats with wax paper. When heating or reheating 3 to 4 servings
of meat slices or pieces, rotate dish 1 /2 turn after halt of c_)king tilnc.
Plate of Leftovers
Meat plus 2 vegetables
Tip: Cover plate of lixnl with wax paper 01 plastic wrap.
I plale High ( I 0) 3to4 min
Sandwiches
Meat-cheese filling: with 2 slices of bread
Moist filling: Sloppy J(_es.barbecue, ham salad,
etc. in bun ( ¼cup per serving)
Tip: Use paper tc.wel or napkin to cover sandwiches.
1 to 2 servings Med-High (7) 2 io 3 min.
3 to 4 servings Meal-High (7) 4 to 5 min.
Ittl 2 servings Meal-High (7) I to 2 min.
3 to 4 servings Meal-High (7) 3 to 4 rain.
soups
Milk-based (6 oz. per serving)
Water-based (6 oz. per serving)
Tip: Cover soups with wax paper or plastic wrap.
1 to 2 servings Meal-High (7) 1/--,to5 min.
3 to 4 servings Meal-High (7) 7 to I 0 min.
1 can (10 oz.) Meal-High (7) 7 ll) X rain.
I to 2 servings High ( 10) 1 E to 3 min.
3 to 4 servings High ( I 0) 5 to 9 min.
1 can (10 oz.) High (1o) 5 to 10 min.
Vegetables
Large pieces or whole: asparagus spears, 1 to 2 servings High ( I 0) 1% Io 3"rain
corn on the cob, etc. 3 to 4 servings High (10) 4 to 6 rain.
Mashed I to 2 servings High (1o) 2 to 4 min.
(X cup per serving) 3 to 4 servings High (10) 5 Io 7 rain.
Small pieces: peas, beans, corn, etc. 1 to 2 servings High (10) I V:to 3 min.
(_ cup per serving) 3 to 4 servings High (10) 5 Io 9 min.
1 can (16 oz.) High (1o) 5 to I 0 rain.
Tip: Cover vegetables lbr most even heating.
14
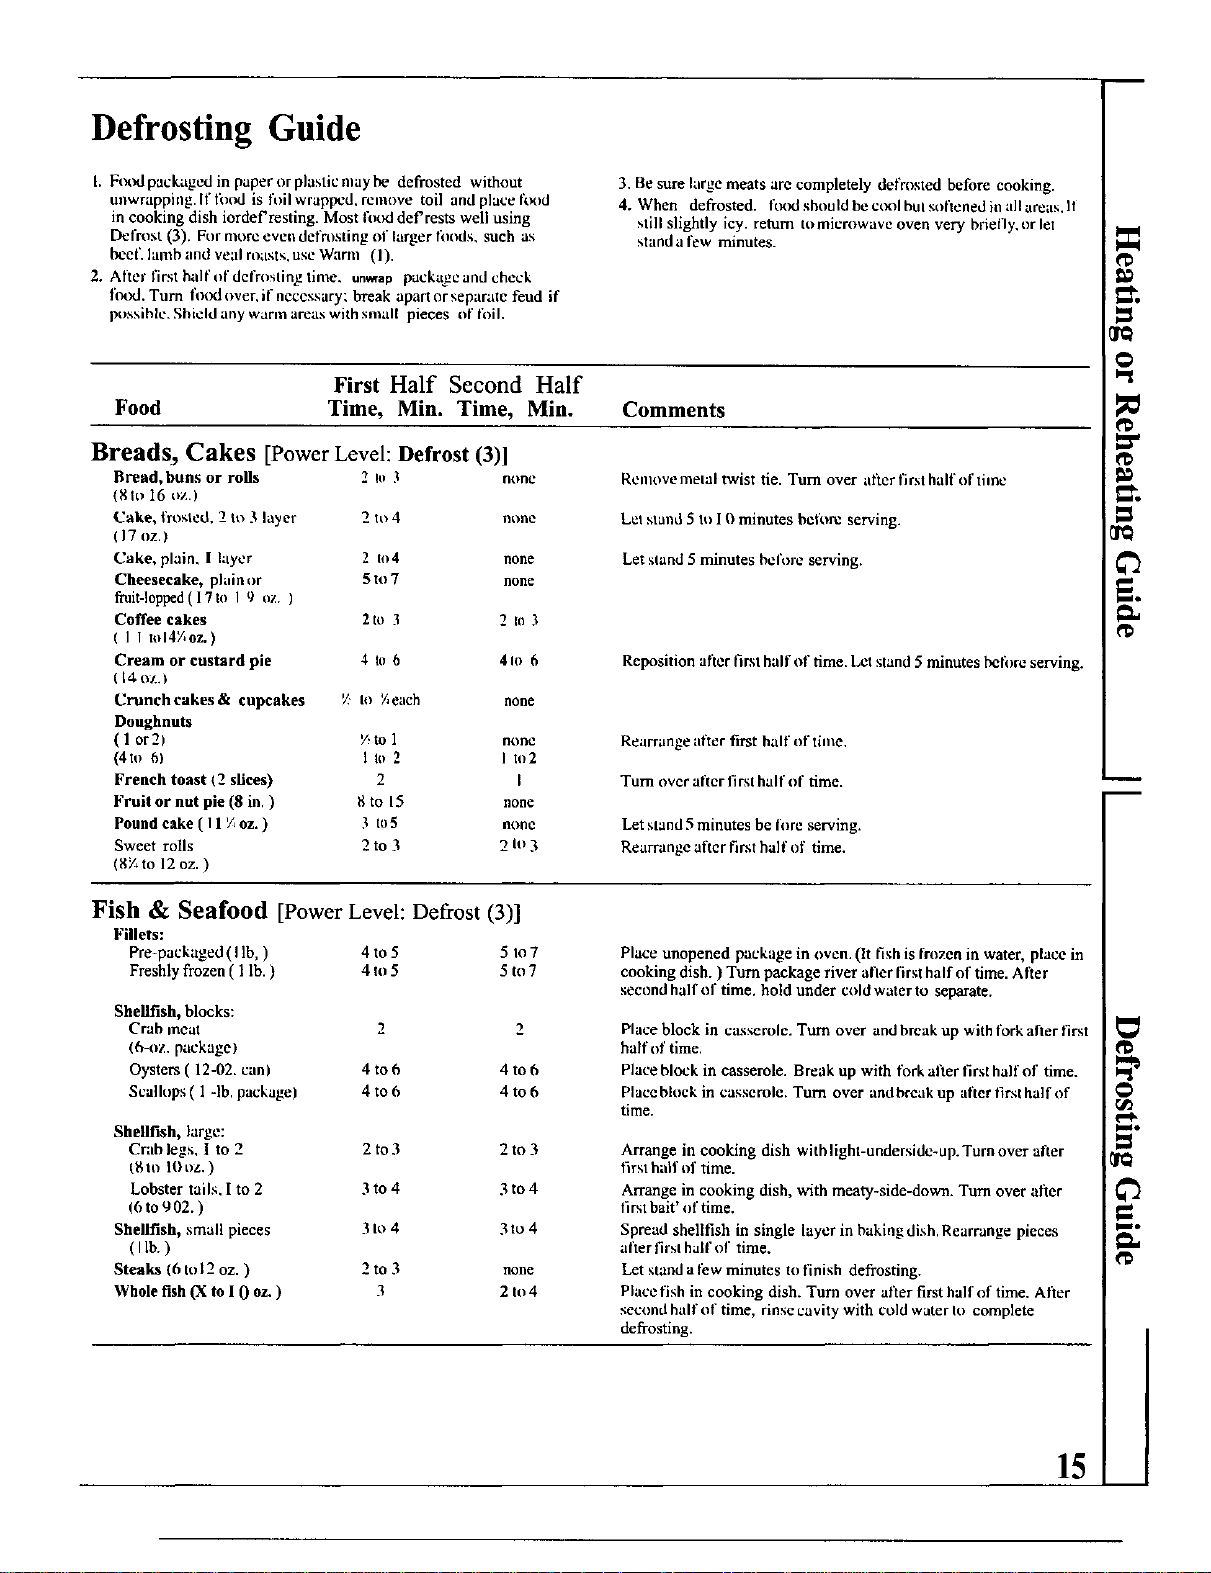
Defrosting Guide
L F_×_dpackaged in paper or plastic may be defrosted without
unwrapping. If ft)_l is fi)il wrapped, rclnove toil anti place ft_d
in cooking dish iordef'resting. Most Ib_vJ def'rests well using
Defrost (3). For more even defrosting of larger fluids, such as
beef. lamb and veal roasts, use Warnl (I).
2. Alter first half uf defroslin_g time, un_op packtuae and check
fi_xl. Turn ftx_d over, if necessary: break apart or separate feud it"
p_ssihle. Shield any warm areas with small pieces of Ibil.
3. Be sure large meats are completely defrosted before cooking.
4. When defrosted, ft_xl should be ctx_l bul sofiened in all areas, lt
still slightly icy. return tomicrowave oven very briefly.or let
stand a l_w minutes.
First Half Second Half
Food Time, Min. Time, Min. Comments
Breads, Cakes [Power Level: Defrost (3)1
Bread, buns or rolls 2 I0 3 none
(Stt_ 16 oz.)
Cake, frosted. 2 tt_ 3 layer 2 t_>4 none
(17 oz.I
Cake, plain. I layer 2 Io4 none
Cheesecake, phlin or 5 to 7 none
fruit-lopped(17to I 9 oz. )
Coffee cakes 2 to 3 2 tll 3
( I 1 tnl4¼oz.)
Cream or custard pie 4 to 6 4 Io 6
( 14 oz.)
Crunchcakes& cupcakes _ Io _each none
Doughnuts
(I or2) '/,to 1 none
(4in 6) 1 Io 2 I Io2
French toast (2 slices) 2 I
Fruil or nut pie (8 in ) 8 to 15 none
Pound cake ( I1 I/.oz. ) 3 tn5 none
Sweet roils 2 to 3 2 tu 3
(8¼ to 12 oz. )
Renuwe mela [ twist tie. Turn over afl.er ft rst half of ti me
Lel stand 5 tu I 0 minutes bellare serving.
Let stand 5 minutes before serving.
Reposition after first half of time. Let stand 5 minutes bcfi_re serving.
Rearrange afier first half of lilac.
Turn over after first half of time.
Let stand 5 minutes be [ore serving.
Rearrange after first hall" of time.
Fish & Seafood [Power Level: Defrost (3)]
Fillets:
Pre-packaged (I lb, ) 4 to 5 5 to 7
Freshly frozen ( 1 lb. ) 4 to 5 5 to 7
Shellfish, blocks:
Crab ;neat 2 2
(6-uz. package)
Oysters ( 12-02. can) 4 to 6 4 to 6
Scallops ( 1 -lb. package) 4 to 6 4 to 6
Shellfish, large:
Crab legs, 1 to 2 2 to 3 2 to 3
tg to 10 t)z. )
Lobster tails. I to 2 3 to 4 3 to 4
(6to902.)
Shellfish, small pieces 3 to 4 3 to 4
(Uh.)
Steaks 16 to 12 oz. ) 2 to 3 none
Whole fish (X to I 0 oz. ) 3 2 to 4
Place unopened package in oven. (It fish is frozen in water, place in
cooking dish. ) Turn package river after first half of time. After
second half of time. hold under cold water to separate.
Place block in casserole. Tttrn over and break up with fork after first
half of time.
Place block in casserole. Break up with fork after first half of time.
Place block in casserole. Turn over and break up after first hal f of
time.
Arrange in cooking dish with light-underside-up. Turn over after
first hall" of time.
Arrange in cooking dish, with meaty-side-down. Turn over after
lir_t bait' of time.
Spread shellfish in single layer in baking dish. Rearrange pieces
after firsl half of time.
Let stand a flew minutes to finish defrosting.
Place fish in cooking dish. Turn over after first half of time. After
second half of time, rinse cavity with cold water tu complete
defrosting.
15
g.
m
i
@
r_
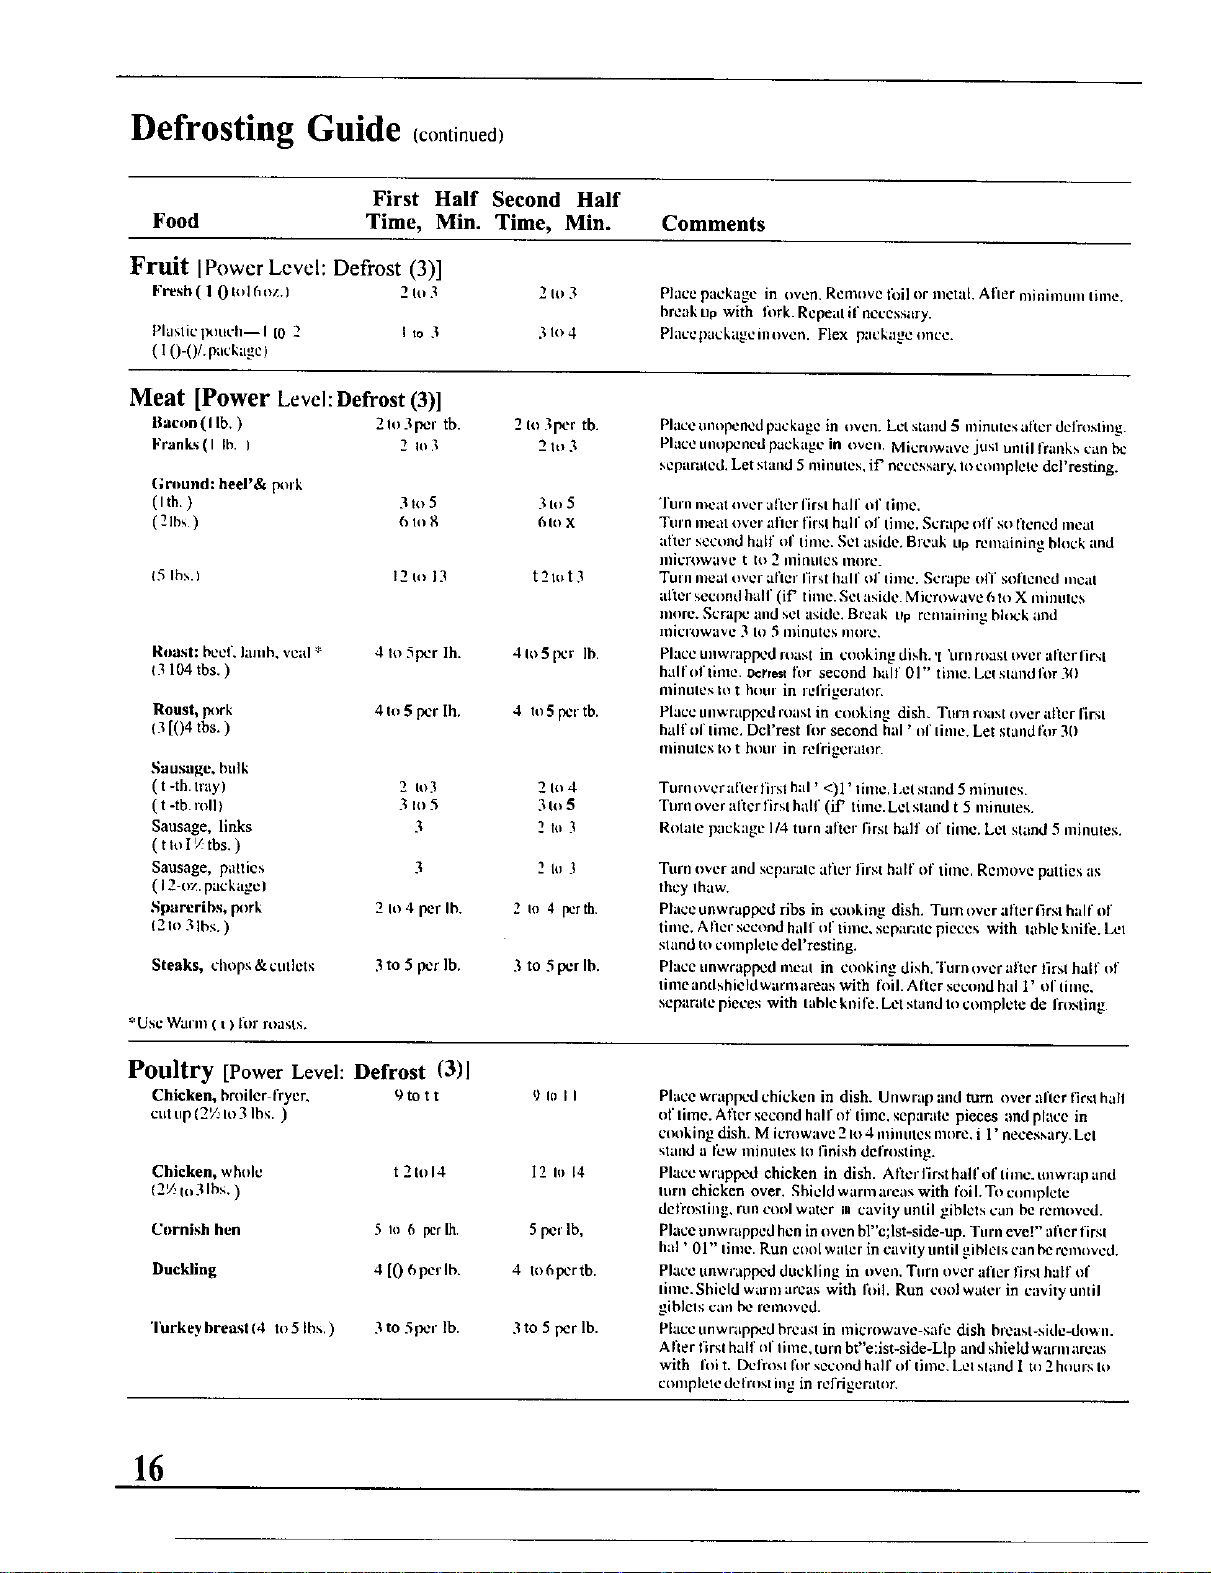
Defrosting Guide co.t m,e >
First Half Second Half
Food Time, Min. Time, Min. Comments
Fruit IPowcr Level: Defrost (3)]
Fresh ( 1 0 lid (1ozA 2 Io 3 2 Io 3 Place package in oven. Remove fi)i] or metaL After minintLnn lime.
breakup with lork. Rcpealffneccssary.
Plasticl_.luch--I l0 2 I to 3 31o4 Placepackagciuoven. Flex packageonce.
( I0-0/. package)
Meat [Power Level: Defrost (3)1
Bacon(I lb. ) 21o 3per tb. 2 to 3per tb.
Franks(I Ih. ] 2 In3 21o3
(;round: heel'& pork
(Ith.) 31o5 31o5
(2lhs) 61o8 61nx
15 Ihs.) 12 to 13 t21ot 3
Roast: heel, lash+ veal * 4 Io 5per ]h. 4 Io 5 per lb.
0 104 tbs.)
Roust, pa)rk 4 to 5 per lb. 4 to 5 pet tb.
(3 [04 tbs. )
Suusllge+ hulk
( t -th. truly) 2 Io3 2 Io 4
( t -tb. roll) 3 Io 5 3 to 5
Sausage, links 3 2 to 3
(ttol_tbs.)
Sausage, patties 3 2 to 3
( 12-oz. peckagc)
Spareribs, pork 2 Io 4 per lb. 2 to 4 perth.
(2to 31bs.)
Steaks, chops & cutlets 3 to 5 per lb.
*Ust_ Warll) ( t ) t/)l" roasts.
3 to 5per lb.
Place unopened package in avon. Let stand 5 minutes after defrosting.
Place unopened package in oven, Micn_wave jusl until I/'anks can be
separaled. Let stand 5 minutes, if' necessary, to complele dcl'resting.
Ttlrn meat over afler firsl half of time.
Turn meat over after firsl hall of time. Scrape ifff so ftcned meal
after second hall of linle. Set aside. Break up remaining block and
ilticrow_tve t Io 2 ininkllCS iln)rc.
Wuru nleal over afler first half of linlc. Scrape off softened iiit2al
after second half (if' time. Set aside. Microwave 6 to X ininnles
more. Scrape and sel aside. Break up rcnlailting block and
inicrowave 3 I0 5 Illiflllles nlOl'e.
Place ullwrapped roast in cooking dish. '1 'urn roast over al_er first
half of time. _rr_t for second half 01" time. Letslandfi_r 3t)
minutes In t hour in ruliigeralor.
Place tmwrapped roast in cooking dish. Tnrn nmst over after firsl
half tff linlc. Dcl'rest Ibr second hal ' of linle. Let stand t_,_r30
minnlcs to t hour in [elrigelalor.
Turn over afler firsl hal ' <)1 ' lime. Let stand 5 minutes.
Turn over after firsl half (if' lime. Let stand t 5 minutes.
Rotale package I/4 turn after first half of lime. Let stand 5 minutes.
Wtu'ltover and separalc after lilSt half of lime. Remove patties as
they thaw.
Phtce unwrapped ribs in cooking dish. Turn over after first hal f of
time. After second half nf time. separate pieces with table knitS. Lel
stand to complcle del'resting.
Place unwrapped meal in conking dish. Turn over after lirst hall of
linleandshicldwamlareas with foiL After second hal 1' ol lime.
_,cparate pieces with table knife. Let stand to complete de frosting
Poultry [Power Level: Defrost (3)1
Chicken, brniler fryer. 9 to t t
cut up(2V!Io 3 Ibs. )
9 to II
Chicken, whtd¢ t 2 to 14 12 Ii) 14
(2'/, to 3 Ihs. )
Cornish hen 5 Io 6 per lb. 5 per Ib,
Duckling 4 [0 6perlb. 4 to6pcr tb.
Turkey breast 14 to 5 Ibs.) 3 to 5 per lb. 3 to 5 per lb.
Place wrapped chicken in dish. Unwrap and turn over after first hall
or lime. After second half of lime, separale pieces and place in
ct_king dish. M icla_wave 2 I,o4 inJunlcs more, i 1" necessary. Lcl
stand a 1+2w nlinUleS Io finish defrosting.
Placewrapped chicken in dish. Allcrfirsthalfoflimc.unwrapand
Inrn chicken over, Shield warm areas with fl)il. To complete
defrosting, run cool water in cavity until giblcls can be removed.
Place unwrapped hen in oven bl"c;lst-side-up. Turn eve!" after first
hal ' 01" linle. Run cool water in cavity until gihlels can be removed+
Place unwrapped duckling in oven. Turn over afler first half of
lime. Shield warm areas with fifth Run cool water in cavity until
giblels can be removed.
Phtce unwrapped breasl in microwave-sail: dish breast-side-down.
After I'ir_t half Ill+lime, turn bt'e:ist-side-Llp and shield wanu areas
with I'oit. Defrost Ibr second half of time. Let sland 1 ill 2 hilurs It)
complele defrost lug in refrigerator.
16
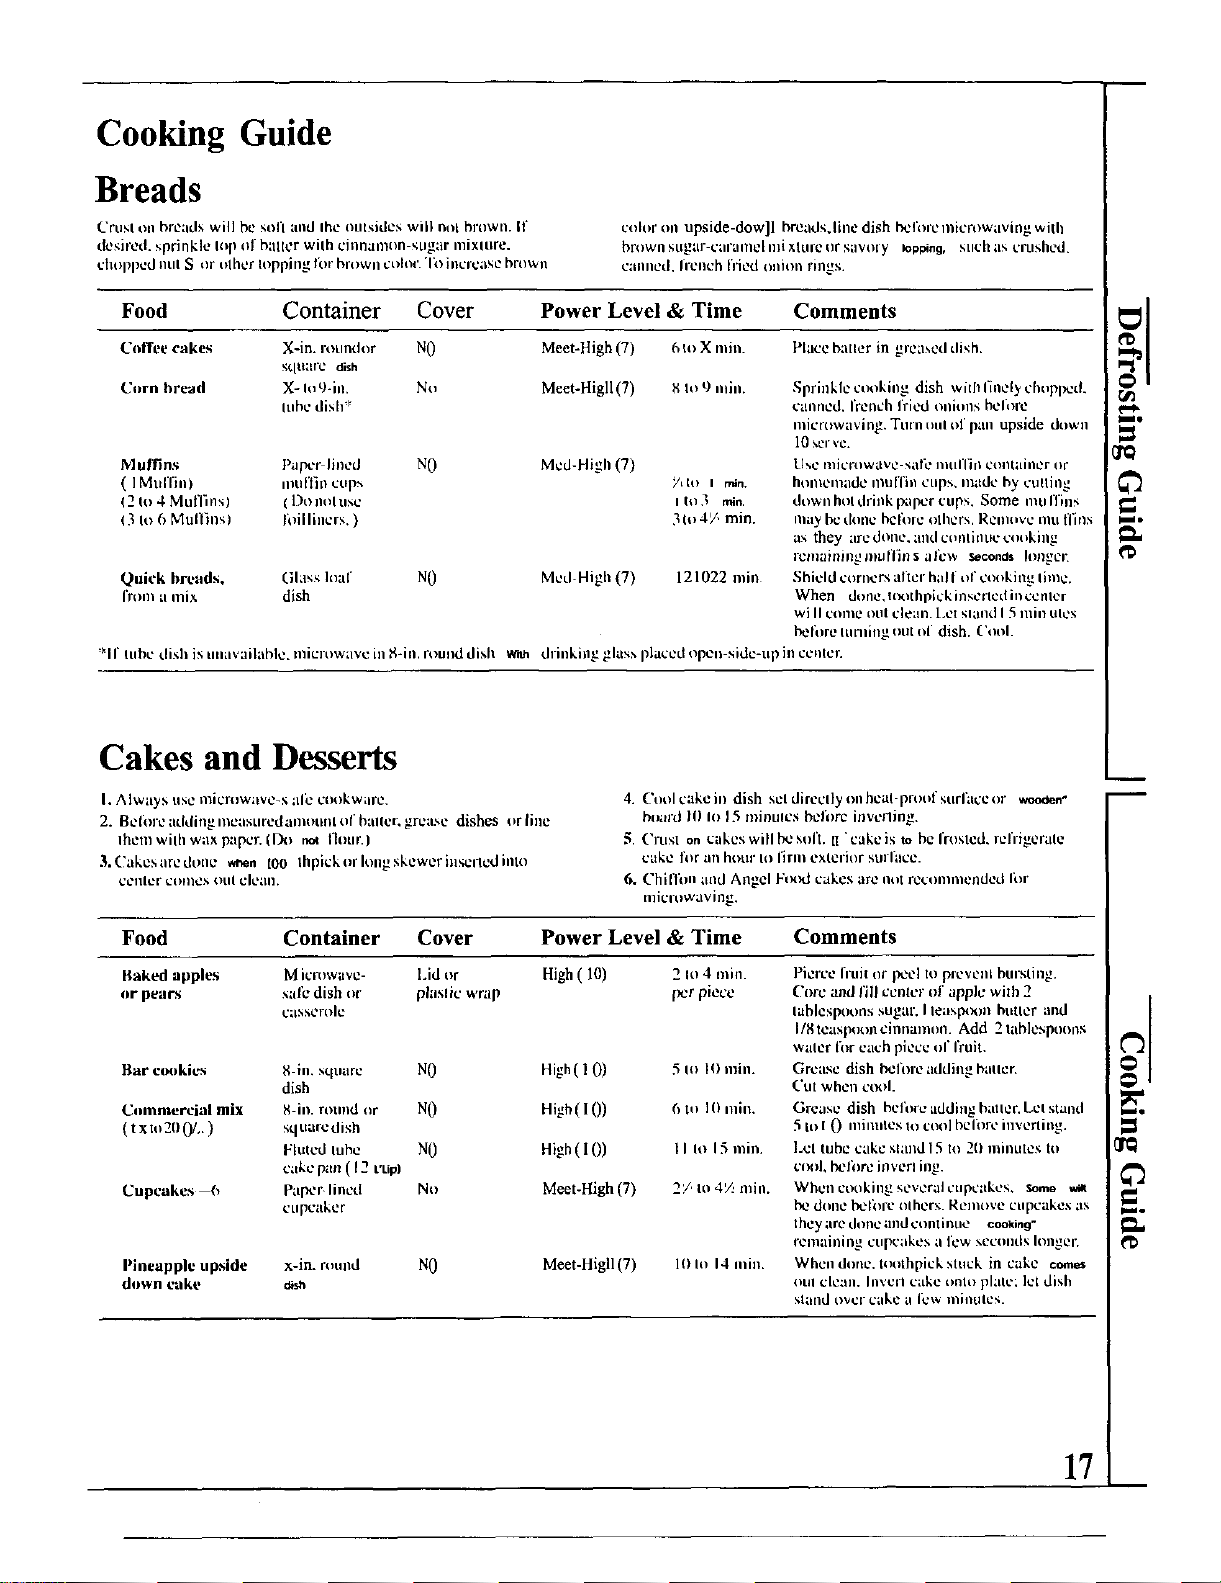
Cooking Guide
Breads
(.'rust on breads will be sofl and Ibe oLIIsidcs will not brown. If
dcsir_2tl, sprinkh.' lop I)f b:lllt_r Wilh cinllanll_n sLIg;ir IllixlUr_.
chopped nut S _)r olher lopping fin ¸brown ct)lor. "1_)increase brown
coh)r on upside-dow]l breads.line dish heroic microwaving with
brown sttgar-_.';ll'_lllle[ nd xltll'e t)F SaVOry bopping, Stlt:h as crushed.
calmed. Ireneh fried otlion rings.
Food Container Cover Power Level & Time Comments
Coffee cakes X-in. roundor NO Meet-High (7) 6 Io X rain. Phlce batter in greased dish.
sqttarc dish
CI)rn hrezld X-Ill t)-itL No Meet-Higll (7) 8 to 9 mi..
lubc dish*
Muffins l)a_'r-linetl NO Mcd-High (7)
( IMttllilll ii)ul'l]ncups 7rio i rain.
12 to 4 Mufl]nsl ( 1)o noluse ito3 rain.
13 It) 6 Mull+ns) fifilliners. ) 3 h)4/, min.
Quick breads, Glass loaf NO Metl+High (7) 121022 mir_
from tl miy. dish
Sprinkle ct_)king dish with finely chopped.
canlled, I'r_n_h hied OlliOllS hcl_)l'e
inicrowaving. Tttrn iml of p_lll upside down
10 serve.
Use nlicrowavc-salu" IIIttl'lill Ctllltail)t2r or
honlemadc muffin cups, made by culling
down hol driak ixlpcr cups. Some mu ITh]s
iIi;ly be done heft)re olhcrs. Rclll{ive mtt ffins
;is they are dot)t.', and conlitlLIt." t.'ooking
renlaillil/gllRl[]'it}s;llc',v Seconds IoI/gt2E
Shield comers alter hall of cooking lime+
When dorle, ttx_thpick inserted in ccnlcr
wi II come otll deal). [.el sland I 5 lUJll UlCS
heft)re laming out of dish. Cool.
*lftttbedishistutavail;ible. microwavcillS+ill, roul)ddish w-_ drinkingglas_,placedopct_side-upirlcenter.
Cakes and Desserts
I. Always usemicrowavc-s aft: cookWare.
2. B¢lt)readdir)gme0suredamotmlUrhallelkgrca_c dishes orline
Ihem wilh wax paper. I_) _ Ilour.)
3.Cakesaredone wi_.n t00 ;hpickorhmgskcwerinscncdimo
_lllel + COIII_2S Otll ok'all+
4. Ct)olcakeii) dish scldirecllyonbeal proofsurhtceor woo_n-
b(ntrd 10 lit 15 ll)il}ulcs belbrc lily€fling.
5. Crust on t:akcs will be soft. tl "cake is to be frosted, rcfiigerale
cLIke for _lii hoLll"Io Iirll) exterior surl_lce.
6. Chiffim and Angel Ftx_d cakes are not recommended li)r
microwaving.
Food Container Cover Power Level & Time Comments
Baked apples Micmwave- lJd or High (10) 2 It) 4 rain.
or peals xafk:dish t)r plaslic wrap per piece
cassorole
Bar c(mkics 8 in. square NO High( 1 0) .5Io IO rain.
dish
Commercial mix 8-in. round or NO High (10) 6 to I0 rain.
(t xto20 0/,.) squarcdish
Fluted luhe NO High (10) I I Io 15 rain.
c_tkep_l/l ( 12 t'tip)
Cupcakes --6 pal_2r lined No Meet-High (7) 2/to 4'/., mill
Ctlpcaker
Pineapple upside x-in. round NO Meet-Higll(7) lO It) 14 mill
down cake aish
Pierce fruit or peel to plevczll bursting.
Core and fill center t)f apple will} 2
lablcspoons sugar. I letlx_>_)l) huller _md
1/Steaslx}oncinnamon. Add 21ahlespoons
waler Ibr each piece o1"frail
Grease dish heft)re adding bauer.
('tit Whell ct_)l.
Grease dish before adding bailer. Lcl stand
5 to [ 0 milmtes to cool bcli)re iiwerling.
Lel tube cake sl;tnd 15 tu 20 inil/UteS to
cl_ )1,beli)re itlVerl ing.
Whencookillgseveralcttpc_tkcs, Some _lt
be done bcfi_re olhers. Remove cupcakes ;is
Ihey are done ;nld COlllil_ue cOoking"
remainitlg cupcakes a few seconds Iol|ger.
Whendor_e. toolhpickstuck in cake come+
utll clean. Ii)vcll cake onh) plate; let dish
Sl_liId t)VCl"cakt_ tl Ie\_i))il)ules.
17
il
F
Cooking Guide
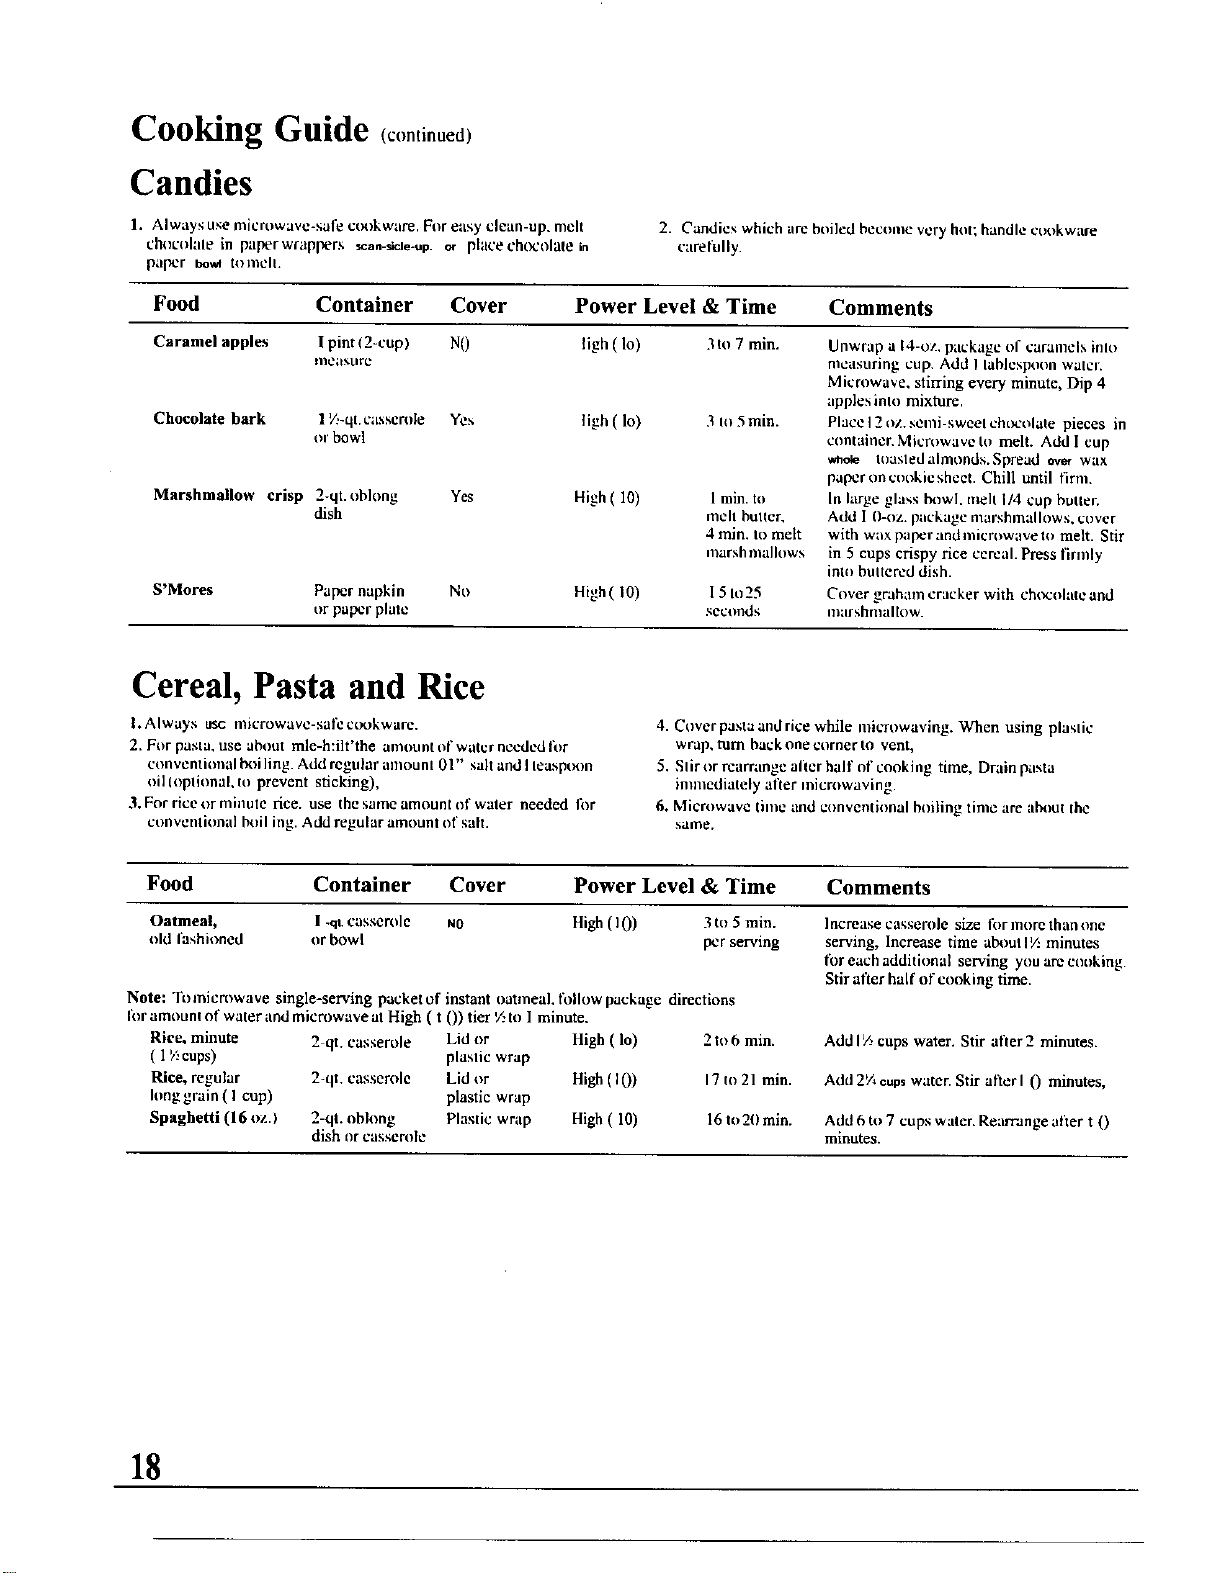
Candies
1. Always use microwave-sail cc_)kware. For easy clean-up, melt
cbocolale in paperwfappers _ean-f_ele-up. or place ch(_'olale in
pal_2r bow_ tomelt.
2. Candies which are boiled become very hol; handle cookware
careliJlly.
Food Container Cover Power Level & Time Comments
Caramel apples I pint (2-cupl N0 ligh(Io) 3 to 7 min.
IneaNtlre
Chocolate bark 1 _-qt. casserole Yes tigh(1o) 3 to 5 rain.
or bowl
Marshmallow crisp 2-qt. obhmg Yes High (10) 1 min. to
dish melt butter,
4 rain. If melt
marsh tltallows
S'Mores Paper napkin No High (10) 15 Io25
or paper plate seconds
U0wrap a 14-oz. package of caralllels inlo
measuring cup. Add I tablespoon water.
Microwave, stirring every minute, Dip 4
apples inlo mixture.
Placel2oz.senli-sweelcht_:olale pieces in
container. Microwave to melt. Add I cup
•a_ele toasledalmonds.Spread ov_ wax
paper onct_okicshcet. Chill until firm.
In large glass b_wl. melt I14 cup butter.
Add I 0-oz. package marshmallows, cover
with wax lulper and microwave to melt. Stir
in 5 cups crispy rice cereal. Press firmly
into buttered dish.
Cover graham cracker with ch_x:olate and
inarsbnlal[ow.
Cereal, Pasta and Rice
I.Always use nlicrowave-sal_zc_rokware.
2. For pasta, use about mle-h:ilt'the amount of water needed fi_r
conventional Ix_iling. Add regular anloun101" sah and I leasp(_m
oil {oplionak Io prevent sticking),
3. For rice or minute rice. use the same amount of water needed for
conventional boil ing. Add regular amoutu of sail.
4. Cover pasta and rice while microwaving. When using plaslic
wrap, "aim back one corner to vent,
5. Slir or reammge after hal f of cooking time, Drain pasta
immediately alter microwaving.
6. Microwave time and conventional boiling time are alx)u( the
same.
Food Container Cover Power Level & Time Comments
Oatmeal, I -qt casserole NO High ( I0) 3 to 5 rain.
old fashioned or [x>wl per serving
Note: To microwave single-serving packet of instant oatmeal, tollow package directions
Ibn'amounl of water and microwaveat High ( t ()) tier '/.,to 1 minute.
Rice, minute 2 qt. casserole Lid or High (lo) 2 to 6 min.
( 1V:cups) plastic wrap
Rice, regular 2-qt. casserole Lid or High (I0) 17to 21 min.
long grain ( I cup) plastic wrap
Spaghetti (16 oz.I 2-qt. obhmg Plastic wrap High (10) 16 to2l)min.
dish or casserole
Increase cagserole size tbr iI]ore than one
serving, Increase time about IV: minutes
lor each additional serving you are cooking
Stir alter haft of cooking time.
Add IV, cups water. Stir after 2 minutes.
Add 2¼ ct_s water. Stir after I 0 minutes,
Add 6 to 7 cups water. Rearrange after t 0
minutes.
18
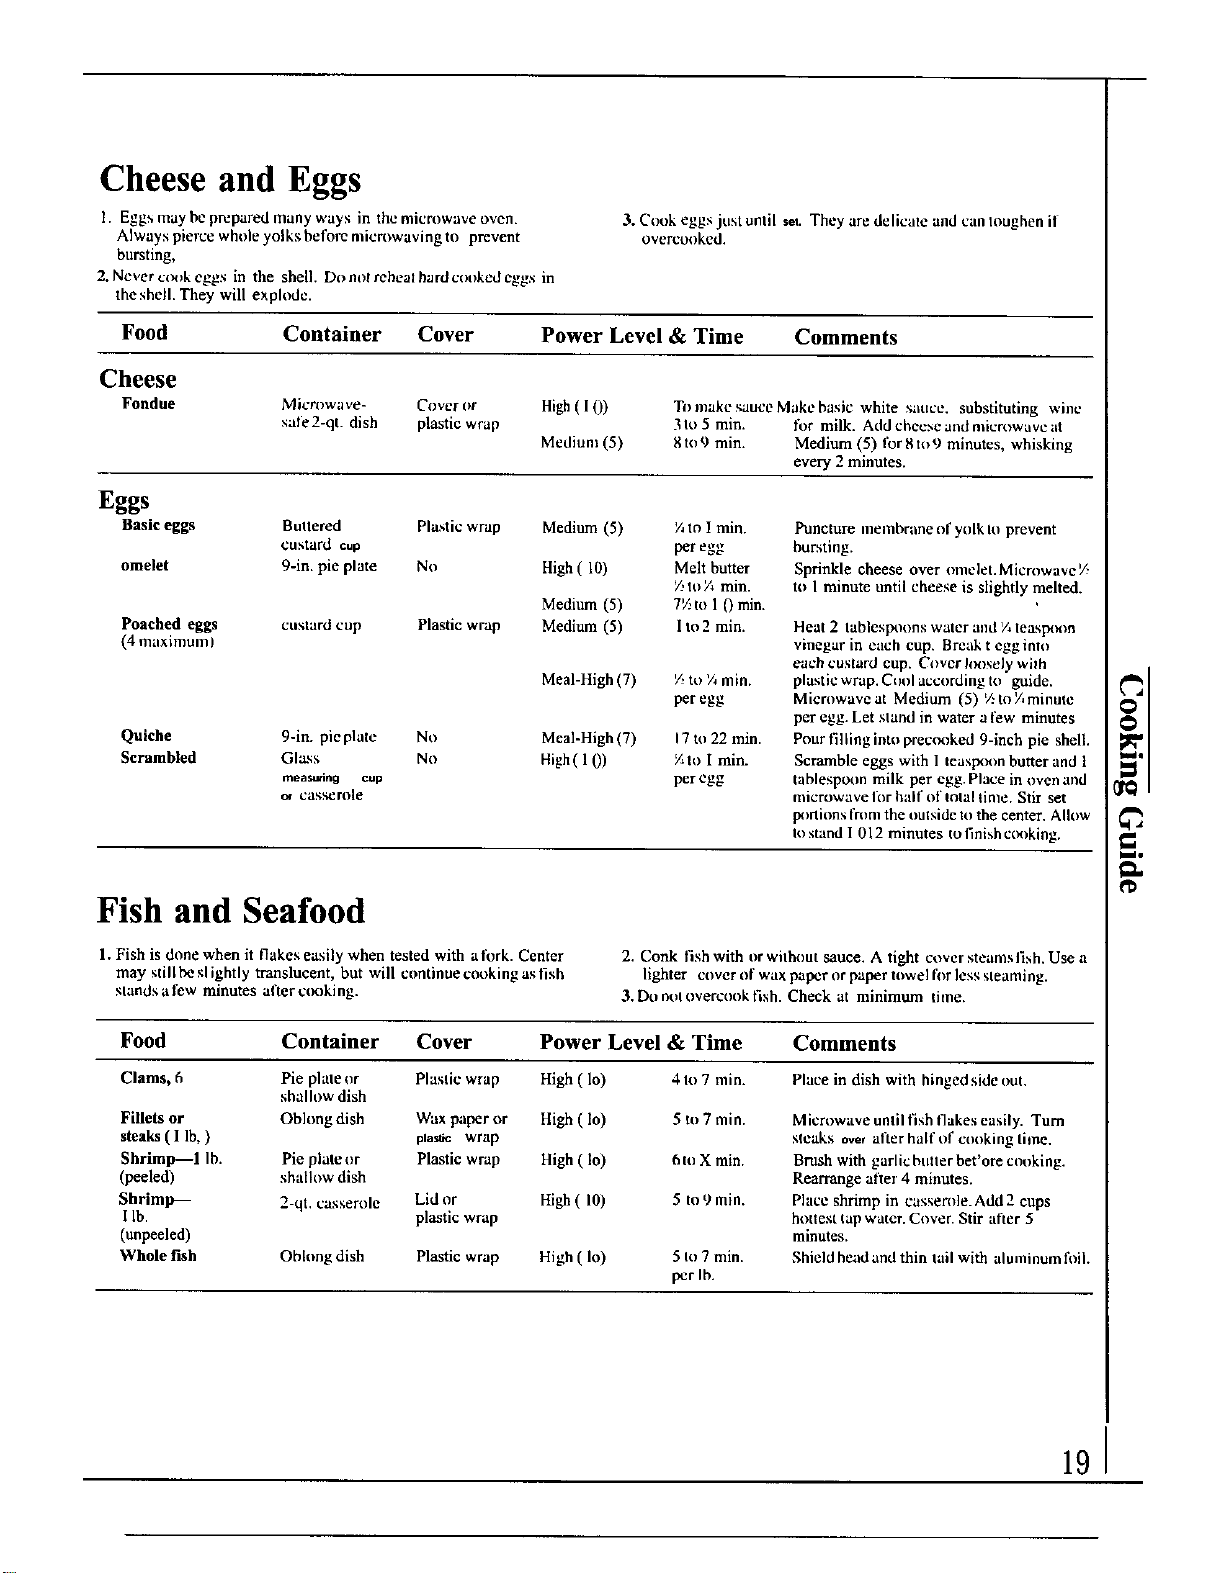
Cheese and Eggs
1. Eggs may be prepared many ways in the microwave oven.
Always pierce whole yolks bel_,re microwaving to prevent
bursting,
2. Never c_mk eggs in the shell. Do no!reheal hard cooked eggs in
theshelk They will explode.
3. Cook eggs just until set. They are delicate and can Ioughen if
overcooked.
Food Container Cover Power Level & Time Comments
Cheese
Fondue Microwave- Coveror High(l()) To make sauce Makc basic white sauce, substituting wine
safe 2-qt. dish plastic wrap 3 to 5 min. fi)r milk. Add cheese and microwave at
Medium (5) g to 9 min. Medium (5) for 8 to9 minutes, whisking
every 2 minutes.
Eggs
Basic eggs Buttered Plastic wrap Medium (5) V,to 1 min. Puncture inernbrane of yolk to prevent
custard cup per egg bursting.
omelet 9-in. pie plate No High (10) Melt butter Sprinkle cheese over omelet. Microwave V.
V,It) ¼ min. to I minute until cheese is slightly melted.
Medium (5) 7V_tu 1 0 min.
custard cup Plastic wrap Medium (5) 1If 2 min.Poached eggs
(4 maximum)
Meal-High (7) '/, to 7, rain.
per egg
Quiehe 9-in. pie plate No Meal-High (7) 17 to 22 min.
Scrambled Glass No High( 10) ¼ to [ rain.
measudng cup per egg
o_ casserole
Heat 2 lablesp*_ons water and I/,leasFaXm
vinegar in each cup. Break t cggimo
each custard cup. Cover hn_sely wilh
plastic wrap. Ct)ol according to guide.
Microwave at Medium (5) %to X,minute
per egg. Let stand in water a I_w minutes
Pour Hlling into precooked 9-inch pie shell.
Scramble eggs with 1 leasp_nm butter and 1
tablespoon milk per egg. Place in oven and
microwave for half of Iolal time. Stir set
I_rtions Ih_m the oulside to the center. Allow
to stand I 012 minutes to Iinish c_x_king.
Fish and Seafood
1. Fish is done when it Hakes easily when tested with a fork. Center
may still be slightly translucent, but will continue cooking as fish
slands a few minutes alter c(K)king.
2. Cook fish with or without sauce. A tight cover steamslish. Use a
lighter cover of wax paper or paper towel fi_rless steaming.
3. Do oft overcook fish. Check at minimum time.
Food Container Cover Power Level & Time Comments
Clams, 6 Pie plate or Plastic wrap High (1o) 4 If 7 rain. Place in dish with hinged side out.
shallow dish
Fillets or Oblong dish Wax paper or High (If) 5 to 7 rain. Microwave until fish flakes easily. Turn
steaks(lib,) plas_e wrap steaks o_,e, afterhalfofcookingtime.
Shrimp_l lb. Pie plate or Plastic wrap High (1o) ,5m X rain. Brush with garlic briner bet'ore cooking.
(peeled) shallow dish Rearrange afler 4 minutes.
Shrimp--- 2 qt. casserole Lid or High (10) 5 to 9 min. Place shrimp in casserole.Add 2 cups
I lb. plastic wrap hottest tap water. Cover. Stir after 5
(unpeeled) minutes.
Whole fish Oblong dish Plastic wrap High (1o) 5 to 7 min. Shield head and thin tail with aluminum EEl.
per lb.
19
Cooking Guide ( <,mi.ucJ
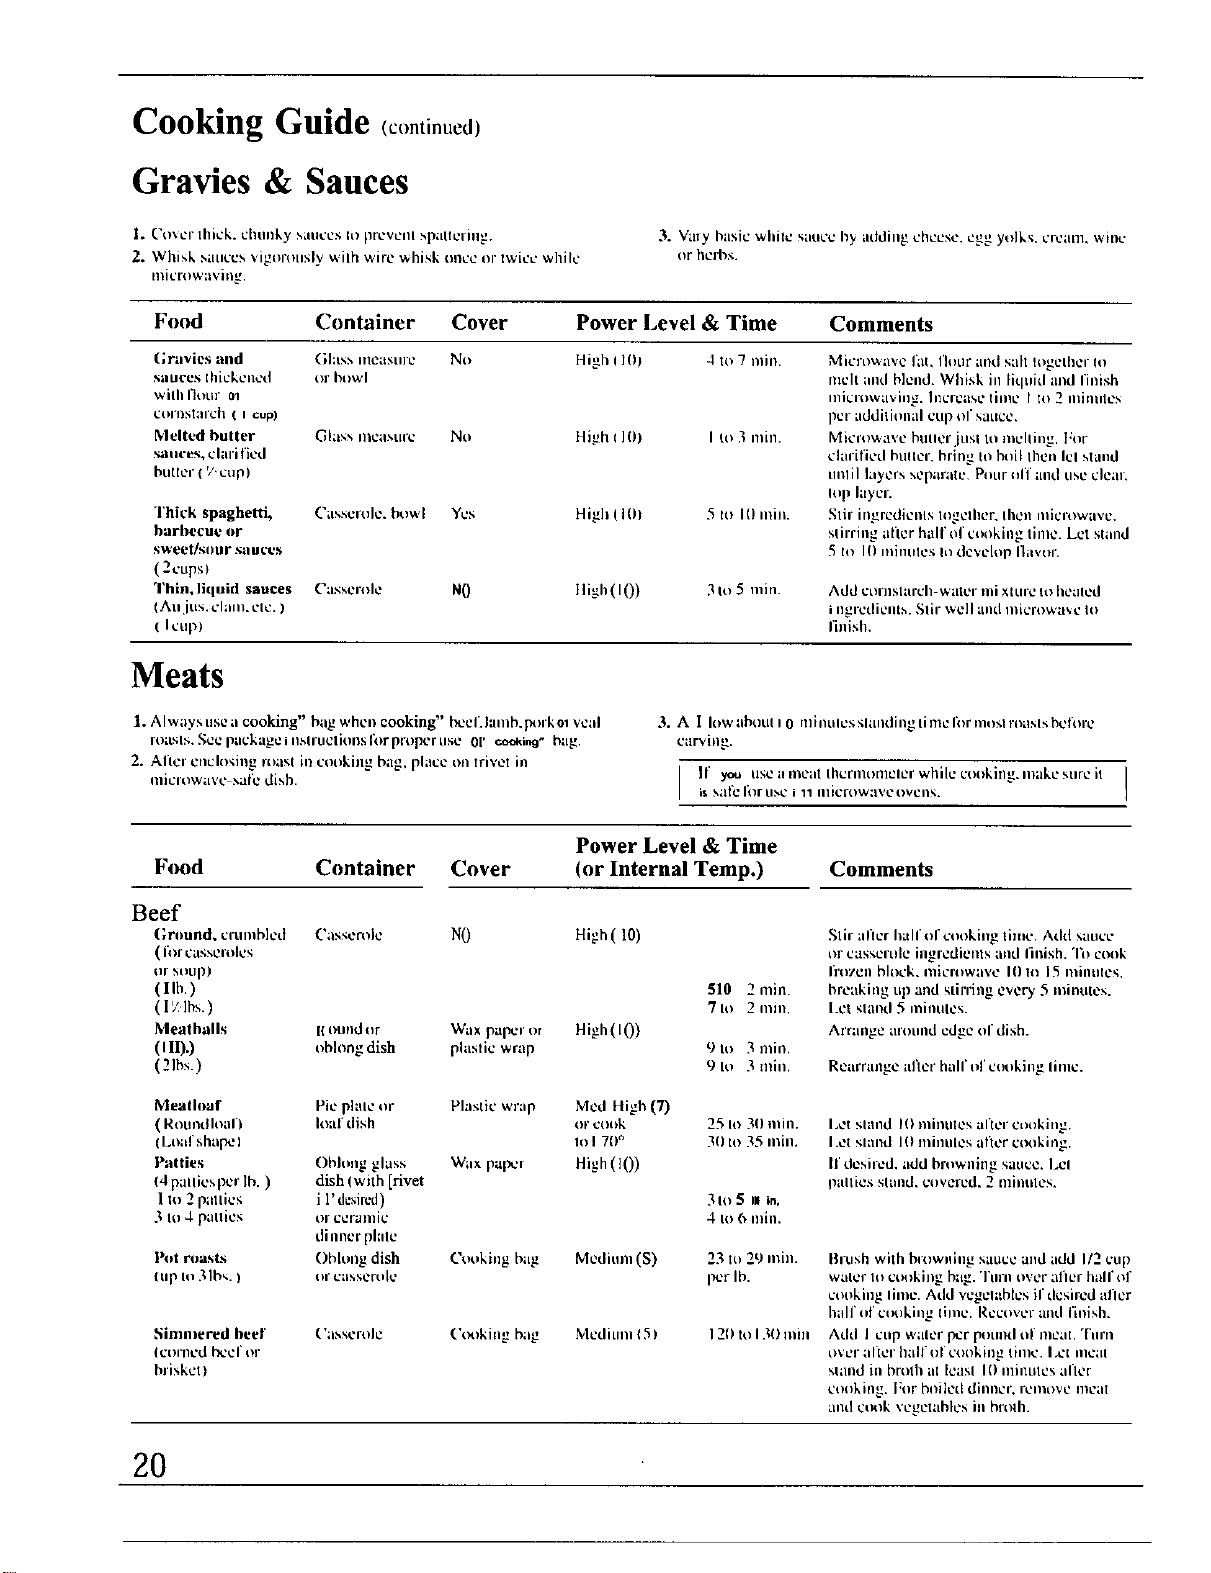
Gravies & Sauces
|. (.'o;cr thick, chlln]-.y sallt;c_. It) prcvciiI _,i)allt_llllg+
2+ Whisk saut:es vigorotlsly wilh wire vchink tinct or twice while
3. Vaty basic white sau_'c by addiilg cheese, egg yolks, cieam, wmc
or herbs.
Food Container Cover Power Level & Time Comments
Gravies and (ilasm IllOttStll'e No High q 10) 4 it+ 7 rain.
sauces thickened or htlwl
willl I']our 01
CorliNtarch ( I cup)
Melted huller Gla_s illea_ui'c No High (]0) I to 3 mhl.
sauces, clari ficd
butter ( '/'cup)
Thick spaghetti, Casxcrole. bowl Yes High (I(1) 5 to 10 mill
bnrbecue or
swI2et/SUll g Naut'es
(2,:ups)
Thin. liquid sauces
(Au ius. chlm.clc. )
(h:up)
Microwave lat, flour and salt togetht2r to
inelt and blend. Whb, k in Ikluid and finish
I)IiCI10_VLLVilIg. blCl't2aNk" {il)lC I It) _ lilitltlti2Y,
per additional clip of maLICe2.
Micl'owave hLItlCI'jLISi tO ill_iPl]g. Por
chu il'icd hullCl', hrhlg to I_il tll_2n lel Mai]d
ttlllil layers :,eparate Pour till" and Line clean
lop layer.
Stil htgredicnts Iogcthur. Ihen mit:rowave.
sfimng altcr hall" of,:ooking time. Let stand
5 to I0 mhltiles hl de\'clop I]avor.
Ca_sei'ide N0 lligh (I()) 3to5 rain. Add {2t)l']lSltlr_.'Jlwa|er nli Xttll'e It) [l_.'ah2d
i ngla2diellt_. _lh" we]l aild Illi_rt)wave to
I'inislL
Meats
1. Always timeacooking" bag whcll cooking" bee f. hilnb, p_)rko1veal
roasts, gcc p_lekag¢iltSlruclionsl_lrproper time 01' c_klng" hag.
2. Al'tcr enclosing roast in I:ot)king bag. place tin trivet in
microwave sale dish.
3. A I h)w ahtlttl I0 milltih2_, shulding lime fi)r nlt)sl roaslr, bc fole
carving.
]l" you LIS_2a ml2at ih_2rlllt)mt21er while t,'ooking, iil_lkt? sure it I
i_ sal_2 I_r Lime i 11 iilicrowa\,¢ovcn_.
I
F_md Container
Beef
(;round, c_-,tm bled ('as_cmlc
( fi)r casseroles
t}r _,t)tlrl )
(lib.)
(l/Ibm.)
Meatballs [I ound {It
( III).) oblong dish
(2]bs)
Mealloaf Pic plate or
(Roundloar) hxd" dish
(Loal shapel
Patties Obh)ng glass
(4 patties ix,,r lb. ) dish(with[rivet
l to 2 pallics i l'desircd)
3 to 4 pallics or ceramic
tit mlcr plait
Pot ruasls ObItmg dish
{tip Io 3 Ibm.) In' casscroh:
Simmered beef ( "asscn)le
(Ct )rrll.+dI_cel' or
brisket)
Cover
N0
Power Level & Time
(or Internal Temp.)
High (10)
510 2 rain.
7 h) 2 inm,
Comments
Wax pal_*r or High(l())
plastic wrap 9 io 3 mill
9 IO 3 miui
Plastic wrap Mcd High (7)
or cook 25 Io 30 mill,
to I 70 ° 3() tO 35 mill.
Wax palx:r High(l())
3 Io _ II in,
4 to611ihl.
CtmNing hag Mediunl (S) 23 to 29 inill.
i_'1 lb.
(+_x_king bag Mcdituu {5) 120 to 130 rain
Stir alier half illcooking lime. Add Mitli:e
or t:arlStrl'tilc ingredients aild I/nish, 'rt) cook
I]'iwcn hhit'k, iliic-rliwav¢ I11lit 15 mhlillt_s,
breakiilg Lip and sth'rhlg 12very 5 Illinutes,
I.cl +;land 5 mintllt!s.
Arrangl2 aroillld edge of dish.
Rearrange allot hall" of cotlking lilllt?,
l,,:t slmld I() minutes al'ter ct>oking.
I.eL sland I0 lninules al_ur clxlking.
If desii_d, add browning ,.aliCe. tel
palties slalld, covered. 2 nliilutes.
Bltlsh with bmwiliilg _.aucc and add 1/2 cup
walcr Io ctx)ki]lg bag. TUrll over aliur hair of
cooking lime. Add vcgclablcs illlcxircd alicr
half (d¸ct_lking time. Recover and i'inish.
Add I Ctlp W_tlei" p,2r pt)tind tll¸ Meat. Turrl
rivet" al_ur hair ol cooking time. I,_t nlcai
"+land in brolh at luasl 10 inii_tilcs allot
12tl(iking. For hoiIt2d dinllel'. 1%2nlovt2 illeal
and cook vegetables in brolh.
2O
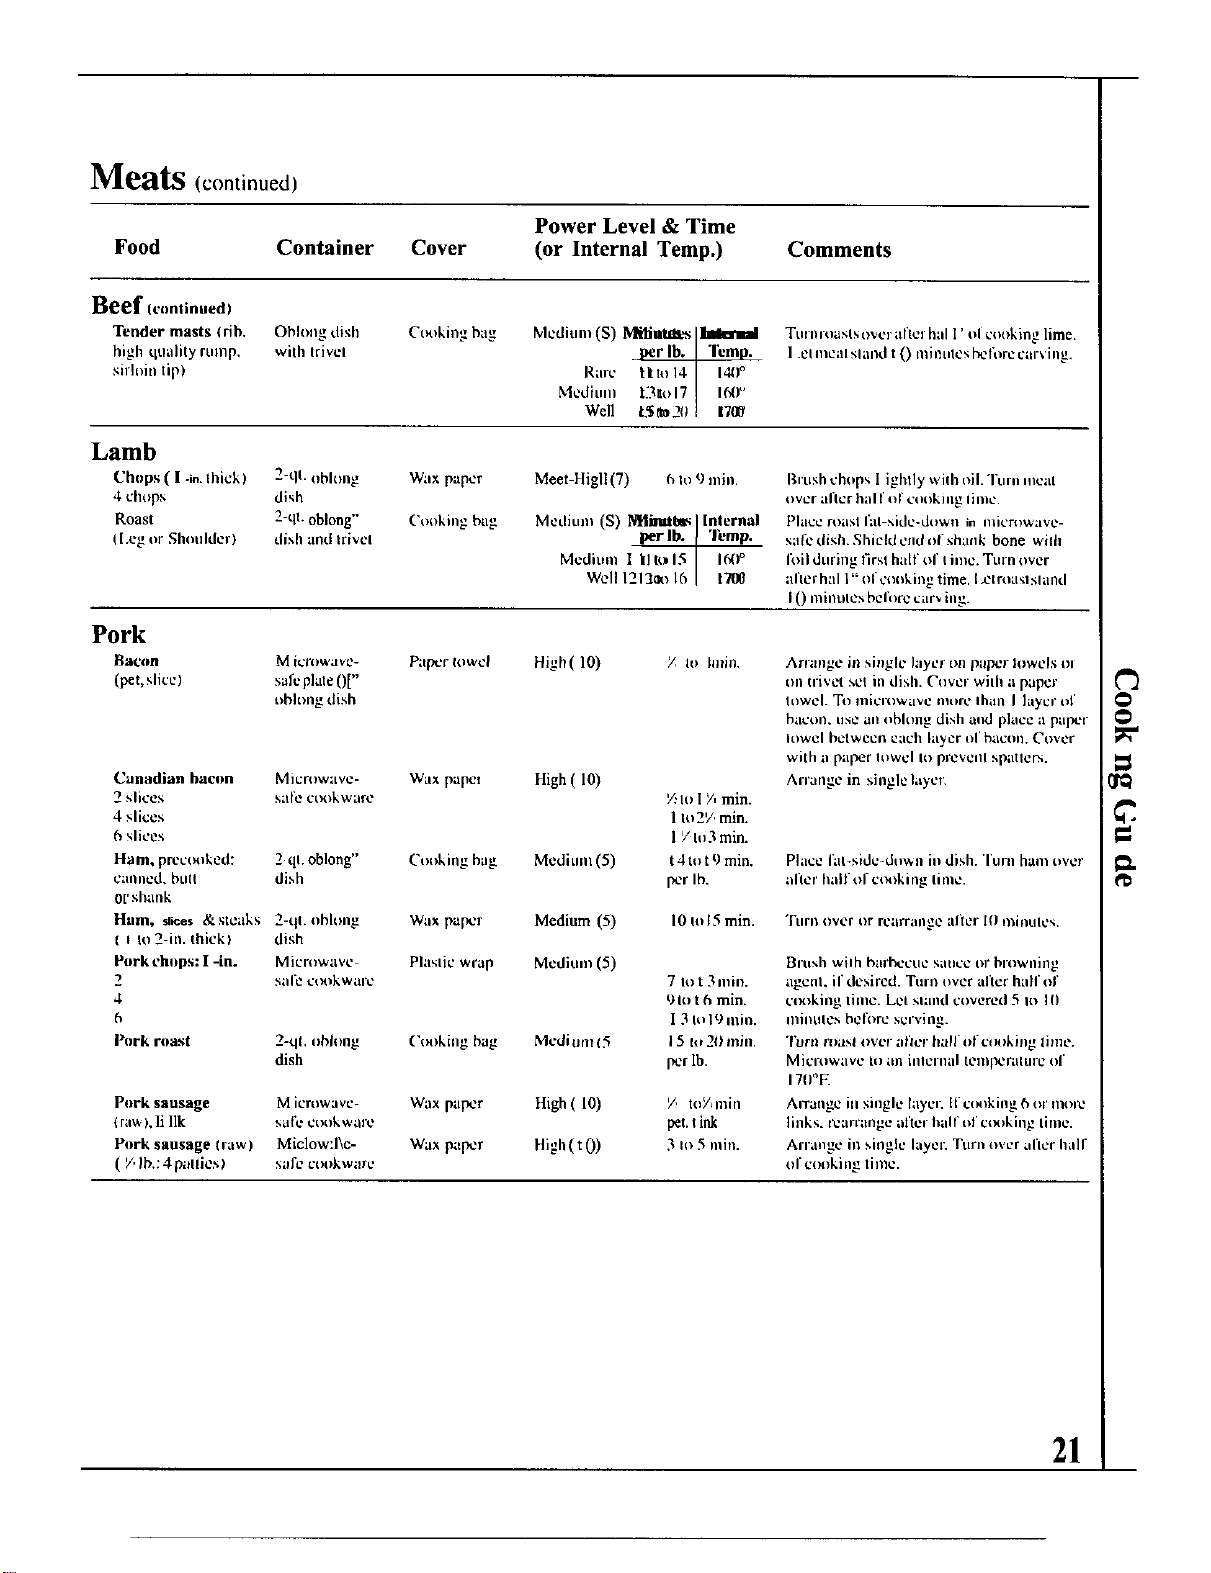
Meats (continued)
Food Container Cover
Power Level & Time
(or Internal Temp.)
Comments
Beef Icnntinued;
Tender masts <rib. Oblong dish
high qtmlity rump, with Irivel
sirhfin tip)
Cookir_g bag
Lamb
Chops ( I .in.thick) 2-qL ohhmg Wax paper
4 chops dish
Roast 2 qt. oblong" Cooking bag
(Leg or Shoulder) dish and trivel
Pork
Bacon
(pet, slice)
M i¢_wave-
salcplate()["
t_bltmg dish
Mcditlnl (S) M_ntB_ _ Turnroasls ove] alter hal I' ol cooking lime.
per lb. I Temp. 1 .ellnCal sland t 0 tninutcs i',clorc carving.
Rare t'tto14 ] 140°
Medium t311ol7 I_)"
Well t.'$rm2) 1706'
Meet-Higll (7) 6 to 9 rain.
Metlium (S) ]gfliml_ Internal
perlb. I "lk'mp.
Mcditml 1 klt_15
I
160°
Well 1212_o Ib [ 1700
Brttsh chops 1 ighlly with oil. Turn meal
over after hal t iff collkillg lilnc
Phlct2 rt)ilSl I';ll side-down in illiL'l-t)wave-
sail: dish. Shield end o(shank bone wilh
Ibil during firsl haft of time. Turn over
afierhal l"ol cooking time. I.ct roasl sland
I0 millUtCr, be fore car_ ing+
Papcrlowcl High(10) Z to hnin
Canadian bacon Microwave- Wax paper
2 slices safe cta_kware
4 slices
6 slices
Ham, prcctmked: 2 ql. oblong" Cooking bag
canned, butt dish
0['shank
Ham, aloes &steaks 2-qt. ohhmg Wax paF,cr
t t R_2-in. thick_ dish
Pnrk chops: I -in. Mica_wave Phlstic wrap
2 sal_ cl_kwarc
4
6
Pork mast 2-ql, obhmg ('_a_king bag
dish
Pork sausage Microwave Wax paper
I ra_ ),li Ilk sail." cookware
Pork sausage Oaw) Miclow:l\c- Wax paper
( V,lb.: 4 patties.) sal_: cookware
High (10)
'/.,to I F, rain.
1 to 2'/, rain.
1 / lu3 rain.
Mediunl (5) t 4 to t 9 rain.
per lb.
Medium (5) 10 tol5 min.
Medium (5)
Medi om t5
High (10)
High(t0)
7 to t 3 IIIill.
OIt) t 15min.
1 3to 19 itlm.
15 to 20 rain.
per lb.
/ toYqBin
pet.t ink
3 to 5 mill
Arrange in single layer on paper towels OI
on tliVCt sol in diM1. Ctwer with i_ paper
towch Tt_ miclx)WaVe more Ihal! I layer of
bacon, use an oblong dish and place a pal_r
Iowel between each layer of bacon. Cover
with a paler Iowcl Io p_velll spatlcr_.
Arrat|ge in singlelayct_
Place lat+sidc-down it+dish. Turn ham over
al'ter halt'of cta_kirlg time.
"i'urll over or r_ilrr;lllge after 1(] minulcs.
81"tlsh wilh btII+IK_CIIC SIllier2 or blXlWlling
agent, il"desired. TuI'r+ over after half of
co:_king lime. Let sllt]l(I covered 5 It_ I0
lllhlttl_+hel'orc st21"yitlg.
"rt_rn roast over after haft of cl_)killg lime.
Mi¢l-OWaVe to _ln hllcrnal telU[_rilttll't2 O1"
17(PF.
AiTange ill single laye=; lI"ctH_killg 6 or I1101_
links, rearrange after hall ¸of c_x)king lime.
Arrange in single laycn Turn over ancr half
or cooking lime.
21
?
m.

Cooking Guide (continued)
Meats (continued)
Veal
Chops ( 1 -in. thick! 2 tlt. obhmg Wax paper Meal-High (7) 6 to 9 rain.
4 chops dish
Roast 2- t. C_kint_ hag Mediunl (5) t 6to2t min.
(shotthler) dis_ oblong
per tb.
Brush chopslightly with oil. Turn meat
over alter hal f of oct*king time.
Place roast fat- or cut-side-down. Turn river
after half of cooking time. Let roast sland
t 0 minutes betbrecarving.
Poultry
LCl turkey breast and olher poultry sland lt)r 5 It) I 0 minutes after microwaving.
I Ifyouuseameatlhermometerwhilecooking, make ]
sure it is sali: for use in microwave ovens.
Food Container Cover Power Level & Time Comments
Chicken
Pieces Plate or Wax paper High 10) 3 to 5 min.
(per piece) obhmg dish total
Whole chicken Oblong dish Wax paper High 10) I 0 to 13 rain.
(X pieces) total
(unstuft_d) Oblong dish Cooking bag Mcd- ligh (7) to to t 2 min.
per lb.
(s_ffed) Obhmg dish Cow,king hag Meal-High (7) 1 0 to 16 rain.
per tb.
Cornish Hens
Halves Square or Wax paper Meal-High (7) t 2 to t 4 rain.
obh)ng dish per tb.
Whole (stu fried or Square or Wax paper Meal-High (7) t 3 m I 5 min.
unslull_'d I obhmg dish per lb.
Turkey
Turkey breast Oblong dish Cry)king bag Meal-High (7)
Arnmge in single layer in c_x_king dish so
thickest n)eaty pieces are to outside edges
of dish. Turn pieces o,,er and rearrange
aflcr hall" of cooking time.
Brush with browning agent, if desired. Slit
hag near closure to vent. Close securely
with plastic tie. C_k breast-side-down.
Turn over after hal f o f cooking [i me. Cook
to I 90° internal temp.
Arrange skin-side-up in dish. on bed of
stuffing, if desired.
Place brc:ist-side-duwn in dish. Turn over
after half of cooking time. Shield tips ol
wings and legs with dill.
13tot 5 min.
per tb.
Tic fibs to breast cavity. Place breast in
cot)king bag. Close securely with plastic lie
Place breast-side-down in dish. Slash bag
on underside near closure to vent. Turn
over after half of ct_king time. C_k to
1900 internal temperature.
22
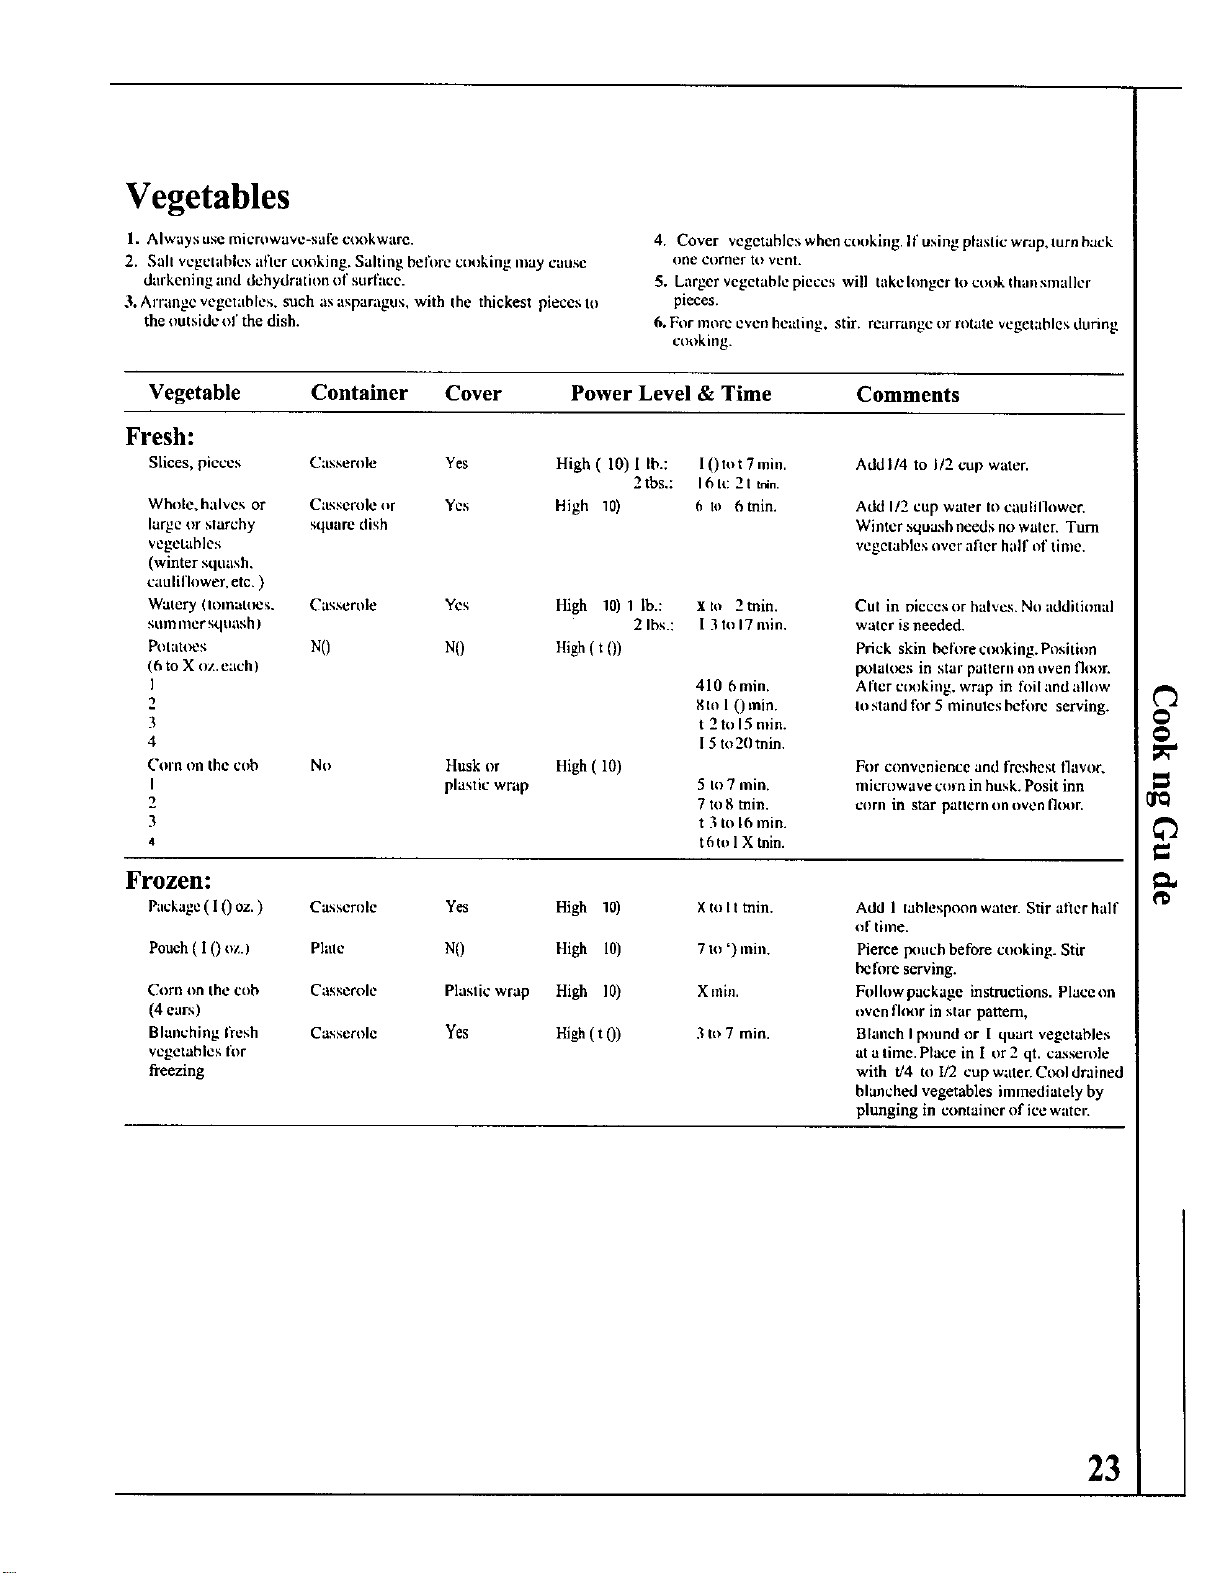
Vegetables
1. Always tlse microwave-sal_" e(x}kwarc.
2. Salt vegetables afler cta_king. Sailing befi)re clinking may cause
darkening and dehydration of surthce.
3. Arrangevegetables, such as asparagus, with the thickest piecesto
the outside of the dish.
4. Cover vegetahleswhencooking, lf usingplasticwrapAurnback
()fie cor[ler R) vet)t.
5. Larger vcgctablepieccs will takehmger locta)kthansmaller
pieces.
6. For more even heating, stir. rearrange or rotate vegetables during
c_x_king.
Vegetable Container Cover Power Level & Time Comments
Fresh:
Slices, pieces
Whole. halves or
large or starchy
vegetables
(winter squash.
cauliflower, etc. )
Watery (h)nn;tlt_;.
stnn nler sqtiash )
Potat_2s
(6 to X oz. each)
I
2
3
4
Corn on the cob
I
2
3
4
Frozen:
Package( 10 oz.)
Pouch ( 1 () oz.I
Corn on the cob
(4 earsl
Blanching I_esh
vegetables for
freezing
Casserole Yes High (10) l lb.: 10tot 7ram.
2 tbs.: 16h: 21 t_n.
Casscroleor Yes High 10) 6 to 6tnin.
square dish
Add I/4 to I/2 cup water.
Add 1/2 cup water to caulillower.
Winter squash needs no waleL Turn
vegetables over after half of dine.
Casserule Yes High 10) 1 lb.: x tu 2 min.
2 Ibs.: l 3 to 17 rain.
NO N0 High ( t O)
No Husk or High (10)
plastic wrap
410 6rain.
8to 1 0rain.
t 2 to 15 rain.
1 5 m20 tnin.
5 to 7 rain.
7 to 8 min.
t 3 to 16 rain.
t 6to 1X tain.
Cut in oieces or halves. No additkmal
water is needed.
Prick skin belbrectmking.Position
potaloes in star pattern on oven fhx)r.
After ctx)king, wrap in ft>iland allow
it) stand lbr 5 minutes bclbre serving.
For convenience and freshest tqavor.
microwave corn in husk. Posit inn
tzorn in star pattern on oven _(_,)IL
Casserule Yes High 10) Xto It thin.
Plale N0 High 10) 7 to ') rain.
Casserole Plastic wrap High 10) Xmin.
Casserole Yes High ( t 0) 3 tt> 7 min.
Add 1 tablespoon water. Stir alter half
of time.
Pierce ixmch before cta_king. Stir
before serving.
Followpackage instructions. Placeon
t_ven floiw in star pattern,
Blanch Ipound or I quart vegetables
at a time. Place in I or 2 qt. casserole
with t!4 to I/2 cup water. Cool drained
blanched vegetables immediately by
plunging in comainer of ice water.
23
¢3
ca,
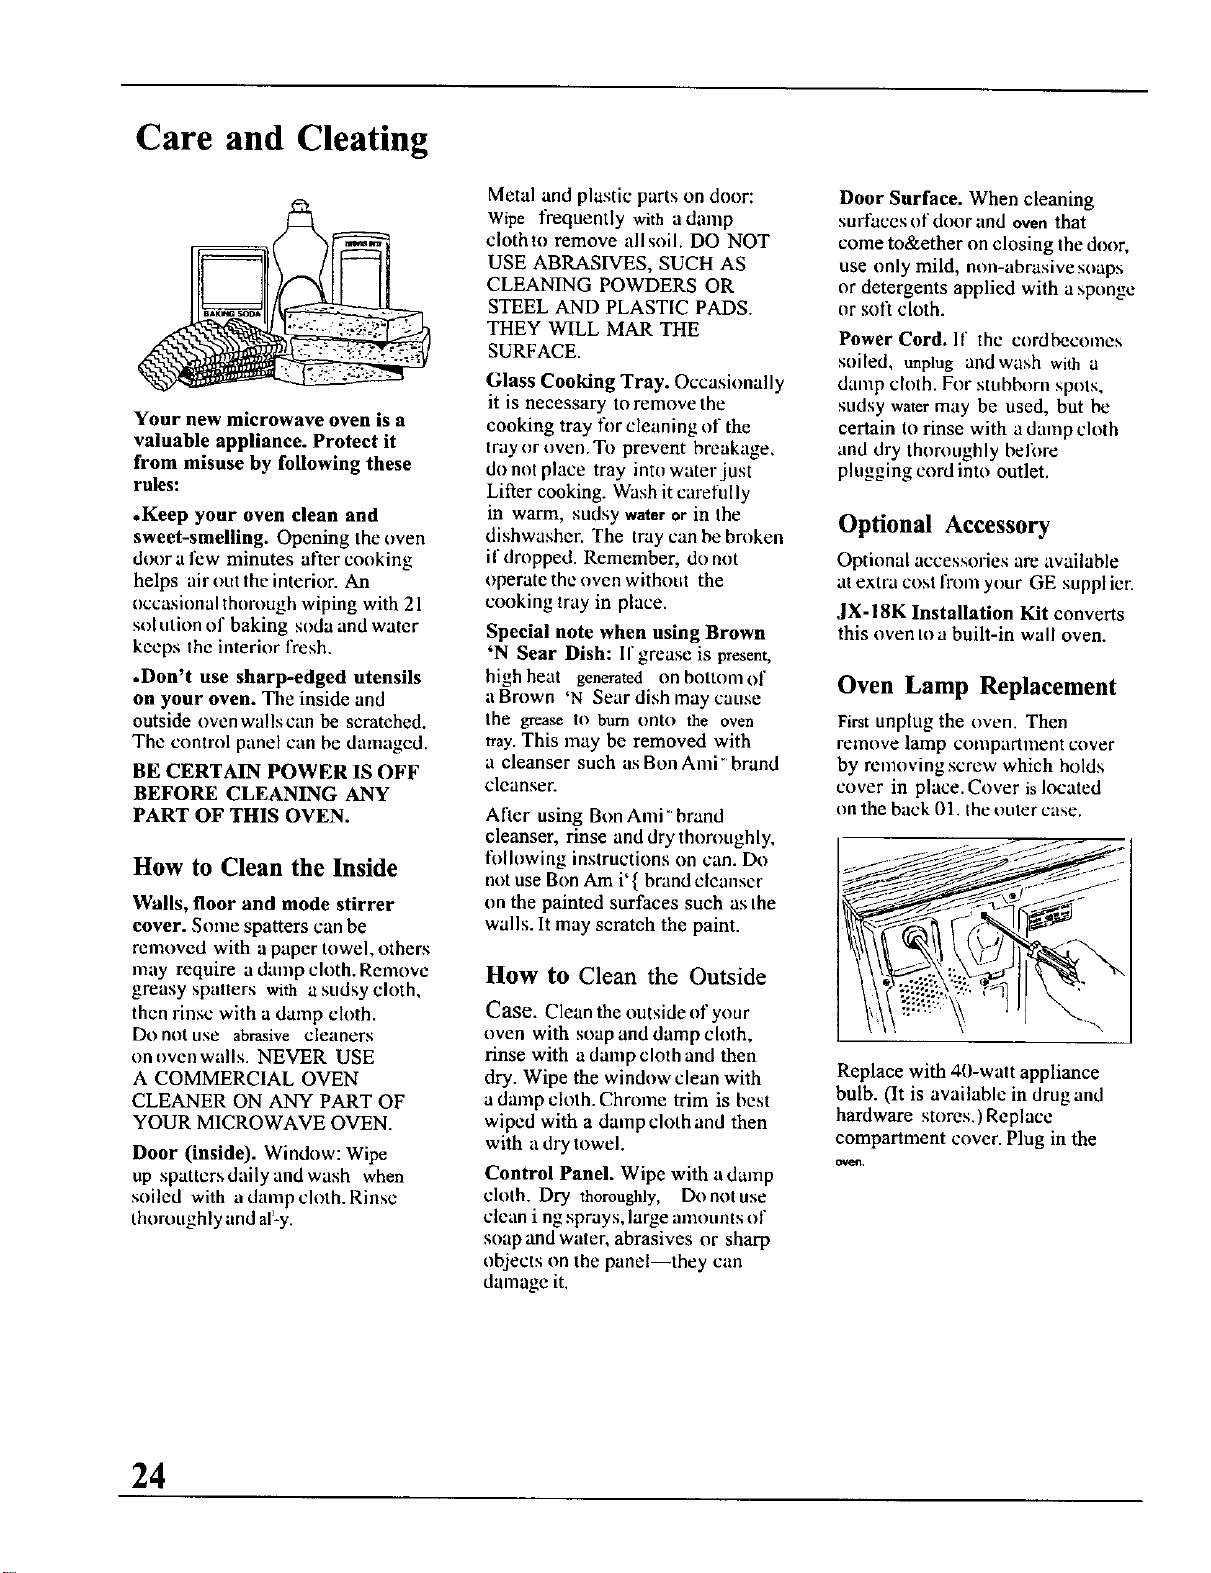
Care and Cleating
Your new microwave oven is a
valuable appliance. Protect it
from misuse by following these
rules:
•Keep your oven clean and
sweet-smelling. Opening the oven
door a few minutes alter cooking
helps air out the interior. An
uccasinnal thorough wiping with 21
sol ution of baking soda and water
keeps the interior fresh.
.Don't use sharp-edged utensils
on your oven. The inside and
outside oven walls can be scratched.
The contrnl panel can be damaged.
BE CERTAIN POWER IS OFF
BEFORE CLEANING ANY
PART OF THIS OVEN.
How to Clean the Inside
Walls, floor and mode stirrer
cover. Some spatters can be
removed with a paper towel, others
may require a damp cloth. Remove
greasy spatters with a sudsy cloth,
then rinse with a damp cloth.
Do not use abrasive cleaners
on oven walls. NEVER USE
A COMMERCIAL OVEN
CLEANER ON ANY PART OF
YOUR MICROWAVE OVEN.
Door (inside). Window: Wipe
up sputters daily and wash when
soiled with a damp cloth. Rinse
thoroughly and al_-y.
Metal and plastic parts on door:
Wipe frequently with adamp
cloth to remove all soil. DO NOT
USE ABRASIVES, SUCH AS
CLEANING POWDERS OR
STEEL AND PLASTIC PADS.
THEY WILL MAR THE
SURFACE.
Glass Cooking Tray. Occasionally
it is necessary to remove the
cooking tray for cleaning of the
tray or oven. To prevent breakage,
do not place tray into water just
Lifter cooking. Wash it carefully
in warm, sudsy water or in Ihe
dishwasher. The tray can be broken
if dropped. Remember, do not
operate the oven without the
cooking tray in place.
Special note when using Brown
'N Sear Dish: If grease is present,
high heat generated on bottom of
a Brown 'N Sear dish may canse
the grease IO burn onto the oven
tray. This may be removed with
a cleanser such as Bon Alni" brand
cleanser.
After using Bon Ami ' brand
cleanser, rinse and dry thoroughly,
l'oth_wing instructions on can. Do
not use Bon Am i' { brand cleanser
on the painted surfaces such us the
walls. It may scratch the paint.
How to Clean the Outside
Case. Clean the outside of your
oven with soap and damp cloth,
rinse with a damp cloth and then
dry. Wipe the window clean with
a damp cloth. Chrome trim is best
wiped with a damp cloth and then
with a dry towel.
Control Panel. Wipe with a dmnp
cloth. Dry thoroughly, Do not use
clean i ng sprays, large mnnunts of
soap and water, abrasives or sharp
objects on the panel--they can
damage it.
Door Surface. When cleaning
surfaces of door and oventhat
come toðer on closing the dt)or,
use only mild, non-abrasive snaps
or detergents applied with a sponge
or soft cloth.
Power Cord. If the cordbecomes
soiled, unplug andwash with a
damp cloth. For stubborn spots,
sudsy water may be used, but be
certain to rinse with a damp cloth
and dry thnroughly belore
plugging cord into outlet.
Optional Accessory
Optional accessories are available
at extra cosl frnm your GE supplier.
JX- !8K Installation Kit converts
this oven to a built-in wall oven.
Oven Lamp Replacement
First unplug the oven. Then
remove lamp compartment cover
by removing screw which holds
cover in place. Cover is located
on the back 01. the outer case.
Replace with 40-watt appliance
bulb. (It is available in drug and
hardware stores.) Replace
compartment anver. Plug in the
24
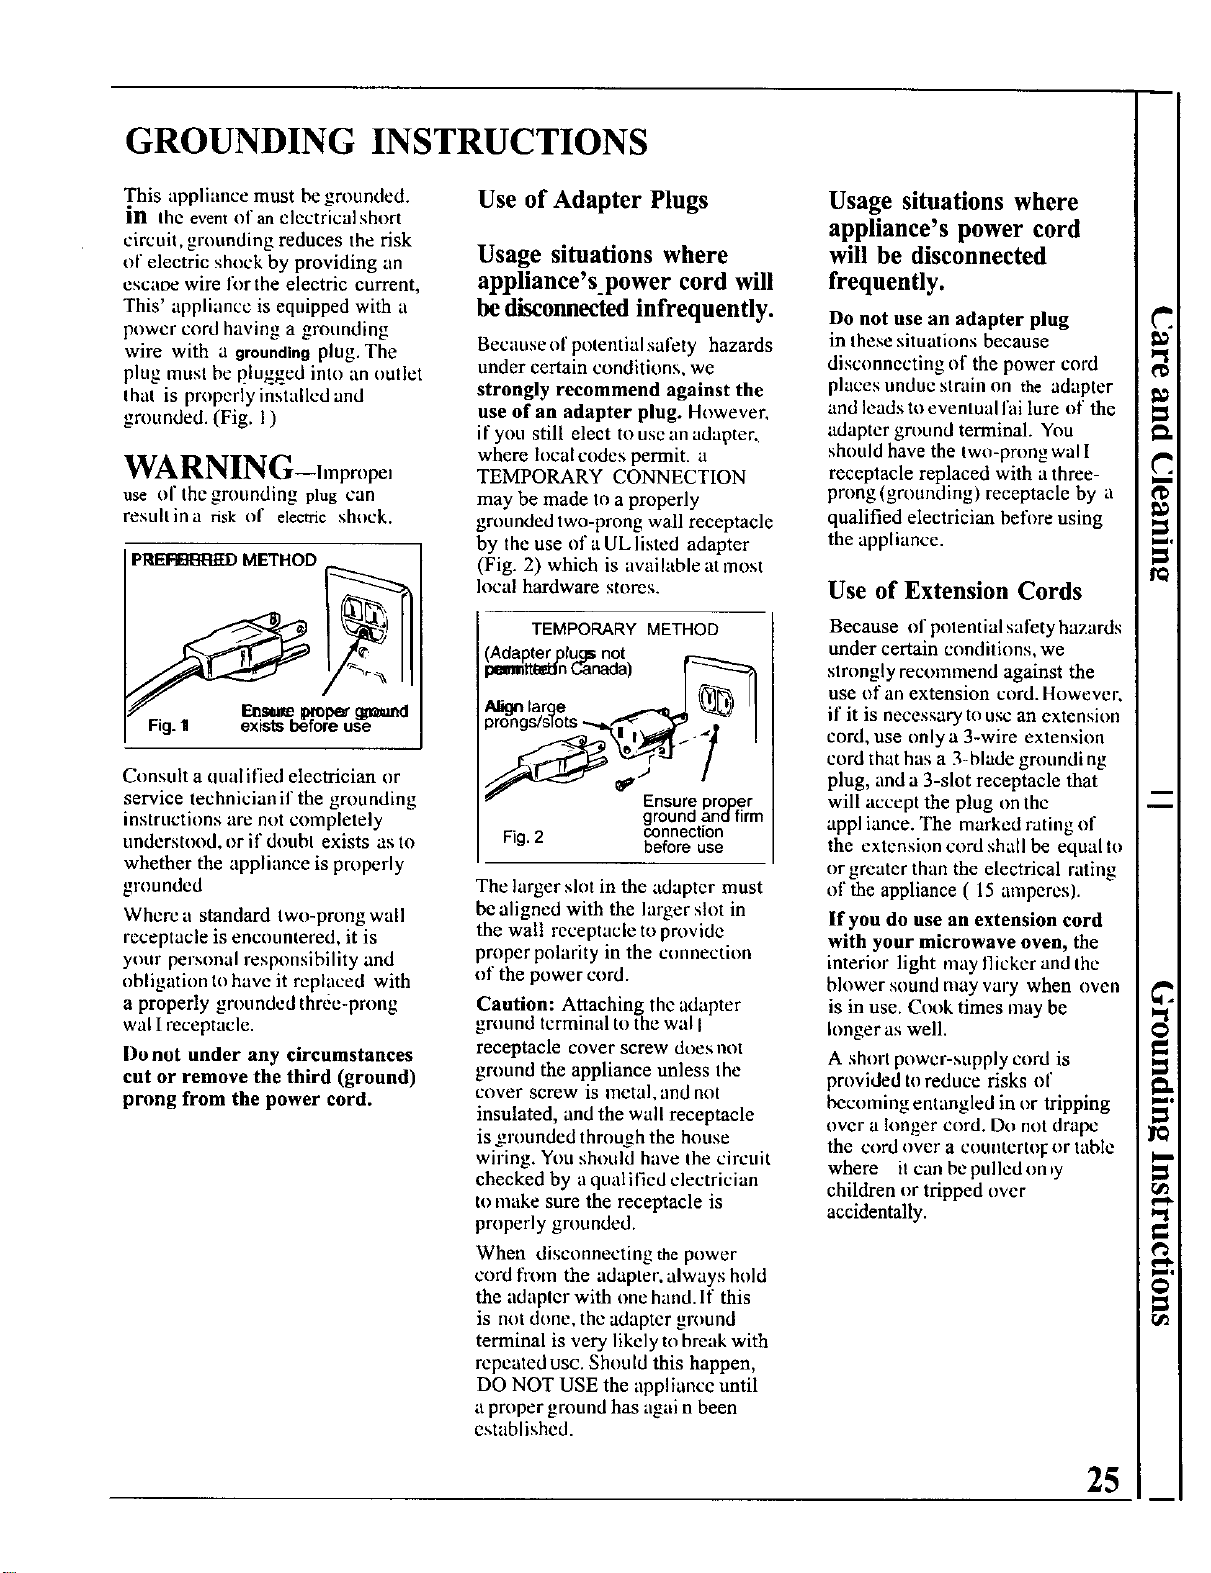
GROUNDING INSTRUCTIONS
This appliance must be grounded.
in the eventof anclcctricalshort
circuit, grounding reduces the risk
of electric shock by providing an
escaoe wire lbr the electric current,
This' appliance is equipped with a
power cord having a grounding
wire with a grounding plug. The
plug masl be plugged into an outlet
that is properly installed and
grounded. (Fig. I)
WARNING-lmprnpe,
use of the grounding plug can
resultina risk of electric shock.
P_ METHOD
Fig.11 existsbrforeuse
Consult a _lualified electrician or
service technician if the grounding
instructions are m)t completely
understood, or if douhl exists as to
whether the appliance is properly
grounded
Where a standard two-prong wall
receptacle is eacntmtered, it is
your personal responsibility and
obligation to have it replaced with
a properly grounded three-prong
wal I receptacle.
l)o not under any circumstances
cut or remove the third (ground)
prong from the power cord.
Use of Adapter Plugs
Usage situations where
appliance's_power cord will
be disconnected infrequently.
Because of pnlential safety hazards
under certain conditions, we
strongly recommend against the
use of an adapter plug. However,
if you still elect to use an adapter.
where local codes permit, a
TEMPORARY CONNECTION
may be made to a properly
grounded two-prong wall receptacle
by the use of a UL listed adapter
(Fig. 2) which is available at most
local hardware stores.
TEMPORARYMETHOD
(Adal_terptu[_ not
pennRe_clnCanada) IS
large _ _ ]
prongs/slots".,._2_ __i_'.. _ !
Ensure proper
groundandfirm
Fig.2 connection
beforeuse
The larger slot in the adapter must
be aligned with the larger slot in
the wall receptacle to provide
proper polarity in the connection
of the power cord.
Caution: Attaching the adapter
ground terminal to the wal I
receptacle cover screw does not
ground the appliance unless the
cover screw is i'netal, and not
insulated, and the wall receptacle
is groanded throu--h the house
wiring. Y',m should have the circuit
checked by a qualificd electrician
to make sure the receptacle is
properly grounded.
When disconnectingthe power
cord fl'nm the adapter, always hold
the adaplcr with one hand. If this
is not done, the adapter ground
terminal is very likely to break with
repeated use. Shou[d this happen,
DO NOT USE the appliance until
a proper grotlud has again been
established.
Usage situations where
appliance's power cord
will be disconnected
frequently.
Do not use an adapter plug
in these situations because
disconnecting of the power cord
places undue strain on the adapter
and leads to eventual fai lure of the
adapter grotmd terminal. You
should have the two-prong wal I
receptacle replaced with a three-
prong (grounding) receptacle by a
qualified electrician befi)re using
the appliance.
Use of Extension Cords
Because of pntential safety hazards
trader certain conditions, we
strongly recommend against the
use of an extension cord. Howeven
if it is necessary to usc an extension
cord, use only a 3-wire extension
cord that has a 3-blade grounding
plug, and a 3-slot receptacle that
will accept the plug on the
appliance. The marked rating of
the extension cord shall be equal to
or greater than the electrical rating
of the appliance ( 15 amperes).
If you do use an extension cord
with your microwave oven, the
interior light may llickcr and the
blower sound may vary when oven
is in use. Cook times may be
hmger as well.
A short power-supply cord is
provided to reduce risks of
becoming entangled in or tripping
over a longer cord. Do not drape
the cord over a COtlntertof or table
where it can bc pulled ooby
children or tripped over
accidentally.
il
!
el
el
il
il
25
el
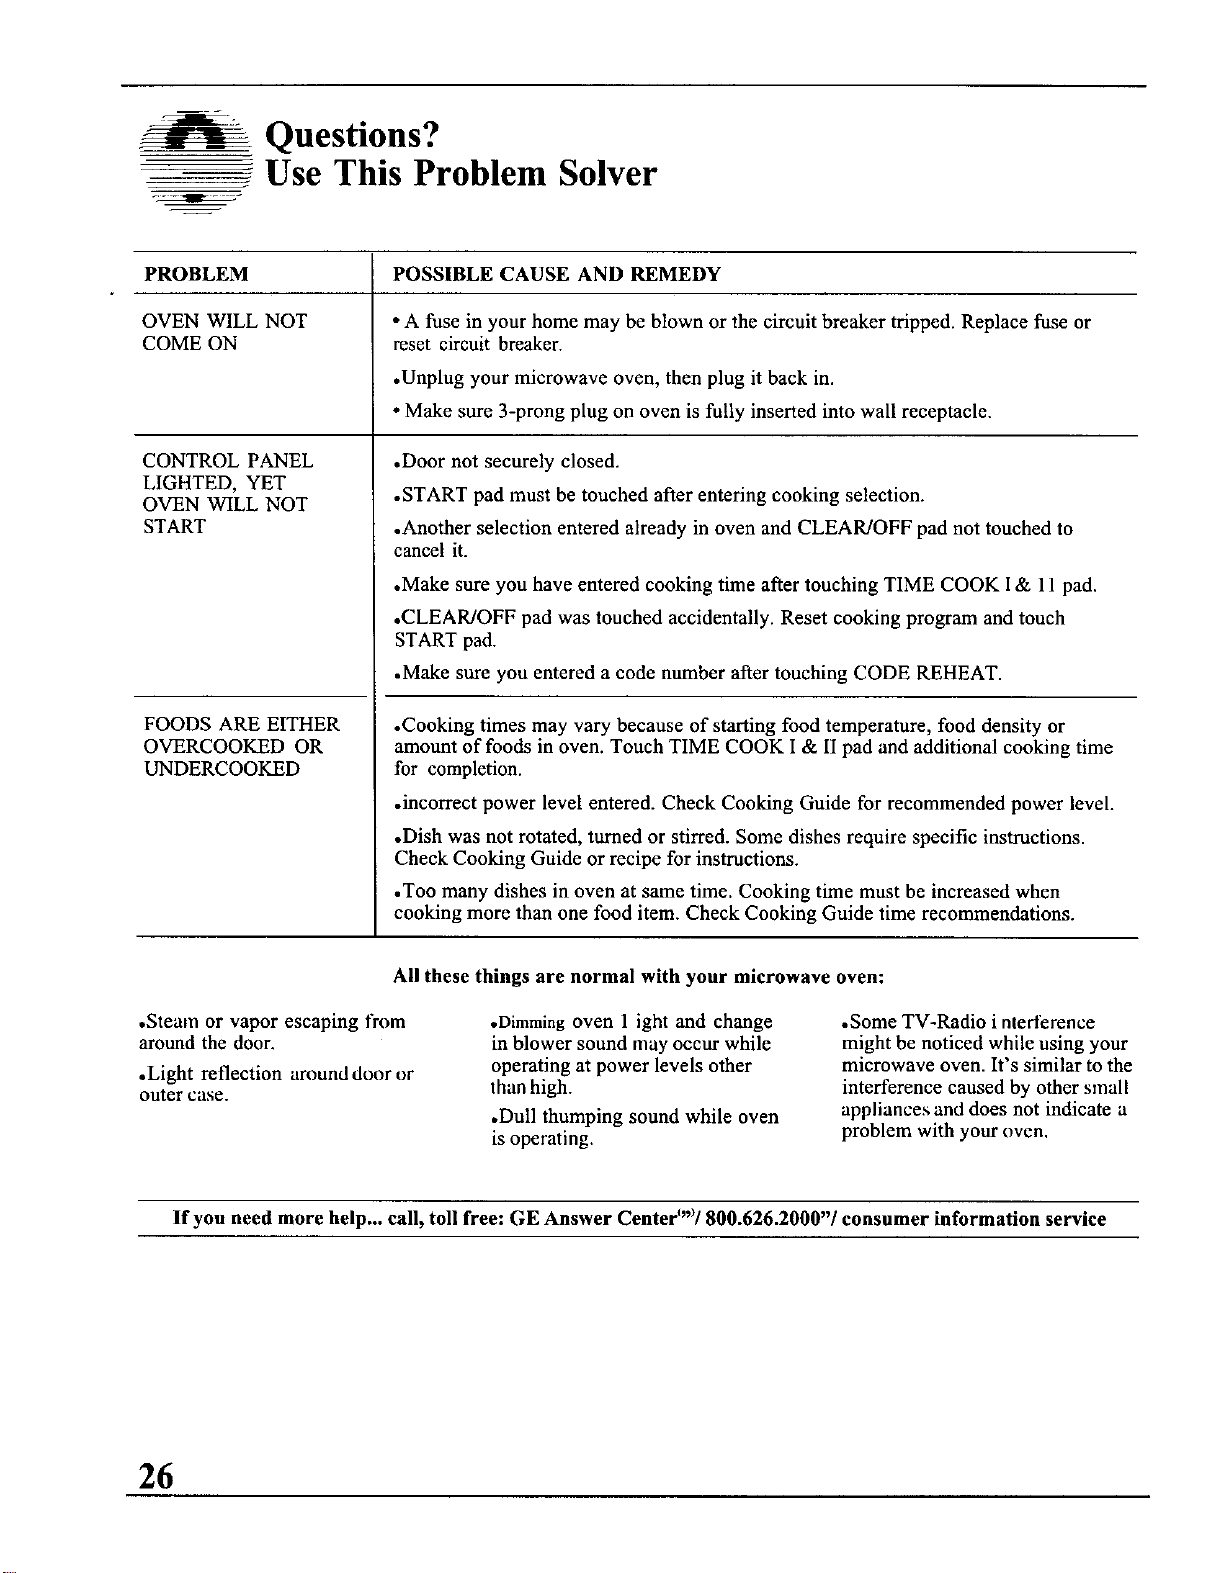
Questions?
Use This Problem Solver
PROBLEM POSSIBLE CAUSE AND REMEDY
OVEN WILL NOT *A fuse in your home may be blown or the circuit breaker tripped. Replace fuse or
COME ON reset circuit breaker.
•Unplug your microwave oven, then plug it back in.
• Make sure 3-prong plug on oven is fully inserted into wall receptacle.
CONTROL PANEL
LIGHTED, YET
OVEN WILL NOT
START
FOODS ARE EITHER
OVERCOOKED OR
UNDERCOOKED
•Door not securely closed.
• START pad must be touched after entering cooking selection.
.Another selection entered already in oven and CLEAR/OFF pad not touched to
cancel it.
•Make sure you have entered cooking time after touching TIME COOK I & 11 pad.
•CLEAR/OFF pad was touched accidentally. Reset cooking program and touch
START pad.
.Make sure you entered a code number after touching CODE REHEAT.
.Cooking times may vary because of starting food temperature, food density or
amount of foods in oven. Touch TIME COOK I & II pad and additional cooking time
for completion.
•incorrect power level entered. Check Cooking Guide for recommended power level.
•Dish was not rotated, turned or stirred. Some dishes require specific instructions.
Check Cooking Guide or recipe for instructions.
.Too many dishes in oven at same time. Cooking time must be increased when
cooking more than one food item. Check Cooking Guide time recommendations.
All these things are normal with your microwave oven:
°Steam or vapor escaping from
arotmd the door.
.Light reflection an)und door or
outer case.
•Dimming oven 1 ight and change
in blower sound may occur while
operating at power levels other
than high.
•Dull thumping sound while oven
is operating.
.Some TV-Radio i ntederence
might be noticed while using your
microwave oven. It's similar to the
interference caused by other small
appliances and does not indicate a
problem with your oven.
If you need more help.., call, toll free: GE Answer Center_"_/800.626.2000"/ consumer information service
26
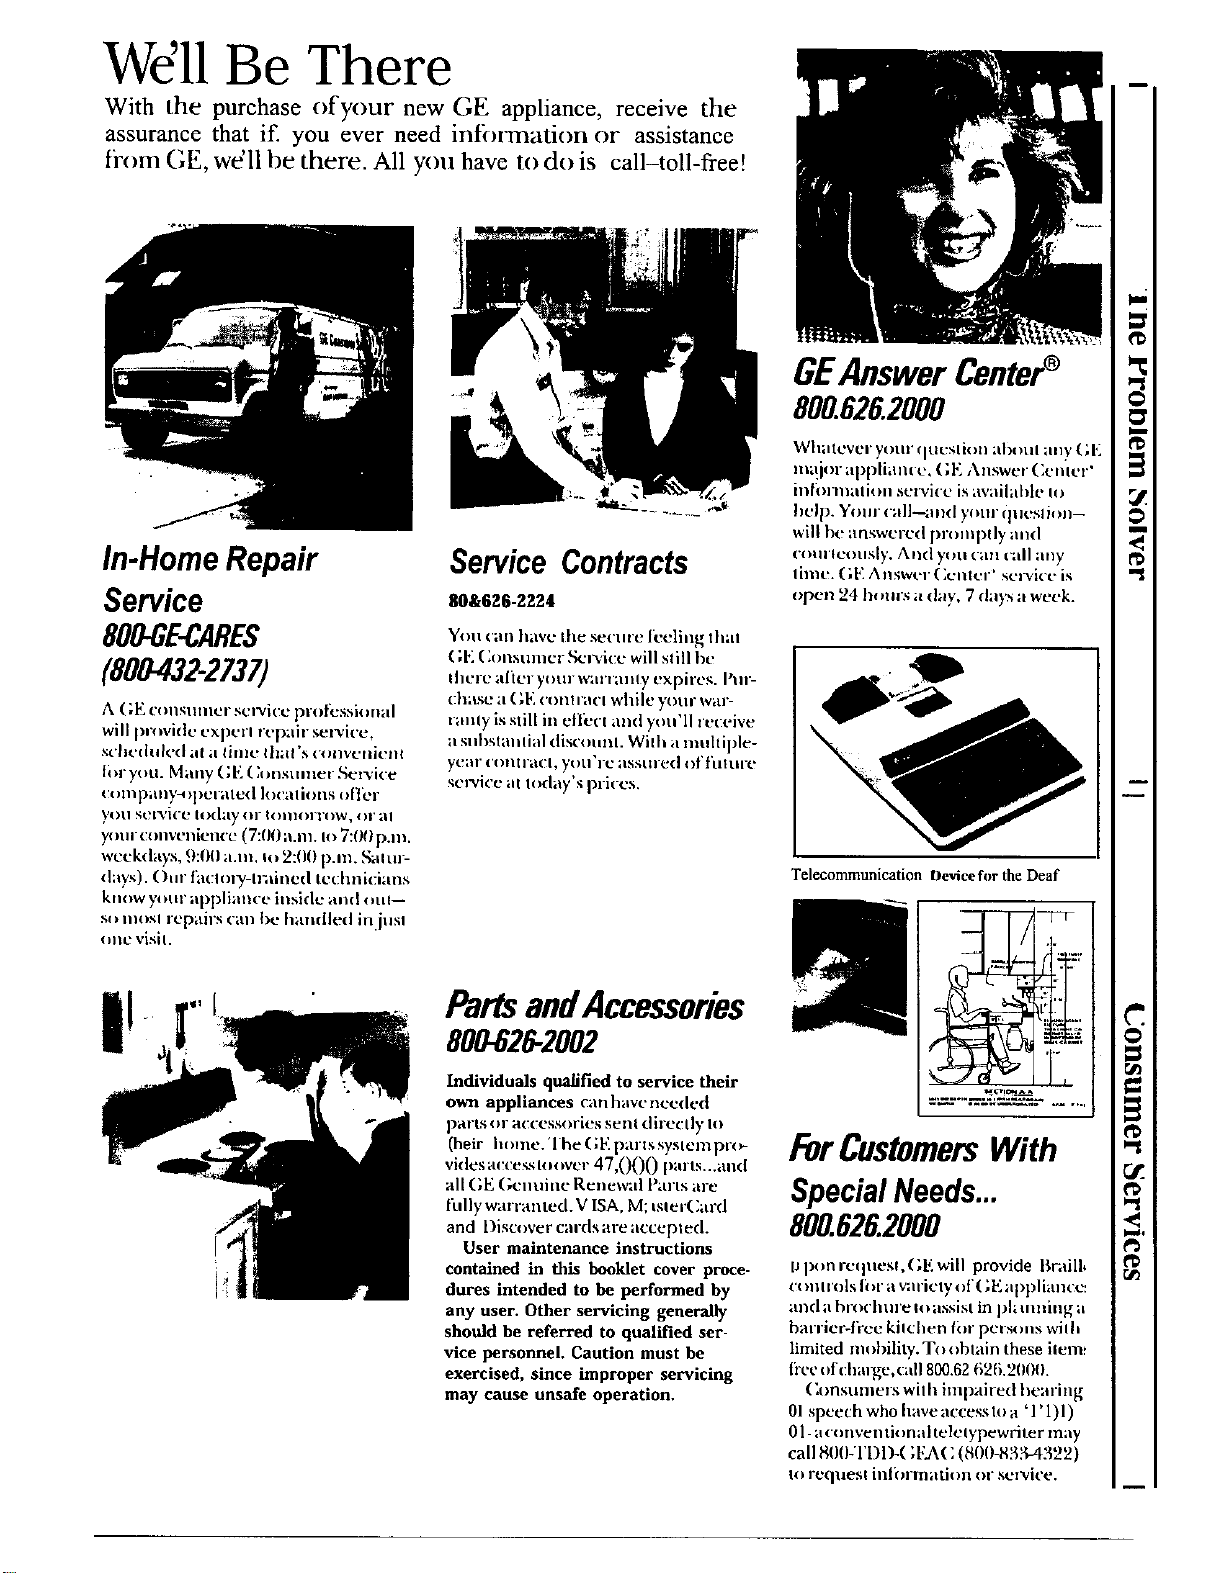
We'llBe There
With the purchase of your new GE appliance, receive the
assurance that if. you ever need intT)rmatitm or assistance
from (,E, we 1l )e there. All you have to do is call-toll-free?
In-HomeRepair
Service
800-GE- RES
(800432-2737)
A ( ;E c{ )ustllller SClWi(:t? pl( )}_:ssi< )hal
will provid," experl r_,pair service,
s_'ht'dlil<'(I all aLlime IIlall's ('_ IIIV_711iC/l{
ti,nyou. Mally (; E (;(mStllner .'Sez'vi{:e
(:,,mpauy-_ _pciated Iocaltions oiler
y()ll gela/i(e tod_ty (iF 1( }lll{)l'l'( 1%_/_( )r all
yc )Un C_)llvenien_,'e (7:(lll a.nl. Ill 7:llllp.m.
weekdays, 9:(RI _t.m, Io 2:(10 p.m. _il Ul-
{l;lys), I)iu" t,i(:ll)13S-Illiille(I le(:hllil:iaus
know your allpliauct" in.side _uld _lu I--
s( i liilisl repilirs (-all tit, haiidlt-d in.lust
_lnc visil,
ServiceContracts
80&6:_6-2224
71111 (all h awl." the set'tire l_.,eliilg thai
( ;1+]( kll/sull/cr .i_l'vit:e will still he
Ihei-e ;iJit, i-yllur warialil_ expires, Pill'-
(:h;Ise a ( 1_] ('1)1111"aU'l whih' yl)tlr wilr-
railly is still in etli, ri ;ilid yotl'll l't'c('ive
_1Sill'*st _111t i_ll disclitint, _iih al milltil)le-
y(:ill" ('(lllllalll, yl)u'rl2 asstll-_.d {if fulul-t,
s('lwice ill Ioday's pli(t's,
PartsandAccessories
800-626-2002
Individuals quarried to service their
own appliances canhaLvcneedt.d
paris ()r a( cc_.ssori_.ssent directly I_l
(heir hollle. 'lhe (; E paris syslem pro-
vides acl:trs,_:l_lovi,'r 47,000 palts...and
all lIE Gt'llUillt" ReilewaI Piu'ls _il-e
t%il]), warr_tllLed. VlSA, M; isiel'(]al'd
and l)isc_)ver cards are accepted.
User maintenance instructions
contained in this booklet cover proce-
dures intended to be performed by
any user, Other servicing generally
should be referred to qualified ser-
vice personnel. Caution must be
exercised, since improper servicing
may cause unsafe operation.
GEAnswer Center®
800.626.2000
Whatever y(_ur qtit'slillli al)llul ally ( ',1']
iliaior ;iliplia Ill c,+(;E A nswt, l (]t.lllt, r'
inlilrltmiioll selx'ict' is awlilallle Io
lit'Ill. 7Ollr (all--alld yllllr (lil(!sii_lli-
will bl_a riswt, i-t,d |)rl)liiplly alld
('l)ill'l('l)llsly,/\lid yl_ll ('_ill c;il] _illy
limt'. (1[] all Sl_/t'l' ( ]t'lllt'l'" st'i_ i('t • is
opt, l1 _4 h( illlS il (lily, 7days il wt't'k.
Telecommunication Devicefor the Deaf
ForCustomers With
SpecialNeeds...
800.626.2000
p i)_,n rc_lnesi,(;E will provide Bv<lilh
C_lllli'ols lilr a val'iCly o f ( 1[ al)pliant:c_
;t0d a brll{'hure I1)assist in iJl_iiniillg a
t)ari-lcr-lrec kilchen t{ll" p('l'SO ns wilh
limited lltoi)ility.T/ioblain these ilelri!
[i'eeofc:haige,cal1800.626211,20111).
(;onsuulelx with ilnpaired hearing
01 speech who (laVe access ttl a ' l' 1)I)
0l- a(onventit,nal teleiypewriler may
call 8(lIldl'Dl)-( ;FAt; (80(1-143;4-4322)
to rcquesl inli,rmati,m or sezvice.
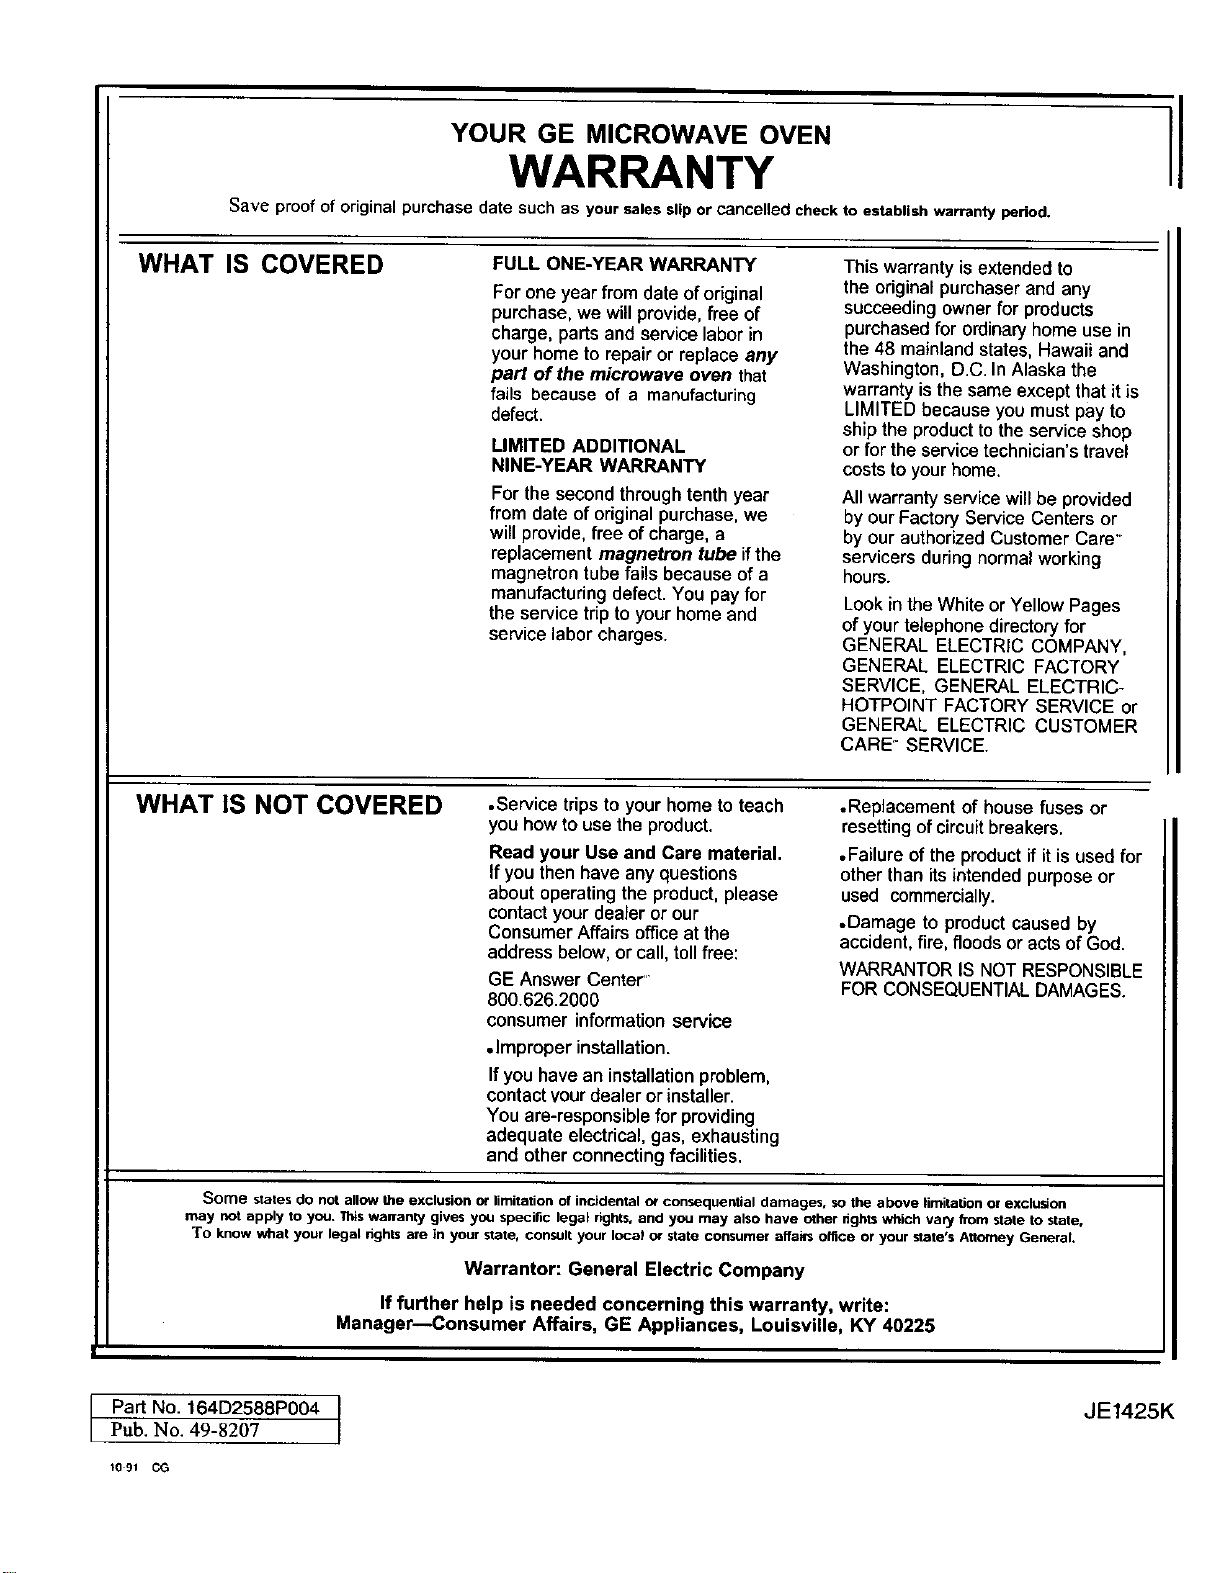
YOUR GE MICROWAVE OVEN
WARRANTY
Save proof of original purchase date such as your sales slip or cancelled check to establish warranty period.
WHAT IS COVERED FULL ONE-YEAR WARRANTY
For one year from dateoforiginal
purchase, we willprovide,free of
charge, parts and servicelabor in
your home to repair or replace any
part of the microwave oven that
fails because of a manufacturing
defect.
LIMITED ADDITIONAL
NINE-YEAR WARRANTY
For the second throughtenthyear
from date of original purchase, we
will provide, free of charge, a
replacement magnetron tube if the
magnetron tube fails because of a
manufacturing defect. You pay for
the service trip to your home and
servicelabor charges.
Thiswarranty isextended to
the originalpurchaser and any
succeeding owner for products
purchased for ordinary home use in
the 48 mainland states, Hawaii and
Washington, D.C. In Alaska the
warranty is the same except that it is
LIMITED because you must pay to
ship the product to the service shop
or forthe service technician's travel
costs to your home.
All warranty service will be provided
by our Factory Service Centers or
by our authorized Customer Care"
servicers during normal working
hours.
Look in the White or Yellow Pages
of your telephone directory for
GENERAL ELECTRIC COMPANY,
GENERAL ELECTRIC FACTORY
SERVICE, GENERAL ELECTRIC-
HOTPOINT FACTORY SERVICE or
GENERAL ELECTRIC CUSTOMER
CARE" SERVICE.
I
WHAT IS NOT COVERED .Service trips to your home to teach
you howto use the product.
Read your Use and Care material.
If you then have any questions
about operating the product, please
contact your dealer or our
Consumer Affairs office at the
address below, or call, toll free:
GE Answer Center'
800.626.2000
consumer information service
•Improper installation.
If you have an installation problem,
contact your dealer or installer.
You are-responsible for providing
adequate electrical, gas, exhausting
and other connecting facilities.
.Replacement of housefuses or
resetting of circuit breakers.
.Failure of the product if it is used for
other than its intended purpose or
used commercially.
•Damage to product caused by
accident, fire, floods or acts of God.
WARRANTORIS NOT RESPONSIBLE
FOR CONSEQUENTIALDAMAGES.
Some states do not allow the exclusion or limitation of incidental o_ consequential damages, so the above limitation or exclusion
may not apply to you. Tffis warranty gives you specific legal rights, and you may also have other nghts which vary from state to state,
To know what your legal rights are in youT state, consult your local or state consumer affairs office or your state's Attorney General,
Warrantor: General Electric Company
If further help is needed concerning this warranty, write:
Manager--Consumer Affairs, GE Appliances, Louisville, KY 40225
JE1425K
Part No. 164D2588P004 ]
Pub. No. 49-8207
tO 91 CO