Operator's Manual
CRRFr MRN
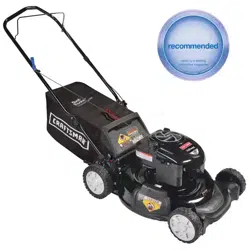
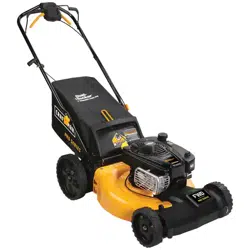
21" LAWN MOWER
Model No. 247.370370
CAUTION" Before using this
product, read this manual and
follow all safety rules and operating
instructions.
,, SAFETY
o ASSEMBLY
OPERATION
MAINTENANCE
PARTS LIST
o ESPANOL
Sears Brands Management Corporation, Hoffman Estates, IL 60179, U.S.A.
Visit our website: www.craftsman.com FormNo 769-07601B
(October1,2012)
WarrantyStatement.............................. Page2
SafetyInstructions............................ Pages3-6
SlopeGuide..................................... Page7
Assembly.................................... Pages8-10
Operation.................................. Pages11-13
ServiceandMaintenance.................... Pages14-17
Off-SeasonStorage.............................. Page18
Troubleshooting................................ Page19
PartsList.................................... Page20-28
Espa_ol........................................ Page33
ServiceNumbers............................ BackCover
CRAFTSMANTWOYEARFULLWARRANTY
Fortwo yearsfromthedateofpurchase,this productiswarrantedagainstanydefectsinmaterialorworkmanship.Defectiveproductwill receivefreerepair
orfreereplacementifrepairisunavailable.
Forwarrantycoveragedetailsto obtainrepairorreplacement,visitthewebsite:www.craftsman.com.
ThiswarrantycoversONLYdefectsinmaterialandworkmanship.WarrantycoveragedoesNOTinclude:
, Expendableitemswhichcanwearoutfromnormalusewithinthewarrantyperiod,suchasmowerblades,bladeadapters,belts,filters,or sparkplugs.
, Productdamageresultingfromuserattemptsat productmodificationor repairorcausedbyproductaccessories.
, Repairsnecessarybecauseofaccidentorfailureto operateormaintainthe productaccordingto allsuppliedinstructions.
, Preventativemaintenanceorrepairsnecessarydueto improperfuelmixture,contaminatedorstalefuel.
Thiswarrantyisvoidifthisproductiseverusedwhileprovidingcommercialservicesorifrentedto anotherperson.
Thiswarrantygivesyouspecificlegalrights,andyoumayalsohaveotherrightswhichvaryfrom stateto state.
SearsBrandsManagementCorporation,HoffmanEstates,IL60179
Engine Oil: SAE 30
Fuel: Unleaded Gasoline
Engine: Briggs & Stratton
Model Number
Serial Number
Date of Purchase
Record the model number, serial number,
and date of purchase above.
© Sears Brands, LLC 2
Thissymbolpointsout importantsafety instructionswhich, if not
followed, couldendangerthe personalsafetyand/or property of
yourself and others.Readandfollow all instructions inthis manual
beforeattempting to operatethis machine.Failureto complywith these
instructionsmay resultinpersonalinjury.Whenyou seethis symbol, HEED
ITSWARNING!
CALIFORNIA PROPOSITION 65
EngineExhaust,someof its constituents,and certain vehiclecomponents
containor emit chemicalsknownto Stateof Californiato causecancerand
birth defectsorother reproductiveharm.
Thismachinewas built to beoperatedaccordingto the safeoperation
practicesinthis manual.Aswith anytype of powerequipment,
carelessnessorerror on the part of the operatorcanresultinseriousinjury.
Thismachineiscapableof amputating fingers, hands,toesandfeet and
throwingdebris. Failureto observethefollowing safety instructionscould
resultin seriousinjury or death.
Your Responsibility--Restrict the useof this powermachineto
personswho read, understandandfollow the warningsand instructionsin
this manual andon the machine.
SAVETHESEINSTRUCTIONS!
GENERAL OPERATION
Readthisoperator'smanualcarefullyinitsentiretybeforeattemptingto
assemblethis machine.Read,understand,andfollowallinstructionson the
machineandinthe manualsbeforeoperation.Keepthismanualina safe
placefor futureandregularreferenceandfororderingreplacementparts
Becompletelyfamiliarwith thecontrolsandtheproperuseofthismachine
beforeoperatingit.
Thismachineisa precisionpieceof powerequipment,nota plaything.
Therefore,exerciseextremecautionat all times.Thismachinehasbeen
designedto performonejob: to mowgrass.Donotuseit foranyother
purpose.
Neverallowchildrenunder14yearsof ageto operatethis machine.Children
14andovershouldreadandunderstandthe instructionsandsafeoperation
practicesinthis manualandonthe machineandshouldbetrainedand
supervisedbyanadult.
Onlyresponsibleindividualswhoarefamiliarwith theserulesof safe
operationshouldbeallowedto usethis machine.
Thoroughlyinspecttheareawheretheequipmentisto beused.Removeall
stones,sticks,wire, bones,toysandotherforeignobjects,whichcouldbe
trippedoveror pickedupandthrownbytheblade.Thrownobjectscancause
seriouspersonalinjury.
Planyourmowingpatterntoavoiddischargeof materialtowardroads,
sidewalks,bystandersandthe like.Also,avoiddischargingmaterialagainst
awall orobstruction,whichmaycausedischargedmaterialto ricochetback
towardtheoperator.
Tohelpavoidbladecontactor a thrownobjectinjury,stayinoperatorzone
behindhandlesandkeepchildren,bystanders,helpersandpetsat least75
feetfrommowerwhileit isinoperation.Stopmachineifanyoneentersarea.
Alwayswearsafetyglassesor safetygogglesduringoperationandwhile
performinganadjustmentor repairto protectyoureyes.Thrownobjects
whichricochetcancauseseriousinjuryto theeyes.
Wearsturdy,rough-soledworkshoesandclose-fittingslacksandshirts.
Shirtsandpantsthatcoverthe armsandlegsandsteel-toedshoesare
recommended.Neveroperatethismachineinbarefeet,sandals,slipperyor
light-weight(e.g.canvas)shoes.
Donotput handsorfeetnearrotatingpartsor underthe cuttingdeck.
Contactwith bladecanamputatefingers,hands,toesandfeet.
Amissingordamageddischargecovercancausebladecontactorthrown
objectinjuries.
Manyinjuriesoccurasa resultofthemowerbeingpulledoverthe foot
duringafall causedbyslippingortripping.Donot hold onto themowerif
youarefalling:releasethe handleimmediately.
Neverpull the mowerbacktowardyouwhileyouarewalking.If youmust
backthemowerawayfroma wallorobstructionfirst lookdownandbehind
to avoidtrippingandthenfollowthesesteps:
a. Stepbackfrom mowerto fullyextendyourarmsforward.
b. Besureyouarewell balancedwith surefooting.
c. Pullthemowerbackslowly,no morethanhalfwaytowardyou.
d. Repeatthesestepsasneeded.
Donotoperatethemowerwhileundertheinfluenceof alcoholordrugs.
Donotengagethe self-propelledmechanismonmachinessoequipped
whilestartingengine.
Thebladecontrolhandleisasafetydevice.Neverattemptto bypassits
operation.Doingsomakesthe safetydeviceinoperativeandmayresultin
personalinjurythroughcontactwith the rotatingblade.Thebladecontrol
handlemustoperateeasilyinbothdirectionsandautomaticallyreturnto the
disengagedpositionwhenreleased.
Neveroperatethe mowerin wetgrass.Alwaysbesureof yourfooting. A
slipandfall cancauseseriouspersonalinjury.Ifyoufeelyouarelosingyour
footing,releasethe bladecontrolhandleimmediatelyandthe bladewill
stoprotatingwithin threeseconds.
Mowonlyindaylightorgoodartificiallight. Walk,neverrun.
Stopthe bladewhencrossinggraveldrives,walksor roads.
Iftheequipmentshouldstarttovibrateabnormally,stoptheengineand
checkimmediatelyforthecause.Vibrationisgenerallyawarningoftrouble.
Shuttheengineoffandwaituntilthebladecomestoacompletestopbefore
removingthegrasscatcheroruncloggingthechute.Thecuttingblade
continuestorotateforafewsecondsafterthebladecontrolisreleased.
Neverplaceanypartofthebodyinthebladeareauntilyouaresurethe
bladehasstoppedrotating.
Neveroperatemowerwithoutpropertrailshield,dischargecover,grass
catcher,bladecontrolhandleorothersafetyprotectivedevicesinplaceand
working.Neveroperatemowerwithdamagedsafetydevices.Failuretodo
socanresultinpersonalinjury.
Mufflerandenginebecomehotandcancauseaburn.Donottouch.
Neverattempttomakeawheelorcuttingheightadjustmentwhilethe
engineisrunning.
Onlyusepartsandaccessoriesmadeforthismachinebythemanufactureras
listedinthePartspagesofthisOperator'sManual.Failuretodosocanresult
inpersonalinjury.
Whenstartingengine,pullcordslowlyuntilresistanceisfelt,thenpull
rapidly.Rapidretractionofstartercord(kickback)willpullhandandarm
towardenginefasterthanyoucanletgo.Brokenbones,fractures,bruisesor
sprainscouldresult.
Ifsituationsoccurwhicharenotcoveredinthismanual,usecareandgood
judgement.
SLOPE OPERATION
Slopesareamajorfactorrelatedto slipandfall accidents,whichcanresultinsevere
injury.Operationonslopesrequiresextracaution.Ifyoufeeluneasyonaslope,do
notmowit. Foryoursafety,usetheSlopeGuideincludedaspartof thismanualto
measureslopesbeforeoperatingthis machineonaslopedor hillyarea.Iftheslope
isgreaterthan 15degrees,do not mowit.
Do:
Mowacrossthe faceofslopes;neverupanddown.Exerciseextremecaution
whenchangingdirectionon slopes.
Watchfor holes,ruts,rocks,hiddenobjects,or bumpswhichcancauseyou
to sliportrip.Tallgrasscanhideobstacles.
Alwaysbesureof yourfooting.Aslipandfallcancauseseriouspersonal
injury.If youfeelyouarelosingyourbalance,releasethebladecontrol
handleimmediatelyandthe bladewill stoprotatingwithin three(3)
seconds.
Do Not:
Donotmowneardrop-offs,ditchesor embankments,becauseyoucould
loseyourfootingor balance.
Donotmowslopesgreaterthan15degreesasshownon theslopeguide.
Donotmowonwetgrass.Unstablefootingcouldcauseslipping.
CHILDREN
Tragicaccidentscanoccurif the operatorisnot alertto thepresenceof children.
Childrenareoftenattractedto the mowerandthemowingactivity.Theydonot
understandthedangers.Neverassumethatchildrenwill remainwhereyoulastsaw
them.
Keepchildrenoutof the mowingareaandunderwatchfulcareof a
responsibleadultotherthanthe operator.
Bealertandturn moweroff ifa childentersthearea.
Beforeandwhilemovingbackwards,lookbehindanddownforsmall
children.
Useextremecarewhenapproachingblindcorners,doorways,shrubs,trees,
orotherobjectsthat mayobscureyourvisionof achildwhomayrunintothe
mower.
Keepchildrenawayfromhotorrunningengines.Theycansufferburnsfrom
ahotmuffler.
Neverallowchildrenunder14yearsofageto operatethismachine.Children
14andovershouldreadandunderstandtheinstructionsandsafeoperation
practicesinthismanualandon the machineandbetrainedandsupervised
byan adult.
SERVICE
Safe Handling of Gasoline:
Toavoid personalinjuryorpropertydamageuseextremecarein handling
gasoline.Gasolineisextremely flammable andthe vaporsare explosive.
Seriouspersonalinjury canoccurwhengasolineis spilledonyourself or your
clotheswhichcan ignite. Washyourskinandchangeclothesimmediately.
Useonlyanapprovedgasolinecontainer.
Neverfill containersinsideavehicleoronatruckor trailer bedwith a plastic
liner.Alwaysplacecontainersonthegroundawayfrom yourvehiclebefore
filling.
Removegas-poweredequipmentfromthetruckortrailerandrefuelit on
theground.Ifthisis notpossible,thenrefuelsuchequipmenton atrailer
with a portablecontainer,ratherthanfrom agasolinedispensernozzle.
Keepthenozzleincontactwiththe rimofthefuel tankorcontaineropening
at all timesuntil fuelingiscomplete.Donotusea nozzlelock-opendevice.
Extinguishall cigarettes,cigars,pipesandothersources
of ignition.
Neverfuel machineindoorsbecauseflammablevaporswill accumulatein
thearea.
Neverremovegascapor addfuelwhileengineishotorrunning. Allow
engineto coolat leasttwo minutesbeforerefueling.
Neverover-fillfuel tank.Toallowforexpansionof thefuel,do not fill above
thebottomof the fueltank neck.
Replacegasolinecapandtightensecurely.
Ifgasolineisspilled,wipeit off the engineandequipment.Movemachineto
anotherarea.Wait5 minutesbeforestartingengine.
Neverstorethe machineor fuelcontainernearanopenflame,sparkorpilot
lightason awaterheater,spaceheater,furnace,clothesdryerorothergas
appliances.
Toreducefire hazard,keepmachinefreeofgrass,leaves,or otherdebris
build-up.Cleanup oil or fuelspillageandremoveanyfuel-soakeddebris.
Allowmachinetocoolat least5 minutesbeforestoring.
4
General Service:
Neverrunan engineindoorsor inapoorlyventilatedarea.Engineexhaust
containscarbonmonoxide,anodorlessanddeadlygas.
Beforecleaning,repairing,or inspecting,makecertainthe bladeandall
movingpartshavestopped.Disconnectthesparkplugwireandground
againstthe engineto preventunintendedstarting.
Checkthebladeandenginemountingboltsatfrequentintervalsforproper
tightness.Also,visuallyinspectbladefordamage(e.g.,bent,cracked,worn).
Replacebladewith theoriginalequipmentmanufacture's(O.EM.)blade
only,listedinthe Partspagesof thismanual.Useof partswhichdo not meet
theoriginalequipmentspecificationsmayleadto improperperformance
andcompromisesafety!
Mowerbladesaresharpandcancut.Wrapthe bladeorweargloves,anduse
extracautionwhenservicingthem.
Keepall nuts,bolts,andscrewstight to besuretheequipmentisin safe
workingcondition.
Nevertamperwith safetydevices.Checktheir properoperationregularly.
Afterstrikingaforeignobject,stoptheengine,disconnectthe sparkplug
wireandgroundagainsttheengine.Thoroughlyinspectthemowerforany
damage.Repairthedamagebeforestartingandoperatingthe mower.
Neverattemptto makeawheelor cuttingheightadjustmentwhilethe
engineisrunning.
Grasscatchercomponents,dischargecover,andtrail shieldaresubjectto
wearanddamagewhichcouldexposemovingpartsorallowobjectsto be
thrown.Forsafetyprotection,frequentlycheckcomponentsandreplace
immediatelywithoriginalequipmentmanufacturer's(O.EM.)partsonly,
listedinthePartspagesof thismanual.Useofpartswhichdo notmeetthe
originalequipmentspecificationsmayleadto improperperformanceand
compromisesafety!
Donotchangetheengine'sgovernorsettingorover-speedthe engine.The
governorcontrolsthemaximumsafeoperatingspeedof theengine.
Checkfuelline,tank,cap,andfittingsfrequentlyfor cracksor leaks.Replace
if necessary.
Donotcrankenginewith sparkplug removed.
Maintainorreplacesafetyandinstructionlabels,asnecessary.
Observeproperdisposallawsandregulations.Improperdisposalof fluids
andmaterialscanharmtheenvironment.
Accordingto the ConsumerProductsSafetyCommission(CPSC)andthe U.S.
EnvironmentalProtectionAgency(EPA),thisproducthasanAverageUseful
Lifeofseven(7)years,or140hoursof operation.At theendof theAverage
UsefulLifehavethemachineinspectedannuallybya Searsor otherqualified
servicedealerto ensurethat all mechanicalandsafetysystemsareworking
properlyandnotwornexcessively.Failureto do socanresultinaccidents,
injuriesordeath.
DO NOT MODIFY ENGINE
Toavoid seriousinjuryordeath,do notmodifyengineinanyway.Tampering
with thegovernorsetting can leadto a runawayengineandcauseit to
operateat unsafespeeds.Nevertamperwith factory setting of engine
governor.
NOTICE REGARDING EMISSIONS
Engineswhkh arecertified to complywith Californiaandfederal EPA
emissionregulationsfor SORE(SmallOff RoadEquipment)arecertified
to operateon regular unleadedgasoline,and mayincludethe following
emissioncontrolsystems:EngineModification (EM),OxidizingCatalyst(OC),
SecondaryAir Injection (SAI)andThreeWayCatalyst(TWC)if soequipped.
SPARK ARRESTOR
Thismachineisequippedwith an internalcombustionengine andshould
not be usedon or nearanyunimprovedforest-covered,brusbcoveredor
grass-coveredlandunlesstheengine'sexhaustsystemisequippedwith a
sparkarrestormeeting applicablelocalor state laws(if any).
If asparkarrestor isused,it shouldbe maintained ineffective working order
bythe operator. Inthe Stateof Californiathe aboveisrequiredby law (Section
4442 of the CaliforniaPublicResourcesCode).Otherstatesmay havesimilar
laws.Federallawsapply onfederallands.
Asparkarrestorfor the muffler isavailablethrough your nearestSearsParts
and RepairServiceCenter.
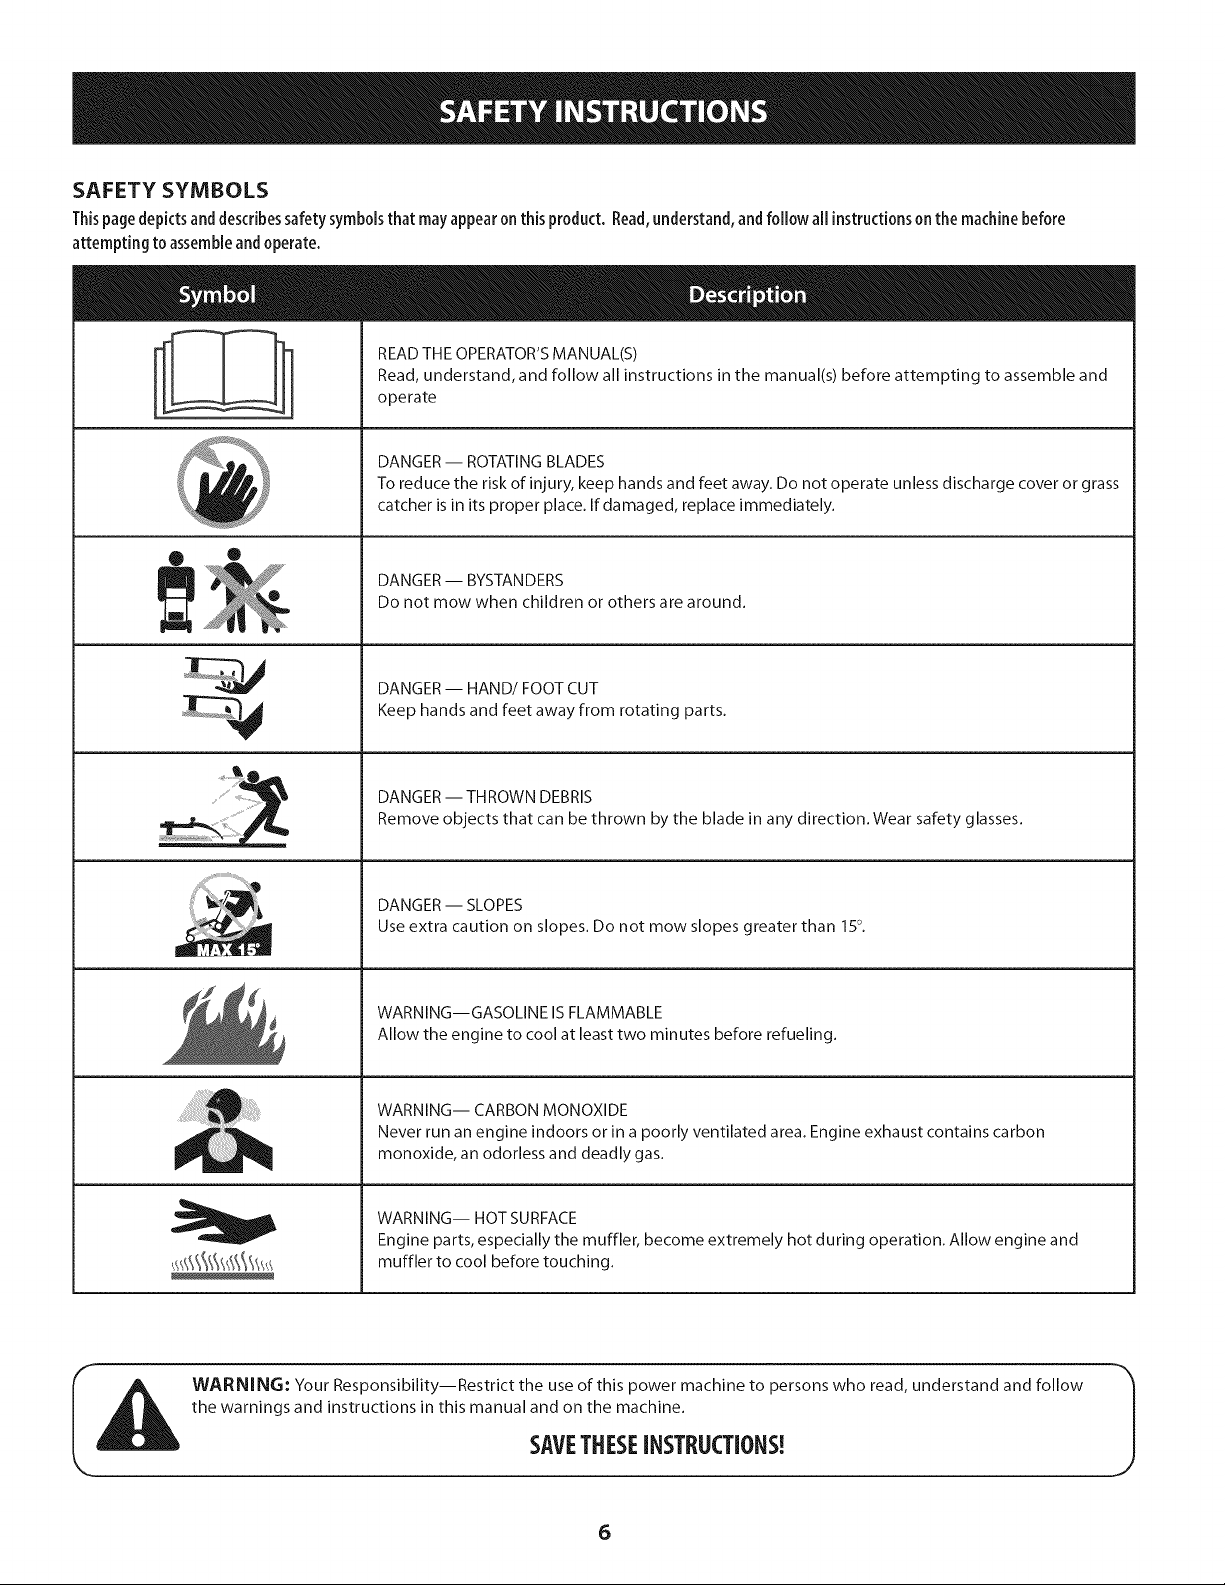
SAFETY SYMBOLS
Thispage depicts and describes safety symbols that may appear on this product. Read, understand, and follow all instructions on the machine before
attempting to assembleand operate.
• ®
imI
READ THE OPERATOR'S MANUAL(S)
Read, understand, and follow all instructions in the manual(s) before attempting to assemble and
operate
DANGER -- ROTATING BLADES
To reduce the risk of injury, keep hands and feet away. Do not operate unless discharge cover or grass
catcher is in its proper place. If damaged, replace immediately.
DANGER -- BYSTANDERS
Do not mow when children or others are around.
DANGER -- HAND/FOOT CUT
Keep hands and feet away from rotating parts.
DANGER-- THROWN DEBRIS
Remove objects that can be thrown by the blade in any direction. Wear safety glasses.
DANGER -- SLOPES
Use extra caution on slopes. Do not mow slopes greater than 15°.
WARNING--GASOLINE IS FLAMMABLE
Allow the engine to cool at least two minutes before refueling.
WARNING-- CARBON MONOXIDE
Never run an engine indoors or in a poorly ventilated area. Engine exhaust contains carbon
monoxide, an odorless and deadly gas.
WARNING-- HOT SURFACE
Engine parts, especially the muffler, become extremely hot during operation. Allow engine and
muffler to cool before touching.
WARNING: Your Responsibility--Restrict the use of this power machine to persons who read, understand and follow
the warnings and instructions in this manual and on the machine.
SAVETHESEINSTRUCTIONS!
6

(OK)
15° Slope
X
(TOO STEEP)
15° Slope
_- _. Figure1
USETHiS SLOPEGAUGETO DETERMINE
iFA SLOPEiS TOOSTEEPFORSAFEOPERATION!
Tocheckthe slope, proceedas follows:
1. Removethis pageand fold alongthe dashedline.
2. Locateavertical object on or behindthe slope(e.g.a pole, building,fence, tree, etc.)
3. Aligneither side of the slope gaugewith the object (SeeFigure1 and Figure2 ).
4. Adjust gaugeup or down until the left cornertouchesthe slope (SeeFigure1 and Figure2).
5.
_O._daShed._fine
If there is agap belowthe gauge,the slope is too steepfor safe operation(SeeFigure2 above).
Figure2
Slopes are a major factor relatedto tip-over and roll-overaccidents which can result in severe injury or death. Do not operate machine on slopes
in excess of 15 degrees. All slopes require extra caution. Always mow across the face of slopes, nevermow up and down slopes.
IMPORTANT:Thisunit isshippedwithout gasolineoroil intheengine.Becertainto
serviceenginewithgasolineandoil asinstructedinthe Operationsectionbefore
startingorrunningyourmachine.
NOTE:Referenceto right andleft handsideof the LawnMowerisobservedfrom the
operatingposition.
OPENINGCARTON
1. Cuteachcornerof thecartonverticallyfromtop to bottom.
2. Removeall looseparts.
3. Removeloosepackingmaterial.
REMOVINGUNITFROMCARTON
1. Lift unit from therearto detachit fromunderlyingcartonmaterialandroll
unit outof carton.
2. Checkcartonthoroughlyforanyotherlooseparts.
LoosePartsin Carton
GrassCatcher
SideDischargeCover
EngineOil
Assembly
Attaching TheHandle
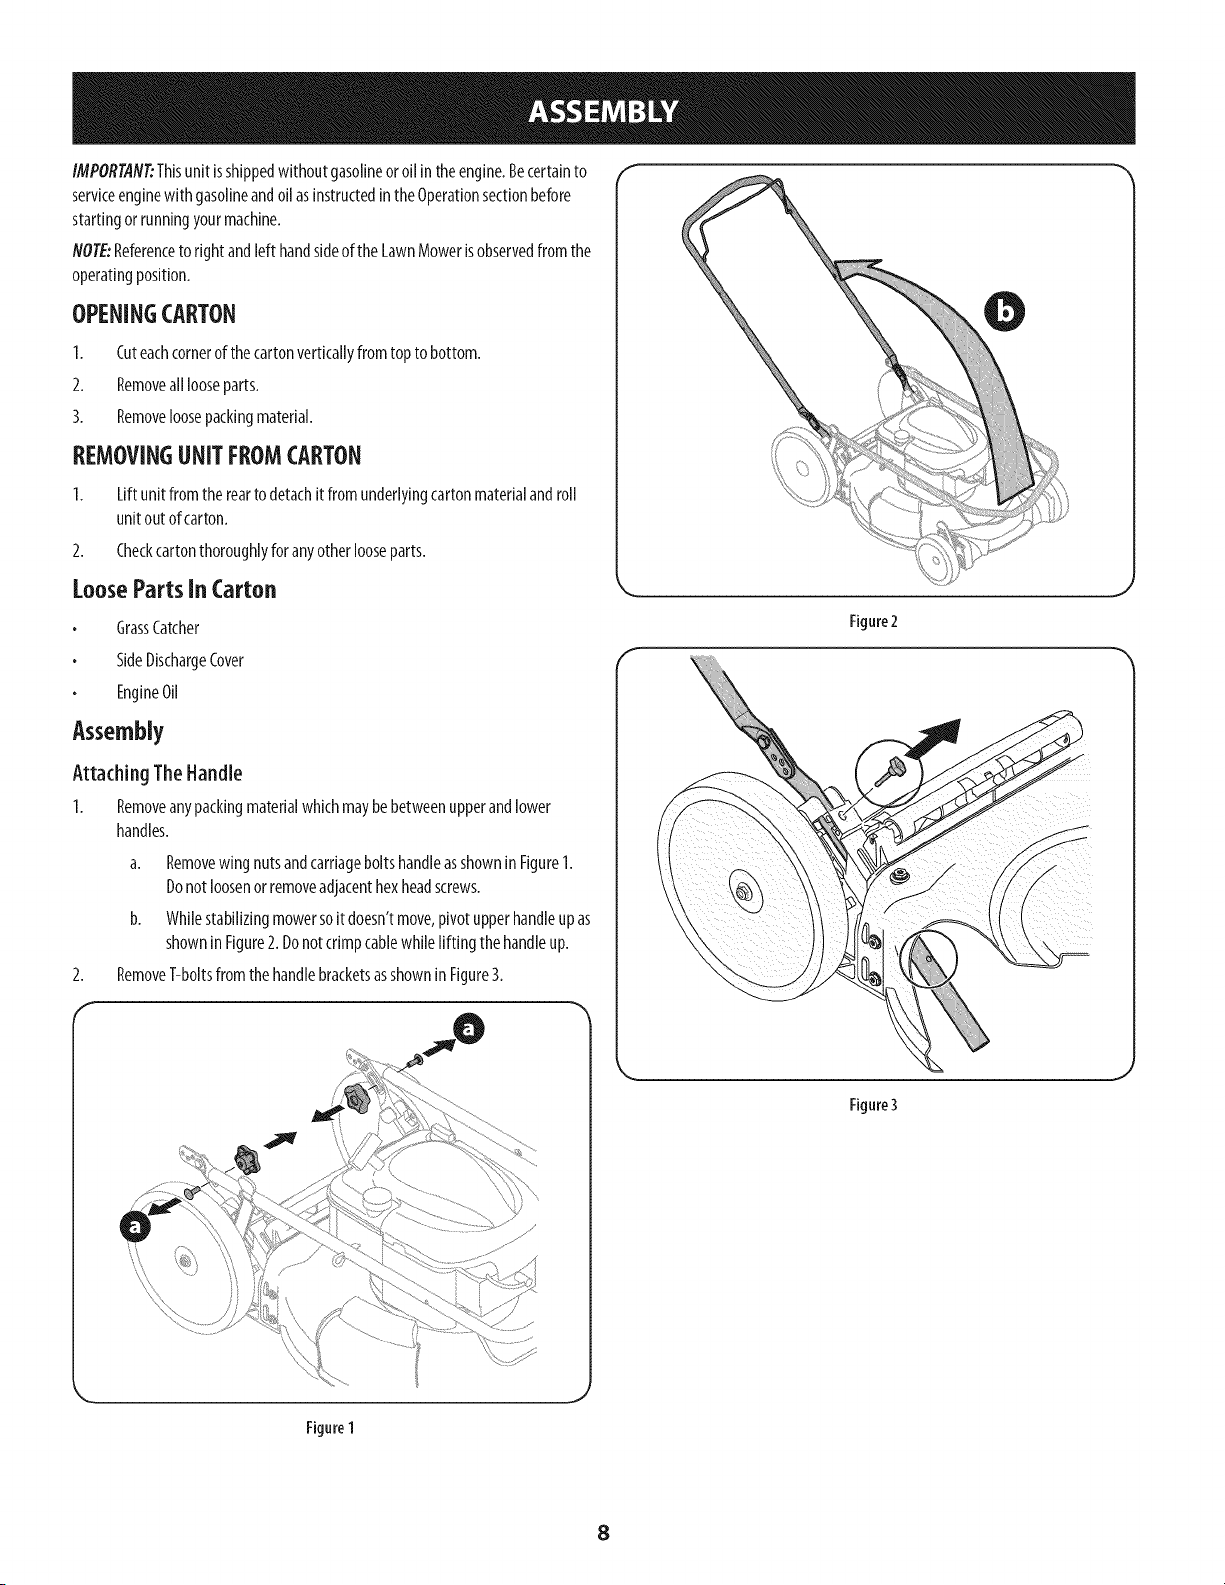
I. Removeanypackingmaterialwhichmaybebetweenupperandlower
handles.
a. Removewingnutsandcarriageboltshandleasshownin FigureI.
Donotloosenor removeadjacenthexheadscrews.
b. Whilestabilizingmowersoit doesn'tmove,pivotupperhandleupas
shownin Figure2. Donotcrimpcablewhilelifting the handleup.
RemoveT-boltsfrom thehandlebracketsasshownin Figure3.
2.
Figure2
Figure3
,,J
Figure1
8
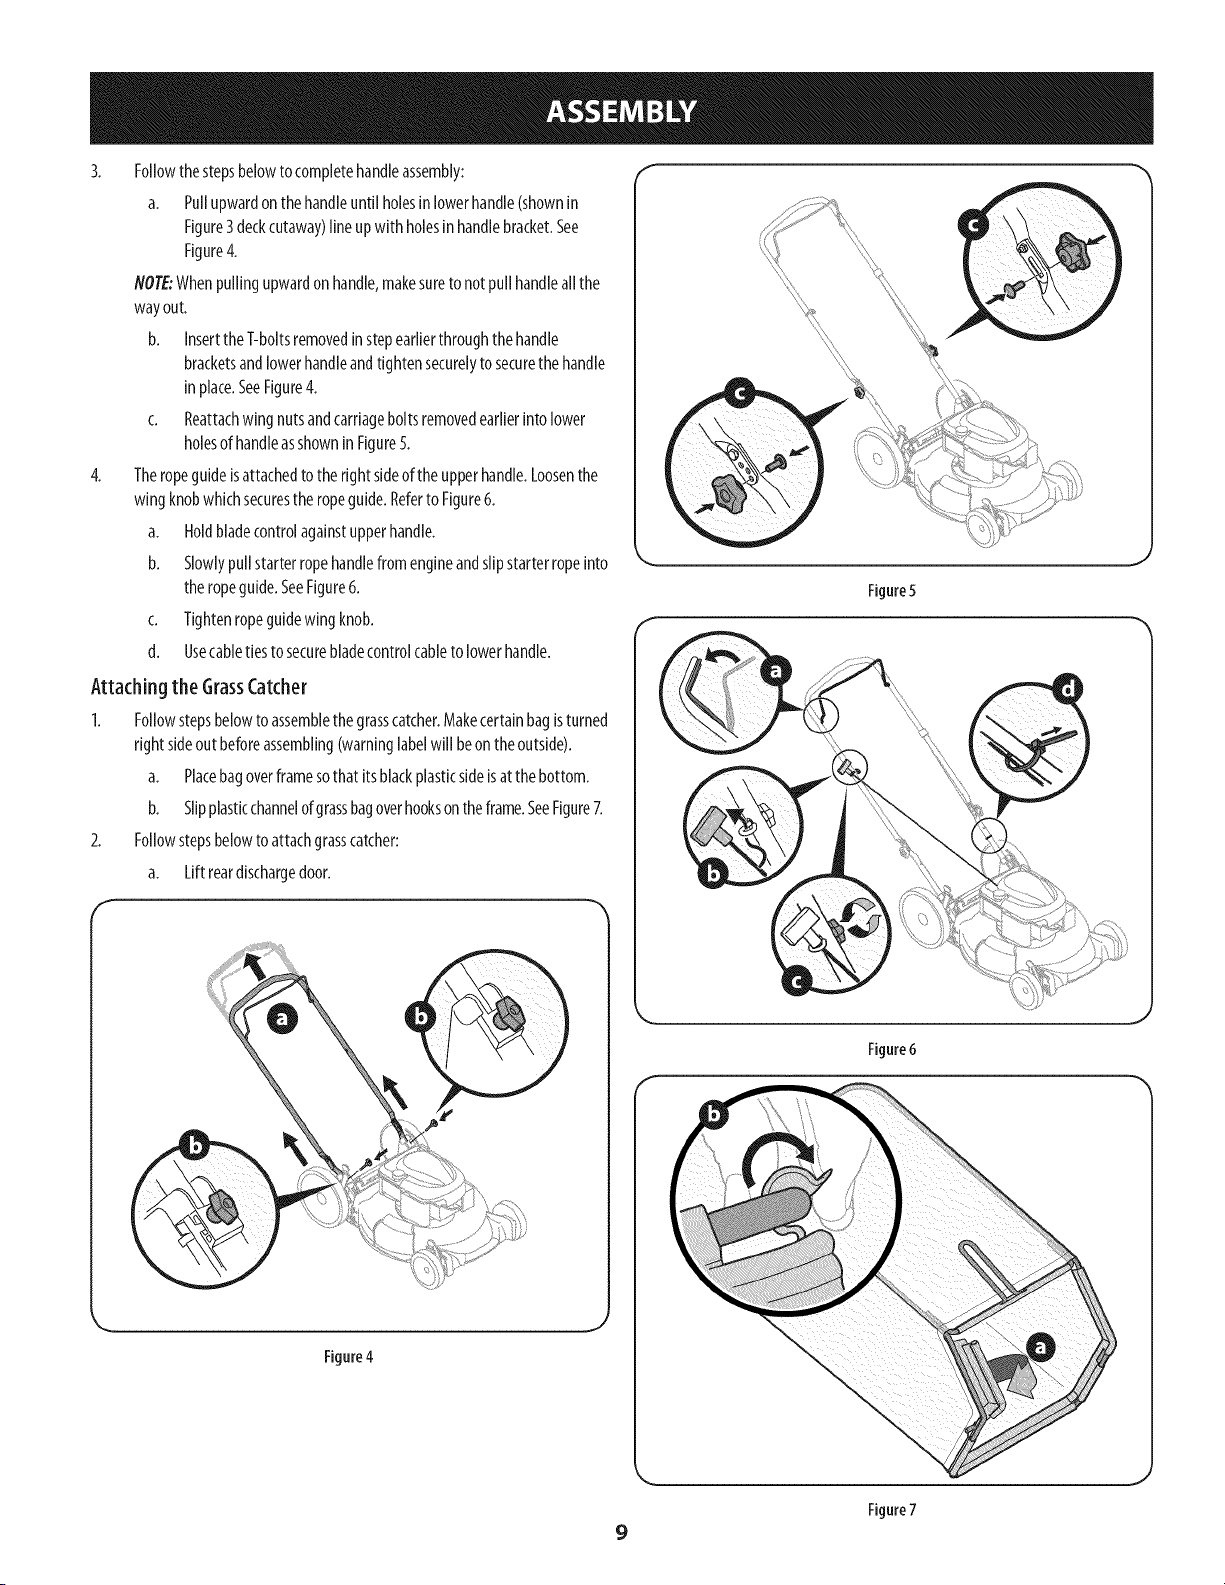
3. Followthe stepsbelowto completehandleassembly:
a. Pullupwardon the handleuntil holesin lowerhandle(shownin
Figure3deckcutaway)lineup with holesinhandlebracket.See
Figure4.
NOTE:Whenpullingupwardonhandle,makesureto not pullhandleall the
wayout.
b. InserttheT-boltsremovedin stepearlierthroughthe handle
bracketsandlowerhandleandtightensecurelyto securethehandle
inplace.SeeFigure4.
c. Reattachwingnutsandcarriageboltsremovedearlierintolower
holesof handleasshownin Figure5.
4. Theropeguideisattachedto therightsideof theupperhandle.Loosenthe
wingknobwhichsecuresthe ropeguide.Referto Figure6.
a. Holdbladecontrolagainstupperhandle.
b. Slowlypullstarterropehandlefromengineandslipstarterropeinto
theropeguide.SeeFigure6.
c. Tightenropeguidewingknob.
d. Usecabletiesto securebladecontrolcableto lowerhandle.
Figure5
Attaching the Grass Catcher
1. Followstepsbelowto assemblethegrasscatcher.Makecertainbagisturned
right sideout beforeassembling(warninglabelwill beontheoutside).
a. Placebagoverframesothat itsblackplasticsideisat the bottom.
b. Slipplasticchannelofgrassbagoverhooksontheframe.SeeFigure7.
2. Followstepsbelowto attachgrasscatcher:
a. Lift reardischargedoor.
Figure4
9
Figure6
Figure7
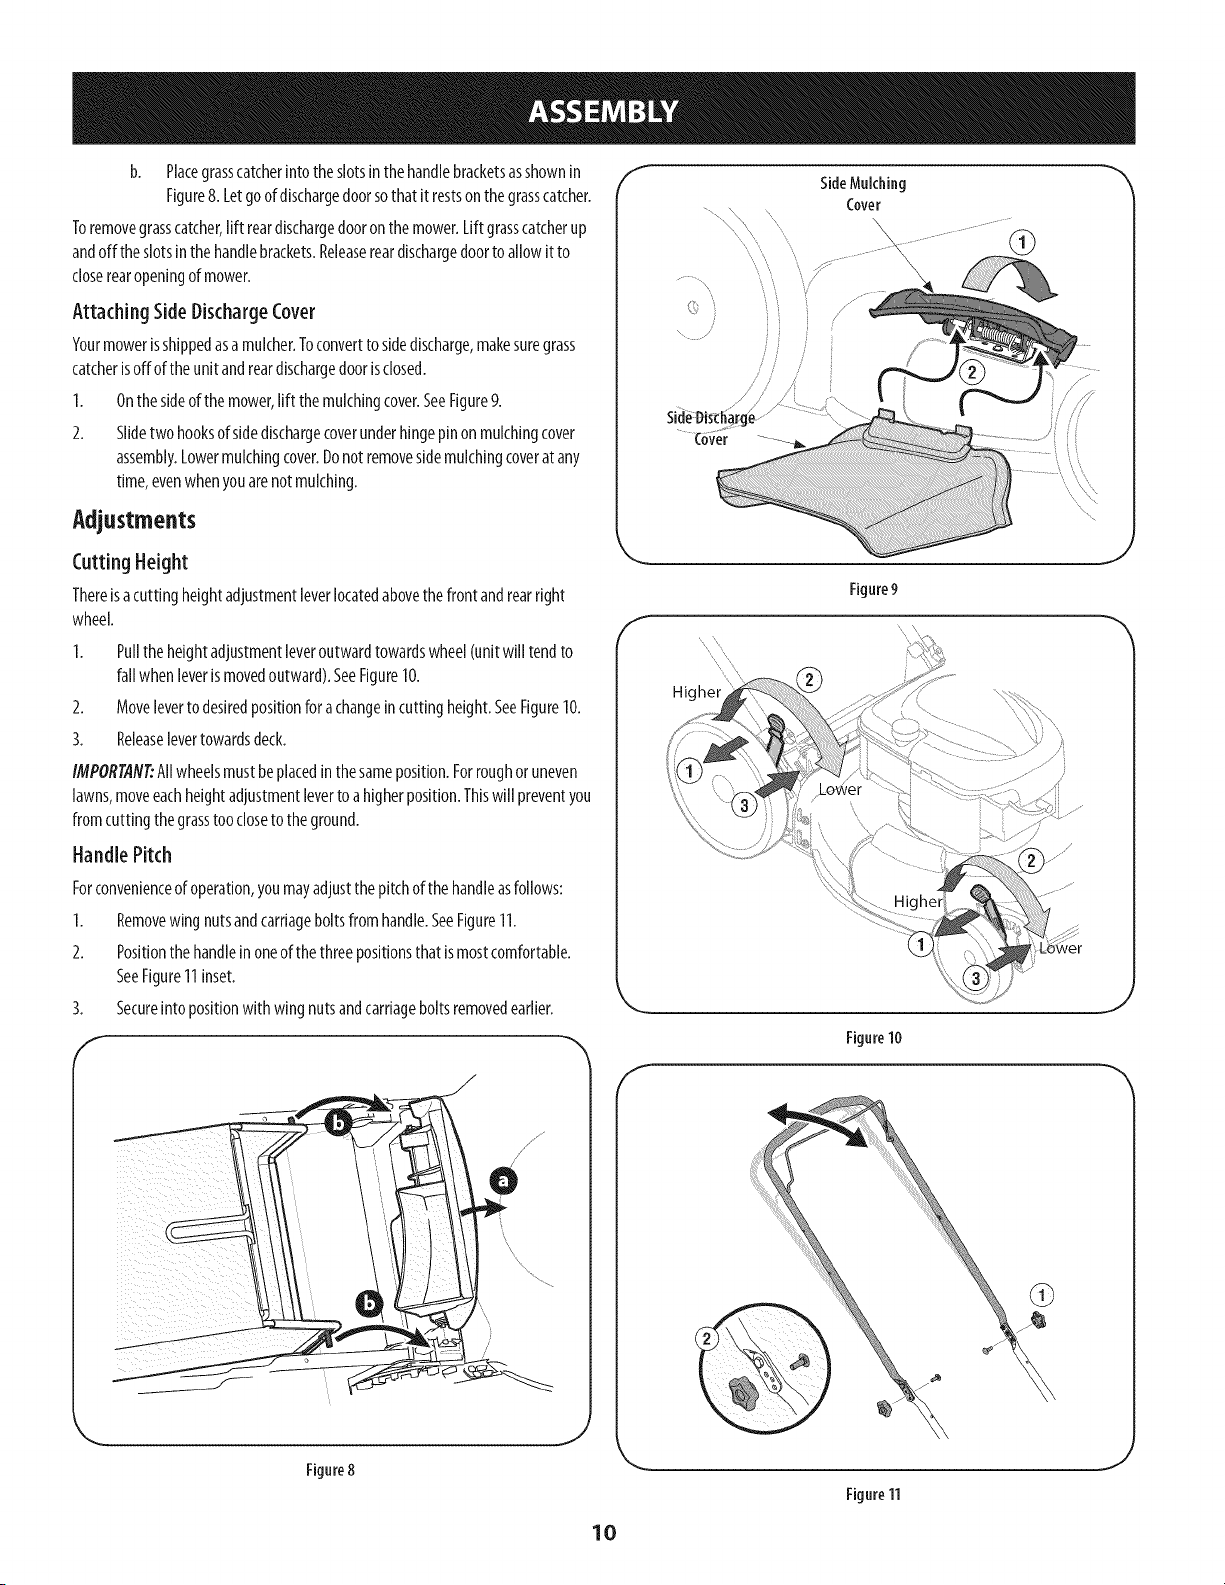
b. Placegrasscatcherinto theslotsinthehandlebracketsasshownin
Figure8. Letgo ofdischargedoorsothat it restsonthegrasscatcher.
Toremovegrasscatcher,lift reardischargedooron themower.Lift grasscatcherup
andoffthe slotsin thehandlebrackets.Releasereardischargedoortoallowit to
closerearopeningof mower.
Attaching SideDischargeCover
Yourmowerisshippedasa mulcher.Toconvertto sidedischarge,makesuregrass
catcherisoffof the unit andreardischargedoorisclosed.
1. Onthesideof themower,lift themulchingcover.SeeFigure9.
2. Slidetwo hooksof sidedischargecoverunderhingepinonmulchingcover
assembly.Lowermulchingcover.Donotremovesidemulchingcoverat any
time,evenwhenyouarenot mulching.
Adjustments
CuttingHeight
Thereisacutting heightadjustmentleverlocatedabovethefront andrearright
wheel.
1. Pullthe heightadjustmentleveroutwardtowardswheel(unitwill tendto
fallwhenleverismovedoutward).SeeFigure10.
2. Moveleverto desiredpositionforachangeincuttingheight.SeeFigure10.
3. Releaselevertowardsdeck.
IMPO2TAN_All wheelsmustbeplacedin thesameposition.Forroughoruneven
lawns,moveeachheightadjustmentleverto ahigherposition.Thiswillpreventyou
fromcutting thegrasstoo closeto theground.
HandlePitch
Forconvenienceof operation,youmayadjustthepitchofthe handleasfollows:
I. Removewing nutsandcarriageboltsfromhandle.SeeFigure11.
2. Positionthe handlein oneofthe threepositionsthat ismostcomfortable.
SeeFigure11inset.
3. Secureinto positionwith wingnutsandcarriageboltsremovedearlier.
E
SideMulching
Cover
f
.................................
Figure9
\\
'\ \
Higher
Figure10
J
J
J
Figure8
Figure11
J
10
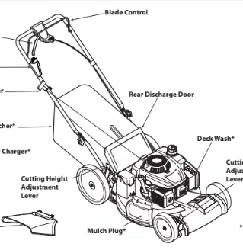
f
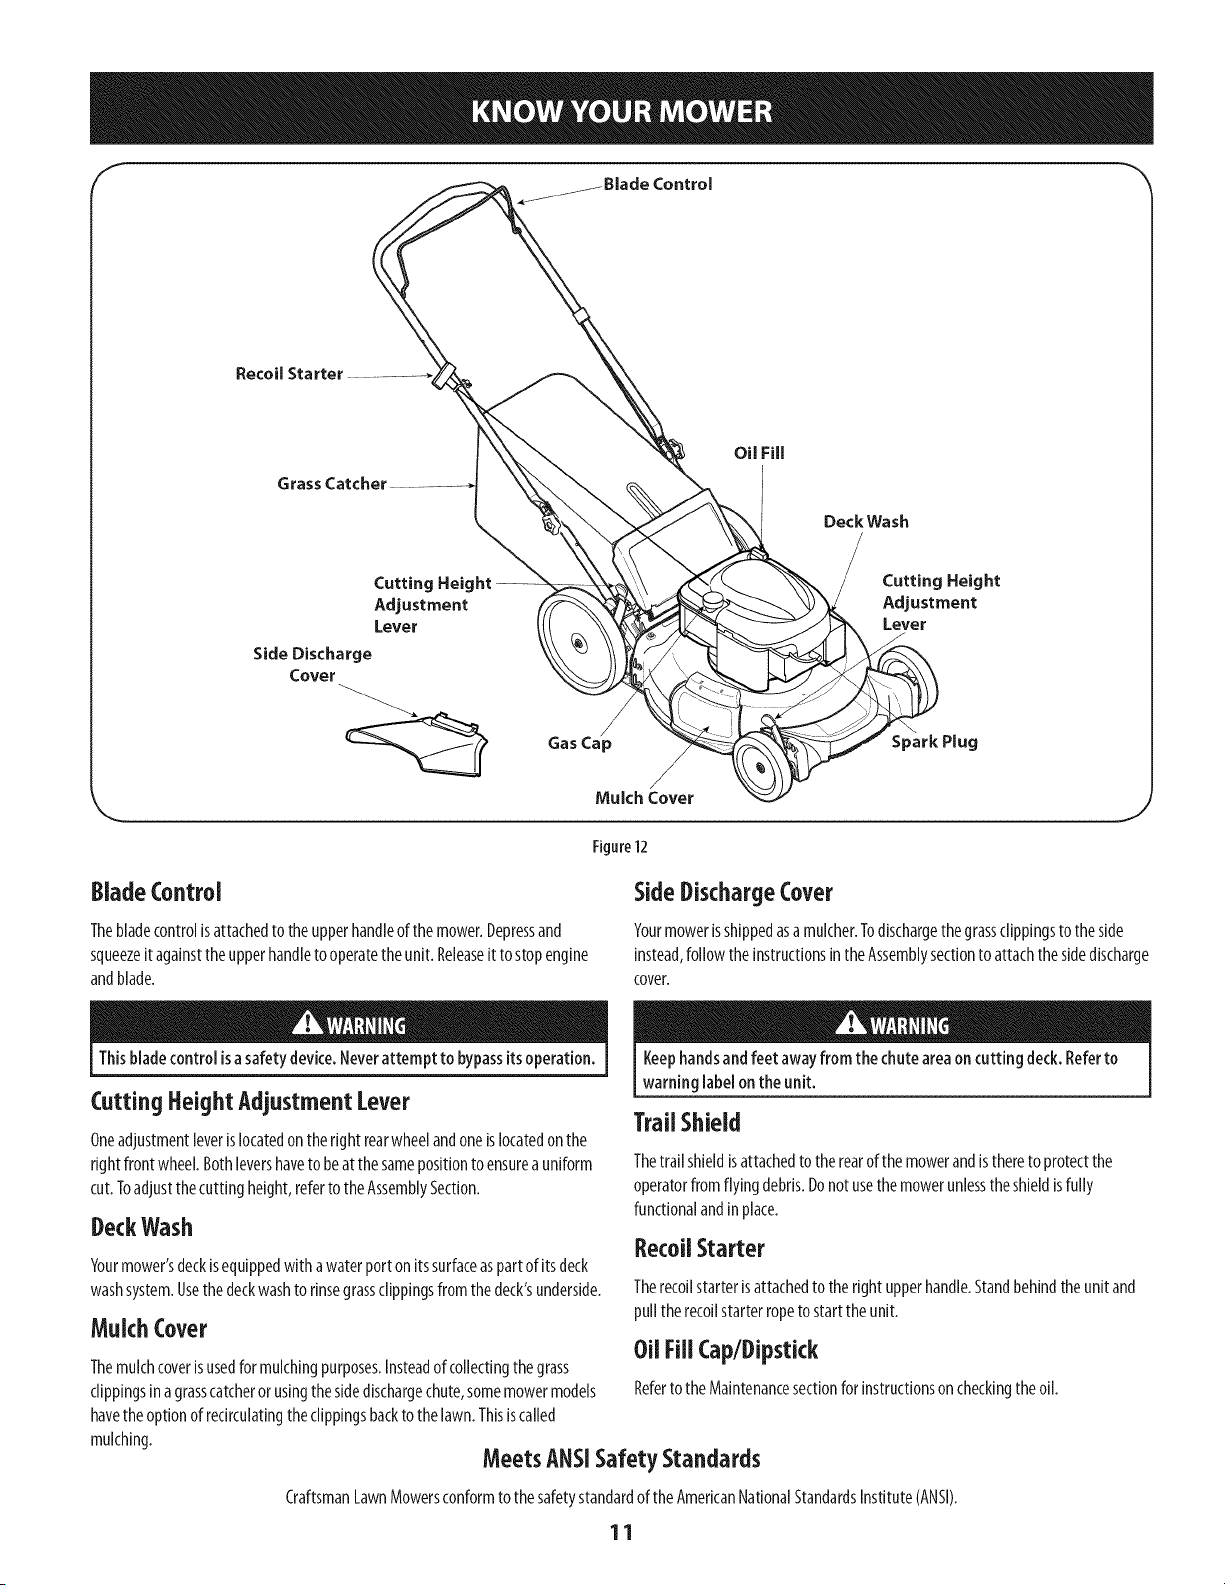
Control
Recoil Starter
Grass Catcher
Deck Wash
Cutting Height
Adjustment
Lever
Side Discharge
Cover
Gas Cap
Mulch Cover
Cutting Height
Adjustment
Lever
Figure12
\
J
BladeControl
Thebladecontrolisattachedto the upperhandleof themower.Depressand
squeezeit againstthe upperhandleto operatetheunit. Releaseit to stopengine
andblade.
SideDischargeCover
Yourmowerisshippedasamulcher.Todischargethegrassclippingsto the side
instead,follow theinstructionsintheAssemblysectionto attachthe sidedischarge
cover.
Thisbladecontrol isasafetydevice.Neverattempt to bypassitsoperation.
CuttingHeightAdjustmentLever
Oneadjustmentleverislocatedon theright rearwheelandoneislocatedonthe
rightfrontwheel. Bothlevershaveto beatthesamepositionto ensurea uniform
cut.Toadjustthecutting height,referto the AssemblySection.
DeckWash
Yourmower'sdeckisequippedwithawaterport on itssurfaceaspartof itsdeck
washsystem.Usethe deckwashto rinsegrassclippingsfrom thedeck'sunderside.
Mulch Cover
Themulchcoverisusedfor mulchingpurposes.Insteadof collectingthegrass
clippingsin agrasscatcherorusingthesidedischargechute,somemowermodels
havetheoptionof redrculatingtheclippingsbackto the lawn.Thisiscalled
Keephandsandfeet awayfrom the chutearea on cutting deck.Referto
warning labelon the unit.
TrailShield
Thetrail shieldisattachedto the rearof the mowerandisthereto protectthe
operatorfromflying debris.Donotusethe mowerunlesstheshieldisfully
functionalandin place.
RecoilStarter
Therecoilstarterisattachedto therightupperhandle.Standbehindthe unit and
pulltherecoilstarterropeto startthe unit.
Oil FillCap/Dipstick
Referto the Maintenancesectionforinstructionson checkingtheoil.
mulching.
MeetsANSISafety Standards
CraftsmanLawnMowersconformto the safetystandardof the AmericanNationalStandardsInstitute(ANSI).
11
GASANDOILFILL-UP f
IMPORTANT:Thisunit isshippedwithout gasolineor oil inthe engine.Becertainto
serviceenginewithgasolineandoil asinstructedin thissectionbeforestartingor
runningyourmachine.
OU(one18ouncebottleshippedwithunit)
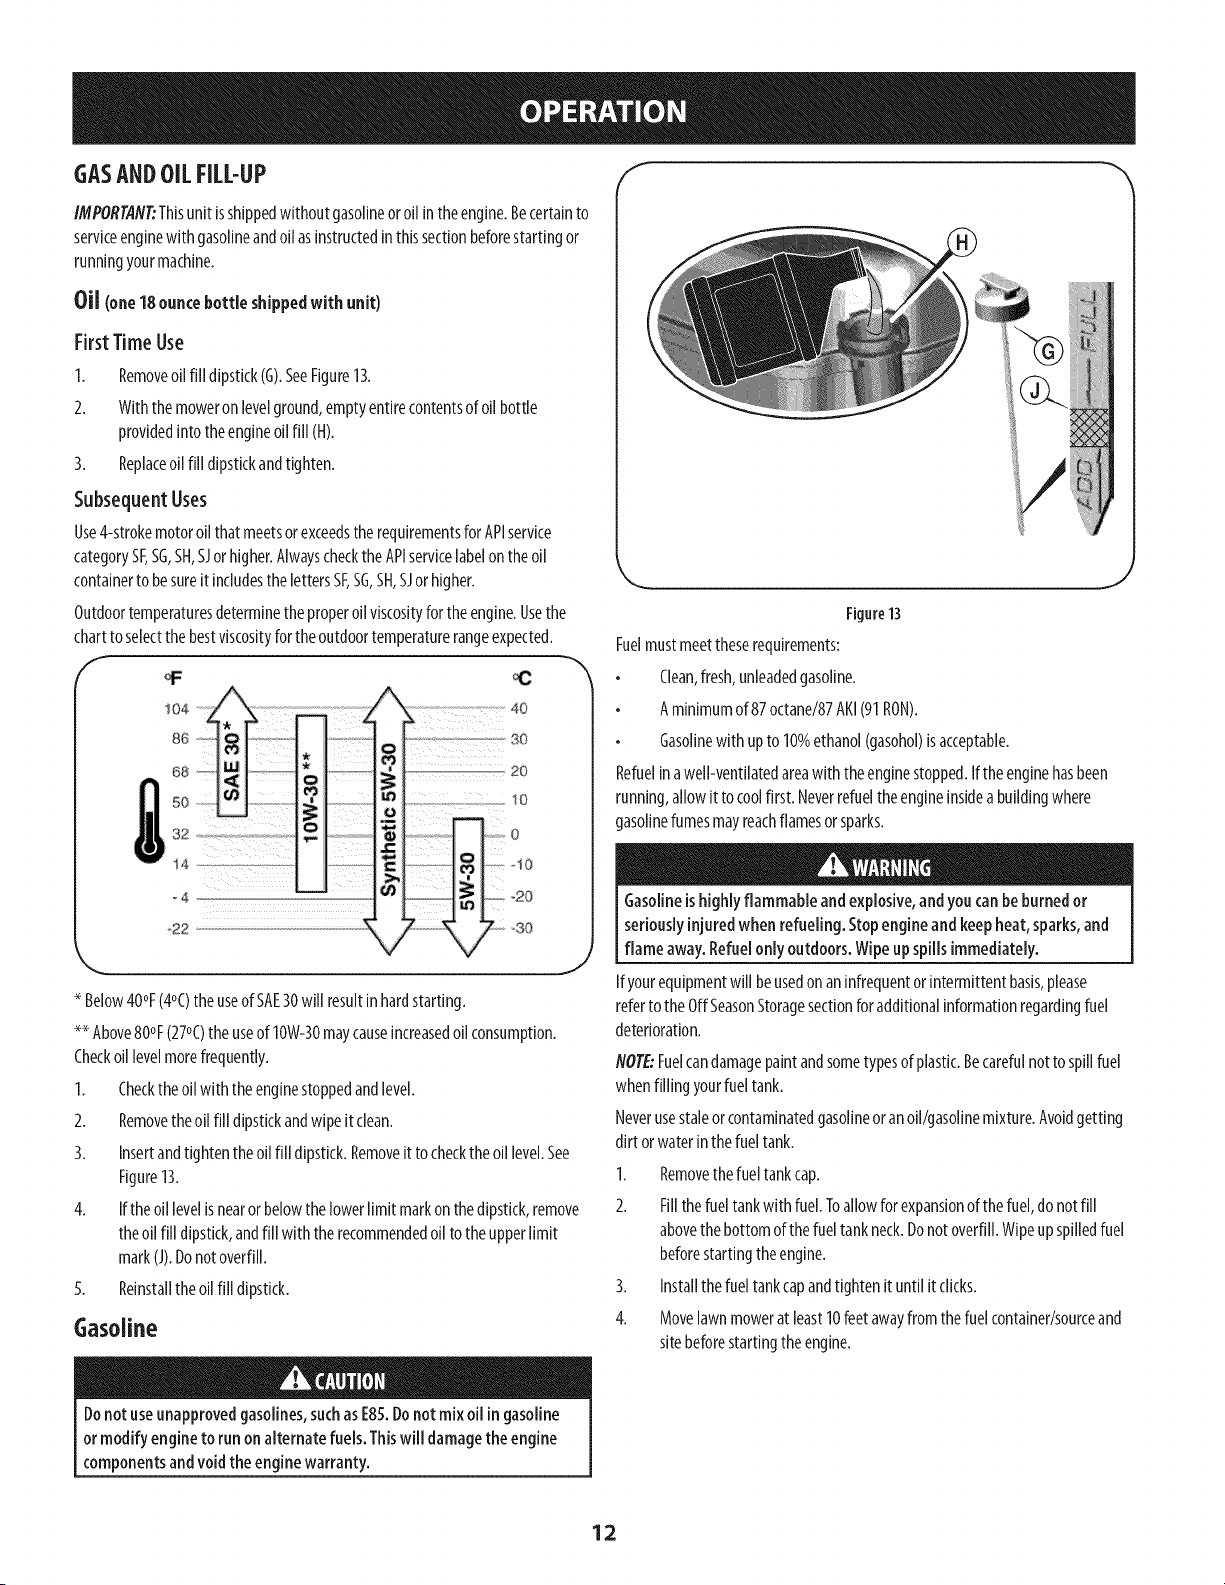
First Time Use
1. Removeoil fill dipstick(G).SeeFigure13.
2. Withthe moweronlevelground,emptyentirecontentsof oil bottle
providedintotheengineoil fill (H).
3. Replaceoil fill dipstickandtighten.
SubsequentUses
Use4-strokemotoroil thatmeetsorexceedstherequirementsfor APIservice
categorySF,SG,SH,SJor higher.AlwayschecktheAPIservicelabelontheoil
containerto besureit includesthelettersSF,SG,SH,SJorhigher.
Outdoortemperaturesdeterminethe properoil vBcosityfor theengine.Usethe
chartto selectthebestviscosityforthe outdoortemperaturerangeexpected.
_ 40
2o
Z>°30
* Below40°F(4°C)the useof SAE30will resultinhardstarting.
** Above80°F(27°C)the useof 10W-30maycauseincreasedoil consumption.
Checkoil levelmorefrequently.
1. Checktheoil withthe enginestoppedandlevel.
2. Removethe oil fill dipstickandwipeit clean.
3. Insertandtightenthe oil fill dipstick.Removeit to checktheoil level.See
Figure13.
4. If the oil levelisnearor belowthe lowerlimit markonthedipstick,remove
theoil fill dipstick,andfill with the recommendedoilto the upperlimit
mark(J).Donotoverfill.
5. Reinstalltheoil fill dipstick.
Gasoline
Figure13
Fuelmustmeettheserequirements:
Clean,fresh,unleadedgasoline.
A minimumof 87octane/87AKI(91RON).
Gasolinewith up to 10%ethanol(gasohol)isacceptable.
Refuelin awell-ventilatedareawith theenginestopped.If theenginehasbeen
running,allowit to coolfirst. Neverrefuelthe engineinsidea buildingwhere
gasolinefumesmayreachflamesorsparks.
J
Gasolineis highlyflammable andexplosive,andyou canbeburned or
seriouslyinjuredwhen refueling. Stopengine and keepheat, sparks,and
flame away.Refuelonly outdoors.Wipeup spills immediately.
Ifyourequipmentwill beusedonaninfrequentorintermittentbasis,please
refertothe OffSeasonStoragesectionfor additionalinformationregardingfuel
deterioration.
NOTE:Fuelcandamagepaintandsometypesof plastic.Becarefulnot to spillfuel
whenfilling yourfuel tank.
Neverusestaleor contaminatedgasolineoranoil/gasolinemixture.Avoidgetting
dirt orwaterinthe fuel tank.
1. Removethefuel tank cap.
2. Fillthefuel tankwith fuel.Toallowfor expansionof thefuel,do notfill
abovethe bottomof the fueltank neck.Donotoverfill.Wipeup spilledfuel
beforestartingtheengine.
3. Installthefuel tankcapandtightenit until it clicks.
4. Movelawnmowerat least10feetawayfromthefuel container/sourceand
sitebeforestartingtheengine.
Donot useunapprovedgasolines,suchasE85.Donot mix oil in gasoline
or modify engine to run on alternate fuels.Thiswill damagethe engine
componentsandvoid the enginewarranty.
12
Besurenooneother than the operator isstanding nearthe lawnmower
while starting engine or operating mower.Neverrun engine indoorsor
inenclosed,poorlyventilated areas.Engineexhaustcontainscarbon
monoxide,an odorlessanddeadlygas.Keephands,feet, hairand loose
clothing awayfrom any moving parts on engine andlawn mower.
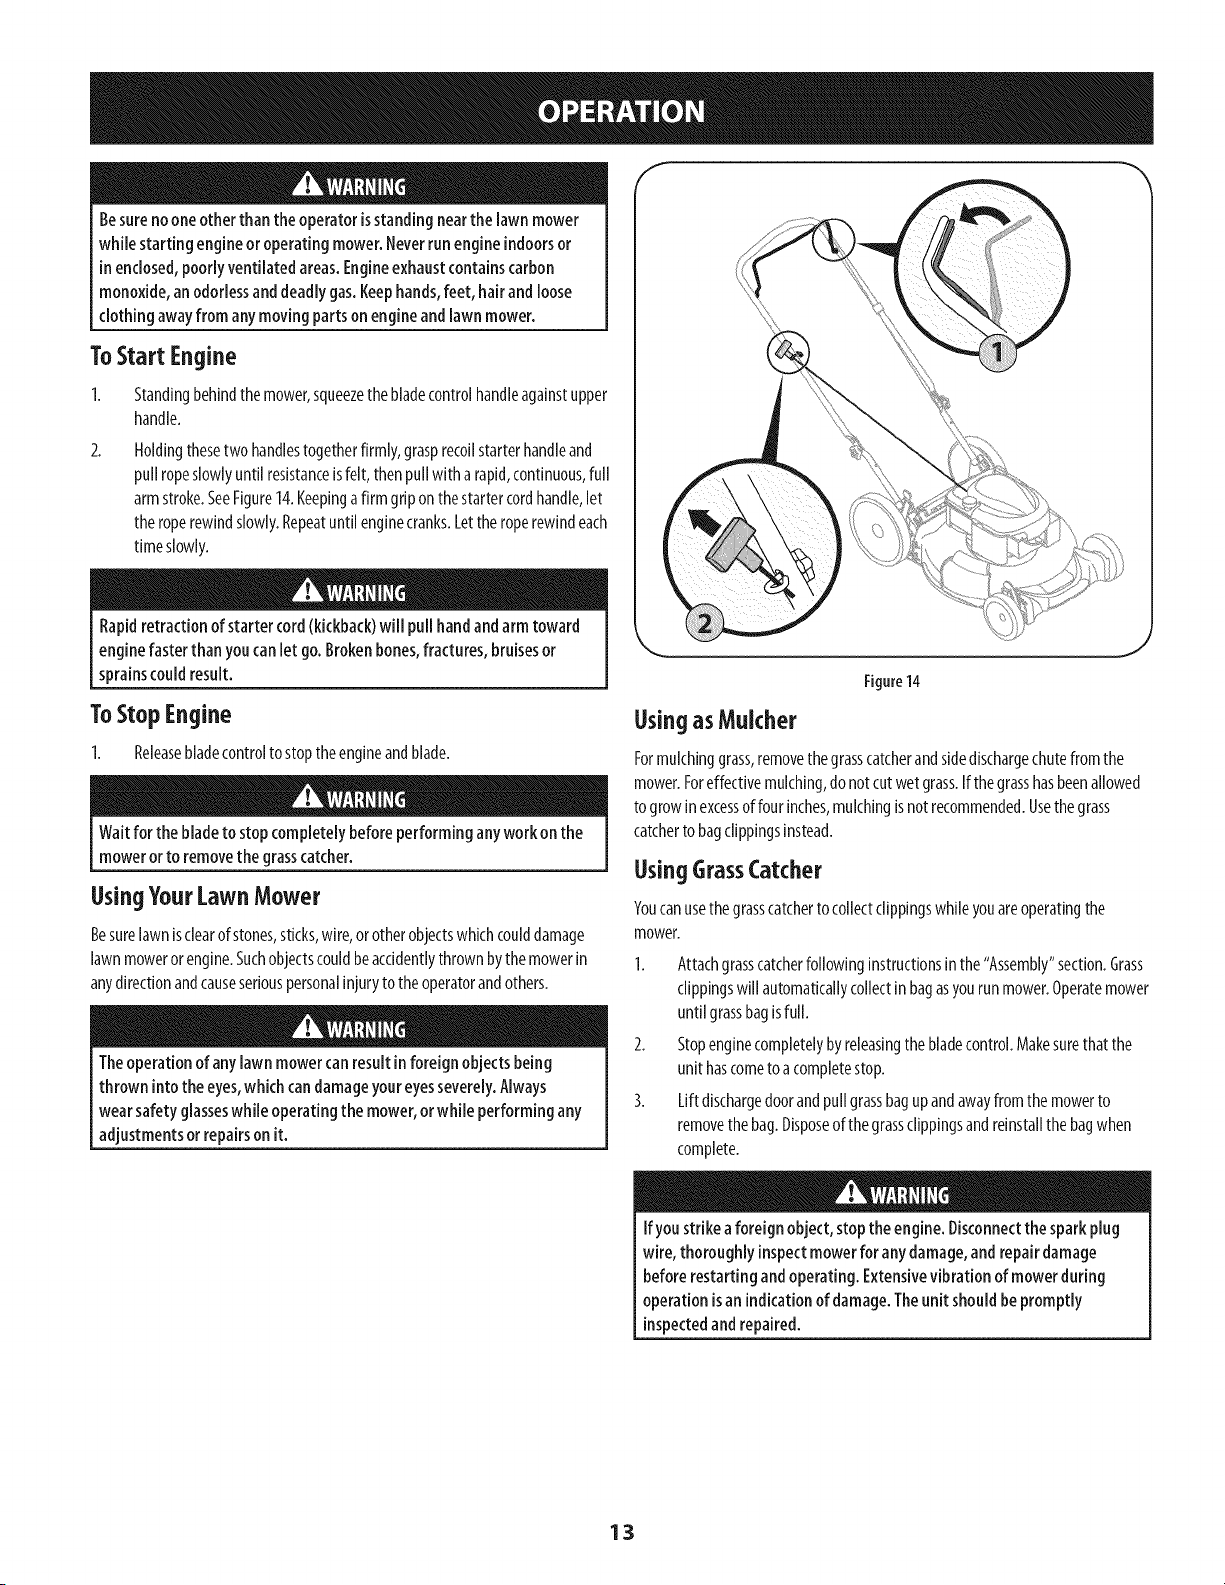
To Start Engine
2.
Standingbehindthemower,squeezethebladecontrolhandleagainstupper
handle.
Holdingthesetwo handlestogetherfirmly,grasprecoilstarterhandleand
pullropeslowlyuntil resistanceisfelt,thenpull witha rapid,continuous,full
armstroke.SeeFigure14.Keepingafirm griponthe startercordhandle,let
theroperewindslowly.Repeatuntil enginecranks.Lettheroperewindeach
timeslowly.
Rapidretraction of starter cord(kickback)will pull handand arm toward
enginefaster than you canlet go. Brokenbones,fractures,bruisesor
sprainscould result.
To Step Engine
1. Releasebladecontrolto stoptheengineandblade.
Wait for the blade to stop completelybefore performing anywork on the
mower or to removethe grasscatcher.
UsingYourLawnMower
Besurelawnisclearof stones,sticks,wire, orotherobjectswhichcoulddamage
lawnmowerorengine.Suchobjectscouldbeaccidentlythrownbythe mowerin
anydirectionandcauseseriouspersonalinjurytotheoperatorandothers.
Theoperationof any lawnmowercan result inforeign objects being
thrown into the eyes,which candamageyour eyesseverely.Always
wearsafety glasseswhile operating the mower,orwhile performingany
adjustmentsor repairson it.
Figure14
Usingas Mulcher
Formulchinggrass,removethe grasscatcherandsidedischargechutefrom the
mower.Foreffectivemulching,do notcutwet grass.If the grasshasbeenallowed
to growinexcessoffour inches,mulchingisnotrecommended.Usethegrass
catcherto bagclippingsinstead.
Using Grass Catcher
Youcanusethegrasscatchertocollectclippingswhileyouareoperatingthe
mower.
1. Attachgrasscatcherfollowinginstructionsinthe"Assembly"section.Grass
clippingswill automaticallycollectinbagasyourun mower.Operatemower
until grassbagisfull.
2. Stopenginecompletelybyreleasingthe bladecontrol.Makesurethat the
unit hascometo acompletestop.
3. Liftdischargedoorandpullgrassbagupandawayfromthe mowerto
removethebag.Disposeofthegrassclippingsandreinstallthe bagwhen
complete.
If you strikea foreign object, stop theengine. Disconnectthe sparkplug
wire, thoroughly inspectmower for any damage,andrepair damage
before restarting andoperating. Extensivevibration of mower during
operationisan indicationof damage.Theunit should be promptly
inspectedandrepaired.
13

MAINTENANCESCHEDULE
EachUse
Beforeperforming any typeof maintenance/service,disengageall controls
andstop the engine.Wait until all moving parts havecometo a complete
stop. Disconnectsparkplug wire and ground it againstthe engineto
preventunintendedstarting.
Ist Monthor5hours
Annuallyor25hours
Annuallyor50hours
Annually
BeforeStorage
1. Engineoil level
2. Looseor missinghardware
3. Aircleaner
4. Unitandengine
1. Engineoil
1. Aircleanerf
2. Controllinkages/pivotsandwheels
3. Undersideof mowerdeck
1. Engineoil ff
1. Sparkplug
2. AirCleaner
1. Fuelsystem
Followthe maintenanceschedulegivenbelow.Thischartdescribesservice
guidelinesonly.Usethe ServiceLogcolumnto keeptrackofcompleted
maintenancetasks.Tolocatethe nearestSearsServiceCenteror to scheduleservice,
simplycontactSearsat 1-800-4-MY-HOME®.
1. Check
2. Tightenorreplace
3. Check
4. Clean
1. Change
1. Clean
2. Lubewith light oil
3. Clean
1. Change
I. Replace
2. Replace
1. Runengineuntil it stopsfrom lackoffuel, or
addstabilizerto afull tankof freshfuel prior
to storage.
Cleanmoreoften underdustyconditionsor whenairbornedebrisis present.Replaceaircleanerif verydirty.
ff Changeoil every25hourswhenoperatingtheengineunderheavyloadorin hightemperatures.
14
Alwaysstop engine,disconnectsparkplugwire, andground againstengine
before performing anytype of maintenanceon your machine.
GENERALRECOMMENDATIONS
Alwaysobservesafetyruleswhenperforminganymaintenance.
Thewarrantyonthislawnmowerdoesnotcoveritemsthat havebeen
subjectedto operatorabuseor negligence.Toreceivefull valuefrom
warranty,operatormustmaintaintheequipmentas
instructedhere.
Changingof engine-governedspeedwill voidenginewarranty.
All adjustmentsshouldbe checkedat leastonceeachseason.
Periodicallycheckall fastenersandmakesurethesearetight.
ENGINEMAINTENANCE
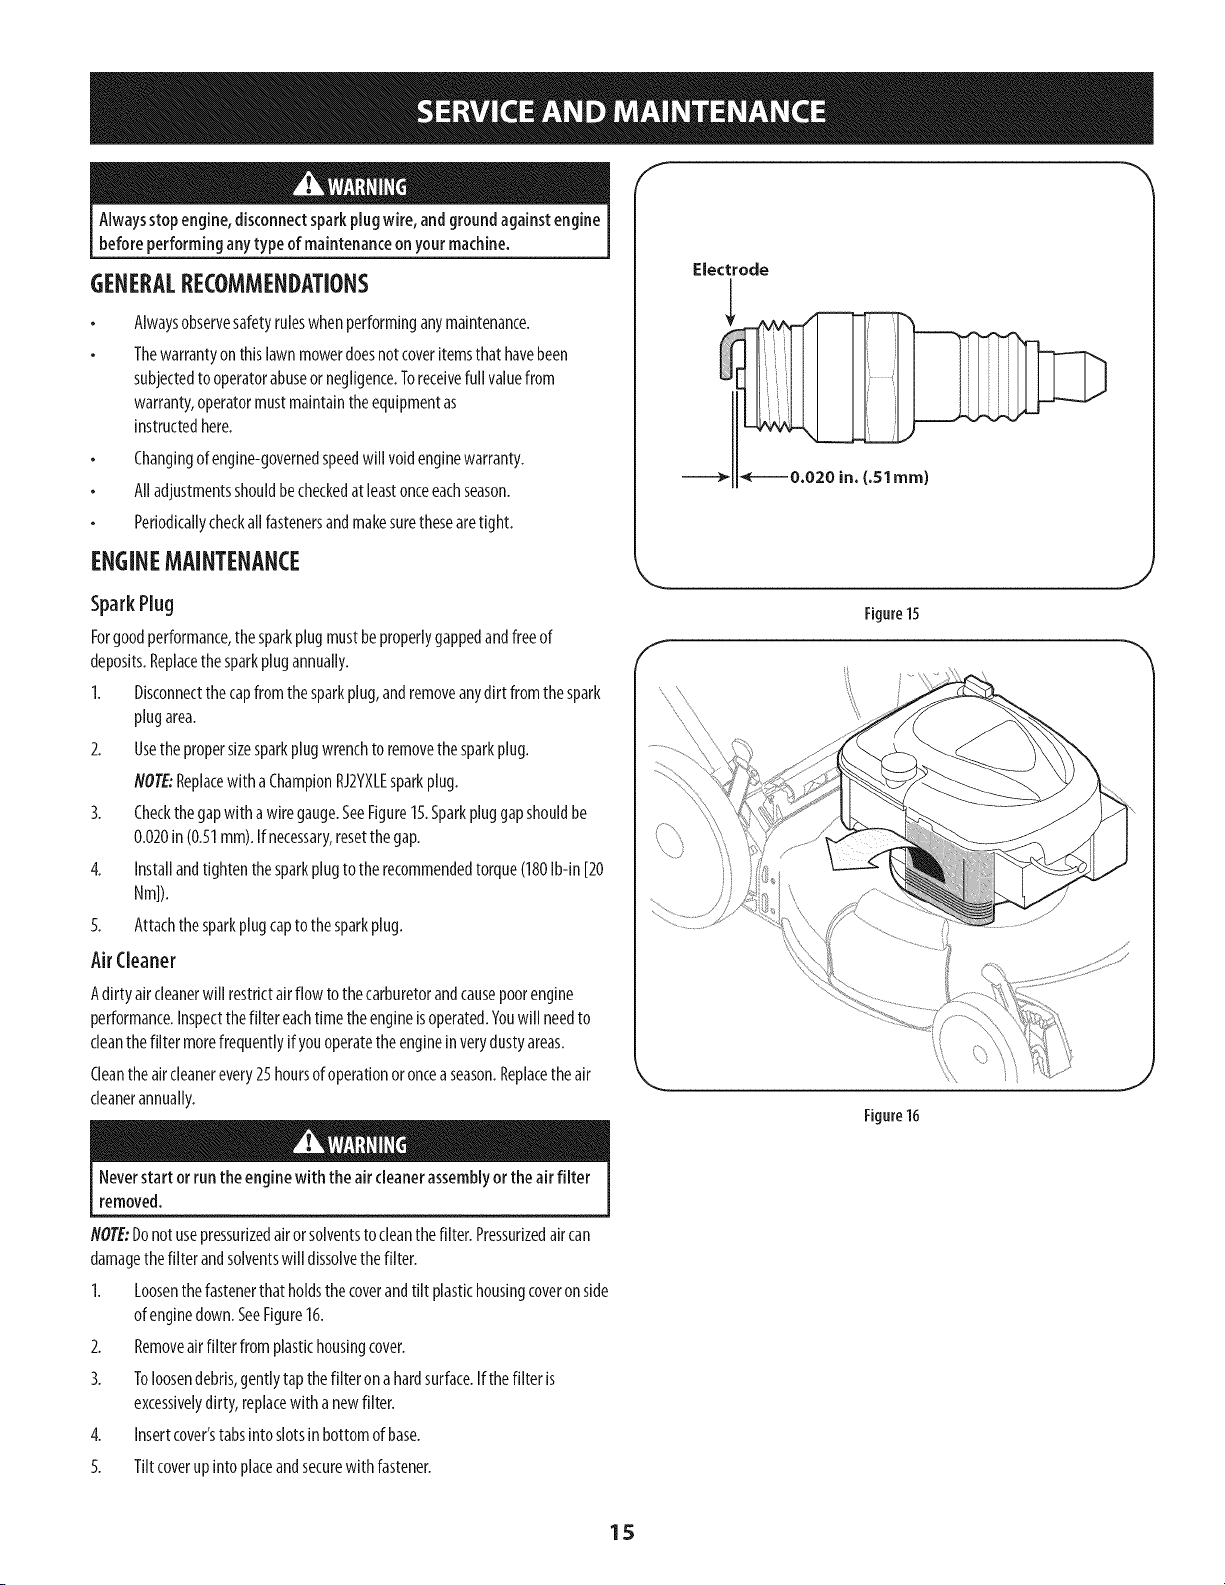
SparkPlug
Forgoodperformance,thesparkplugmustbeproperlygappedandfreeof
deposits.Replacethesparkplugannually.
1. Disconnectthecapfromthe sparkplug,andremoveanydirt fromthespark
plugarea.
2. Usethe propersizesparkplug wrenchto removethesparkplug.
NOTE:Replacewith aChampionRJ2YXLEsparkplug.
3. Checkthegapwitha wiregauge.SeeFigure15.Sparkpluggapshouldbe
0.020in(0.51mm).If necessary,resetthegap.
4. Installandtightenthesparkplugto therecommendedtorque(180Ib-in [20
Nm]).
5. Attachthesparkplug capto the sparkplug.
Air Cleaner
Adirty air cleanerwill restrictairflow to thecarburetorandcausepoorengine
performance.Inspectthe filter eachtimetheengineisoperated.Youwill needto
cleanthe filtermorefrequentlyif youoperatetheengineinverydustyareas.
Cleanthe air cleanerevery25hoursofoperationoroncea season.Replacethe air
cleanerannually.
f
Electrode
Figure15
.J
f
Figure16
Neverstart or run the enginewith the air cleanerassemblyor theair filter
removed.
NOTE:Donotusepressurizedairorsolventsto cleanthefilter. Pressurizedair can
damagethefilter andsolventswill dissolvethefilter.
1. Loosenthefastenerthat holdsthecoverandtilt plastichousingcoveronside
ofenginedown.SeeFigure16.
2. Removeair filterfrom plastichousingcover.
3. Toloosendebris,gentlytapthe filteron a hardsurface.If thefilter is
excessivelydirty, replacewith a newfilter.
4. Insertcover'stabsintoslotsinbottomof base.
5. Tiltcoverup into placeandsecurewith fastener.
15
CheckEngineOil
Checkoil levelbeforeeachoperation.Besureoil levelismaintained.
1. Checkthe oilwith theenginestoppedandlevel.
2. Removethe oil fill dipstickandwipeit clean.
3. Insertandtightendipstick.Removeit to checktheoil level.
4. If the oil levelis nearor belowthe lowerlimit markonthedipstick,remove
theoil filler cap/dipstick,andfill with the recommendedoil to the upper
limit mark.Donotoverfill.
5. Reinstalltheoil fill dipstick.
ChangeEngineOil
Gasolineand its vaporsare extremely flammable andexplosive.Fireor
explosioncancausesevereburnsor death.
Changeengineoilafterthefirstfivehoursofoperation,andeveryfiftyhoursor
onceaseasonthereafter.
Whenyou drain the oil from the top oilfill tube, the fuel tank must be
empty orfuel canleak out andresult in afire orexplosion.Toempty the
fuel tank, runthe engine until it stopsfrom lackof fuel.
1. Withengineoff butstill warm,disconnectthesparkplugwire andkeepit
awayfromthesparkplug.
2. Placeasuitablecontainernextto theengineto catchthe usedoil.
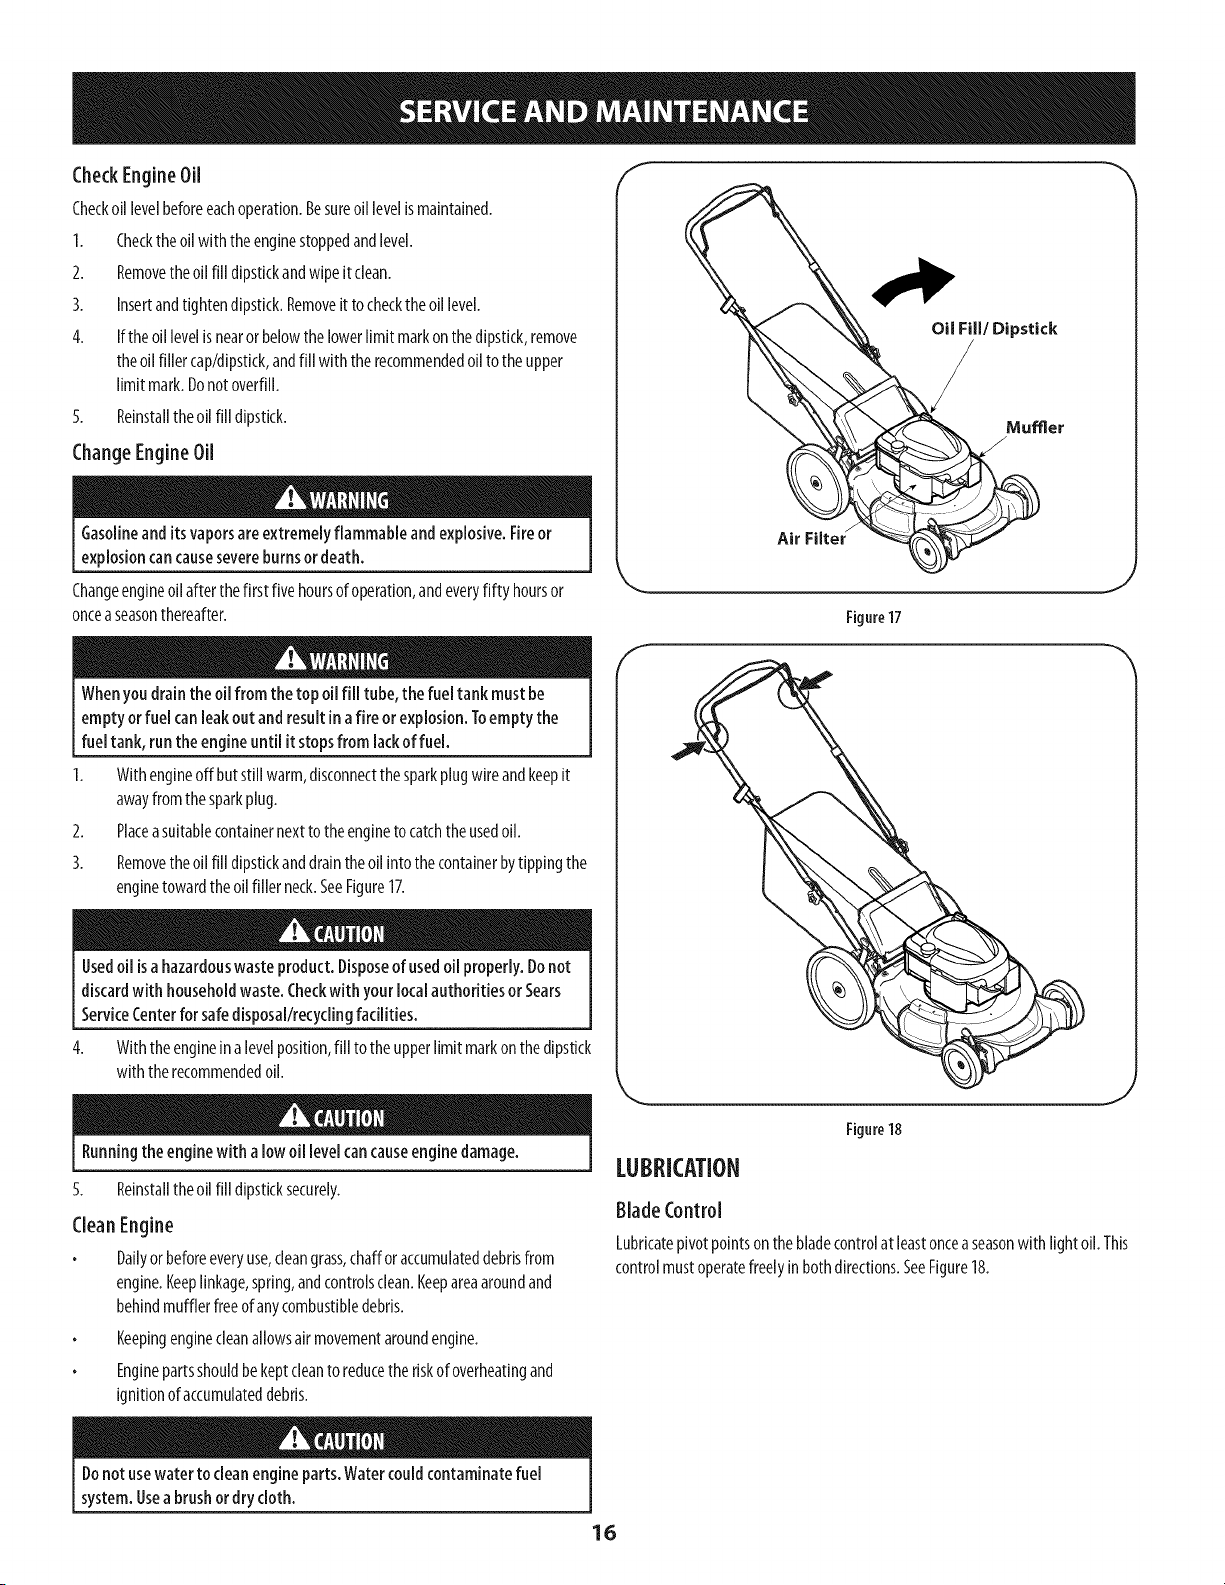
3. Removethe oil fill dipstickanddraintheoil into the containerbytippingthe
enginetowardtheoil filler neck.SeeFigure17.
f
Oil Fill/Dipstick
f
Figure17
Usedoil isa hazardouswaste product. Disposeof usedoil properly. Donot
discardwith householdwaste. Checkwith yourlocalauthorities or Sears
ServiceCenterfor safedisposal/recyclingfacilities.
4.
Withtheenginein alevelposition,fill to the upperlimit markonthedipstick
with the recommendedoil.
Runningthe enginewith a low oil level cancauseengine damage.
5. Reinstalltheoii fill dipsticksecurely.
CleanEngine
Dailyor beforeeveryuse,cleangrass,chaffor accumulateddebrisfrom
engine.Keeplinkage,spring,andcontrolsclean.Keepareaaroundand
behindmufflerfreeof anycombustibledebris.
Keepingenginecleanallowsair movementaroundengine.
Enginepartsshouldbekeptcleanto reducethe riskof overheatingand
ignitionofaccumulateddebris.
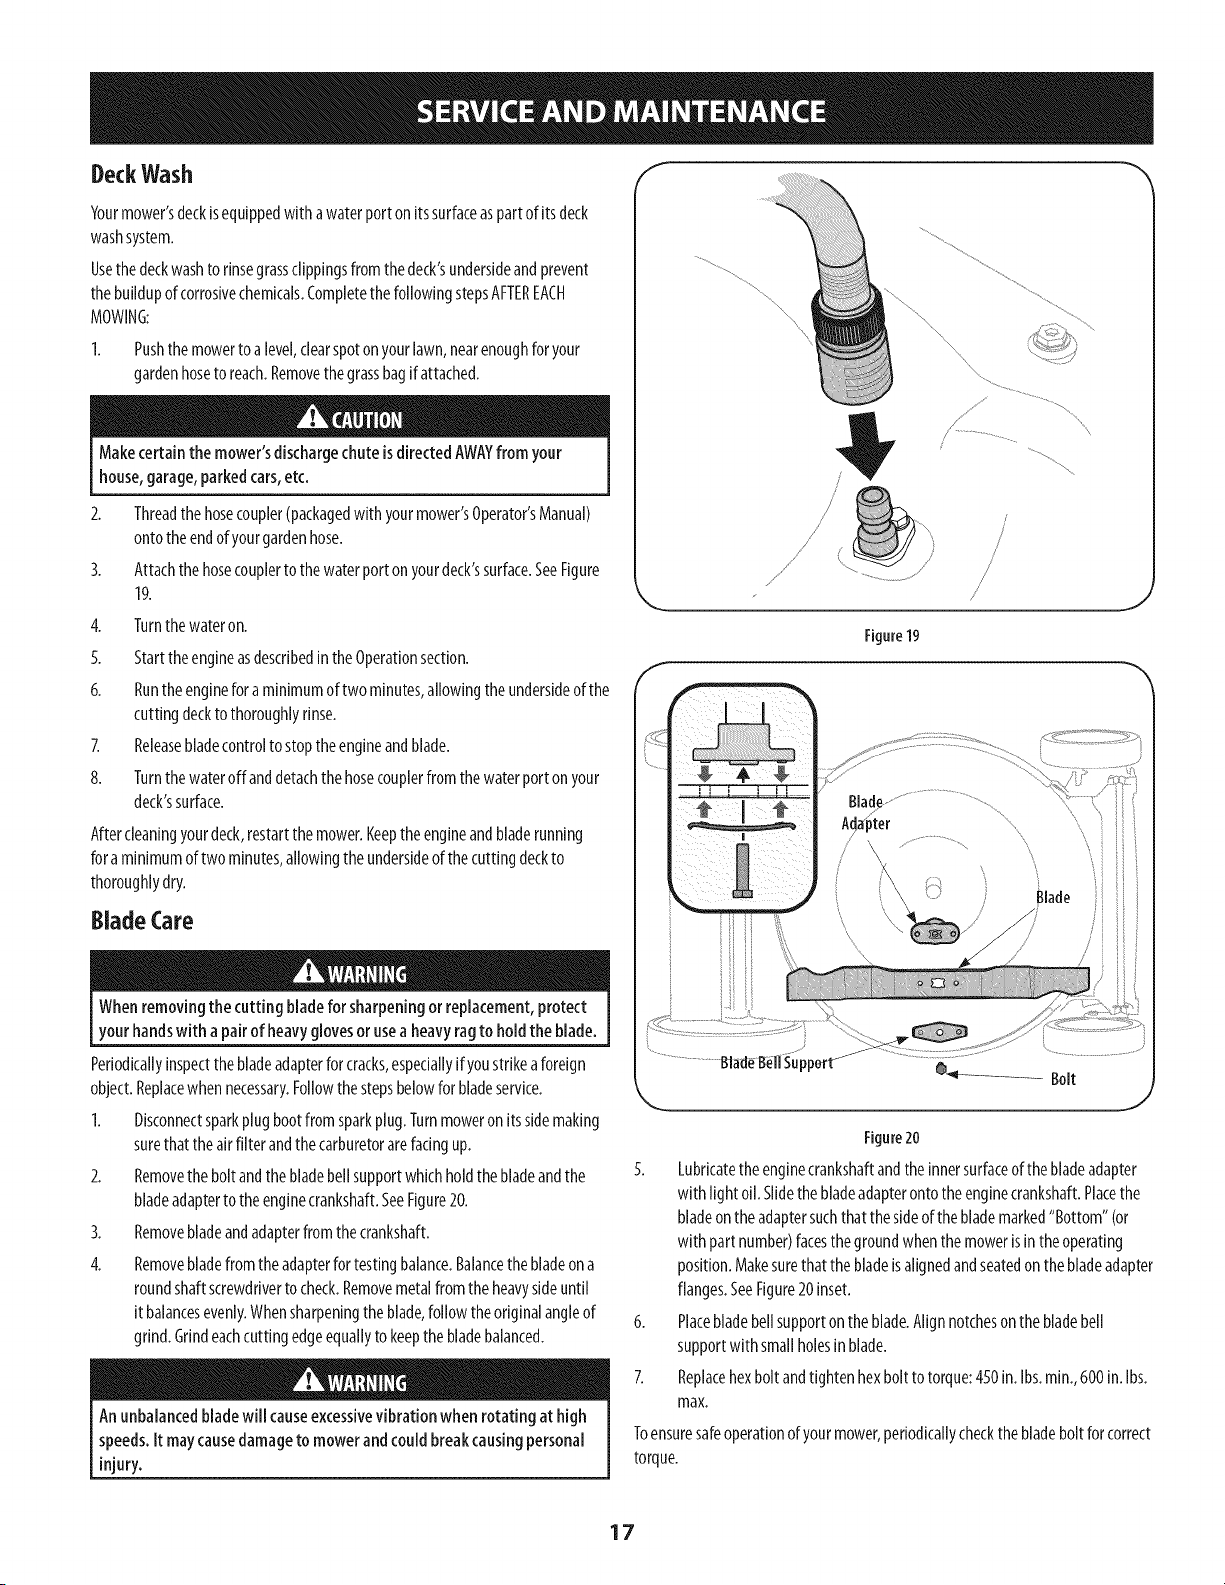
J
Figure18
LUBRICATION
BladeControl
Lubricatepivotpointsonthe bladecontrolat leastonceaseasonwith light oil.This
controlmustoperatefreelyin bothdirections.SeeFigure18.
Donot usewater to cleanengine parts. Watercouldcontaminatefuel
system.Usea brushor drycloth.
16
DeckWash
Yourmower'sdeckisequippedwithawaterport on itssurfaceaspartof its deck
washsystem.
Usethe deckwashto rinsegrassclippingsfrom thedeck'sundersideandprevent
thebuildupof corrosivechemicals.Completethe followingstepsAFTEREACH
MOWING:
Pushthe mowertoa level,clearspotonyourlawn,nearenoughfor your
gardenhoseto reach.Removethegrassbagif attached.
Makecertainthe mower'sdischargechute isdirectedAWAYfrom your
house,garage,parkedcars,etc.
2. Threadthehosecoupler(packagedwith yourmower'sOperator'sManual)
ontotheendofyourgardenhose.
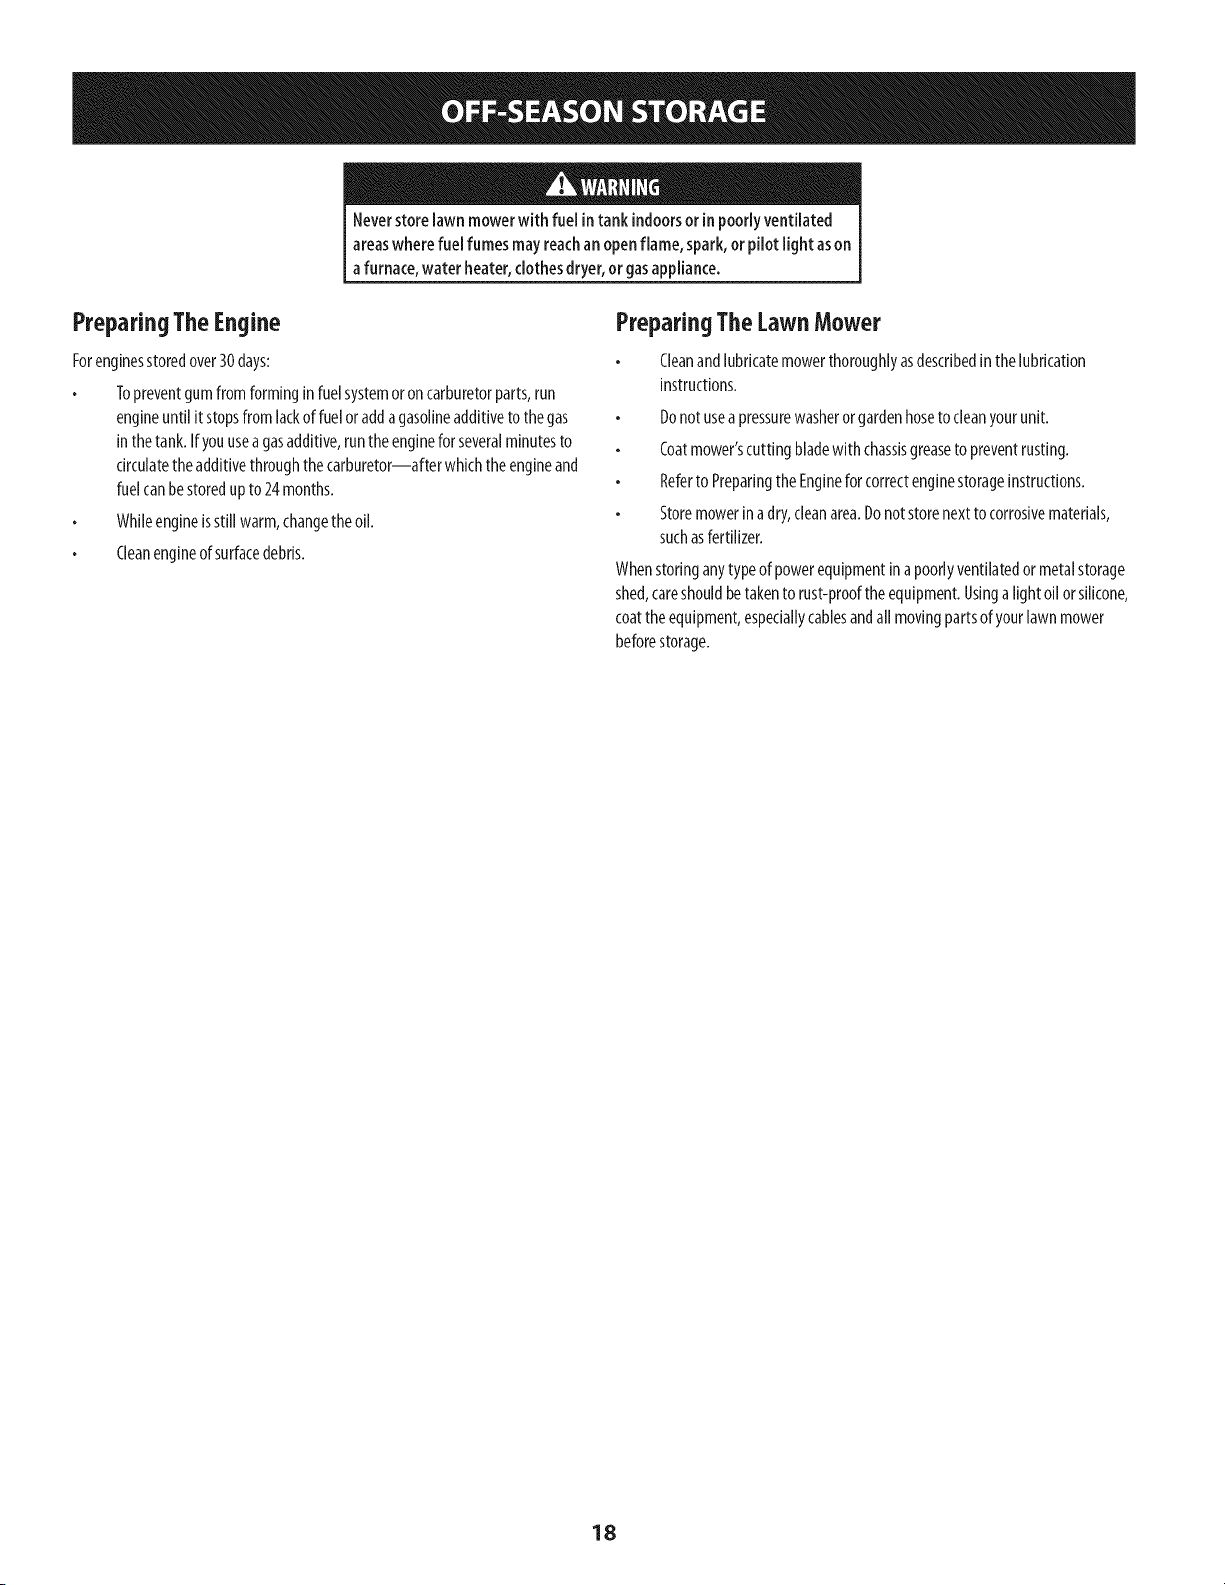
3. Attachthehosecouplerto the waterport onyourdeck'ssurface.SeeFigure
19.
4.
5.
6.
7.
8.
Turnthe wateron.
Starttheengineasdescribedin theOperationsection.
Runtheenginefor aminimumof two minutes,allowingtheundersideof the
cuttingdeckto thoroughlyrinse.
Releasebladecontrolto stoptheengineandblade.
Turnthe wateroff anddetachthe hosecouplerfromthewaterport onyour
deck'ssurface.
Aftercleaningyourdeck,restartthemower.Keeptheengineandbladerunning
fora minimumof two minutes,allowingtheundersideofthecuttingdeckto
thoroughlydry.
Blade Care
When removingthe cutting bladefor sharpeningorreplacement,protect
your handswith apair of heavyglovesorusea heavyragto hold the blade.
Periodicallyinspectthe bladeadapterfor cracks,especiallyifyoustrikeaforeign
object.Replacewhennecessary.Followthestepsbelowfor bladeservice.
1. Disconnectsparkplugbootfromsparkplug.Turnmoweron its sidemaking
surethat the airfilter andthecarburetorarefacingup.
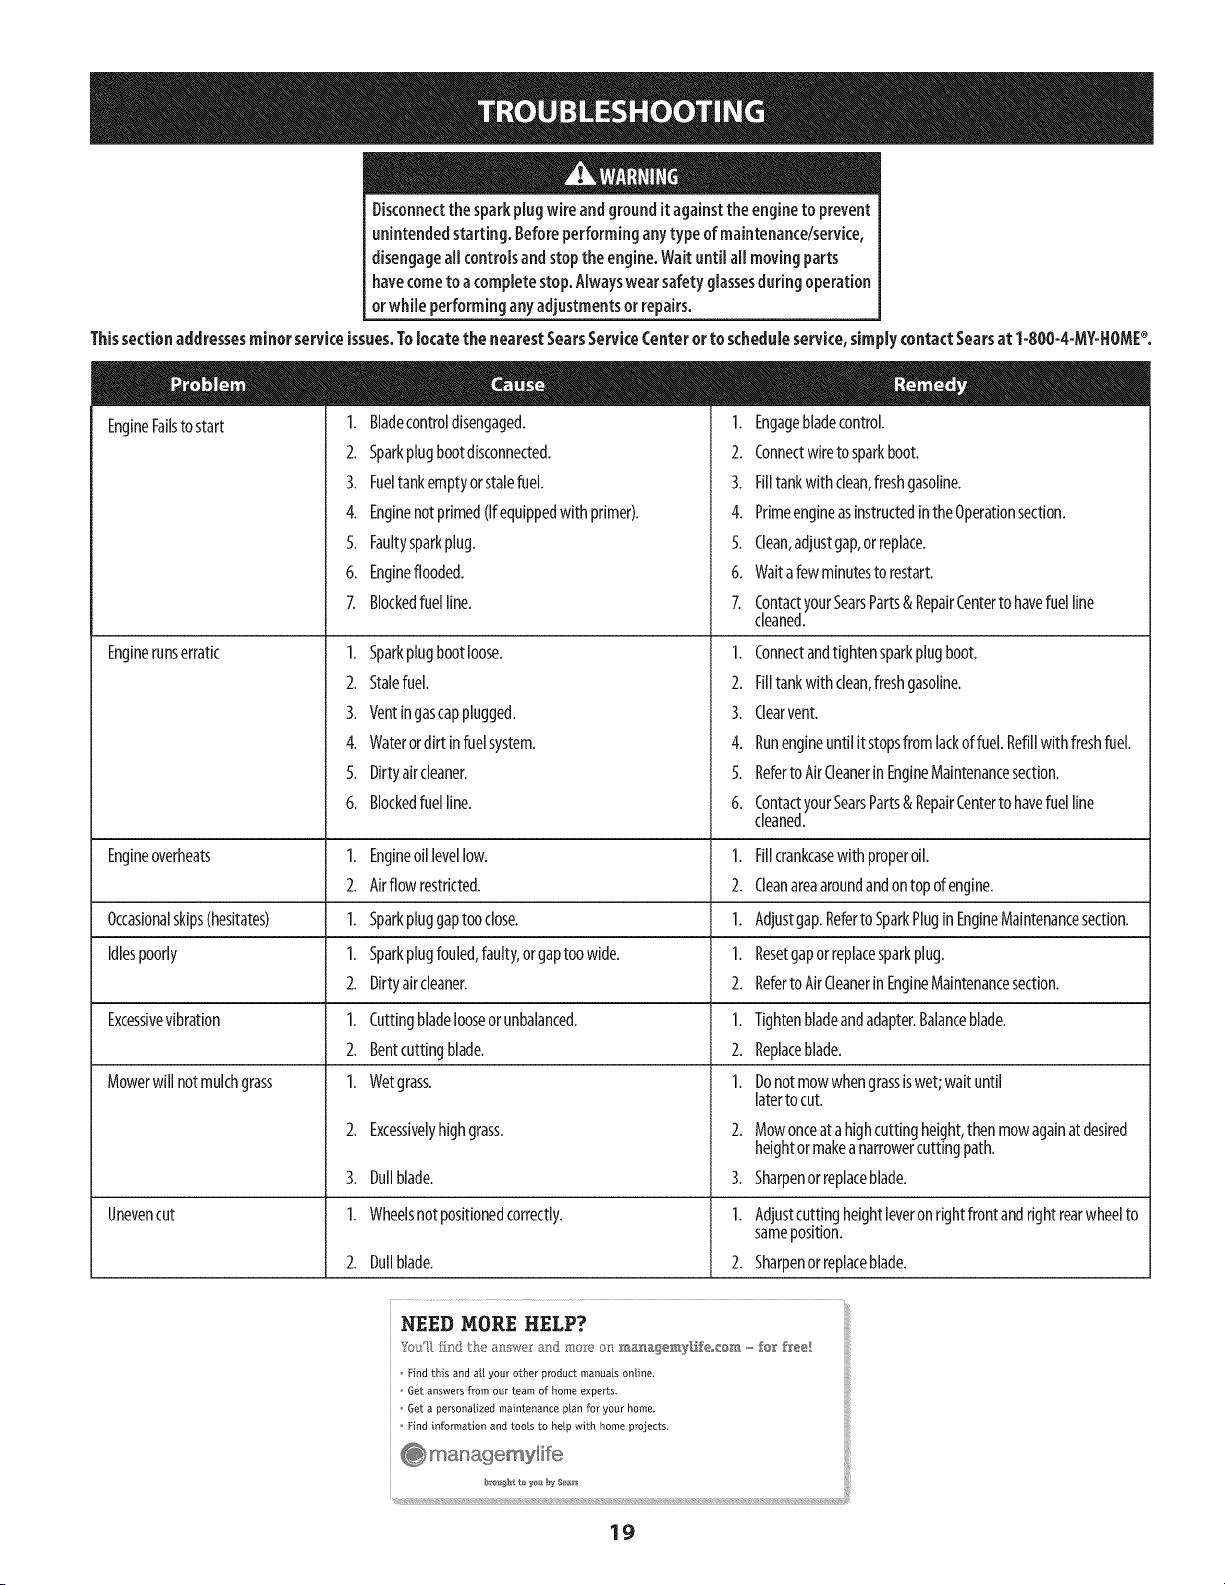
2. Removethe bolt andthebladebellsupportwhichhold thebladeandthe
bladeadapterto the enginecrankshaft.SeeFigure20.
3. Removebladeandadapterfrom thecrankshaft.
4. Removebladefrom the adapterfortestingbalance.Balancethebladeona
roundshaftscrewdriverto check.Removemetalfrom the heavysideuntil
it balancesevenly.Whensharpeningtheblade,followtheoriginalangleof
grind.Grindeachcuttingedgeequallyto keepthe bladebalanced.
An unbalancedbladewill causeexcessivevibrationwhenrotating at high
speeds.It maycausedamageto mower andcouldbreakcausingpersonal
injury.
/
/
Figure19
J
\
Blade
/
Figure20
.5. Lubricatethe enginecrankshaftandtheinnersurfaceof thebladeadapter
with light oil.Slidethebladeadapterontotheenginecrankshaft.Placethe
bladeonthe adaptersuchthatthesideof theblademarked"Bottom"(or
with part number)facesthe groundwhenthe mowerisin theoperating
position.Makesurethatthe bladeisalignedandseatedon thebladeadapter
flanges.SeeFigure20inset.
6. Placebladebellsupportontheblade.Alignnotcheson thebladebell
supportwith smallholesin blade.
7. Replacehexbolt andtightenhexbolt to torque:450in. Ibs.min.,600in.Ibs.
max.
Toensuresafeoperationofyourmower,periodicallycheckthebladeboltforcorrect
torque.
17
Neverstore lawn mowerwith fuel in tank indoorsor in poorlyventilated
areaswhere fuel fumes mayreachan openflame, spark,orpilot light ason
afurnace,water heater,clothesdryer, or gasappliance.
PreparingThe Engine
Forenginesstoredover30 days:
Topreventgumfromforminginfuel systemoron carburetorparts,run
engineuntil it stopsfromlackof fuelor addagasolineadditiveto the gas
inthetank.If youuseagasadditive,runthe enginefor severalminutesto
circulatetheadditivethroughthecarburetor--after whichthe engineand
fuelcanbestoredup to 24months.
Whileengineisstill warm,changetheoil.
Cleanengineof surfacedebris.
PreparingTheLawnMower
Cleanandlubricatemowerthoroughlyasdescribedinthelubrication
instructions.
Donotusea pressurewasherorgardenhoseto cleanyourunit.
Coatmower'scutting bladewith chassisgreaseto preventrusting.
Referto Preparingthe Engineforcorrectenginestorageinstructions.
Storemowerin adry,deanarea.Donotstorenextto corrosivematerials,
suchasfertilizer.
Whenstoringanytype of powerequipmentin apoorlyventilatedor metalstorage
shed,careshouldbetakento rust-proofthe equipment.Usinga lightoil orsilicone,
coattheequipment,especiallycablesandall movingpartsof yourlawnmower
beforestorage.
18
Disconnectthe sparkplug wireand groundit againstthe engineto prevent
unintendedstarting. Beforeperforminganytypeof maintenance/service,
disengageall controlsandstopthe engine.Waituntil a[I movingparts
havecometo acompletestop.Alwayswearsafetyglassesduringoperation
orwhile performingany adjustmentsor repairs.
Thissectionaddressesminorserviceissues.Tolocatethe nearestSearsServiceCenterorto scheduleservice,simplycontactSearsat 1-800-4-MY-HOME_.
EngineFailstostart
Enginerunserratic
1. Bladecontroldisengaged.
2. Sparkplugbootdisconnected.
3. Fueltankemptyor stalefuel.
4. Enginenotprimed(Ifequippedwith primer).
5. Faultysparkplug.
6. Engineflooded.
7. Blockedfuel line.
1. Sparkplugbootloose.
2. Stalefuel.
3. Ventingascapplugged.
4. Waterordirt infuelsystem.
5. Dirtyaircleaner.
6. Blockedfuel line.
Engineoverheats 1. Engineoillevellow.
2. Airflow restricted.
Occasionalskips(hesitates) 1. Sparkpluggaptooclose.
Idlespoorly 1. Sparkplugfouled,faulty,or gaptoowide.
2. Dirtyaircleaner.
Excessivevibration 1. Cuttingbladelooseorunbalanced.
2. Bentcuttingblade.
Mowerwill notmulchgrass 1. Wetgrass.
Unevencut
2. Excessivelyhighgrass.
3. Dullblade.
1. Wheelsnotpositionedcorrectly.
2. Dullblade.
1. Engagebladecontrol.
2. Connectwireto sparkboot.
3. Filltankwith dean,freshgasoline.
4. PrimeengineasinstructedintheOperationsection.
5. Clean,adjustgap,orreplace.
6. Waitafewminutesto restart.
7. ContactyourSearsParts&RepairCenterto havefuelline
cleaned.
1. Connectandtightensparkplugboot.
2. Filltankwith dean,freshgasoline.
3. Clearvent.
4. Runengineuntilitstopsfrom lackoffuel.Refillwithfreshfuel.
5. RefertoAirCleanerinEngineMaintenancesection.
6. ContactyourSearsParts&RepairCenterto havefuelline
cleaned.
1. Fillcrankcasewithproperoil.
2. Cleanareaaroundandontop of engine.
1. Adjustgap.Referto SparkPluginEngineMaintenancesection.
1. Resetgaporreplacesparkplug.
2. RefertoAirCleanerinEngineMaintenancesection.
1. Tightenbladeandadapter.Balanceblade.
2. Replaceblade.
1. Donotmowwhengrassiswet; waituntil
laterto cut.
2. Mowonceat ahighcuttingheight,thenmowagainatdesired
heightor makeanarrowercuttingpath.
3. Sharpenor replaceblade.
1. Adjustcuttingheightleveronrightfront andrightrearwheelto
sameposition.
2. Sharpenor replaceblade.
NEED MORE HELP?
o Find this and all your other product manuals online.
o Get answers from our team of home experts.
o Get a personalized maintenance plan for your home,
Find information and tools to hetp with home projects,
19
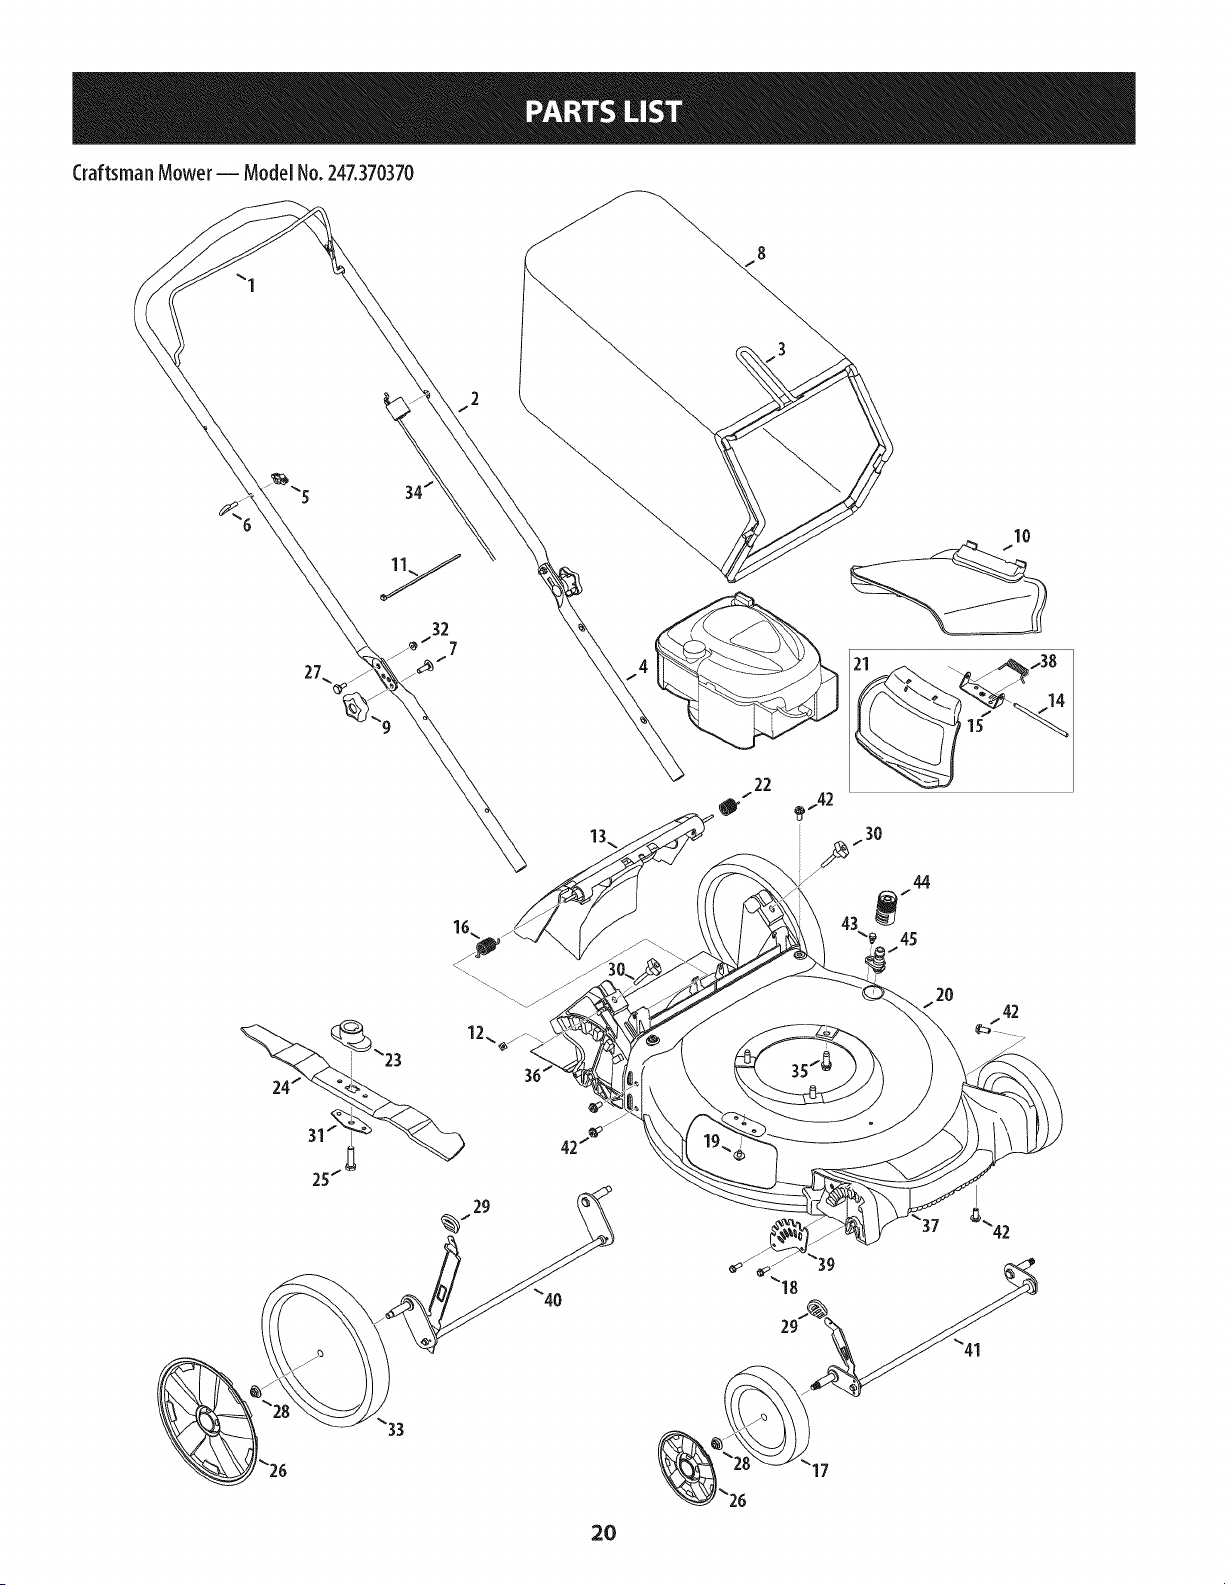
Craftsman Mower- Model No.247.370370
10
32
20
Craftsman Mower -- Model No.247.370370
m
m
1
2
3
4
5
6
7
8
9
10
11
12
13
14
15
16
17
18
19
20
21
22
23
24
747-05204-0637
749-04682A-0637
747-05450
749-04608A-0637
720-0279
710-1205
710-04998
964-04154
720-04072A
731-07486
725-0157
712-04222
631-04369A
747-0710A
787-01779
732-04673
634-04642
710-0895
710-05073
787-01874B-0691
987-02516
732-04674
748-04096
942-0741A
Blade Control
Upper Handle
Grass Catcher Frame
Lower Handle
Wing Nut
Rope Guide
Carriage Screw ,5/16-18
Grass Bag
Hand Knob
Side Chute
Ca ble Tie
Nut, Sq., 1/4-20
Rear Discharge Door Assembly
Hinge Pin
Chute Deflector Bracket
Torsion Spring - RH
Wheel, 7 x 2
Screw, 1/4-15 x .750
Screw, 1/4-20 x .500
Deck- 21"
Hinged Mulch Plug Assembly
Torsion Spring - LH
Blade Adapter
Mulching Blade
N
25
26
27
28
29
30
31
32
33
34
35
36
37
38
39
4O
41
42
43
44
45
N/A
710-1044
731-07531
731-07533
738-04419A
712-04217
720-04130
720-04123A
736-0524B
712-04064
634-04630
946-04661
710-04683A
731-07203
731-07174A
732-1014C
787-01818A-0637
911-04144A
911-04143B
710-04995A
738-04278
921-04041
731-07487
Screw, 3/8-24 x 1.50
Hub Cap - Front
Hub Cap - Rear
Sldr. Screw, .375 x .126 x 1/4-20
Flange Lock Nut, 3/8-16
Adjustment Lever Knob
Wing Nut
Blade Bell Support
Nut, Flange Lock, 1/4-20
Wheel, 11 x 2
Control Cable
TT Seres Screw, 3/8-16 x 1.0
Trail shield
Front Cover
Torsion Spring
Front Height Adjuster Plate
Rear Axle Assembly
Front Axle Assembly
Screw, 5/16-14 x .750
Screw, 1/4-20 x .500
Water Nozzle Adapter
Deck Wash Nozzle
Engine (see breakdown)
B & S Model No. 128M02-0952-F1
21
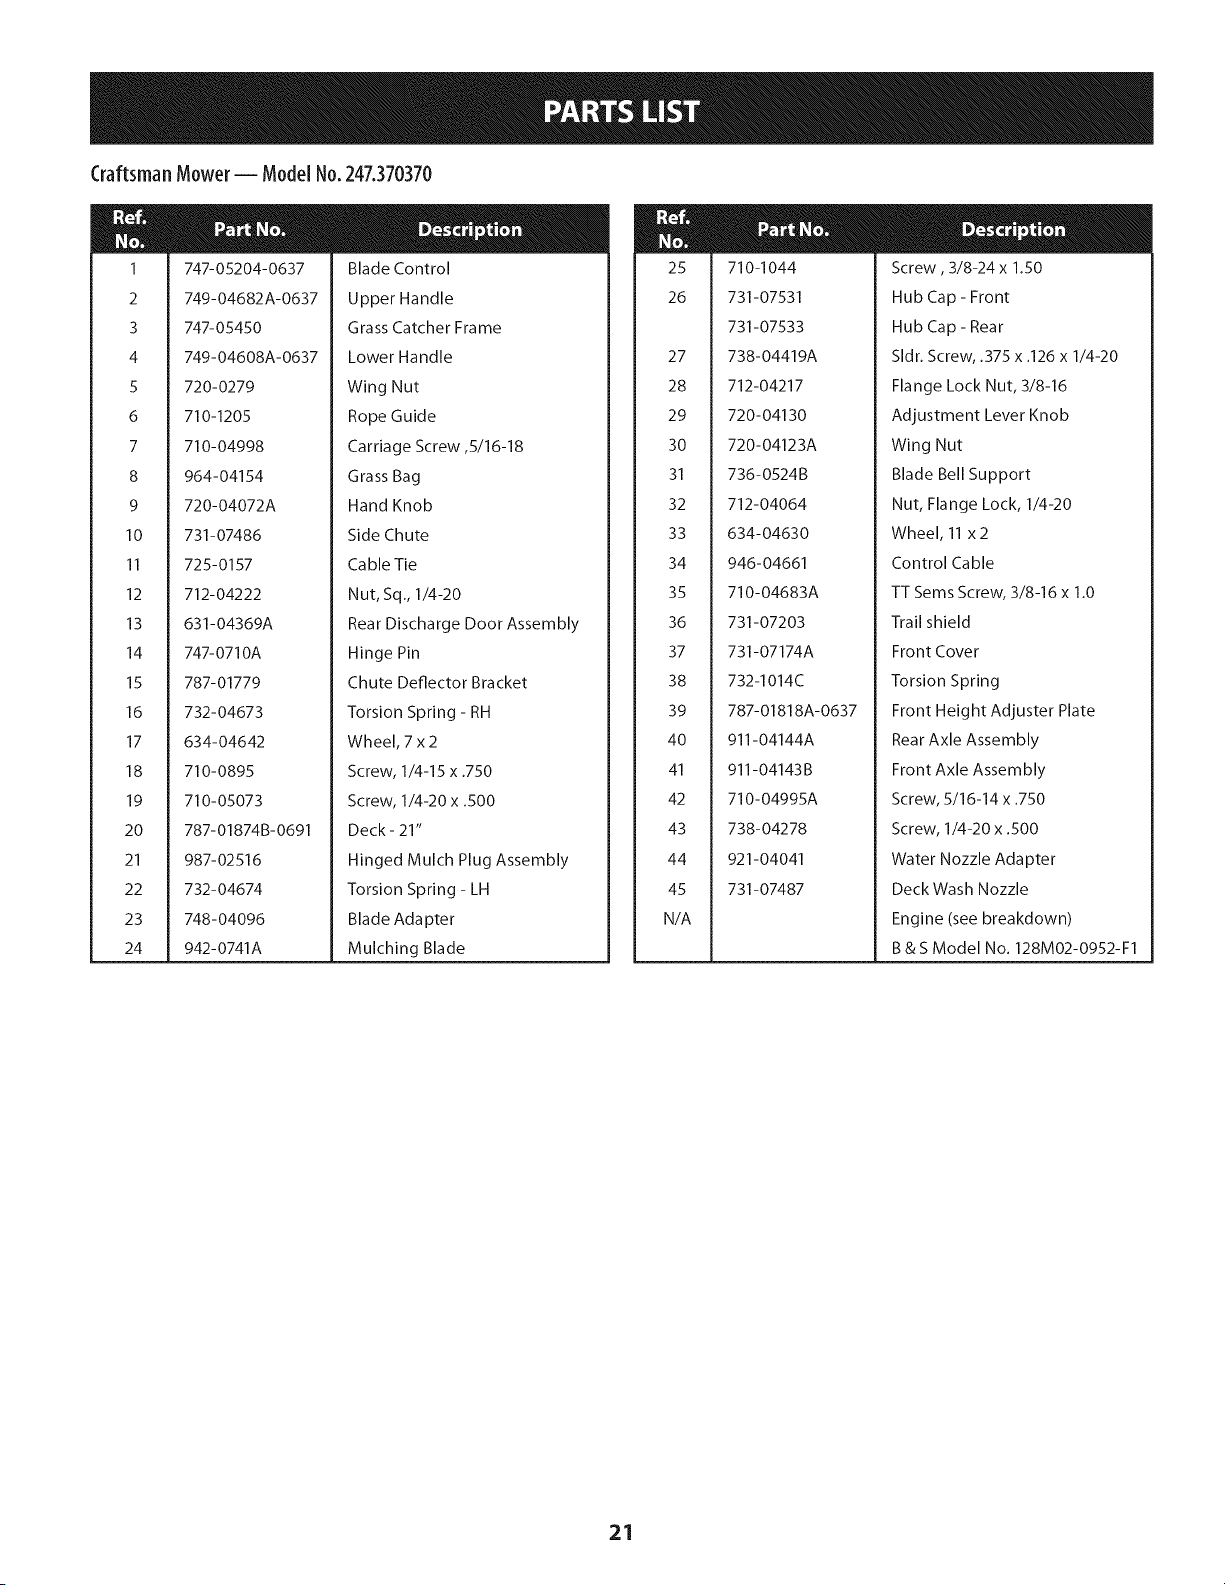
CraftsmanEngineModelNo.128M02-0%2-FIForCraftsmanMower Model No.247.370370
[ 40SHORTB,OOK] [I050OPER,_O_SM,_NOA,] I1329_EP,AOEMENTE_G,_EI I 1339_E_,_,_,_OA,I
306
307 _;,
12
3@
718
sos
89
[505 e
615 0
404 @
616
684
11
24_
22

CraftsmanEngineModelNo.126MO2-6863-FIForCraftsmanMower ModelNo.247.370370
3os
163
_33A_88
127 (_
I 276 @
190
i}
957
222
968
445
202
443 '_
11A
_ 0
163
883
23
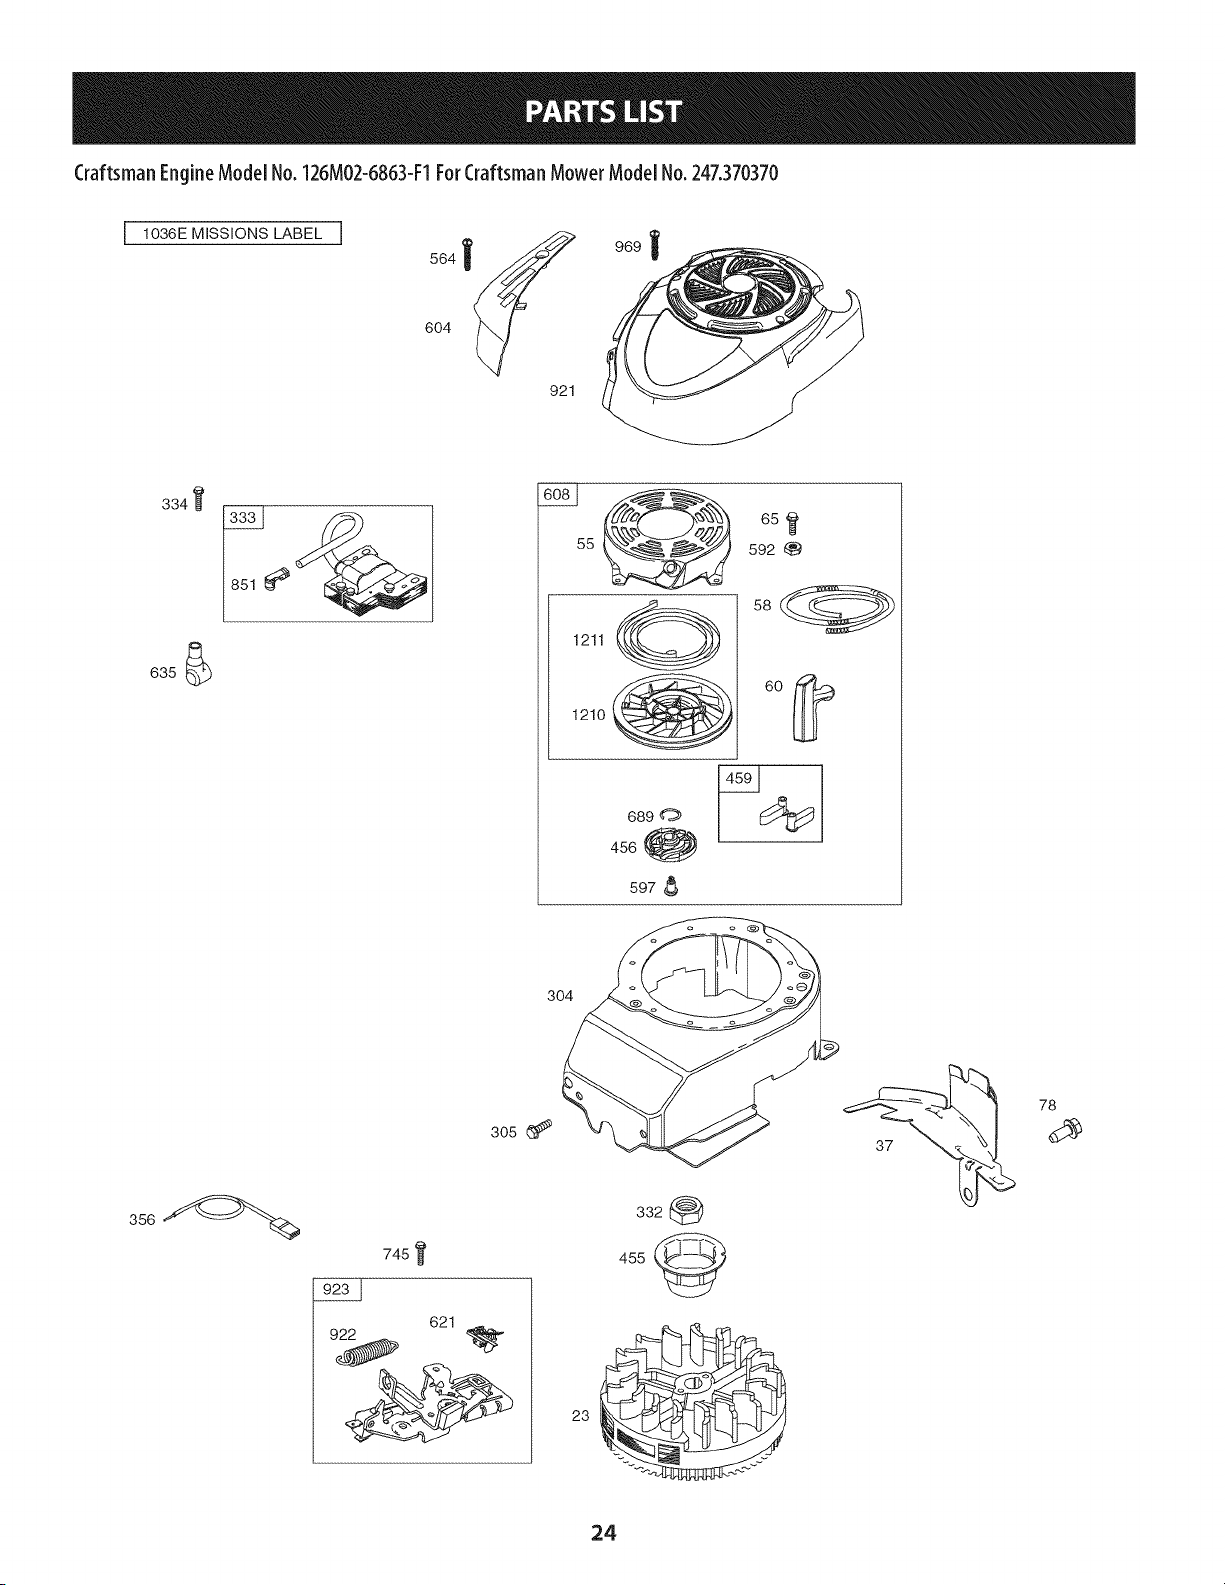
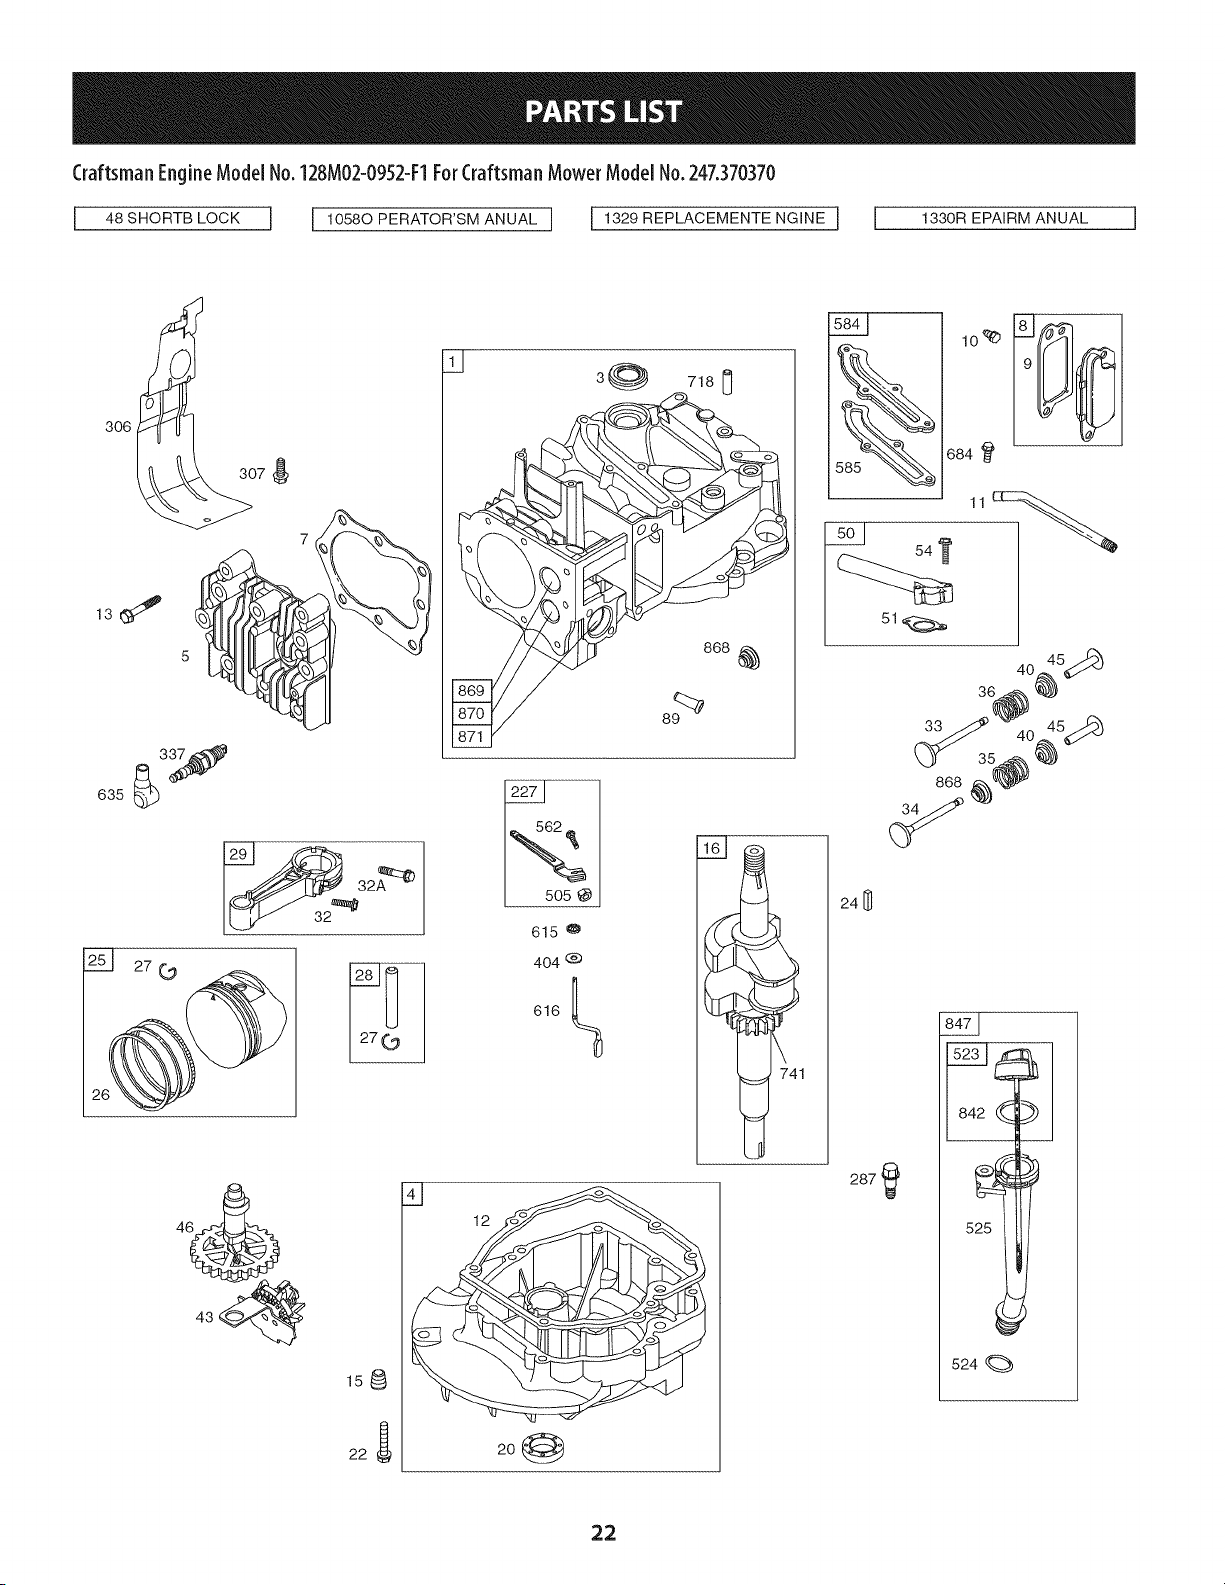
CraftsmanEngineModelNo.126MO2-6863-FIForCraftsmanMower ModelNo.247.370370
1036E MiSSiONS LABEL ]
6O4
921
334_
55 592 (_
1211 @ 58 (__
1210 _ 6O _)
456_
597 8
3O4
305
745
621
332_
455
24
CraftsmanEngineModelNo.126MO2-6863-FIForCraftsmanMower ModelNo.247.370370
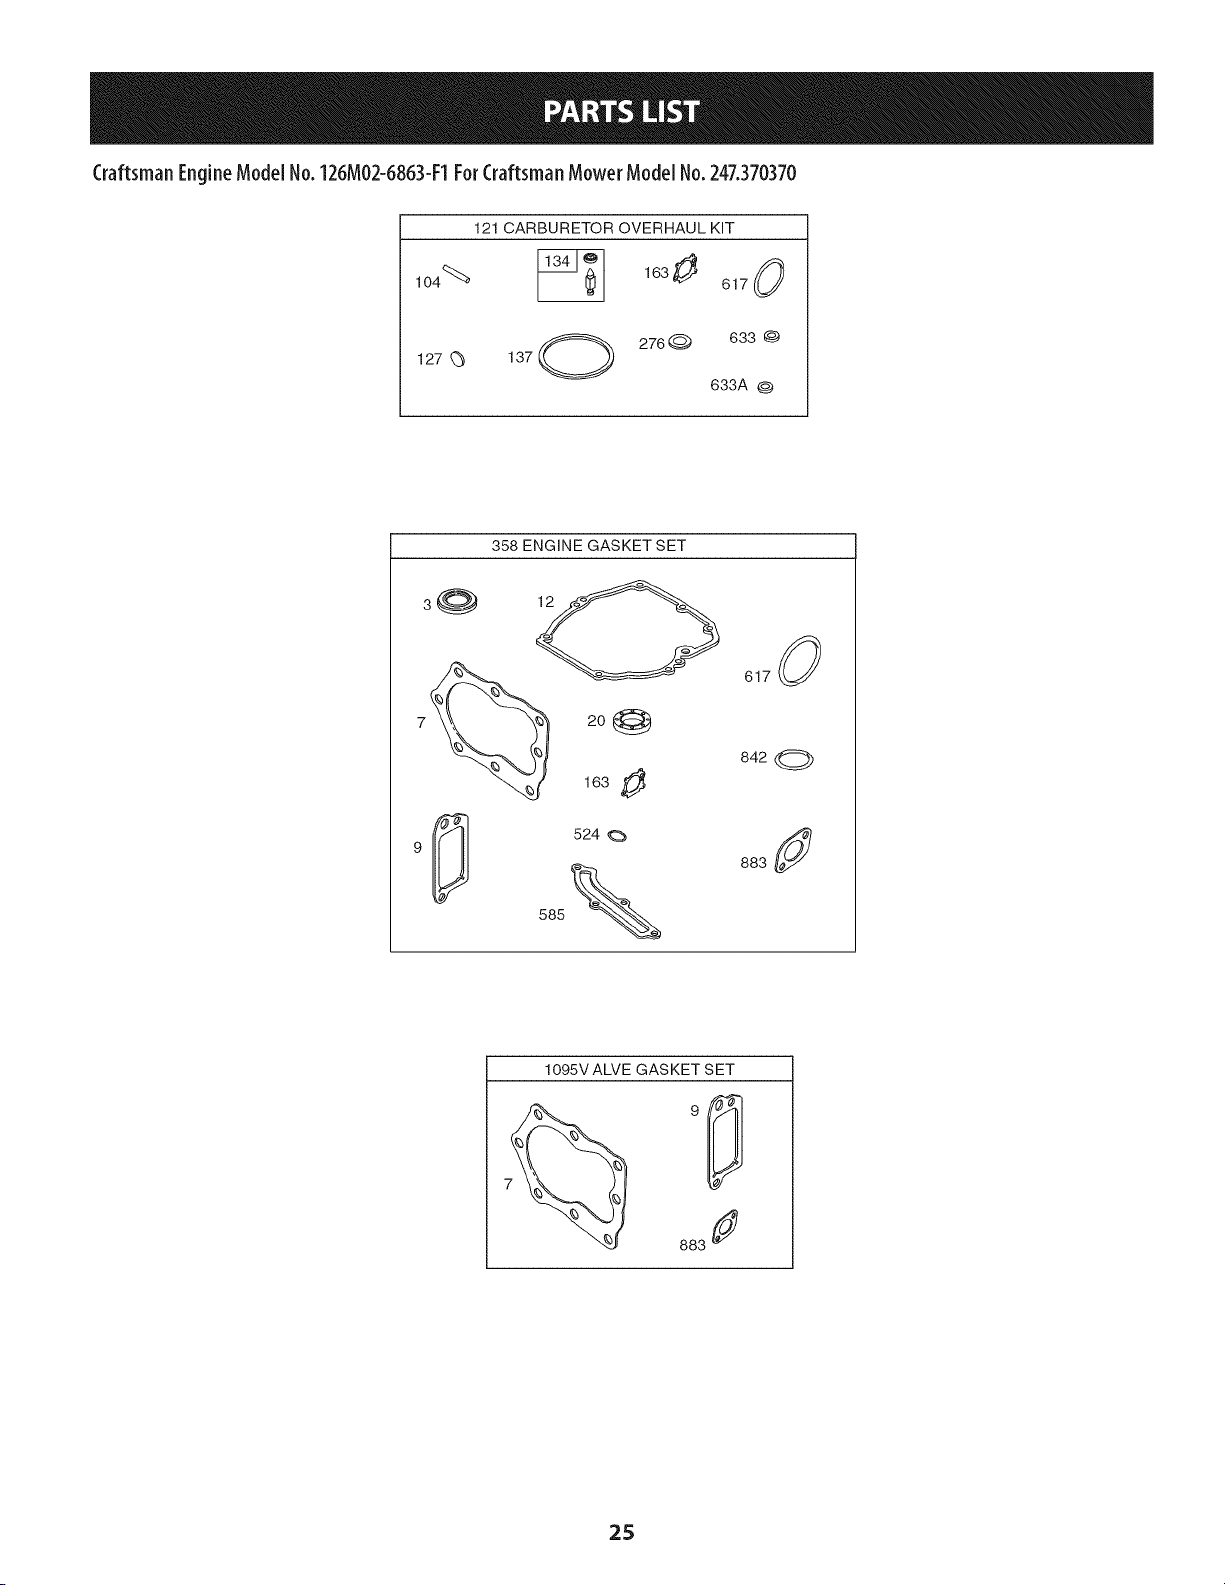
121 CARBURETOR OVERHAUL KIT
o4-,
127 (_
276 @ 633 Q
137
633A @
3@
358 ENGINE GASKET SET
617 0
20@
163
524
585
842 O
883
1095V ALVE GASKET SET
883 _
25

CraftsmanEngineModelNo.126MO2-6863-FIForCraftsmanMower ModelNo.247.370370
590401 Cylinder Assembly
3 299819s Seal-Oil (Magneto Side)
4 493279 Sump-Engine
5 590411 Head-Cylinder
7 799875 Gasket-Cylinder Head
8 590395 Breather Assembly
9 699472 Gasket-Breather 65 690837
10 691125 Screw (Breather Assembly) 78 691108
11 691781 Tube-Breather 81 691740
11A 691923 Tube-Breather 89 692348
12 692232 Gasket-Crankcase 97 696565
13 590422 Screw (Cylinder Head) 104 797622
15 691680 Plug-Oil Drain 108 795935
16 797017 Crankshaft 109 795936
20 399781s Seal-Oil (PTO Side) 117 590440
22 691092 Screw (Crankcase Cover/Sump) 121 498260
23 691987 Flywheel 125 799866
24 222698s Key-Flywheel
25 590404 Piston Assembly (Standard)
590405 Piston Assembly (.020" Oversize) 133 398187
26 590402 Ring Set (Standard) 134 398188
590403 Ring Set (.020" Oversize) 137 796610
27 691588 Lock-Piston Pin 141 796193
28 298909 Pin-Piston 163 795629
29 797306 Rod-Connecting 180 590490
32 691664 Screw (Connecting Rod) (Short) 187 791766
32A 695759 Screw (Connecting Rod) (Long) 188 693999
33 590394 Valve-Exhaust 190 690940
34 590393 Valve-Intake 202 691829
35 691270 Spring-Valve (Intake) 209 699056
36 691270 Spring-Valve (Exhaust)
37 793756 Guard-Flywheel
40 692194 Keeper-Valve 276 271716
43 691997 Slinger-Governor/Oil 287 690940
45 690548 Tappet-Valve 291 790830
46 590463 Camshaft 300 790828
48 N/A Short Block (Not available at this printing) 304 790826
796703 Manifold-Intake
51 796704 Gasket-Intake
54 691650 Screw (Intake Manifold)
55 691421 Housing-Rewind Starter
58 697316 Rope-Starter
60 795426 Grip-Starter Rope
Screw (Rewind Starter)
Screw (Flywheel Guard)
Lock-Muffler Screw
Plug-Oil (Cylinder)
Shaft-Throttle
Pin-Float Hinge
Valve-Choke
Shaft-Choke
Jet-Main (Standard)
Kit-Carburetor Overhaul
Carburetor
127 694468 Plug-Welch
130 696564 Valve-Throttle
Float-Carburetor
Kit-Needle/Seat
Gasket-Float Bowl
Kit- Choke Shaft
Gasket-Air Cleaner
Tank-Fuel
Line-Fuel (Cut To Required Length)
Screw (Control Bracket)
Screw (Fuel Tank)
Link-Mechanical Governor
Spring-Governor (No Color)
222 793754 Bracket-Control
227 690783 Lever-Governor Control
Washer-Sealing
Screw (Dipstick Tube)
Thermostat
Muffler
Housing-Blower
26

CraftsmanEngineModelNo.126MO2-6863-FIForCraftsmanMower ModelNo.247.370370
691108 Screw (Blower Housing)
306 790836 Shield-Cylinder
307 690345 Screw (Cylinder Shield)
332 690662 Nut (Flywheel)
333 590454 Armature-Magneto
334 691061 Screw (Magneto Armature)
337 591040 Plug-Spark
356 692390 Wire-Stop
358 590508 Gasket Set-Engine
365 691688 Screw (Carburetor)
404 690272 Washer (Governor Crank)
425 690670 Screw (Air Cleaner Cover)
443 692523 Screw (Air Cleaner Primer Base)
445 491588s Filter-Air Cleaner Cartridge
455 791960 Cup-Flywheel
456 692299 Plate-Pawl Friction
459 281505s PawI-Ratchet
505 691251 Nut (Governor Control Lever)
523 499621 Dipstick
524 692296 Seal-Dipstick Tube
525 495265 Tube-Dipstick
562 691119 Bolt (Governor Control Lever)
564 698589 Screw (Control Cover)
584 697734 Cover-Breather Passage
585 691879 Gasket-Breather Passage
592 690800 Nut (Rewind Starter)
597 691696 Screw (Pawl Friction Plate)
601 791850 Hose-Clamp (Green)
604 790703 Cover-Control
608 497680 Starter-Rewind
613 790833 Screw (Muffler)
615 690340 Retainer-Governor Shaft
616 698801 Crank-Governor
617 270344s Seal-O Ring
621 692310 Switch-Stop
633 691321 Seal-Choke/Throttle Shaft (Throttle Shaft)
693867 Seal-Choke/Throttle Shaft (Choke Shaft)
635 66538s Boot-Spark Plug
684 690345 Screw (Breather Passage Cover)
689 691855 Spring-Friction
718 690959 Pin-Locating
725 590460 Shield - Heat
741 797521 Gear-Timing
745 691648 Screw (Brake)
842 691031 Seal-O Ring (Dipstick Tube)
847 692047 Dipstick/Tube Assembly
851 493880s Terminal-Spark Plug
868 697338 Seal-Valve
869 691155 Seat-Valve (Intake)
870 690380 Seat-Valve (Exhaust)
871 590409 Bushing-Valve Guide
883 691881 Gasket-Exhaust
921 796706 Cover-Blower Housing
922 692135 Spring - Brake
923 796136 Brake
957 591003 Cap-Fuel Tank
966 795259 Base-Air Cleaner Base
968 692298 Cover-Air Cleaner
969 690700 Screw (Blower Housing Cover)
975 796611 Bowl-Float
1036 Label-Emissions (Available from a Briggs &
Stratton Authorized Dealer)
1058 277039TRI Operator's Manual
1059 692311 Kit-Screw/Washer (Fuel Tank)
1095 590507 Gasket Set-Valve
1210 498144 Pulley/Spring Assembly (Pulley)
1211 498144 Pulley/Spring Assembly (Spring)
1329 N/A Replacement Engine (N/A at this printing)
1330 270962 Repair Manual
1386 790848 Vane-Air
1387 790849 Spring-Air Vane
1388 790850 Screw (Air Vane)
Carburetor Overhaul Kit Key No. 121
Engine Gasket Set Key No. 358
Valve Gasket Set Key No. 1095
27
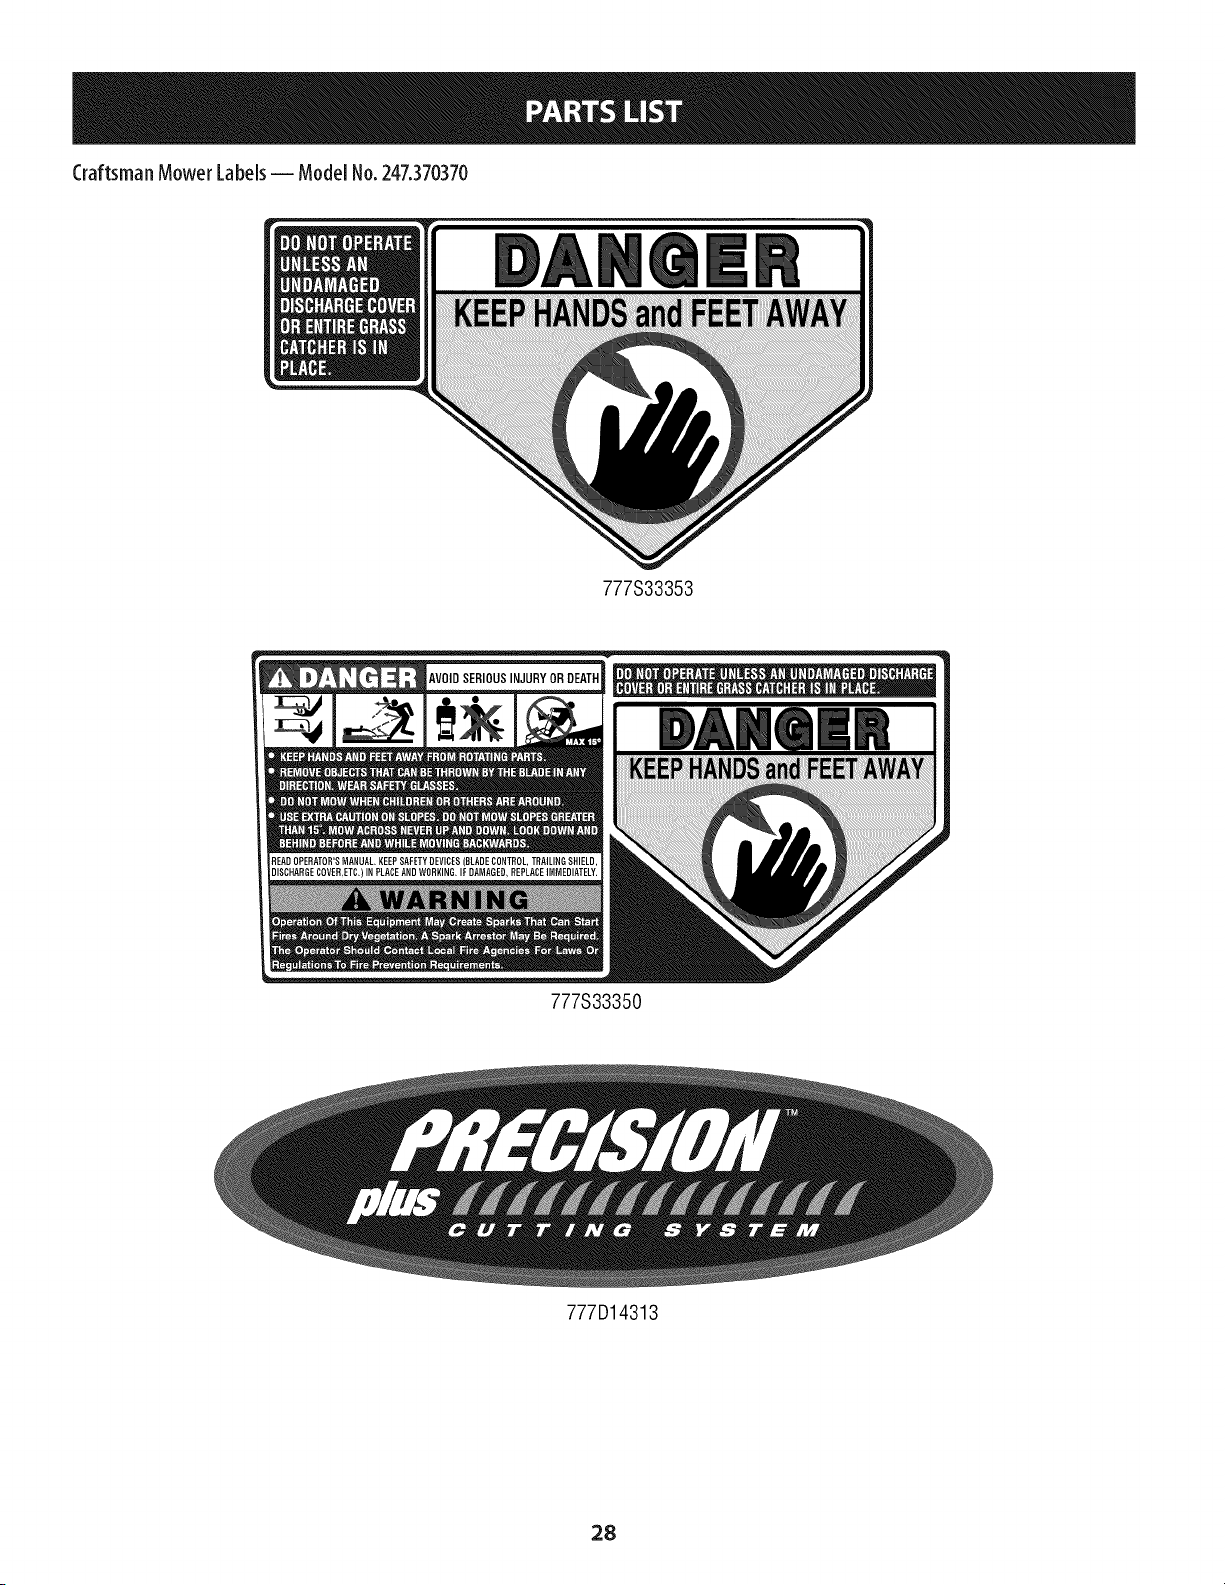
Craftsman Mower Labels -- Model No. 247.370370
777S33353
777S33350
777D14313
28
(ThispageapplicableintheU.S.A.andCanadaonly.)
Sears Brands Management Corporation (Sears),the California Air Resources Board (CARB)
and the United States Environmental Protection Agency (U,S, EPA)
EmissionControl System Warranty Statement (Owner's Defect Warranty Rights and Obligations)
EMISSIONCONTROLWARRANTYCOVERAGEISAPPLICABLETOCERTIFIEDENGINES ANDTOCERTIFIEDMODELYEAR1997ANDLATERENGINESWHICHAREPURCHASEDAND
PURCHASEDINCALIFORNIAIN1995ANDTHEREAFTER,WHICHAREUSEDINCALIFORNIA,USEDELSEWHEREINTHEUNITEDSTATES(ANDAFTERJANUARY1,2001INCANADA).
California and United States Emission Control Defects Warranty Statement
TheCaliforniaAir ResourcesBoard(CARB),U.S.EPAandSearsarepleasedto explainthe
EmissionControlSystemWarrantyonyourmodelyear2000andlatersmalloff-road
engine(SORE).InCalifornia,newsmalloff-roadenginesmustbedesigned,built and
equippedto meettheState'sstringentanti-smogstandards.Elsewhereinthe United
States,newnon-road,spark-ignitionenginescertifiedformodelyear1997andlater
mustmeetsimilarstandardssetforthbytheU.S.EPA.Searsmustwarrantthe emission
controlsystemon yourenginefortheperiodsof timelistedbelow,providedtherehas
beennoabuse,neglectorimpropermaintenanceofyoursmalloff-roadengine.Your
emissioncontrolsystemincludespartssuchasthe carburetor,air cleaner,ignition
system,mufflerandcatalyticconverter.Alsoincludedmaybe connectorsandother
emissionrelatedassemblies.Whereawarrantableconditionexists,Searswill repair
yoursmalloff-roadengineat nocostto youincludingdiagnosis,partsandlabor.
Sears Emission Control Defects Warranty Coverage
Smalloff-roadenginesarewarrantedrelativetoemissioncontrolpartsdefectsfora
periodof oneyear,subjectto provisionssetforthbelow.Ifanycoveredparton your
Owner's Wa rra nty
Asthe smalloff-roadengineowner,youareresponsibleforthe performanceof the
requiredmaintenancelistedinyourOperatingandMaintenanceInstructions.Sears
recommendsthat youretainall yourreceiptscoveringmaintenanceonyoursmall
off-roadengine,butSearscannotdenywarrantysolelyforthe lackofreceiptsor for
yourfailureto ensurethe performanceof all scheduledmaintenance.Asthesmall
off-roadengineowner,youshouldhoweverbeawarethatSearsmaydenyyouwarranty
coverageifyoursmalloff-roadengineorapart hasfaileddueto abuse,neglect,
engineisdefective,thepartwill berepairedor replacedbySears.
Responsibilities
impropermaintenanceor unapprovedmodifications.Youareresponsibleforpresenting
yoursmalloff-roadengineto anAuthorizedSearsServiceDealerassoonasaproblem
exists.Theundisputedwarrantyrepairsshouldbecompletedinareasonableamount
of time,not to exceed30days.Ifyou haveanyquestionsregardingyourwarrantyrights
andresponsibilities,youshouldcontacta SearsServiceRepresentativeat 1-800-469-
4663.Theemissionwarrantyis adefectswarranty.Defectsarejudgedon normalengine
performance.Thewarrantyisnot relatedto an in-useemissiontest.
Soars Emission Control Defects Warranty Provisions
Thefollowingarespecificprovisionsrelativeto yourEmissionControlDefectsWarranty
Coverage.It isinadditionto the Searsenginewarrantyfornon-regulatedenginesfound
in the OperatingandMaintenanceInstructions.
1. WarrantedParts
Coverageunderthiswarrantyextendsonlyto the partslistedbelow(the
emissioncontrolsystemsparts)to theextentthesepartswerepresenton the
enginepurchased.
a. FueIMeteringSystem
• Coldstartenrichmentsystem
• Carburetorandinternalparts
• FuelPump
b. Air lnductionSystem
• Aircleaner
• Intakemanifold
c. IgnitionSystem
• Sparkplug(s)
• Magnetoignitionsystem
d. CatalystSystem
• Catalyticconverter
• Exhaustmanifold
• Airinjectionsystemor pulsevalve
e. MiscellaneousItemsUsedinAboveSystems
• Vacuum,temperature,position,time sensitivevalvesandswitches
• Connectorsandassemblies
2. Lengthof Coverage
Searswarrantsto theinitialownerandeachsubsequentpurchaserthat the
WarrantedPartsshallbefreefromdefectsinmaterialsandworkmanshipwhich
causedthe failureof theWarrantedPartsforaperiodof oneyearfrom the date
theengineisdeliveredto aretailpurchaser.
3. NoCharge
Repairor replacementof anyWarrantedPartwill beperformedat nochargeto
theowner,includingdiagnosticlaborwhichleadsto thedeterminationthata
WarrantedPartisdefective,if thediagnosticwork isperformedat anAuthorized
SearsServiceDealer.Foremissionswarrantyservicecontactyournearest
AuthorizedSearsServiceDealeraslistedin the"YellowPages"under"Engines,
Gasoline,""GasolineEngines,""LawnMowers,"orsimilarcategory.
4. ClaimsandCoverageExclusions
Warrantyclaimsshallbefiled inaccordancewith the provisionsof the Sears
EngineWarrantyPolicy.Warrantycoverageshallbeexcludedforfailuresof
WarrantedPartswhicharenot originalSearspartsor becauseof abuse,neglect
orimpropermaintenanceassetforth intheSearsEngineWarrantyPolicy.Sears
isnotliableto coverfailuresofWarrantedPartscausedbythe useofadd-on,
non-original,ormodifiedparts.
5. Maintenance
AnyWarrantedPartwhichis not scheduledforreplacementasrequired
maintenanceor whichisscheduledonlyforregularinspectionto the effectof
"repairorreplaceasnecessary"shallbe warrantedastodefectsforthewarranty
period.AnyWarrantedPartwhichisscheduledfor replacementasrequired
maintenanceshallbewarrantedasto defectsonlyfortheperiodoftime up
to thefirst scheduledreplacementforthat part.Anyreplacementpart thatis
equivalentin performanceanddurabilitymaybeusedin theperformanceof
anymaintenanceorrepairs.Theowneris responsiblefor the performanceof
all requiredmaintenance,asdefinedintheSearsOperatingandMaintenance
Instructions.
ConsequentialCoverage
Coveragehereundershallextendto thefailureofanyenginecomponentscaused
bythefailureof anyWarrantedPartstill underwarranty.
Inthe USAandCanada,a24hourhot line,1-800-469-4663,hasamenuofpre-recordedmessagesofferingyouenginemaintenanceinformation.
29
GDOC-100188Rev.B

30

31
Congratulationsonmakingasmartpurchase.YournewCraftsman®productisdesignedandmanufacturedforyearsof
dependableoperation.Butlikeall products,it mayrequirerepairfromtime to time.That'swhenhavinga RepairProtection
Agreementcansaveyoumoneyandaggravation.
Here'swhat the Repair ProtectionAgreement_ includes:
[] Expertservice byour10,000professionalrepairspecialists
[] Unlimitedserviceand nocharge forpartsandlaboronallcoveredrepairs
[] Productreplacementupto $1500ifyourcoveredproductcan'tbefixed
[] Discountof 25%from regularpriceof serviceandrelatedinstalledpartsnot coveredbythe agreement;also,25%off
regularpriceof preventivemaintenancecheck
[] Fasthelpby phone- wecallit RapidResolution- phonesupportfromaSearsrepresentative.Thinkof usasa"talking
owner'smanual."
Onceyoupurchasethe RepairProtectionAgreement,a simplephonecallisallthat it takesfor youto scheduleservice.You
cancallanytimedayornight,or scheduleaserviceappointmentonline.
TheRepairProtectionAgreementisa risk-freepurchase.If youcancelfor anyreasonduringthe productwarrantyperiod,
wewill provideafull refund.Or,a proratedrefundanytimeafterthe productwarrantyperiodexpires.PurchaseyourRepair
ProtectionAgreementtoday!
Somelimitations and exclusionsapply. Forpricesand additional informationinthe U.S.A.call 1-800-827-6655.
_Coveragein Canadavarieson someitems.Forfull detailscall SearsCanadaat 1-800-361-6665.
SearsInstallationService
ForSearsprofessionalinstallationof homeappliances,garagedooropeners,waterheaters,andothermajorhomeitems,in
the U.S.A.orCanadacall1-800-4-MY-HOME®.
32
Declaraci6n de garantia .............................. 33
Instrucciones de seguridad ........................ 34-37
Guia de cuesta ....................................... 38
Montaje .......................................... 39-41
Operaci6n ........................................ 42-44
Servicio y Mantenimiento ......................... 45-49
Almacenamiento fuera de temporada ................ 50
Soluci6n de problemas ............................ 52-53
Numero de servicio .................. Cubierta posterior
GARANTIACOMPLETACRAFTSMANPORDOSANOS
PORDOSANOSa partirdelafechadela compra,esteproductoest_garantizadopotdefectosenlosmaterialesy la manodeobra.Losproductosdefectuosos
ser_nreparadossincostoo reemplazadossincostosila reparaci6nnoest_disponible.
Paraobtenerinformaci6nsobreelalcancedela garantiay solicitarlareparaci6no elreemplazo,visiteel sitioWeb:www.craftsman.com.
EstagarantiacubreI)NICAMENTElosdefectosenlosmaterialesyen la manodeobra.EstagarantiaNOcubre:
• Articulosdeduraci6nlimitadaquepuedendesgastarsebajocondicionesnormalesdeusoduranteelperiododegarantia,talescomocuchillasde
cortadora,adaptadoresparacuchillas,correas,filtros deaire,y bujiasdeencendido.
• Productodafiosresultantesdelosintentosdel usuariodemodificaci6ndelproducto,reparaci6nocausadosporaccesoriosdeproductos.
• Reparacionesnecesariasdebidoal accidenteopotnooperaromantenerelproductosegOnlasinstruccionesprovistas.
• Mantenimientopreventivooreparacionesnecesariasdebidoa mezcladecombustibleimpropia,combustiblecontaminadooafiejo.
LapresentegarantiaseanulasiseutilizaesteproductoalgunavezparaprestarservicioscomercialesosiseIoalquilaaotrapersona.
Estagarantiale otorgaderechoslegalesespecificos,peroustedpodriagozardeotrosderechosen raz6ndesulugarderesidencia.
SearsBrandsManagementCorporation,HoffmanEstates,IL60179
Aceite del motor: SAE 30
Combustible: Gasolina sin plomo
Motor: Briggs & Stratton
Numero de modelo
Numero de serie
Fecha de compra
Registre el numero de modelo, numero de serie y fecha
de compra m_s arriba.
© Sears Brands, LLC 33
Lapresendade estesimboloindica quesetrata deinstrucdones
importantes de seguridadquesedebenrespetarparaevitar poneren
peligro suseguddadpersonaly/o materialy ladeotras personas.Leaysiga
todaslasinstruccionesdeeste manualantesdeponer enfundonamiento
estam_quina.Sino respetaestasinstrucdonespodriaprovocarlesiones
personales.Cuandoyeaestesimbolo, ipresteatend6n a laadvertenda!
PROPOSICION 65 DE CALiFORNiA
Elescapedel motor deesteproducto,algunosde suscomponentesy
algunoscomponentesdel vehkulo contieneno liberan sustanciasCluimkas
clueelestado deCalifornia consideracluepuedenprodudr c_ncer,defectos
de nadmiento u otros problemasreproductivos.
Estam_quinafue construida parasetoperadadeacuerdoconlasreglas
de seguddadcontenidasenestemanual.AI igual queconcualquiertipo
de equipo motodzado,undescuidoo error pot parte del operadorpuede
produdr lesionesgraves.Estam_quinaescapazde amputar manosy pies
y de arrojarobjetoscon gran fuerza.Deno respetarlasinstrucdonesde
seguddadsiguientessepuedenprodudr lesionesgraveso la muerte.
Su responsabilidad--Restdnja el usodeesta m_quina motodzada
a laspersonascluelean,comprendany respetenlasadvertendase
instrucdonesqueaparecenen estemanualyen la m_quina.
iGUARDEESTASINSTRUCCIONES!
FUNCIONAMIENTO
Leay sigatodaslasinstruccionescontenidasen estemanualantesde
intentarensamblarestam_quina.Lea,comprenday sigatodaslas
instruccionesquefiguranenla m_quinayen elolos manualesantesde
intentaroperarla.Familiarkesecompletamenteconloscontrolesy conel
usoapropiadode estam_quinaantesdeoperarla.Guardeestemanualenun
lugarseguroparareferenciasfuturasy regularesy parasolicitarrepuestos.
Estarcompletamentefamiliarizadoconloscontrolesy el usoapropiadode
estam_quinaantesdeoperarla.
Estam_quinaesunapiezadeequipodeprecisi6n,no unjuguete.Pottanto,
tengalam_ximaprecauci6nentodomomento.Suunidadhasidodisefiada
pararealizarunatarea:cortarelc_sped.Nolautiliceconningtinotro
prop6sito.
Nopermitanuncaquelos nifiosmenoresde 14afiosoperenestam_quina.
Losnifiosde 14afiosy m_sdebenleery comprenderlasinstrucciones
contenidasenestemanualy debensercapacitadosy supervisadospot
unodelospadres.0nicamentelosindividuosresponsablesquesehayan
familiarizadoconestasreglasdeseguridadparalaoperaci6ndeber_nusar
estam_quina.
Inspecdoneminudosamenteel_reaen dondeutilizar_elequipo.Saque
todaslaspiedras,palos,cables,huesos,juguetesy otrosobjetosextrafios
conlosquepodriatropezaro quepodrianserarrojadosporlacuchilla.Los
objetosarrojadosporlam_quinapuedenprodudrlesionesgraves.Planifique
elpatr6nenelquevaair descargandoel recorteparaevitarqueladescarga
dematerialserealicehadaloscaminos,lasveredas,losobservadores,etc.
Eviteadem_sdescargarmaterialcontralasparedesy obstrucdonesque
podrianprovocarqueelmaterialdescargadorebotecontrael operador.
Paraayudara evitarel contactoconla cuchillao unalesi6nporunobjeto
arrojado,mant_ngaseen la zonadeloperadordetr_sde lasmanijasy
mantengaa losnifios,observadores,ayudantesy mascotasapartadosal
menos75metrosdelapodadoramientrasest_enoperad6n.Detengala
m_quinasialguienentraenlazona.
Paraprotegerselosojosutilicesiempreanteojosoantiparrasde seguddad
mientrasoperalam_quinaomientraslaajustaorepara.Losobjetos
arrojadosquerebotanpuedenlesionargravementela vista.
Utillcezapatosdetrabajoreslstentes,de suelafuertey pantalonesy camlsas
ajustados.Serecomiendautillzarcamlsasy pantalonesquecubranlosbrazos
y laspiernas,as[comocalzadoconpuntasreforzadasen acero.Nuncaopere
estam_quinaconlospiesdesnudos,sandalias,oconzapatosIlgeroso con
losquesepuedaresbalar(pot ejemplo,calzadode Iona).
Nopongalas manosolospiescercadelasplezasrotatodasoen latolvade
lacortadora.Elcontactoconlascuchlllaspuedeprodudrlaamputad6nde
manosy pies.
Unacublertadedescargafaltanteodafiadapuedeprovocarelcontactocon
lacuchillao lesionespotobjetosarrojados.
Muchasleslonesocurrencomoresultadodepasarlacortadorasobrelospies
duranteunacaJdaprovocadapot derrapesotroplezos.Nosesostengadela
podadorasiseest_cayendo,sueltelamanljalnmediatamente.
Nuncatire haciaustedlapodadoramlentrascamlna.Sideberetrocederla
podadoraparaevitarunapareduobst_culo,mirepdmeroabajoy arraspara
evltartropezarseyluegoslgaestospasos:
a. Retrocedadela podadorahastaestirarcompletamentesusbrazos.
b. Aseguresequeest_blen equillbradoy blenparado.
c. Tirede lapodadoralentamentehadausted,no m_sall_de lamltad
deladlstanciaentreustedy la podadora.
d. Repitaestospasoscomoserequiera.
Noopereestam_quinaestandobajolosefectosdelalcoholode drogas.
Noembragueel mecanlsmodeautopropulsi6nenunldadesconesteequipo
mlentrasarrancaelmotor.
Elmecanlsmode controldelacuchillaesundispositivodeseguridad.Nunca
lntentedesviarsedesufundonamlento.Dehacerlonofundonar[anlos
dlsposltlvosdeseguddady podrianprodudrseleslonespersonalesporel
contactoconlascuchlllasglratodas.Lasmanljasdecontrolde lacuchllla
debenfundonarblenen ambasdlrecdonesyregresarautom_ticamenteala
posid6ndedesengranecuandoselassuelta.
34
Nuncaoperelapodadoraenc_spedhumedo.Siempreest_segurode su
equilibdo.Sitropiezay caepuedelesionarsegravemente.Sisienteque
pierdeelequilibrio,suelteinmediatamentelamanijadecontrolde la
cuchillay lacuchilladejar_degirarentressegundos.
Corteelc_spedsolamenteconluzded[ao conunabuenaluzartificial.
Camine,nuncacorra.
Detengalacuchillacuandocrucecaminosdegravilla,pasosoandadores.
Silam_quinacomenzaraa vibrarde maneraanormal,detengael motor,
y busqueinmediatamentelacausa.Lavibrad6nporIogeneralesuna
advertendadealgunproblema.
Apagueelmotory esperehastaquelacuchillasedetengacompletamente
antesde retirarlaguardaparael recortedec_spedo desatorarlatolva.La
cuchillacontinuagirandoporunoscuantossegundosdespu_squeel motor
sehaapagado.Nuncacoloqueningunapartedelcuerpoenel _readela
cuchillahastaqueest_seguroquelacuchillahadetenidosumovimiento
rotatorio.
Nuncaoperelacortadorasinlasguardasapropiadas,cubiertadedescarga,
guardapararecorte,manijadecontroldela cuchillay otrosdispositivosde
seguddady protecd6nen sulugaryfundonando.Nuncaoperelacortadora
silosdispositivosdeseguddadest_ndaffados.Sino Iohace,estopuede
tenetcomoresultadolesiones.
Elsilenciadory elmotorsecalientany puedenprodudrquemaduras.Nolos
toque.
Utilicesolamentepartesy accesonosfabricadosespedalmenteparaesta
m_quina,onginalesdelfabncante(OEM).S[no Iohace,estopuedetener
comoresultadolesionespersonales.
Paraencenderel motor,jalede lacuerdalentamentehastaquesienta
resistencia,luegojaler_pidamente.Elreplieguer_pidodelacuerdade
arranque(tensi6nde retroceso)lejalar_lamanoyelbrazohadael motor
m_sr_pidodeIoqueustedpuedesoltar.Elresultadopuedenserhuesos
rotos,fracturas,hematomasoesguinces.
Sisepresentansituacionesquenoest_nprevistasenestemanualsea
cuidadosoy useelsentidocomtin.
DIENTES
Laspendientessonun factor[mportantequeserelacionaconlosaccidentes
produddospot derrapesy ca[dasyquepuedenproducirlesionesgraves.La
operad6nen pendientesrequieremayorprecaud6n.Sinosesienteseguroen una
pendiente,no lapode.Parasegundad,useel medidorde pendientesqueseincluye
comopartedeestemanualparamedirlapendienteantesde operarlaunidaden
unazona[nclinada.S[lapendientesuperalos15grados,nolapode.
Haga Io siguiente:
Muevalapodadoraatrav_sde lascarasdelapendiente,nuncahaciaardbay
abajo.Tengacuidadocuandocambiededirecd6ncuandooperela m_quinaen
pendientes.
Est_atentoalosagujeros,rakes,rocas,objetosocultosoabultamientosque
puedanprovocarquesederrapeo setropiece.Elc_spedaltopuedeocultar
obst_culos.
Siempreest_segurodesuequilibdo.Sitropiezay caepuedelesionarse
gravemente.Sisientequepierdeelequilibno,suelte[nmediatamentelamanija
decontrolde lacuchillay lacucMladejar_degirarentres(3)segundos.
No haga Io siguiente:
Nocorteelc_spedcercade pozos,hundimientos,bancos,podr[aperderel
equlllbrlo.
Nopodependientesmayoresde 15gradoscomoIoindicael medidorde
pendientes.
Nopodeelc_spedht_medo.SInoest_firmementeparado,puederesbalarse.
NINOS
Puedenocurnracddentestr_gicoss[eloperadornoest_atentoalapresendade
nifos.PotIogeneralalosnifos lesatraenlaspodadorasy laactividaddepodarel
c_sped.Noentiendenlosdesgosnllospeligros.Nuncad_porsentadoquelosnifos
permanecer_nenelmismolugardondelosviopott_ltimavez.
Mantengaalosnifos fueradel_reade trabajoy bajoestdctavigilandade un
adultoresponsableadem_sdeloperador.
Est_alertay apaguela podadorasiun nifo ingresaal _rea.
Antesy mientasseest_moviendohadaarras,mirehadaarrasy cuideque
no hayanlffos.
Tengaextremaprecaud6ncuandoseaproximeaesquinasdegas,entradas
de puertas,_rbolesuotrosobjetosquepuedanobstaculizarlelavistadeun
nifo quepudiesecorrerhadalapodadora.
Mantengaalejadosalosnifosde losmotoresen marchaocalientes.Pueden
sufrlrquemadurasconun sllendadorcallente.
Nuncapermitaquenifos menoresde 14afrosoperenestam_quina.Los
nifos mayoresde 14afrosdebenleery entenderlasinstrucdonesde
operad6ny reglasdeseguddadcontenidasenestemanualy debenset
entrenadosy supervlsadosporsuspadres.
SERVIClO
Manejo seguro de la gasolina:
Paraevitar lesionespersonalesodafos materialesseasumamentecuidadoso
al manipular la gasolina.Lagasolinaesaltamente inflamabley losvapores
son explosivos.Sepuedelesionargravementesi derramagasolinasobreusted
o sobrela ropaya quesepuedeencender.
Utilices61orecipientesparagasolinaautorizados.
NuncaIleneloscontenedoresenel interiordeun vehkuloocami6nocajade
camionetaconrecubrimientospl_sticos.Coloquesiemprelos recipientesen
el pisoy lejosdel vehkuloantesdeIlenarlos.
Retireel equlpoagasollnadelcaml6noremolqueyII_neloenel plso.Slesto
no esposible,entoncesIlenedichoequipoen unremolqueconun redpiente
port_til,envezdedesdeundispensadordegasolina.
Mantengalaboquillade Ilenadoen contactoconel bordede laentradadel
tanquedegasolinaocontenedorentodomomentohastaqueest_Ileno.No
utillceundlsposltlvoparaabrlr/cerrarlaboqullla.
Apaguetodoslosdgardllos,dgarros,pipasy otrasfuentesdecombusti6n.
Nuncacarguecombustibleenlam_quinaen intedoresporqueLosvapores
inflamablespodr[anacumularseen el _rea.
Nuncasaquelatapadelgasniagreguecombustiblemientraselmotorest_
calienteo enmarcha.Dejequeel motorseenfr[eporIomenosdosminutos
antesdevolveracargarcombustible.
35
Nuncarecargueeltanquede combustible.Lleneel tanquenom_sde I
pulgadapordebajode labasedel cuellodellenadoparadejarespadoparala
expansi6ndelcombustible.
Vuelvaacolocarlatapadelagasollnay ajfistelablen.
Limplelagasollnaderramadasobreel motory elequipo.Trasladela
m_quinaaotrazona.Espere5 mlnutosantesde encenderel motor.
Nuncaalmacenela m_quinao elredpientedecombustibleen unespado
cerradodondehayafuego,chlspasoaparatosconpilotocomoporejemplo,
calentadoresdeagua,calentadores,hornos,secadoresde ropau otros
aparatosagas.
Pararedudrel rlesgodeincendlomantengalam_qulnalimpiadepasto,
hojasy deacumulaci6ndeotrosescombros.Limpielosderramesdeacelteo
combustibley saquetodoslosdesechosembebldosconcombustible.
Dejequela m_quinaseenfrie5 minutosporIomenosantesdealmacenarla.
Funcionamiento general:
Nuncaenciendaunmotorenespacioscerradosoenunazonaconpoca
ventilad6n.Elescapedel motorcontienemon6xidodecarbono,ungas
inodoroyletal.
AntesdeIlmpiar,repararo lnspecdonarlam_quina,compruebequela
cuchHlay todaslaspartesquesemuevensehandetenldo.Desconecteel
cabledelabujiay p6ngalodemaneraquehagamasacontrael motorpara
evitarqueseendendade maneraaccidental.
Reviselos pernosdemontajedelacuchlllay del motora lntervalos
frecuentesparaverlficarqueest_nbienapretados.Inspecdoneadem_s
vlsualmentelacuchHlaenbuscadeda_os(abolladuras,desgaste,roturas,
etc.).Reemplacelacuchillaconequipooriginaldelfabrkante(OEM)
Ilstadoen estemanual.Lautilizaci6ndepartesqueno cumplanconlas
espedficacionesde equlposoriginalespodriatenercomoresultadoun
rendimlentolncorrectoy adem_slasegurldadpodriaestarcomprometida.
LascuchHlasde laspodadorassonmuyafiladasy podriancortarlo.Envuelva
lacuchillao utiliceguantesy extremeprecaudonescuandoledeservkio.
Mantengatodoslospernos,tuercasy tornillosbienajustadospara
asegurarsequelam_qulnaseencuentraencondlclonessegurasde
operad6n.
Nuncamanipulelosdispositivosdesegurldadde maneralmprudente.
Controleperi6dicamentequefundonendeformaadecuada.
Despu_sdegolpearconalgtinobjetoextra,o,detengael motor,desconecte
elcabledelabujiay conecteel motoramasa.Inspecdoneminudosamente
lam_quinaparadetermlnarsiest_da_ada.Repareelda_oantesde
encenderlay operarla.
Nuncatrate deajustarunaruedao laalturadecortemientrasel motorest_
enmarcha.
Loscomponentesde latolva pararecorte,cublertadedescargayescudode
riel,est_nsujetosadesgastey daffosquepodriadejarexpuestaspartesque
semueveno permltirquesearrojenobjetos.Paraprotegersusegurldad,
verlfiquefrecuentementetodosloscomponentesy reempl_celoss61ocon
partesdelosfabrkantesdeequlposoriginales(O.E.M.)listadaseneste
manual.Lautilizad6nde partesquenocumplanconlasespeciflcadonesde
equiposoriginalespodriatenercomoresultadoun rendimlento[ncorrectoy
adem_slasegurldadpodriaestarcomprometida.
Nocambielaconflgurad6ndelreguladordelmotorniaceleredemadadoel
mismo.Elreguladorcontrolalaveloddadm_ximaseguradeoperad6ndel
motor.
Verifiquefrecuentementela lineade combustible,eltanque,eltapbn,ylos
accesoriosbuscandorajaduraso pdrdidas.Reemplacedesernecesario.
Noddarranqueal motorsi noest_labujiadeencendido.
Mantengao reemplacelasetiquetasdeseguridad,segtinseanecesario.
Observelasleyesy normasaplicablesparadisponeradecuadamentedelos
desechos.Ladescargainapropiadadeliquidoso materialespuededa_arel
medioambiente.
SegtinlaComisibnde SeguridaddeProductosparaelConsumidordelos
EstadosUnidos(CPSC)y laAgenciadeProtecci6nAmbientaldelosEstados
Unidos(EPA),esteproductotieneunavidatitil mediade siete(7)a_os,
6 140horasde fundonamiento.AI finalizarlavidatitil media,adquiera
unam_quinanuevao hagainspeccionaranualmente_staSearsporuno
uotrodistribuidordeserviciosparacerciorarsedequetodoslos sistemas
mec_nicosy de seguridadfundonancorrectamenteynotienenexcesivo
desgaste.SinoIohace,puedenprodudrseacddentes,lesionesomuerte.
NO MODIFIQUE EL MOTOR
Paraevitar lesionesgraveso la muerte,no modifique elmotor bajo ninguna
circunstancia.Sicambialaconfiguraci6ndel reguladordel motorel motor
puededescontrolarsey operar avelocidadesinseguras.Nuncacambiela
configuraci6nde f_brica del reguladordel motor.
AVISO REFERIDO A EMISIONES
Losmotoresqueest_ncertificadosycumplen con lasregulacionesde
emisionesfederalesEPAy de CaliforniaparaSORE(Equipospequeffostodo
terreno) est_ncertificadospara operarcon gasolina(omfin sinplomo y
puedenincluirlossiguientessistemasde control de emisiones:Modifkaci6n
de motor (EM)y catalizadordeires vias(TWC)si est_nequipadosde esa
manera.
GUARDACHISPAS
Estam_quinaest_equipadacon un motor de combusti6ninternayno
debeser utilizadaen o cercade un terreno agrestecubierto pot bosque,
malezaso hierbaexceptosi el sistemade escapedel motorest_ equipado
conun amortiguador dechispasquecumpla conlasleyeslocaleso
estatalescorrespondientes,en casodehaberlas.
Siseutiliza un amortiguador dechispasel operadorIo debemantener
en condicionesde usoadecuadas.Enel EstadodeCalifornia las medidas
anteriormente mencionadassonexigidaspotley (Artkulo 4442del C6digo
de RecursosPfiblicosde California).Esposiblequeexistanleyessimilaresen
otros estados,l.asleyesfederalesseaplkan en territorios federales.
Puedeconseguirel amortiguador de cbispasparael silenciadoratray, s desu
distribuidor autorizadode motoreso poni_ndoseencontactoconel centrode
servicioSears.
36
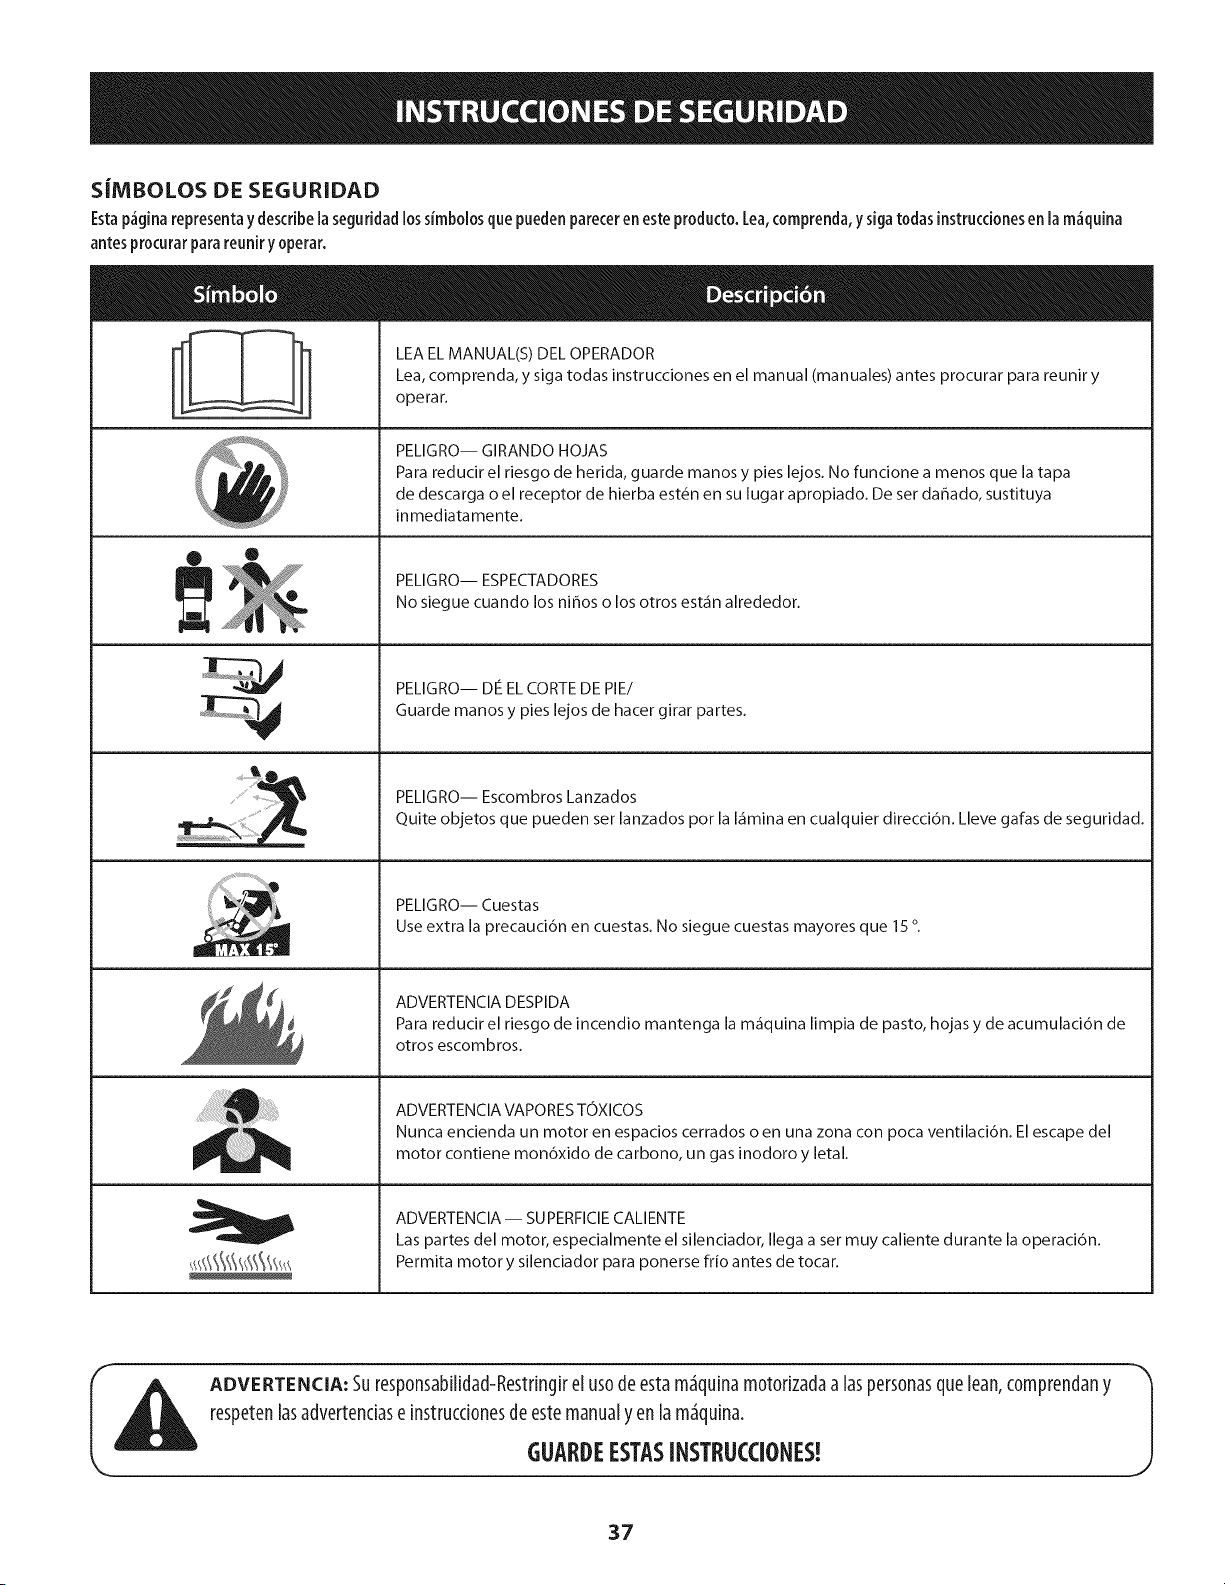
S|MBOLOSDESEGURIDAD
Esta p_gina representa y describe la seguridad los simbolosque pueden parecer en este producto. Lea, comprenda, y siga todas instruccionesen la m_quina
antes procurar para reunir y operar.
• ®
1At
LEA EL MANUAL(S) DEL OPERADOR
Lea, comprenda, y siga todas instrucciones en el manual (manuales) antes procurar para reuniry
operar.
PELIGRO-- GIRANDO HOJAS
Para reducir el riesgo de herida, guarde manos y pies lejos. No funcione a menos que la tapa
de descarga o el receptor de hierba est6n en su lugar apropiado. De ser daflado, sustituya
inmediatamente.
PELIGRO-- ESPECTADORES
No siegue cuando los niflos o los otros est_n alrededor.
PELIGRO-- Die EL CORTE DE PIE/
Guarde manos y pies lejos de hacer girar partes.
PELIGRO-- Escombros Lanzados
Quite objetos que pueden ser lanzados pot la I_mina en cualquier direcci6n. Lleve galas de seguridad.
PELIGRO-- Cuestas
Use extra la precauci6n en cuestas. No siegue cuestas mayores que 15 °.
ADVERTENClA DESPIDA
Para reducir el riesgo de incendio mantenga la m_quina limpia de pasto, hojas y de acumulaci6n de
otros escombros.
ADVERTENCIA VAPORES TOXICOS
Nunca encienda un motor en espacios cerrados o en una zona con poca ventilaci6n. El escape del
motor contiene mon6xido de carbono, un gas inodoro y letal.
ADVERTENClA-- SUPERFIClE CALIENTE
Las partes del motor, especialmente el silenciador, Ilega a set muy caliente durante la operaci6n.
Permita motor y silenciador para ponerse fifo antes de tocar.
ADVERTENCIA: Suresp0nsabilidad-Restringirel us0de esta m_quinam0t0rizadaa laspersonasqueLean,c0mprendany
respetenlasadvertenciase instrucci0nesdeestemanualy en la m_quina.
J
GUARDEESTASINSTRUCCIONES!
37
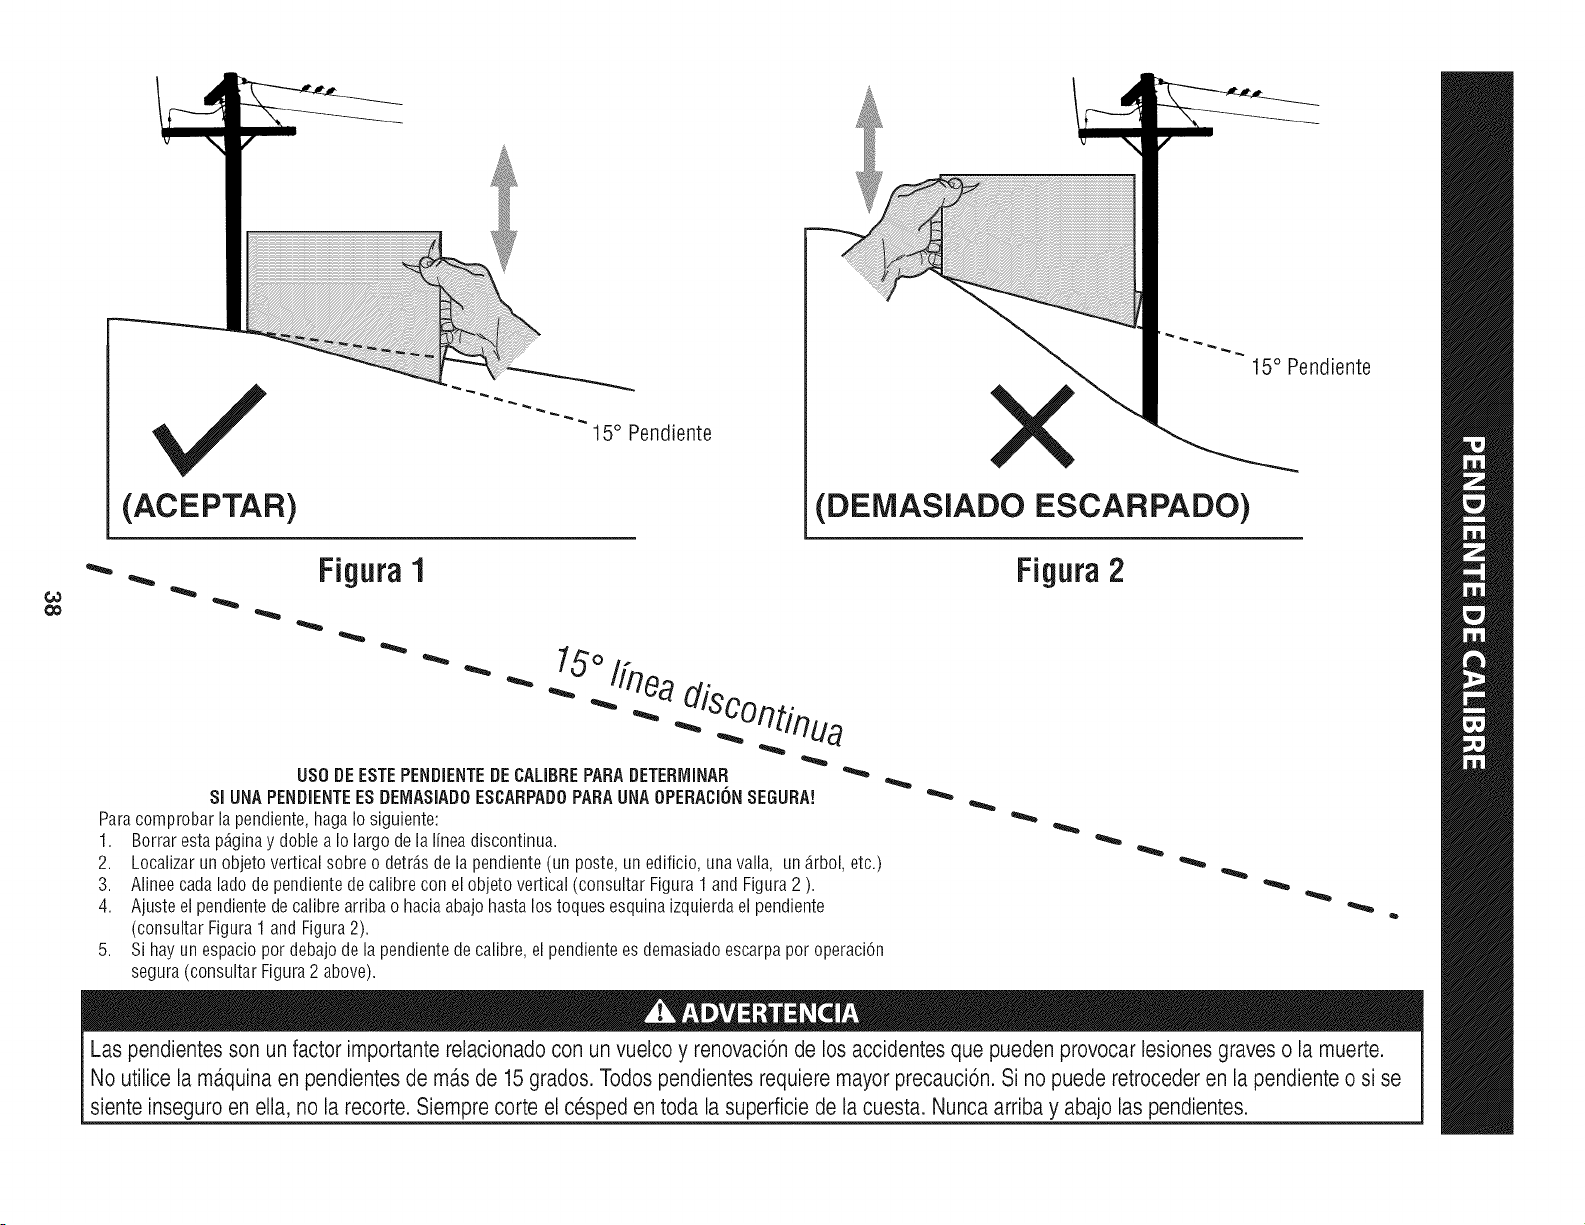
t_
,/
(ACEPTAR)
15° Pendiente
(DEMASIADO ESCARPADO)
_- _. Figura1
" " "- 15°/fneadisco t.
USO BE ESTE PENBiENTE BE CALIBREPARA BETERrvIINAR
SiUNA PENDIENTE ES DEMASIADO ESCARPADO PARA UNA OPERACION SEGURA!
Para comprobar la pendiente, haga Io siguiente:
1. Borrar esta p_gina y doble a Io largo de la linea discontinua.
2.
3.
4.
5,
Localizar un objeto vertical sobre o detr_.sde la pendiente (un poste, un edificio, una valla, un _.rbol,etc.)
Alinee cada lado de pendientede calibre con el objeto vertical (consultar Figura 1 and Figura 2 ).
Ajuste el pendiente de calibre arriba o hacia abajo hasta los toques esquina izquierda el pendiente
(consultar Figura 1 and Figura 2).
Si hay un espacio por debajo de la pendiente de calibre, el pendiente es demasiado escarpa por operaci6n
segura (consultar Figura 2 above).
Figura 2
15° Pendiente
Las pendientesson un factor importante relacionado con un vuelco y renovaci6n de los accidentes que pueden provocar lesiones graves o la muerte.
No utilice la ma.quinaen pendientes de ma.sde 15grados. Todos pendientesrequiere mayor precauci6n. Si no puede retroceder en la pendiente o si se
siente inseguro en ella, no la recorte. Siempre corte el cesped en toda la superficie de la cuesta. Nuncaarriba y abajo las pendientes.
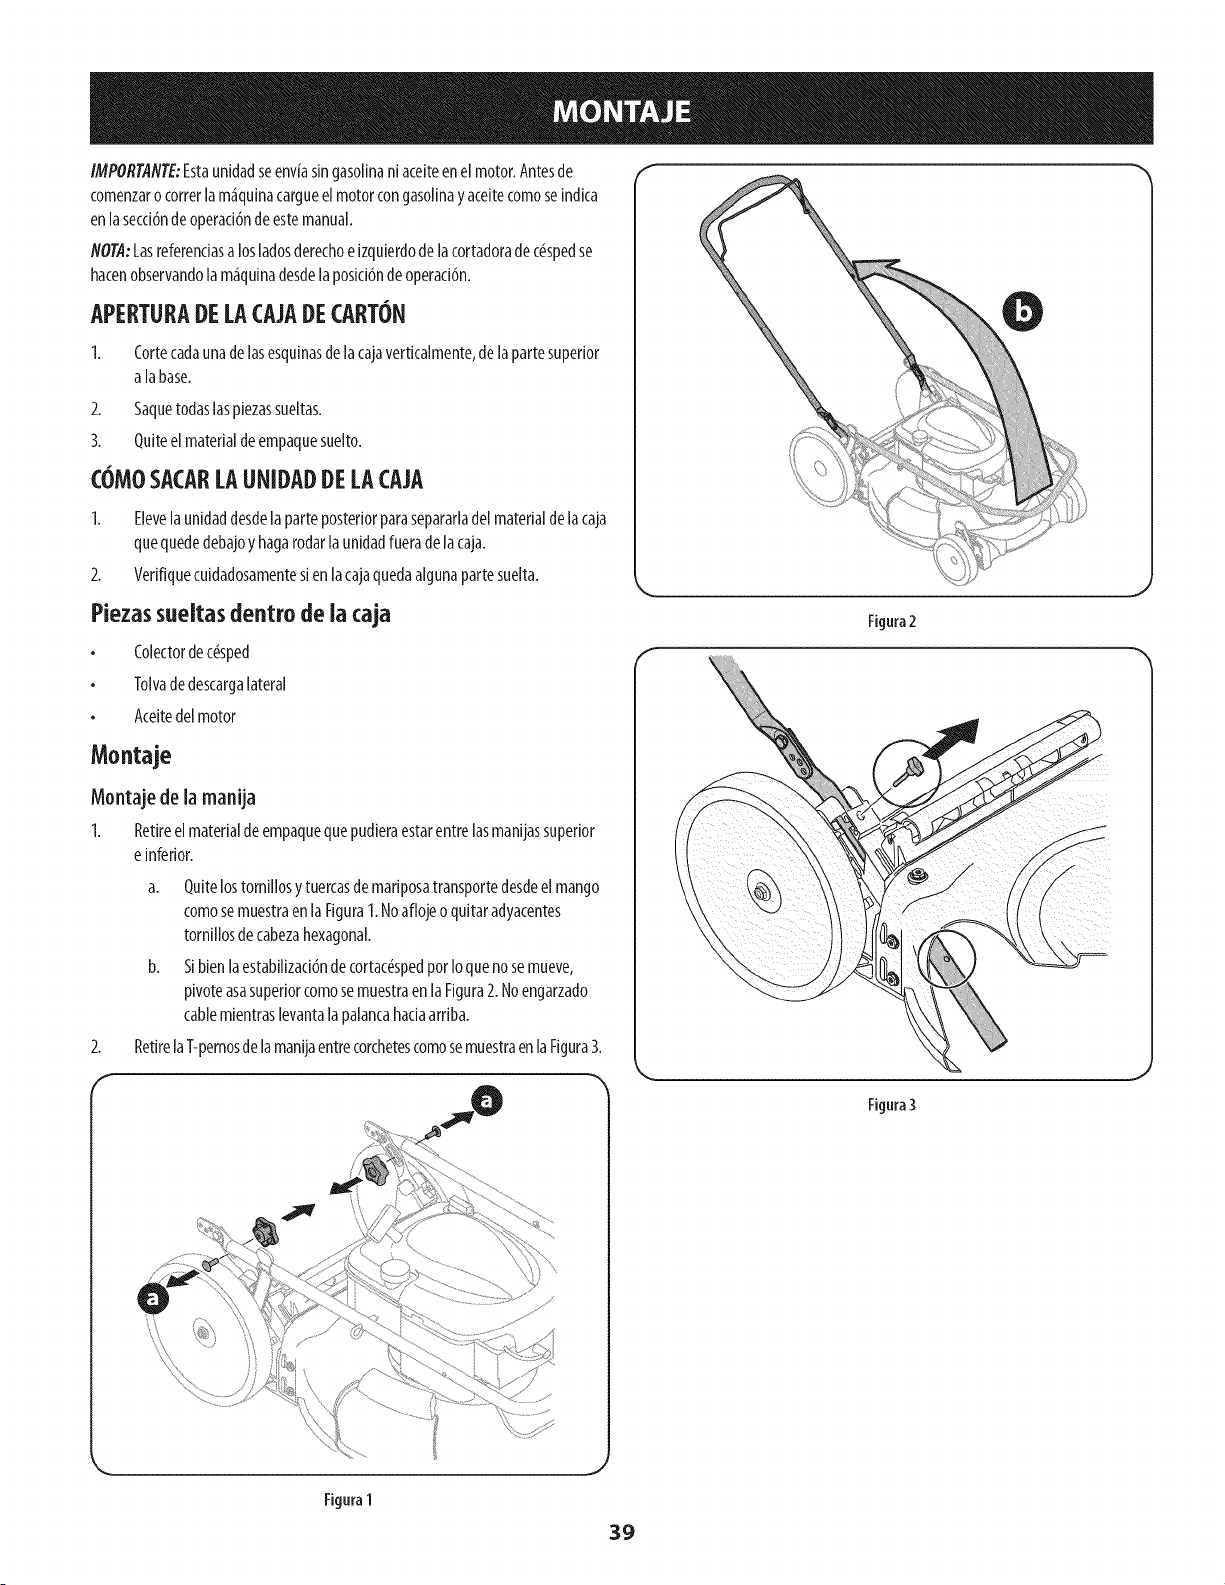
IMPORT,4NTE:Estaunidadseenviasin gasolinani aceiteenelmotor.Antesde
comenzarocorrerlam_quinacargueelmotorcongasolinay aceitecomoseindica
enlasecddnde operaddndeestemanual.
NOT,4:Lasreferendasa losladosderechoe izquierdodela cortadoradec_spedse
hacenobservandolam_quinadesdelaposiddndeoperaddn.
APERTURADELACAJADECARTON
1. Cortecadaunade lasesqulnasde lacajaverticalmente,delapartesuperior
alabase.
2. Saquetodaslasplezassueltas.
3. Quiteelmaterialdeempaquesuelto.
COMOSACARLAUNIDADDELACAJA
1. Elevelaunldaddesdela parteposteriorparasepararladel materialdelacaja
quequededebajoyhagarodarlaunldadfueradelacaja.
2. Verlfiqueculdadosamentesienlacajaquedaalgunapartesuelta.
Piezassueltasdentro de lacaja
Colectordec_sped
Tolvade descargalateral
Aceitedel motor
Montaje
Montaje de la manUa
I. Retireelmaterialdeempaquequepudieraestarentrelasmanijassuperior
einferior.
2.
f
a. Quitelostornlllosy tuercasde marlposatransportedesdeel mango
comosemuestraenlaFlgura1.Noaflojeo qultaradyacentes
tornlllosdecabezahexagonal.
b. S[bienlaestablllzad6ndecortac_spedporIoquenosemueve,
pivoteasasuperiorcomosemuestraen laFlgura2. Noengarzado
cablemlentraslevantala palancahadaarrlba.
RetirelaT-pernosdelamanljaentrecorchetescomosemuestraenla Flgura3.
Figura 2
Figura 3
Figura 1
39
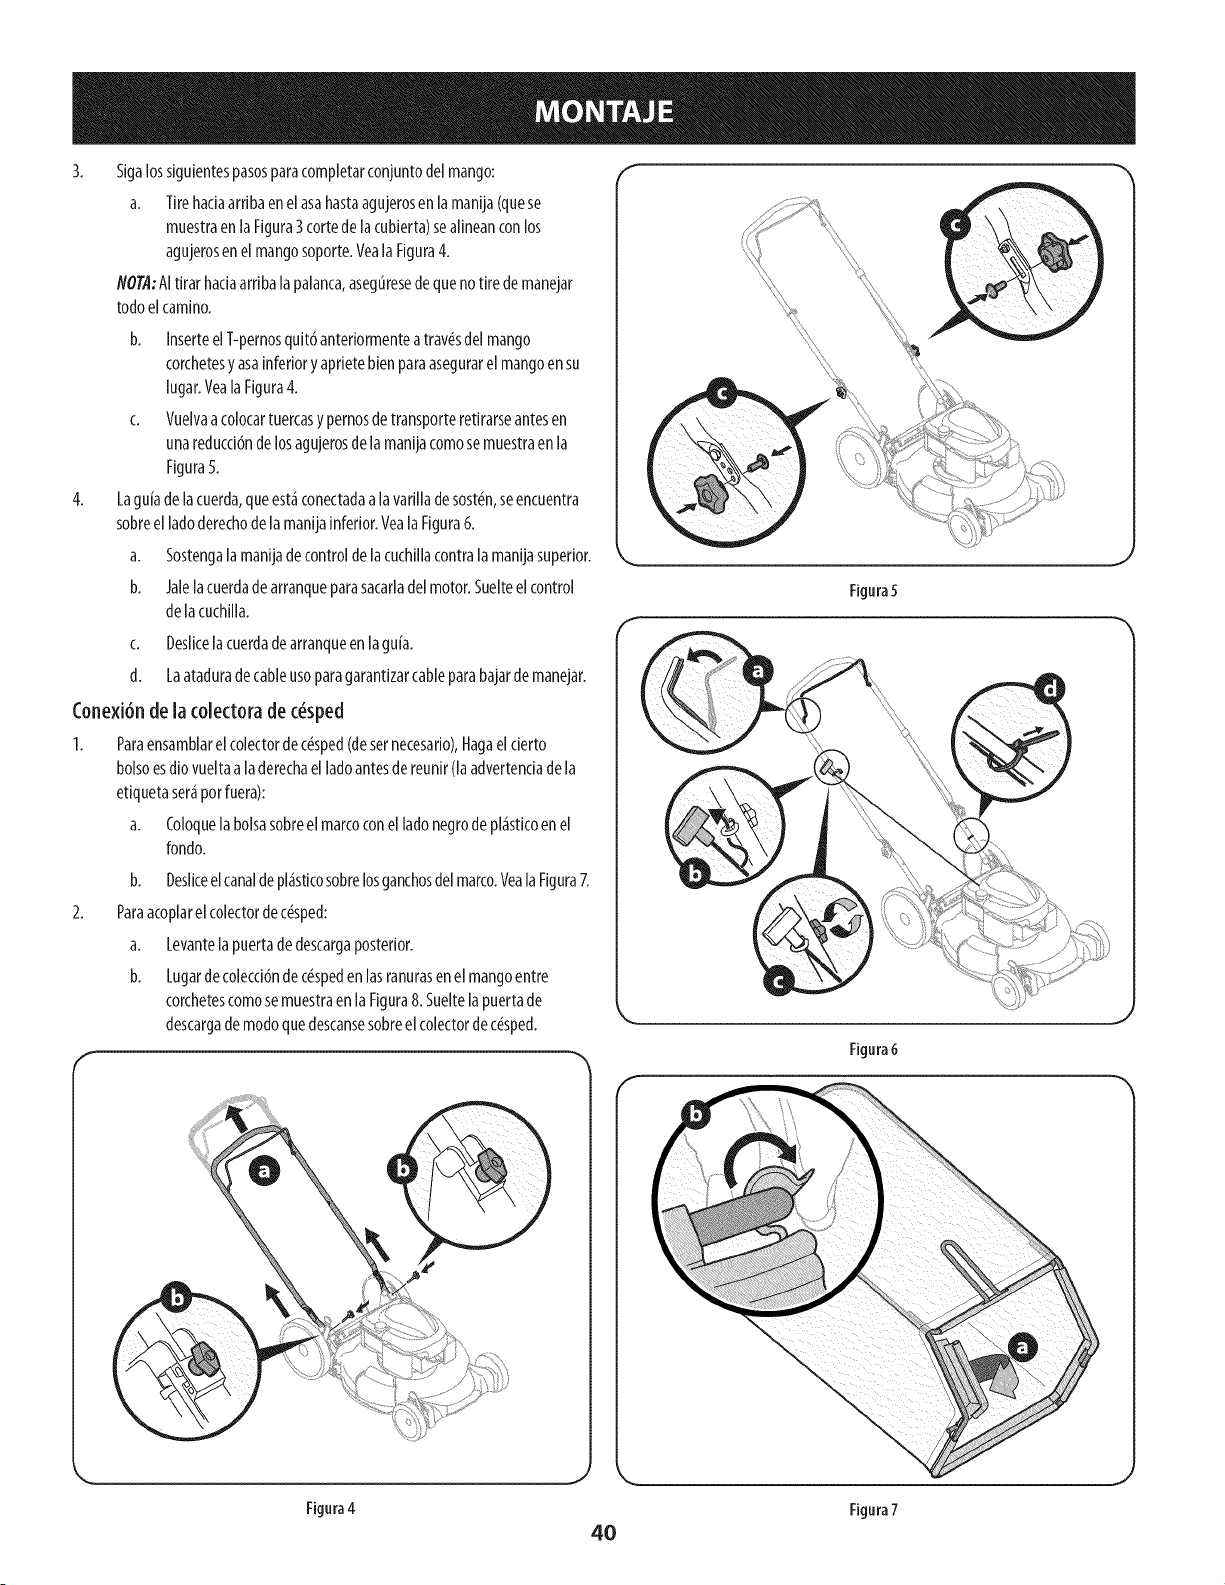
4.
Sigalossiguientespasosparacompletarconjuntodel mango:
a. Tirehadaarribaenelasahastaagujerosenlamanija(quese
muestraen la Figura3cortede la cubierta)sealineanconlos
agujerosenelmangosoporte.YealaFigura4.
NOTA:AItirar hadaarribala palanca,asegtiresedequeno tiredemanejar
todoelcamino.
b. Inserteel T-pernosquit6anteriormenteatrav_sdelmango
corchetesy asainferiory aprietebienparaasegurarelmangoensu
lugar.VealaFigura4.
c. Vuelvaacolocartuercasy pernosdetransporteretirarseantesen
unareducdbndelosagujerosde lamanijacomosemuestraen la
Figura5.
Lagu[adelacuerda,queest_conectadaalavarilladesost_n,seencuentra
sobreel ladoderechodela manijainferior.VealaFigura6.
a. Sostengala manijadecontrolde la cuchillacontrala manijasuperior.
b. Jalelacuerdadearranqueparasacarladel motor.Suelteelcontrol
delacuchilla.
c. Deslicela cuerdadearranqueen laguia.
d. Laataduradecableusoparagarantizarcableparabajardemanejar.
Conexi6nde la (olectora de (_sped
I. Paraensamblarelcolectordec_sped(desernecesario),Hagaelderto
bolsoesdio vueltaa laderechaelladoantesdereunir(la advertendadela
etiquetaser_potfuera):
a. Coloquela bolsasobreelmarcoconel ladonegrode pl_sticoenel
rondo.
b. Deslkeel canaldepl_sticosobrelosganchosdelmarco.VealaFigura7.
Paraacoplarel colectordec_sped:
a. Levantelapuertadedescargaposterior.
b. Lugardecolecd6ndec_speden lasranurasen elmangoentre
corchetescomosemuestraenla Figura8. Sueltelapuertade
descargademodoquedescansesobreelcolectordec_sped.
Figura5
Figura 6
J
Figura4
40
Figura7
,J
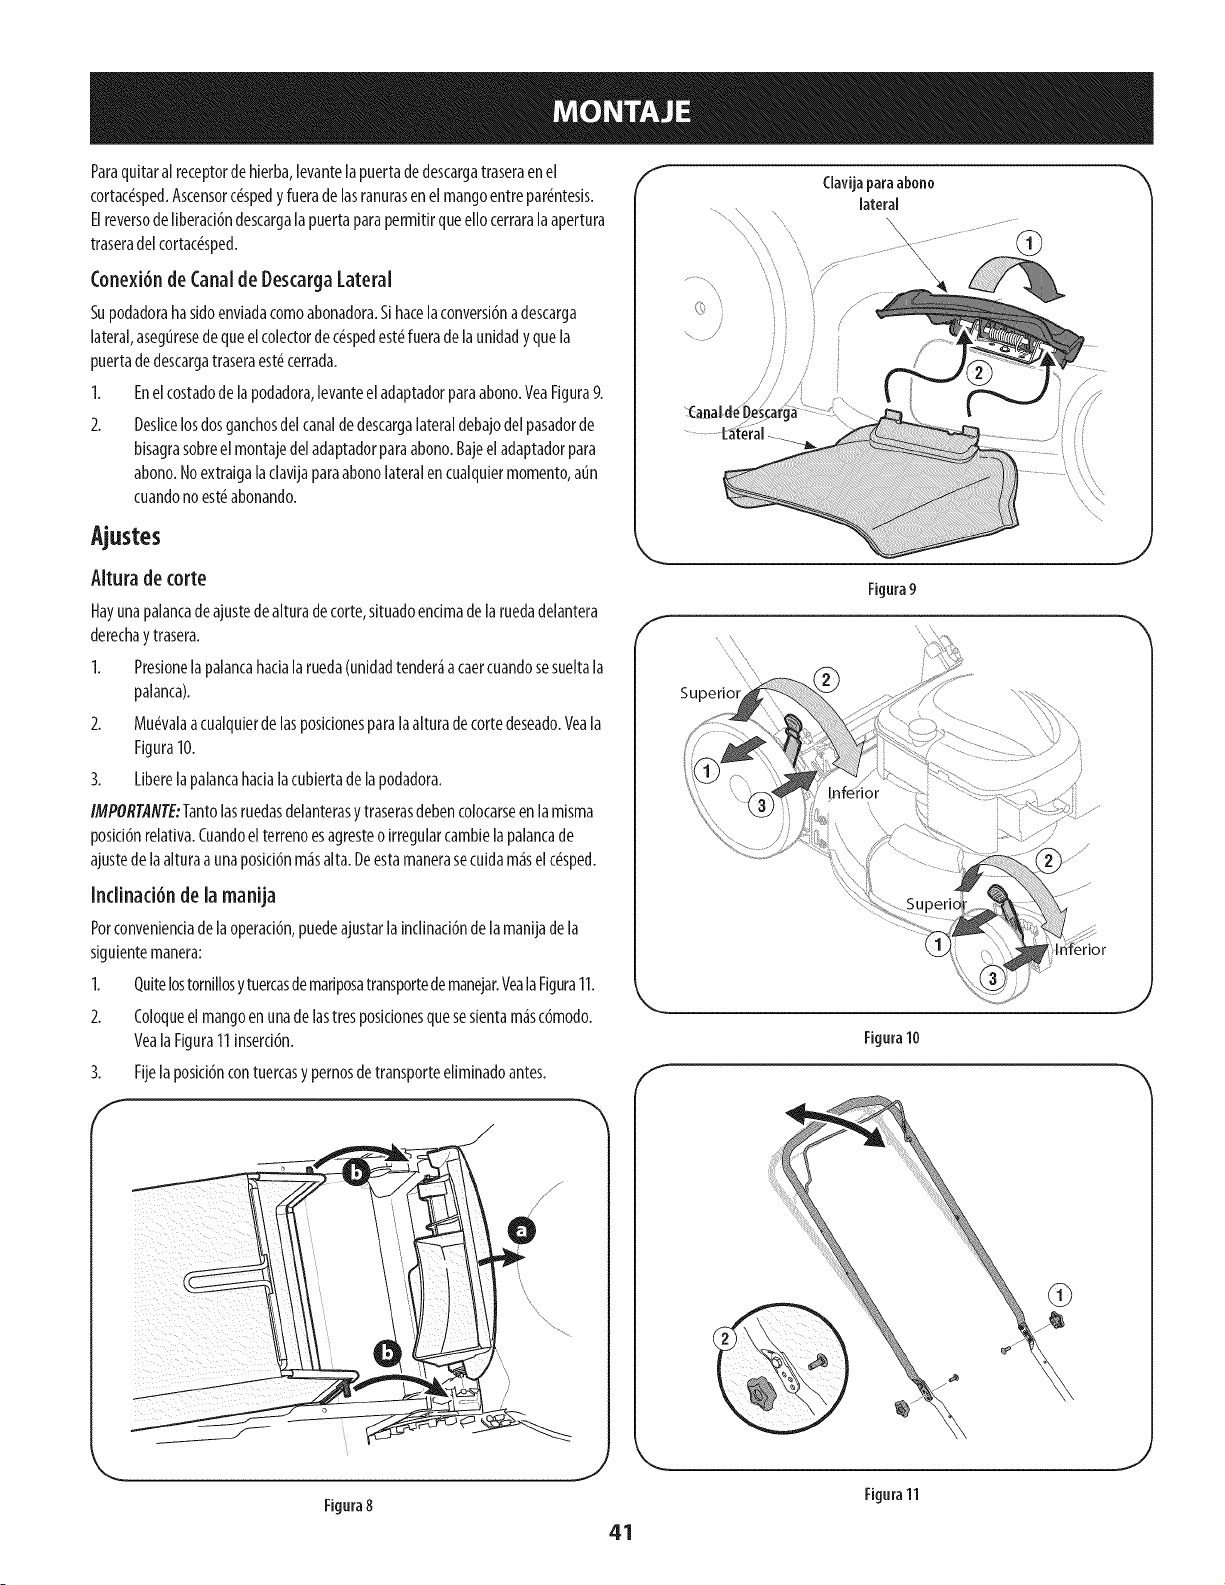
Paraquitaral receptordehlerba,levantelapuertadedescargatraseraenel
cortac_sped.Ascensorc_spedy fueradelasranurasenel mangoentrepar_ntesis.
Elreversodeliberad6ndescargalapuertaparapermitirqueellocerraralaapertura
traseradelcortac_sped.
Conexi6nde Canalde DescargaLateral
Supodadoraha sidoenviadacomoabonadora.Sihatelaconversi6nadescarga
lateral,asegtiresedequeelcolectordec_spedest_fuerade launidady quela
puertadedescargatraseraest_cerrada.
1. Enelcostadodelapodadora,levanteeladaptadorparaabono.YeaFigura9.
2. Deslicelosdosganchosdelcanaldedescargalateraldebajodelpasadorde
bisagrasobreelmontajedel adaptadorparaabono.Bajeel adaptadorpara
abono.Noextraigala davija paraabonolateralencualquiermomento,atin
cuandono est_abonando.
Ajustes
Altura de corte
Hayunapalancadeajustede alturadetorte,situadoencimadelaruedadelantera
derechay trasera.
1. Presionelapalancahacialarueda(unidadtender_acaercuandosesueltala
palanca).
2. Mu_valaacualquierde lasposicionesparalaalturadetortedeseado.Veala
Figura10.
3. Liberelapalancahadalacubiertadelapodadora.
IMPORTANTE:Tantolasruedasdelanterasy traserasdebencolocarseen la misma
posid6nrelativa.Cuandoelterrenoesagresteo irregularcambielapalancade
ajustede laalturaa unaposici6nm_salta. Deestamanerasecuidam_selc_sped.
Indinaci6n de la manija
Porconvenienciade laoperaci6n,puedeajustarlainclinaci6ndelamanijadela
siguientemanera:
1. Quitelostornillosy tuercasdemariposatransportedemanejar.VealaFigura11.
2. Coloqueel mangoenunadelastresposicionesquesesientam_sc6modo.
YealaFigura11inserd6n.
3. Fijela posici6ncontuercasy pernosdetransporteeliminadoantes.
Figura8
J
41
f
Clavijaparaabono
lateral
//;
\\
Figura9
\\
Superiol
Figura10
J
Figura11
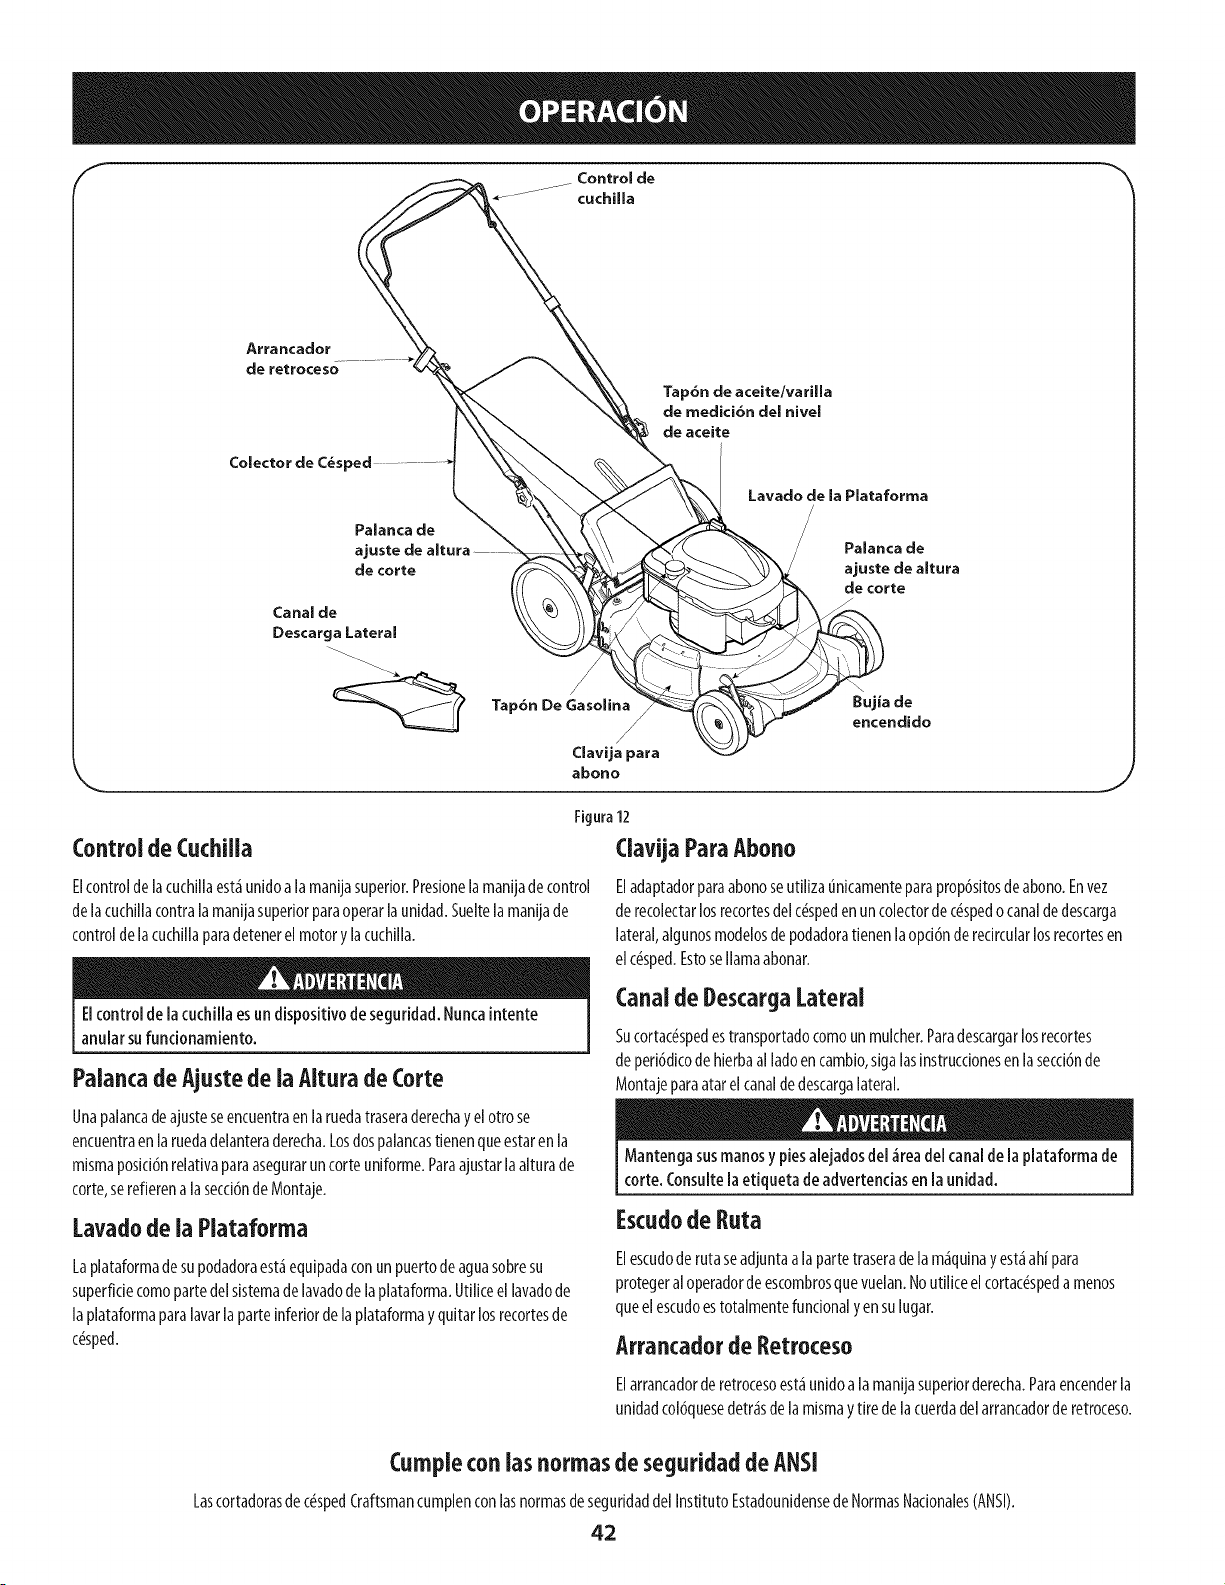
Control de
cuchilla
Tap6n de aceite/varilla
de medici6n de[ hive[
de aceite
Colector de C_sped
Lavado de la Piataforma
Palanca de
ajuste de
de torte
Canal de
Descarga Lateral
Tap6n De Gasoiina
/
Clavija para
Palanca de
ajuste de aJtura
de corte
\
Elujia de
encendido
abono
Control de Cuchiila
Figura12
Clavija ParaAbono
Elcontrolde lacuchillaest_unidoalamanijasuperior.Presionelamanijadecontrol
delacuchillacontralamanijasuperiorparaoperarlaunidad.Sueltelamanijade
controlde lacuchillaparadetenerelmotory lacuchilla.
Elcontrol de lacuchilla esun dispositivode seguridad.Nuncaintente
anular sufuncionamiento.
Palancade Ajustede ia AIturade torte
Eladaptadorparaabonoseutiiizat_nicamenteparaprop6sitosdeabono.Envez
de recolectarlosrecortesdelc_spedenuncolectordec_spedo canaldedescarga
lateral,algunosmodelosdepodadoratienenlaopd6nderecircularlosrecortesen
elc_sped.Estosellamaabonar.
Canalde DescargaLateral
Sucortac_spedestransportadocomounmulcher.Paradescargarlosrecortes
de peri6dicodehierbaalladoencambio,sigalasinstrucdonesen lasecd6nde
Montajeparaatarelcanaldedescargalateral.
Unapalancadeajusteseencuentraen laruedatraseraderechayel otrose
encuentraenlaruedadelanteraderecha.Losdospalancastienenqueestarenla
mismaposici6nrelativaparaaseguraruncorteuniforme.Paraajustarlaalturade
corte,serefierena la secd6ndeMontaje.
Lavadode la Plataforma
Laplataformadesupodadoraest_equipadaconunpuertode aguasobresu
superfidecomopartedelsistemadelavadode laplataforma.Utiliceellavadode
laplataformaparalavarla parteinferiordelaplataformay quitar losrecortesde
c_sped.
Mantengasusmanosy piesalejadosdel _readel canalde la plataformade
corte. Consultela etiqueta de advertendasen la unidad.
Escudode Ruta
Elescudode rutaseadjuntaala partetraseradelam_quinay est_ahipara
protegeraloperadorde escombrosquevuelan.Noutiliceelcortac#spedamenos
queel escudoestotalmentefuncionalyen sulugar.
Arrancadorde Retroceso
Elarrancadorderetrocesoest_unidoa lamanijasuperiorderecha.Paraencenderla
unidadcol6quesedetr_sde lamismay tire de lacuerdadelarrancadorde retroceso.
Cumplecon ias normasdeseguridad deANSi
Lascortadorasdec_spedCraftsmancumplenconlasnormasdeseguridaddelInstituto EstadounidensedeNormasNacionales(ANSI).
42
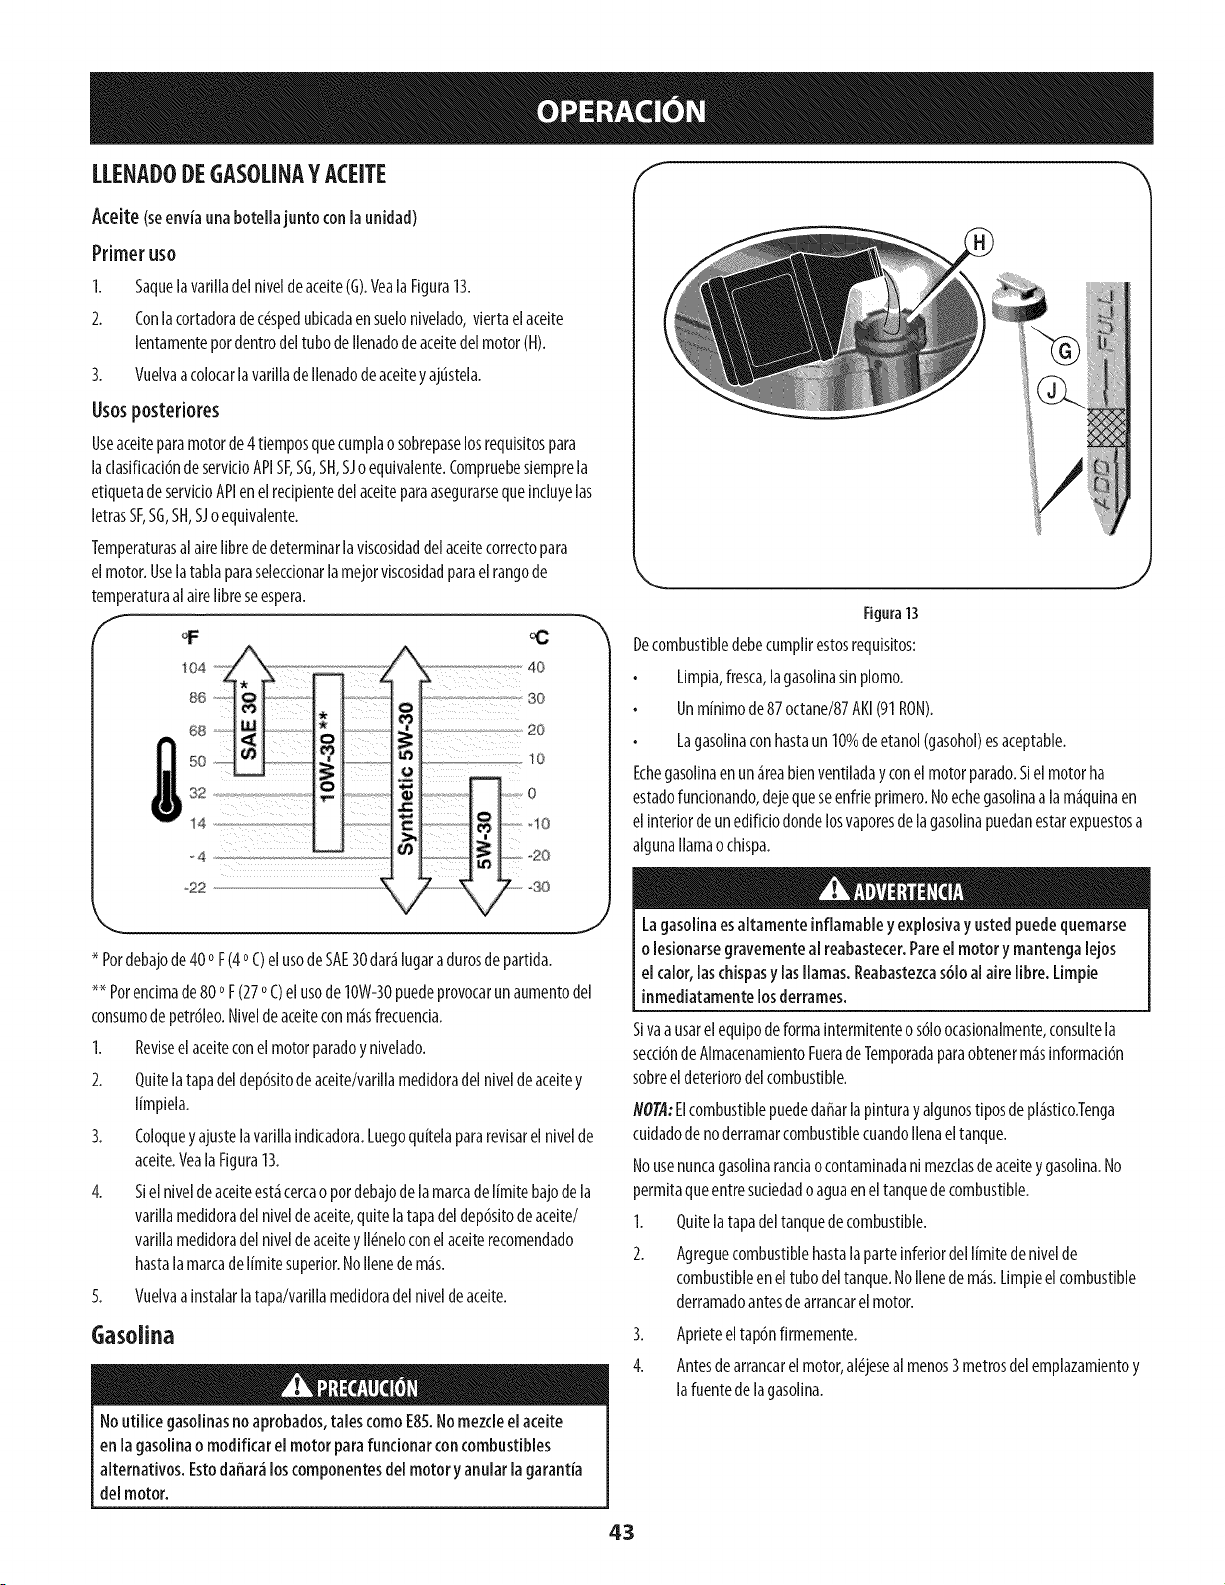
LLENADODEGASOUNAYACEITE f
AceJte (seenviauna botellajuntoconla unidad)
Primer uso
1. Saquela varilladel niveldeaceite(G).VealaFigura13.
2. Conlacortadoradec_spedubkadaensuelonivelado,viertaelaceite
lentamentepordentrodeltubo deIlenadode aceitedel motor(H).
3. Vuelvaacolocarlavarillade Ilenadodeaceitey ajtistela.
Usos postedores
Useaceiteparamotorde4 tiemposquecumplaosobrepaselosrequisitospara
laclasificaci6nde servkioAPISF,%, SH,SJoequivalente.Compruebesiemprela
etiquetadeservidoAPIen elredpientedel aceiteparaasegurarsequeincluyelas
letrasSF,SG,SH,SJoequivalente.
Temperaturasal airelibre dedeterminarlavlscosidaddelaceitecorrectopara
el motor.Uselatablaparaselecdonarlamejorviscosidadparaelrangode
temperaturaal airelibreseespera.
lO4 _
86 i Z
s°
s2
14
_4
_22
4O
o so
2o
18
8
10
_20
J
Pordebajode40° F(4° C)elusodeSAE30dar_ilugaradurosdepartida.
_ Porencimade 80oF(27oC)elusode 10W-30puedeprovocarunaumentodel
consumodepetr61eo.Niveldeaceiteconm_isfrecuencia.
1. Reviseel aceiteconel motorparadoy nivelado.
2. Quitelatapadeldep6sitodeaceite/varillamedidoradel niveldeaceitey
limpiela.
3. Coloquey ajustelavadllaindkadora.Luegoquitelapararevisarel nivelde
aceite.VealaFigura13.
4. Siel niveldeaceiteest,1cercao pordebajode lamarcade limitebajode la
vadllamedidoradel niveldeaceite,quitelatapadel dep6sitodeaceite/
varillamedidoradel niveldeaceitey II_neloconelaceiterecomendado
hastalamarcadelimite superior.NoIlenede m_is.
5. Vuelvaainstalarlatapa/varillamedidoradelniveldeaceite.
Gasolina
Noutilice gasolinasno aprobados,tales comoE85.Nomezcleel aceite
en la gasolinao modifkar el motor parafundonar concombustibles
alternativos.Estodahar_ loscomponentesdel motor y anularla garant(a
del motor.
Figura 13
Decombustibledebecumplirestosrequlsitos:
Limpia,fresca,la gasolinasin plomo.
Unminimode87octane/87AKI(91RON).
J
Lagasolinaconhastaun 10%de etanol(gasohol)esaceptable.
Echegasolinaen un_ireabienventiladayconel motorparado.Sielmotorha
estadofundonando,dejequeseenfdepdmero.Noechegasolinaa lam_iquinaen
elinteriordeunedifldo dondelosvaporesdelagasolinapuedanestarexpuestosa
algunallamao chispa.
Lagasolinaesaltamente inflamabley explosivay ustedpuedequemarse
o lesionarsegravementeal reabastecer.Pareel motory mantengalejos
el calor,laschispasy lasllamas.Reabastezcas61oalaire fibre. Limpie
inmediatamente losderrames.
Sivaa usarel equipodeformaintermltenteos6loocasionalmente,consultela
secd6ndeAlmacenamientoFuerade Temporadaparaobtenerm_isinformad6n
sobreel detedorodelcombustible.
NOTA:Elcombustiblepuededaffarlapinturay algunostiposdepl_istico.Tenga
cuidadodenoderramarcombustiblecuandoIlenaeltanque.
Nousenuncagasolinaranciaocontaminadani mezdasdeaceitey gasolina.No
permitaqueentresuciedado aguaeneltanquede combustible.
1. Quitelatapadeltanquede combustible.
2. Agreguecombustiblehastala parteinferiordellimitedenivelde
combustibleeneltubodeltanque.NoIlenedem_is.Limpieelcombustible
derramadoantesdearrancarelmotor.
3. Apneteeltap6nfirmemente.
4. Antesdearrancarelmotor,al_jesealmenos3 metrosdelemplazamientoy
lafuentedelagasolina.
43
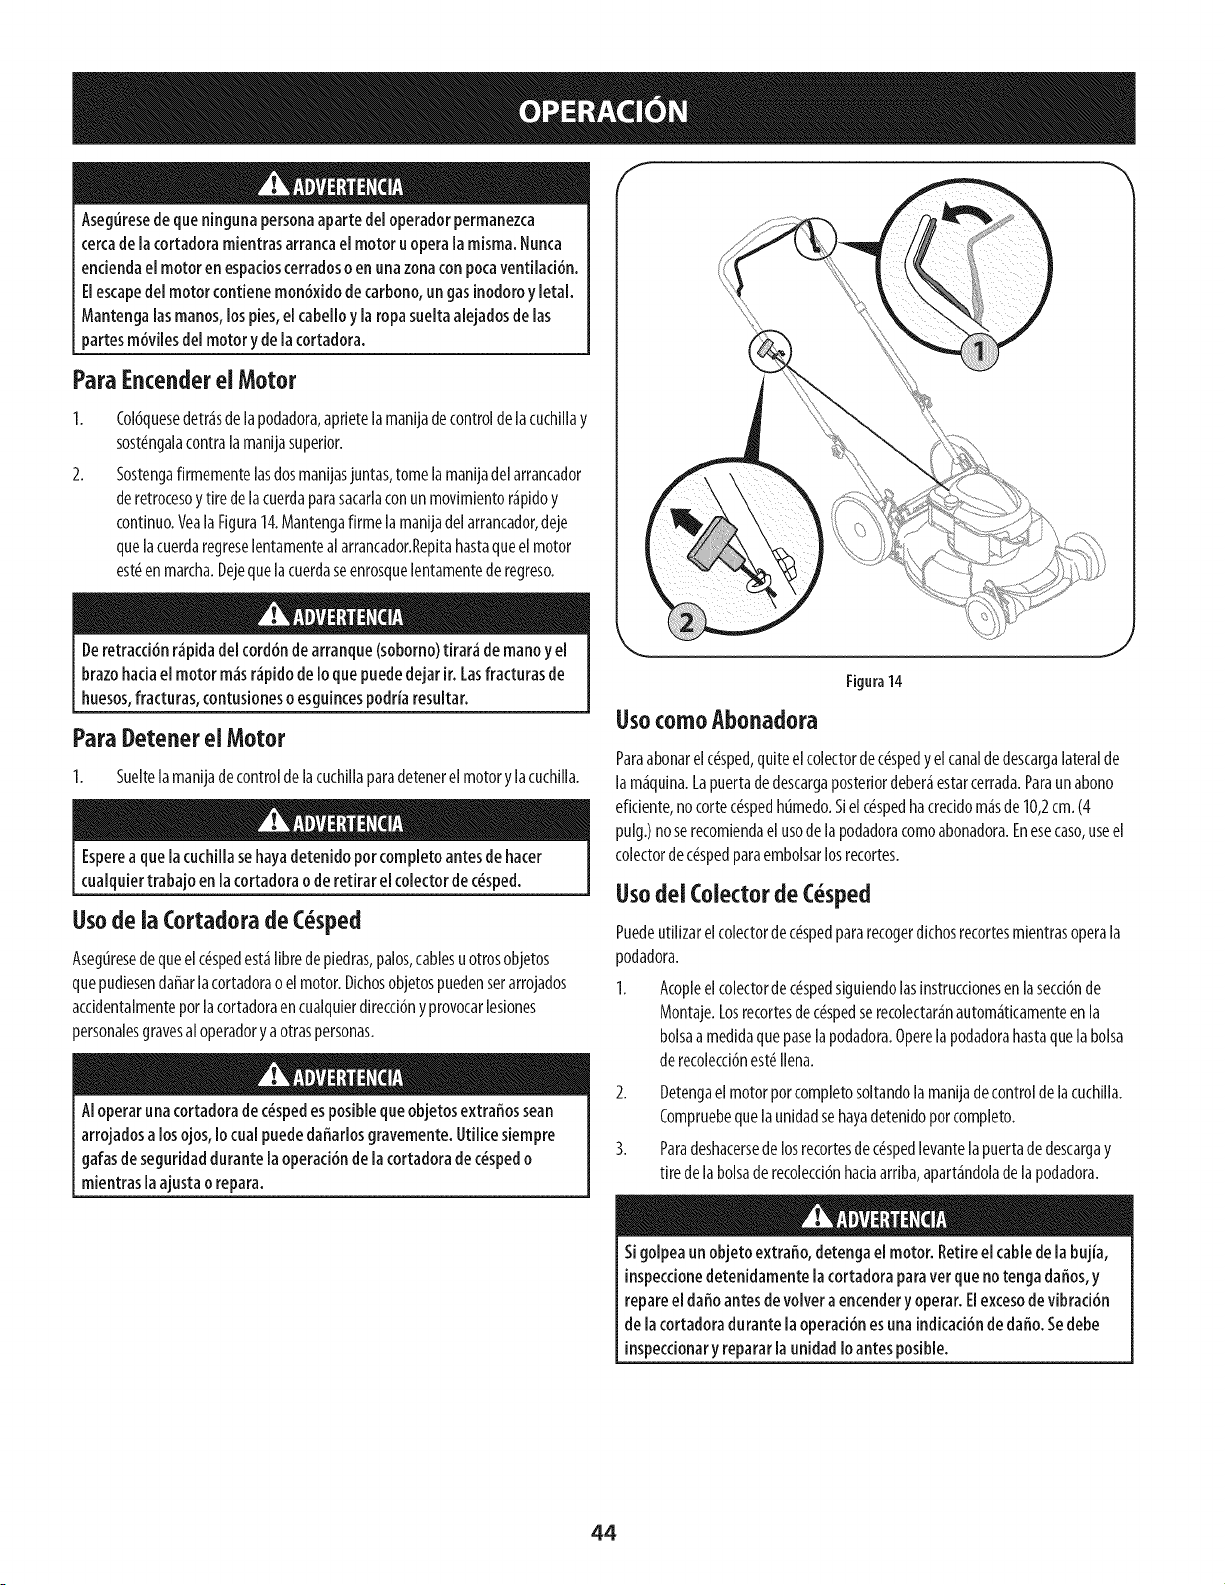
Aseguresede que ningunapersonaaparte del operador permanezca
cercade la cortadoramientrasarrancael motor u operala misma.Nunca
enciendael motor en espacioscerradosoen una zonacon pocaventilaci6n.
Elescapedel motor contienemon6xidodecarbono,un gasinodoroy letal.
Mantengalasmanos,lospies,el cabelloy la ropasueltaalejadosdelas
partesm6vilesdel motor y de la cortadora.
ParaEncenderel Motor
Col6quesedetr_sde lapodadora,aprietelamanijadecontroldelacuchillay
sost_ngalacontralamanijasuperior.
Sostengafirmementelasdosmanijasjuntas,tome lamanijadelarrancador
deretrocesoy tire delacuerdaparasacarlaconunmovimientor_pidoy
continuo.VealaFlgura14.Mantengafirmelamanljadelarrancador,deje
quela cuerdaregreselentamentealarrancador.Repitahastaqueelmotor
est_en marcha.Dejequelacuerdaseenrosquelentamentede regreso.
Deretracci6nr_pidadel cord6ndearranque (soborno)tirar_ de manoy el
brazohaciael motor m_sr_pidode Io quepuededejar it. Lasfracturasde
huesos,fracturas,contusionesoesguincespodriaresultar.
Para Detener ei Motor
1. Sueltelamanijadecontrolde lacuchillaparadetenerelmotory lacuchilla.
Esperea que[acucNiia sehayadetenido pot compietoantesde hacer
cua[quiertrabajo en [a cortadoraode retirare[ co[ectordec_sped.
Usode ia Cortadora de C_sped
AsegLiresede queelc_spedest_librede piedras,palos,cablesuotrosobjetos
quepudiesendaffarlacortadorao el motor.Dkhosobjetospuedenserarrojados
acddentalmenteporlacortadoraencualquierdirecd6nyprovocarlesiones
personalesgravesal operadory a otraspersonas.
AIoperarunacortadorade c_spedesposiblequeobjetosextraffossean
arrojadosa los ojos,Io cual puededaffarlosgravemente.Utilicesiempre
galasdeseguridaddurantela operaci6nde lacortadoradec_spedo
mientraslaajusta o repara.
f
J
Figura14
UsocomoAbonadora
Paraabonarel c_sped,quiteelcolectordec_spedy el canalde descargalateralde
la m_quina.Lapuertadedescargaposteriordeber_estarcerrada.Paraunabono
efidente,nocortec_spedhumedo.SIelc_spedhacreddom_sde 10,2cm.(4
pulg.)noserecomiendaelusode lapodadoracomoabonadora.Enesecaso,useel
colectordec_spedparaembolsarlosrecortes.
Usodei Colectorde C sped
Puedeutilizarelcolectordec_spedpararecogerdichosrecortesmientrasoperala
podadora.
1. Acopleel colectordec_spedsiguiendolas[nstrucdonesen la secd6nde
Montaje.Losrecortesdec_spedserecolectar_nautom_tkamenteen la
bolsaa medidaquepaselapodadora.Operelapodadorahastaquela bolsa
de recolecd6nest_Ilena.
2. Detengaelmotorporcompletosoltandolamanijadecontroldelacuchilla.
Compruebequelaunidadsehayadetenidoporcompleto.
3. Paradeshacersede losrecortesde c_spedlevantelapuertadedescargay
tire delabolsaderecolecd6nhadaarriba,apart_ndoladelapodadora.
Sigolpeaun objeto extraffo, detengael motor. Retireel cablede labujia,
inspeccionedetenidamente lacortadora paravet queno tenga daffos,y
repareel daffoantesde volvera encendery operar.Elexcesode vibraci6n
de lacortadoradurante laoperaci6nesunaindicad6n de daffo.Sedebe
inspecdonary repararla unidadIoantesposible.
44
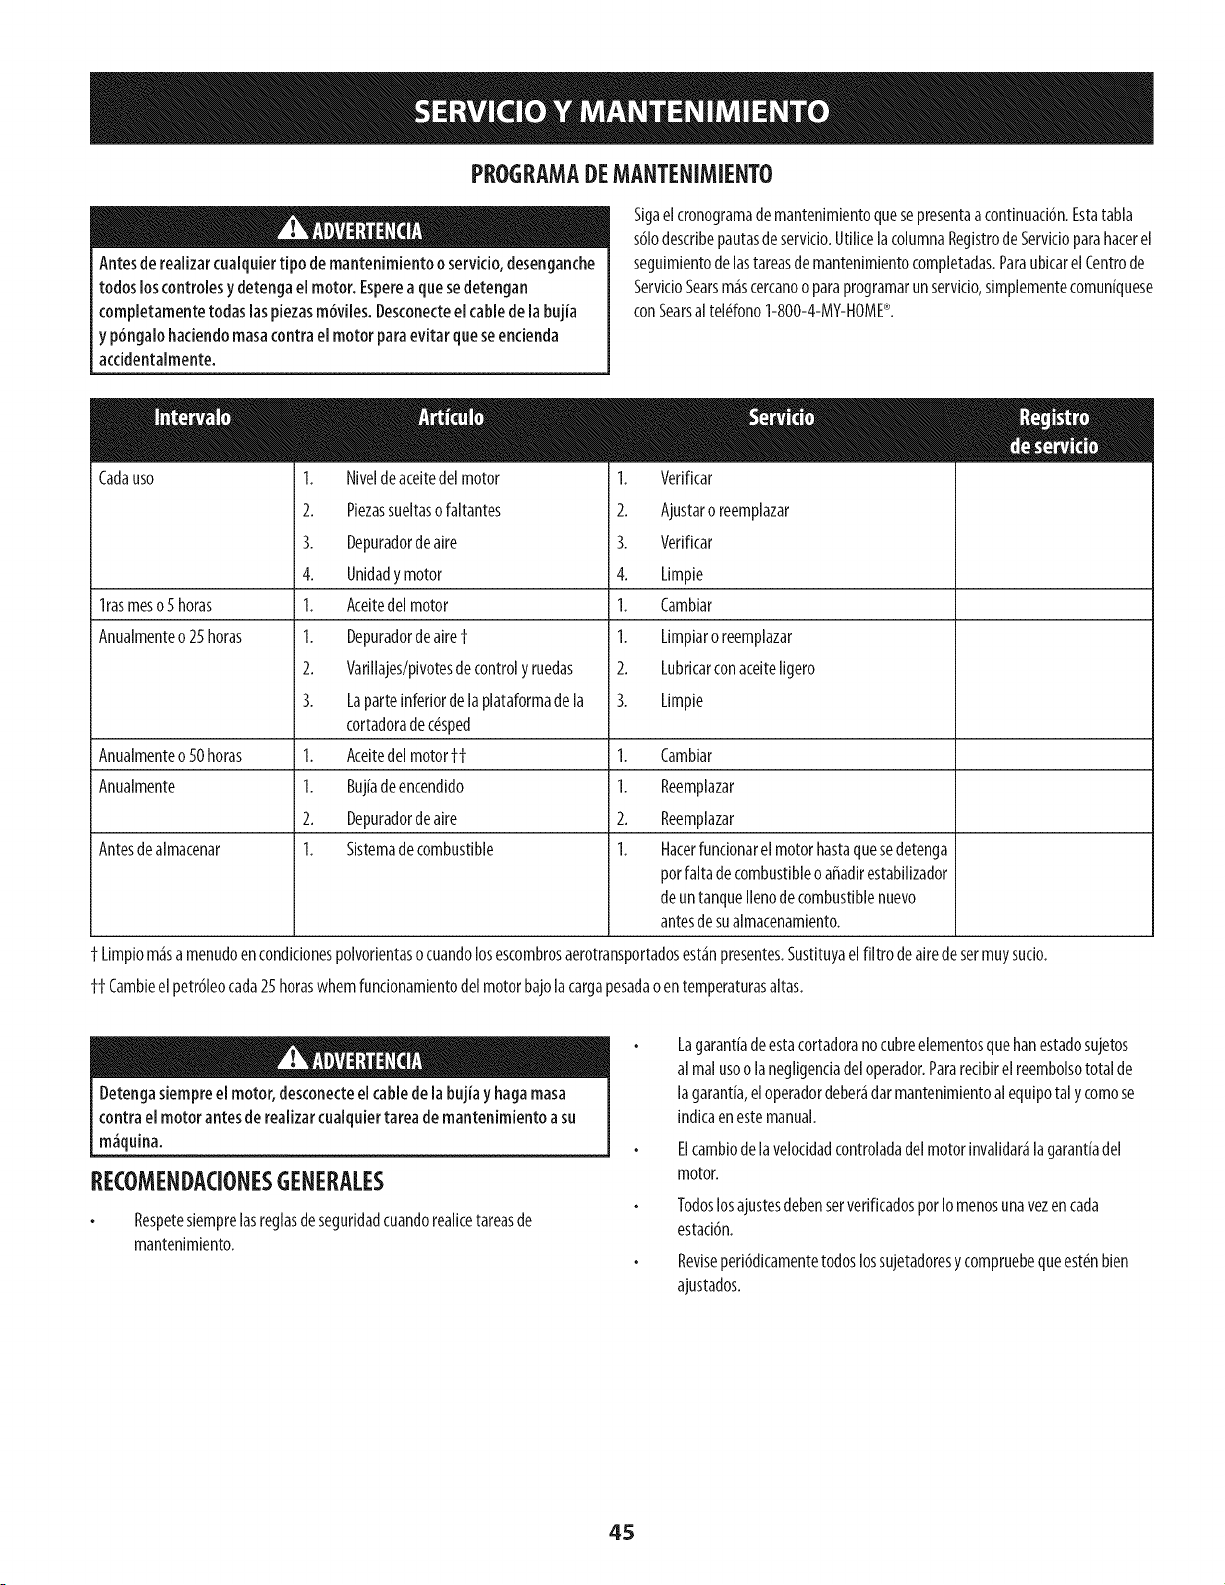
PROGRAMADEMANTENIMIENTO
Antesde realizarcuaiquiertipo de mantenimiento o servicio,desenganche
todos loscontrolesy detengael motor. Esperea quesedetengan
completamentetodaslaspiezasm6viles.Desconecteelcable de labujia
y p6ngalohaciendomasacontrael motor paraevitar queseencienda
accidentalmente.
Sigaelcronogramade mantenimientoquesepresentaa continuaci6n.Estatabla
s61odescribepautasde servicio.UtilicelacolumnaRegistrode Servidoparahacerel
seguimientodelastareasde mantenimientocompletadas.PanubicarelCentrode
ServidoSearsm_scercanoo paraprogramarunservicio,simplementecomuniquese
conSearsal teBfono1-800-4-MY-HOME®.
Cadauso
lras meso5 horas
Anualmenteo25 horas
1. Niveldeaceitedelmotor
2. Piezassueltasofaltantes
3. Depuradordeaire
4. Unidady motor
1. Aceitedel motor
1. Depuradordeairef
2. Varillajes/pivotesde controly ruedas
3. Laparteinferiorde laplataformade la
cortadorade c_sped
Aceitedel motorff
Bujiadeencendido
Depuradordeaire
Sistemadecombustible
1. Verificar
2. Ajustaro reemplazar
3. Verificar
4. Limpie
1. Cambiar
1. Limpiaroreemplazar
2. Lubricarconaceiteligero
3. Limpie
Anualmenteo50horas 1. 1. Cambiar
Anualmente 1. 1. Reemplazar
2. 2. Reemplazar
Antesdealmacenar 1. 1. Hacerfuncionarelmotorhastaquesedetenga
potfaltade combustibleo affadirestabilizador
deuntanqueIlenodecombustiblenuevo
antesdesualmacenamiento.
$ Limpiom_sa menudoencondicionespolvorientaso cuandolosescombrosaerotransportadosest_npresentes.Sustituyaelfiltro deairedesermuysucio.
ff Cambieelpetr6ieocada25horaswhemfuncionamientode[motorbajolacargapesadaoen temperaturasaltas.
Detengasiempree[motor, desconecteel cablede [a buj[ay hagamasa
contrael motor antesde reaiizarcualquiertareade mantenimiento asu
m_quina.
RECOMENDACIONESGENERALES
Respetesiemprelasreglasdeseguridadcuandorealicetareasde
mantenimiento.
Lagarantiadeestacortadorano cubreelementosquehanestadosujetos
al malusoo la negligenciadeloperador.Panredbirel reembolsototal de
lagarantia,el operadordeber_darmantenimientoal equipotaly comose
indicaenestemanual.
Elcambiodelaveloddadcontroladadelmotorinvalidar_lagarantiadel
motor.
TodoslosajustesdebenserverificadosporIo menosunavezencada
estaci6n.
Reviseperi6dicamentetodoslossujetadoresy compruebequeest_nbien
ajustados.
45
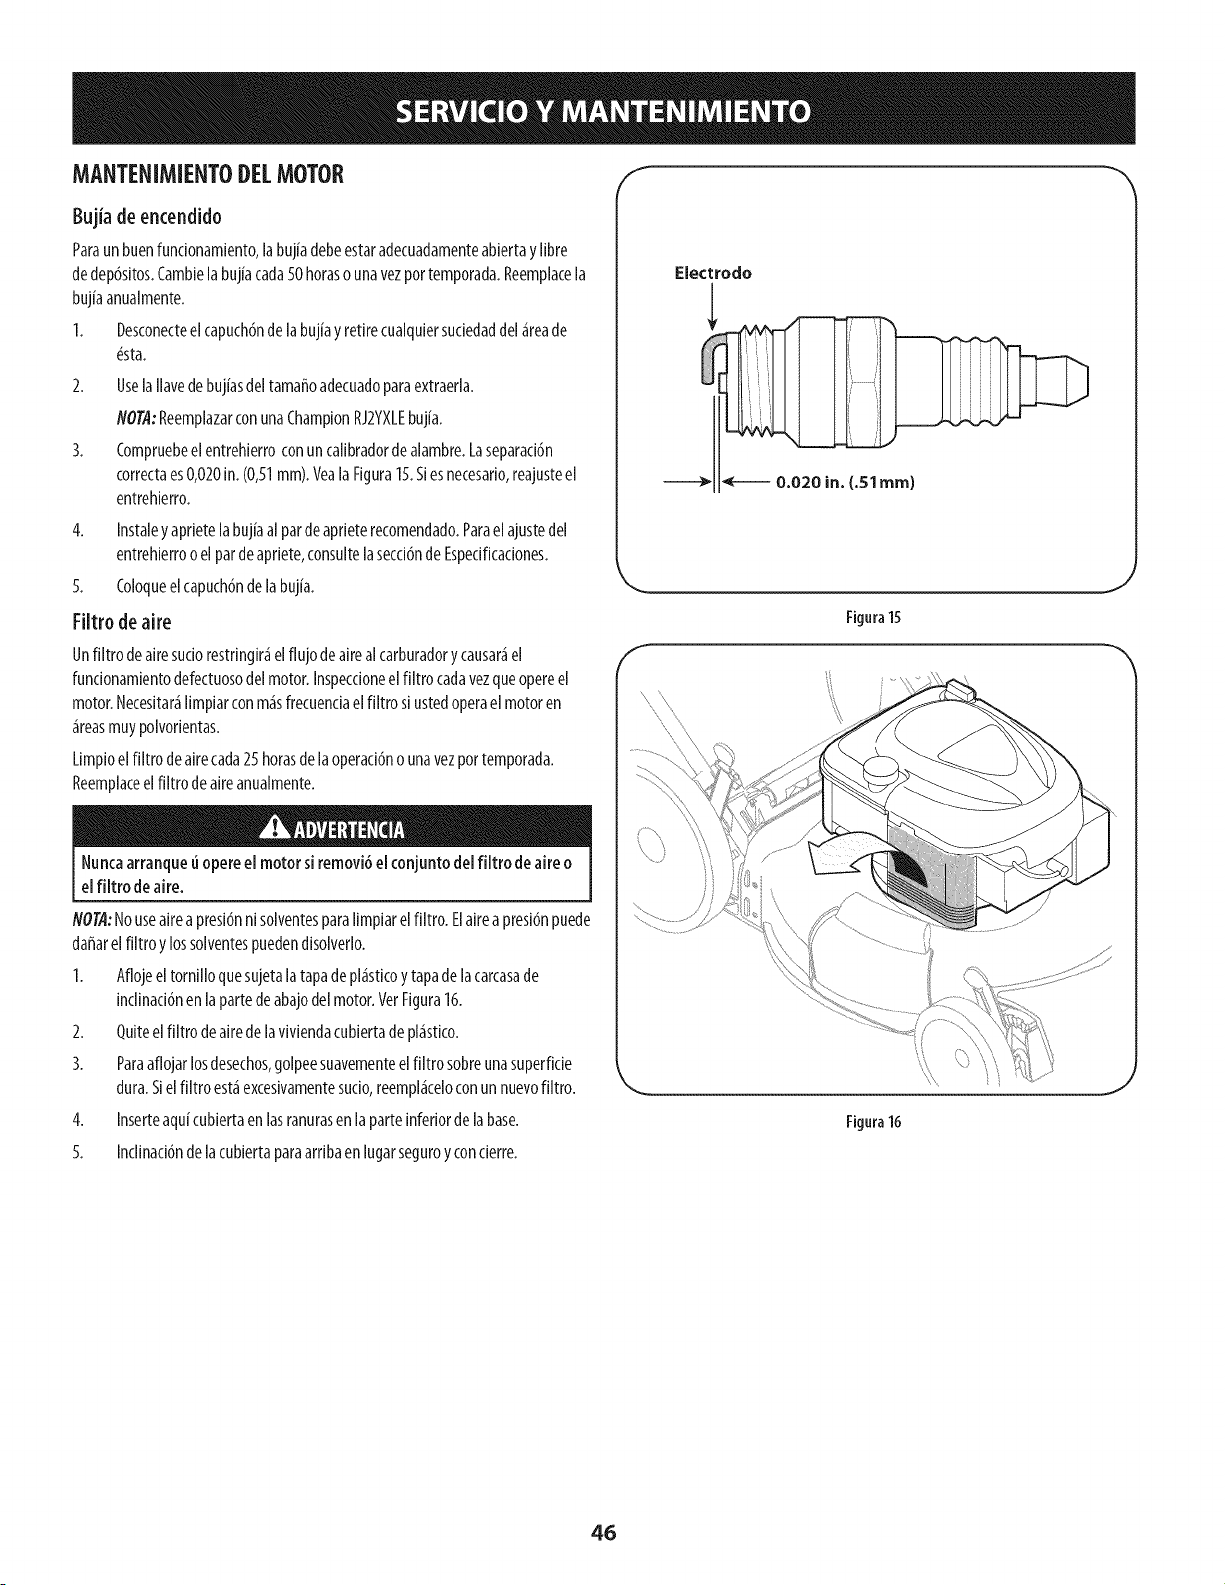
MANTENIMIENTODELMOTOR f
Bujia de encendido
Paraun buenfuncionamiento,la bujiadebeestaradecuadamenteabiertay libre
dedep6sitos.Cambielabujiacada50 horaso unavezportemporada.Reempiacela
bujiaanualmente.
1. Desconecteeicapuch6nde la bujiay retirecualquiersuciedaddei_reade
_sta.
2. UselaIlavedebujiasdeltamaffoadecuadoparaextraerla.
NO@:ReemplazarconunaChampionRJ2YXLEbujia.
3. Compruebeel entrehierroconun calibradorde alambre.Laseparaci6n
correctaes0,020in.(0,51mm).VealaFigura15.Siesnecesario,reajusteel
entrehierro.
4. Instaley aprietela bujiaalpardeaprieterecomendado.Paraelajustedel
entrehierrooelpardeapriete,consultelasecci6nde Especificaciones.
5. Coloqueel capuch6ndela bujia.
Filtrodeaire
Unfiltro deairesuciorestringir_elflujo deairealcarburadory causar_el
funcionamientodefectuosodelmotor.Inspeccioneelfiltro cadavezqueopereel
motor.Necesitar_limpiarconm_sfrecuenciaelfiltro si ustedoperaelmotoren
_reasmuypolvorientas.
Limpioelfiltro deairecada25 horasde laoperaci6no unavezportemporada.
Reemplaceelfiltro de aireanualmente.
Nuncaarranqueu opereel motor si removi6el conjuntode[fiitro de aireo
el fiitro de aire.
NO@:Nouseairea presi6nni soiventesparaiimpiareifiitro. Elaireapresi6npuede
daffarei fiitro y lossoiventespuedendisoiverio.
1. Aflojeeltornilloquesujetaiatapadepi&sticoy tapade [acarcasade
inciinaci6neniapartede abajode[ motor.VerFigura16.
2. Quiteelfiitro deairede iaviviendacubiertadepi&stko.
3. Paraaflojarlosdesechos,golpeesuavementeelfiltro sobreunasuperfide
dura.Siei fiitro est&excesivamentesucio,reempi&ceioconun nuevofiitro.
4. Inserteaquicubiertaen iasranuraseniaparteinferiordeiabase.
5. Inciinaci6ndeiacubiertaparaarribaeniugarseguroy concierre.
f
\
Electrodo
--9 _ O.020in. (.51ram)
Figura15
\\
Figura16
J
46
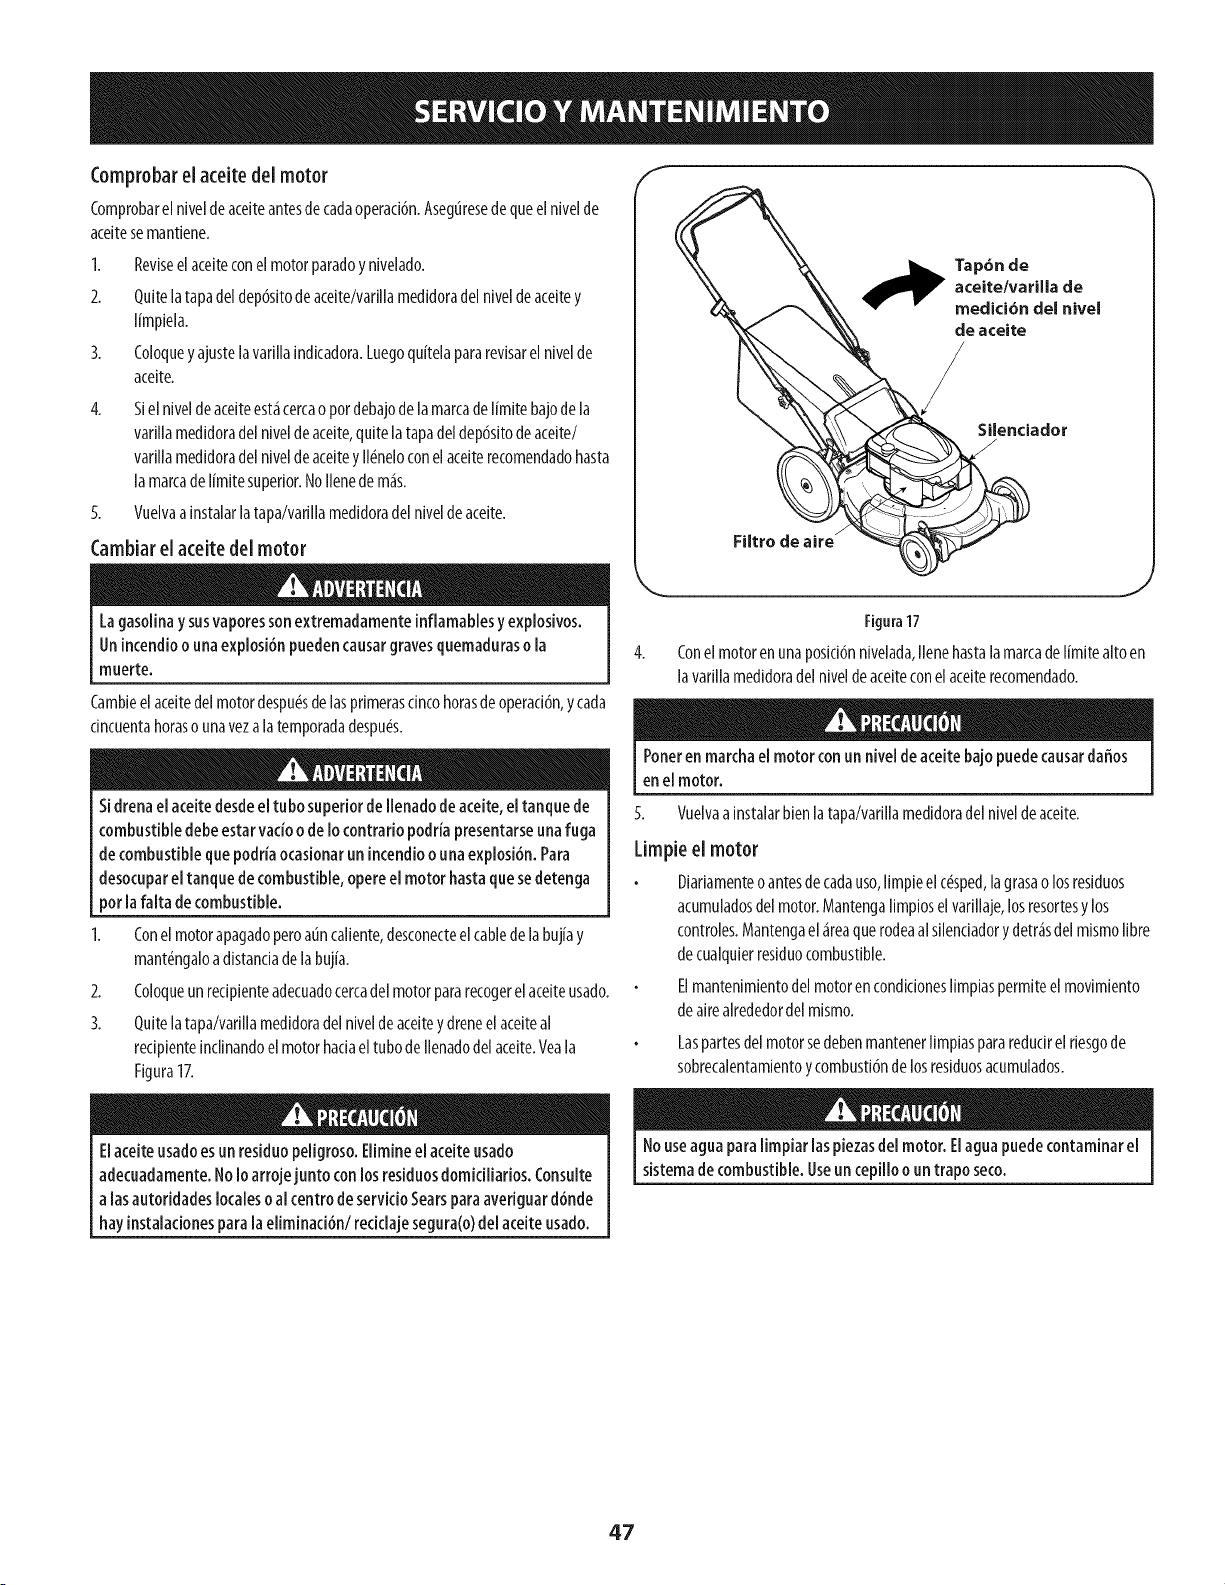
Comprobarel aceitedel motor
Comprobarelnivelde aceiteantesdecadaoperaci6n.Aseguresedequeelnivelde
aceitesemantiene.
1. Reviseel aceiteconelmotorparadoynivelado.
2. Quitelatapadeldep6sitodeaceite/varillamedidoradelniveldeaceitey
limpiela.
3. Coloquey ajustelavarillaindkadora.Luegoquitelapararevisarel nivelde
aceite.
4. Sielnlvelde aceiteest_cercaopordebajodelamarcadelimite bajodela
varillamedidoradelniveldeaceite,quitelatapadeldep6sitodeaceite/
varillamedidoradelniveldeaceitey II_neloconelaceiterecomendadohasta
lamarcadelimitesuperior.NoIlenedem_s.
5. Vuelvaa instalarlatapa/varillamedidoradel niveldeaceite.
Cambiarel aceitedel motor
Filtro de aire /
_ ap6n de
aceite/varUla de
medici6n del nivel
de aceite
/
/
Silenciador
Lagasolinay susvaporessonextremadamenteinflamablesyexplosivos.
Unincendioo unaexplosi6npuedencausargravesquemaduraso la
muerte.
Cambieelaceitedelmotordespu_sde lasprimerascincohorasdeoperaci6n,y cada
cincuentahoraso unavezalatemporadadespu_s.
Sidrenaelaceitedesdeel tubo superior de llenadode aceite,eltanque de
combustibledebeestar vado ode Io contrario podria presentarseunafuga
de combustiblequepodriaocasionarun incendioouna explosi6n.Para
desocuparel tanque decombustible,opereel motor basraquesedetenga
por la falta de combustible.
1. Conelmotorapagadoperoatincaliente,desconecteelcablede labujiay
mant_ngaloadistandadelabujia.
2. Coloqueunredpienteadecuadocercadelmotorpararecogerel aceiteusado.
3. Quitelatapa/varillamedldoradel niveldeaceltey dreneel aceiteal
redpienteinclinandoel motorhadaeltubode Ilenadodelaceite.Yeala
Flgura17.
Elaceiteusadoesun residuopeligroso.Elimineel aceiteusado
adecuadamente.Noloarrojejunto con losresiduosdomkiliarios. Consulte
a las autoridadeslocalesoal centrode servkio Searsparaaveriguard6nde
hay instaladonespara la eliminad6nl recklaje segura(o)del aceiteusado.
Figura17
Conel motorenunaposici6nnivelada,Ilenehastalamarcadelimite altoen
lavarillamedidoradel niveldeaceiteconelaceiterecomendado.
Poneren marchael motor con un nivel deaceitebajo puedecausardaffos
en el motor.
5. Vuelvaainstalarbienlatapa/varillamedidoradelniveldeaceite.
Limpie el motor
Diariamenteoantesdecadauso,limpieelc_sped,lagrasao losresiduos
acumuladosdel motor.Mantengalimpioselvarillaje,losresortesy los
controles.Mantengael _reaquerodeaalsilenciadory detr_sdel mismofibre
de cualquierresiduocombustible.
Elmantenimientodel motorencondicioneslimpiaspermiteel movimiento
de airealrededordel mismo.
Laspartesdel motorsedebenmantenerIimpiaspararedudrelrlesgode
sobrecalentamientoy combusti6nde losresiduosacumulados.
Nouseagua para limpiar laspiezasdel motor. Elaguapuedecontaminar el
sistemade combustible.Useun cepilloo un trapo seco.
47
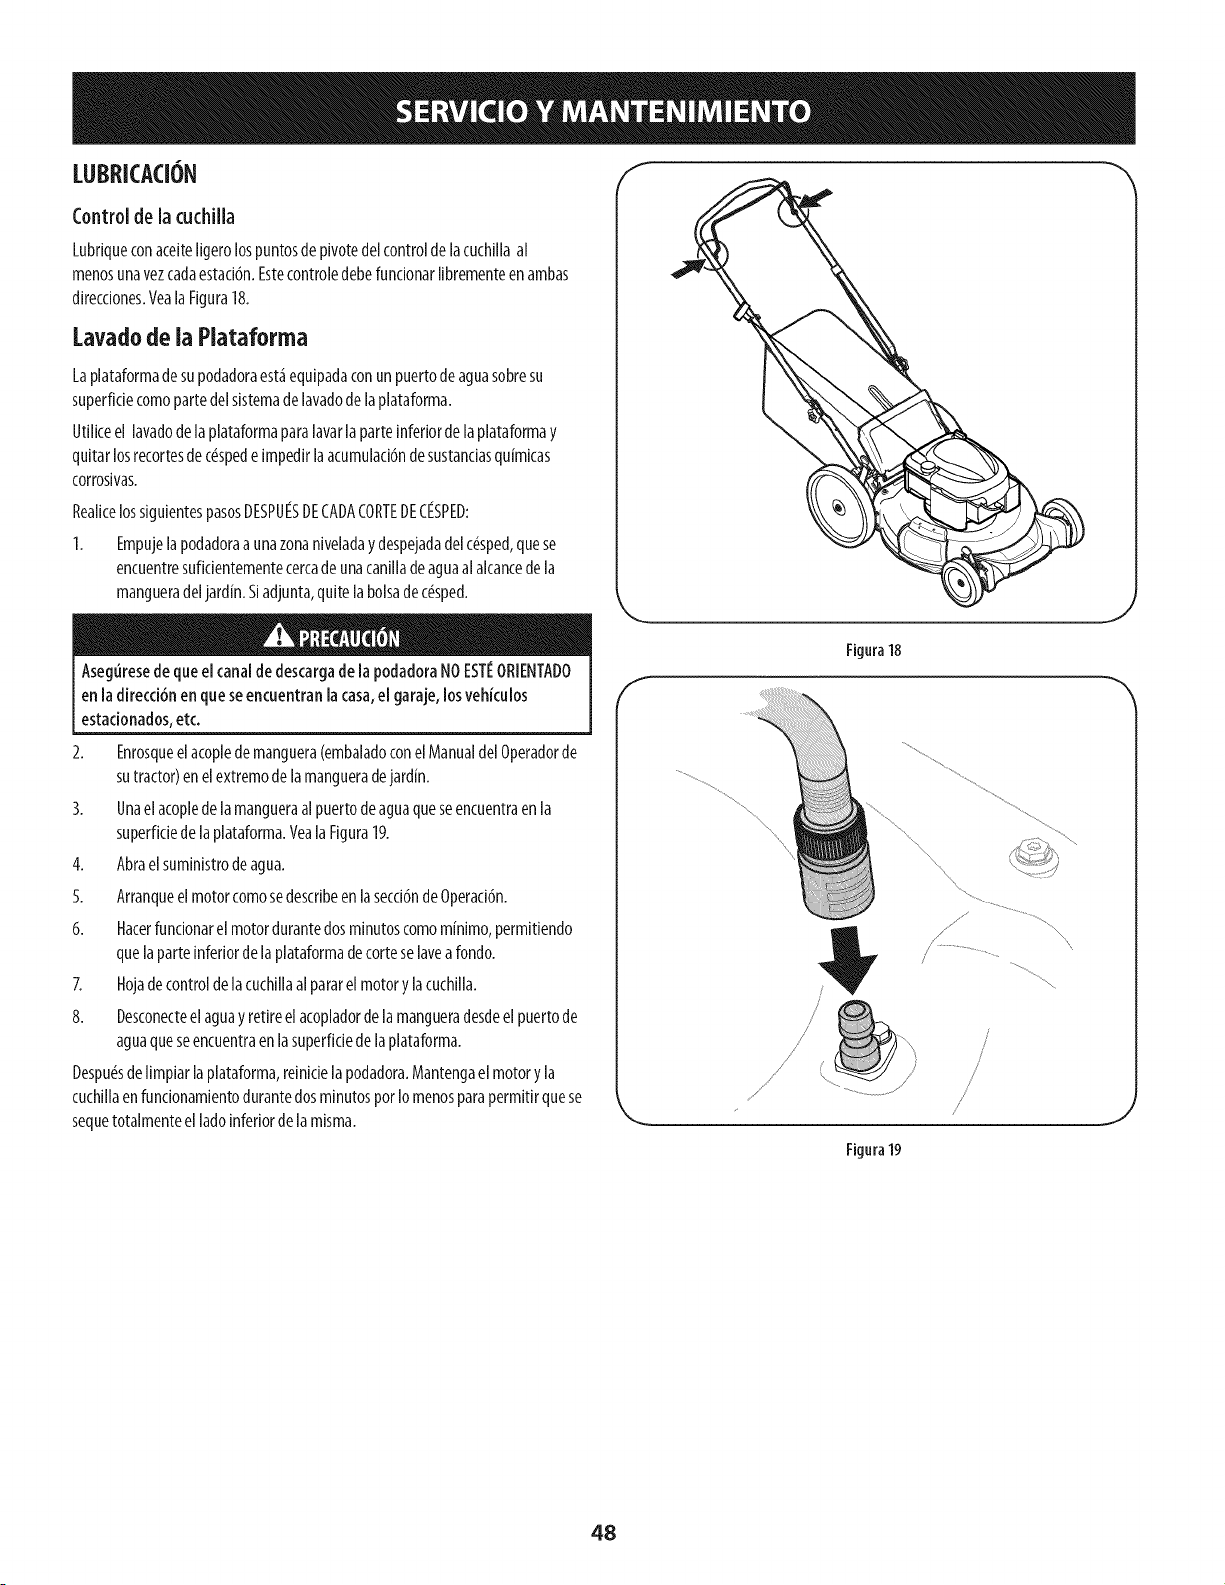
Controlde la cuchilla
Lubnqueconaceiteligerolospuntosdepivotedelcontroldelacuchillaal
menosunavezcadaestad6n.Estecontroledebefundonarllbrementeenambas
dlrecdones.VealaFlgura18.
Lavadode la Plataforma
Laplataformadesupodadoraest_equipadaconunpuertode aguasobresu
superfidecomopartedelslstemadelavadode laplataforma.
Utiliceel lavadodelaplataformaparalavarla parteinferiordelaplataformay
quitarlosrecortesdec_spede [mpedlrlaacumulad6ndesustandasquimkas
corrosivas.
RealkelossiguientespasosDESPUESDECADACORTEDECESPED:
1. Empujela podadoraaunazonaniveladay despejadadelc_sped,quese
encuentresufidentementecercade unacanillade aguaal alcancede la
mangueradeljard[n.Siadjunta,quitelabolsadec_sped.
Aseguresede queel canalde descargade lapodadoraNOESTIeORIENTADO
en la direcci6nen queseencuentranlacasa,el garaje,losvehkulos
estadonados,etc.
2. Enrosqueelacopledemanguera(embaladoconelManualdelOperadorde
sutractor)enelextremode lamangueradejard[n.
3. Unaelacoplede lamangueraalpuertodeaguaqueseencuentraen la
superfidedelaplataforma.Yeala Figura19.
4. Abraelsuministrodeagua.
5. Arranqueel motorcomosedescribeen lasecd6ndeOperad6n.
6. Hacerfundonarelmotordurantedosminutoscomom[nimo,permitiendo
quela parteinferiordelaplataformadecorteselaveafondo.
7. Hojade controldelacuchillaalpararelmotory lacuchilla.
8. Desconecteelaguayretireelacopladorde lamangueradesdeelpuertode
aguaqueseencuentraenlasuperfidede laplataforma.
Despu_sdelimpiarlaplataforma,reinide[a podadora.Mantengaelmotory la
cuchillaenfundonamientodurantedosminutosporIomenosparapermitirquese
sequetotalmenteelladoinferiorde lamisma.
Figura18
f
//"
/
f
/
Figura19
48
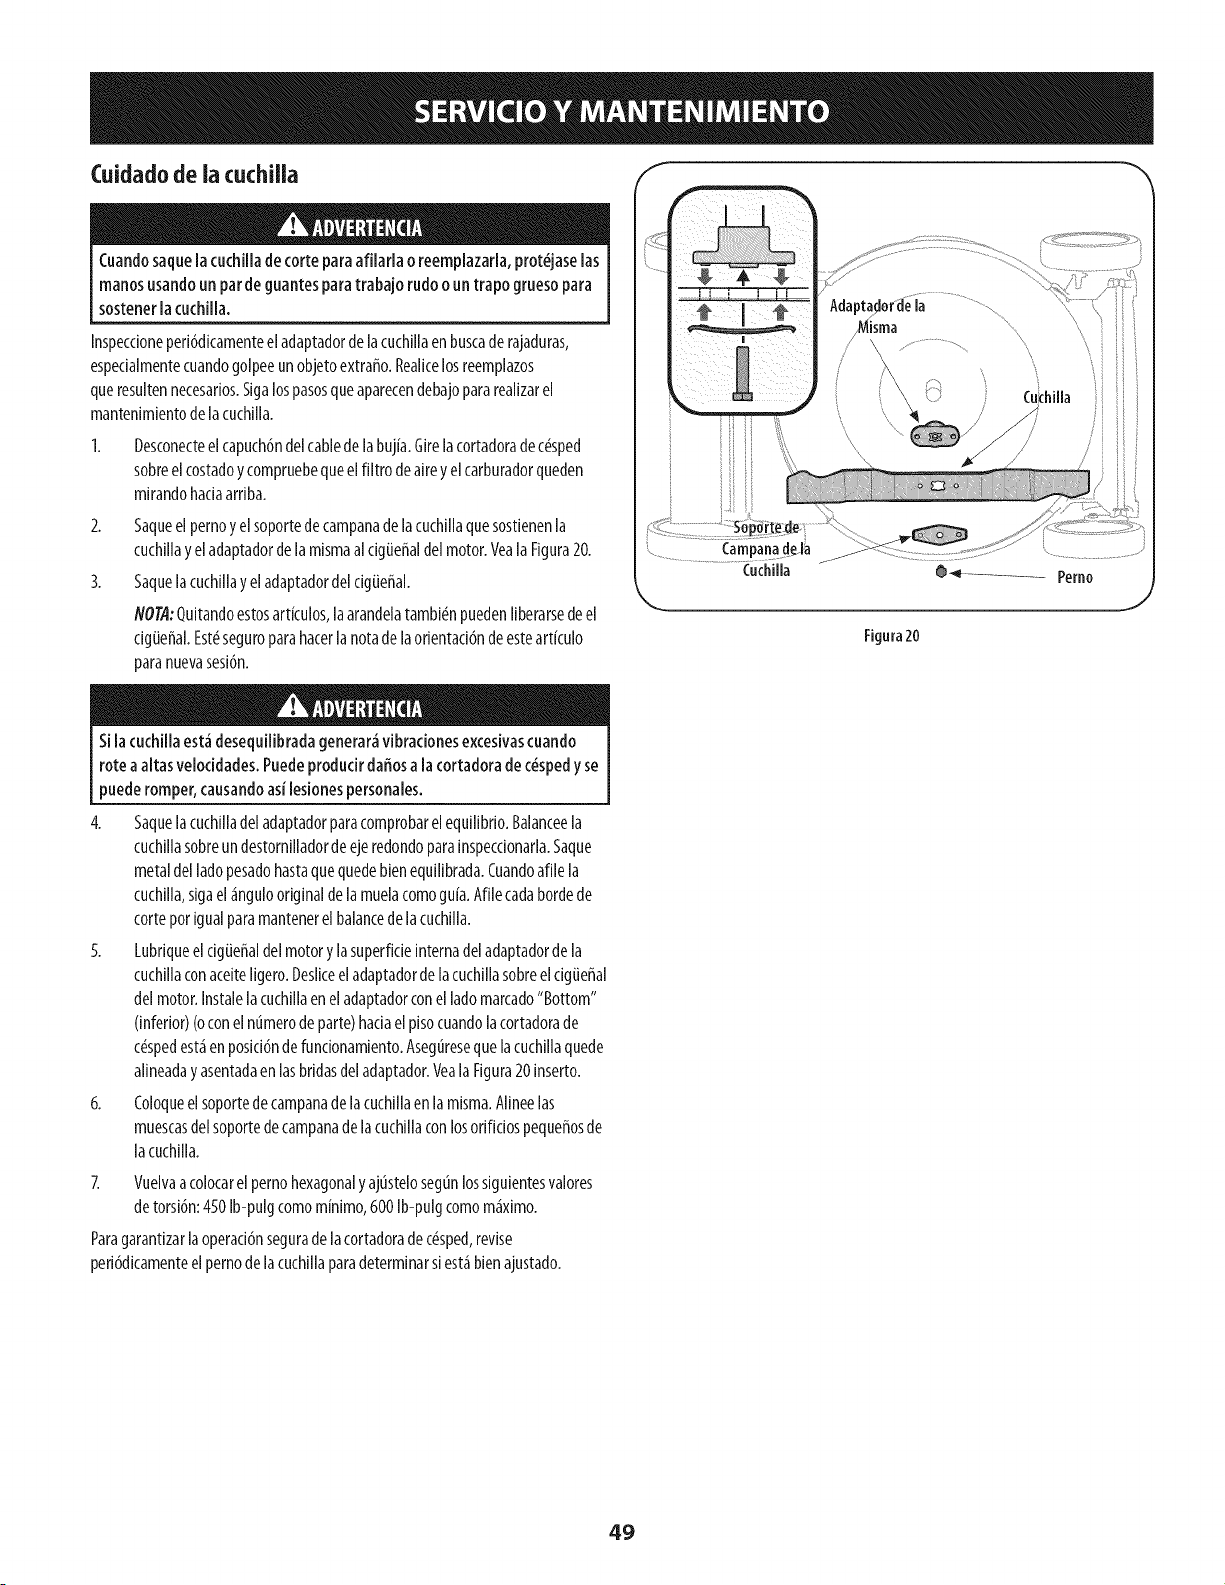
Cuidadode ia cuchUla
Cuandosaquela cuchillade corte paraafilarla o reemplazarla,prot_jaselas
manosusandoun parde guantesparatrabajorudoo untrapogruesopara
sostenerlacuchilla.
Inspeccioneperi6dicamenteeladaptadordelacuchillaen buscaderajaduras,
especialmentecuandogolpeeunobjetoextraffo.Realicelosreemplazos
queresultennecesarios.Sigalospasosqueaparecendebajopararealizarel
mantenimientodelacuchilla.
2.
3.
Desconecteelcapuch6ndelcablede labujia.Girelacortadorade c_sped
sobreel costadoy compruebequeelfiltro deairey elcarburadorqueden
mirandohaciaarriba.
Saqueel pernoy elsoportedecampanadelacuchillaquesostienenla
cuchillayel adaptadordelamismaal cigiJeffaldel motor.YealaFigura20.
Saquela cuchillay eladaptadordel dgiJeffal.
NOTA:Quitandoestosartkulos,laarandelatambi_npuedenliberarsedeel
cigiJeffal.Est_seguroparahacerlanorade laorientaci6ndeesteartkulo
paranuevasesi6n.
Figura20
Silacuchillaest_desequilibradagenerar_vibradonesexcesivascuando
roteaaltas veloddades.Puedeproducirdaffosa la cortadorade c_spedy se
puederomper,causandoasilesionespersonales.
4. Saquela cuchilladeladaptadorparacomprobarelequilibrio.Balanceela
cuchillasobreundestornilladordeeje redondoparainspeccionarla.Saque
metaldel ladopesadohastaquequedebienequilibrada.Cuandoafile la
cuchilla,sigael_ngulooriginaldelamuelacomoguia.Afilecadabordede
corteporigualparamantenerelbalancede la cuchilla.
5. Lubriqueel dgiieffaldelmotory [asuperficieinternadeladaptadordela
cuchillaconaceiteligero.Desliceeladaptadorde la cuchillasobreelcigiJeffal
delmotor.Instalelacuchillaeneladaptadorconel ladomarcado"Bottom"
(inferior)(oconel numerode parte)hadaelpisocuandolacortadorade
c_spedest_en posid6ndefuncionamiento.Aseguresequelacuchillaquede
alineaday asentadaenlasbridasdeladaptador.VealaFigura20inserto.
6. Coloqueel soportedecampanadelacuchillaen lamisma.Alineelas
muescasdelsoportedecampanadelacuchillaconlosorificiospequeffosde
lacuchilla.
Z Vuelvaacolocarelpernohexagonalyajustelosegunlossiguientesvalores
detorsi6n:450Ib-puigcomom[nimo,600Ib-pulgcomom_ximo.
Paragarantizarla operaci6nsegurade la cortadorade c_sped,revise
peri6dicamenteelpernode lacuchillaparadeterminarsiest_bienajustado.
49
Nuncaalmacenelacortadorade c_spedconcombustibleen eltanque en
un espaciocerradooen _reasconpocaventilaci6n, dondelosgasesdel
combustiblepuedanalcanzarelfuego,chispaso unaluzpiloto comolaque
tienen algunoshomos,calentadoresde agua,secadoresde ropao algun
otro dispositivoa gas.
Preparaci6ndeiMotor
Yaquelosmotoresalmacenaronm_sde 30dias:
Paraimpediralagomaformarseenel sistemadecombustibleoen partes
decarburador,dirijaselmotorhastaqueestoseparea faltadel combustible
oaffadirunaditivodegasolinaalgaseneltanque.Siustedusaun aditivo
degas,dirigeelmotordurantevariosminutosparaponerendrculaci6nel
aditivoporelcarburador-- despu#squeelmotory elcombustiblepueden
seralmacenadoshasta24meses.
Mientraselmotorestodaviacaliente,cambioel petr61eo.
Limpieel motordeescombrossuperficiales.
Preparaci6n de ia Cortadora de C_sped
Limpiey lubriquelacortadoracomosedescribeenlasinstruccionesde
lubricad6n.
Noutiliceunalavadoraa presi6nni unamangueradejard[nparalimpiarsu
unidad.
Cubralacuchi[[adelacortadoracongrasaparachasisparaimpedirla
oxidaci6n.
Refi_rasealaPreparaci6ndelMotorparainstruccionesdealmacenajede
motorcorrectas.
Almacenelaunidadenunazonalimpiay seca.Nolaalmacenecercade
materialescorrosivoscomoporejemplofertilizantes.
Cuandoalmacenecualquiertipo deequipomotorizadoen ungalp6ndedep6sito
met_licooconpocaventilaci6n,tengaespecialcuidadode realizarleuntratamiento
antioxidanteal equipo.Useaceiteligeroo siliconapararecubrirelequipo,
especialmenteloscablesy partesm6vilesdesucortadoraantesde almacenarla.
5O

51
Antesde realizarcualquiertipo del mantenimiento/servicio,suelte
todos losmandosy pareel motor. Esperehastaque todaslaspartesde
movimiento hayanvenido a unaparadacompleta.Desconecteel alambre
de bujia y b_selocontrael motor paraprevenir elcomienzoinvoluntario.
Siemprellevepuestoscristalesinastillablesdurante laoperad6n o
realizandocualquierajusteo reparadones.
Estasecddnseocupa de cuestionesdemenor importanda del servkio.Para localizar el m_scercanoCentro de Servkio Sears,o para programar un
servido,simplemente p6ngase en contactoconSearsal 1-800-4-MY-HOMEo
Elmotornoarranca I. Controldelacuchilladesenganchado.
2. Sehadesconectadoelcapuchdndelabujia.
3. Eldepdsitodecombustibleest_vadooelcombustible
sehaechadoa perder.
4. Elmotornoest_cebado.(SiIotiene)
5. Labujianofuncionacorrectamente.
6. Elmotorsedesbordd.
7. Lineadecombustiblebloqueada.
Elmotorfundonademanera I. Elcapuchdndelabujiaest_flojo.
err_tica 2. Elcombustiblesehaechadoaperder.
3. Laventilad6ndelatapadelcombustibleest_
obstrqda.
4. Aguao sudedadenelsistemadelcombustible.
5. Elfiltro deaireest&sudo.
6. Lineadecombustiblebloqueada.
Elmotorrecallenta 1. Elniveldeaceitedelmotorest_ibajo.
2. Flujodealrerestrlngido.
I. Engraneelcontroldelacuchilla.
2. Conecteel cablealcapuch6ndelabujia.
3. Lleneeltanquecongasollnallmplay nueva.
4. Cebeel motortalcomoseexplkaen lasecd6nde
Fundonamiento.
5. Limpie,ajuste[aseparaddn,ocamNelabujia.
6. Esperarunosmlnutosparareactivarse,peronocebe.
7. Contacteconsucentrodepartesy reparadonesSears.
I. Conecteyajusteelcapuchdnde[abujia.
2. Lleneeltanquecongasollnallmplay nueva.
3. Destapelavendlad6n.
4. Vadeeltanquedecombustible.Carguecombustiblenuevoen
eldep6sito.
5. ConsultelasecddnMantenlmlentodelmanual.
6. Contacteconsucentrodepartesy reparadonesSears.
1. Lleneel motorconlacantidady tlpodeacelteadecuado.
2. Limpielosresiduosdealrededordelasaletasderefrlgerad6n
delmotorydelalojamlentodelsoplador.
LNECESITA MAS AYUDA?
Encontrar5 b I_e pue tay m_ en managemylife.com - isin cargo!
En linea podr_ encontrar este manual y los manuales de todos los otros productos que posea,
Sus preguntas ser_n respondidas pot nuestro equipo de especialistas,
Obtenga un plan de mantenimiento personalizado para su hogar.
Encuentre informacidn y herramientas que Io ayudar4n con los proyectos de su hogar.
managemylife
52
Elmotorvadlaaaltasrevoludones 1. Pocaseparad6ndeloselectrodosdelabuj[a. 1. Ajustela separad6n.Consultelasecd6nMantenimientodel
manual.
Elmotorfundonamalenmarcha 1. Buj[aatorada,averladaoexcesodeseparad6n. 1.
lenta 2. Elfiltro deaJreest_sudo. 2.
Demasiadavibrad6n 1. Cuchilladetorteflojaodescentrada. 1.
2. Cuchlllaabollada. 2.
1. C_spedhtimedo. 1.Lacortadoradec_spednoregresa
elrecortedec_spedcomoabono
2. C_speddemasiadoalto.
3. Lacuchilladela cortadoranoest_afilada. 3.
Cortedesigual 1. Laposici6ndelasruedasno escorrecta. 1.
2. LacuchJlladelacortadoranoest_afilada. 2.
LJmpie,reemplaceo reajustela separad6n.
Consultelasecd6nMantenimientodelmanual.
Aprletelacuchlllay eladaptadorBalanceelacuchllla.
Camblelacuchllla.
Notorteelc_spedcuandoest_mojado,esperehastaquesea
m_stardeparahacerlo.
Corteunavezaalturadetorte elevada,luegovuelvaacortarala
alturadeseadao hagaunsenderodetorte m_sangosto.
Afileocamblelacuchllla.
Coloque[ascuatroruedasenlamismaposid6ndealtura.
Afileocamblelacuchllla.
i_NECESITA MAS AYUDA?
[{r_':_':_r_v:r_r_I_ r_! Flue v:_y m_ _!_ managemylife.com _ isin cargo!
En Iff/ea podr4 encontrar este manual y los manuales de todos los otros productos que posea.
Sus preguntas ser_n respondidas por nuestro equipo de especialistas. !!
Obtenga un plan de mantenimier/to personalizado para su hogar,
Encuentre informaciOn y herramientas que Io ayudar4n con los proyectos de su hogar,
mar agemylife iil
53
(Estap_iginaseaplicas6loen EE.UU.y Cana&i).
Sears Brands Management Corporation, el Consejo de Recursos Ambientales de California (CARB) y la Agencia de Protecci6n
Ambiental de los Estados Unidos (EPA) Declaraci6n de garantia del sistema de control de emisiones (derechos y obligaciones
de la garantia de defectos del propietario)
LACOBERTNRADELAGARANTIADECONTROLDEEMISIONESESAPLICABLEALOSMOTORES YNTILICENENCNALQUIERPARTEDELOSESTADOSNNIDOS(YAPARTIRDEL1DEENERODE2001EN
CERTIFICADOSCOMPRADOSENCALIFORNIAEN1995YPOSTERIORMENTEQUESENTILIZANEN CANADA).
CALIFORNIA,YPARALOSMODELOSCERTIFICADOSDELANO1997YPOSTERIORES,QUESECOMPREN
Dedaraci6n de garantia sobre defectos en el control
ElConsejodeRecursosAmbientalesde California(CARB),laEPA(AgendadeProtecci6n
Ambientalde losEENU.)ySearstienenelgustode explkar lagarantiadelsistemadecontrol
de emisionespara motoresdelafro2000yparael futuro conrelaciona motorespequeffostodo
terreno(SORE).EnCalifornia,losnuevosmotorespequeffostodo terrenodebenestardiseiiados,
construidosy equipadosparacumplircon lasrigurosasnormasanti-smogdel estado.Enel resto
de losEstadosNnidos,losmotoresnuevostodoterrenodeencendidoporcNspacertificadospara
el afro1997debencumplk est_ndaressimilaresestableddospor laEPA.Searsdebegarantizar
de emisiones para California y los Estados Unidos
el sistemadecontrolde emisionesde sumotorparalos periodosde tiempoenumeradosa
continuacion,siemprequeno hayaabuso,negligenciao mantenimientoindebidodesumotor
todo terrenopeque_o.Susistemade controldeemisionespuedeincluir piezastalescomoel
carburador,el filtro deaire,elsistemade encendido,el silenciadoryelconversorcatalitico.
Tambi_npuedeincluir conectoresyotrasunidadesrelacionadasconlasemisiones.Dondeexista
unacondicioncubiertaporlagarantia,Searsreparar;_supequeiiomotortodo terrenosincosto
alguno incluyendodiagnostico,piezasy manodeobra
Cobertura de la garantia Sears para defectos en el control de emisiones
Losmotorestodoterrenopeque_osest_ngarantizadosen Io relativoal controlde disposicionesquese indiquena continuaci6n.Si unapartede su motorcubierta
emisionesparadefectosen piezas duranteun per[ododedos afios,sujetoalas por la garanfiaes defectuosa,Searsreparar_o sustituir_dicha parte.
Responsabilidades del propietario en relaci6n con la garantia
Comopropietariodelmotor todoterrenopequeiio,Nd.esresponsabledela realizaciondel
mantenimientorequeridoqueseincluyeen lasinstruccionesde operaciony mantenimiento.
Searsrecomiendaqueseconserventodoslos recibosrelativosal mantenimientodesumotor
todo terrenopequeiio,perono pudedenegarlagarantiasimplementepor lafalta delos mismos,
o por suincumplimientodelmantenimientoprogramado.Comopropietariodelmotor pequeiio
todoterrenodebesaberque,sin embargo,Searslepuedenegarlacoberturade lagarantiasi
sumotortodoterrenopequeffoo unapiezadel mismohanfalladodebidoa abuso,negligencia,
mantenimientoindebidoo a modificacionesnoaprobadas.Nd.esresponsabledepresentarsu
motor todoterrenopequeiioaun distribuidorde serviciosSearsautorizadotan pronto como
aparezcaun problema.Lasreparadonesdela garantiasinconflictodebencompletarseen
un plazode tiempo razonable,nosuperiora 30dias.Sitienealgunapreguntarespectoa sus
derechosy responsabilidadesreferentesa lagarantia,debecontactarconun representantede
serviciosSearsal 1--800--469--4663.Lagarantiade emisionesesunagarantiapordefectos.Los
defectossejuzgande acuerdoconel funcionamientonormaldeun motor.Lagarantianoest_
relacionadacon unapruebade emisionesen uso.
Disposiciones de la garantia Sears para defectos en el control de emisiones
Lassiguientessondisposicionesespedficasrelacionadasconlacoberturade lagarantia para
defectosenel controldeemisiones.Esun a_adidoa lagarantiade motorSearsparamotoresno
reguladosqueseencuentraenlas instruccionesdefuncionamientoy mantenimiento.
I. Piezascongarantia
Lacoberturade estagarantiaseextiendefinicamentealas piezasqueaparecena
continuacion(laspartesdelossistemasdecontrol deemisiones),siemprequedichas
piezasestuvieranyaen el motorenel momentodesucompra.
a. Sistemademediciondecombustible
• Sistemade enriquecimientoparaarranqueenffio
• Carburadorypartesinternas
• Bombadecombustible
b. Sistemade inducci6ndeaire
• Filtrodeaire
• Colectorde admision
c. Sistemadeencendido
• Bujia(s)deencendido
• Sistemadeencendidomagneto
d. Sistemadelcatalizador
• Convertidorcatalitko
• Colectorde escape
• Sistemade inyecciondeaireo v_lvulade impulsos
e. Elementosvariadosusadosen lossistemasanteriores
• V;ilvulasdevacJo,sensiblesa temperatura,posicionytiempo e interruptores
• Conectoresymontajes
2. Alcancede lacobertura
Searsgarantizaal poseedorinicialya loscompradoressubsiguientesquelaspiezascon
garantianotendr;indefectosen matefialesni manodeobra queprovoquenlafallade las
mismasduranteun periododedosa_osa partir dela fechaen queelmotor seentregaa
un compradorparticular.
Sincargo
Lareparationo reemplazodecualquierpartecongarantiaserealizar;_sincargoalguno
parael poseedor,incluyendotareasdediagn6sticoque permitandeterminarsi unaparte
congarantiaesdefectuosa,siemprequedichodiagn6sticoserealiceenun distribuidor
de serviciosSearsautorizado.Paraelservidode lagarantiadeemisiones,contacteal
distribuidordeservidosSearsautorizadom;_scercanoincluidoen las"P_ginasamarillas"
en lascategofias"Motores,gasolina","Motoresde gasolina","Podadorasdec_sped",o
similares.
4. Reclamadonesy exclusionesala cobertura
Lasreclamacionesdelagarantiadebenenviarsedeacuerdoconlasdisposicionesde [a
politka degarantiaparamotoresSears.Lacoberturadela garantiaexcluk;_defectos
en piezascongarantiaqueno seanpartesofiginalesSears,oabuso,negligendao
mantenimientoincorrecto,tal y comoseestableceenla politka degarantiaparamotores
Sears.Searsnoesresponsablede lasfallasen piezascongarantiaprovocadasporel uso
de partesaffadidas,que noseanodginalesoquesehayanmodificado.
5. Mantenimiento
Cualquierpartecongarantiaqueno est_programadaparaserreemplazadacomo
mantenimientorequefido,o ques61odebainspecdonarseregularmenteal efectode
"inspecdoneo reemplacesegunseanecesado",estar;_garantizadacontradefectos
duranteel pefiododelagarantia.Todaslaspiezasgarantizadasqueest_nprogramadas
parasureemplazoparacumplk con losrequisitosdemantenimientoestar;_n
garantizadass6lopor elperiodoanterioral primerreemplazoprogramadoparadicha
pieza.Cualquierpiezade recambioqueseaequivalenteenfundonamientoy durabilidad
puedeusarsepararealizarmantenimientoo reparadones.Elpropietadoesresponsable
de realizartodoel mantenimientorequefido,tal ycomosedefine enlas instruccionesde
fundonamientoymantenimientoSears
6. Coberturaindkecta
Porla presente,la coberturaseextiendea lafalla decualquiercomponentedemotor
provocadapor lafalla de unapiezacongarantiaqueest_todaviaenperiodode garantia.
EnlosEstadosUnidosy Cana&ihayunalineadeatenci6nde 24horas,1-800-469--4663,quecuentaconunmenticonmensajespre-grabadosquecontieneninformaci6nparael
mantenimientodemotores.
54
GDOC-100188Rev.B
Felicitacionespor haberrealizadouna adquisicidninteligente.EIproductoCraftsman®que haadquiridoestddise#adoy fabricado
parabrindarmuchosa#osde funcionamientoconfiable.Perocomotodoslosproductosa vecespuederequerirde reparaciones.Es
en esemomento cuandoel disponerde un Acuerdodeproteccidnpara reparacioneslepuede ahorrardineroy problemas.
Acontinuad6nse detailan lospuntosinduidosenel Acuerdo:
[] Servido experto prestadopornuestros10,000espedalistasenreparadonesprofesionales
[] Servido Uimitado sincargo paralaspiezasy la manodeobraentodaslasreparadonescubiertas
[] Reemplazodel producto hasta1500d6laressinoesposiblerepararel productocubierto
[] Descuentode 25%del predonormaldelservkioy delaspiezasreladonadasconelmismoquenoest_ncubiertaspor
el acuerdo;adem_s,25%del predonormaldelavefificaci6ndemantenimientopreventivo
[] Ayudar_pidapot tei_fono- IoIlamamosResolud6nR_pida- el apoyotelef6nicodeun Chamuscaal representante.
Pienseennosotroscomoel manual"deundueffohablador."
UnavezadquiridoelAcuerdo,puedeprogramarelservidocontan s61orealizarunaIlamadatelef6nica.PuedeIlamaren
cualquiermomentodeldfao dela nocheoprogramarunservk[oen Ifnea.
ElAcuerdodeProtecd6ndeReparad6nesunacomprasinfiesgo.Siustedanulaporalgunaraz6nduranteel peffodode
garantfadeproducto,propordonaremosunreembolsoIleno.O,unreembolsoprorrateadoencualquiermomentodespu_s
delpeffododegarantfadeproductoexpira,iAdquierahoysuacuerdodeprotecd6nparareparadones[
Seaplican determinadas iimitacionesy exclusiones.Para obtener informaci6nadicionai y preciosen los
EstadosUnidosiiameai 1-800-827-6655.
El*Coverageen Canad_variaen algunos artkulos. Paradetalles llenos la llamada ChamuscaCanad_en 1-800-
361-6665.
Servidode instalad6ndeSears
Sideseasolidtarla instalad6nprofesionaldeSearsdeaparatosdom_sticos,dispositivosparaabfirportones,calentadoresde
aguay otrosartkulosdom_sticosimportantes,enlosEstadosUnidoso Canad_Ilameal1-800-4-MY-HOME®.
55

Your Home
For troubleshooting, product manuals and expert advice:
managernylife
www.managemylife.com
For repair - in your home - of all major brand appliances,
lawn and garden equipment, or heating and cooling systems,
no matter who made it, no matter who sold it!
For the replacement parts, accessories and
owner's manuals that you need to do-it-yourself.
For Sears professional installation of home appliances
and items like garage door openers and water heaters.
1-800-4-MY-HOME ® (1-800-469-4663)
Call anytime, day or night (U.S.A. and Canada)
www.sears.com www.sears.ca
Our Home
For repair of carry-in items like vacuums, lawn equipment,
and electronics, call anytime for the location of your nearest
Sears Parts & Repair Service Center
1-800-488-1222 (U.S.A.) 1-800-469-4663 (Canada)
www.sears.com www.sears.ca
To purchase a protection agreement on a product serviced by Sears:
1-800-827-6655 (U.S.A.) 1-800-361-6665 (Canada)
Para pedir servicio de reparaci6n
a domicilio, y para ordenar piezas:
1-888-SU-HOGAR ®
(1-888-784-6427)
www.sears.com
Au Canada pour service en frangais:
1-800-LE-FOYER Mc
(1-800-533-6937)
www.sears.ca
® Registered Trademark / TMTrademark of KCD IP, LLC in the United States, or Sears Brands, LLC in other countries
® Marca Registrada ! TMMarca de Fabrica de KCD IP, LLC en Estados Unidos, o Sears Brands, LLC in otros paises
MCMarque de commerce ! MDMarque deposee de Sears Brands, LLC