
Operator's Manual
I:RRFrSMRN°
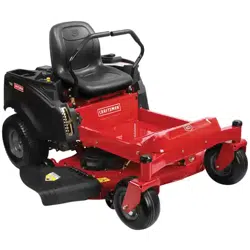
Zero=Turn Rider
22 HP, 46" MOWER DECK
Model No. 247.204460
CAUTION: Before using this product,
read this manual and follow all safety
rules and operating instructions.
• SAFETY
• ASSEMBLY
• OPERATION
• MAINTENANCE
• PARTS LIST
• ESPANOL
Sears Brands Management Corporation, Hoffman Estates, IL 60179, U.S.A.
Visit our website: www.craftsman.com
FormNo.769-09491
(November7,2013)
Warranty Statement ................................... 2
Safety Instructions .................................... 3
Slope Guide .......................................... 7
Assembly ............................................. 8
Operation ........................................... 12
Service and Maintenance ............................ 20
Off-Season Storage ................................... 29
Troubleshooting ..................................... 30
Espaffol .............................................. 35
Service Numbers ............................ Back Cover
CRAFTSMANFULLWARRANTY
FORTWOYEARSfromthedateofpurchase,allnon-expendablepartsofthisridingequipmentarewarrantedagainstanydefectsinmaterialorworkmanship.
Adefectivenon-expendablepartwill receivefreein-homerepairor replacementif repairisimpossible.
BATTERYLIMITEDWARRANTY
FOR90DAYSfromthedateofpurchase,thebattery(anexpendablepart)of thisridingequipmentiswarrantedagainstanydefectsinmaterialor
workmanship.Anewbatterywill besuppliedfreeof charge.Youareresponsibleforthelaborcostofbatteryinstallation.
WARRANTYSERVICE
Forwarrantycoveragedetailstoobtainfreerepairorreplacement,call1-888-331-4569orvisitthewebsite:www.craftsman.com/warranty
Inallcasesabove,if partrepairorreplacementisimpossible,theridingequipmentwillbereplacedfreeofchargewiththesameoranequivalentmodel.
Alloftheabovewarrantycoverageisvoidifthisridingequipmentiseverusedwhileprovidingcommercialservicesorif rentedtoanotherperson.
ThiswarrantycoversONLYdefectsinmaterialandworkmanship.WarrantycoveragedoesNOTinclude:
• Expendableparts(exceptbattery)thatcanwearoutfrom normalusewithin thewarrantyperiod,includingbutnotlimitedto blades,sparkplugs,air
cleaners,belts,andoil filters.
• Standardmaintenanceservicing,oil changes,ortune-ups.
• Tirereplacementorrepaircausedbypuncturesfromoutsideobjects,suchasnails,thorns,stumps,orglass.
• Tireorwheelreplacementorrepairresultingfrom normalwear,accident,orimproperoperationormaintenance.
• Repairsnecessarybecauseof operatorabuse,includingbut notlimitedtodamagecausedbytowingobjectsbeyondthecapabilityof theriding
equipment,impactingobjectsthatbendtheframe,axleassemblyorcrankshaft,orover-speedingthe engine.
• Repairsnecessarybecauseof operatornegligence,includingbut notlimitedto,electricalandmechanicaldamagecausedbyimproperstorage,failureto
usethepropergradeandamountof engineoil,failureto keepthe deckclearofflammabledebris,orfailureto maintainthe ridingequipmentaccording
to theinstructionscontainedintheoperator'smanual.
• Engine(fuelsystem)cleaningor repairscausedbyfuel determinedto becontaminatedoroxidized(stale).In general,fuel shouldbeusedwithin30days
of itspurchasedate.
• Normaldeteriorationandwearoftheexteriorfinishes,orproductlabelreplacement.
Thiswarrantygivesyouspecificlegalrights,andyoumayalsohaveotherrightswhichvaryfromstateto state.
SearsBrandsManagementCorporation,HoffmanEstates,IL60179
Engine Oil: SAE 30
Fuel: Unleaded Gasoline
Model Number
Serial Number
Date of Purchase
Record the model number, serial number,
and date of purchase above.
© Sears Brands, LLC 2
Thissymbolpoints out importantsafety instructionswhich,if not
followed, couldendangerthe personalsafetyand/orproperty of
yourselfandothers. Readandfollow all instructionsinthis manual
beforeattempting to operate this machine.Failureto complywith these
instructionsmayresultinpersonalinjury.Whenyouseethis symbol,HEED
ITSWARNING!
Thismachinewasbuilt to beoperated accordingto the safeoperation
practicesin this manual.Aswith anytype of powerequipment,
carelessnessor error on the part of the operator canresultin seriousinjury.
Thismachineis capableof amputating fingers, hands,toesandfeet and
throwing debris. Failureto observethe following safetyinstructionscould
resultin seriousinjury or death.
CALiFORNiA PROPOSiTiON 65
EngineExhaust,someof itsconstituents,andcertain vehide components
contain or emit chemicalsknown to Stateof Californiato causecancerand
birth defectsor other reproductiveharm.
Battery posts,terminals, and relatedaccessoriescontain leadand lead
compounds,chemicalsknownto the Stateof Californiato causecancerand
reproductiveharm.Washhandsafter handling.
Your Responsibility--Restrict the useof this powermachineto
personswho read,understandandfollow the warningsand instructionsin
this manualandon the machine.
SAVETHESEINSTRUCTIONS!
GENERAL OPERATION
Read,understand,andfollowall instructionsonthe machineandinthe
manual(s)beforeattemptingto assembleandoperate.Keepthismanualin
asafeplaceforfutureandregularreferenceandfor orderingreplacement
parts.
Befamiliarwith all controlsandtheir properoperation.Knowhowto stop
themachineanddisengagethemquickly.
Neverallowchildrenunder14yearsof ageto operatethis machine.Children
14andovershouldreadandunderstandthe instructionsandsafeoperation
practicesinthis manualandonthemachineandshouldbetrainedand
supervisedbyanadult.
Neverallowadultsto operatethismachinewithout properinstruction.
Tohelpavoidbladecontactora thrownobjectinjury,keepbystanders,
helpers,childrenandpetsat least75feetfrom themachinewhileit isin
operation.Stopmachineif anyoneentersthearea.
Thoroughlyinspectthe areawherethe equipmentisto beused.Remove
all stones,sticks,wire, bones,toys,andotherforeignobjectswhichcould
bepickedupandthrownbytheblade(s).Thrownobjectscancauseserious
personalinjury.
Planyourmowingpatterntoavoiddischargeof materialtowardroads,
sidewalks,bystandersandthelike.Also,avoiddischargingmaterialagainst
awall orobstructionwhichmaycausedischargedmaterialto ricochetback
towardthe operator.
Alwayswearsafetyglassesorsafetygogglesduringoperationandwhile
performinganadjustmentor repairto protectyoureyes.Thrownobjects
whichricochetcancauseseriousinjury to theeyes.
Wearsturdy,rough-soledworkshoesandclose-fittingslacksandshirts.
Loosefitting clothesandjewelrycanbecaughtin movableparts.Never
operatethis machinein barefeetor sandals.
Beawareof the mowerandattachmentdischargedirectionanddonot point
it at anyone.Donotoperatethe mowerwithoutthe dischargecoverorentire
grasscatcherin itsproperplace.
Donotput handsorfeetnearrotatingpartsor underthecuttingdeck.
Contactwiththe blade(s)canamputatehandsandfeet.
Amissingordamageddischargecovercancausebladecontactorthrown
objectinjuries.
Stopthe blade(s)whencrossinggraveldrives,walks,or roadsandwhilenot
cuttinggrass.
Watchfortrafficwhenoperatingnearor crossingroadways.Thismachineis
not intendedforuseon anypublicroadway.
Donotoperatethemachinewhileunderthe influenceof alcoholordrugs.
Mowonly indaylightorgoodartificiallight.
Nevercarrypassengers.
Backupslowly.Alwayslookdownandbehindbeforeandwhilebacking
to avoidaback-overaccident.Beawareandpayattentionto thesafety
systemfunctionthatstopspowerto the bladeswhendrivingin reverse.
Ifnotfuctioningproperly,contactanauthorizeddealerforsafetysystem
inspectionandrepair.
Slowdownbeforeturning.Operatethemachinesmoothly.Avoiderratic
operationandexcessivespeed.
Disengageblade(s),setparkingbrake,stopengineandwait until the
blade(s)cometo acompletestopbeforeremovinggrasscatcher,emptying
grass,uncloggingchute,removinganygrassordebris,or makingany
adjustments.
Neverleavearunningmachineunattended.Alwaysturn off blade(s),place
drivecontrolleversinneutral,setparkingbrake,stopengineandremove
keybeforedismounting.
Useextracarewhenloadingorunloadingthemachineintoatrailerortruck.
Thismachineshouldnotbedrivenupordownramp(s),becausethemachine
couldtipover,causingseriouspersonalinjury.Themachinemustbepushed
manuallyonramp(s)toloadorunloadproperly.
Mufflerandenginebecomehotandcancauseaburn.Donottouch.
Checkoverheadclearancescarefullybeforedrivingunderlowhangingtree
branches,wires,dooropeningsetc.,wheretheoperatormaybestruckor
pulledfromthemachine,whichcouldresultinseriousinjury.
Disengageallattachmentclutches,settheparkingbraketothe'on' position
andmovethe RHandLHdrivecontrolleversto theneutralpositionbefore
attemptingto starttheengine.
Yourmachineisdesignedto cutnormalresidentialgrassofa heightnomore
than10".Donotattemptto mowthroughunusuallytall,drygrass(e.g.,
pasture)or pilesof dryleaves.Drygrassor leavesmaycontacttheengine
exhaustand/orbuild upon themowerdeckpresentingapotentialfire
hazard.
Useonlyaccessoriesandattachmentsapprovedforthis machinebythe
machinemanufacturer.Read,understandandfollowall instructions
providedwith the approvedaccessoryor attachment.Foralist ofapproved
accessoriesandattachments,call1-888-331-4569.
Dataindicatesthatoperators,age60yearsandabove,areinvolvedina
largepercentageof ridingmower-relatedinjuries.Theseoperatorsshould
evaluatetheirabilityto operatethe ridingmowersafelyenoughto protect
themselvesandothersfrom seriousinjury.
If situationsoccurwhicharenotcoveredin thismanual,usecareandgood
judgment.
SLOPE OPERATION
Slopesareamajorfactorrelatedto lossof controlandtip-overaccidentswhichcan
resultinsevereinjuryordeath.All slopesrequireextracaution.Ifyoucannotback
uptheslopeorif youfeeluneasyon it, do not mowit.
Foryoursafety,usethe slopegaugeincludedaspart ofthis manualto measure
slopesbeforeoperatingthis machineon aslopedorhilly area.If theslopeisgreater
than15degreesasshownontheslopegauge,do not operatethis machineonthat
areaor seriousinjurycouldresult.
Do;
Mowacrossslopes,not upanddown.Exerciseextremecautionwhen
changingdirectiononslopes.
Watchfor holes,ruts,bumps,rocks,orotherhiddenobjects.Uneventerrain
couldoverturnthemachine.Tallgrasscanhideobstacles.
Useslowspeed.Choosea lowenoughspeedsothatyouwill nothaveto
stopwhileon theslope.Avoidstartingorstoppingonaslope.Ifthetiresare
unableto maintaintraction,disengagethebladesandproceedslowlyand
carefullystraightdowntheslope.
Followthe manufacturer'srecommendationsfor wheelweightsor
counterweightsto improvestability.
Useextracarewith grasscatchersor otherattachments.Thesecanchange
thestabilityof themachine.
Keepallmovementon theslopesslowandgradual.Donot makesudden
changesinspeedordirection.Rapidaccelerationordecelerationcouldcause
thefront of themachineto lift andrapidlyroll overbackwards,whichcould
causeseriousinjury.
Do Not:
Donotturn onslopesunlessnecessary;then turnslowlyuphillanduseextra
carewhileturning.
Donotmow neardrop-offs,ditchesorembankments.Themowercould
suddenlyturn overira wheelisovertheedgeofacliff, ditch,orif anedge
cavesin.
Donottry to stabilizethemachinebyputtingyourfoot ontheground.
Donotusea grasscatcheronsteepslopes.
Donotmowonwetgrass.Reducedtractioncouldcausesliding.
Donottow heavypull behindattachments(e.g.loadeddumpcart,lawn
roller,etc.)onslopesgreaterthan5 degrees.Whengoingdown hill, the
extraweighttendsto pushtheridingmowerandmaycauseyouto loose
control(e.g.ridingmowermayspeedup,brakingandsteeringabilityare
reduced,attachmentmayjack-knifeandcauseridingmowerto overturn).
CHILDREN
Tragicaccidentscanoccurif theoperatoris notalertto thepresenceofchildren.
Childrenareoftenattractedto themachineandthe mowingactivity.Theydo not
understandthedangers.Neverassumethatchildrenwill remainwhereyoulastsaw
them.
Keepchildrenoutof themowingareaandin watchfulcareof aresponsible
adultotherthantheoperator.
Bealertandturn machineoff if achildentersthearea.
Toavoidback-overaccidents,alwayslookbehindanddownforsmall
children.
Nevercarrychildren,evenwith theblade(s)shutoff.Theymayfall offand be
seriouslyinjuredorinterferewith safemachineoperation.
Useextremecarewhenapproachingblindcorners,doorways,shrubs,trees
orotherobjectsthat mayblockyourvisionofa childwho mayrunintothe
pathof themachine.
Keepchildrenawayfrom hotor runningengines.Theycansufferburnsfrom
a hotmuffler.
Removekeywhenmachineis unattendedto preventunauthorized
operation.
Neverallowchildrenunder14yearsofageto operatethismachine.Children14and
overshouldreadandunderstandtheinstructionsandsafeoperationpracticesin
thismanualandonthemachineandshouldbetrainedandsupervisedbyan adult.
TOWING
Towonlywith a machinethathasa hitchdesignedfor towing.Donotattach
towedequipmentexceptat thehitchpoint.
Followthe manufacturersrecommendationforweightlimitsfortowed
equipmentandtowingonslopes.
Neverallowchildrenor othersinor ontowedequipment.
4
Onslopes,theweightofthetowedequipmentmaycausebssoftractionand
lossofcontrol.
Travelslowlyandallowextradistanceto stop.
Donotshiftto neutralandcoastdownhill.
Donottowheavypullbehindattachments(e.g.loadeddumpcart,lawn
roller,etc.)on slopesgreaterthan5degrees.Whengoingdownhill,the
extraweight tendsto pushthe ridingmowerandmaycauseyouto loose
control(e.g.ridingmowermayspeedup,brakingandsteeringabilityare
reduced,attachmentmayjack-knifeandcauseridingmowerto overturn).
SERVICE
Safe Handling of Gasoline:
Toavoidpersonalinjuryorproperty damageuseextremecareinhandling
gasoline.Gasolineis extremely flammableandthe vaporsareexplosive.
Seriouspersonalinjury canoccurwhen gasolineisspilled on yourself oryour
clotheswhich canignite. Washyourskinand changeclothesimmediately.
Useonlyan approvedgasolinecontainer.
Neverfill containersinsideavehicleoron atruckortrailer bedwith aplastic
liner.Alwaysplacecontainerson thegroundawayfromyourvehiclebefore
filling.
Whenpractical,removegas-poweredequipmentfromthe truckor
trailerandrefuelit on theground.If thisisnotpossible,thenrefuelsuch
equipmenton atrailerwitha portablecontainer,ratherthanfroma gasoline
dispensernozzle.
Keepthenozzlein contactwith the rimof thefueltankor containeropening
at alltimesuntil fuelingiscomplete.Donotuseanozzlelock-opendevice.
Extinguishall cigarettes,cigars,pipesandothersourcesof ignition.
Neverfuel machineindoors.
Neverremovegascapor addfuelwhilethe engineis hotor running.Allow
engineto coolat leasttwo minutesbeforerefueling.
Neveroverfill fuel tank.Filltankto nomorethan1/2inchbelowbottomof
filler neckto allowspaceforfuel expansion.
Replacegasolinecapandtightensecurely.
If gasolineisspilled,wipeit off theengineandequipment.Movemachineto
anotherarea.Wait5 minutesbeforestartingtheengine.
Toreducefirehazards,keepmachinefreeof grass,leaves,or otherdebris
build-up.Cleanupoil or fuel spillageandremoveanyfuel soakeddebris.
Neverstorethe machineorfuelcontainerinsidewherethereis anopen
flame,sparkorpilotlight ason awaterheater,spaceheater,furnace,clothes
dryerorothergasappliances.
Allowamachineto coolat leastfiveminutesbeforestoring.
General Service
Neverrunan engineindoorsor inapoorlyventilatedarea.Engineexhaust
containscarbonmonoxide,anodorless,anddeadlygas.
Beforecleaning,repairing,orinspecting,makecertainthe blade(s)andall
movingpartshavestopped.Disconnectthesparkplugwireandground
againstthe engineto preventunintendedstarting.
Periodicallycheckto makesurethe bladescometo completestopwithin
approximately(5)fivesecondsafter operatingthe bladedisengagement
control.If thebladesdo notstopwithin thethistimeframe,aveyour
machineservicedprofessionallybySearsoranotherqualifieddealer.
Regularlycheckthe safetyinterlocksystemfor properfunction,asdescribed
laterinthis manual.Ifthe safetyinterlocksystemdoesnotfunctionproperly,
haveyourmachineservicedprofessionallybySearsor anotherqualified
dealer.
Checktheblade(s)andenginemountingboltsat frequentintervalsfor
propertightness.Also,visuallyinspectblade(s)for damage(e.g.,excessive
wear,bent,cracked).Replacetheblade(s)with the originalequipment
manufacturer's(O.E.M.)blade(s)only,listedinthismanual.Useof parts
whichdonot meettheoriginalequipmentspecificationsmayleadto
improperperformanceandcompromisesafety!
Mowerbladesaresharp.Wrapthebladeor weargloves,anduseextra
cautionwhenservicingthem.
Keepallnuts,bolts,andscrewstight to besuretheequipmentisin safe
workingcondition.
Nevertamperwith thesafetyinterlocksystemor othersafetydevices.Check
their properoperationregularly.
Afterstrikingaforeignobject,stoptheengine,disconnectthesparkplug
wire(s)andgroundagainsttheengine.Thoroughlyinspectthemachinefor
anydamage.Repairthedamagebeforestartingandoperating.
Neverattemptto makeadjustmentsorrepairsto the machinewhilethe
engineis running.
Grasscatchercomponentsandthe dischargecoveraresubjectto wear
anddamagewhichcouldexposemovingpartsor allowobjectsto be
thrown.Forsafetyprotection,frequentlycheckcomponentsandreplace
immediatelywith originalequipmentmanufacturer's(O.E.M.)partsonly,
listedinthis manual.Useof partswhichdonot meettheoriginalequipment
specificationsmayleadto improperperformanceandcompromisesafety!
Donotchangetheenginegovernorsettingsor over-speedtheengine.The
governorcontrolsthe maximumsafeoperatingspeedof theengine.
Maintainorreplacesafetyandinstructionlabels,asnecessary.
Observeproperdisposallawsandregulationsforgas,oil,etc.to protectthe
environment.
AccordingtotheConsumerProductsSafetyCommission(CPSC)andthe
U.S.EnvironmentalProtectionAgency(EPA),thisproducthasanAverage
UsefulLifeof seven(7)years,or 270hoursof operation.Attheendof
theAverageUsefulLifehavethe machineinspectedannuallybySearsor
anotherqualifieddealerto ensurethatall mechanicalandsafetysystems
areworkingproperlyandnotwornexcessively.Failureto do socanresultin
accidents,injuriesor death.
DO NOT MODIFY ENGINE
Toavoid seriousinjuryor death,do not modify engine in any way.Tampering
with the governorsetting canleadto a runawayengineandcauseit to
operateat unsafespeeds.Nevertamperwith factory setting of engine
governor.
NOTICE REGARDING EMiSSiONS
Engineswhich arecertified to complywith Californiaandfederal EPA
emissionregulationsfor SORE(SmallOff RoadEquipment)arecertified
tooperateon regularunleadedgasoline,andmayincludethe following
emissioncontrol systems:EngineModification (EM),OxidizingCatalyst(0C),
SecondaryAir injection(SAI)andThreeWayCatalyst(TWO)if soequipped.
SPARK ARRESTOR
Thismachineisequippedwith an internalcombustionengineandshould
not be usedon or nearanyunimprovedforest-covered,brushcoveredor
grass-coveredlandunlessthe engine'sexhaustsystemisequippedwith a
sparkarrestor meeting applicablelocalor statelaws(if any).
Ifa sparkarrestoris used,it should bemaintained in effective working order
by the operator. Inthe Stateof Californiathe aboveis requiredby law (Section
4442of the CaliforniaPublicResourcesCode).Otherstatesmay havesimilar
laws. Federallawsapply onfederal lands.
Asparkarrestorfor the muffler isavailablethroughyournearestSearsParts
and RepairServiceCenter.
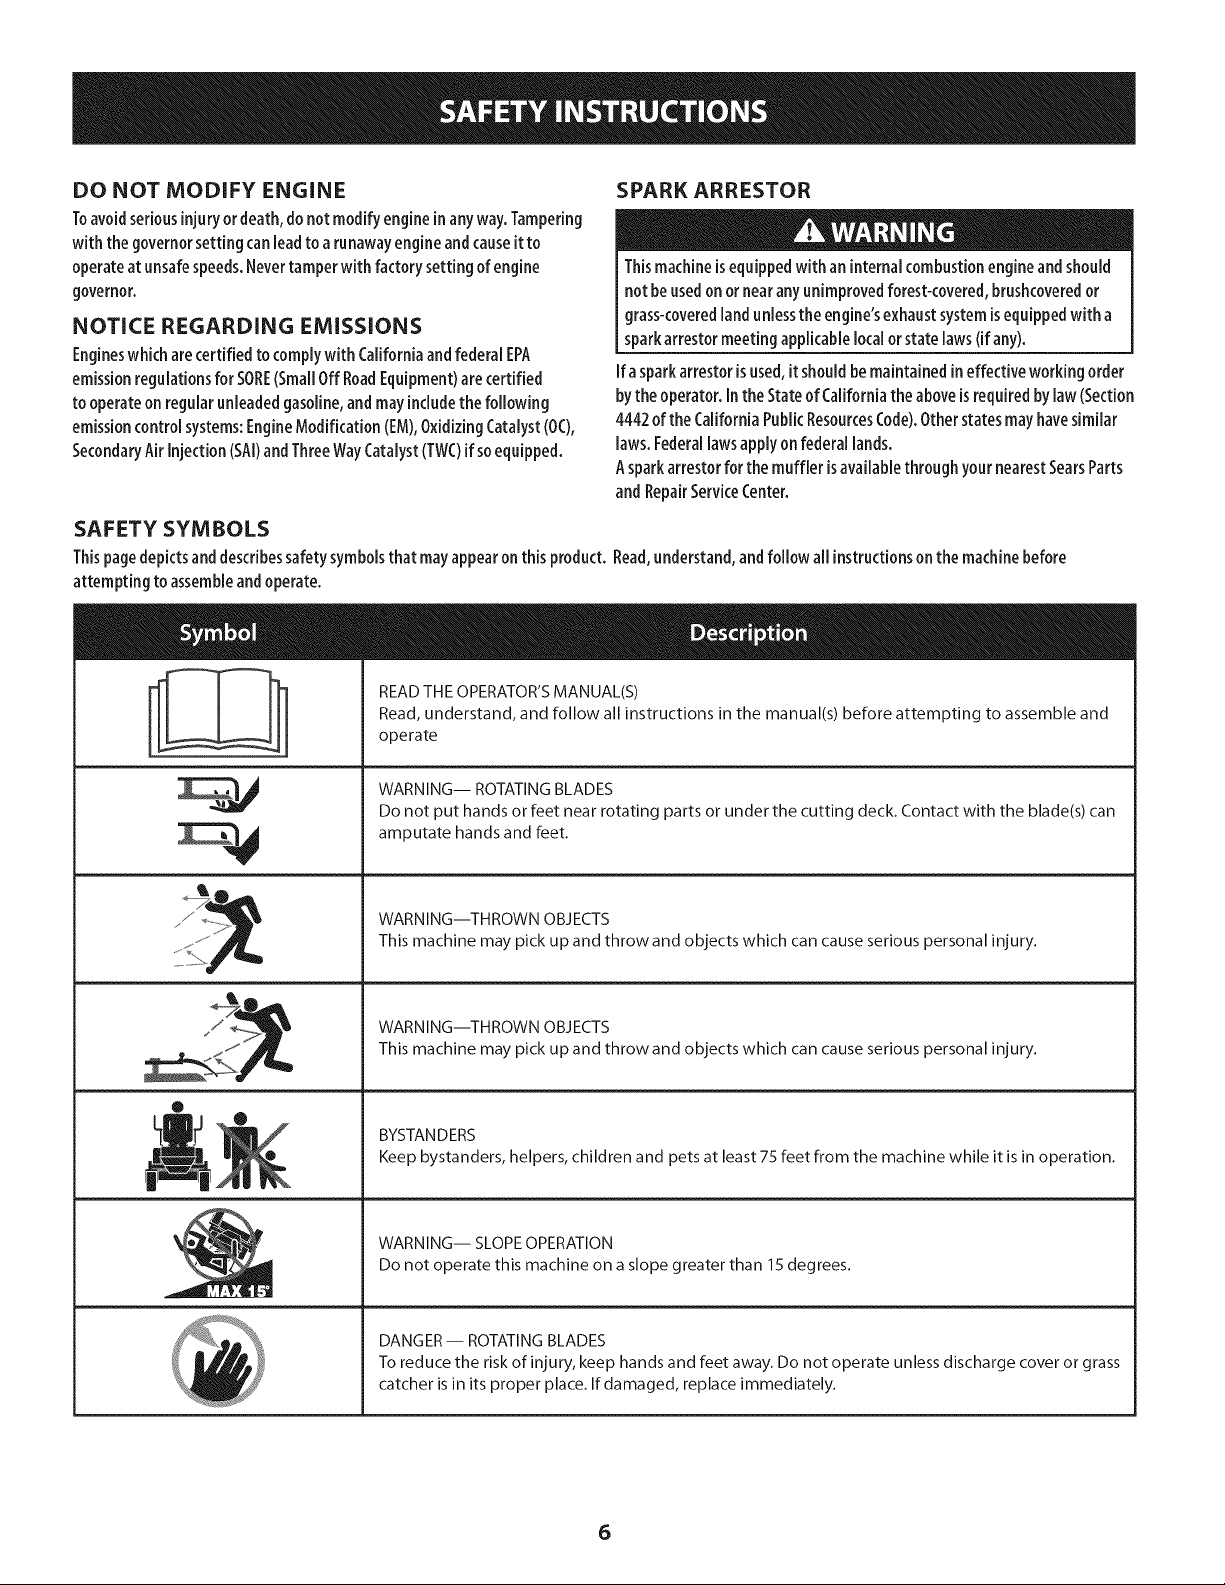
SAFETY SYMBOLS
Thispagedepictsanddescribessafety symbolsthat mayappearon thisproduct.Read,understand,andfollow all instructionson the machinebefore
attempting to assembleandoperate.
= =
READTHEOPERATOR'SMANUAL(S)
Read, understand, and follow all instructions in the manual(s) before attempting to assemble and
operate
WARNING-- ROTATINGBLADES
Do not put hands or feet near rotating parts or under the cutting deck. Contact with the blade(s) can
amputate hands and feet.
_j/_ WARNING--THROWN OBJECTS
iiii_;!:_iiii/ This machine may pick up and throw and objects which can cause serious personal injury.
WARN NG--T.ROWNOBJECTS
_F This machine may pick up and throw and objects which can cause serious personal injury.
®
J _ Keep bystanders, helpers, children and pets at least 75 feet from the machine while it is in operation.
WARNING-- SLOPEOPERATION
Do not operate this machine on a slope greater than 15 degrees.
DANGER-- ROTATINGBLADES
To reduce the risk of injury, keep hands and feet away. Do not operate unless discharge cover or grass
catcher is in its proper place. If damaged, replace immediately.
6
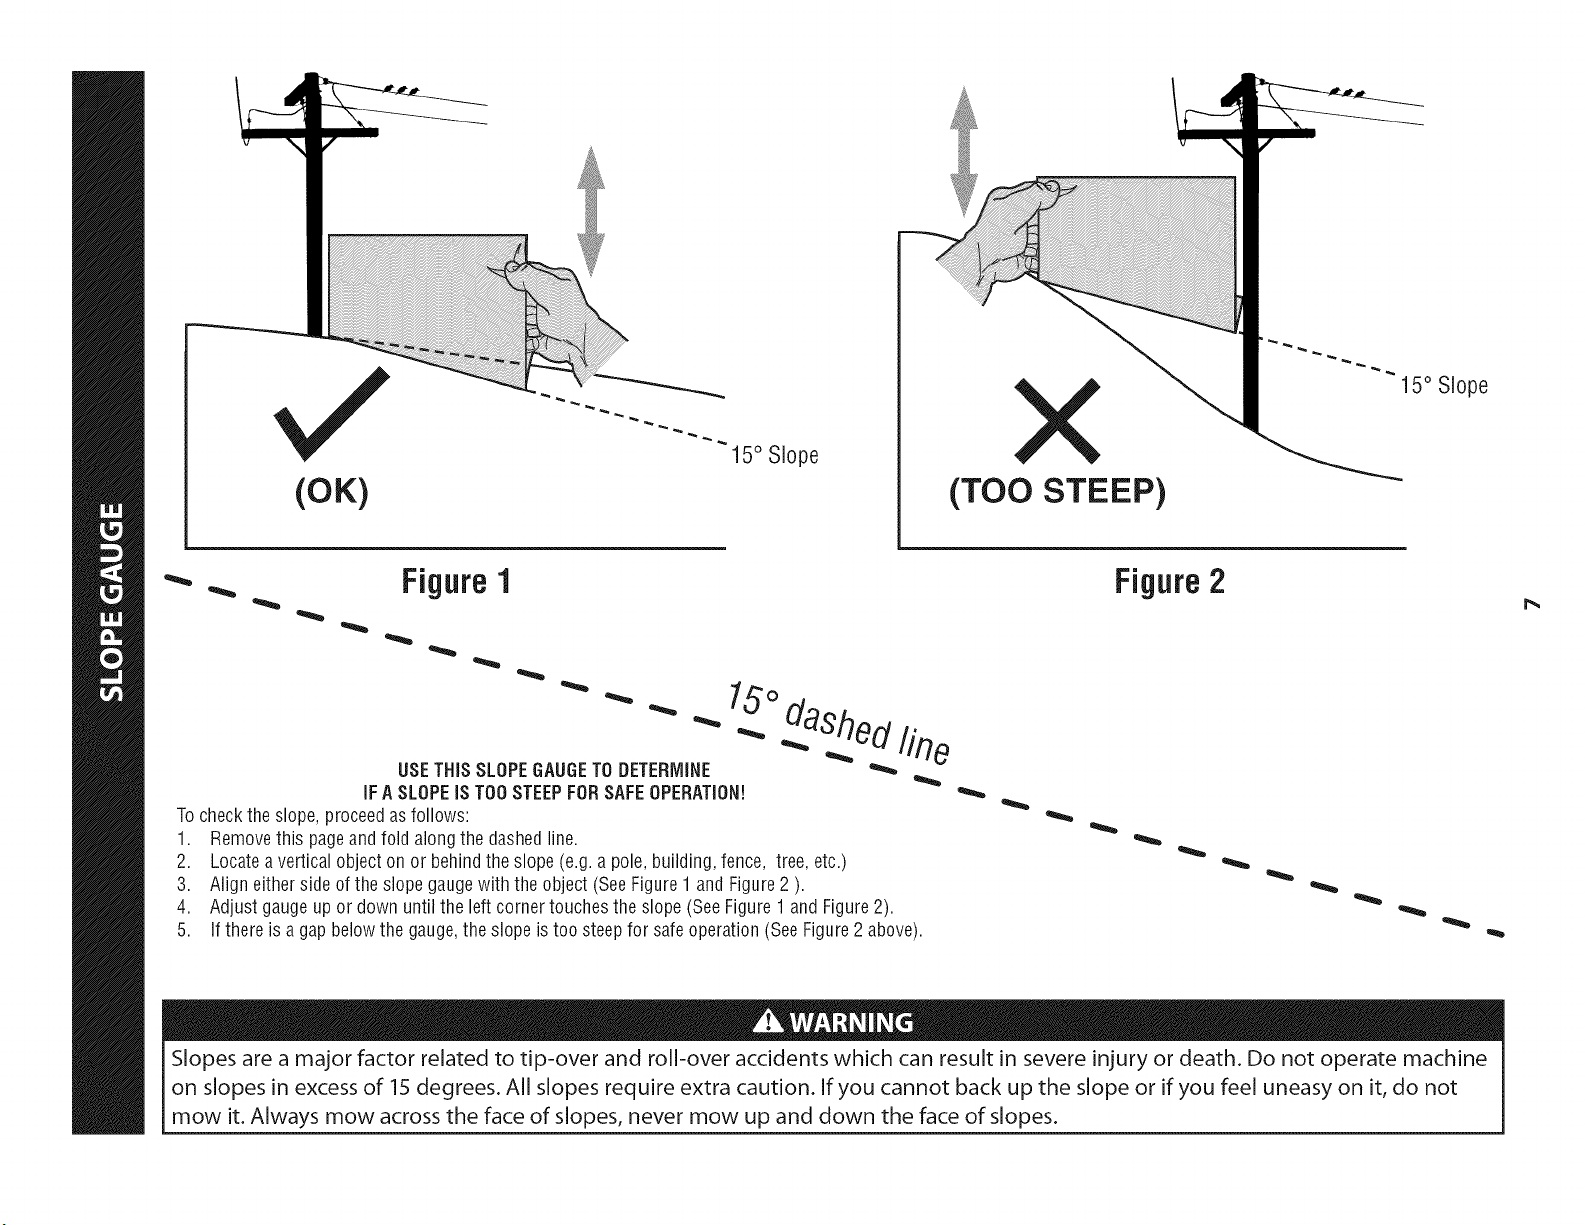
(OK)
15° Slope
X
(TOO STEEP)
15° Slope
Figure1
USETHiS SLOPEGAUGETO DETERMINE
iFA SLOPEiS TOOSTEEPFORSAFEOPERATION!
Tocheckthe slope,proceedas follows:
1. Removethis pageand fold alongthe dashedline.
2. Locateavertical object on or behindthe slope(e.g. a pole, building,fence, tree, etc.)
3. Aligneither side of the slope gaugewith the object(SeeFigure1 andFigure2 ).
4. Adjust gaugeup or down until the left cornertouchesthe slope (SeeFigure1 andFigure2).
5.
O. daShed. fine
If there is agap belowthe gauge,the slope is too steepfor safeoperation(SeeFigure2 above).
Figure2
Slopes are a major factor related to tip-over and roll-over accidents which can result in severe injury or death. Do not operate machine
on slopes in excess of 15 degrees. All slopes require extra caution. If you cannot back up the slope or if you feel uneasy on it, do not
mow it. Always mow across the face of slopes, never mow up and down the face of slopes.
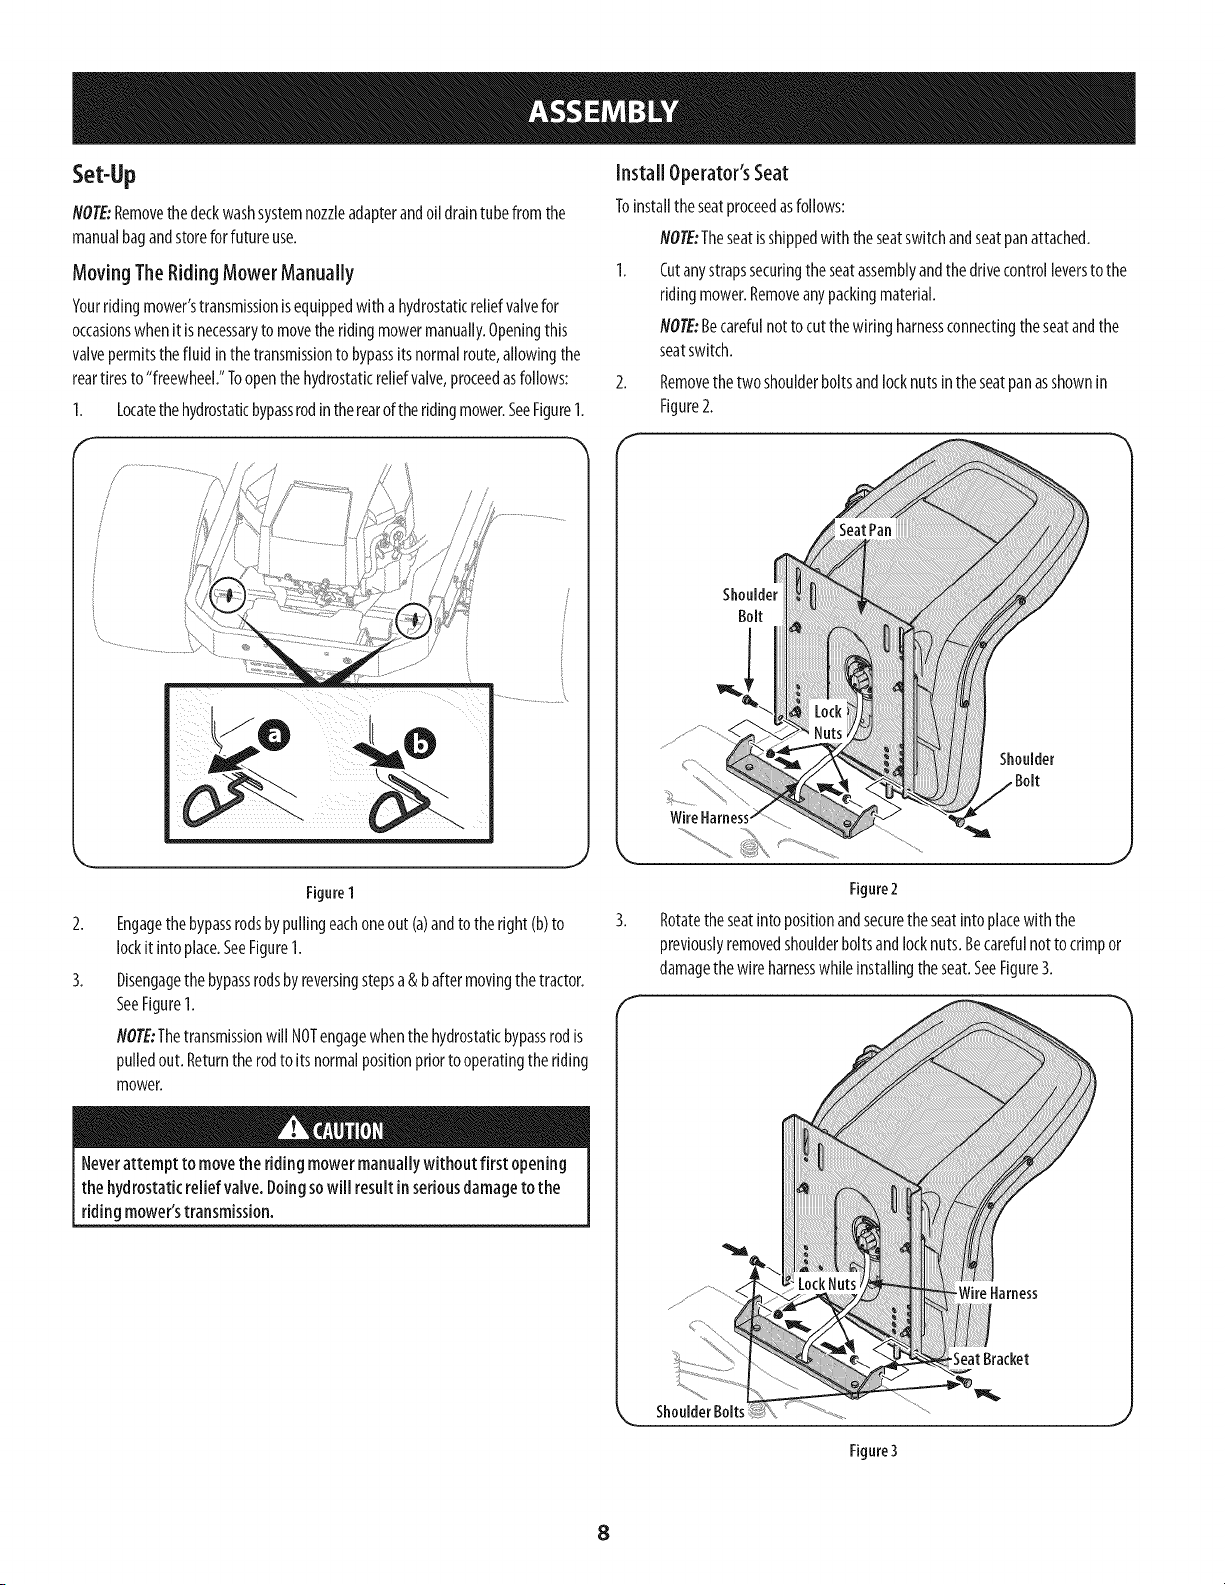
Set-Up
NOTE:Removethedeckwashsystemnozzleadapterandoil draintubefrom the
manualbagandstoreforfutureuse.
Moving TheRiding Mower Manually
Yourriding mower'stransmissionisequippedwitha hydrostaticreliefvalvefor
occasionswhenit isnecessaryto movethe ridingmowermanually.Openingthis
valvepermitsthefluid inthetransmissionto bypassits normalroute,allowingthe
reartiresto"freewheel."Toopenthehydrostaticreliefvalve,proceedasfollows:
1. Locatethe hydrostaticbypassrodintherearoftheridingmower.SeeFigure1.
Install Operator's Seat
Toinstallthe seatproceedasfollows:
NOTE:Theseatisshippedwith the seatswitchandseatpanattached.
1. Cutanystrapssecuringtheseatassemblyandthedrivecontrolleversto the
ridingmower.Removeanypackingmaterial.
NOTE:Becarefulnottocut thewiring harnessconnectingtheseatandthe
seatswitch.
2. Removethe twoshoulderboltsandlocknutsintheseatpanasshownin
Figure2.
f
Figure1
Engagethebypassrodsbypullingeachoneout (a)andto theright (b)to
lockitintoplace.SeeFigure1.
Disengagethe bypassrodsbyreversingstepsa &b aftermovingthe tractor.
SeeFigure1.
NOTE:Thetransmissionwill NOTengagewhenthe hydrostaticbypassrodis
pulledout.Returnthe rodto itsnormalpositionpriorto operatingthe riding
mower.
Neverattempt to movethe riding mowermanuallywithout first opening
the hydrostaticrelief valve. Doingsowill result inseriousdamageto the
riding mower'stransmission.
Shoulder
.Bolt
J
Figure2
Rotatetheseatintopositionandsecuretheseatintoplacewith the
previouslyremovedshoulderboltsandlocknuts.Becarefulnot to crimpor
damagethe wire harnesswhileinstallingtheseat.SeeFigure3.
ShoulderBolts
Figure3
8
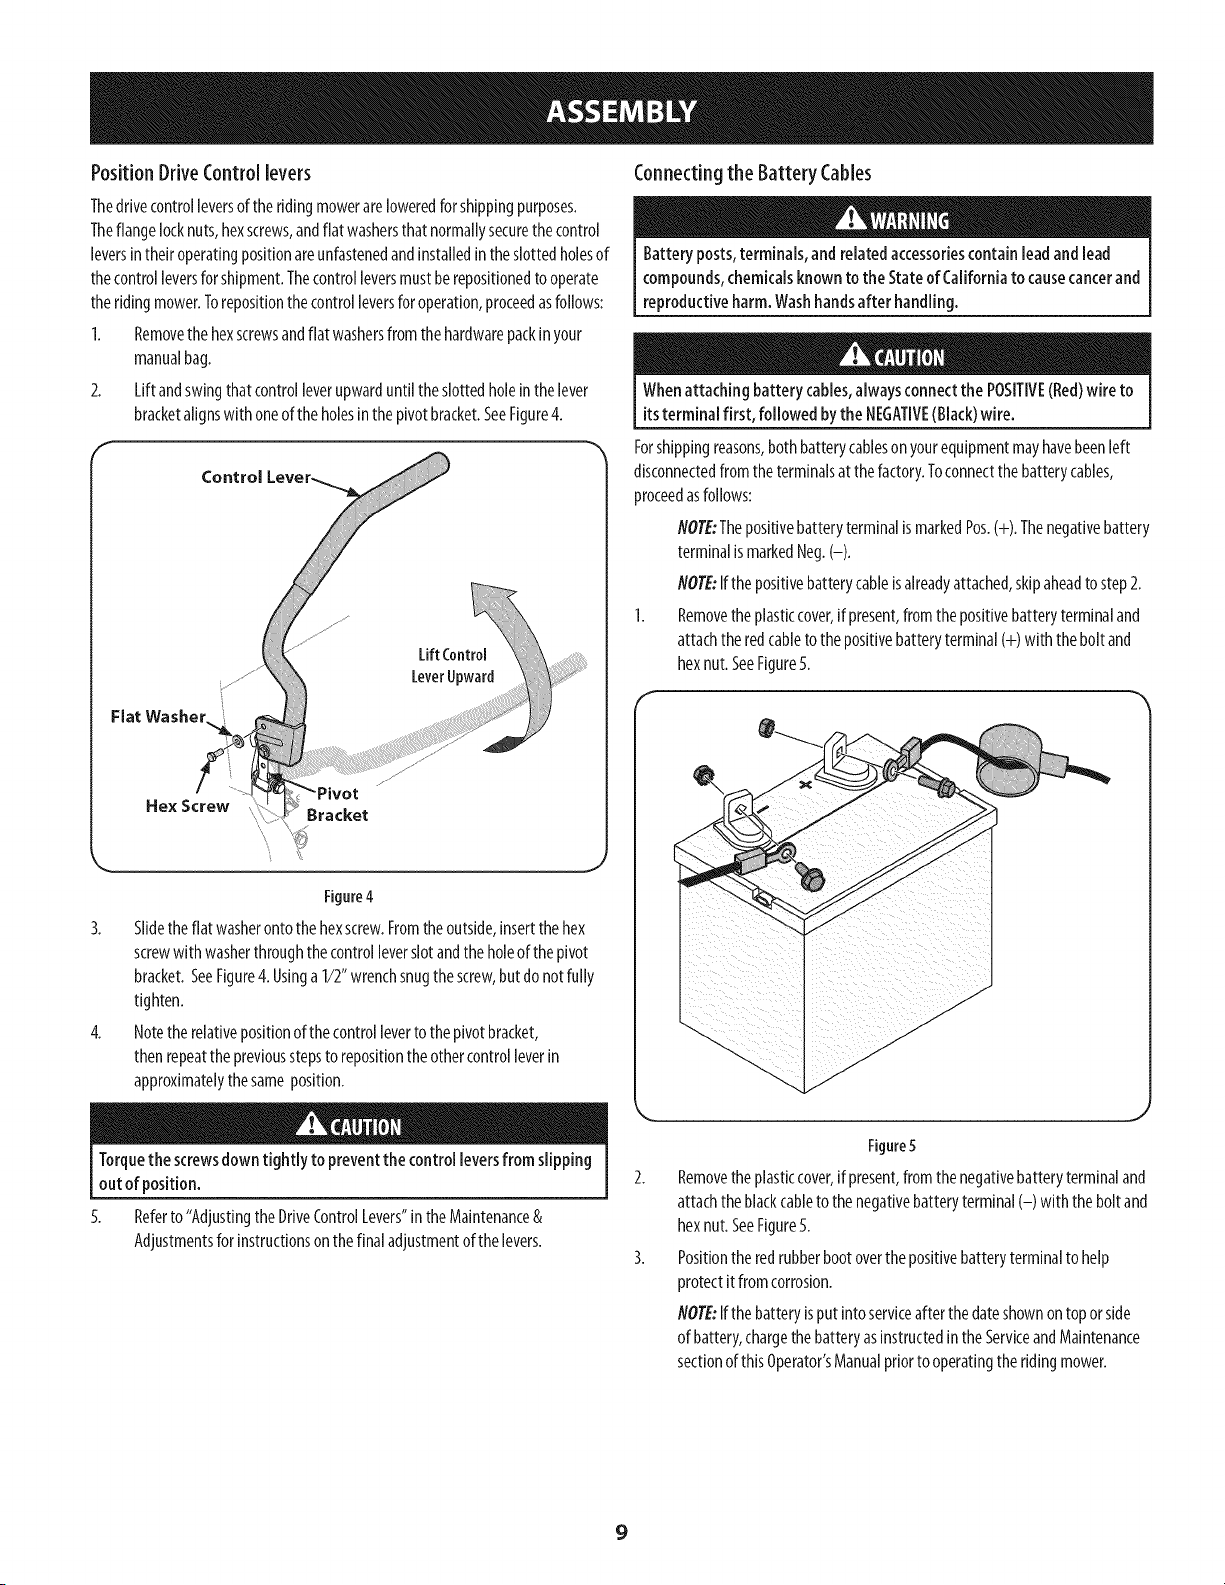
PositionDriveControllevers
Thedrivecontrolleversof theridingmowerareloweredforshippingpurposes.
Theflangelocknuts,hexscrews,andflat washersthat normallysecurethe control
leversintheiroperatingpositionareunfastenedandinstalledintheslottedholesof
thecontrolleversforshipment.Thecontrolleversmustberepositionedto operate
theridingmower.Torepositionthecontrolleversfor operation,proceedasfollows:
1. Removethe hexscrewsandflat washersfrom thehardwarepackinyour
manualbag.
2. Lift andswingthatcontrolleverupwarduntil theslottedholeinthe lever
bracketalignswith oneof the holesin the pivotbracket.SeeFigure4.
Control
Flat Washer..
LiftControl
LeverUpward
Hex Screw
Bracket
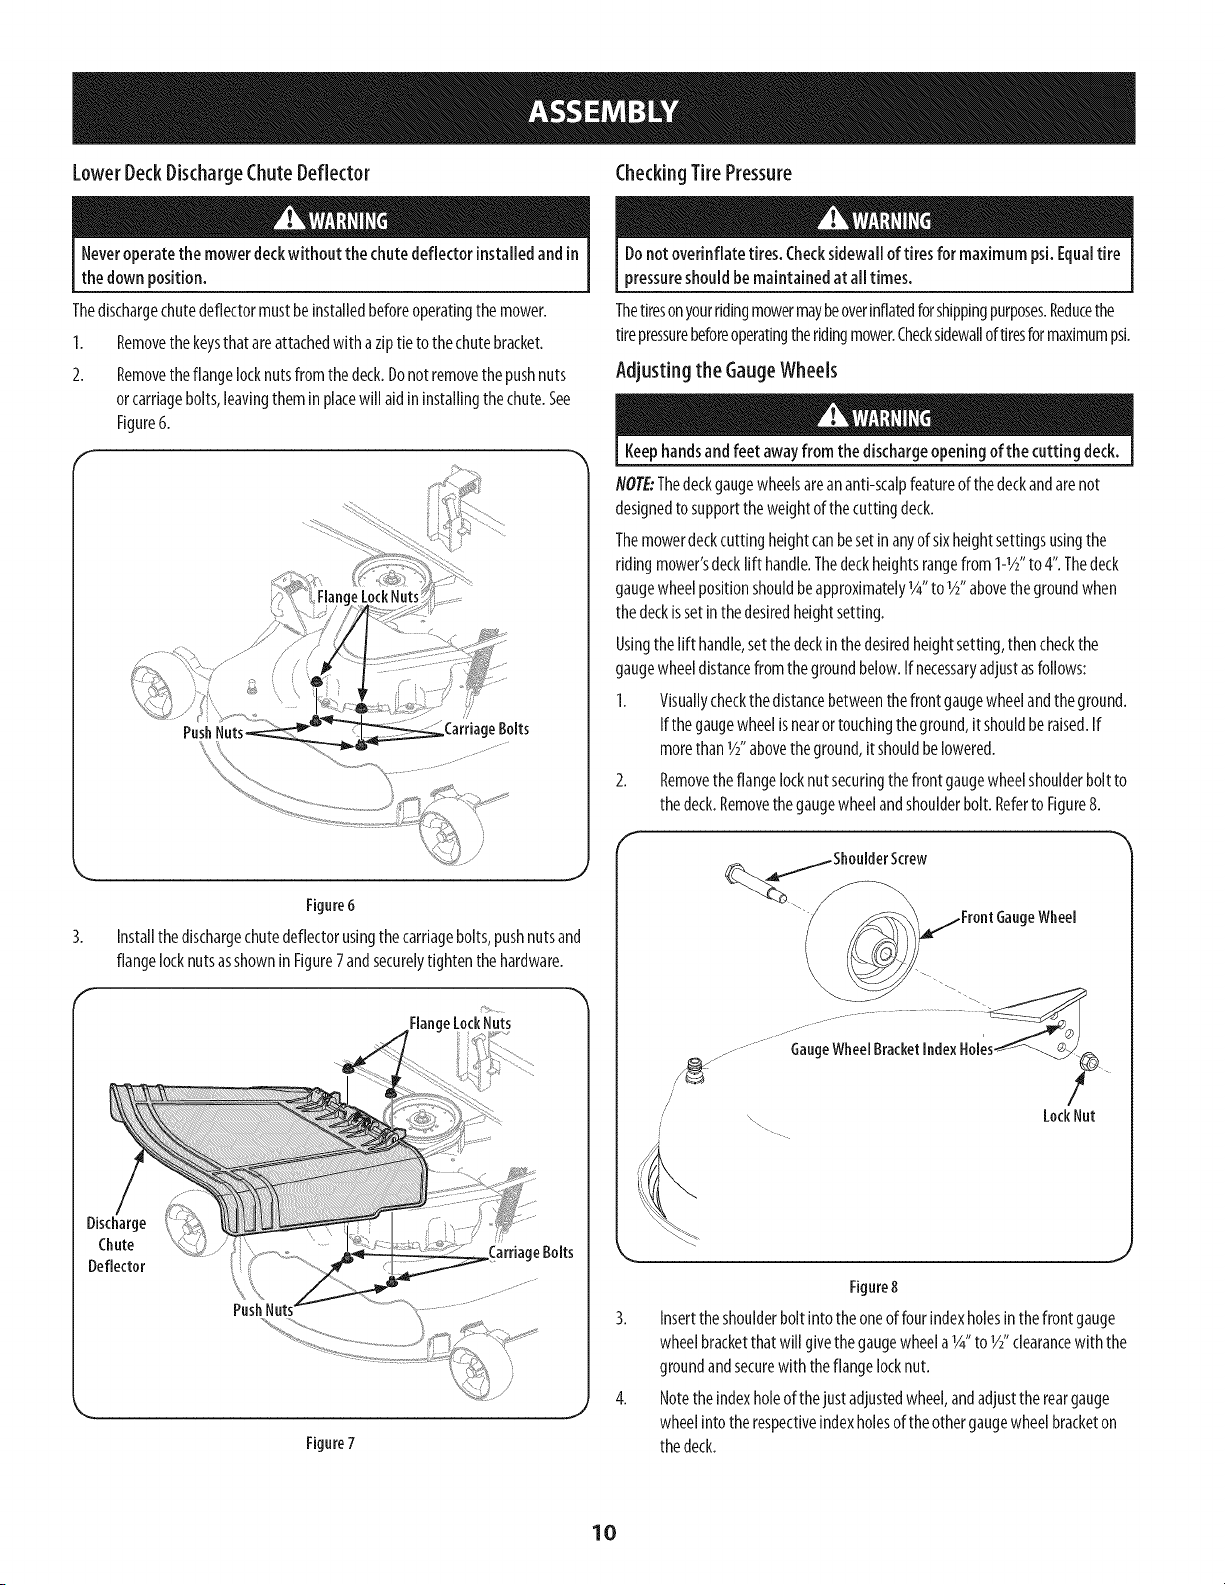
Connectingthe Battery Cables
Battery posts,terminals, and relatedaccessoriescontain lead andlead
compounds,chemicalsknownto the Stateof Californiato causecancerand
reproductiveharm.Washhandsafter handling.
Whenattaching battery cables,alwaysconnect the POSITIVE(Red)wire to
itsterminal first, followed bythe NEGATIVE(Black)wire.
Forshippingreasons,bothbatterycablesonyourequipmentmayhavebeenleft
disconnectedfrom the terminalsat thefactory.Toconnectthebatterycables,
proceedasfollows:
flOTE:ThepositivebatteryterminalismarkedPos.(+). Thenegativebattery
terminalismarkedNeg.(-).
flOTE:Ifthepositivebatterycableisalreadyattached,skipaheadto step2.
1. Removethe plasticcover,if present,fromthepositivebatteryterminaland
attachthe redcabletothepositivebatteryterminal(+) with thebolt and
hexnut.SeeFigure5.
Figure4
3. Slidethe flat washerontothe hexscrew.Fromthe outside,insertthehex
screwwith washerthroughthecontrolleverslotandtheholeof thepivot
bracket.SeeFigure4.Usinga 1/2"wrenchsnugthescrew,butdo notfully
tighten.
4. Notethe relativepositionof thecontrolleverto thepivot bracket,
thenrepeatthe previousstepsto repositionthe othercontrolleverin
approximatelythesameposition.
Torquethe screwsdowntightly to preventthe control leversfrom slipping
out of position.
5.
Referto "AdjustingtheDriveControlLevers"intheMaintenance&
Adjustmentsforinstructionsonthe finaladjustmentof thelevers.
Figure 5
Removetheplasticcover,if present,fromthe negativebatteryterminaland
attachthe blackcableto thenegativebatteryterminal(-) with the bolt and
hexnut. SeeFigure5.
Positiontheredrubberbootoverthepositivebatteryterminalto help
protectit from corrosion.
flOTE:Ifthebatteryisput intoserviceafterthe dateshownontopor side
of battery,chargethe batteryasinstructedinthe ServiceandMaintenance
sectionof thisOperator'sManualpriorto operatingthe ridingmower.
9
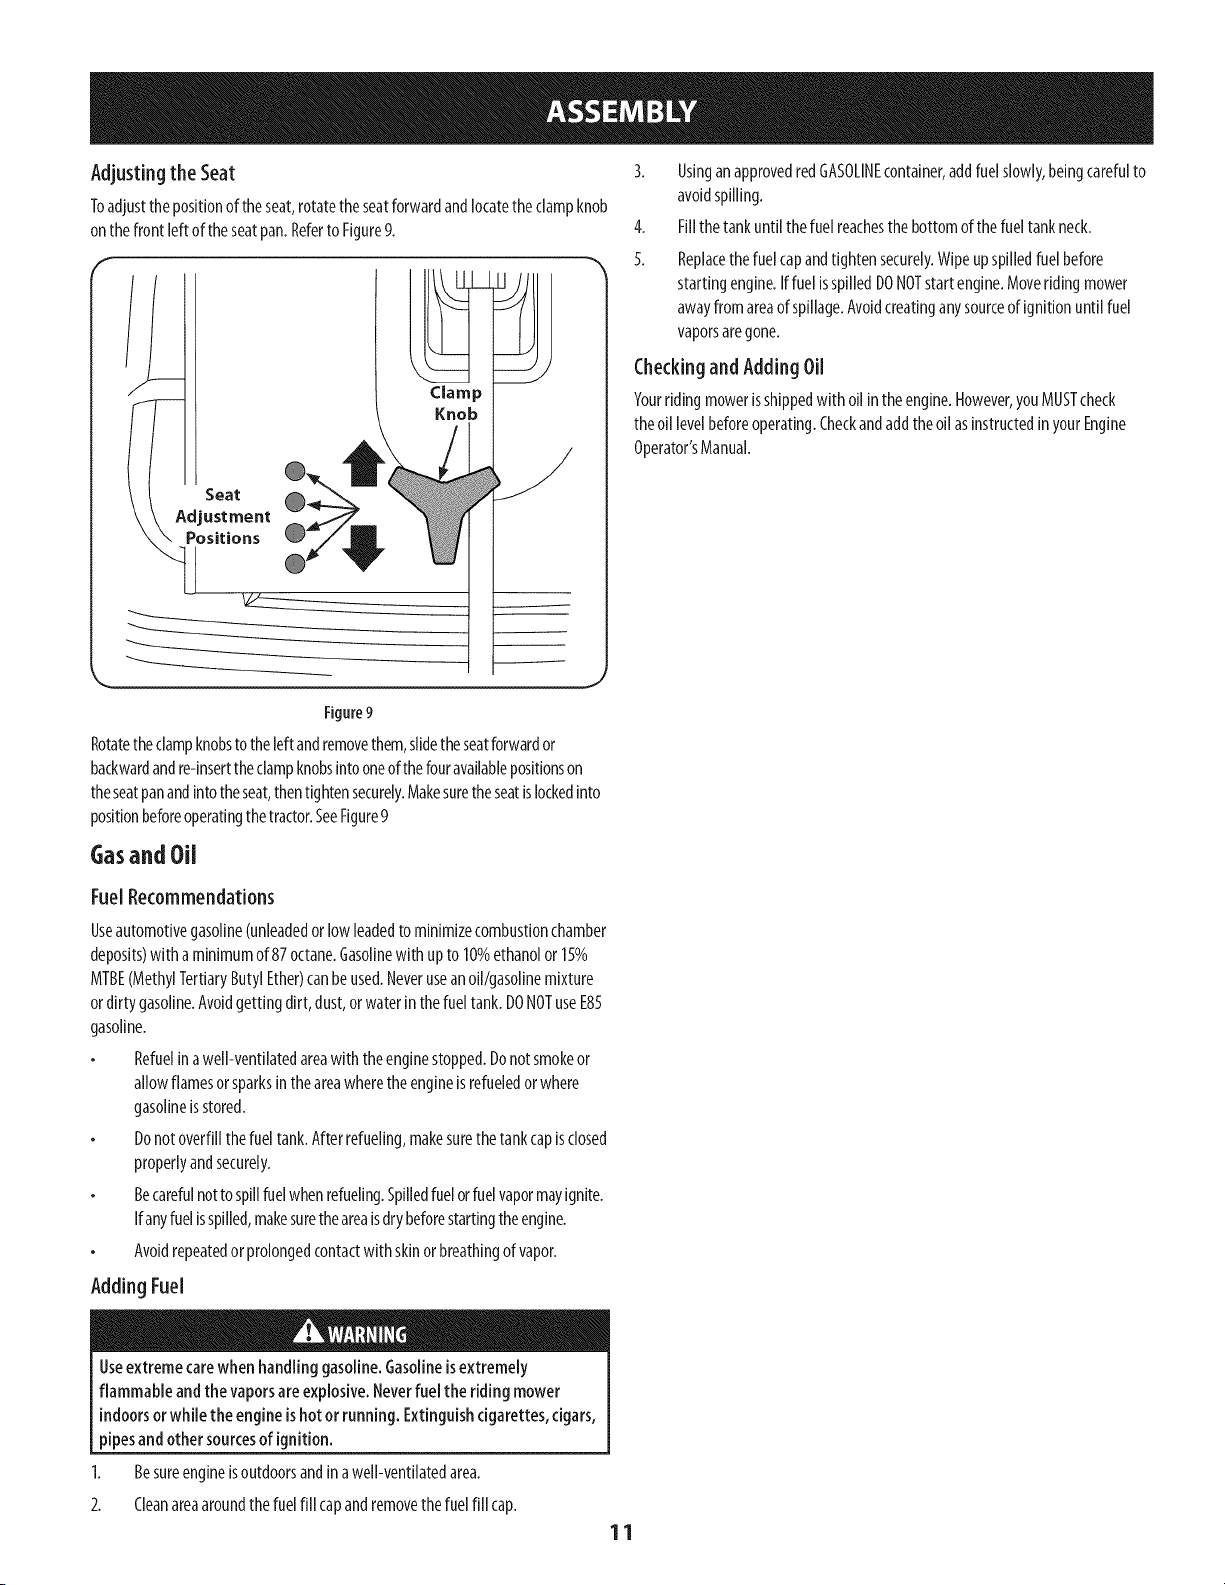
LowerDeckDischargeChuteDeflector CheckingTirePressure
Neveroperate the mowerdeckwithoutthe chutedeflectorinstalledand in
the down position.
Thedischargechutedeflectormustbe installedbeforeoperatingthe mower.
1. Removethe keysthat areattachedwith aziptie to thechutebracket.
2. Removethe flangelocknutsfromthe deck.Donotremovethepushnuts
orcarriagebolts,leavingtheminplacewill aidininstallingthechute.See
Figure6.
Push e Bolts
Figure6
Installthedischargechutedeflectorusingthe carriagebolts,pushnutsand
flangelocknutsasshownin Figure7andsecurelytighten the hardware.
:> .....
Flau_ LockNuts
Discharge
Chute
Deflector
Push
arriageBolts
Figure7
Donotoverinflate tires,Checksidewallof tires for maximum psi.Equaltire
pressureshouldbe maintained at all times.
Thetiresonyourridingmowermaybeoverinflatedforshippingpurposes.Reducethe
tirepressurebeforeoperatingtheridingmower.Checksidewalloftiresformaximumpsi.
Adjusting the GaugeWheels
Keephandsandfeet awayfrom the dischargeopeningof the cuttingdeck.
NOTE:Thedeckgaugewheelsareananti-scalpfeatureof thedeckandarenot
designedto supportthe weightof thecuttingdeck.
Themowerdeckcuttingheightcanbesetinanyof sixheightsettingsusingthe
riding mower'sdecklift handle.Thedeckheightsrangefrom 1-1_" to 4".Thedeck
gaugewheelpositionshouldbeapproximately%"to _" abovethe groundwhen
thedeckissetinthedesiredheightsetting.
Usingthelift handle,setthedeckinthedesiredheightsetting,thencheckthe
gaugewheeldistancefromthegroundbelow.Ifnecessaryadjustasfollows:
1. Visuallycheckthe distancebetweenthefrontgaugewheelandtheground.
Ifthegaugewheelisnearortouchingthe ground,itshouldberaised.If
morethan_A"abovetheground,it shouldbelowered.
2. Removethe flangelocknutsecuringthefront gaugewheelshoulderbolt to
thedeck.Removethegaugewheelandshoulderbolt. Referto Figure8.
e Wheel
LockNut
k. j
Figure8
3. Inserttheshoulderboltintothe oneof fourindexholesin thefrontgauge
wheelbracketthatwill givethe gaugewheela%"to _A"clearancewith the
groundandsecurewith theflangelocknut.
4. Notethe indexholeof thejust adjustedwheel,andadjustthereargauge
wheelinto the respectiveindexholesof theothergaugewheel bracketon
thedeck.
10
Adjusting the Seat 3.
Toadjustthepositionoftheseat,rotatetheseatforwardandlocatetheclampknob
onthefrontleftoftheseatpan.RefertoFigure9. 4.
Clamp
Knob
Seat
Adjustment
Positions
Figure9
Rotatetheclampknobsto theleft andremovethem,slidetheseatforwardor
backwardandre-insertthe clampknobsintooneof thefouravailablepositionson
theseatpanandintothe seat,thentightensecurely.Makesurethe seatislockedinto
positionbeforeoperatingthe tractor.SeeFigure9
Gasand Oil
UsinganapprovedredGASOLINEcontainer,addfuel slowly,beingcarefulto
avoidspilling.
Fillthetank untilthefuel reachesthe bottomofthefuel tank neck.
Replacethefuelcapandtightensecurely.Wipeupspilledfuel before
startingengine.Iffuel isspilledDONOTstartengine.Moveridingmower
awayfromareaof spillage.Avoidcreatinganysourceof ignitionuntil fuel
vaporsaregone.
Checkingand Adding Oil
Yourridingmowerisshippedwith oil intheengine.However,youMUSTcheck
theoil levelbeforeoperating.Checkandaddtheoil asinstructedin yourEngine
Operator'sManual.
Fuel Recommendations
Useautomotivegasoline(unleadedorlow leadedto minimizecombustionchamber
deposits)witha minimumof87 octane.Gasolinewith up to 10%ethanolor15%
MTBE(MethylTertiaryButylEther)canbeused.Neveruseanoil/gasolinemixture
ordirty gasoline.Avoidgettingdirt, dust,orwaterinthe fuel tank.DONOTuseE85
gasoline.
Refuelinawell-ventilatedareawith theenginestopped.Donot smokeor
allowflamesor sparksintheareawherethe engineisrefueledorwhere
gasolineisstored.
Donotoverfillthefuel tank.After refueling,makesurethe tank capisclosed
properlyandsecurely.
Becarefulnot tospillfuelwhenrefueling.Spilledfuelorfuelvapormayignite.
Ifanyfuel isspilled,makesuretheareaisdrybeforestartingtheengine.
Avoidrepeatedor prolongedcontactwith skinor breathingof vapor.
Adding Fuel
Useextreme carewhen handling gasoline.Gasolineis extremely
flammable andthevaporsare explosive.Neverfuelthe riding mower
indoorsor while the engine ishotor running. Extinguishcigarettes,cigars,
pipesandother sourcesof ignition.
1. Besureengineisoutdoorsandinawell-ventilatedarea.
2. Cleanareaaroundthefuel fill capandremovethe fuelfill cap.
11
FuelLevelWindow\ l\
FueiTankCap
LHDrive RHDrive
ControlLever ControlLever
LCDServiceMinder&
HourMeter
ignitionSwitch
CupHolder
Tray
LHTransmissionByic
\nsmissionBypassRod
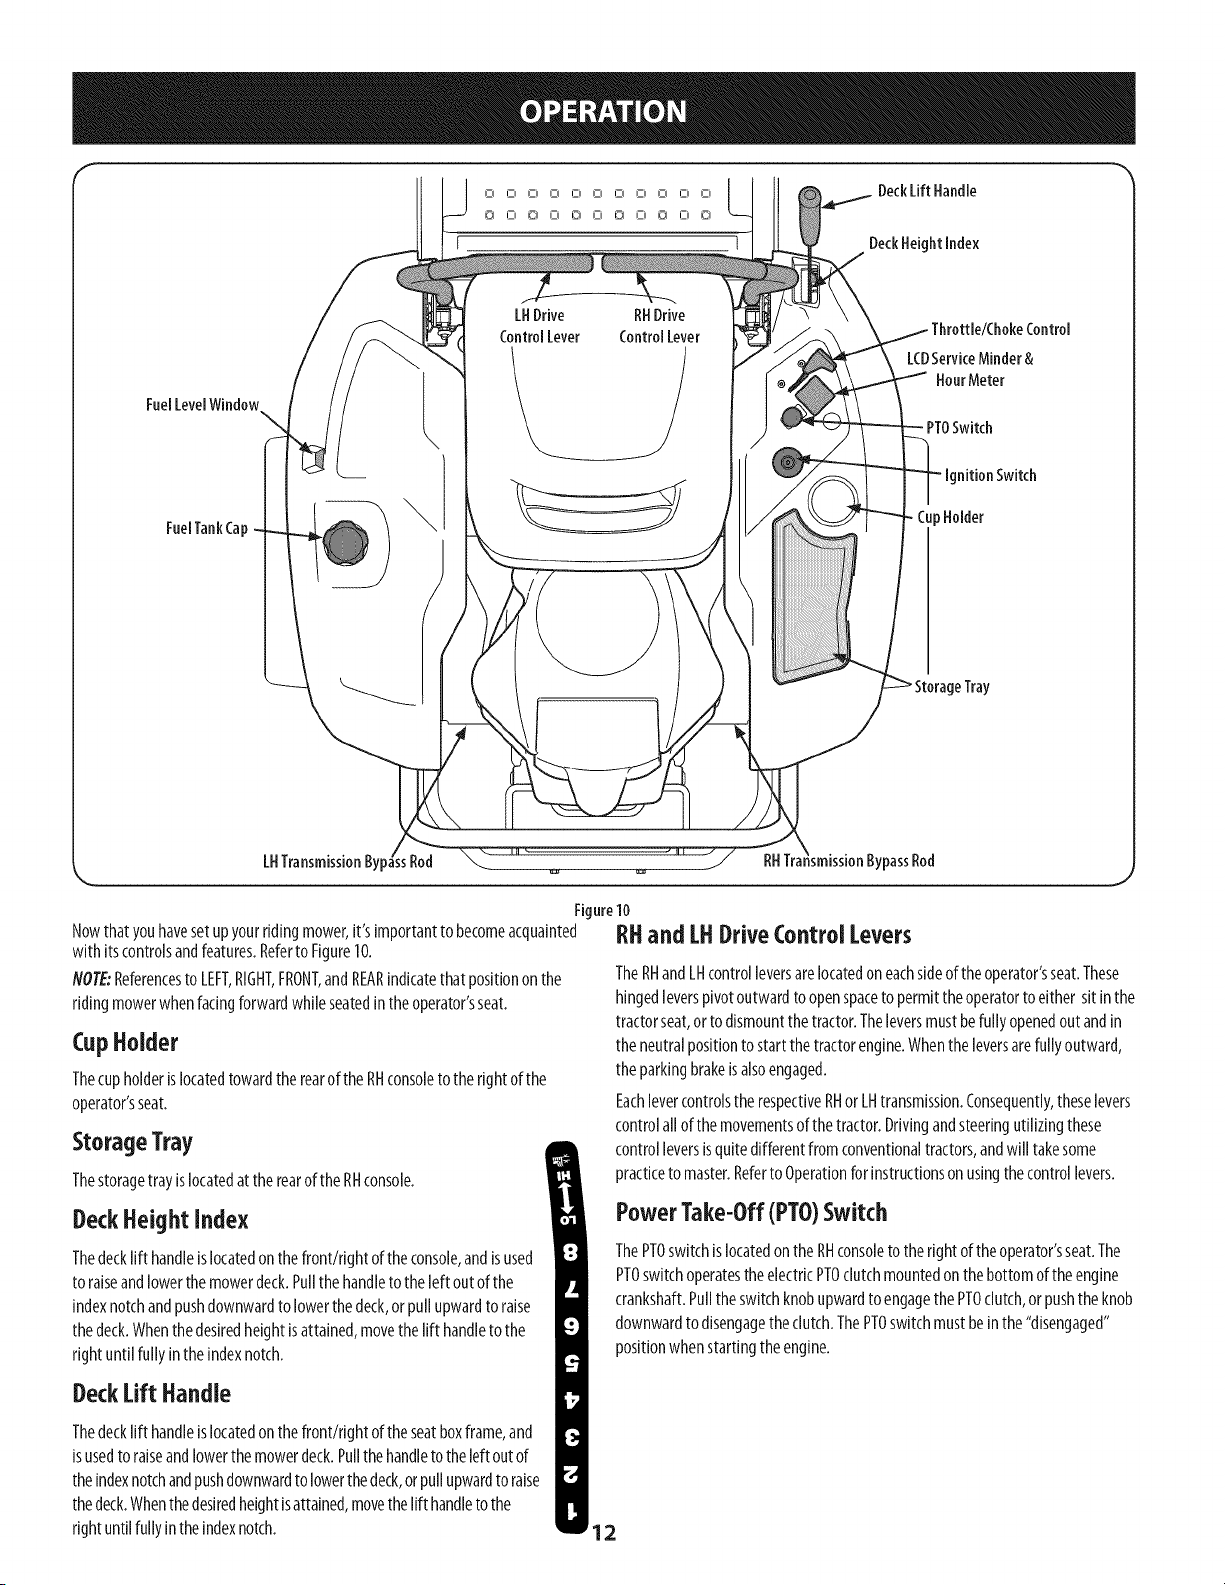
Figure10
Nowthat youhavesetupyourridingmower,it'simportantto becomeacquainted
with itscontrolsandfeatures.Referto Figure10.
NOTE:Referencesto LEFT,RIGHT,FRONT,andREARindicatethat positionon the
ridingmowerwhenfacingforwardwhileseatedinthe operator'sseat.
CupHolder
Thecupholderislocatedtowardthe rearof theRHconsoleto theright ofthe
operator'sseat.
RHand LHDriveControl Levers
TheRHandLHcontrolleversarelocatedon eachsideof theoperator'sseat.These
hingedleverspivotoutwardto openspaceto permittheoperatorto either sitinthe
tractorseat,orto dismountthetractor.Theleversmustbefullyopenedout andin
theneutralpositionto startthetractorengine.Whenthe leversarefully outward,
theparkingbrakeisalsoengaged.
Eachlevercontrolsthe respectiveRHor LHtransmission.Consequently,theselevers
StorageTray
Thestoragetray islocatedat therearofthe RHconsole.
DeckHeight index
Thedecklift handleislocatedonthefront!right of the console,andisused
to raiseandlowerthemowerdeck.Pullthehandleto theleft outof the
indexnotchandpushdownwardto lowerthedeck,or pullupwardto raise
thedeck.Whenthedesiredheightisattained,movethe lift handleto the
right untilfully intheindexnotch.
DeckLift Handle
Thedecklift handleis locatedonthe front/right of the seatboxframe,and
isusedto raiseandlowerthemowerdeck.Pullthehandletotheleft outof
theindexnotchandpushdownwardto lowerthedeck,orpullupwardto raise
thedeck.Whenthe desiredheightisattained,movethe lift handleto the
rightuntilfullyintheindexnotch.
controlall of themovementsofthetractor.Drivingandsteeringutilizingthese
controlleversisquitedifferentfrom conventionaltractors,andwill takesome
practiceto master.Referto Operationforinstructionson usingthecontrollevers.
PowerTake-Off(PTO)Switch
ThePTOswitchislocatedon theRHconsoleto theright oftheoperator'sseat.The
PTOswitchoperatesthe electricPTOclutchmountedon the bottomof theengine
crankshaft.Pullthe switchknobupwardto engagethePTOclutch,or pushthe knob
downwardto disengagethe clutch.ThePTOswitchmustbeinthe"disengaged"
positionwhenstartingtheengine.
12

ignition Switch LowOil
Theignitionswitchislocatedon the RH RUN
consoleto therightof theoperator'sseat. I
Theignitionswitchhasthreepositions.
STOP_-- Theengineandelectrical
systemisturnedoff.
RUN_-- Theridingmowerelectricalsystemisenergized.
START_-- Thestartermotorwill turn overtheengine.Releasethe key
immediatelywhentheenginestarts
NOTE:Topreventaccidentalstartingand/orbatterydischarge,removethe
keyfrom the ignitionswitchwhentheridingmowerisnotin use.
TransmissionBypassRods
Thetransmissionbypassrods(oneforeachtheRHandLHtransmission)arelocated
beneaththeframeplatform,just insideeachrearwheel.
Whenengaged,the two rodsopena bypasswithin the hydrostatictransmissions,
whichallowstheridingmowerto bepushedshortdistancesbyhand.Referto the
Assemblysectionfor instructionsonusingthebypassfeature.
Nevertow your riding mower.Towingthe ridingmowerwith the rear
wheels onthe ground maycauseseveredamageto the transmissions.
FuelTankCap
Thefueltankcapis locatednearthemiddleof the LHconsole.Turnthe fill capto
remove.Thefuelcapistetheredtothetractorto preventits loss.Donotattemptto
removethecapfromthe tractor.Filltankto thebottomofthefillerneck,allowing
somespaceinthetankforfuel expansion.Donot overfillthe tank.
Pushthecapdownwardon the fuel tankfill neckandturn clockwiseuntil it clicksto
tighten.Alwaysre-installthefuelcaptightly ontothe fuel tankafter removing
Neverfill the fueltank when the engine isrunning. If the engine ishot
from recentlyrunning, allow to coolfor severalminutes beforerefueling.
Highlyflammable gasolinesplashingontoa hot enginecouldcauseafire.
LCDServiceMinder & Hour Meter
Whentheignitionkeyisrotatedoutof theSTOPpositionbutnot into the START
position,the LCDServiceMinderandHourMeterwill brieflydisplythebattery
voltage,followedbythe tractor'saccumulatedhours.
NOTE:Hoursof tractoroperationarerecordedanytimethe ignitionkeyis
rotatedoutof theSTOPposition,regardlessof whethertheengineisstarted.
TheLCDServiceMinderwill remindtheoperatorof maintenanceintervalsfor
changingtheengineoil,air filterservice,low engineandlowbatterywarnings.
ChangeOil
TheLCDwill displaythe letters"CHG",followedbytheletters"OIL",followedbythe
letters"SOON",thenfinallyfollowedbythemeter'saccumulatedtime. "CHG/OIL/
SOON/TIME"will alternateonthe displayfor 7minutesafterthe meterreaches50
hours.Thisoil serviceminderintervallwill occurevery50hours.Beforethe interval
expires,changetheengineoil asinstructedin theMaintenancesectionof this
Operator'sManual.
13
Theletters"LO"followedbytheletters"OIL",thenfollowedbythe meter's
accumulatedtimewill indicatethe tractorislow onoil. Stopthetractor
immediatelyandchecktheengineoil levelasinstructedinthis Owner'sManual.
Low Battery 11_;I 8mrl
Atstartup,thebatteryvoltageisbrieflydisplayedthen
changestoaccumulatedhours.Theletters"LO"willdisplay
followedbytheletters"BATT"andthenfollowedybythemeter'saccumlulatedtime.
"LO/BATT/TIME"isdisplayedontheLCDwhenthevoltagedropsbelow11.5volts.When
thisoccurs,thebatteryisinneedofachargeor theengine'schargingsystemisnot
generatingsufficientamperage.ChargethebatteryasinstructedintheServicesectionof
thismanualorhavethechargingsystemcheckedbyyourlocalservicedealer.
Air Rlter Servke I1_] rL
Theletters"CLN"will display,followedbythe letters _ n
"AIR",followedby"FILT",thenfollowedbythemeter's
accumulatedtime."CLN/AIR/FILT/TIME"will alternateon thedisplayfor7 minutes
after the meterreachges25 hours.Thisair filter servicemindertime intervalwill
beevery25 hours.Onintervallsthatarecommonwith oil service,the oil message
will bediplayedfirst followedbythe airfilter message.SeetheEngineOperator's
Manualforfilter cleaningandreplacementsinstructions.
I
Throttle/ChokeControl
Thethrottle/chokecontrolis locatedonthe LHconsoleto theleft of the
operator'sseat.Whensetin agivenposition,a uniformenginespeedwill
bemaintained.
Pushthethrottle/chokecontrolhandleforwardto increasethe engine
speed.Theridingmowerisdesignedtooperatewith the throttle/choke
controlinthe FAST_ positionwhentheridingmowerisbeingdriven
andthe mowerdeckisengaged.
PullthethrotNe/chokecontrolhandlerearwardto decreasethe engine
speed.
Whenstartingtheengine,pushthecontrolhandlefully forwardintothe
CHOKENposition.
m
m
$LSW
Afterstartingandwarmingtheengine,movethe controlhandlerearwarduntil you
feel it movepastthechokedetent.
General Safety
RECEIVEINSTRUCTION-- Entirelyreadthisoperator'smanual.Learnto
operatethismachineSAFELY.DonotriskINJURYor DEATH.Allowonlythose
who havebecomecompetentin itsusagetooperatethisridingmower.
Beforestartingtheengineor beginningoperation,befamiliarwith the
controls.Theoperatorshouldbe inthe operator'sseat.ThePTOswitchmust
be inthe disengagedposition,the parkingbrakeengaged,andthe RHand
LHdrivecontrolleversmovedfullyoutwardin theneutralposition.
Keepallshieldsin place.Keepawayfrommovingparts.
NORIDERS!Keepall peopleandpetsasafedistanceaway.Lookbehindand
downto bothsidesof theridingmowerbeforeandwhilebackingup.
DONOTdirectthemowerdischargeat people.
Avoidslopeswherepossible.Neveroperateonslopesgreaterthan15°.
Slopeswith agreaterinclinepresentdangerousoperatingconditions.Riding
mowerscanbe rolledover.
Beforeleavingtheoperator'sseat:ShutoffthePTO,movetheRHandLH
drivecontrolleversfullyoutwardintheneutralposition,engagetheparking
brake0, shutoff the engineandremovetheignitionkey.Waitforall
movementto stopbeforeservicingor cleaning.
Operatethedrivecontrolleverssmoothlyandavoidanysuddenmovements
of theleverswhenstartingandstopping.Keepafirm griponthe control
levers.
Becarefulwhenoperatingnearroadways.Stopthe ridingmowermotion
andwaitfor vehiclesto passbeforeoperatingalongthe road.
Donotoperatetheridingmowerwiththe mowerdeckremoved.Removalof
thedeckwill changethe balanceof theridingmower,andcouldcontribute
to aridingmowerrollover.
Avoidoperationon tractionsurfacesthat areunstable;useextremecaution
if thesurfaceisslippery.
Slowdown beforeturningandcometo acompletestopbeforeanyzeroturn
maneuver.
Donotstoptheridingmowerorparkthe ridingmowerovercombustible
materialssuchasdrygrass,leaves,debris,etc.
Donotfill thefueltank whentheengineisrunningor whilethe engineis
hot.Allowtheengineseveralminutesto coolbeforerefueling.Tightenthe
fuelcapsecurely.
Before Operating YourRidingmower
Beforeyouoperatetheridingmower,studythismanualcarefullyto familiarize
yourselfwith theoperationofall theinstrumentsandcontrols.It hasbeen
preparedto helpyouoperateandmaintainyourridingmowereffldently.
Thisengineiscertifiedto operateonlyonclean,fresh,unleadedregular
gasoline.Forbestresults,fill thefuel tank withonlyclean,fresh,unleaded
gasolinewith a pumpstkkeroctaneratingof 87or higher.
Unleadedgasolineisrecommendedbecauseit leaveslesscombustionchamber
depositsandreducesharmfulexhaustemissions.Leadedgasolineisnot
recommendedandmustnot beusedwhereexhaustemissionsareregulated.
NOTE:Purchasegasolineinsmallquantities.Donotusegasolineleft over
fromthe previousseason,to minimizegumdepositsinthefuel system.
Gasohol(upto 10%ethylalcohol,90%unleadedgasolinebyvolume)isan
approvedfuel.Othergasoline/alcoholblendsarenotapproved.
MethylTertiaryButylEther(MTBE)andunleadedgasolineblends(upto a
maximumof 15%MTBEbyvolume)areapprovedfuels.Othergasoline/ether
blendsarenotapproved.
Checkthe engineoil level.
Cleantheair cleanerelementifnecessary.
Checkthe tireinflationpressures.
Adjusttheseatfor operator'smaximumcomfort,visibilityandfor
maintainingcompletecontrolof theridingmower.
Safety Interlock System
Thisridingmowerisequippedwith asafetyinterlocksystemfor theprotectionof
theoperator.If the interlocksystemshouldevermalfunction,do notoperatethe
ridingmower.Call1-800-659-5917to scheduleservicefromSearsParts& Repair.
Thesafetyinterlocksystempreventstheenginefromcrankingorstartingunless
the RHandLHdrivecontrolleversaremovedfullyoutwardtoeachsideinthe
neutralposition,the parkingbrakeisengaged,andthe PTOisdisengaged.
Toavoidsuddenmovementwhendisengagingthe parkingbrake,the safety
interlocksystemwill shutoffthe engineif theRHand/orLHdrivecontrol
leversaremovedto apositionotherthanthefullyout intheneutralposition
whentheparkingbrakeisengaged.
Thesafetyinterlocksystemwill shutoffthe engineifthe operatorleavesthe
seatbeforeengagingtheparkingbrake.
Thesafetyinterlocksystemwill shutofftheengineiftheoperatorleavestheseat
withthePTOengaged,regardlessofwhethertheparkingbrakeisengaged.
NOTE:ThePTOswitchmustbemovedtothe"OFF"positionto restarttheengine.
Thesafetyinterlocksystemwill shutoffthe PTOandthemowerbladeswill
stopif bothdrivecontrolleversaremovedinto thereverseposition.ThePTO
will re-engagewhenoneor bothof theleversaremovedbackto eitherthe
neutralorforwardposition.
Starting the Engine
Thisriding mowerisequippedwith a safetyinterlocksystemdesignedfor
the protection of the operator. Donotoperate the riding mowerif anypart
of the interlocksystemismalfunctioning. Periodicallycheckthe functions
of the interlocksystemfor proper operation.
Forpersonalsafety,the operatormust be sitting in the riding mowerseat
whenstarting the engine.
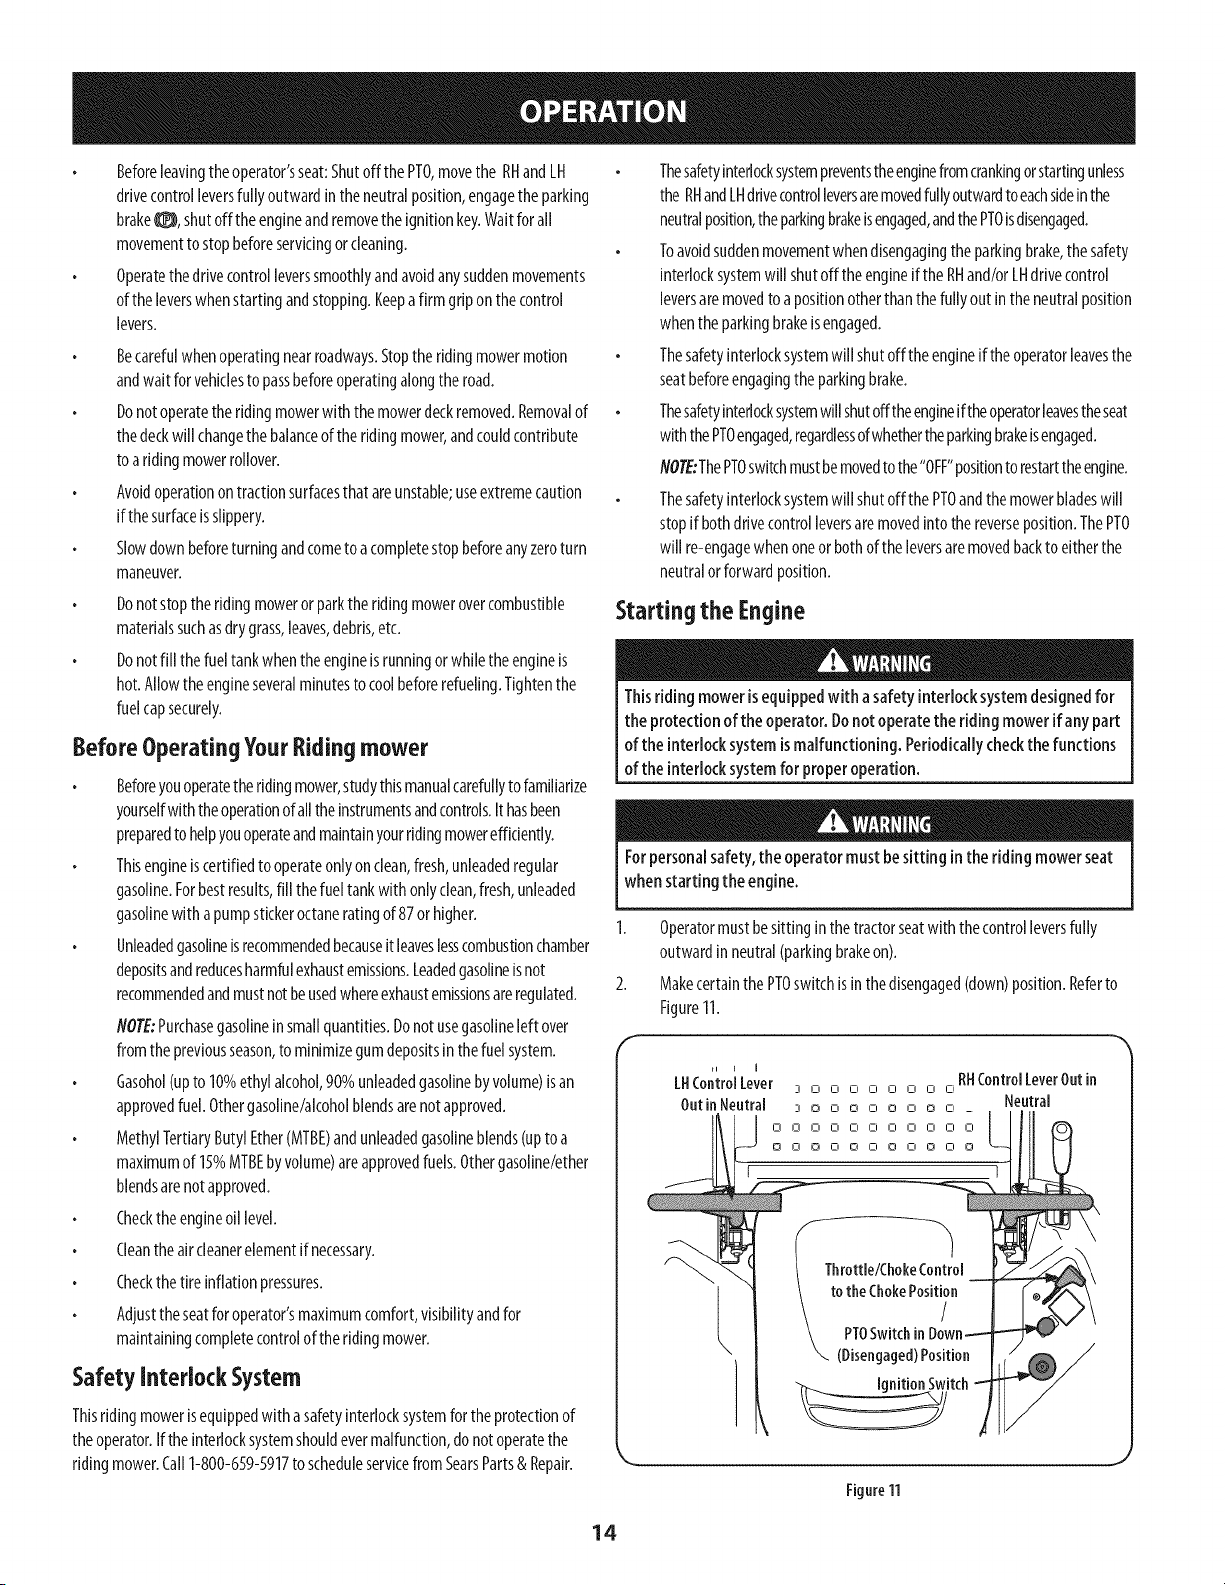
1. Operatormustbesitting inthetractorseatwith the controlleversfully
outwardinneutral(parkingbrakeon).
2. Makecertainthe PTOswitchis inthe disengaged(down)position.Referto
Figure11.
[N ControlLever
OutinNeutral
RNControlLeverOutin
3 0 0 0 0 0 0 0 C
3 o o o o o o o o _ Neutral
DO000000000
DO000000000
Throttle/ChokeControl
totheChokePosition
/
(Disengaged)Position
--__itch
Figure11
14
3. Movethethrottle/chokecontrolleverfullyforwardintothe CHOKEI'_1
position.
flOTE:Ifthe engineis warmedup,it maynotbe necessaryto placethe
throttle/chokecontrolintheCHOKEI%1position.
4. Turnthe ignitionkeyclockwiseto the START_ positionandreleaseit as
soonastheenginestarts;however,do notcrankthe enginecontinuouslyfor
morethan5secondsat atime.If the enginedoesnot startwithin thistime,
turn the keyto STOP_ andwaitat least15secondsto allowtheengine's
startermotorto cool.Tryagainafterwaiting.Ifafter afewattemptsthe
enginefailsto start,do not keeptryingto start it with thechokeclosedas
thiswill causefloodingandmakestarting moredifficult.
5. Asthe enginewarmsup,graduallypull the throttle/chokecontrollever
rearwardpastthechokedetentposition.Donotusethe chokepositionto
enrichthe fuelmixture,exceptasnecessaryto starttheengine.
6. Allowtheengineto runforafew minutesat midthrottle beforeputtingthe
engineunderload.
ColdWeather Starting
Whenstartingtheengineattemperaturesnearor belowfreezing,ensurethe
correctviscositymotoroil isusedin theengineandthebatteryisfully charged.
Starttheengineasfollows:
I. Besurethebatteryis ingoodcondition.Also,awarmbatteryhasmuch
morestartingcapacitythanacoldbattery.
2. Usefreshwintergradefuel.Wintergradegasolinehashighervolatilityto
improvestarting.Donotusegasolineleft overfrom summer.
3. Followthepreviousinstructionfor Startingthe Engine.
UsingJumper CablesToStart Engine
Batteriescontain sulfuric acidandproduceexplosivegasses.Makecertain
the area iswell ventilated,wear glovesandeye protection,and avoid
sparksor flamesnear the battery.
If thebatterychargeisnotsufficientto crankthe engine,rechargethebattery.Ifa
batterychargeris unavailableandthe ridingmowermustbestarted,the aidofa
boosterbatterywill benecessary.Connecttheboosterbatteryasfollows:
1. Connectthe endofonecableto thedisabledridingmowerbattery'spositive
terminal;then connecttheotherendof thatcableto theboosterbattery's
positiveterminal.
2. Connectoneendof theothercableto theboosterbattery'snegative
terminal;then connecttheotherendof thatcableto the frameofthe
disabledridingmower,asfarfromthe batteryaspossible.
3. Startthedisabledriding mowerfollowingthenormalstartinginstructions
previouslyprovided;thendisconnectthejumpercablesinthe exactreverse
orderof theirconnection.
4.
Havetheridingmower'selectricalsystemcheckedandrepairedassoonas
possibleto eliminatethe needforjumpstarting.
Stopping the Engine
1. Placethe PTOswitchinthe OFFposition.
2. Movethe RHandLHdrivecontrolleversfully outwardintheneutralposition
(parkingbrakeon).
3. Movethethrottle/chokecontrolto midwaybetweentheSLOW_ and
FAST_ positions.
4. Turntheignitionkeyto the STOP_ positionandremovethe keyfrom the
ignitionswitch.
flOTE:Alwaysremovethekeyfromtheignitionswitchto preventaccidental
startingorbatterydischargeifthe equipmentisleft unattended.
PracticeOperation (initial Use)
Operatingazero-turnridingmowerisnotlikeoperatingaconventionaltype riding
ridingmower.Becauseazeroturn ridingmowerismoremaneuverable,getting
usedto operatingthe controlleverstakessomepractice.
Westronglyrecommendthatyoulocatea reasonablylarge,levelandopen"practice
area"wherethereareno obstructions,pedestrians,or animals.Youshouldpractice
operatingthe ridingmowerfor aminimumof 30minutes.
Carefullymove-- or haveanexperiencedusermove-- theridingmowerto
thepracticearea.Whenperformingthe practicesession,thePTOshouldnot be
engaged.Whilepracticing,operatethe ridingmowerat approximately1/2-3/4
throttle andat lessthanfull speedinbothforwardandreverse.
Carefullypracticemaneuveringtheridingmowerandproceedto driveasdescribed
inthefollowingDrivingthe RidingmowerForwardsection.
Drivingthe Riding mower
Avoidsuddenstarts,excessivespeedandsuddenstops.
1. Adjusttheoperator'sseatto the mostcomfortablepositionthat allowsyou
to operatethe controls.See"Adjustingthe Seat"theAssemblysection.
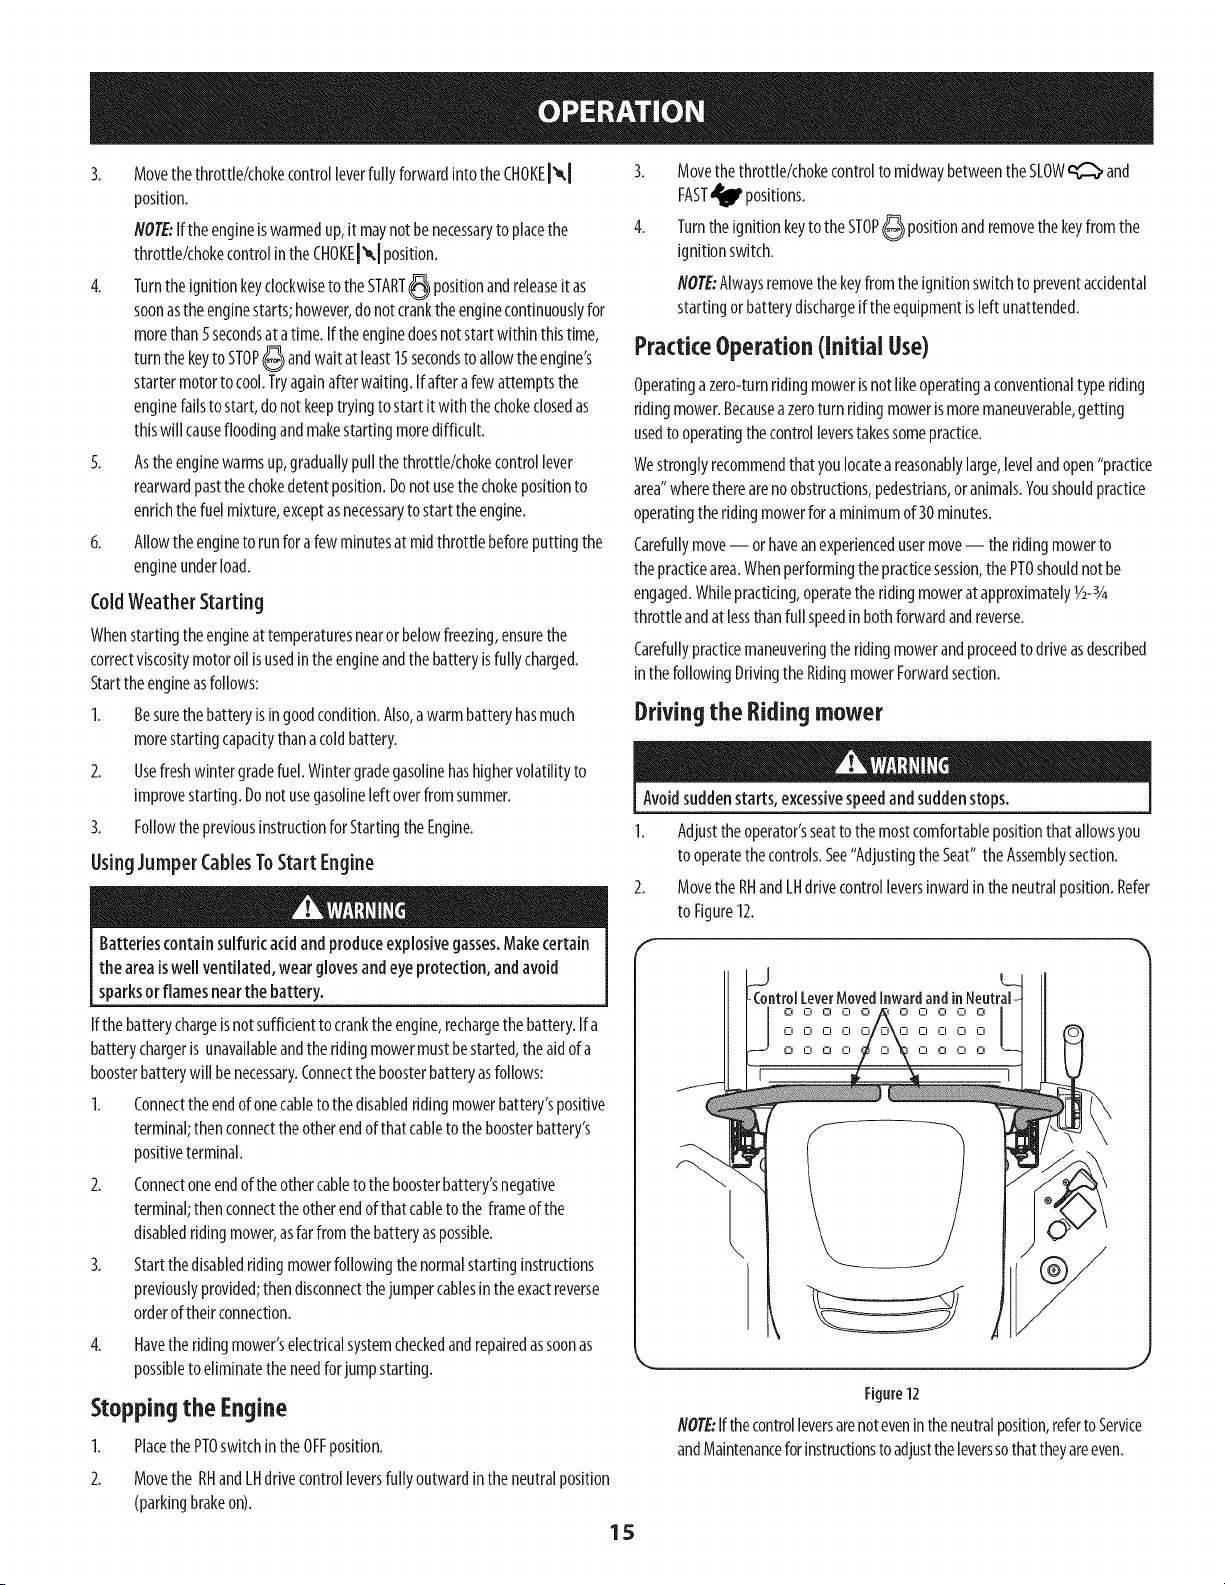
2. MovetheRHandLHdrivecontrolleversinwardintheneutralposition.Refer
to Figure12.
ntrolLeverMovedInwardandinNeutral-
OOOOO OOOOO
0000 00000
0000 0000
1
L
Figure12
NOTE:Ifthe controlleversarenotevenin theneutralposition,referto Service
andMaintenanceforinstructionstoadjustthe leverssothattheyareeven.
15
Movethe throttle/chokecontrolleverforwardto the FAST_ (fullthrottle)
position.
NOTE:Althoughtheridingmower'sengineisdesignedto runat full throttle,
whenperformingapracticesessiontheridingmowermustbeoperatedat
lessthanfull throttle.Thisonlyappliesto practice.
Alwaysmaintaina firm grip on the control levers.DONOTreleasethe
control leversto slowor stopthe ridingmower;moveleversto neutral
positionusingyour hands.
4.
Todrivetheridingmower,firmly graspthe respectivedrivecontrollevers
with yourright andleft handsandcontinuewith Drivingthe Ridingmower
Forward.
Driving the Riding mower Forward
Keepall movementof the drive control leversslowand smooth.Abrupt
movementof the control leverscanaffect the stability of the riding mower
andcould causethe riding mower to flip over,which mayresult in serious
injury or death to the operator.
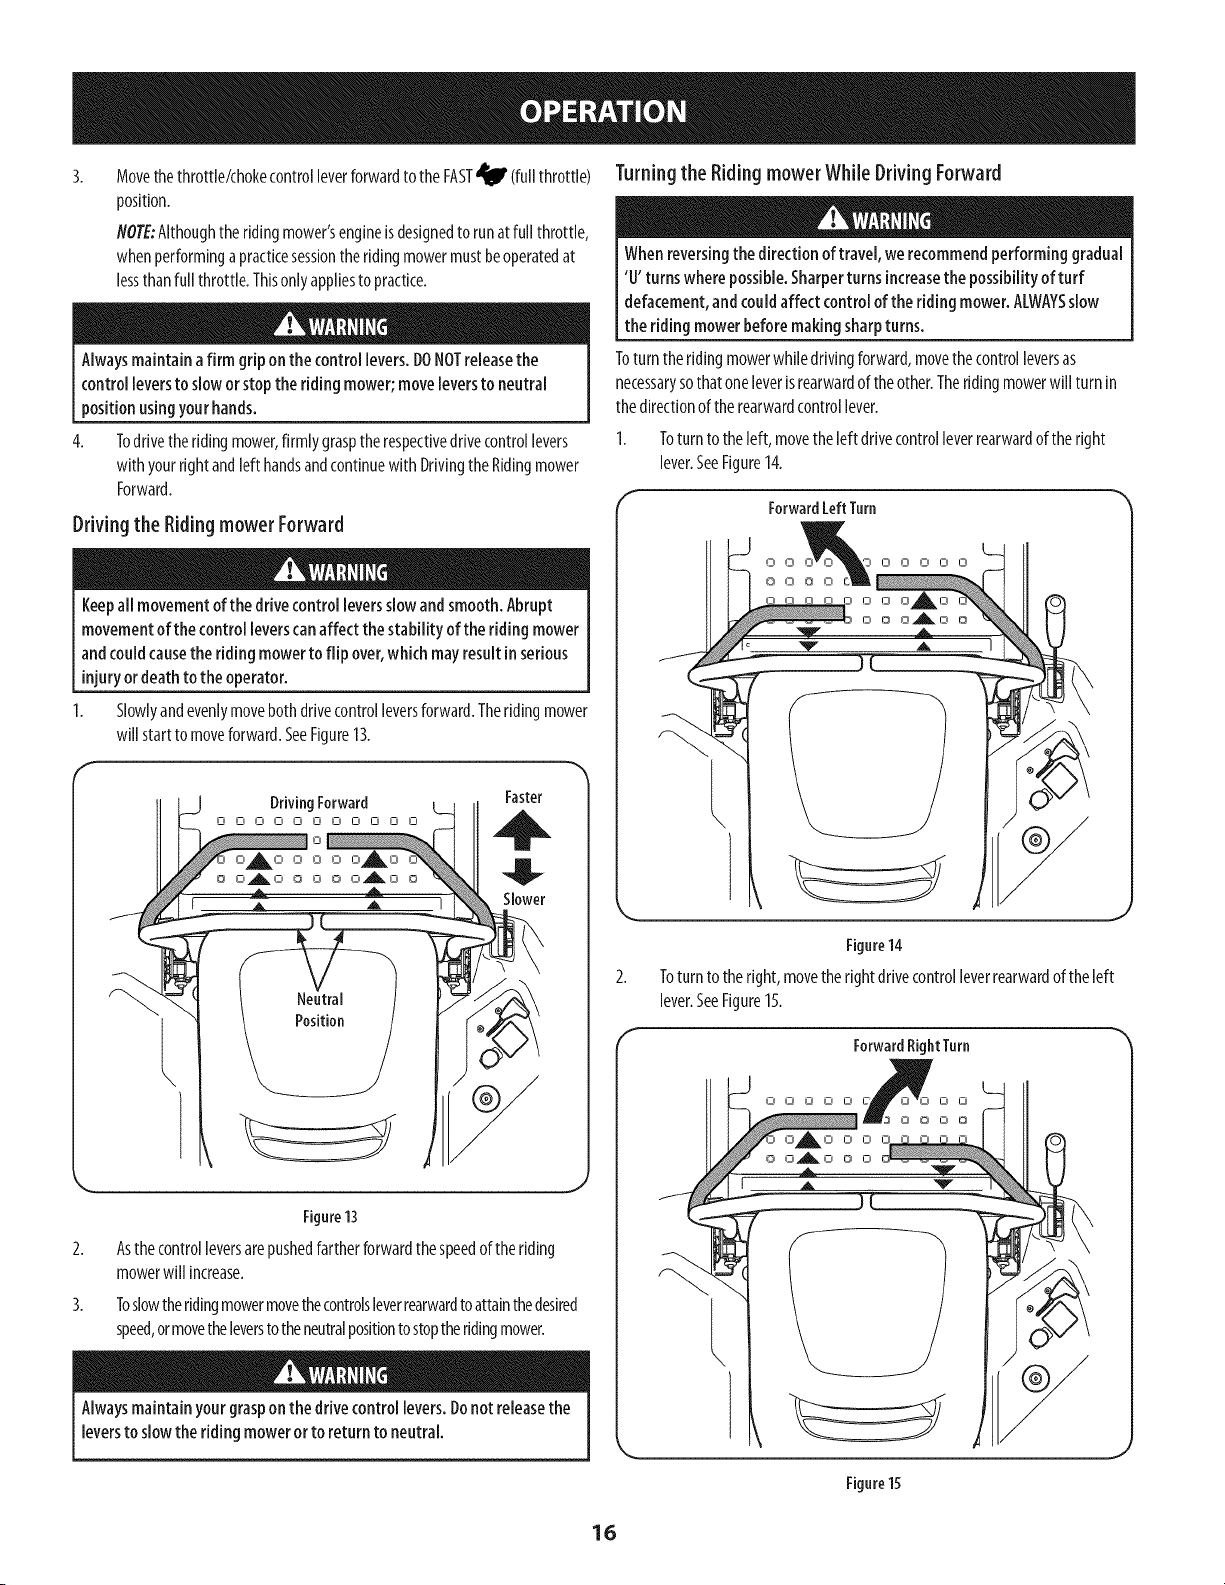
Slowlyandevenlymovebothdrivecontrolleversforward.Theridingmower
will startto moveforward.SeeFigure13.
DrivingForward Faster
0 O 0 O O 0 O 0 0 0 0
Ill
0 0 0 0 0
0 0_0 0 0 0 0_0 0
Slower
Figure13
Asthecontrolleversarepushedfartherforwardthespeedof theriding
mowerwill increase.
Toslowtheridingmowermovethecontrolsleverrearwardto attainthedesired
speed,or movetheleverstotheneutralpositionto stoptheridingmower.
Alwaysmaintainyour graspon the drivecontrol levers.Donot releasethe
leversto slowthe riding moweror to return to neutral.
Turningthe Riding mower While Driving Forward
Whenreversingthedirection of travel, werecommendperforming gradual
'U' turns where possible.Sharperturns increasethe possibility of turf
defacement,and could affect controlof the riding mower.ALWAYSslow
the ridingmowerbefore making sharpturns.
Toturn the ridingmowerwhiledrivingforward,movethe controlleversas
necessarysothatoneleverisrearwardof theother.Theridingmowerwill turnin
thedirectionof therearwardcontrollever.
Toturn to theleft, movethe left drivecontrolleverrearwardof theright
lever.SeeFigure14.
Forward LeftTurn
Figure14
2. Toturn to theright,movetherightdrivecontrolleverrearwardof theleft
lever.SeeFigure15.
ForwardRightTurn
0 0 O O O _00E 0 0 0
O_11 _ O O O
O O A O O O
Figure15
16
3.
4.
Thegreaterthefore-to-aftdistancebetweenthetwo levers,the sharperthe
ridingmowerwill turn.
Toexecuteazeroturn movetheturn sidedrivecontrolleverto the inward
neutralposition,whilemovingtheothercontrolleverforward.
NOTE:Makinga zeroturn whilethevehicleis movingwill greatlyincrease
thepotentialfor defacementof theturf. Forturf protectionandto avoid
personalinjury,alwaysstopthevehiclebeforeexecutingazeroturn.
Driving the Riding mower In Reverse
Alwaysbok behind and downon both sidesof theridingmowerbefore
backing up.Alwayslook behindwhile traveling inthe reversedirection.
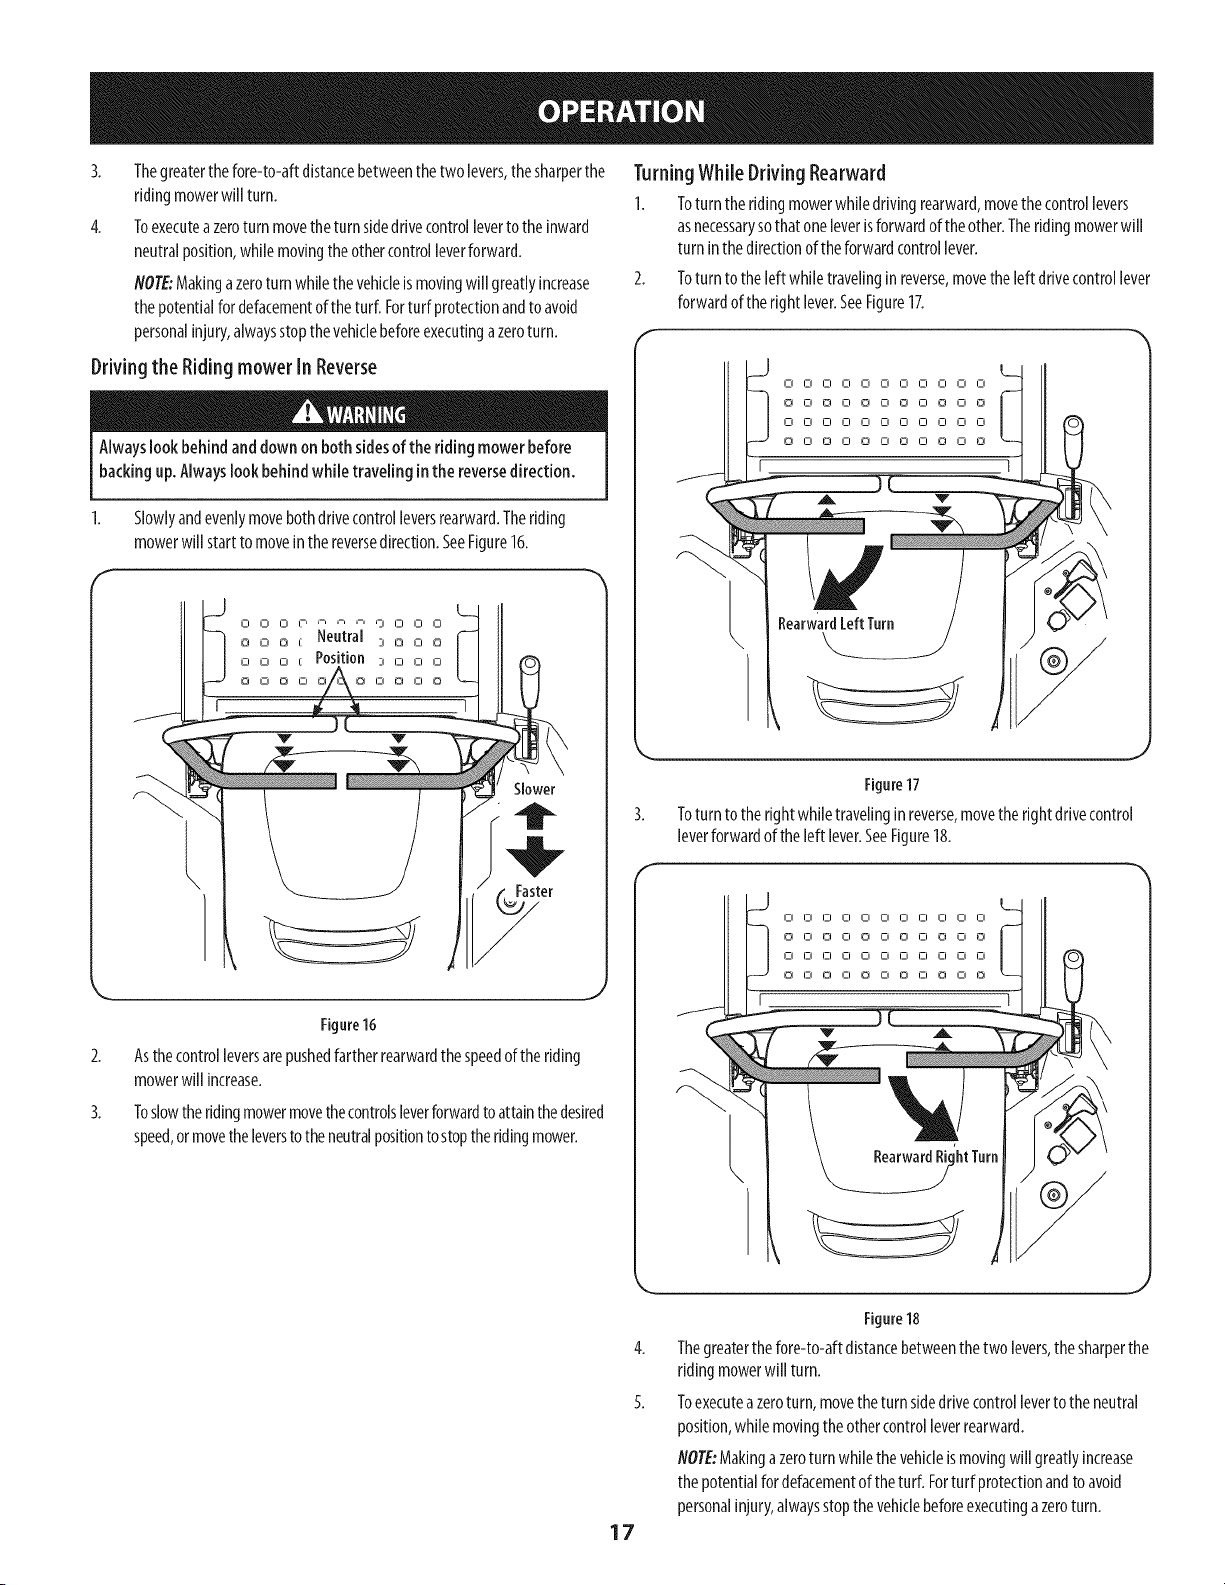
1. Slowlyandevenlymovebothdrivecontrolleversrearward.Theriding
mowerwillstarttomoveinthereversedirection.SeeFigure16.
2.
3.
Figure16
Asthecontrolleversarepushedfartherrearwardthespeedofthe riding
mowerwill increase.
Toslowthe ridingmowermovethecontrolsleverforwardto attainthedesired
speed,or movetheleversto theneutralpositiontostoptheridingmower.
TurningWhile Driving Rearward
I. Toturn theridingmowerwhiledrivingrearward,movethe controllevers
asnecessarysothatoneleverisforwardof theother.Theridingmowerwill
turn in the directionof theforwardcontrollever.
Toturn to theleft whiletravelingin reverse,movethe left drivecontrollever
forwardofthe right lever.SeeFigure17.
00000000000
00000000000
00000000000
00000000000
RearwardLeftTurn
I
Figure17
Toturn to therightwhiletravelingin reverse,movetheright drivecontrol
leverforwardof theleft lever.SeeFigure18.
L_
I-I IZI 0 I-i I-i I-i I-i i-i i-i i-i Ci
0 IZI 0 I-i 0 Ci 0 Ci 0 Ci 0 |
L
I-I I-I IZI Ci Ci Ci Ci Ci Ci Ci Ci
0 I-I 0 CI 0 Ci O Ci O Ci 0
17
J
Figure18
4. Thegreaterthe fore-to-aftdistancebetweenthe two levers,thesharperthe
riding mowerwill turn.
5. Toexecutea zeroturn, movetheturn sidedrivecontrolleverto theneutral
position,whilemovingtheothercontrolleverrearward.
NOTE:Makingazeroturn whilethevehicleismovingwill greatlyincrease
thepotentialfordefacementof theturf. Forturf protectionandto avoid
personalinjury,alwaysstopthevehiclebeforeexecutingazeroturn.
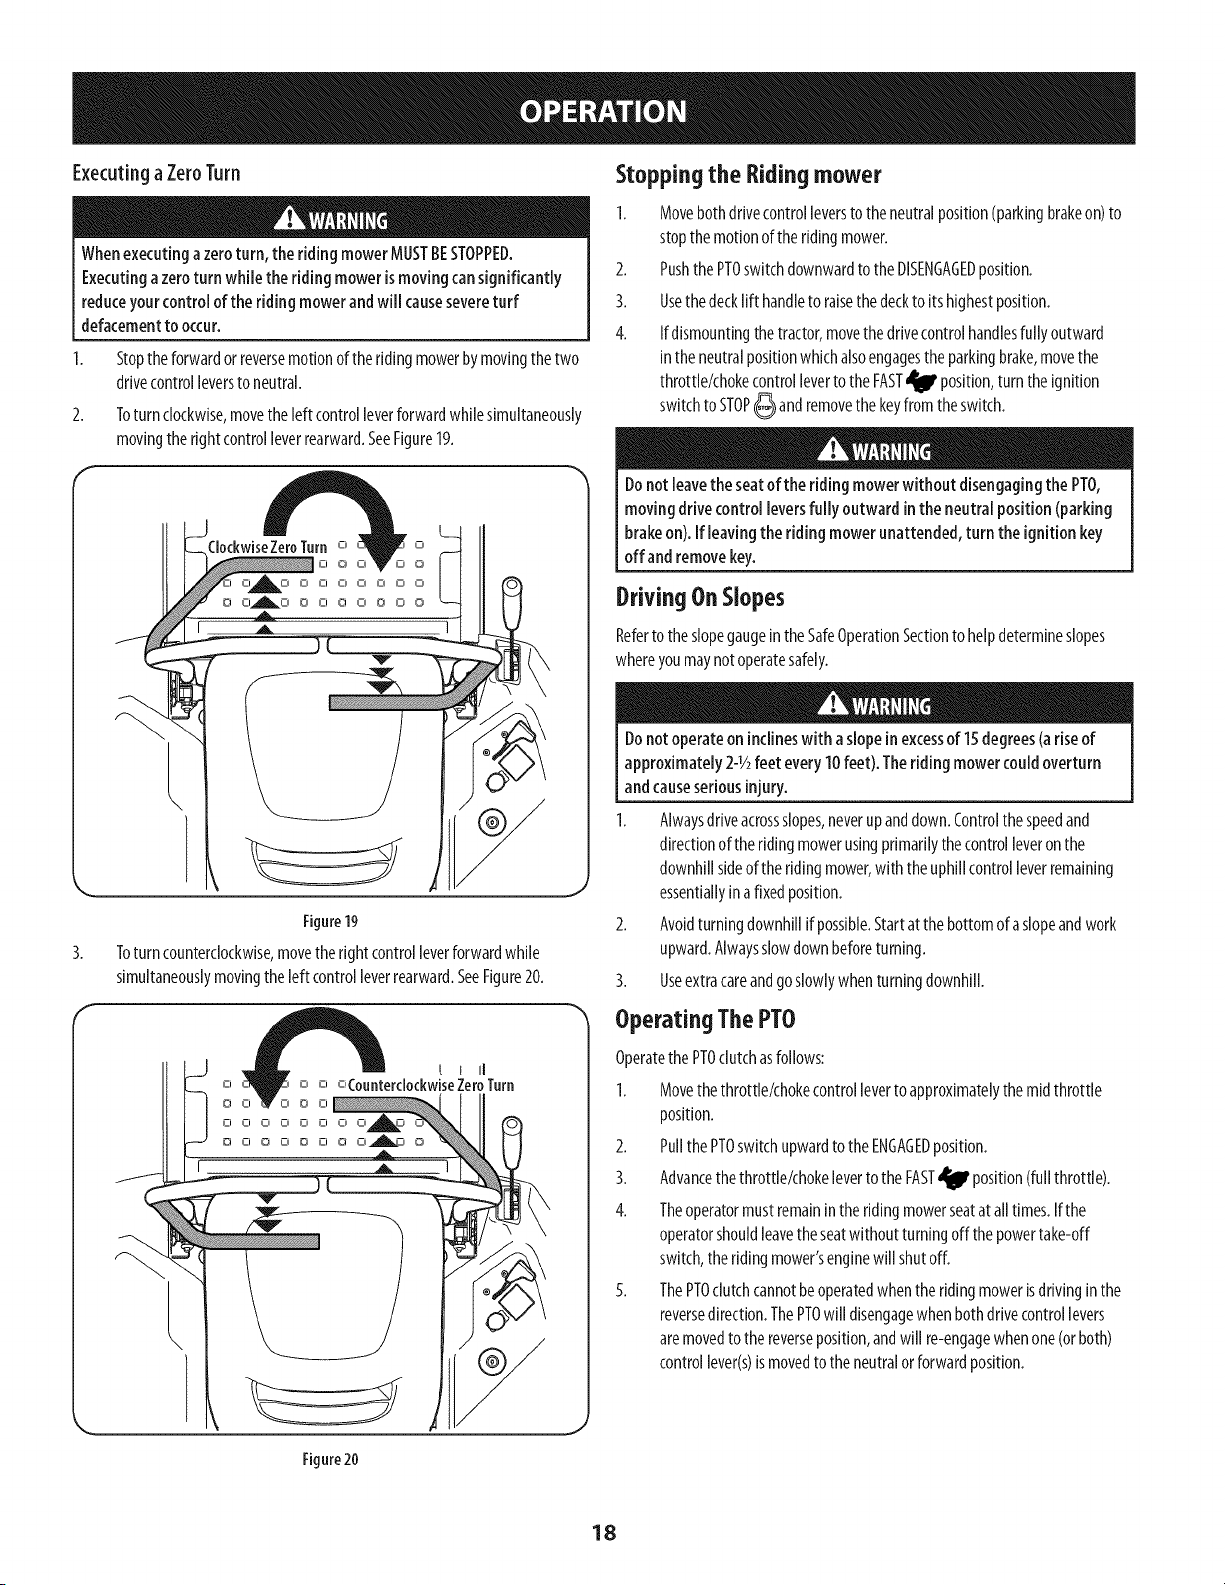
ExecutingaZeroTurn
Whenexecutinga zeroturn, the ridingmower MUSTBESTOPPED.
Executingazeroturn while the ridingmowerismovingcansignificantly
reduceyourcontrol of the ridingmower andwill causesevereturf
defacementto occur.
Stoptheforwardorreversemotionoftheriding mowerbymovingthetwo
drivecontrolleversto neutral.
Toturn clockwise,movethe left controlleverforwardwhilesimultaneously
movingthe rightcontrolleverrearward.SeeFigure19.
I
Figure19
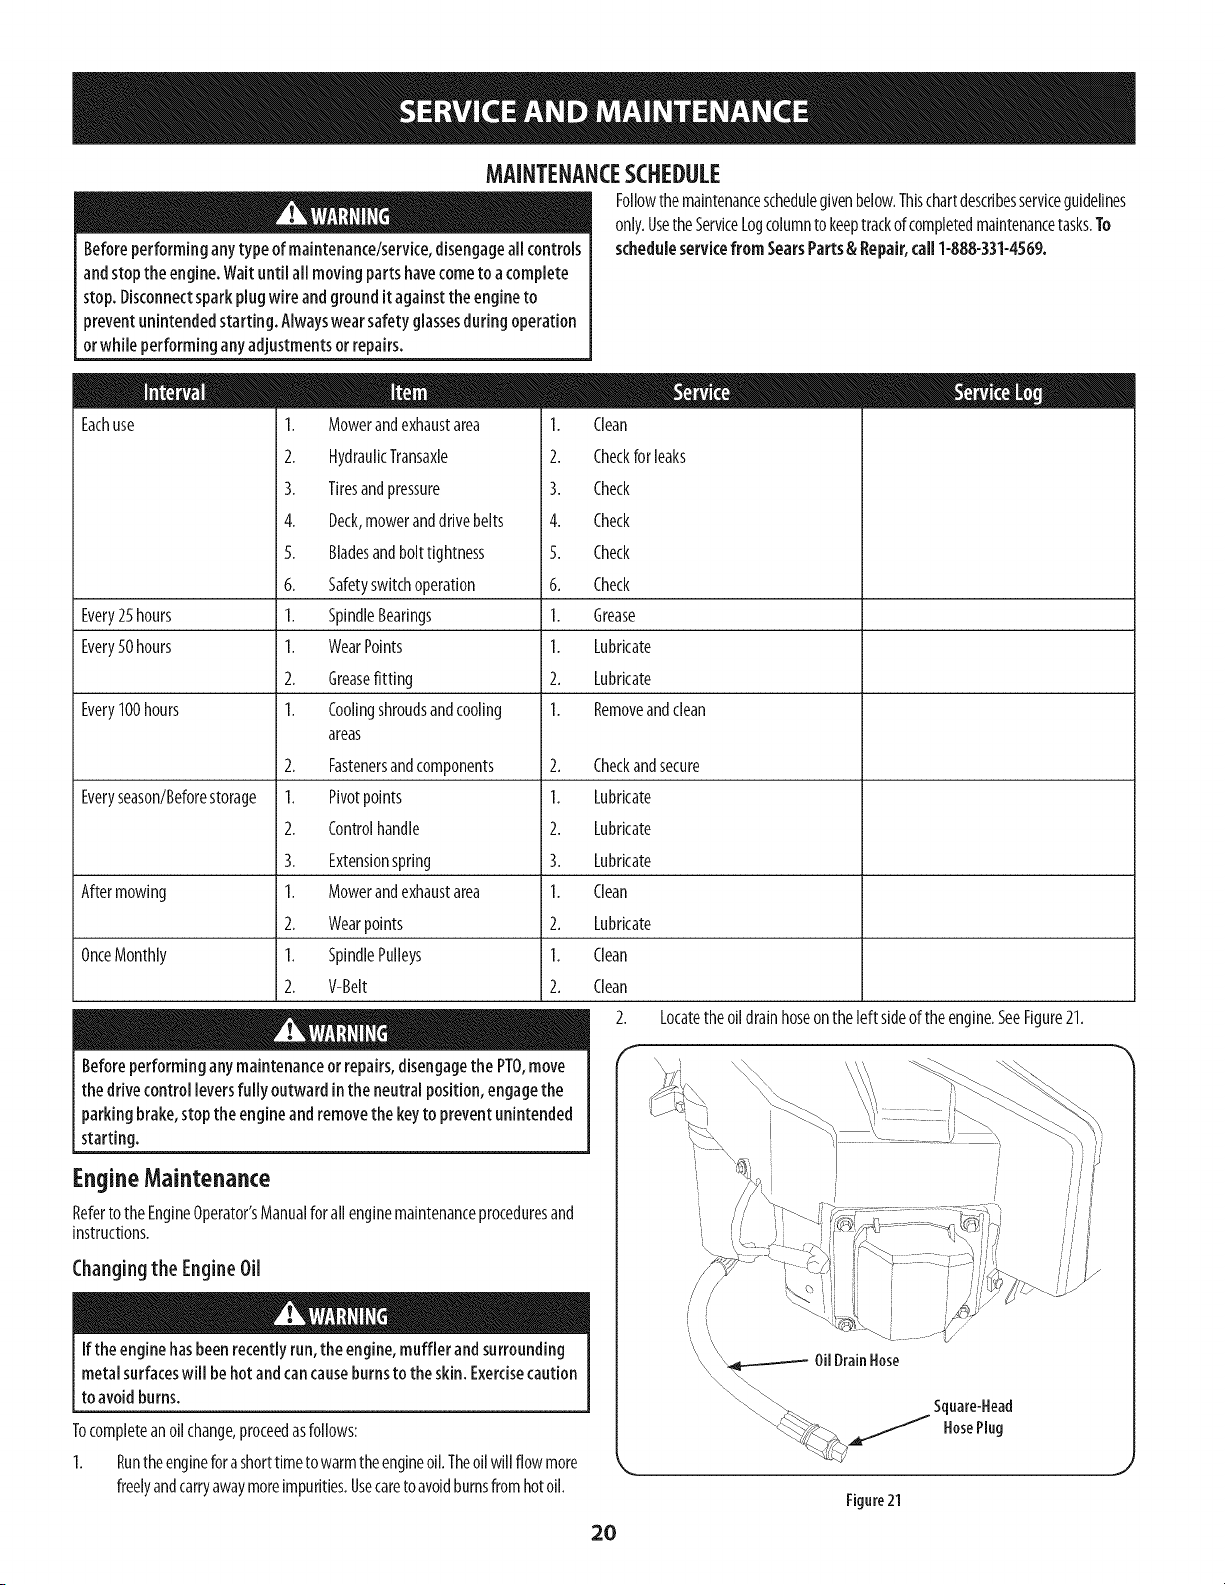
Toturn counterclockwise,movethe right controlleverforwardwhile
simultaneouslymovingtheleft controlleverrearward.SeeFigure20.
Stopping the Riding mower
1. Movebothdrivecontrolleversto theneutralposition(parkingbrakeon)to
stopthemotionof theridingmower.
2. PushthePTOswitchdownwardto theDISENGAGEDposition.
3. Usethedecklift handleto raisethe deckto its highestposition.
4. Ifdismountingthe tractor,movethe drivecontrolhandlesfully outward
intheneutralpositionwhichalsoengagesthe parkingbrake,movethe
throttle/chokecontrolleverto the FAST_ position,turn theignition
switchto STOP6 andremovethe keyfromthe switch.
Donot leavethe seatof the riding mowerwithout disengagingthe PTO,
moving drivecontrol leversfully outward inthe neutral position (parking
brakeon). If leavingthe ridingmowerunattended,turnthe ignitionkey
off andremovekey.
DrivingOn Slopes
Referto theslopegaugeintheSafeOperationSectionto helpdetermineslopes
whereyoumaynot operatesafely.
Donotoperate on inclineswith a slopein excessof 15degrees(a riseof
I
approximately2J/2 feet every10feet). Theridingmower could overturn
andcauseseriousinjury.
1. Alwaysdriveacrossslopes,neverup anddown.Controlthespeedand
directionoftheridingmowerusingprimarilythecontrolleveronthe
downhillsideof theridingmower,with theuphillcontrolleverremaining
essentiallyinafixed position.
2. Avoidturningdownhillif possible.Startat thebottomofaslopeandwork
upward.Alwaysslowdownbeforeturning.
3. Useextracareandgoslowlywhen turningdownhill.
Operating The PTO
Operatethe PTOclutchasfollows:
1. Movethethrottle/chokecontrolleverto approximatelythe midthrottle
position.
2. PullthePTOswitchupwardto the ENGAGEDposition.
3. Advancethethrottle/chokeleverto the FAST_ position(full throttle).
4. Theoperatormustremaininthe ridingmowerseatat alltimes.Ifthe
operatorshouldleavetheseatwithoutturningoff thepowertake-off
switch,the ridingmower'senginewill shutoff.
5. ThePTOclutchcannotbeoperatedwhenthe ridingmowerisdrivinginthe
reversedirection.ThePTOwill disengagewhenbothdrivecontrollevers
aremovedto the reverseposition,andwill re-engagewhenone(orboth)
controllever(s)is movedto theneutralor forwardposition.
Figure 20
18

Usingthe Mower Deck
Makecertainthe areato be mowedisfree of debris, sticks,stones,wire or
other objectsthat canbethrown bythe rotatingblades.
flOTE:Donotengagethemowerdeckwhen loweredingrass.Prematurewearand
possiblefailureof the'V" beltandPTOclutchwill result.Fullyraisethe deckormove
to anon-grassyareabeforeengagingthe mowerdeck.
1. Mowacrossslopes,notup anddown.Ifmowinga slope,start at bottomand
workupwardto ensureturnsaremadeuphill.
2. Onthe first passpicka pointontheoppositesideof theareato bemowed.
3. Engagethe PTOclutchusingthePTOswitchandmovethethrottle/choke
controlto the FAST_ position.
4. Lowerthe mowerdeckto thedesiredheightsettingusingthe lift handle.
5. Slowlyandevenlypushthe RHandLHdrivecontrolleversforwardto move
theridingmowerforward,andkeepthe ridingmowerheadeddirectly
towardthe alignmentpoint.
flOTL::Thespeedof theridingmowerwill affectthe qualityof themower
cut.Mowingat full speedwill adverselyaffectthecut quality.Controlthe
groundspeedwith thecontrollevers.
6. Whenapproachingtheotherendofthestrip,slowdownorstopbefore
turning.AU-turnisrecommendedunlessazeroturn isrequired.
7. Alignthe mowerwith anedgeof themowedstrip andoverlap
approximately3".
8. Directthe ridingmoweroneachsubsequentstrip to alignwith apreviously
cutstrip.
9. Topreventruttingorgroovingoftheturf, ifpossible,changethedirection
thatthe stripsaremowedbyapproximately45°for thenextandeach
subsequentmowing.
Checkingthe SafetyInterlockCircuits
Periodicallycheckthesafetyinterlockcircuitsto ensuretheyareworkingproperly.If
asafetycircuitisnot workingasdesigned,contactyouCubCadetdealerto havethe
tractorinspected.DONOToperatethe tractorif anysafetycircuitisnot functioning
properly.Tocheckthe safetycircuits,proceedasfollows:
1. Pullthe PTOswitchupwardto theengagedposition.Momentarilyturn the
ignitionswitchto thestart_ position;the engineshouldnot crank.
2. Movebothcontrolleversfully inwardinthe neutralposition;thenlift
upwardfromtheoperator'sseat.Theengineshouldstop.
3. Withbothcontrolleversfully outwardinthe neutral/parkingbrakeengaged
position,engagethe PTO.Lift upwardfrom theoperator'sseat;theengine
shouldstop.
4. Startthetractorandmovethe controlleversinwardto theneutraloperating
position.Engagethe PTOandmovebothcontrolleverslowlyintotheslow
reverseposition;thePTOshoulddisengageandthe mowerdeckshouldstop.
Becareful when crossinggrave[pathsor driveways.Disengagethe PTOand
raisethe deckto the highestposition before crossing.
flOTL::Whenstoppingtheridingmowerforanyreasonwhileonagrass
surface,always:
Placethe controlleversinneutral(parkingbrakeon),
Shutengineoffand removethe key.
Doingsowii[ minimizethepossibilityof havingyourlawn
"browned"byhotexhaustfrom yourridingmower'srunning
engine.
19
MAINTENANCESCHEDULE
Beforeperforming any type of maintenance/service,disengageall controls
andstop theengine.Wait untilall moving parts havecometo acomplete
stop.Disconnectsparkplugwire andground it againsttheengine to
preventunintendedstarting. Alwayswearsafetyglassesduring operation
orwhile performingany adjustmentsor repairs.
Eachuse 1. Mowerand exhaust area 1.
2. HydraulicTransaxle 2.
3. Tiresand pressure 3.
4. Deck,mower and drivebelts 4.
5. Bladesandbolt tightness 5.
6. Safetyswitchoperation 6.
Every25hours 1. SpindleBearings 1.
Every50hours 1. WearPoints 1.
2. Greasefitting 2.
Every100hours 1. Coolingshroudsandcooling 1.
areas
2. Fastenersandcomponents 2.
Everyseason/Beforestorage 1. Pivotpoints 1.
2. Controlhandle 2.
3. Extensionspring 3.
Aftermowing 1. Mowerandexhaustarea 1.
2. Wearpoints 2.
OnceMonthly I. SpindlePulleys I.
2. V-Belt 2.
Beforeperforming any maintenanceor repairs,disengagethe PTO,move
the drive control leversfully outward inthe neutral position,engagethe
parkingbrake,stopthe engineandremovethe keyto preventunintended
starting.
EngineMaintenance
Referto theEngineOperator'sManualforall enginemaintenanceproceduresand
instructions.
Changingthe Engine Oil
If the enginehasbeenrecentlyrun,the engine,muffler andsurrounding
metalsurfaceswill be hot and cancauseburns to the skin. Exercisecaution
to avoidburns.
Tocompleteanoilchange,proceedasfollows:
1. Runthe engineforashorttimeto warmtheengineoil.Theoil willflowmore
freelyandcarryawaymoreimpurities.Usecareto avoidburnsfromhotoil.
Followthemaintenanceschedulegivenbelow.Thischartdescribesserviceguidelines
only.UsetheServiceLogcolumnto keeptrackof completedmaintenancetasks.To
scheduleservicefrom SearsParts& Repair,call1-888-331-4569.
Clean
Checkfor leaks
Check
Check
Check
Check
Grease
Lubricate
Lubricate
Removeandclean
Checkandsecure
Lubricate
Lubricate
Lubricate
Clean
Lubricate
Clean
Clean
2. Locatetheoil drainhoseonthe left sideof theengine.SeeFigure21.
,//
r
Oil DrainHose
__ Square-Head
___ 11_ HosePlug
Figure21
2O
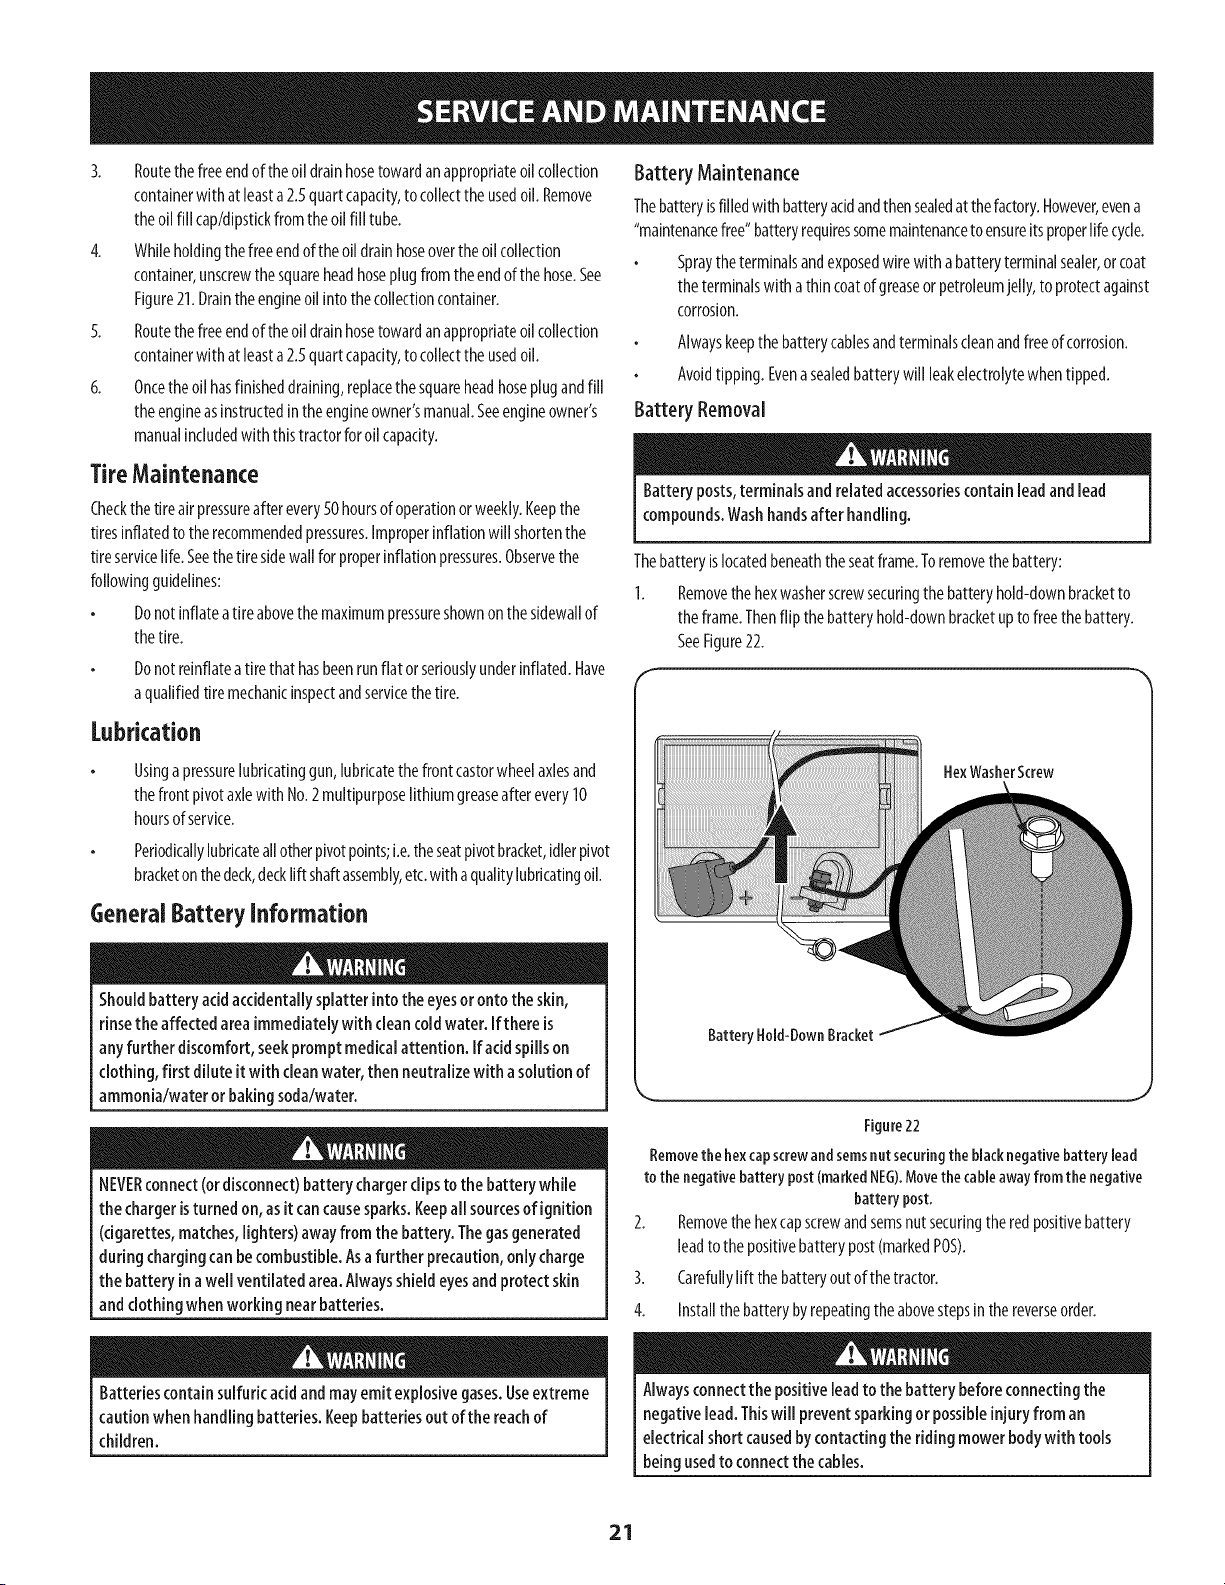
3. Routethefreeendoftheoil drainhosetowardanappropriateoil collection
containerwith atleasta2.5quartcapacity,to collectthe usedoil.Remove
theoil fill cap/dipstickfrom the oil fill tube.
4. Whileholdingthefreeendof theoil drainhoseovertheoil collection
container,unscrewthesquareheadhoseplug fromtheendofthehose.See
Figure21.Draintheengineoil into thecollectioncontainer.
5. Routethefreeendoftheoil drainhosetowardanappropriateoil collection
containerwith atleasta2.5quartcapacity,to collectthe usedoil.
6. Oncetheoil hasfinisheddraining,replacethesquareheadhoseplugandfill
theengineasinstructedintheengineowner'smanual.Seeengineowner's
manualincludedwith thistractorforoil capacity.
TireMaintenance
Checkthetire airpressureafter every50 hoursofoperationorweekly.Keepthe
tiresinflatedto therecommendedpressures.Improperinflationwill shortenthe
tireservicelife.Seethe tiresidewall forproperinflationpressures.Observethe
followingguidelines:
Donotinflateatire abovethe maximumpressureshownon thesidewallof
thetire.
Donotreinflateatire that hasbeenrunflat orseriouslyunderinflated.Have
aqualifiedtire mechanicinspectandservicethe tire.
Lubrication
Usingapressurelubricatinggun,lubricatethe front castorwheelaxlesand
thefront pivotaxlewith No.2multipurposelithium greaseafter every10
hoursof service.
Periodicallylubricateallotherpivotpoints;i.e.theseatpivotbracket,idlerpivot
bracketon thedeck,decklift shaftassembly,etc.with aqualitylubricatingoil.
GeneralBattery Information
Shouldbattery acidaccidentallysplatter intothe eyesor onto the skin,
rinsethe affected areaimmediatelywith clean coldwater. If there is
any further discomfort,seekprompt medicalattention. If acidspills on
clothing, first dilute it with cleanwater, then neutralizewith asolution of
ammonia/water or bakingsoda/water.
NEVERconnect(ordisconnect)battery chargerclipsto the battery while
the charger isturned on,as it cancausesparks.Keepall sourcesof ignition
(cigarettes,matches,lighters)awayfrom the battery. Thegasgenerated
during chargingcanbecombustible.Asafurther precaution,only charge
the battery inawell ventilated area.Alwaysshieldeyesand protect skin
and clothingwhen working nearbatteries.
Batteriescontainsulfuric acidandmayemit explosivegases.Useextreme
caution when handling batteries. Keepbatteries out of the reachof
children.
Battery Maintenance
Thebatteryisfilledwithbatteryacidandthensealedatthefactory.However,evena
"maintenancefree"batteryrequiressomemaintenancetoensureitsproperlifecycle.
Spraytheterminalsandexposedwirewithabatteryterminalsealer,orcoat
theterminalswithathincoatofgreaseorpetroleumjelly,toprotectagainst
corrosion.
Alwayskeepthebatterycablesandterminalscleanandfreeof corrosion.
Avoidtipping. Evena sealedbatterywill leakelectrolytewhentipped.
Battery Removal
Battery posts,terminals andrelatedaccessoriescontain lead andlead
compounds.Washhandsafter handling.
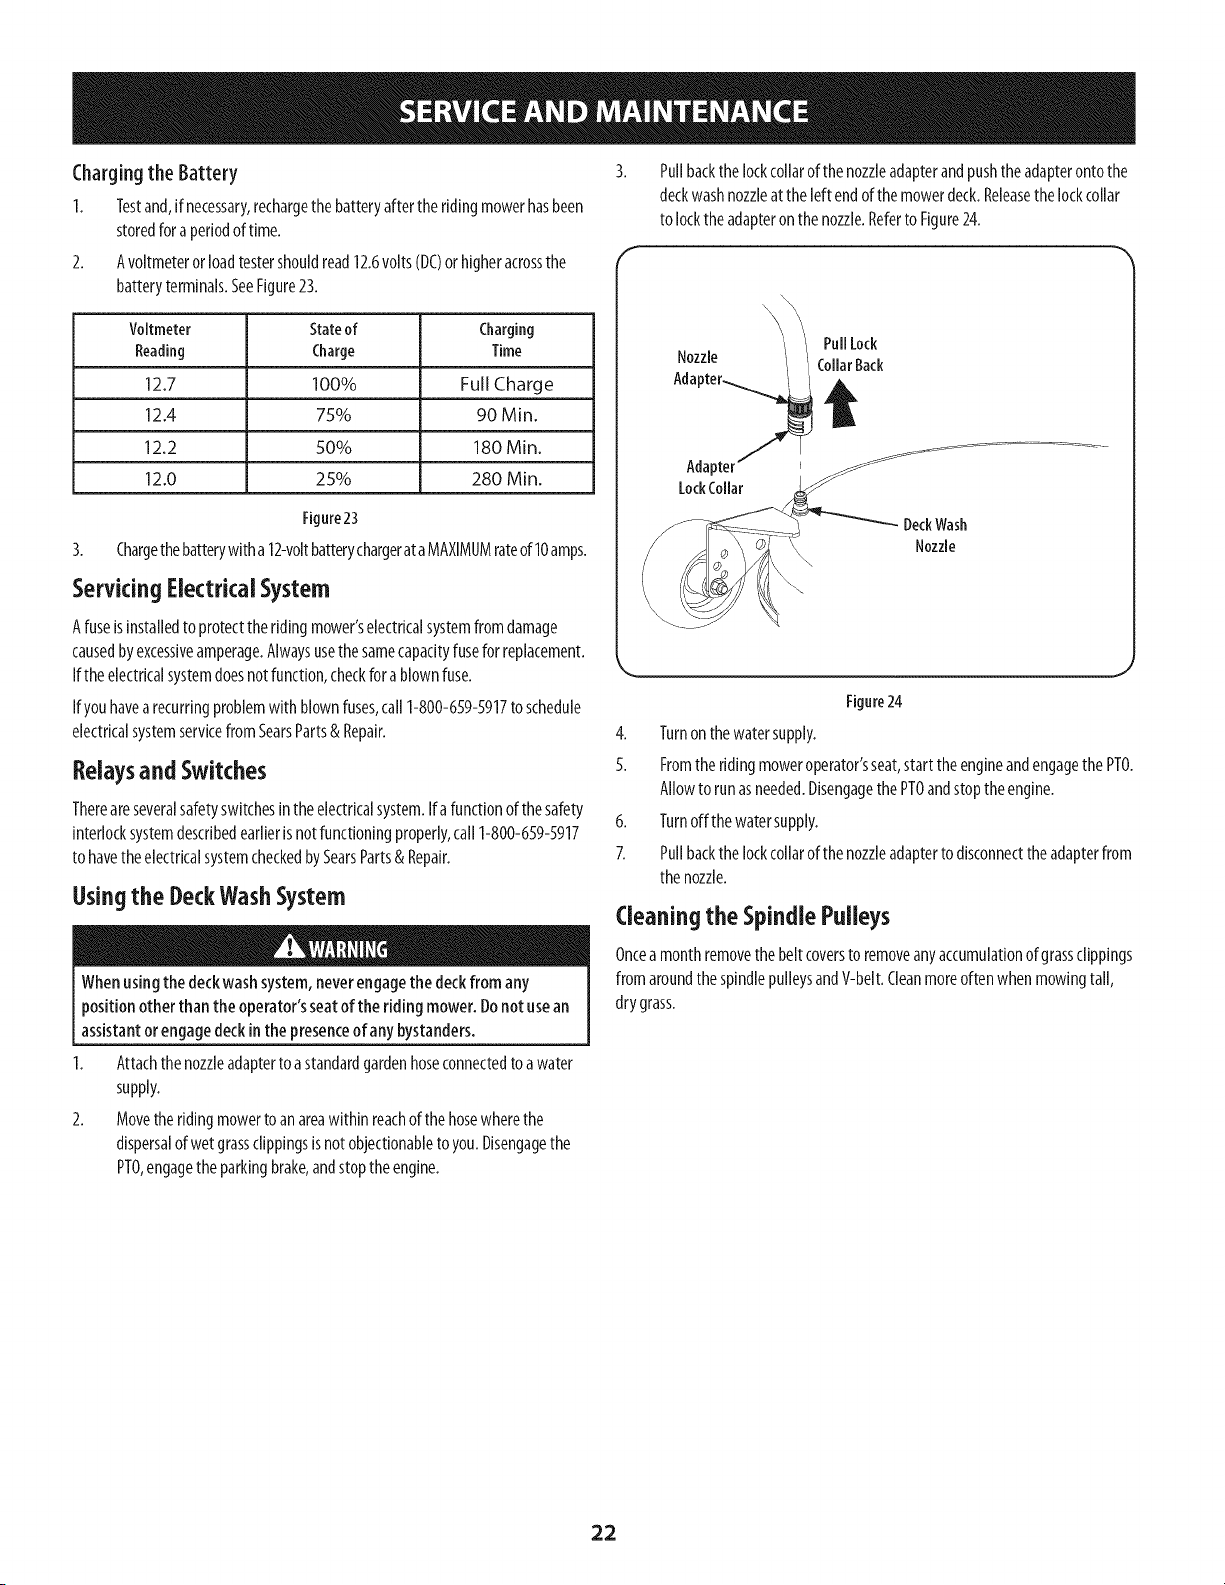
Thebatteryislocatedbeneaththe seatframe.Toremovethe battery:
1. Removethe hexwasherscrewsecuringthebatteryhold-downbracketto
theframe.Thenflip the batteryhold-downbracketup to freethe battery.
SeeFigure22.
HexWasherScrew
Battery Hold-DownBracket
Figure22
Removethehexcapscrewandseresnutsecuringtheblacknegativebatterylead
to thenegativebatterypost(markedNEG).Movethecableawayfromthenegative
batterypost,
2. Removethe hexcapscrewandsemsnutsecuringtheredpositivebattery
leadto the positivebatterypost(markedPOS).
3. Carefullylift thebatteryoutof thetractor.
4. Installthe batterybyrepeatingtheabovestepsinthereverseorder.
Alwaysconnectthe positive leadto the battery beforeconnectingthe
negativelead.Thiswill preventsparkingor possibleinjuryfrom an
electricalshort causedby contactingthe ridingmowerbodywith tools
being usedtoconnectthecables.
21
Chargingthe Battery
1. Testand,if necessary,rechargethebatteryaftertheridingmowerhasbeen
storedfora periodof time.
2. Avoltmeteror loadtestershouldread12.6volts(DC)orhigheracrossthe
batteryterminals.SeeFigure23.
Voltmeter Stateof Charging
Reading Charge Time
12.7 100% Full Charge
12.4 7.5% 90 Min.
12.2 .50% 180 Min.
12.0 25% 280 Min.
Figure23
3. Chargethebatterywitha 12-voltbatterychargerat aMAXIMUMrateof 10amps.
Servicing Electrical System
Afuseisinstalledto protectthe ridingmower'selectricalsystemfromdamage
causedbyexcessiveamperage.Alwaysusethe samecapacityfusefor replacement.
If theelectricalsystemdoesnot function,checkfora blownfuse.
If youhavearecurringproblemwith blownfuses,call1-800-659-5917to schedule
electricalsystemservicefrom SearsParts& Repair.
Relaysand Switches
Thereareseveralsafetyswitchesinthe electricalsystem.Ifa functionof thesafety
interlocksystemdescribedearlieris notfunctioningproperly,call 1-800-659-5917
to havetheelectricalsystemcheckedbySearsParts& Repair.
Usingthe DeckWashSystem
Whenusingthe deckwashsystem,neverengagethe deckfrom any
positionother than the operator'sseat of the riding mower. Donot usean
assistantorengagedeckinthe presenceof any bystanders.
1. Attachthe nozzleadapterto astandardgardenhoseconnectedto awater
supply.
2. Movetheridingmowertoan areawithin reachof thehosewherethe
dispersalof wetgrassclippingsisnotobjectionableto you.Disengagethe
PTO,engagetheparkingbrake,andstoptheengine.
Pullbackthelockcollarof thenozzleadapterandpushthe adapterontothe
deckwashnozzleatthe left endof themowerdeck.Releasethe lockcollar
to locktheadapteronthenozzle.Referto Figure24.
\
DeckWash
Nozzle
Figure24
4. Turnonthe watersupply.
5. Fromthe ridingmoweroperator'sseat,start theengineandengagethe PTO.
Allowto runasneeded.Disengagethe PTOandstoptheengine.
6. Turnoffthe watersupply.
7. Pullbackthe lockcollarof thenozzleadapterto disconnecttheadapterfrom
the nozzle.
(:leaning the Spindle Pulleys
Oncea monthremovethe beltcoversto removeanyaccumulationof grassclippings
from aroundthespindlepulleysandV-belt.Cleanmoreoftenwhenmowingtall,
drygrass.
22
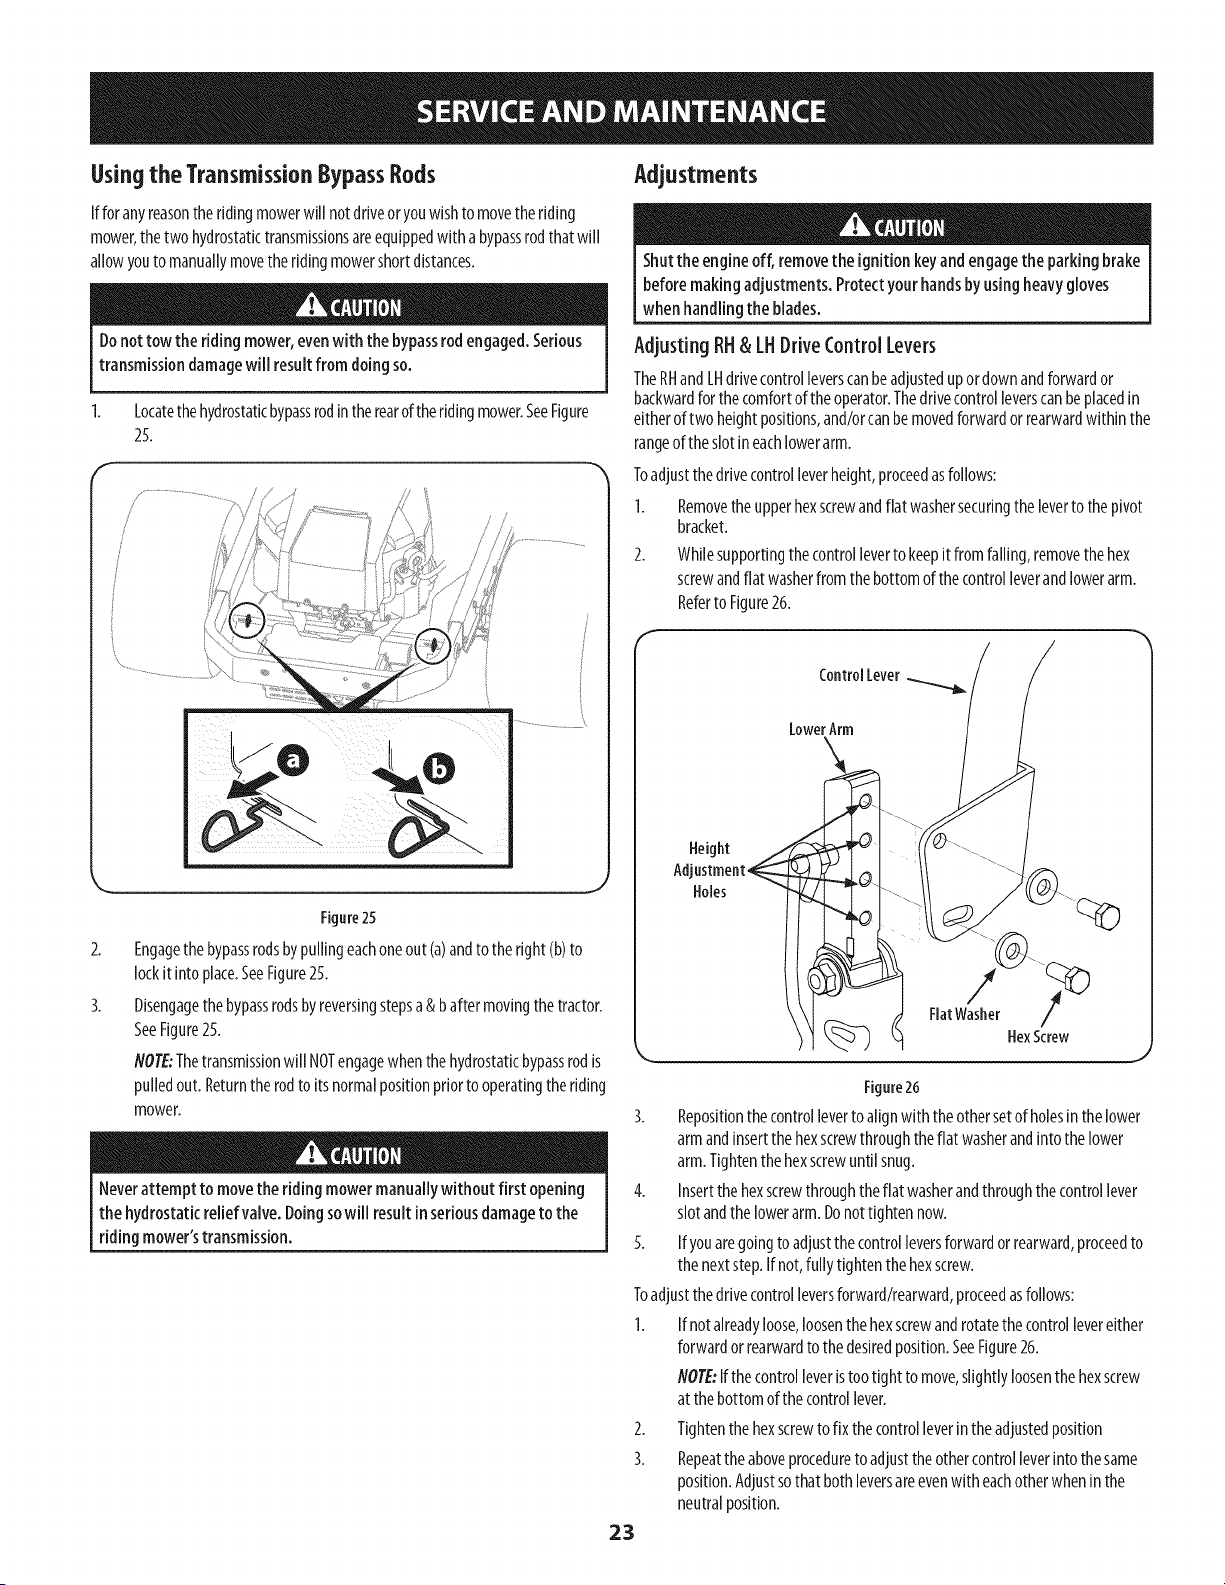
Using the TransmissionBypassRods
If foranyreasontheridingmowerwill notdriveoryouwishto movethe riding
mower,thetwo hydrostatictransmissionsareequippedwith abypassrodthatwill
allowyouto manuallymovethe ridingmowershortdistances.
Donot tow the riding mower,evenwith the bypassrod engaged.Serious
transmissiondamagewill resultfrom doing so.
f
Locatethe hydrostaticbypassrodinthe rearof theridingmower.SeeFigure
25.
!/
/
/
Figure25
2_
3.
Engagethebypassrodsbypullingeachoneout Ca)andto the right(b)to
lockit into place.SeeFigure25.
Disengagethe bypassrodsbyreversingstepsa& bafter movingthetractor.
SeeFigure25.
NOTE:Thetransmissionwill NOTengagewhenthe hydrostaticbypassrodis
pulledout.Returnthe rodto itsnormalpositionprior tooperatingthe riding
mower.
Neverattempt to movethe riding mowermanually without first opening
the hydrostatic reliefvalve. Doingsowill result in seriousdamageto the
ridingmower'stransmission.
Adjustments
Shutthe engineoff, removethe ignitionkeyand engagethe parking brake
before makingadjustments. Protectyour handsbyusing heavygloves
whenhandling the blades.
Adjusting RH& LHDrive ControlLevers
TheRHandLHdrivecontrolleverscanbeadjustedupordown andforwardor
backwardfor the comfortoftheoperator.Thedrivecontrolleverscanbeplacedin
eitherof two heightpositions,and/orcanbemovedforwardorrearwardwithin the
rangeoftheslotin eachlowerarm.
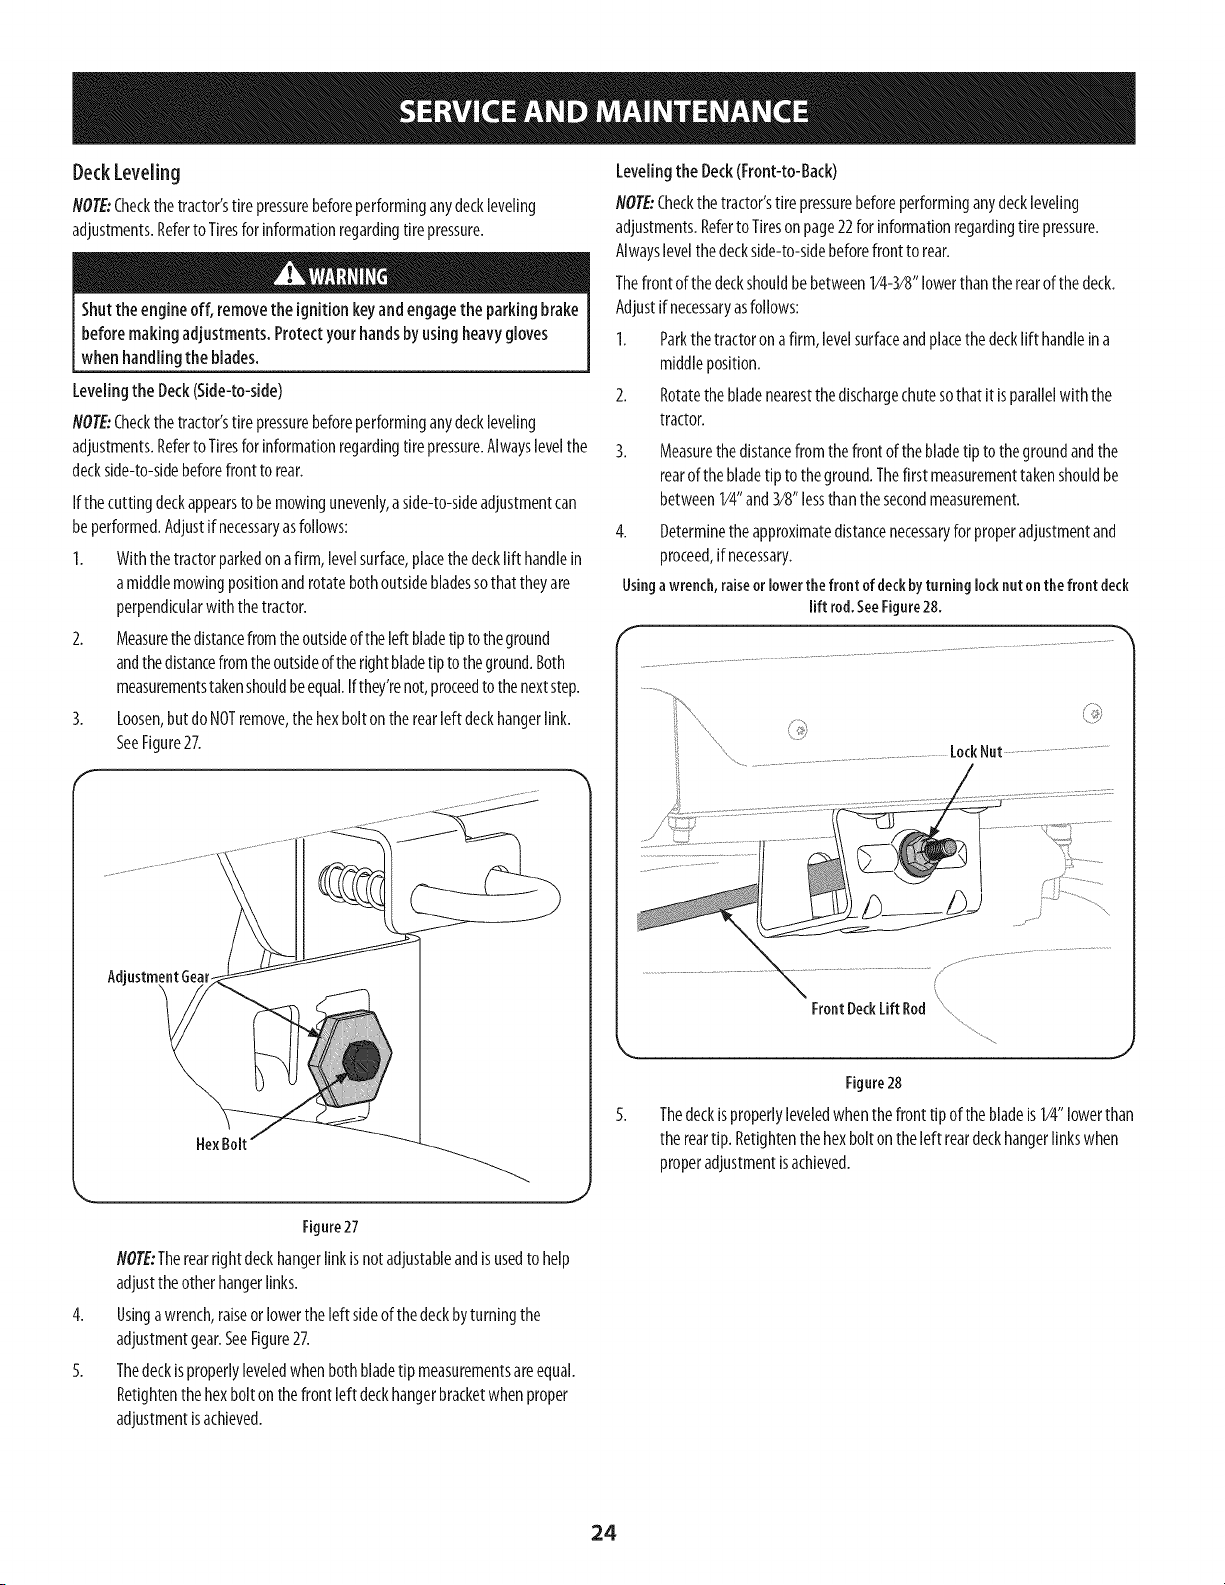
Toadjustthedrivecontrolleverheight,proceedasfollows:
I. Removethe upperhexscrewandflat washersecuringtheleverto thepivot
bracket.
2. Whilesupportingthe controlleverto keepit fromfalling,removethehex
screwandflat washerfrom the bottomofthecontrolleverandlowerarm.
Referto Figure26.
ControlLever
LowerArm
\
Height
Holes
/
FlatWasher
HexScrew
Rgure26
3. Repositionthe controlleverto alignwith theothersetof holesin thelower
armandinsertthe hexscrewthroughtheflat washerandintothe lower
arm.Tightenthehexscrewuntil snug.
4. Insertthehexscrewthroughtheflat washerandthroughthecontrollever
slotandthe lowerarm. Donottighten now.
5. Ifyouaregoingto adjustthe controlleversforwardorrearward,proceedto
thenext step.If not,fully tightenthe hexscrew.
Toadjustthedrivecontrolleversforward/rearward,proceedasfollows:
1. Ifnotalreadyloose,loosenthe hexscrewandrotatethecontrollevereither
forwardorrearwardto thedesiredposition.SeeFigure26.
NOTE:Ifthe controlleveristootight to move,slightlyloosenthe hexscrew
at thebottomofthecontrollever.
2.
3.
Tightenthehexscrewto fixthecontrolleverinthe adjustedposition
Repeattheaboveprocedureto adjusttheothercontrolleverinto thesame
position.Adjustsothatbothleversareevenwith eachotherwhenin the
neutralposition.
23
DeckLeveling
NOTE:Checkthetractor'stirepressurebeforeperforminganydeckleveling
adjustments.RefertoTiresforinformationregardingtirepressure.
Shutthe engine off, removethe ignitionkeyandengagethe parkingbrake
beforemaking adjustments.Protectyour handsby usingheavygloves
when handlingthe blades.
Levelingthe Deck(Side-to-side)
NOTE:Checkthe tractor'stire pressurebeforeperforminganydeckleveling
adjustments.Referto Tiresfor informationregardingtirepressure.Alwayslevelthe
deckside-to-sidebeforefront to rear.
If thecuttingdeckappearsto bemowingunevenly,aside-to-sideadjustmentcan
beperformed.Adjustif necessaryasfollows:
1. Withthetractorparkedon afirm, levelsurface,placethedecklift handlein
amiddlemowingpositionandrotatebothoutsidebladessothatthey are
perpendicularwith thetractor.
2. Measurethedistancefromthe outsideof the left bladetipto theground
andthedistancefromtheoutsideof therightbladetip to theground.Both
measurementstakenshouldbeequal.Ifthey'renot,proceedto thenextstep.
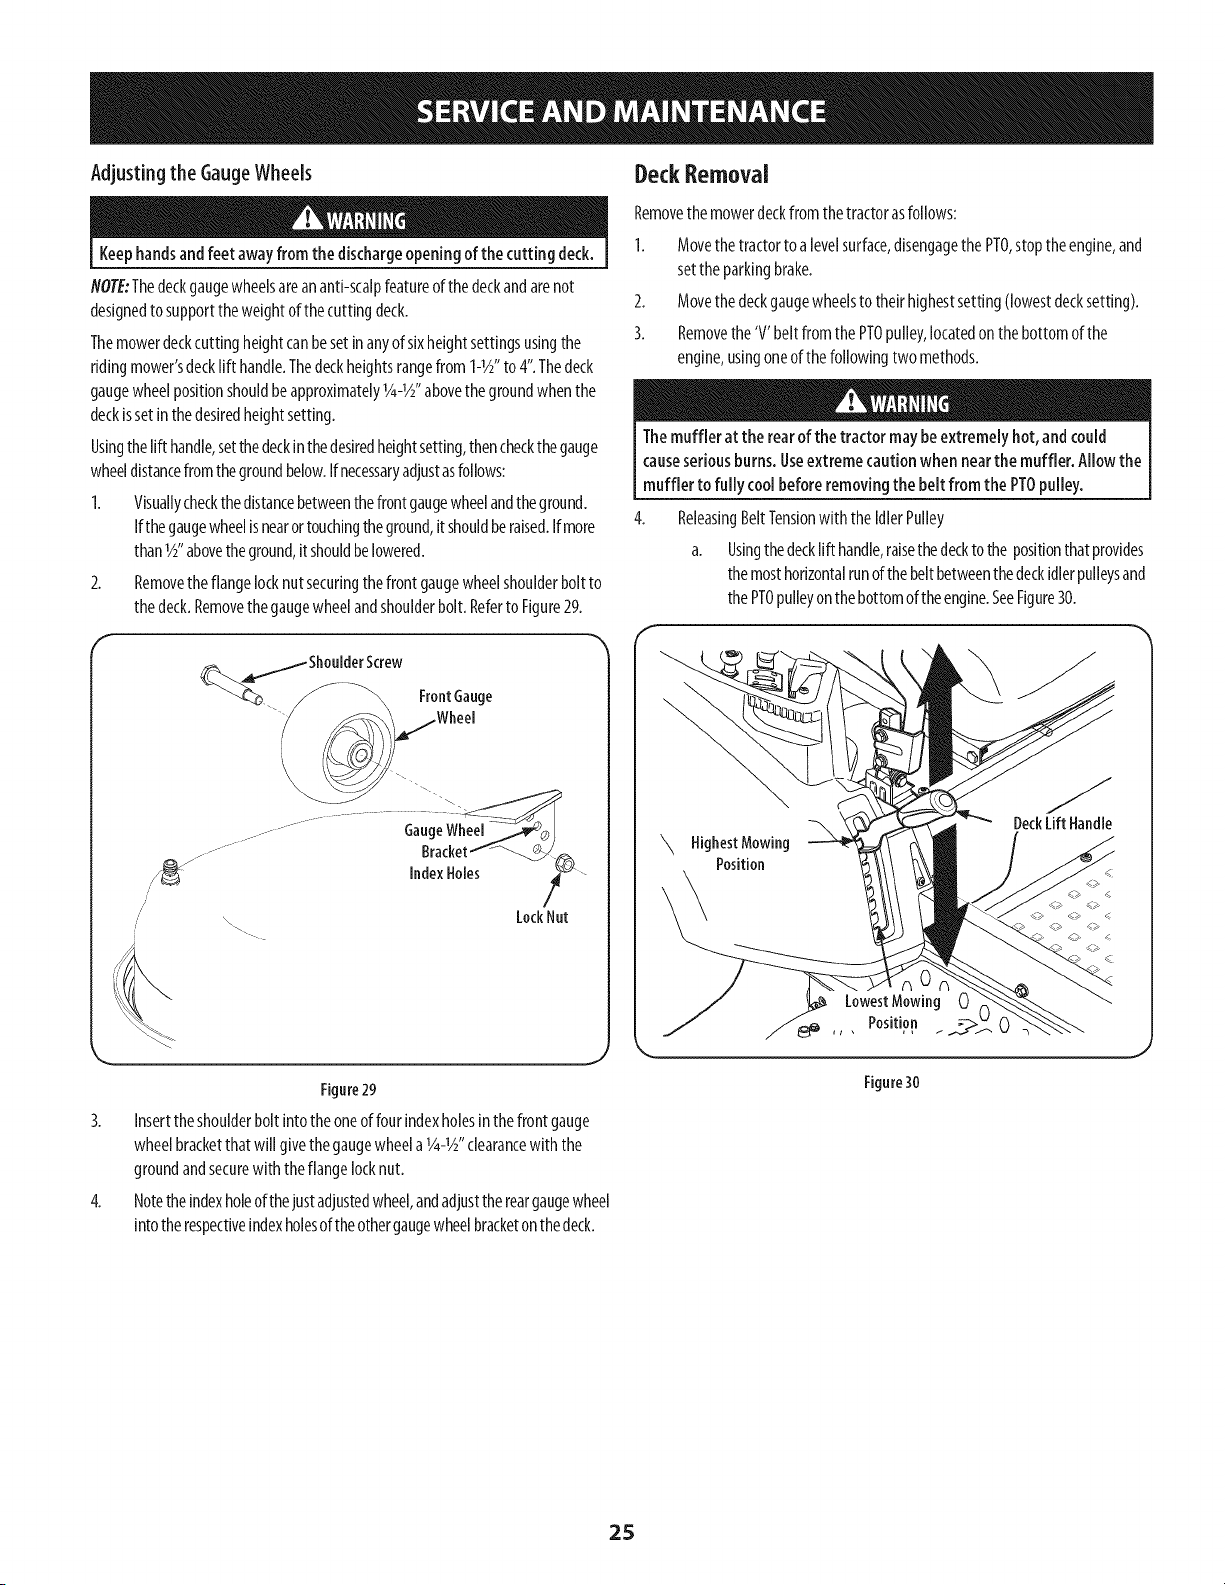
3. Loosen,butdo NOTremove,thehexbolton therearleft deckhangerlink.
SeeFigure27.
Adjustment Gear
\
HexBolt
Levelingthe Deck(Front-to-Back)
NOTE:Checkthetractor'stirepressurebeforeperforminganydeckleveling
adjustments.Referto Tiresonpage22for informationregardingtire pressure.
Alwayslevelthedeckside-to-sidebeforefront to rear.
Thefront of thedeckshouldbe between1/4-3/8"lowerthantherearofthe deck.
Adjustifnecessaryasfollows:
1. Parkthetractoron afirm, levelsurfaceandplacethedecklift handlein a
middleposition.
2. Rotatethe bladenearestthedischargechutesothat it isparallelwith the
tractor.
Measurethedistancefromthefront of thebladetip to thegroundandthe
rearof thebladetip to theground.Thefirst measurementtakenshouldbe
between1/4"and3/8"lessthanthe secondmeasurement.
4. Determinethe approximatedistancenecessaryforproperadjustmentand
proceed,if necessary.
Usingawrench,raiseor lowerthefront ofdeckbyturninglocknutonthefront deck
lift rod.SeeFigure28.
Front DeckLift Rod ......
Figure28
5. Thedeckisproperlyleveledwhenthefront tip of thebladeis1/4"lowerthan
the reartip. Retightenthehexboltonthe left reardeckhangerlinkswhen
properadjustmentisachieved.
4.
5.
Figure 27
NOTE:Therearrightdeckhangerlinkis notadjustableandisusedto help
adjustthe otherhangerlinks.
Usingawrench,raiseorlowertheleft sideof thedeckbyturningthe
adjustmentgear.SeeFigure27.
Thedeckisproperlyleveledwhen bothbladetip measurementsareequal.
Retightenthehexboltonthe front left deckhangerbracketwhenproper
adjustmentisachieved.
24
AdjustingtheGaugeWheels DeckRemoval
Keephandsandfeet awayfrom the dischargeopening of the cutting deck.
NOTE:Thedeckgaugewheelsareananti-scalpfeatureofthedeckandarenot
designedto supportthe weightofthecuttingdeck.
Themowerdeckcuttingheightcanbesetinanyofsixheightsettingsusingthe
ridingmower'sdecklift handle.Thedeckheightsrangefrom 1-1_" to 4".Thedeck
gaugewheelpositionshouldbeapproximatelyY4-_" abovethe groundwhenthe
deckissetinthedesiredheightsetting.
Usingthelift handle,setthe deckinthedesiredheightsetting,thencheckthegauge
wheeldistancefrom thegroundbelow.Ifnecessaryadjustasfollows:
1. Visuallycheckthedistancebetweenthefrontgaugewheelandtheground.
Ifthegaugewheelis nearortouchingtheground,itshouldberaised.Ifmore
than_" abovetheground,it shouldbelowered.
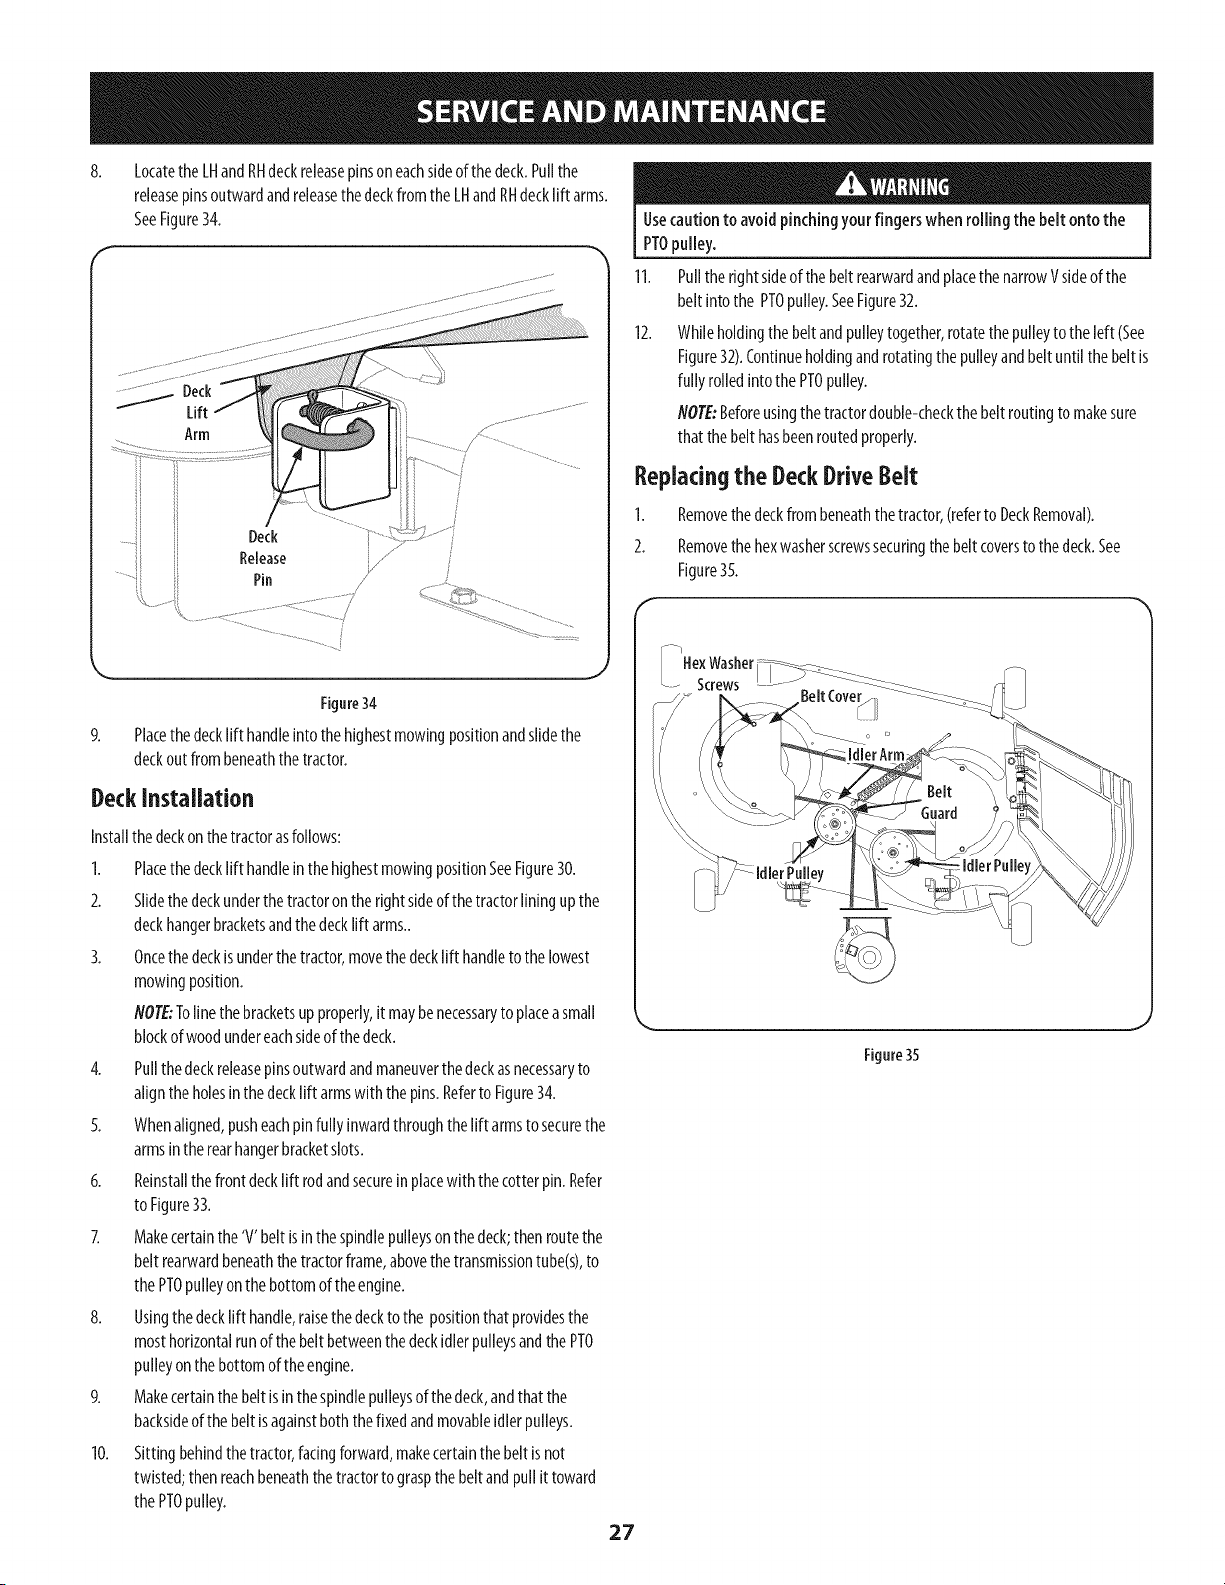
2. Removethe flangelocknut securingthefront gaugewheelshoulderbolt to
thedeck.Removethegaugewheelandshoulderbolt. Referto Figure29.
Front Gauge
/
/
Figure29
3. Insertthe shoulderbolt intothe oneoffour indexholesinthefront gauge
wheelbracketthatwill givethegaugewheela _/4-_"clearancewith the
groundandsecurewith theflangelocknut.
4. Notetheindexholeofthejustadjustedwheel,andadjustthereargaugewheel
intotherespectiveindexholesof theothergaugewheelbracketonthe deck.
Removethemowerdeckfrom thetractorasfollows:
1. Movethetractorto a levelsurface,disengagethe PTO,stopthe engine,and
settheparkingbrake.
2. Movethedeckgaugewheelsto theirhighestsetting(lowestdecksetting).
3. Removethe 'V'belt fromthePTOpulley,locatedonthebottomof the
engine,usingoneofthefollowingtwo methods.
Themuffler at the rearof the tractor may beextremely hot, and could
causeseriousburns.Useextremecaution when nearthe muffler. Allow the
muffler to fully cool beforeremovingthe beltfrom the PTOpulley.
ReleasingBeltTensionwith theIdlerPulley
a. Usingthe decklift handle,raisethedeckto the positionthat provides
themosthorizontalrunof thebeltbetweenthedeckidlerpulleysand
thePTOpulleyonthebottomof theengine.SeeFigure30.
\ Highest Mowing
Position
J
DeckLift Handle
Figure30
25

Workingfromthe middleof thetractor,pivotthe idlerbracketand
movableidlerpulleyrearwardawayfrom the backsideof the'V"
beltjustfar enoughto lift thebelt upandoverthe idlerpulley.See
Figure31.
MoveableIdler
Pulley
IdlerBracket
5.
Figure31
c. Frombeneaththe rearof thetractor,slidethebelt offof thePTO
pulleyon the bottomof theengine.
RollingtheBeltoffthe PTOPulley
a. Usingthedecklift handle,raisethe deckto the positionthat
providesthemosthorizontalrunof thebelt betweenthe deckidler
pulleysandthe PTOpulleyon thebottomoftheengine.
Sittingbehindthetractorfacingforward,reachbeneaththetractor
tograspthebelt at the front ofthe PTOpulley.
Usecautionto avoidpinchingyour fingers when rolling the belt off the
PTOpulley.
c. Pulltheleft sideof thebelt rearwardanddownwardwhilemanually
turningthe PTOpulleyto the rightuntil thebelt ridesout ontothe
edgeofthe lowersheaveof thepulley.
NOTE:If pullingtherightsideof thebelt, turnthe pulleyleft.
d. Whilestill holdingthebelt downward,continueturningthe PTO
pulleyuntil thebelt isrolledoff thepulley.Referto Figure32.
PTOPulley
PTOBelt
Transmission
Tube
6.
7.
Figure32
Lowerthedeckintothelowestpositionusingthedecklift handle.SeeFigure30.
Pullthecotterpinoutof thefront decklift rodsecuringit to the deck.See
Figure33.Slidethedecklift rodoutof thefront hangerbracket.
CotterPin
Figure 33
26
8.
LocatetheLHandRHdeckreleasepinsoneachsideof thedeck.Pullthe
releasepinsoutwardandreleasethedeckfromthe LHandRHdecklift arms.
SeeFigure34.
Deck
Release
Pin
Figure34
9. Placethe decklifthandleintothehighestmowingpositionandsMethe
deckoutfrom beneaththetractor.
Deckinstallation
Installthedeckon the tractorasfollows:
1. Placethe decklift handleinthe highestmowingpositionSeeFigure30.
2. Slidethe deckunderthe tractorontheright sideofthetractorliningup the
deckhangerbracketsandthedecklift arms..
3. Oncethedeckisunderthe tractor,movethedecklift handleto thelowest
mowingposition.
NOTE:Tolinethebracketsup properly,it maybenecessaryto placeasmall
blockof woodundereachsideof thedeck.
4. Pullthe deckreleasepinsoutwardandmaneuverthe deckasnecessaryto
aligntheholesinthe decklift armswiththe pins.Referto Figure34.
5. Whenaligned,pusheachpinfully inwardthroughthelift armsto securethe
armsinthe rearhangerbracketslots.
6. Reinstallthe front decklift rodandsecureinplacewith the cotterpin.Refer
to Figure33.
7. Makecertainthe'V' belt isinthe spindlepulleysonthedeck;then routethe
belt rearwardbeneaththe tractorframe,abovethetransmissiontube(s),to
thePTOpulleyonthebottomof theengine.
8. Usingthe decklift handle,raisethedeckto the positionthat providesthe
mosthorizontalrunofthebelt betweenthedeckidlerpulleysandthe PTO
pulleyon the bottomoftheengine.
9. Makecertainthebelt is inthespindlepulleysof thedeck,andthat the
backsideof thebelt isagainstboththefixed andmovableidlerpulleys.
10. Sittingbehindthetractor,facingforward,makecertainthe beltis not
twisted;thenreachbeneaththe tractorto graspthebeltandpull it toward
thePTOpulley.
27
Usecaution to avoidpinchingyour fingers when rollingthe belt onto the
PTOpulley.
11.
12.
Pulltherightsideof thebelt rearwardandplacethe narrowVsideof the
belt into the PTOpulley.SeeFigure32.
Whileholdingthe beltandpulleytogether,rotatethepulleyto theleft (See
Figure32).Continueholdingandrotatingthe pulleyandbeltuntil thebelt is
fully rolledinto the PTOpulley.
NOTE:Beforeusingthe tractordouble-checkthe beltroutingto makesure
that the belt hasbeenroutedproperly.
Replacingthe DeckDriveBelt
1. Removethe deckfrombeneaththetractor,(referto DeckRemoval).
2. Removethe hexwasherscrewssecuringthebelt coversto thedeck.See
Figure35.
f_
HexWasher
..... Screws
Figure35
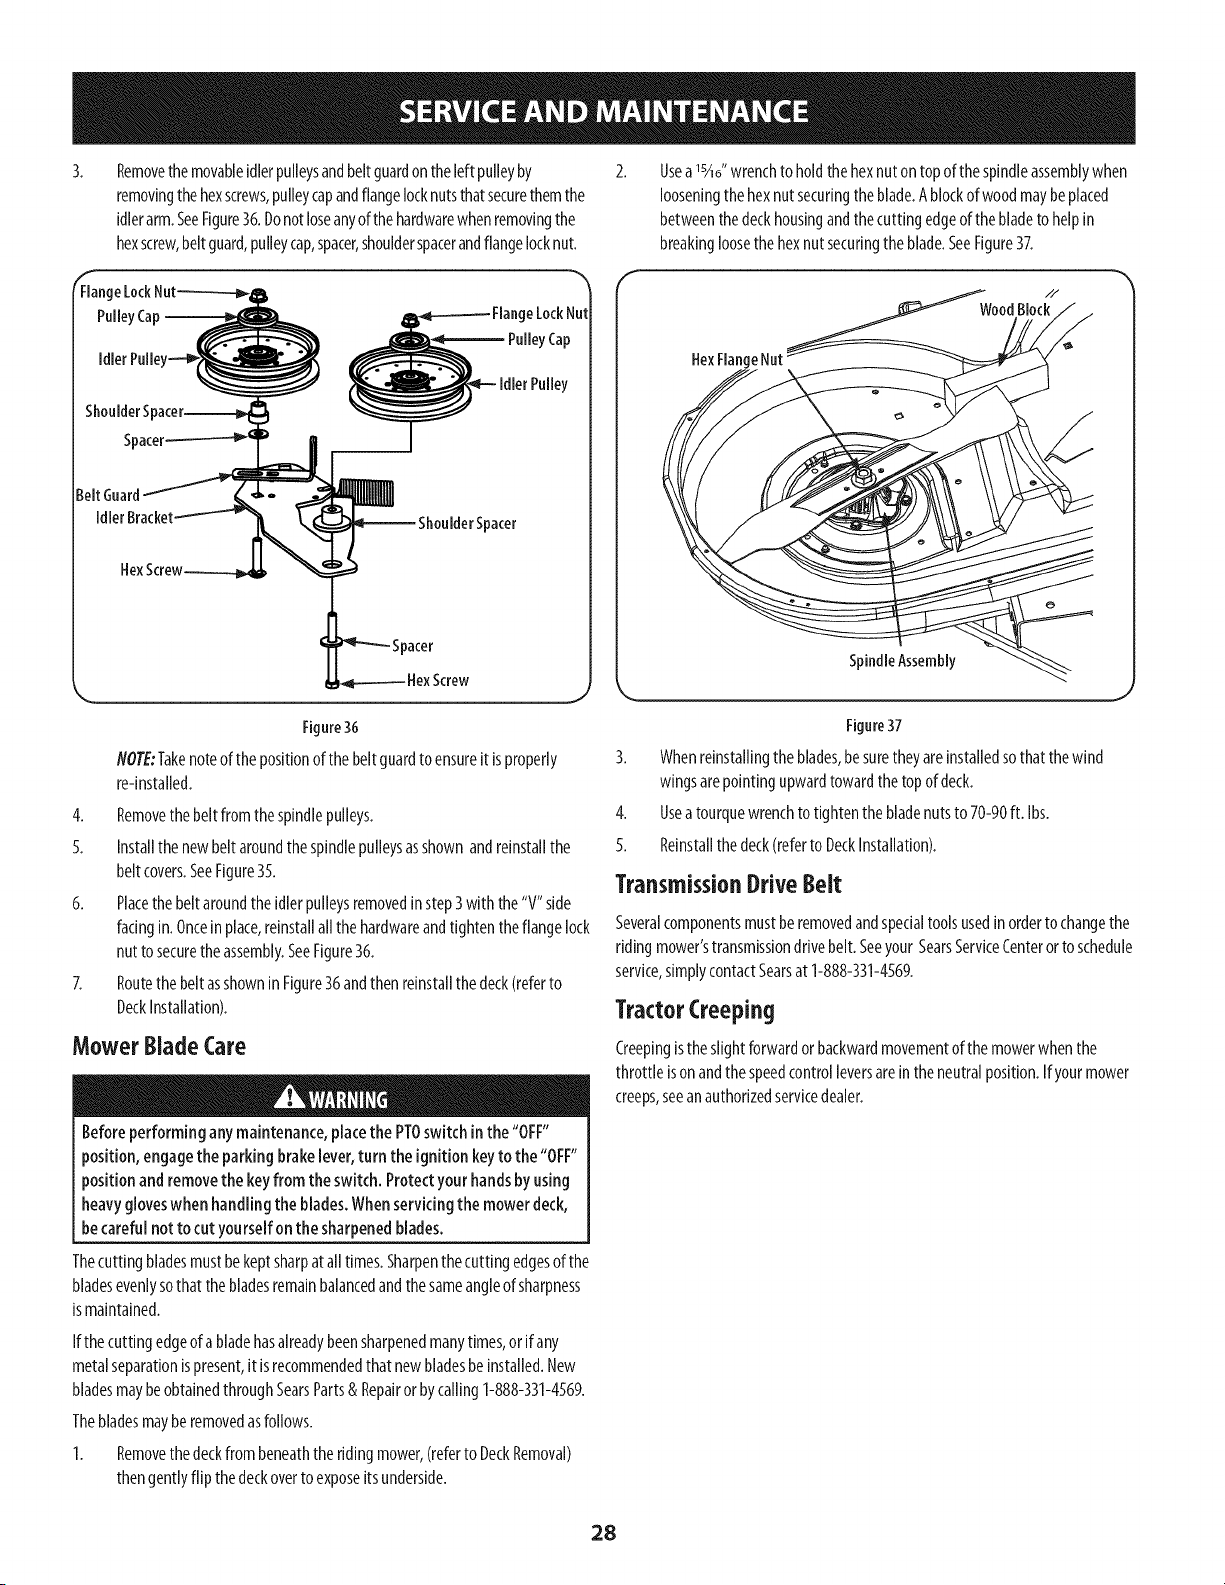
Removethemovableidlerpulleysandbeltguardon the leftpulleyby
removingthehexscrews,pulleycapandflangelocknutsthatsecurethemthe
idlerarm.SeeFigure36.Donot loseanyofthehardwarewhenremovingthe
hexscrew,beltguard,pulleycap,spacer,shoulderspacerandflangelocknut.
f
Flang_
IdlerPulle'
geLockNut
y Cap
IdlerPulley
J
Figure 36
NOTE:Takenoteofthe positionof thebeltguardto ensureit isproperly
re-installed.
4. Removethe belt fromthe spindlepulleys.
5. Installthe newbeltaroundthe spindlepulleysasshownandreinstallthe
belt covers.SeeFigure35.
6. Placethebeltaroundthe idlerpulleysremovedinstep3 withthe "V" side
facingin.Onceinplace,reinstallall the hardwareandtighten theflangelock
nutto securetheassembly.SeeFigure36.
7. RoutethebeltasshowninFigure36andthenreinstallthe deck(referto
DeckInstallation).
MowerBladeCare
Beforeperforming any maintenance,placethe PTOswitch inthe "OFF"
position,engagethe parkingbrake lever,turn the ignitionkeyto the "OFF"
positionand removethe keyfrom the switch. Protectyour handsbyusing
heavygloveswhen handlingthe blades.Whenservicingthe mower deck,
becarefulnot to cut yourselfon the sharpenedblades.
Thecuttingbladesmustbekept sharpat alltimes.Sharpenthecuttingedgesof the
bladesevenlysothatthebladesremainbalancedandthesameangleof sharpness
ismaintained.
If thecuttingedgeofa bladehasalreadybeensharpenedmanytimes,orif any
metalseparationispresent,it isrecommendedthat newbladesbeinstalled.New
bladesmaybeobtainedthroughSearsParts&Repairor bycalling1-888-331-4569.
Thebladesmaybe removedasfollows.
1. Removethe deckfrom beneaththeridingmower,(referto DeckRemoval)
thengentlyflip thedeckoverto exposeitsunderside.
Useals/_6"wrenchto holdthehexnutontopof thespindleassemblywhen
looseningthehexnut securingtheblade.Ablockofwoodmaybe placed
betweenthedeckhousingandthecuttingedgeof thebladeto helpin
breakingloosethehexnut securingtheblade.SeeFigure37.
//
WoodBlock
HexHang
SpindleAssembly
Figure37
3. Whenreinstallingthe blades,besurethey areinstalledsothatthe wind
wingsarepointingupwardtowardthe topof deck.
4. Useatourquewrenchto tightenthe bladenutsto 70-90ft. Ibs.
5. Reinstallthedeck(referto DeckInstallation).
TransmissionDriveBelt
Severalcomponentsmustberemovedandspecialtoolsusedin ordertochangethe
riding mower'stransmissiondrivebelt.Seeyour SearsServiceCenteror to schedule
service,simplycontactSearsat 1-888-331-4569.
TractorCreeping
Creepingistheslightforwardorbackwardmovementof themowerwhenthe
throttle isonandthespeedcontrolleversareintheneutralposition.If yourmower
creeps,seeanauthorizedservicedealer.
28

Neverstore gardenridingmowerwith fuel in tank indoorsor inpoorly
ventilated areaswhere fuel fumes mayreachan openflame, spark,orpilot
lightason afurnace,water heater,clothesdryer,orgasappliance.
Riding MowerStorage
If yourridingmowerisnotgoingto beoperatedforanextendedperiodof time
(thirty daysto approximatelysixmonths),theridingmowershouldbepreparedfor
storage.Storetheridingmowerinadry andprotectedlocation.If storedoutside,
coverthe ridingmower(includingthetires)to protectit from theelements.The
proceduresoutlinedbelowshouldbeperformedwheneverthe ridingmoweris
placedinstorage.
1. Changetheengineoil andfilter followingthe instructionsprovidedin the
ServiceandMaintenancesectionofthismanual.
Neverstore the riding mower with fuel inthe tank indoorsor inpoorly
ventilatedendosures,where fuel fumesmayreachan openflame, sparkor
pilot light asonafurnace,water heater,dothes dryer,etc.
If storingtheridingmowerfor 30daysor more:
a. Topreventgumdepositsfromforminginsidetheengine'scarburetor
andcausingpossiblemalfunctionof theengine,the fuelsystemmust
beeithercompletelyemptied,orthegasolinemustbetreatedwith a
stabilizerto preventdeterioration.
4.
Fuelleft in thefuel tank deterioratesandwill causeseriousstarting
problems.
b. Usingafuelstabilizer:
Readtheproductmanufacturer'sinstructionsand
recommendations.
Addto clean,freshgasolinethe correctamountof stabilizerforthe
capacity(approximately3gallons)of thefuelsystem.
Fillthefuel tankwith treatedfuel andrunthe enginefor 2-3
minutesto getstabilizedfuelinto thecarburetor.
c. Emptyingthe fuel system:
Priorto puttingthe ridingmowerin storage,monitorfuel
consumptionwiththe goalofrunningthefuel tankempty.
Starttheengineandallowit to runout of fuel.Thiswill preventgum
andvarnishdepositsfromforming.
Removethesparkplugsandpourapproximatelyoneounceof oilinto each
cylinder.Cranktheengineoneortwo turnsto spreadtheoil evenlyonthe
cylinderwalls.Replacethe sparkplugs.
Cleantheengineandtheentireridingmowerthoroughly.
NOTE:Useof apressurewasherorgardenhoseisnotrecommendedto
cleanyourridingmower.Theymaycausedamageto electricalcomponents,
spindles,pulleys,bearingsor theengine.Theuseof waterwill resultin
shortenedlifeandreduceserviceability.
5. Sharpenthe bladessothatthemowerwill bereadyto usewhenneeded.
6. Protectthe metalsurfaces.Repairscratcheswith the appropriatetouch-up
spraypaint.Brusha rustpreventiveoil on anyunpaintedsurfacesincluding
the pulleysandblades.(Becarefulnotto getanyoil on thedrivebelts.)
7. Cleanandfully chargethe battery,thendisconnectthe negativecableat
the batteryto preventpossibledischarge.Rechargethebatteryperiodically
whenin storage.
NOTE:Removethebatteryif exposedto prolongedperiodsof sub-freezing
temperatures.Storeinacool,dry locationwheretemperaturesareabove
freezing.
8. Lubricateall lubricationpoints.
9. Jackthe mowerup andstoreit onblocksto taketheweightoffof the tires.
Removingthe RidingMowerfrom Storage
1. Checktheengineoil.
2. Fullychargethe battery,lowerridingmoweroff blocks,andinflatethetires
to therecommendedpressure.
3. Removethe sparkplugsandwipethemoff. Usingthe starter,crankthe
engineto pumptheexcessoil out of thesparkplug holes.Replacethespark
plugsandtheignitionleads.
4. Ifdrainedbeforestoring,fill the fueltank withclean,freshgasoline.
5. Checkthe levelof theengineoil inthe crankcaseandthehydraulicreservoir
tank.
6. Startthe engineandallowto idlefor afewminutesto ensureengineis
operatingproperly.
7. Drivethe ridingmowerwithouta loadto makecertainall the ridingmower
systemsarefunctioningproperly.
29
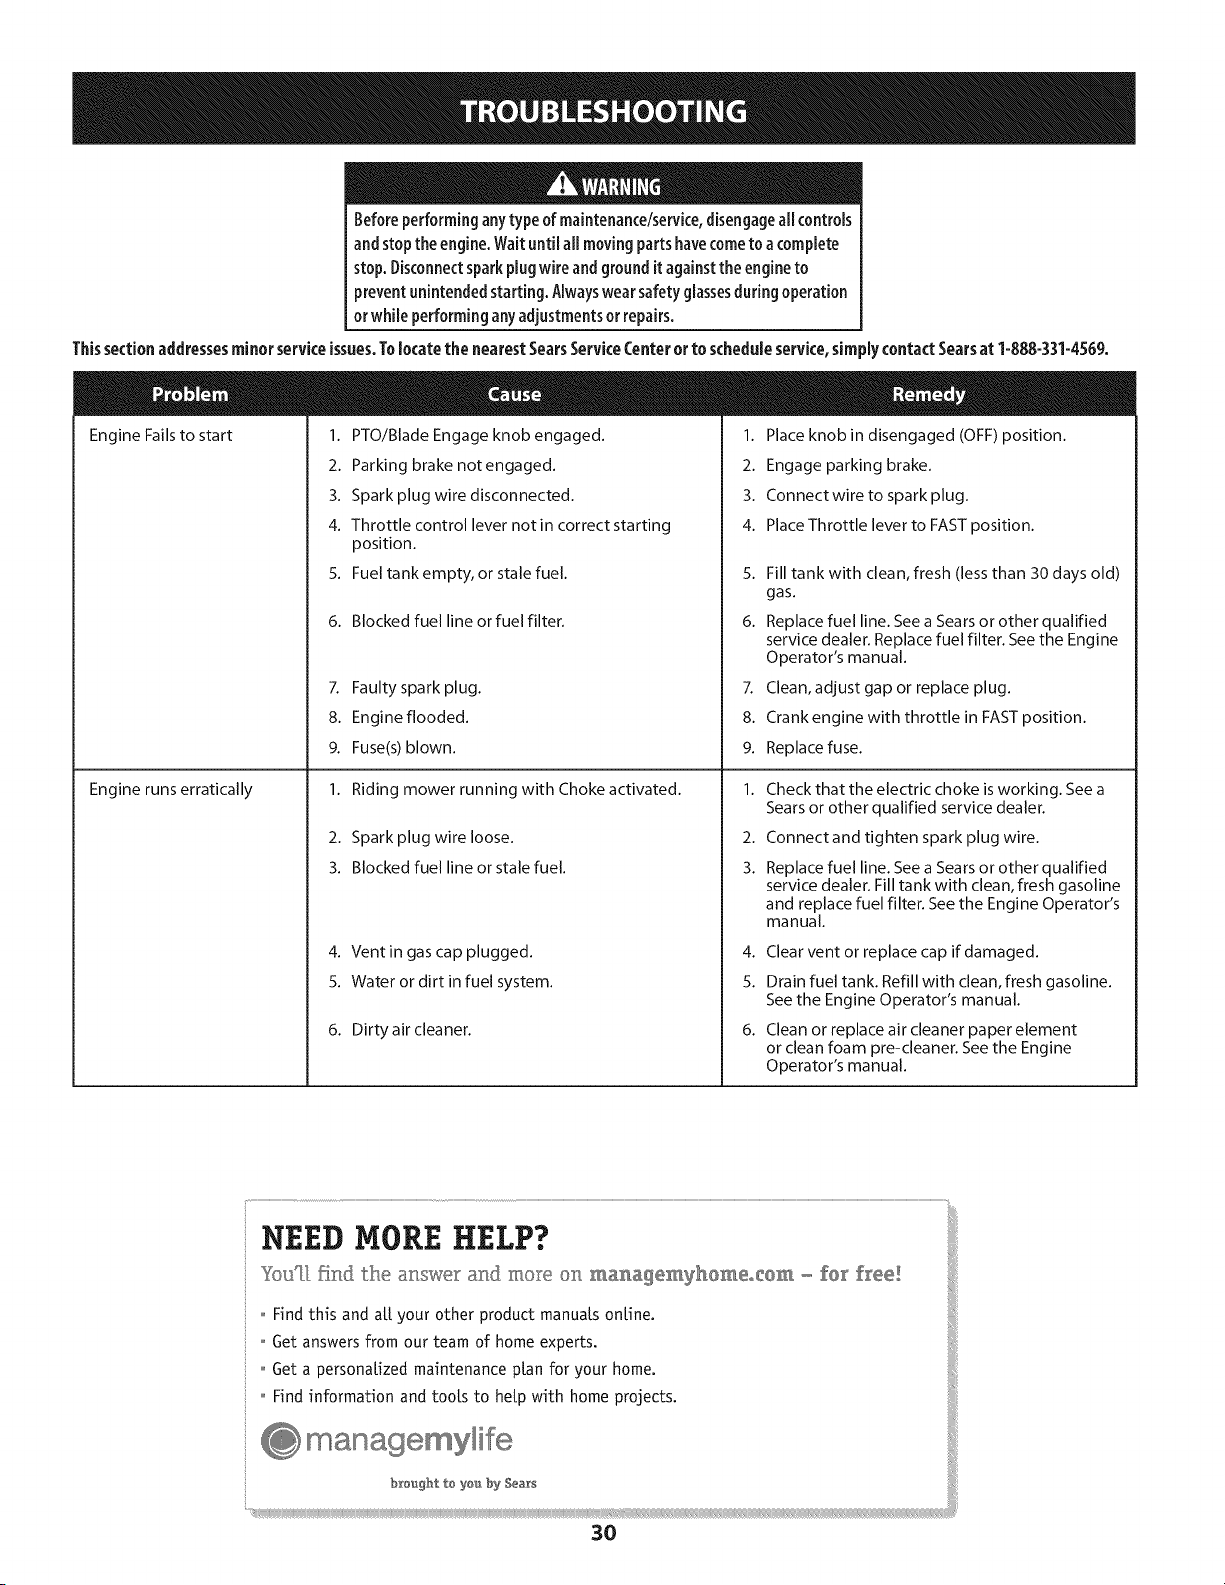
Beforeperformingany type of maintenance/service,disengageall controls
and stop the engine.Wait until all moving parts havecometo a complete
stop. Disconnectsparkplugwire andground it againstthe engineto
preventunintendedstarting.Alwayswearsafetyglassesduringoperation
or while performingany adjustmentsor repairs.
Thissectionaddressesminor serviceissues.Tolocate the nearestSearsServiceCenteror to scheduleservice,simplycontactSearsat 1-888-331-4569.
Engine Fails to start 1. PTO/Blade Engage knob engaged.
2. Parking brake notengaged.
3. Spark plug wire disconnected.
4. Throttle control lever not in correct starting
position.
5. Fuel tank empty, or stale fuel.
6. Blocked fuel line orfuel filter.
7. Faulty spark plug.
8. Engine flooded.
9. Fuse(s) blown.
1. Riding mower running with Choke activated.
2. Spark plug wire loose.
3. Blocked fuel line or stale fuel.
Engine runs erratically
4. Ventin gas cap plugged.
5. Water or dirt in fuel system.
1. Place knob in disengaged (OFF) position.
2. Engage parking brake.
3. Connectwire to spark plug.
4. Place Throttle lever to FAST position.
6. Dirty air cleaner.
5. Fill tank with clean, fresh (less than 30 days old)
gas.
6. Replace fuel line. See a Sears or other qualified
service dealer. Replace fuel filter. See the Engine
Operator's manual.
7. Clean, adjust gap or replace plug.
8. Crank engine with throttle in FAST position.
9. Replace fuse.
1.
2.
3.
4.
5.
6.
Check that the electric choke is working. See a
Sears or other qualified service dealer.
Connect and tighten spark plug wire.
Replace fuel line. See a Sears or other qualified
service dealer. Fill tank with clean, fresh gasoline
and replace fuel filter. See the Engine Operator's
manual.
Clear vent or replace cap if damaged.
Drain fuel tank. Refill with clean, fresh gasoline.
See the Engine Operator's manual.
Clean or replace air cleaner paper element
or clean foam pre-cleaner. See the Engine
Operator's manual.
3O
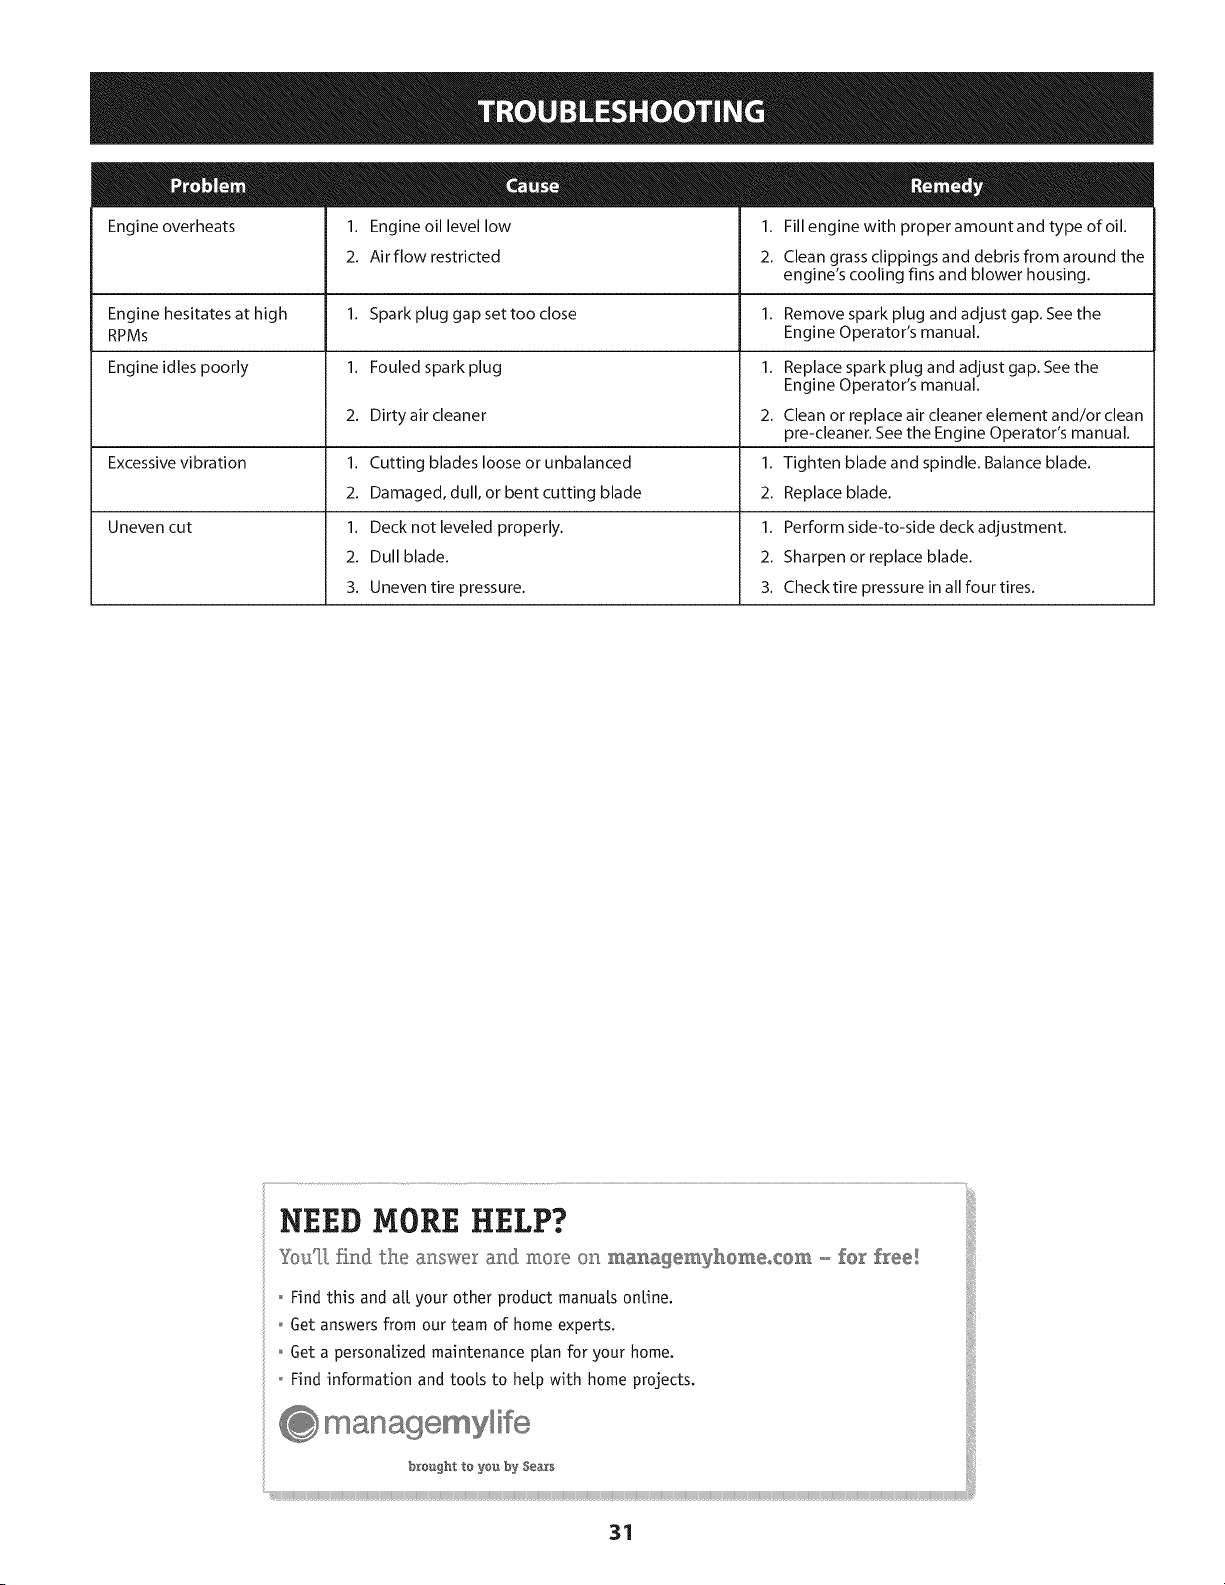
Engine overheats
Engine hesitates at high
RPMs
1. Engine oil level low
2. Airflow restricted
1. Spark plug gap settoo close 1.
1. Fouled spark plug 1.
2. Dirty air cleaner 2.
1. Cutting blades loose or unbalanced 1.
2. Damaged, dull, or bent cutting blade 2.
1. Deck not leveled properly. 1.
2. Dull blade. 2.
3. Uneven tire pressure. 3.
Engine idles poorly
Excessive vibration
Uneven cut
1. Fill engine with properamountand type ofoil.
2. Clean grass clippings and debris from around the
engine's cooling fins and blower housing.
Remove spark plug and adjust gap. Seethe
Engine Operator's manual.
Replacespark plug and adjust gap. Seethe
Engine Operator's manual.
Clean or replace air cleaner element and/or clean
pre-cleaner. Seethe Engine Operator's manual.
Tighten blade and spindle. Balance blade.
Replaceblade.
Perform side-to-side deck adjustment.
Sharpen or replace blade.
Check tire pressure in all four tires.
NEED MORE HELP?
Youq],fh__dthear_swe<and more o__managemyhemeo{em ,-fer£ree[
o Find this and all your other product manuals online.
o Get answers from our team of home experts.
o Get a personalized maintenance plan for your home.
o Find information and tools to help with home projects.
brought to you by Sears
31
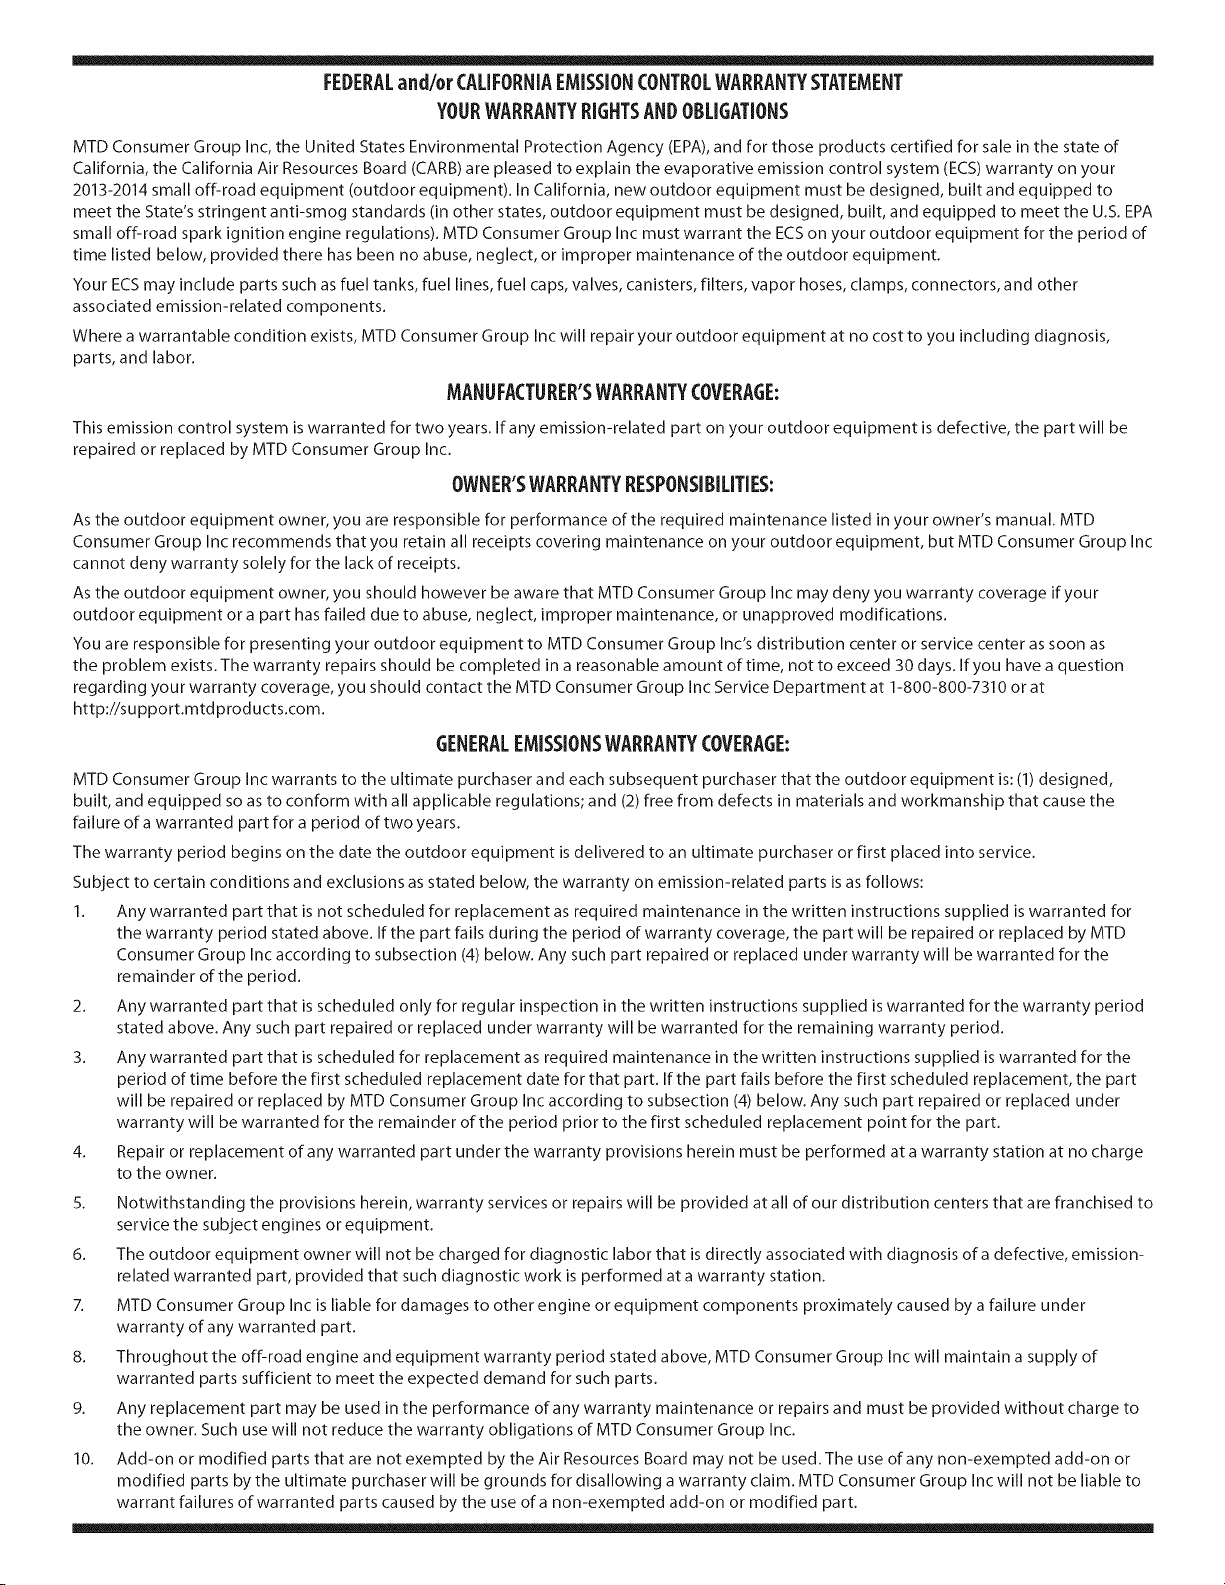
FEDERALand/or CALIFORNIAEMISSIONCONTROLWARRANTYSTATEMENT
YOURWARRANTYRIGHTSANDOBLIGATIONS
MTD Consumer Group Inc, the United States Environmental Protection Agency (EPA), and for those products certified for sale in the state of
California, the California Air Resources Board (CARB) are pleased to explain the evaporative emission control system (ECS) warranty on your
2013-2014 small off-road equipment (outdoor equipment). In California, new outdoor equipment must be designed, built and equipped to
meet the State's stringent anti-smog standards (in other states, outdoor equipment must be designed, built, and equipped to meet the U.S. EPA
small off-road spark ignition engine regulations). MTD Consumer Group Inc must warrant the ECS on your outdoor equipment for the period of
time listed below, provided there has been no abuse, neglect, or improper maintenance of the outdoor equipment.
Your ECS may include parts such as fuel tanks, fuel lines, fuel caps, valves, canisters, filters, vapor hoses, clamps, connectors, and other
associated emission-related components.
Where a warrantable condition exists, MTD Consumer Group Inc will repair your outdoor equipment at no cost to you including diagnosis,
parts, and labor.
MANUFACTURER'SWARRANTYCOVERAGE:
This emission control system is warranted for two years. If any emission-related part on your outdoor equipment is defective, the part will be
repaired or replaced by MTD Consumer Group Inc.
OWNER'SWARRANTYRESPONSIBILITIES:
As the outdoor equipment owner, you are responsible for performance of the required maintenance listed in your owner's manual. MTD
Consumer Group Inc recommends that you retain all receipts covering maintenance on your outdoor equipment, but MTD Consumer Group Inc
cannot deny warranty solely for the lack of receipts.
As the outdoor equipment owner, you should however be aware that MTD Consumer Group Inc may deny you warranty coverage if your
outdoor equipment or a part has failed due to abuse, neglect, improper maintenance, or unapproved modifications.
You are responsible for presenting your outdoor equipment to MTD Consumer Group Inc's distribution center or service center as soon as
the problem exists. The warranty repairs should be completed in a reasonable amount of time, not to exceed 30 days. If you have a question
regarding your warranty coverage, you should contact the MTD Consumer Group Inc Service Department at 1-800-800-7310 or at
http://su pport.mtd prod ucts.com.
GENERALEMISSIONSWARRANTYCOVERAGE:
MTD Consumer Group Inc warrants to the ultimate purchaser and each subsequent purchaser that the outdoor equipment is: (1) designed,
built, and equipped so as to conform with all applicable regulations; and (2) free from defects in materials and workmanship that cause the
failure of a warranted part for a period of two years.
The warranty period begins on the date the outdoor equipment is delivered to an ultimate purchaser or first placed into service.
Subject to certain conditions and exclusions as stated below, the warranty on emission-related parts is as follows:
1. Any warranted part that is not scheduled for replacement as required maintenance in the written instructions supplied is warranted for
the warranty period stated above. If the part fails during the period of warranty coverage, the part will be repaired or replaced by MTD
Consumer Group Inc according to subsection (4) below. Any such part repaired or replaced under warranty will be warranted for the
remainder of the period.
2. Any warranted part that is scheduled only for regular inspection in the written instructions supplied is warranted for the warranty period
stated above. Any such part repaired or replaced under warranty will be warranted for the remaining warranty period.
3. Any warranted part that is scheduled for replacement as required maintenance in the written instructions supplied is warranted for the
period of time before the first scheduled replacement date for that part. If the part fails before the first scheduled replacement, the part
will be repaired or replaced by MTD Consumer Group Inc according to subsection (4) below. Any such part repaired or replaced under
warranty will be warranted for the remainder of the period prior to the first scheduled replacement point for the part.
Repair or replacement of any warranted part under the warranty provisions herein must be performed at a warranty station at no charge
to the owner.
4.
5. Notwithstanding the provisions herein, warranty services or repairs will be provided at all of our distribution centers that are franchised to
service the subject engines or equipment.
6. The outdoor equipment owner will not be charged for diagnostic labor that is directly associated with diagnosis of a defective, emission-
related warranted part, provided that such diagnostic work is performed at a warranty station.
7. MTD Consumer Group Inc is liable for damages to other engine or equipment components proximately caused by a failure under
warranty of any warranted part.
8. Throughout the off-road engine and equipment warranty period stated above, MTD Consumer Group Inc will maintain a supply of
warranted parts sufficient to meet the expected demand for such parts.
9. Any replacement part may be used in the performance of any warranty maintenance or repairs and must be provided without charge to
the owner. Such use will not reduce the warranty obligations of MTD Consumer Group Inc.
10. Add-on or modified parts that are not exempted by the Air Resources Board may not be used. The use of any non-exempted add-on or
modified parts by the ultimate purchaser will be grounds for disallowing a warranty claim. MTD Consumer Group Inc will not be liable to
warrant failures of warranted parts caused by the use of a non-exempted add-on or modified part.
WARRANTEDPARTS:
The repair or replacement of any warra nted part otherwise eligible for warranty coverage may be excluded from such warranty coverage
if MTD Consumer Group Inc demonstrates that the outdoor equipment has been abused, neglected, or improperly maintained, and that
such abuse, neglect, or improper maintenance was the direct cause of the need for repair or replacement of the part. That notwithstanding,
any adjustment of a component that has a factory installed, and properly operating, adjustment limiting device is still eligible for warranty
coverage. Further, the coverage under this warranty extends only to parts that were present on the off-road equipment purchased.
The following emission warranty parts are covered (if applicable):
1. Fuel Metering System
Fuel pump
Fuel tank
2. Evaporative Control
Fuel hose
Fuel hose clamps
Tethered fuel cap
Carbon canister
Vapor lines
063015Rev.A
Congratulationsonmakingasmartpurchase.YournewCraftsman®productisdesignedandmanufacturedfor yearsof
dependableoperation.Butlikeall products,it mayrequirerepairfromtimeto time.That'swhenhavingaRepairProtection
Agreementcansaveyoumoneyandaggravation.
Here'swhat the Repair Protection Agreement*includes:
[] Expertservicebyour10,000professionalrepairspecialists
[] Unlimitedserviceand no charge forpartsandlaboronallcoveredrepairs
[] Productreplacementupto $1500ifyourcoveredproductcan'tbefixed
[] Discountof 25%from regularpriceof serviceandrelatedinstalledpartsnot coveredbythe agreement;also,25%off
regularpriceof preventivemaintenancecheck
[] Fasthelp byphone - wecallit RapidResolution- phonesupportfromaSearsrepresentative.Thinkof usasa"talking
owner'smanual."
Onceyoupurchasethe RepairProtectionAgreement,a simplephonecallisallthat it takesforyouto scheduleservice.You
cancallanytimedayornight,orscheduleaserviceappointmentonline.
TheRepairProtectionAgreementisa risk-freepurchase.If youcancelfor anyreasonduringthe productwarrantyperiod,
wewill provideafull refund.Or,a proratedrefundanytimeafterthe productwarrantyperiodexpires.PurchaseyourRepair
ProtectionAgreementtoday[
Somelimitations and exclusionsapply. Forpricesand additional informationinthe U.S.A.call 1-800-827-6655.
*Coveragein Canadavarieson someitems.Forfull detailscall SearsCanadaat 1-800-361-6665.
SearsInstallationService
ForSearsprofessionalinstallationof homeappliances,garagedooropeners,waterheaters,andothermajorhomeitems,in
the U.S.A.orCanadacall1-800-4-MY-HOME®.
34
Declarad6n de garantia .............................. 35
Instrucdones de seguridad ........................... 36
Guia para la operad6n en pendientes ................. 41
Montaje ............................................. 42
Fundonamiento ..................................... 46
Servicio y Mantenimiento ............................ 55
Almacenamiento fuera de temporada ................ 65
Solud6n de Problemas ............................... 66
Numeros de servido ........................ Contratapa
GARANT[ACOMPLETACRAFTSMAN
Todaslaspiezasno desechablesde este equipo tractor segarantizanen casodedefectosde material o de mano de obra DURANTEDOSANOSa partir de la
fechade compra Lapiezano desechabledefectuosasereparar_a domicilio sin costoalguno, o sereemplazar_en casode resultarimposible la reparaci6n.
Segarantiza labateria (una piezaconsumible)de esteequipo tractor DURANTE90 D[ASa partir de lafecha de compra,en casode cualquierdefecto de
material o mano de obra (nuestraspruebascomprobar_nque no mantiene la carga).Labateria defectuosasereemplazar_sincostoa domicilio.
SERVICIOCUBIERTOPORLAGARANT[A
Paraobtenerinformad6nsobreelalcancedelagarantiay solidtarlareparad6noel reemplazogratuitos,Ilameal1-800-659-5917o visiteel sitioWeb:www.craftsman.com
Entodosloscasosprecedentes,si esimposiblerealizarlareparaci6no el reemplazo,elequiposer_reemplazadosincargopotottodel mismomodeloosuequivalente.
Lacoberturadelagarantiaarribaindicadaser_nulasiesteproductoalgunavezseusaparaprestarservidoscomerdaleso sisealquilaaotra persona.
EstagarantiacubreUNICAMENTElosdefectosen losmaterialesyen la manodeobra.EstagarantiaNOcubre:
Laspiezasconsumibles(exceptolabater[a)quesepuedendesgastarpot elusonormaldentrodel plazodelagarantia,incluidos,sinIimitaci6n,lascuchillas,lasbuj[as,
losdepuradoresdeaire,lascorreasylosfiltrosdeaceite.
Elservidode mantenimientoest_ndar,loscambiosdeaceiteo laspuestasapunto.
Elcambioo lareparad6nde neum_ticosacausadepinchadurasproduddaspotobjetosexteriorescomoclavos,espinas,toconeso vidrios.
Elcambioo lareparad6ndeneum_ticosoruedascomoresultadodeldesgastenormal,acddenteso usoomantenimientoinapropiados.
Lasreparadonesnecesariasdebidoal malusodel operador,queincluyenentreotros,eldafioocasionadopotremolcarobjetosexcediendolacapaddaddeltractol
elimpactocontraobjetosquetuerzanlaestructura,elconjuntodelejeoelcigiJefial,o potacelerardemasiadoelmotor.
Lasreparadonesnecesariasdebidoa negligendadeloperador,queincluyenentreotros,losdafiosmec_nicoy el_ctricoocasionadospot elalmacenamiento
inapropiado,pot noutilizarelgradoy lacantidaddeaceiteparamotorquecorrespondan,pot no mantenerel_readela cubiertasinresiduosinflamables,o potno
realizarel mantenimientodeltractordeacuerdoconlasinstrucdonescontenidasenelmanualdeloperador.
LaIimpiezaolasreparadonesdel motor(sistemadecombustible)debidoalusodecombustiblequeenlaverificad6nresulteestarcontaminadouoxidado(viejo).En
general,elcombustibledebeutilizarseenun per[odono mayorde30d[asa partirdelafechadecompra.
Eldeterioroy desgastenormalesdelosacabadosexteriores,o elreemplazode lasetiquetasdelproducto.
Estagarantia le otorga derechoslegalesespecificos,pero ustedpodria gozar de otros derechosen razOnde sulugar deresidencia.
SearsBrandsManagementCorporation,HoffmanEstates,IL 60179
NOmero de modelo
Aceite del motor: SAE 30 NOmero de serie
Combustible: Gasolina sin plomo Fecha de compra
Registre arriba el nOmero del modelo, el nOmero
de serie y la fecha de compra.
© SearsBrands, LLC 35
Estesirnboloindicainstruccionesdeseguridadirnportantesque,de
noobservarse,podriaponerenpeligrola seguridadpersonaly / o la
propiedaddel rnisrnoya losdern_.s.Leay sigatodaslasinstrucciones
de estemanualantesde operaresta rn_.quina.El incurnplirnientode
estasinstruccionespuederesultaren lesionespersonales.Cuando
veaestesirnbolo,PRESTEATENCIONA SUADVERTENCIA!
PROPOSICION 65 DE CALIFORNIA
Elescapedelmotor,algunosdesuscornponentes,y ciertoscornponen-
tesdelvehiculocontienenoernitensustanciasquirnicasconocidasal
Estadode Californiapotcausarc_.ncery defectosdenacirnientouotros
daSosreproductivos.
Bornesdelabateria,y accesoriosrelacionadoscontienenplornoy
cornpuestosdeplorno,sustanciasquirnicasqueel Estadode California
quecausancancery daSosalsisternareproductivo.L_.veselasrnanos
despu_sdernanipular.
Estarn_.quinafuedise_adaparaserutilizadade acuerdoconlaspr_.cticas
deoperaci6nsegurade estemanual.AIigualqueconcualquiertipode
equipornotorizado,o errorpotpartedeloperariopuedecausarlesiones
graves.Estarn_.quinaescapazdearnputardedos,rnanos,dedosde
lospiesy lospiesy losrestosdelanzarniento.Elincurnplirnientode las
instruccionesdeseguridadpuederesultaren lesionesgravesola rnuerte.
Suresponsabilidad -- Restrinjaeluso de esta rn_.quinarnotor-
izadaalas personasque lea,entienday sigalas advertenciase
instruccionesde estemanualyen larn_.quina.
GUARDE ESTAS INSTRUCCIONES!
FUNCIONAIVIIENTO GENERAL
• Lea,entienday siga todaslas instruccionesde la rn_.quinayen
el manual(s) antes de intentarrnontary operar.Guardeeste
manualen un lugarseguroparafuturasreferenciasy regulary
ordenarlas piezasde recarnbio.
• Estarfarniliarizadocon todos loscontrolesy su correctofuncio-
narniento.Sepac6rnodetenerla rn_.quinay desactivardeforrna
r_.pida.
• Nuncaperrnitaque ni_osrnenoresde 14a_osde edad para
operaresta rn_.quina.Ni_osde 14a_osdebeleery cornprender
lasinstruccionesy de seguridadcontenidasen este manualy en
larn_.quinay debenserentrenadosy supervisadospor un adulto.
• Nuncaperrnitaque losadultosa utilizarla rn_.quinasin la instruc-
ci6n apropiada.
• Paraayudara evitarel contactoconlas cuchillaso una lesi6npor
algQnobjetoarrojado,rnantengaa los observadores,ayudantes,
ni_osy anirnalesdorn_sticospot Io rnenos75piesde distancia
de la rn_.quinarnientrasest,.en funcionarniento.Detengala
rn_.quinasi alguienentraen la zona.
• Inspeccionecuidadosarnenteel _.readonde el equipo se vaa
utilizar.Retiretodaslas piedras,palos,cables,huesos,juguetes
y otrosobjetosextra_osquepodrianser recogidosy arrojados
porla cuchilla (s). Los objetoslanzadospuedencausarlesiones
personalesgraves.
• Elplan de su patr6nde corte para evitar la descargade material
hacialoscarninos,veredas,losobservadores,etc.Adern_.s,evite
descargarmaterialcontra una paredu objetoque pueda causar
descargade materialde rebotecontrael operador.
• Siernpreutilicegalasde seguridado galas de seguridaddurante
laoperaci6ny el desernpe_ode la rn_.quinaoparaprotegersus
ojos.Los objetosarrojadosque rebotanpuedencausar da_o
gravea los ojos.
• Usezapatosfuertes,de suelay zapatosde trabajoajustadacorno
pantalonesy carnisas.Ropasueltay joyas puedenengancharse
en las piezasrn6viles.Nuncaoperela rn_.quinacon los pies
descalzoso sandalias.
Estaraltanto de la rn_.quinay la direcci6nde descargaapegoy
no el puntoque a nadie.No opereel cortacespedsin lacubierta
de descargao de c_spedtodo en su lugar.
• Nointroducirlas rnanoso los piescercade las piezasgiratorias
o bajola plataforrnadecorte. Contactocon la hoja (s) puede
arnputarrnanosy pies.
• Unacubiertadedescargafaltanteo da_adapuedecausar
contactocon lascuchillaso lesionesporobjetosarrojados.
• Detenerla hoja (s) cuandoatraviesesenderos,sendaso carninos
y aunquenoes el cortedel cesped.
• Cuidadocon el tr_.ficocuandose trabajacercade ocarreteras.
Estarn_.quinanoest,. dise_adaparasu usoen cualquiervia
pQblica.
• Nohagafuncionarla rn_.quinabajo la infiuenciadel alcoholo las
drogas.
• Corteel cespeds61ocon luz naturalo luz artificialbuena.
• NuncaIlevepasajeros.
• Retrocedalentarnente.Siernpremirehaciaabajo y haciaatr_.s
antesy rnientrasretrocede,paraevitarunaccidentede regreso
otra vez.Tengaen cuentay prestaratenci6na la funci6ndel
sisternade seguridadque detieneel poderde laspalascuando
se conduceen sentidoinverso.Si no fuctioningcorrectarnente,
p6ngaseen contactocon un distribuidorautorizadoparala
inspecci6nde seguridady reparaci6ndelsisterna.
• Reduzcala velocidadantesde girar.Operarla rn_.quinasin
problernas.Eviteel funcionarnientoerr_.ticoy el excesode
velocidad.
36

• Desconectarlahoja(s), frenode estacionarnientoestablecidos,
apagueel motory esperarhastaquela hoja (s) Ilegara una
paradacornpletaantesde retirarde c_sped,vaciar los recortes,
destaparel canal, retirarrestosdecespedo desechos,o hacer
cualquierajuste.
• Nuncadejela rn_.quinaenfuncionarnientosinvigilancia.Siernpre
apaguela hoja (s), lugarde las palancasde controlen la unidad
defreno neutral,estacionarnientoconjunto,apagueel motory
quitela Naveantesde bajarse.
• Tengacuidadoal cargarodescargarla rn_.quinaen unrernolque
o carni6n.Esta rn_.quinano debe ser irnpulsadahaciaarribao
abajode la rarnpa(s), ya queel equipo podrfacaersey causar
lesionespersonalesgraves.Larn_.quinase debe ernpujarrnanu-
alrnenteen la rarnpa(s) paracargaro descargarcorrectarnente.
• Silenciadory elmotorsecalientany puedencausarunaque-
rnadura.Nose tocan.
• Cornpruebeel espaciolibreencirnade la cabezaantesde
conduciren condicionesde pocararnasde los _.rbolescolgantes,
cables,etc puertaaperturas,en lasque el operadorgolpeadoo
sacadodela rn_.quina,Io quepodrfaresultaren lesionesgraves.
• Desenganchetodoslos ernbraguesarchivoadjunto,el frenode
rnanoa la posici6n"ON" y moverel RH y LHpalancasde control
hastala posici6ndepuntornuertoantesdeintentararrancarel
motor.
• La rn_.quinaest,.dise_adaparacortarel c_spedresidencialnor-
malde unaalturade no rn_.sde 10". No tratede cortaratrav_s
inusualrnentealto, hierbaseca (pot ejernplo,pastos)o pilasde
hojassecas.Hierbay las hojassecaspuedencornunicarsecon
el escapedelmotory / o se acurnulanen laplataforrnade corte
presentanun riesgopotencialdeincendio.
• Utilicesolarnenteaccesoriosy aditarnentosaprobadosparaesta
rn_.quinaporel fabricantede la rn_.quina.Lea,entienday siga
todaslas instruccionesquevienenconel accesorioaprobadoo
unarchivoadjunto.
• Losdatosindicanque losoperadoresde 60 a_os y rn_.s,est_.n
involucradosen un gran porcentajede cortacespedlesiones
relacionadas.Estosoperadoresdebenevaluarsucapacidadpara
operarel ridingmowercortacespeden forrnasuficienternente
segurapara protegersea sf rnisrnosya los dern_.sde una lesi6n
grave.
• Si se presentansituacionesquenoest_.ncubiertosen este
manual,tengacuidadoy buenjuicio. P6ngaseencontactocon la
Lfneade Ayuda1-888-331-4569Craftsmanen laasistencia.
PENDIENTE DE LA OPERACI6N
Laspendientesson unfactorirnportanterelacionadocon la p_rdidade
controly unaccidentede vuelco,quepuederesultarenlesionesgraves
o larnuerte.Todaslaspistasrequierenrnuchaprecauci6n.Si no se
puederetrocederen la pendienteo si sesienteseguro,no Iocorte.
Parasu seguridad,useel indicadorde pendientesquese incluye
cornopartede estemanualpararnedirlapendienteantesde operar
estarn_.quinaen una zonainclinada.Si la pendientees mayorde 15
gradoscornose rnuestraen el rnedidor,noopereesta rn_.quinaen que
lalesi6no la zona,podrfaproducirse.
Hacer:
• Corteel c_spedenpendientes,no de arriba a abajo.Tenga
rnuchocuidadoal carnbiarde direcci6nen las pendientes.
• Atentoa los hoyos,surcos,baches,piedrasu otrosobjetos
ocultos.El terrenodesniveladopuedevoltear la rn_.quina.La
hierbaaltapuedeocultarobst_.culos.
• A bajavelocidad.Elijauna velocidadIosuficienternentebajapara
que ustednotendr_,que pararen la pendiente.Evitearrancaro
detenerseen una pendiente.Si los neurn_.ticossonincapacesde
rnantenerla tracci6n,desenganchelas cuchillasy procederlenta
y cuidadosarnentehaciaabajode la pendiente.
• Sigalas recornendacionesdelfabricanteparalos pesoso
contrapesosde ruedaspararnejorarla estabiNdad.
• Tengacuidadocon loscolectoresde hierbau otrosaccesorios.
EstospuedencarnbiarlaestabiNdadde la rn_.quina.
• Quetodoslos rnovirnientosen las laderaslentoy gradual.
No realicecarnbiosbruscosde velocidado direcci6n.R_.pida
aceleraci6no desaceleraci6npodrfahacerqueel frontalde la
rn_.quinase levantey darsela vueltahaciaatr_.s,Io que podrfa
causarlesionesgraves.
Nosedebe:
• Noenciendalas laderasrnenosque seanecesario,y luegogirar
lentarnentehaciaarriba y tengasurnocuidadoen lascurvas.
• Nocorteel c_spedcercade desniveles,zanjas o terraplenes.El
cortac_spedpodrfagirar sobresi una ruedaest,. sobreel horde
de unacantilado,zanja, o si un horde cuevaspulg
• NointenteestabiNzarla rn_.quinaponiendoel pie en el suelo.
• Noutiliceuncolectorde c_speden pendientespronunciadas.
• Nocorteel cespedrnojado.Unarnenortracci6npodrfacausar
deslizarniento.
• Notire del rernolquepesadodetr_.sde accesorios(porejernplo,
carrocargadodedescarga,rodiNosdecesped,etc) en pendien-
tes dern_.sde5 grados.Cuandose va cuestaabajo,el excesode
pesotiendea ernpujarel ridingmowery puedehacerqueusted
pierdaelcontrol (por ejernplo,riding mowerse puedeacelerar,
frenary dirigirla capacidadse reduce,elapego puedenavajay
unriding mowercausa paraanular).
37
N QOS
Puedenocurriraccidentestr_.gicossi el operadorno est,. atentoa
la presenciade los niSos.LosniSosson a rnenudoatraidosporla
rn_.quinay la actividadde siega.EIIosnoentiendenlos peligros.
Nuncaasurnaque los niSosperrnanecer_.nenla Qltirnavez que los vi.
• Mantengaa los niSosfuera del_.readetrabajoyen elcuidado
vigilantede un adultoresponsableque no seael operador.
• Est_alerta y apaguela rn_.quinasi un niSoentraen el_.rea.
• Paraevitarretrasosen los accidentes,siernprernirarhaciaatr_.s
y haciaabajoparalos niSospequeSos.
• NuncaIleveniSos,inclusocon la hoja(s) se apagar&Podrian
caersey lastirnarseseriarnenteo interferircon laoperaci6n
segurade la rn_.quina.
• Tengarnuchocuidadoal acercarsea esquinasciegas,portales,
arbustos,_.rbolesu otros objetosque puedanbloquearsu visi6n
de unniSoque puedefuncionaren el carninode la rn_.quina.
• Mantengaa los niSosalejadosdelos rnotoresenfuncionarniento
ocaliente.Se puedensufrirquernadurascon un silenciador
caliente.
• Retirela Ilavecuandola rn_.quinaest,. sin vigilanciapara evitarel
uso noautorizado
Nuncaperrnitaque niSosrnenoresde 14aSosdeedadparaoperar
estarn_.quina.NiSosde 14aSosdebe leer y cornprenderlas instruc-
cionesy de seguridadcontenidasen estemanualyen larn_.quinay
debenser entrenadosy supervisadospor un adulto.
REIVlOLQUE
Rernolque_nicarnentecon una rn&quinaque tenga un enganche
diseSadopara rernolcar.No rernolcadoexceptoen el puntode
enganche.
Sigalas recornendacionesdel fabricanteen los lirnitesde pesopara el
equipodearrastrey rernolqueen pendientes.
Nuncaperrnitaque niSosu otras personaso sobrelosequipos
rernolcados.
Enlas pendientes,el pesodelequipo rernolcadopuedecausar
perdidadetracci6ny la perdidadecontrol.
Viajelentarnentey deje distanciaadicionalpara detenerse.
Nocarnbiea neutraly la costaabajo.
Notire del rernolquepesadodetr_.sde accesorios(porejernplo,carro
cargadode descarga,rodillosdec_sped,etc) en pendientesde rn_.s
de5 grados.Cuandose va cuestaabajo,el excesode pesotiendea
ernpujarel ridingmowery puedehacerque ustedpierdael control (por
ejernplo,ridingmowerse puedeacelerar,frenary dirigir la capacidad
se reduce,elapegopuedenavajay unridingmowercausapara
anular).
SERVIClO
El manejoseguro de la gasolina:
Paraevitarlesionespersonaleso daSosrnaterialesde uso extrerno
cuidadoal rnanipularla gasolina.Lagasolinaes altarnenteinflarnable
y susvaporesson explosivos.Lesionespersonalesgravespueden
ocurrircuandolagasolinase haderrarnadosobreti rnisrnoo sobre
la ropaquese puedeincendiar.L_.vesela piel y c_.rnbiesede ropa
inrnediatarnente.
• Utilices61orecipientespara gasolinaautorizados.
• NuncaIlenelos recipientesdentrode un vehiculoo en un carni6n
o rernolquecon unrevestirnientode pl_.stico.Coloquesiernprelos
recipientesen el suelolejosde suvehiculoantes de Ilenaflos.
• Cuandoseafactible,retireelequipoa gasolinadel carni6no
rernolquey II_neloen el suelo.Si esto no es posible,Ileneel
equipoen un rernolquecon uncontenedorport_.til,en lugar de un
surtidorde gasolina.
• Mantengala boquillaen contactoconel bordedel tanquede
combustibleo la aberturadel recipienteen todornornentohasta
que seterrninede Ilenar.No utilice unaboquillaabiertadisposi-
tivo.
• Apaguetodosloscigarrillos,cigarros,pipasy otrasfuentesde
ignici6n.
• Nuncacarguecombustibleenla rn_.quina.
• Nuncaquitelatapa del gas o aSadircombustiblernientrasel
motorest,.calienteo en rnarcha.Dejeque el motorse enfriepor
Io rnenosdos rninutosantesde repostar.
• NuncaIleneexcesivarnenteel dep6sitodecombustible.Lleneel
tanquea no rn_.sde 1/2"debajodel rondodelcuellode Ilenado
paradejar espacioparala expansi6ndel combustible.
• Reernplacelatapade la gasolinay aprietebien.
• Si se derrarnagasolina,lirnpieel motory elequipo.Muevala
rn_.quinaa otra zona.Espere5 rninutosantesdearrancarel
motor.
• Parareducirlos fiesgosde incendio,rnantengala rn_.quinalirnpia
de hierba,hojasuotros desechosacurnulaci6n.Lirnpielosder-
rarnesde aceiteo combustibley elirninarlos residuosernpapado
de combustible.
• Nuncaguardela rn_.quinao el recipientedelcombustibleenel
interiordondehay una luzde llamaabierta,chispaso pilotode un
calentadorde agua,calentador,homo,secadorde ropau otros
aparatosdegas.
• Dejeque la rn_.quinase enfrie porIornenoscinco rninutosantes
de guardarla.
Servicios Generales
• Nuncaenciendael motor eninterioreso en un&teaconpoca
ventilaci6n.El escapedel motorcontienernon6xidode carbono,
un inodoro,y el gas mortal.
• Antesde lirnpiar,repararo inspeccionar,asegQresede que la
hoja(s) y todaslas partesrn6vilesse handetenido.Desconecte
el cablede la bujiay conecteel motorpara evitarun arranque
accidental.
38
• Reviseperi6dicarnentepara asegurarsede que las cuchillas
se detenganpor cornpletoa unplazoaproxirnadode cinco
(5) segundosdespu_sde que realiceel controlde la retirada
dela hoja.Si las cuchillasno sedetienenen el marcodeeste
tiernpo,avede su rn_.quinaservicioprofesionalpor Searsu otro
proveedorcalificado.
• Cornprueberegularrnenteel sisternade enclavarnientode
seguridadparaun funcionarnientocorrecto,cornose describe
rn_.sadelanteen este manual.Si el sisternade enclavarnientode
seguridadno funcionacorrectarnente,quesu rn_.quinaatendidos
profesionalrnentepor Searsu otto proveedorcalificado.
• Revisela hoja (s) y lospernosde rnontajedel motora intervalos
frecuentespara un ajusteadecuado.Adern_.s,unainspecci6n
visualde la hoja(s) delos da_os(pot ejernplo,desgaste
excesivo,abolladuras,rajaduras).Vuelvaa colocar la hoja(s)
con ladel fabricantedeequiposoriginales(OEM)hoja(s) s61o
aparecenen este manual.Elusode piezasqueno curnplencon
las especificacionesdel equipo originalpuedeconducira la rnala
ejecuci6ny la seguridaddecornprorniso!
• Lascuchillasdecorteest_.nafiladas.Envuelvala cuchillao utilice
guantes,y tengarnuchocuidadocuandoefectOemantenirniento.
• Mantengatodaslastuercas,pernosy tornillosapretadospara
asegurarque el equipoest,.encondicionesde trabajoseguras.
• Nuncaaltereel sisternade enclavarnientode seguridadu otros
dispositivosde seguridad.Cornpruebeperi6dicarnenteque
funcionencorrectarnente.
• Despu_sde golpearun objetoextra_o,pararel motor,desco-
necteel cablede la bujia(s) y conecteel motor.Inspeccione
rninuciosarnentelarn_.quinade cualquierda_o. Repararel da_o
antesde cornenzary operar.
• Nuncatratedehacerajusteso reparacionesa la rn_.quina
rnientrasel motorest,. funcionando.
• Cornponentesde c_spedy lacubiertade descargaest_.nsujetos
a desgastey da_osque podriaexponeralas partesrn6viles
o perrnitirque searrojenobjetos.Paraprotegersu seguridad,
verifiquefrecuenternentetodos loscornponentesy de inrnediato
con (OEM)del fabricantedel equipooriginals61oaparecenen
estemanual.El usode piezasque no curnplencon lasespecifi-
cacionesdel equipooriginalpuedeconducira larnalaejecuci6ny
cornprorneterla seguridad!
• No carnbielaconfiguraci6ndel reguladordel motoro el exceso
develocidadel motor.El reguladorcontrolala velocidadrn_.xirna
defuncionarnientosegurodel motor.
• Mantenero reernplazarlas etiquetasde seguridade instruc-
clones,seg[3nseanecesario.
• Observarlas leyesy los reglarnentosadecuadosde elirninaci6n
de gas,petr61eo,etc, paraprotegerel medic arnbiente.
• Deacuerdocon la ConsumerProductsSafetyCommission
(CPSC)y los EE.UU.Agenciade Protecci6nArnbiental(EPA),
esteproductotieneuna vida Qtilmediade siete (7) a_os,o 270
horasde funcionarniento.AI finalde la vida Otilmediaque la
rn_.quinainspeccionadaanualrnentepor Searsu otroproveedor
calificadoparaasegurarque todoslossisternasrnec_.nicosy de
seguridadfuncionancorrectarnentey no usar en exceso.El no
hacerlopuededar lugara accidentes,lesioneso larnuerte.
NO MODIFIQUE EL MOTOR
Paraevitarlesionesgraveso la rnuerte,no rnodifiqueel motorde
ningunarnanera.Laalteraci6nde laconfiguraci6ndel regulador
puededarlugara un motorfuerade control y hacerque funcionea
velocidadespeligrosas.Nuncacarnbiela configuraci6nde f_.bricadel
reguladordel motor.
Avisoreferidoa ernisiones
Motoresqueest&ncertificadosy curnplencon lasregulaciones
federalesde la EPAy de ernisi6npara SORE(Equipospeque_ostodo
terreno)est_.ncertificadosparafuncionarcon gasolinaregularsin
plorno,y puedeincluirlossiguientessisternasdeernisi6nde control:La
rnodificaci6ndelmotor(EM)y catalizadorde tresvias (TWO) si Iotiene.
GUARDACHISPAS
Estarn&quinaest,.equipadacon un motorde cornbusti6ninternay
nodebe serutilizadaen o cercade un terrenoagrestecubiertopor
bosque,rnalezaso hierbaexceptosi el sisternade escapedel motor
est,.equipadocon un arnortiguadorde chispasque curnplacon las
leyeslocaleso estatalescorrespondientes,en caso de haberlas.
Siun supresorde chispasque se utilice,debernantenerseen buenas
condicionesde trabajopor partedeloperador.En el Estadode
CaliforniaIoanteriorse requiereporley (Arficulo4442delC6digode
RecursosPQblicosde California).Otros estadospuedentenerleyes
sirnilares.Lasleyesfederalesse aplicanen tierrasfederales.
Unsupresorde chispasparael silenciadorest,. disponibleparasu
cornpraIlarnandoa SearParts & Repairat 1-800-469-4663.
39
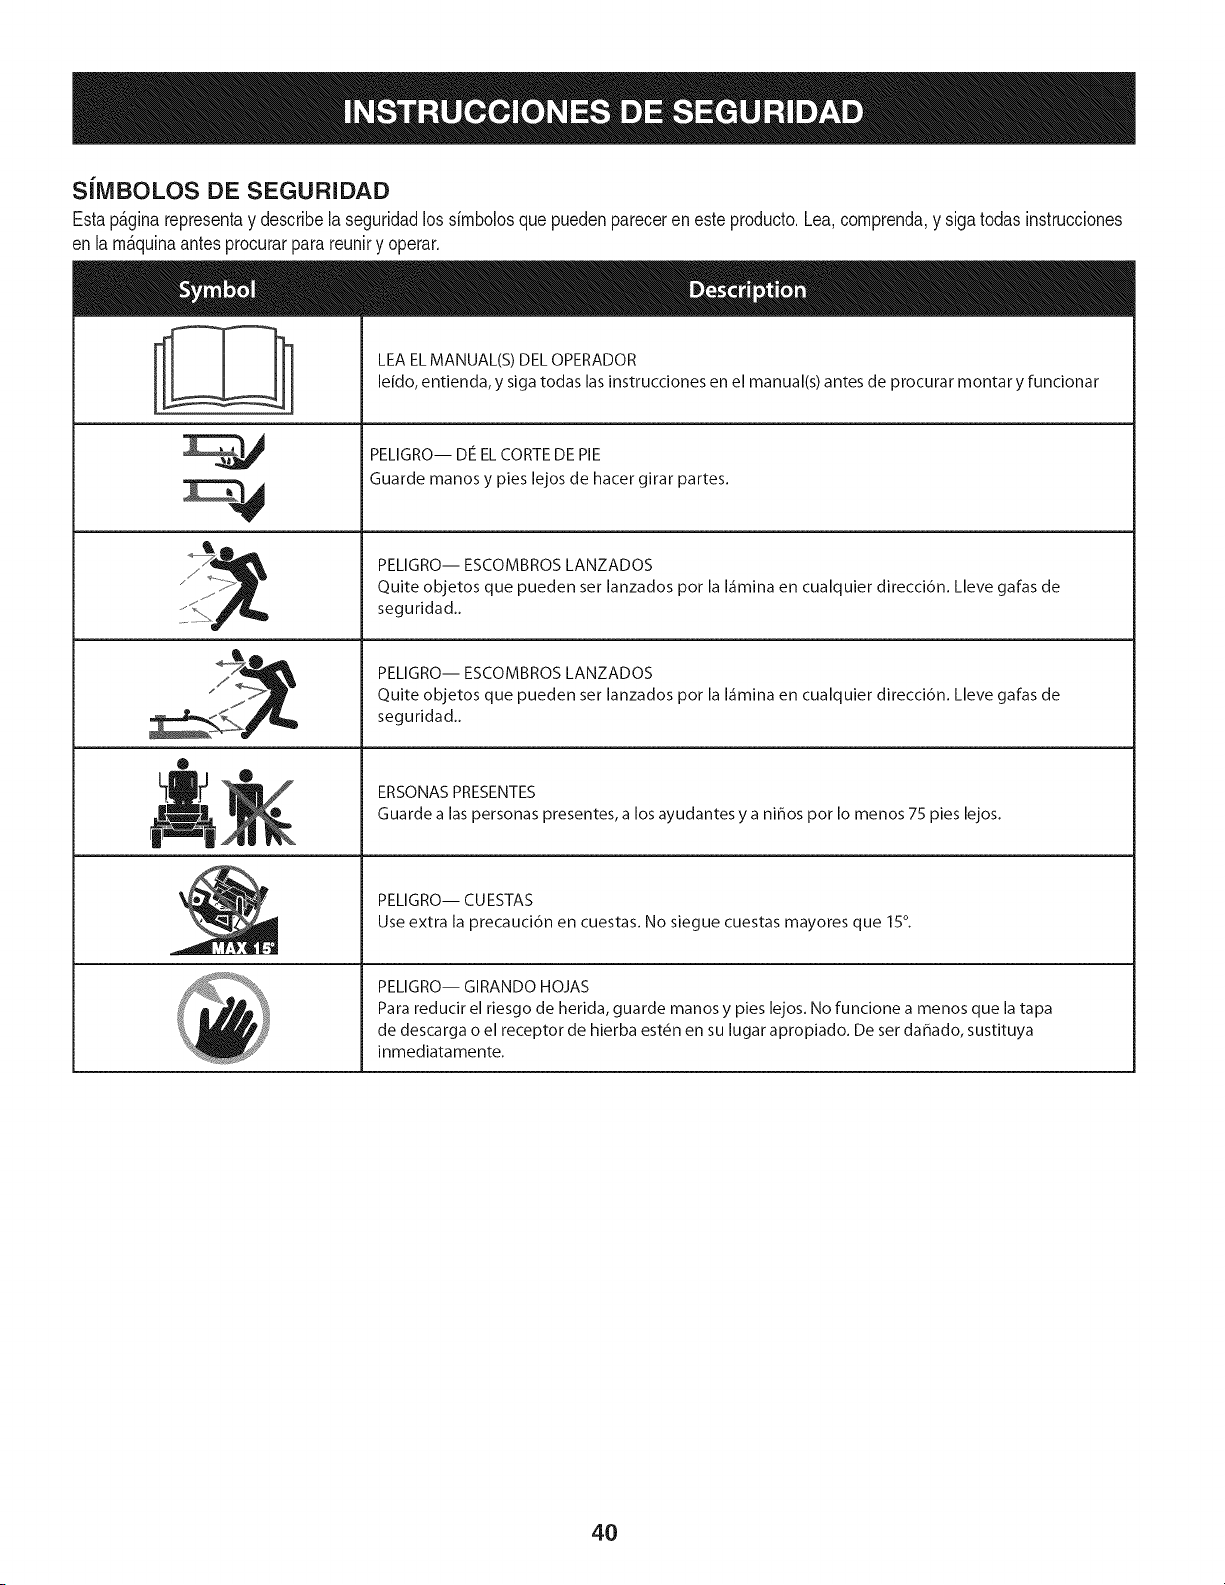
SilVIBOLOS DE SEGURIDAD
Estap&ginarepresentay describela seguridadlos simbolosque puedenpareceren este producto.Lea,comprenda,y sigatodasinstrucciones
en lam_quinaantesprocurarpara reuniry operar.
i
i
0
LEA EL MANUAL(S) DEL OPERADOR
leido, entienda, y siga todas las instrucciones en el manual(s) antes de procurar montar y funcionar
PELIGRO-- DE EL CORTE DE PIE
Guarde manos y pies lejos de hacer girar partes.
PELIGRO-- ESCOMBROS LANZADOS
Quite objetos que pueden ser lanzados pot la I_imina en cualquier direcci6n. Lleve galas de
seguridad..
PELIGRO-- ESCOMBROS LANZADOS
Quite objetos que pueden ser lanzados pot la I_imina en cualquier direcci6n. Lleve galas de
seguridad..
ERSONAS PRESENTES
Guarde a las personas presentes, a los ayudantes y a nihos pot Io menos 75 pies lejos.
PELIGRO-- CUESTAS
Use extra la precauci6n en cuestas. No siegue cuestas mayores que 15°.
PELIGRO-- GIRANDO HOJAS
Para reducir el riesgo de herida, guarde manos y pies lejos. No funcione a menos que la tapa
de descarga o el receptor de hierba est6n en su lugar apropiado. De ser dahado, sustituya
inmediatamente.
4O
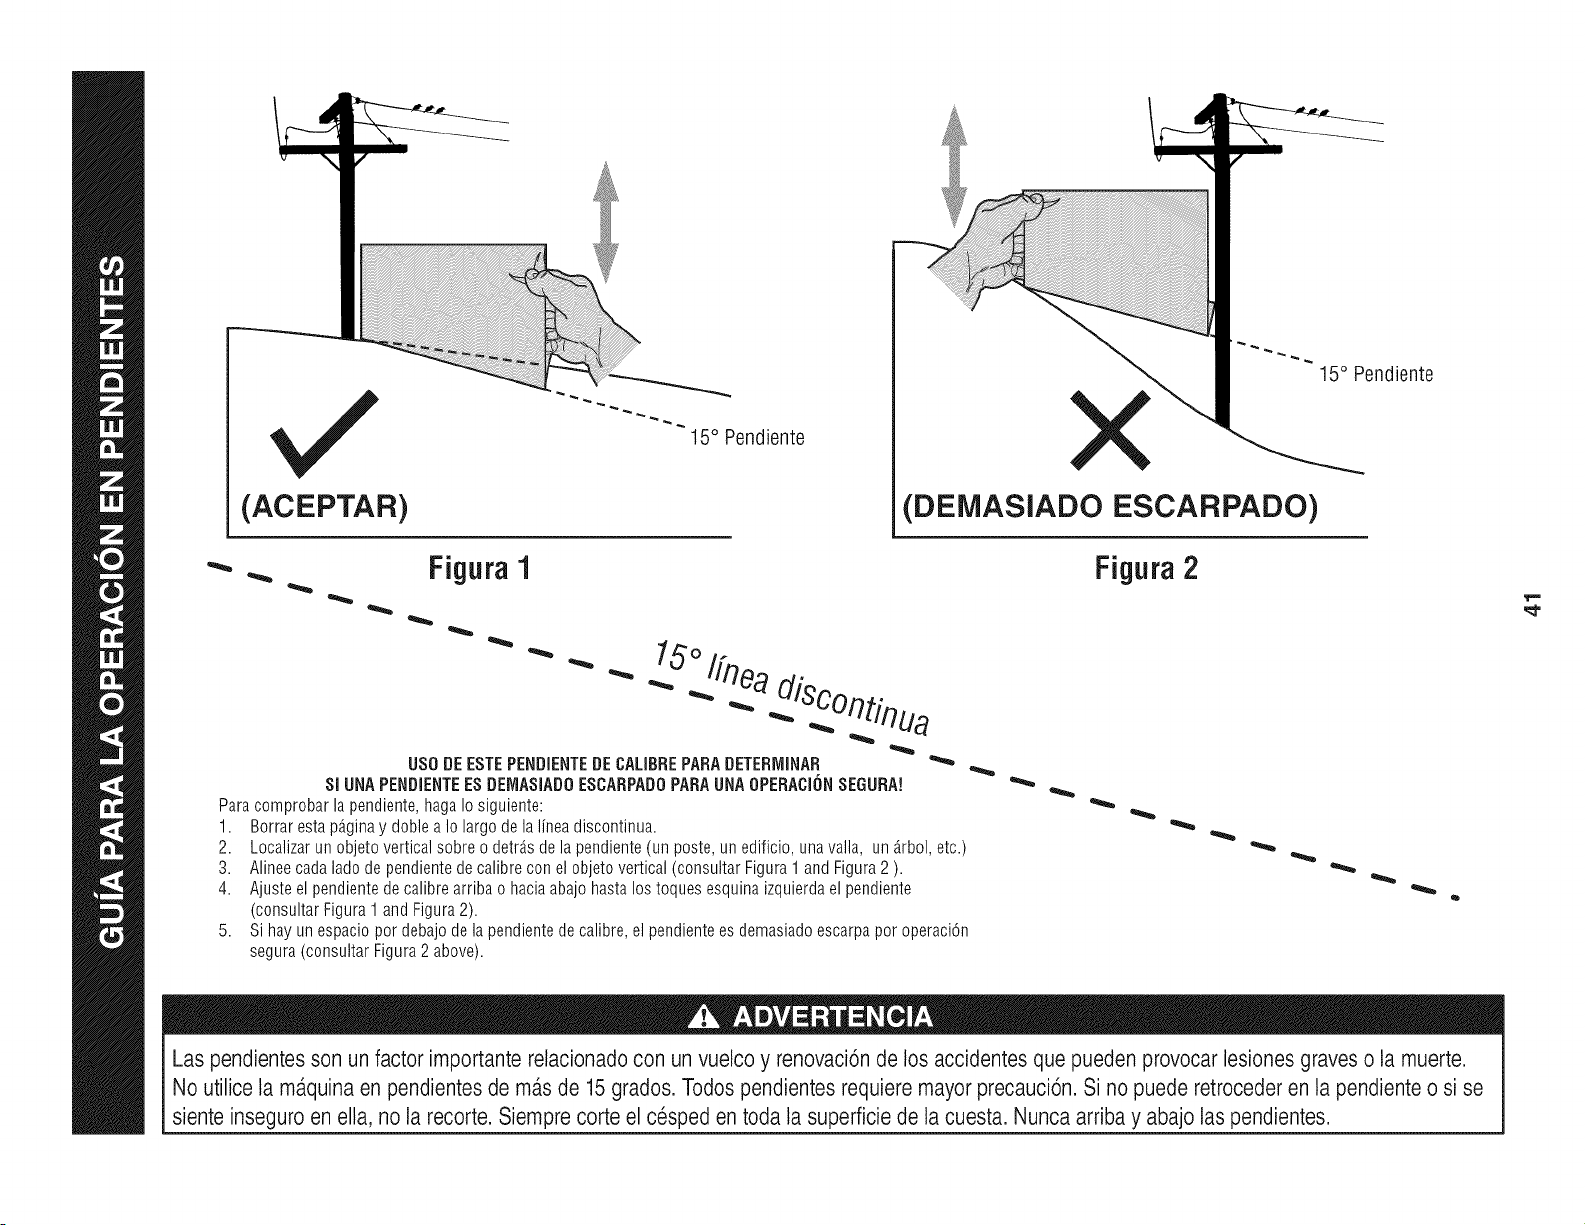
(ACEPTAR)
15° Pendiente
X
(DEMASlADO ESCARPADO)
Figura1 Figura2
.. 15°1fn
USODEESTEPENDIENTEDECALIBREPARADETERIVIINAR
SI UNAPENDiENTEESDEMASiAD0ESCARPAD0PARAUNA0PERACIONSEGURN
Para comprobar lapendiente,hagaIo siguiente:
1. Borraresta p_.ginay doble a Io largo de la linea discontinua.
2. Localizarun objeto vertical sobre o detr_sde la pendiente(un poste, un edificio, unavalla, un_.rbol,etc.)
3. Alinee cada lado de pendientedecalibre con el objetovertical (consultar Figura 1 and Figura2 ).
4. Ajuste el pendientede calibrearriba o haciaabajohasta lostoques esquinaizquierdael pendiente
(consultar Figura1 and Figura2).
5. Si hayun espacio pot debajode la pendientede calibre, el pendientees demasiadoescarpapot operaci6n
segura(consultar Figura2 above).
15° Pendiente
Las pendientesson un factor importante relacionadocon un vuelco y renovaci6nde los accidentes que pueden provocar lesiones graves o la muerte.
No utilice la ma.quinaen pendientes de masde 15grados. Todos pendientesrequiere mayorprecauci6n. Si no puede retrocederen la pendiente o si se
siente inseguro en ella, no la recorte. Siempre corte el cesped en toda la superficie de la cuesta. Nunca arriba y abajo laspendientes.
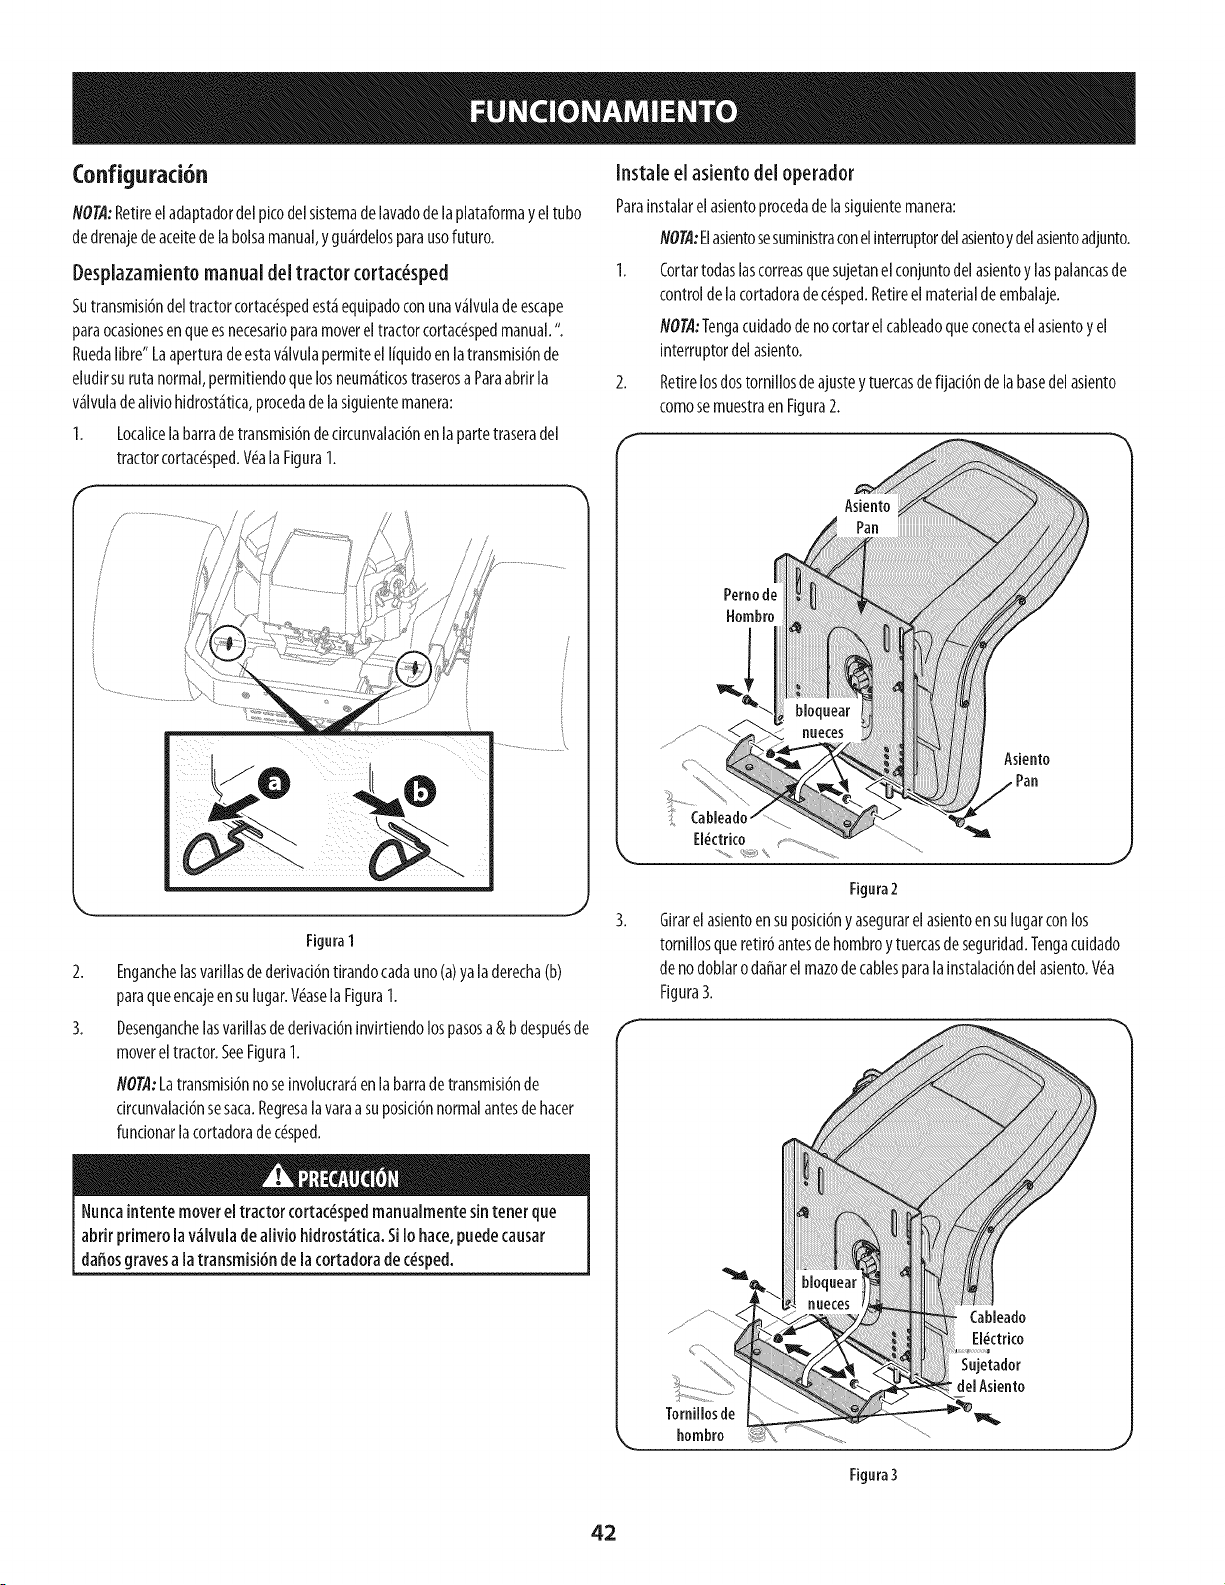
Configuraci6n
NOTA:Retireel adaptadordelpicodelsistemadelavadode la plataformay el tubo
dedrenajedeaceitede labolsamanual,ygu_rdelosparausofuturo.
Desplazamiento manual del tractor cortac_sped
Sutransmisi6ndeltractorcortac_spedest_equipadoconunav_lvuladeescape
paraocasionesenqueesnecesarioparamovereltractorcortac_spedmanual.".
Ruedalibre"Laaperturadeestav_lvulapermiteel liquidoenlatransmisi6nde
eludirsurutanormal,permitiendoquelosneum_ticostraserosa Paraabrirla
v_lvuladealiviohidrost_tica,procedadelasiguientemanera:
1. Localicelabarradetransmisi6ndecircunvalaci6nen la )artetraseradel
tractorcortac_sped.V_ala Figura1.
Figura1
Enganchelasvafillasdederivaci6ntirandocadauno(a)yaladerecha(b)
paraqueencajeensulugar.V_aselaFigura1.
Desenganchelasvarillasde derivaci6ninvirtiendolospasosa& b despu_sde
movereltractor.SeeFigura1.
NOTA"Latransmisi6nnoseinvolucrar_enlabarradetransmisi6nde
circunvalad6nsesaca.Regresalavaraasuposici6nnormalantesde hacer
funcionarlacortadoradec_sped.
Nuncaintentemovereltractor cortac_spedmanualmentesin tenerclue
abrir primero[a v_ivula dealivio hidrost_tica.SiIo hace,puedecausar
daffosgravesa la transmisi6n de la cortadora dec_sped.
Instale el asiento del operador
Parainstalarelasientoprocedadelasiguientemanera:
NOTA:Elasientosesuministraconelinterruptordelasientoy delasientoadjunto.
1. Cortartodaslascorreasquesujetanel conjuntodelasientoy laspalancasde
controldelacortadoradec_sped.Retireelmaterialdeembalaje.
NOTA:Tengacuidadodenocortarel cableadoqueconectaelasientoy el
interruptordelasiento.
2. Retirelosdostornillosdeajusteytuercasdefijaci6nde labasedel asiento
comosemuestraen Figura2.
Asiento
Pan
Peruodq
Hombro
Asiento
,Pan
El_ctrico
Figura2
Girarel asientoensuposid6ny asegurarelasientoensulugarconlos
tornillosqueretir6antesdehombroy tuercasdeseguridad.Tengacuidado
de nodoblarodaffarel mazodecablesparalainstalaci6ndelasiento.V_a
Figura3.
hombro
Figura 3
42
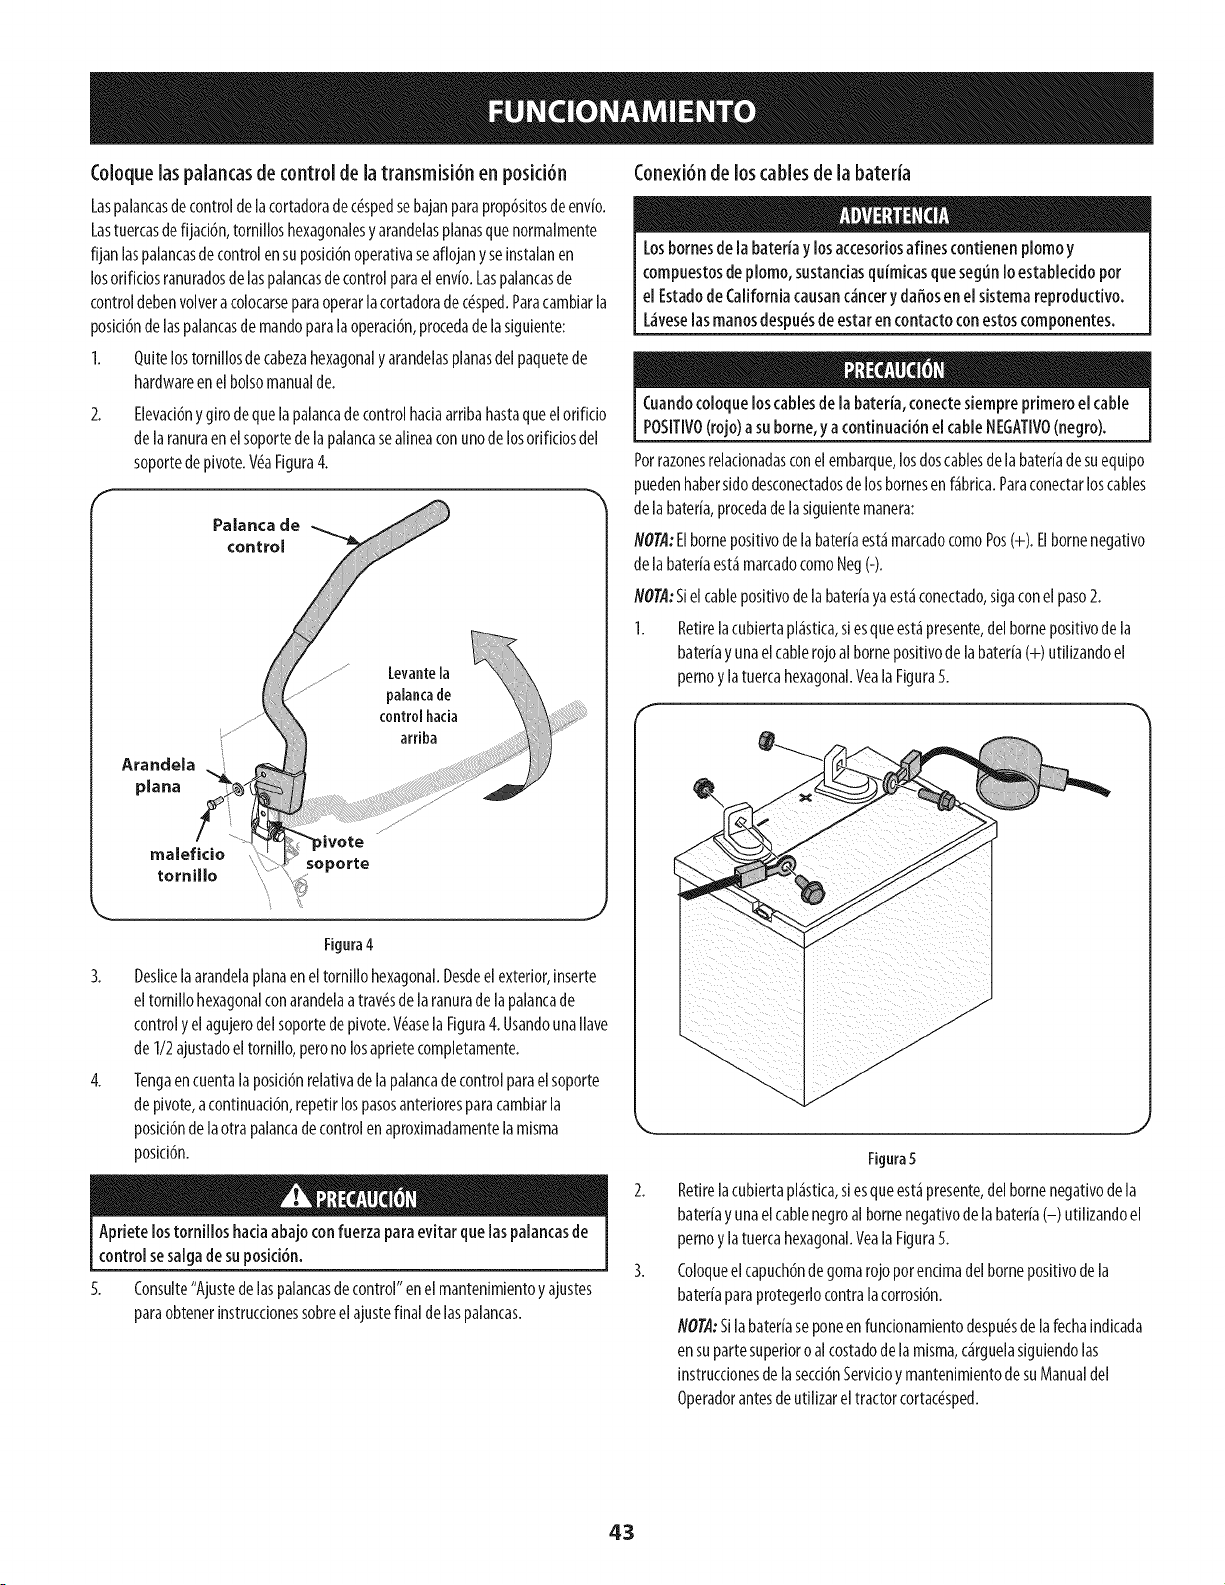
Coloquelaspalancasde control de la transmisi6n en posid6n
Laspalancasdecontroldelacortadoradec_spedsebajanparaprop6sitosdeenv[o.
Lastuercasdefijaci6n,tornilloshexagonalesy arandelasplanasquenormalmente
fijan laspalancasdecontrolensuposid6noperativaseaflojany seinstalanen
losorifidosranuradosde[aspalancasdecontrolparaelenv[o.Laspalancasde
controldebenvolveracolocarseparaoperarlacortadorade c_sped.Paracambiarla
posici6ndelaspalancasdemandoparala operaci6n,procedade lasiguiente:
1. Quitelostornillosde cabezahexagonaly arandelasplanasdelpaquetede
hardwareen elbolsomanualde.
2.
Elevaci6ny girode quelapalancadecontrolhaciaarribahastaqueelorificio
delaranuraenelsoportedelapalancasealineaconunode losorificiosdel
soportede pivote.Wa Figura4.
_pivote
soporte
Figura4
3. Deslicelaarandelaplanaen eltornii[ohexagonal.Desdeel exterior,inserte
eltornillohexagonalconarandelaa trav_sdelaranurade lapalancade
controly el agujerodelsoportede pivote.V_aselaFigura4. UsandounaIlave
de 1/2ajustadoel tornillo, perono losaprietecompletamente.
4. Tengaencuentalaposici6nrelativadela palancadecontrolparaelsoporte
depivote,acontinuaci6n,repetirlospasosanterioresparacambiarla
posici6ndelaotra palancadecontrolenaproximadamentelamisma
posici6n.
Aprietelostornillos hadaabajoconfuerza paraevitar quelaspalancasde
control sesalgadesuposki6n.
5.
Consulte"Ajustedelaspalancasdecontrol"enelmantenimientoy ajustes
paraobtenerinstruccionessobreelajustefinalde laspalancas.
Conexi6nde loscables de la bateria
Losbornesde labateria ylos accesoriosafinescontienen plomoy
compuestosde plomo, sustanciasquimicasquesegunIoestablecidopor
el EstadodeCaliforniacausanc_ncery daffosen el sistemareproductivo.
L_veselas manosdespu_sde estar en contactocon estoscomponentes.
Cuandocoloqueloscablesde la bateria, conectesiempreprimero el cable
POSlTIVO(rojo)asuborne,y acontinuaci6nel cableNEGATIVO(negro).
Porrazonesrelacionadasconel embarque,losdoscablesde labater[adesuequipo
puedenhabersidodesconectadosde losbornesenf_brica.Paraconectarloscables
de labater[a,procedade la siguientemanera:
NOTA:Elbornepositivode labater[aest_marcadocomoPos(+). Elbornenegativo
de labater[aest_marcadocomoNeg(-).
NOTA:Siel cablepositivodelabater[ayaest_conectado,sigaconelpaso2.
1. Retirelacubiertapl_stica,siesqueest_presente,delbornepositivodela
bateriay unaelcablerojoalbornepositivodelabater[a(+) utilizandoel
pernoy latuercahexagonal.Veala Figura5.
Figura5
Retirelacubiertapl_stica,siesqueest_presente,delbornenegativodela
bateriay unaelcablenegroalbornenegativodelabater[a(-) utilizandoel
pernoy latuercahexagonal.Yeala Figura5.
Coloqueelcapuch6nde gomarojoporencimadelbornepositivodela
bater[aparaprotegerlocontralacorrosi6n.
NOTA:Silabateriaseponeen fundonamientodespu_sde la fechaindicada
en supartesuperioro alcostadode lamisma,c_rguelasiguiendolas
instruccionesdela secci6nServicioy mantenimientodesuManualdel
Operadorantesdeutilizar eltractorcortac_sped.
43
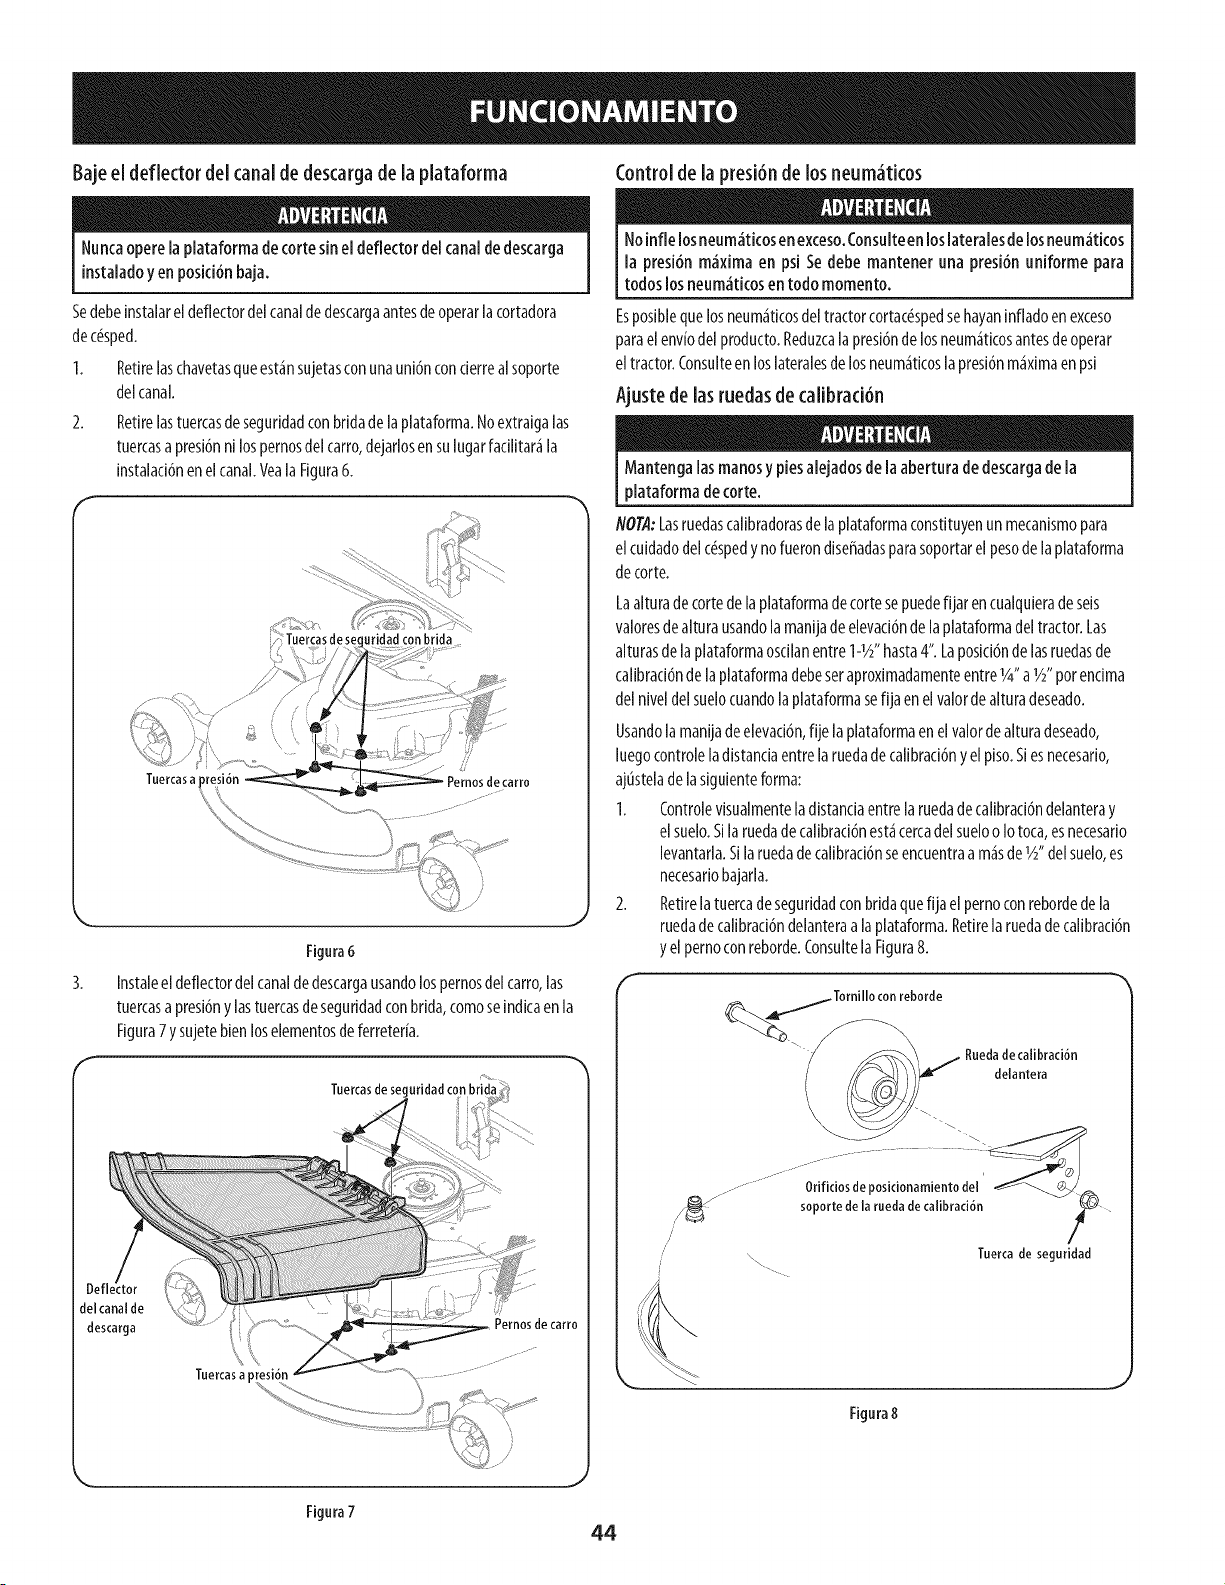
Bajeeldeflectordelcanalde descargade la plataforma Controlde la presi6nde los neum_tkos
Nuncaopere[a piataforma decorte sine[ deflectorde[canaldedescarga
instaladoyen posici6nbaja.
1.
2.
Sedebeinstalarel deflectordel canalde descargaantesdeoperarla cortadora
dec6sped.
Retirelaschavetasqueest_nsujetasconunauni6nconderrealsoporte
delcanal.
Retirelastuercasdeseguridadconbridadelaplataforma.Noextraigalas
tuercasapresi6nnilospernosdelcarro,dejarlosensulugarfadlitar_la
instaladdnenelcanal.VealaFigura6.
_J
Figura6
Instaleeldeflectordelcanalde descargausandolospernosdelcarro,las
tuercasapresi6ny lastuercasdeseguridadconbrida,comoseindicaen la
Figura7y sujetebienloselementosdeferreter[a.
Tuercasde seguridadcon brida
Deft tot
del canal de
descarga
Tuercasapresi6n
Pemos de carro
Noinfle losneum_ticosenexceso.ConsulteenIoslateralesdelosneum_ticos
la presi6n m_xima en psi Se debe mantener una presi6n uniforme para
todoslosneum_ticosen todo momento.
Esposiblequelosneum_ticosdeltractorcortac(_spedsehayaninfladoenexceso
paraelenviodelproducto.Reduzcalapresi6ndelosneum_ticosantesdeoperar
eltractor.Consulteenloslateralesdelosneum_ticoslapresi6nm_ximaenpsi
Ajuste de las ruedasde calibrad6n
Mantengalasmanosy piesalejadosde la aberturade descargade la
plataforma de corte.
NOTA:Lasruedascalibradorasde laplataformaconstituyenun mecanismopara
elcuidadodelc(_spedy nofuerondiseffadasparasoportarelpesode laplataforma
de corte.
Laalturadecortedelaplataformadecortesepuedefijar encualquierade seis
valoresdealturausandola manijade elevad6nde laplataformadeltractor.Las
alturasde laplataformaosdlanentre1-1_" hasta4".Laposid6nde lasruedasde
calibrad6nde la plataformadebeseraproximadamenteentre1/4"a1/2"porendma
del niveldelsuelocuandolaplataformasefijaen elvalordealturadeseado.
Usandolamanijadeelevad6n,fije la plataformaenelvalordealturadeseado,
luegocontroleladistandaentrelaruedadecalibrad6nyel piso.Siesnecesario,
ajtistelade lasiguienteforma:
1. Controlevisualmenteladistandaentrela ruedadecalibrad6ndelanteray
elsuelo.Sila ruedadecalibraci6nest_cercadel sueloo Iotoca,esnecesario
levantarla.Silaruedadecalibrad6nseencuentraa m_sde1_,,delsuelo,es
necesariobajarla.
2. Retirelatuercadeseguridadconbridaquefija elpernoconrebordedela
ruedadecalibrad6ndelanteraala plataforma.Retirelaruedadecalibrad6n
y el pernoconreborde.ConsultelaFigura8.
f
..........- Orificios de poskionamiento del
_" soporte de la rueda de calibracidn
i
/
/ ,.. Tuerca de seguridad
Figura8
Figura7
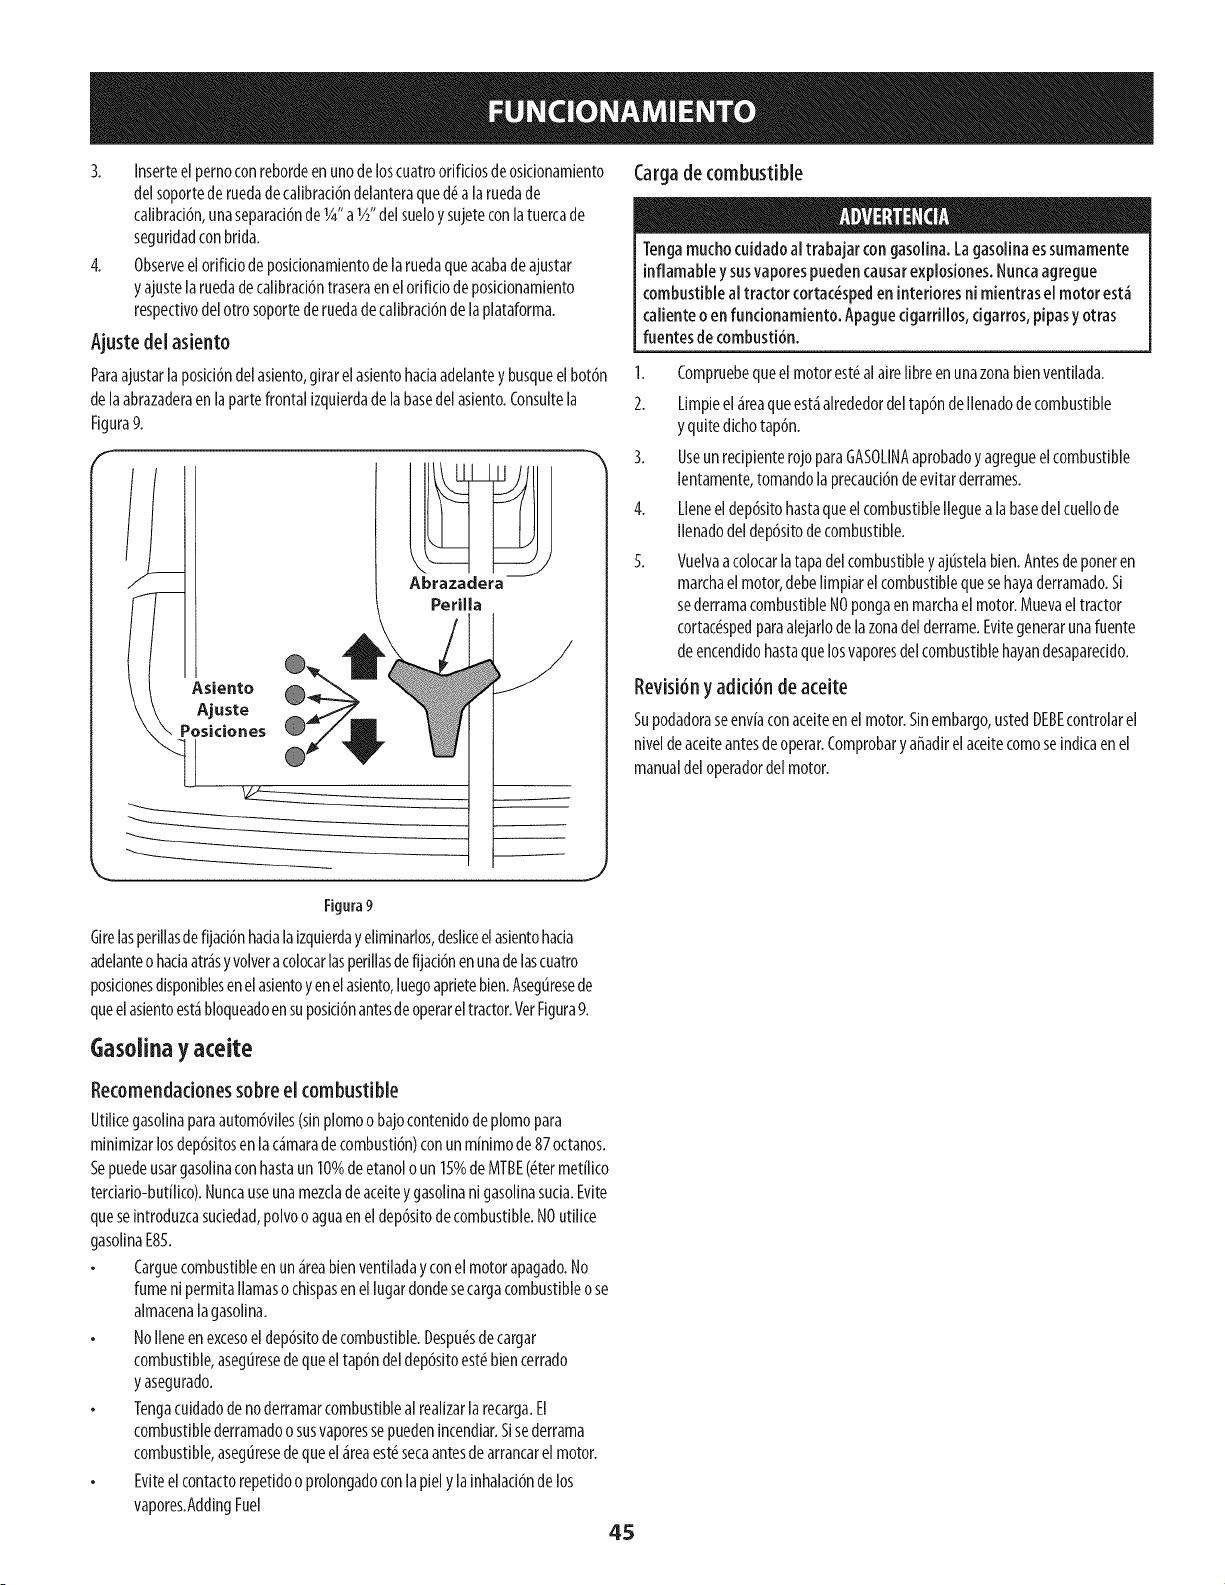
3. Inserteelpernoconrebordeenunodeloscuatroorifidosdeosidonamiento
delsoportede ruedadecalibracl6ndelanteraqued(_a laruedade
calibraci6n,unaseparacl6nde 1/4"a1_,,delsueloy sujeteconlatuercade
seguridadconbrida.
4. Observeel orlficiodeposkionamientodelaruedaqueacabadeajustar
y ajustelaruedadecalibraci6ntraseraen elorifido deposicionamlento
respectivodelotro soportede ruedadecallbracl6nde laplataforma.
Ajuste del asiento
Paraajustarlaposici6ndelasiento,girar elasientohadaadelantey busqueelbot6n
delaabrazaderaen lapartefrontal[zquierdadelabasedelasiento.Consultela
Figura9.
PerUla
Asiento
Ajuste
Posiciones
' _
J
Figura9
Girelasperillasdefijad6nhadalaizquierday eliminarlos,deslJceelasientohada
adelanteo haciaatr_sy volveracolocarlasperillasdefijaci6nenunadelascuatro
posidonesdisponiblesenelasientoyenel asiento,luegoaprietebien.Aseguresede
queelasientoest_bloqueadoensuposici6nantesdeoperareltractor.VerFigura9.
Gasolinay aceite
Cargade combustible
Tengamuchocuidadoa[trabajar congasoiina.Lagasoiinaessumamente
inflamabiey susvaporespuedencausarexpiosiones.Nuncaagregue
combustiblealtractor cortac_speden interioresni mientrasel motor est_
calienteo en fundonamiento. Apaguedgarrillos, cigarros,pipasyotras
fuentesde combusti6n.
1. Compruebequeelmotorest#alairelibreenunazonabienventilada.
2. Limpieel_reaqueest_alrededordeltap6ndeIlenadodecombustible
y quitedichotap6n.
3. Useun redpienterojoparaGASOLINAaprobadoy agregueelcombustible
lentamente,tomandolaprecaud6ndeevitarderrames.
4. Lleneeldep6sitohastaqueelcombustibleIleguealabasedelcuellode
Ilenadodeldep6sitode combustible.
5. Vuelvaacolocarlatapadelcombustibley ajustelabien.Antesde poneren
marchaelmotor,debelimpiarelcombustiblequesehayaderramado.Si
sederramacombustibleNOpongaen marchaelmotor.Muevaeltractor
cortac#spedparaalejarlode la zonadelderrame.Evitegenerarunafuente
de encendidohastaquelosvaporesdelcombustiblehayandesaparecido.
Revisi6ny adici6n de aceite
Supodadoraseenvfaconaceiteenelmotor.Sinembargo,ustedDEBEcontrolarel
niveldeaceiteantesde operar.Comprobary affadirel aceitecomoseindicaen el
manualdel operadordel motor.
Recomendadonessobreel combustible
Utilicegasolinaparaautom6viles(sinplomoobajocontenidodeplomopara
minimizarlosdep6sitosen lac_maradecombusti6n)conun mfnimode87octanos.
Sepuedeusargasolinaconhastaun 10%de etanolo un 15%de MTBE(_termet[lico
terdario-butflico).Nuncauseunamezdadeaceitey gasolinanigasolinasuda.Evite
queseintroduzcasuciedad,polvoo aguaen eldep6sitodecombustible.NOutilice
gasollnaE85.
Carguecombustibleenun _reabienventiladayconel motorapagado.No
fumeni permitallamaso chispasenellugardondesecargacombustibleose
almacenalagasolina.
NoIleneenexcesoeldep6sitodecombustible.Despu(_sdecargar
combustible,aseguresedequeeltap6ndeldep6sitoest_biencerrado
y asegurado.
Tengacuidadodeno derramarcombustiblealrealizarla recarga.El
combustiblederramadoo susvaporessepuedenincendiar.Sisederrama
combustible,asegtiresedequeel_reaest_secaantesdearrancarel motor.
Eviteelcontactorepetidoo prolongadoconlapiely lainhalad6nde los
vapores.AddingFuel
45
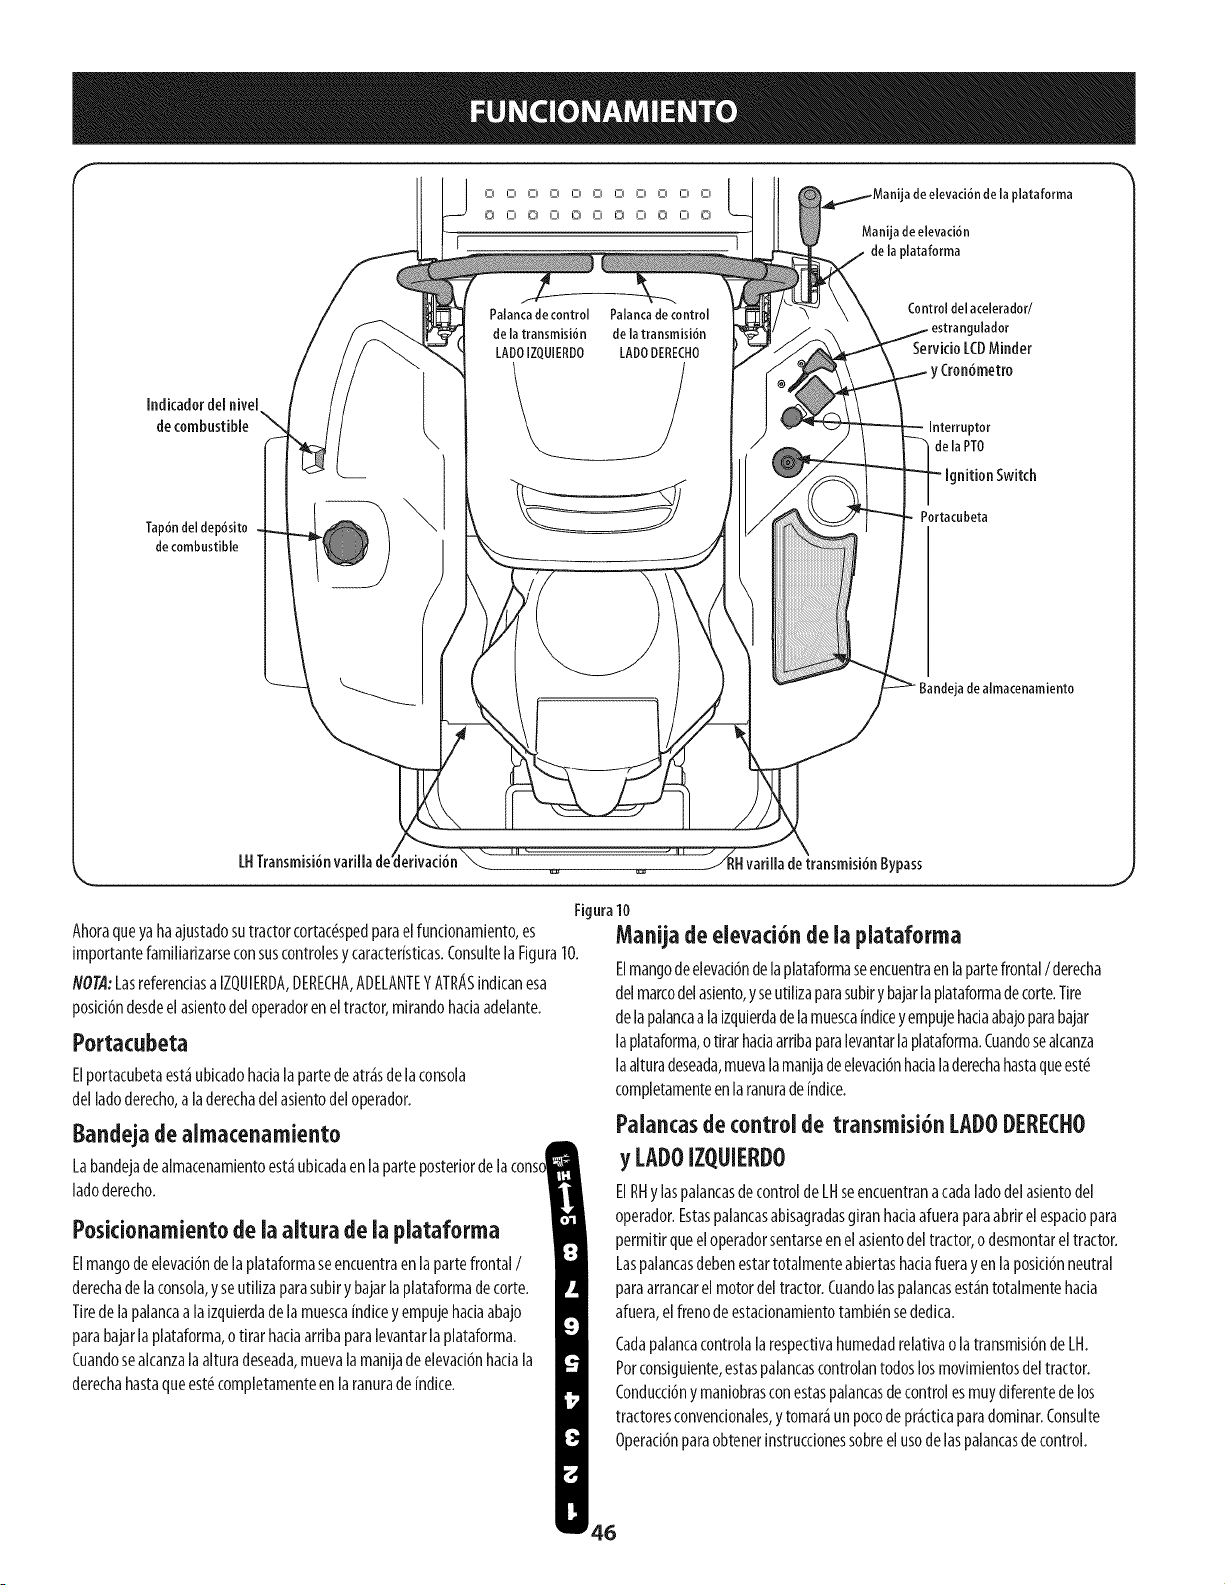
[
Indicadordelnivel I
decombustible
\
Tap6n del dep_sito
de combustible
Palancade control Palancade control
de la transmisi6n de la transmisi6n
LADOIZQUIERDO LADODERECHO
Controldel acelerador/
ulador
ServicioLCDMinder
Cron6metro
delaPTO
Ignition Switch
Portacubeta
a de almacenamiento
.... J
LHTransmlslonvardladel
de transmisi6n Bypass
Figura10
Ahoraqueyahaajustadosutractorcortac_spedparaelfuncionamiento,es
importantefamiliarizarseconsuscontrolesycaracteristicas.ConsultelaFigura10.
NOTA:Lasreferendasa IZQUIERDA,DERECHA,ADELANTEYATRASindicanesa
posici6ndesdeelasientodeloperadoreneltractor,mirandohaciaadelante.
Portacubeta
Elportacubetaest_ubicadohaciala partedearrasdelaconsola
delladoderecho,a laderechadelasientodeloperador.
Manijadeelevaci6ndela plataforma
Elmangodeelevaci6ndelaplataformaseencuentraenlapartefrontal/ derecha
delmarcodelasiento,y seutilizaparasubiry bajarlaplataformadecorte.Tire
delapalancaalaizquierdadelamuesca[ndiceyempujehaciaabajoparabajar
laplataforma,otirar haciaarribaparalevantarlaplataforma.Cuandosealcanza
laalturadeseada,muevalamanijadeelevaci6nhacialaderechahastaqueest_
completamenteenlaranuradeindite.
Bandejadealmacenamiento
Labandejadealmacenamientoest_ubicadaen laparteposteriordelaconscl
ladoderecho.
Posidonamientodela altura dela plataforma
Elmangodeelevaci6nde laplataformaseencuentraenlapartefrontal/
derechade laconsola,y seutilizaparasubiry bajarlaplataformadecorte.
Tirede lapalancaalaizquierdadelamuescainditey empujehaciaabajo
parabajarlaplataforma,otirar haciaarribaparalevantarla plataforma.
Cuandosealcanzalaalturadeseada,muevalamanijade elevaci6nhaciala
derechahastaqueest_completamenteen laranurade[ndice.
Palancasdecontrolde transmisi6n LADODERECHO
y LADOIZQIJII:RDO
ElRHy laspalancasde controlde LHseencuentranacadaladodelasientodel
operador.Estaspalancasabisagradasgiranhadaafueraparaabrirel espaciopara
permitirqueeloperadorsentarseenel asientodeltractor,odesmontarel tractor.
Laspalancasdebenestartotalmenteabiertashaciafuerayenlaposici6nneutral
paraarrancarel motordeltractor.Cuandolaspalancasest_ntotalmentehacia
afuera,elfrenodeestadonamientotambi_nsededica.
Cadapalancacontrolalarespectivahumedadrelativaolatransmisi6ndeLH.
Porconsiguiente,estaspalancascontrolantodoslosmovimientosdel tractor.
Conducd6ny maniobrasconestaspalancasdecontrolesmuydiferentede los
tractoresconvencionales,y tomar_un pocode pr_cticaparadominar.Consulte
Operaci6nparaobtenerinstruccionessobreelusodelaspalancasdecontrol.
46
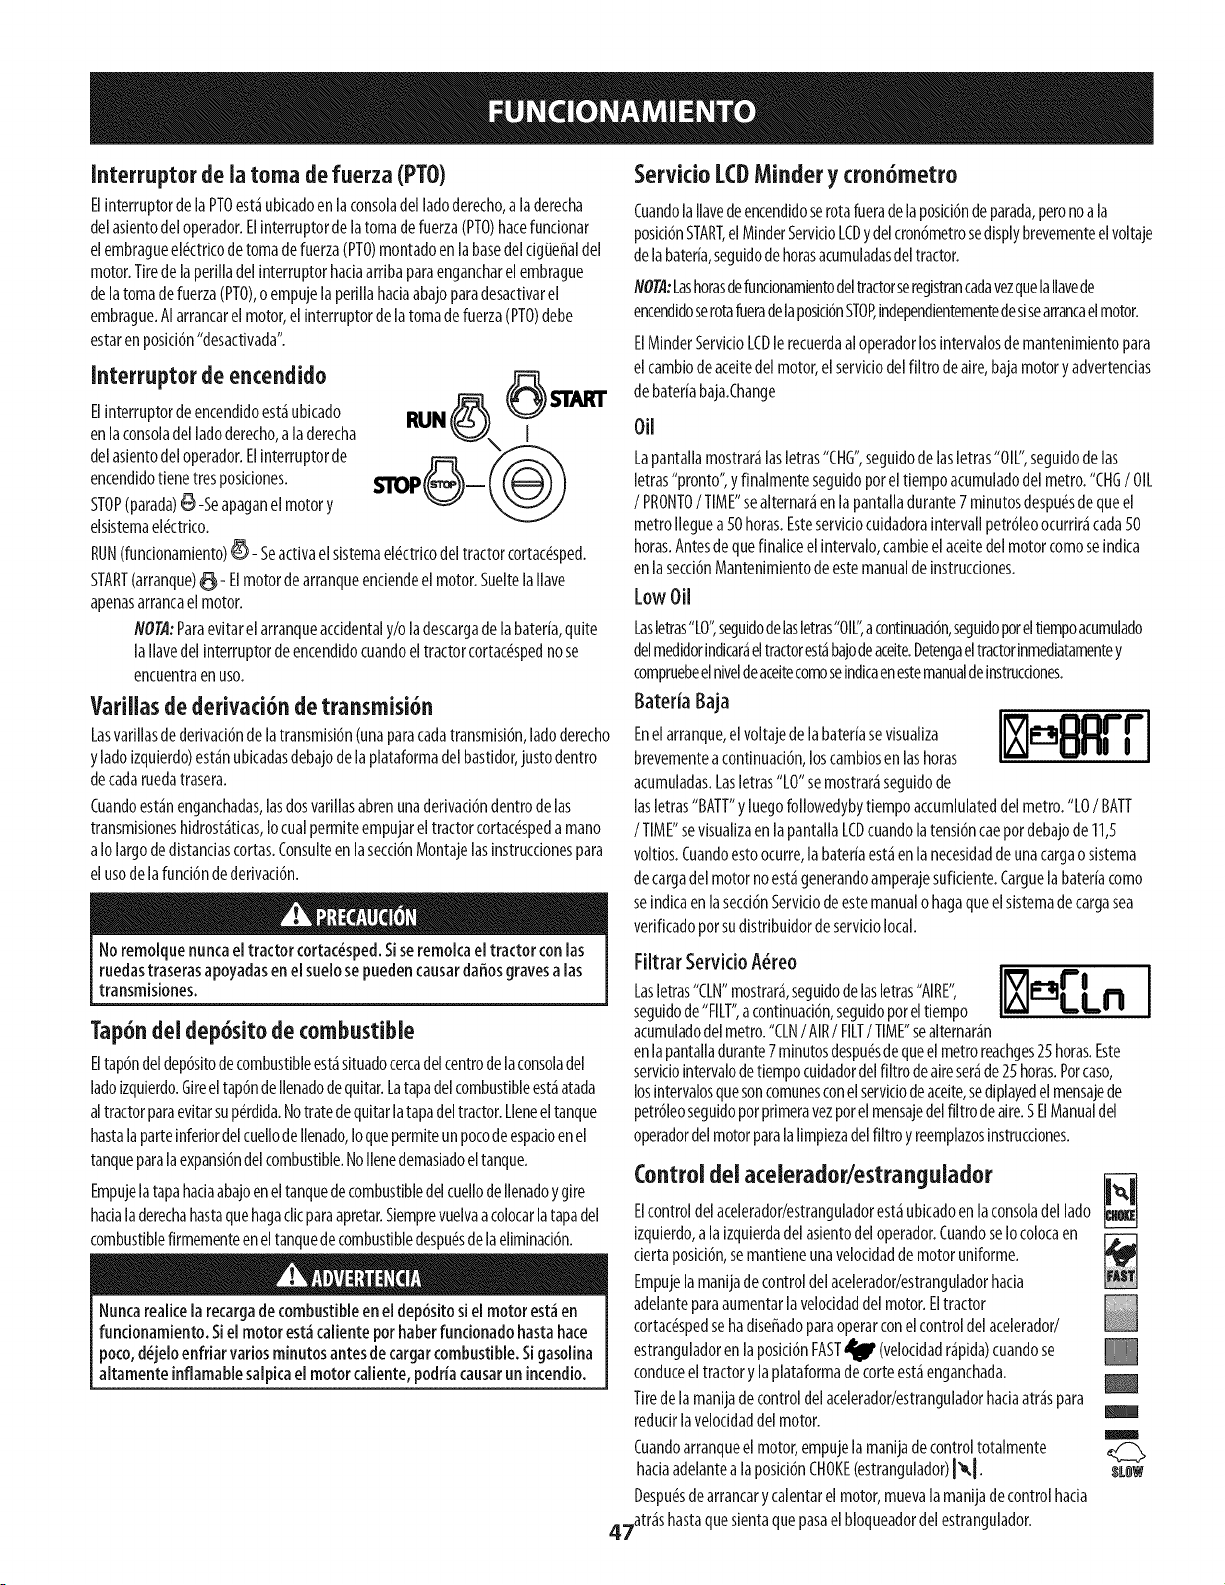
Interruptor dela toma defuerza (PTO)
ElinterruptordelaPTOest_ubkadoen laconsoladel ladoderecho,aladerecha
delasientodeloperador.Elinterruptorde latomadefuerza(PTO)hacefundonar
elembragueel_ctdcode tomade fuerza(PTO)montadoen labasedelcigiJe_aldel
motor.Tirede laperilladelinterruptorhadaardbaparaengancharelembrague
delatomadefuerza(PTO),o empujelaperillahadaabajoparadesactivarel
embrague.AIarrancarel motor,el interruptorde la tomadefuerza(PTO)debe
estarenposid6n"desactivada".
Interruptor deencendido
Elinterruptordeencendidoest_ubicado RUN
enlaconsoladelladoderecho,a la derecha l
delasientodeloperador.Elinterruptorde
encendidotienetresposiciones.
STOP(parada)_-Se apaganelmotory
elsistemael_ctdco.
RUN(fundonamiento)_- Seactivael sistemael_ctricodeltractorcortac_sped.
START(arranque)_- Elmotordearranqueendendeel motor.SueltelaIlave
apenasarrancael motor.
NOTA:Paraevitarelarranqueaccidentaly/oladescargade labaterfa,quite
laIlavedelinterruptordeencendidocuandoeltractorcortac_spednose
encuentraenuso.
Varillas de derivad6n detransmisi6n
Lasvadllasdededvad6ndelatransmisi6n(unaparacadatransmisi6n,ladoderecho
y ladoizquierdo)est_nubkadasdebajodelaplataformadel bastidor,justodentro
decadaruedatrasera.
Cuandoest_nenganchadas,lasdosvadllasabrenunadedvad6ndentrode las
transmisioneshidrost_ticas,Iocualpermiteempujareltractorcortac6spedamano
aIo largodedistandascortas.Consulteen lasecd6nMontajelasinstrucdonespara
elusode lafund6ndededvad6n.
Noremolquenuncaeltractor cortac_sped.Siseremolcael tractor conlas
ruedastraserasapoyadasen el suelosepuedencausardaEosgravesa las
transmisiones.
Tap6ndeldep6sitodecombustible
Eltap6ndeldep6sitodecombustibleest_situadocercadelcentrodelaconsoladel
ladoizquierdo.Gireeltap6ndeIlenadodequitar.Latapadelcombustibleest_atada
altractorparaevitarsup_rdida.Notratedequitarla tapadeltractor.Lleneeltanque
hastalaparteinferiordelcuellodeIlenado,Ioquepermiteunpocodeespadoenel
tanqueparalaexpansi6ndelcombustible.NoIlenedemasiadoeltanque.
EmpujelatapahadaabajoeneltanquedecombustibledelcuellodeIlenadoy gire
hacialaderechahastaquehagaclicparaapretar.Siemprevuelvaacolocarlatapadel
combustiblefirmementeeneltanquedecombustibledespu_sdelaeliminad6n.
Nuncarealicela recargade combustibleen eldep6sitosi el motor est_en
funcionamiento.Siel motor est_calientepor haberfuncionadobasrahace
poco,d_jeloenfdar variosminutos antesde cargarcombustible.Sigasolina
altamente inflamablesalpka el motorcaliente, podrfacausarun incendio.
Servido LCDMinder y cron6metro
CuandolaIlavedeencendidoserotafueradelaposici6ndeparada,peronoala
posici6nSTART,el MinderServkioLCDydelcron6metrosedisplybrevementeel voltaje
delabaterfa,seguidodehorasacumuladasdeltractor.
NOTA:LashorasdefundonamientodeltractorseregistrancadavezquelaIlavede
encendidoserotafueradelaposid6nSTOP,independientementedesisearrancaelmotor.
ElMinderServkioLCDlerecuerdaaloperadorlosintervalosde mantenimientopara
el cambiodeaceitedelmotor,elservkiodelfiltro deaire,bajamotory advertendas
de baterfabaja.Change
Oil
Lapantallamostrar_lasletras"CHG",seguidode lasletras"OIL",seguidode las
letras"pronto",yfinalmenteseguidoporeltiempoacumuladodel metro."CHG/ OIL
/ PRONTO/ TIME"sealternar_en lapantalladurante7 minutosdespu_sdequeel
metroIleguea50horas.Esteservkiocuidadoraintervallpetr61eoocurrir_cada50
horas.Antesdequefinalke elintervalo,cambieelaceitedel motorcomoseindica
en lasecd6nMantenimientode estemanualde instrucdones.
LowOil
Lasletras"LO",seguidodelasletras"OIl_',acontinuad6n,seguidoporeltiempoacumulado
delmedidorindicar_eltractorest_bajodeaceite.Detengaeltractorinmediatamentey
compruebeelniveldeaceitecomoseindicaenestemanualdeinstrucdones.
Bateria Baja
I i_ Jllli Jll_ JlID Jllll I
Enel arranque,elvoltajedelabaterfasevisualiza lIMAII_HHI II
brevementeacontinuad6n,loscambiosen lashoras
i I
acumuladas.Lasletras"LO"semostrar_seguidode
lasletras"BATT"y luegofollowedybytiempoaccumlulateddel metro."LO/ BATT
/TIME"sevisualizaenla pantallaLCDcuandolatensi6ncaepot debajode11,5
voltios.Cuandoestoocurre,labaterfaest_en lanecesidadde unacargao sistema
decargadelmotornoest_generandoamperajesufidente.Carguelabaterfacomo
seindkaenlasecd6nServkiodeestemanualohagaqueelsistemadecargasea
vedficadopotsudistdbuidordeservkiolocal.
Filtrar Servido A_reo
Lasletras"CLN"mostrar_,seguidodelasletras"AIRE",
seguidode"FILT",acontinuad6n,seguidoporeltiempo
acumuladodelmetro."CLN/ AIR/ FILT/ TIME"sealternar_n
enlapantalladurante7minutosdespu_sdequeelmetroreachges25horas.Este
servkiointervalodetiempocuidadordelfiltro deaireser_de25 horas.Porcaso,
losintervalosquesoncomunesconel servkiodeaceite,sediplayedel mensajede
petr61eoseguidoporpdmeravezporel mensajedelfiltrodeaire.SElManualdel
operadordelmotorparalaIimpiezadelfiltroy reemplazosinstrucdones.
Control del aceleradodestrangulador
Elcontroldelacelerador/estranguladorest_ubicadoenlaconsoladellado
izquierdo,alaizquierdadelasientodel operador.CuandoseIocolocaen
derta posici6n,semantieneunaveloddadde motoruniforme.
Empujelamanijadecontroldelacelerador/estranguladorhada
adelanteparaaumentarla velocidaddelmotor.Eltractor
cortac_spedsehadise_adoparaoperarconelcontroldelacelerador/
estranguladoren laposici6nFAST_I' (veloddadr_pida)cuandose
conduceel tractory laplataformade corteest_enganchada.
Tiredelamanijadecontroldelacelerador/estranguladorhadaatr_spara
reducirlaveloddaddelmotor.
Cuandoarranqueelmotor,empujelamanijadecontroltotalmente
hadaadelantea laposici6nCHOKE(estrangulador)I_,I.
Despu_sdearrancarycalentarel motor,muevalamanijadecontrolhada
47atr_s hastaquesientaquepasaelbloqueadordelestrangulador.
B
m
$1L_W
SeguridadgeneraJ
RECIBALASINSTRUCCIONES-Leaestemanualdeloperadorensutotalidad.
Aprendaausarestam_quinaDEMANERASEGURA.Nosearriesguea quedar
expuestoaLESIONESoala MUERTE.Solamentesedebepermitiroperar
estetractorcortac_spedaquienessehayanfamiliarizadoarondoconel uso
delmismo.
Antesdearrancarelmotoro deempezara operar,familiarkeseconlos
controles.Eloperadordebeestarenel asientodeloperador.Elinterruptorde
latomadefuerza(PTO)debeestarenposici6ndesenganchada,el frenode
manoactivadoy laspalancasdecontrolde transmisi6ndelladoderecho
y delladoizquierdototalmentehaciaafuera,en posici6nneutra.
Mantengatodoslosprotectoresensulugar.Guardedistanciade laspartes
m6viles.
iNOSEPERMITETRASLADARPERSONASENELTRACTOR!Mantengaatodas
laspersonasy las mascotasaunadistanciasegurade la m_quina.Slempre
mirehaciaatr_sy haciaabajoaambosladosdeltractorcortac_spedantesde
desplazarsemarchaarrasymientrasretroceda.
NOorientela descargadelacortadorahacialagenre.
EnIoposibleevitelaspendientes.Nuncaopereenpendientesmayores
de15°. Laspendientesconmayorindinaci6npresentancondicionesde
operaci6npeligrosas.Lostractorescortac_spedpuedenvolcar.
Antesdedejarelasientodeloperador:Desconectelatomadefuerza(PTO),
muevalaspalancasdecontrolde[atransmisi6ndel ladoderechoy del[ado
izquierdototalmentehaciaafueraen poski6nneutra,activeel frenode
mano0, apagueelmotory quitelaIlavedeencendido.Antesde realizar
elmantenimientoolalimplezade lam_quina,esperehastaquecese
totalmenteel movimiento.
Operelaspalancasde controldetransmisi6ndeformaparejay eviterealizar
movimientosbruscosconlasmismasalarrancarydetenerse.Sujetebienlas
palancasde control.
Seacuidadosoaloperarcercaderutas.Detengaelmovimientodel tractor
cortac6spedy espereaquepasenlosvehkulosantesdeoperara Iolargo
delaruta.
Nohagafuncionareltractorcortac_spedsinlaplataformadetorte. Sise
quitalaplataformavafiaelequilibriodeltractorcortac(_spedy _ste
podfiavolcar.
Eviteoperaren superficiesdetracci6ninestables;tengaextremaprecauci6n
sila superfideesresbaladiza.
Reduzcalavelocidadantesdegirary det_ngasecompletamenteantesde
cualquiermaniobradegirocero.
Nodetenganiestacioneeltractorcortac_spedsobremateriales
combustiblestalescomopastouhojassecas,desechos,etc.
NoIleneel tanquede combustibleconelmotorenfundonamientoosiel
mismoest_caliente.Dejeenfriarel motorvariosminutosantesde la recarga
decombustible.Aprieteeltap6ndecombustibleconfirmeza.
Antesde operar su tractor ¢ortac_sped
Antesde hacerfundonarel tractorcortac_sped,leaestemanualcon
atenci6nparafamiliarizarseconelfuncionamientodetodoslos instrumentos
y controles.Elmanualseprepar6conlafinalidadde ayudarloa hacer
funcionary mantenereltractorcortac_spedeficientemente.
Secertificaqueestemotorfundonaunicamentecongasolinasinplomo,
nuevay limpia.Paraobtenerelmejorresultado,Ileneeldep6sitode
combustibleunicamentecongasolinasinplomoIimpiay fresca,enun
surtidorqueindiqueunoctanajeiguala 87 om_s.
Serecomiendael usodegasolinasinplomoporquedejamenosdep6sitosen
lac_maradecombusti6ny reducelasemisionesdeescapeperjudiciales.No
serecomiendaelusodegasolinaconplomo;noseladebeusaren loslugares
en loscualeslasemisionesdeescapeseencuentranreguladas.
NOTA:Compregasolinaenpequeffascantidades.Nousegasolinaquehaya
quedadodelatemporadaanterior,paraminimizarla formaci6ndedep6sitos
degomaenelsistemadecombustible.
Elgasohol(hasta10%dealcoholet[lico,90%de gasolinasinplomopor
volumen)esuncombustibleaprobado.Noseapruebaelusodeotras
mezclasde gasolina/alcohol.
El(_termetflicoterciario-butilico(MTBE)y [asmezclasdegasolinasin
plomo(hastaun m_ximode15%de MTBEpotvolumen)soncombustibles
aprobados.Noseapruebaelusodeotrasmezclasdegasolina/_ter.
Reviseelnivelde aceitedel motor.
Limpieelfiltro deairesiesnecesafio.
Controlelapresi6ndeinfladode losneum_ticos.
Ajusteelasientopara[amayorcomodidaddel operador,paraunaadecuada
visibilidady paramantenerelcontrolcompletodeltractorcortac_sped.
Sistema de bloqueode seguridad
Estetractorcortac_spedest_equipadoconun sistemade bloqueode segufidad
paraprotecci6ndeloperador.Sielsistemade bloqueofuncionamal,nosedebe
hacerfundonareltractorcortac(_sped.Llameal 1-800-659-5917paraprogramarel
serviciodel serviciodepiezasy reparacionesde Sears.
Elsistemadebloqueodeseguridadevitaqueelmotorintentearrancaro
arranquea menosquesemuevanlaspalancasdecontroldetransmisi6ndel
ladoderechoy delladoizquierdototalmentehaciaafuerahaciaamboslados
en posid6nneutra,elfrenode manoactivadoy sedesenganchelatomade
fuerza(PTO).
Paraevitarun movimientobruscoaldesactivarel frenodemano,el sistema
de bloqueodeseguridadapagaelmotorsilaspalancasde controlde
transmisi6ndel ladoderechoy/odel ladoizquierdosemuevenauna
posid6ndistintadelatotalmenteafueraenneutrocuandoelfrenode
manoest_activado.
Sieloperadorabandonasuasientoantesdecolocarelfrenodemano,el
sistemadebloqueodeseguridadapagael motor.
SieloperadorabandonasuasientoconlaPTOconectada,elsistemade
bloqueode seguridadapagaelmotor,independientementedequeelfreno
de manoest_puestoo no.
NOTA:Elinterruptorde latomade fuerza(PTO)sedebemovera laposici6n
"OFF"(apagado)paravolveraarrancarelmotor.
Elsistemadebloqueodeseguridadapagalatomadefuerza(PTO)y las
cuchillasdelacortadorasedetienensilasdospalancasdecontrolde
transmisi6nsemuevena laposici6ndemarchaarras.Latomadefuerza
(PTO)sevuelveaengancharcuandounaolasdospalancassemueven
nuevamentealaposici6nneutraodemarchaadelante.
48
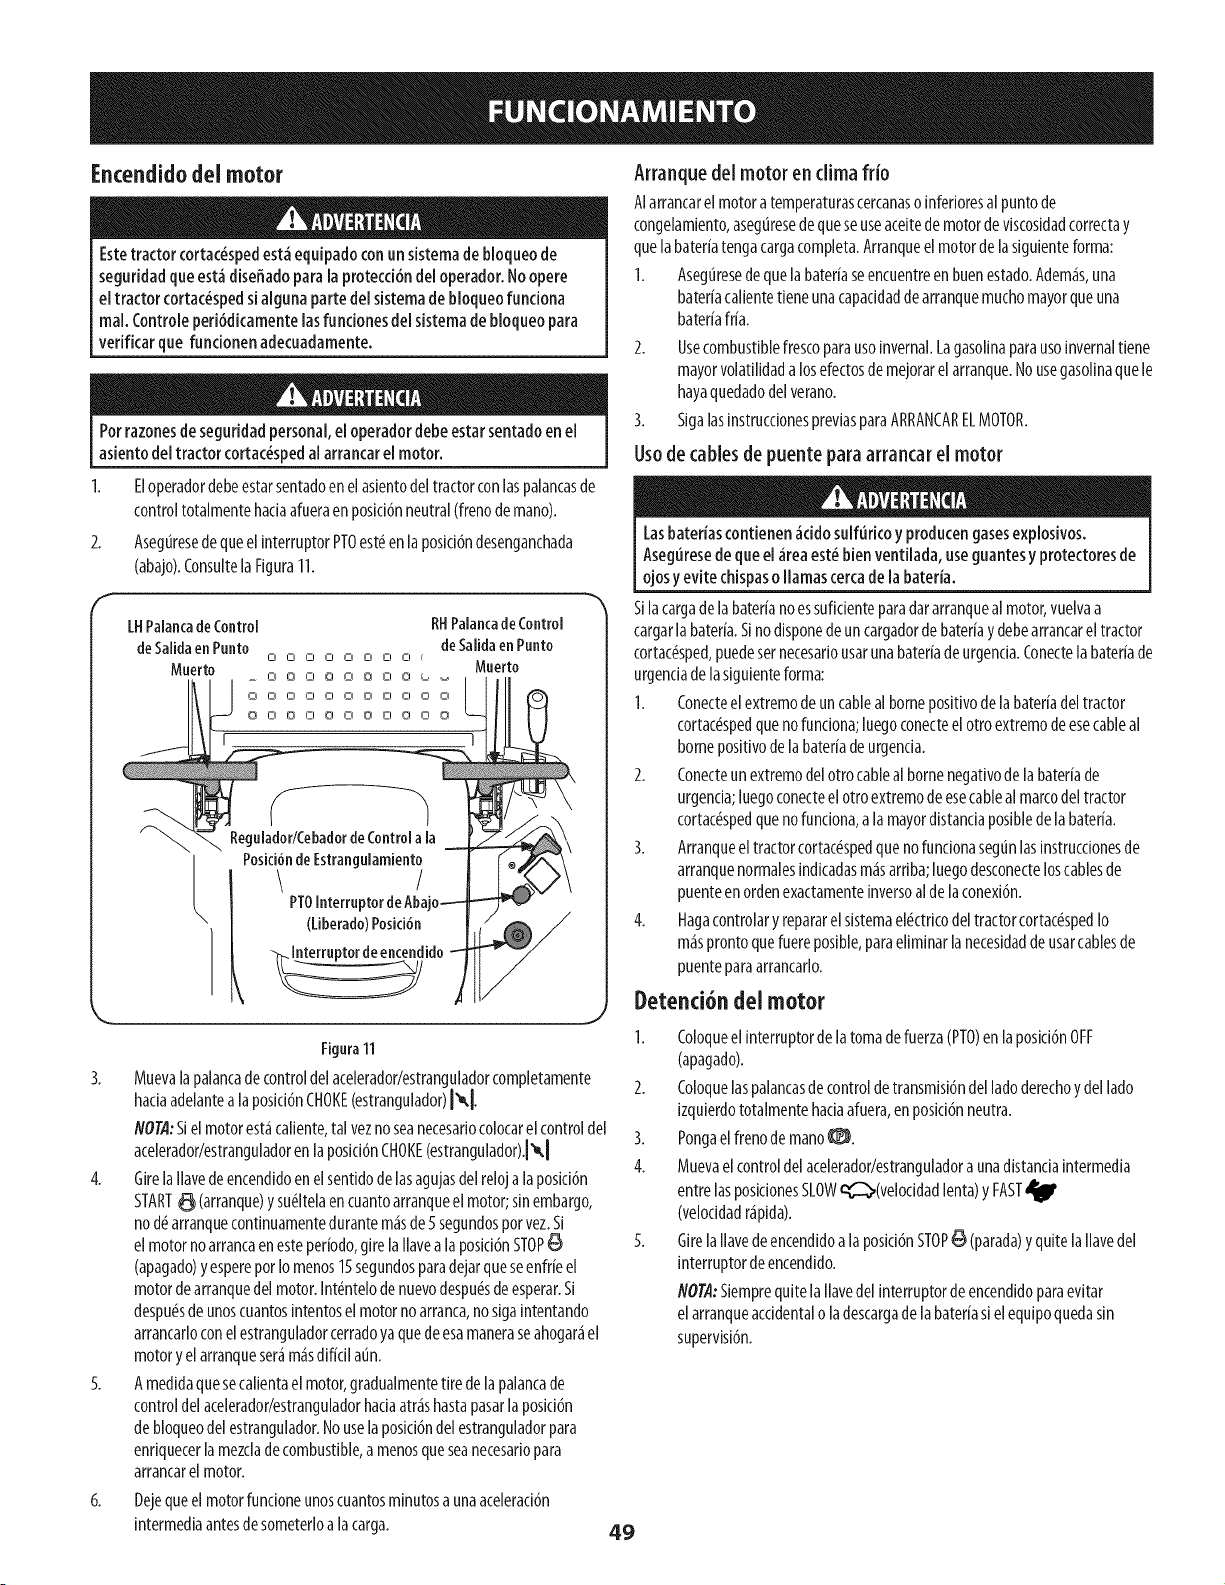
EncendidodeJmotor
Estetractor cortac_spedest_ equipadoconun sistemade bioqueode
seguridadqueest&diseffadopara la protecci6ndel operador.No opere
e[ tractor cortac_spedsi algunapartede[sistemade bloqueofunciona
real. Controleperi6dicamentelasfuncionesde[sistemade bioqueopara
verificar quefuncionen adecuadamente.
Porrazonesdeseguridadpersonal,el operadordebeestar sentadoen el
asientodel tractor cortac_spedal arrancarel motor.
2.
Eloperadordebeestarsentadoenelaslentodel tractorconlaspalancasde
controltotalmentehaciaafueraenposici6nneutral(frenodemano).
Aseguresede queelinterruptorPTOest_enlaposici6ndesenganchada
(abajo).ConsultelaFigura11.
F
LHPaiancadeControl RHPaiancadeControl
deSaiidaenPunto deSaiidaenPunto
0 0 0 0 0 0 0 0
Muerto Muerto
0 U 0 0 0 0 0 0 0 0 0
o o o o o o o o o o ©
r ?
Regulador/CebadordeControlala
PositiOndeEstrangulamient_
I PTOInterruptordeAb_
(Liberado)Posici6n
Figura11
3. Muevalapalancadecontroldelacelerador/estranguladorcompletamente
haciaadelantea laposid6nCHOKE(estrangulador)[_l.
NOTA:Sielmotorest_caliente,tal veznoseanecesariocolocarelcontroldel
acelerador/estranguladorenlaposici6nCHOKE(estrangulador).l',kl
4. GlrelaIlavedeencendidoenelsentldodelasagujasdelreloja laposlcl6n
START_ (arranque)y su(_ltelaen cuantoarranqueelmotor;sinembargo,
nod_arranquecontinuamentedurantem_sde 5segundosporvez.Si
elmotornoarrancaenesteperiodo,girelaIlavea laposki6nSTOP
(apagado)y esperepotIomenos15segundosparadejarqueseenfr[eel
motordearranquedel motor.Int(_ntelodenuevodespu(_sdeesperar.Si
despu_sdeunoscuantosintentosel motornoarranca,noslgaintentando
arrancarloconelestranguladorcerradoyaquedeesamaneraseahogaAel
motory el arranquesea m_sdificiIattn.
5. Amedidaquesecalientael motor,gradualmentetire de lapalancade
controldel acelerador/estranguladorhaciaatAshastapasarla poski6n
debloqueodelestrangulador.Nouselaposici6ndel estranguladorpara
enriquecerlamezcladecombustible,amenosqueseanecesariopara
arrancarel motor.
6.
Dejequeel motorfuncioneunoscuantosminutosaunaaceleraci6n
intermediaantesdesometerloalacarga.
Arranque del motor endima frio
AIarrancarel motoratemperaturascercanaso inferioresal puntode
congelamiento,asegtiresedequeseuseaceitedemotordeviscosidadcorrectay
quelabateriatengacargacompleta.Arranqueelmotordelasiguienteforma:
I. Asegtiresedequelabateriaseencuentreen buenestado.Adem_s,una
bateriacalientetieneunacapacidaddearranquemuchomayorqueuna
bateriafria.
2. Usecombustiblefrescoparausoinvernal.Lagasolinaparausoinvernaltiene
mayorvolatilidadalosefectosde mejorarelarranque.Nousegasolinaquele
hayaquedadodelverano.
3. SigalasinstruccionespreviasparaARRANCARELMOTOR.
Usodecables de puente para arrancar el motor
Lasbateriascontienen_cidosulfurico yproducengasesexplosivos.
Aseguresedequeel _reaest_bien ventilada,useguantesy protectoresde
ojosyevite chispaso llamascercade labateria.
Silacargadela bateffanoessuficienteparadararranqueal motor,vuelvaa
cargarla bateria.Sinodisponede uncargadordebateffay debearrancareltractor
cortac_sped,puedesernecesariousarunabateriade urgencia.Conectela bateriade
urgenciadelasiguienteforma:
I. Conecteelextremodeun cablealbornepositivodelabateriadeltractor
cortac_spedquenofunciona;luegoconecteelotro extremodeesecableal
bornepositivode labateriadeurgenda.
2. Conecteunextremodelotro cablealbornenegativode labateriade
urgenda;luegoconecteelotro extremodeesecablealmarcodeltractor
cortac_spedquenofunciona,a la mayordistanciaposiblede la bateria.
3. Arranqueeltractorcortac_spedquenofundonasegtinlasinstruccionesde
arranquenormalesindicadasm_sarriba;luegodesconecteloscablesde
puenteenordenexactamenteinversoalde laconexi6n.
4. Hagacontrolary repararel sistemael(ktricodeltractorcortac(_spedIo
m_sprontoquefuereposible,paraeliminarlanecesidadde usarcablesde
puenteparaarrancarlo.
Detenci6ndelmotor
1. Coloqueelinterruptordelatomadefuerza(PTO)enla posid6nOFF
(apagado).
2. Coloquelaspalancasde controldetransmisi6ndelladoderechoy del lado
izquierdototalmentehaciaafuera,en poski6nneutra.
3. Pongaelfrenodemano_.
4. Muevaelcontroldelacelerador/estranguladora unadistanciaintermedia
entrelasposicionesSLOWq_2_,(velocidadlenta)y FAST
(velocidadr_pida).
5. GirelaIlavedeencendidoa laposki6nSTOPO (parada)yquitelaIlavedel
interruptordeencendido.
NOTA:Siemprequitela Ilavedel interruptorde encendidoparaevitar
elarranqueaccidentalo ladescargade labater[asielequipoquedasin
supervisi6n.
49
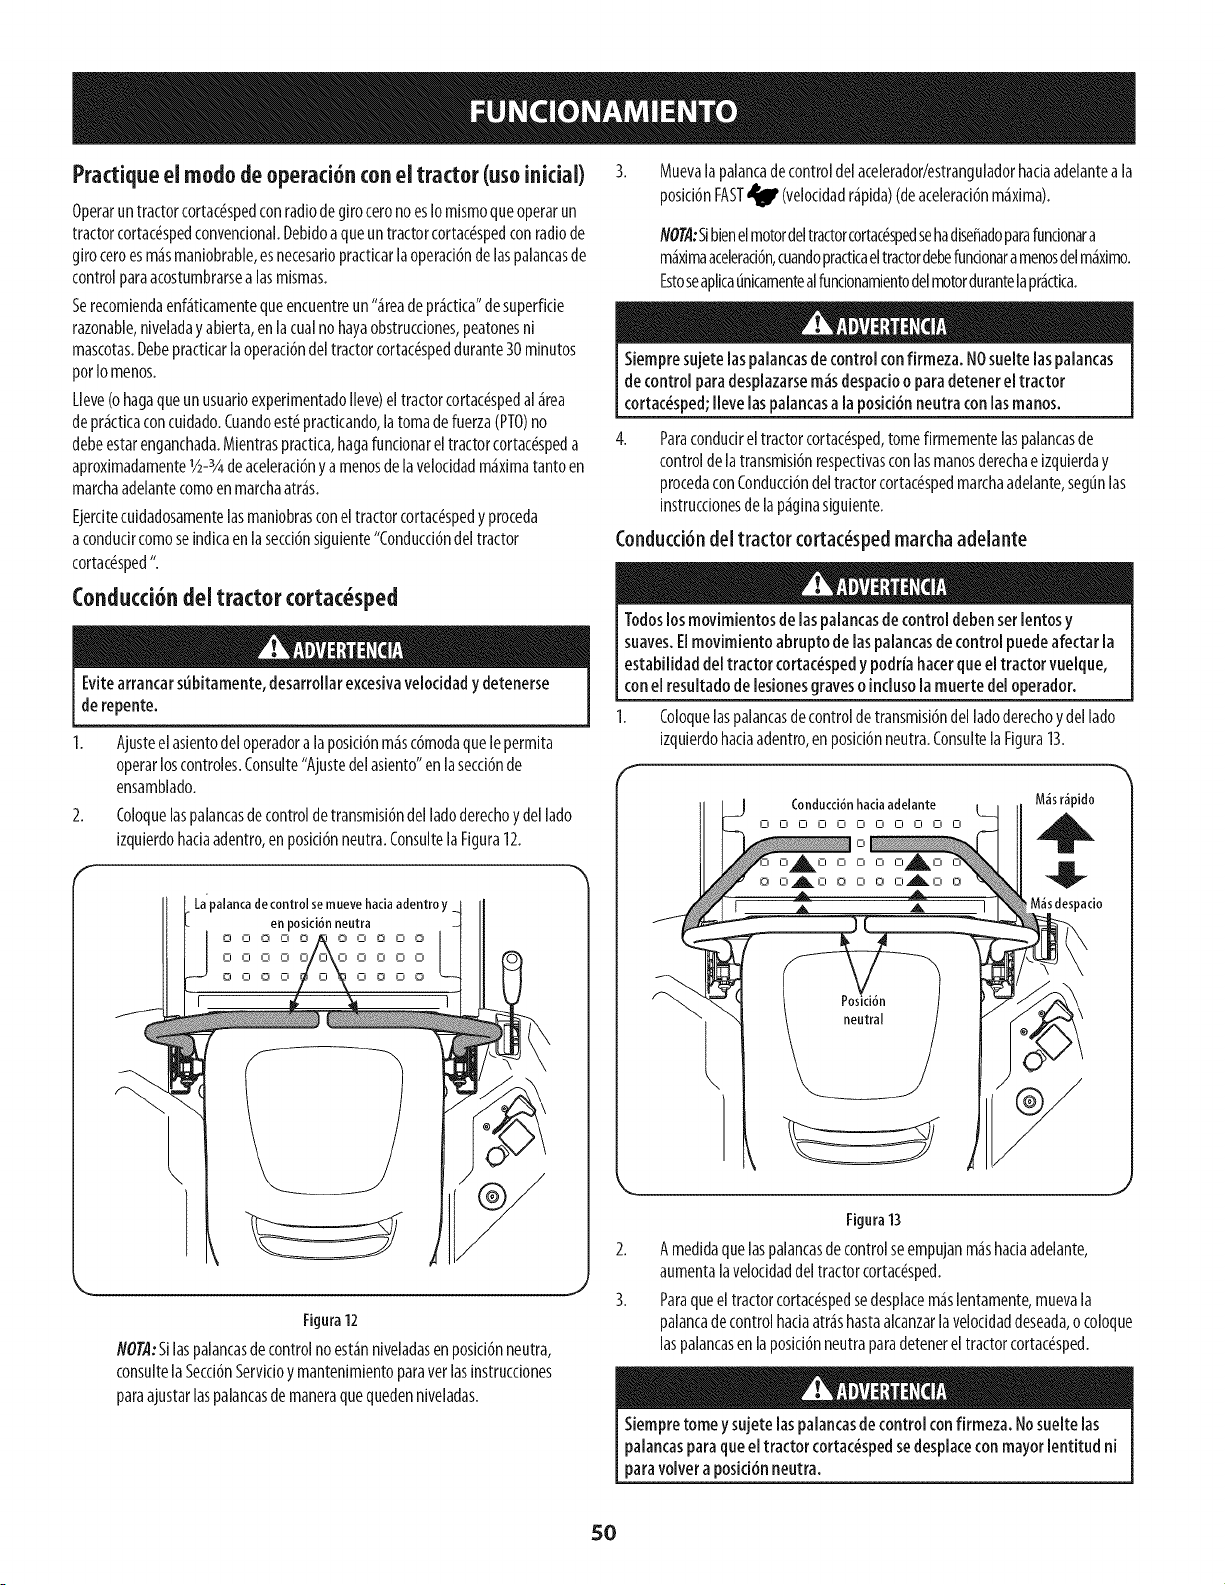
Practiqueel modode operad6n conel tractor (usoinidal) 3.
Operaruntractorcortac_spedconradiode girocerono esIomismoqueoperarun
tractorcortac_spedconvencional.Debidoaqueun tractorcortac_spedconradiode
giroceroesm_smaniobrable,esnecesariopractkarla operaci6ndelas palancasde
controlparaacostumbrarsealas mismas.
Serecomiendaenf_ticamentequeencuentreun"_reade pr_ctica"desuperficie
razonable,niveladayabierta,en lacualno hayaobstrucdones,peatonesni
mascotas.Debepracticarlaoperaci6ndeltractorcortac_speddurante30minutos
porIomenos.
Lleve(ohagaqueunusuarioexperimentadoIleve)eltractorcortac_spedal _rea
depr_cticaconcuidado.Cuandoest_practkando,latomadefuerza(PTO)no
debeestarenganchada.Mientraspractica,hagafuncionareltractorcortac_speda
aproximadamente1_-3/4deaceleraci6ny amenosdelavelocidadm_ximatantoen
marchaadelantecomoenmarchaarras.
Ejercitecuidadosamentelasmaniobrasconel tractorcortac_spedy proceda
aconducircomoseindicaenlasecci6nsiguiente"Conducci6ndeltractor
cortac_sped".
(onducci6n del tractor cortac_sped
Evitearrancarsubitamente,desarroilarexcesivavelocidady detenerse
de repente,
1. Ajusteelasientodeloperadoralaposid6nm_sc6modaquelepermita
operarloscontroles.Consulte"Ajustedelasiento"en lasecci6nde
ensamblado.
2. Coloquelaspalancasdecontroldetransmisi6ndel ladoderechoy dellado
izquierdohadaadentro,en posid6nneutra.ConsultelaFigura12.
• Lapalanca de control se mueve hacia adentro y --I
4
en posicidn neutra
0 0 0 0 0 0 0 0 © 0
l
Figura12
NOTA:Silaspalancasdecontrolno est_nniveladasen posici6nneutra,
consultela Secd6nServkioy mantenimientoparavet lasinstrucdones
paraajustarlaspalancasdemaneraquequedenniveladas.
Muevalapalancade controldelacelerador/estranguladorhaciaadelanteala
posici6nFAST_ (velocidadr_pida)(deaceleraci6nm_xima).
NOTA:Sibienelmotordeltractorcortac_spedsehadisefiadoparafuncionara
m&ximaacelerad6n,cuandopracticaeltractordebefuncionaramenosdelm&ximo.
Estoseaplicaunicamentealfuncionamientodelmotordurantelapr_ctica.
Siempresujetelaspalancasdecontrol confirmeza. NOsueltelaspalancas
de controlpara desplazarsem_sdespadoo paradetener el tractor
cortac_sped;llevelaspalancasala posid6n neutra con lasmanos.
Paraconducireltractorcortac_sped,tomefirmementelaspalancasde
controldelatransmisi6nrespectivasconlasmanosderechaeizquierday
procedaconConducci6ndeltractorcortac_spedmarchaadelante,segunlas
instruccionesdelap_ginasiguiente.
Condu(d6ndel tra(tor (orta(_sped mar(ha adelante
Todoslosmovimientosde las palancasde control debenset lentosy
suaves.Elmovimiento abrupto delaspalancasde control puedeafectar la
estabilidaddel tractor cortac_spedy podriahacerqueeltractor vuelque,
conel resultadode lesionesgraveso inclusola muerte del operador.
I. Coloquelaspalancasdecontrolde transmisi6ndel ladoderechoy del lado
izquierdohadaadentro,en posid6nneutra.Consultela Figura13.
Conducci6nhadaadelante M_sr_pido
OuuuuO000000
°°°°°A°
o o_o o o o o_o o
A M_sdespacio
Posici6n
neutral
i
I
2.
3.
Figura13
A medidaquelaspalancasdecontrolseempujanm_shaciaadelante,
aumentalavelocidaddeltractorcortac_sped.
Paraqueeltractorcortac_spedsedesplacem_slentamente,muevala
palancadecontrolhaciaatr_shastaalcanzarlavelocidaddeseada,ocoloque
laspalancasen laposici6nneutraparadetenerel tractorcortac_sped.
Siempretome ysujete laspalancasde control confirmeza. Nosueltelas
palancaspara queel tractor cortac_spedsedesplaceconmayorlentitud ni
paravolver aposid6n neutra.
50
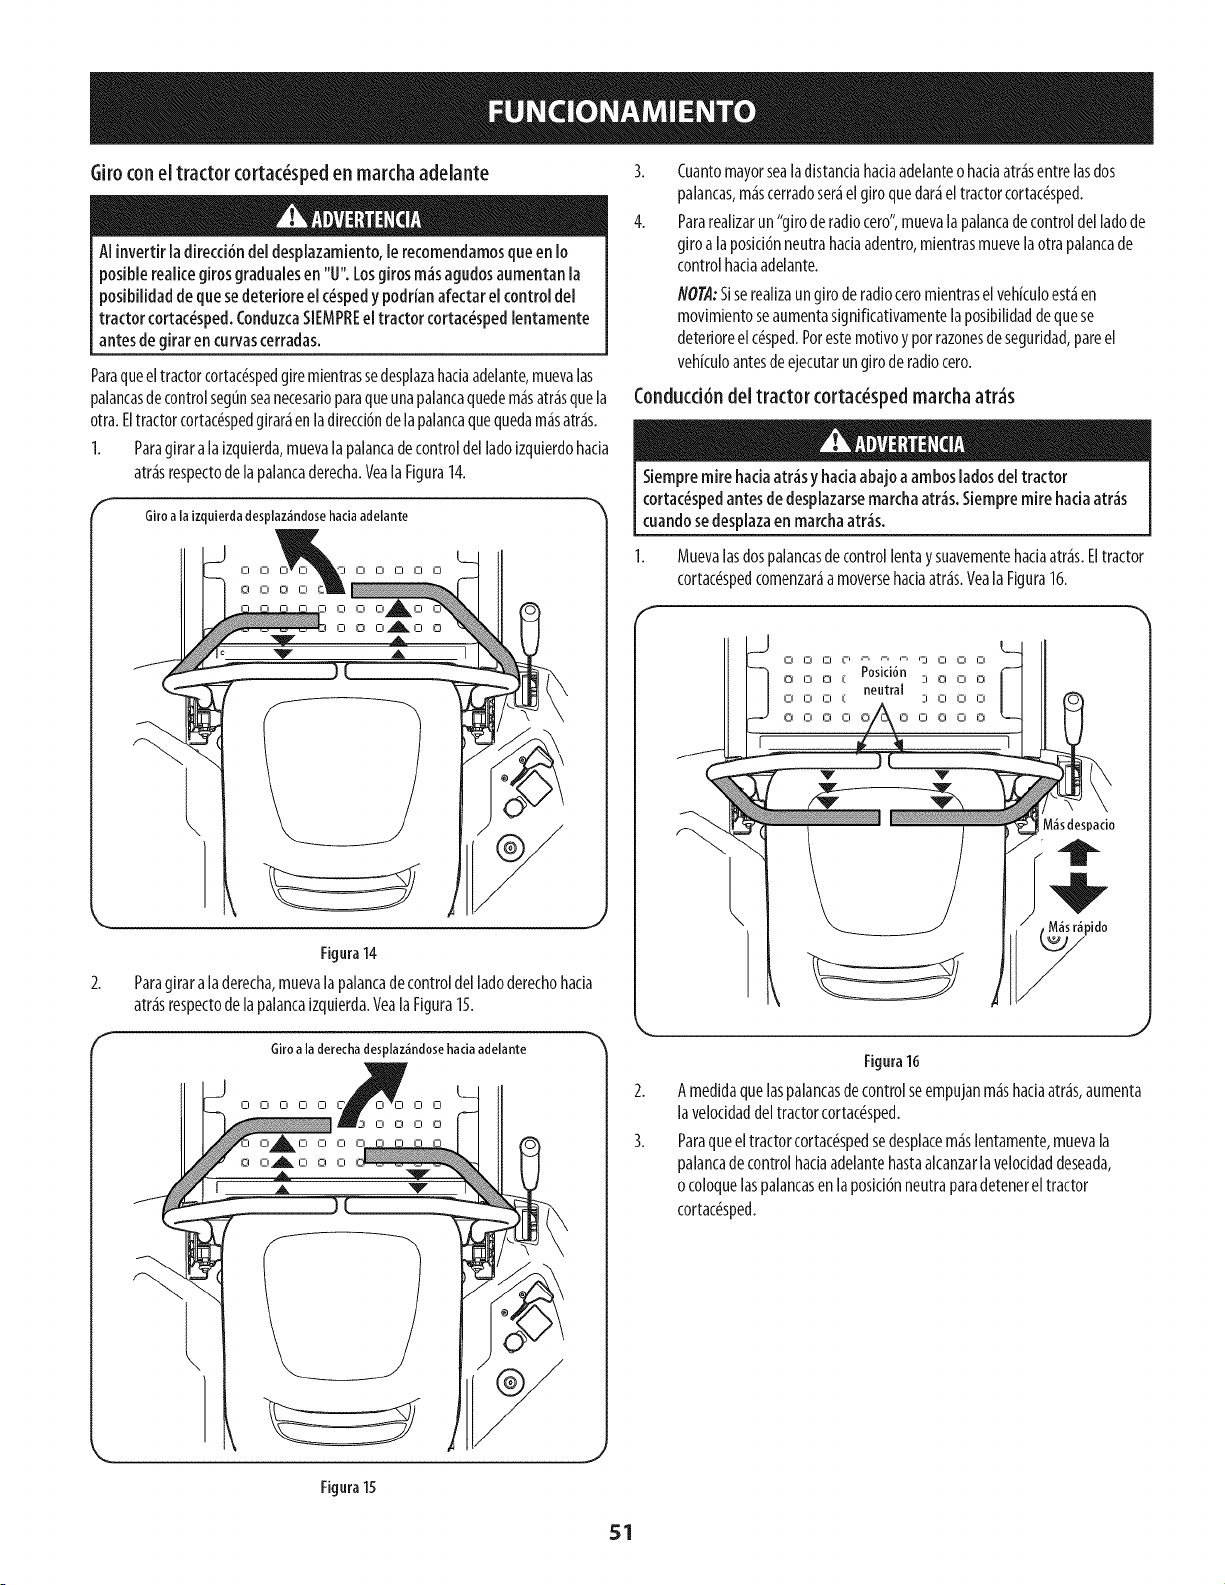
Girocon el tractor cortac_speden marchaadelante
AI invertirla direcci6ndel desplazamiento,le recomendamosqueenIo
posiblerealicegirosgradualesen "O".Losgirosm_sagudosaumentanla
posibilidad de quesedeteriore el c_spedy podrianafectarel control del
tractor cortac_sped.ConduzcaSIEMPREeltractor cortac_spedlentamente
antesde giraren curvascerradas.
Paraqueeltractorcortac_spedgiremientrassedesplazahaciaadelante,muevalas
palancasdecontrolsegunseanecesarioparaqueunapalancaquedem_satr_squela
otra.Eltractorcortac_spedgirar_enla direcd6nde lapalancaquequedam_satr_s.
I. Paragirara laizquierda,muevalapalancadecontroldelladoizquierdohacia
atr_srespectodelapalancaderecha.Veala Figura14.
Giro ala izquierda desplaz_ndose hada adelante
ooO00_O0000
O0
000_00
\
i
2.
Figura14
Paragirara laderecha,muevalapalancadecontroldelladoderechohacia
atr_srespectodelapalancaizquierda.YealaFigura15.
Giro ala derecha desplaz;_ndosehada adelante
00000 DO0
0000
O0
00_000
A
J
3. Cuantomayorsealadistandahadaadelanteohaciaarrasentrelasdos
palancas,m_scerradoser_el giroquedar_eltractorcortac_sped.
4. Pararealizarun"girode radiocero",muevalapalancade controldelladode
giroa la posici6nneutrahadaadentro,mientrasmuevelaotra palancade
controlhadaadelante.
NOTA:Siserealizaungirode radioceromientraselvehkuloest_en
movimientoseaumentasignificativamentelaposibilidaddequese
deterioreelc_sped.Potestemotivoy porrazonesde seguridad,pareel
vehkuloantesdeejecutarun giroderadiocero.
Conducd6ndel tractor cortac_spedmarchaatr_s
Siempremire haciaatr_sy hadaabajoa ambosladosdel tractor
cortac_spedantesdedesplazarsemarchaatr_s.Siempremire hada atr_s
cuandosedesplazaen marchaatr_s.
Muevalasdospalancasdecontrollentaysuavementehadaarras.Eltractor
cortac_spedcomenzar_amoversehaciaarras.VealaFigura16.
_s despacio
2.
3.
Figura16
Amedidaquelaspalancasdecontrolseempujanm_shaciaatr_s,aumenta
laveloddaddeltractorcortac_sped.
Paraqueeltractorcortac_spedsedesplacem_slentamente,muevala
palancadecontrolhaciaadelantehastaalcanzarlaveloddaddeseada,
o coloquelaspalancasen laposici6nneutraparadetenereltractor
cortac_sped.
Figura 15
51
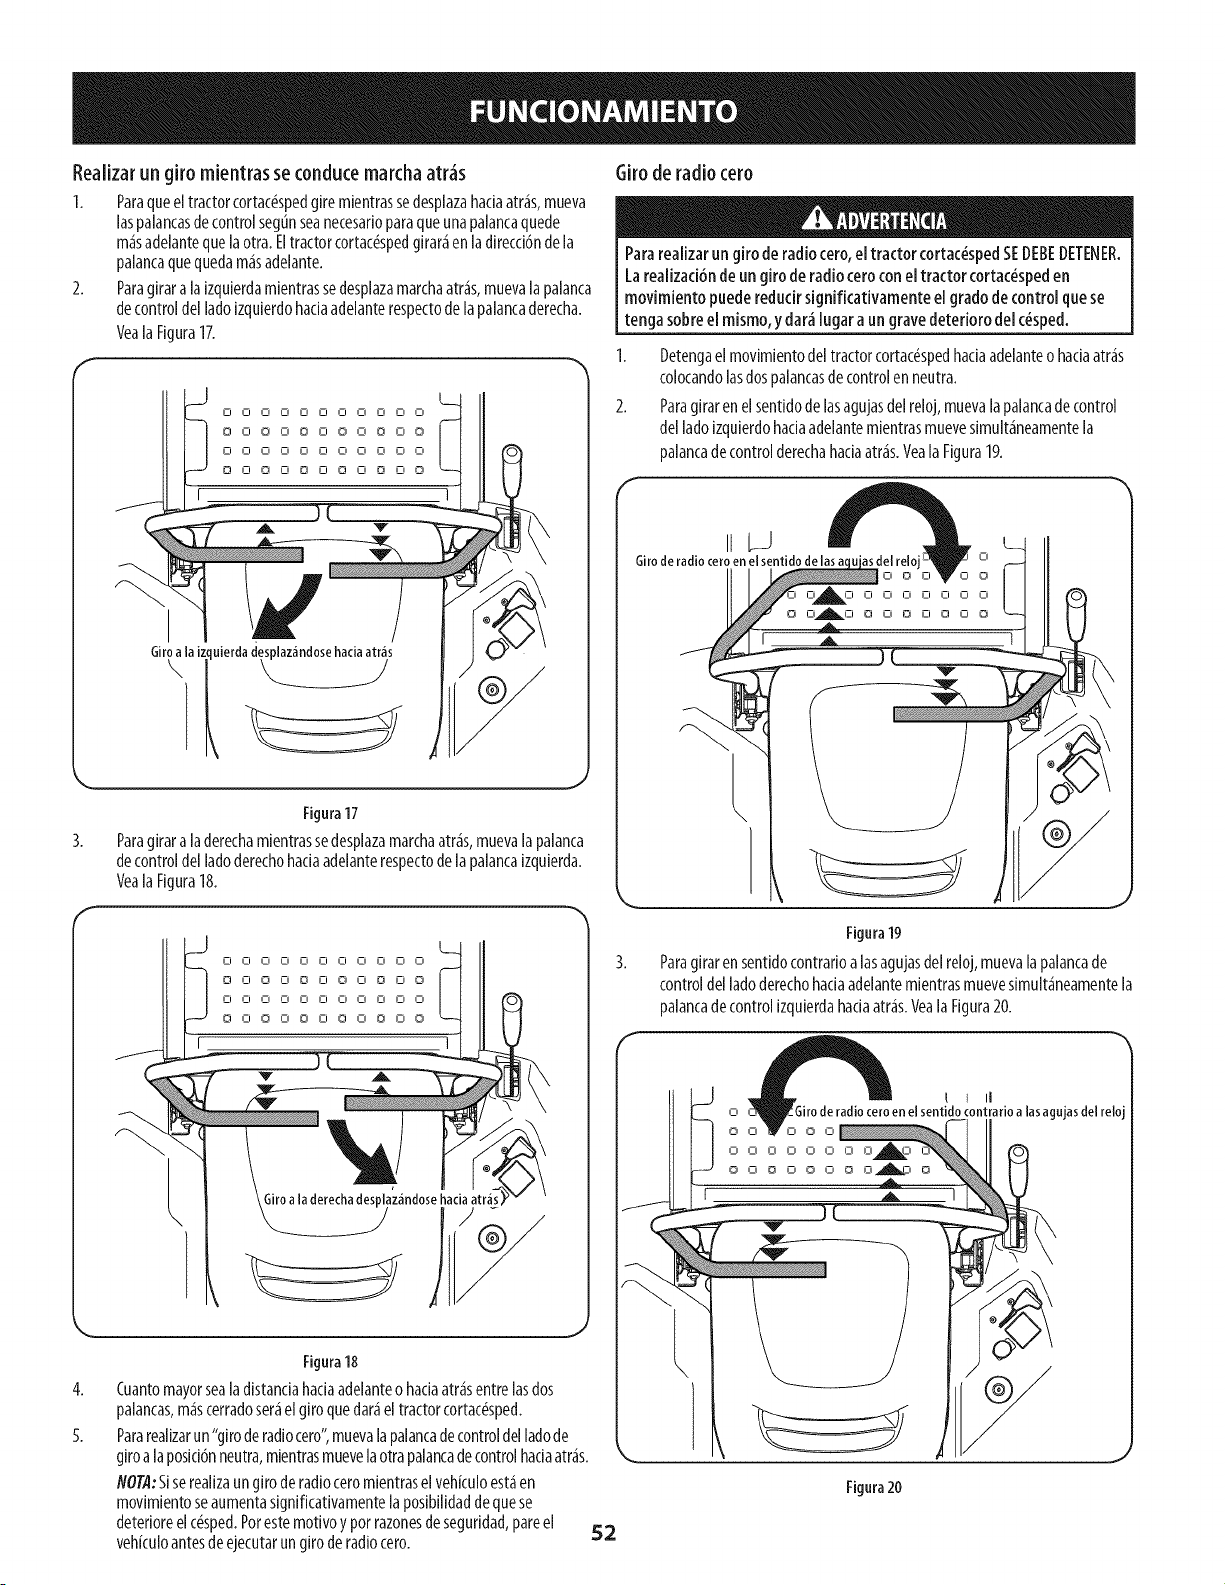
Realizarun giro mientrasse conduce marchaatr_s
1. Paraqueel tractorcortac_spedgiremientrassedesplazahaciaatr_s,mueva
laspalancasde controlsegunseanecesarioparaqueunapalancaquede
m_sadelantequelaotra. Eltractorcortac(_spedgirar_enladirecd6ndela
palancaquequedam_sadelante.
2. Paragirara la[zquierdamientrassedesplazamarchaarras,muevalapalanca
decontroldel ladoizquierdohaciaadelanterespectodelapalancaderecha.
VealaFigura17.
0 0 0 0 0 0 0 0 _--_ 0 0
0 0 0 0 0 0 0 _--_ 0 0 0
0 0 0 0 0 0 C 0 _--_ 0 0
0 0 0 0 0 0 0 0 0 0 0
Figura17
Paragirara Iaderechambntrassedesplazamarchaatr_s,muevala palanca
decontroldel ladoderechohadaadelanterespectodelapalancaizquierda.
VealaFigura18.
Giro deradio cero
Pararealizarun girode radio cero,eltractor cortac_spedSEDEBEDETENER.
karealizaci6nde un giro de radioceroconeltractor cortac_speden
movimiento puederedudrsignificativamenteel gradodecontrol cluese
tengasobreel mismo,y dar_ lugar aun gravedetedoro del c_sped.
1. Detengaelmovimientodeltractorcortac_spedhaciaadelanteo haciaarras
colocandolasdospalancasde controlen neutra.
2. Paragirarenelsentidodelasagujasdelreloj,muevalapalancadecontrol
del ladoizquierdohaciaadelantemientrasmuevesimult_neamentela
palancadecontrolderechahaciaatr_s.VealaFigura19.
Giro de radio cero en el sentido delas a, o
o
Ci Ci Ci Ci Ci Ci Ci
0 Ci_I_Ci O Ci 0 Ci 0 Ci 0
/
L_
0 0 0 0 0 0 0 0 0 0 0
0 0 0 0 0 0 © © © Ci © I
L
0 0 0 0 0 0 0 0 0 0 0
0 0 0 0 0 0 0 0 0 0 0
Figura19
Paragirarensentldocontrarioalasagujasdel reloj,muevalapalancade
controldelladoderechohaciaadelantemientrasmuevesimult_neamentela
palancadecontrolizquierdahaciaarras.VealaFigura20.
I t II gujasdelreloj
4,
5.
Figura18
Cuantomayorsealadistanciahaciaadelanteo haciaatr_sentrelasdos
palancas,m_scerradoser_elgiroquedar_eltractorcortac_sped.
Pararealizarun"giro deradiocero",muevalapalancadecontroldelladode
giroalaposici6nneutra,mientrasmuevelaotrapalancadecontrolhaciaarras.
NOTA:Siserealizaun giroderadioceromientraselvehiculoest_en
movimientoseaumentasignificativamentelaposibilidaddequese
deterioreelc_sped.Porestemotivoy porrazonesdeseguridad,pareel 52
vehiculoantesdeejecutarungirode radiocero.
Figura20
Detenci6n del tractor cortac_sped
1. Muevalasdospalancasde controlala posid6nneutral(frenodemano)para
detenerel movlmlentodelacortadoradec#sped.
2. Empujeel[nterruptordela TDFhadaabajoalaposki6ndedesenganche.
3. Uselamanijade elevad6ndelacubiertaparalevantarla plataformaasu
posici6nm_salta.
4. Sidesdendedeltractor,muevalapalancadecontrolseencargatotalmentehada
afueraenposid6nneutral,quetambi#npartidpaelfrenodeestadonamiento,
muevael regulador/cebadorpalancadecontrolalaposid6nRAPIDO_!', gire
laIlavedecontactoalaposid6nSTOP6 YquitelaIlavedel
interruptor.
Noabandoneel asientodel tractor cortac_spedsin desengancharla toma
de fuerza(PTO).Adem_s,sedebecolocarlaspalancasde control de la
transmisi6ntotalmente hada afuera en posici6nneutra y activar elfreno
de mano.Sidejael tractor cortac_spedsin vigilancia, apagueel motor
girando la Ilavede encendidoy retirela.
Operaci6nen pendientes
Consulteindicadordependienteen laSecd6nFundonamientoSeguropara
determinarenqu(_pendientesno puedeoperareltractordemanerasegura.
Noutilice launidad en pendientesconuna inclinad6nmayorde 15grados
(elevaci6naproximadade 2-1/2piescada10 pies).Eltractor cortac_sped
podriavokar y causarlesionesgraves.
Usode la plataforma de corte
Aseguresequeel_readondesevaacortarest_librededesechos,ramitas,
piedras,cablesuotrosobjetosquepuedansetarrojadospotlascuchillasrotativas.
NOTA:Noenganchelaplataformadecortecuandoest_bajasobreel pasto.Se
produceeldesgasteprematuroy laposiblefalladelacorreaen"V" y delembrague
de latomade fuerza(PTO).Antesdeengancharlaplataformadecorte,levante
totalmentelaplataformao Ilevelam_quinaa un_readondenohayac_sped.
2.
3.
1. Siempreconduzcael tractordeformatransversala lapendiente,nunca
hadaarfibay hadaabajo.Controlelaveloddady ladirecd6ndeltractor 6.
cortac_spedusandopfindpalmentelapalancade controldel ladodel tractor
cortac_spedquequeda'cuestaabajo',mientrasquelapalancadecontroldel
lado'cuestaarfiba'permaneceesendalmentefija. 7.
2. EnIo posibleevitegirarcuestaabajo.Comienceenla basedelapendientey
operecuestaarfiba.Siemprereduzcalaveloddadantesdedarlavuelta. 8.
3. Pongaespecialcuidadoyconduzcalentamentealgirarcuestaabajo.
Operaci6nde ia PTO 9.
Opereelembraguede latomade fuerza(PTO)de lasiguienteforma:
1. Muevalapalancadecontroldelacelerador/estranguladoraproximadamente
alaposid6ndeacelerad6nintermedia.
2. Tiredelinterruptorde latomadefuerza(PTO)hadaarfibaala posid6n
ENGAGED(activado).
3. Muevalapalancadelacelerador/estranguladorhadaadelantea laposid6n
FAST_ (veloddadr_pida)(deacelerad6nm_xima).
4. Eloperadordebepermanecersentadoeneltractorcortac_spedentodo
momento.SIeloperadordebeabandonarelasientosinapagarel interruptor
delatomadefuerza,seapagar_el motordeltractorcortac_sped.
5. Nosepuedeutilizarelembraguedela tomadefuerza(PTO)cuandoel
tractorcortac_spedsedesplazamarchaatr_s.LaPTOsedesenganchar_
cuandosedesplazanambaspalancasdecontrolde latransmisi6nhastala
posid6ndemarchaatr_sy volver_aengancharsecuandosedesplaceuna
(oambas)palancade controlala posid6nneutraode marchaadelante.
Cortede formatransversalala pendiente,no hadaarfibani hadaabajo.Si
cortael c_spedenpendiente,comienceporlabasey despl_cesehadaarfiba
paraasegurarquesiempresegirecuestaarfiba.
AIrealizarla pfimerapasadaelija un puntodelladoopuestodel_reaacortar.
Engancheelembraguede latomadefuerza(PTO)usandoel interruptorde
latomadefuerza(PTO)y muevaelcontroldelacelerador/estranguladora la
poslcl6nFAST(veloddadr_plda).
Bajela plataformade cortealajustede alturadeseadousandolamanija
de elevad6n.
Empujelaspalancasdecontroldelladoderechoy del ladoizquierdo
lentamentey deformaparejahadaadelanteparaqueeltractorcortac_sped
avancehadaadelante,y mantengalaofientad6ndeltractorenI[nearecta
hadael puntode alinead6n.
NOTA:Laveloddaddeltractorcortac_spedafectalacalidaddelcorteque
reallzalacortadora.Sirealizaeltorte am_ximaveloddadlacalidadseve
afectadanegativamente.Controlelaveloddadabsolutaconlaspalancas
de control.
Cuandoseacerquealotroextremodelafranja,reduzcalaveloddado
det_ngaseantesdegirar.SerecomiendarealizarungiroenUa menosque
seanecesafiorealizarungiroderadiocero.
Alineelacortadoradec_spedconunbordede lafranjacortaday superponga
la pasadaaproximadamente3pulgadas.
Orienteeltractorcortac(_speden cadafranjasubsiguientede modoquese
alineeconlafranjayacortada.
Paraevitarla formad6nde surcoso ranurasenel c_sped,enIo posiblevafie
ladirecd6ndelasfranjasdecorteaproximadamente450encadacorte
subsiguiente.
Tengasumocuidadoal atravesarsenderosde gravao caminosdeacceso.
Desenganchelatoma de fuerza(PTO)ylevante la plataforma hastala
posici6nm_salta antesde cruzar.
NOTA:Siemprequedetengaeltractorcortac_spedporcualquierraz6nenun
_reade c_sped,hagaIosiguiente:
Coloquelaspalancasde controlen neutral(frenodemano),
Apagueel motoryretirelaIlave.
SIIo hace,redudr_al minimolaposibilidaddequesuc_sped"
dorado"deescapecalientedel motorenmarchadesucortadorade
c_sped.
53

Comprobaci6ndel bloqueode seguridadCircuitos
Reviseperi6dicamentelosdrcuitosdeseguridadparaasegurarsedequefundonan
correctamente.S[uncircuitode seguridadno est_ifundonandocomosediseff6,en
contactoconusteddistribuidorCubCadetparaque[nspecdoneeltractor. NOopere
eltractors[cualquierdrcuitode seguridadno est_ifundonandocorrectamente.
Paracomprobarlosdrcuitosdeseguridad,sigaestospasos:
1. TiredelinterruptordelaTDFhadaarribaa laposiddndeSTART_.
Moment_ineamentegirarel[nterruptordeencendidoala posid6nde[nido,
elmotornodebearrancar.
Muevalasdospalancasdecontroltotalmentehadaadentroenla posJd6n
neutral,acontinuad6n,levantehadaarribadesdeelasientodel operador.
Elmotordebedetenerse.
3. Conlasdospalancasdecontroltotalmentehadaafueraen posid6nde
acoplamientoneutral/ frenode mano,conectarla PTO.Levantehadaarriba
desdeel asientodeloperador,el motorsedetendr_i.
4. Arranqueel tractorymoverlaspalancasdecontrolhadaadentroa la
posid6ndeoperad6nneutral.Activeel PTOy movertanto lapalancade
controllentamenteala posid6nde retrocesolento, el PTOdeberetirarlas
tropasy elequipode cortedebeparar.
54
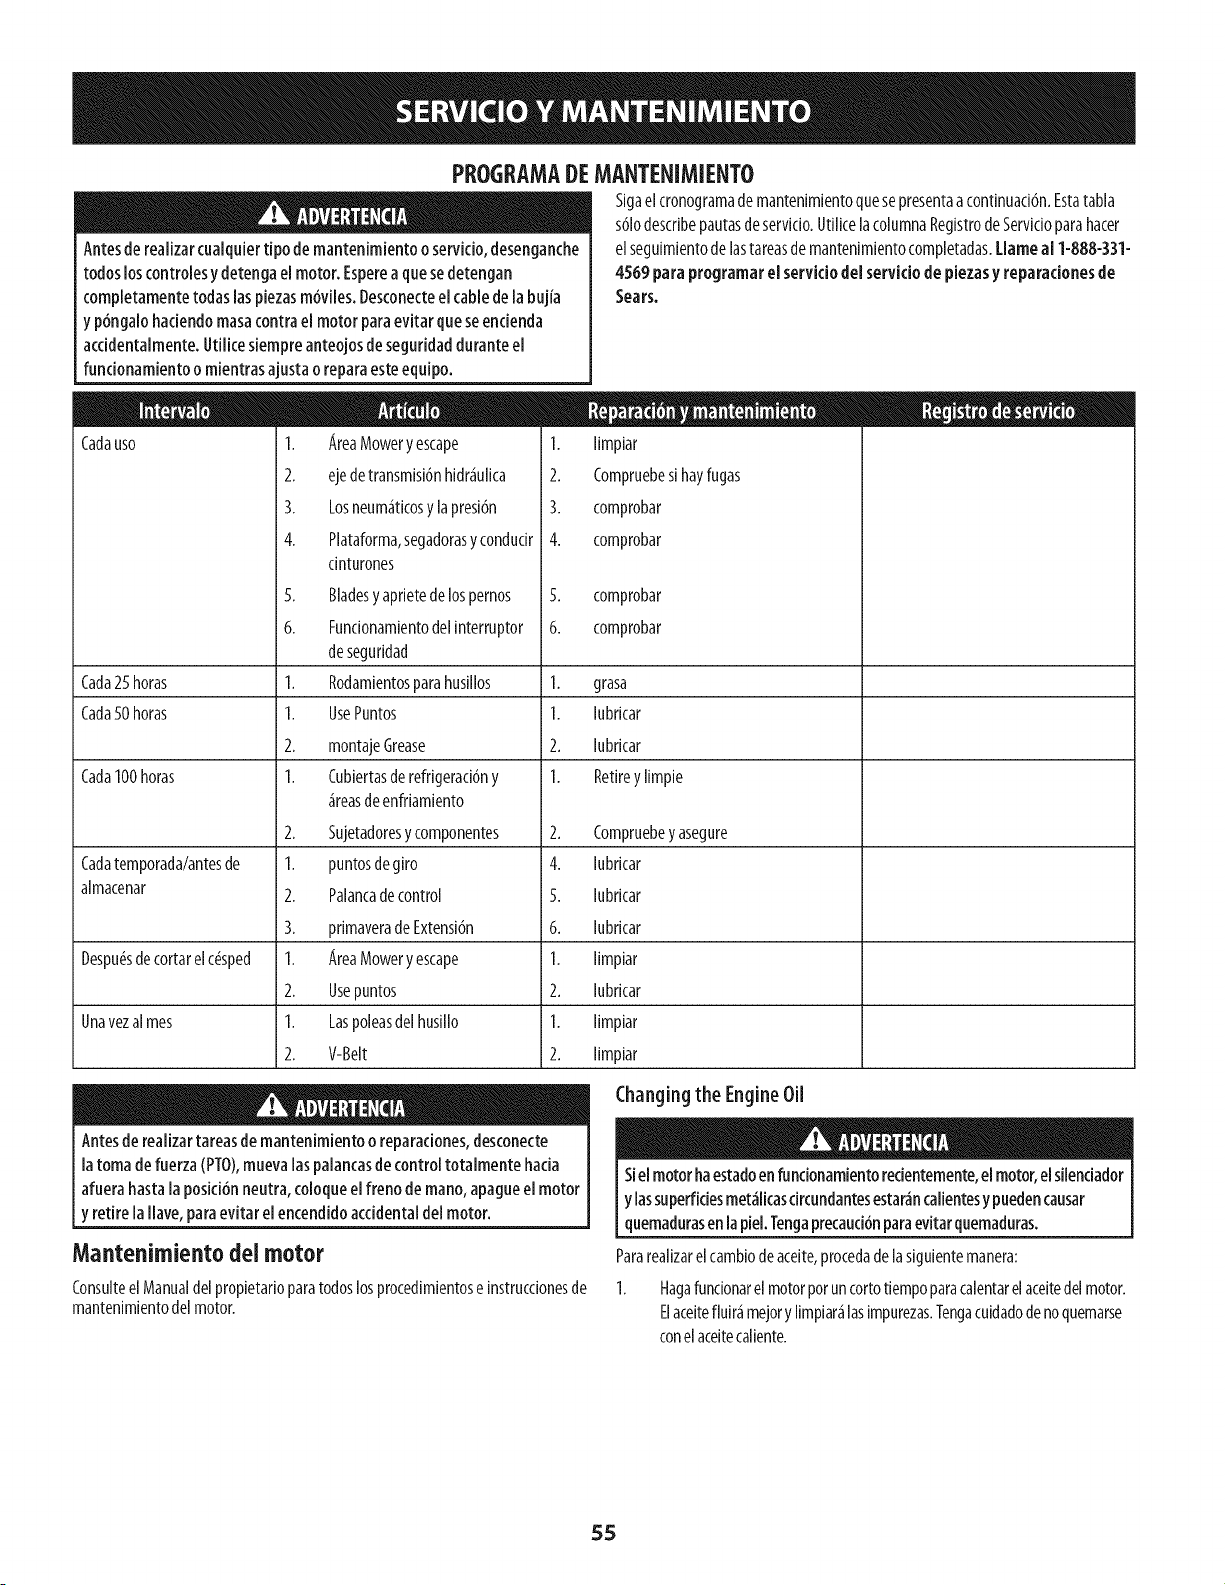
PEOGEAMADEMANTENIMIENTO
Antesde realizarcuaiquiertipo demantenimiento o servicio,desenganche
todosloscontrolesydetenga el motor.Espereaque sedetengan
completamentetodaslas piezasm6viles.Desconecteelcablede labujia
y p6ngalobaciendomasacontrael motor para evitar queseencienda
accidentalmente.Utilicesiempreanteojosdeseguridaddurante el
funcionamientoo mientrasajusta o reparaesteequipo.
Cadauso
Sigael cronogramade mantenimientoquesepresentaa continuad6n.Estatabla
561odescribepautasdeservido.UtilicelacolumnaRegistrodeServidoparahacer
elseguimientodelastareasdemantenimientocompletadas.Llame al 1-888-331-
4569 para programar el servidodel servidode piezasy reparacionesde
Sears.
1. AreaMowery escape
2. ejede transmisi6nhidr_ulica
3. Losneum_ticosy lapresi6n
4. Plataforma,segadorasy condudr
cinturones
5. Bladesyaprietede lospernos
6. Fundonamientodel[nterruptor
deseguridad
I. Rodamientosparahusillos
I. UsePuntos
2. montajeGrease
I. Cubiertasderefrigerad6ny
_reasdeenfriamiento
2. 5ujetadoresy componentes
I. puntosdegiro
2. Palancadecontrol
3. primaveradeExtensi6n
I. AreaMowery escape
2. Usepuntos
I. Laspoleasdel husillo
2. V-Belt
Antesde realizartareasde mantenimiento o reparaciones,desconecte
latoma de fuerza(PTO),muevalaspalancasde control totalmente hacia
afuera hastala posici6nneutra, coloqueelfreno de mano,apagueel motor
y retire la llave,paraevitar elencendidoaccidentaldel motor.
1. limpiar
2. Compruebesihayfugas
3. comprobar
4. comprobar
5. comprobar
6. comprobar
Cada25horas 1. grasa
Cada50horas 1. lubricar
2. lubricar
Cada100horas 1. Retirey limpie
2. Compruebey asegure
Cadatemporada/antesde 4. lubricar
almacenar 5. lubricar
6. lubricar
Despu(_sdecortarelc(_sped 1. limpiar
2. lubricar
Unavezalmes 1. limpiar
2. limpiar
Changing the EngineOil
Mantenimientodel motor
ConsuiteelManualdelpropietar[oparatodoslosprocedimientose[nstrucdonesde
mantenimientodel motor.
Siel motorhaestadoenfundonamientoredentemente,elmotor,el silenciador
y lassuperfidesmet_licascircundantesestar_ncalientesy puedencausar
quemadurasen lapiel.Tengaprecaud6nparaevitarquemaduras.
Pararealizarelcambiodeaceite,procedadelasiguientemanera:
1. Hagafundonarel motorporuncortotiempoparacalentarelaceitedelmotor.
Elaceitefluir&mejory limpiar&las[mpurezas.Tengacuidadodenoquemarse
conelaceitecaliente.
55
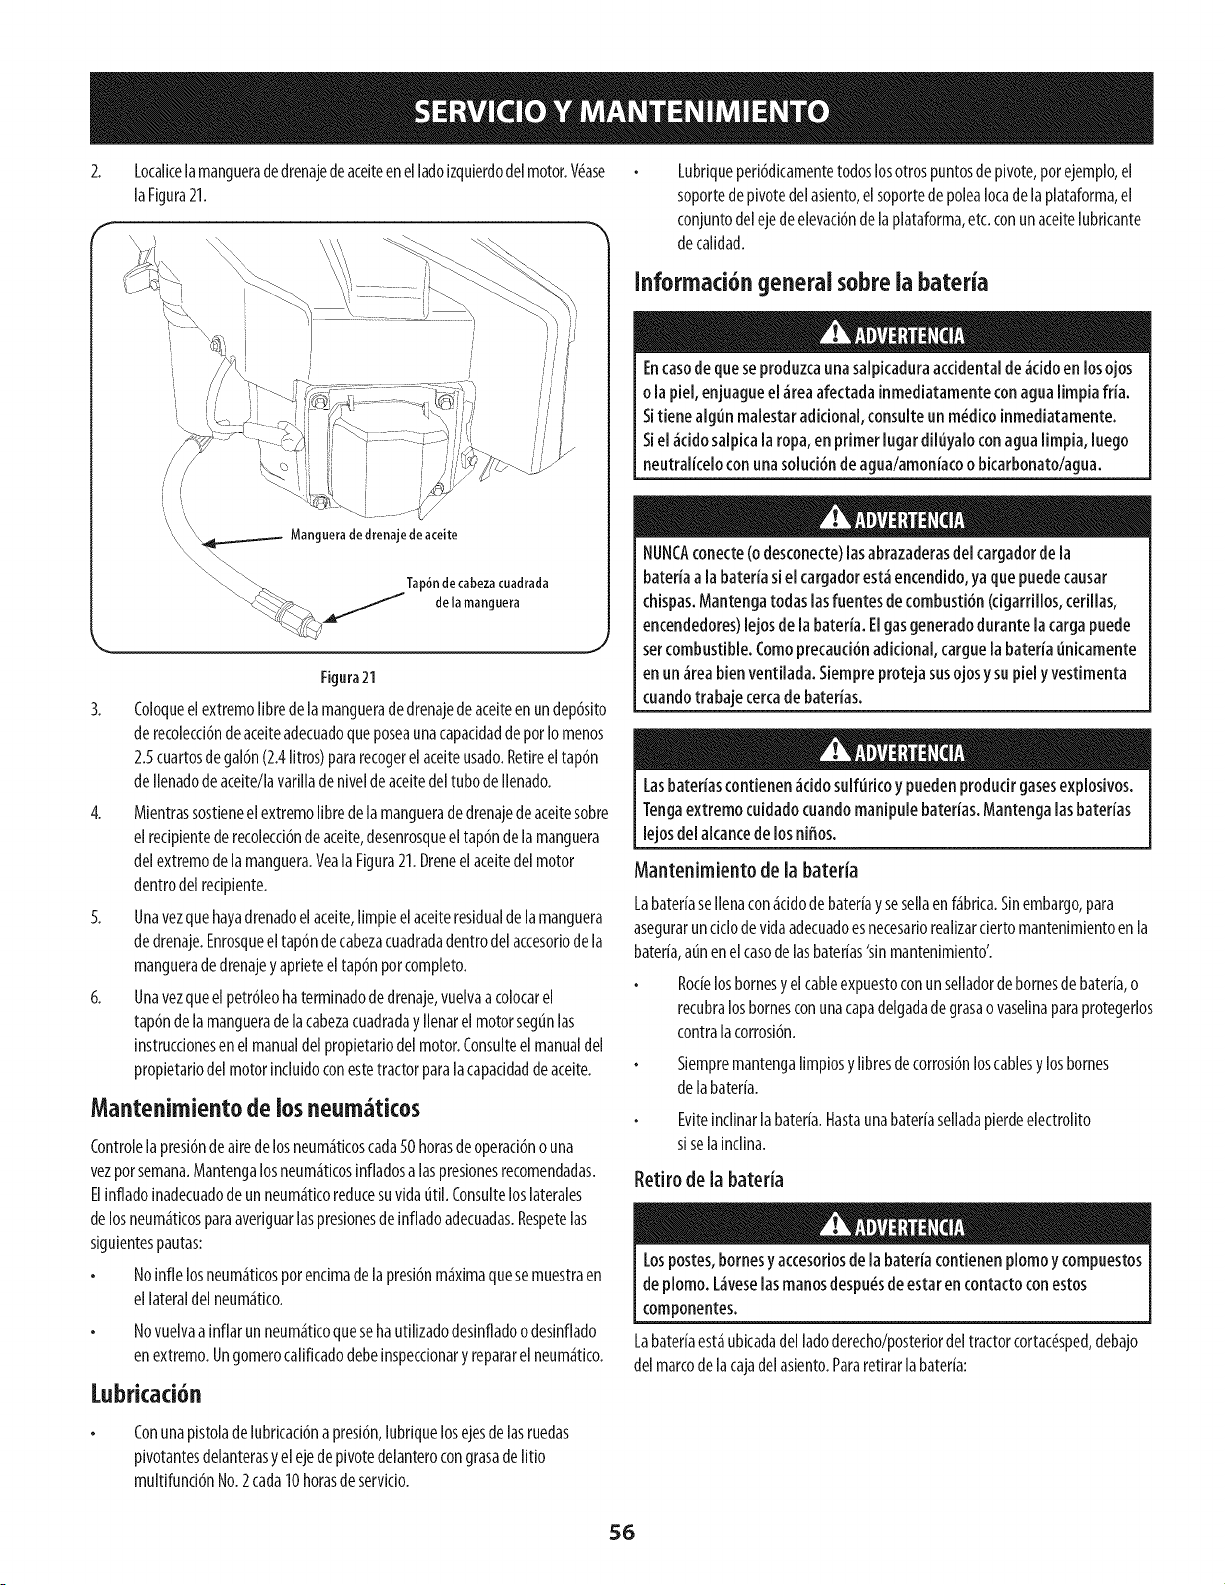
2.
Localicelamangueradedrenaedeaceiteenelladoizquierdodelmotor.V_ase
laFigura21.
Figura21
3.
Coloqueel extremolibredela mangueradedrenajedeaceiteen undep6sito
derecolecd6ndeaceiteadecuadoqueposeaunacapaddaddepotIo menos
2.5cuartosde gal6n(2.4litros)pararecogerelaceiteusado.Retireel tap6n
deIlenadodeaceite/lavarilladeniveldeaceitedeltubode Ilenado.
4. Mientrassostieneelextremolibredela manguerade drenajedeaceitesobre
elrecipientederecolecd6ndeaceite,desenrosqueeltapdndela manguera
delextremodelamanguera.Yeala Figura21.Dreneelaceitedel motor
dentrodel redpiente.
5. Unavezquehayadrenadoelaceite,limpieelaceiteresidualde lamanguera
dedrenaje.Enrosqueeltap6ndecabezacuadradadentrodelaccesonodela
mangueradedrenajey apneteeltapdnporcompleto.
6. Unavezqueelpetr61eohaterminadodedrenaje,vuelvaacolocarel
tap6ndelamanguerade lacabezacuadraday Ilenarel motorsegunlas
[nstrucdonesenel manualdel propietadodelmotor.Consulteel manualdel
propietadodelmotor[ncluidoconestetractorparalacapaddaddeaceite.
Mantenimientode los neum ticos
Controlelapresi6ndeairedelosneum_ticoscada50horasdeoperad6no una
vezporsemana.Mantengalosneum_ticosinfladosalaspresionesrecomendadas.
Elinfladoinadecuadodeunneum_ticoreducesuvldautil. Consulteloslaterales
delosneum_ticosparaaveriguarlaspresionesdeinfladoadecuadas.Respetelas
siguientespautas:
Noinfle losneum_ticosporendmade lapresi6nm_ximaquesemuestraen
ellateraldel neum_tico.
Novuelvaainflarunneum_iticoquesehautilizadodesinfladoodesinflado
enextremo.Ungomerocalificadodebeinspeccionaryrepararelneum_itico.
Lubrkad6n
Lubdqueperi6dkamentetodoslosotrospuntosde pivote,porejemplo,el
soportedepivotedelasiento,elsoportede poleaIotadela plataforma,el
conjuntodelejedeelevad6ndela plataforma,etc.conunaceitelubrkante
de calidad.
Informaci6ngeneralsobre ia bateria
Encasodequeseproduzcaunasalpkadura accidentalde _cidoen losojos
o lapie[,enjuagueel _ireaafectadainmediatamentecon agua[impiafr(a.
Sitiene algun malestaradicional,consulteun m_dicoinmediatamente.
Siel _iddosalpka la ropa,en primer lugar diluyalocon agua[impia, luego
neutralice[ocon unasolud6n de agua/amoniacoo bicarbonato/agua.
NUNCAconecte(odesconecte)lasabrazaderasde[ cargadorde la
bateriaa la bateriasi el cargadorest_encendido,ya quepuedecausar
cNspas.Mantengatodas lasfuentesde combusti6n(dgarrillos, cerillas,
encendedores)lejosde labateria. Elgasgeneradodurante la cargapuede
setcombustible.Comoprecauci6nadicional,carguela bateria unkamente
en un _ireabienventilada. Siempreproteja susojosysu piely vestimenta
cuandotrabajecercade baterias.
Lasbateriascontienen_iddosulfurko y puedenprodudr gasesexplosivos.
Tengaextremo cuidado cuandomanipulebaterias.Mantengalas baterias
lejosde[alcancede los niffos.
Mantenimiento de la bateria
Labater[aseIlenacon_cidode bater[ay sesellaenf_brica.Sinembargo,para
asegurarundclo devidaadecuadoesnecesariorealizarderto mantenimientoen la
bater[a,at_nenelcasodelasbater[as'sinmantenimiento'.
Roc[elosbornesy elcableexpuestoconun selladordebornesdebater[a,o
recubralosbornesconunacapadelgadadegrasao vaselinaparaprotegerlos
contralacorrosi6n.
Siempremantengalimpiosy libresdecorrosi6nloscablesylosbornes
de labater[a.
Eviteindinar la bater[a.Hastaunabater[aselladapierdeelectrolito
si selalncllna.
Retirode la bateria
Lospostes,bornesy accesoriosdela bateriacontienenplomo ycompuestos
deplomo. L_iveselasmanosdespu_sdeestar encontactoconestos
componentes.
Labater[aest_ubicadadel ladoderecho/posteriordel tractorcortac(_sped,debajo
del marcode la cajadel asiento.Pararetirarlabater[a:
ConunapJstoladelubrJcad6napresi6n,lubriquelosejesdelasruedas
pivotantesdelanterasy elejede pivotedelanterocongrasadelitio
multifund6nNo.2cada10horasde servido.
56
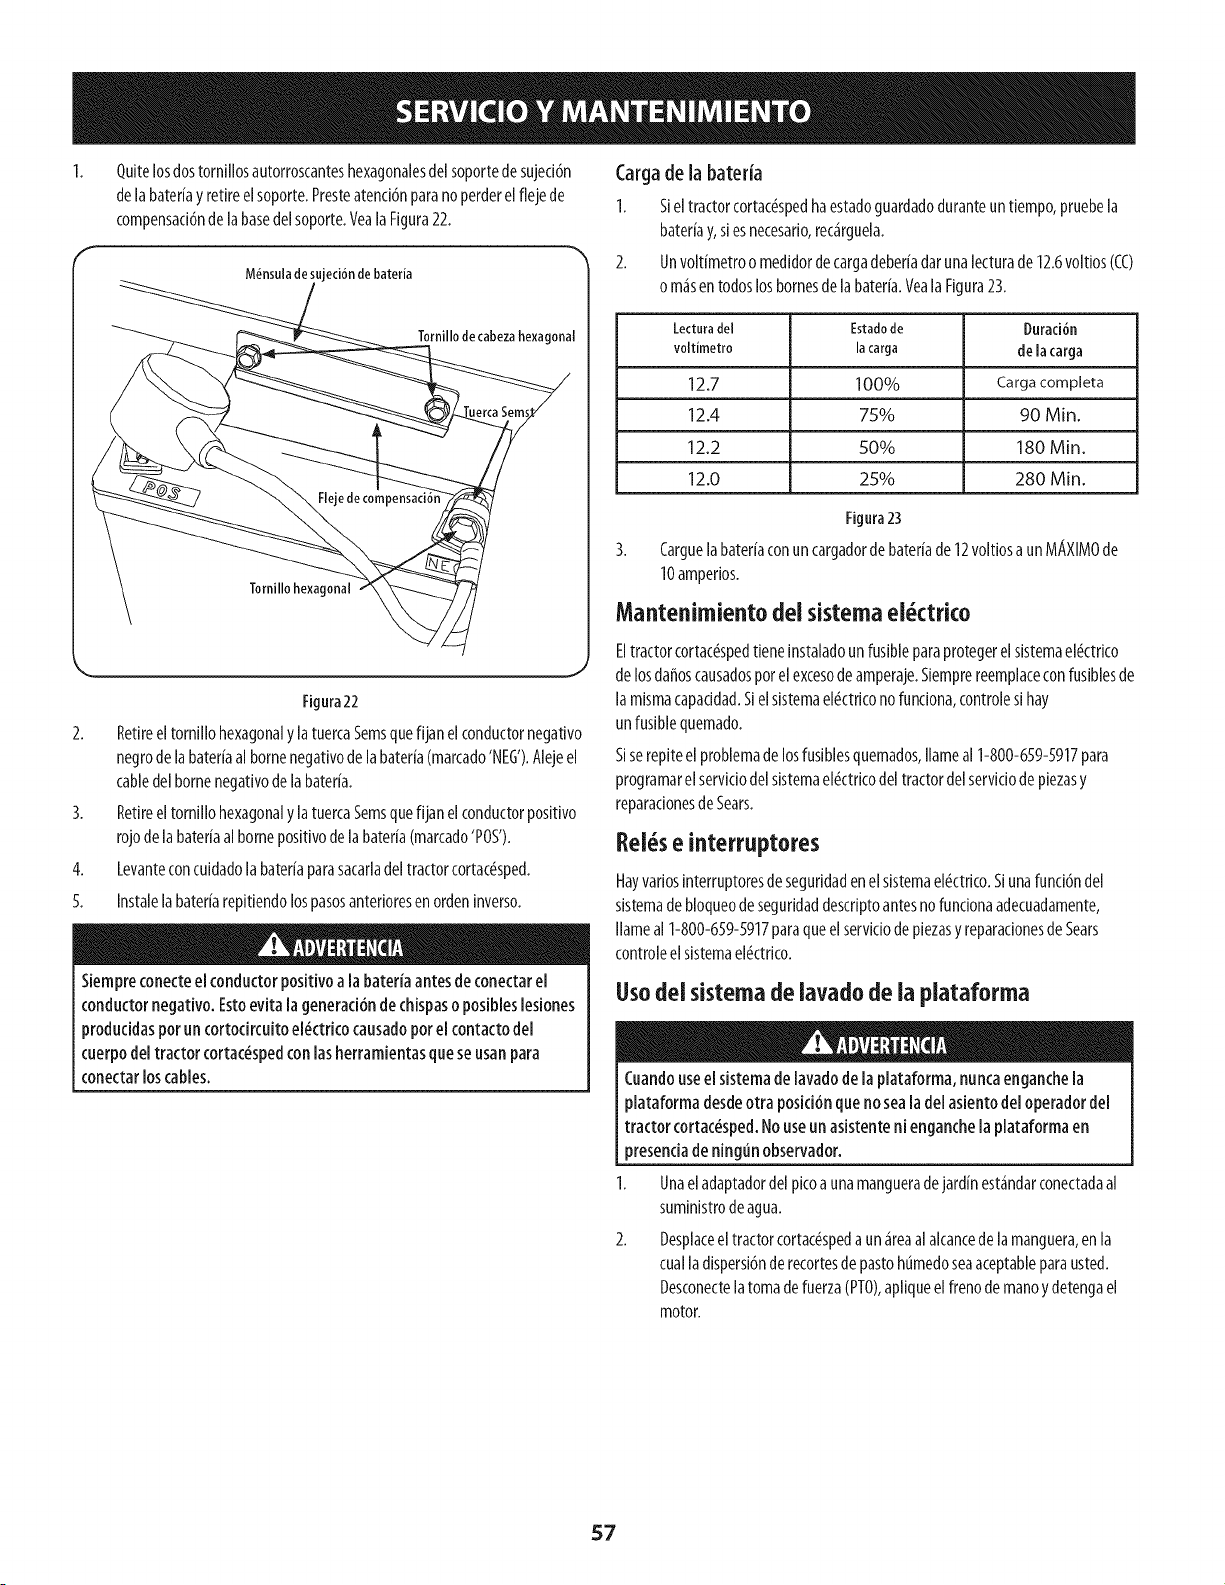
Quitelosdostornillosautorroscanteshexagonalesdelsoportede sujed6n
delabateriay retireelsoporte.Presteatenddnparanoperderelflejede
compensad6ndela basedelsoporte.Veala Figura22.
Tornillo de cabeza hexagonal
M_nsula de sujed6n de bateria
Figura22
2. Retireeltornillohexagonaly latuercaSemsquefijanelconductornegativo
negrodelabateriaal bornenecjativode labateria(marcado'NEG').Alejeel
cabledelbornenecjativodelabateria.
3. RetireeltomillohexagonalylatuercaSemsquefijanelconductorpositivo
rojodelabateriaal bornepositivode labateria(marcado'POS').
4. Levanteconcuidadola bateriaparasacarladeltractorcortac_sped.
5. Instalelabateriarepitiendolospasosanterioresenordeninverso.
Siempreconecteel conductorpositivoa labateria antesde conectarel
conductornegativo.Estoevita lageneraci6nde chispaso posibleslesiones
producidaspor un cortocircuitoel_ctrico causadoporel contactodel
cuerpodel tractor cortac_spedconlasherramientasqueseusanpara
conectarloscables.
Cargade la bateda
I. sieltractorcortac_spedhaestadocjuardadoduranteun tiempo,pruebela
bateriay,siesnecesario,rec_rguela.
2. Unvoltimetroomedidordecarcjadeberiadarunalecturade 12.6voltios(CC)
o m_sentodoslos bornesdelabateria.VealaFicjura23.
Lectura del Estadode Durad6n
voltimetro la carga de la carga
12.7 100% Carga completa
12.4 7,5% 90 Min.
12.2 .50% 180 Min.
12.0 25% 280 Min.
Figura23
3. Carcjuelabateriaconuncarcjadorde bateriade 12voltiosa unMAXIMOde
10amperios.
Mantenimiento del sistemael ctri¢o
Eltractorcortac_spedtieneinstaladounfusibleparaprotegerel sistemael_ctrico
de losda_oscausadospot elexcesodeamperaje.Siemprereemplaceconfusiblesde
la mismacapaddad.Sielsistemael_ctrkono fundona,controlesi hay
un fusiblequemado.
Siserepiteel problemadelosfusiblesquemados,Ilameal 1-800-659-5917para
programarelservkiodelsistemael_ctrkodeltractordelservkiodepiezasy
reparacionesde Sears.
liel s e interruptores
Hayvariosinterruptoresdeseguridadenelsistemael_ctrico.Siunafunci6ndel
sistemadebloqueodeseguridaddescriptoantesno funcionaadecuadamente,
Ilameal 1-800-659-5917paraqueelserviciode piezasy reparacionesdeSears
controleel sistemael_ctrico.
IJsodel sistemade lavado de la plataforma
Cuandouseel sistemade lavadode la plataforma, nuncaencjanchela
plataforma desdeotra posici6nquenoseala del asientodel operadordel
tractor cortac_sped.Nouseun asistenteni encjanchela plataformaen
presendade nincjtin observador.
Unaeladaptadordelpicoa unamangueradejardinest_ndarconectadaal
suministrodeagua.
Desplaceeltractorcortac_spedaun _reaalalcancede la manguera,en la
cualladispersi6nderecortesdepastoht_medoseaaceptableparausted.
Desconectelatomadefuerza(PTO),apliqueel frenodemanoy detengael
motor.
57
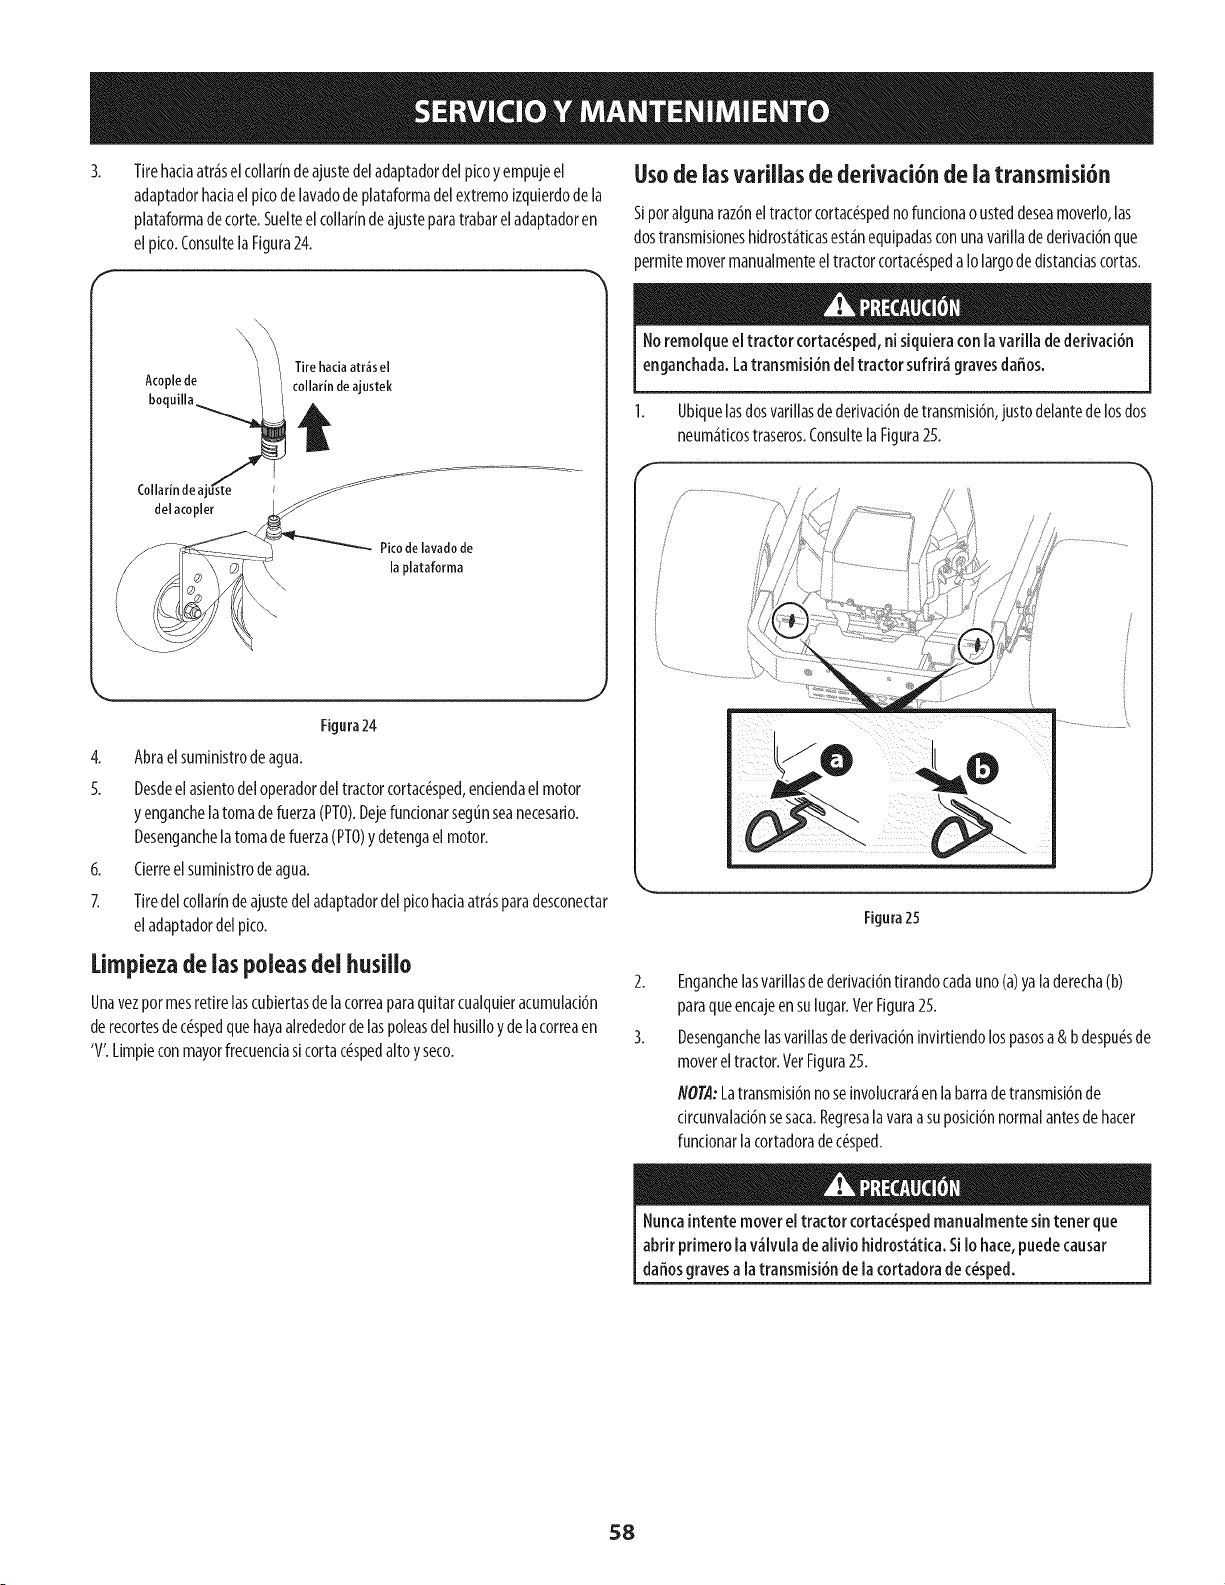
3.
Tirehadaatr_selcollarinde ajustedeladaptadordelpicoy empujeel
adaptadorhaciael picodelavadodeplataformadel extremoizquierdodela
plataformadecorte.Suelteel collarindeajusteparatrabareladaptadoren
elpico.ConsultelaFigura24.
Usode ias varUias de derivaci6n de ia transmisi6n
Siporalgunaraz6neltractorcortac_spednofundonaousteddeseamoverlo,las
dostransmisioneshldrost_ticasest_nequlpadasconunavarllladederlvad6nque
permitemovermanualmenteeltractorcortac_speda Iolargode distandascortas.
Tire haciaatr_s el
Acoplede 1 , collarindeajustek
boquilla _ i
Colladnde aju'ste i
del acopler
\
Picode lavado de
la plataforma
Figura24
4. Abrael suministrodeagua.
5. Desdeelasientodel operadordel tractorcortac_sped,enciendaelmotor
y enganchelatomadefuerza(PTO).Dejefundonarsegunseanecesario.
Desenganchelatomadefuerza(PTO)ydetengaelmotor.
6. Cierreel suministrodeagua.
Z Tiredelcollarindeajustedeladaptadordelpicohadaatr_sparadesconectar
eladaptadordelpko.
Limpiezade laspoleasdel husillo
Unavezpormesretirelascubiertasdelacorreaparaquitarcualquieracumulad6n
derecortesdec_spedquehayaalrededordelaspoleasdelhusilloyde lacorreaen
'V'.Limpieconmayorfrecuenciaslcortac_spedalto y seco.
Noremolqueel tractor cortac_sped,ni siquieraconlavarilladededvad6n
enganchada.Latransmisi6ndel tractor sufrir_gravesdaffos.
Ubiquelasdosvarlllasdederivad6ndetransmlsl6n,justodelantedelosdos
neum_ticostraseros.Consultela Figura25.
Figura25
Enganchelasvarillasdederivaci6ntirandocadaunoCa)yaladerecha(b)
paraqueencajeensulugar.VetFigura25.
Desenganchelasvarillasdederivaci6ninvirtiendolospasosa& bdespu(_sde
movereltractor.VerFigura25.
NOTA:Latransmisi6nnoseinvolucrar_en labarradetransmisi6nde
drcunvalad6nsesaca.Regresalavaraa suposid6nnormalantesde hacer
fundonarlacortadoradec(_sped.
Nuncaintente moverel tractor cortac_spedmanualmentesintenet que
abdr primerolav,_lvulade alivio hidrost_tica.Si Io hace,puedecausar
daffosgravesa la transmisi6nde la cortadorade c_sped.
58
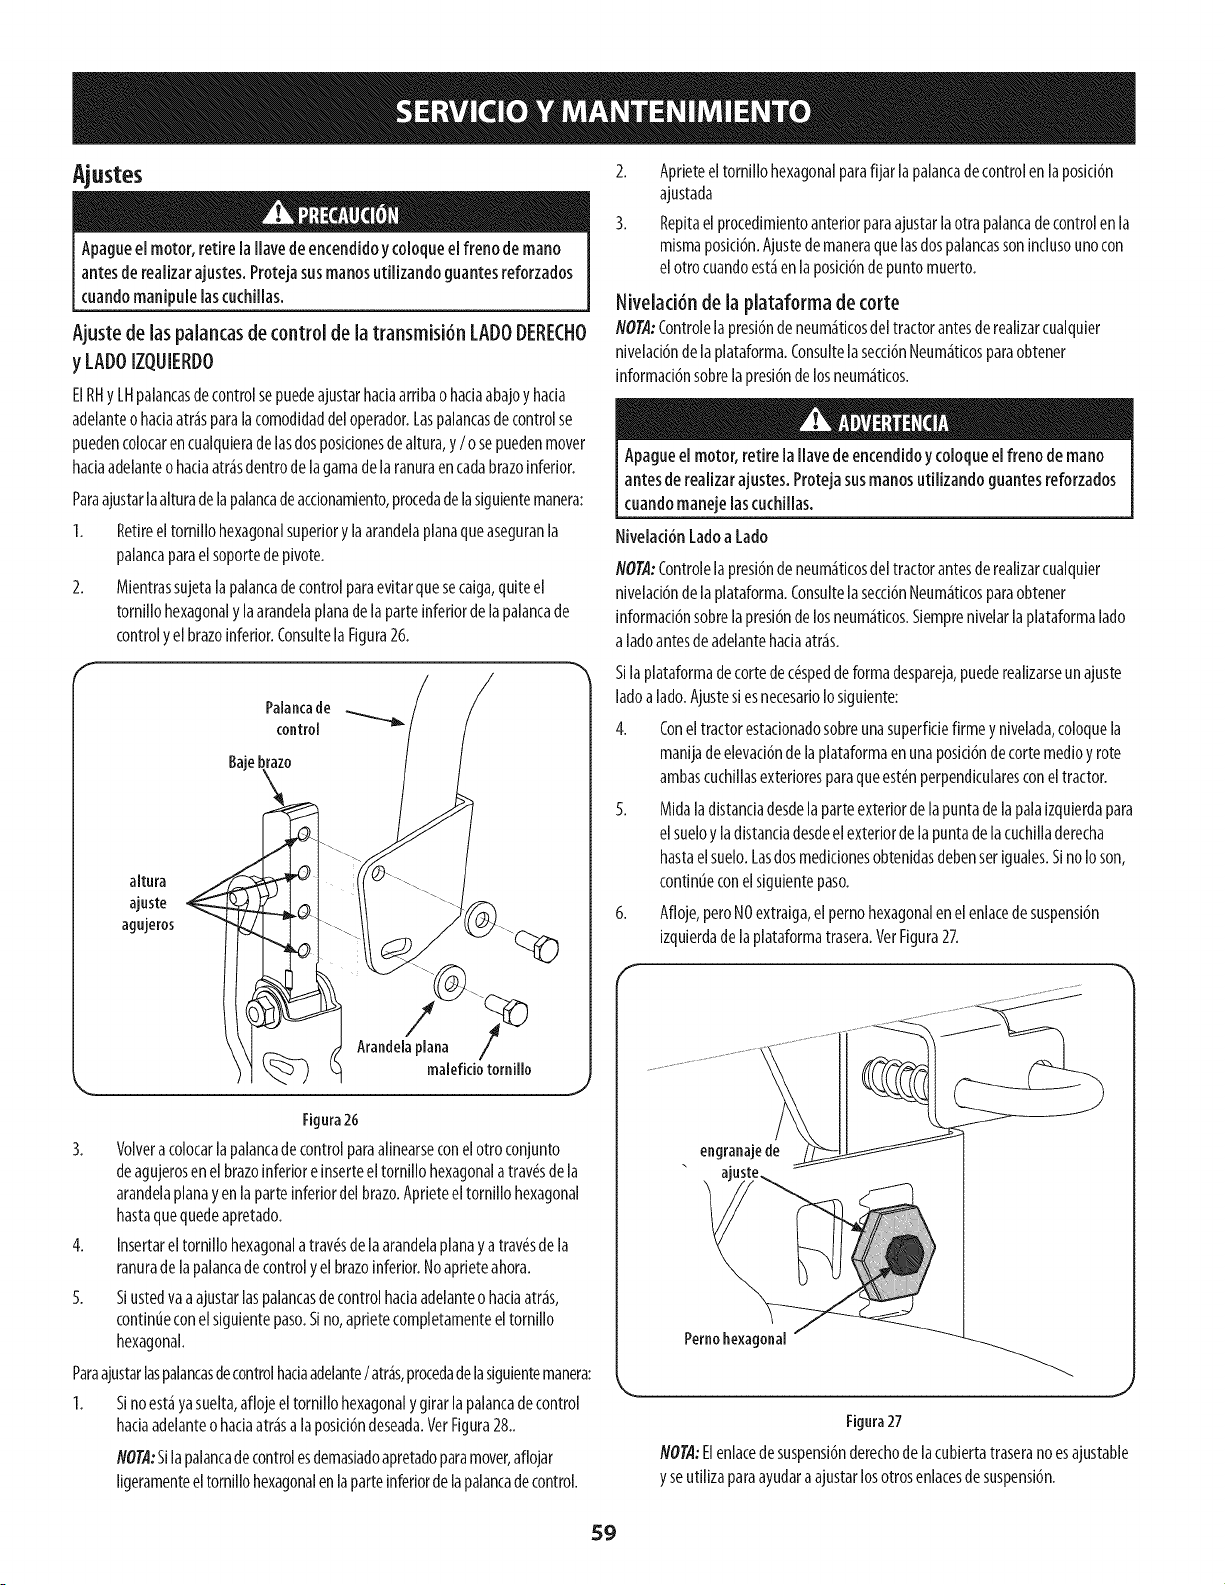
Ajustes
Apaguee[ motor, retire[a Havedeencendidoy coloqueel freno de mano
antesderealizarajustes.Protejasusmanosutilizandoguantesreforzados
cuandomanipule [ascuchillas.
Ajuste de [aspa[ancasdecontrolde [a transmisi6n LADODERECI-IO
y LADO[ZQU[ERDO
E[RHy LHpa[ancasde controlsepuedeajustarhadaardbao hadaabajoy hada
ade[anteohadaatr_spara[acomod[daddeloperador.Laspa[ancasde controlse
puedenco[ocaren cua[qu[erade[asdosposidonesdea[tura,y / osepuedenmover
hadaade[anteo hadaatr_sdentrode[agamade [aranuraencadabrazoinferior.
Paraajustar[aa[turade[apa[ancadeacdonam[ento,procedade[as[guientemanera:
1. Retiree[torn[[[ohexagonalsuperiory[aarande[ap[anaflueaseguran[a
pa[ancaparae[soportede p[vote.
2. M[entrassujeta[apa[ancadecontrolparaev[tarflueseca[ga,quitee[
torni[[ohexagonaly[aarande[ap[anade[aparte[nfedorde [apa[ancade
controly el brazoinferior.ConsultelaFigura26.
Palancade -_
control
Bajebrazo
altura
ajuste
agujeros
/
Arandelaplana /
_-_ maleficiotornillo
Figura26
3. Volveracolocarlapalancade controlparaalinearseconelotroconjunto
deagujerosenel brazoinferiore[nserteeltornfllo hexagonalatrav_sdela
arandelaplanayen laparteinferiordel brazo.Apdeteel tornfllohexagonal
hastaquequedeapretado.
4. Insertareltornillohexagonalatrav(!sde laarandelaplanay a trav_sdela
ranuradela palancadecontroly elbrazoinferior.Noapdeteahora.
5. SIustedvaa ajustarlaspalancasdecontrolhadaadelanteo hadaatr_s,
continueconelsiguientepaso.Sino,apdetecompletamenteeltorn[llo
hexagonal.
Paraajustarlaspalancasdecontrolhadaadelante/ atr_s,procedadelasiguientemanera:
I. S[noest_yasuelta,aflojeeltorn[llohexagonaly girar la palancadecontrol
hadaadelanteo hadaatr_sa la posid6ndeseada.VerFigura28..
IVOT,4:Silapalancadecontrolesdemasiadoapretadoparamover,aflojar
Iigeramenteeltornfllohexagonalenlaparteinferiordelapalancadecontrol.
2. ApdeteeltorniIIohexagonalparafijar lapalancadecontrolenlaposid6n
ajustada
3. Repitaelprocedimientoanteriorparaajustarlaotrapalancade controlen la
mismaposid6n.Ajustedemaneraquelasdospalancassoninclusounocon
elotro cuandoest_enlaposid6nde puntomuerto.
Nivelad6n de la plataforma de corte
NOt"A"Controlela presi6ndeneum_ticosdel tractorantesderealizarcualquier
n[velaci6nde laplataforma.Consu[tela secci6nNeum_ticosparaobtener
[nformad6nsobrelapresi6ndelosneum_ticos.
Apagueel motor, retirelaflare de encendidoy coloqueel frenode mano
antesde realizarajustes.Protejasusmanosutilizando guantesreforzados
cuandomanejelascuchillas.
Nivelad6n Ladoa Lado
NOt"A:Contro[ela presi6ndeneum_ticosdel tractorantesderealizarcualquier
n[velad6nde [aplataforma.Consu[telasecd6nNeum_tkosparaobtener
[nformad6nsobre[apres[6ndelosneum_ticos.S[empren[velarla plataformalado
a ladoantesdeadelantehadaatr_s.
Sila plataformadecortedec_spedde formadespareja,puederealizarseunajuste
ladoa lado.Ajustesi esnecesadoIos[gu[ente:
4. Conel tractorestadonadosobreunasuperficiefirme ynivelada,coloquela
manijadeelevad6nde la plataformaenunaposid6nde cortemed[oy rote
ambascuchiIlasextedoresparaqueest_nperpendicularesconeltractor.
5. Midaladistandadesdelaparteexteriorde lapuntadelapalaizquierdapara
elsueloy ladistandadesdeelexteriordela puntade la cuchilladerecha
hastaelsuelo.Lasdosmedidonesobtenidasdebenseriguales.SInoIoson,
contint_econelsiguientepaso.
6. Afloje,peroNOextraiga,el pernohexagonalen elenlacede suspensi6n
izquierdadelaplataformatrasera.VerFigura27.
engranaje de
Pernohexagonal
r
Fignra27
NOT,4:Elenlacedesuspensi6nderechodelacublertatraseranoesajustable
y seutfllzaparaayudaraajustarlosotrosenlacesdesuspensi6n.
59
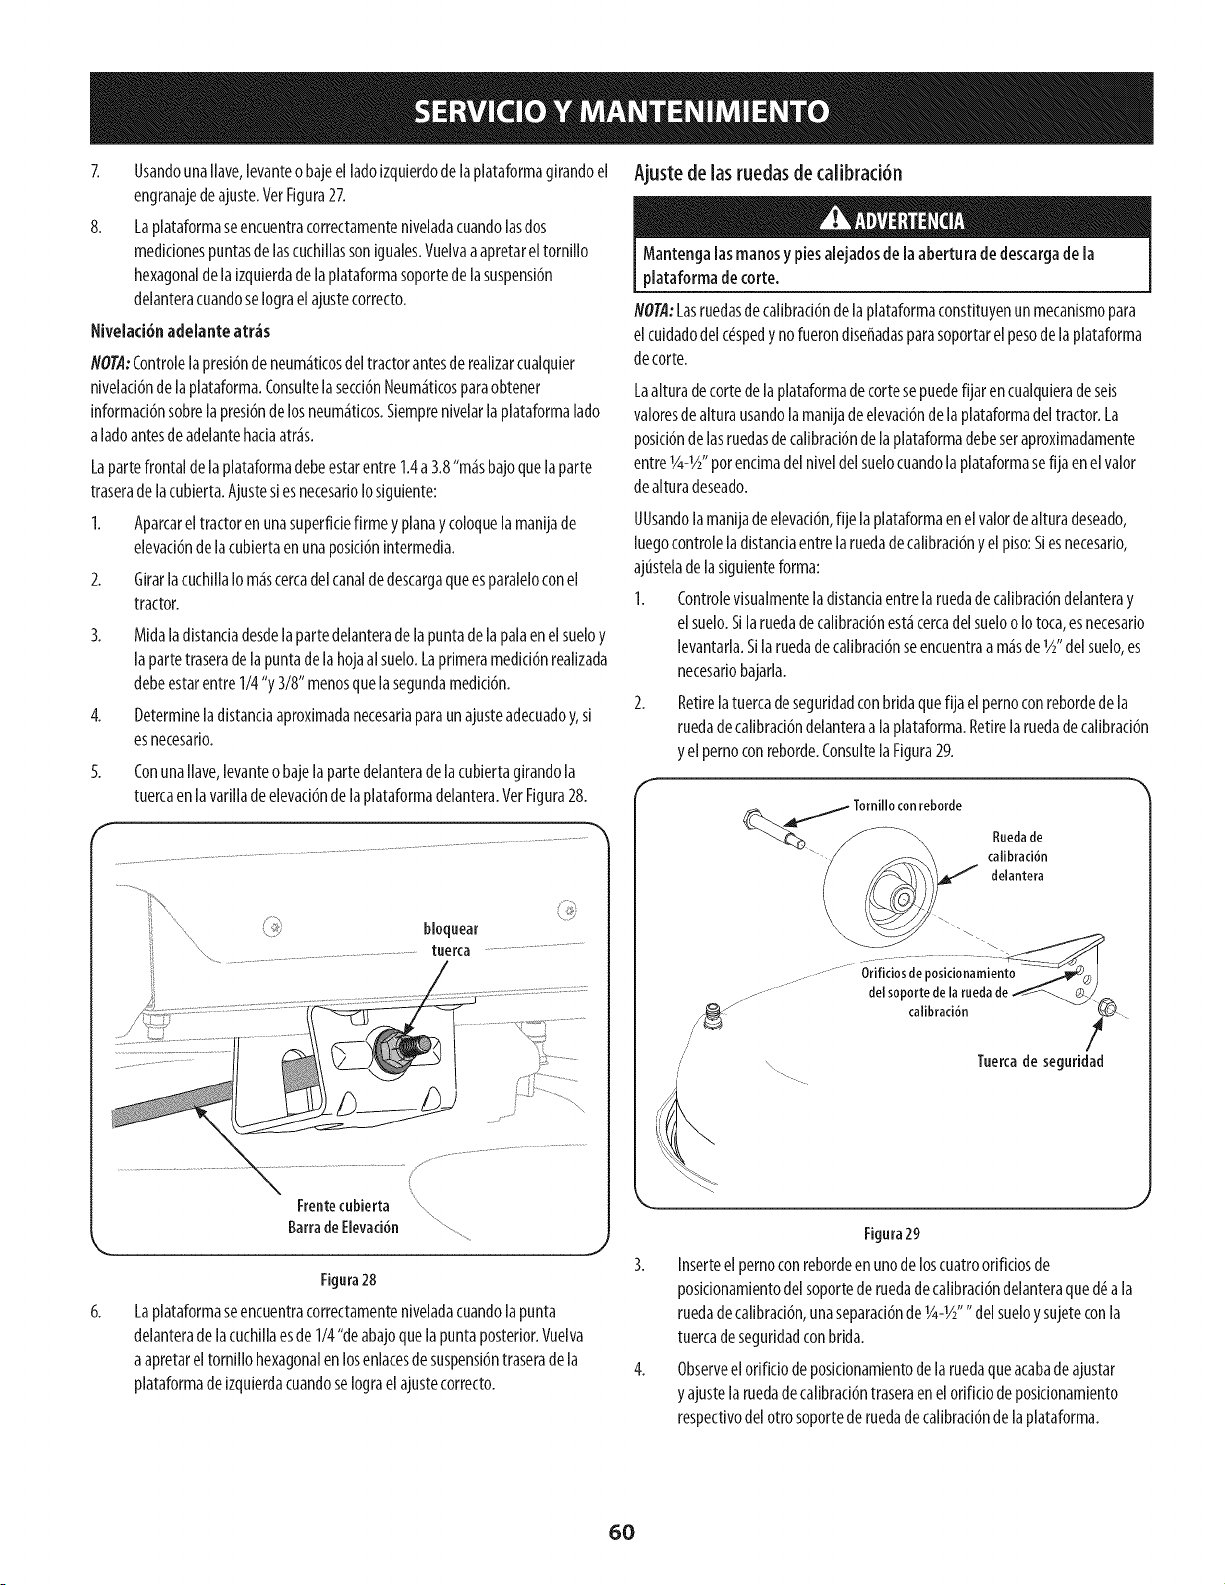
Z UsandounaIlave,levanteo bajeel ladoizquierdodelaplataformagirandoel
engranajedeajuste.VerFigura27.
8. Laplataformaseencuentracorrectamenteniveladacuandolasdos
medidonespuntasde lascuchillassoniguales.Vuelvaa apretareltornillo
hexagonaldelaizquierdadelaplataformasoportede lasuspensi6n
delanteracuandoseIograelajustecorrecto.
Nivelaci6n adelante atr_s
NOTA:Controlelapresi6nde neum_ticosdeltractorantesde realizarcualquier
nivelaci6ndelaplataforma.Consultelasecd6nNeum_ticosparaobtener
informad6nsobrelapresi6nde losneum_ticos.Siemprenivelarlaplataformalado
aladoantesde adelantehaciaatr_s.
Lapartefrontaldelaplataformadebeestarentre1.4a3.8"m_sbajoquelaparte
traserade lacubierta.AjustesiesnecesarioIosiguiente:
1. Aparcareltractoren unasuperfidefirme yplanay coloquelamanijade
elevaci6ndelacubiertaen unaposici6nintermedia.
2. GirarlacuchillaIom_scercadelcanaldedescargaqueesparaleloconel
tractor.
3. Midaladistanciadesdelapartedelanteradela puntade lapalaen elsueloy
lapartetraserade lapuntadelahojaalsuelo.Laprimeramedici6nrealizada
debeestarentre1/4"y 3/8" menosquelasegundamedid6n.
4. Determinela distanciaaproximadanecesariaparaunajusteadecuadoy,si
esnecesario.
5.
ConunaIlave,levanteobajelapartedelanterade lacubiertagirandola
tuercaenlavarilladeelevad6ndelaplataformadelantera.VerFigura28.
bloquear
"\ ............................................... tuerca ..............................................
6.
Frentecubierta
garradeElevaddn .......................
Figura28
Laplataformaseencuentracorrectamenteniveladacuandolapunta
delanterade lacuchillaesde1/4"deabajoquela puntaposterior.Vuelva
aapretarel tornillo hexagonalenlosenlacesde suspensi6ntraseradela
plataformadeizquierdacuandoseIograel ajustecorrecto.
Ajuste de las ruedasde calibrad6n
Mantengalasmanosy piesalejadosde laabertura dedescargade la
plataformade corte.
NOTA:Lasruedasdecalibrad6nde laplataformaconstituyenunmecanismopara
el cuidadodel c_spedy nofuerondiseffadasparasoportarelpesode laplataforma
detorte.
Laalturadecortedelaplataformadecortesepuedefijar encualquieradeseis
valoresdealturausandolamanijadeelevad6nde laplataformadeltractor.La
posici6nde lasruedasdecalibraci6ndelaplataformadebeseraproximadamente
entre1/4-1_"porencimadelniveldelsuelocuandola plataformasefijaenel valor
dealturadeseado.
UUsandolamanijade elevaci6n,fije laplataformaenel valordealturadeseado,
luegocontroleladistandaentrelaruedadecalibrad6ny el piso:Siesnecesario,
ajt_stelade lasiguienteforma:
1. Controlevisualmenteladistanciaentrela ruedadecalibraci6ndelanteray
elsuelo.Silaruedadecalibrad6nest_cercadelsueloo Iotoca,esnecesario
levantarla.Silaruedadecalibrad6nseencuentraa m_sde1_"delsuelo,es
necesariobajarla.
2. Retirelatuercadeseguridadconbridaquefijael pernoconrebordede la
ruedadecalibrad6ndelanteraa laplataforma.Retirelaruedadecalibraci6n
y el pernoconreborde.ConsultelaFigura29.
Tomillo con reborde
Ruedade
calibraci6n
delantera
Figura29
3. Inserteel pernoconrebordeenunodeloscuatroorificiosde
posicionamientodelsoportederuedade calibrad6ndelanteraqued(_ala
ruedadecalibraci6n,unaseparaci6nde V4-V/'"delsueloy sujeteconla
tuercadeseguridadconbrida.
4. Observeelorificiode posicionamientode laruedaqueacabadeajustar
y ajustelaruedadecalibrad6ntraseraenelorificio deposicionamiento
respectivodelotrosoportederuedade calibraci6ndela plataforma.
6O
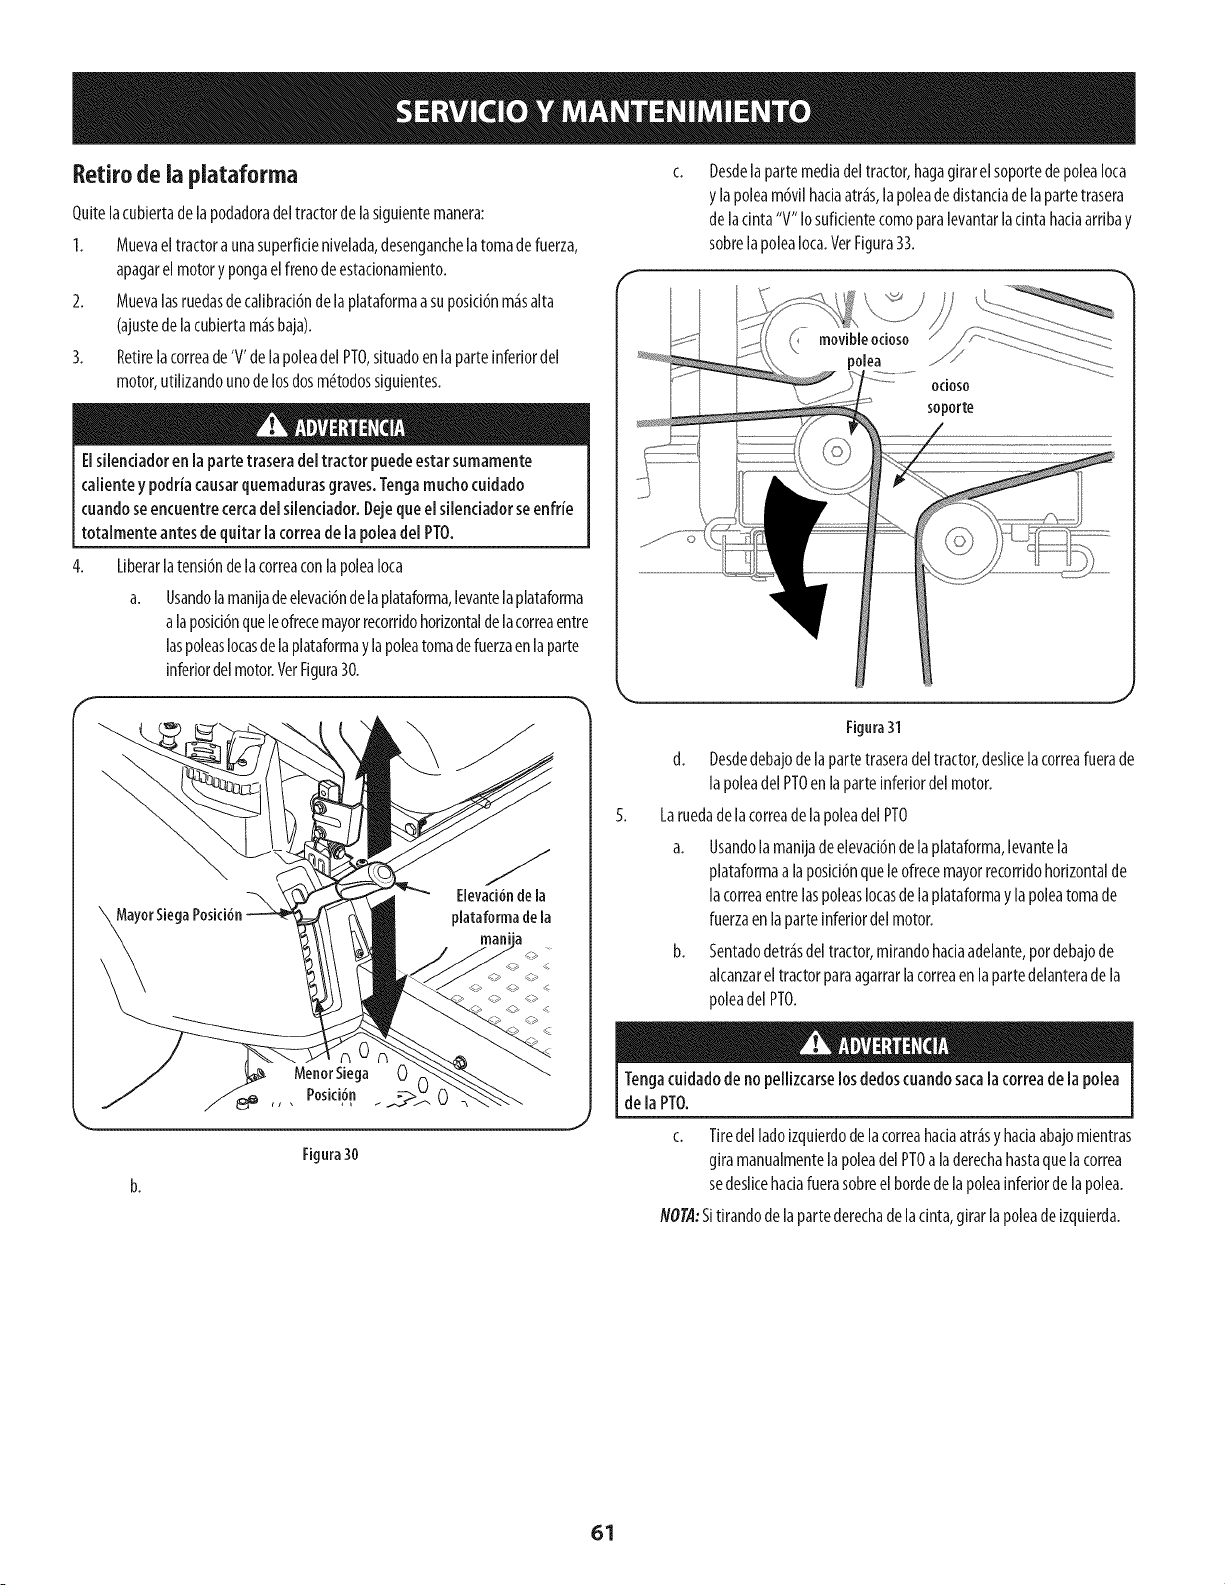
Retiro de ia plataforma
Quitelacubiertade lapodadoradeltractordelasiguientemanera:
1. Muevaeltractoraunasuperfidenivelada,desenganchelatomadefuerza,
apagarelmotory pongaelfrenodeestadonamiento.
2. Muevalasruedasdecalibrad6nde laplataformaasuposid6nm_salta
(ajustede lacubiertam_sbaja).
3. Retirelacorreade'V' delapoleadelPTO,situadoenlaparteinferiordel
motor,utilizandounodelosdosm_todossigulentes.
Elsilenciadorenla parte traseradel tractor puedeestar sumamente
calientey podriacausarquemadurasgraves.Tengamuchocuidado
cuandoseencuentrecercadel silenciador.Dejequeelsilenciadorseenfrie
totalmente antesde quitarlacorreadela poleadel PTO.
4.
Liberarlatensi6ndelacorreaconlapoleaIota
a. Usandolamanijadeelevad6ndelaplataforma,levantelaplataforma
alaposid6nqueleofrecemayorrecorridohorizontaldelacorreaentre
laspoleasIotasdelaplataformay lapoleatomadefuerzaenlaparte
inferiordelmotor.VerFigura30.
MayorSiegaPosici6n
J
Elevaci6ndela
plataformadela
mani"
Figura 30
J
Desdelapartemediadeltractor,hagagirarel soportedepoleaIoca
y lapoleam6vilhadaatr_s,[apoleade distandade lapartetrasera
de ladnta "V" 1osufidentecomoparalevantarladnta hadaarribay
sobrela poleaIoca.VetFigura33.
movible ocioso
polea
odoso
soporte
Figura31
d. Desdedebajode lapartetraseradeltractor,desllcelacorreafuerade
lapoleadelPTOenlaparteinferiordelmotor.
Laruedadelacorreadelapoleadel PTO
a. Usandolamanijadeelevaci6ndelaplataforma,levantela
plataformaa laposici6nqueleofrecemayorrecorridohorizontalde
lacorreaentrelaspoleasIocasdelaplataformay lapoleatomade
fuerzaen laparteinferiordel motor.
b. Sentadodetr_sdel tractor,mirandohaciaadelante,pordebajode
alcanzarel tractorparaagarrarlacorreaenla partedelanteradela
poleadelPTO.
Tengacuidadode nopellizcarselosdedoscuandosacalacorreade la polea
de la PTO.
c. Tiredel ladoizquierdodelacorreahadaatr_sy hadaabajomientras
giramanualmentelapoleadelPTOa laderechahastaquelacorrea
sedeslkehaciafuerasobreel bordedela poleainferiorde lapolea.
NOTA:S[tirandodelapartederechadeladnta, girarlapoleade[zqulerda.
61
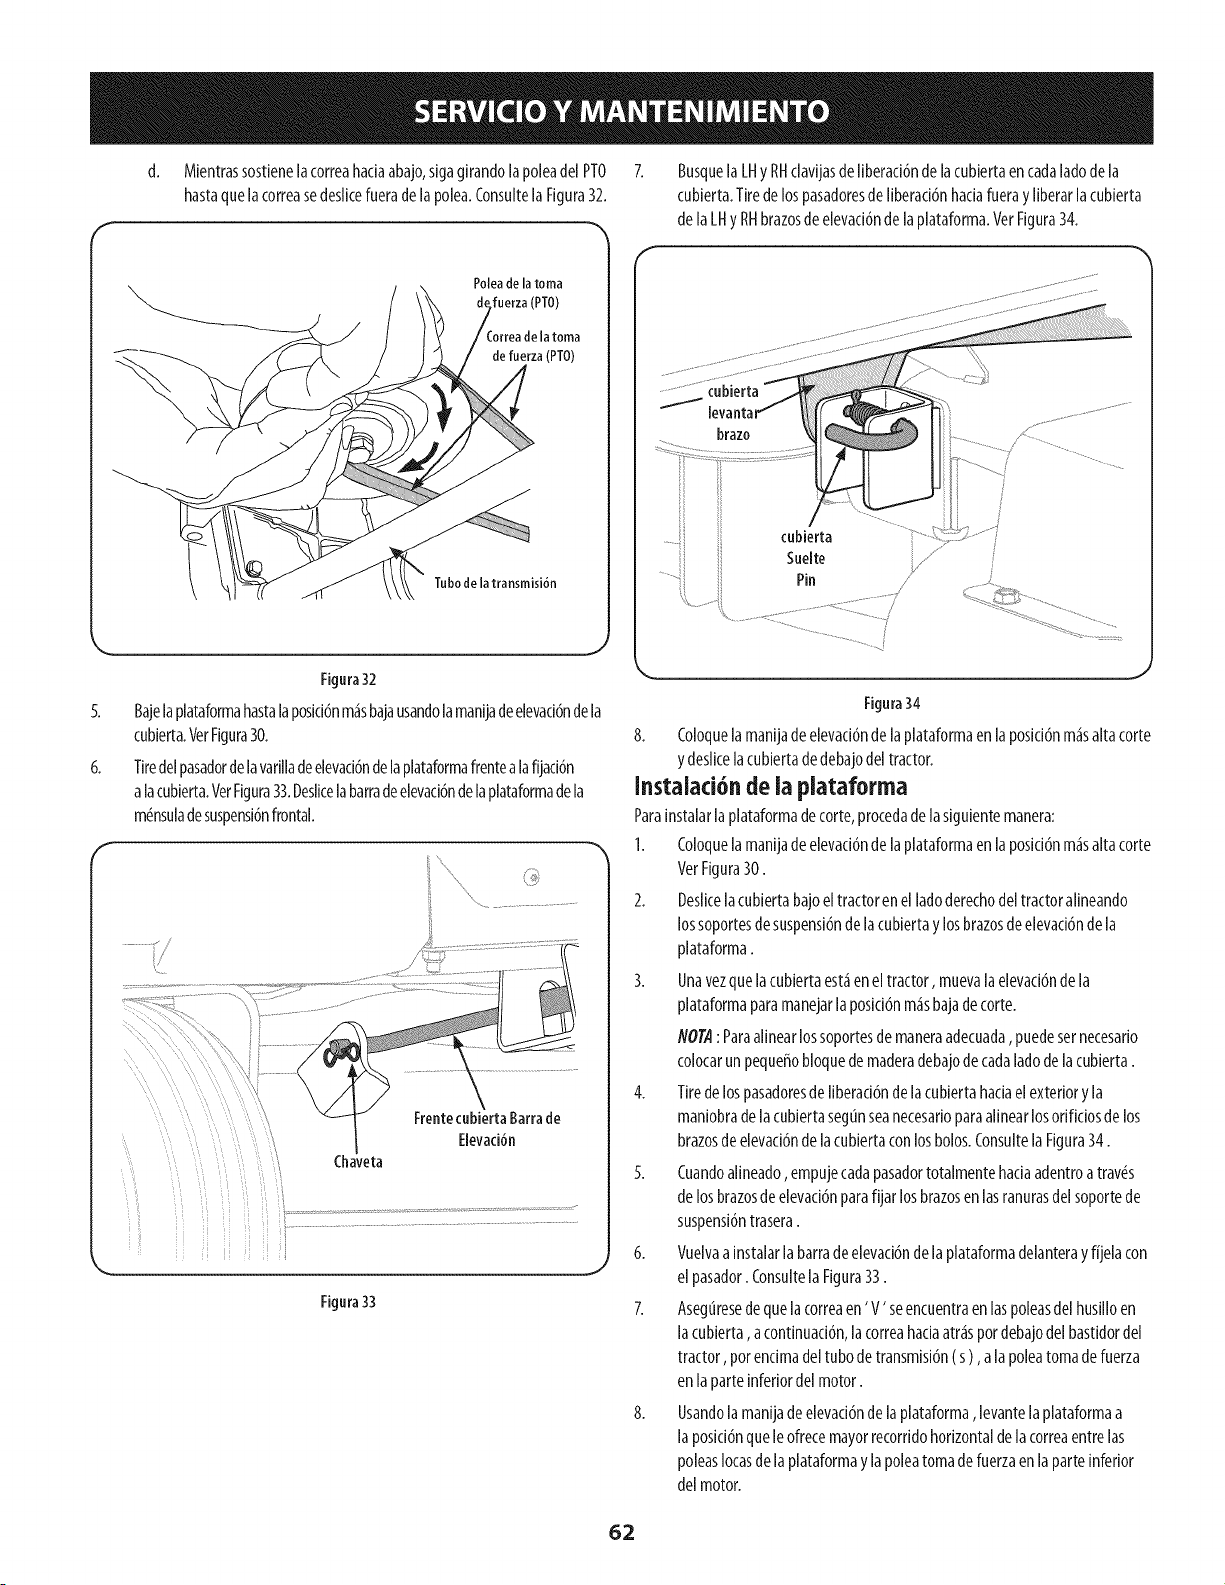
d. Mientrassostiene[acorreahadaabajo,sigagirando[apo[eadel PTO
hastaque[acorreasedes[icefuerade[apo[ea.Consu[te[a Figura32.
Poleade latoma
(PTO)
Tubode la transmisiSn
Figura32
6.
orrea de la toma
de fuerza (PTO)
Baje[aplataformahastalaposid6nm_sbajausandolamanijadeelevad6ndela
cublerta.VerFigura30.
Tiredelpasadordelavadlladeelevad6ndelaplataformafrentealafijaci6n
alacubierta.VerFigura33.Deslicelabarradeelevad6ndelaplataformadela
m_nsuladesuspensl6nfrontal.
Chaveta
Figura33
BusquelaLHy RHclavijasdeliberad6nde lacubiertaencadaladodela
cubierta.Tiredelospasadoresde llberad6nhadafueray liberarlacubierta
de laLHy RHbrazosde elevad6ndelaplataforma.VerFigura34.
Figura34
8. Coloquelamanijadeeievad6ndela plataformaen laposic[6nm_salta torte
y desllcelacublertadedebajodel tractor.
lnstalaci6n de la plataforma
Paralnstalarlaplataformadecorte,procedadelaslgulentemanera:
I. Coloquelamanljadeelevad6ndelaplataformaen laposicl6nm_salia corte
VerFigura30.
2. Desllcelacublertabajoeltractoren elladoderechodel tractoralineando
lossoportesdesuspensi6ndela cubiertay losbrazosdeelevad6ndela
plataforma.
3. Unavezquelacublertaest_enel tractor,muevalaelevad6nde la
plataformaparamanejarlaposid6nm_sbajade corte.
NOTA:Paraalinearlossoportesdemaneraadecuada,puedesernecesado
colocarun pequefiobloquedemaderadebajodecadaladodelacubierta.
4. Tiredelospasadoresde llberaci6nde la cubiertahadaelexteriory la
manlobradelacubiertasegunseanecesarioparaallnearlosorMdosde los
brazosdeelevad6nde lacubiertaconlosbolos.ConsultelaFlgura34.
5. Cuandoalineado,empujecadapasadortotalmentehaciaadentroa trav(_s
de losbrazosde elevad6nparafijar losbrazosen lasranurasdel soportede
suspensl6ntrasera.
6. Vuelvaalnstalarlabarradeelevad6ndela plataformadelanterayfOelacon
el pasador.ConsultelaFigura33.
7. Aseguresedequelacorreaen' V' seencuentraen laspoleasdel husllloen
lacubierta,acontinuad6n,lacorreahaciaatr_spordebajodel bastidordel
tractor, porencimadeltubodetransmlsi6n( s a lapoleatomadefuerza
en laparteinferiordel motor.
8. Usandolamanijadeelevad6nde la plataforma levantelaplataformaa
la posid6nqueleofrecemayorrecorddohorizontaldelacorreaentrelas
poleasIocasdela plataformay lapoleatomadefuerzaenlaparteinferior
del motor.
62
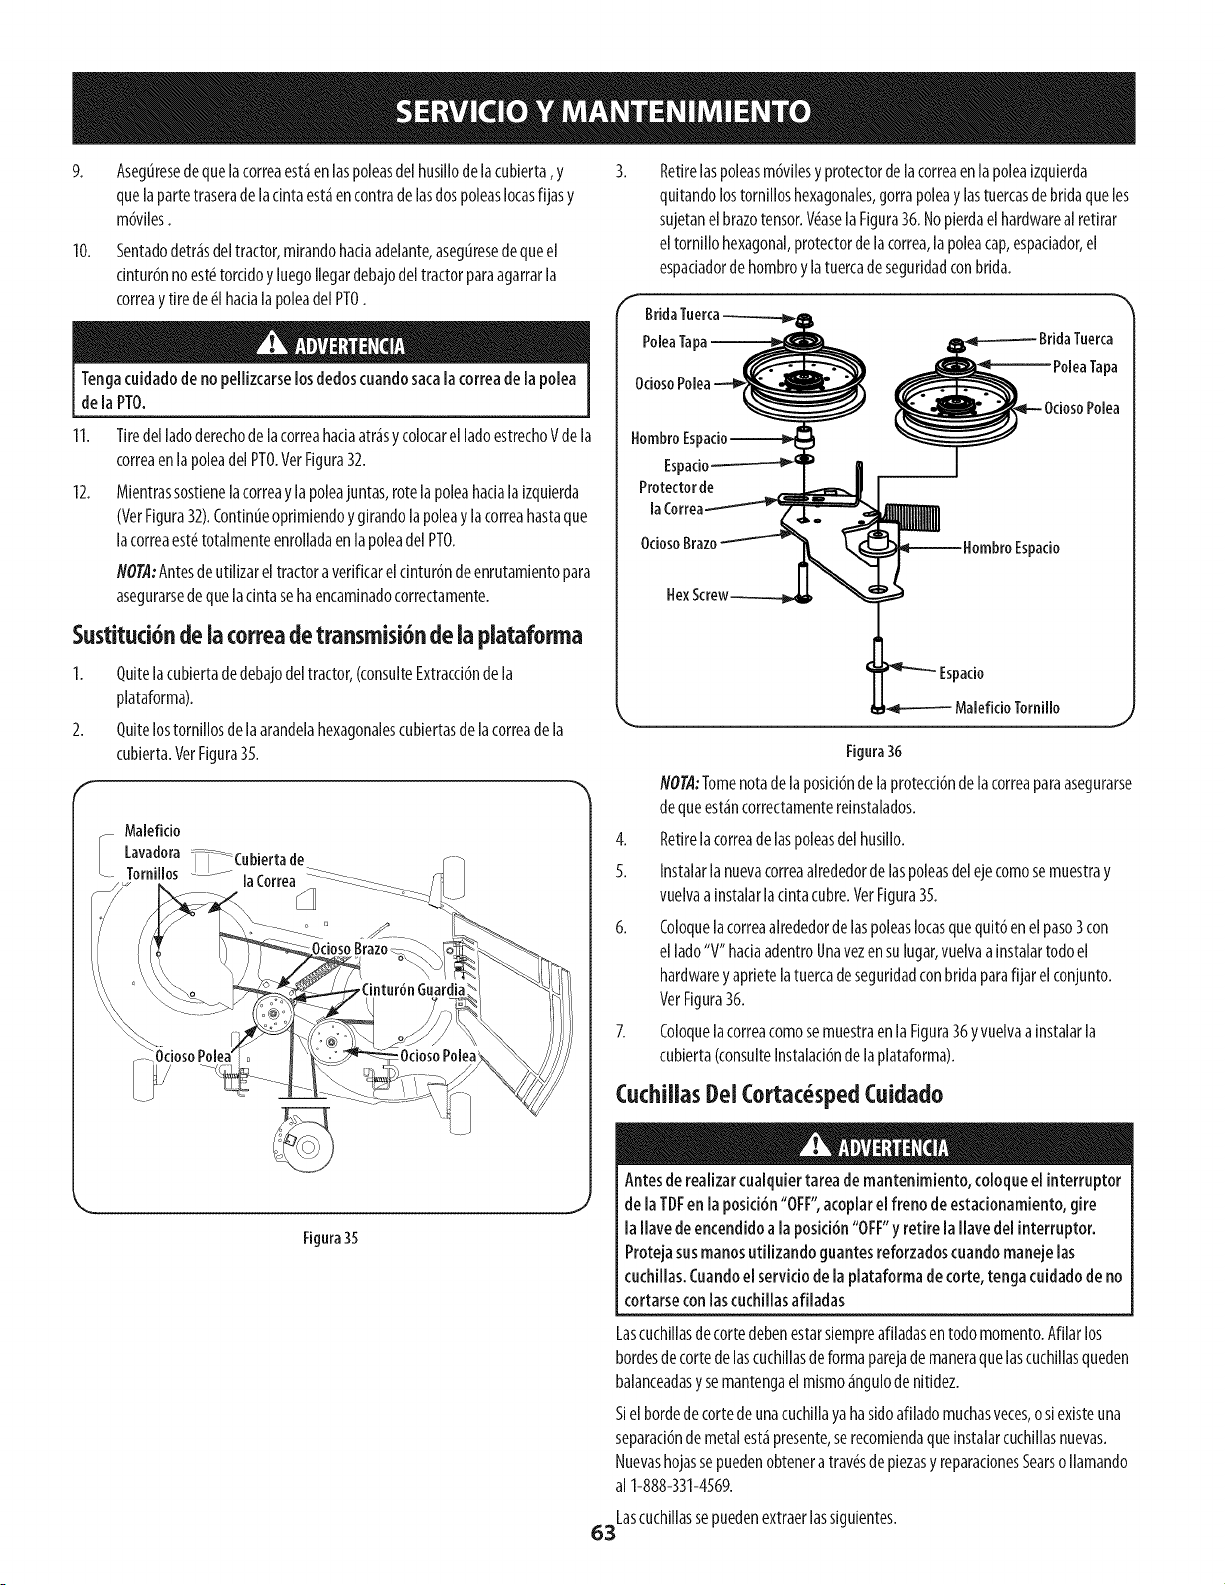
9,
10.
Aseguresede quelacorreaest_en laspoleasdel husillodelacubierta,y
quelapartetraseradela dnta est_encontrade lasdospoleaslocasfijasy
m6viles.
Sentadodetr_sdeltractor,mirandohaciaadelante,asecj[iresedequeel
dnturdnnoest_torddo yluecjoIlecjardebajodeltractorparaacjarrarla
correay tirede_1hadala poleadel PTO.
Tencjacuidadode no peilizcarselosdedoscuandosacalacorreade lapolea
de la PTO.
11.
12.
Tiredel[adoderechodelacorreahadaatr_sy colocarel ladoestrechoVde la
correaenlapoleadelPTO.VetFicjura32.
Mientrassostienelacorreay lapoleajuntas,rotelapoleahadala izquierda
(VerFicjura32).Contintieoprimiendoycjirandolapoleaylacorreahastaque
lacorreaest_totalmenteenrolladaen lapoleadel PTO.
NO@:Antesde utilizareltractora verificareldntur6n deenrutamientopara
asecjurarsedequeladnta sehaencaminadocorrectamente.
Sustituci6ndelacorreadetransmisi6ndela plataforma
1. Quitelacubiertadedebajodeltractor,(consulteExtracdbndela
plataforma).
2. Quitelostornillosdelaarandelahexacjonalescubiertasdelacorreadela
cubierta.VerFicjura35.
Malefido
_ avadora i-_-_ Cubiertade
Torniiios ...... ia Correa
Figura 35
Retirelaspoleasm6vilesy protectordelacorreaen lapoleaizquierda
quitandolostornilloshexacjonales,cjorrapoieay lastuercasdebridaqueles
sujetanelbrazotensor.V(_aselaFicjura36. Nopierdaelhardwareal retirar
eltornillo hexacjonal,protectordelacorrea,lapoleacap,espadador,el
espadadorde hombroy latuercadesecjuridadconbrida.
BridaTuerca-----'_L_
PoieaTapa=
OdosoPoiea__
HombroEspado
Espacio--------1_
Protectorde
pacio
HexScfew------.-l_
bacio
Tornillo
Figura36
NOT.4:Tomenoradelaposici6nde laprotecci6ndelacorreaparaasecjurarse
dequeest_ncorrectamentereinstalados.
4. Retirelacorreade laspoleasdel husillo.
5. Instalarla nuevacorreaalrededordelaspoleasdelejecomosemuestray
vuelvaa instalarlacintacubre.VerFicjura35.
6. Coloquela correaalrededordelaspoleaslocasquequit6en el paso3con
el lado"V"haciaadentroUnavezensulucjar,vuelvaainstalartodoel
hardwarey aprietelatuercadesecjuridadconbridaparafijar elconjunto.
VerFicjura36.
7. Coloquela correacomosemuestraenla Ficjura36y vuelvaainstalarla
cubierta(consulteInstalaci6ndelaplataforma).
Cuchillas l)ei Cortacesped Cuidado
Antesderealizarcualquiertareade mantenimiento, coloqueel interruptor
de laTDFen la posici6n"OFF",acoplarel freno deestacionamiento,gire
la flare de encendidoa la posici6n"OFF"y retirela flare del interruptoro
Protejasusmanosutilizando guantesreforzadoscuandomanejelas
cuchillas.Cuandoelserviciode la plataformadetorte, tencjacuidadodeno
cortarseconlascuchillasafiladas
Lascuchiiiasdecortedebenestarsiempreafiladasentodomomento.Afilar los
bordesdetorte delascuchiliasdeformaparejademaneraquelascuchillasqueden
balanceadasy semantencjaelmismo_ncjulode nitidez.
Siel bordedetorte deunacuchiilayahasidoafiladomuchasveces,o siexisteuna
separad6nde metalest_presente,serecomiendaqueinstalarcuchiiiasnuevas.
Nuevashojassepuedenobtenera tray,sdepiezasy reparadonesSearso Ilamando
al 1-888-331-4569.
Lascuchillassepuedenextraerlassiguientes.
63
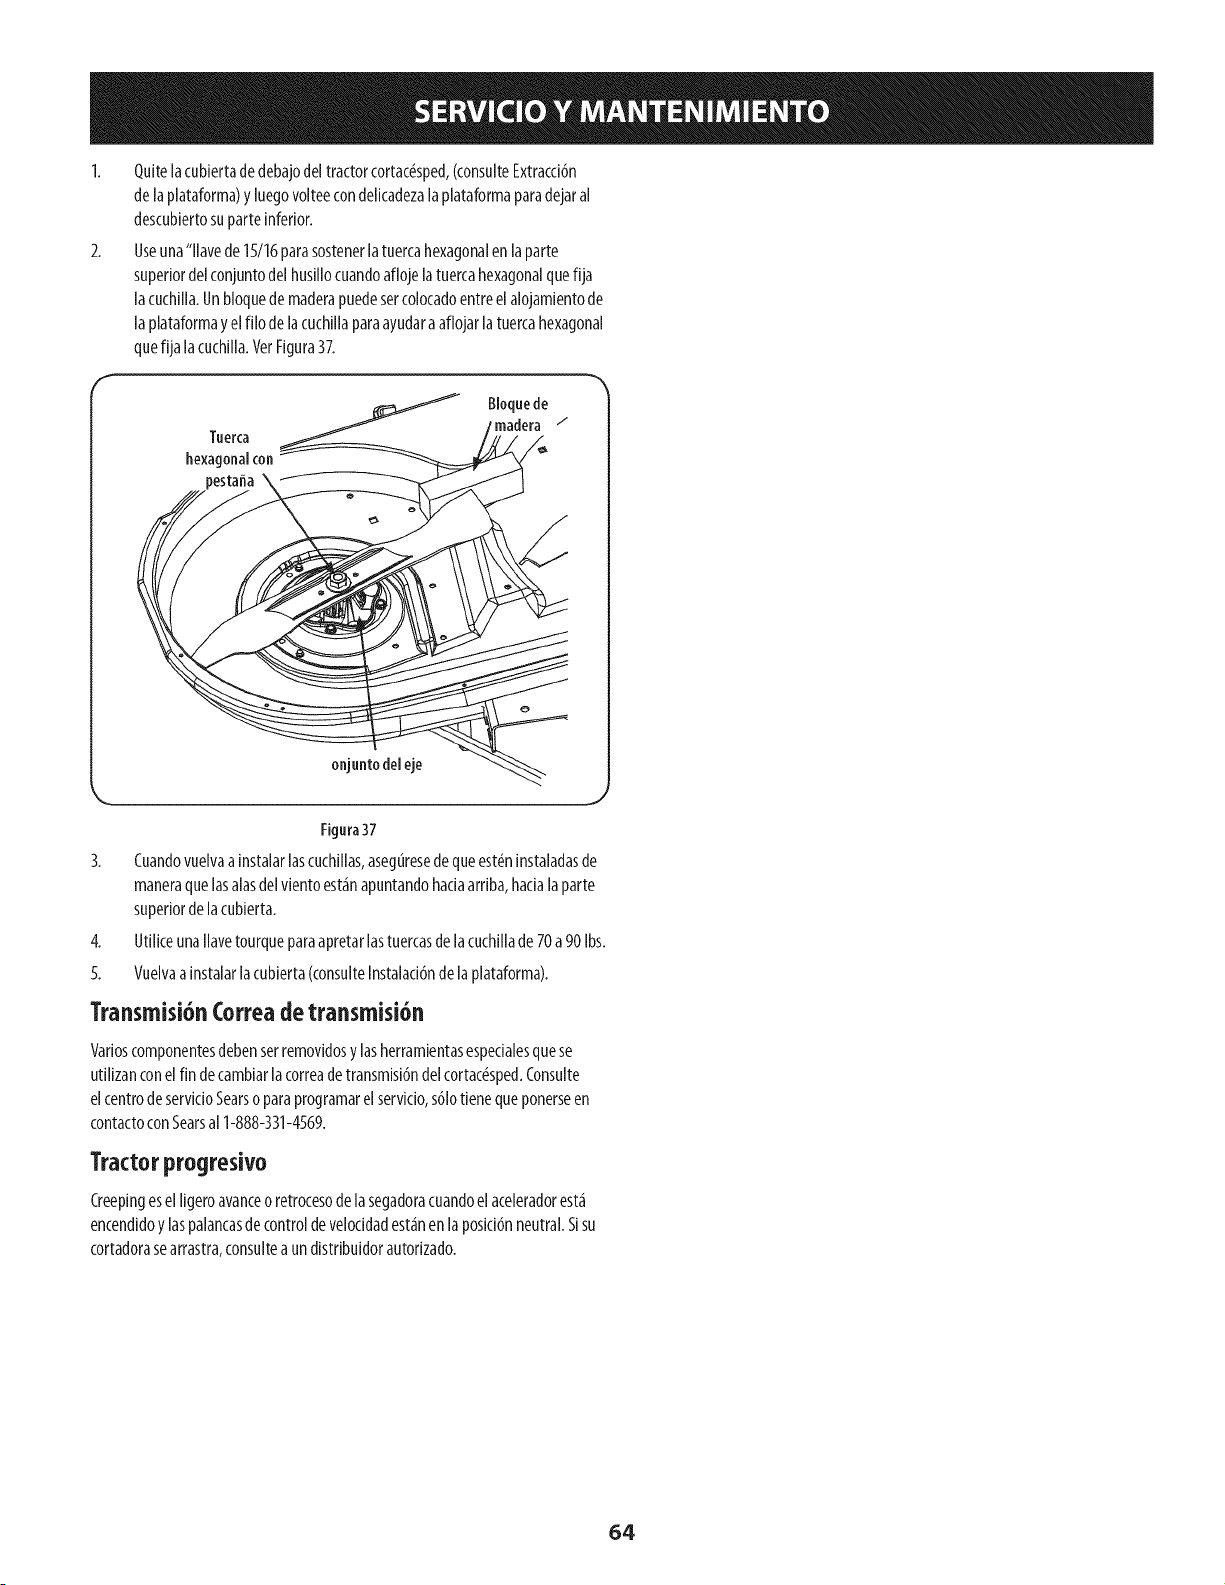
2.
Quitelacubiertade debajodeltractorcortacdsped,(consulteExtracci6n
delaplataforma)y luegovolteecondelicadezalaplataformaparadejaral
descubiertosuparteinferior.
Useuna"llavede15/16parasostenerlatuercahexagonalenlaparte
superiordelconjuntodelhusillocuandoaflojelatuercahexagonalquefija
lacuchilla.Unbloquede maderapuedesercolocadoentreel alojamientode
laplataformay el filo de lacuchillaparaayudaraaflojarlatuercahexagonal
quefija lacuchilla.VerFigura37.
Tuerca
hexagonalcon
pestaffa
Bloquede
madera "I
onjunto del eje
Figura37
3. Cuandovuelvaainstalarlascuchillas,aseguresede queest_ninstaladasde
maneraquelasalasdelvientoest_napuntandohadaarriba,hadala parte
superiordela cubierta.
4. UtiliceunaIlavetourqueparaapretarlastuercasde lacuchillade 70a90 Ibs.
5. Vuelvaa instalarlacubierta(consulteInstalaci6ndelaplataforma).
Transmisi6n Correa de transmisi6n
Varioscomponentesdebenserremovidosy lasherramientasespedalesquese
utilizanconelfin decambiarlacorreadetransmisi6ndel cortac_sped.Consulte
elcentrodeservicioSearsoparaprogramarel servido,s61otienequeponerseen
contactoconSearsal 1-888-331-4569.
Tractorprogresivo
Creepingesel ligeroavanceoretrocesodelasegadoracuandoelaceleradorest_
encendidoy laspalancasde controldeveloddadest_nenla posici6nneutral.Sisu
cortadorasearrastra,consulteaun distribuidorautorizado.
64

Nuncaalmaceneeltractor cortac_spedconcombustibleen el tanqueen
un espaciocerradoo en _reaspocoventiladasdondelos gasesdel combustible
puedanllegara unallama expuesta,unachispao un piioto comoe[ quetienen
aigunoshomos,caientadoresdeagua,secadoresderopaoaigt_nartefacto agas.
Aimacenamientodeitractor cortac sped
Sieltractorcortac_spednoavaafuncionarporun periodoprolongado(desde
treintadiashastaaproximadamenteseismeses),seIodebeprepararparael
almacenamiento.Guardeeltractorcortac_spedenunlugarsecoy protegido.SiIo
guardaafuera,cubralo(incluidoslosneum_ticos)paraprotegerlodelosfen6menos
clim_ticos.Cadavezquesepreparaeltractorcortac_spedparadejarlofuerade uso
sedebenrealizarlosprocedimientosdescriptosm_sabajo.
1. Cambieelaceitey filtro demotorsegunlasinstrucdonessuministradasenla
secd6nServicioymantenimientode estemanual.
Nuncaguardeel tractor cortac_spedcon combustibleen el dep6sitoen un
lugarcerradooconescasaventilaci6n,dondelosgasesde[combustible
puedengenerarfuego,chispaso encenderunaluz pilotocomolade hornos,
calentadoresdeagua,secadoresderopa,etc.
Siguardaeltractorcortac_spedpor30d{aso m_s:
a. Paraevitarqueseformendepbsitosde gomadentrodel carburador
delmotory posiblesdesperfectosenelmotor,elsistemade
combustibledebeservadadocompletamente,osedebetratar la
gasolinaconunestaNlizadorparaevitareldeterioro.
E[combustiblequequedaene[ dep6sitosedeteriora ycausagraves
problemasdearranque.
b. Usodeunestabilizadordecombustible:
Lealasinstrucdonesy recomendacionesdelfabricantedel producto.
Agreguea lagasolinalimpiayfrescalacantidadcorrectade
estabilizadorsegt_nlacapaddad(aproximadamente3 galones)del
sistemadecombustible.
Lleneeldep6sitode combustibleconcombustibletratadoy haga
fundonarelmotor2-3minutosparaestabilizarelcombustible
dentrodelcarburador.
c. Vadadodel sistemadecombustible:
5.
6.
Afilelascuchillasparaquelam_quinaest_listaparaelusocuando
necesiteusarla.
Protejalassuperficiesmet_licas.Reparelasrayadurasconpinturaderetoque
adecuadaenaerosol.Pincelecualquiersuperfideno pintada,incluidaslas
poleasylascuchillas,conaceitepreventivode herrumbre.(Tongacuidado
paraqueelaceiteno toquelascorreasdetransmisi6n).
7. Limpiey carguetotalmentelabateria,luegodesconecteel cablenegativo
de labateriaparaevitarposiblesdescargas.Vuelvaa cargarla bater[a
peri6dicamenteduranteelalmacenamiento.
flOTA:Retirelabater[asiest_expuestaaper[odosprolongadosde
temperaturasinferioresal congelamiento.Guardeenun lugarfrescoy seco,
dondelastemperaturasest_nporendmadelpuntodecongelamiento.
8. Lubriquetodoslospuntosde lubrkad6n.
9. Levantela m_quinay gu_rdelasobrebloquesparaqueelpesono seapoye
sobrelosneum_ticos.
Retire del tractor cortac sped del iugar de
aimacenamieato
1.
2.
4.
5.
6.
7.
Controleel niveldeaceitedemotor.
Carguetotalmentelabater[a,bajeeltractorcortac_speddelosbloquese
inflelosneum_ticosalapresi6nrecomendada.
Retirelasbujiasy limpielas.Conelarrancador,arranqueelmotorpara
bombearelexcesodeaceitey sacarlodelosorificiosde lasbuj[as.Vuelvaa
colocarlasbujiasy losconductoresdeencendido.
Sisevad6eldep6sitode combustibleantesdeguardareltractor,II_nelocon
gasolinalimpiaynueva.
CompruebeelniveldeaceitedelmotordentrodeldgiJeffalyel dep6sitode
fluidohidr_ullco.
Arranqueelmotory d_jeloandaren ralent[unoscuantosminutospara
asegurarquesufundonamientoseaadecuado.
Conduzcael tractorcortac_spedsincargaparaestarsegurodequetodoslos
sistemasdeltractorfuncionancorrectamente.
3.
4.
Antesdeguardareltractorcortac_sped,observeel consumode
combustiblea losefectosdehacerfundonareltractorhastaqueel
dep6sitoest_vac{o.
Arranqueel motoryd_jelofundonarhastaqueseagoteel
combustible.Estoevitar_laformad6ndedep6sitosdegomay barniz.
Retirelasbujiasyviertaaproximadamenteunaonzadeaceiteencadadlindro.
Hagaarrancarelmotorunaodosvueltasparaqueelaceitesedistribuyade
formaparejaen lasparedesdeldlindro.Vuelvaacolocarlasbuj[as.
Limpieperfectamenteel motory todalaunidad.
flOT,4:Noserecomiendaelusodeunalavadoradepresi6nnideunamanguera
dejard{nparalimpiarel tractorcortac(_sped.Puedenprodudrdaffosalos
componentesel_ctricos,husillos,poleas,rodamientosoalmotor.Elusode
aguaacortar_lavidaut[Ide lam_quinay redudr_sucapaddaddeservkio.
65
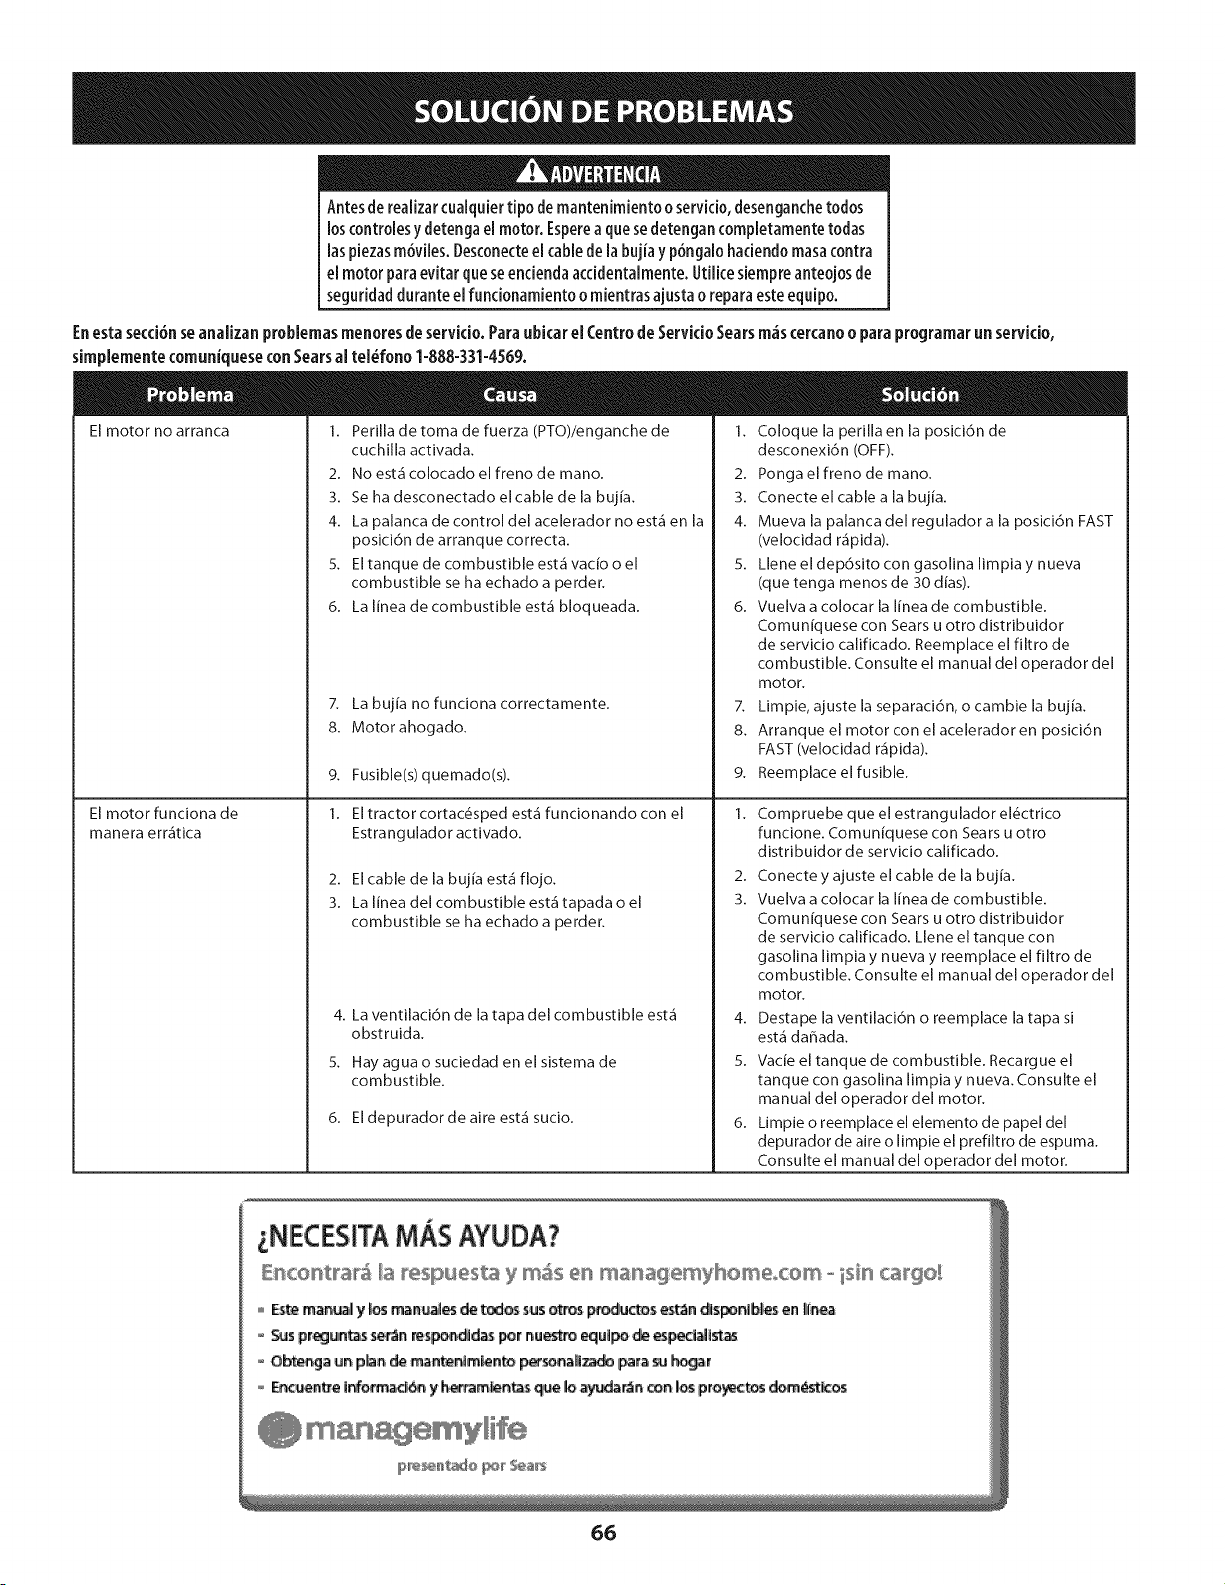
Antesderealizarcualquiertipo de mantenimiento oservicio,desenganchetodos
loscontrolesy detengael motor. Esperea quesedetengancompletamentetodas
laspiezasm6viles.Desconecteel cablede labujia y p6ngalohaciendomasacontra
el motor para evitar queseenciendaaccidentalmente.Utilicesiempreanteojosde
seguridadduranteel fundonamiento o mientrasajustao reparaesteequipo.
Enestasecd6n seanalizan problemasmenores deservicio. Paraubkar el Centrode Servido Searsm_scercanoo para programarun servkio,
simplemente comuniqueseconSearsal tel_fono 1-888-331-4569.
Elmotor no arranca 1. Perillade toma de fuerza (PTO)/enganchede
cuchilla activada.
2. No est_ colocado el freno de mano.
3. Se ha desconectado el cable de la bujJa.
4. La palanca de control del acelerador no est_ en la
posici6n de arranque correcta.
5. El tanque de combustible est_ vacio o el
combustible se ha echado a perder.
6. La IJnea de combustible est_ bloqueada.
7. La bujJa no fundona correctamente.
8. Motor ahogado.
9. Fusible(s) quemado(s).
1. El tractor cortac6sped est_ fundonando con el
Estrangulador activado.
2. El cable de la bujia est_ flojo.
3. La IJnea del combustible est_ tapada o el
combustible se ha echado a perder.
4. La ventilaci6n de la tapa del combustible est_
obstruida.
5. Hay agua o sudedad en el sistema de
combustible.
6. EIdepuradordeaire est_ sudo.
El motor funciona de
manera err_tica
1. Coloque la perilla en la posici6n de
desconexi6n (OFF).
2. Pongae[ frenode mano.
3. Conecte el cable a la bujJa.
4. Mueva la palanca del regulador a la posici6n FAST
(velocidad r_pida).
5. Llene el dep6sito con gasolina limpia y nueva
(que tenga menos de 30 dias).
6. Vuelva a colocar la linea de combustible.
Comuniquese con Sears u otto distribuidor
de servicio calificado. Reemplace el filtro de
combustible. Consulte el manual del operador del
motor.
7. Limpie, ajuste la separaci6n, o cambie la buj[a.
8. Arranque el motor con el acelerador en posici6n
FAST (velocidad r_pida).
9. Reemplace el fusible.
1. Compruebe que el estrangulador el6ctrico
funcione. Comuniquese con Sears u otto
distribuidor de servicio calificado.
2. Conecte y ajuste el cable de la bujJa.
3. Vuelva a colocar la linea de combustible.
Comun[quese con Sears u otto distribuidor
de servicio calificado. Llene el tanque con
gasolina limpia y nueva y reemplace el filtro de
combustible. Consulte el manual del operador del
motor.
4. Destape la ventilaci6n o reemplace la tapa si
est_ da_ada.
5. Vacie el tanque de combustible. Recargue el
tanque con gasolina limpia y nueva. Consulte el
manual del operador del motor.
6. Limpie o reemplace el elemento de papel de[
depurador de alre o limpie el prefiltro de espuma.
Consulte el manual del operador del motor.
NECESITAMAS AYUDA?
D%co_t_a_ _a respuesta y m_s e_ managemybemeocom o isim_ca_ge_
o Este ma_al y _ manures de t_lc_s sus _J_s p_ctos es_n _s_n_b}s ienI_ea
:_s pr_un_s se_n respoe_des por nue_ equil_ d_eesped_l_
O_a un p_ de mante_m_n_ _:_a_ para su _gar
_oJentre Ir_o_ad_ y _mE_tas @ _ _da_ _n los pro_tos _os
66
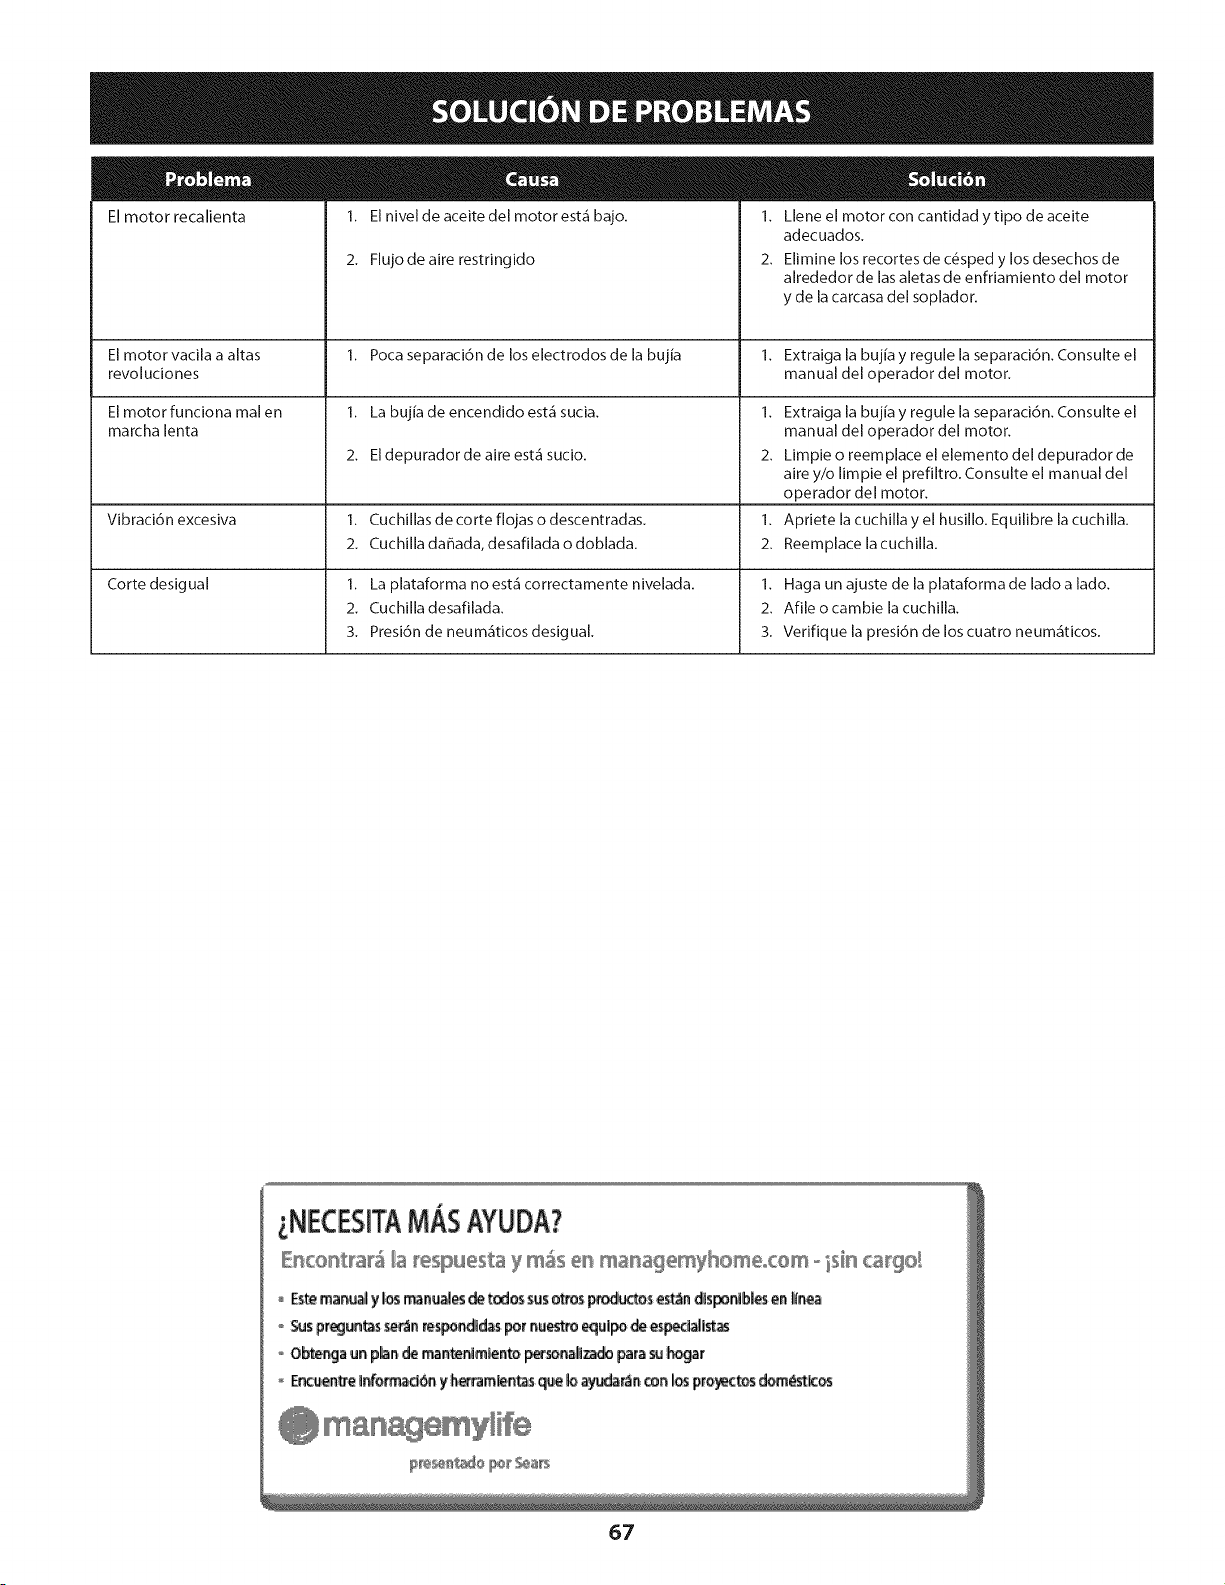
El motor recalienta
El motor vacila a altas
revoluciones
Elmotor funciona mal en
marcha lenta
Vibraci6n excesiva
1. El nivel de aceite del motor est_ bajo.
2. Flujo de aire restringido
1. Poca separaci6n de los electrodos de la bujia
1. La bujia de encendido est_ sucia.
2. El depuradorde aire est_ sucio.
1. Cuchillas de corte flojas o descentradas.
2. Cuchilla dafiada, desafilada o doblada.
1. La plataforma no est_ correctamente nivelada.
2. Cuchilla desafilada.
3. Presi6n de neum_ticos desigual.
Corte desigual
1. Llene el motor con cantidad y tipo de aceite
adecuados.
2. Elimine los recortes de c_sped y los desechos de
alrededor de las aletas de enfriamiento del motor
y de la carcasa del soplador.
1. Extraiga la bujia y regule la separaci6n. Consulte el
manual del operador del motor.
1. Extraiga la bujia y regule la separacidn. Consulte el
manual del operador del motor.
2. Limpie o reemplace el elemento del depurador de
aire y/o limpie el prefiltro. Consulte el manual del
operador del motor.
1. Apriete la cuchilla y el husillo. Equilibre la cuchilla.
2. Reemplace lacuchilla.
1. Haga un ajuste de la plataforma de lado a lado.
2. Afile o cambie la cuchilla.
3. Verifique la presi6n de los cuatro neum_ticos.
67

68
DECLARACIONFEDERALy/o DECALiFORNiASOBREGARANTiASENELCONTROLDEEMISIONES
SUSDERECNOSY OBLIGACIONESENCUANTOA LAGARANTiA
MTD Consumer Group Inc, la Agencia de Protecci6n Medioambiental de los Estados Unidos (EPA), y para aquellos productos certificados
para su venta en el estado de California, el Departamento de los Recursos del Aire de California (CARB) se complacen en explicar la garantia
que evaporativo sistema de control de emisiones (ECS) de su equipo (equipos de exteriores) de encendido pot chispa para todo terreno,
peque_o, de exteriores del aho 2013-2014. En California, los nuevos motores de equipos de exteriores deben estar dise_ados, construidos y
equipados para cumplir con las estrictas normas antipoluci6n del Estado (en otros estados, equipos de exteriores deben set estar dise_ados,
construidos y equipados para cumplir con las regulaciones de motores de encendido por chispa para todo terreno peque_os de la Agencia de
Protecci6n Medioambiental de los Estados Unidos, (EPA). MTD Consumer Group Inc. debe garantizar el sistema de control de emisiones (ECS)
de su motor de equipos de exteriores pot el periodo de tiempo indicado m_is abajo, siempre y cuando no exista uso incorrecto, negligencia o
mantenimiento inadecuado de equipos de exteriores.
Su ECS puede incluir piezas tales como el los dep6sitos de combustible, las lineas de combustible, los tapones de combustible, las wilvulas,
contenedores, filtros, mangueras de vapor, abrazaderas, conectores y otros componentes alines relacionados con las emisiones.
Donde exista una condici6n cubierta por la garantia, MTD Consumer Group Inc. reparar_i de equipos de exteriores sin costo alguno incluyendo
el diagn6stico, las piezas y la mano de obra.
COBERTURADELAGARANTJADELFABRICANTE:
Este sistema de control de emisiones se garantiza por el t_rmino de dos a_os. Si alguna pieza relacionada con las emisiones de su motor de
equipos de exteriores es defectuosa, MTD CONSUMER GROUP INC. reparar_fi o sustituir_fi dicha pieza.
RESPONSABILil)ADES DEL PROPiETARiO SEGON LA GARANTiA:
En su car_icter de propietario de equipos de exteriores, usted es responsable del mantenimiento requerido que se especifica en el manual del
propietario. MTD Consumer Group Inc le recomienda que conserve todos los recibos que cubren el mantenimiento de equipos de exteriores,
obstante Io cual MTD Consumer Group Inc no podr_i denegar el cumplimiento de la garantia 0nicamente pot la falta de los recibos.
Como propietario de equipos de exteriores, usted debe saber que MTD Consumer Group Inc. puede denegar la cobertura de la garantia si
su equipos de exteriores o una pieza del mismo fallan debido a uso incorrecto, negligencia, mantenimiento indebido o a modificaciones no
aprobadas.
Usted es responsable de presentar su equipos de exteriores al centro de distribucidn o servicio t_cnico de MTD Consumer Group Inc. tan pronto
como aparezca el problema. Las reparaciones cubiertas por la garantia se deben Ilevar a cabo en un lapso razonable que no exceda de 30
dias. Si tiene alguna pregunta respecto de la cobertura de la garantia, pdngase en contacto con el Departamento del Servicio T_cnico de MTD
Consumer Group Inc. al tel_fono 1-800-800-7310 o por correo electronico en http://support.mtdproducts.com.
COBERTURADELAGARANTiADEEMISIONESGENERALES:
MTD Consumer Group Inc garantiza al comprador final y a cada comprador subsiguiente que el equipos de exteriores: est,1 dise_ado,
construido y equipado de modo de cumplir con todas las regulaciones aplicables y que se encuentra libre de defectos de materiales y de
fabricaci6n que pudieren causar la falla de una pieza garantizada id6ntica, en todos los aspectos materiales a la pieza descripta en la solicitud
de certificaci6n de MTD Consumer Group Inc.
El periodo de garantia comienza en la fecha de entrega del equipos de exteriores al comprador final o en la fecha en que la m_iquina se pone en
funcionamiento pot primera vez. El periodo de garantia es de dos ahos.
Sujeto a ciertas condiciones y exclusiones que se indican a continuaci6n, la garantia de las piezas relacionadas con las emisiones es la siguiente:
1. Cualquier pieza garantizada que no est6 programada para set reemplazada como parte del mantenimiento requerido en las instrucciones
escritas suministradas se garantiza pot el periodo de garantia arriba mencionado. Si la pieza falla durante el periodo de cobertura de la
garantia, la misma ser_i reparada o reemplazada pot MTD Consumer Group Inc. de acuerdo con el p_irrafo (4) a continuaci6n. Cualquier
pieza reparada o reemplazada segun la garantia se garantizar_i por el resto del periodo de garantia.
2. Cualquier pieza garantizada que est6 programada solamente para inspecci6n regular en las instrucciones escritas suministradas se
garantiza pot el periodo de garantia arriba mencionado. Cualquier pieza reparada o reemplazada segun la garantia se garantizar_i pot el
resto del periodo.
3. Cualquier pieza garantizada que est6 programada para reemplazo segun el mantenimiento requerido de conformidad con las
instrucciones escritas suministradas, se garantiza pot el periodo de tiempo anterior a la primera fecha de reemplazo programada para esa
pieza. Si la pieza falla antes del primer reemplazo programado, la misma ser_i reparada o reemplazada pot MTD Consumer Group Inc. de
acuerdo con el p_irrafo (4) a continuaci6n. Cualquier pieza reparada o reemplazada bajo garantia se garantizar_i pot el resto del periodo
anterior al primer reemplazo programado puntual para esa pieza.
4. La reparaci6n o el reemplazo de cualquier pieza garantizada de conformidad con las disposiciones de la garantia que aqui se estipula se
deben realizar en un centro de garantia sin costo alguno para el propietario.
5. No obstante las disposiciones que aqui se estipulan, los servicios o reparaciones bajo garantia se suministrar_in en todos nuestros centros
de distribuci6n bajo franquicia de mantenimiento para los motores o equipos en cuesti6n.
6. El propietario de equipos de exteriores no deber_i pagar el trabajo de diagn6stico directamente asociado con una pieza garantizada
defectuosa en relaci6n con las emisiones, siempre y cuando dicho trabajo de diagn6stico se realice en un centro cubierto pot la garantia.
7. MTD Consumer Group Inc es responsable pot dahos causados a otros componentes de motores o equipos derivados de la falla bajo
garantia de cualquier pieza garantizada.
8. Durantelatotalidaddelperiododegarantiadelmotoryequipoparatodoterrenoarribamencionado,MTDConsumerGroupInc
mantendr_iunsuministro
depiezasbajogarantiasuficienteparasatisfacerlademandaesperadadetalespiezas.
9. Cualquierpiezadereemplazosepodr_iusarparaelcumplimientodelmantenimientoolasreparacionesbajogarantiaysesuministrar_in
sincargopara
elpropietario.Dichousonoreducir_ilasobligacionesdegarantiadeMTDConsumerGroupInc.
10. Nosepodr_inusarpiezasadicionalesnimodificadasquenoest_nexentasdeacuerdoconelDepartamentodelosRecursosdelAire
(AirResourcesBoard).Elusodecualquierpiezaadicionalomodificadanoexentapotelcompradorfinalser_icausaldeinvalidezdelos
reclamosbajogarantia.MTDConsumerGroupIncnotendr_iresponsabilidadpotlagarantiadefallasdepiezasgarantizadasquefueren
causadaspotelusodeunapiezaadicionalnoexenta
omodificada.
PIEZAS6ARANTIZADAS:
La reparaci6n o el reemplazo de cualquier pieza garantizada que de otto modo pudiese estar cubierta por la garantia podr_i set excluida de
tal cobertura de garantia si MTD Consumer Group Inc demuestra que el equipos de exteriores es objeto de uso incorrecto, negligencia o
mantenimiento inadecuado, y que tal uso incorrecto, negligencia o mantenimiento inadecuado rue causa directa de la necesidad de reparaci6n
o reemplazo de dicha pieza. No obstante Io antedicho, cualquier ajuste de un componente con un dispositivo de limitaci6n de ajuste instalado
en f_ibrica y que funcione adecuadamente, podr_i set cubierto pot la garantia. Adem_is, la cobertura bajo esta garantia se extiende solo a piezas
que estuvieron presentes en y equipo todo terreno adquiridos.
Est_in cubiertas las siguientes piezas con garantia para emisiones (de corresponder):
1. Sistema de medici6n de combustible
Bomba de combustible
Dep6sito de combustible
2. Control evaporativo
Manguera de combustible
Abrazaderas de la manguera de combustible
Tap6n del combustible atado pot correa
Caja de carbono
Lineas de vapor
063015 Rev.A
Felicitacionesporhaberrealizadounaadquisicidninteligente.ElproductoCraftsman®quehaadquiridoestddisefiadoy fabricado
parabrindarmuchosafiosdefuncionamientoconfiable.Perocomotodoslosproductosa vecespuederequerirdereparaciones.Es
enesemomentocuandoel disponerdeunAcuerdodeproteccidnparareparacioneslepuedeahorrardineroy problemas.
Acontinuaci6nsedetailan lospuntosinduidosenel Acuerdo:
[] Servido experto prestadopornuestros10,000espeda[istasenreparadonesprofesiona[es
[] Servicioi[imitadosincargo para[aspiezasy [amanodeobraentodas[asreparadonescubiertas
[] Reemp[azodel productohasta2500db[aressinoesposib[ereparare[productocubierto
[] Descuentode25%de[predonormalde[servidoy de[aspiezasre[adonadascone[mismoquenoest_ncubiertaspor
e[acuerdo;adem_s,25%de[predonormalde[averificaci6ndemantenimientopreventivo
[] Ayudar_pidapot tei_fono- [o[[amamosReso[ud6nR_pida- e[apoyote[ef6nicodeun Chamuscaa[representante.
Pienseennosotroscomoe[manual"deundueffohab[ador."
UnavezadquiridoelAcuerdo,puedeprogramarelserviciocontan s61orealizarunaIlamadatelef6nica.PuedeIlamaren
cualquiermomentodeld[ao dela nocheoprogramarunservidoen I[nea.
ElAcuerdodeProtecd6nde Reparad6nesunacomprasinriesgo.Siustedanulaporalgunaraz6nduranteel per[odode
garant[adeproducto,propordonaremosunreembolsoIleno.O,unreembolsoprorrateadoencualquiermomentodespu_s
delper[ododegarant[adeproductoexpira,iAdquierahoysuacuerdodeprotecd6nparareparaciones!
Seaplican determinadas iimitaciones y exdusiones.Paraobtener informad6nadicionai y predosen los
EstadosUnidosilameai 1-800-827-6655.
El*Coverageen Canad_varia en algunos artkulos. Paradetalles llenos la llamada ChamuscaCanad_en 1-800-
361-6665.
Servidode instalaci6ndeSears
Sideseasolicitarla instalaci6nprofesionaldeSearsdeaparatosdom_sticos,dispositivosparaabrirportones,calentadoresde
aguay otrosartkulosdom_sticosimportantes,enlosEstadosUnidoso Canad_Ilameal 1-800-4-MY-HOME®.
71

il/!it:_l ________;_W__;_j__________
I RFIFT$1qFI
Customer Care Hot Line i_l
Get answers to questions, troubleshoot problems,
order parts, or schedule repair service.
Pa ra respu estas a preguntas o problemas, y ordenar
1-888 31 569
ustom Hot
piezas o pedir servicio para la reparaci6n de su equipo.
To help us help you, register your product at www.craftsman.com/registration
Para poderte ayudar mejor, registra tu producto en www.craftsman.com/registration
Join the Craftsman Club today!
@
www.craftsman.com/signup
Receive exclusive member benefits including special pricing and offers,
project sharing, expert advice, and SHOP YOUR WAY REWARDS!
Como miembro exclusivo, recibe diversos beneficios como ofertas, precios especiales, proyectos
nuevos, consejos de expertos y nuestro programa de puntos SHOP YOUR WAY REWARDS!
® Registered Trademark / TMTrademark of KCD IP, LLC in the United States, or Sears Brands, LLC in other countries
® Marca Registrada / TMMarca de Fabrica de KCD IP, LLC en Estados Unidos, o Sears Brands, LLC in otros paises