®
ELECTRIC SELF-CLEANING RANGE
Use & Care Guide
ESTUFA ELECTRICA AUTOLIMPIANTE
Manual del usuario
r J
r"
Sears Roebuck and Co., Hoffman Estates, IL 60179 U.S.A. P/N316000968(0001)
www.sears.com
Table of Content
Free-Standing Range Warranty ........................................ 2
Product Record ................................................................ 2
IMPORTANT SAFETY INSTRUCTIONS ....................... 3-4
Control Pad Functions ...................................................... 5
Setting the Clock and Minute Timer .................................. 6
Surface Cooking ............................................................... 7
Indicator Light(s) ............................................................... 7
Setting Surface Controls ................................................... 8
Setting Warm Zone Controls (if equipped) ........................ 9
Setting Warmer Drawer Controls (if equipped) ............... 10
Before Setting Oven Controls .......................................... 11
Setting Oven Controls ............................................... 12-14
Oven Cleaning ........................................................... 15-16
General Cleaning ....................................................... 17-19
Changing Oven Light ...................................................... 20
Adjusting Oven Temperature .......................................... 20
Avoid Service Checklist ............................................. 21-22
Sears Service ................................................................. 24
Product Record
In this space below, record the date of purchase, model
and serial number of your product. You will find the model
and serial number printed on an identification plate. The
identification plate is located on the right side of the oven
front frame in the storage compartment.
790.
Model No.
Serial No.
Date of Purchase
Save these instructionsand your sales receipt for future
reference.
Free-Standing Range Warranty
FULL ONE YEAR WARRANTY ON ALL PARTS
If, within one year from the date of installation, any part fails to function properly due to a defect in material or workmanship, Sears
will repair or replace it, at our option, free of charge.
LIMITED WARRANTY ON CERAMIC-GLASS COOKTOP AND RADIANT SURFACE COOKING ELEMENTS
For the second through fifth year from the date of installation, Sears will at our option repair or replace parts with defects as listed
below. You pay for labor.
• Cracking ofthe ceramic-glass cooktop due to thermal
shock
• Discoloration of the ceramic-glass cooktop
• Wear-off of the pattern on the ceramic-glass.
• Cracking of the rubber seal between the ceramic-glass
cooktop and the porcelain edge
• Burn-out of any of the radiant surface cooking elements
If the product is subjected to other than private family use, the above warranty is effective for only 90 days.
WARRANTY SERVICE IS AVAILABLE BY CONTACTING THE NEAREST SEARS SERVICE CENTER IN THE UNITED STATES.
This warranty gives you specific legal rights, and you may also have other rightswhich vary from state to state.
Sears Roebuck and Co. Dept. 817 WA Hoffman Estates, IL 60179
To Further Add To The Value Of Your Range, Buy a Sears Maintenance Agreement.
Years of Ownership Coverage 1st Year 2nd Year 3rd Year
1. Replacement of Defective Parts other than W MA MA
Ceramic-Glass Cooktop and Radiant
Surface Cooking elements
2. Ceramic-Glass Cooktop and Radiant W W W
Surface Cooking elements
3. Labor W MA MA
4. Annual Preventive Maintenance MA MA MA
Check at your request
W=Warranty MA=Maintenance Agreement
Kenmore Ranges are designed, manufactured, and tested for years ofdependable operation. Yet, any major home appliance may
require service from time to time. The Sears Warranty plus the Sears Maintenance Agreement helps provide protection from
unexpected repair bills.
The chart above compares the warranty and Maintenance Agreement and shows you the benefits of a Sears Range Maintenance
Agreement.
Contact your Sears Sales Associate or Local Sears Service Center today and purchase a Sears Maintenance Agreement.
2
IMPORTANT SAFETY INSTRUCTIONS
Read all instructions before using this appliance.
Save these instructions for future reference.
This manual contains many important safety messages. Always read and obey all safety messages.
This is the safety alert symbol. It alers you to safety messages that informyou of hazards that can killor hurtyou or others, or cause
damage to the product,
Indicates an imminently hazardous situation which, if notavoided may result in death or serious injury.
Indicates an imminently hazardous situation which, if not avoided may result in minor or moderate injury, or product-
damage-only.
All safety messages will identify the hazard, tell you how to reduce the chance of injury, and tell you what can happen if the
instructions are not followed.
• All ranges can tip.
• Injury to persons could result.
(_ • Install anti-tip device packed
with range.
• See Installation Instructions.
To reduce the risk of tipping, the range must
be secured by properly installed anti-Up
bracket provided with the range. To check if
the bracket is installed properly, visually
check that rear leveling leg is inserted into
and fully secured by the anti-tip bracket by
removing lower panel or storage drawer. For
models with a warmer drawer or broiler
compartment, grasp the top rear edge of the
range and carefully attempt to tilt it forward.
Refer to the Installation Instructions for
proper anti-tip bracket installation.
• Remove all tape and packaging before using the range.
Destroy the carton and plastic bags after unpacking the range.
Never allow children to play with packaging material.
• Proper Installation--Be sure your appliance Is properly
installed and grounded by a qualified technician in
accordance with the National Electrical Code ANSl/NFPA
No. 70 latest edition and local electrical code
requirements. Install only per installation instructions
provided in the literature package for this range.
Ask your dealer to recommend a qualified technician and an
authorized repair service. Know how to disconnect the power
to the range at the circuitbreaker or fuse box in case of an
emergency.
• User servicing--Do not repair or replace any part of the
appliance unless specifically recommended in the
manuals. All other servicing should be done only by a
qualified technician, This may reduce the risk of personal injury
and damage to the range.
• Never modify or alter the construction of a range by
removing leveling legs, panels, wire covers, anti-tip
brackets/screws, or any other part of the product.
Stepping, leaning or sitting on the doors or
drawers of this range can result in serious injuries and also
cause damage to the range. Do not allow children to climb or ....FIR
play around the range. The weight of a child on an open door
may cause the range to tip, resultingin sedous burns or other
(,J
injury, r'-
Do not use the oven or warmer drawer for "1_
storage.
Do not store Items of interest to children in
the cabinets above a range or on the backguerd of a range.
Children climbingon the range to reach items could be sedously
injured.
Never Use Your Appliance for Warming or
Heating the Room.
• Storage in or on Appliance--Flammable materials should
not be stored in an oven, warmer drawer, broiler
compartment, near surface units or in the storage drawer.
This includes paper, plastic and cloth items, such as
cookbooks, plasticware and toweis, as well as flammable
liquids, Do not store explosives, such as aerosol cans, on or
near the range,
• Do Not Leave Children Alone--Children should not be left
alone or unattended in the area where appliance is in use.
They should never be allowed to sit or stand on any part of the
appliance,
• DO NOT TOUCH SURFACE UNITS, AREAS NEAR THESE
UNITS, HEATING ELEMENTS OR INTERIOR SURFACES OF
THE OVEN. Both surface units and oven heating elements
may be hot even though they are dark in color. Areas near
surface units may become hot enough to cause burns. During
and after use, do not touch, or let clothing or other flammable
materials touch these areas untilthey have had sufficient time
to cool. Among these areas are the cooktop, surfaces facing
the cooktop, the oven vent openings and surfaces near these
openings, oven door and window.
• Wear Proper Apparel--Loose-fitting or hanging garments
should never be worn while using the appliance. Do not let
clothing or other flammable materials contact hot surfaces.
• Do Not Use Water or Flour on Grease Fires--Smother the
fire with a pan lid, or use baking soda, a dry chemical or
foam-type extinguisher.
3
IMPORTANT SAFETY INSTRUCTIONS
• When heating fat or grease, watch it closely. Fat or grease
may catch fire if allowed to become too hot.
• Use Only Dry Potholders--Molst or damp potholders on
hot surfaces may result in burns from steam. Do not let
potholders touch hot heating elements. Do not use a towel or
other bulky cloth instead of a potholder.
• Do Not Heat Unopened Food Containers--Buildup of
pressure may cause container to burst and result in injury.
• Remove the oven door from any unused range if it is to be
stored or discarded.
IMPORTANT--Do not attempt to operate the range during a
power failure. If the power falls, always turn off the range, If
the range is not turned off and the power resumes, the range will
begin to operate again. Once the power resumes, reset the
clock and oven function.
IMPORTANT INSTRUCTIONS FOR USING
YOUR COOKTOP
• Know which knob controls each surface heating unit.
Place a pan of food on the unitbefore turning it on, and turn
the unit off before removing the pan.
• Use Proper Pan Size--This appliance is equipped with one or
more surface units of different sizes. Select utensils having flat
bottoms large enough to cover the surface unit heating
element. The use of undersized utensils will expose a portion
of the heating element to direct contact and may result in
ignition of clothing. Proper relationship of utensil to element
will also improve efficiency.
• Utensil Handles Should Be Turned Inward and Not Extend
Over Adjacent Surface Units--To reduce the risk of bums,
ignition of flammable materials, and spillage due to
unintentional contact with the utensil, the handle of the utensil
should be positionedso that it is turned inward, and does not
extend over adjacent surface units.
• Never Leave Surface Units Unattended st High Heat
Settings--Boilovers cause smoking and greasy spillovers that
may ignite, or a pan that has boiled dry may melt.
• Protective Liners--Do not use aluminum foil to line oven
bottom, or any other part of the range. Only use aluminum foil
as recommended in this manual. Improper installation of these
liners may result in risk of electric shock, or fire.
• Glazed Cooking Utensils_Only certain types of glass, glass/
ceramic, ceramic, earthenware, or other glazed utensils are
suitable for cooktop service without breaking due to the sudden
change in temperature, Check the manufacturer's
recommendations for cooktop use.
• When flaming foods under a ventilating hood, turn the fan
on.
FOR GLASS COOKTOPS
• Do Not Cook on Broken Cooktop--lf cooktop should break,
cleaning solutions and spillovers may penetrate the broken
cooktop and create a risk of electric shock. Contact a qualified
technician immediately.
• Clean Cooktop with Caution--If a wet sponge or cloth is used
to wipe spills on a hot cooking area, be careful to avoid a
steam burn. Some cleaners can produce noxious fumes if
applied to a hot surface.
IMPORTANT INSTRUCTIONS FOR USING
YOUR OVEN
• Use Care When Opening Oven Door or Warmer Drawer--
Stand to the side of the range when opening the door of a hot
oven. Let hot air or steam escape before you remove or
replace food in the oven.
• Keep Oven Vent Ducts Unobstructed. The oven vent is
located below the backguard. Touching the surfaces in this
area when the oven is operating may cause severe burns.
Also, do notplace plastic or heet-sensitive items on or near the
oven vent. These items could melt or ignite.
• Placement of Oven Racks. Always place oven racks in
desired locationwhile oven is cool. if rack must be moved
while oven is hot use extreme caution. Use potholders and
grasp the rackwith both hands to reposition. Do not let
potholders contact the hot heating elements in the oven.
Remove all utensils from the rack before moving.
• Do not use the broiler pan without its insert. The broiler
pan and its insert allow dripping fat to drain and be kept away
from the high heat of the broiler.
• Do not cover the broiler insert with aluminum foil.
Exposed fat and grease could ignite.
• Cold temperatures can damage the electronic control.
When using the appliance for the first time, or when the
appliance has not been used for an extended period of time,
be certain the unit has been in temperatures above 32°F (0°C)
for at least 3 hours before turning on the power to the
appliance
IMPORTANT INSTRUCTIONS FOR CLEANING
YOUR RANGE
• Clean the range regularly to keep all parts free of grease
that could catch fire. Do not allow grease to accumulate.
• Kitchen cleaners and aerosols--Always follow the
manufacturer's recommended directions for use. Be aware
that excess residue from cleaners and aerosols may ignite
causing damage and injury.
• Clean Ventilating Hoods Frequently--Grease should not be
allowed to accumulate on the hood or filter. Follow
manufacturer's instructionsfor cleaning.
SELF CLEANING OVENS
• Clean in the self-cleaning cycle only the parts listed in this
Owner's Guide. Before self cleaning the oven, remove the
broiler pan and any utensils or foods from the oven.
• Do Not Use Oven Cleaners--No commercial oven cleaner or
oven liner protective coating of any kind should be used in or
around any part ofthe oven.
• Do Not Clean Door Gasket--The door gasket is essential for
a good seal. Care should be taken not to rub, damage or
move the gasket.
SAVE THESE tNS]RU( T ONS
4
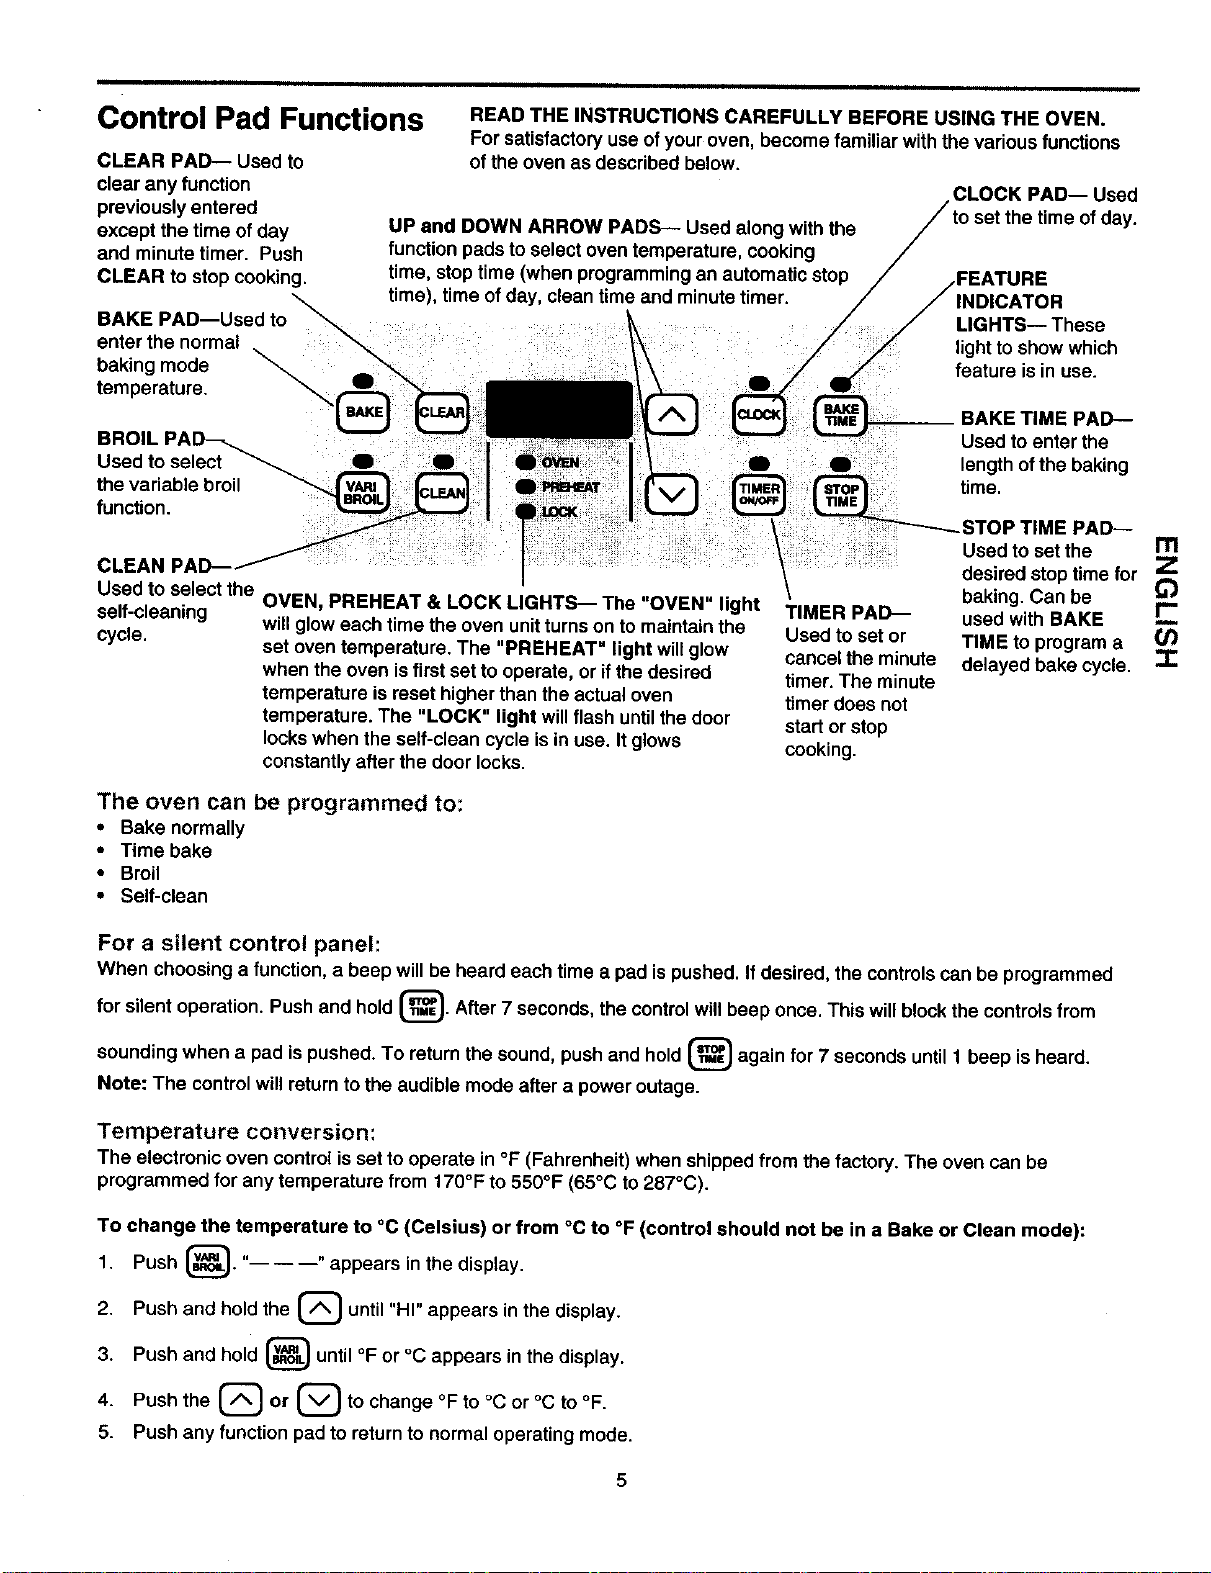
Control Pad Functions
CLEAR PAD-- Used to
clear any function
previously entered
except the time of day
and minutetimer. Push
CLEAR to stop cooking.
READ THE INSTRUCTIONS CAREFULLY BEFORE USING THE OVEN.
For satisfactoryuse ofyour oven, become familiar withthe various functions
of the oven as described below.
UP and DOWN ARROW PADS-- Used along with the
functionpads to select oven temperature, cooking
time, stoptime (when programmingan automaticstop
CLOCK PAD-- Used
set the time of day.
time), time ofday, clean time and minutetimer.
BAKE PAD--Used to
enter the normal
baking mode "___
temperature.
INDICATOR
LIGHTS-- These
lightto show which
feature is in use.
BAKE TIME PAD--
Used toenter the
length ofthe baking
time.
Used to select the
self-cleaning
cycle.
The oven can
• Bake normally
• Time bake
• Broil
• Self-clean
OVEN, PREHEAT & LOCK LIGHTS--- The "OVEN" light
willgloweach time the oven unitturnson to maintainthe
set oven temperature. The "PREHEAT" light willglow
when the oven isfirst set to operate, or ifthe desired
temperature is reset higherthan the actual oven
temperature. The "LOCK" light willflash untilthe door
lockswhen the self-clean cycle isin use. Itglows
constantlyafter the door locks.
be programmed to:
TIMER PAD_
Used to set or
cancel the minute
timer. The minute
timer does not
start or stop
cooking.
TIME PAD--
Used to set the rll
desired stop timefor Z
baking. Can be _'_
used with BAKE ,-r-
TIME to programa 01
delayed bake cycle. -r-
For a silent control panel:
When choosinga function, a beep willbe heard each time a pad ispushed. If desired, the controlscan be programmed
for silent operation. Push and hold []. After 7 seconds, the controlwillbeep once. This willblockthe controlsfrom
sounding when a pad ispushed. To return the sound, push and hold [] again for 7 seconds until 1 beep is heard.
Note: The control will return to the audible mode after a power outage.
Temperature conversion:
The electronic oven control is set to operate in °F (Fahrenheit) when shippedfrom the factory,The oven can be
programmed for anytemperature from 170°F to 550°F (65°C to287°C).
To change the temperature to °C (Celsius) or from °C to °F (control should not be in a Bake or Clean mode):
1. Push [_. "------" appears inthe display.
2. Push and hold the [] until"HI" appears in the display.
3. Push and hold {_) until°F or °C appears in the display.
4. Push the [] or [_) to change °F to °C or °C to °F.
5. Push any functionpad to returnto normal operating mode.
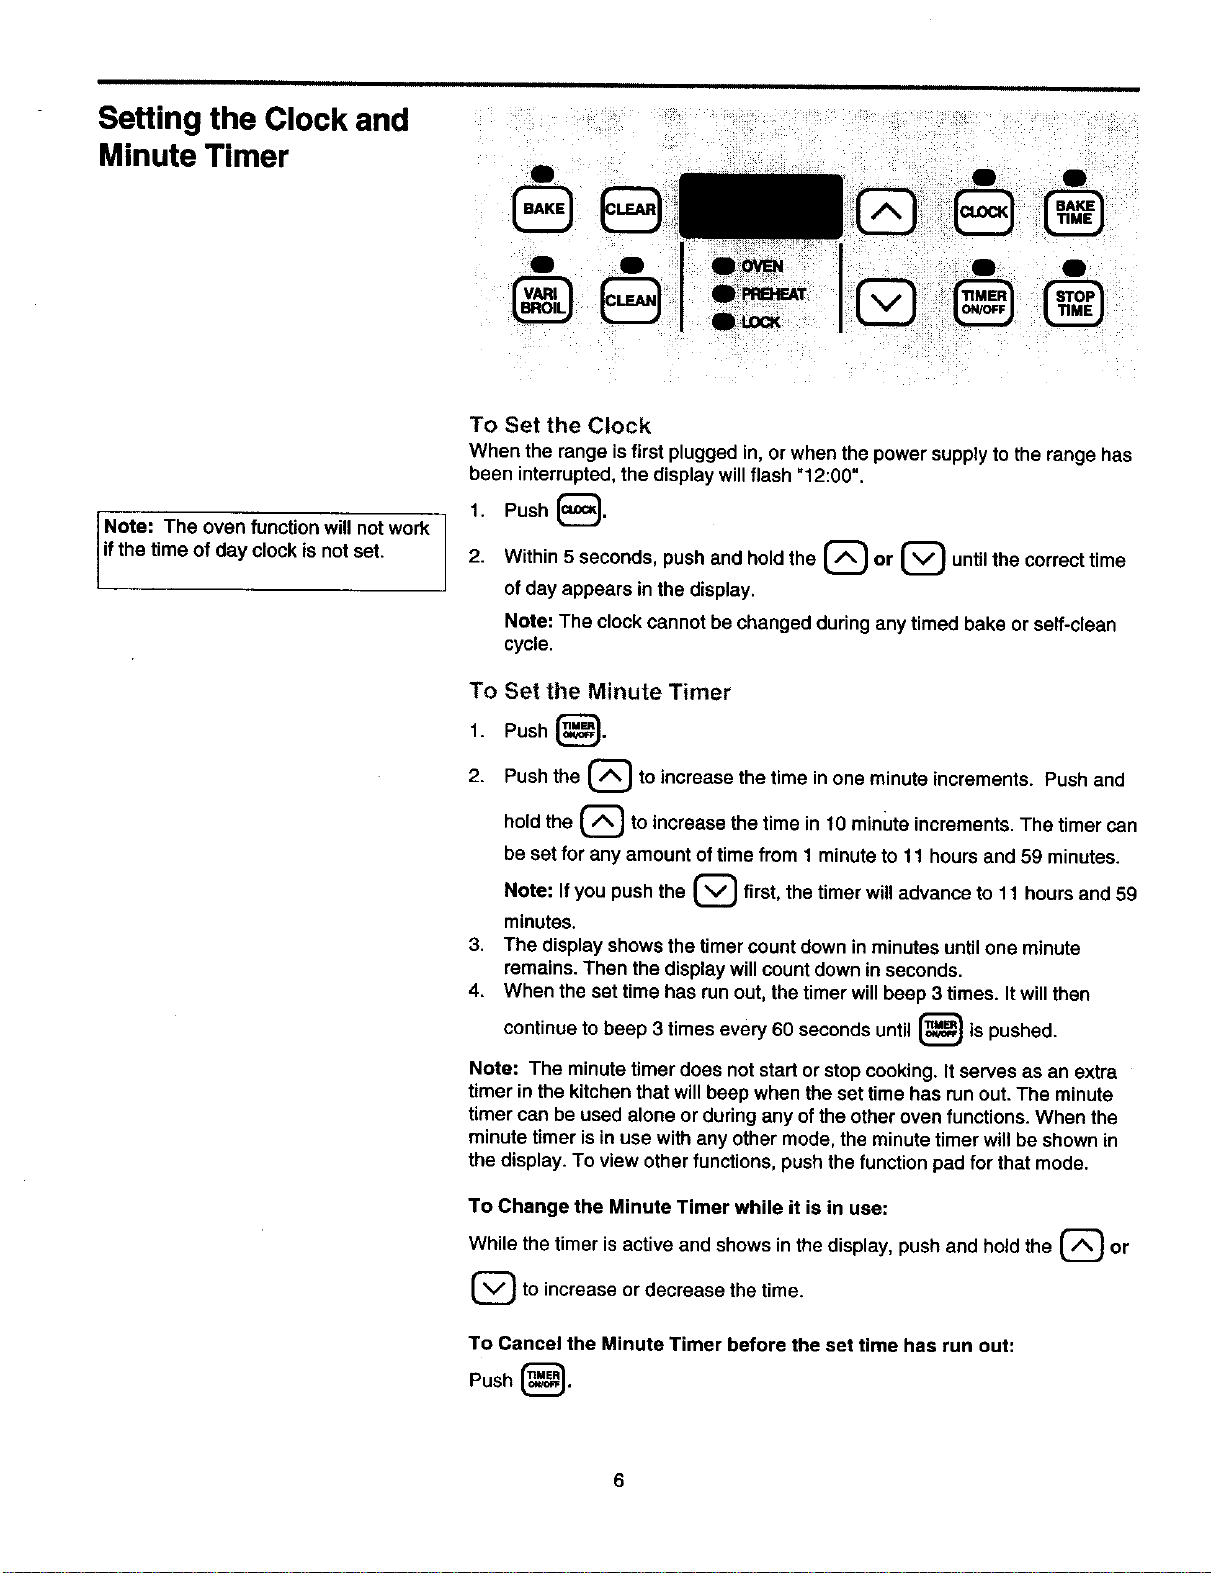
Setting the Clock and
Minute Timer
8B
B
Note: The oven functionwillnot work
f the time of day clock isnot set.
To Set the Clock
When the range is first plugged in, or when the power supply to the range has
been interrupted, the display will flash "12:00".
1. Push _.
2. Within 5
seconds, push and hold the _ or L._ untilthe correct time
of day appears in the display.
Note: The clock cannot be changed during any timed bake or self-clean
cycle.
To Set the Minute Timer
1. Push [].
2. Push the _ to increase the time in one minute increments. Push and
3,
4.
hold
the _ to increase the time in 10 minute increments. The timer can
be set for any amount of time from 1 minute to 11 hours and 59 minutes.
you push the [] first, the timer willadvance to 11 hours and 59
Note: If
minutes.
The displayshows the timer countdown in minutesuntil one minute
remains. Then the displaywillcount downin seconds.
When the set time has runout, the timer willbeep 3 times. Itwillthen
beep 3 times every 60 secondsuntil [] is pushed.
continue
to
Note: The minutetimer does not start orstop cooking. It serves as an extra
timer in the kitchenthat will beep when the set time has runout.The minute
timer can be used alone or duringany of the otheroven functions. When the
minute timer isin use with any othermode, the minute timer willbe shown in
the display.To view other functions, pushthe function pad for that mode.
To Change the Minute Timer while it is in use:
While the timer is active and shows in the display, push and hold the (_ or
]to increase or decrease the time.
To Cancel the Minute Timer before the set time has run out:
Push [].
6
Surface Cooking
Ceramic-Glass Cooktop
The ceramic-glass cooktop has electric heatingcoils located belowthe
surface of the glass. The design ofthe glass cooktop outlinesthe area of the
surface unitbelow. Most importantly,make sure the diameter ofthe pan
matches the diameter of the unit. Heat istransferred up throughthe surface of
the cooktopto the cookingutensil.Only flat-bottomed pans shouldbe used.
The type and size ofthe cookware, number of surface units in use and the
settingsofthe unitsare factors that will affectthe amount ofheat thatwill
spread to areas surroundingthe surface units.The areas surroundingthe
unitsmay become hot enoughto cause burns.
The cooktop shouldnot be used as a cutting board or work surface inthe
kitchen. Dropping heavy or hard objects on the cooktop may crack it. Pans
with rough bottoms may scratch the cooktop surface. Do not place foods
directly on the smoothtop surface (without cooking utensils) damage to glass
or difficulty in cleaning will result.
Radiant Surface Units
The Radiant Surface Unit isa group of heating coilsenclosed in a ceramic
fixture below theglass cooktop.The unittemperature rises graduallyand
evenly. As the temperature rises,the unitwillglow red. To maintain the
selected setting,the unitwillcycle on and off.The heating unit retainsenough
heat to providea uniformand consistent heat duringthe off cycle. The
ceramic fixture thermally insulatesthe heating unit, concentratingheat inthe
heating zone. Forefficientcooking, turnoffthe unitseveral minutes before
cooking iscomplete. This willallow residualheat to complete the cooking
process. The amount of residualheat depends on the type and quality of
cooking utensil, the quantity of food being cooked and the selected heat
setting.
Dual Radiant Surface Units (if equipped)
The dual radiant surface unit is made up of an inner and outer coil within the
same surface unit. A control knob and rocker switch is used for operating the
different coils. The smaller unit or inner coil has a lower wattage and can be
used to prepare smaller quantities of food in smaller pans. The larger unit or
both inner and outer coils has a higher wattage and can be used to prepare
larger quantities of food in larger pans. When using the outer coil, both inner
and outer coils operate.
I11
I"
Indicator Light(s)
There are 2 different surface control lightsthat willglowon your range_a
surface indicator and a hot cooktop surface indicator.
The surface indicator, locatedon the controlpanel, glows when any surface
unitisturned on.A quick glance at the lightafter cookingisan easy check to
be sure all surface controlsare turned off.
The hot cooktop surface indicator, located underthe glass cooktopor on
the controlpanel, willcome on as the surface cookingarea heats up and will
continueto glowuntilthe glass cooktop has cooled downto a moderate level.
7
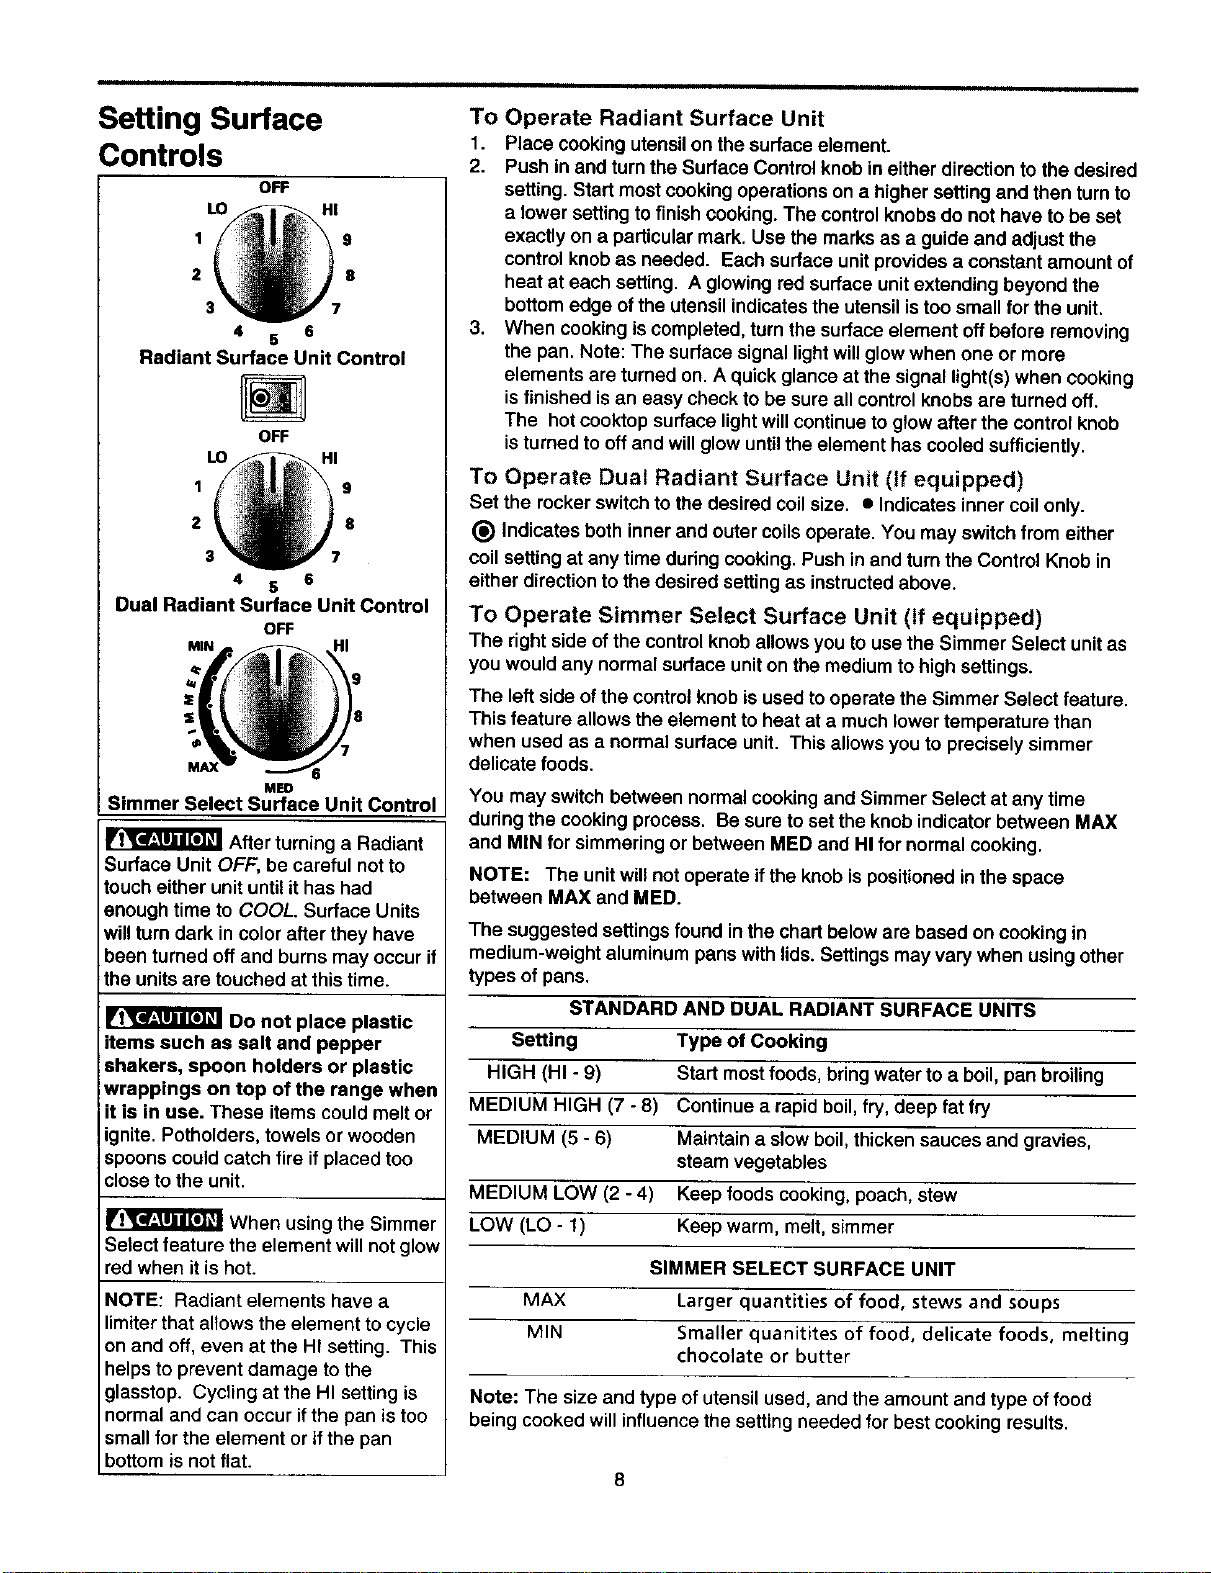
Setting Surface
Controls
OFF
LO HI
1 9
2 8
3 7
4 6
5
Radiant Surface Unit Control
LO
1
2
3
4
OFF
HI
9
8
I
5 6
Dual Radiant Surface Unit Control
oFF
MIN HI
6
MED
Simmer Select Surface Unit Control
After turning a Radiant
Surface Unit OFF, be careful not to
touch either unit until ithas had
enough time to COOL. Surface Units
will turn dark in color after they have
been turned off and burns may occur if
the units are touched at this time.
Do not place plastic
items such as salt and pepper
shakers, spoon holders or plastic
wrappings on top of the range when
it is in use. These itemscould melt or
ignite. Potholdere,towels or wooden
spoons couldcatch fire if placedtoo
close tothe unit.
When using the Simmer
Select feature the element will not glow
red when it is hot.
NOTE: Radiant elements have a
limiter that allows the element to cycle
on and off, even at the HI setting. This
helps to prevent damage to the
glasstop. Cycling at the HI setting is
normal and can occur if the pan is too
small for the element or ifthe pan
bottom is not flat.
To Operate Radiant Surface Unit
1. Place cookingutensilon the surface element.
2. Push in and turnthe Surface Control knobin either directionto the desired
setting. Start mostcookingoperations on a highersettingand then turnto
a lower settingtofinish cooking. The controlknobsdo not have to be set
exactly on a particularmark. Use the marksas a guide and adjust the
controlknob as needed. Each surface unitprovides a constant amount of
heat at each setting. A glowingred surface unitextending beyond the
bottomedge ofthe utensilindicatesthe utensil istoo small for the unit.
3. When cookingiscompleted,turn the surface element offbefore removing
the pan. Note: The surface signal lightwillglowwhen one or more
elements are turned on. A quickglance at the signal light(s) when cooking
isfinished isan easy check to be sure all controlknobsare turned off.
The hotcooktop surface lightwillcontinueto glowafter the controlknob
isturned to offand willglowuntilthe element has cooled sufficiently.
To Operate Dual Radiant Surface Unit (If equipped)
Set the rockerswitchto the desired coilsize. • Indicates inner coilonly.
(_) Indicates both inner and outercoilsoperate. You may switch from either
coil settingat any time during cooking.Push in and turnthe Control Knob in
either directionto the desired settingas instructedabove.
To Operate Simmer Select Surface Unit (If equipped)
The rightside of the controlknoballowsyou to use the Simmer Select unitas
you would any normal surface uniton the mediumto high settings.
The leftside of the control knobis used to operate the Simmer Select feature.
This feature allowsthe element to heat at a much lower temperature than
when used as a normal surface unit. This allowsyou to precisely simmer
delicate foods.
You may switchbetween normal cooking and Simmer Select at any time
during the cooking process. Be sure to set the knob indicator between MAX
and MIN for simmering or between MED and I-IIfor normal cooking.
NOTE: The unitwill not operate ifthe knob ispositionedin the space
between MAX and MED.
The suggested settingsfound in the chart below are based on cookingin
medium-weight aluminum pans with lids. Settingsmay vary when usingother
types of pans.
STANDARD AND DUAL RADIANT SURFACE UNITS
Setting Type of Cooking
HIGH (HI - 9) Start mostfoods, bringwater to a boil,pan broiling
MEDIUM HIGH (7 - 8) Continuea rapid boil,fry, deep fat fry
MEDIUM (5 - 6) Maintain a slow boil,thickensauces and gravies,
steam vegetables
MEDIUM LOW (2 - 4) Keep foodscooking,poach, stew
LOW (LO - 1) Keep warm, melt, simmer
SIMMER SELECT SURFACE UNIT
MAX Larger quantities of food, stews and soups
MIN Smaller quanitites of food, delicate foods, melting
chocolate or butter
Note: The size and type of utensil used, and the amount and type of food
being cooked will influence the setting needed for best cooking results.
8
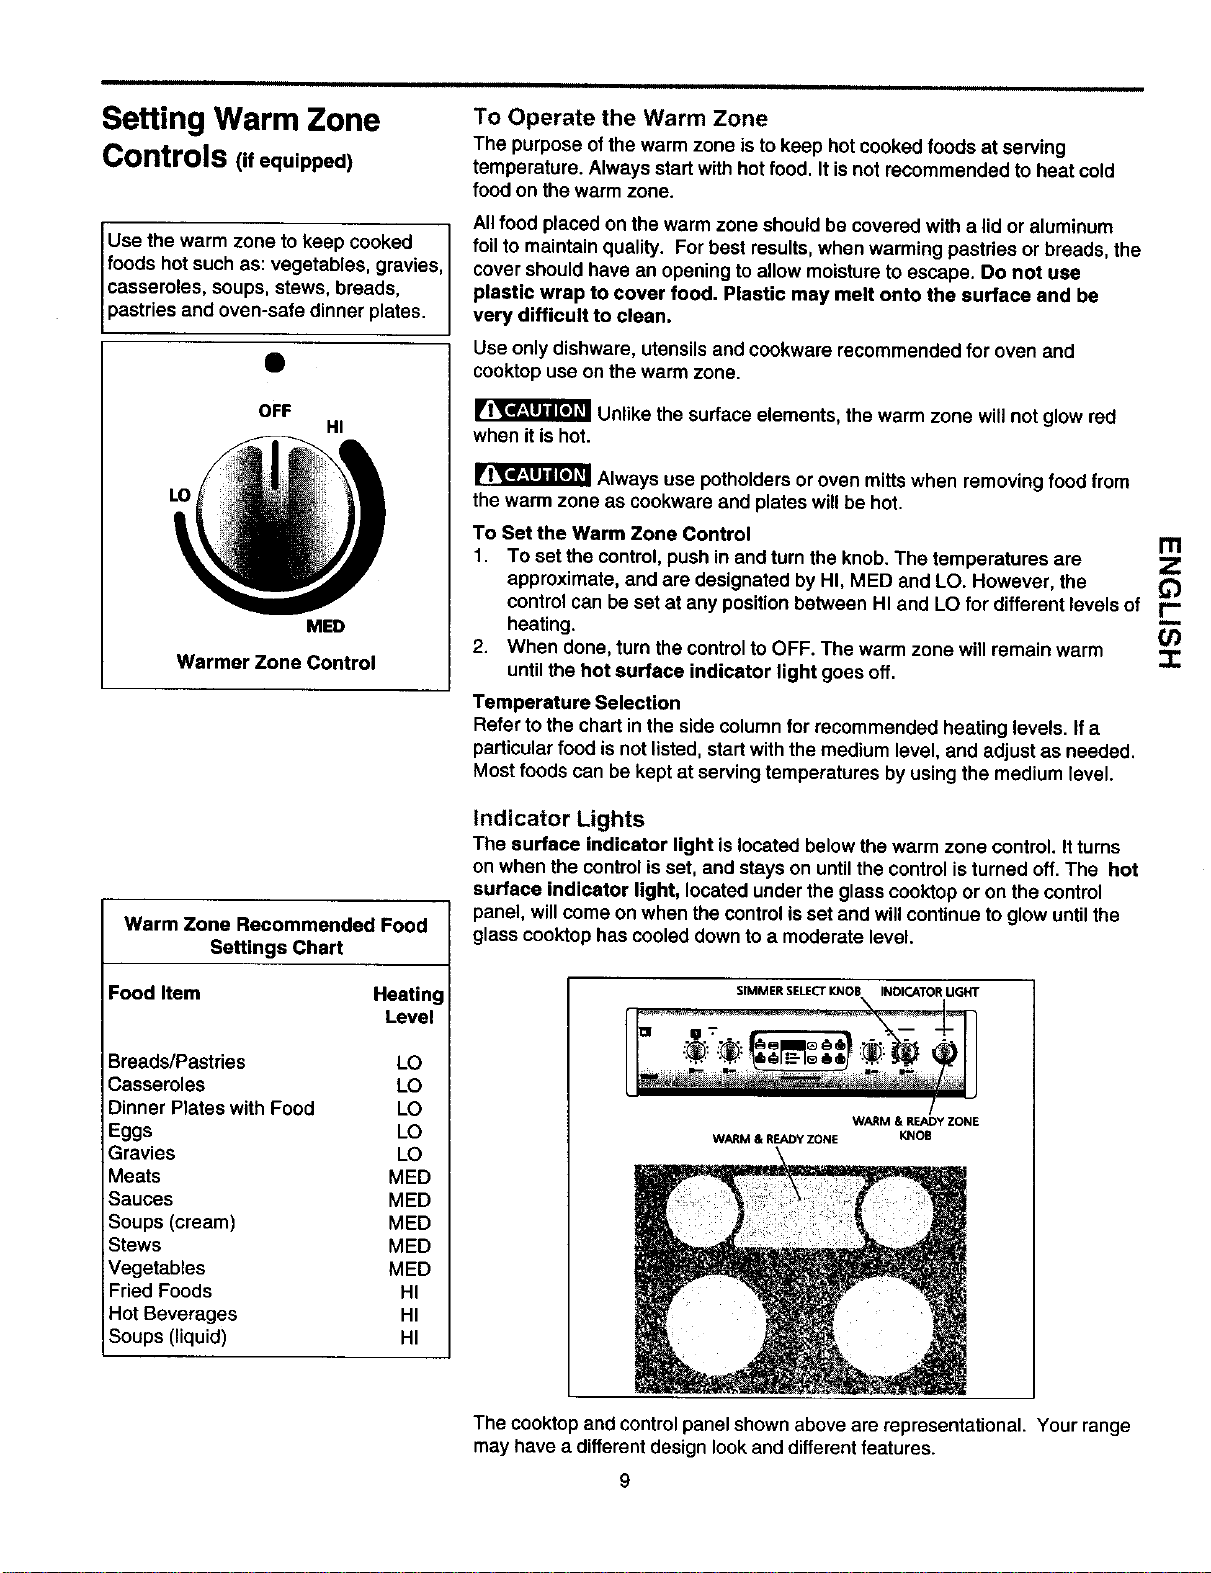
Setting Warm Zone
Controls (. equipped)
Use the warm zone to keep cooked
foods hot such as: vegetables, gravies,
casseroles, soups, stews, breads,
pastries and oven-safe d nner plates.
S
OFF
HI
LO
MED
Warmer Zone Control
Warm Zone Recommended Food
Settings Chart
Food Item Heating
Level
Breads/Pastries LO
Casseroles LO
Dinner Plates with Food LO
Eggs LO
Gravies LO
Meats MED
Sauces MED
Soups (cream) MED
Stews MED
Vegetables MED
Fried Foods HI
Hot Beverages HI
Soups (liquid) HI
To Operate the Warm Zone
The purpose ofthe warm zone isto keep hotcooked foods at serving
temperature. Always startwith hot food. It is not recommended to heat cold
food on thewarm zone.
All food placed on the warm zone should be covered with a lid or aluminum
foil to maintain quality. For best results, when warming pastries or breads, the
cover should have an opening to allow moisture to escape. Do not use
plastic wrap to cover food. Plastic may melt onto the surface and be
very difficult to clean.
Use only dishware, utensils and cookware recommended for oven and
cooktop use on the warm zone.
Unlike the surface elements, the warm zone will not glow red
when it is hot.
Always use potholders or oven mitts when removing food from
the warm zone as cookware and plates willbe hot.
To Set the Warm Zone Control
1. To
set the control,push in and turnthe knob. The temperatures are -_
approximate, and are designated by HI, MED and LO. However, the t'2t
control can be set at any position between HI and LO for different levels of
heating.
2. When done, turn the control to OFF. The warm zone will remain warm
until the hot surface indicator light goes off.
Temperature Selection
Refer tothe chart in the side column for recommended heating levels. If a
particularfood isnot listed, startwith the medium level, and adjustas needed.
Most foods can be kept at serving temperatures by usingthe medium level.
Indicator Lights
The surface indicator light islocated belowthe warm zone control. Itturns
on when the controlisset, and stays on untilthe controlisturned off. The hot
surface indicator light, located under the glass cooktopor on the control
panel, willcome on when the controlis set and willcontinueto glowuntil the
glass cooktop has cooled downto a moderate level.
SIMMER SELECT KNOB INDICATOR UGHT
L
!
W/_IM & READyZONE
WARM & READY ZONE KNOB
The cooktop and control panel shown above are representational. Your range
may have a different design look and different features.
9
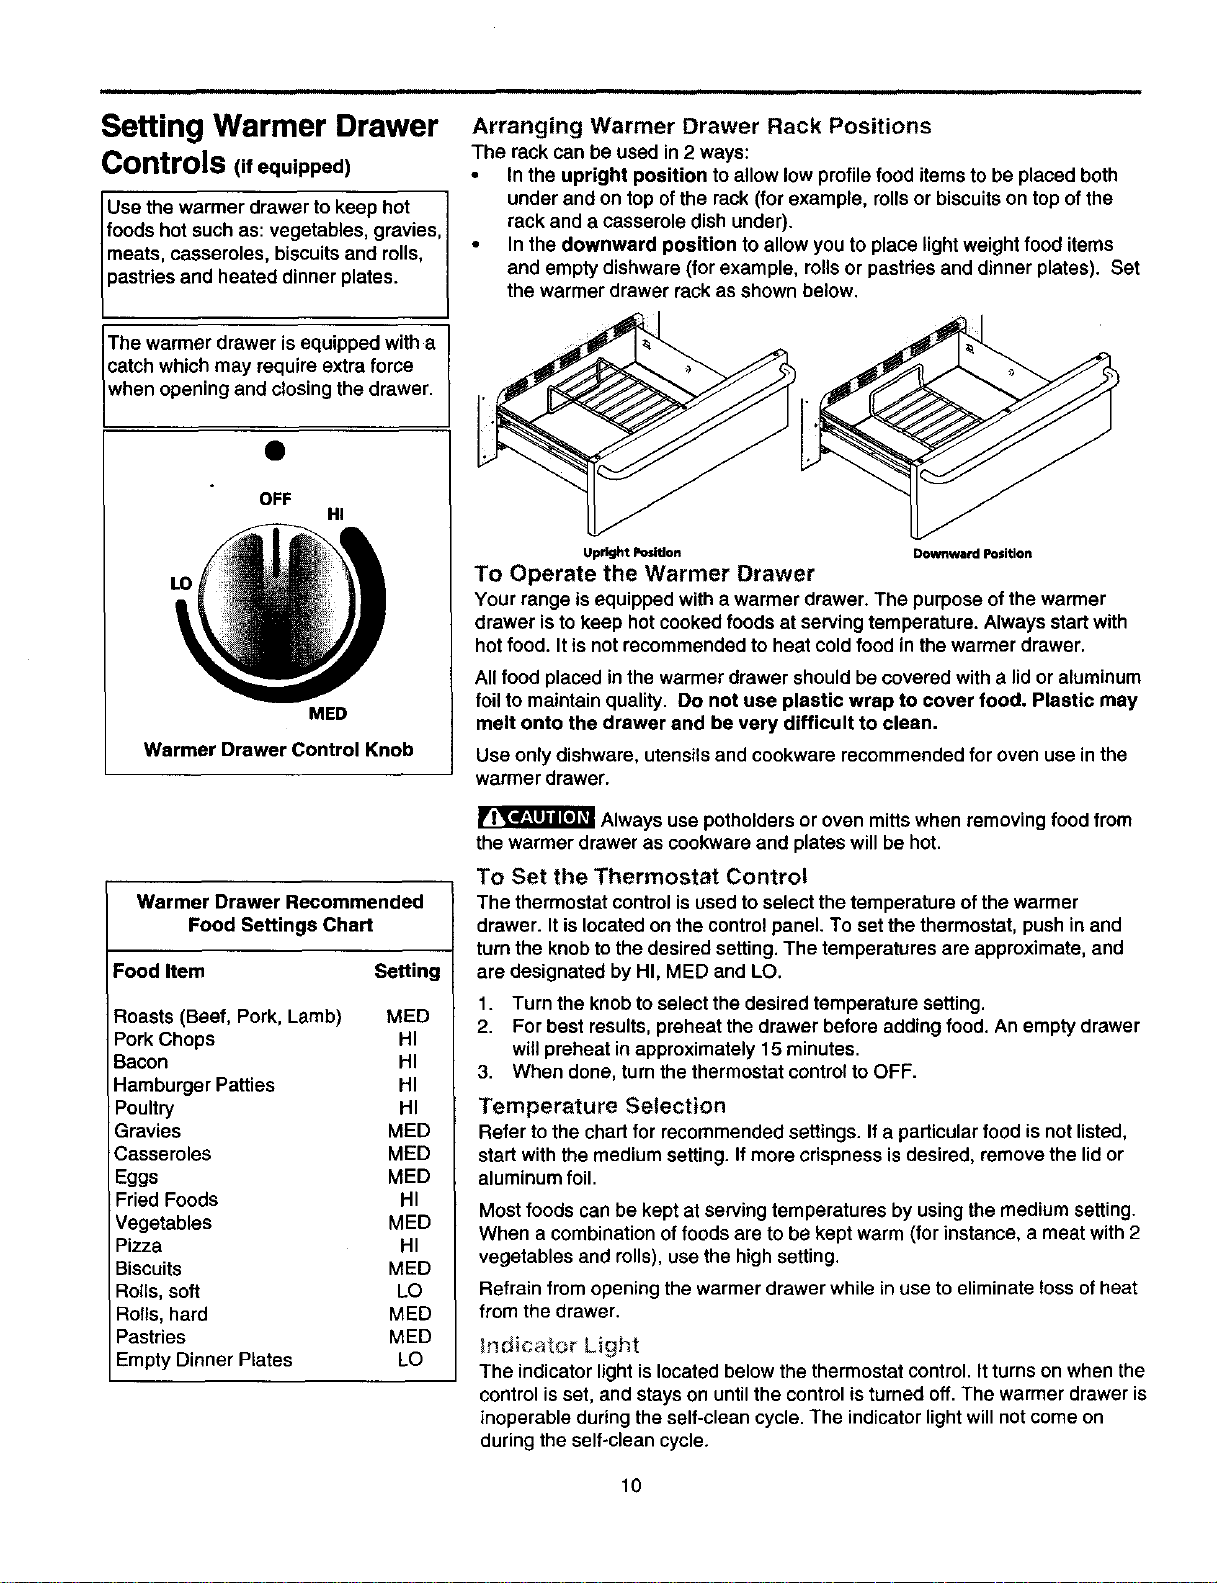
Setting Warmer Drawer
Controls (.equipped)
Use the warmer drawer to keep hot
foodshot such as: vegetables, gravies,
meats, casseroles, biscuitsand rolls,
pastries and heated dinnerplates.
The warmer drawer is equipped with a
catch which may require extra force
when opening and closingthe drawer.
OFF
HI
LO
MED
Warmer Drawer Control Knob
Warmer Drawer Recommended
Food Settings Chart
Food Item Setting
Roasts (Beef, Pork, Lamb) MED
Pork Chops HI
Bacon HI
Hamburger Patties HI
Poultry HI
Gravies MED
Casseroles MED
Eggs MED
Fried Foods HI
Vegetables MED
Pizza HI
Biscuits MED
Rolls, soft LO
Roils, hard MED
Pastries MED
Empty Dinner Plates LO
Arranging Warmer Drawer Rack Positions
The rack can be used in 2 ways:
• In the upright position toallow low profilefood itemsto be placed both
under and on top ofthe rack(for example, rollsor biscuitson top ofthe
rack and a casserole dishunder).
• In the downward position to allow you to place lightweight food items
and empty dishware (for example, rollsor pastriesand dinner plates). Set
the warmer drawer rack as shown below.
Upright I_ltlon Downward Position
To Operate the Warmer Drawer
Your range is equipped with a warmer drawer. The purposeof the warmer
drawer isto keep hot cookedfoods at servingtemperature. Always start with
hot food. Itis not recommended to heat coldfood in the warmer drawer.
Allfood placed in the warmer drawer shouldbe covered with a lid or aluminum
foil to maintain quality. Do not use plastic wrap to cover food. Plastic may
melt onto the drawer and be very difficult to clean.
Use onlydishware, utensils and cookware recommended for oven use inthe
warmer drawer.
Always use potholders or oven mitts when removingfoodfrom
the warmer drawer as cookwara and plates will be hot.
To Set the Thermostat Control
The thermostat controlisused to selectthe temperature of the warmer
drawer. It is locatedon the controlpanel. To set the thermostat, pushin and
turn the knob tothe desired setting. The temperatures are approximate, and
are designated by HI, MED and LO.
1. Turn the knobto select the desired temperature setting.
2. For best results, preheat the drawer before adding food. An empty drawer
will preheat in approximately 15 minutes.
3. When done, turn the thermostat control to OFF.
Temperature Selection
Refer to the chart for recommended settings. If a particular food is not listed,
start with the medium setting. If more crispness is desired, remove the lid or
aluminum foil.
Most foods can be kept at servingtemperatures by using the mediumsetting.
When a combination of foods are to be kept warm (for instance, ameat with 2
vegetables and rolls), use the high setting.
Refrain from opening the warmer drawer while in use to eliminate toss of heat
from the drawer.
hdic_tor Light
The indicator light is located below the thermostat control. It turns on when the
control is set, and stays on until the control is turned off. The warmer drawer is
inoperable during the self-clean cycle. The indicator light will not come on
during the self-clean cycle,
10
Before Setting Oven
Controls
Arranging Oven Racks
ALWAYS ARRANGE OVEN RACKS WHEN THE OVEN IS COOL (PRIOR
TO OPERATING THE OVEN), Always use oven mittswhen usingthe oven.
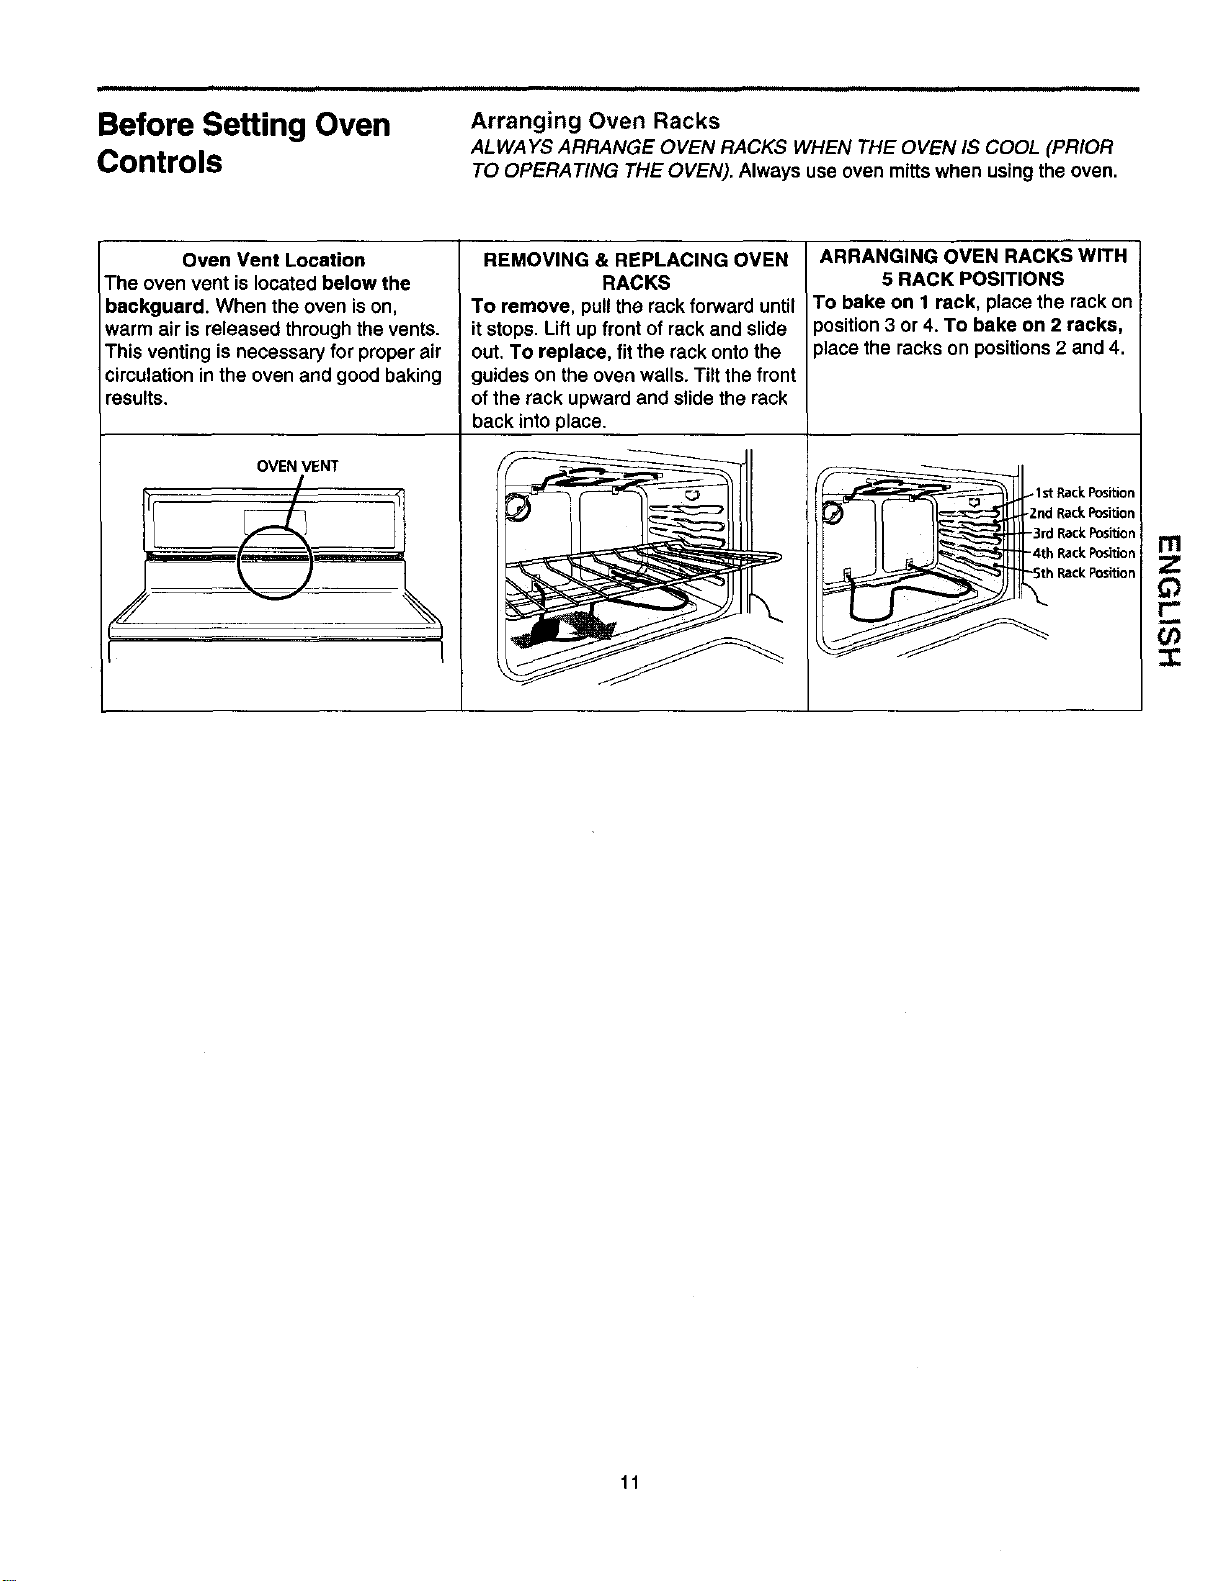
Oven Vent Location
The oven vent is locatedbelow the
backguard. When the even ison,
warm air is released through the vents.
This venting is necessary for properair
circulationin the oven and good baking
results.
J
I
OVEN VENT
I
REMOVING & REPLACING OVEN
RACKS
To remove, pullthe rack forward until
it stops. Lift upfrontof rackand slide
out. To replace, fit the rack ontothe
guides on the oven walls. Tilt the front
of the rack upwardand slide the rack
back intoplace.
ARRANGING OVEN RACKS WITH
5 RACK POSITIONS
To bake on 1 rack, place the rack on
)osition 3 or 4. To bake on 2 racks,
)lace the rackson positions2 and 4.
_lst RackPosition
) ,Znd RackPosition
-3rd Rack Position
-4th Rack Position
; -5th Rack Position
m
z
if)
-r
11
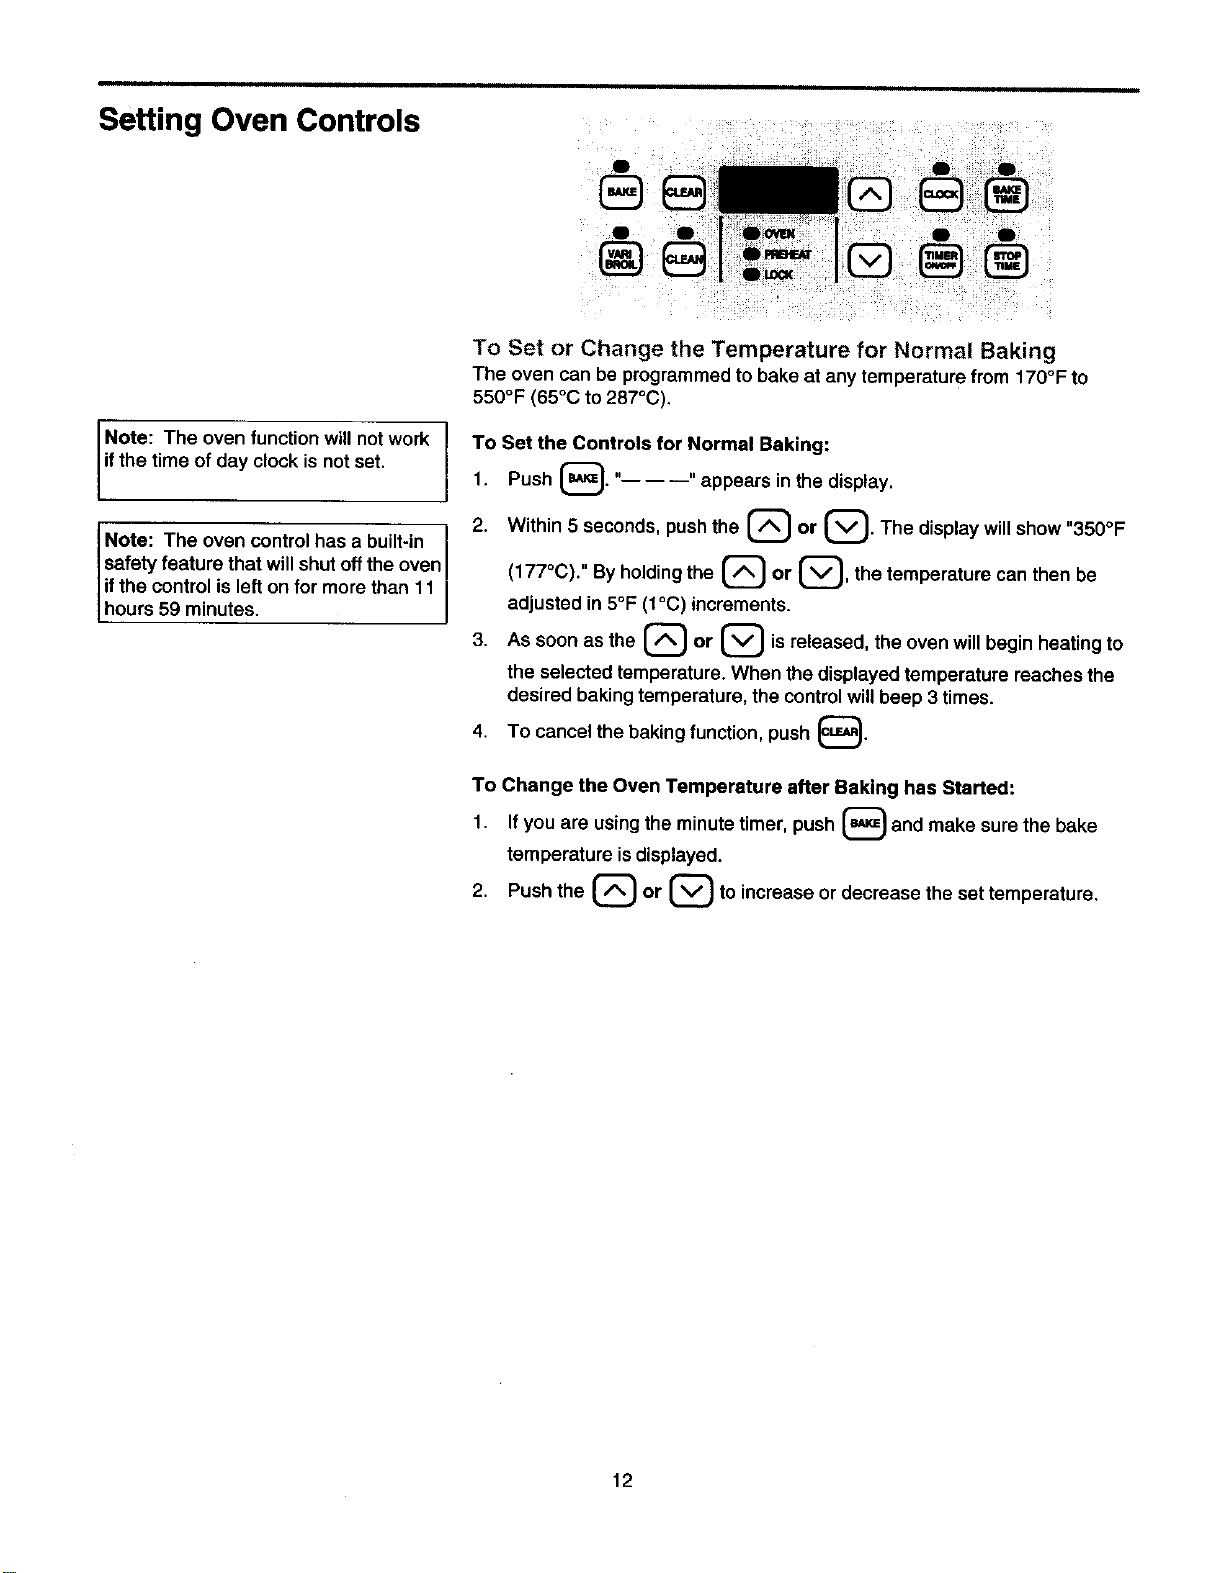
Setting Oven Controls
Note: The oven functionwillnot work
f the t me of day clock is not set.
Note: The oven controlhas a built-in I
safety feature that willshut offthe oven I
ifthe control is lefton for more than 11
hours 59 minutes.
To Set or Change the Temperature for Normal Baking
The oven can be programmedto bake at any temperature from 170°F to
550°F (65°C to 287°C).
To Set the Controls for Normal Baking:
1. Push _. " -"appears inthe display.
2. Within 5 seconds, pushthe [] or (_. The display willshow "350°F
(177°C). " By holdingthe [] or {_, the temper=are can then be
adjusted in 5°F (1°C) increments.
3. As soon as the [] or [] isreleased, the oven willbegin heatingto
the selected temperature. When the displayed temperature reaches the
desired bakingtemperature, the controlwillbeep 3 times.
4. To cancel the baking function, push _.
To Change the Oven Temperature after Baking has Started:
you are usingthe minutetimer, push _ and make sure the bake
1. If
temperature isdisplayed.
or [] to increase or decrease the set temperature.
2. Push the
12
Setting Oven Controls
(continued)
Use caution when using
the automatic timer. Use the automatic
timer when cooking cured or frozen
meats and most fruits and vegetables.
Foods that can easily spoil such as
milk, eggs, fish, meat or poultry,
should be chilledin the refrigerator
first. Even when chilled, they should
not stand in the oven for more than 1
hour before cookingbegins, and
shouldbe removed promptlywhen
cookingiscompleted.
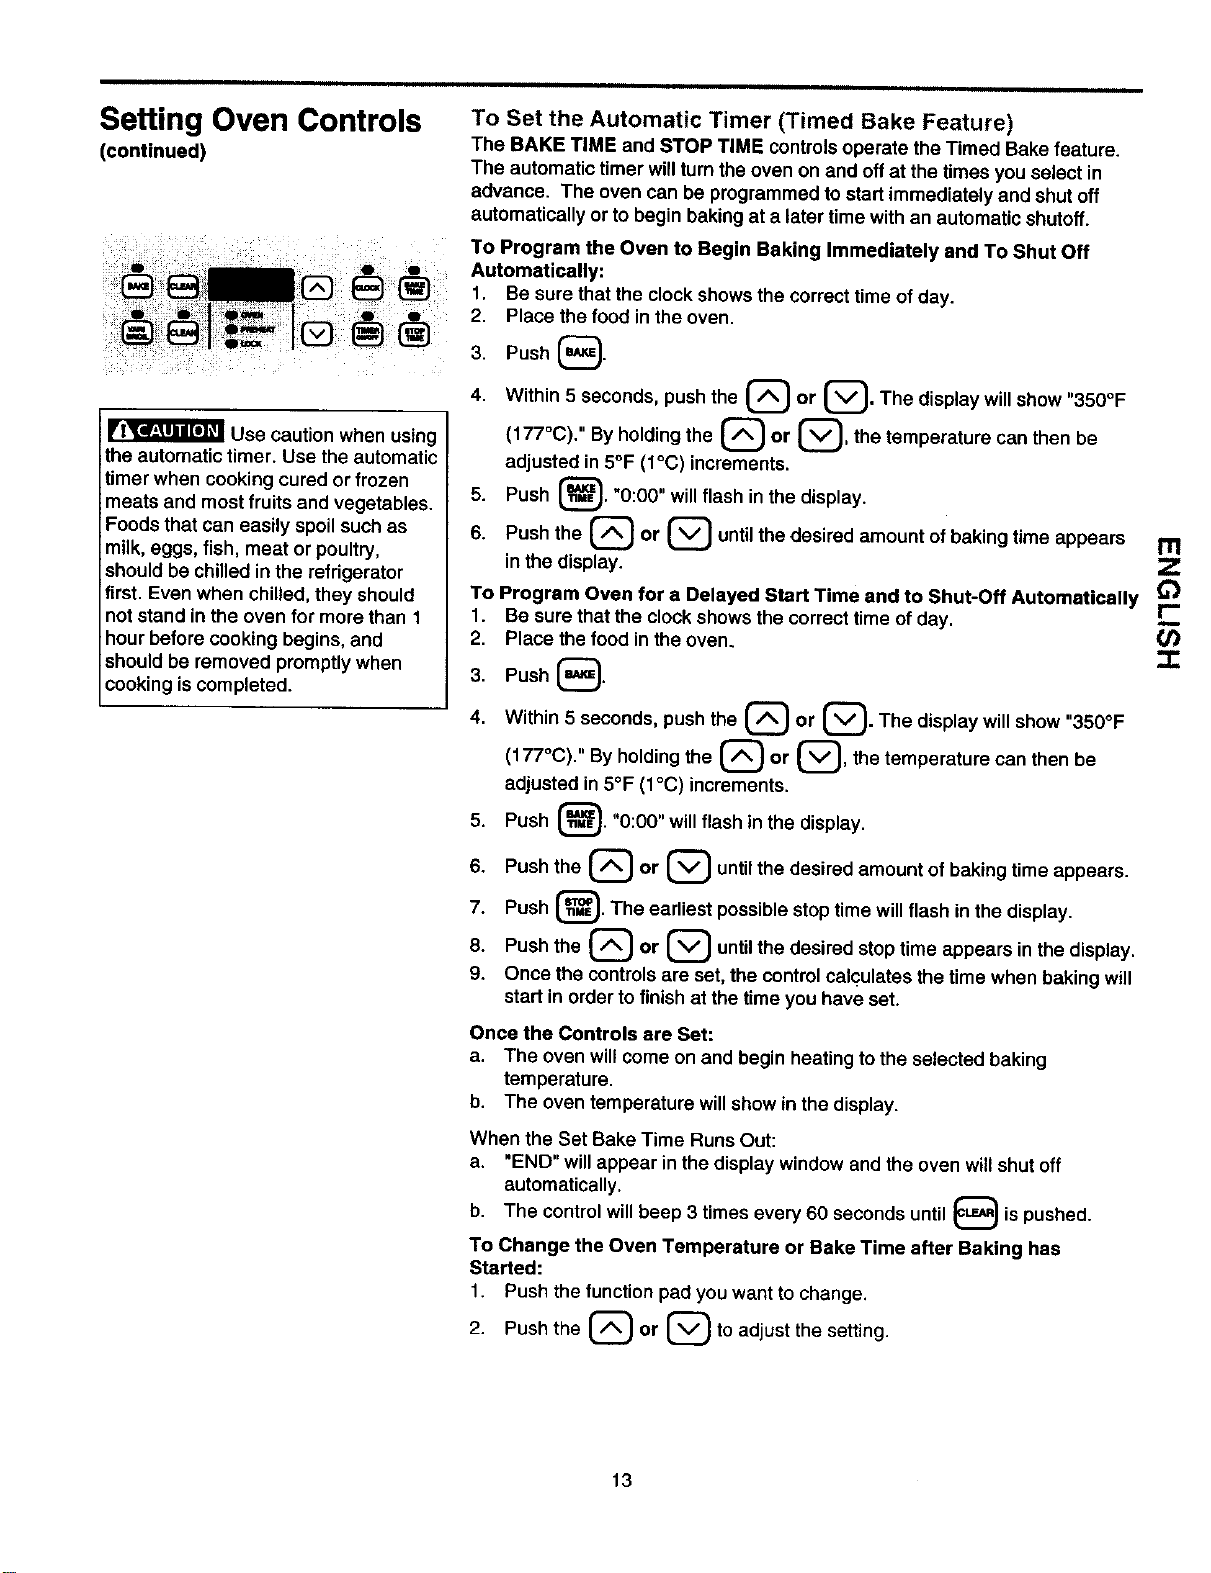
To Set the Automatic Timer (Timed Bake Feature)
The BAKE TIME and STOP TIME controlsoperate the Timed Bake feature.
The automatic timer willturnthe oven on and offat the times you select in
advance. The oven can be programmed to startimmediately and shut off
automatically or to begin baking at a later time with an automatic shutoff.
To Program the Oven to Begin Baking Immediately and To Shut Off
Automatically:
1. Be sure that the clock shows the correcttime of day.
2. Place the food in the oven.
3. Push {_.
4. Within 5 seconds, push the [] or {_. The display will show "350°F
(177°C). " By holding the [] or _, the temperature can then be
adjusted in 5°F (1°C) increments.
5. Push _. "0:00" willflash in the display.
6. Push the [] or _ until the desired amount of baking time appears
in the display.
To Program Oven for a Delayed Start Time and to Shut-Off Automatically
1. Be sure that the clock showsthe correcttime of day,
2, Place the food in the oven.
3,
4,
Push {_.
Within 5 seconds, push the [] or {_. The display will show "350°F
(177°C). " By holding the [] or {_, the temperature can then be
adjusted in 5°F (1°C) increments.
Push _. "0:00" willflash in the display.
5.
6. Push the [] or _ until the desired amount of baking time appears.
7. Push _. The earliest possible stop time will flash in the display.
8. Push the _J or _ until the desired stop time appears in the display.
9. Once the controlsare set, the control calculates the time when baking will
start in order to finish at the time you have set.
Once the Controls are Set:
a. The oven will come on and begin heating tothe selected baking
temperature.
b, The oven temperature willshow inthe display.
When the Set Bake Time Runs Out:
a. "END" will appear in the display window and the oven willshut off
automatically.
b. The control will beep 3 times every 60 seconds until _?J is pushed.
To Change the Oven Temperature or Bake Time after Baking has
Started:
1. Push thefunction pad you want tochange.
2. Push the {_ or {_ to adjust the setting.
13
Setting Oven Controls
(continued)
I
I I
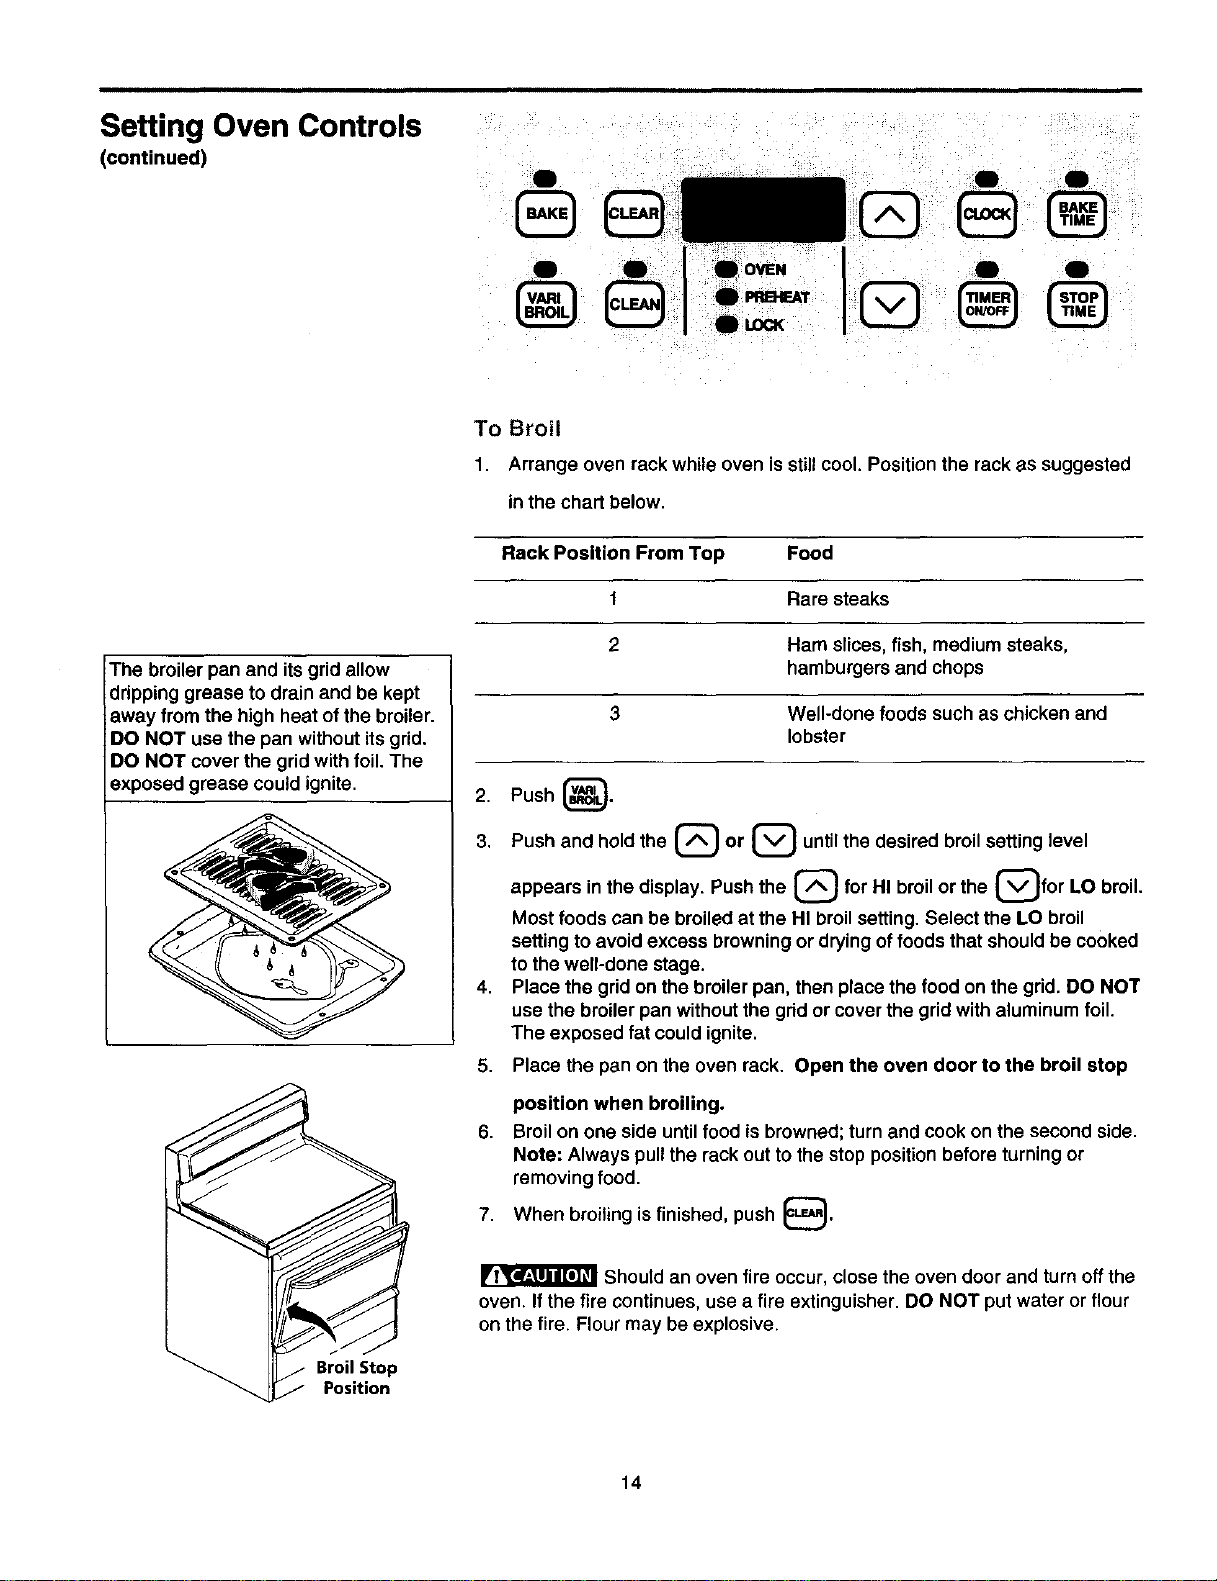
To Broil
1. Arrange oven rackwhile oven isstillcool. Positionthe rackas suggested
inthe chart below.
The broiler pan and itsgrid allow
ddpping grease to drain and be kept
away from the high heat of the broiler.
DO NOT use the pan without its grid.
DO NOT cover the grid with foil. The
exposed grease could ignite.
2,
3.
BroilStop
Position
Rack Position From Top Food
t Rare steaks
2 Ham slices,fish, mediumsteaks,
hamburgers and chops
3 Well-done foods such as chicken and
lobster
4,
5,
6.
7,
Push _}.
Push and holdthe_} or [] untilthedesiredbroilsettinglevel
appears in the display. Push the L._ for HI broil or the L._for LO broil.
Most foods can be broiled at the HI broil setting. Select the LO broil
setting to avoid excess browning or drying of foods that should be cooked
to the well-done stage.
Place the grid on the broiler pan, then place the food on the grid. DO NOT
use the broiler pan without the grid or cover the grid with aluminum foil.
The exposed fat could ignite.
Place the pan on the oven rack. Open the oven door to the broil stop
position when broiling.
Broilon one side until food is browned; turnand cook on the second side.
Note: Always pullthe rackout to the stop positionbefore turningor
removing food.
broilingisfinished, push _.
When
Should an oven fire occur, close the oven door and turn off the
oven. If the fire continues, use a fire extinguisher. DO NOT put water or flour
on the fire. Flour may be explosive.
14
Oven Cleaning
& l.o-
During the self-cleaning
cycle, the outside of the range can
become very hot to the touch. DO
NOT leave small children unattended
near the appliance.
The health of some
birdsis extremely sensitive to the
fumes given off during the self-
cleaning cycle of any range. Move
birds to another well-ventilated room.
DO NOT line the oven
walls, racks, bottom or any other part
of the range with aluminum foil. Doing
sowill destroy heat distribution,
produce poor baking results and cause
permanent damage to the oven interior
(aluminum foil will melt to the interior
surface of the oven).
DO NOT force the oven
door open. This can damage the
automatic door lockingsystem. Use
cautionwhen opening the door after
the self-cleaning cycle is completed.
The oven may stillbe VERY HOT.
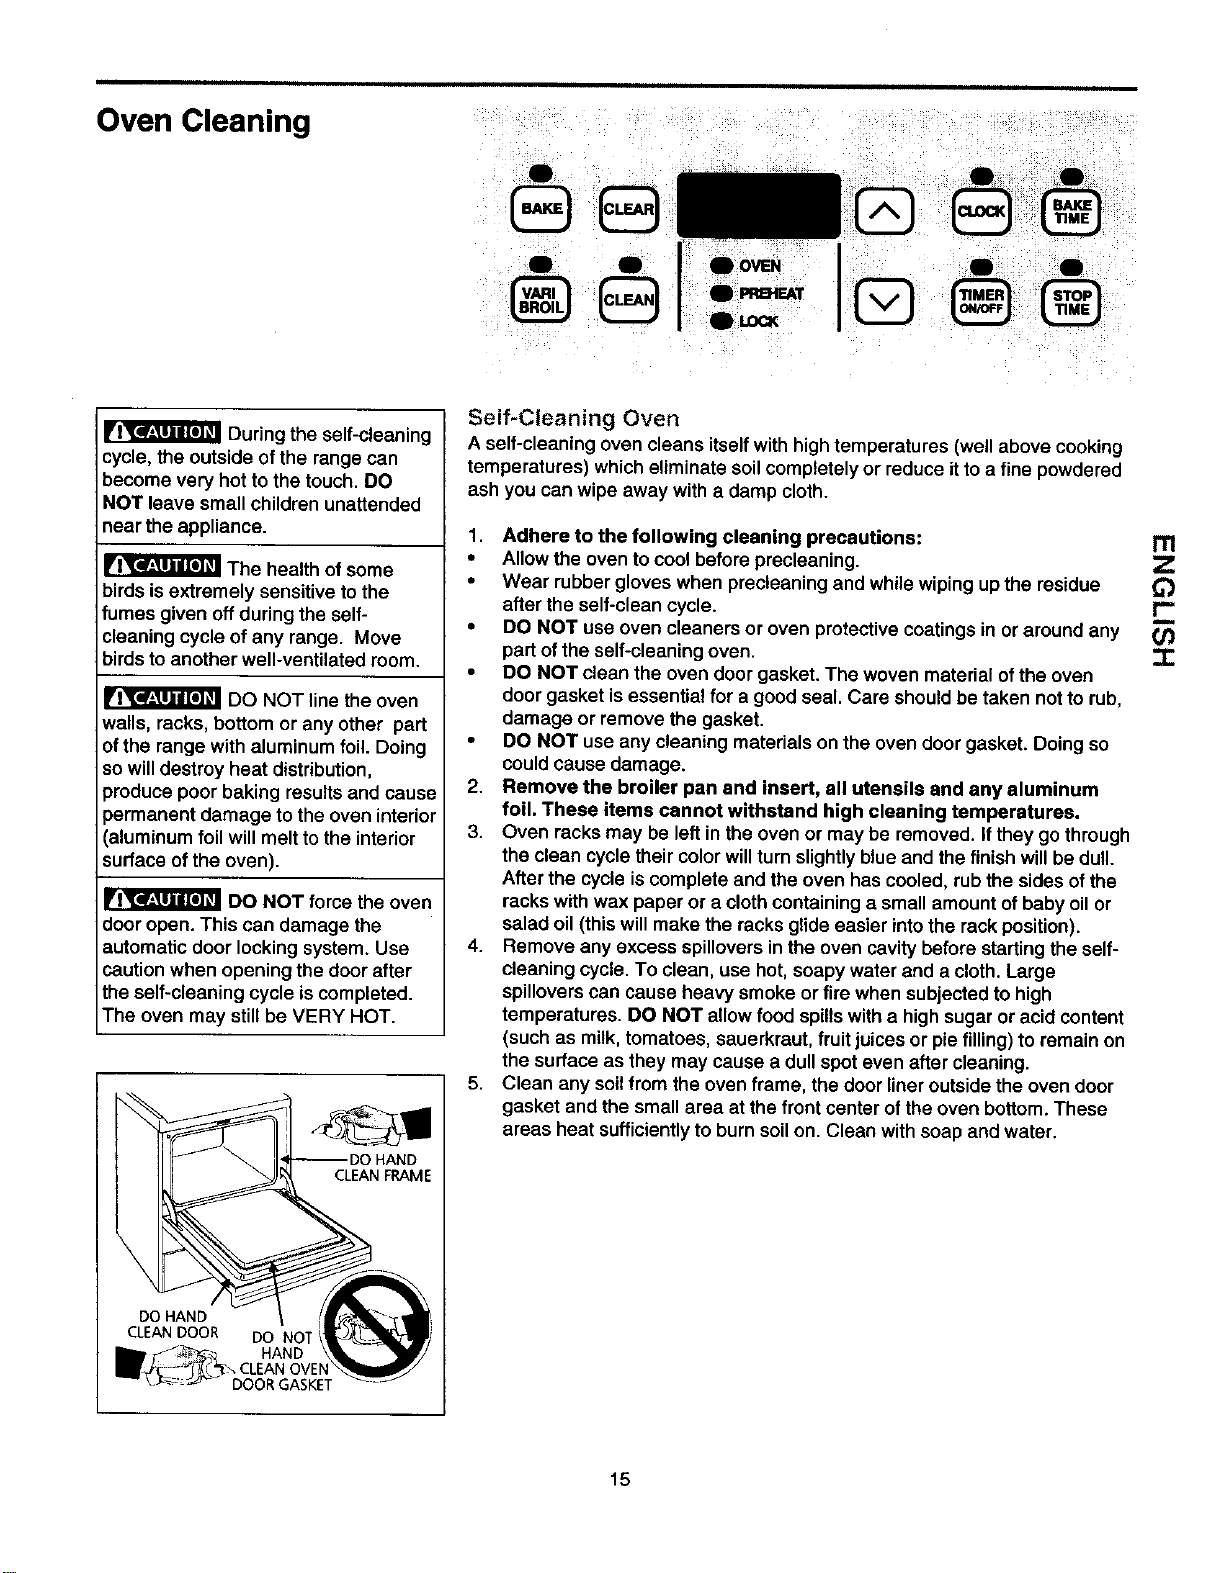
CLEAN FRAME
Self-Cleaning Oven
A self-cleaning ovencleans itselfwith hightemperatures (wellabove cooking
temperatures) whicheliminate soilcompletely or reduce itto a fine powdered
ash you can wipe away with a damp cloth.
1. Adhere to the following cleaning precautions:
• Allow the oven tocool before precleaning.
• Wear rubbergloves when precleaning and while wipingupthe residue
afterthe self-clean cycle.
• DO NOT use oven cleaners or oven protectivecoatings in or aroundany
part ofthe self-cleaningoven.
• DO NOT clean the oven door gasket. The woven materialof the oven
door gasket isessential for a good seal. Care shouldbe taken not to rub,
damage or remove the gasket.
• DO NOT use any cleaning materials on the oven door gasket. Doing so
couldcause damage.
2. Remove the broiler pan end insert, ell utensils and any aluminum
foil. These items cannot withstand high cleaning temperatures.
3. Oven racksmay be leftin the oven or may be removed. Ifthey go through
the clean cycletheir colorwillturnslightlyblueand thefinish willbe dull.
After the cycle is complete and the oven has cooled, rub the sides of the
racks with wax paper or a cloth containing a small amount of baby oil or
salad oil (this will make the racks glide easier intothe rack position).
4. Remove any excess spillovers in the oven cavity before starting the self-
cleaning cycle. To clean, use hot, soapy water and a cloth. Large
spillovers can cause heavy smoke or fire when subjected to high
temperatures. DO NOT allow food spillswith a high sugar or acid content
(such as milk, tomatoes, sauerkraut, fruit juices or pie filling) to remain on
the surface as they may cause a dull spot even after cleaning.
5. Clean any soil from the oven frame, the door liner outside the oven door
gasket and the small area at the front center of the oven bottom. These
areas heat sufficiently to burn soil on. Clean with soap and water.
m
r-
15
Oven Cleaning
(continued)
@®
Q
@
Use care when opening
the oven door after the self-cleaning
cycle. Stand to the side of the oven
when opening the door to allow hot air
or steam toescape.
DO NOT force the oven
door open. This can damage the
automatic door locking system. Use
caution when opening the door after
the self-cleaning cycle is completed.
The oven may still be VERY HOT.
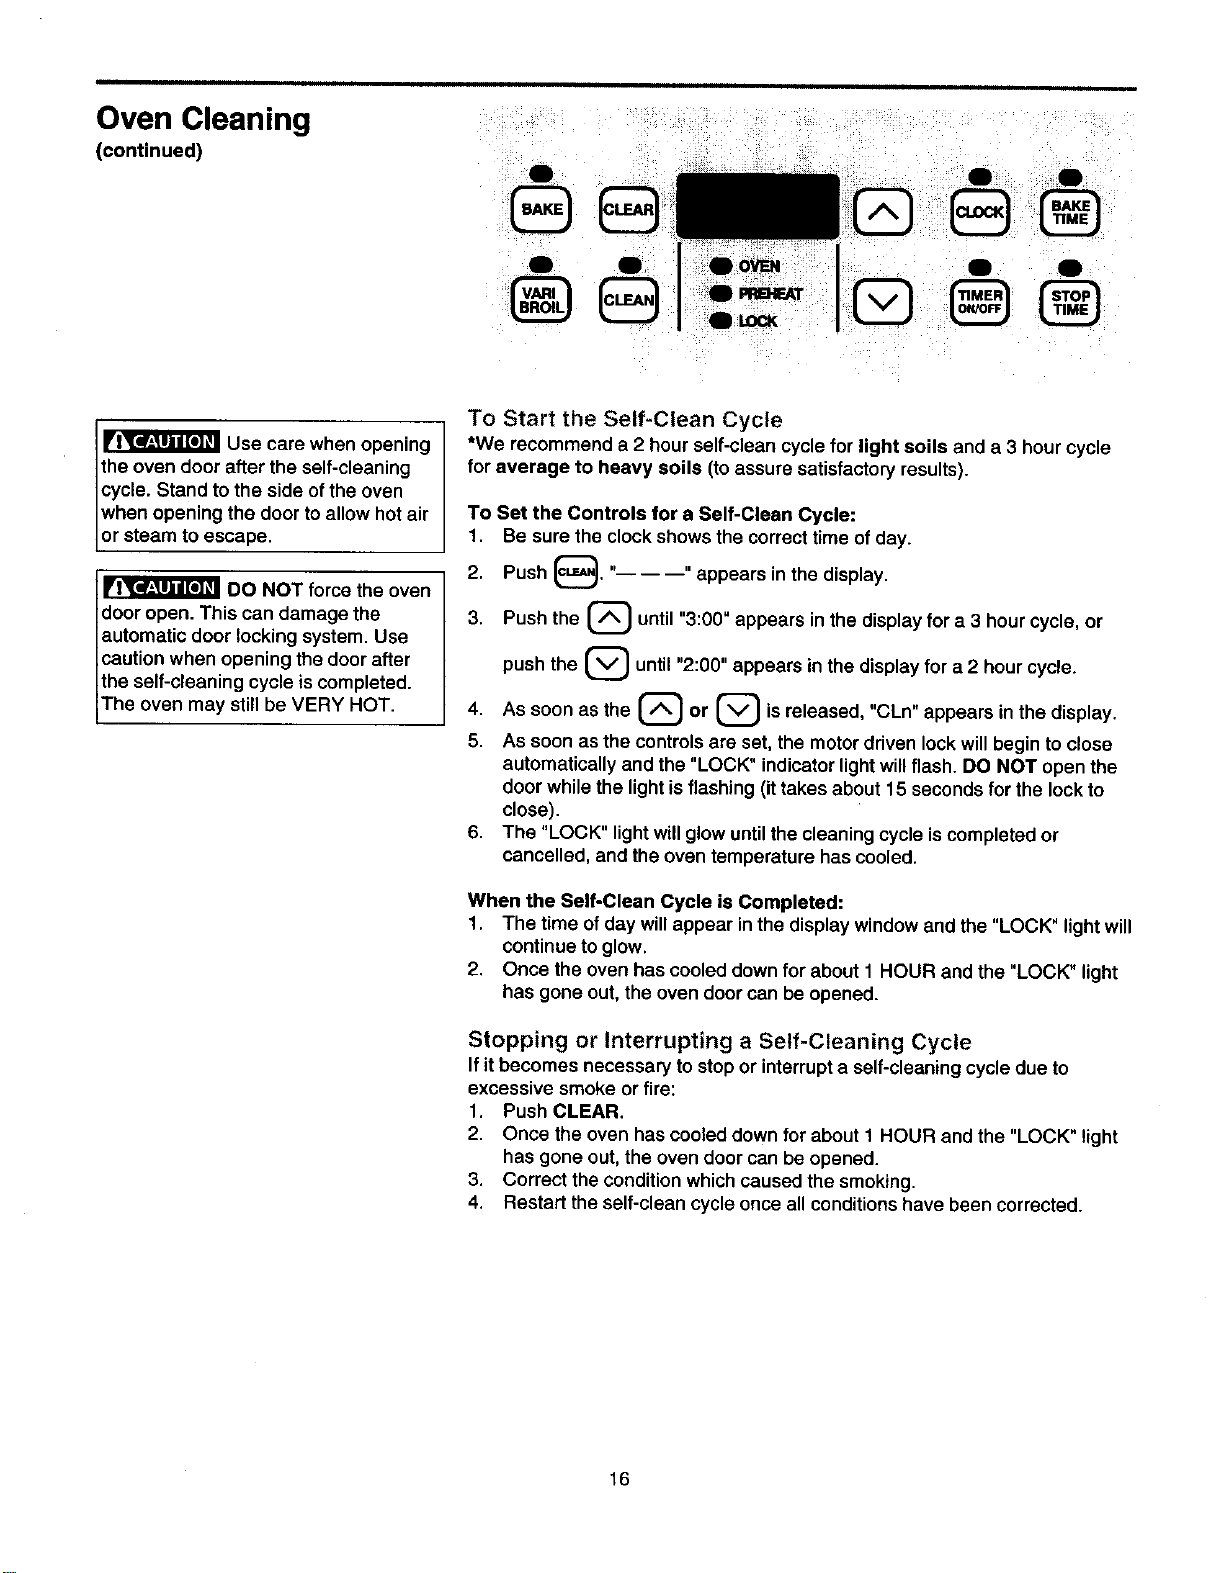
To Start the Self-Clean Cycle
*We recommend a 2 hour self-clean cycle for light soils and a 3 hour cycle
for average to heavy soils (to assure satisfactory results).
To Set the Controls for a Self-Clean Cycle:
1. Be sure the clock shows the correcttime of day.
c_., "appears in the display.
2. Push
3. Push the {_ until "3:00" appears in the display for a 3 hour cycle, or
push the _) until "2:00" appears in the display for a 2 hour cycle.
4. As
soon as the _ or L_I isreleased, "CLn" appears in the display.
5. As soon as the controls are set, the motor driven lock will begin to close
automatically and the "LOCK" indicator light will flash. DO NOT open the
door while the light is flashing (it takes about 15 seconds for the lock to
close).
6. The "LOCK" light will glow until the cleaning cycle is completed or
cancelled, and the oven temperature has cooled.
When the Self-Clean Cycle is Completed:
1. The time of day willappear inthe display window and the "LOCK" lightwill
continuetoglow.
2. Once the oven has cooled downfor about 1 HOUR and the "LOCK" light
has gone out, the oven door can be opened.
Stopping or Interrupting a Self-Cleaning Cycle
If it becomes necessary to stop or interrupt a self-cleaning cycle due to
excessive smoke or fire:
1. Push CLEAR.
2. Once the oven has cooled down for about 1 HOUR and the "LOCK" light
has gone out, the oven door can be opened.
3. Correct the condition which caused the smoking.
4. Restart the self-clean cycle once all conditions have been corrected.
16
General Cleaning Cleaning Various Parts of Your Range
Before cleaning any partof the range, be sure all controlsare turned OFF and
the range is COOL. REMOVE SPILLOVERS AND HEAVY SOILING AS
SOON AS POSSIBLE. REGULAR CLEANINGS WILL REDUCE THE
NUMBER OF MAJOR CLEANINGS LATER.
Surfaces How to Clean
Aluminum (Trim Pieces) & Vinyl Use hot, soapy water and a cloth, Dry with a clean cloth.
Glass, Painted and Plastic Control
Knobs, Body Parts, and Decorative
Trim
Stainless Steel, Chrome Control
Panel, Decorative Trim
Porcelain Enamel Broiler Pan and
Insert, Door Liner, Body Parts,
Warmer Drawer (if equipped)
Oven Racks
=3
Oven Door
I' _ --DO HAND
_ _: CLEANFRAME
CLEANDOOR O0 NOT
_5_ HAND2 '/
_ DOORGASKET
Forgeneral cleaning, use hot,soapy water and a cloth. Formore difficult soils
and built-up grease, apply a liquid detergent directly onto the soil. Leave on
soil for 30 to 60 minutes. Rinse with a damp cloth and dry. DO NOT use
abrasive cleaners on any of these materials; they can scratch. To remove
control knobs, turn to the OFF position; grasp firmly and pull straightoff the
shaft. To replace knobs after cleaning, line up the flat sides of both the knob
and the shaft; then push the knob into place.
Before cleaning the controlpanel, turnall controlsto OFF and remove the
control knobs. To remove, pull each knob straight off the shaft. Clean using
hot, soapy water and a dishcloth. Rinse with a clean water and a dishcloth.
Cover stubborn spots with an ammonia-soaked paper towel for 30 to 40
minutes. Rinse. Be sure to squeeze excess water from the cloth before
wiping the panel; especially when wiping around the controls. Excess water in
or around the controls may cause damage to the appliance. Cleaners made
especially for stainless steel such as Stainless Steel Magic, trademark of
Magic American Corp., or similar products are recommended. Always follow
the manufacturer's instructions. Be sure to rinse the cleaners as bluish stains
may occur during heating and cannot be removed. To replace knobs after
cleaning, line up the flat sides of both the knob and the shaft; then push the
knob into place.
Gentle scouringwith a soapy scouringpad willremove most spots. Rinse
with a 1:1 solutionof clear water and ammonia. Ifnecassary, cover difficult
spots with an ammonia-soaked paper towel for 30 to 40 minutes. Rinse with
clean water and a damp cloth, and then scrub with a soap-filled scouring pad.
Rinse and wipe dry with a clean cloth. Remove all cleaners or the porcelain
may become damaged during future heating. DO NOT use spray oven
cleaners on the cooktop.
Oven racks may be removed or left in the oven during the self-clean cycle for
cleaning. If removed, clean by using a mild, abrasive cleaner following
manufacturer's instructions. Rinse with clean water and dry.
Ifthe racks are cleaned inthe self-clean cycle, their color willturn slightlyblue
and the finish will be dull. After the self-clean cycle is complete, and the oven
has cooled, rub the sides of the racks with wax paper or a cloth containing a
small amount of baby oil or salad oil (this will make the racks glide easier into
the rack positions).
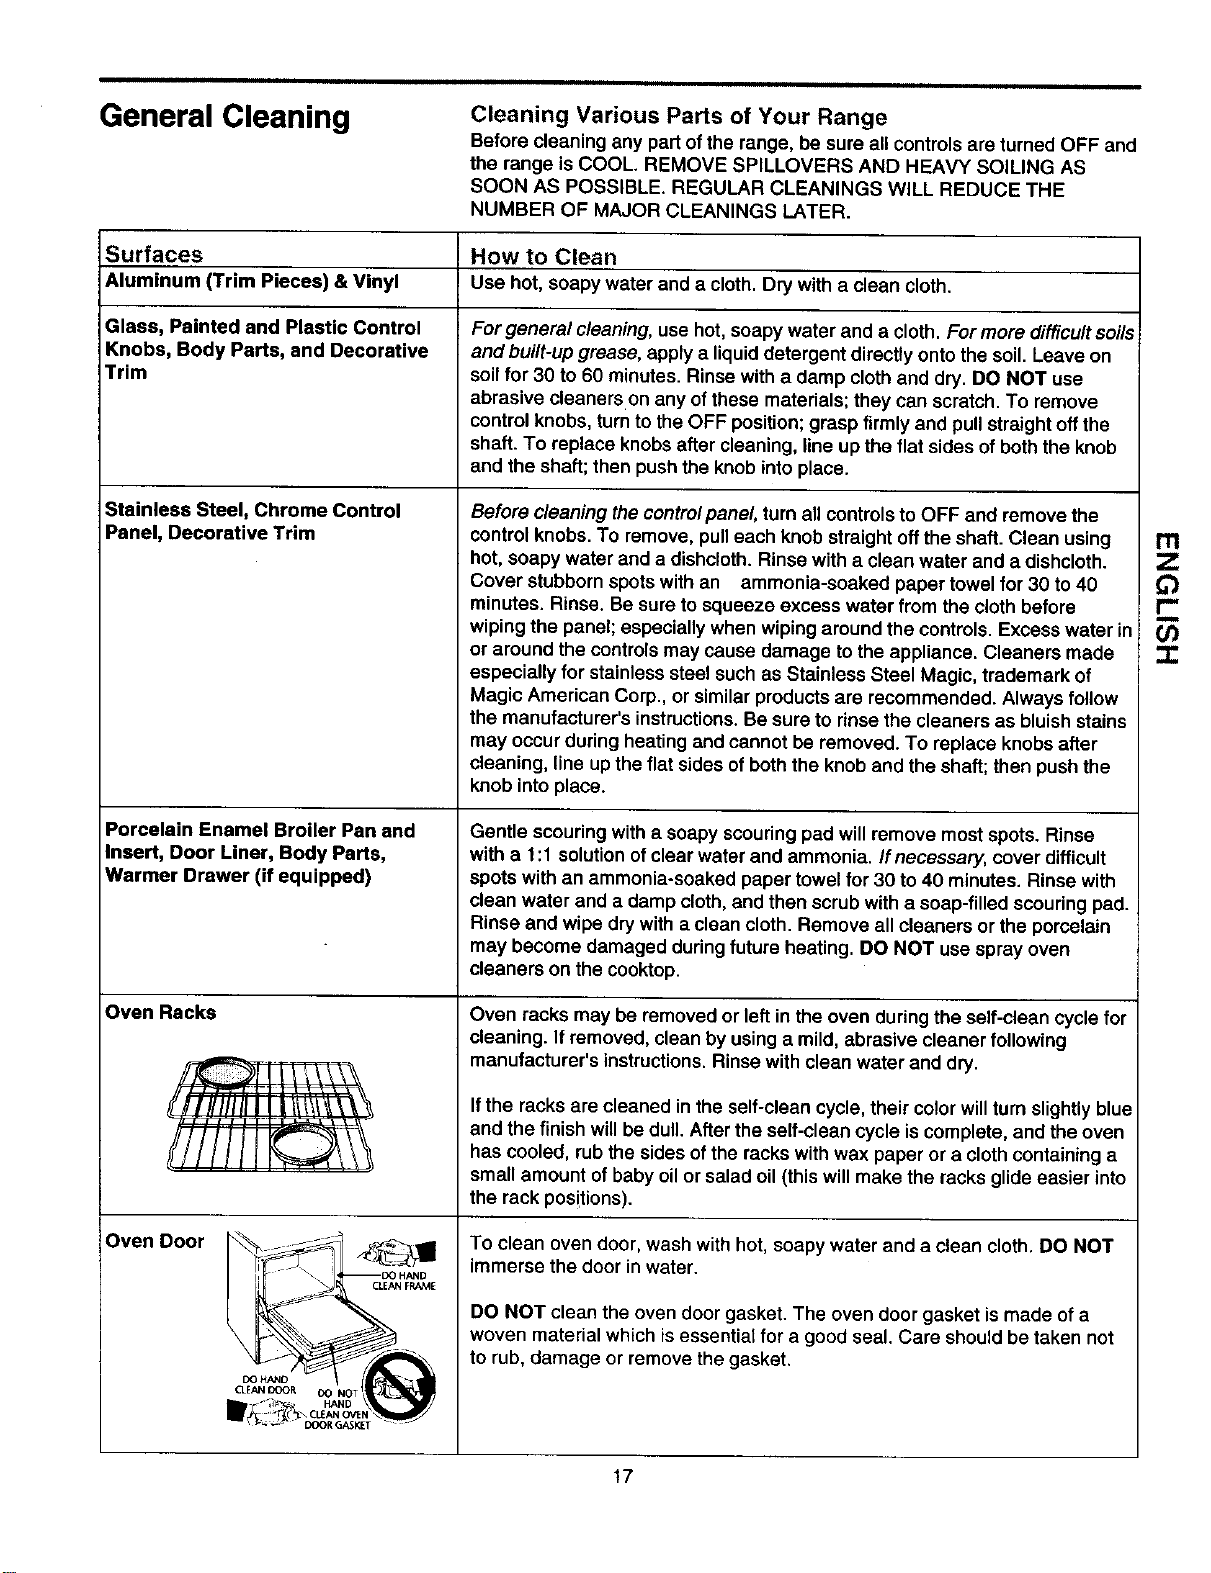
To clean oven door, wash withhot, soapy water and a clean cloth. DO NOT
immerse the door in water.
DO NOT clean the oven door gasket. The oven door gasket is made of a
woven material which is essential for a good seal. Care should be taken not
to rub, damage or remove the gasket.
Ill
!"
=;
17
General Cleaning
DO NOT use a cooktop
cleaner on a hotcooktop, The fumes
can be hazardous to your health, and
can chemically damage the ceramic-
g ass surface.
_1_ Before cleaning the
cooktop, be sure the controls are
turned to OFF and the cooktop is
COOL.
Ceramic-Glass Cooktop Cleaning
Correct and consistentcleaning isessential to maintainingyourceramic-glass
cooktop, If foodspills,grease spatters and metal rub-off from aluminum
cookware are not removed, they may be burned ontothe surface ofthe
cooktop and cause permanent discoloration.
Daily Cleaning
For normal soil:
1, Allow cooktop surface to cool,
2. Wipe up spillsand spatters usinga clean paper towel. Always use a new,
clean paper towel when cleaning the ceramic-glass cooktop.
3. Rub a few drops of a recommended ceramic-glase cooktop cleaning
cream onto soiled area using a clean, damp paper towel. Buff with a dry
paper towel until all soiland cream are removed. Frequent cleaning
leaves a protective coating of siliconewhich helps in preventing scratches
and abrasions. Clean surface with the cooktop cleaning cream after each
use,
4. Rinse with another clean damp. paper towel. Buffdry with a dry paper
towel.
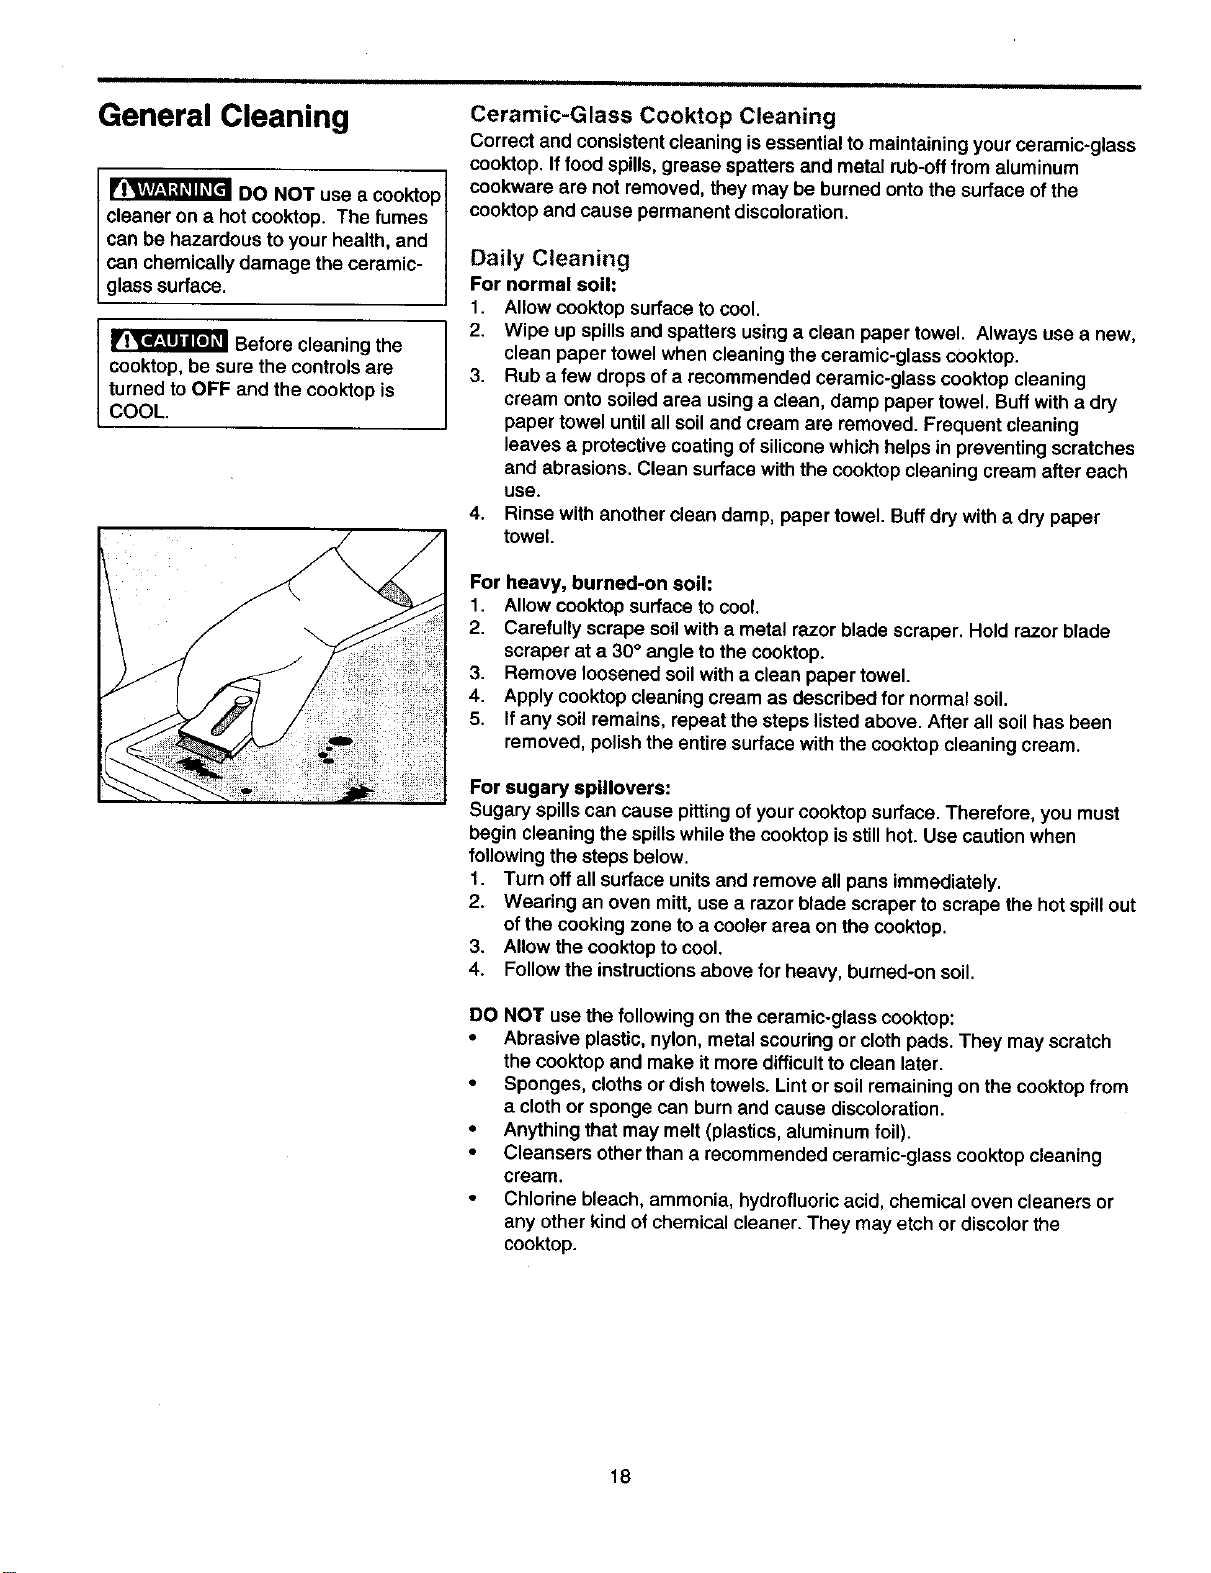
For heavy, burned-on soil:
1. Allowcooktop surface to cool.
2, Carefully scrape soilwith a metal razor blade scraper. Hold razor blade
scraper at a 30° angle tothe cooktop.
3, Remove loosened soilwith a clean paper towel.
4, Apply cooktop cleaningcream as describedfor normal soil,
5. If any soil remains, repeat the steps listed above, After all soilhas been
removed, polish the entire surface withthe cooktopcleaning cream.
For sugary apillovers:
Sugary spills can cause pitting of your cooktopsurface. Therefore, you must
begin cleaningthe spillswhile the cooktop isstillhot. Use cautionwhen
followingthe stepsbelow.
1. Turn off all surface unitsand remove all pans immediately,
2. Wearing an oven mitt,use a razor blade scraper to scrape the hot spill out
of the cooking zone to a cooler area on the cooktop.
3. Allow the cooktop to cool.
4. Follow the instructions above for heavy, burned-on soil.
DO NOT use the following on the ceramic-glass cooktop:
• Abrasive plastic, nylon, metal scouring or cloth pads. They may scratch
the cooktop and make it more difficult to clean later.
• Sponges, cloths or dish towels. Lint or soilremaining on the cooktop from
a cloth or sponge can burn and cause discoloration.
• Anything that may melt (plastics, aluminum foil).
• Cleansers otherthan a recommended ceramic-glass cooktop c_eaning
cream.
• Chlorine bleach, ammonia, hydrofluoric acid, chemical oven cleaners or
any other kind of chemical cleaner. They may etch or discolor the
cooktop.
18
General Cleaning
'continued)
The door is heavy. For
safe, temporary storage, lay the door
flat with the inside of the door facing
Iown.
Le_ Glide
Figure 1
Figure 2
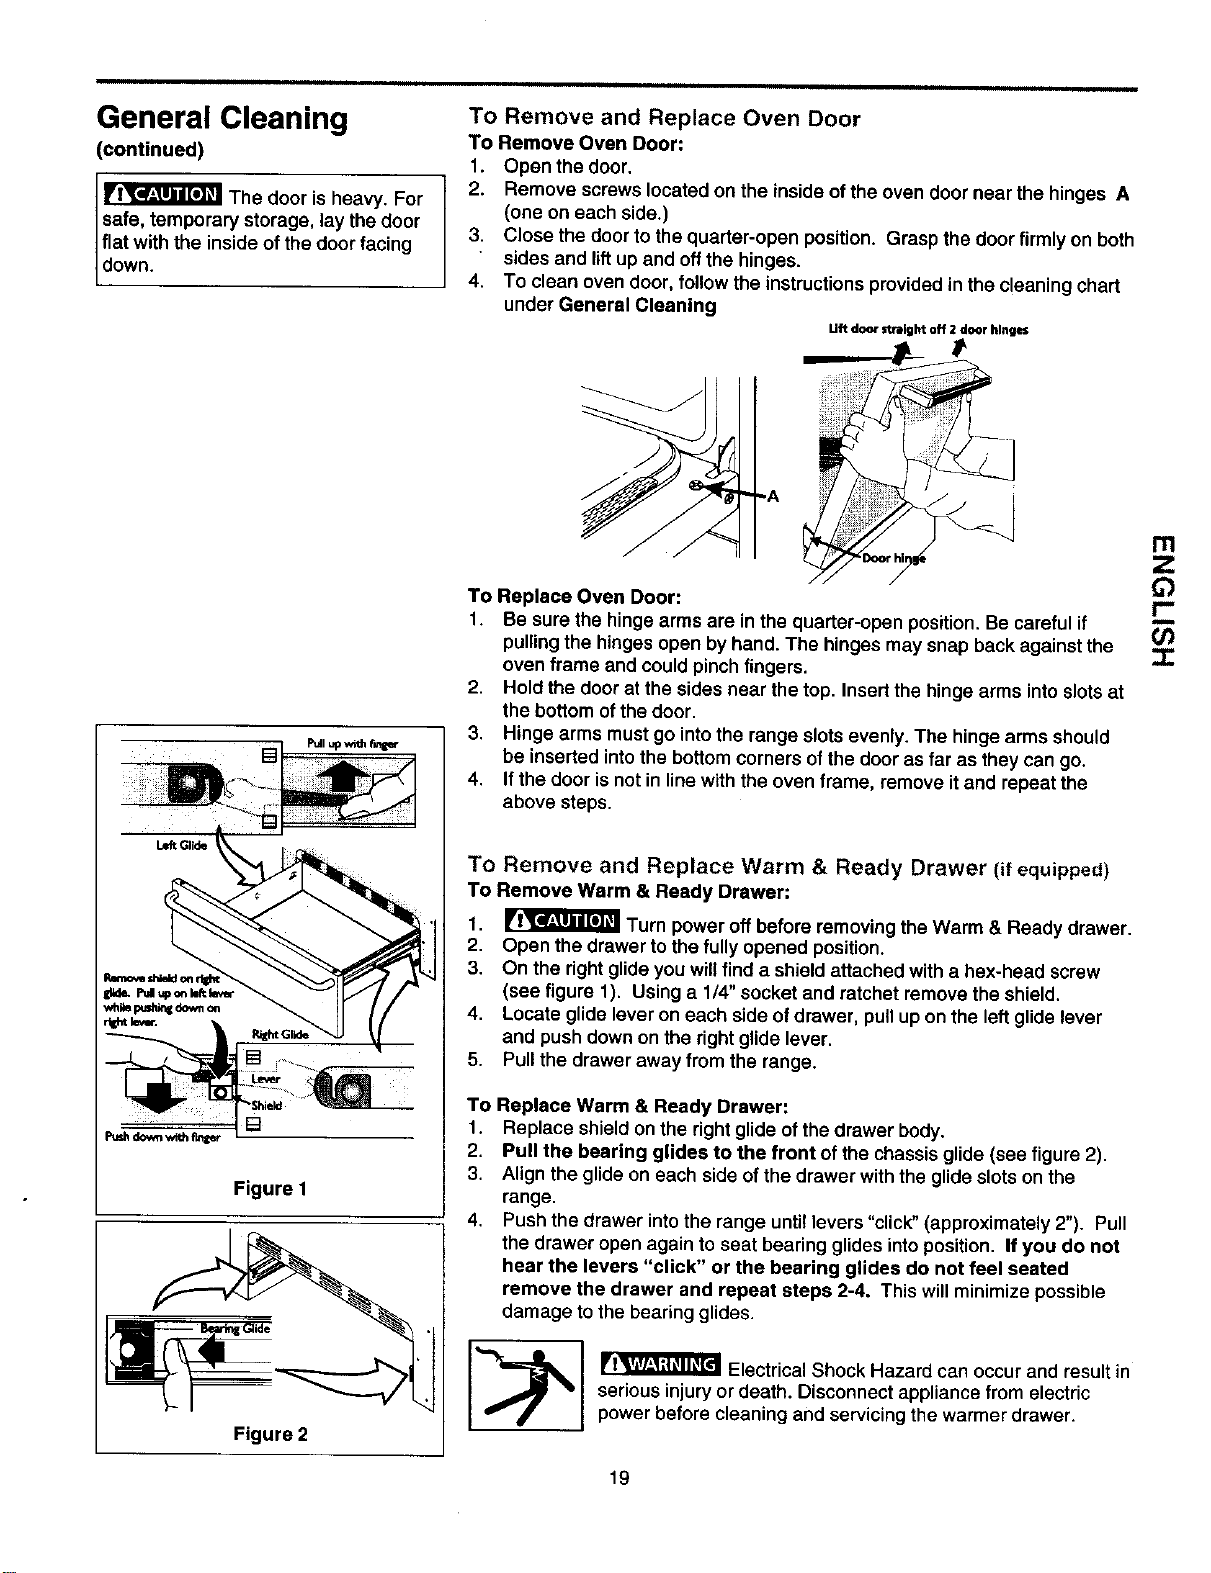
To Remove and Replace Oven Door
To Remove Oven Door;
1. Open the door.
2. Remove screws locatedon the inside ofthe oven door near the hinges A
(one on each side.)
3. Close the doorto the quarter-open position. Grasp the door firmly on both
sides and liftup and offthe hinges.
4. To clean oven door,followthe instructionsprovided inthe cleaningchart
under General Cleaning
Uft door straight off 2 door hinges
J .A
To Replace Oven Door:
1. Be sure the hinge arms are in the quarter-open position.Be careful if
pullingthe hingesopen byhand. The hinges may snap back againstthe
oven frame and could pinch fingers.
2. Hold the doorat the sides near the top. Insertthe hinge arms intoslotsat
the bottom of the door.
3. Hinge arms mustgo intothe range slots evenly. The hinge arms should
be inserted intothe bottomcorners of the door as far as they can go.
4. Ifthe door isnot in linewith the oven frame, remove itand repeat the
above steps.
To Remove and Replace Warm & Ready Drawer (if equipped)
To Remove Warm & Ready Drawer;
1. r _ Turn poweroff before removingthe Warm & Ready drawer.
2. Open the drawer tothe fully opened position.
3. On the rightglide you willfind a shield attached with a hex-head screw
(see figure 1). Using a 1/4"socket and ratchet remove the shield.
4. Locate glide lever on each side of drawer, pullup on the leftglide lever
and push downon the right glide lever.
5. Pullthe drawer away from the range.
To Replace Warm & Ready Drawer:
1. Replace shield onthe rightglide of thedrawer body.
2. Pull the bearing glides to the front ofthe chassis glide (see figure 2).
3. Align the glide on each side ofthe drawer withthe glide slots on the
range.
4. Pushthe drawer intothe range until levers "click" (approximately2"). Pull
the drawer open againto seat bearing glides intoposition. If you do not
hear the levers "click" or the bearing glides do not feel seated
remove the drawer and repeat steps 2-4. This willminimize possible
damage to the bearing glides.
I"_l _ ElectricalShock Hazard can occurand resultin
serious injury or death. Disconnect appliance from electric
power before cleaning and servicing the warmer drawer.
Ill
r-
I
19
Changing Oven Light
(some models)
Be surethe range is unpluggedand all parts are COOL before
replacing the oven light.Wear a leather-faced glove for protectionagainst
possible brokenglass.
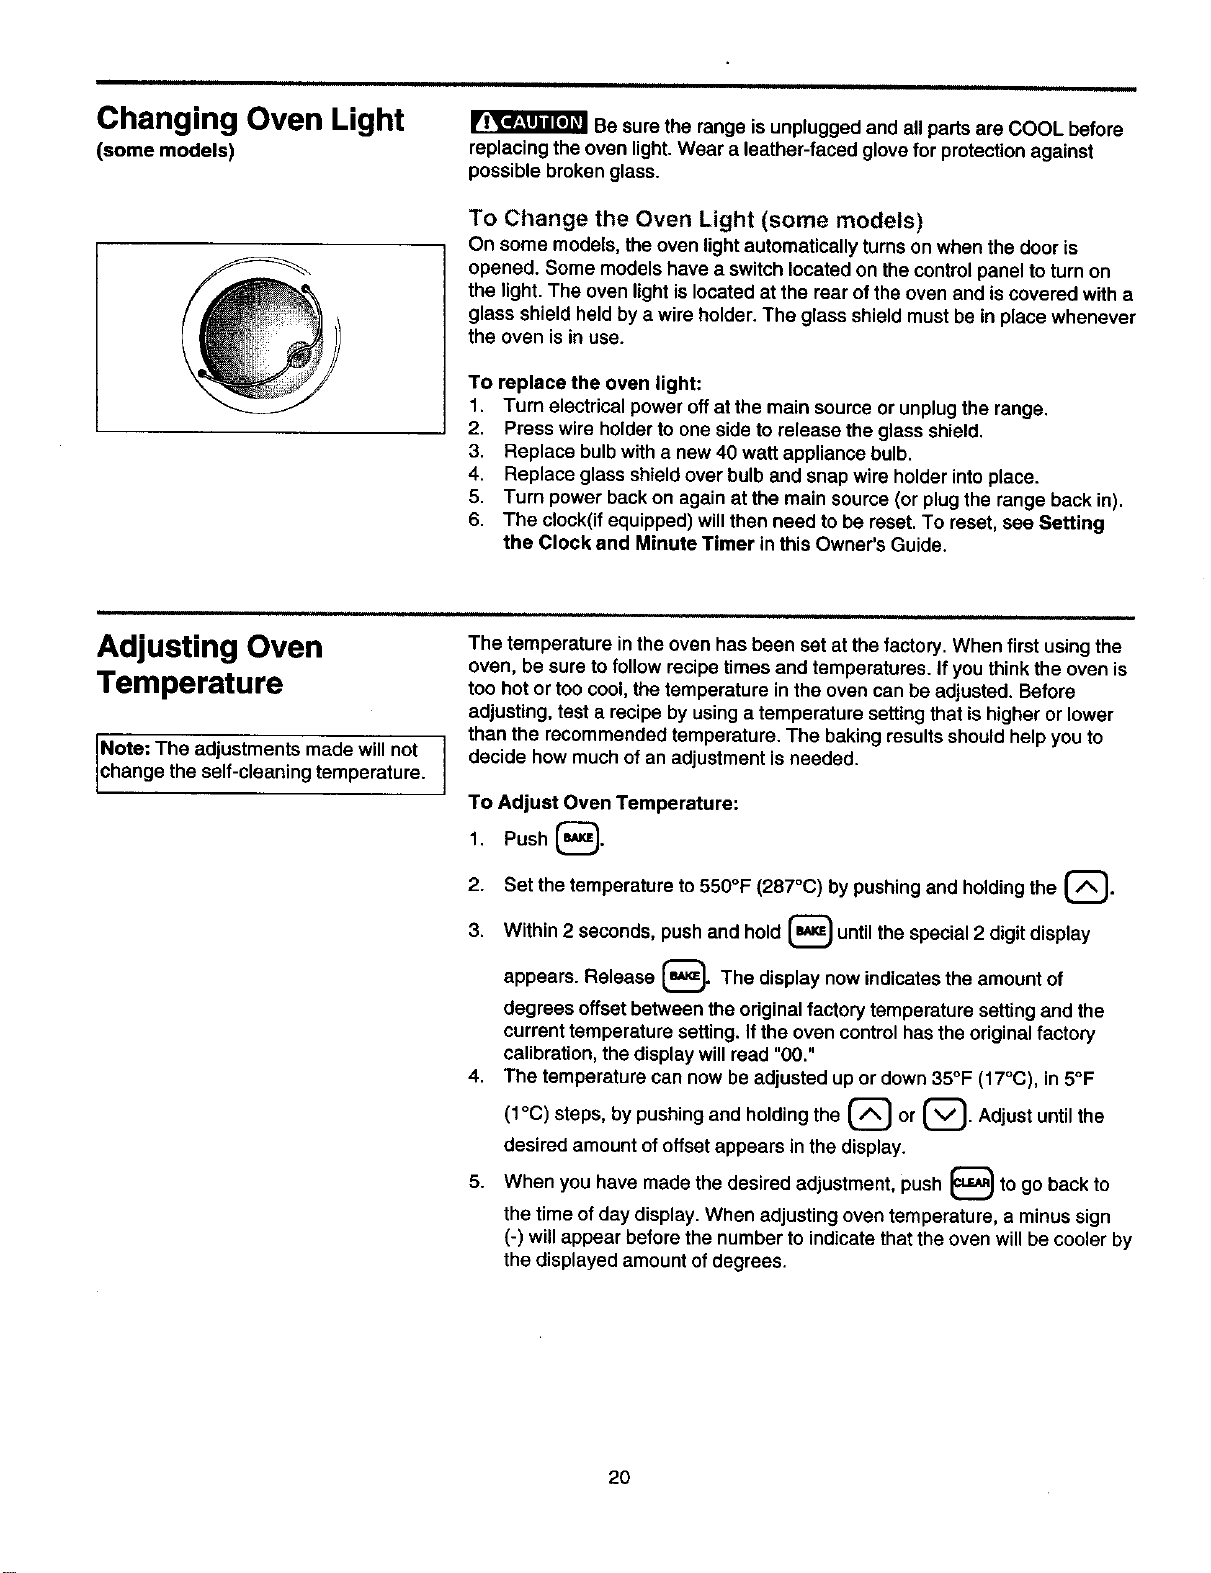
To Change the Oven Light (some models)
On some models, the oven lightautomaticallyturns on when the door is
opened. Some modelshave a switch locatedon thecontrolpanel toturn on
the light.The oven lightis locatedat the rear ofthe oven and is covered witha
glass shield heldby a wire holder.The glass shield must bein place whenever
the oven is in use.
To replace the oven light:
1. Turn electrical poweroffat the main sourceor unplugthe range.
2. Press wire holderto one side to release the glass shield.
3. Replace bulbwith a new40 watt appliance bulb.
4. Replace glass shieldover bulb and snap wire holderintoplace.
5. Turn power backon again at the main source (orplugthe range back in).
6. The clock(ifequipped) willthen need to be reset. To reset, see Setting
the Clock and Minute Timer in this Owner's Guide.
Adjusting Oven
Temperature
Note: The adjustments madewill not
change the self-cleaning temperature.
The temperature in the oven has been set at the factory.When first using the
oven, be sure to follow recipe times and temperatures. If you think the oven is
too hot or too cool, the temperature in the oven can be adjusted. Before
adjusting, test a recipe by using a temperature settingthat is higher or lower
than the recommended temperature. The baking results should help you to
decide how much of an adjustment is needed.
To Adjust Oven Temperature:
1, Push (_.
temperature to550°F (287°C) bypushingand holdingthe (_.
2. Set the
seconds, pushand hold _ untilthe special2 digitdisplay
3,
Within 2
appears. Release _ The display now indicatesthe amount of
degrees offsetbetween the originalfactorytemperature settingand the
current temperature setting. If the oven controlhasthe originalfactory
calibration,the display willread "00,"
4. The temperature can now be adjusted up or down35°F (17°C), in 5°F
(1°C) steps, by pushingand holdingthe (_ or (_. Adjust untilthe
desired amountof offsetappears in the display.
you have made the desired adjustment, push _ to go back to
5. When
the time of day display.When adjusting oven temperature, a minussign
(-) willappear before the number to indicatethat the oven willbe cooler by
the displayed amountof degrees.
20
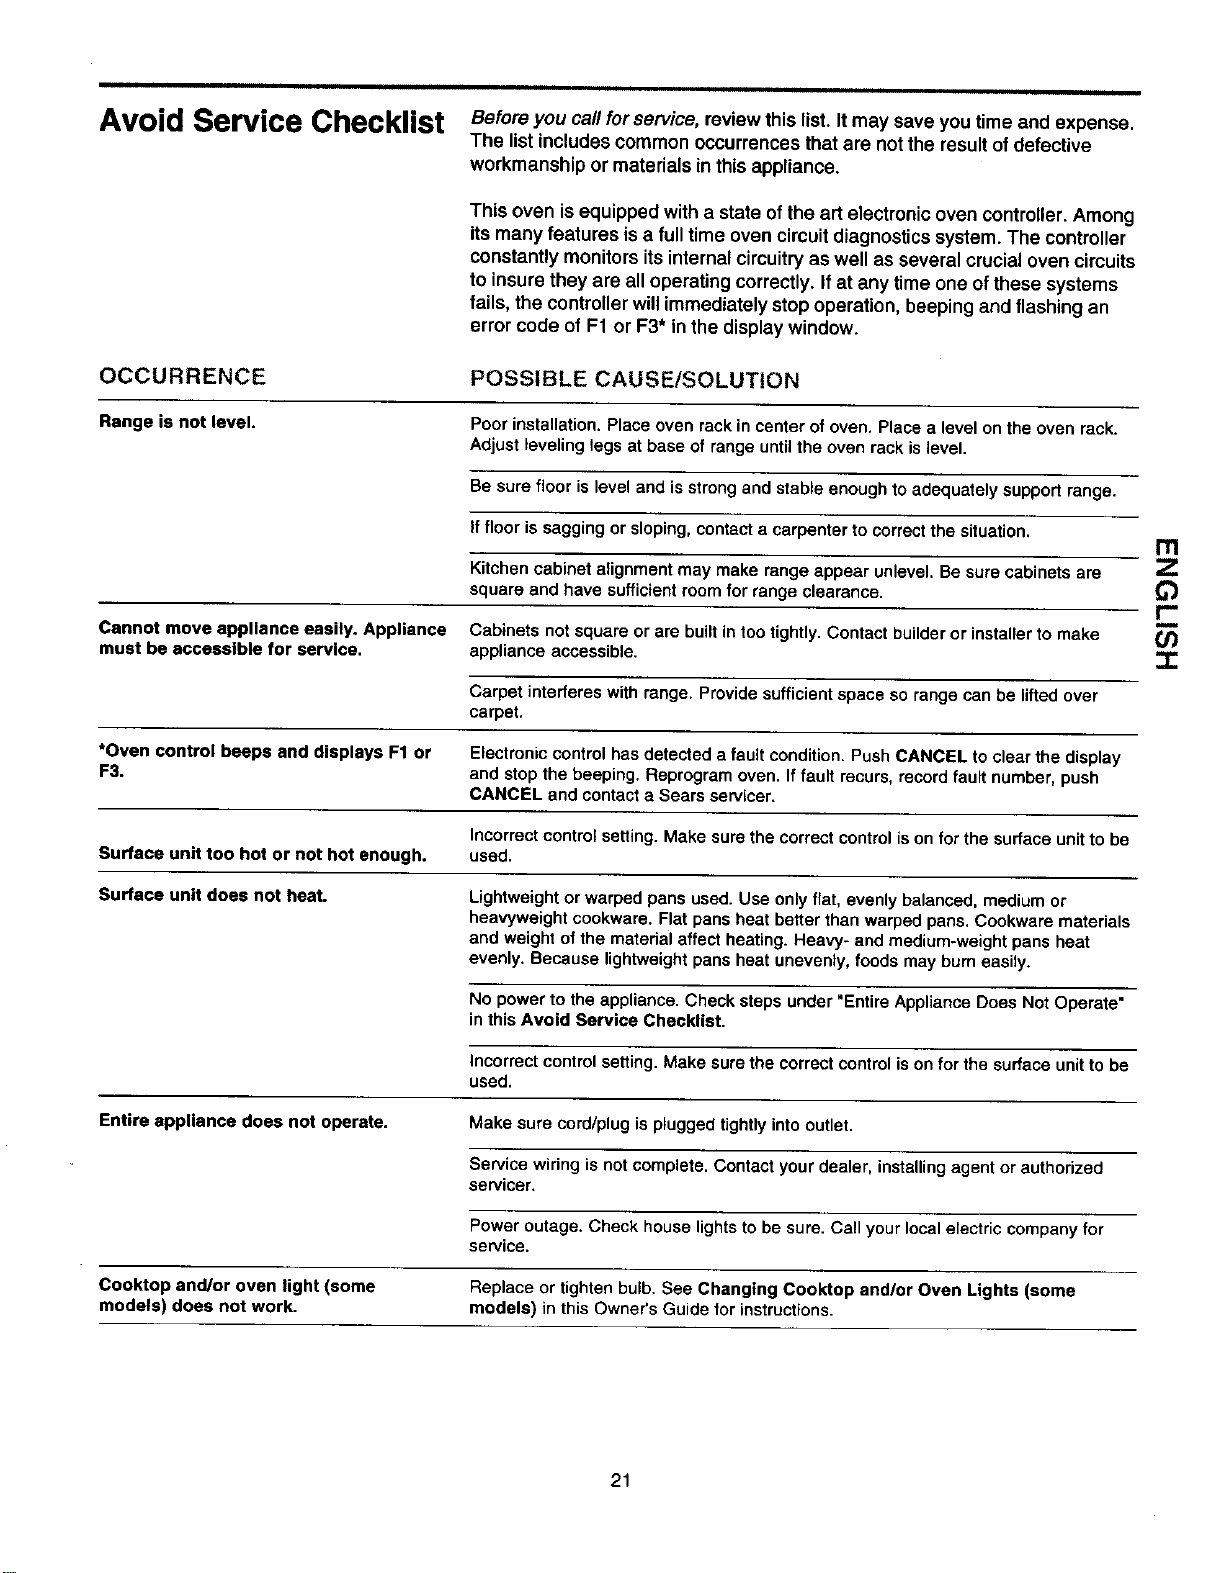
Avoid Service Checklist Before you call for service, reviewthis list. Itmay save you time and expense.
The list includescommon occurrencesthat are notthe resultofdefective
workmanship or materials inthis appliance.
This oven isequipped with a state ofthe art electronic oven controller. Among
itsmany features is a full time oven circuitdiagnosticssystem.The controller
constantlymonitorsits internalcircuitryas well as several crucial oven circuits
to insure they are all operating correctly. Ifat any time one ofthese systems
fails, the controllerwillimmediatelystop operation, beeping and flashing an
error code of F1 or F3* in the displaywindow.
OCCURRENCE
POSSIBLE CAUSE/SOLUTION
Range is not level.
Poor installation. Place oven rack in center of oven. Place a level onthe oven rack.
Adjust leveling legs at base of range until the oven rack islevel.
Be sure floor is level and isstrong and stable enough to adequately support range.
If floor is sagging or sloping, contacta carpenter to correct the situation.
Kitchen cabinet alignment may make range appear unlevel. Be sure cabinets are
square and have sufficient room for range clearance.
Cannot move appliance easily. Appliance Cabinets not square or are built in tootightly. Contact builder or installer to make
must be accessible for service, appliance accessible,
Carpet interferes with range. Provide sufficientspace so range can be lifted over
carpet.
*Oven control beeps and displays F1 or Electronic control has detected a fault condition. Push CANCEL to clear the display
F3. and stop the beeping. Repregram oven. Iffault recurs, record fault number, push
CANCEL and contacta Sears servicer.
Incorrect control setting. Make sure the correct control ison for the surface unitto be
Surface unit too hot or not hot enough, used.
Surface unit does not heat. Lightweight or warped pans used. Use only flat, evenly balanced, medium or
heavyweight cookware. Flat pans heat better than warped pans. Cookware materials
and weight ofthe matedal affect heating. Heavy- and medium-weight pans heat
evenly. Because lightweight pans heat unevenly, foods may bum easily.
No power to the appliance. Check steps under "Entire Appliance Does Not Operate"
in this Avoid Service Checklist.
Incorrect control setting. Make sure the correct control ison for the surface unit to be
used.
Entire appliance does not operate.
Make sure cord/plug is plugged tightly into outlet.
Service wiring is not complete. Contact your dealer, installing agent or authorized
servicer.
Power outage. Check house lightsto be sure. Call your local electric company for
service.
Cooktop and/or oven light (some Replace or tighten bulb. See Changing Cooktop and/or Oven Lights (some
models) does not work. models) in this Owner's Guide for instructions.
Ill
r-
=.
21
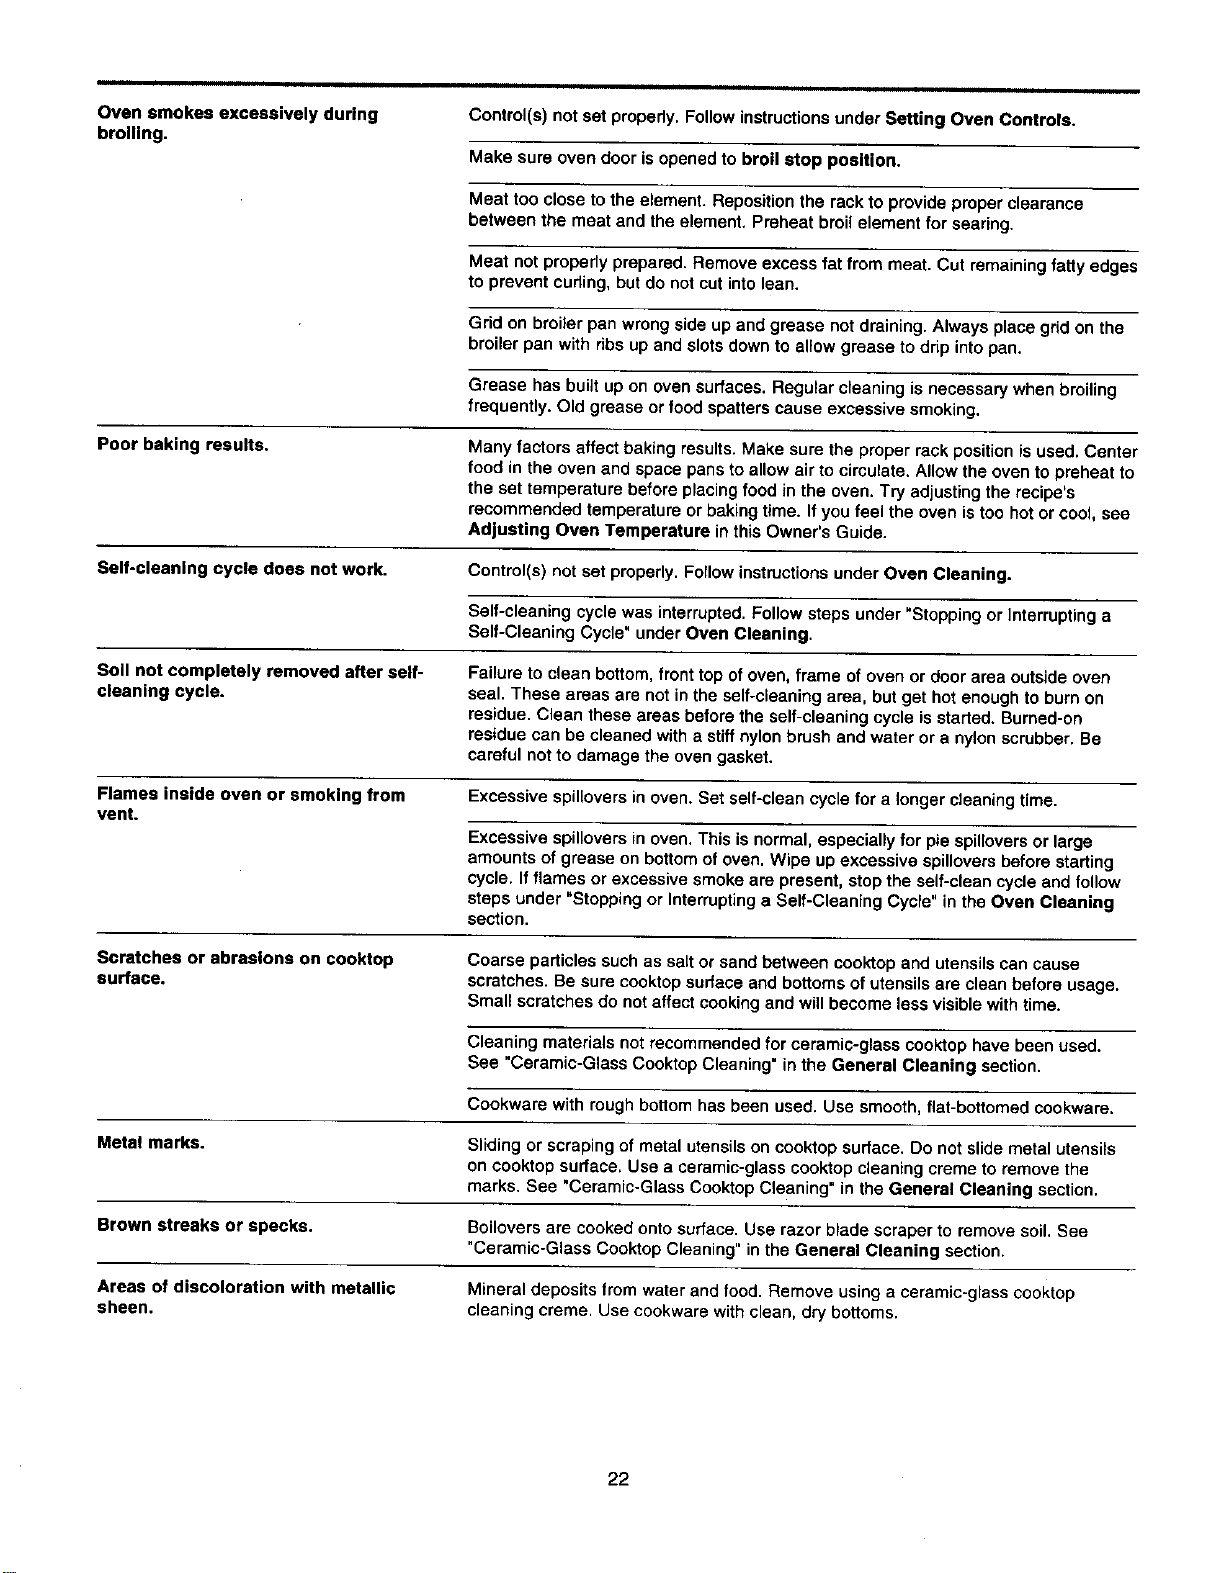
Oven smokes excessively during
broiling.
Poor baking results.
Self-cleaning cycle does not work.
Control(s) not set properly. Follow instructionsunder Setting Oven Controls.
Make sure oven door is opened to broil stop position.
Meat too close to the element. Reposition the rack to provide proper clearance
between the meat and the element. Preheat broil element for searing.
Meat not properly prepared. Remove excess fat from meat. Cut remaining fatty edges
to prevent cuding, but do not cut into lean.
Grid on broiler pan wrong side up and grease notdraining. Always place grid on the
broiler pan with ribsup and slotsdown to allow grease to drip intopan.
Soil not completely removed after self-
cleaning cycle.
Flames inside oven or smoking from
vent.
Scratches or abrasions on cooktop
surface.
Grease has built up on oven surfaces. Regular cleaning is necessary when broiling
frequently. Old grease or food spatters cause excessive smoking.
Many factors affect baking results. Make sure the proper rack position is used. Center
food in the oven and space pans to allow air to circulate. Allow the oven to preheat to
the set temperature before placing food in the oven. Try adjusting the recipe's
recommended temperature or baking time. If you feel the oven is too hot or cool, see
Adjusting Oven Temperature in this Owner's Guide.
Control(s) not set properly. Follow instructionsunder Oven Cleaning.
Self-cleaning cycle was interrupted.Follow steps under "Stopping or Interrupting a
Self-Cleaning Cycle" under Oven Cleaning.
Failure to clean bottom, front top of oven, frame of oven or door area outside oven
seal. These areas are not in the self-cleaning area, but get hot enough to burn on
residue. Clean these areas before the self-cleaning cycle is starled. Burned-on
residue can be cleaned with a stiff nylon brush and water or a nylon scrubber. Be
careful not to damage the oven gasket.
Excessive spillovers in oven. Set self-clean cycle for a longer cleaning time.
Excessive spillovers in oven. This is normal, especially for pie spilloversor large
amounts of grease on bottom of oven. Wipe up excessive spillovers before starting
cycle. If flames or excessive smoke are present, stopthe self-clean cycle and follow
steps under "Stopping or Interruptinga Self-Cleaning Cycle" in the Oven Cleaning
section.
Metal marks.
Coarse particles such as salt or sand between cooktop and utensils can cause
scratches. Be sure cooktop surface and bottoms of utensils are clean before usage.
Small scratches do not affect cooking and will become less visible with time.
Cleaning materials not recommended for ceramic-glass cooktop have been used.
See "Ceramic-Glass Cooktop Cleaning" in the General Cleaning section.
Cookware with rough bottom has been used. Use smooth, flat-bottomed cookware.
Sliding or scraping of metal utensils on cooktop surface. Do not slide metal utensils
on cooktop surface. Use a ceramic-glass cooktop cleaning creme to remove the
marks. See "Ceramic-Glass Cooktop Cleaning" in the General Cleaning section.
Brown streaks or specks. Boilovers are cooked onto surface. Use razor blade scraper to remove soil. See
"Ceramic-Glass Cooktop Cleaning" in the General Cleaning section.
Areas of discoloration with metallic Mineral deposits from water and food. Remove usinga ceramic-glass cooktop
sheen, cleaning creme, Use cookware with clean, dry bottoms.
22

Ill
E
23
In U.S.A. or Canada
for in-home major brand repair service:
Call 24 hours a day, 7 days a week
1-800-4- MY-HOME"(1-800-469-4663)
Para pedir servicio de reparacibn a domicillio - 1-800.676.5811
Au Canada pour tout le service -- 1-877-LE-FOYER"(1-877-533-8937)
For the repair or replacement parts you need:
Call6 a.m. - 11 p.m. CST,7 daysa week
PartsDirect"
1-800-366-PART (1-800-366-7278)
www.sears.com/partsdlrect
Para ordenar piezas con entrega a domicilio - 1-800-659-7084
For the location of a Sears Service Center in your area:
Call 24 hours a day, 7 days a week
1-800-488-1222
To purchase or inquire about a Sears Maintenance Agreement:
Call 7 a.m. - 5 p.m. CST, Monday - Saturday
1-800-827-6655


