Loading ...
Loading ...
Loading ...
NOTE:Ifthissawistobeusedforcom-
merciallogging,achainbrakeisrequired
andshallnotberemovedorotherwisedis-
abledtocomplywithFederalOSHARegula-
tionsforCommercialLogging.
SAFETYNOTICE:Exposuretovibrations
throughprolongeduseofgasolinepowered
handtoolscouldcausebloodvesselornerve
damageinthefingers,hands,andjointsof
peopleproneto circulationdisordersor
abnormalswellings.Prolongeduseincold
weatherhasbeenlinkedtobloodvessel
damagein otherwisehealthypeople.If
symptomsoccursuchasnumbness,pain,
lossofstrength,changeinskinosiorortexture,
orlossoffeelinginthefingers,hands,orjoints,
discontinuetheuseofthistoolandseek
medicalattention.Ananti-vibrationsystem
doesnotguaranteetheavoidanceofthese
problems.Userswhooperatepowertoolson
acontinualandregularbasismustmonitor
closelytheirphysicalconditionandthe
conditionofthistool.
SPECIALNOTICE:Yoursawisequipped
withatemperaturelimitingmufflerandspark
arrestingscreenwhichmeetsthe
requirementsofCaliforniaCedes4442and
4443.AllU.S.forestlandandthestatesof
California,Idaho,Maine,Minnesota,New
Jersey,Oregon,andWashingtonrequireby
lawthatmanyinternalcombustionengines
tobeequippedwithasparkarrestingscreen.
Ifyouoperateachainsawinastateorlocale
wheresuchregulationsexist,youarelegally
responsibleformaintainingtheoperating
conditionoftheseparts.Failuretodosois
aviolationofthelaw.RefertotheSERVICE
sectionfor maintenanceof thespark
arrestingscreen.
FailuretofollowallSafetyRulesandPrecau-
tionscanresultinseriousinjury.Ifsituations
occurwhicharenotcoveredinthismanual,
usecareandgoodjudgement.Ifyouneed
assistance,contactyourauthorizedservice
dealerorcall1-800-554-6723.
STANDARDS:ThissawislistedbyUnder-
writer'sLaboratedes,]nc.,inaccordancewith:
ANSI B175.1-2000 American National
Standards for Gasoline-Powered Chain
Saws - Safety Requirements
CSA Z62.1-1995 Chain Saws - Occupa-
tional Health and Safety
CSA Z62.3-1996 Chain Saw Kickback Oc-
cupational Health and Safety
Protective gloves (not provided) should be
worn during assembly.
ATTACHING THE BAR & CHAIN (If not
already attached)
_WARNING: If receivedassembled,
repeat all steps to ensure your saw isproperly
assembled and all fasteners are secure. Al-
ways wear gloves when handling the chain.
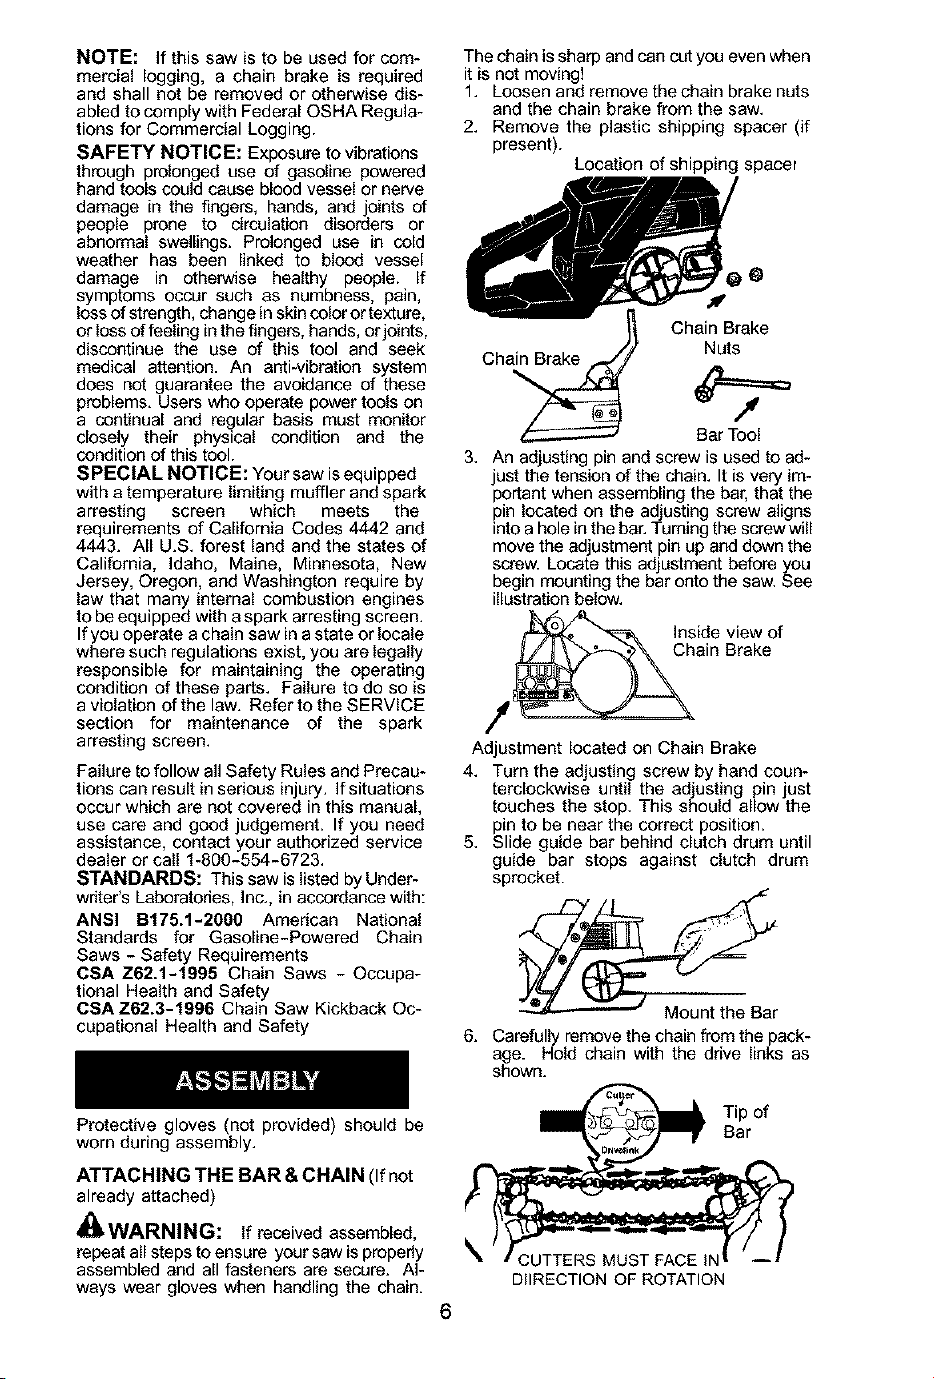
The chain is sharp and can cut you even when
it is not moving!
1. Loosen and remove the chain brake nuts
and the chain brake from the saw.
2. Remove the plastic shipping spacer (if
present).
Location of shipping spacer
J
j ChainBak
Ch Nuts
Bar Tool
3. An adjusting pin and screw is used to ad-
just the tension of the chain. It is very im-
portant when assembling the bar, that the
pin located on the adjusting screw aligns
into a hole in the bar. Turning the screw will
move the adjustment pin up and down the
screw. Locate this adjustment before you
begin mounting the bar onto the saw. See
illustration below.
Inside view of
hain Brake
Adjustment located on Chain Brake
4. Turn the adjusting screw by hand coun-
terclockwise until the adjusting pin just
touches the stop. This should allow the
pin to be near the correct position.
5. Slide guide bar behind clutch drum until
guide bar stops against clutch drum
sprocket.
6. Carefully remove the chain from the pack-
age. Hold chain with the drive links as
shown.
rof
DIIRECTION OF ROTATION
Loading ...
Loading ...
Loading ...