

Operator's Manual
32cc/1.9 cu.in. 2-Cycle
17 Inch Cutting Path / 0.095 Inch Line
GASOLINE WEEDWAOKER ®
Model No.
358.791800
• Safety
• Assembly
• Operation
• Maintenance
• Parts List
• Espar_ol, p. 17
WARNING:
Read and follow all Safety Rules and Operating
Instructions before first use of this product.
For answers to your questions about this product:
Call 7 am-7 pm, Mon.-Sat., or 10 am-7 pm, Sun.
1-800-235-5878 _Hoo_slisted are Central Time)
Sears, Roebuck and Co., Hoffman Estates, IL 60179 U.S.A.
545140964 12/15/06
WarrantyStatement 2 Storage 11
SafetyRules 2 TroubleshootingTable 12
Assembly 4 EmissionsStatement 13
Operation 5 PartsList 15
Maintenance 8 Spanish 17
Service&Adjustments 9 PartsandOrdering BackCover
ONEYEAR FULL WARRANTY ON CRAFTSMAN ® GAS WEEDWACKER ®
When used and maintained according to the operator's manual, if this product fails
due to a defect in material or workmanship within one year from the date of pur-
chase, return it to any Sears store, Sears Service Center, or other Craftsman outlet in
the United States for free repair (or replacement if repair proves impossible).
This warranty excludes cutting line, spark plug and air filter, which are expendable
parts that can wear out from normal use in less than one year.
This warranty applies for only 30 days from purchase date if this product is used
for commercial or rental purposes.
This warranty gives you specific legal rights, and you may also have other rights
which vary from state to state.
Sears, Roebuck and Co., Hoffman Estates, IL 60179
4tSWARNING: When using gar-
dening appliances, basic safety pre-
cautions must always be followed to
reduce the risk of fire and serious
injury. Read and follow all instructions.
This power unit can be dangerous! Op-
erator is responsible for following
instructions and warnings on unit and in
manual. Read entire operator's manual
before using unit! Be thoroughly familiar
with the controls and the proper use of
the unit. Restrict the use of this unit to
persons who have read, understand,
and will follow the instructions and
warnings on the unit and in the manual.
Never allow children to operate this unit.
OPERATOR'S SAFETY INFORMATION
MANUAL ON THE UNIT
£t
,1_ DANGER: Never use blades or
flailing devices. This unit is designed
for line trimmer use only. Use of any
other accessories or attachments will
increase the risk of injury.
QO0
• IWARNING: Trimmer line throws
objects violently. You and others can be
blinded/injured. Wear eye and leg
protection. Keep body parts clear of ro-
tating line.
Eye Protection
A(_,WARNING: Hazard zone for
thrown objects. Trimmer line can
throw objects violently. Others can be
blinded or injured. Keep children, by-
standers, and animals 50 feet (15 me-
ters) away. Stop unit immediately if ap-
proached.
If situations occur which are not cov-
ered in this manual, use care and
good judgment. If you need assis-
tance, contact your Sears Service
Center or call 1-800-235-5878.
2
OPERATORSAFETY
• Dressproperly.Alwayswearsafety
glassesorsimilareye protection
when operating, or performing main-
tenance, on your unit (safety
glasses are available). Eye protec-
tion should be marked Z87.
• Always wear face or dust mask if op-
eration is dusty.
• Always wear heaW, long pants, long
sleeves, boots, and gloves. Wearing
safety leg guards is recommended.
• Always wear foot protection. Do not
go barefoot or wear sandals. Stay
clear of spinning line.
• Secure hair above shoulder length.
Secure or remove loose clothing or
clothing with loosely hanging ties,
straps, tassels, etc. They can be
caught in moving parts.
• Being fully covered also helps pro-
tect you from debris and pieces of
toxic plants thrown by spinning line.
• Stay Alert. Do not operate this unit
when you are tired, ill, upset or un-
der the influence of alcohol, drugs,
or medication. Watch what you are
doing; use common sense.
• Wear hearing protection.
• Never start or run inside a closed
room or building. Breathing exhaust
fumes can kill.
• Keep handles free of oil and fuel.
UNIT / MAINTENANCE SAFETY
,I_WARNING: Disconnect the
spark plug before performing mainte-
nance except carburetor adjustments.
• Look for and replace damaged or
loose parts before each use. Look
for and repair fuel leaks before use.
Keep in good working condition.
• Replace trimmer head parts that are
chipped, cracked, broken, or dam-
aged in any other way before using
the unit.
• Maintain unit according to recom-
mended procedures. Keep cutting
line at proper length.
• Use only 0.095" (2.4 mm) diameter
Craftsman brand replacement line.
Never use wire, rope, string, etc.
• Install required shield properly before
using the unit. Use only specified trim-
mer head; make sure it is properly
installed and securely fastened.
• Make sure unit is assembled cor-
rectly as shown in this manual.
• Make carburetor adjustments with
lower end supported to prevent line
from contacting any object.
• Keep others away when making car-
buretor adjustments.
• Use only recommended Craftsman
accessories and replacement parts.
• Have all maintenance and service
not explained in this manual per-
formed by a Sears Service Center.
FUEL SAFETY
• Mix and pour fuel outdoors.
• Keep away from sparks or flames.
• Do not smoke or allow smoking near
fuel or the unit or while using the unit.
• Avoid spilling fuel or oil. Wipe up all
fuel spills before starting engine.
• Move at least 10 feet (3 meters)
away from fueling site before start-
ing engine. Stop engine and allow it
to cool before removing fuel cap.
• Empty the fuel tank before storing or
transporting the unit. Use up fuel left
in the carburetor by starting the en-
gine and letting it run until it stops.
• Store unit and fuel in area where fuel
vapors cannot reach sparks or open
flames from water heaters, electric
motors or switches, furnaces, etc.
• Always store gasoline in a container
approved for flammable liquids.
CUTTING SAFETY
_WARNING: Inspect the area be-
fore each use. Remove objects
(rocks, broken glass, nails, wire, etc.)
which can be thrown by or become
entangled in line. Hard objects can
damage the trimmer head and be
thrown causing serious injury.
• Use only for trimming, scalping, mow-
ing and sweeping. Do not use for
edging, pruning or hedge trimming.
• Keep firm footing and balance. Do not
overreach.
• Keep all parts of your body away from
muffler and spinning line. Keep engine
below waist level. A hot muffler can
cause serious burns.
• Cut from your left to your right. Cutting
on right side of the shield will throw
debris away from the operator.
• Use only in daylight or good artificial
light.
• Use only for jobs explained in this
manual.
TRANSPORTING AND STORAGE
• Stop tile unit before carrying.
• Allow engine to cool before storing
or transporting in vehicle.
• Empty the fuel tank before storing or
transporting the unit. Use up fuel left
in the carburetor by starting the en-
gine and letting it run until it stops.
• Storeunitandfuelinareawhere
fuelvaporscannotreachsparksor
openflamesfromwaterheaters,
electricmotorsorswitches,furnaces,
etc.
• Storeunitsolinelimiterbladecan-
notaccidentallycauseinjury.The
unitcanbehungbytheshaft.
• Storeunitoutofreachofchildren.
Thisunitisnotequippedwithananti-
vibrationsystemandisintendedfor
occasionaluseonly.
SAFETYNOTICE:Exposuretovibra-
tionsthroughprolongeduseofgaso-
linepoweredhandtoolscouldcause
bloodvesselornervedamageinthe
fingers,hands,andjointsofpeople
pronetocirculationdisordersorab-
normalswellings.Prolongedusein
coldweatherhasbeenlinkedtoblood
vesseldamageinotherwisehealthy
people.Ifsymptomsoccursuchas
numbness,pain,lossofstrength,
changeinskincolorortexture,orloss
offeelinginthefingers,hands,or
joints,discontinuetheuseofthistool
andseekmedicalattention.Ananti-
vibrationsystemdoesnotguarantee
theavoidanceoftheseproblems.Us-
erswhooperatepowertoolsonacon-
tinualandregularbasismustmonitor
closelytheirphysicalconditionandthe
conditionofthistool.
SPECIALNOTICE:Thisunitis
equippedwithatemperaturelimiting
mufflerandsparkarrestingscreen
whichmeetstherequirementsofCali-
forniaCodes4442and4443.AllU.S.
forestlandandthestatesofCalifornia,
Idaho,Maine,Minnesota,NewJersey,
Oregon,andWashingtonrequireby
lawthatmanyinternalcombustionen-
ginesbeequippedwithasparkarrest-
ingscreen.Ifyouoperateinalocale
wheresuchregulationsexist,youare
legallyresponsibleformaintainingthe
operatingconditionoftheseparts.
Failuretodosoisaviolationofthe
law.Fornormalhomeowneruse,the
mufflerandsparkarrestingscreenwill
notrequireanyservice.After50hours
ofuse,werecommendthatyourmuf-
flerbeservicedorreplacedbya
SearsServiceCenter.
CARTONCONTENTS
Checkcartoncontentsagainstthefol-
lowinglist.
Model358.791800
• Trimmer
• Shield
• WingNut(screwedontoshield)
• Containerofoil
Examinepartsfordamage.Donot
usedamagedparts.
NOTE:Ifyouneedassistanceorfind
partsmissingordamaged,call
1-800-235-5878.
Itisnormalforthefuelfiltertorattlein
theemptyfueltank.
Findingfueloroilresidueonmuffleris
normalduetocarburetoradjustments
andtestingdonebythemanufacturer.
ASSEMBLY
_WARNING:Alwaysstopunit
anddisconnectsparkplugbeforeper-
forminganyassemblyprocedures.
_,WARNING:Ifreceivedas-
sembled,repeatallstepstoensure
yourunitisproperlyassembledandall
fastenersaresecure.
ADJUSTINGTHE HANDLE
_,WARNING: When adjusting the
assist handle, be sure it remains above
the safety label and below the mark or
arrow on the shaft.
1. Loosen wing nut on handle.
2. Rotate the handle on the shaft to an
upright position; retighten wing nut.
ATTACHING SHIELD
_,WARNING: The shield must be
properly installed. The shield provides
partial protection from the risk of thrown
objects to the operator and others and
is equipped with a line limiter blade
which cuts excess line to the proper
length. The line limiter blade (on under-
side of shield) is sharp and can cut you.
For proper orientation of shield, see
KNOW YOUR TRIMMER illustration in OP-
ERATION section.
1. Remove wing nut from shield.
2. Insert bracket into slot as shown.
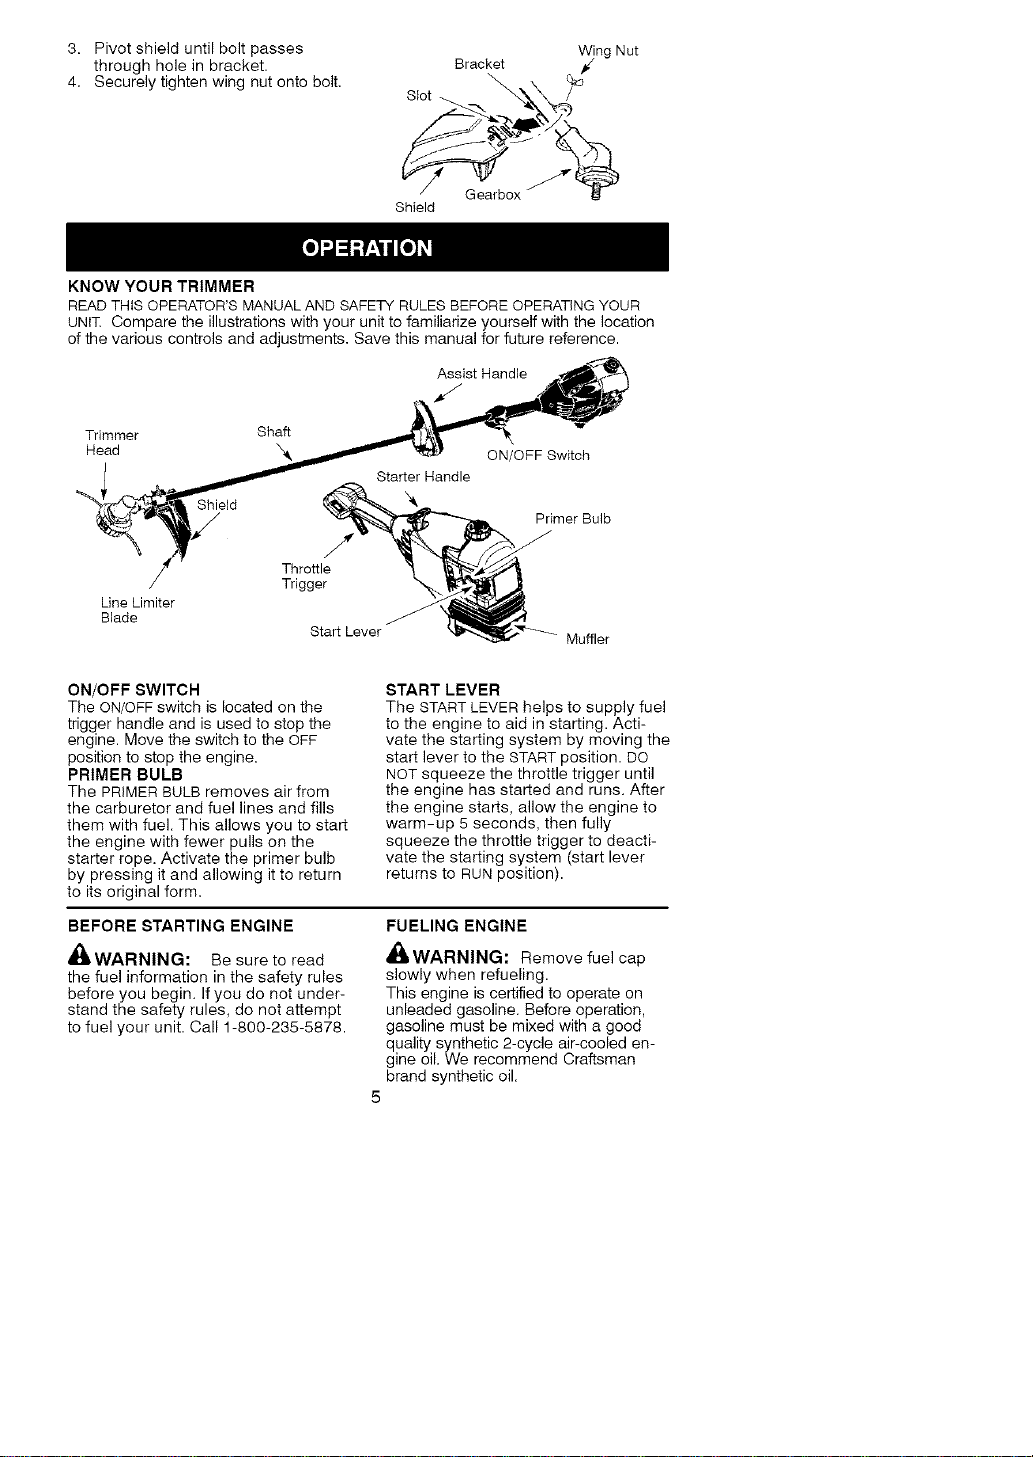
3. Pivotshielduntilboltpasses
throughholeinbracket.
4. Securelytightenwingnutontobolt.
Slot
Wing Nut
Bracket _/
St
Gearbox
Shield
KNOW YOUR TRIMMER
READ THIS OPERATOR'S MANUAL AND SAFETY RULES BEFORE OPERATING YOUR
UNIT. Compare the illustrations with your unit to familiarize yourself with the location
of the various controls and adjustments. Save this manual for future reference.
Assist Handle
J
Trimmer Shaft
Head X4_
Shield
Starter Handle
ON/OFF Switch
Primer Bulb
Line Limiter
Blade
Throttle
Trigger
Start Lever
Muffler
ON/OFF SWITCH
The ON/OFF switch is located on the
trigger handle and is used to stop the
engine. Move the switch to the OFF
position to stop the engine.
PRIMER BULB
The PRIMER BULB removes air from
the carburetor and fuel lines and fills
them with fuel. This allows you to start
the engine with fewer pulls on the
starter rope. Activate the primer bulb
by pressing it and allowing it to return
to its original form.
START LEVER
The START LEVER helps to supply fuel
to the engine to aid in starting. Acti-
vate the starting system by moving the
start lever to the START position. DO
NOT squeeze the throttle trigger until
the engine has started and runs. After
the engine starts, allow the engine to
warm-up 5 seconds, then fully
squeeze the throttle trigger to deacti-
vate the starting system (start lever
returns to RUN position).
BEFORE STARTING ENGINE
,_WARNING: Be sure to read
the fuel information in the safety rules
before you begin. If you do not under-
stand the safety rules, do not attempt
to fuel your unit. Call 1-800-235-5878.
FUELING ENGINE
_WARNING: Remove fuel cap
slowly when refueling.
This engine is certified to operate on
unleaded gasoline. Before operation,
gasoline must be mixed with a good
quality synthetic 2-cycle air-cooled en-
gine oil. We recommend Craftsman
brand synthetic oil.
5
Mixgasolineandoilataratioof40:1.A
40:1ratioisobtainedbymixing8.2
ouncesofoilwith1gallonofunleaded
gasoline.Includedwiththistrimmerisa
3.2ouncecontainerofoil.Pourtheen-
tirecontentsofthiscontainerinto1gal-
lonofgasolinetoachievetheproper
fuelmixture.DONOTUSEautomotive
oilormarineoil.Theseoilswillcause
enginedamage.Whenmixingfuel,fol-
lowinstructionsprintedoncontainer.
Onceoilisaddedtogasoline,shake
containermomentarilytoassurethat
thefuelisthoroughlymixed.Always
readandfollowthesafetyrulesrelat-
ingtofuelbeforefuelingyourunit.
IMPORTANT
Alcoholblendedfuels(calledgasohol
orusingethanolormethanol)canat-
tractmoisturewhichleadstosepara-
tionandformationofacidsduringstor-
age.Acidicgascandamagethefuel
systemofanenginewhileinstorage.
Toavoidengineproblems,emptythe
fuelsystembeforestoragefor30days
orlonger.Drainthegastank,startthe
engineandletitrununtilthefuellines
andcarburetorareempty.Usefresh
fuelnextseason.
Neveruseengineorcarburetorclean-
erproductsinthefueltankorperma-
nentdamagemayoccur.
SeetheSTORAGEsectionforaddition-
alinformation.
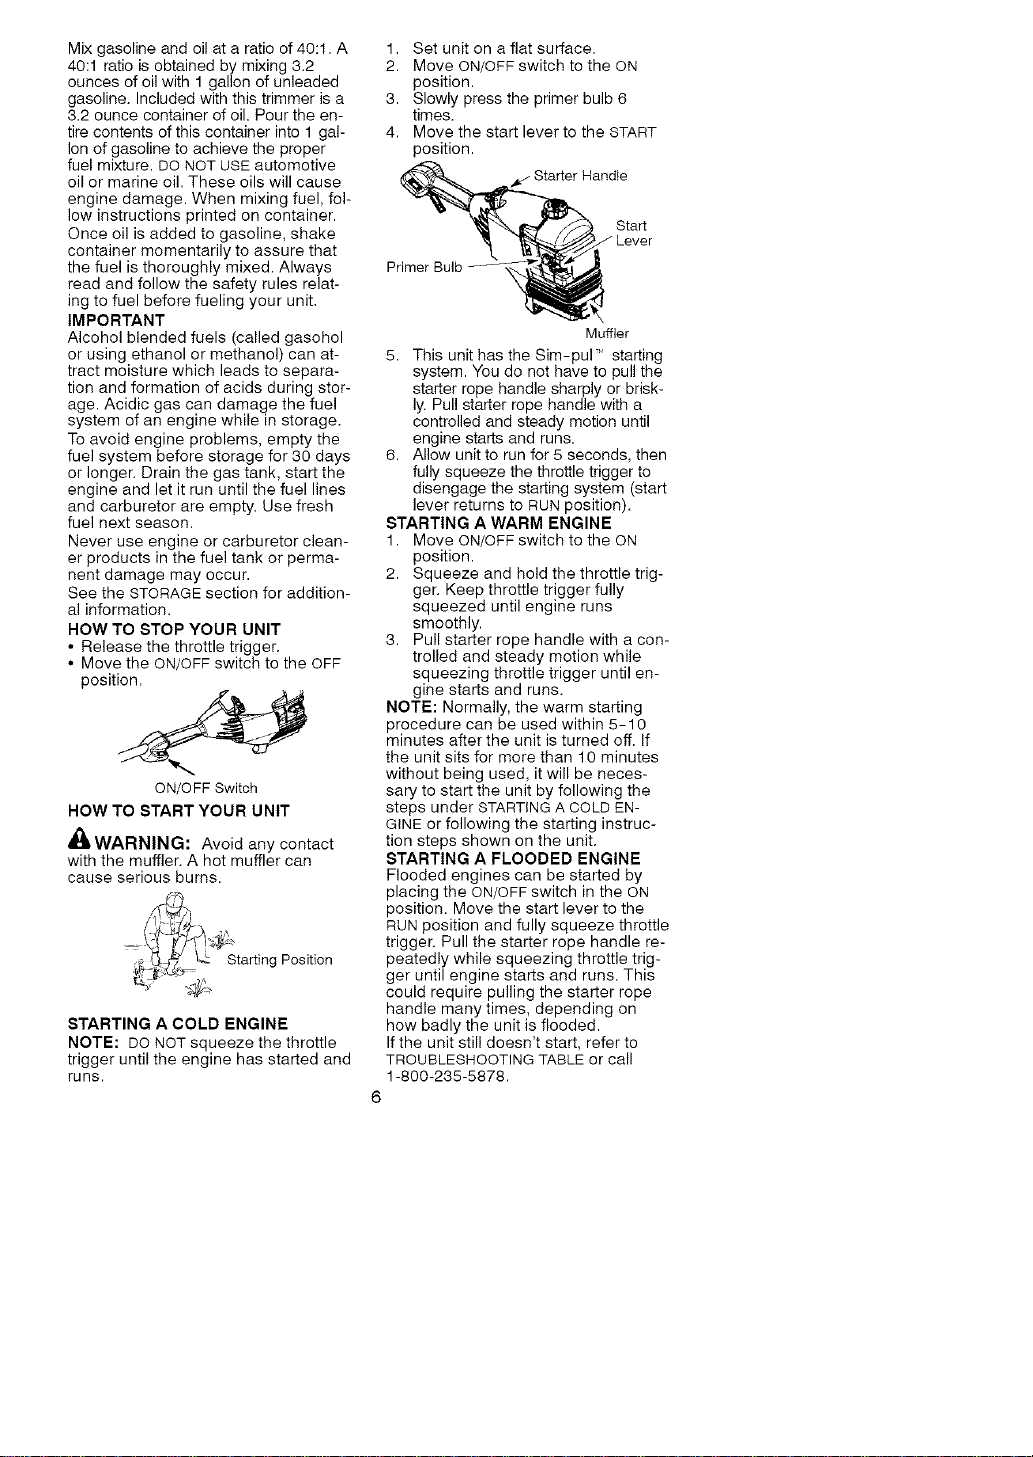
HOW TO STOP YOUR UNIT
• Release the throttle trigger.
• Move the ON/OFF switch to the OFF
position.
ON/OFF Switch
HOW TO START YOUR UNIT
,_WARNING: Avoid any contact
with the muffler. A hot muffler can
cause serious burns.
_4_// _ Starting Position
STARTING A COLD ENGINE
NOTE: DO NOT squeeze tile throttle
trigger until the engine has started and
runs.
1. Set unit on a flat surface.
2. Move ON/OFF switch to the ON
position.
3. Slowly press the primer bulb 6
times.
4. Move the start lever to the START
position.
Primer
Start
Muffler
5. This unit has the Sim-pul' starting
system. You do not have to pull the
starter rope handle sharply or brisk-
ly. Pull starter rope handle with a
controlled and steady motion until
engine starts and runs.
6. Allow unit to run for 5 seconds, then
fully squeeze the throttle trigger to
disengage the starting system (start
lever returns to RUN position).
STARTING A WARM ENGINE
1. Move ON/OFF switch to the ON
position.
2. Squeeze and hold the throttle trig-
ger. Keep throttle trigger fully
squeezed until engine runs
smoothly.
3. Pull starter rope handle with a con-
trolled and steady motion while
squeezing throttle trigger until en-
gine starts and runs.
NOTE: Normally, the warm starting
procedure can be used within 5-10
minutes after the unit is turned off. If
the unit sits for more than 10 minutes
without being used, it will be neces-
sary to start the unit by following the
steps under STARTING A COLD EN-
GINE or following the starting instruc-
tion steps shown on the unit.
STARTING A FLOODED ENGINE
Flooded engines can be started by
placing the ON/OFF switch in the ON
position. Move the start lever to the
RUN position and fully squeeze throttle
trigger. Pull the starter rope handle re-
peatedly while squeezing throttle trig-
ger until engine starts and runs. This
could require pulling the starter rope
handle many times, depending on
how badly the unit is flooded.
If the unit still doesn't start, refer to
TROUBLESHOOTING TABLE or call
1-800-235-5878.
6
OPERATING INSTRUCTIONS
To maximize operating efficiency, do
not run the engine for longer than 1
minute at a time at full throttle.
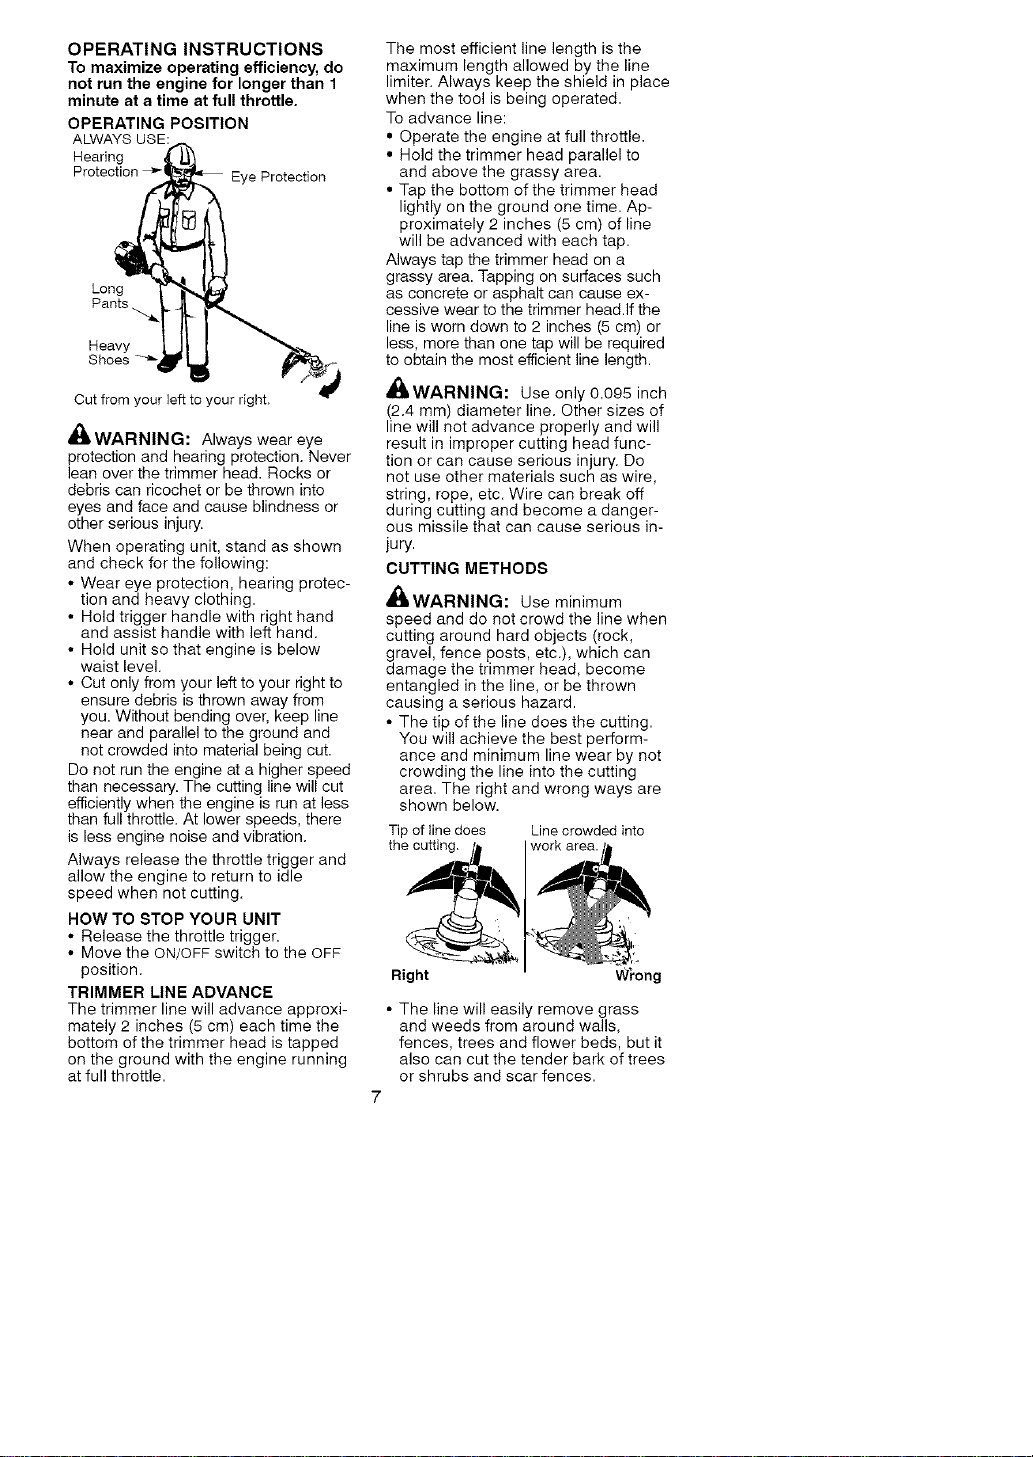
OPERATING POSITION
ALWAYS USE:
Hearing
Protection _( Eye Protection
Long
Pants
Heavy
Shoes
Cut from your left to your right,
,_WARNING: Always wear eye
protection and hearing protection. Never
lean over the trimmer head. Rocks or
debris can ricochet or be thrown into
eyes and face and cause blindness or
other serious injury.
When operating unit, stand as shown
and check for the following:
• Wear eye protection, hearing protec-
tion and heavy clothing.
• Hold trigger handle with right hand
and assist handle with left hand.
• Hold unit so that engine is below
waist level.
• Cut only from your left to your right to
ensure debris is thrown away from
you. Without bending over, keep line
near and parallel to the ground and
not crowded into material being cut.
Do not run the engine at a higher speed
than necessary. The cutting line will cut
efficiently when the engine is run at less
than full throttle. At lower speeds, there
is less engine noise and vibration.
Always release the throttle trigger and
allow the engine to return to idle
speed when not cutting.
HOW TO STOP YOUR UNIT
• Release the throttle trigger.
• Move the ON/OFF switch to the OFF
position.
TRIMMER LINE ADVANCE
The trimmer line will advance approxi-
mately 2 inches (5 cm) each time the
bottom of the trimmer head is tapped
on the ground with the engine running
at full throttle.
The most efficient line length is the
maximum length allowed by the line
limiter. Always keep the shield in place
when the tool is being operated.
To advance line:
• Operate the engine at full throttle.
• Hold the trimmer head parallel to
and above the grassy area.
• Tap the bottom of the trimmer head
lightly on the ground one time. Ap-
proximately 2 inches (5 cm) of line
will be advanced with each tap.
Always tap the trimmer head on a
grassy area. Tapping on surfaces such
as concrete or asphalt can cause ex-
cessive wear to the trimmer head.if the
line is worn down to 2 inches (5 cm) or
less, more than one tap will be required
to obtain the most efficient line length.
_,WARNING: Use only 0.095 inch
(2.4 ram) diameter line. Other sizes of
line will not advance properly and will
result in improper cutting head func-
tion or can cause serious injury. Do
not use other materials such as wire,
string, rope, etc. Wire can break off
during cutting and become a danger-
ous missile that can cause serious in-
jury.
CUTTING METHODS
A_,WARNING: Use minimum
speed and do not crowd the line when
cutting around hard objects (rock,
gravel, fence posts, etc.), which can
damage the trimmer head, become
entangled in the line, or be thrown
causing a serious hazard.
• The tip of the line does the cutting.
You will achieve the best perform-
ance and minimum line wear by not
crowding the line into the cutting
area. The right and wrong ways are
shown below.
Tip of line does Line crowded into
the cutting,
Right W_'ong
• The line will easily remove grass
and weeds from around walls,
fences, trees and flower beds, but it
also can cut the tender bark of trees
or shrubs and scar fences.
7
• Fortrimmingorscalping,useless
thanfullthrottletoincreaselinelife
anddecreaseheadwear,especially:
•Duringlightdutycutting.
•Nearobjectsaroundwhichtheline
canwrapsuchassmallposts,
treesorfencewire.
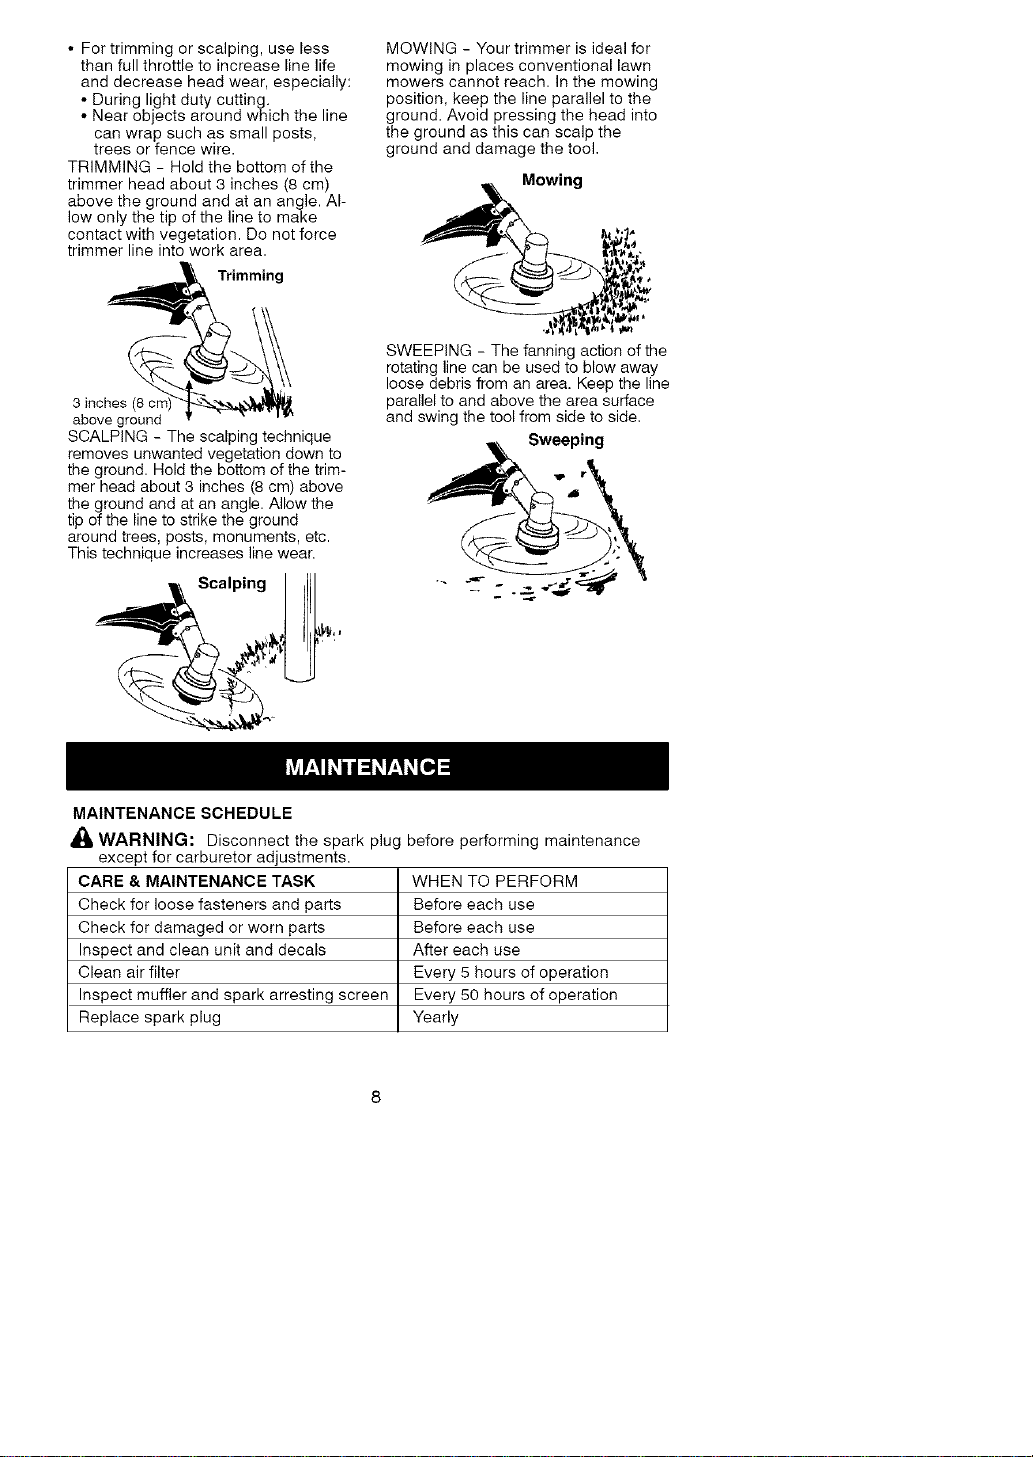
TRIMMING- Holdthebottomofthe
trimmerheadabout3inches(8cm)
abovethegroundandatanangle.Al-
lowonlythetipofthelinetomake
contactwithvegetation.Donotforce
trimmerlineintoworkarea.
Trimming
MOWING - Your trimmer is ideal for
mowing in places conventional lawn
mowers cannot reach. In the mowing
position, keep the line parallel to the
ground. Avoid pressing the head into
the ground as this can scalp the
ground and damage the tool.
Mowing
3 inches (8 crr
above ground
SCALPING - The scalping technique
removes unwanted vegetation down to
the ground. Hold the bottom of the trim-
mer head about 3 inches (8 cm) above
the ground and at an angle. Allow the
tip of the line to strike the ground
around trees, posts, monuments, etc.
This technique increases line wear.
Scalping
SWEEPING - The fanning action of the
rotating line can be used to blow away
loose debris from an area. Keep the line
parallel to and above the area surface
and swing the tool from side to side.
Sweeping
MAINTENANCE SCHEDULE
WARNING: Disconnect the spark plug before performing maintenance
except for carburetor adjustments.
CARE & MAINTENANCE TASK
Check for loose fasteners and parts
Check for damaged or worn parts
Inspect and clean unit and decals
Clean air filter
Inspect muffler and spark arresting screen
Replace spark plug
WHEN TO PERFORM
Before each use
Before each use
After each use
Every 5 hours of operation
Every 50 hours of operation
Yearly
GENERAL RECOMMEN DATIONS
The warranty on this unit does not
cover items that have been subjected
to operator abuse or negligence. To
receive full value from the warranty,
the operator must maintain unit as
instructed in this manual. Various ad-
justments will need to be made peri-
odically to properly maintain your unit.
CHECK FOR LOOSE
FASTENERS AND PARTS
• Spark Plug Boot
• Air Filter
• Housing Screws
• Assist Handle Screw
• Debris Shield
CHECK FOR DAMAGED OR
WORN PARTS
Contact Sears Service Center for re-
placement of damaged or worn parts.
• ON/OFF Switch - Ensure ON/OFF
switch functions properly by moving
the switch to the OFF position. Make
sure engine stops; then restart en-
gine and continue.
• Fuel Tank - Discontinue use of unit
if fuel tank shows signs of damage
or leaks.
• Debris Shield - Discontinue use of
unit if debris shield is damaged.
INSPECT AND CLEAN UNIT AND DE-
CALS
• After each use, inspect complete
unit for loose or damaged parts.
Clean the unit and decals using a
damp cloth with a mild detergent.
• Wipe off unit with a clean dry cloth.
CLEAN AIR FILTER
A dirty air filter decreases engine per-
formance and increases fuel consump-
tion and harmful emissions. Always
clean after every 5 hours of operation.
1. Clean the cover and the area
around it to keep dirt from falling
into the carburetor chamber when
the cover is removed.
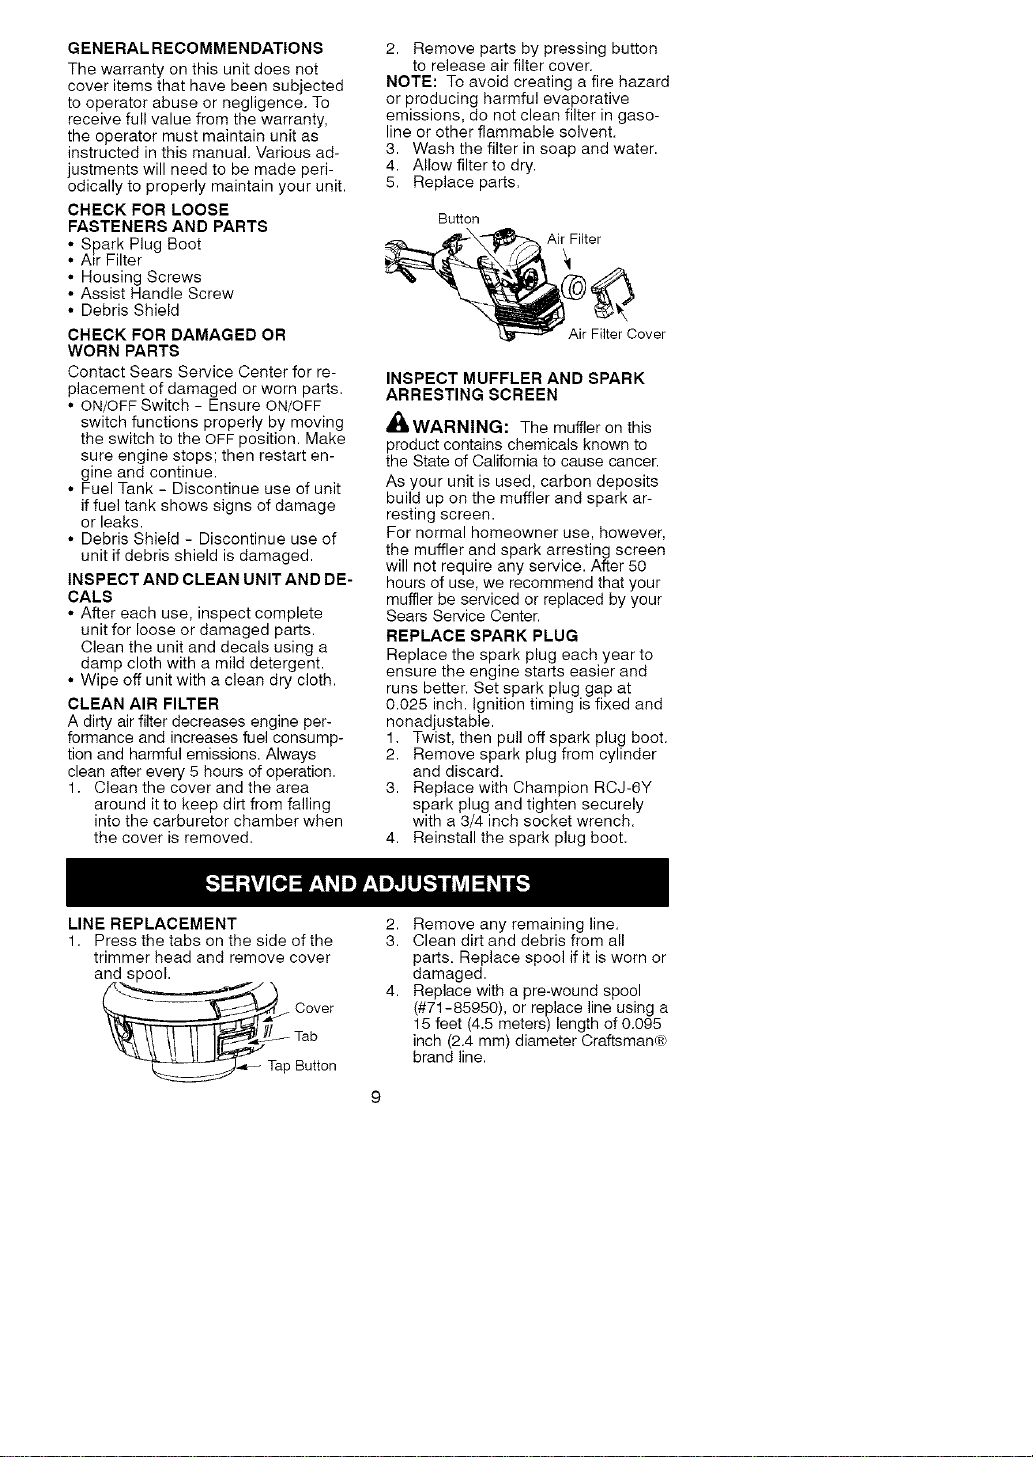
2. Remove parts by pressing button
to release air filter cover.
NOTE: To avoid creating a fire hazard
or producing harmful evaporative
emissions, do not clean filter in gaso-
line or other flammable solvent.
3. Wash the filter in soap and water.
4. Allow filter to dry.
5. Replace parts.
Button
Air Filter
Air Filter Cover
INSPECT MUFFLER AND SPARK
ARRESTING SCREEN
'_'WARNING: The muffler on this
product contains chemicals known to
the State of California to cause cancer.
As your unit is used, carbon deposits
build up on the muffler and spark ar-
resting screen.
For normal homeowner use, however,
the muffler and spark arresting screen
will not require any service. After 50
hours of use, we recommend that your
muffler be serviced or replaced by your
Sears Service Center.
REPLACE SPARK PLUG
Replace the spark plug each year to
ensure the engine starts easier and
runs better. Set spark plug gap at
0.025 inch. Ignition timing is fixed and
nonadjustable.
1. Twist, then pull off spark plug boot.
2. Remove spark plug from cylinder
and discard.
3. Replace with Champion RCJ-6Y
spark plug and tighten securely
with a 3/4 inch socket wrench.
4. Reinstall the spark plug boot.
LINE REPLACEMENT
1. Press the tabs on the side of the
trimmer head and remove cover
and spool.
Cover
Tap Button
2. Remove any remaining line.
3. Clean dirt and debris from all
parts. Replace spool if it is worn or
damaged.
4. Replace with a pre-wound spool
(#71-85950), or replace line using a
15 feet (4.5 meters) length of 0.095
inch (2.4 mm) diameter Craftsman€R)
brand line.
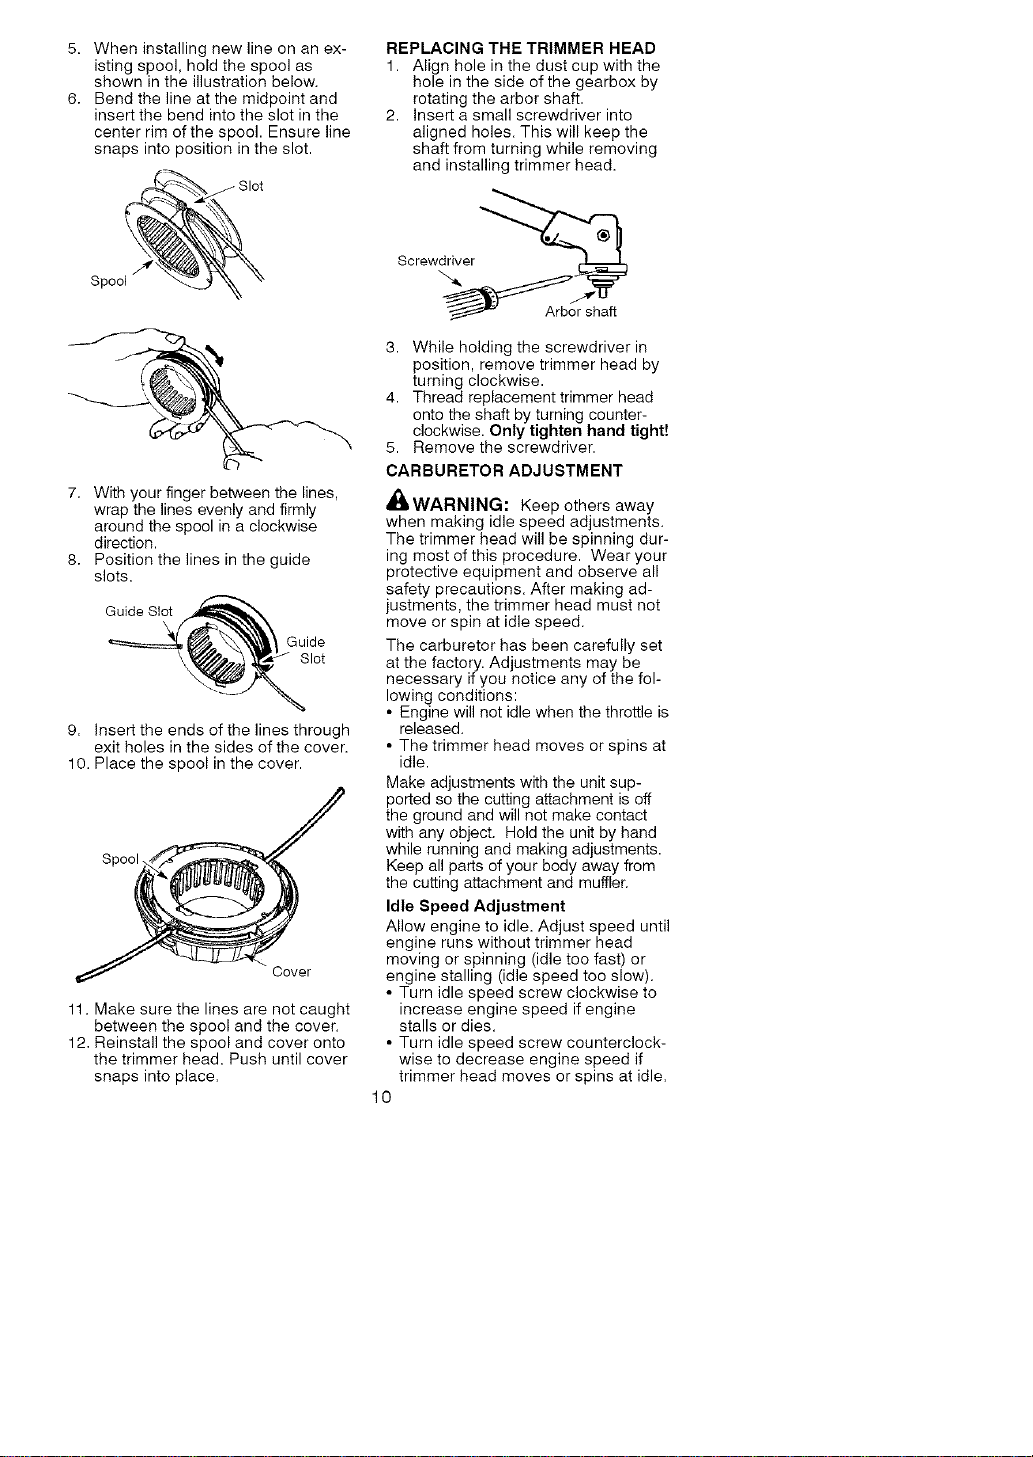
5. Wheninstallingnewlineonanex-
istingspool,holdthespoolas
shownintheillustrationbelow.
6. Bendthelineatthemidpointand
insertthebendintotheslotinthe
centerrimofthespool.Ensureline
snapsintopositionintheslot.
Spool
7. Withyourfingerbetweenthelines,
wrapthelinesevenlyandfirmly
aroundthespoolinaclockwise
direction.
8. Positionthelinesintheguide
slots.
Guide Slot
Guide
Slot
\
9. Insert the ends of the lines through
exit holes in the sides of the cover.
10. Place the spool in the cover.
Spool
Cover
11. Make sure the lines are not caught
between the spool and the cover.
12. Reinstall the spool and cover onto
the trimmer head. Push until cover
snaps into place.
REPLACING THE TRIMMER HEAD
1. Align hole in the dust cup with the
hole in the side of the gearbox by
rotating the arbor shaft.
2. Insert a small screwdriver into
aligned holes. This will keep the
shaft from turning while removing
and installing trimmer head.
Screwdriver
3. While holding the screwdriver in
position, remove trimmer head by
turning clockwise.
4. Thread replacement trimmer head
onto the shaft by turning counter-
clockwise. Only tighten hand tight!
5. Remove the screwdriver.
CARBURETOR ADJUSTMENT
,_WARNING: Keep others away
when making idle speed adjustments.
The trimmer head will be spinning dur-
ing most of this procedure. Wear your
protective equipment and observe all
safety precautions. After making ad-
justments, the trimmer head must not
move or spin at idle speed.
The carburetor has been carefully set
at the factory. Adjustments may be
necessary if you notice any of the fol-
lowing conditions:
• Engine will not idle when the throttle is
released.
• The trimmer head moves or spins at
idle.
Make adjustments with the unit sup-
ported so the cutting attachment is off
the ground and will not make contact
with any object. Hold the unit by hand
while running and making adjustments.
Keep all parts of your body away from
the cutting attachment and muffler.
Idle Speed Adjustment
Allow engine to idle. Adjust speed until
engine runs without trimmer head
moving or spinning (idle too fast) or
engine stalling (idle speed too slow).
• Turn idle speed screw clockwise to
increase engine speed if engine
stalls or dies.
• Turn idle speed screw counterclock-
wise to decrease engine speed if
trimmer head moves or spins at idle.
10
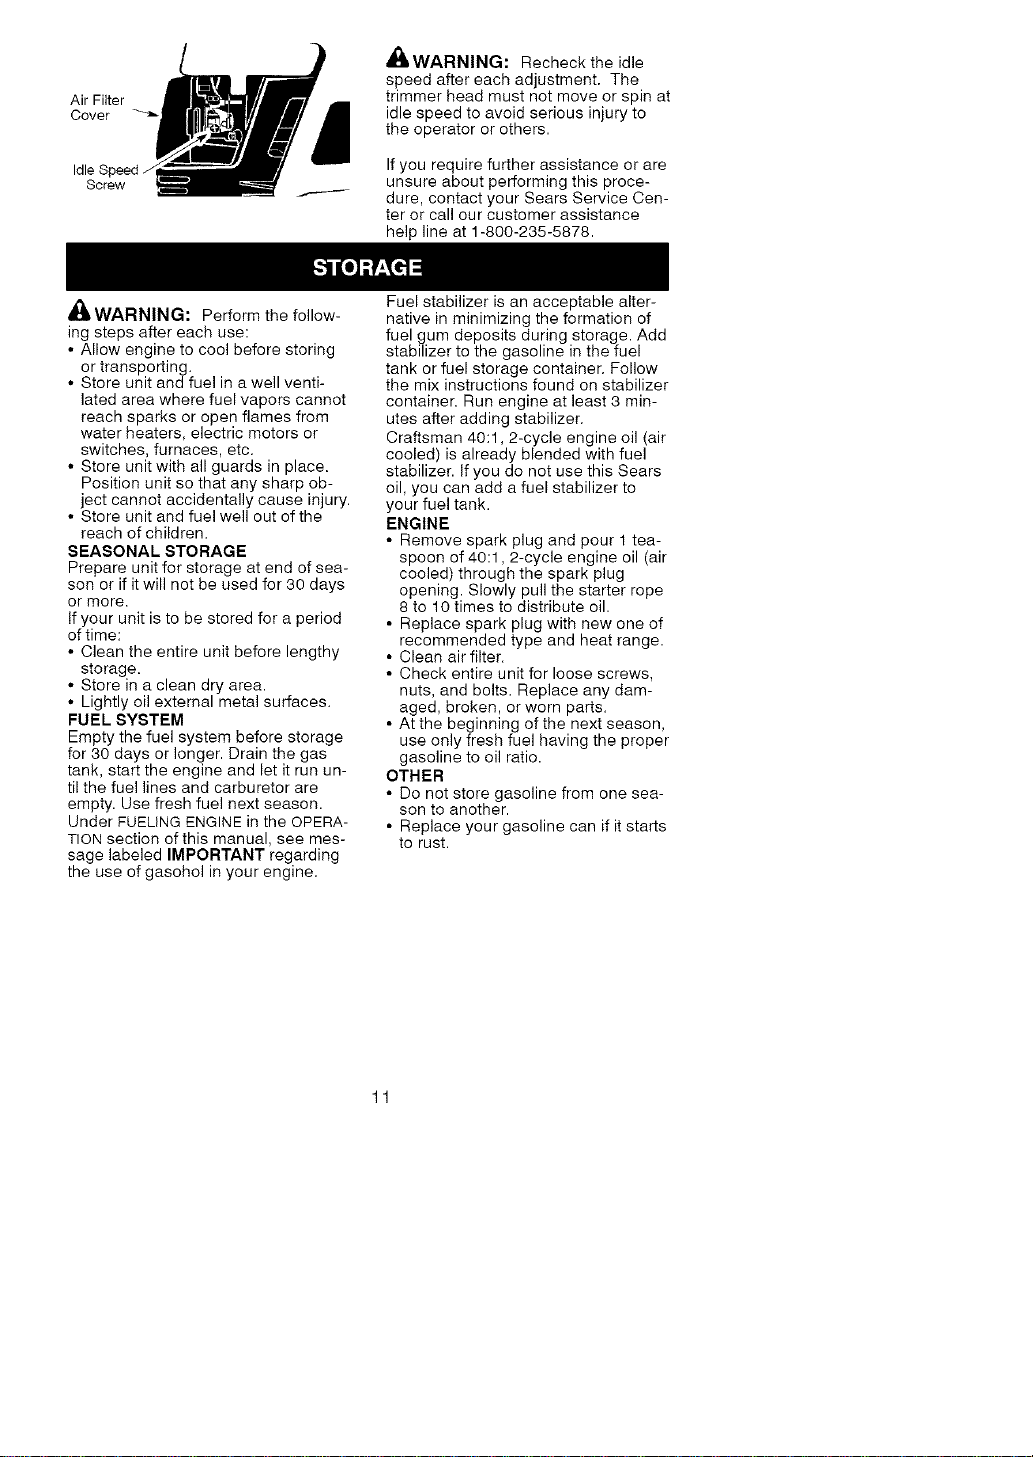
Air Filter __
Cover
Idle Speed
Screw
_WARNING: Recheck the idle
speed after each adjustment. The
trimmer head must not move or spin at
idle speed to avoid serious injury to
the operator or others.
If you require further assistance or are
unsure about performing this proce-
dure, contact your Sears Service Cen-
ter or call our customer assistance
help line at 1-800-235-5878.
_WARNING: Perform the follow-
ing steps after each use:
• Allow engine to cool before storing
or transporting.
• Store unit and fuel in a well venti-
lated area where fuel vapors cannot
reach sparks or open flames from
water heaters, electric motors or
switches, furnaces, etc.
• Store unit with all guards in place.
Position unit so that any sharp ob-
ject cannot accidentally cause injury.
• Store unit and fuel well out of the
reach of children.
SEASONAL STORAGE
Prepare unit for storage at end of sea-
son or if it will not be used for 30 days
or more.
If your unit is to be stored for a period
of time:
• Clean the entire unit before lengthy
storage.
• Store in a clean dry area.
• Lightly oil external metal surfaces.
FUEL SYSTEM
Empty the fuel system before storage
for 30 days or longer. Drain the gas
tank, start the engine and let it run un-
til the fuel lines and carburetor are
empty. Use fresh fuel next season.
Under FUELING ENGINE in the OPERA-
TION section of this manual, see mes-
sage labeled IMPORTANT regarding
the use of gasohol in your engine=
Fuel stabilizer is an acceptable alter-
native in minimizing the formation of
fuel gum deposits during storage. Add
stabilizer to the gasoline in the fuel
tank or fuel storage container. Follow
the mix instructions found on stabilizer
container. Run engine at least 3 min-
utes after adding stabilizer.
Craftsman 40:1,2-cycle engine oil (air
cooled) is already blended with fuel
stabilizer. If you do not use this Sears
oil, you can add a fuel stabilizer to
your fuel tank.
ENGINE
• Remove spark plug and pour 1 tea-
spoon of 40:1,2-cycle engine oil (air
cooled) through the spark plug
opening. Slowly pull the starter rope
8 to 10 times to distribute oil.
• Replace spark plug with new one of
recommended type and heat range.
• Clean air filter.
• Check entire unit for loose screws,
nuts, and bolts. Replace any dam-
aged, broken, or worn parts.
• At the beginning of the next season,
use only fresh fuel having the proper
gasoline to oil ratio.
OTHER
• Do not store gasoline from one sea-
son to another.
• Replace your gasoline can if it starts
to rust.
11
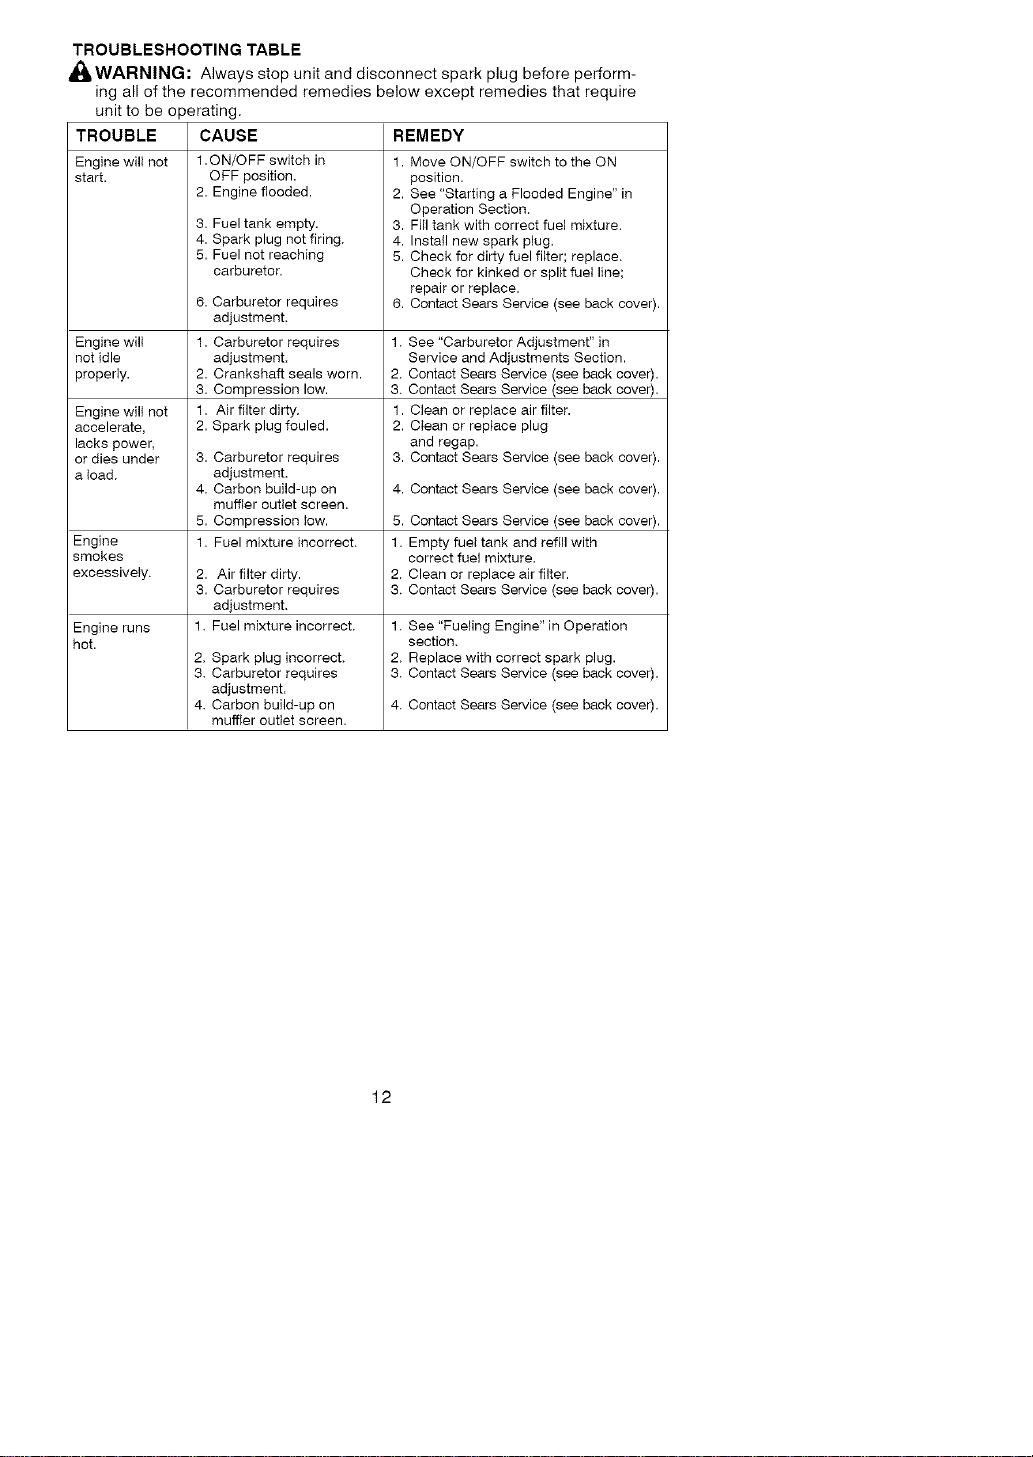
TROUBLESHOOTING TABLE
_,WARNING: Always stop unit and disconnect spark plug before perform-
ing all of the recommended remedies below except remedies that require
TROUBLE
Engine will not
start.
unit to be operating.
CAUSE REMEDY
1.ON/OFF switch in
OFF position.
2. Engine flooded.
3. Fuel tank empty.
4. Spark plug not firing.
5. Fuel not reaching
carburetor.
1. Move ON/OFF switch to the ON
position.
2. See "Starting a Flooded Engine" in
Operation Section.
3. Fill tank with correct fuel mixture.
4. Install new spark plug.
5. Check for dirty fuel filter; replace.
Check for kinked or split fuel line;
repair or replace.
Contact Sears Service (see back cover).
6. Carburetor requires 6.
adjustment.
Engine will 1. Carburetor requires 1. See "Carburetor Adjustment" in
not idle adjustment. Service and Adjustments Section.
properly. 2. Crankshaft seals worn. 2. Contact Sears Service (see back cover).
3.
1.
2.
Engine wilt not
accelerate,
lacks power.
or dies under
a load.
Engine
smokes
excessively.
Engine runs
hot.
3. Carburetor requires
adjustment.
4. Carbon build-up on
muffler outlet screen.
5. Compression low.
1. Fuel mixture incorrect.
Compression low. 3. Contact Sears Service (see back cover).
Air filter dirty. 1. Clean or replace air filter.
Spark plug fouled. 2. Clean or replace plug
and regap.
3. Contact Sears Service (see back cover).
2. Air filter dirty.
3. Carburetor requires
adjustment.
1. Fuel mixture incorrect.
2. Spark plug incorrect.
3. Carburetor requires
adjustment.
4. Carbon build-up on
muffler outlet screen.
4. Contact Sears Service (see back cover).
5. Contact Sears Service (see back cover).
1. Empty fuel tank and refill with
correct fuel mixture.
2. Clean or replace air filter.
3. Contact Sears Service (see back cover).
1. See "Fueling Engine" in Operation
section.
2. Replace with correct spark plug.
3. Contact Sears Service (see back cover).
4. Contact Sears Service (see back cover).
12

YOUR WARRANTY RIGHTS AND OB-
LIGATIONS: The U.S. Environmental
Protection Agency/California Air Re-
sources Board and Sears, Roebuck
and Co., U.S.A., are pleased to explain
the emissions control system warranty
on your year 2007 and later small off-
road engine. In California, all small off-
road engines must be designed, built,
and equipped to meet the State's strin-
gent anti-smog standards. Sears must
warrant the emission control system on
your small off-road engine for the peri-
ods of time listed below provided there
has been no abuse, neglect, or improp-
er maintenance of your small off-road
engine. Your emission control system
includes parts such as the carburetor,
the ignition system and the fuel tank
(California only). Where a warrantable
condition exists, Sears will repair your
small off-road engine at no cost to you.
Expenses covered under warranty in-
clude diagnosis, parts and labor.
MANUFACTURER'S WARRANTY
COVERAGE: If any emissions related
part on your engine (as listed under
Emissions Control Warranty Parts List)
is defective or a defect in the materials
or workmanship of the engine causes
the failure of such an emission related
part, the part will be repaired or re-
placed by Sears. OWNER'S WAR-
RANTY RESPONSIBILITIES: As the
small off-road engine owner, you are
responsible for the performance of the
required maintenance listed in your op-
erator's manual. Sears recommends
that you retain all receipts covering
maintenance on your small off-road en-
gine, but Sears cannot deny warranty
solely for the lack of receipts or for your
failure to ensure the performance of all
scheduled maintenance. As the small
off-road engine owner, you should be
aware that Sears may deny you war-
ranty coverage if your small off-road
engine or a part of it has failed due to
abuse, neglect, improper maintenance,
unapproved modifications, or the use of
parts not made or approved by the orig-
inal equipment manufacturer. You are
responsible for presenting your small
off-road engine to a Sears authorized
repair center as soon as a problem ex-
ists. Warranty repairs should be com-
pleted in a reasonable amount of time,
not to exceed 30 days. If you have any
questions regarding your warranty rights
and responsibilities, you should contact
your nearest authorized service center
or call Sears at 1-800-469-4663.
WARRANTY COMMENCEMENT
DATE: The warranty period begins on
the date the small off-road engine is
purchased. LENGTH OF COVERAGE:
This warranty shall be for a period of
two years from the initial date of pur-
chase. WHAT IS COVERED: REPAIR
OR REPLACEMENT OF PARTS. Re-
pair or replacement of any warranted
part will be performed at no charge to
the owner at an approved Sears Servi-
ce Center. Ifyou have any questions
regarding your warranty rights and re-
sponsibilities, you should contact your
nearest authorized service center or call
Sears at 1-800-469-4663. WARRAN-
TY PERIOD: Any warranted part which
is not scheduled for replacement as re-
quired maintenance, or which is sched-
uled only for regular inspection to the
effect of "repair or replace as neces-
sary" shall be warranted for 2 years.
Any warranted part which is scheduled
for replacement as required mainte-
nance shall be warranted for the period
of time up to the first scheduled replace-
ment point for that part. DIAGNOSIS:
The owner shall not be charged for
diagnostic labor which leads to the de-
termination that a warranted part is de-
fective if the diagnostic work is per-
formed at an approved Sears Service
Center. CONSEQUENTIAL DAM-
AGES: Sears may be liable for dam-
ages to other engine components
caused by the failure of a warranted
part still under warranty. WHAT IS NOT
COVERED: All failures caused by
abuse, neglect, or improper mainte-
nance are not covered. ADD-ON OR
MODIFIED PARTS: The use of add-on
or modified parts can be grounds for
disallowing a warranty claim. Sears is
not liable to cover failures of warranted
parts caused by the use of add-on or
modified parts. HOW TO FILE A
CLAIM: If you have any questions re-
garding your warranty rights and re-
sponsibilities, you should contact your
nearest authorized service center or call
Sears at 1-800-469-4663. WHERE TO
GET WARRANTY SERVICE: Warranty
services or repairs shall be provided at
all Sears Service Centers. Call
1-800-469-4663.
13
MAINTENANCE, REPLACEMENT
AND REPAIR OF EMISSION RE-
LATED PARTS: Any Sears approved
replacement part used in the perfor-
mance of any warranty maintenance or
repair on emission related parts will be
provided without charge to the owner if
the part is under warranty.
EMISSION CONTROL WARRANTY
PARTS LIST: Carburetor, Ignition Sys-
tem: Spark Plug (covered up to mainte-
nance schedule), Ignition Module, Muf-
fler including catalyst, Fuel Tank
(California only). MAINTENANCE
STATEMENT: The owner is responsible
for the performance of all required main-
tenance as defined in the operator's
manual.
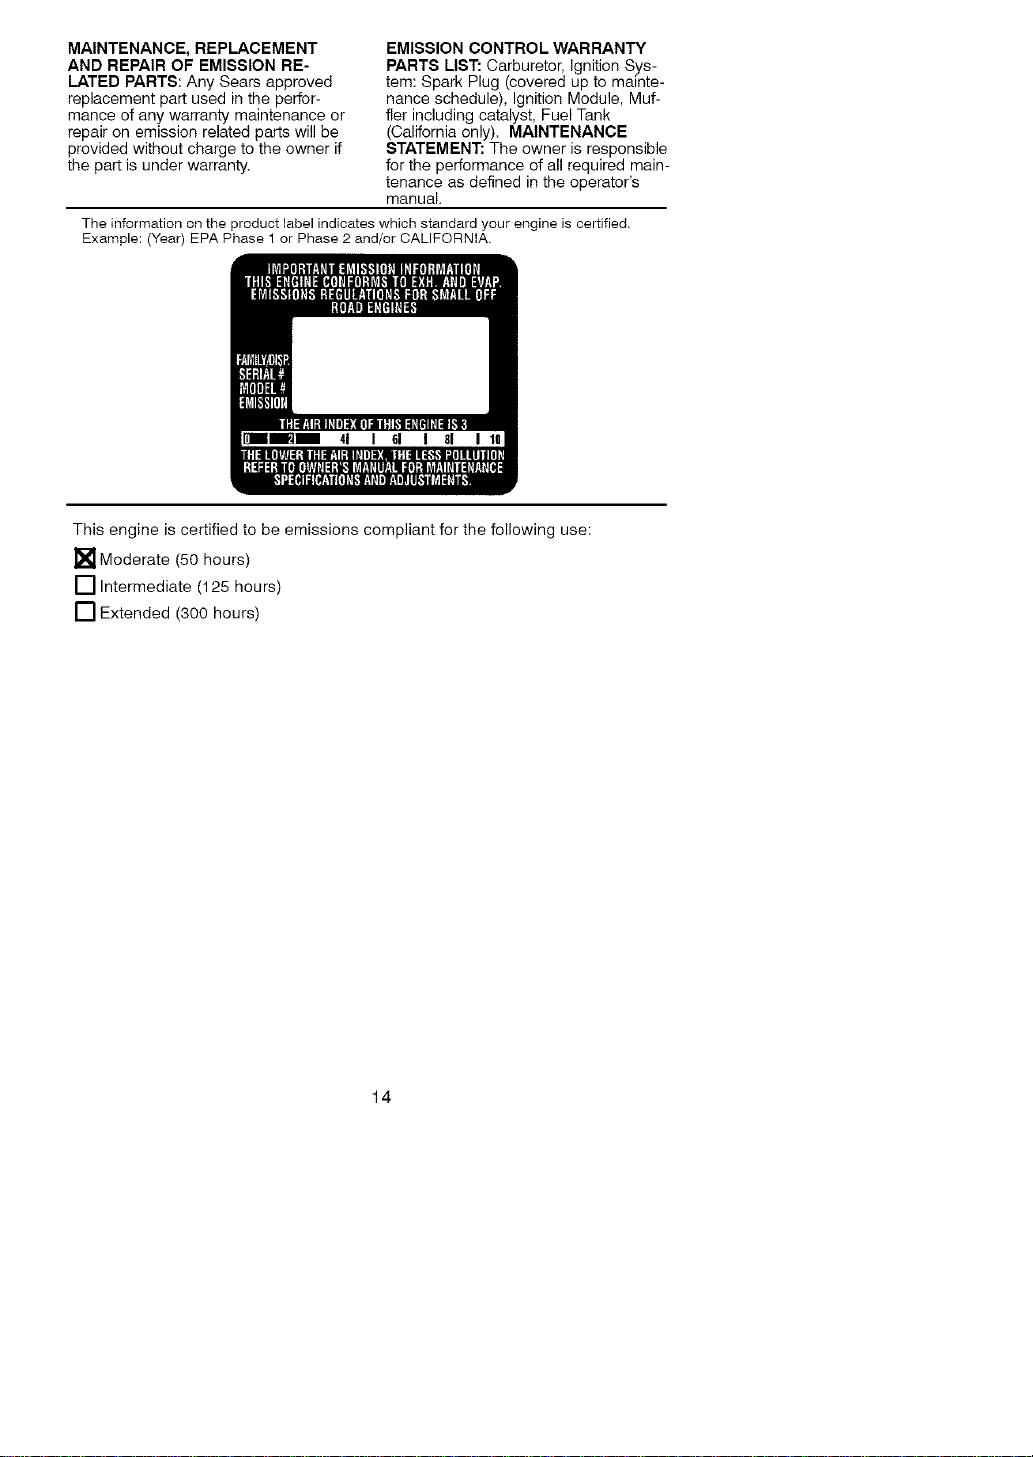
The information on the product label indicates which standard your engine is certified.
Example: (Year) EPA Phase 1 or Phase 2 and/or CALIFORNIA.
41 I 61 I 81 I
This engine is certified to be emissions compliant for the following use:
[] Moderate (50 hours)
[] Intermediate (125 hours)
[] Extended (300 hours)
14
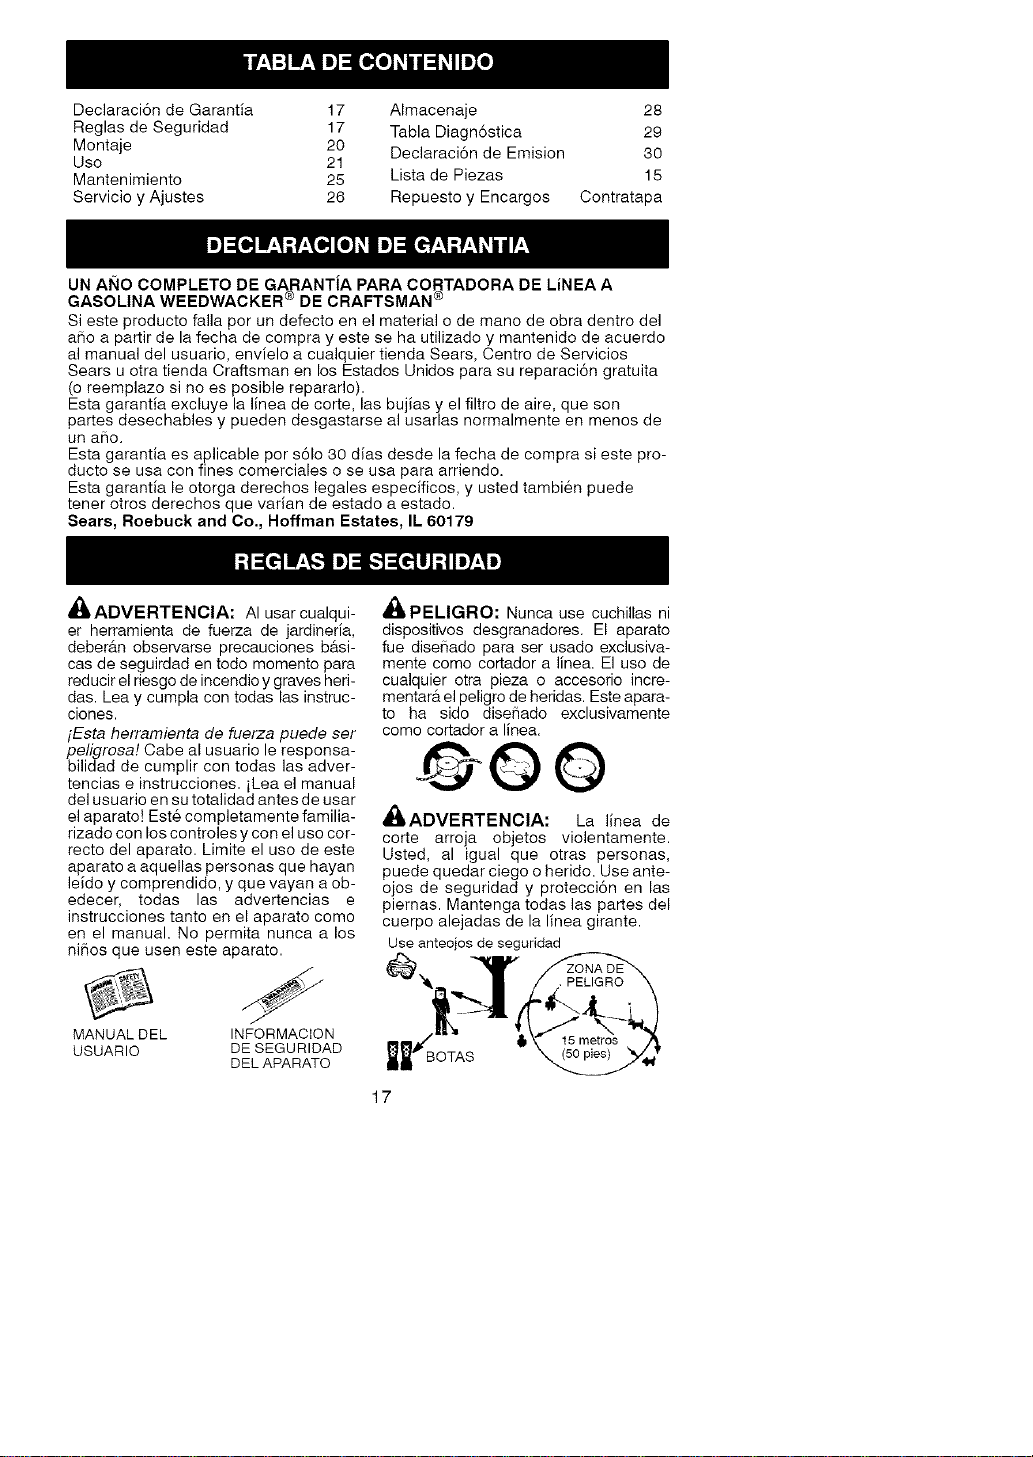
Declaraci6n de Garantia 17 AImacenaje 28
Reglas de Seguridad 17 Tabla Diagn6stica 29
Montaje 20 Declaraci6n de Emision 30
Uso 21
Mantenimiento 25 Lista de Piezas 15
Servicio y Ajustes 26 Repuesto y Encargos Contratapa
UN AI_IO COMPLETO DE GARANTJA PARA CORTADORA DE LiNEA A
GASOLINA WEEDWACKER ® DE CRAFTSMAN ®
Si este producto falla por un defecto en el material o de mano de obra dentro del
a_o a partir de la fecha de compra y este se ha utilizado y mantenido de acuerdo
al manual del usuario, envielo a cualquier tienda Sears, Centro de Servicios
Sears u otra tienda Craftsman en los Estados Unidos para su reparaci6n gratuita
(o reemplazo si no es posible repararlo).
Esta garantia excluye la linea de corte, las bujias y el filtro de aire, que son
partes desechables y pueden desgastarse al usarlas normalmente en menos de
un al_o,
Esta garantia es aplicable per s61o 30 dias desde la fecha de compra si este pro-
ducto se usa con fines comerciales o se usa para arriendo.
Esta garantia le otorga derechos legales especificos, y usted tambien puede
tener otros derechos que varian de estado a estado.
Sears, Roebuck and Co., Hoffman Estates, IL 60179
d_ADVERTENCIA: AI usar cualqui-
er herramienta de fuerza de jardineria,
deber_.n observarse precauciones b_.si-
cas de seguirdad en todo momento para
reducir el riesgo de incendio y graves heri-
das. Lea y cumpla con todas las instruc-
clones.
iEsta herramienta de fuerza puede ser
peligrosa! Cabe al usuario le responsa-
bilidad de cumplir con todas las adver-
tencias e instrucciones, iLea el manual
del usuario en su totalidad antes de usar
el aparato! Est6 completamente familia-
rizado con los controles y con el uso cor-
recto del aparato. Limite el uso de este
aparato a aquellas personas que hayan
leido y comprendido, y que vayan a ob-
edecer, todas las advertencias e
instrucciones tanto en el aparato como
en el manual. No permita nunca a los
ni_os que usen este aparato.
MANUAL DEL INFORMACION
USUARIO DE SEGURIDAD
DEL APARATO
PELIGRO: Nunca use cuchillas ni
dispositivos desgranadores. El aparato
fue diseSado para ser usado exclusiva-
mente como cortador a line& El uso de
cualquier otra pieza o accesorio incre-
mentar& el peligro de heridas. Este apara-
to ha sido diseSado exclusivamente
como cortador a line&
@00
_ILADVERTENCIA: La linea de
corte arroja objetos violentamente.
Usted, al igual que otras personas,
puede quedar ciego o herido. Use ante-
ojos de seguridad y protecci6n en las
piernas. Mantenga todas las partes del
cuerpo alejadas de la linea girante.
Use anteojos de seguridad
BOTAS
17
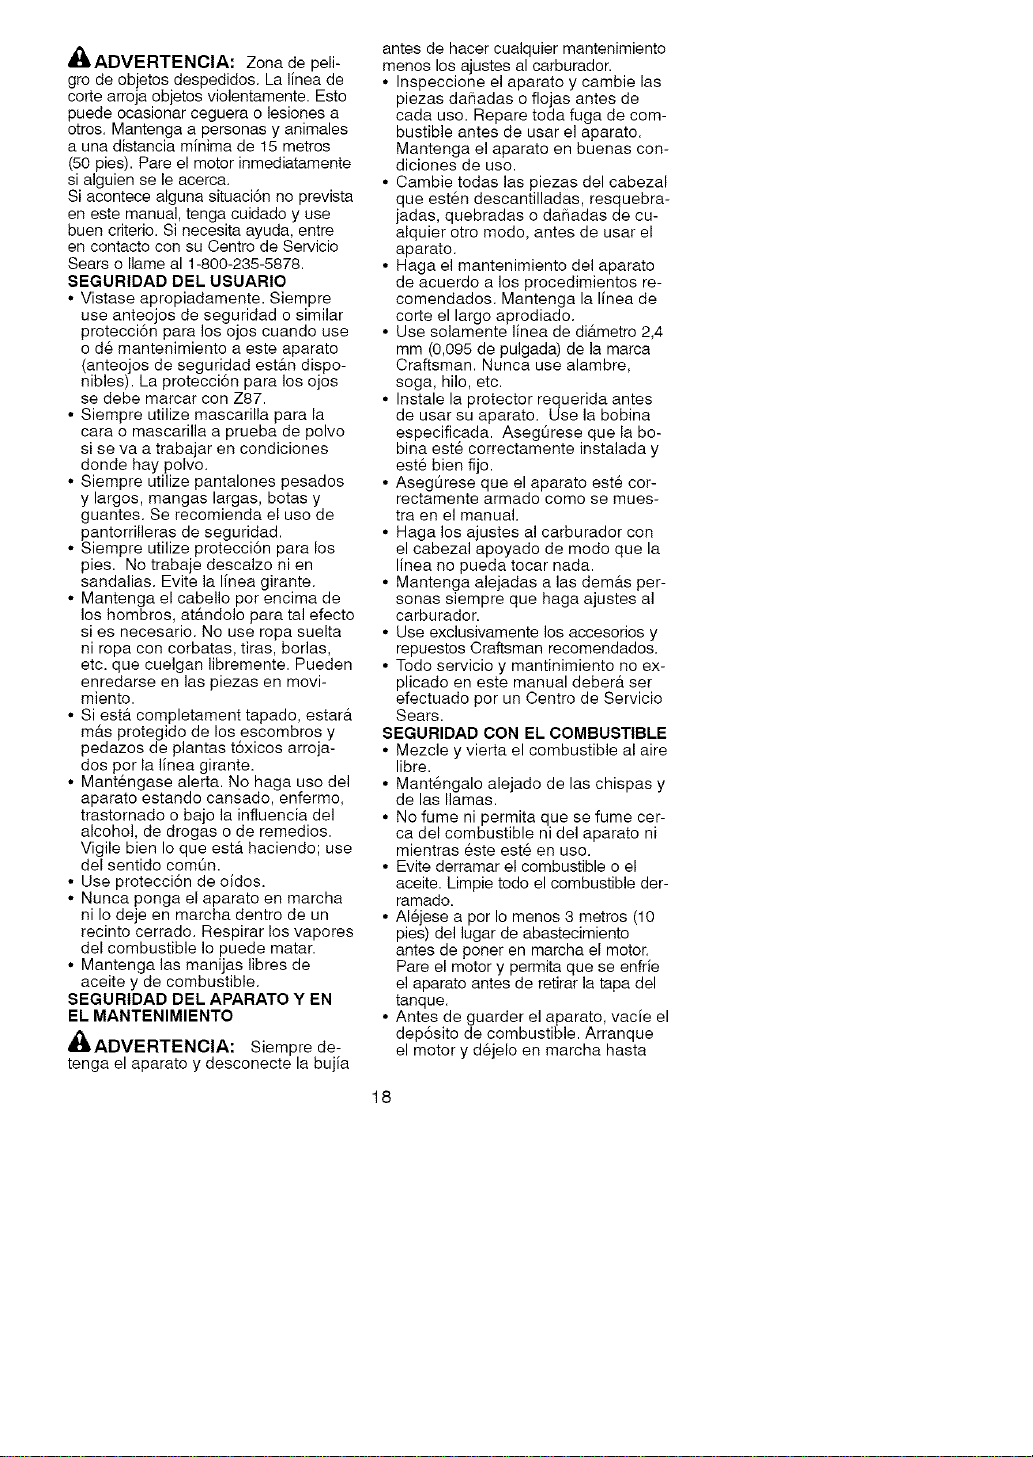
_,ADVERTENClA: Zona de peli-
gro de objetos despedidos. La linea de
corte arroja objetos violentamente. Esto
puede ocasionar ceguera o lesiones a
otros. Mantenga a personas y animales
a una distancia minima de 15 metros
(50 pies). Pare el motor inmediatamente
si alguien se le acerca.
Si acontece alguna situaci6n no prevista
en este manual, tenga cuidado y use
buen criterio. Si necesita ayuda, entre
en contacto con su Centro de Servicio
Sears o Ilame al 1-800-235-5878.
SEGURIDAD DEL USUARIO
• Vistase apropiadamente. Siempre
use anteojos de seguridad o similar
protecci6n para los ojos cuando use
o d6 mantenimiento a este aparato
(anteojos de seguridad est_.n dispo-
nibles). La protecci6n para los ojos
se debe marcar con Z87.
• Siempre utilize mascarilla para la
cara o mascarilla a prueba de polvo
si se va a trabajar en condiciones
donde hay polvo.
• Siempre utilize pantalones pesados
y largos, mangas largas, botas y
guantes. Se recomienda el uso de
pantorrilleras de seguridad.
• Siempre utilize protecci6n para los
pies. No trabaje descalzo ni en
sandalias. Evite la linea girante.
• Mantenga el cabello pot encima de
los hombres, at_.ndolo para tal efecto
si es necesario. No use ropa suelta
ni ropa con corbatas, tiras, borlas,
etc. que cuelgan libremente. Pueden
enredarse en las piezas en movi-
miento.
• Si ester completament tapado, estar_t
m_ts protegido de los escombros y
pedazos de plantas t6xicos arroja-
dos por la linea girante.
• Mantengase alerta. No haga uso del
aparato estando cansado, enfermo,
trastornado o bajo la influencia del
alcohol, de drogas o de remedios.
Vigile bien Io que ester haciendo; use
del sentido com0n.
• Use protecci6n de oidos.
• Nunca ponga el aparato en marcha
ni Io deje en marcha dentro de un
recinto cerrado. Respirar los vapores
del combustible Io puede matar.
• Mantenga las manijas libres de
aceite y de combustible.
SEGURIDAD DEL APARATO Y EN
EL MANTENIMIENTO
,_ADVERTENCIA: Siempre de-
tenga el aparato y desconecte la bujia
antes de hacer cualquier mantenimiento
menos los ajustes al carburador.
• Inspeccione el aparato y cambie las
piezas da_adas o flojas antes de
cada uso. Repare toda fuga de com-
bustible antes de usar el aparato.
Mantenga el aparato en buenas con-
diciones de uso.
• Cambie todas las piezas del cabezal
que est6n descantilladas, resquebra-
jadas, quebradas o da_adas de cu-
alquier otto mode, antes de usar el
aparato.
• Haga el mantenimiento del aparato
de acuerdo a los procedimientos re-
comendados. Mantenga la linea de
corte el largo aprodiado.
• Use solamente linea de di_tmetro 2,4
mm (0,095 de pulgada) de la marca
Craftsman. Nunca use alambre,
soga, hilo, etc.
• Instale la protector requerida antes
de usar su aparato. Use la bobina
especificada. AsegQrese que la bo-
bina este correctamente instalada y
est6 bien fijo.
• AsegOrese que el aparato est6 cor-
reotamente armado come se mues-
tra en el manual.
• Haga los ajustes al carburador con
el cabezal apoyado de mode que la
linea no pueda tocar nada.
• Mantenga alejadas alas dem_.s per-
sonas siempre que haga ajustes al
carburador.
• Use exclusivamente los accesorios y
repuestos Craftsman recomendados.
• Todo servicio y mantinimiento no ex-
plicado en este manual deber_t set
efectuado por un Centro de Servicio
Sears.
SEGURIDAD CON EL COMBUSTIBLE
• Mezcle y vierta el combustible al aire
libre.
• Mant6ngalo alejado de las chispas y
de las llamas.
• No fume ni permita que se fume cer-
ca del combustible ni del aparato ni
mientras 6ste est6 en use.
• Evite derramar el combustible o el
aceite. Limpie todo el combustible der-
ramado.
• AI6jese a per Io menos 3 metros (10
pies) del lugar de abastecimiento
antes de poner en marcha el motor.
Pare el motor y permita que se enfrie
el aparato antes de retirar la tapa del
tanque.
• Antes de guarder el aparato, vacie el
dep6sito de combustible. Arranque
el motor y d_jelo en marcha hasta
18
que se detenga con el fin de agotar
el combustible que pueda quedar en
el carburador.
• Guarde el aparato y el combustible
en un lugar donde los vapores del
combustible no puedan alcanzar
chispas ni llamas provenientes de
los termotanques, los motores o in-
terruptores el6ctricos, los calefac-
tores centrales, etc.
• AImac6ne siempre combustible en
un recipiente aprobado para los
liquidos inflamables.
SEGURIDAD AL CORTAR
,_ADVERTENCIA: Inspeccione el
&tea antes de cada uso. Retire los obje-
tos (piedrae, vidrio roto, clavoe, alambre,
etc.) que se puedan enredar en la linea
o que _sta pueda arrojar. Los objetos
duros pueden daSar el cabezal y 6ete
los puede arrojar, causando graves heri-
dae.
• Use el aparato exclusivamente para
recortar, para cortar c6sped y para
barrer. No Io use para cortar bordes,
para podar ni para recortar seto.
• Mantenga el equilibrio, con los pies
en una euperficie eetable. No se ex-
tienda demasiado.
• Mantenga todas las partes del cuer-
po alejadas de la linea girante y del
silenciador.
• Mantenga el motor por debajo del
nivel de la cintura. El silenciador
puede causar graves quemaduras
cuando est& caliente.
• Corte siempre de izquierda a dere-
cha. Si se corta con la linea del lado
derecho del protector, los escombros
volar&n en sentido opuesto al usuario.
• Use el aparato Onicamente de dia o
en luz artificial fuerte.
• Use el aparato solamente para las
tareas explicadas en este manual.
TRANSPORTE Y ALMACENAMIENTO
• Antes de proceder a su transporte,
detenga el aparato.
• Espere que el motor se enfrie y fije
bien el aparato antes de quardarlo o
de transportarlo en un vehiculo.
• Vacie el tanque de combustible antes
de guardar el aparato o de transpor-
tarlo. Consuma todo el combustible
restante en el carburador poniendo el
motor en marcha y dejb,ndolo en mar-
cha hasta que le motor se pare solo.
• Guarde el aparato y el combustible
en un lugar donde los vapores del
combustible no puedan alcanzar
chispas ni llamas provenientes de
los termotanques, los motores o in-
terruptores el6ctricos, los calefac-
tores centrales, etc.
• Guarde el aparato de modo que el cu-
chilla limitadora de linea no pueda
causar heridas accidentales. Se
puede colgar el aparato par la caja el
eje de propulsi6n.
• Guarde el aparato fuera del alcance
de los niSos.
Este aparato no esta equipado con un
sistema de anti-vibraci6n y se diseSa
si es usado ocasionalmente.
AVlSO SPECIAL: El estar expuesto a
las vibraciones a trav6s del usa pro-
Iongado de herramientas de fuerza a
gasolina puede cuasar daSos a los va-
sos sanguineos o a los nervios de los
dedos, las manos y las coyunturas en
aquellas personas que tienen propen-
sidad a los trastornos de la circulaci6n
o alas hinchazones anormales. El usa
prolongado en tiempo frio ha sido aso-
ciado con daSos a los vasos sna-
guineos de personas que par otra
parte se encuentran en perfecto esta-
do de salud. Si ocurren sintomas tales
come el entumecimiento, el dolor, la
falta de fuerza, los cambios en el color
o la textura de la piel o falta de sentido
en los dedos, las manos o las coyun-
turas, deje de usar esta m&quina in-
mediatamente y procure atenci6n
m6dica. Los sistemas de anti-vibra-
ci6n no garantizan que se eviten tales
problemes. Los usuarios que hacen
uso continuo y prolongando de las
herramientas de fuerza deben fiscali-
zar atentamente su estado fisico y el
estado del aparato.
AVlSO ESPECIAL: Su aparato viene
equipada con silenciador limitador de
temperatura y con rejilla antichispa que
cumpla los requisitos de los C6digos de
California 4442 y 4443. Todas las tierras
forestadas federales, m&s los estados
de California, Idaho, Maine, Minnesota,
Nueva Jersey, Washington y Oreg6n,
requieren par ley que muchos motores
de combusti6n interna est6n equipados
con rejilla antichispa. Si usted el aparato
en un estado y otra Iocalidad donde ex-
isten tales reglamentos, usted tiene la
responsabilidad juridica de mantener
estas piezas en correcto estado de fun-
cionamiento. De Io contrario, estar& en
infracci6n de la ley. Para el usa normal
del dueSo de la casa, el silenciador y la
rejilla antichispa no requerir&n ningOn
servicio. Despu6s de 50 horas de uso,
recomendamos que al silenciador se le
de servicio o sea substituido por un
Centro de Servicio Sears.
19
CONTENIDO DE LA CAJA
Use la siguiente lista para verificar que
todas la piezas hayan side incluidas:
Modelo 358.791800
• Cortadora
• Protector
• Tuerca Mariposa (atomillada en la
protector)
• Recipiente de aceite
Examine las piezas para verificar que
no haya da_os. No use piezas da_a-
das.
AVlSO: Si necesita ayuda, si faltan
piezas o si hay piezas da_adas, Ilame
al n_mero 1-800-235-5878.
Es normal escuchar que el filtro de com-
bustible golpetee en el tanque vacio.
Es normal encontrar residuos de aceite
o de gasolina en el silenciador, debido a
los ajustes al carburador y a las pruebas
efectuadas por el fabricante.
MONTAJE
,_ADVERTENCIA: Siempre de-
tenga el aparato y desconecte la bujia
antes de realizar procedimientos de
montaje.
,_,ADVERTENCIA: Si recibi6 el
aparato ya armado, repita todos los
pasos para asegurar que el mismo se
encuentre correctamente armado y
que todos los fijadores se encuentren
bien ajustados.
AJUSTE DEL MANGO
_ADVERTENCIA: AI ajustar la
mango auxiliar, asegOrese que _ste se
mantenga sobre la etiqueta de seguri-
dad y debajo la marca o la flecha en el
eje.
1. Afloje la tuerca mariposa en el
mango.
2. Gire el mango en posici6n vertical.
Vuelva a apretar la tuerca mariposa
firmemente.
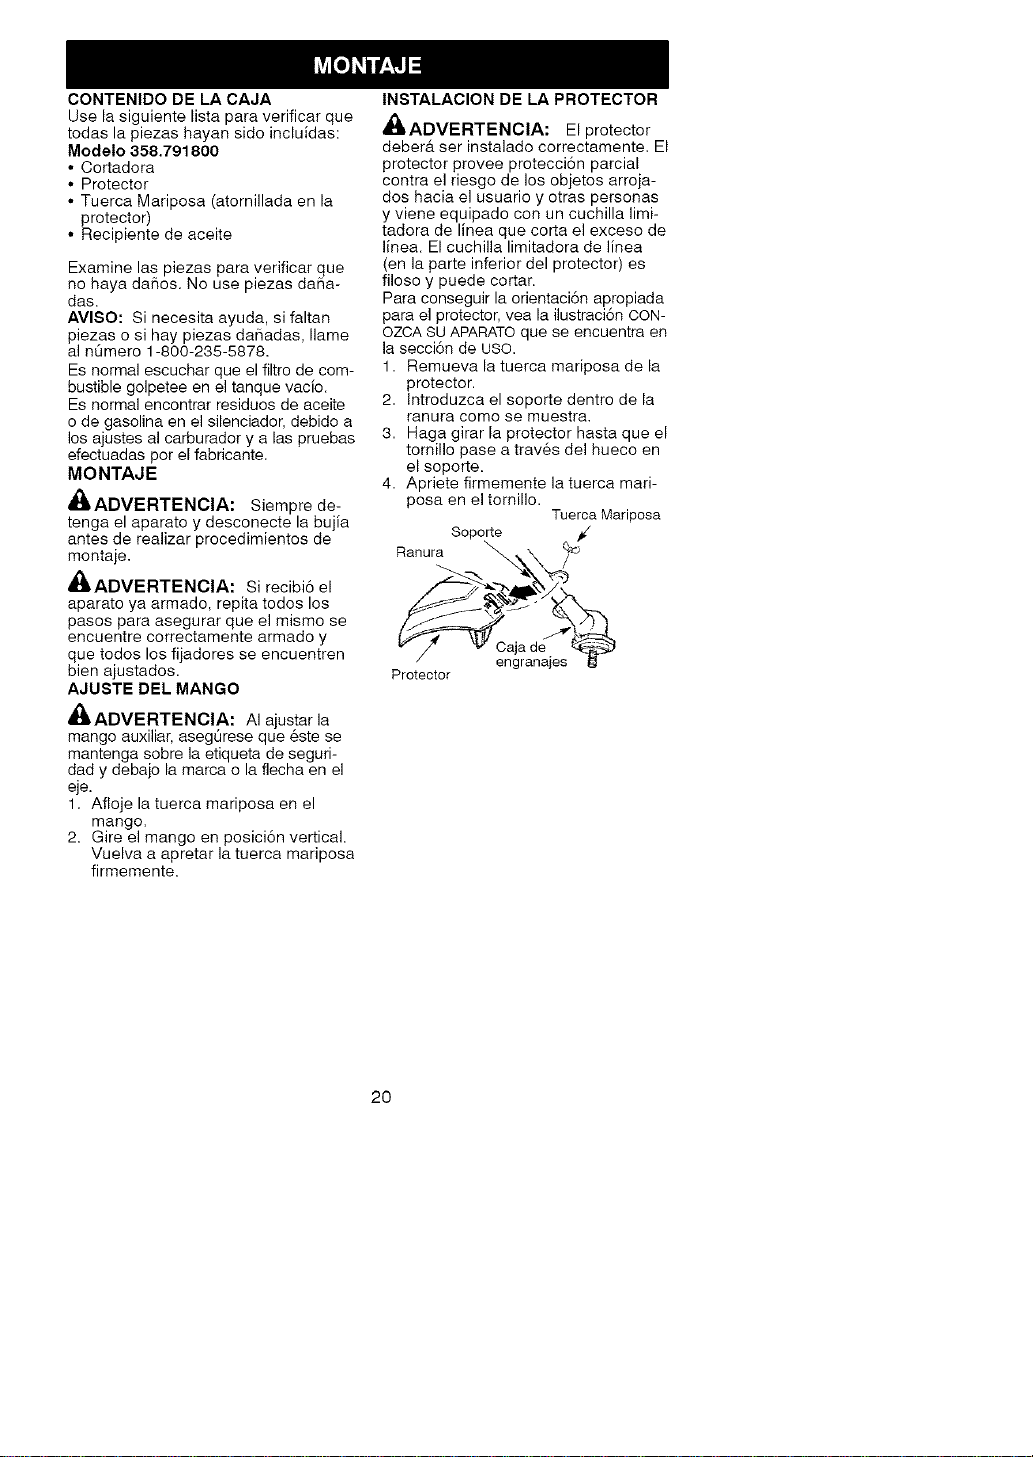
INSTALAClON DE LA PROTECTOR
,_ADVERTENClA: El protector
deberf ser instalado correctamente. El
protector provee protecci6n parcial
contra el riesgo de los objetos arroja-
dos hacia el usuario y otras personas
y viene equipado con un cuchilla limi-
tadora de linea que corta el exceso de
linea. El cuchilla limitadora de linea
(en la parte inferior del protector) es
filoso y puede cortar.
Para conseguir la orientaci6n apropiada
para el protector, vea la ilustraci6n OON-
OZCA SUAPARATO que se encuentra en
la secci6n de USO.
1. Remueva la tuerca mariposa de la
protector.
2. Introduzca el soporte dentro de la
ranura como se muestra.
3. Haga girar la protector hasta que el
tomillo pase a trav_s del hueco en
el soporte.
4. Apriete firmemente la tuerca mari-
posa en el tomillo.
Tuerca Mariposa
Soporte /¢'
Ranura
Caja de
engranajes
Protector
20
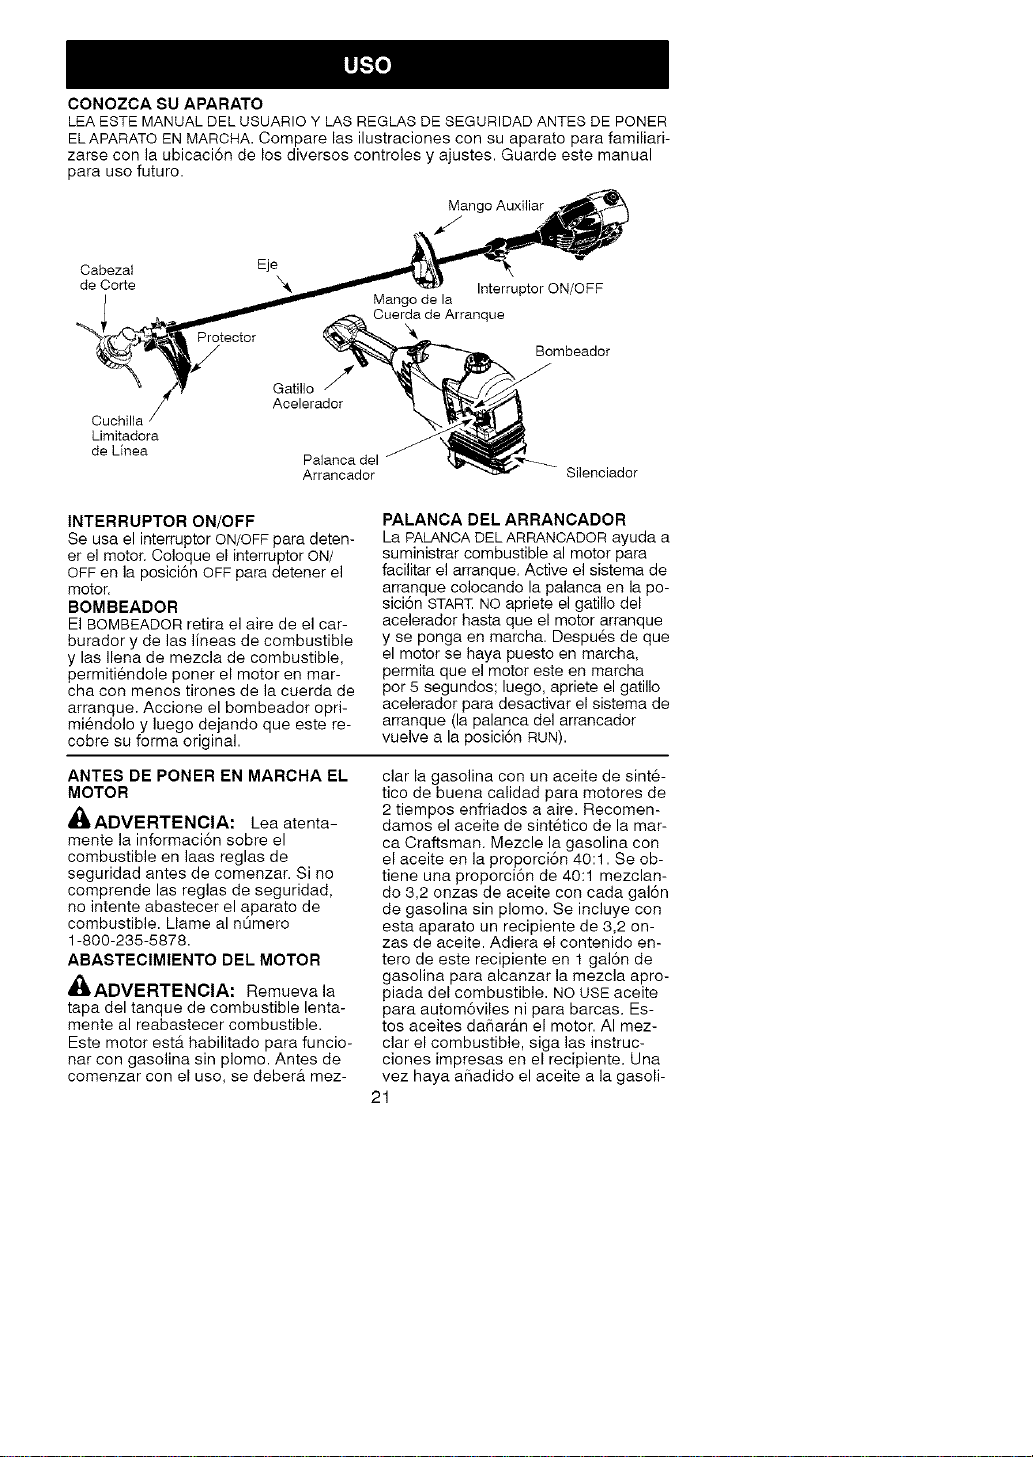
CONOZCA SU APARATO
LEA ESTE MANUAL DEL USUARIO Y LAS REGLAS DE SEGURIDAD ANTES DE PONER
ELAPARATO EN MAROHA. Compare las ilustraciones con su aparato para familiari-
zarse con la ubicaci6n de los diversos controles y ajustes. Guarde este manual
para uso futuro.
Mango Auxiliar
Cabezat Eje
de Corte
Protector
Interrupter ON/OFF
Mango de la
Cuerda de Arranque
Bombeador
Cuchilla
Limitadora
de Linea
Gatiflo
Acelerador
Palanca del
Arrancador
Silenciador
INTERRUPTOR ON/OFF
Se usa el interruptor ON/OFF para deten-
er el motor. Coloque el interruptor ON/
OFF en la posici6n OFF para detener el
motor.
BOMBEADOR
El BOMBEADOR retira el aire de el car-
burador y de las lineas de combustible
y las Ilena de mezcla de combustible,
permiti6ndole poner el motor en mar-
cha con menos tirones de la cuerda de
arranque. Accione el bombeador opri-
miendolo y luego dejando que este re-
cobre su forma original.
PALANCA DEL ARRANCADOR
La PALANCA DELARRANCADOR ayuda a
suministrar combustible al motor para
facilitar el arranque. Active el sistema de
arranque colocando la palanca en la po-
sici6n START NO apriete el gatillo del
acelerador hasta que el motor arranque
y se ponga en marcha. Despu6s de que
el motor se haya puesto en marcha,
permita que el motor este en marcha
por 5 segundos; luego, apriete el gatillo
acelerador para desactivar el sistema de
arranque (la palanca del arrancador
vuelve a la posici6n RUN).
ANTES DE PONER EN MARCHA EL
MOTOR
_ADVERTENCIA: Lea atenta-
mente la informaci6n sobre el
combustible en laas reglas de
seguridad antes de comenzar. Si no
comprende las reglas de seguridad,
no intente abastecer el aparato de
combustible. Llame al nOmero
1-800-235-5878.
ABASTECIMIENTO DEL MOTOR
,I_ADVERTENOIA: Remueva la
tapa del tanque de combustible lenta-
mente al reabastecer combustible.
Este motor ester habilitado para funcio-
nat con gasolina sin plomo. Antes de
comenzar con el uso, se deberb, mez-
clar la gasolina con un aceite de sint6-
tico de buena calidad para motores de
2 tiempos enfriados a aire. Recomen-
damos el aceite de sintetico de la mar-
ca Craftsman. Mezcle )a gasolina con
el aceite en la proporc_on 40:1. Se ob-
tiene una proporci6n de 40:1 mezclan-
do 3,2 onzas de aceite con cada gal6n
de gasolina sin plomo. Se incluye con
esta aparato un recipiente de 3,2 on-
zas de aceite. Adiera el contenido en-
tero de este recipiente en 1 gal6n de
gasolina para alcanzar la mezcla apro-
piada del combustible. NO USE aceite
para autom6viles ni para barcas. Es-
tos aceites daihar&n el motor. AI mez-
clar el combustible, siga las instruc-
clones impresas en el recipiente. Una
vez haya aSadido el aceite a la gasoli-
21
na,agitealrecipientebrevemente
paraasegurarqueelcombustibleest6
completamentemezclado.Siempre
leaysigalasinstruccionesdeseguri-
dadquetienenquevetconelcom-
bustibleantesdeabastecerelaparato.
IMPORTANTE
Loscombustiblemezcladosconalco-
hol(losIlamadosgasohololosque
contienenetanolometanol)pueden
atraerlahumedad,Ioquepuedecau-
sarlaseparaci6nylaformaci6nde
&cidosduranteelalmacenaje.Laga-
solina&cidapuededaflarelsistema
decombustibledelmotorduranteel
almacenaje.
Paraevitarproblemasconelmotor,
deber&vaciarseelsistemadecom-
bustibleantesdealmacenarelaparato
por30diasom&s.Vacieeltanquede
combustible,pongaelmotorenmar-
chayd6jeloenmarchahastaquelas
lineasdecombustibleyelcarburador
quedenvacios.Usecombustiblefres-
coparalapr6ximatemporada.
Nuncauseproductosdelimpiezade
motorocarburadoreneltanquede
combustibleyaquedehacerlapuede
provocardaflospermanentes.
Vealasecci6ndeALMAOENAJEpara
informaci6nadicional.
PARA DETENER EL MOTOR
• Suelte el gatillo acelerador.
• Mueva el interruptor ON/OFF a la po-
sici6n OFF.
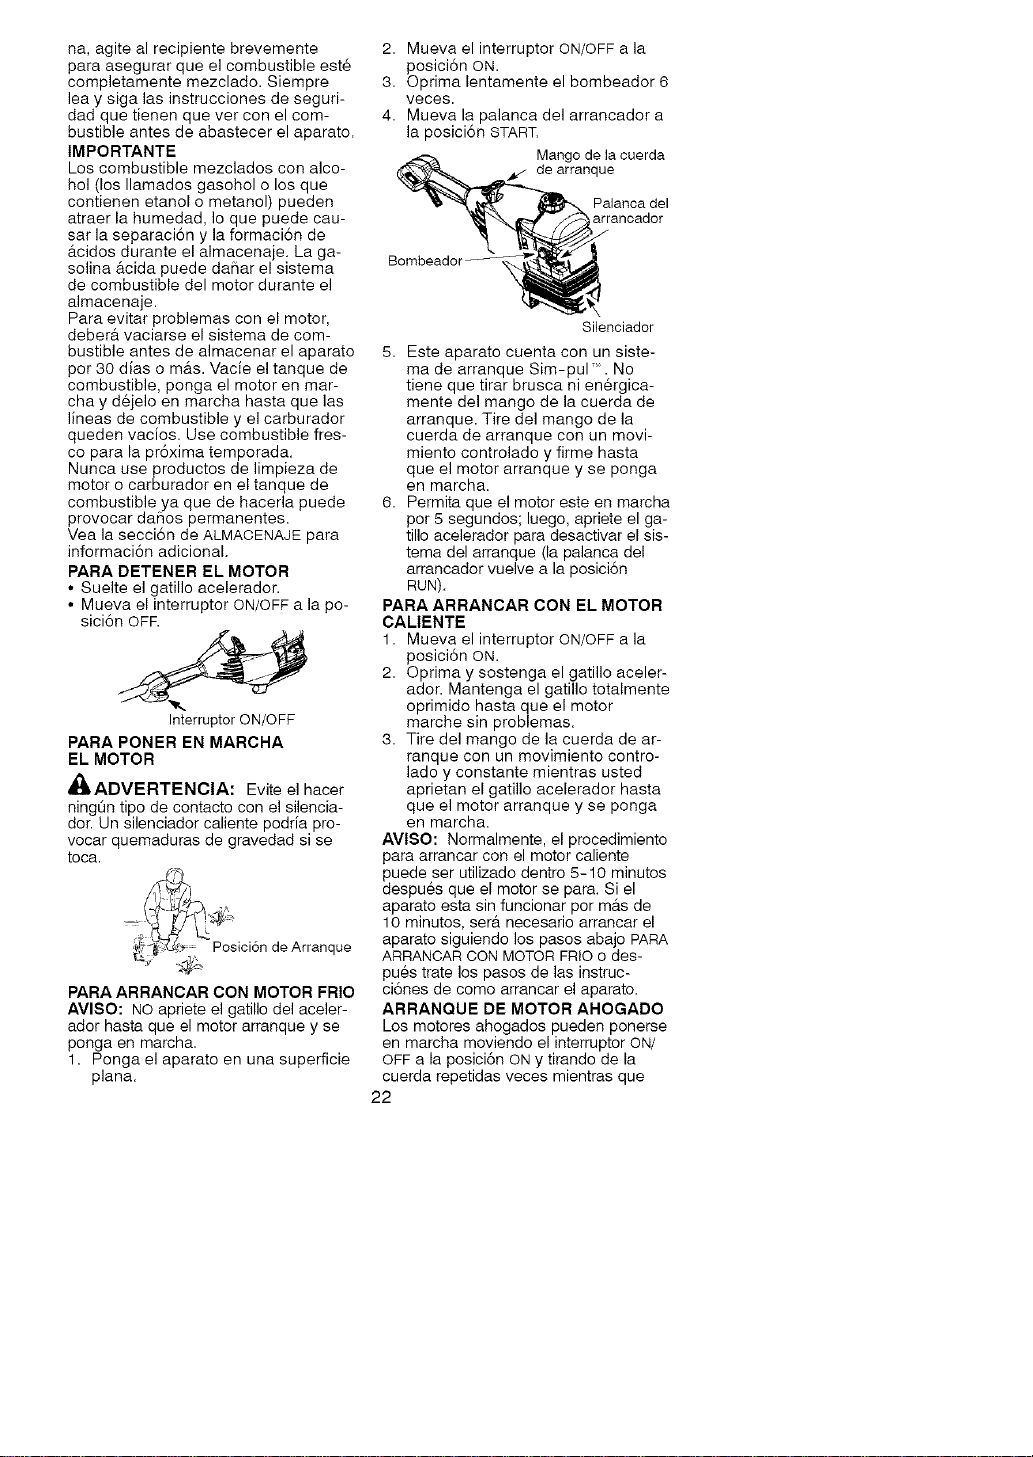
Interruptor ON/OFF
PARA PONER EN MARCHA
EL MOTOR
_ADVERTENCIA: Evite el hacer
ningOn tipo de contacto con el silencia-
dor. Un silenciador caliente podria pro-
vocar quemadurae de gravedad si se
toca.
"].
_'i/_ .C_ Poslclon de Arranque
PARA ARRANCAR CON MOTOR FRIO
AVISO: NO apriete el gatillo del aceler-
ador hasta que el motor arranque y se
ponga en marcha.
1. Ponga el aparato en una superficie
plana.
2. Mueva el interruptor ON/OFF a la
posici6n ON.
3. Optima lentamente el bombeador 6
veces.
4. Mueva la palanca del arrancador a
la posici6n START.
Mango de la cuerda
de arranque
Palanca del
arrancador
Silenciador
5. Este aparato cuenta con un siste-
ma de arranque Sim-pul_". No
tiene que tirar brusca ni en6rgica-
mente del mango de la cuerda de
arranque. Tire del mango de la
cuerda de arranque con un movi-
miento controlado y firme hasta
que el motor arranque y se ponga
en marcha.
6. Permita que el motor este en marcha
por 5 segundos; luego, apriete el ga-
tillo acelerador para desactivar el sis-
tema del arranque (la palanca del
arrancador vuelve a la posici6n
RUN).
PARA ARRANCAR CON EL MOTOR
CALIENTE
1. Mueva el interruptor ON/OFF a la
posici6n ON.
2. Optima y sostenga el gatillo aceler-
ador. Mantenga el gatillo totalmente
oprimido hasta que el motor
marche sin problemas.
3. Tire del mango de la cuerda de ar-
ranque con un movimiento contro-
lade y constante mientras usted
aprietan el gatillo acelerador hasta
que el motor arranque y se ponga
en marcha.
AVlSO: Normalmente, el procedimiento
para arrancar con el motor caliente
puede ser utilizado dentro 5-10 minutos
despu6s que el motor se para. Si el
aparato esta sin funcionar per m&s de
10 minutos, ser& necesario arrancar el
aparato siguiendo los pasos abajo PARA
ARRANCAR CON MOTOR FRIO o des-
pu6s trate los pasos de las instruc-
ci6nes de como arrancar el aparato.
ARRANQUE DE MOTOR AHOGADO
Los motores abogados pueden ponerse
en marcha moviendo el interruptor ON/
OFF a la posici6n ON y tirando de la
cuerda repetidas veces mientras que
22
presionaelgatilloaceleradorhastael
motorarranqueysepongaenmarcha.
Estopodr&requerirquesetiredela
cuerdadelmangorepetidasvecesde-
pendiendoquetanahogadoseen-
cuentreelmotor.
Sielaparatosiguesinponerseen
marcha,vealaTABLADIAGNOSTICAo
IlamealnOmero1-800-235-5878.
INSTRUCCIONESDE USO
Para maximizar la efieaeia operativa,
no haga funeionar el motor durante
mas de 1 minuto en et momento a la
velocidad maxima.
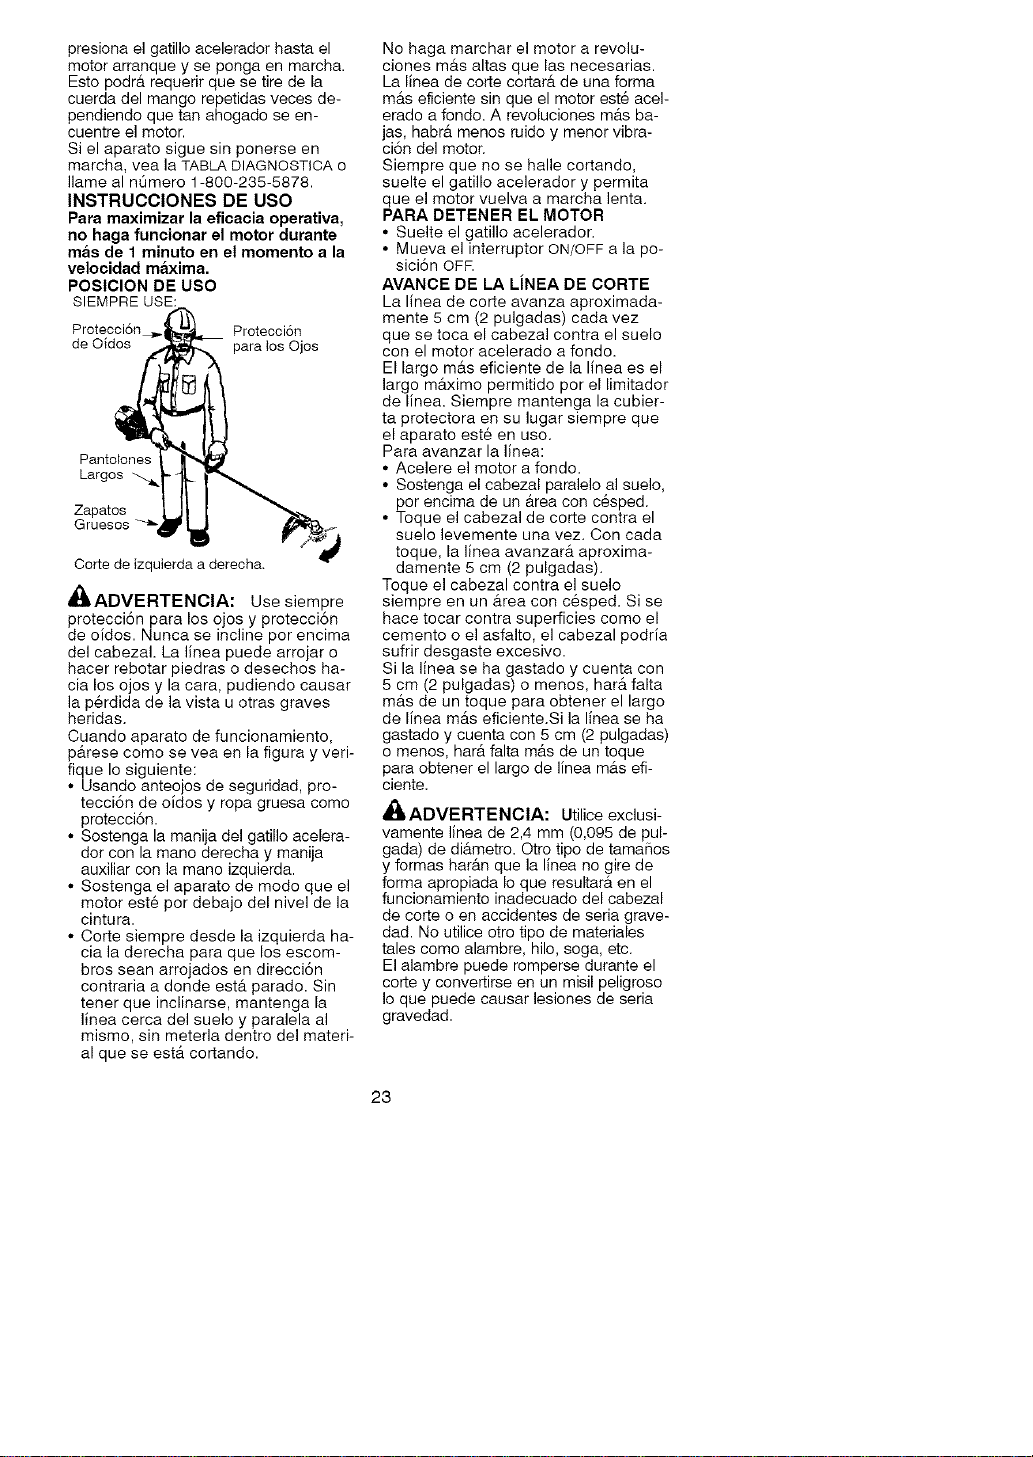
POSIClON DE USO
SIEMPRE USE:
Proteccion Proteccion
de Oidos para los Ojos
Pantolone.'
Largos
Zapatos
Gruesos
Corte de izquierda a derecha.
_ADVERTENCIA: Use siempre
protecci6n para los ojoe y protecci6n
de oidos. Nunca se incline per encima
del cabezal. La linea puede arrojar o
hacer rebotar piedras o desechos ha-
cia los ojos y la cara, pudiendo causar
la perdida de la vista u otras graves
heridas.
Cuando aparato de funcionamiento,
parese como se vea en la figura y veri-
fique Io siguiente:
• Usando anteojos de seguridad, pro-
tecci6n de oidos y ropa gruesa come
protecci6n.
• Sostenga la manija del gatillo acelera-
dot con la mane derecha y manija
auxiliar con la mane izquierda.
• Sostenga el aparato de mode que el
motor est6 por debajo del nivel de la
cintura.
• Corte siempre desde la izquierda ha-
cia la derecha para que los escom-
bros sean arrojados en direcci6n
contraria a donde esta parado. Sin
tener que inclinarse, mantenga la
linea cerca del suelo y paralela al
mismo, sin meterla dentro del materi-
al que se esta cortando.
No haga marchar el motor a revolu-
clones m&s altas que las necesarias.
La linea de corte cortar& de una forma
m&s eficiente sin que el motor este acel-
erado a fondo. A revoluciones m&s ba-
jas, habr& menos ruido y menor vibra-
ci6n del motor.
Siempre que no se halle cortando,
suelte el gatillo acelerador y permita
que el motor vuelva a marcha lenta.
PARA DETENER EL MOTOR
• Suelte el gatillo acelerador.
• Mueva el interruptor ON/OFF a la po-
sici6n OFR
AVANCE DE LA LiNEA DE CORTE
La linea de corte avanza aproximada-
mente 5 cm (2 pulgadas) cada vez
que se toca el cabezal contra el suelo
con el motor acelerado a fondo.
El largo m&s eficiente de la linea es el
largo m&ximo permitido per el limitador
de linea. Siempre mantenga la cubier-
ta protectora en su lugar siempre que
el aparato est6 en uso.
Para avanzar la linea:
• Acelere el motor a fondo.
• Sostenga el cabezal paralelo al suelo,
per encima de un &rea con c6sped.
• Toque el cabezal de corte contra el
suelo levemente una vez. Con cada
toque, la linea avanzar& aproxima-
damente 5 cm (2 pulgadas).
Toque el cabezal contra el suelo
siempre en un &rea con cesped. Si se
hace tocar contra superficies como el
cemento o el asfalto, el cabezal podria
sufrir desgaste excesivo.
Si la linea se ha gastado y cuenta con
5 cm (2 pulgadas) o menos, hat& falta
m&s de un toque para obtener el largo
de linea m&s eficiente.Si la linea se ha
gastado y cuenta con 5 cm (2 pulgadas)
o menos, har& falta m&s de un toque
para obtener el largo de linea m&s eft-
ciente.
ADVERTENCIA: Utilice exclusi-
vamente linea de 2,4 mm (0,095 de pul-
gada) de di&metro. Otro tipo de tamafloe
y formas har&n que la linea no gire de
forma apropiada Io que reeultar& en el
funcionamiento inadecuado del cabezal
de corte o en accidentee de eeria grave-
dad. No utilice otto tipo de materiales
tales come alambre, hilo, eoga, etc.
El alambre puede romperse durante el
corte y convertirse en un misil peligroeo
Io que puede causar leeionee de seria
gravedad.
23
METODOS DE CORTE
_ADVERTENCIA: Use la veloci-
dad minima y no acerque el aparato
demasiado al cortar cerca de objetos
s61idos (piedra, gravilla, postes, etc.):
estos pueden daSar el cabezal, pue-
den enredarse en la linea o la linea los
puede arrojar violentamente al aire,
causando serio peligro.
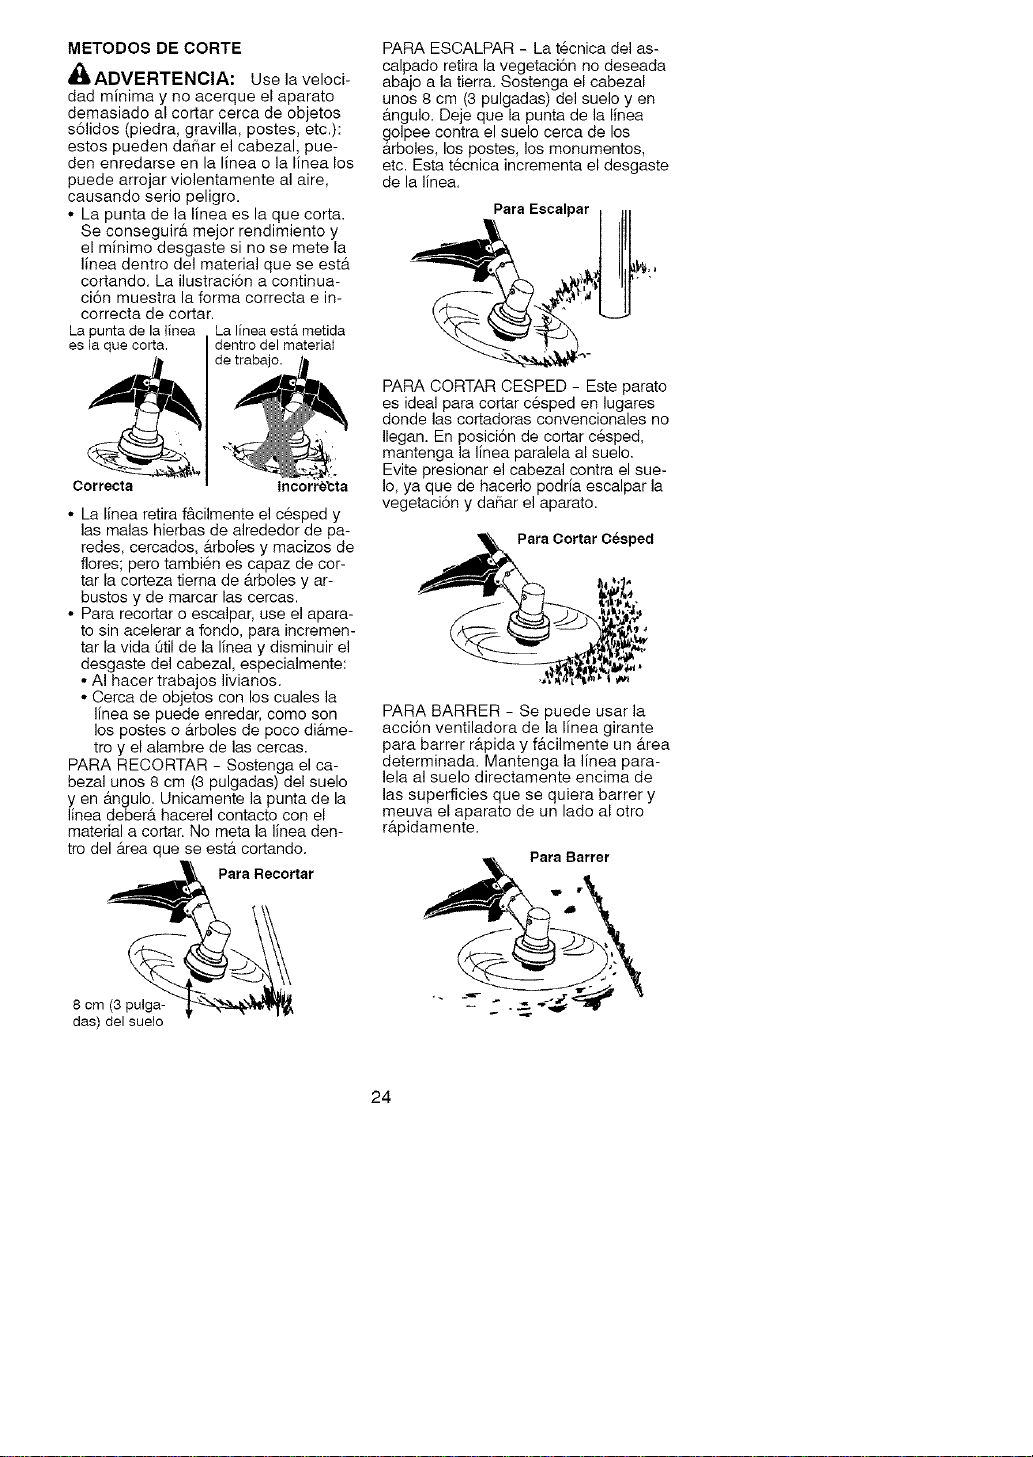
• La punta de la linea es la que corta.
Se conseguir& mejor rendimiento y
el minima desgaste si no se mete la
linea dentro del material que se est&
cortando. La ilustraci6n a continua-
ci6n muestra la forma correcta e in-
correcta de cortar.
La punta de la linea La linea esta metida
es la que corta, dentro del material
Correcta Incorr_'cta
• La linea retira f&cilmente el c6sped y
las malas hierbas de alrededor de pa-
redes, cercados, &rboles y macizos de
flares; pero tambi6n es capaz de car-
tar la corteza tierna de &rboles y ar-
bustos y de marcar las cercas.
• Para recortar o escalpar, use el apara-
to sin acelerar a fondo, para incremen-
tar la vida Otil de la linea y disminuir el
desgaste del cabezal, especialmente:
• AI hacer trabajos livianos.
• Cerca de objetos con los cuales la
linea se puede enredar, come son
los postes o &rboles de poco di&me-
troy el alambre de las cercas.
PARA RECORTAR - Sostenga el ca-
bezal unos 8 cm (3 pulgadas) del suelo
yen &ngulo. Unicamente la punta de la
linea deber& hacerel contacto con el
material a cortar. No meta la linea den-
tro del &rea que se est& cortando.
Para Recortar
PARA ESCALPAR - La t6cnica del as-
calpado retira la vegetaci6n no deseada
abajo a la tierra. Sostenga el cabezal
unos 8 cm (3 pulgadas) del suelo yen
&ngulo. Deje que la punta de la linea
golpee contra el suelo cerca de los
&rboles, los postes, los monumentos,
etc. Esta t6cnica incrementa el desgaste
de la linea.
Para Escalpar
PARA CORTAR CESPED - Este parato
es ideal para cortar c6sped en lugares
donde las cortadoras convencionales no
Ilegan. En posici6n de cortar c6sped,
mantenga la linea paralela al suelo.
Evite presionar el cabezal contra el sue-
Io, ya que de hacerlo podria escalpar la
vegetaci6n y daflar el aparato.
Para Cortar Cesped
PARA BARRER - Se puede usar la
acci6n ventiladora de la linea girante
para barter r&pida y f&cilmente un &tea
determinada. Mantenga la linea para-
lela al suelo directamente encima de
las superficies que se quiera barrer y
meuva el aparato de un lade al otro
rb,pidamente.
Para Barrer
8 cm (3 pulga-
das) del suelo
24
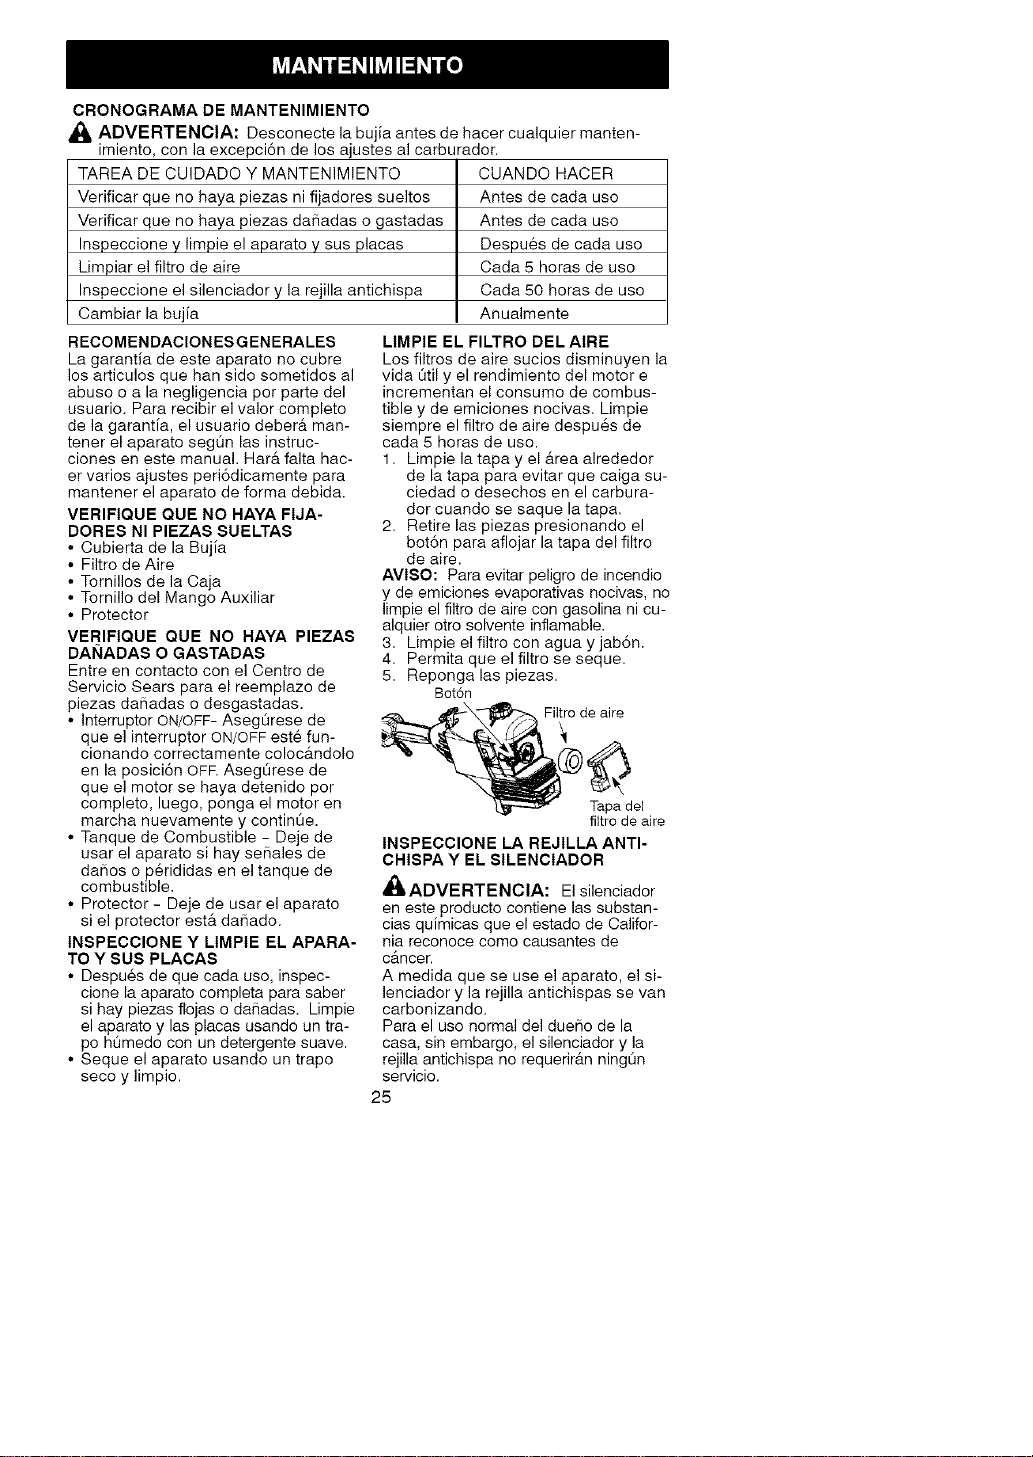
CRONOGRAMA DE MANTENIMIENTO
ADVERTENCIA: Desconecte la bujia antes de hacer cualquier manten-
imiento, con la excepci6n de los ajustes al carburador.
TAREA DE CUIDADO Y MANTENIMIENTO CUANDO HACER
Verificar que no haya piezas ni fijadores sueltos Antes de cada usa
Verificar que no haya piezas daSadas o gastadas Antes de cada usa
Inspeccione y limpie el aparato y sus placas Despu6s de cada usa
Limpiar el filtro de aire Cada 5 horas de use
Inspeccione el silenciador y la rejilla antichispa Cada 50 horas de usa
Cambiar la bujia Anualmente
RECOMENDACIONES GENERALES
La garantia de este aparato no cubre
los articulos que ban sido sometidos al
abuso o a la negligencia per parte del
ueuario. Para recibir el valor completo
de la garantia, el usuario deber& man-
tenet el aparato segQn las instruc-
clones en este manual. Harb, falta hac-
er varioe ajuetes peri6dicamente para
mantener el aparato de forma debida.
VERIFIQUE QUE NO HAY,& FIJA-
DORES NI PIEZAS SUELTAS
• Cubierta de la Bujia
• Filtro de Aire
• Tornillos de la Caja
• Tornillo del Mango Auxiliar
• Protector
VERIFIQUE QUE NO HAYA PIEZAS
DAI_IADAS O GASTADAS
Entre en contacto con el Centro de
Servicio Sears para el reemplazo de
piezas daSadas o desgaetadae.
• Interruptor ON/OFF- Aeeg0rese de
que el interruptor ON/OFF est6 fun-
cionando correctamente coloc&ndolo
en la poeici6n OFF. Aseg0rese de
que el motor ee haya detenido per
completo, luego, ponga el motor en
marcha nuevamente y continOe.
• Tanque de Combustible - Deje de
usar el aparato si hay seSales de
daSos o p6rididas en el tanque de
combustible.
• Protector - Deje de usar el aparato
ei el protector est& daiTado.
INSPECCIONE Y LIMPIE EL APARA-
TO Y SUS PLACAS
• Despu6s de que cada uso, inspec-
clone la aparato completa para saber
si hay piezae flojas o daiTadae. Limpie
el aparato y las placas usando un tra-
po hQmedo con un detergente suave.
• Seque el aparato usando un trapo
seco y limpio.
LIMPIE EL FILTRO DEL AIRE
Los filtros de aire sucios disminuyen la
vida Otil y el rendimiento del motor e
incrementan el consumo de combus-
tible y de emiciones nocivas. Limpie
siempre el filtro de aire despu6s de
cada 5 horas de usa.
1. Limpie la tapa y el &rea alrededor
de la tapa para evitar que caiga su-
ciedad o desechos en el carbura-
dor cuando se saque la tapa.
2. Retire las piezas presionando el
bot6n para aflojar la tapa del filtro
de aire.
AVlSO: Para evitar peligro de incendio
y de emiciones evaporativas nocivas, no
limpie el filtro de aire con gasolina ni cu-
alquier otro solvente inflamable.
3. Limpie el filtro con agua y jab6n.
4. Permita que el filtro se seque.
5. Reponga las piezas.
Bot6n
Filtro de aire
Tapa del
filtro de aire
INSPECCIONE LA REJILLA ANTI-
CHISPA Y EL SILENCIADOR
ADVERTENCIA: El silenciador
en este producto contiene las substan-
cias qulm_cas que el estado de Califor-
nia reconoce como causantes de
c&ncer.
A medida que se use el aparato, el si-
lenciador y la rejilla antichispas se van
carbonizando.
Para el usa normal del dueSo de la
casa, sin embargo, el silenciador y la
rejilla antichispa no requerir&n ning0n
servicio.
25
Despuesde50horasdeuse,
recomendamosquealsilenciadorsele
deserviciooseasubstituidopotundis-
tribuidorautorizadodelservicio.
CAMBIE LA BUJIA
Deber_. cambiarse la bujia anualmente
para asegurar que el motor arranque
f_.cilmente y tenga un mejor rendimein-
to. Ajuste la separaci6n de los electro-
dos a 0,6 mm (0,025 de pulgada). El
encendido es fijo e inalterable.
1. Gire y saque la cubierta de la bujia.
2. Retire la bujia del cilindro y des6che-
la.
3. C_tmbiela pot una bujia Champion
RCJ-6Y y ajuste firmemente la
bujia nueva con una Ilave de cubo
de 19 mm (3/4 de pulgada).
4. Instale nuevamente la cubierta de
la bujia.
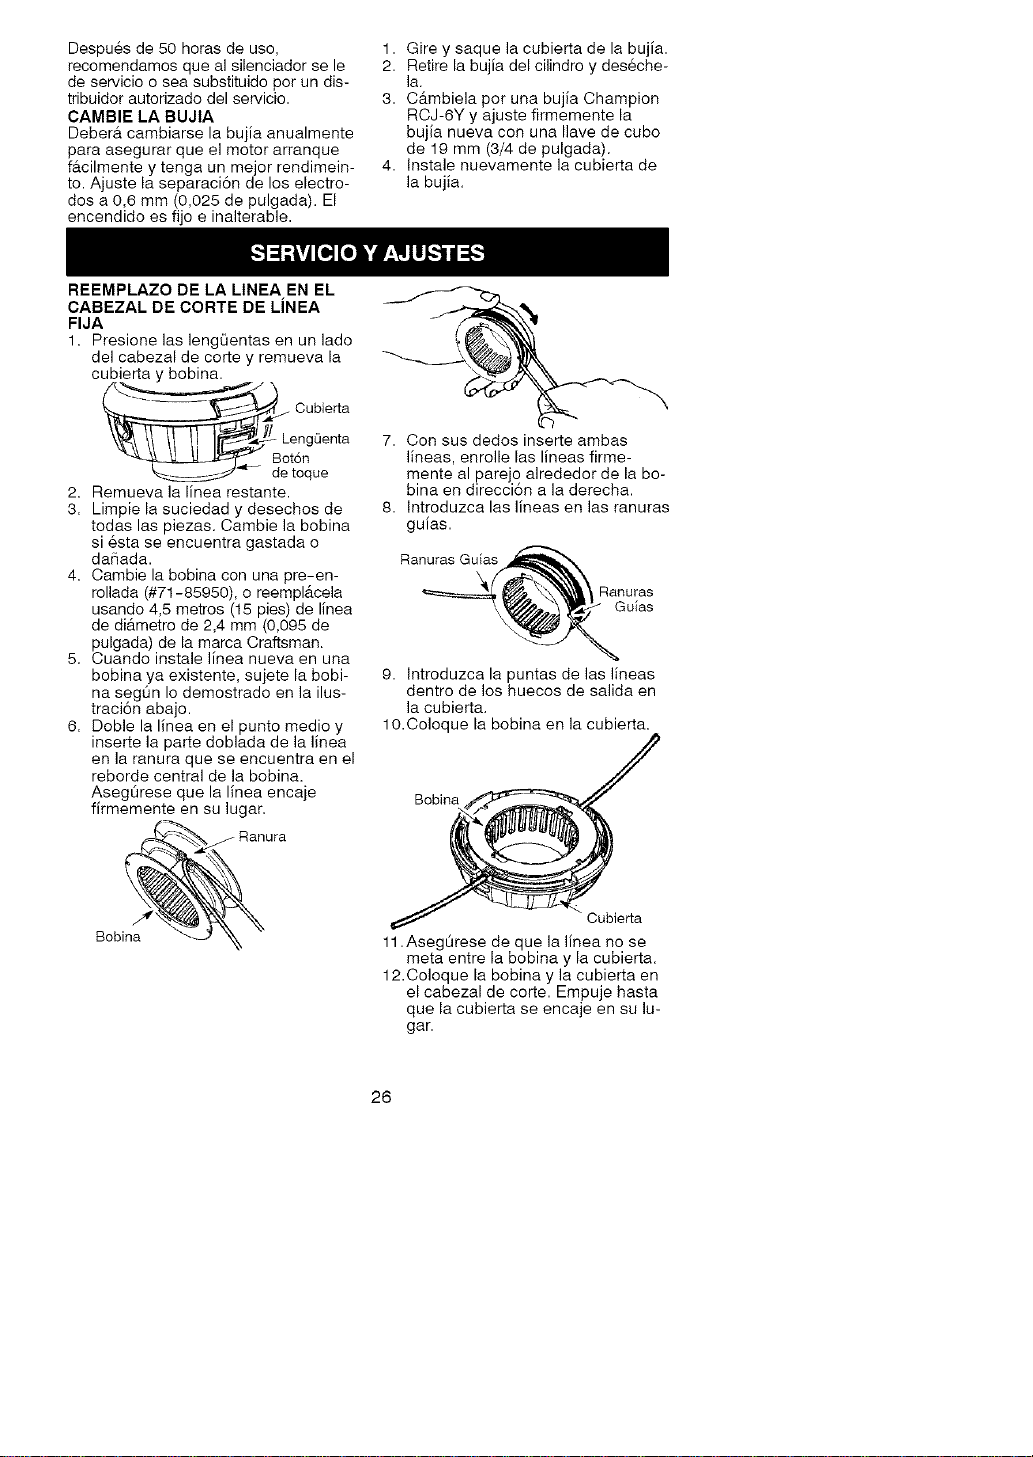
REEMPLAZO DE LA LINEA EN EL
CABEZAL DE CORTE DE LINEA
FIJA
1. Presione las lengQentas en un lado
del cabezal de corte y remueva la
cubierta y bobina.
Cubierta
LengQenta
Boton
de toque
2. Remueva la linea restante.
3. Limpie la suciedad y desechos de
todas las piezas. Cambie la bobina
si 6sta se encuentra gastada o
dafiada.
4. Cambie la bobina con una pre-en-
rollada (#71-85950), o reempl_tcela
usando 4,5 metros (15 pies) de linea
de di_tmetro de 2,4 mm (0,095 de
pulgada) de la marca Craftsman.
5. Cuando instale linea nueva en una
bobina ya existente, sujete la bobi-
na segQn Io demostrado en la ilus-
traci6n abajo.
6. Doble la linea en el punto medio y
inserte la parte doblada de la linea
en la ranura que se encuentra en el
reborde central de la bobina.
Aseg0rese que la linea encaje
firmemente en su lugar.
7. Con sus dedos inserte ambas
lineas, enrolle las lineas firme-
mente al parejo alrededor de la bo-
bina en direcci6n a la derecha.
8. Introduzca las lineas en las ranuras
guias.
Ranuras Guias
Ranuras
\ Guias
9. Introduzca la puntas de las lineas
dentro de los huecos de salida en
la cubierta.
10.Coloque la bobina en la cubierta.
Bobina
Bobina
Cubierta
11.Aseg0rese de que la linea no se
meta entre la bobina y la cubierta.
12.Coloque la bobina y la cubierta en
el cabezal de core. Empuje hasta
que la cubierta se encaje en su lu-
gar.
26
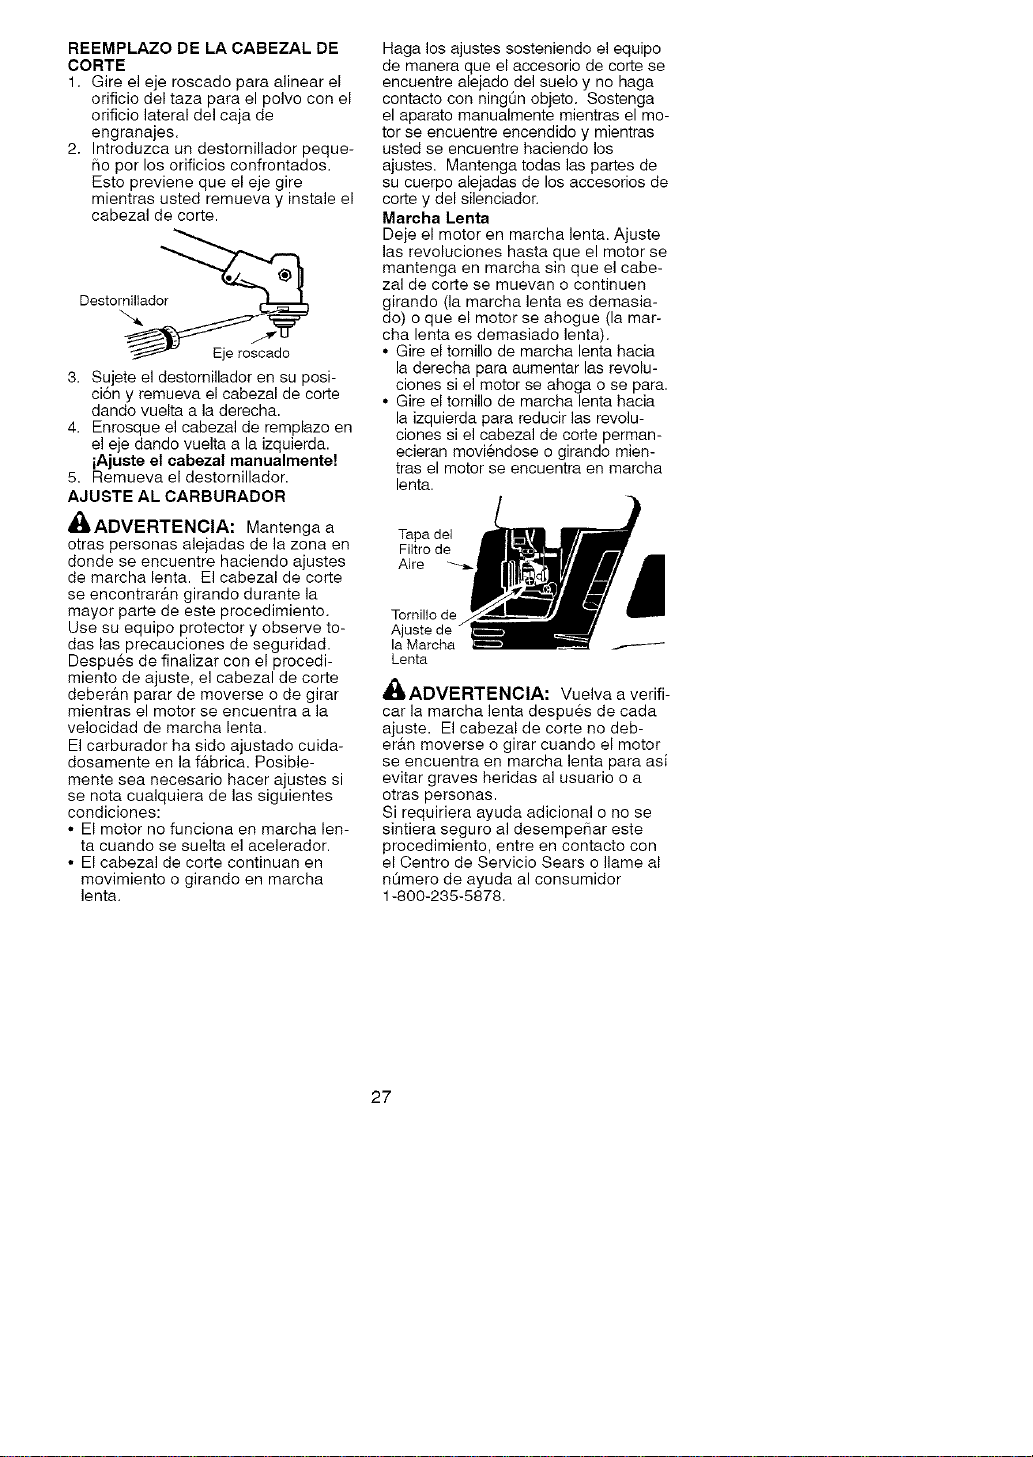
REEMPLAZO DE LA CABEZAL DE
CORTE
1. Gire el eje roscado para alinear el
orificio del taza para el polvo con el
orificio lateral del caja de
engranajes.
2. Introduzca un destornillador peque-
5o per los orificios confrontados.
Esto previene que el eje gire
mientras usted remueva y instale el
cabezal de corte.
Destornillado_
3. Sujete el destornillador en su posi-
ci6n y remueva el cabezal de corte
dando vuelta a ]a derecha.
4. Enrosque el cabezal de remplazo en
el eje dando vuelta a la izquierda.
iAjuste el cabezal manualmente!
5. Remueva el destornillador.
AJUSTE AL CARBURADOR
,i_ADVERTENCIA: Mantenga a
otras personas alejadas de la zona en
donde se encuentre haciendo ajustes
de marcha lenta. El cabezal de corte
se encontrar_tn girando durante la
mayor parte de este procedimiento.
Use su equipo protector y observe to-
das las precauciones de seguridad.
Despu6s de finalizar con el procedi-
miento de ajuste, el cabezal de corte
deber_tn parar de moverse o de girar
mientras el motor se encuentra a la
velocidad de marcha lenta.
El carburador ha sido ajustado cuida-
dosamente en la f_tbrica. Posible-
mente sea necesario hacer ajustes si
se nota cualquiera de las siguientes
condiciones:
• El motor no funciona en marcha len-
ta cuando se suelta el acelerador.
• El cabeza] de corte continuan en
movimiento o girando en marcha
lenta.
Haga los ajustes sosteniendo el equipo
de manera que el accesorio de corte se
encuentre alejado del suelo y no haga
contacto con ningQn objeto. Sostenga
el aparato manualmente mientras el mo-
tor se encuentre encendido y mientras
usted se encuentre haciendo los
ajustes. Mantenga todas las partes de
su cuerpo alejadas de los accesorios de
corte y del silenciador.
Marcha Lenta
Deje el motor en marcha lenta. Ajuste
las revoluciones hasta que el motor se
mantenga en marcha sin que el cabe-
zal de corte se muevan o continuen
girando (la marcha lenta es demasia-
do) o que el motor se ahogue (la mar-
cha lenta es demasiado lenta).
• Gire el tornillo de marcha lenta hacia
la derecha para aumentar las revolu-
ciones si el motor se ahoga o se para.
• Gire el tornillo de marcha lenta hacia
la izquierda para reducir las revolu-
ciones si el cabezal de corte perman-
ecieran movi6ndose o girando mien-
tras el motor se encuentra en marcha
lenta.
Tapa del
Filtro de
Aire
Tornillo de
Ajuste de
la Marcha
Lenta
_ILADVERTENClA: Vuelva a verifi-
car la marcha lenta despu6s de cada
ajuste. El cabezal de corte no deb-
er&n moverse o girar cuando el motor
se encuentra en marcha lenta para asi
evitar graves heridas al usuario o a
otras personas.
Si requiriera ayuda adicional o no se
sintiera seguro al desempeSar este
procedimiento, entre en contacto con
el Centre de Servicio Sears o Ilame al
nOmero de ayuda al consumidor
1-800-235-5878.
27
_ADVERTENClA: Realice los
siguientes pasos despu_s de cada uso:
• Permita que el motor se enfrie antes
de guardado o transportarlo.
• Guarde el aparato y el combustible
en un lugar bien ventilado donde los
vapores del combustible no puedan
entrar en contacto con chispas ni lla-
mas abiertas provenientes de clenta-
dores de agua, motores o interrpu-
tores electricos, calefactores
centrales, etc.
• Guarde el aparato con todos los pro-
tectores en su lugar y coloquelo de
modo que las piezas cortantes no
puedan causar heridas per acci-
dente.
• Guarde el aparato y el combustible
en un lugar completamente fuera del
alcance de los niSos.
ESTACIONAL ALMACENAJE
Prepare el aparato para almacenarlo
al final de la temporada o si no Io va a
usar por m&s de 30 dias.
Siva a almacenar el aparato durante
un periodo largo de tiempo:
• Limpie el aparato por completo antes
del almacenaje.
• Almacene en un _trea limpia y seca.
• Aplique una pequeSa cantidad de
aceite a las superficies externas
met&licas.
SlSTEMA DE COMBUSTIBLE
Vacie el sistema de combustible antes
de almacenar el aparato por 30 dias o
m&s. Vac[e el tanque de combustible,
ponga el motor en marcha y d6jelo en
marcha hasta que las lineas de com-
bustible y el carburador est6n vacios.
Use combustible fresco para la pr6xi-
ma temporada.
Yea el mensaje marcado como
IMPORTANTE, que se refiere al uso de
combustibles con mezcla de alcohol en
su aparato, en la secci6n de uso, bajo
ABASTECIMIENTO DEL MOTOR. Los esta-
bilizadores de combustible son una al-
ternativa aceptable para minimizar la for-
maci6n de dep6sitos de goma durante
el almacenaje.
A_ada estabilizador a la gasolina en el
tanque de combustible o en el recipiente
para almacenar el mismo. Siga las
instrucciones de mezcla que se encuen-
tran impresas en el envase. Ponga el
motor en marcha y dejelo en marcha
por unos 3 minutes despu6s de haberle
puesto estabilizador.
El aceite Craftsman 40:1 para motores a
2 tiempos (enfriados a aire) viene mez-
clado con estabilizador de combustible.
Si no usa este aceite de Sears, usted
podr_t a_adir estabilizador al tanque de
combustible.
MOTOR
• Retire la bujia y vierta una cucharad-
ita de aceite 40:1 para motores a 2
tiempos (enfriados a aire) por la ab-
ertura para la bujia. Lentamente, tire
de la cuerda de arranque de 8 a 10
veces para distribuir el aceite.
• Cambie la bujia per una nueva del
tipo y de la gama de calor recomen-
dados.
• Limpie el filtro de aire.
• Examine todo el aparato para verificar
que no haya tornillos, tuercas ni per-
nos sueltos. Cambie todas la piezas
da_adas, quebradas o gastadas.
• AI principio de la pr6xima temporada,
use exclusivamente combustible
fresco con la proporci6n correcta de
gasolina a aceite.
OTROS
• No guarde la gasolina de una tempo-
rada a la proxlma.
• Cambie el recipiente de gasolina si
se empieza a oxidar.
28
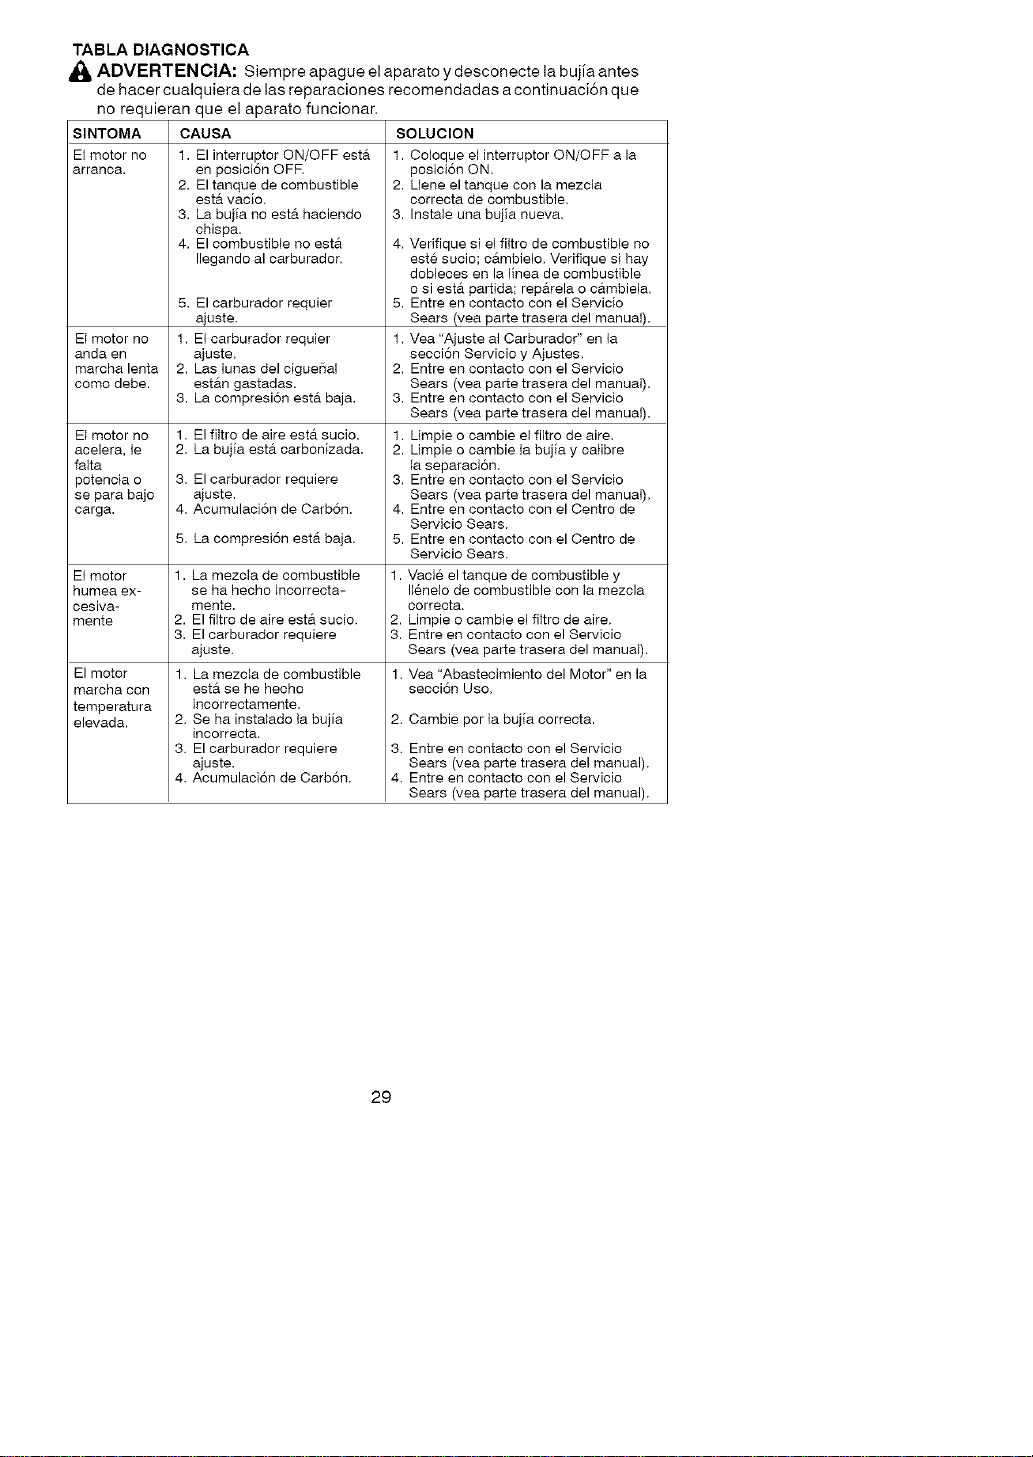
TABLA DIAGNOSTICA
_, ADVERTENCIA: Siempre apague elaparato y desconecte la bujia antes
de hacer cualquiera de las reparaciones recomendadas acontinuaci6n que
SINTOMA
EI motor no
arranoa.
no requieran que el aparato funcionar.
CAUSA
1. El interruptor ON/OFF esta
en posici6n OFF.
2. El tanque de combustible
estA vacio.
3. La bujia no estA haciendo
chispe.
4. El combustible no est'.
Ilegando al carburador.
El motor no
anda en
mercha lente
como debe.
El motor no
acelera, le
feita
potencia o
se para bajo
carga.
EI motor
humee ex-
cesiva-
mente
El motor
marcha con
temperatura
elevada.
5. El carburador requier
ajuste.
1. EI carburador requier
ajuste.
2. Las lunas del cigue_al
estan gastedas.
3. La compresi6n esta baja.
1. El filtro de aire est'. sucio.
2. La bujia est#. carbonizada.
3. Elcerburedorrequiere
ajuste.
4. Acumulaci6n de Carb6n.
5. La compresi6n estA baja.
1. La mezcie de combustible
se ha hecho incorrecta-
mente.
2. El filtro de aire est#. sucio.
3. El cerburador requiere
ajuste.
1. La mezcta de combustible
esta se he hecho
incorreotamente.
2. Se ha instalado la bujia
incorreota.
3. El carburador requiere
ajuste.
4. Acumulaci6n de Carbon.
SOLUCION
1. Coloque el h_terruptor ON/OFF a la
posioi6n ON.
2. Uene el tanque con la mezcla
correcta de combustible.
3. Instele una bujia nueva.
4. Vefifique si e] ffltro de combustible no
este sucio; cambielo. Verifique si hay
dobieces en la ]inea de combustible
o si est#t partida; reparela o c_tmbiela.
5. Entre en contacto con el Servicio
Sears (vea parte trasera del manual).
1. Vea "Ajuste al Oarburador" en la
secci6n Servicio y Ajustes.
2. Entre en contacto con el Servicio
Sears (vea parte trasera del manual).
3. Entre en contacto con el Servicio
Sears (vea parte trasera del manual).
1. Limpie o cambie el filtro de aire.
2. Umpie o cambie la bujia y calibre
la separaci6n.
3. Entre en contacto con el Servicio
Sears (vea parte trasera del manual).
4. Entre en contacto con el Oentro de
Servicio Sears.
5. Entre en contacto con el Oentro de
Servicio Sears.
1. Vacie el tanque de combustible y
116nelode combustible con ta mezcla
correct&
2. Limpie o cambie el ffltro de aire.
3. Entre en contacto con el Servicio
Sears (vea parte trasera del manual).
1. Vea "Abastecimiento del Motor" en la
secci6n Uso.
2. Cambie por la bujia correcta.
3. Entre en contecto con el Servicio
Sears (vea parte trasera del manual).
4. Entre en contacto con el Servicio
Sears (vea parte trasera del manual).
29
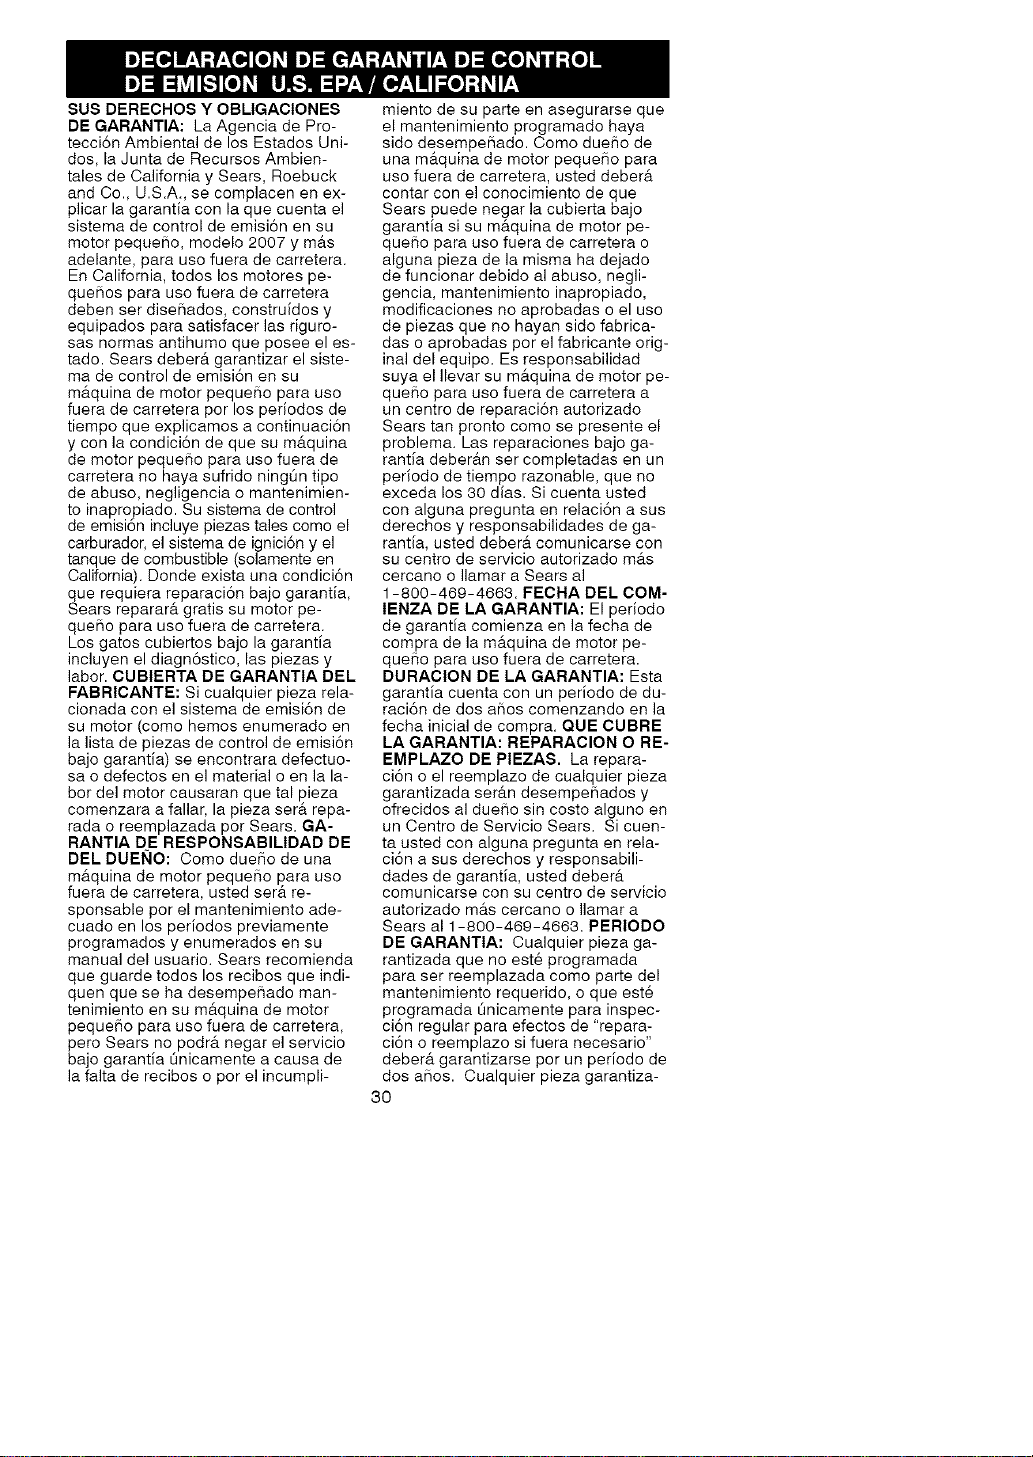
SUS DERECHOS Y OBLIGACIONES
DE GARANTIA: La Agencia de Pro-
tecci6n Ambiental de los Estados Uni-
dos, la Junta de Recursos Ambien-
tales de California y Sears, Roebuck
and Co., U.S.A., se complacen en ex-
plicar la garantia con la que cuenta el
sistema de control de emisi6n en su
motor peque_o, modelo 2007 y m&s
adelante, para uso fuera de carretera.
En California, todos los motores pe-
que_os para uso fuera de carretera
deben ser dise_ados, construidos y
equipados para satisfacer las riguro-
sas normas antihumo que posee el es-
tado. Sears deber& garantizar el siste-
ma de control de emisi6n en su
m&quina de motor peque_o para uso
fuera de carretera por los periodos de
tiempo que explicamos a continuaci6n
y con la condici6n de que su m&quina
de motor peque6o para uso fuera de
carretera no haya sufrido ningOn tipo
de abuso, negligencia o mantenimien-
to inapropiado. Su sistema de control
de emision incluye piezas tales como el
carburador, el sistema de ignici6n y el
tanque de combustible (solamente en
California). Donde exista una condici6n
que requiera reparaci6n bajo garantia,
Sears reparar& gratis su motor pe-
que_o para uso fuera de carretera.
Los gatos cubiertos bajo la garantia
incluyen el diagn6stico, las piezas y
labor. CUBIERTA DE GARANTIA DEL
FABRICANTE: Si cualquier pieza rela-
cionada con el sistema de emisi6n de
su motor (como hemos enumerado en
la lista de piezas de control de emisi6n
bajo garantia) se encontrara defectuo-
sa o defectos en el material o en la la-
bor del motor causaran que tal pieza
comenzara a fallar, la pieza ser& repa-
rada o reemplazada pot Sears. GA-
RANTIA DE RESPONSABILIDAD DE
DEL DUEI_IO: Como due_o de una
m&quina de motor pequeSo para uso
fuera de carretera, usted ser& re-
sponsable por el mantenimiento ade-
cuado en los periodos previamente
programados y enumerados en su
manual del usuario. Sears recomienda
que guarde todos los recibos que indi-
quen que se ha desempeSado man-
tenimiento en su m&quina de motor
pequeSo para uso fuera de carretera,
pero Sears no podrb, negar el servicio
bajo garantia 0nicamente a causa de
la falta de recibos o por el incumpli-
miento de su parte en asegurarse que
el mantenimiento programado haya
sido desempe_ado. Como due_o de
una m&quina de motor peque_o para
uso fuera de carretera, usted deber&
contar con el conocimiento de que
Sears puede negar la cubierta bajo
garantia si su m&quina de motor pe-
que_o para uso fuera de carretera o
alguna pieza de la misma ha dejado
de funcionar debido al abuso, negli-
gencia, mantenimiento inapropiado,
modificaciones no aprobadas o el uso
de piezas que no hayan sido fabrica-
das o aprobadas por el fabricante orig-
inal del equipo. Es responsabilidad
suya el Ilevar su m&quina de motor pe-
que_o para uso fuera de carretera a
un centro de reparaci6n autorizado
Sears tan pronto como se presente el
problema. Las reparaciones bajo ga-
rantia deber&n ser completadas en un
periodo de tiempo razonable, que no
exceda los 30 dias. Si cuenta usted
con alguna pregunta en relaci6n a sus
derechos y responsabilidades de ga-
rantia, usted deber& comunicarse con
su centro de servicio autorizado m&s
cercano o Ilamar a Sears al
1-800-469-4663. FECHA DEL COM-
IENZA DE LA GARANTIA: El periodo
de garantia comienza en la fecha de
compra de la m&quina de motor pe-
queSo para uso fuera de carretera.
DURACION DE LA GARANTIA: Esta
garantia cuenta con un periodo de du-
raci6n de dos aSos comenzando en la
fecha inicial de compra. QUE CUBRE
LA GARANTIA: REPARACION O RE-
EMPLAZO DE PIEZAS. La repara-
ci6n o el reemplazo de cualquier pieza
garantizada ser&n desempeSados y
ofrecidos al dueSo sin costo alguno en
un Centro de Servicio Sears. Si cuen-
ta usted con alguna pregunta en rela-
ci6n a sus derechos y responsabili-
dades de garantia, usted deber&
comunicarse con su centro de servicio
autorizado m&s cercano o Ilamar a
Sears al 1-800-469-4663. PERIODO
DE GARANTIA: Cualquier pieza ga-
rantizada que no est6 programada
para ser reemplazada como parte del
mantenimiento requerido, o que este
programada 0nicamente para inspec-
clon regular para efectos de "repara-
ci6n o reemplazo si fuera necesario"
deber& garantizarse por un periodo de
dos a_os. Cualquier pieza garantiza-
30
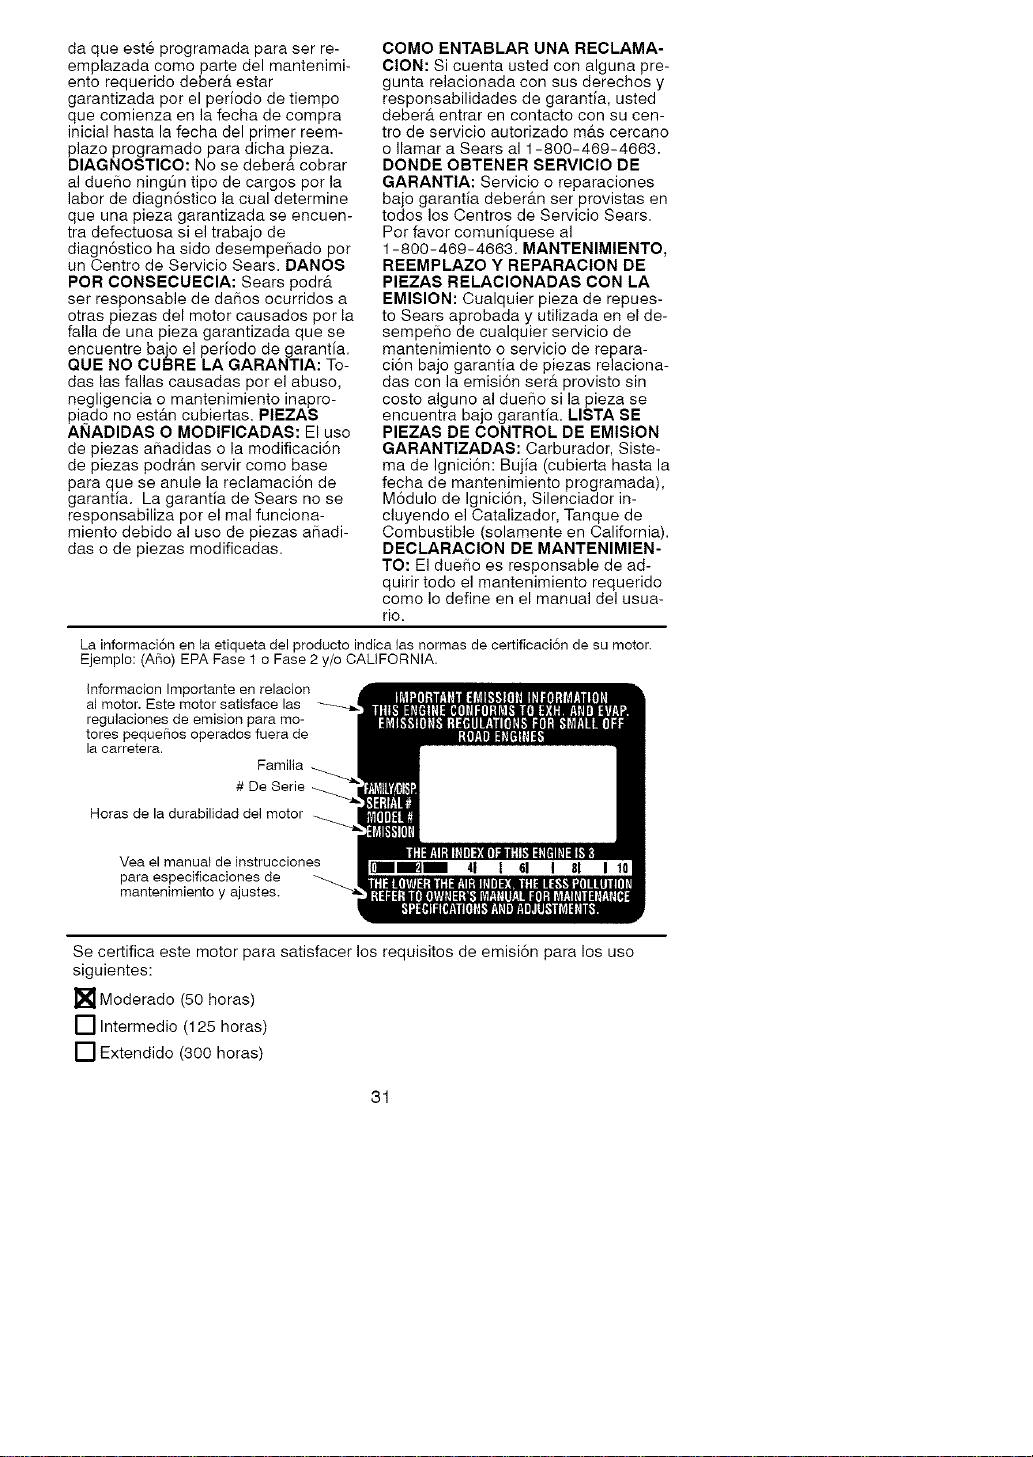
daqueest6programadaparaserre-
emplazadacomopartedelmantenimi-
entorequeridodeber_,estar
garantizadaporelperiododetiempo
quecomienzaenlafechadecompra
inicialhastalafechadelprimerreem-
plazoprogramadoparadichapieza,
DIAGNOSTICO:Nosedeber&cobrar
aldueSoningOntipodecargosporla
labordediagn6sticolacualdetermine
queunapiezagarantizadaseencuen-
tradefectuosasieltrabajode
diagn6sticohasidedesempeSadopor
unCentrodeServicioSears.DANOS
PORCONSECUEClA:Searspodr&
serresponsablededaSosocurridosa
otraspiezasdelmotorcausadospotla
falladeunapiezagarantizadaquese
encuentrebajoelperiododegarantia.
QUENOCUBRELAGARANTIA:To-
daslasfallascausadasporelabuso,
negligenciaomantenimientoinapro-
piadonoest&ncubiertas.PIEZAS
ANADIDASOMODIFICADAS: El uso
de piezas aSadidas o la modificaci6n
de piezas podr_.n servir como base
para que se anule la reclamaci6n de
garantia. La garantia de Sears no se
responsabiliza por el real funciona-
miento debido al uso de piezas aSadi-
das o de piezas modificadas.
COMO ENTABLAR UNA RECLAMA-
CION: Si cuenta usted con alguna pre-
gunta relacionada con sus derechos y
responsabilidades de garantia, usted
deber& entrar en contacto con su cen-
tre de servicio autorizado mrs cercano
o Ilamar a Sears al 1-800-469-4663.
DONDE OBTENER SERVIClO DE
GARANTIA: Servicio o reparaciones
bajo garantia deber_tn ser provistas en
todos los Centros de Servicio Sears.
Pot favor comuniquese al
1-800-469-4663. MANTENIMIENTO,
REEMPLAZO Y REPARACION DE
PIEZAS RELAClONADAS CON LA
EMISION: Cualquier pieza de repues-
to Sears aprobada y utilizada en el de-
sempeSo de cualquier servicio de
mantenimiento o servicio de repara-
ci6n bajo garantia de piezas relaciona-
das con la emisi6n set& provisto sin
costo alguno al dueSo si la pieza se
encuentra bajo garantia. LISTA SE
PIEZAS DE CONTROL DE EMISlON
GARANTIZADAS: Carburador, Siste-
ma de Ignici6n: Bujia (cubierta hasta la
fecha de mantenimiento programada),
M6dulo de Ignici6n, Silenciador in-
cluyendo el Catalizador, Tanque de
Combustible (solamente en California).
DECLARACION DE MANTENIMIEN-
TO: El dueSo es responsable de ad-
quirir todo el mantenimiento requerido
como Io define en el manual del usua-
rio.
La informaci6n en la etiqueta del producto indica 1as normas de certificaci6n de su motor.
Ejemplo: (A[_o) EPA Fase 1 o Fase 2 y/o CALIFORNIA.
Informacion Importante en relacion
al motor, Este motor satisface las
regulaciones de emision para mo-
tores peque[_os operados fuera de
la oarretera.
Familia
# De Serie
Horas de la durabilidad de1 motor
Vea el manuat de instrucciones
para especificaciones de
mantenimiento y ajustes.
41 61
Se certifica este motor para satisfacer los requisites de emisi6n para los uso
siguientes:
[] Moderado (50 horas)
[] Intermedio (125 horas)
[] Extendido (300 horas)
31

Your Home
For repair - in your home - of all major brand appliances,
lawn and garden equipment, or heating and cooling systems,
no matter who made it, no matter who sold it!
For the replacement parts, accessories and
owner's manuals that you need to do-it-yourself.
For Sears professional installation of home appliances
and items like garage door openers and water heaters,
1-800-4-MY-HOME ® Anytime, day or night
(1-800-469-4663) (U.S.A. and Canada)
www.sears.com www.sears.ca
Our Home
For repair of carry-in products like vacuums, lawn equipment,
and electronics, call or go on-line for the nearest
Sears Parts and Repair Center.
1-800-488-1222 Anytime, day or night (U.S.A only)
www.sears.com
To purchase a protection agreement (U,S,A,)
or maintenance agreement (Canada) on a product serviced by Sears:
1-800-827-6655 (U.S.A.) 1-800-361-6665 (Canada)
Para pedirservicio de reparation Au Canada pour service enfrangais:
a domicilio,y para ordenar piezas: 1,8004_E.FOYERMC
1.888.SU.HOGAR sM (1_00-533-8937)
1-888784-6427 www sears ca
,, ( - ) • ,
© Sears, Roebuckand Co.
® Registered Trademark / TM Trademark / SMService Mark of Sears, Roebuck and Co.
® Mama Registrada / TMMarca de Fabrica / SMMarca de Servicio de Sears, Roebuck and Co.
MD
McMarque de commerce / Marque d6posee de Sears, Roebuck and Co.