®
GAS RANGE
COClNA (ESTUFA) DE GAS
Models, Mode]os 362.61020, 61021, 61028, 61120, 61121, 61128, 71091, 71098, 72210,
72211, 72212, 72214, 72760, 72761, 72765, 72768, 75190, 75191,
75192, 75198, 75199, 75210, 75211, 75212, 75214
rfl
r"
leSmt
D1
ZI
183D55BOPlt0
(SR85025) 201 JR
Printed _n Mex|co
This brook/s printed on r_c3_Jed pape_,
Sears, Roebuck and Co., Hoffman Estates, tL 60179 U.S.A.
www.sears.com
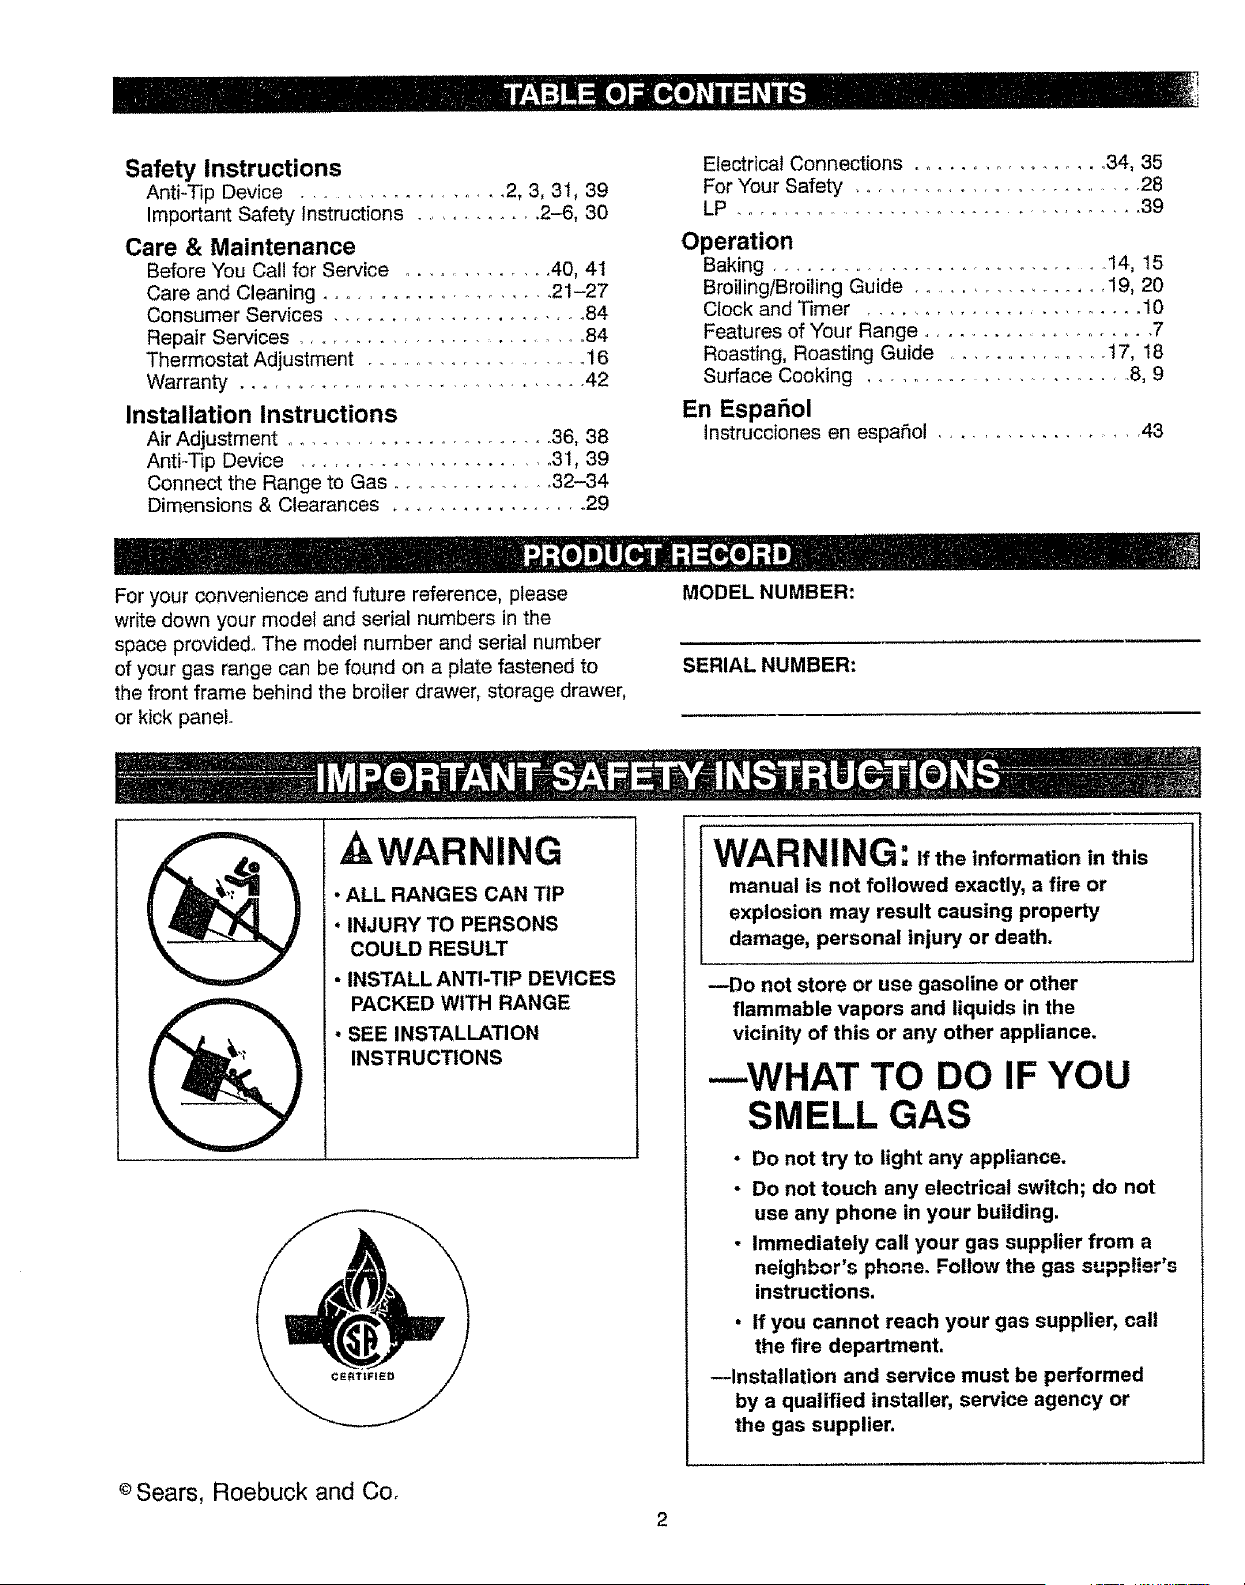
Safety Instructions
Anti-Tip Device ................. 2, 3, 3t, 39
Important Safety Instructions ............ 2-6, 30
Care & Maintenance
Before You Call for Service .............. 40, 41
Care and Cleaning ...................... 21-27
Consumer Services .................... 84
Repair Services .......................... 84
Thermostat Adjustment ...................... 16
Warranty ................................. 42
Installation Instructions
Air Adjustment ........................ 36, 38
AntFT_p Device ....................... 31, 39
Connect the Range to Gas ............... 32-34
Dimensions & Clearances ................. 29
Electrical Connections ................. 34, 35
For Your Safety ........................... 28
LP ..................................... 39
Operation
Baking ................................ 14, 15
Broiling/Broiling Guide ................. 19, 20
Clock and Timer ........................ 10
Features of Your Range ...................... 7
Roasting, Roasting Guide ................. 17, 18
Surface Cooking ....................... 8, 9
En EspaSol
lnstrucciones en espaSol .................... 43
For your convenience and future reference, please
write down your modet and serial numbers in the
space provided,, The model number and serial number
of your gas range can be found on a plate fastened to
the front frame behind the broiler drawer, storage drawer,
or kick panel.
MODEL NUMBER:
SERIAL NUMBER:
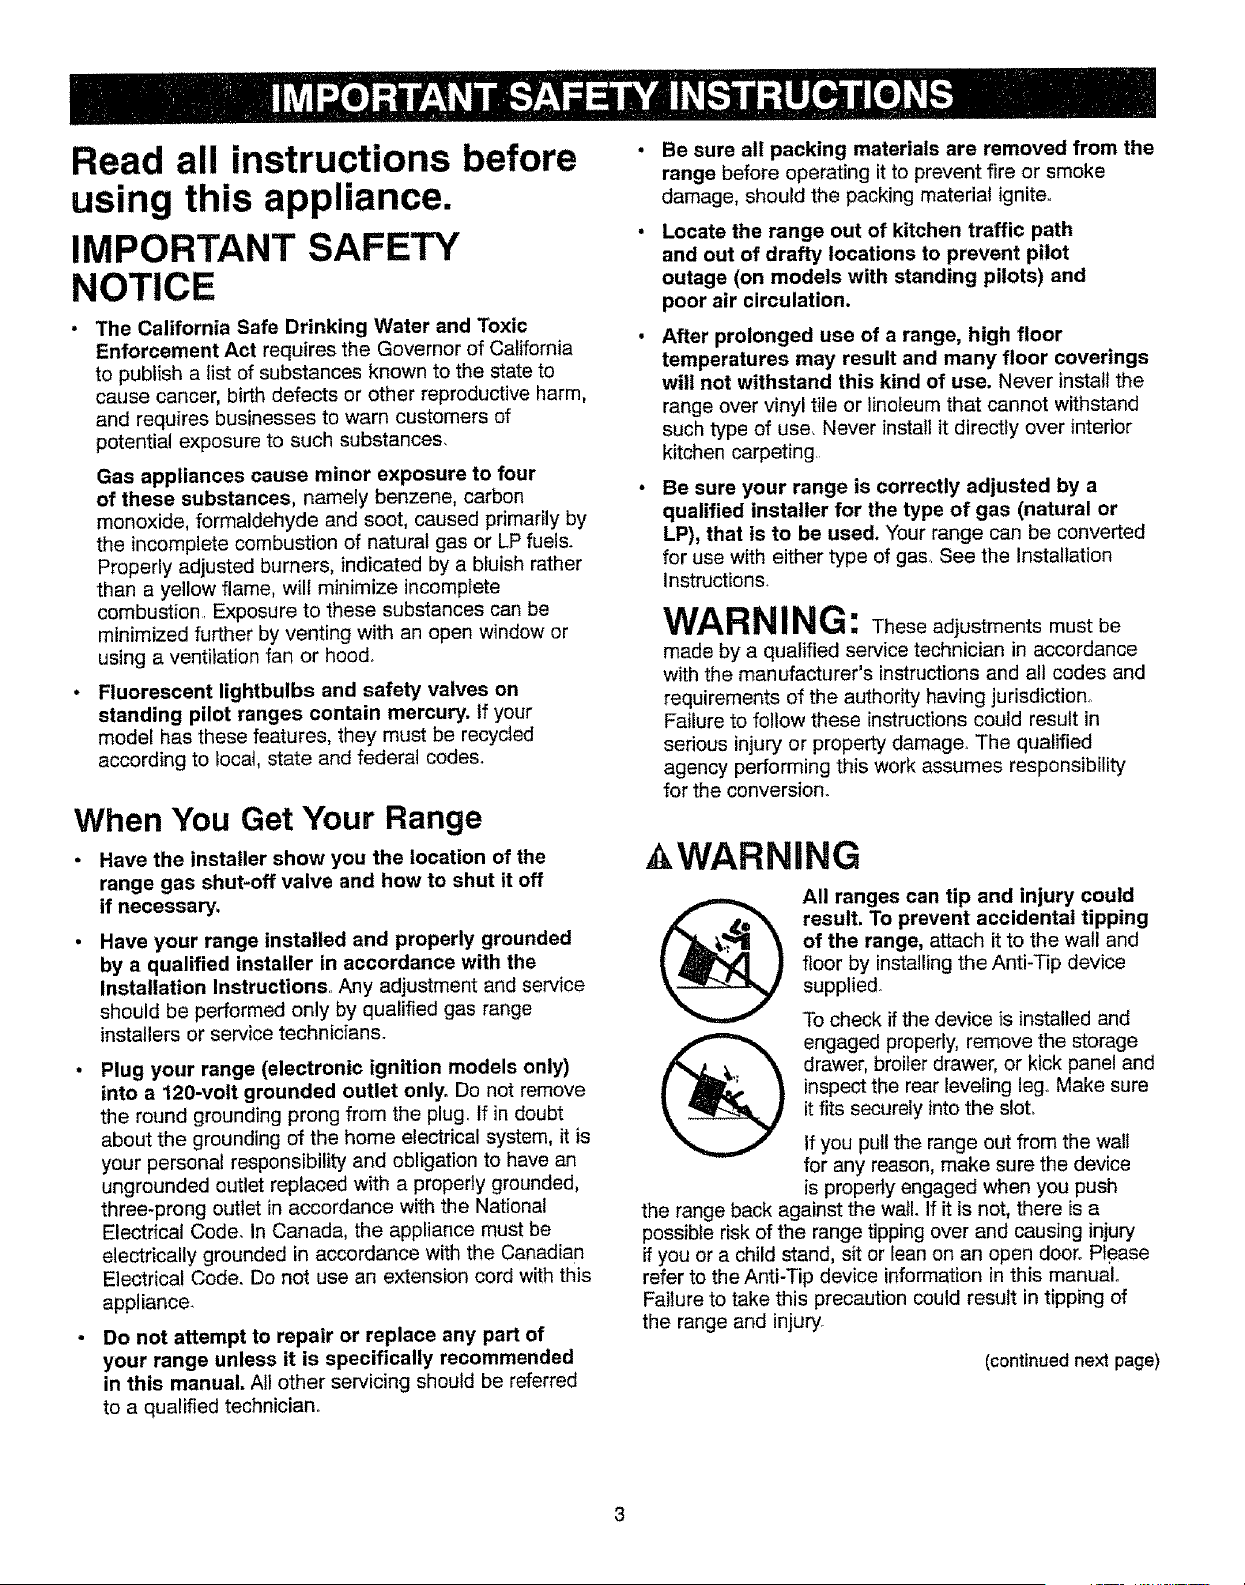
A WARNING
• ALL RANGES CAN TIP
• INJURY TO PERSONS
COULD RESULT
• INSTALL ANTI-TIP DEVICES
PACKED WITH RANGE
. SEE INSTALLATION
INSTRUCTIONS
WARNING: If the information in this
manual is not followed exactly, a fire or
explosion may result causing property
damage, personal injury or death,
redo not store or use gasoline or other
flammable vapors and liquids in the
vicinity of this or any other appliance,
---WHAT TO DO IF YOU
SMELL GAS
- Do not try to light any appliance.
• Do not touch any electrical switch; do not
use any phone in your building.
• Immediately call your gas supplier from a
neighbor's phone. Follow the gas supptier's
instructions.
• If you cannot reach your gas supplier, call
the fire department.
--Installation and service must be performed
by a qualified installer, service agency or
the gas supplier.
© Sears, Roebuck and Co,
2
Read all instructions before
using this appliance.
IMPORTANT SAFETY
NOTICE
The California Safe Drinking Water and Toxic
Enforcement Act requires the Governor of California
to publish a list of substances known to the state to
cause cancer, birth defects or other reproductive harm,
and requires businesses to warn customers of
potential exposure to such substances.
Gas appliances cause minor exposure to four
of these substances, namely benzene, carbon
monoxide, formaldehyde and soot, caused primarily by
the incomplete combustion of natural gas or LP fuels.
Properly adjusted burners, indicated by a bluish rather
than a yellow flame, will minimize incomplete
combustion. Exposure to these substances can be
minimized further by venting with an open window or
using a ventilation fan or hood°
Fluorescent lightbulbs and safety valves on
standing pilot ranges contain mercury, if your
model has these features, they must be recycled
according to local, state and federal codes.
When You Get Your Range
• Have the installer show you the location of the
range gas shut-off valve and how to shut it off
if necessary.
Have your range installed and properly grounded
by a qualified installer in accordance with the
Installation Instructions Any adjustment and service
should be performed only by qualified gas range
installers or service technicians.
Plug your range (electronic ignition models only)
into a 120-vott grounded outlet only. Do not remove
the round grounding prong from the plug. If in doubt
about the grounding of the home electrical system, it is
your personal responsibility and obligation to have an
ungrounded outlet replaced with a properly grounded,
three-prong outlet in accordance with the National
Electrical Code. In Canada, the appliance must be
electrically grounded in accordance with the Canadian
Electrical Code. Do not use an extension cord with this
appliance_
Do net attempt to repair or replace any part of
your range unless it is specifically recommended
in this manual, All other servicing should be referred
to a qualified technician°
Be sure all packing materials are removed from the
range before operating it to prevent fire or smoke
damage, should the packing material ignite..
Locate the range out of kitchen traffic path
and out of drafty locations to prevent pilot
outage (on models with standing pilots) and
poor air circulation.
After prolonged use of a range, high floor
temperatures may result and many floor coverings
will not withstand this kind of use. Never instatt the
range over vinyl tile or linoleum that cannot withstand
such type of use. Never install it directly over interior
kitchen carpeting.
Be sure your range is correctly adjusted by a
qualified installer for the type of gas (natural or
LP), that is to be used. Your range can be converted
for use with either type of gas See the Installation
Instructions.
WAR NI NG: Theseadjustments mustbe
made by a qualified service technician in accordance
with the manufacturer's instructions and all codes and
requirements of the authority having jurisdiction..
Failure to follow these instructions could result in
serious injury or property damage.. The qualified
agency performing this work assumes responsibility
for the conversion.
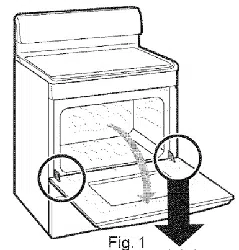
AWARNING
All ranges can tip and injury could
result, To prevent accidental tipping
of the range, attach it to the wall and
floor by installingthe Anti-Tip device
supplied.
To check if the device is installed and
engaged properly, remove the storage
drawer, broiler drawer, or kick panel and
inspect the rear leveling leg.. Make sure
it fits securely into the sloL
If you pull the range out from the walt
for any reason, make sure the device
is proper_y engaged when you push
the range back against the wa_LIf it is not, there is a
possible risk of the range tipping over and causing injury
if you or a child stand, sit or lean on an open door. Please
refer to the Anti-Tip device information in this manual°
Failure to take this precaution could result in tipping of
the range and injury.
(continued next page)
Using Your Range
• Do not leave children alone or unattended where a
range is hot or in operation. They could be seriously
burned.
Do not allow anyone to climb, stand or hang on
the door, storage or broiler drawer (depending on
model) or cooktop. They could damage the range
and even tip it over, causing severe personal injury
Let the burner grates and other surfaces cool
before touching them or leaving them where
children can reach them.
CAUTION: ITEMS OF INTEREST TO CHILDREN
SHOULD NOT BE STORED IN CABINETS ABOVE A
RANGE OR ON THE BACKSPLASH OF A RANGE--
CHILDREN CLIMBING ON THE RANGE TO REACH
ITEMS COULD BE SERIOUSLY INJURED.
Never wear loose fitting or hanging garments while
using the appliance. Be careful when reaching for
items stored in cabinets over the ceoktop,
Flammable material could be ignited ff brought
in contact with flames or hot oven surfaces and
may cause severe burns,
Do not use water on grease fires, Never pick up a
flaming pan. Turn the controls off Smother a flaming
pan on a surface unit by covering the pan completely
with a well-fitting lid, cookie sheet or fiat tray Use a
multi-purpose dry chemical or foam-type fire
extinguisher,
Flaming grease outside a pan can be put out by
covering it with baking soda or, if available, by using a
multi-purpose dry chemical or foam-type fire
extinguisher,
Flame in the oven, storage drawer, or broiler drawer
can be smothered completely by closing the oven door
or drawer and turning the oven off or by using a multi-
purpose dry chemical or foam-type fire extinguisher.
Do not store flammable materials in an oven, range
broiler or storage drawer, or near the cooktop.
Do not store or use combustible materials,
gasoline or other flammable vapors and liquids
in the vicinity of this or any other appliance.
Do not let cooking grease or other flammable
materials accumulate in or near the range,
Cook meat and poultry thoroughly---meat to at
least an INTERNAL temperature of 160°F and poultry
to at least an INTERNAL temperature of 180°F
Cooking to these temperatures usually protects against
foodborne illness
For your safety, never use your appliance for
warming or heating the room.
Surface Cooking
• Always use the LITE position (on models with
electronic ignition) or the HI position (on models
with standing pilots) when igniting the top burners
and make sure the burners have ignited.
• Never leave the surface burners unattended at high
flame settings. Believers cause smoking and greasy
spillovers that may catch on fire.
. Adjust the top burner flame size so it does not
extend beyond the edge of the cookware. Excessive
flame is hazardous
Use only dry pot holders--moist or damp pot holders
on hot surfaces may result in burns from steam
Do not let pot holders come near open flames
when lifting cookware. Do not use a towel or other
bulky cloth in place of a pot holder
To minimize the possibility of burns, ignition of
flammable materials and spillage, turn cookware
handles toward the side or back of the range without
letting them extend over adjacent burners.
Always turn the surface burners to OFF before
removing cookware.
Carefully watch foods being fried at a high flame
setting.
Never block the vents (air openings) of the range.
They provide the air inlet and outlet that are necessary
for the range to operate properly with correct
combustion, Air openings are located in the
following places:
--Oven vent at the rear of the cooktop.
--Air intake under the broiler drawer.
--Air vent at the top of the oven door.
, Do not use a wok on models with sealed burners if
the wok has a round metal ring that is placed over
the burner grate to support the wok. This ring acts as
a heat trap, which may damage the burner grate and
burner head, Also, it may cause the burner to work
improperly. This may cause a carbon monoxide levet
above that allowed by current standards, resulting in a
health hazard.
• Foods for frying should be as dry as possible, Frost
on frozen foods or moisture on fresh foods can cause
hot fat to bubble up and over the sides of the pan,
• Use the least possible amount of fat for effective
shallow or deep fat frying. Filling the pan too full
of fat can cause spillovers when food is added_
• If a combination of oils or fats will be used
in frying, stir together before heating or as fats
melt slowly
• Always heat fat slowly and watch as it heats.
• Use a deep-fat thermometer whenever possible to
prevent overheating fat beyond the smoking point
• Never try to move a pan of hot fat, especially a deep
fat fryer. Wait unlit the fat is coo{°
• When using glass cookware, make sure it is designed
for top-of-range cooking.
• Use proper pan size. Avoid pans that are unstable or
easily tipped. Select cookware having flat bottoms large
enough to properly contain food and avoid boilovers
and spillovers and large enough to cover burner grates.
This will both save cleaning time and prevent
hazardous accumulations of food, since heavy
spattering or spillovers left on the range can igniter
Use pans with handles that can be easily grasped
and witl remain cool.
• Keep all plastics away from the top burners.
• Do not leave plastic
items on the
cooktop--they may
melt if left too close
to the vent.
• Do not leave any items on the cooktopo The hot air
from the vent may ignite flammable items and will
increase pressure in closed containers, which may
cause them to burst.
To avoid the possibility of a burn, always be certain
that the controls for all burners are at the OFF
position and all grates are cool before attempting
to remove them.
When flaming foods are under the hood, turn
the fan off. The fan, if operating, may spread
the flames.
If the range is located near a window, do not hang
long curtains that could blow over the top burners and
create a fire hazard.
When a pilot goes out (on models with standing
pilots), you will detect a faint odor of gas as your signal
to relight the pilot. When reiighting the pilot, make sure
the burner controls are in the OFF position, and follow
instructions in the Installation instructions
to relight
if you smell gas, and you have already made sure the
pilots are lit (on models with standing pilots), turn off the
gas to the range and call a qualified service technician.
Never use an open flame to locate a leak,.
(continued next page)
Vent appearance and location vary
Baking, Broiling and Roasting
° Do not use the oven for a storage area. Items stored
in the oven can ignite.
. Stand away from the range when opening the door
of a hot oven. The hot air and steam that escape
can cause burns to hands, face and eyes.
• Keep the oven free from grease buildup°
• Place the oven shelves in the desired position while
the oven is cool.
, Pulling out the shelf to the shelf-stop is a
convenience in lifting heavy foods. It is also a
precaution against burns from touching hot
surfaces of the door or oven walls. The lowest
position (R) is not designed to slide.
• Do not heat unopened food containers_ Pressure
could build up and the container could burst,
causing an injury.
. Do not use aluminum foil anywhere in the oven
except as described in this manual. Misuse could
result in a fire hazard or damage to the range,
• Never use aluminum foil to line the oven bottom.
Improper use of foil could start a fire°
° When using cooking or roasting bags in the oven,
follow the manufacturer's directions,
• Use only glass cookware that is recommended for
use in gas ovens.
, Always remove broiler pan from the oven or the
broiler compartment as soon as you finish broiling.
Grease left in the pan can catch on fire if oven is used
without removing the grease from the broiler pan,
. When broiling, if meat is too close to the flame, the
fat may ignite. Trim excess fat to prevent excessive
flare-ups,
• Make sure the broiler pan is in place correctly to
reduce the possibility of grease fires°
• If you should have a grease fire in the broiler pan,
tum the oven off and keep the broiler compartment door
closed to contain fire until it bums out.
SAVE THESE
Cleaning Your Range
• Clean only parts listed in this Use and
Care Manual.
• Keep the range clean and free of accumulations of
grease or spillovers, which may ignite.
• Be careful when you clean the cooktop because
the area over the pilot will be hot (for standing
pilot models).
• For continuous clean models, do not use oven
cleaners on any of the continuous cleaning
surfaces. Continuous cleaning surfaces can be
identified by their rough surface finish,1
INSTRUCTIONS
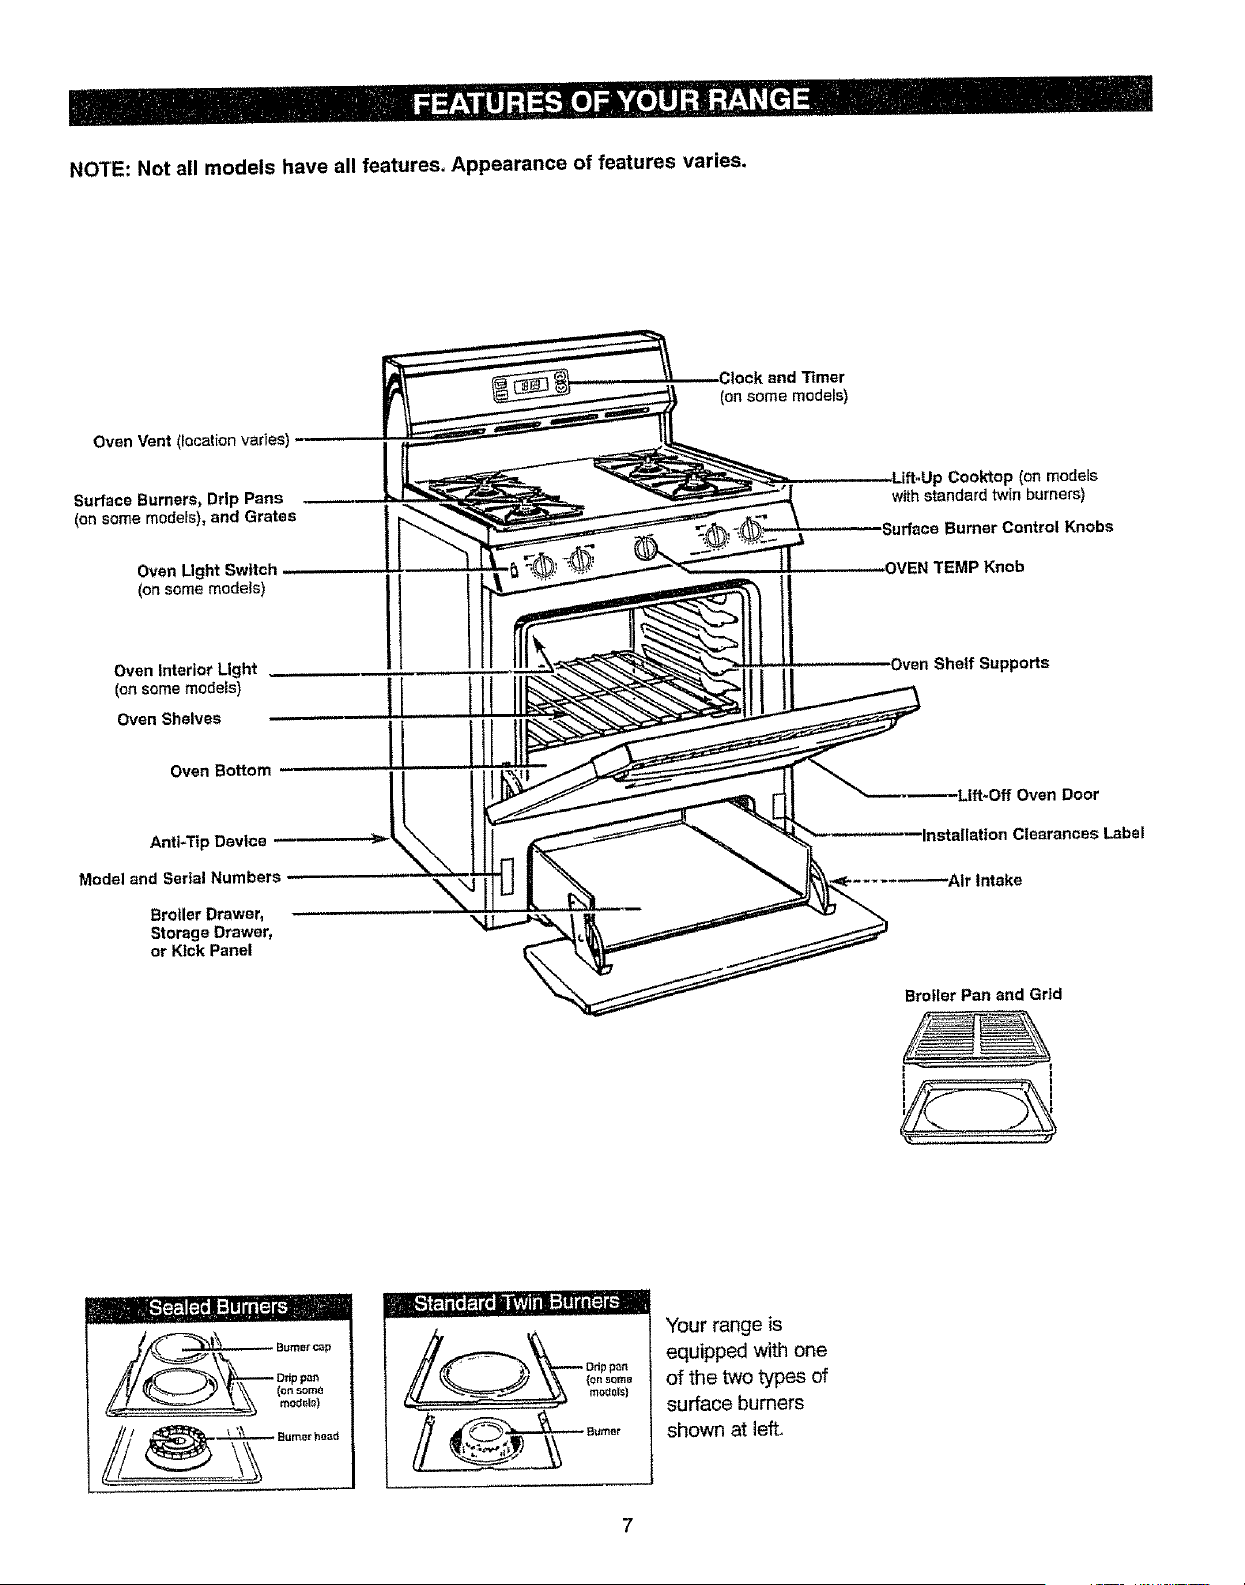
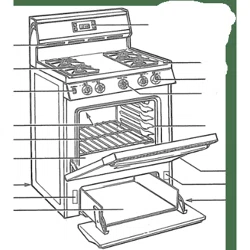
NOTE: Not all models have all features. Appearance of features varies.
Oven Vent (_ocation varies)
Surface Burners_ Drip Pans
(on some models), and Grates
Oven Light Switch
(on some models)
Oven interior Light
(on some modets)
Oven Shelves
Clock and Timer
(on some models)
on models
wffh standard twin burners)
Control Knobs
TEMP Knob
Oven Bottom
Anti-Tip Device
Model and Serial Numbers
Broiler Drawer,
Storage Drawer,
or Kick Panel
Door
Clearances Label
Broiler Pan and Grid
!
I .... !
I I
_ • Burner c_p
Drip pa_
t/V _'_'_7 _ \\ Ionsor_
_ SUrrmr
Your range is
equipped with one
of the two types of
surface burners
shown at left.
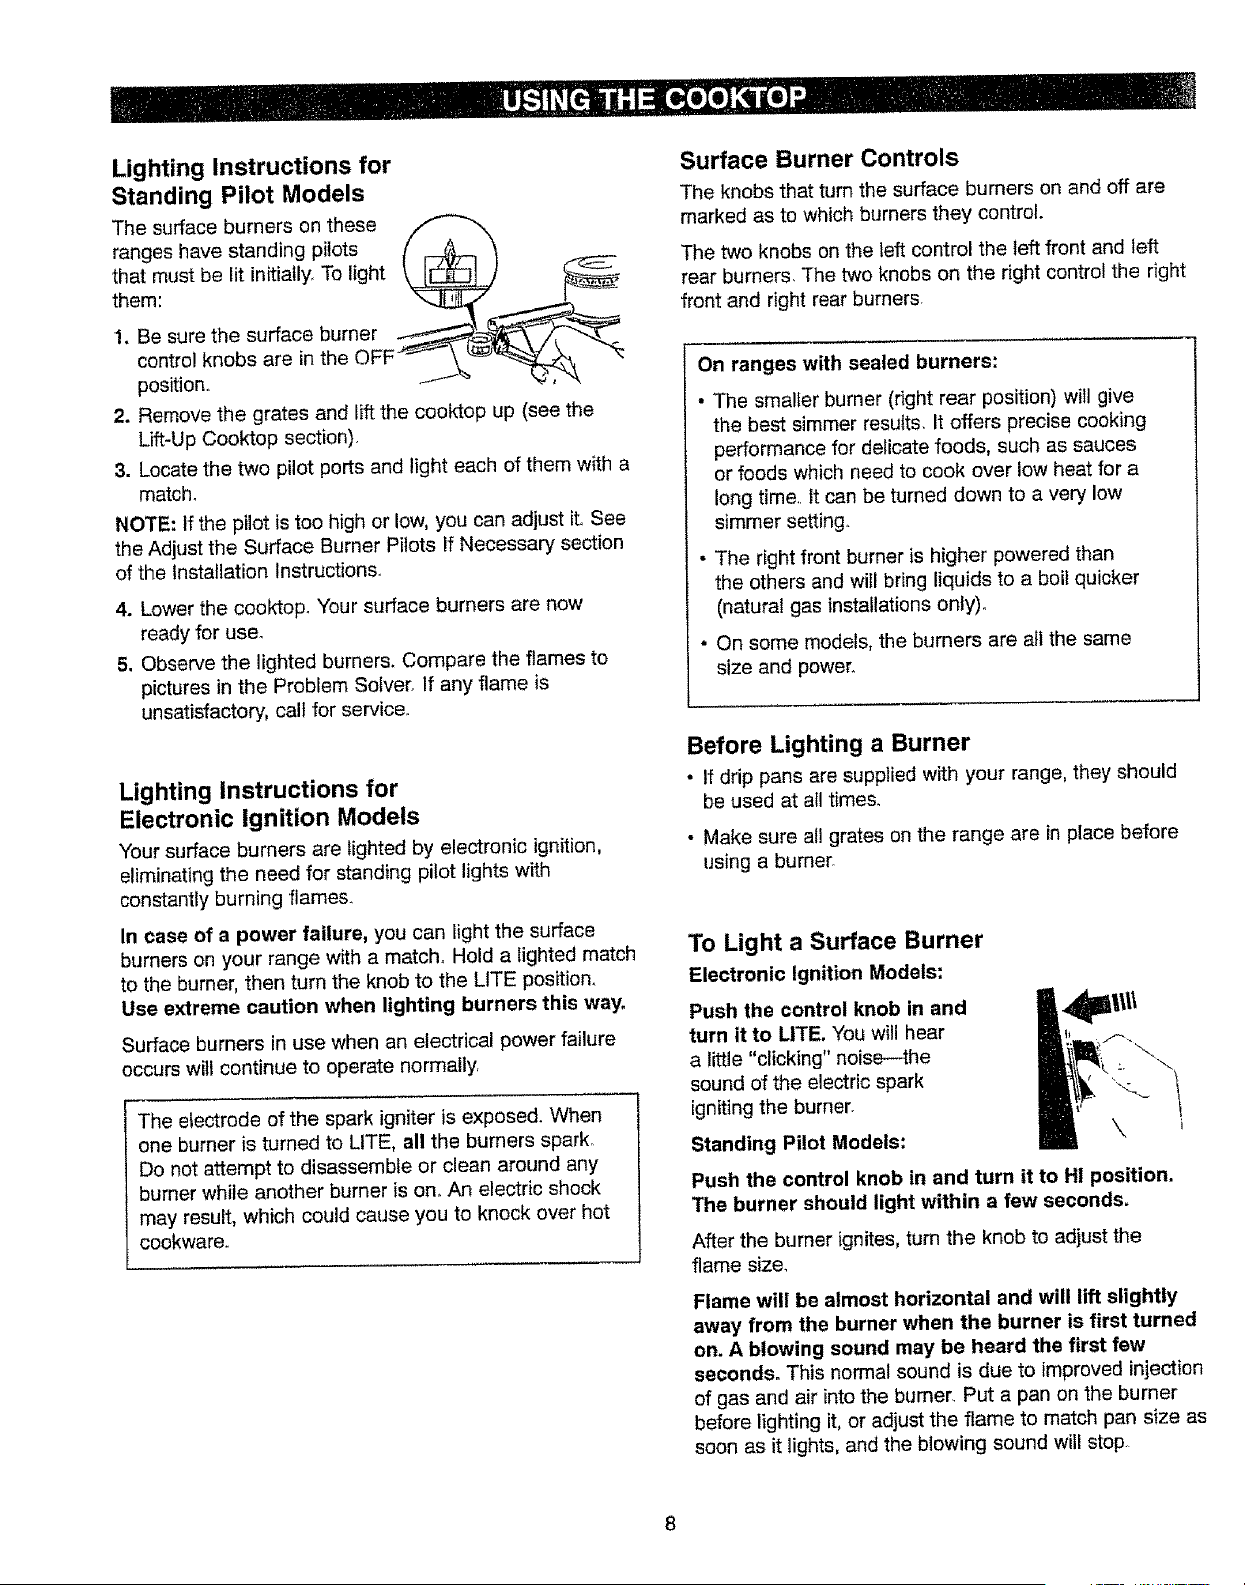
Lighting Instructions for
Standing Pilot Models
The surface burners on these
ranges have standing pilots ( r-_ _t
that must be lit in_tia_ly_To light _
lhe:_ sure the surface burner ____-..__---.&'_7__
position,, ----_'_ "_, "_
2. Remove the grates and lift the cooktop up (see the
Uft-Up Cooktop section).
3. Locate the two pilot ports and light each of them with a
match.
NOTE: If the pilot is too high or low, you can adjust it. See
the Adjust the Surface Burner Pilots If Necessary section
of the installation Instruction&
4. Lower the cooktop. Your surface burners are now
ready for use.
5, Observe the lighted burners. Compare the flames to
pictures in the Problem Solver, If any flame is
unsatisfactory, calt for service.
Lighting Instructions for
Electronic Ignition Models
Your surface burners are lighted by electronic ignition,
eliminating the need for standing pilot lights with
constantly burning flames.
In case of a power failure, you can light the surface
burners on your range with a match° Hold a lighted match
to the burner, then turn the knob to the LITE position.
Use extreme caution when lighting burners this way,
Surface burners in use when an electrical power failure
occurs wilt continue to operate normally,
The electrode of the spark igniter is exposed. When
one burner is turned to LITE, all the burners spark.
Do not attempt to disassemble or clean around any
burner while another burner is on. An electric shock
may result, which could cause you to knock over hot
cookware.
Surface Burner Controls
The knobs that turn the surface burners on and off are
marked as to which burners they control.
The two knobs on the left control the left front and left
rear burners, The two knobs on the right control the right
front and right rear burners,
On ranges with sealed burners:
The smatIer burner (right rear position) will give
the best simmer results, It offers precise cooking
performance for delicate foods, such as sauces
or foods which need to cook over low heat for a
long time,. It can be turned down to a very low
simmer setting.
• The right front burner is higher powered than
the others and will bring liquids to a boil quicker
(natural gas installations only)o
• On some models, the burners are all the same
size and power°
Before Lighting a Burner
• If drip pans are supplied with your range, they should
be used at all times.
• Make sure all grates on the range are in place before
using a burner.
To Light a Surface Burner
Electronic Ignition Models:
Push the control knob in and
turn it to LITE. You will hear
a little "clicking" noise---the
sound of the electric spark -.<.
igniting the burner. ,,
Standing Pilot Models: \
Push the control knob in and turn it to H! position.
The burner should light within a few seconds.
After the burner ignites, turn the knob to adjust the
flame size,
Flame will be almost horizontal and will lift slightly
away from the burner when the burner is first turned
on. A blowing sound may be heard the first few
seconds. This normal sound is due to improved injection
of gas and air into the burner. Put a pan on the burner
before lighting it, or adjust the flame to match pan size as
soon as it lights, and the blowing sound will stoF
After Lighting a Burner
• After the burner ignites, turn the knob to adjust
the flame.
• Check to be sure the burner you turned on is the one
you want to use.
• Do not operate a burner for an extended period of time
without cookware on the grate. The finish on the grate
may chip without cookware to absorb the heat.,
• Be sure the burners and grates are coot before you
place your hand, a pot holder, cleaning cloths or other
materials on them.
How to Select Flame Size
Watch the flame, not the knob, as you reduce heat.
The flame size on a gas burner should match the
cookware you are using_
FOR SAFE HANDLING OF
COOKWARE NEVER LET THE
FLAME EXTEND UP THE
SIDES OF THE COOKWARE.
Any flame larger than the bottom of the cookware is
wasted and only serves to heat the handle,
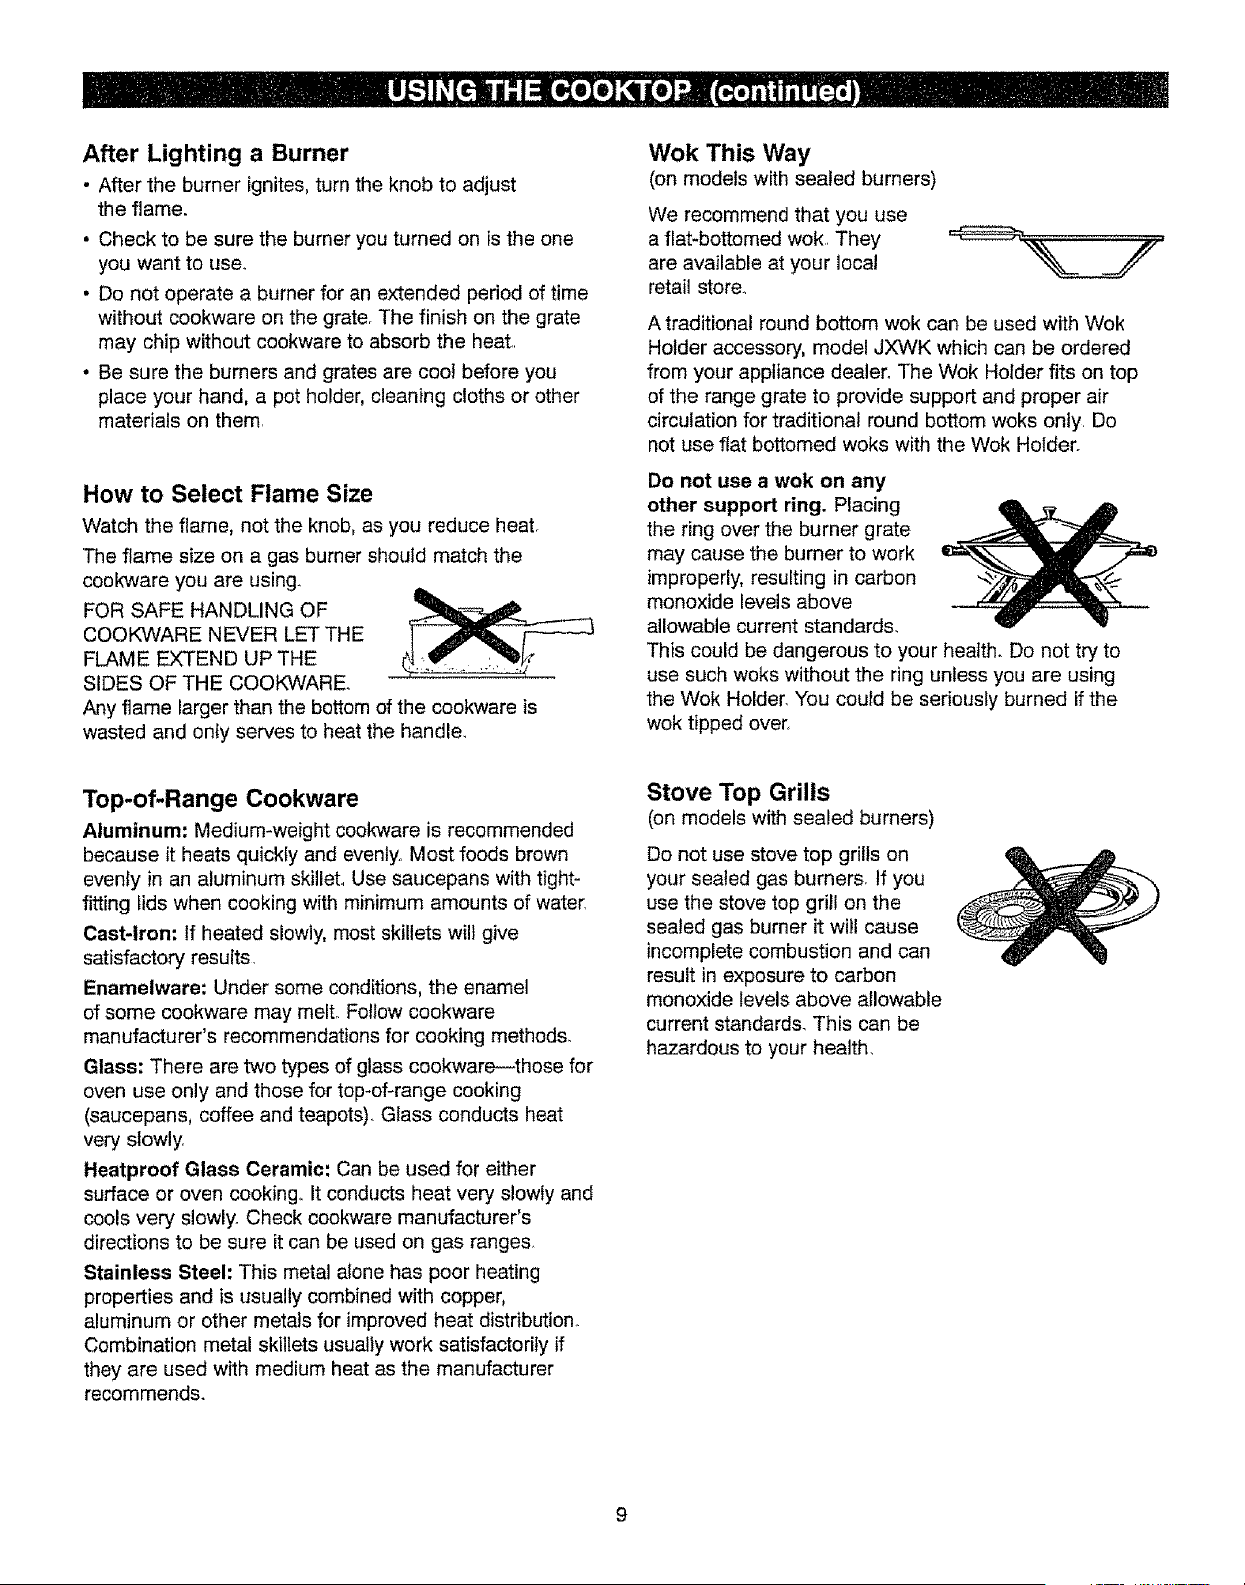
Wok This Way
(on models with sealed burners)
We recommend that you use
a flat-bottomed wok. They
are available at your local
retail store..
A traditional round bottom wok can be used with Wok
Holder accessory, model JXWK which can be ordered
from your appliance dealer. The Wok Holder fits on top
of the range grate to provide support and proper air
circulation for traditional round bottom woke only. Do
not use flat bottomed woks with the Wok Holder.
Do not use a wok on any
other support ring. Placing
the ring over the burner grate
may cause the burner to work
improperly, resulting in carbon
monoxide levels above
allowable current standards.
This could be dangerous to your health. Do not try to
use such woks without the ring unless you are using
the Wok Holder. You could be seriously burned if the
wok tipped over
Top-of-Range Cookware
Aluminum: Medium-weight cookware is recommended
because it heats quickly and evenly. Most foods brown
evenly in an aluminum skillet, Use saucepans with tight-
fitting lids when cooking with minimum amounts of water
Cast-iron: If heated slowly, most skillets will give
satisfactory results.
Enamelware: Under some conditions, the enamel
of some cookware may melt. Follow cookware
manufacturer's recommendations for cooking methods.
Glass: There are two types of glass cookware--those for
oven use only and those for top*of-range cooking
(saucepans, coffee and teapots). Glass conducts heat
very slowly,
Heatproof Glass Ceramic: Can be used for either
surface or oven cooking. It conducts heat very slowly and
cools very slowly_ Check cookware manufacturer's
directions to be sure it can be used on gas range&
Stainless Steel: This metal alone has poor heating
properties and is usually combined with copper,
aluminum or other metals for improved heat distribution_
Combination metal skillets usually work satisfactorily if
they are used with medium heat as the manufacturer
recommends.
Stove Top Grills
(on models with sealed burners)
Do not use stove top grills on
your sealed gas burners. If you
use the stove top grill on the
sealed gas burner it will cause
incomplete combustion and can
result in exposure to carbon
monoxide levels above allowable
current standards. This can be
hazardous to your health,
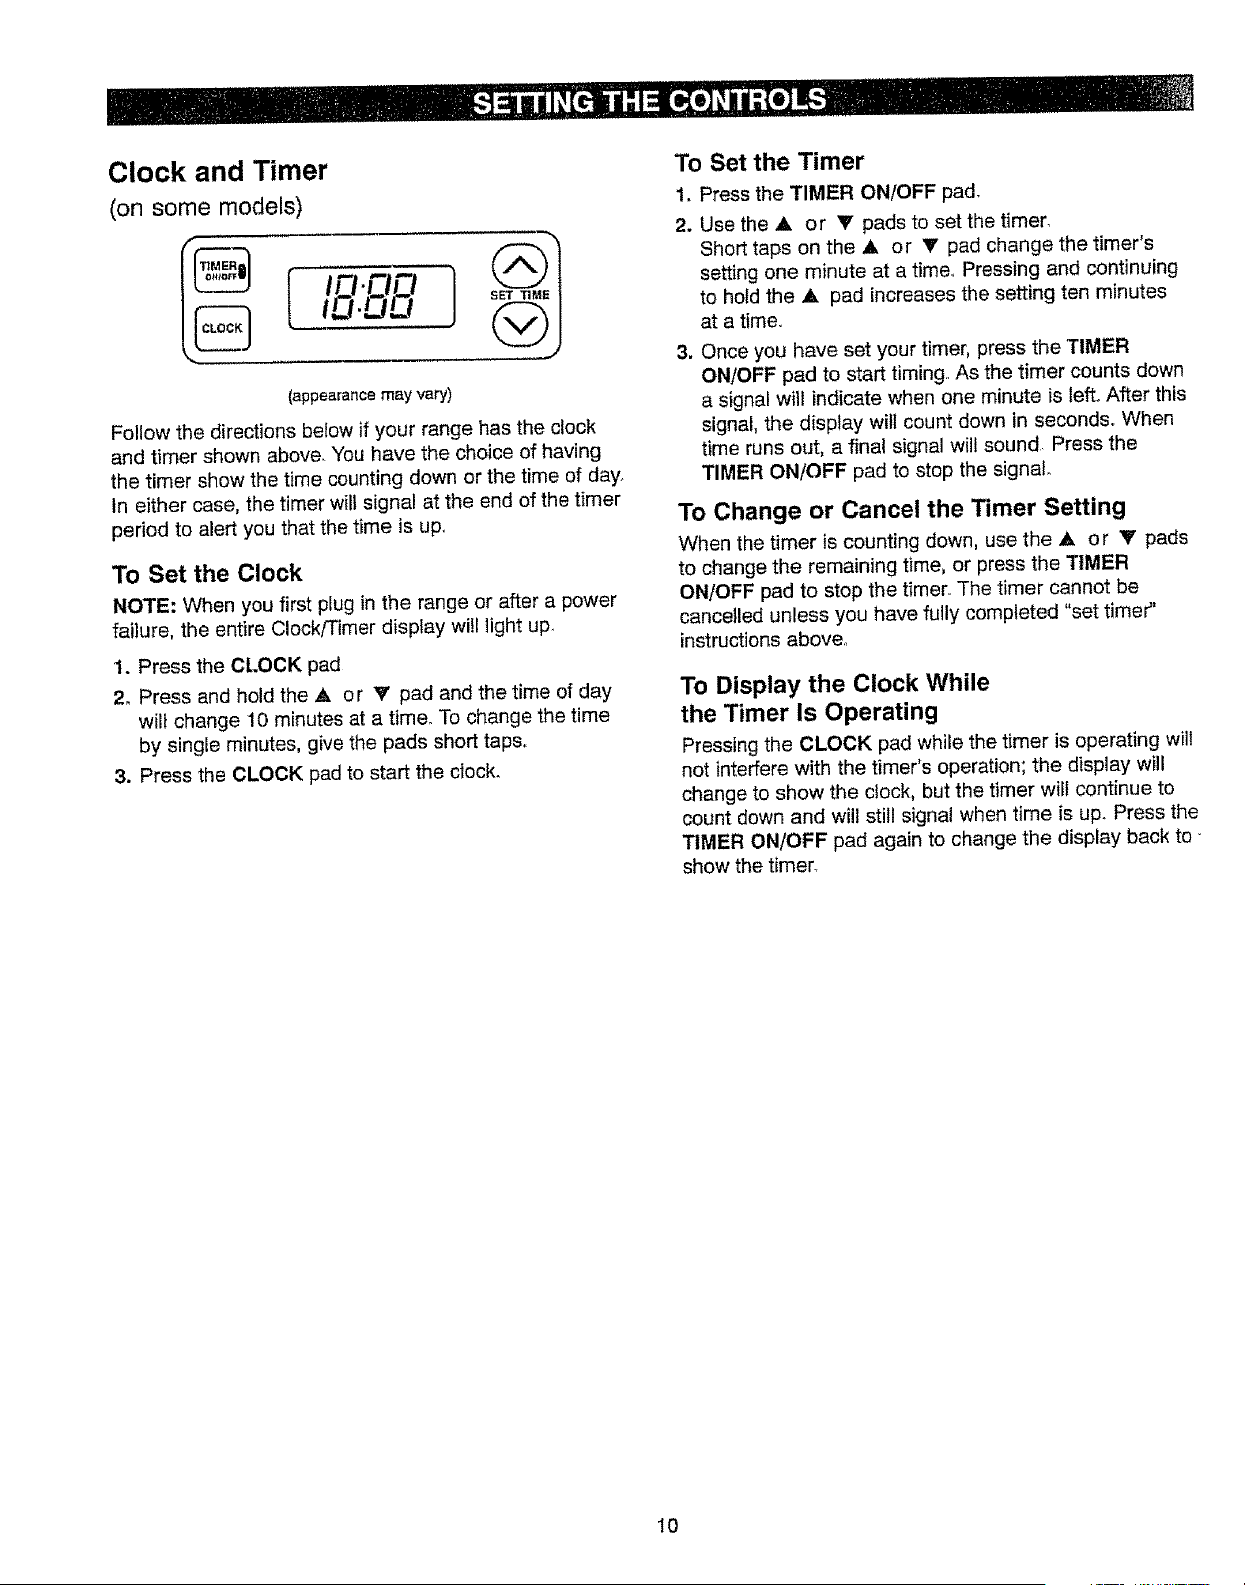
Clock and Timer
(on some models)
I h _.F_lO
(appearancemayvary)
Follow the directions below if your range has the clock
and timer shown above. You have the choice of having
the timer show the time counting down or the time of day.
In either case, the timer will signal at the end of the timer
period to alert you that the time is up_
To Set the Clock
NOTE: When you first plug in the range or after a power
failure, the entire Clock[Timer display will _ight up
1. Press the CLOCK pad
2, Press and hold the A o r V pad and the time of day
will change '10 minutes at a time. To change the time
by single minutes, give the pads short taps,,
3. Press the CLOCK pad to start the clock.
To Set the Timer
1. Press the TIMER ON/OFF pad,
2. Use the A or V pads to setthe timer,
Short taps on the A or V pad change the timer's
setting one minute at a time. Pressing and continuing
to hold the A pad increases the setting ten minutes
at a timer
3. Once you have set your timer, press the TIMER
ON/OFF pad to start timing, As the timer counts down
a signal will indicate when one minute is left. After this
signal, the display will count down in seconds,, When
time runs out, a final signal will sound Press the
TIMER ON/OFF pad to stop the signal.
To Change or Cancel the Timer Setting
When the timer is counting down, use the A o r V pads
to change the remaining time, or press the TIMER
ON/OFF pad to stop the timer. The timer cannot be
cancelled unless you have fully completed "set timer"
instructions above.
To Display the Clock While
the Timer Is Operating
Pressing the CLOCK pad while the timer is operating will
not interfere with the timer's operation; the display will
change to show the ctock, but the timer wilt continue to
count down and will still signal when time is up_ Press the
TIMER ON/OFF pad again to change the display back to-
show the timer_
10
Before Using Your Oven
Be sure you understand how to set the control properly.
Practice removing and replacing the shelves while the
oven is cool. Read the information and tips on the
following pages. Keep this manual handy where you can
refer to it, especially during the first weeks of using your
new range.
Lighting Instructions for
Standing Pilot Models
Some models have standing oven pilots that must be
lit initially.
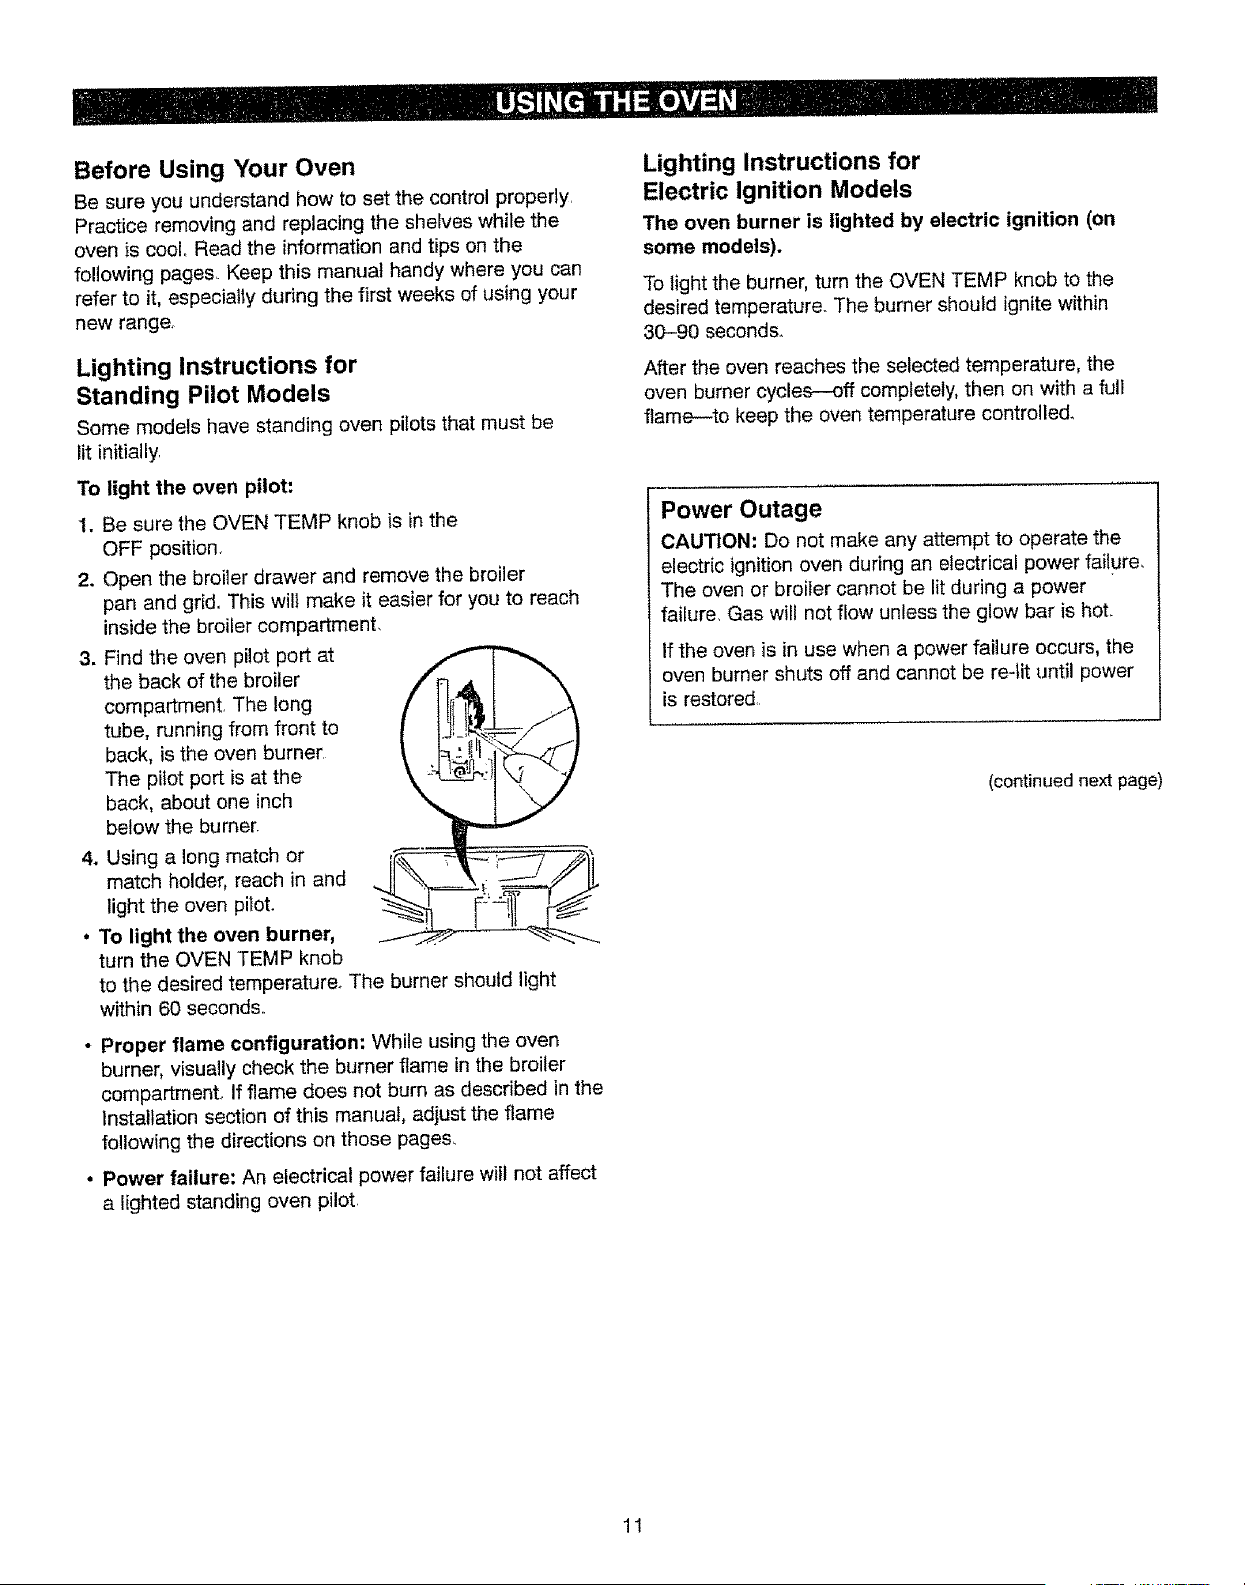
To light the oven pilot:
1. Be sure the OVEN TEMP knob is in the
OFF position.
2. Open the broiler drawer and remove the broiler
pan and grid, This will make it easier for you to reach
inside the broiler compartment.
3. Find the oven pilot port at
the back of the broiler
compartment, The long
tube, running from front to
back, is the oven burner
The pilot port is at the
back, about one inch
below the burner.
4. Using a long match or
match holder, reach in and
light the oven pilot.
• To light the oven burner,
turn the OVEN TEMP knob
to the desired temperature. The burner should light
within 60 seconds.
- Proper flame configuration: While using the oven
burner, visually check the burner flame in the broiler
compartment. If flame does not bum as described in the
Installation section of this manual, adjust the flame
following the directions on those pages,
• Power failure: An electrical power failure will not affect
a lighted standing oven pilot.
Lighting Instructions for
Electric Ignition Models
The oven burner is lighted by electric ignition (on
some models).
To light the burner, turn the OVEN TEMP knob to the
desired temperature. The burner should ignite within
30-90 seconds.
After the oven reaches the selected temperature, the
oven burner cycles--off completely, then on with a full
flame--to keep the oven temperature controlled.
Power Outage
CAUTION: Do not make any attempt to operate the
electric ignition oven during an electrical power failure.
The oven or broiler cannot be lit during a power
failure. Gas will not flow unless the glow bar is hot.
If the oven is in use when a power failure occurs, the
oven burner shuts off and cannot be re-lit until power
is restored.
(continued next page)
11
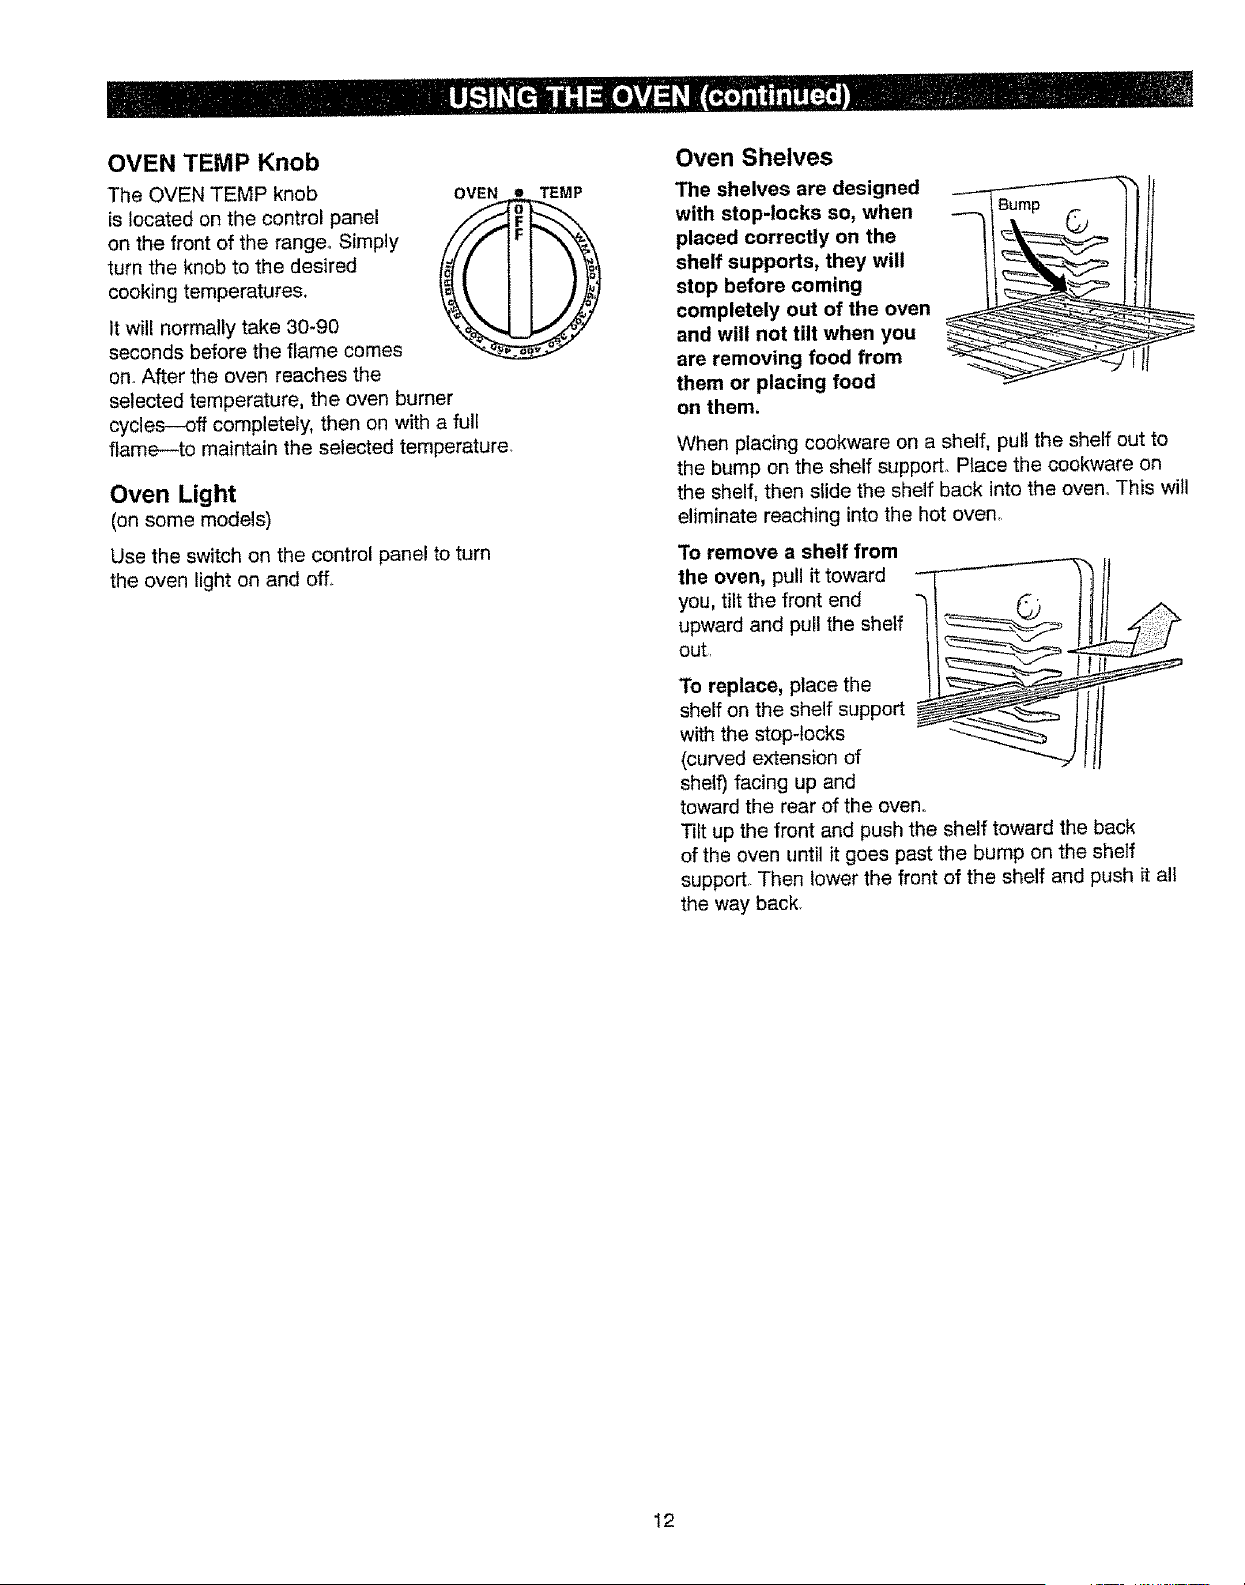
OVEN TEMP Knob
The OVEN TEMP knob
is located on the control panel
on the front of the range,. Simply
turn the knob to the desired
cooking temperatures.
It will normally take 30-90
seconds before the flame comes
on..After the oven reaches the
selected temperature, the oven burner
cycles---off completely, then on with a full
flame--to maintain the selected temperature.
Oven Light
(on some models)
Use the switch on the control panel to turn
the oven light on and off_
Oven Shelves
The shelves are designed
with stop-locks so, when
placed correctly on the
shelf supports, they will
stop before coming
completely out of the oven
and will not tilt when you
are removing food from
them or placing food
on them.
When placing cookware on a shelf, pult the shelf out to
the bump on the shelf support. Place the cookware on
the shelf, then slide the shelf back into the oven° This will
eliminate reaching into the hot oven,
To remove a shelf from
the oven, pull it toward
you, tilt the front end
upward and pull the shelf
out.
To replace, place the
shelf on the shelf support
with the stop-locks
(curved extension of
shelf) facing up and
toward the rear of the even.
_lt up the front and push the shelf toward the back
of the oven until it goes pest the bump on the shelf
support. Then lower the front of the shelf and push _tall
the way back_
12
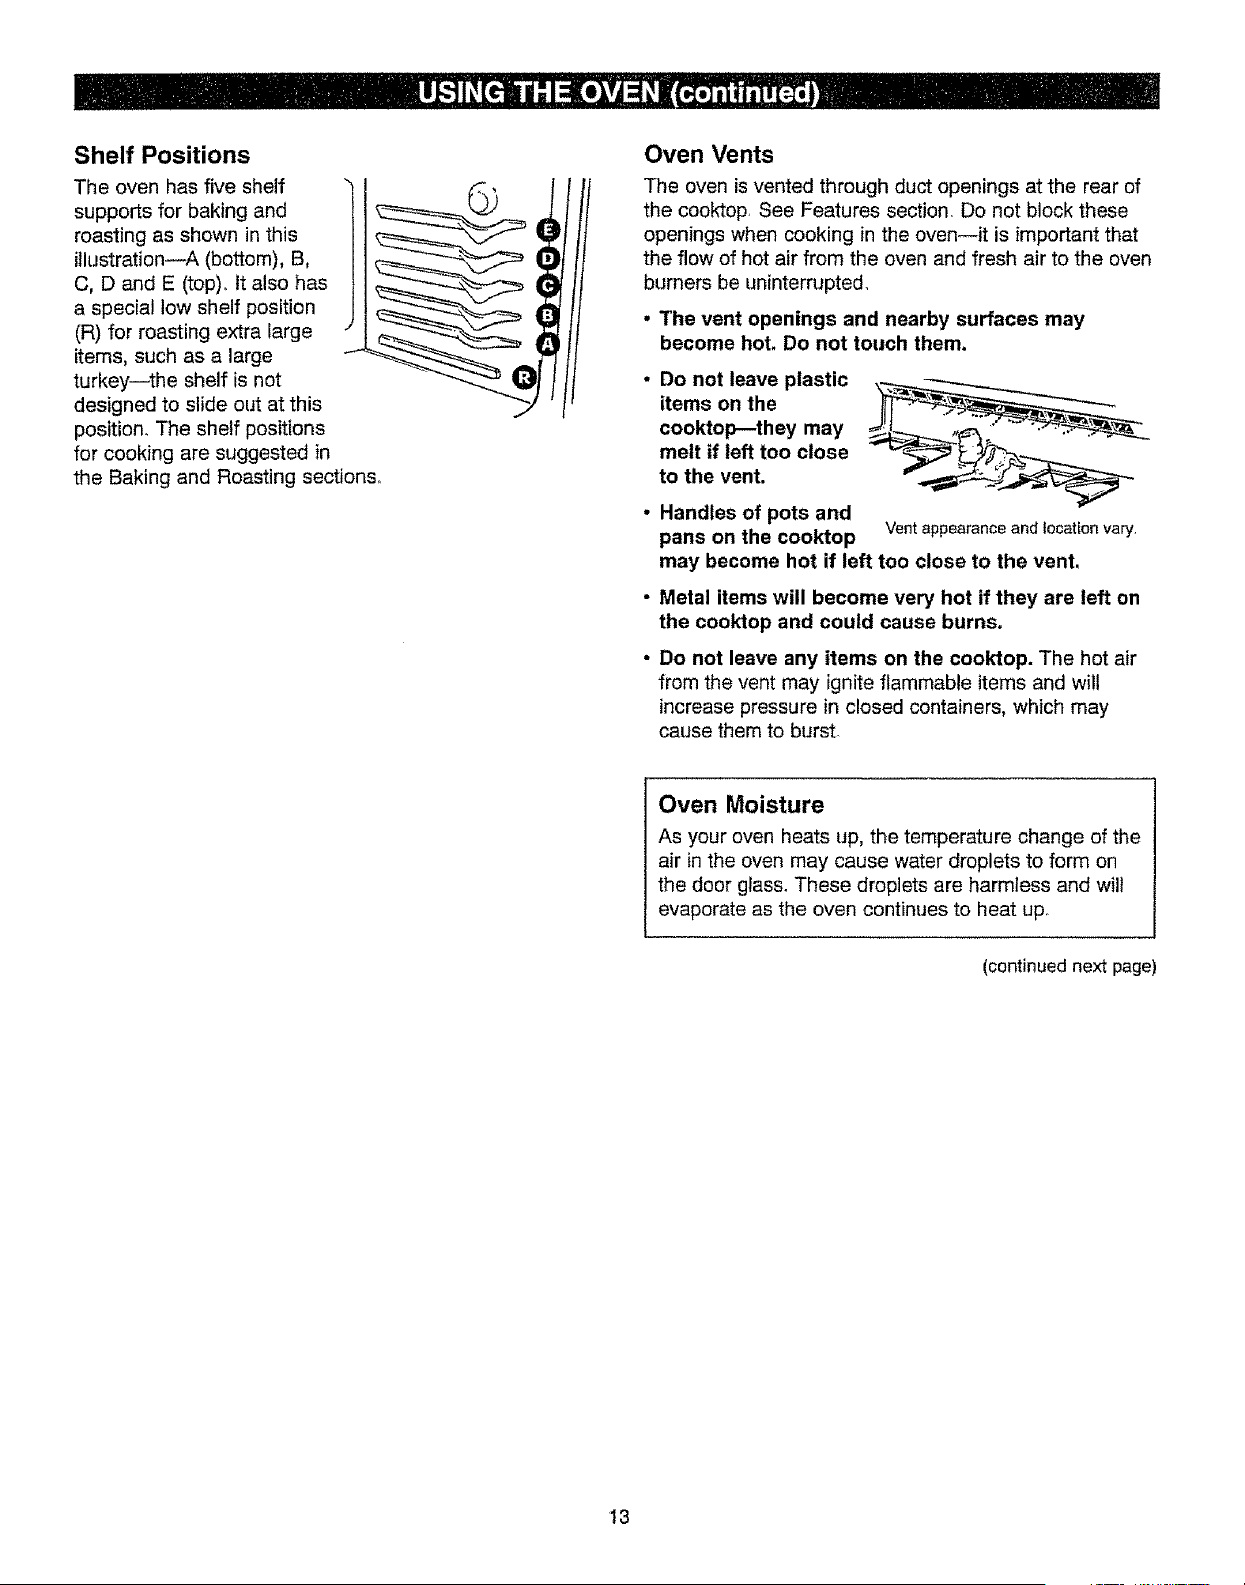
Shelf Positions
The oven has five shelf
supports for baking and
roasting as shown in this
itlustration--A (bottom), B,
C, D and E (top). it also has
a special low shelf position
(R) for roasting extra large
items, such as a large
turkey--the shelf is not
designed to slide out at this
position. The shelf positions
for cooking are suggested in
the Baking and Roasting sections°
Oven Vents
The oven is vented through duct openings at the rear of
the cooktop See Features section. Do not block these
openings when cooking in the oven--it is important that
the flow of hot air from the oven and fresh air to the oven
burners be uninterrupted.
. The vent openings and nearby surfaces may
become hot. Do not touch them.
• Do not leave plastic
items on the
cooktop--they may
melt if left too close
to the vent.
• Handles of pots and
pans on the cooktop Vent appearance and location vary
may become hot if left too close to the vent.
• Metal items will become very hot if they are left on
the cooktop and could cause burns.
• Do not leave any items on the cooktop. The hot air
from the vent may ignite flammable items and will
increase pressure in closed containers, which may
cause them to burst
Oven Moisture
As your oven heats up, the temperature change of the
air in the oven may cause water droplets to form on
the door glas& These droplets are harmless and will
evaporate as the oven continues to heat up.
(continued next page)
13
Baking
Your oven temperature is controlled very accurately
using an oven control system, It is recommended that
you operate the oven for a number of weeks to become
familiar with your new oven's performance, tf you think
an adjustment is necessary, see the Adjust the Oven
Thermostat section_
How to Set Your Range for Baking
To avoid possible burns, place the shelves in the
correct position before you turn the oven on.
1. Close the oven door, Turn the OVEN TEMP knob to
the desired temperature,
2. Check the food for doneness at the minimum time on
the recipe Cook longer if necessa_
3. Turn the OVEN TEMP knob to OFF and then remove
food,
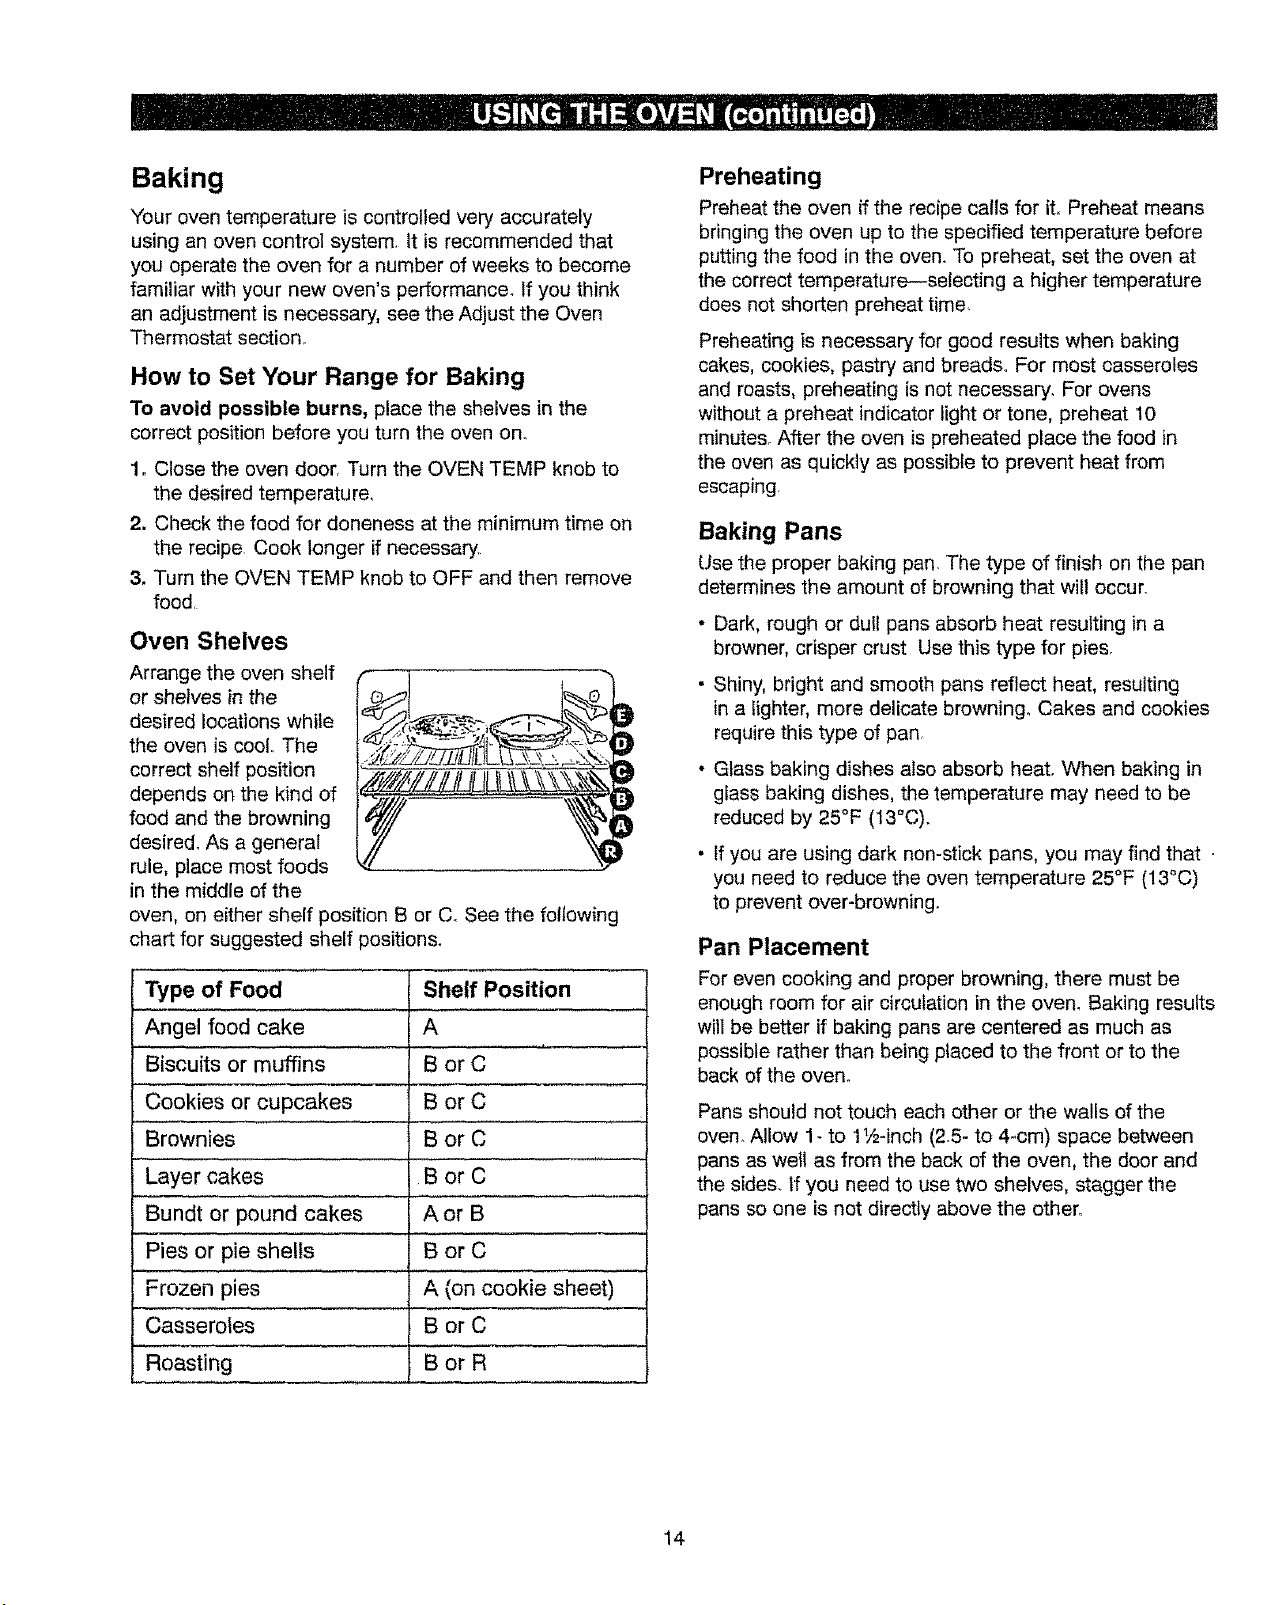
Oven Shelves
Arrange the oven shelf
or shelves in the
desired locations while
the oven is cool. The
correct shelf position
depends on the kind of
food and the browning
desired, As a generai
rule, place most foods
in the middle of the
oven, on either shelf position B or C. See the following
chart for suggested shelf positions.
Type of Food
Angel food cake
Biscuits or muffins
Cookies or cupcakes
Brownies
Layer cakes B or C
Bundt or pound cakes A or B
Pies or pie shells B or C
Frozen pies
Casseroles
Roasting
Shelf Position
A
B orC
B orC
-B or C
A (on cookie sheet)
BorC
BorR
Preheating
Preheat the oven if the recipe calls for it. Preheat means
bringing the oven up to the specified temperature before
putting the food in the oven. To preheat, set the oven at
the correct temperature--selecting a higher temperature
does not shorten preheat time,
Preheating is necessary for good results when baking
cakes, cookies, pastry and breads. For most casseroles
and roasts, preheating is not necessary, For ovens
without a preheat indicator light or tone, preheat 10
minutes, After the oven is preheated place the food in
the oven as quickly as possible to prevent heat from
escaping.
Baking Pans
Use the proper baking pan. The type of finish on the pan
determines the amount of browning that will occur.
. Dark, rough or dull pans absorb heat resulting in a
browner, crisper crust Use this type for pies.
• Shiny, bright and smooth pans reflect heat, resulting
in a iighter, more delicate browning, Cakes and cookies
require this type of pan,
o Glass baking dishes also absorb heat. When baking in
glass baking dishes, the temperature may need to be
reduced by 25°F (13°C).
• If you are using dark non-stick pans, you may find that -
you need to reduce the oven temperature 25°F (13°C)
to prevent over-browning.
Pan Placement
For even cooking and proper browning, there must be
enough room for air circulation in the oven_ Baking results
will be better if baking pans are centered as much as
possibte rather than being placed to the front or to the
back of the oven°
Pans should not touch each other or the walls of the
oven. Allow 1 - to t 1/2-inch (2.5- to 4-cm) space between
pans as well as from the back of the oven, the door and
the sides. If you need to use two shelves, stagger the
pans so one is not directly above the other.
14
Baking
(continued)
Baking Guides
When using prepared baking mixes, follow package
recipe or instructions for the best baking results,
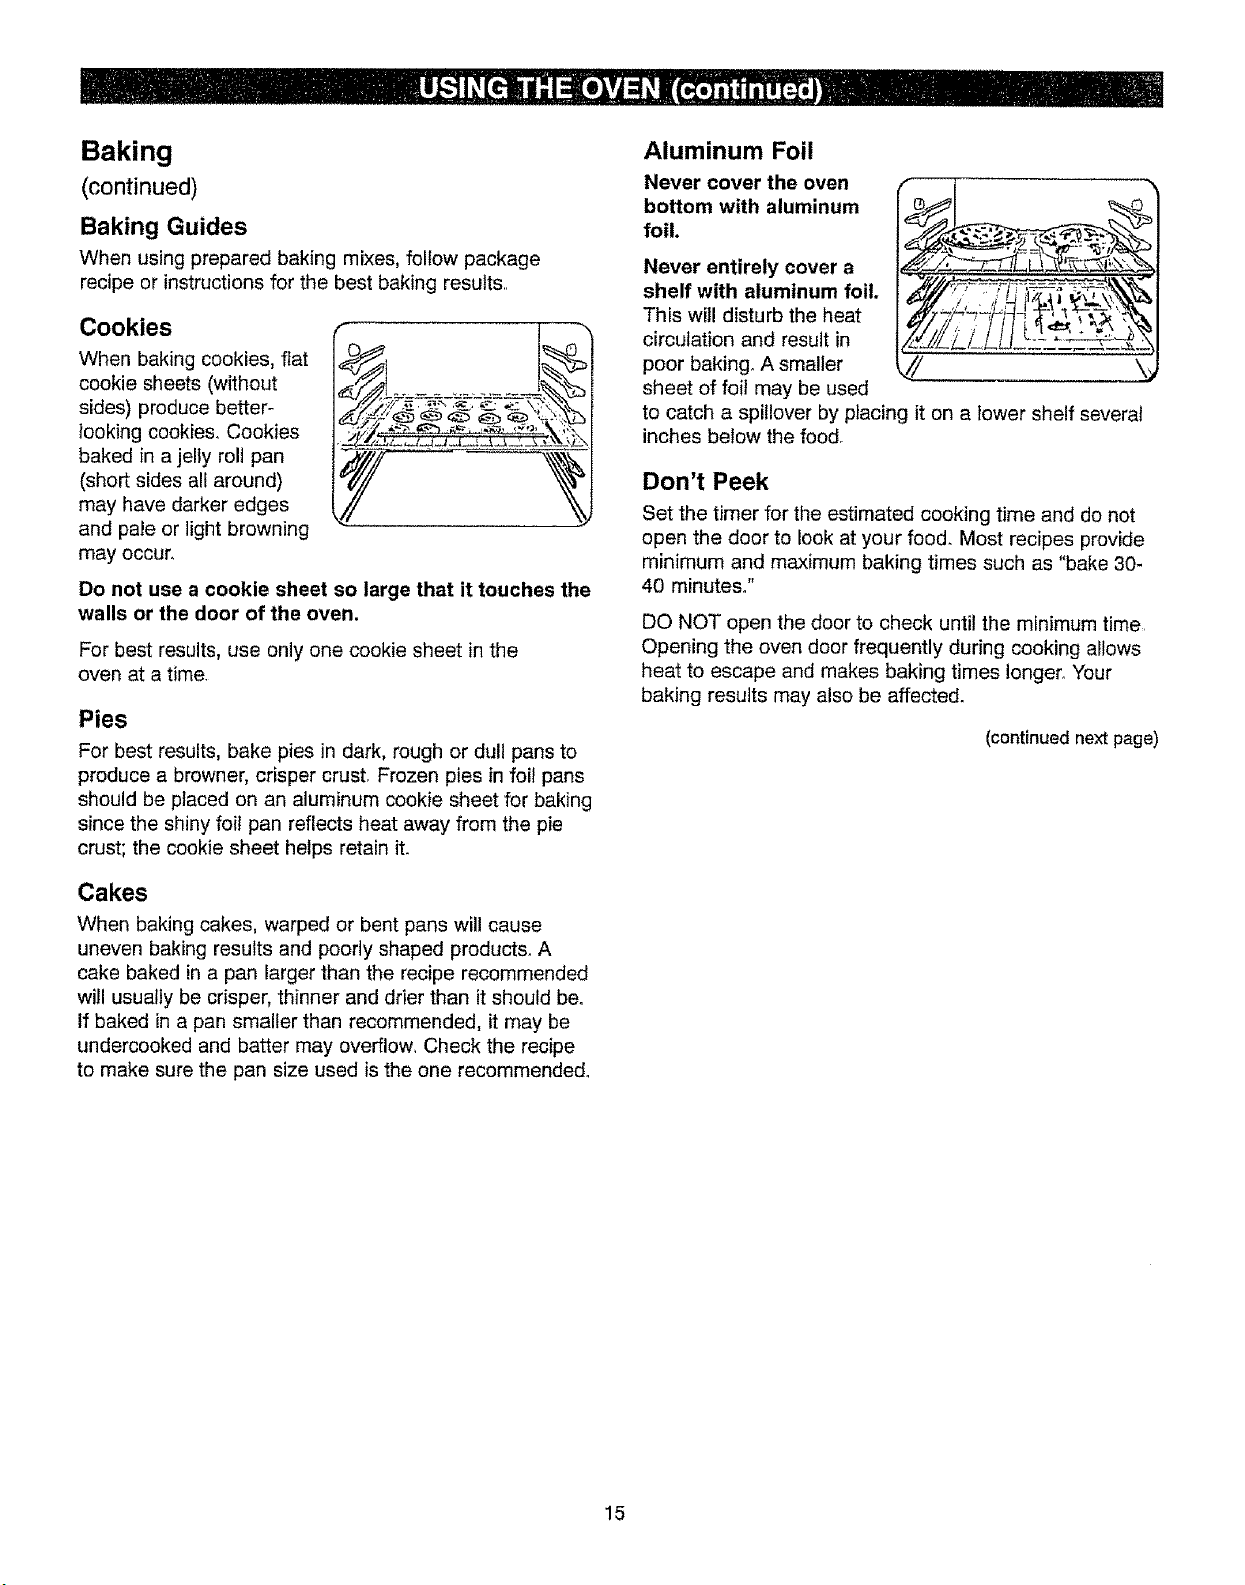
Cookies
When baking cookies, flat
cookie sheets (without
sides) produce better- ._.,"_-_
looking cookies. Cookies
baked in a jelly rolt pan
(short sides all around)
may have darker edges
and pale or light browning
may occur,
Do not use a cookie sheet so large that it touches the
walls or the door of the oven.
For best results, use only one cookie sheet in the
oven at a time.
Pies
For best results, bake pies in dark, rough or dull pans to
produce a browner, crisper crust. Frozen pies in foil pans
should be placed on an aluminum cookie sheet for baking
since the shiny foil pan reflects heat away from the pie
crust; the cookie sheet helps retain it.
Cakes
When baking cakes, warped or bent pans will cause
uneven baking results and poorly shaped products. A
cake baked in a pan larger than the recipe recommended
will usually be crisper, thinner and drier than it should be.
If baked in a pan smaller than recommended, it may be
undercooked and batter may overflow, Check the recipe
to make sure the pan size used is the one recommended_
Aluminum Foil
Never cover the oven
bottom with aluminum
foil,
Never entirely cover a
shelf with aluminum foil.
This will disturb the heat
circulation and result in
poor baking° A smaller
sheet of foil may be used
to catch a spillover by placing it on a lower shelf several
inches below the food.
Don't Peek
Set the timer for the estimated cooking time and do not
open the door to Iook at your food. Most recipes provide
minimum and maximum baking times such as "bake 30-
40 minutes."
DO NOT open the door to check until the minimum time
Opening the oven door frequently during cooking allows
heat to escape and makes baking times longer Your
baking resutts may also be affected.
(continued next page)
15

Adjust the Oven Thermostatn
Do It Yourself!
You may feel that your new oven cooks differently
than the one it replaced. We recommend that you use
your new oven for a few weeks to become more familiar
with it, following the times given in your recipes as a
guide.
If you think your new oven is too hot or too cold, you
can adjust the thermostat yourself. If you think it is too
hot, adjust the thermostat to make it cooler. If you think it
is too cool, adjust the thermostat to make it hotter.
We do not recommend the use of thermometers,
such as those found in grocery stores, to check the
temperature setting of your new oven_ These
thermometers may vary 20-40°F (I1-22°C)
To Adjust the Thermostat:
Pull the oven TEMP knob off the range and look at the
back side.
To make adjustment, loosen (approximately one turn), but
do not completely remove, the two screws on the back of
the knob. With the back of the knob facing you, hold the
outer edge of the knob with one hand and turn the front
of the knob with the other han&
(appearance mayva_)
To raise the oven temperature, move the top screw
toward the righL You'll hear a click for each notch you
move the knob. To lower the temperature, move the top
screw toward the left. Each click will change the oven
temperature approximately 10°F (6°C). [Range is plus
or minus 60°F (33°C) from the arrow.]
We suggest that you make the adjustment one click from
the original setting and check oven performance before
making any additional adjustments.
After the adjustment is made, retighten screws so they
are snug, but be careful not to overtighten. Reinstall knob
on range and check performance.
Air Adjustment Shutter for Oven Burners
The air adjustment shutter for the bottom burner
regulates the flow of air to the flames,
See the Installation Instructions of this manual for
instructions for location and proper adjustment of
the shutter,
The Type of Margarine Will Affect
Baking Performance
Most recipes for baking have been developed using high
fat products such as butter or margarine (80% fat). If you
decrease the fat, the recipe may not give the same
results as with a higher fat product.
Recipe failure can result if cakes, pies, pastries, cookies
or candies are made with low fat spreads. The lower the
fat content of a spread product, the more noticeable
these differences become.
Federal standards require products labeled "margarine" to
contain at least 80% fat by weight. Low fat spreads, on
the other hand, contain less fat and more water, The high
moisture content of these spreads affect the texture and
flavor of baked goods, For best results with your old
favorite recipes, use margarine, butter or stick spreads
containing at least 70% vegetable oil,
16
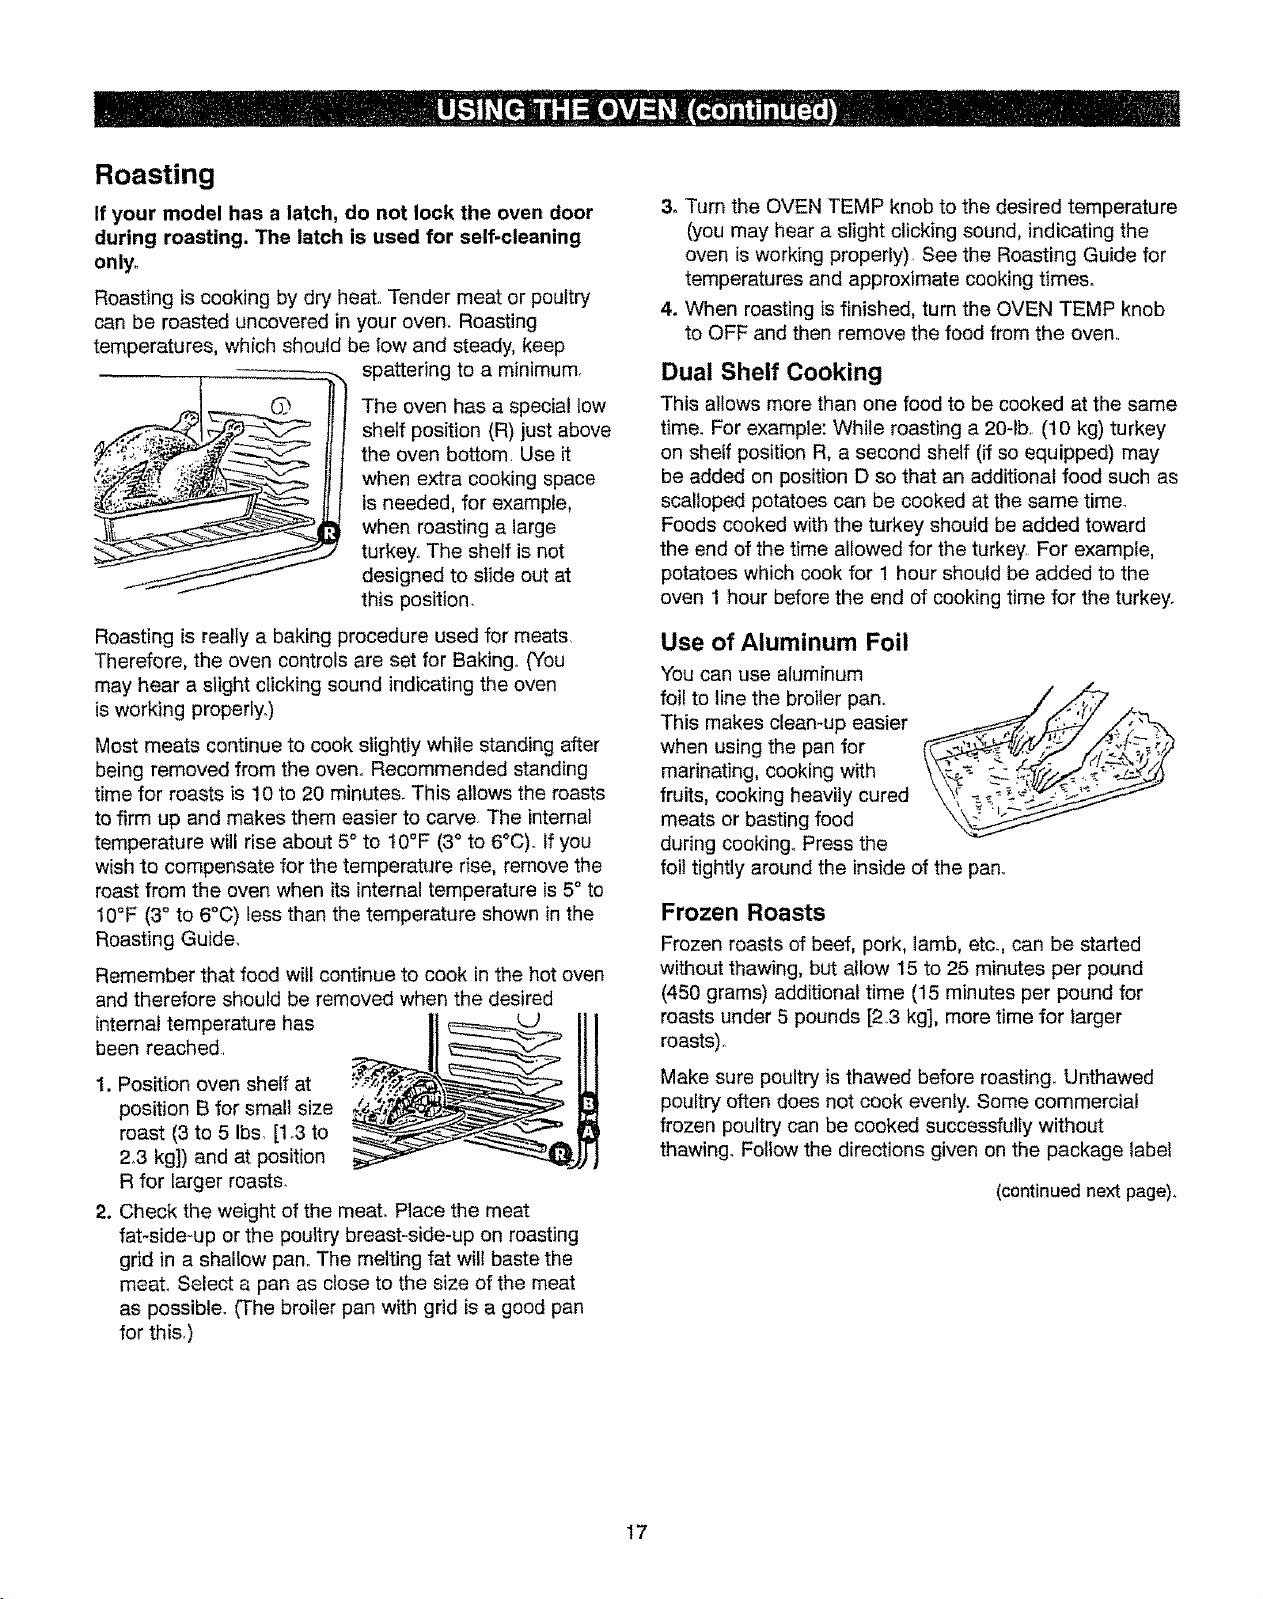
Roasting
If your model has a latch, do not lock the oven door
during roasting, The latch is used for self-cleaning
onlyo
Roasting is cooking by dry heat.. Tender meat or poultry
can be roasted uncovered in your oven. Roasting
temperatures, which should be low and steady, keep
spattering to a minimum,
The oven has a special tow
shelf position (R) just above
the oven bottom Use it
when extra cooking space
is needed, for example,
when roasting a large
turkey° The shelf is not
designed to slide out at
this position,
Roasting is really a baking procedure used for meats
Therefore, the oven controls are set for Baking° (You
may hear a slight clicking sound indicating the oven
is working properly,)
Most meats continue to cook slightly while standing after
being removed from the oven, Recommended standing
time for roasts is t0 to 20 minutes. This allows the roasts
to firm up and makes them easier to carve, The internal
temperature will rise about 5° to tO°F (3 ° to 6°C). If you
wish to compensate for the temperature rise, remove the
roast from the oven when its internal temperature is 5 ° to
10°F (3 ° to 6°C) less than the temperature shown in the
Roasting Guide,
Remember that food will continue to cook in the hot oven
and therefore should be removed when the desired
internal temperature has
been reached,
1. Position oven shelf at
position B for small size
roast (3 to 5 Ibso [1.3 to
2.3 kg]) and at position
R for larger roasts.
2. Check the weight of the meat. Place the meat
fat-side-up or the poultry breast-side-up on roasting
grid in a shallow pan° The melting fat wil! baste the
meat. Select a pan as close to the size of the meat
as possible. (The broiler pan with grid is a good pan
for this,)
3, Turn the OVEN TEMP knob to the desired temperature
(you may hear a slight clicking sound, indicating the
oven is working properly) See the Roasting Guide for
temperatures and approximate cooking times.
4. When roasting is finished, turn the OVEN TEMP knob
to OFF and then remove the food from the oven,,
Dual Shelf Cooking
This allows more than one food to be cooked at the same
time. For example: While roasting a 20-1b, (10 kg) turkey
on shelf position R, a second shelf (if so equipped) may
be added on position D so that an additional food such as
scalloped potatoes can be cooked at the same time.
Foods cooked with the turkey should be added toward
the end of the time allowed for the turkey For example,
potatoes which cook for 1 hour should be added to the
oven 1 hour before the end of cooking time for the turkey.
Use of Aluminum Foil
You can use aluminum
foil to line the broiler pan,.
This makes clean-up easier
when using the pan for
marinating, cooking with
fruits, cooking heavily cured
meats or basting food
during cooking.. Press the
foil tightly around the inside of the pan..
Frozen Roasts
Frozen roasts of beef, pork, lamb, etc., can be started
without thawing, but allow 15 to 25 minutes per pound
(450 grams) additional time (15 minutes per pound for
roasts under 5 pounds [2.3 kg], more time for larger
roasts).
Make sure poultry is thawed before roasting. Unthawed
poultry often does not cook evenly. Some commercial
frozen poultry can be cooked successfully without
thawing. Follow the directions given on the package label
(continued next page).
17
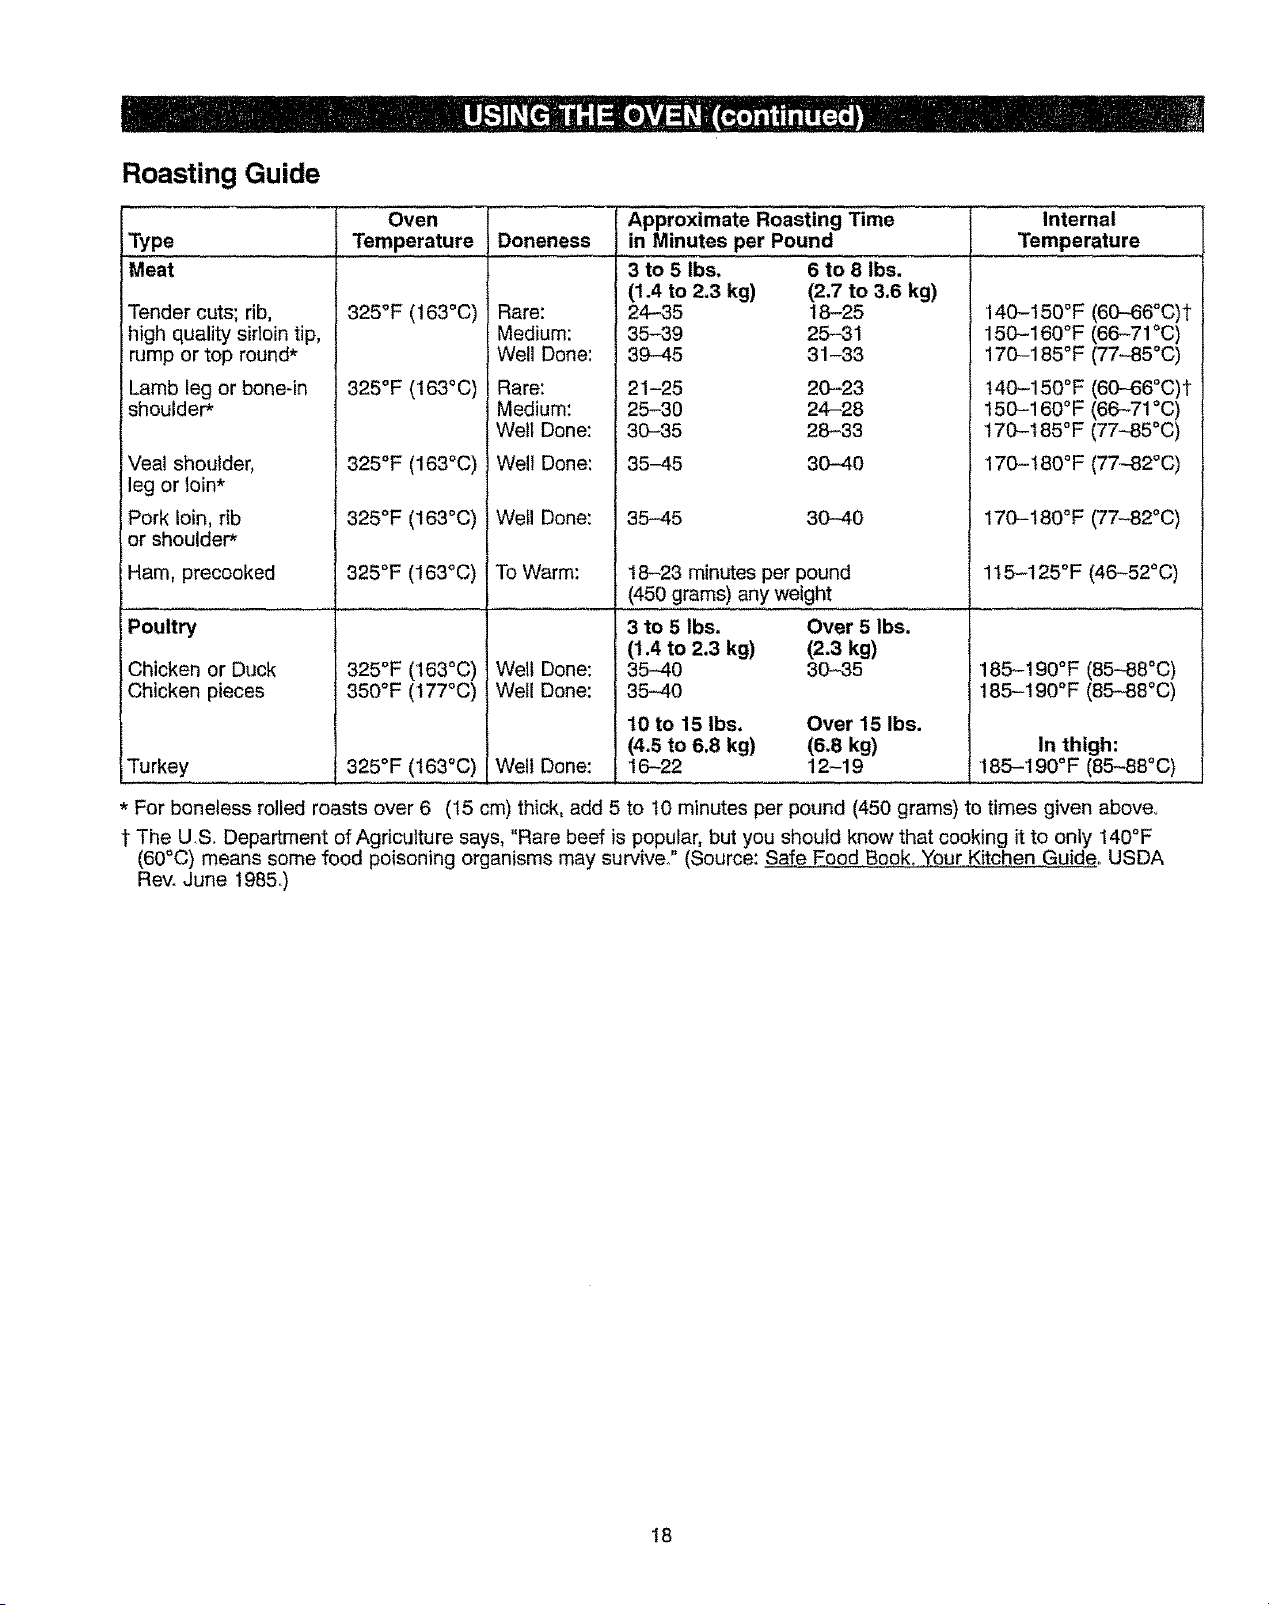
Roasting Guide
Oven Internal
Type Temperature Doneness Temperature
Meat
Tender cuts; rib,
high quality sirloin tip,
rump or top round*
Lamb leg or bone-in
shoulder*
Veal shoulder,
leg or loin*
Pork loin, rib
or shoulder*
Ham, precooked
Poultry
Chicken or Duck
Chicken pieces
Turkey
325°F (163°C)
325°F (163°C)
325°F (163°C)
325°F (163°C)
Rare:
Medium:
Well Done:
Rare:
Medium:
Well Done:
Well Done:
Wetl Done:
Approximate Roasting Time
in Minutes per Pound
3 to 5 Ibs. 6 to 8 lbs.
(1.4 to 2,3 kg) (2.7 to 3.6 kg)
24-35 18-25
35-39 25-31
39-45 31-33
2 '1-25 20-23
25-30 24-28
30-35 28-33
35-45 30-40
35-45 30-40
140-150°F (60--66°C)t
150-160°F (66-71 °C)
170-185°F (77-85°C)
t40-150°F (60-66°C)t
150-160°F (66-71 °C)
t 70-t 85°F (77--85°C)
170-t 80°F (77---82°C)
170-180°F (77-82°C)
325°F (163°C)
325°F (163°C)
350°F (177°C)
325°F (t63°C)
To Warm:
Well Done:
Well Done:
18-23 minutes per pound
(450 grams) any weight
3 to 5 lbs. Over 5 Ibs.
(1.4 to 2.3 kg) (2.3 kg)
35-40 30-35
35-40
10 to 15 ibs, Over 15 Ibs.
(4.5 to 6.8 kg) (6.8 kg)
16-22 12-19Welt Done:
115-125°F (46-52°C)
185-190°F (85--88°0)
185-190°F (85--88°C)
In thigh:
185-190°F (85-88°C)
* For boneless rolled roasts over 6 (15 cm) thick, add 5 to 10 minutes per pound (450 grams) to times given above.
t The U S. Department of Agriculture says, "Rare beef is popular, but you shoufd know that cooking it to only 140°F
(60°C) means some food poisoning organisms may survive.r" (Source: Safe Eood Book_ Your Kitchen Guide,. USDA
Rev. June 1985.)
18
Broiling
Broiling is cooking food by direct heat from above the
food. Your range has a convenient drawer below the oven
for broiling It also has a specially designed broiler pan
and grid that allows the dripping fat to drain away from
the high heat of the gas flame.
it is recommended that meat be cooked to at least an
INTERNALtemperature of t60°F (71°C) and poultry
to at least an INTERNAL temperature of 180°F (82°C)
Cooking to these temperatures usually protects against
foodborne illness.
Distance from the heat source may be changed by
positioning the broiler pan and grid on one of the three
shelf positions in the broiler drawer--A (bottom of broiler
drawer), B (middle) and C (top).
Most fish and tender cuts of meat can be broiled.
Follow these directions to keep spattering and smoking
to a minimum.
The oven door and broiler drawer door must be
closed during broiling.
Turn most foods once during cooking (the exception is
thin fillets of fish; oil one side, place that side down on the
broiler grid and cook without turning until done), Time the
food for about one-hatf the total cooking time, turn the
food, then continue to cook to the preferred doneness_
How to Broil
1o The broiler drawer does not need to be preheated
for broiling,
2, If the meat has fat or gristle around the edge, cut
vertical slashes through both about 2 (5 cm) apart,
but do not cut into meat° If desired the fat may be
trimmed, leaving a layer about t/8 (3 ram) thick_
3, Arrange the food on the grid and position the broiler
pan on the appropriate sheff in the broiIer drawer.
Placing the food closer to flame sears the exterior
and increases the surface browning of food, but also
increases spattering and the possibility of fats and
meat juices igniting.
4, Close the broiler drawer and turn the OVEN TEMP
knob to BROIL.
5. When broiling is finished, turn the OVEN TEMP knob
to OFE Remove the broiler pan from the broiler drawer
and serve the food immediately. Do not leave a soiled
broiler pan and grid inside the range.
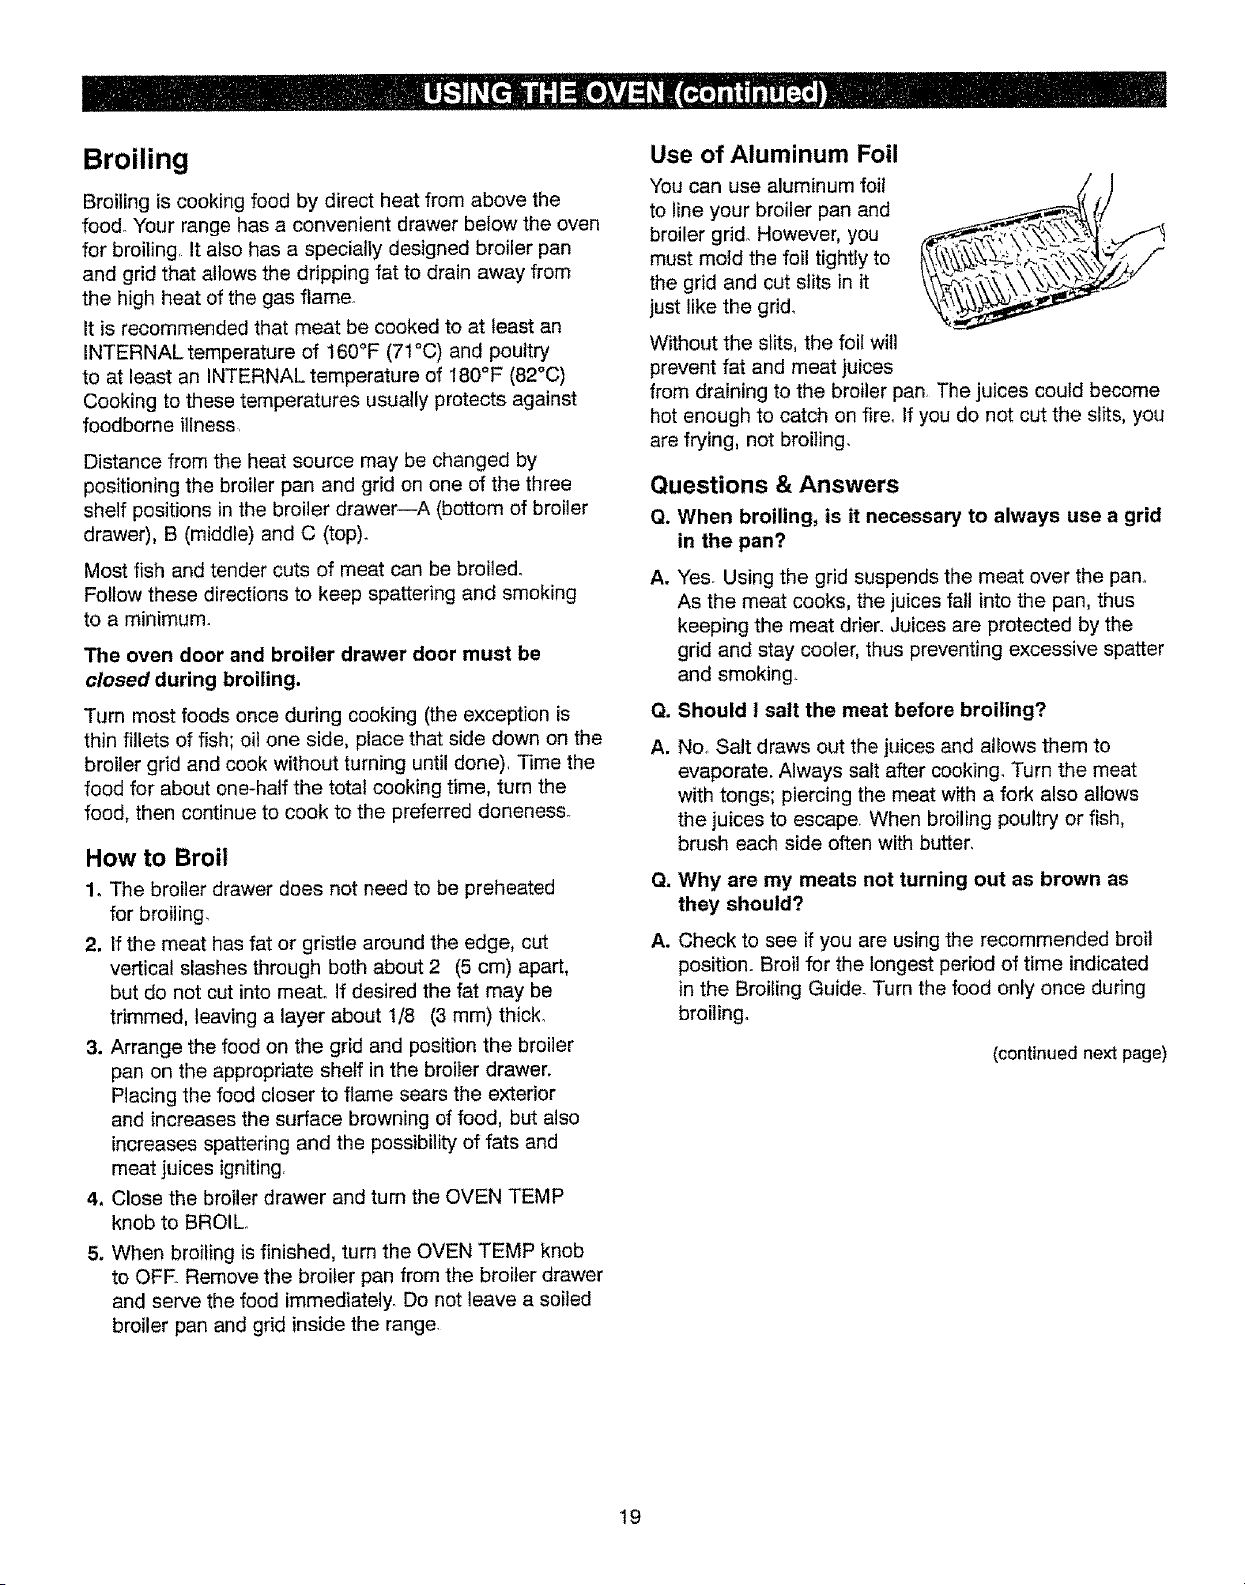
Use of Aluminum Foil
You can use aluminum foil
to line your broiler pan and
broiler grid. However, you
must motd the foil tightly to
the grid and cut slits in it
just like the grid.
Without the slits, the foil will
prevent fat and meat juices
from draining to the broiler pan. The juices could become
hot enough to catch on fire° If you do not cut the slits, you
are frying, not broiling.
Questions & Answers
Q. When broiling, is it necessary to always use a grid
in the pan?
A.
Yes. Using the grid suspends the meat over the pan°
As the meat cooks, the juices fall into the pan, thus
keeping the meat drier_ Juices are protected by the
grid and stay cooler, thus preventing excessive spatter
and smoking.
Q. Should ! salt the meat before broiling?
A,
No, Salt draws out the juices and allows them to
evaporate. Always salt after cooking. Turn the meat
with tongs; piercing the meat with a fork also allows
the juices to escape When broiling poultry or fish,
brush each side often with butter.
Q=
A.
Why are my meats not turning out as brown as
they should?
Check to see if you are using the recommended broil
position. Broil for the longest period of time indicated
in the Broiling Guide. Turn the food only once during
broiling.
(continued next page)
19
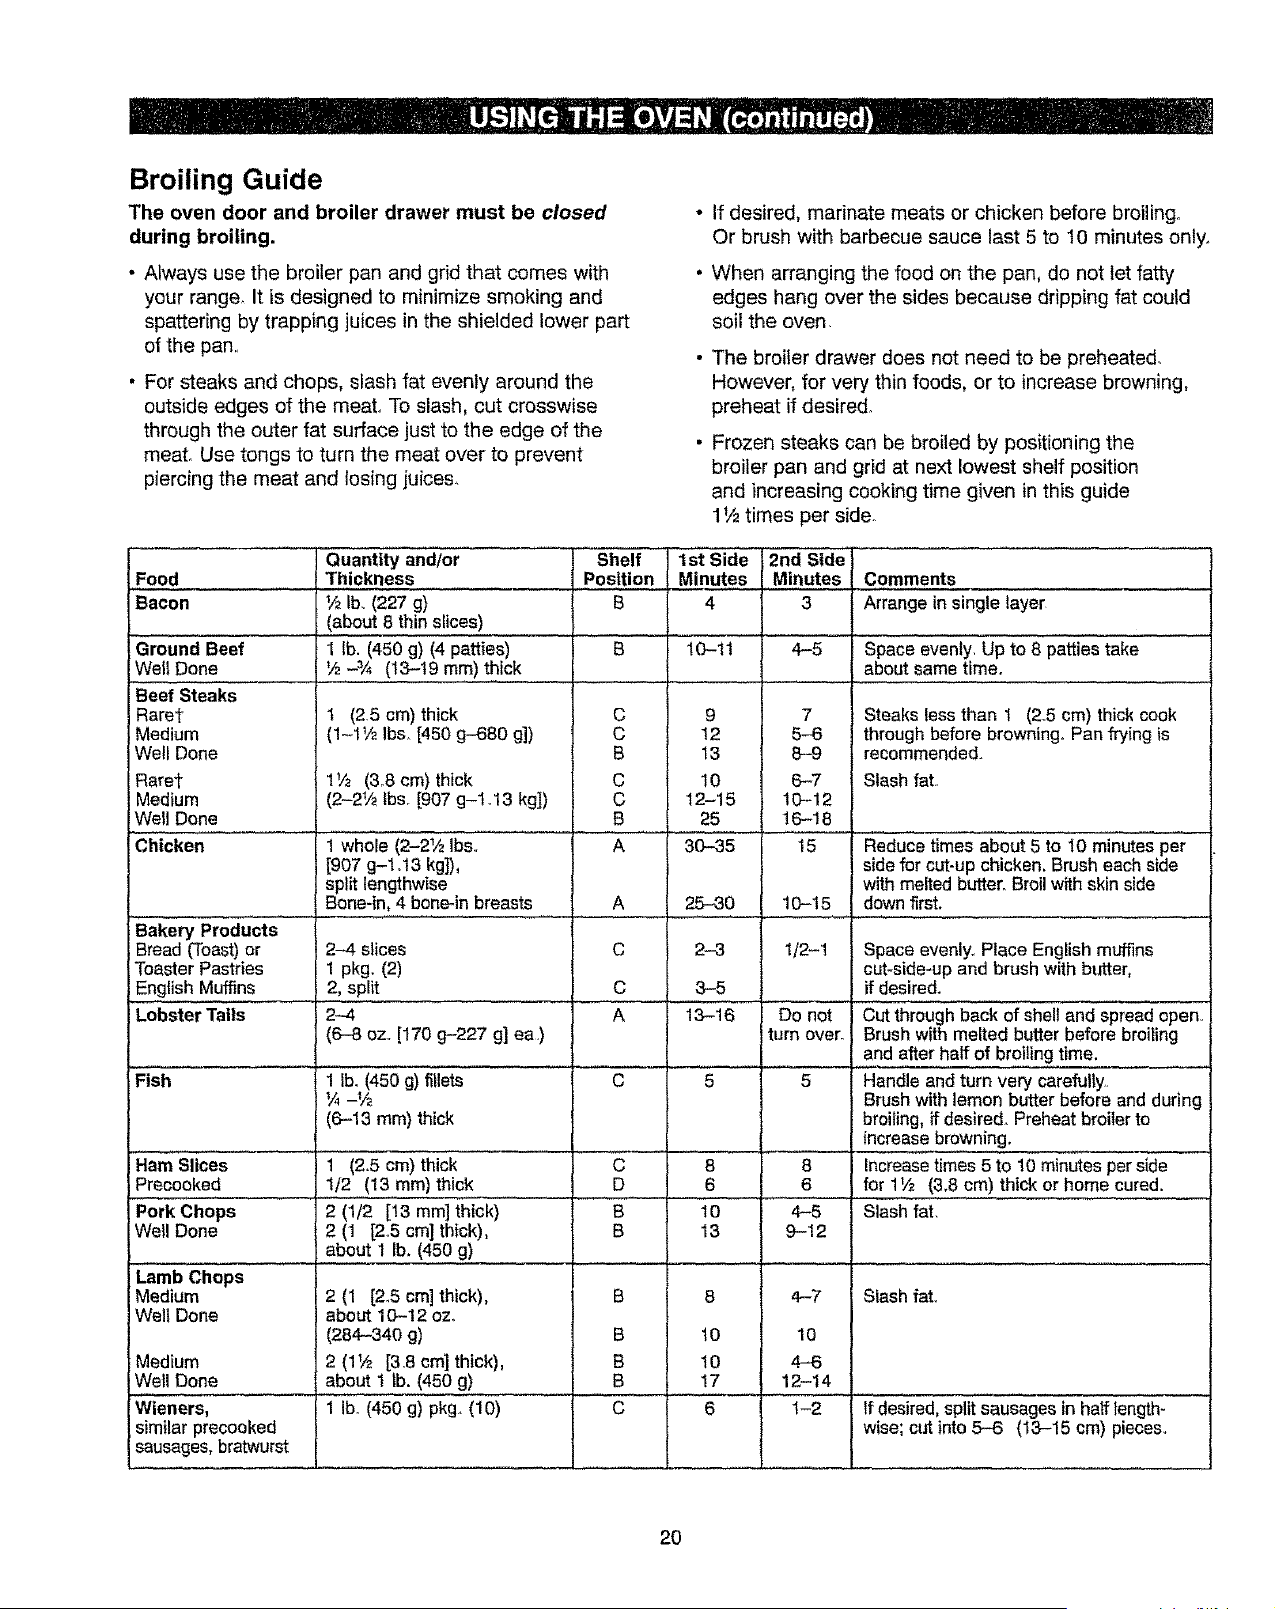
Broiling Guide
The oven door and broiler drawer must be closed
during broiling.
• Always use the broiler pan and grid that comes with
your range. It is designed to minimize smoking and
spattering by trapping juices in the shielded lower part
of the pan.
• For steaks and chops, slash fat evenly around the
outside edges of the meal To slash, cut crosswise
through the outer fat surface just to the edge of the
meat. Use tongs to turn the meat over to prevent
piercing the meat and losing juices.
o If desired, marinate meats or chicken before broilingo
Or brush with barbecue sauce last 5 to t0 minutes ontyo
• When arranging the food on the pan, do not tet fatty
edges hang over the sides because dripping fat could
soil the oven.
• The broiier drawer does not need to be preheated.
However, for very thin foods, or to increase browning,
preheat if desired.
• Frozen steaks can be broiled by positioning the
broiler pan and grid at next lowest shelf position
and increasing cooking time given in this guide
1t/2times per side.
i..F°od
Bacon
Ground Beef
Well Done
Beef Steaks
Rarer
.Medium
Well Done
Rarer
Medium
Well Done
Quantity and/or
Thickness
1/2ib. (227 g)
, (about 8 thin slices)
1 lb. (450 g) (4 patties)
V2JA (13-t9 ram) thick
Shelf
Position
B
B
lstSide 2nd Side
Minutes Minutes
4 3
10-11 4-5
Comments
Arrange in single layer
space evenly. Up to 8 patties take
about same time.
t (2.5 cm) thick
(1-1Vz Ibs. [450 g-680 g])
11/2 (3_8cm) thick
(2-21/_tbs [907 g-t_13 kg])
C
C
B
C
C
B
9
t2
13
10
12-15
25
7
5-6
8-9
6-7
10-12
16-18
Steaks less than 1 (2_5 cm) thick cook
through before browning° Pan frying is
recommended.
Slash fat..
Chicken 1 whole (2-21/2 IbS,r
[907 g-1.13 kg]),
split lengthwise
Bone=in, 4 bone-in breasts
Bakery Products ................
Bread (Toast) or 2-4 slices
Toaster Pastries 1 pkg. (2)
English Muffins 2, spilt
Lobster Tails 2--4
(_ OZ,r [170 g-227 g] ea.)
' Fish 1 lb. (450 g) fillets
(6-13 ram) thick
Ham Slices 1 (2,5 cm) thick
Precooke d t/2 (13 ram)thick
Pork Chops 2 (1/2 [13 mini thick)
Well Done 2 (1 [2..5 cm] thick),
about 1 Ib, (450 g) ...
Lamb Chops
i Medium 2 (1 [2.5 cm] thick),
IWell Done about 10-12 ozo
(284-340 g)
Medium 2 (1_/_ [3.8 cm] thick),
Well Done about 1 lb. (450 g)
[Wieners, 1 Ib_ (450 g) pkg. (10)
similar precooked
sausages, bratwurst
A
A
C
C
A
C
C
D
B
B
B
B
B
B
30-35 15 Reduce times about 5 to 10 minutes per
side for cut-up chicken. Brush each side
with melted butter. Broil with skin side
25-30 10-15 down first.
! !
1/2-'1
2--3
3-5
13-16 Do not
turn over.
5 5
8 8
6 6
10 4-5
13 9-12
........ ! .........
8 4--7
10 10
10 4-6
17 12-14
Space evenly° Place English muffins
cut-side-up and brush with butter,
if desired.
Cut through back of shell and spread open..
Brush with melted butter before broiling
and after hall of broiling time.
Handle and turn very carefuiiy.
Brush with lemon butter before and during
broiling, if desired. Preheat broiler to
increase browning.
Increase times 5 to 10 minutes per side
for 1_,'_(3.8 cm) thick or home cured.
Slash fat,
Slash faL
C 6 1-2 tf desired, split sausages in hall length-
wise; cut into 5-6 (13-15 cm) pieces,,
2O
Propercareandcleaningare importantsoyourrangewill
giveyouefficientandsatisfactoryservice°Followthese
directionscarefullyin caringforit to helpassuresafeand
propermaintenance,.
BE SURE ELECTRICAL POWER IS DISCONNECTED
BEFORE CLEANING ANY PART OF YOUR RANGE.
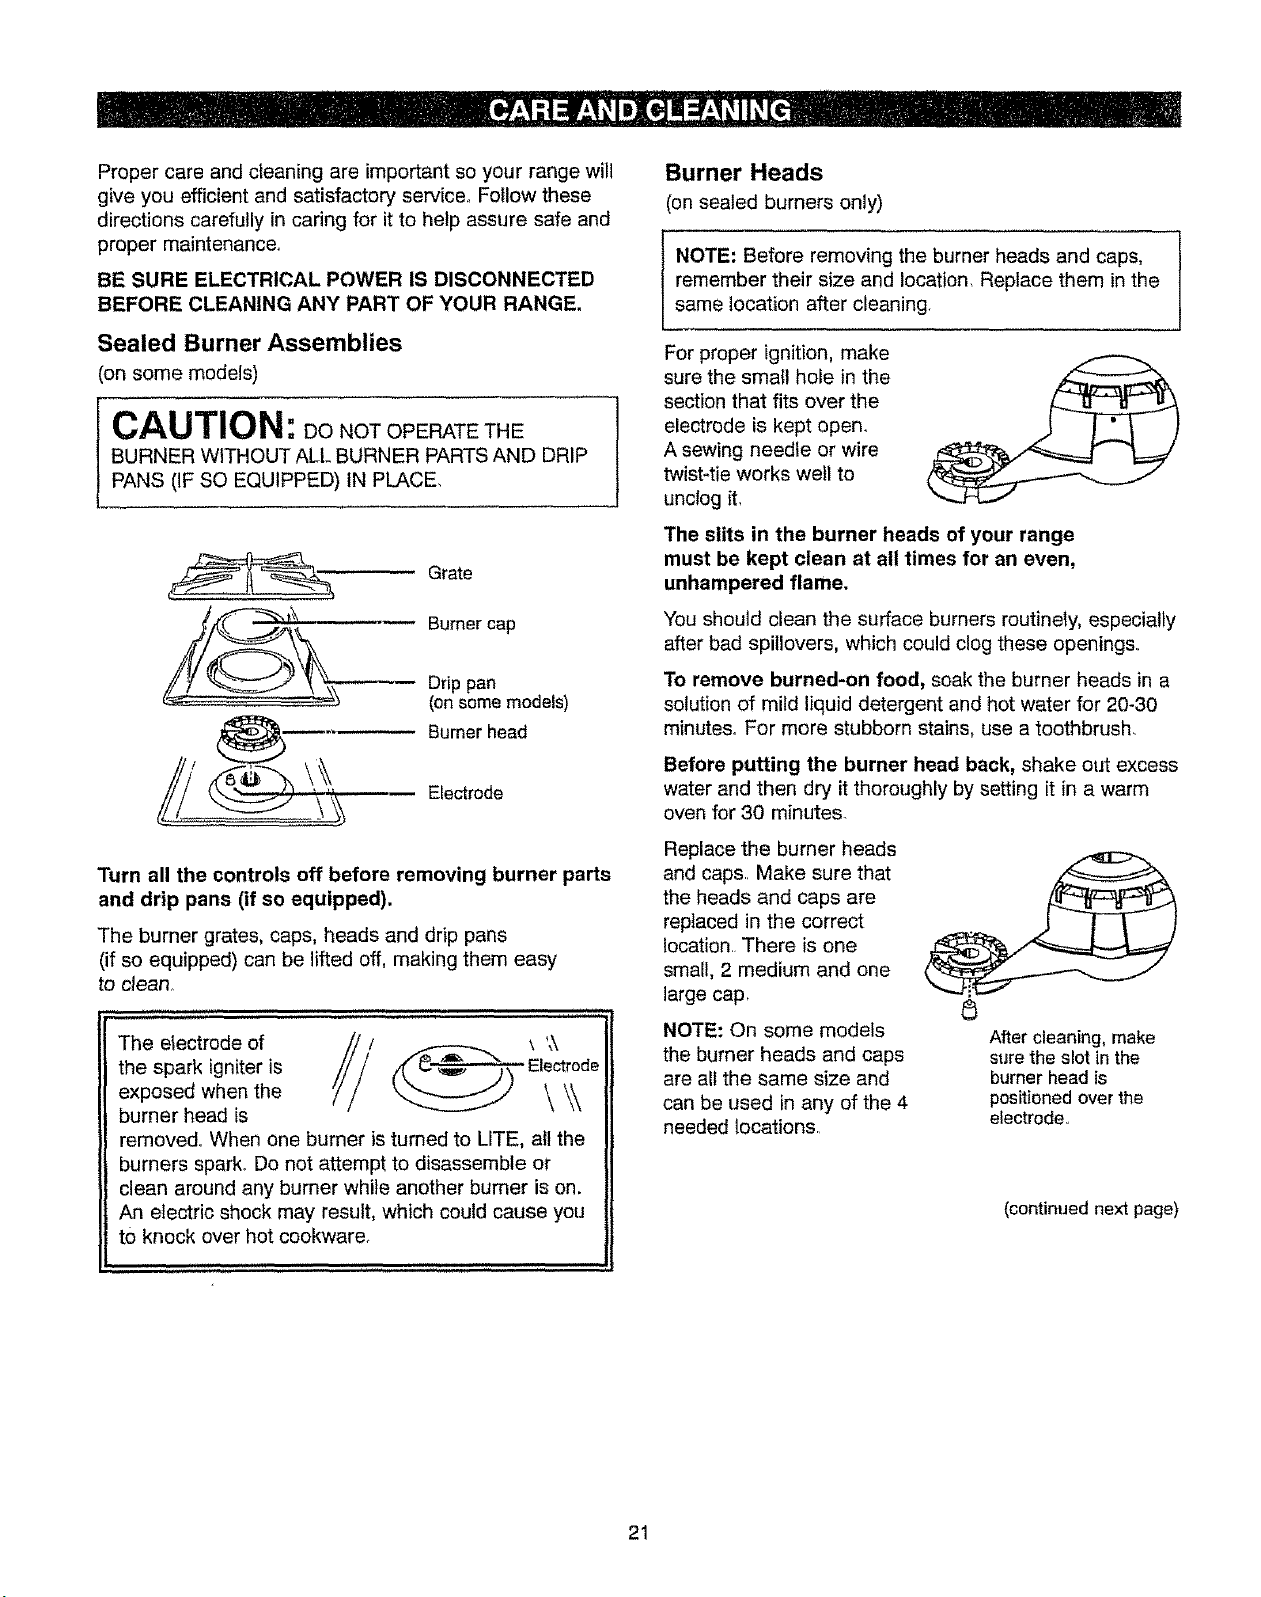
Sealed Burner Assemblies
_n some models)
CAUTION: Do NOT OPERATE THE
BURNERW THOUTALL_BURNERPARTSANDDRIP
PANS (IFSO EQUIPPED)IN PLACE,
Grate
Burner cap
Drip pan
(on some models)
(_---_,_ Burner head
Electrode
Turn all the controls off before removing burner parts
and drip pans (if so equipped).
The burner grates, caps, heads and drip pans
(if so equipped) can be lifted off, making them easy
to clean,
The electrode of _"--_"_"
the spark igniter is
Electrode
exposed when the '_ \ \\
burner head is
removed° When one burner is turned to LITE, al! the
burners spark° Do not attempt to disassemble or
clean around any burner while another bumer is on.
An electric shock may result, which could cause you
to knock over hot cookware,
...... ,i, ,,,,
Burner Heads
(on sealed burners only)
NOTE: Before removing the burner heads and caps,
remember their size and location, Replace them in the
same location after cleaning,
For proper ignition, make
sure the small hole in the
section that fits over the
electrode is kept open.
A sewing needle or wire
twist-tie works wetl to
unclog it,
The slits in the burner heads of your range
must be kept clean at all times for an even,
unhampered flame.
You should clean the surface burners routinely, especially
after bad spillovers, which could clog these openings..
To remove burned-on food, soak the burner heads in a
solution of mild liquid detergent and hot water for 20-30
minute& For more stubborn stains, use a toothbrush.
Before putting the burner head back, shake out excess
water and then dry it thoroughly by setting it in a warm
oven for 30 minutes.
Replace the burner heads
and caps. Make sure that
the heads and caps are
replaced in the correct
location. There is one
small, 2 medium and one
large cap.
NOTE: On some models
the burner heads and caps
ere all the same size and
can be used in any of the 4
needed locations.
After cleaning, make
sure the slot in the
burner head is
positioned over the
electrode.
(continued next page)
21
Burner Caps
(on sealed burners only)
Lift off when cool. Wash burner caps in hot, soapy water
and rinse with clean water, You may scour with a plastic
scouring pad to remove burned-on food particles°
Dry them in a warm oven or with a cloth--don't
reassemble them wet. Replace the burner caps.
Left Drip Pan
Small _
Medium_ Medium
Medium
Front of Range
Make sure that caps are replaced on the correct size
burner. There is one small, 2 medium and one large cap.
NOTE: On some models the caps are all the same size
and can be used in any of the 4 needed locations.
Right Drip Pan
/
Smai
Large
Burner Grates
Lift out when coo!. The
grates should be washed
regularly and, of course,
after spillovers Wash
them in hot, soapy water and rinse with clean water. After
cleaning, dry them thoroughly by putting them in a warm
oven for a few minutes. Don't put the grates back on the
range while they are wet. When replacing the grates, be
sure they're positioned securely over the burners.
To prevent rusting on cast iron grates, apply a light
coating of cooking oil on the bottom of the grates.
To get rid of burned-on food, place the grates in a
covered container (or plastic bag) with 1Acup (62 ml)
ammonia to loosen the soil. Let sit overnight (or
approximately 12 hours), then scrub with a soapfilled
scouring pad if necessary° Rinse grates thoroughly and
dry completely before replacing them on the range top,
Although they're durable, the grates will gradually lose
their shine, regardless of the best care you can give
them. This is due to their continual exposure to high
temperatures.
Do not operate a burner for an extended period of
time without cookware on the grate. The finish on the
grate may chip without cookware to absorb the heat.
CAUTION: Do not clean the grates in a dishwasher or
in a self-cleaning oven,
Drip Pans Left
(on some models) !
Remove the grates
and lift out the drip
pans° The drip pans
can be cleaned in a
dishwasher or by hand.
To get rid of burned-
on food, place the drip pans in a covered container
(or plastic bag) with I/_cup (62 rot) ammonia to
loosen the soi!. Then scrub with a soap-filled
scouring pad if necessary
Right
When replacing the drip pans, make sure they are in the
correct position.
CAUTION: Do not clean the drip pans in a
self-cleaning oven,
Cooktop Surface
To avoid damaging the porcelain enamel surface of
the cooktop and to prevent it from becoming dull,
clean up spills right away. Foods with a lot of acid
(tomatoes, sauerkraut, fruit juices, etc.) or foods with high
sugar content could cause a dull spot if allowed to sit.
When the surface has cooled, wash and rinse_.For other
spills such as fat spatterings, etc., wash with soap and
water once the surface has cooied_ Then rinse and polish
with a dry cloth.
Be carefu{ when you clean the cooktop because the area
over the pilot will be hot (on models with standing pilots)..
Do not store flammable materials in an oven or
near the cooktop. Do not store or use combustible
materials, gasoline or other flammable vapors and
liquids in the vicinity of this or any other appliance.
22
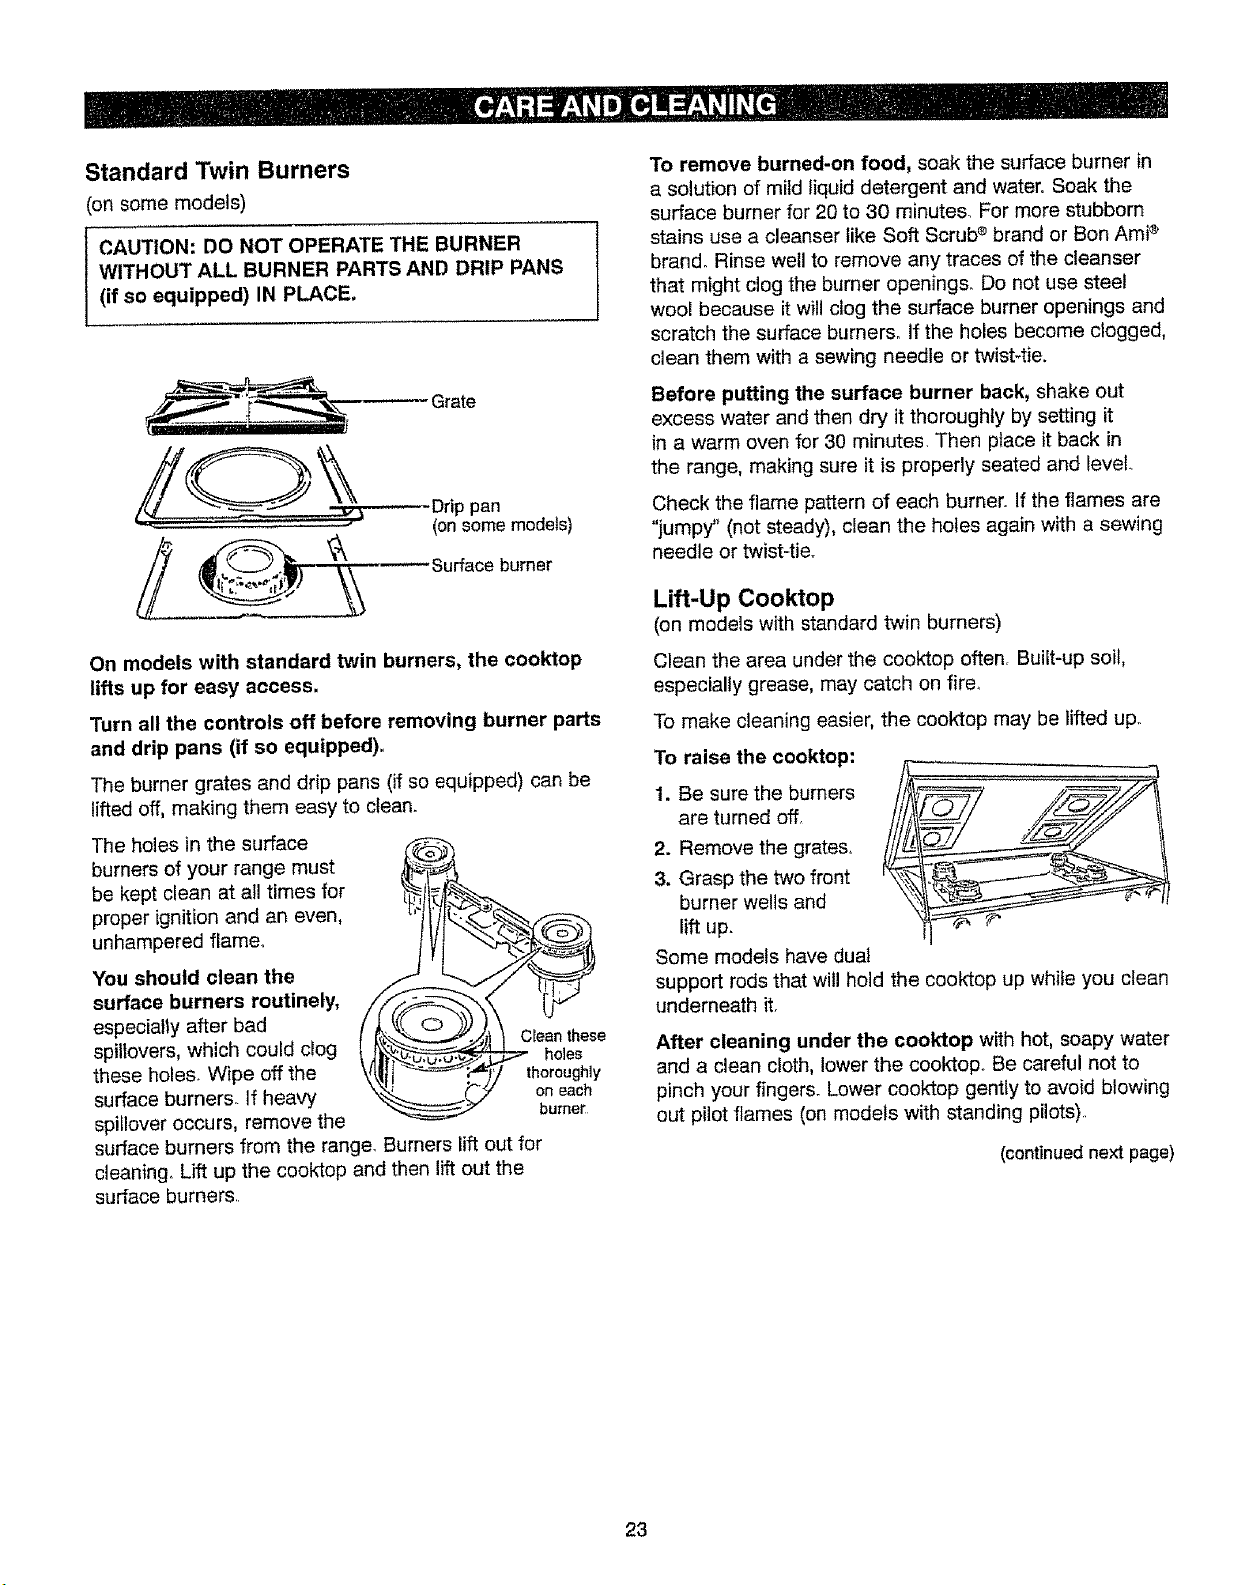
Standard Twin Burners
(on some models)
CAUTION: DO NOT OPERATE THE BURNER
WITHOUT ALL BURNER PARTS AND DRIP PANS
(if so equipped) IN PLACE,
Grate
pan
(on some models)
Surface burner
On models with standard twin burners, the cooktop
lifts up for easy access.
Turn all the controls off before removing burner parts
and drip pans (if so equipped).
The burner grates and drip pans (if so equipped) can be
lifted off, making them easy to clean.
The holes in the surface
burners of your range must
be kept clean at all times for
proper ignition and an even,
unhampered flame°
You should clean the
surface burners routinely,
especially after bad
spillovers, which could clog
these holes. Wipe off the
surface burners. If heavy
spiIIover occurs, remove the
surface burners from the range_ Burners lift out for
cleaning, Lift up the cooktop and then lift out the
surface burners
Clean these
holes
thoroughly
on each
burner
To remove burned-on food, soak the surface burner in
a solution of mild liquid detergent and water. Soak the
surface burner for 20 to 30 minutes. For more stubborn
stains use a cleanser like Soft Scrub ® brand or Ben AmP
brand_ Rinse well to remove any traces of the cleanser
that might clog the burner openings_ Do not use steel
wool because it will clog the surface burner openings and
scratch the surface burners, if the holes become clogged,
clean them with a sewing needle or twist-tie.
Before putting the surface burner back, shake out
excess water and then dry it thoroughly by setting it
in a warm oven for 30 minutes. Then place it back in
the range, making sure it is properly seated and level.
Check the flame pattern of each burner. If the flames are
"jumpy" (not steady), clean the holes again with a sewing
needle or twist-tier
Lift-Up Cooktop
(on models with standard twin burners)
Clean the area under the cooktop often, Built-up soil,
especially grease, may catch on fire°
To make cleaning easier, the cooktop may be lifted up.
To raise the cooktop:
1. Be sure the burners
are turned off.
2. Remove the grates.
3. Grasp the two front
burner wells and _._
lift up.
Some models have dual
support rods that will hold the cooktop up while you clean
underneath it.
After cleaning under the cooktop with hot, soapy water
and a clean cloth, lower the cooktop. Be careful not to
pinch your fingers. Lower cook-top gently to avoid blowing
out pilot flames (on models with standing pilots),
(con_nued next page)
23
Oven Air Vents
Never block the vents (air openings) of the range.
They provide the air inlet and outlet that are
necessary for the range to operate properly with
correct combustion, Air openings are located at the
rear of the cooktop, at the top and bottom of the oven
door, and at the bottom of the range, under the kick
panel, storage drawer or broiler drawer (depending on
the model)
Broiler Pan and Grid
After broiling, remove the broiler pan from the oven or
broiler compartment (depending on your model). Remove
the grid from the pan, Carefully pour out grease from the
pan into a proper container. Wash and rinse the broiler
pan and grid in hot water with a soap-filled or plastic
scouring pad.
If food has burned on, sprinkle the grid with detergent
while hot and cover with wet paper towels or a dishcloth.
Soaking the pan will remove burned-on foods.
The broiler pan and grid may be cleaned with a
commercial oven cleaner.
Both the broiler pan and grid can also be cleaned in a
dishwasher.
Do not store a soiled broiler pan and grid anywhere in
the range.
CAUTION: Do not clean the broiler pan or grid in a self-
cleaning oven.
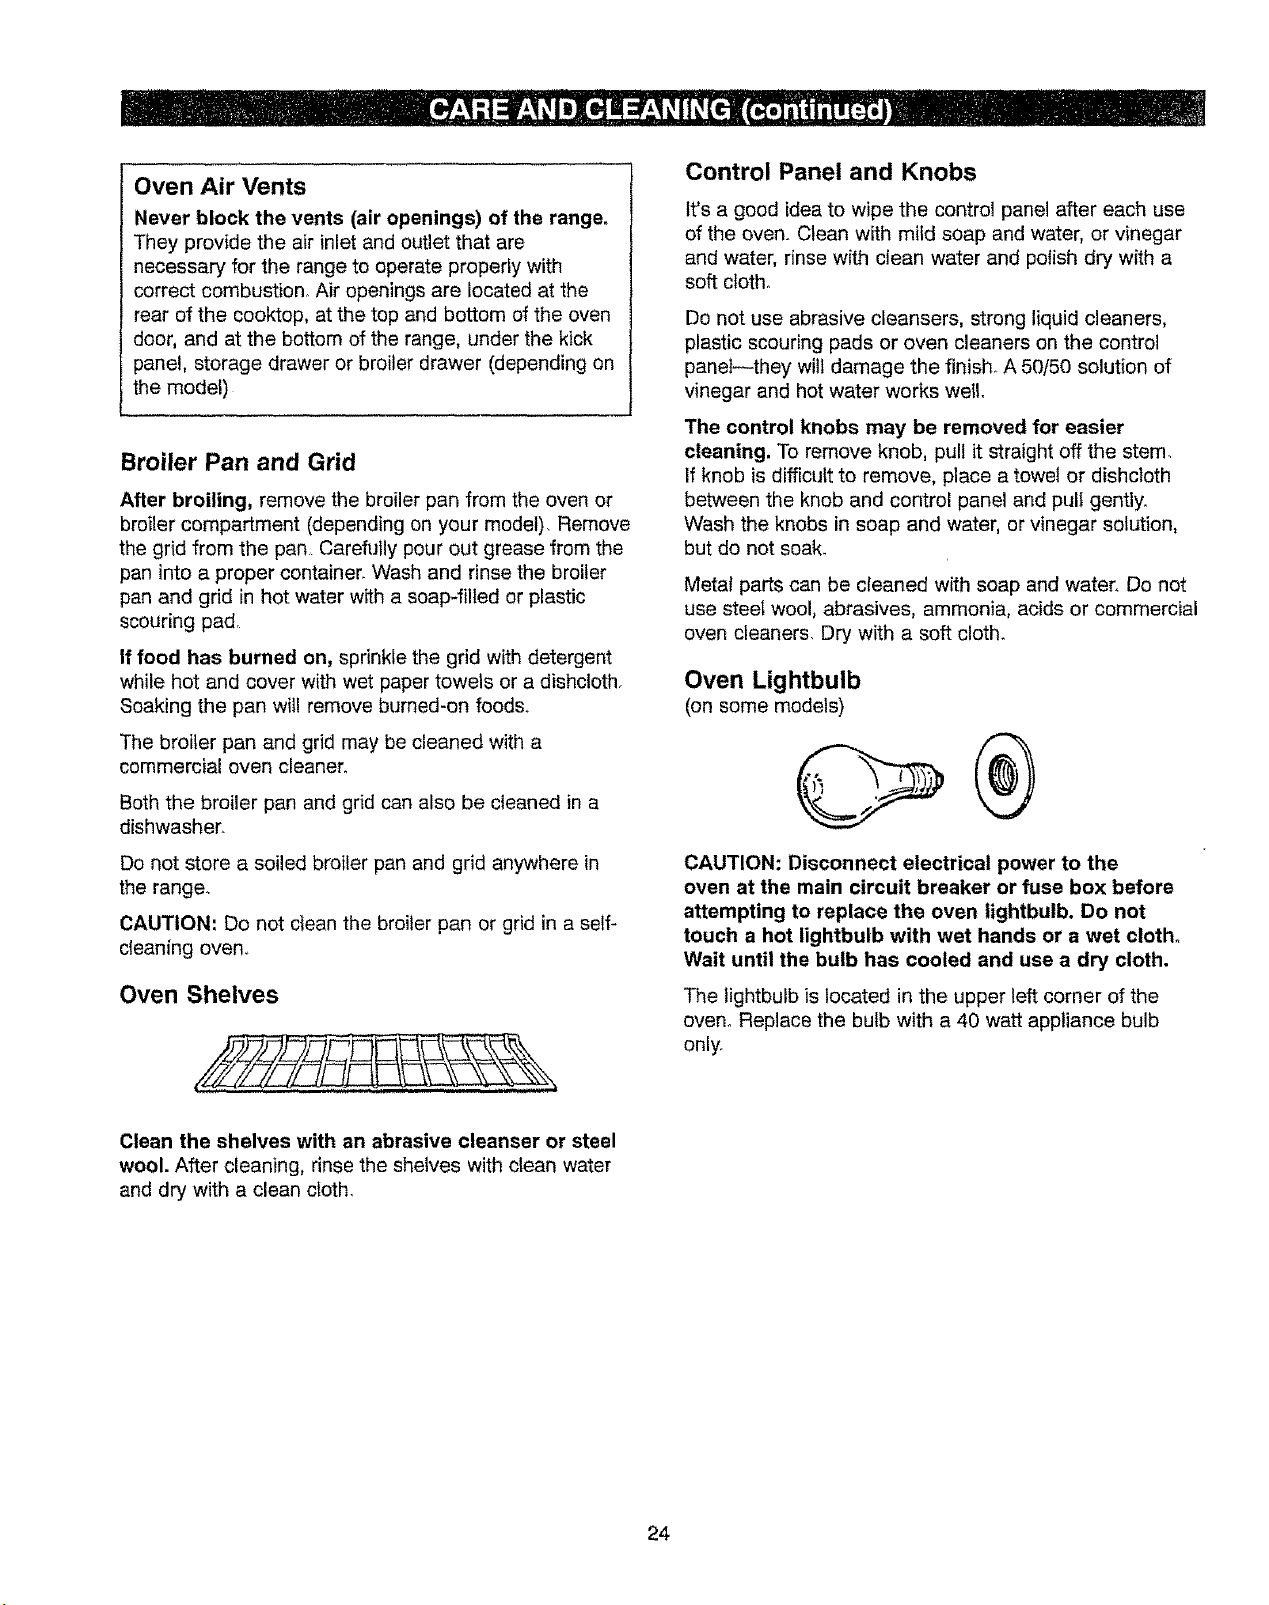
Oven Shelves
Control Panel and Knobs
It's a good idea to wipe the control panel after each use
of the oven. Clean with mild soap and water, or vinegar
and water, rinse with clean water and polish dry with a
soft cloth.
Do not use abrasive cleansers, strong liquid cleaners,
plastic scouring pads or oven cleaners on the control
panel--they will damage the finish. A 50/50 solution of
vinegar and hot water works well.
The control knobs may be removed for easier
cleaning. To remove knob, pul! it straight off the stem.
if knob is difficult to remove, place a towel or dishcloth
between the knob and control panel and pull gently.
Wash the knobs in soap and water, or vinegar solution,
but do not soak.
Metal parts can be cleaned with soap and water. Do not
use steet wool, abrasives, ammonia, acids or commercial
oven cleaners. Dry with a soft cloth.
Oven Lightbulb
(on some models)
CAUTION: Disconnect electrical power to the
oven at the main circuit breaker or fuse box before
attempting to replace the oven lightbulb. Do not
touch a hot lightbulb with wet hands or a wet cloth.
Wait until the bulb has cooled and use a dry cloth,
The lightbulb is located in the upper left corner of the
oven_ Replace the bulb with a 40 watt appliance bulb
only.
Clean the shelves with an abrasive cleanser or steel
wool. After cleaning, rinse the shelves with clean water
and dry with a clean cloth.
24
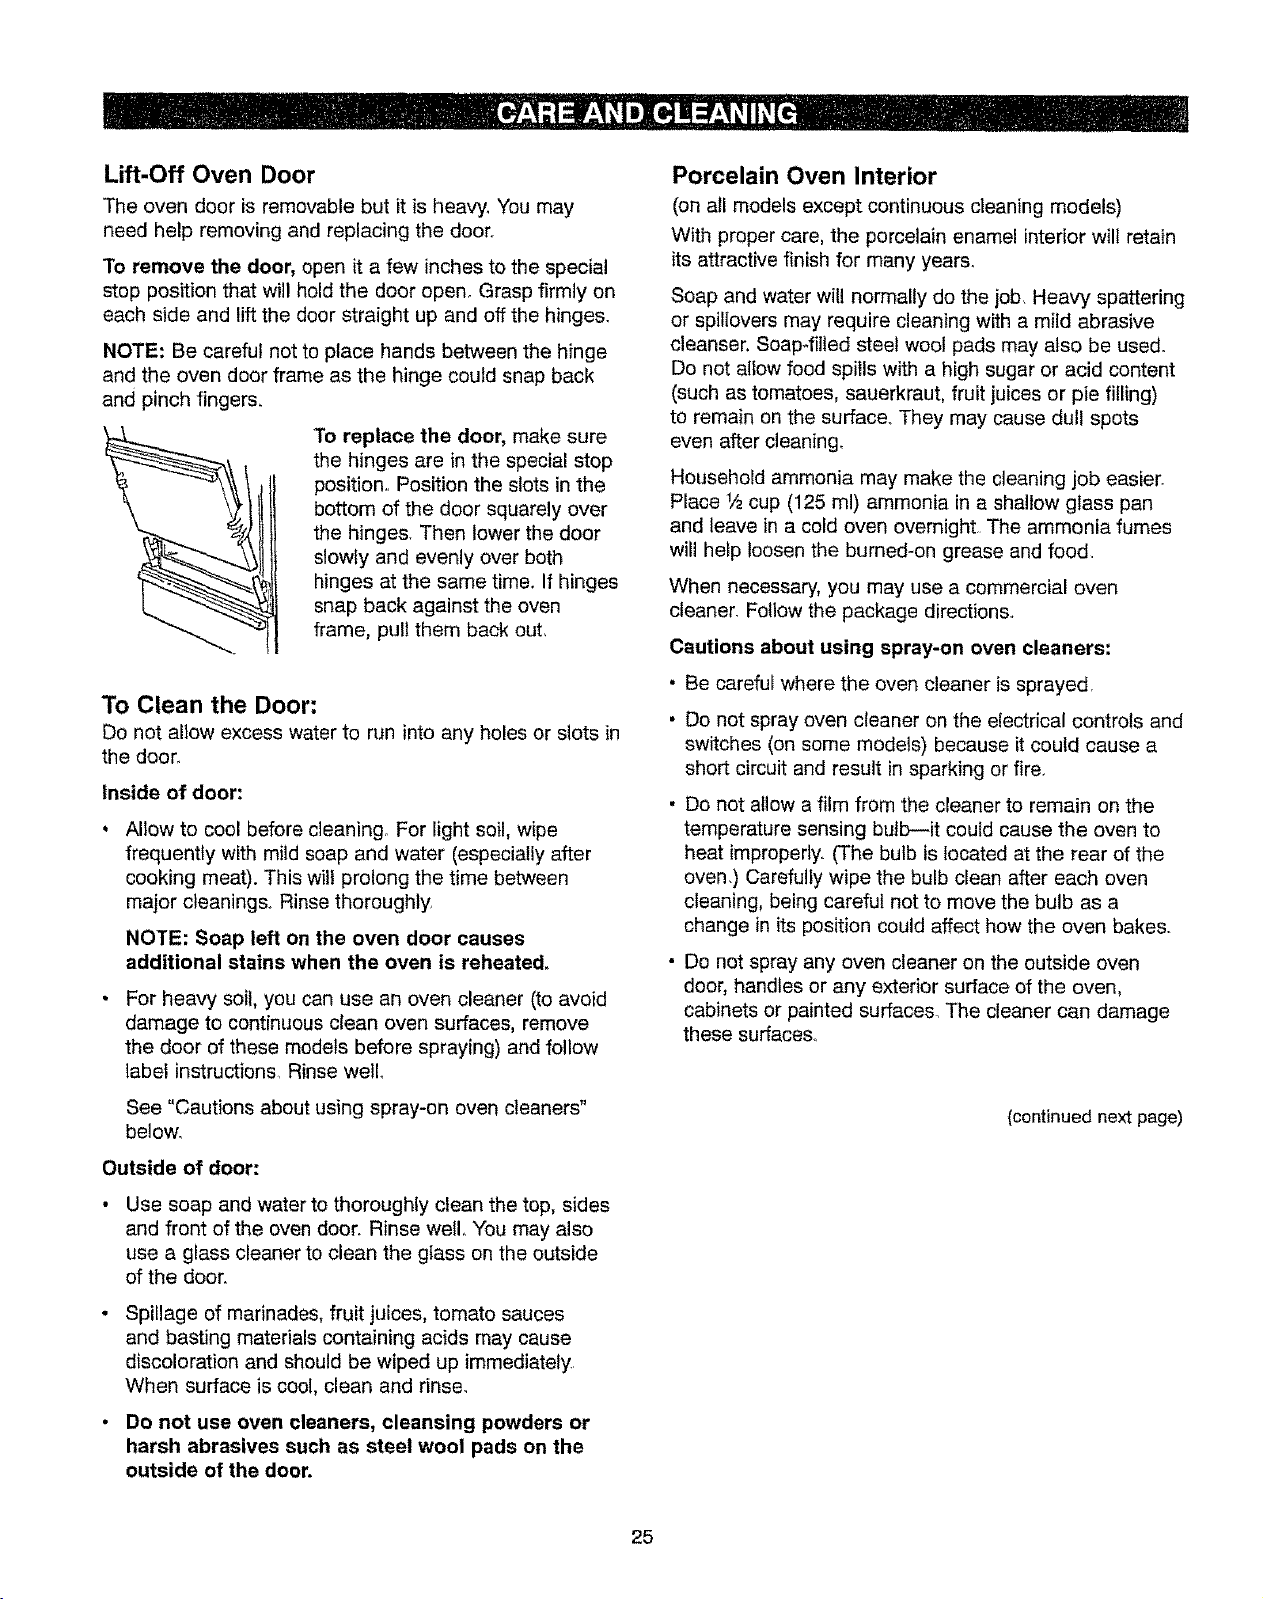
Lift-Off Oven Door
The oven door is removable but it is heavy, You may
need help removing and replacing the door,,
To remove the door, open it a few inches to the special
stop position that will hold the door open. Grasp firmly on
each side and lift the door straight up and off the hinges.
NOTE: Be careful not to place hands between the hinge
and the oven door frame as the hinge could snap back
and pinch fingers.
To replace the door, make sure
the hinges are in the special stop
position,, Position the slots in the
bottom of the door squarely over
the hinges. Then lower the door
slowly and evenly over both
hinges at the same time. If hinges
snap back against the oven
frame, pull them back out,
To Clean the Door:
Do not allow excess water to run into any holes or slots in
the door.
Inside of door:
Allow to cool before cleaning, For light soil, wipe
frequently with mild soap and water (especially after
cooking meat). This will prolong the time between
major cleanings. Rinse thoroughly
NOTE: Soap left on the oven door causes
additional stains when the oven is reheated,
For heavy soil, you can use an oven cleaner (to avoid
damage to continuous clean oven surfaces, remove
the door of these models before spraying) and follow
labet instructions. Rinse well
See "Cautions about using spray-on oven cleaners"
below,
Outside of door:
Use soap and water to thoroughly clean the top, sides
and front of the oven door° Rinse well, You may also
use a glass cleaner to clean the glass on the outside
of the door.
Spillage of marinades, fruit juices, tomato sauces
and basting materials containing acids may cause
discoloration and should be wiped up immediately
When surface is cool, clean and rinse.
• Do not use oven cleaners, cleansing powders or
harsh abrasives such as steel wool pads on the
outside of the door.
Porcelain Oven Interior
(on all models except continuous cleaning models)
With proper care, the porcelain enamel interior wilt retain
its attractive finish for many years.
Soap and water will normally do the job, Heavy spattering
or spillovers may require cleaning with a mild abrasive
cleanser, Soap4illed steel wool pads may also be used.
Do not allow food spills with a high sugar or acid content
(such as tomatoes, sauerkraut, fruit juices or pie filling)
to remain on the surface. They may cause dull spots
even after cleaning.
Household ammonia may make the cleaning job easier.
Place 1/2cup (125 m!) ammonia in a shallow glass pan
and leave in a cold oven overnight The ammonia fumes
will help loosen the burned-on grease and food.
When necessary, you may use a commercial oven
cleaner. Follow the package directions,,
Cautions about using spray-on oven cleaners:
* Be careful where the oven cleaner is sprayed,
• Do not spray oven cleaner on the electrical controls and
switches (on some models) because it could cause a
short circuit and result in sparking or fire.
. Do not allow a film from the cleaner to remain on the
temperature sensing bulb--it could cause the oven to
heat improperly. (The bulb is _ocated at the rear of the
oven.) Carefully wipe the bulb clean after each oven
cleaning, being careful not to move the bulb as a
change in its position could affect how the oven bakes.
• Do not spray any oven cleaner on the outside oven
door, handles or any exterior surface of the oven,
cabinets or painted surfaces, The cleaner can damage
these surfaces°
(continued next page)
25
Oven Bottom
The oven bottom has a porcelain enamel finish.
To make cleaning easier, protect the oven bottom from
excessive spi!!overs by placing a cookie sheet on the
shelf below the shelf you are cooking on, You can use
aluminum foil ff you do not cover the whole shelf. This is
particularly important when baking a fruit pie or other
foods with a high acid content° Hot fruit fillings or other
foods that are highly acidic (such as tomatoes, sauerkraut
and sauces with vinegar or lemon juice) may cause
pitting and damage to the porcelain enamel surface and
should be wiped up immediately
If a spillover does occur on the oven bottom, allow the
oven to cool first, Remove the oven bottom for easier
clean-up and to prevent damage to the continuous
cleaning oven coating (on some models).
Frequent wipings with mild soap and water (particularly
after cooking meat) will prolong the time between major
cleanings. Rinse thoroughly. Soap left on the oven bottom
can cause stains.
For heavy soil, use an abrasive cleaner or a soap-filled
steel wool pad,, A commercial oven cleaner may also be
used, following the package directions
Removable Kick Panel
(on some models)
The kick panel may be removed for cleaning
under the range.
To remove, lift up the bottom of
the panel slightly to disengage
the panel from the tabs at the
base of the range. Pull the bottom
of the panel forward until the
spring clips are released at the
top of the panel,
To replace, insert the two slots at
the bottom of the panel onto the
two tabs at the base of the range
and push the top of the panel
forward to engage the spring clips.
Removable Broiler Drawer
(on some models)
To remove:
1. When the broiler is coot, remove the grid and pan_
2. Pull the broiler drawer out until it stops, then push it
back in about one inch.
3. Grasp the handle, lift and
pull the broiler drawer out.
Clean the broiler drawer with
hot, soapy water,
To replace:
Hold the broiler drawer in the raised position as you slide
it partway into the range. Then lower the drawer and
push it completely closed.
Removable Storage Drawer
(on some models)
The storage drawer is a good place to store cookware
and bakeware, Do not store plastics and flammable
material in the drawer.
Do not overload the storage drawer. If the drawer is too
heavy, it may slip off the track when opened.
The storage drawer may be removed for cleaning under
the range. Clean the storage drawer with a damp cloth or
sponge, Never use harsh abrasives or scouring pads.
To remove the storage drawer:
1. Pull the drawer straight out __
until it stops, q_
2. Tilt the front of the drawer up
and free of the range°
To replace the storage drawer:
1. Set the stops on the back of the drawer over the stops
in the range°
2. Slide the drawer evenly and straight back, so that 1he
rails in the range are engaged.
26
Special Care of the Continuous Cleaning
Oven Interior
(on some models)
The special coating is a porous ceramic material,
which is dark in color and feels slightly rough to
the touch.
The continuous cleaning oven cleans itself while
cooking, The oven walls are finished with a speciat
coating that cannot be cleaned in the usual manner with
soap, detergents, steel wool pads, commercial oven
cleaners, coarse abrasive pads or coarse brushes. Use
of such cleansers and/or the use of oven sprays will
cause permanent damage.
If magnified, the surface would appear as peaks, valleys
and sub-surface "tunnels." This rough finish tends to
prevent grease spatters from forming little beads or
droplets that run down the side wails of a hard-surface
oven liner, leaving unsightly streaks that require hand
cleaning. Instead, when spatter hits the porous finish, it is
dispersed and partial;y absorbe& This spreading action
increases the exposure of oven soil to heated air and
makes it somewhat tess noticeable
Soil may not disappear completely and at some time
after extended usage, stains may appear that cannot
be removed.
The special coating works best on small amounts of
spatter, It does not work well with larger spills, especially
sugars, egg or dairy mixtures° The oven bottom does not
have the continuous cleaning oven coating and can be
removed and cleaned with a commercial oven cleaner.
This special coating is not used on the oven shelves,
oven bottom or the inside of the oven door. Remove
these to clean with a commercial oven cleaner to prevent
damaging the continuous cleaning oven coating,
Make sure the oven bottom is in place before you
turn the oven on for any reason.
Use care in removing and replacing the oven bottom
and shelves and in placing and removing dishes and
food to avoid scratching, rubbing or otherwise damaging
the porous finish on the oven wall&
To Clean the Continuous Cleaning Oven:
1. Let range parts cool before handling We recommend
rubber gloves be worn when cleaning.
2. Remove shelves and cookwareo
3. Soil visibility may be reduced by operating the oven at
400°F (204°C). Close the door and turn OVEN TEMP
knob to 400°F (204°C) Time for at least four hours.
Repeated cycles may be necessary before
improvement in appearance is apparent.
Remember: During the operation of the oven, the
door and other range surfaces will get hot enough
to cause burns. Do not touch. Let the range cool
before replacing the oven shelves,
4. if a spiilover or hea W soiling occurs on the porous
surface, as soon as the oven has cooled, remove as
much of the soil as possible using a small amount of
water and a stiff-bristle nylon brush. Use water
sparingly and change it frequently, keeping it as clean
as possible, and be sure to blot it up with paper towels,
cloths or sponges. Do not rub or scrub with paper
towels, ctoths or sponges, since they wil! leave
unsightly lint on the oven finish. If water leaves a white
ring on the finish as it dries, apply water again and blot
it with a clean sponge, starting at the edge of the ring
and working toward the center.
The oven bottom has a porcelain enamel finish.
The oven bottom comes out for cleaning away from the
continuous cleaning oven,
The inside of the oven door has a porcelain enamel
finish, The oven door lifts off for cleaning away from the
continuous cleaning oven For instructions on how to
clean the inside of the oven door refer to the Lift-Off
Oven Door section.
Do not use soap, detergent, steel wool pads,
commercial oven cleaners, silicone oven sprays,
coarse pads or coarse brushes on the porous
surface. These products will spot, clog and damage
the porous surface and reduce its ability to work
Do not scrape the porous surface with a knife or
spatula--they could permanently damage the finish.
27
FOR YOUR SAFETY
If you smell gas:
1. Open windows.
2. Don't touch electrical switches.
3. Extinguish any open flame.
4o Immediately call your gas supplier.
FOR YOUR SAFETY
Do not store or use combustible materials, gasoline
or other flammable vapors and liquids in the vicinity
of this or any other appliance.
BEFORE YOU BEGIN
Read these instructions completely and carefully,
IMPORTANT: Save these instructions for
the local electrical inspector's use.
INSTALLER: Leave these instructions
with the appliance after installation is completed.
CONSUMER: Keep this Use and
Care Manual and the Installation Instructions
for future use.
This appliance must be properly grounded.
WARNING
Improper installation, adjustment, alteration, service
or maintenance can cause injury or property damage.
Refer to this manual. For assistance or additional
information, consult a qualified installer, service
agency, manufacturer (dealer) or the gas supplier.
Never reuse old flexible connectors. The use of old
flexible connectors can cause gas leaks and personal
injury. Always use NEW flexible connectors when
installing a gas appliance.
CAUTION:
Do not attempt to operate the oven of this range
during a power failure (electric ignition models only).
IMPORTANT:
Remove all packing material and literature from oven
before connecting gas and electrical supply to range.
28
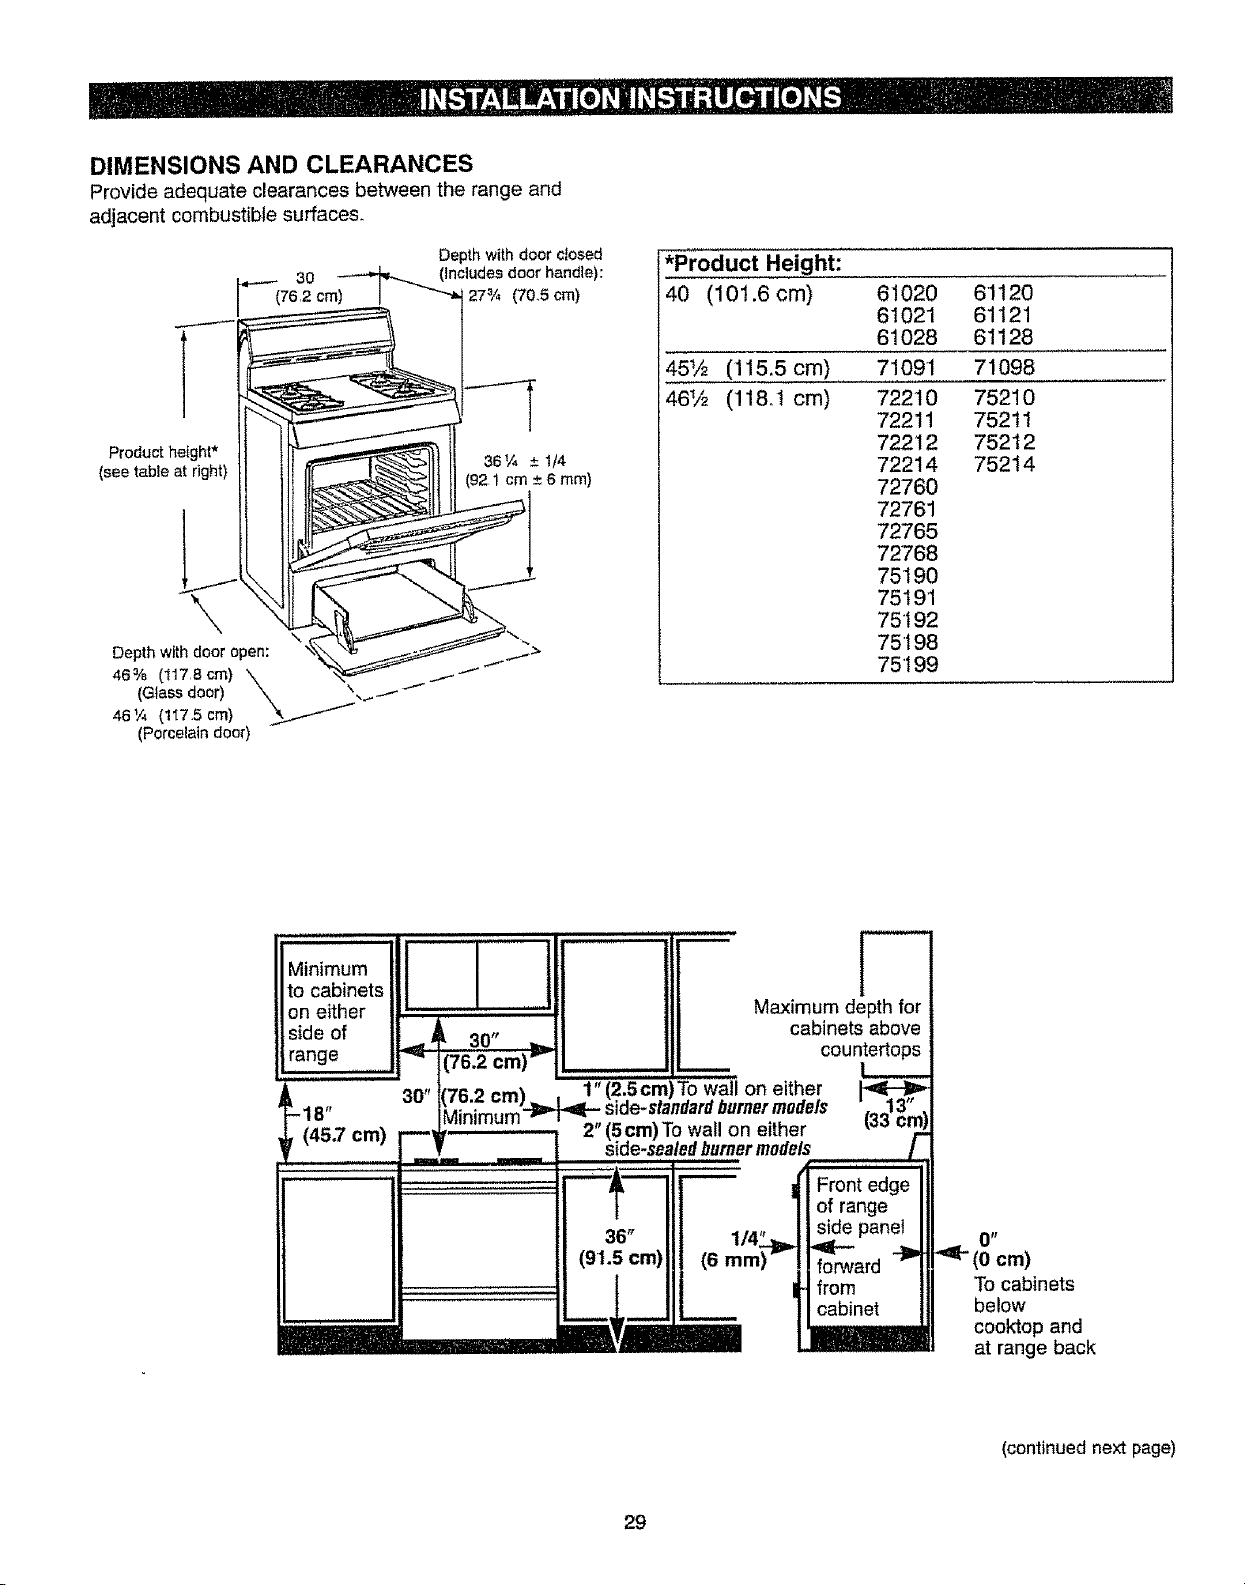
DIMENSIONS AND CLEARANCES
Provide adequate clearances between the range and
adjacent combustible surfaces.
De 3th with door closed
...-- 30 _ (Includes door handle):
(76,2 cm) I _ 27_/. (70,5 cm)
(sPr:tdu_"tehi_ , -_i _4mm)
(Porcelain door)
*Product Height:
40 (101.6 cm)
451/2 (115.5 cm)
461/2 (118,t crn)
61020
61021
61028
71091
72210
72211
72212
72214
72760
72761
72765
72768
75190
75t 91
75"192
75198
75 t 99
61120
61121
61128
71098
75210
75211
75212
75214
............ i i
Minimum
to cabinets
on either
side of
range
_ 30"
' (76.2 cm)
r--
Maximum depth for
cabinets above
countertops
L____
30" 76 2 cm) i;; (215cm)To wall on either
Minimum_ side-standard burnermodels _
(33 _m
m_ 2"(5cm)To wall o either
side-sealed burnermodels
i_
36"
(91.5 cm)
....... _=,,,,_
I1'
(6 mm)
/-
Front edge
of range
side panel
forward
from
cabinet
.,-(°"ore)
To cabinets
below
cook'top and
at range back
(continued next page)
29
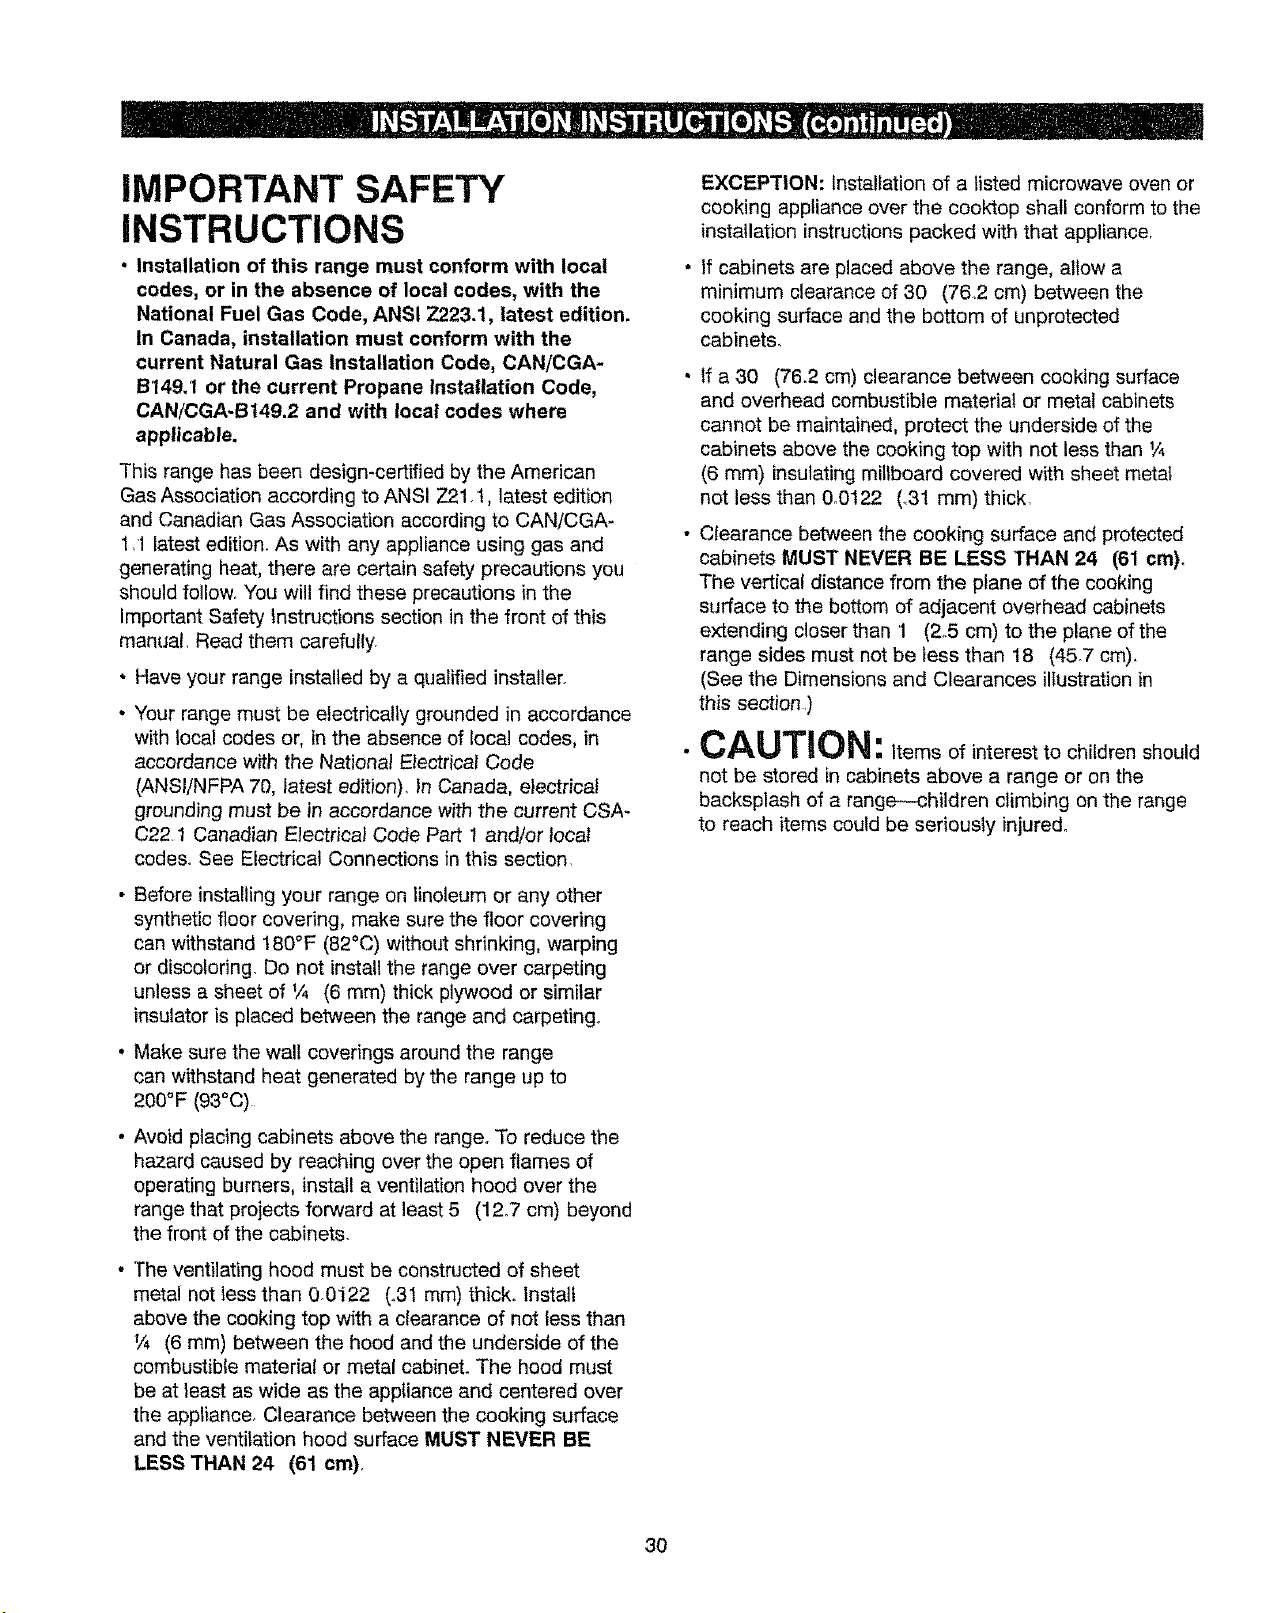
iMPORTANT SAFETY
INSTRUCTIONS
• Installation of this range must conform with local
codes, or in the absence of local codes, with the
National Fuel Gas Code, ANSI Z223.1, latest edition.
In Canada, installation must conform with the
current Natural Gas Installation Code, CAN/CGA-
B149.1 or the current Propane Installation Code,
CAN/CGA-Bt49.2 and with local codes where
applicable.
This range has been design-certified by the American
Gas Association according to ANSI Z21. t, latest edition
and Canadian Gas Association according to CAN/CGA-
1,1 latest edition. As with any appliance using gas and
generating heat, there are certain safety precautions you
should follow. You will find these precautions in the
important Safety Instructions section in the front of this
manual, Read them carefully,
• Have your range installed by a qualified installer.
• Your range must be electrically grounded in accordance
with {ocal codes or, in the absence of local codes, in
accordance with the National Electrical Code
(ANSI/NFPA 70, latest edition). In Canada, electrical
grounding must be in accordance with the current CSA-
C221 Canadian Electric.a} Code Part 1 and/or local
codes,, See Electrical Connections in this section,
• Before installing your range on linoleum or any other
synthetic floor covering, make sure the floor covering
can withstand 180°F (82°C) without shrinking, warping
or discoloring. Do not install the range over carpeting
unless a sheet of t/, (6 mm) thick plywood or similar
insulator is placed between the range and carpeting.
• Make sure the wall coverings around the range
can withstand heat generated by the range up to
200°F (93°C)
• Avoid placing cabinets above the range. To reduce the
hazard caused by reaching over the open flames of
operating burners, install a ventilation hood over the
range that projects forward at least 5 (12o7 cm) beyond
the front of the cabinets.
• The ventilating hood must be constructed of sheet
metal not iess than 0.0122 (.31 mm) thick, install
above the cooking top with a clearance of not less than
_,,_(6 ram) between the hood and the underside of the
combustible material or metal cabinet. The hood must
be at least as wide as the appliance and centered over
the appliance. Clearance between the cooking surface
and the ventilation hood surface MUST NEVER BE
LESS THAN 24 (61 cm),
EXCEPTION: Installation of a listed microwave oven or
cooking appliance over the cooktop shall conform to the
installation instructions packed with that appliance.
if cabinets are placed above the range, allow a
minimum clearance of 30 (76,2 cm) between the
cooking surface and the bottom of unprotected
cabinets.
If a 30 (76.2 cm) clearance between cooking surface
and overhead combustible material or metal cabinets
cannot be maintained, protect the underside of the
cabinets above the cooking top with not less than 1/4
(6 mm) insulating millboard covered with sheet metal
not less than 0o0122 (.31 mm) thick.
Clearance between the cooking surface and protected
cabinets MUST NEVER BE LESS THAN 24 (61 cm).
The vertical distance from the plane of the cooking
surface to the bottom of adjacent overhead cabinets
extending closer than 1 (2.5 cm) to the plane of the
range sides must not be tess than 18 (457 cm).
(See the Dimensions and Clearances illustration in
this section ,)
CAUTION: itemsofinteresttochildrenshould
not be stored in cabinets above a range or on the
backsplash of a range--children climbing on the range
to reach items could be seriously injured°
3O
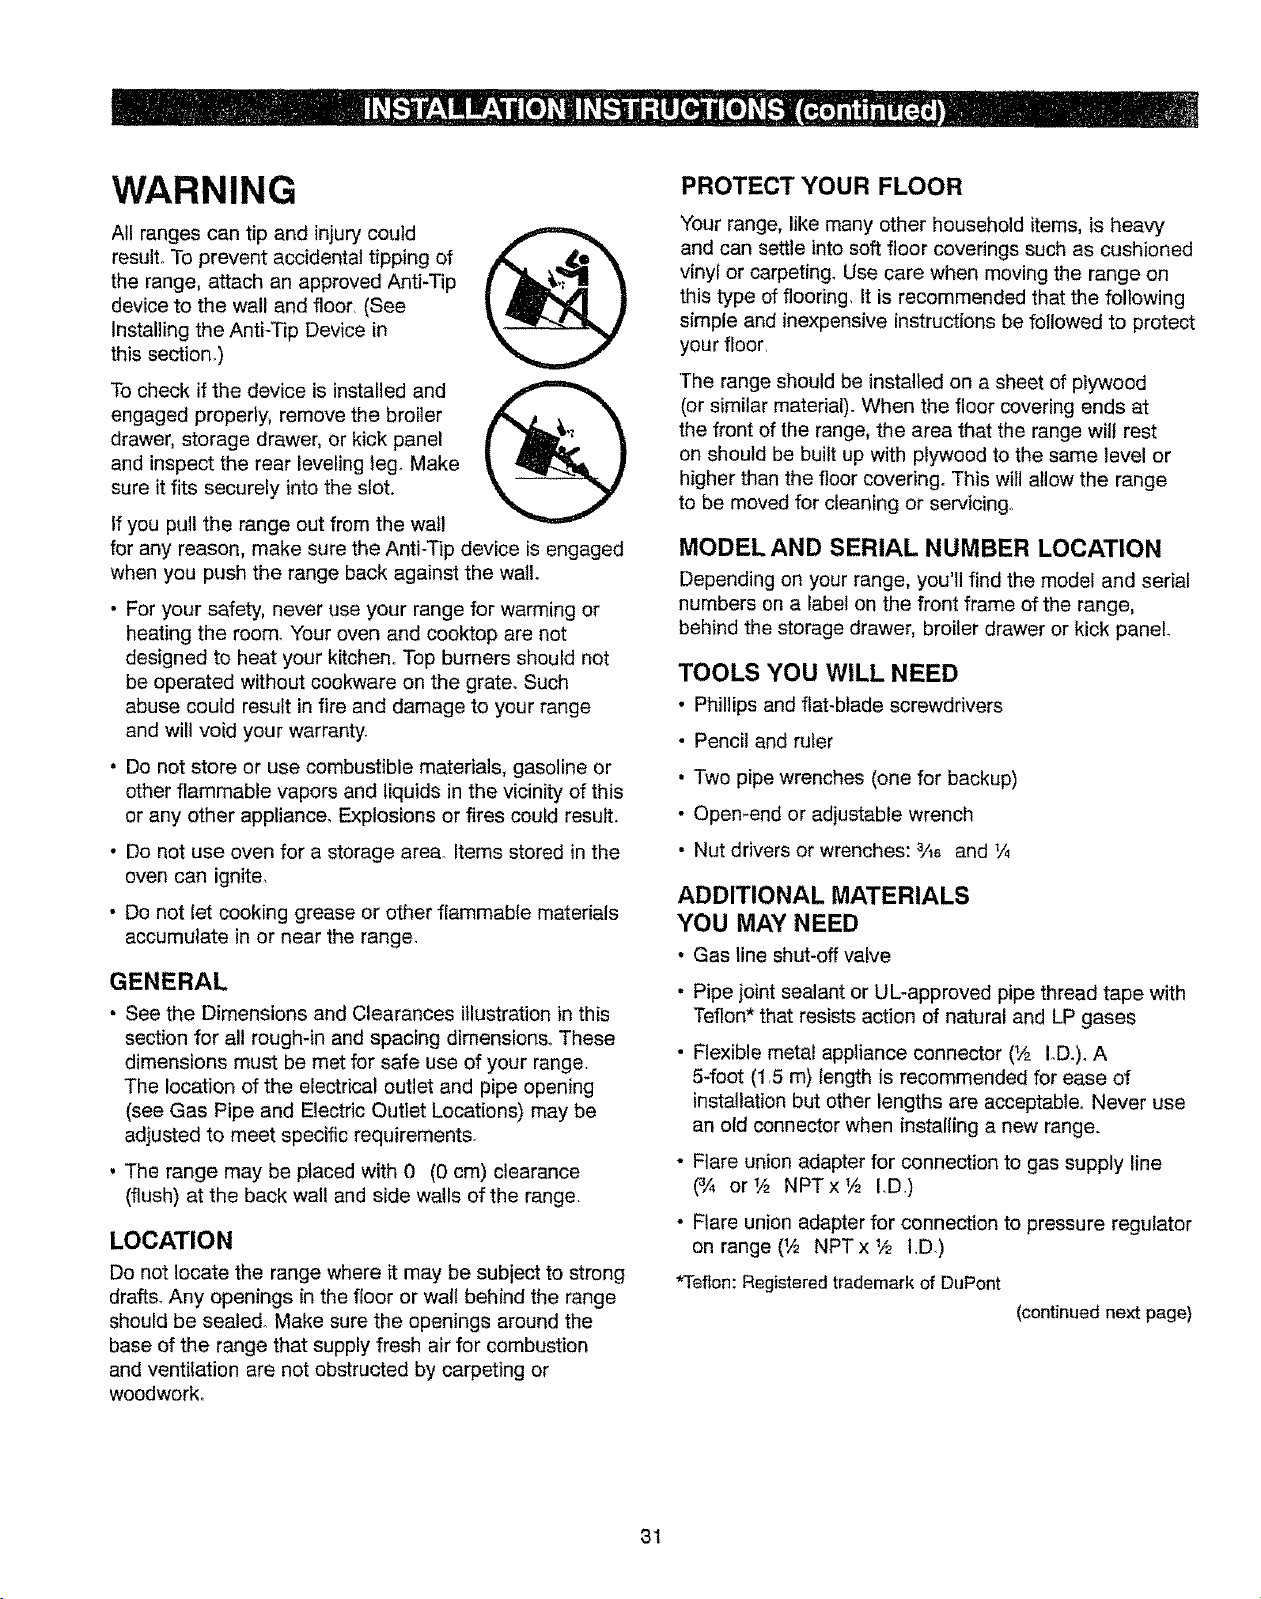
WARNING
All ranges can tip and injury could
result° To prevent accidental tipping of
the range, attach an approved Anti-Tip
device to the wall and floor, (See
Installing the Anti-Tip Device in
this section.)
To check if the device is installed and
engaged properly, remove the broiler
drawer, storage drawer, or kick panel
and inspect the rear leveling tego Make
sure it fits securely into the slot.
if you pull the range out from the wall
for any reason, make sure the Anti-Tip device is engaged
when you push the range back against the wall.
• For your safety, never use your range for warming or
heating the room, Your oven and cooktop are not
designed to heat your kitchen° Top burners should not
be operated without cookware on the grate. Such
abuse could result in fire and damage to your range
and will void your warranty.
• Do not store or use combustible materials, gasoline or
other flammable vapors and liquids in the vicinity of this
or any other appliance, Explosions or fires could resutt.
• Do not use oven for a storage area. Items stored in the
oven can ignite.
• Do not let cooking grease or other flammable materials
accumulate in or near the range.
GENERAL
• See the Dimensions and Clearances illustration in this
section for all rough-in and spacing dimensions. These
dimensions must be met for safe use of your range.
The location of the electrical outlet and pipe opening
(see Gas Pipe and Electric Outlet Locations) may be
adjusted to meet specific requirements.
• The range may be placed with 0 (0 cm) clearance
(flush) at the back wall and side walls of the range.
LOCATION
Do not locate the range where it may be subject to strong
drafts_ Any openings in the floor or wall behind the range
should be sealed° Make sure the openings around the
base of the range that supply fresh air for combustion
and ventilation are not obstructed by carpeting or
woodwork.
PROTECT YOUR FLOOR
Your range, like many other household items, is heavy
and can settle into soft floor coverings such as cushioned
vinyi or carpeting. Use care when moving the range on
this type of flooring, It is recommended that the following
simple and inexpensive instructions be followed to protect
your floor,
The range should be installed on a sheet of plywood
(or similar material). When the floor covering ends at
the front of the range, the area that the range wi]f rest
on should be built up with plywood to the same level or
higher than the floor covering. This will allow the range
to be moved for cleaning or servicing.
MODEL AND SERIAL NUMBER LOCATION
Depending on your range, you'll find the model and serial
numbers on a label on the front frame of the range,
behind the storage drawer, broiler drawer or kick panel
TOOLS YOU WILL NEED
• Phillips and flat-blade screwdrivers
• Pencil and ruler
• Two pipe wrenches (one for backup)
• Open-end or adjustable wrench
• Nut drivers or wrenches: a.48 and 1/4
ADDITIONAL MATERIALS
YOU MAY NEED
• Gas line shut-off valve
• Pipe joint sealant or UL-approved pipe thread tape with
Teflon* that resists action of natural and LP gases
• Flexible metal appliance connector (I/2 LDo). A
5-foot (1,5 m) length Jsrecommended for ease of
installation but other lengths are acceptable° Never use
an old connector when installing a new range.
• Flare union adapter for connection to gas supply line
(3A or _/_ NPT x _/_ I,D.)
• Flare union adapter for connection to pressure regulator
on range (1/2 NPT x 1/2 ID)
*Teflon: Registered trademark of DuPont
(continued next page)
31

PREPARATION
• Remove all tape and packaging+ Lift up the cooktop
(on models with standard twin burners) and remove
any packing matedat under ito Make sure the standard
twin burners are properly seated and level.
• Remove plastic film that covers some chrome parts
(around oven door, side trim),
" Take the accessory pack out of the oven..
• Check to be sure that no range parts have come loose
during shipping.
STEP 1
Provide Adequate Gas Supply
Your range is designed to operate at a pressure of
4 (10.2 cm) of water column on natural gas or, if
designed for LP gas (propane or butane), 10 (25A4 cm)
of water column. Make sure you are supplying your range
with the type of gas for which it is designed. This range is
convertible for use on natural or propane gas. If you
decide to use this range on LP gas, conversion must be
made by a qualified LP installer before attempting to
operate the range on that gas+
For proper operation, the pressure of natural gas supplied
to the regulator must be between 4 (10,2 cm) and 13
(33 cm) of water column.. For LP gas, the pressure
supplied must be between 10 (25,4 cm) and 13 (33 cm)
of water column+ When checking for proper operation of
the regulator, the inlet pressure must be at least t
(2.5 cm) greater than the operating (manifold) pressure
as given above The pressure regulator located at the
inlet of the range manifo{d must remain in the supply line
regardless of whether natural or LP gas is being used,,
A flexible metal appliance connecter used to connect the
range to the gas supply line should have an I+D, of i/2
and be 5 feet (t .5 m) in length for ease of installation, In
Canada, flexible connectors must be single wall metal
connectors no longer than 6 feet (1+8m) in length.
STEP 2
Connect the Range to Gas
Shut off the main gas supply vaive before disconnecting
the old range and leave it off unti} new hook-up has been
completed. Don't forget to retight the pilot on other gas
appliances when you turn the gas back on+
Because hard piping restricts movement of the range,
the use of an A_G..A.-certffied flexible metal appliance
connector is recommended unless local codes require a
hard-piped connection+ Never use an otd connector when
installing a new range. If the hard piping method is used,
you must carefully align the pipe; the range cannot be
moved after the connection is made,
To prevent gas leaks, use pipe joint compound
or wrap Teflon* pipe thread tape around all male
(external) pipe threads.
*Teflon: Registered trademark of DuPont
Gas Pipe and Electric Outlet Locations for
Models Equipped with Sealed Burnets
This area attows
for flush range
installation with
through-the-walt
connection of pipe
stub/shut-off
valve and rear
wall 120V outtet+
Shortest
connection from
hard pipestub
4
This area allows for
flush range installation
with through+the"floor
I connection of pipe
_hut-off valve,
32
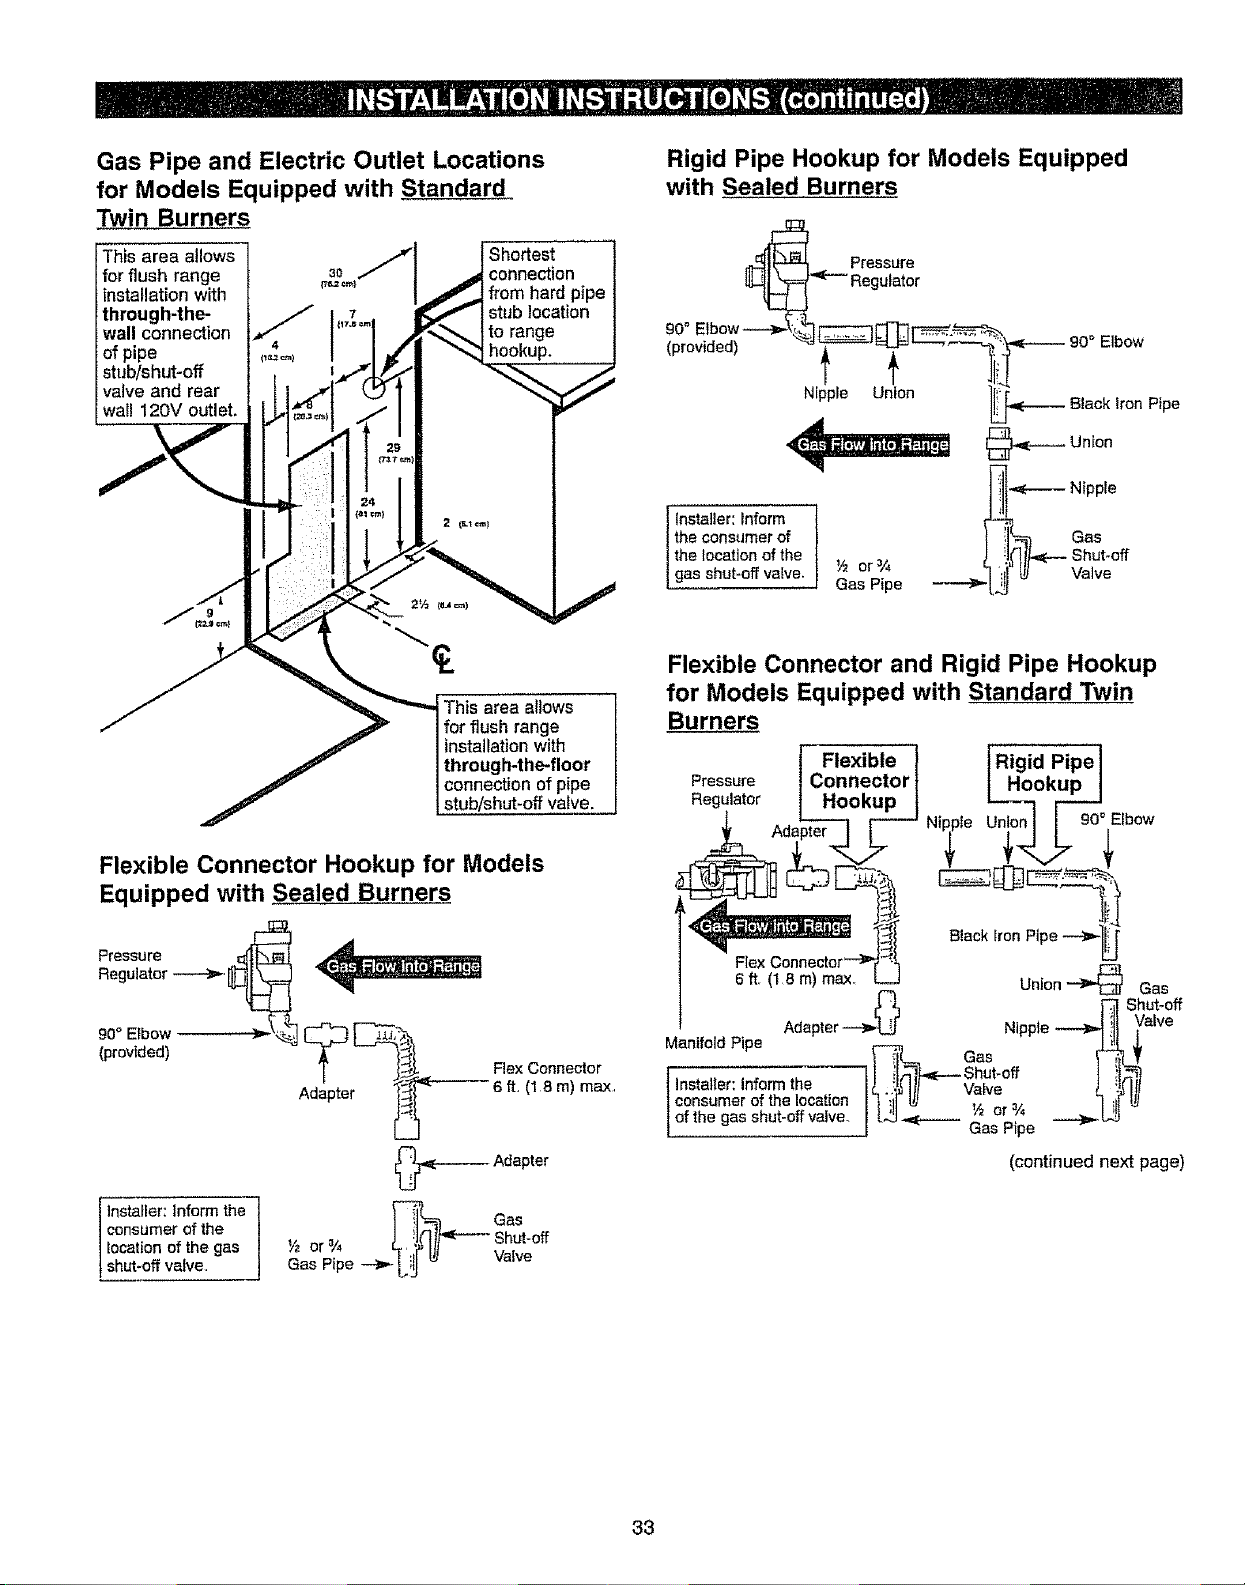
Gas Pipe and Electric Outlet Locations
for Models Equipped with Standard
Twin Burners
This area allows
for flush range
installation with
through-the-
wall connection
of pipe i,_=l
stub/shut-off
valve and rear
wall 120V outlet.
Shortest
connection
from hard pipe
stub location
to range
hookup.
This area allows
for flush range
installation with
through4he-floor
connection of pipe
stub/shut-off valve,
Flexible Connector Hookup for Models
Equipped with Sealed Burners
Pressure ._
Adapter _- 6 ft. (1 8 m) max.
L_J
_ Adapter
Installer: inform the ] _ _ Gas
consumer of the J L _J_'tl_ _'--" Shut'°ff
location of the gas V2 or %
shut=off valve. Gas Pipe _1=.- L_ E/ Valve
Rigid Pipe Hookup for Models Equipped
with Sealed Burners
_ Pressure
o _"'_"- Regulator
Installer: inform 1
the consumer of
the location of the
gas shut-off valve. ½ or =/,
Gas Pipe
90 _ Elbow
-- 8lack iron Pipe
--- Union
-_,._ Nipple
{}p_ Gas
L 'J_]l/_-"s.ut-eff
Flexible Connector and Rigid Pipe Hookup
for Models Equipped with Standard Twin
Burners
( Flexible ) (RigidPipel
Pressure (Connector( ( Hookup (
Regulator I Hookup ( _ _ ibow
u°i°
l Flex Connector -"_ h L'7_
| 6 ft. (18 m) max,. LJ Union _ Gas
| r_ _ Shut-off
I A,°ptor_ N_pp,e_ !liValve
Ma.lto,_Pi_e __as _ t
,o,ta,,er:,nform,hT--- °ff J
consumer of the location | ) !I(_ Y_ or =/4 q _i[
I of the gas shut-off valve_ / L,,3_ Gas Pipe ---_ U-3
(continued next page)
33
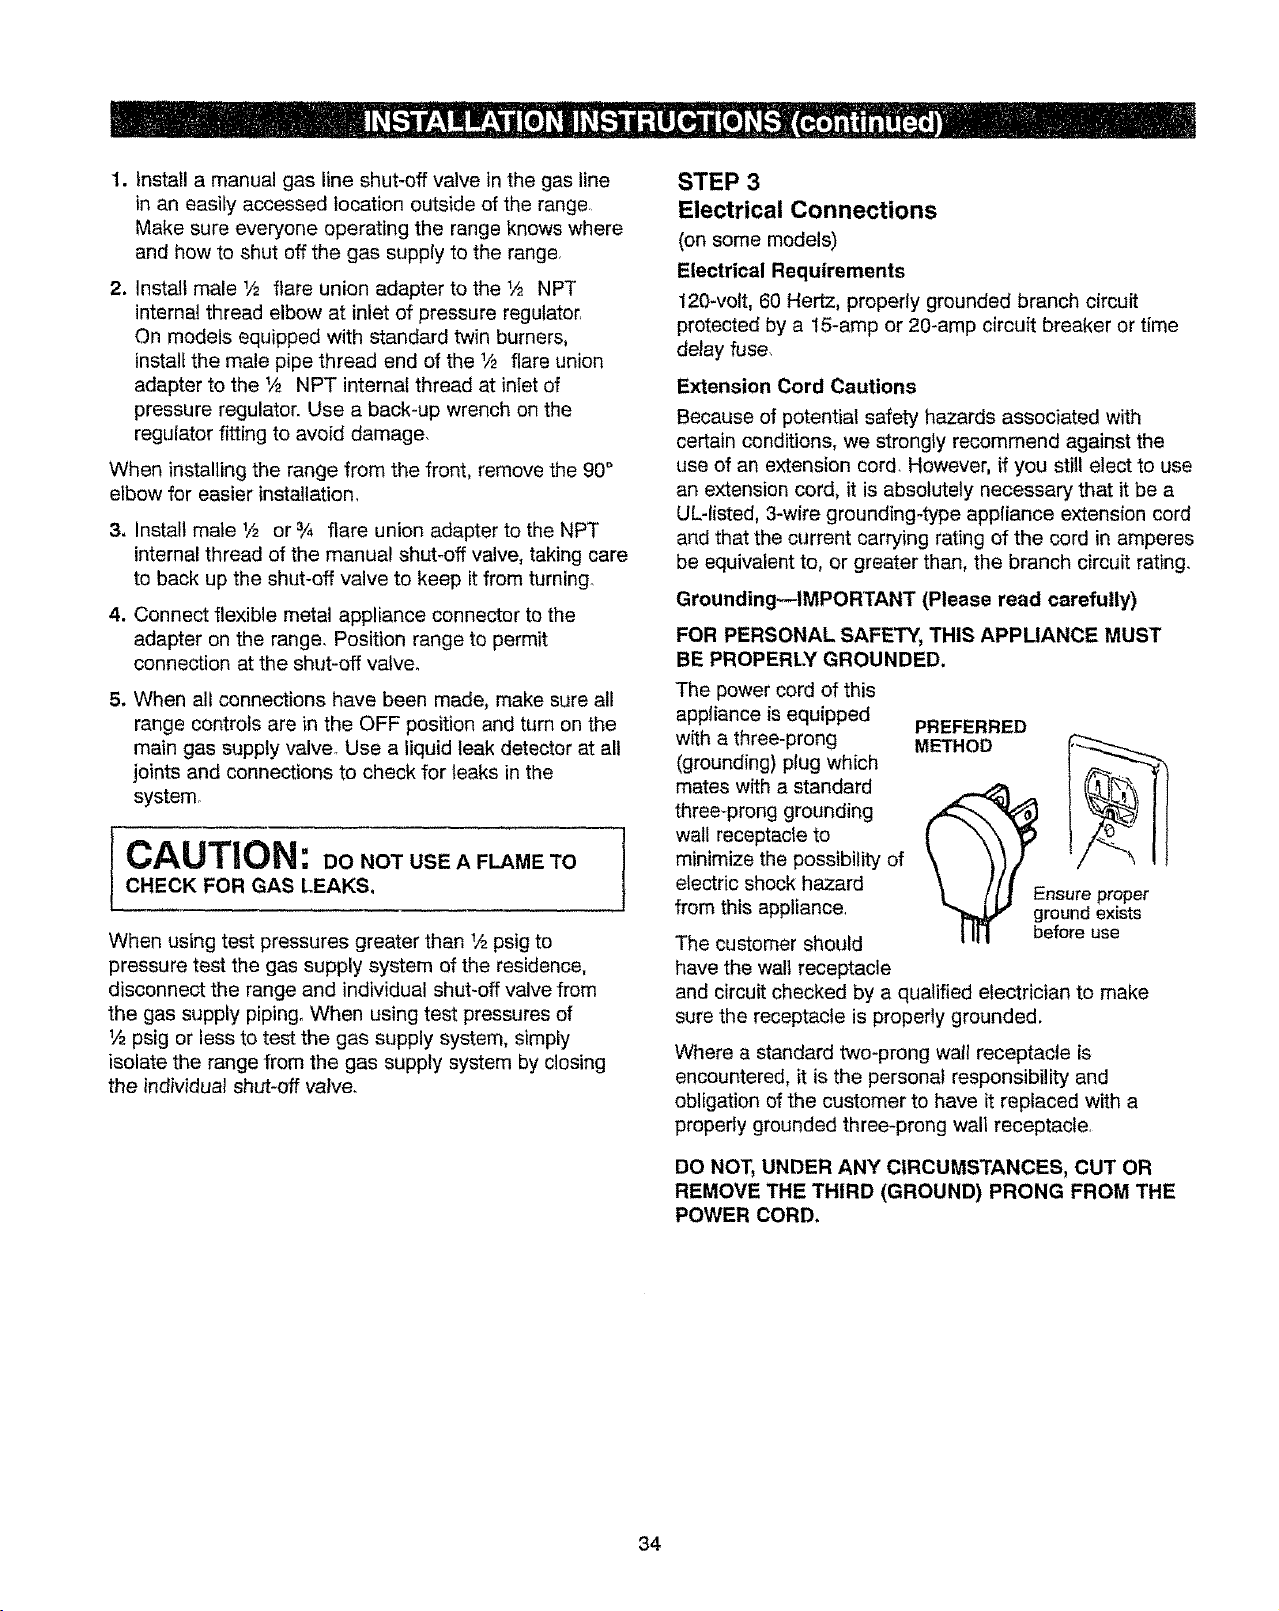
1. install a manual gas line shut-off valve in the gas line
in an easily accessed location outside of the range,
Make sure everyone operating the range knows where
and how to shut off the gas supply to the range
2, Install male 1/2 flare union adapter to the _,5 NPT
internal thread elbow at inlet of pressure regulator.
On models equipped with standard twin burners,
install the male pipe thread end of the V2 flare union
adapter to the 1A NPT internal thread at inlet of
pressure regulator. Use a back-up wrench on the
regulator fitting to avoid damage.
When installing the range from the front, remove the 90°
elbow for easier installation.
3, Install mate _,¢ or % flare union adapter to the NPT
internal thread of the manual shut-off valve, taking care
to back up the shut-off valve to keep it from turning.
4. Connect flexible metal appliance connector to the
adapter on the range. Position range to permit
connection at the shut-off valve.
5, When all connections have been made, make sure all
range controls are in the OFF position and turn on the
main gas supply valve. Use a liquid leak detector at all
joints and connections to check for leaks in the
system.
I CAUTION: DO NOT USE A FLAME TO ]CHECK FOR GAS LEAKS.
When using test pressures greater than 1/2psig to
pressure test the gas supply system of the residence,
disconnect the range and individual shut-off valve from
the gas supply piping. When using test pressures of
1/2psig or less to test the gas supply system, simply
isolate the range from the gas supply system by closing
the individual shut-off valve.
STEP 3
Electrical Connections
(on some models)
Electrical Requirements
120-volt, 60 Hertz, properly grounded branch circuit
protected by a 15-amp or 20-amp circuit breaker or time
delay fuse.
Extension Cord Cautions
Because of potential safety hazards associated with
certain conditions, we strongly recommend against the
use of an extension cord. However, ff you still elect to use
an extension cord, it is absolutely necessary that it be a
UL-listed, 3-wire grounding-type appliance extension cord
and that the current carrying rating of the cord in amperes
be equivalent to, or greater than, the branch circuit rating.
Grounding_tMPORTANT (Please read carefully)
FOR PERSONAL SAFETY_ THIS APPLIANCE MUST
BE PROPERLY GROUNDED.
The power cord of this
appliance is equipped
with a three-prong
(grounding) plug which
mates with a standard
three-prong grounding
wall receptacle to
minimize the possibility of
electric shock hazard
from this appliance.
The customer should
have the wall receptacle
PREFERRED
METHOD _
and circuit checked by a qualified electrician to make
sure the receptacle is properly grounded.
Where a standard two-prong wall receptacle is
encountered, it is the personal responsibility and
obligation of the customer to have it replaced with a
properly grounded three-prong wall receptacle
DO NOT, UNDER ANY ClRCUMSTANCES_ CUT OR
REMOVE THE THIRD (GROUND) PRONG FROM THE
POWER CORD,
34
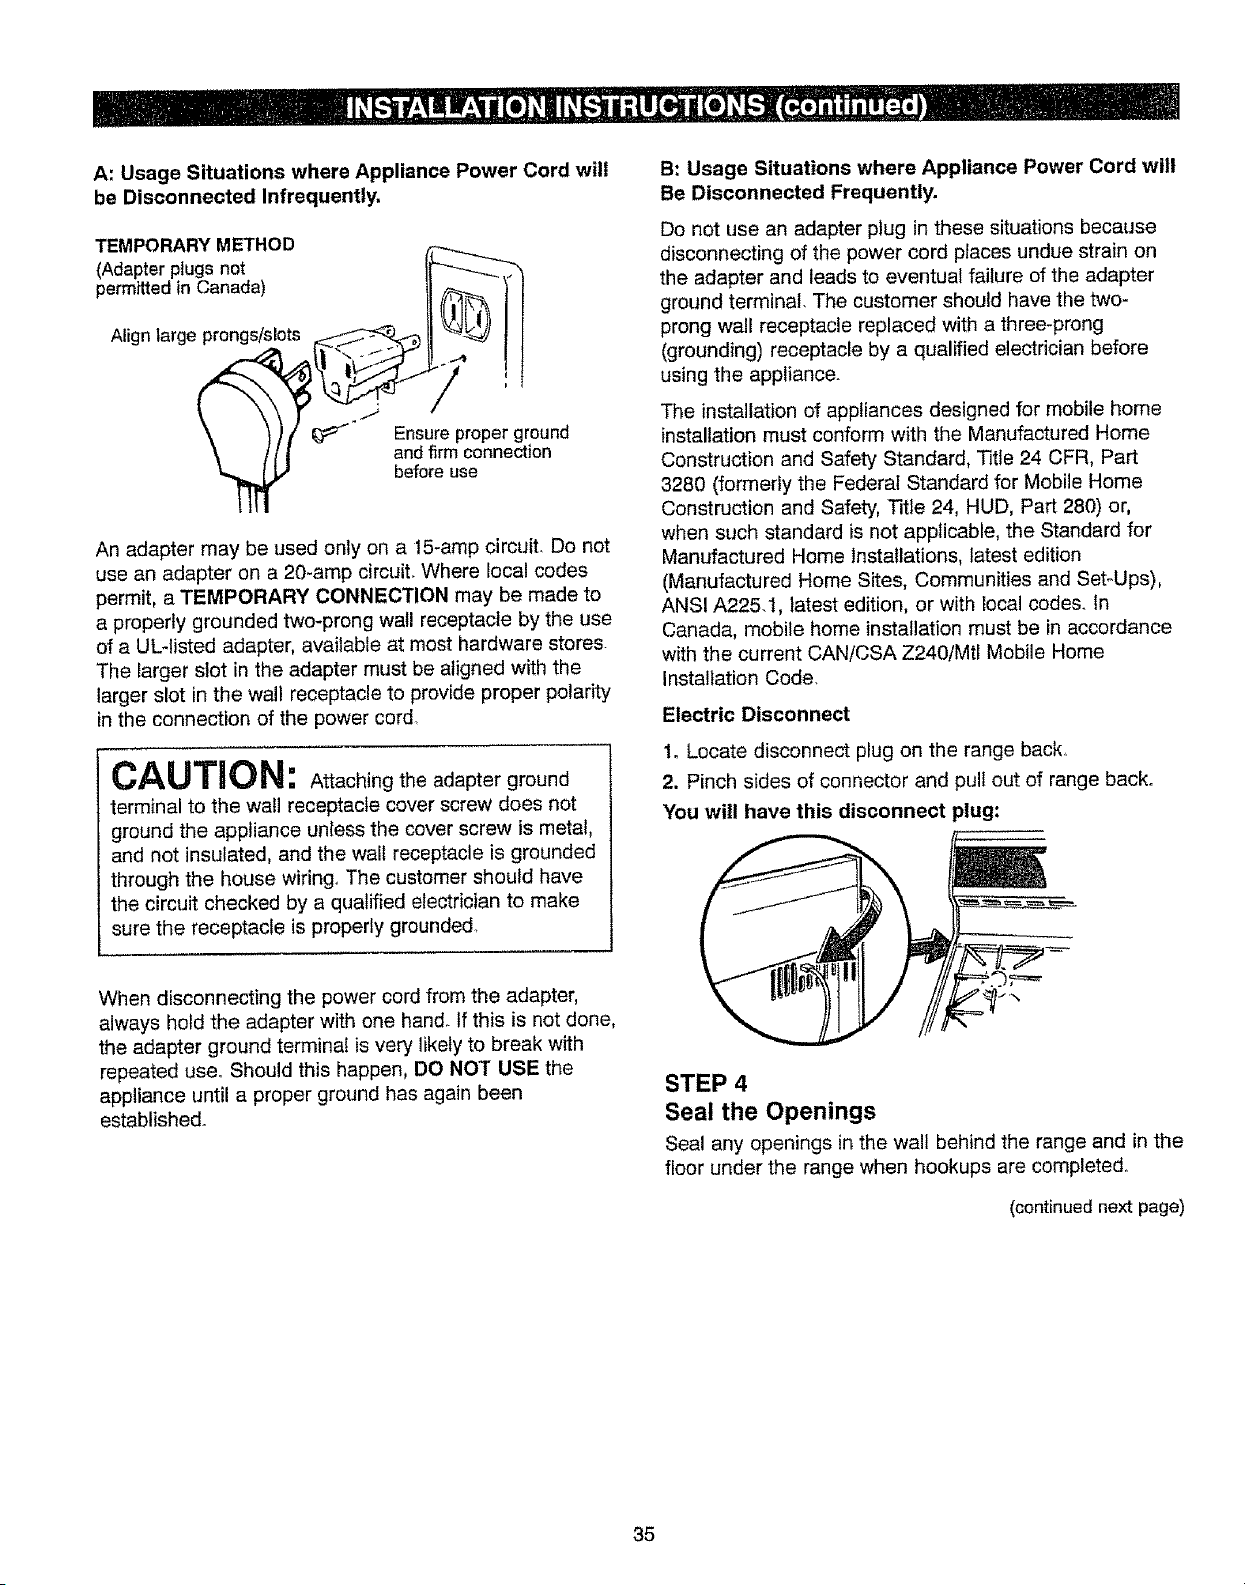
A: Usage Situations where Appliance Power Cord will
be Disconnected Infrequently.
TEMPORARY METHOD
(Adapter plugsnot _._-._,
permitted in Canada) _-l'l
Align large prongs/slots _ _-_-) J l
\ / _ | and firm connection
_ before use
An adapter may be used only on a 15-amp cimuit. Do not
use an adapter on a 20-amp circuit. Where local codes
permit, a TEMPORARY CONNECTION may be made to
a properly grounded two-prong wall receptacle by the use
of a UL-tisted adapter, available at most hardware stores.
The larger stot in the adapter must be aligned with the
larger slot in the wall receptacle to provide proper polarity
in the connection of the power cord.
CAUTION: A.aoh ngtheadapter ground
terminal to the wall receptacle cover screw does not
ground the appliance unless the cover screw is metal,
and not insulated, and the wall receptacle is grounded
through the house wiring° The customer should have
the circuit checked by a qualified electrician to make
sure the receptacle is properly grounded_
When disconnecting the power cord from the adapter,
always hotd the adapter with one hand_ tf this is not done,
the adapter ground terminal is very likely to break with
repeated use. Should this happen, DO NOT USE the
appliance until a proper ground has again been
established.
B: Usage Situations where Appliance Power Cord wii!
Be Disconnected Frequently.
Do not use an adapter plug in these situations because
disconnecting of the power cord ptaces undue strain on
the adapter and leads to eventual failure of the adapter
ground terminal. The customer should have the two-
prong wall receptacle replaced with a three-prong
(grounding) receptacle by a qualified electrician before
using the appliance.
The installation of appliances designed for mobile home
installation must conform with the Manufactured Home
Construction and Safety Standard, Title 24 CFR, Part
3280 (formerly the Federal Standard for Mobile Home
Construction and Safety, Title 24, HUD, Part 280) or,
when such standard is not applicable, the Standard for
Manufactured Home Installations, latest edition
(Manufactured Home Sites, Communities and Set-Ups),
ANSI A225.1, latest edition, or with local codes, tn
Canada, mobile home installation must be in accordance
with the current CAN/CSA Z240/Mtl Mobile Home
Installation Code.
Electric Disconnect
1. Locate disconnect plug on the range back°
2. Pinch sides of connector and pull out of range back.
You will have this disconnect plug:
STEP 4
Seal the Openings
Seal any openings in the wall behind the range and in the
floor under the range when hookups are completed°
(continued next page)
35
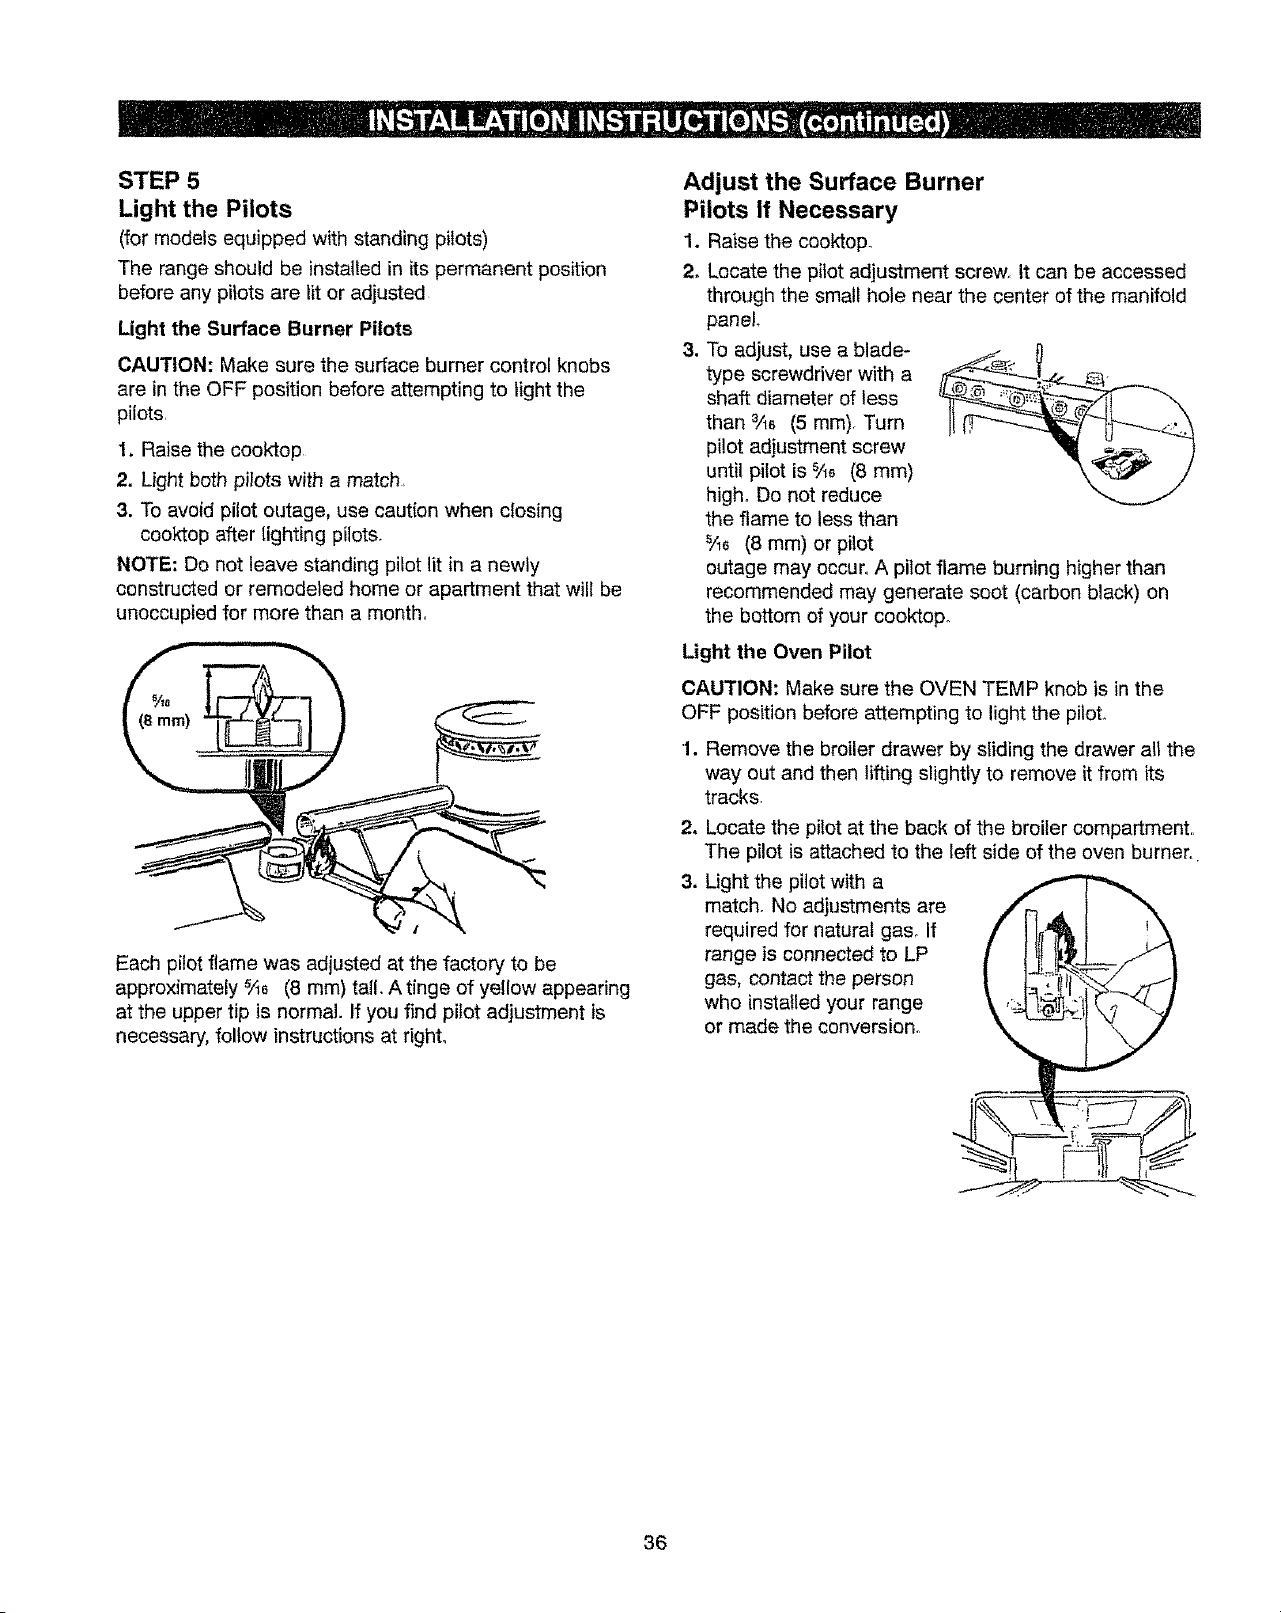
STEP 5
Light the Pilots
(for models equipped with standing pilots)
The range should be installed in its permanent position
before any pilots are lit or adjusted
Light the Surface Burner Pilots
CAUTION: Make sure the surface burner control knobs
are in the OFF position before attempting to light the
pilots.
1, Raise the cooktop
2. Light both pilots with a match
3. To avoid pilot outage, use caution when closing
cooktop after lighting pilots,
NOTE: Do not leave standing pilot lit in a newly
constructed or remodeled home or apartment that will be
unoccupied for more than a month
Each pilot flame was adjusted at the factory to be
approximately %6 (8 ram) tall. A tinge of yellow appearing
at the upper tip is normal. If you find pilot adjustment is
necessary, follow instructions at right,
Adjust the Surface Burner
Pilots if Necessary
1. Raise the cooktop.
2. Locate the pilot adjustment screw. It can be accessed
through the small hole near the center of the manifold
panel
3, To adjust, use a blade-
type screwdriver with a
shaft diameter of less
than 3/16 (5 mm). Turn
pilot adjustment screw
until pilot is 5/1_ (8 ram)
high° Do not reduce
the flame to less than
%_ (8 mm) or pilot
outage may occur., A pilot flame burning higher than
recommended may generate soot (carbon black) on
the bottom of your cooktopo
Light the Oven Pilot
CAUTION: Make sure the OVEN TEMP knob is in the
OFF position before attempting to light the piloL
'1. Remove the broiler drawer by sliding the drawer all the
way out and then lifting slightfy to remove it from its
tracks,
2. Locate the pilot at the back of the broiler compartment.
The pilot is attached to the left side of the oven burner,,
3. Light the pilot with a
match° No adjustments are
required for natural gas° If
range is connected to LP
gas, contact the person
who installed your range
or made the conversion.
36
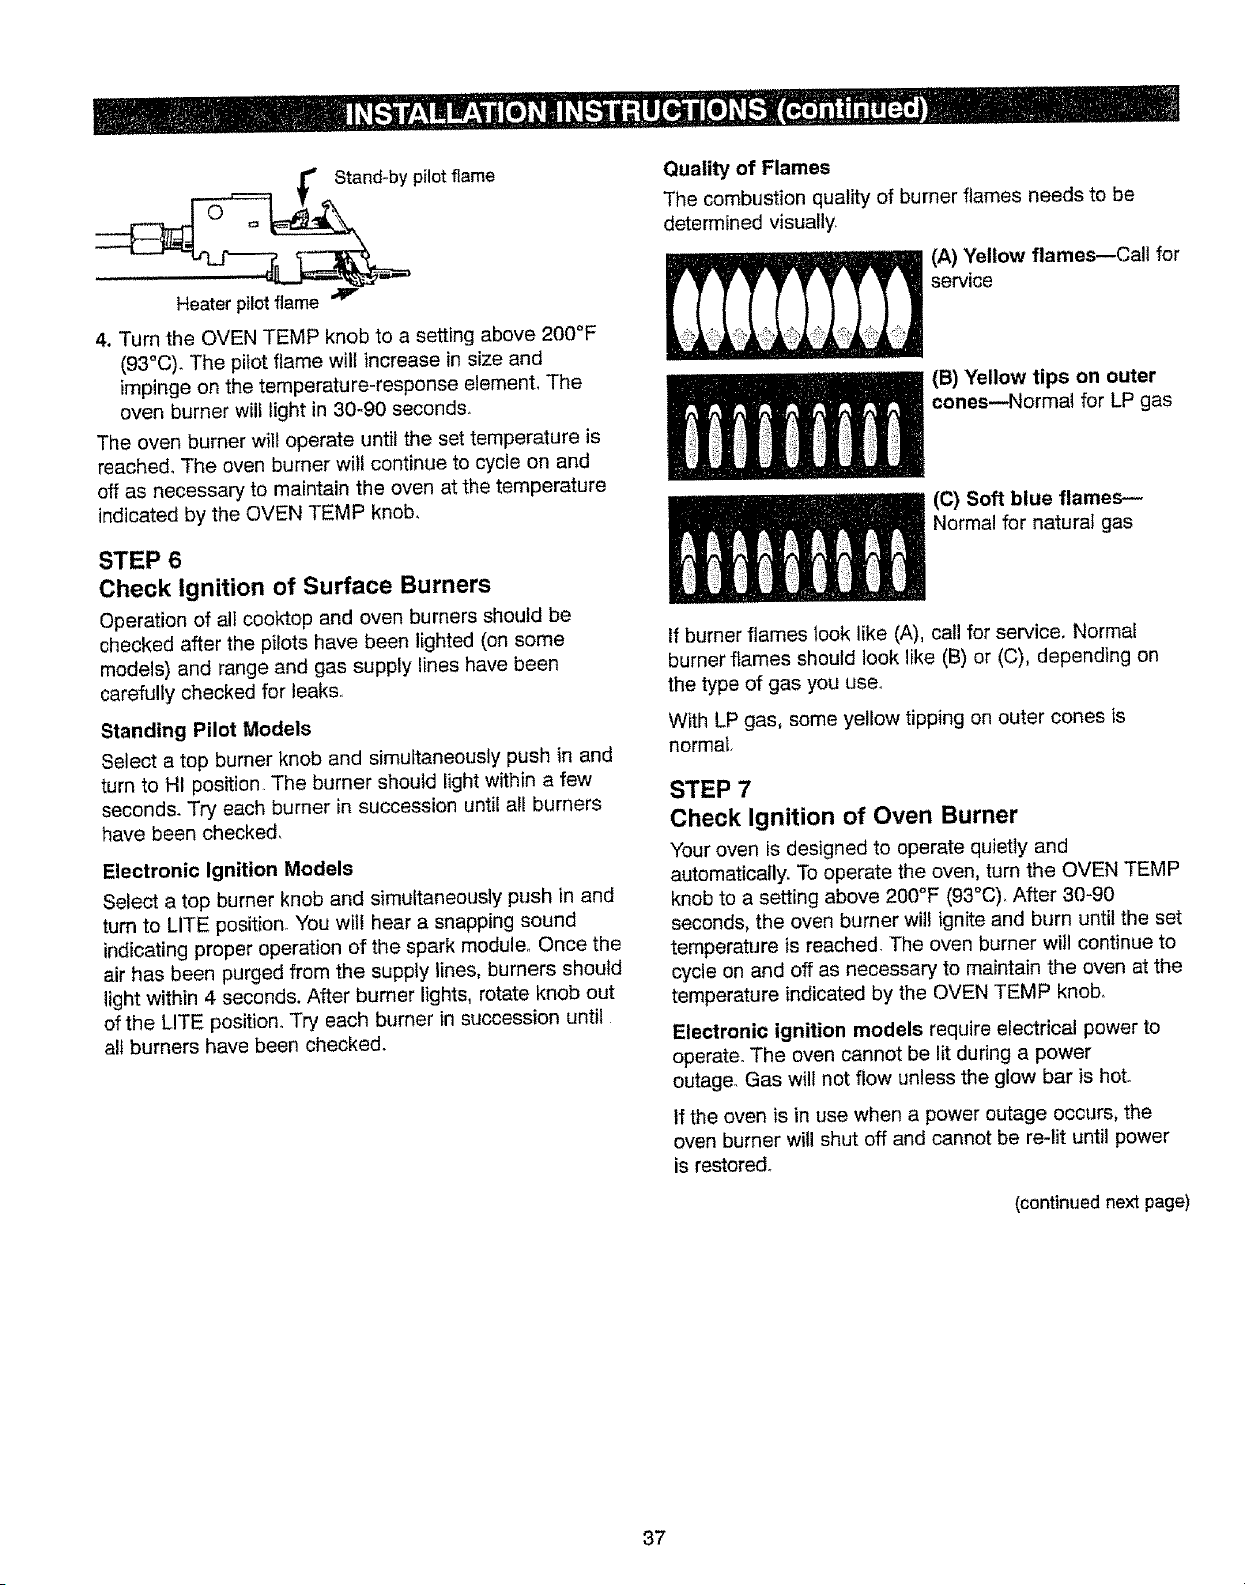
* Stand-by pilot flame
Heater pilot flame
4, Turn the OVEN TEMP knob to a setting above 200°F
(93°C)_ The pilot flame will increase in size and
impinge on the temperature-response element, The
oven burner will light in 30-90 seconds.
The oven burner will operate until the set temperature is
reached, The oven burner will continue to cycle on and
off as necessary to maintain the oven at the temperature
indicated by the OVEN TEMP knob.
STEP 6
Check Ignition of Surface Burners
Operation of alI cooktop and oven burners should be
checked after the pilots have been lighted (on some
models) and range and gas supply lines have been
carefully checked for leaks,,
Standing Pilot Models
Select a top burner knob and simultaneously push in and
turn to HI position, The burner should light within a few
seconds. Try each burner in succession until all burners
have been checked,
Electronic Ignition Models
Select a top burner knob and simultaneously push in and
turn to LITE position. You wilt hear a snapping sound
indicating proper operation of the spark module. Once the
air has been purged from the supply lines, burners should
light within 4 seconds. After burner lights, rotate knob out
of the LITE position° Try each burner in succession until
all burners have been checked.
Quality of Flames
The combustion quality of burner flames needs to be
determined visually.
(k) Yellow flames--Call for
service
(B) Yellow tips on outer
cones--Normal for LP gas
(C) Soft blue flames--
Norma! for naturat gas
If burner flames took like (A), call for service. Normal
burner flames should took like (B) or (C), depending on
the type of gas you use.
With LP gas, some yellow tipping on outer cones is
normal.
STEP 7
Check Ignition of Oven Burner
Your oven is designed to operate quietly and
automatically, To operate the oven, turn the OVEN TEMP
knob to a setting above 200°F (93°C)_ After 30-90
seconds, the oven burner will ignite and burn until the set
temperature is reached. The oven burner will continue to
cycle on and off as necessary to maintain the oven at the
temperature indicated by the OVEN TEMP knob°
Electronic ignition models require electrical power to
operate° The oven cannot be lit during a power
outage. Gas will not flow unless the glow bar is hot.
If the oven is in use when a power outage occurs, the
oven burner will shut off and cannot be re-lit until power
is restored°
(continued next page)
37
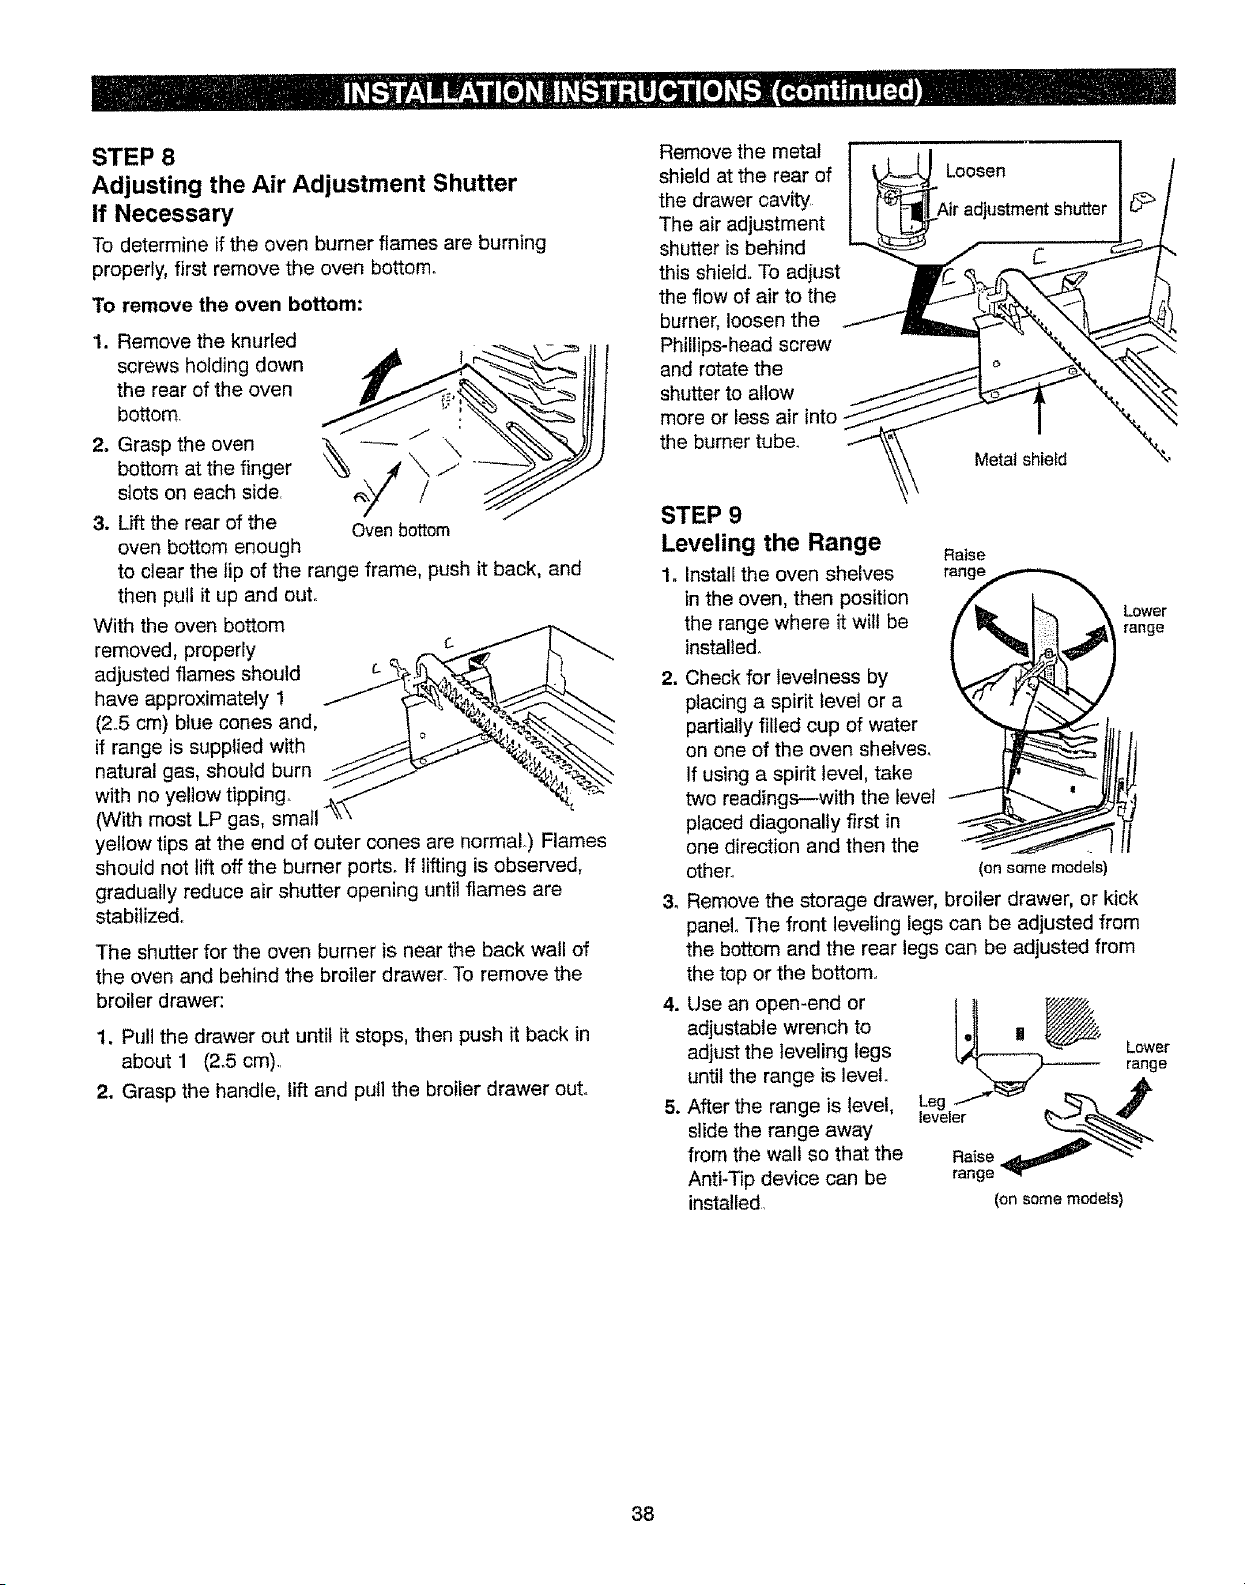
STEP 8
Adjusting the Air Adjustment Shutter
If Necessary
To determine if the oven burner flames are burning
properly, first remove the oven bottom,
To remove the oven bottom:
1. Remove the knurled
screws holding down
the rear of the oven
bottom.
2. Grasp the oven
bottom at the finger
slots on each side.
3. Lift the rear of the
oven bottom enough
Oven bottom
to clear the tip of the range frame, push it back, and
then pull it up and out.
With the oven bottom
removed, properly c
adjusted flames should
have approximately !
(2.5 cm) blue cones and,
if range is supplied with
natural gas, should burn
with no yellow tipping,.
0Nith most LP gas, small
yellow tips at the end of outer cones are normaL) Flames
should not lift off the burner ports. If lifting is observed,
gradually reduce air shutter opening until flames are
stabilized.
The shutter for the oven burner is near the back wall of
the oven and behind the broiler drawer. To remove the
broiler drawer:
1, Pull the drawer out until it stops, then push it back in
about 1 (2.5 cm)..
2. Grasp the handle, lift and pull the broiler drawer out.
Remove the metal
shield at the rear of
the drawer cavity
The air adjustment
shutter is behind
this shield. To adjust
the flow of air to the
burner, loosen the
Phillips-head screw
and rotate the
shutter to allow
more or less
the burner tube.
Loosen
adjustmentshutter
Metal shield
STEP 9
Leveling the Range
1, Install the oven shelves
in the oven, then position
the range where it will be
installed.
Raise
range
Lower
range
2. Check for levelness by
placing a spirit level or a
partially filled cup of water
on one of the oven shelves.
If using a spirit level, take
two readings--with the level
placed diagonally first in
one direction and then the
other.r (ansomemodels)
3. Remove the storage drawer, broiler drawer, or kick
panel The front leveling legs can be adjusted from
the bottom and the rear legs can be adjusted from
.
5_
the top or the bottom_
Use an open-end or
adjustable wrench to
adjust the leveling legs
until the range is level.
After the range is level,
slide the range away
from the walt so that the
Anti-Tip device can be
installed,
I__' Lower
L,. _ range
(on some models)
38
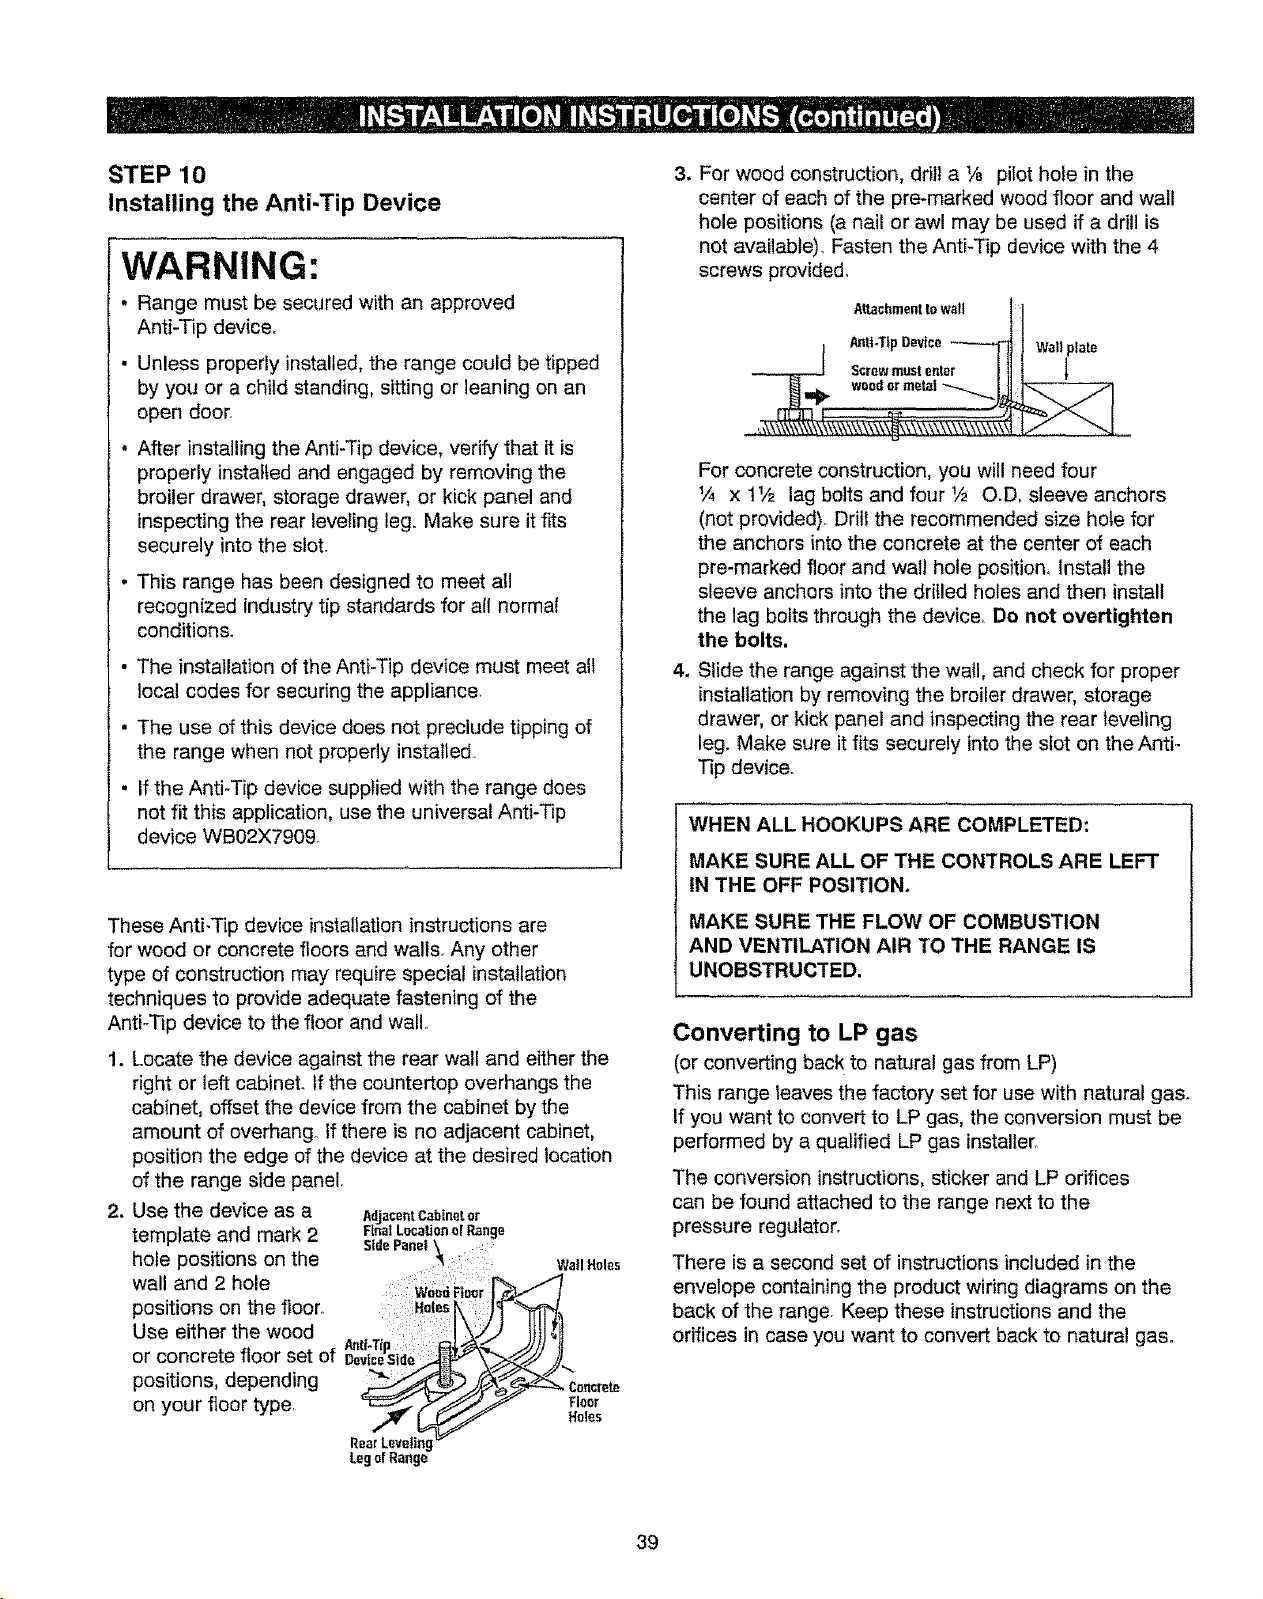
STEP 10
Installing the Anti-Tip Device
WARNING:
• Range must be secured with an approved
Anti-Tip device.
• Unless properly installed, the range could be tipped
by you or a child standing, sitting or leaning on an
open door
• After installing the Anti-Tip device, verify that it is
properly installed and engaged by removing the
broiler drawer, storage drawer, or kick panel and
inspecting the rear leveling leg. Make sure it fits
securely into the sial
• This range has been designed to meet all
recognized industry tip standards for all normal
condition&
• The installation of the Anti-Tip device must meet alt
local codes for securing the appliance
• The use of this device does not preclude tipping of
the range when not properly installed
. If the Anti-Tip device supplied with the range does
not fit this application, use the universal Anti-Tip
device WB02X7909
These Anti-Tip device installation instructions are
for wood or concrete floors and wall& Any other
type of construction may require special installation
techniques to provide adequate fastening of the
Anti-Tip device to the floor and wall
1. Locate the device against the rear wall and either the
right or left cabinet. If the countertop overhangs the
cabinet, offset the device from the cabinet by the
amount of overhang° tf there is no adjacent cabinet,
position the edge of the device at the desired location
of the range side panel
2. Use the device as a AdjacentCablneter
template and mark 2 FtnalLecalJonel R_nge
SidePanel
hole positions on the :_ we.Holes
wall and 2 hole
positions on the floor. :=;Holes
Use either the wood
or concrete floor set of
positions, depending "_
on your floor typer Floor
Holes
RearLeveling
Legof Range
3. For wood construction, drill a V8 pilot hole in the
center of each of the pre-marked wood floor and wall
hole positions (a nail or awl may be used if a drill is
not available), Fasten the Anti-Tip device with the 4
screws provided,
Attachmentto wall l:l
_l, mp Device_ I W.ltp,ate
Screwmust enter ill |
4_
For concrete construction, you will need four
_/_ x tl/2 lag bolts and four 1/2 O D, sleeve anchors
(not provided)_ Drill the recommended size hole for
the anchors into the concrete at the center of each
pre-marked floor and wall hole position° Install the
sleeve anchors into the drilled holes and then install
the lag bolts through the device, Do not overtighten
the bolts.
Slide the range against the wall, and check for proper
installation by removing the broiler drawer, storage
drawer, or kick panel and inspecting the rear leveling
leg. Make sure it fits securely into the slot on the Anti-
Tip device.
WHEN ALL HOOKUPS ARE COMPLETED:
MAKE SURE ALL OF THE CONTROLS ARE LEFT
IN THE OFF POSITION.
MAKE SURE THE FLOW OF COMBUSTION
AND VENTILATION AIR TO THE RANGE IS
UNOBSTRUCTED.
Converting to LP gas
(or converting back to natural gas from LP)
7"his range 1eaves the factory set for use with natural gas.
If you want to convert to LP gas, the conversion must be
performed by a qualified LP gas installer
The conversion instructions, sticker and LP orifices
can be found attached to the range next to the
pressure regulator
There is a second set of instructions included in the
envelope containing the product wiring diagrams on the
back of the range Keep these instructions and the
orifices in case you want to convert back to natural gas°
39
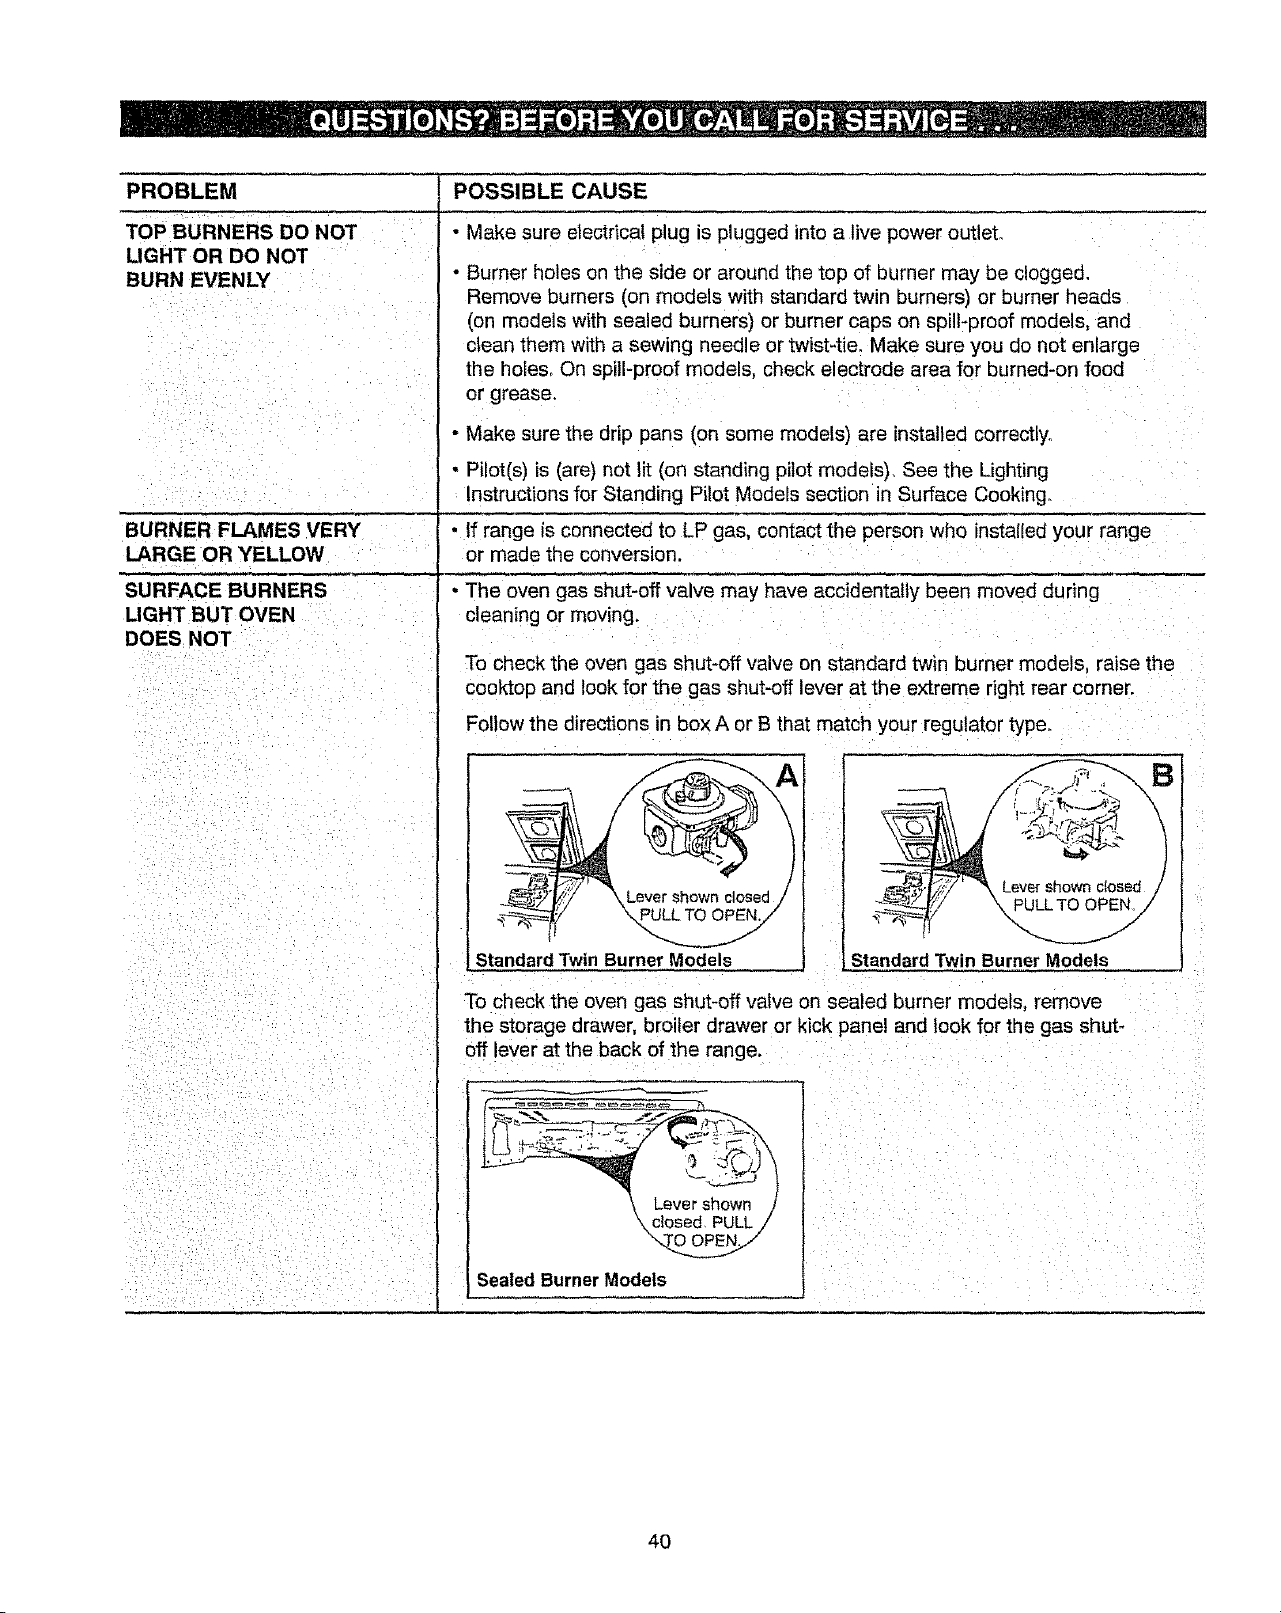
PROBLEM
TOP BURNERS DO NOT
UGHT OR DO NOT
BURN EVENLY
POSSIBLE CAUSE
Make sure electrical plug is plugged into a live power outlet.
BURNER FLAMES VERY
LARGE OR YELLOW
SURFACE BURNERS
LIGHT BUT OVEN
DOES NOT
Burner holes on the side or around the top of burner may be clogged.
Remove burners (on models with standard twin burners) or burner heads
(on models with sealed burners) or burner caps on spill-proof models, and
clean them with a sewing needle or twist4ie. Make sure you do not enlarge
the holes_ On spill-proof models, check electrode area for burned-on food
or grease.
- Make sure the drip pans (on some models) are installed correctly.
• Pilot(s) is (are) not lit (on standing pilot models). See the Lighting
Instructions for Standing Pilot Models section in Surface Cooking.
• If range is connected to LP gas, contact the person who installed your range
or made the conversion.
• The oven gas shut-off valve may have accidentally been moved during
cleaning or moving.
To check the oven gas shut-off valve on standard twin burner models, raise the
cooktop and look for the gas shut-off lever at the extreme right rear corner.
Follow the directions in boxA or B that match your regulator type.
Lever shown closed//
PULL TO OPEN,i"
Standard Twin Burner Models
Lever shown c_osed/
Standard Twin Burner Models
To check the oven gas shut-off valve on sealed burner models, remove
the storage drawer, broiler drawer or kick panel and look for the gas shut*
off lever at the back of the range.
eversnown /
\closed PULL /
Sealed Burner Models
40
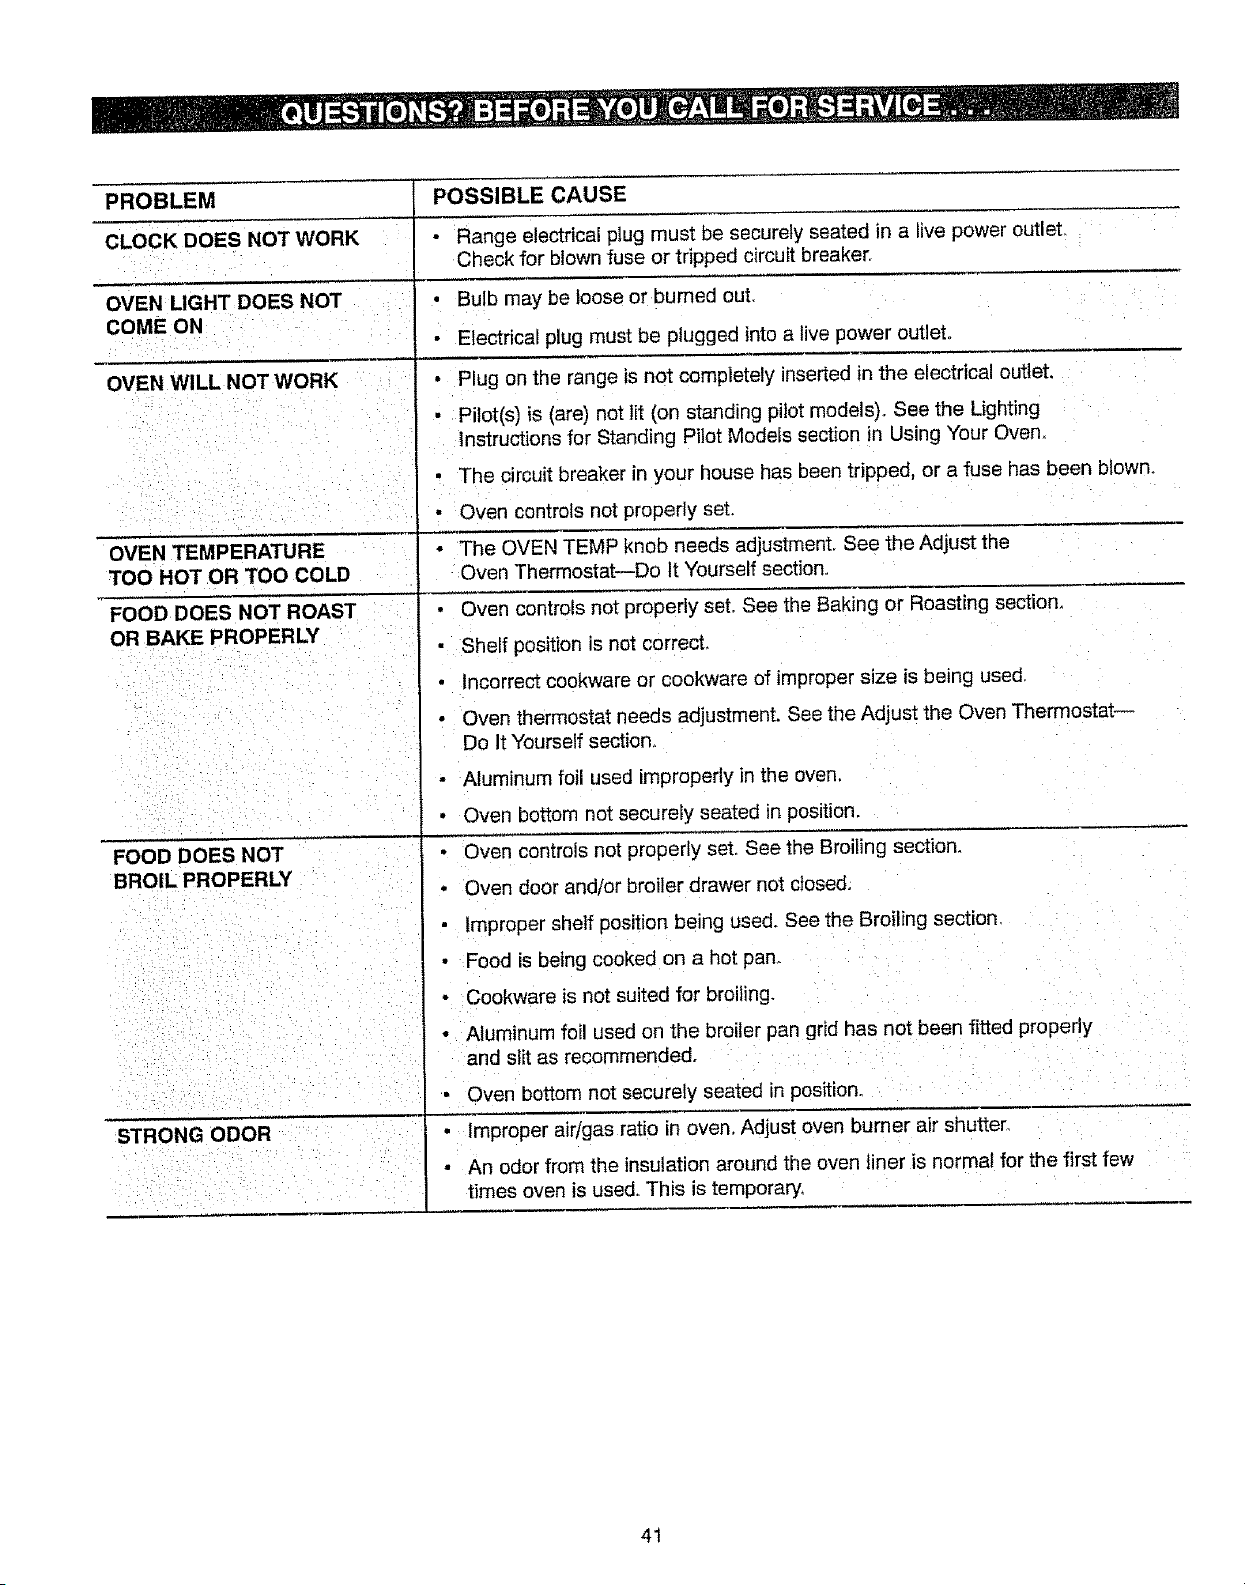
PROBLEM
CLOCK DOES NOT WORK
OVEN LIGHT DOES NOT
COME ON
OVEN WILL NOT WORK
OVEN TEMPERATURE
TOO HOT OR TOO COLD
FOOD DOES NOT ROAST
OR BAKE PROPERLY
FOOD DOES NOT
BROIL PROPERLY
STRONG ODOR
POSSIBLE CAUSE
Range electrical plug must be securely seated in a live power outlet
Check for blown fuse or tripped circuit breaker.
• Bulb may be loose or burned out.
• Electrical plug must be plugged into a live power outlet°
, Plug on the range is not completely inserted in the electrical outtet.
• Pilot(s) is (are) not lit (on standing pilot models). See the Lighting
Instructions for Standing Pilot Models section in Using Your Oven.
• The circuit breaker in your house has been tripped, or a fuse has been blown.
• Oven controls not properly set.
- The OVEN TEMP knob needs adjustment. See the Adjust the
Oven Thermostat--Do It Yourself section.
• Oven controls not properly set. See the Baking or Roasting section.
• Shelf position is not correct.
Incorrect cookware or cookware of improper size is being used.
• Oven thermostat needs adjustment. See the Adjust the Oven Thermostat--
Do It Yourself section.
Aluminum foil used improperly in the oven.
• Oven bottom not securely seated in position.
• Oven controls not properly set. See the Broiling section_
• Oven door and/or broiler drawer not closed.
• improper shelf position being used. See the Broiling section.
• Food is being cooked on a hot pan.
• Cookware is not suited for broiling.
• Aluminum foil used on the broiler pan grid has not been fitted properly
and slit as recommended.
• Oven bottom not securely seated in position°
• Improper air/gas ratio in oven. Adjust oven burner air shutter.
• An odor from the insulation around the oven liner is normal for the first few
times oven is used This is temporary.
41
®
FREE-STANDING GAS
RANGE WARRANTY
F
FULL ONE YEAR WARRANTY ON ALL PARTS
If, within one year from the date of instaflation_ any part fails to function property due to a defect in material or
workmanship, Sears will repair or replace it, at our option, free of charge
If this product is subjected to other than private family use, the above warranty is effective for only 90 days,
WARRANTY SERVICE IS AVAILABLE BY CONTACTING THE NEAREST SEARS
SERVICE CENTER IN THE UNITED STATES.
This warranty gives you specific legal rights, and you may also have other rights which vary from state to state
Sears Roebuck and Co Dept 817 WA Hoffman Estates, IL 60179
To Further Add To The Value Of Your Range, Buy a Sears Maintenance Agreement.
F Years of Ownership Coverage 1st Year 2nd Year 3rd Year
1. Replacement of Defective Parts W MA MA
2. Annual Preventive Maintenance MA MA MA
Check at your request
.............. J
W - Warranty MA - Maintenance Agreement
Kenmore Appliances are designed, manufactured and tested for years of dependable operation.
Yet, any appliance may require service from time to time. The Sears Maintenance Agreement offers
you an outstanding service program for your product..
The table above shows the additional benefits a Sears Maintenance Agreement offers compared to
a Sears Warranty.
Contact your Sears Sales Associate or local Sears Service Center to purchase
a Sears Maintenance Agreement,
42
Instrucciones de seguridad
Dispositivo anti-volcaduras ............ 43, 44, 72, 80
Instrucciones de seguridad importantes .... 43-47, 71
Cuidado y mantenimiento
Ajuste del termostato del homo ............... 57
Antes de Itamar para servicio ................ 81, 82
Cuidado y limpieza ......................... 62-68
Garantia .................................. 83
Servicios al consumidor ....................... 84
Servicios de reparaci6n ........................ 84
Instrucciones para la instalacibn
Ajuste del aire ......................... 77, 79
Conecte la cocina al gas ................... 73-75
Conexiones el@ctricas ...................... 75, 76
Dimensiones y espacios ....................... 70
Dispositivo antiwolcaduras .................. 72, 80
Para su seguridad ............................. 69
LP (propano) .................................. 80
Funcionamiento
Asar al fuego directo/Gufa ................... 60, 61
Caracteristicas de su cocina .................. 48
Cocinando en la supefficie ................. 49-51
CSmo asar/Guia ........................ 58, 59
Hornear .............................. 53-57
Reloj e indicador de tiempo ................... 52
Para su conveniencia y referencia futura, por favor
escriba los nQmeros de modelo y serie en el espacio que
se provee. El nL_mero de modelo y el numero de serie de
su cocina de gas pueden ser encontrados en una placa
sujetada a fa parle deiantera del marco de la cocina
detr_s del caj6n de asador o de almacenamiento, odel
panel de protecci6n..
NUMERO DE MODELO:
NUMERO DE SERIE:
AADVERTENCIA
- TODAS LAS COCINAS SE
PUEDEN VOLCAR
- LESIONES PERSONALES
PUEDEN OCURRIR
• INSTALE LOS DISPOSITIVOS
ANTI-VOLCADURAS QUE
VIENEN CON SU COCINA
• VEA LAS INSTRUCCIONES
PARA LA INSTALACION
® Sears, Roebuck and Co.
ADVERTENCIA: siu ted.osigue con
exactitud la informacibn de esta gu/a, pudiera causar
un incendio o una exptosibn que resultaria en da_os
a la propiedad, lesiones personales o muerte.
No almacene o use gasolina u otros vapores y
liquidos inflamables en proximidad a _ste o a
cuaiquier otro aparato electrodom_stico.
--- QUE HACER SI
DETECTA OLOR A GAS
• No trate de encender ningdn aparato
electrodom_stico°
. No toque ningdn interruptor el_ctrico;
no use ningdn tel_fono en su edificio.
- Llama inmediatamente a la compa_ia
suministradora de gas desde el tetSfono
de un vecinoo Siga las instrucciones de la
compaSia de gas.
• Si no pudiera comunicarse con ia compaSia de
gas, Ilame a la estaci6n de bomberos.
-- La instalacibn y los servicios de reparaci6n
deber_n set realizados pot un instalador
calificado, una agencia de servicios o ia
compa_ia suministradora de gas.
43
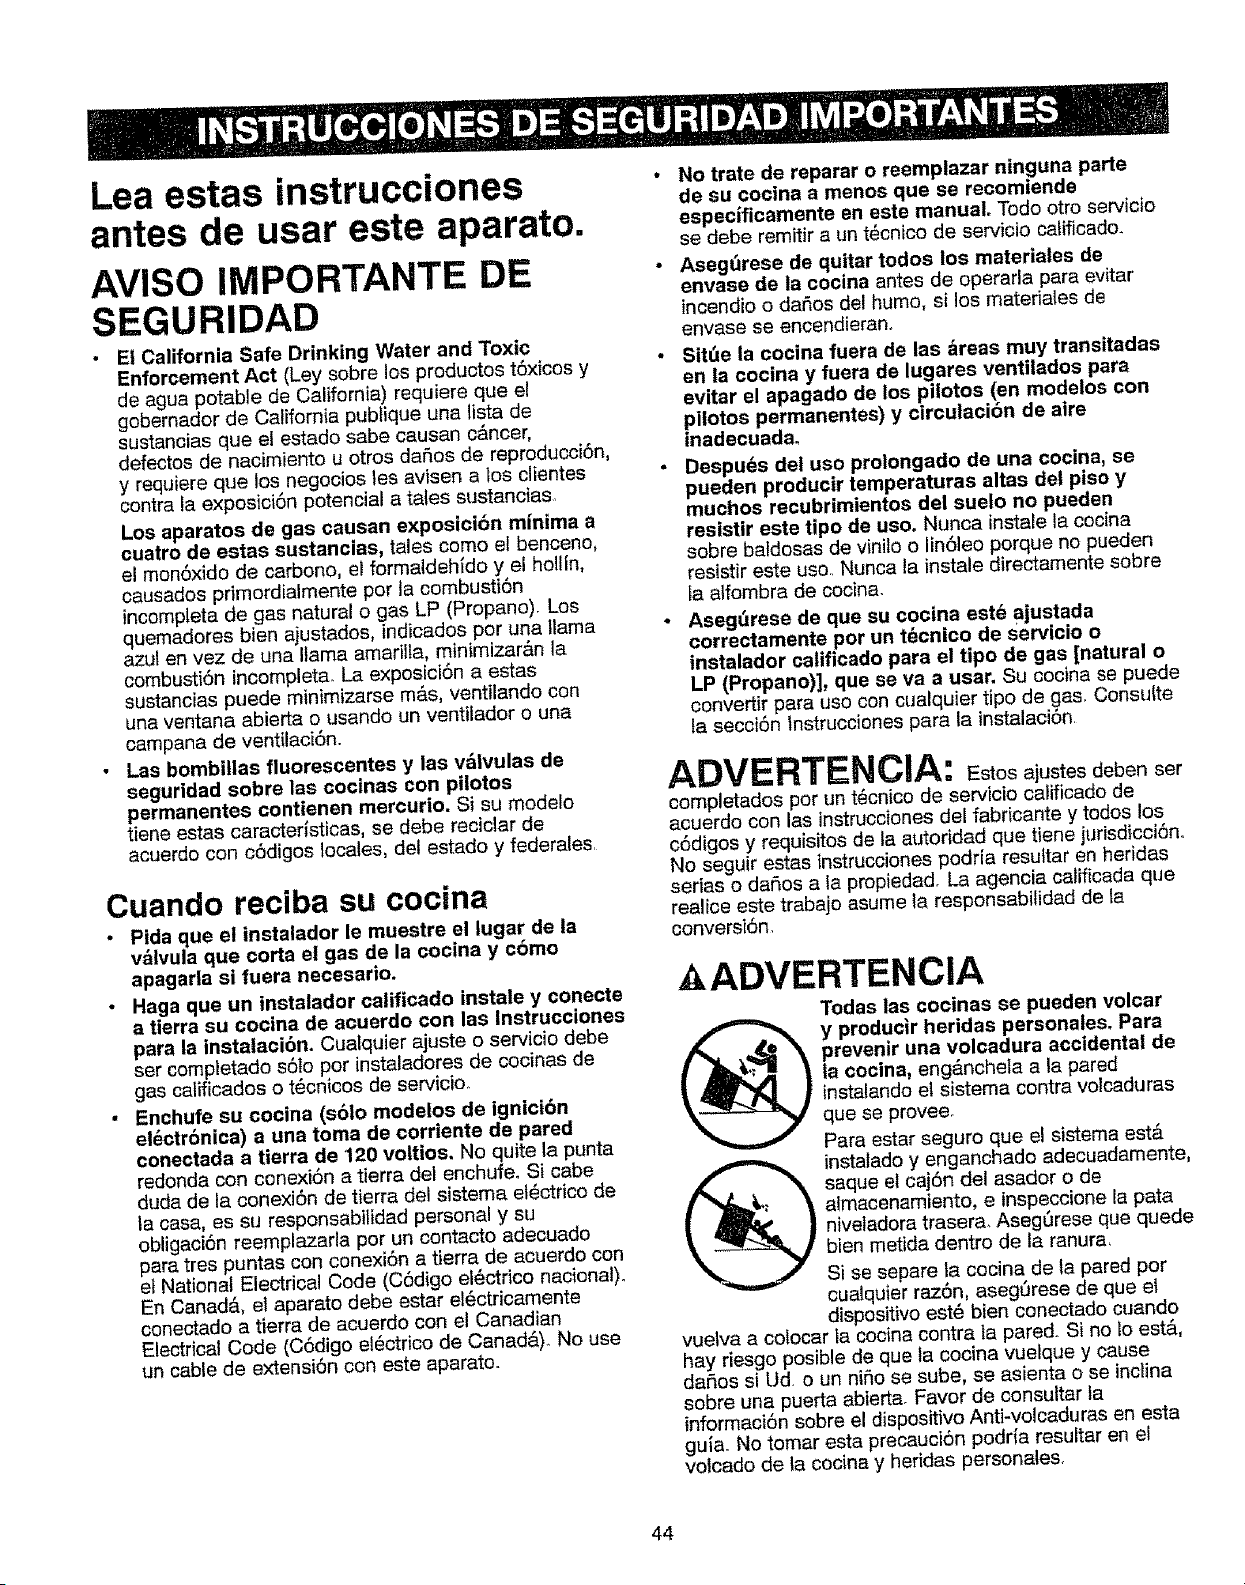
Lea estas instrucciones
antes de usar este aparato.
AVISO IMPORTANTE DE
SEGURIDAD
• Et California Safe Drinking Water and Toxic
Enforcement Act (Lay sobre los produotos t6xicos y
de agua potable de California) requiere que el
gobernador de California publique una tista de
sustancias qua el estado sabe causan c&ncer,
defectos de nacimiento u otros daSes de reproducci6n,
y requiare qua los negocios les avisen a los clientes
contra la exposici6n potencial a tales sustancias.
Los aparatos de gas causan exposici6n minima a
cuatro de estas sustancias, tales come el benceno,
el mQn6xido de carbono, el formaldehido y el hollin,
causados primordialmente per la combusti6n
incompleta de gas natural o gas LP (Propane). Los
quemadores bien ajustados, indicados per una llama
azul en vez de una llama amadlta, minimizar&n la
combusti6n incompleta_ La exposici6n a estas
sustancias puede minimizarse re&s, ventilando con
una ventana abierta o usando un ventilador ouna
campana de ventilaci6n.
• Las bombillas fluorescentes y las vdlvulas de
seguridad sobre las cocinas con piiotos
permanentes contienen mercuric. Si su modelo
tiene estas caracteristicas, se debe reciclar de
acuerdo con c6digos locales, del estado y federales.
Cuando reciba su cocina
• Pida qua el instalador le muestre el lugar de la
vblvula que corta el gas de la cocina y come
apagarla si fuera necesario.
• Haga qua un instalador calificado instals y conecte
a tierra su cocina de acuerdo con las Instrucciones
para la instataci6n. Cualquier ajuste o servicio debe
ser cempletado s6Io per instaladores de cocinas de
gas calfficados o t_cnicos de servicioo
• Enchufe su cocina (s61o modelos de ignicibn
ei_ctr6nica) a una toma de corriente de pared
conectada a tierra de '120 voltios. No quite la punta
redonda con conexi6n a tierra del enchufeo Si cabe
duda de la conexi6n de tierra del sistema el_ctrico de
la casa, es su responsabilidad personal y su
obligaci6n reemplazada per un contacto adecuado
para tres puntas con conexi6n a tierra de acuerdo con
el National Electrical Code (C6digo el6ctrico nacional)o
En Canada., el aparato debe estar el6ctricamente
conectado a tierra de acuerdo con el Canadian
Electrical Code (C6digo el_ctrico de Canad&)o No use
un cable de extensi6n con este aparato.
• No trate de reparar o reemplazar ninguna parte
de su cocina a manes qua se recomiende
especJficamente en este manual. Todo otro servicio
se debe remitir a un t_cnico de servicio calificado.
• Aseg_rese de quttar todos los materiales de
envase de la cocina antes de operarla para evitar
tncendio o daSos del humo, si los materiales de
envase se encendierano
• Sit_e la cocina fuera de las _reas muy transitadas
en la cocina y fuera de lugares ventilados para
evitar el apagado de los pilotos (an modelos con
piiotos permanentes) y cireulacibn de aire
tnadecuada.
• Despuds del use prolongado de una cocina, se
pueden producir temperaturas altas del piso y
muchos recubrimientos del susie no pueden
resistir este tipo de use. Nunca instate la cocina
sobre batdosas de vinito o lin61eo porque no pueden
resistir este use, Nunca la instale directamente sobre
la alfombra de cocina.
• Aseg_rese de que su cocina est_ ajustada
correctamente per un t_cnico de servicio o
instalador calificado para el tipo de gas [natural o
LP (Propane)], que se va a usar. $u cocina se puede
convertir para use con cualquier ripe de _las. Consulte
la secci6n tnstrucciones para la instalacion
ADVERTENCIA: Estosaiostesdebenset
completados per un t_cnico de servicio caiificado de
acuerdo con las instrucciones del fabricante y todos los
c6digos y requisites de la autoridad que tiene jurisdiccibn..
No seguir estas instrucciones podria resuttar en heridas
serias o daSos a ta propiedad. La agencia calificada que
realice este trabajo asume la responsabitidad de la
converst6n_
AADVERTENCIA
Todas las cocinas se pueden volcar
y produclr heridas personales. Para
prevenir una volcadura accidental de
la cocina, eng_nchela a la pared
instatando el sistema contra volcaduras
qua se proveeo
Para estar seguro que el sis_ema est_
instalado y enganchado adecuadamente,
saq_e et caj6n del asador o de
almacenamiento, e inspeccione la pata
niveladora trasera_ Aseg0rese qua quede
bien metida dentro de ta ranura,
Si se separe ta cccina de la pared per
cualquier raz6n, aseg_rese de qua et
dispositivo est_ bien conectado cuando
vuelva a colocar }a cocina contra ta pared. Si no loest&,
hay riesgo posible de que la cocina vuelque y cause
daSos si Udo un niSo se sube, se asienta o se inclina
sobre una puerta abierta. Favor de consultar ta
informaci6n sobre el dispesitivo Anti-velcaduras en esta
gulao No tomar esta precauci6n podria resultar en el
velcado de la cocina y heridas personales.
44
AI usar su cocina
No deje a los nifios solos o desatendidos donde
hay una cocina caliente o en operaci6n. Pueden
quemarse gravemente.
No permita que nadle se suba, se pare, o se
cuelgue de ia puerta, del caj6n de almacenamiento
odel asador (en ciertos modelos) o de la
superficie de cocci6n de la cocina. Podria dar_arse
la cocina o volcarla, causando da_o personal grave_
Deje que las parrillas de los quemadores y otras
superficies se enfrien antes de tocarlas o dejarlas
donde los nifios puedan tocarlas.
PRECAUCION: ARTICULOS DE INTERES PARA
LOS NIl;lOS NO SE DEBEN GUARDAR DENTRO
DE LOS ARMARIOS ENCIMA DE UNA COCINA
O SOBRE I.A CON SOLA POSTERIOR DE LA
COCINA--LOS NINOS QUE SUBEN A LA
COCINA PARA TOMAR ALGO PUEDEN
DAI_IARSE GRAVEMENTE.
• No Ileve nunca vestidos desabrochados o
caidos al usar el aparato. Tenga cuidado al tomar
los articulos guardados en los armarios sobre la
superficie de cocci6n. Los materiales inflamables
se podrian encender si tuvieran contacto con llamas
o superficies calientes del homo y podrian causar
quemaduras graves..
, No use agua para fuegos causados por la grasa.
Nunca recoja una sartdn en llamas. Apague los
controles. Ahogue una sartdn en llamas sobre un
quemador cubriendo completamente la sart_n con
una tapa que ajuste, una hoja de hornear, o una hoja
plana.. Use un extintor de sustancia quimica seca de
multi-uso o de tipo espum&
• La grasa en llamas fuera de una sart_n se puede
extinguir cubri6ndola con bicarbonato s6dico, o si est&
disponible, usando un extintor de sustancia quimica
seca de multFuso o de tipo espuma.
° Las llamas en el homo o el caj6n del asador o de
almacenamiento se pueden ahogar completamente
cerrando la puerta del homo o et caj6n y apagando et
homo o usando un extintor de sustancia quimica seca
de multi-uso o de tipo espumao
• No guarde los materiales inflamables dentro
del homo, del asador de la cocina, del caj6n del
asador o de aimacenamiento, o cerca de la
superficie de cocci6n.
• No guarde ni use materiales combustibles,
gasolina u otros vapores o liqutdos cerca de este
o cualquier otro aparato.
• No deje que la grasa de cocina u otros materiates
inflamables se acumulen dentro o cerca de la
cocina.
Cocine muy bien todas las carnes, incluyendo las
carries de aves; las cames de res, por ejemplo, deben
cocinarse a una temperatura INTERNA de por Io
menos 160°F (71°C) y las cames de ayes deben
cocinarse a una temperatura INTERNA de por Io
menos 180°F (82°C). Por to general, cocinar a estas
temperaturas pro!ege contra las enfermedades que se
transmiten a traves de los alimento&
Por su seguridad, nunca use su aparato para
calentar la habitaci6n.
Cocinando en la superficie
• Siempre use la posici6n LITE (encender) (en
modelos con ignicibn et6ctrbnica) o la posicibn HI
(alto) (en modelos con pilotos permanentes) at
encender los quemadores de superficie para
asegurarse de que hayan encendido los
quemadores.
Nunca deje desatendidos los quemadores en las
posiciones de llamas altas. Las salpicaduras pueden
causar humo y derrames de grasa que pueden
encenderse.
Ajuste el tamafio de la llama del quemador de
superficie para que no extienda sobre la
extremidad de la cacerola. Las llamas excesivas
son peligrosas.
Use s61o agarraderas secas--las agarraderas
h(Jmedas o mojadas sobre superficies calientes
pueden resultar en quemaduras por el vapor.
No deje que las agarraderas se acerquena las
llamas at levantar una cacerola. No use una toalla
u otro trapo abultado en vez de usar una agarradera.
Para minimizar la posibilidad de quemaduras,
el incendio de materiaies inflamables y derrames,
coloque los mangos hacia la parte de atr#,s de la
cocina sin extenderlos sobre los quemadores
Siempre apague los quemadores de superficie
antes de quitar una cacerola.
(continua en la p_gina siguiente)
45

Cocinando en la superficie
(continuacibn)
• Vigile con atenci6n los alimentos que se frien en
llama alta°
• Nunea obstruya los respiraderos (aberturas de
aire) de la cocina. Estas proporcionan la entrada y
la salida de aire necesarias para que la cocina
funcione adecuadamente con una combustt6n
correcta. Los respiraderos de aire se loealizan
en los lugares siguientes:
--Respiradero def homo en la parte posterior de la
superficie de cocci6n de la coclna,
--Entrada de aire debajo del eaj6n del asador.
--Respiradero de aire en la parte superior de la puerta
del homo,
NO use ollas metdlicas (tipo "wok") en los modelos
con quemadores seilados si la oila metblica tiene
anillo metblico que se colca sobre la parrUla del
quemador para soportar la otla metblica. Este anillo
aetna como trampa de calor, 1ocuat puede daSar la
parrilla del quemador y la cabeza del quemador
Tambi_,n, puede causar que el quemador funcione de
manera lnadecuada. Esto puede causar que el nivel
de rnon6xido de carbono sea superior a los estAndar
actuales permitidos, resultando en un peligro para
la salud.
• Los alimentos para freir deben estar tan secos
como sea posible. La escarcha sobre los alimentos
congelados o la humedad sobre los alirnentos frescos
pueden provocar que la grasa cailente burbujee y se
salga pot los lades del recipienteo
• Use la cantidad minima de grasa para freir de una
manera mds eficaz. Llenar el recipiente de grasa
puede causar salpicaduras ai afiadir alimentos
• Si una comblnacibn de aceites o grasas se usara
al freir, revuelva antes de catentar o mientras la grasa
se derrite _entamente,.
• Siempre caliente la grasa lentamente y obs_rvela
cuando se calienta.
• Use un term6metro para freir con aceite cuando
sea posfble para evitar sobrecalentar la grasa y que
eche humo,
- Nunca trate de mover una sart_n de grasa callente,
especialmente un freidor con bastante aceite. Espere
hasta que se enfrle et aceite.
• AI usar recipientes de vidrio, asegt_rese de que
est6n disefiados para la cocci6n sobre la cocinao
Aleje todos los
artmulos de material
pidstico de los
quemadores de
superficie.
No deje articulos de
pl&stlco sobre la
superficie---se pueden La apariencia y la ubicacibn de_
respiradero varlan
derretir si se dejan muy
cerca del respiradero.
Use el tamaho correcto de recipiente. Evite usar
los recipientes que no son estables o se vuelcan
f&citmente. Seleccione los recipientes con fondo piano
bastante grandes para contener el alimento y evitar
las sa!picaduras y derrames, y Io bastante grandes
para cubrir las parrillas de los quemadores. Esto
ahorrar& e] tiempo de limpieza e impedir& la
acumulaci6n peligrosa de alimentos; las salpicaduras
o los derrames dejados sobre la cocina pueden arder
Use recipientes con mangos que se pueden agarrar
f&cUmente y que se mantengan frlos.
No deje articulos sobre la superficie de la eocina.
El aire caliente del respiradero puede hacer que tos
objetos inflamables ardan y aumente la presi6n de
los reciptentes cerrados, 1o que puede originar que
estallen.
• Para evitar la posibitidad de una quemadura,
siempre asegerese de que los controtes para
todos los quemadores est_n apagados y que todas
las parrtllas de los quemadores estdn frias antes
de tratar de quitarlas.
• Cuando los allmentos Incendiados estdn debajo de
la campana, apague el ventilador. El ventilador, si
esta funcionando, puede propagar tas llamas.
• Si la cocina est_ Iocalizada cerca de la ventana, no
cuelgue tas cortinas largas que podrian ser Ilevadas
por el viento sobre los quemadores de superficie y
crear un peligro de incendiQ
• Cuando un piloto se apaga (en modelos con
pilotos permanentes), descubrir& un olor ligero de
gas como una seSat para volver a encender el pitoto.
AI volver a encender el piloto, asegQrese de que los
controtes de los quemadores est_n apagados, y siga
las instrucciones en las Instrucciones para la
instalaci6n para volver a encender el piloto.
Si huele a gas, y se ha asegurado ya de que los
pilotos estan encendidos (en modeios con pilotos
permanentes), apague el gas de la cccina y Ilame
a un t_cnico calificado. Nunca use una llama viva
para encontrar una fuga.
46
Hornear, asar al fuego directo
y asar
• No use el horno para guardar cosas. Los articulos
guardados en el homo se pueden quemar.
• Permanezca lejos de la cocina al abrir la puerta de
un homo caliente. El aire caliente y el vapor qua
escapan pueden causar quemaduras en las
manos, la tara y los ojos_
, Mantenga el horno limpio de la grasa que se
acumulao
• Coloque las parrillae det homo en las posiciones
deseadas mientras que el horno est_ frio.
Sacando la parriUa hasta la posicibn en qua se
detiene podr_ levantar f_cilmente los alimentos
pesados. Es tambi_n una precauci6n contra
quemaduras at tocar las superficies calientes de la
puerta o las parades dei homo° La posici6n m_s
baja "R" no est_ disel_ada para deslizarse.
No caliente los recipientes sellados qua contienen
comida. La presibn podria aumentar y el recipiente
podria estallar, causando da_os.
No use papel aluminio en ningt_n sitio del horno
excepto como se describe en eate manual. El real
manejo podrfa resultar en un peligro de incendio o
daSo a la cocina.
No se debe jam_s utilizar papel de aluminio para
revestir la superficie inferior del horno. El uso
inapropiado de aluminio pudiera iniciar un
incendio.
• AI usar las bolsas de cocct6n o de asar en el
homo, siga las instrucciones del fabricante.
• Use s61o los recipientes de vidrto que se
recomiendan para uso en los hornos de gas.
• Siempre quite ia bandeja del asador del homo o
del compartimiento para asar al fuego directo tan
pronto como termine de asar. La grasa dejada en Ia
bandeja se puede encender si se usa el homo sin
quitar la grasa de la bandeja de1asador.
• AI asar al fuego directo, si la carne est& demasiado
cerca de la llama, la grasa puede encenderse.
Corte ta grasa excesiva para evitar llamas aitas.
• Asegbrese de que la bandeja dal asador est6
colocada correctamente para reducir la posibilidad
de incendios causados por ta grasao
Si hubiera un incendio causado por la grasa en ia
bandeja del asador, apague el control del horno y
mantenga cerrados el caj6n del asador y la puerta det
homo para contener el fuego hasta q_e se apague.
Limpieza de su cocina
• Limpie s61o las partes enumeradas en este manual
de uso y de cuidado,
• Mantenga la cocina limpia y libre de
acumulaciones de grasa o salpicaduras, las cuales
se pueden encender.
• Tenga cuidado al limpiar la superficie de coccibn
porque el _rea sobre el piloto estar& caliente (para
modelos con pilotos permanantes).
• Para modelos de limpieza continua, no use
limpiadores para hornos sobre ningunas de las
superficies de limpieza continua, Las superficies
de limpieza continua se pueden identfficar por su
acabado &spero.
GUARDE ESTAS INSTRUCCIONES
47
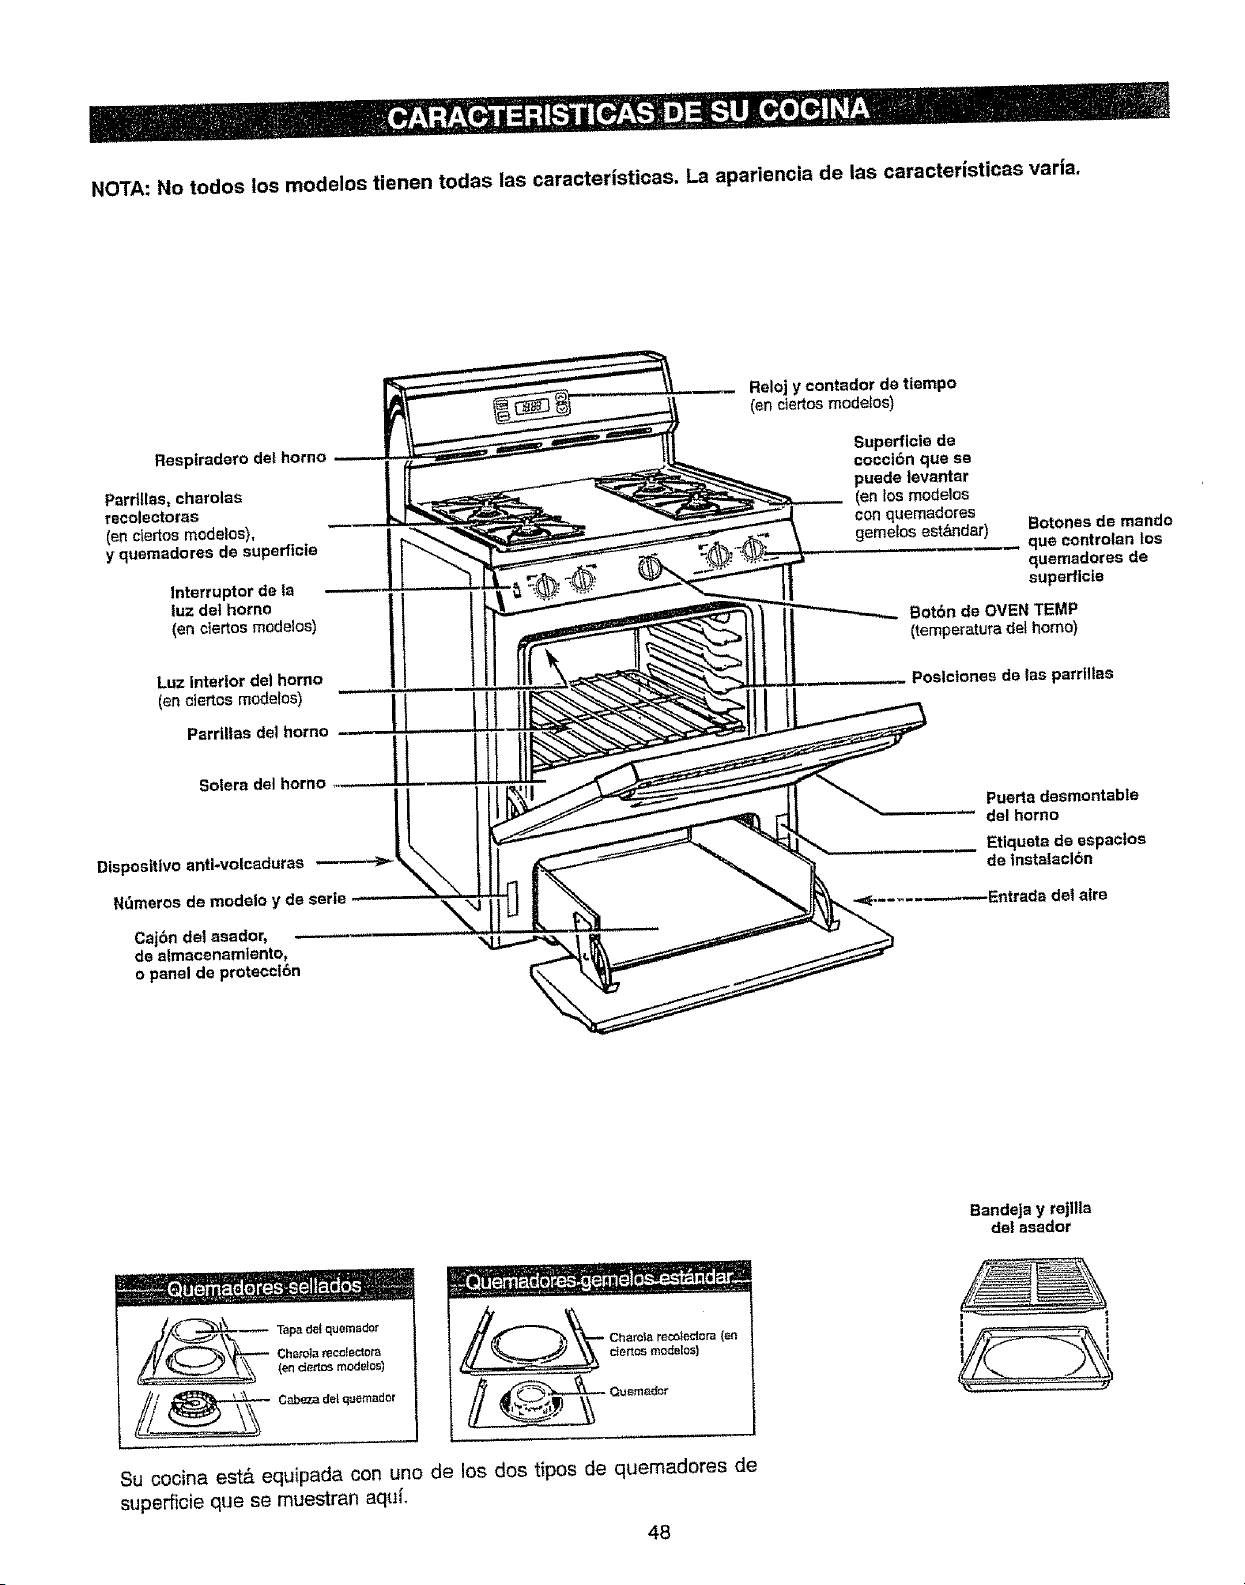
NOTA: No todos los modelos tienen todas las caractefisticas. La apariencia de las caracteristicas varia.
Resptradero de_ homo
Parrtllas,charolas
reeolectoras
(en ciertosmodelos),
y quemadores de superfic|e
Interrupter de ta
luz de! homo
(en ctertosmodelos)
Luz interior del homo
(en ctertos modelos)
Parrlltas del homo
Reloj y contador de tiempo
(en ctertesmodetos)
Superficte de
coccl6n que se
puede tevantar
(en los modetos
con quemadores
geme_os est_J_dar)
Botones de mando
qua controlan _os
quemadores de
superfic|e
Botbn de OVEN TEMP
(temperatura del homo)
=os[clones de fas parrillas
Solera del homo
Dlsposfflvo anti-volcaduras _J=_
N_meros de modelo y de serte
Caj6n de1 asador,
de almacenamlento_
o panel de proteccl6n
Puerta desmontable
del homo
Etiqueta de espac|os
de lnstalacl6n
Entrada de! a|re
Tap_ de_ querrlador
Cham_a recclect_ta
{en detto_ modelos)
CabeT_ de| quemador
_ Charotarecotectora(_
dert_,s modelos)
Su cocina est& equipada con uno de los dos tipos de quemadores de
superficie que se muestran aquL
48
Bandeja y rejllla
de| asador
I t
I
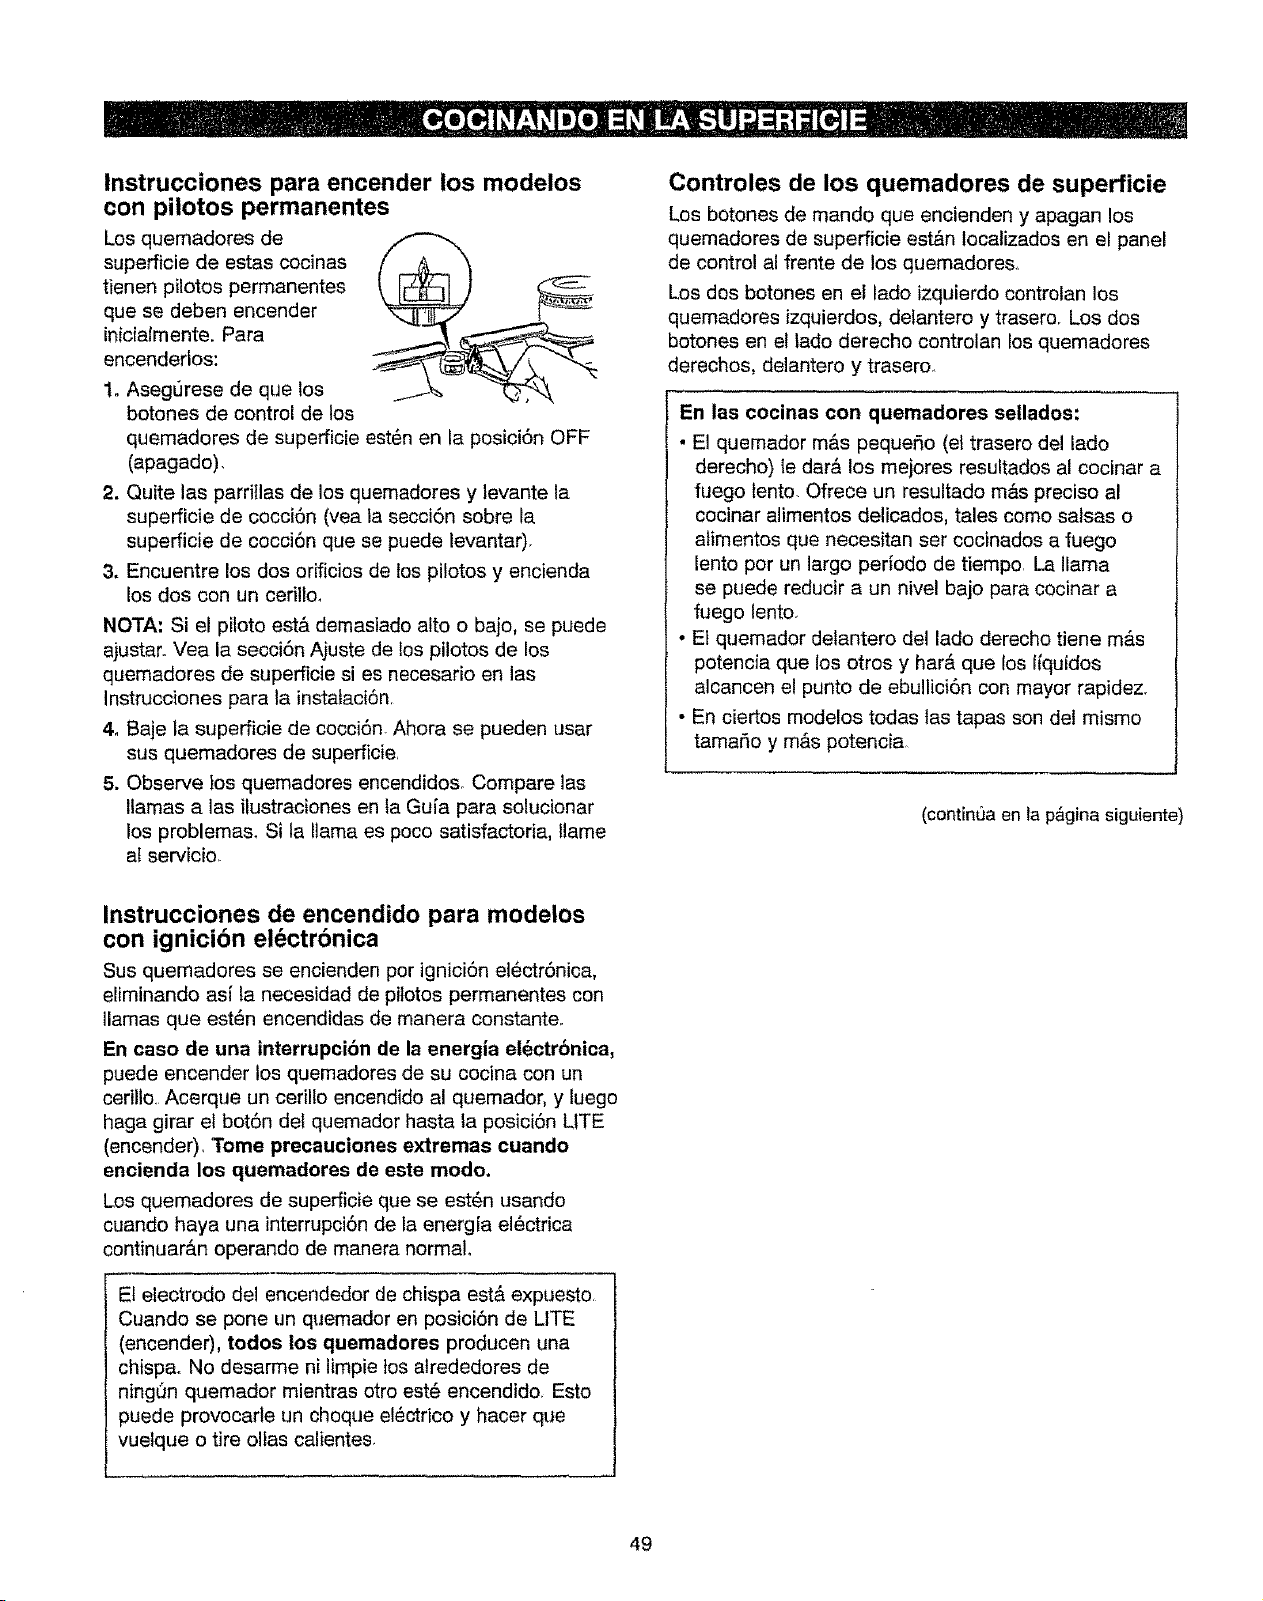
lnstrucciones para encender los modelos
con pilotos permanentes
supefficie de estas cocinas
tienen pilotos permanentes
que se deben encender
inicialmente. Para
encendedos:
1. Asegt]rese de que los
botones de control de los
quemadores de superficie est_n en la posici6n OFF
(apagado).
2. Quite las parritlas de los quemadores y levante la
supefficie de cocci6n (vea la secci6n sobre la
superficie de cocci6n que se puede levantar).
3. Encuentre los dos orificios de los pilotos y encienda
los dos con un cefilIo_
NOTA: Si el piloto est& demasiado alto o bajo, se puede
ajustar. Vea la secci6n Ajuste de los pi!otos de los
quemadores de superficie si es necesario en las
Instrucciones para la instataci6n
4, Baje la superficie de cocci6n Ahora se pueden usar
sus quemadores de supefficie,
5. Observe tos quemadores encendido& Compare las
llamas alas ilustraciones en la Guia para solucionar
Ios problemas. Si la llama es poco satisfactoda, llame
al servicio.
Controles de los quemadores de superficie
Los botones de mando que encienden y apagan los
quemadores de superficie est&n localizados en el panel
de control al frente de los quemadoreso
Los dos botones en el lado izquierdo controtan los
quemadores izquierdos, delantero y trasero. Los dos
botones en el tado derecho controlan los quemadores
derechos, delantero y trasero.
En las cocinas con quemadores sellados:
• El quemador m&s pequeSo (el trasero de! lado
derecho) le dar& los mejores resultados al cocinar a
fuego lento. Ofrece un resultado m&s preciso al
cocinar alimentos delicados, tales como salsas o
alimentos que necesitan ser cocinados a fuego
lento por un largo pefiodo de tiempo. La llama
se puede reducir a un nivel bajo para cocinar a
fuego lento.
• El quemador detantero del lado derecho tiene m_.s
potencia que los otros y har#, que los liquidos
alcancen el punto de ebullici6n con mayor rapidez.
• En ciertos modelos todas tas tapas son det mismo
tamar_o y m&s potencia
(continQa en la p&gina siguiente)
Instrucciones de encendido para modelos
con ignici6n el ctr6nica
Sus quemadores se encienden por ignici6n ei_ctr6nica,
eliminando asi la necesidad de pilotos permanentes con
llamas que est_n encendidas de manera constante.
En caso de una interrupcibn de la energla et_ctrbnica,
puede encender los quemadores de su cocina con un
cerillo Acerque un cerillo encendido al quemador, y luego
haga girar el bot6n del quemador hasta la posici6n UTE
(encender), Tome precauciones extremas cuando
encienda los quemadores de este modo,
Los quemadores de superficie que se est_n usando
cuando haya una interrupci6n de la energfa el_ctrica
continuar&n operando de manera normal,
EI electrodo del encendedor de chispa est& expuesto,
Cuando se pone un quemador en posici6n de LITE
(encender), todos los quemadores producen una
chispa. No desarme ni limpie los alrededores de
ning(]n quemador mientras otro est6 encendido. Esto
puede provocade un choque el_ctrico y hacer que
vuelque o tire olfas calientes,
49
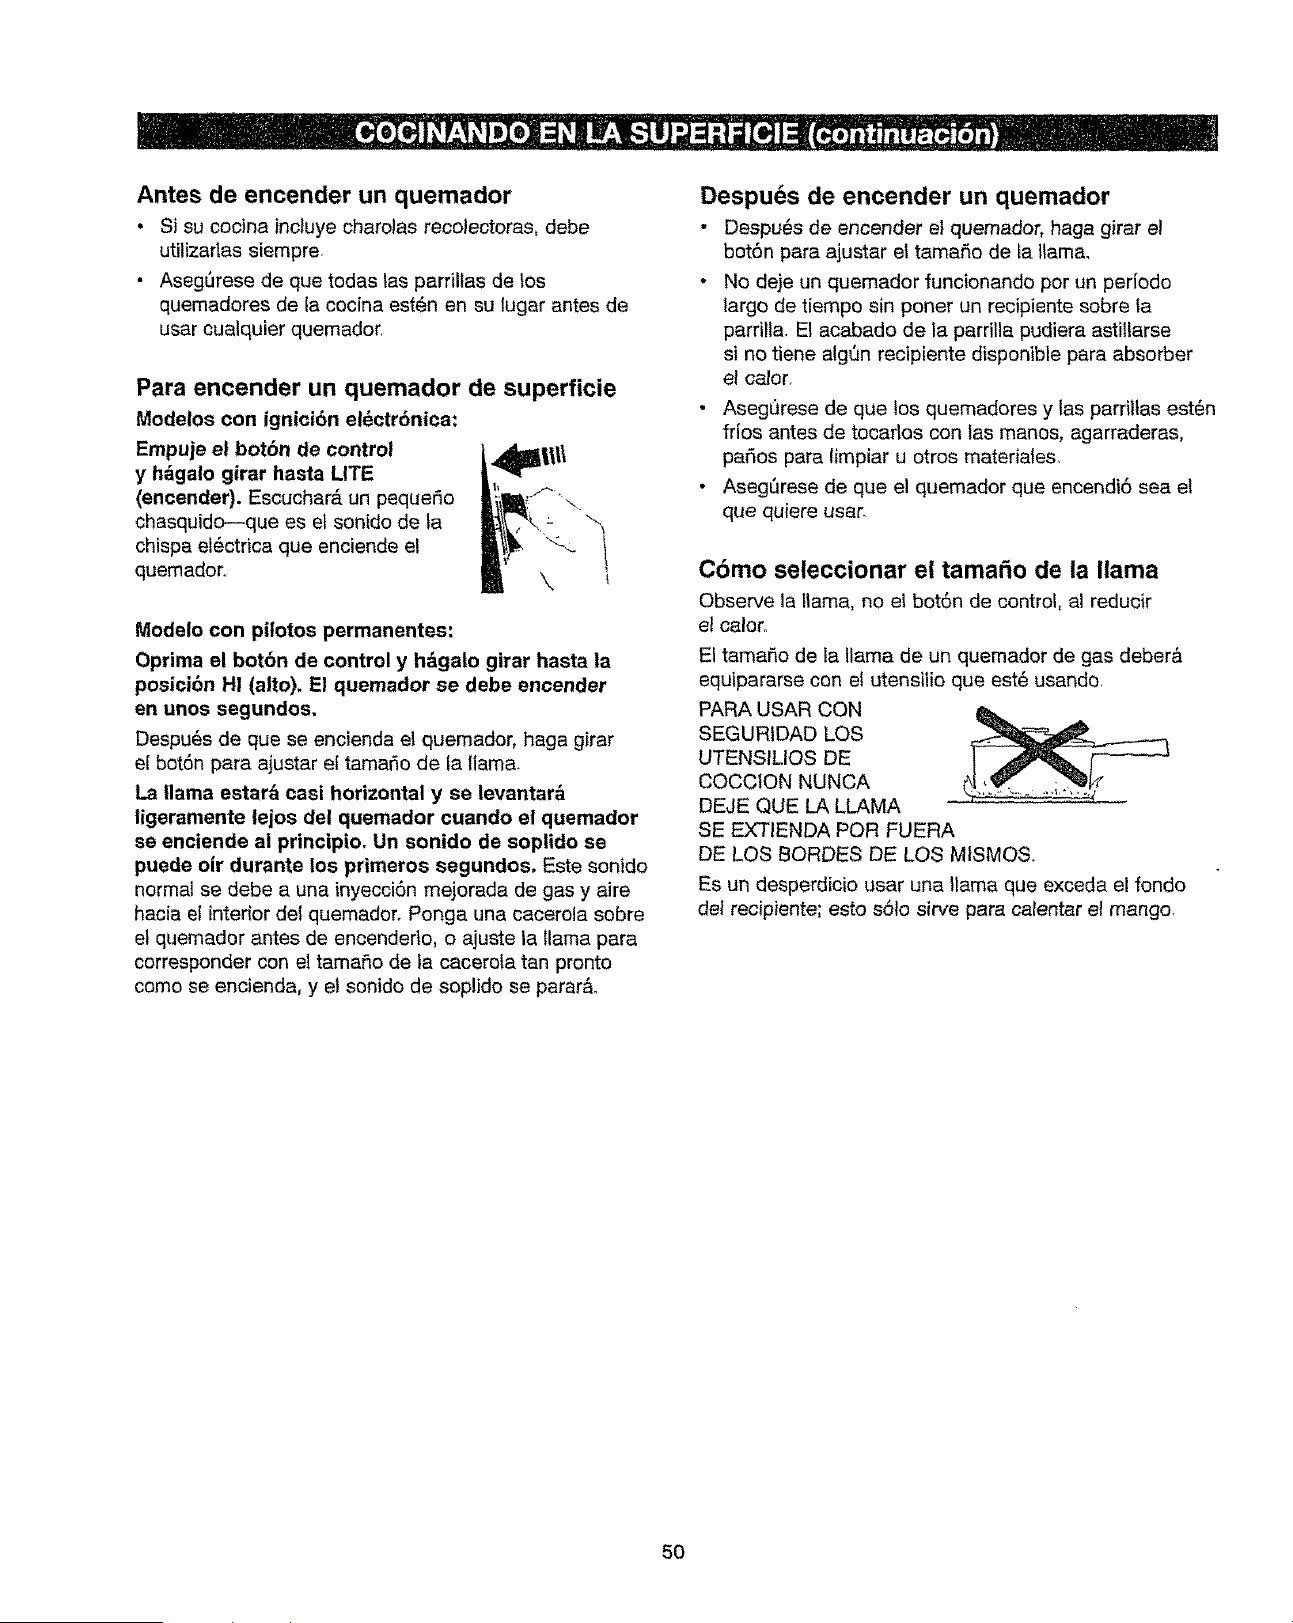
Antes de encender un quemador
• Si su cocina incluye charolas recolectoras, debe
utilizarias siempre,
• AsegSrese de que todas las parrillas de los
quemadores de la cocina est_n en su lugar antes de
usar cualquier quemador.
Para encender un quemador de superficie
Modelos con ignici6n el_ctrdnica:
Empuje el bot6n de control
y hdgalo girar hasta LITE
(encender). Escuchar_, un peque_o
chasquido---que es el sonido de la
chispa el_ctrica que enciende el
quemador_.
Modelo con pilotos permanentes:
Oprima el botbn de control y hbgato girar hasta la
posicibn H! (alto). El quemador se debe encender
en unos segundos,
Despu_s de que se encienda el quemador, haga girar
e[ bot6n para ajustar el tamar_o de la llama,
La llama estar_ casi horizontal y se levantar_
ligeramente iejos del quemador cuando el quemador
se enciende at principio, Un sonido de soplido se
puede oir durante los primeros segundos. Este sonido
normal se debe a una inyecci6n mejorada de gas y aire
hacia el intedor del quemador_ Ponga una cacerola sobre
et quemador antes de encenderto, o ajuste la llama para
corresponder con el tamafio de !a cacerola tan pronto
como se encienda, y el sonido de soplido se parar_
Despuds de encender un quemador
• Despu_s de encender el quemador, haga girar el
bot6n para ajustar et tamaSo de la llama.
• No deje un quemador funcionando per un periodo
largo de tiempo sin poner un recipiente sobre ta
parrilla. El acabado de la parritla pudiera astiltarse
si no tiene algQn recipiente disponible para absorber
el calor,
• Asegurese de que los quemadores y las parriltas est_n
frios antes de tocarlos con las manos, agarraderas,
paBos para limpiar u otros materiales.
• AsegSrese de que el quemador que encendi6 sea el
que quiere usar.
C6mo seleccionar el tamaho de la llama
Observe la _lama, no el bot6n de control, al reducir
el calor.
El tamafio de la llama de un quemador de gas deber&
equipararse con el utensilio que est6 usando.
PARA USAR CON
SEGURIDAD LOS
UTENSILIOS DE
COCCION NUNCA
DEJE QUE LA LLAMA
SE EXTIENDA POR FUERA
DE LOS BORDES DE LOS MISMOS.
Es un desperdicio usar una liama que exceda el rondo
del recipiente; esto s61o sirve para calentar el mango.
5O
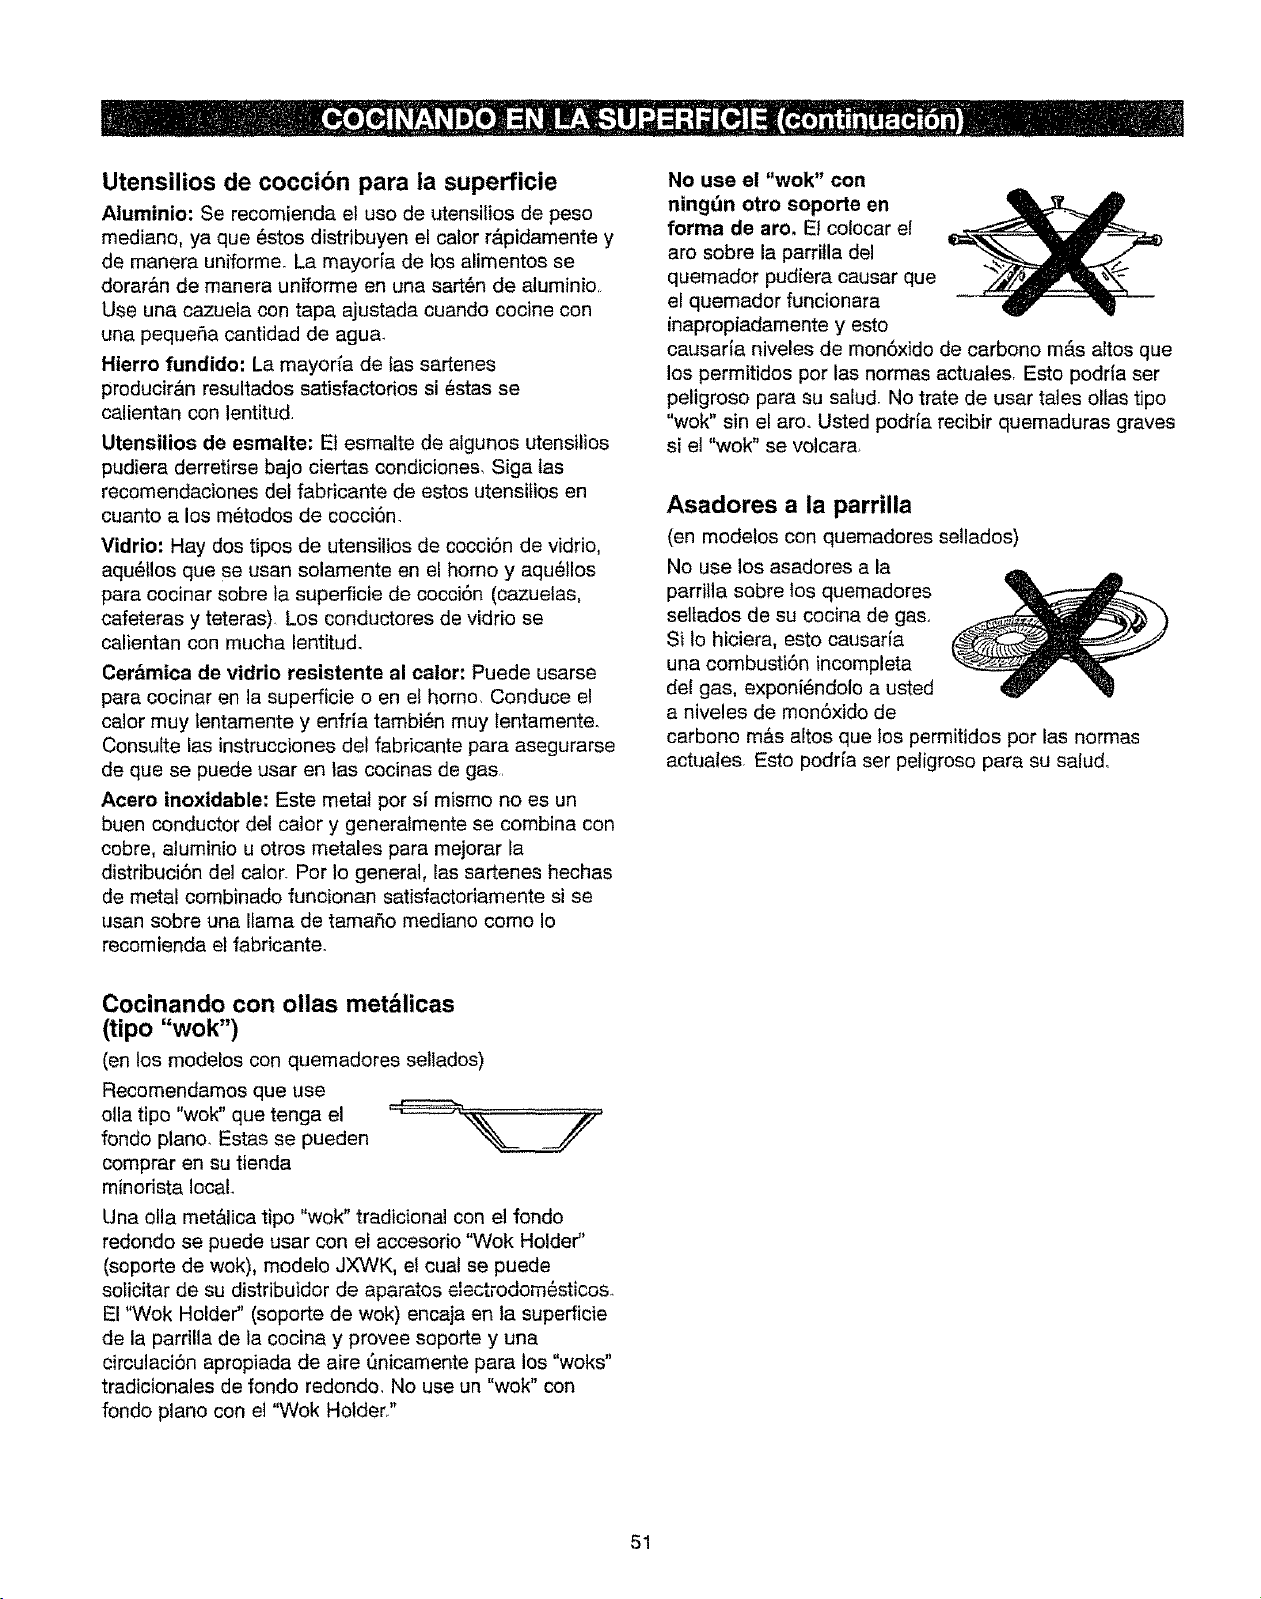
Utensilios de coccibn para la superficie
Aluminio: Se recomienda et uso de utensitios de peso
mediano, ya qua _stos distribuyen el calor r&pidamente y
de manera uniformeo La mayor[a de los alimentos se
dorar&n de manera uniforme en una sart6n de aluminio,
Use una cazuela con tape ajustada cuando cocine con
una pequeSa cantidad de agua.
Hierro fundido" La mayorfa de fas sartenes
producir&n resultados satisfactorios si _stas se
calientan con lentitud
Utensilios de esmalte: Et esmalte de aigunos utensilios
pudiera derretirse bajo ciertas cendiciones, Siga las
recomendaciones det fabricante de estos utensilios en
cuanto a los m_todos de cocci6n.
Vidrio: Hay dos tipos de utensitios de cocci6n de vidrio,
aqu_l!os que se usan solamente en el homo y aqu_llos
para cocinar sobre la superficie de cocci6n (cazuetas,
cafeteras y teteras) Los conductores de vidrio se
calientan con mucha lentitud,
Cer&mica de vidrio resistente al caior: Puede usarse
pare cocinar en la superficie o en el homo, Conduce el
calor muy tentamente y enfria tambi_n muy lentamenteo
Consu[te las instrucciones del fabficante pare asegurarse
de que se puede user entas cocinas de gas.
Acero inoxidable: Este metal por si mismo no es un
buen conductor del calory generatmente se combina con
cobre, aluminio u otros metales para mejorar la
distribuci6n de1 calor. Por Io general, las sartenes hechas
de metal combinado funcionan satisfactodamente si se
usan sobre una IIama de tamafio mediano como Io
recomienda el fabricante°
No use el "wok" con
ningdn otto soporte en
forma de aro. E! colocar el
aro sobre la parritla del
quemador pudiera causer qua
el quemador funcionara
inapropiadamente y esto
causaria niveles de mon6xido de carbono m_.s altos que
los permitidos por las normas actuates, Esto podda ser
petigroso pare su salud. No trate de user tales oltas tipo
"wok" sin el aro. Usted podr[a recibir quemaduras graves
si el "wok" se volcara
Asadores a la parrilla
(an modelos con quemadores sellados)
No use los asadores ala
parri_la sobre los quemadores
seltados de su cocina de ga&
Si Io hiciera, esto causafia
una combusti6n incomplete
de! gas, exponi_ndolo a usted
a niveles de mon6xido de
carbono m&s altos que los permitidos por las normas
actuales Esto podr[a ser petigroso pare su salud,
Cocinando con ollas met_licas
(tipo "wok")
(en los modelos con quemadores sellados)
Recomendamos qua use
olla tipo "wok" qua tonga el
rondo piano, Estas se pueden
comprar en su tienda
minorista local.
Una olla metblica tipo "wok" tradicional con e! rondo
redondo se puede usar con el accesorio "Wok Holder"
(soporte de wok), modelo JXWK, el cual se puede
soiicitar de su distribuidor de aparatos elect;odom6stico&
El '¥qok Holder" (soporte de wok) encaja en la superficie
de la parrilla de la cocina y provee soporte y una
circulaci6n apropiada de aire _nicamente para los "woks"
tradicionales de rondo redondo. No use un "wok" con
fondo piano con el "Wok Holder,."
51
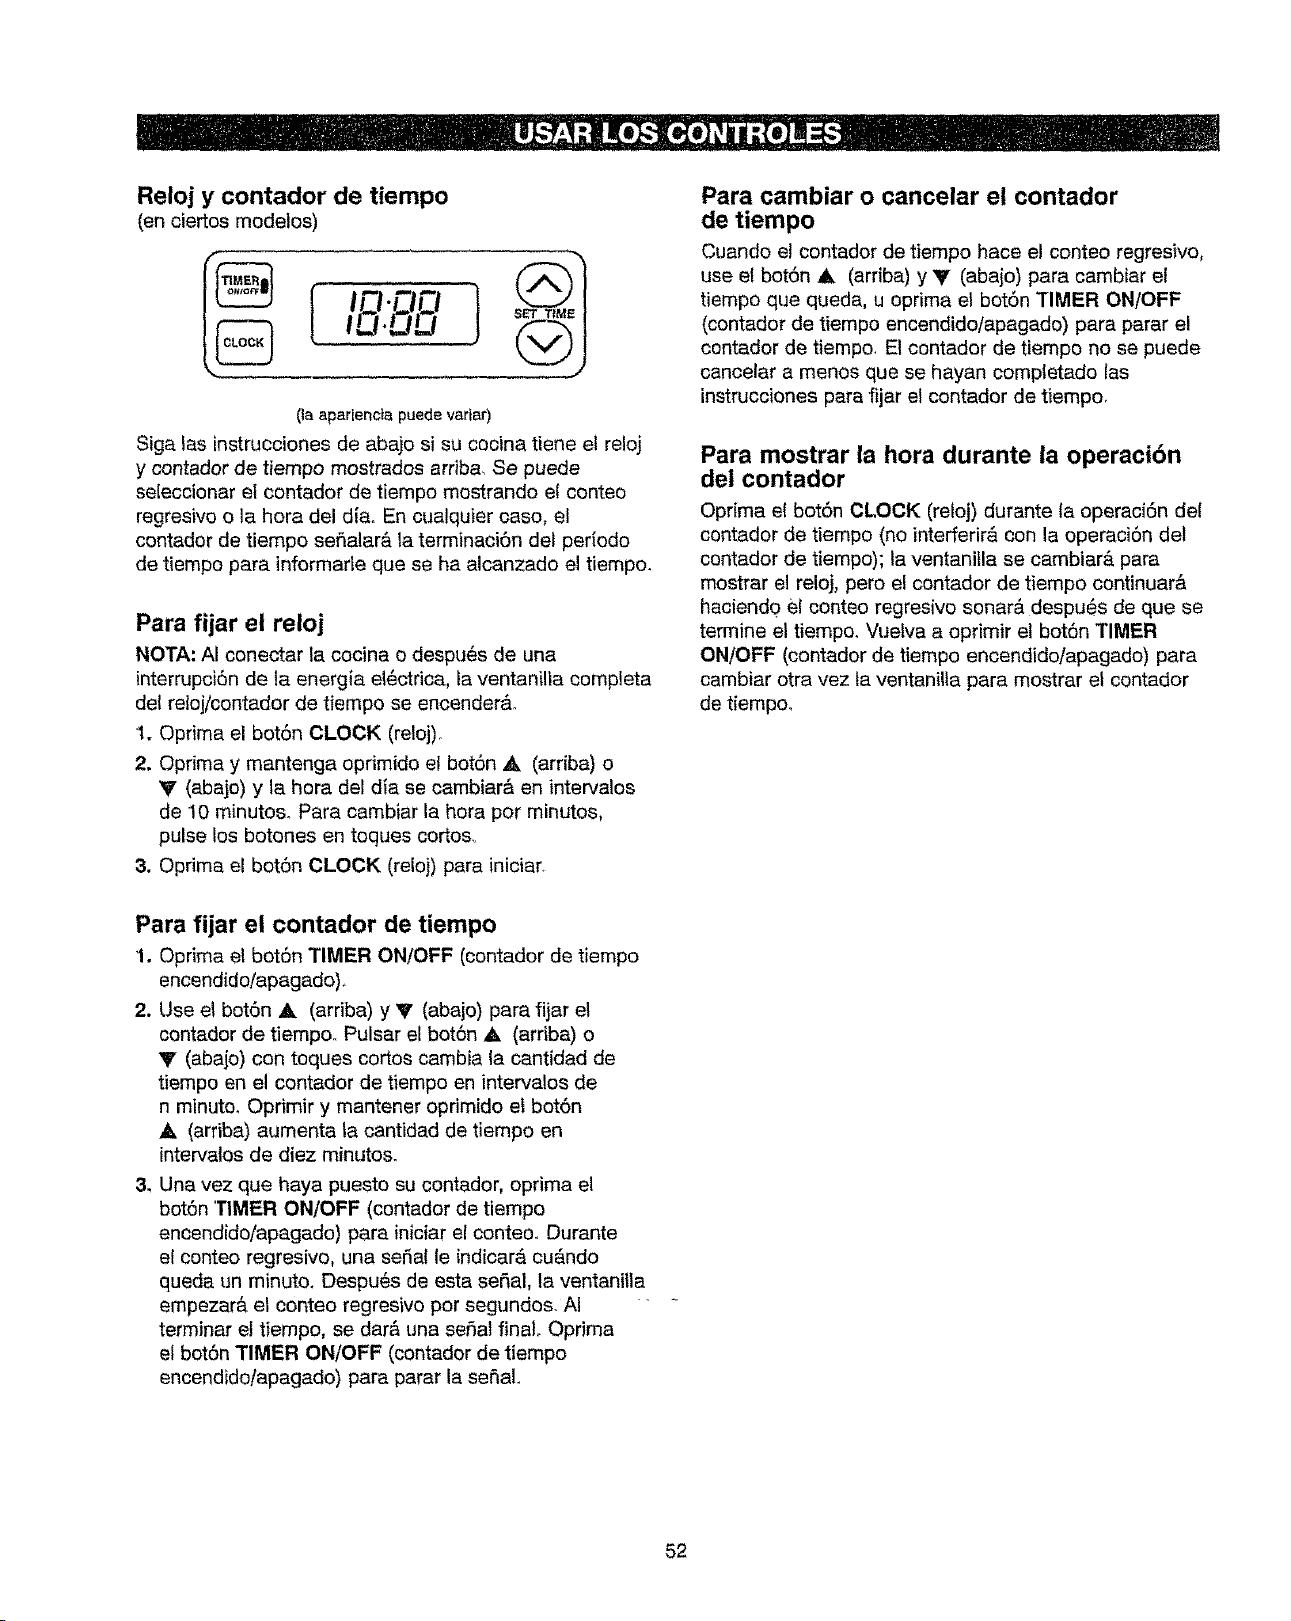
Reloj y contador de tiempo
(enciertos modeles)
r
I ,,_-,oo
! .DD
SET TIME
@
,J
(la apar[encia puede variar)
Siga las instrucciones de abajo si su cocina tiene el reloj
y contador de tiempo mostrados arriba. Se puede
se[eccionar el centador de tiempo mestrando el centeo
regresivo o la hera del die. En cualquier case, el
contador de tiempo sefialar& la terminaci6n del per(ode
de tiempo para informar[e que se ha alcanzado el tiempe.
Para fijar el reloj
NOTA: AI conectar la cocina o despu_s de una
interrupci6n de la energia el_ctrica, la ventanilla completa
del reloj/contador de tiempo se encender&o
1. Optima el bot6n CLOCK (reloj)_
2. Optima y mantenga opdmido el bot6n & (arriba) o
y (abajo) y la hera del die se cambiar& en intervalos
de 10 minutoso Pare cambiar la hera per minutes,
pulse los botches en toques cortes,,
3. Oprima el bot6n CLOCK (relej) para iniciar
Para cambiar o cancelar el contador
de tiempo
Cuando e! contador de tiempo hace el conteo regresivo,
use ei bot6n A (arriba) y V (abajo) pare cambiar et
tiempo que queda, u oprima el bot6n TIMER ON/OFF
(contador de tiempo encendidotapagado) para parer el
contador de tiempo, El contador de tiempo no se puede
canceler a menos que se hayan compietado las
instrucciones para fijar el contador de tiempo.
Para mostrar la hera durante la operacibn
dei contador
Oprima ei bot6n CLOCK (reloj) durante ta operaci6n def
contador de tiempo (no interferir8 con la operaci6n de!
contador de tiempo); la ventanilla se cambiar& pare
mostrar e! reloj, pero el contador de tiempo continuer&
haciend0 el conteo regresive sonar_ despu_s de que se
termine el tiempo. Vuelva a oprimir el bot6n TIMER
ON/OFF (contador de tiempo encendido/apagado) para
cambiar otra vez la ventanilta para mostrar el contador
de tiempo,,
Para fijar el contador de tiempo
1. Oprima el bot6n TIMER ON/OFF (contador de tiempo
encendido/apagado).
2. Use el bot6n A (arriba) y V (abajo) pare fijar el
contador de tiempoo Pulsar el bot6n ,& (arriba) o
T (abajo) con toques cortes cambia la cantidad de
tiempo en el contador de tiempo en intervalos de
n minute, Opdmir y mantener oprimido el bot6n
_k (arriba) aumenta la cantidad de tiempo en
intervalos de diez minutes.
3. Una vez que haya puesto su contador, oprima el
bot6n 'TIMER ON/OFF (contador de tiempo
encendido/apagado) pare iniciar el conteo,, Durante
el conteo regresivo, una sedal le indicar& cuAndo
queda un minute, Despu_s de esta seSal, la ventanilla
empezar& el conteo regresivo per segundos. AI
terminar et tiempo, sedar& una seSal final. Opdma
el bot6n TIMER ON/OFF (contador de tiempo
encendido/apagado) pare parer la seSaL
52
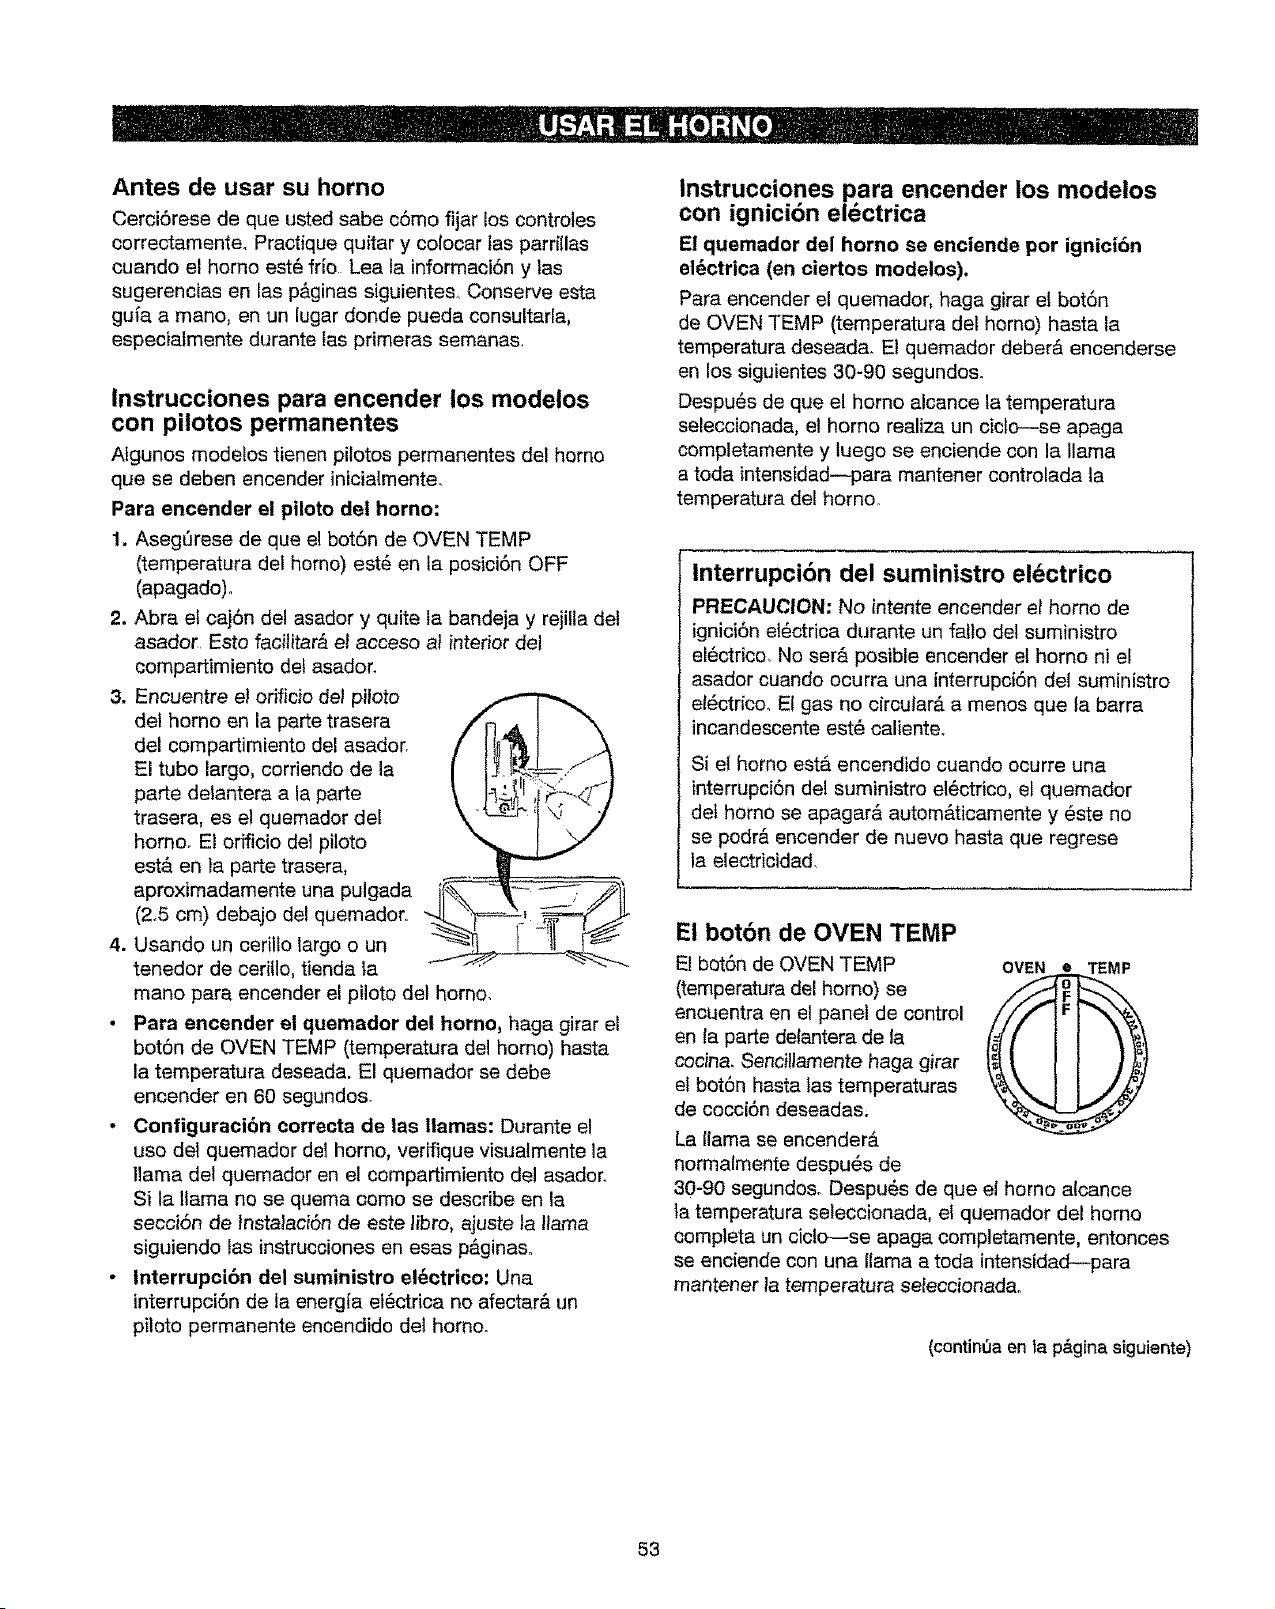
Antes de usar su homo
Cerci6rese de que usted sabe c6mo fijar los controles
correctamenteo Practique quitar y colocar tas parrillas
cuando et homo est6 frJo Lea la informaci6n y tas
sugerencias en las p&ginas siguientes., Conserve esta
guia a mane, en un lugar deride pueda consultarla,
especiatmente durante tas primeras semanas.
Instrucciones para encender los modelos
con pilotos perrnanentes
Algunos modelos tienen pilotos permanentes del homo
que se deben encender inicialmente_
Para eneender el piloto del homo:
1. Aseg_rese de que el bot6n de OVEN TEMP
(temperatura deI homo) est6 en la posici6n OFF
(apagado).
2. Abra et caj6n del asador y quite ta bandeja y rejilla del
asador, Esto facititar_, et acceso al interior det
compartimiento det asador.
3. Encuentre el oriflcio del pitoto
del homo en la parte trasera
del compartimiento del asador,
El tube largo, corriendo de la
parte delantera a la parte
trasera, es el quemador del
homo° El orificio del piloto
est& en la parte trasera,
aproximadamente una pulgada 'i_
(2.5 cm) debajo de! quemador,
-4"
4. Usando un oerilfo largo o un
tenedor de ceritlo, tienda la
mane para encender el piloto del homo,
• Para encender el quemador del homo, haga girar el
bot6n de OVEN TEMP (temperatura de! homo) hasta
la temperatura deseada. El quemador se debe
encender en 60 segundos.
• Configuraci6n correcta de las llamas: Durante el
use del quemador del homo, verifique visuatmente la
llama del quemador en el compartimiento de! asador.
Si la llama no se quema come se describe en la
secci6n de Instalaci6n de este libro, ajuste la llama
siguiendo las instrucciones en esas p_ginas°
• interrupci6n del suministro el_ctrico: Una
interrupci6n de la energia ef_ctrica no afectar& un
piloto permanente encendido del homo.
Instrucciones para encender los modelos
con ignicion electrica
E! quemador del homo se enciende por ignici6n
el_ctrica (en ciertos modelos).
Para encender el quemador, haga girar et bot6n
de OVEN TEMP (temperatura del homo) hasta la
temperatura deseada. El quemador deber& encenderse
en los siguientes 30-90 segundos.
Despu6s de que el homo alcance la temperatura
seleccionada, el homo realiza un ciclo--se apaga
comptetamente y luego se enciende con la llama
a toda intensidad--para mantener controlada la
temperatura de! homo°
lnterrupcidn del suministro eldctrico
PRECAUCION: No intente encender et homo de
ignici6n el6ctrica durante un fallo del suministro
el6ctrico_ No ser_ posible encender et homo ni e!
asador cuando ocurra una interrupci6n del suministro
el_ctrico. Et gas no circular& a menos que la barra
incandescente est_ caliente.
Si el homo est& encendido cuando ocurre una
interrupci6n del suministro el6ctrico, el quemador
det homo se apagar& autom&ticamente y _ste no
se pedrO,encender de nuevo hasta que regrese
la eleetricidad,
El bot6n de OVEN TEMP
Et bot6n de OVEN TEMP OVEN
oTEMP
(temperatura del homo) se _LC_._
encuentra en et panel de control
O
en la parte delantera de la
cocina. Sencillamente haga girar
el bot6n hasta tas temperaturas
de cocci6n deseadas,
La llama se encender&
normalmente despu_s de
30-90 segundoso Despu_s de que el homo alcance
la temperatura seleccionada, el quemador del homo
completa un ciclc---se apaga completamente, entonces
se enciende con una llama a toda intensidad---para
mantener la temperatura seleccionada°
(contin0a en la p&gina siguiente)
53
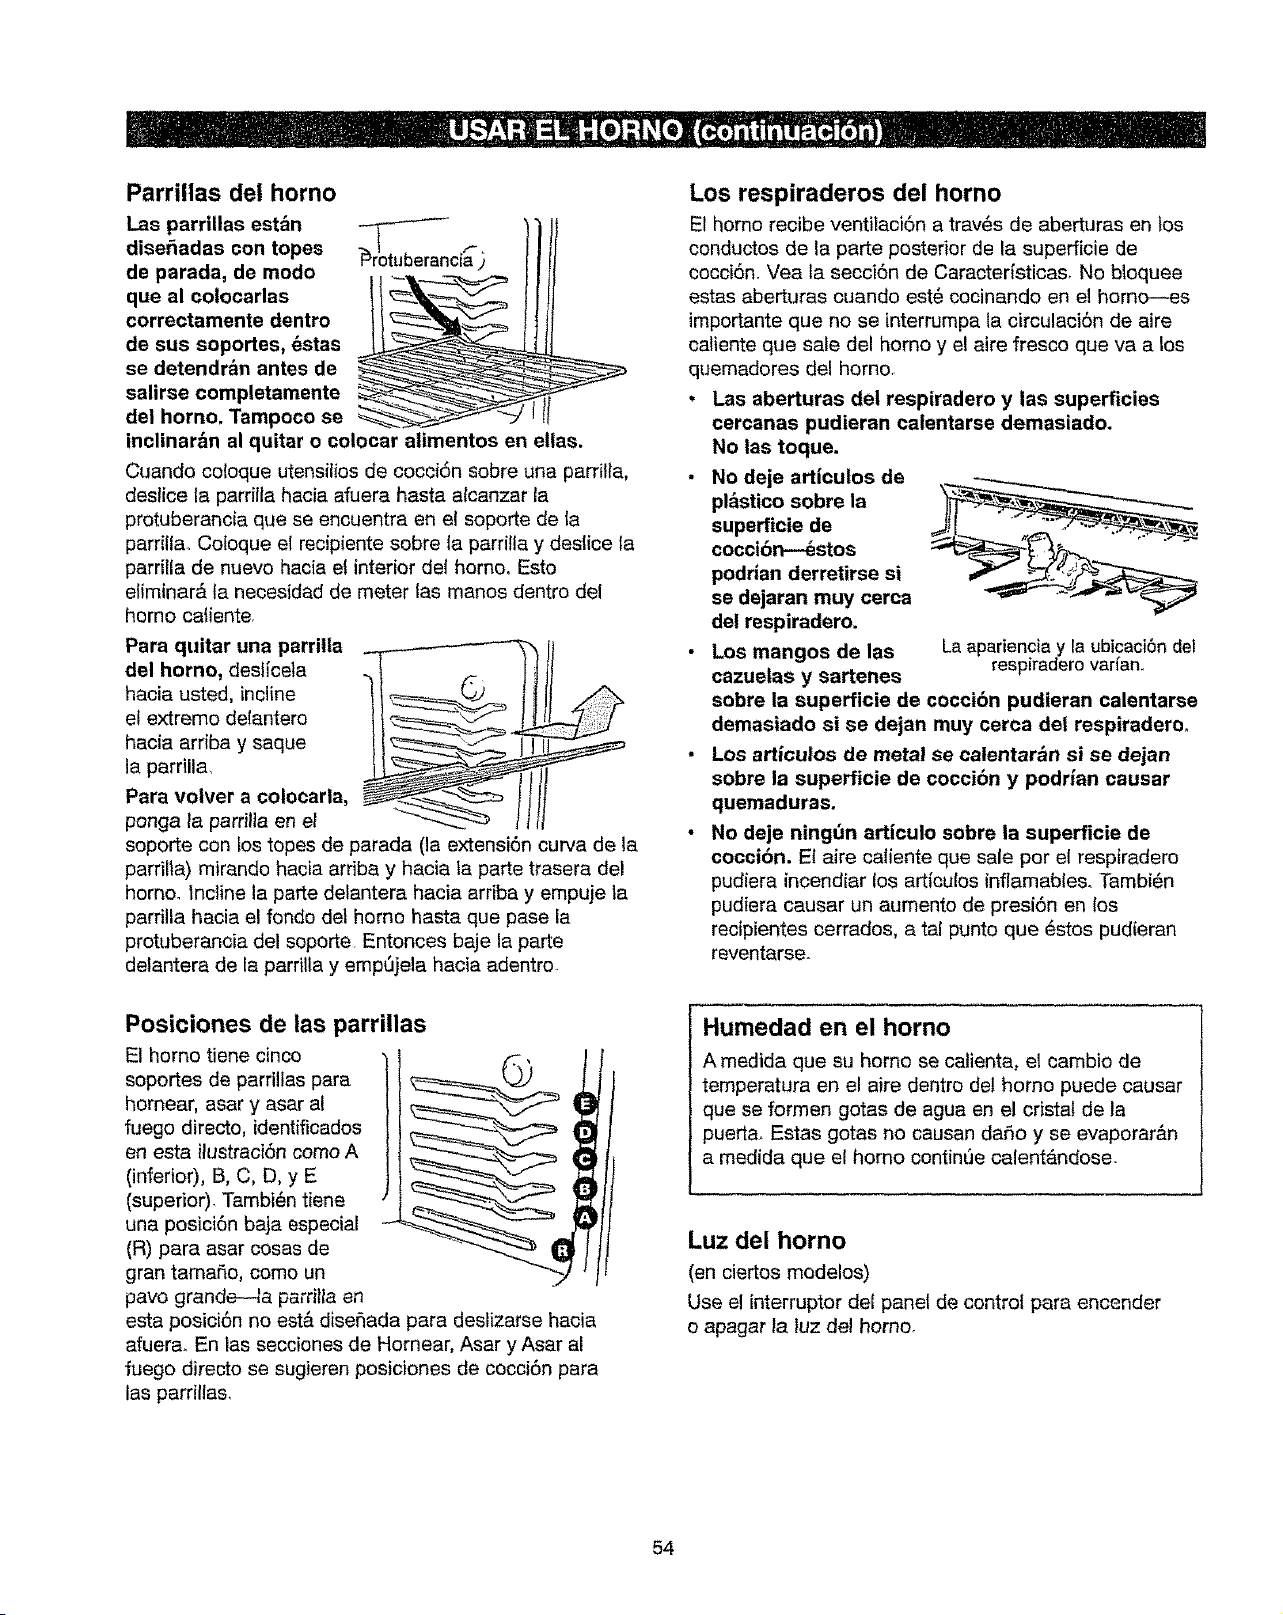
Parrillas dei homo
Las parrillas est_n
dise_adas con topes ]_t ib,rOtu eranci_)
de parada, de modo =__,L-
que al colocarlas !t_
correctamente dentro
de sus soportes, _stas
se detendr_n antes de
salirse completamente _
del horno. Tampoco se
inclinar_n al quitar o colocar alimentos en eUas.
Cuando coloque utensilios de cocci6n sobre una parrilla,
deslice la parrilla hacia afuera hasta alcanzar la
protuberancia que se encuentra en el soporte de la
parrilla.. Co[oque el recipiente sobre la parritla y deslice la
parrilla de nuevo hacia et interior det homo, Esto
eliminar& la necesidad de meter las manos dentro del
homo catiente.
Para quitar una parriila
del homo, deslicela
hacia usted, incline
el extreme delantero
hacia arriba y saque
la pardlla,
Para volver a colocarla,
ponga la parrilla en el
soporte con los topes de parada (la extensi6n curva de la
parrilia) mirando hacia arriba y hacia la parte trasera del
horno. Incline la parte delantera hacia arriba y empuje la
parrilla hacia el rondo det homo hasta que pase la
protuberancia del soporte Entonces baje la parte
delantera de la parrilla y empt_jela hacia adentro.
Los respiraderos del horno
E1homo reoibe ventilaci6n a trav_s de aberturas en los
conductos de la parte posterior de la superficie de
cocci6n. Vea ta secci6n de Caracteristicas. No bioquee
estas aberturas ouando est_ cocinando en el horno--es
importante que no se interrumpa ta circulaci6n de aire
oaliente que sale del homo y el aire fresco que va a los
quemadores del homo.
• Las aberturas dei respiradero y las superficies
cercanas pudieran calentarse demasiado.
No las toque.
• No deje artieulos de
pl&stico sobre la
superficie de
coccibn--_stos
podrian derretirse si
se dejaran muy cerca
del respiradero.
• Los mangos de las La apariencia y la ubicacibn del
cazuetas y sartenes respiraderovarfan,
sobre la superficie de coccibn pudieran calentarse
demastado si se dejan muy cerca del respiraderoo
• Los articuios de metal se calentar&n si se dejan
sobre la superfieie de coccibn y podrian causar
quemaduras.
• No de]e ning_n articulo sobre ia superficie de
coccibn. El aire catiente que sale por el respiradero
pudiera incendiar los articulos inflamables. Tambi_n
pudiera causar un aurnento de presi6n en los
recipientes cerrados, a tal punto que _stos pudieran
reventarse.
Posiciones de las parrillas
E1homo tiene cinco
soportes de parrillas para
hornear, asar y asar al
fuego directo, identificados
en esta ilustraciSn como A
(inferior), B, C, D, y E
(superior). Tambi_n tiene
una posici6n baja especial
(R) para asar cosas de
gran tamaSo, como un
pavo grande--qa parrilla en
esta posici6n no est& dise_ada para deslizarse hacia
afuera_ En las secciones de Hornear, Asar y Asar al
fuego directo se sugieren posiciones de cocci6n para
las parrillas.
Humedad en el horno
A medida que su homo se catienta, el cambio de
temperatura en el aire dentro del homo puede causar
que se formen gotas de agua en el cristal de la
puerta. Estas gotas no causan da,5o y se evaporar&n
a medida que el homo continue calentAndose.
Luz del horno
(en ciertos modelos)
Use el interruptor del panel de control para encender
o apagar la luz del homo.
54
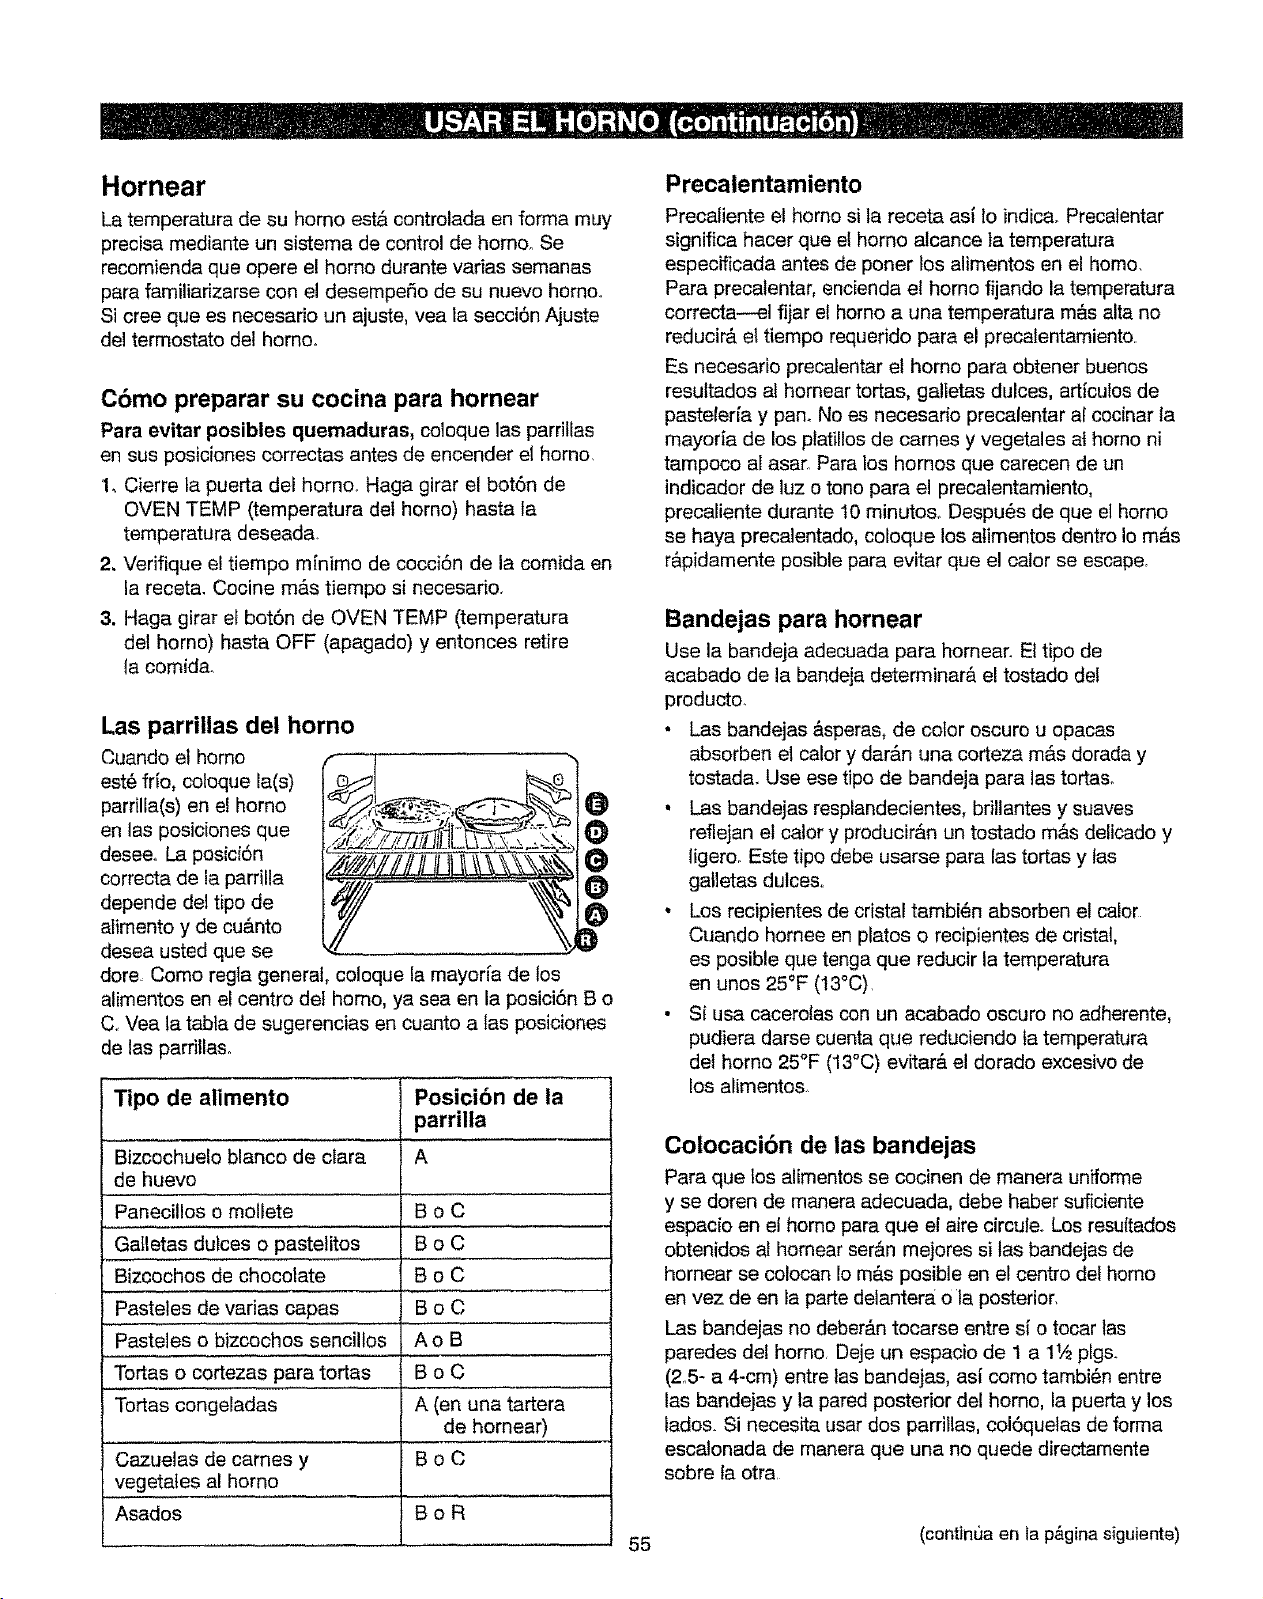
Hornear
La temperatura de su homo est& controlada en forma muy
precisa mediante un sistema de control de homo° Se
recomienda que opere el homo durante vadas semanas
para familiarizarse con el desempeSo de su nuevo homo.
Si cree que es necesario un ajuste, yea la secci6n Ajuste
del termostato del homo°
Cbmo preparar su cocina para hornear
Para evitar posibles quemaduras, coloque las parrillas
en sus posiciones correctas antes de encender el homo,
14 Cierre ta puerta del homo,. Haga girar el bot6n de
OVEN TEMP (temperatura det homo) hasta ia
temperatura deseada
2, Vedfique el tiempo mfnimo de cocci6n de la comida en
la receta. Cocine m_s tiempo si necesario+
3. Haga girar ef bot6n de OVEN TEMP (temperatura
del homo) hasta OFF (apagado) y entonces retire
la comida.
Las parriilas del homo
Cuando el homo
est_ fifo, coleque la(s)
parrilla(s) en el homo _)
en las posiciones que 0
desee. La posici6n
correcta de la parrilla _t
depende del tipo de
alimento y de cu&nto
desea usted que se
dore Come regla general, coloque la mayorfa de los
alimentos en el centre del homo, ya sea en la posici6n B o
C. Vea ta tabla de sugerencias en cuanto a tas posiciones
de las parriilas.
Tipo de alimento
.....Bizcochuelo blanCode 'clara
de huevo
Panecillos o moilete
Gatletas dulces o pastelitOS
Bizcochos de chocolate
Pasteles de varias capas
Posicibn de la
parrilla
A
BoC
BoC
BoC
goC
Pasteles o bizcochos sencillos A o B
Tortas o cortezas para tortas B o C
Tortas congeladas A (en una tartera
de hornear)
Cazuelas de carnes y B o C
vegetates al homo
Asados B o R
Precalentamiento
Precaliente el homo si la receta asi 1o indic& Precalentar
significa hacer que el homo alcance ta temperatura
especificada antes de poner los alimentos en el homo.
Para precalentar, encienda el homo fijando la temperatura
correcta--et fijar el homo a una temperatura m&s alta no
reducir& et tiempo requerido para el precalentamiento
Es necesario precalentar el homo para obtener buenos
resuttados al hornear tortas, galietas dulces, articulos de
pastelerfa y pan_ No es necesario precalentar al cocinar la
mayor[a de los platillos de cames y vegetales al homo ni
tampoco al asar. Para los hornos que carecen de un
indicador de luz o tone para el precalentamiento,
precaliente durante 10 minute& Despu6s de que el homo
se haya precalentado, coloque los atimentos dentro Io mAs
r&pidamente posible para evitar que el calor se escape_
Bandejas para hornear
Use la bandeja adecuada para homear. El tipo de
acabado de la bandeja determinar& el tostado del
producto.
• Las bandejas &speras, de color oscuro u opacas
absorben el calory dar&n una corteza m&s dorada y
tostada. Use ese tipo de bandeja para las tortas°
• Las bandejas resplandecientes, bdllantes y suaves
reflejan el calory producir&n un tostado m&s delicado y
ligeroo Este tipo debe usarse para las tortas y las
gatletas dulces.
• Los recipientes de cristal tambi_n absorben el calor
Cuando hornee en plates o recipientes de cristal,
es posible que tenga que reducir la temperatura
en unos 25°F (13°(3).
• Si usa cacerolas con un acabado oscuro no adherente,
pudiera darse cuenta que reduciendo la temperatura
del homo 25°F (13°C) evitar& e! dorado excesivo de
los alimentos,
Cotocacibn de las bandejas
Para que los alimentos se cocinen de manera uniforme
y se doren de manera adecuada, debe haber suficiente
espacio en el homo para que el aire circule. Los resu|tados
obtenidos at hornear ser&n mejores si las bandejas de
hornear se colocan Io m&s posible en el centre del homo
en vez de en la parte delantera o la posterior.
Las bandejas no deber&n toearse entre s[ o tocar las
paredes de! homo, Deje un espacio de 1 a 11,,_pigs.
(2.5- a 4-cm) entre }as bandejas, asi come tambi_n entre
las bandejas y la pared posterior de{ homo, la puerta y los
lades. Si necesita usar dos parrillas, col6quelas de forma
escalonada de manera que una no quede directamente
sobre ta otra
55
(continua en la p&gina siguiente)
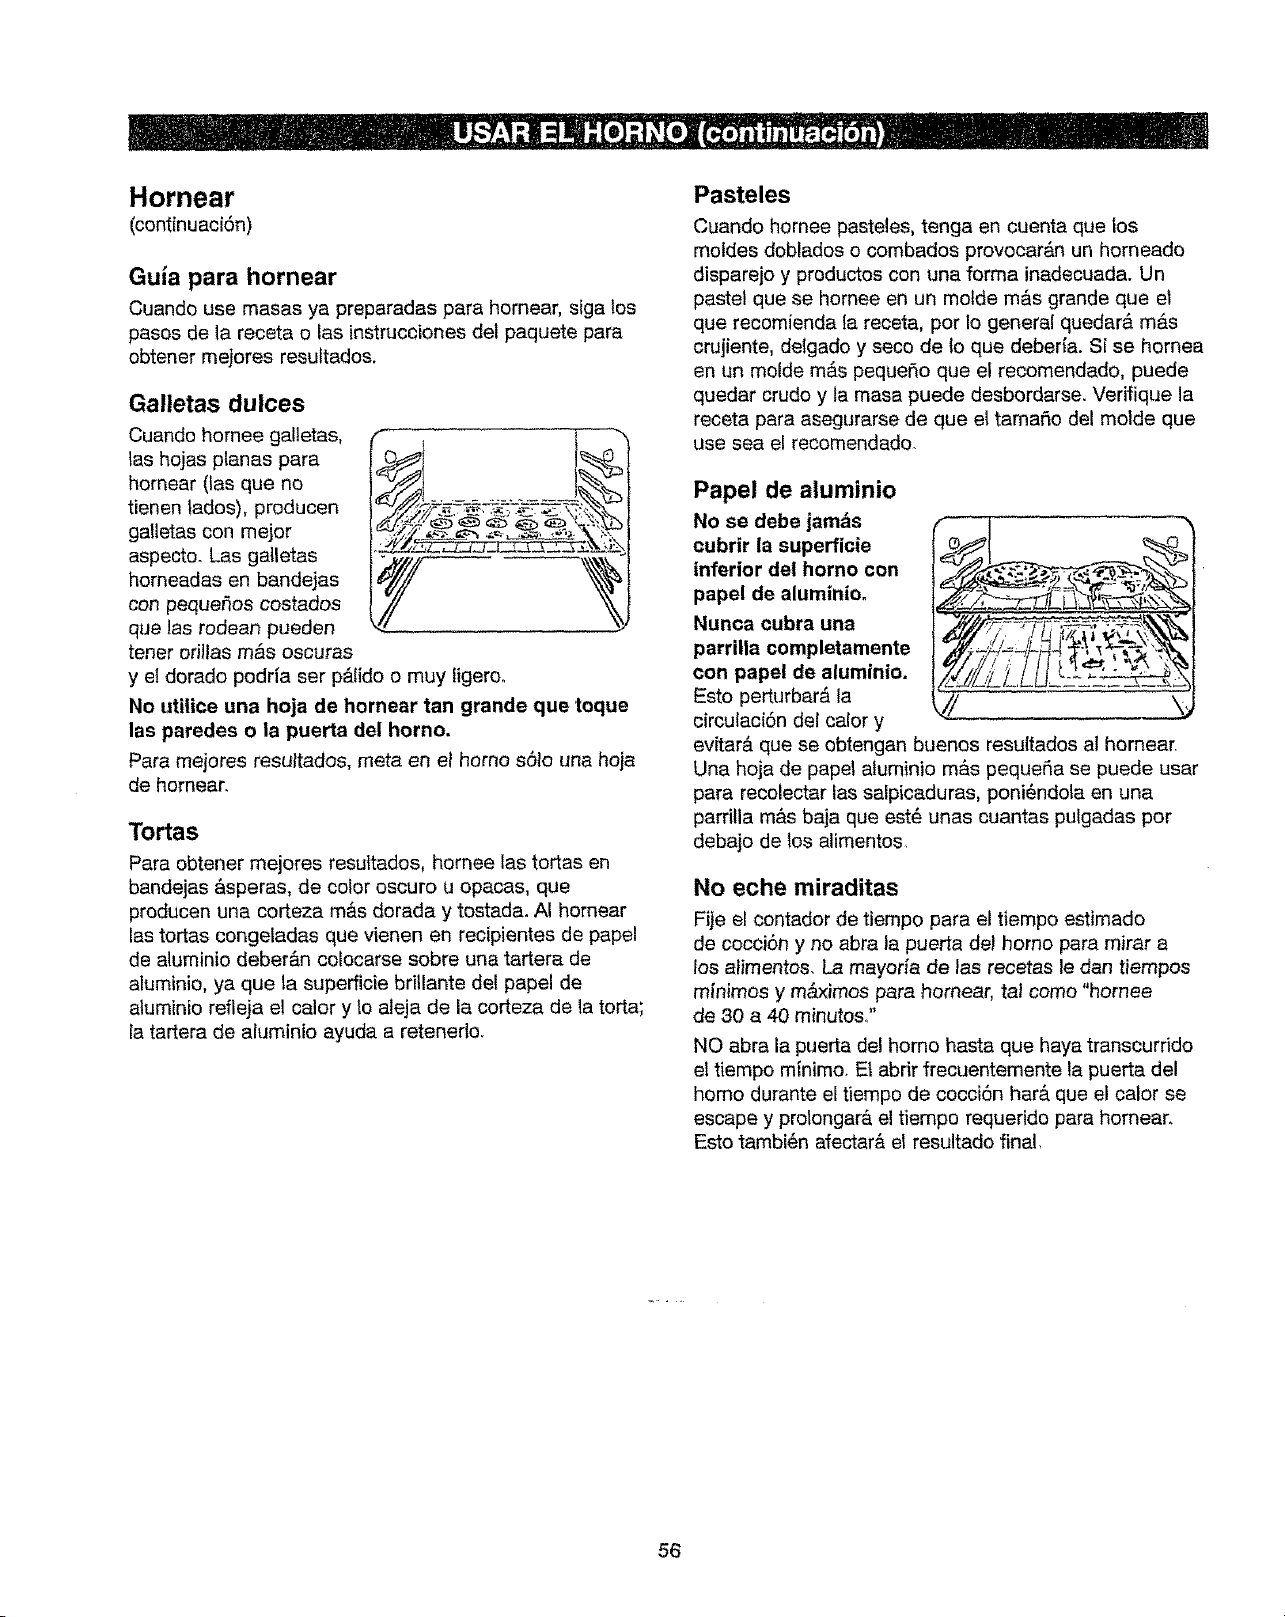
Hornear
(continuaci6n)
Guia para hornear
Cuando use masas ya preparadas para hornear, siga los
pasos de la receta o las instrucciones del paquete para
obtener mejores resultados.
Galletas duices
Cuando homee galietas,
_ashojas ptanas para
hornear (las que no
tienen _ados), producen
galletas con mejor
aspecto. Las gatletas
homeadas en bandejas
con pequer_os costados
qua las rodean pueden
tenor odllas m&s oscuras
y e{ dorado podrfa ser pAlido o muy ligeroo
No utilice una hoja de homear tan grande que toque
las parades o ia puerta del horno.
Para mejores resuffados, meta en el homo sSIo una hoja
de homear.
Tortas
Para obtener mejores resuttados, borneo las tortas en
bandejas &speras, de color oscuro u opacas, que
producen una corLeza m&s dorada y tostada. AI hornear
[as tortas congeladas qua vienen en recipientes de papel
de aluminio deber&n colocarse sobre una tartera de
alumtnio, ya que la superficie brillante del papel do
aluminio refleja el calory lo aleja de la corteza de la torta;
la tartera de aluminio ayuda a retenedo.
Pasteles
Cuando hornee pasteles, tenga en cuenta que los
moldes doblados o combados provocar&n un horneado
disparejo y productos con una forma inadecuada. Un
pastel que se hornee en un mofde m&s grande qua el
que recomienda la receta, por Io general quedar& mAs
crujiente, de_gado y seco de io que deber{a. Si se hornea
en un molde m_s pequeSo que el recomendado, puede
quedar crudo y la masa puede desbordarse. Verifique la
receta para asegurarse de qua el tamafio del molde que
use sea el recomendado_
Papel de aluminio
No so debe jam_s
cubrir la superficie
inferior del horno con
papal do aluminioo
Nunca cubra una
parrilla completamente
con papa! de aluminto.
Esto perturbar& la
circutaci6n del calor y
evitar& qua se obtengan buenos resultados al hornear
Una hoja de papal atuminio m&s pequeSa se puede usar
para recolectar ias salpicaduras, poni6ndola en una
parrilla m&s baja qua est6 unas cuantas pulgadas por
debajo de los alimentos,
No eche miraditas
Fije el contador de tiempo para el tiempo estimado
de cocciSn y no abra Japuerta de! homo para mirar a
los alimentos. La mayorfa de las recetas le dan tiempos
minimos y m_ximos para homear, tat come "hornee
de 30 a 40 minutoso"
NO abra la puerta del homo hasta qua haya transcurrido
el tiempo minimo. Et abrir frecuentemente la puerta del
homo durante el tiempo do cocci6n har& que el calor se
escape y prolongar& el tiempo requerido para hornear.
Esto tambi_n afectar& el resultado final.
56
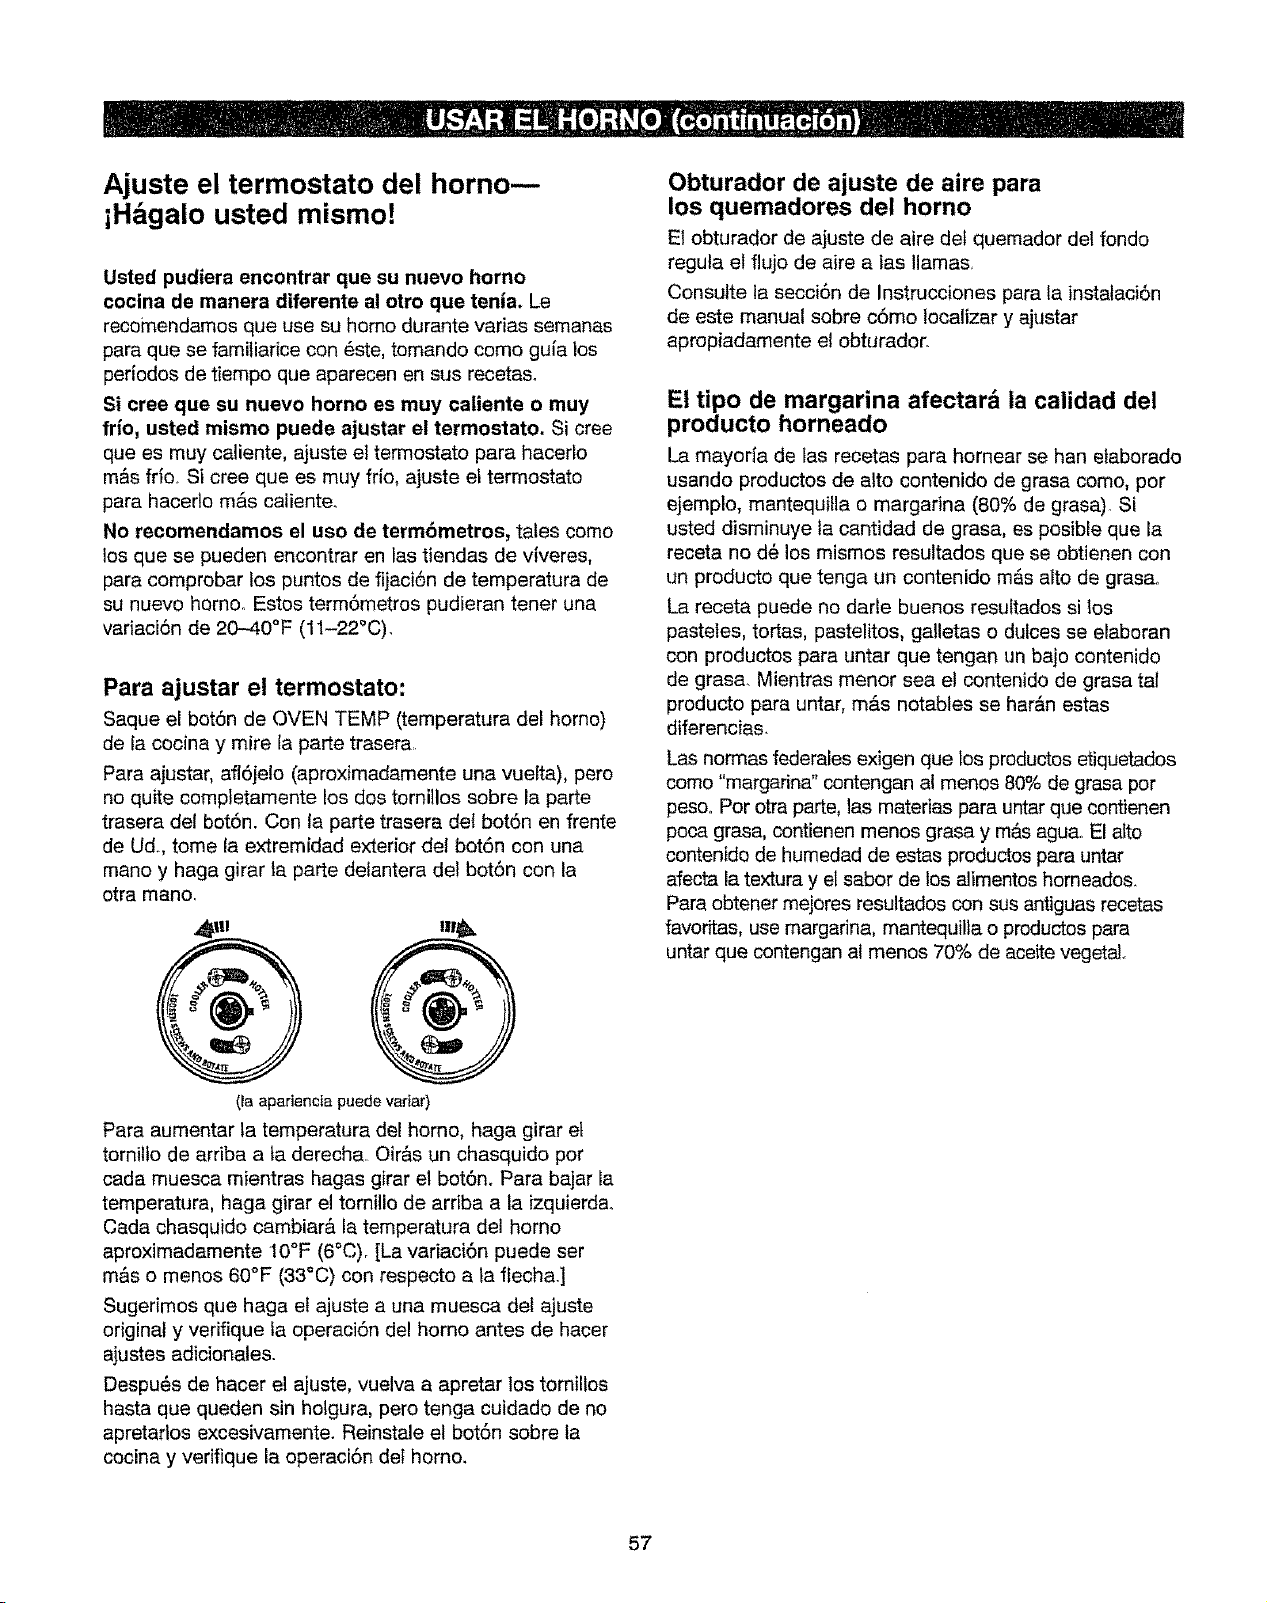
Ajuste el termostato del horno--
ill,gale usted mismo!
Usted pudiera encontrar que su nuevo homo
cocina de manera diferente al otto que tenia. Le
recomendamos que use su homo durante varias semanas
para que se familiarice con _ste, tomando come guia los
periodos de tiempo que aparecen en sus recetas_
Si cree que su nuevo homo es muy catiente o muy
frJo, usted mismo puede ajustar el termostato. Si cree
que es muy catiente, ajuste et termostato para hacerio
m&s frio. Si cree que es muy frJo, ajuste el termostato
para hacerto m&s caliente_
No recomendamos el use de termbmetros, tales come
los que se pueden encontrar en ias tiendas de vJveres,
para comprobar los puntos de fijaci6n de temperatura de
su nuevo homo° Estos term6metros pudieran tenet una
variaci6n de 20--40°F (11-22°C).
Para ajustar el termostato:
Saque el bot6n de OVEN TEMP (temperatura del homo)
de la cocina y mire la parte trasera..
Para ajustar, afl6jelo (aproximadamente una vueFta), pete
no quite completamente los dos tornillos sobre la parte
trasera del bot6n. Con la parte trasera det bot6n en frente
de Ud.., tome la extremidad exterior del bot6n con una
mane y haga girar _aparte delantera del bot6n con la
otra mane.
(la apariencia puede vadar)
Para aumentar la temperatura del homo, haga girar et
tornitlo de arriba a la derecha. Oir&s un chasquido per
cada muesca mientras hagas girar el bot6n. Para bajar la
temperatura, haga girar el tornillo de arriba a la izquierda.
Cada chasquido cambiar& la temperatura de] homo
aproximadamente I O°F (6°C). [La variaci6n puede ser
m&s o menos 60°F (33°C) con respecto a la ffecha.]
Sugerimos que haga el ajuste a una muesca del ajuste
original y verifique la operaci6n del homo antes de hacer
ajustes adicionales.
Despu6s de hacer el ajuste, vuelva a apretar los tomillos
hasta que queden sin hoigura, pero tenga cuidado de no
apretarlos excesivamente. Reinstale el bot6n sobre la
cocina y verifique la operaci6n del homo.
Obturador de ajuste de aire para
los quemadores del homo
E1obturador de ajuste de aire del quemador det rondo
regula el flujo de aire alas llamas,
Consulte la secci6n de Instrucciones para la instalaci6n
de este manual sabre c6mo localizar y ajustar
apropiadamente el obturador.
El tipo de margarina afectar la calidad del
producto horneado
La mayoria de _as recetas para hornear se han etaborado
usando productos de alto contenido de grasa come, per
ejemplo, mantequilla o margarina (80% de grasa)_ Si
usted disminuye la cantidad de grasa, es posible que la
receta no d_ los mismos resultados que se obtienen con
un producto que tenga un contenido m_s aJto de grasa_
La receta puede no darle buenos resultados si los
pasteles, tortas, pastelitos, galletas o dulces se elaboran
con productos para untar que tengan un bajo contenido
de grasa Mientras menor sea el contenido de grasa tal
producto para untar, m&s notables se har&n estas
diferencias.
Las normas federales exigen que los productos etiquetados
come "margarina" contengan at menos 80% de grasa per
peso,. Per otra parte, las materias para untar que contienen
poca grasa, contienen menos grasa y m_s agua,. El alto
contenide de humedad de estas productos para untar
afecta la textura y el saber de los alimentos horneados.
Para obtener mejores resultados con sus antiguas recetas
favoritas, use margarina, mantequilla o productos para
untar que contengan al menos 70% de aceite vegetaL.
57
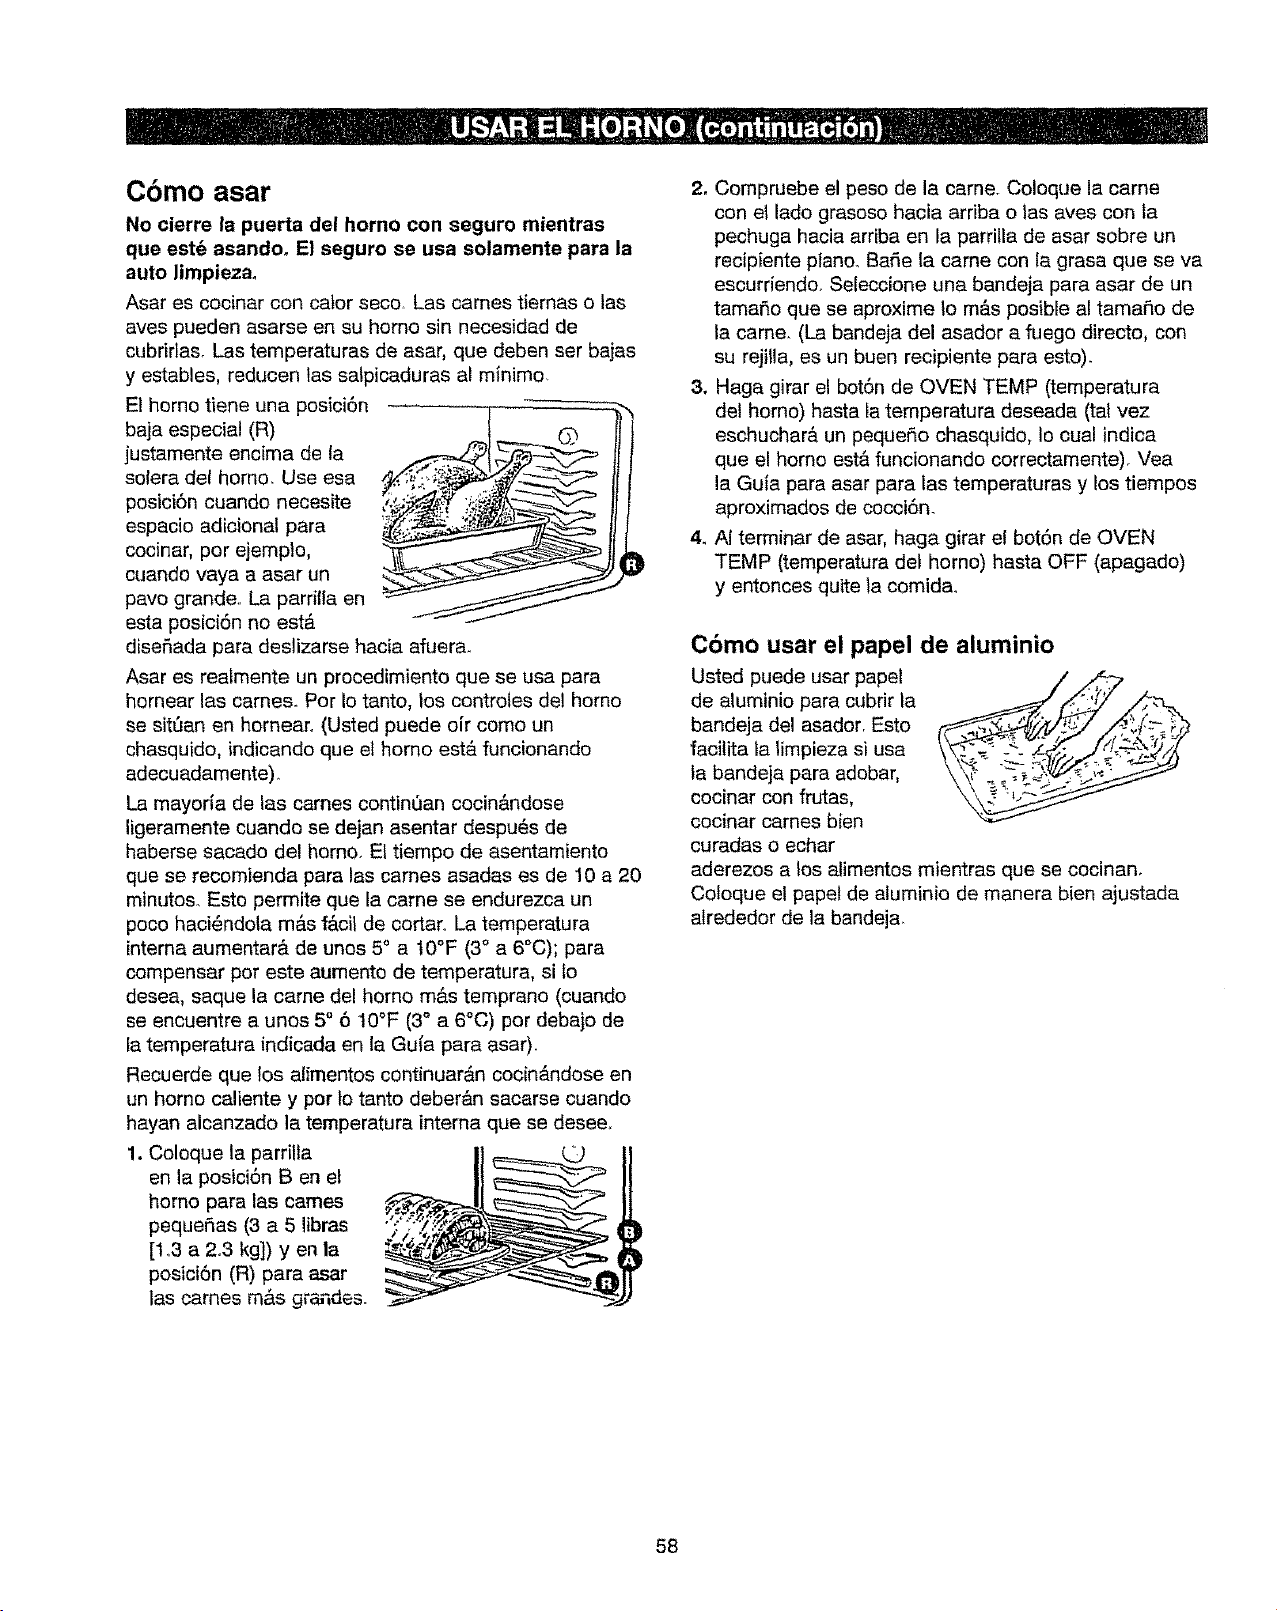
Cbmo asar
No cierre la puerta del horno con seguro mientras
qua est6 asandoo El seguro se usa solamente para la
auto limpieza.
Asar es cociner con cater seco, Las carries tiernes o las
ayes pueden asaree en su homo sin necesidad de
cubrirtas. Las temperatures de asar, que deben ser bajes
y estables, reducen las salpicaduras al rnJnimo
E1homo tiene una posici6n
baja especial (R) , ........ G
justamente encima de la .....:___ __
setera del homo. Use esa
posici6n cuando necesite
espacio adicional pare
cocinar, per ejernplo,
cuando vaya a asar un
pave grande,. La parrilla en
esta posici6n no est_
disefiada pare deslizarse hacia afuera.
Asar es realrnente un procedirniento que se usa pare
hornear las carnes. Per Io tanto, los controtes de! homo
se sit, an en hornear,, (Usted puede oir come un
chasquido, indicando que el horno est& funcionando
edecuadamente),
La mayorla de las cames contint_an cocin&ndose
ligeramente cuando se dejan asentar despu6s de
haberse sacedo del hornoo El tiempo de esentamiento
qua se recomienda para las carries asadas es de 10 a 20
minutes. Esto permite que la came se endurezca un
poco haci6ndola m&s f&cil de cortar. La ternperatura
interne aurnentar& de unes 5° a t0°F (3° a 6°C); para
cornpenser per este aurnente de temperature, si Io
desea, saquela carne del horno m&s temprano (cuando
se encuentre a unos 5 ° 6 10°F (3° a 6°C) per debajo de
la temperatura indicada en la Gufa para asar).
Recuerde que los alirnentos continuar&n cocinAndose en
un homo caliente y per to tanto deber&n sacarse cuando
hayan alcanzado la temperature intema que se desee..
1. Coloque le parrilla _ I___
en la posici6n B en el
horno pare las cames _;___
pequefias (3 a 5 libras ;_i_
[1 _3 a 2_3 kg]) yen la _'
posici6n (R) pare asar
les carnes rn&s gra,qdes. _"_----_JJ
2, Cornpruebe el peso de la cerne. Co!oque la came
con el lade grasoso hacia arriba o 1as eves con la
pechuga hacia arriba en la parrilla de asar sobre un
recipiente plane. BaSe la carne con la grasa qua se va
escurriendo° Seleccione una bandeja pare asar de un
tamaflo qua se aproxime lo m&s posible al tama_o de
la carrie. (La bandeja del asador a fuego directo, con
su rejilla, es un buen recipiente pare esto).
3. Haga girar el bot6n de OVEN TEMP (temperatura
det homo) hasta la ternperatura deseada (tat vez
eschuchar& un pequeSo chasquido, Io cual indica
que el horno est& funcionando correctamente). Vea
la GuJa para asar para las temperaturas y los tiernpos
aproximados de cocci6n.
4. AI terminar de asar, haga girar et bot6n de OVEN
TEMP (temperatura del homo) hasta OFF (apagado)
y entonces quite la comidao
C6mo usar el papei de aluminio
Usted puede usar papal .,,_;.
de aluminio pare cubrir la .:.., ,,
bandeja del asadorr Esto 7. ,, ._
facilita la limpieza si usa _/._/
cocinar con frutas, "k_\_':__
cocinar carries blen
curadas o echar
aderezos a los alimentos mientras que se cocinano
Coloque et papet de alurninio de manera bien ajustada
alrededor de la bandeja
58
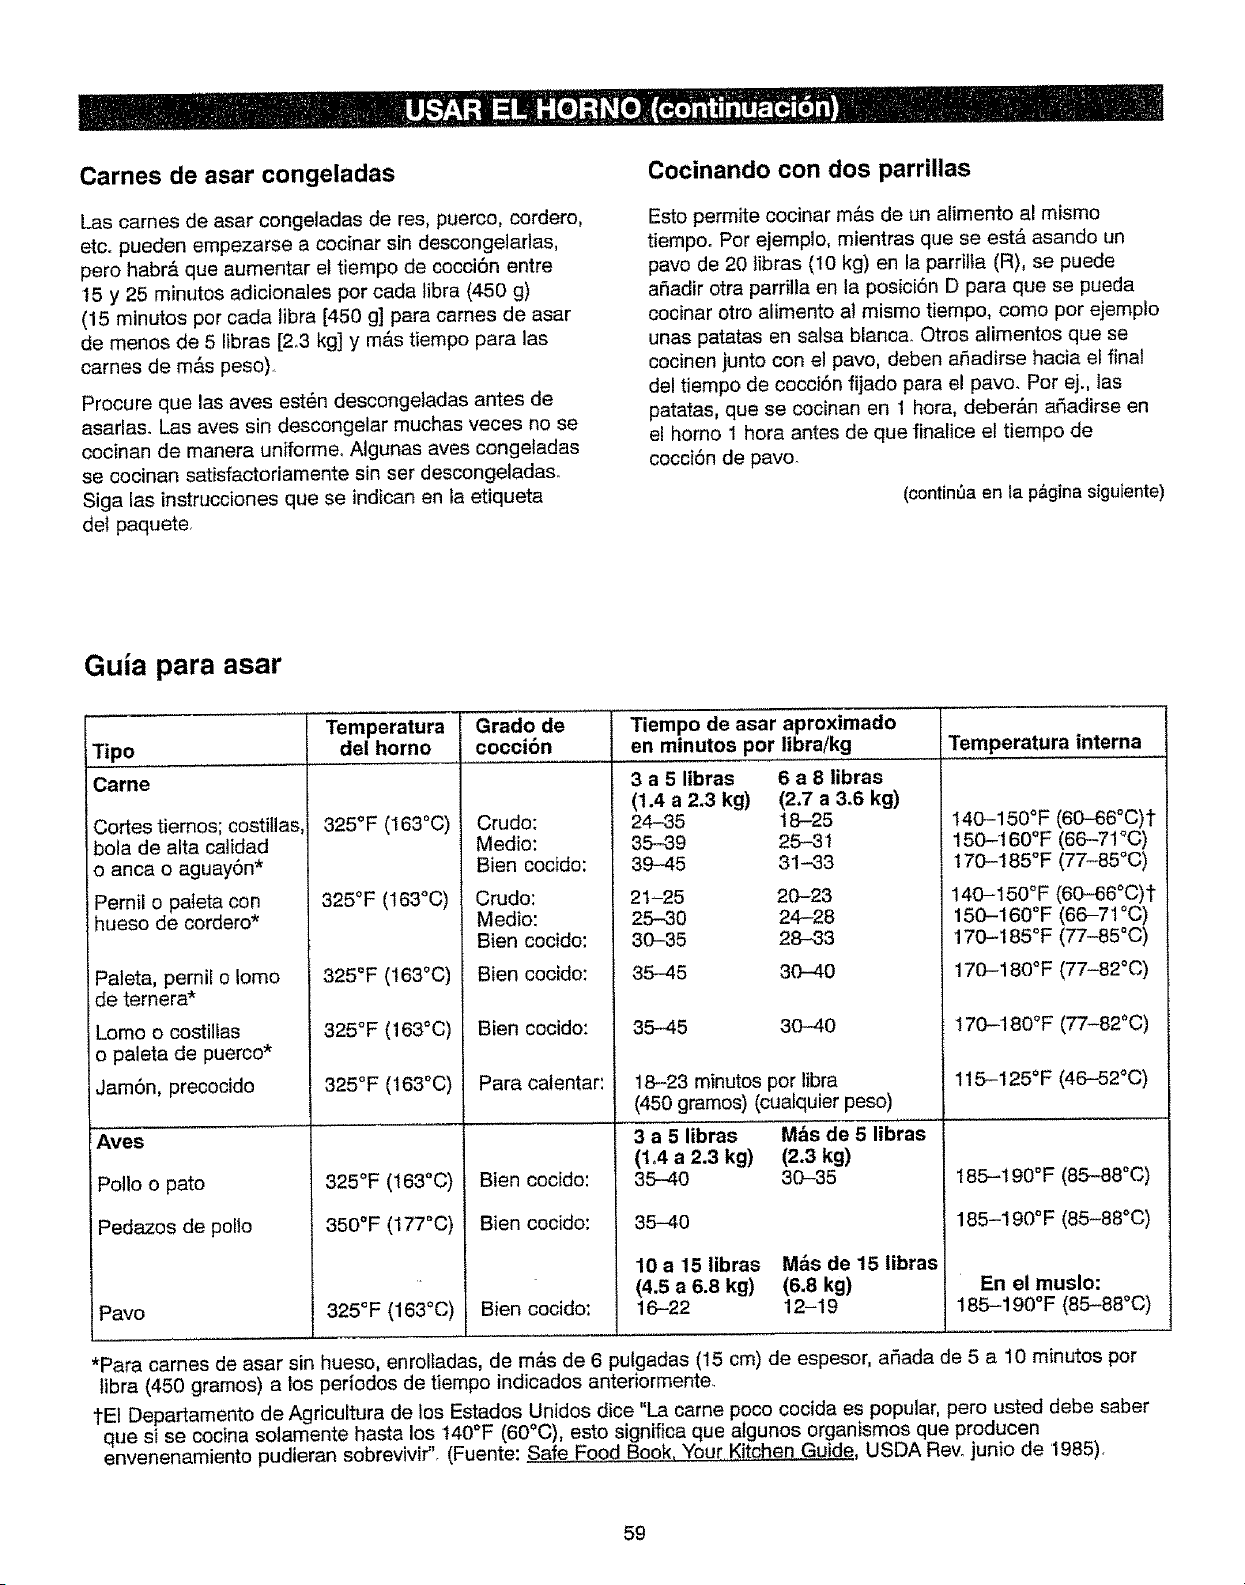
Carnes de asar congeladas
Las carnes de asar congeladas de res, puerco, cordero,
etc° pueden empezarse a cocinar sin descongelarlas,
pero habr& que aumentar et tiempo de cocci6n entre
t5 y 25 minutos adicionales por cada libra (450 g)
(15 minutos por cada libra [450 g] para carnes de asar
de menos de 5 libras [2.3 kg] y m&s tiempo para las
carnes de m&s peso)._
Procure que las aves est_n descongeladas antes de
asarlas. Las ayes sin descongelar muchas veces no se
cocinan de manera uniforme, Algunas aves congetadas
se cocinan satisfactoriamente sin ser descongelada&
Siga las instrucciones que se indican en la etiqueta
de/paquete
Cocinando con dos parrillas
Esto permite cocinar m&s de un alimento al mismo
tiempoo Pot ejemplo, mientras que se est& asando un
pavo de 20 libras (10 kg) en la parrilla (R), se puede
a5adir otra parrilla en la posici6n D para que se pueda
cocinar otto alimento al mismo tiempo, como por ejemplo
unas patatas en salsa blanc& Otros alimentos que se
cocinen junto con el pavo, deben aSadirse hacia el final
del tiempo de cocoi6n fijado para el pavo. Pot ej., tas
patatas, que se cocinan en 1 hora, deber&n aSadirse en
e! homo 1 hora antes de que finalice el tiernpo de
cocci6n de pavo.
(continUa en la p&gina siguiente)
Guia para asar
Temperatura Grado de
Tipo del homo coccibn
Carne
Cortes tiemos; costillas
bola de alta caJidad
o anca o aguay6n*
Pernil o pateta con
hueso de cordero*
Paleta, pemil o Iomo
de temera*
Lomo o costillas
o paleta de puerco*
325°F (163°C)
325°F (163°0)
325°F (163°C)
325°F (163°C)
Crudo:
Medio:
Bien cocido:
Crudo:
Medio:
Bien cocido:
Bien cocido:
Bien cocido:
Tiempo de asar aproxtmado
en minutos por libra/kg
3 a 5 libras 6 a 8 libras
(1.4 a 2.3 kg) (2.7 a 3.6 kg)
24-35 18-25
35-39 25-3t
39-45 31-33
2t-25 20-23
25-30 24--28
30-35 28-33
35-45 30-40
3_5 3_0
Temperatura tnterna
140-150°F (60-66_C)t
150-t 60°F (66-7!°C)
170-t85°F (77-85°C)
140-150°F (60-66°C)t
150-160°F (66-71 °C)
170-185°F (77-85°C)
170-180°F (77-82°(3)
170-180°F (77-82°C)
Jam6n, precocido
Ayes
Polio o pato
Pedazos de polio
Pavo
325°F (163°C)
325°F (163°C)
350°F (177°C)
325 °F (1630C)
Para calentar:
Bien cooido:
Bien cooido:
Bien cocido:
18-23 minutos por libra
(450 gramos) (cualquier peso)
3 a 5 libras M_s de 5 libras
(1,4 a 2.3 kg) (2.3 kg)
35-40 30-35
35-40
10 a 15 libras
(4.5 a 6.8 kg)
16-22
Mbs de 15 iibras
(6.8 kg)
12-19
115-125°F (46-52°C)
t85-190°F (85-88°C)
185-!90°F (85-88°0)
En el muslo:
185-190°F(85-88°C)
*Para carnes de asar sin hueso, enrolladas, de m&s de 6 pulgadas (!5 cm) de espesor, aSada de 5 a 10 minutos por
libra (450 gramos) a los periodos de tiempo indicados anteriormente,
tEl Departamento de Agricultura de los Estados Unldos dice "La came poco cocida es popular, pero usted debe saber
que si se cocina solamente hasta los t40°F (60°(3), esto significa que algunos organismos que producen
envenenamiento pudieran sobrevivir". (Fuente: Safe..Eood Book, Your Kitchen Guide, USDA Rev. junio de '1985).
59
For repair of major brand appliances in your own home... ::....
no matter who made it, no matter who sold it!
1-800-4-MY-HOME ® Anytime, day or night
(1-800-469-4663) (US,A. and Canada)
www.sears.com www,sears,,ca ,
: !
:: For repair of carry-in products like vacuums, lawn equipment
and electronics, call for the location of your nearest
Sears Parts and Repair Center.
1 www°sears.com .:.:
For the replacement parts, accessories and owner's manuals
that you need to do-it-yourself, call Sears PartsDirect m !
1-800-488-1222 Anytime, day or night (U.SA. only)
1-800-366-PART 6 a,m,,-11 p.m, CST, 7 days a week
(1-800-366-7278) (U,S.A, only)
To purchase or inquire about a Sears Service Agreement
or Sears Maintenance Agreement: :::::
1-800-827-6655 (US.A.) 1-800-361-6665 (Canada)
7 a.m. - 5 p,m CST, Mon.. - Sat. 9 a.m. - 8 pom..EST, M- F, 4 p.m. Sat°
Para pedir servicio de reparaci6n a
L:
: domicilio, y pare ordenar piezas:
! 1-888-SU-HOGAR sM
(1-888-784-6427)
Au Canada pour service en franc_,ais:
HomeCentral®
1-800-LE-FOYER Mc ,
(1-800_533-6937)
® Registered Trademark / TM Trademark / _ Service Mark of Sears. Roebuck end Co
® Marca Reglstreda 1 TM Marca de F&brica I s*_Merca de Servicio de Sears, Roebuck and Co
_._cMarque de commerce I _.o Marque _posee de Seine. Roebuck and Co
@ Sears, Roebuck and Co
84