
Loading ...
• The operator must maintain a secure body position and
have a firm grip and footing when using this tool.
• This tool is not electrically insulated. Never use the
tool if there is any chance of it coming into contact with
live electricity.
CAUTION
Think safety! Safety is a combination of operator common
sense and alertness at all times when tool is being used.
SAVE ALL WARNINGS AND INSTRUCTIONS
FOR FUTURE REFERENCE
AIR SUPPLY SETUP AND CONNECTION
Refer to Figure 1
• Figure 1 shows the recommended air supply hook-up.
• The use of air line lubricators and air line filters is
recommended to prevent water in the line that can
damage the tool. Drain the air tank daily. Clean the
air inlet filter screen on at least a weekly schedule
to remove accumulated dirt or other matter that can
restrict air flow.
• The tool’s air inlet used for connecting an air supply has
a standard 1/4” NPT American thread.
• If an air line lubricator is not used, before operating the
tool add a few drops of Pneumatic Tool Oil into the tool
inlet. Repeat each hour of constant use.
CAUTION
This air tool requires lubrication BEFORE initial use and
before and after each additional use.
OPERATION
CAUTION
Never mount a grinding wheel on a sander. A grinding
wheel that bursts can cause very serious injury or death
when not properly guarded.
• Ensure the sanding pad is fixed securely to the tool.
Use the supplied wrench to hold the shaft nut in place
while turning the sanding pad clockwise to tighten and
counterclockwise to loosen.
• Select the correct 6" sanding disc for the job. Use 6"
hook and loop sanding disc.
• Connect to suitable air supply as recommended.
CAUTION
Risk of unsafe operation. Firmly grasp air hose with hand
when installing or disconnecting to prevent hose whip.
• Touch the sander lightly to the work and allow
the
sanding disc to cut. Take care when sanding around
sharp edges and surfaces to avoid the disc snagging,
the disc may be brought to an abrupt stop or
considerably slowed, causing the tool to kick in
the hands.
• Do not continue to use sanding discs that are worn or
clogged. Do not use undersized or oversized sanding
discs. The disc should be no more than 1/4" larger in
diameter than the sanding pad, and not smaller than the
sanding pad.
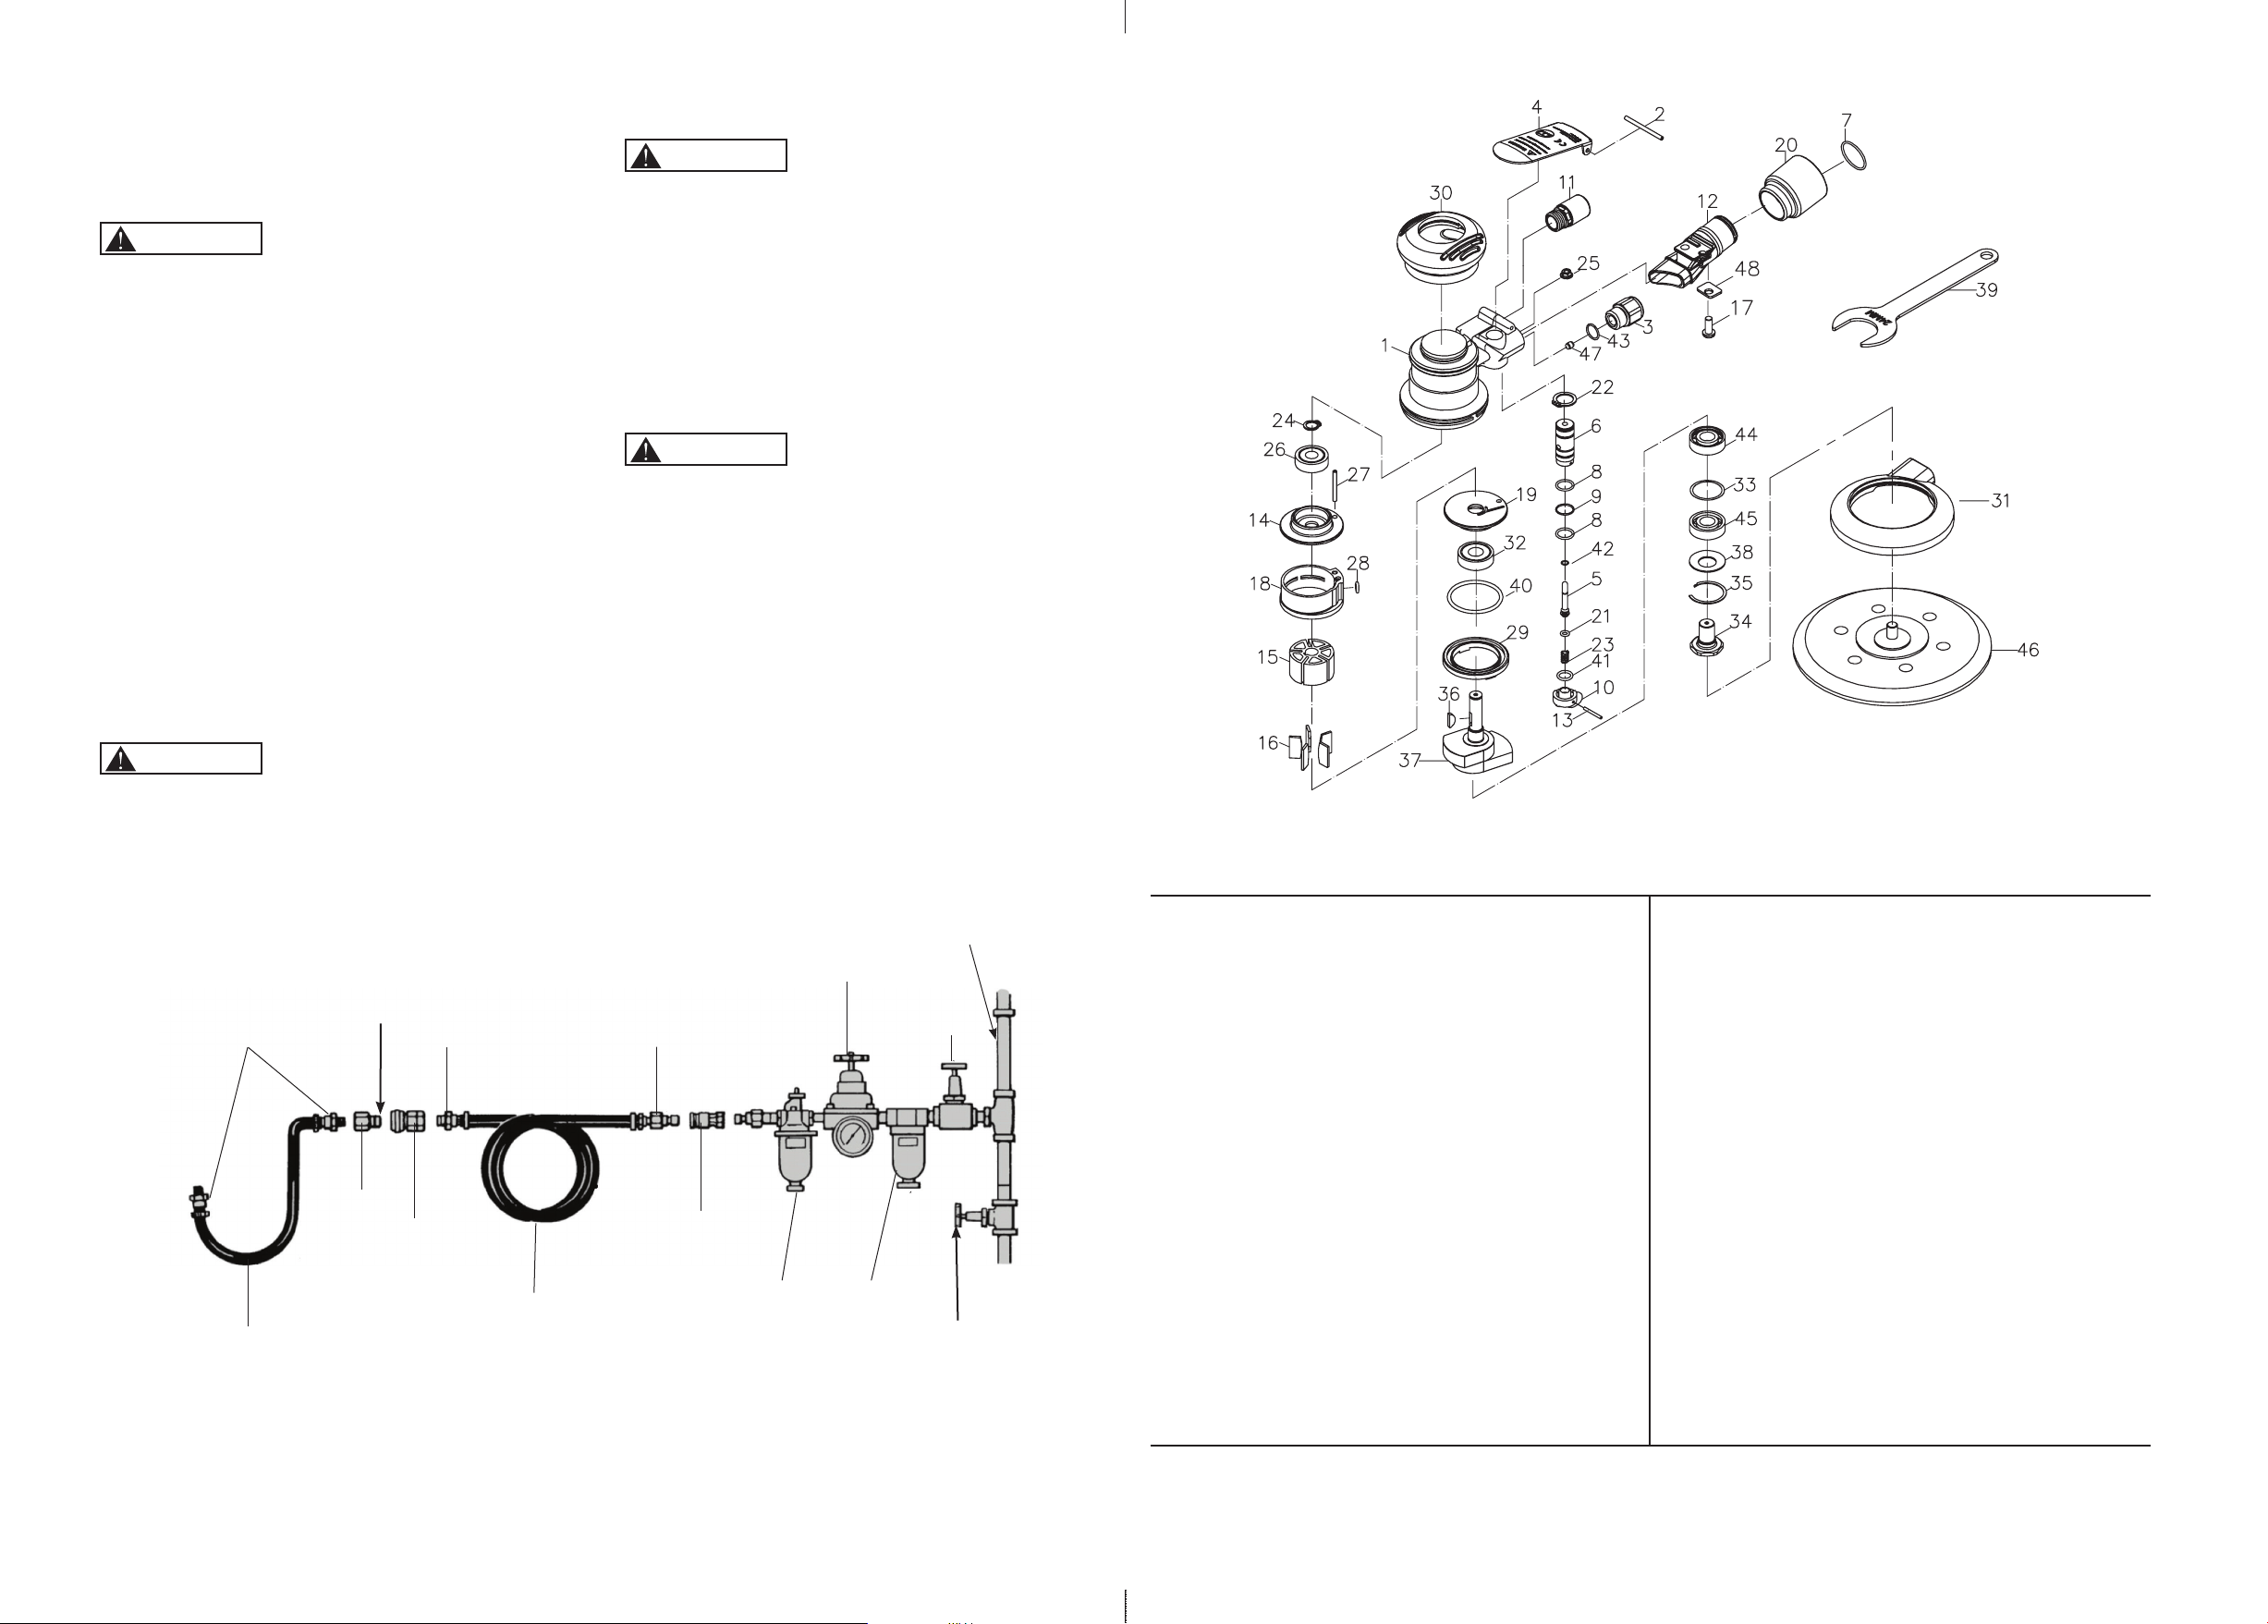
Key# Part# Description
1 AS631601 Housing
2 AS631602 Spring Pin (3*40L)
3 AS631603 Air Inlet
4 AS631604 Throttle Lever
5 AS631605 Shaft
6 AS631606 Bushing
7 AS631607 O-Ring (21.5*1.5)
8 AS631608 O-Ring 2 (10.7*1.5)
9 AS631609 O-Ring (10.5*1)
10 AS631610 Regulator
11 AS631611 Silencer
12 AS631612 Adapter
13 AS631613 Spring Pin (2*18L)
14 AS631614 Rear End Plate
15 AS631615 Rotor
16 AS631616 Rotor Blade(5)
17 AS631617 Screw (M5*12L)
18 AS631618 Cylinder
19 AS631619 Front End Plate
20 AS631620 Swivel Exhaust
21 AS631621 O-Ring (3.68*1.78)
22 AS631622 Retaining Ring (STW-14)
23 AS631623 Spring
24 AS631624 Retainer Ring
Key# Part# Description
25 AS631625 Nut (M5*0.8)
26 AS631626 Ball Bearing (6000zz)
27 AS631627 Spring Pin (3*28)
28 AS631628 O-Ring (5*2)
29 AS631629 Lock Ring
30 AS631630 Grip Hat
31 AS631631 Shroud
32 AS631632 Ball Bearing (6001zz)
33 AS631633 Washer
34 AS631634 Shaft
35 AS631635 Snap Ring
36 AS631636 Key
37 AS631637 Balancer Shaft
38 AS631638 Washer (3*13)
39 AS631639 Spanner
40 AS631640 O-Ring (39.4*3.1)
41 AS631641 O-Ring (8.8*1.7)
42 AS631642 O-Ring (2*1)
43 AS631643 O-Ring (13.5*1.5)
44 AS631644 Ball Bearing (6001)
45 AS631645 Ball Bearing (6001P)
46 AS631646 Pad (6")
47 AS631647 Stopper
48 AS631648 Washer
Figure 1
Tailpiece
Adaptor
Adaptor
Main Air
Hose
Whip Hose
Coupler
Coupler
Oiler
Filter
DRAIN
DAILY
Regulator
PIPES AND
FITTINGS
Stop Valve
Tailpiece
Adaptor
OIL HERE
DAILY
Tailpiece
Adaptor