
Loading ...
Loading ...
Loading ...
ENGLISH
8
the charger securely using drywall screws (purchased
separately) at least 1" (25.4 mm) long, with a screw head
diameter of 0.28–0.35" (7–9mm), screwed into wood to an
optimal depth leaving approximately 7/32" (5.5 mm) of the
screw exposed. Align the slots on the back of the charger
with the exposed screws and fully engage them in theslots.
COMPONENTS (FIG. A)
WARNING: Never modify the power tool or any part
of it. Damage or personal injury couldresult. Use only
DEWALT
battery packs with this product. Use of any
other battery may create risk of fire.
Refer to Figure A at the beginning of this manual for a
complete list ofcomponents.
Intended Use
Your
DEWALT
heat gun has been designed for stripping
paint, soldering pipes, shrinking PVC, welding and bending
plastics as well as general drying and thawingpurposes.
DO NOT use under wet conditions or in presence of
flammable liquids orgases.
The heat gun is a professional power tool. DO NOT let
children come into contact with the tool. Supervision is
required when inexperienced operators use thistool.
To Attach the Correct Accessory
This tool is supplied with a set of accessories for
differentapplications.
Icon Description Purpose
Reflector nozzle or
hook nozzle
Heat shrink wrap, reflecting
heat around item, avoiding
excess heat burning or
hurting surface behind item
being heated.
2" (50 mm) Fish tail
surface nozzle
Drying, removing paint,
removing vinyl or linoleum,
thawing (heat spread over
wide area)
1. Make sure the trigger switch
1
is in the off position and
the tool is disconnected from the power source. Ensure
the nozzle has cooleddown.
2. Place the desired accessory onto thenozzle.
OPERATION
WARNING: To reduce the risk of serious personal
injury, turn unit off and remove the battery pack
before making any adjustments or removing/
installing attachments or accessories. An
accidental start-up can causeinjury.
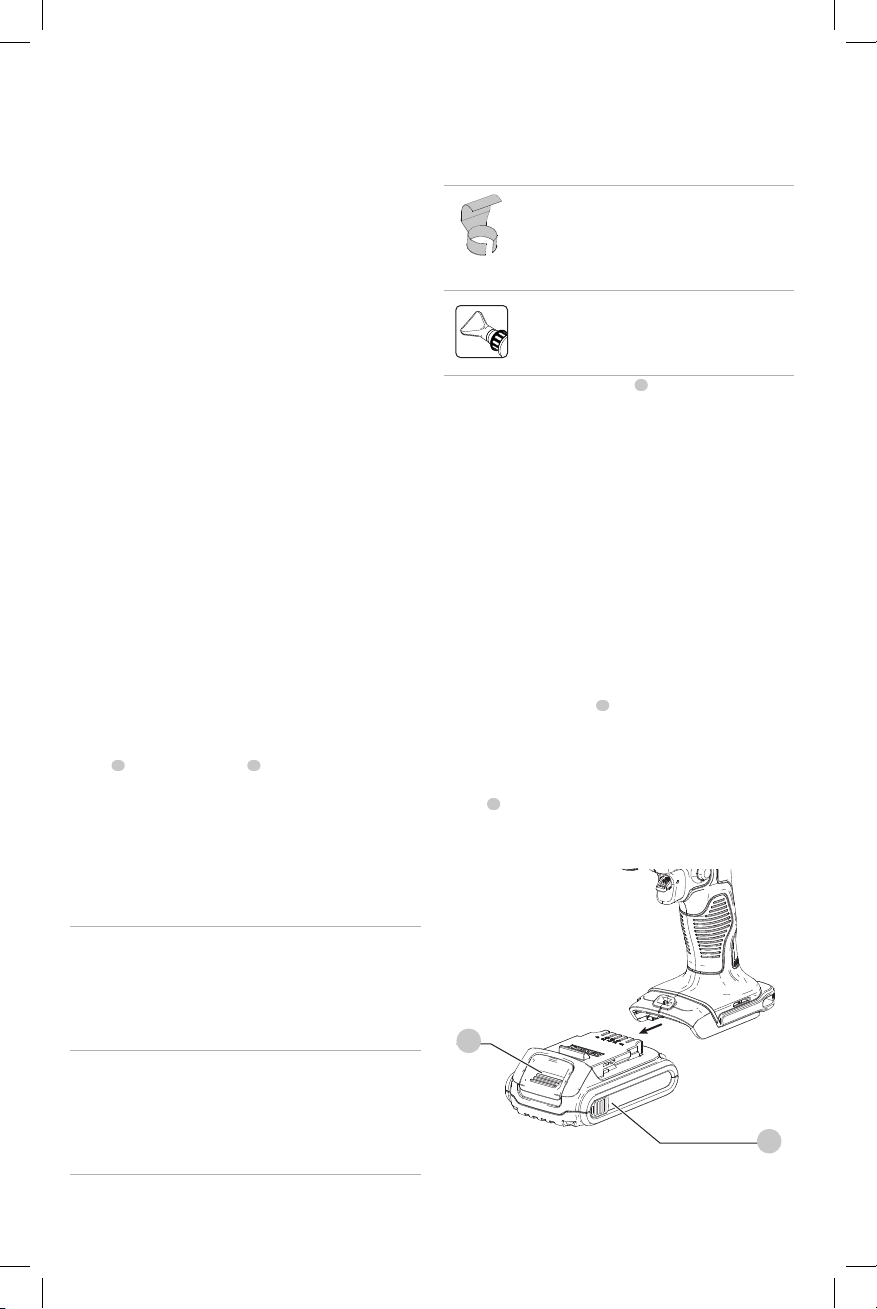
Installing and Removing the Battery Pack
(Fig. C)
NOTE: For best results, make sure your battery pack is
fullycharged.
To install the battery pack
7
into the tool handle, align the
battery pack with the rails inside the tool’s handle and slide
it into the handle until the battery pack is firmly seated in
the tool and ensure that it does notdisengage.
To remove the battery pack from the tool, press the release
button
6
and firmly pull the battery pack out of the tool
handle. Insert it into the charger as described in the charger
section of thismanual.
Fig.C
6
7
ASSEMBLY AND ADJUSTMENTS
WARNING: To reduce the risk of serious personal
injury, turn unit off and remove the battery pack
before making any adjustments or removing/
installing attachments or accessories. An
accidental start-up can causeinjury.
Air Temperature (Fig. A)
The air temperature can be adjusted to suit a wide range of
applications. Slide the air temperature adjustment
switch
3
toward the air vents
2
for higher or away from
the vents for lowerheat.
Preliminary heat claims reach 550 ° F (288 ° C) on the low
setting and 875 ° F (468 ° C) on the high setting.
Applications
The table below suggests settings for differentapplications.
Setting Applications
Low • Drying paint and varnish
• Removing stickers
• Waxing and dewaxing
• Drying wet timber prior to filling
• Shrinking PVC wrapping and insulation tubes
• Thawing frozen pipes
High • Bending plastic pipes and sheets
• Loosening rusted or tightly fastened nuts and bolts
• Removing paint and lacquer
• Removing linoleum or vinyl floor tiles
• Heat shrink wrap around wires.
• Removing/ melting glue/ adhesive
Loading ...
Loading ...
Loading ...