Docum ent Scanner
User’s M anual
Regulatory m odel: FF- 1901B/ FF- 1902B
Avision I nc.

User ’s Man ua l
ii
Tra dem a r k s
Microsoft is a U.S. regist ered tradem ark of Microsoft Corporat ion.
Windows, Windows 7, Windows 8, and Windows 10 are either
registered tradem arks or t radem arks of Microsoft Corporat ion in
the Unit ed States and/ or ot her countries.
Energy St ar
®
is a regist ered tradem ark of the U.S. government .
I BM, I BM PC are regist ered tradem arks of I nt ernat ional Business
Machines Corp.
Ot her brands and product nam es herein are tradem arks or
registered tradem arks of t heir respect ive holders.
Copyright
All rights reserved. No part of this publicat ion m ay be
reproduced, t ransm it t ed, t ranscribed, stored in a retrieval
system , or translat ed into any language or com puter language,
in any form or by any means, electronic, m echanical, m agnet ic,
opt ical, chem ical, m anual, or ot herwise, w it hout the prior writ ten
perm ission of Avision I nc.
Material scanned by this product m ay be prot ect ed by
governm ent al law s and ot her regulations, such as copyright
laws, t he cust om er is solely responsible for com plying w it h all
such laws and regulations.
W a rrant y
The inform at ion cont ained in t his docum ent is subj ect t o
change without notice.
Avision m akes no warranty of any kind with regard t o this
m at erial, including, but not lim it ed to, t he im plied warranties
of fit ness for a part icular purpose.
Avision shall not be liable for errors contained herein or for
incident al or consequential dam ages in connect ion wit h t he
furnishing, perform ance, or use of this m at erial.

Use r’s M anual
iii
Federal Com m unica t ions Com m ission ( FCC) com pliance
inform a t ion st at em ent
Par t 1 5
This equipm ent has been tested and found t o com ply wit h the
lim it s for a Class B digit al device, pursuant t o Part 15 of the FCC
Rules. These lim it s are designed to provide reasonable
prot ect ion against harm ful interference in a resident ial
inst allat ion. This equipm ent generat es, uses and can radiat e
radio frequency energy and, if not inst alled and used in
accordance with the inst ructions, m ay cause harm ful
int erference t o radio com m unicat ions.
However, there is no guarantee t hat interference will not occur
in a particular installat ion. I f t his equipm ent does cause harm ful
interference to radio or t elevision recept ion, which can be
det erm ined by turning the equipm ent off and on, the user is
encouraged to t ry to correct t he interference by one of the
following m easures:
Reorient or relocat e t he receiving antenna.
I ncrease t he separat ion bet ween t he equipm ent and
receiver.
Connect the equipm ent into an outlet on a circuit
different from t hat to which the receiver is connected.
Consult t he dealer or an experienced radio/ TV technician
for help.
This device com plies wit h Part 15 of the FCC Rules. Operation is
subj ect t o the following two condit ions: (1) This device m ay not
cause harm ful interference, and ( 2) t his device m ust accept any
int erference received, including interference t hat may cause
undesired operat ion.

Use r’s M anual
iv
Europea n Union Re gulat ory N otice
Product s bearing t he CE m arking com ply with t he following EU
Direct ives:
Low Volt age Direct ive 2014/ 35/ EC
EMC Direct ive 2014/ 30/ EC
Restrict ion of the use of certain hazardous subst ances (RoHS)
Direct ive 2011/ 65/ EU
RED (Radio Equipm ent Direct ive) (2014/ 53/ EC)
CE com pliance of this product is valid if powered wit h t he correct
CE- m arked AC adapt er provide by Avision.
This product satisfies the Class B lim it s of EN55022, EN55024,
safet y requirem ent s of EN 60950 and ROHS requirem ent s of
EN50581.
* This machine is certified as Class 1 LED product.
* Not e

Use r’s M anual
v
Disposal of W ast e Equipm ent by Users in Pr ivate Union
This sym bol on the product or on it s packaging indicates that the
product can not be disposed of wit h your ot her household wast e.
I nst ead it should be sent to appropriat e facilit ies for recovery
and recycling in an effort t o prot ect hum an health and t he
environm ent . Fore m ore informat ion about where you can drop
off your waste equipment for recycling, please contact your local
cit y office, your household wast e disposal service or t he shop
where you purchased the product .
As an ENERGY STAR
®
Part ner, Avision I nc. has
det erm ined that t his product m eet s the ENERGY
STAR guidelines for energy efficiency.
Syst em Re quirem e n t s
CPU: I ntel
®
Core™ 2 Duo or higher
Mem ory: 32 bit : 2 GB
64 bit : 4 GB
Opt ical Drive: DVD- ROM Drive
USB Port: USB port 3.1 Gen 1( com pat ible with USB
2.0/ 3.0)
Com pat ible
Operat ing
Syst em :
Microsoft Windows XP( SP3) , Windows Vist a,
Windows 7, Windows 8 (32 bit s/ 64 bit s) ,
Windows 10 (32 bit s/ 64 bit s)

Use r’s M anual
vi
Product Sa fety Guide
Please clearly read all these inst ructions, and follow all inst ruct ions
and warnings before installing and using t he dev ice.
The following indicat ions are used in this docum ent to obviat e any
chance of accident or dam age to you and/ or t he device.
W ARN I NG
I ndicates pot ent ially hazardous sit uat ions, w hich
if inst ructions are not followed, could result in
death or serious injury.
CAUTI ON
I ndicates a pot ent ially hazardous sit uat ion
which, if inst ructions are not followed, m ay
result in m inor or m oderat e inj ury or dam age to
property.
W ARN I NG
Use only the AC pow er adapter t hat cam e w ith your device.
Using any ot her AC power adapt er could cause fire, elect rical
shock, or inj ury.
Use only t he AC power cord and USB cable that cam e wit h your
device and avoid abrasions, cuts, fraying, crim ping, and kinking.
Using any ot her AC pow er cord and USB cable could cause fire,
elect rical shock, or injury.
Do not place obj ect s on t op of the AC power cord, and do not
allow t he AC power adapter or the AC power cord t o be st epped
on or run over.
Place t he device and it s AC power adapter near an elect rical
outlet where the AC power adapter can easily be unplugged.
I f you use an extension cord wit h the device, m ake sure that
the t ot al am pere rat ing of the devices plugged into t he
extension cord does not exceed the cord's am pere r at ing.
Place t he device close enough to the com puter so that t he
interface cable can easily reach bet ween t he device and t he
com puter.

Use r’s M anual
vii
Do not place or st ore t he device or its AC power adapter:
Out doors
Near excessive dirt or dust , wat er, or heat sources
I n locations subj ect t o shocks, v ibrat ions, high
tem perat ure or hum idit y, direct sunlight , st rong light
sources, or rapid changes in t em perat ure or hum idit y
Do not use t he device with wet hands.
Never disassem ble, m odify, or at t em pt t o repair the AC pow er
adapt er, device, or device opt ion by yourself, except as
specifically explained in t he device's docum ent ation. This could
cause fire, elect rical shock, or inj ury.
Do not insert obj ect s into any opening, as they m ay t ouch
dangerous volt age point s or short-out com ponent s. Beware of
elect rical shock hazards.
Unplug t he device and the AC power adapter, and refer
servicing to qualified service personnel under t he following
condit ions:
The AC power adapter or plug is dam aged.
Liquid has ent ered the device or t he AC power adapter.
Obj ect has entered t he device or the AC power adapter.
The device or the AC power adapter has been dropped,
or t he case has been dam aged.
The device or the AC pow er adapter does not operat e
norm ally ( i.e. appearance of sm oke, strange sm ell, odd
noise, et c.), or exhibit s a dist inct change in perform ance
Unplug t he device and the AC power adapter before cleaning.

Use r’s M anual
viii
CAUTI ON :
Do not at t em pt t o operate t he bat t ery in t em perat ure
out side t he range of - 20° ~ 60° C. I f so, this m ay cause
cracking, rupt uring, burst ing, em ission of flam e or expulsion
of molten m etal to the outside of the equipm ent enclosure.
Note the t he operat ing tem perature for t he batt ery is from -
20° t o 60° C and the operat ing tem perature for t he product
is from 10° to 35° C.
Do not locate the device on racket y or aslope tables. Do not
locate t he device on unst able surface. The device may fall
down and this may result in injury.
Do not place heavy obj ect s on t he unit . I t m ay cause
unbalance and the device may fall down. This m ay result in
injury.
St ore t he AC Power cord/ USB cable bundled out of the reach of
children to avoid t he risk of inj ury.
Keep plast ic bags bundled out of the reach of children or throw
them away t o avoid t he danger of suffocation.
I f you are not going to use the device for a long period, unplug
the AC power adapt er from t he elect rical outlet .
FCC Caut ion:
Any changes or m odifications not expressly approved by t he
party responsible for com pliance could void the user’s authorit y
to operat e t his equipm ent.
This device is intended only for OEM integrat ors under t he
following conditions:
1) The antenna m ust be inst alled such t hat 20 cm is m aint ained
bet ween t he antenna and users.
2) The t ransm it t er m odule m ay not be co- located wit h any
other t ransm itt er or ant enna.
I MPORTAN T NOTI CE:
FCC Radiat ion Exposure St atem ent :

Use r’s M anual
ix
This equipm ent com plies wit h FCC radiation exposure lim it s set
forth for an uncontrolled environm ent . This equipm ent should be
inst alled and operat ed wit h m inim um dist ance 20cm bet ween
the radiator & your body. To m aintain com pliance wit h FCC RF
exposure com pliance requirem ents, please avoid direct contact
to t he t ransm it t ing antenna during transm itt ing.
I C N otice :
Operat ion is subj ect t o t he following t wo condit ions:
1) This device m ay not cause interference and
2) This device m ust accept any interference, including
int erference t hat m ay cause undesired operat ion of t he device.
I MPORTAN T NOTE:
I C Radiation Exposure St at em ent:
This equipm ent com plies wit h I C radiation exposure lim it s set
forth for an uncontrolled environm ent . End users m ust follow t he
specific operat ing inst ruct ions for satisfying RF exposure
com pliance. This equipm ent should be inst alled and operat ed
wit h m inim um dist ance 20cm between the radiator & your body.
This transm itt er m ust not be co- locat ed or operating in
conjunct ion wit h any ot her antenna or t ransm itt er.
Règlem ent d’ I ndust ry Cana da
Les condit ions de fonct ionnem ent sont sujet tes à deux
conditions:
( 1) Ce périphérique ne doit pas causer d’interférence et .
( 2) Ce périphérique doit accepter toute interférence, y com pris
les interférences pouvant pert urber le bon fonct ionnem ent de ce
périphérique.
W ired ( Et hernet ) a nd W ireless ( W i- Fi) N e tw orks:
The availabilit y of these feat ures varies according to your
product m odel.

Use r’s M anual
1- 1
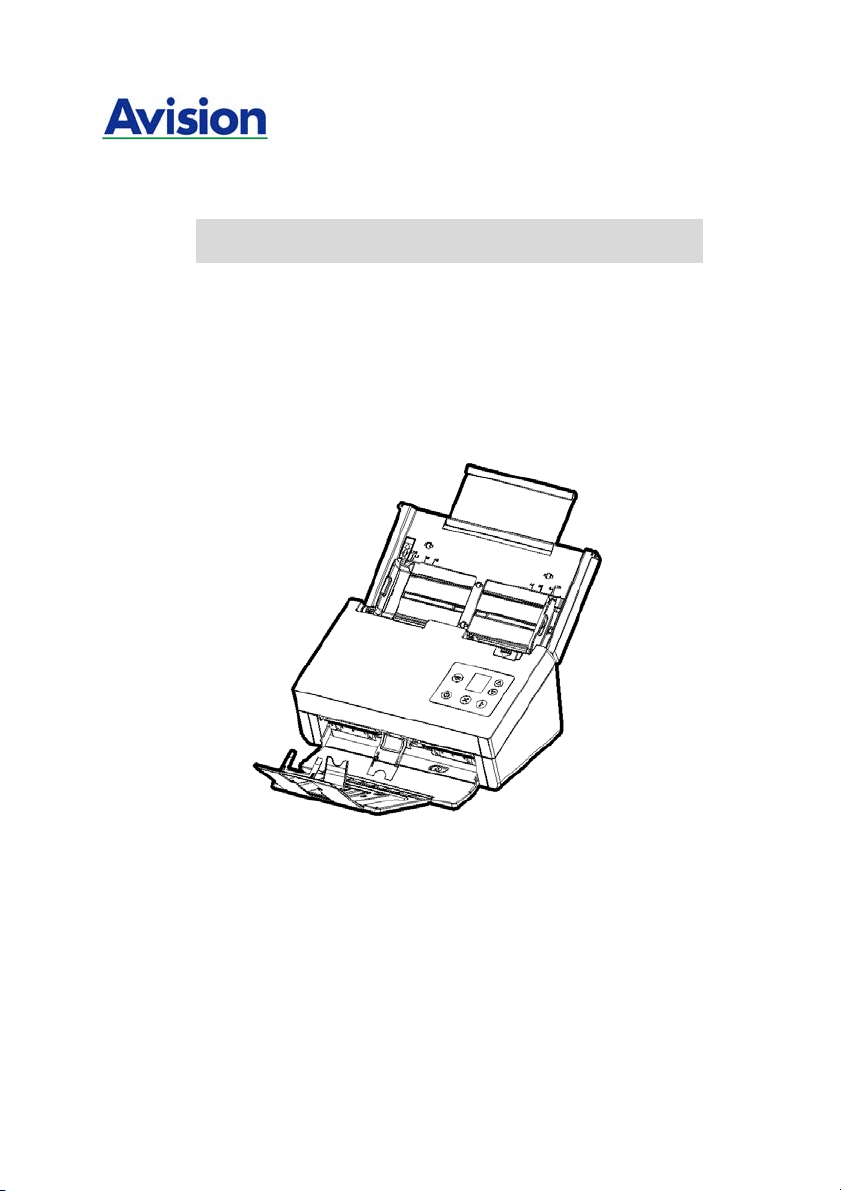
1 . I nt roduct ion
Congrat ulations on your purchase of the high speed
docum ent im age scanner. Wit h t his scanner, you can you
scan your mult i- page docum ent s from the aut o docum ent
feeder at a rated speed to increase your efficiency.
Before you inst all and operat e t he new scanner, please t ake a
few m inut es t o read t hrough t his m anual. I t provides proper
inst ruct ions for you to unpack, inst all, operate and m aintain
the scanner.
1 .1 Pack age I tem s
T
he following figure indicat es the package cont ents. Please
check all the it em s against your checklist. I f you do not
receive all t he it em s, please cont act your authorized local
dealer im m ediately.

Use r’s M anual
1- 2
1 . Sca nner Main Unit
2 . Quick Guide/ CD
3 . * Et hernet Ca ble
4 . USB Ca ble
5 . Pow e r Adapt er & Pow er Cord
6 . Calibra t ion Sh e e t ( for FF- 1 9 0 1 B on ly)
N ote:
1. Only use the AC adapter DA- 48M24 by APD included in the
m achine. Using ot her AC adapt ers m ay dam age the m achine
and void the warranty.
2. Please unpack t he packing carefully, and check t he content s
against the checklist . I f any it em s are m issing or dam aged,
please cont act your dealer im m ediately.
3. To access m ore service supports, visit www.avision.com to
regi
st er your Avision’s product .
4. * : Availability varies due to scanner m odel.
2
4
1
5
6
3 *

Use r’s M anual
1- 3
1 .2 Front View
Pa r t N am e Descr ipt ion
Extension Can be pulled out and adj ust ed to the
size of the docum ent being scanned.
Paper Widt h
Switch
Slide it up or down to fit your paper
size.
ADF Paper Tray
Load the docum ent onto this part
when scanning docum ent.
Paper Guides Adjust s to the widt h of the docum ent s
to prevent skewing of the scanned
pages.
Operat ion Panel
LCD screen:
Shows a num ber indicating a scan-t o
dest inat ion via the Up/ Down but tons.
The Power Button:
Press to turn on the power.
The Scan But ton:
Press to start a scan.
The Cancel Button:
Press to cancel a scanning job during
operation.
Extension
Paper Guide
Paper Stopper
Power But t on
Paper Guide
ADF
Paper Tray
LCD Screen w ith
Up/ Down But t ons
Cancel But t on
Scan But t on
Paper Width Swit ch
Use r’s M anual
1- 4
Docum e n t
Cover
Open it t o place the docum ent on the
glass plat en.
Paper St opper
Adjust to the length of t he docum ents
to prevent t hem from falling apart.
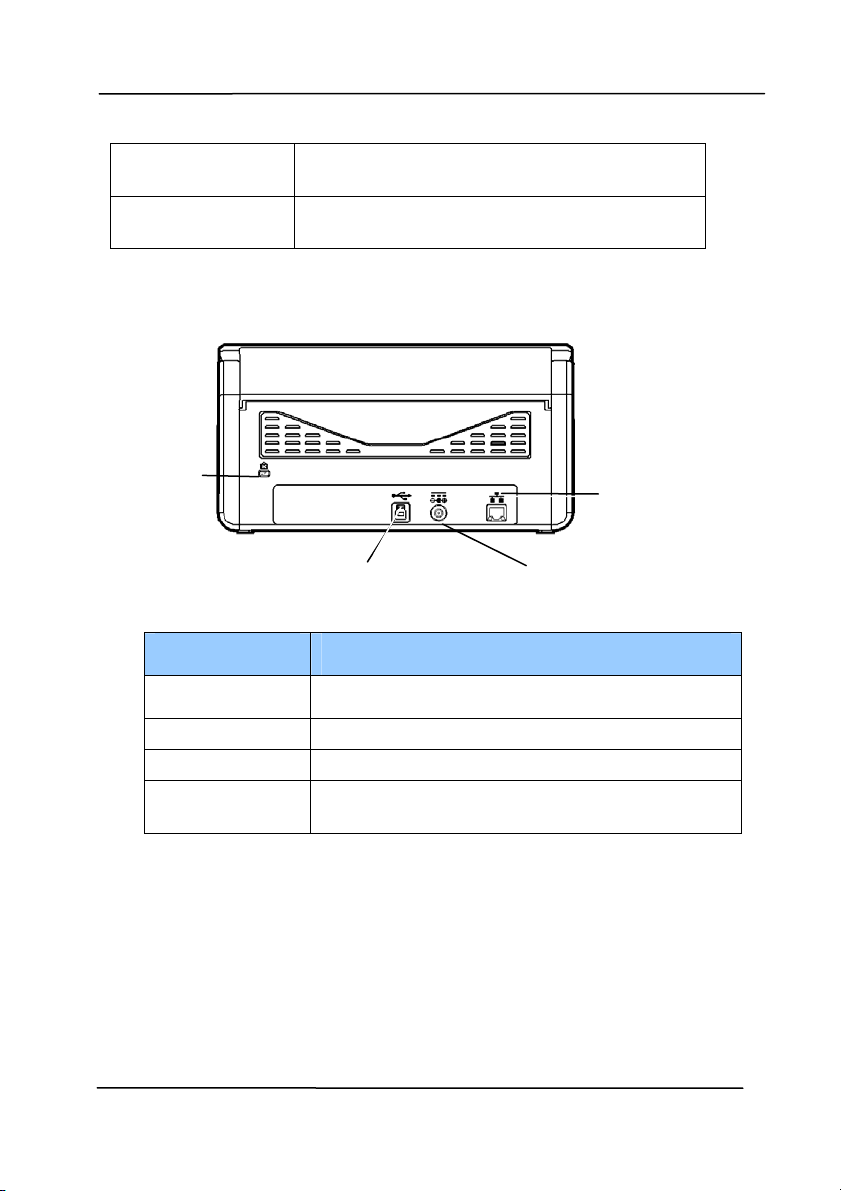
1 .3 Rear Vie w
I tem Descr ipt ion
LAN Port Used to connect to net work.
Pow e r Jack Connect the AC adapt er t o the scanner.
USB Port Connect to your com puter.
Ke nsington
Se curity Slot
At tach to a lock t o secure t he scanner.
LAN Port
Power Jack
USB Port
Securit y Slot

Use r’s M anual
1- 5
1 .4 Cont rol Panel
I tem Descr ipt ion
Display t he scanning and error st atus.
Display using TWAI N or But t on Manager V2 and
its funct ion.
Used t o scroll up and down t o select your funct ion
but t on via t he software application - But t on
Manager V2.
Press to st art a scan via t he software application -
Button Manager V2.
Press to cancel a scanning job during operat ion.
Press to return t o t he hom e screen.
Press to t urn on the power.
Long press to turn off t he power.
Press 2 seconds t o t urn on or off the Wi- Fi
connect ion.
Turn solidly on in blue to indicate Wi- Fi
connect ion is r eady.
Wired (Et hernet ) and Wireless (Wi- Fi) Networks:
The availabilit y of these feat ures varies according to your
product m odel.

Use r’s M anual
1- 6
1 .5
LCD D ispla y
After inst alling the scanner driver and connect ing the scanner t o
your com puter, the following LCD display will be prom pted:
Refer to chapt er 4 – Using Avision Propert ies Dialog Box on how
to st art a scan wit h TWAI N user int erface.
After inst alling scanner driver, Butt on Manager software
applicat ion, and connect ing t he scanner to your com puter, the
following LCD display will be prom pt ed:
Refer to chapt er 6 – Using the Button on how t o press the
button to com plet e a scan.
I ndicat es current
scan set t ings
I ndicat es using
TWAI N to st art
a scan
I ndicat es the
Scan Count
0
I ndicat es
Button Nam e
of Butt on
Manager
0
iScan
I ndicat es
Funct ion # of
Button Mana
g
er
I ndicat es current
scan set t ings
I ndicat es the
Scan Count

Use r’s M anual
1- 7
St atus Bar
I con N a m e LED Light Color/ St at us I ndica t ion
Wi- Fi Mode
Successful
Connect ion
No Display
No Wi- Fi USB dongle
Et hernet
Mode
Successful
Connect ion
No Display
No connect ion of the
wired network cable.
Auto
Docum ent
Feeder
Mode
A green icon indicates
there is paper in t he
Auto Docum ent
Feeder.
A whit e icon indicat es
no paper in Auto
Docum ent Feeder.

Use r’s M anual
1- 8
1 .6 Rem ova ble Parts
ADF Roller
Reverse Roller

Use r’s M anual
2- 1
2 . Scanner I nstalla t ion
2 .1 Preca utions
Keep the scanner out of direct sunl
ight. Direct exposure
to t he sun or excessive heat m ay cause dam age t o the
unit .
Do not inst all the scanner in a hum id or dust y place.
Be sure t o use t he proper AC power source.
Place the scanner securely on an even, flat surface.
Tilt ed or uneven surfaces m ay cause m echanical or
paper- feeding problem s.
Ret ain the scanner box and packing m at erials for
shipping purposes.

Use r’s M anual
2- 2
2 .2 Connect ing to Pow er
Be for e conne cting, m a k e sure t he pow e r sw itch is off.
Pl
ug the sm all end of the power adapt or into the power j ack of
your scanner. I nsert t he ot her end to an appropriat e power
out let.
2 .3 Turning on t he Pow e r
Press the Pow er Swi
tch but ton on t he front panel, t he Power
LED will flash. When it is finished and ready t o scan, the LED
indicat or will stop flashing and becom e st eadily on. To turn
off the scanner, press the Power Swit ch button for about 3
seconds, the Power LED will be off.

Use r’s M anual
2- 3
2 .4 I nst alling t he Sca nner D r ive r
N ote:
1. To ensure your com puter can ident ify the USB scanner,
please install scanner driver first before connecting the
scanner t o your com puter.
2. The scanner driver cont ains TWAI N, I SI S and WI A driver.
After t he inst allat ion of scanner driver is com pleted, this
scanner allows you to scan via a TWAI N, I SI S, or a WI A
int erface. St art your TWAI N- com pliant im age edit ing
software application to select a TWAI N or WI A user
interface or your I SI S soft ware to select an I SI S user
interface. You m ay also launch Microsoft’s Scanner and
Cam era Wizard t o scan via a WI A user int erface.
1. Place t he supplied CD- ROM ont o your CD- ROM drive.
2. The software inst allat ion graphic appears. I f not , run
“se t up.ex e ”.

Use r’s M anual
2- 4
Cont ents on t he insta llation gra phic:
I nst all Scanner D r ive r : To com m unicat e with your
scanner, you need to inst all the scanner driver.
I nst all Butt on M anager V2 : To use the butt ons on
the scanner, you need to inst all Button Manager V2.
To ensure Button Manager V2 works properly, please
FI RST inst all scanner driver before inst alling Butt on
Manager V2.
I nst a ll Virt ual Scanner Link : To connect your
com puter to the scanner in t he net work, you need to
inst all t he Net work Setup Tool. * Virtual Scanner Link:
The availabilit y varies according t o scanner m odel.
I nst a ll AVScan X: To scan and organize your m ult i-
page docum ent(s) , you can inst all t he soft ware
application to m anage them easily and effect ively.
View M anual: Click “Vie w Ma nual” t o view or
print t he det ailed user m anual for t he scanner and
Button Manager V2 respectively.
3. Click I nst a ll Scanner Driver to inst all t he scanner driver
and t hen click I n sta ll But t on M anager V2 to inst all t he
Button Manager V2 unt o your com puter.

Use r’s M anual
2- 5
2 .5 Connect ing to Com puter
1. Connect the square end of the USB cable to the USB port of
your scanner. Connect the r e cta ngle end t o the USB port at
the rear side of your com puter.
N ote: The scanner is designed wit h a USB 3.1 interface to
ensure t he opt im al speed. I f your com puter com es wit h a
USB 3.1 port , m ake sure t o connect the scanner t o your
com put er t o the USB 3.1 port w hich is dist inguished in blue
color at t he back of your com puter. The USB 3.1 port
enhances your scanning speed and is also com patible with
USB 2.0 and USB 1.1.
2. The com puter should det ect a new USB device and prom pt a
“New H a rdw a re Found” m essage.
3. By following the on-screen inst ruct ions, click t he Next
button to cont inue. When t he cert ificat ion screen appears,
click Continue Anyw ay t o com plet e t he installation.
4. When the Finish dialog is prom pt ed, click the Finish button.

Use r’s M anual
2- 6
2 .6 Connect ing a N etw ork Ca ble
1. Connect one end of your network cable to an available port
of the swi
tching hub of your LAN.
2. Connect the other end t o the LAN port m arked
at the
back of the product as shown.

Use r’s M anual
2- 7
2 .7 Using t he N e t w ork Scanner for t he Fir st Tim e
Before connect ing to t he net work scanner, m ake sure that
Vi
rtual Scanner Link (Net w ork Setup Tool) has been inst alled
ont o your com puter. The Network Set up Tool is included in the
supplied soft ware CD.
1. St art [ Vir t ual Sca nner Link ] by choosing St a rt > All
Progra m s> Avision Vir t ual Sca n ner> Vir t ual Sca nner
Link. The m ain window will be displayed and t he scanners
in your net work will be searched autom at ically. I n a few
seconds, t he result including the scanner m odel and
scanner’s I P address will be displayed as shown.
2. Choose the scanner you wish to connect and then press
[ Connect ] . I f connect ion is successful, a connect ion
m ark will be displayed as shown.
Use r’s M anual
2- 8
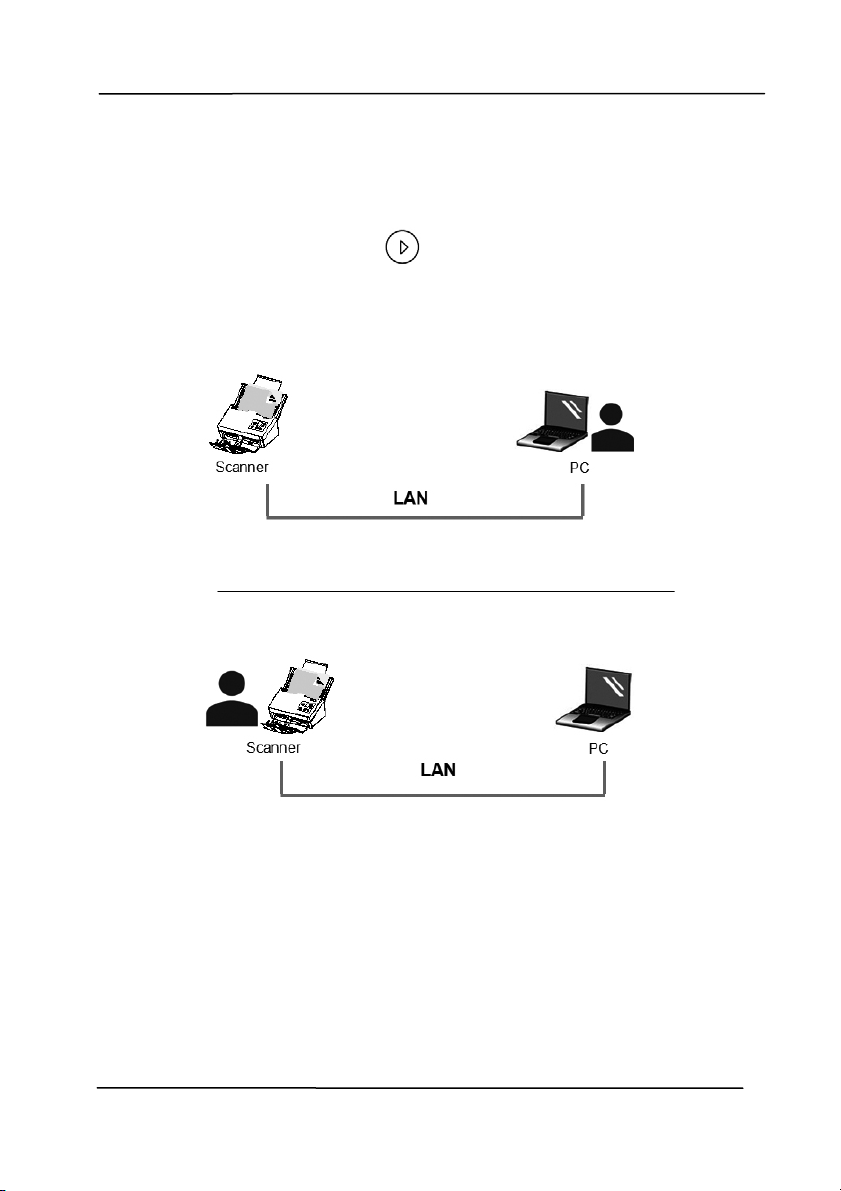
3. Aft er t he scanner has been connected successfully,
launch your TWAI N- com pliant im age- edit ing software
application t o st art a scan (Figure A) .
Or sim ply press the
[ Scan] butt on on the scanner to
st art a scan (Figure B) .
Figure A
Figure B

Use r’s M anual
2- 9
N ote:
The VSL program allows mult iple users t o connect to t he
network scanner at anyt im e. Yet, t he scanner operation can
be used by one user at a t im e. I f the network scanner is
being used by ot her user, you will be prom pt ed wit h a
m essage to connect the scanner later. When the scanner is
available, you will also be prom pt ed wit h a message to
connect t he scanner and st art scanning your docum ent.
I f the net work scanner has not been found, it is probably
the scanner and your com puter are not in the sam e LAN. I n
this case, you can assign a specific I P address of the
scanner t o let [ Virtual Scanner Link] aut om at ically search
the scanner. Click the [ Opt ion] ( 1)button, type your I P
address on the [ Searching Address] field, t hen click t he [ + ]
( 2) butt on and finally click [ OK] (3) t o com plet e.
Searching Tim e: When the program is launched, it
autom at ically searches t he scanner in the net work in 5
seconds (default ) . The searching t im e can be changed from
a range of 5 to 20 seconds.
I f the [ Virt ua l Scanner Lin k ] program has been closed
and t hen launched again, [ Vir t ual Scanner Lin k ] will
autom at ically search and connect t he network scanner it
has previously connect ed to.
The connect ion is always enabled, w hether the scanner
enters into the sleeping m ode or t urns off and on again.
VSL will autom at ically det ect t he previously connect ed
scanner and connect again.
(1)
(3)
(2)

Use r’s M anual
2- 10
2 .8 How t o Sw it ch t o An other Com puter on t he N et w ork
Sca nner
Please follow t hese st eps to connect t he net work scanner t o
other com puter in the net work:
1. Turn on the scanner.
2. Make sure t hat a LAN (Et hernet ) cable has been connected
to t he scanner and that the Virtual Scanner Link (VSL) has
been inst alled to your com puter. ( Refer t o the preceding
sect ion 2.3~ 2.7)
3. St art [ Vir t ual Sca nner Link ] by choosing St a rt > All
Progra m s> Avision Vir t ual Sca n ner> Vir t ual Sca nner
Link. The m ain window will be displayed and t he scanners
in your net work will be searched autom at ically .
4. On the scanner, press
+ ( Scan+ Cancel/ Hom e
buttons) at the sam e tim e. The following opt ions will be
displayed in the screen.
5. Use the Arrow key t o select [ VSL List ] and then press
( OK) , all t he com puters ( host nam e) in t he LAN will be
displayed in the screen.
1. PC 1
2. PC 2
3. PC 3
I nform ation
VSL List
I nform ation
VSL List

Use r’s M anual
2- 11
6. Use the Arrow key t o select the com puter you want t o
connect and then press ( OK) .
7. The scanner st arts connect ing to t he com puter.
8. Repeat st ep 4 and select [ I nform at ion] . The product
inform ation including firm ware version, I P address, Mac
address, PC Link will be displayed in t he screen. I f
connect ion is successful, the correct com puter nam e w ill be
shown in [ PC Link ] .
9. Press to go back t o the following hom e screen. The
button profile of the com puter w ill also be changed.
10. Press the
[ Scan] butt on on the scanner to st art a scan.
FW Version:
0.82
I P Address:
10.1.23.78
Mac Address:
0002300045567
PC Link:
PC 2
I nform ation
VSL List

Use r’s M anual
3- 1
3 . Com plet ing Your First
Scan
3 .1 Loa ding Your Docum ent in the ADF Pape r Tr ay
3 .1 .1 Notice on Usin g t h e ADF
Before using t he ADF, please m ake sure t hat your paper meet s
t
he following specifications:
Docum ent ( s) can range in size from 50 x 50 m m (2 x 2 in.)
to 242 x 356 m m ( 9.5 x 14 in.) .
Docum ent ( s) can range in weight from 27 ~ 413 g/ m
2
( 7
~ 110 lb.)
I D cards up to 1.25 m m t hick
Docum ent(s) should be square or rect angular and in good
condition (not fragile or w orn) .
Docum ent(s) should be free of curl, wrinkle, t ears, wet ink,
or punch holes.
Docum ent(s) should be free of st aples, paper clips, paper
st icky not es.

Use r’s M anual
3- 2
Fa nning Your D ocu m e nt
N ote: To avoid occasional m ult i- feeds or paper jam s, please
fan your docum ent s and align t he t op edges before feeding
them into the scanner.
1. Hold bot h ends of the docum ent s and fan them a few
tim es.
2. Rot at e t he docum ent s by 90 degrees and fan t hem in the
sam e m anner.
3. Align the edges of the docum ents in a st ep- like pat t ern
( see pict ure below) .
St ep- like
Scanning
Direct ion

Use r’s M anual
3- 3
Docum e n t Feeding
1. Unfold t he docum ent feeder and it s extension.
2. Raise t he paper stopper.

Use r’s M anual
3- 4
3. Raise t he paper guide to hold your m ult i- page docum ent .
4. Load t he st ack of docum ent
face down wit h the top of the
pages pointing into the feeder.
5. Verify t hat the paper guides are aligned wit h the edges of
the st ack.
Use r’s M anual
3- 5
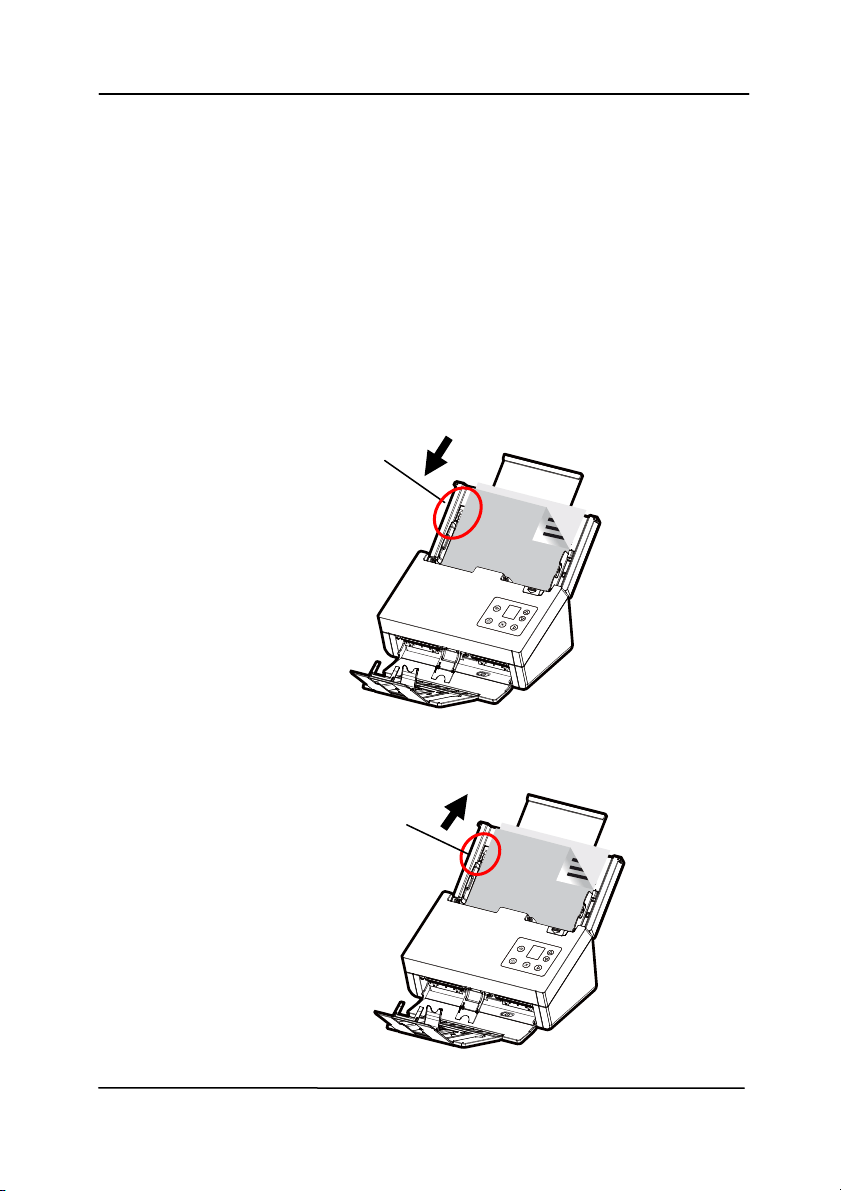
N ote: Th e [ Paper W idt h] sw it ch:
I f your document widt h is 216 m m ( 8.5 in.) :
Slide t he [ Pape r W idth] swit ch DOW N to fix your paper
guide t o convenient ly load the lett er-size docum ent.
I f your document widt h is larger t han 216 mm (8.5 in.) :
I f your docum ent widt h is larger t han 216 m m (8.5 in.)
such as invoices wit h punch holes, slide the [ Pape r
W idt h] swit ch UP and m ove the paper guide to the right
end t o load your docum ent s.
Slide D OW N t he [ Pape r
W idt h] swit ch to set
your paper widt h to 216
m m ( 8.5 in.)
Slide UP t he [ Pa per W idth]
swit ch to set your paper
width larger t han 216 m m
(
8.5
in.
)

Use r’s M anual
3- 6
3 .1 .2 Sca nnin g Thin Pape r
To scan a st ack of thi
n paper, it is recom m ended to raise the
paper weight and t hen m ake the output t ray in a flat position to
keep the paper from rolling or possible paper j am s due t o the
paper stack in the output t ray.
For norm al docum ent scanning, press down the paperweight and
keep the output t ray in an angled position t o prevent paper from
falling apart.
To scan thin paper,
1. Lift up the paperweight as shown.
2. Slide the posit ion adj uster of the output t ray t o m ake t he
out put tray in a flat posit ion.

Use r’s M anual
3- 7
3. Load a stack of thin paper int o t he paper tray. Align t he
paper guides and m ake sure t he edges of paper slightly
touch the paper guides on bot h side as illust rat ed.
8B

Use r’s M anual
3- 8
3 .1 .3 Sca nning a Sta ck of D ocu m e nt w ith Variou s sizes
and W
eights
When scanning a bat ch of document s wit h different sizes and
weight s, be sure t o follow t hese guidelines to avoid a skewed
im age or a paper jam :
1. Align the docum ents TOP EDGE first in the sequence of
paper size from large to sm all.
2. I f two pages are of the sam e size yet with different weight,
arrange these pages in the sequence of paper weight from
heavyweight t o lightweight.

Use r’s M anual
3- 9
3. Align the edges of the docum ents by t apping t he bot t om of
the st ack against the t able top.
4. Center t hese pages in the docum ent feeder and m ake sure
that the edges of page of the largest size slightly touch the
Paper Guide.

Use r’s M anual
3- 10
3 .2 Ve r ifying Your Scanner I nst a lla tion
T
o verify if your scanner inst allat ion is correct , Avision provides
you a useful t est program called Avision Capt ure Tool. Wit h this
tool, you can perform sim ple scans and view the capt ured
im ages. I n addit ion, it helps you com plete your scan at a rat ed
speed.
The following procedure describes how t o verify your scanner
inst allation. I f t he inst allat ion is not correct , please review t he
preceding sect ion to check if the cable connect ion and scanner
driver have been successfully inst alled.
Before you begin, be sure t he scanner is on.
1. Select St art> Program s> Avision xxx Scanner> Avision
Capt ure Tool. The Select Scanner Model dialog box will be
displayed.
2. Select your driver t ype and scanner m odel and click OK.
The follow ing Avision Capture Tool dialog box will be
displayed.

Use r’s M anual
3- 11
3. Choose your desired file form at from the File Form at drop
down list box. ( Default is JPEG, ot her choice includes TI FF,
MTI FF, PDF, MPDF, GI F, and BMP.) The supported file
form at s vary depending on your scanner m odel.
4. Type your desired folder nam e and file nam e in t he File Path
box. (Default is C: \ Docum ents and Sett ings\ User Nam e\ My
Docum ent s\ My Scan\ I m age.)
N ote: I f you do not wish t o save the scanned im age,
deselect the Save but ton since default is Save Enable. I n this
case, t he thum bnail view will be disabled. And t herefore,
after v iew ing all the scanned im ages, only t he last one w ill
rem ain on the screen.
5. Click t he Setup button ( ) or choose Set up from t he
File m enu t o prom pt t he Scanner Properties dialog box.
Set up
Act ual
Size
Fit
Page
Scan
File Format
Save
File Pat h

Use r’s M anual
3- 12
6. From the I m age Select ion Box, choose your desired im age
type for your scanned im age. ( Default is Front B&W) I f you
have a duplex scanner, choose Front and Rear t o scan bot h
sides of your docum ent .
7. Click OK to quit the Scanner Propert ies dialog box. (To
learn m ore det ails about t he Scanner Propert ies dialog box,
please see t he subsequent chapt er, Using the Scanner
Propert ies Dialog Box.)
8. Place your docum ent face down on the docum ent glass or
face up in the auto docum ent feeder.
9. I n the Scan Validat ion dialog box, click t he Scan butt on
(
) or choose Scan from the File m enu.
10. The docum ent will be scanned and displayed in the Scan
Validat ion screen. After t he scanned im ages have been
displayed, your scanner inst allat ion verificat ion is com plet ed.
I m age
Select ion
Box

Use r’s M anual
3- 13
11. You can view t he scanned im age in Fit Page (
) or Actual
Size ( 100% ) but ton (
) from the Viewing toolbars at the
right side.
12. Click the Close box or Quit from t he File m enu to exit the
Scan Validat ion Tool.
Display View
Thumbnail View
Use r’s M anual
3- 14
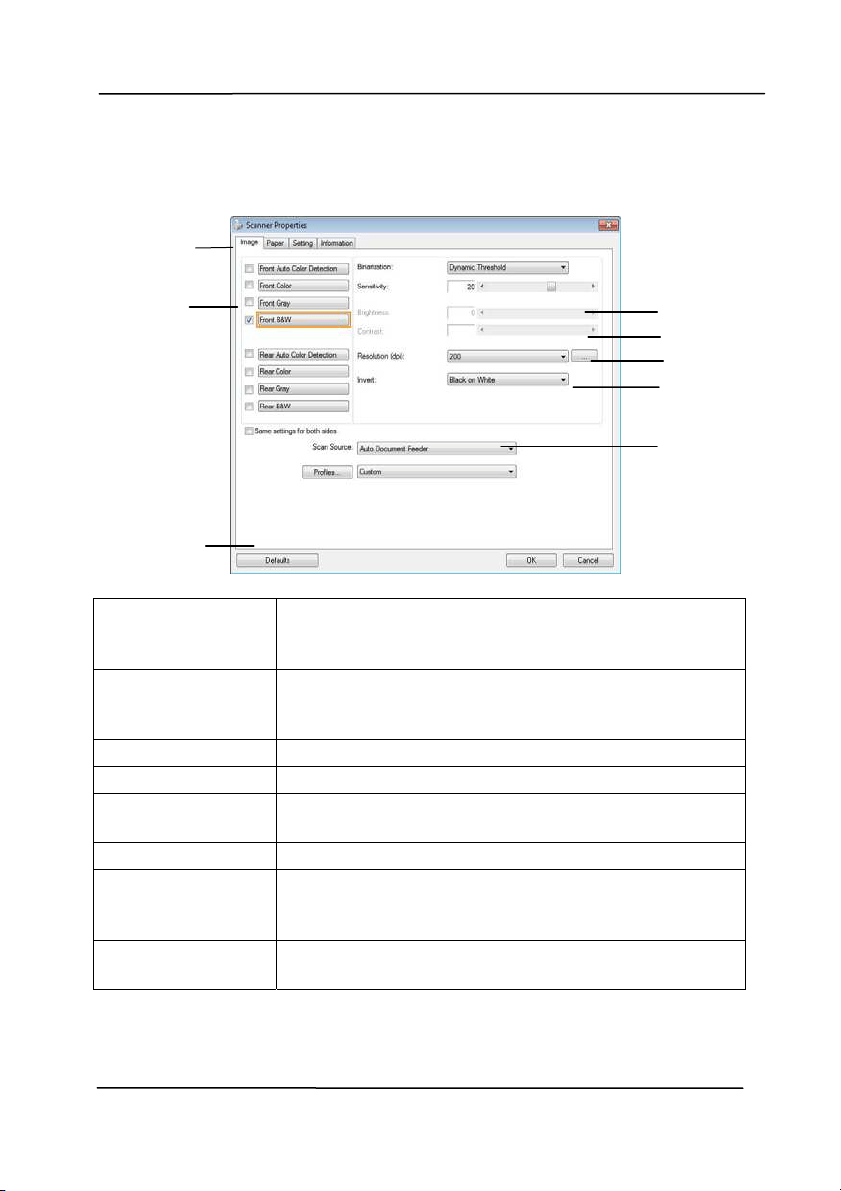
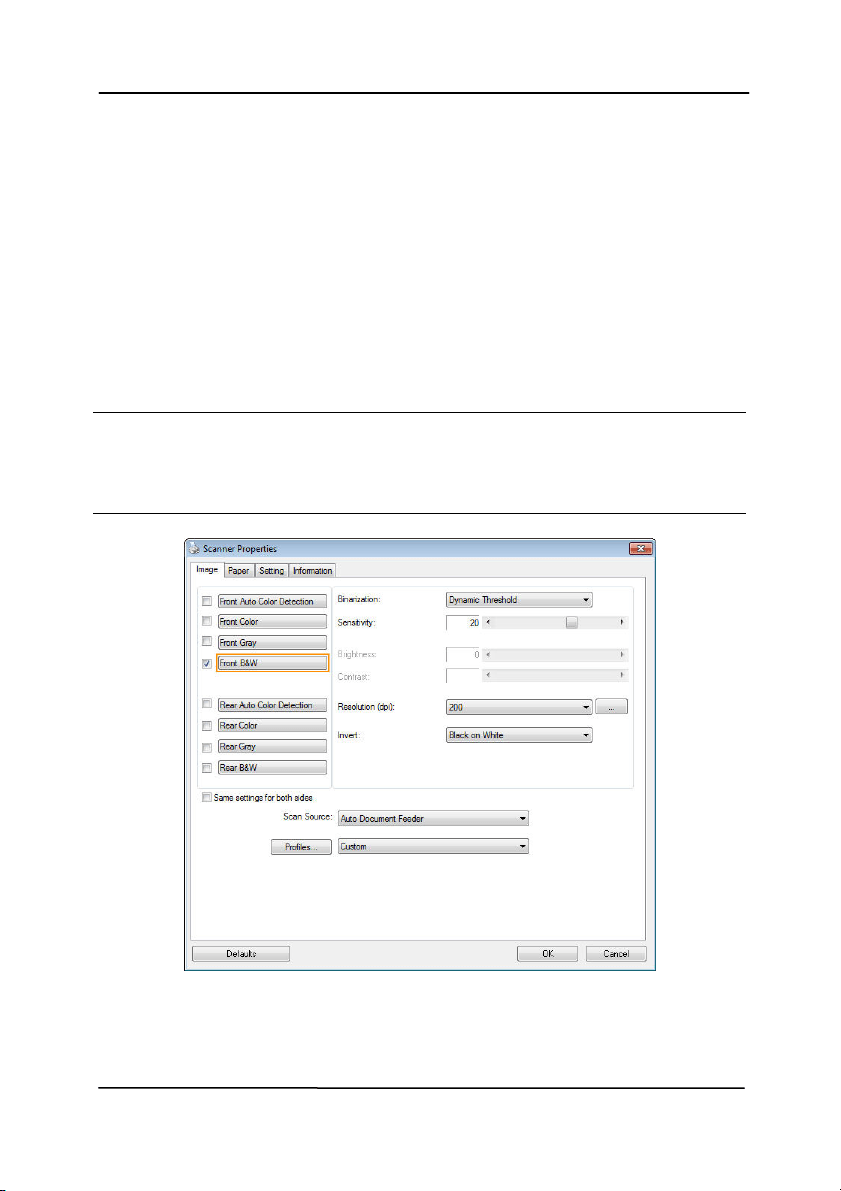
3 .3 A Gla n ce of t he Sca nner Propert ies Dia log Box
1 . Ta b Opt ion s Choice: I m age, Com pression, Color Dropout ,
Paper, Mult i- Feed Det ect ion, Prev iew, Options,
Settings, I nform ation.
2 . I m a ge
Se le ct ion Box
Choose your im age t ype and t he side of
docum ent you wish to scan. Opt ions vary
based on type of scanner.
3 . Bright ness Adj ust the bright ness lev el from –100 to + 100.
4 . Cont rast Adj ust the cont rast level from –100 t o + 100.
5 . Re solu t ion
Determ ine the qualit y of the scanned im age.
The indust ry st andard is 200 dpi.
6 . I nvert Reverse the color of your scanned im age.
7 . Scan Sour ce
Choice : Aut o Docum ent Feeder, Flat bed,
Flatbed (Book) , Autom at ic ( varies due t o
different scanner m odel)
8 . D e fault s Reset all values on the tabs t o t he fact ory
default set t ings.
3
4
5
6
7
1
2
8
Use r’s M anual
4- 1
4 . Using t he Sca nner
Propert ies Dialog Box
The Scanner Properties dialog box allows you to configure the
scanner’s set tings. I t consists of several t abbed windows each
of which will be described in this chapter.
N ote: I n this chapt er, all opt ions are available based on a
duplex ( double- side) scanner. I f you have purchased a sim plex
( single-side) scanner, all opt ions are available for single sided
only.
The Scanner Pr opert ie s dialog box

Use r’s M anual
4- 2
4 .1 But tons on the Scanner Pr ope rtie s Dia log Box
The butt ons on t he Sca nner Properties dia log box
But tons
Descr ipt ion
Defaults Click the D e fault s butt on, the fact ory default
set t ings will be shown on each t ab.
Cancel Click t he Ca ncel butt on to leave t he Scanner
Propert ies dialog box.

Use r’s M anual
4- 3
The following table shows t he default sett ings:
Ta b nam e Defa ult set t ings
I m a ge I m age:Front B&W
Binarizat ion:Dynam ic Threshold
Resolut ion:200 dpi
I nvert:Blank on Whit e
Scan Source:Auto Docum ent Feeder
Threshold:None
Brightness:None
Cont rast:None
Com pression None
Color Dropout
None
Pa per Cropping:Aut om at ic
Deskew:Yes
Orientat ion:Portrait
OverScan:0.00
Note: The availability of this opt ion
varies due t o scanner m odel.
Unit :I nch
Mult i- Feed
Det e ction
None
Preview None
Options Rotat ion Degrees:None
Blank Page Rem oval:None
Edge Fill:Whit e,0 m m
I m age Control Opt ion:None
Se t t ing Enable Energy Saver:Enable, 15
m inutes after last scan act ion
Show Scanning Progress:Yes
Show Warning Message:Yes
Save Sett ings after Closing:Yes
I m print e r Digit al I m printer

Use r’s M anual
4- 4
4 .2
Show ing or Hiding Tabs
The [ Scanner Pr ope r t ie s] dialog box is displayed in default
wit h t hree basic t abs - I m age, Paper, and I nform at ion. To
show m ore tabs, click t he [ Sca nner Propert ies] icon to access
m ore scan set tings.
To show m ore tabs,
1 . Click t he [ Scanner Pr ope r t ies] icon (
) on the upper
left corner, and choose [ Ta b] to show available tab nam es.
The available tabs include Com pression, Color Drop out,
Preview, Rot at ion, Separat ion, Mult i- Feed, Opt ions,
Sett ings, and I m print er. (Not e: the options vary based on
scanner m odel.)
2 . Choose t he t ab you want to display. The select ed tab w ill
be shown with a check m ark and then displayed in the
[ Scanner Pr operties] dialog box.
3 . To access the set tings, click t he select ed t ab on the t op of
the [ Scanner Prope r t ies] dialog box. The page of the
select ed tab will be displayed.
To hide a tab window,
1 . Click the [ Scanner Prope r t ies] icon (
) on the upper
left corner, and choose [ Ta bs] t o show available tab
nam es.
2 . Choose t he tab you want t o hide. Then, t he selected tab
will be hided in t he [ Scanner Proper t ies] dialog box.
Note: The [ I m age] , [ Pa per] , and [ I nform a t ion] tab can
not be hided since they preprogram m ed to be displayed by
default.

Use r’s M anual
4- 5

Use r’s M anual
4- 6
4 .3
The I m a ge Tab
The I m age tab allows you to choose t he front side and (or) t he
rear side of your docum ent , the t ype of im age, and t o set
several basic scan sett ings. Note that except for t he resolut ion,
you can set individual scan set tings for t he front side and the
rear side. For exam ple, all set tings in the I m age tab,
Com pression tab, Color Dropout t ab can be set individually for
the front and the rear side. However, the set tings in the Paper
tab, the Opt ion tab, and t he Set ting tab have to be set the
sam e for t he front and rear side.
The I m a ge t ab dia log box

Use r’s M anual
4- 7
4 .3 .1 The I m a ge Se lect ion Box
The I m age Select ion box includes t he
im age type and docum ent side opt ion. I f
you wish to scan bot h t he front side and
the rear side of your color document , you
can check bot h Front Color and Rear Color
at t he sam e tim e. Note the opt ions vary
based on type of scanner.
Ex a m ple 1
:Scanning a tw o- sided color docum e nt , bot h
sides in color
Side/ I m age
Se lect ion
Front
Rear

Use r’s M anual
4- 8
Ex a m ple 2
:Scanning a tw o- sided color docum e nt , one
in B& W , t h e other in color
Side/ I m age
Se lect ion
Front
Rear
I m a ge Type Descript ion
Color Choose Color if you wish to scan a color
im age for your original in color.
Gra y Choose Gray im age if your original contains
act ual shades of gray.
B& W Choose B&W if your original contains only
text, pencil or ink sket ch.
B& W Gr a y Color

Use r’s M anual
4- 9
Front/ Rear Aut o Color Det ect ion:
Click t o aut om at ically det ect and scan the front or t he rear
page of your color document in color im age m ode. I f your
docum ent is in colors, t he scanner will autom at ically scan the
docum ent into a color im age. I f your docum ent is non- color,
you can choose the output t o be eit her B&W or Gray from t he
Non- Color Select ion opt ion. This opt ion is useful when you
have a mixture of color and non-color docum ent.
Note: I f you choose Front Rear Aut o Color Det ect ion, you can
not specify t he im age m ode of your rear page and vice versas.
Modes of Aut o Color Det ect ion:
I f [ Fr ont/ Rear Aut o Color Detect ion ] is select ed, its m odes
will be displayed. Choice includes Nor m al, I gnore Pape r
Color. For paper wit h background color such as invoices,
choosing [ I gnore Pa per Color ] w ill autom at ically rem ove the
background color and enhance the det ect ion accuracy.
N orm a l I gnore single background
color

Use r’s M anual
4- 10
Se nsit ivit y of Aut o Color Det e ction
I f your document s cont ain prim arily B&W t ext and sm all
am ount of light or pale colors and you do not wish them t o be
recognized as color im age to save the file size, you can
increase the sensit ivit y value by m oving the bar t o t he right t o
let these im ages to be det ect ed as B&W. The value ranges from
1 to 100. The default is 37.
Or iginal
Se nsit ivit y: 1
( The im a ge is recognized
as a color one)
Se nsit ivit y: 1 0 0
( The im a ge is recognized
as a black a nd w hit e one)

Use r’s M anual
4- 11
Sa m e se t t ings on both sides:
Click t o apply sam e scan sett ings for bot h sides of your
docum ents. Aft er checking this option, any set tings you have
changed will autom at ically applied to bot h t he front side and
the rear side. For exam ple, if you choose your ideal resolution
to be 300 dpi, t his will be applied bot h to the front side and
rear side of your docum ent .

Use r’s M anual
4- 12
4 .3 .2 Ot her I m age Options
Bina r iza tion Thi
s is the process of converting a
grayscale or color im age to a bi- tonal
im age. There are several different
m et hods of perform ing this conversion.
Options: Dyna m ic Threshold,
Dynam ic Thresh old ( AD) , Fix e d
Processing, H alftone 1 ~ 5 , Error
Diffu sion .
Dynam ic Threshold: Select ing
Dynam ic Thresh old allows the scanner
to dynam ically evaluate each docum ent
to det erm ine t he opt im al threshold value
to produce t he highest quality im age.
This is used to scan m ixed docum ent
containing faint t ext, shaded background,
or color background wit h a single set t ing.
I f Dynam ic Threshold is select ed,
Threshold, Brightness, and Contrast are
not available.
Dynam ic Threshold ( AD) : Select ing
Dynam ic Thresh old ( AD) to perform
the enhanced m ode of the Dynam ic
Threshold feature. However, using this
m ode m ay slow down your scanning
speed.
Se nsit ivit y of Dynam ic Th r e shold
Occasionally your scanned im age m ay
contain sm all dot s or speckles. To rem ove
these spot s, increase t he sensitivit y value
by m oving t he bar t o the right. The value
ranges from 1 t o 30. The default is 20.

Use r’s M anual
4- 13
Fix ed Processing: Used for black- and-
white and ot her high cont rast docum ent s. A
single level is set t o det erm ine the black-
and- whit e transit ion. The t hreshold is
program m able over t he ent ire density
range. Fixed Pr oce ssing set s Contrast t o
0. I f Fix ed Processing is select ed,
Contrast is not available.
Halft one: I n addit ion to t he black and
whit e display, Halft one can present a
som ehow gray shade of im age by using
different size of dots. Halft one im age looks
like the picture we have seen in t he
newspaper. Options include H a lftone 1 ,
Halft one 2 , Halft one 3 , Halft one 4 ,
Halft one 5 .
Er r or Diffu sion : Error Diffusion is a t ype
of Halftone. Error Diffusion gives good
im age t exture and m akes text in im ages
m ore readable than Halft one.
Halft one I m a ge

Use r’s M anual
4- 14
Er r or Diffu sion I m a ge
Dynam ic Thresh old
Dynam ic Thresh old ( AD)

Use r’s M anual
4- 15
Thresh old Used to convert a grayscale im age t o a
bi- t onal im age. The value ranges from 0 t o
255. A low t hreshold value produces a
lighter im age, and can be used to subdue
backgrounds and subtle, unneeded
inform ation. A high threshold value produces
a darker im age, and can be used to help pick
up faint im ages.
Adjust the t hreshold set t ing by dragging t he
Threshold sliding bar to the left or right to
achieve the desired threshold sett ing.
2 0 0 dpi,
Thresh old:5 0 ,
Br ight ness: 0
2 0 0 dpi,
Thresh old:1 0 0 ,
Br ight ness: 0

Use r’s M anual
4- 16
Gra y
Docum e n t Type: Choice: N orm a l, Photo, Docum ent
Three opt ions of docum ent t ype are provided when you choose
Gray as the im age type for your scanned docum ent . Choice:
N orm a l, Photo, D ocum e nt.
Docum e n t : Choose Docum ent if your original contains
pure t ext or a m ixt ure of text and graphic since it is an
optim al set ting for regular business docum ent . When
using Docum ent, only Threshold can be adj ust ed.
Phot o: Choose Phot o if your original contains phot o to
reproduce your photo in vivid grayscale im age. When
using Phot o, no Threshold and Cont rast can be adj ust ed.
N orm a l: When using Norm a l, Threshold, Bright ness, and
Cont rast can be adj ust ed.
Thresh old: The value ranges from 0 to 255. The default is
230. A low t hreshold value produces a lighter im age, and can
be used to subdue backgrounds and subt le, unneeded
inform ation. A high threshold value produces a darker im age,
and can be used to help pick up faint im ages. Adj ust t he
threshold set ting by dragging t he Th r e shold sliding bar to t he
left or right to achieve the desired threshold set t ing.

Use r’s M anual
4- 17
N orm a l
Phot o
Docum e n t
( Thr eshold: 2 3 0 )
N orm a l
Phot o
Docum e n t
( Thr eshold: 2 3 0 )

Use r’s M anual
4- 18
Br ight ness Adj ust s the lightness or darkness of an
im age. The higher the value, the brighter
the im age. Drag the slider to t he right or
left to increase or decrease the brightness.
The range is from –100 to + 100.
Cont rast Adjust s the range bet ween the darkest and
the lightest shades in the im age. The
higher t he contrast , t he bigger t he different
grayscale. Drag the slider t o t he right or
left to increase or decrease the cont rast.
The range is from –100 to + 100.
Br ight ness: - 5 0 Brightness: 0
( N or m al)
Br ight ness: + 5 0
Cont rast : - 5 0 Cont rast : 0
( N or m al)
Cont rast : + 5 0

Use r’s M anual
4- 19
Resolu t ion A good cont rol of the resolut ion result s a
good det ail of an im age that scans. The
resolution is m easured by dot s per inch
( dpi) . Norm ally, the great er t he dpi num ber,
the higher the resolut ion and the im age file
size. Be aware that great er resolution t akes
m ore t im e t o scan, and m ore disk space for
the scanning im age. For your inform at ion,
an A4 size color im age scanned at 300 dpi at
True Color m ode consum es approxim ately 25
MB of disk space. A higher resolution
( usually m eans over 600 dpi) is only
recom m ended when you need to scan a
sm all area at True Color m ode.
Choose a resolution value from the drop
down list . The default value is 200 dpi.
Available resolutions are 75, 100, 150, 200,
300, 400 and 600. Or you m ay choose your
desired value by clicking t he box in the right
side of the drop down list and press t he
arrow key to select your desired value and
then click t he Add button to include it in the
drop down list . N ot e: The resolut ion is up to
300 dpi if an im print er or a MI CR reader is
inst alled or connect ed to the scanner.
Resolu t ion: 7 5 dpi
Resolu t ion: 1 5 0 dpi

Use r’s M anual
4- 20
I nve r t Reverses t he brightness and the colors in the
im age. The default set ting is Black on a Whit e
background. Reverse m ode is Whit e on a Black
background. For color im ages, each pixel will be
changed into it s com plem entary color at the
com m and of I nvert.
Bla ck on W hit e
W h it e on Bla ck

Use r’s M anual
4- 21
Sca n
Source
Choice:
Aut o Docu m ent Feeder: Used to scan
m ult iple pages.
Flatbed: Used to scan a single page. For
exam ple, pages from newspaper clipping,
paper wit h wrinkles or curls.
Flatbed ( book ) : Used t o scan several
inside pages from book.
Aut om a tic: Allow t he scanner aut om at ically
set it s scan source. I f Au t om at ic is select ed
and t here is docum ent in bot h the aut o
docum ent feeder (ADF) and the flat bed, then
t he scan source will be aut om at ically set to
ADF. I f Aut om a tic is select ed and there is
docum ent only in flatbed, then the scan
source will be set to flat bed.
M e r ge Tw o Sides int o One I m a ge:
I f you have a sheet -fed duplex scanner with
front input t ray, you can scan an A3 size
docum ent wit h an innovat ive m et hod. Thus,
fold your A3 size docum ent into A4, and then
load the paper in the front t ray. Choose
Merge Two Sides from the Scan Source
option and then t he scanner is able to scan
both sides of your document and m erge t wo
A4 im ages into one A3 im age.
When you select Merge Two Sides into One
I m age, t he Cropping or Mult i- feed funct ion
will be disabled.
N ote: This feat ure m ust be used with a
carrier sheet . Regarding how t o load a
docum ent with a Carrier Sheet , refer t o
Sect ion 4.6.2, Other Paper Select ion.
N ote t he opt ions vary based on t ype of
sca n ner .

Use r’s M anual
4- 22
N ote: I f you have purchased a duplex sheet -
fed scanner, choose [ Merge Tw o Sides] on the
[ Scan Source] , t hen the scanner is able to scan
both sides of your document and m erge t hem
int o a single im age.
I f “Merge Two Sides into One I m age” is
select ed, it s choice w ill be available including
“ Merge Horizontally” , “ Merge Vert ically” , “ Merge
Vertically ( Back Side Flip) ” . I f t he reverse side
of your docum ent is upside down, choose
“ Merge Vertically (Back Side Flip) ” and t he back
side will be autom at ically rotated 180 degrees
and m erged.
N ote t he opt ions vary based on t ype of
sca n ner .
Front
Side
Rear
Side
Merge Vertically
Front
Side
Rear
Side
Merge Horizont ally

Use r’s M anual
4- 23
Color
Mat ching
The purpose of Color Matching is gett ing the
accurat e color. This opt ion uses the default
param et ers ( I CC profile) to adj ust the colors
of the im age.
Choice: N on e , Docum ent, Phot o
None: Choose “ None” to disable this
option.
Docu m ent: Choose “ Docum ent” if your
original contains pure text or a m ixture of
text and graphic since it is an optim al
sett ing for regular business docum ent .
Phot o: Choose “Phot o” if your original
contains phot o t o reproduce your phot o
in vivid color im age.
N orm a l
After Color Mat ching

Use r’s M anual
4- 24
4 .3 .3 Sca nnin g color im a ges
T
he following options are available for scanning color im ages.
Brightness
Contrast
Resolution
I nvert
4 .3 .4 Sca nnin g grayscale im ages
The follow ing opt ions are available for scanning gray im ages.
Brightness
Contrast
Resolution
I nvert
4 .3 .5 Sca nnin g B& W im ages
T
he following opt ions are available for scanning B&W im ages.
Binarization (Dynam ic Threshold)
Resolution
I nvert
Or
Binarizat ion (Fix Processing)
Threshold
Brightness
Resolut ion
I nvert

Use r’s M anual
4- 25
4 .3 .6 Edit in g Pr ofile s
The Scanner Properties dialog box allows you to change and
save your frequentl
y used scan set tings into a profile. You can
edit t hese profiles by renam ing or deleting them .
To a dd a ne w profile,
1. Cust om ize your sett ings. (For exam ple, change your
resolution, im age t ype, cropping m ethod, scan size, or
other scan set tings.)
2. Click t he I m age tab and t hen choose “Profiles” to prom pt
the “Edit Your Profile” dialog box.
3. Click “ Add” to enter t he nam e of the profile and then
choose “Save” .
4. The new profile will be saved and shown in the “ Profiles”
dropdown list box.

Use r’s M anual
4- 26
To load a profile,
1. From t he I m age tab dialog box, choose your favorable
profile from the “Profiles” dropdown list box.
2. Your favorable profile will be im m ediat ely loaded and
displayed on Scanner Properties dialog box.
To delet e a profile ,
1. From t he I m age tab dialog box, click “ Profiles” to prom pt
t he Edit Your Profile dialog box.
2. Choose the profile you want t o delete from the dropdown
list box.
3. Click “ Delete” . A Confirm message “Are you sure you want
to delet e t his profile?” is prom pt ed.
4. Choose “Yes” t o delet e or “ Cancel” to quit .

Use r’s M anual
4- 27
To r e nam e a profile ,
1. From t he I m age tab dialog box, click “ Profiles” to prom pt
t he Edit Your Profile dialog box.
2. Choose the profile you want t o renam e from the dropdown
list box and then click t he Renam e butt on.
3. Enter new nam e for the profile.
4. Choose “ Save” t o save the new profile or “ Cancel” t o quit.
N ote:
The preset default profiles include Flatbed, Sim plex- B&W,
200 dpi, Sim plex-Gray, 200 dpi, Sim plex- Color, 200 dpi,
Duplex- B&W, 200 dpi, Duplex- Gray, 200 dpi, Duplex-Color,
200 dpi. I f you have a sim plex or a sheet fed scanner, the
duplex or t he flat bed opt ion will not be available.
I f any set ting for a current profile has been changed, a [ * ]
sign will be m arked before the nam e of current profile, for
exam ple, [ * Duplex, Color , 2 0 0 dpi] . I f desire, click t he
[ OK] or [ Sca n] butt on and a dialog box will be prom pted to
let you save the new profile.

Use r’s M anual
4- 28
4 .4 The Com pression Ta b
The Com pression t ab allows you t o com press your scanned
im age and choose t he level of com pression. Bi- t onal im ages
are norm ally com pressed using CCI TT st andard called Group 4
( G4). Color and grayscale im ages are often com pressed using
JPEG technol
ogy. Move the JPEG Qualit y slider to the right or
left to increase or decrease the level of com pression. Not e t he
greater t he com pression level, the lower im age qualit y. Default
is 50% .
Note that the com pression depends on your im age edit ing
application. I f your im age edit ing applicat ion does not support
the type of com pression form at , then eit her a warning
m essage will appear or t he im age quality of the com pressed file
will not be accept able.
JPEG ( Joint Phot ographic Editor Group). This group developed
and lent t heir nam e t o a file com pression standard for color and
grayscale im ages that is widely used by scanners, and soft ware
applications. On Microsoft Windows- based syst em s, a file wit h
the extension .jpg has norm ally been com pressed using this
st andard.
For scanning color or gray im ages, t he following com pressions
are available:
None
JPEG
For scanning B&W im ages, t he following com pressions are
available:
None
G4

Use r’s M anual
4- 29
Com pression :
To com plete your scan at a rated speed, t he scanned im age is
com pressed by default during transm ission. However, if you
wish to obt ain the highest im age qualit y, you can choose t o
uncom press the im age dat a before it is outputted.
To Applica t ion:
Choose if you wish to com press the im age dat a and transfer it
from t he TWAI N driver t o the applicat ion. Note Bi- t onal im ages
are norm ally com pressed using CCI TT st andard called Group 4
( G4). Color and grayscale im ages are often com pressed using
JPEG technology. Move the [ I m a ge Quality] slider t o t he
right or left t o increase or decrease your im age qualit y. Not e
the great er t he im age quality, the lower t he com pression level.
Default is 50% .
Note that the com pression depends on your im age edit ing
application. I f your im age edit ing applicat ion does not support
the type of com pression format , then t he im age of the
com pressed file will look abnorm al.
From Sca n ner : ( N ot e: The a vailabilit y of t his feat ure
varies due t o sca n ne r m odel.)
Choose if you wish to com press the scanned im age and transfer
it from the scanner t o the TWAI N driver.
Choice: Uncom pressed, * Best I m age Qualit y ( Low Com pression
Level) , Bet ter I m age Quality ( Norm al Com pression Level) ,
Norm al I m age Quality ( High Com pression Level) . ( * : Fact ory
Default)
Scanned
I m age
Scanned
I m age
Scanner
Scanner Driver
I m age Editing
Application

Use r’s M anual
4- 30
The Com pression tab dialog box

Use r’s M anual
4- 31
4 .5 The Color D r opout Ta b
4 .5 .1 Color Dropou t Select ion
The [ Color Dropou t ] tab allows you to select either green,
red, blue, or a color of your choice to rem ove the detai
ls of the
select ed color from a scanned im age. This feat ure is used to
sharpen your text when using OCR ( Opt ical Character
Recognit ion) software. Not e this feature applies only t o the
gray or black and white im age.
Choice: N on e , Auto, Re m ove Red, Rem ove Green,
Rem ove Blu e , Cust om
- N one : Does not rem ove any color.
- Aut o: Autom at ically out put s t he im age wit h the det ails of
the prim ary color rem oved.
- Re m ove Re d/ Rem ove Gree n/ Re m ove Blue: Outputs
the im age with t he det ails of the specified color rem oved.
- Cu stom : Specify the color you wish t o rem ove by entering
its RGB ( Red, Green, and Blue) value respect ively.
Advanced Opt ions:
- Qualit y M ode : Range: 0~ 20. Default : 10
When [ Qualit y Mode] is select ed, you can det erm ine t he
color t o be dropped out using the [ Filter Threshold] slider. A
low er value will drop m ore of the select ed color out , while a
higher value will leave m ore of the select ed color in.
- N orm a l M ode: Use an opt im ized set ting to det erm ine t he
color.

Use r’s M anual
4- 32
Original
Auto/ Rem ove Green
( norm al m ode)
Rem ove Red (norm al m ode)
Rem ove Green (quality
m ode: Threshold: 18)
Preview the color dropout result :
To preview the color dropout result , please follow t hese st eps:
1. Click the [ Scanner Prope r t ies] icon (
) on the upper
left corner, and choose [ Ta b] to show available tab
nam es.
2. Choose [ Pr e vie w ] to show t he Preview t ab.
3. Click the [ Pr e vie w ] tab to show t he Preview page.
4. Load your docum ent t o the scanner and click t he
[ Pr eview ] but ton to get a preview im age.
5. On the [ I m age] t ab, click [ Gray] or [ Black and White]
im age m ode and then choose [ Cust om ] on the [ Color
Dropout] tab. A [ Preview window ] but t on will be
displayed.
6. Click the [ Pr e view w indow ] button to prom pt t he
[ Pr eview ] window wit h the previewed im age.

Use r’s M anual
4- 33
7. Move your cursor over the preview im age. Your m ouse
cursor now becom es an Eyedropper.
8. Click to select a color which you wish t o rem ove.
9. Click and hold your mouse button to view t he result
after rem oving the specified color. I f the result is
sat isfact ory, click [ OK] to close t he Preview window.
The Preview Window The Color dropout result

Use r’s M anual
4- 34
The Color D r opout dia log box

Use r’s M anual
4- 35
To select a color on t he Color palet t e,
1. Click the Color
Dropout t ab from
the Scanner
Propert ies dialog
box.
2. Choose Gray or
B&W from the
I m age Select ion
box and click
“ Cust om ” from the
Color Dropout
drop-down menu.
The Color palet te
appears.

Use r’s M anual
4- 36
3. Move your cursor
over t he palet t e. The
cursor becom es a
cross sign.
4. Click to choose a color. The RGB values are changed
sim ult aneously.

Use r’s M anual
4- 37
4 .6 The Pa per Tab
The Paper tab allows you t o define values relat ing t o im age
out put (i.e., Auto Crop or not , Scan Area, OverScan, Mult i- Feed
Det ect ion).
The Paper t a b dialog box

Use r’s M anual
4- 38
4 .6 .1 Cropping
Croppi
ng allows you to capt ure a portion of the docum ent
being scanned. Choice : Autom a t ic, Autom a t ic ( 3 6 ”) ,
Fix ed t o Transport , EOP ( End of Pa ge) D ete ct ion,
Autom a t ic M ult iple , Rela t ive t o Docum e nts.
Options Descr ipt ion
Autom a t ic
Autom at ic adj ust s the cropping window
according to different document sizes and
autom at ically st raighten a skewed
docum ent. Use t his opt ion for batches of
m ixed-sized document s.
Autom a t ic
( 3 6 ”)
Autom at ically adjust s the cropping window
according to different document sizes
sm aller t han 36” and autom at ically
st raighten a skewed im age. Use this opt ion
for bat ches of m ixed- sized docum ent .
N ote: Th e ava ila bility of t his feature
varies due t o sca n ne r m odel.
Fix ed t o
Tra n sport
This feature allows you to define the area
or zone t o be im aged. Use for batches of
sam e-sized docum ent s. I f you select t his
option, you can use t he arrow keys to
define t he x and y offset values, widt h and
length to redefine your scanned area. The
Display window will show im age placem ent
as you change t he values.
EOP ( End of
Pa ge)
Det e ction
This feature allows you to define the area
or zone t o be im aged. Use for batches of
sam e-width but different lengt h
docum ents. I f you select this option, you
can use t he arrow keys t o define t he x and
y offset values, width and length to
redefine your scanned area. The Display
window will show im age placem ent as you
change t he values.

Use r’s M anual
4- 39
Autom a t ic
Mult iple
This opt ion allows you to place various
sized document s such as phot os, I D Cards,
or business cards on the flatbed (if
available) and let s you creat e m ultiple
individually cropped im ages in one scan.
Note: To correct ly creat e m ult iple im ages,
please m ake sure there is at least 12m m
( 0.5”) of space bet ween each docum ent.
Rela t ive t o
Docum e n t
This opt ion allows you to crop different
areas on your docum ents and deliver t hese
im ages in B&W, Gray, or Color separat ely.
For exam ple, t here are applications which
require you to st ore the ent ire docum ent in
B&W and a part of the docum ent in color t o
save storage space. This is useful for
docum ents where a phot ograph or
signat ure appears in a consist ent area on
the docum ent such as resum es, and so on.
The follow ing opt ions are only available when Fixed to
Tra n sport is select ed.
X- Offse t — the dist ance from t he left end of the
scanner t o the left edge of the scanning area.
Y- Offse t — the posit ion from t he t op end of the
docum ent t o the t op end of the scanning area.
W idt h — the widt h of the scanning area.
Length — t he lengt h of the scanning area.
Cente r : autom at ically calculates the x-offset for cent er-
fed feeding based upon document size select ed.
— relocat e the scan area by click t he arrow key on
the cross sign while retain t he scan size. View t he result
from t he Display window.

Use r’s M anual
4- 40
The Adjust m ent opt ion is available when Aut om at ic is
select ed.
Adjust m ent —adds a positive/ negative m argin value
Top/ Bot t om or t oward left/ right of the im age.
Adjust m ent is used when the aut om at ic docum ent feeder
is used. Adj ust m ent reduces the possibility of corner
clipping on skewed im ages. To set Adj ust m ent values, use
the UP/ Down but tons to select where you want t o apply
Adjust m ent values: Top/ Bot tom or Left / Right, and t hen
select the am ount of inches/ m m / pixels applied. Select a
value within the range of 0.00 t o 1.00 / -1.00.

Use r’s M anual
4- 41
Rela t ive t o Docum e n t : (used for batches of sam e- sized
docum ents)
This opt ion allows you to crop different areas on your
docum ents and deliver t hese im ages in B&W, Gray, or Color
separat ely. For exam ple, t here are applicat ions which require
you to st ore the ent ire docum ent in B&W and a part of the
docum ent in color t o save st orage space. This is useful for
docum ents where a phot ograph or signat ure appears in a
consist ent area on the docum ent such as resum es, and so on.
The following procedure describes how t o reproduce t he ent ire
docum ent in B&W and a portion of docum ent ( pict ure) in color.
1. On the Paper tab, choose “ Relative t o Document” or “ Fixed
to Transport” from the Cropping opt ion.
2. Choose your scan size from the Scan Area opt ion. The
select ed scan size will be displayed in a red rect angular
box. This is also t he scan size of your entire docum ent.
( For exam ple, I SO B5. I f you have not chosen a scan area
and leave the select ion as None, t hen the default area will
be the scanner’s maxim um .)
A red
rect angular
box

Use r’s M anual
4- 42
3. Click the Preview t ab t o display t he Preview window. A
black rect angular box appears t o indicat e the m ax. scan
size your have just select ed.
4. Click t he Preview butt on to view t he ent ire im age in low
resolution to correct ly crop your relative scan area.
5. Select im age t ype from the I m age Select ion box. The
select ed im age will appear in highlighted color. (For
exam ple, Front Color)
6. Place your cursor on the Preview window and click your
left m ouse but t on. A cross sign will appear as illustrat ed.
Creat e your relat ive scan size diagonally by dragging t he
left m ouse but t on to your preferable size. The selected
area will appear in a red box as illustrat ed.
A black
rect angular
box
T
he Preview
I m age
T
he Preview
Button
The I m age
Select ion
Box

Use r’s M anual
4- 43
7. Check t he B&W im age from the I m age Select ion box t o
scan the ent ire docum ent .
8. Click t he Scan but t on to st art scanning the docum ent in
two im age types and sizes. ( See t he result in below .)
The ent ire docum ent in B&W The relat ive area in color
T
he
Relative
Area
A Cross
Sign

Use r’s M anual
4- 44
4 .6 .2 Ot her Pa per Select ion
Carrie r Sh e e t M ode:
Check t hi
s opt ion t o autom at ically crop t he scan window
according to your docum ent size when scanning non-st andard
docum ent ( fragile, irregular- size docum ent ) wit h a carrier sheet
( opt ional) . Not e: The availabilit y of this opt ion varies due t o
scanner m odel.
Loa ding Docum e n t s Usin g a Ca rrier Sheet
A Carrier Sheet is a plast ic sheet specifically used for loading
non-st andard docum ent onto the scanner. I t allows you to scan
docum ent t hat can not be scanned in the regular way. Also,
docum ents larger t han A4 size, such as A3 and B4, can be
scanned by folding in half, insert ing into t he Carrier Sheet , and
scanning in duplex m ode. You can also scan docum ents that
can be dam aged quit e easily such as photographs, or irregular
size docum ent s that are difficult to load direct ly such as
clippings.
To scan docu m e nt using a Carrie r Sh e e t ,
For docum ents larger t han A4 / Let t e r size , such a s A3
a. Fold the sheet t o be scanned in half.
b. Fold t he sheet t ightly and sm ooth out crease. Ot herwise,
the sheet m ay be skewed during scanning.
1 . Ope n t he Ca r r ier Sheet and pla ce t he docum e nt
inside.
Align the t op of the docum ent to t he t op of the Carrier
Sheet ( the printed area).

Use r’s M anual
4- 45
For docum ents larger t han A4 / le t t e r size, such a s
A3
Align the t op of the docum ent to t he t op of the Carrier
Sheet ( the printed sect ion) and the folded portion t o the
right edge of the Carrier Sheet so t hat the docum ent fit s
int o the Carrier Sheet at the upper corner.
For n on- st a nda rd docum e nt
Center your docum ent in the Carrier Sheet .
2. Load the Carrier Sheet wit h t he gray sect ion (printed
sect ion) facing downwards.
3. Adjust the paper guides to the widt h of the Carrier Sheet .
Adjust the paper guides so t hat there is no space
bet ween t he guides and the Carrier sheet . Space bet ween
the guides and Carrier Sheet m ay cause the Carrier Sheet
to becom e unaligned during scanning, and skew t he
scanned im age.
4. St art the scan.

Use r’s M anual
4- 46
N otice :
[ Carrier Sheet ] is available for t he m odels t hat support the
Carrier Sheet .
Som e funct ions are disabled when [ Carrier Sheet ] is
checked.
This opt ion m ay not work properly on som e applicat ions.
Sca n Area
Choose your desired paper size wit h the drop- down list box. Or
you m ay select a cust om paper size by clicking the Scan Area
box and then click Add to include in t he choice.
Choices a r e listed below :
N one
US Let ter - 8 .5 ”x 1 1 ”
US Legal – 8 .5 ” x 1 4 ”
I SO A4 – 2 1 x 2 9 .7 cm
I SO A5 – 1 4 .8 x 2 1 cm
I SO A6 – 1 0 .5 x 1 4 .8 cm
I SO A7 – 7 .4 x 1 0 / 5 cm
I SO B5 – 1 7 .6 x 2 5 cm
I SO B6 – 1 2 .5 x 1 7 .6 cm
I SO B7 – 8 .8 x 1 2 .5 cm
JI S B5 – 1 8 .2 x 2 5 .7 cm
JI S B6 – 1 2 .8 x 1 8 .2 cm
JI S B7 – 9 .1 x 1 2 .8 cm
Sca nner Max im um
Long Pa ge ( < 1 1 8 ”)

Use r’s M anual
4- 47
Long Pa ge ( < 1 1 8 ”) :
When you need to scan docum ent s whose lengt h exceeds
scanner m axim um , please choose Long Pa ge. Note if Long
Pa ge is select ed, the M ult i- Feed Det e ction will not be
available. ( Not e: This opt ion and the m axim um allowable
docum ent lengt h vary due t o t ype of scanner.)
When Long Page ( < 1 1 8 ”) is select ed, be sure t o specify your
docum ent size in the Length and W idth field.
N otice w hen scanning long pa ge docum e nt :
1. Pull out t he extension in t he ADF Paper Tray.
2. Secure enough space around the Out put Tray t o prevent
the ej ect ed paper from falling off t he Output Tray.
3. To ensure t he perform ance, in color m ode, set the
resolution to be 300 dpi or low er; in Black and Whit e
m ode, set t he resolution t o be 600 dpi or lower.
4. Depending on your system environm ents, applicat ion, or
your specified paper size, t here m ay be insufficient
m em ory t o perform scanning.
OverScan
Overscan allows you t o add a specific m argin at t op and bot t om
or right and left (Opt ions vary based on t he t ype of scanner) of
the edge of the im age. This is used to reduce possible corner
clipping on the skewed im ages and often applied t o a bat ch of
skewed docum ent t o be scanned in the auto docum ent feeder.
Select a value bet ween 0 and + 5 m m . Note the overscan
result w ill not be shown in t he Display window and that the
availability of the funct ion varies based on type of scanner.
Pre- Feed
Choice: Enable, Disable. I f enable is select ed, you can set t he
am ount of tim e the scanner starts pre- feeding your paper after
your docum ent s has been loaded int o the feeder. The default is
disable. Not e: The availabilit y of this opt ion varies due t o
scanner m odel.

Use r’s M anual
4- 48
Tra n sport Tim eou t
Set the am ount of tim e the scanner will wait and then st art
auto scan aft er t he first scan job is com plet ed. I f you have
m any separat e docum ent s need t o be scanned at the sam e
scan sett ings, t his feature is especially useful. The default is 0.
The value ranges from 0 to 30 seconds.
N ote:
1 Wit hin t he specified t im eout period, if you load your
docum ent t o the feeder, the scanner starts scanning
autom at ically.
2 I f your scanner has a flatbed opt ion and you place your
paper on the flatbed, after t he t im eout period, you need
to click t he Scan button on t he TWAI N user interface t o
st art scanning.

Use r’s M anual
4- 49
Ba ckground
Se t t ing
This opt ion allows you to set your scan
background. Choice : W hit e Ba ckground,
Bla ck Back ground.
Note: For a sheet - fed scanner with an auto
docum ent feeder, t his opt ion is current ly
available only in t he “Auto crop” m ode. For a
scanner with a flat bed plat en, this opt ion is
available either in t he “ Auto crop” or t he
“ Fixed to Transport” m ode.
Whit e Background
Black Background

Use r’s M anual
4- 50
4 .7 The M ulti- Fe e d Det ect ion Tab
Mult i- Feed D e t ect ion
M
ult i-Feed Det ect ion allows you to det ect overlapped docum ent
that go through the auto docum ent feeder. Mult i- Feed usually
occurs due t o st apled docum ents, adhesives on docum ents, or
elect ro- st at ically charged docum ent. Not e: The availabilit y of
the funct ion varies based on type of scanner.

Use r’s M anual
4- 51
Addit iona l Length Det ect ion
Addit ional Length Det ection allows you to define the length of
docum ent being m ult i- fed. This value indicates the addit ional
length exceeding your scan area. The Display window will
show t he size of the docum ent as you change the value. A
value of 0 indicat es no addit ional length det ect ion. The
Addit ional Length Det ection is best used when scanning sam e-
size docum ent s in the auto docum ent feeder.
Ult ra sonic Detect ion
Ult rasonic Detect ion allows you to set overlapped docum ent by
det ect ing paper t hickness bet ween docum ent s. Not e: The
availability of the funct ion varies based on type of scanner.
St op Scanning a fter Mult i- Feed
- I f this is not select ed, t he scanner will continue scanning
the rest docum ent t hough m ult i- feed is detect ed. Aft er t he
entire docum ent has been scanned, a m ult i-feed dialog box
will be prom pt ed to indicat e t he page num ber w hich has
been det ect ed mult i- feed and need to be rescanned.
- I f this is select ed, t he following opt ions will be displayed.
St op: I f this is select ed, t he scanner will st op scanning after a
m ult i- feed is det ect ed. No furt her dialog box will be prom pt ed.
Ask : I f t his is select ed, t he im age of the page which has been
det ect ed m ulti- feed will be displayed and t hree opt ions are
provided.
Continue Sca n: I f the im age of the m ult i- feed
page is accept able, select
[ Continue Scan] to cont inue
scanning t he rest pages.

Use r’s M anual
4- 52
Cont inue
Sca n( Discard
I m a ge) :
I f the im age of the m ult i- feed
page is not accept able, select
[ Continue Scan ( D isca rd
I m a ge) ] to scan t he rest pages
yet the m ult i- feed page will be
ignored and you need to rescan
the page again.
Stop Sca n:
The scanner st op scans. Rem ove
the rem aining pages in t he
scanner. Rem ove st aples or any
adhesive t apes on your
docum ent. Or fan your docum ent
and rescan the rest pages.
Mult i- Fe e d Ala r m
I f a wave file is added, the scanner will m ake a sound
alarm if m ult i- feed is det ect ed yet no Warning dialog box
will be displayed.
How t o a dd t he sound a larm :
1. Click t he Browse but ton on the right side of the speaker
icon. The Open dialog box appears.
2. Choose your wave file.
3. Click t he Open but ton. The wave file is added.
Unit s
Defines the prim ary m easurem ent syst em . I nches,
Millim eter s, and Pix els are available.

Use r’s M anual
4- 53
4 .8
Th e Pr e vie w Ta b
The Preview t ab allow s you t o preview (a low- resolution scan)
your im age before final scan. This preview im age lets you
allocat e your scan area. You can choose your scan area by t he
“ Scan Area” drop down list box or placing your cursor on the
Display window and dragging it diagonally on the Display
window. Then, a red rect angle box will appear t o indicat e t he
select ed area.
Note: I f you choose “Autom at ic Cropping” on the “Paper Tab” ,
then t o select a scan area on t he Preview t ab is not allowed.
The Previe w Ta b
The Display
Window

Use r’s M anual
4- 54
4 .9
The Enhance m ent Tab
The Enhancem ent t ab allows you to set following addit ional
im age processing set t ings.
The Opt ion tab dia log box

Use r’s M anual
4- 55
Punch
Hole
Rem ova l
You can rem ove punch holes from the output
scanned im age when scanning punched docum ent.
Note t he availabilit y of t his feat ure varies
depending on your scanner m odel.
Punch holes can not be rem ove d w hen:
Resolution is set lower t han 150dpi
The hole is near t he edge of the document
The holes are not aligned along the edge of the
docum ent
Punch Hole Rem oval is available only when
“ Auto Crop” is enabled. I f either “Fixed to
Transport” , “EOP ( End of Page) Detect ion”,
“ Autom at ic Mult iple” , “ Relat ive t o Document s” is
select ed from the Cropping opt ion on the Paper
tab, t he Punch Hole Rem oval opt ion will be
disabled.
Original
Output im age

Use r’s M anual
4- 56
Sha dow Rem ova l When 「Fla t bed」on the 「Sca n
Source 」 opt ion is select ed on t he
「I m a ge」t ab, t he 「Shadow
Rem ova l」opt ion will be enabled. Click
to rem ove the shadow on the book spine
when scanning a book.
Be for e Sh a dow
Rem ova l
After Sh a dow Rem oval

Use r’s M anual
4- 57
Ba ckground Processing: The [ Ba ckground Processing]
option allows you to sm ooth background color or rem ove it t o
m ake im age clearer. The opt ion is especially useful for
docum ents wit h color form s such as invoices.
Choices: None ( defa ult) , Sm ooth, Rem ova l
- N one - no background processing will be perform ed
( default )
- Sm oot h - produces im ages wit h a m ore uniform
background color. This opt ion im proves im age qualit y.
- Re m oval - identifies the background color and then
rem oves it .
Se nsit ivit y: Choice: 0 , 1 , 2 , 3 , 4 . Default : 0
- The higher t he value, t he m ore background color will be
kept .
Mode: Aut o, M oiré
I f [ Sm ooth] is select ed in t he [ Back ground Pr oce ssin g]
option, t hen the choices for the [ Mode] opt ion includes Aut o,
and Moiré.
- Aut o - uses the fact ory preprogram m ed m ode to proceed
background sm oothing.
- M oiré – Rem ove t he m oiré patt erns t hat appear on the
background of the im age when scanning print ed m at erial.
I f [ Rem ova l] is select ed in t he [ Back ground Pr oce ssin g]
option, t hen the [ Mode] opt ion will be replaced wit h [ Fill
Color] . Choices: Whit e, Auto.
- W hit e - ident ifies the background color and subst it ut es it
wit h whit e.
- Aut o - ident ifies the background color and subst itut es it
wit h t he color of the largest background zone.

Use r’s M anual
4- 58
Ba ckground Processing: None
Ba ckground Processing:
Sm oot h
Ba ckground Processing:
Rem oval
Fill Color: Whit e
N ote: Background color in sm all zone will not be processed or
rem oved.

Use r’s M anual
4- 59
Edge
Fill
Check Whit e or Black if you wish to add white or
black edge on the border of your scanned im age.
Enter t he value from 0 to 5 mm . Default value is 0.
Or iginal
Edge Fill: 5 m m ( Bla ck )
I f you want t o add a whit e or black fram e on the
edges of the scanned im age, check "Edge
Extension".
The default value is 0. The m axim um value is half of
the short side of the select ed scan area.
For exam ple, if you choose an A4 size ( 8.26
"X11.69"), then t he m axim um value of the white or
black box is 4.14" (half of "8.26").

Use r’s M anual
4- 60
Despeckle
Occasionally sm all dot s or specks appear in the background of
a scanned im age. Rem ove unwanted speckles provides a
cleaner im age for OCR (Opt ical Charact er Recognit ion)
processing, and also helps to reduce com pressed file size.
Define t he speckles (also known as im age noise) you wish to
rem ove by specifying it s number (size) and radius ( range) . The
m easuring unit is pixel. The higher t he num ber, the m ore
speckles w ill be rem oved.
Before Despeckle
( noise num ber: 0, noise radius: 1)
After Despeckle
( noise num ber: 22, noise radius: 10)
N ote:
The funct ion is currently available for Black and Whit e
im age only.
To scan at rat ed speed, it is recom m ended to set the
noise radius up to 10 pixels.

Use r’s M anual
4- 61
Line Rem oval: When Black and W hit e im age m ode is
select ed on the [ I m a ge] tab, the [ Line Re m oval] opt ion will
be enabled. Line Rem oval erases lines on the im age and then
reconst ructs charact ers so the OCR ( Opt ical Character
Recognit ion) accuracy can be im proved.
Choices: None, Form , Horizont al, Vert ical
N one – t he default m ode which does not rem ove any line.
Form – rem ove any form in the docum ent.
Horizont a l – select [ H or izontal] and then enter t he length of
horizontal line t o rem ove only t he horizontal line exceeding
your specified length.
Vertical – select [ Ve r t ica l] and t hen ent er t he length of
vertical line t o rem ove only t he vertical line exceeding your
specified length.
N one Rem ove Form
Rem ove Horizon t al Line
( ove r 3 0 m m )
Rem ove Ve r t ica l Line
( ove r 7 0 m m )

Use r’s M anual
4- 62
4 .1 0 The Rotat ion Ta b
The Rot at i
on tab allows you t o set t he following im age rot at ing
options:

Use r’s M anual
4- 63
Rot at e
I m a ge
Choose the rotation angle from the drop down
list if you wish to rotat e your scanned im age.
Choice: N on e , 9 0 ° CW ( clockw ise ) ,
9 0 ° CCW ( counter clock w ise) , 1 8 0 ° , Aut o
based on cont ents. Aut o rot at e every
even pa ge.
Or iginal
Rot at e 9 0 ° CW
Rot at e 9 0 ° CCW
Rot at e 1 8 0 °
Auto base d on cont ent s: Autom at ically
rot at e im ages based on the cont ents of
docum ent. When
「Auto base d on
cont ent s
」 is select ed, it s m odes will be
enabled to let you select more options.
Mode: Quick, Full Text, Com plexity
Quick – the default m ode t o let you rot at e
im ages at the fast est speed.
Full Text – t he enhanced m ode for
docum ents wit h m ixed text orient at ion.
Com ple x it y – t he enhanced m ode yet at the
slowest speed for docum ent with com plex
im age or t ext orientat ion.

Use r’s M anual
4- 64
Auto r otat e every even page:
Autom at ically rotate 180° on every even
page. This is especially useful when you scan
the inside pages from a book. As a result , if
you choose “Flatbed (book) ” from the “ Scan
Source” opt ion, “aut o rot at e every even page”
will be selected as default .
N ote: This option var ie s based on t ype of
sca n ner .
Docum e n t w ith various
t e x t orienta t ions
Docum e n t w ith dark or
com plex back ground

Use r’s M anual
4- 65
Split
I m a ge
By splitt ing an im age, two separat e im ages are
creat ed horizontally or vertically. This is useful
for docum ent s cont aining two pages per im age
when you want t o save t hem as t wo im ages
( one page for one im age) . Choice : None,
Horizont a l, Vert ical. Default is None.
Horizont a l: Divide one im age into the upper
half and t he lower half.
Vertical: Divide one im age into the left half and
the right half.
Split Horizonta lly
Split Vert ical

Use r’s M anual
4- 66
Flip Side
Rot at ion
Select “ fanfold” to rot at e t he im age of the
reverse side t o 180 degrees.
This is applied t o double- sided docum ent
which are viewed in portrait are som etim e
fed int o t he scanner in landscape or vice
versa.
Choice: Book, Fa nfold.
I f “Book” is select ed, the im age of the
reverse side will not be rot at ed.
The following illust rat ion shows t he document s which should
be viewed in portrait are fed into the scanner in landscape

Use r’s M anual
4- 67
I m a ge
Cont rol
Option
Check t he Mirror box if you wish to reverse the right
and left side of your im age.
Or iginal
The M irror Effect

Use r’s M anual
4- 68
4 .1 1 The Separation Tab
The Separation tab allows you to enable the det ect ion engine t o
det ect the blank page, barcode, and patch code and then not ify
t
he software applicat ion which support s docum ent separat ion to
separat e your m ult i-page docum ent s. Choices: Blank Page
Rem oval, Barcode Detect ion, Pat ch Code Det ect ion.
Bla nk Pa ge
Rem ova l
Choices: None, Blank Page Rem oval Threshold,
I m age Size.
N one – Do not rem ove the blank pages.
Thresh old - Move the slider to the left or right
to define your threshold for t he blank page.
I m a ge Size – Range: 1~ 10000 KB. Specify
your desired im age size to det ect t he page as a
blank page. For exam ple, if 3 KB is select ed,
any page less than 3 KB will be recognized as
blank page.

Use r’s M anual
4- 69
Ba r code
Det e ction
Check [ Enable] to det ect barcode and not ify
the software application for advanced
processing. Please note the whole docum ent
will be checked and no specific det ect ion area
needs t o be designat ed.
When the bar code has been detect ed successfully,a file
[ avbarcode.ini] will be creat ed and st ored in the following pat h:
Windows XP:
C: \ Docum ents and Set t ings\ All Users\ Applicat ion
Dat a\ % PRODUCTNAME%
Vist a, Windows 7, Windows 8, Windows 10:
C: \ Program Data\ % PRODUCTNAME%
Ba r code Types:
The following barcode t ypes can be det ect ed.
Tw o- dim ensional codes
Azt ec
Dat aMat rix
PDF417
QR Code
One- dim e nsiona l barcodes:
Add- 2
Add- 5
Airline 2 of 5
Aust ralian Post 4-St at e Code
BCD Mat rix
Codabar
Code 128 (A,B,C)
Code 2 of 5
Code 32
Code 39
Code 39 Ext ended
Code 93
Code 93 Ext ended
Dat aLogic 2 of 5

Use r’s M anual
4- 70
EAN 128 ( GS1, UCC)
EAN- 13
EAN- 8
GS1 Dat aBar
I ndust rial 2 of 5
I ntelligent Mail ( One Code)
I nterleaved 2 of 5
I nverted 2 of 5
I TF-14 / SCC- 14
Matrix 2 of 5
Patch Codes
Post Net
Royal Mail (RM4SCC)
UCC 128
UPC- A
UPC- E
N ote:
Recom m ended resolution: 200~ 600 dpi for regular
barcode, 300~ 600 dpi for QR code
Skewed barcodes m ay not be recognized correct ly.
Using the sam e sheet repeat edly m ay decrease the
recognit ion accuracy due t o accum ulat ed dirt on the sheet s.
I f the sheet is not recognized correct ly or gets sm udged,
replace it with a new sheet .
Ba r code Zone:
Specify the barcode zone to be det ect ed.
Select 「All」 to checks the whole docum ent and det ect s
barcodes. Or you m ay speed up t he process by specifying a
det ect ion area since only t he specified area is checked.
Choice: All, Top, Bott om , Left, Right, Bottom Right ,
Bott om Left, Top Right, Top Left

Use r’s M anual
4- 71
Choice for barcode zone on a page :
All
Top
Bott om
Left
Right
Bott om
Right
Bott om
Left
Top Right
Top Le ft
Pat ch code D ete ct ion:
Check [ Enable] to det ect patch codes and not ify the soft ware
applicat ion for advanced processing.
A pat ch code is a pat tern of parallel, alternating black bars and
spaces ( i.e. a barcode) t hat is print ed on a docum ent . Patch
code sheet is m ost com m only used as a docum ent separat or in
a st ack of docum ent .

Use r’s M anual
4- 72
You can find various sizes of pat ch codes (PDF) by choosing
[ St a r t] m enu> [ All Program s] > [ Avision Sca nner
Se r ies] > [ Patch code ] in succession.
Sim ply print t he PDF file to produce t he pat ch code sheet .
I nsert the pat ch code sheets to wherever you want t he file to
separat e.
N otes to print the patch code s:
Use blank whit e paper.
Set the scaling t o 100% . The sheet is not recognized
correct ly when printed in a size sm aller t han t he original.
Do not use t oner saving m ode. The sheet is not recognized
correct ly when t he print is too light.
Do not use t hin paper in order t o avoid bleed-through from
the back.
When you copy a patch code sheet that you print ed out,
m ake sure t o copy by the sam e size and brightness as t he
original copy.
Use the sam e sheet repeat edly m ay decrease the
recognit ion accuracy due t o accum ulat ed dirt on the sheet s.
I f the sheet is not recognized correct ly or gets sm udged,
replace it with a new sheet .
Patch code sheet

Use r’s M anual
4- 73
4 .1 2 The Sett ing Tab
The Sett i
ng tab allows you t o set t he following sett ings:
The Set t ing ta b dialog box
Energy Saving
Cont rol
Check t he Enable Energy Saver box
and m ove the slider t o set t he am ount
of tim e t o st art t he energy saver aft er
your last act ion. The range is from 1 to
60 m inutes.
Ena ble Pow er
Off
Check t he Enable Pow e r Off box and
m ove the slider t o set t he am ount of
tim e to autom at ically turn off the
scanner aft er your last act ion. The
range is from 1 t o 480 minutes. The
default is 240 m inutes (4 hours) . Not e
the value of “ Power Off” has to be
greater than or equal to the value of
“ Energy Saving”.

Use r’s M anual
4- 74
Cache
Mode: None, Pa ge N um ber, M em ory
Size.
This opt ion allows you to assign a specified
m em ory size from t he available RAM to
process the im age dat a. By specifying a
sm aller m em ory size, you can free m ore
m em ory for ot her applicat ions you are
running. By specifying a larger m em ory
size, you can have m ore m em ory to
process the im age dat a especially when you
have a large am ount of docum ents needed
to be scanned.
You can also specify your m em ory size by
the page number. For your inform ation, an
A4 color docum ent scanning at 300 dpi
consumes approxim at es 24MB.
I m a ge Count
When the selected cache m ode is “ none” ,
the im age count option allows you t o assign
num ber of pages you need to scan. For
exam ple, if you wish t o scan the first two
pages, sim ply m ove the page slider to 2,
and t he scan act ion will be st opped when
the scanning of the first two pages have
been com pleted.

Use r’s M anual
4- 75
Show Scanning
Progress
Check and the scanning progress bar
will be shown during scanning.
Show W arning
Message
Check t o show t he warning m essages
such as “ADF pad count exceeds
50,000 scans (the number varies based
on type of scanner). Please replace t he
ADF pad and reset t he pad count.”
Sa ve Set t ings
after Closing
Check t o save your scanner propert ies
sett ings aft er leaving t he dialog box.
Next tim e when you open t he Scanner
Propert ies dialog box, the previously
saved set t ings will be shown.

Use r’s M anual
4- 76
4 .1 3 The I m printer Tab
The I m pri
nt er t ab allows you to print alphanum eric charact ers,
date, t im e, docum ent count and cust om m essage on your
scanned im age if digit al im printer is select ed or at the back of
your docum ent if ext ernal im print er is select ed.
Choice: Ex t ernal I m print er, D igit al I m print e r . I f you have
inst alled an ext ernal im printer, choose ext ernal im printer. I f
you do not have an im print er, choose digit al im print er. Note
External I m printer provides a vertical and rear- side print
capability w hile digit al printer provides a horizontal and front-
side print capabilit y.

Use r’s M anual
4- 77
Cont ents
Print All Check Pr int All to aut om at ically print t he
text at all pages of your docum ent s.
Uncheck Print All t o print t he t ext for t he
first page of your docum ents only.
Cust om Enter your cust om text t o be included in your
print st ring.
Count er Show t he docum ent count for t he scan
session. This value is increased sequentially
by t he scanner.
Dat e/ Tim e Choose if you wish to include the dat e and
tim e in your print st ring.
Form at : YYYYMMDDHHSS For exam ple,
20090402170645- check0001 indicat es year,
m ont h, dat e, hour, seconds, your custom
text and the counter.
Cust om
Font
Choose your desired font.
Choice: N or m al, Fix ed W idth
Fix ed W idth ( Mono spaced) fonts have a
fixed character spacing. So each charact er
occupies the sam e width.
Adva nce d
Font
Att ributes
Choose your font at t ributes. Choice :
N orm a l, Underline, Double , and Bold.

Use r’s M anual
4- 78
St ring
Or ie ntat ion
Choose your string orient at ion.
Choice: N or m al, Rot at ed, Vert ical,
Vertical I nversion, 9 0 degrees CW , 9 0
degr e e s CCW
N orm a l
Rot at ed
Vertical
Vertical I nversion
9 0 degrees CW
9 0 degrees CCW
I f you check t he digital im print er t o st am p
text on your scanned im age, the illust rat ion of
norm al and rot at ed st ring is shown below:
N orm a l
Rot at ed

Use r’s M anual
4- 79
Print
Posit ion
Choose the posit ion you wish to print your
st ring. Move the slider t o t he right t o increase
the value or t o the left t o decrease t he value.
Range: 0~ 355m m , default : 0 m m
The value indicates the height from t he
bott om of your paper t o the last letter of your
st ring. This opt ion is available only if an
ext ernal im print er is inst alled.
Print Position ( for digita l im print er)
Choose the position of your print ed st ring. Choice: Top,
Middle , Bott om , Cust om . I f Cust om is select ed, enter t he X
and Y offset value to specify the posit ion.
More: Click t he [ More] butt on to display m ore font opt ions.
This opt ion is available for digit al im printer ( st am p text on your
scanned im age) only. This funct ion is not available on som e
m odels.
Font size: Move the slider to change the font size from 1 to
10. Densit y: Move the slider to change the source densit y from
0 to 255. The select ed density will appear at t he sam e t im e.
Tra n sparency: Move the slider to choose an appropriat e
transparency value from 0% (not transparent ) to 100%
( com pletely t ransparent ) so that your text can be partially
transparent and you can see t he background im age.
T
he value o
f
Print Posit ion
000z1abc 2010

Use r’s M anual
4- 80
4 .1 4 The I nform at ion Tab
The I nform ation tab displays the following syst em and scanner
in
form ation.
The I nform a t ion t ab dia log box
The “Report ” butt on
:
I f you encounter any error m essage while using the scanner,
click t he Report button. A report.txt file [
Windows XP:
C: \ Docum ents and Set t ings\ All Users\ Applicat ion
Dat a\ % PRODUCTNAME% ;
Vist a, Windows 7, Windows 8,
Windows 10:
C: \ Program Dat a\ % PRODUCTNAME% ( C: syst em
drive)] will be generated. Please send t his file t o the nearest
service center for t rouble shooting.
xxx

Use r’s M anual
4- 81
The “Reset Roller Count” butt on:
After scanning over a recom m ended number of pages (refer t o
subsequent sect ion 7.4 Replacing the ADF Roller) through t he
ADF, t he ADF roller m ay be worn out and you m ay experience
problem s wit h docum ent feeding. I n t his case, it is highly
recom m ended to replace t he ADF roller with a new one. (Not e
the replacem ent of the ADF roller has to be perform ed only by
authorized service center. Therefore, please ret urn your
scanner for roller replacem ent.) Aft er replacing t he ADF roller,
click t he “ Reset Roller Count” but t on to reset t he roller count .
N ote:The lifet im e and the replacing procedure vary based on
type of scanner.

Use r’s M anual
5- 1
5 . I SI S I nt erfa ce Operation
* Please refer to the preceding chapt er, Scanner I nstallation, to
inst all I SI S scanner driver. You m ay st art t he supplied
QuickScan software applicat ion to scan via t he I SI S user
int erface.
The I SI S driver operat ion m et hod is sim ilar t o the TWAI N’s.
Every funct ion on t he I SI S int erface screen is briefly described
as below:
Mode: Select one of scan m odes, including B&W, gray, color
options.
Dit her: 5 halft one levels available, can be disabled.
Dot s per in ch: Select your desired resolution.
Paper Size : Select your desired paper size.
Br ight ness: Adj ust your scan im age brightness or darkness.
Cont rast : Adj ust the range bet ween t he darkest and t he lightest
shades in t he im age.
Default: Click t o reset all set tings.
Area: Select your desired scan area or position.

Use r’s M anual
6- 1
6 . Using t he But t ons
The following pict ure shows the 4 buttons and 1 funct ion
screen on the scanner.
6 .1 I nst alling But ton M anager V2
Button Manager V2 provi
des you an easy way t o scan your
docum ent and then link the scanned im age t o your designat ed
software application. All t his can be done by a sim ple touch of
the but ton on the scanner. Yet, before you scan, it is
recom m ended to check the but ton configurat ions first to ensure
a proper file form at and a dest inat ion applicat ion.
Funct ion Scr een
Funct ion- Select
Button
Cancel But t on
Scan But t on

Use r’s M anual
6- 2
6 .2 Checking t h e But ton Configurat ions before Sca nning
1. Button Manager V2 runs from the syst em t ray. Aft er Button
Manager V2 and the scanner driver are properly inst alled,
Bu
tt on Manager V2 is st arted and t he Butt on icon will be
displayed on t he system t ray at t he bot t om right corner of
your com puter screen.
2. Left-click t he But ton Manager V2 icon to prom pt the
following Button Panel.
The Button Panel
T
his indicates
the scanner model
The Funct ion
I con
( The number of
function icons
vary based on
type of
scanner.)

Use r’s M anual
6- 3
3. The Button Panel shows the first five scanning but tons.
Right- click t he butt on (funct ion) you wish t o check. The
Button Propert ies window appears.
I f you wish t o change t he sett ing, use t his window t o reset
t he sett ing for t he file form at , dest inat ion application, or
other scan set tings.
4. Click t he OK butt on t o leave the window.
Folder and
file nam e
for t he
scanned
im age
I m age Mode
Selection
Box
Nam e of t he Selected But ton
Scan To
dest inat ion
and set tings
But t on
Nam e
OCR
set t ings
Basic Scan
Param eters

Use r’s M anual
6- 4
6 .3 Sca nning Fr om One Touch of t he Bu t t ons
1. Adjust the paper guide for the widt h of paper and load the
docum ent wi
th their t ops into the autom at ic document feeder.
2. Check t he but t on nam e on the LCD screen to ensure if you
are select ing the proper scan set tings and dest ination
applicat ion. ( For exam ple, if you wish t o scan wit h But ton,
“ Scan to App” , which opens Microsoft Paint and displays t he
scanned im age in the window of Microsoft Paint , the LCD
screen should show “ Scan to App”) .
3. Press the Sca n button on t he scanner.
4. After t he scanning is finished, t he Microsoft Paint soft ware
will be launched and the scanned im age appears in t he m ain
window of Microsoft Paint as below.
N ote:
1. For det ails inform at ion on how to use the But t on Manager
V2, please refer to the user’s m anual in the supplied CD.
2. You m ay also use But ton Manager V2 on your desktop by
st art ing Button Manager V2 from All Program s or double
clicking t he Avision Scanner Ut ilit y from the Control Panel.

Use r’s M anual
7- 1
7 . Start ing a Scan from Your
Mobile Device
Wit h a * Wi- Fi m odule, the scanner can be converted into a
wireless device. When the MB App has been inst alled on your
m obile device, t he scanned im ages can be received from t he
m obile device.
* Wired (Et hernet) and Wireless (Wi- Fi) Net works:
The availabilit y of these feat ures varies according to your
product m odel.
7 .1 Mak ing Pr e paration
MB Applicat ion
Download the M B Applicat ion on your m obile device from
an applicat ion st ore such as Google Play.
MB
Applica t ion
MB App

Use r’s M anual
7- 2
7 .2 Turning on W ir e less Conn e ct ion
After t urni
ng on t he power of the scanner, the wireless
connect ion is t urned on by default . The Wi- Fi LED light will t urn
solidly on in blue.
Note the product supports only t he AP( Access Point) m ode. This
m eans t he product it self is an Access Point and can connect
wirelessly to a sm artphone, t ablet, or a wireless com puter
wit hout a Wi-Fi rout er.
7 .3 St art ing a Sca n From Your M obile D evice
Make sure t hat the MB Applicat ion (Scan App) has been
in
st alled on your m obile device. The MB Applicat ion can be
purchased for free from an application store such as Google
Play.
1. Enable [ W i- Fi] from [ Set tings] of your wireless com puter,
sm artphone, or tablet and then choose Avision–xxxxxx
( xxxxxx indicat es the last six digits of the Mac Address at
the back of the scanner) to be your Wi- Fi net work (SSI D) .
AP( Access Point )

Use r’s M anual
7- 3
2. St arting MB App by t aping [ Applicat ions] and then t he
MB icon
on your m obile device. The m obile device
begins searching t he available scanner in t he wireless
net work.
I n a second, the m ain screen will be displayed if
scanner has been found successfully.
This indicates the
scanner m odel.
Avision–xxxxxx

Use r’s M anual
7- 4
N ote:
I f the scanner is not found, please check t he followings:
The scanner is not ready yet. Tap [ M ore Se t t ings] and
then [ Sear ch sca nner] t o search the scanner again.
Check if the m obile device and the scanner are in t he
sam e wireless LAN.
3. Check if the default set t ings m eet your requirem ents. I f
not , t ap the set ting icon and change the scan set tings t o
fit your specific scanning task.
I
TEM DESCRI PTI ON
Resolut ion: Select your desired resolution.
The higher resolution, t he great er t he im age
qualit y and disk space.
Choice: 1 5 0 , 2 0 0 , * 3 0 0 dpi
Scan Size: Select your paper size or you m ay
choose Auto to let t he scanner det ect your
docum ent size aut om at ically.
Choice: * Aut o size, A4 , LTR ( Le t t er) , LGL
( Le gal) , 4 x6 , 5 x 7
File Form at : Select the file form at for your
im age.
Choice: * JPEG, PDF, TI FF
N ote:
The JPEG file does not support the B&W
im age.
The TI FF file form at supports only t he
B&W im age.

Use r’s M anual
7- 5
Select to scan t he front side (sim plex) or
both the front side and the rear side ( duplex)
of your docum ent .
Choice: * Sim plex, Duplex
Note: The duplex mode is available to scan
from t he aut o docum ent feeder only.
Color Mode: Select your desired im age m ode.
Choice: * Color, B& W , Gray
* Default set tings
4. Place your docum ent t o the scanner.
5. Tap the [ St ar t scan ] butt on to st art a scan.
6. I n a few seconds, t he scanned im ages will be
displayed in a t hum bnail view. Tap the im age to
enlarge the im age.
The t humbnail
view and
file nam e

Use r’s M anual
8- 1
8 . Maint ena nce
8 .1 Clea ning t he AD F
From t i
m e to tim e, t he Reverse roller and t he Feeding Rollers
m ay be contam inat ed wit h ink, toner particles, or paper dust .
I n this case, the paper m ay not be fed sm oot hly. Please follow
the following st eps to clean the Reverse roller and the Feeding
Rollers t o ensure t he best of the scanner.
The Cleaning St eps:
1. Soak a clean cloth wit h som e isopropyl alcohol (95% ) .
2. Press t he ADF release butt on and open the front door.

Use r’s M anual
8- 2
3. Wipe t he feeding rollers unt il they are cleaned.
4. Press bot h sides of the cover of the ADF reverse roller and
pull t he cover down.

Use r’s M anual
8- 3
5. Press and wipe t he rollers one by one. Rotate t he roller until
the surfaces are com plet ely cleaned.
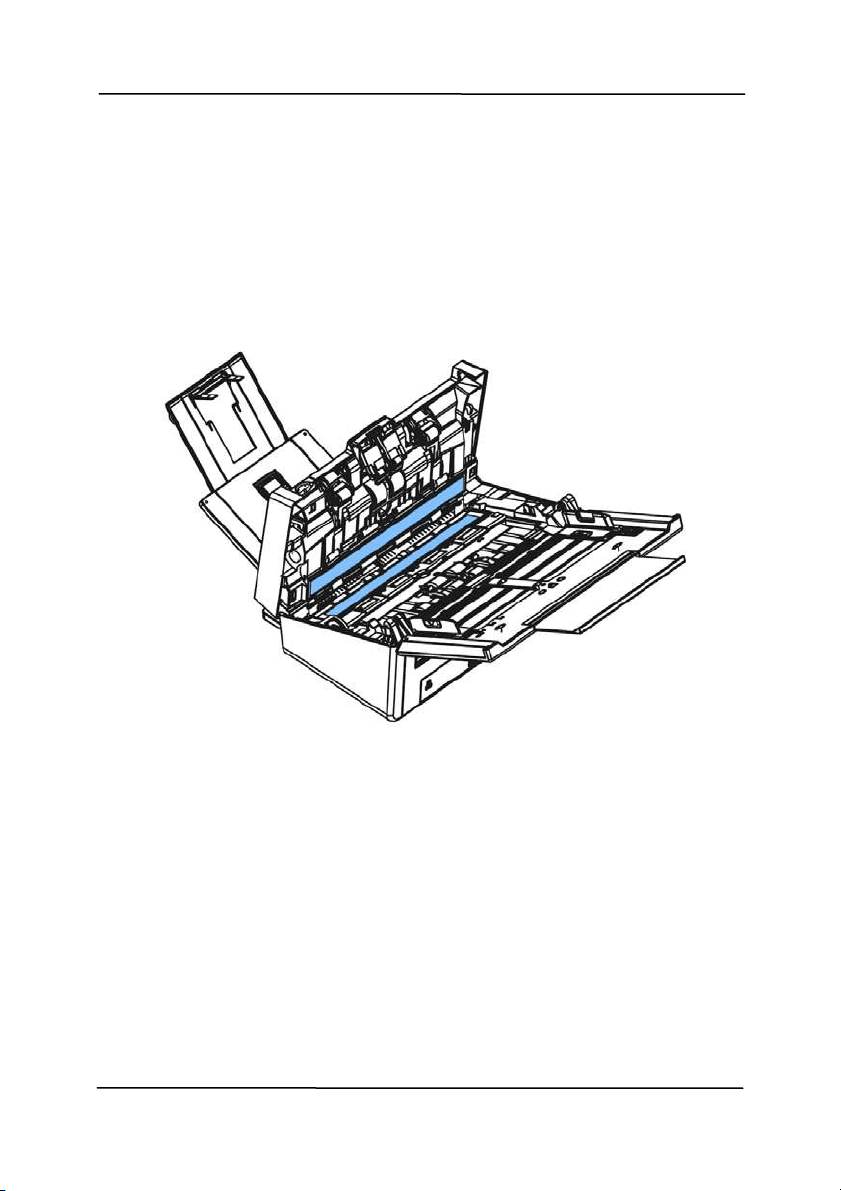
Use r’s M anual
8- 4
8 .2 Clea ning t he Glass
1. Press t he ADF release butt on. Open the front door.
2. Wet a clean clot h with som e isopropy
l alcohol. ( 95% )
3. Wipe t he glass as illustrat ed below by m oving t he swab from
side to side t o rid the dust or dirt.

Use r’s M anual
8- 5
8 .3 Calibrat ing t he Scanner
C
alibrate only if t he scanned im age looks fuzzy, the color looks
abnorm al ( e.g., darker than norm al) , after m ore than 8,000
scans, or t he scanner has been st ored wit hout use for a long
tim e. The calibrat ion process reset s the Contact I m age Sensor t o
resum e it s color and sharpness precision.
1. Turn on the scanner.
2. St art your TWAI N- com pliant im age edit ing soft ware
application such as Avision Capt ure Tool by choosing
St art> Program s> Avision XXXX Scanner> Avision Capt ure
Tool (XXXX indicat es your scanner m odel) . The Select
Scanner Model dialog box will be displayed.
3. Select your driver t ype and scanner m odel and click OK.
The Avision Capt ure Tool dialog box will be displayed.
4. Click the “ Set up” but t on to prom pt t he TWAI N user
int erface.
5. Click the “ Set t ings” tab and t hen click t he “ Calibrat ion ”
button. An “I nse r t calibrat ion sheet ” dialog box appears.
6. Hold the edges of the calibration sheet ( included) and insert
it to the feeder of the scanner as shown.

Use r’s M anual
8- 6
N ote: Only hold the edges of the calibration sheet with your
fingers and do not t ouch the whit e or black area.
7. Click the “ OK” button on t he “ I nsert ca librat ion
sheet ” dialog box to st art calibrat ing t he scanner.
8. When t he calibrat ion is com plet ed, the LED light w ill
t urn solidly on, if t here is no error m essage, it m eans
the calibration is com plet ed successfully.
W a rning: I f the calibrat ion process failed, t he LED light will
be flashing and an error m essage will be displayed on the
screen. Power off the scanner and t hen repeat the
calibrat ion st ep again.

Use r’s M anual
8- 7
W a rning:
Do not interrupt the calibration sequence or t ry t o shut off
the device w hile it is calibrat ing. I f you st op the calibrat ion
before it has com plet ed, a calibration error m ay occur. As a
result , when you next power up the unit, an error m essage
m ay be displayed, and you will have to power off t he unit
and repeat the inst ruct ions in t his sect ion.
Calibrat e the scanner only when color of the scanned im age
looks abnorm al.
Keep the calibrat ion sheet from dust and debris. Any dirt
m ay make t he calibration chart invalid or im pact t he
calibrat ion result .
Use only t he included calibration sheet to calibrat e the
scanner.

Use r’s M anual
8- 8
8 .4 Replacing the ADF Reverse Roller
After scanning approxim at ely 100,000 pages through t he ADF,
t
he reverse roller will be worn out and you m ay have problem s
wit h document feeding. I t is t im e t o replace t he Reverse roller.
For ordering the replacem ent, please cont act your dealer.
Disa sse m blin g Pr oce dure
1. Press t he ADF release butt on.
2. Gent ly open the ADF front door t o the left.
3. Hold the reverse roller cover wit h your fingers as shown and
place it down.

Use r’s M anual
8- 9
4. Press t he right end of the reverse roller externally to det ach
it from the slot and then det ach the left end from it s hole.

Use r’s M anual
8- 10
Reassem bling Procedure
1. Grab the right end of the reverse roller ( flat side facing Up)
and insert it to it s original place.
2. I nsert the left end of the reverse roller t o the hole of it s
original place.
3. I nsert the right end of the reverse roller to it s slot.
Flat side
Up

Use r’s M anual
8- 11
4. Close t he reverse roller Cover.
5. Close the ADF cover.

Use r’s M anual
8- 12
8 .5 Replacing the ADF Rolle r s
After scanning approxim at ely 200,000 pages through t he ADF,
the ADF roller m ay be worn out and you m ay experience
probl
em s wit h docum ent feeding. I n this case, you m ay need to
replace a new ADF roller. For ordering the ADF roller, please
consult your nearest dealer and follow t he procedure below t o
replace it .
Disa sse m blin g Pr oce dure
1. Press t he ADF release button to open the front door.
2. Pull t he cent er of the roller cover to open it .

Use r’s M anual
8- 13
3. Move t he t ab of the ADF roller DOW N as indicated.
4. Detach the right end of the ADF roller from t he scanner and
rem ove t he ADF roller.

Use r’s M anual
8- 14
Asse m blin g Pr oce dure
1. I nsert t he left end of t he ADF roller first to its slot and place t he
ADF roller t o it s proper posit ion.
Make sure the belt in t he center of the lower ADF roller is
inst alled horizont ally wit h t he ot her rollers as indicat ed.
2. Move t he t ab of the ADF roller UP.
3. Close the ADF roller cover. A snap- in sound could be heard if
correctly inst alled.
The Belt

Use r’s M anual
9- 1
9 . Troubleshoot ing
9 .1 Clea r ing a Pape r Jam
I n the event of a paper jam , follow the procedures below t o
rem ove t he paper:
1. Press the ADF rel
ease butt on on the right side. Gently
open t he front door.
2. Carefully pull t he paper out of the ADF unit.
3. Close t he front door. Your scanner is now ready t o use.

Use r’s M anual
9- 2
9 .2 Er r or Condit ions
I f
t here is error during scanning, t he LED light w ill be flashing in
red color and error drawing will be displayed. Refer t o the
follow ing table to clear t he error condit ions.
ERROR
DRAW I N G/ MEAN I N G
CAUSE HOW TO RESTORE
Pa perj am
1. Original has
becom e st uck in
the feeder.
2. Original exceeds
m ax. length
[ 300 dpi: 36”
( 914m m ) , 600
dpi: 14”
( 356m m ) ]
Open the feeder
cover and pull t he
original out of the
feeder.
Cove r opens
Feeder cover
opens.
Close t he feeder
cover.
Miss Feed
Failed to pick paper
1. Fan the
docum ents.
2. Load the
docum ent with
its edges
slightly t ouch
the paper
guides.

Use r’s M anual
9- 3
Mult i- Feed
More t han one pieces
of paper fed in the
feeder。
1. Rem ove t he
paper.
2. Fan the paper
for several t im es.
3. Make sure t he
edge of paper
near the paper
guide and try
again.

Use r’s M anual
9- 4
More t han
two sheets
of paper
are fed in
the paper
path.
Cont inue
Scan
I f the im age of the
m ult i- feed page is
acceptable, select
[ Continue Scan]
to continue
scanning t he rest
pages.
Cont inue
Scan
( Discard
I m age)
I f the im age of the
m ult i- feed page is
not acceptable,
select [ Cont inue
Sca n ( D isca rd
I m a ge) ] to scan
the rest pages yet
the m ult i-feed
page will be
ignored and you
need to rescan the
page again.
The scanner st op
scans. Rem ove
t he rem aining
pages in the
scanner. Fan your
docum ent and
rescan the rest
pages.
Use the Up and Down key ( / )
to select your act ion.

Use r’s M anual
9- 5
9 .3 Quest ions a nd Answ ers
Quest ion:
W h e n t he scanner is pow e r e d on,
it m a k es noises a nd w on’t st and
ready.
Answ er: There are two possibilities:
1) You m ight fail to push the scanner
shipping lock t o it s “ unlocked” posit ion.
I f this is the case, pull t he scanner
st at us swit ch t o it s “ unlocked” posit ion
first .
2) The scanner is not placed on an
even, flat desktop surface. This m ay
cause the scanner to m alfunct ion.
Quest ion:
Paper becom es j am m ed during
sca n ning.
Answ er:
1) Open the front door.
2) Pull out t he j am m ed paper carefully.
3) Close t he front door.
Quest ion:
More t han one sheet of paper are
fed int o t he scanner.
Answ er:
1) Open the scanner front door.
2) Rem ove the m ult i-fed sheet s.
3) Close t he front door.
4) Flatt en the corners and edges.
Loosen the paper before putting it
int o the paper guide again.
5) Check the feeding roller condit ion.
I f necessary, follow the cleaning
directions in sect ion 7.1 and
perform t he cleaning.

Use r’s M anual
9- 6
Quest ion:
Paper becom es skew e d in t he
sca n ner .
Answ er:
1) Use the slide guide t o keep t he
paper pat h st raight.
2) Check t he condit ion of t he feeding
roller. I f necessary, follow the
cleaning direct ions in Sect ion 7.1
and perform t he cleaning.
Quest ion: W hy does m y sca nned im a ge
alw a ys com e out t oo dark ?
Answ er:
1) Please adj ust t he screen set tings to
sRGB.
2) Please adj ust t he brightness
sett ings on the screen from
application soft ware.
Quest ion:
W h e n I ch oose optical resolution
t o be 6 0 0 dpi, t he " auto crop" a nd
"deskew " funct ions w ill be
disabled.
Answ er:
Since to perform auto crop and deskew
consumes great deal of syst em
m em ory, it is suggested if you wish to
perform "aut o crop" and "deskew"
functions, please choose your opt ical
resolution to be sm aller t han 600 dpi
to prevent a error m essage.

Use r’s M anual
9- 7
9 .4 Tech nical Service
Before cont act ing Avision, please prepare t he following
inform at ion by referring to Section 4.14, The I nform at ion Tab:
Scanner serial & revision num ber (locat ed on the bot t om of
the scanner) ;
Hardware confi
gurat ion (e.g., your host CPU type, RAM size,
free disk space, display card, interface card);
The nam e and version of your scanning soft ware applicat ion;
The version of your scanner driver.
Please call us at :
Hea dqua rt e r
Avision I n c.
No. 20, Creation Road I , Science- Based I ndust rial Park,
Hsinchu 300, Taiwan, ROC
TEL: + 886 ( 3) 578-2388
FAX: + 886 ( 3) 577- 7017
E- MAI L: service@avision.com .tw
Web Si
te: htt p: / / www.avision.com .tw
US and Canada Area
Avision Labs, I nc.
6815 Mowry Ave., Newark CA 94560, USA
TEL: + 1 ( 510) 739-2369
FAX: + 1 ( 510) 739-6060
E- MAI L: support @avision-labs.com
Web Si
te: ht t p: / / www.avision.com

Use r’s M anual
9- 8
China Area
Hongca i Technology Lim it e d
7A, No.1010, Kaixuan Road, Shanghai 200052 P.R.C.
TEL :+ 86- 21- 62816680
FAX :+ 86-21-62818856
E- MAI L :sales@avision.net .cn
Web Sit e: ht tp: / / www .avision.com .cn
Europe Ar e a
Avision Europe Gm bH
Bischofst r. 101 D- 47809 Krefeld Germ any
TEL: + 49- 2151-56981-40
FAX: + 49- 2151-56981-42
E- MAI L: info@avision- europe.com
Web Sit e: htt p: / / www.avision.de
Espaço Brasil
Avision Br a sil Lt da.
Avenida Jabaquara, 2958 - Cj . 75 - Mirandópolis –
CEP: 04046- 500 - São Paulo, Brasil
TEL: + 55- 11- 2925- 5025
E- MAI L: suport e@avision.com .br
Web Sit e: http: / / www.avision.com .br

Use r’s M anual
10-1
1 0 . Specificat ions
All specifica t ions a re subje ct t o change w it hout notice. For
the m ost up- to- date and det ailed specifications, please refer t o
our web sit e at ht t p: / / www.avision.com
Model Num ber: FF- 1901B/ FF-1902B
Opt ical Resolution: 600 dpi
Output Resolution: 72 ~ 1200 dpi (adjust able by 1 dpi
increm ent s)
Scanning Modes: Black & Whit e / Gray / Color
ADF Capacit y: Up to 100 pages (80 g/ m
2
) (20 lb.)
Max. Docum ent Size: 242 x 356 m m (9.5 x 14 in.)
Min. Docum ent Size: 50 x 50 m m ( 2 x 2 in.)
Paper Weight: 27 ~ 413 g/ m
2
( 7 ~ 110 lb.)
I D Card Thickness: < 1.25 m m
I nterface: USB 3.1 Gen 1, RJ- 45 Et hernet
10/ 100/ 1000 Mb, Wi- Fi
Power Source: 24V, 1.5A ( FF-1901B)
24V, 2.0A ( FF- 1902B)
Operat ing Tem perature: 10º C ~ 35º C
Dim ensions: (WxDxH) :
Max. 316 x 680 x 239 m m
( 12.4 x 26.8 x 9.4 in.)
Min. 316 x 191 x 168 m m
( 12.4 x 7.5 x 6.6 in.)
Weight: 4.3 kg ( 9.48 lbs.)

Use r’s M anual
10-2
W i- Fi Specifica tions:
Model: CF- WU810N
Main Chipset RTL8188EUS
Host interface USB 2.0
Frequency
Range
2.412~ 2.484 GHz
Wi- Fi Standard
I EEE 802.11b
I EEE 802.11g
I EEE 802.11n
Transm it Speed
11b: 1/ 2/ 5.5/ 11 Mbps
11g: 6/ 9/ 12/ 24/ 36/ 48/ 54 Mbps
11n: 150 Mbps
Transm it Power
Max. 18 dBm
Securit y
WPA- PSK/ WPA2-PSK
WPA/ WPA2
WEP
Operat ing
Syst em
Windows XP/ Vist a/ 7/ 8/ 8.1/ 10 ( 32/ 64 bit )
Max OS 10.6 ~ 10.11
Linux Kernel 2.6.18~ 3.10