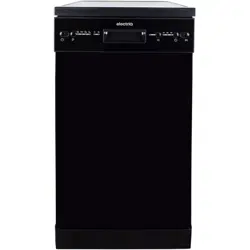
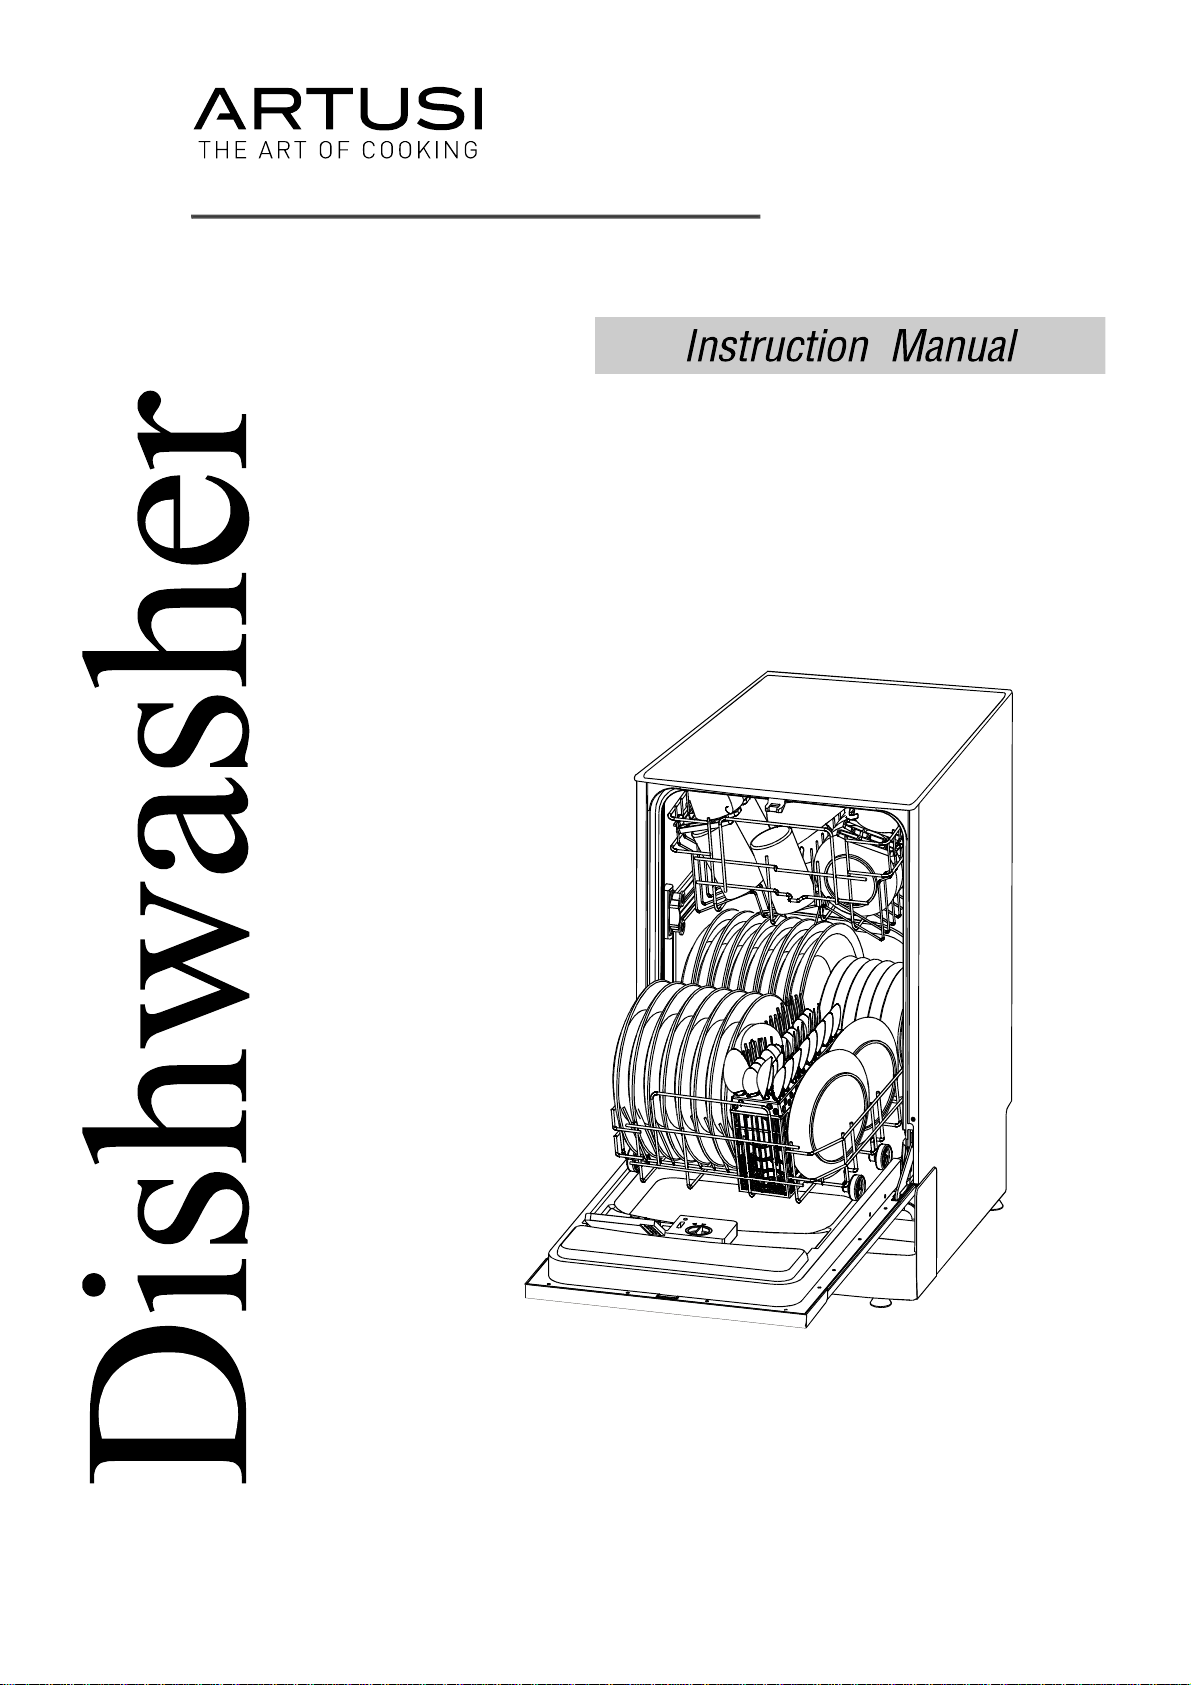
ADWFI458
DishwasherFeatures.......................................2.
AttentionbeforeorafterloadingtheDishwasher
Baskets..........................................................7
FilteringSystem.............................................12
CaringfortheDishwasher...............................13
A.RinseAidDispenser...................................3.
B.Detergent.................................................5.
LoadingtheupperBasket.................................7
LoadingtheLowerBasket..............................8...
CutleryBasket.............................................9...
WashCycleTable...........................................11
TurningontheAppliance................................11
ChangetheProgramme.................................11..
AttheEndoftheWashCycle...........................11.
Beforecallingforservice.................................21
Errorcodes...................................................22
Technicalinformation.....................................23
ControlPanel...................................................2
WaterConnection...........................................20.
15
Pleasecarefullyreadtheinstallationinstruction
.....................................................................
....15Aestheticpanel'sdimensionsandinstallation
Tensionadjustmentofthedoorspring.17..............
Connectionofdrainhoses.......................................17.
Dishwasherinstallationsteps..........................18.
ToreviewthesectionontroubleshootingTips
willhelpyoutosolvesomecommonproblems
byyourself.
DearCustomer,
Pleasecarefullyreadthismanualbeforeusingthe
dishwasher,itwillhelpyoutouseandmaintainthe
dishwasherproperly.
Passitontoanysubsequentowneroftheappliance.
ThismanualcontainssectionsonsafetyInstructions,
OperatingInstructions,InstallationInstructionsand
TroubleshootingTips,etc.
Themanufacturer,followingapolicyofconstant
developmentandupdatingoftheproduct,may
makemodificationswithoutgivingpriornotice.
Keepittorefertoitatalaterdate.
Ifyoucannotsolvetheproblemsbyyourself,
pleaseaskforthehelpofprofessionaltechnicians.
Thisapplianceisintendedtobeusedinhouseholdand
similarapplicationssuchas:
– staffkitchenareasinshops,officesandotherworking
environments;
– farmhouses;
– byclientsinhotels,motelsandotherresidentialtype
environments;
– bedandbreakfasttypeenvironments.
1
Thisappliancemustbegrounded.Intheeventofa
malfunctionorbreakdown,groundingwillreduce
theriskofanelectricshockbyprovidingapathof
leastresistanceofelectriccurrent.Thisappliance
isequippedwithacordhavinganequipment-
groundingconductorandagroundingplug.
Theplugmustbepluggedintoanappropriateoutlet
thatisinstalledandgroundedinaccordancewith
alllocalcodesandordinances.
Keepchildrenawayfromdetergentandrinseaid,keep
childrenawayfromtheopendoorofthedishwasher,
therecouldstillbesomedetergentleftinside.
Donotabuse,siton,orstandonthedoorordish
rackofthedishwasher.
Donottouchtheheatingelementduringor
immediatelyafteruse.
(Thisinstructionisonlyapplicabletomachines
withavisualheatingelement.)
Donotwashplasticitemsunlesstheyaremarked
dishwashersafeortheequivalent.Forplasticitems
n
otsomarked,checkthemanufacturer's
recommendations.
Useonlydetergentandrinseadditives
designedforanautomaticdishwasher.
Neverusesoap,laundrydetergent,orhand
washingdetergentinyourdishwasher.Keep
theseproductsoutofthereachofchildren.
Duringinstallation,thepowersupplymustnot
beexcessivelyordangerouslybentorflattened.
Donottamperwithcontrols.
Donotplaceanyheavyobjectsonorstandonthe
doorwhenitisopen.Theappliancecouldtip
forward.
Whenloadingitemstobewashed:
1)Locatesharpitemssothattheyarenotlikely
todamagethedoorseal;
2)Warning:Knivesandotherutensilswith
sharppointsmustbeloadedinthebasket
withtheirpointsdownorplacedina
horizontalposition.
Whenusingyourdishwasher,youshould
preventplasticitemsfromcomingintocontact
withtheheatingelement.(Thisinstructionisonly
applicabletomachineswithavisualheating
element.)
Ifthesupplycordisdamaged,itmustbereplaced
bythemanufactureroritsserviceagentora
similarlyqualifiedpersoninordertoavoida
hazard.
Pleasedisposeofpackingmaterialsproperly.
Usethedishwasheronlyforitsintendedfunction.
Removethedoortothewashingcompartmentwhen
removinganolddishwasherfromserviceordiscardingit.
Dishwasherdetergentsarestronglyalkaline,they
canbeextremelydangerousifswallowed.Avoid
contactwithskinandeyesandkeepchildrenaway
fromthedishwasherwhenthedoorisopen.
Checkthatthedetergentcomparmentisempty
aftercompletionofthewashcycle.
Theapplianceistobeconnectedtothewater
mainsusingnewhosesetsandthatoldhose-sets
shouldnotbereused.
Themaximumnumberofplacesettingstobe
washedis8.
Childrenshouldbesupervisedtoensurethattheydo
notplaywiththeappliance.
Thisapplianceisnotintendedforusebypersons
(includingchildren)withreducedphysical,sensoryor
mentalcapabilities,orlackofexperienceand
knowledge,unlesstheyhavebeengivensupervision
orinstructionconcerninguseoftheappliancebya
personresponsiblefortheirsafety.
Whenusingyourdishwasher,followtheprecautionslistedbelow:
WARNING!
Thedoorshouldnotbeleftopen,
sincethiscouldincreasetheriskoftripping.
Donotoperateyourdishwasherunlessall
enclosurepanelsareproperlyinplace.Open
thedoorverycarefullyifthedishwasheris
operating,thereisariskofwatersquirtingout.
Improperconnectionoftheequipment-grounding
conductorcanresultintheriskofanelectricshock.
Checkwithaqualifiedelectricianorservice
representativeifyouareindoubtwhetherthe
applianceisproperlygrounded.Donotmodifythe
plugprovidedwiththeappliance;Ifitdoesnotfit
theoutlet.Haveaproperoutletinstalledbya
qualifiedelectrician.
Whenthewashingprogramiscompleted,disconnect
themainsplugfromthemainssocketandclosethe
watertap.
Themaximumpermissibleinletwaterpressureis1Mpa.
Theminimumpermissibleinletwaterpressureis0.04Mpa.
Togetthebestperformancefromyourdishwasher,readall
operatinginstructionsbeforeusingitforthefirsttime.
2
5
Powerlight.indicator
2
3
4
Programbuttons:Toselectwashingprogram
whenpressthebutton.
Programindicatorlights.
Powerbutton:Toturnon/offthepowersupply.
RinseAidlight:comesonwhenitneedstobefilled.indicator
4
5
3
2 1
Normal 3in1Rapid
On/Off
Inten.
11
12
MainFilter
5
DetergentDispenser
6
CupShelf
7
SilverwareBasket
CoarseFilter
9
RinseAidDispenser
10
Inletpipeconnector
12
Drainpipeconnector
11
LowerBasket
3
SprayArms
2
UpperBasket
1
4
Trayass.
10
Frontview
8
1
2
3
4
5
6
7
8
9
Backview
Beforeusingyourdishwasherforthefirsttime:
3
A. Filltherinseaiddispenser
B. Fillindetergent
Therinseaidisreleasedduringthefinalrinsetopreventwaterfromformingdropletsonyourdishes,whichcan
leavespotsandstreaks.Italsoimprovesdryingbyallowingwatertorolloffthedishes.Yourdishwasheris
designedtouseliquidrinseaids.Therinseaiddispenserislocatedinsidethedoornexttothedetergentdispenser.
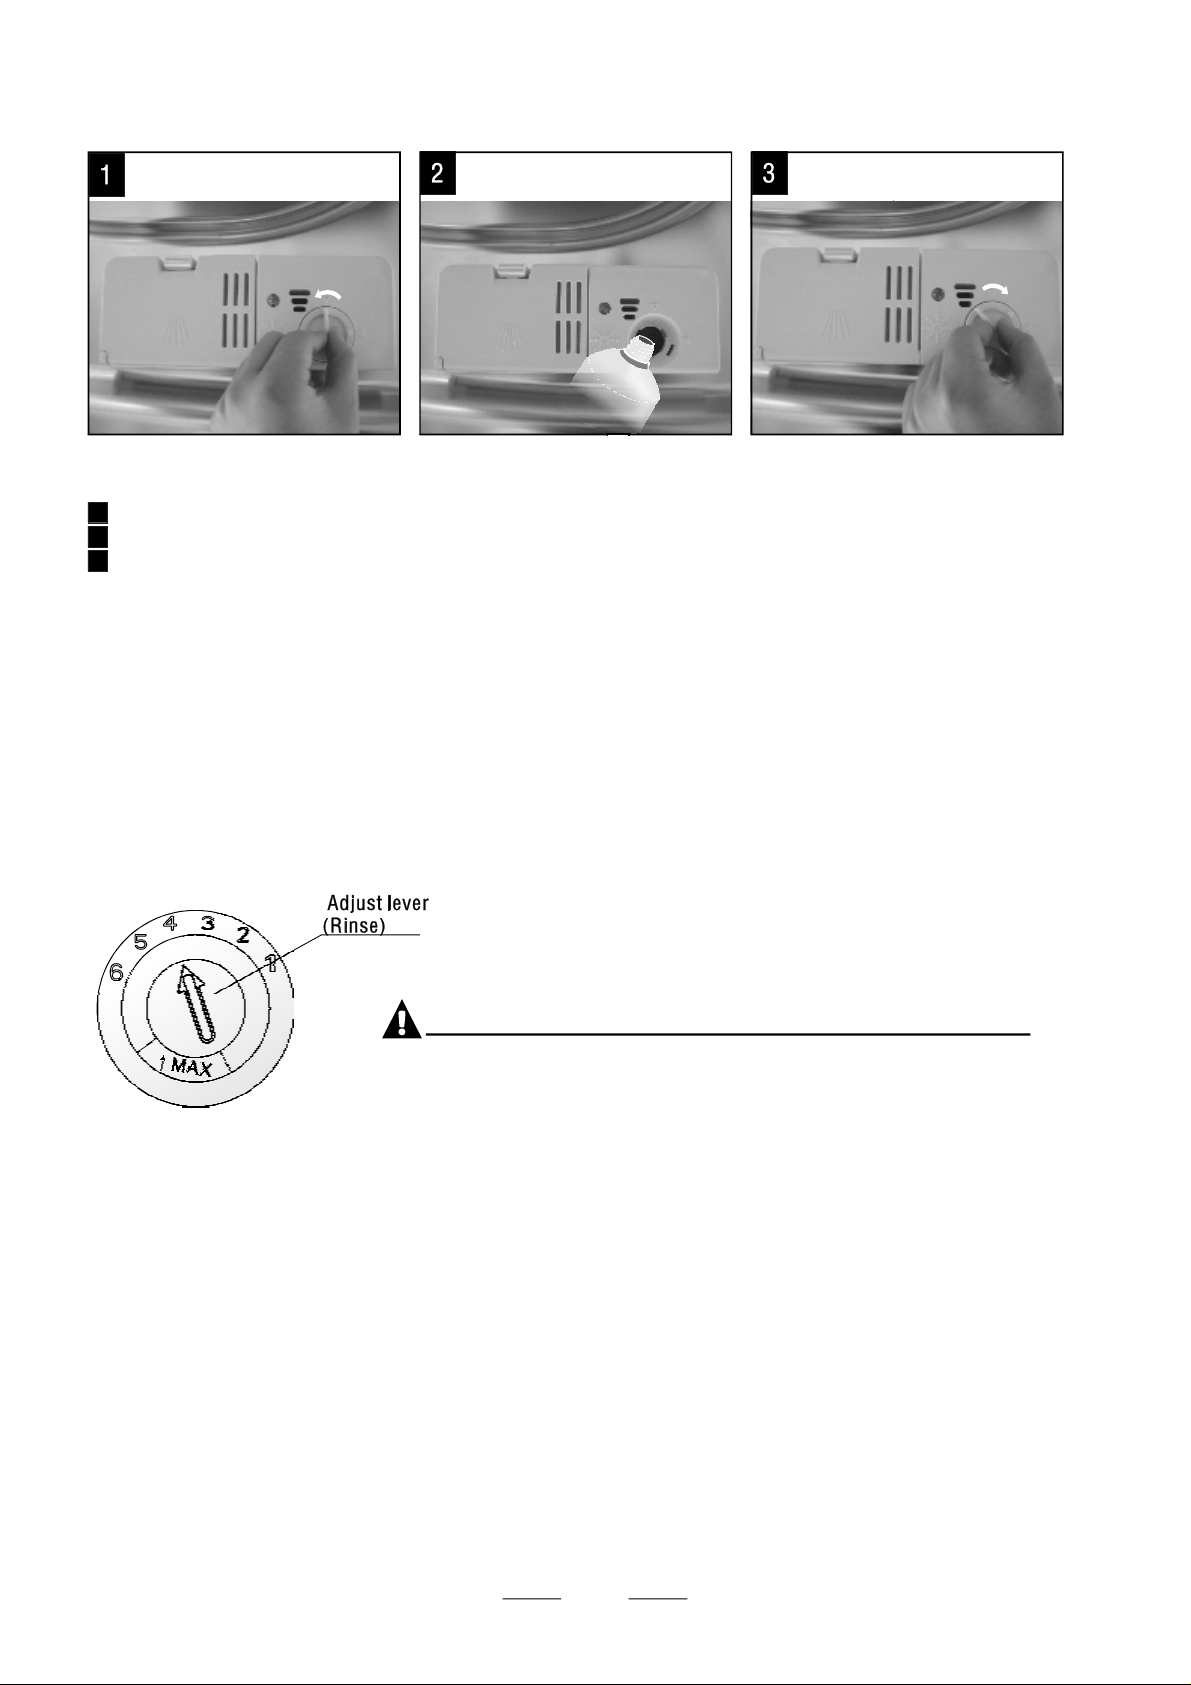
Tofillthedispenser,openthecapandpourtherinseaidintothedispenseruntilthelevelindicatorturnscompletely
black.Thevolumeoftherinseaidcontainerisabout110ml.
RinseAidDispenser
FunctionofRinseAid
Rinseaidisautomaticallyaddedduringthelastrinse,ensuringthoroughrinsing,andspotandstreakfreedrying.
Attention!
Onlyusebrandedrinseaidfordishwasher.Neverfilltherinseaiddispenserwithanyothersubstances
(e.g.Dishwashercleaningagent,liquiddetergent).Thiswoulddamagetheappliance.
Astherinseaiddiminishes,thesizeoftheblackdot
ontherinseaidlevelindicatorchanges,asillustratedbelow.
Full
3/4full
1/2full
1/4full-Shouldrefilltoeliminatespotting
Empty
Ifthereisnorinse-aidwarninglightinthecontrolpanel,youcanjudgetheamountofrinse-aidbythecoloroftheopticallevel
indicator"C"locatednexttothecap.Whentherinse-aidcontainerisfull,thewholeindicatorwillbedark.Astherinse-aid
diminishes,thesizeofthedarkdotdecreases.Youshouldneverlettherinseaidgetbelow1/4full.
WhentoRefilltheRinseAidDispenser
4
RINSEAIDDISPENSER
Toopenthedispenser,turnthecaptothe"open"(left)arrowandliftitout.
Pourtherinseaidintothedispenser,beingcarefulnottooverfill.
Replacethecapbyinsertingitalignedwith"open"arrowandturningittotheclosed(right)arrow.
Becarefulnottooverfillthedispenser,becausethiscouldcauseoversudsing.Wipeawayanyspills
withadampcloth.Don'tforgettoreplacethecapbeforeyouclosedishwasherdoor.
Attention!
Cleanupanyrinseaidspiltduringfillingwithanabsorbentclothtoavoidexcessfoaming
duringthenextwash.
AdjustingRinseAidDispenser
1
2
3
Therinseaiddispenserhassixscales.Alwaysstartwiththedispenserseton"4".
Ifspotsandpoordryingareaproblem,increasetheamountofrinseaiddispensed
byremovingthedispenserlidandrotatingthedialto"5".Ifthedishesstillarenot
dryingproperlyorshowingspots,adjustthedialtothenexthigherleveruntilyour
dishesarespot-free.Therecommendedsettingis"4".(Factoryvalueis"4".)
Increasethedoseiftherearedropsofwaterorlimespotsonthedishesafterwashing.
Reduceitiftherearestickywhitishstainsonyourdishesorabluishfilmonglasswareor
knifeblades.
NOTE:
5
AmountofDetergenttoUse
ProperUseofDetergent
Useonlydetergentspecificallymadefortheuseindishwashers.Keepyourdetergentfreshanddry.
Don'tputpowdereddetergentintothedispenseruntilyou'rereadytowashdishes.
Dishwasherdetergentiscorrosive!Takecaretokeepitoutofreachofchildren.
WARNING!
Basedontheirchemicalcomposition,detergentscanbesplitintwobasictypes:
Theuseof“normal” washingprogramsincombinationwithconcentrateddetergents
reducespollutionandisgoodforyourdishes;thesewashprogramsarespecificallymatched
tothedirt-dissolvingpropertiesoftheenzymesoftheconcentrateddetergent.Forthisreason
“normal”washprogramsinwhichconcentrateddetergentsareusedcanachievethesame
resultsthatcanotherwiseonlybeachievedusing“intensive” programs.
Detergenttabletsofdifferentbrandsdissolveatdifferentspeeds.Forthisreasonsome
detergenttabletscannotdissolveanddeveloptheirfullcleaningpowerduringshort
programs.Thereforepleaseuselongprogramswhenusingdetergenttablets,to
ensurethecompleteremovalofdetergentresiduals.
Thedispensermustberefilledbeforethestartofeachwashcyclefollowingtheinstructions
providedinthewashcycletable.Yourdishwasheruseslessdetergentandrinseaidthan
conventionaldishwasher.Generally,onlyonetablespoonofdetergentisneededfor
anormalwashload.Moreheavilysoileditemsneedmoredetergent.Alwaysaddthe
detergentjustbeforestartingthedishwasher,otherwiseitcouldgetdampandwillnot
dissolveproperly.
ConcentratedDetergent
DetergentTablets
DetergentDispenser
Alwaysaddthedetergentjustbeforestartingeachwashcycle.
Onlyusebrandeddetergentandrinseaidfordishwasher.
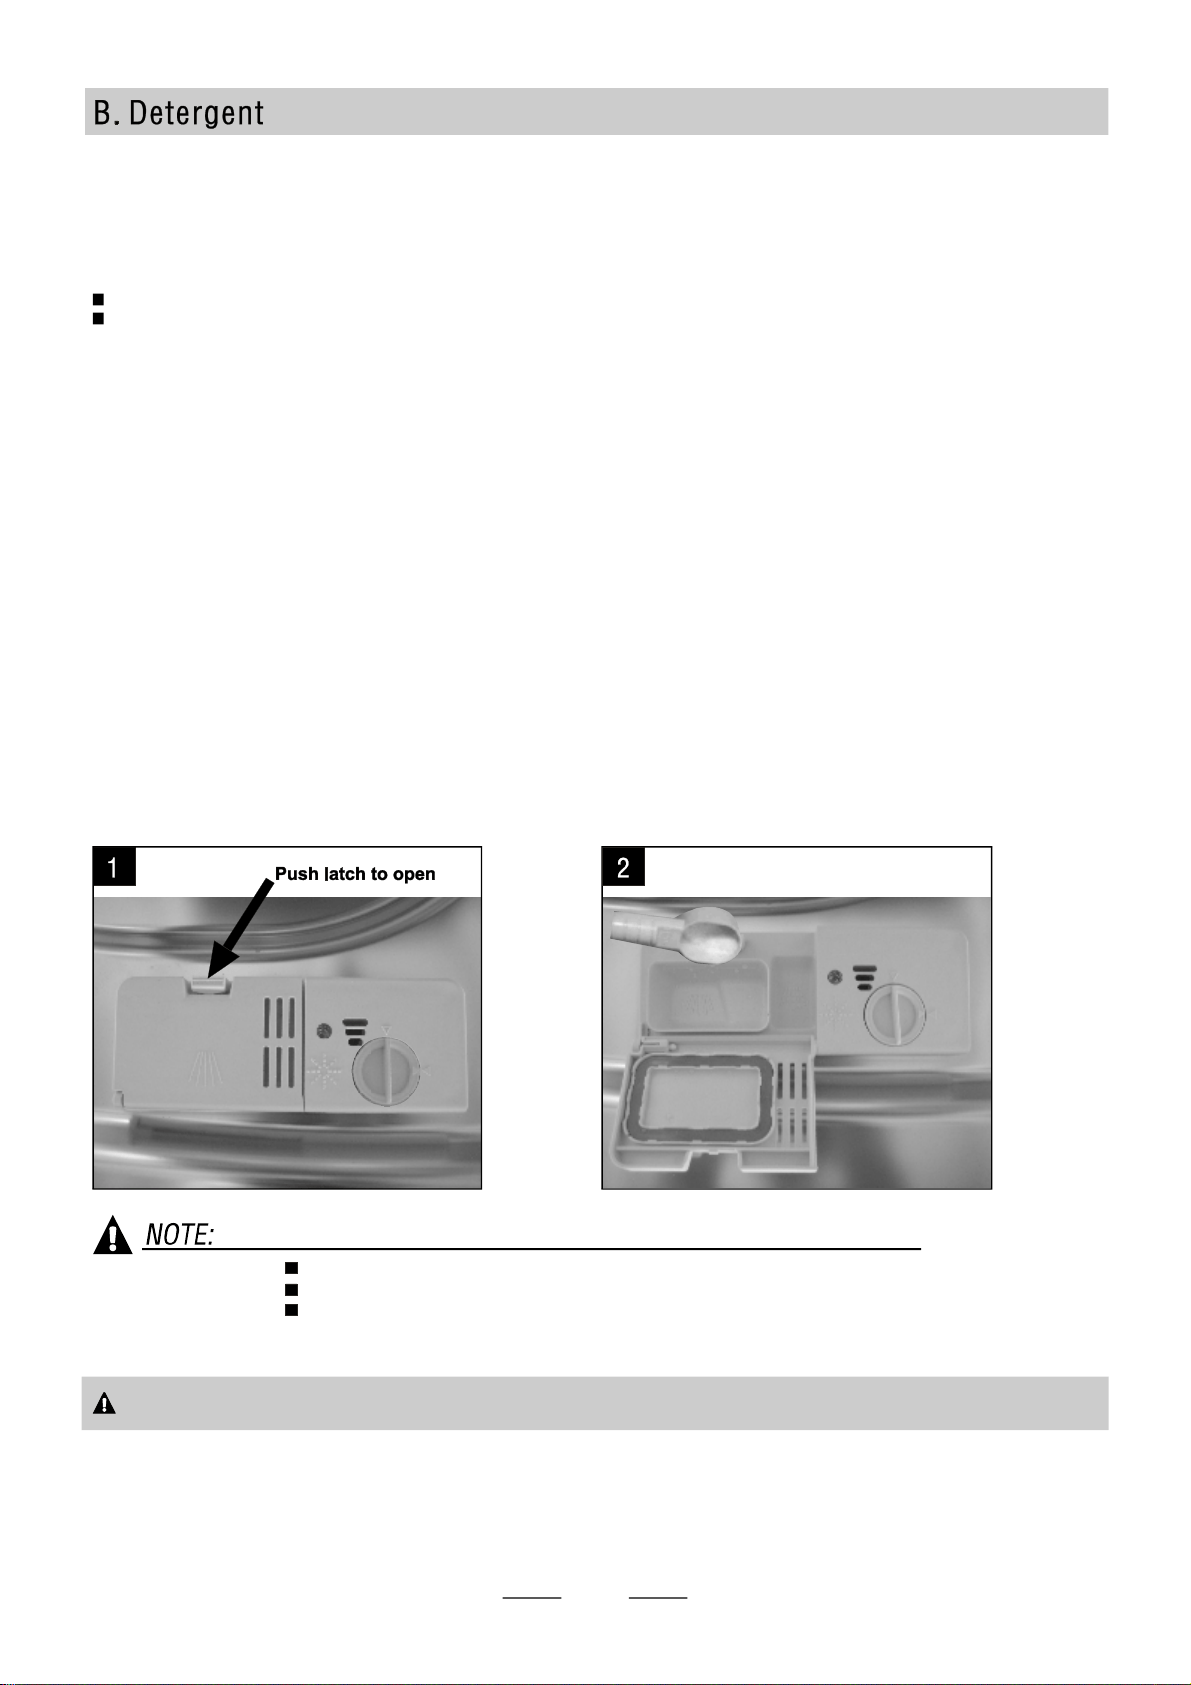
Ifthelidisclosed:pressreleasebutton.Thelidwillspringopen.
conventional,alkalinedetergentswithcausticcomponents
lowalkalineconcentrateddetergentswithnaturalenzymes
Detergentswithitschemicalingredientsarenecessarytoremovedirt,crushdirtandtransportitoutofthedishwasher.
Mostofthecommercialqualitydetergentsaresuitableforthispurpose.
6
Fillthedetergentdispenserwithdetergent.
Themarkingindicatesthedosinglevels,as
illustratedontheright:
Theplaceofmainwashcycledetergentplaced,
“MIN”meansapproximately20gofdetergent.
Theplaceofpre-washcycledetergentplaced,
approximately5gofdetergent
Pleaseobservethemanufacturersdosingandstorage
recommendationsasstatedonthedetergentpackaging.
Closethelidandpressuntilitlocksinplace.
Ifthedishesareheavilysoiled,placeanadditionaldetergentdoseinthepre-washdetergent
chamber.Thisdetergentwilltakeeffectduringthepre-washphase.
Youfindinformationabouttheamountofdetergentforthesingleprogrammesonthe
lastpage.Pleaseaware,thataccordingtothelevelsoilingandthespecifichardnessof
waterdifferencesarepossible.
Pleaseobservethemanufacturer'srecommendationsonthedetergentpackaging.
Detergents
Thereare3sortsofdetergents
1.Withphosphateandwithchlorine
2.Withphosphateandwithoutchlorine
3.Withoutphosphateandwithoutchlorine
NOTE:
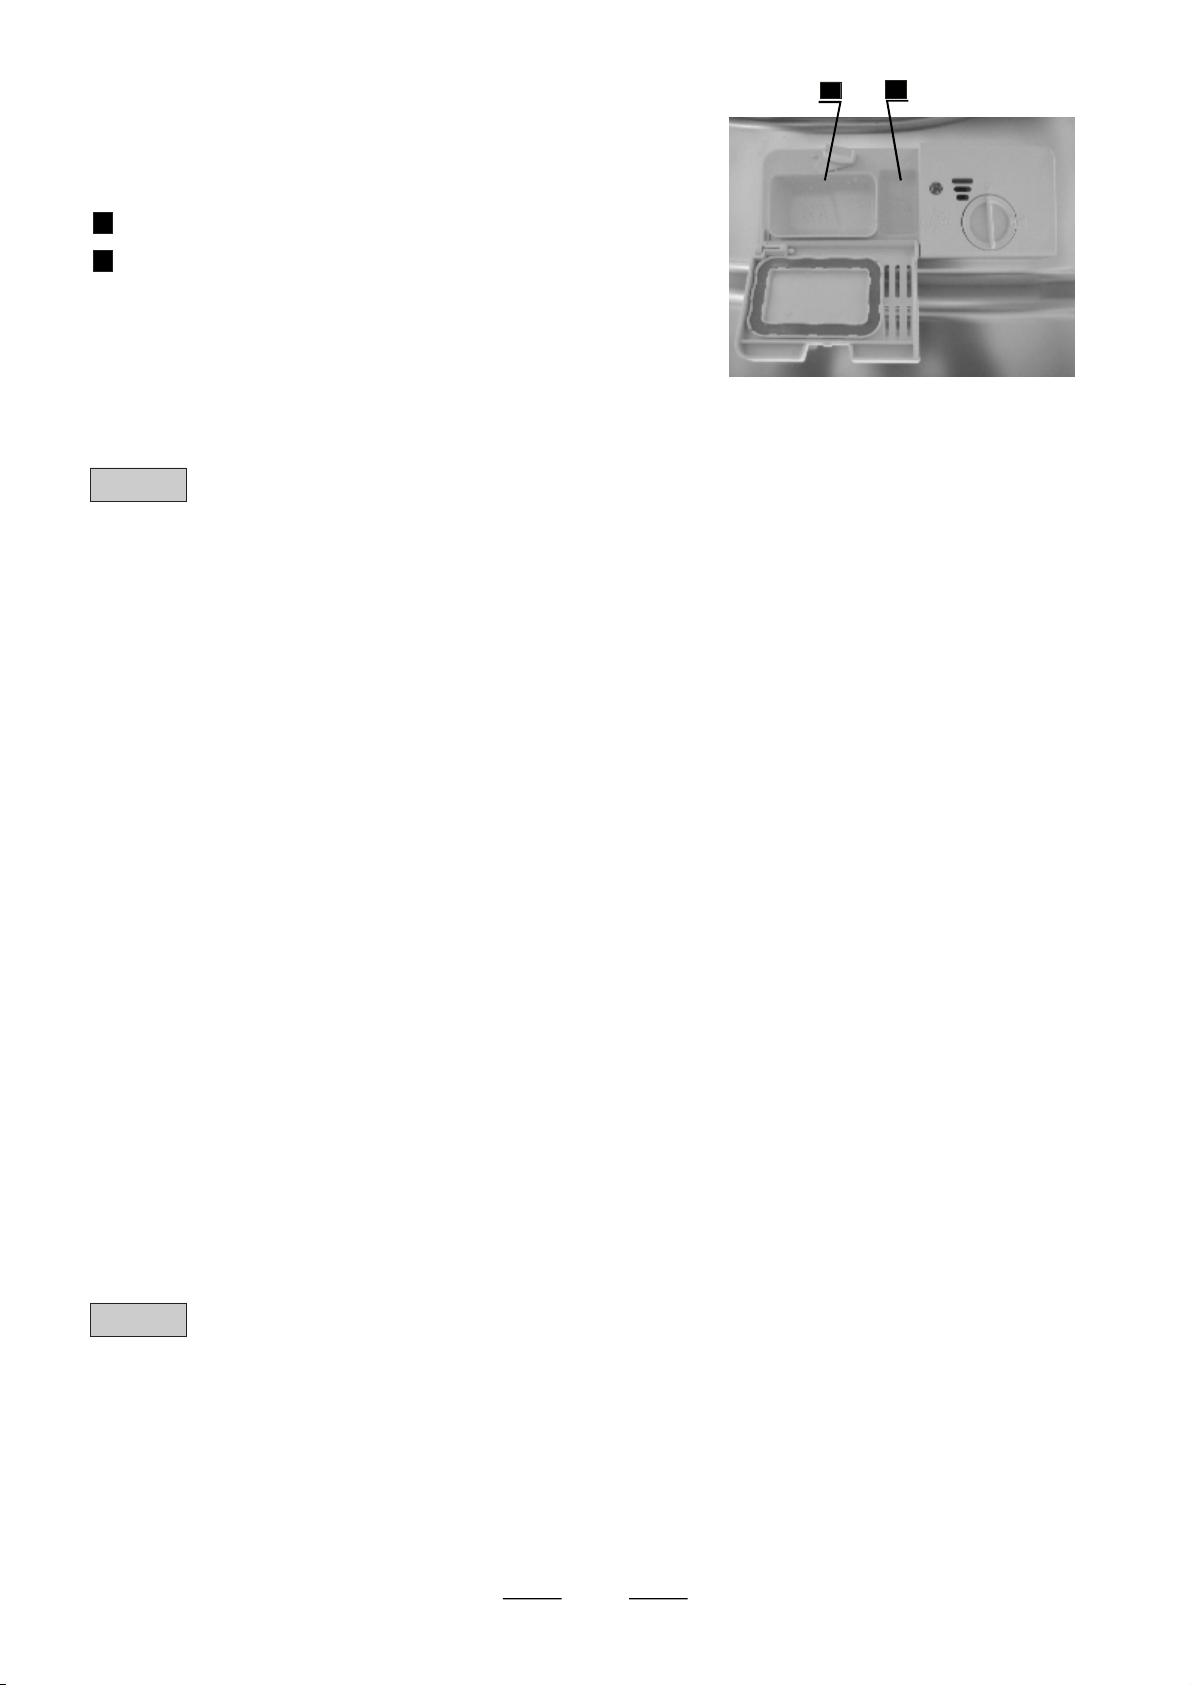
A
B
Fillindetergent
Normallynewpulverizeddetergentiswithoutphosphate,thusthewatersoftenerfunctionof
phosphateisnotgiven.Ifdetergentswithoutphosphatewereusedincaseofhardwater
oftenwhitespotsappearatdishesandglasses.Inthiscasepleaseaddmoredetergenttoreach
betterresults.Detergentswithoutchlorinedoonlybleachalittle.Strongandcoloredspotswillnot
removedcompletely.Inthiscasepleasechooseaprogramwithhighertemperature.
Attention
Keepalldetergentsinasafeplaceoutofchildren'sreach.
Alwaysaddthedetergentinthedispenserjustbeforestartingthedishwasher.
NOTE:
Useof“2in1”、“3in1”、“4in1”and“5in1”Combination/CompactDetergents
Theseproductsaredetergentswithintegratedandcombineddetergent/rinseaidand
saltfunctions.Beforeusingtheseproductsyoushouldfirstcheckthatthewaterhardness
inyoursupplyiscompatiblewiththeuseoftheseproductsasperthedetergentmanu-
facturers(ontheproductpackaging).Theseproductsshouldbestrictlyusedaccordingto
thedetergentmanufacturer'sinstructions.Ingeneraldetergentsthatincluderinseaidor
watersoftenerareonlyabletoservegoodresultsundercertainconditions:rinseaidand
watersoftenercannotadaptedtospecificconditions.Forthisreasonsinsomecases
theremightbeunwantedcleaningordryingresults.Pleaseaskthedetergentmanufac-
turertoinformyouaboutthebestconsumeconditions.Ifyouencounterproblemswhen
usingtheseproductsforthefirsttimethenpleasecontactthedetergentmanufacturers
careline.Themanufacturerofyourdishwasherisnotliablefordamagescausedby
compactdetergentsnorgiveswarrantyifyouusecompactdetergents.
Whenuse “2in1”、“3in1”、“4in1”or“5in1”Combination/CompactDeter-
gents,pleasepayattentiontomakesurethatthesizeoftheCombinationDetergents
isfittedtothedispenser,sothatCombinationDetergentscanbeeasetoputinthe
dispenser,anddispenserwouldnotbebroken.
A
B
7
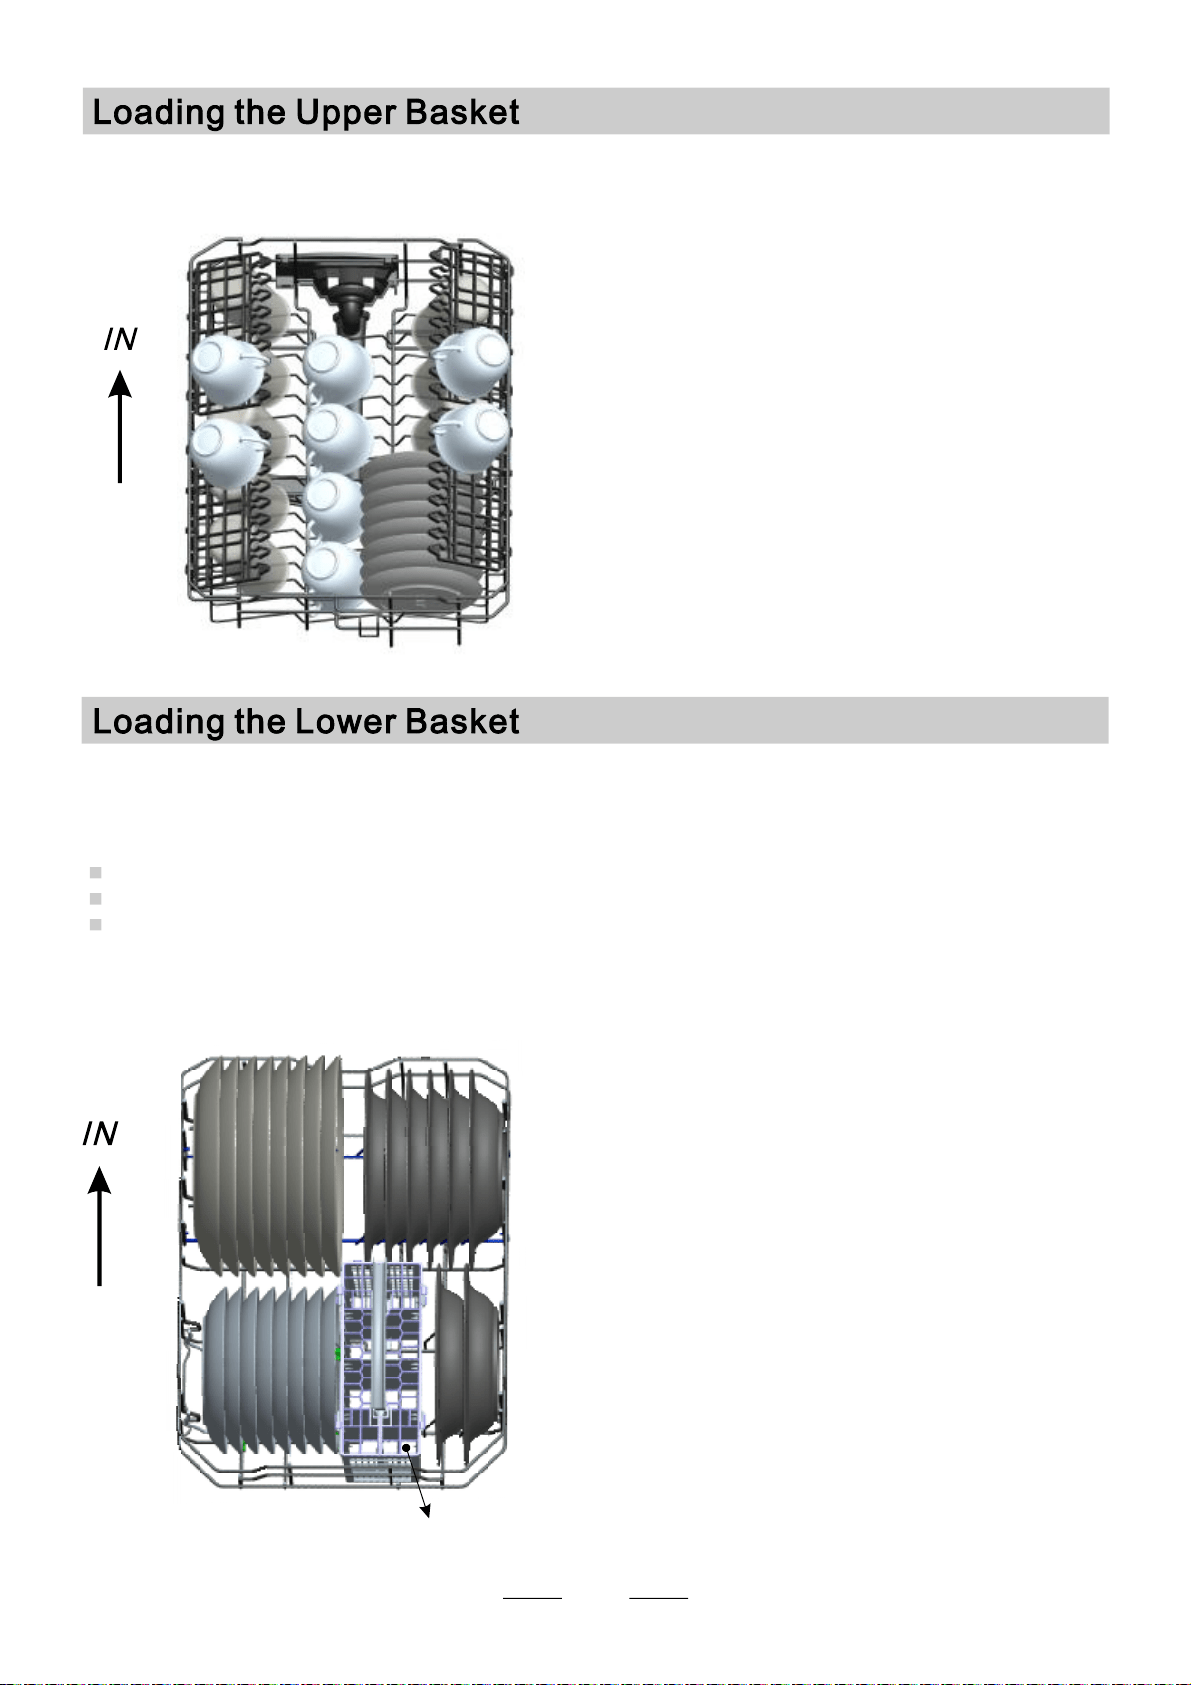
Theupperbasketisdesignedtoholdmoredelicateandlighterdishwaresuchasglasses,coffee
andteacupsandsaucers,aswellasplates,smallbowlsandshallowpans(aslongastheyare
nottoodirty).
Positionthedishesandcookwaresothattheywillnotbemovedbythesprayofwater.
Wesuggestthatyouplacelargeitemsanditemsthatarethemostdifficulttocleanintothelowerbasket
suchas:pots,pans,lids,servingdishesandbowls,asshowninthefigurebelow.
Itispreferabletoplaceservingdishesandlidsonthesideoftheracksinordertoavoidblockingtherotationofthe
topsprayarm.
Pots,servingbowls,etc,mustalwaysbeplacedtopdown.
Deeppotsshouldbeslantedtoallowwatertoflowout.
Pleaseberemindedthat:
TheBottomBasketfeaturesfoldingspikessothatlargerormorepotsandpanscanbeloaded.
1
Cups
2
3
Glasses
Saucers
5
7
Soupplates
Dessertdishes
4
6
Dinnerplates
Silverwarebasket
1
1
3
2
4
1
6
1
1
1
2
3
5
4
6
4
7

8
FoldingSpikesofLowerBasket
Forbetterstackingofpotsandpans,
thespikescanbefoldeddownas
showinthepictureright.
AdjustingtheUpperBasket
Theheightoftheupperbasketcanbeadjustedinordertocreatemorespaceforlargeutensils
bothfortheupper/lowerbasket.Theheightoftheupperbasketcanbeadjustedbyplacingthe
wheelsondifferentheightoftherails.Longitems,servingcutlery,saladserversandknives
shouldbeplacedontheshelfsothattheydonotobstructtherotationofthesprayarms.
Theshelfcanbefoldedbackorberemovedwhennotrequiredforuse.
CutleryBasket
Cutleryshouldbeplacedinthecutlerybasketwiththehandlesatthebottom.Iftherackhassidebaskets,the
spoonsshouldbeloadedseparatelyintotheappropriateslots,especiallylongutensilsshouldbeplacedinthe
horizontalpositionatthefrontoftheupperbasketasshowninthepicture.
Teaspoons
4
Soupspoons
2
Forks
1
3
Dessertspoons
5
Knives

Cutlerywithwooden,hornchinaor
mother-of-pearlhandles
Plasticitemsthatarenotheatresistant
Oldercutlerywithgluedpartsthatarenot
Temperatureresistant
Bondedcutleryitemsordishes
Pewterorcooperitems
Crystalglass
Steelitemssubjecttorusting
Woodenplatters
Itemsmadefromsyntheticfibres
Donotputinitemsthataredirtyofcigaretteash,candlewax,lacquerorpaint.
Ifyoubuynewdishespleasemakesurethattheyaresuitablefordishwashers.
Sometypesofglassescanbecome
dullafteralargenumberofwashes
Silverandaluminumpartshavea
tendencytodiscolourduringwashing
Glazedpatternsmayfadeifmachine
washedfrequently
Pleasedonotoverloadyourdishwasher.Donotusedishthatisnotsuitablefor
dishwashers.Thisisimportantforgoodresultsandforreasonableenergyconsume.
Beforeloadingthedishes,youshould:
Removelargeleft-over
Softenremnantsofburntfoodinpans
Dishesandcutlerymustnotimpedetherotationofthesprayarms
Loadhollowitemssuchascups,glasses,pansetc.withtheopeningdownwardssothat
watercannotcollectinthecontaineroradeepbase
9
NOTE:
NOTE:
Arenotsuitable
Areoflimitedsuitability
Loadingcutleryanddishes
Whenloadingthedishesandcutlery,pleasenote:

10
Di
To
T
shesanditemsofcutlerymustnotlieinsideoneanother,orcovereachother
avoiddamagetoglasses,theymustnottouch
Loadlargeitemswhicharemostdifficulttocleanintothelowerrack
heupperrackisdesignedtoholdmoredelicateandlighterdishwaresuchasglasses,coffee
andteacups
Attention!
Longbladedknivesstoredinanuprightpositionareapotentialhazard!
Longand/orsharpitemsofcutlerysuchascarvingknivesmustbepositioned
horizontallyintheupperbasket.
Damagetoglasswareandotherdishes
Possiblecauses:
Typeofglassormanufacturingprocess.Chemicalcompositionofdetergent.
Watertemperatureanddurationofdishwasherprogramme.
Suggestedremedy:
Useglasswareorporcelaindishesthathavebeenmarkeddishwasher-proofbythe
manufacturer
UseamilddetergentthatisdescribedaskindofdishesIfnecessary,seekfurther
informationfromdetergentmanufacturers.
Selectaprogrammewithaslowatemperature.
Topreventdamage,takeglassandcutleryoutofthedishwasherassoonaspossible
aftertheprogrammehasended.

11
Standarddailycyclefor
normallysoiledloads,such
aspots,plates,glasses.
Ashorterwashforlightly
soiledloadsandquickwash
Normal
Rapid
Pre-wash
Wash(55℃)
Rinse(65℃)
Drying
Wash(45℃)
Rinse(45℃)
5/20g.
15g.
160
30 10
0.78
0.4
Forheaviestsoiledcrockery,
andcommonlysoiledpots,
pans,dishesetcwithdried
onsoiling;
Pre-wash(50℃)
Pre-wash
Wash(65℃)
Rinse
Rinse
Rinse(55℃)
Drying
1.2
18
5/20g
13
120
Forcommonlysoiledloads,
Usemultifunctionaldetergent
pre-wash
Wash(50℃)
Rinse(65)
Drying
℃
3in1
155
0.85
12
(AS/NZS2007.1)
Ifsomeoftheprogramlightsbegintoglimmer,thatindicatesthemachineisoutoforder,turnoff
themainpowerandwatersupplybeforecallingaservice(seethesectionentitled"Errorcodes").
Aforgottendishcanbeaddedatanytimebeforethedetergentcupopens.
Openthedooralittletostopthewashing.
Afterthesprayarmsstopworking,youcanopen
thedoorcompletely.
Loadtheforgottendishes.
Closethedoor,thedishwasherwillstartrunningagain
after10seconds.
4
3
2
1
NOTE:
Itisdangeroustoopenthedoorwhenwashing,becausethehotwatermayscaldyou.
Startingawashcycle
1.Drawoutthelowerandupperbasket,loadthedishesandpushthemback.Itiscommendedthatloadingthelowerbasket
first,thantheupperone(seethesectionentitledLoadingtheDishwasher.)
2.Pourinthedetergent(seethesectionentitledDetergentandRinseAid)
3.Inserttheplugintothesocket.Thepowersupplyis240VAC50Hz,thespecificationofthesocketis10A250VAC.
4.Makesurethatthewatersupplyisturnedontofullpressure.
5.Openthedoor,pressthePowerbutton,thenpresstheyourdesiredprogram.(Seethesectionentitled."WashCycleTable".)
6.Withalittleforcetoensurethedoorisproperlyclosed.
NOTE:Aclickcouldbeheardwhenthedoorisclosedperfectly.
7.Whentheworkingcyclehasfinished,turnoffthepowerandwatersupply.
Acyclethatisunderwaycanonlybemodifiedifithasonlybeenrunningforashorttime.Otherwise,thedetergent
mayhavealreadybeenreleased,andtheappliancemayhavealreadydrainedthewashwater.Ifthisisthecase,thedetergent
dispensermustberefilled(seethesectionentitled"LoadingtheDetergent").
Openthedoor,Presstheprog.Buttonmorethanthreesecondstocanceltheprogram,thenyoucanchangethe
programtothedesiredcyclesetting(seethesectionentitled"Startingawashcycle").Then,closethedoor.
NOTE:
Ifyouopenthedoorwhilewashing,themachinewillpause,whenyouclosethedoor,itwillkeeponworkingafter10seconds.
Whentheworkingcyclehasfinished,thebuzzerofthedishwasherwillsoundfor8seconds,thenstop.Turnoff
theapplianceusingtheON/OFFbutton,shutoffthewatersupplyandopenthedoorofthedishwasher.
Waitforafewminutesbeforeunloadingthedishwashertoavoidhandlingthedishesandutensilswhilethey
arestillhotandmoresusceptibletobreakage.Theywillalsodrybetter.
12
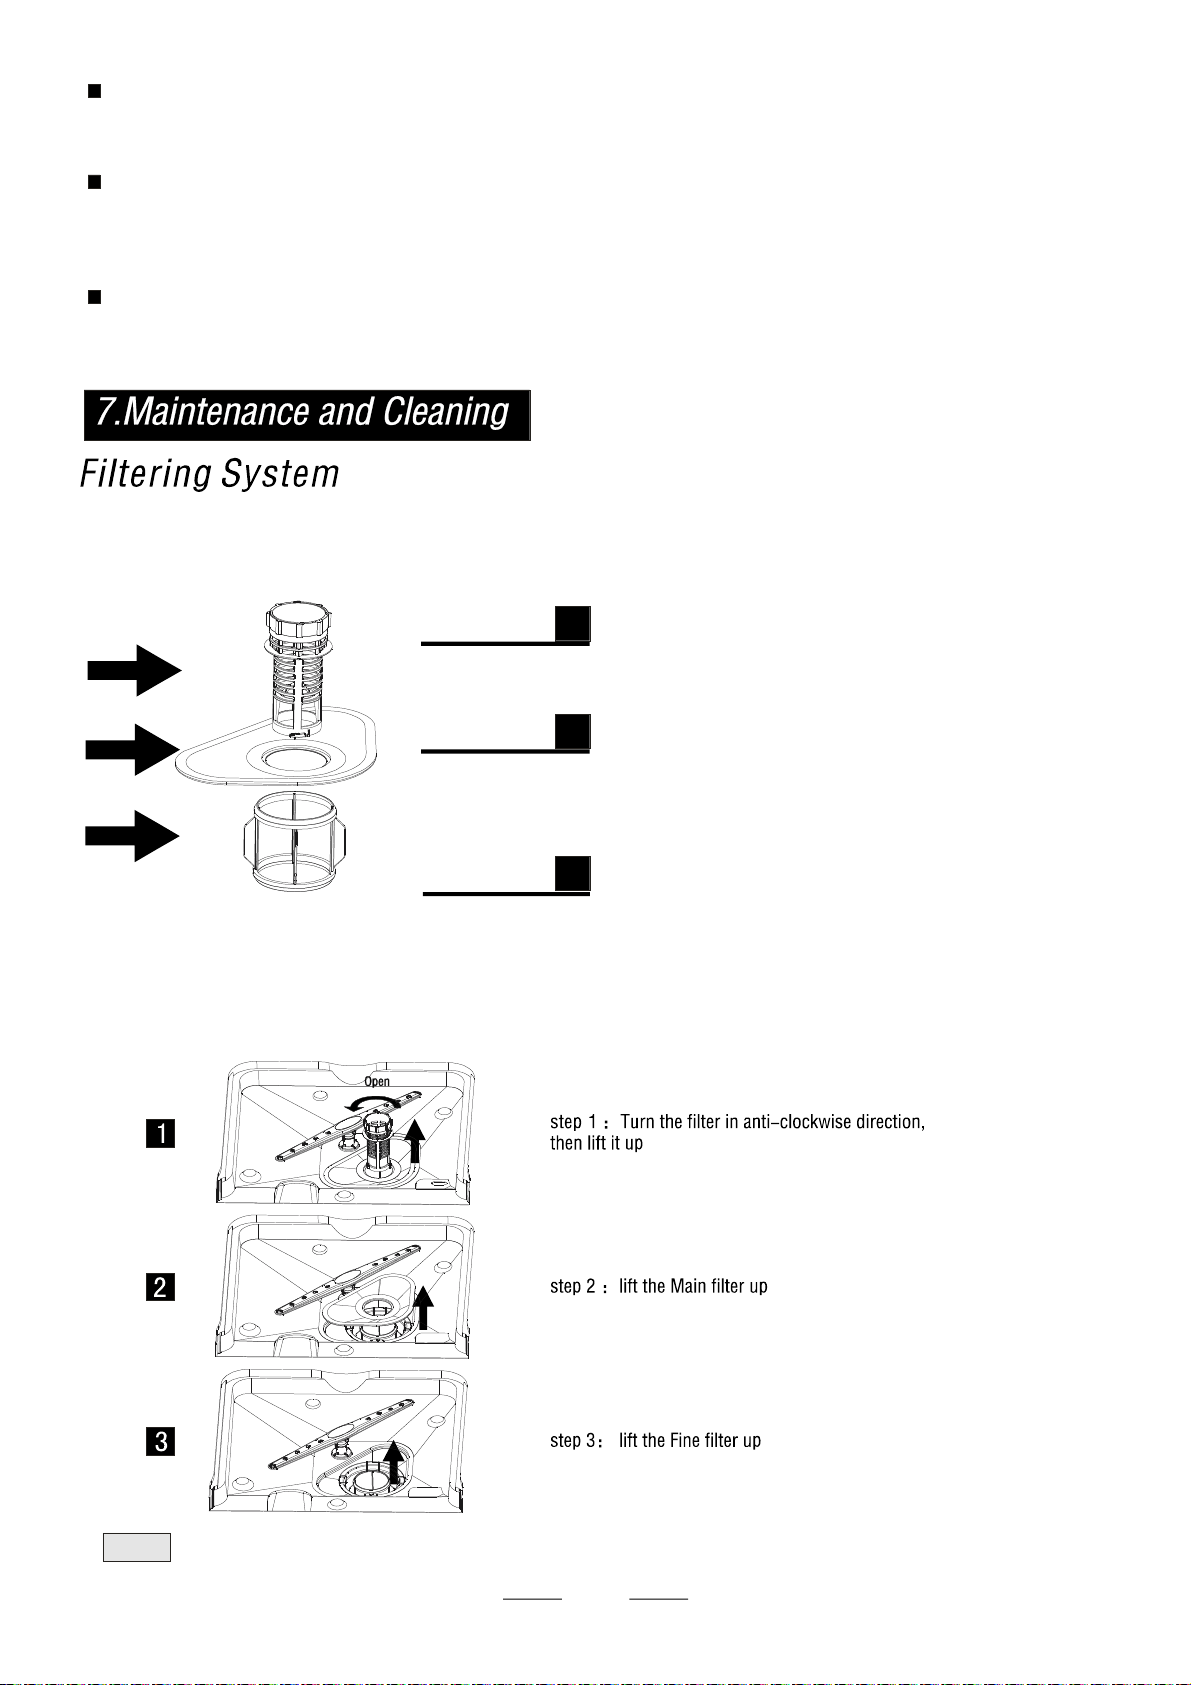
Thefilterpreventslargerremnantsoffoodorotherobjectsfromgettinginsidethepump.
Theresiduesmayblockthefilter,inthiscasetheymustberemoved.
Thefiltersystemconsistsofacoarsefilter,aflat(Mainfilter)
Andamicrofilter(Finefilter).
Mainfilter
Foodandsoilparticlestrappedinthisfilterarepulverizedbya
specialjetonthelowersprayarmandwasheddownthe
drain.
Coarsefilter
Largeritems,suchaspiecesofbonesorglass,thatcouldclog
thedrainaretrappedinthecoarsefilter.Toremoveanitem
caughtinthisfilter,gentlysqueezethetapsonthetopofthis
filterandliftitout.
Finefilter
Thisfilterholdssoilandfoodresiduesinthesumpareaand
preventsitfrombeingredepositonthedishesduringacycle.
2
3
1
2
3
1
-Inspectthefiltersforblockingaftereverytimethedishwasherhasbeenused.
-Byunscrewingthecoarsefilter.youcanremovethefiltersystem.Removeanyfoodremnantsandcleanthe
filtersunderrunningwater.
SwitchOfftheDishwasher
Inthedigitaldisplayappears0(remainingprogrammetime),onlyinthiscasetheprogrammehasended.
1.SwitchoffthedishwasherbypressingtheON/OFFbutton.
2.Turnoffthewatertap!
Openthedoorcarefully.
Hotdishesaresensitivetoknocks.Thedishesshouldthereforebeallowedtocooldownaround15minutes
beforeremovingfromtheappliance.
Openthedishwasher'sdoor,leaveitajarandwaitafewminutesbeforeremovingthedishes.Inthiswaythey
willbecoolerandthedryingwillbeimproved.
Unloadingthedishwasher
Itisnormalthatthedishwasheriswetinside.
Emptythelowerbasketfirstandthentheupperone.ThiswillavoidwaterdrippingfromtheupperBasketonto
thedishesinthelowerone.
NOTE:
Whenfollowingthisprocedurefromstep1tostep3,thefiltersystemwillberemoved;
whenfollowingitfromstep3tostep1,thefiltersystemwillbeinstalled.
13
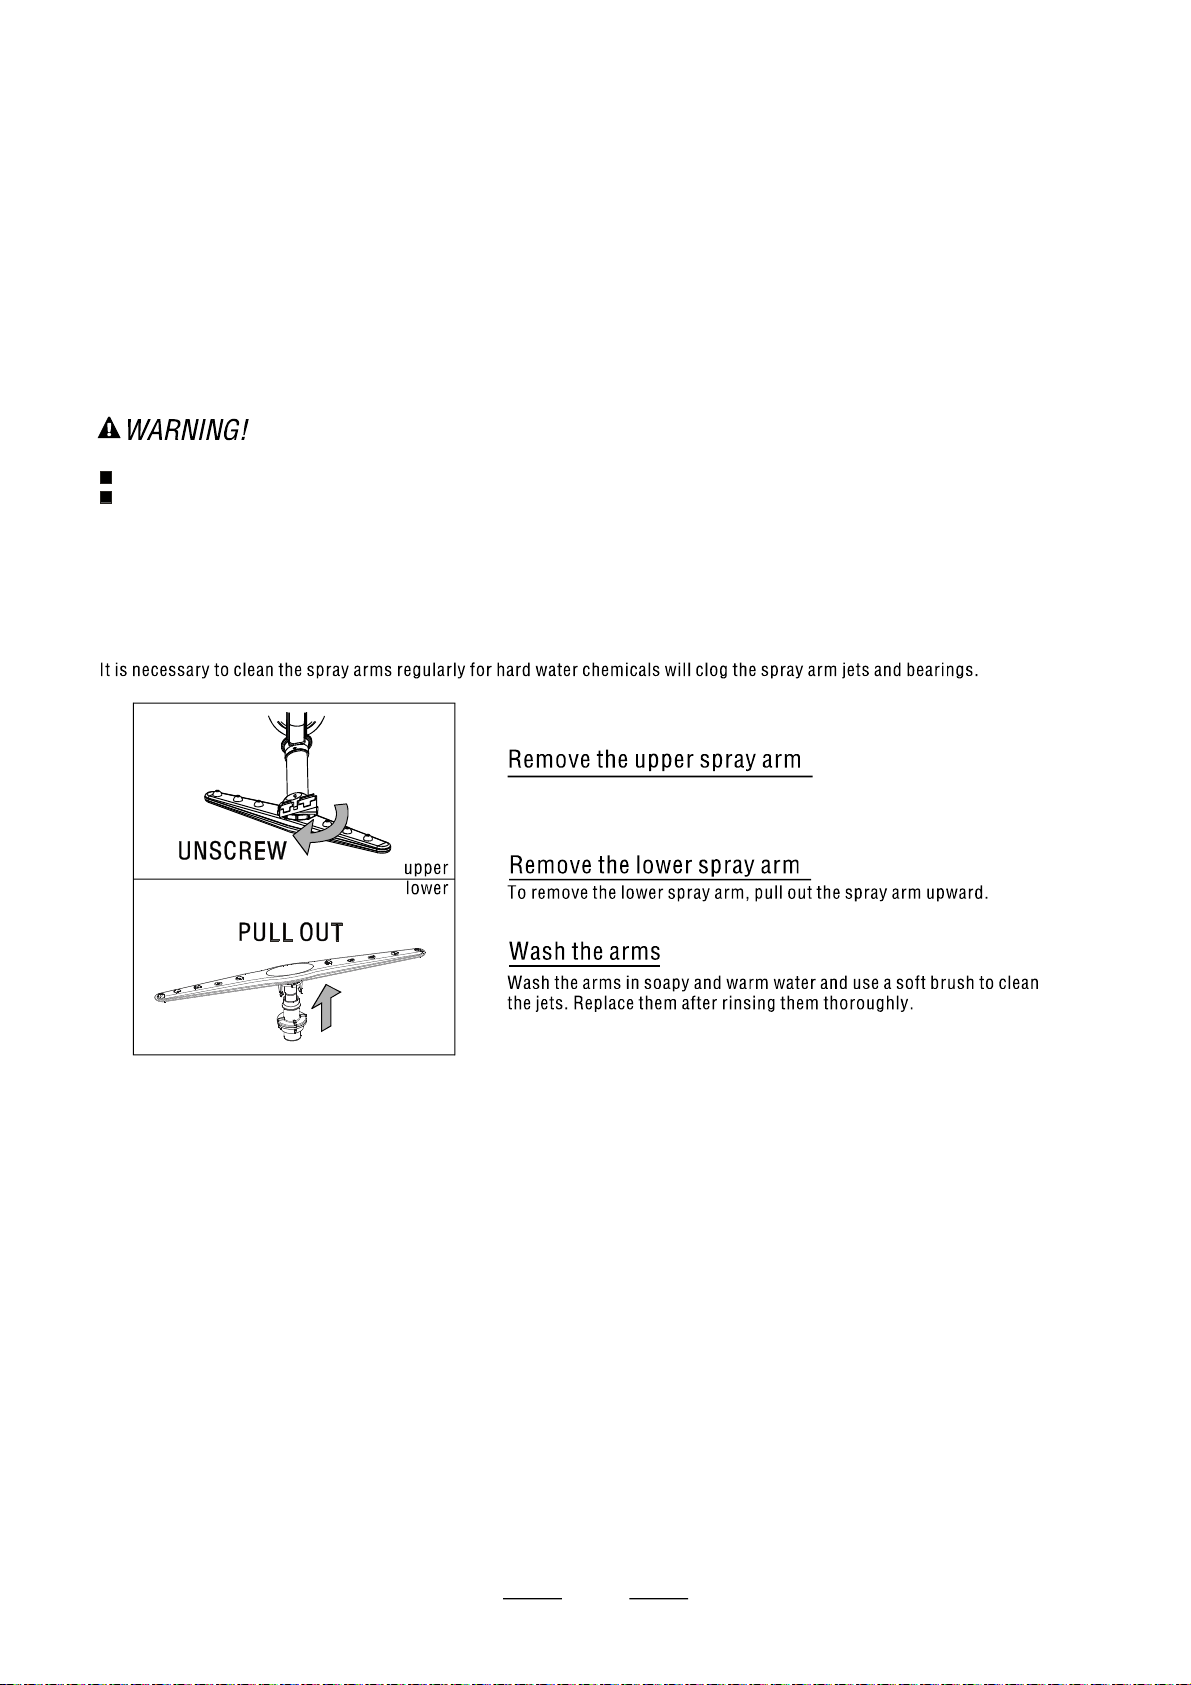
CleaningtheSprayArms
CaringfortheDishwasher
ProtectAgainstFreezing
Filterassembly
Tocleanthecoarsefilterandthefinefilter,useacleaningbrush.Then,reassemblethefilter
partsasshowninthefiguresleftandreinserttheentireassemblyinthedishwasher,positioning
initsseatandpressingdownward.
Thedishwashermustneverbeusedwithoutthefilters.Improperreplacementofthefiltermay
reducetheperformanceleveloftheapplianceanddamagedishesandutensils.
Forbestperformanceandresults,thefilterassemblymustbecleaned.Thefilterefficientlyremovesfood
particlesfromthewashwater,allowingittoberecycledduringthecycle.Forbestperformanceandresults,
thefiltermustbecleanedregularly.Forthisreason,itisagoodideatoremovethelargerfoodparticles
trappedinthefilteraftereachwashcyclebyrinsingthesemicircularfilterandcupunderrunningwater.
Toremovethefilterdevice,pullthecuphandleintheupwarddirection.Theentirefilterassemblyshouldbe
cleanedonceaweek.
Thedishwashermustneverbeusedwithoutthefilters.
Improperreplacementofthefiltermayreducetheperformanceleveloftheapplianceand
damagedishesandutensils.
1.Cutofftheelectricalpowertothedishwasher.
2.Turnoffthewatersupplyanddisconnectthewaterinletpipefromthewatervalve.
3.Drainthewaterfromtheinletpipeandwatervalve.(Useapantocatchthewater)
4.Reconnectthewaterinletpipetothewatervalve.
5.Removethefilteratthebottomofthetubanduseaspongetosoakupwaterinthesump.
pleasetakefrostprotectionmeasuresonthedishwasherinwinter.Everytimeafterwashingcycles,
pleaseoperateasfollows:
Thecontrolpanelcanbecleanedbyusingalightlydampenedcloth.
Aftercleaning,makesuretodryitthoroughly.
Fortheexterior,useagoodappliancepolishwax.
Neverusesharpobjects,scouringpadsorharshcleanersonanypartofthedishwasher.
Toremovetheuppersprayarm,screwoffthenutclockwisethenremove
thearm.

Theinstallationofthepipes
andelectricalequipments
shouldbedonebyprofessionals.
ElectricalShockHazard
Disconnectelectricalpowerbefore
installingdishwasher.
Failuretodosocanresultindeathor
electricalshock.
Theinstallationpositionofdishwashershouldbeneartheexistinginletanddrainhosesand
powercord.
Onesideofthecabinetsinkshouldbechosentofacilitatetheconnectionofdrainhosesof
thedishwasher.
Installationpreparation
Note:pleasechecktheaccompanyinginstallationaccessories(hookforaestheticpanel
,screw)
●
14
Aftereverywash,turnoffthewatersupplytothe
applianceandleavethedoorslightlyajarsothat
moistureandodoursarenottrappedinside.
Beforecleaningorperformingmaintenance,always
removetheplugfromthesocket.Donotrunrisks.
Whenyougoonholiday,itisrecommendthatyouruna
washcyclewiththedishwasheremptyandthenremove
theplugfromthesocket,turnoffthewatersupplyand
leavethedooroftheapplianceslightlyajar.Thiswillhelp
thesealstolastlongerandpreventodoursfromforming
withintheappliance.
Iftheappliancemustbemoved,trytokeepitinthevertical
position.Ifabsolutelynecessary,itcanbepositionedon
itsback.
Oneofthefactorsthatcauseodourstoforminthe
dishwasherisfoodthatremainstrappedintheseals.
Periodiccleaningwithadampspongewillpreventthis
fromoccurring.
Tocleantheedgearoundthedoor,youshoulduseonlyasoftwarm,dampcloth.
Toavoidpenetrationofwaterintothedoorlockandelectricalcomponents,donot
useaspraycleanerofanykind.
Neveruseaspraycleanertocleanthedoorpanelasitmaydamagethedoorlockandelectricalcomponents.
Abrasiveagentsorsomepapertowelsshouldnotbeusedbecauseoftheriskofscratchingorleavingspots
onthestainlesssteelsurface.
Tocleantheexteriorandrubberpartsofthedishwasher,
donotusesolventsorabrasivecleaningproducts.Spray
onsurfacecleanersshouldalsobeavoided,Theuseof
thesecleaningproductscouldresultinthesurfacebeing
damagedandthedevelopmentofrustandcorrosion.
Rather,useonlyaclothandwarmsoapywater.
Toremovespotsorstainsfromthesurfaceofthe
interior,useaclothdampenedwithwaterandalittle
vinegar,oracleaningproductmadespecificallyfor
dishwashers.
15
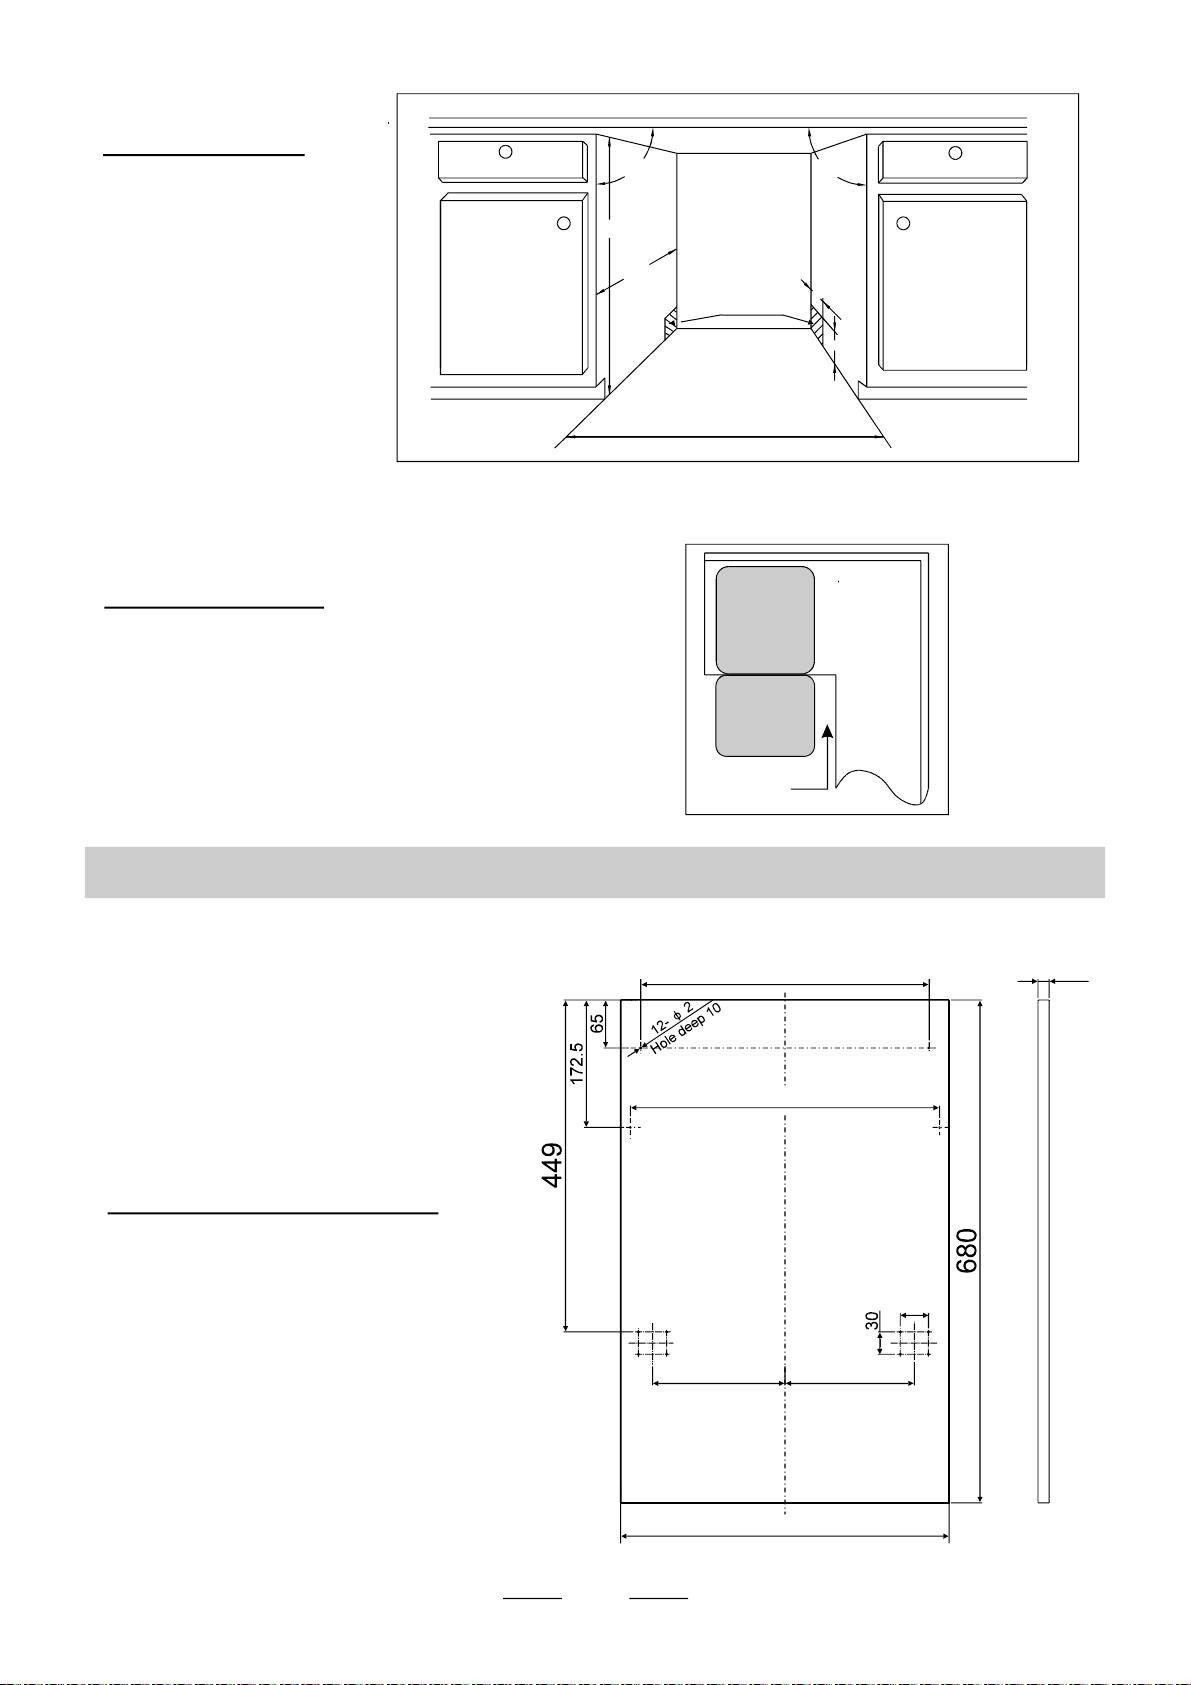
Minimumspacewhen
thedoorisopened
【Figure2】
Cabinetdimensions
【Figure1
】
Lessthan5mm
betweenthetop
ofdishwasherand
cabinetandthe
outerdooraligned
tocabinet.
90 °
90 °
450mm
820mm
100
580mm
80
Spacebetweencabinet
bottomandfloor
Electrical,drainand
watersupplyline
entrances
Cabinet
Dishwasher
Doorof
dishwasher
Minimumspaceof50mm
1
Theaestheticwoodenpanelcouldbeprocessedaccordingtothefigure3
Theaestheticpanelshould
beprocessedinaccordance
withtheillustrateddimensions
【Figure3
】
● Aestheticpanel'sdimensionsandinstallation
15
444
390
418
179 175
38
16
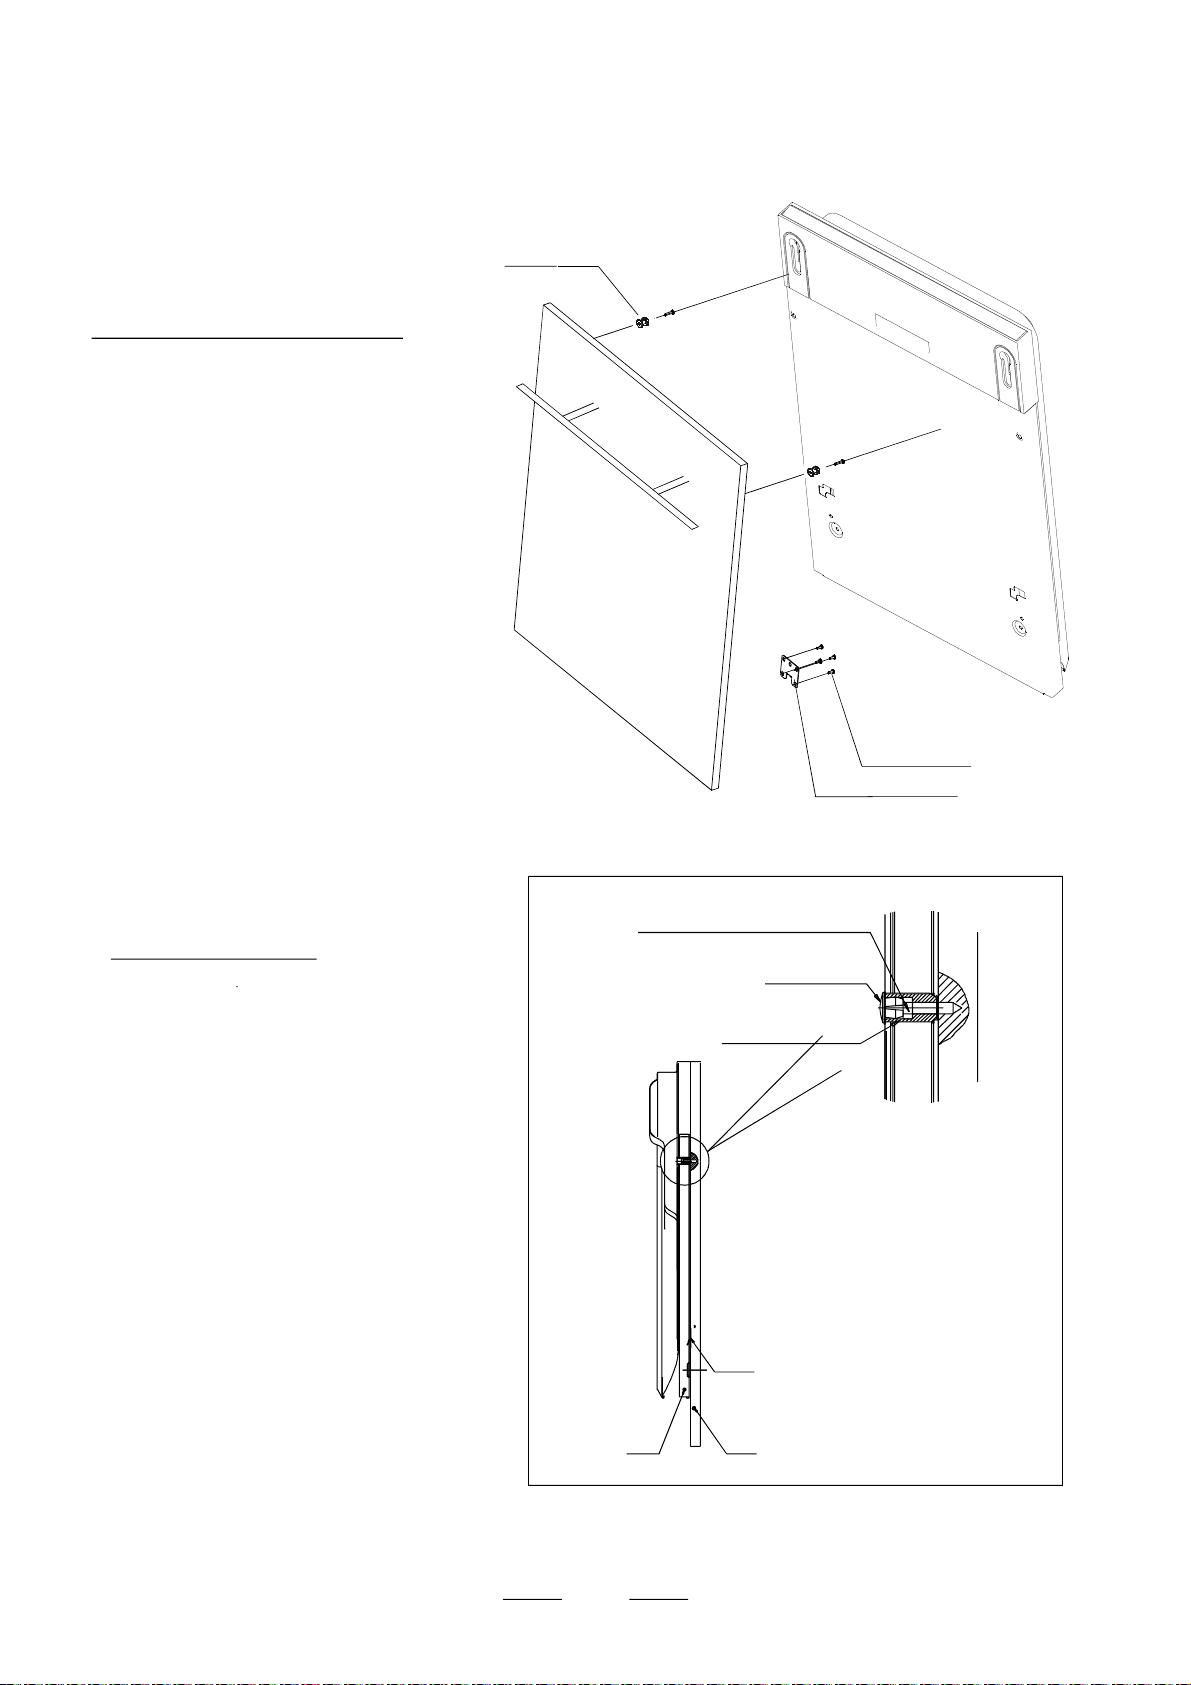
Installationofaestheticpanel
【Figure4a
】
2Installthehookontheaestheticwoodenpanelandputthehookintotheslotoftheouterdoorof
dishwasher(seefigure4a).Afterpositioningofthepanel,fixthepanelontotheouterdoorby
screwsandbolts(Seefigure4b).
Installationofaesthetic
woodenpanel
【Figure4b
】
.Takeawaythecover
.Pinupthescrew
.Getbackthecover
1
2
3
Hophook
St4countersunk
headscrew
Lowerhook
Furnituredoor
Hookforaestheticdoor
Outerdoorof
dishwasher
Spacerforfurnituredoor
Cover
4X18screw
17
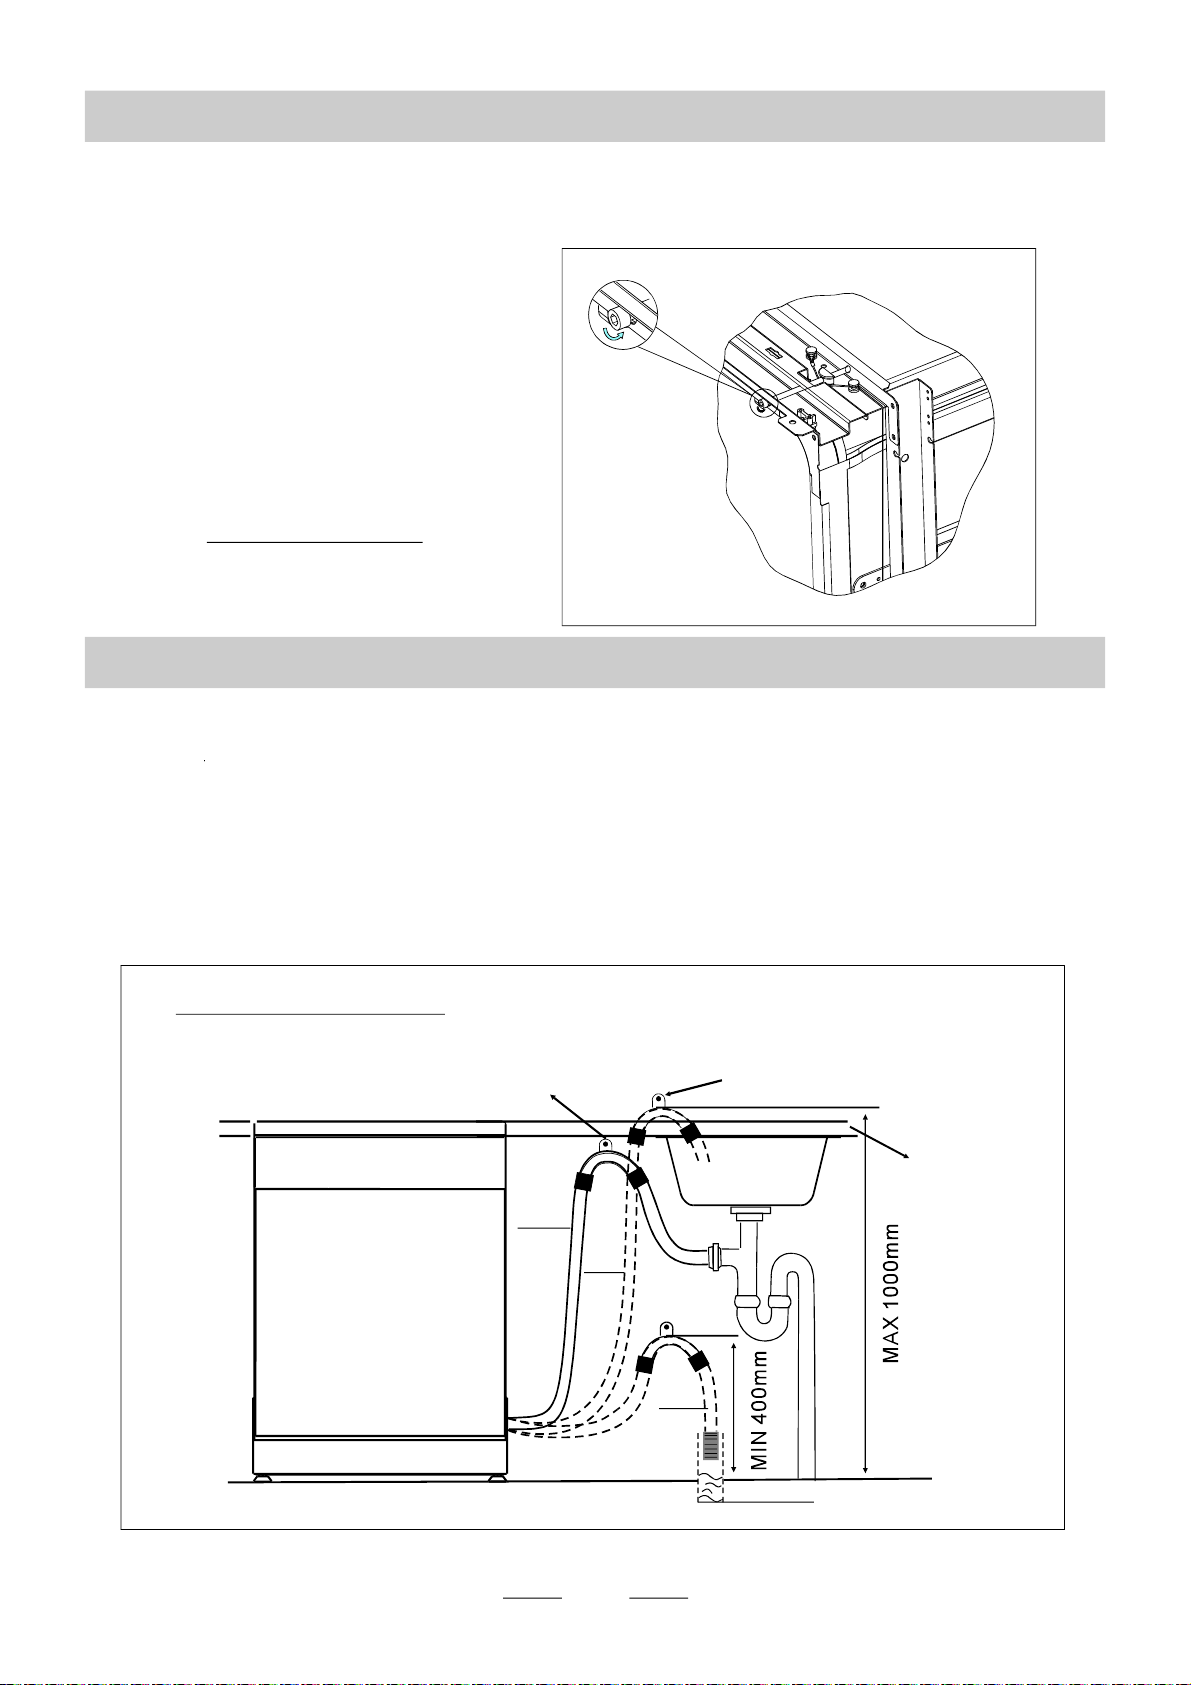
Tensionadjustment
ofthedoorspring
【Figure5】
Tensionadjustmentofthedoorspring
●
Connectionofdrainhoses
●
Thedoorspringsaresetatthefactorytothepropertensionfortheouterdoor.Ifaesthetic
woodenpanelareinstalled,youwillhavetoadjustthedoorspringtension.Rotatetheadjusting
screwtodrivetheadjustortostrainorrelaxthesteelcable(seefigure5).
relax
Adjustthedoorspring
tensionuntilthedoor
remainsbalanceinthe
fully-openedposition.
Insertthedrainhoseintoadrainpipewithaminimumdiameterof4cm,orletit
runintothesink,makingsuretoavoidbendingorcrimpingit.Usethespeical
plasticsupportthatcomeswiththeappliance(figure6).Thetopofthehosemustbeat
aheightbetween40and100cm.Thefreeendofthehosemustnotbeimmersedin
watertoavoidthebackflowofit.ATTENTION:Thespecialplastichosesupportmustbe
solidlyfastenedtothewalltopreventthedrainhosefrommovingandallowingwater
tospilloutsidethedrain.
Drainpipeconnection
【Figure6】
φ 40mm
A
B
C
Counter
Front
Drainpipe
Drainhosehook
Closethedrainhosehooktothecounter
NOTE
Thetopofthehose
mustbeataheight
between
40and100cm.
Thefreeendofthe
hosemustnotbe
immersedinwater.
18
【Figure7】
8
5
SCREW
RUBBER
COVER
1
7
2
6
SCREW
CONEGEAR
6B
6A
Dishwasherinstallationsteps
●
.
.
.
.
1
2
3
4
5
9
Installthefurnituredoortotheouterdoorofthedishwasherusingthebracketsprovided.Refer
tothetemplateforpositioningofthebrackets.
AdjustthetensionofthedoorspringsbyusinganAllenkeyturninginaclockwisemotionto
tightentheleftandrightdoorsprings.Failuretodothiscouldcausedamagetoyourdishwasher
(Illustration2)
Connecttheinlethosetothecoldwatersupply
Connectthedrainhose.Refertodiagram(Figure6)
Connectthepowercord
Affixthecondensationstripundertheworksurfaceofcabinet.Pleaseensurethecondensation
stripisflushwithedgeofworksurface.
Placethedishwasherintoposition.
Levelthedishwasher.Therearfeetcanbeadjustedfromthefrontofthedishwasherbyturning
thescrewsontheleftandrighthandsideofthecabinet(Illustration6A).Toadjustthefrontfeet,
useawrenchandturnthefrontfeetuntilthedishwasherislevel(Illustration6B).
Thedishwashermustbesecuredinplace.Therearetwowaystodothis:
A.Normalworksurface-securetotheworksurfacebyusingtwowoodscrewsensuringthe
dishwasherweightisnotbeinghitbythesurface(Illustration7).
B.Marbleorgraniteworktop-securethebrackettothesidepanelofthedishwasherandsecure
thedishwashertothefurniturehousing.Puttherubbercapoverthescrew(Illustration8).
6
7
8

Dishwashermustbelevelforproperdishrackoperationandwashperformance.
Placelevelondoorandracktrackinsidethetubasshowntocheckthatthe
dishwasherislevel.
levelthedishwasherbyadjustingthefourlevelinglegsindividually.
eae
1
2
3Whenlevelthedishwasher,plspayattentionnottoletthedishwashertipover.
Illustrationoffeetadjustment
【Figure8
】
NOTE:
Themaximumadjustment
heightofthefeetis60mm.
19
Thisappliancemustbeearthed.Intheevent
ofamalfunctionorbreakdown,earthingwill
reducetheriskofelectricshockbyprovidinga
pathofleastresistancefortheelectriccurrent.This
applianceisequippedwithacordhavingan
equipment-earthingconductorandanearthing
plug.Theplugmustbepluggedintoanappropriate
outletthatisinstalledandearthedinaccordance
withalllocalstandardsandrequirements.
Improperconnectionoftheequipment-
groundingconductorcanresultintherisk
ofanelectricshock.Checkwithaqualified
electricianorservicerepresentativeifyou
areindoubtwhethertheapplianceis
properlygrounded.Donotmodifytheplug
providedwiththeappliance;Ifitisnotfit
fortheoutlet.Haveaproperoutletinstalled
byaqualifiedelectrician.
n
n
Ensurethevoltageandfrequencyofthepowerbeingcorrespondsto
thoseontheratingplate.Onlyinserttheplugintoanelectricalsocketwhichisearthed
properly.Iftheelectricalsockettowhichtheappliancemustbeconnectedisnot
appropriatefortheplug,replacethesocket,ratherthanusingaadaptorsorthelikeas
theycouldcauseoverheatingandburns.
Pleaselookattheratinglabeltoknowtheratingvoltageandconnectthedishwashertotheappropriatepowersupply.
Usetherequiredfuse10amp,timedelayfuseorcircuitbreakerrecommendedandprovideseparatecircuitserving
onlythisappliance.
WARNING!
Forpersonalsafety:
DONOTUSEANEXTENSIONCORDORANADAPTERPLUGWITHTHISAPPLIANCE.
DONOT,UNDERANYCIRCUMSTANCES,CUTORREMOVETHEEARTHING
CONNECTIONFROMTHEPOWERCORD.
Checklever
fronttoback
Checkleversidetoside

20
Inordertoavoidthatthereismorewaterstayingintheinlethose,
pleaseclosethehydrantafterusing.(Forthemodels:nosafetyinlethose.)
PositioningtheAppliance
Thefollowingthingsshouldbecheckedbeforestartingthedishwasher.
Thecontentofthismanualisveryhelpfultotheusers.
Afterinstallation,pleasemakesuretokeepthismanual.
1 Thedishwasherislevelandfixedproperly.
2 Theinletvalveisopen.
3 Thereisnoleakageattheconnectionsoftheconducts.
4 Thewiresaretightlyconnected.
5 Thepowerisswitchedon.
6 Theinletanddrainhosesarenotknottedandkinked.
7 Allpackingandprintingmaterialsshouldbetakenoutofthedishwasher.
Connectthecoldwatersupplyhosetoathreaded3/4(inch)connectorandmakesure
thatitisfastenedtightlyinplace.
Ifthewaterpipesareneworhavenotbeenusedforanextendedperiodoftime,letthe
waterruntomakesurethatthewaterisclear.Thisprecautionisneededtoavoidthe
riskofthewaterinlettobeblockedanddamagetheappliance.
Positiontheapplianceinthedesiredlocation.Thebackshouldrestagainstthewallbehindit,andthesides,
alongtheadjacentcabinetsorwalls.Thedishwasherisequippedwithwatersupplyanddrainhosesthatcan
bepositionedeithertotherightortheleftsidestofacilitateproperinstallation.
WaterOutlet(Drainhose)
Connectthewaterdrainhose.Thedrainhosemustbecorrectlyfittedtoavoidwaterleaks.
Ensurethatthewaterinlethoseisnotkinkedorsquashed.
Drilloutspigot13mmpriortofittingdrainhose.
ExtensionHose
Ifyouneedadrainhoseextension,observetouseasimilardrainhose.
Itmustbenolongerthan4metres;otherwisethecleaningeffectofthedishwashercouldbereduced.
SyphonConnection
Thewasteconnectionmustbeataheightofbetween40cm(minimum)and100cm(maximum)
fromthebottomofthedish.Thewaterdrainhoseshouldbefixedbyahoseclip.
Inordertoavoidmorewaterstayingintheinlethose,
pleaseclosethehydrantafterusing.(Forthemodels:nosafetyinlethose.)
Ifthesinkis1000mmhigherfromthefloor,theexcesswaterinhosescannot
bedraineddirectlyintothesink.Itwillbenecessarytodrainexcess
waterfromhosesintoabowlorsuitablecontainerthatisheldoutsideandlower
thanthesink.
21
Fuseblown,orthe
circuitbreakertriggered
Replacefuseorresetcircuitbreaker.Removeanyother
appliancessharingthesamecircuitwiththedishwasher
Spilledrinse-aid
Alwayswipeuprinse-aidspillsimmediately.
Hardwaterminerals
Asprayarmis
knockingagainst
aniteminabasket
Itemsofcrockery
arelooseinthe
washcabinet
Thismaybecaused
byon-siteinstallation
orthecross-sectionof
thepiping.
Tocleantheinterior,useadampspongewith
dishwasherdetergentandwearrubbergloves.
Neveruseanyothercleanerthandishwasher
detergentfortheriskoffoamingorsuds.
Interrupttheprogramme,andrearrangetheitems
whichareobstructingthesprayarm.
Interrupttheprogramme,
andrearrangetheitemsofcrockery.
Thishasnoinfluenceonthedishwasherfunction.
ifindoubt,contactasuitablyqualifiedplumber.
Detergentwith
colourantwasused
Makesurethatthedetergentistheonewithout
colourant.
Improperdetergent
Makesurethedishwasheristurnedonandthedooris
closedsecurely.
Checkthatthewatersupplyisconnectedproperlyand
thewateristurnedon.
Makesuretoclosethedoorproperlyandlatchit.
Makesurethepowercordisproperlypluggedintothe
wallsocket.
Powersupplyisnot
turnedon
Errorcode:E1;
Waterpressureislow
Doorofdishwasher
notproperlyclosed.
Kinkindrainhose
Filterclogged
Kitchensinkclogged
Checkdrainhose.
Checkcoarsethefilter
(seesectiontitled"CleaningTheFilter")
Checkthekitchensinktomakesureitisdrainingwell.
Iftheproblemisthekitchensinknotdraining,youmay
needaplumberratherthanaservicemanfordishwashers.
Useonlythespecialdishwasherdetergenttoavoid
suds.Ifthisoccurs,openthedishwasherandletsuds
evaporate.Add1gallonofcoldwatertothetub.Close
andlatchthedishwasher,thenStartthe"soak"wash
cycletodrainoutthewater.Repeatifnecessary.
Technical
problems
General
problems
Noise
Theaffecteditemsare
notcorrosionresistant.
Theitemsshouldbecorrosionresistant.
22
Thedisheswerenot
loadedcorrectly.
Seenotesin"LoadingtheDishwasherBaskets".
Selectamoreintensiveprogramme.
See"WashCycleTable".
Usemoredetergent,orchangeyourdetergent.
Rearrangetheitemssothatthespraycanrotatefreely.
Cleanand/orfitthefiltercombinationcorrectly.
Cleanthesprayarmjets.See"CleaningtheSpray
Arms".
Uselessdetergentifyouhavesoftwaterandselect
ashortestcycletowashtheglasswareandtoget
themclean.
Useamildabrasivecleanertoeliminatethosemarks.
Re-loadingthedishesproperly.
Loadthedishwasherassuggestedinthedirections.
Increasetheamountofrinse-aid/refilltherinse-aid
dispenser.
Donotemptyyourdishwasherimmediatelyafter
washing.Openthedoorslightlysothatthesteamcan
escape.Beginunloadingthedishwasheronlyoncet
hedishesarebarelywarmtothetouch.Emptythelow
basketfirst.Thispreventswaterformdroppingoff
dishesintheupperbasket.
Inshortprogramthewashingtemperatureislower.
Thisalsolowerscleaningperformance.Choose
aprogramwithalongwashingtime.
Waterdrainageismoredifficultwiththeseitems.
Cutleryordishesofthistypearenotsuitablefor
washinginthedishwasher.
Theprogrammewas
notpowerfulenough.
Notenoughdetergent
wasdispensed.
Itemsareblocking
thepathofsprayarms.
Thefiltercombination
inthebaseofwash
cabinetisnotcleanor
isnotcorrectlyfitted.
Thismaycause
thesprayarmjets
togetblocked.
Combinationofsoft
waterandtoomuch
detergent.
Aluminumutensils
haverubbedagainst
dishes.
Dishesblock
detergentcups.
Improperloading
Toolittlerinse-aid
Dishesareremoved
toosoon
Wrongprogram
hasbeenselected
Useofcutlerywith
alow-qualitycoating
Unsatis
-factory
washing
result
Unsatis
-factory
drying
result
WARNING!
Ifoverflowoccurs,turnoffthemainwatersupplybeforecallingaservice.
Ifthereiswaterinthebasepanbecauseofanoverfillorsmallleak,
thewatershouldberemovedbeforerestartingthedishwasher.
Longerinlettime.
Faucetsisnotopened,orwaterintakeisrestricted,orwaterpressure
istoolow.
Malfunctionoftemperaturesensororofheatingelement.
Shortcircuitorbreakoftemperaturesensor
Opencircuitorbreakoftemperaturesensor
Longerheatingtime,
butnotreachingrequiredtemperature
Failureoftemperaturesensor
Failureoftemperaturesensor
Someelementofdishwasherleaks.
Overflow.
Longerdrainingtime.
Theinstallationpositionofthedrainpipeistoohigh.
23
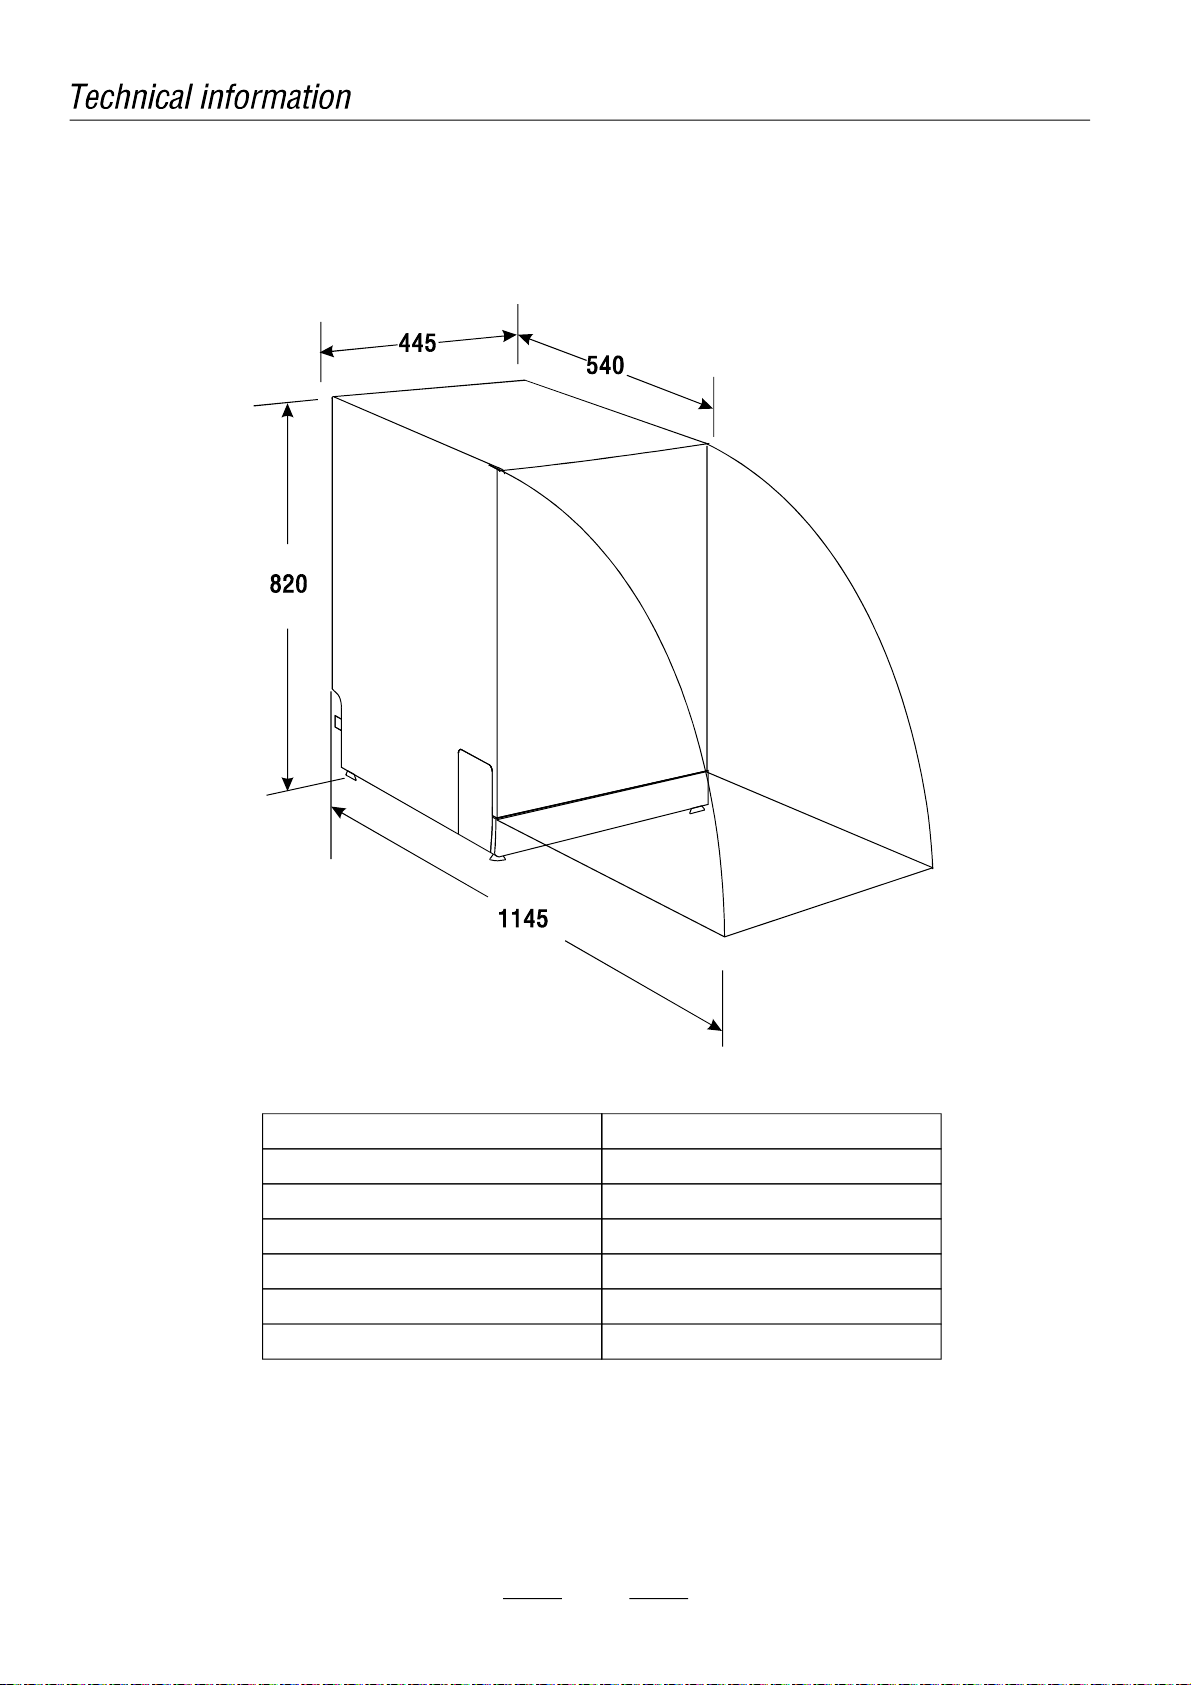
Height:820mm(adjustable+60mm)
Width:445mm
Depth:540mm
VoltageconnectedLoad:seeratinglabel
Waterpressure:0.04-1.0MPa
Powersupply:seeratinglabel
Capacity:8Placesettings

Warranty Card
Worldwide Appliances Pty Limited
A.B.N. 45868077422
Distributed by Eurolinx pty Ltd
Oce:
48-50 Moore Street, Leichhardt N.S.W 2040
Post:
Locked Bag 3000, Annandale, N.S.W 2038
P: 1300 694 583
WARRANTY REGISTRATION
Your ongoing satisfaction with your artusi
product is important to us. We ask that you
complete the enclosed Warranty Registration
Card and return it to us so that we have a record
of the artusi product purchased by you.
PRIVACY
Worldwide Appliances respects your
privacy and is committed to handling your
personal information in accordance with the
National Privacy Principles and the Privacy
Act 1988 (Cth). A copy of the Worldwide
Appliances Privacy Policy is available at
www.artusi.com.au. Worldwide Appliances will
not disclose any personal information set out
in the Warranty Registration Card (“Personal
Information”) without your consent unless
required by:
1. law;
2. any Worldwide Appliances related company;
3. any service provider which provide services
to artusi or assist artusi in providing services
(including repair and warranty services) to
customers. Our purpose in collecting the
Personal Information is
to keep a record of the artusi product purchased
by you, in order to provide a better warranty
service to you in the unlikely event that there is
a problem with your artusi product. Worldwide
Appliances may contact you at any one or more
of the address, email address or telephone
numbers set out in the Warranty Registration
Card. Please contact artusi on 1300 694
583 should you not wish to be contacted by
Worldwide Appliances.
WARRANTY
1. Warranty
Worldwide Appliances warrants that each artusi
product will remain, for a period of either 12
months or 24 months of warranty. All Warranties
are valid from the original date of purchase, And
warranty claims must be accompanied by the
proof of purchase.
24 months warranty products:
All Built-in Appliances – Limited to Ovens,
Gas, Induction and Electric Cooktops, and All
Rangehoods. Freestanding Cookers - Gas and
Electric Models (900mm Width).
artusi.com.au
Dishwashers - Freestanding, Fully Integrated,
Semi Integrated and built-in. All Wine coolers. All
Dryers.
12 months warranty products:
Freestanding Cookers - Gas and Electric Models
in 50cm, 54cm and 60cm Widths
Portable Appliances* – Benchtop Models and
Portable Gas Models
2. What is not Covered by the Warranty.
The Warranty does not apply if an artusi product
is defective by a factor other than a defect arising
in the manufacture of the artusi product, including
but not limited to:
(a) damage through misuse (including failure
to maintain, service or use with proper care),
neglect, accident or ordinary wear and tear
(including deterioration of parts and accessories
and glass breakage);
(b) use for purpose for which the artusi product
was not sold or designed;
(c) use or installation which is not in accordance
with any specied instructions for use or
installation;
(d) use or operation after a defect has occurred or
been discovered;
(e) damage through freight, transportation or
handling in transit (other than when Worldwide
Appliances is responsible);
(f) damage through exposure to chemicals, dusts,
residues, excessive voltage, heat, atmospheric
conditions or other forces or environmental
factors outside the control or Worldwide
Appliances;
(g) repair, modication or tampering by the
purchaser or any person other than Worldwide
Appliances, an employee of Worldwide
Appliances or an authorised artusi service
contractor*;
(h) use of parts, components or accessories
which have not been supplied or specically
approved by artusi.
(i) damage to surface coatings caused by cleaning
or maintenance using products not recommended
in the artusi product handbook provided to the
purchaser upon purchase of the artusi product;
(j) damage to the base of an electric oven due to
items having been placed on the base of the oven
cavity or covering the base, such as aluminium
foil (this impedes the transfer of heat from the
element to the oven cavity and can result in
irreparable damage); or
(k) damages, dents or other cosmetic
imperfections not aecting the performance of the
artusi in respect of an artusi product purchased
as a “factory second” or from display
The Warranty does not extend to light globes
used in artusi products.
3. Domestic Use
Each artusi product is made for domestic use.
This Warranty may not extend to artusi products
used for commercial purposes.
Continued over...
Artusi Warranty May 2015.indd 1 29/04/2015 10:29 am

4. Time for Claim under the Warranty
You must make any claim under this Warranty
within twenty eight (28) days after the occurrence
of an event which gives rise to a claim pursuant
to the Warranty, by booking a service call on the
telephone number below.
5. Proof of Purchase
Customers must retain proof of purchase in order
to be eligible to make a warranty claim in respect
of an artusi product.
6. Claiming under the Warranty
Customers will bear the cost of claiming under
this Warranty unless Worldwide Appliances
determines the expenses are reasonable, in which
case the customer must claim those expenses
by providing written evidence of each expense
to Worldwide Appliances at the address on the
Warranty Registration Card.
7. Statutory Rights
(a) These terms and conditions do not aect your
statutory rights.
(b) The limitations on the Warranty set out in this
document do not exclude or limit the application
of the consumer guarantees set out in the Act or
any other equivalent or corresponding legislation
in the relevant jurisdiction where to do so would:
(i) contravene the law of the relevant jurisdiction;
or
(ii) cause any part of the Warranty to be void.
(c) Worldwide Appliances excludes indirect or
consequential loss of any kind (including, without
limitation, loss of use of the artusi product) and
(other than expressly provided for in these terms
and conditions) subject to all terms,
conditions and warranties implied by custom, the
general law, the Act or other statute.
(d) The liability of Worldwide Appliances to you
for a breach of any express or non-excludable
implied term, condition or warranty is limited at
the option of Worldwide Appliances to:
(i) replacing or repairing the defective part of the
artusi product;
(ii) paying the cost of replacing or repairing the
defective part of the artusi product;
(iii) replacing the artusi product; or
(iv) paying the cost of replacing the artusi
product.
(e) Our goods come with guarantees that cannot
be excluded under the Australian Consumer
Law. You are entitled to a replacement or refund
for a major failure and for compensation for any
other reasonably foreseeable loss or damage.
You are also entitled to have the goods repaired
or replaced if the goods fail to be of acceptable
quality and the failure does not amount to a
major failure.
8. Defects
Any part of an artusi product deemed to be
defective and replaced by Worldwide Appliances
is the property of Worldwide Appliances.
Worldwide Appliances reserves the right to
inspect and test artusi products in order to
determine the extent of any defect and the
validity of a claim under the Warranty.
All warranty service calls must be booked via
the customer care department. The team can
be contacted on 1 300 85 64 11 option 1 or
customercare@eurolinx.com.au
01052015
Warranty Card continued
artusi.com.au
2
Please complete and send to ARTUSI at: REPLY PAID 83617
LEICHHARDT NSW 2040
Last Name: First Name:
Address:
State: Postcode: Email:
Home Phone: Mobile:
Purchase Date: / / (Please attach proof of purchase to validate warranty)
MODEL NUMBER
SERIAL NUMBER
(if you cannot locate the serial number please call ARTUSI on 1300 856 411)
1
2
3
4
WARRANTY REGISTRATION CARD
01052015
01052015
Warranty Card tear off
Artusi Warranty May 2015.indd 2 29/04/2015 10:29 am