Centrifugal Juicer
U ser Manual
SIF-10011
Facebook: @sifenefans
Message: @sifenefans
Email:[email protected]

Contents
C hapter 1 Precautions for safe use
C hapter 2 Parts and their functions
C hapter 3 D irections for use
C hapter 4 M aintenance
C hapter 5 Safety indexes
C hapter 6 F ault analysis and elimination
Foreword
Thank you for using our juicer. F or correct use and maintenance of the product, we have specially
com piled this U ser’s M anual. P lease read it carefully before using the product and keep it for future
reference.
This U ser’s M anual is suitable for our
SIF-10011 juicers only. We reserve the right of final interpretation
of it. All contents herein are your reference for use and m aintenance only. Please consult our custom er
service department about matters not mentioned herein and give us your valuable criticism s and
suggestions. We hope to make your life warm , convenient and healthy through our products.
Chapter 1: Precautions for safe use
1. M ake sure the product has an input voltage of AC 120V~60H z before use.
2. D isconnect the power supply before dism antling, assembling or adjusting any part.
3. The product has Y type connection. If the power cable is damaged, contact our customer service
department or have it replaced by a designated service center directly.
4. Before use, check whether any parts such as the power cable or the plug is damaged and, if it is,
stop using the product and contact our customer service departm ent promptly.
5. If product m aintenance is necessary after use, contact our custom er service departm ent or have the
maintenance done by a designated service center directly. It is dangerous to dismantle the product
by yourself.
6. Before connecting the power supply, m ake sure the detachable parts such as the juice strainer and
the top cover are all properly installed.
7. When the product is runnin g, never put hands or sharp articles into its feed opening, replace the
pushing rod with any object, or have eyes close to the feed opening as this m ay cause accidents to
happen.
8. Keep the juice strainer and m otor wheels away from the operator’s body and other hard foreign
objects when the product is running to avoid personal injuries and product damage.
9. After juicing, do not dism antle the detachable parts of the product until the m otor and the juice
strainer have both stopped and the power supply has been disconnected.
10. Operate with the rated operating time strictly: Juice continually for 1 minute each tim e, at most.
After ending any function above, stop for 2 minutes to end a cycle. Stop for 15 to 20 minutes after
3 successive cycles and start again after the motor has cooled down. This practice can prolong life
of the product.
11. If the product stops running while in use, it is possibly caused by the tem perature protection of the
motor. D isconnect the power supply for cooling and use the product 15 to 20 m inutes later.
12. To avoid deformation and dam age caused by heat, do not disinfect any accessories in hot water
above 80℃ or microwave ovens. P arts of the juicer in contact with food materials should be clean,
hygienic, reliable and in com pliance with relevant food hygien e certification.
13. D o not place main unit of the product into water or other liquids, or flush out with water or other
liquids (it can be wiped with a soft cloth).
14. D o not clean th e product with steel wool, abrasive cleansers, or corrosive liquids (such as gasoline
or acetone).
15. Put the product in a place out of reach of children. U se or play of the product by persons with
disabled limbs, sensory or mental disorders, or by persons without relevant experience or
knowledge (including children) is forbidden.
16. D o not process any fruits or vegetables with cores, hard seeds, shells, or thick skins until their cores,
hard seeds, shells, or thick skins have been removed.
17. This product is suitable for individuals and/ or fam ilies only.
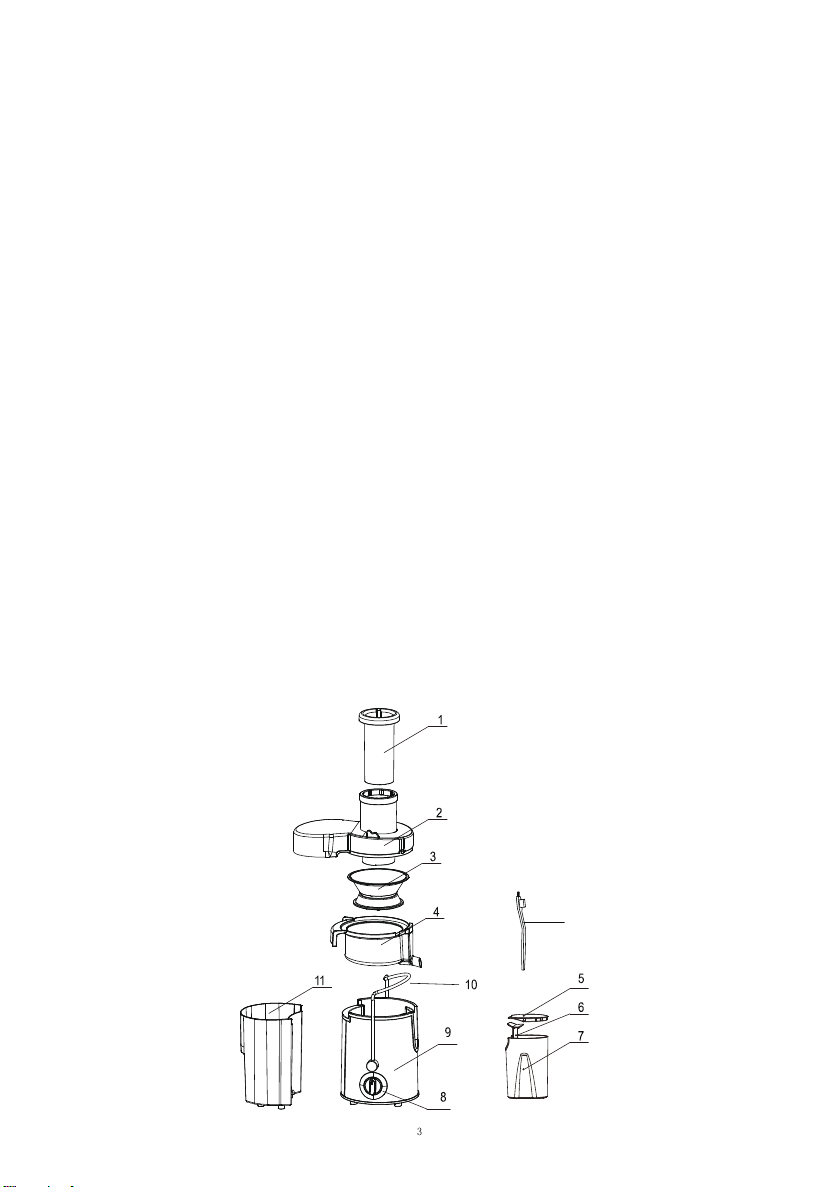
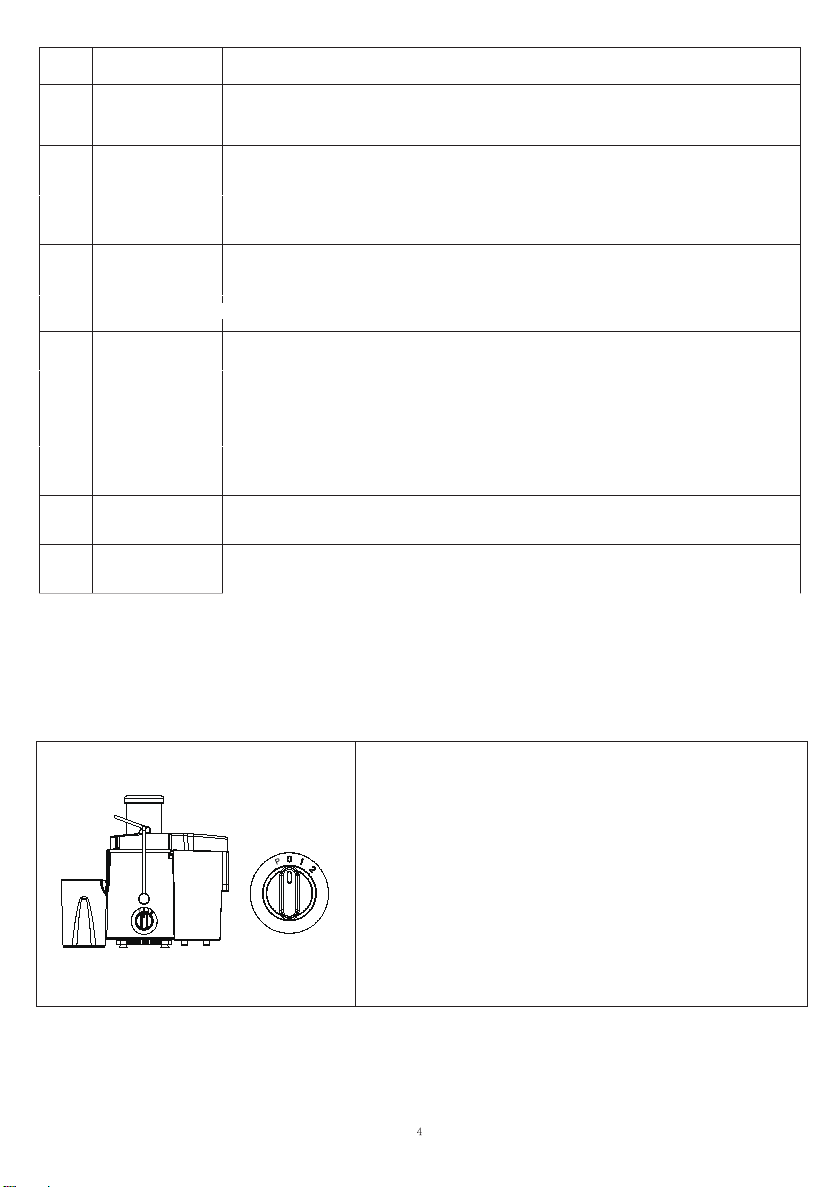
Chapter 2: Parts and their functions
12
N o. Part F unction
1 Pushing rod
F or gently pushing the food materials in food m aterial feeding to ensure full
contact between the food materials and the juice strainer and im prove
juicing efficiency.
2 Top cover
F or connecting with the main unit. As a key part for juicing and safety
protection.
3 Juice strainer
F or cutting food m aterials by the cutter holder at its bottom , filtering juice,
and separating fruit residue by the lateral strainer.
M iddle ring
F or discharging the juice separated by the juice strainer by m eans of pressing.
Juice cup cove Put cover on the juice cup to keep foreign bodies out when accepting juice.
To separate the fruit juice from foam .
A container for accepting juice; easy for cleaning.
F or controlling the operating status (including inching, low speed, and high
speed) of the product.
As the main part of the product, it contains parts such as the m otor an d
serves as the power source of the product.
Baffle
Juice cup
Knob switch
M ain unit
Pull rod
A key com ponent for starting the safety switch and locking the body an d
header to allow the machine under n orm al working condition.
4
5
6
7
8
9
10
11
F ruit
cup
reside F or collecting the fruit residue separated by the juice strainer by means of
pressing.
G ears
0: F or closing and stopping
Inching: Inching
1: A low-speed gear for processing soft fruits and vegetable
Chapter 3: D irections for use
C lean the parts in contact with food materials thoroughly before using the product for the first tim e
(see the content of “C hapter 4 M aintenance” ).
s
such as watermelons, tom atoes, cucumbers and
strawberries.
2: A high- speed gear for processing all fruits and vegetables
(see
“II. Tips for fruit selection” under “ D irections for use”
for the selection of fruits, vegetables and gears)
I. U se of product
The product is designed with a dual-action safety system and can run after all parts are correctly
installed. Install and use the product following the steps below.
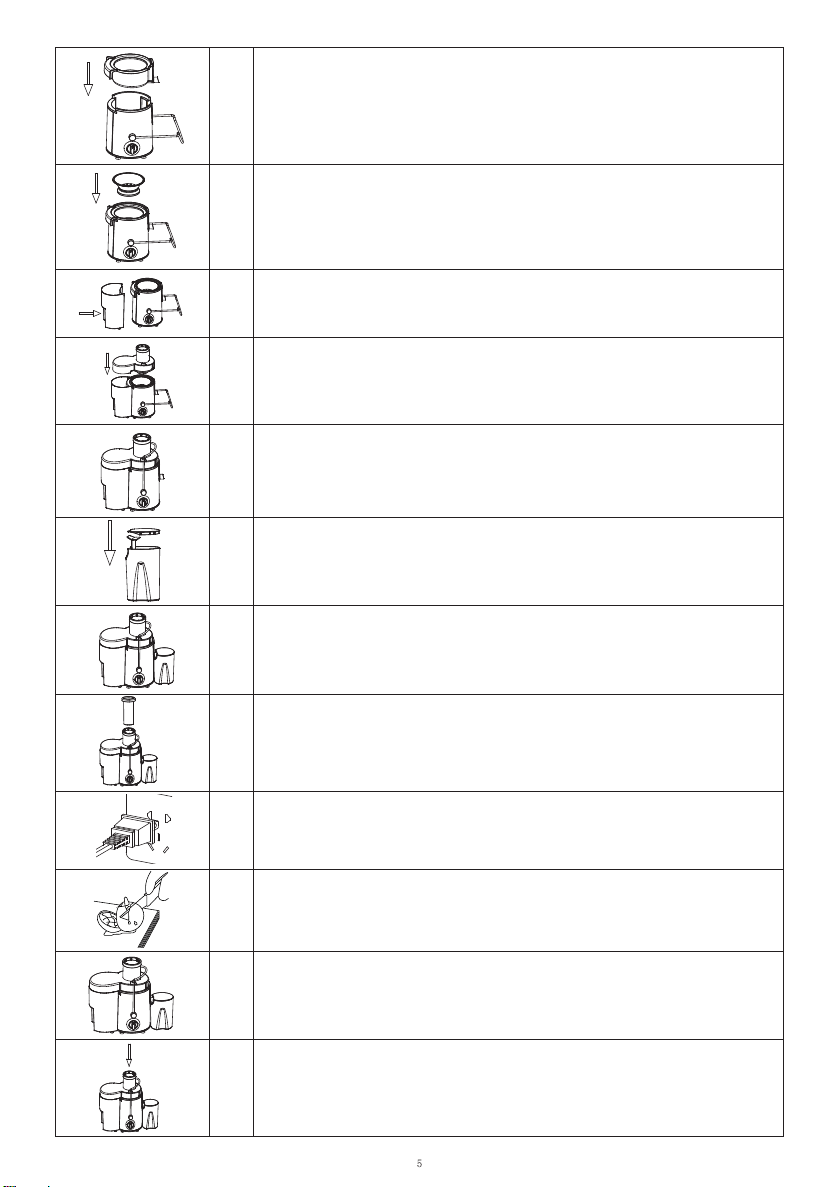
1 Install m iddle ring on the body. P roper installation is required.
2
Put the juice strainer into the middle ring and properly install it on the
motor wheel (before use, check whether the juice strainer is dam aged
and, if it is, do not use the product and contact a designated service
center).
3 Install the pom ace cup.
4
Put the header right above on the body and properly install it as per
the direction indicated on the header.
5
Put the pulling rod inside the two grooves of the header until
com pletely in place or the product will not work norm ally.
6
Allow the fruit juice cup baffle to slide in the juice cup along th e neck.
Put on the cup cover.
7 Put juice cup under the outlet.
8
Align the groove of the pushing rod with the flange inside the feeding
port and put the pushing rod inside the feeding port.
9
C onnect the power supply. (M ake sure the switch is off before
connecting the power supply).
10
C lean fruits and vegetables
and cut them into blocks suitable for the
food material inlet (remove hard seeds, shells, or thick skins of the
fruits and vegetables, if any, first).
11 Activate the switch, start working with working time ≤1min.
12 P ut the prepared fruit and vegetables in the feeding port.
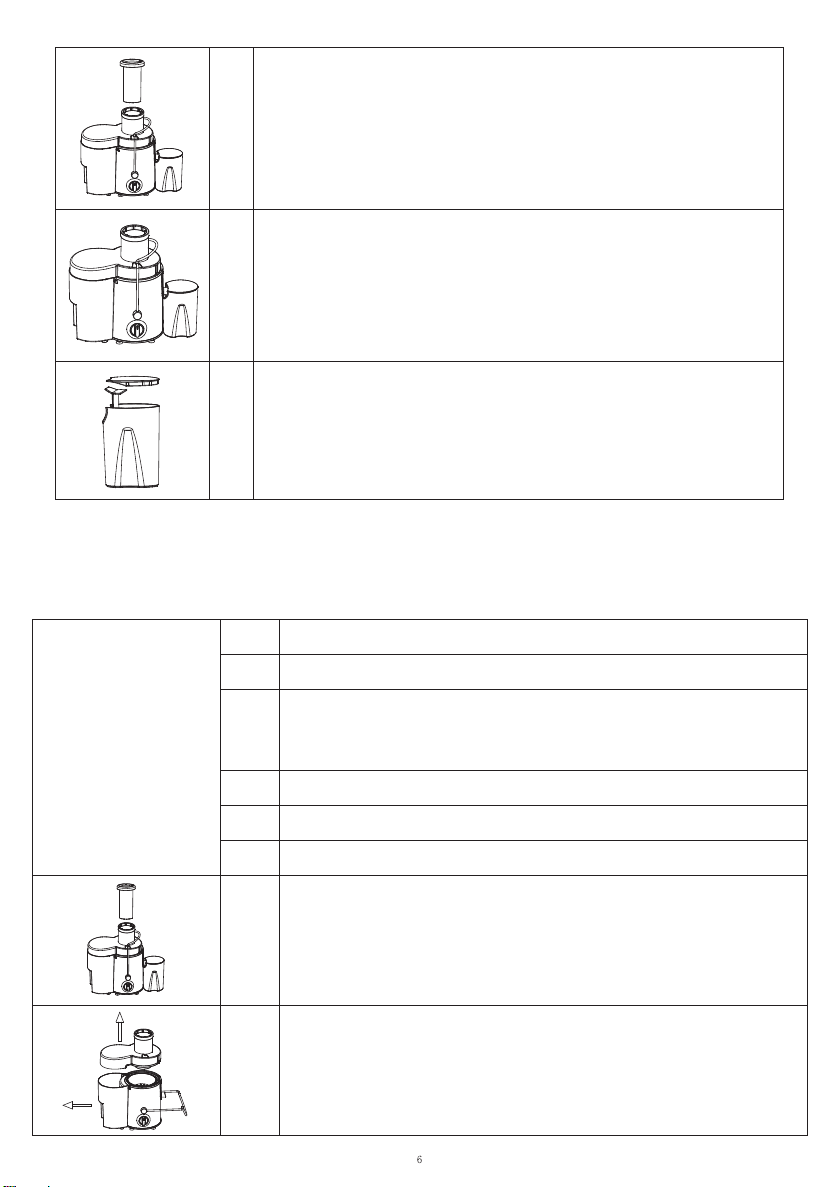
13
Push the blocks of fruit and vegetables gently through the feeding port
with the pushing rod. Too m uch excessive force will affect the juicing
efficiency.
(N ever put your fingers or other objects inside the feeding port!
D isconnect the power and clean the pomace cup when the pom ace or
juice cup is filled.)
14
When there is no longer juice flowing via the juice outlet after good
material processing, turn the switch off, disconnect the power supply
and take the juice cup from the juice nozzle after the motor and the
juice strainer have both stopped running (drink the juice soon,
otherwise its taste and nutrition will both be influenced after som e
tim e from exposure to air).
15
Take the j
uice cup away from the outlet nozzle when the motor and
juicing screen has completely stopped.
The foam baffle attached to the juice cup m ay help you obtain a cup
of foam less juice. The baffle m ay be neglected if juice with foam is
required.
Chapter 4: Maintenance
1 Turn the power switch off before cleaning the product.
2 Clean the product promptly after use.
3
Exterior of main unit of the product may be wiped with a wet cloth. D o not
place the main unit of the product into water or other liquids, or flush out with
water or other liquids.
4 Store th e product in a dry place without direct ultraviolet rays.
5 M ake sure the product is clean and dry before storing it.
6 Clean the detachable parts following the steps below.
1 Take out th e pushing rod.
2
Pull open the pull rod from right direction and take off the header.
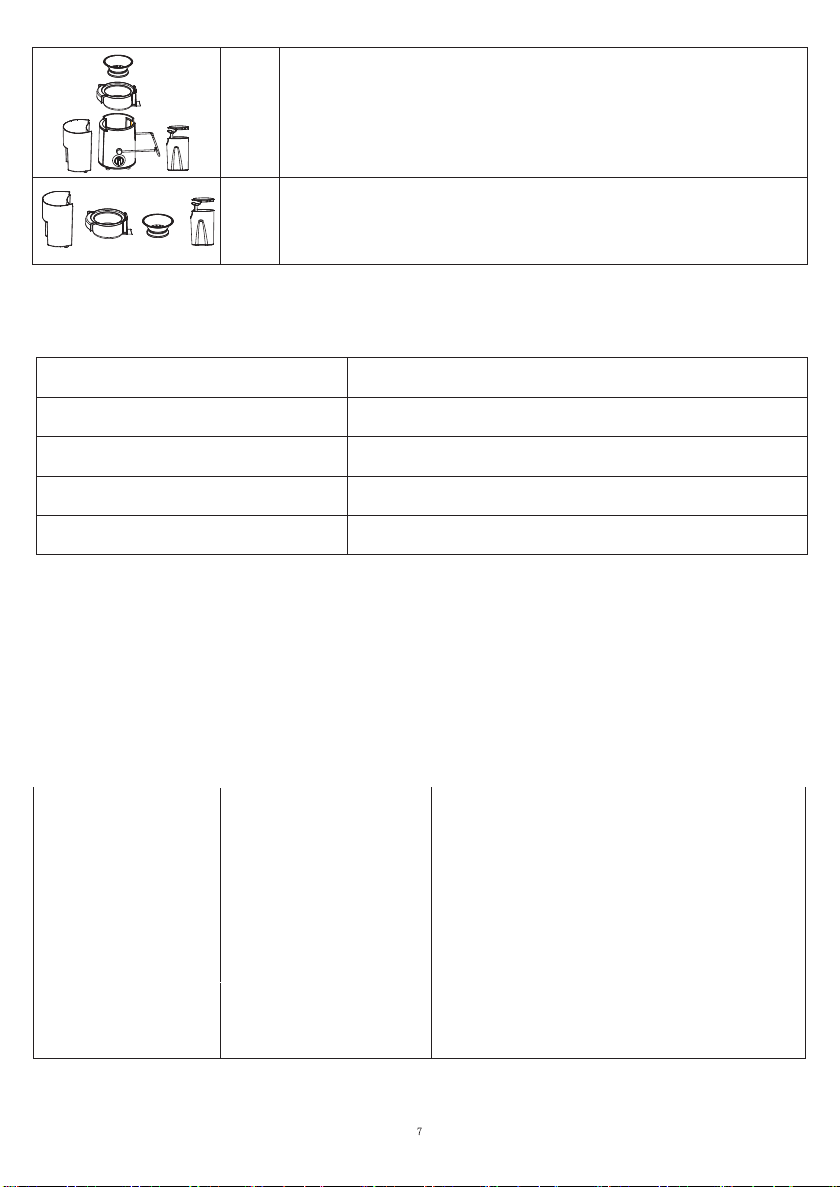
3 Remove the juice strainer and the middle rin g in order.
4
With water, clean the pomace cup, middle ring, juicing screen, and juice cup
successively.
Chapter 5: Safety indexes
As a class II electric appliance, this product needs no grounding device.
Chapter 6: Fault analysis and elimination
F ault Possible cause Elimination
After the power supply is
connected and the switch
is turned on, the product
does not run.
1. The m iddle ring is not
correctly in stalled.
2. The top cover is not
correctly in stalled.
3 The top cover contact has
fractured.
1. Install the m iddle ring correctly.
2. Install the top cover correctly.
3. R eplace the top cover.
There is a bad sm ell from
the motor the first few
tim es using the product.
It is n ormal.
If the bad smell still exists after the product has been
used several times, have the product tested by a
designated service center.
Rated voltage 120V~
Rated power 500W
Rated frequen cy 60H z
Continual juicin g time ≤1 min.
Time interval ≥2 min.

The product stops
autom atically while in use.
1. The voltage is too low.
2. There are too many food
materials in the product.
3. The pushin g was rod is
pushed too violently.
4. The m otor is under
temperature protection.
1. C h eck whether the voltage is too low.
2. D isconnect the power supply and rem ove th e surplus
food m aterials.
3. G ently push the pushin g rod.
4. Stop th e product and start it again 20 to 30 m inutes
later.
There is a lot of residue in
the juice.
1. The juice strainer is
damaged.
2. There is a lot of residue in
the middle ring.
1. Replace the juice strainer.
2. C lean th e middle ring.
The product has abnormal
vibration or big noise.
1. The juice strainer is not
correctly installed, resulting in
poor runnin g balance.
2. The product is not steadily
placed or the foot pad has
fallen off.
3. The voltage is too high; or
4. There are many food
materials in the product.
1. Install the juice strainer correctly.
2. P lace the product steadily or in stall the foot pad
correctly.
3. C heck whether the voltage is too high.
4. D isconnect the power supply and rem ove th e surplus
food m aterials.
There is very little juice.
1. There is a lot of residue in
the middle ring.
2. The pushin g rod was
pushed too violently.
1. C lean the m iddle ring.
2. G ently push the pushing rod.
The cutter holder is
seized.
The cutter holder is wound or
seized by food m aterials.
D isconnect the power supply, take out the food
materials and cut them into smaller blocks.
N otes:
The table above introduces the com mon faults and their cause analysis and elim ination methods. F or
other faults, contact our custom er service department or have the product repaired by a designated
service center directly. D o not dism antle or repair the product by yourself.
Facebook: @sifenefans
Message: @sifenefans
Email:[email protected]