
Device of this mark is a trademark of
Sharp Corporation.
Plasmacluster is a registered trademark
or a trademark of Sharp Corporation.
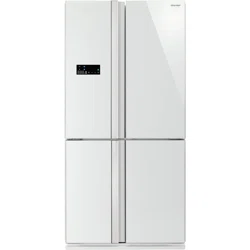
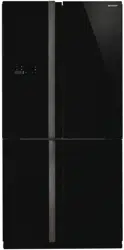
REFRIGERATOR - FREEZER
OPERATION MANUAL
CONTENTS
WARNING• . . . . . . . . . . . . . . . . . . . . . . . . . . . . . . . . . 2
CAUTION• . . . . . . . . . . . . . . . . . . . . . . . . . . . . . . . . . . 2
INSTALLATION• . . . . . . . . . . . . . . . . . . . . . . . . . . . . . 3
DESCRIPTION• . . . . . . . . . . . . . . . . . . . . . . . . . . . . . . 4
OPERATION• . . . . . . . . . . . . . . . . . . . . . . . . . . . . . . . 6
AUTOMATIC ICE MAKER• . . . . . . . . . . . . . . . . . . . . 12
STORING FOOD• . . . . . . . . . . . . . . . . . . . . . . . . . . . 15
CARE AND CLEANING• . . . . . . . . . . . . . . . . . . . . . . 16
BEFORE YOU CALL FOR SERVICE• . . . . . . . . . . . 17
SPECIFICATION• . . . . . . . . . . . . . . . . . . . . . . . . . . . 18
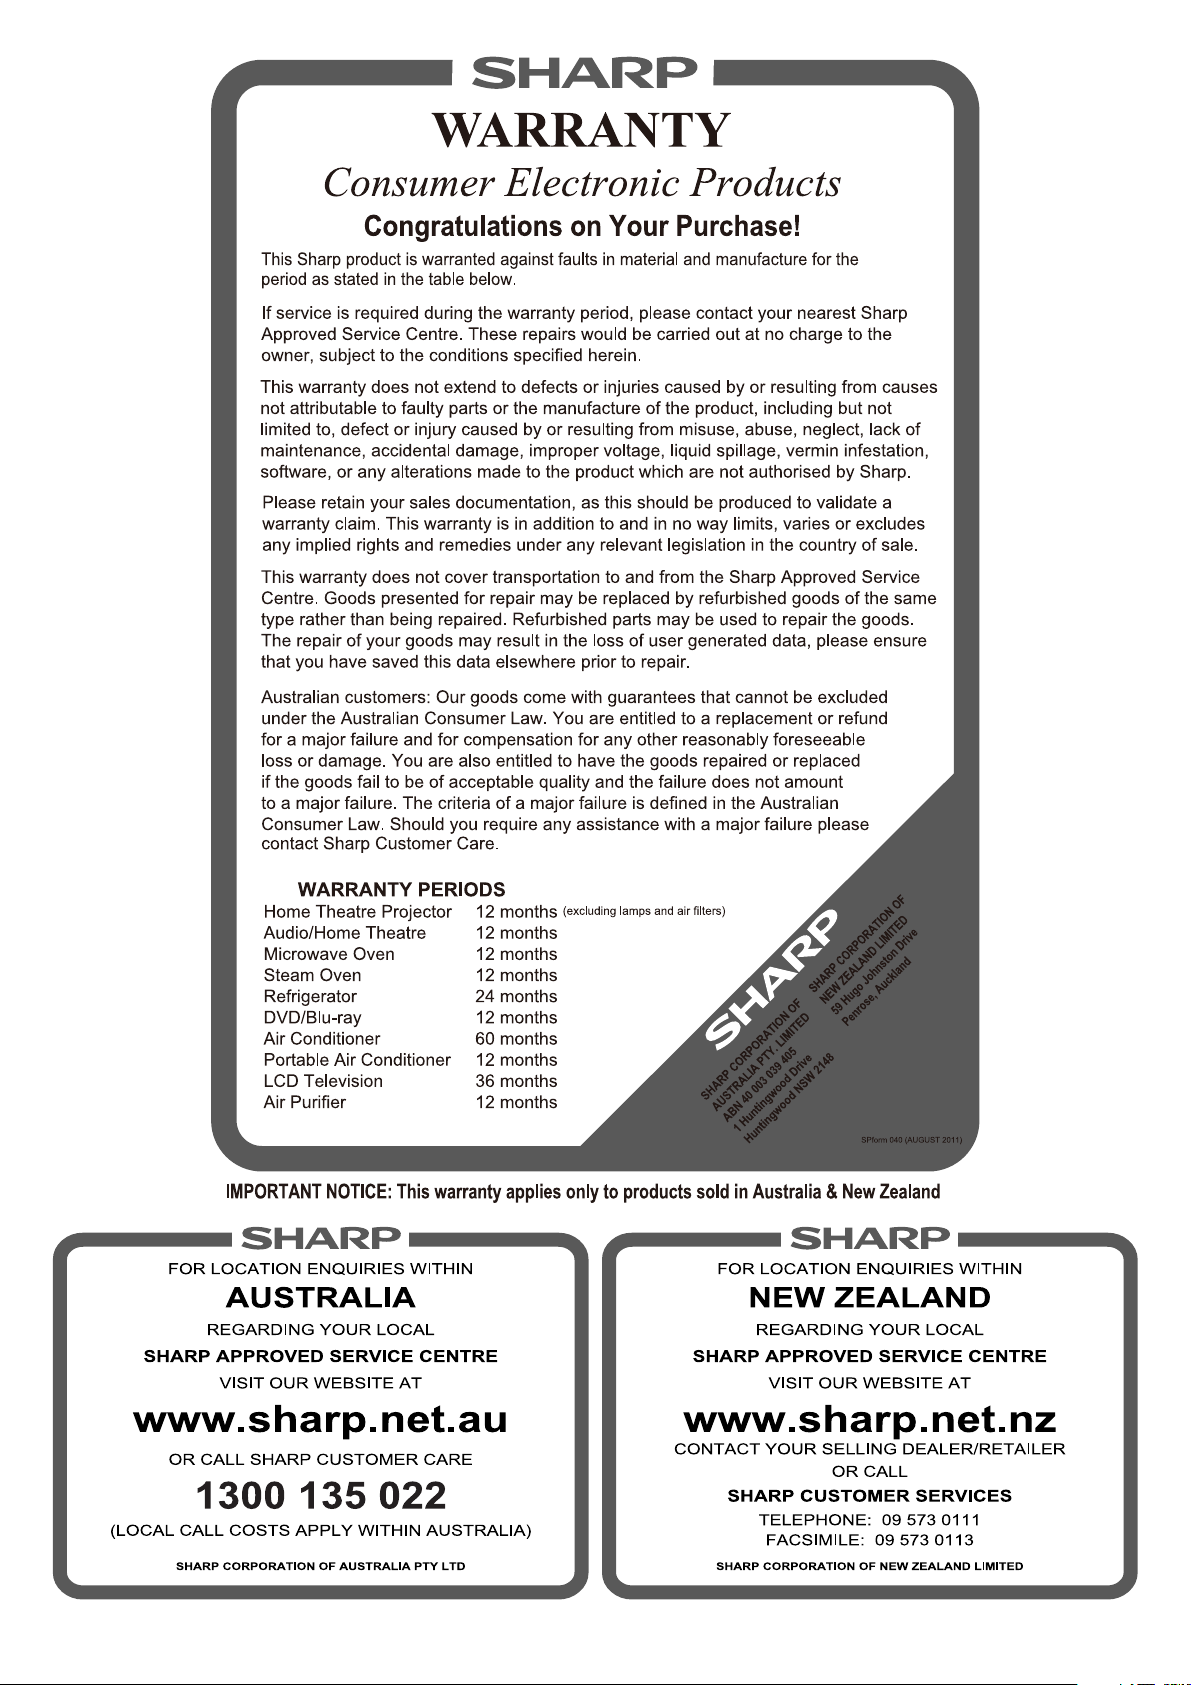
WARRANTY• ............................... 19
MODEL
SJ-FS676V

2
Household use only
Thank you very much for buying this SHARP product. Before using your SHARP refrigerator,
please read this operation manual to ensure that you gain the maximum benet from it.
This refrigerator contains ammable refrigerant (R600a: ■
isobutane) and insulation blowing gas (cyclopentane).
Observe the following rules to prevent ignition and
explosion.
The refrigeration system behind and inside the •
refrigerator contains refrigerant. Do not allow any sharp
objects to come into contact with the refrigeration
system.
Do not use mechanical devices or other means to •
accelerate the defrosting process. (This refrigerator has
adopted automatic defrosting system.)
Do not use electric appliances inside the refrigerator.•
Use only the specied parts for the refrigerator •
compartment light.
Do not block the openings on the circumference of the •
refrigerator.
Do not use ammable sprays, such as spray paint near •
the refrigerator. It may cause explosion or re.
If the refrigeration system should get punctured, do not •
touch the wall outlet and do not use open ames. Open
the window and air out the room. Then ask a service
agent approved by SHARP for servicing.
This refrigerator should be disposed appropriately. •
Take the refrigerator to a recycling plant for ammable
refrigerant and insulation blowing gases.
Do not store highly volatile and ammable materials such ■
as ether, petrol, propane gas, aerosol cans, adhesive
agents and pure alcohol etc.
These materials are liable to explode.
Dust deposited on the power plug may cause re. Wipe it ■
off carefully.
Do not attempt to change or modify this refrigerator. This ■
may result in re, electric shock or injury.
Do not touch the machinery parts of the automatic ice ■
maker (upper section of the ice storage box). Operating
the ice maker may cause injury.
Ensure that the refrigerator presents no danger to children ■
while being stored for disposal. (e.g. remove the magnetic
door seals to prevent child entrapment.)
WARNING
Attention about Power supply: ■
Do not use an extension cord or adapter plug.•
Make sure that the power cord has not been damaged •
during installation or moving. If the power plug or cord
is loose, do not insert the power plug. There is a risk of
electric shock or re.
Disconnect from the mains electricity supply by removing •
the mains plug from the electricity supply socket. Do
not remove by pulling the mains lead. This may cause
electric shock or re.
Should the exible supply cord be damaged, it must be •
replaced by a service agent approved by SHARP as a
special cord is required.
Do not touch the compressor unit or its peripheral parts, ■
as they become extremely hot during operation and the
metal edges may cause injury.
Do not touch foods or metal containers in the freezer ■
compartment with your wet hands. This may cause
frostbite.
Do not place bottled and canned drinks in the freezer as ■
they may crack when frozen.
In case of gas leak, ventilate the area by opening a ■
window, etc. Do not touch the refrigerator or the power
outlet.
Do not place objects containing liquid or unsteady objects ■
on top of refrigerator.
This refrigerator is not intended for use by persons ■
(including children) with reduced physical, sensory or
mental capabilities, or lack of experience and knowledge,
unless they have been given supervision or instruction
concerning use of the refrigerator by a person responsible
for their safety. Young children should be supervised to
ensure that they do not play with the refrigerator.
CAUTION
3
WARNING
Do not install the refrigerator in a damp or wet location ■
as this may cause damage to the insulation and a
leakage. Condensation may also build on the outer
cabinet and cause rust.
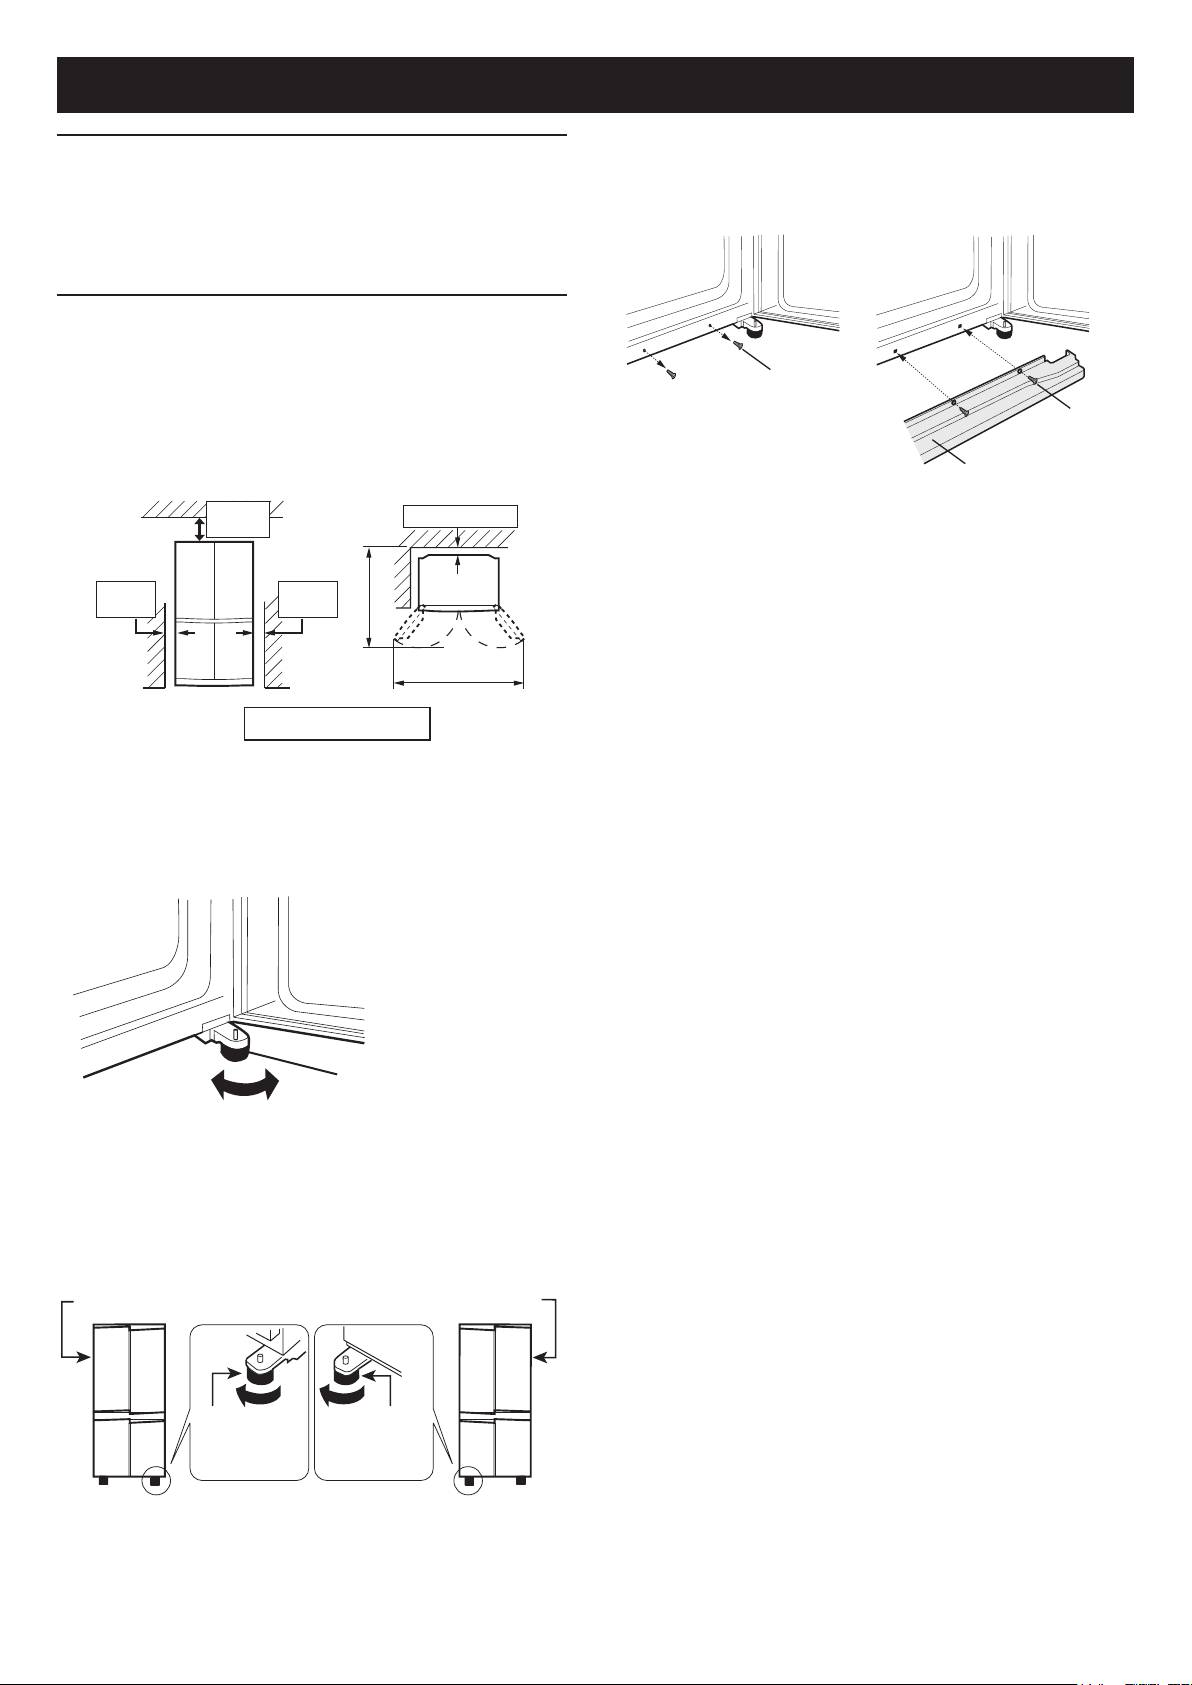
1
Keep adequate ventilation space around the refrigerator.
The gure shows the minimum required space for •
installing the refrigerator. The amount of space
around the refrigerator affects the amount of power
consumption.
Insufcient spacing will decrease cooling efciency •
and increase energy consumption. This may reduce
the life of the unit and void warranty.
2
Use the two front adjustable feet, to ensure that the
refrigerator is positioned rmly and at on the oor.
Before using your refrigerator
Clean the inside parts with a cloth soaked in warm water.
If soapy water is used, wipe it off thoroughly with water.
INSTALLATION
90mm
or more
60mm
or more
60mm
or more
1180 mm
1500 mm
60mm or more
3
When right and left doors are not properly aligned, adjust
using the adjustable feet.
NOTE
Position your refrigerator so that the plug is accessible.•
Keep your refrigerator out of direct sunlight.•
Do not place next to heat generating appliance.•
Do not place directly on the ground. Provide suitable stand.•
If the mains power is switched on when the door is open, the •
door alarm will sound. Close the door to stop the alarm.
Adjustable foot
When the left door is
raised.
When the right door is
raised.
Lower the foot
at right side.
Lower the foot
at left side.
(Until the adjustable foot on the
other side is slightly off-ground.)
4
Remove the 4 screws of the cabinet lower part, and
then set the foot cover (supplied inside the refrigerator
compartment) with removed 4 screws.
Screw
(4 screws)
Screw
Foot cover
Free standing type
5
Connect the power plug to a 230/240 volt. 10 amp.
power point.
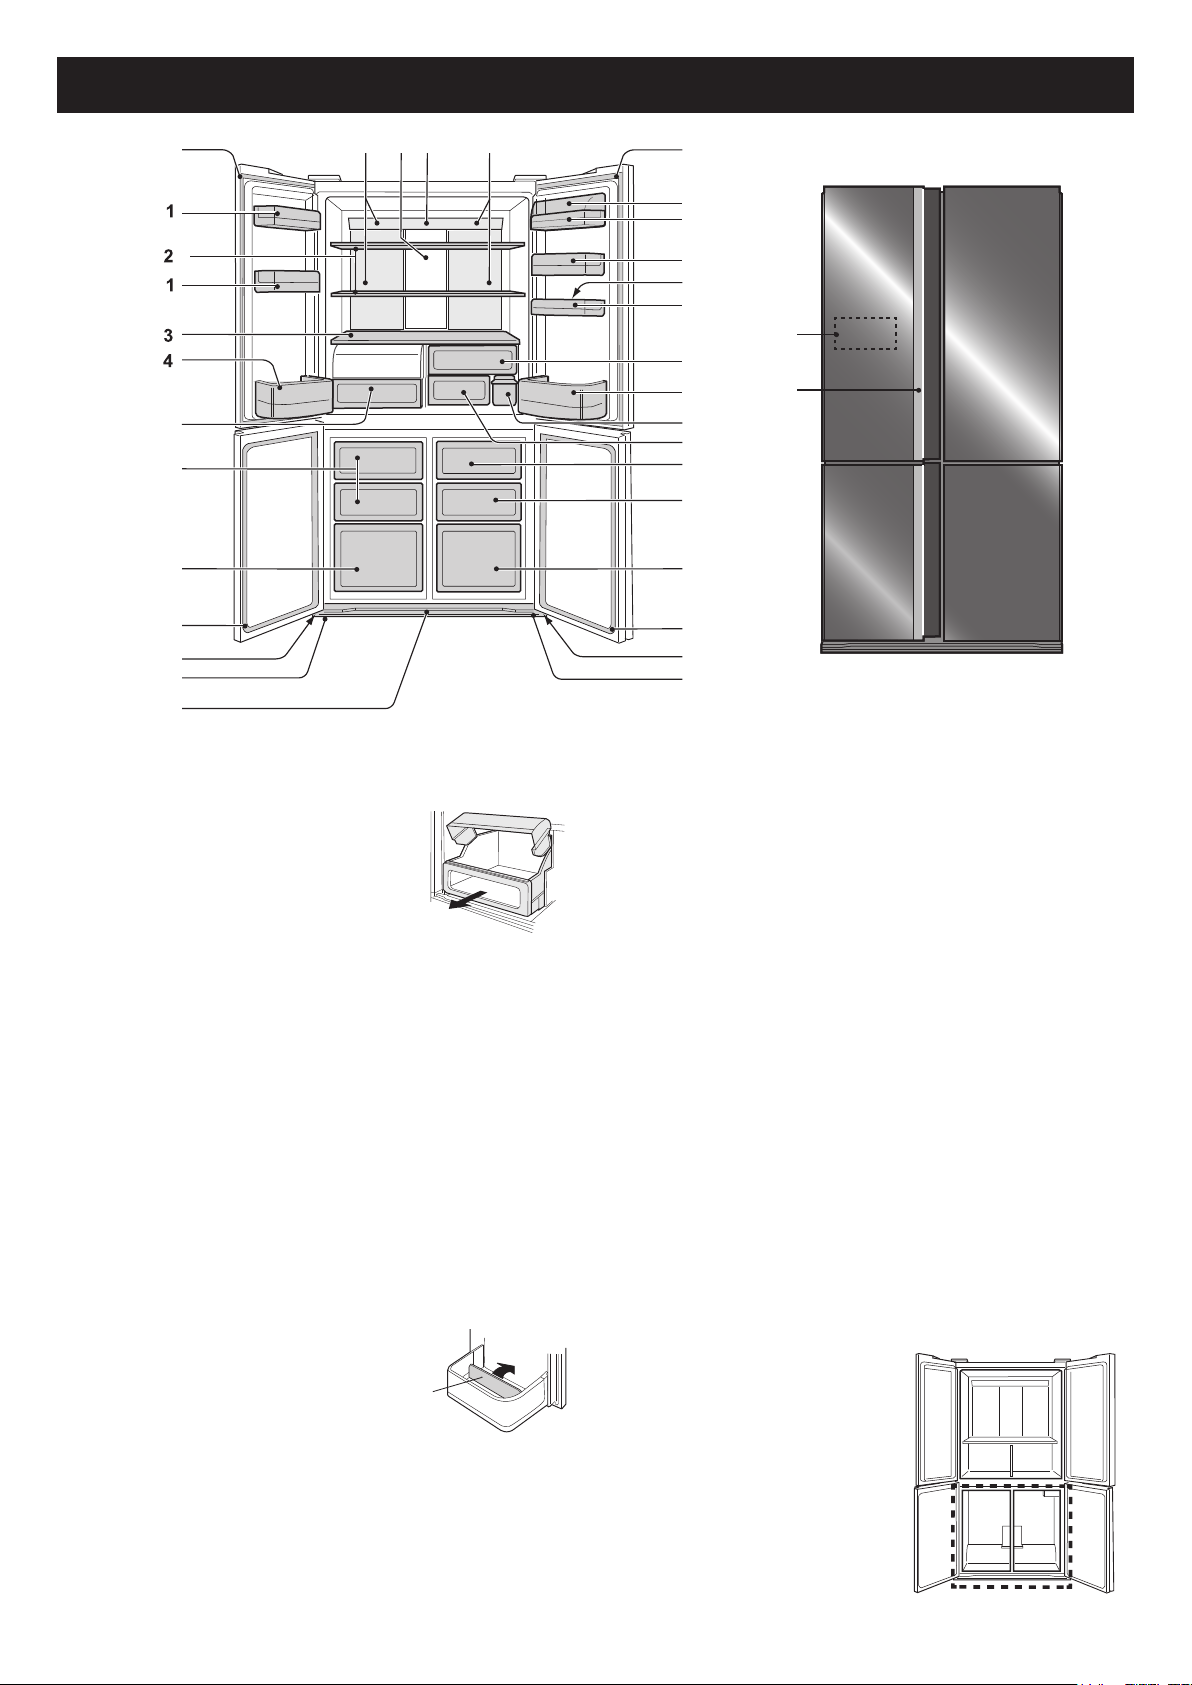
4
Door pockets 1.
(3 pcs.)
Refrigerator shelves 2.
(2 pcs.)
Shelf3.
Bottle pocket (left)4.
Highly sealed vegetable crisper5.
The cover of the Vegetable crisper
opens as the case is pulled.
Freezer cases (small) 6.
(3 pcs.)
Freezer cases (large) 7.
(2 pcs.)
Casters 8.
(4 pcs.)
Adjustable feet 9.
(2 pcs.)
Foot cover10.
Aluminum panel11.
The panel is cooled from the rear, thus indirectly cools
the refrigerator compartment. In this way, food is
refrigerated gently, without exposing it to cold air ow.
Light12.
Utility pocket cover13.
Utility pocket14.
Egg tray15.
Egg pocket16.
Fruit case17.
Bottle pocket (right)18.
To store large-size bottles, move the
partition all the way back.
Water tank19.
Fresh case20.
Ice storage box21.
To prevent damage to the Ice storage box, do not make
ice in the Ice storage box or pour oil into it.
Magnetic door seals 22.
(4 pcs.)
Eco sign23.
With the refrigerator door left open, the lamp will slowly
change its color from blue to orange. It shows that the
temperature in the refrigerator is rising.
Touch control panel24.
Handle indicator25.
When Plasmacluster, Energy saving and Temperature
increase sign start the operation, the indicator will ash.
Plasmacluster : Blue
Energy saving : Green
Temperature increase sign : Orange
Deodorising unit
Deodorising catalyst is installed on the routes of cold air.
No operation and cleaning are required.
NOTE
Deodorising unit cannot remove all of the odours thoroughly. •
Wrap the food with strong odours.
If you wish to store large items within
your freezer
You may remove any of the items numbered 6,7,21.
Partition
DESCRIPTION
17
18
5
22 22
22
22
23
21
7
7
6
6
8 8
9
9
10
11 12 12
13
14
1
15
16
19
20
24
25
5
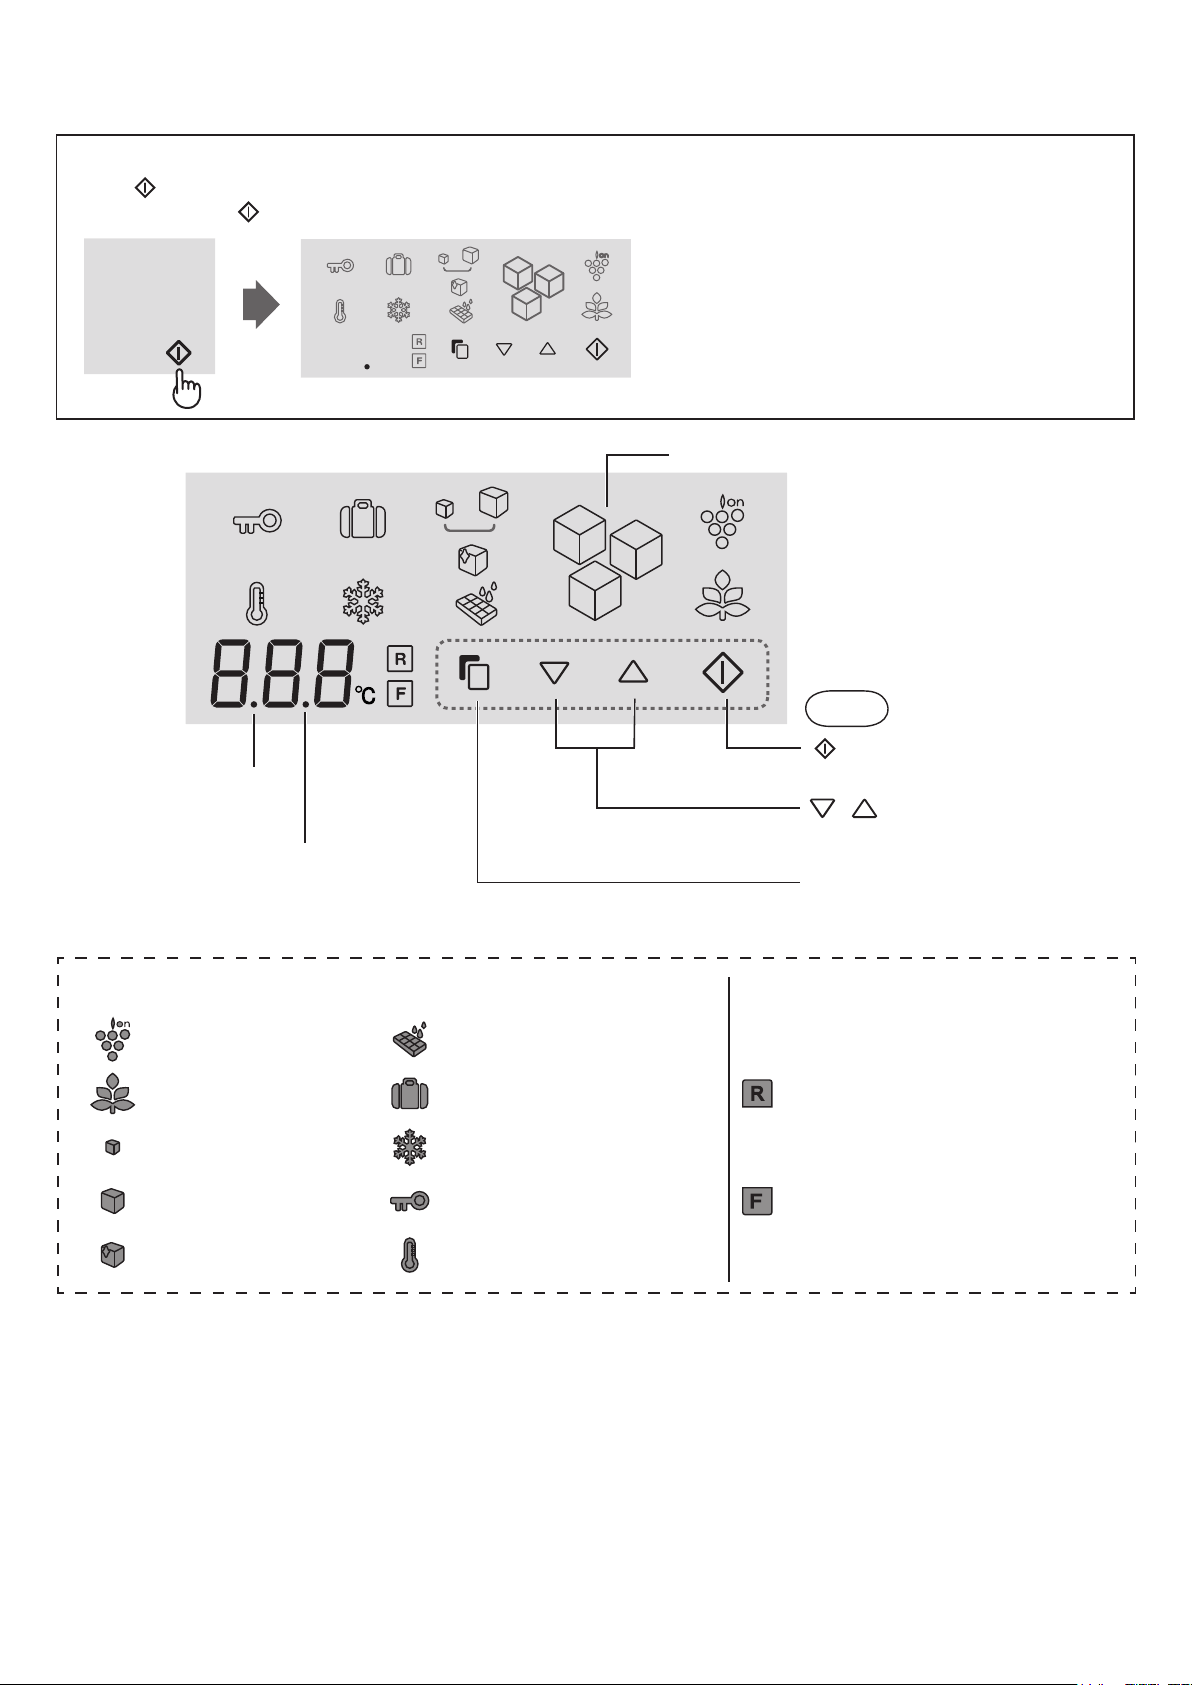
Touch control panel
To operate, touch the keys.
To light the control panel
Press
(Enter) key.
Normally, only the
(Enter) key is displayed.
The panel will light and show the current setting.•
After setting the features, when there is no operation •
for 1 minute, the display will automatically return to
the standby display.
Thus if there is no operation for another 1 minute, the
display will be turned off.
<Standby display>
Ice making process indicator
(Enter) key
Finalize the setting.
/ key
Press to select feature ON/OFF or
temperature setting.
Select key
Press to select feature icon and door
alarm signal.
Sound OFF indication
This indication shows
sound “OFF”.
Door alarm indication
This indication shows door
alarm “ON”.
Feature icons
Icons of features in operation are colored.
Controlling temperature icons
Plasmacluster Ice tray cleaning
Energy saving Vacation mode Refrigerator compartment
Ice making Express Freezing
Large ice making Child lock Freezer compartment
Clear ice making Temperature increase sign
At the time of re-power distribution
When there is a power failure during the operation of •
Express freezing or Ice tray cleaning, the operation is
stopped.
Ice making process indicator returns to the initial state.•
The other settings will show similarly as before having the •
power failure.
Keys
Every time you open the door
Control panel will light up to show the current setting.
Operation is not accepted while the refrigerator door is •
opened.
6
OPERATION
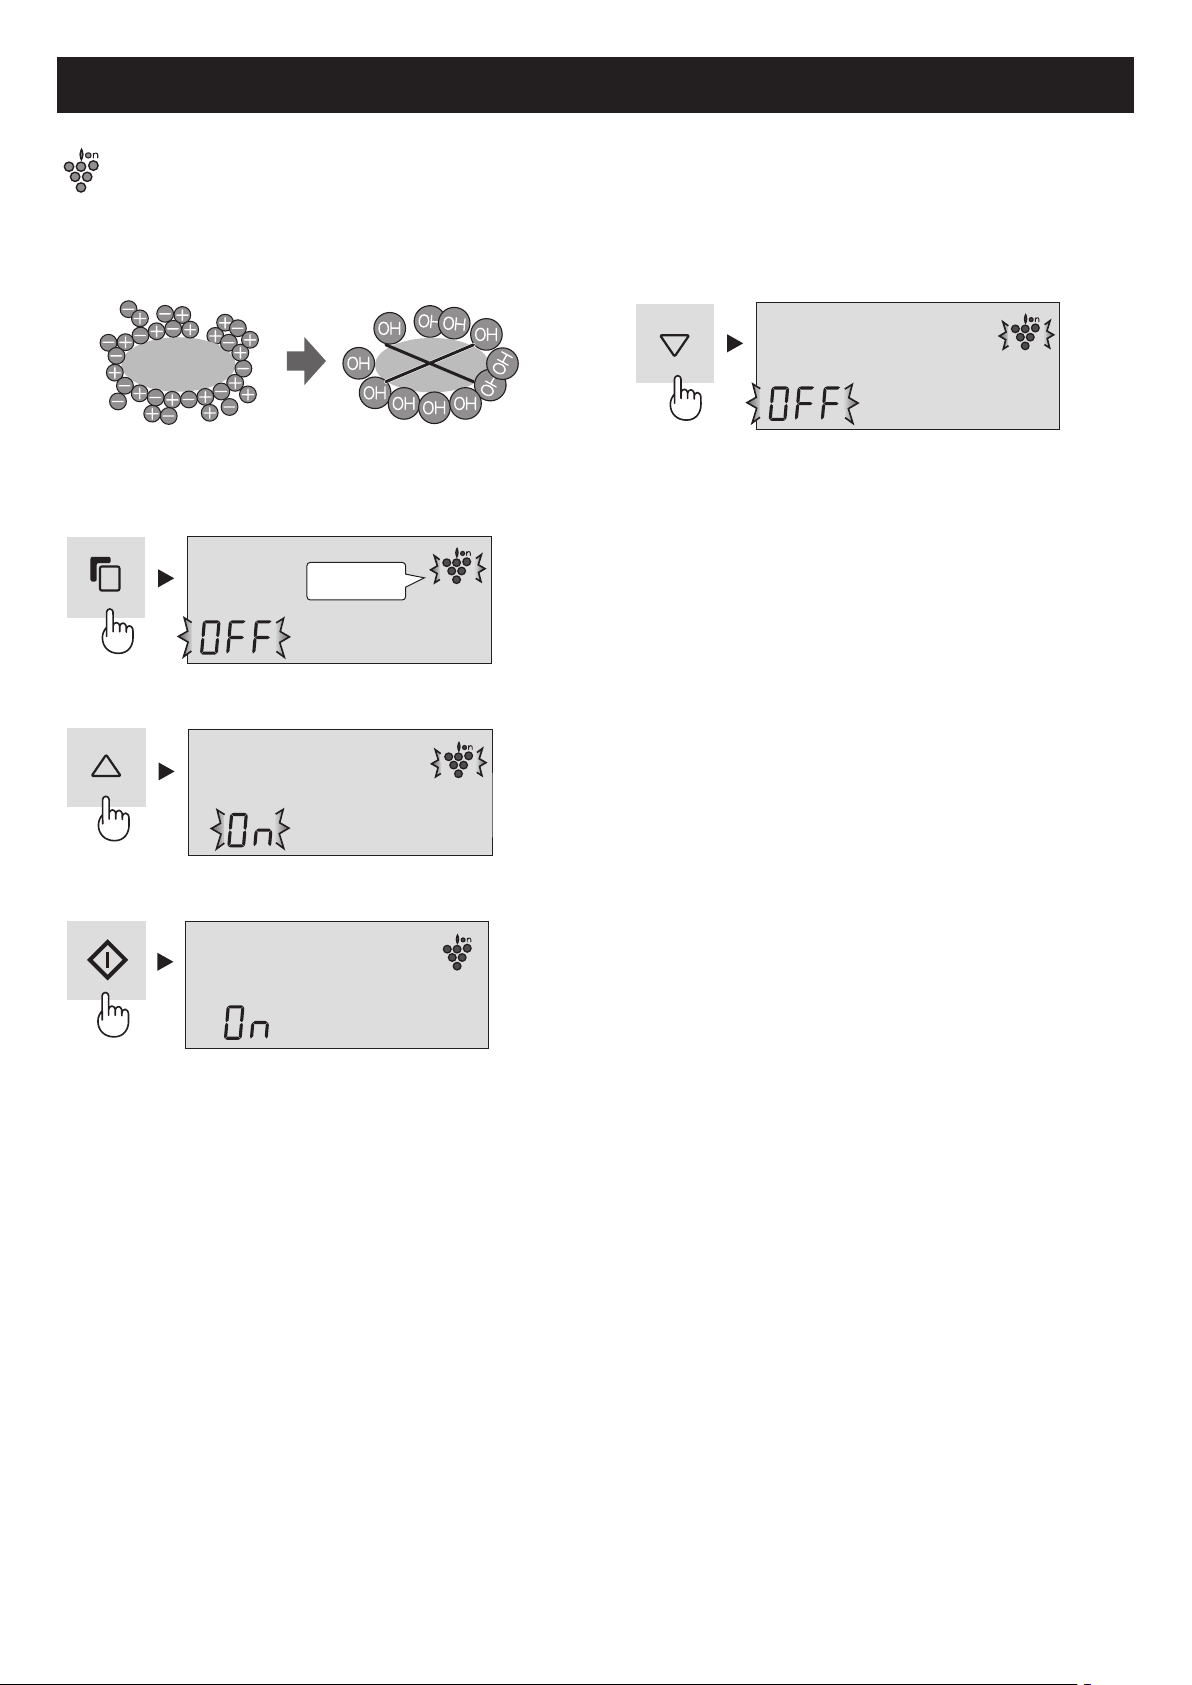
Plasmacluster
The ionizer inside your refrigerator releases clusters of ions,
which are collective masses of positive and negative ions,
into the refrigerator compartment.
These ion clusters inactivate airborne mould fungus.
To start operation
1
Select “Plasmacluster icon”.
2
Select “ON”.
3
Finalize the setting.
Additionally the handle indicator (Blue) will blink
3 times.
Handle indicator in operation
Every time you close the door, the indicator will ash. (Blue)•
If Energy saving is also in operation, the indicator will ash •
6 times.
(Blue→Green→Blue→Green→Blue→Green)
mould
fungus
To cancel operation
It is the same method as starting operation.
Select “OFF” in step 2.
NOTE
There may be a slight odour in the refrigerator. This is the •
smell of ozone generated by the ionizer. The amount of
ozone is minimal, and quickly decomposes in the refrigerator.
Flashing
7
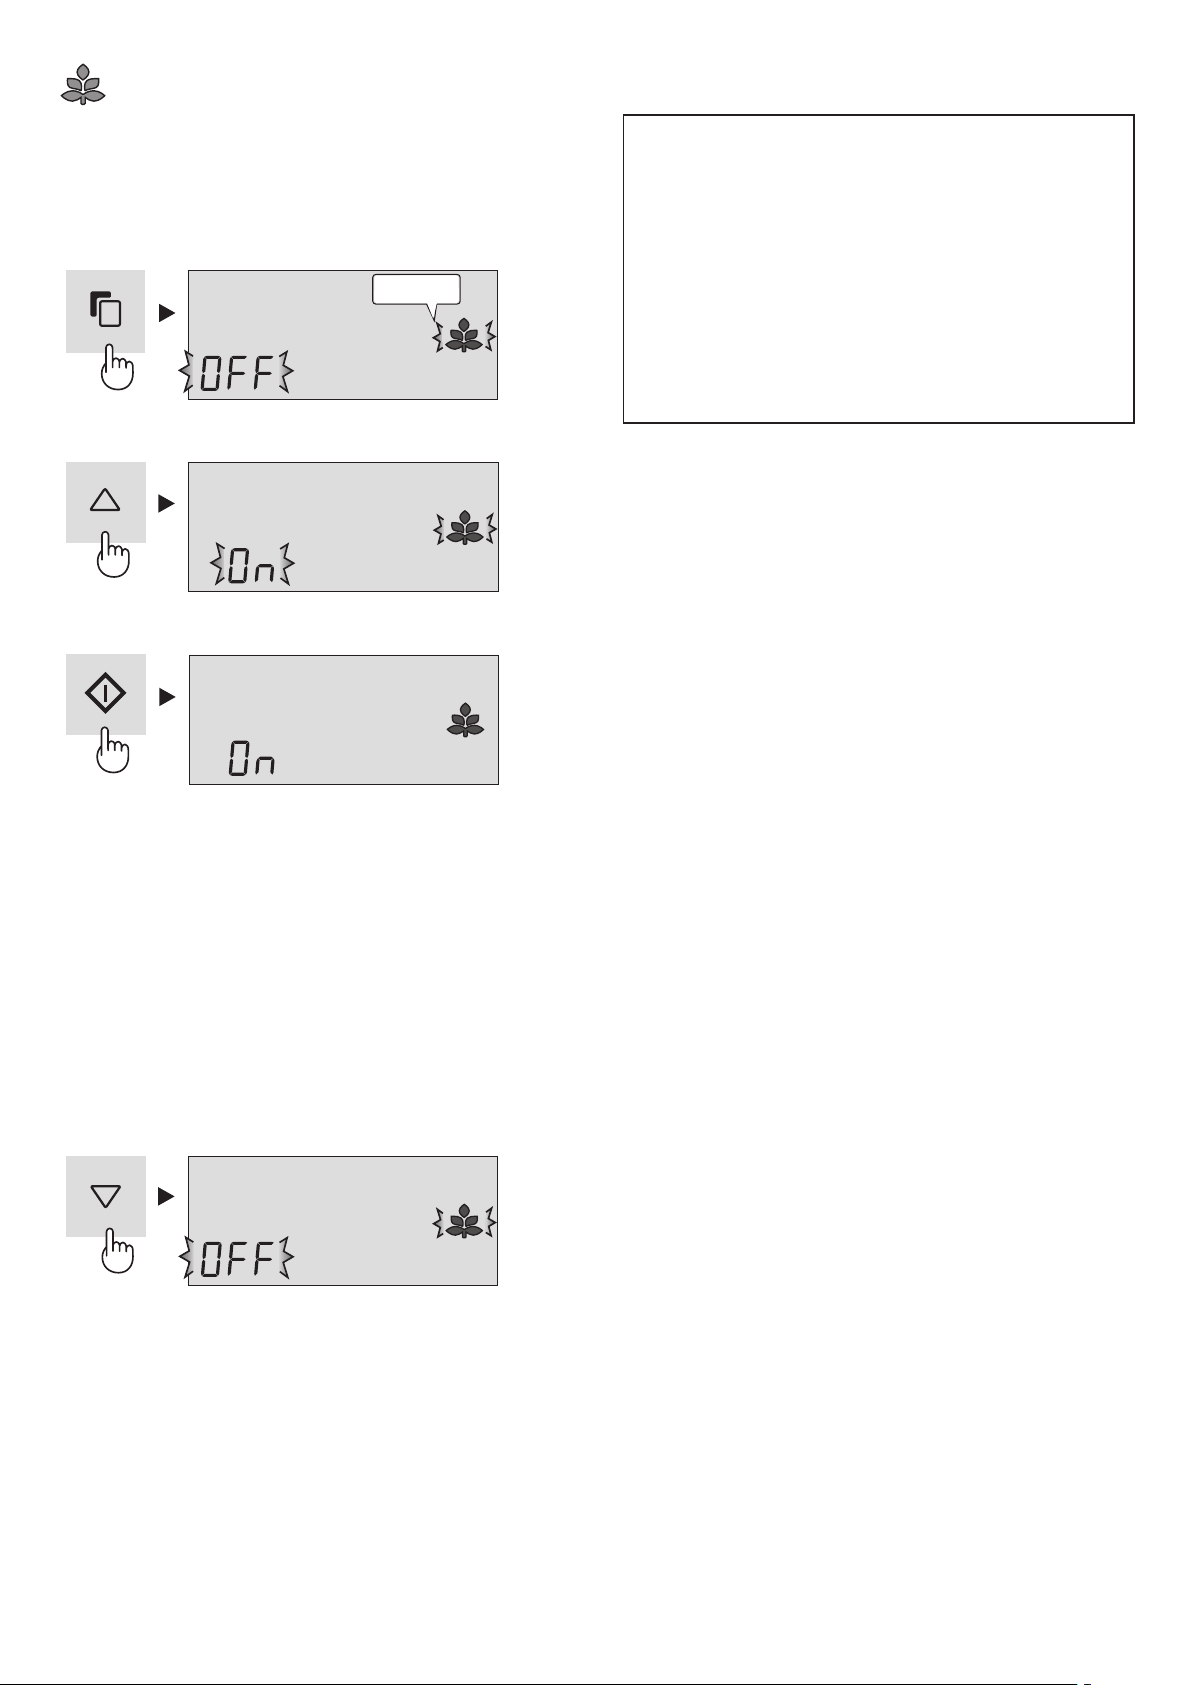
Energy Saving
Use this feature when you want to switch the appliance to
energy-saving operation.
To start operation
1
Select “Energy saving” icon.
(The icon is green.)
2
Select “ON”.
3
Finalize the setting.
Additionally the handle indicator (Green) will blink
3 times.
Handle indicator in operation
Every time you close the door, the indicator will ash •
(Green).
If Plasmacluster is also in operation, the indicator will ash •
6 times.
(Blue→Green→Blue→Green→Blue→Green)
To cancel operation
It is the same method as starting operation.
Select “OFF” in step 2.
NOTE
While this feature is operating, the inside temperature of the •
refrigerator and freezer compartment will be higher than the
preset temperature by about 1°C(refrigerator) and about
2°C(freezer). This is the guide under the condition of the
preset temperature 3°C(refrigerator) and -18°C(freezer). The
display of preset temperature will not be changed.
The efciency of power saving depends on the usage •
environment (controlling temperature, ambient temperature,
frequency of opening or closing the door, amount of food).
Cancel this feature when you feel the beverages are not •
cooled enough or ice making takes time.
Tips for saving energy
Keep the ventilation space as much as possible around ■
the refrigerator.
Keep your refrigerator out of direct sunlight, and do not ■
place next to heat generating appliance.
Open your refrigerator door as briey as possible. ■
Hot foods should be cooled before storing. ■
Place the food evenly on the shelves to allow the ■
cooling air to circulate efciently.
Flashing
8
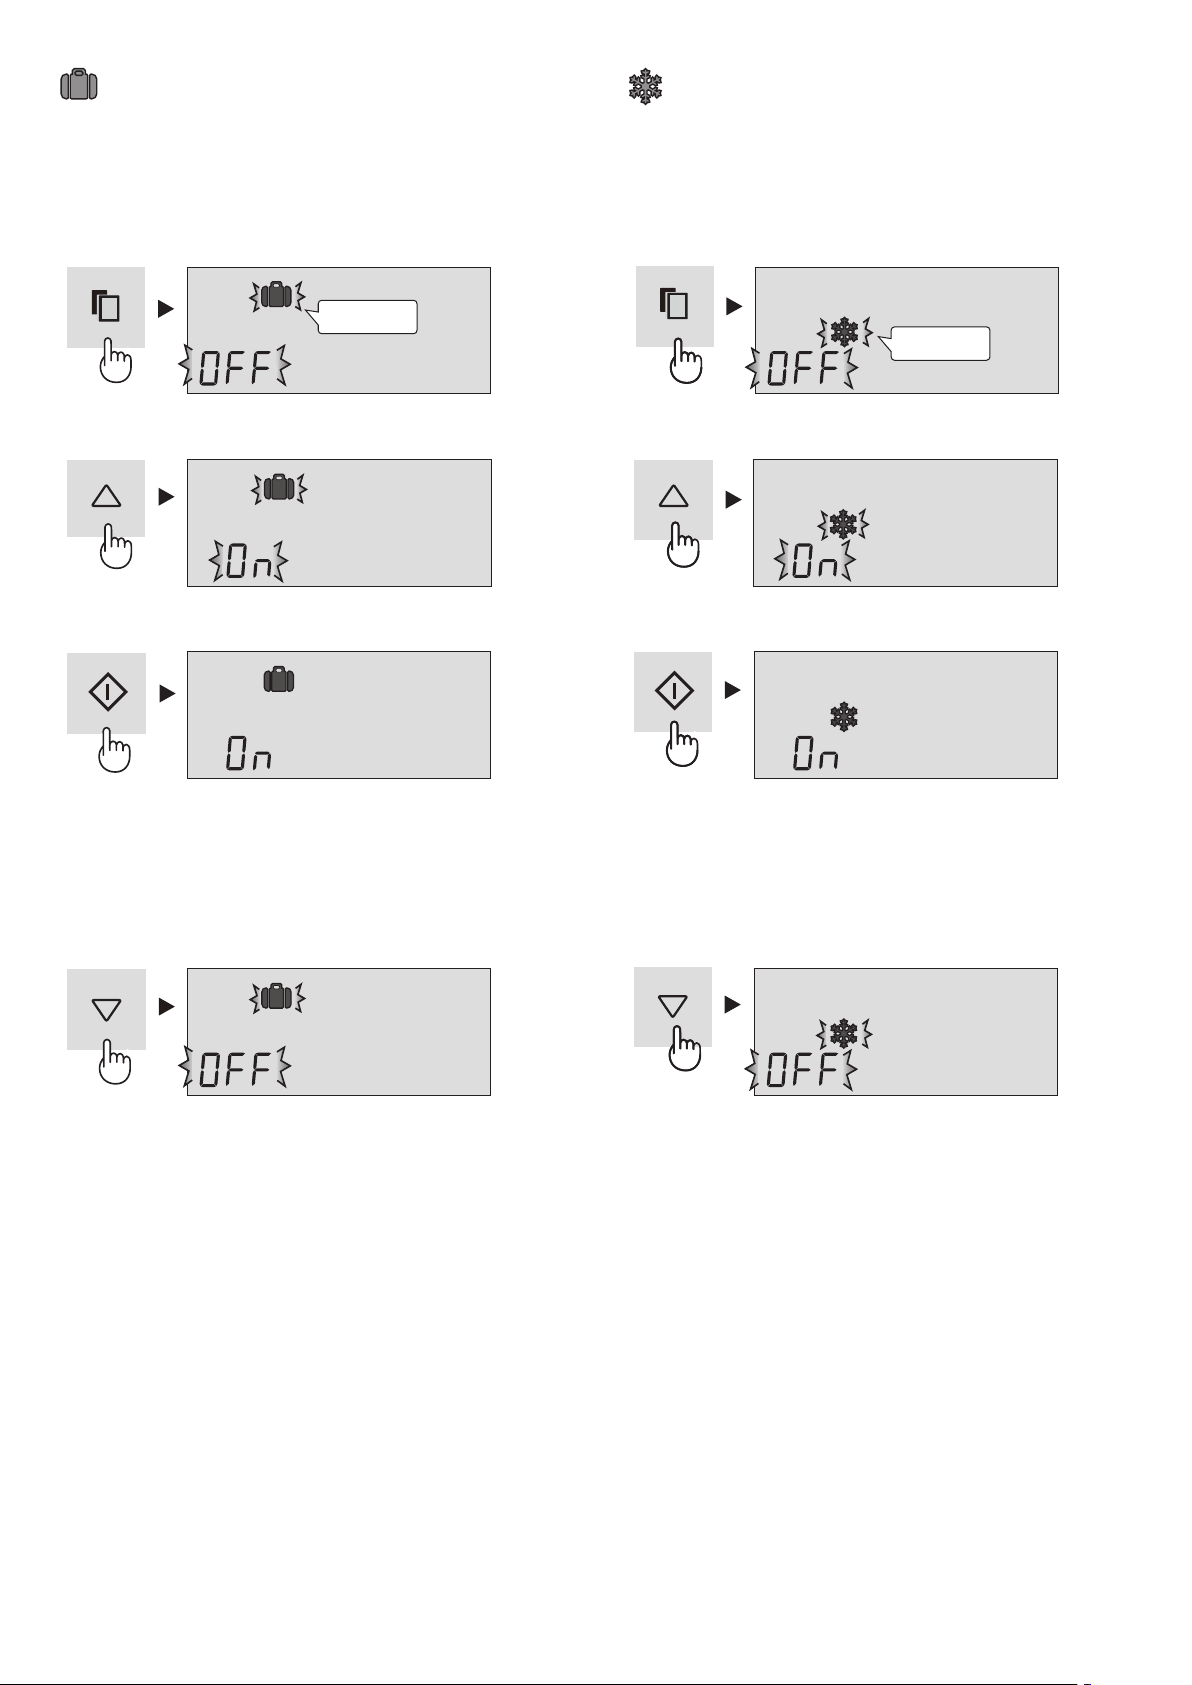
Vacation mode
Use this feature when going on a trip or leaving the house
for a long time.
To start operation
1
Select “Vacation mode” icon.
2
Select “ON”.
3
Finalize the setting.
To cancel operation
It is the same method as starting operation.
Select “OFF” in step 2.
NOTE
The temperature inside the refrigerator compartment will be •
adjusted to about 10°C.
Food storage period in the refrigerator compartment becomes •
approx.1/2-1/3 of normal operation. Please utilize only when
there is no perishable food.
Temperature of refrigerator compartment cannot be modied. •
(“10°C” is indicated on the display.)
Express Freezing
High-quality frozen foods can be made using this feature
and is convenient for home-freezing.
To start operation
1
Select “Express freezing” icon.
2
Select “ON”.
3
Finalize the setting.
To cancel operation
It is the same method as starting operation.
Select “OFF” in step 2.
NOTE
Express Freezing ends automatically in about 2 hours. •
(The icon will disappear.)
Large foods cannot be frozen in a single operation.•
Express Freezing may require more than 2 hours in the case •
operation overlaps with defrosting as operation is started after
defrosting is completed.
Avoid opening the door as much as possible during operation •
of this feature.
Flashing
Flashing
9
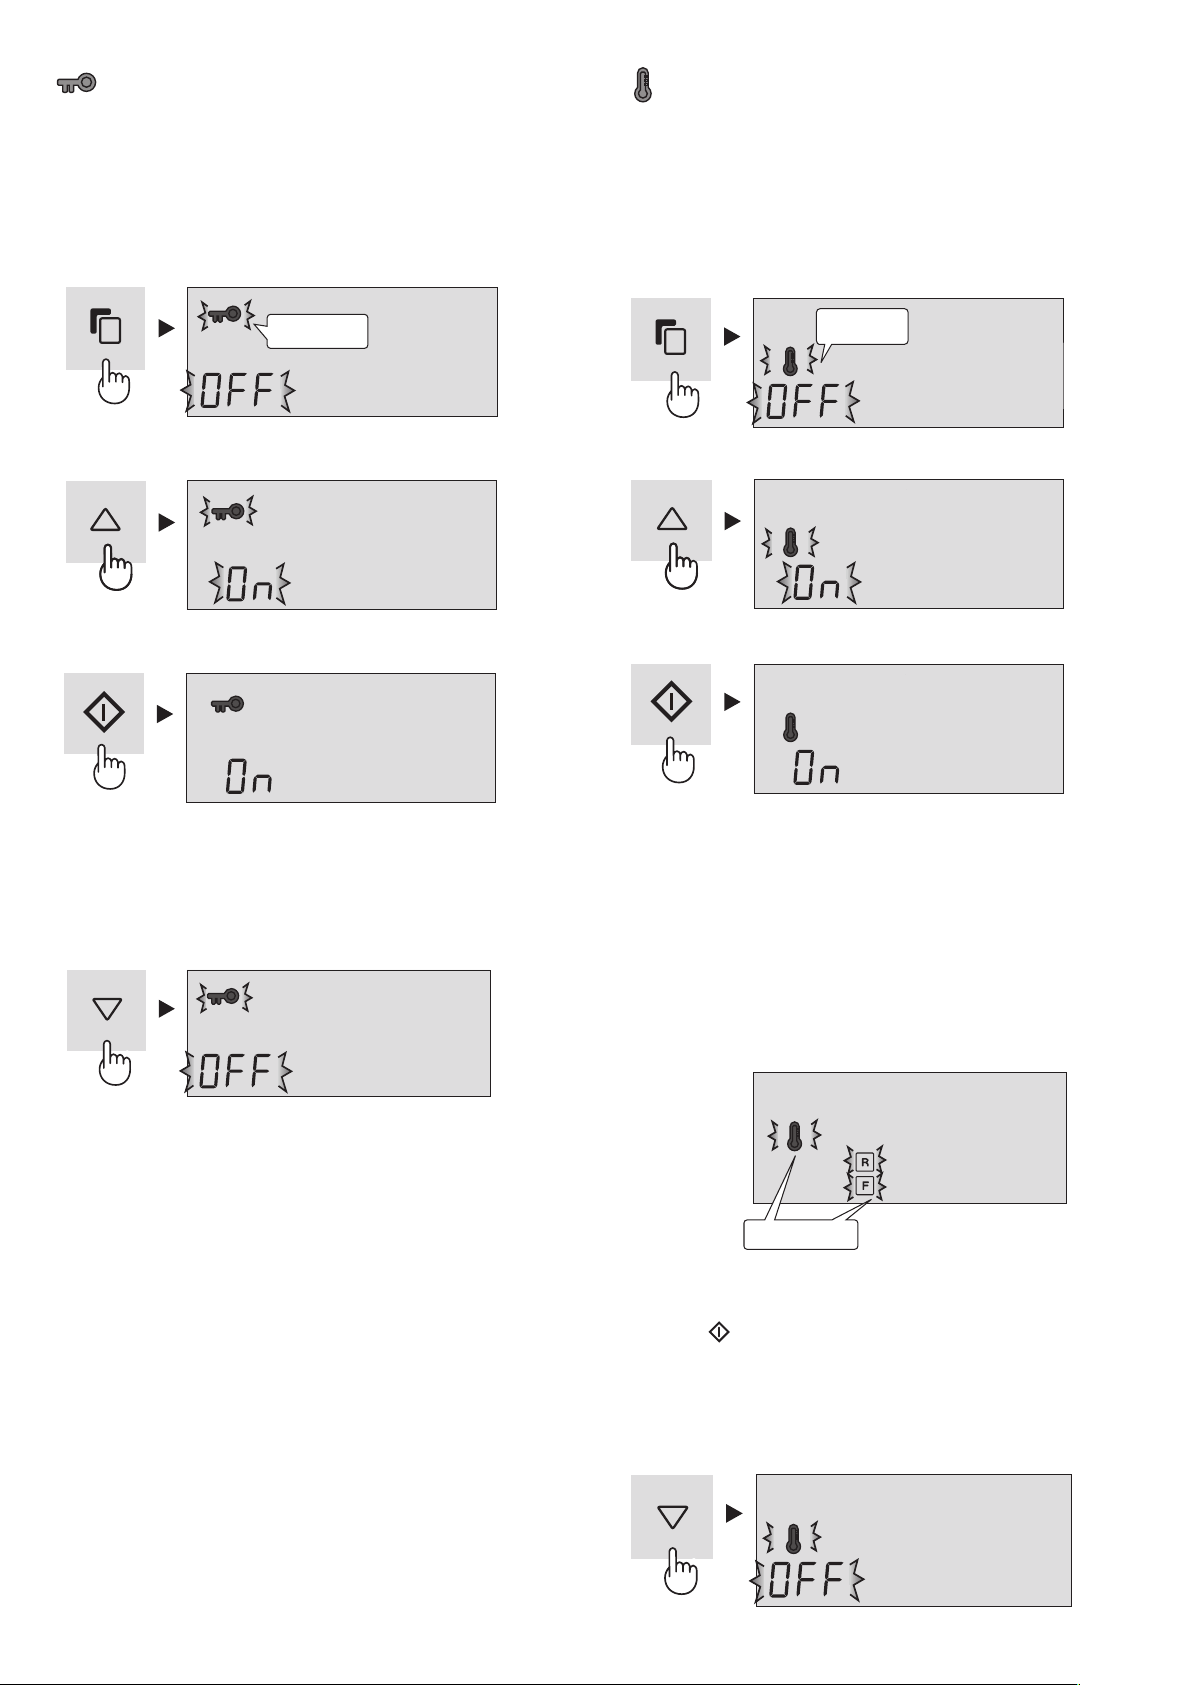
Child Lock
Key operation of the control panel will be locked. Use this
feature to prevent the panel from being used unintentionally
by children or someone.
To start operation
1
Select “Child lock” icon.
2
Select “ON”.
3
Finalize the setting.
To cancel operation
It is the same method as starting operation.
Select “OFF” in step 2.
Temperature Increase sign
While this feature is operating, it will indicate the rise of
inside temperature caused by power failure or some other
malfunction.
To start operation
1
Select “Temperature incrase sign” icon.
(The icon is orange.)
2
Select “ON”.
3
Finalize the setting.
Additionally the handle indicator (Orange)
will blink
3 times.
Indication of temperature increase
If the inside temperature becomes as follows, temperature •
increase will be indicated.
Refrigerator : more than 10°C
Freezer: more than -10°C
Check the quality of food before you eat.•
Indication
Icons will blink.•
Handle indicator (orange) will blink every 30 seconds.•
How to cancel the indicator blink
Press the
key while the icons are blinking.
To cancel operation
It is the same method as starting operation.
Select “OFF” in step 2.
Flashing
Flashing
Blink slowly
10
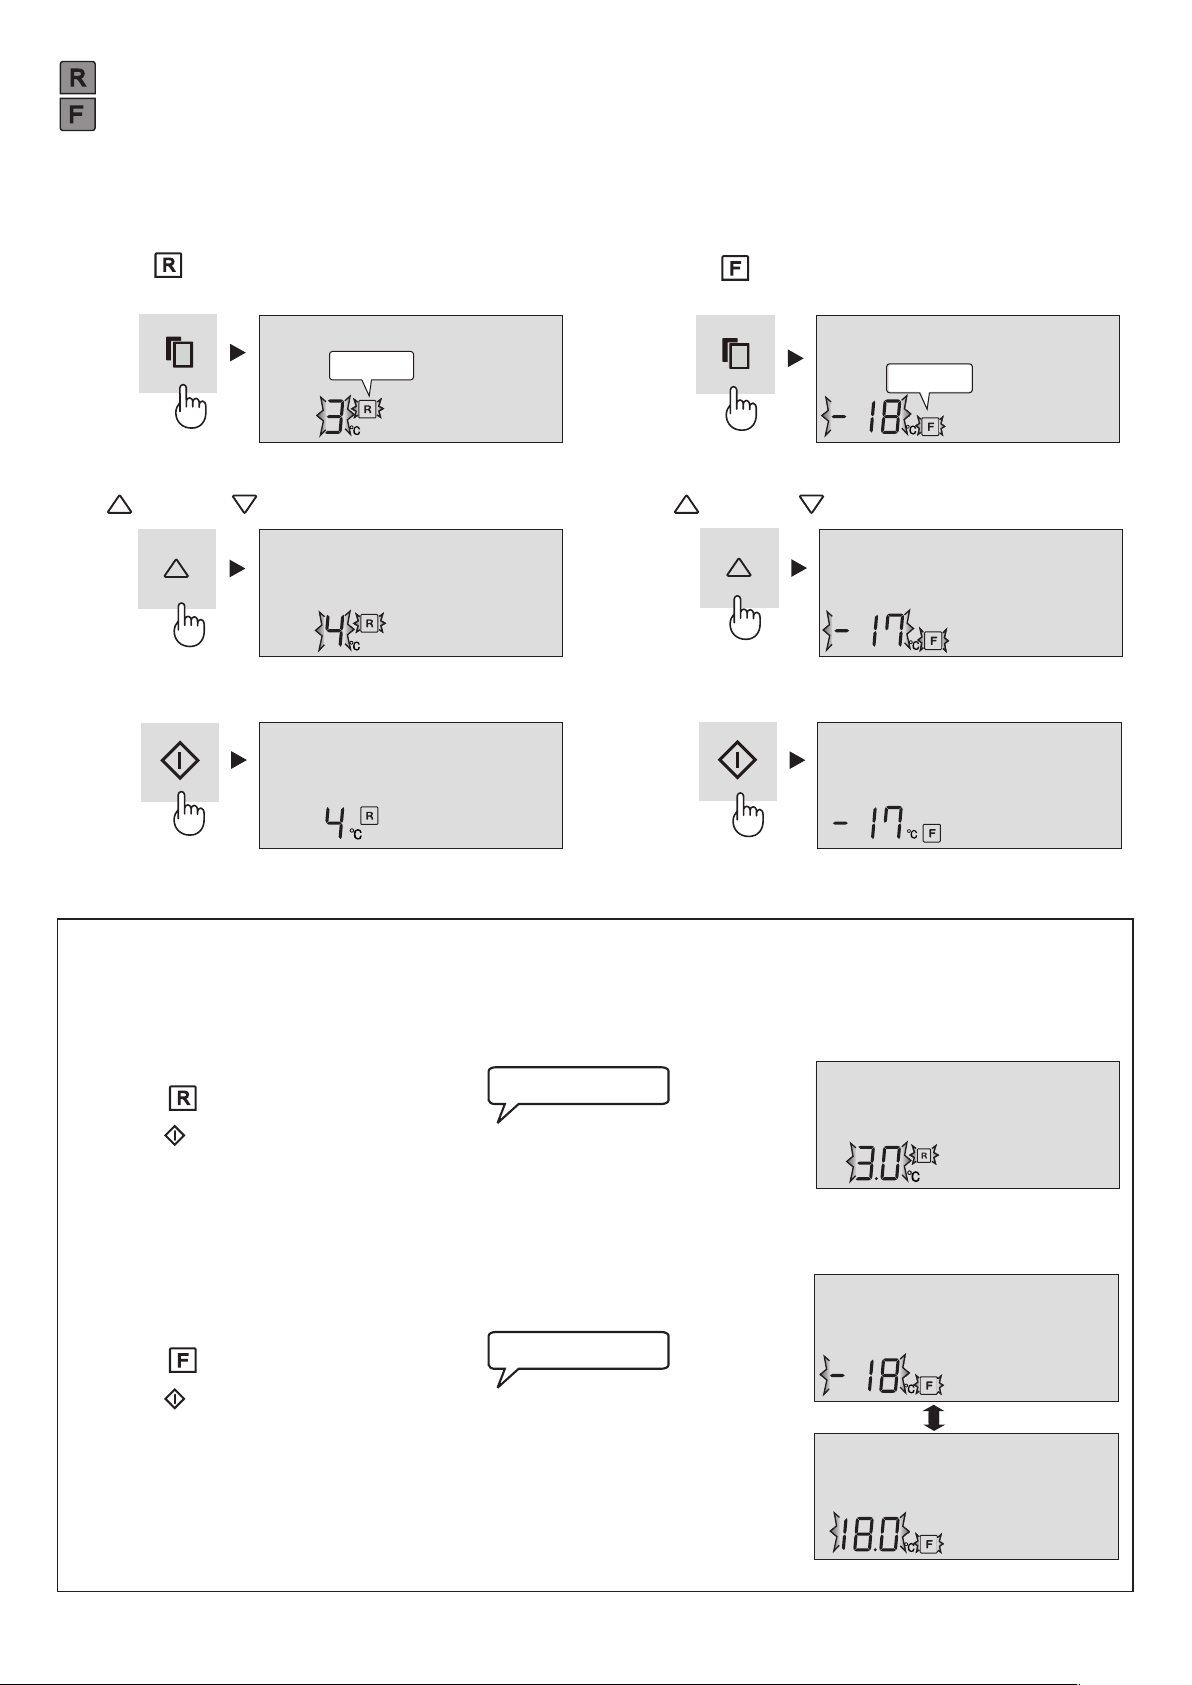
Advanced Setting of Freezer / Refrigerator compartment
The temperature of freezer compartment and refrigerator compartment can be adjusted in steps of 0.5 °C by following steps
1
to
3
below.
Refrigerator compartment
Select
1.
icon.
Press
2.
key continuously for 3 seconds or more.
The current preset temperature on the display will be changed to 3.0 °C.
(The display will be indicated like right gure.)
Adjust the temperature in the same way as steps
3.
2 to 3 above.
Follow steps
1
to
2
again if you want to adjust the temperature in steps of 1°C.
Freezer compartment
Select
1.
icon.
Press
2.
key continuously for 3 seconds or more.
The current preset temperature on the display will be changed to -18.0 °C.
(The display will be indicated alternately like right gure.)
Adjust the temperature in the same way as steps
3.
2 to 3 above.
Follow steps
1
to
2
again if you want to adjust the temperature in steps of 1°C.
Controlling Temperature
The refrigerator controls its temperature automatically. However, if needed, adjust the temperature as follows.
Refrigerator compartment
Adjustable between 0°C and 6°C in steps of 1°C.
1
Select
icon.
The display shows the current preset temperature.
2
Set the temperature.
[
: increase,
: decrease ]
3
Finalize the setting.
Freezer compartment
Adjustable between -13°C and -21°C in steps of 1°C.
1
Select
icon.
The display shows the current preset temperature.
2
Set the temperature.
[
: increase,
: decrease ]
3
Finalize the setting.
Beep beep beep
Flashing
Flashing
Beep beep beep
11
Door Alarm
At rst, door alarm is set “ON”.•
When the refrigerator door is left open, the door alarm will •
sound.
The door alarm will sound in 1 minute after opening the •
door and again after 1 minute (once in each case).
If the door is left open for approx. 3 minutes, the alarm will •
sound continuously.
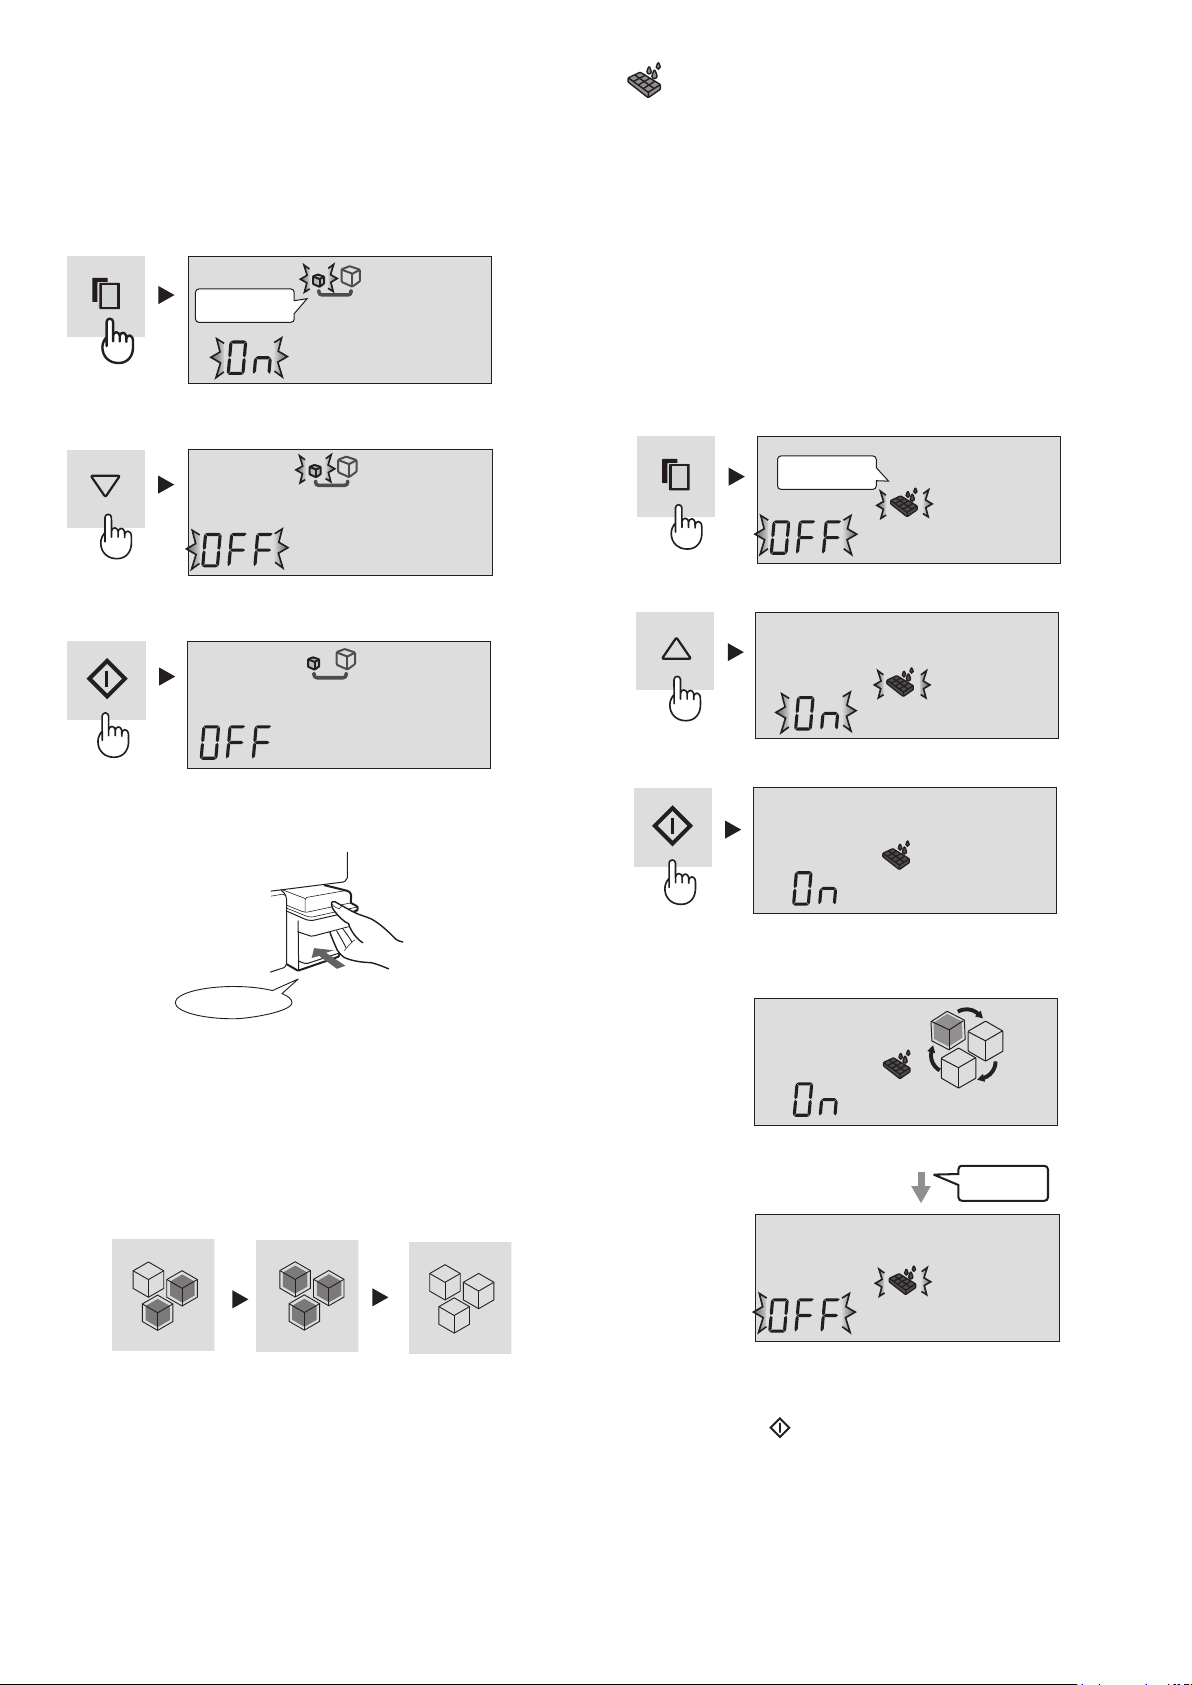
To cancel operation
1
Select the door alarm indication like the below gure.
2
Select “OFF”.
3
Finalize the setting.
To start operation
It is the same method as canceling operation.
Select “ON” in step 2.
At standby display
The indication will disappear.
Door alarm indication
It shows Door alarm “ON”.
At standby display
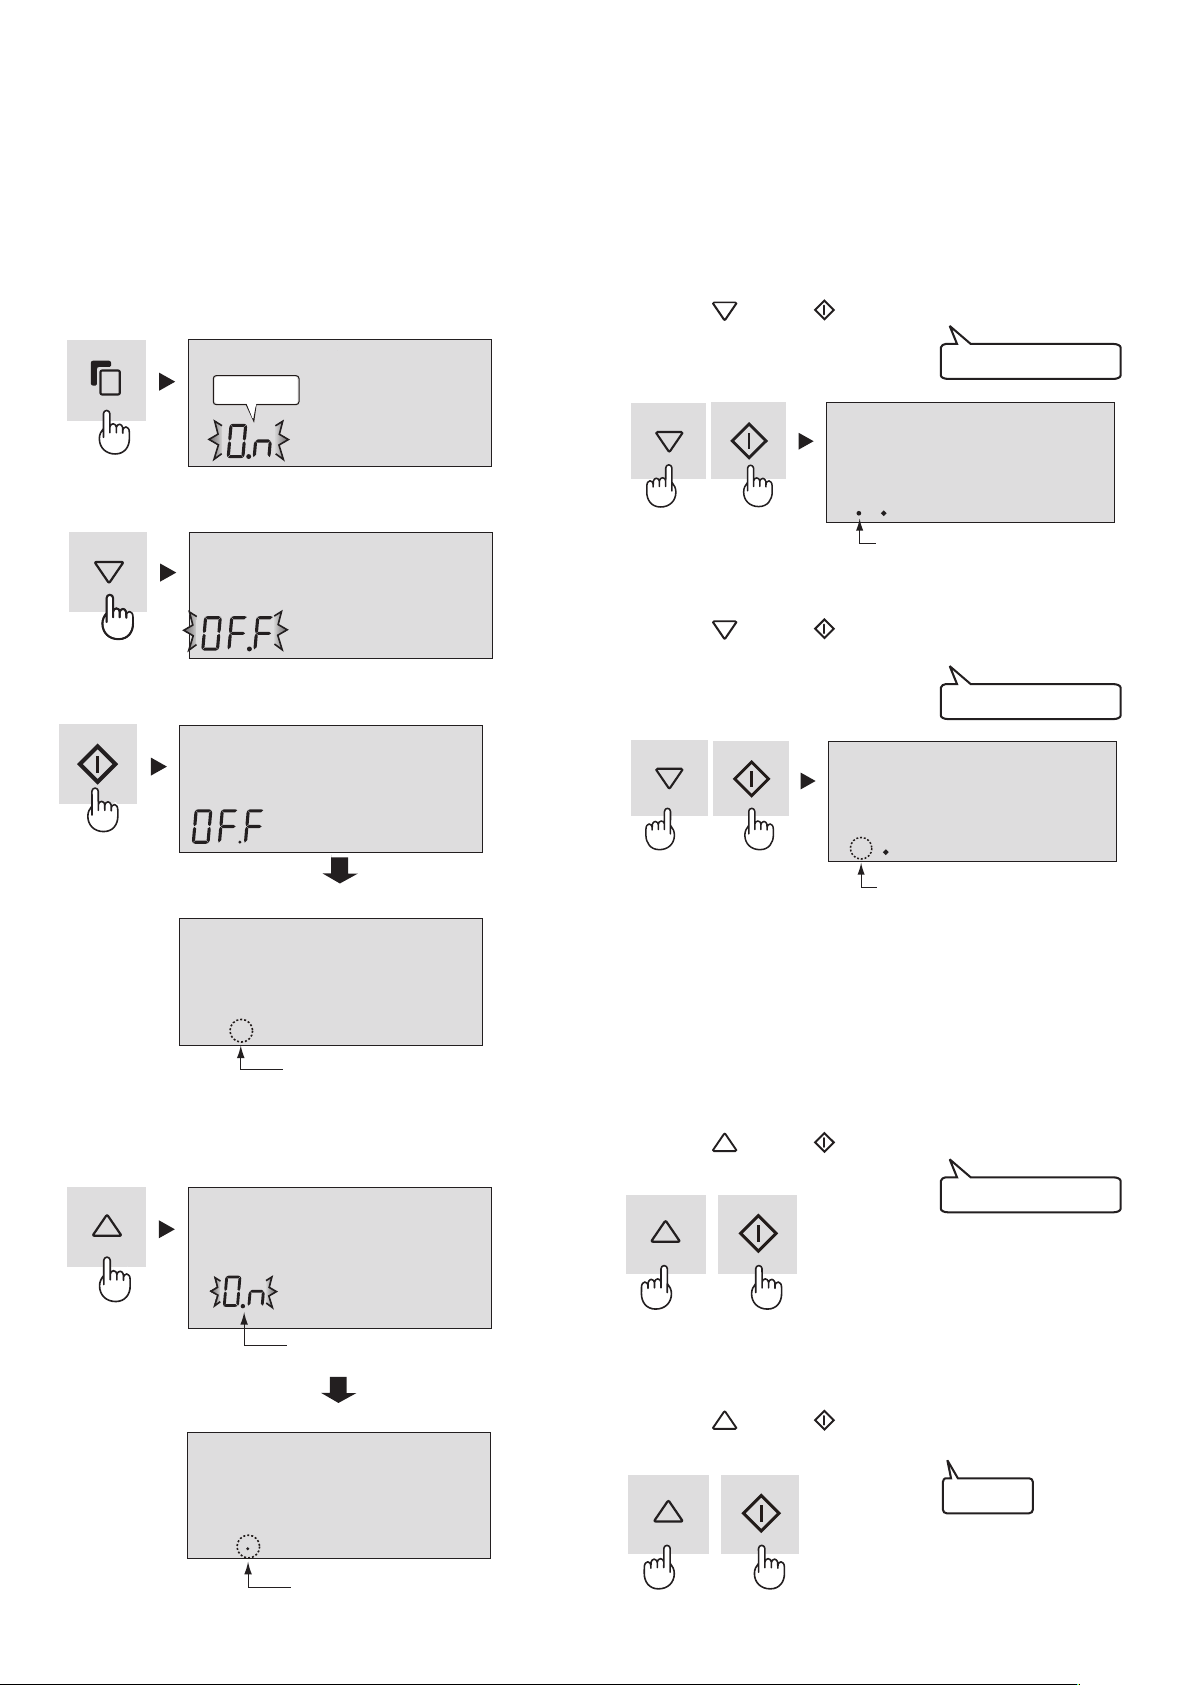
Sound ON/OFF
At rst, the sound is set “ON”.•
Use this feature when you want to switch the sound of key •
operation and the ending sound of Ice tray cleaning to “ON”
or “OFF”.
To set sound “OFF”
Press the
key and key simultaneously and
continuously for 3 seconds or more.
To set sound “ON”
Press the
key and key simultaneously and
continuously for 3 seconds or more again.
It shows the sound “OFF”.
The indication will disappear.
Lighting ON/OFF
Use this feature when you want to switch the lighting of •
control panel and handle indicator when opening the door
to “ON” or “OFF”.
To set “OFF”
Press the
key and key simultaneously and
continuously for 3 seconds or more.
The display will be turned off.
To set “ON”
Press the
key and key simultaneously and
continuously for 3 seconds or more again.
Beep beep beep
Beep
Flashing
Beep beep beep
Beep beep beep

12
Detection lever
The volume of ice cubes are
checked periodically by the
detection lever.
Ice cube volume will decrease when
the ice cubes are not smoothed.
AUTOMATIC ICE MAKER
Water tank
(Approx. 1.8 L)
Shovel
Ice storage box
Noise-prevention
sheet
To turn down the
dropping sound of ice
cubes.
Do not throw away
this sheet.
Ice storage area
Stored ice cube volume (Maximum)
Normal size ice : Approx. 232 pcs.
Large size ice : Approx. 112 pcs.
Food area
Store the small
frozen food.
How ice cubes are made
Water supply
Water is sent from the ●
water tank to the ice tray.
Ice making
Ice cubes are made. ●
(8 pieces at one time)
The number of ice cubes ●
per cycle may sometimes
change.
Releasing
Ice tray rotates, releasing ●
the ice and returns to
“Water supply”.
The ice tray will not rotate ●
when the ice storage box
is full.
<Refrigerator compartment>
Water tank
Pump
Pipe
Ice tray
Detection
lever
Ice storage
box
<Freezer compartment>
Detection
lever
Full volume
(About half the volume)
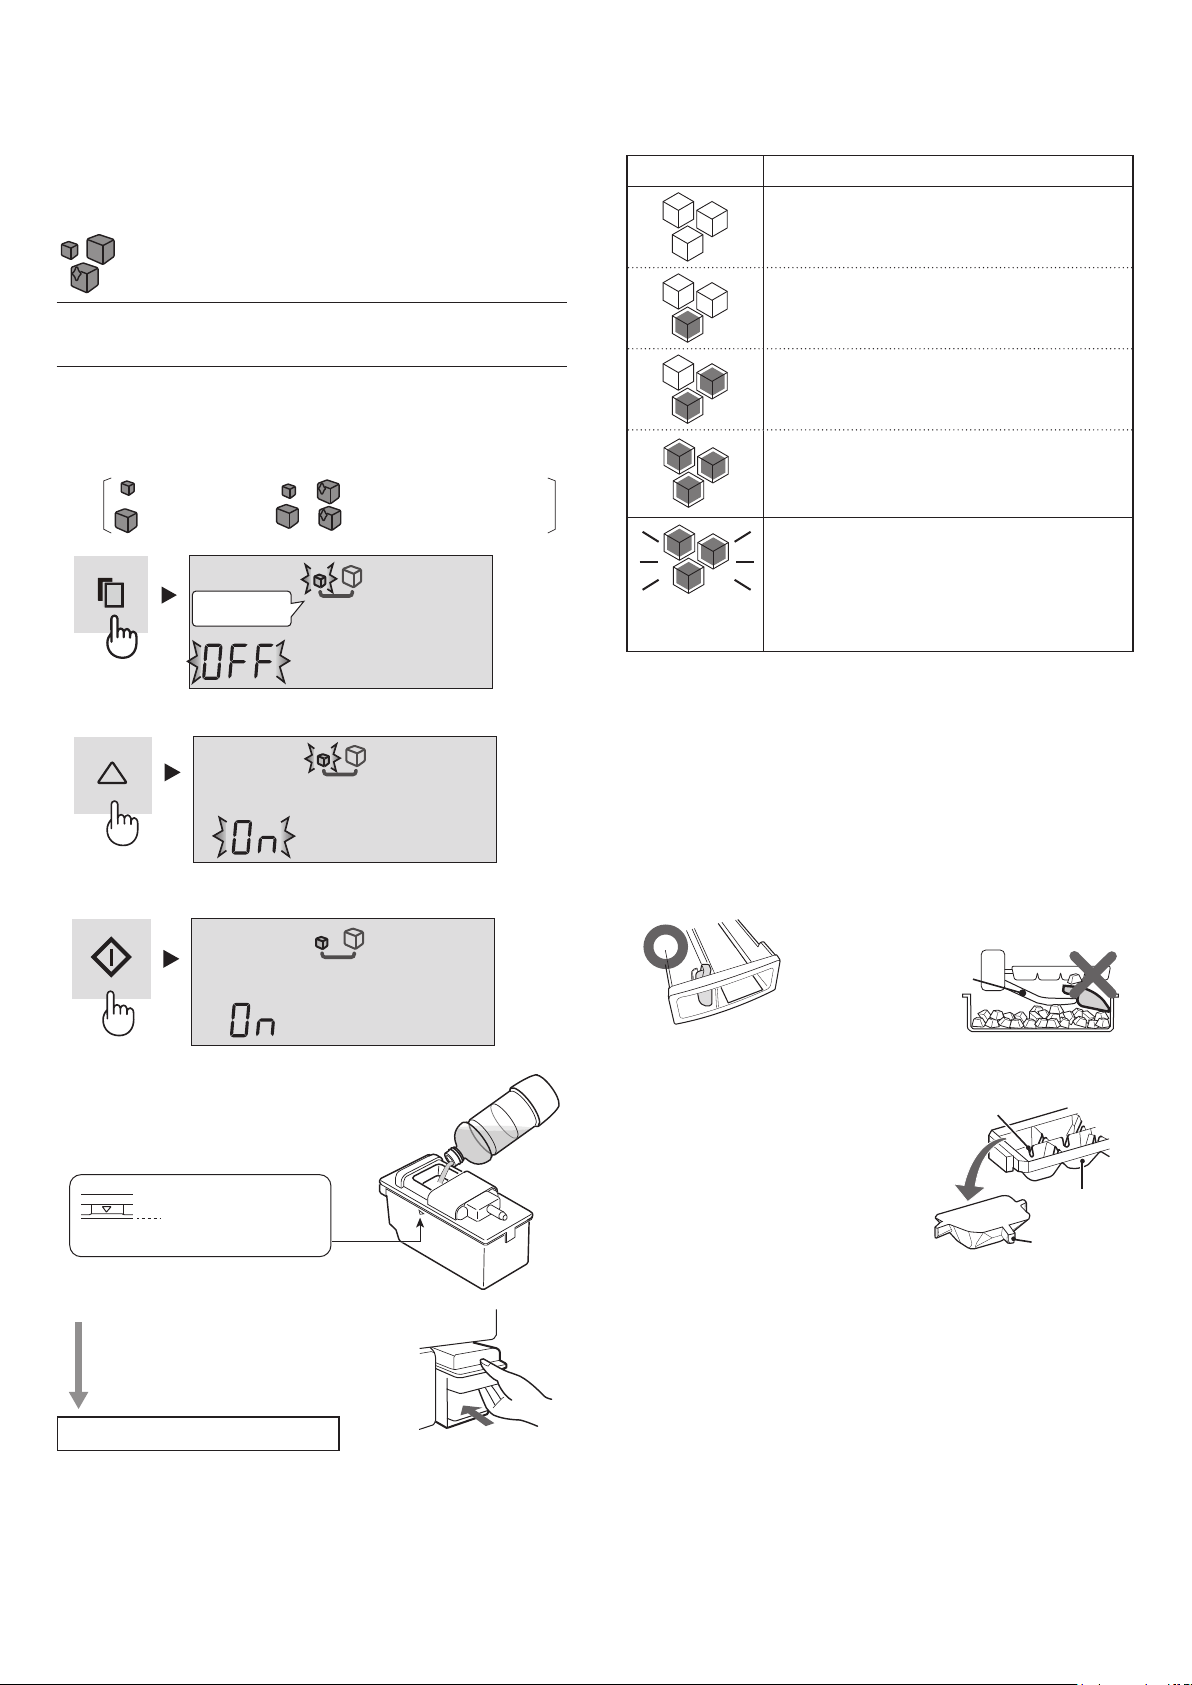
Ice making options
There are 5 modes you can choose as shown below.
The size or the clarity of ice cube differs according to the selected mode.
Mode Icon Ice size Clarity of ice
Required time
for each ice making
Ice making OFF
[
Normal ice
[
Normal Normal Approx.2 hours
Large ice
[
Large Normal Approx.3 and a half hours
Clear ice
(Normal size)
[
Normal High Approx.6 hours
Clear ice
(Large size)
[
Large High Approx.8 hours
NOTE
2 types of ice cube are made at the same time.•
Cube Multifaceted shape
More than one mode cannot be selected at one time. •
The ice making time as shown above is only a rough indication •
at the ambient temperature of 30°C, the temperature
adjustment set to Med, Energy saving turned off, and with no
opening or closing of the doors.
Ice making right after changing the mode
The rst batch of ice cubes made right after changing the •
operating mode does not reect the change in size or clarity.
This is because there are still half-made ice cubes left in the
ice tray when switching to the changed mode. Ice cubes of the
2nd batch or later will reect the mode change.
Ice making takes longer when:
The room temperature is high.•
Less cooling operation, e.g. in winter.•
Many food products are stored.•
Refrigerator is defrosting.•
The door is frequently opened.•
When you restart the ice making operation.•
Energy saving mode is in operation.•
The clarity of clear ice is declined
under the following conditions
Ice making is carried out for the rst time.•
Large amount of food are stored in the other compartments.•
Energy saving or Express freezing is in operation. •
The temperature is set higher or lower than the initial •
temperature adjustment. (Refrigerator : 3°C, Freezer : -18°C)
Ice tray
Ice tray is located at
the upper section in
the back.
(Unremovable)
13
Preparations for the rst-time
ice making
Wash the water tank and the ice storage box.•
Carry out the Ice tray cleaning mode to clean the ice tray •
and the pipe.
(There may be odor or dirt within the automatic ice
maker.)
Ice making
WARNING
Use potable water only.
To start operation
At rst, all the ice making mode are set “OFF”.
1
Select one of the four modes.
Normal ice Clear ice (normal size)
Large ice
+
Clear ice (large size)
2
Select “ON”.
3
Finalize the setting.
4
Pull out the water tank and pour
water into it.
Do not tilt the water tank ●
when carrying as the water
may spill.
5
Set the water tank.
Securely insert the water tank. ●
Ice cubes will not be made
unless the tank is inserted fully.
NOTE
It takes about 24 hours to make the rst set of ice cubes.•
For hygienic reasons, replace the water once a week even •
when there is water remaining in the tank.
When you leave the tank empty, it may sometimes make a •
groaning noise but this is normal.
+
Tank is full at this
position.
Ice is made automatically.
Ice making process indication
Ice cube process indication will change according to the
completion of the ice making as follows.
Indication Condition
Automatic ice making is not operating.•
Within 5 minutes after the water supply.•
Ice making is started.
About two-thirds of the ice making is •
completed.
When the ice storage box is full.•
Ice making is nished. The ice cubes are
dropped to the ice storage box.
(Control panel will light up to show the
completion.)
Water tank is out of water. Pour water into
the water tank.
Even if the water tank is empty, the •
ashing will be turned off by opening and
closing the refrigerator doors. However,
the ashing will restart after a short time.
NOTE
Do not use other than potable water. Do not use hot water •
(heat-resistance:60°C), juice, tea, soda and sports drink etc.
(Dirtying of interior may result.) Malfunction of the ice maker
may occur as a result.
Large size ice may not be made when the water level of the •
water tank is low even if large ice mode is selected.
Do not place the shovel or food on top of the ice cubes. This •
may cause the automatic ice maker to malfunction (damage
of the detection lever, etc.) or the case not being able to be
pulled out. Set the shovel at the designated location.
Protrusions of ice cubes
There are some slits placed in •
the ice tray. Therefore, the ice
cubes coming from the tray will
have protrusions from these slits.
The protrusions may be pointed. •
Be careful when putting the ice
cube directly in your mouth.
White in ice cubes and oating substance
The minerals contained in water may solidify and whiten as •
water freezes. Minerals turn into a state which is insoluble
in water once it freezes, so melting the ice cubes will leave
only white oating substance, but this is normal.
This is more likely to happen when you use hard water •
(e.g.The hardness of the water is 100mg/L or more).
The same thing will happen even if clear ice is set “ON”.•
(Flashing)
Detection lever
Slit
Ice tray
Protrusion
Flashing
14
Canceling the ice making mode
Use this feature during night time or winter time.•
You can use the ice storage box as a freezer case.•
To cancel operation
1
Select ice making mode which is in operation.
2
Select “OFF”.
3
Finalize the setting.
4
Empty the water tank.
Dry it thoroughly and set into the original position.
After canceling the ice making
Even after canceling the set ice making mode, it will •
conduct once the ice releasing operation, therefore the ice
tray and the detection lever will operate.
After nishing the ice releasing operation, ice making •
process indication will turn off.
Do not put any food until the ice making process indication •
turns off. Otherwise, it may break the detection lever.
To start operation again
Refer to “Ice making”.
Ice tray cleaning
You can clean the ice tray and the pipe.
Use this feature at the beginning or when the refrigerator
has not been used for a long time.
The water is supplied from the water tank to the ice tray •
forcibly.
The water discharge amount at one cleaning will be 100mL.•
However, when large ice mode is set as on, the water
discharge will be 230mL.
Preparation
Pour water into the water tank and set into the original
position. Empty the ice storage box.
To start operation
1
Select ice tray cleaning icon.
2
Select “ON”.
3
Finalize the setting. (Ice tray cleaning will start.)
During ice tray cleaning operation
It takes about 40 sec.
Do not pull out the ice storage box.
The process indication will toggle like in the
above picture.
4
Follow steps
2
to
3
again.
5
Finally push
button. Empty the water of the ice
storage box.
Dry it thoroughly and set into the original position.
NOTE
Once it completes cleaning, it returns to the ice making
operation that it is currently set at.
♪
♪
Flashing
Flashing
Empty

15
STORING FOOD
IN
OUT
Refrigeration reduces the rate of food spoilage.
To maximise the shelf life of perishable food products,
ensure that the food is of the freshest possible quality.
The following is a general guide to help promote longer food
storage.
Fruit / Vegetables
To minimize moisture loss, fruit and vegetables should be
loosely enclosed in a plastic material (e.g. wrap, bags) and
place in the vegetable crisper and fruit case.
If you store a lot of vegetables, dew may form. This has no
effect on the operation or the performance. Use a dry cloth
to remove the dew.
Dairy Products & Eggs
Most dairy products have a use by date on the outer •
packaging which informs the recommended temperature
and shelf life of the product.
Eggs should be stored in the Egg tray.•
Meats / Fish / Poultry
Place on a plate or dish and cover with paper or plastic •
wrap.
For larger cuts of meat, sh, or poultry, place to the rear of •
the shelves.
Ensure all cooked food is wrapped securely or placed in an •
airtight container.
NOTE
Evenly place the food on the shelves •
to allow the cooling air to circulate
efciently.
Hot foods should be cooled before •
storing. Storing hot foods increases the
temperature in the unit and increases
the risk of food spoilage.
Do not block the outlet and inlet of the •
cool air circulating circuit with foods
or containers; otherwise the foods will
not be evenly cooled throughout the
refrigerator.
Keep the door securely closed.•
Do not place food directly in front of cold air
outlet. This may lead to the food freezing.
For best freezing
Quality of foods should be fresh.•
Freeze small quantities of food at a time to freeze them •
quickly.
Food should be properly sealed, sealed tightly or covered.•
Evenly place the food in the freezer.•
Label bags or containers to keep an inventory of frozen •
food.
Ice cubes
Frozen foods
(Small size)
Frozen foods
(Big size)
Bottles etc.
Juice etc.
Small foods
Vegetables
Fruits
Dairy products
Small foods
Eggs etc.
Bottles etc.
(Big size)
Meat, Fish, Poultry etc.
This section is not suitable
to store vegetables as
they may freeze.
16
WARNING
Unplug the refrigerator rst to prevent electric shock. ■
Do not splash water directly on the outer cabinet or ■
the interior. This may lead to rusting and deterioration
of the electrical insulation.
IMPORTANT
To prevent cracking on inside surfaces and plastic
components, follow these tips.
Wipe any food oils adhered to plastic components.•
Some household chemicals may cause damage, so use •
only diluted washing-up liquid (soapy water).
If undiluted detergent is used or soapy water is not wiped •
off thoroughly, cracking of plastic parts can result.
Wipe any spills from the refrigerator immediately as acid •
or alkaline in the food can cause cracking and staining of
plastic parts.
1
Remove the water tank and clean and dry it thoroughly
to prevent water stain or bacteria from being attached.
(Once a week)
2
Remove the accessories e.g. shelves from the cabinet
and door. Wash them in warm soapy dishwashing water;
rinse in clean water and dry.
3
Clean the inside with a cloth soaked in warm soapy
dishwashing water. Then, use cold water to wipe off
soapy water.
4
Wipe the exterior with a soft cloth each time it is soiled.
5
Clean the Magnetic door seal with a toothbrush and
warm soapy dishwashing water.
6
Wipe the control panel with the dry cloth.
NOTE
Do not use hot water, household cleaning powders, creams or •
spray-on cleaning products, or any other cleaning products such
as mineral turpentine, methylated spirits, thinners, petrol etc.
These may damage your refrigerator and may void any warranty.
If the power supply is disconnected, please wait for at least •
5 minutes before re-connecting power.
The glass shelves weigh approximately 3 kg each. Hold rmly •
when removing from the cabinet or carrying.
Do not drop objects inside the refrigerator or strike the inner •
wall. This may cause the inner surface to crack.
Defrosting
Defrosting is fully automatic due to a unique energy saving
system.
When the compartment light is blown
Contact the service agent approved by SHARP to request a
replacement compartment light. The compartment light is not
to be removed other than by qualied service personnel.
When transporting
Before transporting, empty the ice tray by the following •
procedure.
Empty the water tank and the ice storage box.
1
Set Ice tray cleaning mode “ON”.
2
(Refer to “Ice tray cleaning”.)
About 40sec. later, empty water or ice of ice storage
3
box when you hear the ending sound.
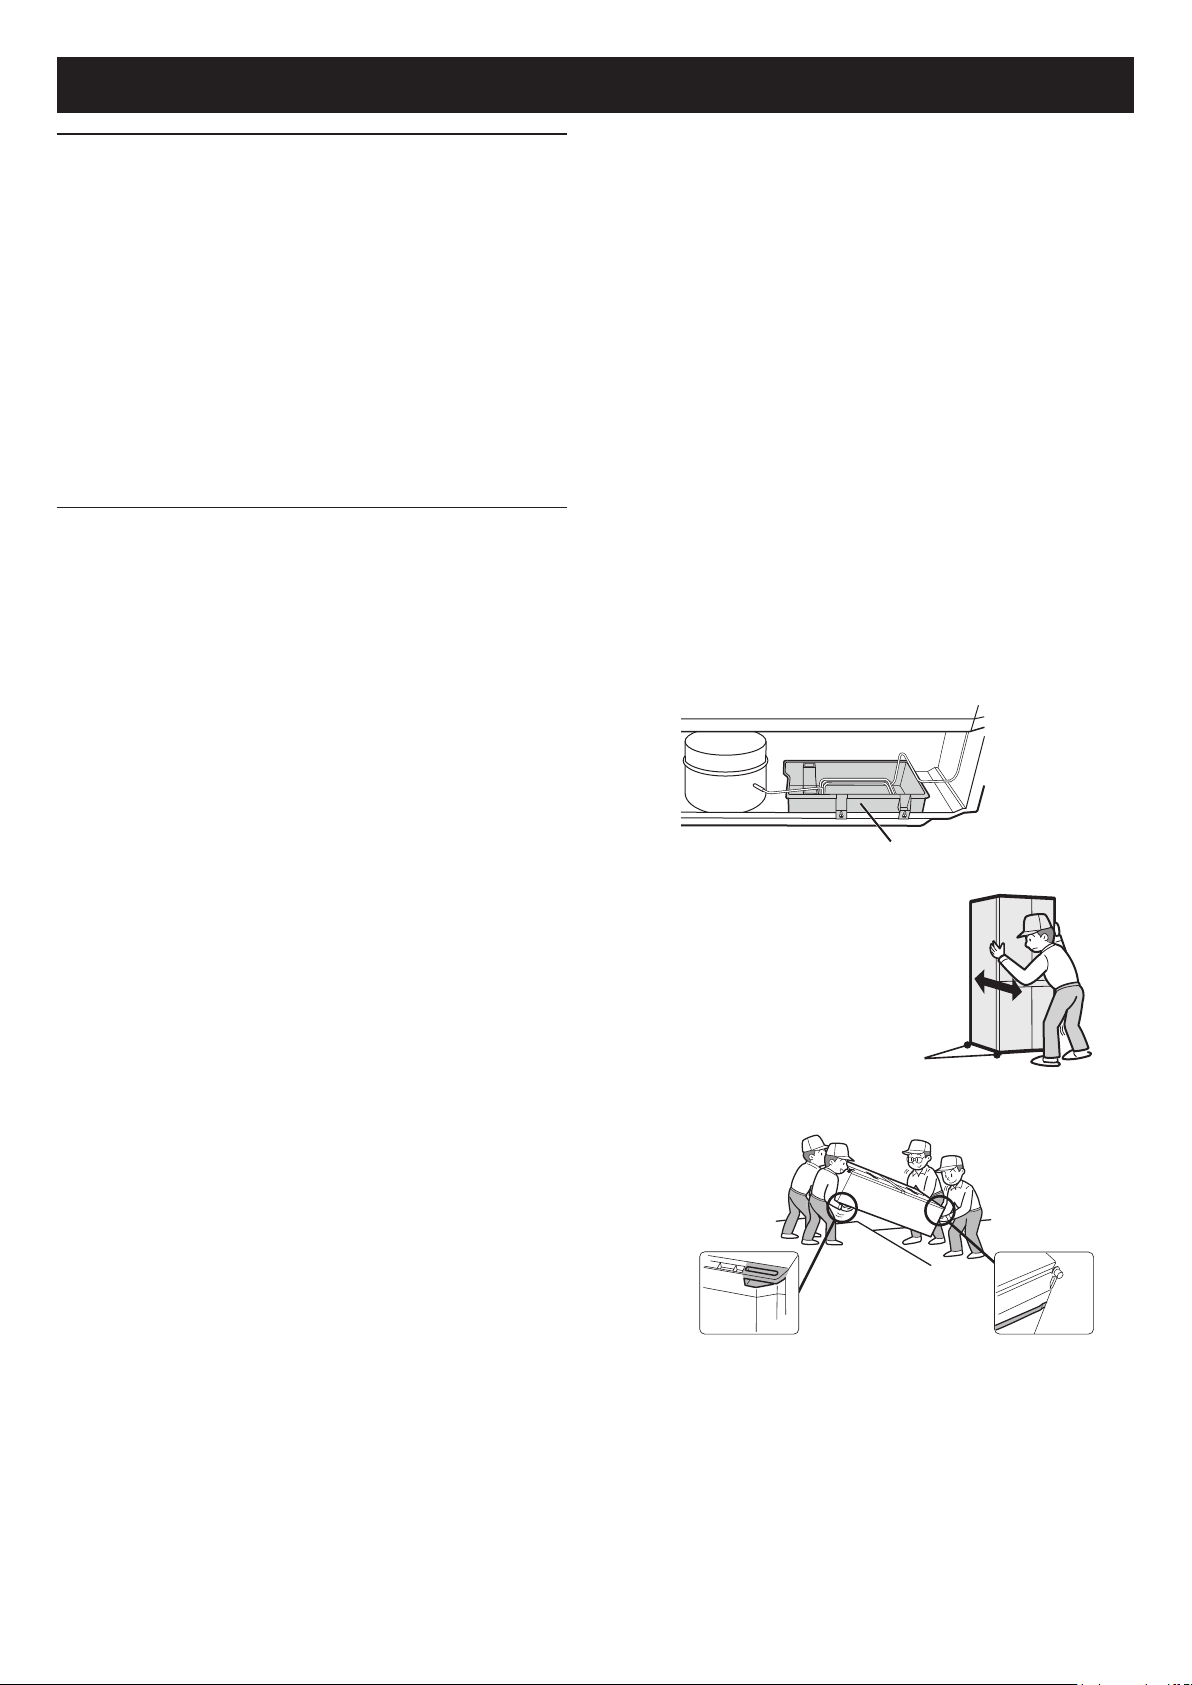
Wipe up water in the evaporating pan. Before wiping up •
the water, wait more than 1 hour after pulling out the plug
because refrigeration cycle equipment is extremely hot.
(The evaporating pan is located on the rear of the product.)
The casters allow the refrigerator to •
move back and forth.
Carry the refrigerator by holding the handles located on the •
rear and bottom.
Switching off your refrigerator
If the refrigerator needs to be switched off for an extended
period, the following steps should be taken to reduce the
growth of mould:
Remove all food.1.
Remove the power plug from the power point.2.
Clean and dry the interior thoroughly.3.
Ensure that all the doors are wedged open slightly for air 4.
circulation.
CARE AND CLEANING
Casters
Evaporating pan
17
Before you call for service, check the following points.
Problem Solution
The outside of the cabinet is hot
when touched.
This is normal. The hot pipe is in the cabinet in order to prevent condensation
generation.
When there is refrigerator noise. It is normal for the refrigerator to produce the following sounds.
Loud noise produced by the compressor when operation starts •
--- Sound becomes quieter after a while.
Loud noise produced once a day by the compressor •
--- Operating sound produced immediately after automatic defrost operation.
Sound of owing uid (gurgling sound, zzing sound) •
--- Sound of refrigerant owing in pipes (sound may become louder from time to time).
Cracking or crunching sound, squeaking sound •
--- Sound produced by expansion and contraction of inner walls and internal parts
during cooling.
Frosting or condensation
generation occurs inside or
outside the refrigerator.
This may occur in one of the following cases. Use a wet cloth for wiping frost and a dry
cloth for wiping condensation.
When the ambient humidity is high.•
When the door is frequently opened and closed.•
When food containing plenty of moisture is stored. (Wrapping is required.)•
The foods in the refrigerator
compartment freeze.
Is the refrigerator operated for a long time with refrigerator temp. control set at 0°C?•
Is the refrigerator operated for a long time with freezer temp. control set at -21°C?•
Low ambient temperature may cause food to freeze even if refrigerator temp. control •
is set to 6°C.
Noticeable odours. Wrapping is required for food with strong odours.•
The control panel does not
work.
This may occur in one of the following cases.
The panel or your nger is soiled with dripping, oil and etc.•
When you touch the panel with gloved hand, adhesive bandage on your nger, nail or •
objects.
Sticker or tape is afxed on the keys.•
Touch position is slightly off from the keys.•
Operate time is not enough for the keys to work.•
ICE MAKING
Problem Solution
Ice maker is not producing ice. Is there water in the water tank? (If there isn’t, ice making process indication will ash.)•
Is the water tank securely set?•
Have you left the shovel or other food products in the ice storage box?•
Isn’t all the ice making mode set at “OFF”?•
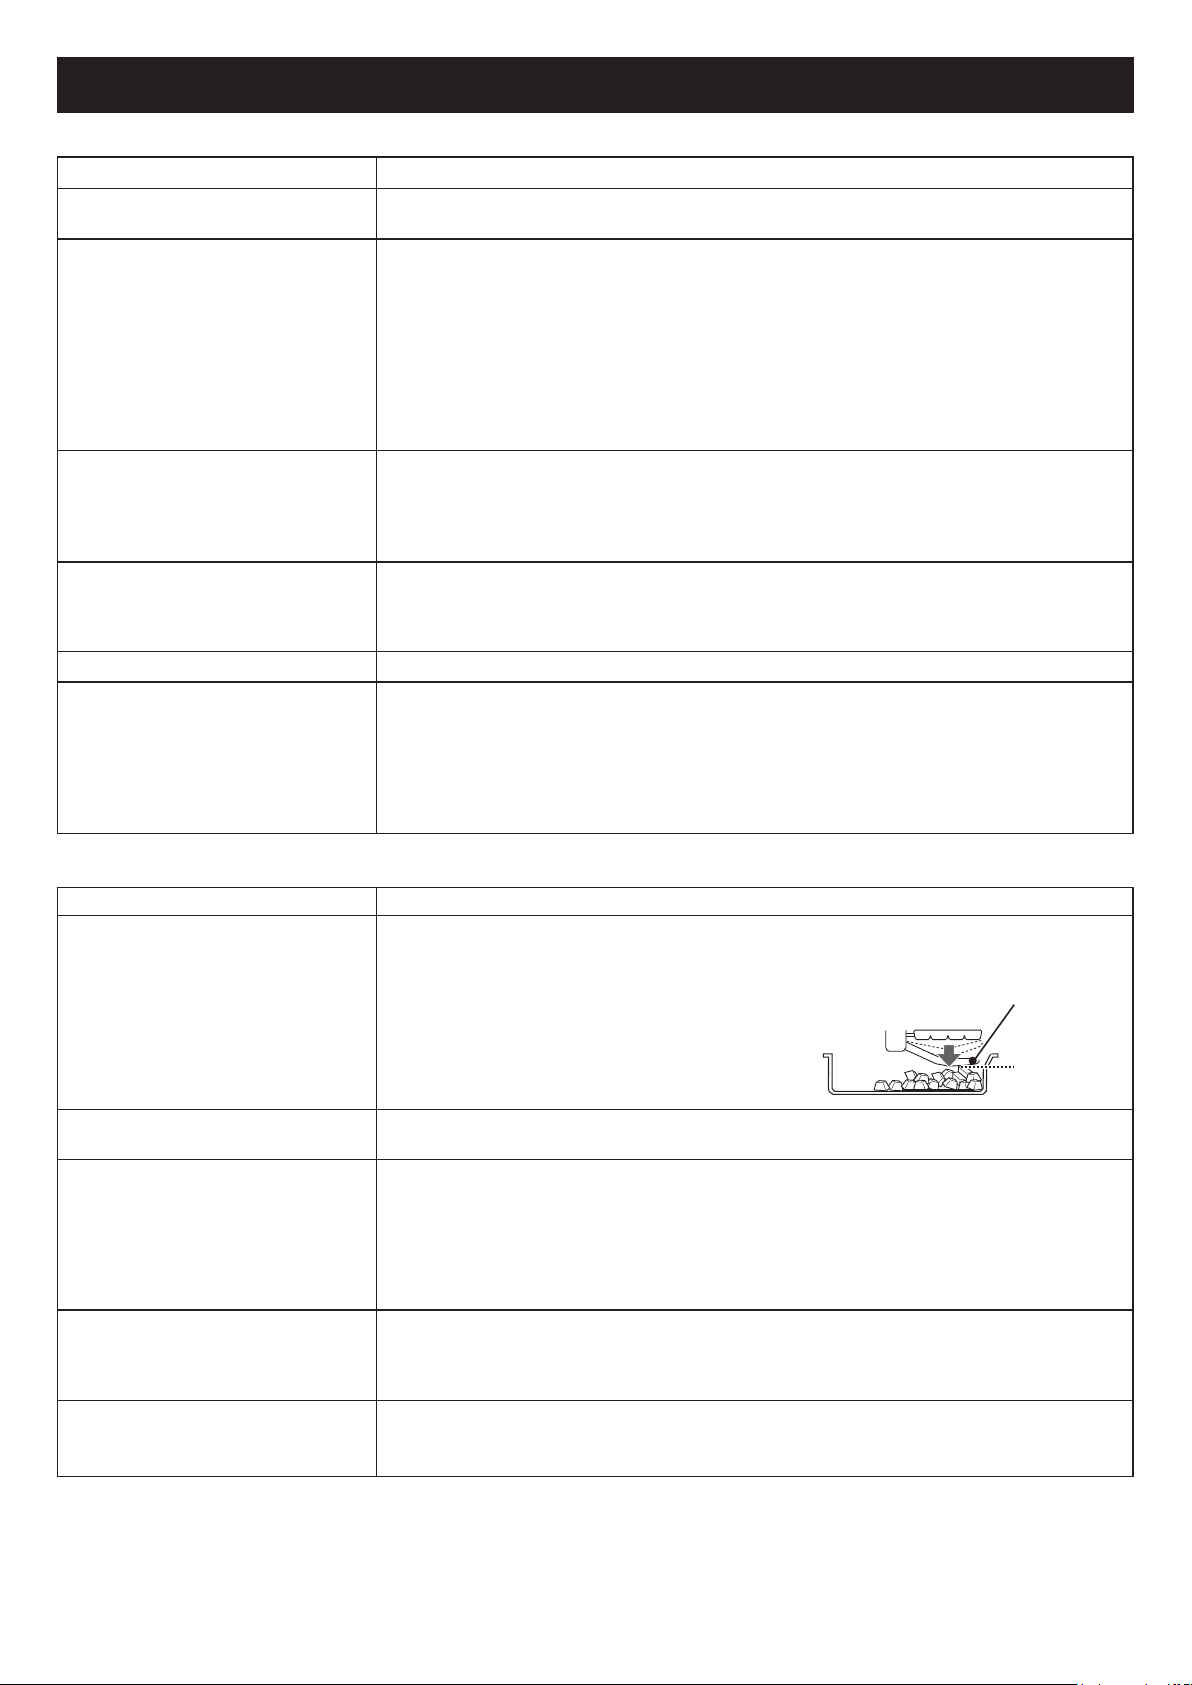
Are the ice cubes piled up at the back of the •
ice storage box? (Spread out the ice cubes evenly.)
Try the “Ice tray cleaning”. If the ice tray •
cleaning works properly, wait for one day.
You may get ice again.
Ice cubes are made slow Has the ice making operation just been restarted?•
Is it just after relling the tank with potable water?•
Ice cubes are small, rounded or
connected.
There is protrusion or holes in ice
cubes.
Ice cubes may become small or connected to each other, especially just before or •
after water supply.
If you store ice cubes for a long time, they may become smaller, rounded, lumped •
together.
The protrusion you may see comes from the slits in the ice tray.•
The hole comes from air bubbles in ice cubes which may be lumped together and form •
bigger holes.
Ice cubes have some odour. Is the water in the water tank old or with some odour?•
Is there remaining detergent or bleach in the water tank used for cleaning the water •
tank?
If ice cubes has been left unused for a long time, odours may transfer to the ice cubes.•
No water or ice cubes drop even
when performing
“Ice tray cleaning”.
Is the ice storage box full with ice cubes? Have you left the shovel or other food •
products in the ice storage box? (Empty the ice storage box.)
Is there water in the water tank?•
If you still require service contact your SHARP Approved Service Centre.
SHARP Approved Service Centre locations can be found in the Support area of our website:
Australia : http://www.sharp.net.au
New Zealand : http://www.sharp.net.nz
BEFORE YOU CALL FOR SERVICE
Detection
lever
Detection of
full volume
18
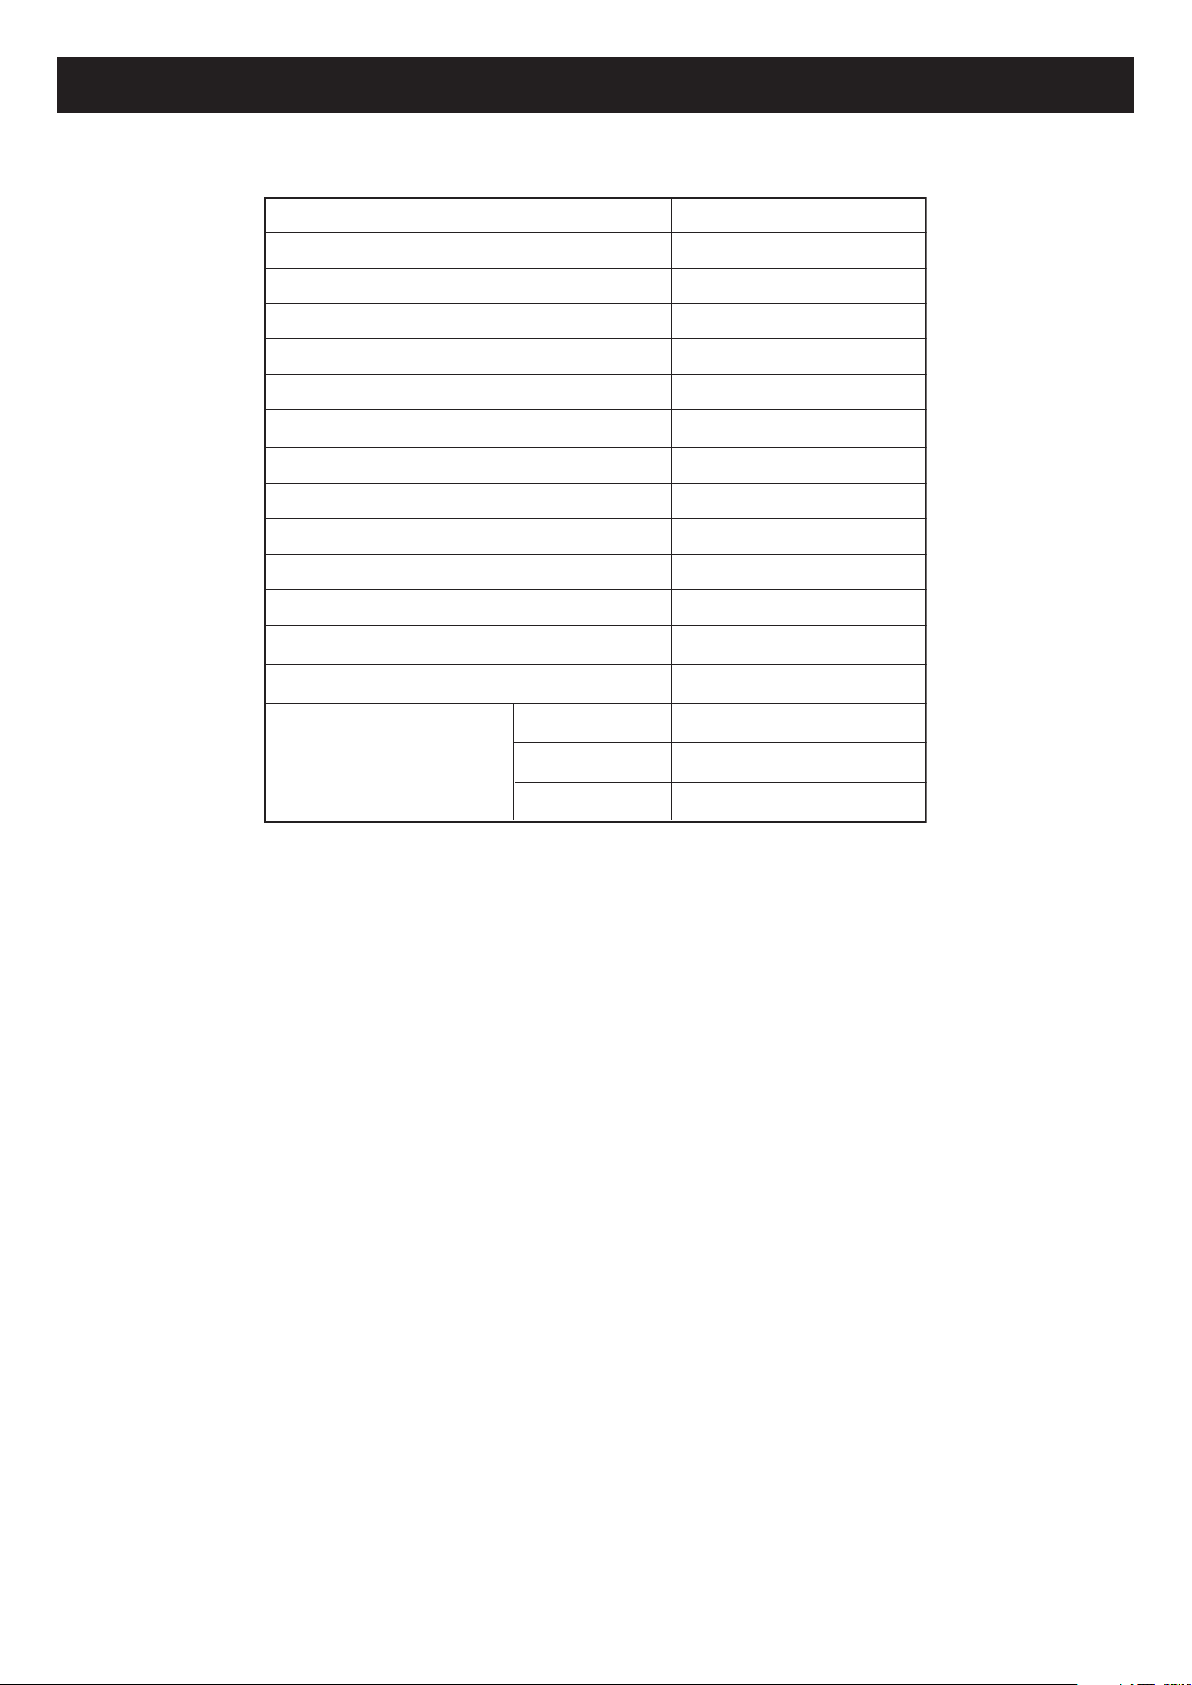
SPECIFICATION
Rated voltage (V~)
Rated frequency (Hz)
Rated current (A)
Rated input of heating systems (W)
Defrosting input (W)
Refrigerant
Charge (g)
Rated storage volume (L)
Rated gross volume (L)
Climate class
Insulation blowing gas
Group (AS / NZS 4474.1)
Net weight (kg)
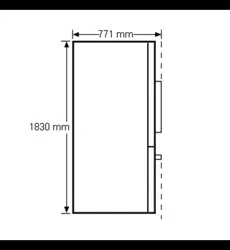
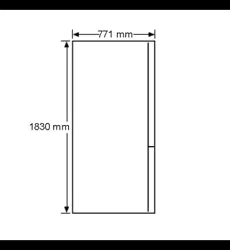
Outer dimensions
(mm)
220 - 240
SJ-FS676V
50
1.3 - 1.4
173 - 206
191 - 223
R600a
T
83
Cyclo pentane
5B
595
676
118
1830
892
766
Height
Width
Depth
19

TINS-B351CBRZ 12HK TH
1
Printed in Thailand
SHARP CORPORATION OF AUSTRALIA PTY.LTD.
A. B. N. 40 003 039 405
1 HUNTINGWOOD DRIVE, HUNTINGWOOD, N.S.W. 2148
P.O.BOX 6827, BLACKTOWN. N.S.W. 2148
SHARP CORPORATION OF NEW ZEALAND LIMITED
59 HUGO JOHNSTON DRIVE P.O. BOX 12244, PENROSE, AUCKLAND