Loading ...
Loading ...
Loading ...
7
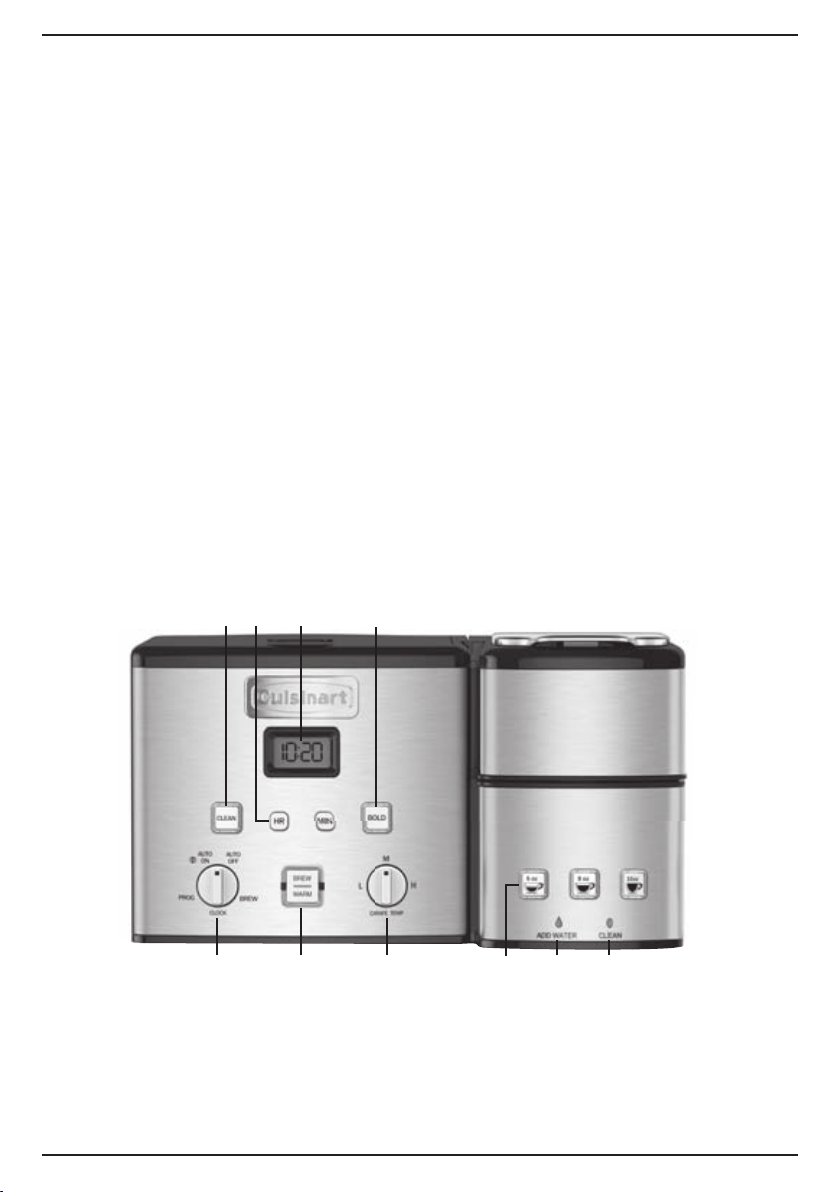
1. Power Switch (not shown)
Located on the right side of your brewer.
Use to turn your Coffeemaker on and off.
2. Clock Display
Displays time of day, Auto On, and
Auto Off times.
3. Clean Indicator
Indicates time to clean Coffeemaker
to remove calcium buildup.
4. Hour and Minute Buttons
Use to set hours and minutes for time
of day, Auto On, and Auto Off times.
5. BOLD Cup Setting with Indicator
Use to select bolder coffee flavor strength.
6. BREW/WARM Button
Top half of button “BREW” will be lit
when unit is ready to brew. The top half
will flash slowly while brewing. The bottom
half of button “WARM” will be lit at end of
a carafe brew cycle to indicate Keep Warm
is activated.
7. Function Knob
a. PROG
Select to program Auto On time.
Coffeemaker can be programmed to
automatically start brewing up to 24 hours
in advance.
b. AUTO ON
Select to automatically start brewing coffee
at the time you’ve programmed.
c. AUTO OFF
Select to program your Coffeemaker to
automatically shut off Keep Warm mode
up to 4 hours after brewing.
d. BREW
Select to begin brew cycle when BREW
button is pressed.
e. CLOCK
Select to set time of day.
8. Carafe Temperature Knob
Set the heater plate to Low (L), Medium (M),
or High (H) to keep coffee in the carafe at the
temperature you prefer.
GETTING TO KNOW YOUR CONTROL PANEL
12-CUP COFFEEMAKER CONTROLS
Detailed programming and use instructions are on pages 8–10.
SINGLE-SERVE COFFEEMAKER CONTROLS
Detailed use instructions are on pages 11–14.
9. Brew Buttons
6 oz. button; 8 oz. button; 10 oz. button.
10. Add Water Indicator
Indicates the need to add water to brew.
11. Clean Indicator
Indicates it is time to clean the Coffeemaker
to remove calcium buildup.
867
2
5
3
10
119
4
Loading ...
Loading ...
Loading ...