I NJ
Save This Manual For Future Reference
Owner's Manual
Manual de operaciones
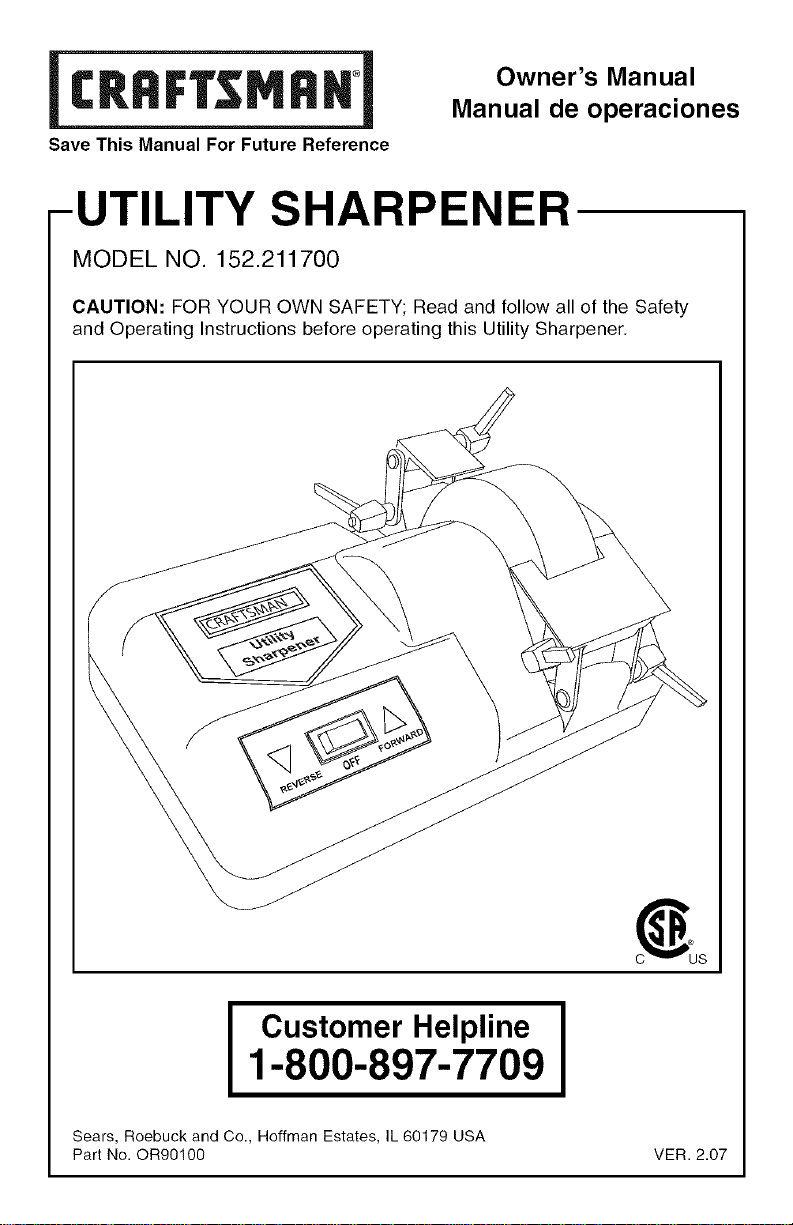
fUTILITY SHARPENER
MODEL NO. 152.211700
CAUTION: FOR YOUR OWN SAFETY; Read and follow all of the Safety
and Operating Instructions before operating this Utility Sharpener,
I Customer Helpline1-800-897-7709 I
Sears, Roebuck and Co., Hoffman Estates, IL 60179 USA
Part No. ©R90100 VER. 2.07
SECTION PAGE
Warranty ................................................................................................................ 2
Safety Instructions ............................................................................................... 3
Grounding Instructions ....................................................................................... 6
Specific Safety Instructions for Utility Sharpeners .......................................... 7
Know Your Utility Sharpener .............................................................................. 8
Operating the Utility Sharpener ........................................................................ 10
Maintenance ....................................................................................................... 12
Troubleshooting Guide ...................................................................................... 12
Parts List............................................................................................................. 13
Espa_ol ............................................................................................................... 17
Service ................................................................................................................ 32
FULLONEYEAR WARRANTY
If this product fails due to a defect in material or workmanship within one year
from the date of purchase, RETURN IT TO THE NEAREST SEARS STORE OR
CRAFTSMAN OUTLET, and it will be replaced, free of charge.
This warranty gives you specific legal rights, and you may also have other rights,
which vary, from state to state.
Sears, Roebuck and Co., Dept. 817 WA, Hoffman Estates, IL 60179
GENERAL SAFETY INSTRUCTIONS
Operating a Utility Sharpener can be dangerous if safety and common sense
are ignored. The operator must be familiar with the operation of the tool. Read
this manual to understand this Utility Sharpener. DO NOT operate this Utility
Sharpener if you do not fully understand the limitations of this tool. DO NOT
modify this Utility Sharpener in any way.
BEFORE USING THE UTILITY SHARPENER
To avoid serious injury and damage to the tool, read and follow all of the Safety and
Operating Instructions before operating the Utility Sharpener.
1. Some dust created by using power tools contains chemicals known to the State of
California to cause cancer, birth defects, or other reproductive harm. Some exam-
ples of these chemicals are:
• Lead from lead-based paints.
• Crystalline silica from bricks, cement, and other masonry products.
• Arsenic and chromium from chemically treated lumber.
Your risk from these exposures varies, depending on how often you do this type of
work. To reduce your exposure to these chemicals: work in a well-ventilated area,
and work with approved safety equipment, such as those dust masks that are
specially designed to filter out microscopic particles.
2. READ the entire Owner's Manual. LEARN how to use the tool for its intended
applications.
3. GROUND ALL TOOLS. If the tool is supplied with a 3-prong plug, it must be
plugged into a 3-contact electrical receptacle. The 3rd prong is used to ground the
tool and provide protection against accidental electric shock. DO NOT remove the
3rd prong. See Grounding Instructions on page 5.
4. AVOID A DANGEROUS WORKING ENVIRONMENT. DO NOT use electrical tools
in a damp environment or expose them to rain.
5. DO NOT use electrical tools in the presence of flammable liquids or gases.
6. ALWAYS keep the work area clean, well lit, and organized. DO NOT work in an
environment with floor surfaces that are slippery from debris, grease, and wax.
7. KEEP VISITORS AND CHILDREN AWAY. DO NOT permit people to be in the
immediate work area, especially when the electrical tool is operating.
8. DO NOT FORCE THE TOOL to perform an operation for which it was not designed.
It will do a safer and higher quality job by only performing operations for which the
tool was intended.
9,
WEAR PROPER CLOTHING. DO NOT wear loose clothing, gloves, neckties, or
jewelry. These items can get caught in the machine during operations and pull the
operator into the moving parts. You must wear a protective cover on your hair, if
your hair is long, to prevent it from contacting any moving parts.
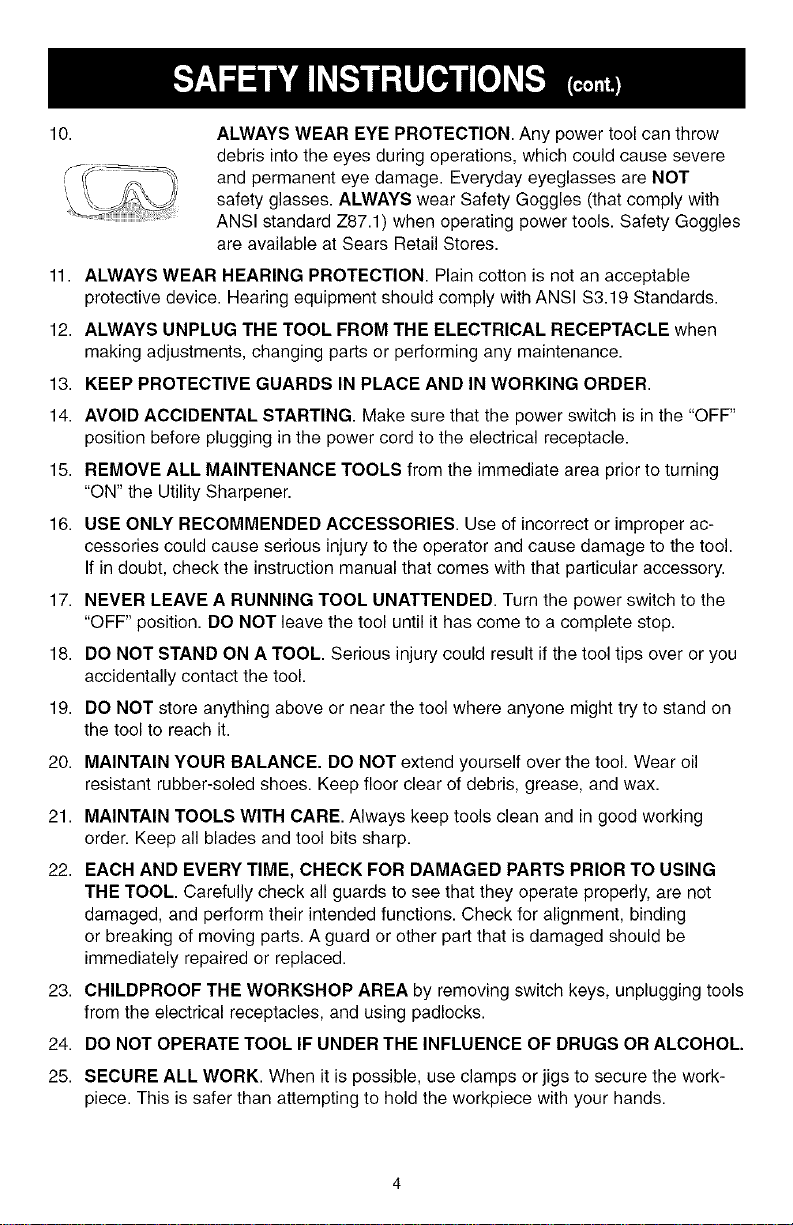
10.
ALWAYSWEAREYEPROTECTION.Anypowertoolcanthrow
debrisintotheeyesduringoperations,whichcouldcausesevere
andpermanenteyedamage.Everydayeyeglasses are NOT
safety glasses. ALWAYS wear Safety Goggles (that comply with
ANSI standard Z87.1) when operating power tools. Safety Goggles
are available at Sears Retail Stores.
11. ALWAYS WEAR HEARING PROTECTION. Plain cotton is not an acceptable
protective device. Hearing equipment should comply with ANSI $3.19 Standards.
12. ALWAYS UNPLUG THE TOOL FROM THE ELECTRICAL RECEPTACLE when
making adjustments, changing parts or performing any maintenance.
13. KEEP PROTECTIVE GUARDS IN PLACE AND IN WORKING ORDER.
14. AVOID ACCIDENTAL STARTING. Make sure that the power switch is in the "OFF"
position before plugging in the power cord to the electrical receptacle.
15. REMOVE ALL MAINTENANCE TOOLS from the immediate area prior to turning
"ON" the Utility Sharpener.
16. USE ONLY RECOMMENDED ACCESSORIES. Use of incorrect or improper ac-
cessories could cause serious injury to the operator and cause damage to the tool.
If in doubt, check the instruction manual that comes with that particular accessory.
17. NEVER LEAVE A RUNNING TOOL UNATTENDED. Turn the power switch to the
"OFF" position. DO NOT leave the tool until it has come to a complete stop.
18. DO NOT STAND ON A TOOL. Serious injury could result if the tool tips over or you
accidentally contact the tool.
19. DO NOT store anything above or near the tool where anyone might try to stand on
the tool to reach it.
20. MAINTAIN YOUR BALANCE. DO NOT extend yourself over the tool. Wear oil
resistant rubber-soled shoes. Keep floor clear of debris, grease, and wax.
21. MAINTAIN TOOLS WITH CARE. Always keep tools clean and in good working
order. Keep all blades and tool bits sharp.
22. EACH AND EVERY TIME, CHECK FOR DAMAGED PARTS PRIOR TO USING
THE TOOL. Carefully check all guards to see that they operate properly, are not
damaged, and perform their intended functions. Check for alignment, binding
or breaking of moving parts. A guard or other part that is damaged should be
immediately repaired or replaced.
23. CHILDPROOF THE WORKSHOP AREA by removing switch keys, unplugging tools
from the electrical receptacles, and using padlocks.
24. DO NOT OPERATE TOOL IF UNDER THE INFLUENCE OF DRUGS OR ALCOHOL.
25. SECURE ALL WORK. When it is possible, use clamps or jigs to secure the work-
piece. This is safer than attempting to hold the workpiece with your hands.

26.USE A PROPER EXTENSION CORD IN GOOD CONDITION. When using an
extension cord, be sure to use one heavy enough to carry the current your product
will draw. The table on the next page shows the correct size to use depending on
cord length and nameplate amperage rating. If in doubt, use the next heavier gauge.
The smaller the gauge number, the larger diameter of the extension cord. If in doubt
of the proper size of an extension cord, use a shorter and thicker cord. An under-
sized cord will cause a drop in line voltage resulting in a loss of power and over-
heating. USE ONLY A 3-WIRE EXTENSION CORD THAT HAS A 3-PRONG
GROUNDING PLUG AND A 3-POLE RECEPTACLE THAT ACCEPTS THE
TOOL'S PLUG.
27. ALWAYS WEAR A DUST MASK TO PREVENT INHALING DANGEROUS DUST
OR AIRBORNE PARTICLES, including wood dust, crystalline silica dust and
asbestos dust. Direct particles away from face and body. Always operate tool in well
ventilated area to provide for dust removal. Use dust collection system wherever
possible. Exposure to the dust may cause serious and permanent respiratory or
other injury, including silicosis (a serious lung disease), cancer, and death. Avoid
breathing the dust, and avoid prolonged contact with the dust. Allowing dust to get
into your mouth or eyes, or lay on your skin may promote absorption of harmful
material. Always use properly fitting NIOSH/OSHA approved respiratory protection
appropriate for the dust exposure, and wash exposed areas with soap and water.
SAVE THESE INSTRUCTIONS.
GUIDE LINES FOR EXTENSION CORDS
If you are using an extension cord outdoors, be sure it is marked with the suffix
"W-A" ("W" in Canada) to indicate that it is acceptable for outdoor use.
Be sure your extension cord is properly sized, and in good electrical condition.
Always replace a damaged extension cord or or have it repaired by a qualified person
before using it.
Protect your extension cords from sharp objects, excessive heat, and damp or wet
areas.
120 VOLT OPERATION ONLY
25' LONG 50' LONG 100' LONG 150' LONG
0 to 6 Amps 18 AWG 16 AWG 16 AWG 14 AWG
6 to 10 Amps 18 AWG 16 AWG 14 AWG 12 AWG
10 to 12 Amps 16 AWG 16 AWG 14 AWG 12 AWG
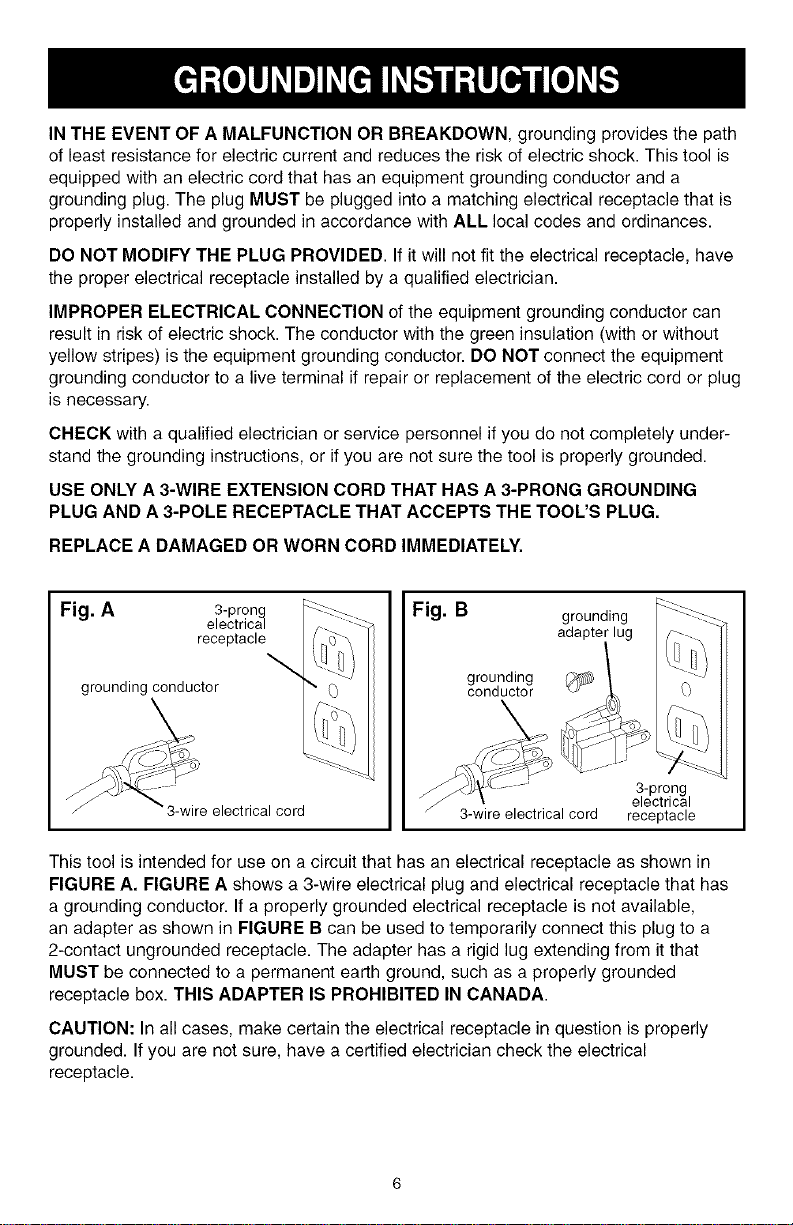
IN THE EVENT OF A MALFUNCTION OR BREAKDOWN, grounding provides the path
of least resistance for electric current and reduces the risk of electric shock. This tool is
equipped with an electric cord that has an equipment grounding conductor and a
grounding plug. The plug MUST be plugged into a matching electrical receptacle that is
properly installed and grounded in accordance with ALL local codes and ordinances.
DO NOT MODIFY THE PLUG PROVIDED. If it will not fit the electrical receptacle, have
the proper electrical receptacle installed by a qualified electrician.
IMPROPER ELECTRICAL CONNECTION of the equipment grounding conductor can
result in risk of electric shock. The conductor with the green insulation (with or without
yellow stripes) is the equipment grounding conductor. DO NOT connect the equipment
grounding conductor to a live terminal if repair or replacement of the electric cord or plug
is necessary.
CHECK with a qualified electrician or service personnel if you do not completely under-
stand the grounding instructions, or if you are not sure the tool is properly grounded.
USE ONLY A 3-WIRE EXTENSION CORD THAT HAS A 3-PRONG GROUNDING
PLUG AND A 3-POLE RECEPTACLE THAT ACCEPTS THE TOOL'S PLUG.
REPLACE A DAMAGED OR WORN CORD IMMEDIATELY.
Fig. A Fig. B
grounding
grounding conductor conductor
electrical cord
grounding
adapter lug
3-wire electrical cord
3-prong
electrical
receptacle
This tool is intended for use on a circuit that has an electrical receptacle as shown in
FIGURE A, FIGURE A shows a 3-wire electrical plug and electrical receptacle that has
a grounding conductor. If a properly grounded electrical receptacle is not available,
an adapter as shown in FIGURE B can be used to temporarily connect this plug to a
2-contact ungrounded receptacle. The adapter has a rigid lug extending from it that
MUST be connected to a permanent earth ground, such as a properly grounded
receptacle box. THIS ADAPTER IS PROHIBITED IN CANADA.
CAUTION: In all cases, make certain the electrical receptacle in question is propedy
grounded. If you are not sure, have a certified electrician check the electrical
receptacle.
SPECIFIC SAFETY INSTRUCTIONS
FOR UTILITY SHARPENERS
1.
2.
3.
4.
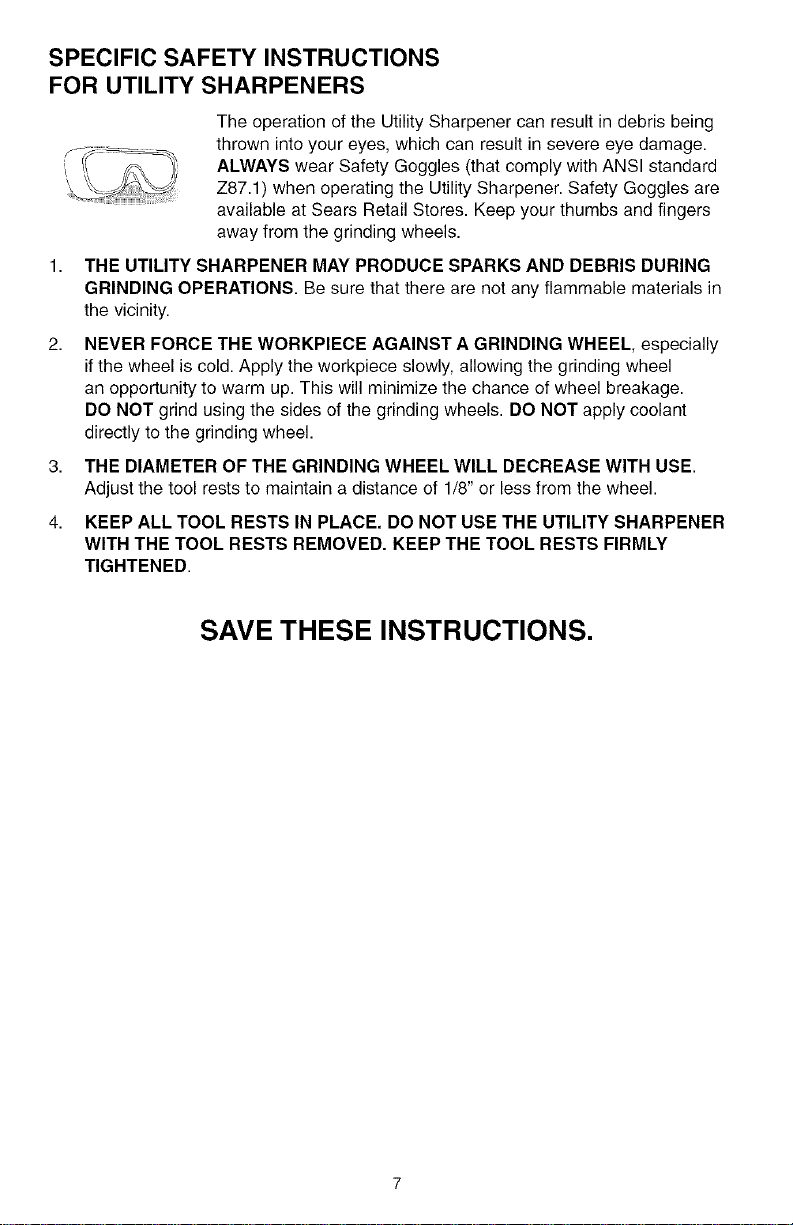
The operation of the Utility Sharpener can result in debris being
thrown into your eyes, which can result in severe eye damage.
ALWAYS wear Safety Goggles (that comply with ANSI standard
Z87.1) when operating the Utility Sharpener. Safety Goggles are
available at Sears Retail Stores. Keep your thumbs and fingers
away from the grinding wheels.
THE UTILITY SHARPENER MAY PRODUCE SPARKS AND DEBRIS DURING
GRINDING OPERATIONS. Be sure that there are not any flammable materials in
the vicinity.
NEVER FORCE THE WORKPIECE AGAINST A GRINDING WHEEL, especially
if the wheel is cold. Apply the workpiece slowly, allowing the grinding wheel
an opportunity to warm up. This will minimize the chance of wheel breakage.
DO NOT grind using the sides of the grinding wheels. DO NOT apply coolant
directly to the grinding wheel.
THE DIAMETER OF THE GRINDING WHEEL WILL DECREASE WITH USE.
Adjust the tool rests to maintain a distance of 1/8" or less from the wheel.
KEEP ALL TOOL RESTS IN PLACE. DO NOT USE THE UTILITY SHARPENER
WITH THE TOOL RESTS REMOVED. KEEP THE TOOL RESTS FIRMLY
TIGHTENED.
SAVE THESE INSTRUCTIONS.
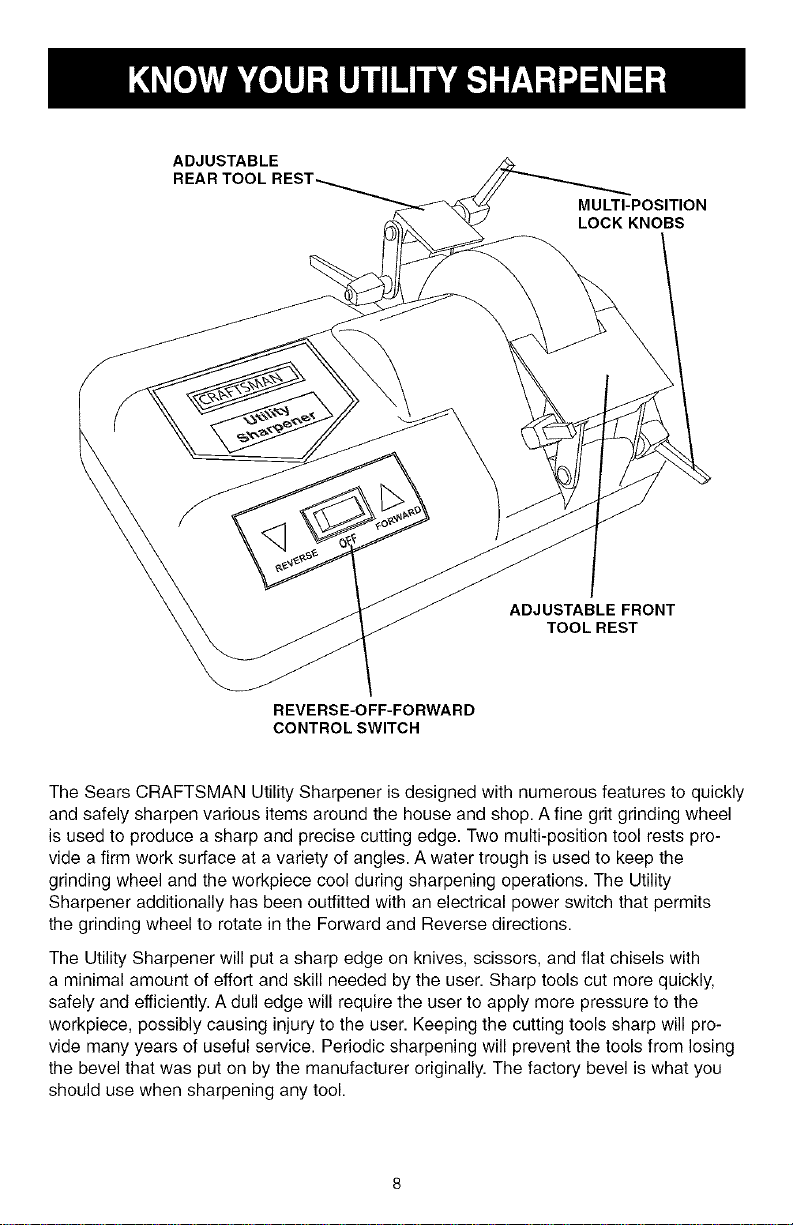
ADJUSTABLE
REAR TOOL
MULTI-POSITION
LOCK KNOBS
ADJUSTABLE FRONT
TOOL REST
REVERSE-OFF-FORWARD
CONTROL SWITCH
The Sears CRAFTSMAN Utility Sharpener is designed with numerous features to quickly
and safely sharpen various items around the house and shop. A fine grit grinding wheel
is used to produce a sharp and precise cutting edge. Two multi-position tool rests pro-
vide a firm work surface at a variety of angles. A water trough is used to keep the
grinding wheel and the workpiece cool during sharpening operations. The Utility
Sharpener additionally has been outfitted with an electrical power switch that permits
the grinding wheel to rotate in the Forward and Reverse directions.
The Utility Sharpener will put a sharp edge on knives, scissors, and flat chisels with
a minimal amount of effort and skill needed by the user. Sharp tools cut more quickly,
safely and efficiently. A dull edge will require the user to apply more pressure to the
workpiece, possibly causing injury to the user. Keeping the cutting tools sharp will pro-
vide many years of useful service. Periodic sharpening will prevent the tools from losing
the bevel that was put on by the manufacturer originally. The factory bevel is what you
should use when sharpening any tool.

Sharpeningisaneasyoperationtoperformaslongasthefollowingitemsarefollowed:
1. CLEANtheitemtobesharpenedpriortobeginninganysharpeningoperations.
2. ALWAYSusethefactorybevel(cuttingedgeangle)asaguidetosharpeningthe
tool.
3. SHARPENthetoolspriortostartinganyjobinvolvingthetools.Theuserwillthen
belesslikelytorushthesharpeningprocedure,andthenwilldoasaferandbetter
job.
4. SHARPENthetoolsinnumerouslightpressurepassesinsteadofheavilypressing
thetoolagainstthegrindingwheel.Lightpasseswillbesaferandproduceamuch
sharperedge on the tool. Heaw passes will create a ragged and rough edge on the
tool.
5. DO NOT sharpen tools that are cracked or bent. A damaged tool should be
discarded.
6.
The Utility Sharpener IS NOT to be used as a Bench Grinder to remove large
amounts of material. The grinding wheel rotates much slower than a Bench Grinder.
The grinding wheel uses a much finer grit grinding wheel than a Bench Grinder's
grinding wheel.
TheUtilitySharpenerisdesignedforsharpeningknives,scissors,flatchisels,andmore.
ALWAYSWEAREYEPROTECTION!Hotsparksmaybeproducedduringsharpening
operations.
1. TheelectricalpowerswitchmustbeintheOFFposition.
2. Thepowercordmustbeunpluggedfromtheelectricalreceptacle.
3. PlacetheUtilitySharpeneronflat,firm,andwater-resistantsurface.
4. Loosenthetwolockknobsthatholdthefronttoolrestuntilthetoolrestcanbe
movedawayfromthestone.Thelockknobsmayberepositionedbypullingthe
knoboutslightly.Thispermitstheknobtoberotatedforadditionallooseningor
tightening.
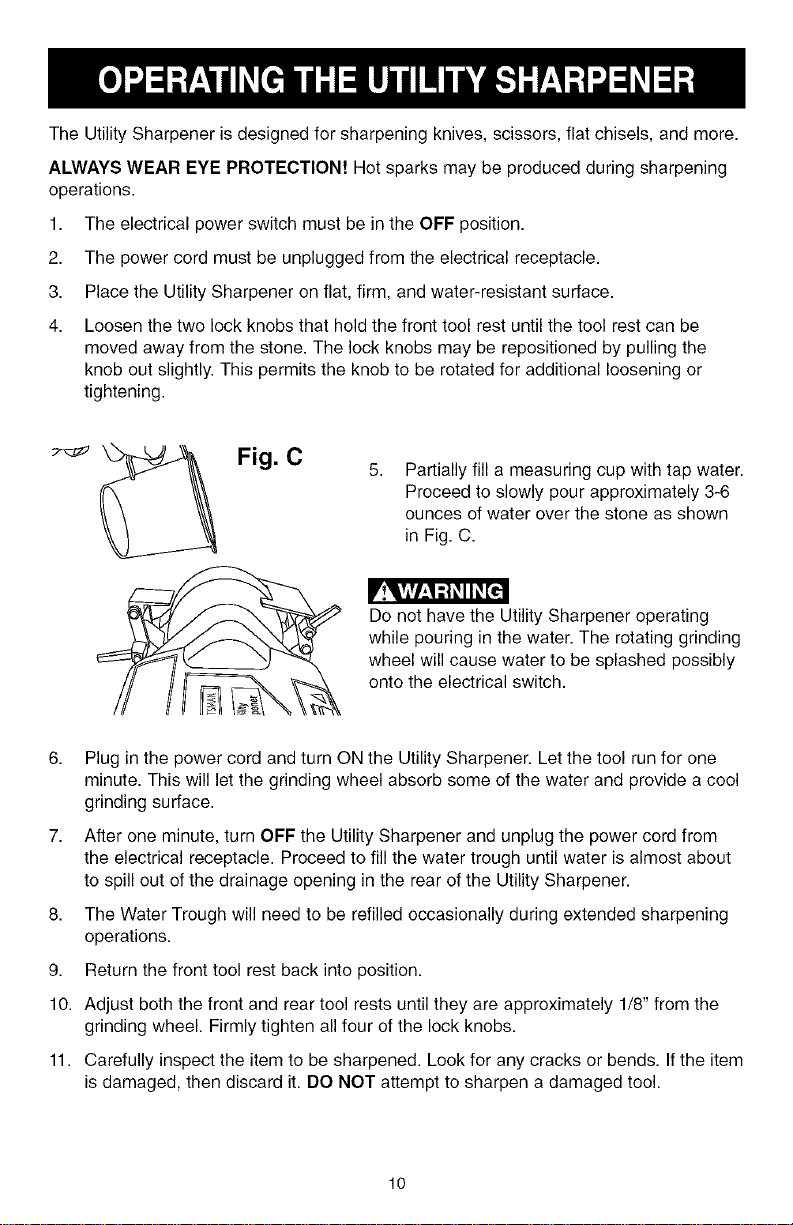
Fig. C
Partially fill a measuring cup with tap water.
Proceed to slowly pour approximately 3-6
ounces of water over the stone as shown
in Fig. C.
Do not have the Utility Sharpener operating
while pouring in the water. The rotating grinding
wheel will cause water to be splashed possibly
onto the electrical switch.
6. Plug in the power cord and turn ON the Utility Sharpener. Let the tool run for one
minute. This will let the grinding wheel absorb some of the water and provide a cool
grinding surface.
7. After one minute, turn OFF the Utility Sharpener and unplug the power cord from
the electrical receptacle. Proceed to fill the water trough until water is almost about
to spill out of the drainage opening in the rear of the Utility Sharpener.
8. The Water Trough will need to be refilled occasionally during extended sharpening
operations.
9. Return the front tool rest back into position.
10. Adjust both the front and rear tool rests until they are approximately 1/8" from the
grinding wheel. Firmly tighten all four of the lock knobs.
11. Carefully inspect the item to be sharpened. Look for any cracks or bends. If the item
is damaged, then discard it. DO NOT attempt to sharpen a damaged tool.
10
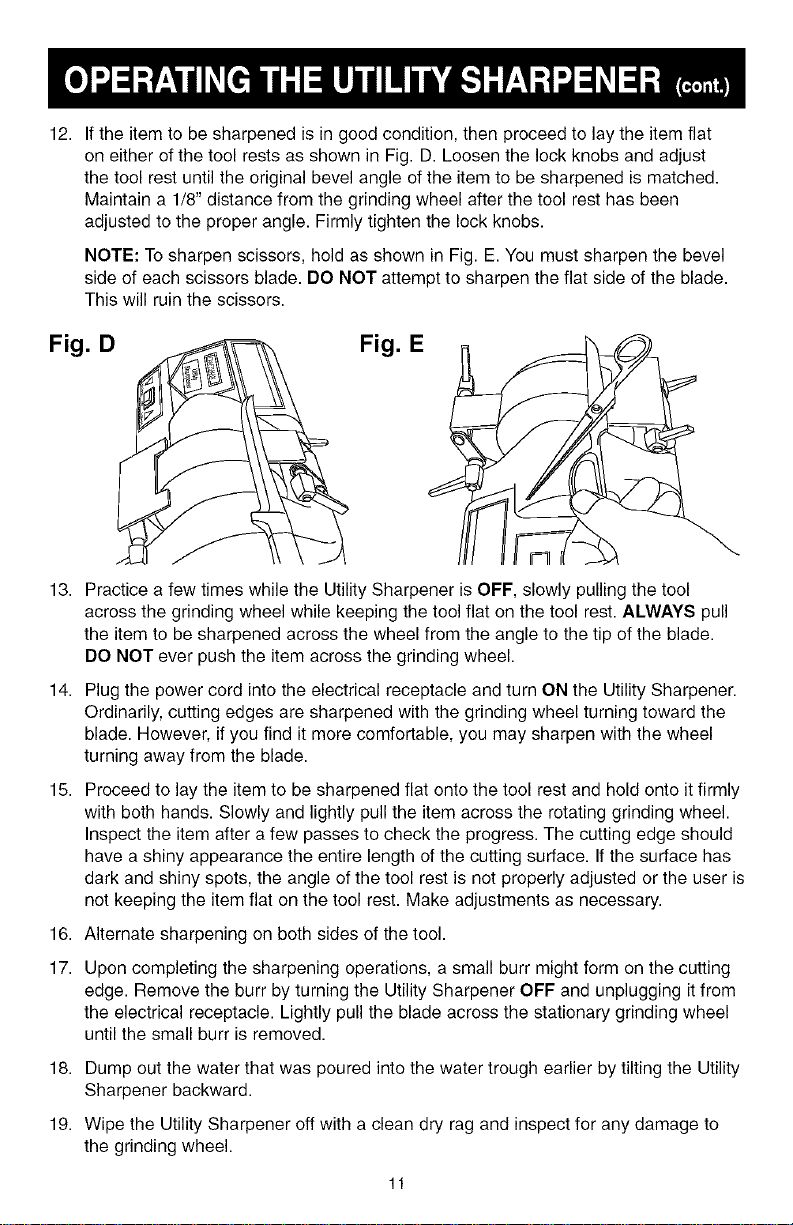
12. If the item to be sharpened is in good condition, then proceed to lay the item flat
on either of the tool rests as shown in Fig. D. Loosen the lock knobs and adjust
the tool rest until the original bevel angle of the item to be sharpened is matched.
Maintain a 1/8" distance from the grinding wheel after the tool rest has been
adjusted to the proper angle. Firmly tighten the lock knobs.
NOTE: To sharpen scissors, hold as shown in Fig. E. You must sharpen the bevel
side of each scissors blade. DO NOT attempt to sharpen the flat side of the blade.
This will ruin the scissors.
Fig. D Fig. E
L
13. Practice a few times while the Utility Sharpener is OFF, slowly pulling the tool
across the grinding wheel while keeping the tool flat on the tool rest. ALWAYS pull
the item to be sharpened across the wheel from the angle to the tip of the blade.
DO NOT ever push the item across the grinding wheel.
14. Plug the power cord into the electrical receptacle and turn ON the Utility Sharpener.
Ordinarily, cutting edges are sharpened with the grinding wheel turning toward the
blade. However, if you find it more comfortable, you may sharpen with the wheel
turning away from the blade.
15. Proceed to lay the item to be sharpened flat onto the tool rest and hold onto it firmly
with both hands. Slowly and lightly pull the item across the rotating grinding wheel.
Inspect the item after a few passes to check the progress. The cutting edge should
have a shiny appearance the entire length of the cutting surface. If the surface has
dark and shiny spots, the angle of the tool rest is not properly adjusted or the user is
not keeping the item flat on the tool rest. Make adjustments as necessary.
16. Alternate sharpening on both sides of the tool.
17. Upon completing the sharpening operations, a small burr might form on the cutting
edge. Remove the burr by turning the Utility Sharpener OFF and unplugging it from
the electrical receptacle. Lightly pull the blade across the stationary grinding wheel
until the small burr is removed.
18. Dump out the water that was poured into the water trough earlier by tilting the Utility
Sharpener backward.
19. Wipe the Utility Sharpener off with a clean dry rag and inspect for any damage to
the grinding wheel.
11
Turn the power switch "OFF" and unplug the power cord from its power source prior to
any maintenance.
CLEANING
With the Utility Sharpener unplugged, rotate the abrasive wheel slowly and inspect for
any damage.
CAUTION: REPLACE the abrasive wheel if there is any damage at all. FAILURE to
replace a damaged wheel can cause serious injury to the operator.
CAUTION: DO NOT USE FLAMMABLE MATERIALS to clean the Utility Sharpener.
A clean dry rag or brush is all that is needed to remove dust and debris buildup.
Repairs to the Utility Sharpener should be performed by trained personnel only.
Contact your nearest Sears Service Center for authorized service. Unauthorized repairs
or replacement with non-factory parts could cause serious injury to the operator and
damage to the Utility Sharpener.
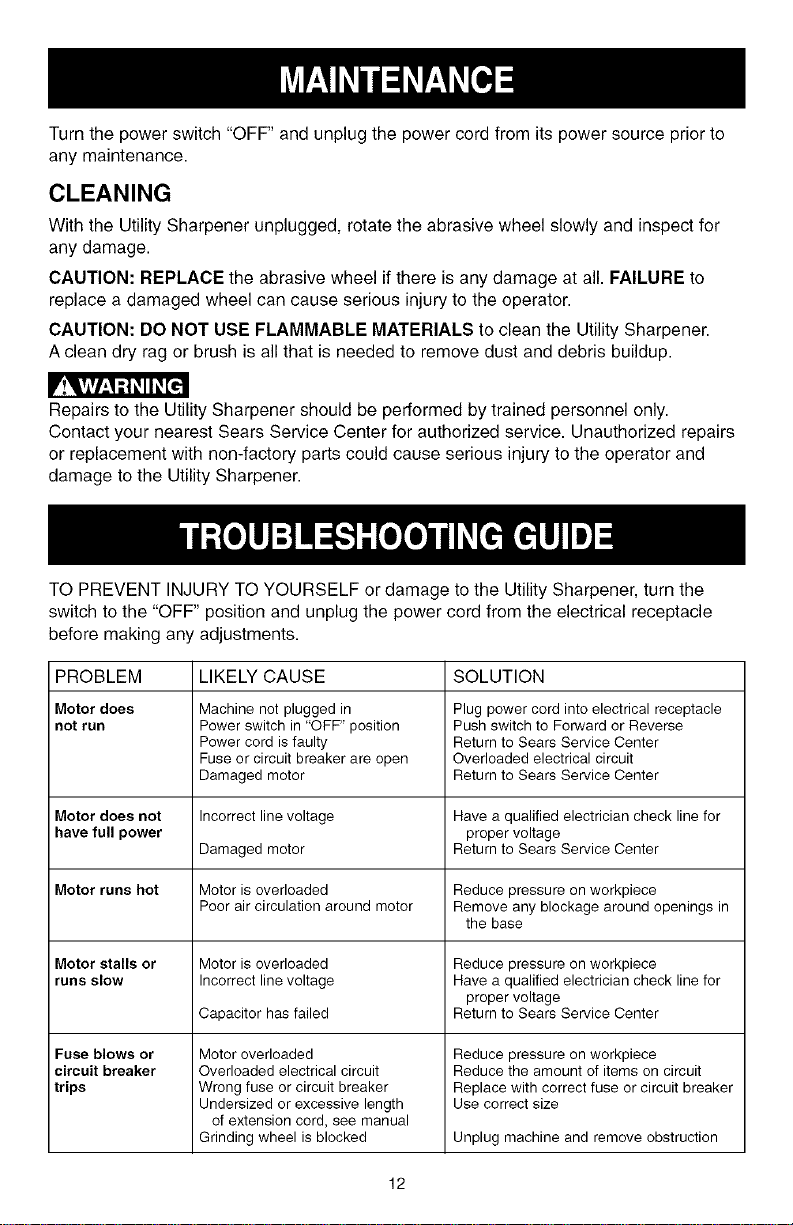
TO PREVENT INJURY TO YOURSELF or damage to the Utility Sharpener, turn the
switch to the "OFF" position and unplug the power cord from the electrical receptacle
before making any adjustments.
PROBLEM LIKELY CAUSE SOLUTION
Motor does Machine not plugged in Plug power cord into electrical receptacle
not run Power switch in 'OFF" position Push switch to Forward or Reverse
Power cord is faulty Return to Sears Service Center
Fuse or circuit breaker are open Overloaded electrical circuit
Damaged motor Return to Sears Service Center
Motor does not Incorrect line voltage Have a qualified electrician check line for
have full power proper voltage
Damaged motor Return to Sears Service Center
Motor runs hot Motor is overloaded Reduce pressure on workpiece
Poor air circulation around motor Remove any blockage around openings in
the base
Motor stalls or Motor is overloaded Reduce pressure on workpiece
runs slow Incorrect line voltage Have a qualified electrician check line for
proper voltage
Capacitor has failed Return to Sears Service Center
Fuse blows or Motor overloaded Reduce pressure on workpiece
circuit breaker Overloaded electrical circuit Reduce the amount of items on circuit
trips Wrong fuse or circuit breaker Replace with correct fuse or circuit breaker
Undersized or excessive length Use correct size
of extension cord, see manual
Grinding wheel is blocked Unplug machine and remove obstruction
12
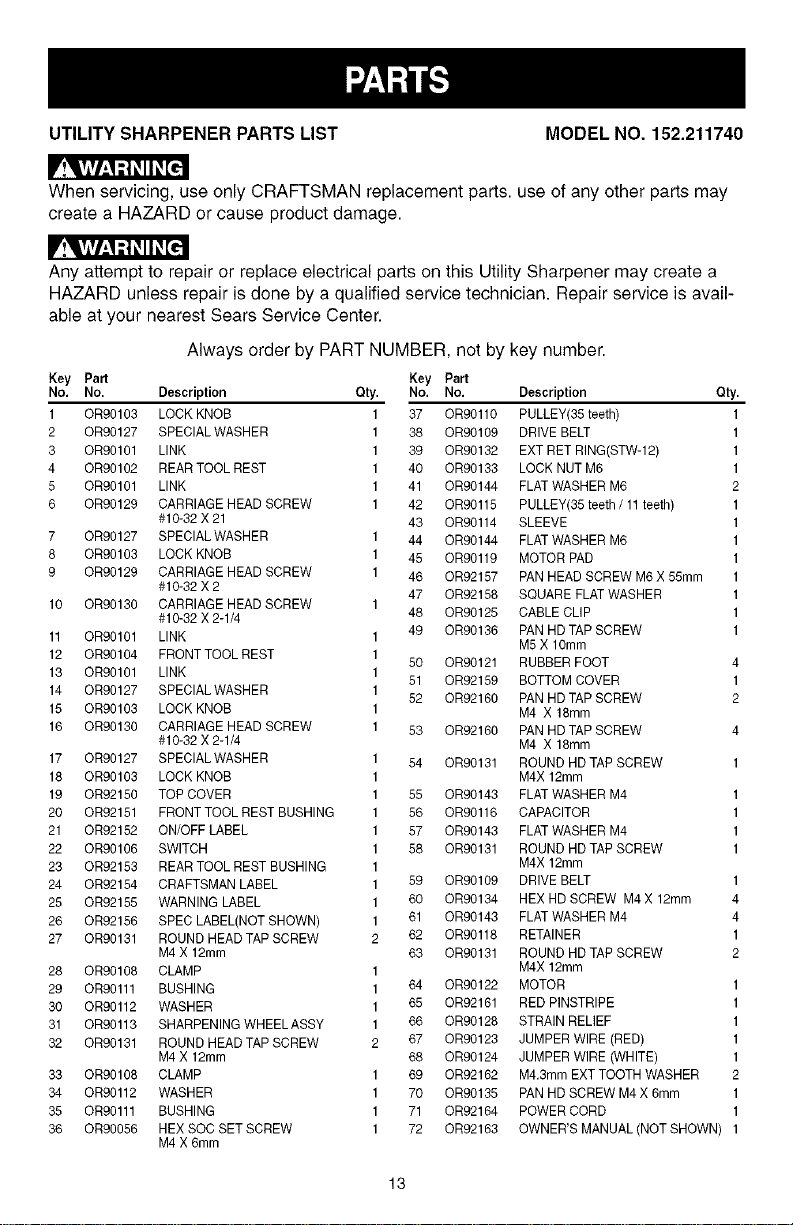
UTILITY SHARPENER PARTS LIST MODEL NO. 152.211740
When servicing, use only CRAFTSMAN replacement parts, use of any other parts may
create a HAZARD or cause product damage.
Any attempt to repair or replace electrical parts on this Utility Sharpener may create a
HAZARD unless repair is done by a qualified service technician. Repair service is avail-
able at your nearest Sears Service Center.
Always order by PART NUMBER, not by key number.
Key Part Key Part
No. No. Description Qty. No. No.
1 OR90103 LOCK KNOB 1 37 OR90110
2 OR90127 SPECIAL WASHER 1 38 OR90109
3 OR90101 LINK 1 39 OR90132
4 OR90102 REARTOOL REST 1 40 OR90133
5 OR90101 LINK 1 41 OR90144
6 OR90129 CARRIAGE HEAD SCREW 1 42 OR90115
#10-32 X 21 43 OR90114
7 OR90127 SPECIAL WASHER 1 44 OR90144
8 OR90103 LOCK KNOB 1 45 OR90119
9 OR90129 CARRIAGE HEAD SCREW 1 46 OR92157
#10-32 X 2
47 OR92158
10 OR90130 CARRIAGE HEAD SCREW 1
#10-32 X 2-1/4 48 OR90125
11 OR90101 LINK 1 49 OR90136
12 OR90104 FRONT TOOL REST 1
50 OR90121
13 OR90101 LINK 1
51 OR92159
14 OR90127 SPECIAL WASHER 1
52 OR92160
15 OR90103 LOCK KNOB 1
16 OR90130 CARRIAGE HEAD SCREW 1 53 OR92160
#10-32 X 2-1/4
17 OR90127 SPECIAL WASHER 1 54 OR90131
18 OR90103 LOCK KNOB 1
19 OR92150 TOP COVER 1 55 OR90143
20 OR92151 FRONT TOOL REST BUSHING 1 56 OR90116
21 OR92152 ON/OFF LABEL 1 57 OR90143
22 OR90106 SWITCH 1 58 OR90131
23 OR92153 REAR TOOL REST BUSHING 1
24 OR92154 CRAFTSMAN LABEL 1 59 OR90109
25 OR92155 WARNING LABEL 1 60 OR90134
26 OR92156 SPEC LABEL(NOT SHOWN) 1 61 OR90143
27 OR90131 ROUND HEAD TAP SCREW 2 62 OR90118
M4 X 12rnrn 63 OR90131
28 OR90108 CLAMP 1
29 OR90111 BUSHING 1 64 OR90122
30 OR90112 WASHER 1 65 OR92161
31 OR90113 SHARPENING WHEELASSY 1 66 OR90128
32 OR90131 ROUND HEAD TAP SCREW 2 67 OR90123
M4 X 12rnrn 68 OR90124
33 OR90108 CLAMP 1 69 OR92162
34 OR90112 WASHER 1 70 OR90135
35 OR90111 BUSHING 1 71 OR92164
36 OR90056 HEX SOC SET SCREW 1 72 OR92163
M4 X 6rnrn
Description Qty.
PULLEY(35 teeth) 1
DRIVE BELT 1
EXT RET RING(STW-12) 1
LOCK NUT M6 1
FLAT WASHER M6 2
PULLEY(35 teeth / 11teeth) 1
SLEEVE 1
FLAT WASHER M6 1
MOTOR PAD 1
PAN HEAD SCREW M6 X 55rnrn 1
SQUARE FLAT WASHER 1
CABLE CLIP 1
PAN HD TAP SCREW 1
M5 X 10rnrn
RUBBER FOOT 4
BOTTOM COVER 1
PAN HD TAP SCREW 2
M4 X 18mm
PAN HD TAP SCREW 4
M4 X 18mm
ROUND HD TAPSCREW 1
M4X 12mm
FLAT WASHER M4 1
CAPACITOR 1
FLAT WASHER M4 1
ROUND HD TAPSCREW 1
M4X 12mm
DRIVE BELT 1
NEX BD SCREW M4 X 12mm 4
FLAT WASHER M4 4
RETAINER 1
ROUND HD TAPSCREW 2
M4X 12mm
MOTOR 1
RED PINSTRIPE 1
STRAIN RELIEF 1
JUMPER WIRE (RED) 1
JUMPER WIRE (WHITE) 1
M4.3mm EXT TOOTH WASHER 2
PAN HD SCREW M4 X 6mm 1
POWER CORD 1
OWNER'S MANUAL(NOT SHOWN) 1
13
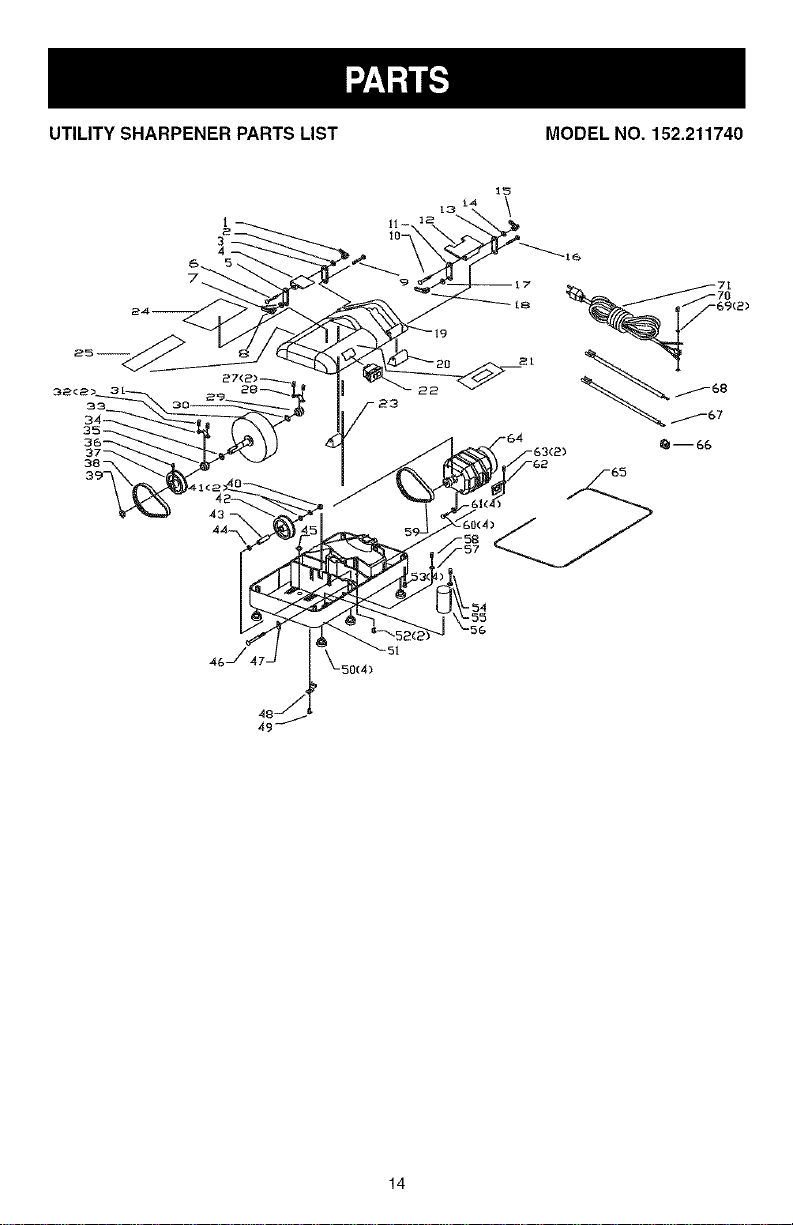
UTILITY SHARPENER PARTS LIST MODEL NO. 152.211740
t
14

15

16
I NJ Manual de operaciones
Conserve este manual para propbsitos de referencia futura
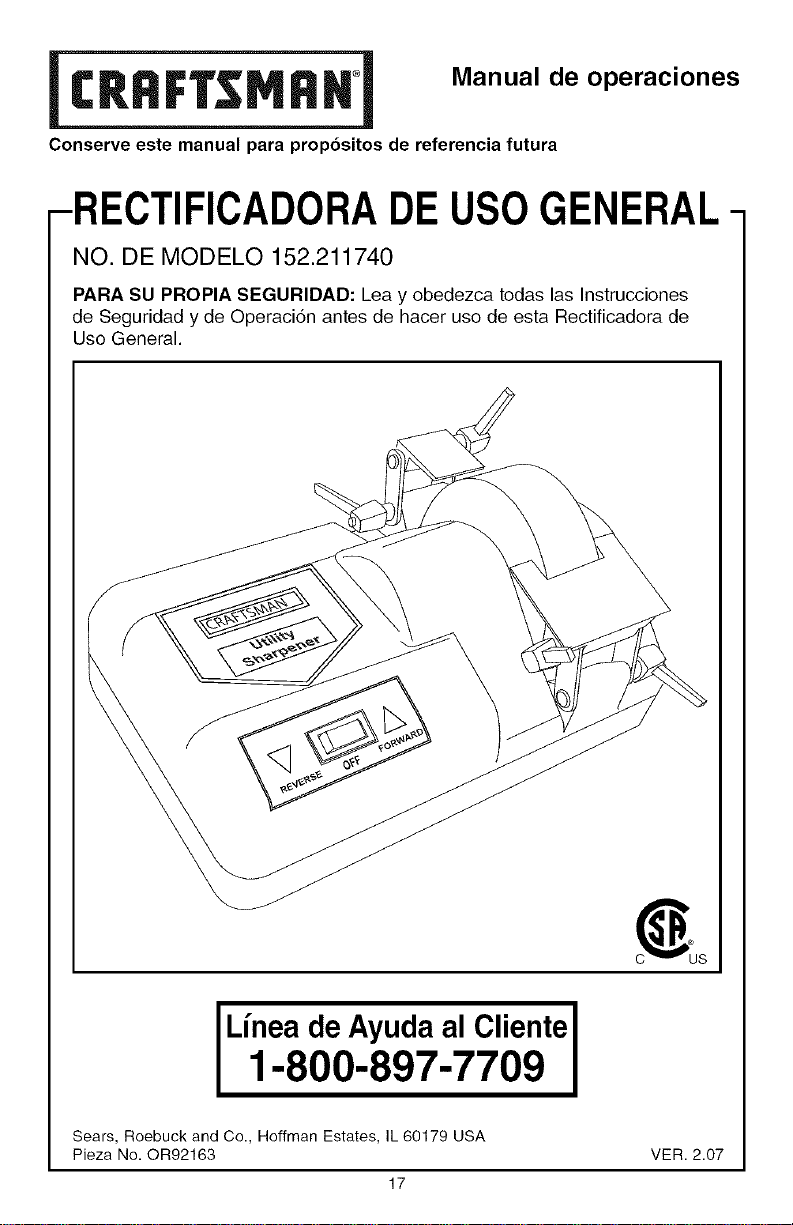
-RECTIFICADORADEUSOGENERAL-
NO. DE MODELO 152.211740
PARA SU PROPIA SEGURIDAD: Lea y obedezca todas las Instrucciones
de Seguridad y de OperaciSn antes de hacer uso de esta Rectificadora de
Uso General.
ILinea deAyuda al ClienteI1-800-897-7709
Sears, Roebuck and Co., Hoffman Estates, IL 60179 USA
Pieza No. OR92163
17
VER. 2.07
SECCION PAGINA
Garantia .............................................................................................................. 18
Instrucciones de seguridad .............................................................................. 19
Instrucciones de conexi6n a tierra .................................................................. 22
Instrucciones de seguridad espec_ficas
para las rectificadoras de uso general ............................................................ 23
Conozca su rectificadora de uso general ....................................................... 24
Funcionamiento de la rectificadora de uso general ...................................... 26
Mantenimiento .................................................................................................... 28
Guia de Iocalizaci6n de averias ....................................................................... 28
Listado de piezas ............................................................................................... 29
Servicio ............................................................................................................... 32
GARANTIA COMPLETA DE UN AI':,IO
Si este producto falla debido a un defecto material o de elaboracion dentro de un
a5o desde la fecha de compra, DEVUELVALO A LA TIENDA SEARS O
CRAFTSMAN MAS CERCANA, y se Io reemplazar_, sin costo alguno.
Esta garantia le concede derechos legales espec[ficos, y usted tambien puede
gozar de otros derechos que varfan de un estado al otro.
Sears, Roebuck and Co., Depto. 817 WA, Hoffman Estates, IL 60179 USA
18
INSTRUCCIONES GENERALES DE SEGURIDAD
El funcionamiento de una Rectificadora de Uso General puede resultar peligroso si se hace
caso omiso de la seguridad y del sentido comL_n.El operario debe estar familiarizado con el
funcionamiento de la herramienta. Lea este manual para entender su Rectificadora de Use
General. NO OPERE esta Rectificadora de Uso General si no entiende a cabalidad las
limitaciones de dicha herramienta. NO realice modificaciones de cualquier tipo a esta
Rectificadora de Uso General.
ANTES DE UTILIZAR LA RECTIFICADORA DE USO GENERAL
'!Y_.!elvA::1:i II_ _,[e.]I'
Para evitar las heridas graves y el dafio a la herramienta, lea y obedezca todas las
Instrucciones de Seguridad y Operaci6n antes de operar la Rectificadora de Uso General.
1. Parte del polvo que se crea usando las herramientas electricas contiene productos
qufmicos que el estado de California reconoce come causantes de ca.ncer,defectos de
nacimiento, o dafios en el sistema reproductivo. AIgunos ejemplos de estos productos
qufmicos son:
• El plomo de pinturas con base de plomo
• El Silic6n cristalino de ladrillos, cemento, y de otros productos de albafiileria
• El arsenico y el cromo de la madera de construccion qufmicamente tratada
El riesgo de estas exposiciones vada, dependiendo de cuantas veces se realiza este
tipo de trabajo. Para reducir tu exposici6n a estos productos qufmicos, trabaje en un
a.reabien ventilada, y trabaje con el equipo aprobado de seguridad, tal como mascaras
dis@adas para el polvo.
2. LEA a consciencia el Manual del Propietario. APRENDA c6mo hacer use de esta
herramienta para sus aplicaciones dise_adas.
3. CONECTE TODAS LAS HERRAMIENTAS A TIERRA. Si la herramienta se suministra
con un enchufe de 3 machos, se le debe enchufar a un tomacorrientes que disponga de
3 contactos electricos. El tercer macho se utiliza para conectar la herramienta a tierra y
ofrecer proteccion contra los choques electricos accidentales. NO quite el tercer macho.
Vea las Instrucciones de Conexion a Tierra en la pagina 22.
4. EVITE UN ENTORNO LABORAL PELIGROSO. NO utilice las herramientas electricas
en un entorno humedo, ni tampoco las exponga a Iluvia.
5. NO utilice herramientas electricas si hay gases o liquidos inflamables presentes.
6. MANTENGA SIEMPRE su zona de trabajo limpia, bien alumbrada y organizada. NO
TRABAJE en un entorno con superficies de piso resbalosas a consecuencia de los
escombros, la grasa y la cera.
7. MANTENGA ALEJADOS A LOS NINOS Y VISITANTES. No permita que haya
personas en la zona inmediata de trabajo, particularmente cuando la herramienta
electrica se encuentre en funcionamiento.
8. NO FUERCE LA HERRAMIENTA a realizar operaciones para las cuales no fue
disefiada. Realizarb_una labor mas segura y de mejor calidad si se le utiliza para
realizar operaciones para las cuales fue disehada.
9. UTILICE VESTIMENTA APROPIADA. NO vista ropa holgada, guantes, corbatas ni
articulos de joyeria. Estos articulos pueden quedar atrapados en la mdtquinadurante las
operaciones y tirar del operario, atrayendolo hacia las piezas en movimiento. El usuario
debe Ilevar una cubierta protectiva sobre el cabello, si tiene cabellera larga, para impedir
el contacto con cualquier pieza en movimiento.
19
10. UTILICE PROTECClON OCULAR SIEMPRE. Cualquier herramienta
mecanica puede arrojar escombros hacia los ojos durante el fun-
cionamiento, pudiendo esto resultar en lesionamiento ocular grave y
permanente. Los anteojos cotidianos NO son galas de seguridad.
Utilice galas de proteccion SlEMPRE (que cumplan con la normativa Z87.1 de ANSI) durante
la operacion de herramientas mecanicas. Las galas de proteccion estan disponibles en las
tiendas Sears de ventas aldetal.
11. UTILICE PROTECCION AUDITIVA SIEMPRE. El algodon corriente no representa
un dispositivo protector aceptable. La proteccion auditiva debe cumplir con la
normativa $3.19 de ANSI.
12. SIEMPRE DESENCHUFE LA HERRAMIENTA DEL TOMACORRIENTES cuando vaya
a realizar ajustes, cambiar piezas o realizar cualquier clase de mantenimiento.
13. MANTENGA LOS ESCUDOS DE PROTECCION EN SU SITIO Y EN BUEN ESTADO
DE FUNCIONAMIENTO.
14. EVITE EL ARRANQUE ACCIDENTAL. Aseg0rese de que el interruptor de potencia se
encuentre en la posicion de "APAGADO" antes de enchufar el cordon de potencia en el
tomacorrientes.
15. QUITE TODAS LAS HERRAMIENTAS DE MANTENIMIENTO de la zona inmediata
antes de encender la rectificadora de banco.
16. SOLO UTILICE ACCESORIOS RECOMENDADOS. El uso de accesorios incorrectos o
inapropiados puede ocasionar heridas graves al operafio y ocasionar daSo a la herra-
mienta. Si tiene dudas, consulte el manual de instrucciones que se adjunta con el
accesorio especifico.
17. JAMAS DEJE UNA HERRAMIENTA EN FUNClONAMIENTO SIN ATENDER. Conmute
el interruptor de energfa a la posicion de apagado. NO abandone la herramienta basra
que esta se haya detenido por completo.
18. NO SE PARE SOBRE LA HERRAMIENTA. Pueden producirse heridas graves si la
herramienta se vuelca o si usted hace contacto con la herramienta accidentalmente.
19. NO ALMACENE nada por encima ni cerca de la m&quina en donde alguien pueda
intentar pararse en la herramienta para alcanzarlo.
20. MANTENGA SU EQUlLIBRIO. NO se extienda sobre la herramienta. Haga uso de
zapatos con suela de caucho resistente al aceite. Mantenga el piso libre de escombros,
grasa o cera.
21. MANTENGA SUS HERRAMIENTAS CUIDADOSAMENTE. Mantenga sue herramientas
limpias yen buen estado. Mantenga afiladae todas las hojas y brocas.
22. REVISE Sl HAY PIEZAS DANADAS ANTES DE CADA USO DE LA HERRAMIENTA.
Revise todos los protectores cuidadosamente para comprobar que funcionan correcta-
mente y que no estan daSados, y que realizan sus funciones diseSadas correctamente.
Revise el alineamiento, la fijacion o la ruptura de las piezas en movimiento. Cualquier
protector uotra pieza que se encuentre daSada debe repararse o reemplazarse
inmediatamente.
23. HAGA SU TALLER A PRUEBA DE NINOS quitando las Ilaves del interruptor,
desenchufando las herramientas de los tomacorrientes y mediante el uso de candados.
24. NO OPERE LA HERRAMIENTA BAJO LA INFLUENClA DE LAS DROGAS O DEL
ALCOHOL.
2O
25. AFIANCE TODO EL MATERIAL. Siempre que resulte posible, utilice abrazaderas o
plantillas para asegurar el material. Esto ofrece mayor seguridad que intentar sujetar el
material con sus propias manos.
26. UTILICE UNA EXTENSION ELECTRICA CORRECTAY EN BUEN ESTADO. Cuando
vaya a hacer uso de una extension electrica, aseg]3rese de utilizar una que sea Io sufi-
cientemente fuerte como para transportar la corriente a set utilizada pot su herramienta.
La siguiente tabla presenta las dimensiones correctas a utilizarse de acuerdo con las
dimensiones de la extension y la clasificacion de amperaje en la placa de notaciones.
Si tiene dudas, utilice la siguiente extension de mayor calibre. Mientras menor sea el
nOmero de calibre, mayor ser_.el di_tmetro de la extension electrica. Si tiene dudas
sobre las dimensiones correctas de una extension electrica, utilice un cordon mas corto
y mas grueso. Una extension de dimensiones insuficientes producir_, una cafda en el
voltaje de Ifnea, resultando en una perdida de potencia y el sobrecalentamiento. SOLO
UTILICE UNA EXTENSION ELECTRICA DE 3 HILOS QUE DISPONGA DE UN
ENCHUFE DE CONEXlON A TIERRA DE 3 MACHOS, Y UN RECEPTACULO DE 3
POLOS QUE ACEPTE EL ENCHUFE DE LA MAQUINA.
27. UTILICE SlEMPRE UNA CARETA DE POLVO PARA IMPEDIR LA ASPIRAClON DE
POLVO PELIGROSO O PARTfCULAS AI_REAS incluyendo polvo de madera, polvo de
silice cristalina y polvo de asbesto. Aleje las particulas de la cara y del cuerpo. Siempre
haga uso de la herramienta en zonas con buena ventilaci6n y proporcione la extraccion
apropiada del polvo. Utilice un sistema de recoleccion de polvo siempre que sea
posible. La exposicion al polvo puede causar daflo respiratorio grave y permanente u
otras heridas, incluyendo silicosis (una enfermedad pulmonar grave), c_.ncery la
muerte. Evite respirar el polvo y evite el contacto prolongado con el polvo. El permitir la
entrada del polvo en la boca o los ojos, o que permanezca sobre su piel, puede pro-
mover la absorcion de material daflino. Haga uso siempre de dispositivos de proteccion
respiratoria aprobados pot NIOSH/OSHA con buen ajuste y apropiados para la exposi-
cion al polvo; lave las.
GUARDE ESTAS INSTRUCClONES.
21
DIRECTRICES PARA LAS EXTENSIONES ELECTRICAS
Si est_i haciendo uso de una extension el_ctrica a la intemperie, este seguro de que la
extension se encuentre marcada con "W-A" ("W" en el Canada), Io que indica que su uso a
la intemperie es aceptable.
Este seguro del dimensionamiento correcto de su extensi6n electrica, y que se encuen-
tre en buen estado electrico. Repare siempre una extensi6n electrica daflada, o procure que
una persona experta la repare antes del uso.
Proteja sus extensiones electricas contra los objetos filosos, el calor en exceso y los
lugares mojados o hL_medos.
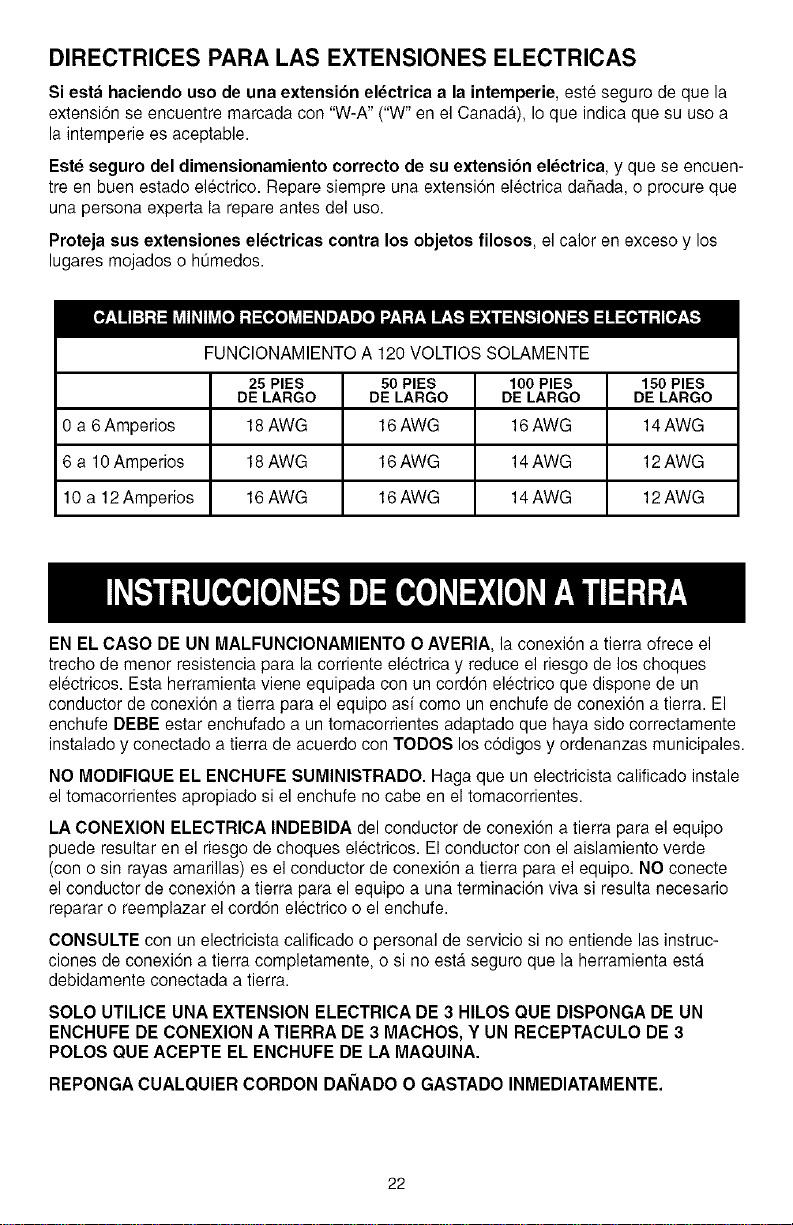
FUNCIONAMIENTO A 120 VOLTIOS SOLAMENTE
25 PIES 50 PIES 100 PIES 150 PIES
DE LARGO DE LARGO DE LARGO DE LARGO
0 a 6 Amperios 18 AWG 16 AWG 16 AWG 14 AWG
6 a 10 Amperios 18 AWG 16 AWG 14 AWG 12 AWG
10 a 12 Amperios 16AWG 16AWG 14AWG 12AWG
EN EL CASO DE UN MALFUNCIONAMIENTO O AVERIA, la conexion a tierra ofrece el
trecho de menor resistencia para la corriente electrica y reduce el riesgo de los choques
electricos. Esta herramienta viene equipada con un cordon electrico que dispone de un
conductor de conexi6n a tierra para el equipo asi como un enchufe de conexi6n a tierra. El
enchufe DEBE estar enchufado a un tomacorrientes adaptado que haya sido correctamente
instalado y conectado a tierra de acuerdo con TODOS los c6digos y ordenanzas municipales.
NO MODIFIQUE EL ENCHUFE SUMINISTRADO. Haga que un electricista calificado instale
el tomacorrientes apropiado si el enchufe no cabe en el tomacorrientes.
LA CONEXION ELECTRICA INDEBIDA del conductor de conexion a tierra para el equipo
puede resultar en el riesgo de choques electricos. El conductor con el aislamiento verde
(con o sin rayas amarillas) es el conductor de conexi6n a tierra para el equipo. NO conecte
el conductor de conexion a tierra para el equipo a una terminaci6n viva si resulta necesario
reparar o reemplazar el cord6n electrico o el enchufe.
CONSULTE con un electricista calificado o personal de servicio si no entiende las instruc-
ciones de conexion a tierra completamente, o si no esta seguro que la herramienta esta
debidamente conectada a tierra.
SOLO UTILICE UNA EXTENSION ELECTRICA DE 3 HILOS QUE DISPONGA DE UN
ENCHUFE DE CONEXION A TIERRA DE 3 MACHOS, Y UN RECEPTACULO DE 3
POLOS QUE ACEPTE EL ENCHUFE DE LA MAQUINA.
REPONGA CUALQUIER CORDON DANADO O GASTADO INMEDIATAMENTE.
22
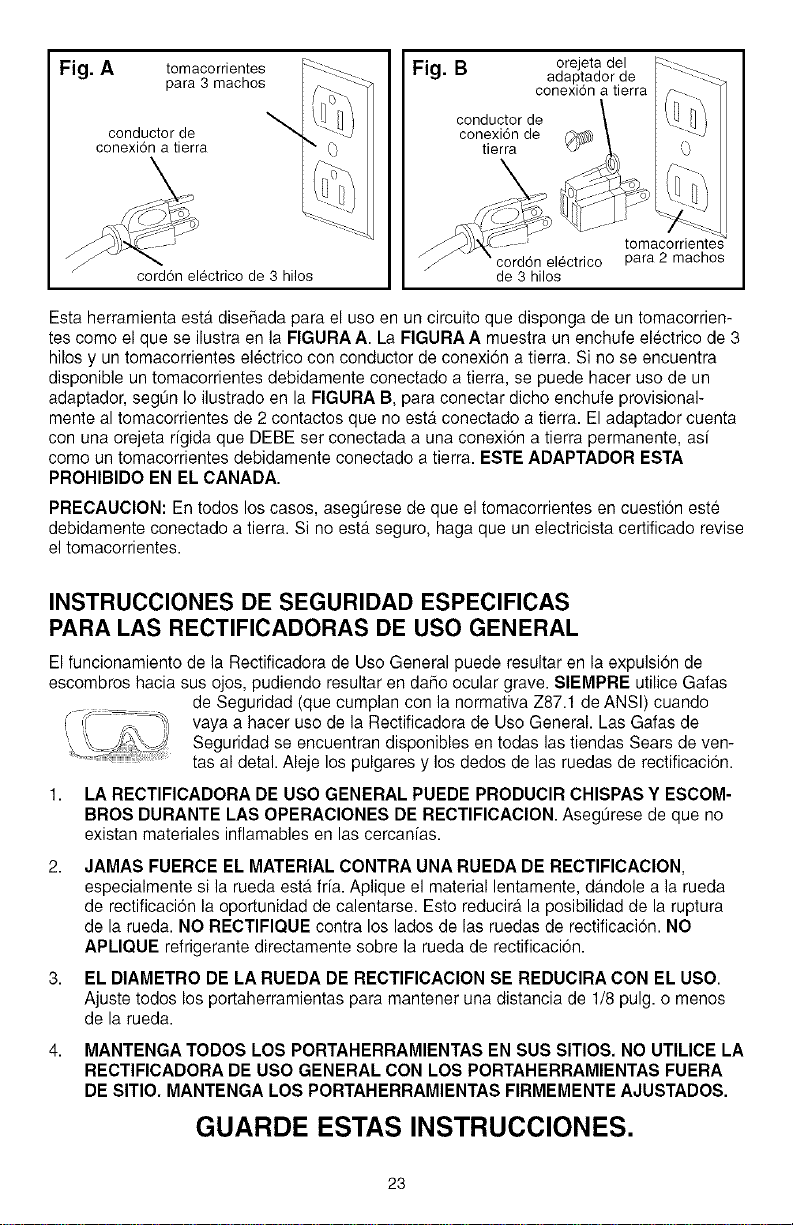
Fig. A
conductor de
conexi6n a tierra
..... }
corddn electrico de 3 hilos
tomacorrientesdi/, __ Fig. 1_ orejeta del _--"_(n
adaptador de _---._
para 3 machos conexi6n a tierra r_-..
conductor de ! _ _
conexi6nde _) ---
tierra _[7" 0
_------'_- tom _corriente)
cord6n electrico para 2 machos
de 3 hilos
Esta herramienta esta dise_ada para el uso en un circuito que disponga de un tomacorrien-
tes como el que se ilustra en la FIGURA A. La FIGURA A muestra un enchufe electrico de 3
hilos y un tomacorrientes electrico con conductor de conexion a tierra. Si no se encuentra
disponible un tomacorrientes debidamente conectado atierra, se puede hacer uso de un
adaptador, segQnIo ilustrado en la FIGURA B, para conectar dicho enchufe provisional-
mente al tomacorrientes de 2 contactos que no esta conectado atierra. El adaptador cuenta
con una orejeta rfgida que DEBE ser conectada a una conexion a tierra permanente, asf
como un tomacorrientes debidamente conectado atierra. ESTE ADAPTADOR ESTA
PROHIBIDO EN EL CANADA.
PRECAUClON: En todos los cases, asegurese de que el tomacorrientes en cuestion este
debidamente conectado a tierra. Si no esta seguro, haga que un electricista certificado revise
el tomacorrientes.
INSTRUCCIONES DE SEGURIDAD ESPECIFICAS
PARA LAS RECTIFICADORAS DE USO GENERAL
El funcionamiento de la Rectificadora de Use General puede resultar en la expulsion de
escombros hacia sus ojos, pudiendo resultar en da_o ocular grave. SIEMPRE utilice Gafas
de Seguridad (que cumplan con la normativa Z87.1 de ANSI) cuando
vaya a hacer uso de la Rectificadora de Use General. Las Gafas de
Seguridad se encuentran disponibles en todas las tiendas Sears de ven-
tas al detal. Aleje los pulgares y los dedos de las ruedas de rectificacion.
1. LA RECTIFICADORA DE USO GENERAL PUEDE PRODUCIR CHISPAS Y ESCOM-
BROS DURANTE LAS OPERACIONES DE RECTIFICACION. Aseg@ese de que no
existan materiales inflamables en las cercanfas.
2. JAMAS FUERCE EL MATERIAL CONTRA UNA RUEDA DE RECTIFICACION,
especialmente si la rueda esta.fria. Aplique el material lentamente, d_mdolea la rueda
de rectificaci6n la oportunidad de calentarse. Esto reducira la posibilidad de la ruptura
de la rueda. NO RECTIFIQUE contra los lades de las ruedas de rectificacion. NO
APLIQUE refrigerante directamente sobre la rueda de rectificacion.
3. EL DIAMETRO DE LA RUEDA DE RECTIFICAClON SE REDUClRA CON EL USO.
Ajuste todos los portaherramientas para mantener una distancia de 1/8 pulg. o menos
de la rueda.
4. MANTENGA TODOS LOS PORTAHERRAMIENTAS EN SUS SITIOS. NO UTILICE LA
RECTIFICADORA DE USO GENERAL CON LOS PORTAHERRAMIENTAS FUERA
DE SITIO. MANTENGA LOS PORTAHERRAMIENTAS FIRMEMENTE AJUSTADOS.
GUARDE ESTAS INSTRUCCIONES.
23
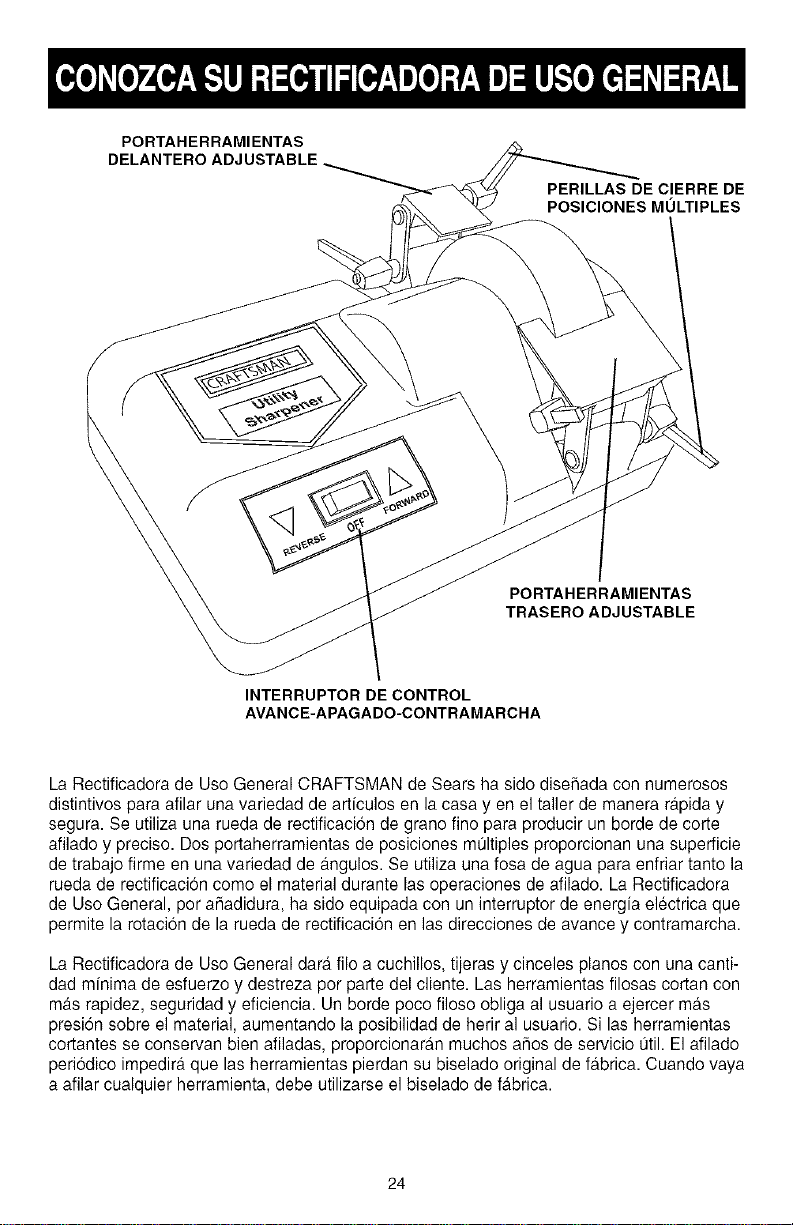
PORTAHERRAMIENTAS
DELANTERO ADJUSTABLE
PERILLAS DE CIERRE DE
POSICIONES MOLTIPLES
PORTAHERRAMIENTAS
TRASERO ADJUSTABLE
INTERRUPTOR DE CONTROL
AVANCE-APAGADO-CONTRAMARCHA
La Rectificadora de Uso General CRAFTSMAN de Sears ha sido dise_ada con numerosos
distintivos para afilar una variedad de art[culos en la casa y en el taller de manera rapida y
segura. Se utiliza una rueda de rectificaci6n de grano fino para producir un borde de corte
afilado y preciso. Dos portaherramientas de posiciones multiples proporcionan una superficie
de trabajo firme en una variedad de a.ngulos.Se utiliza una fosa de agua para enfriar tanto la
rueda de rectificacion como el material durante las operaciones de afilado. La Rectificadora
de Uso General, por a_adidura, ha sido equipada con un interruptor de energia electrica que
permite larotacion de la rueda de rectificacion en las direcciones de avance y contramarcha.
La Rectificadora de Uso General dara. filo a cuchillos, tijeras y cinceles pianos con una canti-
dad minima de esfuerzo y destreza por parte del cliente. Las herramientas filosas cortan con
m_tsrapidez, seguridad y eficiencia. Un borde poco filoso obliga al usuario a ejercer ma.s
presi6n sobre el material, aumentando la posibilidad de herir al usuario. Si las herramientas
cortantes se conservan bien afiladas, proporcionara.n muchos a_os de servicio util. El afilado
periodico impedirb_que las herramientas pierdan su biselado original de fa.brica.Cuando vaya
a afilar cualquier herramienta, debe utilizarse el biselado de fa.brica.
24
La rectificacion es una operacion fb,cil de realizar con tal de que se obedezcan los siguientes
arficulos.
1,
2.
3.
4,
5,
6,
LIMPIE el articulo a ser afilado antes de dar comienzo a cualquier operacidn de
rectificacion.
SlEMPRE utilice el biselado de fb,brica (b,ngulodel filo cortante) como guia para afilar la
herramienta.
RECTIFIQUE las herramientas antes de iniciar cualquier trabajo que envuelva el uso
de las mismas. El usuario se verb.menos inclinado a apresurar el procedimiento de
rectificacion, realizando entonces un trabajo mb,sseguro y mejor.
RECTIFIQUE las herramientas con numerosos pases a presion ligera en vez de
presionar fuertamente la herramienta contra la rueda de rectificacion. Los pases ligeros
serb,nmb,s seguros y producirb,n un borde mb,safilado sobre la herramienta. Los pases
pesados producirb,n un file mellado y rugoso en la herramienta.
NO RECTIFIQUE herramientas que esten agrietadas o torcidas. Cualquier herramienta
daSada debe descartarse.
La Rectificadora de Uso General NO debe utilizarse como Rectificadora de Banco para
eliminar grandes cantidades de material, ya que su rueda de rectificacion gira mucho
mb,slento que la de una Rectificadora de Banco. La rueda de rectificacion de la
Rectificadora de Use General dispone de un grano mucho mb,sfine que la rueda de
rectificaci6n de la Rectificadora de Banco.
25
La Rectificadora de Uso General ha sido dise_ada para afilar cuchillos, tijeras, cinceles
planes, y touche mas.
iUTILICE PROTEOOION OCULAR SIEMPRE! Las operaciones de rectificacion pueden
producir chispas calientes.
1. El interruptor de potencia electrica debe estar en la posicion de APAGADO.
2. El cordon de energia debe estar desenchufado del tomacorrientes.
3. Coloque la Rectificadora de Use General sobre una superficie plana, firme y resistente
al agua.
4. Afioje las dos perillas de cierre que sostienen el portaherramientas delantero hasta que
sea posible apartar el portaherramientas de la piedra. Las perillas de cierre podran
reposicionarse tirando ligeramente de la perilla. Esto permite que la perilla pueda girarse
para el aflojamiento o apriete adicional.
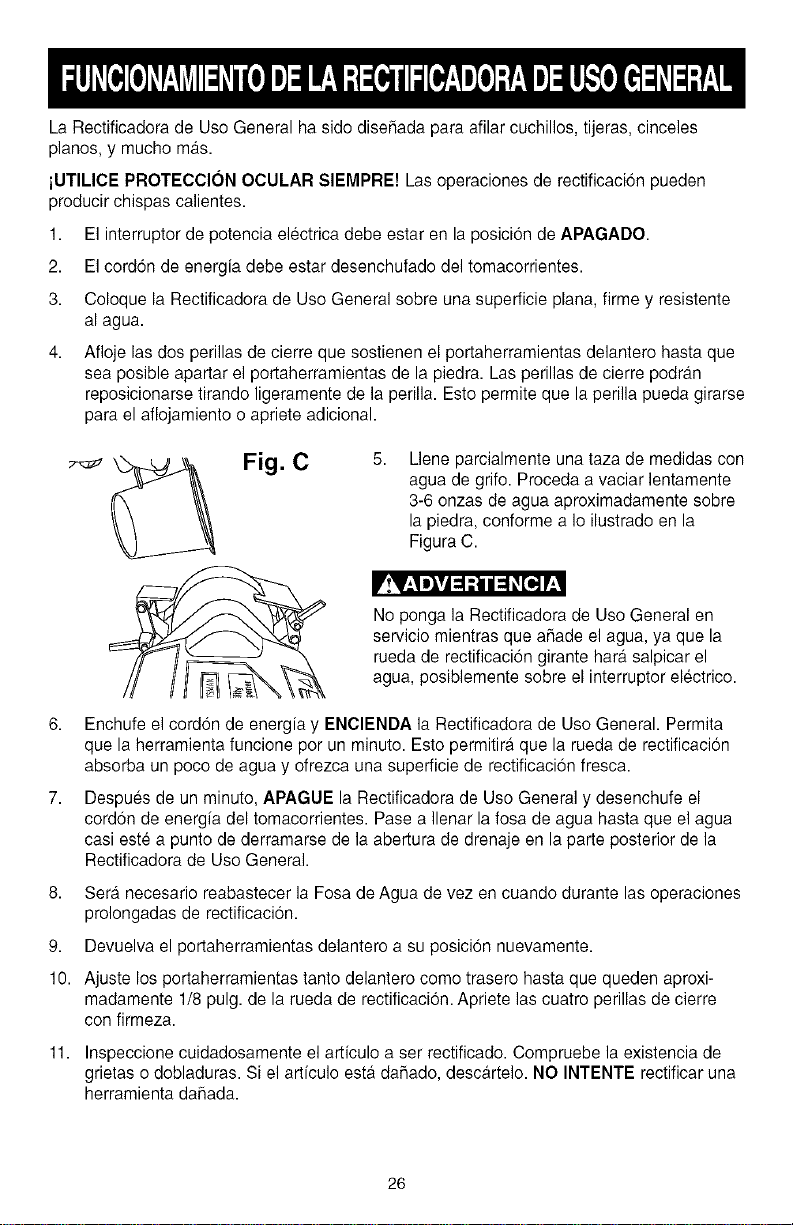
Fig. C 5.
Uene parcialmente una taza de medidas con
agua de grifo. Proceda avaciar lentamente
3-6 onzas de agua aproximadamente sobre
la piedra, conforme a Io ilustrado en la
Figura C.
'!Y__It_vAq :i / q _[_ r
No ponga la Rectificadora de Use General en
servicio mientras que aSade el agua, ya que la
rueda de rectificaci6n girante hara.salpicar el
agua, posiblemente sobre el interrupter electrico.
6,
7,
Enchufe el cord6n de energia y ENClENDA la Rectificadora de Uso General. Permita
que la herramienta funcione por un minute. Esto permitira que la rueda de rectificacion
absorba un poco de agua y ofrezca una superficie de rectificaci6n fresca.
Despues de un minuto, APAGUE la Rectificadora de Use General y desenchufe el
cordon de energia del tomacorrientes. Pase a Ilenar la fosa de agua hasta que el agua
casi este a punto de derramarse de la abertura de drenaje en la parte posterior de la
Rectificadora de Uso General.
8. Sera necesario reabastecer la Fosa de Agua de vez en cuando durante las operaciones
prolongadas de rectificacion.
9. Devuelva el portaherramientas delantero a su posicion nuevamente.
10. Ajuste los portaherramientas tanto delantero come trasero hasta que queden aproxi-
madamente 1/8 pulg. de la rueda de rectificacion. Apriete las cuatro perillas de cierre
con firmeza.
11. Inspeccione cuidadosamente el articulo a ser rectificado. Compruebe la existencia de
grietas o dobladuras. Si el articulo esta da_ado, desc#,rtelo. NO INTENTE rectificar una
herramienta da_ada.
26
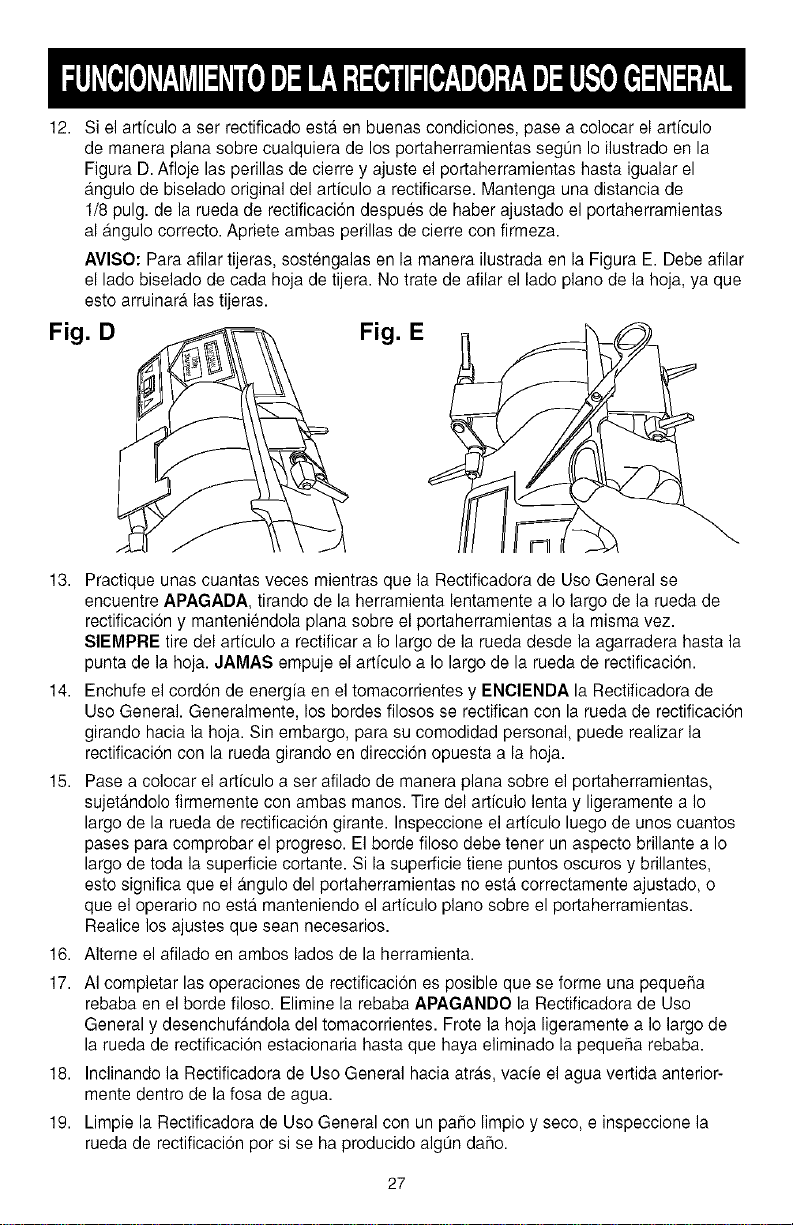
12. Si el artfculo a ser rectificado esta. en buenas condiciones, pase a colocar el arficulo
de manera plana sobre cualquiera de los portaherramientae segun Io ilustrado en la
Figura D. Afloje las perillae de cierre y ajuste el portaherramientas hasta igualar el
a.ngulode bieelado original del articulo a rectificarse. Mantenga una distancia de
1/8 pulg. de la rueda de rectificacidn despues de haber ajustado el portaherramientas
al a.ngulocorrecto. Apriete ambas perillas de cierre con firmeza.
AVlSO: Para afilar tijeras, sostengalas en la manera ilustrada en la Figura E. Debe afilar
el lado biselado de cada hoja de tijera. No trate de afilar el lado piano de la hoja, ya que
esto arruinara,las tijeras.
Fig. D Fig. E
L
13. Practique unae cuantas veces mientras que la Rectificadora de Uso General se
encuentre APAGADA, tirando de la herramienta lentamente a Io largo de la rueda de
rectificacion y manteniendola plana sobre el portaherramientae a la misma vez.
SIEMPRE tire del articulo a rectificar a Io largo de la rueda desde la agarradera hasta la
punta de la hoja. JAMAS empuje el artfculo a Io largo de la rueda de rectificacion.
14. Enchufe el cordon de energia en el tomacorrientes y ENClENDA la Rectificadora de
Uso General. Generalmente, los bordes filosos se rectifican con la rueda de rectificaci6n
girando hacia la hoja. Sin embargo, para su comodidad personal, puede realizar la
rectificacion con la rueda girando en direccion opuesta a la hoja.
15. Pase a colocar el arficulo a ser afilado de manera plana sobre el portaherramientas,
sujeta.ndolo firmemente con ambas manos. Tire del articulo lenta y ligeramente a Io
largo de la rueda de rectificacion girante. Inspeccione el artfculo luego de unos cuantos
pases para comprobar el progreso. El borde filoso debe tener un aspecto brillante a Io
largo de toda la superficie cortante. Si la superficie tiene puntos oscuros y brillantes,
esto significa que el a.ngulo del portaherramientas no esta.correctamente ajustado, o
que el operario no esta.manteniendo el articulo piano sobre el portaherramientas.
Realice los ajustes que sean necesarios.
16. AIterne el afilado en ambos lados de la herramienta.
17. AI completar las operaciones de rectificacion es posible que se forme una pequeha
rebaba en el borde filoso. Elimine la rebaba APAGANDO la Rectificadora de Uso
General y desenchufa.ndola del tomacorrientes. Frote la hoja ligeramente a Iolargo de
la rueda de rectificacion estacionaria hasta que haya eliminado la peque_a rebaba.
18. Inclinando la Rectificadora de Uso General hacia atra.s,vacie elagua vertida anterior-
mente dentro de la fosa de agua.
19. Limpie la Rectificadora de Uso General con un paso limpio y seco, e inspeccione la
rueda de rectificaci6n por si se ha producido algOn daflo.
27
Apague el interruptor de energia y desenchufe el cordon de energfa de la fuente de potencia
antes de realizar cualquier mantenimiento.
LIMPIEZA
Con la Rectificadora de Uso General desenchufada, gire la rueda abrasante lentamente e
inspeccionela per si existe cualquier da_o.
PRECAUClON: REPONGA la rueda abrasante si existe cualquier tipo de da_o. El dejar de
reponer una rueda da_ada puede resultar en heridas graves para el operario.
PRECAUCION: NO UTILICE MATERIALES INFLAMABLES para limpiar la Rectificadora de
Use General. Solo se necesita un patio limpio y seco o un cepillo para quitar el polvo y la
acumulaci6n de escombros.
'!V:! ;IrA :1:i i :1_[_ !
Las reparaciones a la Rectificadora de Use General deben ser realizadas per personal
experto solamente. Comuniquese con su Centre de Servicio de Sears mb,s cercano para
recibir servicio autorizado. Las reparaciones desautorizadas, o el use de piezas de recambio
que no sean de fabrica, podrian resultar en heridas graves para el usuario y da_o a la
Rectificadora de Use General.
PARA EVITAR HERIRSE A SI MISMO o daSar la Rectificadora de Use General, conmute
el interruptor a la posicion de "APAGADO" y desenchufe el cordon de energfa del toma-
corrientes antes de realizar cualquier ajuste.
PROBLEMA CAUSA PROBABLE SOLUCION
El motor no Ma.quina desenchufada Enchufe el cordon de potencia altomacorrientes
funciona Interruptor de potencia en posicion de Eleve el interruptor a la posicion de encendido
apagado ("OFF") ("ON")
Cordon de potencia defectuoso Devuelva la unidad al Centro de Servicio Sears
Fusible o diayuntor de circuitos abierto Circuito electrico sobrecargado
Motor da_ado Devuelva la unidad al Centro de Servicio Sears
El motor no Voltaje de Ifnea incorrecto Haga queun electricista cempetente revise la
alcaoza toda fuerza linea para asegurar que haya el voltaje eorrecto.
Motor da_ado Devuelva la unidad al Centro de Servicio Sears
El motor se calieeta Motor sobrecargado Reduzca la presidn sebre el material
Mala circulacion de aire alrededor del Quite cualquier ebstrucci6n en terno al motor
motor
El motor se ataaca Motor sobrecargado Reduzca la presi6n sebre el material
o corre leotamente Voltaje de linea incorrecto Haga queun electricista competente revise la
linea para asegurar que haya el voltaje correcto.
Falla de capacitador Devuelva la unidad al Centro de Servicio Sears
El fusible se funde
o se dispara el
disyuntor de
circuitos
Motor sobrecargado
Circuito electrico sobrecargado
Fusible o disyuntor de circuito
equivocado
Extension electrica de dimensiones
insuficientes o de largo excesivo,
vease el manual
Rueda de rectificacion bloqueada
Reduzca la presi6n sobre el material
Reduzca la cantidad de articulos en el mismo circuito
Rep6ngalo con el fusible o disyuntor decircuitos
correcto
Utilice el tamaSo correcto
Desenchufe la m_quina y quite las obstrucciones
28
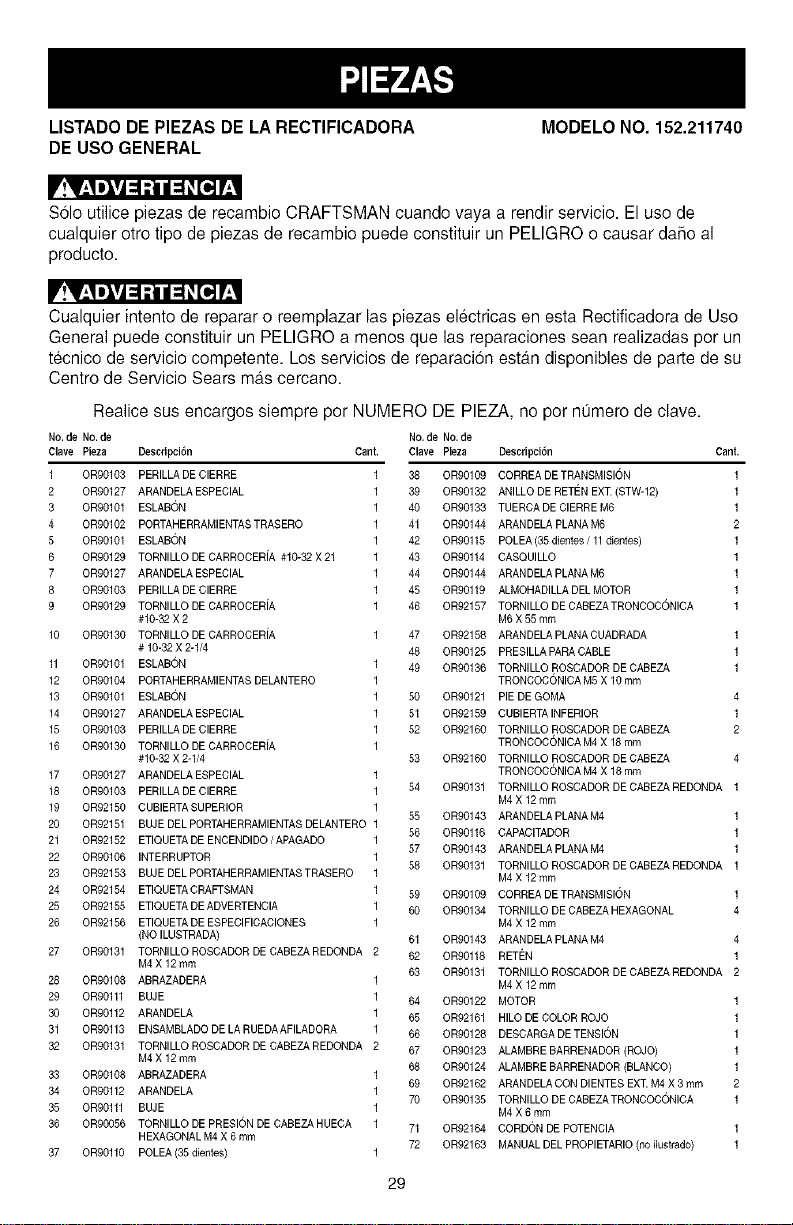
LISTADO DE PIEZAS DE LA RECTIFICADORA MODELO NO. 152.211740
DE USO GENERAL
'!V__!eXvA::1:i II_ _,[e.]I'
Solo utilice piezas de recambio CRAFTSMAN cuando vaya a rendir servicio. El use de
cualquier otro tipo de piezas de recambio puede constituir un PELIGRO o causar da_o al
producto.
'!V__!elvA::1:i II_ _,[e.]I'
Cualquier intento de reparar o reemplazar las piezas electricas en esta Rectificadora de Uso
General puede constituir un PELIGRO a menos que las reparaciones sean realizadas por un
tecnico de servicio competente. Los servicios de reparacion esta.ndisponibles de parte de su
Centro de Servicio Sears mas cercano.
Realice sus encargos siempre por NUMERO DE PIEZA, no por numero de clave.
No. de No. de
Clave Pleza
1 OR90103
2 OR90127
3 OR90101
4 OR90102
5 OR90101
6 OR90129
7 OR90127
8 OR90103
9 OR90129
10 OR90130
11 OR90101
12 OR90104
13 OR90101
14 OR90127
15 OR90103
16 OR90130
17 OR90127
18 OR90103
19 OR92150
20 OR92151
21 OR92152
22 OR90106
23 OR92153
24 OR92154
25 OR92155
26 OR92156
27 OR90131
28 OR90108
29 OR90111
30 OR90112
31 OR90113
32 OR90131
33 OR90108
34 OR90112
35 OR90111
36 OR90056
37 OR90110
No.de No. de
Descrlpcl6n Cant, Clave Pleza Descrlpcl6n Cant,
PERILLA DE CIERRE 1 38 OR90109 CORREA DE TRANSMISION 1
ARANDELAESPECIAL 1 39 OR90132 ANILLO DE RETEN EXT.(STW-12) 1
ESLABON 1 40 OR90133 TUERCA DE CIERREM6 1
PORTAHERRAMIENTASTRASERO 1 41 OR90144 ARANDELA PLANA M6 2
ESLABON 1 42 OR90115 POLEA(35 dientes/ 11dientes) 1
TORNILLODE CARROCERiA #10-32 X 21 1 43 OR90114 CASQUILLO 1
ARANDELAESPECIAL 1 44 OR90144 ARANDELA PLANAM6 1
PERILLA DE CIERRE 1 45 OR90119 ALMOHADILLA DEL MOTOR 1
TORNILLODE CARROCERiA 1 46 OR92157 TORNILLO DE CABEZATRONCOCONICA 1
#10-32 X 2 M6X 55 mm
TORNILLODE CARROCERiA 1 47 OR92158 ARANDELA PLANACUADRADA 1
# 10-32X 2-1/4 48 OR90125 PRESILLA PARACABLE 1
ESLABON 1 49 OR90136 TORNILLO ROSCADOR DE CABEZA 1
PORTAHERRAMIENTASDELANTERO 1 TRONCOCONICA M5 X10 ram
ESLABON 1 50 OR90121 PIE DEGOMA 4
ARANDELAESPECIAL 1 51 OR92159 CUBIERTA INFERIOR 1
PERILLA DE CIERRE 1 52 OR92160 TORNILLO ROSCADOR DECABEZA 2
TORNILLODE CARROCERiA 1 TRONCOCONICA M4 X 18 mm
#10-32 X 2-1/4 53 OR92160 TORNILLO ROSCADOR DE CABEZA 4
ARANDELAESPECIAL 1 TRONCOCONICA M4 X 18 mm
PERILLADECIERRE 1 54 OR90131 TORNILLOROSCADORDECABEZAREDONDA 1
M4X12mm
CUBIERTASUPERIOR 1
55 OR90143 ARANDELA PLANAM4 1
BUJE DEL PORTAHERRAMIENTAS DELANTERO 1
56 OR90116 CAPACITADOR 1
ETIQUETADEENCENDIDO /APAGADO 1
57 OR90143 ARANDELA PLANAM4 1
INTERRUPTOR 1
58 OR90131 TORNILLOROSCADORDECABEZAREDONDA 1
BUJE DEL PORTAHERRAMIENTAS TRASERO 1 M4 X 12 mm
ETIQUETACRAFTSMAN 1 59 OR90109 CORREA DE TRANSMISION 1
ETIQUETADEADVERTENCIA 1 60 OR90134 TORNILLO DE CABEZA HEXAGONAL 4
ETIQUETADEESPECIFICACIONES 1 M4 X 12 mm
(NO ILUSTRADA) 61 OR90143 ARANDELA PLANAM4 4
TORNILLOROSCADORDECABEZAREDONDA 2 62 OR90118 RETEN 1
M4X12mm
63 OR90131 TORNILLOROSCADORDECABEZAREDONDA 2
ABRAZADERA 1 M4 X 12 mm
BUJE 1 64 OR90122 MOTOR 1
ARANDELA 1 65 OR92161 HILO DE COLOR ROJO 1
ENSAMBLADO DE LA RUEDAAFILADORA 1 66 OR90128 DESCARGADETENSION 1
TORNILLOROSCADORDECABEZAREDONDA 2 67 OR90123 ALAMBREBARRENADOR(ROJO) 1
M4X12mm
68 OR90124 ALAMBREBARRENADOR (BLANCO) 1
ABRAZADERA 1
69 OR92162 ARANDELA CON DIENTES EXT.M4 X 3 mm 2
ARANDELA 1
70 OR90135 TORNILLO DE CABEZATRONCOCONICA 1
BUJE 1 M4 X 6 mm
TORNILLODE PRESION DE CABEZA HUECA 1 71 OR92164 CORDON DEPOTENCIA 1
HEXAGONALM4 X 6 mm
72 OR92163 MANUAL DEL PROPIETARIO(no ilustrado) 1
POLEA (35dientes) 1
29
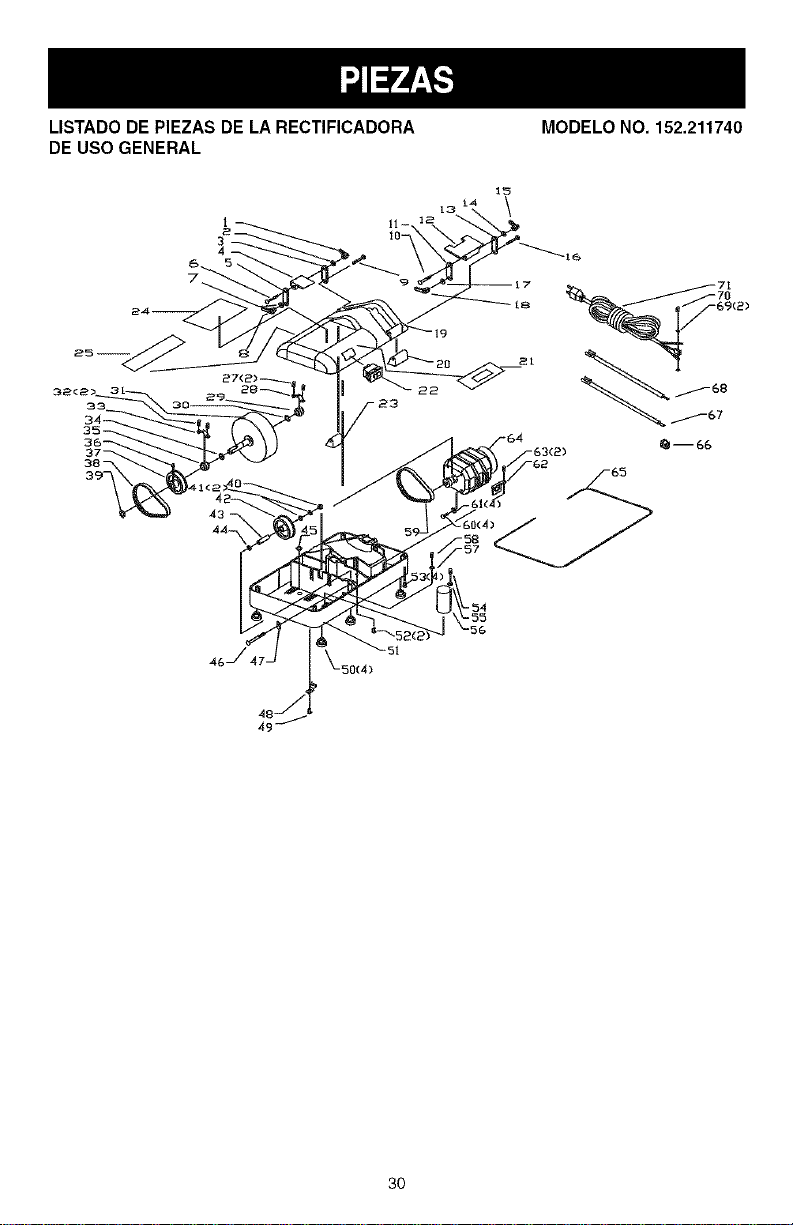
LISTADO DE PIEZAS DE LA RECTIFICADORA MODELO NO. 152.211740
DE USO GENERAL
t
3O

31

Your Home
For repair - in your home - of all major brand appliances,
lawn and garden equipment, or heating and cooling systems,
no matter who made it, no matter who sold it !
For the replacement parts, accessories and
owner's manuals that you need to do-it-yourself.
For Sears professional installation of home appliances
and items like garage door openers and water heaters.
1-800-4-MY-HOME ® Call anytime, day or night
(1-800-469-4663) (USA. and Canada)
www,sears,com www.sears.ca
For expert home solutions advice: www.managemyhome.com
Our Home
For repair of carry-in products like vacuums, lawn equipment,
and electronics, call or go on-line for the nearest
Sears Parts & Repair Service Center
1-800-488-1222 (U.S.A.) 1-800-469-4663 (Canada)
Call anytime, day or night
www.sears.com www.sears.ca
To purchase a protection agreement on a product serviced by Sears:
1-800-827-6655 (U.S.A.) 1-800-361-6665 (Canada)
Para pedir serviciode reparacion
a domicitio,ypara ordenar piezas:
1-888-SU-HOGAR®
(1-888-784-6427)
Au Canada pour serviceen frangais:
1-800-LE-FOYERMc
(1-800-533-6937)
www.sears.ca
© Sears Branch, LLC
® Registered Trademark / T_ Trademark / sMService Mark of Sears Brands, LLC
® Marca Registrada / TMMarca de Fabrica / sMMarca de Servicio de Sears Brands, LLC
MCMarque de commerce / MDMarque d_pos6e de Sears Brands, LLC

