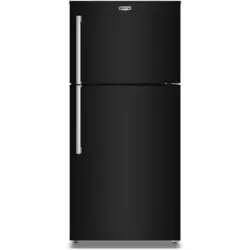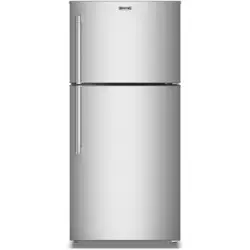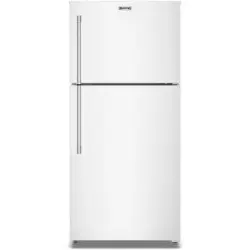
THANK YOU for purchasing this high-quality product. Register your new refrigerator at www.maytag.com. In Canada, register your
refrigerator at www.maytag.ca.
For future reference, please make a note of your product model and serial numbers. These can be located on the inside wall of the
refrigerator compartment.
Model Number ___________________________________________ Serial Number____________________________________________
Para obtener acceso a “Instrucciones para el usuario del refrigerador” en español, o para obtener información adicional acerca de su
producto, visite: www.maytag.com.
Necesitará su número de modelo y de serie, ubicado en el interior del compartimiento del refrigerador.
REFRIGERATOR
USER INSTRUCTIONS
Table of Contents/Table des matières
REFRIGERATOR SAFETY.....................................................................2
Proper Disposal of Your Old Refrigerator...........................................3
INSTALLATION INSTRUCTIONS .........................................................3
Unpack the Refrigerator...................................................................... 3
Location Requirements....................................................................... 4
Electrical Requirements ...................................................................... 4
Water Supply Requirements...............................................................4
Connect the Water Supply...............................................................
...5
Refrigerator Doors............................................................................... 6
Reversibility Kit Instructions..............................................................11
Adjust the Doors ...............................................................................11
REFRIGERATOR USE .........................................................................12
Using the Controls ............................................................................12
REFRIGERATOR FEATURES .............................................................13
Refrigerator Shelves..........................................................................13
Deli Drawer........................................................................................13
Crisper...............................................................................................13
FREEZER FEATURES .........................................................................14
Freezer Shelf .............................................................................
........14
DOOR FEATURES ...............................................................................14
Door Rails..........................................................................................14
Door Bins...........................................................................................14
Utility Compartment..........................................................................14
Ice Maker.......................................
....................................................15
REFRIGERATOR CARE.......................................................................15
Cleaning ............................................................................................15
Changing the Light Bulb ...................................................................16
Vacation and Moving Care ...............................................................16
TROUBLESHOOTING..........................................................................17
Refrigerator Operation ......................................................................17
Temperature and Moisture ...............................................................18
Ice and Water.....................
...............................................................18
ACCESSORIES ....................................................................................18
WARRANTY..........................................................................................19
BRAND BADGE PLACEMENT TEMPLATE...................BACK COVER
SÉCURITÉ DU RÉFRIGÉRATEUR ..................................................... 20
Mise au rebut appropriée de votre vieux réfrigérateur..................... 21
INSTRUCTIONS D'INSTALLATION ......................
............................. 21
Déballage du réfrigérateur ................................................................ 21
Exigences d'emplacement ............................................................... 22
Spécifications électriques................................................................. 22
Spécifications de l’alimentation en eau............................................ 23
Raccordement de la canalisation d'eau........................................... 23
Portes du réfrigérateur...................................................................... 24
Instructions pour l'ensemble d’inversion du sens d’ouverture........ 30
Ajustement des portes...................................................................... 30
UTILISATION DU RÉFRIGÉRATEUR................................................. 31
Utilisation des commandes .............................................................. 31
CARACTÉRISTIQUES DU RÉFRIGÉRATEUR .................................. 32
Tablettes du réfrigérateur ..........................
....................................... 32
Tiroir pour spécialités alimentaires................................................... 32
Bac à légumes .................................................................................. 32
CARACTÉRISTIQUES DU CONGÉLATEUR...................................... 33
Tablette du congélateur.................................................................... 33
CARACTÉRISTIQUES DE LA PORTE................................................ 33
Tringles de porte............................................................................... 33
Balconnets de porte ......................................................................... 34
Compartiment utilitaire ..................................................................... 34
Machine à glaçons..........................
.................................................. 34
ENTRETIEN DU RÉFRIGÉRATEUR ................................................... 35
Nettoyage.......................................................................................... 35
Remplacement des ampoules d’éclairage....................................... 35
Entretien avant les vacances ou lors d’un déménagement............. 36
DÉPANNAGE........................................................................................ 37
Fonctionnement du réfrigérateur..................................................
.... 37
Température et humidité .................................................................. 38
Glaçons et eau............................................................
...................... 38
ACCESSOIRES .................................................................................... 39
GARANTIE............................................................................................ 40
GABARIT DE POSITIONNEMENT
DE L’INSIGNE DE LA MARQUE.................. CO
UVERTURE ARRIÈRE
W10885251B
2
REFRIGERATOR SAFETY
You can be killed or seriously injured if you don't immediately
You
can be killed or seriously injured if you don't
follow
Allsafetymessageswilltellyouwhatthepotentialhazardis,tellyouhowtoreducethechanceofinjury,andtellyouwhatcan
happeniftheinstructionsarenotfollowed.
Your safety and the safety of others are very important.
Wehaveprovidedmanyimportantsafetymessagesinthismanualandonyourappliance.Alwaysreadandobeyallsafety
messages.
Thisisthesafetyalertsymbol.
Thissymbolalertsyoutopotentialhazardsthatcankillorhurtyouandothers.
Allsafetymessageswillfollowthesafetyalertsymbolandeithertheword“DANGER”or“WARNING.”
Thesewordsmean:
follow instructions.
instructions.
DANGER
WARNING
StateofCaliforniaProposition65Warnings:
WARNING:ThisproductcontainsoneormorechemicalsknowntotheStateofCaliforniatocausecancer.
WARNING:ThisproductcontainsoneormorechemicalsknowntotheStateofCaliforniatocausebirthdefectsorother
reproductiveharm.
IMPORTANTSAFETYINSTRUCTIONS
WARNING:
Toreducetheriskoffire,electricshock,orinjurywhenusingyourrefrigerator,followthesebasicprecautions:
SAVETHESEINSTRUCTIONS
■ Plugintoagrounded3prongoutlet.
■ Donotremovegroundprong.
■ Donotuseanadapter.
■ Donotuseanextensioncord.
■ Disconnectpowerbeforeservicing.
■ Replaceallpartsandpanelsbeforeoperating.
■ Removedoorsfromyouroldrefrigerator.
■ Connecttoapotablewatersupplyonly.
■ Usenonflammablecleaner.
■ Keepflammablematerialsandvapors,suchasgasoline,
awayfromrefrigerator.
■ Usetwoormorepeopletomoveandinstallrefrigerator.
■ Disconnectpowerbeforeinstallingicemaker(onicemaker
kitreadymodelsonly).
■ Useasturdyglasswhendispensingice(onsomemodels).
■ Donothittherefrigeratorglassdoors(onsomemodels).
■ Thisapplianceisnotintendedforusebypersons(including
children)withreducedphysical,sensoryormental
capabilities,orlackofexperienceandknowledge,unless
theyhavebeengivensupervisionorinstructionconcerning
useoftheappliancebyapersonresponsiblefortheir
safety.
■ Childrenshouldbesupervisedtoensurethattheydonot
playwiththeappliance.
3
INSTALLATION INSTRUCTIONS
Unpack the Refrigerator
RemovethePackaging
IMPORTANT:Donotremovethewhitefoamairreturninsertfrom
behindthecontrolpanelontheceilingoftherefrigerator.Ifthe
insertisremoved,icemaymigratedownfromthefreezerand
causeiciclestoform.
Removetapeandglueresiduefromsurfacesbeforeturning
ontherefrigerator.Rubasmallamountofliquiddishsoap
overtheadhesivewithyourfingers.Rinsewithwarmwater
anddrywithasoftcloth.
Donotusesharpinstruments,rubbingalcohol,flammable
fluids,orabrasivecleanerstoremovetapeorglue.These
productscandamagethesurfaceofyourrefrigerator.For
moreinformationsee,“RefrigeratorSafety.”
CleanBeforeUsing
Afteryouremoveallofthepackagematerials,cleantheinsideof
yourrefrigeratorbeforeusingit.Seethecleaninginstructionsin
“RefrigeratorCare.”
Proper Disposal of Your Old Refrigerator
IMPORTANT:Childentrapmentandsuffocationarenotproblems
ofthepast.Junkedorabandonedrefrigeratorsarestilldangerous
–eveniftheywillsitfor“justafewdays.”Ifyouaregettingridof
youroldrefrigerator,pleasefollowtheseinstructionstohelp
preventaccidents.
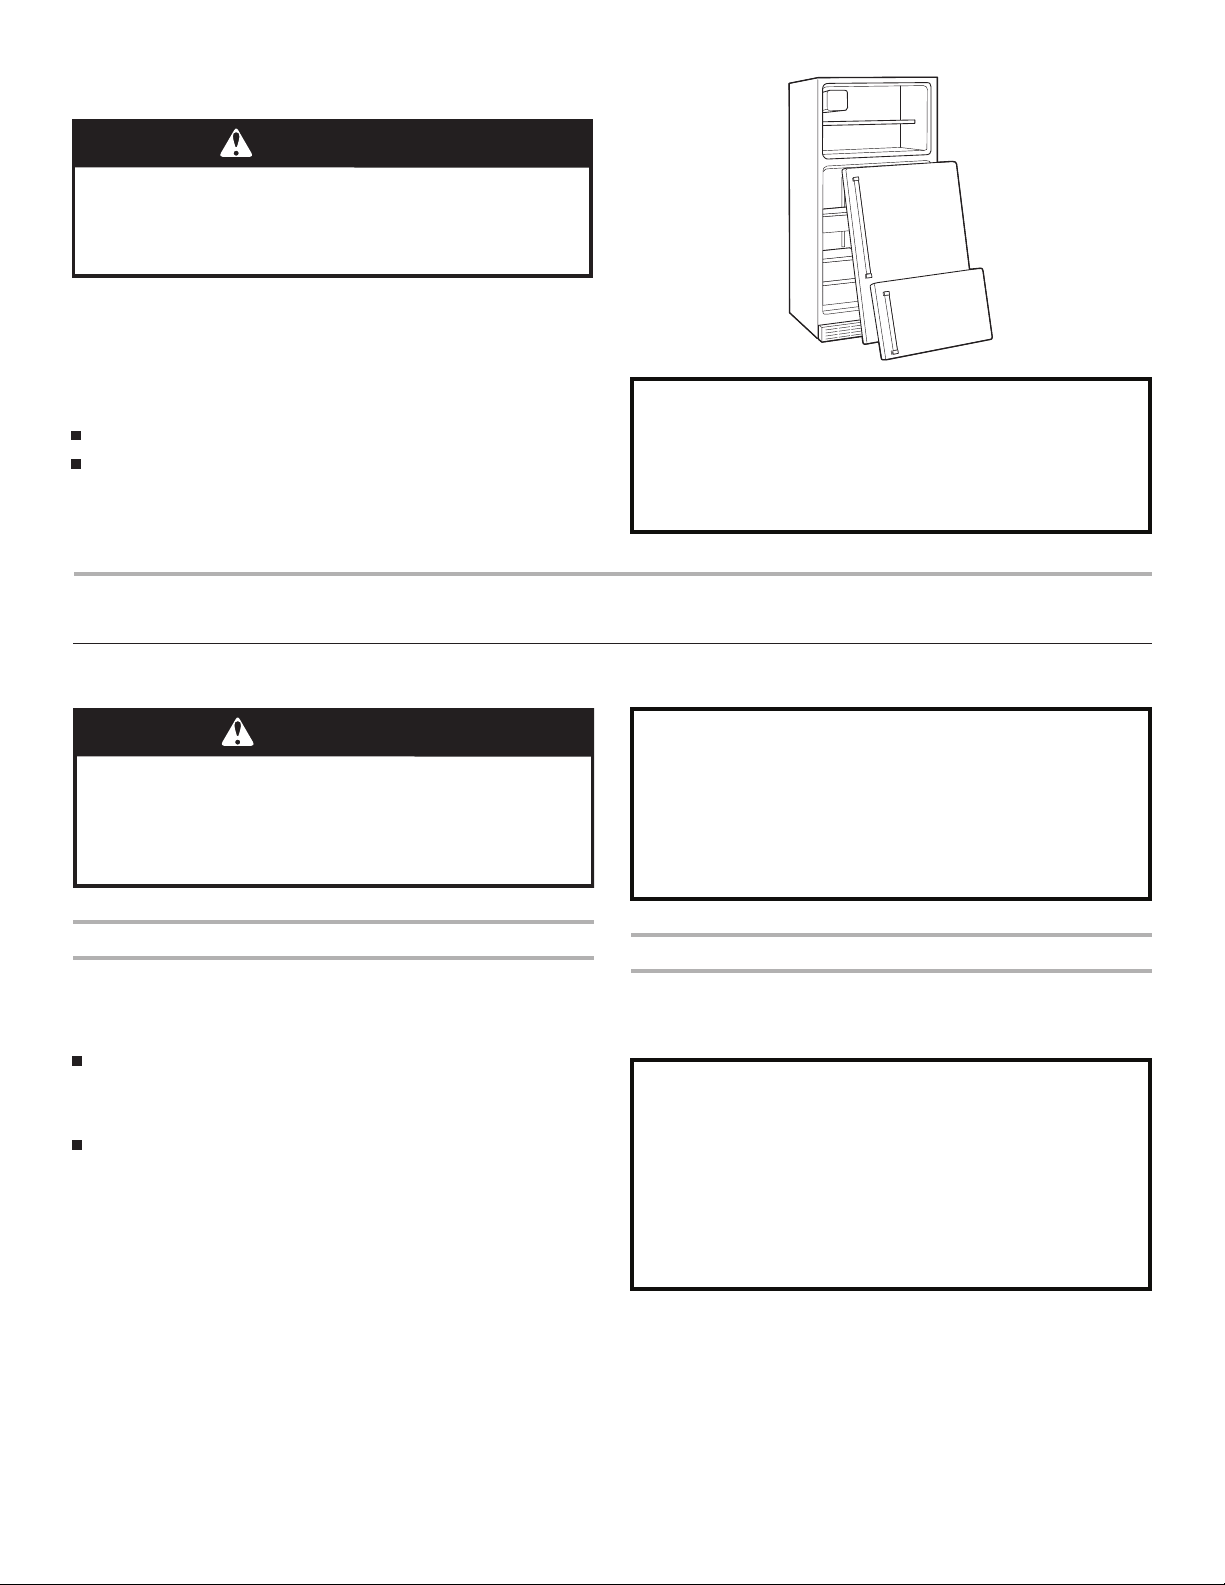
BeforeYouThrowAwayYourOldRefrigeratororFreezer:
Takeoffthedoors.
Leavetheshelvesinplacesothatchildrenmaynoteasily
climbinside.
WARNING
Suffocation Hazard
Remove doors from your old refrigerator.
Failure to do so can result in death or brain damage.
Important information to know about disposal of
refrigerants:
DisposeofrefrigeratorinaccordancewithFederalandLocal
regulations.Refrigerantsmustbeevacuatedbyalicensed,
EPAcertifiedrefrigeranttechnicianinaccordancewith
establishedprocedures.
WARNING
Excessive Weight Hazard
Use two or more people to move and install
refrigerator.
Failure to do so can result in back or other injury.
When Moving Your Refrigerator:
Yourrefrigeratorisheavy.Whenmovingtherefrigeratorfor
cleaningorservice,besuretocoverthefloorwith
cardboardorhardboardtoavoidfloordamage.Alwayspull
therefrigeratorstraightoutwhenmovingit.Donotwiggleor
“walk”therefrigeratorwhentryingtomoveit,asfloor
damagecouldoccur.
Important information to know about glass shelves
and covers:
Donotcleanglassshelvesorcoverswithwarmwaterwhen
theyarecold.Shelvesandcoversmaybreakifexposedto
suddentemperaturechangesorimpact,suchasbumping.
Temperedglassisdesignedtoshatterintomanysmall,
pebble-sizepieces.Thisisnormal.Glassshelvesandcovers
areheavy.Usebothhandswhenremovingthemtoavoid
dropping.
4
Location Requirements
IMPORTANT:Thisrefrigeratorisdesignedforindoorhousehold
useonly.
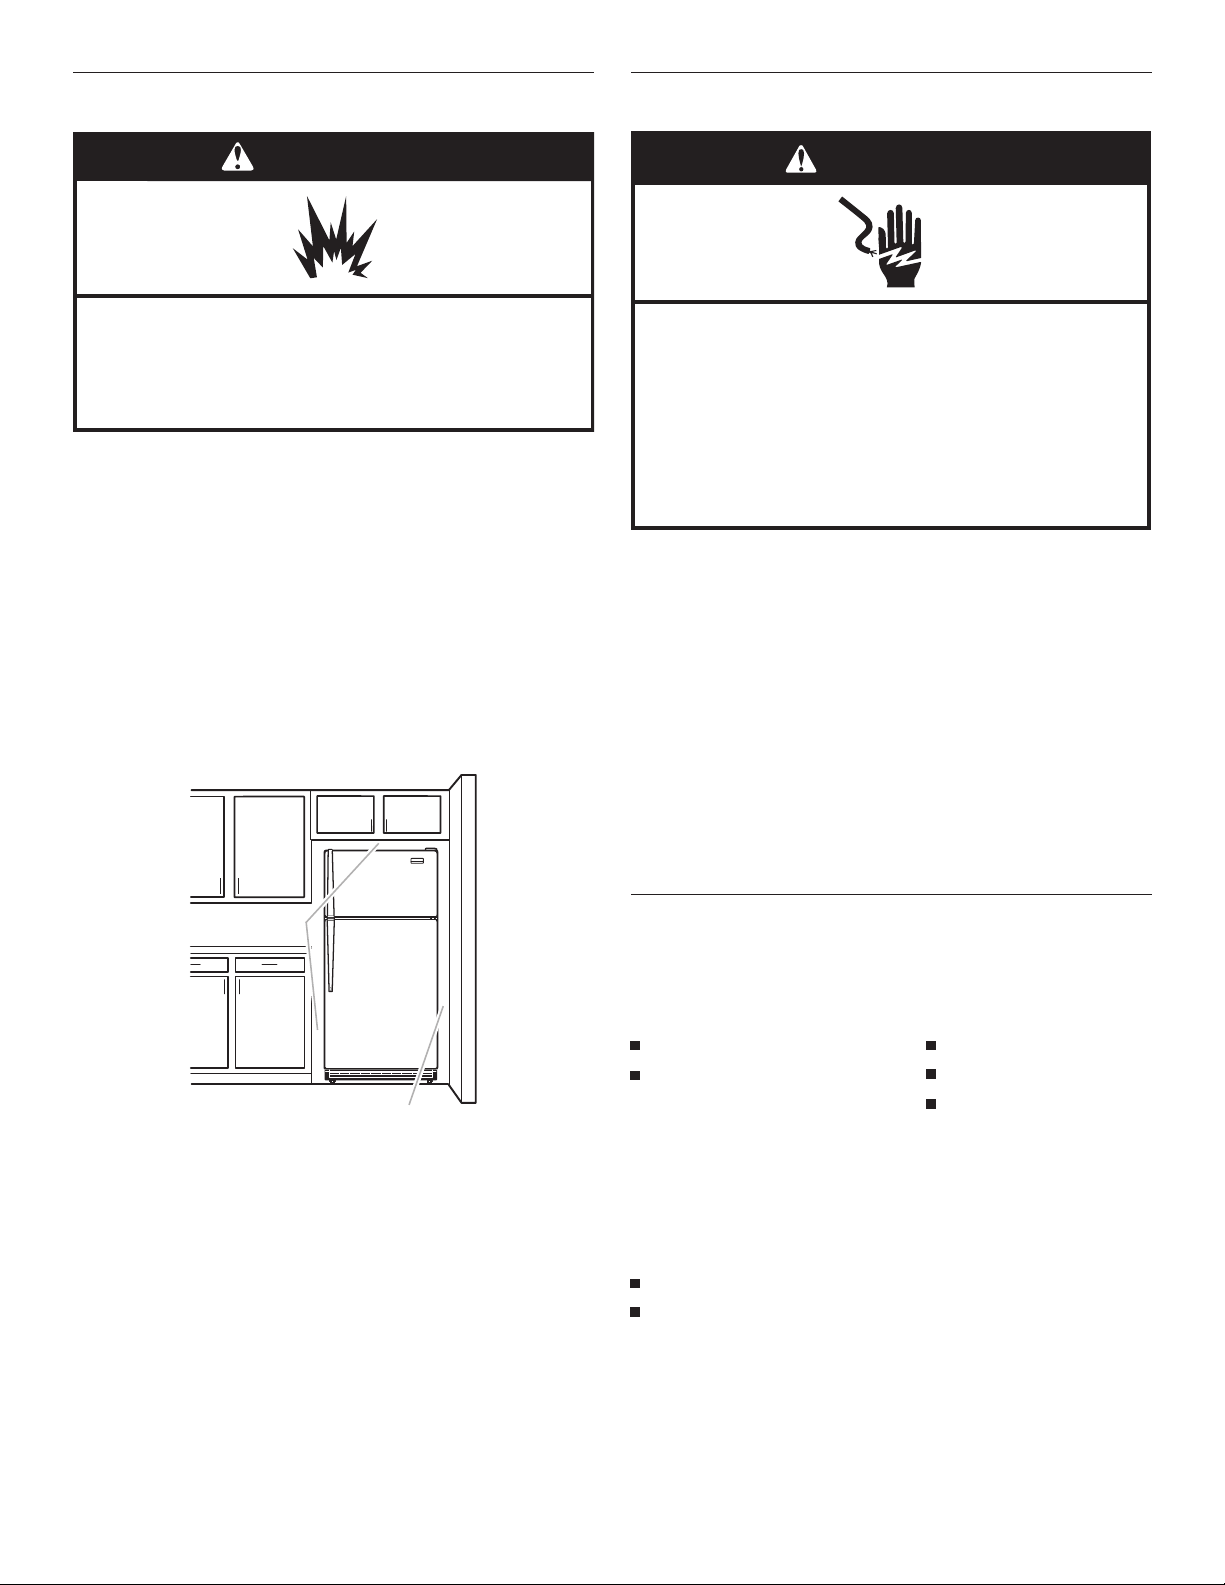
Toensureproperventilationforyourrefrigerator,allowfor½"
(1.25cm)ofspaceoneachsideandatthetop.Allowfor1"
(2.54cm)ofspacebehindtherefrigerator.Ifyourrefrigeratorhas
anicemaker,allowextraspaceatthebackforthewaterline
connections.Wheninstallingyourrefrigeratornexttoafixedwall,
leavea2"(5.08cm)minimumspaceonthehingeside(some
modelsrequiremore)toallowthedoortoswingopen.
NOTE:Thisrefrigeratorisintendedforuseinalocationwherethe
temperaturerangesfromaminimumof55°F(13°C)toamaximum
of110°F(43°C).Thepreferredroomtemperatu
rerangefor
optimumperformance
,whichreduceselectricityusageand
providessuperiorcooling,isbetween60°F(15°C)and90°F
(32°C).Itisrecommendedthatyoudonotinstalltherefrigerator
nearaheatsource,suchasanovenorradiator.
Electrical Requirements
Beforeyoumoveyourrefrigeratorintoitsfinallocation,itis
importanttomakesureyouhavetheproperelectricalconnection.
RecommendedGroundingMethod
A115-volt,60Hz,AC-only,15-or20-ampfused,grounded
electricalsupplyisrequired.Itisrecommendedthataseparate
circuitservingonlyyourrefrigeratorbeprovided.Useanoutletthat
cannotbeturnedoffbyaswitch.Donotusean
extensioncord.
NOTE:Beforeperforminganytypeofinstallation,cleaning,
orremovingalightbulb,turncoolingofforturnthecontrol
(Thermostat,Refrigerator,orFreezercontroldependingonthe
model)toOFF,andthendisconnecttherefrigeratorfromthe
electricalsource.Whenyouarefinished,reconnecttherefrigerator
totheelectricalsourceandturncoolingonorresetthecontrol
(Thermostat,Refrigerator,orFreezercontroldependingonthe
model)tothedesiredsetting.See“UsingtheControls”intheUser
Instructions,UserGuide,orUse&CareGuide.
Water Supply Requirements
Gathertherequiredtoolsandpartsbeforestartinginstallation.
Readandfollowtheinstructionsprovidedwithanytoolslisted
here.
TOOLSNEEDED:
NOTE:Yourrefrigeratordealerhasakitavailablewitha¹⁄₄"
(6.35mm)saddle-typeshut-offvalve,aunion,andcoppertubing.
Beforepurchasing,makesureasaddle-typevalvecomplieswith
yourlocalplumbingcodes.Donotuseapiercing-typeor³⁄₁₆"
(4.76mm)saddlevalvewhichreduceswaterflowandclogsmore
easily.
IMPORTANT:
Allinstallationsmustmeetlocalplumbingcoderequirements.
Usecoppertubingandcheckforleaks.Installcoppertubing
onlyinareaswherethehouseholdtemperatureswillremain
abovefreezing.
WARNING
Explosion Hazard
Keep flammable materials and vapors, such as
gasoline, away from refrigerator.
Failure to do so can result in death, explosion, or fire.
1
/
2" (1.25 cm)
2" (5.08 cm)
Flat-bladescrewdriver
⁷⁄₁₆"and¹⁄₂"open-endortwo
adjustablewrenches
¹⁄₄"nutdriver
¹⁄₄"drillbit
Cordlessdrill
Electrical Shock Hazard
Plug into a grounded 3 prong outlet.
Do not remove ground prong.
Do not use an adapter.
Do not use an extension cord.
Failure to follow these instructions can result in death,
fire, or electrical shock.
WARNING
5
WaterPressure
Acoldwatersupplywithwaterpressureofbetween30and
120psi(207and827kPa)isrequiredtooperatethewater
dispenserandicemaker.Ifyouhavequestionsaboutyourwater
pressure,callalicensed,qualifiedplumber.
ReverseOsmosisWaterSupply
IMPORTANT:Thepressureofthewatersupplycomingoutofa
reverseosmosissystemgoingtothewaterinletvalveofthe
refrigeratorneedstobebetween30and120psi(207and
827kPa).
Ifareverseosmosiswaterfiltrationsystemisconnectedtoyour
coldwatersupply,thewaterpressuretothereverseosmosis
systemneedstobeaminimumof40to60psi(276to414kPa).
Ifthewaterpressuretothereverseosmosissystemislessthan
40to60psi(276
to414kPa):
Checktoseewhetherthesedimentfilterinthereverse
osmosissystemisblocked.Replacethefilterifnecessary.
Allowthestoragetankonthereverseosmosissystemtorefill
afterheavyusage.
Ifyouhavequestionsaboutyourwaterpressure,callalicensed,
qualifiedplumber.
Connect the Water Supply
Readalldirectionsbeforeyoubegin.
IMPORTANT:Ifyouturntherefrigeratoronbeforethewaterlineis
connected,turntheicemakeroff.
ConnecttoWaterLine
1.Unplugrefrigeratorordisconnectpower.
2.Turnoffmainwatersupply.Turnonnearestfaucetlong
enoughtoclearlineofwater.
3.Locatea½"to1¹⁄₄"(1.25cmto3.18cm)verticalcoldwater
pipeneartherefrigerator.
IMPORTANT:
Makesureitisacoldwaterpipe.
Horizontalpipewillwork,butdrillonthetopsideofthe
pipe,notthebottom.Thiswillhelpkeepwaterawayfrom
thedrillandnormalsedimentfromcollectinginthevalve.
4.Determinethelengthofcoppertubingyouneed.Measure
fromtheconnectiononthelower-leftrearofrefrigeratortothe
waterpipe.Add7ft(2.1m)toallowforcleaning.Use¹⁄₄"
(6.35mm)O.D.(outsidediameter)coppertubing.Besureboth
endsofcoppertubingarecutsquare.
5.Usingacordlessdrill,drilla¹⁄₄"holeinthecoldwaterpipeyou
haveselected.
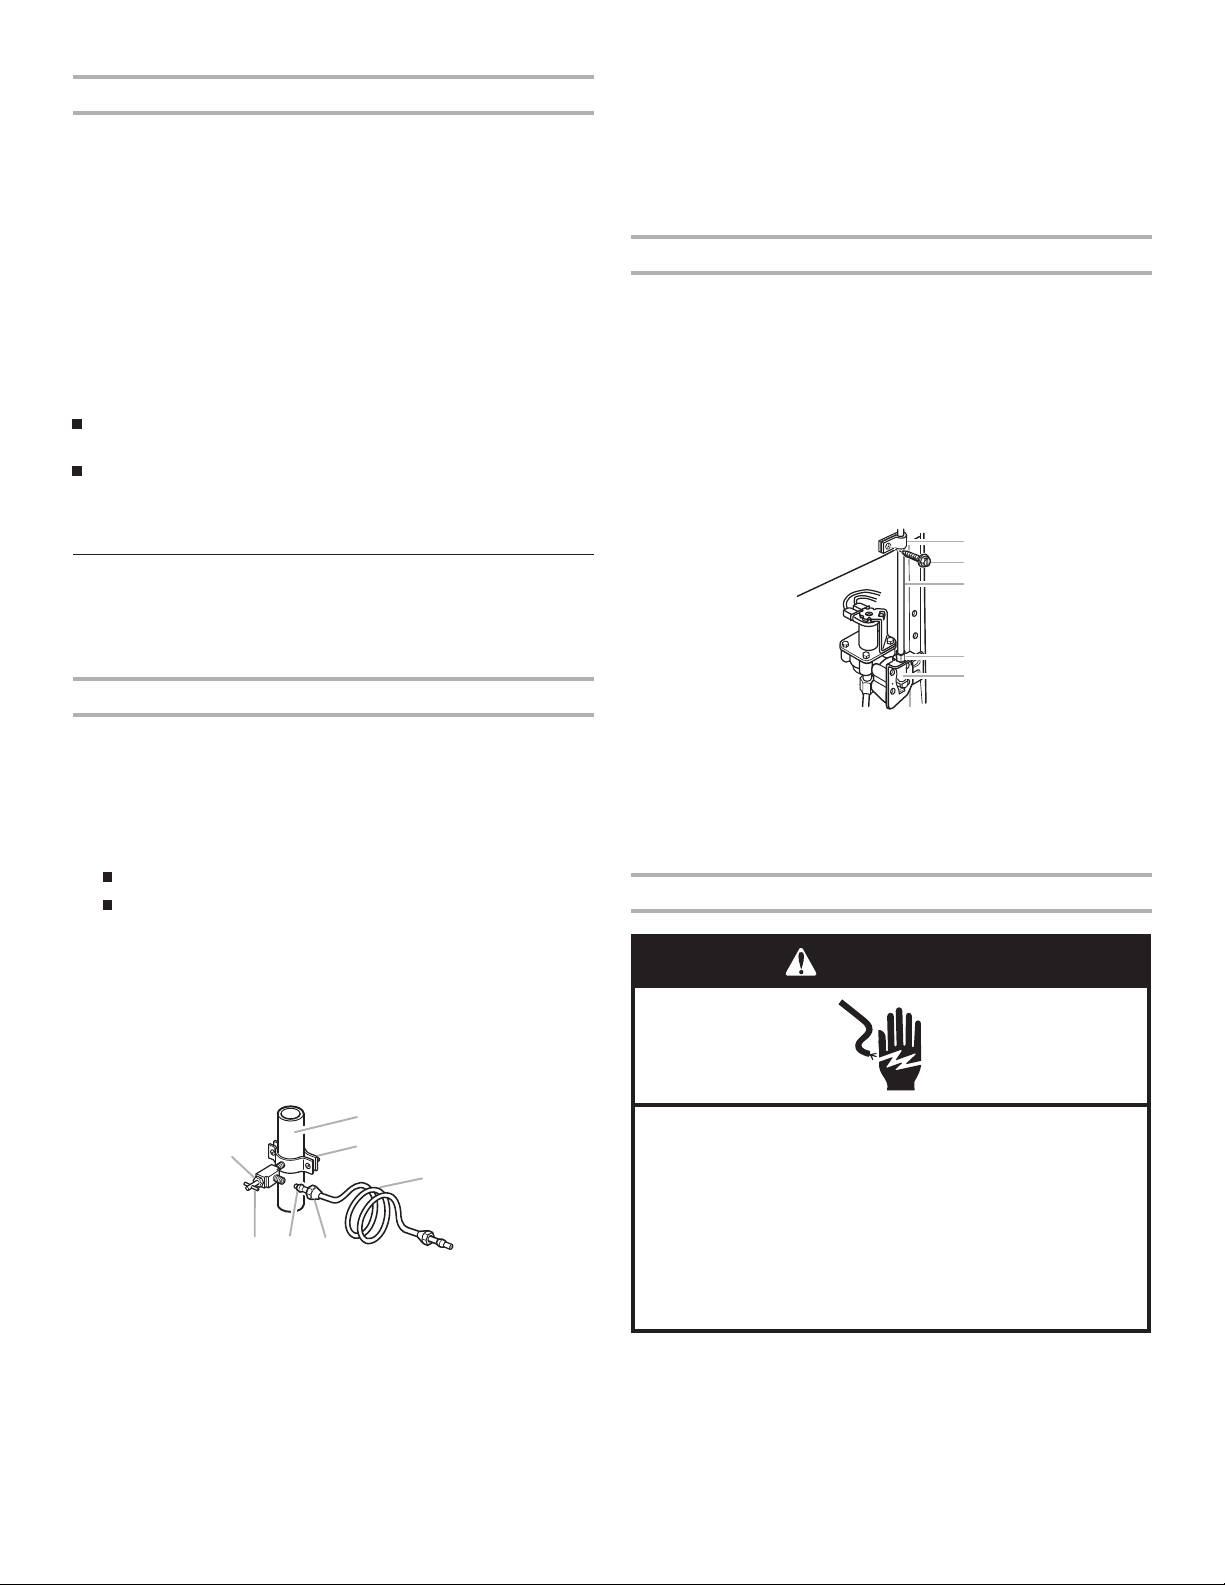
6.Fastentheshut-offvalvetothecoldwaterpipewiththepipe
clamp.Besuretheoutletendissolidlyinthe¹⁄₄"drilledholein
thewaterpipeandthatthewasherisunderthepipeclamp.
Tightenthepackingnut.Tightenthepipeclampscrewsslowly
andevenlysowashermakesawatertightseal.Donot
overtightenoryoumaycrushthecoppertubing.
7.Slipthecompressionsleeveandcompressionnutonthe
coppertubingasshown.Inserttheendofthetubingintothe
outletendsquarelyasfarasitwillgo.Screwcompressionnut
ontooutletendwithadjustablewrench.Donotovertighten.
8.Placethefreeendofthetubinginacontainerorsinkandturnon
themainwatersupply.Flushthetubinguntilwaterisclear.Turn
offtheshut-offvalveonthewaterpipe.Coilthecoppertubing.
ConnecttoRefrigerator
1.Unplugrefrigeratorordisconnectpower.
2.Attachthecoppertubingtothevalveinletusinga
compressionnutandsleeveasshown.Tightenthe
compressionnut.Donotovertighten.
3.Usethetubeclamponthebackoftherefrigeratortosecure
thetubingtotherefrigeratorasshown.Thiswillhelpavoid
damagetothetubingwhentherefrigeratorispushedback
againstthewall.
4.Turnshut-offvalveon.
5.Checkforleaks.Tightenanyconnections(including
connectionsatthevalve)ornutsthatleak.
6.Theicemakerisequippedwithabuilt-inwaterstrainer.Ifyour
waterconditionsrequireasecondwaterstrainer,installitin
the¹⁄₄"
(6.35mm)waterlineateithert
ubeconnection.Obtain
awaterstrainerfromyournearestappliancedealer.
CompletetheInstallation
1.Plugintoagrounded3prongoutlet.
NOTE:Allow24hourstoproducethefirstbatchofice.Discard
thefirstthreebatchesoficeproduced.Allow3daystocompletely
fillicecontainer.
A. Cold water pipe
B. Pipe clamp
C. Copper tubing
D. Compression nut
E. Compression sleeve
F. Shut-off valve
G. Packing nut
A
B
C
DEF
G
A. Tube clamp
B. Tube clamp screw
C. Copper tubing
D. Compression nut
E. Valve inlet
A
C
B
D
E
Electrical Shock Hazard
Plug into a grounded 3 prong outlet.
Do not remove ground prong.
Do not use an adapter.
Do not use an extension cord.
Failure to follow these instructions can result in death,
fire, or electrical shock.
WARNING
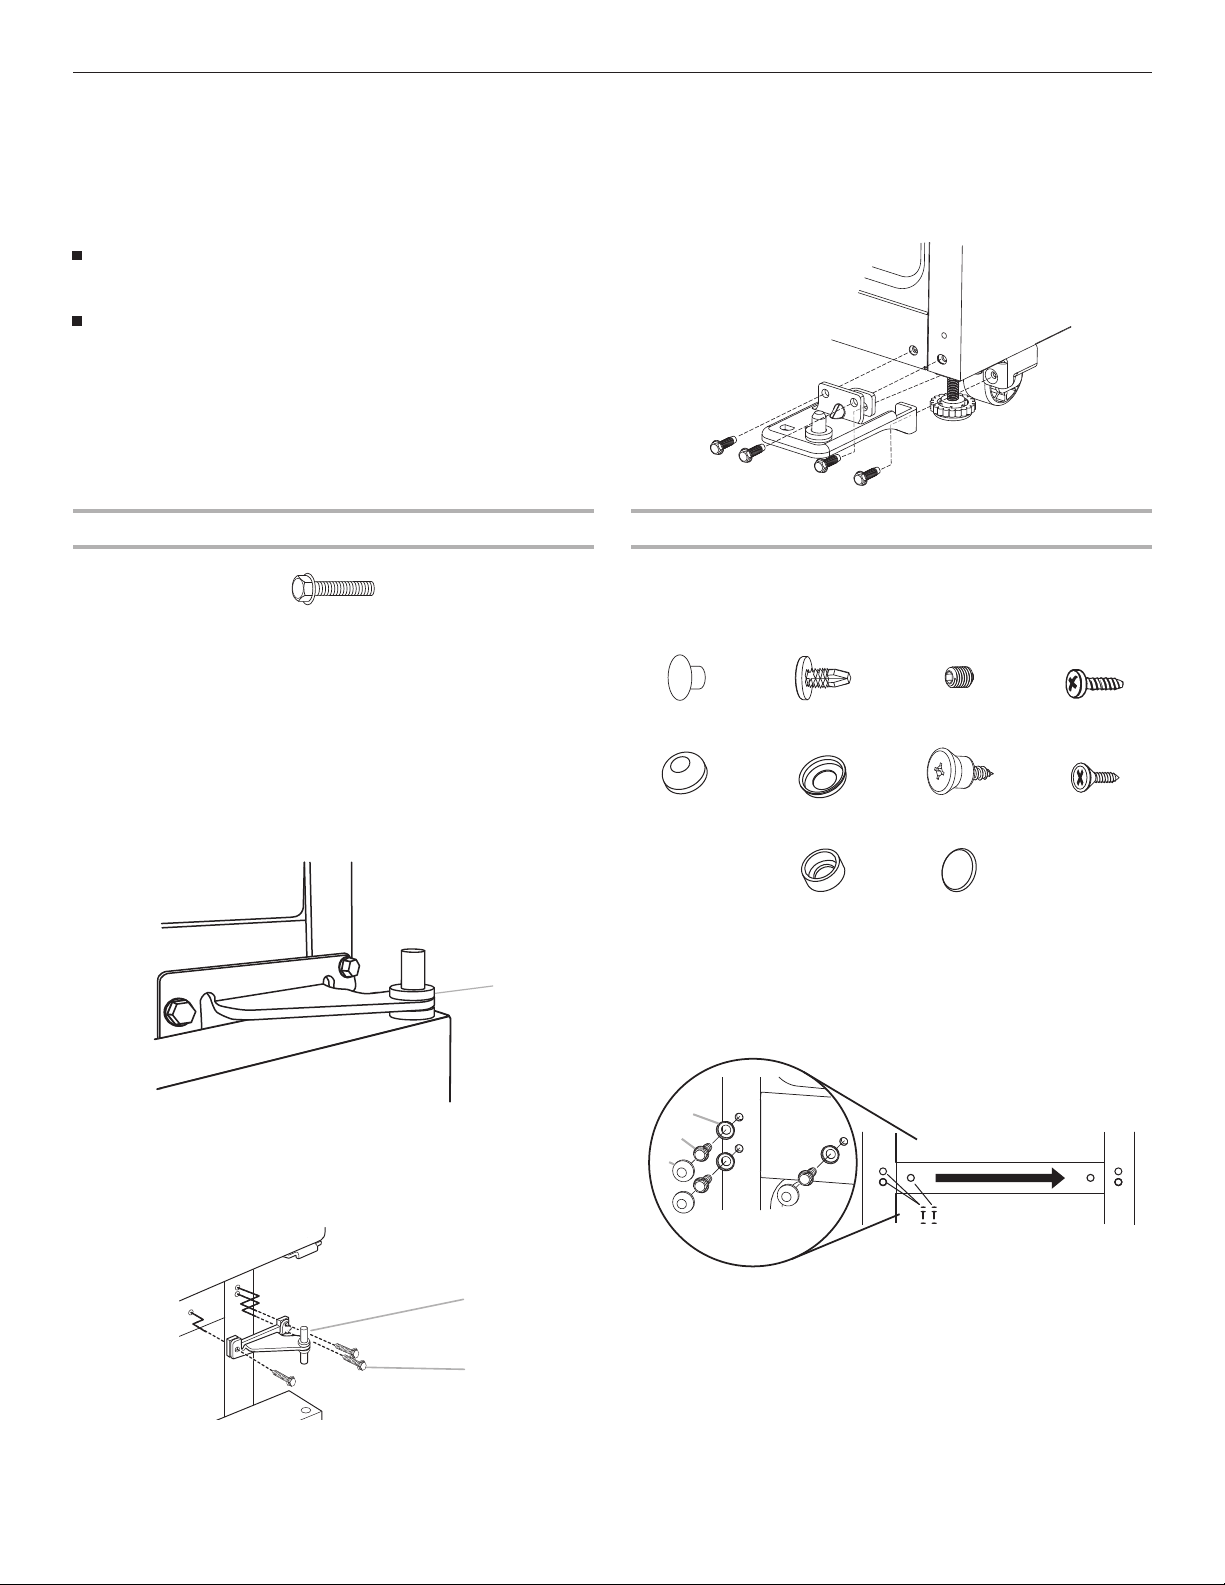
6
Refrigerator Doors
Dependingonthewidthofyourdoorway,youmayneedto
removethedoorstomovetherefrigeratorintoyourhome.Also,
thedoorhingesarefactoryinstalledontheright-handside.Ifyou
wantthedoortoopenfromtheotherdirection,youmustreverse
thedoorswing.
IMPORTANT:
Beforeyoubegin,turntherefrigeratorcontroloff,unplug
refrigeratorordisconnectpower.Removefoodandany
adjustabledoororutilitybinsfromdoors.
Dependingonyourmodel,yourrefrigeratorhaseither
Style1–ContourDoorsorStyle2–StandardDoors.Reference
thegraphicspecifictoyourmodellaterinthissection
following“FinalSteps.”
NOTE:AReversibilityKit,whichincludesanewBrandBadge
andholecovers,isavailable.
ToolsNeeded:⁵⁄₁₆"hex-headsocketwrench,#2phillips
screwdriver,flat-bladescrewdriver,⁵⁄₁₆"open-endwrench,flat
2"puttyknife
RemoveDoorsandHinges
⁵⁄₁₆
" Hex-head Hinge Screw
1.Unplugrefrigeratorordisconnectpower.
2.Usingahex-headsocketwrench,removethethree⁵⁄₁₆"
hex-headhingescrewsfromthetophingeandliftupto
removethehinge.SeeTopHingegraphic.
NOTE:Provideadditionalsupportforthedoorswhilethe
hingesarebeingmoved.Donotdependonthedoormagnets
toholdthedoorsinplacewhileyouareworking.
3.Liftthefreezerdooroffofthecenterhingeandsetitaside.
4.Removethewasherfromthetopofthecenterhingepin.
5.Usingahex-headsocketwrenchandanopen-endwrench,
removethethreescrewsfromthecenterhingeandremove
thehinge.Setaside.
6.Removethewasherfromthebott
omofthece
nterhingepin.
7.Lifttherefrigeratordoorfromthebottomhingeandsetaside.
8.Usingahex-headsocketwrench,removethefour⁵⁄₁₆"
hex-headhingescrewsfromthebottomhingeandpullthe
hingefromthebottomoftherefrigeratordoor.
ReverseDoorsandHinges(optional)
IMPORTANT:Ifyouwanttoreverseyourdoorssothattheyopen
intheoppositedirection,followthesesteps.Ifyouarenot
reversingthedoors,see“ReplaceDoorsandHinges.”
Seecompletegraphicslaterintheseinstructions.
ReverseCenterHinge
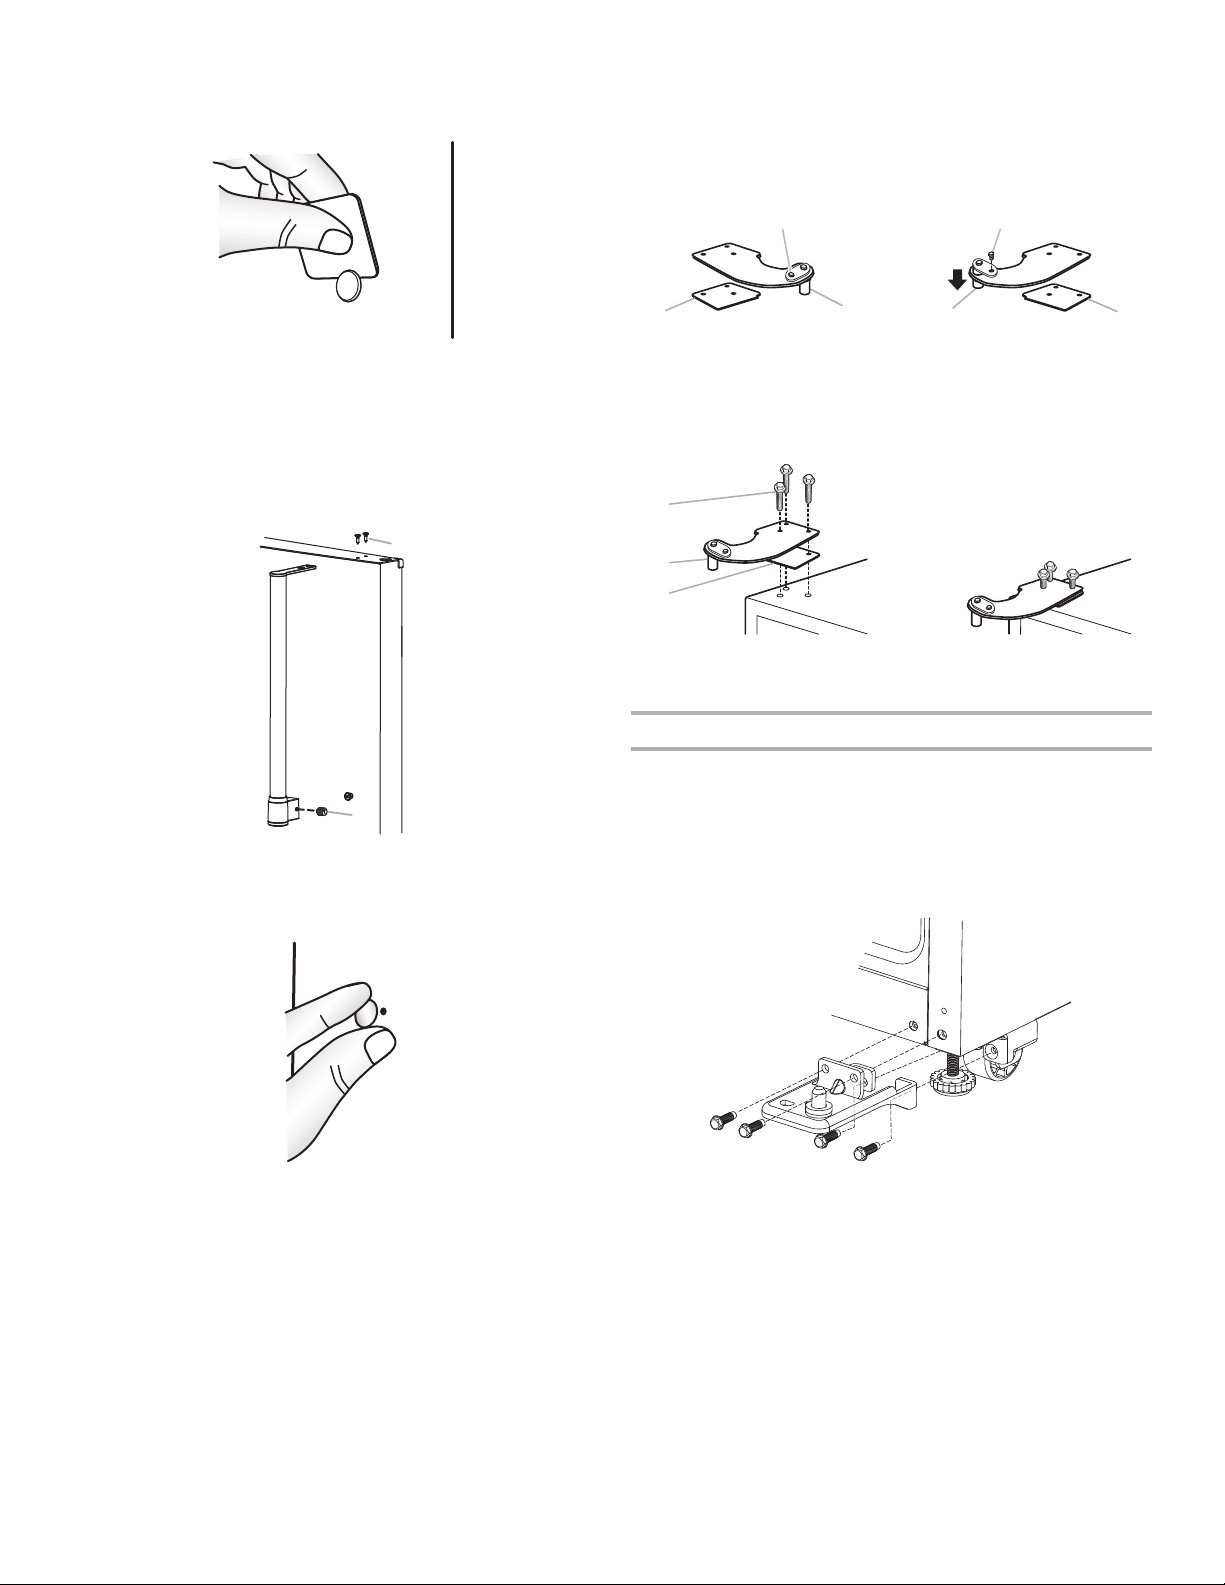
1.Removethethreedomecapsandscrewsfromthehandle
sideandusethemtofilltheholescreatedwhenthehinge
screwswereremoved.
2.Usingthethree⁵⁄₁₆"hex-headhingescrews,removedin
Step1,inserttwoscrewshalfwayintotheholes,leaving
spacetoinsertthecenterhinge.
3.Oncetherefrigeratordoorisinplace,slidethecenterhinge
fromtherightontothescrews,insertthethird
screw,andthen
tightenall
screwscompletely.
A. Washer
A. Center hinge
B.
⁵⁄₁₆
" hex-head hinge screws
A
A
B
A. Dome cap washers
B. Hex-head hinge screws
C. Dome caps
DoorHinge
HolePlug
CabinetHinge
HolePlug
DomeCap
DomeCap
Washer
Setscrew
Shoulder
Screw
Shoulder
ScrewWasher
DoorStop
Screw
Flat-Head
Handle
Screw
DoorHandle
HoleCap
A
B
C

7
NOTE:Makesurethewashersareinplaceonboththetop
andbottompinsofthecenterhinge.
ReverseFreezerDoor
1.Removethethreecabinetholeplugsfromthetopofthe
cabinetandplacetheminthehingeholesontheopposite
side.
2.Removethedoorhandles.
■ Removethetwoflat-headhandlescrewsfromthebottom
ofthefreezerdoorhandle.
■ Usingthe¹⁄₈"hexkey,loosenthesetscrewattachingthe
topofthehandle.
■ Pullthehandleawayfromthedoortoreleaseitfromthe
shoulderscrew.Keepallpartstogether.
3.Usingtheplastictool(provided),removethebrandbadge
fromthefreezerdoorbypryinguptheright-handsideand
slowlypeelingthebadgeawayfromthedoor,revealingthe
holetomountthedoorhandle.
NOTES:
■ Toavoidscratchingthefinish,donotuseasharpor
metallicobjecttoprythebrandbadgefromthedoor.
■ Rubasmallamountofliquiddishsoapoveranyadhesive
residuewithyourfingers.Rinsethedoorwithwarmwater
anddrywithasoftcloth.
4.Removetheshoulderscrewanditswasherfromtheleft-hand
sideofthedoorandfastenitintotheholethatwasbehindthe
brandbadge.
5.Removethedoorstopfromthebottomofthefreezerdoor.
6.Movethedoorstoptotheoppositeside,makingsurethatthe
holeinthedoorstopplateisalignedperfectlywiththeholefor
thecenterhingepin.
7.Usingthescrewremovedearlier,fastenthedoorstoptothe
bottomofthefreezerdoor.
8.Placethehandleontheshoulderscrewandpushthehandle
towardthedooruntilthemountingbaseisflushagainstthe
door.
9.Fastenthebottomofthehandletothebottomofthefreezer
door.
10.Tightenallscrews.Setasidethefreezerdooruntilthehinges
andrefrigeratordoorareinplace.
ReverseRefrigeratorDoor
1.Removethedoorstopfromthebottomoftherefrigerator
door.
2.Replacethedoorstopontheoppositesideoftherefrigerator
door,makingsurethattheholeinthedoorstopplateis
alignedperfectlywiththeholeforthebottomhingepin.
3.Fastenthedoorstoptothedoor.
4.Removethedoorhandles.
■ Removethescrewsfromthetopoftherefrigeratordoor
handle.
■ Removethesetscrewfromthelowerpartofthehandle.
■ Pullthehandleawayfromthedoortoreleaseitfromthe
shoulderscrew.Keepallpartstogether.
A.
⁵⁄₁₆
" Hex-head hinge screws
B. Washers
A. Cabinet hole plugs
A. Shoulder screw
B. Setscrew
C. Flat-head handle screws
A
A
B
A
B
A
C
A. Door stop screw
B. Door stop
A. Door stop screw
A. Door stop screw
B. Door stop
AB
A
AB
8
5.Removethecapcoveringtheholeontheoppositesideofthe
doorwheretherefrigeratordoorhandlewillbeinstalledand
discardthecap.
6.Removetheshoulderscrewanditswasherfromtheleft-hand
sideofthedoorandfastenitintotheholethatwasbehindthe
cap.
7.Placethehandleontheshoulderscrewandpushthehandle
towardthedooruntilthemountingbaseisflushagainstthe
door.
8.Fastenthetopoftherefrigeratorhandletothetopofthe
refrigeratordoor.
9.Covertheremainingholewiththecap(provided).
10.Removedoorhingeholeplugfromthe
refrigeratordoor.Move
tooppositeside.
11.Tightenallscrews.Setasiderefrigeratordooruntilbottom
hingeisinstalledontheoppositesideoftherefrigerator.
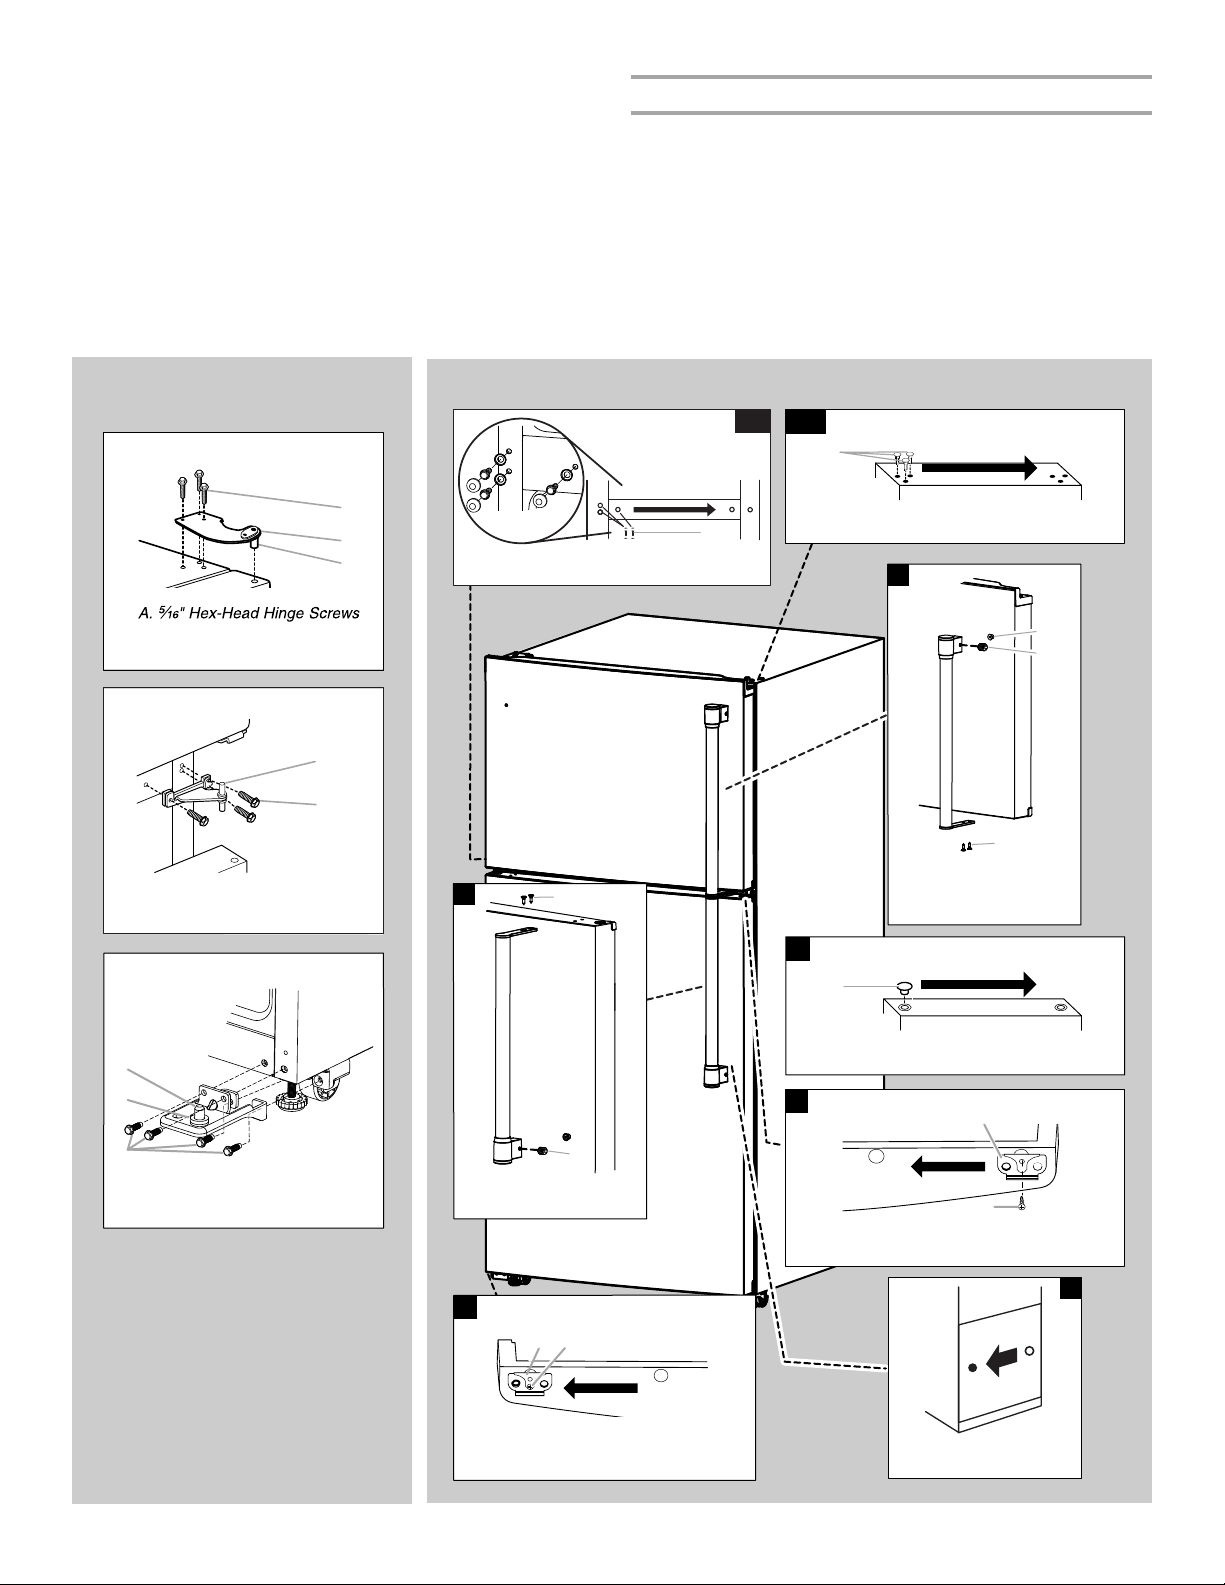
ReverseTopHinge-Contourdoormodelsonly
1.Removethescrewattachingthehingepintothehinge.Turn
thehingeoversothatitispointingintheoppositedirection.
2.Placetheplasticspacerbeneaththehingesothatitwillbe
betweenthehingeandthecabinet,makingsuretheholes
arealigned.
3.Fastenthetophingetotheoppositesideofthecabinet,
insertingthescrewsonlyhalfway,soyouwillbeableto
replacean
dalignthefreezerdoorlater.
ReplaceDoorsandHinges
IMPORTANT:Provideadditionalsupportforthedoorswhilethe
hingesarebeingmoved.Donotdependonthedoormagnetsto
holdthedoorsinplacewhileyouareworking.
InstallRefrigeratorDoor
1.Insertthehingepinintothebottomhingeoftherefrigerator
doorandfastenthehingetothecabinet.Donottighten
completely.
2.Placethewasherontopofthebottomhingepin.
3.Placetherefrigeratordoorontothebottomhingepin.
4.Measurethedistancefromthebottomoftherefrigeratordoor
tothefloor.Thedistanceshouldbeapproximately1⁴⁄₅"
(4.6cm).
NOTE:Ifnecessary,loosenthebottomhinge,without
removingthescrews,adjustthedoortothecorrectheightand
fullytightenthescrews.
A. Flat-head handle screws
B. Setscrew
A
B
A. Plastic spacer
B. Hinge pin screw
C. Hinge pin
A.
⁵⁄₁₆
" hex-head hinge screws
B. Top hinge pin
C. Plastic spacer
A. Bottom hinge
CCA
A
BB
C
B
A
9
InstallFreezerDoor
1.Placewasherontheupperhingepinofthecenterhinge.
2.Placethefreezerdoorontheupperhingepinofthecenter
hinge.
3.Insertthetophingepinintothedrilledholeinthetopofthe
freezerdoor.Donottightenthescrewscompletely.
4.Alignthedoorssothatthebottomofthefreezerdooraligns
evenlywiththetopoftherefrigeratordoor.Tightenallscrews.
NOTE:Thedistancebetweenthedoorsshouldbe
approximately³⁄₄"(19mm).
FinalSteps
1.Plugintherefrigeratororreconnectthepower.
2.Resetthecontrols.See“UsingtheControls.”
3.Returnallremovabledoorpartstodoorsandfoodto
refrigerator.
Style1–ContourDoor
Door Swing Reversal (optional)
4
1-2
A.DoorHingeHolePlug
3
A
A.DoorStop
B.DoorStopScrew
A
Removal of Door Stops
B
A.CabinetHingeHolePlugs
A
Door Removal &
Replacement
5
A.DoorStop
B.DoorStopScrew
B
A
Reinstallation of Door Stops
Center Hinge
Top Hinge
1-1
A.
5
/
16
"Hex-HeadHinge
Screws,
DomeCapsandDomeCapWashers
A
B.
5
/
16
"Hex-HeadHingeScrews
A.CenterHinge
A
B
B.TopHinge
C.HingePin
A
B
C
A.DoorHandle
HoleCap
7
A.BottomHinge
Bottom Hinge
B.Washer
C.
5
/
16
"Hex-HeadHingeScrews
A
B
C
A.Flat-HeadHandleScrew
B.Setscrew
6
A
A.ShoulderScrew
B.Setscrew
C.Flat-HeadHandleScrew
2
B
C
A
B

10
Style2–StandardDoors
Door Removal &
Replacement
Door Swing Reversal (optional)
A.DoorHingeHolePlug
A.DoorHandleSealingScrews
3
4
A
A
A.CabinetHingeHolePlugs
1-2
A
Top Hinge
B.
5
/
16
"Hex-HeadHingeScrews
C.TopHinge
B
C
A.TopHingeCover
A
A.DoorHandle
HoleCap
7
1-1
A.
5
/
16
"Hex-HeadHinge
Screws,
DomeCapsandDomeCapWashers
A
Center Hinge
B.
5
/
16
"Hex-HeadHingeScrews
A.CenterHinge
A
B
A.BottomHinge
Bottom Hinge
B.Washer
C.
5
/
16
"Hex-HeadHingeScrews
A
B
C
A.DoorStopScrew
B.
DoorStop
BA
5
SideView
FrontView
A.Flat-HeadHandleScrew
B.Setscrew
6
A
A.ShoulderScrew
B.Setscrew
C.Flat-HeadHandleScrew
2
B
B
C
A

11
Reversibility Kit Instructions
IfyourmodelcamewithaReversibilitykit,pleaseusetheBrand
BadgePlacementtemplateandthefollowinginstructionstoinstall
theBrandBadgeontheoppositesideofthefreezerdoor.
PartsIncluded:
Brandbadgeremovaltool
Brandbadgetemplate(onlastpageofUserInstructions)
Doorhandleholecap
ToolsNeeded:
Scissors
Maskingtape
FreezerDoor
1.Usingtheremovaltool(provided),removethebrandbadge
fromthefreezerdoorbyliftinguptheright-handsideand
peelingthebadgeawayfromthedoorfromrighttoleft.
NOTE:Toavoidscratchingthedoor,donotuseasharpor
metallicobjecttoprythebrandbadgefromthedoor.
2.Rubasmallamountofliquiddishsoapoveranyadhesive
residuewithyourfingers.Rinsethedoorwithwarmwaterand
drywithasoftcloth.
3.Cutthetemplatealongthedottedlinesthatmatchtheshape
ofthebrandbadge.
4.Aligntheedgesofthetemplatewiththesideandtopofthe
freezerdoorandtapethetemplatetothedoor.
NOTE:Whenthetemplateiscorrectlyaligned,theholeinthe
door,wherethehandlewas,willbewithinthecutoutofthe
template,asshown.
5.Usingthecutoutasaguide,pressthebrandbadgeontothe
freezerdoormakingsurethattheholeiscompletelycovered.
6.Slowlyremovethetemplate.
Adjust the Doors
IMPORTANT:YourrefrigeratorcomplieswithAmerican
DisabilitiesAct(ADA)guidelines.
DoorClosing
Yourrefrigeratorhastwofrontadjustablelevelers-oneonthe
rightandoneontheleft.Ifyourrefrigeratorseemsunsteadyor
youwantthedoorstocloseeasier,adjusttherefrigerator'stilt
usingthefollowinginstructions:
1.Turnthelevelertolowerorraisethatsideoftherefrigerator.It
maytakeseveralturnstoadjustthetiltoftherefrigerator.
■ Toraise,turnthelevelertotheright.
■ Tolower,turnthelevelertotheleft.
NOTE:Havingsomeonepushagainstthetopofthe
refrigeratortakessomeweightoffthelevelersandrollers
whichmakesiteasiertoadjust.
2.Openbothdoorsagaintomakesuretheycloseaseasilyas
youlike.Ifnot,tilttherefrigeratorslightlymoretotherearby
turningbothlevelinglegstotheleft;itmaytakeseveralmore
turns.
NOTE:Tokeeptherefrigeratorlevel,youshouldturnboth
levelinglegsthesameamount.
3.Usingalevel,besurethattherefrigeratorisstilllevelsideto
side.Readjustifnecessary.
DoorAligning
Ifthespacebetweenyourdoorslooksuneven,youcanadjustit
usingthefollowinginstructions:
1.Dependingonyourmodel,removethetophingecover.
2.Loosenthetophingescrewsusinga⁵⁄₁₆"socketorwrench.
3.Havesomeoneholdthedoorinplaceorputaspacerbetween
thedoorswhileyoutightenthetophingescrews.
4.Replacethetophingecover,ifremovedinStep1.
12
REFRIGERATOR USE
Using the Controls
Yourrefrigeratorhastwocontrolsthataffectthetemperature.The
Temperaturecontrolislocatedatthetopfrontoftherefrigerator
compartmentandtheAirflowcontrolislocatedonthebackwall
ofthefreezercompartment.
IMPORTANT:
Therecommendedsettingshouldbecorrectfornormal
householdrefrigeratoruse.Thecontrolsaresetcorrectly
whenmilkorjuiceisascoldasyoulikeandwhenicecream
isfirm.
Wait24hoursforyourrefrigeratortocoolcompletelybefore
addingfood.Ifyouaddfoodbeforetherefrigeratorhascooled
completely,yourfoodmayspoil.
NOTE:Adjustingtherefrigeratorandfreezertemperature
controlstoacolderthanrecommendedsettingwillnotcool
thecompartmentsanyfaster.
Ifthetemperatureistoowarmortoocoldintherefrigerator
orfreezer,firstchecktheairventstobesuretheyarenot
blockedbeforeadjustingthecontrols.
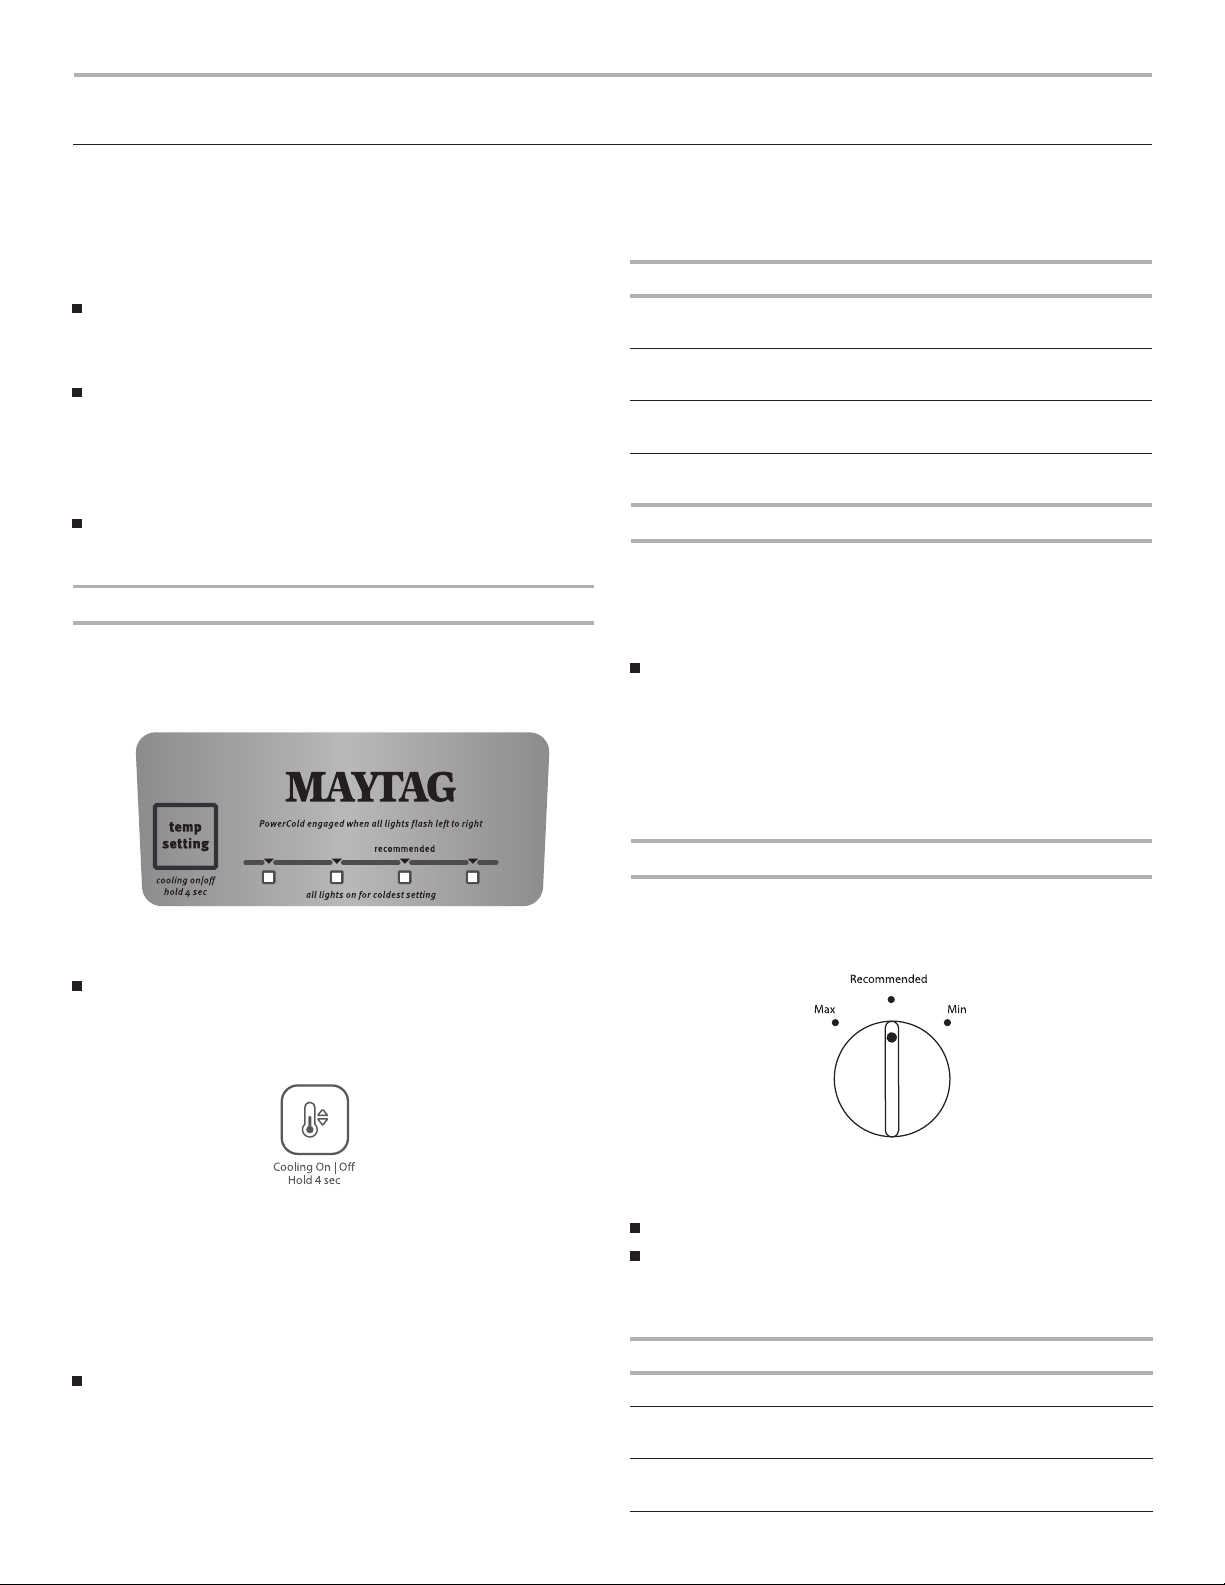
TemperatureControl
Foryourconvenience,thetemperaturecontrolispresetatthe
factory.Whenyoufirstinstallyourrefrigerator,makesurethe
controlisstillpresetasshown.
RecommendedSetting
CoolingOff/On
Toturncoolingoff,pressandholdTEMPSETTINGfor
4secondsuntilalllightsturnonfor1second.Toturncooling
backon,pressandholdTEMPSETTINGagainfor4seconds.
NOTE:Neithercompartmentwillcoolwhenthecontrolissetto
OFF.
AdjustingtheTemperatureControl
Ifyouneedtoadjustthetemperatureineithertherefrigeratoror
freezercompartment,usethesettingslistedinthefollowingchart
asaguide.
NOTE:Exceptwhenstartingtherefrigerator,donotadjustthe
controlmorethanonesettingatatime.Wait24hoursbetween
adjustmentsforthetemperaturetostabilize.
PressTEMPSETTINGtotogglebetweenthefourLEDlights
whichindicatethetemperaturesetting.Readingfromleftto
right,theLEDinthefirstpositionistheleastcold.TheLEDs
indicateincreasinglycoldersettingsasyoucontinuetothe
rightuntilallfourLEDsareilluminated.
NOTE:Forthefirsttofourthsetting,onlyoneLEDofthefour
LEDswillbelit.AllfourLEDswillbelitwhenyouhave
reachedthecoldestsetting.
AdditionalFeature
PowerColdFeature
ThePowerColdfeaturesetsthefreezerandrefrigeratortothe
lowesttemperaturesettingstoassistwithperiodsofhigh
refrigeratoruse,fullgroceryloads,ortemporarilywarmroom
temperatures.
ToturnonthePowerColdfeature,pressTEMPSETTING
continuallyuntilalltheLEDlightsareblinkingon/off
progressivelyfromlefttoright.PressTEMPSETTINGagainto
returntotheCOLDsetpoint.
NOTE:Dependingontheenvironmentconditions,the
PowerColdfeaturewillremainactivatedupto24hours.When
thefeatureturnsoff,thetemperaturewillreturntothe
recommendedsetpoint.
AirflowControl
TheAirflowcontrolregulatestheamountofairflowingbetween
thefreezerandtherefrigeratorcompartments.
Whenyouplugintherefrigeratorforthefirsttime,turntheAirflow
controltotheRecommendedsetting.
AdjustingtheAirflowControl
Ifyouwanttotemporarilyincreasethecoldairflowtoaspecific
compartment,adjustthecontrol.
Max-Increaseairflowtothefreezer.
Min-Increaseairflowtotherefrigerator.
IMPORTANT:Oncetheperformanceisachieved,returnthe
AirflowcontroltotheRecommendedsettingtokeepthe
refrigeratoroperatingatoptimumefficiency.
CONDITION/REASON:ADJUSTMENT:
REFRIGERATORtoowarmTEMPSETTINGcontrolone
settinghigher
FREE
ZERtoo
warm/
T
oolittleice
AIRFLOWorTEMPSETTING
controlonesettinghigher
REFRIGERATORtoocoldTEMPSETTINGcontrolone
settinglower
FREEZERtoocoldAIRFLOWorTEMPSETTING
controlonesettinglower
CONDITION/REASON:ADJUSTMENT:
HeavyiceuseMax
HotroomtemperatureMax-tomaintainice-making
productionrate
LargequantityofgroceriesMin-toquicklychillfoodand
beverages
®
®
®
®
13
REFRIGERATOR FEATURES
Yourmodelmayhavesomeorallofthesefeatures.
Refrigerator Shelves
Theshelvesinyourrefrigeratorareadjustabletomatchyour
individualstorageneeds.
Storingsimilarfooditemstogetherinyourrefrigeratorand
adjustingtheshelvestofitdifferentheightsofitemswillmake
findingtheexactitemyouwanteasier.Itwillalsoreducethe
amountoftimetherefrigeratordoorisopen,andsaveenergy.
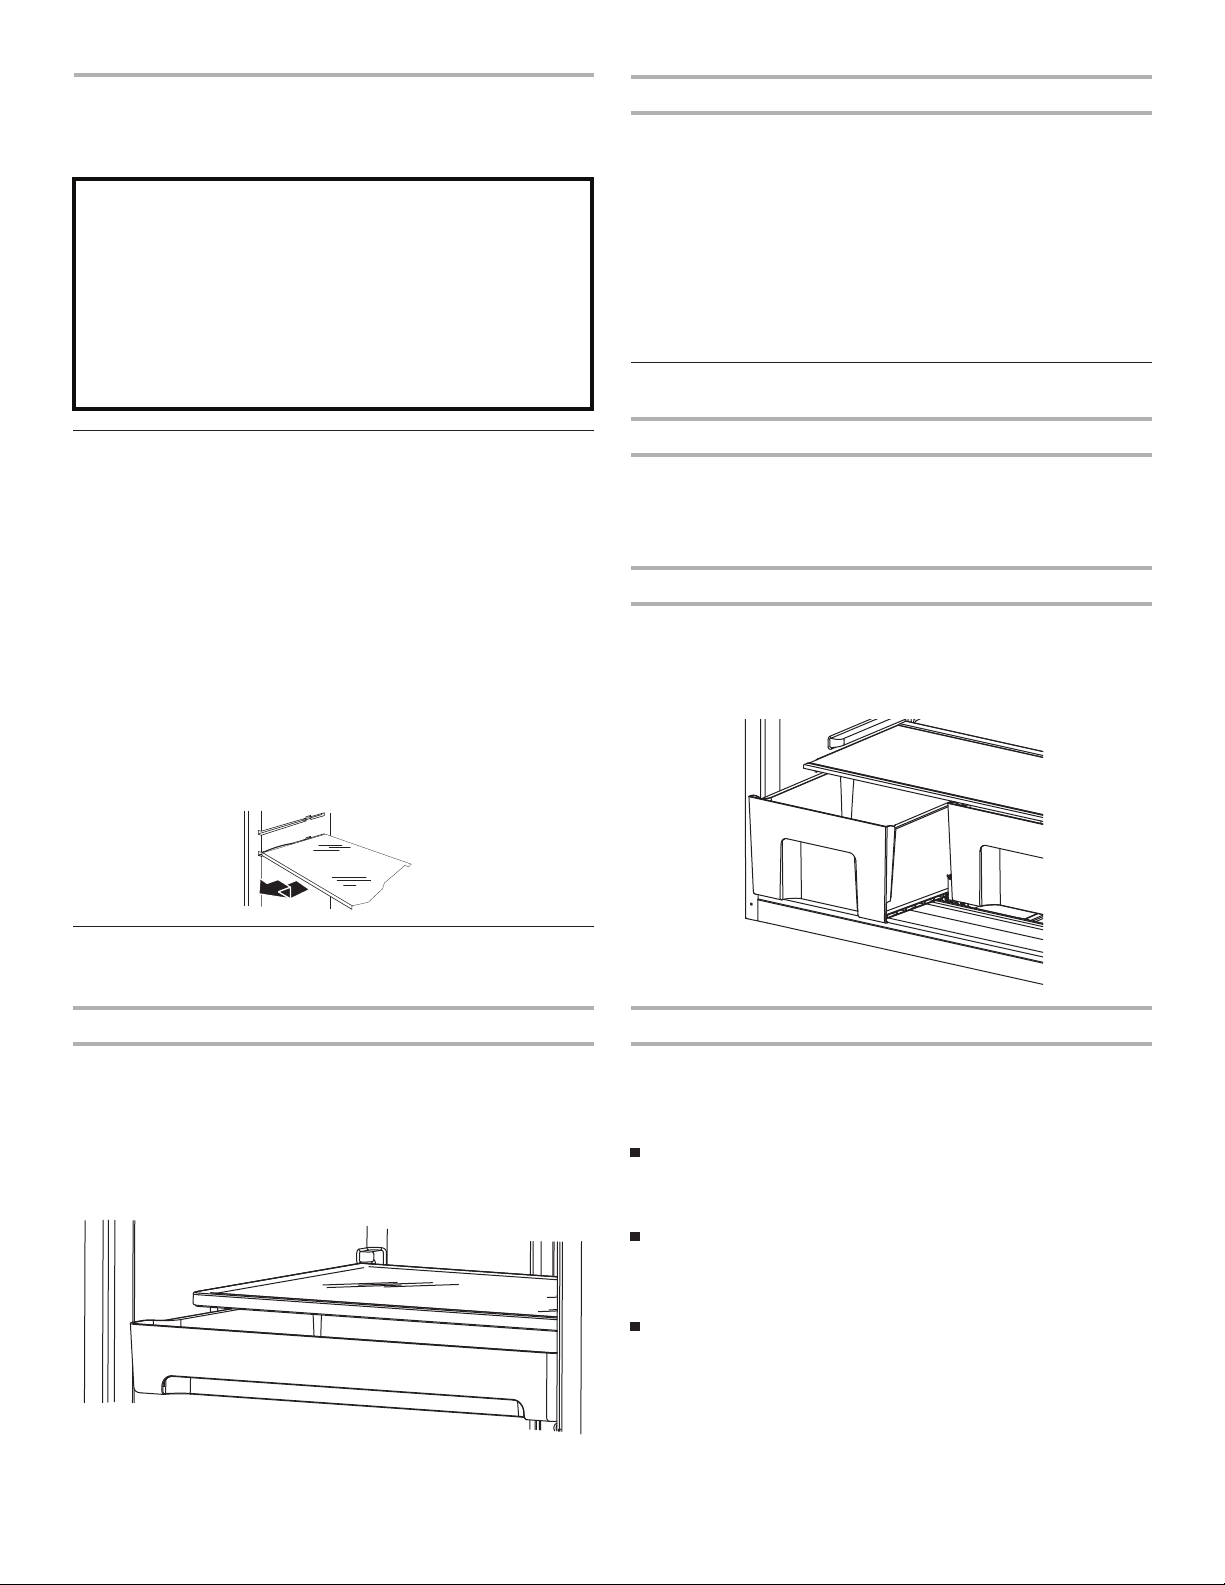
Toremoveandreplaceashelf:
1.Removeitemsfromtheshelf.
2.Slidetheshelfstraightouttothestop.
3.Dependingonyourmodel,liftbackorfrontoftheshelfpast
thestop.Slideshelfouttherestoftheway.
4.Replacetheshelfbyslidingthebackoftheshelfintothe
track
inthewallof
thecabinet.
5.Guidethefrontoftheshelfintotheshelftrack.Besuretoslide
theshelfinalltheway.
Deli Drawer
Thedelidrawerdesignallowsflexiblepositioning.
DeliDrawer
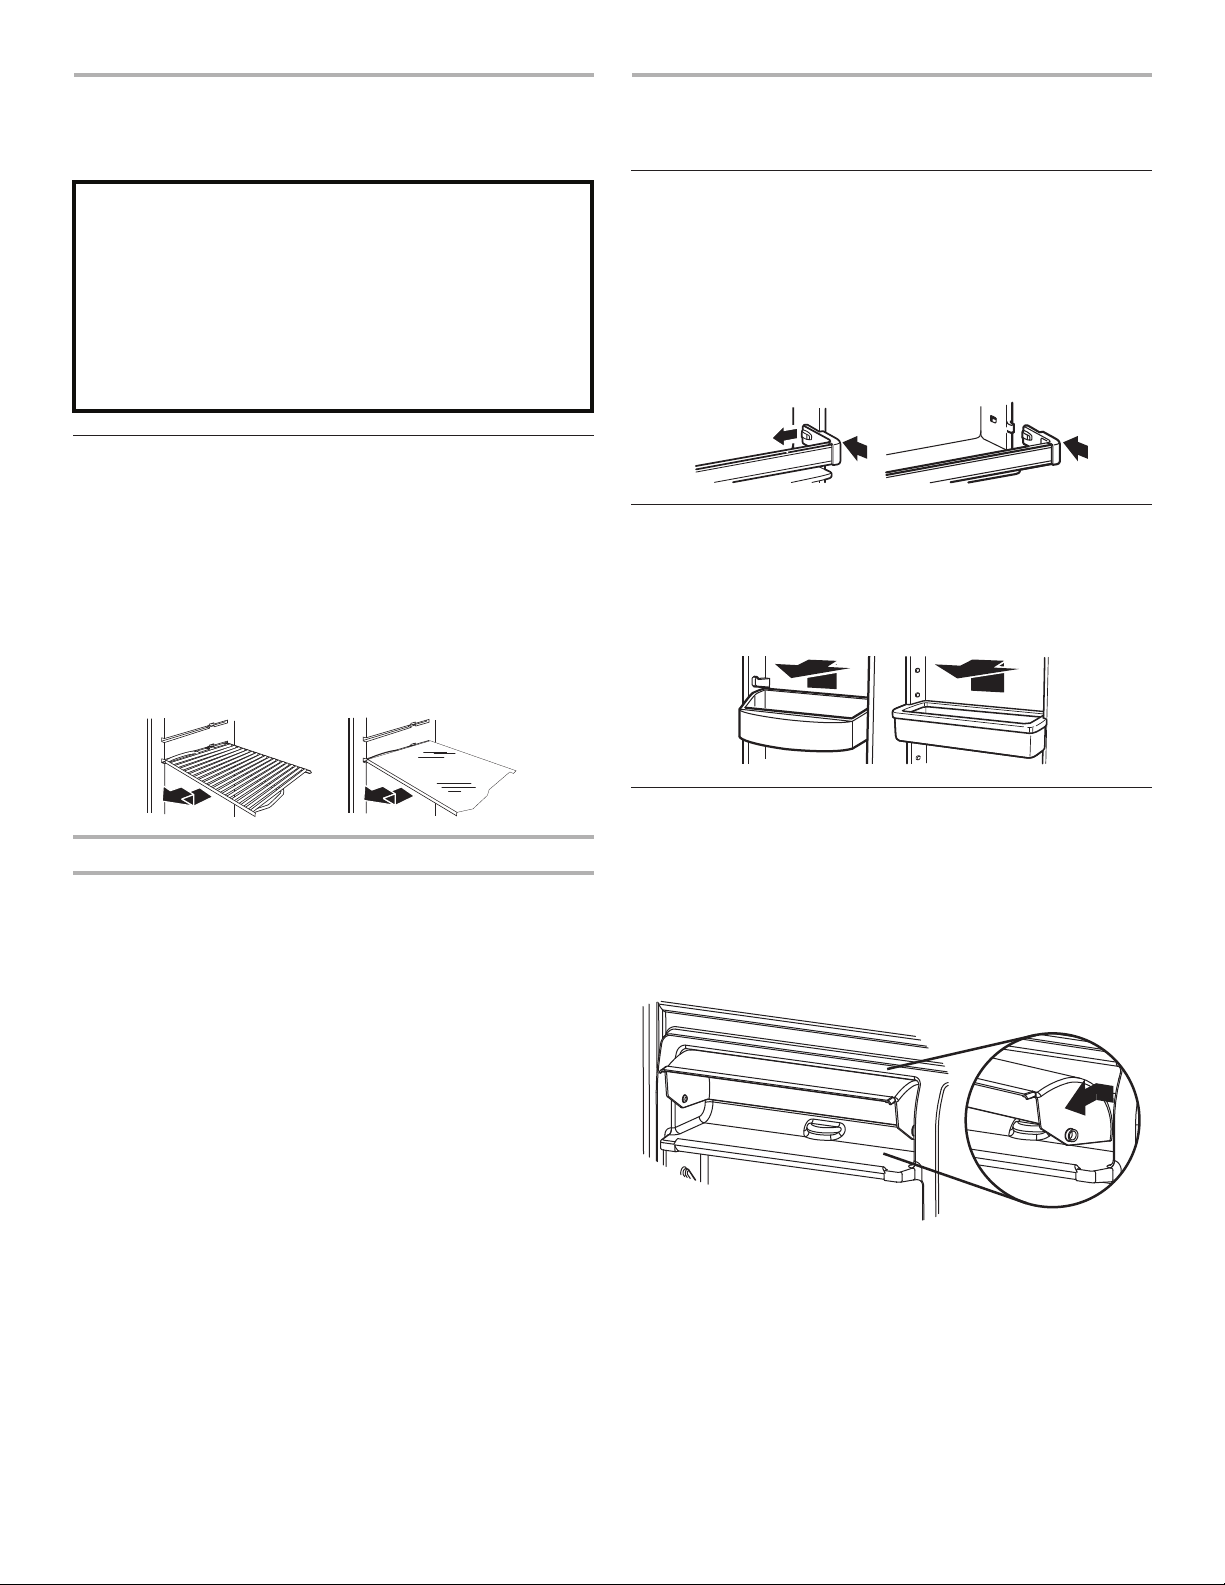
Toremoveandreplacethedelidrawer:
1.Slidedelidrawerouttothestop.
2.Liftfrontofdelidrawerwithonehandwhilesupportingbottom
ofdrawerwithotherhand.Slidedrawerouttherestofthe
way.
3.Replacethedrawerbyslidingitbackinfullypastthedrawer
stop.
MeatStorageGuide
Storemostmeatinoriginalwrappingaslongasitisairtightand
moisture-proof.Rewrapifnecessary.Seethefollowingchartfor
storagetimes.Whenstoringmeatlongerthanthetimesgiven,
freezethemeat.
Freshfishorshellfish.........................Usesamedayaspurchased
Chicken,groundbeef,varietymeats(liver)......................1-2days
Coldcuts,steaks/roasts..................................................3-5days
Curedmeats...................................................................7-10days
Leftovers-Coverleftoversw
ithplasticwrap,a
luminumfoil,or
plasticcontainerswithtightlids.
Crisper
CrisperDrawers
Toremoveandreplacethecrisperdrawer:
1.Slidethecrisperdrawerstraightouttothestop.Liftthefront
andslidethedrawerouttherestoftheway.
2.Replacethedrawerbyslidingthedrawerinfullypastthestop.
CrisperCover
Toremoveandreplacethecrispercover:
1.Removethecrisper(s).
2.Pulltheglassstraightout.
3.Replacetheglassbypushingitstraightin.
CrisperHumidityControl
Youcancontroltheamountofhumidityinthemoisture-sealed
crisper.AdjustthecontroltoLOWorHIGH.
LOW(open)letsmoistairoutofthecrisperforbeststorageof
fruitsandvegetableswithskins.
Fruit:Wash,letdry,andstoreinrefrigeratorinplasticbagor
crisper.Donotwashorhullberriesuntiltheyarereadytouse.
Sortandkeepberriesinoriginalcontainerincrisperorstorein
alooselyclosedpaperbagonarefrigeratorshelf.
Vegetableswithskins:Placeinplasticbagorplasticcontainer
andstoreincrisper.
HIGH(closed)keepsmoistairinthecrisperforbeststorageof
fresh,leafyvegetables.
Leafyvegetables:Washincoldwater,drain,andtrimortearoff
bruisedanddiscoloredareas.Placeinplasticbagorplastic
containerandstoreincrisper.
Important information to know about glass shelves
and covers:
Donotcleanglassshelvesorcoverswithwarmwaterwhen
theyarecold.Shelvesandcoversmaybreakifexposedto
suddentemperaturechangesorimpact,suchasbumping.
Temperedglassisdesignedtoshatterintomanysmall,
pebble-sizepieces.Thisisnormal.Glassshelvesandcovers
areheavy.Usebothhandswhenremovingthemtoavoid
dropping.
14
FREEZER FEATURES
Yourmodelmayhavesomeorallofthesefeatures.
Freezer Shelf
Dependingonyourmodel,theshelfmaybewireorglass.
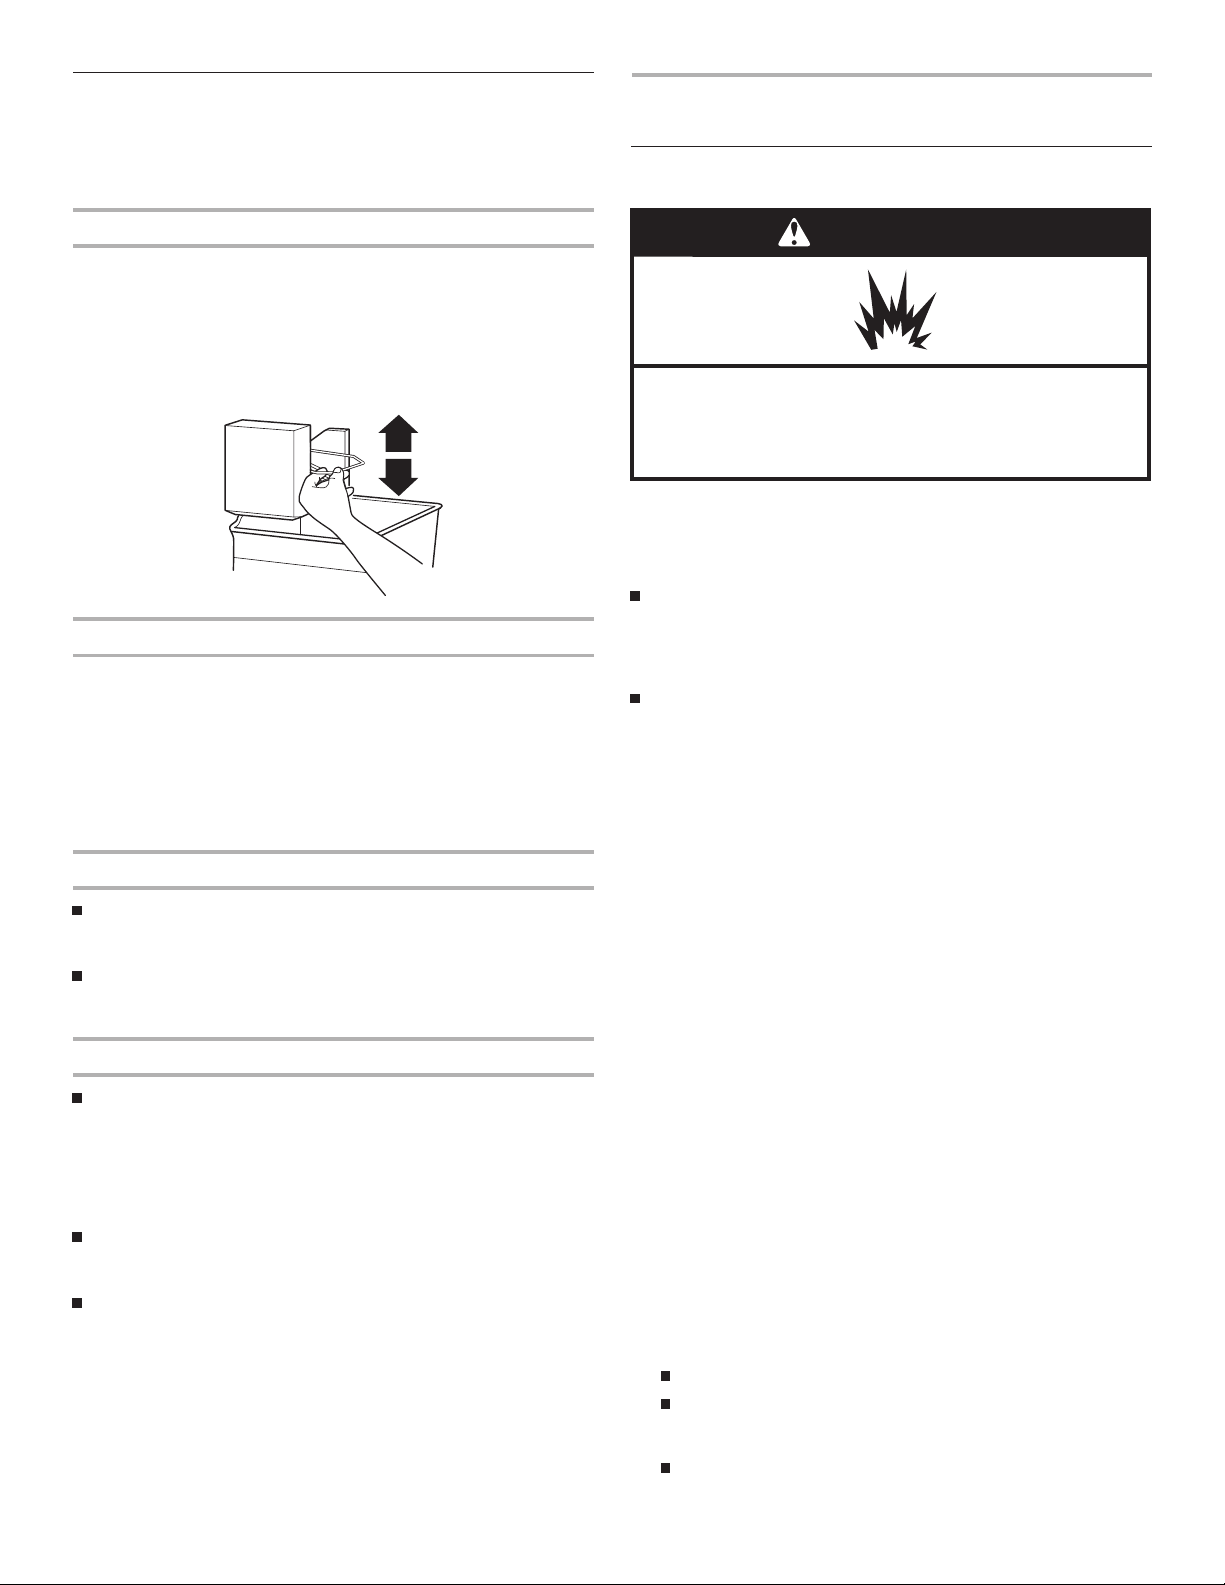
Toremoveandreplaceashelf:
1.Removeitemsfromtheshelf.
2.Slidetheshelfstraightouttothestop.
3.Dependingonyourmodel,liftbackorfrontoftheshelfpast
thestop.Slideshelfouttherestoftheway.
4.Replacetheshelfbyslidingthebackoftheshelfintothetrack
inthewallofthecabinet.
5.Guidethefrontoftheshelfintotheshelftrack.Besuretoslide
theshelfinalltheway.
FrozenFoodStorageGuide
Storagetimeswillvaryaccordingtothequalityandtypeoffood,
thetypeofpackagingorwrapused(shouldbeairtightand
moisture-proof),andthestoragetemperature.Sealthepackage
orcontainersecurelytoavoidtasteandodortransferthroughout
theproduct.Icecrystalsinsideasealedpackagearenormal.This
simplymeansthatmoistureinthefoodandairinsidethepackage
havecondensed,creatingicecrystals.
Putnomoreunfrozenfoodintothefreezerthanwillfreezewithin
24hours(nomorethan2to3lbsoffoodpercubicfoot[907to
1,350gperL]offreezerspace).Leaveenoughspaceinthe
freezerforairtocirculatearoundpackages.Thefreezerdoormust
closetightl
y.
NOTE:Formor
einformationonpreparingfoodforfreezing,check
afreezerguideorreliablecookbook.
DOOR FEATURES
Yourmodelmayhavesomeorallofthesefeatures.
Door Rails
Thedoorrailsmayberemovedforeasiercleaning.
Toremoveandreplacetherails:
1.Dependingonyourmodel,removetherailsbypushingin
slightlyonthefrontofthebracketwhilepullingoutonthe
insidetab.Repeatthesestepsfortheotherend.
2.Replacetherailsbyaligningtheendsofthebracketswiththe
buttonsonthesidesofthedoorliner.Firmlysnapbracketand
assemblyontothetabsabovetheshelfasshown.
Door Bins
Toremoveandreplacethebins:
1.Removethebinbyliftingitandpullingitstraightout.
2.Replacethebinbyslidingitinabovethedesiredsupportand
pushingitdownuntilitstops.
Utility Compartment
Theutilitycompartmentmayberemovedforeasiercleaning.
Toremoveandreplacetheutilitycompartment:
1.Removetheutilitycompartmentbysqueezingagainstone
sidewhileraisingtheutilitycompartmentupandpullingit
straightout.
2.Replacetheutilitycompartmentbypositioningonesideinthe
lockandslidingintheoppositesideuntilitstops.
Important information to know about glass shelves
and covers:
Donotcleanglassshelvesorcoverswithwarmwaterwhen
theyarecold.Shelvesandcoversmaybreakifexposedto
suddentemperaturechangesorimpact,suchasbumping.
Temperedglassisdesignedtoshatterintomanysmall,
pebble-sizepieces.Thisisnormal.Glassshelvesandcovers
areheavy.Usebothhandswhenremovingthemtoavoid
dropping.
15
Ice Maker
IMPORTANT:Formodelswithawaterfilter,afterconnectingthe
refrigeratortoawatersourceorreplacingthewaterfilter,filland
discardthreefullcontainersoficetopreparethewaterfilterfor
use.
TurningtheIceMakerOn/Off
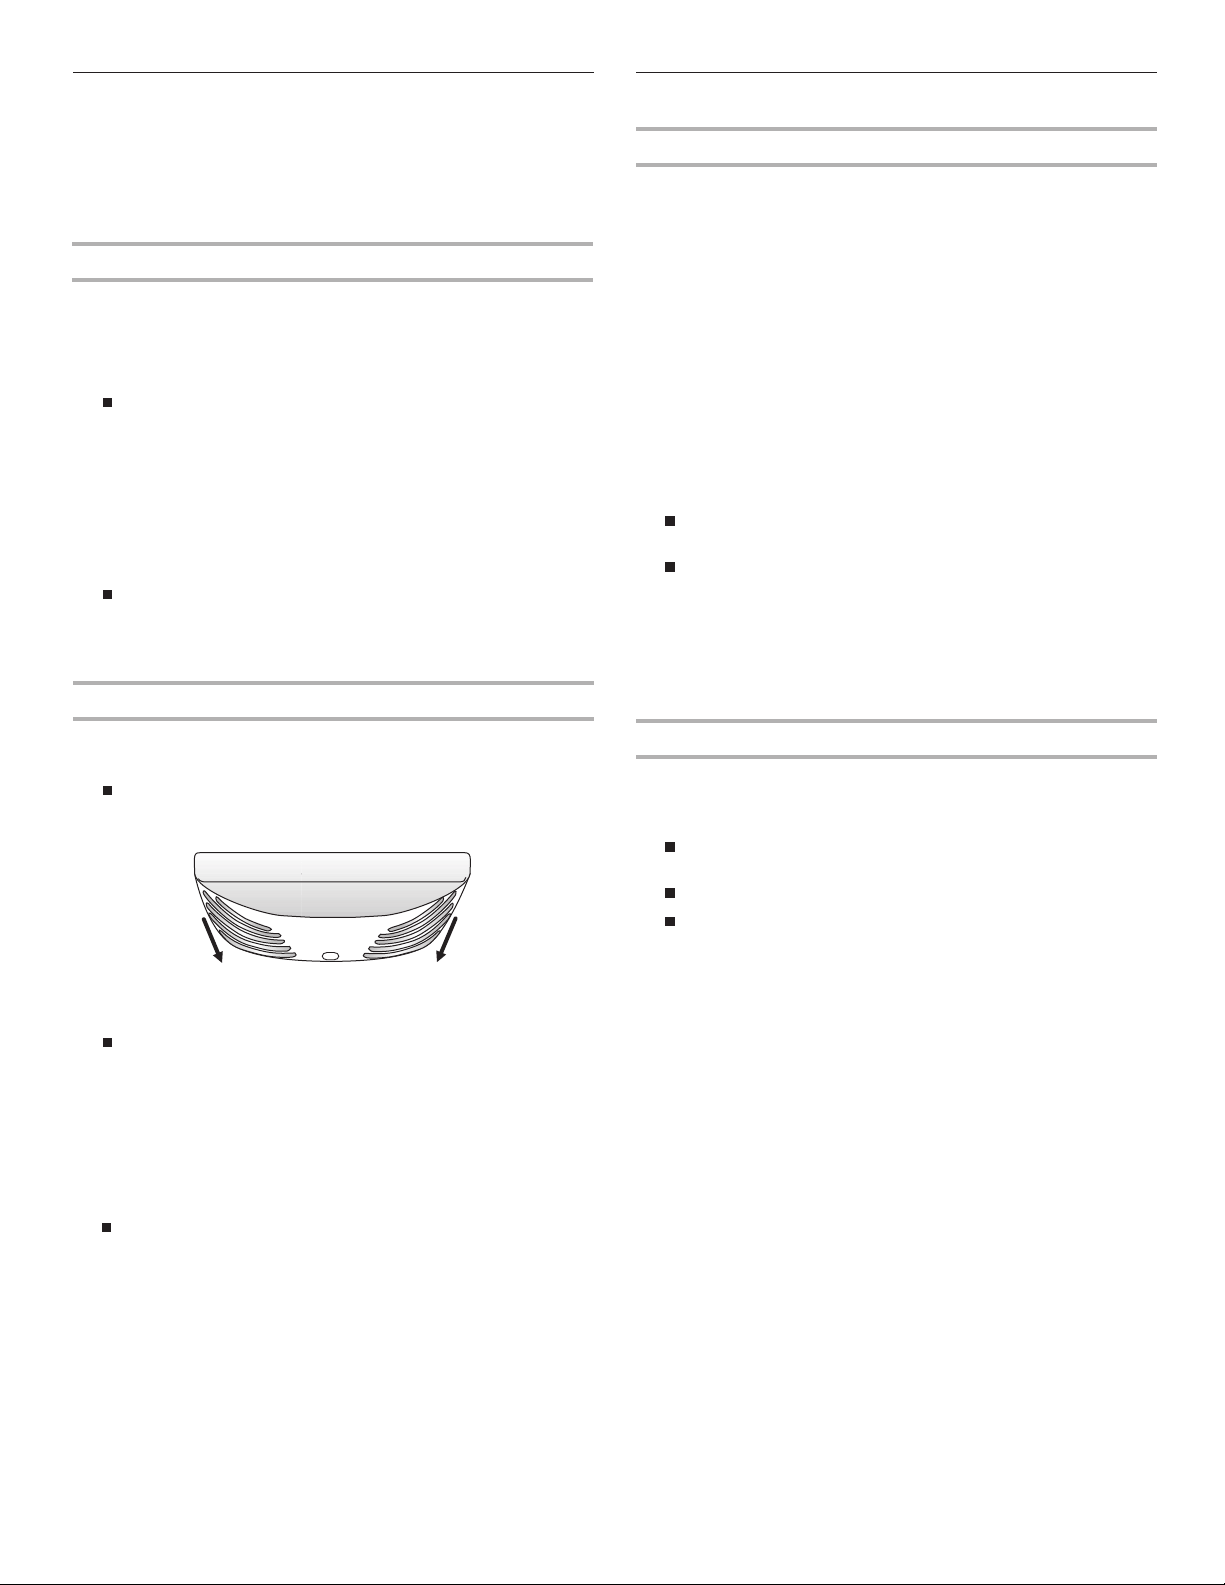
Toturntheicemakeron,simplylowerthewireshut-offarm.
Tomanuallyturntheicemakeroff,liftthewireshut-offarmtothe
Off(armup)positionandlistenfortheclick.
NOTE:Youricemakerhasanautomaticshutoff.Asiceismade,
theicecubeswillfilltheicestoragebinandtheicecubeswill
raisethewireshut-offarmtotheOff(armup)position.Donot
forcethewireshut-offarmupordown.
IceStorageBin
1.Washtheicestoragebinwithmildsoapandwarmwater.
2.Slidetheicestoragebinundertheicemakerandpushit
towardthebackasfarasitwillgo.
3.Lowerthearmontheicemakertothe“On”position.
NOTE:Itusuallytakesapproximately24hoursfortheice
makertobeginproducingice.Youmaynoticetheicehas
an“off-taste.”Ifso,discardthefirstthreebatchesofice
produced.Afterthatthe“off-taste”shouldbegone.
IceProductionRate
Theicemakershouldproduceapproximately8to12batches
oficeina24-hourperiod.Allow3daystocompletelyfillthe
icecontainer.
Toincreaseiceproduction,lowerthefreezerandrefrigerator
temperatures.See“UsingtheControls.”Wait24hours
betweenadjustments.
Remember
Thequalityofyouricewillbeonlyasgoodasthequalityofthe
watersuppliedtoyouricemaker.Avoidconnectingtheice
makertoasoftenedwatersupply.Watersoftenerchemicals
(suchassalt)candamagepartsoftheicemakerandleadto
poorqualityice.Ifasoftenedwatersupplycannotbeavoided,
makesurethewatersoftenerisoperatingproperlyandiswell
maintained.
Donotuseanythingsharptobreakuptheiceinthebin.This
cancausedamagetotheicestoragebinandthedispenser
mechanism.
Donotstoreanythingontopoforintheicemakerorice
storagebin.
REFRIGERATOR CARE
Cleaning
Boththerefrigeratorandfreezersectionsdefrostautomatically.
However,cleanbothsectionsaboutonceamonthtoavoid
buildupofodors.Wipeupspillsimmediately.
IMPORTANT:
Becauseaircirculatesbetweenbothsections,anyodors
formedinonesectionwilltransfertotheother.Youmust
thoroughlycleanbothsectionstoeliminateodors.Toavoid
odortransferanddryingoutoffood,wraporcoverfoods
tightly.
Forstainlesssteelmodels,stainlesssteeliscorrosion-
resistantandnotcorrosion-proof.Tohelpavoidcorrosionof
yourstainlesssteel,keepyoursurfacescleanbyusingthe
followingcleaninginstructions.
ToCleanYourRefrigerator:
NOTE:Donotuseabrasiveorharshcleanerssuchaswindow
sprays,scouringcleansers,flammablefluids,muriaticacid,
cleaningwaxes,concentrateddetergents,bleaches,orcleansers
containingpetroleumproductsonexteriorsurfaces(doorsand
cabinet),plasticparts,interioranddoorliners,orgaskets.Donot
usepapertowels,scouringpads,orotherharshcleaningtools.
1.Unplugrefrigeratorordisconnectpower.
2.Handwash,rinse,anddryremovablepartsandinterior
surfacesthoroughly.Useacleanspongeorsoftclothanda
milddetergentinwarmwater.
3.Cleantheexteriorsurfaces.
Paintedmetal:Washpaintedmetalexteriorswithaclean,
softclothorspongeandamilddetergentinwarmwater.
Rinsesurfaceswithclean,warmwateranddryimmediatelyto
avoidwaterspots.
Stainlesssteel:Washstainlesssteelsurfaceswithaclean,
softclothorspongeandamilddetergentinwarmwater.
Rinsesurfaceswithclean,warmwateranddryimmediatelyto
avoidwaterspots.
NOTE:Whencleaningstainlesssteel,alwayswipeinthe
directionofthegraintoavoidcross-grainscratching.
4.Thereisnoneedforroutinecondensercleaninginnormal
homeoperatingenvironments.Iftheenvironmentis
particularlygreasyordustyorthereissignificantpettraffic
inthehome,thecondensershouldbecleanedevery2to
3monthstoensuremaximumefficiency.
Ifyouneedtocleanthecondenser:
Removethebasegrille.
Useavacuumcleanerwithasoftbrushtocleanthegrille,
theopenareasbehindthegrille,andthefrontsurfacearea
ofthecondenser.
Replacethebasegrillewhenfinished.
5.Pluginrefrigeratororreconnectpower.
WARNING
Explosion Hazard
Use nonflammable cleaner.
Failure to do so can result in death, explosion, or fire.
16
bluB thgiL eht gnignahC
Freezer Compartment Light
1. Unplug refrigerator or disconnect power.
2. Remove the light shield (on some models).
Top of the freezer compartment - Slide the light shield
toward the back of the compartment to release it from the
light assembly.
3. Remove the light bulb and replace it with an appliance bulb of
the same size and shape.
To replace an LED light bulb in the freezer compartment,
order part number W10565137 (3.6 watts).
NOTE: Some LED replacement bulbs are not
recommended for wet/damp environments. The
refrigerator and freezer compartments are considered to
be wet/damp environments. If using a brand of LED bulb
other than the recommended LED bulb, before
installation, read and follow all instructions on the LED
packaging.
If an incandescent bulb is used to replace an LED bulb,
use only incandescent bulbs for household appliances
with a maximum of 25 watts.
4. Replace the light shield.
5. Plug in refrigerator or reconnect power.
Vacation and Moving Care
Vacations
If You Choose to Leave the Refrigerator On While You’re
Away:
1. Use up any perishables and freeze other items.
2. If your refrigerator has an automatic ice maker and is
connected to the household water supply, turn off the water
supply to the refrigerator. Property damage can occur if the
water supply is not turned off.
3. If you have an automatic ice maker, turn off the ice maker.
NOTE: o thet mra ffo-tuhs eriw eht esiaR tisop )pu( ffO ion.
4. Empty the ice bin.
If You Choose to Turn Off the Refrigerator Before You
Leave:
1. Remove all food from the refrigerator.
2. If your refrigerator has an automatic ice maker:
Turn off the water supply to the ice maker at least one day
ahead of time.
When the last load of ice drops, raise the wire shut-off arm
to the Off (up) position.
3. Turn off the Temperature controls. See “Using the Controls.”
4. Clean refrigerator, wipe it, and dry well.
5. Tape rubber or wood blocks to the tops of both doors to prop
them open far enough for air to get in. This stops odor and
mold from building up.
Moving
When you are moving your refrigerator to a new home, follow
these steps to prepare it for the move.
1. If your refrigerator has an automatic ice maker:
Turn off the water supply to the ice maker at least one day
ahead of time.
Disconnect the water line from the back of the refrigerator.
When the last load of ice drops, raise the wire shut-off arm
to the Off (up) position.
2. Remove all food from the refrigerator and pack all frozen food
in dry ice.
3. Empty the ice bin.
4. Turn off the Temperature controls. See “Using the Controls.”
5. Unplug refrigerator.
6. Clean, wipe, and dry thoroughly.
7. Take out all removable parts, wrap them well, and tape them
together so they don’t shift and rattle during the move.
8. Depending on the model, raise the front of the refrigerator so it
rolls more easily OR raise the leveling screws so they don't
scrape the floor. See “Adjust the Door(s)” or “Door Closing
and Door Alignment.”
9
. Tape the doors closed and tape the power cord to the back of
the refrigerator.
When you get to your new home, put everything back and refer to
the “Installation Instructions” section for preparation instructions.
Also, if your refrigerator has an automatic ice maker, remember to
reconnect the water supply to the refrigerator.
NOTE: Applies to some models.
IMPORTANT: The light bulbs in both the refrigerator and freezer
compartments of your new refrigerator use LED technology. If the
lights do not illuminate when the refrigerator and/or freezer door is
opened, call for assistance or service.
1. Unplug refrigerator or disconnect power.
2. Remove the light bulb and replace it with an appliance bulb
of the same size and shape.
3. Plug in refrigerator or reconnect power.
To replace the LED bulb with an LED bulb, order part
number W10716219 (4 watts).
NOTE: Some LED replacement bulbs are not
recommended for wet/damp environments. The
refrigerator and freezer compartments are considered to
be wet/damp environments. If using a brand of LED bulb
other than the recommended LED bulb, before
installation, read and follow all instructions on the LED
packaging.
To replace an LED bulb with an incandescent bulb, use
only incandescent bulbs for household appliances with
a maximum of 60 watts.
Refrigerator Compartment Light
The refrigerator light bulb is located behind the control.
17
TROUBLESHOOTING
First try the solutions suggested here. If you need further assistance or more recommendations that may help you avoid a service call,
refer to the warranty page in this manual and scan the code with your mobile device, or visit www.maytag.com/product_help.
In Canada, visit www.maytag.ca.
Contact us by mail with any questions or concerns at the address below:
In the U.S.A.:
Maytag Brand Home Appliances
Customer eXperience Center
553 Benson Road
Benton Harbor, MI 49022-2692
In Canada:
Maytag Brand Home Appliances
Customer eXperience Centre
200 – 6750 Century Ave.
Mississauga, Ontario L5N 0B7
Please include a daytime phone number in your correspondence.
Refrigerator Operation
The refrigerator will not operate
Power cord unplugged? Plug into a grounded 3 prong outlet.
Is outlet working? Plug in a lamp to see if the outlet is
working.
Household fuse blown or circuit breaker tripped? Replace
the fuse or reset the circuit breaker. If the problem continues,
call an electrician.
Controls on? Make sure the refrigerator control is ON. See
“Using the Controls.”
New installation? Allow 24 hours following installation for the
refrigerator to cool completely.
NOTE: Adjusting the temperature controls to coldest setting
will not cool the refrigerator more quickly.
The lights do not work
Light bulb burned out? Replace light bulb. See “Changing the
Light Bulb.”
The motor seems to run too much
Your new refrigerator may run longer than your old one due to its
high-efficiency compressor and fans. The unit may run even
longer if the room is warm, a large food load is added, the door is
opened often, or if the door has been left open.
The refrigerator seems noisy
Refrigerator noise has been reduced over the years. Due to this
reduction, you may hear intermittent noises from your new
refrigerator that you did not notice from your old model. Below are
listed some normal sounds with explanations.
Buzzing - heard when the water valve opens to fill the ice
maker
Pulsating - fans/compressor adjusting to optimize
performance
Hissing/Rattling - flow of refrigerant, movement of water
lines, or from items placed on top of the refrigerator
Sizzling/Gurgling - water dripping on the heater during
Defrost cycle
Popping - contraction/expansion of inside walls, especially
during initial cooldown
Water running/dripping - may be heard when ice melts
during defrosting and water runs into the drain pan
Creaking/Cracking - occurs as ice is being ejected from the
ice maker mold
The doors will not close completely or they pop open
Door blocked open? Move food packages away from door.
Bin or shelf in the way? Push bin or shelf back in the correct
position.
Crisper cover in the way? Make sure the crisper cover is fully
pushed in so that the back rests on the supports.
Refrigerator not tilted toward the rear? So the doors will
close easier, raise the front of the refrigerator so that it tilts
slightly downward toward the rear. See “Adjust the Doors.”
Door closed too quickly? Close the door slowly and firmly to
keep the door from popping open.
Electrical Shock Hazard
Plug into a grounded 3 prong outlet.
Do not remove ground prong.
Do not use an adapter.
Do not use an extension cord.
Failure to follow these instructions can result in death,
fire, or electrical shock.
WARNING

18
Thedoorisdifficulttoopen
Gasketsdirtyorsticky?Cleangasketsandcontactsurfaces
withmildsoapandwarmwater.Rinseanddrywithsoftcloth.
Temperature and Moisture
Temperatureistoowarm
Newinstallation?Allow24hoursfollowinginstallationforthe
refrigeratortocoolcompletely.
Dooropenedoftenorleftopen?Allowswarmairtoenter
refrigerator.Minimizedooropeningsandkeepdoorfully
closed.
Largeloadoffoodadded?Allowseveralhoursfor
refrigeratortoreturntonormaltemperature.
Controlssetcorrectlyforthesurroundingconditions?
Adjustthecontrolsasettingcolder.Checktemperaturein
24hours.See“UsingtheControls.”
Thereisinteriormoisturebuildup
NOTE:Somemoisturebuildupisnormal.
Humidroom?Contributestomoisturebuildup.
Dooropenedoftenorleftopen?Allowshumidairtoenter
refrigerator.Minimizedooropeningsandkeepdoorfully
closed.
Ice and Water
Theicemakerisnotproducingiceornotenoughice
Refrigeratorconnectedtoawatersupplyandthesupply
shut-offvalveturnedon?Connectrefrigeratortowater
supplyandturnwatershut-offvalvefullyopen.
Kinkinthewatersourceline?Akinkinthelinecanreduce
waterflow.Straightenthewatersourceline.
Icemakerturnedon?Makesurewireshut-offarmorswitch
(dependingonmodel)isintheOnposition.
Newinstallation?Wait24hoursaftericemakerinstallation
foriceproductiontobegin.Allow3daystocompletelyfillthe
icecontainer.
Largeamountoficerecentlyremoved?Allow24hoursfor
icemakertoproducemoreice.
Icecubejammedintheicemakerejectorarm?Remove
icefromtheejectorarmwithaplasticutensil.
Reverseosmosiswaterfiltrationsystemconnectedto
yourcoldwatersupply?Thiscandecreasewaterpressure.
See“WaterSupplyRequirements.”
Theicecubesareholloworsmall
NOTE:Thisisanindicationoflowwaterpressure.
Watershut-offvalvenotfullyopen?Turnthewatershut-off
valvefullyopen.
Kinkinthewatersourceline?Akinkinthelinecanreduce
waterflow.Straightenthewatersourceline.
Reverseosmosiswaterfiltrationsystemconnectedto
yourcoldwatersupply?Thiscandecreasewaterpressure.
See“WaterSupplyRequirements.”
Questionsremainregardingwaterpressure?Calla
licensed,qualifiedplumber.
Off-taste,odor,orgraycolorintheice
Newplumbingconnections?Newplumbingconnections
cancausediscoloredoroff-flavoredice.
Icestoredtoolong?Discardice.Washicebin.Allow
24hoursforicemakertomakenewice.
Odortransferfromfood?Useairtight,moisture-proof
packagingtostorefood.
Arethereminerals(suchassulfur)inthewater?Awater
filtermayneedtobeinstalledtoremovetheminerals.
ACCESSORIES
Thefollowingaccessoriesareavailableforyourrefrigerator.
Toorder,contactusandaskforthepartnumber.
IntheU.S.A.,visitwww.maytag.com/accessoriesorcall
1-800-688-9900.
InCanada,visitwww.maytag.caorcall1-800-807-6777.
affresh
®
StainlessSteelCleaner:
InU.S.A.,orderPart#W10355016
InCanada,orderPart#W10355016B
affresh
®
StainlessSteelWipes:
InU.S.A.,orderPart#W10355049
InCanada,orderPart#W10355049B
affresh
®
Kitchen&ApplianceCleaner:
InU.S.A.,orderPart#W10355010
InCanada,orderPart#W10355010B
AirFilter:
OrderPart#W10311524
ReversibilityKit:
OrderPart#W10395149
WARNING
Explosion Hazard
Use nonflammable cleaner.
Failure to do so can result in death, explosion, or fire.
19
11/14
MAYTAG
®
REFRIGERATION
LIMITEDWARRANTY
ATTACHYOURRECEIPTHERE.PROOFOFPURCHASEISREQUIRED
TOOBTAINWARRANTYSERVICE.
Pleasehavethefollowinginformationavailablewhenyoucallthe
CustomereXperienceCenter:
Name,addressandtelephonenumber
Modelnumberandserialnumber
Aclear,detaileddescriptionoftheproblem
Proofofpurchaseincludingdealerorretailernameandaddress
IFYOUNEEDSERVICE:
1.Beforecontactingustoarrangeservice,pleasedeterminewhetheryourproductrequiresrepair.Some
questionscanbeaddressedwithoutservice.PleasetakeafewminutestoreviewtheTroubleshootingor
ProblemSolversectionoftheUseandCareGuide,scantheQRcodeontherighttoaccessadditional
resources,orvisithttps://www.maytag.com/product_help.
2.AllwarrantyserviceisprovidedexclusivelybyourauthorizedMaytagServiceProviders
.IntheU.S.andCanada,
directallrequestsforwarrantyserviceto:
MaytagCustomereXperienceCenter
IntheU.S.A.,call1-800-688-9900.InCanada,call1-800-807-6777.
Ifoutsidethe50UnitedStatesorCanada,contactyourauthorizedMaytagdealertodeterminewhetheranother
warrantyapplies.
https://www.maytag.com/
product_help
TEN YEAR LIMITED WARRANTY
WHAT IS COVERED WHAT IS NOT COVERED
FIRSTYEARLIMITEDWARRANTY(PARTSANDLABOR)
Foroneyearfromthedateofpurchase,whenthismajor
applianceisinstalled,operatedandmaintainedaccording
toinstructionsattachedtoorfurnishedwiththeproduct,
MaytagbrandofWhirlpoolCorporationorWhirlpool
Canada,LP(hereafter“Maytag”)willpayforfactory
specifiedreplacementpartsandrepairlabortocorrect
defectsinmaterialsorworkmanshipthatexistedwhenthis
majorappliancewaspurchased,oratitssolediscretion
replacetheproduct.Intheeventofproductreplacement,
yourappliancewillbewarrantedfortheremainingtermof
theoriginalunit'swarrantyperiod.
SECONDTHROUGHTENTHYEARLIMITED
WARRANTY(
COMPRESSORONLY-LABORNOT
IN
CLUDED)
Inthesecondthroughtenthyearsfromthedateoforiginal
purchase,whenthismajorapplianceisinstalled,operated
andmaintainedaccordingtoinstructionsattachedtoor
furnishedwiththeproduct,Maytagwillpayforafactory
specifiedreplacementcompressortocorrectnon-cosmetic
defectsinmaterialsorworkmanshipinthispartthatprevent
functionoftherefrigeratorandthatexistedwhenthismajor
appliancewaspurchased.Thislimited10-yearwarrantyis
forthecompressoronlyanddoesnotincludelabor.
YOURSOLEANDEXCLUSIVEREMEDYUNDERTHIS
LIMITEDWARRANTYSHALLBEPRODUCTREPAIRAS
PROVIDEDHEREIN.ServicemustbeprovidedbyaMaytag
designatedservice
company.Thislim
itedwarrantyisvalid
onlyintheUnitedStatesorCanadaandappliesonlywhen
themajorapplianceisusedinthecountryinwhichitwas
purchased.Thislimitedwarrantyiseffectivefromthedate
oforiginalconsumerpurchase.Proofoforiginalpurchase
dateisrequiredtoobtainserviceunderthislimitedwarranty.
1.Commercial,non-residentialormultiple-familyuse,oruseinconsistentwith
publisheduser,operatororinstallationinstructions.
2.In-homeInstructiononhowtouseyourproduct.
3.Servicetocorrectimproperproductmaintenanceorinstallation,installationnot
inaccordancewithelectricalorplumbingcodesorcorrectionofhousehold
electricalor
plumbing(i.e.housewiring,fuses
orwaterinlethoses).
4.Consumableparts(i.e.lightbulbs,batteries,airorwaterfilters,preservation
solutions,etc.).
5.Defectsordamagecausedbytheuseofnon-genuineMaytagpartsor
accessories.
6.Damagefromaccident,misuse,abuse,fire,floods,actsofGodorusewith
productsnotapprovedbyMaytag.
7.Repairstopartsorsystemstocorrectproductdamageordefectscausedby
unauthorizedservice,alterationormodificationoftheappliance.
8.Cosmeticdamageincludingscratches,dents,chips,andotherdamageto
appliancefinishesunlesssuchdamageresultsfromdefectsinmaterialsand
workmanshipandisreportedtoMaytagwithin30days.
9.Discoloration,rustoroxidationofsurfacesresultingfromcausticorcorr
osive
environme
ntsincludingbutnotlimitedtohighsaltconcentrations,highmoisture
orhumidityorexposuretochemicals.
10.Foodormedicinelossduetoproductfailure.
11.Pick-upordelivery.Thisproductisintendedforin-homerepair.
12.Travelortransportationexpensesforserviceinremotelocationswherean
authorizedMaytagservicerisnotavailable.
13.Removalorreinstallationofinaccessibleappliancesorbuilt-infixtures(i.e.trim,
decorativepanels,flooring,cabinetry,islands,countertops,drywall,etc.)that
interferewithservicing,removalorreplacementoftheproduct.
14.Serviceorpartsforapplianceswithoriginalmodel/serialnumbersremoved,
alteredornoteasilyd
etermined.
Thecostof
repairorreplacementundertheseexcludedcircumstancesshallbe
bornebythecustomer.
DISCLAIMEROFIMPLIEDWARRANTIES
IMPLIEDWARRANTIES,INCLUDINGANYIMPLIEDWARRANTYOFMERCHANTABILITYORIMPLIEDWARRANTYOFFITNESSFORA
PARTICULARPURPOSE,ARELIMITEDTOONEYEARORTHESHORTESTPERIODALLOWEDBYLAW.Somestatesandprovincesdonotallow
limitationsonthedurationofimpliedwarrantiesofmerchantabilityorfitness,sothislimitationmaynotapplytoyou.Thiswarrantygivesyou
specificlegalrights,andyoualsomayhaveotherrightsthatvaryfromstatetostateorprovincetoprovince.
DISCLAIMEROFREPRESENTATIONSOUTSIDEOFWARRANTY
Maytagmakesnorepresentationsaboutthequality,durability,orneedforserviceorrepairofthismajorapplianceotherthantherepresentations
containedinthiswarranty.Ifyouwant
alongerormorecomprehensivewarrantythanthelimitedwarrantythatcomeswiththismajorappliance,
youshouldaskMaytagoryourretaileraboutbuyinganextendedwarranty.
LIMITATIONOFREMEDIES;EXCLUSIONOFINCIDENTALANDCONSEQUENTIALDAMAGES
YOURSOLEANDEXCLUSIVEREMEDYUNDERTHISLIMITEDWARRANTYSHALLBEPRODUCTREPAIRASPROVIDEDHEREIN.MAYTAG
SHALLNOTBELIABLEFORINCIDENTALORCONSEQUENTIALDAMAGES.Somestatesandprovincesdonotallowtheexclusionorlimitationof
incidentalorconsequentialdamages,sotheselimitationsandexclusionsmaynotapplytoyou.Thiswarrantygivesyouspecificlegalrights,and
youalsomayhaveotherrightsthatvaryfromstatetostateorprovincetoprovince.
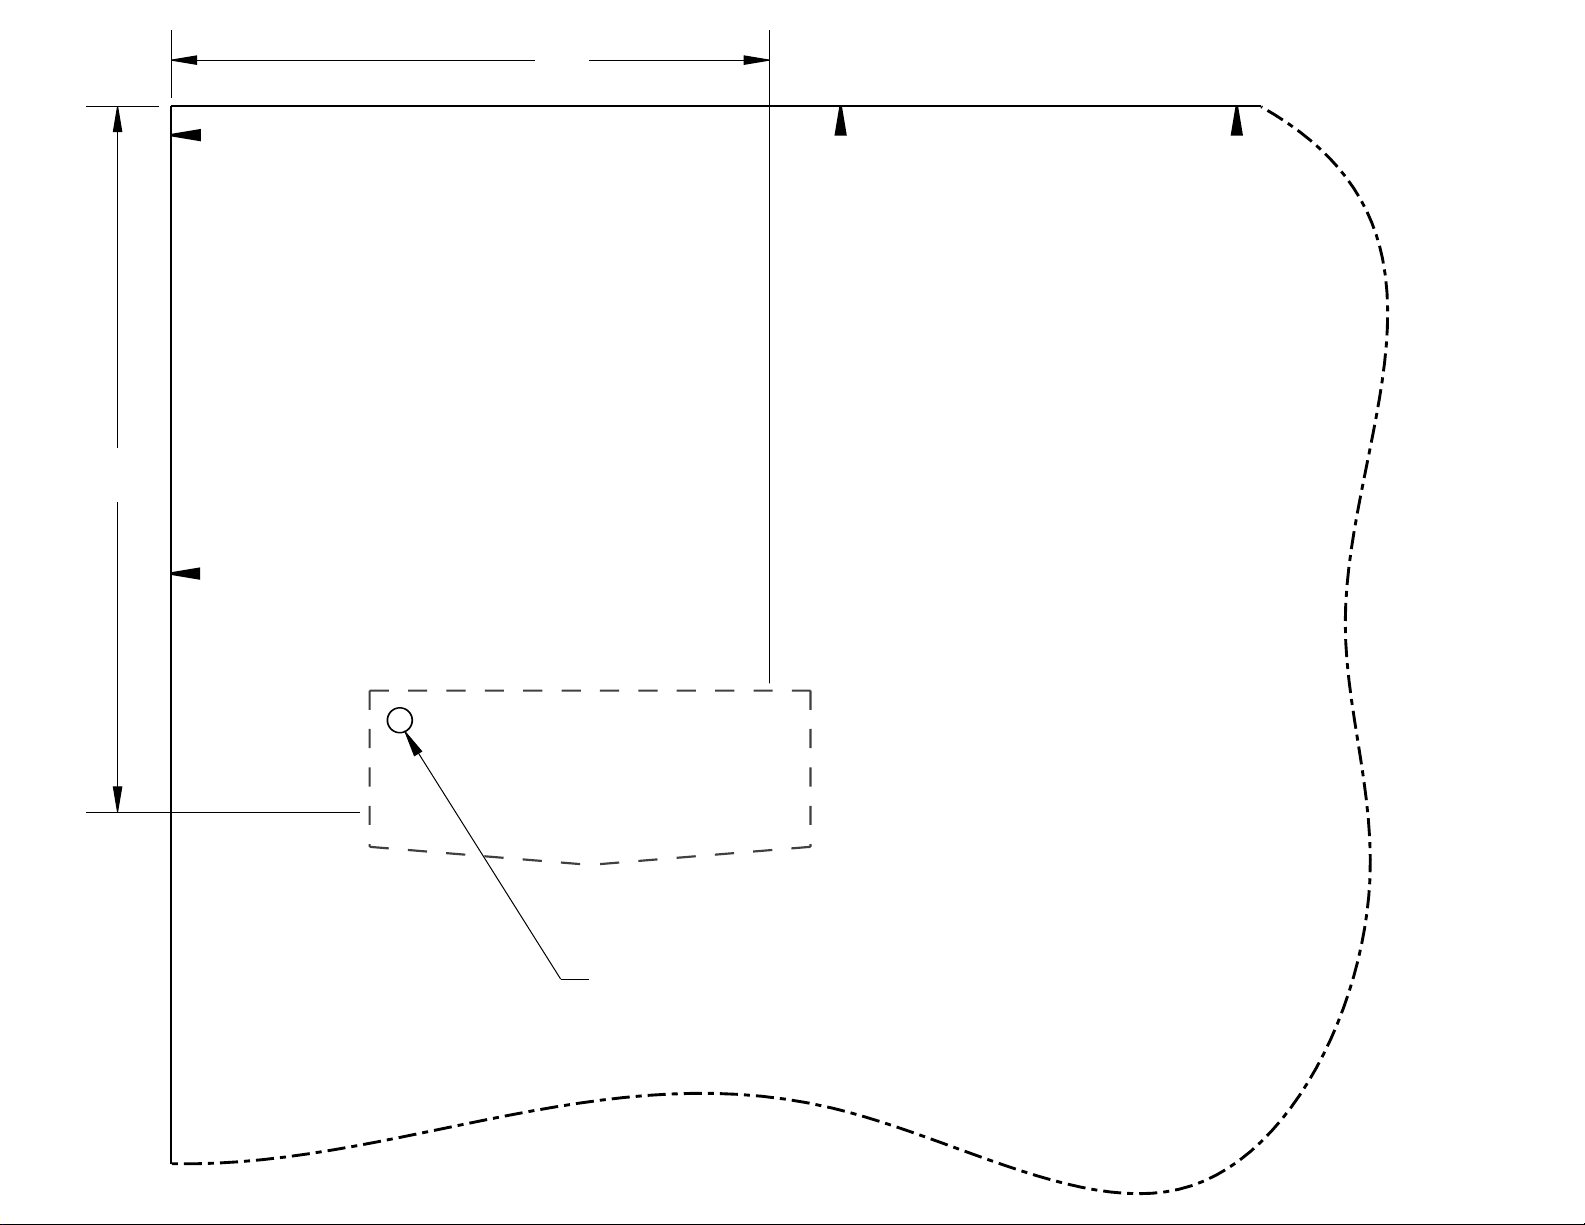
Align with top of the door.
Aligner avec le sommet de la porte.
Standard Door
Porte Standard
Align with side of the door.
Aligner avec le côté de la porte.
Ideal position of hole (shown as suggestion)
Position idéale du trou (suggérée)
4
²⁹⁄₃₂
"
(12,5 cm)
4
⁵⁄₃₂
"
(10,6 cm)

W10885251
B
®
/™©2016.UsedunderlicenseinCanada.Allrightsreserved.
UtilisésouslicenceauCanada.Tousdroitsréservés.
06/16