
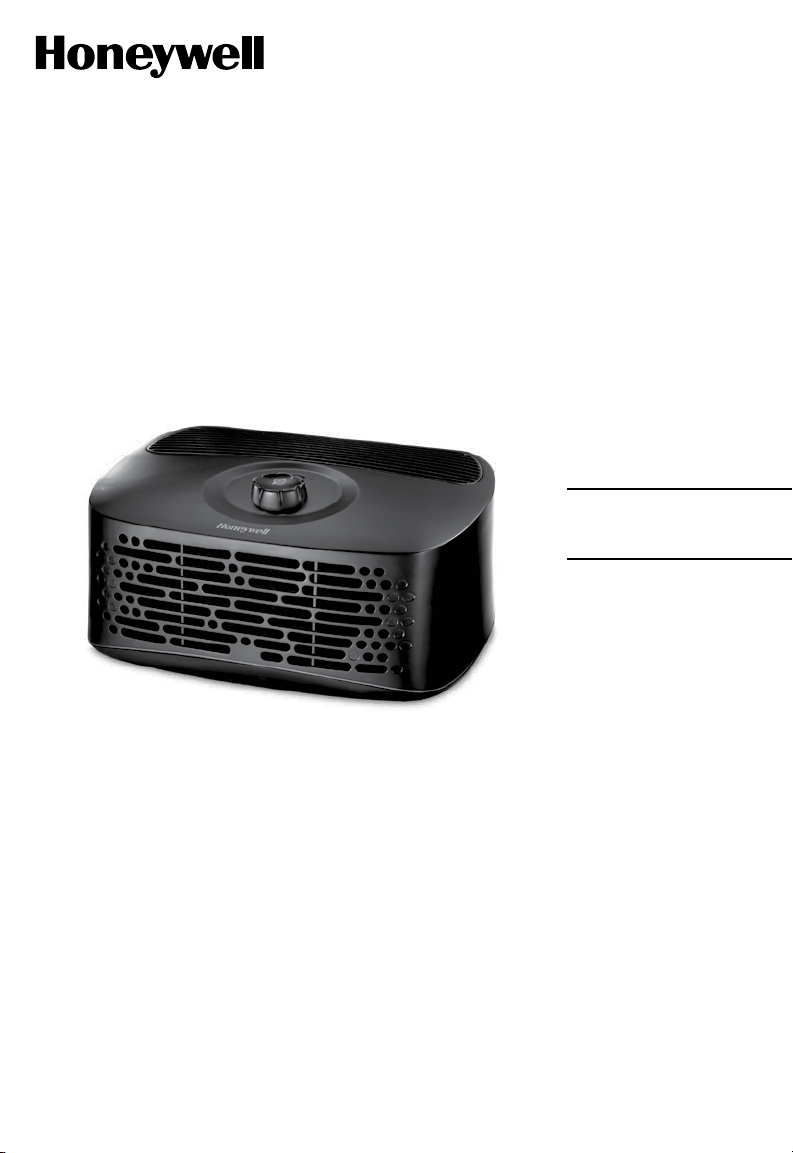
HEPA AIR PURIFIER
Owner’s Manual
HPA020 SERIES
If you have any questions about the operation
of this product, please call us toll-free at
18004770457, or visit our website at:
www.HoneywellPluggedIn.com/contact-us

2
1. Read all instructions before operating the air
purifier.
2. Place air purifier where it would not be easily
overturned by persons in the household.
3. ALWAYS turn the air purifier controls to the
OFFposition and unplug from the wall outlet
when not in use.
4. To disconnect the air purifier, make sure the
unit is powered OFF then grip the plug and
pull it from the wall outlet. NEVER pull by
the cord.
5. DO NOT use any product with a damaged
cord or plug, any product that malfunctions,
or any product that has been dropped or
damaged in any manner. Keep the cord away
from heated surfaces.
6. DO NOT use air purifier outdoors.
7. DO NOT use air purifier unless it is fully
assembled.
8. DO NOT run power cord under carpets, and
DO NOT cover with throw rugs. Arrange cord
such that it will not be a tripping hazard.
9. DO NOT use air purifier where combustible
gases or vapours are present.
10. DO NOT expose the air purifier to rain, or use
near water, in a bathroom, laundry area, or
other damp location.
11. The air purifier MUST be used in its upright
position.
12. DO NOT allow foreign objects to enter
ventilation or exhaust opening as this may
cause electric shock or damage to the air
purifier. DO NOT block air outlets or intakes.
13. Locate air purifier near the outlet and DO
NOT use with extension cord or power strip.
14. This appliance has a polarized plug (one
blade is wider than the other). To reduce the
risk of electric shock, this plug is intended to
fit only one way in a polarized outlet. If the
plug does not fit fully in the outlet, reverse the
plug. If it still does not fit, contact a qualified
electrician. DONOTattempt to defeat this
safety feature.
15. A loose fit between the ACoutlet (receptacle)
and plug may cause overheating and a
distortion of the plug. Contact a qualified
electrician to replace loose or worn outlet.
16. DO NOT sit, stand, or place heavy objects on
the air purifier.
17. ALWAYS disconnect power supply before
servicing.
18. Keep out of reach of children and pets.
19. Filters may be harmful if ingested. Avoid
breathing dust when changing filters.
20. SAVE THESE INSTRUCTIONS.
IMPORTANT SAFETY INSTRUCTIONS
READ AND SAVE THESE SAFETY INSTRUCTIONS BEFORE USING
THIS AIR PURIFIER
When using electrical appliances, basic precautions should always be followed to reduce the risk
of fire, electric shock, and injury to persons, including the following:
For FCC compliance information, please see last page of this manual.
WARNING: To Reduce The Risk of Fire or Electric Shock, DO NOT Use This Air Purifier
With Any SolidState Speed Control Device.
3
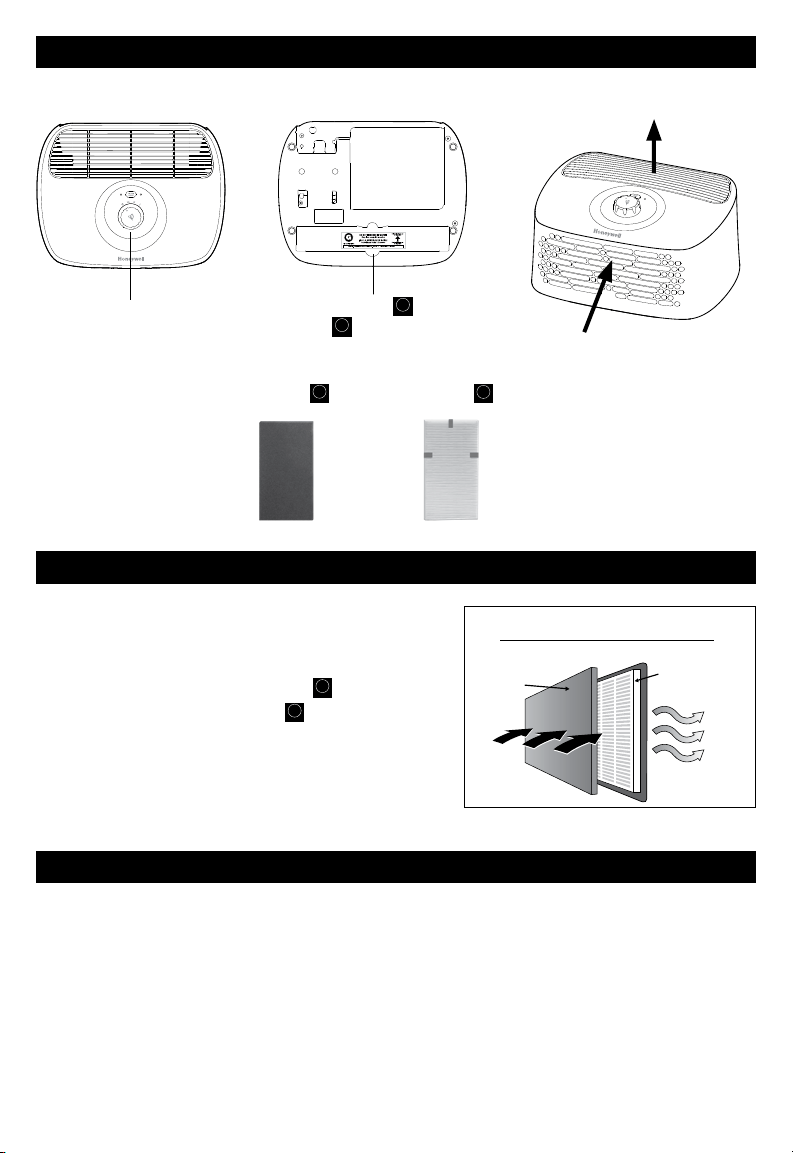
2-Stage Cleaning System
HEPA Filter
Odor Reducing
Pre-Filter
Room Air
Cleaner Air
STAGE 1
STAGE 2
GETTING TO KNOW YOUR AIR PURIFIER
Fig. 1
GETTING STARTED
• Select a firm, level and flat location.
• When operating, large volumes of air are drawn toward the air purifier. Surrounding areas should be cleaned
and/or vacuumed frequently to prevent build-up of dust and other contaminants. This may also help prolong
the life of the filter. If the unit is placed on a light colored carpet, a small mat or rug should be used underneath
to prevent staining. This is especially important in homes with contamination from smoking, fireplaces, or where
candles are burned.
• Ensure the front of the unit faces away from the closest wall or furniture.
• Ensure no grilles are blocked.
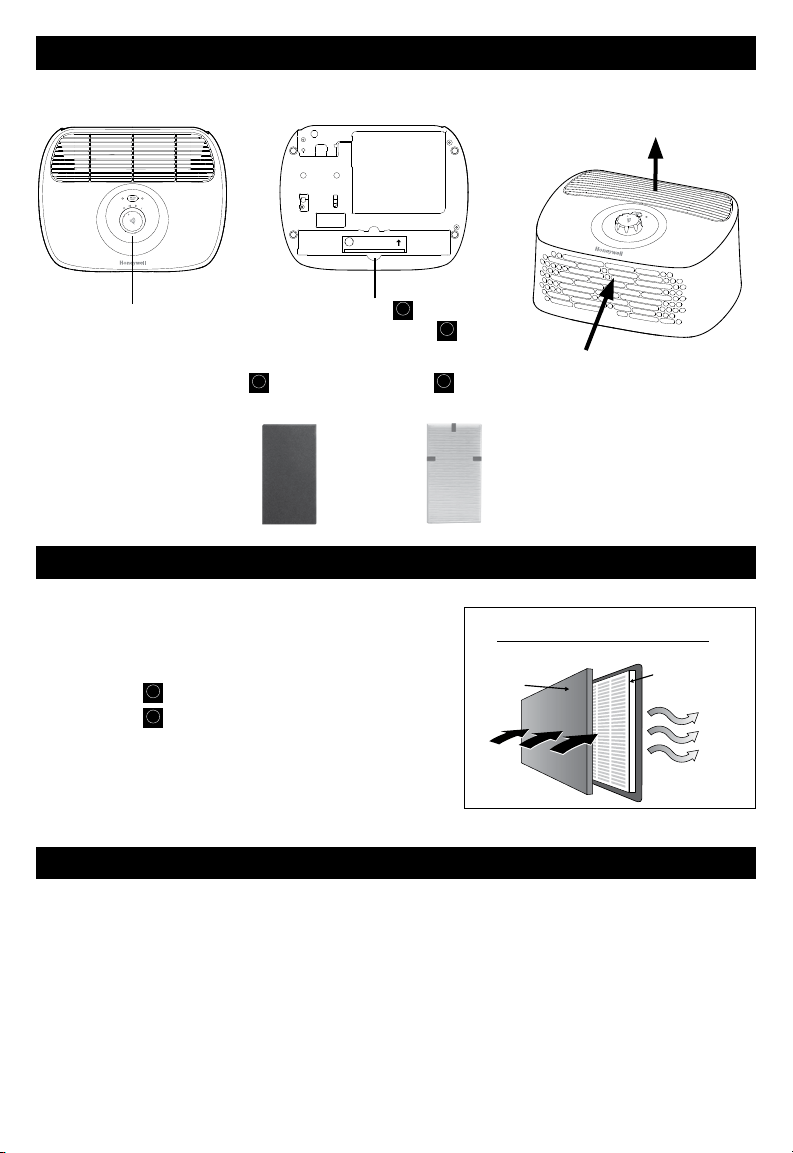
HOW YOUR AIR PURIFIER WORKS
Control Panel
HEPA Filter
Filter
G
&
Odor Reducing PreFilter
A
Pre-Filter
Cleaner Air is Released
Back into the Room
Bottom of air purifierTop of air purifier
Air Intake
DO NOT IMMERSE IN WATER!
¡NO LO SUMERJA EN AGUA!
www.replacementfilters.com • 1-800-477-0457
Replace every 12 months
Substituya cada 12 meses
P/N A001610R0
This side in
Este lado adentro
G
Type
A
Pre-Filter
Odor Reducing
PreFilter
Type
Filter
G
Certified
HEPA Filter
This model air purifier incorporates a 2-stage cleaning system
to help clean the air that passes through the filter in the unit
(Fig. 1).
Stage 1: Type
A
Pre-Filter
Odor Reducing PreFilter
Stage 2: Type
Filter
G
Certified HEPA Filter that captures the
following microscopic airborne allergens and particles:
dust, pollen, pet dander, dust mite debris and smokes
as small as 0.3 microns or larger from the air that
passes through the filter.
4
INSTALL CERTIFIED HEPA FILTERS AND ODOR REDUCING PREFILTER
The Certified HEPA Filter and Odor Reducing PreFilter are supplied
within your air purifier. New air purifiers have their filters wrapped to
ensure purity and are labeled to help identify the proper replacement
filter (Type
Filter
G
Certified HEPA Filter and Type
A
Pre-Filter
Odor Reducing
PreFilter).
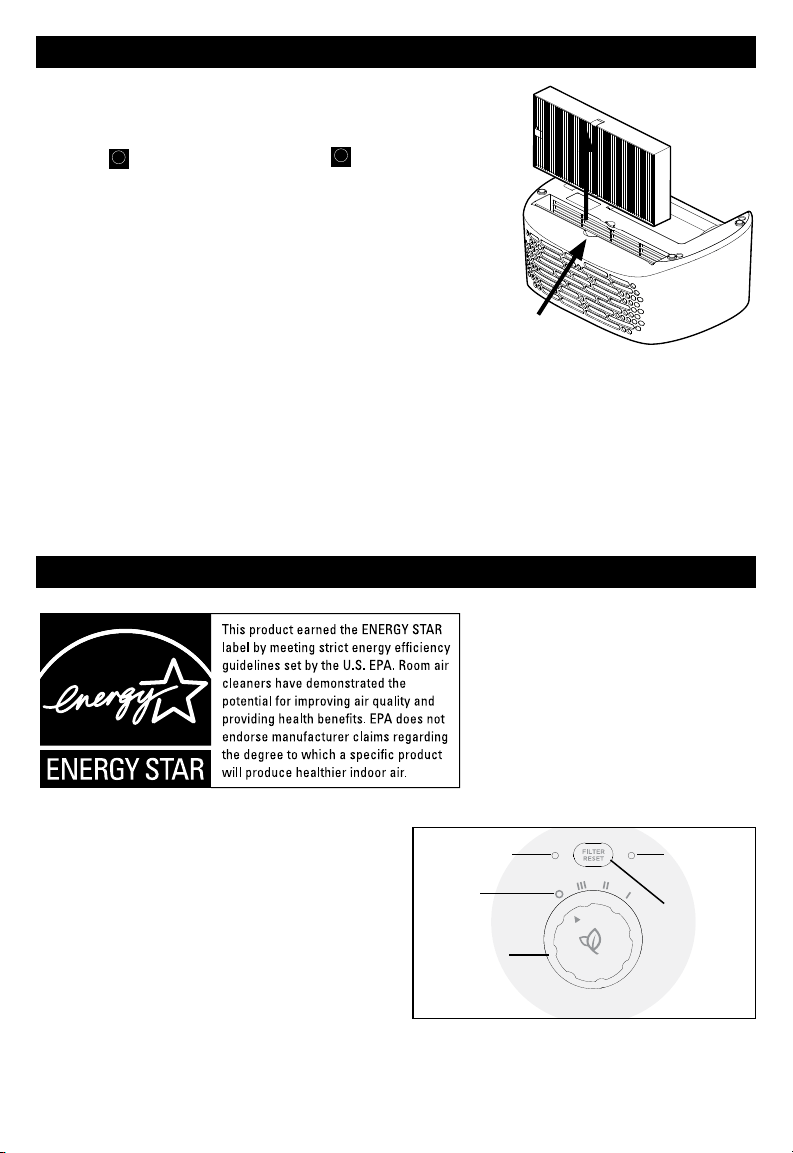
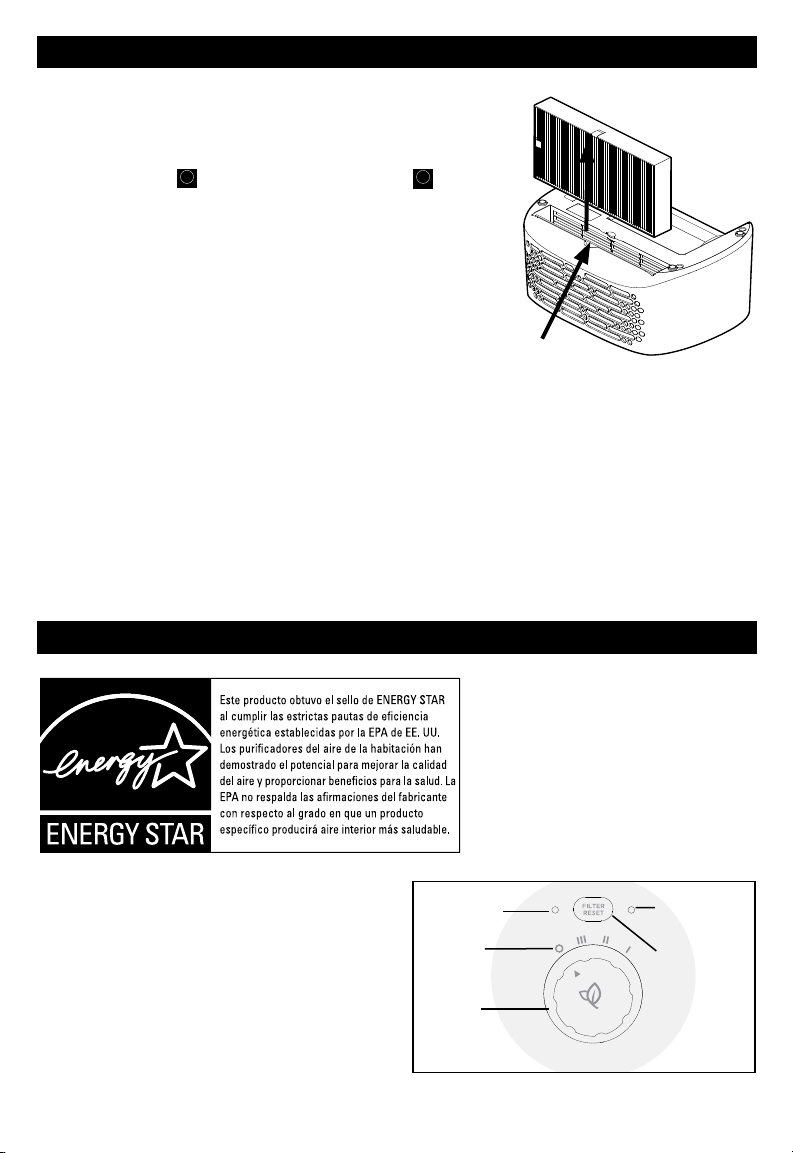
• Before using your new air purifier you must remove the wrappers
covering the filters and pre-filter. Make sure the air purifier is OFF
and unplugged.
• Turn the air purifier upside down on a flat surface. The filter is
visible from the bottom of the unit (Fig. 2).
• Remove the Certified HEPA Filter by grasping the filter from the
finger notches. There are small molded tabs that secure the filter
in place and prevent it from slipping out of the unit. Pull away from
tabs and up to remove. When removing a used filter that is not wrapped in plastic, pull the red tab to remove.
• Remove the protective plastic wrap from the HEPA Filter and PreFilter.
• Install the PreFilter first by sliding it in behind the front grille of the air purifier and securing it in the molded slots.
• Install the Certified HEPA Filter by sliding it in the opening on bottom of the air purifier. Ensure that the red tab
is accessible for easy removal.
WARNING: Filters may be harmful if ingested. Avoid breathing dust when changing filters.
Molded tabs
secure filter
Fig. 2
OPERATION
• Ensure the air purifier is plugged into a working
electrical outlet
• Turn the Power Knob to desired setting
(O = Off, III = High, II = Medium, I = Low)
Portable air purifiers are more effective in rooms
where all the doors and windows are closed. It is
recommended that you run your air purifier while
you are at home to help clean the air.
The energy efficiency of this ENERGY
STAR certified model is measured
based on a ratio between the model’s
CADR for Smoke and the electrical
energy it consumes, or CADR/Watt.
Power Control
Knob
Cleaning
Levels
Power ON LED
FILTER
RESET
Button
Check Filter
Indicator
Light
Fig. 3
5
This model has an electronic filter check to remind you when to check
and replace your filters based on the air purifier’s hours of use. A red
LED will illuminate when it is time to check/replace your filters.
When the HEPA Filter or PreFilter needs to be replaced, the light will
remain on until it is RESET. You may unplug the air purifier without
interrupting the filter check.
You should periodically check the filters depending on operating conditions, the HEPA Filter should be replaced
every 12 months and the pre-filter every 3 months.
REPLACE WITH CERTIFIED HEPA FILTER
Filter
G
and ODOR REDUCING PREFILTER
A
Pre-Filter
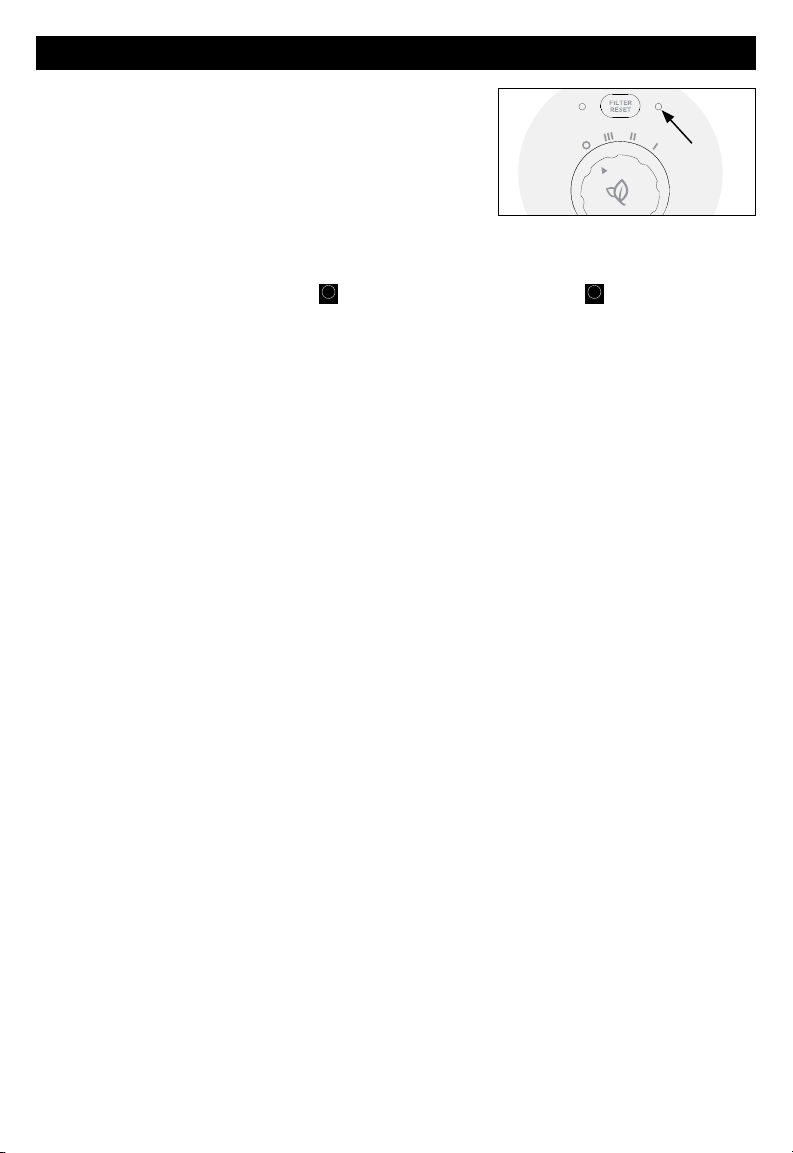
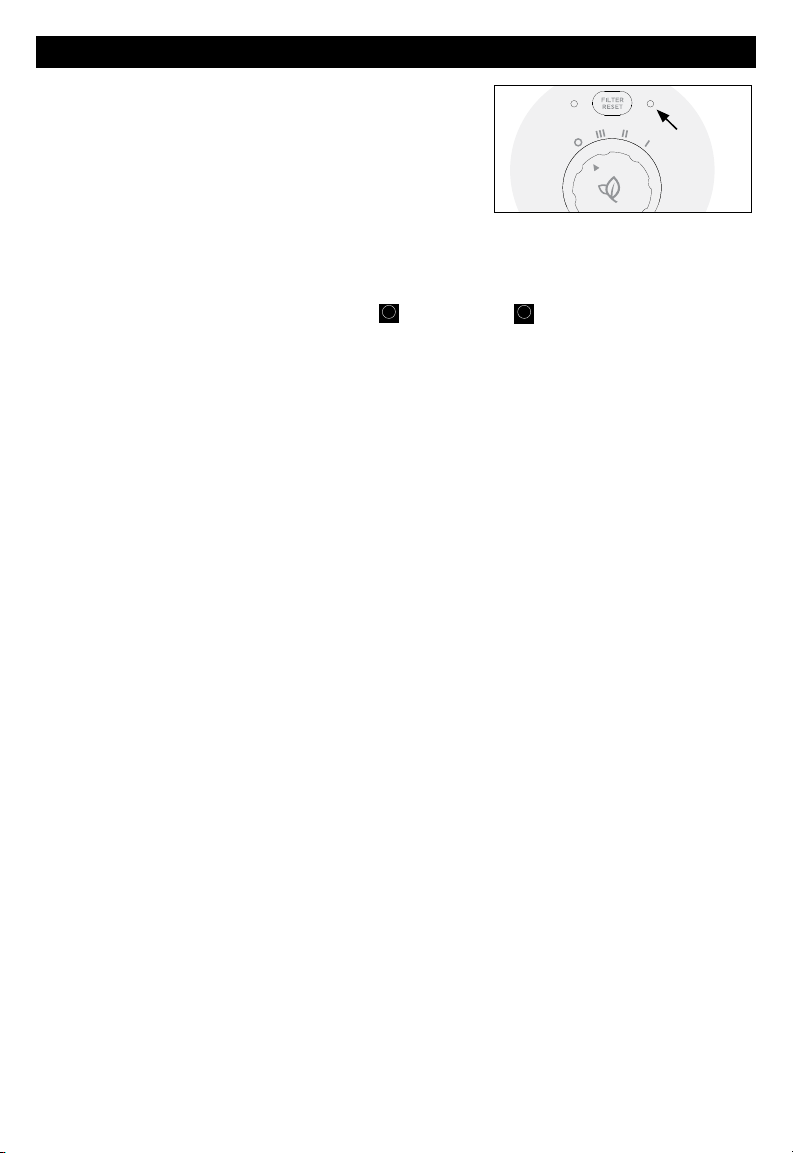
To RESET the Electronic Filter Check:
When the filter check light remains on and solid, it is time to replace the Odor Reducing PreFilter and reset the
filter monitor. With the unit powered ON, press the FILTER RESET button next to the Check Filter LED and hold
for approximately 2 seconds until the light turns off (Fig. 4).
When the LED illuminates and is flashing, it is time to replace the HEPA Filter and reset the filter monitor. With
the unit powered ON, press FILTER RESET button and hold for approximately 2 seconds until the light turns OFF
(Fig. 4).
Manual (or Early) Reset of Electronic Filter Check
Depending on your individual usage (environment and hours used), you may need to replace the filters more or
less frequently. Each time you replace your filters, you should reset the filter monitor. You may manually reset
the filter monitor for the PreFilter or the HEPA Filter, or both. If you change the PreFilter or HEPA Filter before
the Check Filter LED is illuminated, it is possible to reset the filter monitor. You must first manually illuminate the
Check Filter LED. Follow these steps:
1. With unit powered ON, press the FILTER RESET button for 5 seconds to illuminate the LED in “solid” mode.
2. To reset filter monitor for PreFilter: press and hold FILTER RESET button for 2 seconds until LED changes to
flashing mode.
3. TAP FILTER RESET button to shut LED off. The pre-filter monitor is now set to “clean status”.
4. To reset filter monitor for HEPA Filter: LED must be in “flashing mode”. Follow Step 1 above, then TAP FILTER
RESET button again to illuminate the LED in “flashing mode”.
5. Press and hold FILTER RESET button for 2 seconds until LED shuts off. The HEPA Filter monitor is now set to
“clean status”.
6. To reset filter monitor for both PreFilter and HEPA Filter: Follow Steps 1, 2, and 5 above.
ELECTRONIC FILTER CHECK REMINDER
Check
Filter
Indicator
Light
Fig. 4

6
ACCESSORIES AND REPLACEMENT FILTER
You may purchase Honeywell Replacement Certified HEPA Filter
Filter
G
and Honeywell Odor Reducing PreFilter
A
Pre-Filter
at the store where you purchased your air purifier or, order directly from www.HoneywellPluggedIn.com. Use
only Genuine Honeywell Replacement Filters. You have the option to use the Honeywell Household Gas & Odor
Reducing PreFilter
Pre-Filter
A
+
instead of the Odor Reducing
A
Pre-Filter
PreFilter. It is also available at many retailers and on
www.HoneywellPluggedIn.com.
If you have any questions, please calll 18004770457, or visit our website at:
www.HoneywellPluggedIn.com/contact-us.
FREQUENTLY ASKED QUESTIONS
My Air Purifier is starting to make noise and the air output is less. What’s wrong?
The filters may be dirty. High amounts of particles can block the pores in the filter and stop the air from moving
through it. Replace the filters.
How long should I run my Air Purifier?
The unit will be most effective when doors and windows are closed. It is recommended that you run your air
purifier while you are at home to help clean the air. If desired or conditions warrant, you may run your air
purifier 24 hours a day.
Can I wash any of the filters in my Air Purifier?
No. Washing any of the filters will ruin them.
When should I replace my filters?
You should periodically check the filters depending on operating conditions, the HEPA Filter should be
replaced every 12 months and the pre-filter every 3 months.
CONSUMER RELATIONS
We are here to help. Call us toll-free at: 18004770457
Or visit our website at: www.HoneywellPluggedIn.com/contact-us
Please be sure to specify the model number.
NOTE: IF YOU EXPERIENCE A PROBLEM, PLEASE CONTACTCONSUMERRELATIONSFIRST OR SEE YOUR
WARRANTY. DO NOT RETURN TO THE ORIGINAL PLACE OF PURCHASE. DO NOT ATTEMPT TO OPEN THE
MOTOR HOUSING YOURSELF, DOING SO MAY VOID YOUR WARRANTY AND CAUSE DAMAGE TO THE
AIRPURIFIER ORPERSONALINJURY.
CLEANING AND STORAGE
We recommend that you clean the air purifier at least once every 3 months and before extended storage. Use only
a dry cloth to wipe the external surfaces of the air purifier.
DO NOT USE WATER, WAX, POLISH, OR ANY CHEMICAL SOLUTION.
If your Air Purifier will not be used for more than 30 days, we recommend that you:
• Remove the HEPA Filter and the Odor Reducing PreFilter from the unit.
• Place each filter in separate airtight plastic bags to preserve freshness.
• Avoid breathing dust when changing filters.

7
You should first read all instructions before
attempting to use this product.
A. This 5 year limited warranty applies to repair or
replacement of product found to be defective
in material or workmanship. This warranty does
not apply to damage resulting from commercial,
abusive, unreasonable use or supplemental damage.
Defects that are the result of normal wear and
tear will not be considered manufacturing defects
under this warranty. KAZ IS NOT LIABLE FOR
INCIDENTAL OR CONSEQUENTIAL DAMAGES
OF ANY NATURE, ANY IMPLIED WARRANTY
OF MERCHANTABILITY OR FITNESS FOR A
PARTICULAR PURPOSE ON THIS PRODUCT
IS LIMITED IN DURATION TO THE DURATION
OF THIS WARRANTY. Some jurisdictions do not
allow the exclusion or limitation of incidental or
consequential damages or limitations on how long
an implied warranty lasts, so the above limitations
or exclusions may not apply to you. This warranty
gives you specific legal rights, and you also may
have other rights which vary from jurisdiction to
jurisdiction. This warranty applies only to the original
purchaser of this product from the original date of
purchase.
B. At its option, Kaz will repair or replace this
product if it is found to be defective in material or
workmanship.
C. This warranty does not cover damage resulting from
any unauthorized attempts to repair or from any
use not in accordance with the instruction manual.
D. This warranty does not cover the HEPA Filters or
PreFilters except for material or workmanship
defects.
Please go to www.HoneywellPluggedIn.com/warranty-
registration to register your product and receive product
information updates and new promotional offers.
5 YEAR LIMITED WARRANTY
8
Si tiene alguna pregunta sobre el funcionamiento
de este producto, llámenos lada gratuita al
18004770457, o visite nuestro sitio web en:
www.HoneywellPluggedIn.com/contact-us
PURIFICADORE
DE AIRE HEPA
Manual del Usuario
SERIES HPA020

9
1. Lea todas las instrucciones antes de hacer
funcionar el purificador de aire.
2. Coloque el purificador de aire donde no
pueda ser volcado fácilmente por personas
en el hogar.
3. Cuando el purificador de aire no esté en
uso, coloque SIEMPRE los controles en la
posición de APAGADOy desconecte del
tomacorriente.
4. Para desconectar el purificador de aire,
asegúrese que la unidad esté APAGADA
luego sujete el enchufe y retírelo del
tomacorriente. NUNCA tire del cable.
5. NO utilice ningún producto con el enchufe
o el cable dañados. Tampoco lo utilice si no
funciona bien, si se ha caído o se ha dañado
de una forma u otra. Mantenga el cable lejos
de las superficies calientes.
6. NO utilice el purificador de aire en el exterior.
7. NO utilice el purificador de aire a menos que
esté totalmente ensamblado.
8. NO pase el cable de corriente debajo de
alfombras, y NO lo cubra con tapices.
Coloque el cable de manera que no cause
tropiezos.
9. NO utilice el purificador de aire donde haya
gases o vapores inflamables.
10. NO exponga el purificador de aire a la lluvia,
ni lo utilice cerca del agua, en el baño, sala
de lavado, u otro lugar húmedo.
11. El purificador de aire DEBE utilizarse en
posición vertical.
12. NO permita que objetos extraños entren en
los orificios de ventilación ni en las salidas de
aire, ya que esto podría causar una descarga
eléctrica o dañar el purificador de aire.
NO obstruya las entradas o salidas de aire.
13. Coloque el purificador de aire cerca del
tomacorriente y NO utilice con un cable de
extensión o multicontacto.
14. Este aparato tiene un enchufe polarizado
(una clavija es más ancha que la otra). Para
reducir el riesgo de descarga eléctrica, sólo
hay una forma de introducir el enchufe
en un tomacorriente polarizado. Si el
enchufe no entra completamente, invierta
la posición. Si tampoco entra, llame a un
electricista calificado. NOintente anular esta
característica de seguridad.
15. Una conexión floja entre el tomacorriente de
CA (receptáculo) y el enchufe podría provocar
sobrecalentamiento y la deformación del
enchufe. Contacte a un electricista calificado
para reemplazar el tomacorriente flojo o
desgastado.
16. NO se siente ni se pare sobre el purificador de
aire, ni coloque objetos pesados encima de
éste.
17. SIEMPRE desconecte el aparato antes de
realizar el mantenimiento.
18. Mantenga fuera del alcance de niños y
mascotas.
19. Los filtros pueden ser dañinos si se ingieren.
Evite respirar el polvo al cambiar los filtros.
20.
GUARDE ESTAS INSTRUCCIONES.
IMPORTANTES INSTRUCCIONES DE
SEGURIDAD
LEA Y GUARDE ESTAS INSTRUCCIONES DE SEGURIDAD ANTES
DE UTILIZAR EL PURIFICADOR DE AIRE.
Cuando se utilizan aparatos eléctricos, siempre se deben seguir las precauciones básicas para
reducir el riesgo de incendio, descarga eléctrica y lesiones a las personas, incluyendo lo siguiente:
Para obtener información sobre el cumplimiento de la FCC, por favor consulte la última
página de este manual.
ADVERTENCIA: Para Reducir el Riesgo de Incendio o Descarga Eléctrica, NO Utilice Este
Purificador de Aire Con Ningún Dispositivo de Control de Velocidad Transistorizado.
10
CONOZCA SU PURIFICADOR DE AIRE
PARA INICIAR
• Selecccione un lugar firme, plano y nivelado.
• Cuando está funcionando, grandes volúmenes de aire son atraídos hacia el purificador de aire. Las áreas
circundantes se deben limpiar y/o aspirar con frecuencia para evitar la acumulación de polvo y otros partículas.
Esto también puede ayudar a prolongar la vida útil del filtro. Si la unidad se coloca sobre una alfombra de
color claro, un tapete pequeño o alfombrilla debe utilizarse debajo para evitar manchas permanentes. Esto es
especialmente importante en los hogares con contaminación de tabaco, chimeneas, o donde se usan velas.
• Asegúrese que el frente de la unidad esté en dirección opuesta a la pared o muebles más cercanos.
• Asegúrese que las rejillas no estén bloqueadas.
CÓMO FUNCIONA SU PURIFICADOR DE AIRE
Panel de Control
Filtro HEPA
Filtro
G
y
Prefiltro
A
Prefiltro
Reductor de Olores
Se Libera Aire más Limpio
en la Habitación
Parte inferior
del purificador de aire
Parte superior
del purificador de aire
Entrada de Aire
Prefiltro Reductor de
Olores Tipo
A
Prefiltro
Filtro Certificado
HEPA Tipo
Filtro
G
Filtro HEPA
Prefiltro Reductor
de Olores
Aire de la
Habitación
Aire Más
Limpio
Sistema de Limpieza de 2 Etapas
ETAPA 1
ETAPA 2
Fig. 1
Este modelo de purificador de aire incorpora un sistema de
limpieza de 2 etapas para ayudar a limpiar el aire que pasa a
través del filtro en la unidad (Fig. 1).
Etapa 1: Prefiltro Reductor de Olores Tipo
A
Prefiltro
Etapa 2: Filtro Certificado HEPA Tipo
Filtro
G
que captura los
siguientes alérgenos y partículas microscópicas en el
aire: polvo, polen, caspa de mascotas, desechos de
ácaros del polvo y humo, tan pequeños como 0.3
micras o más grandes del aire que pasa a través
del filtro.
11
OPERACIÓN
• Asegúrese que el purificador de aire esté conectado
a un tomacorriente eléctrico funcional.
• Gire la Perilla de Potencia al ajuste deseado
(O = Apagado, III = Alto, II = Medio, I = Bajo)
Los purificadores de aire Portátiles son más
eficaces si cierra las puerta y las ventanas de la
habitación donde se encuentran. Se recomienda
que opere su purificador de aire mientras esté en
casa para ayudar a limpiar el aire.
INSTALACIÓN DE FILTROS CERTIFICADOS HEPA Y EL PREFILTRO REDUCTOR DE OLORES
El Filtro HEPA Certificado y el Prefiltro Reductor de Olores se
suministran dentro de su purificador de aire. Los purificadores de
aire nuevos tienen sus filtros envueltos para garantizar la pureza y
están etiquetados para ayudar a identificar el filtro de reemplazo
adecuado (Filtro Tipo
Filtro
G
HEPA Certificado y Prefiltro Tipo
A
Prefiltro
Reductor de Olores).
• Antes de utilizar su purificador de aire nuevo, debe retirar los
envoltorios que cubre los filtros y el prefiltro. Asegúrese que el
purificador de aire esté APAGADO y desconectado.
• Voltee el purificador de aire boca abajo sobre una superficie plana.
El filtro es visible desde la parte inferior de la unidad (Fig. 2).
• Retire el Filtro HEPA Certificado sujetándolo de las muescas para
los dedos. Hay pequeñas lengüetas moldeadas que aseguran el
filtro en su lugar y evitan que se salga de la unidad. Separe de
las lengüetas y jale hacia arriba para retirar. Para quitar un filtro
usado que no está envuelto en plástico, tire de las lengüetas rojas para retirar.
• Retire la envoltura plástica protectora del Filtro HEPA y el Prefiltro.
• Instale primero el prefiltro deslizándolo detrás de la rejilla frontal del purificador de aire y asegurando las
lengüetas moldeadas.
• Instale el Filtro HEPA Certificado deslizándolo en la abertura en la parte inferior del purificador de aire.
Asegúrese que la lengüeta roja esté accesible para facilitar la extracción.
ADVERTENCIA: Los filtros pueden ser dañinos si se ingieren. Evite respirar el polvo al cambiar los filtros.
Perilla de
Control de
Potencia
Niveles de
Limpieza
LED de
ENCENDIDO
Botón de
REINICIO DEL
FILTRO
Luz Indicadora
de Verificación
del Filtro
Fig. 3
Fig. 2
Las lengüetas
moldeadas
aseguran el filtro
La eficiencia energética de este modelo
con certificación ENERGY STAR se mide en
función de una relación entre el CADR del
modelo para el Humo y la energía eléctrica
que consume, o CADR/Watt.
12
RECORDATORIO ELECTRÓNICO DE CAMBIO DE FILTRO
Este modelo cuenta con un verificador electrónico del filtro para
recordarle cuando debe revisar y cambiar sus filtros basado en las
horas de uso del purificador de aire. Una luz roja LED se iluminará
cuando sea tiempo de revisar/cambiar sus filtros.
Cuando sea necesario reemplazar el Filtro HEPA o el prefiltro, la luz
permanecerá encendida hasta que la REINICIE. Puede desenchufar
el purificador de aire sin interrumpir la verificación del filtro.
Debe revisar periódicamente los filtros dependiendo de las condiciones de funcionamiento, el Filtro HEPA debe
reemplazarse cada 12 meses y el prefiltro cada 3 meses.
REEMPLACE CON EL FILTRO CERTIFICADO HEPA
Filtro
G
y el PREFILTRO
A
Prefiltro
REDUCTOR DE OLORES
Para REINICIAR el Verificador Electrónico del Filtro:
Cuando la luz de revisión del filtro permanece encendida y sin parpadear, es tiempo de cambiar el Prefiltro
Reductor de Olores y reiniciar el monitor del filtro. Con la unidad ENCENDIDA, presione el botón de REINICIO
DEL FILTRO junto a la luz LED del Verificador del Filtro y manténgalo presionado durante aproximadamente 2
segundos hasta que la luz se apague (Fig. 4).
Cuando la luz LED se encienda y parpadee, es tiempo de cambiar el Filtro HEPA y reiniciar el monitor del filtro.
Con la unidad ENCENDIDA, presione el botón de REINICIO DEL FILTRO y manténgalo presionado durante
aproximadamente 2 segundos hasta que la luz se APAGUE (Fig. 4).
Reinicio Manual (o Temprano) del Verificador Electrónico del Filtro
Dependiendo de su uso individual (ambiente y horas de uso), es posible que necesite reemplazar los filtros más
o menos frecuentemente. Cada vez que reemplace sus filtros, debe reiniciar el monitor del filtro. Puede reiniciar
manualmente el monitor del filtro para el Prefiltro o el Filtro HEPA, o ambos. Si cambia el Prefiltro o el Filtro HEPA
antes de que se encienda la luz LED del Verificador del Filtro, es posible reiniciar el monitor del filtro. Primero
debe encender manualmente la luz LED del Verificador del Filtro. Siga estos pasos:
1. Con la unidad ENCENDIDA, presione el botón de REINICIO DEL FILTRO durante 5 segundos para encender la
luz LED en modo “estable”.
2. Para reiniciar el monitor del filtro para el Prefiltro: presione y mantenga presionado el botón de REINICIO DEL
FILTRO durante 2 segundos hasta que la Luz LED cambie a modo intermitente.
3. PULSE el botón de REINICIO DEL FILTRO para apagar la luz LED. El monitor del prefiltro ahora está
configurado como “estado limpio”.
4. Para reiniciar el monitor del filtro para el Filtro HEPA: la luz LED debe estar en “modo intermitente”. Siga el
Paso 1 anterior, luego PULSE nuevamente el botón de REINICIO DEL FILTRO para encender la luz LED en
“modo intermitente”.
5. Presione y mantenga presionado el botón de REINICIO DEL FILTRO durante 2 segundos hasta que la luz LED
se apague. El monitor del Filtro HEPA ahora está configurado como “estado limpio”.
6. Para reiniciar el monitor del filtro para el Filtro HEPA y el Prefiltro: Siga los Pasos 1, 2 y 5 anteriores.
Luz Indicadora
de Verificación
del Filtro
Fig. 4

13
LIMPIEZA Y ALMACENAMIENTO
Le recomendamos que limpie su purificador de aire al menos una vez cada 3 meses y antes de guardarlo de
forma prolongada. Use solamente un paño seco para limpiar las superficies exteriores del purificador de aire.
NO USE AGUA, CERA PARA MUEBLES NI NINGÚN OTRO PRODUCTO QUÍMICO.
Si no va a utilizar su Purificador de Aire durante más de 30 días, se recomienda:
• Retirar el Filtro HEPA y el Prefiltro Reductor de Olores de la unidad.
• Coloque cada filtro en diferentes bolsas de plástico herméticas para conservar su frescura.
ACCESORIOS Y FILTRO DE REEMPLAZO
Puede comprar el reemplazo del Filtro Certificado HEPA
Filtro
G
de Honeywell y el Prefiltro
A
Prefiltro
Reductor de
Olores de Honeywell en la tienda donde compró su purificador de aire o, puede ordenarlos directamente en
www.HoneywellPluggedIn.com. Utilice sólo los Filtros de Reemplazo Originales de Honeywell. Tiene la opción de
usar el Prefiltro
A
+
Prefiltro
Reductor de Olores y Gases en el Hogar de Honeywell en lugar del Prefiltro
A
Prefiltro
Reductor de
Olores. También está disponible en muchas tiendas o en www.HoneywellPluggedIn.com.
Si tiene alguna pregunta, por favor llame al 18004770457, o visite nuestro sitio web en:
www.HoneywellPluggedIn.com/contact-us
Mi Purificador de Aire ha empezado a hacer ruido y cada vez sale menos aire. ¿Qué sucede?
Los filtros pueden estar sucios. Grandes cantidades de contaminantes pueden bloquear los poros en el filtro
y evitar que el aire pase a través de él. Cambie los filtros.
¿Cuánto tiempo debo dejar funcionando mi Purificador de Aire?
La unidad será más eficaz cuando las puertas y las ventanas estén cerradas. Se recomienda que opere su
purificador de aire cuando esté en casa para ayudar a limpiar el aire. Si lo desea o cuando las condiciones lo
ameriten, puede operar su purificador de aire las 24 horas del día.
¿Puedo lavar los filtros en mi Purificador de Aire?
No. Lavar cualquiera de los filtros los arruinará.
¿Cuándo debo reemplazar mis filtros?
Debe revisar periódicamente los filtros dependiendo de las condiciones de funcionamiento, el Filtro HEPA
debe reemplazarse cada 12 meses y el prefiltro cada 3 meses.
SERVICIO AL CLIENTE
Estamos aquí para ayudar. Llame lada gratuita al: 18004770457
O visite nuestro sitio web: www.HoneywellPluggedIn.com/contact-us
Por favor asegúrese de especificar el número de modelo.
NOTA: EN CASO DE ALGÚN PROBLEMA, POR FAVOR PRIMERO CONTACTE SERVICIO AL CLIENTE O
CONSULTE SU GARANTÍA. NO DEVUELVA AL LUGAR ORIGINAL DE COMPRA. NO INTENTE ABRIR LA
CARCASA DEL MOTOR USTED MISMO, HACERLO PODRÍA ANULAR LA GARANTÍA Y CAUSAR DAÑO
EN EL PURIFICADOR DE AIRE O PROVOCAR LESIONES PERSONALES.

14
Antes de usar este producto, por favor lea
completamente las instrucciones.
A. La presente garantía limitada de 5 años cubre
la reparación o reemplazo del producto si éste
presenta un defecto de fábrica o de mano de obra.
Esta garantía excluye todo daño resultante del uso
comercial, abusivo o inadecuado del producto,
o de daños asociados. Los defectos resultantes
del desgaste normal no se consideran defectos
de fábrica en virtud de la presente garantía. KAZ
NO SERÁ CONSIDERADA RESPONSABLE DE
DAÑOS FORTUITOS O INDIRECTOS DE NINGÚN
TIPO. TODA GARANTÍA IMPLÍCITA DE CALIDAD
COMERCIAL O DE CONVENIENCIA CON UN
FIN ESPECÍFICO RELACIONADA CON ESTE
PRODUCTO TENDRÁ LA MISMA VIGENCIA
QUE LA PRESENTE GARANTÍA. En ciertos
lugares no se permite la exclusión o limitación
de daños fortuitos o indirectos, ni los límites de
duración aplicables a una garantía implícita. Por
consiguiente, es posible que estas limitaciones
o exclusiones no se apliquen en su caso. Esta
garantía le confiere ciertos derechos legales
específicos. Es posible que usted también tenga
otros derechos legales, los que varían según la
jurisdicción. La presente garantía sólo es válida
para el comprador inicial del producto a partir de la
fecha de compra.
B. A su discreción, Kaz reparará o reemplazará el
presente producto si se constata que presenta un
defecto de fábrica o de mano de obra.
C. Esta garantía no cubre los daños ocasionados por
tentativas de reparación no autorizadas o por todo
uso que no esté en concordancia con el presente
manual de instrucciones.
D. Esta garantía no cubre los Filtros HEPA o los
Prefiltros, con la excepción de defectos de material
o de mano de obra.
Por favor visite www.HoneywellPluggedIn.com/
warranty-registration para registrar su producto y
reciba actualizaciones de información del producto y
nuevas ofertas promocionales.
GARANTÍA LIMITADA DE 5 AÑOS

15
FCC COMPLIANCE / CUMPLIMIENTO DE LA FCC
NOTE: This equipment has been tested and found to comply with the limits for a Class B digital device, pursuant
to Part 15 of the FCC Rules. These limits are designed to provide reasonable protection against harmful
interference in a residential installation. This equipment generates, uses, and can radiate radio frequency energy
and, if not installed and used in accordance with the instructions, may cause harmful interference to radio
communications. However, there is no guarantee that interference will not occur in a particular installation. If this
equipment does cause harmful interference to radio or television reception, which can be determined by turning
the equipment off and on, the user is encouraged to try to correct the interference by one or more of the following
measures:
• Reorient or relocate the receiving antenna.
• Increase the separation between the equipment and receiver.
• Connect the equipment into an outlet on a circuit different from that to which the receiver is connected.
• Consult the dealer or an experienced radio TV technician for help.
Warning: Changes or modifications to this unit not expressly approved by the party responsible for compliance
could void the user’s authority to operate the equipment.
NOTA: Este equipo ha sido probado y cumple con los límites correspondientes para un dispositivo digital Clase
B, según la Parte 15 de las Normas de la FCC (Comisión Federal de Comunicaciones de EE.UU.). Estos límites
están diseñados para proporcionar protección razonable contra interferencias perjudiciales en una instalación
residencial. Este equipo genera, utiliza y puede emitir energía de frecuencias de radio y, si no es instalado y usado
de acuerdo a las instrucciones, puede causar interferencias perjudiciales en las comunicaciones de radio. Sin
embargo, no hay garantía de que no ocurrirán las interferencias en una instalación determinada. Si este equipo
causa interferencias perjudiciales en la recepción de radio o televisión, que se pueden identificar encendiendo y
apagando el equipo, recomendamos al usuario que intente solucionar las interferencias tomando una o más de
las siguientes medidas:
• Cambiar la orientación o posición de la antena receptora.
• Aumentar la separación entre el equipo y el receptor.
• Conectar el equipo a un tomacorriente de un circuito diferente del que está conectado el receptor.
• Consultar al proveedor o a un técnico de radio TV con experiencia para recibir ayuda.
Advertencia: Cambios o modificaciones hechos a esta unidad que no hayan sido expresamente aprobados por la
parte responsable del cumplimiento pueden anular la autoridad del usuario para utilizar el equipo.

A007022R0
16AUG21
© 2021 All rights reserved.
Kaz USA, Inc., a Helen of Troy Company
400 Donald Lynch Blvd., Suite 300, Marlborough, MA 01752
Honeywell is a trademark of Honeywell International Inc., used under license by Helen of Troy Limited.
Distributed in Canada by: Kaz Canada, Inc., a Helen of Troy Company
6700 Century Avenue, Suite 210, Mississauga, Ontario L5N 6A46
Contact us at 18004770457 or www.HoneywellPluggedIn.com/contact-us
The ENERGY STAR® name and mark are registered trademarks owned by the U.S. EPA.
Made in China
© 2021 Todos los derechos reservados.
Kaz USA, Inc., Una Empresa de Helen of Troy
400 Donald Lynch Blvd., Suite 300, Marlborough, MA 01752
Honeywell es una marca registrada de Honeywell International Inc., utilizada bajo licencia por Helen of Troy Limited.
Distribuido en Canada por Kaz Canada, Inc., una Empresa de Helen of Troy
6700 Century Avenue, Suite 210, Mississauga, Ontario L5N 6A4
Contáctenos al teléfono 18004770457 o al sitio web www.HoneywellPluggedIn.com/contact-us
El nombre y la marca ENERGY STAR® son marcas registradas propiedad de U.S. EPA
Hecho en China

Brand: Honeywell
Category: Air Purifiers
Model: HPA020 Series
Artwork Part #: A007022R0
Die Line Part #: NA
Subject: Owner’s Manual
Region: US
Flat Size: IN: W11x H8
Folded Size: IN: W5.5 x H8
Scale: 1/1
Material: 70# Matte Text
Page Count: 16
Revision: 3
Date:
16AUG21
Release Date: 19AUG21
Re-release Date:
Special Instructions:
Colors:
Dielines (Do not print) Spot Colors
Quality Requirement of Artwork and Quality
Clarification Process of Artwork Printing:
Meet EngQS06&02
Helen of Troy
Creative Services
Marlborough, MA 01752, USA
+1 508 490 7000
Cyan
0%
Magenta
0%
Yellow
0%
Black
100%
PMS
XXXX
PMS
XXXX