Loading ...
Loading ...
Loading ...
7
P R O D U C T C AR E
6
P R O D U C T C O N T R O L S
Although the hood is cleaned upon completion of the
manufacturing process, you will probably need to clean
your hood again after installation. Wipe the surface of the
hood with a good household cleaner applied with a soft
cloth, or stainless steel polish, depending on the fi nish of
your hood. This will leave a protective fi nish on the hood.
Hood Operation
Always turn on your hood before you begin cooking to
establish airfl ow in the kitchen. Also let the blower run
for a few minutes to clear the air after you turn off your
cooking appliance. This will help keep the kitchen air
cleaner.
Light knob – Push once to turn lights on. Push again to
turn lights off . Rotate clockwise to increase light intensity
and counterclockwise to decrease light intensity. Light
setting will stay the same when turned on or off .
Fan knob – Push once to turn blower on. Push again
to turn blower off . Rotate clockwise to increase blower
speed and counterclockwise to decrease blower speed.
Heat Lamp Switch – Push to turn on/off heat lamps (not
included).
Before Using the Hood
Settings and Functions
Light control
Fan control Heat Lamp control
Light control Fan control Heat Lamp controls
36” model
48” & 60” model
Any piece of equipment works better and lasts longer
when maintained properly and kept clean. Ventilation
equipment is no exception. Your hood must be kept
clean and maintained properly.
Cleaning Baffl e Filters
As air passes through a baffl e fi lter, grease particles
collect on the stainless steel U-shaped baffl e channels
and drip down into the bottom of the fi lter. Baffl e fi lters
are extremely effi cient when compared to mesh fi lters.
The power of the hood is increased as more air passes
through a baffl e fi lter than with mesh fi lters, which are
usually dirty. Baffl e fi lters are almost universally required
in commercial installations due to their superior ability
to capture grease. The baffl e fi lters should be examined
periodically to assure that all surfaces and parts are clean.
The fi lters can be washed in a dishwasher or in a sink with
hot, soapy water. Simple periodic cleaning will ensure
maximum fi lter eff ectiveness.
• DO NOT use caustic detergent to clean the fi lters. An
abrasive or corrosive cleaner may damage the fi nish.
• DO NOT take the baffl e fi lters apart to clean them. It is
not necessary and will void the fi lter warranty.
Cleaning and Maintenance
C AU T I O N
Unplug power cords from control panel before
cleaning or servicing hood.
2
1
3
1
1
2
1
2
3
2
2
1
3
3
3
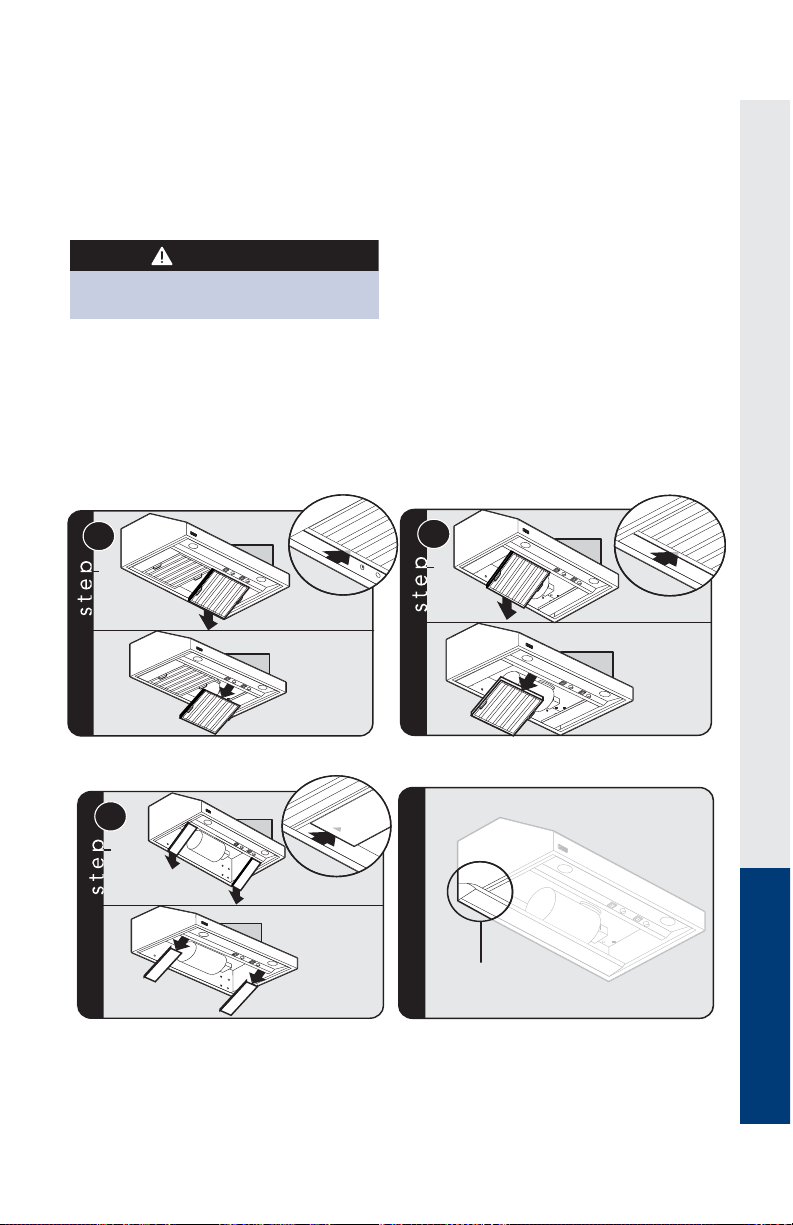
Grease trough
Slide fi lter forward off of rear lip. Lower fi lter rear,
then slide fi lter front out.
Slide fi lter forward off of rear lip. Lower fi lter rear,
then slide fi lter front out.
When cleaning fi lters, always remove the grease
trough and clean by soaking in a sink with hot
soapy water.
Slide spacer forward off of rear lip. Lower spacer
rear, then slide spacer front out.
Loading ...
Loading ...
Loading ...