
Lea el manual de instrucciones detenidamente
y asegúrese de comprender las instrucciones
antes de utilizar la máquina.
La gasolina que contiene hasta 10 % de etanol
(E10) se puede usar en esta máquina. El uso
de gasolina que tenga más de 10 % de etanol
(E10) anulará la garantía del producto.
114 08 58-27
Operator Manual
Manual del operador
Z 142 / 967924801-00
Please read the operator manual carefully and
make sure you understand the instructions
before using the machine.
Gasoline containing a maximum of 10% ethanol
(E10) is permitted for use in this machine. The
use of gasoline with more than 10% ethanol
(E10) will void the product warranty.
English / Spanish
2018-10-22 SR

©2018 All rights reserved.
Orangeburg, SC Printed in U.S.A.
When this product is worn out and no longer
used, return it to the reseller or other party for
recycling.
7RLPSOHPHQWLPSURYHPHQWVVSHFL¿FDWLRQV
and designs can be altered without prior
QRWL¿FDWLRQ
Note that no legal demands can be placed
based on the information contained in these
instructions.
Use only original parts for repairs. The use of
other parts voids the warranty.
Do not modify or install non-standard
equipment to the unit without consent from the
PDQXIDFWXUHU0RGL¿FDWLRQVWRWKHXQLWPD\
cause unsafe operations or damage the unit.
WARNING! Failure to follow cautious
operating practices can result in dangerous
injury to the operator or other persons. The
owner must understand these instructions,
and must let only approved persons who
understand these instructions to operate the
mower.
Each person operating the mower must be of
sound mind and body and must not be under
WKHLQÀXHQFHRIPLQGDOWHULQJVXEVWDQFHV
WARNING! Engine exhaust, some of its
constituents, and certain vehicle components
contain or emit chemicals known to the State of
California to cause cancer and birth defects or
other reproductive harm.
WARNING! Battery posts, terminals
and related accessories contain lead and lead
compounds, chemicals known to the State of
California to cause cancer and birth defects
or other reproductive harm. Clean your hands
after handling.
CONFORMITY CERTIFICATES
USA requirements
Labels are placed on the engine and/or in the engine compartment stating that the machine
ZLOOIXO¿OOWKHUHTXLUHPHQWV7KLVLVDOVRDSSOLFDEOHWRVSHFLDOUHTXLUHPHQWVIRUDQ\RIWKHVWDWHV
&DOLIRUQLDHPLVVLRQUXOHVHWF'RQRWUHPRYHWKHVHODEHOV&HUWL¿FDWHVFDQDOVREHVXSSOLHG
with the machine at delivery or written in the Engine manual. Take care of them as they are
valuable documents.
WARNING! Engine exhaust and certain
vehicle components contain or emit chemicals
considered to cause cancer, birth defects,
or other reproductive system damage. The
engine exhaust contains carbon monoxide,
which is an odorless, colorless, poisonous gas.
Do not use the machine in enclosed spaces.

CONTENTS
INTRODUCTION ......................................................4
Driving and Transport on Public Roads ...............4
Towing ..................................................................4
Operating .............................................................4
SYMBOLS AND DECALS ........................................6
SAFETY ....................................................................7
Protecting Children ..............................................7
Personal Safety Equipment .................................8
Slope Operation ...................................................8
Safe Handling of Gasoline ................................... 9
Transport ............................................................10
Towing ................................................................ 11
Spark Arrestor .................................................... 11
CONTROLS ............................................................12
Steering Control Levers ..................................... 13
Park Brake .........................................................13
Ignition Switch .................................................... 13
Throttle Control .................................................. 14
Choke control .....................................................14
Service Meter .....................................................14
Blade Switch ......................................................14
Fuse ...................................................................15
)XHO6KXW2ႇ9DOYH ............................................15
Cutting Height Lever .......................................... 15
Bypass Linkages ................................................15
Seat Adjustment Lever .......................................15
Fuel Tank............................................................16
Tracking .............................................................16
OPERATION ...........................................................17
Training ..............................................................17
Operating on Hills ..............................................19
Moving Machine By Hand ..................................20
MAINTENANCE .....................................................21
Battery ................................................................23
Safety System ....................................................24
Park Brake .........................................................24
Tire Pressures ....................................................24
Caster Wheels ...................................................25
9EHOWV ................................................................25
Adjusting the Mower Deck ................................. 26
Cutting Blades ....................................................27
Cleaning .............................................................27
LUBRICATION ........................................................28
Transmission ......................................................28
Engine Oil ..........................................................29
Wheel and Deck Zerks ....................................... 29
TROUBLESHOOTING ...........................................30
STORAGE ...............................................................31
SCHEMATIC ...........................................................32
TECHNICAL DATA ................................................. 33
6(59,&(-2851$/ ..............................................35
INTRODUCCIÓN....................................................39
Conducción y transporte en vías públicas ......... 39
Remolque ...........................................................39
Funcionamiento .................................................39
SÍMBOLOS Y RÓTULOS .......................................41
SEGURIDAD...........................................................42
Seguridad infantil ............................................... 42
Equipo de seguridad personal ........................... 43
Funcionamiento en pendientes .......................... 43
Manipulación segura de la gasolina ................... 44
Transporte ..........................................................46
Remolque ...........................................................46
Parachispas .......................................................46
CONTROLES..........................................................47
Palancas de control de la dirección ................... 48
Freno de estacionamiento .................................48
Interruptor de encendido .................................... 49
Interruptor de cuchilla ........................................49
Estrangulador .....................................................49
Medidor de servicio ............................................49
Control del acelerador ........................................ 49
Fusible ...............................................................50
9iOYXODGHFRUWHGHFRPEXVWLEOH ........................50
Palanca de altura de corte .................................50
9DULOODMHVGHGHULYDFLyQ ......................................50
Desplazamiento .................................................50
Depósito de combustible ....................................51
Palanca de ajuste del asiento ............................51
OPERACIÓN ..........................................................52
Capacitación ......................................................52
Trabajo en pendientes ....................................... 54
Mover la máquina manualmente ........................ 55
MANTENIMIENTO ................................................. 56
Batería ............................................................... 58
Sistema de seguridad ........................................ 59
Freno de estacionamiento .................................59
Ruedecillas ........................................................60
Presión de los neumáticos ................................. 60
&RUUHDVHQ9 ...................................................... 60
Ajuste del equipo de corte .................................61
Discos de corte .................................................. 62
Limpieza .............................................................62
LUBRICACIÓN .......................................................63
Transmisión ........................................................63
Cambio de aceite del motor ...............................64
Engrasadores de rueda y equipo ....................... 64
SOLUCIÓN DE PROBLEMAS ..............................65
ALMACENAMIENTO.............................................. 66
ESQUEMA ..............................................................67
DATOS TÉCNICOS ................................................68
5(*,6752'(6(59,&,2 ....................................70

4
INTRODUCTION
Congratulations
Thank you for purchasing a Husqvarna ride-
on mower. This machine is built for superior
HႈFLHQF\WRUDSLGO\PRZSULPDULO\ODUJHDUHDV
A control panel easily accessible to the operator
and a hydrostatic transmission regulated by
steering controls both contribute to the machine’s
performance.
This manual is a valuable document. Read the
contents carefully before using or servicing the
machine. The following of instructions (use,
service, maintenance) by all who operate this
machine is important for the safety of the operator
and others. It can also considerably increase the
life span of the machine and increase its resale
value.
If you sell your machine, be sure to give the
operator manual to the new owner.
7KH¿QDOFKDSWHURIWKLVRSHUDWRUPDQXDOSURYLGHV
D6HUYLFH-RXUQDO0DNHVXUHWKDWVHUYLFHDQG
repair work are documented. A correctly kept
service journal reduces service costs for the
PDLQWHQDQFHDQGDႇHFWVWKHPDFKLQH¶VUHVDOH
value. Please contact your dealer for more
information. Take the operator manual along
when the machine is taken to your dealer for
service.
General
In this operator manual, left and right, backward
and forward are used in relation to the machine’s
usual driving direction.
Continuous dedication to improve our products
UHTXLUHWKDWVSHFL¿FDWLRQVDQGGHVLJQDUHVXEMHFW
to change without notice.
Driving and Transport on Public Roads
&KHFNDSSOLFDEOHURDGWUDႈFUHJXODWLRQVEHIRUH
transporting on public roads. If the machine is
transported, you must always use approved
fastening equipment and make sure that the
machine is correctly attached. DO NOT operate
this machine on public roadways.
Towing
If machine is equipped with a tow hitch, use much
more caution when towing. Do not let children or
others in or on the towed equipment. Make wide
WXUQVWRDYRLGMDFNNQL¿QJ7UDYHOVORZO\DQGOHDYH
more distance to stop.
Do not tow on sloped ground. The weight of the
towed equipment may cause loss of traction and
loss of control.
Follow the manufacturer's recommendation for
weight limits for towed equipment. Do not tow
near ditches, canals, and other hazards.
Operating
This machine is constructed only for mowing
grass on lawns and even ground without
obstacles such as stones, tree stumps, etc. The
machine can also be used for other tasks when
equipped with special accessories provided by
the manufacturer. Operating instructions for the
accessories are provided with delivery. All other
types of uses are incorrect. The manufacturer’s
directions concerning operation, maintenance,
and repairs must be carefully followed.
Lawn mowers and all power equipment, can
be potentially dangerous if used improperly.
Safety requires good judgment, careful use in
accordance with these instructions and common
sense.
The machine must only be operated, maintained,
and repaired by persons familiar with the
machine’s special characteristics and who are
also knowledgeable about the safety instructions.
Use only approved repair parts to maintain this
machine.
Accident prevention regulations, other general
safety regulations, occupational safety rules, and
WUDႈFUHJXODWLRQVPXVWEHIROORZHGZLWKRXWIDLO
8QDXWKRUL]HGPRGL¿FDWLRQVWRWKHGHVLJQRIWKH
machine may absolve the manufacturer from
liability for resulting personal injury or property
damage.

5
INTRODUCTION
Good Service
Husqvarna's products are sold throughout the
world and only in specialized retail stores with
complete service. This ensures that you as a
customer receive only the best support and
service. Before the product is delivered, the
machine has, for example, been inspected and
DGMXVWHGE\\RXUUHWDLOHU6HHWKHFHUWL¿FDWHLQWKH
6HUYLFH-RXUQDOLQWKLVRSHUDWRUPDQXDO
When you need spare parts or support in service
questions, warranty issues, etc., please consult
the following professional:
Manufacturing Number
The machine’s manufacturing number can be
IRXQGRQWKHSULQWHGSODWHDႈ[HGWRWKHHQJLQH
compartment.
Stated on the plate, from the top are:
• The machine’s type designation (I.D.).
• The manufacturer’s type number (Model).
• The machine’s serial number (Serial no.)
Please have the type designation and serial
number available when ordering spare parts.
This manual belongs to the machine with the
manufacturing number:
Engine Transmission
The engine’s manufacturing number is stamped
on one of the valve covers.
The plate states:
• The engine’s model.
• The engine’s type.
• Code
Please have these available when ordering spare
parts.
The wheel motors and hydrostatic pumps have a
EDUFRGHGHFDODႈ[HGDWWKHUHDU
72
REGISTRO DE SERVICIO
6(59,&,2'(+25$6
Acción
Fecha, Lectura De Medidor,
Sello, Firma
Realizar el mantenimiento después de 25 horas
Realizar el mantenimiento después de 50 horas
5HHPSOD]DUHO¿OWURGHDFHLWHGHOPRWRU
Limpiar/reemplazar las bujías
5HHPSOD]DUHO¿OWURGHFRPEXVWLEOH
5HYLVDUODVFRUUHDVHQ9
Comprobar/apretar los pernos de los ejes de las ruedecillas
(cada 200 horas
&DPELDUHOFDUWXFKRGHSDSHOGHO¿OWURGHDLUH
6(59,&,2'(+25$6
Acción
Fecha, Lectura De Medidor,
Sello, Firma
Realizar el mantenimiento después de 25 horas
Realizar el mantenimiento después de 50 horas
Realizar el mantenimiento después de 100 horas
Revisar/ajustar el equipo de corte
/LPSLDUODFiPDUDGHFRPEXVWLyQ\UHFWL¿FDUORVDVLHQWRV
de las válvulas
Comprobar el reglaje de la válvula del motor
5HHPSOD]DUHOSUH¿OWURGHHVSXPDGHOSXUL¿FDGRUGHDLUH
$/0(12681$9(=$/$f2
Acción
Fecha, Lectura De Medidor,
Sello, Firma
Limpiar la toma de aire de refrigeración del motor (25 horas)
5HHPSOD]DUHOSUH¿OWURGHHVSXPDGHOSXUL¿FDGRUGHDLUH
horas)
5HHPSOD]DUHOFDUWXFKRGHSDSHOGHO¿OWURGHDLUH
Cambiar el aceite del motor (50 horas)
5HHPSOD]DUHO¿OWURGHDFHLWHGHOPRWRUKRUDV
Comprobar/ajustar la altura de corte
Comprobar/ajustar el freno de estacionamiento (50 horas)
Limpiar/cambiar las bujías (100 horas)
&DPELDUHO¿OWURGHFRPEXVWLEOHKRUDV
Comprobar el reglaje de la válvula del motor
71
REGISTRO DE SERVICIO
DESPUÉS DE 10 HORAS
Acción
Fecha, Lectura De Medidor,
Sello, Firma
Cambiar el aceite del motor
MANTENIMIENTO DIARIO
Acción
Fecha, Lectura De Medidor,
Sello, Firma
Limpiar los residuos del cortacésped
Revisar el nivel del aceite del motor
Comprobar la presión de los neumáticos
Revisar la parte inferior del equipo
Comprobar el sistema de seguridad
Comprobar si hay fugas en el sistema de combustible
Inspeccionar las protecciones y blindajes de seguridad
Revisar el ajuste del freno
6(59,&,2'(+25$6
Acción
Fecha, Lectura De Medidor,
Sello, Firma
&RPSUREDUHO¿OWURGHDLUHGHODERPEDGHFRPEXVWLEOH
$¿ODUUHHPSOD]DUODVFXFKLOODVGHFRUWHVLHVQHFHVDULR
Comprobar la presión de los neumáticos
Revisar las los cables de la batería
Lubricar de acuerdo con la tabla de lubricación
Comprobar/limpiar las tomas de aire de refrigeración del motor
/LPSLDUHOSUH¿OWURGHHVSXPDGHOSXUL¿FDGRUGHDLUH
6(59,&,2'(+25$6
Acción
Fecha, Lectura De Medidor,
Sello, Firma
Realizar el mantenimiento después de 25 horas
/LPSLDUUHHPSOD]DUHOFDUWXFKRGH¿OWURGHSDSHOGHOSXUL¿FDGRUGHDLUH
(intervalos más cortos para condiciones de funcionamiento con mucho
polvo)
Cambiar el aceite del motor
Lubricar de acuerdo con la tabla de lubricación
RN
6
SYMBOLS AND DECALS
These symbols are found on the machine and in
the operator manual. Study them carefully so that
you know what they mean.
IMPORTANT INFORMATION Xxxx xxxxxx
xxxxx xxxx xxxxxxxxx xxxxxx xxxxxxxxx.
WARNING! Xxxx xxxxxx xxxxx xxxx
xxxxxxxxx xxxxxx xxxxxxxxx.
Used in this publication to tell the reader of a
risk of personal injury or death, particularly if the
reader neglects to follow the instructions in the
manual.
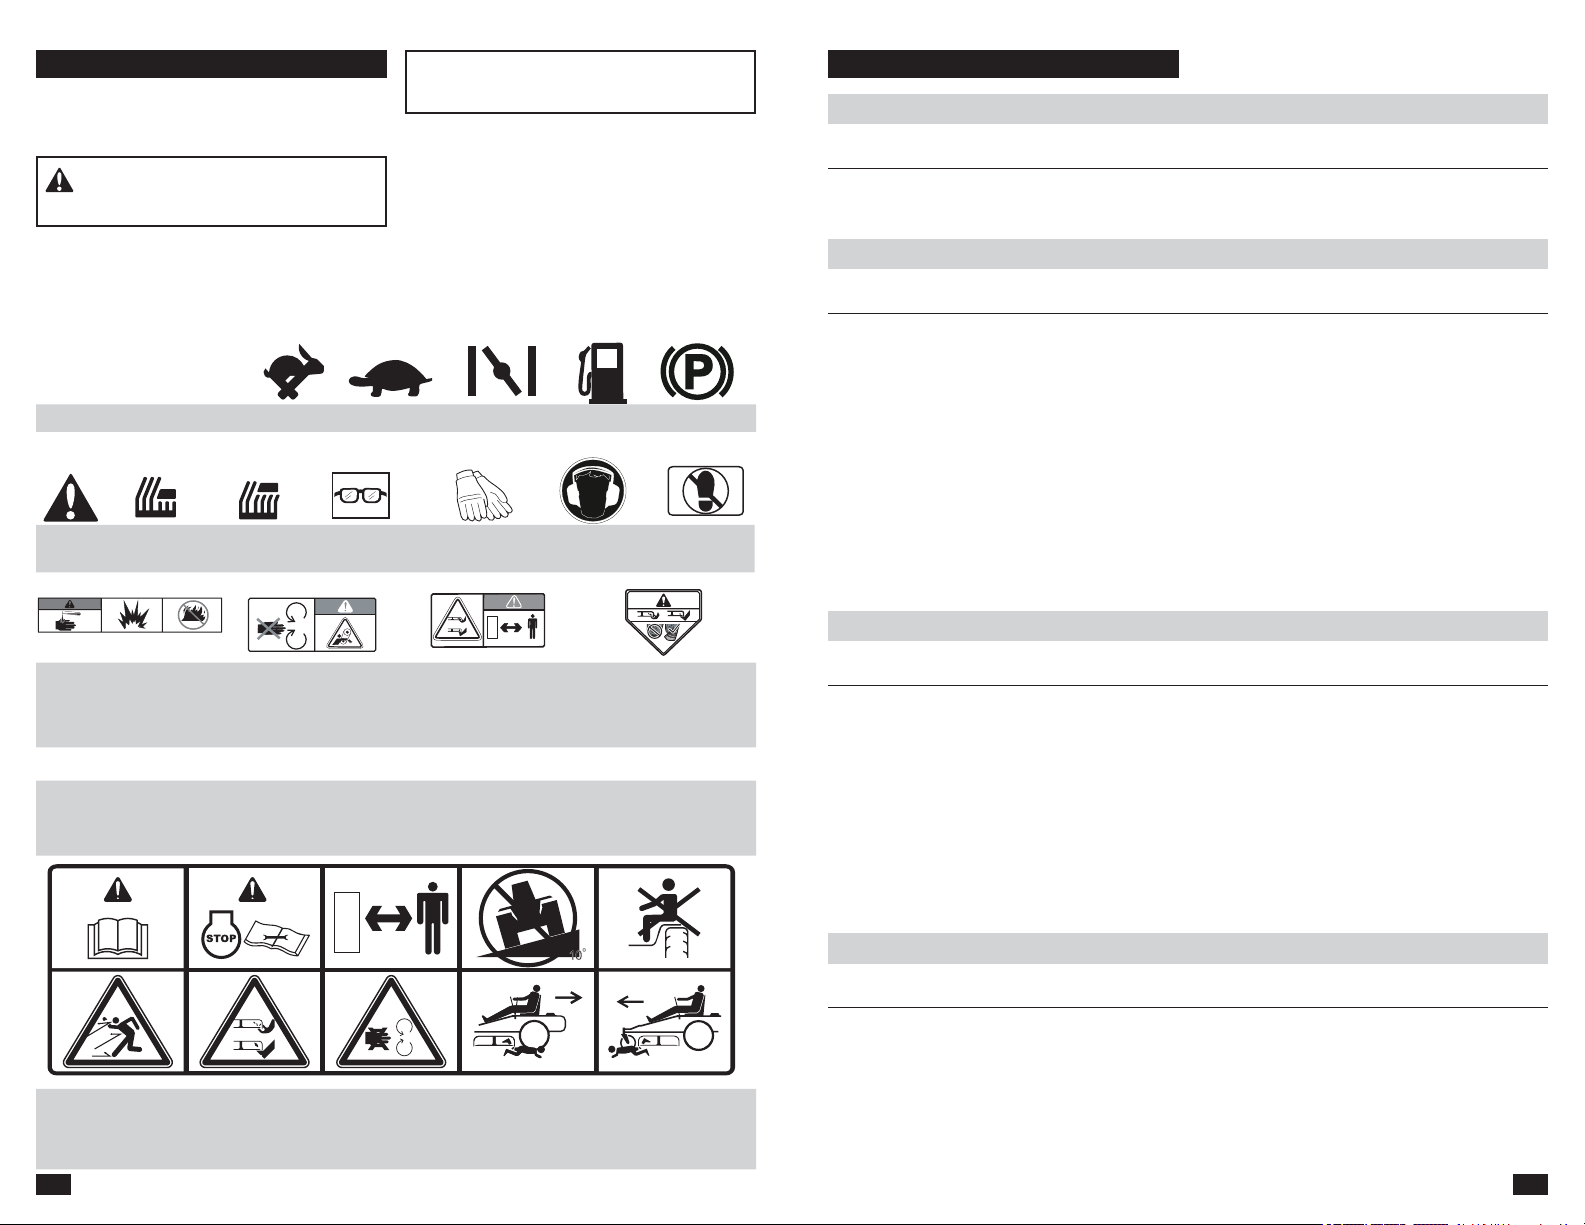
Reverse Neutral Fast Slow Choke Fuel Park Brake
Danger Cut Height
Low
Cut Height
High
Use protective
glasses
Use protective
gloves
Wear hearing
protection
Do not
stand here
Read Operator
Manual
6KXWRႇHQJLQH
remove key before
maintenance
or repair
Keep a safe
distance from
the machine
Use on slopes no
greater than 10° No passengers
Full body
exposure to
thrown objects
6HYHULQJRI¿QJHUV
and toes
Do not open or
remove safety
shields with engine
running
Careful backing up,
watch for
other persons
Careful going
forward, watch for
other persons
Warning!
Battery acid is
corrosive, explosive
DQGÀDPPDEOH
Warning!
Do not touch parts
Warning!
Keep away from the
discharge deck
Warning!
Do not use without
GHÀHFWRU
or grass catcher
Used in this publication to tell the reader of a
risk of material damage, particularly if the reader
neglects to follow the instructions in the manual.
Used also when there is a possibility for misuse or
misassembly.

7
SAFETY
WARNING! THIS CUTTING MACHINE
IS CAPABLE OF AMPUTATING HANDS
$1')((7$1'7+52:,1*2%-(&76
)$,/85(722%6(59(7+()2//2:,1*
SAFETY INSTRUCTIONS COULD RESULT IN
6(5,286,1-85<25'($7+
General Operation
• Read, understand,
and follow all
instructions on the
machine and in
the manual before
starting.
• It is recommended
that someone be
aware that you are mowing and can provide
help in case of injury or accident.
• Anyone who operates, maintains, and/or
VHUYLFHVWKLVPDFKLQHPXVW¿UVWUHDGDQG
understand this Operator Manual. Local laws
may regulate the age of the user. The owner
is responsible for training the users of this
equipment.
• The owner and operator of this equipment
can prevent accidents and is responsible for
accidents or injuries occurring to themselves,
other people and/or property.
• Do not put hands or feet near rotating parts or
under the machine. Keep clear of the discharge
opening at all times.
• Only let responsible adults, who are familiar
with the instructions, to operate the machine.
• Clear the area of
objects such as
rocks, toys, wire,
etc., which could
be picked up and
thrown by the
blades.
• Be sure the area
is clear of bystanders before operating. Stop
machine if anyone enters the area.
• Do not mow in reverse unless fully necessary.
Always look down and behind before and while
backing.
• Do not direct discharged material toward
anyone. Avoid discharging material against a
wall or obstruction. Material may ricochet back
toward the operator. Stop the blades when
crossing gravel surfaces.
• Do not operate machine without the full grass
catcher, discharge guard, or other safety
devices in place and working.
• Slow down before turning.
WARNING! CHILDREN CAN BE
6(5,286/<,1-85('25.,//('%<7+,6
EQUIPMENT. Carefully read and follow all the
safety instruction that follow.
IMPORTANT INFORMATION The American
Academy of Pediatrics recommends that
children be a minimum of 16 years of age
before operating a riding lawn mower.
Protecting Children
Tragic accidents can occur if the operator is
not alert to the presence of children. Children
are frequently attracted to the machine and the
mowing activity. Do not assume that children will
stay where you last saw them.
• Keep children out
of the mowing area
and in the watchful
care of a responsible
adult other than the
operator.
• Be alert and turn
PDFKLQHRႇLIDFKLOG
enters the area.
• Before and while backing, look behind and
down for small children.
• Do not carry children, even with the blades
VKXWRႇ7KH\PD\IDOORႇDQGEHVHULRXVO\
injured or interfere with safe machine operation.
Children who have
been given rides
in the past may
suddenly come into
the mowing area for
another ride and be
run over or backed
over by the machine.
Safety Instructions
These instructions are for your safety. Read them
carefully.
• Do not let children to operate the machine.
• Use extreme care when going near blind
corners, shrubs, trees, or other objects that may
block your view of a child.
70
REGISTRO DE SERVICIO
6(59,&,2'((175(*$
Acción
Fecha, Lectura De Medidor,
Sello, Firma
Cargar y conecte la batería
Ajustar la presión de los neumáticos de todas las ruedas a 15
psi (1 bar)
Conectar la caja de contacto al cable para el interruptor
de seguridad del asiento
9HUL¿FDUTXHHOPRWRUWHQJDODFDQWLGDGFRUUHFWDGHDFHLWH
Ajustar la posición de los controles de la dirección
Llenar con combustible y abrir la válvula de corte de combustible
Arrancar el motor
Comprobar:
Que haya impulso en ambas ruedas
El ajuste del equipo de corte
Interruptor de seguridad del freno de estacionamiento
Interruptor de seguridad del equipo de corte
Interruptor de seguridad en el asiento
Interruptor de seguridad en los controles de la dirección
Funcionalidad del freno de estacionamiento
Avance hacia delante
Marcha atrás
Acoplamiento de las cuchillas
9HORFLGDGGHUDOHQWt
Revisar el régimen de ralentí alto del motor
Informar al cliente acerca de:
Necesidad y ventajas de seguir el programa de
mantenimiento
Necesidad y ventajas de dejar la máquina para el servicio
Efectos del servicio y de mantener un registro de servicio
en el valor de reventa de la máquina
Áreas de aplicación para triturar
Llenar los documentos de venta, etc.
69
DATOS TÉCNICOS
TORNILLOS HEXÁGONOS
Los valores de par indicados se deben utilizar como pauta
JHQHUDOFXDQGRQRVHWHQJDLQIRUPDFLyQGHORVYDORUHVGHSDUHVSHFt¿FRV
7RUQLOOHUtDHVWiQGDUGH((88
Grade SAE Grade 5 SAE Grade 8 Flangelock Screw
w/Flangelock Nut
Size ft./lbs Nm ft./lbs Nm ft./lbs Nm
Tamaño de culata (diámetro en
SXOJDGDVURVFD¿QDRJUXHVD
1/4 9 12 13 18
5/16 18 24 28 38 24 33
3/8314246624054
7/16 50 68 75 102
1/2 75 102 115 156
9/16 110 149 165 224
5/8 150 203 225 305
3/4 250 339 370 502
7/8 378 512 591 801
1-1/8 782 1060 1410 1912
** Grado 5 - Calidad comercial mínima (no se recomienda una menor calidad)
7RUQLOOHUtDHVWiQGDUHQVLVWHPDPpWULFR
Grade Grade 8.8 Grade 10.9 Grade 12.9
Size ft./lbs Nm ft./lbs Nm ft./lbs Nm
Tamaño de culata (diámetro en milímetros,
URVFD¿QDRJUXHVD
M4 1.5 2 2.2 3 2.7 3.7
M5 3 4 4.5 6 5.2 7
M6 5.2 7 7.5 10 8.2 11
M78.21112161520
M813.51818.82521.830
M1024 3335.24843.559
M12 43.5 59 62.2 84 75 102
M14 70.5 96 100 136 119 161
M16 108 146 147 199 176 239
M18 142 193 202 274 242 328
M20 195 264 275 373 330 447
M22 276 374 390 529 471 639
M24 353 478 498 675 596 808
M27 530 719 735 996 904 1226
(VSHFL¿FDFLRQHVGHSDU
Perno del cigüeñal del motor 75 pies/lb (102 Nm)
Tornillos de polea de corte 75 pies/lb (102 Nm)
Tuercas del asa 75 pies/lb (102 Nm)
Tornillo de la cuchilla 60 pies/lb (81 Nm)
Sujetadores estándar 1/4" 9 pies/lb (12 Nm)
Sujetadores estándar 5/16" 18 pies/lb (25 Nm)
Sujetadores estándar 3/8" 33 pies/lb (44 Nm)
Sujetadores estándar 7/16" 52 pies/lb (70 Nm)
Sujetadores estándar 1/2" 80 pies/lb (110 Nm)
8
SAFETY
• $OZD\VWXUQRႇEODGHVPRYHWKHVWHHULQJ
control lever out to the park brake position, stop
engine and remove keys before dismounting.
• Do not carry passengers. The machine is only
intended for use by one person.
• Disengage blades when not mowing. Shut
RႇHQJLQHDQGZDLWIRUDOOSDUWVWRFRPHWRD
complete stop before cleaning the machine,
removing the grass catcher or unclogging the
discharge guard.
• Operate the machine only in daylight or good
DUWL¿FLDOOLJKW
• Do not operate the machine while under the
LQÀXHQFHRIDOFRKRORUGUXJV
• :DWFKIRUWUDႈFZKHQRSHUDWLQJQHDURU
crossing roadways.
• Use extra care when loading or unloading the
machine into a trailer or truck.
• Always wear eye protection when operating
machine.
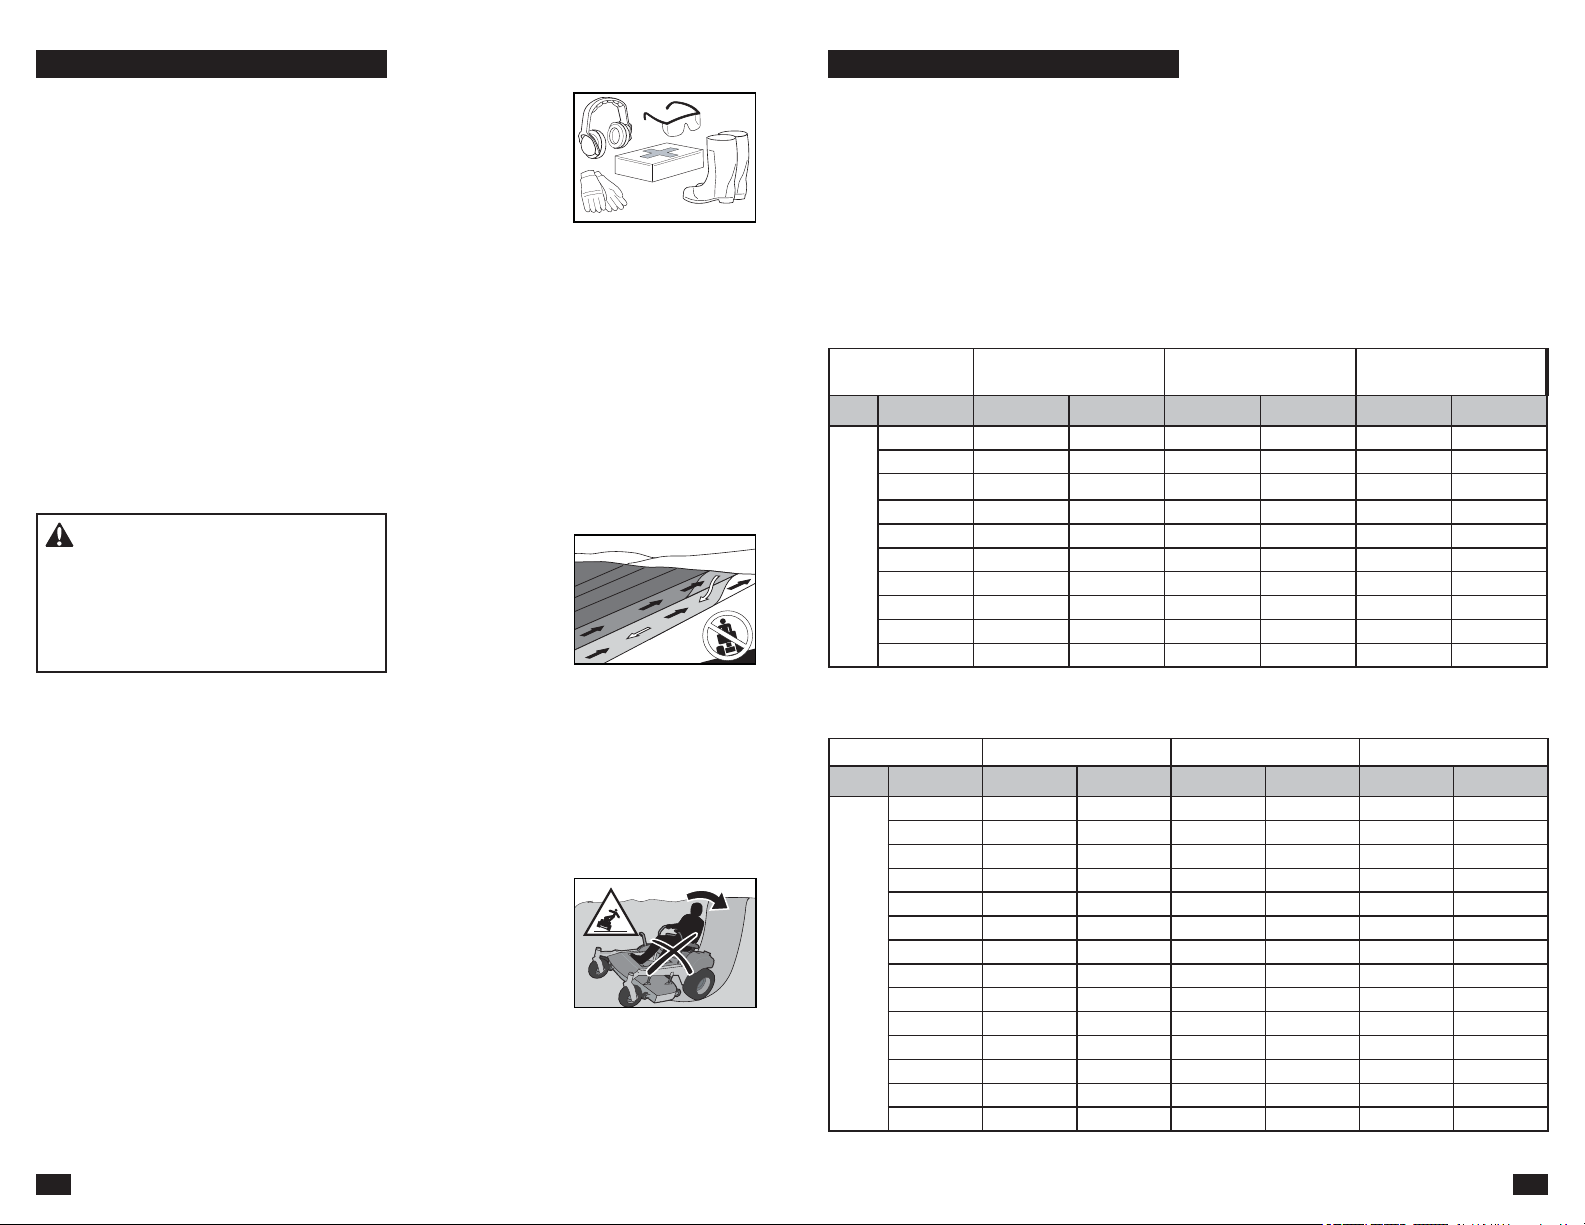
Personal Safety Equipment
0DNHVXUHWKDW¿UVWDLG
equipment is close at
hand when using the
machine.
Do not use the
machine when
barefoot.
Always wear protective
shoes or boots, preferably with steel toe caps.
Always wear approved protective glasses or a full
visor when assembling or driving.
Always wear gloves when handling the blades.
Do not wear loose clothing that can get caught in
moving parts.
Use ear protectors to avoid damage to hearing.
Slope Operation
Slopes are a major factor related to loss of control
and tip-over accidents, which can result in severe
injury or death. Operation on slopes requires
much more caution. If you cannot back up the
slope or if you feel uneasy on it, do not mow it.
• Mow up and down
slopes (10 degrees
maximum), not
across.
• Watch for holes,
ruts, bumps, rocks,
or other hidden
objects. Uneven
terrain could overturn the machine. Tall grass
can hide obstacles.
• Choose a low ground speed so that you will not
have to stop while on the slope.
• Do not mow on wet grass. Tires may lose
traction.
• Avoid starting, stopping, or turning on a slope. If
the tires lose traction, disengage the blades and
proceed slowly straight down the slope.
• Keep movement
on the slopes slow
and gradual. Do
not make sudden
changes in speed
or direction, which
could cause
machine to roll over.
• Use extra care while operating machine with
grass catchers or other attachments; the
VWDELOLW\RIWKHPDFKLQHFDQEHHႇHFWHG
• Do not use on steep slopes.
• Do not try to stabilize the machine by putting a
foot on the ground.
WARNING! When using the machine,
approved personal protective equipment must
be used. Personal protective equipment cannot
eliminate the risk of injury but it will reduce the
degree of injury if an accident does happen.
Ask your retailer for help in choosing the right
equipment.
• Wear proper Personal Protective Equipment
(PPE) while operating this machine, including
(at a minimum) sturdy footwear, eye protection,
and hearing protection. Do not mow in shorts
and/or footwear with open toes.
• Data indicates that operators age 60 years and
above are involved in a large percentage of
riding mower-related injuries. These operators
must evaluate if they can safely operate the
ULGLQJPRZHUVXႈFLHQWO\WRSURWHFWWKHPVHOYHV
and others from serious injury.
• Follow the manufacturer’s recommendation for
wheel weights or counterweights.
• Keep machine free of grass, leaves or other
debris buildup which can touch hot exhaust or
engine parts and burn. Do not let the mower
deck plow leaves or other debris that can cause
a buildup to occur. Clean oil or fuel spillage
before operating or storing the machine.
• Let machine cool before storage.
9
SAFETY
• If fuel is spilled on clothing, change clothing
immediately.
• Do not start the engine near spilled fuel.
• Do not use gasoline as a cleaning agent.
• If leaks arise in fuel system, the engine must
not be started until problem has been resolved.
• Check the fuel level before each use and leave
space for the fuel to expand, as the heat from
the engine and the sun may otherwise cause
WKHIXHOWRH[SDQGDQGRYHUÀRZ
General Maintenance
• Do not use the
machine indoors or
in spaces lacking
proper ventilation.
The exhaust
fumes contain
carbon monoxide,
an odorless and
poisonous lethal gas.
WARNING! The engine and the exhaust
system become very hot during operation.
There is a risk for burns if touched. Let engine
and exhaust system to cool before refueling.
• Make sure that the equipment is in good
condition and that all nuts and bolts, especially
those fastening the blade attachments, are
properly tightened and torqued.
• Maintain or replace safety and instruction labels
as necessary.
• Do not interfere with the intended function of a
safety device or reduce the protection provided
by a safety device. Check their proper operation
UHJXODUO\1(9(5RSHUDWHDPDFKLQHZLWKD
safety device that does not function properly.
• Check grass catcher components and the
discharge guard frequently and replace with
manufacturer’s recommended parts when
necessary.
WARNING! The engine must not
EHVWDUWHGZKHQWKHGULYHU¶VÀRRUSODWHRU
protective plates for the mower deck’s drive
belt is removed.
• 'RQRWPRZQHDUGURSRႇVGLWFKHVRU
embankments. The machine could suddenly
roll over if a wheel is over the edge or the edge
caves in.
WARNING! Do not drive up or down hills
with slopes greater than 10 degrees. Do not
drive across slopes.
Safe Handling of Gasoline
To avoid personal injury or property damage, use
much more care in handling gasoline. Gasoline is
YHU\ÀDPPDEOHDQGWKHYDSRUVDUHH[SORVLYH
• Extinguish all cigarettes, cigars, pipes, and
other sources of ignition.
• Use only approved gasoline containers.
• Do not remove gas cap or add fuel with
the engine running. Let engine cool before
refueling.
• Do not fuel the
machine indoors.
• Do not keep the
machine or fuel
container where
there is an open
ÀDPHVSDUNRUSLORW
light such as on a
water heater or other appliance.
• Before you begin refueling, minimize the risk of
static electricity by touching a metal surface.
• 'RQRW¿OOFRQWDLQHUVLQVLGHDYHKLFOHRURQD
truck or trailer bed with plastic liner. Always
place containers on the ground away from the
YHKLFOHZKHQ¿OOLQJ
• 'RQRWRYHU¿OOIXHOWDQN5HSODFHJDVFDSDQG
tighten securely.
• Remove gas-powered equipment from the truck
or trailer and refuel it on the ground. If this is not
possible, refuel such equipment with a portable
container, rather than from a gasoline dispenser
nozzle.
• Keep the nozzle in contact with the rim of the
fuel tank or container opening at all times until
fueling is complete. Do not use a nozzle lock-
open device.
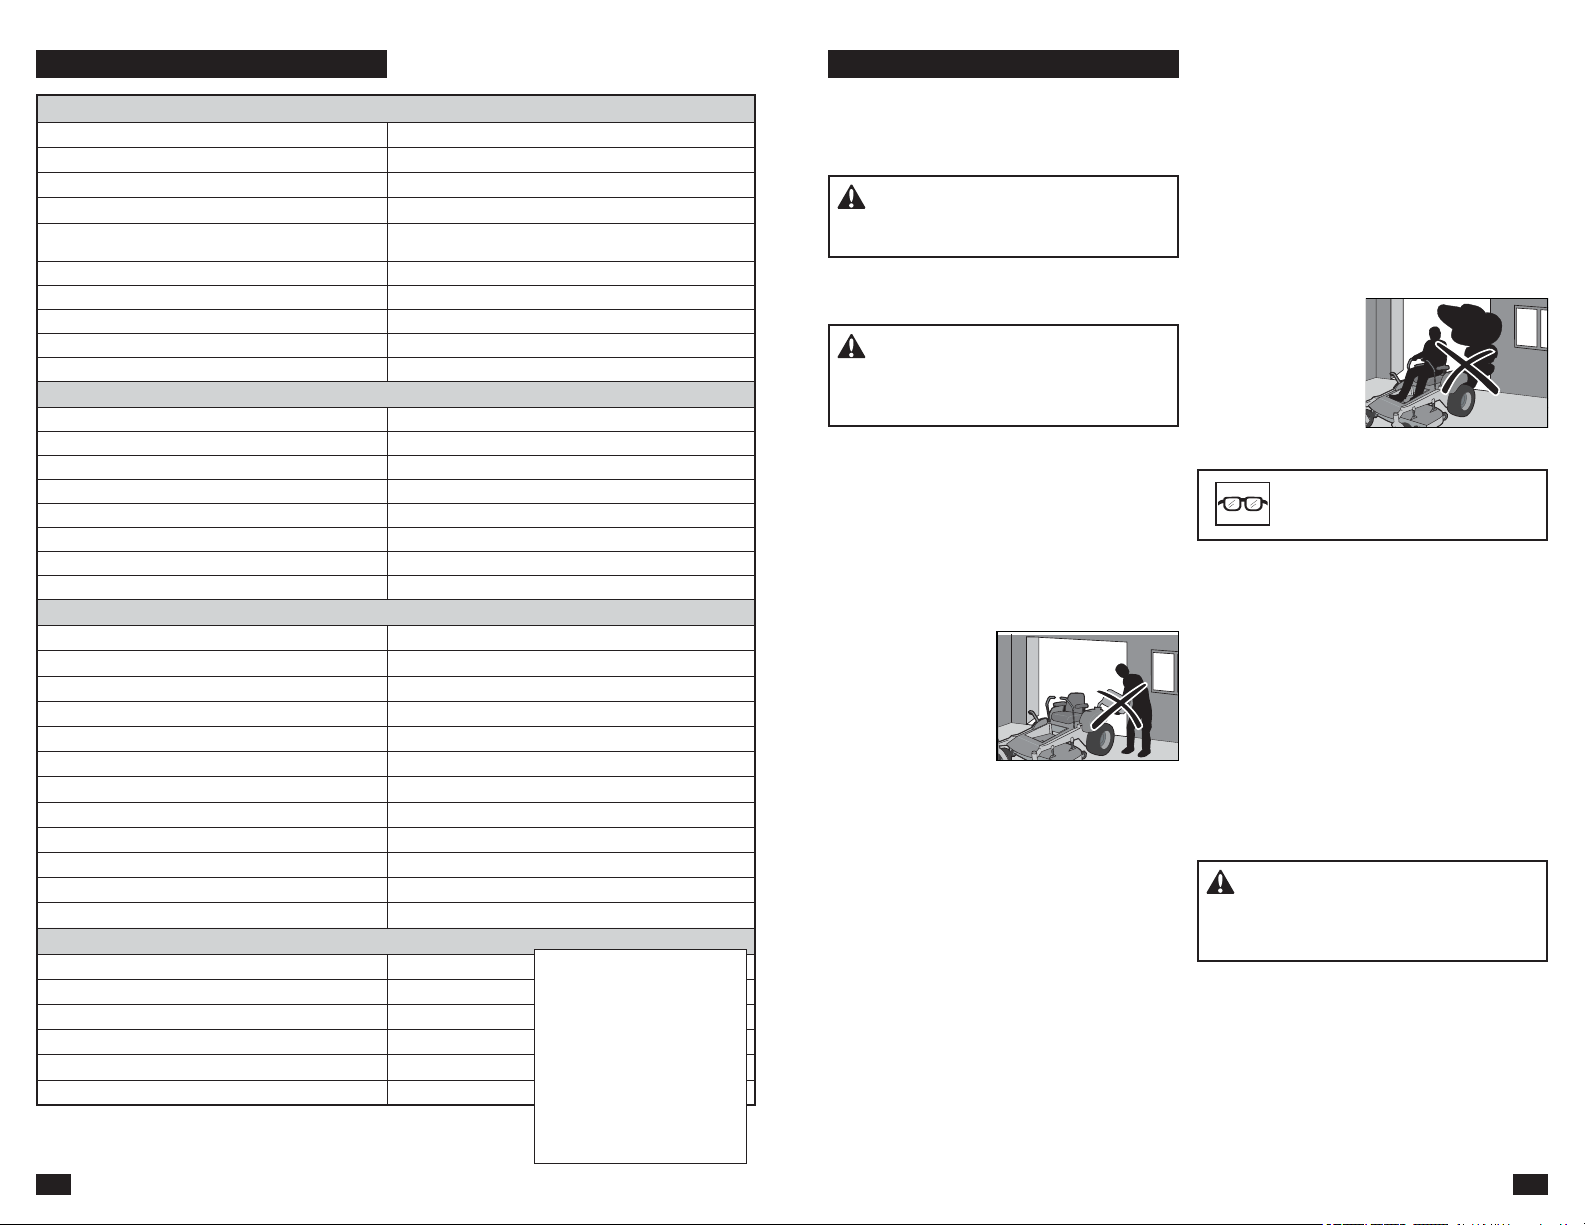
CAUTION! Use protective glasses
for maintenance work.
• Do not change the settings of governors and
avoid running the engine with overly high
engine speeds. If you run the engine too fast,
machine components could be damaged.
• 7RUHGXFHWKHULVNRI¿UHNHHSWKHPDFKLQHIUHH
of grass, leaves or other debris buildup. Clean
oil or fuel spills and remove fuel-soaked debris.
Let machine cool before storing.
68
DATOS TÉCNICOS
MOTOR
Fabricante Kohler
Tipo KT600-3011
Electricidad
17 hp
1)
Lubricación $SUHVLyQFRQ¿OWURGHDFHLWH
Combustible
Sin plomo mín. 87 octanos (alcohol etílico
máx. 10 %, MTBE máx. 15 %)
Capacidad del depósito de combustible 13,25 litros
Refrigeración Refrigerado por aire
Filtro de aire Estándar
Alternador 12 amp
Motor de partida Eléctrico
TRANSMISIÓN
Transmisión Transejes hidrostáticos
Control de la dirección Palancas dobles, sujeción de espuma
9HORFLGDGGHDYDQFH 0-10,5 km/h
9HORFLGDGGHUHWURFHVR 0-5,6 km/h
Frenos Freno de estacionamiento mecánico
Neumáticos de la ruedecilla delantera 11 x 4-5
Neumáticos traseros, neumático ara césped 18 x 7.5-8
Presión de los neumáticos 15 PSI / 103 kPa / 1 bar
BASTIDOR
Ancho de corte 107 cm
Altura de corte 3,8 - 10,2 cm
Número de cuchillas 2
Longitud de la cuchilla 42 cm
Rodillo de nariz Si
Ruedas de apoyo 0
Asiento neumático Estándar
Reposabrazos con bisagras Opcional
Medidor de horas N/A
Acoplamiento de la cuchilla Embrague electromagnético
Construcción del equipo Estampe
Productividad
10,117 m
2
/h
DIMENSIONES
Peso 263 kg
Longitud base de la máquina 191,5 cm
Altura base de la máquina 101,6 cm
Ancho base de la máquina 105,5 cm
Ancho total, tolva arriba 112 cm
Ancho total, tolva abajo 127 cm
1)
/DFODVL¿FDFLyQGHSRWHQFLD
declarada por el fabricante
del motor es la potencia
bruta de salida promedio
HQOD530HVSHFL¿FDGDGH
un motor de producción
típico para el modelo de
motor que se mide con las
normas SAE para potencia
bruta del motor. Consulte las
HVSHFL¿FDFLRQHVGHOPRWRU
del fabricante.
67
ESQUEMA
10
SAFETY
• Do not operate this machine on public
roadways.
• &KHFNDQGDELGHE\ORFDOWUDႈFUHJXODWLRQV
before transporting the machine on public
roads.
• Do not tow this machine, it may cause damage
to the drive system.
• Do not tow trailers, etc. with this mower. They
may jackknife or overturn, causing damage to
the mower and possible serious injury to the
operator.
• Load the unit onto truck or trailer by driving up
ramps of suitable strength using a slow speed.
DO NOT LIFT! The machine is not intended to
be lifted by hand.
• When loading or unloading this machine, do
not use more than the maximum recommended
operation angle of 10 degrees.
IMPORTANT INFORMATION The park brake
LVQRWVXႈFLHQWWRORFNWKHPDFKLQHLQSODFH
during transport. Ensure that the machine is
well fastened to the transport vehicle. Always
reverse the machine onto the transport vehicle
to avoid tipping it over.
• Stop to inspect the equipment if you run over or
into anything. If necessary, make repairs before
starting.
• Do not make adjustments or repairs with the
engine running.
• The blades are sharp and can cause cuts and
gashes. Wrap blades or use protective gloves
when handling them.
• Check the park brake’s functionality regularly.
Adjust and service as necessary.
• Do not work with the starter circuit if there is
spilled fuel.
• 0DNHVXUHWKDWWKHIXHO¿OOHUFDSLVPRXQWHG
WLJKWO\DQGQRÀDPPDEOHVXEVWDQFHVDUHNHSWLQ
an open vessel.
• Sparking can occur
when working with
the battery and the
heavy cables of the
starter circuit. This
can cause battery
H[SORVLRQ¿UHRU
eye injury. Sparking
will not occur after
the grounding cable (normally negative, black)
is removed from the battery.
• Disconnect the grounding cable from the battery
¿UVWDQGUHFRQQHFWLWODVW
• Do not make a bridge short circuit across the
starter relay to run the starter.
• Be very careful when handling battery acid.
Acid on skin can cause serious corrosive burns.
If you spill battery acid on your skin, rinse
immediately with water.
• Acid in the eyes can cause blindness, contact a
doctor immediately.
• Be careful when
servicing the battery.
Explosive gases
form in the battery.
Do not perform
maintenance on
the battery when
smoking or near
RSHQÀDPHVRU
sparks. The battery can explode and cause
serious injury or damage.
• The machine is tested and approved only
with the equipment originally provided or
recommended by the manufacturer. Only use
approved repair parts for the machine.
• The mulch blades must only be used in familiar
areas when higher quality mowing is desired.
• Regularly clean the deck and the underside of
the deck. Avoid spraying engine and electrical
components with water.
Transport
• The machine is heavy and can cause serious
crushing injuries. Be extra cautious when it is
loaded on or unloaded from a vehicle or trailer.
• Use full width ramps for loading machine into a
trailer or truck.
• Use an approved trailer to transport the
machine. Operate the park brake by securing
the steering controls in the outboard position
ZLWKHODVWLFRUUDWFKHWVWUDSV7XUQRႇWKHIXHO
supply. Fasten the machine down with approved
devices such as bands, chains or straps.
• Both front and rear tie down straps must be
used and directed down and out from the
machine.
WARNING! Use extreme caution when
loading the machine into a truck or trailer using
ramps. There is the possibility of serious injury
RUGHDWKLIWKHPDFKLQHIDOOVRႇWKHUDPSV

11
SAFETY
Towing
If machine is equipped with a tow hitch, use much
more caution when towing. Do not let children or
others in or on towed equipment.
0DNHZLGHWXUQVWRDYRLGMDFNNQL¿QJ7UDYHO
slowly and leave more distance to stop. Do not
tow on sloped ground. The weight of the towed
equipment may cause loss of traction and loss of
control.
Follow the manufacturer’s recommendation for
weight limits for towed equipment. Do not tow
near ditches, canals, and other hazards.
Spark Arrestor
This mower is equipped with an internal
combustion engine and must not be used on
or near unimproved forested, bush covered
or grassy lands unless the engine’s system is
equipped with a spark arrestor meeting applicable
local or state laws. Federal laws apply on federal
lands.
If a spark arrestor is used, it must be maintained
LQHႇHFWLYHZRUNLQJRUGHUE\WKHRSHUDWRU
$VSDUNDUUHVWRUIRUWKHPXႉHULVDYDLODEOH
through your authorized Husqvarna dealer.
66
ALMACENAMIENTO
Almacenamiento durante el invierno
La máquina debe prepararse para el
DOPDFHQDPLHQWRDO¿QDOGHODWHPSRUDGDGHFRUWH
o si se no se va a utilizar durante más de 30 días.
El combustible que se deja en el depósito durante
largos períodos de tiempo (30 días o más) puede
dejar residuos pegajosos que pueden obstruir el
carburador y alterar la función del motor.
Los estabilizadores de combustible son una
opción aceptable para evitar la acumulación de
residuos pegajosos que se producen durante el
almacenamiento.
Agregue estabilizador al combustible del depósito
o al contenedor de almacenamiento. Utilice
siempre la proporción de mezcla indicada por
el fabricante del estabilizador. Haga funcionar
el motor durante al menos 10 minutos después
de agregar el estabilizador para que llegue al
combustible. No vacíe el depósito de combustible
ni el carburador si ha agregado estabilizador.
Para preparar la máquina para el
almacenamiento:
1. Limpie la máquina completamente, en
especial debajo del equipo de corte. Retoque
los daños en la pintura y rocíe una capa
delgada de aceite en la parte inferior del
equipo de corte para evitar la corrosión.
2. Inspeccione la máquina para ver si hay piezas
dañadas o desgastadas y apriete las tuercas
\ORVWRUQLOORVTXHVHKD\DQDÀRMDGR
3. Cambie el aceite del motor y deséchelo de
forma adecuada.
4. 9DFtHORVGHSyVLWRVGHFRPEXVWLEOHRDJUHJXH
un estabilizador de combustible. Arranque
el motor y déjelo funcionar hasta que el
carburador se quede sin combustible o el
estabilizador haya llegado al carburador.
5. Extraiga la bujía de encendido y vierta
aproximadamente una cucharada de
aceite de motor en el cilindro. Arranque
el motor para que el aceite se distribuya
uniformemente y a continuación, vuelva a
colocar la bujía.
6. Lubrique todos los engrasadores, juntas y
ejes.
7. Extraiga la batería. Limpie, cargue y guarde la
batería en un lugar fresco, pero protegida del
frío directo.
8. Guarde la máquina en un lugar limpio y seco
y cúbrala para protegerla mejor.
Servicio
Cuando solicite piezas de repuesto, indique el
año de compra, modelo, tipo y número de serie.
Utilice siempre piezas de repuesto Husqvarna
originales.
Una comprobación anual en un taller de servicio
autorizado es una buena forma de garantizar
que la máquina funcione de manera óptima en la
temporada siguiente.
$'9(57(1&,$No almacene el motor
con combustible en el depósito en interiores
o espacios con poca ventilación donde los
vapores del combustible puedan entrar en
contacto con llamas abiertas, chispas o una
llama piloto como la de una caldera, depósito
de agua caliente, secadora de ropa, etc.
Manipule el combustible con cuidado. Es muy
LQÀDPDEOH\SXHGHSURYRFDUGDxRVSHUVRQDOHV
graves y daños a la propiedad. Drene el
combustible en un recipiente aprobado al aire
libre y almacénelo lejos de llamas abiertas o
fuentes de ignición. No utilice gasolina para la
limpieza. Utilice un desengrasador y agua tibia.
65
SOLUCIÓN DE PROBLEMAS
Problema / Causa
El motor no arranca
El interruptor de la cuchilla está activado
Los controles de dirección no están bloqueados
en la posición externa
La batería está agotada
Hay contaminación en el carburador o la tubería
de combustible
La válvula de corte del suministro de
combustible está cerrada
Filtro de combustible obstruido o la tubería de
combustible
Sistema de encendido defectuoso
El arranque no hace girar el motor
La batería está agotada
Mal contacto de las conexiones de cable de la
terminal de la batería
Fusible fundido
Falla en el circuito de seguridad del arranque.
Consulte Sistema de seguridad en la sección
Mantenimiento
(OPRWRUIXQFLRQDFRQGL¿FXOWDG
Carburador defectuoso
2EVWUXFFLyQHQHO¿OWURRVXPLQLVWURGH
combustible
El estrangulador se tira hacia fuera con el motor
caliente
9iOYXODGHYHQWLODFLyQREVWUXLGDHQHOWDSyQGH
combustible
Depósito de combustible prácticamente vacío
Bujías sucias
Mezcla de combustible enriquecida o mezcla de
combustible-aire.
Tipo de combustible incorrecto
Agua en el combustible
Filtro de aire obstruido
El motor parece débil
Filtro de aire obstruido
Bujías sucias
Ajuste incorrecto del carburador
Aire atrapado en el sistema hidráulico
/DPiTXLQDYLEUD
Las cuchillas están sueltas
Las cuchillas están mal equilibradas
El motor está suelto
El motor se sobrecalienta
Obstrucción en la entrada de aire o las aletas de
refrigeración
Sobrecarga del motor
9HQWLODFLyQGH¿FLHQWHDOUHGHGRUGHOPRWRU
Regulador del régimen del motor defectuoso
Escasez o ausencia de aceite en el motor
Hay contaminación en el carburador o la tubería
de combustible
Bujías sucias
La batería no se carga
Mal contacto de las conexiones de cable de la
terminal de la batería
El cable de carga está desconectado
/DPiTXLQDVHPXHYHOHQWDPHQWHGHIRUPD
irregular, o no se mueve en absoluto
El freno de estacionamiento está activado
9DULOODMHGHGHVYLDFLyQGHODERPEDKLGUiXOLFD
conectado
La correa de transmisión está suelta o se salió
Aire atrapado en el sistema hidráulico
(OHTXLSRGHFRUWHQRHVWiDFRSODGR
La correa de transmisión del equipo de corte se
soltó
El contacto del acoplamiento electromagnético
se soltó
El interruptor de la cuchilla está defectuoso o se
soltó de contacto del cable
Fusible fundido
El transeje tiene fugas de aceite
Daño en los sellos, el alojamiento o las juntas
Aire atrapado en el sistema hidráulico
Resultados de corte desiguales
Diferente presión de aire en los neumáticos en
los lados izquierdo y derecho.
Cuchillas dobladas
La suspensión del equipo de corte es desigual
/DVFXFKLOODVHVWiQGHVD¿ODGDV
La velocidad de conducción es demasiado alta
La hierba es demasiado larga
Hay hierba acumulada debajo del equipo de
corte
1
2
10
11
12
3
4
6
7
9
8
5
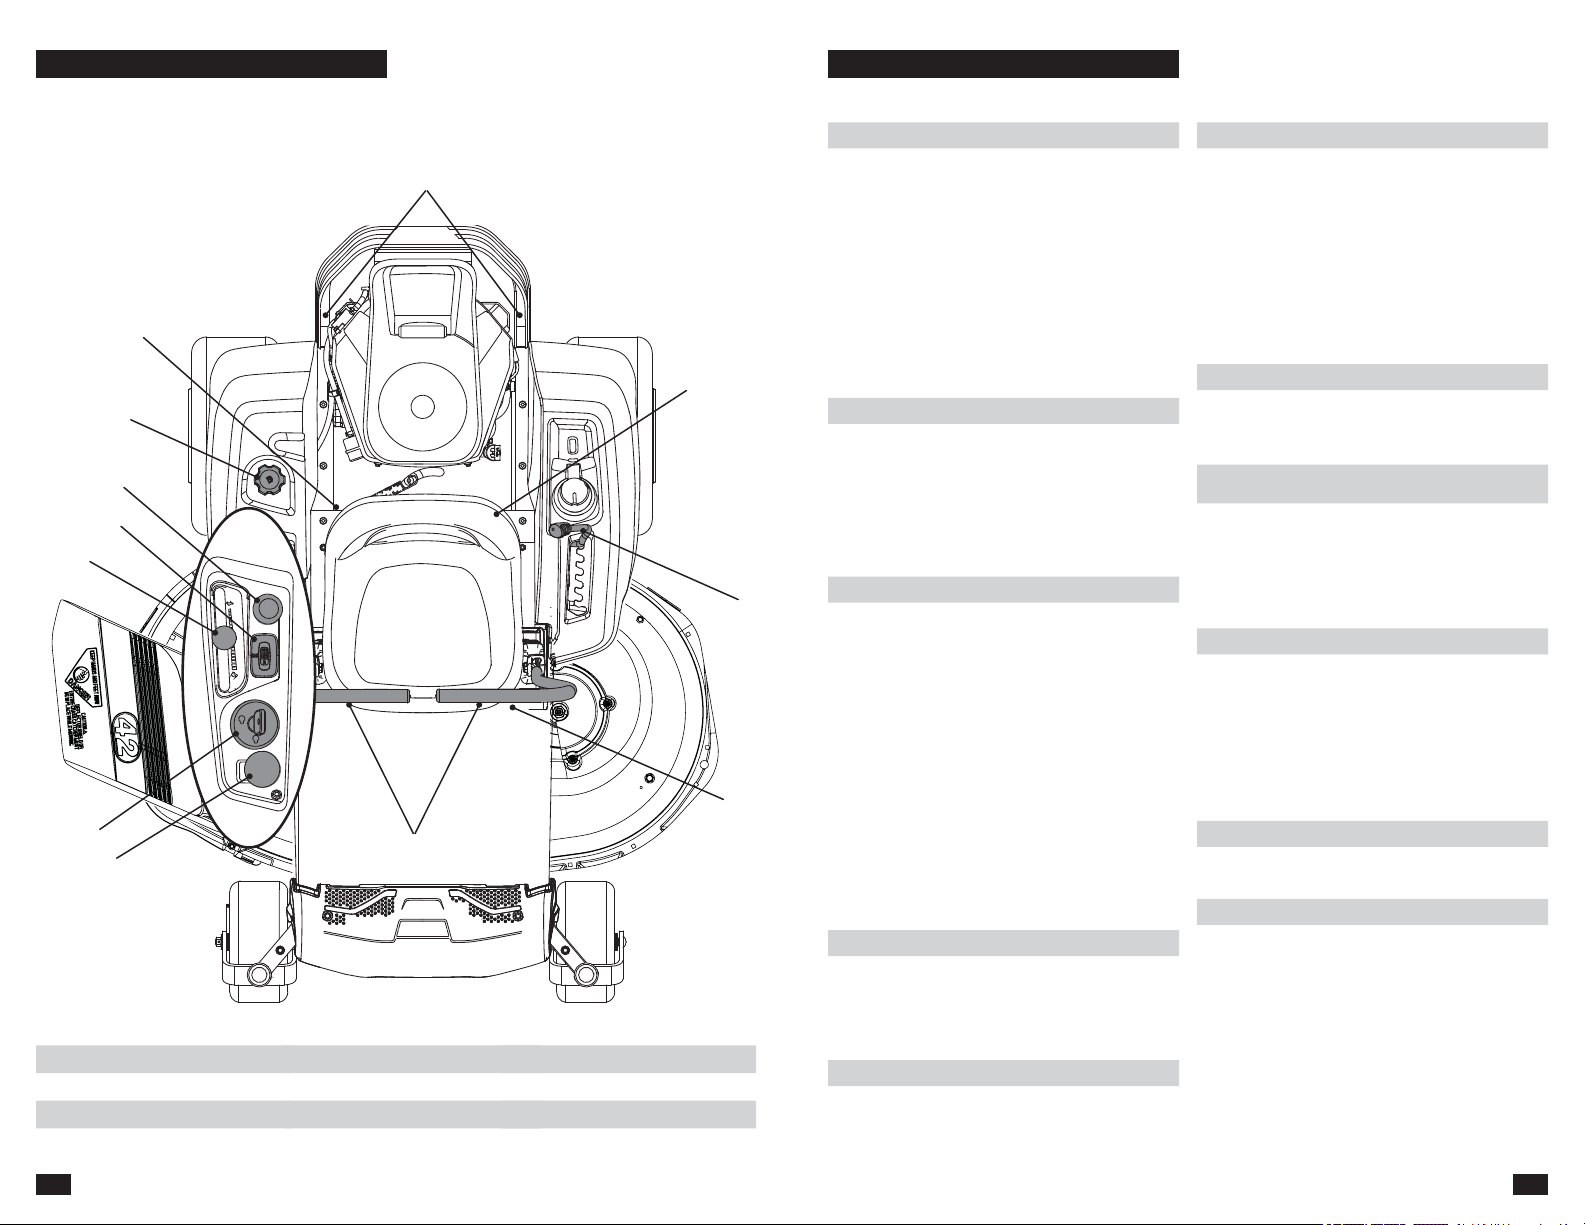
12
CONTROLS
1. Steering / park brake controls
2. Tracking bolt, left
3. Deck lift
4. Fuse
5. Bypass Linkages
)XHOVKXWRႇYDOYH
7. Fuel tank
8. Choke control
9. Throttle control
10. Service meter
11. Ignition switch
12. Blade switch
This operator manual describes the Husqvarna
=HUR7XUQ5LGHU7KHULGHULV¿WWHGZLWKDIRXU
stroke overhead valve engine.
Transmission from the engine is made via
belt-driven hydraulic pumps. Using the left and
ULJKWVWHHULQJFRQWUROVWKHÀRZLVUHJXODWHGDQG
thereby the direction and speed.
Park
Brake
Forward
Neutral
Reverse
13
CONTROLS
Steering Control Levers
The machine’s speed and direction are
continuously variable using the two steering
controls. The steering controls can be moved
forward or backward about a neutral position.
There is a neutral position, which is locked if the
steering controls are moved out.
When both controls are in the neutral position (N),
the machine stands still.
By equally moving both controls forward or
backward, the machine moves in a straight line
forward or backward.
For example, to turn right while moving forward,
move the right control towards the neutral
position. The rotation of the right wheel is reduced
and the machine turns to the right.
WARNING! The machine can turn very
rapidly if one steering control is moved much
further forward than the other.
Park Brake
IMPORTANT INFORMATION Failure to bring
the steering / park brake controls inward at the
same time will cause the unit's safety system to
shut the unit down.
The park brake is integrated with the steering
control levers. Move both levers out from the
neutral position to engage the park brake.
To release the park brake, pull both steering
control levers inwards to the neutral position at
the same time. Do not try to operate the unit
without both levers being inwards out of the
engaged position or machine components could
be damaged.
Ignition Switch
The ignition switch is placed on the control panel
and is used to start and stop the engine.
Zero turn can be achieved by moving one control
backward (behind the neutral position) and
carefully moving the other steering control forward
from its neutral position. The rotation direction
when zero turning is determined by which
steering control is moved backward behind the
neutral position. If the left steering control is pulled
backward, the machine turns to the left. Use more
care when using this maneuver.
If the steering controls are in uneven positions
ZKHQVWDQGLQJVWLOORUGRQRW¿WLQWKHVORWVIRU
moving the controls out, they can be adjusted.
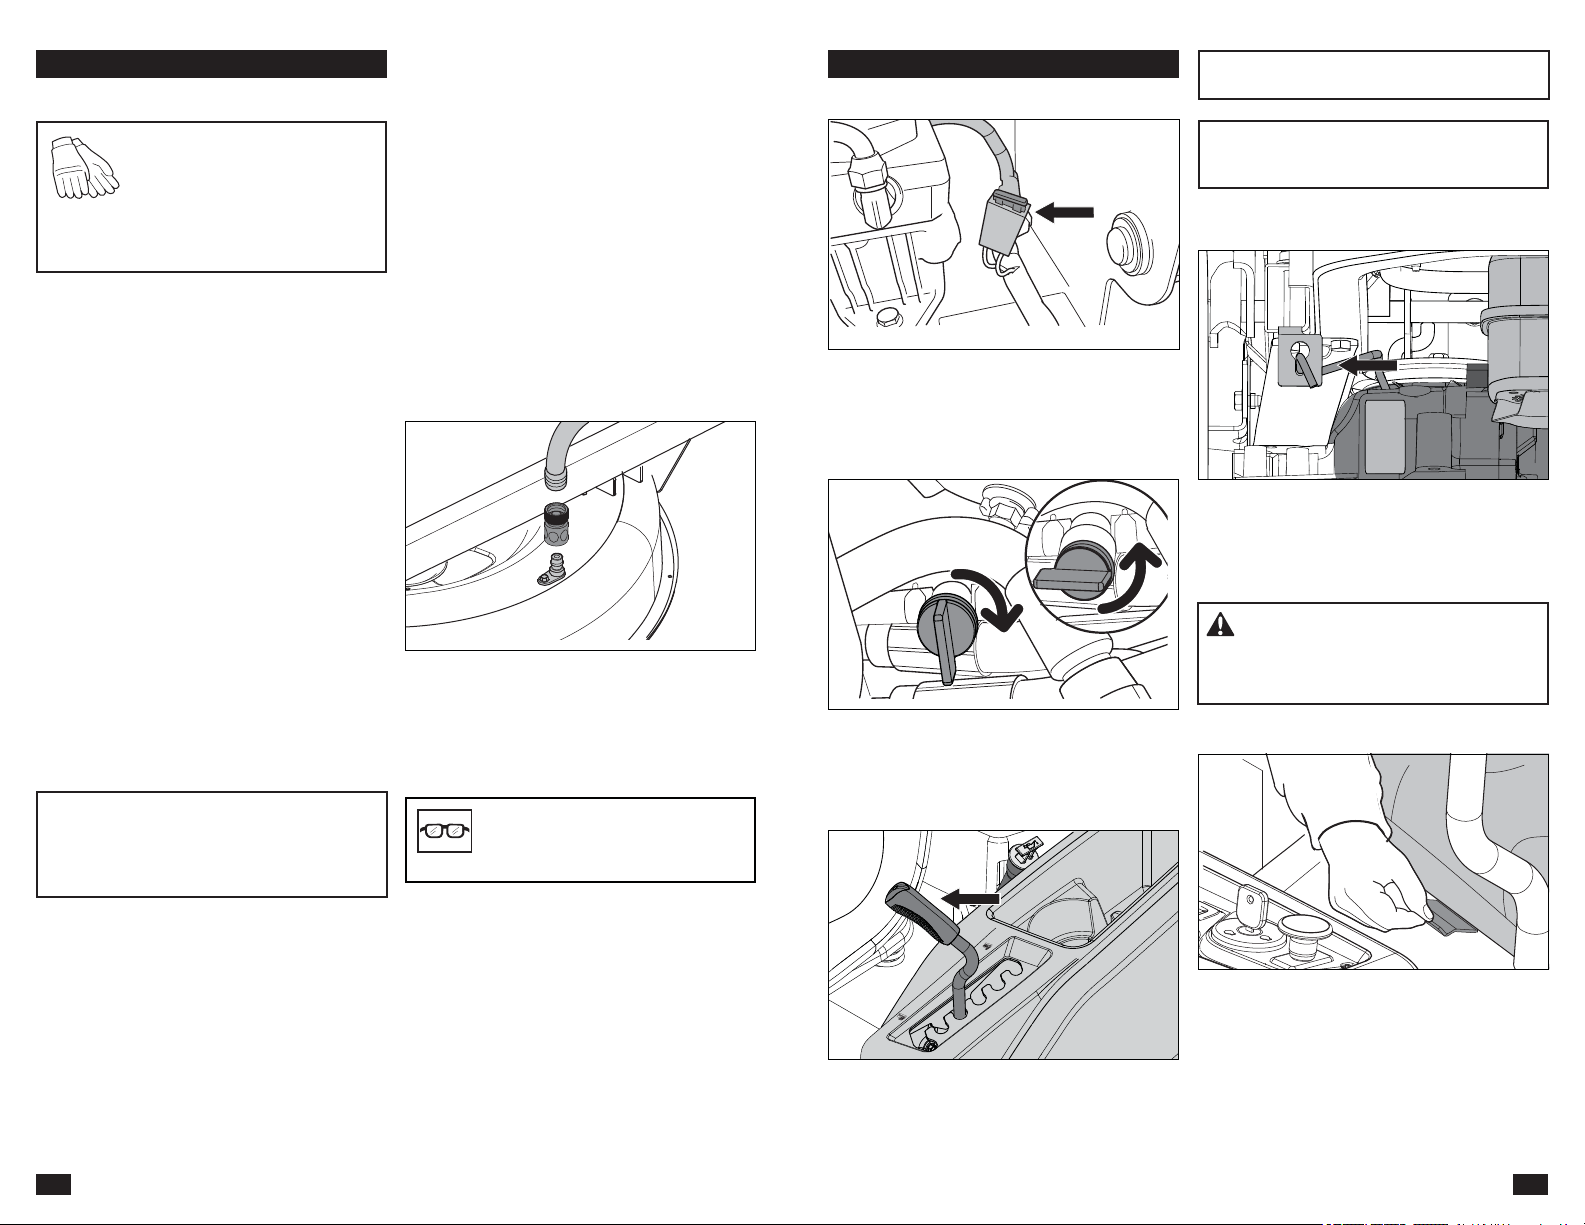
64
LUBRICACIÓN
Cambio de aceite del motor
NOTA: Cambie el aceite del motor cuando
el motor esté caliente. Consulte el manual
del propietario del motor para ver las
recomendaciones para realizar un cambio de
DFHLWH\GH¿OWURDGHFXDGR
1. Estacione la máquina en una
VXSHU¿FLHQLYHODGD$SOLTXHHOIUHQRGH
estacionamiento.
2. Limpie la suciedad y los desechos del área
alrededor de la tapa del tanque de llenado
de aceite.
3. Quité la tapa/varilla de nivel.
4. Ubique la manguera de drenado que se
encuentra al lado trasero izquierdo del
motor. Ponga un contenedor de un tamaño
adecuado bajo el extremo de la manguera
de drenado y quite el tapón de vaciado de
aceite.
$'9(57(1&,$! Para prevenir
quemaduras, se debe apagar el motor y dejar
que se enfríe un poco para que aún esté
caliente, pero para que las áreas que rodean el
motor no lo estén.
5. Permita que el aceite se drene
completamente del motor.
6. 9XHOYDDSRQHUHOWDSyQGHODPDQJXHUDGH
GUHQDGR\DSULpWHOD¿UPHPHQWH
7. Llene el motor con un aceite nuevo hasta
la parte de abajo de las marcas del tubo de
llenado. Compruebe el nivel con la varilla
de nivel.
8. 9XHOYDDSRQHUODWDSDGHOWDQTXHGHOOHQDGR
GHDFHLWH¿UPHPHQWHFXDQGRHOQLYHOGH
aceite indique FULL.
9. Consulte el historial de mantenimiento para
YHUORVLQWHUYDORVGHFDPELR\GHYHUL¿FDFLyQ
del aceite.
Engrasadores de rueda y equipo
Utilice únicamente grasa para cojinetes de buena
calidad.
La grasa de marcas reconocidas (empresas
petroquímicas, etc.) generalmente mantiene una
buena calidad.
Montaje de la rueda delantera
Lubrique las carreras 3-4 con una pistola de
engrase en cada juego de cojinetes de las
ruedas.
Cojinetes de las ruedas delanteras
Lubrique las carreras 3-4 con una pistola de
engrase en cada juego de cojinetes de las
ruedas.
Ejes del equipo
Baje el equipo de corte completamente. Lubrique
con una pistola de engrase, 2-3 recorridos por
el eje a través las aberturas que hay en las
protecciones de la correa.
Si usa una pistola de engrase sin manguera de
goma, debe retirar la placa de pie para acceder al
eje central.
63
LUBRICACIÓN
Información general
Retire la llave de contacto para evitar
movimientos involuntarios durante las tareas de
lubricación.
Si realiza la lubricación con una lata de aceite,
debe contener aceite de motor.
Si lubrica con grasa, a menos que se indique lo
contrario, use grasa de bisulfuro de molibdeno de
grado alto.
Para el uso diario, la máquina debe lubricarse
dos veces por semana.
Limpie el exceso de grasa después de la
lubricación.
Es importante evitar que quede lubricante en las
FRUUHDVRODVVXSHU¿FLHVGHDYDQFHGHODVSROHDV
de correa. Si esto ocurre, intente limpiarlas
con alcohol. Si la correa continúa deslizándose
después de la limpieza, se debe reemplazar.
No se debe usar gasolina ni otros productos
derivados del petróleo para limpiar las correas.
INFORMACIÓN IMPORTANTE Utilice
lubricación mínima y quite el exceso de
lubricante para que no entre en contacto con
ODVFRUUHDVRODVVXSHU¿FLHVGHDYDQFHGHOD
polea de correa.
Transmisión
La transmisión no necesita mantenimiento ni
comprobaciones de nivel o cambios de aceite.
Si se produce una fuga, reemplace la unidad
o póngase en contacto con su distribuidor
Husqvarna.
12/12 Cada año Lubricar con pistola de engrase
1/52 Cada semana &DPELDU¿OWUR
1/365 Todos los días Cambiar aceite
Comprobar el nivel
$'9(57(1&,$ Las fugas de aceite
hidráulico a presión pueden tener fuerza
VX¿FLHQWHSDUDSHQHWUDUHQODSLHO\FDXVDU
daños graves. Si sufre alguna lesión por un
HVFDSHGHÀXLGRFRQVXOWHDXQPpGLFRGH
inmediato. Pueden desarrollarse infecciones o
reacciones graves si no se recibe tratamiento
médico inmediatamente.
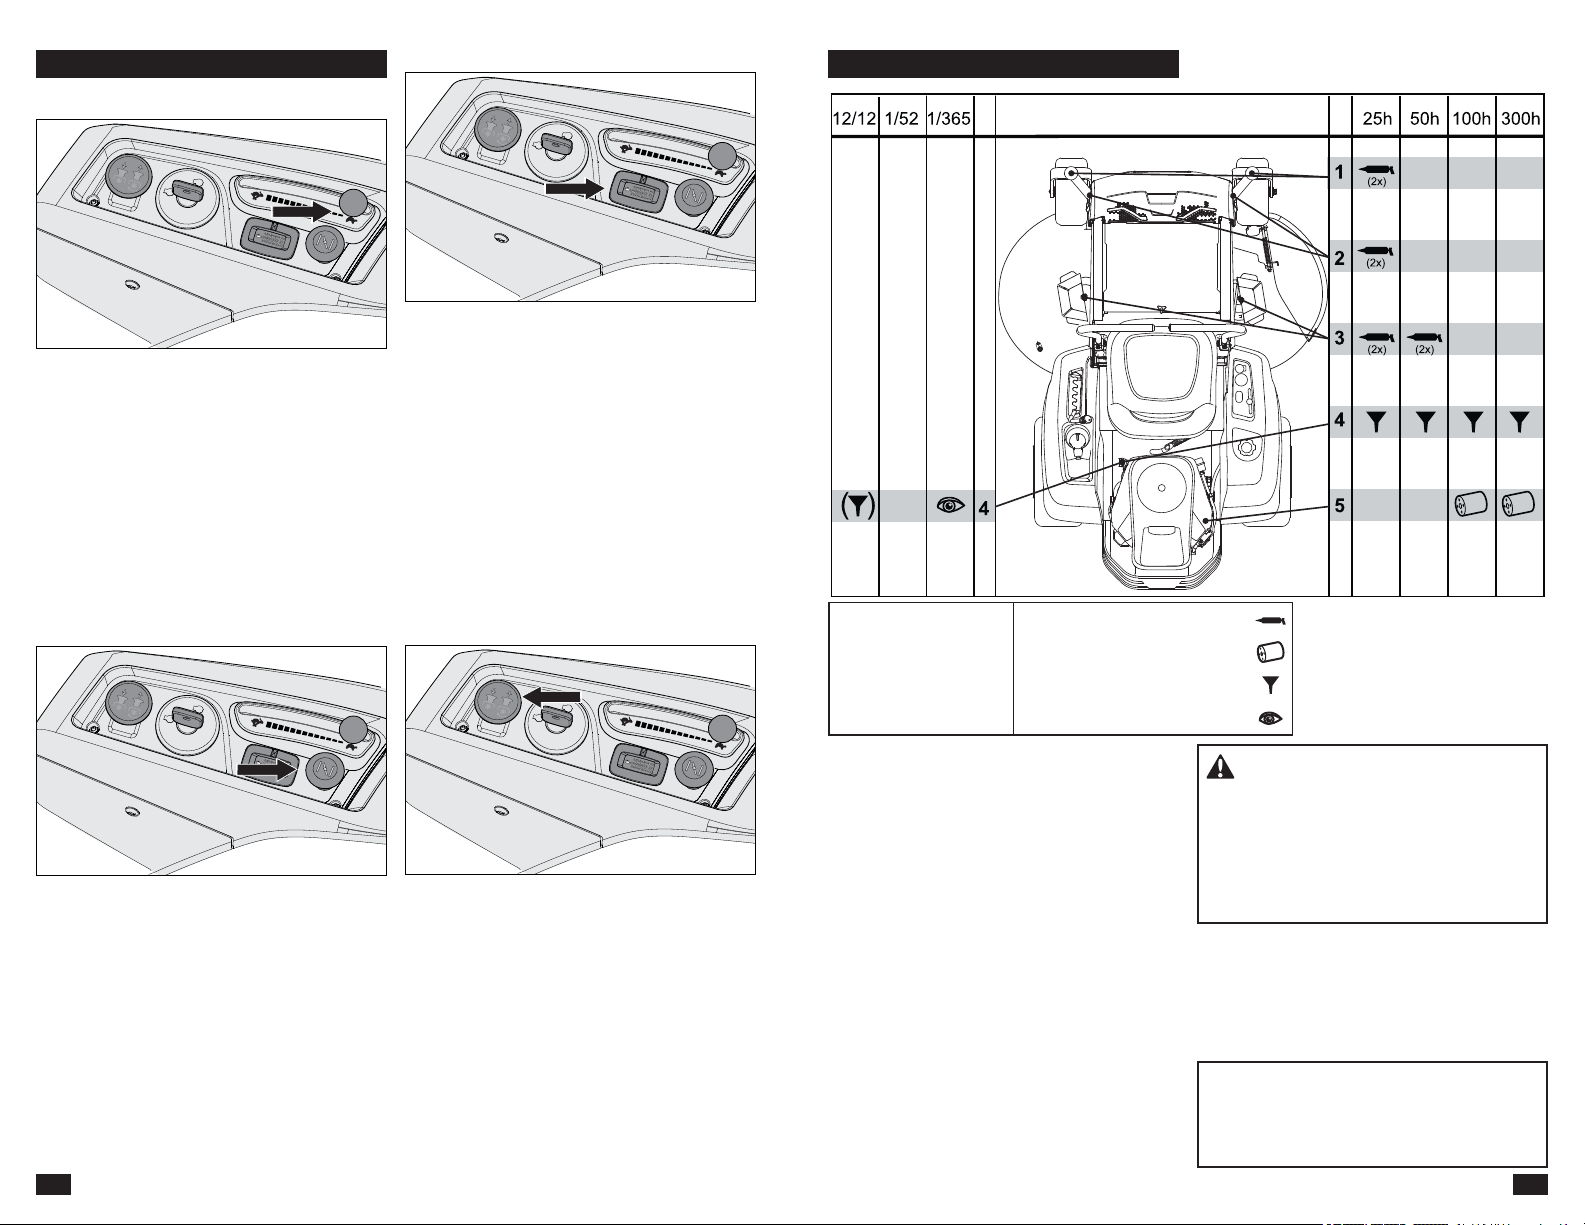
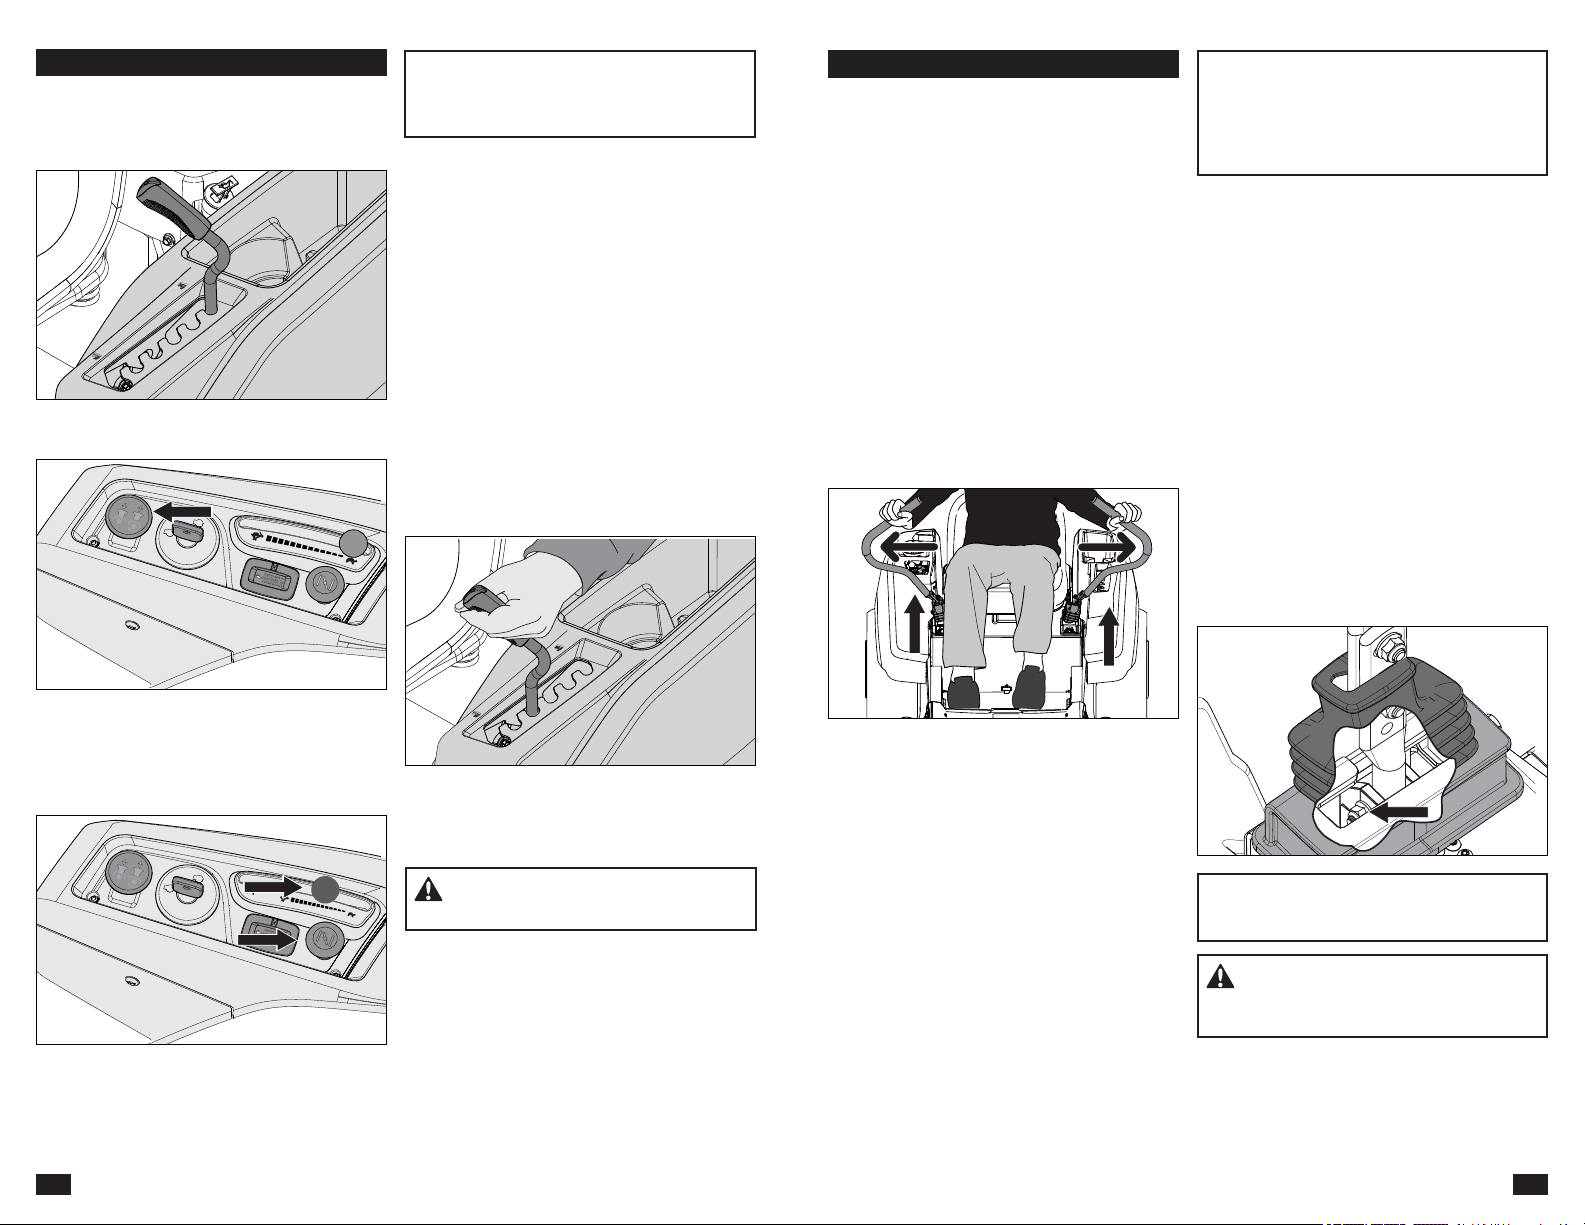
Blade Switch
To engage the mower deck, pull the knob out;
mower blades are disengaged when the knob is
pressed down.
Service Meter
The service meter displays the total operating
time with the blade activated.
At 50 hour intervals of operation, an oil can
icon shows and stays on for two hours before
an automatic reset occurs. To manually reset
WKHPHWHUWXUQWKHNH\RႇDQGRQ¿YHWLPHVDW
one second intervals. To service the engine and
PRZHUVHHWKH6HUYLFH-RXUQDORIWKLVPDQXDO
Note: The service meter operates (clocks hours)
only when the engine is running. Be sure to turn
WKHNH\R௺ZKHQWKHXQLWLVQRWLQXVHWRSUHYHQW
meter hours from accumulating.
Throttle Control
The throttle control regulates the engine speed
and thereby the rate of rotation of the blades,
assuming the blade switch is pulled out.
To increase or decrease the engine speed, the
control is moved forward or back respectively.
Avoid idling the engine for long periods, as there
is a risk of fouling the spark plugs. USE FULL
THROTTLE WHEN MOWING, for best mower
performance and battery charging.
Choke control
The choke control is used for cold starts to
provide the engine with a richer fuel mixture.
For cold starts the control should be pulled up.
14
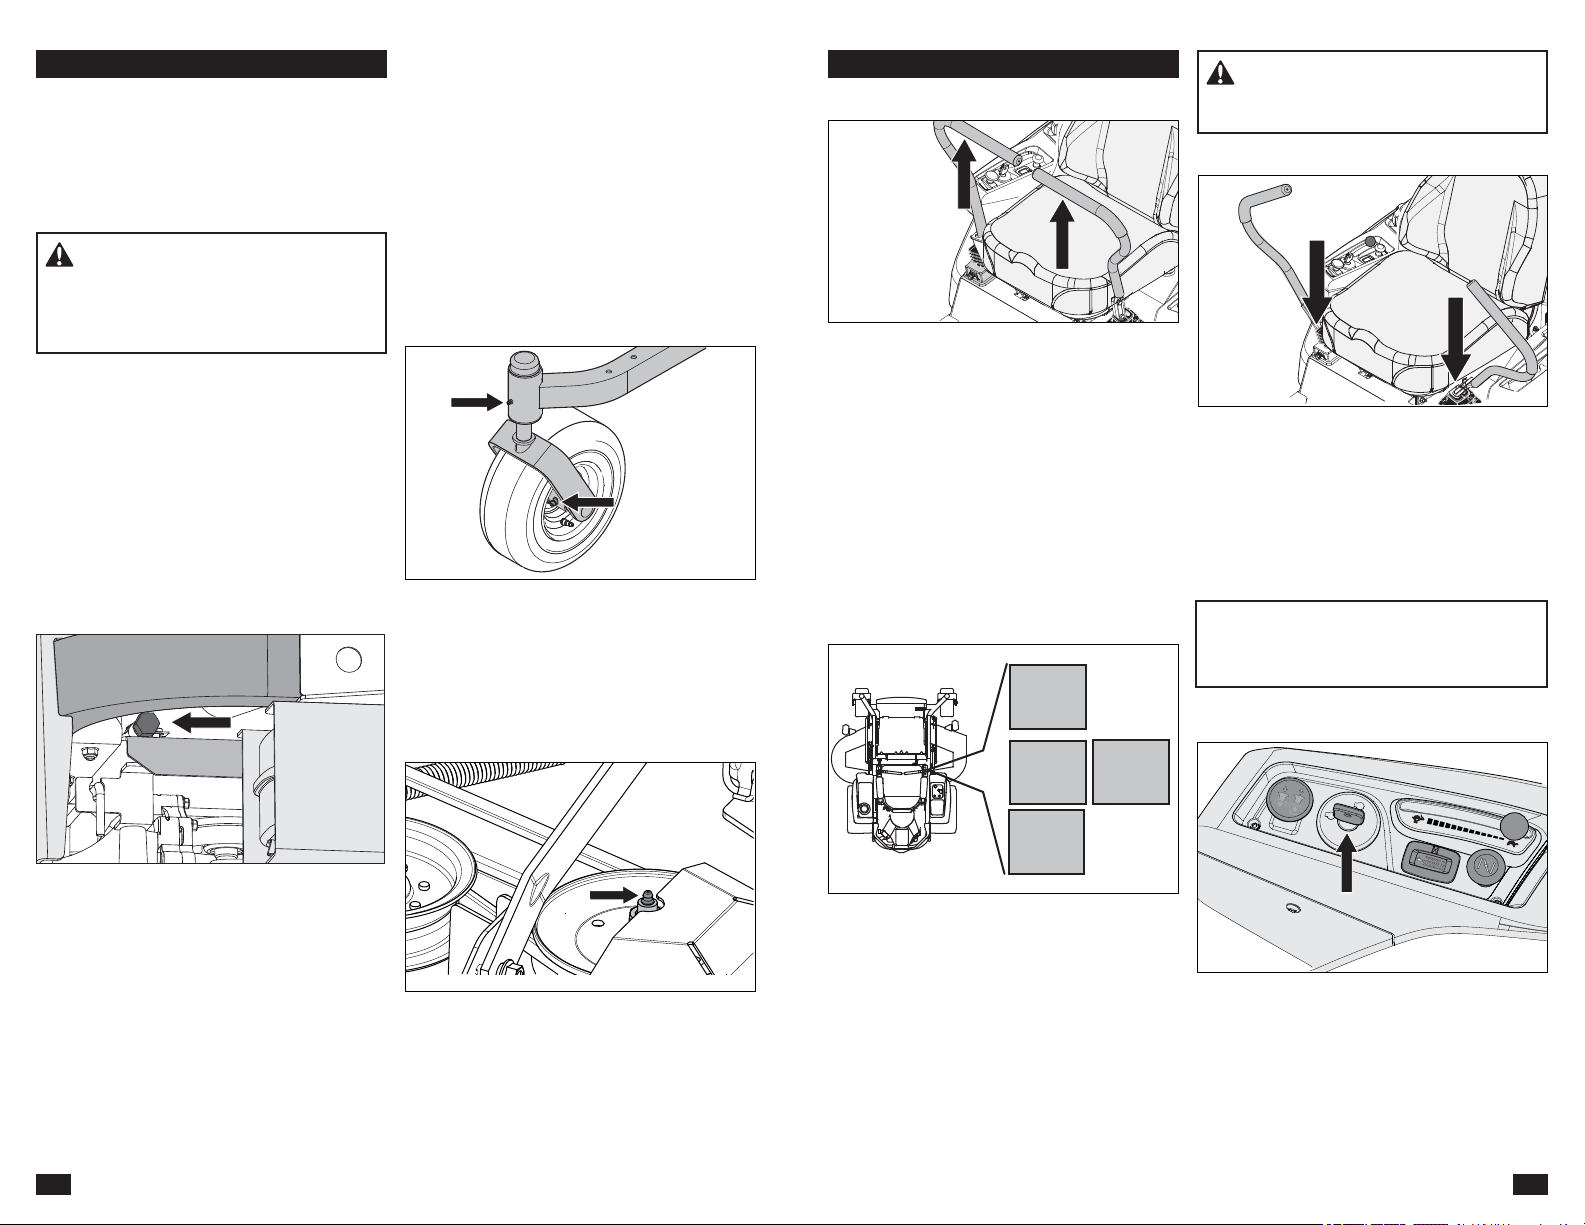
CONTROLS
The 20 amp primary fuse is located on the left
hand side of the machine. It is accessed by tilting
WKHVHDWIRUZDUG7KHIXVHLVDÀDWSLQW\SHXVHG
in automobiles.
Fuse
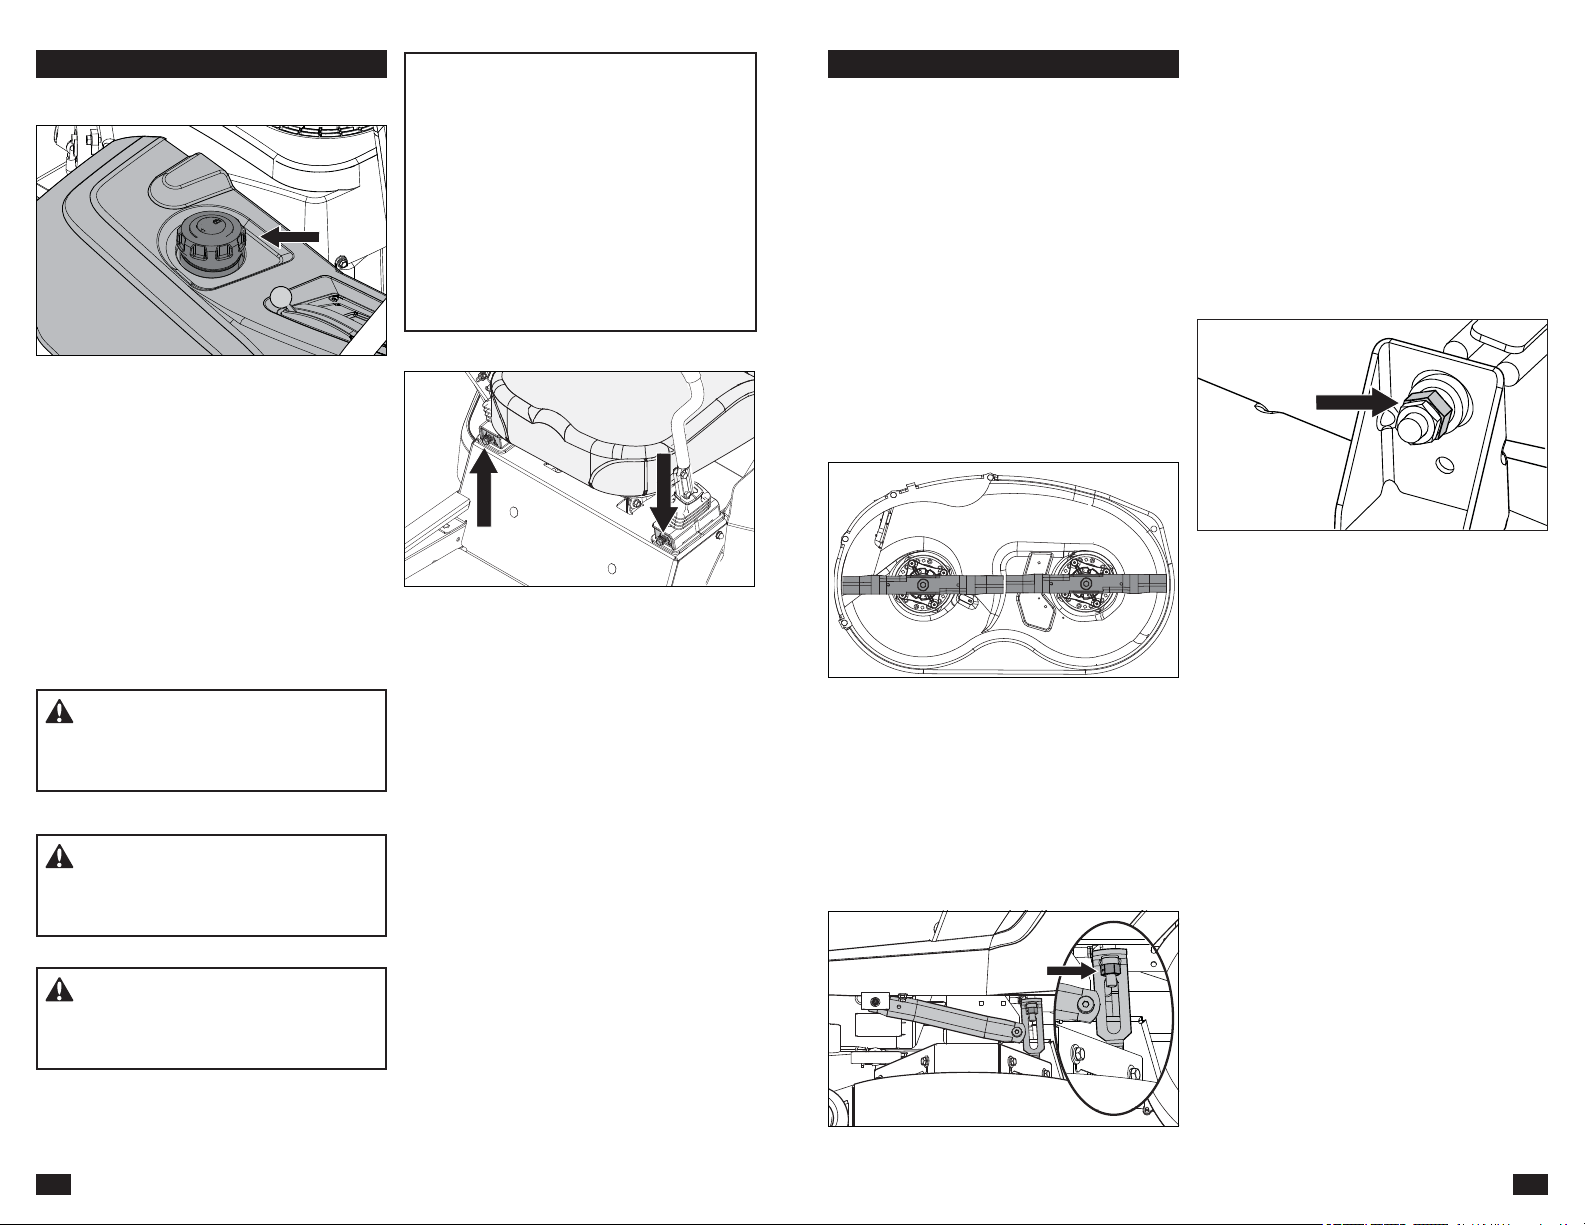
)XHO6KXW2ႇ9DOYH
7KHIXHOVKXWRႇYDOYHLVORFDWHGDWWKHULJKWUHDU
RIWKHVHDW7KHYDOYHLVRႇZKHQWKHKDQGOHWDELV
turned perpendicular to the fuel line.
Cutting Height Lever
IMPORTANT INFORMATION To obtain an
even cutting height, it is important that the air
pressure in all tires is 15 psi / 103 kPa / 1 bar.
IMPORTANT INFORMATION Always raise the
deck to the highest position for transport.
To set the deck cutting height, pull the cutting
height lever inwards and move it to the desired
height notch.
Bypass Linkages
WARNING! Bypass linkages are located
FORVHWRWKHPXႉHU7RSUHYHQWEXUQVWKH
HQJLQHVKRXOGEHVKXWRႇDQGDOORZHGWRFRRO
before the bypass linkage levers are handled.
Transaxle bypass linkages must be engaged
when pushing or pulling the mower. The release
levers are located on each side of the rear of the
unit below the rear engine guard. See Moving
Machine By Hand in the Operation section.
15
CONTROLS
Seat Adjustment Lever
The seat can be adjusted lengthways. When
making adjustments, the lever below the right side
of the seat is pulled up, after which the seat can be
moved backward or forward.
62
MANTENIMIENTO
INFORMACIÓN IMPORTANTE El perno de
la cuchilla especial está tratado con calor.
Reemplácelo por un perno Husqvarna si es
necesario. No utilice tornillería de grado inferior
DOHVSHFL¿FDGR
Discos de corte
$9,62/DVFXFKLOODVVRQD¿ODGDV
Protéjase las manos con guantes
y/o envuelva las cuchillas con un
paño grueso cuando las manipule.
(OD¿ODGRGHODVFXFKLOODVGHEHUHDOL]DUORXQ
taller de servicio autorizado.
Para conseguir el mejor resultado de corte, es
LPSRUWDQWHTXHODVFXFKLOODVHVWpQELHQD¿ODGDV\
sin daños.
Reemplace las cuchillas que estén dobladas o
agrietadas después de golpear obstáculos.
Deje que el taller de servicio decida si una
cuchilla con mellas grandes se puede reparar o
si hay que reemplazarla. Equilibre las cuchillas
GHVSXpVGHOD¿ODGR5HYLVHORVPRQWDMHVGHODV
cuchillas.
Reemplazo de las cuchillas
1. Quite el perno de la cuchilla girándolo en
contra del sentido de las agujas del reloj.
2. ,QVWDOHFXFKLOODVQXHYDVRUHD¿ODGDVFRQ
el lado que lleva estampadas las palabras
GRASS SIDE (lado del pasto) orientado hacia
el suelo/hierba (hacia abajo) o THIS SIDE
UP (este lado hacia arriba) orientado hacia el
equipo y la carcasa de la cortadora.
3. $VLHQWHODDSHUWXUDGHODFXFKLOOD¿UPHPHQWH
en la carcasa de la cortadora.
4. $SULHWHHOSHUQRGHODFXFKLOODFRQ¿UPH]D
5. Apriete el perno de la cuchilla a un par de 45-
60 lb-pie (60-81 Nm).
Limpieza
La limpieza regular, especialmente por debajo
del equipo de corte, aumenta la vida útil de
la máquina. Limpiar la máquina directamente
después de cada uso (una vez que se haya
enfriado), antes de que la suciedad se adhiera.
No rocíe con agua la parte superior del equipo
de corte. Utilice aire comprimido para limpiar la
VXSHU¿FLHVXSHULRUGHOHTXLSRGHFRUWH1RXWLOLFH
lavadoras de alta presión ni equipos de limpieza
al vapor. Evite rociar el motor y los componentes
eléctricos con agua.
Limpie regularmente la parte inferior del equipo
con presión de agua normal. Conecte el conector
rápido (del paquete de accesorios) en cualquier
manguera de jardín. Después de cortar, coloque
ODPDQJXHUDHQHORUL¿FLRGHOLPSLH]D\DEUDHO
suministro de agua.
9XHOYDDDUUDQFDUHOFRUWDFpVSHG\FRQHFWHODV
cuchillas para utilizar la acción giratoria para
eliminar los residuos. Asegúrese de que la
manguera quede alejada de las cuchilla de corte.
1RODYHODVVXSHU¿FLHVFDOLHQWHVFRQDJXDIUtD
Deje que la unidad se enfríe antes de lavarla.
$9,62 Utilice gafas de protección
para realizar las tareas de limpieza y lavado.
Tornillería
Revísela diariamente. Inspeccione toda la
máquina para ver si faltan tornillos o si hay
tornillos sueltos.
61
MANTENIMIENTO
Ajuste del equipo de corte
Nivelación del equipo
Ajuste el equipo mientras el cortacésped esté en
XQD VXSHU¿FLH QLYHODGD $VHJ~UHVH GH TXH ORV
QHXPiWLFRV HVWpQ LQÀDGRV D OD SUHVLyQ FRUUHFWD
Consulte Datos técnicos / Transmisión. Si los
neumáticos tienen aire de menos o de más,
el equipo no puede ajustarse correctamente.
Levante el equipo hasta la posición más alta (de
transporte).
El equipo se debe ajustar en un punto ligeramente
más alto en la parte trasera.
NOTA: Para garantizar la precisión del procedimiento
GHQLYHODFLyQODFRUUHDGHWUDQVPLVLyQGHOHTXLSR
de corte debe instalarse antes de nivelar el equipo.
1. Use guantes resistentes. Gire cada punta de la
cuchilla para alinearla la parte delantera con la
trasera con el equipo de lado a lado.
2. 0LGDGHVGHOD VXSHU¿FLH GHOVXHOR KDVWD OD
parte inferior de la punta de la cuchilla en el
lado de descarga del equipo de corte. Registre
esta medida.
3. 9D\D DOODGR RSXHVWR \FRPSUXHEH TXH OD
medida sea la misma. Si es necesario hacer
ajustes, con una llave de 3/4" o una llave inglesa,
gire las tuercas de ajuste de la articulación de
elevación en cada lado hacia la izquierda para
bajar o hacia la derecha para subir. Ajuste hasta
que ambas medidas sean iguales.
4. Gire cada cuchilla para alinearla con el equipo
desde la parte delantera a la trasera. Si la
punta de la cuchilla delantera no se encuentra
6,35 mm a 9,525 mm debajo de la parte
trasera, extraiga la placa de pie para acceder
la delantera plataforma ajuste. Use una llave
inglesa para girar las tuercas en el varillaje de
la suspensión delantera. Girar en el sentido
de las agujas del reloj hará que se levante la
parte delantera del cortacésped, y contra el
sentido de las agujas del reloj se baja la parte
delantera. Adjuste la tuerca hasta que la punta
de la cuchilla delantera se encuentra 6,35 mm
a 9,525 mm debajo de la parte trasera.
NOTA: Esto colocará el equipo de corte en una
posición de medida estándar. En función del tipo
de pasto que éste cortando o las condiciones
DPELHQWDOHVHVSRVLEOHTXHGHEDUHDOL]DUDMXVWHV
adicionales para lograr el corte deseado.
16
CONTROLS
IMPORTANT INFORMATION Experience
indicates that alcohol blended fuels (called
gasohol, ethanol or methanol) can attract
moisture which leads to separation and formation
of acids during storage. Acidic gas can damage
the fuel system of an engine while in storage. To
avoid engine problems, the fuel system should be
emptied before storage of 30 days or longer. Drain
the gas tank, start the engine and let it operate
until the fuel lines and carburetor are empty.
Use fresh fuel the next season. See Storage
for additional information. Do not use engine or
carburetor cleaners in the fuel tank or permanent
damage may occur.
Tracking
If the mower is not tracking straight, check the
air pressure in both rear tires. Recommended air
pressure for the rear tires is 15 psi (1 bar).
1. Tracking adjustments are made using the
tracking bolts. The tracking bolts limit the
motion control levers when in the full-forward
position.
2. For preliminary tracking adjustment, move
unit to an open, unobstructed area such as an
HPSW\SDUNLQJORWRURSHQ¿HOG
3. Using a 1/2" wrench, back the tracking bolts
RXWXQWLOÀXVKZLWKQXW
4. Test operate unit by driving it at full throttle
and the full forward position on both motion
control levers. Gradually turn in the tracking
bolt on the right hand side until the unit
noticeably starts drifting right.
5. Drive forward at full throttle with both motion
control levers in the full forward position.
Gradually turn in the left tracking bolt until unit
tracks straight.
Fuel Tank
WARNING)LOOWRERWWRPRI¿OOHUQHFN
'RQRWRYHU¿OO&OHDQRႇVSLOOHGRLORUIXHO'R
not store, spill or use gasoline near an open
ÀDPH
Read the safety instructions before refueling. The
capacity for each tank is 3-1/2 gallons.
Regularly check the gas cap gasket for damage
and keep the cap correctly tightened.
The engine will operate on a minimum of
87-octane unleaded gasoline (no oil mix).
Environmentally adapted alkylate gasoline can
be used. See Technical Data concerning ethanol
fuel. Methanol fuel is not allowed. Do not use E85
alcohol based fuel. Damage to the engine and
components may occur.
When operating in temperatures below 32° F, use
fresh, clean winter grade gasoline to help insure
good cold weather starting.
WARNING! The engine and the exhaust
system, become very hot during operation.
There is a risk for burns if touched. Let engine
and exhaust system to cool before refueling.
WARNING*DVROLQHLVKLJKO\ÀDPPDEOH
2EVHUYHFDXWLRQDQG¿OOWKHWDQNRXWGRRUV
(see Safe Handling of Gasoline in the Safety
section).

17
OPERATION
Read the Safety section and following pages, if
you are unfamiliar with the machine.
Training
Due to unique steering capabilities, zero turn
mowers are far more maneuverable than typical
riding mowers.
Review this section fully prior to trying to move the
PRZHUXQGHULWVRZQSRZHU:KHQ¿UVWRSHUDWLQJ
the mower or until becoming comfortable with
controls, use a reduced throttle speed and
reduced ground speed. DO NOT move control
levers to the furthest forward or reverse positions
during initial operation.
First time users must become familiar with the
mower’s movement on a hard surface, such as
concrete or blacktop PRIOR to trying to operate
on turf. Until the operator becomes comfortable
with the mower controls and zero turning
capability, overly aggressive maneuvers may
damage turf.
Steering
To move forward and backward
The direction and speed of the mower’s
PRYHPHQWVDUHHႇHFWHGE\WKHPRYHPHQWRIWKH
control lever(s) on each side of mower. The left
control lever controls the left wheel. The right
control lever controls the right wheel.
First time users must push the mower (see
Moving Machine By Hand in the Operation
VHFWLRQWRDQRSHQÀDWDUHDZLWKRXWRWKHU
persons, vehicles or obstacles nearby. To move
the unit under its own power, the operator must
sit in the seat and start the engine (see Before
Starting in the Operation section). Adjust the
engine speed to idle, disengage the park brake
but do not engage the blades at this time. Pull
control levers inward. As long as the control levers
have not been moved forward or backwards, the
mower will not move.
Slowly move both control levers forward slightly.
This will let the mower start moving forward in a
straight line. Pull the control levers back to the
neutral position and stop the mower from moving.
Pull back slightly on control levers, allowing the
mower to move backwards. Push the control
levers forward to the neutral position to stop the
mower from moving.
To turn to the right
While moving in a forward direction, pull the right
lever back towards the neutral position while
maintaining the position of the left lever, this will
slow the rotation of the right wheel and cause the
machine to turn in that direction.
To turn to the left
While moving in a forward direction pull the left
lever back towards the neutral position while
maintaining the position of the right lever, this will
slow the rotation of the left wheel and cause the
machine to turn in that direction.
To zero turn
:KLOHPRYLQJLQDIRUZDUGGLUHFWLRQ¿UVWSXOOERWK
control levers back until the mower stops or slows
dramatically.
Then by alternating one lever slightly to the
forward position and the other in the reverse
position, complete the turn.
WARNING! The engine exhaust contains
carbon monoxide, which is a odorless,
colorless, poisonous gas. Do not use the
machine in enclosed spaces.
7KHIROORZLQJFRQGLWLRQVPXVWEHIXO¿OOHGEHIRUH
the engine can be started:
• The blade switch must be pressed down into
the disengaged position.
• Both steering / park brake controls must be in
the locked (outer) position.
WARNING! Make sure the work area is
free from objects that could be thrown by the
rotating blades. Clear the lawn of stones and
other objects.
Before Starting
1. Read the sections on Safety and Controls
before starting the machine.
2. Do the daily maintenance before starting (see
Maintenance Schedule in the Maintenance
section).
3. &KHFNWKDWWKHUHLVVXႈFLHQWIXHOLQWKHIXHO
tank.
4. Adjust the seat to the desired position.
IMPORTANT INFORMATION The seat should
not be adjusted while the unit is in motion.
60
MANTENIMIENTO
3UHVLyQGHORVQHXPiWLFRV
Todos los neumáticos deben tener una presión
de 15 psi / 103 kPa / 1 bar.
INFORMACIÓN IMPORTANTE NO agregue
ningún tipo de camisa de neumático ni material
de relleno de espuma a los neumáticos. Las
cargas excesivas creadas por neumáticos
rellenos de espuma causan fallas prematuras.
Utilice solo neumáticos especificados por el
fabricante original.
Ruedecillas
Revíselas cada 200 horas. Compruebe que las
ruedas giren libremente. Si las ruedas no giran
libremente, lleve la unidad al distribuidor para el
servicio.
Los neumáticos rellenos con espuma o
neumáticos macizos anulan la garantía.
Desmontaje y montaje
Quite la tuerca, la arandeia y el perno de la rueda.
Tire de la rueda de la horquilla y tenga cuidado
con los espaciadores. Para su instalación, siga el
proceso inverso. Apretar el perno de la rueda.
&RUUHDVHQ9
Revíselas cada 100 horas de funcionamiento.
Revise si hay grietas profundas y mellas grandes.
NOTA: La correa mostrará algunas pequeñas
grietas en la operación normal.
Las correas no son ajustables. Reemplace las
correas si empiezan a deslizarse por desgaste.
Extracción de la correa del equipo
(VWDFLRQH OD PiTXLQD HQ XQD VXSHU¿FLH
nivelada. Aplique el freno de estacionamiento.
2. Baje el equipo a la posición de corte más baja.
3. Quite los pernos de las protecciones de la correa
y quite las protecciones.
4. Retire cualquier resto de suciedad o hierba que
se pueda haber acumulado alrededor de los
DORMDPLHQWRVGHODFRUWDGRUD\WRGDVXSHU¿FLH
del equipo.
$ÀRMHODWXHUFDTXHVXMHWDODJXtDGHODFRUUHD
Tenga en cuenta la posición de la guía de la
correa para la reinstalación.
1. Presione hacia adentro el brazo guía para
liberar la tensión de la correa.
2.
3. Levante con cuidado la correa hacia la parte
superior de las poleas de la carcasa de la
cortadora y quite la correa del equipo.
Instalación de la correa del equipo
NOTA: Para facilitar la instalación de la cinta de la
SODWDIRUPDFRQVXOWHODHWLTXHWDVREUHODUXWDTXH
está en la parte superior del equipo.
1. Envuelva la correa del equipo alrededor de la
polea del embrague eléctrico que está ubicada
en el eje del motor.
2. Pase la correa hacia adelante y hacia arriba
en el equipo.
3. Coloque la correa alrededor de la polea tensora
de resorte.
4. Enrolle la correa alrededor de la polea tensora
¿MD\GHORVDORMDPLHQWRVGHOPDQGULO
5. Empuje hacia dentro el brazo guía y dirija
cuidadosamente la correa sobre la polea tensora
¿MD 8QD YH] TXH FRUUHD HVWiFRUUHFWDPHQWH
instalada, suelte lentamente del brazo guía para
tensar la correa.
6. 9XHOYD DUHYLVDU OD UXWDGH OD FLQWDSDUD
asegurarse de que coincida con la etiqueta
sobre la ruta, y que la cinta no esté torcida.
7. Ajuste a la guía de la correa suelta en el agujero
del brazo polea y apriete el perno de la polea.
8. 9XHOYD DFRORFDU ODV SURWHFFLRQHVGH OD
correa en ambas carcasas de los mandriles y
asegúrelas con los broches.
59
MANTENIMIENTO
Sistema de seguridad
La máquina está equipada con un sistema de
seguridad que impide el arranque o la conducción
en las condiciones siguientes.
El motor solo puede arrancarse cuando:
• el equipo de corte está desacoplado.
• los controles de la dirección/freno de
estacionamiento están en la posición neutra
externa y bloqueada, lo que asegura que
haya una activación completa del freno de
estacionamiento para un arranque seguro.
INFORMACIÓN IMPORTANTE Para poder
conducir, el operador debe sentarse en el
asiento y los controles de la dirección/freno de
estacionamiento deben ponerse en la posición
de acoplado (exterior). En caso contrario, el
motor se detendrá.
NOTA: Si los controles de la dirección no se mantienen
HQODSRVLFLyQH[WHULRUFRPSOHWDODWHQVLyQVHSXHGH
ajustar apretando la tuerca en la parte trasera del
pivote. (Consulte Freno de Estacionamiento en esta
sección).
Realice inspecciones diarias para asegurarse de
que el sistema de seguridad funcione intentando
arrancar el motor sin cumplir una de las
condiciones anteriores. Cambie las condiciones y
vuelva a intentarlo.
Si la máquina arranca cuando una de estas
condiciones no se cumple, apáguela y repare el
sistema de seguridad antes de volver a usarla.
Asegúrese de que el motor se detenga cuando
el freno de estacionamiento no está activado y el
operador abandone el asiento.
Compruebe que el motor se detenga si las
cuchillas de corte están acopladas y el conductor
abandona temporalmente el asiento.
2. &RQHFWHHOFDEOH52-2GHODEDWHUtDHQOD
WHUPLQDOSRVLWLYDGHODEDWHUtD
3. Conecte el cable de la tierra NEGRO en la
terminal negativa (-) de la batería.
4. Deslice el soporte de montaje nuevamente
sobre la batería y vuelva a apretar las tuercas.
5. 9XHOYDDSRQHUODFXELHUWDGHODVWHUPLQDOHV
Freno de estacionamiento
Compruebe visualmente que no haya daños
en las palancas de control de la dirección,
las conexiones o los interruptores del freno
de estacionamiento. Realice una prueba de
GHWHQFLyQ\FRPSUXHEHTXHKD\DVX¿FLHQWH
acción de frenado.
Para ajustar el freno de estacionamiento,
póngase en contacto con el taller de servicio de
Husqvarna.
Para ajustar la tensión del freno de
estacionamiento, mueva la cubierta que cubre la
base de control de la dirección. Apriete la tuerca
del pivote de 1/2" hasta que la acción de frenado
sea la adecuada. Reemplace la cubierta de la
dirección y asegúrese de que la parte superior de
la cubierta se posicione entre los dos pernos de
ajuste del control de la dirección.
Para realizar cualquier otro ajuste en el freno de
estacionamiento, póngase en contacto con el
taller de servicio de Husqvarna.
INFORMACIÓN IMPORTANTE La máquina
debe estar absolutamente detenida cuando se
aplica el freno de estacionamiento.
$'9(57(1&,$Un ajuste defectuoso
reducirá la capacidad de frenado y puede
provocar un accidente.
18
OPERATION
Starting the Engine
1. Sit on the seat.
2. Raise the mower deck to the highest position.
1. Disengage the mower blades by pressing the
blade switch downwards.
1. 0RYHWKHVWHHULQJSDUNEUDNHFRQWUROV¿UPO\
out to the locked position.
2. Move the throttle lever to the middle throttle
position. If the engine is cold, the choke
control should be pulled up.
IMPORTANT INFORMATION Do not
RSHUDWHWKHVWDUWHUIRUPRUHWKDQ¿YHVHFRQGV
each time. If the engine does not start, wait
approximately ten seconds before retrying.
3. Move throttle control to full throttle (rabbit
symbol).
4. Engage the mower deck by pulling the blade
switch up.
5. Pull control levers inward and slowly move
both control levers slightly forward to move
forward in a straight line.
WARNING! Make sure that no one is
near mower when engaging blade switch.
1. When the engine starts, immediately release
the ignition key back to the run position.
2. Set the engine speed with the throttle. Let
the engine to operate at a moderate speed,
approximately mid throttle, for a short time
before use. USE FULL THROTTLE WHEN
MOWING.
Running
1. Release the park brake by pulling the steering
/ park brake controls inwards to the neutral
position at the same time.
NOTE: The mower is equipped with an
operator presence system. If the operator
WULHVWROHDYHWKHVHDWZLWKWKHHQJLQHUXQQLQJ
ZLWKRXW¿UVWVHWWLQJWKHSDUNEUDNHWKHHQJLQH
ZLOOVKXWR௺
2. Lower the mower deck to the desired cutting
height.
1. Push in and turn the ignition key to the start
position.

19
OPERATION
IMPORTANT INFORMATION When stopping
and leaving the machine, both steering / park
brake controls must be moved out to the locked
position at the same time.
IMPORTANT INFORMATION Leaving the
ignition switch in a position than OFF will cause
the battery to be discharged.
WARNING! Do not drive the rider on
terrain that slopes more than 10 degrees.
Mow slopes up and down, never side to side.
Avoid sudden directional changes. Do not drive
across slopes.
Operating on Hills
Read the Safety Instructions Driving on Slopes
in the Safety section.
• Use the slowest speed possible before starting
up or down hills.
• Avoid stopping or changing speed on hills.
• If stopping is fully necessary, pull steering / park
brake controls into the neutral position and push
outward to engage the park brake.
• Pull the steering / park brake controls back to
the center of the mower and push forward to
regain forward movement.
• Make all turns slowly.
Mowing Tips
• 2EVHUYHDQGÀDJURFNVDQGRWKHU¿[HGREMHFWV
to avoid collisions.
• Begin with a high cutting height and reduce it
until the desired mowing result is attained. The
average lawn must be cut to 2-1/2" during the
cool season and over 3" during the hot months.
For healthier and better looking lawns, mow
often after moderate growth.
• For best cutting performance, grass over 6" in
KHLJKWPXVWEHPRZHGWZLFH0DNHWKH¿UVWFXW
relatively high; the second to the desired height.
• The mowing result will be best with a high
engine speed (the blades rotate rapidly) and
low speed (the rider moves slowly). If the grass
is not too long and dense, the driving speed can
EHLQFUHDVHGZLWKRXWQHJDWLYHO\DႇHFWLQJWKH
mowing result.
• 7KH¿QHVWODZQVDUHREWDLQHGE\PRZLQJ
often. The lawn becomes more even and the
grass clippings more equally distributed over
the mown area. The total time taken is not
increased as a higher operating speed can be
used without poor mowing results.
• Avoid mowing wet lawns. The mowing result
is poorer because the wheels sink into the soft
lawn, clumps build, and grass clippings fasten
under the cowling.
• When mowing large areas, start by turning to
the right so that clippings will discharge away
from shrubs, fences, driveways, etc. After one
or two rounds, mow in the opposite direction
PDNLQJOHIWKDQGWXUQVXQWLO¿QLVKHG
• Hose the mower deck underside with water
after each use. When cleaning, the mower deck
shall be raised into the transport position. Make
VXUHWKHPRZHULVFRROHGDQGWKHHQJLQHLVRႇ
• Use compressed air to clean top surface of
WKHGHFN$YRLGÀRRGLQJZDWHURQWRSVXUIDFH
engine and electrical components.
• When the mulching kit is used, it is important
that the mowing interval is frequent.
Stopping the Engine
1. Move the throttle to the minimum position
(tortoise symbol).
2. Move the steering controls at the same time
out to the park brake position.
3. Disengage the mower deck by pressing the
blade switch down.
4. Raise the mower deck to the highest position.
If the engine has been worked hard, let it
idle at least 60 seconds to attain a usual
operating temperature before stopping. To
prevent fouling the spark plugs, avoid idling
the engine for longer periods.
5. Turn the ignition key to the stop position.
Remove key. Always remove key when
leaving the mower to prevent unauthorized
use.
58
MANTENIMIENTO
El cortacésped está equipado con una batería
que no requiere mantenimiento. Sin embargo,
cargar periódicamente la batería con un cargador
de batería automotriz prolongará su vida útil.
• Mantenga la batería y las terminales limpias.
• Mantenga los pernos de la batería apretados.
• Consulte la tabla para conocer los tiempos de
carga.
BATERÍA
ESTÁNDAR
ESTADO
DE CARGA
TIEMPO DE CARGA APROXIMADO DE LA
BATERÍA* PARA LA CARGA
COMPLETA A 27
O
C
Régimen máximo en:
50
amperios
30
amperios
20
amperios
10
amperios
12,6 V 100% - CARGA COMPLETA -
12,4V 75% 20 min. 35 min. 48 min. 90 min.
12,2V 50% 45 min. 75 min. 95 min. 180 min.
12,0V 25% 65 min. 115 min. 145 min. 280 min.
11,8V 0% 85 min. 150 min. 195 min. 370 min.
*El tiempo de carga depende de la capacidad,
el estado y la antigüedad de la batería, la
WHPSHUDWXUD\ODH¿FDFLDGHFDUJDGRU
Limpieza de la batería y las terminales
La corrosión y la suciedad de la batería y las
terminales pueden hacer que la batería pierda
potencia.
1. $ÀRMHODVGRVWXHUFDVSXHVWDVHQORVSHUQRV
GHWLSR-ODWHUDOHVVRORORVX¿FLHQWHSDUDTXH
el soporte de montaje de la batería se deslice
hacia abajo de la batería.
2. Con dos llaves 1/2", desconecte el cable de
la batería NEGRO y después el cable de la
EDWHUtD52-2
3. Retire con cuidado la batería del cortacésped
4. Enjuague la batería con agua pura y séquela.
5. Limpie las terminales y los extremos del cable
de la batería con un cepillo de alambre hasta
que brillen.
6. Cubra los terminales con grasa o vaselina.
Cambio de la batería
1. Instale una batería nueva con las terminales
en la misma posición que en la batería
antigua.
Batería
Si la batería está demasiado baja como para
arrancar el motor, se debe recargar.
Si utiliza los cables de puente para realizar
un arranque de emergencia, siga este
procedimiento:
Uso del cable puente
1. Conecte cada extremo del cable rojo a la
WHUPLQDO326,7,9$GHFDGDEDWHUtD
teniendo cuidado de no hacer cortocircuito
contra el chasis.
2. Conecte un extremo del cable NEGRO
DODWHUPLQDO1(*$7,9$GHODEDWHUtD
totalmente cargada.
3. Conecte el otro extremo del cable NEGRO
a una CONEXIÓN A TIERRA DEL CHASIS
en buenas condiciones del cortacésped con
la batería descargada, lejos del depósito de
combustible y la batería.
Para quitar los cables, invierta el orden
1. Quite el cable NEGRO primero del chasis y
luego de la batería completamente cargada.
2. 4XLWHHOFDEOH52-2GHODVGRVEDWHUtDVHQ
último lugar.
$9,62 Las baterías de plomo y
ácido generan gases explosivos. Mantenga
las baterías alejadas de chispas, llamas y
tabaquería. Use siempre protección ocular
cuando esté cerca de las baterías.
INFORMACIÓN IMPORTANTE No abrir o
quitar las tapas o cubiertas. No es necesario
agregar ni revisar el nivel del electrolito.
Use siempre dos llaves para los tornillos de las
terminales.
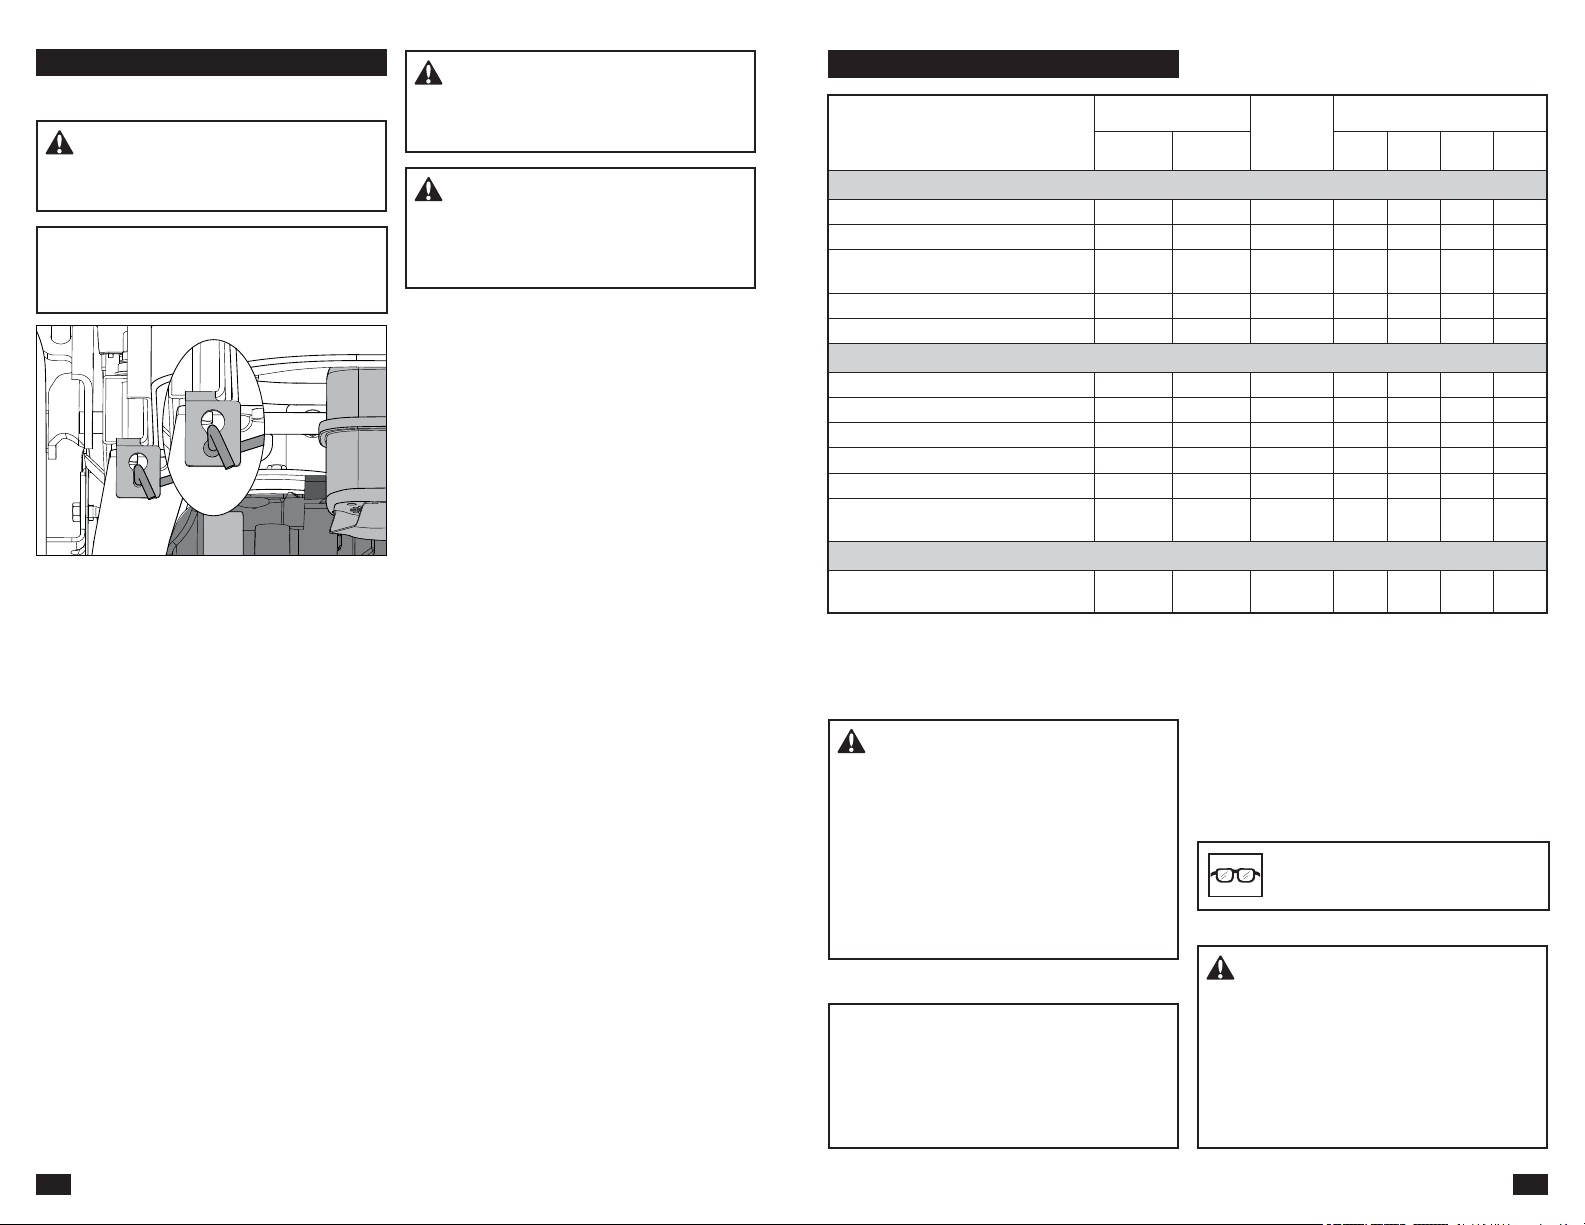
57
MANTENIMIENTO
MANTENIMIENTO
DIARIO
AL MENOS
81$9(=$/
AÑO
,17(59$/2'(
MANTENIMIENTO EN HORAS
ANTES DESPUÉS 25 50 100 300
COMPROBAR
Ajustar el cable del acelerador
Ŷ
Ajustar el equipo de corte
ƔƔ
El estado de las correas, poleas de
correa
ƔƔ
Las ruedecillas (cada 200 horas)
ƔƔ
El reglaje de la válvula del motor
3)
ƇƇ
CAMBIO
Las bujías
ŶŶ
El aceite del motor
ŶŶ
(O¿OWURGHDFHLWHGHOPRWRU
ŶŶ
(O¿OWURGHFRPEXVWLEOH
ŶŶ
(O¿OWURGHDLUHGHSDSHO
2)
ŶŶ
(OSUH¿OWURGHHVSXPDGHOSXUL¿FDGRU
de aire
2) 4)
Ŷ
TAMBIÉN
Realizar el mantenimiento después
de 300 horas
3)
ƇƇ
$'9(57(1&,$ Lista de comprobación
para antes de realizar cualquier operación de
mantenimiento o ajuste
• Aplique el freno de estacionamiento.
• Coloque el interruptor de cuchilla en la
posición desacoplada.
• Gire la llave de contacto a la posición de
apagado y saque la llave.
• Asegúrese de que la cuchilla y todas las
partes móviles se hayan detenido por
completo.
1)
Primer cambio, después de 8 a 10 horas.
Cuando se trabaja con una carga pesada o a
temperaturas ambiente elevadas, el reemplazo
se debe realizar cada 50 horas
2)
En condiciones de mucho polvo, se debe
aumentar la frecuencia de la limpieza y el
reemplazo.
3)
Realizado por un taller de servicio autorizado.
4)
Si está provisto
Ɣ = Descrito en este manual
Ƈ = No se describe en este manual
Ŷ = Consulte el manual del fabricante del motor
$9,62Use siempre protección
ocular cuando esté cerca de las
baterías.
$'9(57(1&,$No produzca un corto
en las terminales de la batería al permitir
que una llave o cualquier otro objeto entre
en contacto con ambas terminales al mismo
tiempo. Antes de conectar la batería, quítese
pulseras metálicas, relojes, anillos, etc.
La terminal positiva debe conectarse primero
para evitar que se produzcan chispas por
conexiones a tierra accidentales.
INFORMACIÓN IMPORTANTE El
cortacésped está equipado con un sistema
de conexión a tierra negativo de 12 voltios. El
otro vehículo también debe tener un sistema
de conexión a tierra negativo de 12 voltios. No
utilice el cortacésped con sistema para hacer
arrancar otros vehículos.
20
OPERATION
WARNING! Bypass linkages are located
FORVHWRWKHPXႉHU7RSUHYHQWEXUQVWKH
HQJLQHVKRXOGEHVKXWRႇDQGDOORZHGWRFRRO
before the bypass linkage levers are handled.
WARNING! Use more caution when
loading the machine into a truck or trailer using
ramps. There is the possibility of dangerous
LQMXU\RUGHDWKLIWKHPDFKLQHIDOOVRႇWKH
ramps.
Moving Machine By Hand
WARNING! Make no adjustments without:
• the engine stopped,
• the park brake activated
IMPORTANT INFORMATION To manually
push the mower, engage the hydro bypass
levers on both sides, pull both steering / park
brake controls inwards and push machine.
When pushing or pulling the mower, engage the
EZT bypass linkages. The EZT bypass linkages
are located on the rear of the frame, below the
rear engine guard.
1. Raise the deck into the highest cutting
position.
2. Move the steering / park brake controls
inwards to the neutral position.
3. Pull the EZT bypass linkages up and out of
the keyhole slots. Release the levers with the
head outside the frame and held in the bypass
position.
4. To reengage the EZT’s to drive, reverse the
above procedure.
Load the machine into truck or trailer by driving
slowly up the ramps. DO NOT LIFT! The machine
is not intended to be lifted by hand.

21
MAINTENANCE
Maintenance Schedule
Following is a list of maintenance procedures
that must be performed on the machine. For
those points not described in this manual, visit an
authorized service workshop. An annual service
MAINTENANCE
DAILY
AT LEAST
ONCE
EACH
YEAR
0$,17(1$1&(,17(59$/
IN HOURS
BEFORE AFTER 25 50 100 300
CHECK
Park brake for adjustment
Ɣ
Engine’s oil level (each refueling)
Ŷ
Safety system
Ɣ
For fuel and oil leakages
Ƈ
For damage
Ƈ
For loose hardware (screws, nuts)
Ƈ
For mower deck damage
Ƈ
Tire pressures
ƔƔƔƔ
Battery connections
Ɣ ƔƔƔƔ
CLEAN
Engine’s cooling air intake
ŶŶ
Below the mower deck
Ɣ
Around the engine
Ƈ
Around belts, belt pulleys
ƇƇƇƇ
Engine’s cooling air intake
2)
ŶŶ
$LUFOHDQHUIRDPSUH¿OWHU
2)
ŶŶ
$LUFOHDQHUSDSHU¿OWHUFDUWULGJH
2)
ŶŶ
ALSO
,QVSHFWPXႉHUVSDUNDUUHVWRU
ƇƇƇƇ
Start the engine & blades,
listen for unusual sounds
Ƈ
Sharpen
3)
/ Replace mower blades
ƔƔ
1)
First change after 8-10 hours. When
operating with a heavy load or at high ambient
temperatures, replace at 50 hour intervals.
2)
In dusty conditions, cleaning and replacement
are required more frequently.
3)
Performed by authorized service workshop.
carried out by an authorized service workshop is
recommended to maintain your machine in the
best possible condition and to make sure of safe
operation.
Read General Maintenance in the Safety
section.
Ɣ = Described in this manual
Ƈ = Not described in this manual
Ŷ = Refer to the engine manufacturer’s manual
WARNING! Before performing service or
adjustment:
• Engage the park brake.
• Disengage the blade switch.
• Turn the ignition switch to OFF position and
remove the key.
• Make sure the blades and all moving parts
have completely stopped.
56
MANTENIMIENTO
Programa de mantenimiento
La siguiente es una lista de procedimientos
de mantenimiento que se deben realizar en la
máquina. Para los puntos que no se describen
en este manual, visite un taller de servicio
autorizado. Se recomienda enviar la máquina a
revisión una vez al año en un taller de servicio
autorizado para mantenerla en las mejores
condiciones posibles y para garantizar un
funcionamiento seguro. Lea Mantenimiento
general en la sección Seguridad.
1)
Primer cambio, después de 8 a 10 horas.
Cuando se trabaja con una carga pesada o a
temperaturas ambiente elevadas, el reemplazo
se debe realizar cada 50 horas.
2)
En condiciones de mucho polvo, se debe
aumentar la frecuencia de la limpieza y el
reemplazo.
3)
Realizado por un taller de servicio autorizado.
MANTENIMIENTO
DIARIO
AL
MENOS
81$9(=
AL AÑO
,17(59$/2'(
MANTENIMIENTO EN HORAS
ANTES DESPUÉS 25 50 100 300
COMPROBAR
El freno de estacionamiento
Ɣ
El nivel de aceite del motor
(cada reabastecimiento)
Ŷ
El sistema de seguridad
Ɣ
Que no haya fugas de combustible ni
aceite
Ƈ
Si hay daños
Ƈ
6LKD\WRUQLOOHUtDÀRMD
Ƈ
El equipo de corte
Ƈ
La presión de los neumáticos
ƔƔƔƔ
Las conexiones de la batería
ƔƔƔƔƔ
LIMPIAR
Toma de aire de enfriamiento del motor
ŶŶ
Debajo del equipo de corte
Ɣ
A fondo la zona alrededor del motor
Ƈ
La zona que rodea correas, poleas de
correas
ƇƇƇƇ
La toma de aire de refrigeración del motor
2)
ŶŶ
(OSUH¿OWURGHOSXUL¿FDGRUGHDLUHGH
espuma
2)
ŶŶ
(OFDUWXFKRGHO¿OWURGHOSXUL¿FDGRUGHDLUH
de papel
2)
ŶŶ
TAMBIÉN
Inspeccionar el silenciador/parachispas
ƇƇƇƇ
Arrancar el motor y las cuchillas, revisar si
hay ruidos inusuales
Ƈ
$¿ODU
3)
/ reemplazar las cuchillas de corte
ƔƔ
Ɣ = Descrito en este manual
Ƈ = No se describe en este manual
Ŷ = Consulte el manual del fabricante del motor

55
OPERACIÓN
0RYHUODPiTXLQDPDQXDOPHQWH
$'9(57(1&,$ Los varillajes de
derivación están situados cerca del silenciador.
Para prevenir quemaduras, el motor debe
estar apagado y debe dejarse enfriar antes de
manipular las palancas del varillaje derivación.
$'9(57(1&,$ No realice ningún ajuste
sin:
• el motor detenido
• el freno de estacionamiento activado
$'9(57(1&,$ Tenga mucho cuidado
cuando cargue la máquina en un camión o
remolque usando rampas. Existe la posibilidad
de daños graves o peligro de muerte si la
máquina se cae de las rampas.
INFORMACIÓN IMPORTANTE Para empujar
manualmente la cortacésped, acople las
palancas de desvió hidráulicas en ambos lados,
tire el freno de dirección y de estacionamiento
hacia dentro y empuje la máquina.
Cuando empuje o tira del cortacésped, acople
los varillajes de derivación EZT. Los varillajes de
derivación EZT se encuentran en la parte trasera del
bastidor, debajo de la protección trasera del motor.
1. Levante el equipo a la posición de corte más
alta.
2. Mueva los controles de la dirección/freno de
estacionamiento simultáneamente hacia dentro,
hasta la posición neutra.
3. Tire de los varillajes de derivación EZT hacia
arriba y retírelos de las ranuras de la chaveta.
Suelte las palancas con la cabeza fuera
del bastidor y manténgala en la posición de
derivación.
• Use una manguera para limpiar el equipo de
corte por debajo después de cada uso. Durante
la operación de limpieza, el equipo de corte debe
levantarse a la posición de transporte. Asegúrese
de que el cortacésped se haya enfriado y el motor
esté apagado.
• Evite cortar césped húmedo. El resultado del corte
HVGH¿FLHQWHSRUTXHODVUXHGDVVHKXQGHQHQHO
césped blando, se acumulan huellas y los recortes
de pasto se atoran bajo el carenado.
• Use una manguera para limpiar el equipo de
corte por debajo después de cada uso. Durante
la operación de limpieza, el equipo de corte debe
levantarse a la posición de transporte. Asegúrese
de que el cortacésped se haya enfriado y el motor
esté apagado.
• 8WLOLFHDLUHFRPSULPLGRSDUDOLPSLDUODVXSHU¿FLH
superior del equipo. Evite que se acumule
DJXDHQODVXSHU¿FLHVXSHULRUHQHOPRWRU\ORV
componentes eléctricos.
• Cuando se utiliza el kit para triturar, es importante
que el intervalo de corte sea frecuente.
4. Para volver a acoplar el EZT a la marcha, realice
el procedimiento anterior a la inversa.
Cargue la máquina en un camión o remolque
conduciendo lentamente por rampas. ¡NO
/(9$17(/$ 0È48,1$ /D PiTXLQDQR HVWi
diseñada para ser levantada manualmente.
22
MAINTENANCE
MAINTENANCE
DAILY
AT LEAST
ONCE
EACH
YEAR
0$,17(1$1&(,17(59$/
IN HOURS
BEFORE AFTER 25 50 100 300
CHECK
Throttle cable for adjustment
Ŷ
Mower deck for adjustment
ƔƔ
Condition of belts, belt pulleys
ƔƔ
Caster wheels (at 200 hour intervals)
ƔƔ
Engine valve clearance
3)
ƇƇ
CHANGE
Spark plugs
ŶŶ
Engine oil
1)
ŶŶ
EngineRLO¿OWHU
ŶŶ
)XHO¿OWHU
ŶŶ
3DSHUDLU¿OWHU
2)
ŶŶ
$LUFOHDQHUIRDPSUH¿OWHU
2) 4)
Ŷ
ALSO
Do the 300-hour service
3)
ƇƇ
1)
First change after 8-10 hours. When
operating with a heavy load or at high ambient
temperatures, replace at 50 hour intervals.
2)
In dusty conditions, cleaning and replacement
are required more frequently.
3)
Performed by authorized service workshop.
4)
If equipped.
Ɣ = Described in this manual
Ƈ = Not described in this manual
Ŷ = Refer to the engine manufacturer’s manual
WARNING! Do not short battery
terminals by allowing a wrench or other objects
to contact both terminals at the same time.
Before connecting battery, remove metal
bracelets, wristwatch bands, rings, etc.
3RVLWLYHWHUPLQDOPXVWEHFRQQHFWHG¿UVWWR
prevent sparks from accidental grounding.
CAUTION! Always wear eye
protection when around batteries.
IMPORTANT INFORMATION The mower is
equipped with a 12-volt negative grounded
system. The other vehicle must also be a
12-volt negative grounded system. Do not use
your mower to start other vehicles.
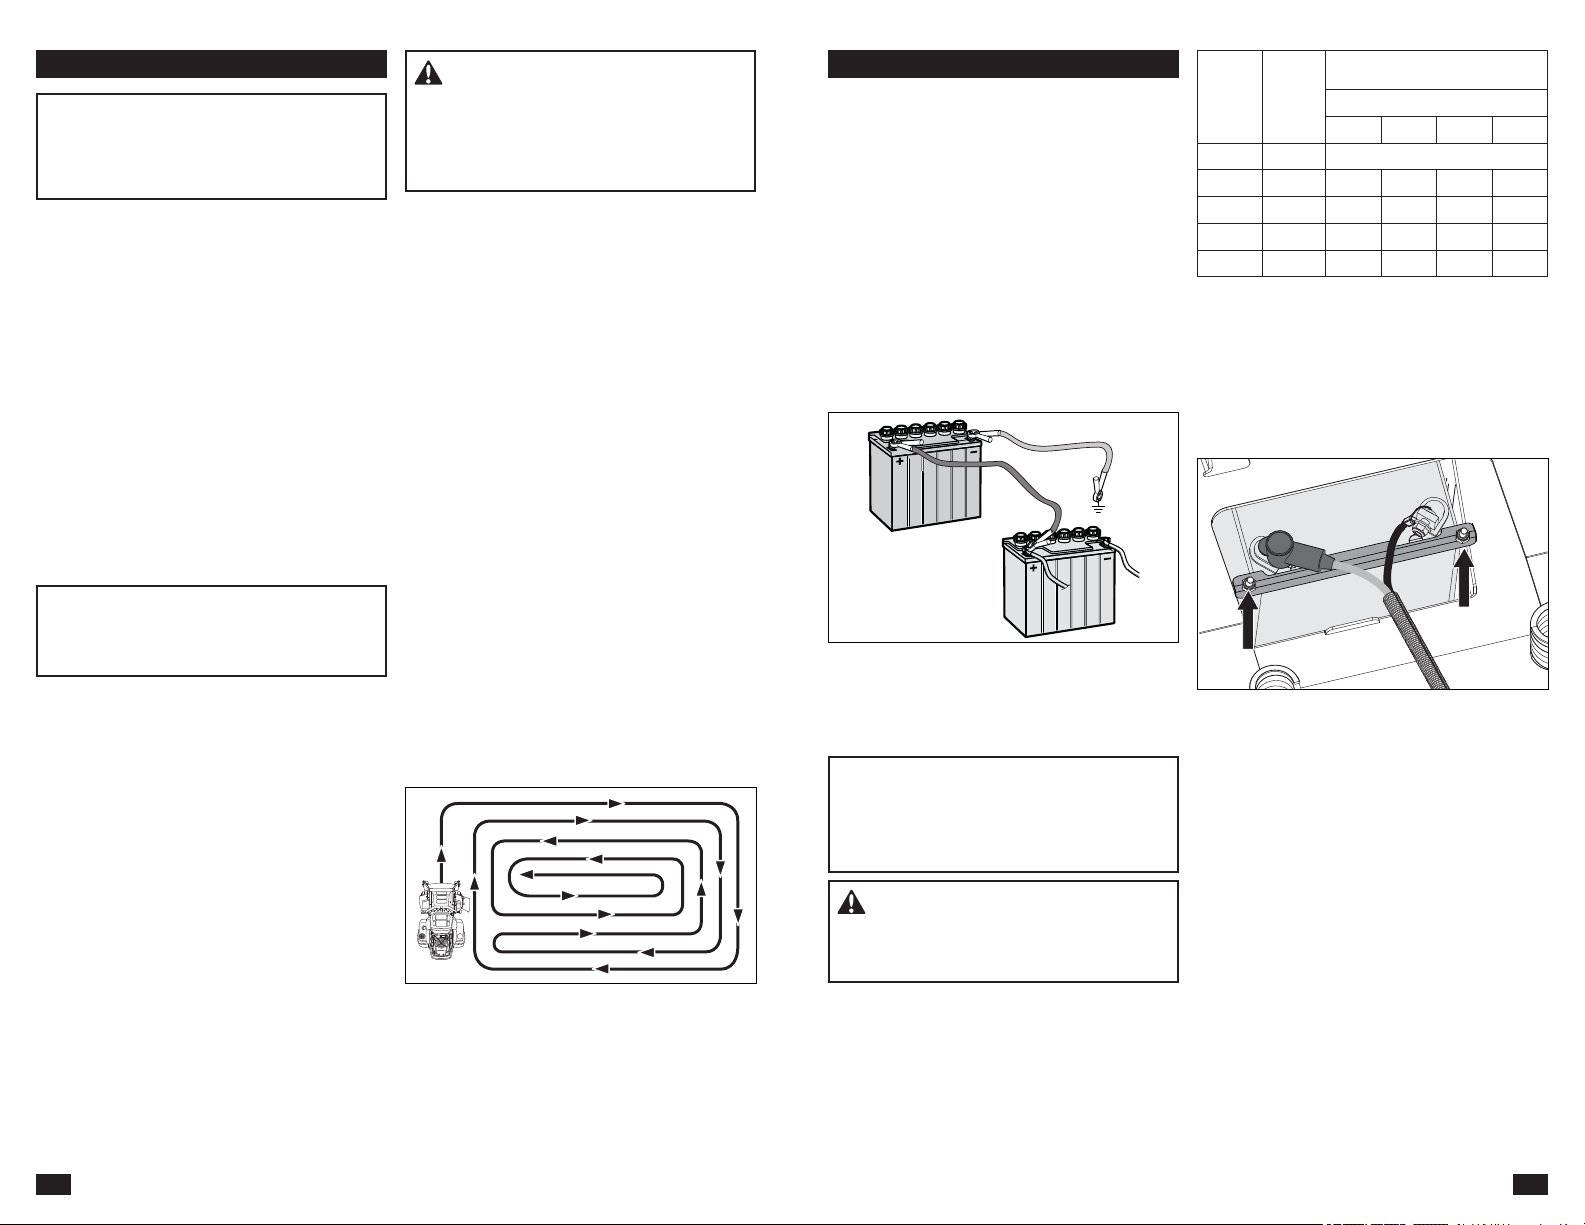
23
MAINTENANCE
IMPORTANT INFORMATION Do not try to
open or remove caps or covers. Adding or
checking level of electrolyte is not necessary.
Always use two wrenches for the terminal
screws.
The mower is equipped with a maintenance
free battery. Servicing is not necessary. Periodic
charging of the battery with an automotive type
battery charger will extend its life.
• Keep battery and terminals clean.
• Keep battery bolts tight.
• See chart for charging times.
Cleaning battery and terminals
Corrosion and dirt on the battery and terminals
can cause the battery to lose power.
1. Loosen the two nuts attached to the side
-EROWVMXVWHQRXJKWKDWWKHEDWWHU\PRXQW
EUDFNHWVOLGHVGRZQRႇWKHEDWWHU\
CAUTION! Lead-acid batteries generate
H[SORVLYHJDVHV.HHSVSDUNVÀDPHDQG
smoking materials away from batteries. Always
wear eye protection when around batteries.
Battery
If the battery is too weak to start the engine, it
must be recharged.
Jumper Cable Use
1. Connect each end of the RED cable to the
326,7,9(WHUPLQDORQHDFKEDWWHU\WDNLQJ
care not to short against chassis.
2. Connect one end of the BLACK cable to the
1(*$7,9(WHUPLQDORIWKHIXOO\FKDUJHG
battery.
3. Connect the other end of the BLACK cable
to a good CHASSIS GROUND on the mower
with the discharged battery, away from the
fuel tank and battery.
To remove cables, reverse order
1. 5HPRYH%/$&.FDEOH¿UVWIURPFKDVVLVDQG
then from the fully charged battery.
2. Remove RED cable last from both batteries.
2. Using two 1/2" wrenches disconnect BLACK
battery cable then RED battery cable.
3. Carefully remove the battery from the mower
4. Rinse the battery with plain water and dry.
5. Clean terminals and battery cable ends with a
wire brush until shiny.
6. Coat the terminals with grease or petroleum
jelly.
Replacing battery
1. Install the new battery with terminals in the
same position as the old battery.
2. &RQQHFW5('EDWWHU\FDEOH¿UVWWRSRVLWLYH
battery terminal.
3. Connect BLACK grounding cable to negative
(-) battery terminal.
4. Slide mount bracket back up over battery and
tighten nuts.
5. Replace terminal boot cover.
STD
BATTERY
STATE
OF
CHARGE
APPROXIMATE CHARGING TIME*
TO FULL CHARGE AT 80
O
F
Maximum Rate at:
50 Amps 30 Amps 20 Amps 10 Amps
9 100%
- FULL CHARGE -
9 75% 20 min. 35 min. 48 min. 90 min.
9 50% 45 min. 75 min. 95 min. 180 min.
9 25% 65 min. 115 min. 145 min. 280 min.
9 0% 85 min. 150 min. 195 min. 370 min.
*Charging time depends on battery capacity,
FRQGLWLRQDJHWHPSHUDWXUHDQGHႈFLHQF\RIFKDUJHU
54
OPERACIÓN
Detención del motor
1. Mueva el acelerador a la posición mínima (con
el símbolo en forma de tortuga).
2. Mueva los controles de la dirección/freno de
estacionamiento fuera de la posición neutra.
3. Desacople el equipo de corte presionando el
interruptor de cuchilla hacia abajo.
4. Levante el equipo de corte hasta la posición
más alta. Si el motor ha trabajado duro, déjelo
funcionar en ralentí durante al menos 60
segundos para que alcance una temperatura
normal de operación antes de detenerlo. Para
no ensuciar las bujías de encendido, evite dejar
el motor en ralentí durante períodos más largos.
5. Coloque la llave de encendido en la posición de
parada. Retire la llave. Siempre retire la llave
cuando termine de usar el cortacésped para
evitar el uso no autorizado.
Consejos para cortar el césped
• 2EVHUYHHLGHQWL¿TXHURFDV\RWURVREMHWRV¿MRV
para evitar colisiones.
• Comience con una altura de corte elevada y
redúzcala hasta lograr el resultado de corte
deseado. El césped promedio se debe cortar
aproximadamente a 6,35 cm durante la temporada
fría y a más de 7,62 durante los meses de calor.
Para que el césped crezca más sano y tenga
mejor aspecto, córtelo con frecuencia después
de un crecimiento moderado.
• Para un mejor rendimiento del corte, el césped
de más de 15,20 cm de altura debe cortar dos
veces. Haga el primer corte relativamente alto;
el segundo a la altura deseada.
• El resultado del corte será mejor con un
régimen del motor alto (cuando las cuchillas
giran rápidamente) y a baja velocidad (el
cortacésped se mueve lentamente). Si el pasto
no está demasiado largo y denso, la velocidad
de conducción puede aumentarse sin afectar
negativamente el resultado de corte.
• Las mejores jardines se obtienen cortando el
césped con frecuencia. El césped se vuelve más
uniforme y los recortes de pasto se distribuyen
de manera más homogénea en el área de corte.
El tiempo total que se tarda no aumenta ya que
se puede usar una velocidad mayor sin que ello
perjudique los resultados del corte.
INFORMACIÓN IMPORTANTE Cuando se
detenga y salga de la máquina, tanto el freno
de dirección como el de estacionamiento deben
moverse a la posición de bloqueo al mismo
tiempo.
INFORMACIÓN IMPORTANTE Dejar el
interruptor de encendido en cualquier posición
que no sea la de apagado hace que la batería
se descargue.
• Cuando corte áreas grandes, comience girando
hacia la derecha, de modo que los recortes
se descarguen lejos de los arbustos, bardas,
caminos, etc. Después de una o dos vueltas, corte
en la dirección opuesta, dando vueltas hacia la
izquierda hasta que termine.
Trabajo en pendientes
Lea las instrucciones de seguridad de Conducción
en pendientes en la sección Seguridad.
• Se debe usar la velocidad más lenta posible antes
de comenzar a bajar o subir colinas.
• Evite detenerse o cambiar de velocidad en las
colinas.
• Si es absolutamente necesario detenerse, mueva
los controles de la dirección a la posición neutra,
empújelos hacia fuera de la unidad y acople el
freno de estacionamiento.
• Para volver a iniciar el movimiento, mueva los
controles de la dirección nuevamente a la posición
neutra.
• Presione hacia delante para recobrar el
movimiento de avance.
• Dé todas las vueltas despacio.
$'9(57(1&,$ No conduzca en lomas
con pendientes superiores a 10 grados. Realice
el corte en las pendientes hacia arriba y hacia
abajo, nunca de lado a lado. Evite cambios
repentinos en el sentido de marcha. No conduzca
a través de pendientes.
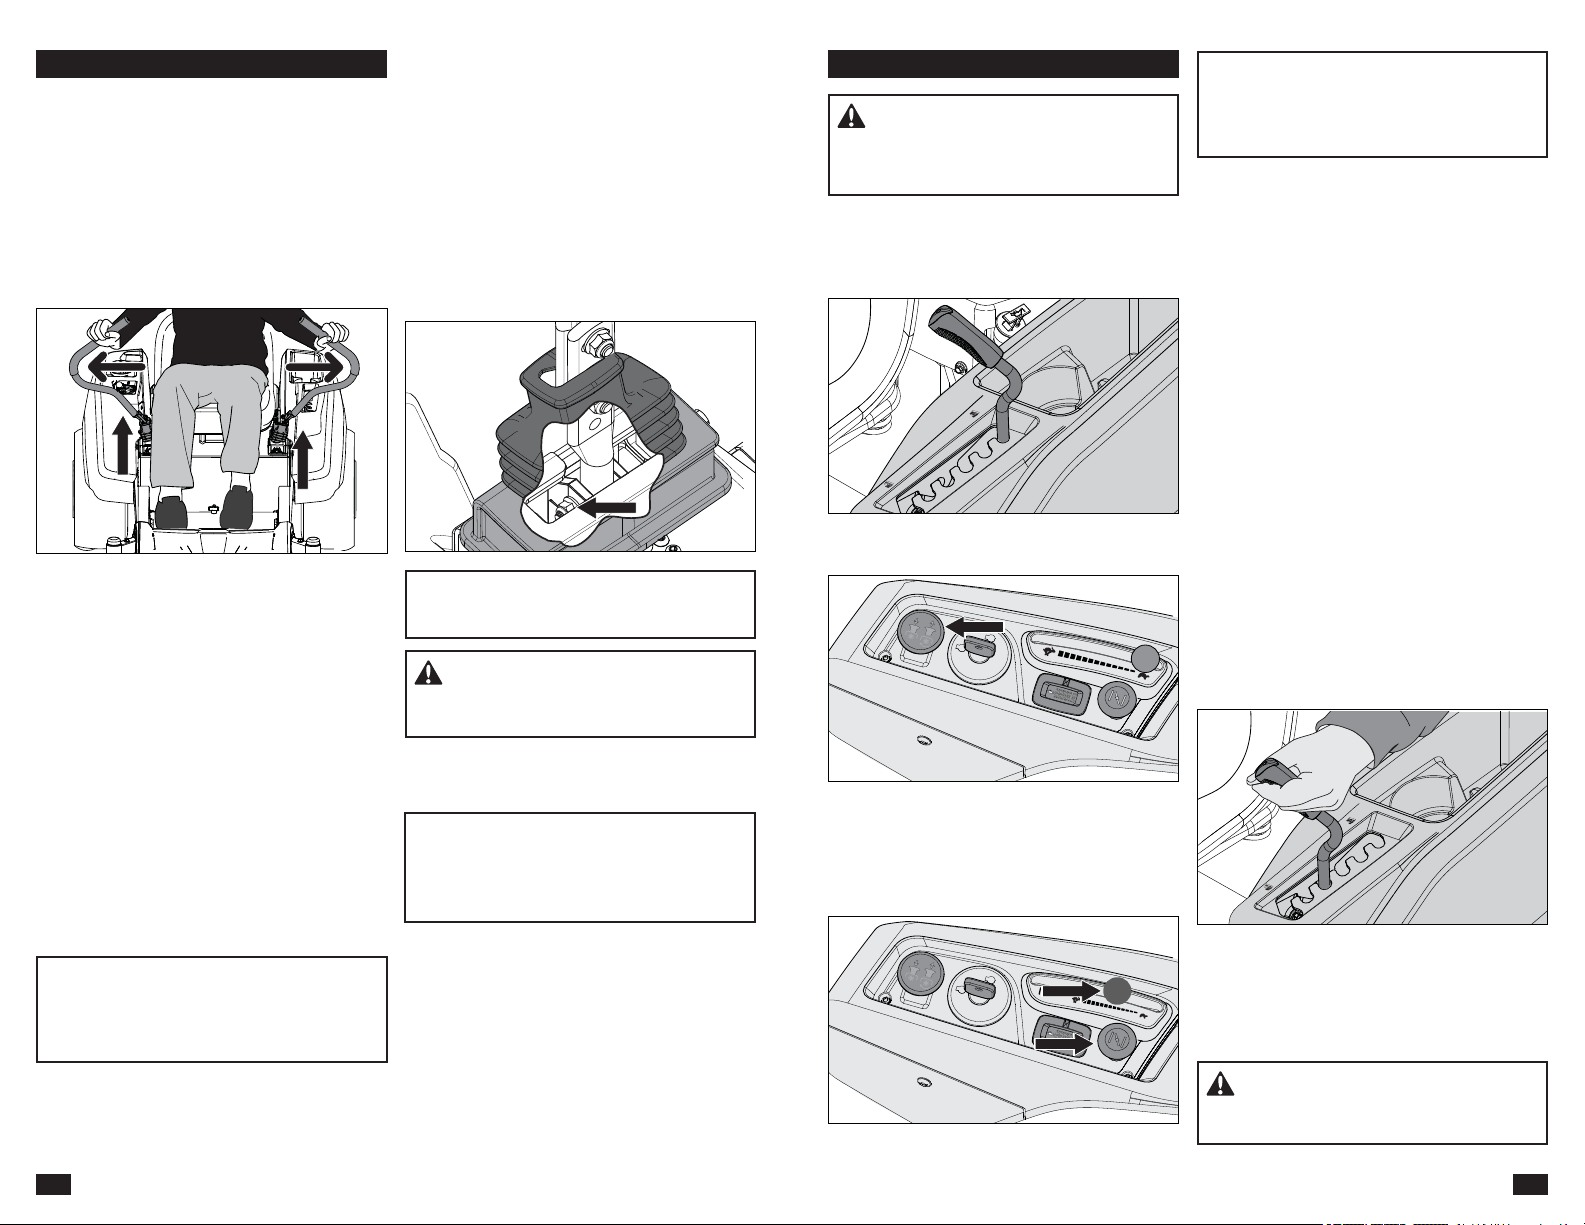
53
OPERACIÓN
$'9(57(1&,$!
Los gases de escape
del motor contienen monóxido de carbono, que
es un gas venenoso inodoro e incoloro. No
utilice la máquina en espacios cerrados.
Arranque del motor
1. Siéntese en el asiento.
2. Levante el equipo de corte hasta la posición
más alta.
3. Desacople las cuchillas de corte presionando
el interruptor de cuchilla hacia abajo.
4. Mueva los controles de la dirección/freno de
HVWDFLRQDPLHQWR¿UPHPHQWHKDFLDDIXHUDKDVWD
la posición de bloqueo.
5. Mueva el acelerador hasta la posición
intermedia. Si el motor está frío, el estrangulador
se debe tirar hacia arriba.
INFORMACIÓN IMPORTANTE No haga
funcionar el motor de arranque durante más
de cinco segundos cada vez. Si el motor no
arranca, espere unos diez segundos antes de
volver a intentarlo.
6. Presione y gire la llave de encendido a la
posición de arranque.
7. Cuando el motor arranque, suelte
inmediatamente la llave de encendido para
volver a la posición de funcionamiento.
8. Ajuste el régimen del motor con el acelerador.
Deje que el motor funcione a una velocidad
moderada, aproximadamente a media
aceleración, durante un breve instante antes
de su uso.
9. USE LA ACELERACIÓN MÁXIMA AL
CORTAR.
Operación
1. Suelte el freno de estacionamiento moviendo
los controles de la dirección/freno de
estacionamiento hacia dentro, hasta la posición
neutra.
NOTA: El cortacésped está equipado con un
sistema de detección de presencia del operador.
&XDQGR HO PRWRU HVWp HQ IXQFLRQDPLHQWR
cualquier intento del operador de dejar el asiento
sin primero activar el freno de estacionamiento
apagará el motor.
2. Baje el equipo de corte hasta la altura de
corte deseada.
3. Mueva el acelerador hasta la posición de
aceleración máxima (con el símbolo de
conejo).
$'9(57(1&,$ Asegúrese de que no
haya nadie cerca del cortacésped al activar el
interruptor de cuchilla.
4. Conecte el equipo de corte tirando el interruptor
de cuchilla hacia arriba.
5. Gire las palancas de control hacia adentro y
mueva despacio ambas palancas de control
ligeramente hacia adelante para avanzar en
una línea recta.
24
MAINTENANCE
Safety System
The machine is equipped with a safety system
that prevents starting or driving under the
following conditions.
The engine can only be started when:
• the mower deck is disengaged.
• the steering / park brake controls are in the
outer, locked neutral position, making sure
of full parking brake engagement for a safe
startup.
Park Brake
9LVXDOO\FKHFNWKDWQRGDPDJHLVIRXQGRQWKH
steering control levers, links or switches belonging
to the park brake. Do a standstill test and check
WKDWWKHUHLVVXႈFLHQWEUDNLQJDFWLRQ
To adjust the park brake tension, move the boot
covering the steering control base. Tighten the
1/2" pivot nut until the braking action is correct.
Replace the steering boot, making sure the boot
top sits between the two adjustment bolts on the
steering control.
For any further adjust to the park brake, contact
the Husqvarna service workshop.
WARNING! Faulty adjustment will result
in reduced braking ability and can cause an
accident.
NOTE: If the steering / park brake controls are
QRWKROGLQJLQWKHIXOORXWERDUGSRVLWLRQWKH
tension can be adjusted by tightening the nut on
the backside of the pivot. (See Park Brake in this
section).
Make daily inspections to make sure that the
safety system works by trying to start the engine
when one of the conditions is not met. Change
the conditions and try again.
If the machine starts when one of these
FRQGLWLRQVLVQRWPHWWXUQWKHPDFKLQHRႇDQG
repair the safety system before using the machine
again.
Make sure the engine stops when the park brake
is not engaged and the operator leaves the
seated position.
Check that the engine stops if the mower blades
DUHHQJDJHGDQGWKHGULYHUWHPSRUDULO\PRYHVRႇ
the drivers seat.
IMPORTANT INFORMATION To be able to
drive, the driver must sit in the seat and the
steering / park brake controls must be moved
into the engaged (outer) position. Otherwise
the engine will stop.
IMPORTANT INFORMATION The machine
must be standing still when applying the park
brake.
Tire Pressures
All tires must be at 15 psi / 103 kPa / 1 bar.
IMPORTANT INFORMATION DO NOT add
DWLUHOLQHURUIRDP¿OOPDWHULDOWRWKHWLUHV
([FHVVLYHORDGVFUHDWHGE\IRDP¿OOHGWLUHVZLOO
cause premature failures.
2QO\XVH2(0VSHFL¿HGWLUHV
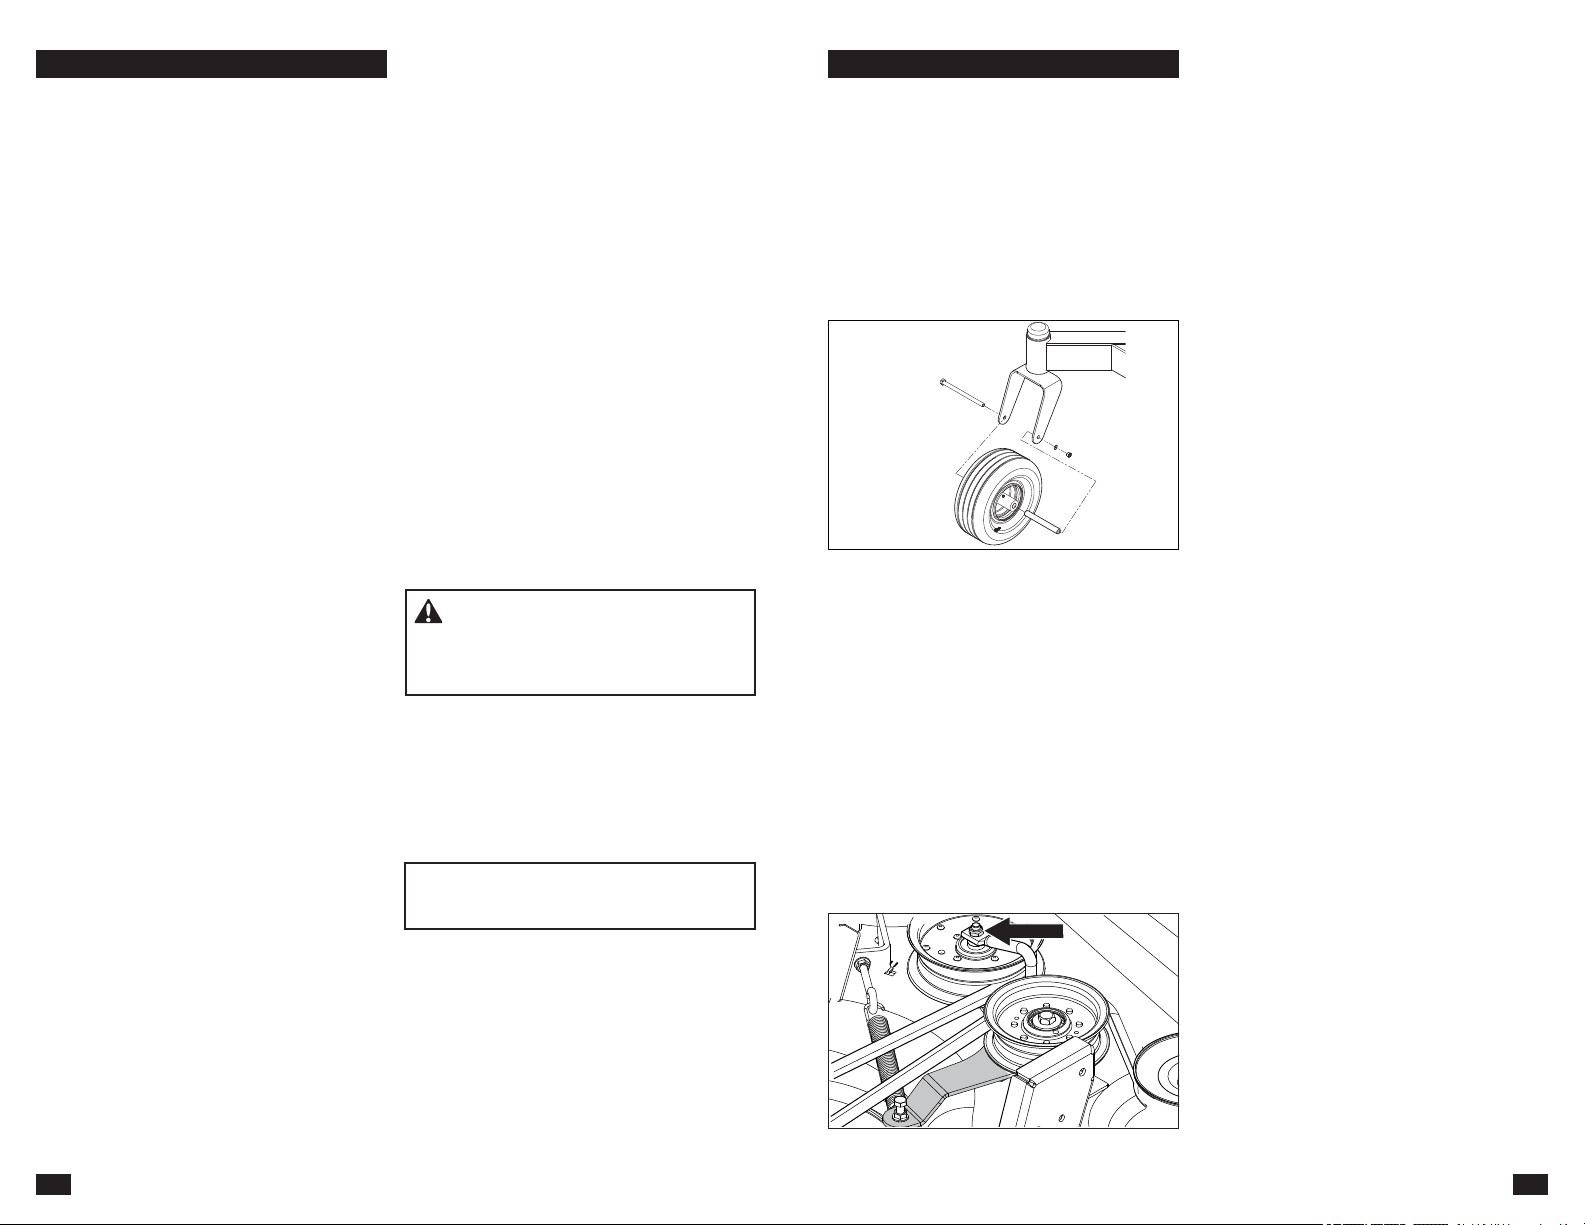
25
MAINTENANCE
Caster Wheels
Check at 200 hour intervals. Check that wheels
turn freely. If wheels do not turn freely take the
unit to your dealer for service.
)RDP¿OOHGWLUHVRUVROLGWLUHVZLOOYRLGWKH
warranty.
Removal and installation
Remove nut, washer, and caster bolt. Pull the
wheel out of the yoke and take care of the
spacers. Install in reverse order. Tighten caster
bolt.
9EHOWV
Check at 100 hour intervals of operation. Check for
severe cracking and large nicks.
NOTE: The belt will show some small cracks in
usual operation.
The belts are not adjustable. Replace belts if they
begin to slip from wear.
Deck Belt Removal
1. Park on a level surface. Engage park brake.
2. Lower the deck into the lowest cutting position.
3. Remove the bolts from the belt shields and
remove the shields.
4. Remove dirt or grass from around the cutter
housings and the deck surface.
5. Loosen the nut securing the belt guide. Note
the position of the belt guide for reinstallation.
6. Push inward on the idler arm to release the
tension on the belt.
7. Carefully lift the belt over the top of the cutter
housing pulleys and remove belt from the deck.
Deck Belt Installation
127()RUHDVHLQLQVWDOOLQJWKHGHFNEHOWUHIHUWR
the routing decal on the top of the deck.
1. Wind the deck belt around the electric clutch
pulley located on the engine shaft.
2. Route the belt forward and up onto the deck.
3. Position the belt around spring loaded idler
pulley.
4. Wind the belt around the stationary idler pulley
and the mandrel housings.
5. Push inward on the idler arm and carefully put
the belt over the stationary idler pulley. When
the belt is correctly routed, slowly release the
idler arm to tension the belt.
6. Double check the belt routing to make sure it
matches the routing decal, and the belt does
not have twists.
7. Set the loosened belt guide into the idler arm
hole and tighten the pulley bolt.
8. Replace belt shields on both mandrel housings
and secure with fasteners.
52
OPERACIÓN
Lea la sección Seguridad y las páginas siguientes
si no está familiarizado con la máquina.
Capacitación
Debido a su exclusiva capacidad de dirección,
los cortacésped de giro cero son mucho más
maniobrables que los cortacésped típicos.
Esta sección se debe analizar en su totalidad
antes de intentar mover el cortacésped con su
propia potencia. Antes de utilizar por primera vez
el cortacésped o hasta que se sienta cómodo
con los controles, utilice una menor velocidad de
aceleración y una velocidad de desplazamiento
reducida. NO mueva las palancas de control a la
posición más adelantada ni a las posiciones de
marcha atrás durante el funcionamiento inicial.
Los usuarios primerizos deben familiarizarse con el
PRYLPLHQWRGHOFRUWDFpVSHGHQXQDVXSHU¿FLHGXUD
como el hormigón o el asfalto ANTES de intentar
conducir en césped. Hasta que el operador se
sienta cómodo con los controles del cortacésped
y la capacidad de giro cero, las maniobras
excesivamente bruscas pueden dañar el césped.
Dirección
3DUDPRYHUODPiTXLQDKDFLDDGHODQWH\KDFLD
DWUiV
El sentido de marcha y la velocidad de los
movimientos del cortacésped se ven afectados
por el movimiento de las palancas de control a
cada lado del cortacésped. La palanca de control
izquierda controla la rueda izquierda. La palanca de
control derecha controla la rueda derecha.
Los usuarios primerizos deben empujar
el cortacésped (consulte Mover la máquina
manualmente en la sección Operación) hasta un
lugar abierto y plano, sin otras personas, vehículos
u obstáculos cerca. Para mover la máquina con
su propia potencia, el operador debe sentarse
en el asiento y arrancar el motor (consulte Antes
de arrancar en la sección Operación). Ajuste el
régimen del motor en ralentí y quite el freno de
estacionamiento moviendo las palancas de control
de la dirección hacia adentro. No conecte las
cuchillas. Mientras las palancas de control no se
muevan hacia delante o hacia atrás, el cortacésped
no se moverá.
Mueva lentamente ambas palancas de control
un poco hacia delante. Esto permitirá que el
cortacésped se mueva hacia delante en línea recta.
Tire las palancas de control hacia atrás a la posición
neutra y el cortacésped dejará de moverse.
Tire ligeramente hacia atrás las palancas de control
para que el cortacésped se mueva hacia atrás.
Empuje las palancas de control hacia delante,
hasta la posición neutra y el cortacésped dejará
de moverse.
Para girar a la derecha
Mientras se mueve en la dirección de avance, tire
de la palanca derecha hacia atrás hacia la posición
neutral y mantenga a la vez la posición de la palanca
izquierda, esto reducirá la velocidad de rotación
de la rueda derecha y hará que la máquina gire en
esa dirección.
Para girar a la izquierda
Mientras se mueve en la dirección de avance, tire
de la palanca izquierda hacia atrás hacia la posición
neutral y mantenga a la vez la posición de la palanca
derecha, esto reducirá la velocidad de rotación de
la rueda izquierda y hará que la máquina gire en
esa dirección.
Para realizar el giro cero
Mientras se mueve en el sentido de avance, primero
tire de ambas palancas de control hacia atrás
hasta que el cortacésped se detenga o reduzca
drásticamente su velocidad.
A continuación, alternando una palanca ligeramente
hacia la posición de avance y la otra en la posición
de retroceso, realice el giro.
1. Lea las secciones sobre Seguridad y Controles
antes de arrancar la máquina.
2. Realice el mantenimiento diario antes de arrancar
(consulte el Programa de mantenimiento en la
sección Mantenimiento).
3. &RPSUXHEHTXHKD\DVX¿FLHQWHFRPEXVWLEOHHQ
el depósito de combustible.
1. Ajuste el asiento en la posición deseada.
Las condiciones siguientes deben cumplirse antes
de que se pueda arrancar el motor:
• El interruptor de cuchilla se debe presionar hacia
abajo a la posición desacoplada.
• Ambos controles de dirección/freno de
estacionamiento deben estar en la posición
neutra bloqueada (exterior).
$'9(57(1&,$Asegúrese de que el área
de trabajo esté libre de objetos que puedan ser
lanzados por las cuchillas giratorias. Despeje el
césped de piedras y otros objetos.
Antes de arrancar
INFORMACIÓN IMPORTANTE El asiento
no debe ajustarse cuando la unidad está en
movimiento.
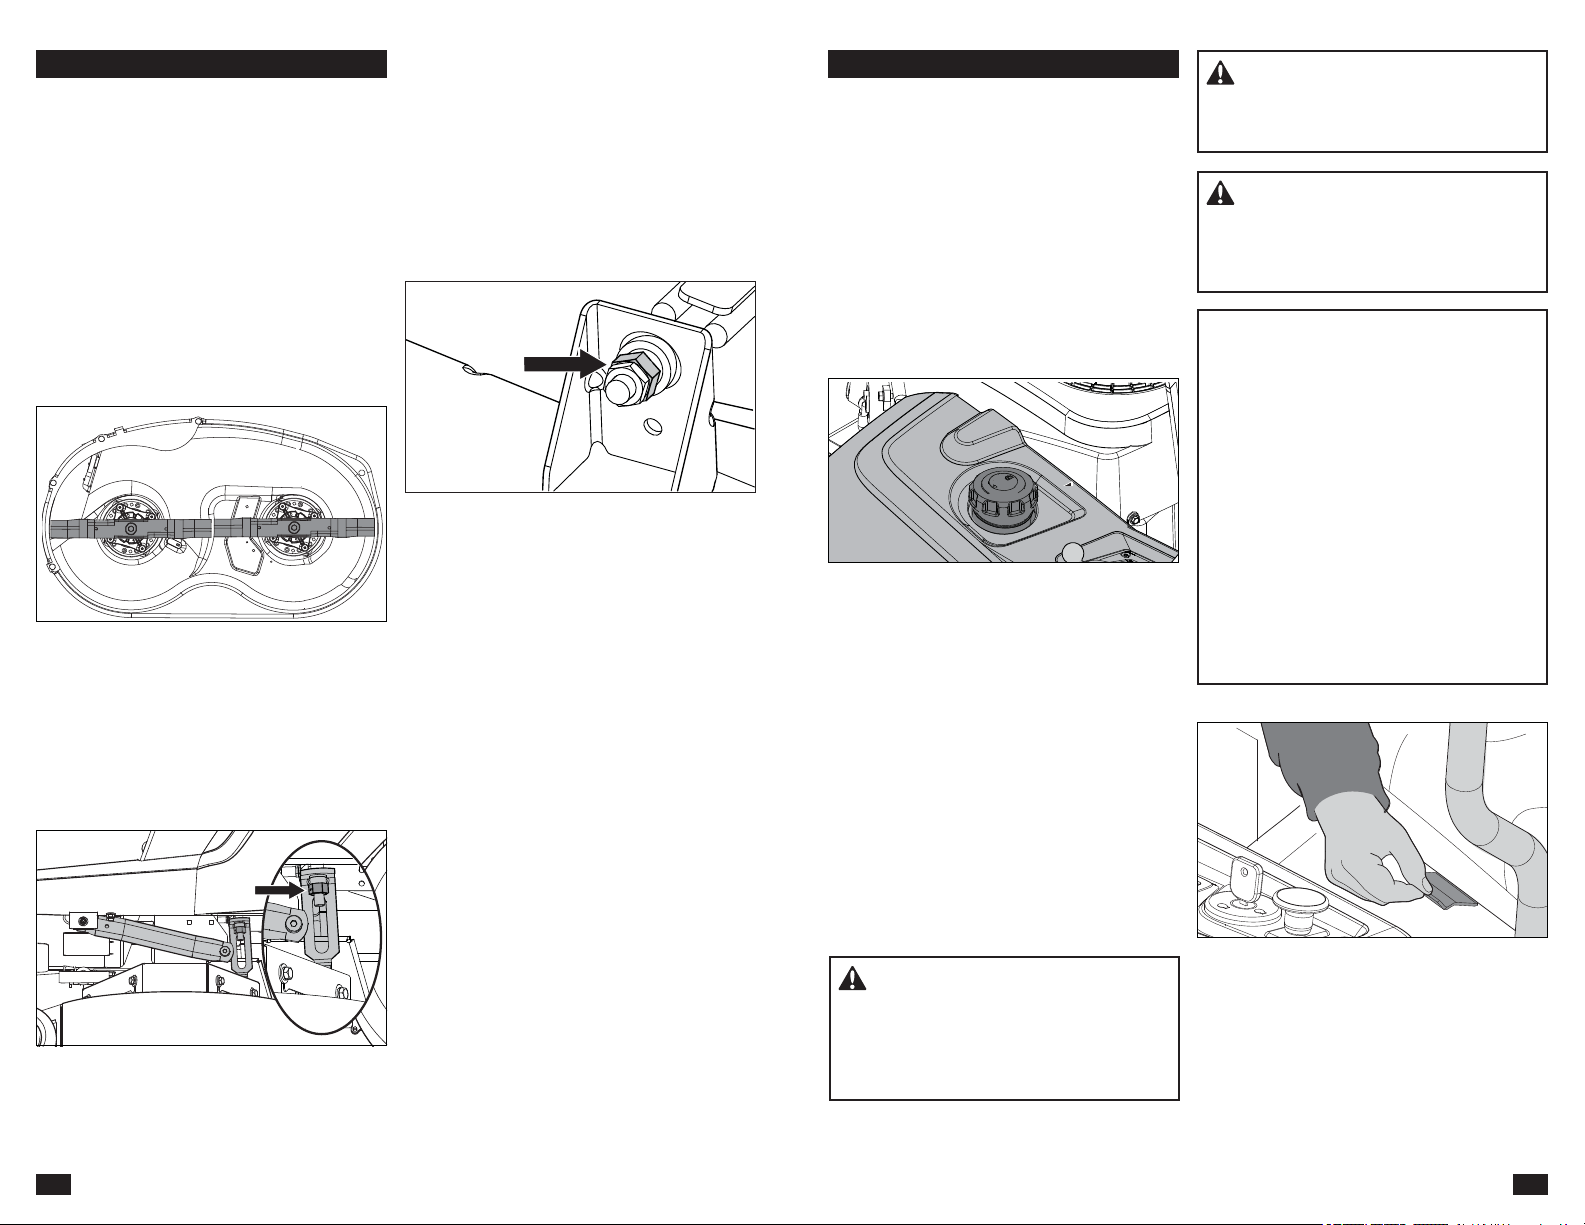
51
CONTROLES
Depósito de combustible
INFORMACIÓN IMPORTANTE La experiencia
indica que los combustibles mezclados con
alcohol (llamados gasohol, etanol o metanol)
pueden atraer la humedad, lo que lleva a la
separación y la formación de ácidos durante el
almacenamiento. El gas ácido puede dañar el
sistema de combustible de un motor mientras
está almacenado. Para evitar problemas en
el motor, el sistema de combustible se debe
vaciar antes de ser almacenado por 30 días o
más. Drene el tanque de gasolina, encienda el
motor y déjelo en marcha hasta que los tubos
de combustible y el carburador estén vacíos.
Use combustible nuevo la temporada siguiente.
Consulte la sección Almacenamiento para
obtener más información. No use productos de
limpieza para motor o carburador en el depósito
de combustible porque puede ocurrir un daño
permanente.
Lea las instrucciones de seguridad antes de cargar
combustible. La máquina tiene un solo depósito
de combustible, justo detrás de la consola. La
capacidad del depósito es de 13,25 litros.
Revise con regularidad la junta del tapón de la
gasolina para ver si hay daños y mantenga la tapa
debidamente apretada.
El motor se pondrá en funcionamiento en un mínimo
de 85 octanos gasolina sin plomo (no mezcla de
aceite). Se puede utilizar gasolina de alquilatos
adaptada para el medio ambiente. Consulte
también la sección Datos técnicos relacionada
con el combustible etanol. No se admite el uso de
combustible metanol. No utilice combustible E85 a
base de alcohol. Pueden producirse daños en el
motor y sus componentes.
Cuando use la máquina en temperaturas inferiores
a 0° C, use gasolina de invierno limpia y nueva para
asegurar un buen arranque en climas fríos.
$'9(57(1&,$La gasolina es altamente
LQÀDPDEOH5HVSHWHODVSUHFDXFLRQHV\OOHQHHO
depósito de combustible al aire libre (consulte
las instrucciones de seguridad).
$'9(57(1&,$ Llene hasta la parte
inferior del tubo de llenado. No lo llene de más.
Limpie las salpicaduras de aceite o combustible.
No almacene, derrame ni use gasolina cerca de
XQDÀDPDDELHUWD
$'9(57(1&,$ El motor y el sistema
de escape se calientan mucho durante el
funcionamiento. Existe riesgo de quemaduras
si se tocan. Deje que el motor y el sistema de
escape se enfríen antes de llenar el depósito de
combustible.
Palanca de ajuste del asiento
El asiento se puede ajustar longitudinalmente.
Al realizar los ajustes, la palanca situada bajo el
lado derecho del asiento se levanta, tras lo cual el
asiento se puede mover hacia delante o hacia atrás.
4. Pruebe la unidad conduciéndola a aceleración
máxima y con ambas palancas de control de
movimiento en la posición completamente
hacia delante. Gire gradualmente el perno de
alineación del lado derecho hasta que la unidad
comience a desviarse notablemente hacia la
derecha.
5. Conduzca hacia delante a aceleración máxima
con ambas palancas de control de movimiento
en la posición completamente hacia adelante.
Gire gradualmente el perno de alineación
izquierdo hasta que la unidad se desplace en
línea recta.
26
MAINTENANCE
4. Turn either blade to align with the deck front-
to-rear. If the front blade tip does not measure
1/4" to 3/8" (6,35 mm to 9,52 mm) lower than
the rear, remove the foot plate access the front
deck adjustment. With an adjustable wrench,
loosen the jam nut on the front suspension
linkage.
Make adjustment to level with the front lift link
nut.Clockwise raises the front of the mower,
counter clockwise will lower the front. Adjust
the nut until rear blade tip is 1/4" to 3/8" (6,35
mm to 9,52 mm) higher than the front blade tip.
NOTE: This will position the mower deck in a
standard measurement position. Depending on
the type of grass being mowed or environmental
FRQGLWLRQVDGGLWLRQDODGMXVWPHQWVPD\EH
required to get the desired cut.
Adjusting the Mower Deck
Leveling deck
Adjust the deck while the mower is on a level
VXUIDFH0DNHVXUHWKHWLUHVDUHLQÀDWHGWR
the correct pressure. See Technical Data /
Transmission,IWLUHVDUHXQGHURURYHULQÀDWHG
the deck cannot be correctly adjusted. Raise the
deck to the highest (transport) position.
The deck must be adjusted slightly higher in the
rear.
NOTE: To insure the precision of the leveling
SURFHGXUHWKHPRZHUGHFNGULYHEHOWPXVWEH
installed before leveling the deck.
1. Wear heavy gloves. Turn each outer blade tip
to align front to rear with the deck side-to-side.
2. 0HDVXUHIURPWKHÀRRUVXUIDFHXSWRWKH
bottom of the blade tip on the discharge side
of the mower deck. Record the measurement.
3. Move to the opposite side, check that
measurement is the same. If adjustment is
required—with a 3/4" or adjustable wrench,
turn the lift link adjustment nuts on either
side counter clockwise to lower or clockwise
to raise. Adjust until both measurements are
equal.
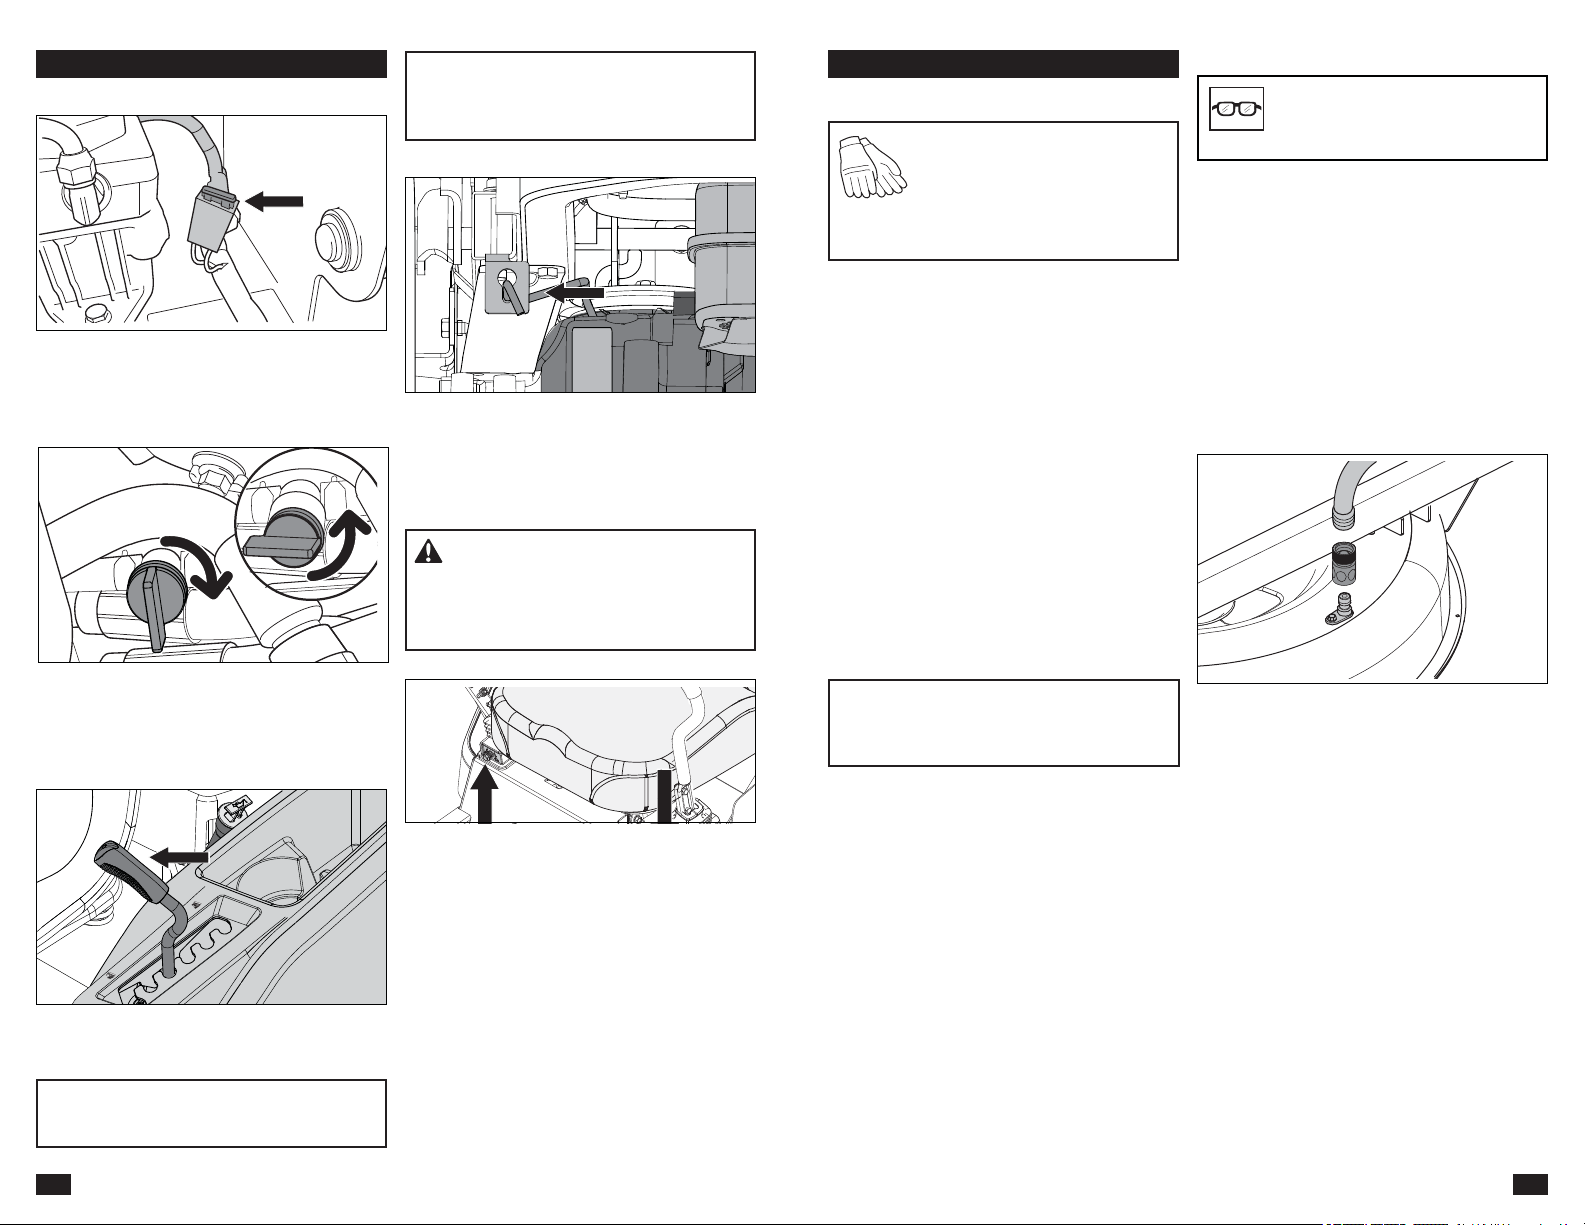
27
MAINTENANCE
IMPORTANT INFORMATION Special blade
bolt is heat treated. Replace with a Husqvarna
bolt if required. Do not use lower grade
KDUGZDUHWKDQVSHFL¿HG
CAUTION! Blades are sharp.
Protect your hands with gloves
and/or wind heavy cloth around
the blades before handling.
The sharpening of blades must be carried out
by an authorized service workshop.
CAUTION! Use protective glasses
when cleaning and washing.
Cleaning
Regular cleaning, especially under the mower
deck, will increase the machine’s life-span. Clean
the machine directly after use (after it is cooled),
before the debris sticks.
Do not spray water on the top of the mower deck.
Use compressed air to clean the top side of the
mower deck. Do not use a high pressure washer
or steam cleaner. Avoid spraying engine and
electrical components with water.
Clean the underside of the deck with normal
water pressure. Attach the quick connect (from
the accessory packet) to any garden hose. After
mowing, snap the hose to the cleanout port and
turn on water supply.
Cutting Blades
For the best mowing results, it is important that
blades are correctly sharpened and not damaged.
Replace blades that have been bent or cracked
when hitting obstacles.
Let the service workshop decide if a blade with
large nicks can be repaired/ground or must be
replaced. Balance the blades after sharpening.
Check the blade mounts.
Blade replacement
1. Remove blade bolt by turning counter
clockwise.
2. Install new or resharpened blade with
stamped GRASS SIDE facing towards
ground/grass (down) or THIS SIDE UP facing
deck and cutter housing.
3. 6HDWWKHEODGHVRSHQLQJ¿UPO\RQWRWKHFXWWHU
housing.
4. Tighten blade bolt securely.
5. Torque blade bolt to 45-60 ft/lbs (60-81 Nm).
Restart the mower and engage the blades to use
the spinning action to wash away debris. Make
sure the hose is away from the mower blades.
Do not rinse hot surfaces with cold water. Let unit
cool before washing.
Hardware
Check daily. Inspect the entire machine for loose
or missing hardware.
50
CONTROLES
9DULOODMHVGHGHULYDFLyQ
Los varillajes de derivación del transeje deben
acoplarse cuando empuje o tire del cortacésped.
Las palancas de liberación están ubicadas en cada
lado de la parte trasera de la unidad por debajo de
la protección trasera del motor. Consulte Mover la
máquina manualmente en la sección Operación.
$'9(57(1&,$ Los varillajes de
derivación están situados cerca del silenciador.
Para prevenir quemaduras, el motor debe
estar apagado y debe dejarse enfriar antes de
manipular las palancas del varillaje derivación.
Desplazamiento
Si el cortacésped no se mueve en línea recta, revise
la presión de aire de los dos neumáticos traseros. La
presión de aire recomendada para los neumáticos
traseros es de 15 psi (1 bar).
1. Los ajustes de la rodadura se realizan mediante
pernos de alineación. Los pernos de alineación
actúan como dispositivos limitadores para las
palancas de control de movimiento cuando
la máquina está en posición completamente
hacia delante.
2. Para realizar un ajuste preliminar de la
alineación, traslade la unidad a un área abierta
y sin obstrucciones, como un estacionamiento
vacío o campo abierto.
3. Con una llave de 1/2", gire los pernos de
alineación hacia fuera hasta que queden a ras
con la tuerca.
Fusible
El fusible principal de 20 amperios está ubicado
en el lado izquierdo de la máquina. Acceda a él
inclinando el asiento hacia adelante. El fusible es
del tipo plano que se usa en los automóviles.
9iOYXODGHFRUWHGHFRPEXVWLEOH
La válvula de corte de combustible está ubicada en
la parte trasera derecha del asiento. La válvula está
desconectada cuando el manillar está en posición
perpendicular a la tubería de combustible.
Palanca de altura de corte
INFORMACIÓN IMPORTANTE Para obtener
una altura de corte uniforme, es importante que
la presión de aire de los neumáticos sea de 15
psi / 103 kPa / 1 bar.
INFORMACIÓN IMPORTANTE Eleve siempre
la plataforma a la posición más alta para el
transporte.
Para ajustar la altura de corte del equipo, tire
de la palanca de altura de corte hacia dentro y
muévala a la muesca de la altura deseada.

49
CONTROLES
Interruptor de encendido
El interruptor de encendido se encuentra en
el panel de control y se utiliza para arrancar y
detener el motor.
Control del acelerador
El acelerador regula el régimen del motor y la
velocidad de rotación de las cuchillas, asumiendo
que el interruptor de cuchilla se haya accionado.
Consulte Interruptor de cuchilla.
Para aumentar o disminuir el régimen del motor,
el control se mueve hacia adelante o hacia atrás
respectivamente.
Evite el funcionamiento del motor en ralentí
durante períodos prolongados, ya que existe
el riesgo de contaminar las bujías. USE
ACELERACIÓN MÁXIMA AL CORTAR, para un
mejor rendimiento del cortacésped y carga de la
batería.
Medidor de servicio
El medidor de servicio muestra la cantidad total
de horas que el motor ha estado funcionando e
indica cuando el motor y el cortacésped necesitan
reparación.
Cada 50 horas de funcionamiento, aparecerá
un icono de lata de aceite que permanecerá
encendido durante dos horas, antes de que se
produzca un reinicio automático. Para restablecer
manualmente el medidor, gire la llave a la
posición de apagado cinco veces con intervalos
de un segundo. Para obtener información sobre
el mantenimiento del motor y el cortacésped,
consulte el Registro de servicio de este manual.
NOTA: El indicador de servicio funciona (horas
de reloj) solo cuando el motor está en marcha.
Asegúrese de poner la llave en posición de
DSDJDGRFXDQGRODXQLGDGQRHVWpHQXVRSDUD
evitar la acumulación de horas del medidor.
Estrangulador
El estrangulador se utiliza para los arranques en
frío para proporcionar al motor una mejor mezcla
de combustible.
Para los arranques en frío el control se debe tirar
hacia arriba.
Interruptor de cuchilla
Para acoplar el equipo de corte, tire de la perilla
hacia afuera; las cuchillas de corte se desacoplan
cuando la perilla se presiona hacia abajo.
12/12 Each year
Lubricate with
grease gun
1/52 Each Week Filter change
1/365 Each day Oil change
Level check
28
LUBRICATION
General
Remove the ignition key to prevent unintentional
movements during lubrication.
:KHQOXEULFDWLQJZLWKDQRLOFDQLWPXVWEH¿OOHG
with engine oil.
When lubricating with grease, unless otherwise
stated, use a high grade molybdenum disulphide
grease.
For daily use, the machine must be lubricated
twice weekly.
Clean away unwanted grease after lubrication.
It is important to avoid getting lubricant on the
belts or the drive surfaces of the belt pulleys.
If this happens, try to clean them with spirits. If
the belt continues to slip after cleaning, the belt
must be replaced. Gasoline or other petroleum
products must not be used to clean belts.
IMPORTANT INFORMATION Use minimal
lubrication and remove excess lubricant so that
is does not come into contact with belts or belt
pulley drive surfaces.
Transmission
The transmission is maintenance free. It is not
necessary to do level checks or oil changes. If
a leak occurs, replace the unit or contact your
Husqvarna dealer.
WARNING! Escaping hydraulic oil under
SUHVVXUHFDQKDYHVXႈFLHQWIRUFHWRSHQHWUDWH
the skin, causing dangerous injury. If injured
E\HVFDSLQJÀXLGVHHDGRFWRULPPHGLDWHO\
Dangerous infection or reaction can develop if
proper medical treatment is not administered.
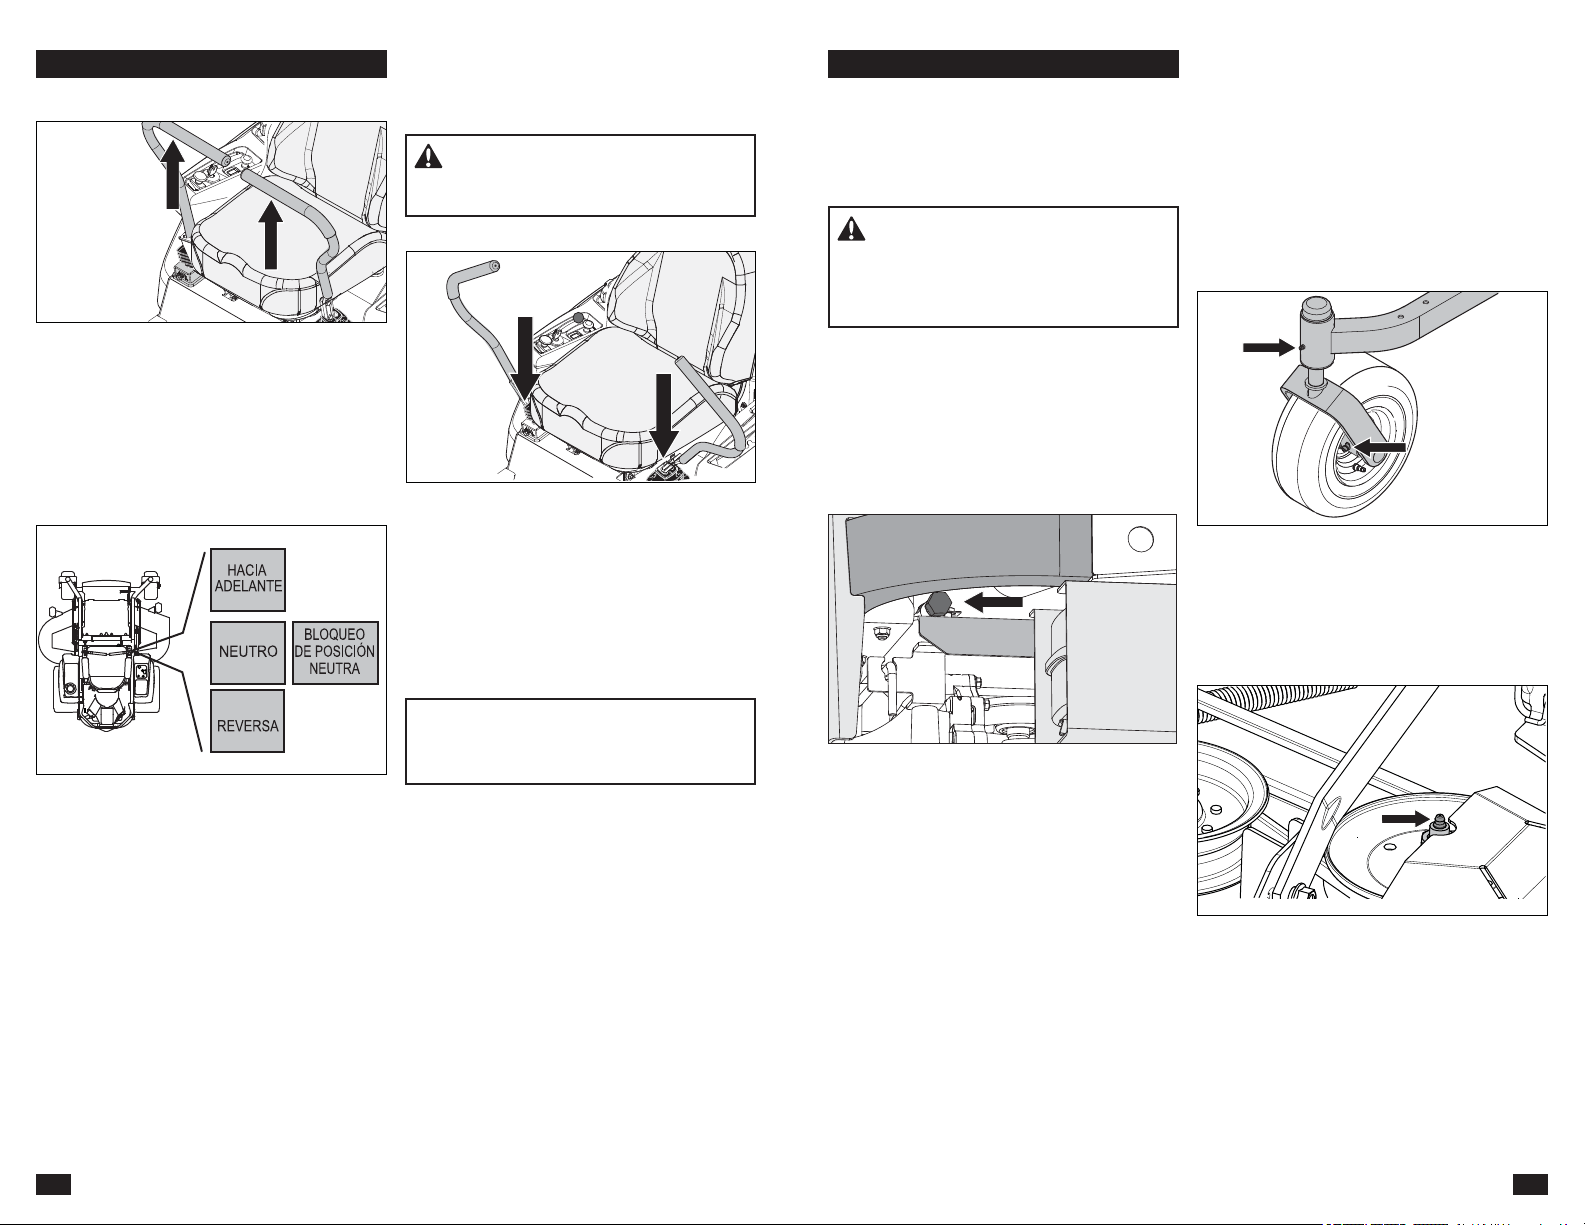
29
LUBRICATION
Engine Oil
NOTE: Change the engine oil when the engine
is warm. Refer to the engine owner’s manual
IRUWKHFRUUHFWUHSODFHPHQWRLODQG¿OWHUFKDQJH
recommendations.
1. Park on a level surface. Apply park brake.
2. Clean the dirt and debris from the area around
WKHRLO¿OOFDS
3. Remove the cap/dipstick.
4. Locate the drain hose at the left rear of the
engine near the bypass linkage. Place an
adequately sized container under the end of
the drain hose and remove the oil drain plug.
Wheel and Deck Zerks
Use only good quality bearing grease.
Grease from well-known brand names
(petrochemical companies, etc.) usually maintains
a good quality.
Front Wheel Mount
Lubricate 3-4 strokes with a grease gun on each
set of wheel bearings.
Front Wheel Bearings
Lubricate 3-4 strokes with a grease gun on each
set of wheel bearings.
Deck Spindles
Lower the cutting deck completely. Lubricate with
a grease gun, 2-3 strokes per spindle through the
openings in the belt shields.
If a grease gun without rubber hose is used, the
foot plate must be removed to access the center
spindle.
WARNING! The engine drain plug is
ORFDWHGFORVHWRWKHPXႉHU7RSUHYHQWEXUQV
WKHHQJLQHVKRXOGEHVKXWRႇDQGDOORZHGWR
cool slightly so the engine is still warm but the
surrounding surfaces and oil are not.
5. Allow the oil to fully drain from the engine.
6. Replace the drain hose plug and tighten
securely.
7. Fill the engine with new oil to the bottom of
WKH¿OOWXEHWKUHDGV&KHFNWKHOHYHOZLWKWKH
dipstick.
8. 5HSODFHWKHRLO¿OOFDSVHFXUHO\ZKHQWKHRLO
level is FULL.
9. 5HIHUWRWKH6HUYLFH-RXUQDOIRURLOFKHFNLQJ
and changing intervals and change
recommendations.
48
CONTROLES
Palancas de control de la dirección
La velocidad y la dirección de la máquina son de
tipo variable continua con los dos controles de la
dirección. Los controles de la dirección se pueden
mover hacia adelante o hacia atrás sobre una
posición neutra. Además, hay una posición neutra
que se bloquea si los controles de la dirección se
mueven hacia afuera.
Cuando ambos controles están en la posición
QHXWUD1ODPiTXLQDSHUPDQHFH¿MD
INFORMACIÓN IMPORTANTE Si no trae las
palancas de control de dirección hacia adentro
simultáneamente hará que el sistema de
seguridad de la unidad apague el aparato.
Freno de estacionamiento
El freno de estacionamiento está integrado con
las palancas de control de la dirección. Mueva las
palancas hacia afuera de la posición neutra para
acoplar el freno de estacionamiento.
Para soltar el freno de estacionamiento, gire ambas
palancas de control de dirección hacia dentro hasta
la posición neutra. No intente operar la unidad sin
que ambas palancas estén hacia dentro, fuera de
la posición de acoplamiento, o los componentes de
la máquina se pueden dañar.
$'9(57(1&,$La máquina puede girar
muy rápidamente si mueve un control de la
dirección mucho más que el otro.
Al mover los dos controles la misma cantidad
hacia adelante o hacia atrás, la máquina se
mueve en línea recta hacia adelante o hacia atrás
respectivamente.
Por ejemplo, para girar hacia la derecha mientras
se desplaza hacia adelante, mueva el control de
la derecha hacia la posición neutra. La rotación
de la rueda derecha se reduce y la máquina gira
a la derecha.
El giro cero se puede lograr moviendo un control
hacia atrás (detrás de la posición neutra) y
desplazando con cuidado el otro control de la
dirección hacia adelante desde su posición neutra.
El sentido de rotación durante el giro cero se
determina según el control de la dirección que se
mueva hacia atrás por detrás de la posición neutra.
Si el control de la dirección izquierda se mueve
hacia atrás, la máquina gira a la izquierda. Tenga
mucho cuidado al llevar a cabo esta maniobra.
Si los controles de la dirección están en posiciones
irregulares cuando está detenido o no encajan en
las ranuras para mover los controles hacia afuera,
pueden ajustarse.
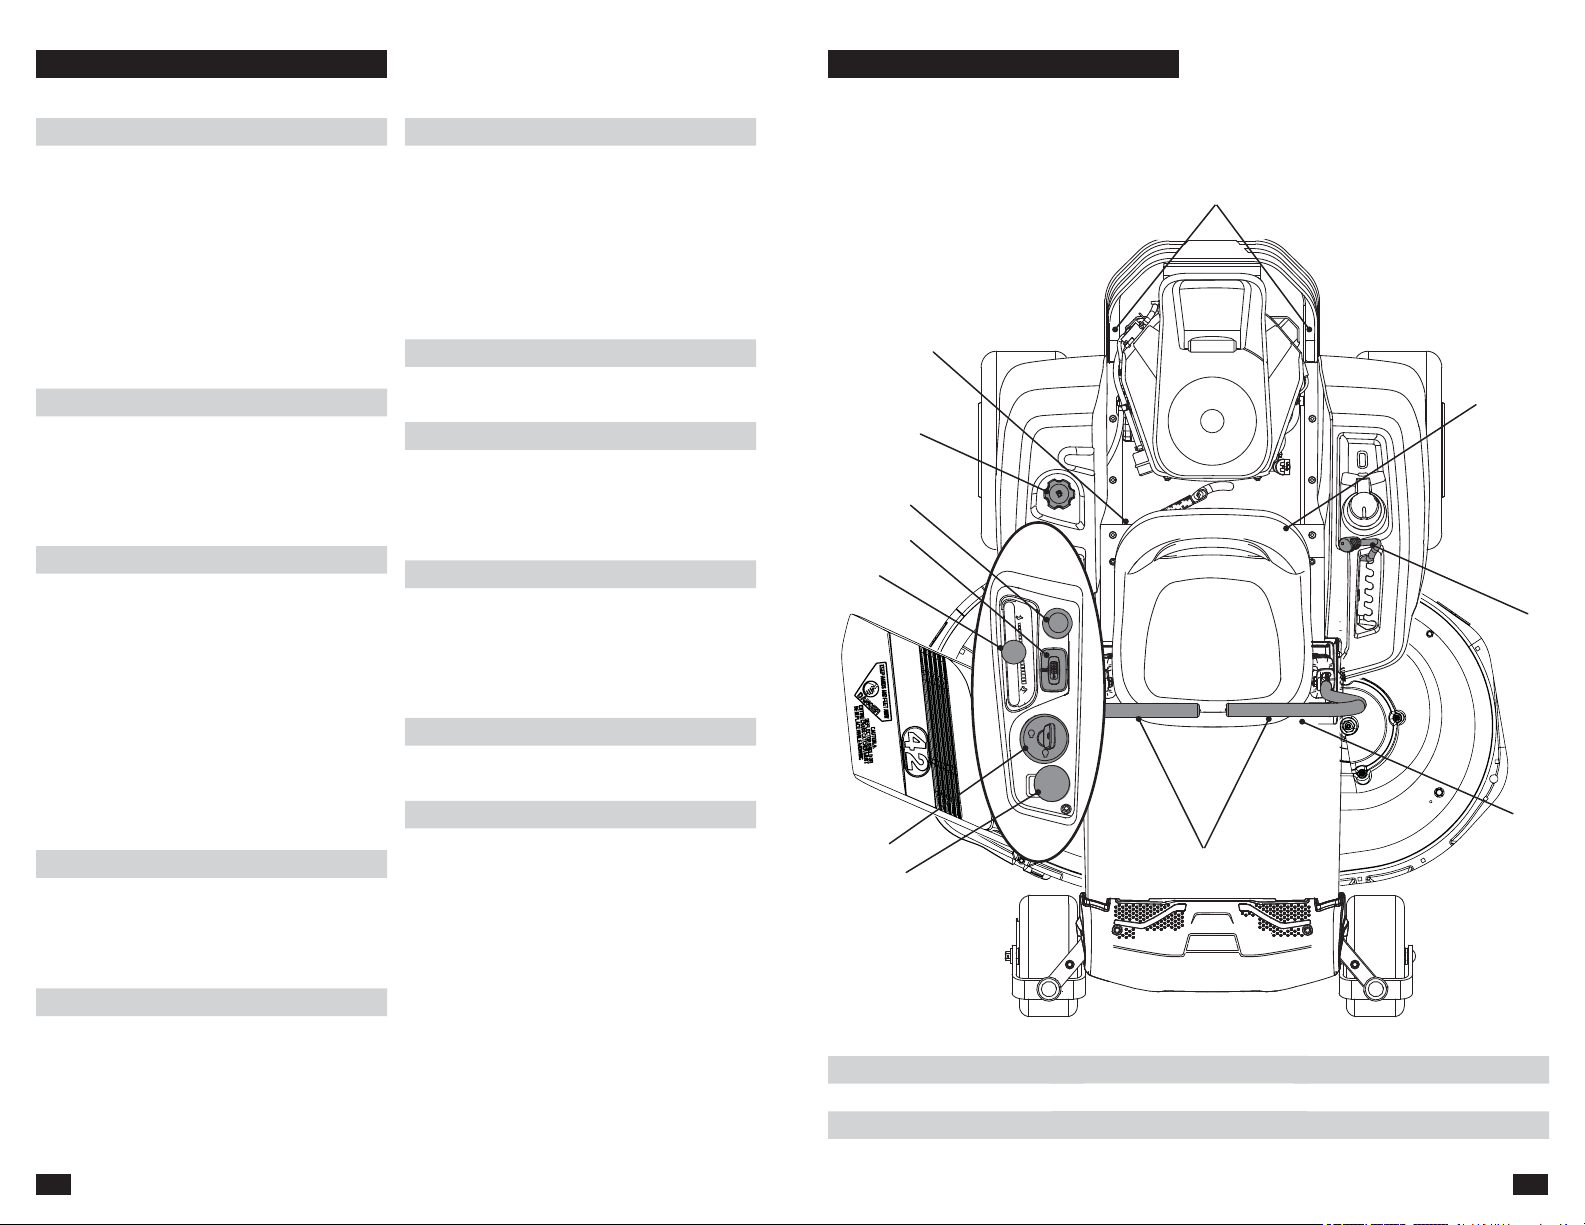
47
CONTROLES
Este manual del operador corresponde al
cortacésped Zero Turn de Husqvarna. El
cortacésped está equipado con un motor de
válvula superior de cuatro tiempos.
La transmisión del motor se hace mediante
bombas hidráulicas accionadas por correa.
Utilizando los controles de la dirección izquierdo
y derecho, el caudal regula el sentido de marcha
y la velocidad.
1. Palancas de dirección/freno
2. Ajuste de la alineación
3. Elevación del equipo
4. Fusibles
9DULOODMHVGHGHULYDFLyQ
9iOYXODGHFRUWHGHFRPEXVWLEOH
7. Depósito de combustible
8. Control del
Estrangulador
9. Control del acelerador
10. Medidor de servicio
11. Interruptor de encendido
12. Interruptor de cuchilla
1
2
10
11
12
3
4
6
7
9
8
5
30
TROUBLESHOOTING
Problem / Cause
Engine will not start
Blade switch is engaged
Steering controls are not locked in the
neutral position
Park brake is not activated
Dead battery
Contamination in the carburetor or fuel line
)XHOVXSSO\VKXWRႇYDOYHLVFORVHG
&ORJJHGIXHO¿OWHURUIXHOOLQH
Ignition system faulty
Starter does not turn the engine over
Dead battery
Battery terminal cable contacts are defective
Blown fuse
Fault in the starter safety circuit. See Safety
System in the Maintenance Section
Engine runs rough
Faulty carburetor
&ORJJHGIXHO¿OWHURUMHW
Choke is activated with a warm engine
Clogged ventilation valve on the fuel cap
Fuel tank nearly empty
Fouled spark plugs
Rich fuel mixture or fuel-air mixture.
Wrong fuel type
Water in fuel
&ORJJHGDLU¿OWHU
Engine seems weak
&ORJJHGDLU¿OWHU
Fouled spark plugs
Carburetor incorrectly adjusted
Air trapped in hydraulic system
Machine vibrates
Blades are loose
Blades are incorrectly balanced
Engine is loose
Engine overheats
&ORJJHGDLULQWDNHRUFRROLQJ¿QV
Engine overloaded
Poor ventilation around engine
Defective engine speed regulator
Too little or no oil in the engine
Contamination in the fuel line
Fouled spark plugs
Battery not charging
Battery terminal cable contacts are defective
Charging lead is disconnected
Mower moves slowly, unevenly, or not at all
Park brake activated
Bypass linkage engaged
7UDQVPLVVLRQGULYHEHOWLVVODFNRURႇ
Air trapped in hydraulic system
Mower deck not engaging
Drive belt for the mower deck is loose
Electromagnetic coupling contact is loose
Blade switch is faulty or loose from cable
contact
Blown fuse
Transaxle leaks oil
Damaged seals, housing, or gaskets
Air trapped in hydraulic system
Uneven mowing results
Unequal air pressures in tires
Bent blades
Suspension for the mower deck is uneven
Blades are dull
Driving speed too high
Grass is too long
Grass has collected under the mower deck

31
STORAGE
Winter Storage
The machine should be readied for storage at the
end of the mowing season or if it will not be in use
for more than 30 days. Fuel allowed to stand for
long periods of time (30 days or more) can leave
sticky residues that can clog the carburetor and
disrupt engine function.
Fuel stabilizers are an acceptable option to
prevent the sticky residues that can occur during
storage.
Add stabilizer to the fuel in the tank or in the
storage container. Always use the mixing ratios
VSHFL¿HGE\WKHPDQXIDFWXUHURIWKHVWDELOL]HU
Operate the engine for at least ten minutes
after adding the stabilizer so that it reaches the
carburetor. Do not empty the fuel tank and the
carburetor if stabilizer has been added.
To ready the machine for storage:
1. Thoroughly clean the machine, especially
below the mower deck. Touch up damage
to the paint and spray a thin layer of oil on
the underside of the mower deck to avoid
corrosion.
2. Inspect the machine for worn or damaged
parts and tighten any nuts or screws that may
have become loose.
3. Change the engine oil; dispose correctly.
4. Empty the fuel tanks or add a fuel stabilizer.
Start the engine and let it operate until the
carburetor is drained of fuel or the stabilizer
has reached the carburetor.
5. Remove the spark plug and put about a
tablespoon of engine oil into the cylinder.
Turn over the engine so that the oil is evenly
GLVWULEXWHGDQGWKHQUH¿WWKHVSDUNSOXJ
6. Lubricate all grease zerks, joints and axles.
7. Remove the battery. Clean, charge and store
the battery in a cool area and protected from
direct cold.
8. Store the machine in a clean, dry area and
cover it for more protection.
Service
When ordering spare parts, please specify the
purchase year, model, type, and serial number.
Always use genuine Husqvarna spare parts.
An annual check-up at an authorized service
workshop is a good way to make sure that your
machine performs its best the following season.
WARNING! Do not store an engine with
fuel in the tank indoors or in poorly ventilated
spaces where fuel vapor can come in contact
ZLWKRSHQÀDPHVVSDUNVRUDSLORWOLJKW
such as in a boiler, hot water tank, clothes
dryer, etc. Handle the fuel with care. It is very
ÀDPPDEOHDQGFDQFDXVHGDQJHURXVSHUVRQDO
injury and property damage. Drain the fuel
into an approved container outdoors and
VWRUHIDUDZD\IURPRSHQÀDPHRUVRXUFHVRI
ignition. Do not use gasoline for cleaning. Use
a degreaser and warm water.
46
SEGURIDAD
INFORMACIÓN IMPORTANTE El freno de
HVWDFLRQDPLHQWRQRHVVX¿FLHQWHSDUDEORTXHDU
la máquina en su lugar durante el transporte.
Asegúrese de que la máquina esté bien
sujetada al vehículo de transporte. Siempre
ingrese la máquina marcha atrás al vehículo de
transporte para evitar el volcamiento.
$'9(57(1&,$
Tenga mucho cuidado
cuando cargue la máquina en un camión o
remolque usando las rampas. Existe la posibilidad
de daños graves o peligro de muerte si la máquina
se cae de las rampas.
Transporte
• La máquina es pesada y puede causar
daños graves por aplastamiento. Extreme las
precauciones cuando se cargue o descargue
de un vehículo o un remolque.
• Utilice rampas de ancho completo para cargar
la máquina un remolque o camión
• Utilice un remolque aprobado para transportar
la máquina. Active el freno de estacionamiento,
apague el suministro de combustible y sujete
la máquina con anclajes homologados,
como bandas, cadenas o correas durante el
transporte.
• Deben usarse correas de sujeción en las partes
delantera y trasera, en dirección hacia abajo y
hacia fuera de la máquina.
• No utilice esta máquina en vías públicas.
• &RQVXOWH\UHVSHWHODVQRUPDVGHWUi¿FRORFDOHV
antes de transportar la máquina en cualquier
camino.
• No remolque esta máquina, ya que podrían
producirse daños en el sistema de transmisión.
• No remolque ningún elemento con este
cortacésped, a menos que esté equipado con
un gancho de remolque. Puede producirse un
efecto tijera o volcarse y dañar el cortacésped y
posiblemente causar daños graves al operador.
• Cargue la unidad en un camión o remolque
utilizando rampas de una resistencia correcta
y a baja velocidad. ¡No levante la máquina! La
máquina no está diseñada para ser levantada
manualmente.
• Al cargar o descargar la máquina, no exceda
el ángulo de operación máximo recomendado
de 10°.
Remolque
Si la máquina está equipada con un sistema de
remolque, extreme las precauciones al remolcar.
No lleve a niños ni otras personas dentro del
equipo remolcado o sobre éste.
Realice giros amplios para evitar el efecto tijera.
Desplácese lentamente y guarde más distancia
SDUDGHWHQHUVH1RUHPROTXHHQXQDVXSHU¿FLH
en pendiente. En las pendientes, el peso del
equipo remolcado puede provocar pérdida de
tracción y pérdida de control.
Obedezca las recomendaciones del fabricante
sobre los límites de peso para el equipo
remolcado. No remolque cerca de zanjas,
canales y otros peligros.
Parachispas
Este cortacésped está equipado con un motor
de combustión interna y no se debe usar sobre
ninguna porción de tierra sin mejorar, cubierta por
arbustos o malezas a menos que el sistema del
motor cuente con un dispositivo apagachispas
que cumpla con las leyes locales o estatales
pertinentes (si las hay). Las leyes federales se
aplican a las tierras federales.
Si se usa un dispositivo apagachispas,
el operador debe mantenerlo en buenas
condiciones de trabajo.
Se puede obtener un apagachispas para
el silenciador a través de un distribuidor de
Husqvarna autorizado.
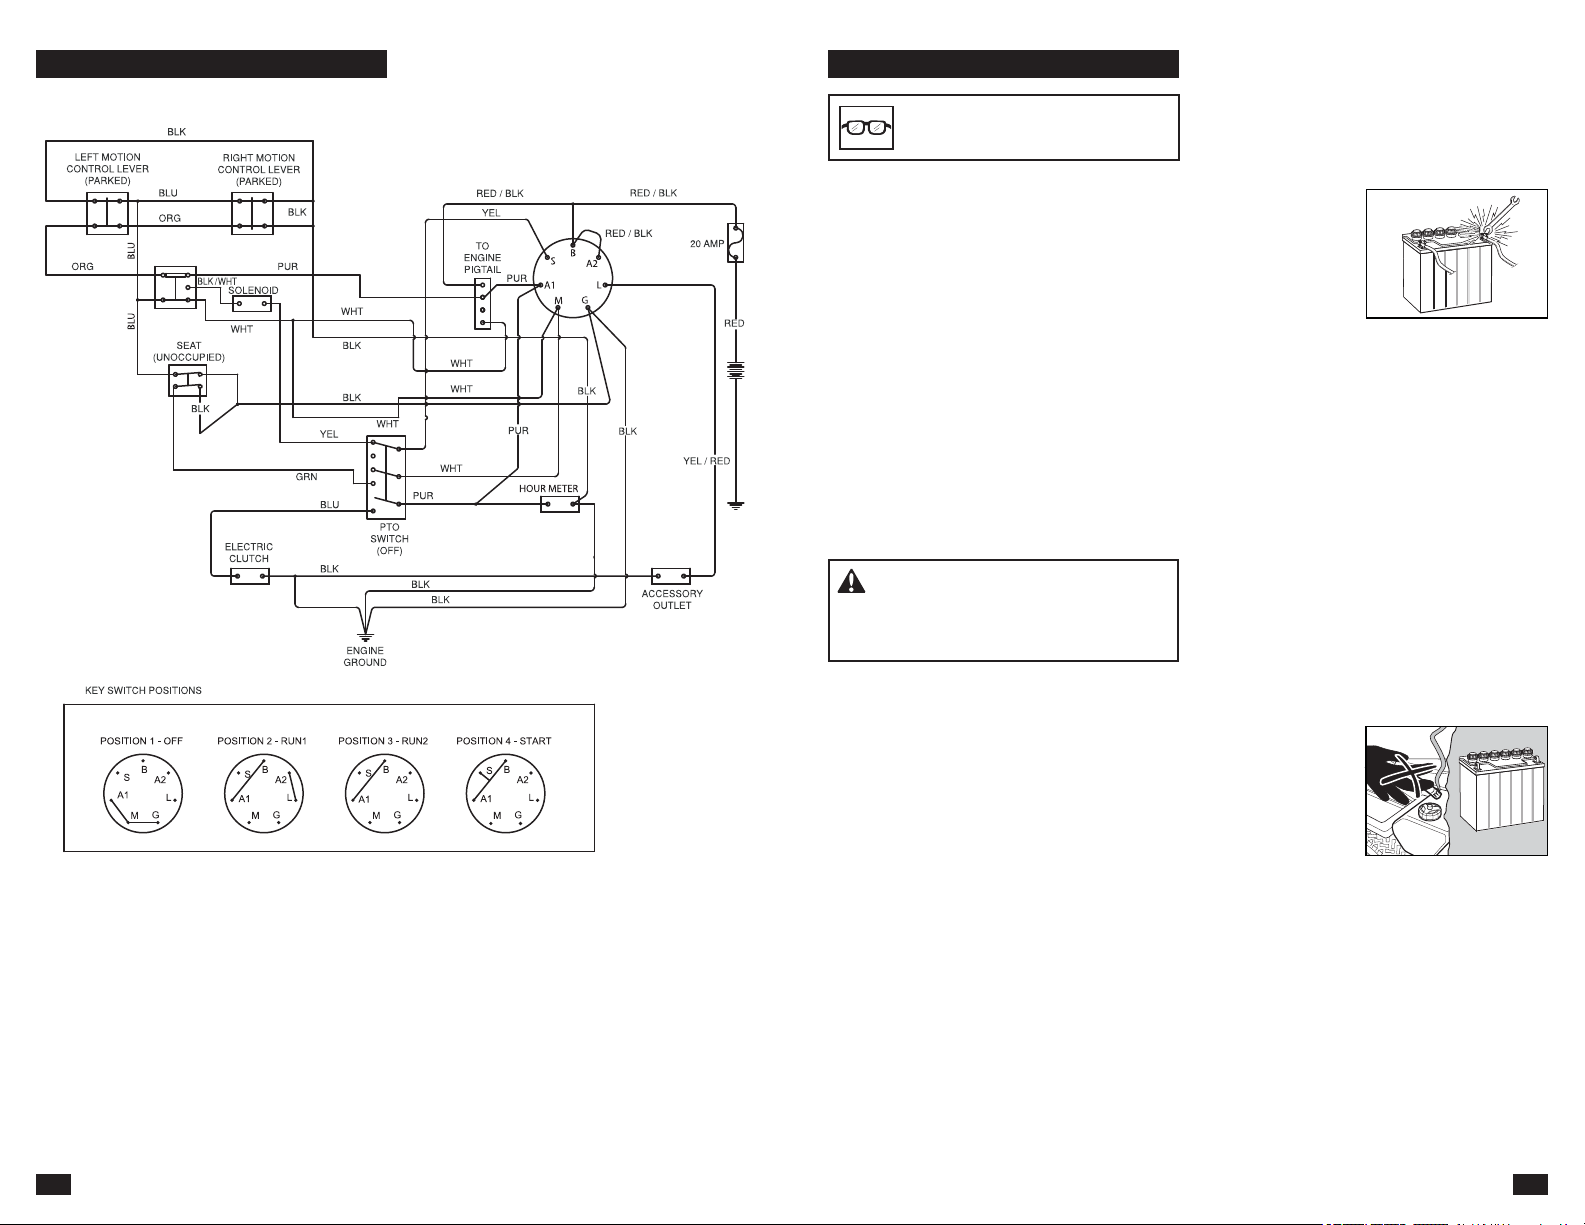
45
SEGURIDAD
$'9(57(1&,$El motor no debe
arrancarse si se he retirado la placa del piso
del conductor o cualquier placa protectora de
la correa de transmisión del equipo de corte.
• Asegúrese de que el equipo esté en buen
estado y que todas las tuercas y los pernos,
sobre todo los que aseguran los accesorios de
la cuchilla, estén correctamente apretados con
el par de apriete adecuado.
• Cuide el estado de las etiquetas de seguridad
e instructivas, o sustitúyalas, según sea
necesario.
• 1RLQWHU¿HUDFRQODIXQFLyQSURSLDGHORV
dispositivos de seguridad ni reduzca la
protección provista por un dispositivo de
seguridad. Revise con regularidad que operen
bien. NO haga funcionar una máquina con
un dispositivo de seguridad que no funcione
correctamente.
• Revise frecuentemente los componentes
del recogedor de césped y la protección de
descarga y realice los reemplazos necesarios
con piezas recomendadas por el fabricante.
$9,62Utilice gafas de protección
para trabajos de mantenimiento.
• No cambie los ajustes de los reguladores y
evite usar la máquina con un régimen del motor
demasiado alto. Si hace funcionar el motor
demasiado rápido, los componentes de la
máquina podrían dañarse.
• Para reducir el riesgo de incendio, mantenga la
máquina limpia y sin acumulación de césped,
hojas u otra basura. Limpie las salpicaduras de
aceite o combustible y quite los restos mojados
con combustible. Permita que la máquina se
enfríe antes de almacenarla.
• Deténgase para inspeccionar el equipo si
pasa por encima de algo o topa algo. Si es
necesario, haga reparaciones antes de arrancar
la máquina.
• No haga ajustes o reparaciones con el motor en
funcionamiento.
• /DVFXFKLOODVHVWiQD¿ODGDV\SXHGHQFDXVDU
cortes y heridas profundas. Envuelva las
cuchillas o use guantes protectores durante su
manipulación.
• Compruebe el funcionamiento del freno de
estacionamiento con regularidad. Hágale los
ajustes y el servicio necesarios.
• No trabaje con el circuito del motor de arranque
si hay combustible derramado.
• Asegúrese de que el tapón del depósito de
FRPEXVWLEOHHVWpFHUUDGR¿UPHPHQWH\QRKD\D
VXVWDQFLDVLQÀDPDEOHVDOPDFHQDGDVHQXQ
recipiente abierto.
• Pueden producirse
chispas cuando
se trabaja con
la batería y los
cables pesados
del circuito del
motor de arranque.
Esto puede causar
una explosión de
la batería, incendio o daños en los ojos. No
se producirán chispas una vez que el cable
de conexión a tierra (por lo general negativo,
negro) se extraiga de la batería.
• Desconecte el cable de conexión a tierra de la
batería primero y vuelva a conectarlo en último
lugar.
• No haga un cortocircuito de puente en el relé
del motor de arranque para activar el motor de
arranque.
• Tenga mucho cuidado al manipular el ácido
de la batería. El ácido puede causar graves
quemaduras corrosivas en la piel. Si se
derrama ácido de la batería sobre la piel,
enjuague inmediatamente con agua.
• El ácido en los ojos puede causar ceguera,
póngase en contacto con un médico de
inmediato.
• Tenga cuidado
cuando efectúe
trabajos en la
batería. En ella
se forman gases
explosivos. No
lleve a cabo el
mantenimiento de
la batería mientras
esté fumando o si se encuentra cerca de llamas
abiertas o chispas. La batería puede explotar y
causar daños graves o lesiones.
• La máquina ha sido probada y aprobada solo
con el equipo proporcionado originalmente o
recomendado por el fabricante. Utilice solo
piezas de repuesto aprobadas para la máquina.
• Las cuchillas para mantillo solo deben usarse
en áreas conocidas donde se desee un corte
de mayor calidad.
• Limpie regularmente la plataforma y la parte
inferior de la plataforma, evite salpicar con agua
el motor y los componentes eléctricos.
32
SCHEMATIC
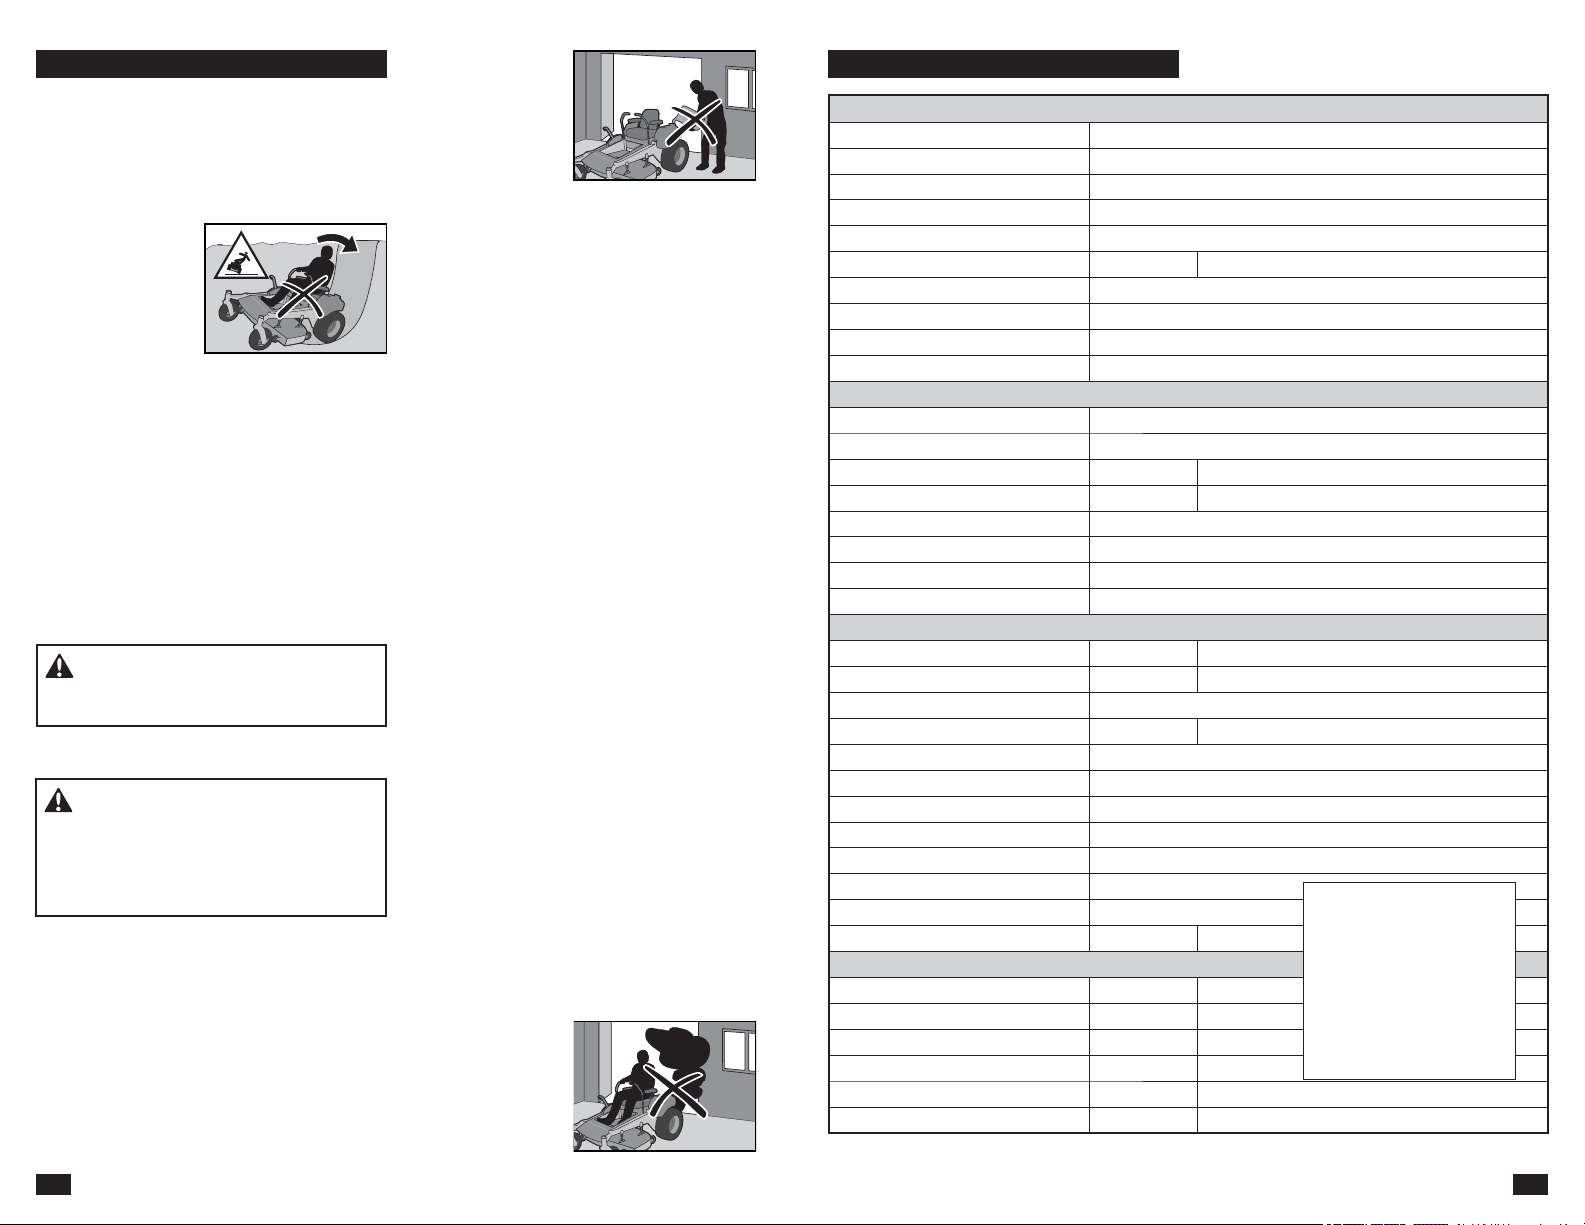
33
TECHNICAL DATA
ENGINE
Manufacturer Kohler
Type KT600-3011
Power
17 HP
1)
Lubrication 3UHVVXUHZLWKRLO¿OWHU
Fuel Min 87 octane unleaded (Max ethanol 10%, Max MTBE 15%)
Fuel tank capacity 3-1/2 gallons 13.25 litres
Cooling Air cooled
$LU¿OWHU Standard
Alternator 12 amp
Starter Electric
TRANSMISSION
Transmission Hydrostatic transaxles
Steering control Dual levers, foam gripped
Speed forward 0-6.5 mph 0-10,5 km/h
Speed reverse 0-3.5 mph 0-5,6 km/h
Brakes Mechanical park brake
Front caster tires 11 x 4-5
Rear tires, turf pneumatic 18 x 7.5-8
Tire pressure 15 PSI / 103 kPa / 1 bar
FRAME
Cutting Width
42" 107 cm
Cutting Height 1-1/2" - 4" 3,8 - 10,2 cm
Number of Blades 2
Blade Length 21" 53 cm
Nose Roller Yes
Anti-scalp roller 0
Sprung Seat Standard
Hinged Arm Rests Optional
Service Meter N/A
Blade Engagement Electric Clutch
Deck Construction Stamped
Productivity 2.4 acres/h
9,712 m
2
/h
DIMENSIONS
Weight 580 lbs 263 kg
Base Machine Length 75" 191,5 cm
Base Machine Height 40" 101,6 cm
Base Machine Width 41-1/2" 105,5 cm
Overall Width, Chute Up 44" 112 cm
Overall Width, Chute Down 50" 127 cm
1)
The power rating as declared
by the engine manufacturer
is the average gross power
RXWSXWDWWKHVSHFL¿HG
RPM of a typical production
engine for the engine
model measured using
SAE Standards for engine
gross power. Refer to the
engine manufacturer engine
VSHFL¿FDWLRQV
44
SEGURIDAD
$'9(57(1&,$No conduzca en lomas
con pendientes superiores a 10 grados. Y no
conduzca a través de pendientes.
• No corte el césped húmedo. Los neumáticos
podrían perder tracción.
• Evite arrancar, parar o girar en una pendiente.
Si los neumáticos pierden tracción, desacople
las cuchillas y avance lentamente y en línea
recta bajando la pendiente.
• Mantenga el
desplazamiento
lento y gradual en
las pendientes.
No haga cambios
repentinos de
velocidad o
dirección, pues
podría causar que la máquina se vuelque.
• Ponga especial atención mientras usa la
máquina con recogedores de césped u
otros accesorios, ya que pueden afectar la
estabilidad de la máquina.
• No use la máquina en pendientes
pronunciadas.
• No intente estabilizar la máquina poniendo el
pie en el suelo.
• No corte cerca de declives, zanjas o
terraplenes. La máquina podría volcarse de
repente si una rueda pasa sobre la orilla o si la
orilla termina en un hoyo.
$'9(57(1&,$El motor y el sistema
de escape se calientan mucho durante el
funcionamiento. Existe riesgo de quemaduras
si se tocan. Deje que el motor y el sistema de
escape se enfríen antes de llenar el depósito
de combustible.
Manipulación segura de la gasolina
• No llene la máquina
de combustible en
interiores.
• No almacene
la máquina o
el recipiente de
combustible donde
KD\DXQDÀDPD
abierta, chispa o una luz de piloto como la de
un calentador de agua u otros aparatos.
• Antes de comenzar el reabastecimiento de
combustible, reducir al mínimo el riesgo de
HOHFWULFLGDGHVWiWLFDWRFDQGRXQDVXSHU¿FLHGH
metal.
• No llene los recipientes adentro de un vehículo
o en un camión o trailer con forro de plástico.
Coloque siempre los recipientes en el suelo y
lejos del vehículo durante el llenado.
• No llene de más el tanque de combustible.
9XHOYDDFRORFDUODWDSDGHODJDVROLQD\
asegúrela apretándola.
• Retire el equipo que funciona con gasolina
del camión o trailer y rellénelo en el suelo.
Si esto no es posible, rellene el equipo con
un recipiente portátil, en lugar de hacerlo
directamente con la boquilla del dispensador de
gasolina.
• Mantenga la boquilla en contacto con el
borde del tanque o recipiente de combustible
abriéndolo en todo momento hasta que el
llenado de combustible esté completo. No use
un dispositivo que mantenga abierta la boquilla.
• Si el combustible se derrama sobre la ropa,
cámbiesela de inmediato.
• No arranque el motor cerca de combustible
derramado.
• No utilice gasolina como producto de limpieza.
• Si surgen fugas en el sistema de combustible,
no se debe arrancar el motor hasta que el
problema se haya resuelto.
• Compruebe el nivel de combustible antes de
cada uso y deje espacio para que se expanda
el combustible, ya que el calor del motor y el sol
pueden hacer que el combustible se expanda y
se desborde.
Mantenimiento general
• No utilice la máquina en un espacio interior
o en espacios
sin ventilación
adecuada. Los
gases de escape
contienen monóxido
de carbono, un gas
inodoro, venenoso
y letal.
Para evitar una lesión personal o un daño en la
propiedad, tenga cuidado extremo al manejar
la gasolina. La gasolina es extremadamente
LQÀDPDEOH\ORVYDSRUHVVRQH[SORVLYRV
• Apague los cigarrillos, habanos, pipas y otras
fuentes de ignición.
• Use solo recipientes de gasolina aprobados.
• No retire el tapón de la gasolina ni agregue
combustible con el motor en funcionamiento.
Permita que el motor se enfríe antes de volver a
llenar el tanque de combustible.
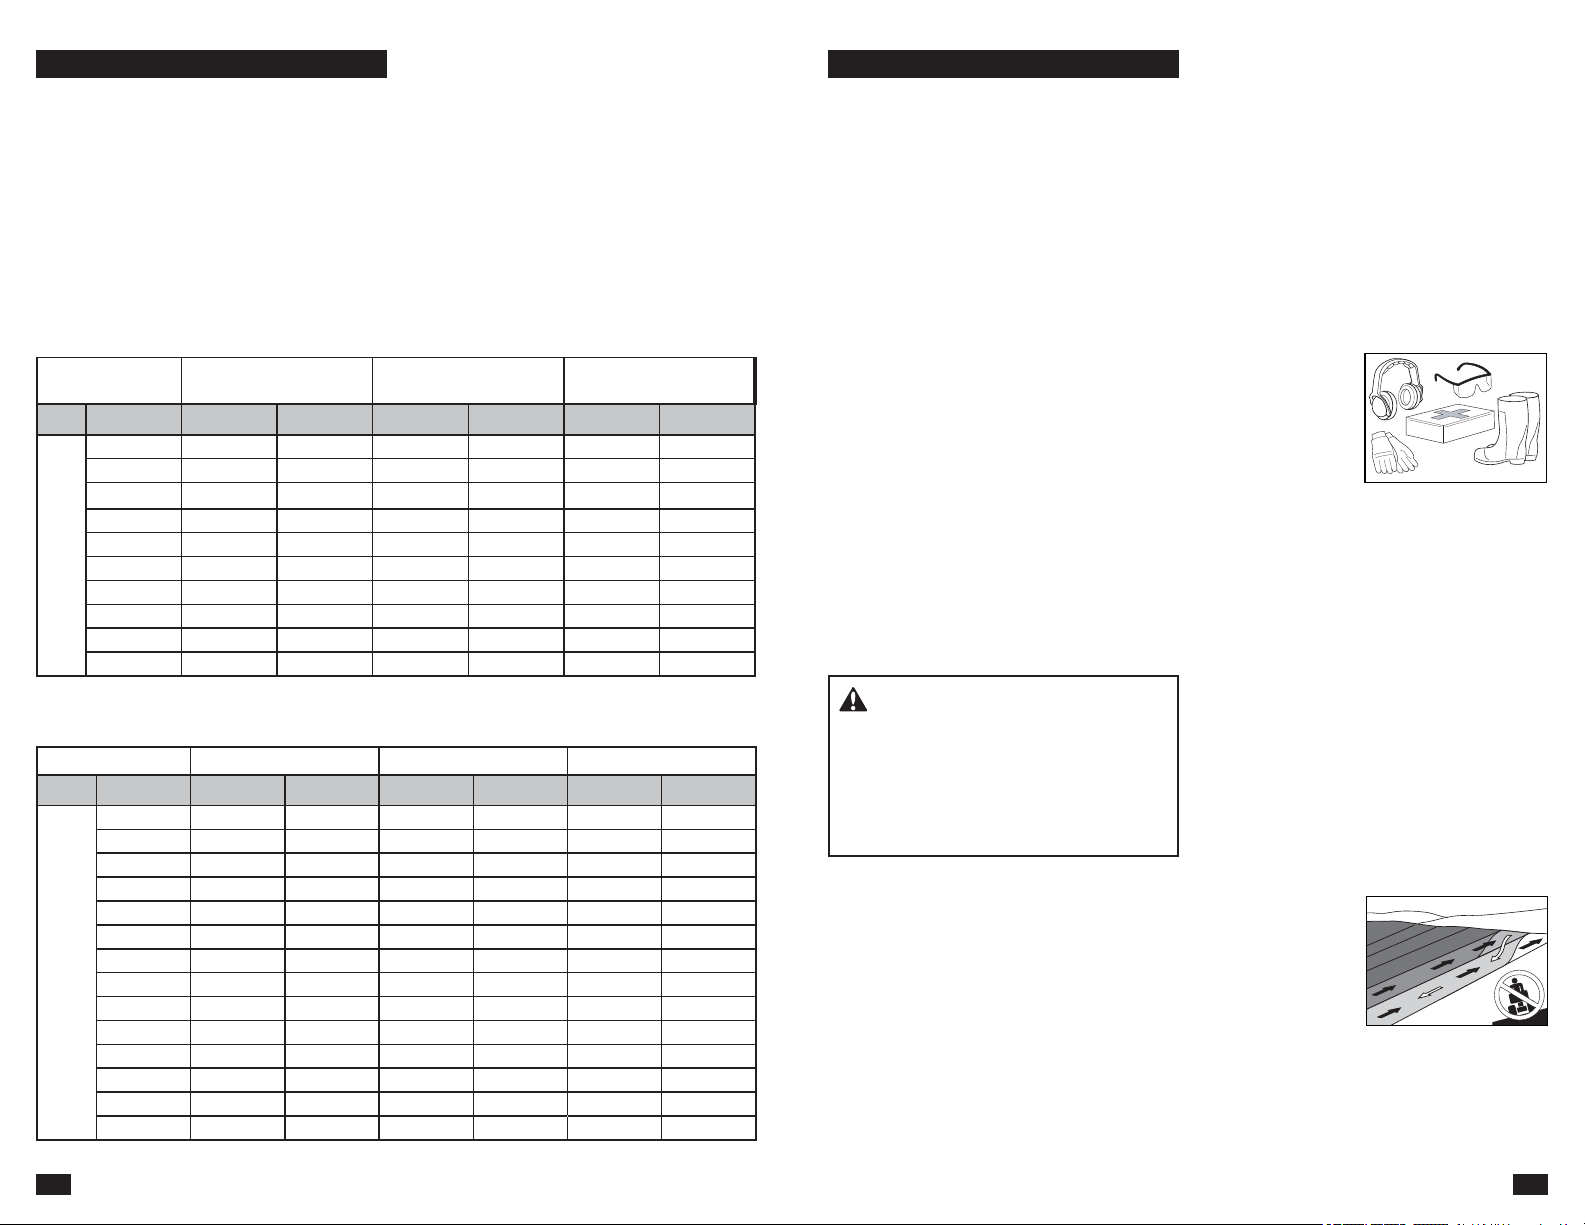
43
SEGURIDAD
• No maneje la máquina si no tiene el recogedor
de césped completo, la protección de descarga
u otros dispositivos de seguridad en su lugar y
en funcionamiento.
• Desacelere antes de dar la vuelta.
• No deje la máquina en funcionamiento sin
vigilar. Siempre detenga las cuchillas, active el
freno de estacionamiento, detenga el motor y
retire la llave antes de descender.
• No transporte pasajeros La máquina se ha
diseñado solamente para que la use una sola
persona.
• Desenganche las hojas cuando no esté
cortando césped. Apague el motor y espere
hasta que todas las partes se detengan por
completo antes de limpiar la máquina, retirar el
recogedor de césped o destapar la protección
de descarga.
• Opere la máquina únicamente durante el día o
FRQEXHQDOX]DUWL¿FLDO
• No opere la máquina mientras esté bajo la
LQÀXHQFLDGHDOFRKRORGURJDV
• (VWpSHQGLHQWHGHOWUi¿FRFXDQGRRSHUHOD
máquina cerca de caminos o al cruzarlos.
• Tenga cuidado extremo cuando cargue o
descargue la máquina de un trailer o camión.
• Use siempre protección ocular cuando opere la
máquina.
$'9(57(1&,$Cuando utilice la
máquina, debe utilizar un equipo de protección
personal homologado. El equipo de protección
personal no puede eliminar el riesgo de
lesiones pero reducirá el grado de lesiones en
caso de que se produzca un accidente. Pida
ayuda a su distribuidor para elegir los equipos
de protección adecuados.
• Use equipo de protección personal (PPE,
Personal Protective Equipment) mientras
usa esta máquina, incluido (como mínimo)
un calzado resistente, protección ocular y
protectores auriculares. No corte en pantalones
cortos ni con calzado que deje los dedos
descubiertos.
• Los datos indican que los operadores de 60
años o más son víctimas de un gran porcentaje
de lesiones relacionadas con la conducción
de un cortacésped. Estos operadores deben
evaluar su habilidad para operar la cortadora de
FpVSHGHQIRUPDVX¿FLHQWHPHQWHVHJXUDFRPR
para protegerse a sí mismos y a los demás de
una lesión grave.
• Siga las recomendaciones del fabricante para
los pesos de las ruedas o los contrapesos.
• Mantenga la máquina libre de cualquier
acumulación de césped, hojas u otra basura,
pues podrían entrar en contacto con el escape
caliente y/o las partes del motor y quemarse.
No permita que la plataforma de la cortadora
de césped levante hojas u otra basura que
pueda causar acumulaciones. Limpie cualquier
derrame de aceite o combustible antes de
operar o almacenar la máquina.
• Permita que la máquina se enfríe antes de
almacenarla.
Equipo de seguridad personal
• Asegúrese de tener
a mano el equipo
de primeros auxilios
durante la utilización
de la máquina.
• No utilice la máquina
si está descalzo.
• Es imperativo usar
zapatos o botas de protección, preferiblemente
con puntera de acero.
• Siempre use gafas protectoras homologadas
o un visor completo al realizar el montaje o
durante la conducción.
• Siempre use guantes al manipular las cuchillas.
• No lleve ropa ancha que pueda quedar
atrapada en las piezas móviles.
• Utilice protectores auriculares para evitar daños
en los oídos.
Funcionamiento en pendientes
Las pendientes son un factor importante
relacionado con la pérdida de control y
accidentes donde se vuelca, que pueden causar
daños graves o la muerte. El uso en todas las
pendientes requiere tener especial precaución. Si
usted no puede retroceder de una pendiente o si
se siente incómodo en la pendiente, no la pode.
• Corte las pendientes
hacia arriba y hacia
abajo, no de un lado
a otro.
• Tenga cuidado con
los hoyos, surcos,
protuberancias,
piedras y otros
objetos ocultos. El terreno disparejo podría
volcar la máquina. El césped alto puede ocultar
obstáculos.
• Elija una velocidad absoluta baja, así no tiene
que detenerse mientras está en la pendiente.
34
TECHNICAL DATA
Standard 1/4" fasteners 9 ft/lb
Standard 5/16" fasteners 18 ft/lb
Standard 3/8" fasteners 33 ft/lb
Standard 7/16" fasteners 52 ft/lb
Standard 1/2" fasteners 80 ft/lb
HEX HEAD CAP SCREWS
The torque values shown should be used as a general guideline
ZKHQVSHFL¿FWRUTXHYDOXHVDUHQRWJLYHQ
U.S. Standard Hardware
Grade SAE Grade 5 SAE Grade 8 Flangelock Screw
w/Flangelock Nut
Size ft./lbs Nm ft./lbs Nm ft./lbs Nm
Shank Size (Diameter in inches,
¿QHRUFRDUVHWKUHDG
1/4 9 12 13 18
5/16 18 24 28 38 24 33
3/8314246624054
7/16 50 68 75 102
1/2 75 102 115 156
9/16 110 149 165 224
5/8 150 203 225 305
3/4 250 339 370 502
7/8 378 512 591 801
1-1/8 782 1060 1410 1912
** Grade 5 - Minimum commercial quality (lower quality not recommended)
Metric Standard Hardware
Grade Grade 8.8 Grade 10.9 Grade 12.9
Size ft./lbs Nm ft./lbs Nm ft./lbs Nm
Shank Size (Diameter in millimeters,
¿QHRUFRDUVHWKUHDG
M41.522.232.73.7
M53 44.565.27
M6 5.2 7 7.5 10 8.2 11
M78.21112161520
M8 13.5 18 18.8 25 21.8 30
M1024 3335.24843.559
M12 43.5 59 62.2 84 75 102
M14 70.5 96 100 136 119 161
M16 108 146 147 199 176 239
M18 142 193 202 274 242 328
M20 195 264 275 373 330 447
M22 276 374 390 529 471 639
M24 353 478 498 675 596 808
M27 530 719 735 996 904 1226
Engine crankshaft bolt 50 ft/lb
Deck pulley bolts 150 ft/lb
Lug nuts 75 ft/lb
Blade bolt 90 ft/lb
7RUTXH6SHFL¿FDWLRQV
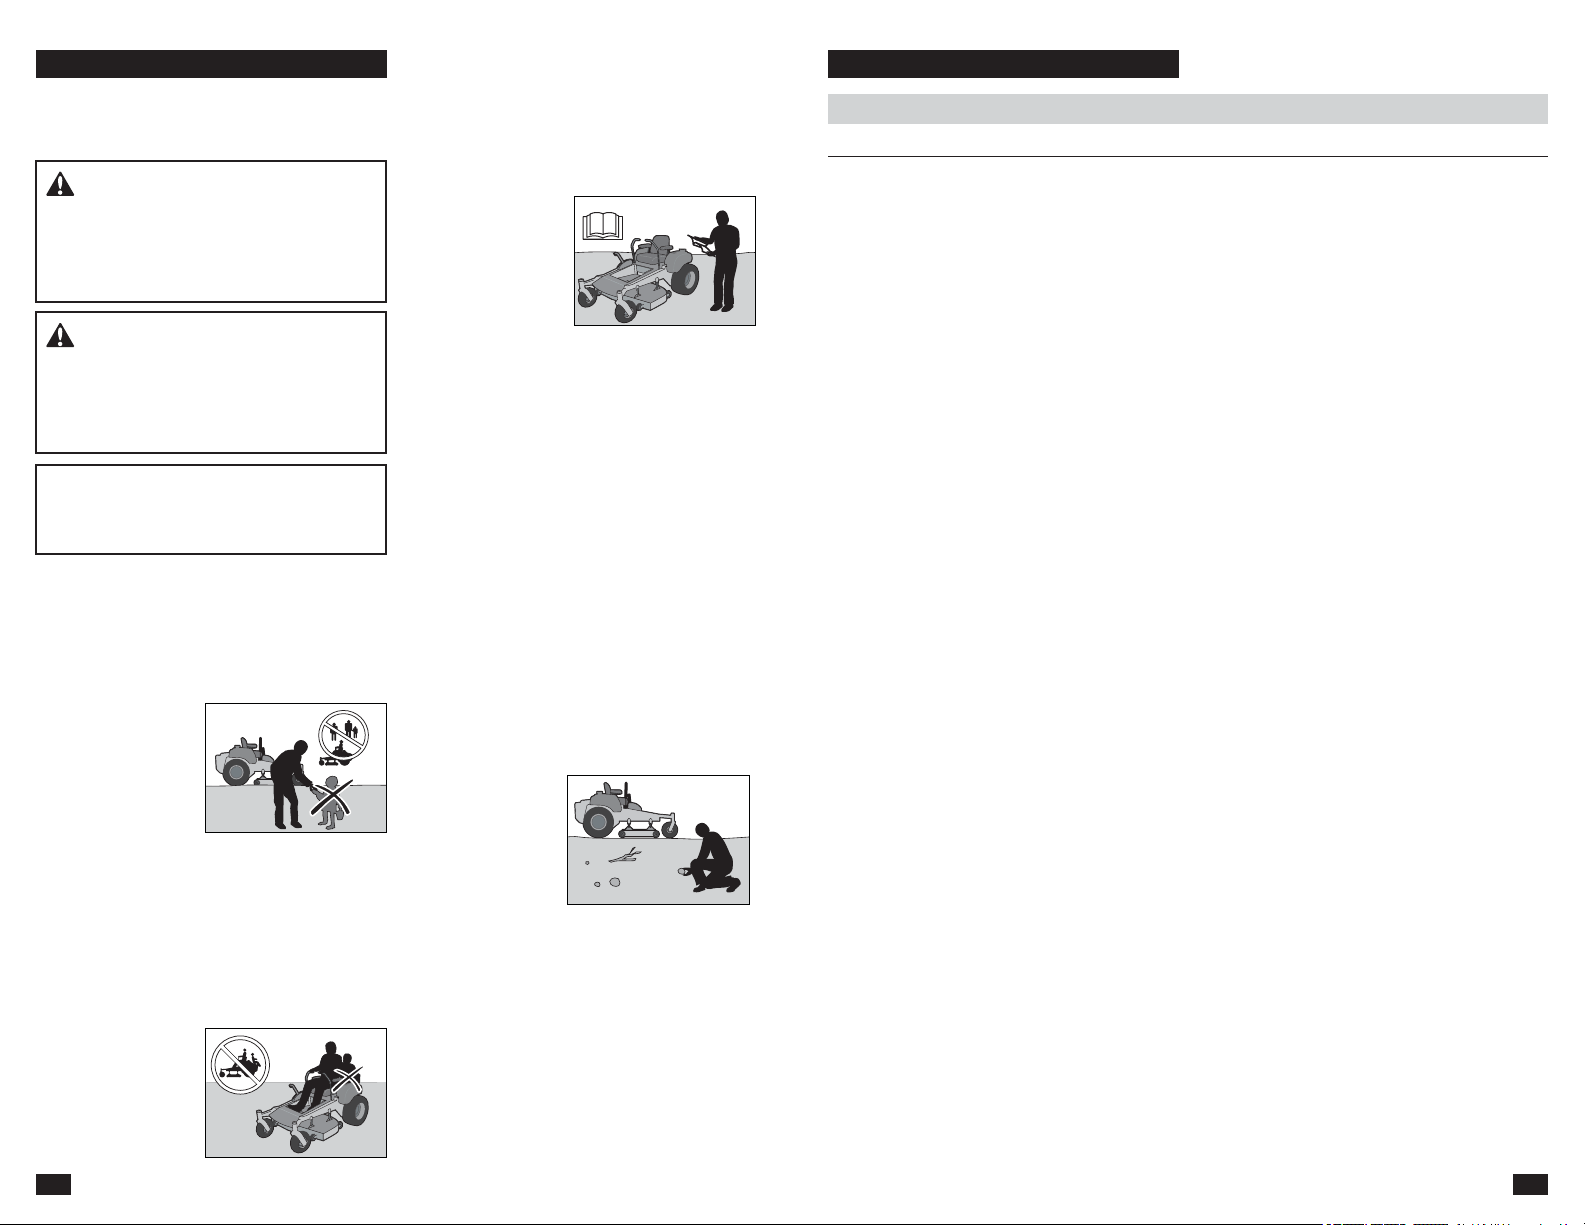
35
SERVICE JOURNAL
'(/,9(5<6(59,&(
Action Date, mtr reading, stamp, sign
Charge and connect the battery
Adjust the tire pressure of all wheels to 15 PSI (1 bar)
Connect the contact box to the cable for the seat’s safety switch
Check that the right quantity of oil is in the engine
Adjust the position of the steering controls
)LOOZLWKIXHODQGRSHQWKHIXHOVKXWRႇYDOYH
Start the engine
Check:
Drive to both wheels
Mower deck pitch and adjustment
Safety switch for the park brake
Safety switch for the mower deck
Safety switch in the seat
Safety switch in the steering controls
Park brake functionality and adjustment
Driving forward
Driving backward
Engaging the blades
Idle speed
Engine high idle speed
Inform the customer about:
Need and advantages of following the service schedule
Need and advantages of leaving the machine for service
(ႇHFWVRIVHUYLFHDQGPDLQWDLQLQJDVHUYLFHMRXUQDORQWKH
machine’s resale value
Application areas for mulching
Fill in the sales papers, etc.
Delivery service has
been carried out
No remaining notes
&HUWL¿HG
42
SEGURIDAD
Uso general
• Lea, entienda y
siga todas las
instrucciones sobre
la máquina en el
manual antes de
comenzar.
• Se recomienda
que alguien esté al tanto de que está usando
la máquina y pueda prestar ayuda en caso de
lesión o accidente.
• Cualquier persona que opere, realice
mantenimiento y/o servicio en esta máquina
primero debe leer y comprender este manual
del operador. Las leyes locales pueden
controlar la edad del usuario. El propietario es
responsable de capacitar a los usuarios de este
equipo.
• Tanto el propietario como el operador de
este equipo pueden evitar que se produzcan
accidentes y son responsables de accidentes
o lesiones que sufran ellos mismos u otras
personas y/o de daños a la propiedad.
• No coloque las manos ni los pies cerca de
las partes giratorias ni debajo de la máquina.
Manténgase alejado de la abertura de descarga
en todo momento.
• Sólo permita que los adultos responsables,
que estén familiarizados con las instrucciones,
operen la máquina.
• Quite de la zona los
objetos como rocas,
juguetes, cables,
etc. que podrían
engancharse en
la cuchilla y ser
arrojados.
• Asegúrese de que el área esté libre de curiosos
antes de operar la máquina. Detenga la
máquina si alguien entra en el área.
• No corte en reversa, a menos que sea
absolutamente necesario. Siempre mire hacia
abajo y hacia atrás antes y cuando vaya en
reversa.
• No dirija el material que se descarga hacia
nadie. Evite descargar el material contra una
pared u otra obstrucción. El material puede
rebotar hacia el operador. Detenga las cuchillas
FXDQGRDWUDYLHVHVXSHU¿FLHVGHJUDYD
$'9(57(1&,$ESTA MÁQUINA
CORTADORA PUEDE AMPUTAR MANOS Y
3,(6<$552-$52%-(7266,126,*8(
LAS INSTRUCCIONES DE SEGURIDAD
38('(&$86$5'$f26*5$9(62/$
MUERTE.
$'9(57(1&,$ESTE EQUIPO ES
PELIGROSO PARA LOS NIÑOS, PUEDE
&$86$5/(6,21(6*5$9(62/$
MUERTE. Lea y siga atentamente todas las
instrucciones de seguridad que se indican a
continuación.
INFORMACIÓN IMPORTANTE La Academia
Norteamericana de Pediatría recomienda que
solo niños mayores de 16 años operen o se
suban a un cortacésped.
Seguridad infantil
Pueden ocurrir trágicos accidentes si el operador
no está atento a la presencia de niños. A los
niños suelen atraerles las máquinas y el corte
del césped. No dé por un hecho que los niños
permanecerán donde usted los vio por última vez.
• Mantenga a los
niños alejados del
área de corte y bajo
la supervisión de un
adulto responsable
además del
operador.
• Esté alerta y apague
la máquina si un niño entra en el área.
• Antes y mientras avance en reversa, mire hacia
atrás y hacia abajo por si hay niños presentes.
• No lleve niños arriba de la máquina, incluso
cuando las cuchillas estén desactivadas.
Pueden caerse y lesionarse gravemente
o interferir con la operación segura de la
máquina. Los niños a quienes se les da una
vuelta en la máquina
pueden aparecer
de repente en el
área de corte para
otra vuelta y ser
atropellados o
golpeados con la
máquina.
Instrucciones de seguridad
Estas instrucciones son para su propia seguridad.
Léalas atentamente.
• No permita que los niños operen la máquina.
• Tenga cuidado extremo al acercarse a curvas
sin visibilidad, arbustos, árboles u otros objetos
que puedan bloquear su visión e impedir que
vea a un niño.
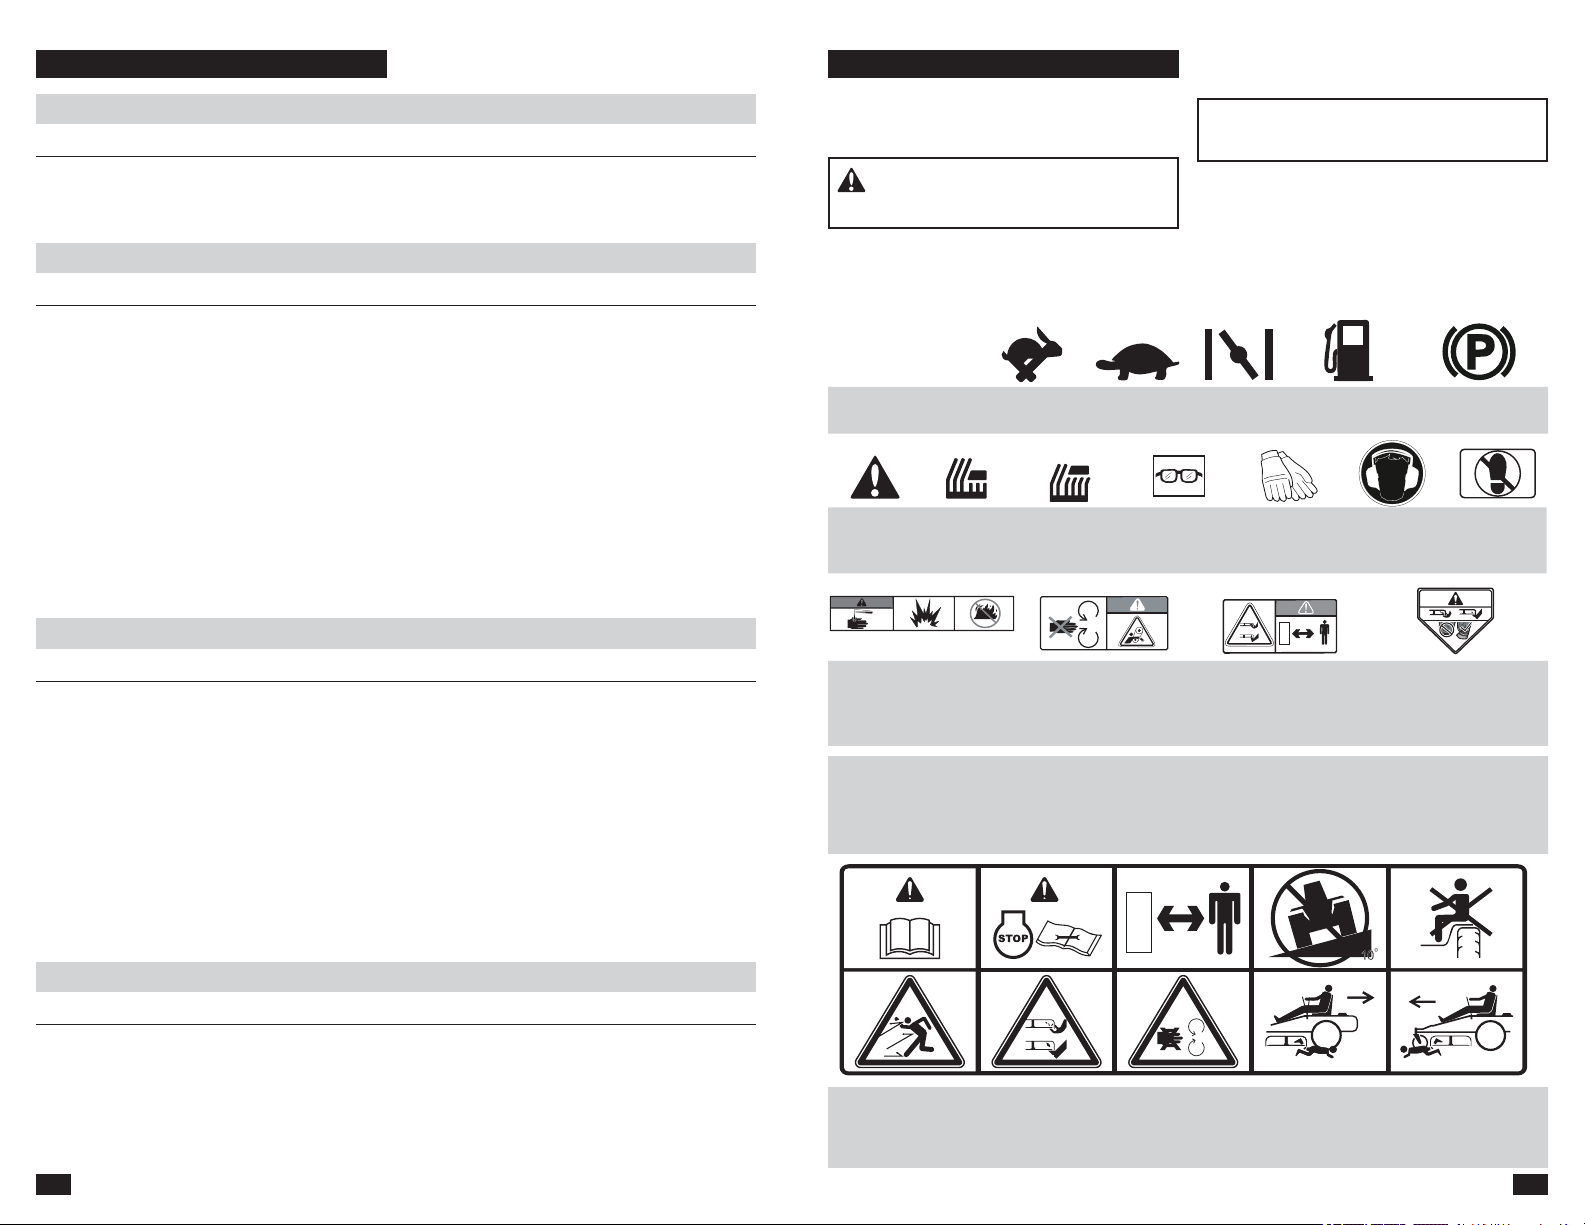
RN
41
SÍMBOLOS Y RÓTULOS
INFORMACIÓN IMPORTANTE Xxxx xxxxxx
xxxxx xxxx xxxxxxxxx xxxxxx xxxxxxxxx.
$'9(57(1&,$! Xxxx xxxxxx xxxxx
xxxx xxxxxxxxx xxxxxx xxxxxxxxx.
Reversa Neutro Rápido Lento
Estrangulador
Combustible Freno de
estacionamiento
Advertencia
Altura de
corte baja
Altura de
corte alta
Use gafas de
protección
Use guantes
protectores
Use
protectores
auriculares
No se pare
aquí
Lea el manual
del operador
Apague el motor y
retire la llave antes
de realizar tareas
de mantenimiento o
reparación
Mantenga una
distancia segura
de la máquina
Uso en pendientes
no superiores a 10°
No se permite llevar
pasajeros
Exposición del
cuerpo entero a
objetos arrojados
Corte de dedos de
manos y pies
No abra ni retire
las protecciones de
seguridad con el
motor en marcha
Tenga cuidado al
dar marcha atrás,
observe si hay
otras personas
Tenga cuidado al
avanzar, observe si
hay otras personas
Advertencia!
El ácido de la batería es
corrosivo, explosivo e
LQÀDPDEOH
Advertencia!
No toque las piezas
Advertencia!
Mantenga una
distancia segura
de la máquina
Advertencia! No opere
sin el colector o sin la
FRUD]DGHOGHÀHFWRU
Estos símbolos se encuentran en la máquina y en
el manual del operador. Estúdielos atentamente
SDUDTXHVHSDTXpVLJQL¿FDQ
6HXVDQHQHVWDSXEOLFDFLyQSDUDQRWL¿FDUDO
lector de un riesgo de daños personales o que
puede causar la muerte, especialmente si el
lector no sigue las instrucciones proporcionadas
en el manual.
6HXVDQHQHVWDSXEOLFDFLyQSDUDQRWL¿FDUDO
lector de un riesgo de daños en el material,
sobre todo si el lector no sigue las instrucciones
proporcionadas en el manual. Se usan también
cuando hay un riesgo potencial de uso indebido o
montaje incorrecto.
36
SERVICE JOURNAL
AFTER 10 HOURS
Action Date, mtr reading, stamp, sign
Change the engine oil
'$,/<6(59,&(
Action Date, mtr reading, stamp, sign
Clean debris from mower
Check engine oil level
Check the tire pressures
Check underside of deck
Check safety system
Check fuel system for leaks
Inspect safety guards and shields
Check brake adjustment
+2856(59,&(
Action Date, mtr reading, stamp, sign
&KHFNWKHIXHOSXPS¶VDLU¿OWHU
Sharpen/Replace mower blades if required
Check the tire pressures
Check battery cables
Lubricate according to lubrication chart
Check/clean the engine’s cooling air intake
&OHDQWKHDLUFOHDQHU¶VIRDPSUH¿OWHU
50-HOUR 6(59,&(
Action Date, mtr reading, stamp, sign
Do the 25-hour service
&OHDQUHSODFHWKHDLUFOHDQHU¶VSDSHU¿OWHUFDUWULGJH
(shorter intervals for dusty operating conditions)
Change engine oil
Lubricate according to lubrication chart

37
SERVICE JOURNAL
100-HOUR 6(59,&(
Action Date, mtr reading, stamp, sign
Do the 25-hour service
Do the 50-hour service
&KDQJHWKHHQJLQHRLO¿OWHU
Clean/replace the spark plugs
5HSODFHWKHIXHO¿OWHU
&KHFN9EHOWV
Check / tighten caster wheel axle bolts (at 200 hour intervals)
&KDQJHWKHDLU¿OWHU¶VSDSHUFDUWULGJH
300-HOUR 6(59,&(
Action Date, mtr reading, stamp, sign
Do the 25-hour service
Do the 50-hour service
Do the 100-hour service
Check / adjust the mower deck
Clean the combustion chamber and grind the valve seats
Check the engine valve clearance
5HSODFHWKHDLUFOHDQHU¶VIRDPSUH¿OWHU
AT LEAST ONCE EACH YEAR
Action Date, mtr reading, stamp, sign
Clean the engine’s cooling air intake (at 25 hour intervals)
5HSODFHWKHDLUFOHDQHU¶VIRDPSUH¿OWHUDWKRXULQWHUYDOV
5HSODFHWKHDLU¿OWHU¶VSDSHUFDUWULGJH
Change the engine oil (50 hours)
5HSODFHWKHHQJLQHRLO¿OWHUKRXUV
Check / adjust the cutting height
Check / adjust the park brake (50 hours)
Clean / change the spark plugs (100 hours)
&KDQJHWKHIXHO¿OWHUKRXUV
Check the engine valve clearance
40
INTRODUCTION
Buen servicio
Los productos Husqvarna se venden en
todo el mundo y solo en tiendas minoristas
especializadas con servicio completo. Esto
asegura que como cliente, usted reciba solo el
mejor nivel de asistencia y servicio. Antes de la
entrega del producto, el distribuidor ha sometido
la máquina, por ejemplo, a inspecciones y
DMXVWHV&RQVXOWHHOFHUWL¿FDGRHQHO5HJLVWURGH
servicio de este manual del operador.
Cuando necesite piezas de repuesto o ayuda
con respecto a preguntas de servicio, asuntos
de garantía, etc., consulte a los siguientes
profesionales:
Número de fabricación
El número de fabricación de la máquina se puede
encontrar en la placa impresa colocada en el
compartimiento del motor.
En la placa se indican los siguientes detalles,
desde la parte superior:
• La designación del tipo de máquina (I. D.).
• El número de tipo del fabricante (Modelo).
• El número de serie de la máquina (Número de
serie)
Tenga a mano la designación del tipo y el número
de serie cuando haga pedidos de piezas de
repuesto.
Este manual pertenece a la máquina con el
número de fabricación:
Motor Transmisión
El número de fabricación del motor se encuentra
estampado en una de las tapas de las válvulas.
La placa indica:
• El modelo del motor.
• El tipo de motor.
• Código
Tenga esta información disponible cuando haga
pedidos de piezas de repuesto.
Los motores de las ruedas y las bombas
hidrostáticas tienen un código de barras adherido
en la parte trasera.

39
INTRODUCCIÓN
Felicitaciones
Gracias por adquirir un cortacésped Husqvarna.
Esta máquina se ha fabricado para lograr una
H¿FLHQFLDVXSHULRUDOFRUWDUFRQUDSLGH]iUHDV
grandes. Un panel de control fácilmente accesible
para el operador y una transmisión hidrostática
regulada por controles de la dirección contribuyen
al rendimiento de la máquina.
Este manual es un documento valioso. Lea
el contenido con atención antes de utilizar la
máquina o de realizar tareas de mantenimiento.
Es importante que todas las personas que operen
esta máquina cumplan estas instrucciones
(uso, servicio, mantenimiento) para proteger la
seguridad del operador y de las demás personas.
Asimismo, este cumplimiento puede aumentar
considerablemente la vida útil de la máquina y su
valor de reventa.
Si vende la máquina, asegúrese de proporcionar
el manual del operador al nuevo propietario.
El último capítulo de este manual del operador
proporciona un registro de servicio. Asegúrese de
documentar las labores de servicio y reparación
realizadas. Un registro de servicio bien mantenido
reduce costos de servicio para el mantenimiento
y mejora el valor de reventa de la máquina.
Póngase en contacto con su concesionario
para obtener más información. Cuando lleve la
máquina a mantenimiento en el concesionario,
lleve con ella el manual del operador.
Información general
En este manual del operador, hacia la izquierda
y hacia la derecha, hacia atrás y hacia adelante
se utilizan en relación con la dirección de
conducción normal de la máquina. La dedicación
continua a mejorar nuestros productos requiere
TXHODVHVSHFL¿FDFLRQHV\HOGLVHxRHVWpQVXMHWRV
a cambios sin previo aviso.
Conducción y transporte en vías
públicas
Consulte las normas de circulación vigentes
antes del transporte en vías públicas. Si va a
transportar la máquina, siempre debe utilizar
anclajes homologados y asegurarse de que
la máquina esté bien sujeta. NO utilice esta
máquina en vías públicas.
Remolque
Si la máquina está equipada con un sistema de
remolque, extreme las precauciones al remolcar.
No lleve a niños ni otras personas dentro del
equipo remolcado o sobre él. Realice giros
amplios para evitar el efecto tijera. Desplácese
lentamente y guarde más distancia para
detenerse.
1RUHPROTXHHQXQDVXSHU¿FLHHQSHQGLHQWH(Q
las pendientes, el peso del equipo remolcado
puede provocar pérdida de tracción y pérdida
de control. Obedezca las recomendaciones
del fabricante sobre los límites de peso para el
equipo remolcado. No remolque cerca de zanjas,
canales y otras zonas de riesgo.
Funcionamiento
Esta máquina está diseñada solo para cortar
pasto en céspedes y tierra nivelada sin
obstáculos tales como piedras, tocones de
árboles, etc. La máquina también puede utilizarse
para otras tareas cuando está equipada con
accesorios especiales proporcionados por el
fabricante. Las instrucciones de operación de
los accesorios se suministran con la entrega.
Cualquier otra clase de uso es incorrecta.
Las instrucciones del fabricante sobre el
funcionamiento, mantenimiento y reparación
deberán seguirse atentamente.
Los cortacésped y todos equipos electrónicos
pueden ser peligrosos si no se usan
correctamente. Para mantener la seguridad, se
requiere tener buen juicio, utilizar la máquina de
acuerdo con estas instrucciones y con sentido
común.
Solo personas que conozcan las características
especiales de la máquina y que además
conozcan las instrucciones de seguridad pueden
utilizar, mantener o reparar la máquina. Utilice
exclusivamente piezas de repuesto aprobadas
para mantener esta máquina.
Las normas de prevención de accidentes,
otras reglas de seguridad generales, reglas de
seguridad laboral y las leyes de tránsito deben
seguirse sin excepción.
/DVPRGL¿FDFLRQHVQRDXWRUL]DGDVHQHOGLVHxR
de la máquina absuelven al fabricante de
cualquier tipo de responsabilidad por daños
personales o daños a la propiedad resultantes.
CERTIFICADOS DE CONFORMIDAD
Requisitos para EE.UU.
En el motor y/o en el compartimiento del motor hay etiquetas que indican que la máquina
cumple con los requisitos. Esto también es aplicable a requisitos especiales para cualquiera
de los estados, (normas de emisiones de California, etc.). No retire ninguna de estas etiquetas.
7DPELpQHVSRVLEOHTXHVHLQFOX\DQFHUWL¿FDGRVFRQODPiTXLQDHQHOPRPHQWRGHVXHQWUHJDR
que estén escritos en el manual del motor. Cuídelos porque son documentos valiosos.
Cuando este producto esté desgastado y ya no
se use, debe devolverse al distribuidor o a un
tercero para su reciclaje.
3DUDLPSOHPHQWDUPHMRUDVODVVSHFL¿FDFLRQHV
\GLVHxRVSXHGHQPRGL¿FDUVHVLQSUHYLRDYLVR
Tenga en cuenta que no es posible presentar
demandas legales en función de la información
contenida en estas instrucciones.
Utilice únicamente piezas originales para las
reparaciones. El uso de otras piezas anula la
garantía.
1RPRGL¿TXHQLLQVWDOHHTXLSRQRHVWiQGDUHQ
la unidad sin el consentimiento del fabricante.
/DVPRGL¿FDFLRQHVDODXQLGDGSXHGHQ
provocar operaciones inseguras o daños en la
unidad.
$'9(57(1&,$No seguir las prácticas
de operación con cautela puede provocar
lesiones graves al operador o a otras
personas. El propietario debe comprender
estas instrucciones, y debe permitir que solo
personas con la debida capacitación y que
comprendan estas instrucciones utilicen el
cortacésped.
Cada persona que maneje el cortacésped
debe estar en buenas condiciones físicas y
PHQWDOHV\QRGHEHHVWDUEDMRODLQÀXHQFLDGH
ninguna sustancia que altere la mente.
$'9(57(1&,$Los gases de escape
del motor, algunos de sus componentes y
algunos componentes del vehículo contienen
o emiten químicos que según el Estado de
California provocan cáncer y malformaciones
congénitas u otros daños reproductivos.
$'9(57(1&,$Los gases de escape
del motor y ciertos componentes del vehículo
contienen o emiten productos químicos
que se consideran causantes de cáncer,
malformaciones congénitas u otros daños en el
sistema reproductor. Los gases de escape del
motor contienen monóxido de carbono, que es
un gas venenoso, inodoro e incoloro. No utilice
la máquina en espacios cerrados.
$'9(57(1&,$Los postes de batería,
terminales y accesorios relacionados contienen
plomo y compuestos de plomo, químicos que
según el Estado de California provocan cáncer
y malformaciones congénitas u otros daños
reproductivos. Lávese las manos luego de su
uso.

