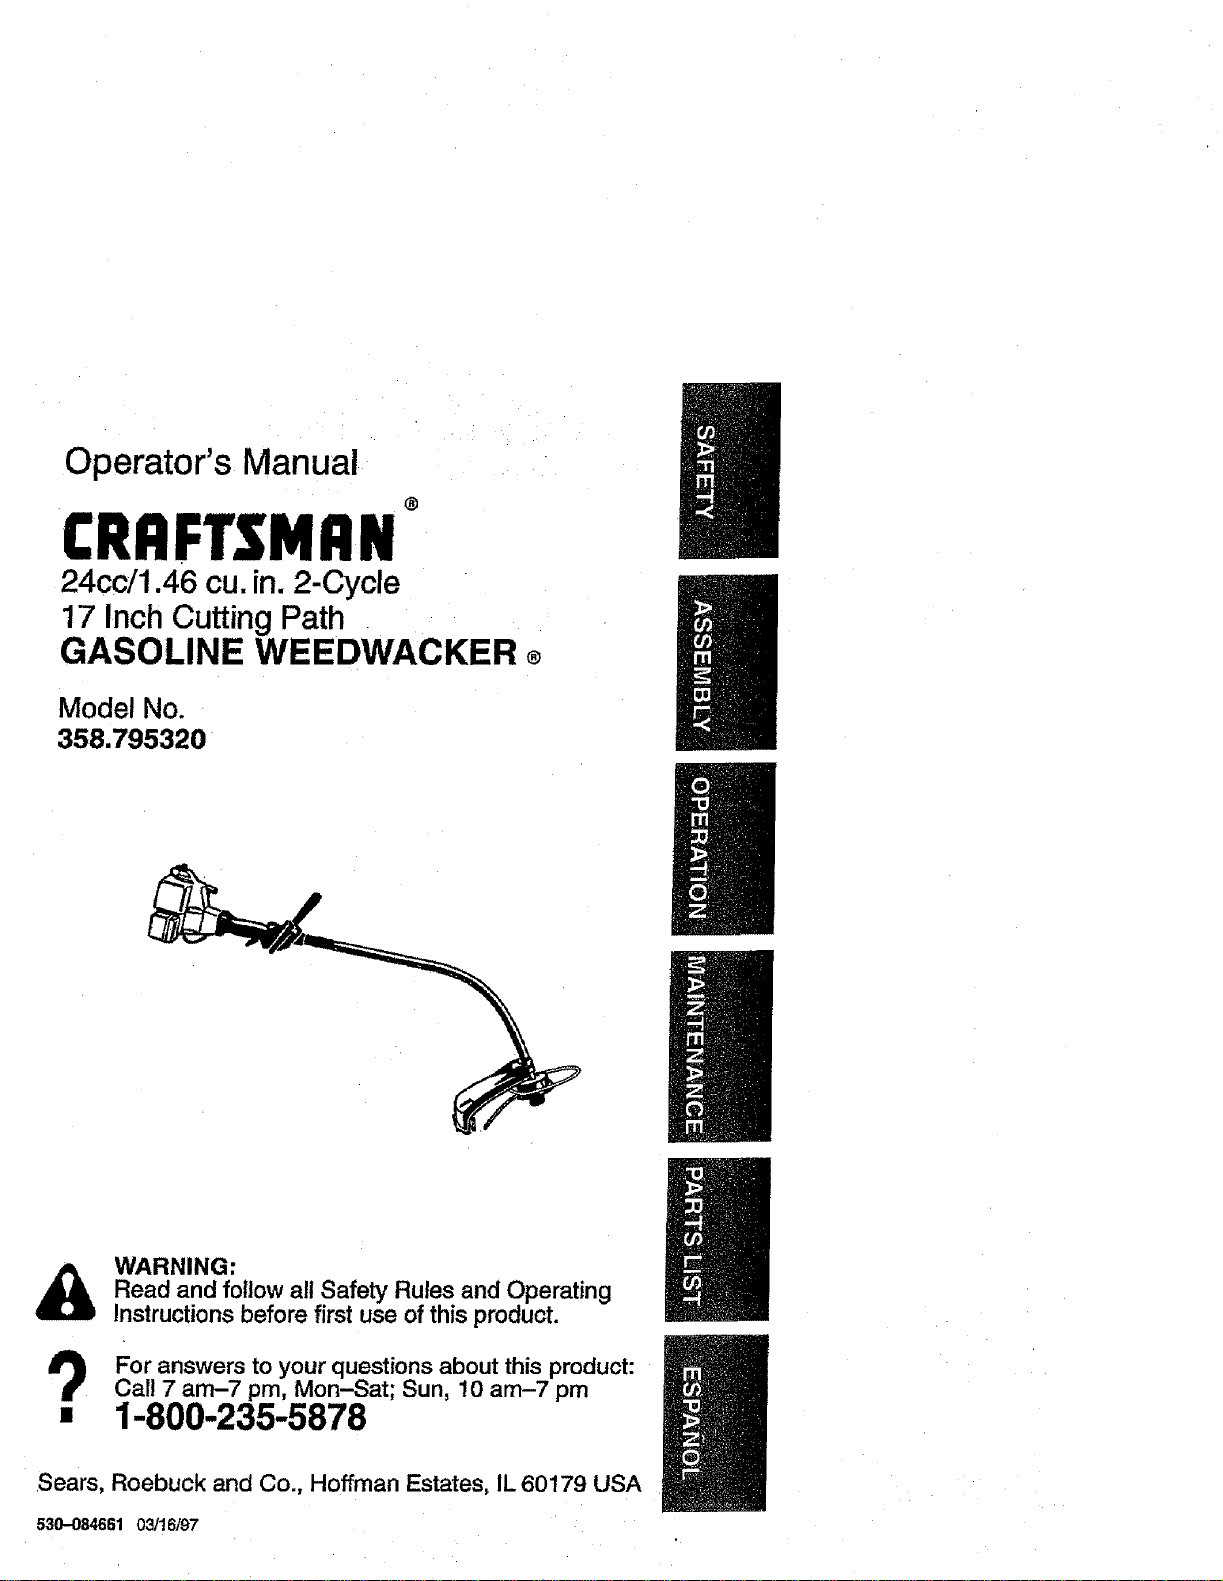
Operator's Manual
®
CRRFTSMRN
24cc/1.46 cu. in. 2-Cycle
17 Inch Cutting Path
GASOLINE WEEDWACKER ®
Model No.
358.795320
//
I
I
&
WARNING:
Read and follow all Safety Rules and Operating
Instructions before first use of this product.
For answers to your questions about this product:
Carl 7 am-7 pm, Mon-Sat; Sun, 10 am-7 pm
1-800-235-5878
Sears, Roebuck and Co., Hoffman Estates, IL 60179 USA
530-084661 03/16/97
WarrantyStatement 2 Storage 10
SafetyRules 2 TroubleshootingChart 1!
Assembly 4
Operation 5 RepairPartsList 12
Maintenance 8 Spanish 16
Service&Adjustments 9 Partsand Ordering BackCover
FULL ONE YEAR WARRANTY ON CRAFTSMAN GAS POWERED
WEEDWACKER ® LINE TRIMMER
For one year from the date of pumhase, when this Craftsman Gas Powered
Weedwacker_ Line Trimmer is maintained, lubricated, and tuned up according to
the operating and maintenance instructionsin the Operator's Manual, Sears will
repair,free of charge, any defect in materials or workmanship.
This warranty excludes nylon line, spark plug, and air filter, whichare expendable
parts and become worn duringnormal use.
if th_sWeedwacker® Line Trimmer is used for commercial purposes, this warran-
ty applies for only90 days from the date of pumhase. If this Weedwacker_ Line
Trimmer is used for rental purposes, this warranty applies for only 30 days from
the date of purchase. This warranty applies only while this product is in use in the
United States.
WARRANTYSERVICE IS AVAILABLEBY RETURNING THE WEEDWACKER® LINE
TRIMMER TO THENEARESTSEARS SERVICE CENTER IN THE UNITEDSTATES.
This warranty gives you specific legal rights, and you may also have other rights
which vary from state to state.
Sears, Roebuck and Co., D/817 WA Heffman Estates, IL 60179
WARNING: Whenusinggardening
appliances,basicsafetyprecautions
mustalwaysbefollowedtoreducethe
riskoffireandseriousinjury.Readand
follow all instructions.
Thispower unitcanbedangerous!
Operatorisresponsibleforfollowing
instructionsandwarningsonunitand
in manual.ReadentireOperator's
Manualbeforeusingunit!Bethorough-
lyfamiliar withthecontrolsandthe
properuseoftheunit.Restricttheuse
ofthisunittopersonswhohaveread,
understand,andwillfollow theinstruc-
tionsand warningsontheunitand in
themanual. Neverallowchildrento
operatethisunit.
Safetyinformationontheunit
DANGER: Neverusebladesorflail-
ingdevices.Thisunitisdesignedfor
linetrimmeruseonly.Useofanyother
accessoriesor attachmentswillin.
creasethe riskofinjury.
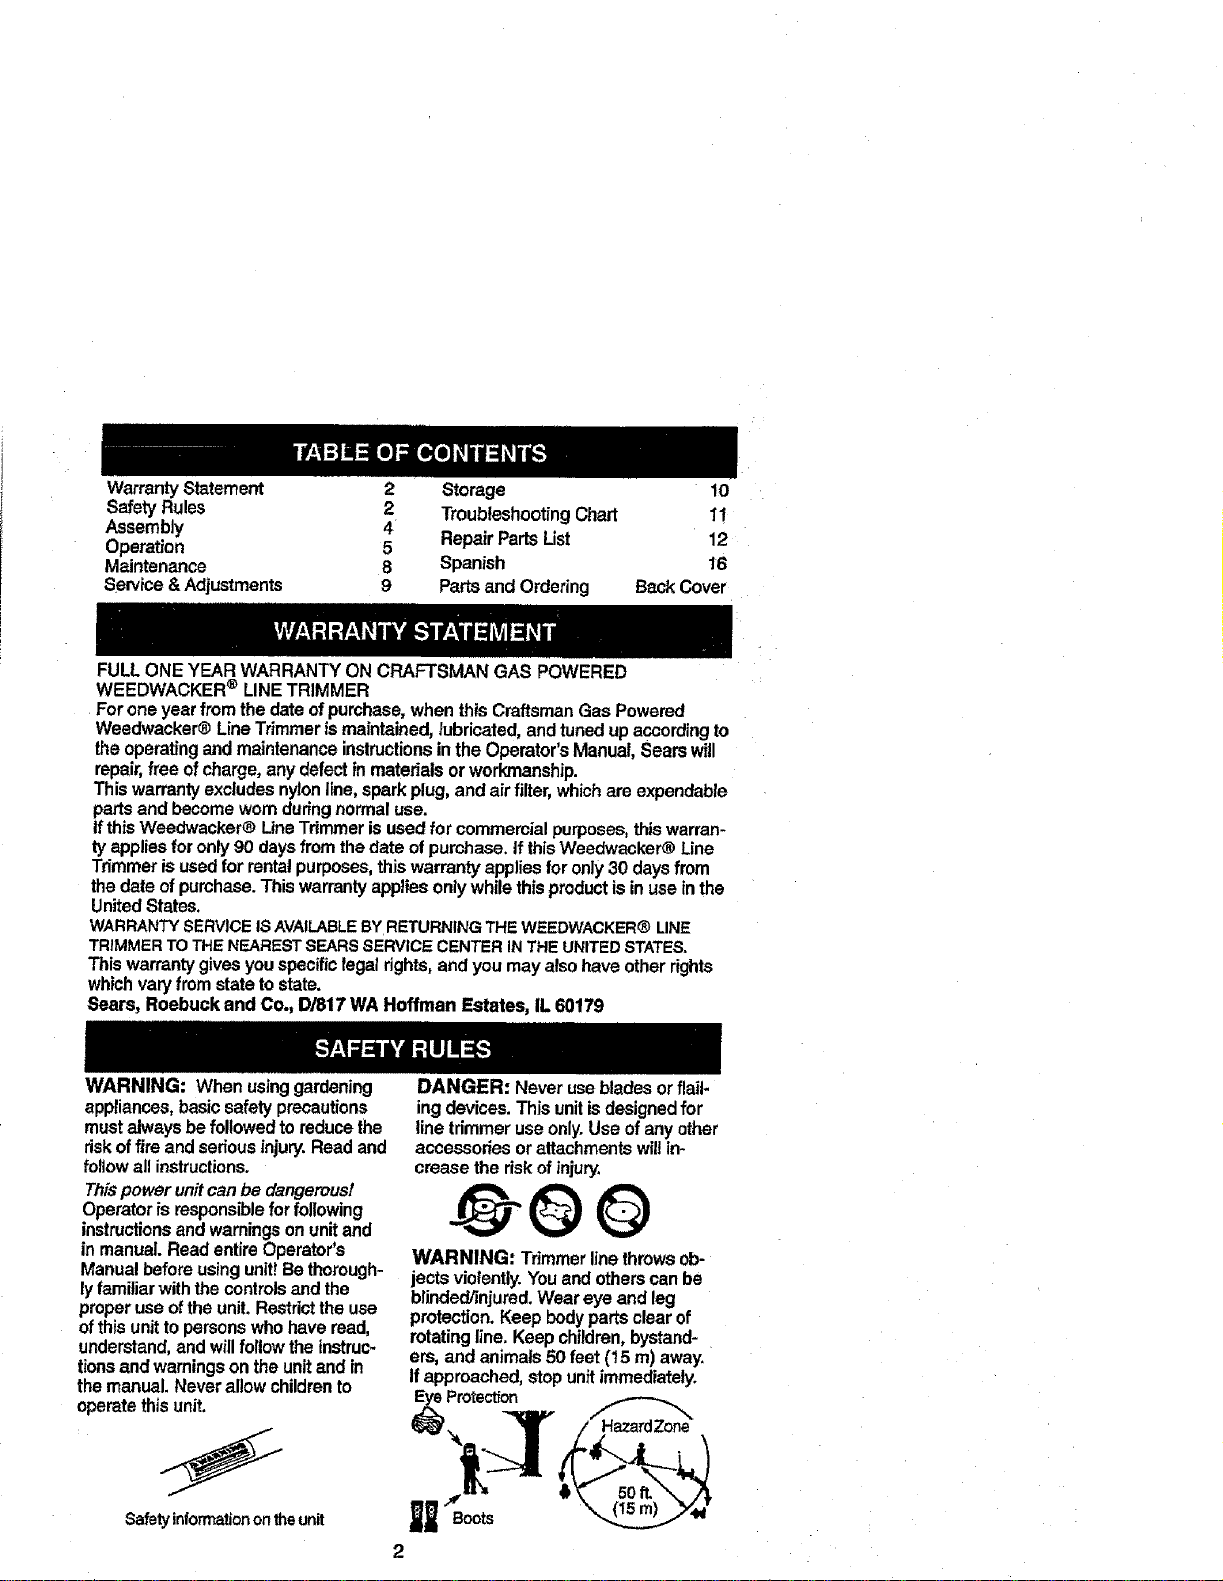
WARNING: Trimmerlinethrowsob-
jectsviolently.Youand otherscanbe
blinded/injured.Weareye andleg
protection.Keep bodypartsclearof
rotatingline.Keepchildren,bystand-
ers, and animals 50 feet (15 m) away.
Ifapproached,stopunitimmediately.
_Prote_on
2
• tfsituationsoccurwhichare notcov-
ered in this manual, use care and
goodjudgement.If you need assis-
tance, contactSearsService or call
the1-800numberlistedonthefront of
thismanual.
OPERATOR SAFETY
• Alwayswearsafetyeye protection.
• Always,wearlongpants,long
sleeves,boots,and gloves.Wearing
safetylegguardsisrecommended.
Do notgo barefootorwearsandals.
Stay clearofspinningline.
• Securehairaboveshoulderlength.
Secureorremove looseclothingor
clothingwithlooselyhangingties,
straps,tassels,etc.They can be
caughtin movingparts.
• Do notoperatewhenyouare tired,
ill,or undertheinfluenceofalcohol,
drugs,ormedication.
• Wear hearingprotectionifyouuse
unitfor morethan1-1/2 hoursper
day.
• Neverstartorruninsidea closed
roomorbuilding.Breathingexhaust
fumescankilt.
• Keephandlesfreeofoilandfuel.
UNIT / MAINTENANCE SAFETY
• Disconnectthesparkplugbefore
performingmaintenanceexceptcar-
buretoradjustments.
• Lookforandreplacedamagedor
leosepartsbeforeeachuse.Look
for and repairfuelleaksbefore use.
Keepingoodworkingcondition.
• Replacetrimmerheadpartsthatare
chipped,cracked,broken,ordam-
aged inanyotherwaybeforeusing
theunit.
• Makesureunitisassembledcorrect-
lyas showninthismanual.
• Makecarburetoradjustmentswith
lowerendsuppertedtopreventline
from contactinganyobject.
• Keepothersaway whenmakingcar-
buretoradjustments.
• UseonlyrecommendedCraftsman
accessoriesandreplacementparts.
FUEL SAFETY
° Mixandpourfueloutdoors.
° Keepawayfromsparksorflames.
• Usea containerapprovedfor fuel.
• Donotsmokeorallowsmokingnear
fuel ortheunit.
' Wipeupall fuelspills.
• Moveat least 10 feet (3 meters)
away fromfuelingsit=
engine.
• Stopengineand allowtocoolbefore
removingfuelcap.
CUTTING SAFETY
• Useonlyfortrimming,mowing,
ing,andsweeping.Do notusefor
pruningorhedgetrimming.
• Inspecttheareabeforeeachuse.
Removeobjects(rocks,broken
glass,nails,wire,etc.)whichcanbe
thrownbyorbecomeentangledin
line.Hardobjectscandamagethe
trimmerbeadandbethrowncausing
seriousinjury.
• Keepfirmfoolingand balance.Do
notoverreach.
• Keepall partsofyourbodyaway
from mufflerandspinningline.Keep
enginebelowwaistlevel A hotmuf-
fler cancauseseriousbums.
• Cuttingonleftsideoftheshieldwill
throwdebrisawayfrom theoperator.
TRANSPORTING AND
STORAGE
• Allowenginetocool;secureunitbe-
forestoringortransportinginvehicle.
• Emptythefueltankbeforestoring or
transportingtheunit.Useupfuelleft
inthecarburetorbystartingtheen-
gineand lettingitrununtilitstops.
• Storeunitandfuelin areawherefuel
vapors cannot reachsparksor open
flames from water heaters,electric
motorsor switches,furnaces, etc.
• Storeunitsolinelimiter cannotacci-
dentally causeinjury.The unitcanbe
hung by thetube.
• Storeunitout ofreachofchildren.
• If situationsoccur which are notcov-
ered in this manual, use care and
good judgment.If you need assis-
tance,call 1-800-235-5878.
SPECIAL NOTICE: Thisunitisnot
equippedwitha temperaturelimiting
mufflerandsparkarrestingscreen
whichmeetstherequirementsofCali-
forniaCodes4442 and4443. AllU.S.
forest landandthestatesofCalifornia,
Idaho,Maine,Minnesota,NewJersey,
Oregon,andWashingtonrequireby
lawthatmanyinternalcombustionen-
ginesbeequippedwitha sparkarres-
torscreen.Ifyouoperateina locale
wheresuchregulationsexist,youare
3
legally responsible for installing and tionof the law, Contact your Sears
maintaining the operating condition of Service Center for the correct parts.
these parts. Failure to doso is a viola-
CARTON CONTENTS
Check carton contents against the fol-
lowinglist.
Model 358,795320
• Trimmer
• Shield with wing nut
• Assist Handle with'bolt and wing nut
• Container of Oil
• Spool with 20 ft. ofline
Examine partsfor damage, Do not use
damaged parts.
NOTE: it you need assistance or find
pads missing or damaged, call
1-800-235-5878.
It is normal forthe fuel filter to rattle in
the empty fuel tank,
Findingfuel or oilresidue on muffler is
normaldue tocarburetor adjustments
and testing done by the manufacturer.
ASSEMBLY
WARNING: Ifreceivedassembled,
repeatallstepstoensureyourunitis
pmpedyassembledand allfasteners
aresecure.
Besuretoassemblethehandletothe
unitbeforeyouassembletheshield.
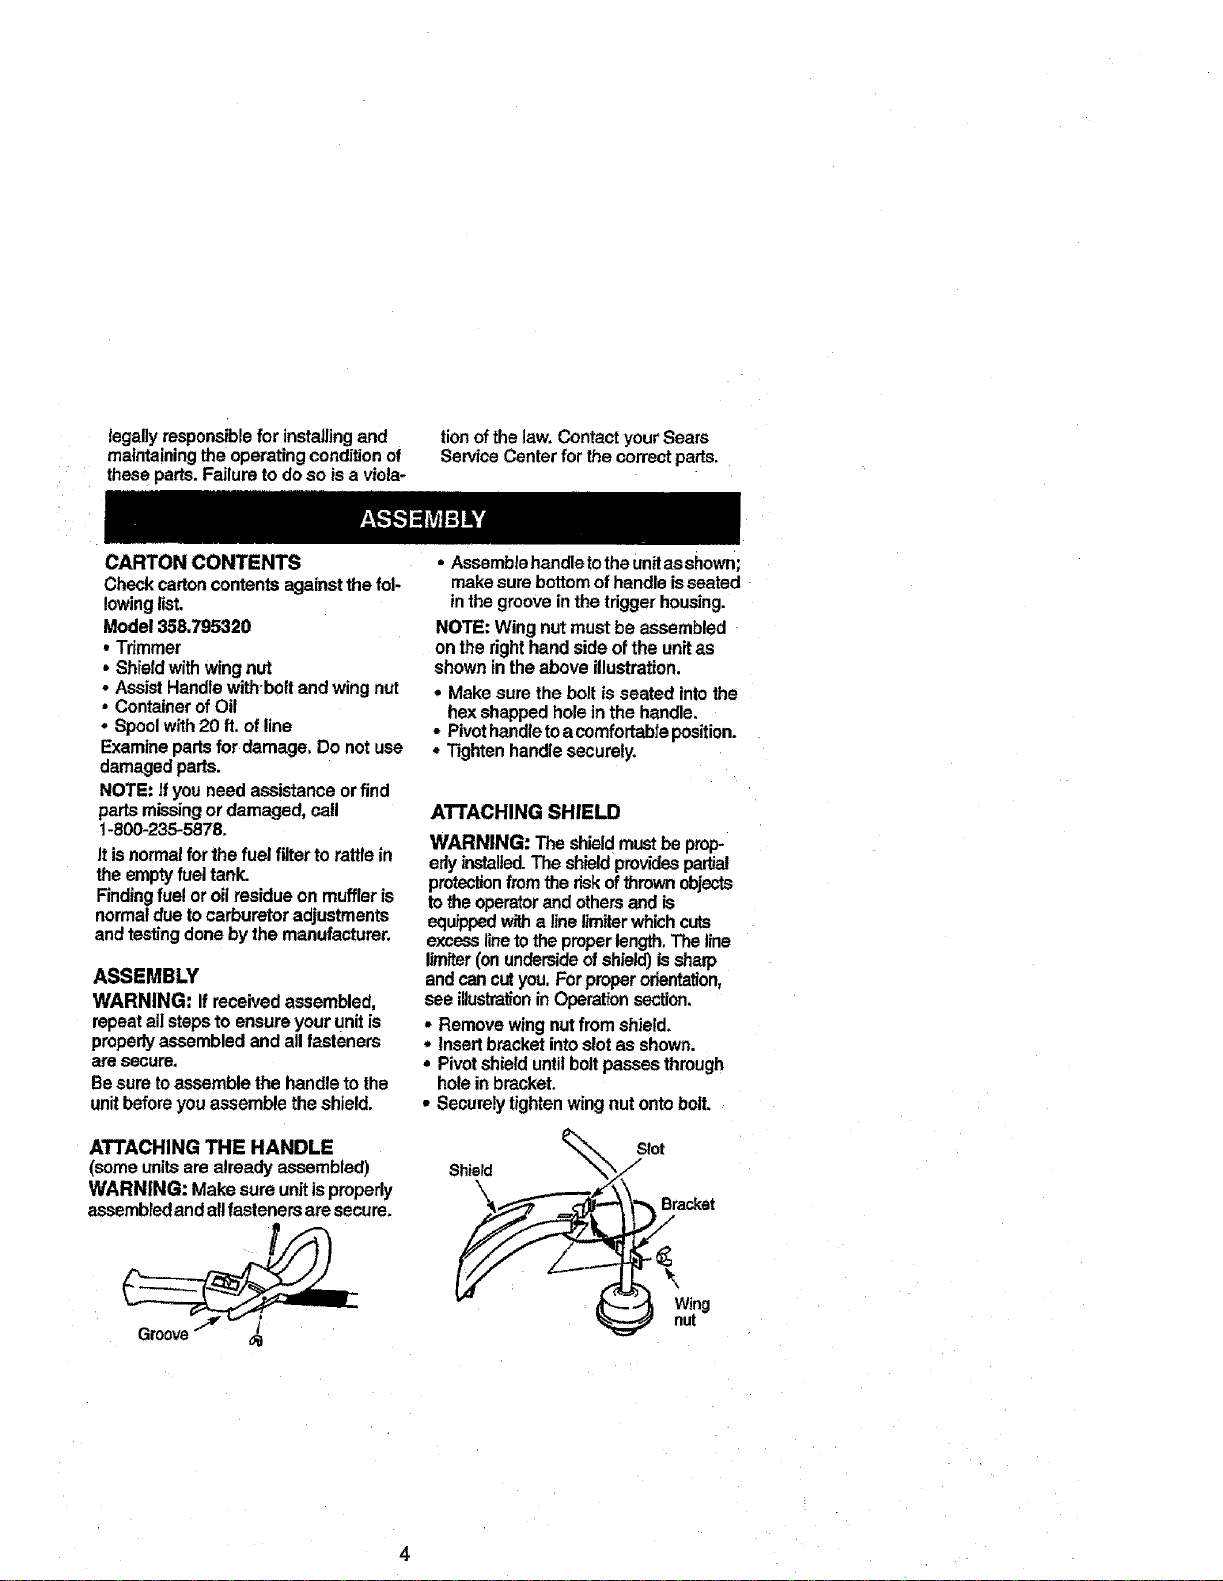
ATTACHING THE HANDLE
(some unitsare already assembled)
WARNING: Make sure unitis propedy
assembled and allfasteners are secure.
• Assembiehandletotheunitasshown;
make sure bottom of handle isseated
inthe groove in the trigger housing.
NOTE: Wing nut must be assembled
on the right hand side of the unitas
shown in the above illustration.
• Make sure the bolt is seated into the
hex shapped hole in the handle.
• Pivothandle toacomfortable position.
• Tighten handle securely.
ATTACHING SHIELD
WARNING: The shield must be prop-
erly installed.The shield providespartial
protectionfromthe risk of thrown objects
to the operatorand othersand is
equippedwitha linellm_terwhichcuts
excess lineto the properlength. The line
limtter(on undersideofshield) is sharp
and can cutyou. For properorientation,
see illustrationin Operationsection.
• Remove wing nut from shield.
- Insert bracket into slot as shown.
• Pivot shield untilbolt passes through
hole in bracket.
• Securely tighten wing nut onto bolt.
_-_ Slot
"_,__ Bracket
Wing
nut
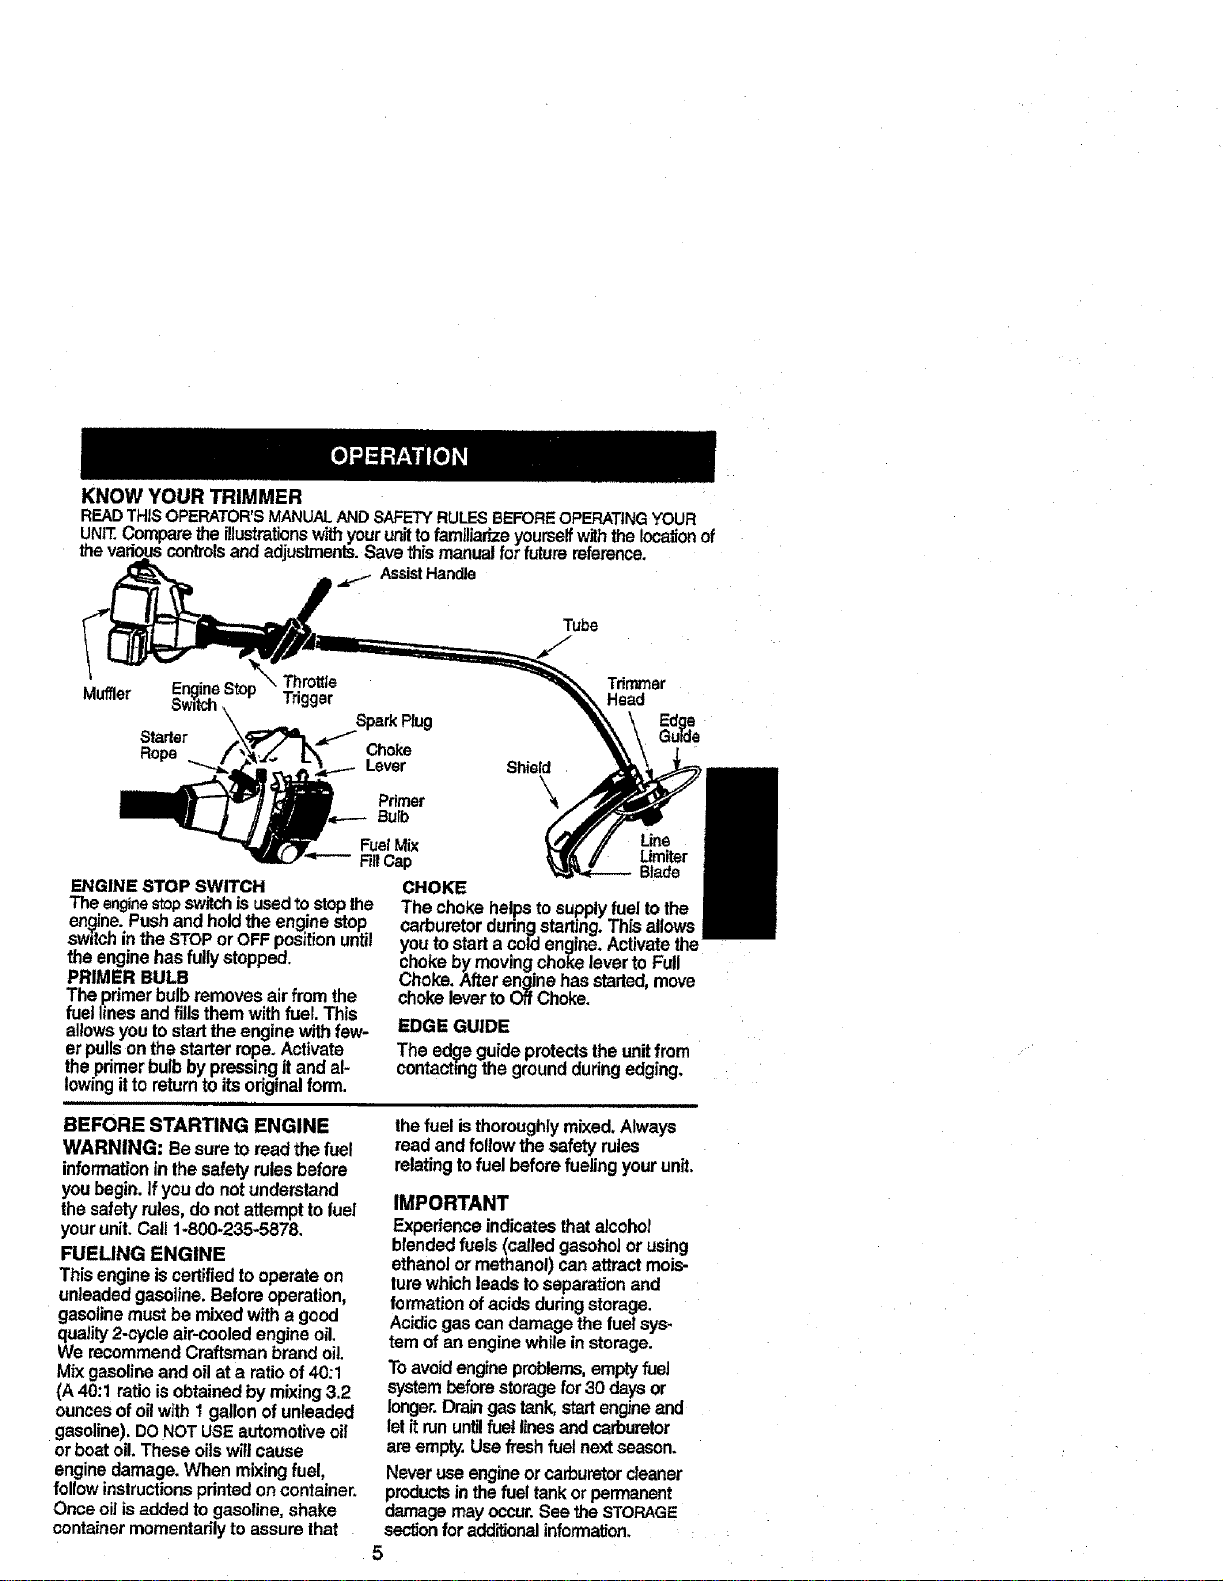
KNOWYOURTRIMMER
READTHiSOPERATOR'SMANUALAND SAFETYRULESBEFOREOPERATINGYOUR
UNIT.Compare the illustrations with your unit b familiarize yourself withthe !ocationof
e various controlsand adjustments. Save this manual for future mferenca.
AssistHandle
Tube
Muffler EngineStop Throttle Tdrr_rner
Switch Trigger Head
Starter
Rope
ENGINE STOP SWITCH
Choke
Lever
Primer
Bulb
Shield
\
FuelMix Line
FillCap Limiter
B!ade
CHOKE
Theenginestopswitchis usedtostopthe
engine.Pushandholdtheenginestop
swltcnintheSTOPorOFFpositionuntil
theenginehas fully stopped.
PRIMER BULB
Theprimerbulb removesairfrom the
fuellinesandfillsthem withfuel. This
allowsyoutostarttheenginewithfew-
erpullson thestarterrope,Activate
theprimerbulbbypressingitandal-
lowingitto returntoitsoriginalform.
The chokehelps tosupplyfueltothe
carburetorduringstarting.This allows
youtostarta coldengine.Activatethe
chokebymovingchokeleverto Full
Choke.After enginehasstarted,move
chokelevertoOff Choke.
EDGEGUIDE
The edQeguideprotectstheunitfrom
contactingthe groundduringedging,
BEFORE STARTING ENGINE
WARNING: Besureto readthefuel
informationin thesafetyrulesbefore
youbegin.Ifyou do notunderstand
thesafelyrules,do notattempttoluel
yourunit.Call1-800-235-5878,
FUELING ENGINE
Thisengineiscertifiedtooperateon
unleadedgasoline.Beforeoperalion,
gasoiinemust be mixedwitha good
quality2-cycleair-cooledengineoil,
We recommendCraftsmanbrandoil.
Mixgasolineandoilat a ratioof40:1
(A40:1 ratioisobtainedby mixing3.2
ouncesofoilwith_ gallonofunFeaded
gaseline),DONOTUSEautomotiveoil
orboatoil.Theseoilswillcause
enginedamage.When mixingfuel,
follow inslructionspdntedoncontainer.
Onceoilisaddedtogasoline,shake
containermomentarilyto assurethat
thefuel isthoroughlymixed,Always
readandfollow the safetyrules
relatingtofuel beforefuelingyourunit.
IMPORTANT
Experience indicates that alcohol
blended fuels (called gasehol or using
ethanol or methanol) can attract mois-
lure which leads to separation and
formation ofacids during storage.
Acidic gas can damage the fuel sys-
tem of an engine while in storage.
Toavoid engine problems,empty fuel
system before storage for30 days or
longer.Draingas tank, start engine and
let it mn until fuel line,sand carburetor
are empty. Use freshfuel next season.
Never use engine or carburetorcleaner
productsin the fuel tank or permanent
damage may occur. See the STORAGE
sectionfor additionalinformation.
5
HOW TO STOP YOUR UNIT
Push and hold the engine stop switch
in the STOP or OFF position until the
unit has fully stopped.
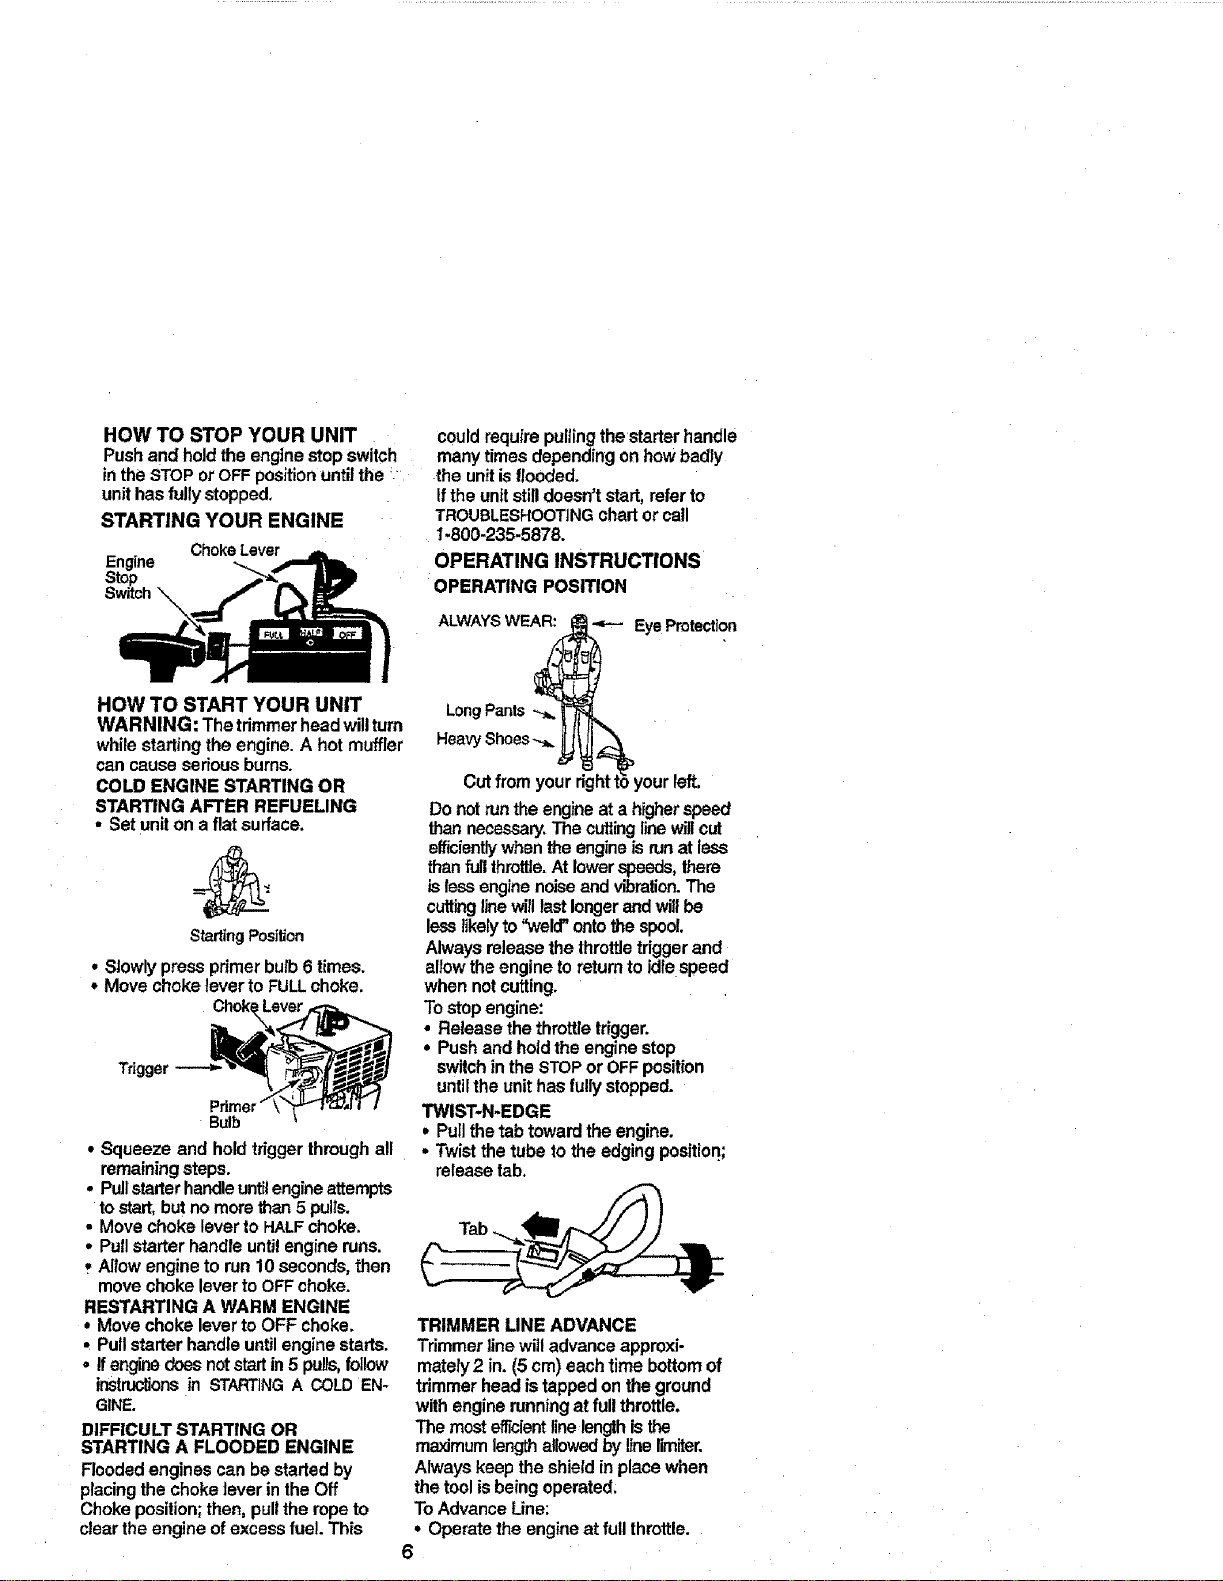
STARTING YOUR ENGINE
ChokeLever
Engine -__
Stop
Switch_
could require pullingthe starter handle
many times depending on how badly
the unitis flooded.
Ifthe unit still doesn't start, refer to
TROUBLESHOOTINGchart or call
1-800-235-5878.
OPERATING INSTRUCTIONS
OPERATING POSITION
ALWAYS WEAR: _ Eye Protection
HOW TO START YOUR UNIT
WARNING: The tdmmer head will turn
while starting the engine. A hot muffler
can cause serious burns.
COLD ENGINE STARTING OR
STARTING AFTER REFUELING
• Set unit on a flat surface.
StartingPosition
• Slowlypressprimerbulb6 limes.
• MovechokelevertoFULLchoke.
Trigger
Bulb
• Squeeze and hold trigger through all
remaining steps.
° Pullstarter handleuntilengine attempts
to start,but no more than 5 pulls.
• Move choke lever to HALFchoke.
• Pullstarter handle until engine runs.
Allow engine to run 10 seconds, then
move choke lever to OFFchoke.
RESTARTING A WARM ENGINE
• Move choke lever to OFF choke.
• Pull starter handle untilengine starts.
° If engine does notstart in 5 pulis,follow
ir_truclionsin STARTINGA COLDEN-
GINE.
DIFFICULT STARTING OR
STARTING A FLOODED ENGINE
Flooded engines can be started by
placing the choke lever in the Off
Choke position; then, pull the rope to
clear the engine ofexcess fue!. This
Cut from your dghtI left.
Do not run the engine at a higher speed
than necessa_,.The cuttinglinew_ cut
efficiently when the engineis runat less
than full throttle.At lowerspeeds, there
is less engine noise and vlbralion.The
cuttinglinewill lastlonger and willbe
lesslikely to"weld" ontothe spool.
Always release the throttle trigger and
allow the engine to return to idle speed
when notcutting.
To stop engine:
• Release the throttle trigger.
• Push and hold the engine stop
switch in the STOPor OFF position
untilthe unit has fully stopped.
TWIST-N-EDGE
• Pullthe tab toward the engine.
• Twist the tube to the edging position.;
release tab.
TRIMMER UNE ADVANCE
Trimmer line will advance approxi-
mately 2 in. (5 cm) each time bottom of
tdmmer head is tapped on the ground
with engine running at full throttle.
The most efficientlinelengthisthe
maximum length allowedby linelimiter.
Always keep the shield in place when
the tool is being operated;
ToAdvance Line:
° Operate the engine at full throttle.
6
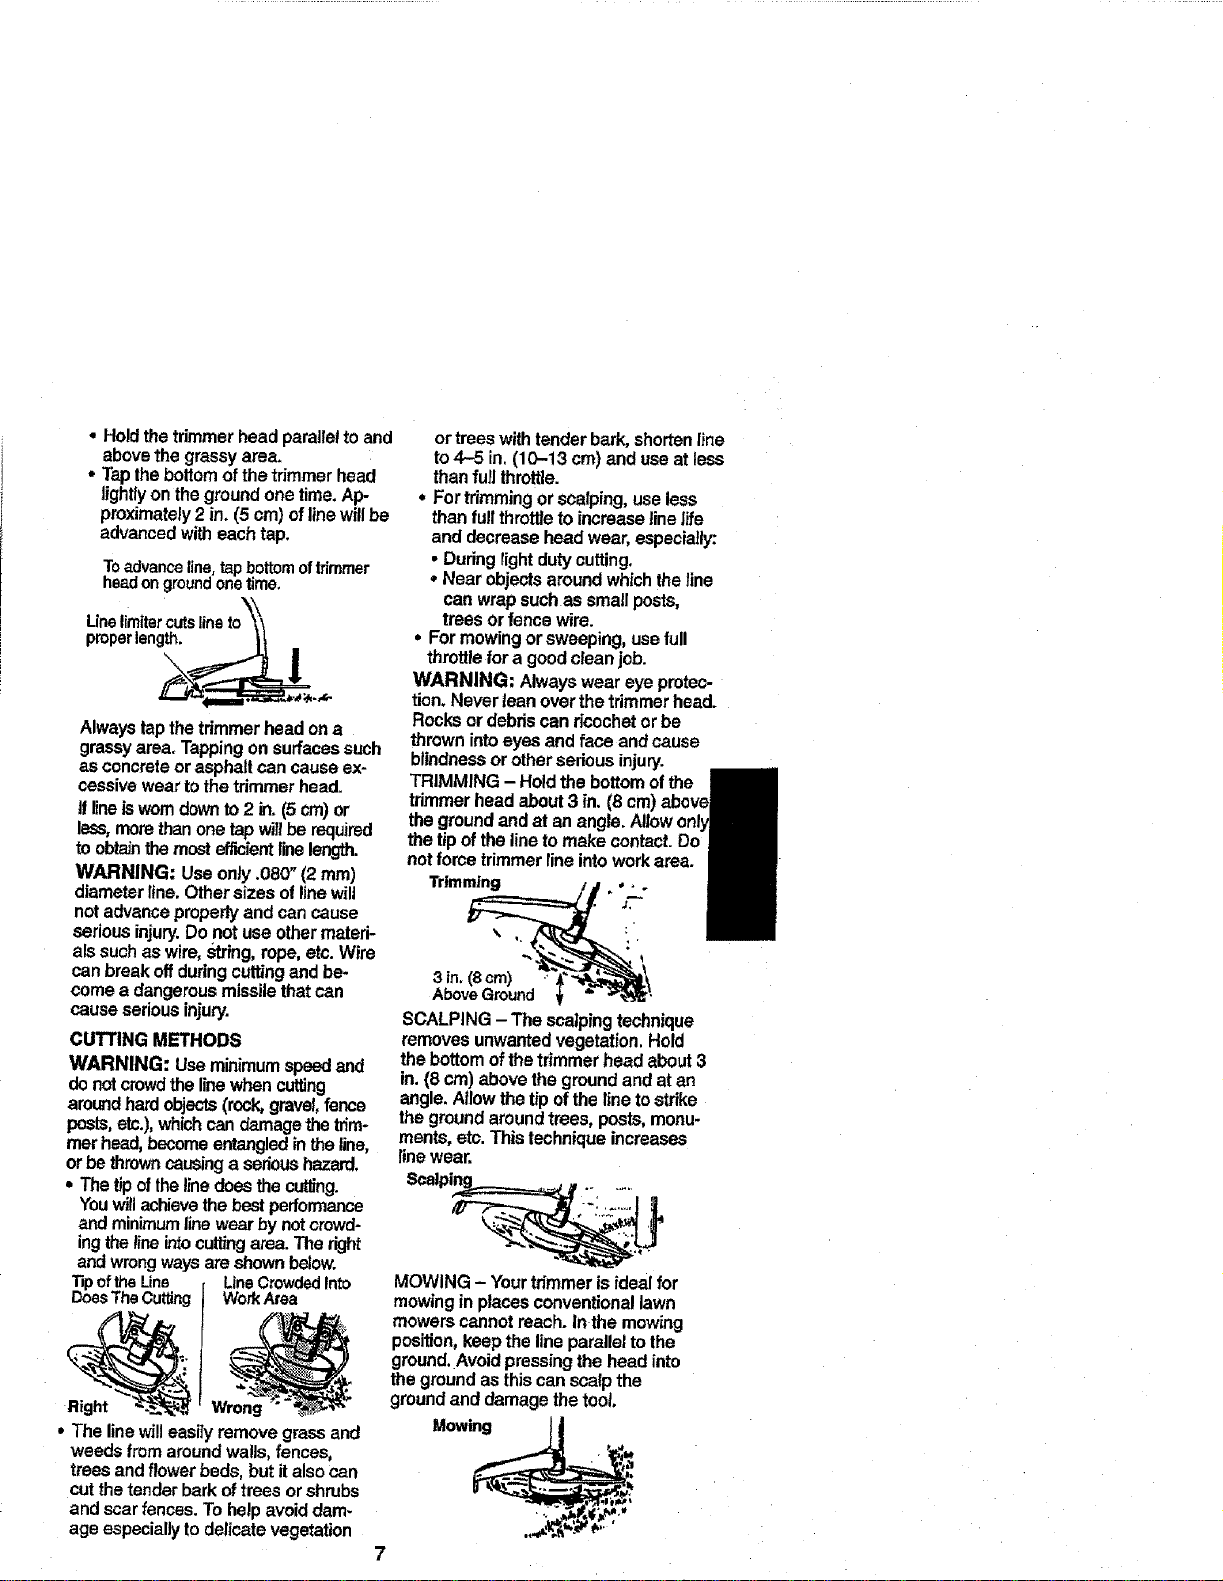
• Holdthetrimmerheadparalleltoand
abovethegrassyarea.
• Tapthebottomofthetrimmerhead
lightlyonthegroundonetime.Ap-
proximately2 in.(5 cm)oflinewillbe
advancedwitheachtap.
Toadvance line,tapbottomoftrimmer
headongroundonetime.
Always tap the trimmer head on a
grassy area. Tapping on surfaces such
as concrete or asphalt can cause ex-
cessive wear to the trimmer head.
If lineisworn downto 2 in. (5 cm) or
less,more than one tap willbe required
to obtainthe most officiantline length.
WARNING" Use only .080" (2 ram)
diameter line. Other sizes o! line will
not advance properly and can cause
serious injury. Do not use other materi-
als such as wire, String, rope, etc. Wire
can break off during cutting and be-
come a dangerous missile that can
cause serious injury.
CUTTING METHODS
WARNING: Use minimumspeed and
do notcrowdthe linewhen cutting
around hard objects(rock, gravel, fence
posts,etc.),which can damage the trim-
mer head, become entan_ed inthe line,
or be thrown causing a serious hazard,
* The tipof the linedoes the curing.
Youwillachieve the best performance
and minimum linewear by notcrowd-
ingthe lineintocuttingarea. The right
and wrong waysare shown below.
Tipofthe Une LineCrowdedInto
DoesTheCutting WorkArea
Right
* The line willeasily remove grass and
weeds from around walls, fences,
trees and flower beds, but it also can
cut the tender bark of trees or shrubs
and scar fences. To help avoid dam-
age especially to delicate vegetation
or trees with tender bark, shorten line
to4-5 in. (10-13 cm) and use at less
than full throttle.
• For trimming or scalping, use less
than full throttleto increase line life
and decrease head wear, especially:
• During light duty cutting,
• Near objects around which the line
can wrap such as small posts,
trees or fence wire.
° For mowing or sweeping, use full
throttle for a goodclean job.
WARNING: Always wear eye protec-
tion. Never teen over the trimmer head.
Rocks or debris can ricochet or be
thrown intoeyes and face and cause
blindness or other serious injury.
TRIMMING - Hold the bottom of the
trimmer head about 3 in. (8
the ground and at an
the tip ofthe line to make contact.
notfome trimmer line intowork area.
Trimming
:3in. (8 cm)
AboveGround
SCALPING - The scalping technique
removes unwanted vegetation. Hold
the bottom of the trimmer head about 3
in. (8 cm) above the ground and at an
angle. Allow the tipof the line to strike
the ground around trees, posts, monu-
ments, etc. This technique increases
line wear.
Scelpi_o... .
MOWING - Your trimmer is ideal for
mowing in places conventional lawn
mowers cannot reach. In the mowing
position, keep the line parallel to the
ground, Avoid pressing the head into
the ground as this can scalp the
ground and damage the tool.
Mowing Ii
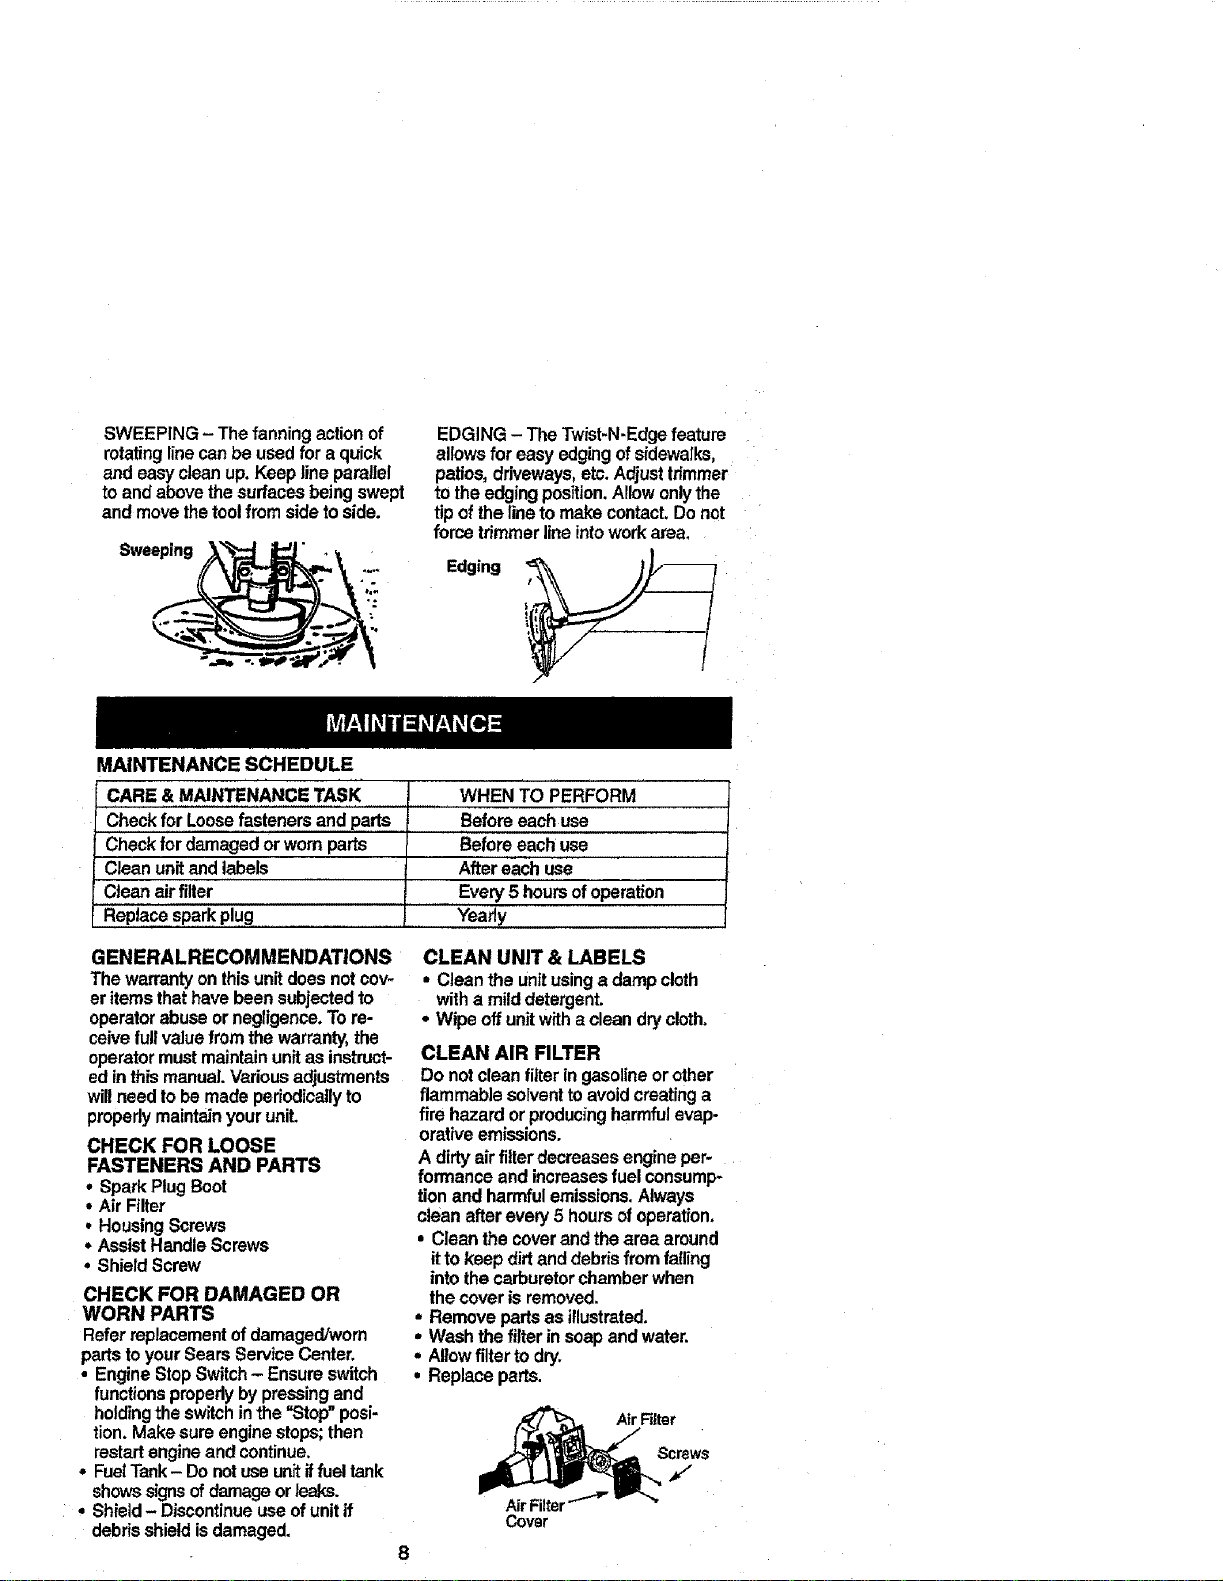
SWEEPING- Thefanningactionof
rotatinglinecanbe usedfor a quick
andeasycleanup.Keeplineparallel
to and abovethesurfacesbeingswept
and movethetoolfromsidetoside.
MAINTENANCESCHEDULE
EDGING- TheTwist-N-Edgefeature
allows for easy edgingof sidewalks,
patios,driveways,etc.Adjust trimmer
to the edging position.Allow onlythe
tipof thelineto make contact.Do not
forcetrimmerlineintoworkarea.
Edging _',_1
CARE& MAINTENANCETASK
CheckforLoosefastenersandparts
Checkfor damagedorwornparts
Cleanunit andtabels
Cleanair filter
Replace sparkplug
WHEN TO PERFORM
Beforeeachuse
Beforeeachuse
Aftere_h use..........
.........Every5 hoursofoperation
Yearly
GENERALRECOMMENDATIONS
The warrantyonthisunitdoesnotcov-
er itemsthathavebeensubjectedto
operatorabuseornegligence.Tore-
ceivefullvaluefromthewarranty,the
operatormustmaintainunitas instruct-
edinthismanualVariousadjustments
willneedtobemadeperiodicallyto
properlymaintainyourunit.
CHECK FOR LOOSE
FASTENERS AND PARTS
• SparkPlugBoot
• AirFilter
, HousingScrews
• Assist HandleScrews
• ShieldScrew
CHECK FOR DAMAGED OR
WORN PARTS
Referreplacementofdamaged/worn
partstoyourSearsService Center.
• EngineStopSwitch- Ensureswitch
functionspropedybypressingand
holdingtheswitchinthe "Stop"posi-
tion.Makesureenginestops;then
restartengineandcontinue.
• FuetTank- Donotuseunititfueltank
showssignsofdamageorleaks.
• Shield- Discontinueuse ofunit if
debrisshieldisdamaged.
CLEAN UNIT & LABELS
• Cleanthe unitusinga dampcloth
witha milddetergent.
• Wipeoffunitwitha cleandrycloth.
CLEAN AIR RLTER
Do notcleanfilteringasolineorother
flammablesolventtoavoidcreatinga
fire hazardorproducingharmfulevap-
orativeemissions.
A dirtyair filter decreasesengineper-
formanoeand increasesfuelconsump-
tionandharmfulemissions.Always
cleanafterevery5 hoursofoperation.
• Cleanthecoverandtheareaaround
ittokeepdirt anddebrisfrom failing
intothecarburetorchamberwhen
thecoverisremoved.
• Removeparts asillustrated.
• Washthefilterinsoapandwater.
• Allowfiltertodry.
• Replaceparts.
SFdter .
Cover
REPLACE SPARK PLUG
Replacethespark plugeachyearto
ensuretheenginestarts easierand
runsbetter. Setsparkpluggapat
,025in.ignitiontimingisfixedand
nonadjustable.
• Twist,thenpu!loffsparkplugboot.
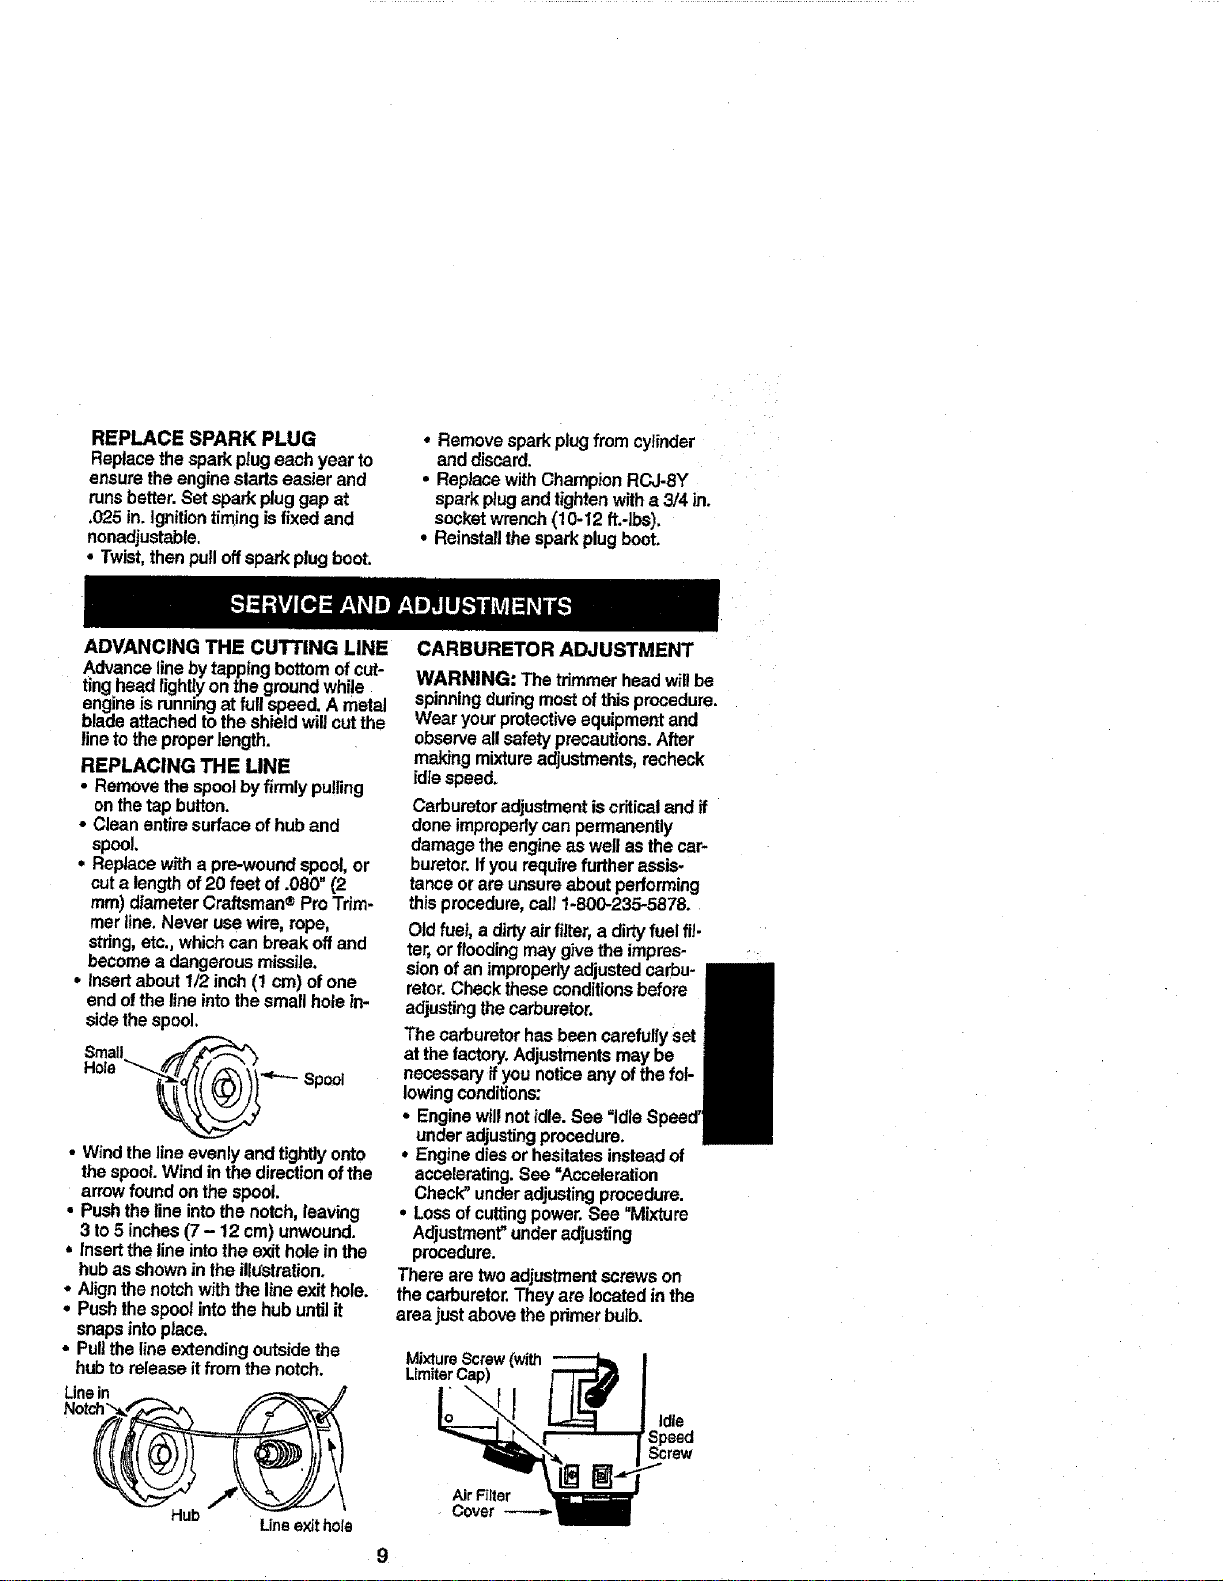
ADVANCING THE CU'R'ING LINE
Advancelinebytappingbottomofcut-
ringheedtightlyonthegroundwhile
engineis runningat fullspeed.A metal
bladeattachedtotheshieldwillcutthe
line totheproperlength.
REPLACING THE LINE
• Removethespoolbyfirmlypu!ling
onthetapbutton.
• Cleanentiresurfaceofhuband
spool.
• Replacewitha pre-woundspool,or
cuta lengthof20 feet of.080"_2
ram)diameterCraftsman®ProTrim-
merline.Neverusewire,rope,
string,etc,,whichcanbreakoffand
becomea dangerousmissile.
• insertabout1/2inch(1 cm)ofone
endo!thelineintothesmallholein-
sidethespool.
Smati ._'-.P"_
Hole__' _,..__Spool
• Windthelineevenlyand tightlyonto
thespool.Windinthe directionofthe
arrowfoundonthespool.
• Pushthelineintothenotch,leaving
3 to5 inches(7 - 12 cm)unwound.
• Inserttheline intothee_dtholeinthe
hubas shownintheillustration.
• Alignthenotchwith thelineexithole.
• Pushthespoolintothe hubuntilit
snapsinto place.
• Pullthelineextendingoutsidethe
hub toreleaseitfrom thenotch.
Line exit hole
• Removesparkplugfromcylinder
anddiscard.
• ReplacewithChampionRCJ-SY
sparkplugand tightenwitha 3/4in.
socketwrench(10-12 ft.-Jbs).
° Reinstallthesparkplugboot.
CARBURETOR ADJUSTMENT
WARNING: The trimmerheadwillbe
spinningduringmostofthisprocedure.
Wearyourprotectiveequipmentand
observeall safetyprecautions.After
makingmixtureadjustments,recheck
idtespeed.
Carburetoradjustmentiscriticalandif
doneimproperlycanpermanently
damagetheengineaswellas thecar-
buretor.Ifyourequ|refurtherassis-
tanceorareunsureaboutperforming
thisprocedure,call1.800-235-5878.
Oldfuel, a dirtyairfilter,a dirtyfuelIll-
ter,orfloodingmay givethe impres-
sionofanimproperlyadjustedcarbu-
retor.Checktheseconditionsbefore
adjustingthecarburetor.
The carburetorhasbeencarefullySet
at thefactory.Adjustmentsmay be
necessaryifyounoticeanyofthefol-
lowingconditions;
° Enginewillnotidle.
underadjustingprocedure.
• Enginediesorhesitatesinsteadof
accelerating.See =Acceleration
Check"underadjustingprocedure.
• Lossofcuttingpower.See "Mixture
Adjustment"underadjusting
procedure.
Therearetwoadjustmentscrewson
thecarburetor.Theyarelocatedin the
area justabovetheprimerbulb.
MixtureScrew(with
LirniterCap)
Idle
Speed
Screw
AirF{Iter
Cover
CARBURETOR PRESETS
Whenmakingcarburetorpresetadjust-
ments,donotforce plasticlimitercaps
beyondstopsor damagewilloccur.
Ifcarburetorpresetsare notneeded,
proceedto=AdjustingProcedure,Idle
Speed."
Toadjustpresets:
• Turnmixturescrewcounterclockwise
untilitstops.
• Turntheidlespeedscrewclockwise
untilitstops.Nowturncounterclock-
wise4-1/2 turns.
=Startengine,cutgrassfor3 minutes,
and proceedtotheadjustment
section.Ifenginedoes notstart,
refertotroubleshootingchartorcall
the 1-800numberlistedonthefront
ofthismanual.
* Ifengineperformanceisacceptable
atthepresetpositions,nofurther
adjustmentisnecessary.
ADJUSTING PROCEDURE
IdleSpeed
Allowenginetoidle.Adjustspeeduntil
enginerunswithoutstalling.
• Turnclockwiseto increaseengine
speed ifenginestallsordies.
oTurncounterclockwiseto decrease
speed.
Nofurther adjustmentsarenecessary
ifperformanceissatisfactory.
Mixture Adjustment "H"
DONOToperateengineat fullthrottle
for prolongedperiodswhilemakingad-
justments.Damagetotheenginecan
occur.Extendlinetothelengtha!-
lowedbythelinetimiterand cutsome
grass.Basedonperformancewhile
cutting,turnthemixtureadjustmentin
1/16-turnincrementsasfollows:
• Clockwiseuntil theenginehasgood
powerwhilecuttingwithnohesita-
tion.
Donot adjust by soundor speed,but
judge by how wellthe engineper-
forms whilecutting.
• Counterclockwiseif theenginehas
speedbutdiesorlackspowerwhile
cutting.
Aftercompletingadjustments,check
foracceleration.Resetifnecessary.
Acceleration Check
Ifenginedies orhesitatesinsteadof
accelerating,turn mixtureadjustment
counterclockwiseuntil youhave
smoothacceleration.Recheckandad-
justas necessaryfor acceptableper-
formance.
Prepare unitforstorageat endofsea-
son orif itwiltnotbeusedfor30 days
ormore.
WARNING:
• Allowenginetocool,and secure the
unitbeforestoringortransporting.
* Storeunitandfuel ina wellventi-
latedareawherefuelvaporscannot
reachsparksoropenflamesfrom
waterheaters,electricmotorsor
switches,furnaces, etc.
* Storeunitwithallguardsinplace.
Positionunitsothatanysharpobject
cannotaccidentallycauseinjury.
• Storeunitandfuel welloutofthe
reachofchildren.
EXTERNAL SURFACES
Ifyour unitistobe storedfor a period
oftime,cleanitthoroughlybeforestor-
age. Storein a cleandryarea.
. Ughtiy oil extemalmetalsurfaces.
FUEL SYSTEM
Under Fueling Engine in the Operating
Section of this manual, see message
labeled IMPORTANT regarding the use
of gasohol in your engine.
Fuel stabilizer is an acceptable alter-
native in minimizing the formation of
fuel gum deposits duringstorage. Add
stabilizer to the gasoline in the fuel
tank or fuel storage container. Follow
the mix instructions found on stabilizer
container. Run engine at least 5 min-
utss after adding stabilizer.
CRAFTSMAN40:1, 2-cycle engine oil
(air cooled) is already blended with
fuel stabilizer. If you do not use this
Sears oil,you can add a fuel stabilizer
to your fuel tank.
10
ENGINE
• Removesparkplugand pour1tea-
spoonof40:1,2-cycleengineoil(air
cooled)throughthesparkplugopen-
ing.Slowlypullthestarterrope8 to
10timestodistributeoil
• Replacesparkplugwithnewoneof
recommendedtypeandheatrange.
• Cleanairfilter.
• Checkentireunitforloosescrews,
nuts,and bolts.Replaceanydam*
aged,broken,orwomparts.
• Atthebeginningofthenextseason;
useonlyfresh fuel havingtheproper
gasolinetooilratio.
OTHER
• Donotstoregasolinefrom onesea-
sonte another.
• Replacegasotinecanifitstartstorust.
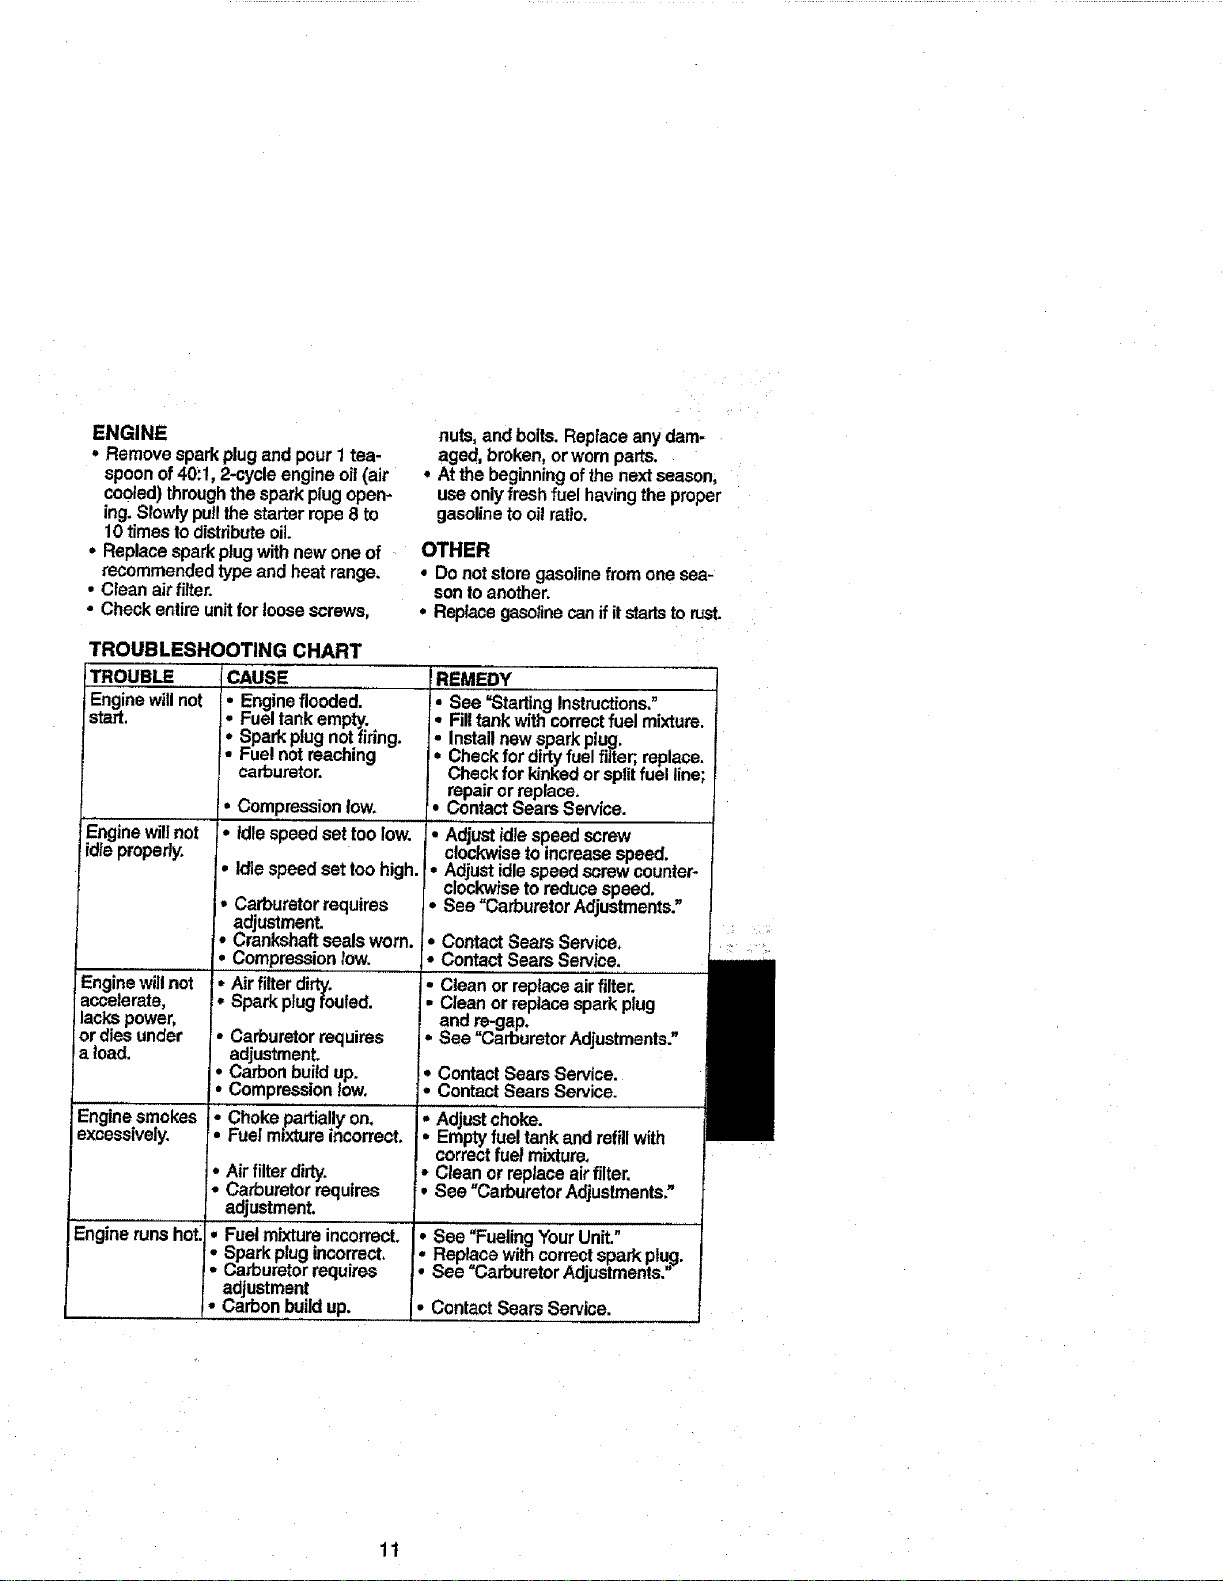
TROUBLESHOOTING CHART
TROUBLE ICAUSE
Engine will no - Engine flooded.
start. ! Fuel tank empty.
Spark plug notfiring.
Fuel not reaching
carburetor.
• Compression low.
idleEngineproperly.Willnot • Idle speed set too low.
- Idle speed set too high.
• Carburetor requires
adjustment.
• Crankshaft seals worn.
• Compression low.
Air filter dirty.
_° Spark plug fouled.
• Carburetor requires
adjustment.
• Carbon bui_ up.
• Compression low.
Choke partially on.
: J'-uelmixture incorrect.
Engine will not
accelerate,
lacks power,
or dies under
a lead.
Enginesmokes
excessively.
* Airfilterdirty.
• Carburetorrequires
adjustment,
EnginerunshotI Fuelmixture incorrect.
' Sparkplugincorrect.
J
Carburetorrequires
adjustment
• Carbonbuildup.
i
REMEOY
See "S_artingInstructions."
-=Filltankwithcorrectfuelmixture.
Installnewsparkplug.
: Checkfordirtyfuel filter;replace.
Checkfor kinkedorsplitfuel line
repairorreplace.
* ContactSearsService.
i Adjustidlespeedscrew
clockwisetoincreasespeed.
Adjustidlespeedscrewcounter-
clockwisetoreducespeed.
See "CarburetorAdjustments."
• ContactSearsService.
• ContactSearsService,
Cleanor replaceairfilter.
: Cleanor replacesparkplug
and re-gap.
• See "CarburetorAdjustments."
• ContactSearsService.
• ContactSearsService.
• Adjustchoke.
• Emptyfueltankandrefillwith
correctfuelmixture.
• Cleanorreplaceair filter.
• See =CarburetorAdjustments._
• See "FuelingYourUnit."
• Replace withcorrectsparkplug.
• See =CarburetorAdjustments."
• Contact SearsService.
11
, , ===== =
= = =
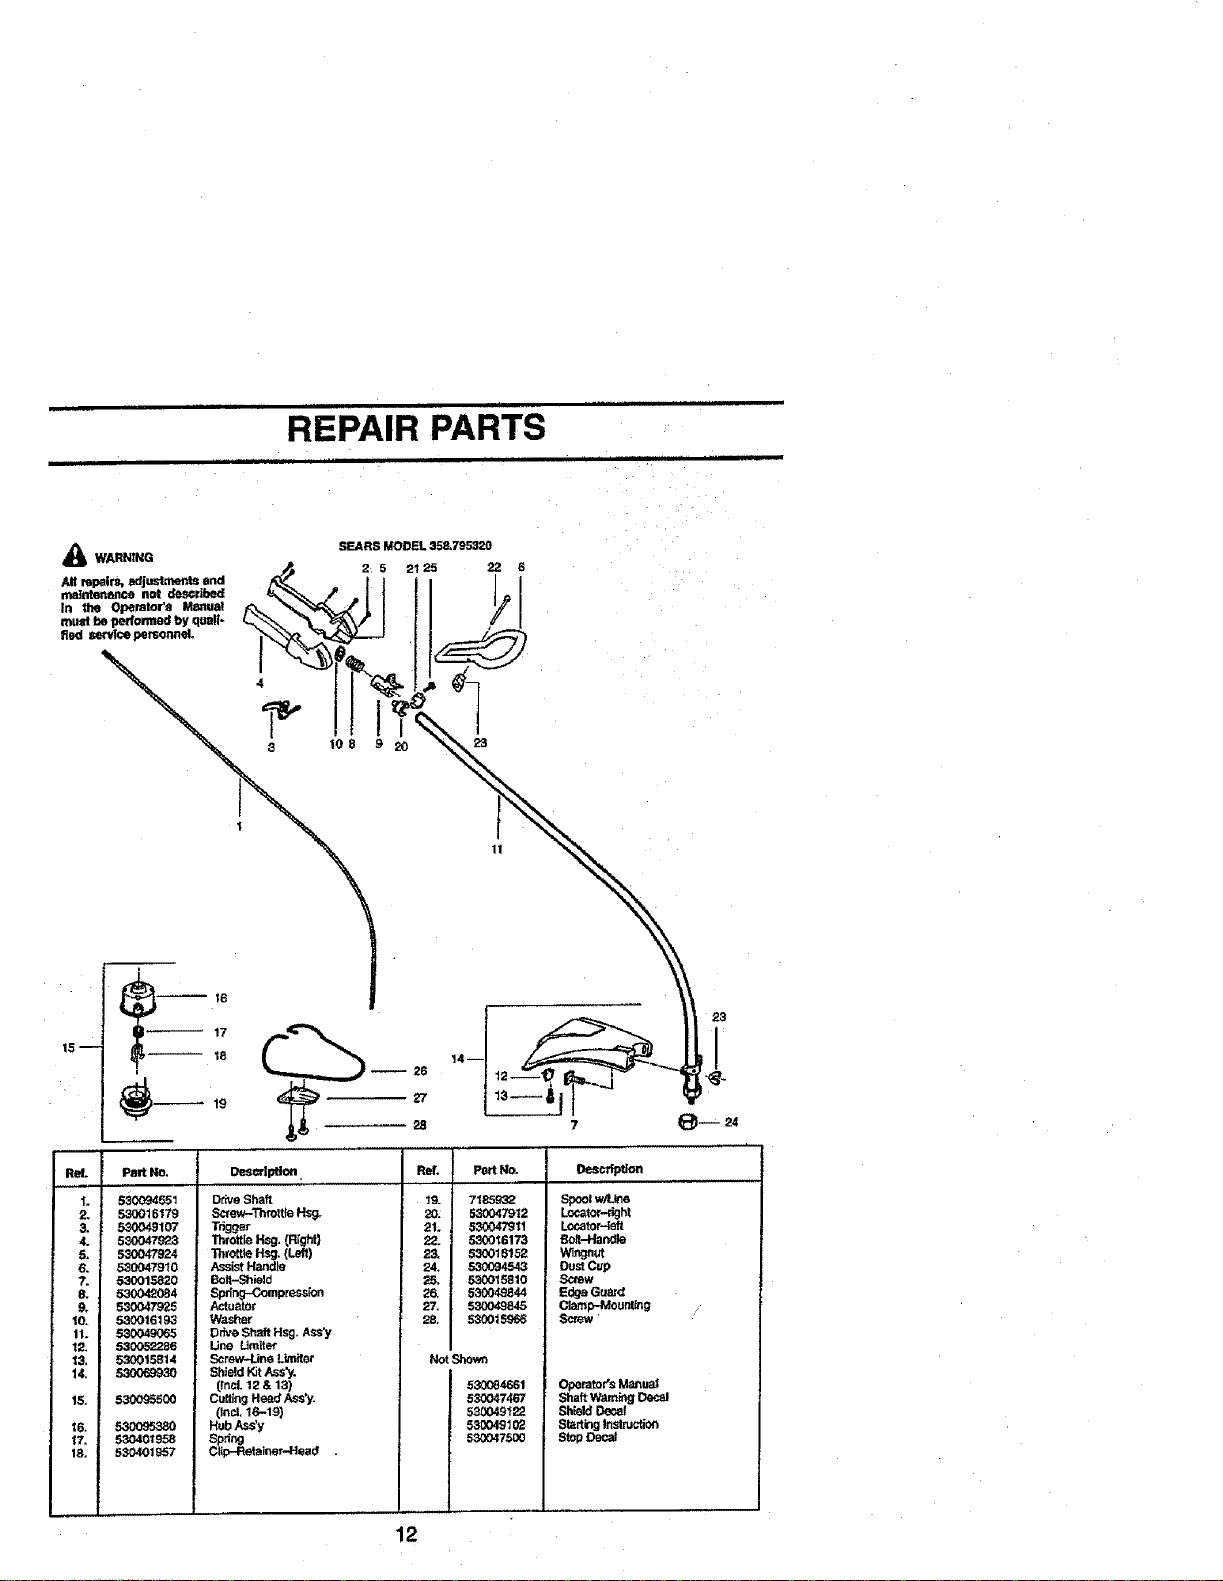
REPAIR PARTS
L i i = = .
& WA_NG
AE rep_lr_ adjustrnont_ and P" _-_2_ _ _ _
ma]nton_on not described
In the Opemtor's Mmmat
must be pedo_ by quail-
fled se'tvfcepersonnel
3 108 9 20
SEARS MODEL358.795320
21 25 22 6
17
15 -- 18
ROt. Part No.
"L 530094551
. 530016179
• 530049107
4. 5_0478_3
5- 530047924
6. 530047910
7. 530015820
530_0B4
9_ 53004792_
10. 530016193
11. .5,30049065
_2_ 53_86
13. 530015814
14. 530069930
15. 530095500
16. 530095380
17, 530401958
18. 530401957
_ 26
DesCr]p.0n
DriveShaft
Screu_ThrottreHsg.
Trigger
]hrottie Hsg• (Right}
lhrot_e H_. (Left)
AssistHandle
BoJt-Shield
Sp_ng-CompreSsien
Aclut_tor
Washer
DdveSh_t Hsg_A_'y
Uno Umiter
Screw,4,ineLimitor
ShieldKitAss'y.
(;ncl.12 & 13)
CuffingHead Ass'y.
(Incl.16-19)
HubAss'y
Sp_r_
Clip-Retainer-Head .
ROt.
19.
20.
21.
22.
23.
24.
25.
2_
27,
28.
Port No.
7185932
5_0479t2
5300479€1
5300_6173
530018152
530094543
530015810
53004,9844
530O49845
530015966
Not Shown
530084661
530047467
530049"f22
530049102
530O475OO
oon_peo.
Spoolw_L_e
Locator-dght
Locator-_eft
Bo_-Han_ie
Wingnut
DustCup
Screw
Edga Guard
Clamp-Mount_g
Screw
Operator'sMonua_
ShaftWarningDecal
ShieldDecal
Slad_TngInstruction
StopDecal
12
23

iiiiiiii i
REPAIR PARTS
6 4
32 52 3
56 50 53 63
28
8 735369 38
14 11 12
64 6! 16 49
23 62 1
57
67
Rid'. Part No.
1, 530016164
2. 530015_2
3. 530016168
4. 530015880
6. 5_015810
7. 530019233
9. 530019194
10. 530015945
11. 530049390
12. 530049389
13, 530069886
14. 530039163
15. 5&q036145
16. 530015954
17, 530O15826 1
18.i 53_7953
1_ 53O014532
20 _15
21,
22, 530014861
I_-sedpflo. !Ref. Part No,
_rter Spring 28. ;
Screw 29, i 530049489
Rett_r-Pufley 30. 530036579
Screw 31. 530016197
Statt_r Handk_ 32. 530049377
_ctaw 33. 530019181
IGasket-CylindertCarb. 34, 53C069757
iSpark Plug (RCJ-SY) 35. _58
Gasket.K:_rb. 36, 53C015849
Retainer Ring-C'case 37. 530319223
Lead Wire 38. 5300_75,€
Ground Wlro
FIp_heef Ass'y. 39. 530015162
tgnili_ Mod_ 40. 530047914
Spacet4gn_t. Module 41. 530015557
Scmw-lgnit, Module
Washer-Thrust
D_ Cou_ng
CrankshaftAss'y.
3or_ectJngRodASSy.
=iston Ring
3tank_sa Assy,
(Incf+l0 & 23-26}
Descd_on
Muffler Cove_
Muf_er B_fife-Exit
MufflerBaffle-First
MufflerSpdng
Rear Shroud
GasP.et--C'case
cy_er _e
Carb. Adaptor t_t
Screw-Carb AdioS.
Gas'_4-.Cy_nder
Carburetor Assy K_
(Incl. I.,imller Cap)
Piston Pin Rak_iner
_t_oke Plate
Screw
Ref Part No,
54. 530069_70
55. 53001434"/"
56. ! 530014,36_
57, _16
! 58. 530014729
53. 530038114
60. 530049469
61. _32
62, 5300_400
Meffler Kit
(Inc[ 27--31)
Fuel Cap Assy.
Fue_ Pickup Assy
Engine Gasket KIt
(Ind. 7.9,33, 37)
C'ease/C's_ Assy.
(Incl. _0,19,P,2-2S)
ONOff Switch
F_'_ Hou_eg Ass,a,.
Rope
S_ter F_lfe¥ Kit
(Incl.64)
Fuel L_e-Ca_L_Tank
Screw
23. 530032125 IrmerBear[ng
24. 530032124 Ou_erB_aring
25. 530019179 C'caseSeal
26. 530015941 Rat. Ring/C'shaft
27, 530036578 Muffler Body
42+_530047916 ChokeLever
43. _1525_ WaveWasher
44. 530015852 ChokeSpacer
4_, 530049089 A_f_ox
46. 5300479_ Air F_terFoam
47. 5,._)049079 AirF_er Cover
48. 530015966 _ Box
49. 530049066 "rhmttlaC_bleAssy
50. 53004,9"299 Fue_TankAss'y.
51. 530015953 Screw-CyUnder
52. 530036793 ShroudIsolator
53. 530069247 FuelLine-Cad0/Tank
65. 530036792 Isolator-C'case
66. 53006_756 PLstonK3t
(_'ncL21,68 & Pin)
67. 53006_380 Spad<Anes_or Kil
13
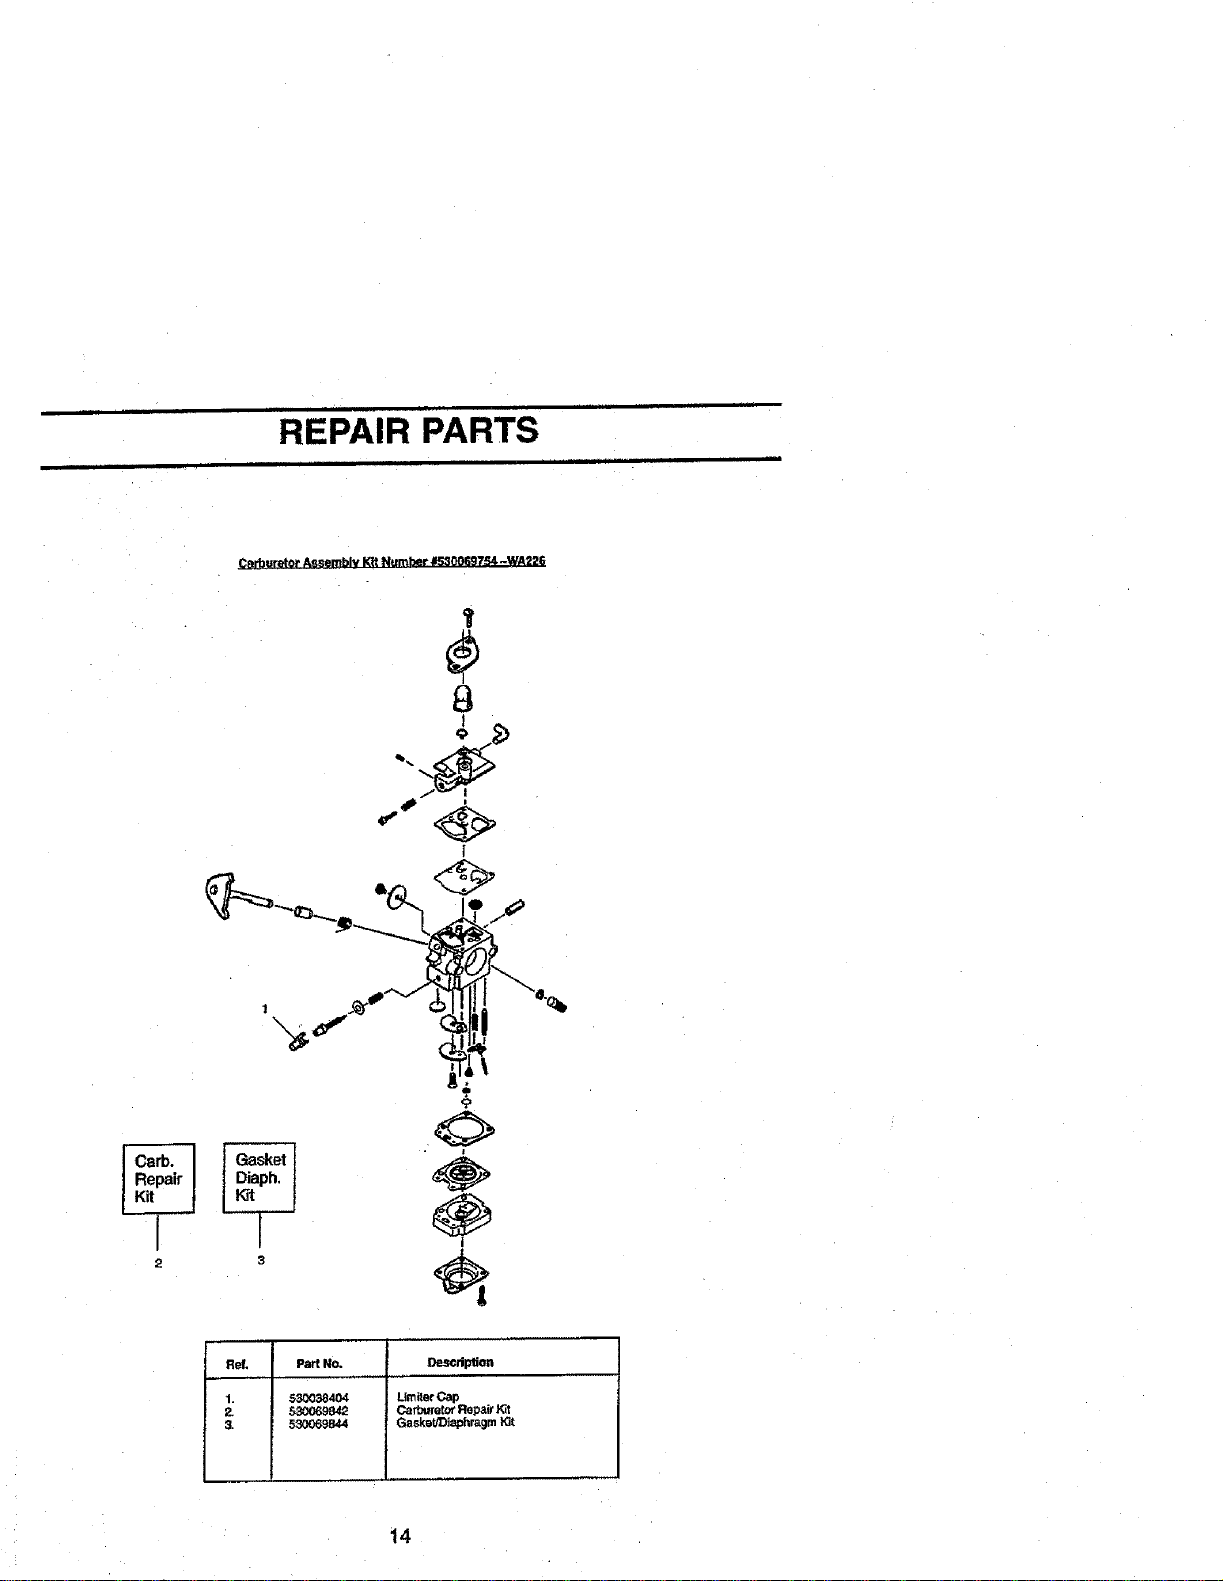
._cD.l_r _o r A_emblv I_t Number #r_006_._4 -WA226
1
÷
ReL Part No. Descrip_on
. 530038404 LtmiterCap
5_00_B42 Ca_retor Repair J_t
3. 530069844 Gasket/DisphragmKit
I
14

15
Declarac_deGaran6a 16 SewicioyAjuste 24
ReglasdeSeguridad 16 Almacenamiento 26
Montaje 1B TablaDiagnd_stica 27
Uso 19 Repuestos.yEncargos Contratapa
Mantenimiento 23
GARANTIADE UN AN PARALA CORTADORA DE HIERBAS A GASOUNA
CRAFTSMAN WEEDWACI__R®
Porunafio desdela fechade cornpracuandoestaunidada gaso_naCraftsman
Weedw_ker_, es mantemda,lubncaday puestaa puntodeacuerdocon las
mstruc_ deopemcidny mantenimientoenelmanualdel operado,Sears
reparara_bredecostocuaJquierdefectodematerialodernanodeobra.
Estagarar_'aexcluyelacuerdadenylon,bujfay filtmdeaim,lascualesson
partesdescartabfesque se desgastanduranteelusonormal.
S! esteWeedwa.cker@se usaparafinescomercieles,estagarantfase aplicadu-
rante9ua/assolamentea partirde lafechadecompra.SiesteWeedwacker@se
.usapara.Tinesdealquile_r,estagara..ntfaseap/icadumnte30d_assolamenteapartir
oep mcnaoecorn.pra. bstagaranuaseaplma_1o mlentrasesteproductoseuse
enlos Estaaosuniaos.
ELSERVICIODEGARANTtAESTADISPONIBLEDEVOLV1ENDOELWEEDWACKER®
ALCENTRO0 DEPARTAMENTODESERVICIODESEARSMASCERCANOENLOS
ESTADOSUNIDOS°
Estagar'_ntia!eotorgaderechoslegaJesespecl'fl_ yustedpuedetambidnten-
er ozrosoerecnosque vadanoe _-stadoa Estado.
Sears, Roebuckand Co. Dept.D/817WAlloffman Estates,IL 60179
aD_Cl_ AI usar_
N oeruemapu_e serpe/i_!
_ns deseguridadquese
enelapamto yen ez
_iLeael Manual de]UsuaHoen
_" tota,r_lad antesde haceruso de!
ES_..to=_wntafamzT_,tzado
€_cor_ y e_ u_ocoaecto de_
L,Jm_ef u_o de e_e a]_zato
_le_do y
_ones enel aparatoyen el
_l=r;caualYquelasvay_ a cumpli_
pern_ que los n_s usen
esteapar_.
16
Infozmaci6nde _ en
elaparato
PEMGRO: Nurma use cucidl_s nl
paraserusado€omo€_,tadoragnea.B
_n_ incmn_nta_ el I_r_o de
AD_ClA: La_n_ de <_
9b_etosvio_camente,_do
osse_ y proteccidndepien_tas.

17

• $1se cor'_conlaIfr_a de! lado
izquierdodelprotector,los
escombrosvolardnen sentido
opuestoel usuado.
TRANSPORTE Y
ALMACENAMIENTO
- Espereque elmotorse enfrfey fije
_ien elapartoantesde guardarloo
oe'_sportar]o en unvehfculo.
• Vac_'eeltanquedecombustible
antesde guardarelapamto ode
_'_-'por_do. Consuma todo el
com_'Me re_nte en el
_bumdor poniendoel motor en
marchay dejdndeloenmarcha
hastaqueelmotorse pare solo.
• Guardeelapar_ y el combustible
en unlu_r dondelosvaporesdel
CpmDU_l_Dle rio pued,_l
.cnispasni llamaspmvenientesde
lostermotanques,losmotomso
intenuPtores_, los
celefactores_, etc.
• Guardeelaparatodemocloque el
!imitadordeIfneanopueoacausar
ne.rkfas9ccidentales.Se puede
co,garelaparatoporeltubo.
• _uarde elaparatofuemdel aicance
delosn'_os.
Si acontece elguna situad6n no
pmv_. enestemanuel,tenga cuidado
y useDuenc_. Sinecesitaayuda,
Ilameel 1-800-235-5878
AVlSO ESPECIAL: Este aparato no
.._ene equipado con silenciador
_or de temperatum.ni con rejil_
quecumplalosrequisitosde
_ C6dlgosde California4442 y 4443.
las tienas forestadasfederales,
rndslos estadosde Cai_mia, Idaho,
Maine, Mi_nr_sota, Nue_ra Jersey,
umgony washington,reqtaerenporley
que muchosmotoms de cornbusti(_
interna est_n equ__ con re_la
anti_dspa.Si u_ed UbT_ael aparato
donde e0dsten taJes _lamenteos,
usted_ne la responsabir_iadjuddica
deinstalary mantenerestaspmzasen
correctoestadode funcionamiento.De
1ocontrado,estan_,eninfraccidnde la
tey. EntreencontactoconsuCentrode
8ewicioAutorizado parainformaci6n
sobrelaspiezascorrectas.
CONTENIDO DE LA CAJA
Verifiqueque_ induidastodaslas
piezasquefiguranen lalistaa
conlinuact6n.
Modelo356.795320
* Cortadora
° Protectorytuercamariposa
. MangoAuxifiarytomilloytuercamad-
posa
, Recipinetedeaceite
* Bobinacon6 m (20 pies)de Ifnea
ExanW _s piezasparava_x_rqueno
est_ndar,adas.Nousepiezasdar,adas.
s_neoes_ayud__ piezas0hay
pieza.sda_ llameal1-800-235..5878.
AVISO:Exnom_ escucharquego_ee
e_fi"_ode_ end tanquevado.
Esnorm_encc_mrresiducsdecombus-
tibleo aceiteenelslendadordebidoa
losajustesal_ ya taspruebas
efectuad_porelfabdcar_.
MONTAJE
ADVERTENCIA: s_reci_ d aparato
yamontado,mpitatodoslospasospara
aswgu_rqueestdcortectamentearmado
yquetodoslos_dores est_ ffjosyse-
gums.
18

COMOINSTARLARELMANGO
(Algur_sunidadesvienenconelmango
yainstaJado)
• Monted .m_:jo en el aq_0-atocomose _s-
0-a;_ quelaprateinfenorde_rrmngo
se a't:u_We en fa _ en la oJbiertade{
: La perit_de ajuste deberaserarmada
_o de__no.
• Qimeln-_._go_ _g_ra _ _si_n rr_s
cordodable._ de ajust_ bien el
mango.
INSTALAClON DEL CABEZAL Y
DEL PROTECTOR
AO_ Es _presc_Z_
q_ el proteotoreste_e insta-
lado.Proveeprotecci6nparcialcoNraet
peligrode objetosanohadoshada el
usuadoo hada temerosy vieneequipa-
do deun r_nitadorde lineaqusco_ael
excesode h'neaparaquequededellargo
q_ co_. FI B'nitadorde llnea
(dd_o delprot_r) eslilosoycorI_L
. Introduzcatamensulaporlaranura
comose ilustra.
• Gireelprotectorhastaqueelpemo
paseporel odficioenla mensula.
, Enrosquelatuerca manposaa!pemo
y ajdstelabien.
or % Ranura
LEA ESTE MANUAL DEL USUARIO Y LAS FEGLAS DE SERGLIRADAD ANTES DE PONER
TapadelTanque
deCombus_'bts
I_i'B_OPTOR
Se uUlizaelintermptorparapararel
motor.Empuiey sujeteel intenuptor
enlaposiciOnde STOP o OFF hasta
quelaunidadse hayadetenidocom-
pletamente.
BOMBEAOOR
Elbombeadorret_raa_e _e iasI_neas
de €omboslff:dey lasIfenade
Esto perrr q e
pongae_motorentu_ €oo
men_ _ a _ soga _ a_anqu_
oe_nao quemmme suformaoriginaL
Gufa_ra
bordes
de
PERILLA
[] pedlla ayoda a proveer
alcarburadordu_ el arranque.Esto
le_ al usoado por_r on motor
fn'oen funciormmiento.Accione elce-
badorcotocandolapalan_ enlaposi-
START.Despudsdequeel motor
sehayapuestoen marcha,coloqueel
cebadorenla posici_nRUN.
GUIA PARABORDES
La gufaparabordes impedird que el
aparatotoqueelsueloduranteelpro-
cedimientode borde_r.
19
N_rEs DE PONER EL MOTOR
EN MARCHA
ADVERT_CI_u Aseg0msede
haler lefdo la infomlac_n sobm el
combm_le enmsm_as de _
seguddadantesdecornered. ,Sino
_,T_. IJame
ABASTECLMI_RO DEL MOTOR
E_e motorest_ habBadopare
.flj_c_mr con _ sin piomo.
Antes de usar, se debe_ mez¢_ la
_ con un acei_ de buerm
pare motoresde2 _'dempos
enfdados aa_ _ et
a_be mama _ Me;_e la
ga.._ con e_ace_ en la propor_n
aceeeconcadagain degasck_ sin
_): NOUSEace_ePare
aUtomOvg_ ni pam bar¢o_ Estos
ace_es da_rdn d motor. N mezdar
_6as e. el_ U.avez
quehayaa_b elaceitea la
gaso_ a_e _ referee
rim=rob._a_y_ _
reds de_ q.e_enenque
vet €on eJ_ antes de
at_a=ec_e_aparao.
IMPORTANTE
(los_mados gap=_! o losque
con_._ e_k:_ometan_pueden
dma_ et _
_que de_ porea
._ re_a q.e iasI_eas de
_a_o_ Guandovayaa u_arela_umo
nuevameme,use_ fmco.
Vea_s bsmedo.es de
N.MACENAMIENTO pa_ obta_r
rodsir/mmaciones.
Nun¢_ use productos de _ de
motor oca,'burador en el tanque de
p.rov_araanos pe_
2O
PAPA-PARA_ EL MOTOR -
Presioney sostengael interruptorpara
detenerelmotoren faposici6nSTOPo
enla positf6nOFFhastaqueelmotor
se hayadetenidoporcompleto.
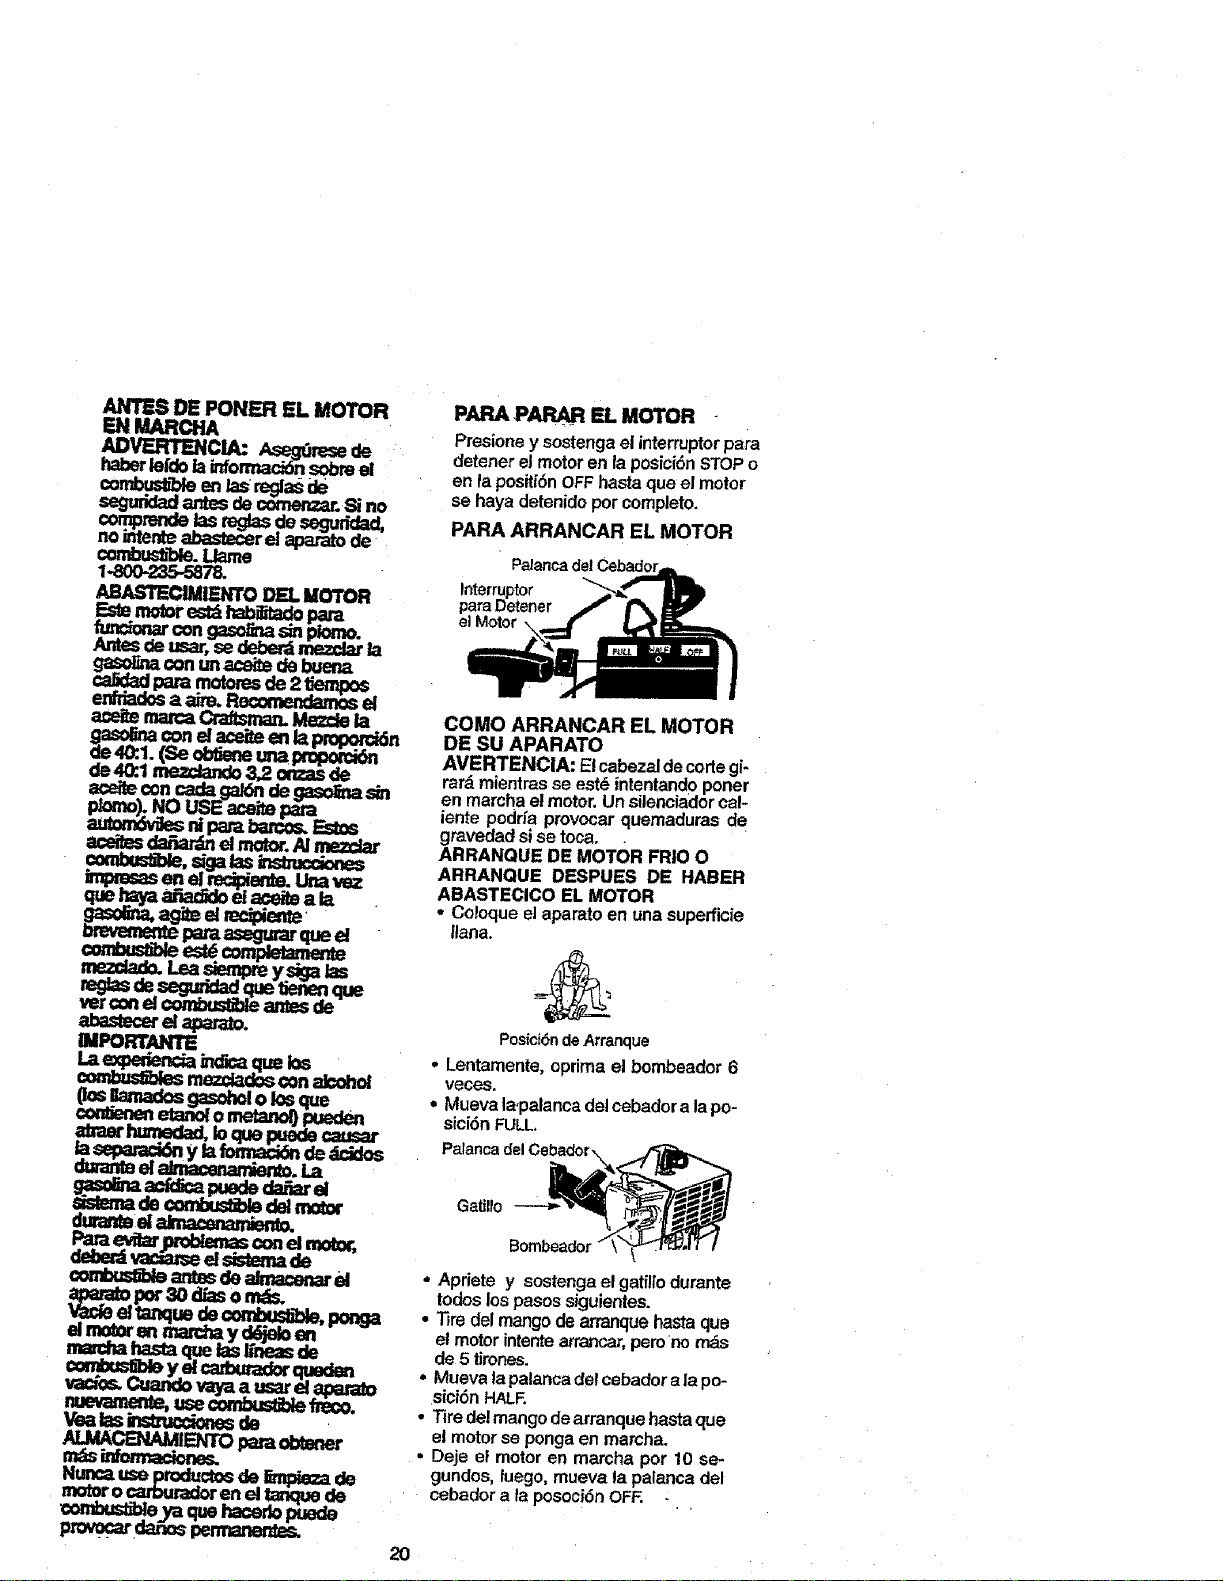
PARA ARRANCAR EL MOTOR
Interruptor
para Detener
elMotor
COMO ARRANCAR EL MOTOR
DE SU APARATO
AVERTENCIA: El cabezal de corte gi-
rard mientras se est_ intentando porter
en marcha elmotor. Un silenciador cal-
iente podria provocar quemaduras de
gravedad st se toca. .
ARRANQUE DE MOTOR FRIO O
ARRANQUE DESPUES DE HABER
ABASTECICO EL MOTOR
. Coloque el aparato en una superflcie
tlana.
Posid6ndeArranque
• Lentamente, oprima el bombeador 6
V_CP-_S.
• Mueva la,palanca del cebador a lapo-
sici6n FULL.
Gat_llo
, Apriete y sostenga el gatillodurante
todos los pasos skjuientes.
• Tire del mango de arranque basra que
el motor intente arra,ncar,perono rnds
de 5 timnes.
• Mueva la palanca de!cebador a la po-
sici6n HALF.
° Tire del mango de arranque hasta clue
el motor se ponga en marcha.
• Deje el motor en marcha pot 10 se-
gundos, fuego, mueva la palanca del
cebador a la posoci6n OFF. -..
ARRANQUEDEMOTORCALIENTE
° Mueva la palanca del cebador a la po-
sici6n OFF.
° Tire de( mango de arranque hasta que
el motor arranque,
• Si el motor no arranca despu_s de 5 ti-
tones, siga las instmccionesbajo el t[tu-
1oARRANQEUDEMOTORFRIO.
COMO ARRANCAR UN MOTOR
AHOGADO
Los motores ahogados pueden ponerse
en marcha moviendo la palanca del ce-
bador a laposici6n OFF;luego, tire de la
cuerda para aclarar el exceso de com-
bustible. Esto podrd requerir que se tire
de la cuerda muchas veces dependien-
do cuan ahogade se encuentm el me-
tot. Si el apamto sigue sinponerse en
marcha, yea la TABLADIGNOSTICA o
Ilame al ndmero 1-800-235-5878.
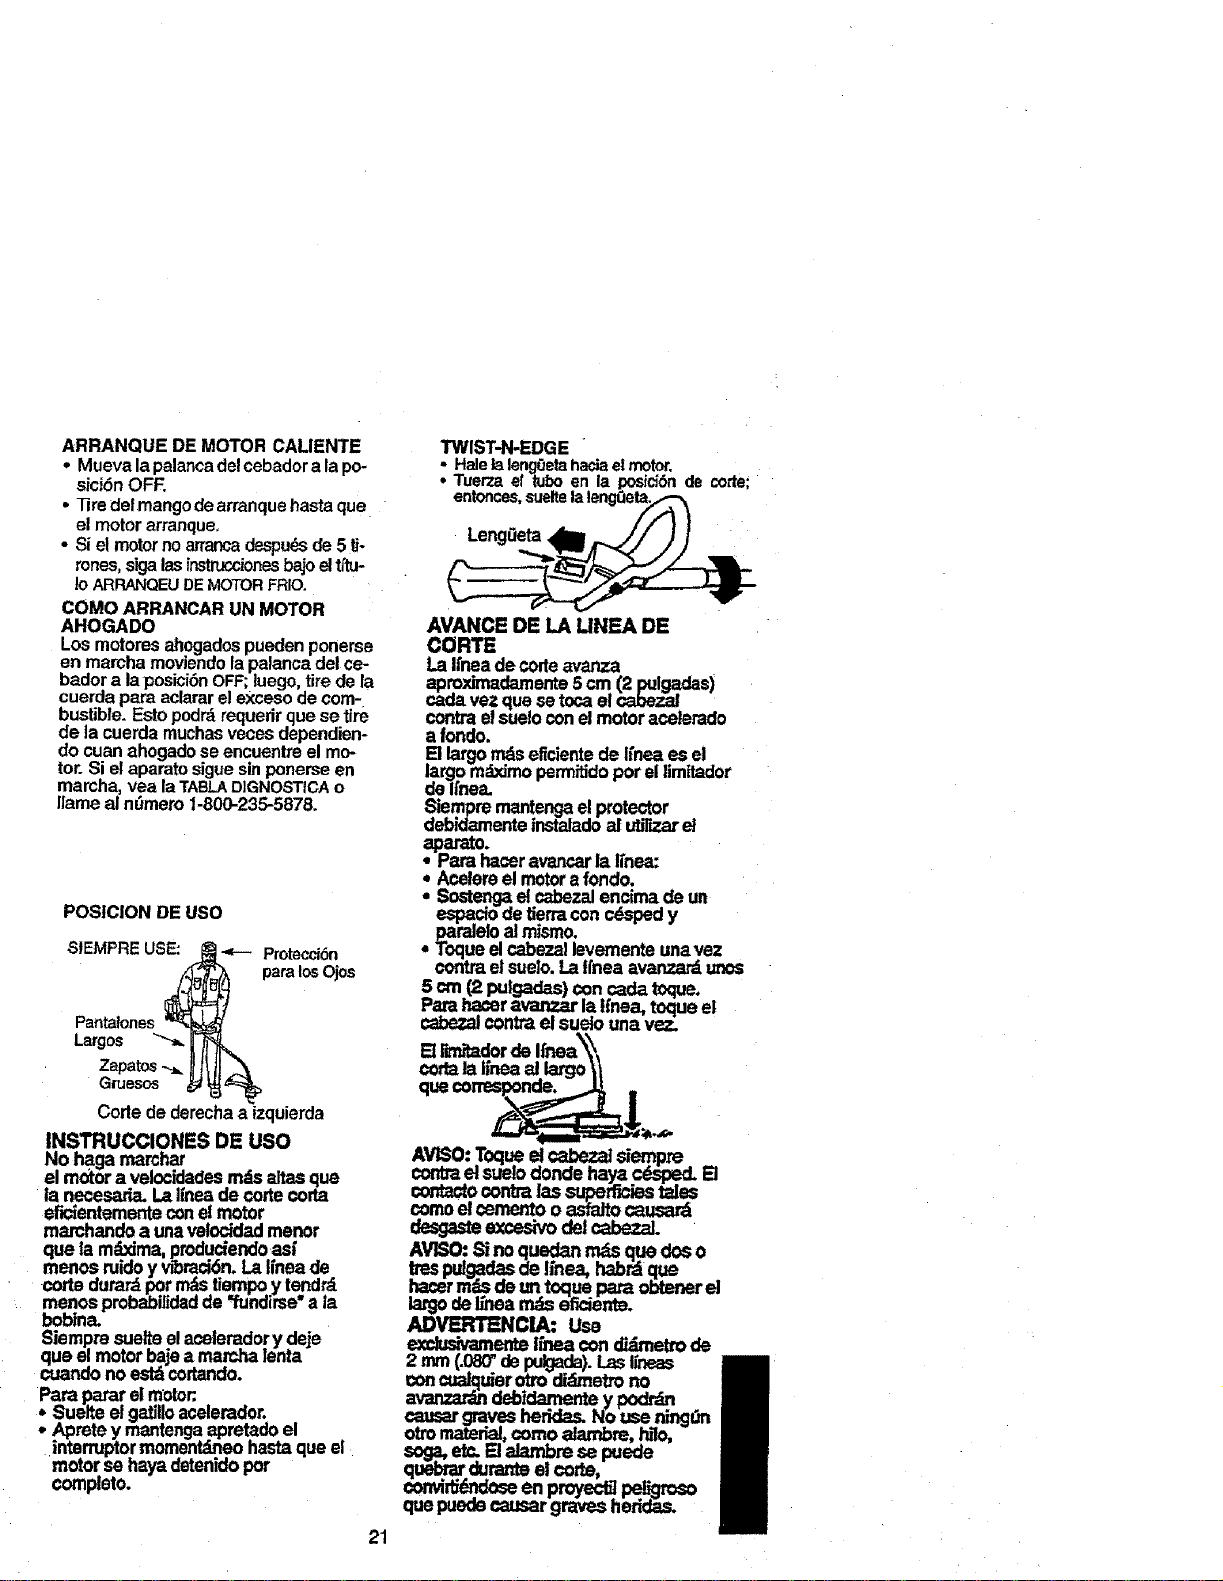
POSICION DE USO
S!EMPREUS_._--- ProtecciSn
para los Ojos
Pantalones
Largos "'-_.._'_,.
Zapatos _ _tl JJ _\
Code dederechaa izquierda
INSTRUCCIONES DE USO
No haga marchar
elmotor a velocidadesmdsaltasque
la rrecesada.LaIfneadecorte€orta
efictentementeconel motor
marchando a unavelocidadmenor
que la mdxima,ptoduciendoas/
memosruidoy wl_raci6n.La Iineade
colts durampotrodsttempo,y tendrd
menos probabilidadde"tunoirse"a la
bobina.
Siempresuetteel acolemdory deje
que elmotor bajea marcha]enta
€_,Jandono ostdcod_.
Parapararet motor:,
* Suelteelgatilloacelerador.
- Apretey mantengaapretadoel
interruptormomentdneohastaqueel
motorse hayadetenkJopot
completo.
21
TWIST-N-EDGE
: Hale ta leng0ela hacta el motor.
Tuerza e( lubo en la pos(d(_n de corte;
entonces, suelte la lengQe_-'_
)
AVANCE DE LA LINEA DE
CORTE
LaI(neadecodeavanza
ap.mximadamente5 cm (2 pulgadas)
caoavezque setocael _bez_l
¢ontraelsLmIocon elmotoraceletado
a fondo,
E! largorodseficientede l(neaes el
largomdxJmopermifidoporellimitador
deIt'nea.
Siempremantengaelprotector
debidamenteinstaladoal ub'Ezarel
aparato.
* Parahaceravancarla li'nas:
* Acolareel motora fondo.
- Soet_ el cabezaJencimade un
espa.ciode tierra,con c_d y
paraueloalmisrno.
, Toqueelcabezallevementeunavez
contraelsuelo.Lalfneaavanzardunos
crn.(2putgadas)con cadatoque.
aranacoravanzarla t(nea, toqueel
cabezal€ontrael suelounavez.
Elre'n,'_adordeIfnea\\
€odaJaJ(neaaJk_'go\1
que€orresponde,-.,J_ =
AVBO: Toq_ _ cabeza] siempre
cemtmel sueJooonde hay'ace_pecLB
cemtaotoconbalassupeff_as tales
comoelcementooasfaitocausard
desga..,_eexcesh,odelcabezaL
AViSO:8i noque_ rodsqUedes o
.trespulgadasde hnea,habr_que
naserm(Lsdeun toque para obtenered
largode Iinearndseficienta.
ADVERTENCIA: Use
excludva_enteifnea condidmetrode
2 rnm(.080"depulgada)._ Ifneas m
concualquierotrodidmetrono
m
avanz_'dndeOi_nte y podrdn
¢ausargravesheddas.No use ning(m
otton-,a_rial,comoalambre, _l_
sog_ etc.El _re se puede
qu_mr _ el €orte,
convir'd.6r_oseen proyec_ pe!h_'oso
quepueaecaasar graveshe_

ADV_ffI_ICIA: Use.sk_m
_6n de ojo_ Nuncase inc_e
Sobreelcabez_ B _ puede
arrojar.ohacerrebot_r_edmsy
escorr_rosque puedend_"en los
ojosy la tara delusuadoy causar
ceguerau otras_'aves heddas.
PARARECORTAR - Sostengael
aparatode modoqueel cabd_
q.uedea unosScm (3 pU}gadas)de]
sue_oyen dngub. Perrnit_,q_
lmicamerdetd,puntade laUneahaga
contaclo.No metaialfnea dentrodel
4ma que se e_ trabajar_.
Por Encima
delSue]o
PAPAESCALPAR- Lat_ca de
escalparseusaparequear,#_c_
_ deseada.So_ elcabe_ a
uncsi_cm (3 pulga.'_) del suetoy en
4nguio.Deje queP.'.'-puntadela h_nea
e_sue_oalmdedorde los
am_e_ los.pcs_s,los mcnmnentos,
et_.Esta_,_a _nmlen_ _
desga_e de la Enea,
PAPA ESC,N..PAR
PAPA CORTAR CESPED-B .a,oarato
es idealpavacoe_arcdspeden_os
cortarcdsped,mag_tengafaI_nea
pasalelaelsueio.Eviteapre_ el
cabez_ €ontraelsuelo,ya quelal
p.mceo_m_entopuedees_par el suelo
y aa_arel aparato.
PARACORTAR_|
cespeo .
22
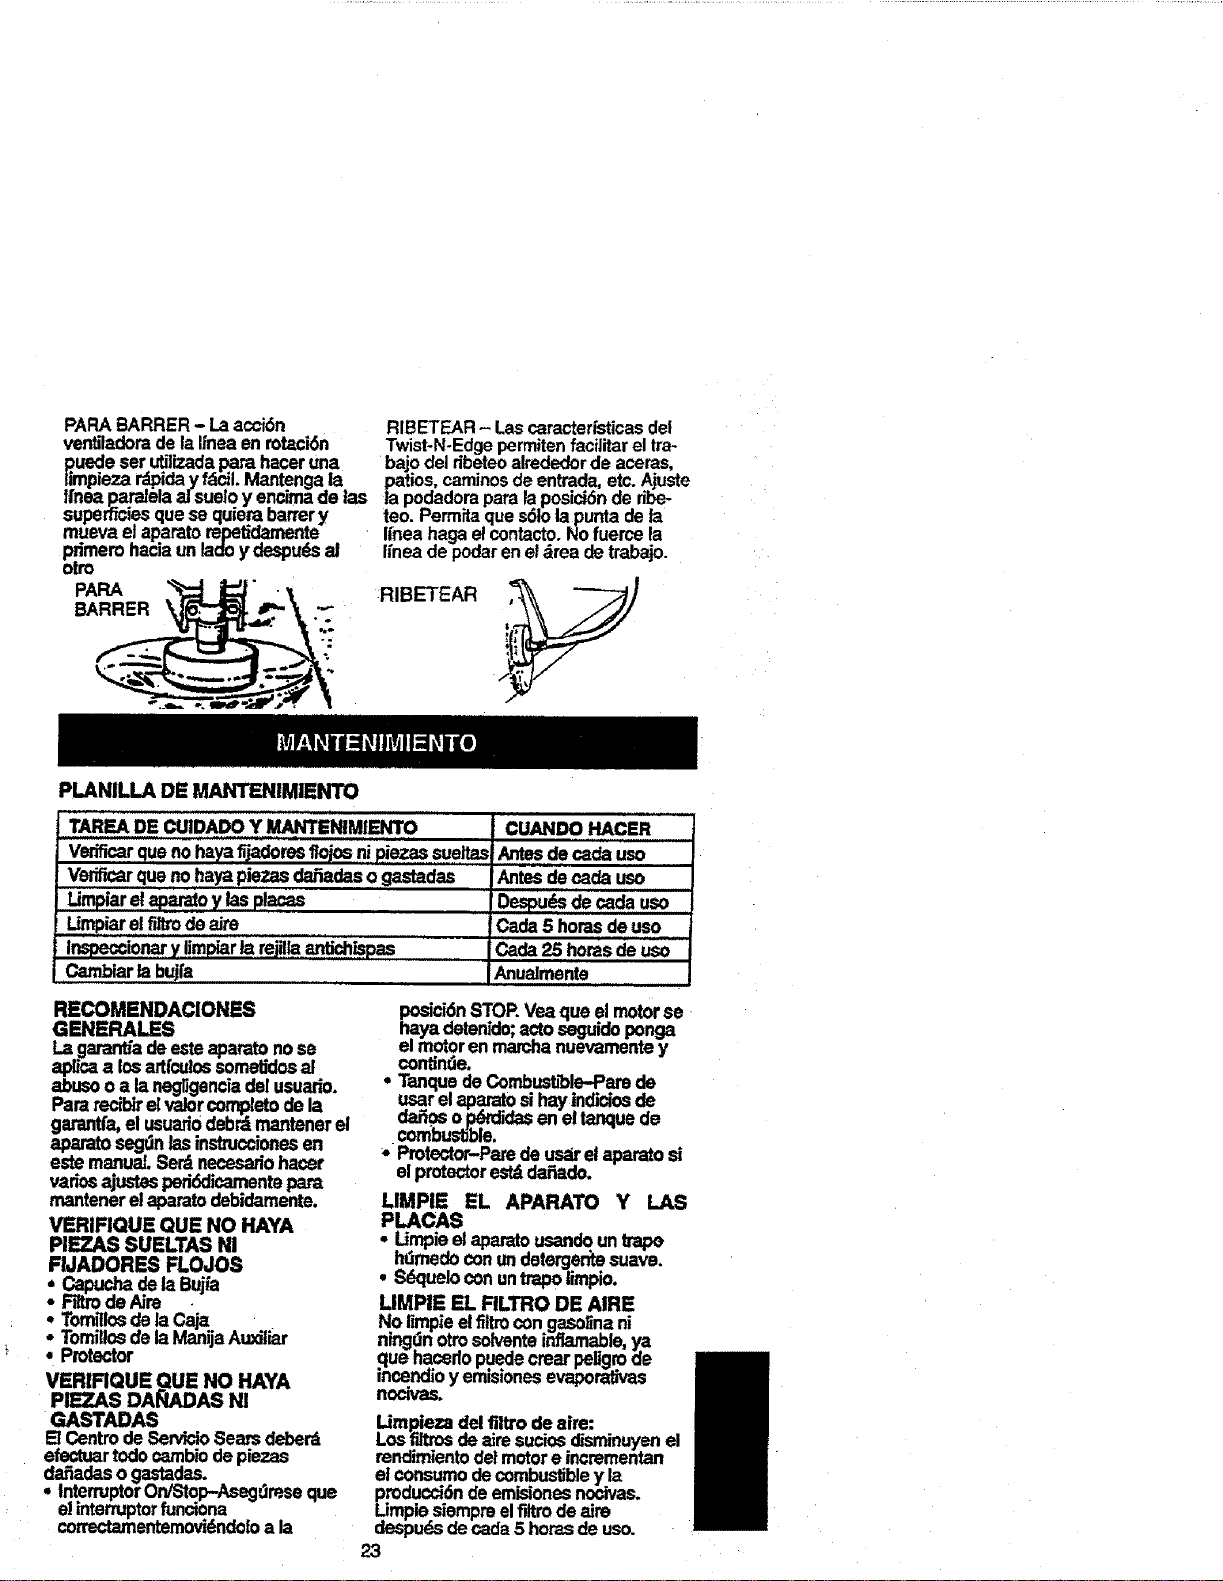
PARABARRER- Laacci6n RIBETEAR- Lascaracterfsticasdel
vent,adorade laIfneaenrot,_ci6n Twist-N-Edgepermitenfacilitarel Ira*
p.uedeserutiffzadapara haceruna bajodel dbeteoalredederde aceras,
timpiezar_.ida.y f_'L Mantengala patios,caminosdeentrade,etc.Ajuste
ffneaparaJelaaJsueloy encimade las la podadoraparalaposici6nde ribe-
superfi¢i.esquese quierabartery teo. Permitaque s61olapuntadela
muevaeJaparatorepetidamente ,nea hagaelcontacto.Nofuerce la
pdmemhaciaunladey despudsal Ifneade podareneldrea detrabajo.
otro
PAPA _ i_J" "_,
PLANILLA DE MANTENIMIENTO
RIBETEAR
t
3:
TAREADE CUIDADOY MANTENIMIENTO
Vedficarquenohaya_adems flo_osnipiezassuaitas
Verificarque.no.hayapiezasdafiadasogastadas
Umpiarel aparaioy lasplacas
Umpiarelfill_ de aim ..
Inspeccionary limpiarta re_llaantidlispas
Cambiarlabujfa .......
CUANDO HACER
Antesdecada uso
Antesdecada uso
Despudsdecadauso
Cada 5 horasdeuso
Cada2.5horasde uso
Anuaimente
RECOMENDACIONES
GENEFIALES
Lagaranffadeesteaparatono se
aplicaa losartfculossomel_losal
abucooa lanegligenciadel usuado.
Parareciblrelvalorcorr_pletode la
garantfa,el usuariodebr4mantenerel
aparatoseg0nlasinstruccionesen
este manual.Set4 necesadohacer
vadosajustesped6dicarnentepara
mantenere!apamtodebidamente.
VERIFIQUE QUE NO HAYA
PIEZAS SUELTAS NI
F JA.O..FLOJOS
: Tommosdelacaja
Tomillosde laManijaAu_iar
• Protector
VERIRQUE QUE NO HAYA
PIEZAS DAI_DAS N!
GAETADAS
ElCentrodeSewidoSeas deberd
efeotuartodocamblodepiezas
daSadaso gastadas.
• InterruptorOn/Stop-Asegumseque
elintermptorfunciona
correctamentemovi_ndo[oa la
posici6nSTOR Veaque elmotorse-
hayadetenido;aotoseguidoponga
el motoren marchanuevamentey
contimle.
• Tanquede Combustible-Parede
usarel aparatosihayindiciosde
da_.0so..p_lidas enel tanquede
combustible.
- Protector-Parede usarel aparatosi
elprotectorest4dafiedo.
LIMPIE EL APARATO Y LAS
PLACAS
• Urnpieelaparatousandountrape
homedoconundetergen_ suave.
• Sdqueloconuntrapolimpio.
LIMPIE EL RLTRO DE AIRE
N_31impieelfiltrocon gasoEnani
unottosolventei_ ._le, y.a
que nacenop_e crearpeligroae
ince_o yemisionesevaporativas
nocivas.
Lim_eza del filVo de aim:
Los_ deaimSuciosoisminuyenel
renairmentodetmotore incmmentan
elco_sumode combustibley la
producoi6ndeemisionesnocivas.
Limpieaiempmelfiltrode aim
despudsde cada5 horasdeuso.
23
,ios
re
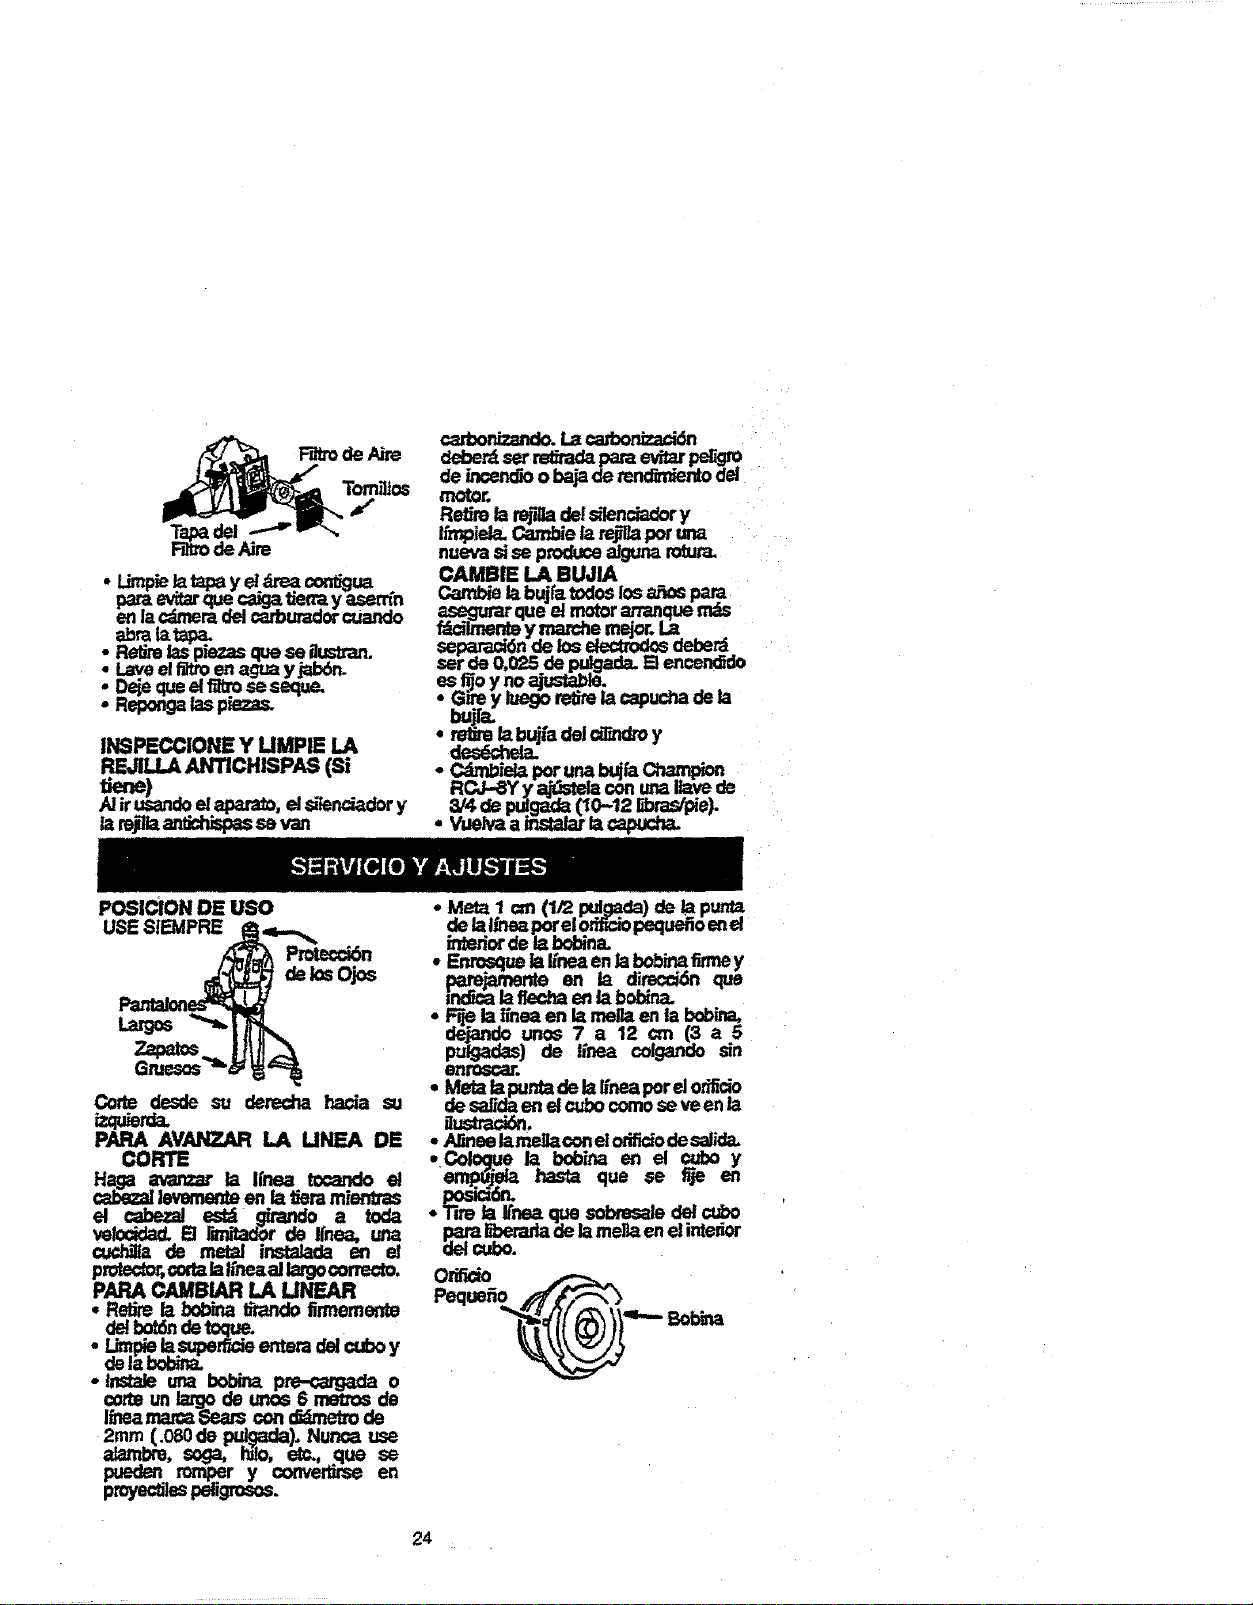
• l.:,mpie_ tapay eh_rea_,'r_ua
para.evitarqueca,icjatien'ay asem'n
en lacdmeradel carburadorcuando
abrala.tapa.,
! let_ lasp'._as_ seausa'an.
Laveel flareen agu=y jalx_
De_equeelt_lrose seque.
Reponga_s pk=as.
II_PECCIONE Y MMPIE LA
REJILLA ANTICHISPAS (Si
"t_.e) ......
A!irusanoo= apera_, el sEenciadory
larej_ ant_pas sevan
cadxmizando.La€_rboniza_n
deberdserre_rada paraev_,r _
deincen¢_ o ba_ de re_nto del
motor.
Re, rela _'i_ de!dlendadory
hmpiela.Cambielare_'llaporuna
numtasise producealgunarolura_
CAMB|E LA BUJIA
P_.ambiela buj_ todoslos_ par9
.as_ar que el motorap'an.quemas
GE'ey luegor_m _ €_puc_ _ b
bujra_ .
* relJmlabuj=adeidEndroy
. Cdmbielaporunabujra_
RCJ_Yy _ conuna _.._.de
8/4 de pu_g_ (10-12 _/pie;.
- Yuelva a i#_;ta_ la cai:u:ha.
POSICION DE USO
USE$1EMPRE
Corte desdesu dere_ hada su
izqmerda.
PAPA AVANZAR LA UNEA DE
tORTE
Haga avamar la Ifnea tocando el
c_:i¢_l leven_nte en la_ra mieneas
el ¢abezal estd gim_o a toda
ve_ E! r_,_tad_rde l[nea, una
cucP_ de metal instalada en el
protec_x,_rta laIfneaal largocormcto.
PAPA CAMBIARLA LINEAR
• Retire la bobinaErandofirmemente
• delbot6ndetoque.
• lnstale una bobin= pre,_rga_ o
cor_ un largode unos 6 mem_ de
I/nee.rnan_ Sea._ con cEdmetrode
2mm (.080de _). Nunca use
alambre, soga, htlo, e_, que se
pueden rcm_ r y converlime en
proyectilespeligrosos.
. Meta_ =,n(I/2 pU_gada)de_apur_
delalmea porelodf_iopeque_oenel
interiorde I_bobina.
• Enrosquelali'neaenlabobir_,f_ne y
pare".._pe__e en la _recci6n clue
• F_ la Eneaen I= megaen la bobina,
_jan_ unos 7 a 12 cm (3 a 5
_)de
t_nea colgando sin
• Meta la puntadela Ifnea porelor_=_o
des_da en elc_o comoseve enm
• Armeelamell=¢_n elodficiodesalida.
• Co[¢<tue la bob_na en el cubo y
er_u_,le_. basra que se fije en
• "rimla Ii'ne_que sobre_le del cubo
24
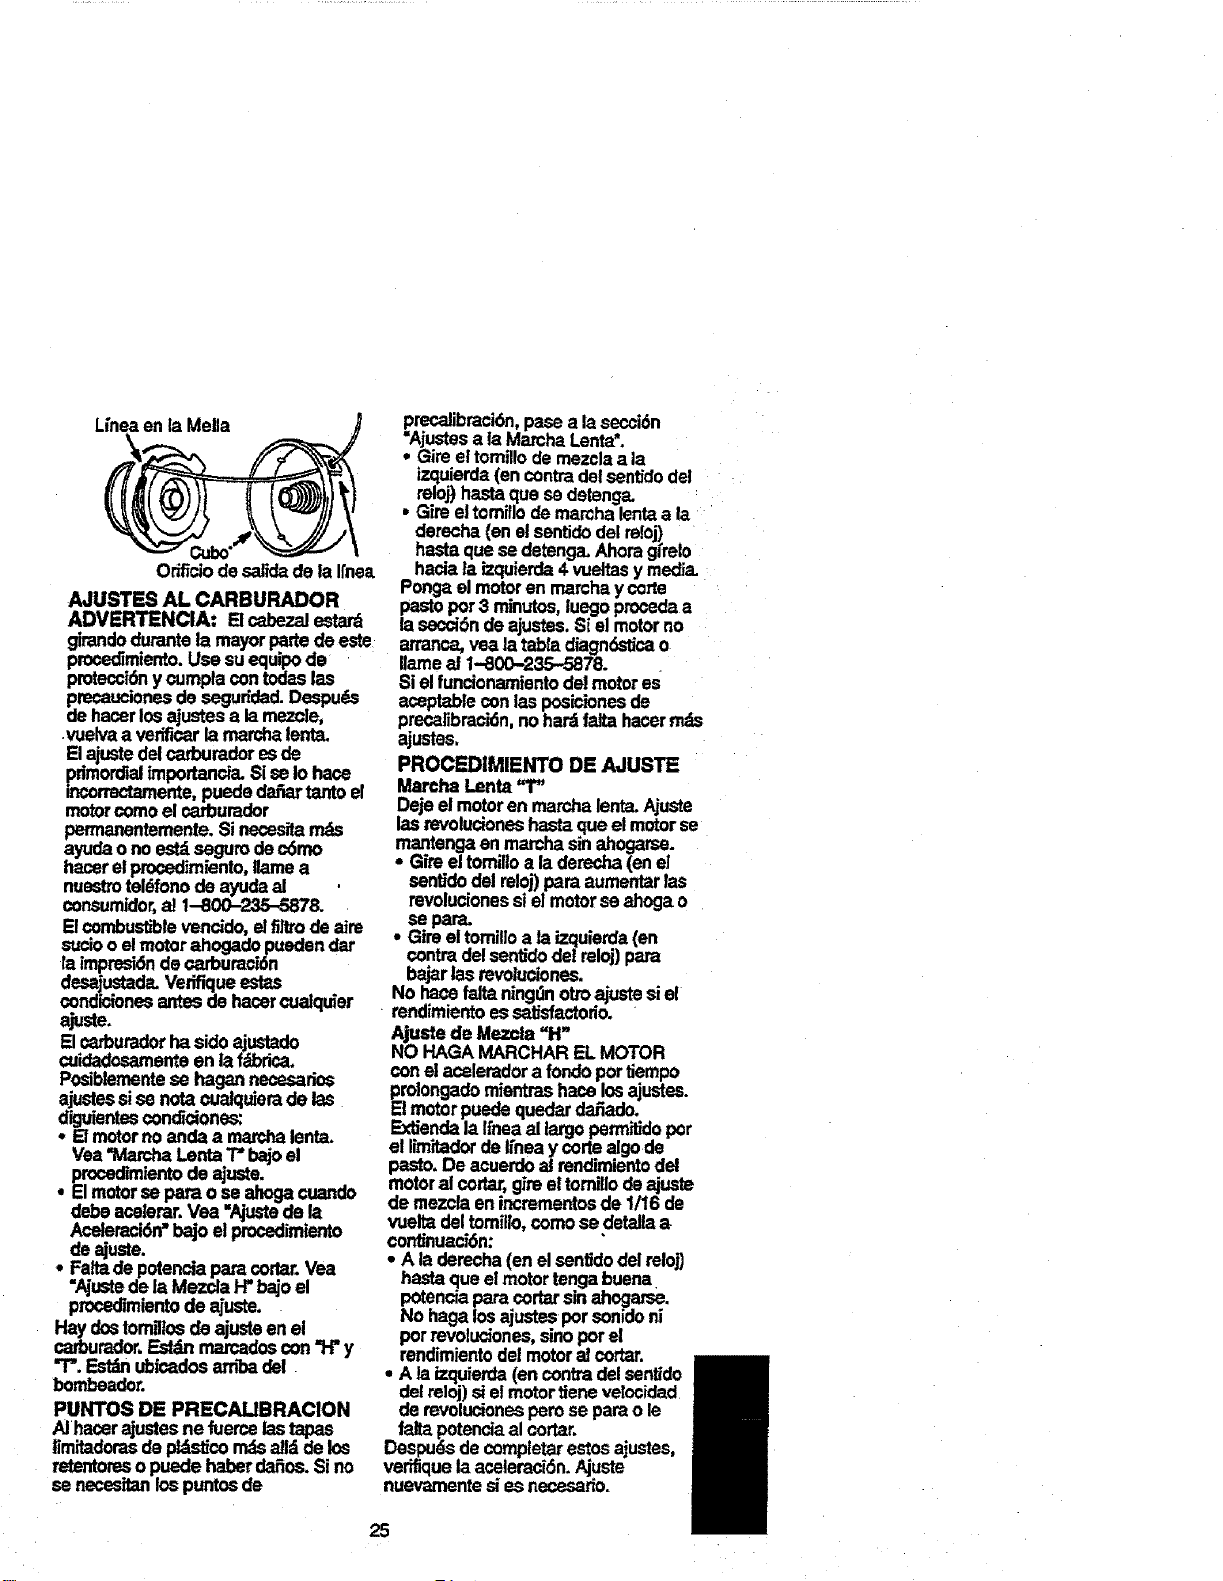
Lineaenia Mella
Odficiodesar_ladela Ifne_
AJUSTES AL CARBURADOR
ADVERTENCIA: Elcabezalestard
gimndodumntela mayorpartede este
proce_miento.Usesuequip(>de
protecel6nycumplacontodaslas
precaucionesdeseguddad.Despuds
dehacerlosajustesa lamezP.Je,
.welva a verificarlamarchalenta.
Elajuotede! carburador es de
pdmomialimportancia. Si se Io haos
inaotmctamente, puede da_ar tanto el
motorcomo el cmburader
permanentemente.Sinecesitarods
_yuda onoestdsegurode cSmo
acerelprocedimiento,Ilamea
nuestrotel6fonodeayudael .
consumider,a! 1-800-235-5878.
Elcombuslible vencido,elfi_o deaim
suoiooelmotorahogadopuedendar
ra impresk_de carburaci6n
desajustade.Verifiqueestas
condicionesantesde hacercualquier
ajuste.
Elostburadorhaside ajustade
cuidadosamenteen laf_Lbdca.
Posiblementese hagennecosarios
_ljustessise notecuatquierade las
iguientescondiciones:
• E1motorno andaa marcha lenta.
Vea"MamhaLentaT" bajoel
procedknientode ajuste.
• Elmotor se pareo se ahogacuando
dabsaoslerar.Vea "Ajustede la
Aceleraci6n"bajoelprocedimiento
de ajuste.
• Fabledepotenciaparecorlar. Vea
"AjL_'tede laMazda H"bajoel
proced'n'nientodeajuste.
Haydostom_tosde ajustaenel
carburader.F_.eldnmarcadoscon=H"y
"T'.Est_ ubicadosarribade!
bombeador.
PUNTOS DE PRECALIBRAClON
A!hacerajustesnefuercelastapes
limitadorasdeptds_corndselld delos
retentoresopuedehaberda_os.Si no
se necesitanlospuntosde
precalibraci6n,pasea lasecci6n
=Ajustesa la MarchaLenta'.
• Gireeltomillodemezclaa la
izquierda(an contradelsentJdode!
reloj)hastequase detenga.
• Gim eltom!riode marcha lentaa la
derecha(enelsent!dodel mloj)
hastaquese detenga.Ahoragfrelo
hacialaizquierda4 vueltasy media.
Pongael motor en rnamhaycode
pastopot 3 minutos, luegoprcoedaa
lasecci6ndeajustes.Siel motorno
arranos,,tea latabiadiagn_-ticao
llamaal 1-800-235-5878.
$i elfuncionam|entode!motores
aceptable conlasposicionesde
precalibraci6n,nohardfaltahacerrods
ajustes.
PROCEDIMIENTO DE AJUSTE
Maroha Lenta "T"
Dejeel motoren mamhalenta.Ajuste
lasrevolucioneshastaqueel motorse
mantenga enmarchasin ahogarse.
• Gireeltomilloa laderecha(enel
sentidedel relo_pare aumentarlas
revolucionessiel motorse ahogao
se pare.
• Gimel tomilloa laizquierda(an
contra del sentidodetreloj)pare
bajarlasrevoiuciones.
No hacefeltaningt_nottoajustesiel
rendimientoes _actodo.
Ajustede Mezcia"H"
NO HAGAMARCHAREL MOTOR
conel acelemdora fondoportiempo
prolongademientrashate losajustes.
E!motorpuedequedarde,ado.
Extiendala [ineaal largo permitidopor
el limitadordeIfneay cortealgode
pasto.Deacuerdoal mndimientode!
motoralcortar,gireettomi,o deajuste
de mezcla enincrementosde 1/16de
vueltadeltomillo, comosedetallaa
continuad6n:
• A laderecha (enelsentidodelrelo_
hastaquee! motortengabuena
potenciaparecortar sinahogarse.
No hegalosajustesporsonideni
porrevoludones,sinoporel
rendimientode!motoralcotter.
• Ala izquierda(en€ontmde!sentido
de!reloj)siel motortienevelocidad
derevolucionesperose parao le
faltapotenciaalcortar.
Despudsdecompletarestosajustes,
verifiquelaaoslemci6n.Ajuste
nuevarnentesies necesario.
25
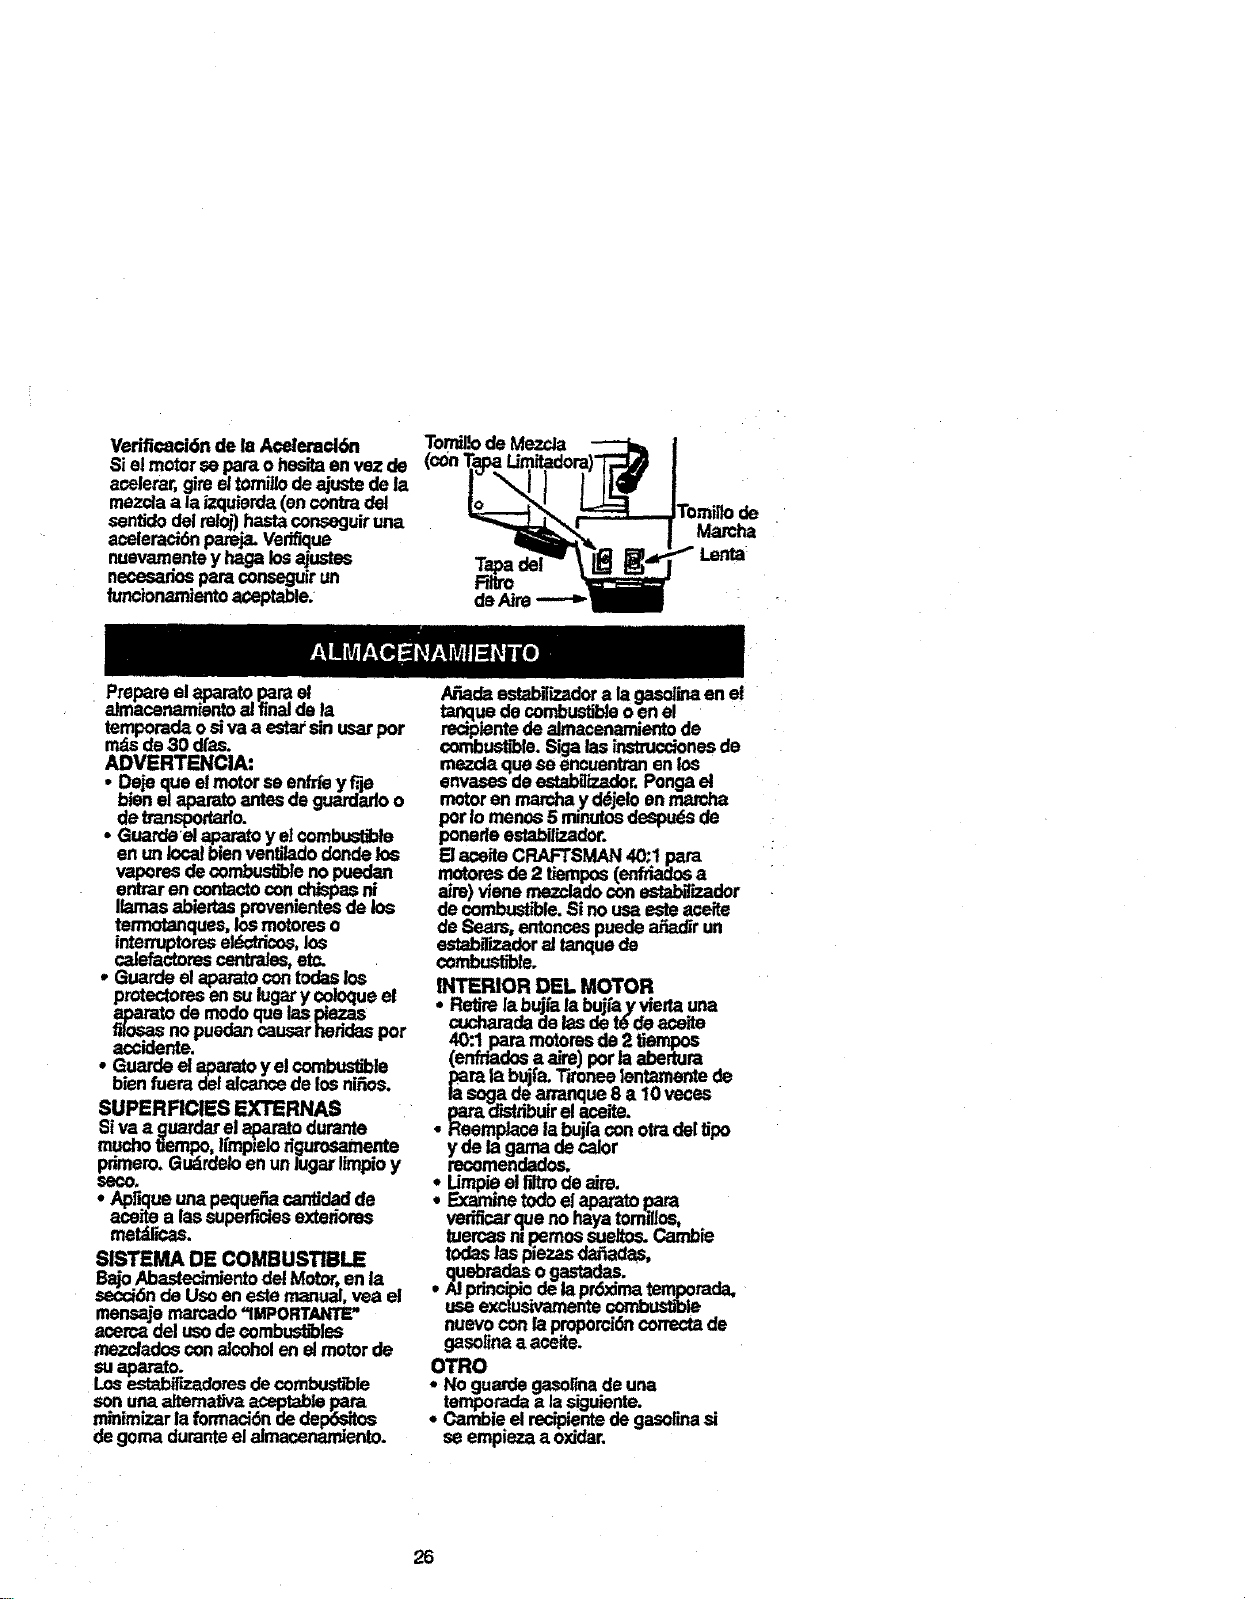
Vedfic_ac_6ndelaA¢_m_6n
Sielmotorsepamohesitaen vezde (cdn1
ac_emr, gimelt0m_ deaius_edela
senfidodelreloj)hastaconseguiruna
aosleraci6nparej_ Vedfique
nuevamentey hagalosajustes
necesadosparacon.s_, ir un
tuncionamientoaGep_.me:
_de|
ade
March=
Prepareelapara._ para.el
almacenarn_nto al finaldela
teml_rada oelva a est_ sin usarpot
m_ _e 30 dfas.
ADVERTENCIA:
detranspottado.
vaporesdecom_ nopued_.
entraren¢ontactocon.chisp_ n._
llamasablertasproven_entesae ,os
termotanques,_ motoreso
intermptoresel(_tdpos,lOS
c_efa_'_oresosn_, ez_
• G_rde ela_ratocontodd.los _
protecto.rysensur_gar,y €?_lue e_
aparato€lemodeClUelas
nopuedanc_usarheridaspot
accidente.
• Guardeela_aratoy elcombust_le
bienfuera_1 elcanos delosniEos.
SUPERFICIES EXT_RNAS
$iva a _uard_ el a_..0 durante .
mucho tiempo,nmp=e_ongurosam.,eme
pfirnero.Gudrdetoenun _gar limpio y
fieoo,
met_s.
SISTEMA DE COMBUSTIBLE
BajoAb.apte_mi'entodelMotor,enla_
sebcionoe Usoenestemanu=, yea e[
mm,., o_r r=do' O AFm'
acerc_del usoa¢ ¢ombuSt_leS
mezcladosconelcoholen elmotorde
suapa_to.
Los_d_T_zadores decombustible
degomaduranteelalmacenamiento.
A_ad=estabiliz_dora la g_ina en e!
tamluede con_usttblooenp__
redpientede=ma._.enp.mientq oe
combustible._iga msmstruo=ones ae
mezcla quese e.nc._n_ane.nlop_,
envasesdeosta_._r, k'ong__
motor enmand_ayck_jeloon
porIomenos5 minutosoespue_
ponedeestabl_izador.
ElaositeCRAFTSMAN40:1 pare
motorosde 2 lL=mpos(enfdado__.a .
elre)vtenemezdado=onest=_zapo,r
de(_mbu_'ble. Sino usaestea_:e_
de_m;, ententes puedeaifadirun
estabi]izadoraltanque_e
comb_.
INTERIOR DEI. MOTOR
• Reg.'relabujialabujfay viertaur=a
cucnaradadelasdet6 deacelte
40:1_ mo*p_esde 2 ti_
_ra la=>_ta._=mneejenmmen==
lasoga_ mTaJ:KlUe.Ua 10 veces
pareff_douir elace_e.
• Reer_ iabuifacon ot_ del tipo
yde _agarnade¢elor
reosrnenclaOos,
• Umpieelfiftmdeaim.
• F.xaminetodoelapamtoEp'a
verlficarclueno h_yatpmilLosj'-ie
_ercas ntpemossuel_)s._;.arnu
todaslaspiezasdafladas,
quebradeso_stad_.
• _ principledelapr<_ma_m_._r'a_
useexc_usivamemecon-,ous=o_
nuevocon lapropo_dn correctade
gaso_n_s _eite.
OTRO
• No guardpg.a:soltnadeuna
temp0ra_ a la siguiente.
• Cambieelrecipie,_ede gasolinas_
se empiezaa Oxidar.
26
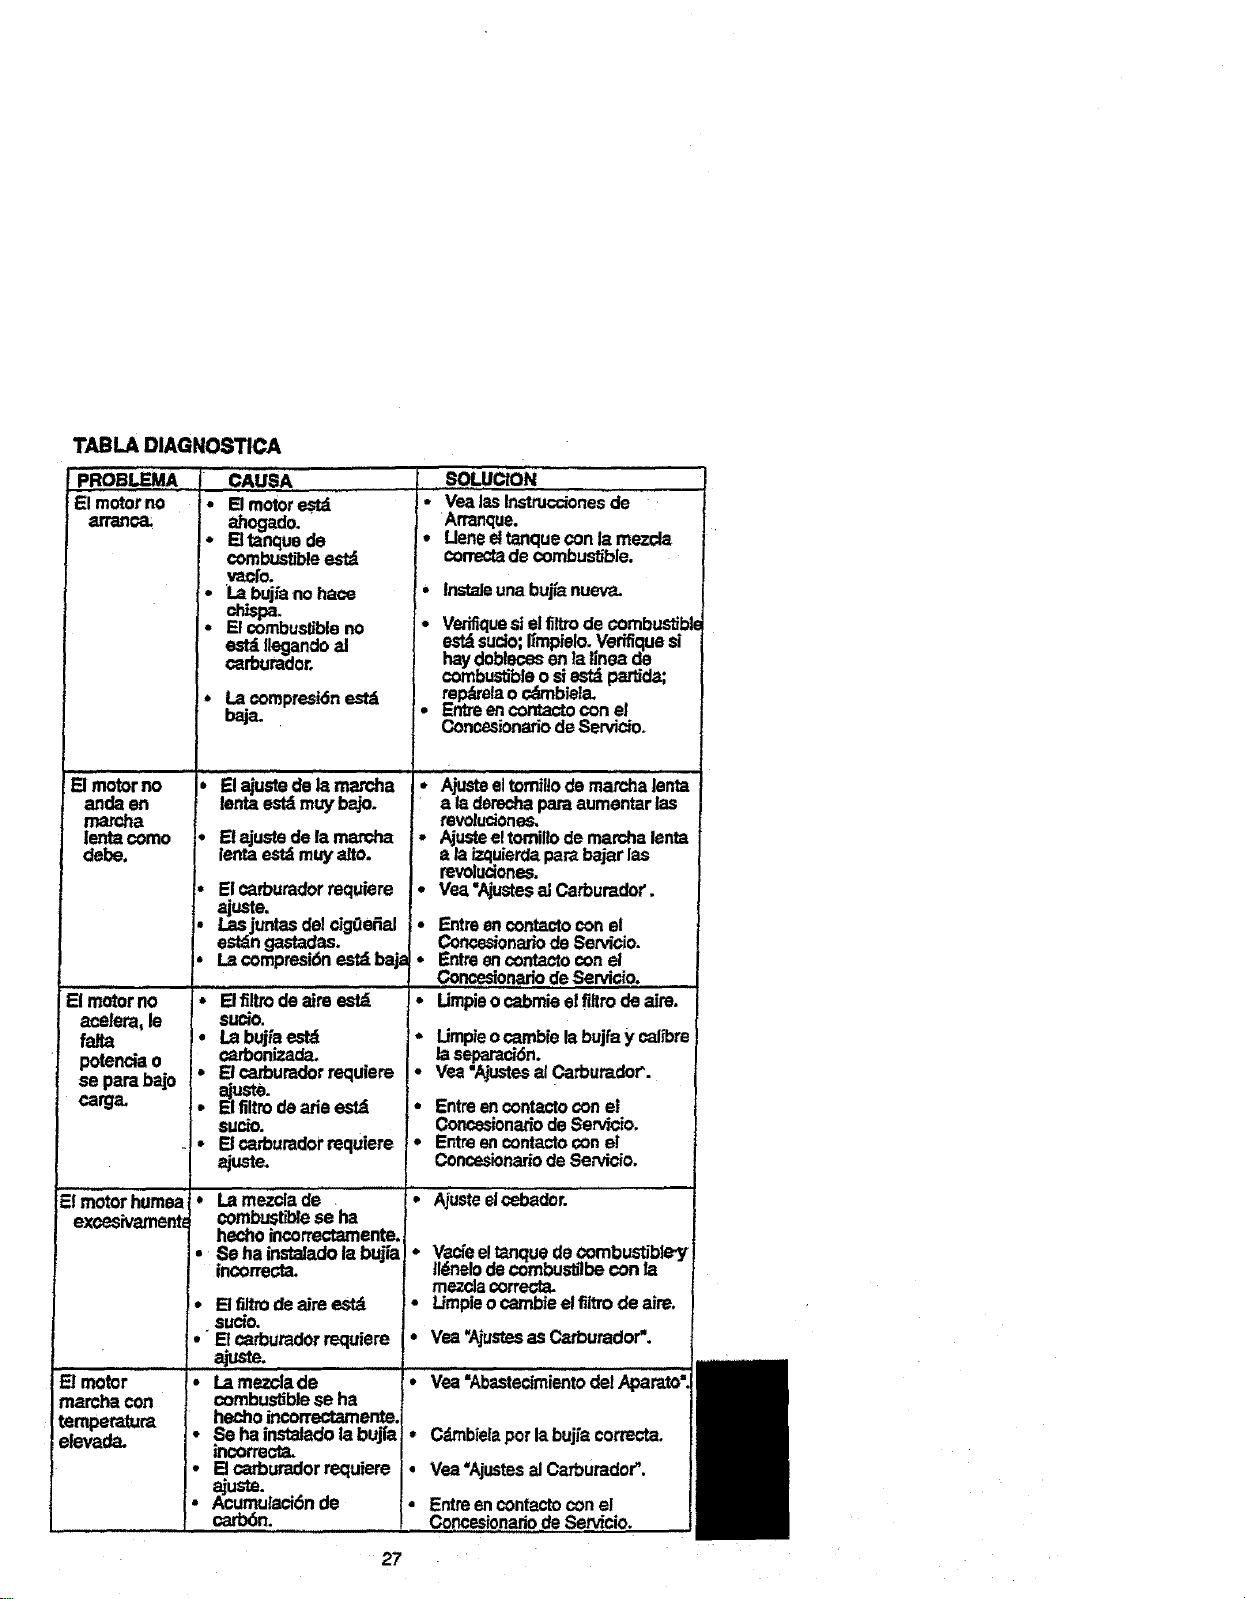
TABLA DIAGNOSTICA
PROeLeMA
Elmotorno • B motore_
arrano_, ahogado.
• Eltanquede •
combustibleestd
vacfo. I,
'• La bujfanohace
ch_pa.
• El€ombuslJbleno •
estdIlegandoal
carburador.
• Lacompresidne._H'd
baja. °
Elmotorno • I_1ajustedela maria *
anda en lent=estdmuy bajo.
mamha
lentacomo • E!ajus_ delamamha -
debe, lent=estdmuy afro.
, Elcad_uradorrequiem •
aide.
[. Lasjuntasde_cig0e_J _
ie
estdngastadas.
• Lacompresi6nestdbaje •
Elmotor no • Elflirt0 deair• estd •
acelem,le sue!o.
falta • Labujfaestd *
notenciao carbonizada.
_-".._ k_=. , Elcarburadorrequiem -
_Js_e.
(:alga. * Elfiltrodeadeest_ "
$UC_O.
• Elcarburadorrequiem *
El motor humea * Lamezci= *
excesivamen_ combus_e se ha !
hechoincorrectarnente,
I" Se ha instaladola bujfa *
inco_.
• El filtrodeair• estd
sucio.
• "Etcarburadorrequiem •
..... ; a J=e. •
El motor Lamezclade
marchacon combustiblese ha
temperature hechoincorrect=mente.i
_i_'_-'- • Se hainstaladolabujfa •
-'-'-_ inoorrecta.
• B carburadorrequiem I•
ajuste. !
• Acumu_i6n de •
carb6n.
SOLUCION
Vea las Instruccionesde
Arranque.
Lien• eltanque con la mezda
con-ectade combu_ble.
Instal• una buj_ nueva.
_que s! el firm de combustibl_
sucio, Ifmpielo.Vedfique si
haydobleces en _at_ea de
combustible o siastd pardda;
rep_'ela o cdmbie_a.
Entre en contaotocon et
Concesionariode Servicio.
Ajusteel tomiUode mamha lent=
ala derechapare aumentar las
revolution•s,
Ajustee! tomillo de marcha lent=
ala izquierdapare bajar las
revoludones.
Vea "Ajustesal Carburador.
Entreencontactoconel
Concesionadode8en/ioio.
Entreencontactoconel
ConcesionariodeServicio.
Umpieocabmiee!filtrodeaire.
Umpieocambfelabujfay calibre]
lasel_d6n. J
Vea"AjustesalCarbumdor. j
I
Entreenconta_'tocone!
ConcesionadodeServicio. J
Entreencontactooon el
ConcesionariodeSewic_o. I
Ajusteelcebador. I
1
Vadeeltanquede Combustible-y]
ff_nelode€ombus'albeconta |
mezclacorre_:la. |
UmpieoceJnbieelfiitrodeaim. I
|
Vea"AjustesasCarburador'. I
|
' " l_
Vea"AbastecimientodelApamto'.
Cdmbielapot labuj_acorrecta. III
vea "AjustesalCarburador_. t|
Entreencontactoconel Ill
ConcesionariodeServicio. ill
27

For the repair or replacement parts you need
delivered directly to your home
Call 7 am - 7 pm, 7 days a week
1-800-366-PART
(1-800-366-7278)
Para ordenar piezas con entrega a
domicilio - 1-800-659-7084
For in-house major brand repair service
Call 24 hours a day, 7 days a week
1-800-4-REPAIR
(1-800-473-7247)
Para pedir servicio de reparaci6n a
domicilio- 1-800-676=-5811
For the location of a Sears Parts and
Repair Center in your area
Call 24 hours a day, 7 days a week
1-800-488-1222
For information on purchasing a Sears
Maintenance Agreement or to inquire
about an existing Agreement
Call 9 am - 5 pro, Monday-Saturday
1-800-827-6655
When requesting service or ordering
parts, always provide the following
information:
• Product Type • Part Number
• Model Number ° Part Description
America's Repair Specialists