Home
Bookmarks
Home
Denon
Denon AVR-X8500HA User Manual
Page 19
Denon AVR-X8500HA 13.2 Ch. 150W 8K AV Amplifier with HEOS® Built-in
User Manual - Page 19
For AVR-X8500HA.
PDF File Manual
,
359 pages
,
Read Online
|
Download pdf file
Accessories
Inserting The Batteries
Operating Range Of The Remote Control Unit
Features
High Quality Sound
High Performance
Easy Operation
Part Names And Functions
Front Panel
Display
Rear Panel
Remote Control Unit
Connections
Speaker Installation
Connecting Speakers
Before Connecting Speakers
Speaker Configuration And “Amp Assign” Settings
Connecting 5.1: Channel Speakers
Connecting 7.1: Channel Speakers
Connecting 9.1: Channel Speakers
Connecting 13.1: Channel Speakers
Connecting 15.1: Channel Speakers
Bi Amp Connection
Connecting 11.1: Channel Speakers: Second Pair Of Front Speakers
Connecting Multi Zone Speakers
Connecting An External Power Amplifier
Connecting A TV
Connection 1 : TV Equipped With An HDMI Connector And Compatible With The ARC (Audio Return Channel) / EARC (Enhanced Audio Return Channel)
Connection 2 : TV Equipped With An HDMI Connector And Incompatible With The ARC (Audio Return Channel) / EARC (Enhanced Audio Return Channel)
Connection 3 : TV Equipped Without An HDMI Connector
Connecting A Playback Device
Connecting A Set Top Box (Satellite Tuner/cable TV)
Connecting A DVD Player Or Bluray Disc Player
Connecting A Bluray Disc Player Compatible With The Denon Link HD Function
Connecting A Player Device Compatible With The 8K
Connecting A Video Camcorder Or Game Console
Connecting A Turntable
Connecting A Device With A Multichannel Output Connector
Connecting A USB Memory Device To The USB Port
Connecting FM/AM Antennas
Connecting To A Home Network (LAN)
Wired LAN
Wireless LAN
Connecting An External Control Device
REMOTE CONTROL Jacks
TRIGGER OUT Jacks
Connecting The Power Cord
Playback
Basic Operation
Turning The Power On
Selecting The Input Source
Adjusting The Volume
Turning Off The Sound Temporarily (Muting)
Playback A DVD Player/Bluray Disc Player
Playing A USB Memory Device
Playing Files Stored On USB Memory Devices
Listening To Music On A Bluetooth Device
Playing Music From Bluetooth Device
Pairing With Other Bluetooth Devices
Reconnecting To This Unit From A Bluetooth Device
Listening To FM/AM Broadcasts
Listening To FM/AM Broadcasts
Tuning In By Entering The Frequency (Direct Tune)
Changing The Tune Mode (Tune Mode)
Tuning In To Stations And Presetting Them Automatically (Auto Preset Memory)
Presetting The Current Broadcast Station (Preset Memory)
Listening To Preset Stations
Specify A Name For The Preset Broadcast Station (Preset Name)
Skipping Preset Broadcast Stations (Preset Skip)
Cancelling Preset Skip
Listening To Internet Radio
Listening To Internet Radio
Playing Back Files Stored On A PC Or NAS
Playing Back Files Stored On A PC Or NAS
Getting The HEOS App
HEOS Account
Playing From Streaming Music Services
Listening To The Same Music In Multiple Rooms
AirPlay Function
Playing Songs From Your IPhone, IPod Touch Or IPad
Playing ITunes Music With This Unit
Play A Song From Your IPhone, IPod Touch Or IPad On Multiple Synced Devices (AirPlay 2)
Spotify Connect Function
Playing Spotify Music With This Unit
Convenience Functions
Adding To HEOS Favorites
Playing Back HEOS Favorites
Deleting A HEOS Favorites
Adjusting The Audibility Of Dialog And Vocals (Dialog Enhancer)
Adjusting The Volume Of Each Channel To Match The Input Source (Channel Level Adjust)
Adjusting The Tone (Tone)
Displaying Your Desired Video During Audio Playback (Video Select)
Adjusting The Picture Quality For Your Viewing Environment (Picture Mode)
Playing The Same Music In All Zones (All Zone Stereo)
Selecting A Sound Mode
Selecting A Sound Mode
Direct Playback
Pure Direct Playback
Auto Surround Playback
Description Of Sound Mode Types
Sound Mode That Can Be Selected For Each Input Signal
HDMI Control Function
Setting Procedure
Smart Menu Function
Sleep Timer Function
Using The Sleep Timer
Quick Select Plus Function
Calling Up The Settings
Changing The Settings
Panel Lock Function
Disabling All Key Button Operations
Disabling All Button Operations Except VOLUME
Canceling The Panel Lock Function
Remote Lock Function
Disabling The Sensor Function Of The Remote Control Unit
Enabling The Remote Sensor Function
Web Control Function
Controlling The Unit From A Web Control
Playback In ZONE2/ZONE3 (Another Room)
Connecting ZONE
Playback In ZONE2/ZONE3
Settings
Menu Map
Menu Operations
Audio
Subwoofer Level Adjust
Bass Sync
Surround Parameter
Restorer
Audio Delay
Volume
Audyssey
Graphic EQ
Video
Picture Adjust
HDMI Setup
Output Settings
Analog Video Out
On Screen Display
4 K/8K Signal Format
TV Format
Inputs
Input Assign
Source Rename
Hide Sources
Source Level
Input Select
Speakers
Audyssey Setup
Procedure For Speaker Settings (Audyssey Setup)
Error Messages
Retrieving Audyssey Setup Settings
Manual Setup
Amp Assign
Speaker Config.
Distances
Levels
Crossovers
Bass
Front Speaker
2ch Playback
Network
Information
Connection
WiFi Setup
Settings
Network Control
Friendly Name
Diagnostics
HEOS Account
You Have Not Signed In
You Have Already Signed In
General
Language
ECO
ZONE2 Setup / ZONE3 Setup
Zone Rename
Quick Select Names
Trigger Out 1 / Trigger Out 2
Front Display
Firmware
Information
Remote ID
Usage Data
Save & Load
Setup Lock
Operating External Devices With The Remote Control Unit
Registering Preset Codes
Operating Devices
Operating Learning Function
Operating Macro Function
Specifying The Zone Used With The Remote Control Unit
Setting The Remote ID
Setting The Display Time Length Of The Remote Control Unit Display
Setting The Back Light
Restoring All Settings Of The Remote Control Unit To Default
Tips
Tips
Troubleshooting
Power Does Not Turn On / Power Is Turned Off
Operations Cannot Be Performed Through The Remote Control Unit
Display On This Unit Shows Nothing
No Sound Comes Out
Desired Sound Does Not Come Out
Sound Is Interrupted Or Noise Occurs
No Video Is Shown On The TV
The Menu Screen Is Not Displayed On The TV
The Color Of The Menu Screen And Operations Content Displayed On The Television Is Different From Normal
AirPlay Cannot Be Played Back
USB Memory Devices Cannot Be Played Back
Bluetooth Cannot Be Played Back
The Internet Radio Cannot Be Played Back
Music Files On PC Or NAS Cannot Be Played Back
Various Online Services Cannot Be Played
The HDMI Control Function Does Not Work
Cannot Connect To A Wireless LAN Network
When Using HDMI ZONE2, The Devices Does Not Function Properly
Update/upgrade Error Messages
Resetting Factory Settings
Resetting Network Settings
Restoring The Firmware To The Factory Defaults
Appendix
About HDMI
Video Conversion Function
Playing Back A USB Memory Devices
Playing Back A Bluetooth Device
Playing Back A File Saved On A PC Or NAS
Playing Back Internet Radio
Personal Memory Plus Function
Last Function Memory
Explanation Of Terms
Trademark Information
Specifications
Index
Page 19/359
Page 1
Page 2
Page 3
Page 4
Page 5
Page 6
Page 7
Page 8
Page 9
Page 10
Page 11
Page 12
Page 13
Page 14
Page 15
Page 16
Page 17
Page 18
Page 19
Page 20
Page 21
Page 22
Page 23
Page 24
Page 25
Page 26
Page 27
Page 28
Page 29
Page 30
Page 31
Page 32
Page 33
Page 34
Page 35
Page 36
Page 37
Page 38
Page 39
Page 40
Page 41
Page 42
Page 43
Page 44
Page 45
Page 46
Page 47
Page 48
Page 49
Page 50
Page 51
Page 52
Page 53
Page 54
Page 55
Page 56
Page 57
Page 58
Page 59
Page 60
Page 61
Page 62
Page 63
Page 64
Page 65
Page 66
Page 67
Page 68
Page 69
Page 70
Page 71
Page 72
Page 73
Page 74
Page 75
Page 76
Page 77
Page 78
Page 79
Page 80
Page 81
Page 82
Page 83
Page 84
Page 85
Page 86
Page 87
Page 88
Page 89
Page 90
Page 91
Page 92
Page 93
Page 94
Page 95
Page 96
Page 97
Page 98
Page 99
Page 100
Page 101
Page 102
Page 103
Page 104
Page 105
Page 106
Page 107
Page 108
Page 109
Page 110
Page 111
Page 112
Page 113
Page 114
Page 115
Page 116
Page 117
Page 118
Page 119
Page 120
Page 121
Page 122
Page 123
Page 124
Page 125
Page 126
Page 127
Page 128
Page 129
Page 130
Page 131
Page 132
Page 133
Page 134
Page 135
Page 136
Page 137
Page 138
Page 139
Page 140
Page 141
Page 142
Page 143
Page 144
Page 145
Page 146
Page 147
Page 148
Page 149
Page 150
Page 151
Page 152
Page 153
Page 154
Page 155
Page 156
Page 157
Page 158
Page 159
Page 160
Page 161
Page 162
Page 163
Page 164
Page 165
Page 166
Page 167
Page 168
Page 169
Page 170
Page 171
Page 172
Page 173
Page 174
Page 175
Page 176
Page 177
Page 178
Page 179
Page 180
Page 181
Page 182
Page 183
Page 184
Page 185
Page 186
Page 187
Page 188
Page 189
Page 190
Page 191
Page 192
Page 193
Page 194
Page 195
Page 196
Page 197
Page 198
Page 199
Page 200
Page 201
Page 202
Page 203
Page 204
Page 205
Page 206
Page 207
Page 208
Page 209
Page 210
Page 211
Page 212
Page 213
Page 214
Page 215
Page 216
Page 217
Page 218
Page 219
Page 220
Page 221
Page 222
Page 223
Page 224
Page 225
Page 226
Page 227
Page 228
Page 229
Page 230
Page 231
Page 232
Page 233
Page 234
Page 235
Page 236
Page 237
Page 238
Page 239
Page 240
Page 241
Page 242
Page 243
Page 244
Page 245
Page 246
Page 247
Page 248
Page 249
Page 250
Page 251
Page 252
Page 253
Page 254
Page 255
Page 256
Page 257
Page 258
Page 259
Page 260
Page 261
Page 262
Page 263
Page 264
Page 265
Page 266
Page 267
Page 268
Page 269
Page 270
Page 271
Page 272
Page 273
Page 274
Page 275
Page 276
Page 277
Page 278
Page 279
Page 280
Page 281
Page 282
Page 283
Page 284
Page 285
Page 286
Page 287
Page 288
Page 289
Page 290
Page 291
Page 292
Page 293
Page 294
Page 295
Page 296
Page 297
Page 298
Page 299
Page 300
Page 301
Page 302
Page 303
Page 304
Page 305
Page 306
Page 307
Page 308
Page 309
Page 310
Page 311
Page 312
Page 313
Page 314
Page 315
Page 316
Page 317
Page 318
Page 319
Page 320
Page 321
Page 322
Page 323
Page 324
Page 325
Page 326
Page 327
Page 328
Page 329
Page 330
Page 331
Page 332
Page 333
Page 334
Page 335
Page 336
Page 337
Page 338
Page 339
Page 340
Page 341
Page 342
Page 343
Page 344
Page 345
Page 346
Page 347
Page 348
Page 349
Page 350
Page 351
Page 352
Page 353
Page 354
Page 355
Page 356
Page 357
Page 358
Page 359
Contents
Table of Contents
Search
Previous
Next
Troubleshooting
Bookmarks
Loading ...
Loading ...
Loading ...
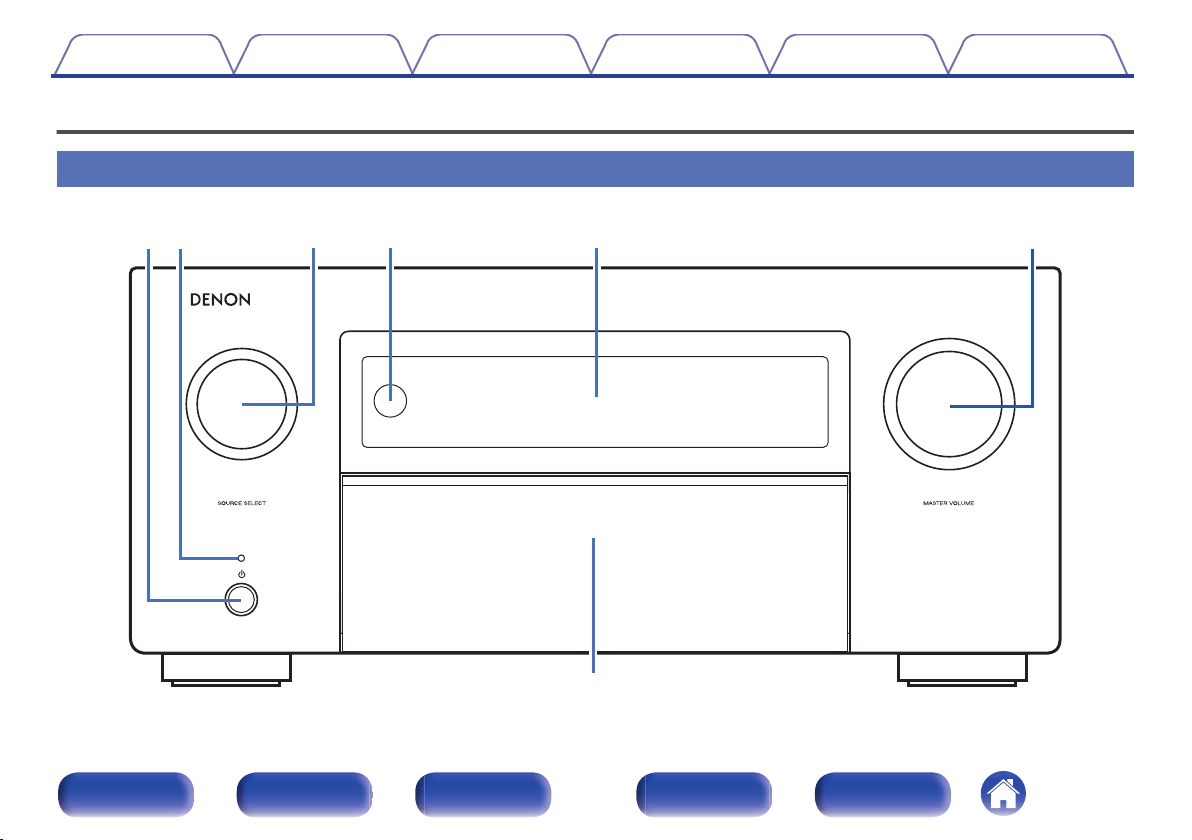
Part names and functions
Front panel
.
u
r
w
qe
y
t
For details, see the next page.
Contents
Connections
Playback
Settings
Tips
Appendix
19
Front panel
Display
Rear panel
Remote
Index
Loading ...
Loading ...
Loading ...
File type: PDF
File name: 47487894_avr-x8500ha.pdf
File size: 18.98 MB
File Language: English
Pages: 359
Author: Denon
File created: 2021-02-10
Published: 2022-05-16
Updated: 2023-08-07
Verified by
Mozell Leffler
on 2023-08-07
Download File
Table of Contents
×
Accessories
9
Inserting The Batteries
10
Operating Range Of The Remote Control Unit
10
Features
11
High Quality Sound
11
High Performance
14
Easy Operation
18
Part Names And Functions
19
Front Panel
19
Display
23
Rear Panel
25
Remote Control Unit
29
Connections
33
Speaker Installation
34
Connecting Speakers
43
Before Connecting Speakers
43
Speaker Configuration And “Amp Assign” Settings
47
Connecting 5.1: Channel Speakers
49
Connecting 7.1: Channel Speakers
50
Connecting 9.1: Channel Speakers
55
Connecting 13.1: Channel Speakers
64
Connecting 15.1: Channel Speakers
69
Bi Amp Connection
75
Connecting 11.1: Channel Speakers: Second Pair Of Front Speakers
77
Connecting Multi Zone Speakers
78
Connecting An External Power Amplifier
82
Connecting A TV
83
Connection 1 : TV Equipped With An HDMI Connector And Compatible With The ARC (Audio Return Channel) / EARC (Enhanced Audio Return Channel)
84
Connection 2 : TV Equipped With An HDMI Connector And Incompatible With The ARC (Audio Return Channel) / EARC (Enhanced Audio Return Channel)
85
Connection 3 : TV Equipped Without An HDMI Connector
86
Connecting A Playback Device
87
Connecting A Set Top Box (Satellite Tuner/cable TV)
88
Connecting A DVD Player Or Bluray Disc Player
89
Connecting A Bluray Disc Player Compatible With The Denon Link HD Function
90
Connecting A Player Device Compatible With The 8K
91
Connecting A Video Camcorder Or Game Console
92
Connecting A Turntable
93
Connecting A Device With A Multichannel Output Connector
94
Connecting A USB Memory Device To The USB Port
95
Connecting FM/AM Antennas
96
Connecting To A Home Network (LAN)
98
Wired LAN
98
Wireless LAN
99
Connecting An External Control Device
100
REMOTE CONTROL Jacks
100
TRIGGER OUT Jacks
101
Connecting The Power Cord
102
Playback
103
Basic Operation
104
Turning The Power On
104
Selecting The Input Source
104
Adjusting The Volume
105
Turning Off The Sound Temporarily (Muting)
105
Playback A DVD Player/Bluray Disc Player
105
Playing A USB Memory Device
106
Playing Files Stored On USB Memory Devices
107
Listening To Music On A Bluetooth Device
110
Playing Music From Bluetooth Device
111
Pairing With Other Bluetooth Devices
113
Reconnecting To This Unit From A Bluetooth Device
114
Listening To FM/AM Broadcasts
115
Listening To FM/AM Broadcasts
116
Tuning In By Entering The Frequency (Direct Tune)
117
Changing The Tune Mode (Tune Mode)
118
Tuning In To Stations And Presetting Them Automatically (Auto Preset Memory)
118
Presetting The Current Broadcast Station (Preset Memory)
119
Listening To Preset Stations
119
Specify A Name For The Preset Broadcast Station (Preset Name)
120
Skipping Preset Broadcast Stations (Preset Skip)
121
Cancelling Preset Skip
122
Listening To Internet Radio
123
Listening To Internet Radio
124
Playing Back Files Stored On A PC Or NAS
125
Playing Back Files Stored On A PC Or NAS
126
Getting The HEOS App
129
HEOS Account
130
Playing From Streaming Music Services
131
Listening To The Same Music In Multiple Rooms
134
AirPlay Function
138
Playing Songs From Your IPhone, IPod Touch Or IPad
139
Playing ITunes Music With This Unit
139
Play A Song From Your IPhone, IPod Touch Or IPad On Multiple Synced Devices (AirPlay 2)
140
Spotify Connect Function
141
Playing Spotify Music With This Unit
141
Convenience Functions
142
Adding To HEOS Favorites
143
Playing Back HEOS Favorites
143
Deleting A HEOS Favorites
144
Adjusting The Audibility Of Dialog And Vocals (Dialog Enhancer)
144
Adjusting The Volume Of Each Channel To Match The Input Source (Channel Level Adjust)
145
Adjusting The Tone (Tone)
146
Displaying Your Desired Video During Audio Playback (Video Select)
147
Adjusting The Picture Quality For Your Viewing Environment (Picture Mode)
148
Playing The Same Music In All Zones (All Zone Stereo)
149
Selecting A Sound Mode
150
Selecting A Sound Mode
151
Direct Playback
152
Pure Direct Playback
153
Auto Surround Playback
153
Description Of Sound Mode Types
154
Sound Mode That Can Be Selected For Each Input Signal
159
HDMI Control Function
165
Setting Procedure
165
Smart Menu Function
166
Sleep Timer Function
168
Using The Sleep Timer
169
Quick Select Plus Function
170
Calling Up The Settings
171
Changing The Settings
172
Panel Lock Function
173
Disabling All Key Button Operations
173
Disabling All Button Operations Except VOLUME
173
Canceling The Panel Lock Function
174
Remote Lock Function
175
Disabling The Sensor Function Of The Remote Control Unit
175
Enabling The Remote Sensor Function
175
Web Control Function
176
Controlling The Unit From A Web Control
176
Playback In ZONE2/ZONE3 (Another Room)
178
Connecting ZONE
178
Playback In ZONE2/ZONE3
183
Settings
185
Menu Map
185
Menu Operations
189
Audio
190
Subwoofer Level Adjust
190
Bass Sync
190
Surround Parameter
191
Restorer
199
Audio Delay
200
Volume
201
Audyssey
202
Graphic EQ
205
Video
207
Picture Adjust
207
HDMI Setup
209
Output Settings
214
Analog Video Out
218
On Screen Display
218
4 K/8K Signal Format
219
TV Format
221
Inputs
222
Input Assign
222
Source Rename
224
Hide Sources
225
Source Level
225
Input Select
226
Speakers
227
Audyssey Setup
227
Procedure For Speaker Settings (Audyssey Setup)
229
Error Messages
235
Retrieving Audyssey Setup Settings
237
Manual Setup
238
Amp Assign
238
Speaker Config.
248
Distances
254
Levels
255
Crossovers
256
Bass
257
Front Speaker
258
2ch Playback
258
Network
261
Information
261
Connection
261
WiFi Setup
262
Settings
264
Network Control
266
Friendly Name
266
Diagnostics
267
HEOS Account
268
You Have Not Signed In
268
You Have Already Signed In
268
General
269
Language
269
ECO
269
ZONE2 Setup / ZONE3 Setup
273
Zone Rename
275
Quick Select Names
275
Trigger Out 1 / Trigger Out 2
276
Front Display
276
Firmware
277
Information
280
Remote ID
282
Usage Data
282
Save & Load
283
Setup Lock
283
Operating External Devices With The Remote Control Unit
284
Registering Preset Codes
285
Operating Devices
288
Operating Learning Function
291
Operating Macro Function
294
Specifying The Zone Used With The Remote Control Unit
298
Setting The Remote ID
299
Setting The Display Time Length Of The Remote Control Unit Display
299
Setting The Back Light
300
Restoring All Settings Of The Remote Control Unit To Default
300
Tips
301
Tips
302
Troubleshooting
304
Power Does Not Turn On / Power Is Turned Off
305
Operations Cannot Be Performed Through The Remote Control Unit
306
Display On This Unit Shows Nothing
306
No Sound Comes Out
307
Desired Sound Does Not Come Out
308
Sound Is Interrupted Or Noise Occurs
311
No Video Is Shown On The TV
312
The Menu Screen Is Not Displayed On The TV
314
The Color Of The Menu Screen And Operations Content Displayed On The Television Is Different From Normal
314
AirPlay Cannot Be Played Back
315
USB Memory Devices Cannot Be Played Back
316
Bluetooth Cannot Be Played Back
317
The Internet Radio Cannot Be Played Back
318
Music Files On PC Or NAS Cannot Be Played Back
319
Various Online Services Cannot Be Played
320
The HDMI Control Function Does Not Work
320
Cannot Connect To A Wireless LAN Network
321
When Using HDMI ZONE2, The Devices Does Not Function Properly
322
Update/upgrade Error Messages
323
Resetting Factory Settings
324
Resetting Network Settings
325
Restoring The Firmware To The Factory Defaults
326
Appendix
327
About HDMI
327
Video Conversion Function
331
Playing Back A USB Memory Devices
333
Playing Back A Bluetooth Device
334
Playing Back A File Saved On A PC Or NAS
335
Playing Back Internet Radio
336
Personal Memory Plus Function
336
Last Function Memory
336
Explanation Of Terms
337
Trademark Information
347
Specifications
350
Index
356
Search:
×
Search