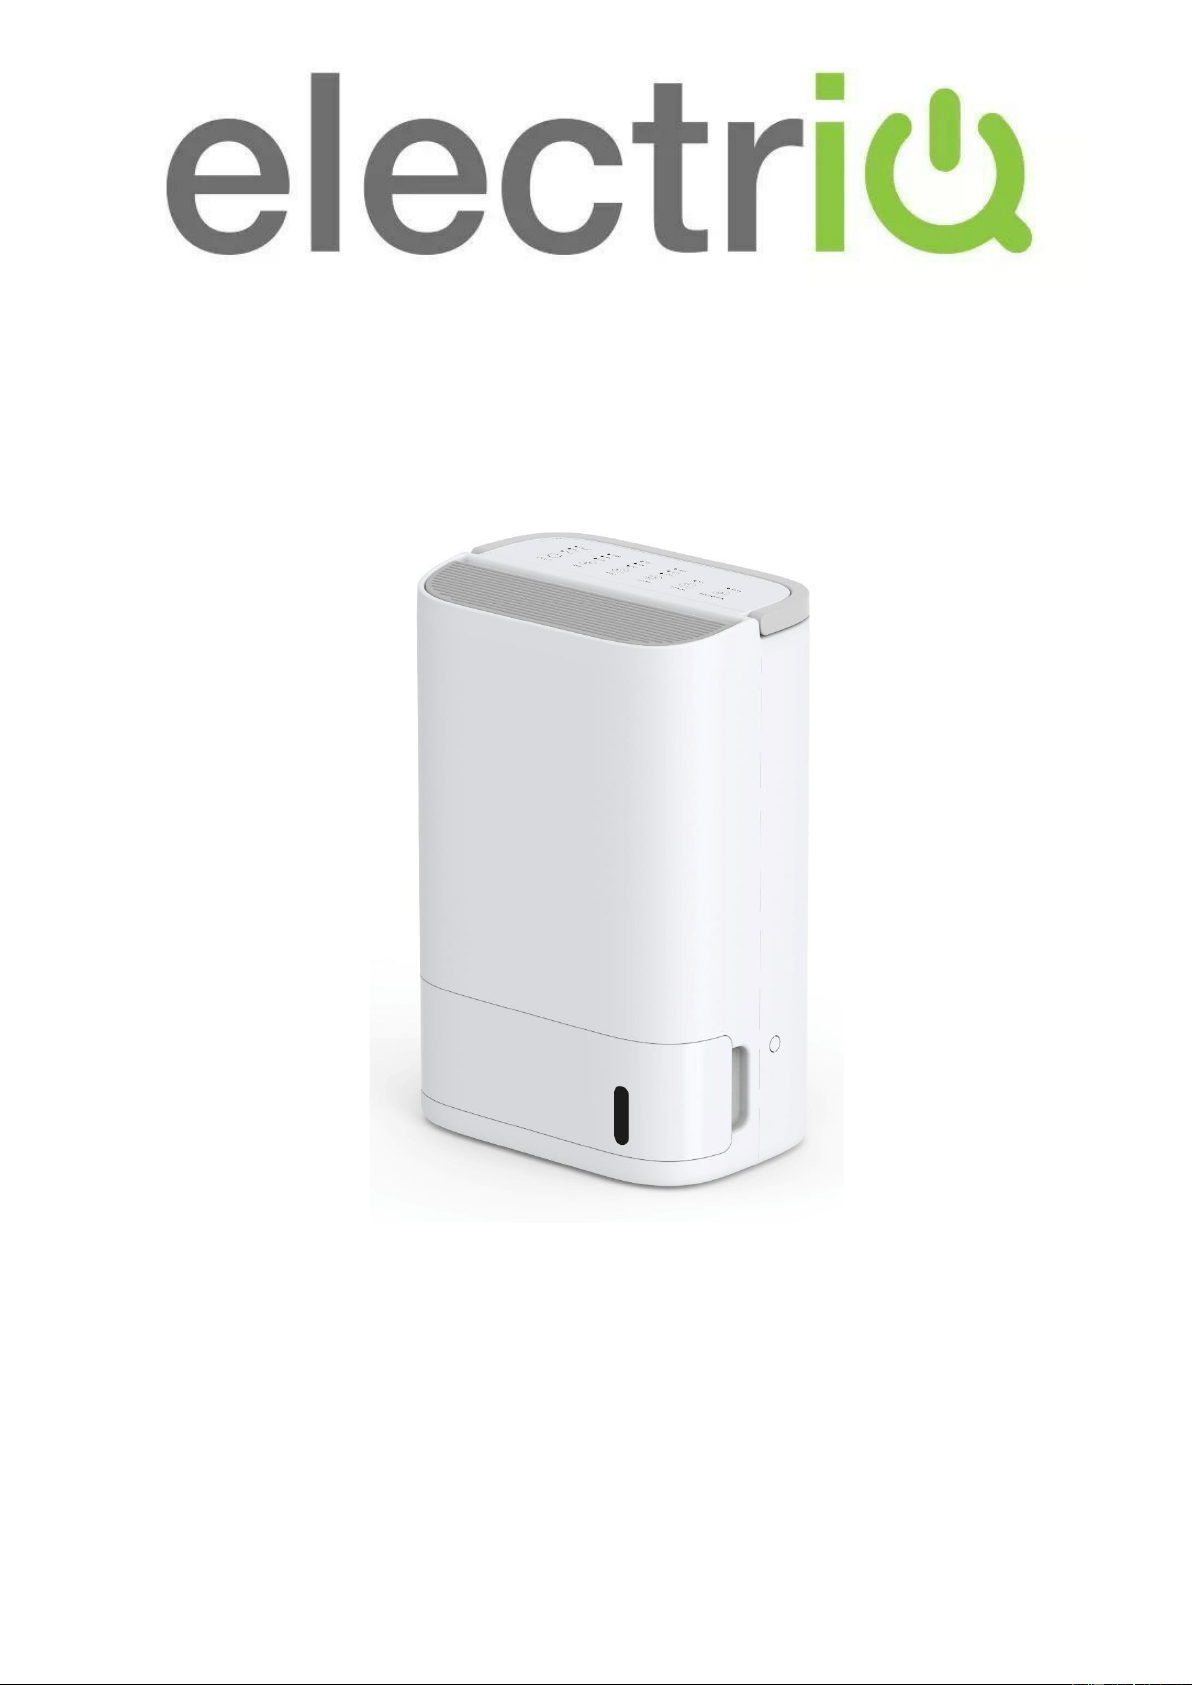
USER MANUAL
DESICCANT DEHUMIDIFIER
DESD8LW
Thank you for choosing electriQ.
Please read this user manual before using this innovative dehumidifier and keep it safe
for future reference.

2
CONTENTS
SAFETY INSTRUCTIONS
3
FEATURES
6
PRODUCT OVERVIEW
7
POSITIONING THE DEHUMIDIFIER
8
CONTROL PANEL
9
WATER DRAINAGE
10
SETTING UP THE APP
12
CONNECTING TO THE APP
15
CONTROLLING YOUR DEVICE
17
SMART SCENES AND AUTOMATION
19
CONNECTION TROUBLESHOOTING
21
CARE AND MAINTENANCE
22
TROUBLESHOOTING
23
TECHNICAL SPECIFICATION
24
SUPPORT
25

3
SAFETY INSTRUCTIONS
IMPORTANT
• Carefully read the instructions before
operating the unit.
• This appliance is only intended for use
in an indoor domestic environment. Any
other use is not recommended by the
manufacturer and may cause fire,
electrical shock or other injuries to
person or damage to property.
• Rating: This unit must only be
connected to a 220-240V earthed
outlet. Installation must be in
accordance with the regulations of the
country where the unit is used.
• If you are in any doubt about the
suitability of your electrical supply, have
it checked and, if necessary, modified
by a qualified electrician.
• This dehumidifier has been tested and
is safe to use. However, as with any
electrical appliance – care must be
taken during use.
• Disconnect the power from the
appliance before dismantling,
assembling or cleaning.
• Avoid touching any moving parts of the
appliance.
• Never insert fingers, pencils or any
other objects through the guard.
• This appliance is not intended for use
by persons (including children) with
reduced physical, sensory or mental
capabilities. It is also not intended for
use by those with a lack of experience
and knowledge unless they have been
given supervision or instruction
concerning the use of the appliance by
a person responsible for their safety.
• Do not leave children unsupervised with
this appliance.
• Do not clean the unit by spraying it or
immersing it in water.
• Never connect the unit to an electrical
outlet using an extension cord. If a
power outlet is not available, one
should be installed by a qualified
electrician.
• Never operate this appliance if the cord,
power adapter or plug is damaged.
Ensure the power cord is not stretched
or exposed to sharp object/edges.
• A damaged power supply cord should
be replaced by the manufacturer or a
qualified electrician in order to avoid a
hazard.
• Any service other than regular cleaning
or filter replacement should be
performed by an authorized service
representative. Failure to comply could
result in a voided warranty.
• Do not use the appliance for any
purpose other than its intended use.
• Do not tilt the unit while in use. The unit
is designed to work only in a vertical
position. This dehumidifier must always
be stored upright, otherwise irreparable
damage may be caused.
• This unit will still operate for
approximatively 3-4 minute after
pressing the power button to turn off.
This is normal and ensures the
desiccant wheel is drained of water.
Avoid restarting the dehumidifier until 5
minutes have passed after being turned
off.
• Never use the mains plug as a switch to
start or turn off the dehumidifier. Use
the provided power button located on
the control panel.

4
• Always place the unit on a dry and
stable surface.
• The appliance should not be installed in
a laundry or wet room where the
humidity is higher than 85% RH. This
unit should be operated at an ambient
temperature between 1°C and 32°C.
• Do not dry laundry directly above the
unit. To prevent water from entering the
dehumidifier, laundry should be placed
at least 40 cm away from your
dehumidifier.
• Do not place the unit next to heat
sources (e.g. electrical fires, fireplaces,
etc.)
• Desiccant dehumidifiers tend to absorb
odours from the surrounding
environment like cigarettes, cooking,
cosmetics, new furniture etc. This smell
is described as a burning or sour smell.
This is released during operation as the
zeolite disc is heated. This is not a sign
of a fault and the smell will fade after
usage.
• Do not store or use gasoline, petrol,
paint, solvents or other flammable
vapours and liquids in the vicinity of this
dehumidifier or any other appliance. Do
not use dehumidifiers where flammable
gases or VOC can be released or
accumulate. Avoid mishandling the
dehumidifier. Dropping, throwing the
unit can cause damage to its internals
and increases the risks of operating it.
• The handle on the appliance is
designed to aid in its movement and
should not be used to support the full
weight of the dehumidifier. When
carrying the unit, it should be kept
upright and suifficiently supported from
its base.
• Due to continuous product development
the layout and availability of features
within the app may vary.
ENERGY SAVING AND UNIT SAFETY
PROTECTION TIPS
• Do not cover or restrict the airflow from
the outlet or inlet grills.
• For maximum performance, the unit
should be operated at least 20 cm away
from walls and 50 cm from other objects
within the room.
• Keep the filters and grills of the
appliance clean. Under normal
conditions, filters and grills should only
need cleaning once every three weeks
(approximately). Do not use the unit
without the mesh air filter as this will
allow dirt to gather inside the
dehumidifier, which could invalidate the
warranty.
• A dirty filter will restrict the airflow into
the machine, which will increase the
resistance on the fan and could result in
damage and might invalidate the
warranty.
• Since the filters remove airborne
particles, more frequent cleaning may be
necessary depending on the air quality.
Vacuum and wash the mesh filters with
hot soapy water and dry them before
placing them back in the unit.
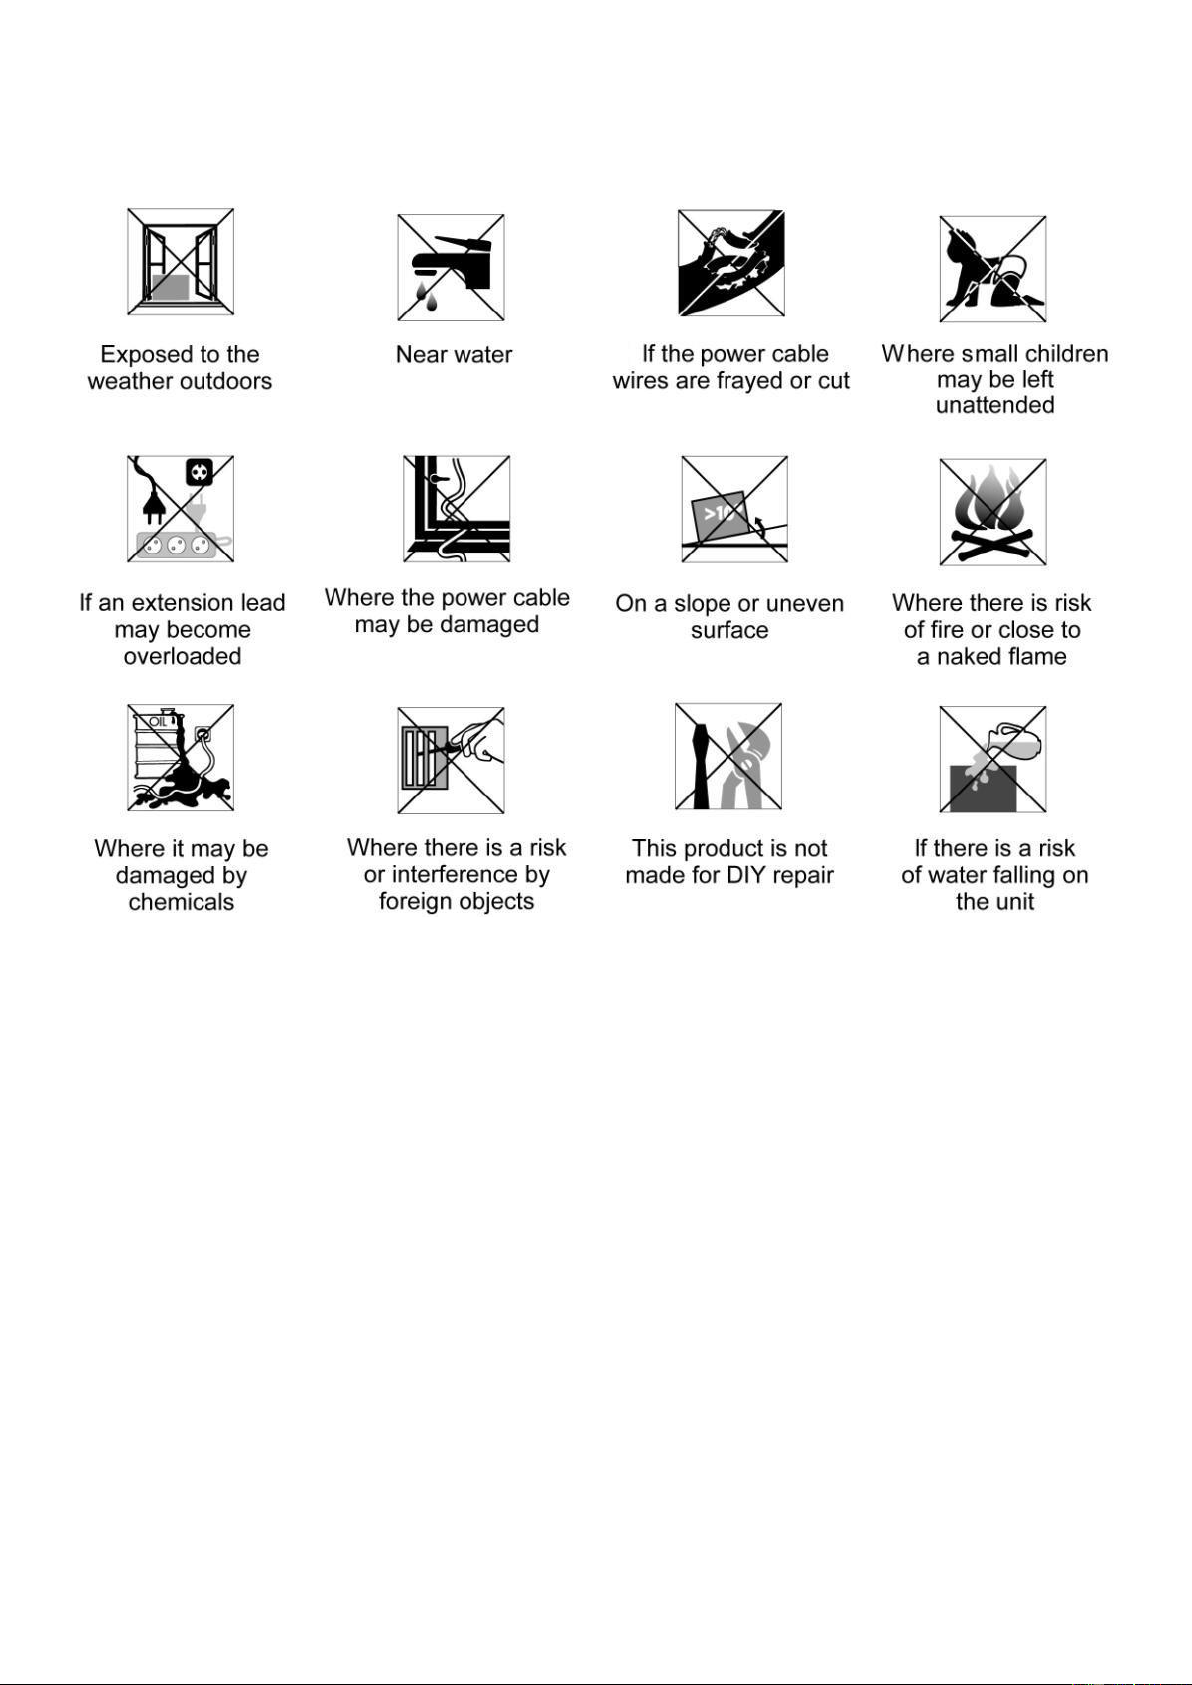
VISUAL SAFETY GUIDE
WHERE OR WHEN NOT TO USE YOUR DEHUMIDIFIER

6
FEATURES
Your DESD8LW is a high quality desiccant dehumidifier with features not found in other units.
1. Efficient, easy to use and quiet.
2. Intelligent CPU controlled digital humidistat with 3 modes (Low, Mid and High),
3. Control and monitor the humidity or temperature remotely using your Android or Apple phone / tablet.
4. Alexa and Google home compatible: use voice commands to conveniently operate the smart
dehumidifier.
5. Advanced scheduling abilities using the App.
6. Easy to use control panel with LED indicators.
7. Works very well at low temperatures compared with classic compressor dehumidifiers.
8. Heats the air passing through by between 5-10°C, making the air dry and warm reducing heating bills.
9. Ioniser creates negative ions which cause floating particulates such as dust, pet dander and allergens
in the air, to cling together removing them from the air.
10. Swing feature allows direction of air flow to be adjusted.
11. Tank full alarm & auto-stop function.
12. Anti-tip switch to protect the machine should it be accidentally tipped over.
13. Recessed carry handle for portability.
The DESD8LW desiccant dehumidifiers uses compressor-free desiccant technology to extract water from
the environment. Desiccant dehumidifiers are ideal both at standard and low temperatures working in an
ambient temperature range of between 1-32°C. The DESD8LW is light and easy to move, as it does not
contain a heavy compressor. It also works intelligently as it is designed to extract unwanted humidity while
saving money due to its advanced power saving logic.
It features an intelligent digital humidistat with variable humidity selectable between 50% and 60% RH,
ensuring your room is not over dried, and power is not wasted. Alternatively the Auto mode can be selected
to run continuously.
7
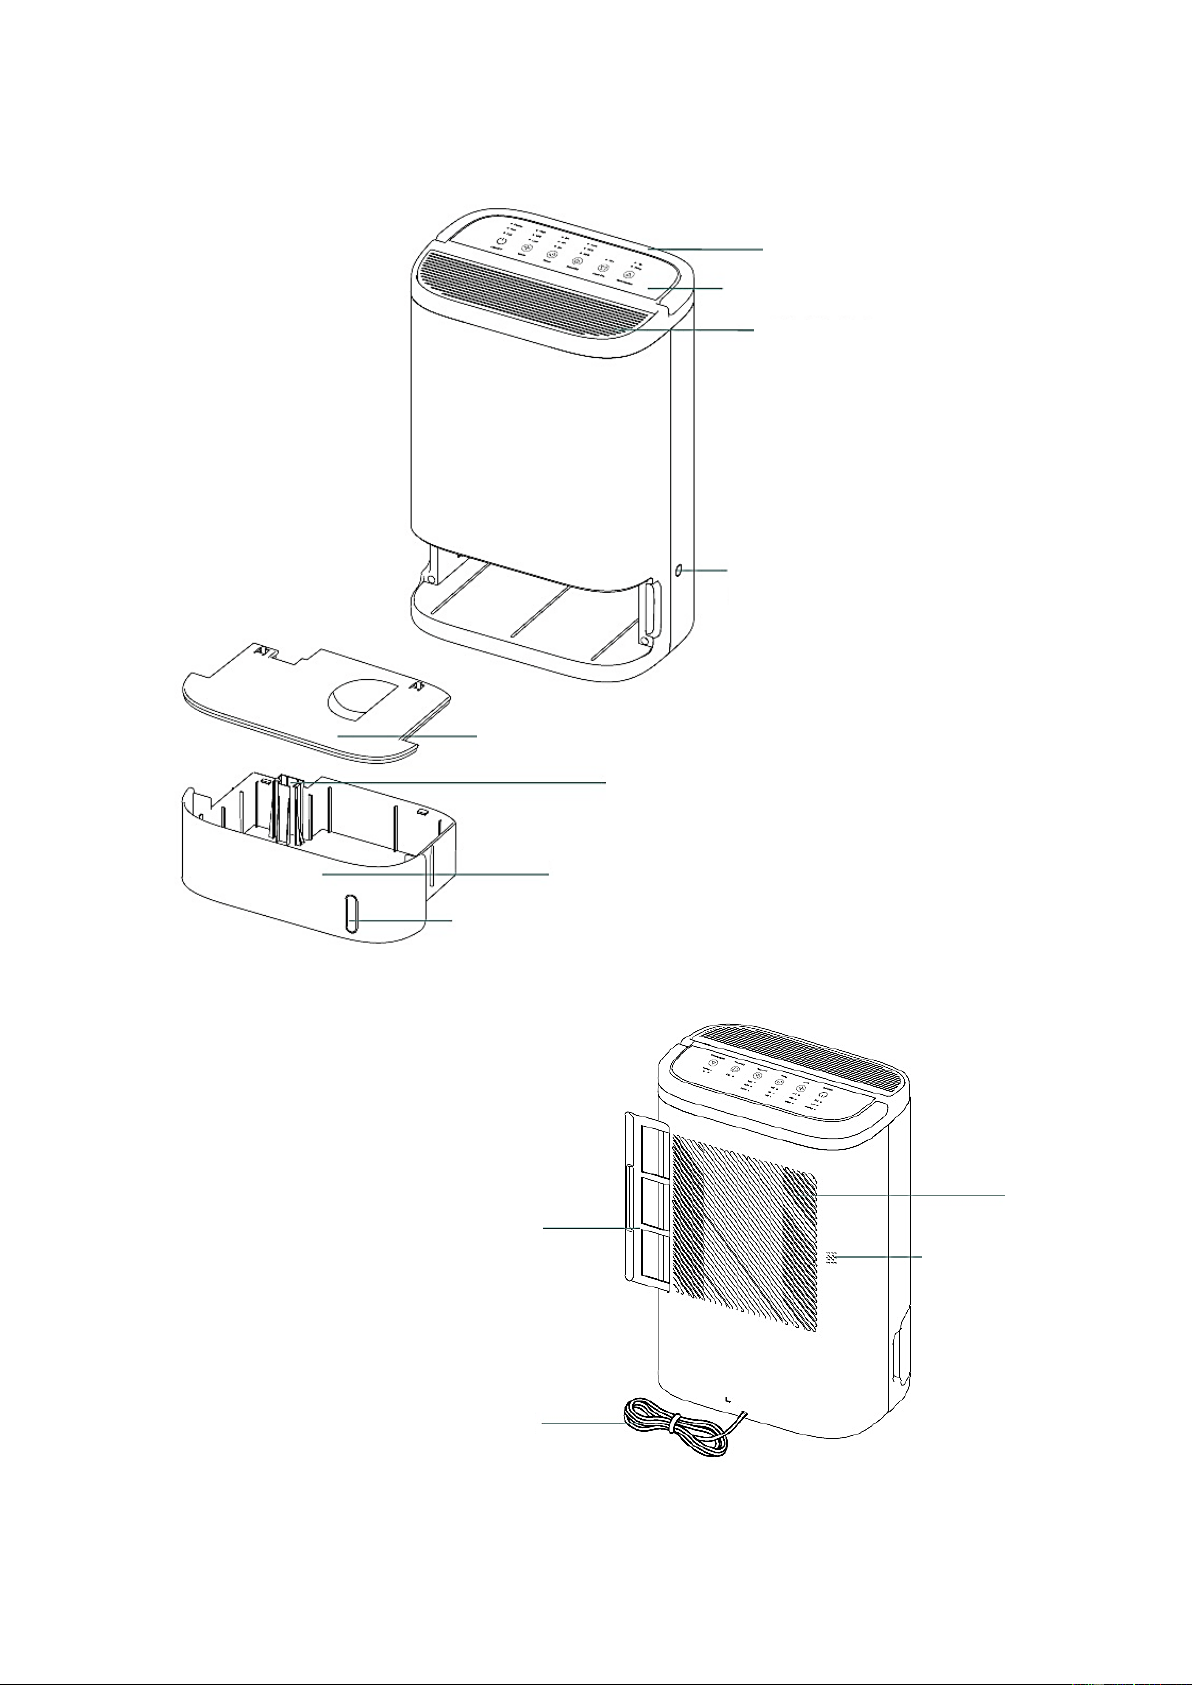
PRODUCT OVERVIEW
Handle
Air Outlet
Control Panel
Contnuous Drainage
Hole
Water Tank Cover
Float
Water Tank
Water Level Window
Air Inlet
Humidity Sensor
Filter
Power Cord
8
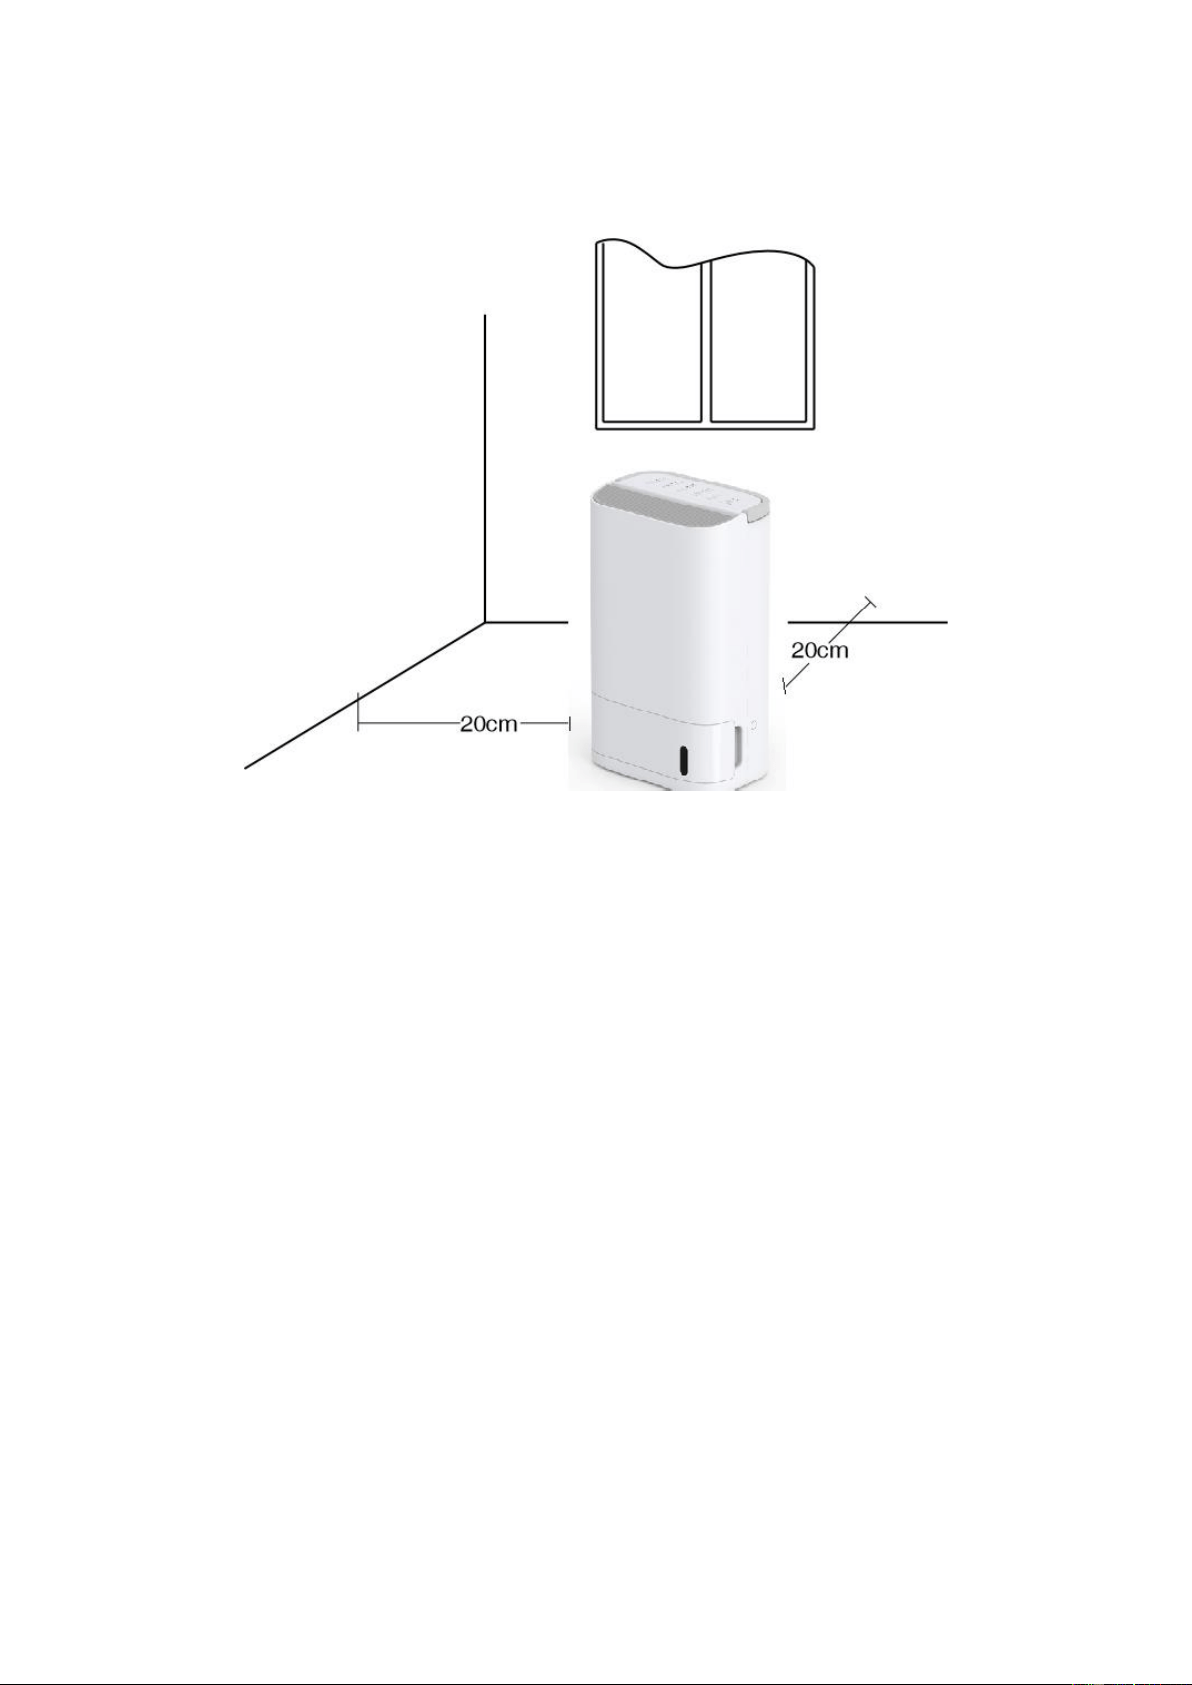
POSITIONING THE DEHUMIDIFIER
A badly positioned dehumidifier will have little effect. In positioning the dehumidifier please ensure circulation
of the air is not restricted around the unit. At least 20 cm space should be allowed around the unit.
This dehumidifier is designed for indoor residential / small office applications only and any commercial or
industrial use will invalidate the warranty.
Use the dehumidifier in an enclosed area for maximum efficiency. Close all external doors and windows to
create an effective operating environment. Do not use outdoors.
Your electriQ dehumidifier will begin to protect your space from the harmful effects of excessive moisture as
soon as it is turned on. Excess moisture is dispersed throughout your home. For this reason, the dehumidifier
should be positioned in a central and clear location so that it can draw this moist air towards it. A warm
hallway or landing is an ideal position for your dehumidifier. If possible, leave interior doors ajar to allow air
circulation between rooms.
Alternatively, if you have a serious problem in one area you can begin by positioning the dehumidifier in that
area and moving it to a more central location at a later date. Please note the unit should not be placed directly
against a radiator or other heat source. When positioning your electriQ dehumidifier, ensure that it is placed
clear of any obstacle that may limit the air movement, and ensure it is placed on a dry flat surface.
INSTALLATION
Remove any water from the water tank before starting the unit. In order to save energy, do not open windows
or doors while the unit is running. Place the unit on a hard / flat surface. We would advise the unit be left to
run continuously for 24 hours on its first use.
9
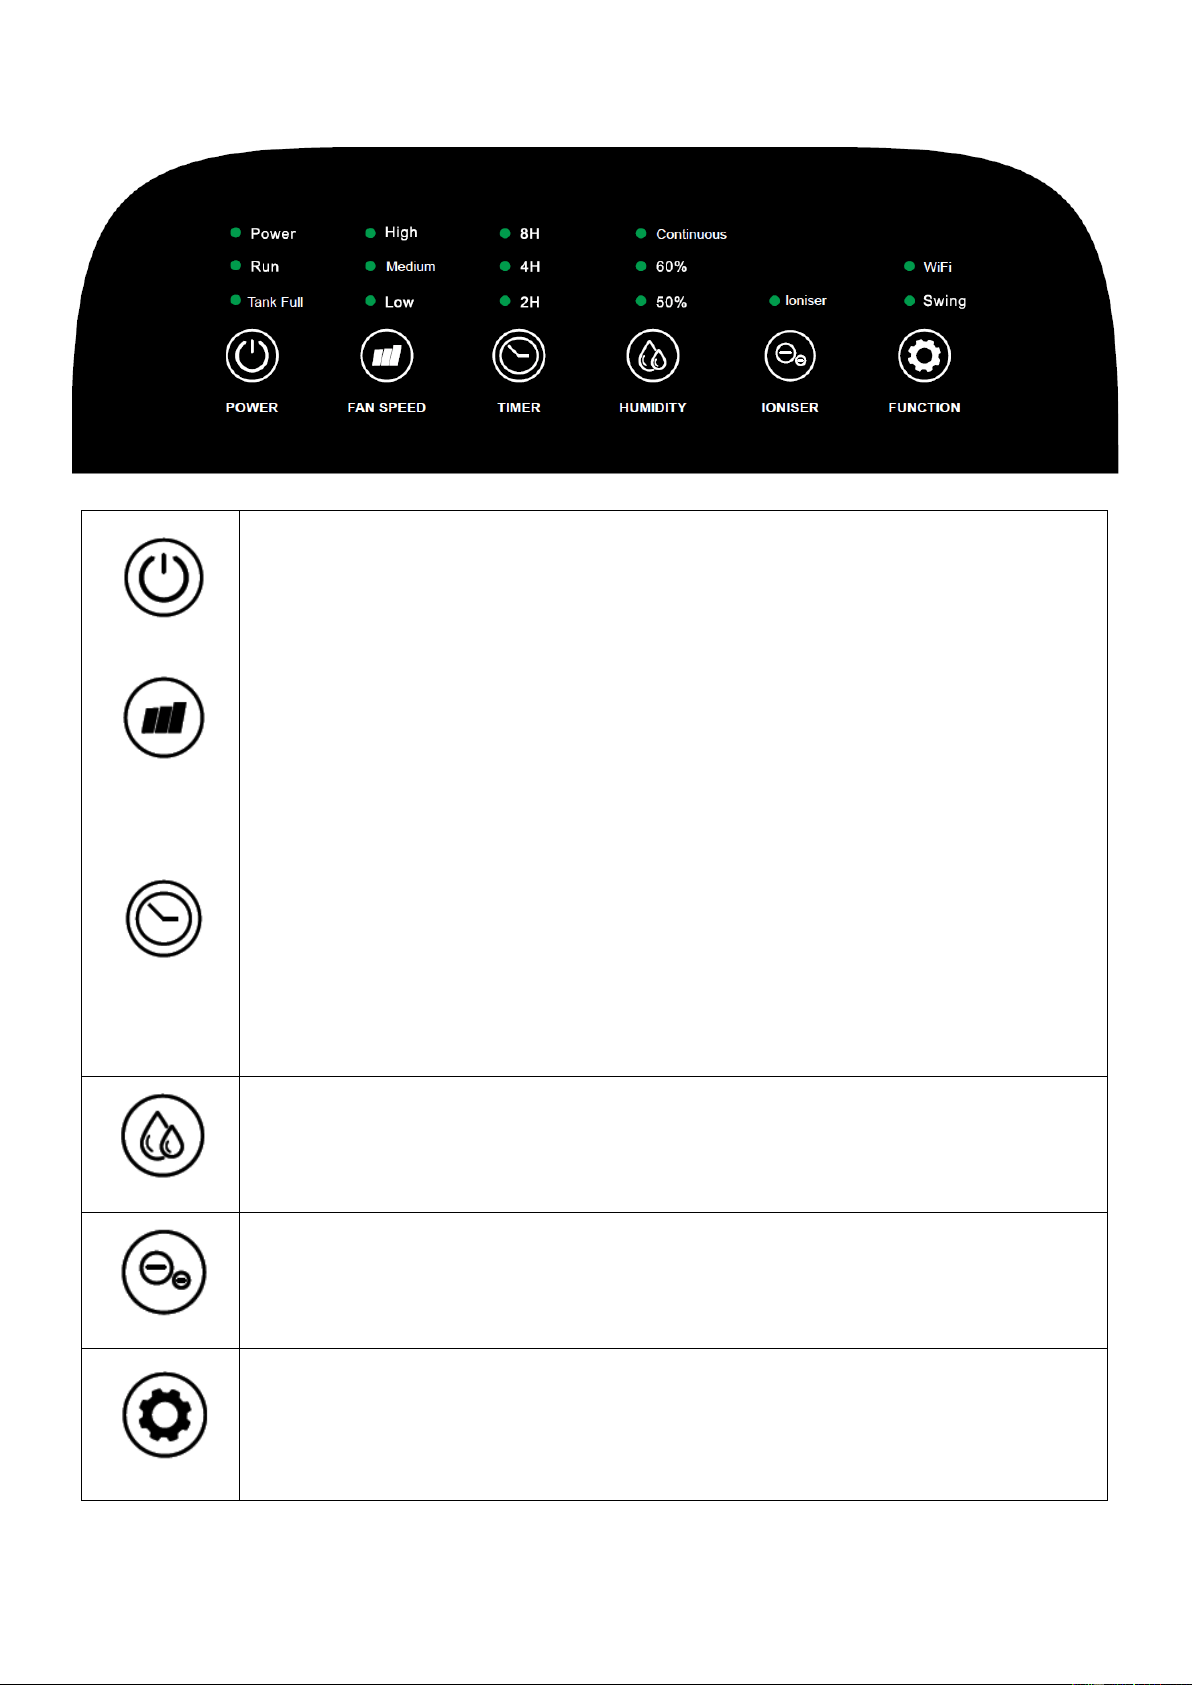
CONTROL PANEL
POWER
POWER BUTTON
Press to turn the appliance ON and OFF. The POWER indicator illuminates when the
unit is turned on, The RUN indicator will illuminate while the unit is dehumidifying and
the TANK FULL indicator will illuminate when the unit has stopped due to a full water
tank.
FAN SPEED
FAN SPEED BUTTON
Changes the fan speeds between High, Medium and Low. The corresponding
indicator will illuminate above to show the currently selected fan speed.
TIMER
TIMER BUTTON
The timer can be set in 2 hour increments between 2 hours and 14 hours. The
addition of the illuminated indicators shows the duration of the timer. i.e. if 2h and 4h
are illuminated, the timer is set to 6 hours.
WHILE RUNNING: Repeatedly press the TIMER button to set in how many hours
the unit will turn off. Note: If the water tank fills during operation of the timer, the
timer will stop until the water tank has been emptied, before resuming the
countdown.
WHILE IN STANDBY: Repeatedly press the TIMER button to set in how many
hours the unit will start. Note the unit will start with the previously used settings.
HUMIDITY
HUMIDITY BUTTON
Alternate between RH50%, RH60% and Contnuous. Once the humidity level falls
below the target of 50% or 60%, the unit will stop dehumidifying until the humidity
rises. The Continuous setting ensures the appliance will not stop dehumidifying and
is ideal for laundry in conjunction with the high fan speed.
IONISER
IONISER BUTTON
The ioniser button creates negative ions which cause floating particulates such as
dust, pet dander and allergens in the air to cling together removing them from the air.
FUNCTION
FUNCTION BUTTON
Here the swing function can be controlled, either swing or stop, stopping at any angle
within 70 degrees. The FUNCTION button is also used for configuring the WiFi
function.
10
WATER DRAINAGE
The water tank has a maximum capacity of 2.5L with a 7L per day working capacity. When the water tank is
full, the unit will stop operating. When this happens, the TANK FULL light will flash on the control panel, and
the unit will bleep.
Note: Only empty the water tank when it is full or before moving or storing the unit. There are two ways
to dispense collected water.
USE THE INTERNAL WATER TANK
When the tank is full, the unit will stop running, and the TANK FULL indicator light will display. Grip the tank
securely and carefully slide it out of the unit. Empty the water tank and reinsert it into the dehumidifier. The
tank must be in place and securely seated for the dehumidifier to operate again. The dehumidifier will re-start
when the tank is restored to its correct position.
NOTES:
• Do not remove the water tank immediately after the unit stops. Please wait a while to avoid the water
dripping into the unit and causing damage.
• Only empty the water tank when it is full or before moving or storing the unit.
• Do not rest the tank on the floor because the bottom of the tank could be uneven and the tank may fall,
causing water to spill.
• When you remove the tank, do not touch sensors or any parts which are situated behind the tank. Doing so
may damage the product. Be sure to push the tank gently all the way into the unit. Banging the tank against
anything or failing to push it securely into place may prevent the unit from operating.
• Do not remove or damage the float switch in the water tank, otherwise the machine will stop working.
• Please make sure the water tank cover is put back into place correctly before the water tank is reinserted.
• If the water tank is inserted incorrectly, the full tank indicator will illuminate. Remove the water tank and
reinsert to turn the indicator off and resume normal use.
• At all times, avoid water entering the unit. It may cause an electrical hazard and damage the unit.
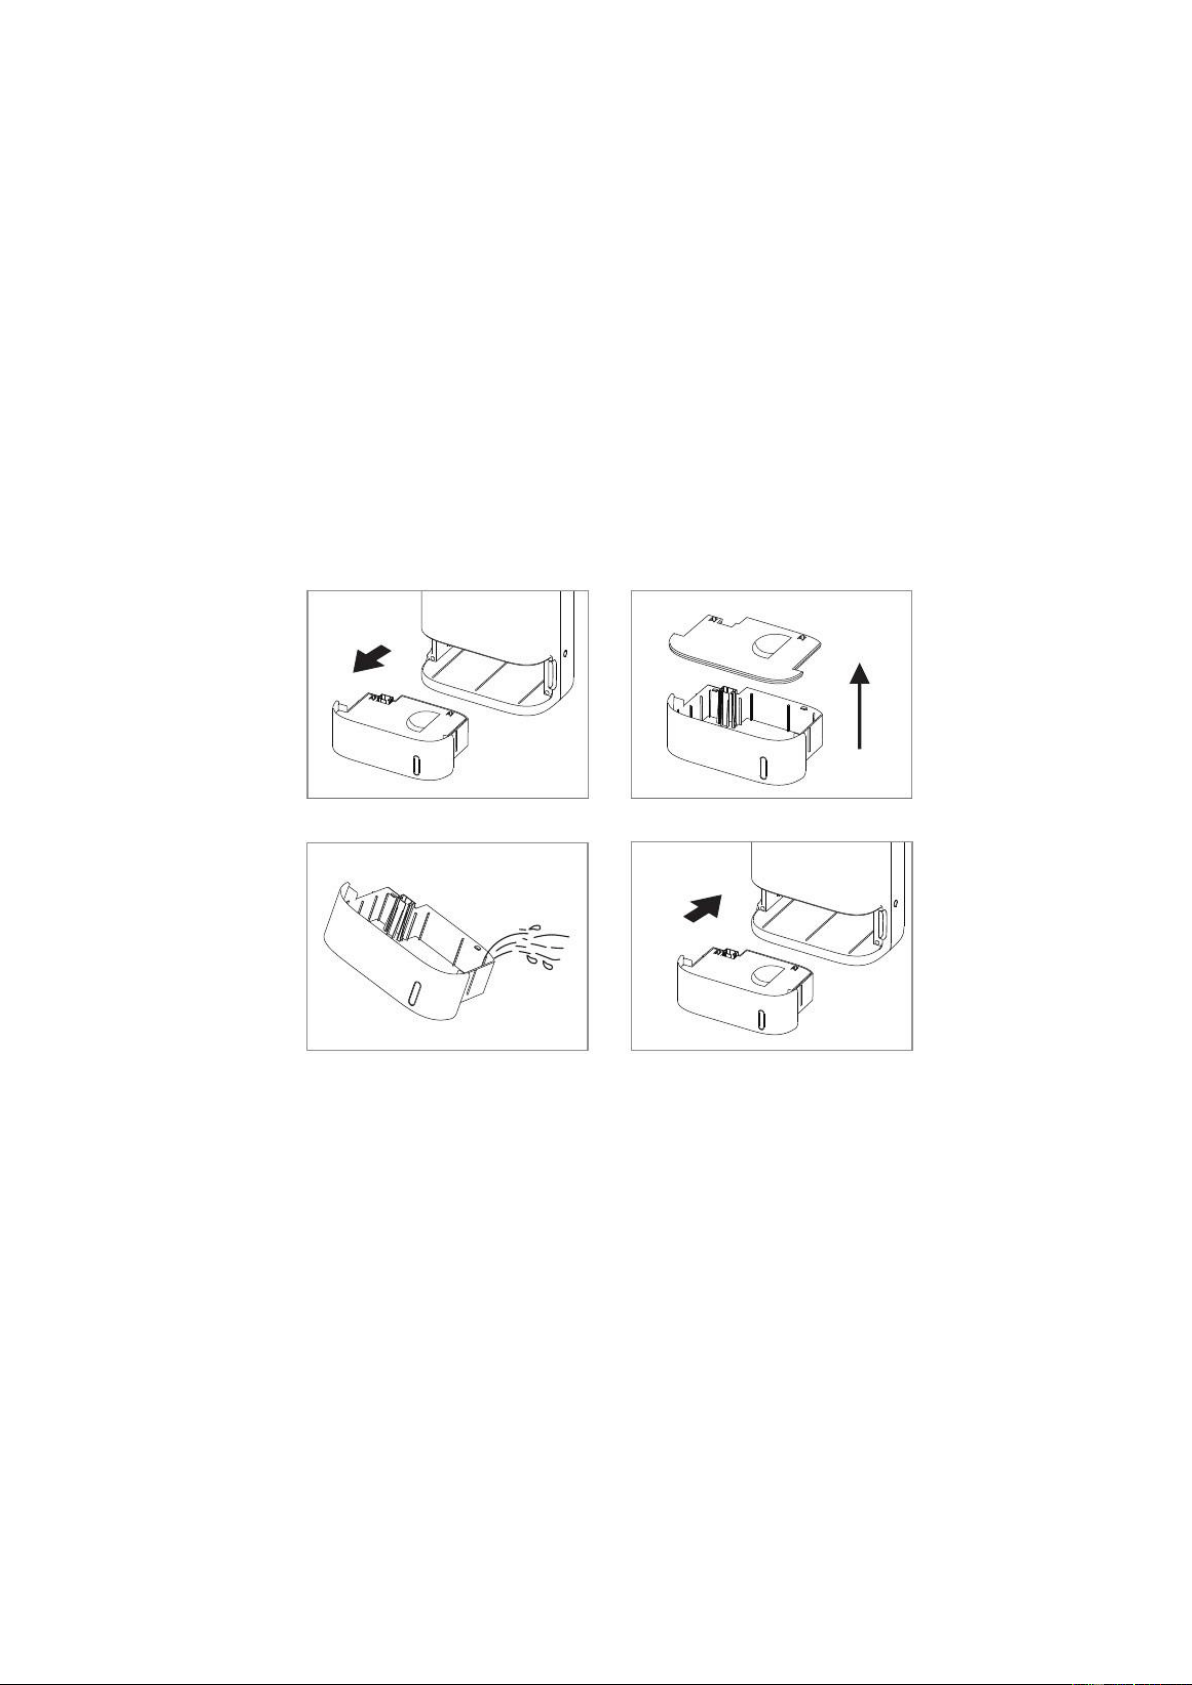
1. Take out the water tank 2. Remove the water tank cover
3. Empty the water 4. Reset the tank and it will restart
EMPTYING THE WATER TANK:
11
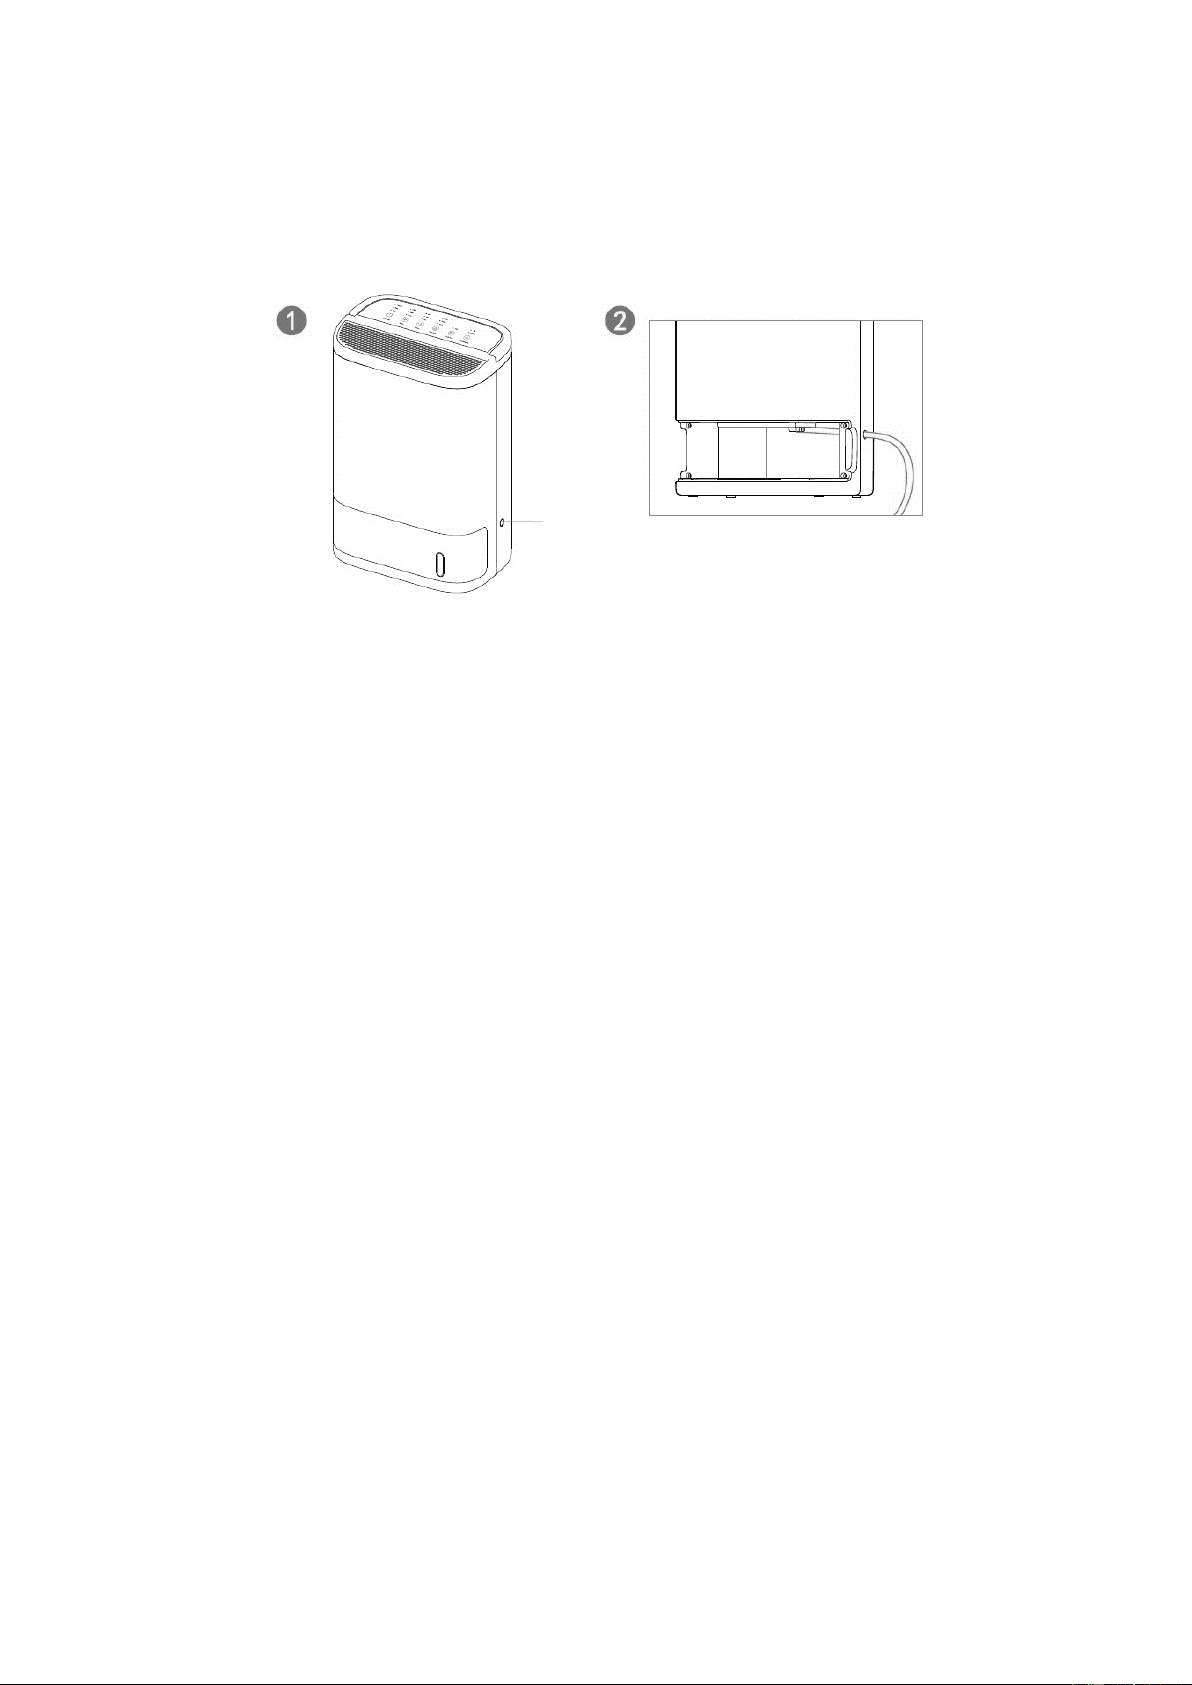
SET UP CONTINUOUS DRAINAGE
The dehumidifier has a continuous drain hole that can be connected to a plastic pipe with a 14 mm inner
diameter (not supplied). Water can be drained into a large receptacle or sink, for example, or through the
wall into an outside drain. Please follow the steps below to set your unit up for continuous drainage.
1. Cut off the cover for the continuous drain on the back of the unit.
2. Remove the water tank and connect a water tube with an inner
diameter of 14mm to the drain connector, and ensure the connection
is tight
3. Replace the water tank into position within the unit.
This unit uses gravity to dispose of the water collected and as such the drain should be lower than the
dehumidifier water outlet. Be sure to run the water pipe downwards and let the water flow out smoothly. Do
not kink or bend the pipe.
NOTES:
• When the continuous drain feature is not being used, remove the pipe installation, to start the water
collecting in the water tank.
• The permanent drain can be used in conjunction with a water pump (e.g. when draining from a cellar)
to lift the water upwards.
Plastic block
12
SETTING UP THE WIFI APP
BEFORE YOU START
• Ensure your router provides a standard 2.4GHz connection.
• If your router is dual-band ensure that both networks have different network names (SSID). The provider
of your router / Internet service provider will be able to provide advice specific to your router.
• Place the dehumidifier as close as possible to the router during setup.
• Once the app has been installed on your phone, turn off the data connection, and ensure your phone is
connected to your router via WiFi.
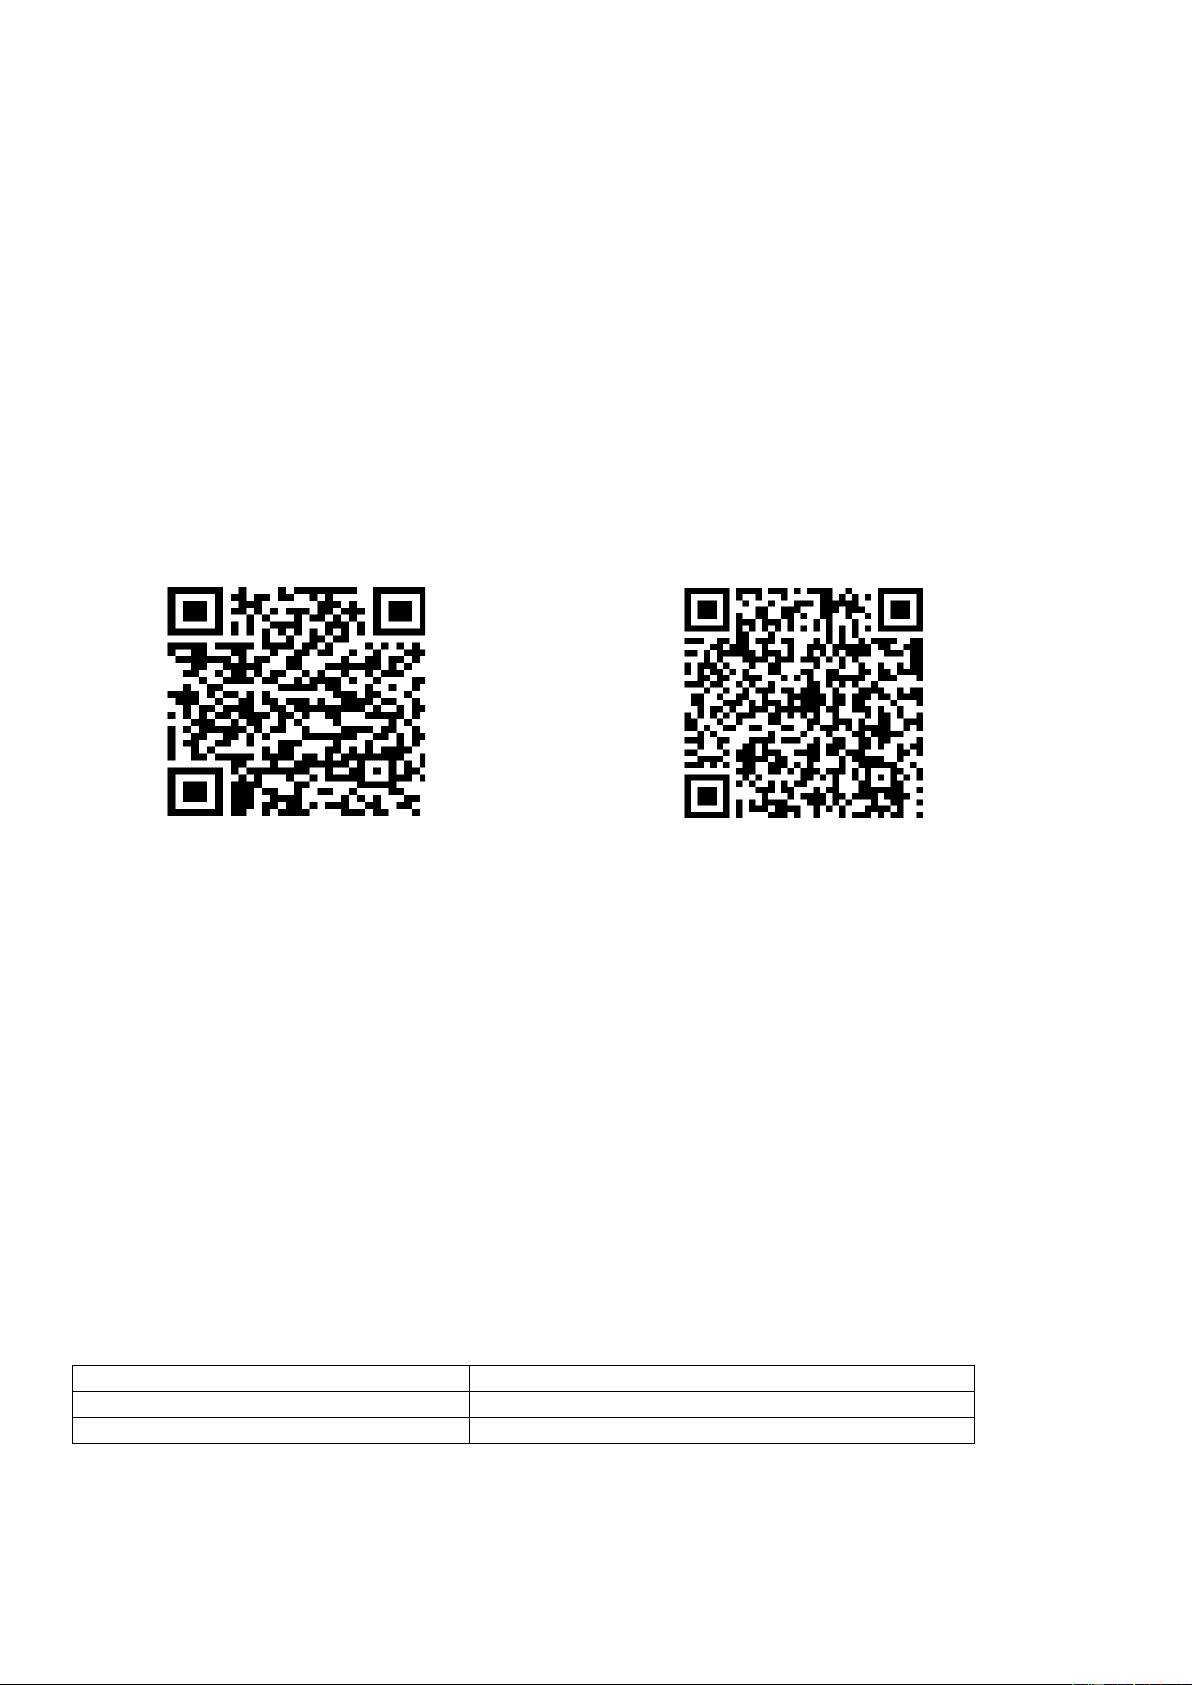
DOWNLOAD THE APP TO YOUR PHONE
Download the ”TUYA SMART” app, from your chosen app store, using the QR codes below, or by
searching for the app in your chosen store.
Android IOS
CONNECTION METHODS AVAILABLE FOR SETUP
The smart device has two different setup modes, CF (Quick Connection) and AP (Access Point). The quick
connection is a quick and simple way to set the unit up. AP connection uses a direct local wifi connection
between your phone and the dehumidifier to upload the network details.
Before starting the setup, please ensure that your dehumidifier is in the correct standby mode for the
connection type you are attempting, the display your dehumidifier will indicate this.
To connect to the WIFI, press and hold the FUNCTION button when the unit is in standby mode for
approximately 7 seconds
CHANGING BETWEEN CONNECTION MODES / WIFI RESET
To change the unit between the two connection types, hold the FUNCTION button for 7 seconds. The
connection mode is signified by the frequency of the flashing Smart light. This will also remove any
previous WIFI configuration.
Connection Type
Frequency of Flashes
CF (Quick Connection)
Flashes twice per second
AP (Access Point)
Flashes once per second

13
REGISTER THE APP
1. Press on the register button
at the bottom of the screen.
2. Read the Privacy policy
and press the Agree
Button.
3. Enter your email address or
phone number and press
continue to register.
4. A verification code will be
sent by the method selected
in step 3. Enter the code into
the app.
6. The app is now registered.
It will automatically log you
in following reqistration.
5. Type in the password you
would like to create. This
needs to be 6-20 characters,
with letters and numbers.
14
SETTING UP YOUR HOME WITHIN THE APP
TUYA is designed so it can work with a large number of compatible smart devices within your
home. It can also be set up to work with multiple devices within different houses. As such, during
the setup process the app requires that different areas are created and named to allow easy
management of all your devices. When devices are then added, they are assigned to one of the
rooms you have created.
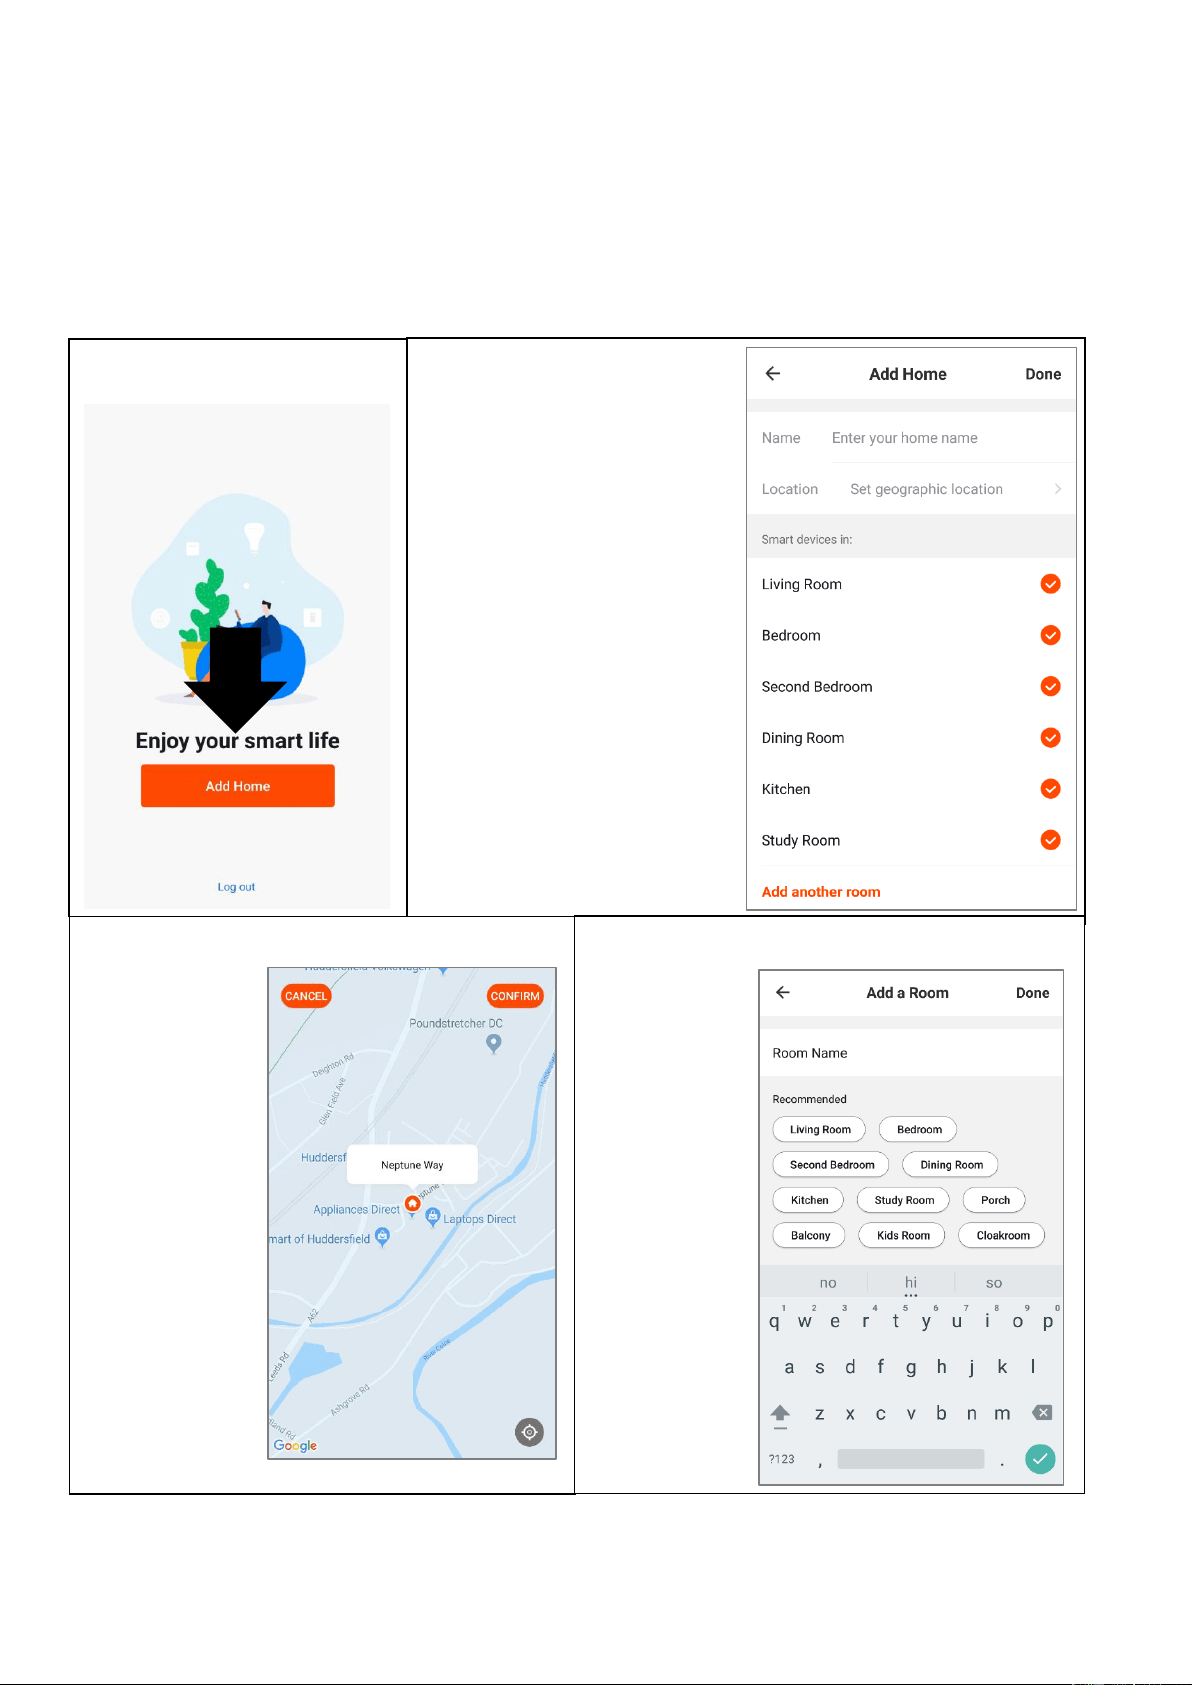
CREATING ROOMS
1. Press on the ADD HOME
button.
2. Type in a name for your
home,
3. Press on the location button
to select the location of your
home. (See SETTING
YOUR LOCATION below)
4. New rooms can be added
by pressing the ADD
ANOTHER ROOM option at
the bottom. (See ADD
ANOTHER ROOM below)
5. Untick any rooms that are
not required on the app.
6. Press DONE in the top right
corner.
SETTING YOUR LOCATION
Use your finger to
move the orange
HOME symbol.
When the symbol
is in the
approximate
location of your
home, press the
confirm button in
the top right
corner.
ADD ANOTHER ROOM
Type in the
name of the
room, and
press Done in
the top right
corner
15
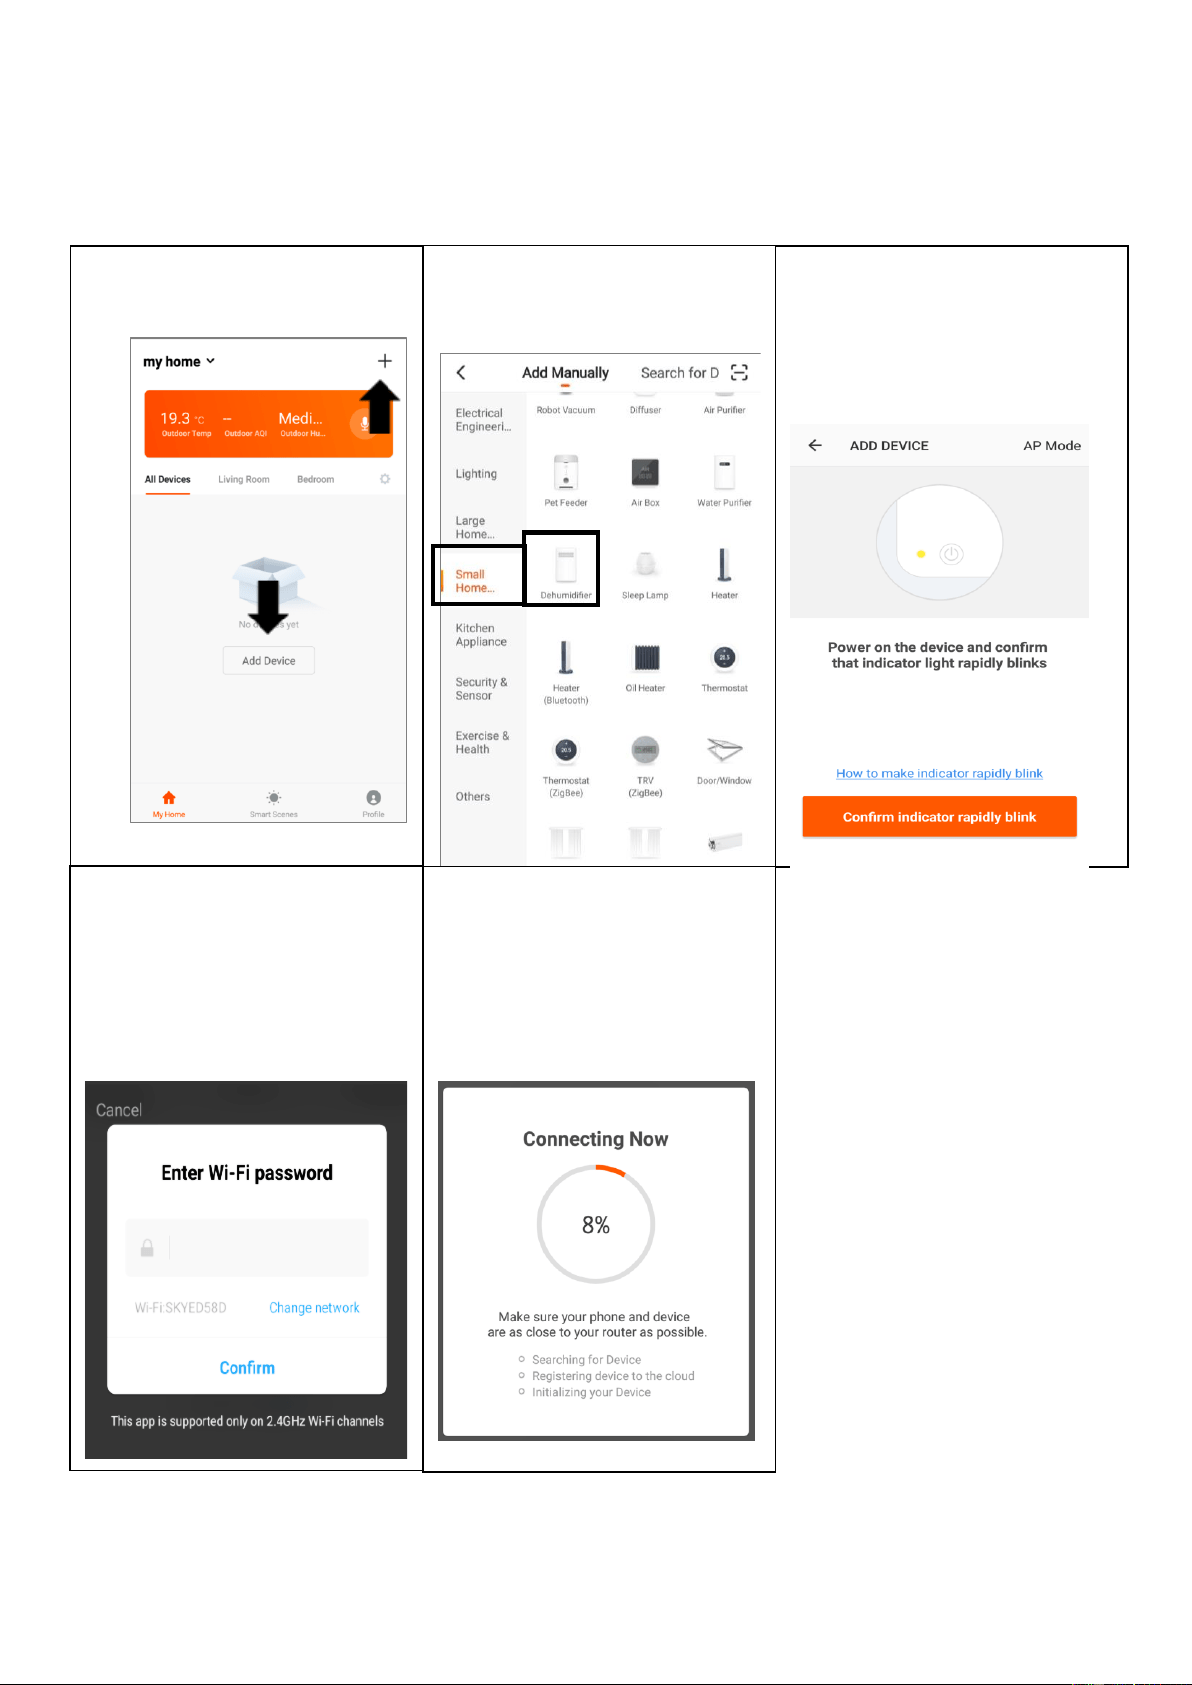
CONNECTING USING QUICK CONNECTION
Before initiating the connection, make sure the unit is in standby mode, with the WIFI light flashing
twice per second. If not, follow the instructions for changing the connection mode. Ensure your
phone is connected to the WiFi network. (We advise turning mobile data off during setup)
2. Select the type of device
as “Dehumidifier”in the
Small Home Appliance tab.
3. Ensure the WiFi light on the
dehumidifier is flashing
twice per second,then
press on the orange button
at the bottom of the screen
to confirm.
5. This will then transfer the
settings to the dehumidifier.
Wait for this to complete. If
this fails, retry. If still
unsuccessful please review
the troubleshooting section
for further help.
1. Open app and press “+” to
add device, or use the add
device button
4. Enter your WiFi password and
press confirm.
16
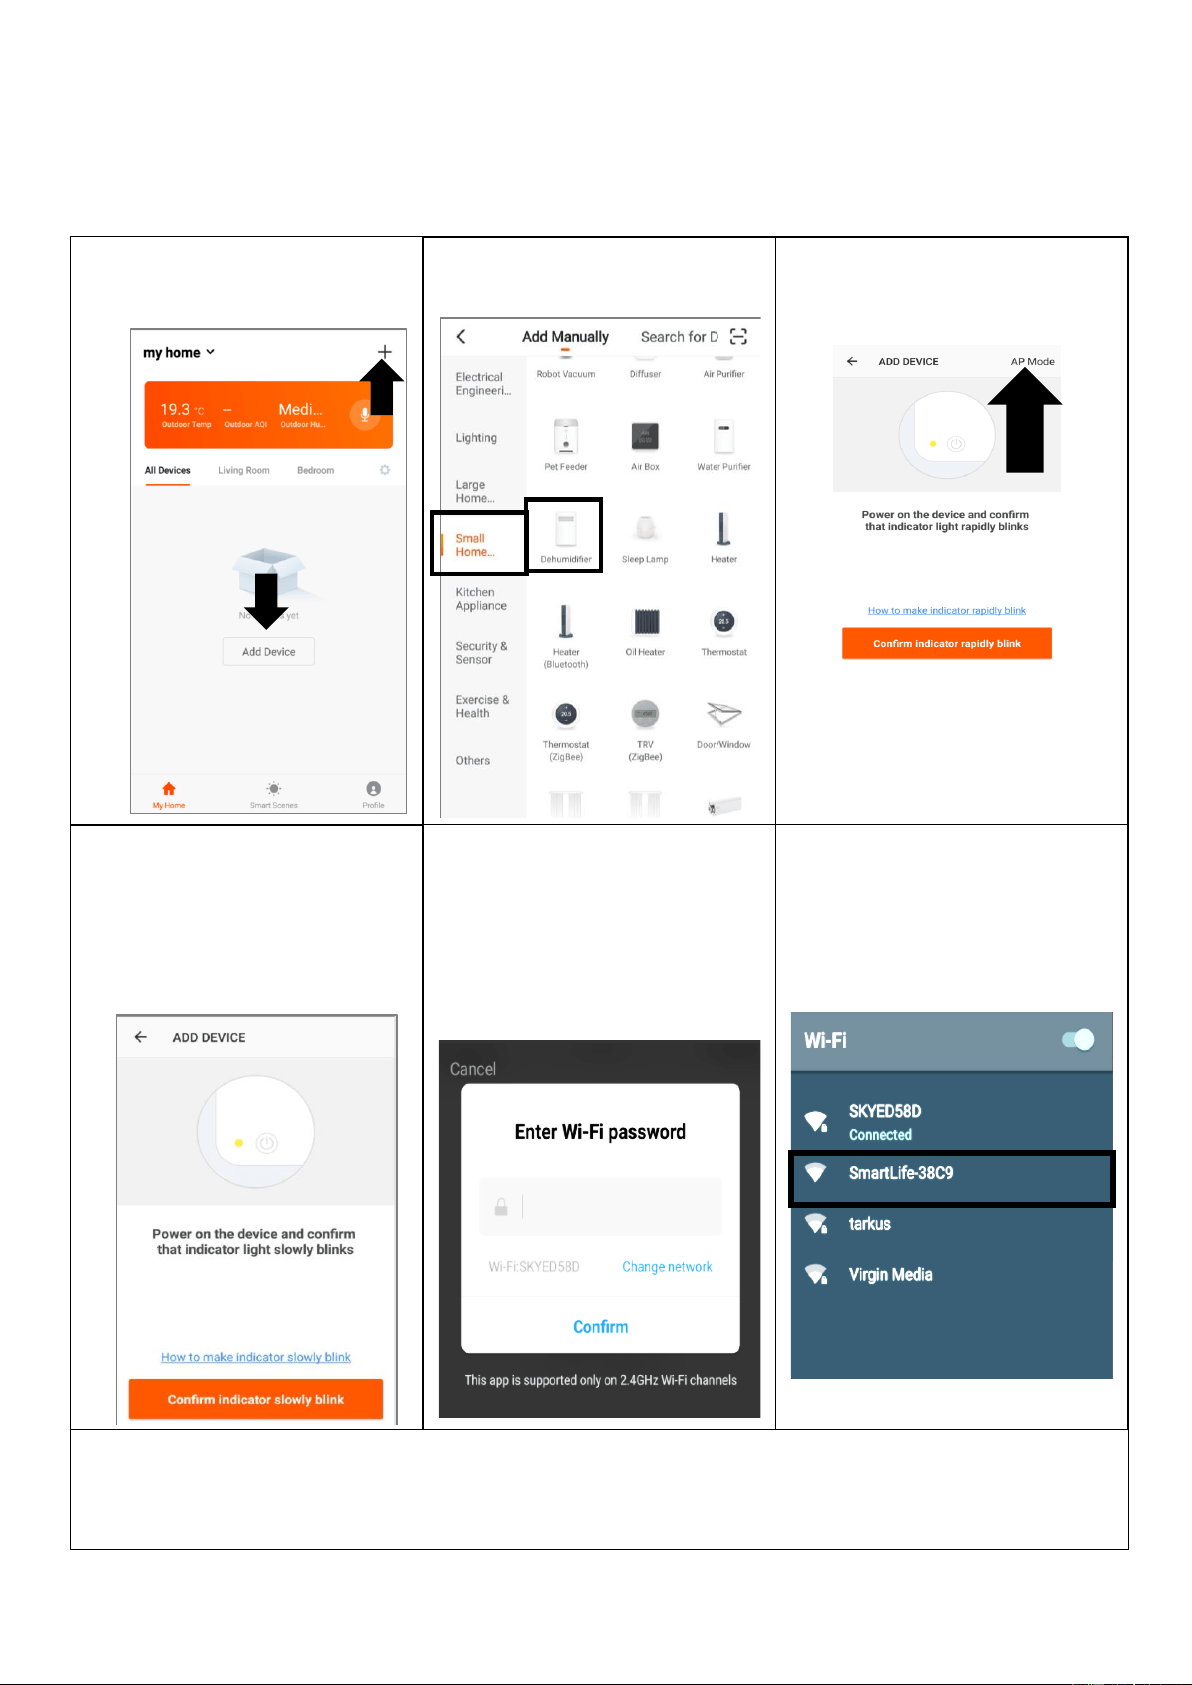
CONNECTING USING AP MODE (ALTERNATIVE METHOD)
Before initiating the connection, make sure the unit is in standby mode, with the WiFi light flashing
once per second. If not, follow the instructions for changing the connection type. Ensure your
phone is connected to the WiFi network. (We advise turning mobile data off during setup)
1. Open app and press “+” to
add device, or use the add
device button
2. Select the type of device
as “Dehumidifier”
3. Press on the AP mode
button in the top right of the
screen.
4. Ensure the WiFi light on the
dehumidifier is slowly
flashing (once per second),
then press on the orange
button at the bottom of the
screen to confirm
5. Enter your WiFi password and
press confirm.
6. Go to network settings in your
phone and connect to the
“SmartLife xxx” connection.
There is no password to
enter. Then return back to the
app to complete setup.
This will then transfer the settings to the dehumidifier.
Once the connection process has completed, go back to the network settings on your phone to ensure
your phone has reconnected to your WiFi router.
17
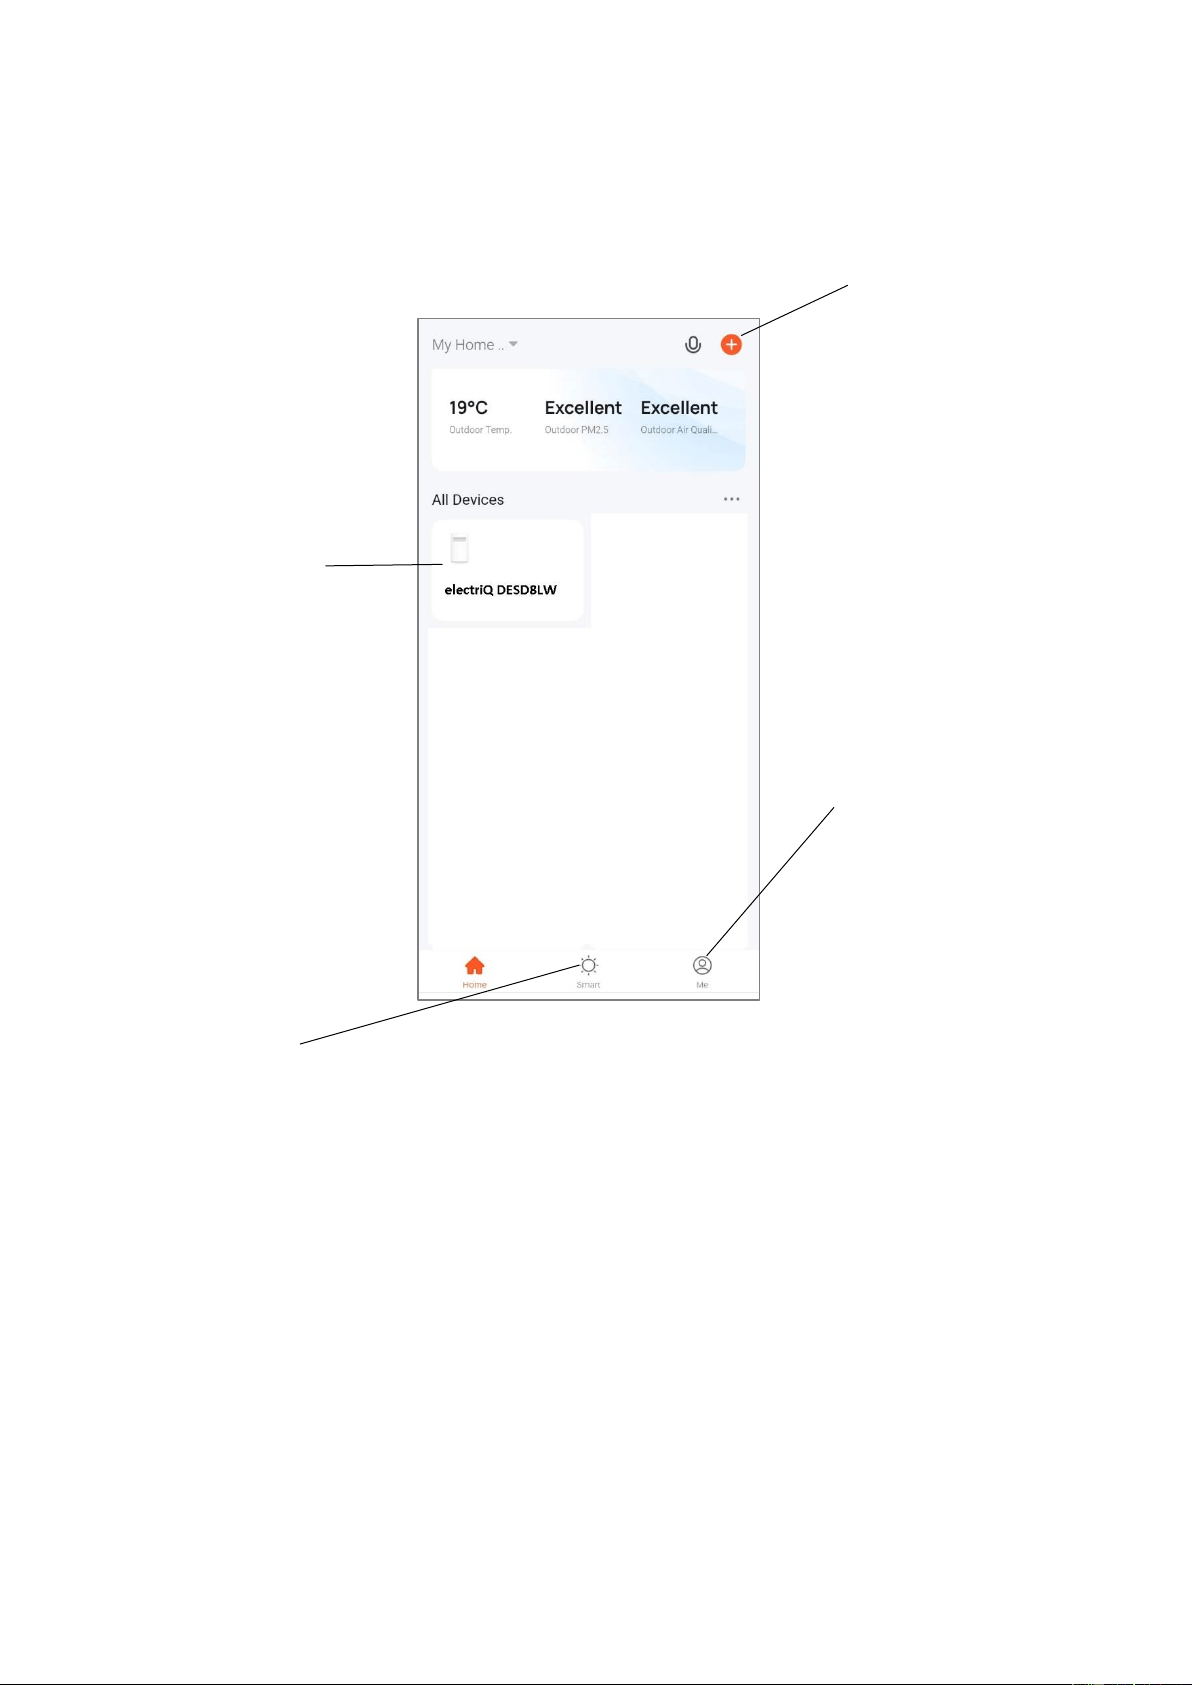
CONTROLLING YOUR DEVICE THROUGH THE APP
THE HOME SCREEN
Chose the device
to control
Add a device
Smart Scenes /
Automation
Access the user
profile

18
DEVICE SCREEN
The device screen is the main control screen for the dehumidifier, providing access to the controls to
amend the functions of the dehumidifier
Schedule: Use the schedule to set up times when the
device will turn on or off.
Countdown: set a time period for the to shutdown.
Swing: Activate and de-activate the movement of the
louvres.
Ioniser: Turn on and off the Ioniser feature.
Target Humidity: the
humidity level you are
aiming for
Profile: Use to change the
name of the dehumidifier
and amend user settings.
Settings: see below
Back: Returns to the
Home Screen
Indoor Humidity: Displays
current humidity of the room
Power: Turn the unit on and
off.
Speed Menu: Select the
required fan speed
(opens drop down menu)
Set Humidity Level: Set
the level from 30% to
80% using the + and –
buttons.
Speed: shows currently
selected fan speed
19
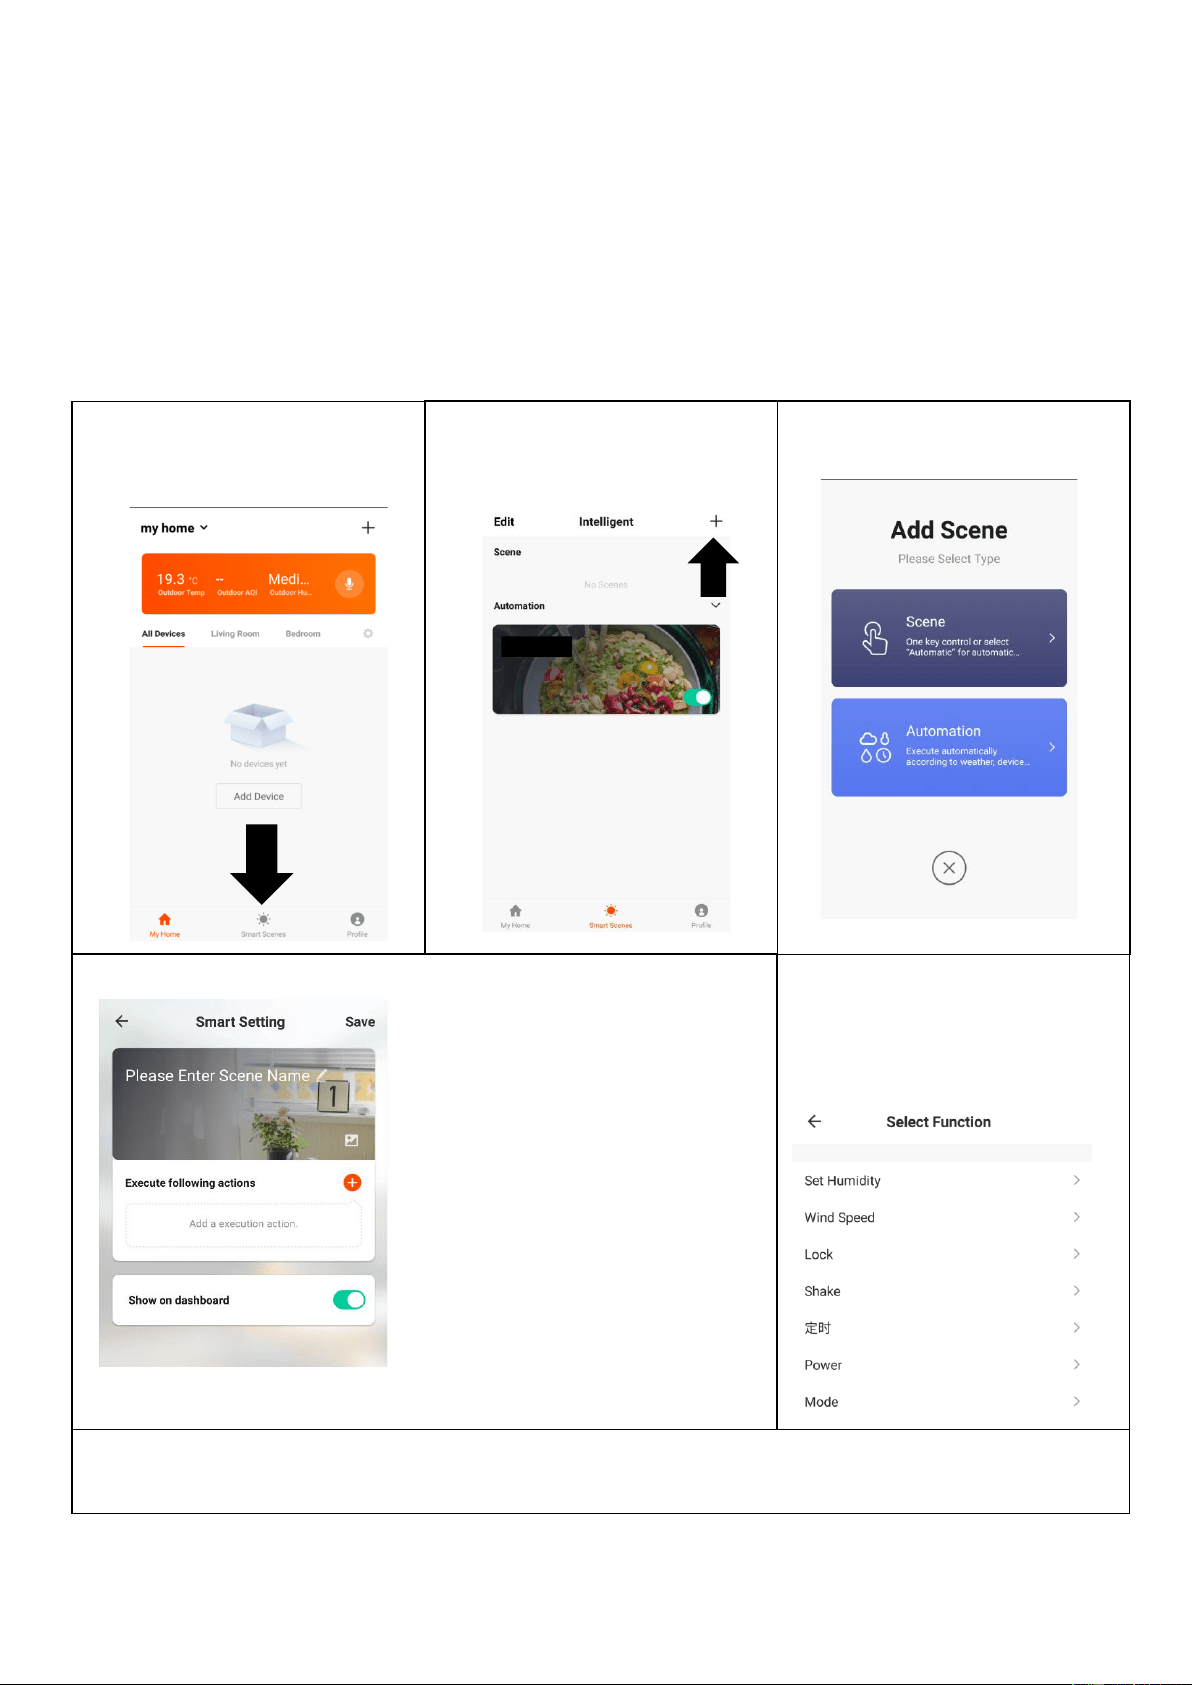
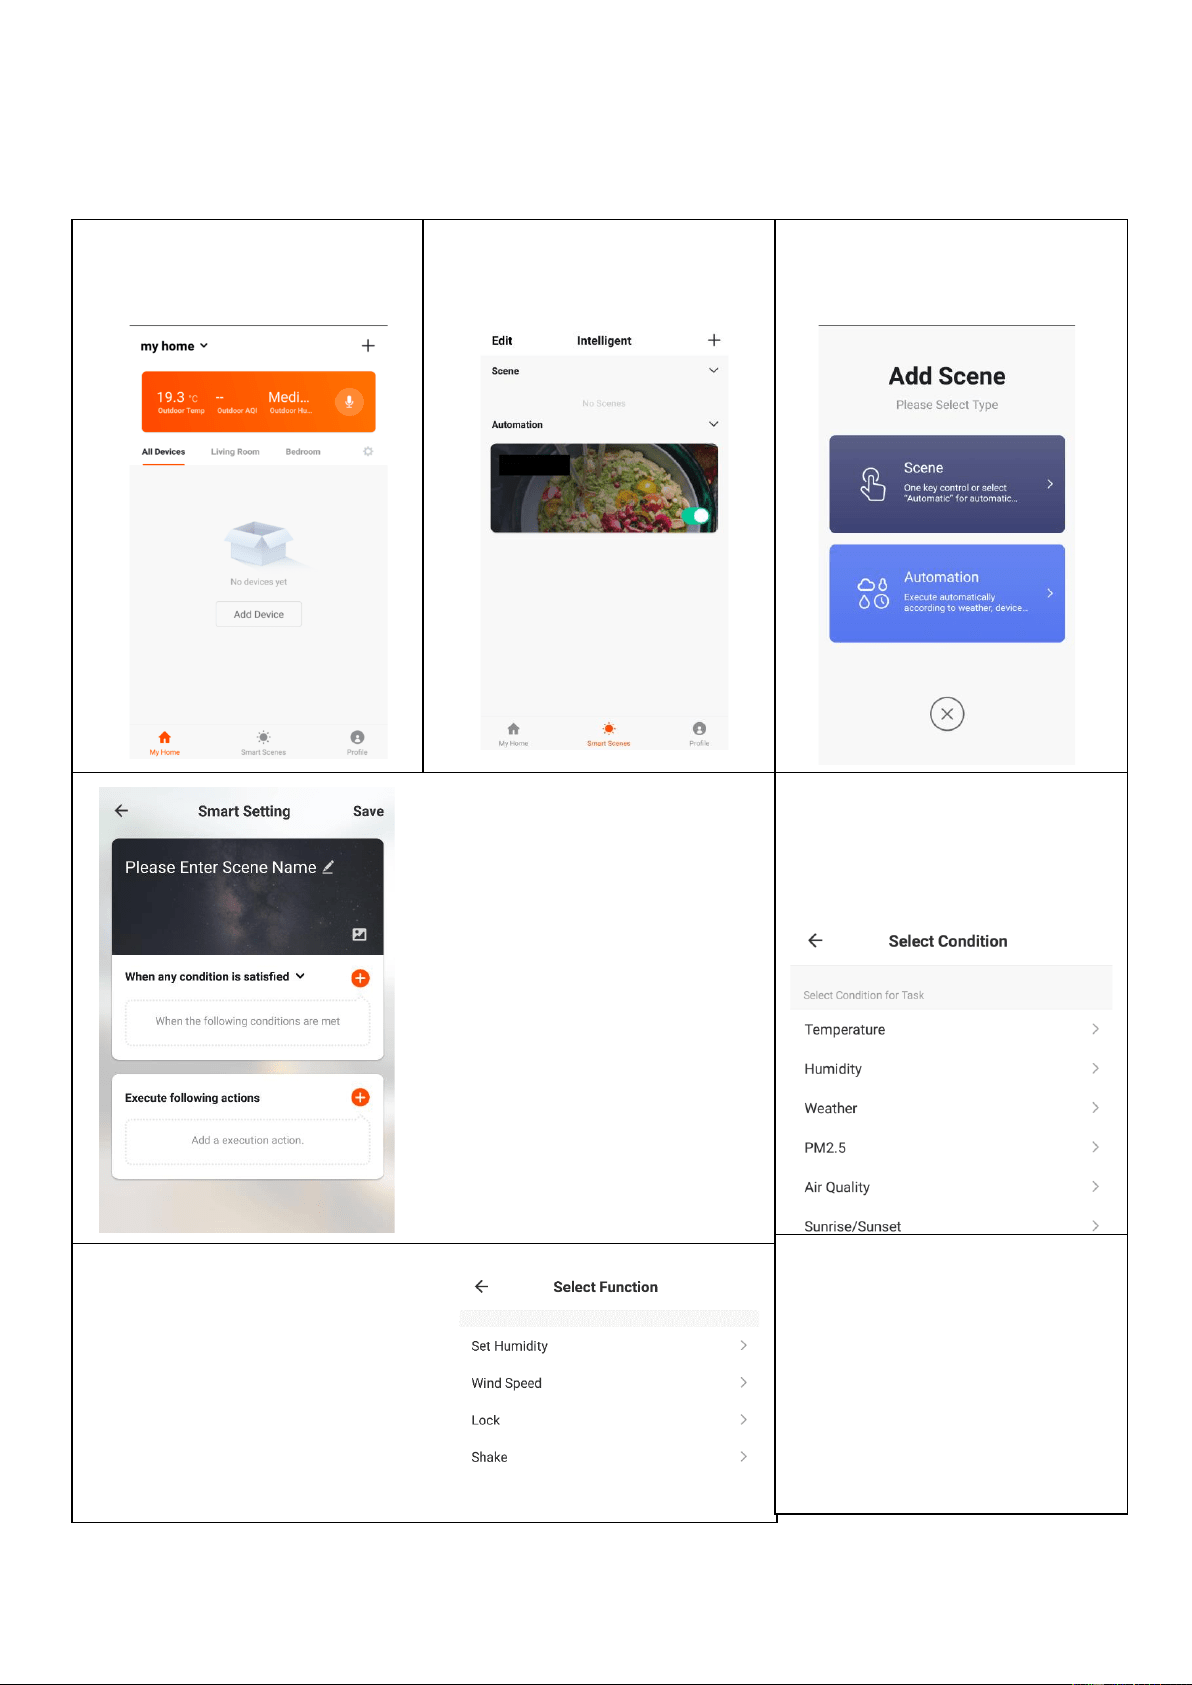
SMART SCENES
Smart Scenes is a powerful tool providing the option to customise the operation of the dehumidifier based
both on conditions within the room and outside influences. This gives the user the option of specifying
much more intelligent actions. These are split into two categories Scene and Automation.
SCENE
Scene allows for a one-touch button to be added to the Home screen. The button can be used to change a
number of settings in one go and can change all the settings within the unit. A number of scenes can easily
be set up, allowing the user to easily change between a number of preset configurations.
Below is an example of how to set up a scene:
1. Press on the Smart Scene
tab at the bottom of the
Home screen
3. Select Scene to create a
new Scene
2. Press on the Plus in the top
right corner to add a smart
scene.
4. Press the Pen next to
“Please Enter Scene Name” to
input the name for your Scene
Show on Dashboard: Leave
this on if you require the scene
to be displayed as a button on
the Home Screen
Press the Red Plus to add the
action required. Then select
the dehumidifier from the list of
devices.
5. Chose the function, set the
value for the function, and then
press the back button in the top
right corner, to return to the
previous screen.
6. Once all the functions required have been added, press the Save button in the top right corner to
finalise and save your new Scene
20
AUTOMATION
Automation allows an automatic action to be set up for the device. This can be triggered by the Time,
indoor temperature, humidity of the room, weather conditions, and a range of other influences.
1. Press on the Smart Scene
tab at the bottom of the
Home screen
2. Press on the Plus in the top
right corner to add a smart
scene.
3. Select Automation to
create a new Automation
Scene
4. Setup is very similar to the scene
setup on the previous page, and
includes an extra section for
specifying a trigger for the scene to
start.
Press the Pen next to “Please Enter
Scene Name” to input the name for
your Scene
Press the Red Plus next to “When
any condition is satisfied” to add the
trigger
Press the Red Plus next to “Execute
following actions” to add the action
required. Then select the
dehumidifier from the list of devices.
6. Chose the function, set
the value for the function,
and then press the back
button in the top right
corner, to return to the
previous screen.
5. Select the condition when
the automation should start.
A number of triggers can be
combined.
7. Once all the functions required
have been added, press the
Save button in the top right
corner to finalise and save your
new scene.
The automation is now set up, it
can be turned on and off using
the toggle on the image shown
on step 2.
21
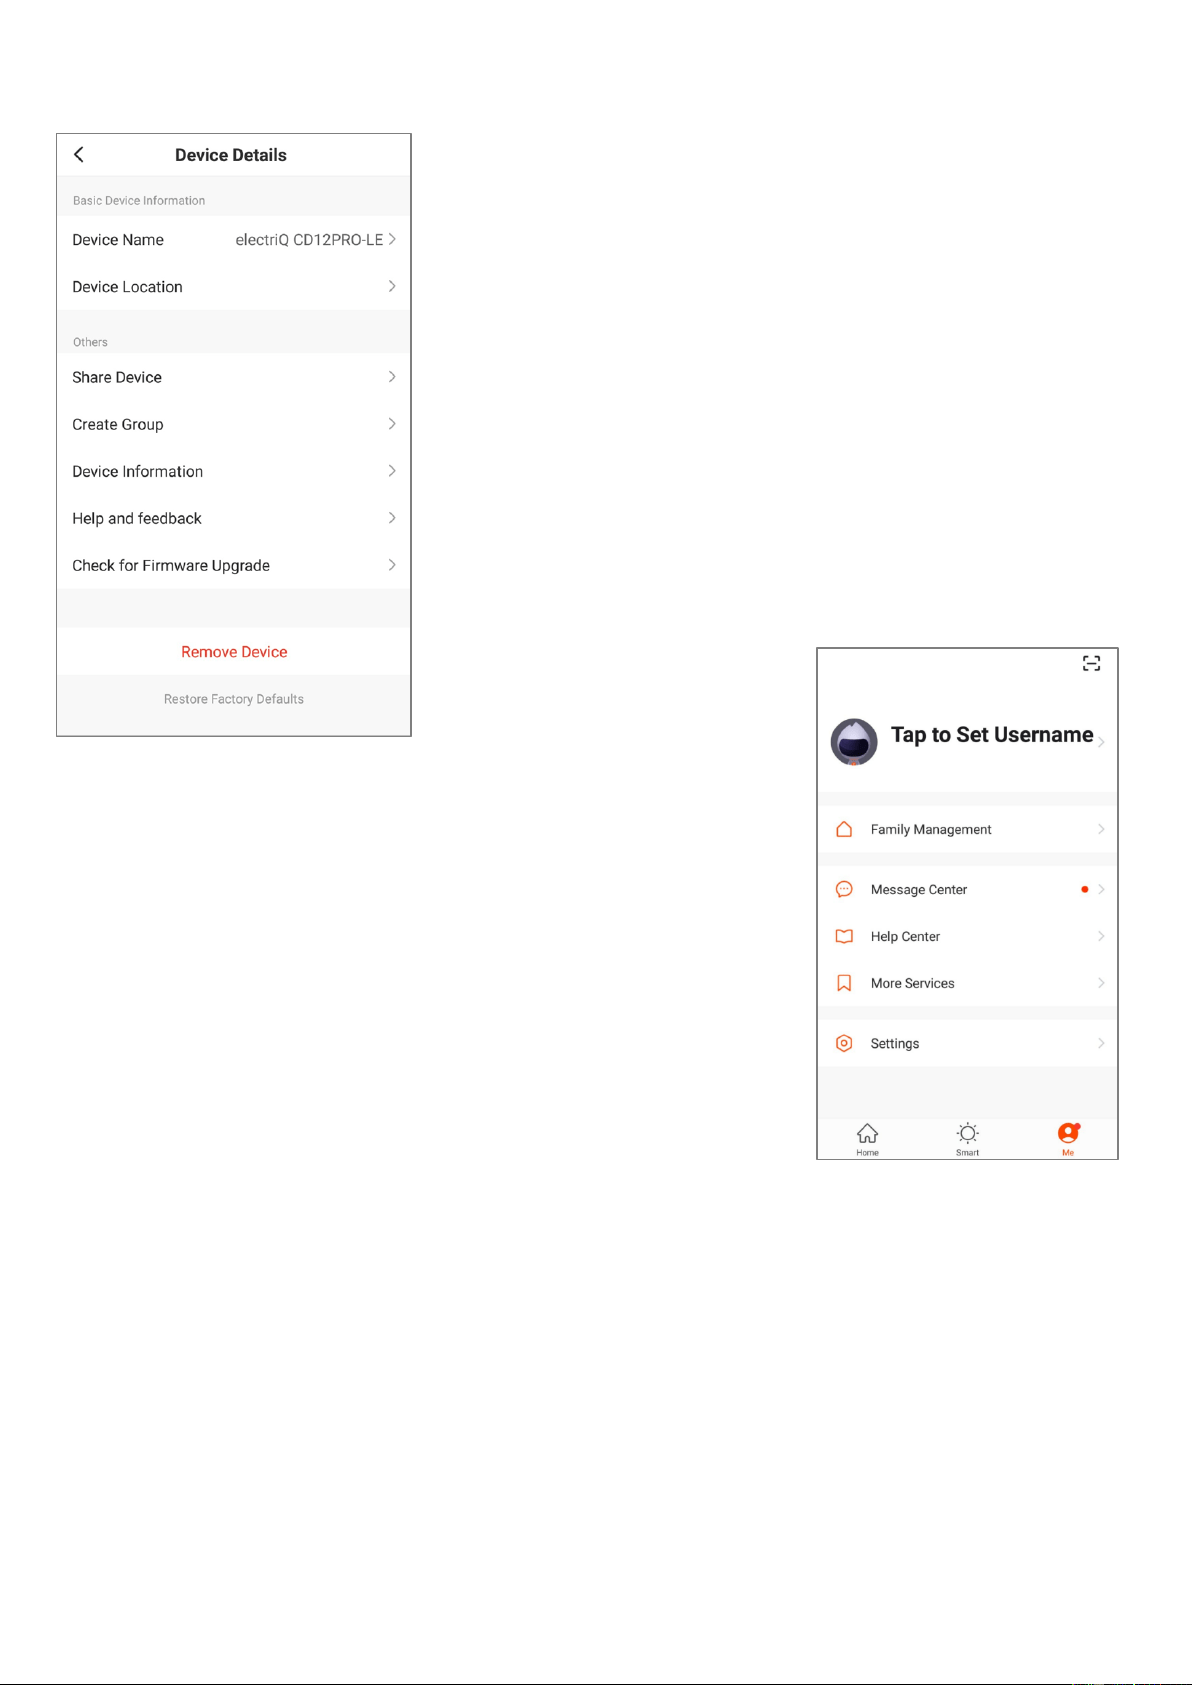
DEVICE DETAILS SCREEN
The device details screen gives you the option to edit the details for
the device, and use some of its additional features. The device details
screen can be accessed from the device screen by pressing on the
symbol in the top right hand corner.
CHANGING THE NAME OF YOUR DEVICE
The top option within this allows you to change the name of the device
to something relevant to the use of the product, such as “Living Room
Dehumidifier”. Within the menu, you also have the option of setting up
a pattern lock or change your password.
DEVICE SHARING
This allows you to share access to the controls of your dehumidifier
with friends and family.
PROFILE TAB
The Profile tab allows you to make changes to the app, such as
setting up a username and editing or adding rooms.
Within the Profile tab, you are also able to change settings related
to the app itself.
CONNECTION TROUBLESHOOTING
1. Check whether the device is powered on and is in the correct standby mode, if not please refer to the
CHANGING BETWEEN CONNECTION MODES section on page 12.
2. Ensure the wifi password has been entered into the app correctly (Case sensitive)
3. Check that the phone is connected to the wifi you are connecting the device to.
4. Ensure the network you are connecting it to is 2.4Ghz (5Ghz wifi networks are not supported), and that
there is a strong wifi signal to the item.
5. If your router is dual band, ensure that the 2.4ghz network has a different network name (SSID). Further
advice on changing router settings will be available from your Internet service provider / Router
manufacturer.
6. Check the settings on the router. Encryption should be WPA2-PSK and authorisation type should be set
to AES
7. Try using the alternative connection method. i.e. If connection is failing when attempting to connect
through CF mode, try AP mode.

22
CARE AND MAINTENANCE
Always shut off the unit and unplug it from the mains before cleaning or performing any
maintenance. When it is not in use for long periods, it is advisable to remove the plug from the power
socket. Do not use chemical solvents (such as benzene, alcohol or gasoline) as they may cause
irreversible damage to the unit.
FILTER CLEANING
The Air-inlet may gather dust easily, clean it often with a soft, damp cloth. If the filter is covered by
dust, the airflow and the performance of the unit will be affected. It may even cause damage to the
unit. We recommend that you regularly clean the filters. The dehumidifier must be disconnected
from the socket before maintenance, and the filters must be allowed to fully dry before use.
1. Remove the filters from the unit, and tap the dust away.
2. Clean the mesh filter with a vacuum cleaner or a soft brush.
3. If dirt and grease have accumulated , wash the mesh filter in hot soapy water.
4. Replace the filters in position.
NOTE: Never use the unit without the mesh filter.
CLEAN THE WATER TANK
Every few weeks, clean the tank to prevent the growth of mould, mildew and bacteria. Partially fill
the tank with clean water and add a little mild detergent. Swish it around before emptying the tank
and rinsing.
NOTE: Do not use a dishwasher to clean the tank. After cleaning and drying the tank must be
reinserted securely into the dehumidifier in order to restart operation.
END OF SEASON MAINTENANCE
1. Empty and clean the water tank.
2. Clean the unit and the filters as per the cleaning procedure above.
3. Cover the unit and keep it in a dry place.
POWER CORD MAINTENANCE AND REPLACEMENT
If the power cord is damaged, it could cause a short circuit or become a fire risk. Please avoid pulling
the cord, twisting or pressing it and keep it away from pets. If the power cord is damaged, power
the unit off and unplug it immediately. Contact an electrician or service centre for repair; do not
attempt to repair the unit yourself.
23
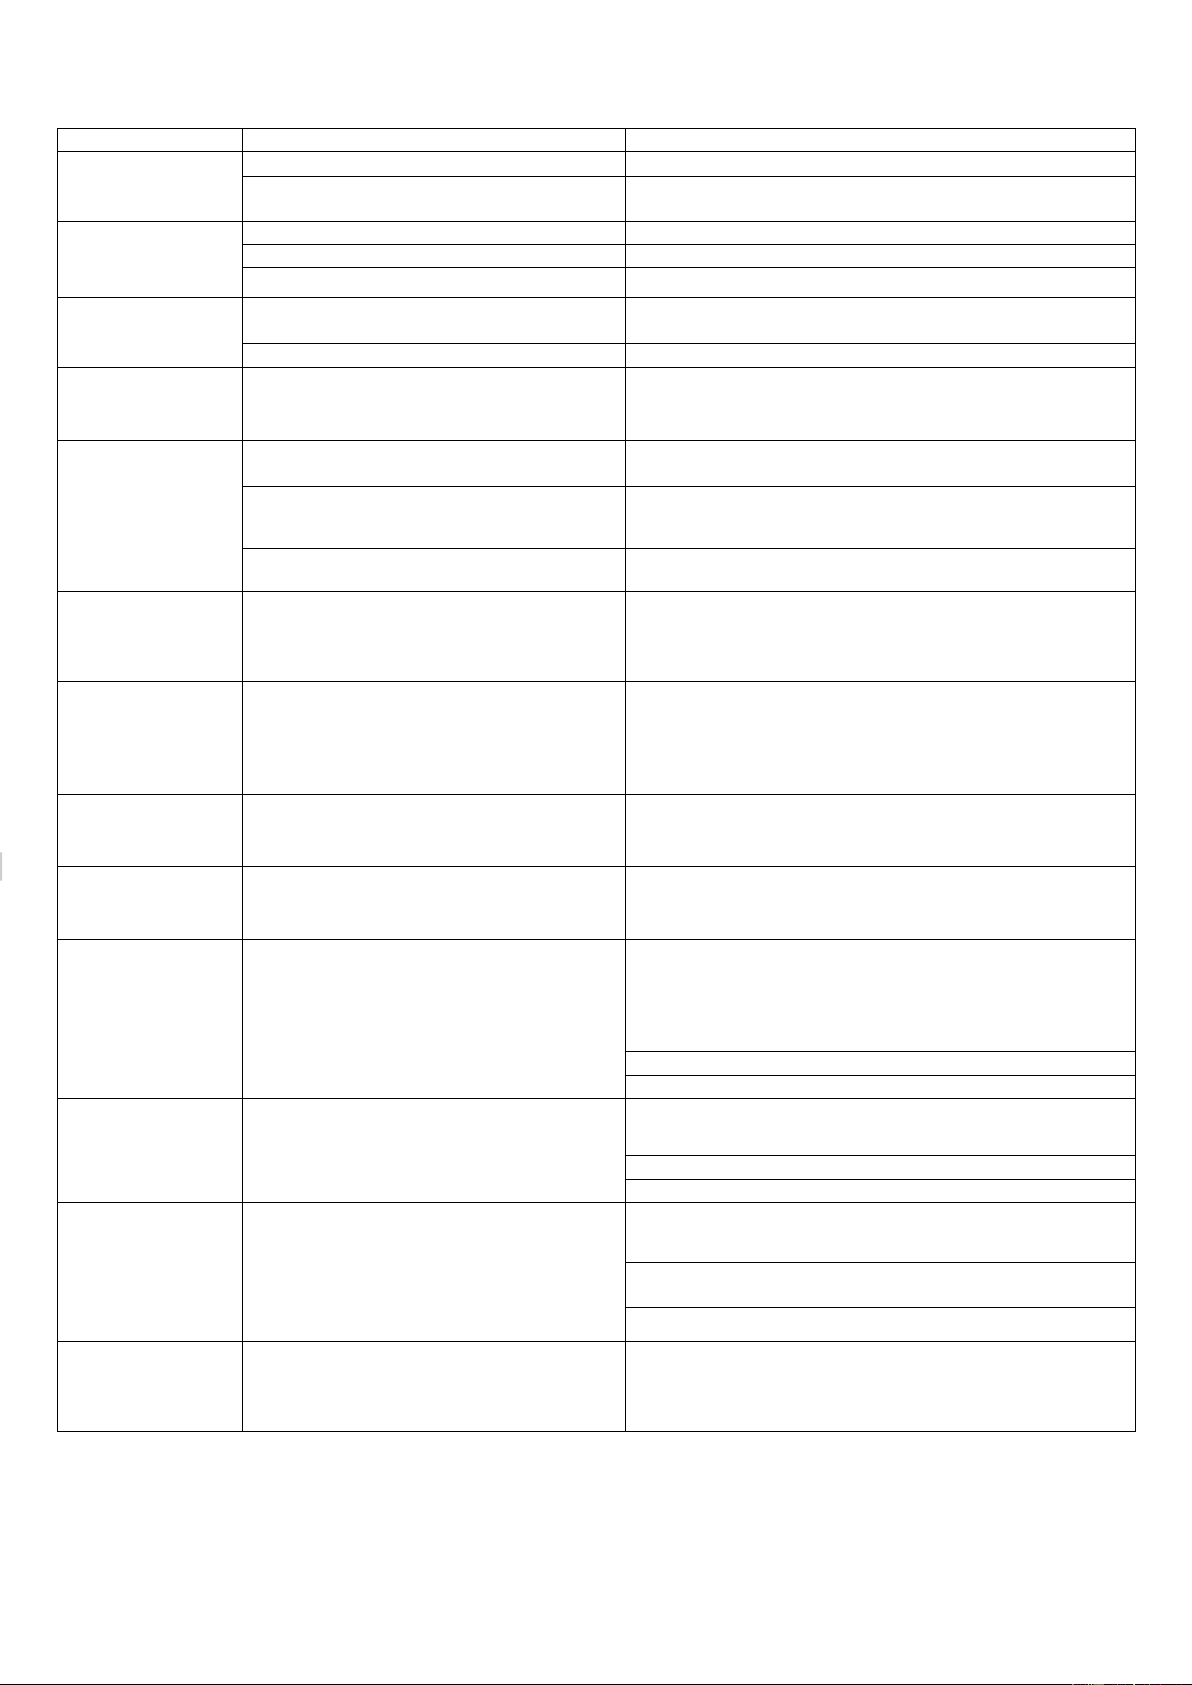
TROUBLESHOOTING
Problem
Possible Cause
Solution
Unit does not work
Water tank displaced or full
Check water tank placement or empty water tank
Room temperature is too high, or air-outlet is
covered
Reduce room temperature, clear air outlet
Poor performance
Filter is dirty
Clean the filter
Door & windows are open
Close door & windows
Air-inlet or out-let is blocked.
Clean air-inlet & air-outlet
Too Noisy
Unit is on an uneven surface.
Place the machine on a flat surface. Add carpet or rubber mat
underneath
Filter is blocked
Clean the filter
The device does not
dehumidify
The relative humidity in the room where the
dehumidifier is operating is too low.
The dehumidifier dries down to the target relative humidity set
and will then go into standby if the desired humidity has been
reached.
The dehumidifier
works, but relative
humidity is still high
The place is too large. This dehumidifier can
dry up to 40m².
We recommend using a dehumidifier with a greater capacity.
Call customer service line for advice.
There are too many sources of moisture.
Bathing, washing, drying clothes and cooking
all put moisture into the air.
We recommend using a dehumidifier with a greater capacity.
Paraffin or Calor gas heating can add too
much moisture into the air
Consider using alternative heat sources
The windows were
clear, and now
condensation has
returned.
The outside air temperature has dropped
significantly, and the windows are colder.
Set the dehumidifier to 50%RH and run for longer
I cannot remove the
condensation from
my windows, even
in “Auto” mode
The surface temperature of the windows is
too low for a dehumidifier to prevent
condensation. Common with single glazed
windows or poorly insulated houses when the
outside air temperature drops below 0⁰C
Keep running the dehumidifier on “Auto” 24 hours a day and if
the air temperature outside increases the condensation on
windows may clear
The dehumidifier is
blowing out warm
air
The dried air is passed over a heating
element before it is blown into the room as
part of the dehumidification process
This is normal and helpful, especially in the cold weather; a
dehumidifier is not an air cooler.
Knocking noise
coming from the
dehumidifier
The motor wheel is low on lubrication or dirt
may have entered the motor ball bearings
Run the dehumidifier in Auto mode for two days to increase
the lubrication, if the fault persists then call the service centre
Water not draining
down the hose
The hose is fitted for continuous drainage, but
the water still goes into the tank
Negative air pressure in the room is pulling the water back
into the dehumidifier overflow.
Insert a 3 mm hole into the top of the tube 25 mm down from
the spout. This will introduce air into the tube and balance out
the air pressure.
Dirt is gathered in the internal tray. May need servicing.
If the fault persists then call the service centre
Dehumidifier leaks
water onto the floor
Usually means that the dehumidifier is not on
a level surface or that the filter has not been
cleaned often enough and dirt has fallen into
the internal tray dehumidifier.
Check that the water bucket is not cracked by filling it with
water and placing it on kitchen paper on the kitchen side.
Check if filters are clean
If the fault persists then call the service centre
Machine not
switching off the
heater when desired
humidity is reached
Temperature and relative humidity sensor that
reads the room reading is unable to read the
correct readings
Clean the filter and blow the air sensor with a vacuum cleaner
or hairdryer on the COLD setting to clear the sensor of dirt
Unplug the dehumidifier for 10 minutes to reset PCB and then
turn back on.
If the fault persists then call the service centre
On pressing power
off fan still works for
several minutes and
switches off
Unit is drying/cooling internally before going in
off mode
Normal operation. DO NOT remove power until this has
finished.
Note: when the fault cannot be solved by the solutions above, please contact the service centre for help, do not attempt repairs.
24
FREQUENTLY ASKED QUESTIONS
WHY DOESN’T THE UNIT WORK /OR STOPS SUDDENLY?
The water tank may be full or displaced. Empty the tank and carefully replace in the unit to rectify.
WHY DOES IT REQUIRE EMPTYING VERY REGULARLY?
When you first use your dehumidifier, it will work harder to reduce the room humidity down to 50%. This is the time
when it will produce the most water and as such will require emptying most frequently (even 2-3 times /day). As the
room becomes dryer, the dehumidifier will collect less water and it will take longer to fill the tank, this is perfectly
normal. When the target relative humidity has been reached the dehumidifier will stop collecting water and will operate
for longer periods in fan-only mode, this is normal operation. The intelligent logic of your machine will save you money.
WHAT DESIRED HUMIDITY SHOULD I SET THE DEHUMIDIFIER TO?
Unless you are using the unit to dry clothes, we recommend setting the desired humidity to between 50% and 60%.
For unoccupied properties, garages and etc, set the unit 60%RH with the fan in mid or low mode according to your
needs. That will ensure minimum power consumption while preventing moisture-related issues.
THE ROOM HAS REACHED THE DESIRED HUMIDITY, BUT STILL HAVING PROBLEMS WITH CONDENSATION
If you find that you still have condensation on your windows or you need to dry the air further, set the unit to Auto
(continuous) mode with the fan set to High mode. This may be necessary if you have single glazed windows, the
house is poorly insulated or if the outside air temperature drops towards freezing. Using the unit in High mode will add
more heat to your room and reduce your heating bill as dry air will heat quicker
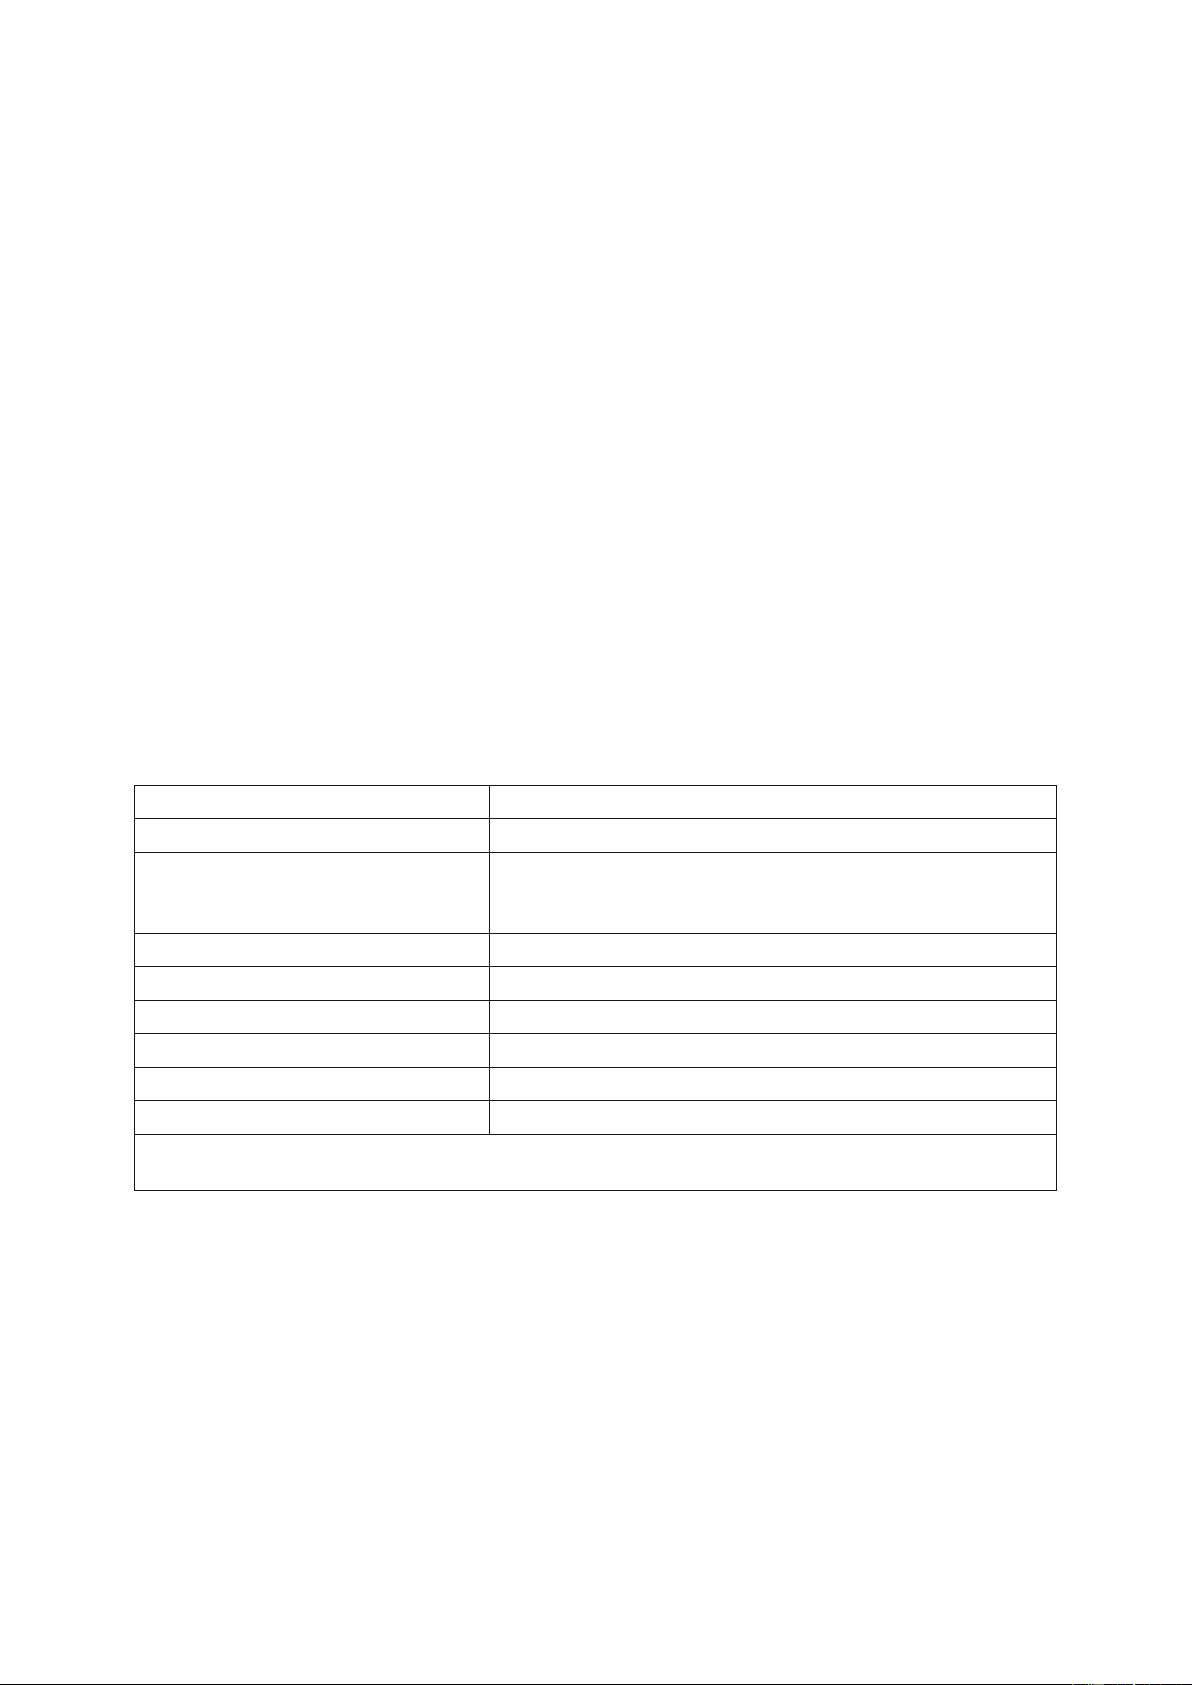
TECHNICAL SPECIFICATIONS
Model No.
DESD8LW
Rated Voltage
220-240V ~ 50/60Hz
Dehumidify Capacity
20°C and 60%RH low fan speed: 4L per day (330 Watts)
20°C and 60%RH high fan: 7L per day (650 Watts)
30°C and 80%RH high fan: 8L per day (650 Watts)
Max Rated Input Power
650 W
Tank Capacity
2.5 litres
Noise level
30 dB(A)
Dimensions
300 x 200 x 455mm
Net Weight
5.7 kg
Operating temperature
-10°C to 50°C
All information provided is for reference only. Products specifications may change due to
continuous product development.

25
electriQ UK SUPPORT
For your own convenience, make these simple checks before calling the service line.
1. Has the unit been standing upright? (for at least 2 hrs)
2. Is the unit plugged into the mains? Is the fuse OK?
3. Switch the unit on and wait three minutes to see if the issue is resolved.
4. Check whether the water tank is full.
5. Have you followed the troubleshooting procedures?
If the unit still fails to operate call: 0330 390 3061 or fill in the online form
Office hours: 9AM - 5PM Monday to Friday
www.electriQ.co.uk
Unit J6, Lowfields Business Park
Lowfields Way, Elland
West Yorkshire, HX5 9DA
Disposal: Do not dispose of this product as unsorted waste. Collection of such waste must be handled separately as
special treatment is necessary.
Recycling facilities are now available for all customers at which you can deposit your old electrical products.
Customers will be able to take any old electrical equipment to participating sites run by their local councils. Please
remember that this equipment will be further handled during the recycling process, so please be considerate when
depositing your equipment. Please contact the local council for details of your local household waste recycling
centre
DECLARATION OF CONFORMITY
Hereby, electriQ declares that this Portable air conditioner is in compliance with Directive 2014/53/ EU. The
full text of the EU declaration of conformity is available at the following internet address:
https://www.electriQ.co.uk/content/declaration-of-conformity
V20210831a