Loading ...
Loading ...
Loading ...
Limited 1-Year Warranty
The limited warranty is valid only on products bought through authorized resellers and used in the
United States and Canada. Buying through an unauthorized reseller or using this product outside of
the United States and Canada automatically voids this warranty.
This warranty is available to consumers only. You are a consumer if you own a Baby Brezza
appliance that was purchased at retail for personal, family or household use. Except as otherwise
required under applicable state law, this warranty is not available to retailers or other commercial
purchasers or owners. We warrant that your Baby Brezza appliance will be free of defects in
material or workmanship under normal home use for one year from the date of original purchase.
Customer will be required to present original proof of purchase in order to obtain the warranty
benefits. In the event that you do not have proof of purchase date, the purchase date for purposes
of this warranty will be the date of manufacture. If your Baby Brezza appliance should prove to be
defective within the warranty period, we will repair it or, if we consider it necessary, replace it.
To obtain warranty services, please call Customer Service at 1-888-396-6552 or write to:
Baby Brezza, 250 Passaic Street, Newark, NJ 07104 Attn: Customer Service.
If you can not remedy problems with the machine by using the troubleshooting chart above,
please contact Customer Service at 1-888-396-6552 or email cs@babybrezza.com
Any other servicing should be performed by an authorized service representative.
1. Place the appliance on a flat surface where it is out of reach of children
and it will not be knocked or moved during operation.
2. Remove the lid, baskets and accessory rack from the sterilizer base.
3. Pour water on the base/heater surface to MAX line (165ml/5.5oz).
Never fill past MAX line. We recommend using distilled water to avoid
mineral scale build-up on the heating plate. However, you can use bottled
water or tap water but you may need to descale more frequently.
4. Place the lower basket on the base.
5. Place clean bottles with their opening facing downward on the bottle posts
6. Place the accessory tray in the lower basket (tray not for use with tall bottles).
7. Place bottle accessories on the accessory rack (nipples, collars, caps, etc)
8. Place the upper basket on top of the lower basket, ensuring that it fits
securely without any gaps.
9. Place breast pump parts or more accessories in the upper basket.
10. Press the On/O button once and the function icons will light up.
Choose your desired function following the instructions below.
If there is no selection of function after pressing on/o button, the
appliance will automatically switch o.
Automatic Sterilize/Dry Function:
1. Choose the drying time (after steam sterilization): Press the Sterilize/Dry
button 1 time for 30 minute dry time, 2 times for 45 minute dry time,
3 times for 60 minute dry time. The sterilize/dry cycle will start 3 seconds
after the last button press.
2. When the sterilization cycle starts, the timer will count up second-by-second
for the duration of the sterilization cycle.
3. When the sterilization cycle is complete, the appliance will beep, pause for
3 seconds and begin the drying cycle for the amount of time selected in
step 1. The timer on the timer will count down second-by-second until it
reaches 00:00.
4. When the drying cycle is completed, the appliance will beep 5 times and
switch o automatically.
Troubleshooting
Condition Possible Cause Remedy
Appliance will
not start.
Unit is unplugged.
Unit is not turned on.
Insucient water is in heater
plate area.
Add 165ml (5.5oz) water to heater
plate area.
Make sure the plug is securely
inserted into the power outlet.
Press On/O switch before
choosing function.
5
6
Clean heater plate after each use
and use distilled water.
Scaling on
water tank
heater plate.
Items not dry
after drying cycle.
Water is collecting on recessed or
indented areas of items placed
in sterilizer.
Mineral rich water used
persistently.
Make sure parts are placed so they
they do not collect water.
Drying cycle selected not long
enough to suciently dry items
in sterilizer.
Select longer drying time.
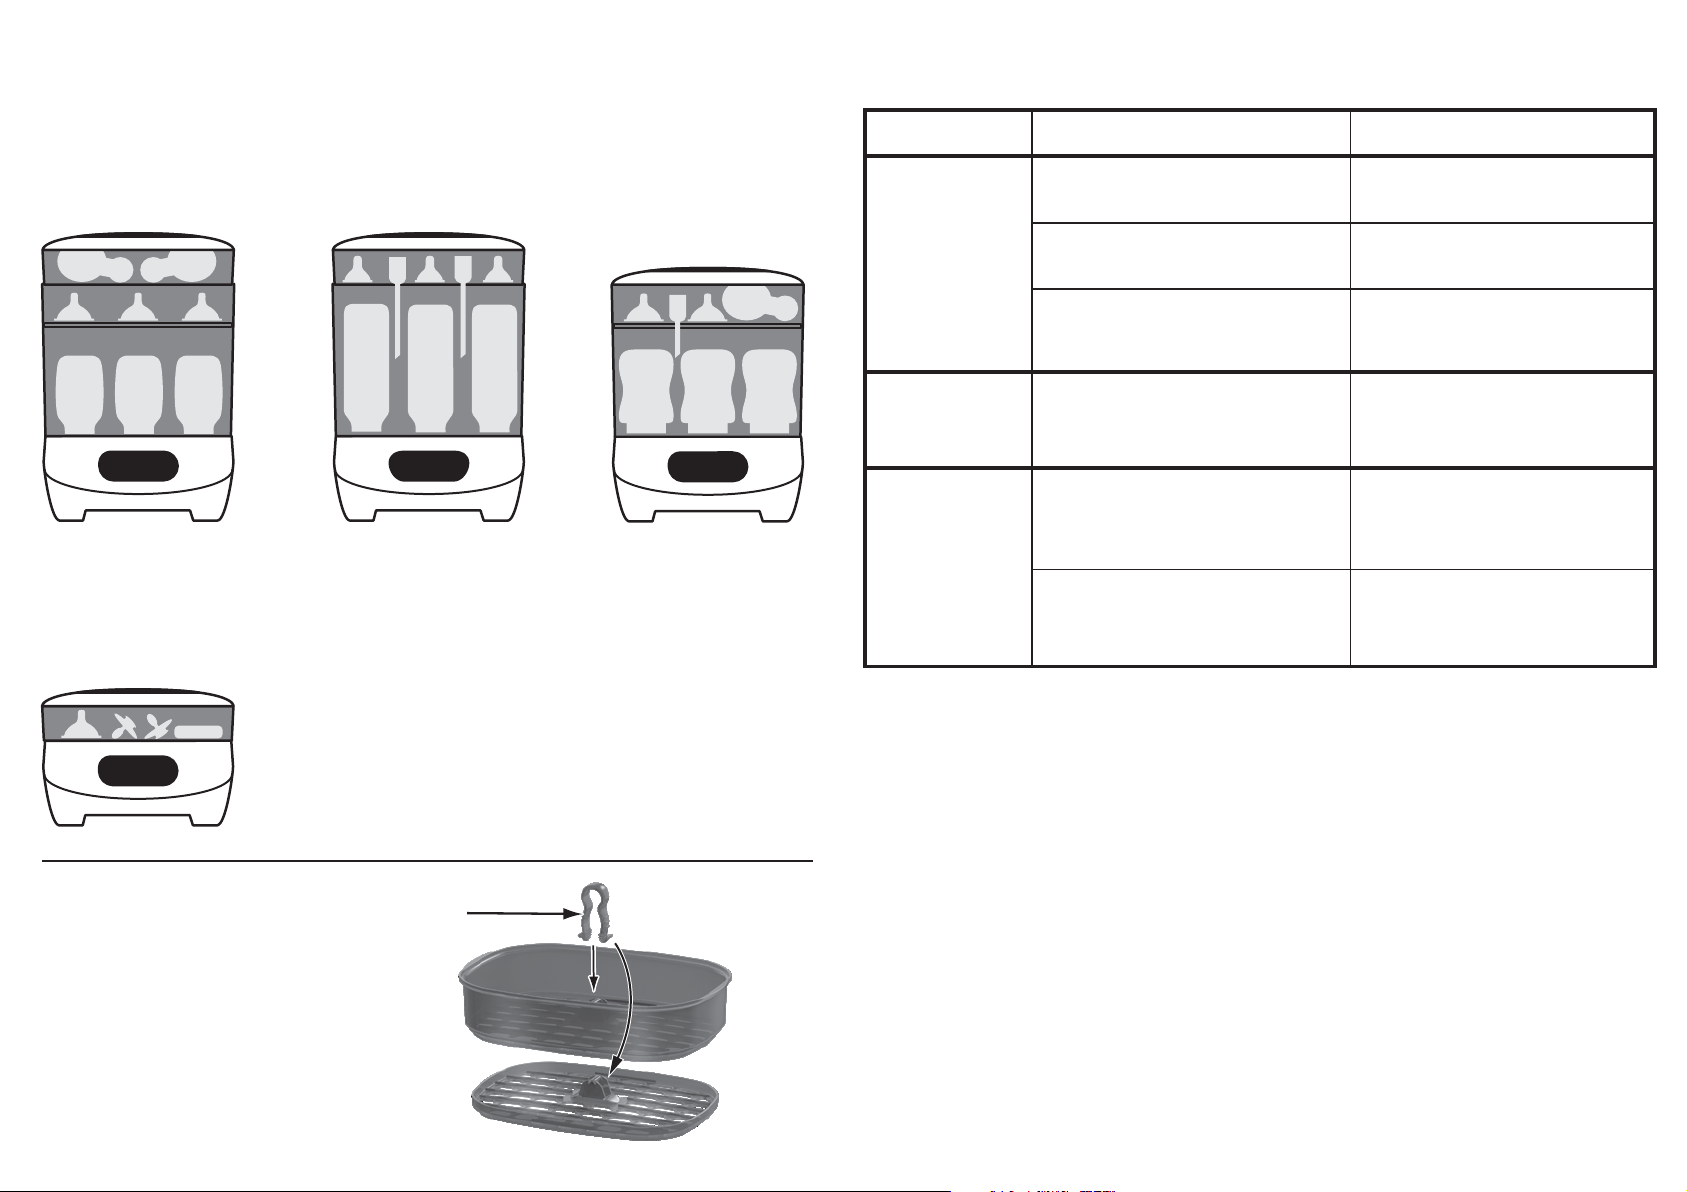
Modular set-up options
Upper & Lower Baskets
WITHOUT Accessory Tray
For use with tall bottles,
and accessories.
Upper Basket only
WITHOUT Accessory Tray
For use with accessories
pacifiers and small items.
The tongs can be inserted and stored in the
upper basket or the accessory tray.
When the tongs are clicked into place,
they can be used to lift the basket or tray.
Gently squeeze the tongs to remove them.
They can also be used to grasp parts and
bottle nipples in the sterilizer.
Breast pump parts and any other items safe for
steam sterilization can be placed in the lower or
upper baskets. Try dierent configurations to find
what set-up works best for you.
TIP: For best drying performance, Do not overload
the Sterilizer Dryer.
Upper & Lower Baskets
With Accessory Tray
For use with short bottles,
accessories & pump parts.
Lower Basket only
With Accessory Tray
For use with short bottles,
accessories & pump parts.
Using the included tongs
or