User Manual Ninja KTST200UK Black Kettle and Toaster Set
PARTS
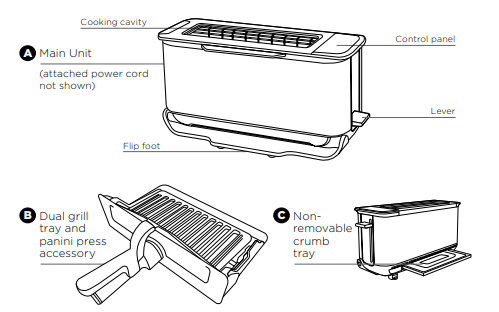
To order replacement parts or additional accessories, visit ninjakitchen.co.uk or contact customer service at 0800 862 0453
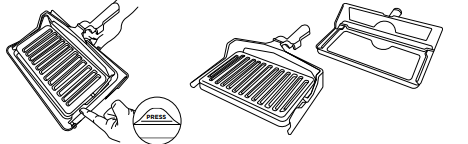
Converting the Panini Press into a Grill tray
1 Lift up top handle to separate the plates.
2 Push the PRESS tab on the left panini arm inward, sliding it off the grill tray pin.
3 Slide the right panini press arm off the grill tray pin.
4 Use as a grill tray for Grill, Bake and Reheat functions.
5 Re-attach top plate for Panini function.
NOTE: To re-attach the panini press, align right panini arm hole with right grill tray pin. Push the PRESS tab and align the panini hole with the bake pin to slot in place.
BEFORE FIRST USE
- Remove and discard any packaging material and tape from the unit. Some stickers are to be permanently kept on the unit, ONLY remove stickers with ‘peel here’.
- Remove all accessories from the box and read this manual carefully. Please pay particular attention to operational instructions, warnings and important safeguards to avoid any injury or property damage.
- Separate the panini press from the grill tray following the instructions listed in the Converting the Panini Press into a Grill tray section. Then wash the panini press and grill tray in warm, soapy water. Rinse and dry thoroughly. NEVER submerge the main unit in water.
- We recommend placing the grill tray inside the toaster and running it on GRILL HIGH for minutes without adding food. Refer to section below FLIPPING TO GRILL POSITION for how to use the toaster on GRILL mode. Make sure the area is well ventilated. This removes any packaging residue and odour traces that may be present. This is completely safe and not detrimental to the performance of the toaster.
NOTE: For longest life, we recommend hand-washing the accessories.
For best results, remove the panini press from the grill tray and wash separately
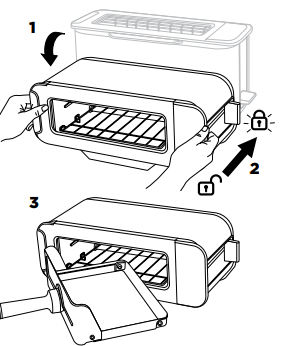
FLIPPING TO THE GRILL POSITION
- Flip the unit down
- Push the toast lever back to open the cooking cavity. Lock icon: Lever must be pushed all the way back to lock position. The lock icon will illuminate if the lever is locked and flash if not locked.
- Insert the grill tray to begin grilling.
“LOC”
Appears on the display when the unit is in the horizontal mode but the lever has not been pushed back and locked into place. There will be an audible click when lever is locked and LOC will disappear.
“NO PAN”
Appears on the display if the grill tray is not inserted and START/STOP has been pressed to start cooking. Insert pan correctly to begin cooking.
The unit will auto shut off if the grill tray has been removed for 5 minutes.
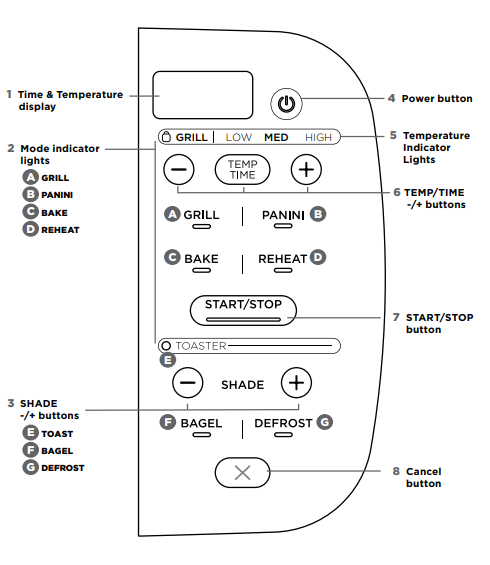
USING THE CONTROL PANEL
When the unit is flipped from toaster position to grill position the control panel will change to show all functions and the buttons you are able to select in that mode.
HORIZONTAL FUNCTIONS
A GRILL: Ideal for melted cheese on toast, toasted sandwiches or for crisping foods.
B PANINI: Make cafe style pressed panini and toasted sandwiches.
C BAKE: Evenly bakes breakfast pastries and even small quiches
D REHEAT: Quickly reheat cooked foods like a slice of pizza.
VERTICAL FUNCTIONS
E TOAST: Evenly toasts up to 2 slices of bread to your perfect level of darkness.
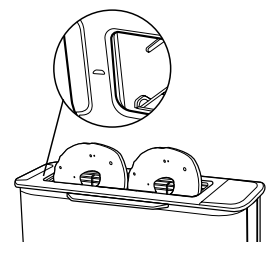
F BAGEL: Perfectly toast up to 2 bagel halves when they’re placed cut-side forward in the toaster. The icon on your unit will show instructed direction.
G DEFROST: Press for added time when toasting bread and bagels from frozen.
OTHER OPERATING BUTTONS
- Time display: Shows the cook time and will count down when cooking is in progress
- Mode Indicator lights: Signify horizontal or vertical orientation. Flip unit down and press down lever to engage horizontal functions.
- SHADE -/+ buttons: Adjust the toast shade for TOAST and BAGEL functions.
- Power button: Press to turn unit on or of
- Temperature Indicator Lights: LOW/ MED/HIGH for temperature control in GRILL, PANINI, BAKE and REHEAT functions.
- TEMP/TIME -/+ buttons: Press TEMP/ TIME to toggle between selections, then use -/+ buttons to adjust.
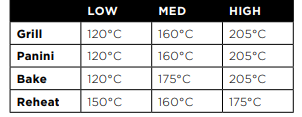
Approximate temperature guide
NOTE: The cook time and temperature can be adjusted at any time during the cooking cycle.
7 START/STOP button: Press to start or stop cooking. Cooking will begin shortly thereafter.
8 Cancel Button: Press to cancel and eject your food load when in toaster mode.
USING THE TOASTER MODES (VERTICAL)
Toast
1 Flip the unit up to the Toaster position and make sure the lever is pulled up. Check the flip foot is at the bottom of the unit. 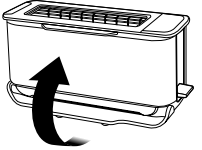
2 Use the +/- SHADE buttons to select the desired shade level from 1-7.
NOTE: There is no temperature or time adjustment available for the TOAST function. These are automated within the shade selection.
3 Place your sliced bread into the toaster slot. Push the lever down to start the toasting cycle
NOTE: Check on progress during cooking by lifting lever to raise toast. The cooking cycle will continue so push lever back down once done
NOTE: Select CANCEL during a cooking cycle. This will pop the toast up.
4 When toasting is finished, the unit will beep and the lever and the toast will pop up.
NOTE: The unit uses an algorithm to ensure consistent shade results whether toasting from a cold or pre-warmed unit. As a result the total toast time may change - to add more or less time adjust the shade setting on the dial.
Bagel
1 Flip the unit up to the Toaster position and make sure the lever is pulled up.
2 Select the BAGEL button. The button will illuminate.
3 Select your desired shade level by rotating the shade dial.
NOTE: There is no temperature or time adjustment available for the BAGEL function. These are automated within the shade selection.
4 Place bagel halves, cut-side facing you, in the toaster. There is a small icon on the unit to indicate. Push the lever down to start toasting.
NOTE: Check on progress during cooking by lifting lever to raise toast. The cooking cycle will continue so push lever back down once done.
NOTE: Select CANCEL during a cooking cycle. This will pop the bagel up.
5 When toasting is finished, the unit will beep and the lever and the bagel will pop up.
NOTE: The unit uses an algorithm to ensure consistent shade results whether toasting from a cold or pre-warmed unit. As a result the total toast time may change - to add more or less time adjust the shade setting on the dial.
Defrost
- Defrost can ONLY be used with either the TOAST or BAGEL function.
- Select the DEFROST button to add extra time for defrosting your food before toasting.
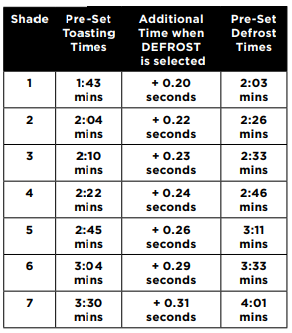
NOTE: These are default times on first use when the unit is cold. Times will vary when the unit has heated up.
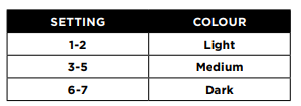
TIPS FOR CHOOSING YOUR SHADE SELECTION
- With multiple slices, place next to each other. Make sure there is no overlap of the slices so they can toast consistently. If bread slices do not fit next to each other, try rotating them sideways for a better fit.
- For drier or stale breads, adjust the shade lower than your standard setting.
- For freshly baked or whole wheat breads, adjust the shade higher than your standard setting.
- Sweet or fruit bread (fruit loaf, tea cakes) toast much quicker, adjust the shade setting lower.
- For breads with an uneven surface (like English muffins), adjust the shade higher than your standard setting. Be sure to slice bread evenly for consistent toasting.
- For thick-cut pieces, adjust the shade higher than your standard setting. Be sure to slice bread evenly for consistent toasting.
- Split bagels in half before toasting. Place the cut side facing you.
- For frozen waffles, frozen French toast or frozen bagels ensure you also press the Defrost button to add extra time.
- Be aware that very thin slices may burn. Use the lowest shade selection and monitor while toasting
USING THE GRILL MODES (HORIZONTAL)
- From the toaster position, flip the unit down so it is horizontal. Push the lever back until it clicks into place. Select GRILL.
- Set the time. Press the TEMP/TIME button to see the time display. Then use the +/- buttons to select a time between 1 minute and 10 minutes.
- Set the temperature. Press the TEMP/ TIME button then use the +/- buttons to select LOW/MED/HIGH.
- Place ingredients on the grill tray and insert tray into the unit.
- Press START/STOP to begin the cooking cycle. Cooking will only begin if the tray is correctly inserted.
- During cooking, you can remove the grill tray to check on food. The timer will pause until the grill tray has been reinserted in the unit.
- When cooking time reaches zero, the unit will beep to signal the cooking cycle is complete.
NOTE: If cooking for less than 10 minutes, the clock will count down by minutes and seconds. If cooking for 10 minutes or more, the clock will count down by minutes only until the times reaches below 10 minutes.
Panini
- Flip unit down to the horizontal position and push the lever back. Select PANINI.
- Set the time. Press the TEMP/TIME button to see the time display. Then use the +/- buttons to select a time between 1 minute and 20 minutes.
- Set the temperature. Press the TEMP/ TIME button then use the +/- buttons to select LOW/MED/HIGH
- Place ingredients in the panini press and insert into the unit. Cooking will begin when the press is correctly inserted.
- Press START/STOP to begin the cooking cycle. Cooking will only begin if the tray is correctly inserted.
- During cooking, you can remove the panini press to check on food. The timer will pause until the grill tray has been reinserted in the unit.
- When cooking time reaches zero, the unit will beep to signal the cooking cycle is complete.
Bake
- Flip unit down to the horizontal position and push the lever back. Select BAKE.
- Set the time. Press the TEMP/TIME button to see the time display. Then use the +/- buttons to select a time between 1 minute and 20 minutes.
- Set the temperature. Press the TEMP/ TIME button then use the +/- buttons to select LOW/MED/HIGH.
- Place ingredients on the grill tray and insert tray into the unit.
- Press START/STOP to begin the cooking cycle. Cooking will only begin if the tray is correctly inserted.
- During cooking, you can remove the grill tray to check on food. The timer will pause until the grill tray has been reinserted in the unit
- When cooking time reaches zero, the unit will beep to signal the cooking cycle is complete.
Reheat
- Flip unit down to the horizontal position and push the lever back. Select REHEAT.
- Set the time. Press the TEMP/TIME button to see the time display. Then use the +/- buttons to select a time between 1 minute and 20 minutes
- Set the temperature. Press the TEMP/ TIME button then use the +/- buttons to select LOW/MED/HIGH.
- Place ingredients on the grill tray and insert tray into the unit.
- Press START/STOP to begin the cooking cycle. Cooking will only begin if the tray is correctly inserted.
- During cooking, you can remove the panini press to check on food. The timer will pause until the grill tray has been reinserted in the unit.
- When cooking time reaches zero, the unit will beep to signal the cooking cycle is complete.
MAINTENANCE
CLEANING
The unit should be cleaned thoroughly after every use
- Unplug the unit and allow it to cool down before cleaning
- Empty the crumb tray by partly sliding it out of the unit when the unit is in the vertical position. Wipe crumbs off and fully insert back into the unit.
- Use a damp cloth to clean the exterior of the main unit and the control panel. A non-abrasive liquid cleanser or mild spray solution may be used. Apply the cleanser to the cloth, not the unit surface, before cleaning.
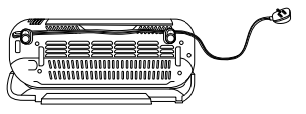
POWER CORD MANAGEMENT
Our cord management system is designed so it will not interfere with the toaster’s flip functionality.
Option 1: Socket on the right. Place the cord in the left hook on the back of the toaster. Twist the cord so the wide side is horizontal in order to securely fasten the cord in the hook. 
Option 2: Socket on the left or behind the toaster. Place the cord in both hooks on the back of the toaster. Twist the cord so the wide side is horizontal in order to securely fasten the cord in the hooks.