0 er'
Manual
Professional Outdoor Grills
and 12" Professional Outdoor
Cooktop
Barbecues professionnels
et tables de cuisson
professionnelles de plein
air de 30 cm (12 po)
Manuel du propri_taire
La section fran_aise commence _ la page 37
Parrillas profesionales para
el aire libre g estufa profesional
para el aire libre de 12"
Manual del propietario
La secci6n en espafio! empieza en la p(_gina 73
149-80553 I
lO-O8JR
C US

Consumer Information
Professiona! Outdoor Grills & Cooktops
Introduction
Your new Monogram grill or cooktop makes an eloquent statement of stgle, convenience and
outdoor planning flexibilitg. Whether gou chose it for its puritg of design, assiduous attention to
detail-or for both of these reasons-gou'll find that gour Monogram grill's or cooktop's superior
blend of form and function will delight gou for gears to come.
The information on the following pages will help gou operate and maintain gour grill
or cooktop properlg.
Contents
Care and Cleaning
Basting Pan ................................... 27
Batterg Replacement .......................... 28
Burners .................................... 2/4-26
Control Panel and Knobs ...................... 27
Cooktop Burner Grates ......................... 25
Cooktop Spark Igniters and Electrode .......... 26
Cooktop Surface Burners....................... 26
Custom Grill Cover ............................. 29
Cutting Board .................................. 27
Drip Tray ...................................... 26
Fuse Replacement ............................. 29
Grill Grate(s) ................................... 2]
Grill Light(s) .................................... 25
Heat Diffusers .................................. 2]
Infrared Burner ................................. 25
Main Burners ................................... 2/4
Orifices ......................................... 2/4
Rotisserie ...................................... 27
Securitg Loop .................................. 29
SideShelf Removal ............................ 27
Smoker Box ................................... 27
Spider and Insect Warning ..................... 2]
StainlessSteelSurfaces ........................ 27
Wheels ........................................ 29
Consumer Services
Important Phone Numbers .................... ]1
Model and Serial Number ....................... 4
Problem Solver ................................ ]0
Product Registration ............................. 4
Safetg Instructions ......................... ], 5-9
Warrantg for Customers in Canada ............ ]5
Warrantg for Customers in the USA ........... ]6
Using the Grill
Cooktop Burners .............................. 17
Drawer Organizers ............................ 22
Features ................................... !0, !1
Grilling Guide .................................. 15
Grilling Hints ................................... 14
Infrared Sear Burner ........................... 16
Lighting the Grill ........................... 12, 1]
Main Burners .................................. 12
Rotisserie .................................. 18-20
Smoker Sgstem ................................ 21
Tank Drawer with LPTank Retainer Loop ...... 12
Temperature Gauge ........................... 12
Warming Shelf ................................. 14
Safetg Precautions
Professiona! Outdoor Grills & Cooktops
FOR OUTDOOR USE ONLY
IMPROPER INSTALLATION, ADJUSTMENT, ALTERATION, SERVICE OR
MAINTENANCE CAN CAUSE PROPERTY DAMAGE, INJURY OR DEATH.
READ THIS MANUAL THOROUGHLY BEFORE INSTALLATION, USE OR
SERVICING OF THIS EQUIPMENT.
TESTEDIN ACCORDANCEWITH
ANSI Z21.58, LATESTEDITION
STANDARD FOROUTDOOR COOKING
GASAPPLIANCES.THIS GRILL/COOKTOP
IS FOROUTDOOR USEONLY.
Check gour local building codes for
the proper method of installation.
In the absence of local codes, this
unit should be installed in accordance
with the National Fuel Gas Code No.
Z223.1/NFPA 54, Latest Edition and
the National Electric Code ANSI/NFPA
No. 70, Latest Edition.
FOR OUTDOOR USEONLY
If stored indoors, detach and leave
L.R cylinder outdoors.
-&DANGER
If gou smell gas:
1. Shut off gas to the appliance.
2. Extinguish ang open flame.
3. Open hood.
4. If odor continues, keep awag from
the appliance and immediatelg
call your gas supplier or your
fire department.
-&WARNING
1. Do not store or use gasoline
or other flammable vapors
and liquids in the vicinity of this
or ang other appliance.
2. An LPcglinder not connected for use
shall not be stored in the vidnitg
of this or ang other appliance.
-&WARNING
Do not trg lighting this appliance
without reading the lighting
instructions contained in this
Owner's Manual.
-&WARNING
Spiders and insects can nest in
the burners or orifices of this or ang
outdoor gas appliance. The presence
of spiders, spider webs or other
insects can cause the gas to flow from
the front of the burner. This is a very
dangerous condition which can cause
a fire to occur behind the valve panel,
damaging the grill or cooktop and
making it unsafe for use. See the
Spider and insect warning in the Care
and Cleaning section.
Consumer Informotion
Professiona! Outdoor Grills & Cooktops
Before
using your
grill or
cooktop
Readthis manual carefullg. It is intended to help
gou operate and maintain gour new grill or
cooktop properlg.
Keep it handg for answers to gour questions.
If gou don't understand something or need more
help, there is a list of toll-free consumer service
numbers included in the back section of this
manual.
OR
Visit our Website at: monogram.com
Write
down the
model &
serial
numbers
On 12" cooktops gou will find them on a label
in the rear of the burner box below the burner
grates or on the bottom panel of the grill head.
See features page for location.
On 54", 42" and ]0" built-in and free-standing
models, gou will find them on the bottom
of the drip trag or behind the control panel.
These numbers are also on the Consumer
Product Ownership Registration Card.
Before sending in the registration card,
please write these numbers here:
Model Number
Serial Number
Use these numbers in ang correspondence or
service calls concerning gour grill or cooktop.
If blou
received a
damaged
grill or
cooktop
Immediatelg contact the dealer (or builder)
that sold gou the grill or cooktop.
Save time
& moneg
Before gou request service, check the Problem
Solver in the back of this manual.
It lists causes of minor operating problems
that gou can correct gourself.
If btou
need
service
Toobtain service, see the Consumer Services
page in the back of this manual.
We are proud of our service and want gou to be
pleased. If for some reason gou are not happg
with the service gou receive, here are steps to
follow for further help.
FIRST,contact the people who serviced gour
appliance. Explain whg gou are not pleased.
In most cases, this will solve the problem.
NEXT,if gou are still not pleased, write all
the details-including gour phone number-to:
Manager, Customer Relations
GEAppliances
Appliance Park
Louisville, KY/40225
Important Safetg Instructions
Professiona! Outdoor Grills & Cooktops
IMPORTANT SAFETY NOTICE
The California Safe Drinking Water and Toxic
Enforcement Act requires the Governor of
California to publish a list of substances known
to the state to cause cancer, birth defects
or other reproductive harm, and requires
businesses to warn customers of potential
exposure to such substances.
• Gas appliances can cause minor exposure
to four of these substances, nemelg benzene,
carbon monoxide, formaldehgde end soot,
caused primerilg bg the incomplete
combustion of natural gas or LPfuels.
Also, used in one of the components
of the IRburner, is crgstolline Silica.
Properlg adjusted burners, indicated bg
a bluish rather then e gellow flame, will
minimize incomplete combustion. Exposure
to these substances isminimized because
this is an outdoor unit.
-aWARNING: SAFETYPRECAUTIONS
When using gour appliance, follow basic
safetg precautions, including the following:
Be sure gour appliance is properlg installed
and grounded bg a qualified technician
in accordance with the provided installation
instructions.
Do not attempt to repair or replace ang
part of gour grill or cooktop unless it is
specifically recommended in this manual.
All other servicing should be referred to
a qualified technician.
If the grill is installed bg a professional
installer or technician, be sure that he shows
gou where gour gas supplg shutoff is located.
All gas lines must have a shutoff that is reodilg
and easilg accessible.
Read this manual carefullg and completelg
before using gour grill or cooktop to reduce
the risk of fire, burn hazard or other injurg.
Pleaseretain this manual for future reference.
This outdoor cooking gas appliance is not
design certified for and is not to be installed
in or on recreational vehicles, portable
trailers, boats or ang other moving
installation.
Never allow anyone to sit, stand or play
on or around the grill or cooktop at ang time.
When in use, portions of the grill or cooktop
get hot enough to cause severe burns.
Do not store items of interest to children
around or below the grill or cooktop, in
the grill drawers or built-in enclosure.
Children should not be left alone or
unattended in an area where the grill or
cooktop is located. Never allow children to
crawl inside the grill or built-in enclosure.
Never let clothing, pot holders or other
flammable materials come in contact with
or too close to any grate, burner or hot
surface until it has cooled. Fabric mag
ignite and result in personal injurg.
Do not use water or other liquids
on grease fires. Never pick up a flaming pan.
Turn the controls off. Smother a flaming pan
on a burner bg covering the pan completely
with a well-fitting lid,cookie sheet or flat tray.
Use a multi-purpose d% chemical or foam-type
fire extinguisher.
Flaming grease outside a pan can be put out
by covering it with baking soda or by using
a multi-purpose drg chemical or foam-tgpe
fire extinguisher.
• Have a multi-purpose drg chemical
or foam-tgpe fire extinguisher accessible.
• Use this appliance onlg for its intended use
as described in this manuel.
• Do not leave the grill or cooktop unattended
while cooking.
• For personal safetg, wear proper apparel.
Loosefitting garments or sleeves should
never be worn while using this appliance.
Some sgnthetic fabrics ere highlg flammable
and should not be worn while cooking.
• Onlg certain tgpes of glass, heat-proof
glass ceramic, earthenware, or other glazed
utensils are suitable for grill use. Unsuitable
types of materials may break with sudden
temperature changes. Use only on low
or medium heat settings according
to the manufacturer's directions.
Important Safetg Instructions
Professiona! Outdoor Grills & Cooktops
WARNING: SAFETYPRECAUTIONS
Do not heat unopened food containers
as a buildup of pressure mag cause
the container to burst.
• Use a pot holder when opening the hood.
Open the hood slowlg to allow heat and steam
to escape.
• Use only dry pot holders-moist or damp pot
holders on hot surfaces mag result in burns
from steam. Do not use a towel or other bulkg
cloth in place of a pot holder. Do not let pot
holders touch hot portions of the grill grate
or burner grates.
• Never lean over an open grill.
• Pag close attention when lighting a burner.
Be certain gou are rotating the igniter labeled
for the burner gou intend to use.
• When using the grill, do not touch the grill
grate, burner grate or immediate surrounding
areas as these areas become extremely hot
and could cause burns. Keep children away!
Grease is extremely flammable. Let hot
grease cool before attempting to handle
or dispose of it. Avoid letting grease deposits
collect in the drip tray. Clean the drip trag
often.
Do not use aluminum foil to line drip
trag or grill grates. This can severelg upset
combustion air flow or trap excessive heat
in the control area.
• When using the cooktop burners, alwags use
fiat-bottomed pans which are large enough
to cover the burner. Adjust the flame so that
it heats onlg the bottom of the pan to avoid
ignition of clothing. Position handles awag
from the grill to avoid burns associated with
spillovers and heat from the grill. Hold the
handle of the pan with a pot holder when
turning or stirring food.
• Do not use the grill for cooking excessivelg
fattg meats or products which promote
flare-ups.
• Never grill without the drip trag in place and
pushed all the wag to the back of the grill.
Without it, hot grease could leak downward
and produce a fire or explosion hazard.
• Never rotisserie cook without the basting
pan in place and pushed all the wag to
the back of the grill under the food being
cooked. Without it, hot grease could leak
downward and produce a fire or explosion
hazard.
- Cook meat and poultrg thoroughlg--
meat to at least an INTERNAL 160°F and
poultrg to at least an INTERNAL 180°F.
Cooking to these temperatures usuallg
protects against foodborne illness.
• For proper lighting and performance of the
burners it is necessarg to keepthe ports clean.
• Clean the grill with caution. To avoid steam
burns, do not use a wet sponge or cloth to
clean the grill while it is hot. Some cleaners
produce noxious fumes or can ignite if applied
to a hot surface.
• Do not operate the grill or cooktop under
unprotected combustible construction.
Alwags adhere to the required clearances listed
in the Installation Instructions. Useonlg in
well-ventilated areas. Do not use in buildings,
garages, sheds,breezewags or other such
enclosed areas.Thisunit isfor outdoor useonlg.
• Do not locate the grill where the grill exhaust
is directed at combustible materials, windows
(open or closed),doorwags, etc. Thegrill vents
combustion gases and smoke to the back of
the appliance.
• Keepthe area surrounding the grill free from
combustible materials, trash, or combustible
fluids and vapors such as gasoline or charcoal
lighter fluid. Donot obstruct the flow of
combustion and ventilation air.
- Allow 12" minimum clearance on both
sides and the back of the grill to adjacent
vertical combustible construction.
At least once a gear, the unit should be
inspected for the presence of spiders, spider
webs or other insects. The burner area is a
common and desired spider haven and can
present a dangerous condition which can
damage the grill or cooktop and render it
unsafe for use. The presence of spiders, spider
webs or other insects can cause the gas to
flow from the front of the burner. This isa verg
dangerous condition which can cause a fire to
occur behind the valve panel. Check and clean
the burners immediatelg if ang of the following
conditions exist:
i. The smell of gas inconjunction with extreme
gellow tipping of the burner flames.
2. The grill or cooktop burners do not reach
temperature.
3. The grill or cooktop burners heat unevenlg.
4. The burners make popping noises.
WARNING: SAFETYPRECAUTIONS
o
o
Do not use charcoal on the grill.
Keep ang electrical supplg cord and
the fuel supplg hose awog from ang heated
surfaces. Electrical cords should be placed
awog from wolkwogs to avoid tripping
hazard.
Never touch the grill grates, hood or
immediate surrounding metal surfaces
with gour bore hands as these areas become
extremelg hot during use and could cause
burns.
Use an insulated glove or mitt when opening
and operating the grill. Open grill hood slowIg
to allow heat and smoke to escape before
fullg opening.
- The grill hood must be fulig opened
when lighting. Never leon over a hot grill
surface or look directlg into the grill when
attempting to light.
- Do not operate grill under the influence
of alcohol or drugs.
if equipped, never place more than
30 pounds on a side shelf. Do not lean
on shelves.
if ang burner does not light or goes out
during operation, turn off all gas control
knobs with hood open and wait five (5)
minutes before attempting to relight.
Prior to using grill, ensure that all tie down
wires hove been removed from burners.
For LP gas models onlg:
Be sure to CLOSE the LPtank mounted valve
after everg use of the grill.
• if a free-standing unit is stored indoors
ensure that it is cool before attempting to
move it and store it in a well-ventilated area.
If LID,the cglinder must be unhooked and the
LP cglinder stored outside in a well ventilated
area, awag from heat and out of the reach
of children. From the caster side of the grill,
push--never pull--the grill.
• Place gour grill well awag from areas where
children plag.
• Never move the grill when hot.
Never store additional or emptg propane
cglinders in the grill cabinet or around the
grill. Never fill the cglinder more than 80% full.
Failure to follow these steps mag result in a
fire causing death or serious injurg.
- Never use o dented or rustg LP tank.
See the requirements in the Installation
Instructions.
Never put more than one LP cglinder
below o free-standing grill. Never modifg
the free-standing grill to house a larger
cglinder or more than one cglinder at a time.
Do not store spare tanks in a built-in
enclosure.
Keep the ventilation openings of the LP
cglinder enclosure free and dear from debris.
LP units require an LP tank equipped
with a tgpe 1 connector, an overfill
protection device and a collar to protect
the valve. If gou use a tank exchange
sgstem, be sure to exchange this tank
for a similorlg equipped tank.
- The pressure regulator and hose assemblg
supplied with the product must be used.
Replacement pressure regulators and hoses
must be specified bg GE.
- For built-in side burners and built-in
cooktops onlg: Use proper pan size--avoid
pans that are unstable or easilg tipped.
Select cookware having flat bottoms large
enough to properlg contain food and avoid
boilovers and spillovers and large enough
to cover the burner grate. This will save
cleaning time and prevent hazardous
accumulations of food, since heavg
spattering or spillovers left on the range can
ignite. Use pans with handles that can be
easilg grasped and remain cool.
For natural gas models onlg:
- Be sure to CLOSE the manual safetg valve
supplging the unit after everg use of the grill.
This appliance and its individual shut-off
valve must be disconnected from the gas
supplg piping sgstem during ang pressure
testing of that sgstem at test pressures in
excess of 0.5 psi (3.5 kPa).
This appliance must be isolated from
the gas supplg piping sgstem by closing
its individual manual shut-off valve during
ang pressure testing of the gas supplg piping
sgstem at test pressures equal to or less
than 0.5 psi (3.5 kPa).
- Be sure to close the manual shut-offvalve
to the unit offer everg use.
Important Safety Instructions
Professiona! Outdoor Grills & Cooktops
WARNING: SAFETYPRECAUTIONS
Do notuse thegrilluntila leektesthas been
performed.
AWARNING:
TEST FOR LEAKS
A complete gas tightness check must
be performed at the installation site.
To prevent fire or explosion hazard, DO NOT
use or permit sources of ignition in the area
while performing a leak test. Perform leak
test outdoors only. Never perform a leak test
with fire or flame. DO NOTSMOKEWHILE
PERFORMINGTHE LEAKTEST.
,,Create a soapy solution of equal parts mild
dishwashing detergent and water.
• Check to be sure all controls are in the OFF
position.
Turn on the fuel supply. For natural gas, turn
manual shut-off valve handle 1/4 turn to align
with gas flow. For LID,turn cylinder valve knob
counterclockwise one full rotation.
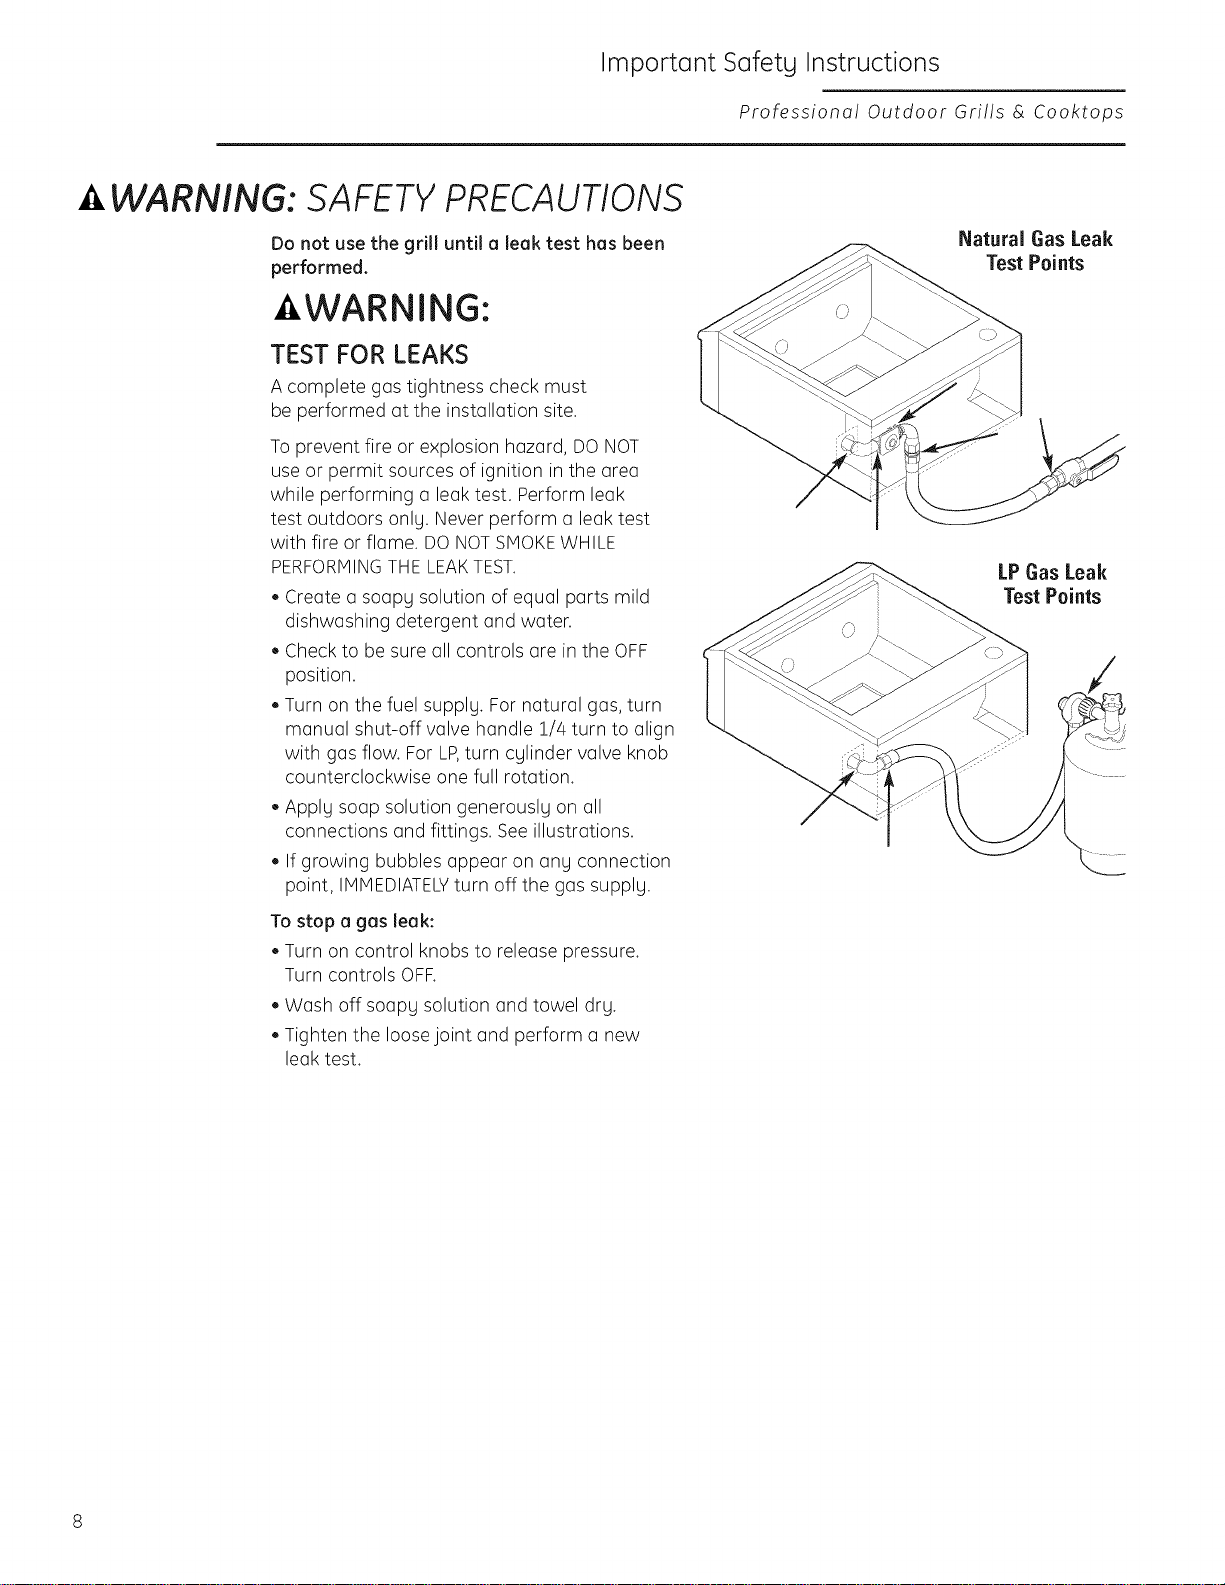
• Apply soap solution generously on all
connections and fittings. See illustrations.
If growing bubbles appear on any connection
point, IMMEDIATELYturn off the gas supply.
To stop a gas leak:
,,Turn on control knobs to release pressure.
Turn controls OFF.
• Wash off soapy solution and towel dry.
Tighten the loose joint and perform a new
leak test.
Natural Gas Leak
Test Points
LP Gas Leak
Test Points
WARNING: SAFETYPRECAUTIONS
SPECIAL NOTE ON WINDY CONDITIONS
Never use the grillinwindy conditions.
If located in a consistently windy area
(oceanfront, mountaintop, etc.) a windbreak
will be required on the rear wall and both
sides of the grill. Windbreak construction
is the responsibility of the owner and must
adhere to the specified clearances listed
in the Installation Instructions.
As a high-performance gas appliance,
your grill requires significant amounts of air
to support the combustion process. Your grill
has been engineered to take air in through
the control panel area and exhaust
the combustion byproducts out through
the gap between the front and rear hoods.
Using your grill in windy conditions can
disrupt the proper flow of air through your
grill, leading to reduced performance or,
in certain severe cases, causing heat buildup
in the control panel area. This can lead
to problems such as burn hazards when
the control panel surfaces become too hot
to touch and, ultimately, failure of the wiring
and internal components if the conditions
persist.
If you have a freestanding grill, it is best to
position the unit so the prevailing wind blows
into the front control panel, thus supporting
the proper airflow. Winds hitting the back
of the grill directly are the most likely to cause
problems, although wind blowing along the
hood gap can also be problematic.
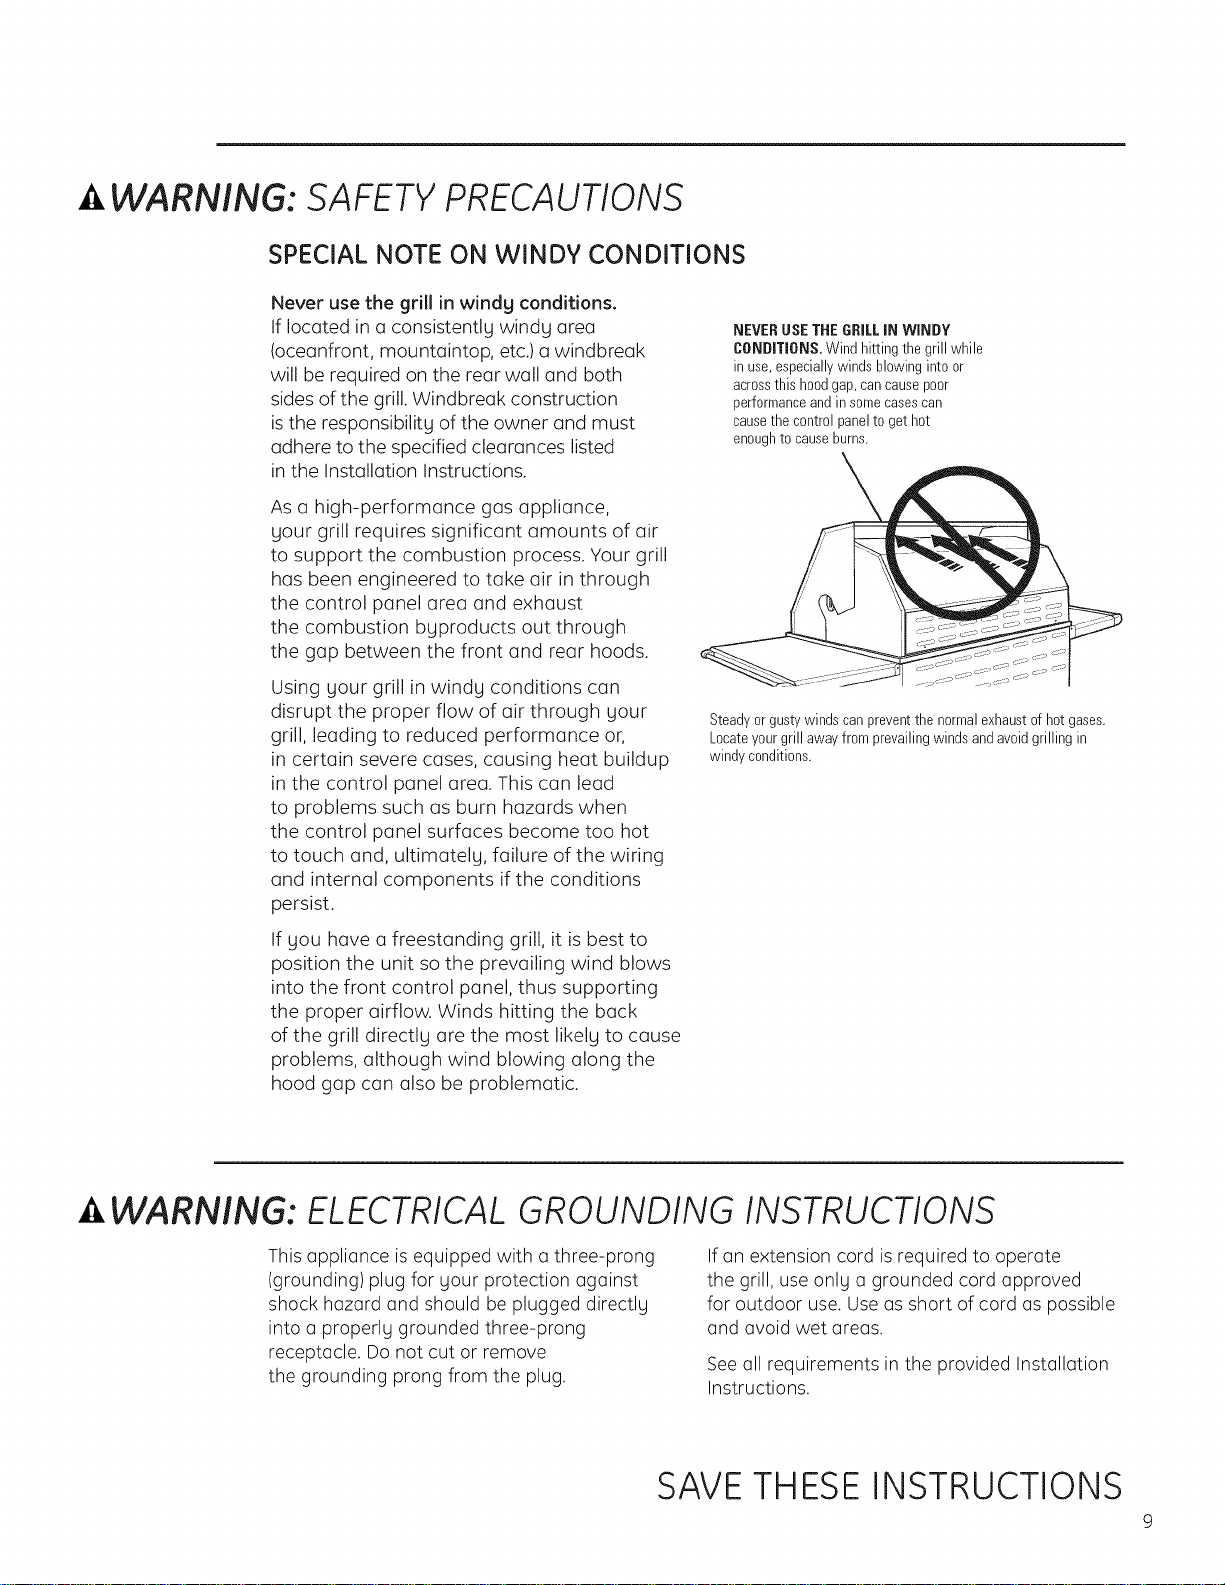
NEVERUSETHEGRILLIN WINDY
CONDITIONS.Wind hitting the grill while
in use,especiallywinds blowinginto or
acrossthis hoodgap, cancausepoor
performanceandinsomecasescan
causethe controlpanelto gethot
enoughto causeburns.
Steadyorgustywindscanpreventthe normalexhaustofhot gases.
Locateyourgrill awayfrom prevailingwindsandavoidgrilling in
windy conditions.
WARNING: ELECTRICAL GROUNDING INSTRUCTIONS
This appliance is equipped with a three-prong
(grounding) plug for your protection against
shock hazard and should be plugged directly
into a properly grounded three-prong
receptacle. Do not cut or remove
the grounding prong from the plug.
If an extension cord is required to operate
the grill, use only a grounded cord approved
for outdoor use. Use as short of cord as possible
and avoid wet areas.
See all requirements in the provided Installation
Instructions.
SAVETHESEINSTRUCTIONS
9
Features of Your Grill and Cooktop
Professiono! Outdoor Grills & Cooktops
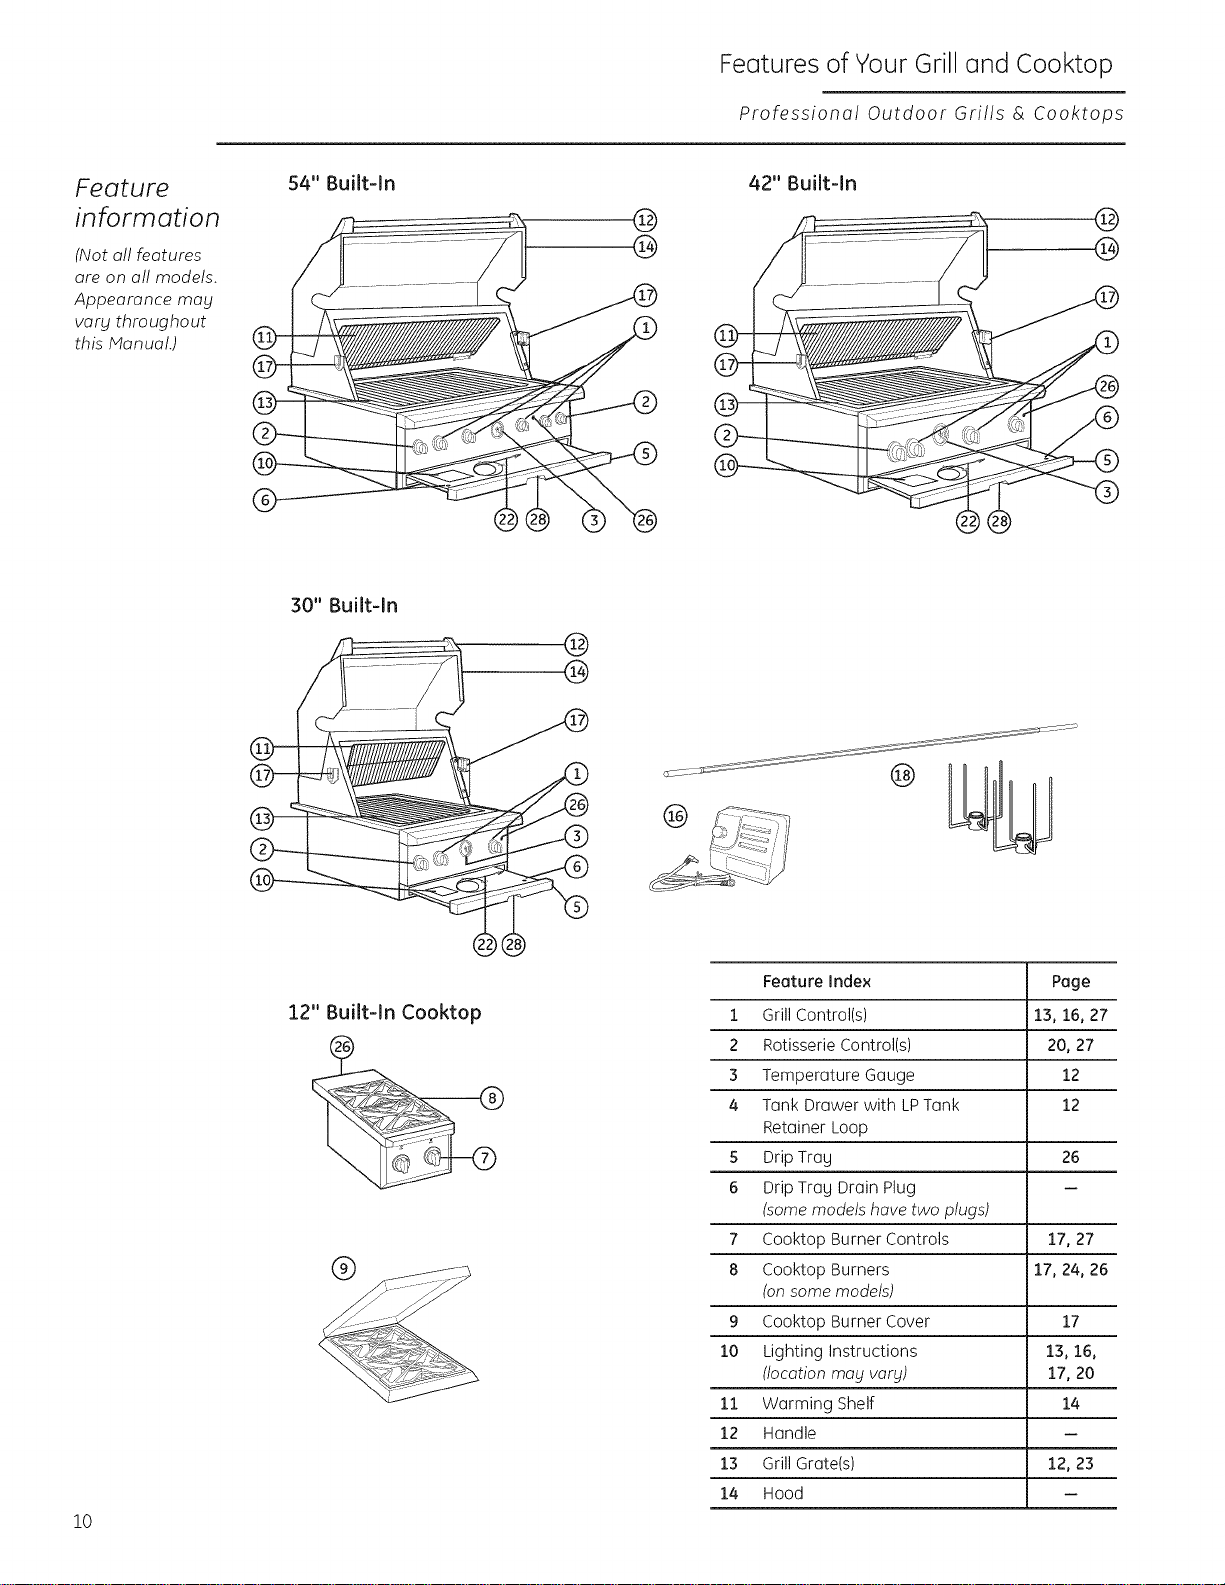
Feature
information
(Not a!! features
are on al! models.
Appearance mag
varbl throughout
this Manual.)
54" Built-In
®
@
42" Built-ln
®
30" Built-In
®
@
®
10
12" Built-In Cooktop
Feature Index Page
1 Grill Control(s) 13, 16, 27
2 Rotisserie Control(s) 20, 27
3 Temperature Gauge 12
4 Tank Drawer with LPTank 12
Retainer Loop
5 Drip Tray 26
6 Drip Tray Drain Plug
Isome models have two plugs)
7 Cooktop Burner Controls 17, 27
8 Cooktop Burners 17, 24, 26
(onsome models)
9 Cooktop Burner Cover 17
10 Lighting Instructions 13, 16,
IIocation may vary) 17, 20
11 Warming Shelf 14
12 Handle
13 Grill Grate(s) 12, 23
14 Hood
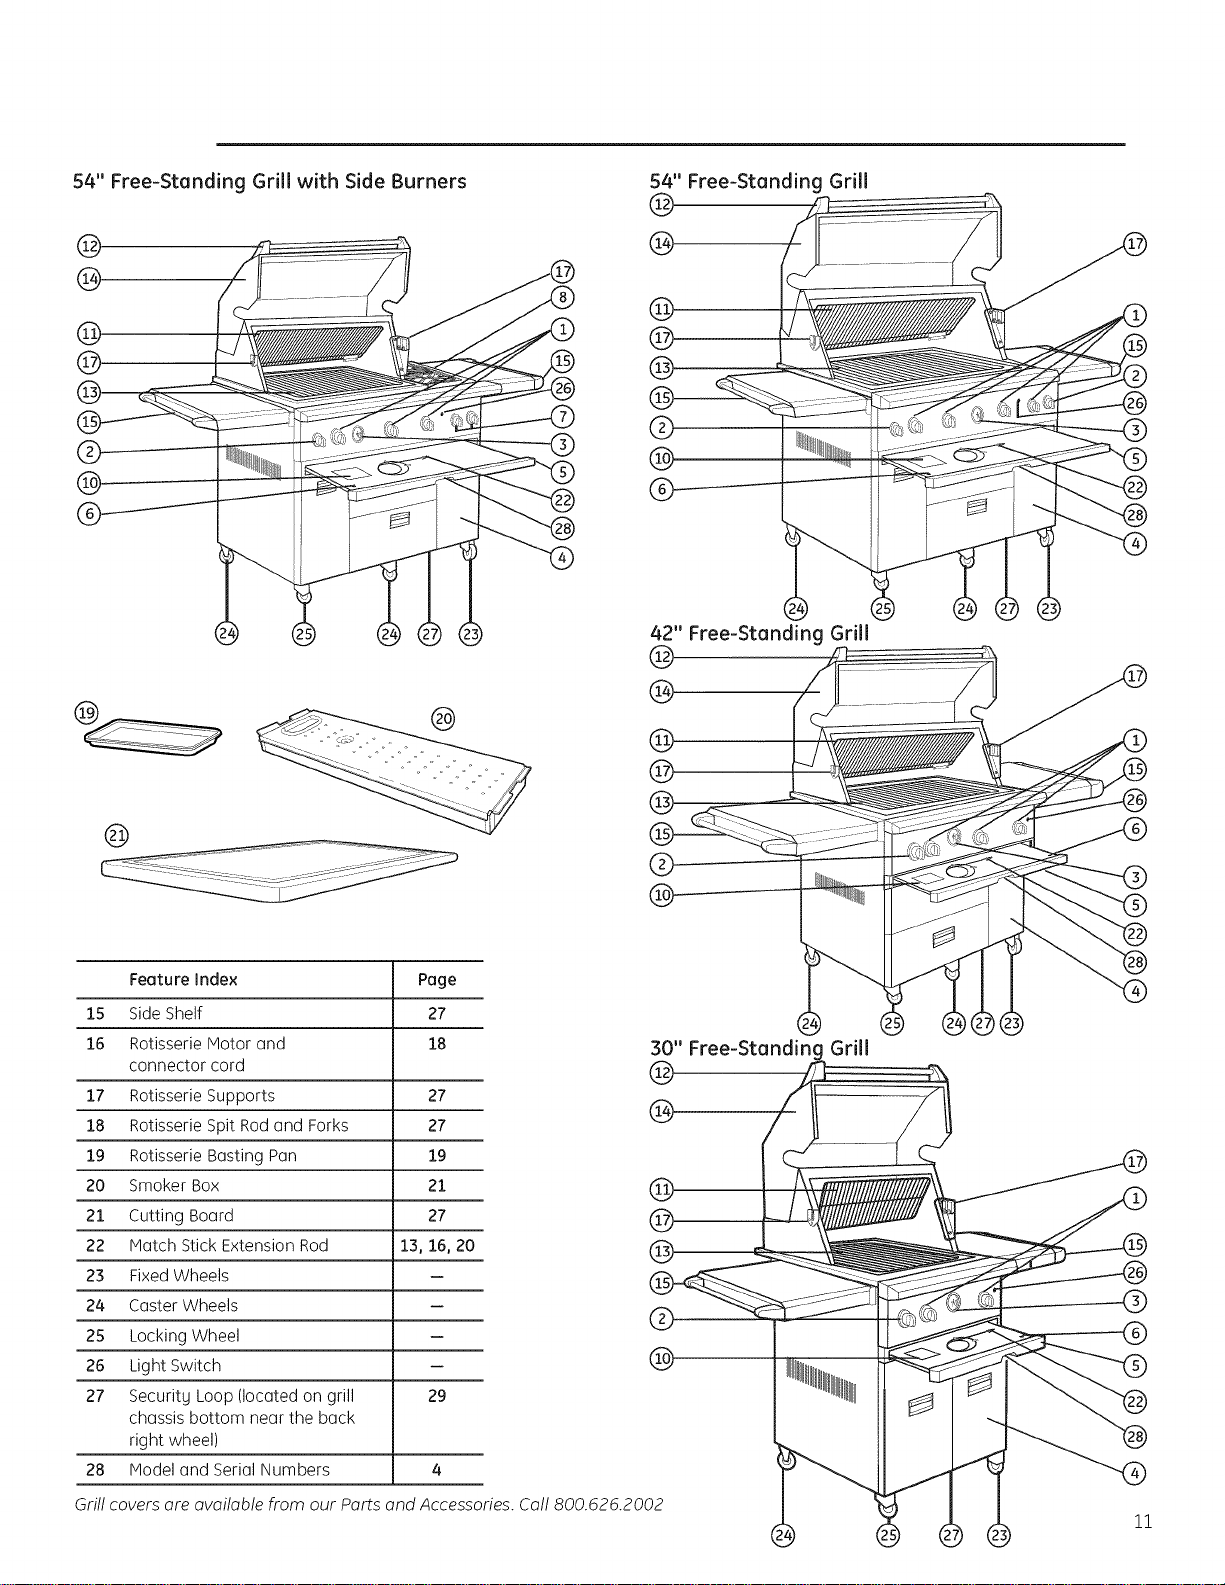
54"Free-StandingGrillwith SideBurners
@
@-
@
@-
@
Feature Index Page
15 Side Shelf 27
16 Rotisserie Motor and 18
connector cord
17 Rotisserie Supports 27
18 Rotisserie Spit Rodand Forks 27
19 Rotisserie Basting Pan 19
20 Smoker Box 21
21 Cutting Board 27
22 Hatch Stick Extension Rod 13, 16, 20
23 FixedWheels
24 Caster Wheels
25 Locking Wheel
26 Light Switch
27 Security Loop (located on grill 29
chassis bottom near the back
right wheel)
28 Hodel and Serial Numbers 4
Grill covers are available from our Parts and Accessories. Call 800.626.2002
Free-Standing Grill
®
@
42" Free-Standing Grill
@-
@-
®
@
11

The Grill
Professiono! Outdoor Grills & Cooktops
Location
Allow 12" minimum clearance on both sides
and the back of the grill to adjacent vertical
combustible construction. Seethe Installation
Instructions for complete details.
Tank drawer
with LP tank
retainer loop
(free-standing
models onlg)
To install the LPtank, fullg extend the tank
drawer and lift the retainer loop. Place the tank
on the drawer bottom, inserting the loop on
the bottom of the tank through the hole in
the drawer bottom. Tilt the tank forward to lower
the retainer loop to engage the top ring on the
tank. Insert the coupler sleeve on the regulator
over the tank inlet; turn clockwise to tighten.
Do not overtighten the coupler (see Installation
Instructions). Open the tank valve when readg
to use the grill. Alwags close the tank valve
when cooking is complete.
Before
lighting
the
outdoor
grill or
cooktop
WARNING: IMPORTANT!
Inspect the gas supplg piping or hose prior
to turning the gas on. If there is evidence of
cuts, wear or abrasion, it must be replaced prior
to use. Ang replacement pressure regulator
or hose assemblg must be the tgpe specified
bg the manufacturer.
For LPuse, the pressure regulator and hose
assemblg supplied with the unit must be used.
This LPtank is equipped with overfill protection.
When gou refill or trade in gour tank, make sure
the one gou receive also has overfill protection.
If the grill uses LPgas, connect the regulator
to the LPtank and check the hose and regulator
connections for leaks with a soap and water
solution before operating the grill.
Keep a sprag bottle of soapg water near the gas
supplg valve and check the connections for gas
leaks before each use.
Turn all knobs to OFFthen turn on the gas
supplg.
Do not use the grill if the odor of gas is
present.
Temperature
gauge
The temperature gauge is meant to be a general
indicator of surface temperatures with the hood
in the closed position. It is especiallg useful
during pre-heat when indicated temperatures
become stable (approximatelg 10-!5 minutes
with all main burners on Hi).
NOTE:On models equipped with the Infrared
Sear Burner,the temperature gauge will not
respond when onlg that burner isturned on.
Forthe 54" grill model, the temperature gauge
will not respond if onlg the far left main burner
is turned on.
Temperature gauge
lain
grill
burners
The grill section consists of stainless steel grill
grates, stainless steel heat diffusers and
stainless steel main burners.
The grates provide the grilling surface.
The heat diffuser helps protect the main burner
ports from blockage and distributes heat.
Main burner
Heatdiffuser
Grill grates
Each main burner is rated at 25,000 BTUs.
12
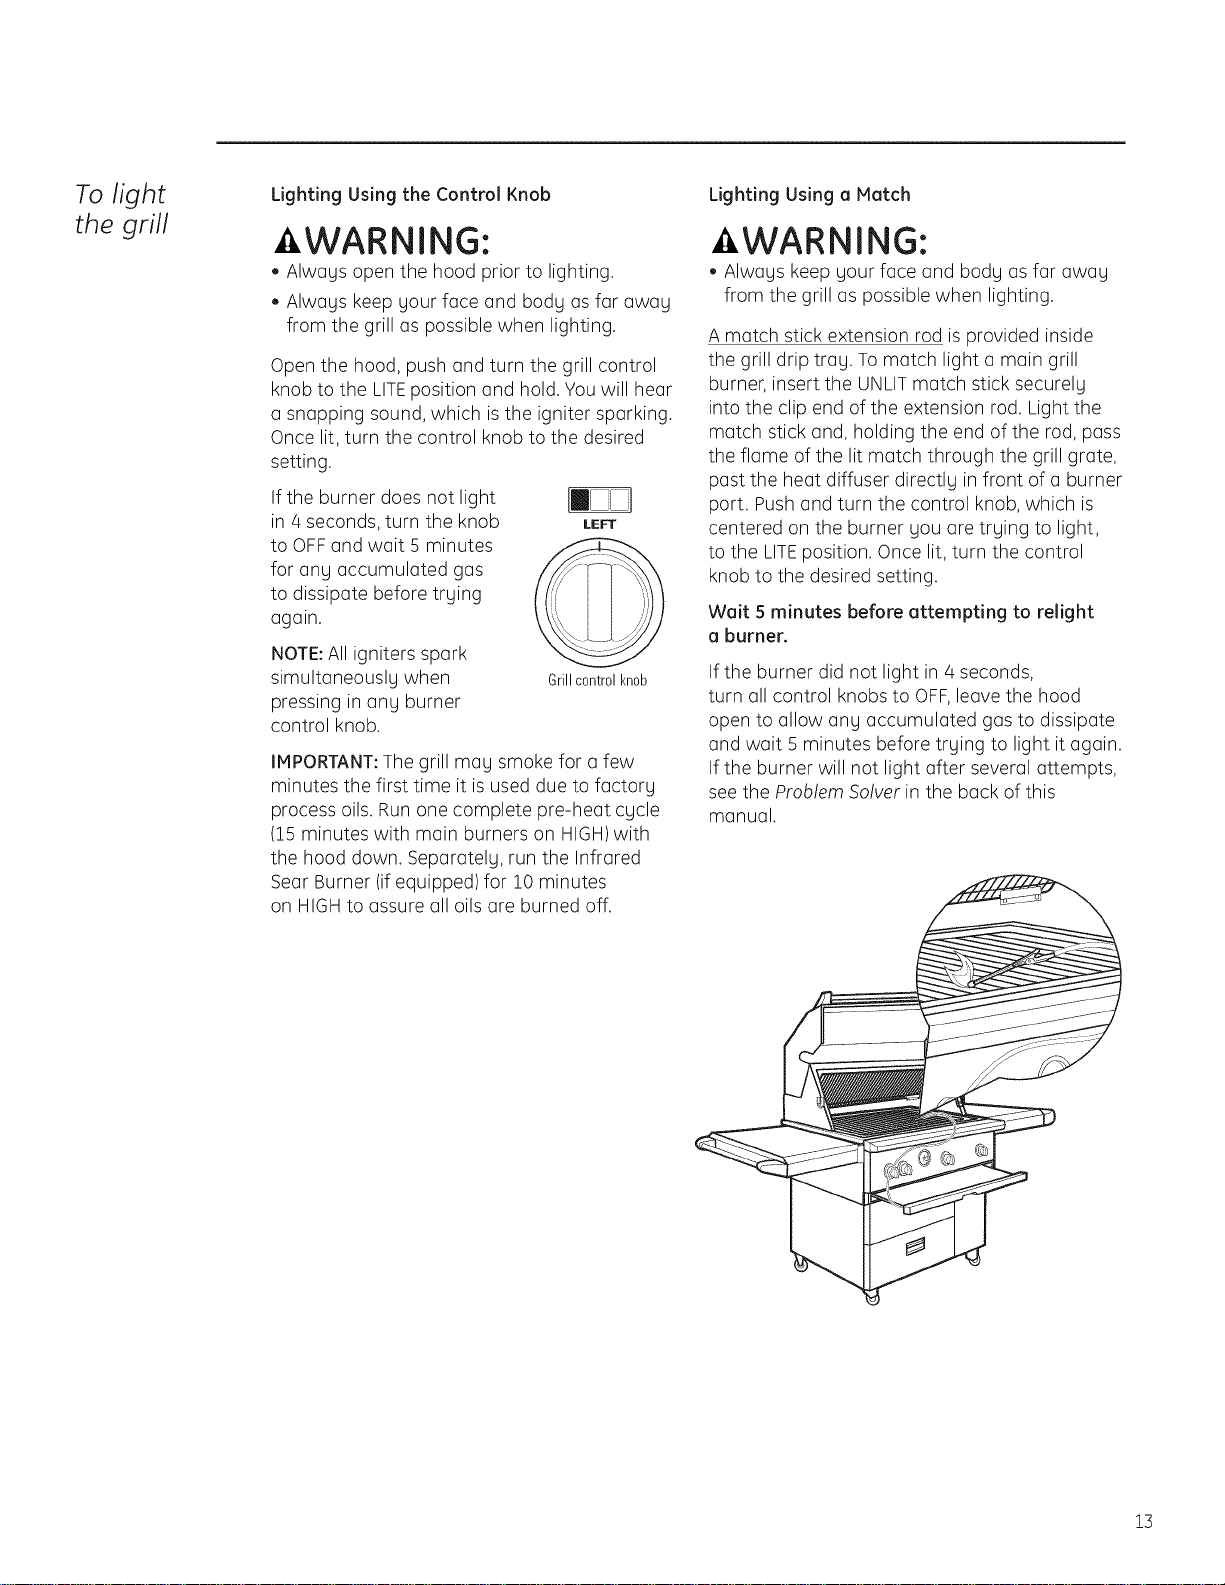
To light
the grill
Lighting Using the Control Knob
-aWARNING:
• Always open the hood prior to lighting.
Always keep your face and body as far away
from the grill as possible when lighting.
Open the hood, push and turn the grill control
knob to the LITEposition and hold. You will hear
a snapping sound, which is the igniter sparking.
Once lit, turn the control knob to the desired
setting.
If the burner does not light
in 4 seconds, turn the knob
to OFFand wait 5 minutes
for any accumulated gas
to dissipate before trying
again.
NOTE:All igniters spark
simultaneously when
pressing in ann burner
control knob.
Grillcontrol knob
IMPORTANT:The grill man smoke for a few
minutes the first time it is used due to factory
process oils. Run one complete pre-heat cycle
(15 minutes with main burners on HIGH)with
the hood down. Separately, run the Infrared
Sear Burner (ifequipped) for 10 minutes
on HIGHto assure all oils are burned off.
Lighting Using a Match
Zi,WARNING:
,, Always keep your face and body as far away
from the grill as possible when lighting.
A match stick extension rod is provided inside
the grill drip tray. To match light a main grill
burner, insert the UNLITmatch stick securely
into the clip end of the extension rod. Light the
match stick and, holding the end of the rod, pass
the flame of the lit match through the grill grate,
past the heat diffuser directly in front of a burner
port. Push and turn the control knob, which is
centered on the burner you are trying to light,
to the LITEposition. Once lit, turn the control
knob to the desired setting.
Wait 5 minutes before attempting to relight
a burner.
If the burner did not light in 4 seconds,
turn all control knobs to OFF,leave the hood
open to allow any accumulated gas to dissipate
and wait 5 minutes before trying to light it again.
If the burner will not light after several attempts,
see the Problem Solver in the back of this
manual.
13
The Grill
Professiona! Outdoor Grills & Cooktops
Using
the grill
Grilling requires high heat for searing and proper
browning. Host foods are cooked at the HI heat
setting for the entire cooking time with the hood
in the open position. However, when grilling
large pieces of meat or poultry, it may be
necessary to turn the heat to a lower setting
after the initial browning. This cooks the food
through without burning the outside and is
usually done with the hood closed.
Foods cooked for a long time or basted with
a sugary marinade may need a lower heat
setting near the end of the cooking time.
Do not leave the grill unattended while
cooking.
1. Light the grill using the instructions in the drip
tray or by following the instructions in the
Tolight the gril! section of this manual.
2. Turn all main burner control knobs to HI and
preheat the grill for 10-!5 minutes. The hood
isto be closed during preheating.
3. Place the food on the grill and cook
to the desired doneness. The control knob
may be set to any position to adjust the heat
setting if necessary.
NOTE:The hot grill sears the food, sealing
in the juices. The longer you preheat the grill,
the faster the meat browns and the darker
the grill marks will be.
Grilling
hints
When turning the meat over, always use
a spatula as it will not puncture the meat,
allowing the juices to run out. This will help to
keep the meat juicy. Turn the meat only once,
as juices are lost when the meat is repeatedly
turned. Season or salt the meat after it has
been cooked; seasonings have a tendency
to dry the meat out if applied before grilling.
Be sure to trim any excess fat from meat
or poultry. To prevent steaks or chops from
curling while they are being cooked, slit the fat
around the edges at about 2-inch intervals.
To test for doneness, make a small cut in
the center of the meat.
The doneness of meat is affected by
the thickness of the cut. It is impossible to
cook a thin piece of meat to a rare doneness.
A steak should be at least 1-inch thick to have
it turn out rare and juicy. The cooking time
isaffected by the temperature of the meat
when you start to cook it, the size and shape
of the cut and the kind of meat you are
cooking. The degree of doneness desired
also affects the time.
The U.S.Department of Agriculture says,
"Rare beef is popular, but you should know
that cooking it to only 1/40°F.means some
food poisoning organisms may survive."
(Source: Safe Food Book.Your Kitchen Guide.
USDAlatest edition.)
When defrosting meats it is recommended
that it be done overnight in the refrigerator
as opposed to a microwave. This in general
yields ajuicier cut of meat.
Always ensure that the meat is thoroughly
cooked by using a meat thermometer.
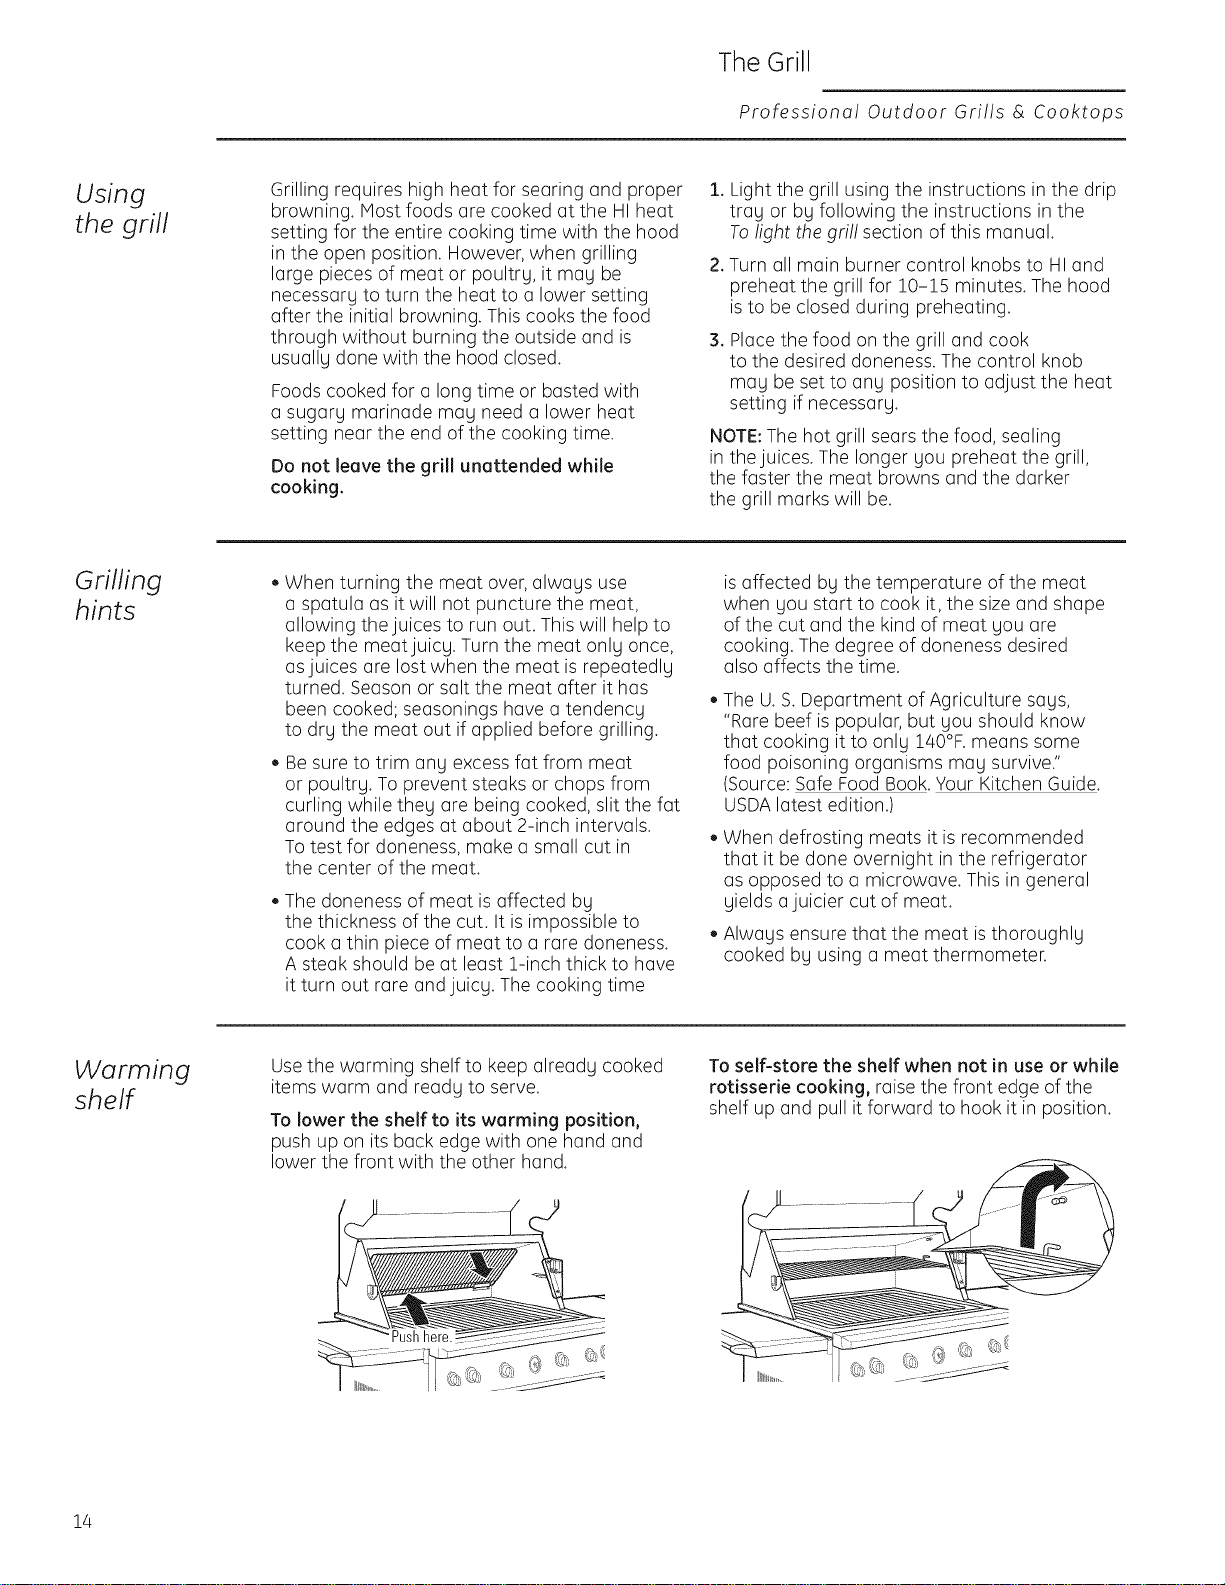
Warming
shelf
Usethe warming shelf to keep already cooked
items warm and ready to serve.
To lower the shelf to its warming position,
push up on its back edge with one hand and
lower the front with the other hand.
To self-store the shelf when not in use or while
rotisserie cooking, raise the front edge of the
shelf up and pull it forward to hook it in position.
14

Grilling
guide
This is a suggested guide only. There are many variables that will affect cooking performance. These include
wind, temperature, humidity and cut of meat. Remember to pre-heat the grill with all the main burners on high
for !0-!5 minutes with the hood closed for best cooking performance.
Weight/ Hood Control
Food Thickness Position Setting Comments
FreshVegetables
Beets,carrots,turnips Closed Medium Slice.Dot with butteror margarine.Wrap in
heavy-duty foil.Turn occasionally.
Onion :]_/2"slices Closed Medium Brushoccasionallywith melted butter or
margarine.Turnonce.
Sweetpotatoes Whole Closed Medium Wrap individually inheavy-duty foil.
Rotateoccasionally.
Whitepotatoes 6to 8 Closed High Wrap individually inheavy-duty foil.
Rotateoccasionally.
FrozenVegetables
Asparagus,troccoli, Closed Medium Dotwith butter or margarine.
trussds sprouts,green Wrap in heavy-duty foil.
L)eans,peas Turnoccasionally.
Beef
Hamturgers ]_/2"to 3/4" Medium
Steaks-rare IF_40°)
Steaks-medium IF_60°)
Steaks-well doneIF_70°)
Lamb ChopslSteaks
Rare (140°)
Medium (160°)
Well done (170°)
Pork
Chops
1"
!½"
1"
!½"
1"
!½"
1"
!½"
1"
!½"
!"
Open
Open
Open
Open
Open
Open
Open
Open
High
High
Medium
to High
Medium
Medium
Medto HI
Medium
Medto HI
Medium
Medium
Turnonce when juices riseto the surface.
Donotleaveunattended.Aflare-up could occur.
Removeexcessfat from edge.
Slashremainingfat at 2"intervals.
Turnonce.
Removeexcessfat from edge.
Slashremainingfat at 2"intervals.
Turnonce.
1" Medium Removeexcessfat from edge.
lY/' Medium Slashremainingfat at 2"intervals.
Turnonce.Cookwelldone.
Rbs Closed Medium Turnoccasionally.
Low Duringthe lastfew minutes,brushwith barbecue
sauce,turn severaltimes.
Precookedhamsteaks !/2" Open Medium Removeexcessfat from edge.
to High Slashremaining fat at 2" intervals.
Turnonce.
Hotdogs Open Medium Slitskin.Turnonce.
Poultry
Broilerfryer,halved 2to 3 Ibs. Closed Lowto Placeskinsideup.Turnfrequently,brushingwith
or quartered Medium melted butter margarine,oilor marinade.
Breasts Closed Medium
Fishand Seafood
Steaks:halltut, 3/4"to !" Closed Lowto Turnonce.Brushwith melted butter,margarine
salmon,swordfish Medium or oilto keepmoist.
Wholecatfish, 4 to 8ounces Closed Lowto Turnonce.Brushwith melted butter,margarine
raintow trout Medium or oilto keepmoist.
NOTE:Meat temperatures listed are center meat temperatures using the meat probe (purchased separately).
15
The Grill
Professional Outdoor Grills & Cooktops
Infrared
sear
burner
(on some
modelsl
To light
the infrared
sear burner
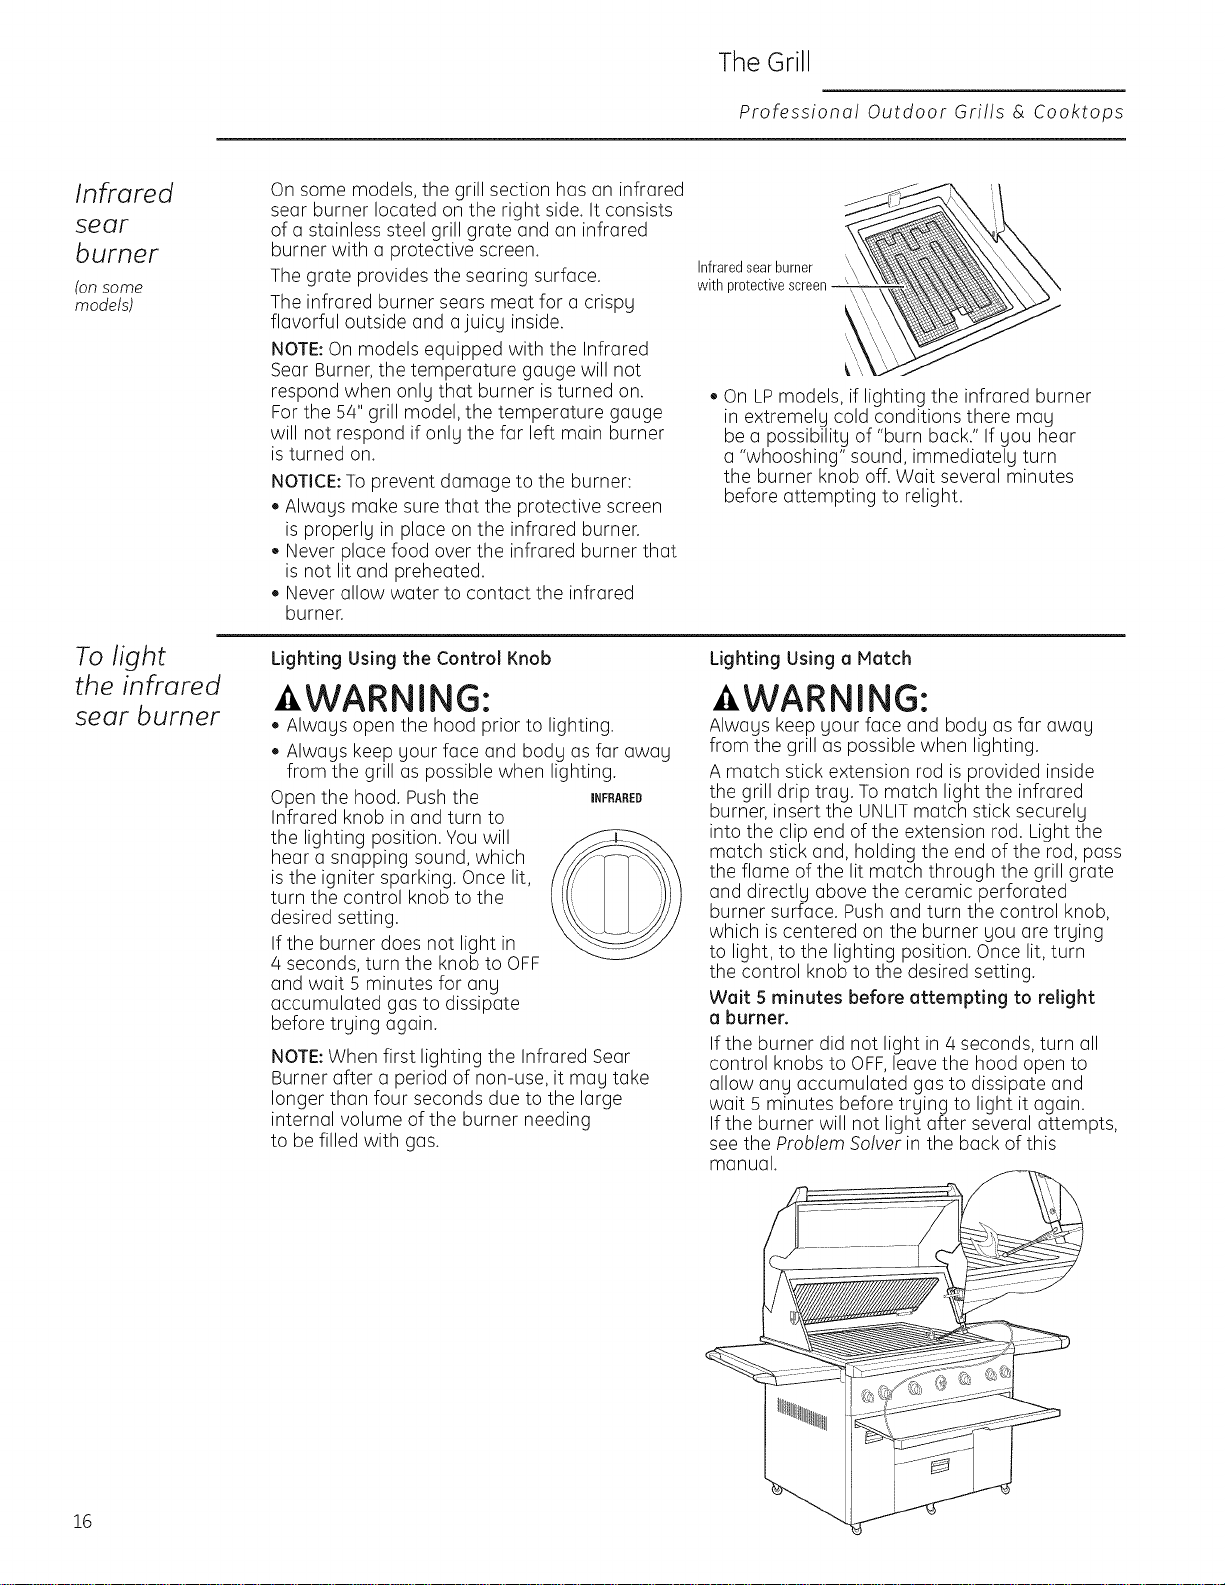
On some models, the grill section has an infrared
sear burner located on the right side. It consists
of a stainless steel grill grate and an infrared
burner with a protective screen.
The grate provides the searing surface.
The infrared burner sears meat for a crispy
flavorful outside and ajuicy inside.
NOTE:On models equipped with the Infrared
Sear Burner, the temperature gauge will not
respond when only that burner isturned on.
Forthe 54" grill model, the temperature gauge
will not respond if only the far left main burner
is turned on.
NOTICE:To prevent damage to the burner:
Always make sure that the protective screen
is properly in place on the infrared burner.
Never place food over the infrared burner that
is not lit and preheated.
Never allow water to contact the infrared
burner.
Infraredsearburner
with protectivescreen
• On LPmodels, if lighting the infrared burner
in extremely cold conditions there may
be a possibility of "burn back." If you hear
a "whooshing" sound, immediately turn
the burner knob off. Wait several minutes
before attempting to relight.
Lighting Using the Control Knob
WARNING:
Always open the hood prior to lighting.
Always keep your face and body as far away
from the grill as possible when lighting.
Open the hood. Push the iNFRARED
Infrared knob in and turn to
the lighting position. You will
hear a snapping sound, which
is the igniter sparking. Once lit,
turn the control knob to the
desired setting.
If the burner does not light in
4 seconds, turn the knob to OFF
and wait 5 minutes for any
accumulated gas to dissipate
before trying again.
NOTE:When first lighting the Infrared Sear
Burner after a period of non-use, it may take
longer than four seconds due to the large
internal volume of the burner needing
to be filled with gas.
Lighting Using a Match
WARNING:
Always keep your face and body as far away
from the grill as possible when lighting.
A match stick extension rod is provided inside
the grill drip tray. To match light the infrared
burner, insert the UNLITmatch stick securely
into the clip end of the extension rod. Light the
match stick and, holding the end of the rod, pass
the flame of the lit match through the grill grate
and directly above the ceramic perforated
burner surface. Pushand turn the control knob,
which is centered on the burner you are trying
to light, to the lighting position. Once lit, turn
the control knob to the desired setting.
Wait 5 minutes before attempting to relight
a burner.
If the burner did not light in 4 seconds, turn all
control knobs to OFF,leave the hood open to
allow any accumulated gas to dissipate and
wait 5 minutes before trying to light it again.
If the burner will not light after several attempts,
see the Problem Solver in the back of this
manual.
16
Cooktop Burners
Professiona! Outdoor Grills & Cooktops
Cooktop
burners
Ion some models
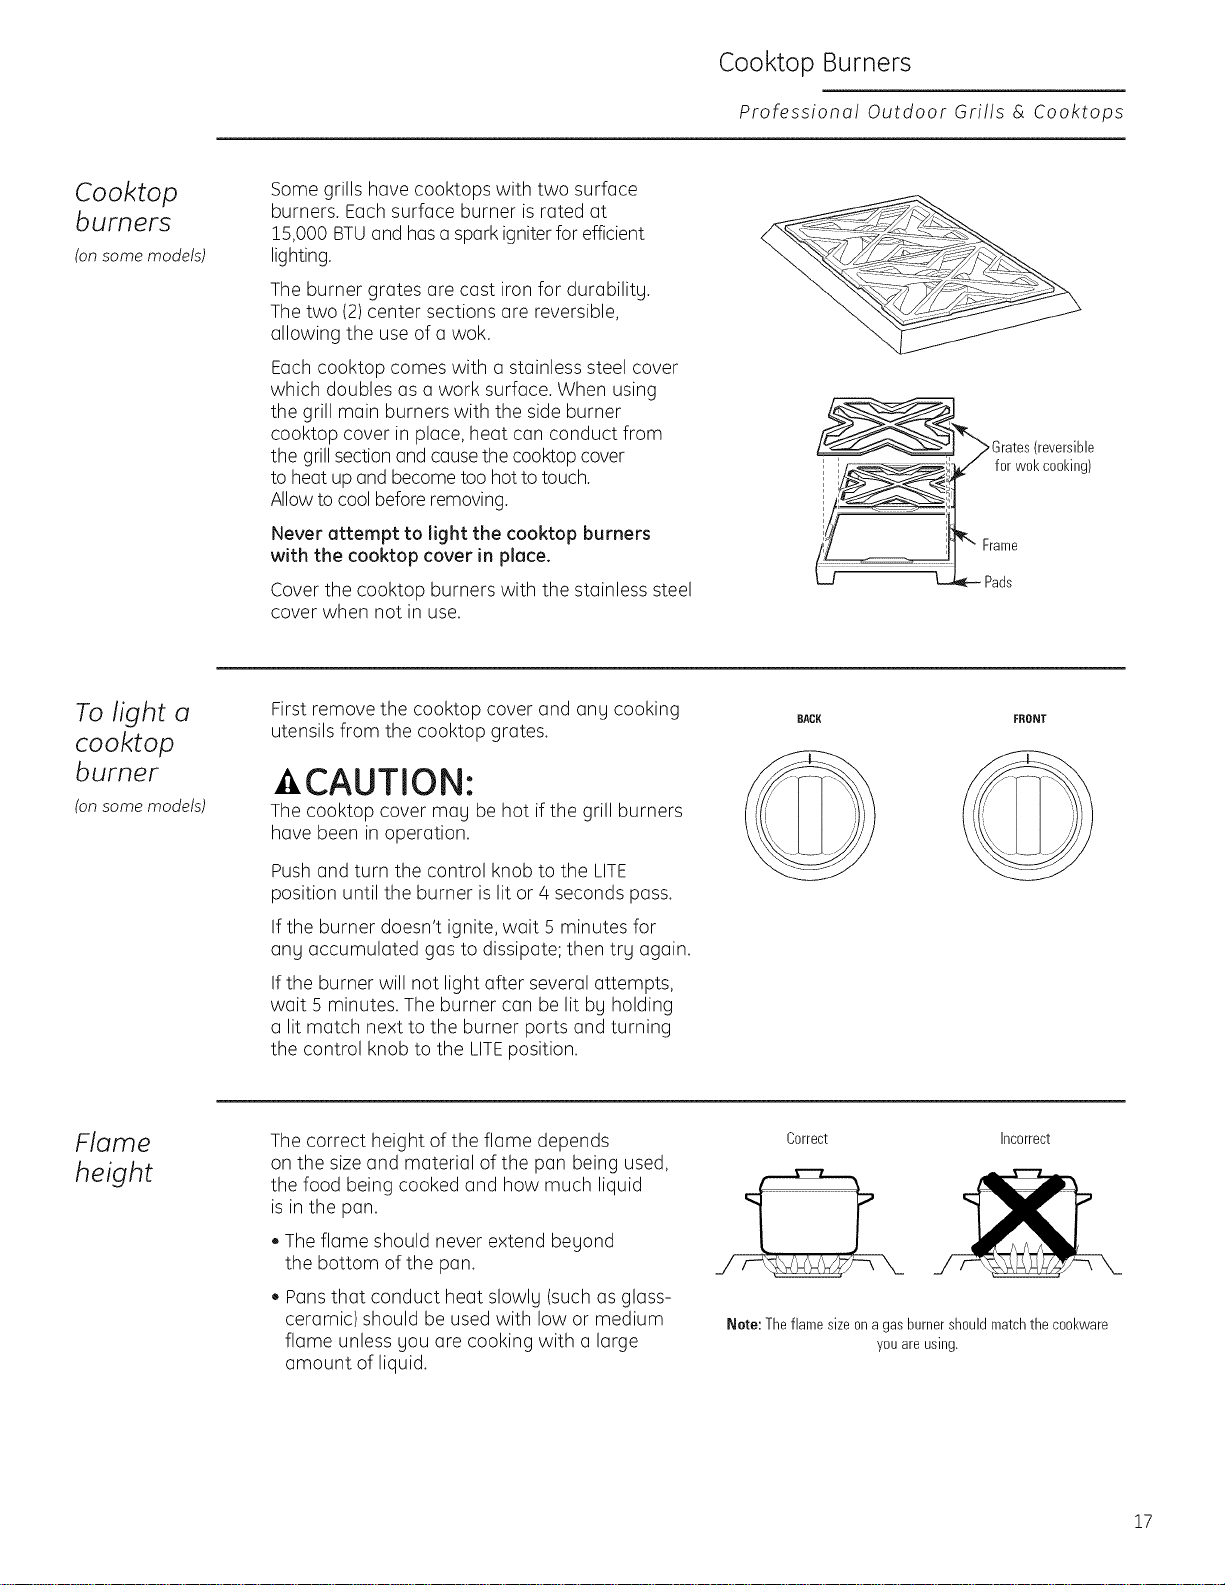
Some grills have cooktops with two surface
burners. Eachsurface burner is rated at
15,000 BTUand hasa spark igniterfor efficient
lighting.
The burner grates are cast iron for durabilitg.
The two (2)center sections are reversible,
allowing the use of a wok.
Eachcooktop comes with a stainless steel cover
which doubles as a work surface. When using
the grill main burners with the side burner
cooktop cover in place, heat can conduct from
the grill section and causethe cooktop cover
to heat up and become too hot to touch.
Allowto cool before removing.
Never attempt to light the cooktop burners
with the cooktop cover in place.
Cover the cooktop burners with the stainless steel
cover when not in use.
>Grates(reversible
for wokcooking)
Frame
To light a
cooktop
burner
Ion some models
First remove the cooktop cover and ang cooking
utensils from the cooktop grates.
CAUTION:
The cooktop cover may be hot if the grill burners
have been in operation.
Pushand turn the control knob to the LITE
position until the burner is lit or 4 seconds pass.
If the burner doesn't ignite, wait 5 minutes for
ang accumulated gas to dissipate; then trg again.
If the burner will not light after several attempts,
wait 5 minutes. The burner can be lit bg holding
a lit match next to the burner ports and turning
the control knob to the LITEposition.
BACK FRONT
Flame
height
The correct height of the flame depends
on the size and material of the pan being used,
the food being cooked and how much liquid
is in the pan.
The flame should never extend begond
the bottom of the pan.
Pansthat conduct heat slowlg (such as glass-
ceramic) should be used with low or medium
flame unless gou are cooking with a large
amount of liquid.
Correct Incorrect
JF-k
Nete: Theflamesizeona gasburnershouldmatchthe cookware
youare using.
17
The Rotisserie Sgstem
Professiona! Outdoor Grills & Cooktops
Rotisserie
system
The rotisserie sgstem is designed to cook items
from the back of the grill using infrared heat.
The rotisserie motor has three speeds (High,
Medium and Low)and iscapable of turning up
to a 15 lb.cut of meat or poultrg. The actual
capacitg islimited bg clearance.
IMPORTANT:To prevent damage, the rotisserie
motor must be removed and stored when using
the grill main burners.
The rotisserie burner, located at the back of the
grill, is an infrared tgpe which provides intense
searing radiant heat. This intense heat is
magnificent for searing in the natural juices
and nutrients found in qualitg cuts of meat.
Once lit, the rotisserie burner will reach cooking
temperatures in about i minute. The orange/red
glow will even out in about 5 minutes.
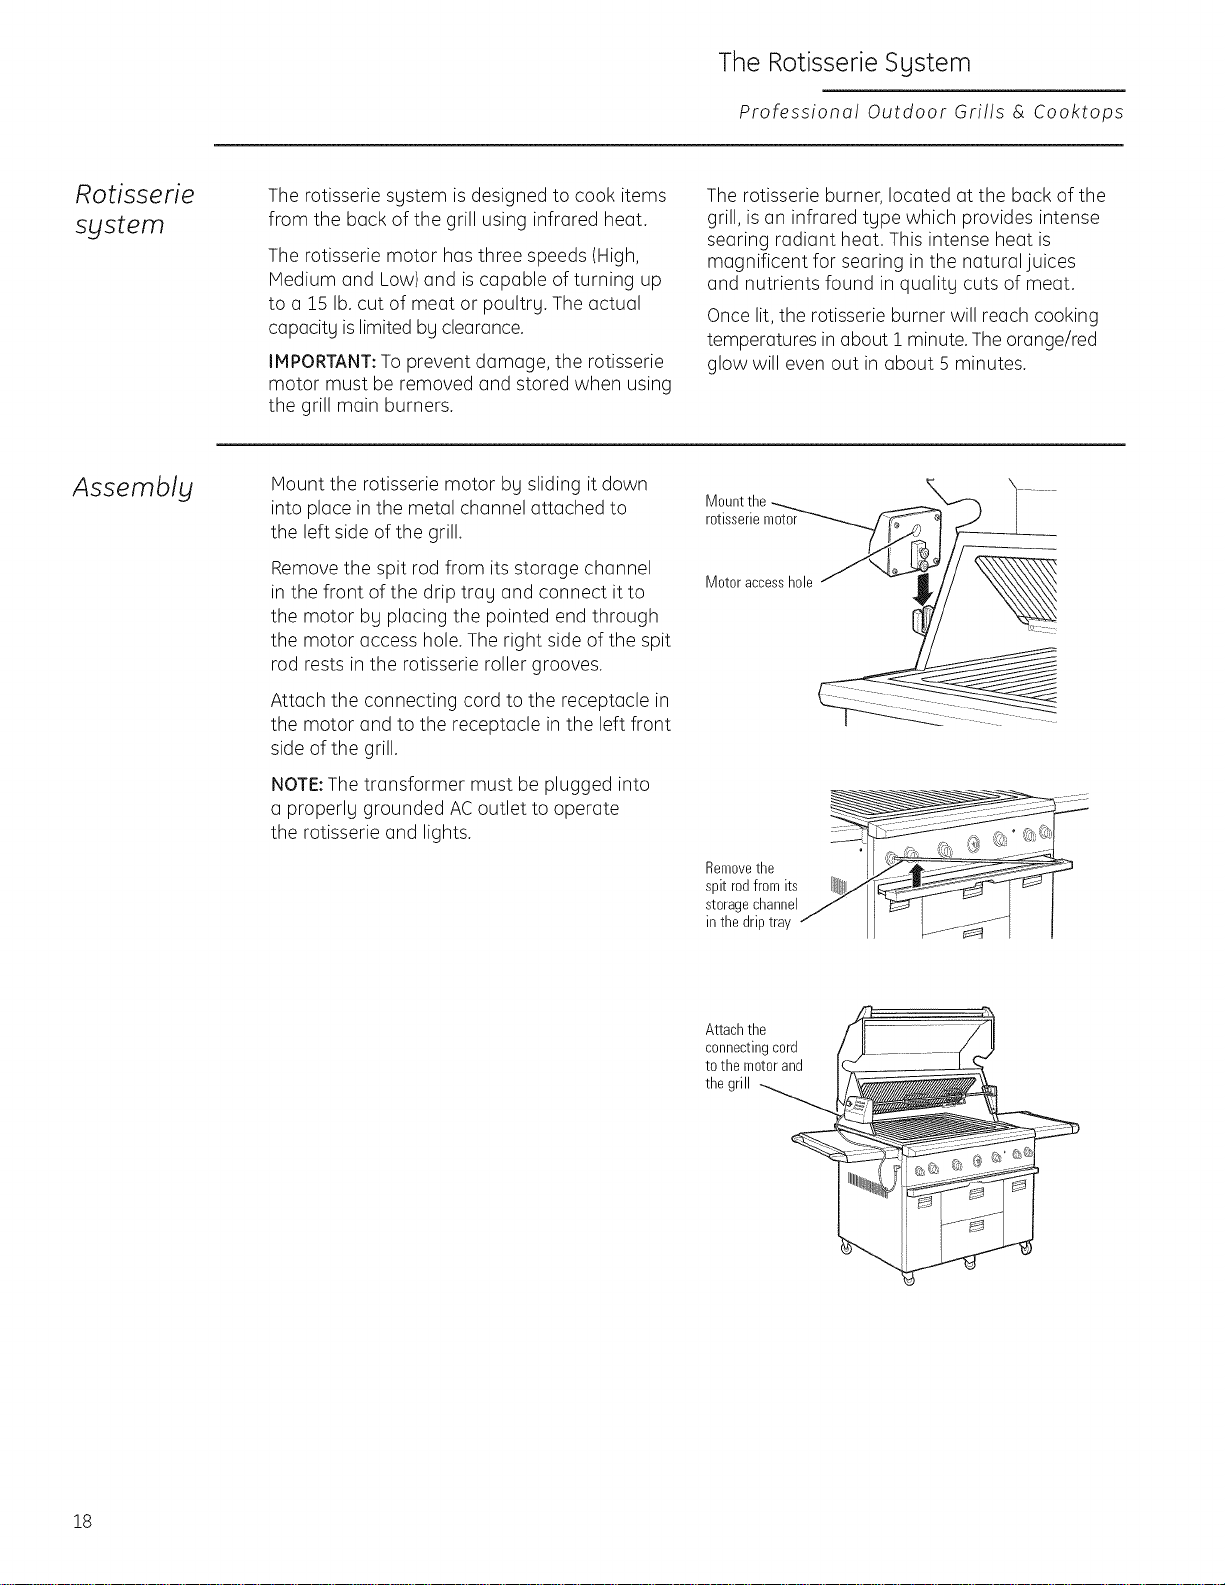
Assembly
Mount the rotisserie motor bg sliding it down
into place inthe metal channel attached to
the left side of the grill.
Removethe spit rod from its storage channel
in the front of the drip trag and connect it to
the motor bg placing the pointed end through
the motor access hole. The right side of the spit
rod rests in the rotisserie roller grooves.
Attach the connecting cord to the receptacle in
the motor and to the receptacle in the left front
side of the grill.
NOTE:The transformer must be plugged into
a properlg grounded AC outlet to operate
the rotisserie and lights.
Mount the
rotisseriemot_
Motor accessho'e J "",Le_
Removethe E
spit rodfrom its
storagechannel
in the driptray
Attachthe
connectingcord
to the motorand
thegrill
18
To setup
the gril! for
rotisserie
cooking
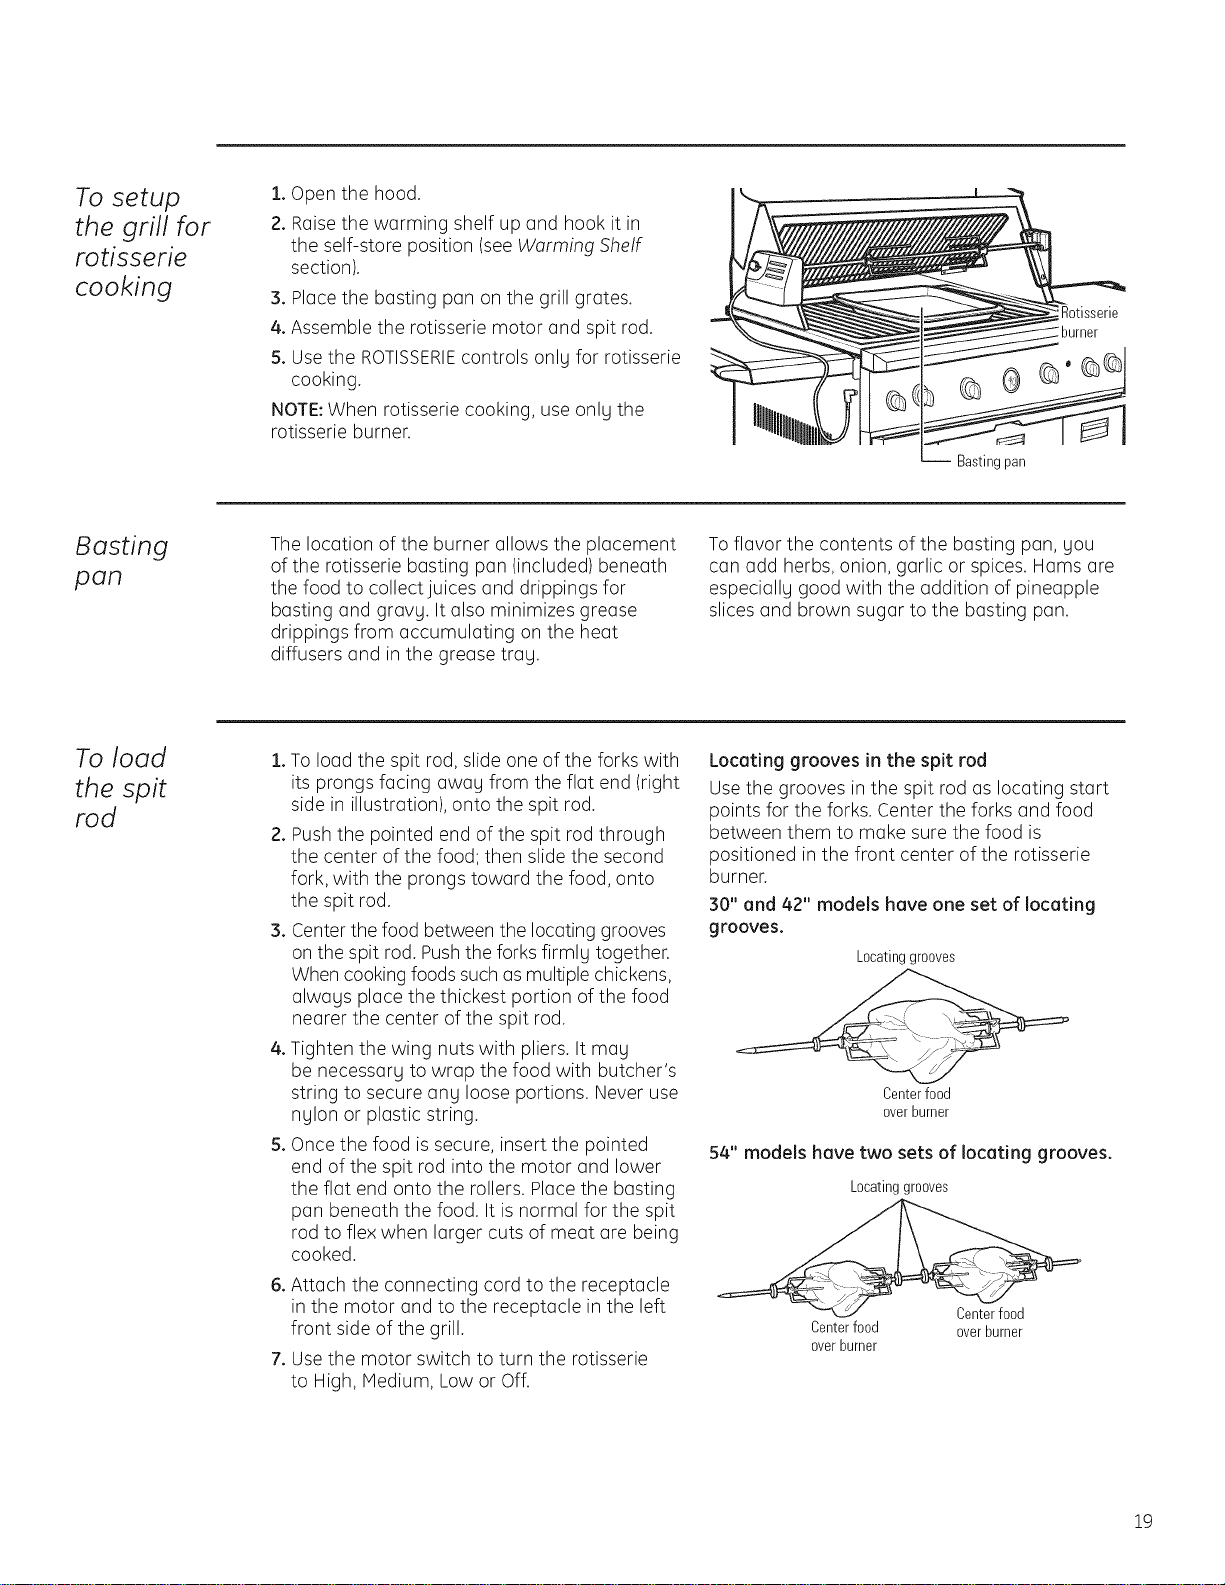
1.Open the hood.
2. Raisethe warming shelf up and hook it in
the self-store position (see Warming Shelf
section).
3. Placethe basting pan on the grill grates.
4. Assemble the rotisserie motor and spit rod.
5. Usethe ROTISSERIEcontrols only for rotisserie
cooking.
NOTE:When rotisserie cooking, use only the
rotisserie burner.
-- Basting pan
Basting
pan
The location of the burner allows the placement
of the rotisserie basting pan (included) beneath
the food to collect juices and drippings for
basting and gravy. It also minimizes grease
drippings from accumulating on the heat
diffusers and in the grease tray.
Toflavor the contents of the basting pan, you
can add herbs, onion, garlic or spices. Hams are
especially good with the addition of pineapple
slices and brown sugar to the basting pan.
To load
the spit
rod
1.To load the spit rod, slide one of the forks with
its prongs facing away from the flat end (right
side in illustration), onto the spit rod.
2. Pushthe pointed end of the spit rod through
the center of the food; then slide the second
fork, with the prongs toward the food, onto
the spit rod.
3. Center the food between the locating grooves
on the spit rod. Pushthe forks firmly together.
When cooking foods such as multiple chickens,
always place the thickest portion of the food
nearer the center of the spit rod.
4. Tighten the wing nuts with pliers. It may
be necessary to wrap the food with butcher's
string to secure any loose portions. Never use
nylon or plastic string.
5. Once the food is secure, insert the pointed
end of the spit rod into the motor and lower
the flat end onto the rollers. Place the basting
pan beneath the food. It is normal for the spit
rod to flex when larger cuts of meat are being
cooked.
6. Attach the connecting cord to the receptacle
in the motor and to the receptacle in the left
front side of the grill.
7. Usethe motor switch to turn the rotisserie
to High, Medium, Low or Off.
Locating grooves in the spit rod
Use the grooves in the spit rod as locating start
points for the forks. Center the forks and food
between them to make sure the food is
positioned in the front center of the rotisserie
burner.
30" and 42" models have one set of locating
grooves.
Locating grooves
Centerfood
overburner
54" models have two sets of locating grooves.
Locating grooves
Centerfood
overburner
Centerfood
overburner
19
The Rotisserie System
Professiona! Outdoor Grills & Cooktops
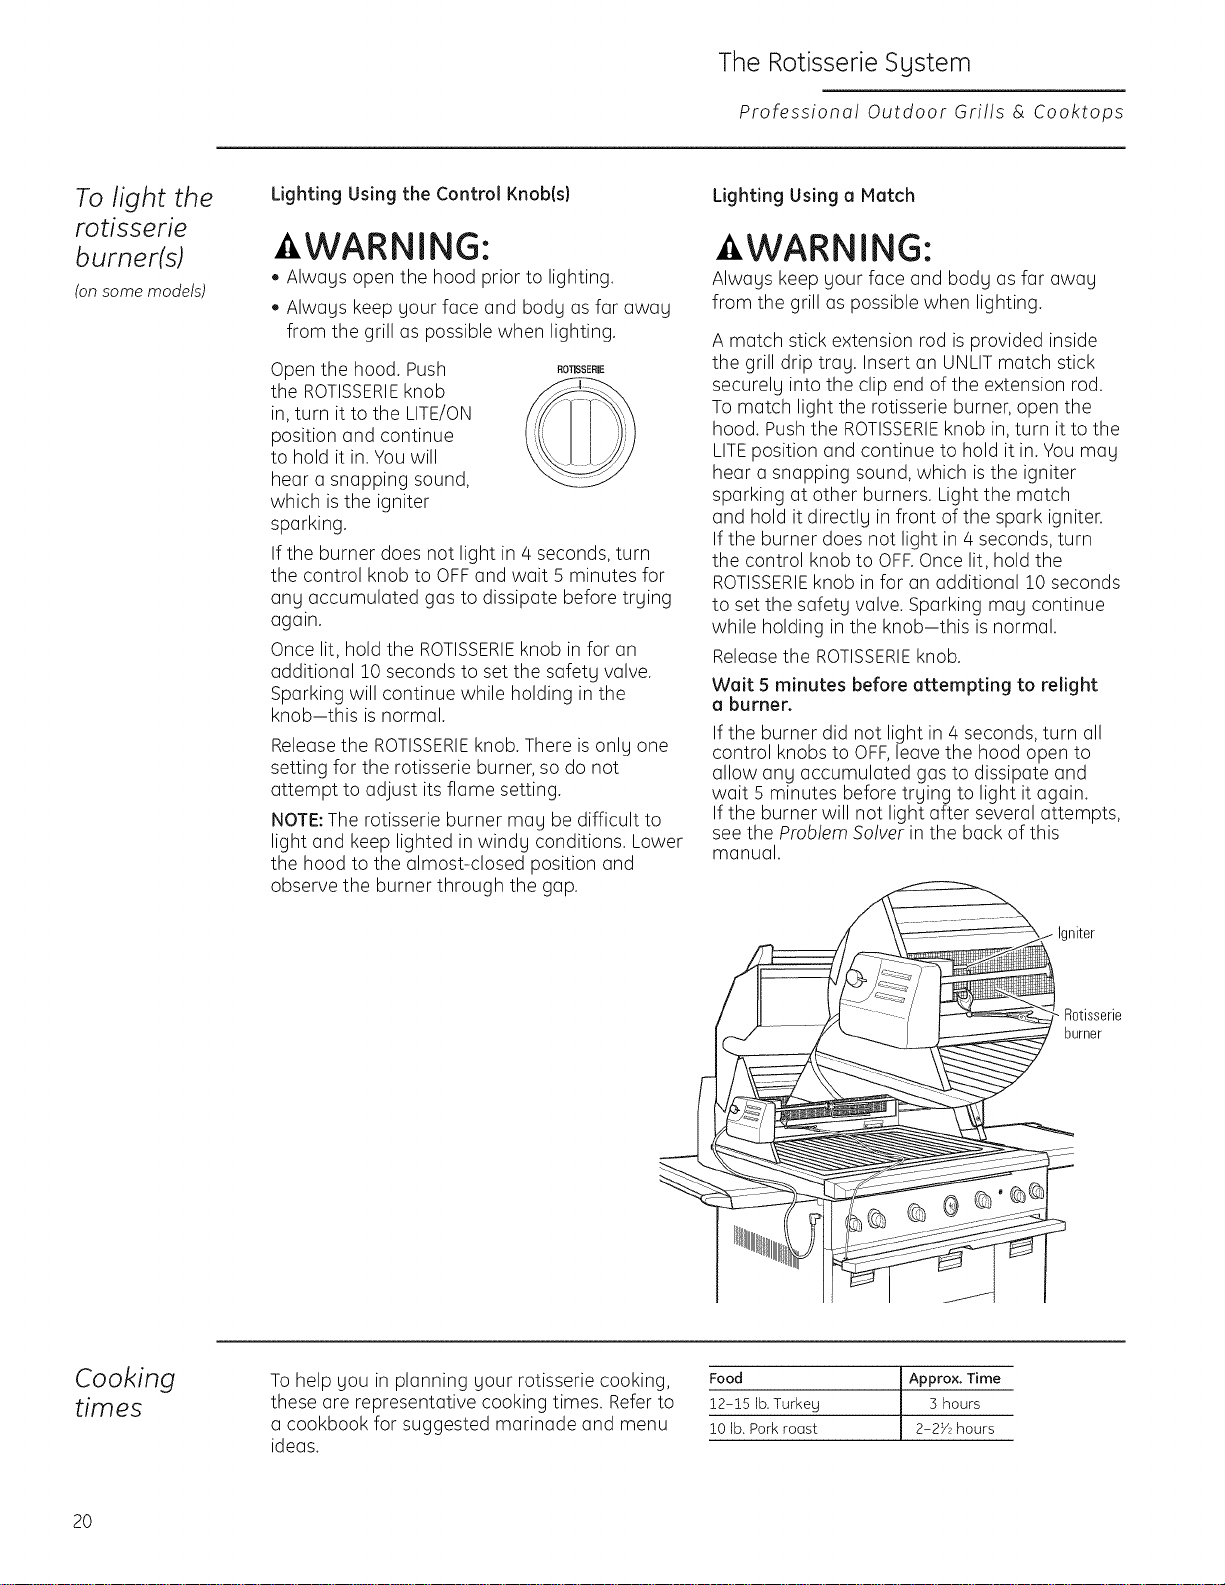
To light the
rotisserie
burner(s)
(onsomemodels!
Lighting Using the Control Knobls}
WARNING:
• Always open the hood prior to lighting.
Always keep your face and body as far away
from the grill as possible when lighting.
Open the hood. Push RO_SSERIE
the ROTISSERIEknob
in, turn it to the LITE/ON
position and continue
to hold it in. Youwill
hear a snapping sound,
which is the igniter
sparking.
If the burner does not light in 4 seconds, turn
the control knob to OFFand wait 5 minutes for
any accumulated gas to dissipate before trying
again.
Once lit, hold the ROTISSERIEknob in for an
additional 10 seconds to set the safety valve.
Sparking will continue while holding in the
knob-this is normal.
Releasethe ROTISSERIEknob. There is only one
setting for the rotisserie burner, so do not
attempt to adjust its flame setting.
NOTE:The rotisserie burner may be difficult to
light and keep lighted in windy conditions. Lower
the hood to the almost-closed position and
observe the burner through the gap.
Lighting Using a Match
- WARNING:
Always keep your face and body as far away
from the grill as possible when lighting.
A match stick extension rod is provided inside
the grill drip tray. Insert an UNLITmatch stick
securely into the clip end of the extension rod.
To match light the rotisserie burner, open the
hood. Push the ROTISSERIEknob in, turn it to the
LITEposition and continue to hold it in. You may
hear a snapping sound, which isthe igniter
sparking at other burners. Light the match
and hold it directly in front of the spark igniter.
If the burner does not light in 4 seconds, turn
the control knob to OFF.Once lit, hold the
ROTISSERIEknob in for an additional 10 seconds
to set the safety valve. Sparking may continue
while holding in the knob-this is normal.
Release the ROTISSERIEknob.
Wait 5 minutes before attempting to relight
a burner.
If the burner did not light in 4 seconds, turn all
control knobs to OFF,leave the hood open to
allow any accumulated gas to dissipate and
wait 5 minutes before trying to light it again.
If the burner will not light after several attempts,
see the Problem Solver in the back of this
manual.
Cooking
times
To help you in planning your rotisserie cooking,
these are representative cooking times. Refer to
a cookbook for suggested marinade and menu
ideas.
Food Approx. Time
12-15 lb. Turkey 3 hours
10 lb. Pork roost 2-P/2 hours
20
The Smoker System
Professiona! Outdoor Grills & Cooktops
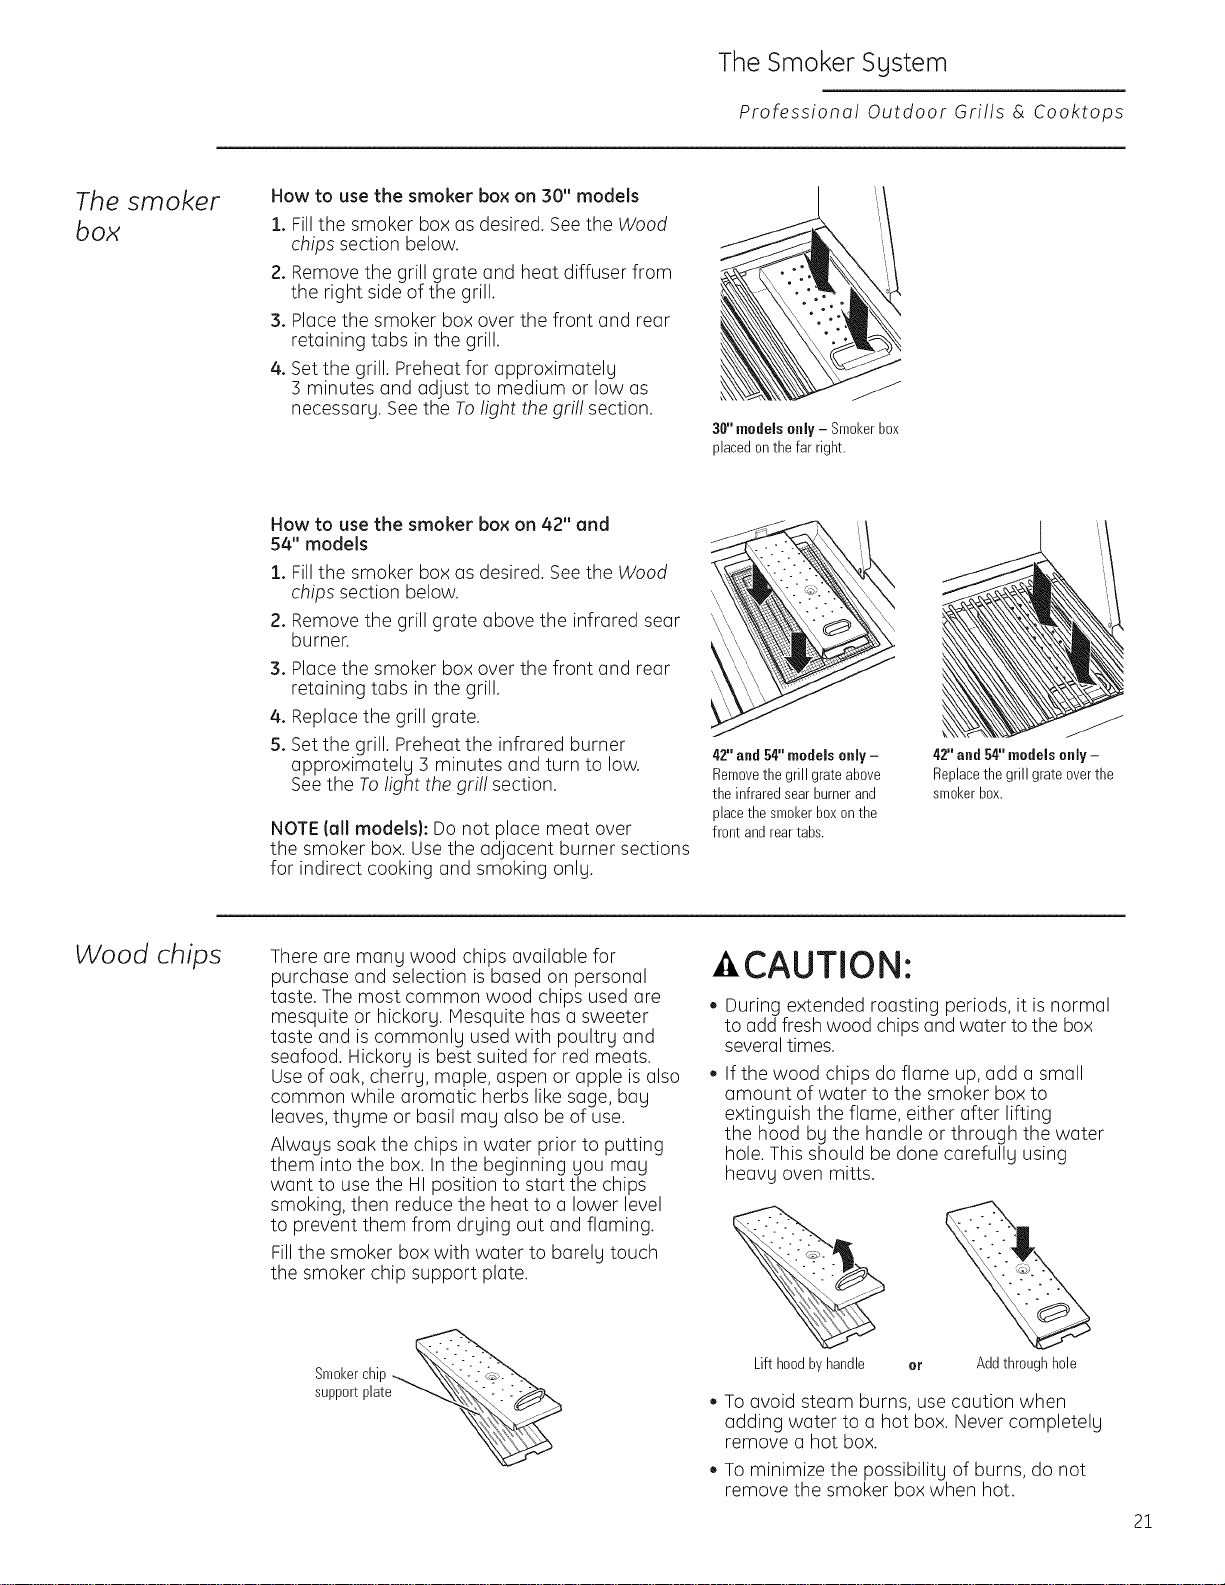
The smoker
box
How to use the smoker box on 30" models
1. Fillthe smoker box as desired. Seethe Wood
chips section below.
2. Remove the grill grate and heat diffuser from
the right side of the grill.
3. Placethe smoker box over the front and rear
retaining tabs in the grill.
4. Set the grill. Preheat for approximately
] minutes and adjust to medium or low as
necessary. See the Tolight the gril! section.
30" medels enly - Smokerbox
_laced on the far right.
How to use the smoker box on 42" and
54" models
1. Fillthe smoker box as desired. Seethe Wood
chips section below.
2. Remove the grill grate above the infrared sear
burner.
3. Placethe smoker box over the front and rear
retaining tabs in the grill.
4. Replace the grill grate.
5. Set the grill. Preheat the infrared burner
approximately ] minutes and turn to low.
See the Tolight the gril! section.
NOTE (all models): Do not place meat over
the smoker box. Use the adjacent burner sections
for indirect cooking and smoking only.
\\
\
42" and54" models enly -
Removethe grill grateabove
the infraredsearburnerand
placethesmokerboxonthe
front andreartabs.
t
42" and 54"models only -
Replacethegrill grate overthe
smokerbox.
Wood chips There are many wood chips available for
purchase and selection is based on personal
taste. The most common wood chips used are
mesquite or hickory. Mesquite has a sweeter
taste and is commonly used with poultry and
seafood. Hickory is best suited for red meats.
Useof oak, cherry, maple, aspen or apple is also
common while aromatic herbs like sage, bay
leaves, thyme or basil may also be of use.
Always soak the chips in water prior to putting
them into the box. In the beginning you may
want to use the HI position to start the chips
smoking, then reduce the heat to a lower level
to prevent them from drying out and flaming.
Fillthe smoker box with water to barely touch
the smoker chip support plate.
CAUTION:
During extended roasting periods, it is normal
to add fresh wood chips and water to the box
several times.
If the wood chips do flame up, add a small
amount of water to the smoker box to
extinguish the flame, either after lifting
the hood by the handle or through the water
hole. This should be done carefully using
heavy oven mitts.
Lift hoodby handle or Add throughhole
To avoid steam burns, use caution when
adding water to a hot box. Never completely
remove a hot box.
To minimize the possibility of burns, do not
remove the smoker box when hot.
21
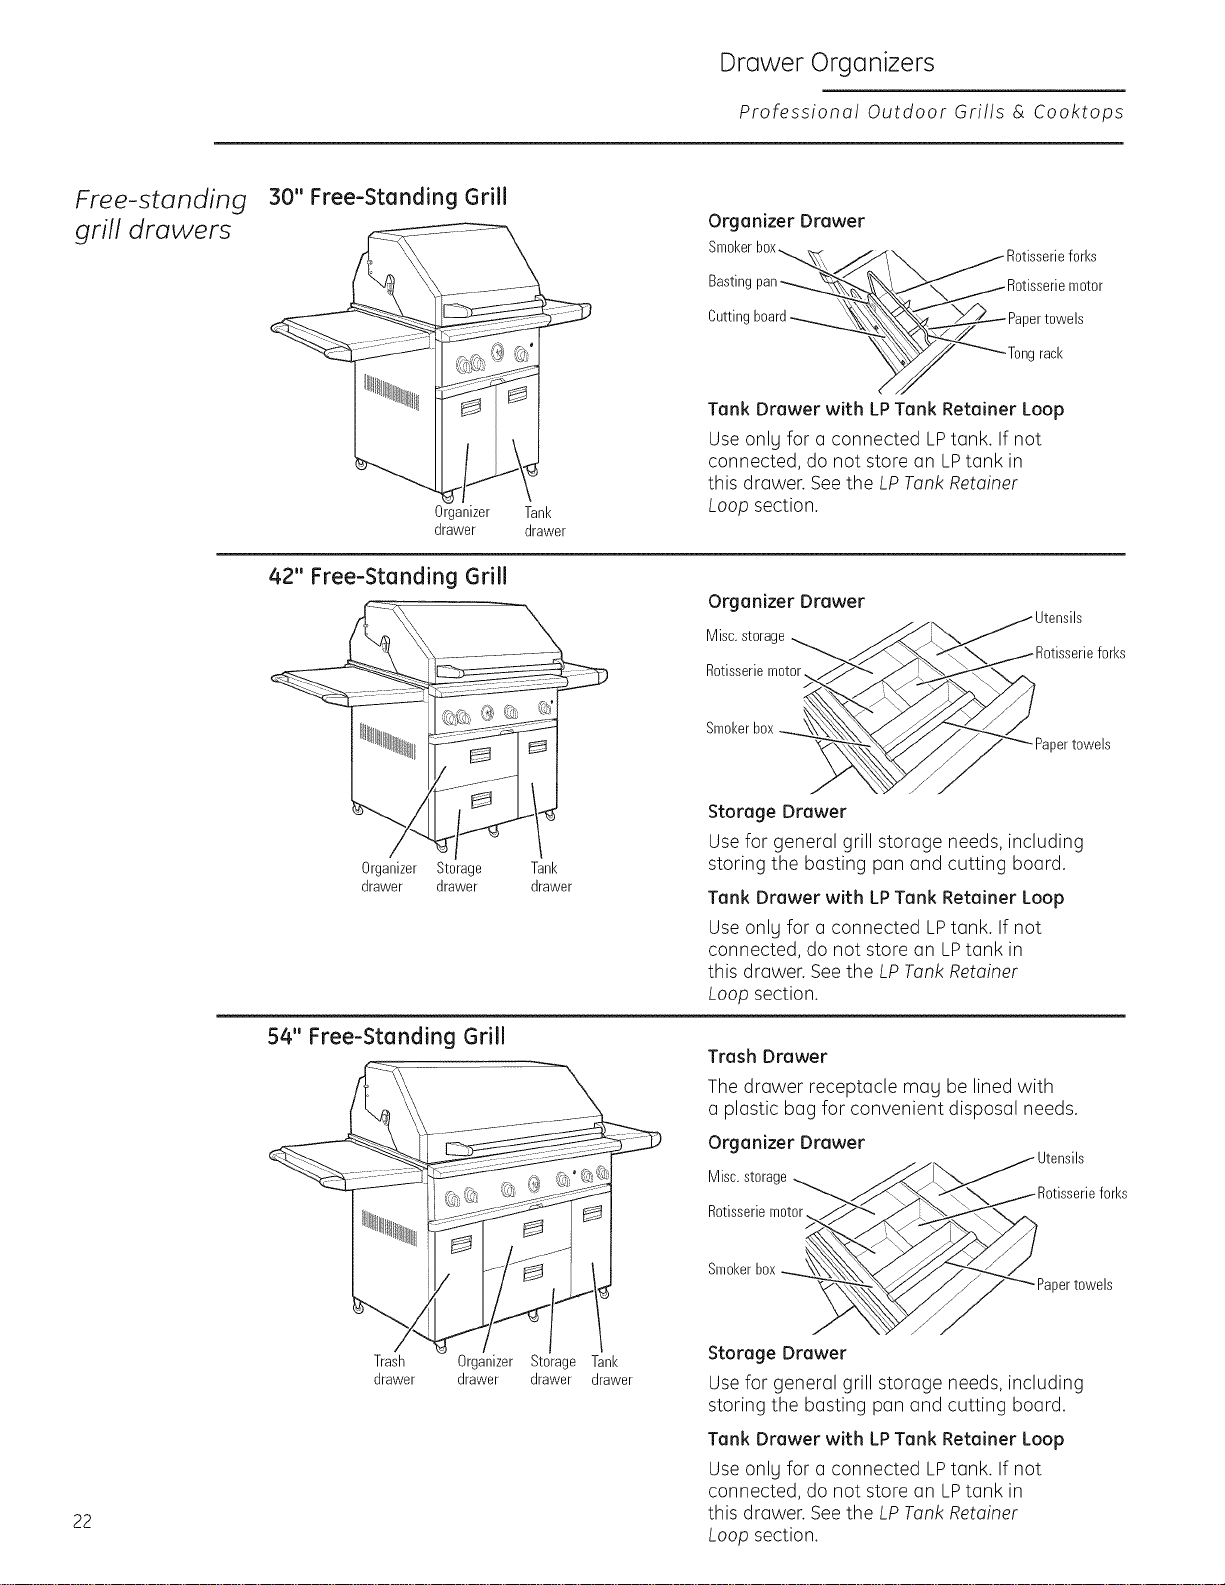
Free-standing
grill drawers
22
30" Free-Standing Grill
Organizer
drawer
Drawer Organizers
Professional Outdoor Grills & Cooktops
42" Free-Standing Grill
Tank
drawer
Organizer Storage
drawer drawer
Organizer Drawer
Smokerb°x_-X-V'_x_''_ \_ j_,,,- , x _ Rotisserieforks
Bastingpan"--_'_'.._,_, __f_ / Rotisserie mator
_ ,xXXxXX i'r_!/
j ......... Tong rack
Tank Drawer with LPTank Retainer Loop
Use only for a connected LPtank. If not
connected, do not store an LPtank in
this drawer. Seethe LP Tank Retainer
Loop section.
Tank
drawer
Organizer Drawer
Rotisseriemotor,x,,,S_ r.. _- ,, -_
Storage Drawer
\ _Utensils
_1_Rotisserie forks
/ Paper towels
J
/
54" Free-Standing Grill
Trash Organizer Storage Tank
drawer drawer drawer drawer
Use for general grill storage needs, including
storing the basting pan and cutting board.
Tank Drawer with LPTank Retainer Loop
Use onlu for a connected LPtank. If not
connected, do not store an LPtank in
this drawer. Seethe LP Tank Retainer
Loop section.
Trash Drawer
The drawer receptacle mau be lined with
a plastic bag for convenient disposal needs.
Organizer Drawer
Storage Drawer
Use for general grill storage needs, including
storing the basting pan and cutting board.
Tank Drawer with LPTank Retainer Loop
Use onlu for a connected LPtank. If not
connected, do not store an LPtank in
this drawer. Seethe LP Tank Retainer
Loop section.

Care and Cleaning
Professional Outdoor Grills & Cooktops
Spider
and insect
warning
- WARNING:
Spiders and insects can nest in the burners
or orifices of this or any outdoor gas appliance.
The presence of spiders, spider webs or other
insects can cause the gas to flow away from the
burner. This can cause a fire or explosion that
could result in serious injury.
You should inspect the burners at least once
a year or immediately if any of the following
conditions occur:
1. The smell of gas inconjunction with
the burner flames appearing yellow.
2. The grill or cooktop burners do not reach
temperature.
3. The grill or cooktop burners heat unevenly.
4. The burners make popping noises.
If blockage exists,clean the burners immediately.
Seethe Main gril! burners and the Orificessections
in Careand Cleaning.
Grill grate(s)
The best time to clean the grill grates is
immediately after cooking is completed and
after turning off the flame. Wear a barbeque
mitt to protect your hand from the heat and
steam. Dipa brass bristle barbeque brush in
cold tap water and scrub the hot grate. Dip
the brush frequently in the bowl of water. Steam,
created as water contacts the hot grill, assists
the cleaning process by softening any food
particles. The food particles should fall into the
drip tray. If the grill is allowed to cool before
cleaning, cleaning will be more difficult.
Forharder baked-on food particles, remove the
grill grate and soak for about one hour in warm
water. Lightly scrub with a Scotch BriteC_pad.
The grill grates may also be cleaned in
a dishwasher.
Grill grates
Heat
diffusers
The heat diffusers under the grilll grates are
made from stainless steel and can be removed
from the grill when cool.
Clean by hand using warm sudsy water and
a Scotch Brite®pad.
The heat diffusers may also be cleaned in
a dishwasher.
The diffusers are nonreversible. Note the
orientation of the alignment features when
removing and exercise care when replacing.
If placed in the grill backwards, the diffuser will
interfere with the grill grate. Remove, rotate 180°
and reinstall.
Heatdiffuser
23
Care and Cleaning
Professional Outdoor Grills & Cooktops
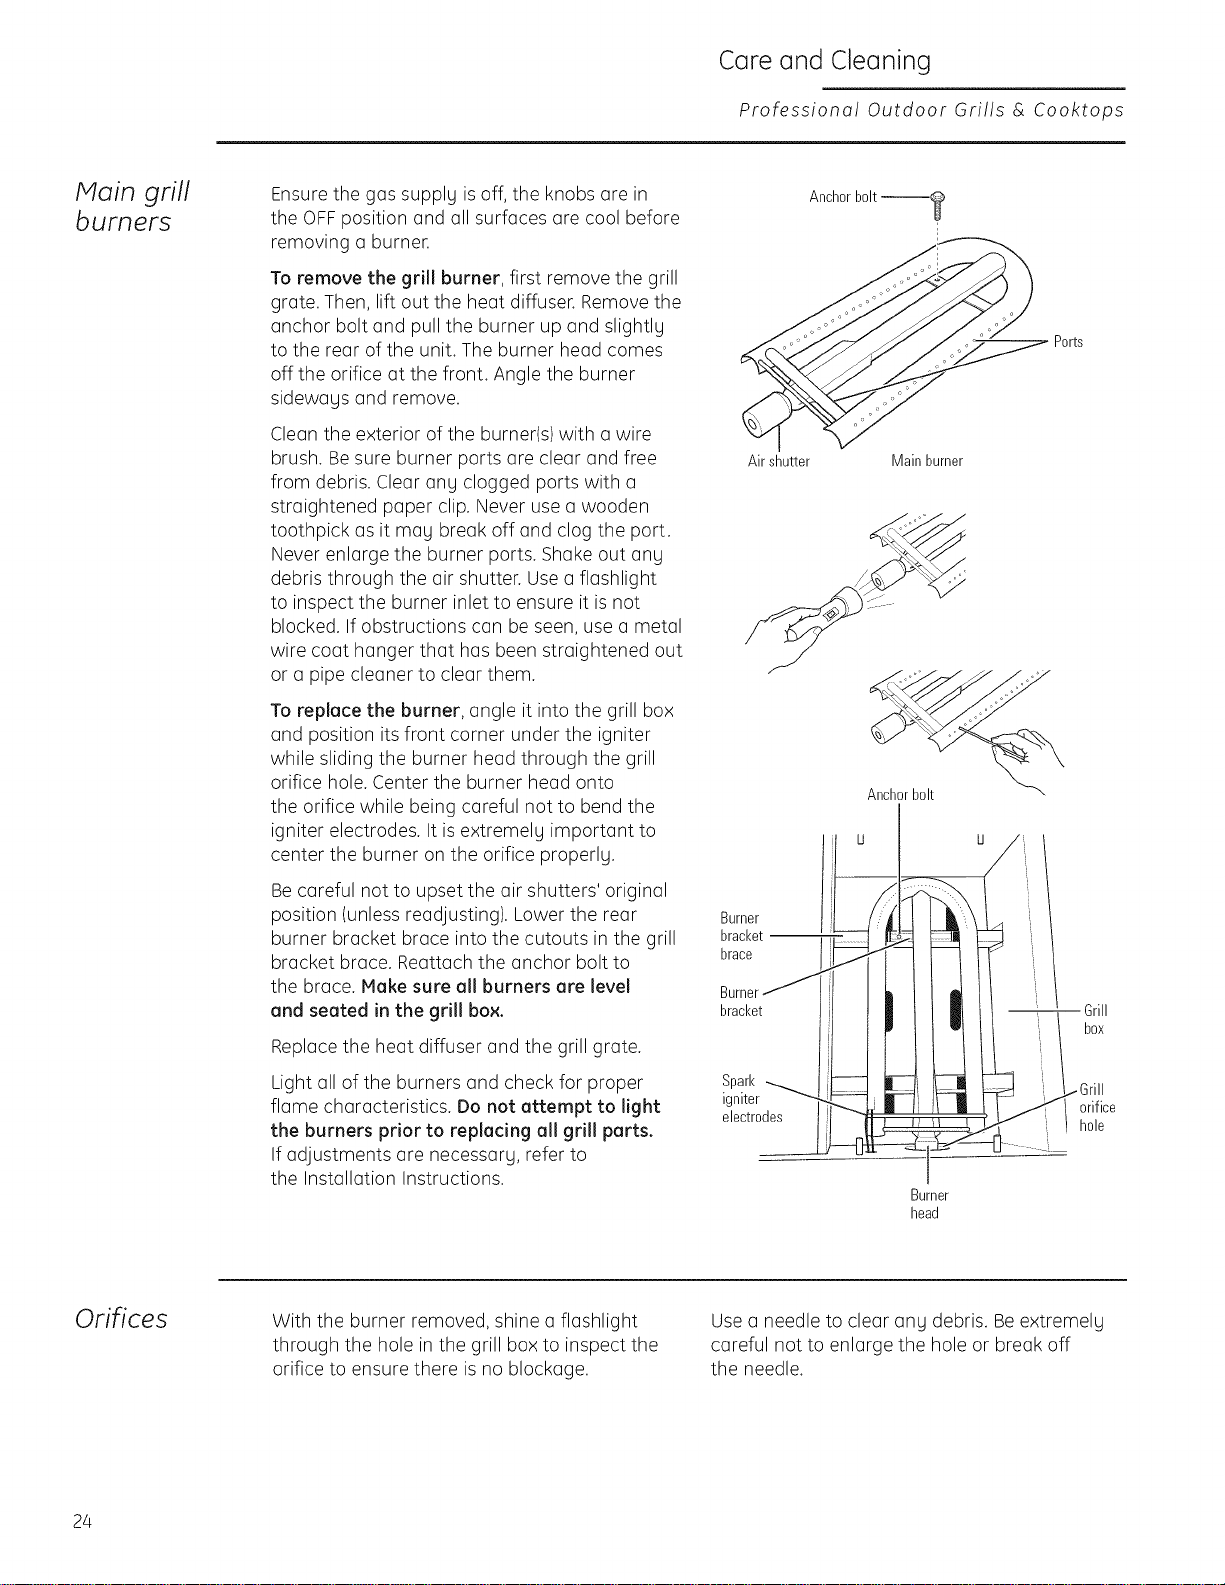
Main grill
burners
Ensurethe gas supply is off, the knobs are in
the OFFposition and all surfaces are cool before
removing a burner.
To remove the grill burner, first remove the grill
grate. Then, lift out the heat diffuser. Remove the
anchor bolt and pull the burner up and slightly
to the rear of the unit. The burner head comes
off the orifice at the front. Angle the burner
sideways and remove.
Clean the exterior of the burner(s) with a wire
brush. Be sure burner ports are clear and free
from debris. Clear any clogged ports with a
straightened paper clip. Never use a wooden
toothpick as it may break off and clog the port.
Never enlarge the burner ports. Shake out any
debris through the air shutter. Use a flashlight
to inspect the burner inlet to ensure it is not
blocked. If obstructions can be seen, use a metal
wire coat hanger that has been straightened out
or a pipe cleaner to clear them.
To replace the burner, angle it into the grill box
and position its front corner under the igniter
while sliding the burner head through the grill
orifice hole. Center the burner head onto
the orifice while being careful not to bend the
igniter electrodes. It is extremely important to
center the burner on the orifice properly.
Becareful not to upset the air shutters' original
position (unless readjusting). Lower the rear
burner bracket brace into the cutouts in the grill
bracket brace. Reattach the anchor bolt to
the brace. Make sure all burners are level
and seated in the grill box.
Replace the heat diffuser and the grill grate.
Light all of the burners and check for proper
flame characteristics. Do not attempt to light
the burners prior to replacing all grill parts.
If adjustments are necessary, refer to
the Installation Instructions.
Anchorholt --?
i
Ports
Air shutter Main burner
Anchorholt
Burner
bracket !!_
brace
Burner il
f,,,f
,gn,ter -"_,_-<_1_-_-
electrodes t_I _ 1 II II !
Burner
head
/
i / Grill
_ I hox
Orifices
With the burner removed, shine a flashlight
through the hole in the grill box to inspect the
orifice to ensure there is no blockage.
Use a needle to clear any debris. Beextremely
careful not to enlarge the hole or break off
the needle.
24
Infrared
sear
burner
(OR some
models)
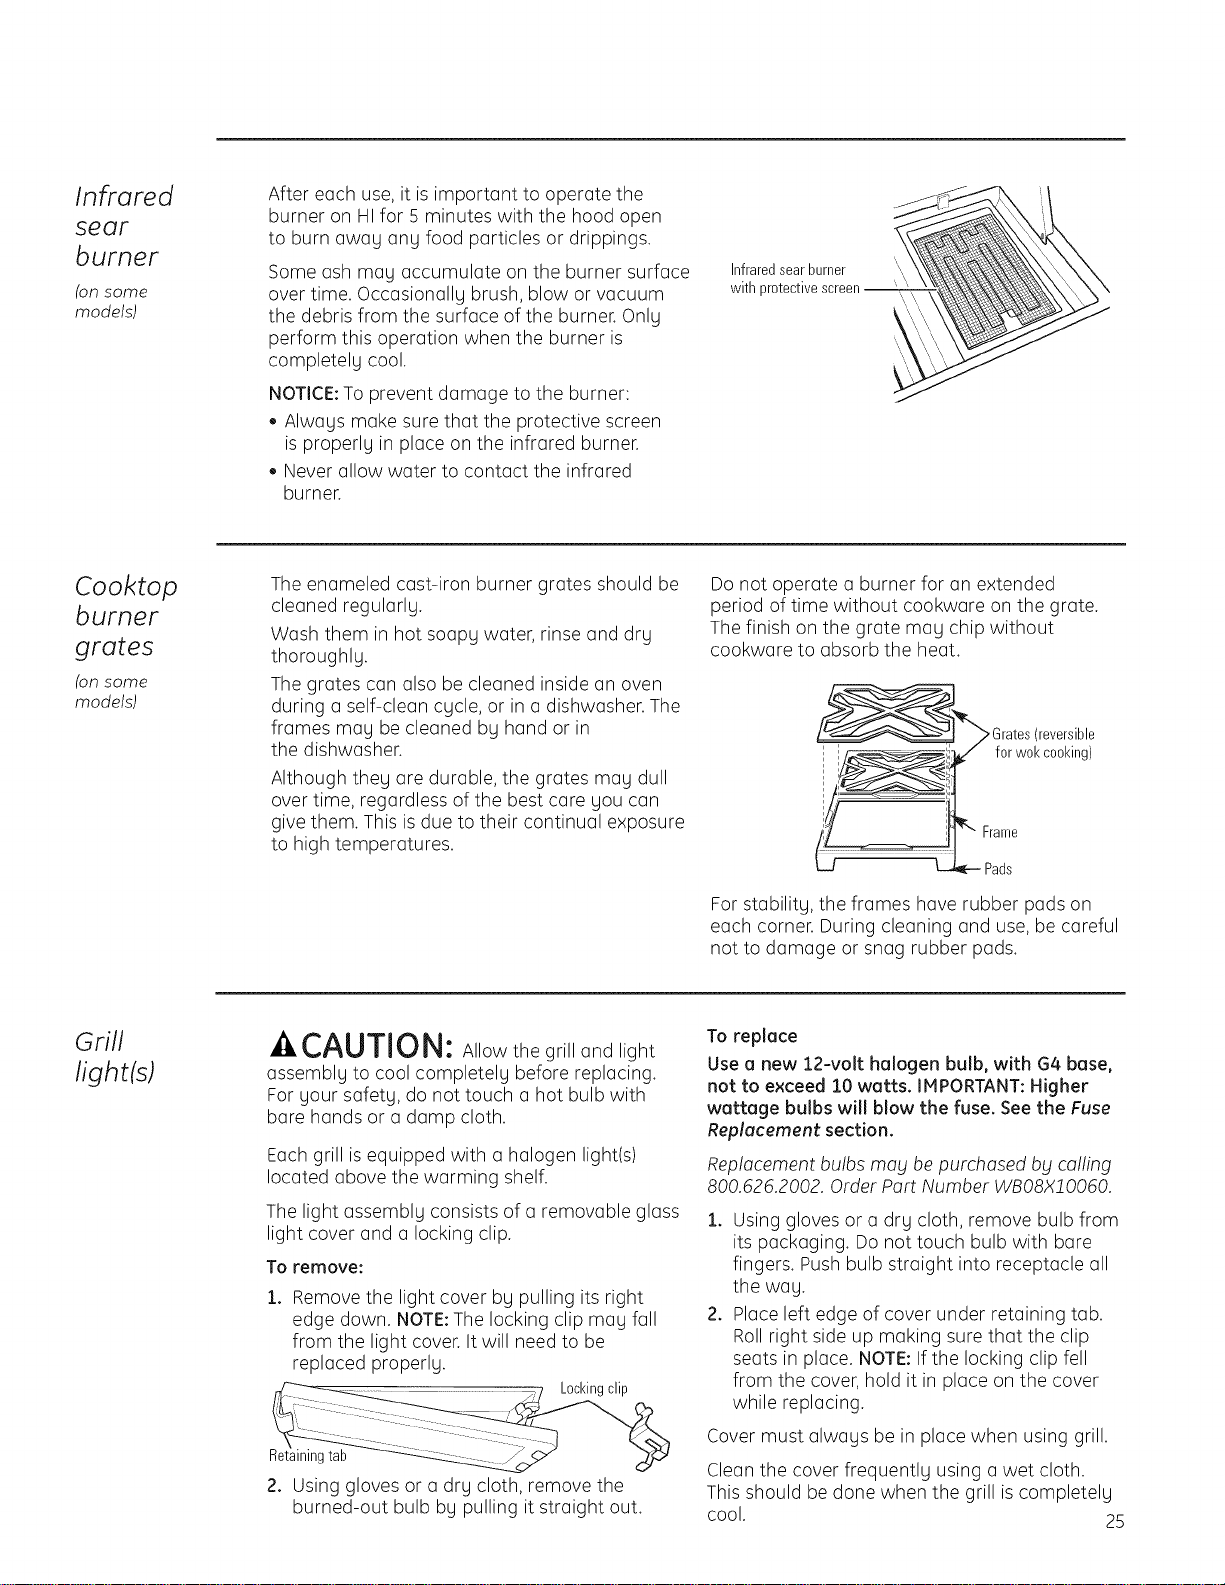
After each use, it is important to operate the
burner on HIfor 5 minutes with the hood open
to burn away any food particles or drippings.
Some ash may accumulate on the burner surface
over time. Occasionally brush, blow or vacuum
the debris from the surface of the burner. Only
perform this operation when the burner is
completely cool.
NOTICE:To prevent damage to the burner:
• Always make sure that the protective screen
is properly in place on the infrared burner.
Never allow water to contact the infrared
burnen
Infraredsearburner
with F
Cooktop
burner
grates
(OR some
models)
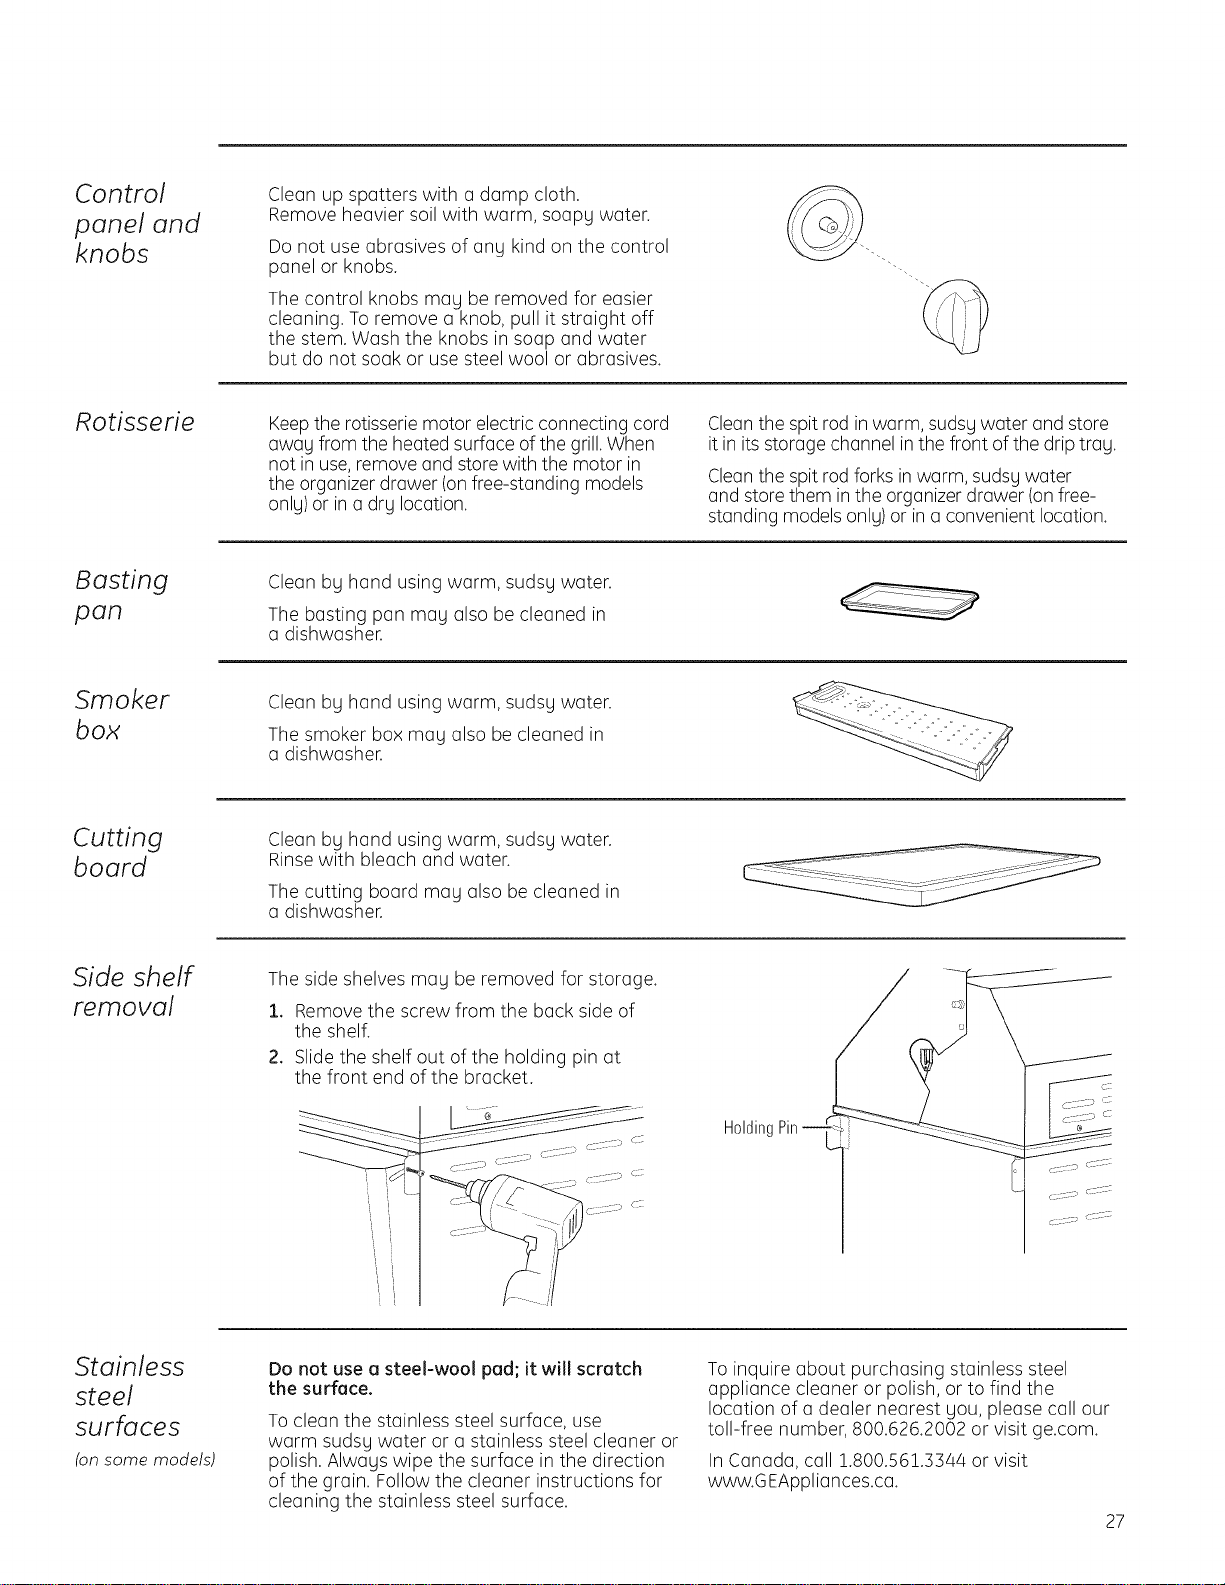
The enameled cast-iron burner grates should be
cleaned regularly.
Wash them in hot soapy water, rinse and dry
thoroughly.
The grates can also be cleaned inside an oven
during a self-clean cycle, or in a dishwasher. The
frames may be cleaned by hand or in
the dishwasher.
Although they are durable, the grates may dull
over time, regardless of the best care you can
give them. This is due to their continual exposure
to high temperatures.
Do not operate a burner for an extended
period of time without cookware on the grate.
The finish on the grate may chip without
cookware to absorb the heat.
>Grates(reversible
for wokcooking)
Frame
Pads
For stability, the frames have rubber pads on
each corner. During cleaning and use, be careful
not to damage or snag rubber pads.
Grill
light(s)
-&CAUTION: Allow the grill and light
assembly to cool completely before replacing.
For your safety, do not touch a hot bulb with
bare hands or a damp cloth.
Each grill is equipped with a halogen light(s)
located above the warming shelf.
The light assembly consists of a removable glass
light cover and a locking clip.
To remove:
1. Remove the light cover by pulling its right
edge down. NOTE:The locking clip may fall
from the light cover. It will need to be
replaced properly.
Retaining tab _ _>O /
2. Using gloves or a dry cloth, remove the
burned-out bulb by pulling it straight out.
To replace
Use a new 12-volt halogen bulb, with G4 base,
not to exceed 10 watts. IMPORTANT: Higher
wattage bulbs will blow the fuse. See the Fuse
Replacement section.
Replacement bulbs mag bepurchased bg calling
800.626.2002. Order Part Number WBO8X!O060.
1. Using gloves or a dry cloth, remove bulb from
its packaging. Do not touch bulb with bare
fingers. Push bulb straight into receptacle all
the way.
2. Place left edge of cover under retaining tab.
Roll right side up making sure that the clip
seats in place. NOTE:If the locking clip fell
from the cover, hold it in place on the cover
while replacing.
Cover must always be in place when using grill.
Clean the cover frequently using a wet cloth.
This should be done when the grill is completely
cool. 25

Care and Cleaning
Professional Outdoor Grills & Cooktops
Cooktop
burners
(OR some
models)
The burner consists of the burner base and the
burner head. They can be lifted off, making them
easy to clean.
WARNING:
DO NOTOPERATETHE BURNERWITHOUTALL
BURNERPARTSIN PLACE.Surface burners
should be cleaned routinely, especially after
bad spillovers which can clog the slots and
holes in the burner heads. Improperly
assembled or dirty burners may lead to an
explosion, which could result in serious injury.
The electrode is located at the front of each
burner. Do not attempt to disassemble or clean
around any burner while another burner is on or
being lighted. An electric shock may result.
Burnerhead
Slot andpost_
Electrode
Burnerbase
To remove the burner parts:
,
2.
Turn all controls OFF before removing any
burner parts.
When cool, lift off the burner grates, burner
heads and burner bases for easier cleaning.
Cleaning
Lift off burner parts only when cool. Wash in hot,
soapy water. You may use a plastic scouring pad
to remove burned-on food particles. Burners
are dishwasher-safe, but hand-washing is
recommended.
To remove burned-on food, soak the burner
heads and bases in a solution of mild liquid
detergent and hot water for 20-30 minutes.
For more stubborn stains, use a plastic
scouring pad or toothbrush.
After Cleaning
Before replacing the burner parts, shake out
excess water and then dry them thoroughly.
To replace the burner parts:
1. Replace the burner base, making sure that
the slots are properly aligned with the
electrode and the posts on the cooktop.
2. Place the burner head on top of the burner
base. Make sure that the burner head is
properly seated on the burner base.
Slot and post--
Slot and post
Burnercap properly seated
Slot and post Slot and
Burner cap not properly seated
post
Cooktop
spark
igniters
and
electrodes
(on some models)
The electrode of the electronic ignition system is
positioned at the front of the burner base. When
cleaning the cooktop, becareful not to snag the
igniter with your cleaning cloth. Damage to the
igniter could occur.
Be careful not to push in a control knob while
cleaning. It could cause the igniter to spark.
Hake sure that the white ceramic igniters on
the cooktop are dry and clean. Clean the metal
portion of the electrode with a soft cloth or
emery board.
Do not attempt to remove the electrode from
the cooktop.
Cleanthis metalpart
with anemeryboard.
1
Donotcleanthis
white ceramicpart
with anemeryboard.
Drip tra£
26
The full-width drip tray will collect grease from the
grill section, as well as boilovers and spillsfrom
the cooktop burners (onsome models).
Allow the tray and its contents to cool before
attempting to clean. Using paper towels or a
sponge, and a general-purpose cleaner, wipe the
grease from the tray often to avoid the possibility
of a greasefire.
NOTE:Drain holesare provided for the easy
removal of accumulated rain water. Extendthe drip
tray partially forward to exposethe drain plug(s).
Placea container under the tray and remove the
drain plug(s).After water has drained, complete
cleaning by wiping the tray dry using paper
towels or a sponge.
Control
panel and
knobs
Clean up spatters with a damp cloth.
Remove heavier soil with warm, soapg water.
Do not use abrasives of ang kind on the control
panel or knobs.
The control knobs mag be removed for easier
cleaning. To remove a knob, pull it straight off
the stem. Wash the knobs in soap and water
but do not soak or use steel wool or abrasives.
"- ..
Rotisserie
Keepthe rotisserie motor electric connecting cord
awag from the heated surface of the grill.When
not in use, remove and store with the motor in
the organizer drawer (onfree-standing models
onlg) or in a drg location.
Cleanthe spit rod in warm, sudsg water and store
it in its storage channel inthe front of the drip trag.
Cleanthe spit rod forks in warm, sudsg water
and store them in the organizer drawer (onfree-
standing models onlg)or in a convenient location.
Basting
pan
Clean bu hand using warm, sudsu water.
The basting pan may also be cleaned in
a dishwasher.
Smoker
box
Clean bu hand using warm, sudsu water.
The smoker box may also be cleaned in
a dishwasher.
Cutting
board
Clean bu hand using warm, sudsu water.
Rinse with bleach and water.
The cutting board may also be cleaned in
a dishwasher.
Side shell:
removal
The side shelves may be removed for storage.
1. Removethe screw from the back side of
the shelf.
2. Slide the shelf out of the holding pin at
the front end of the bracket.
Pin
Stainless
steel
surfaces
(on some models)
Do not use e steel-wool pad; it will scratch
the surface.
To clean the stainless steel surface, use
warm sudsu water or a stainless steel cleaner or
polish. Always wipe the surface in the direction
of the grain. Follow the cleaner instructions for
cleaning the stainless steel surface.
To inquire about purchasing stainless steel
appliance cleaner or polish, or to find the
location of a dealer nearest you, please call our
toll-free number, 800.626.2002 or visit ge.com.
In Canada, call 1.800.561.3344 or visit
www.GEAppliances.ca.
27
Care and Cleaning
Professional Outdoor Grills & Cooktops
Batterbl
replacement
The grill has a battery back-up which provides
power to the grill ignition system, allowing it to
operate when not connected to an ACoutlet
or during an electrical power outage.
For built-in grill models, the battery location
varies depending on where the installer located
it during installation.
For free-standing models, the battery is located
on the back side of the grill behind the lower
access panel.
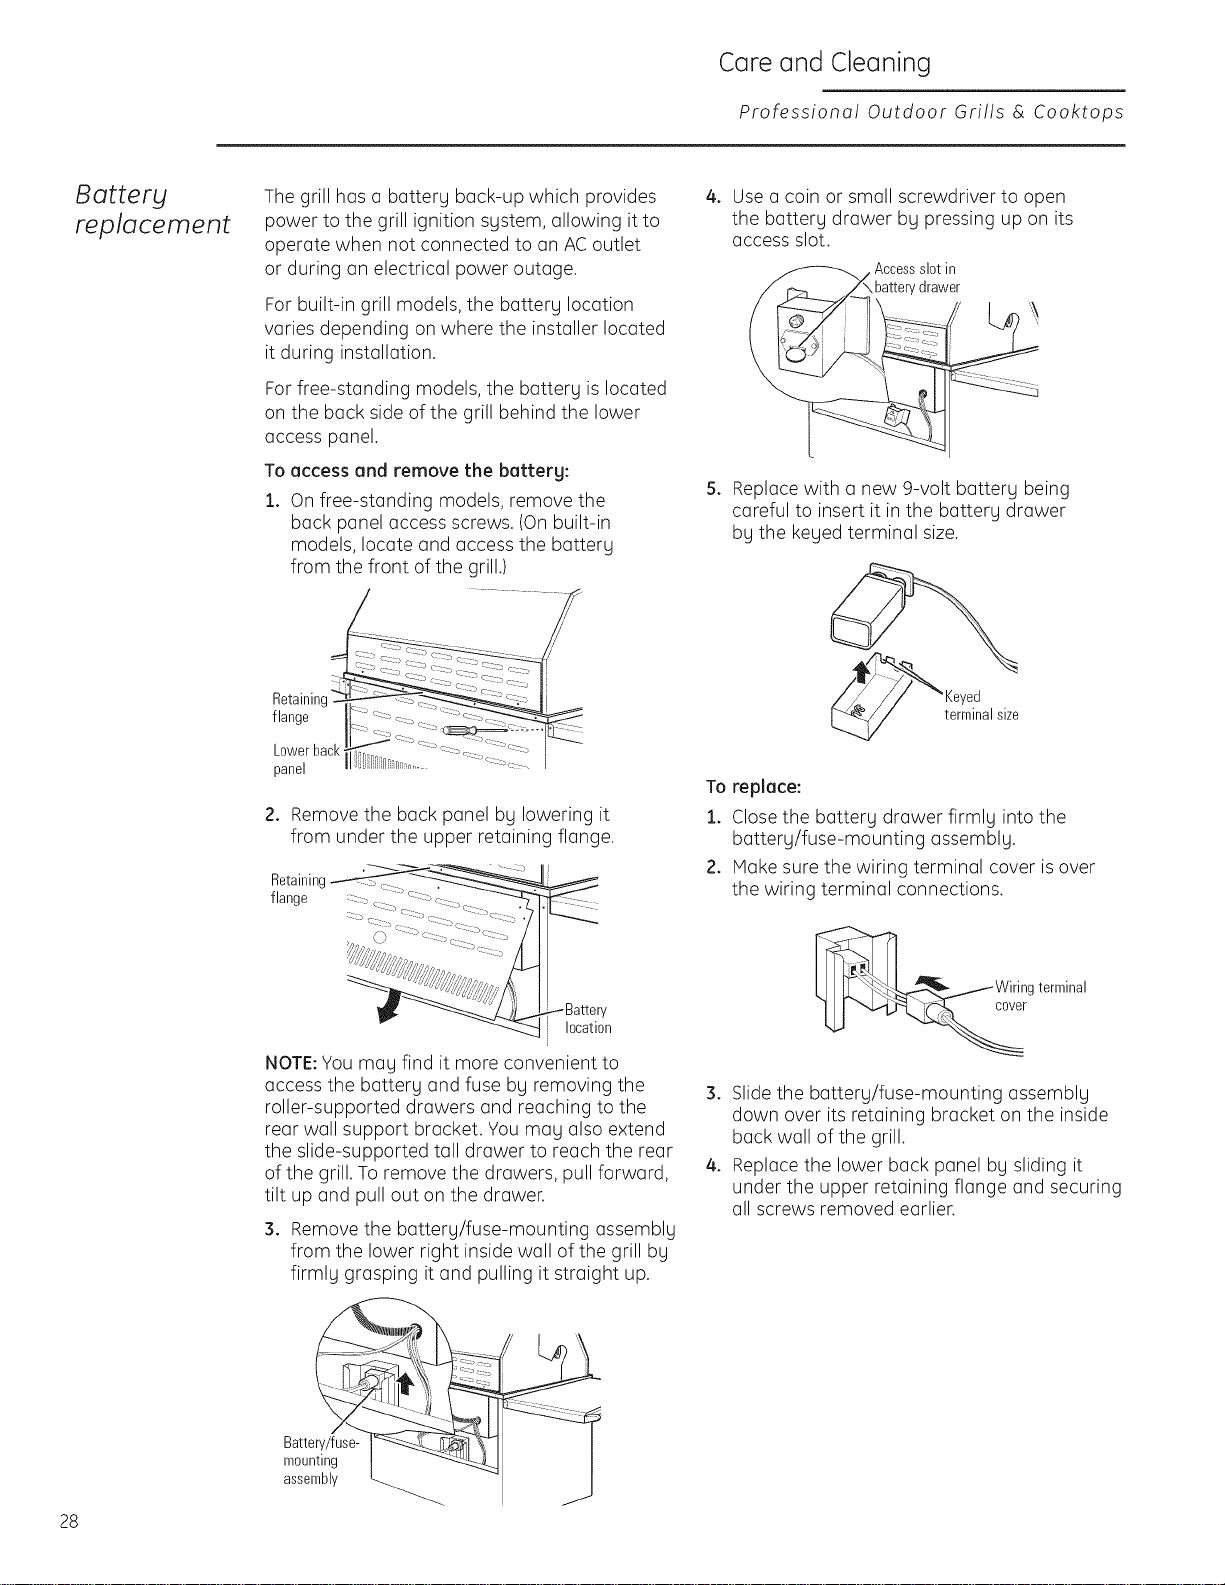
To access and remove the batterg:
1. On free-standing models, remove the
back panel access screws. (On built-in
models, locate and access the battery
from the front of the grill.)
Retaining
flange
panel
2. Remove the back panel by lowering it
from under the upper retaining flange.
Retaininc
flange : ::::_-
c:
location
i
NOTE:You may find it more convenient to
access the battery and fuse by removing the
roller-supported drawers and reaching to the
rear wall support bracket. You may also extend
the slide-supported tall drawer to reach the rear
of the grill. To remove the drawers, pull forward,
tilt up and pull out on the drawer.
3. Remove the battery/fuse-mounting assembly
from the lower right inside wall of the grill by
firmly grasping it and pulling it straight up.
4. Usea coin or small screwdriver to open
the battery drawer by pressing up on its
access slot.
(
slot in
drawer
5. Replace with a new 9-volt battery being
careful to insert it in the battery drawer
by the keyed terminal size.
'ed
terminal size
To replace:
1. Closethe battery drawer firmly into the
battery/fuse-mounting assembly.
2. Make sure the wiring terminal cover is over
the wiring terminal connections.
rwiring
terminal
3. Slide the battery/fuse-mounting assembly
down over its retaining bracket on the inside
back wall of the grill.
4. Replacethe lower back panel by sliding it
under the upper retaining flange and securing
all screws removed earlier.
Battery/fuse-
mounting
assembly
28
Fuse
replacement
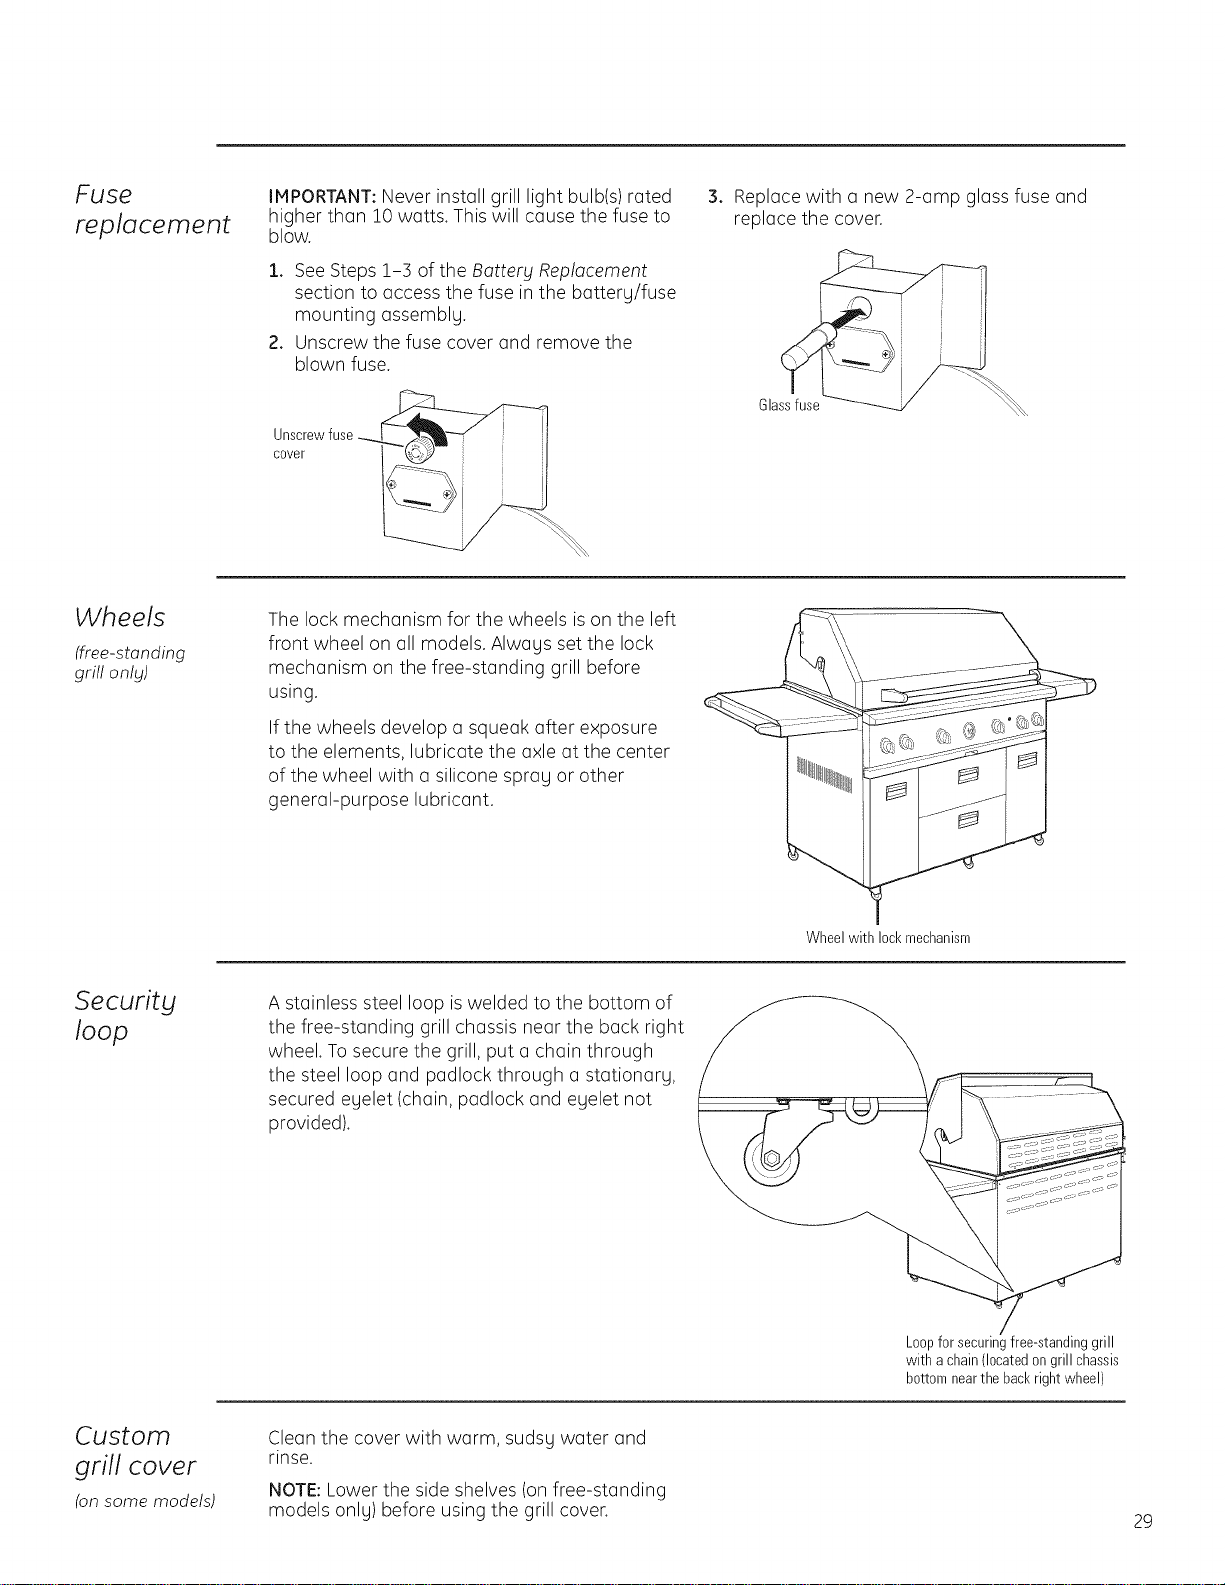
IMPORTANT:Never install grill light bulb(s)rated
higher than 10 watts. This will cause the fuse to
blow.
1. See Steps 1-3 of the Battery Replacement
section to access the fuse in the batterg/fuse
mounting assemblg.
2. Unscrew the fuse cover and remove the
blown fuse.
Unscrewfuse
cover
3,
Replace with a new 2-amp glass fuse and
replace the cover.
Glassfuse
Wheels
(free-standing
grill only)
The lock mechanism for the wheels is on the left
front wheel on all models. Alwags set the lock
mechanism on the free-standing grill before
using.
If the wheels develop a squeak after exposure
to the elements, lubricate the axle at the center
of the wheel with a silicone sprag or other
general-purpose lubricant.
Wheel with lockmechanism
Securitg
loop
A stainless steel loop iswelded to the bottom of
the free-standing grill chassis near the back right
wheel. To secure the grill, put a chain through
the steel loop and padlock through a stationarg,
secured egelet (chain, padlock and egelet not
provided).
Loopfor securingfree-standinggrill
with a chain(locatedongrill chassis
bottomnearthe backright wheel)
Custom
grill cover
(on some models)
Clean the cover with warm, sudsg water and
rinse.
NOTE:Lower the side shelves (onfree-standing
models onlU)before using the grill cover.
29
The Problem Solver
Professiona! Outdoor Grills & Cooktops
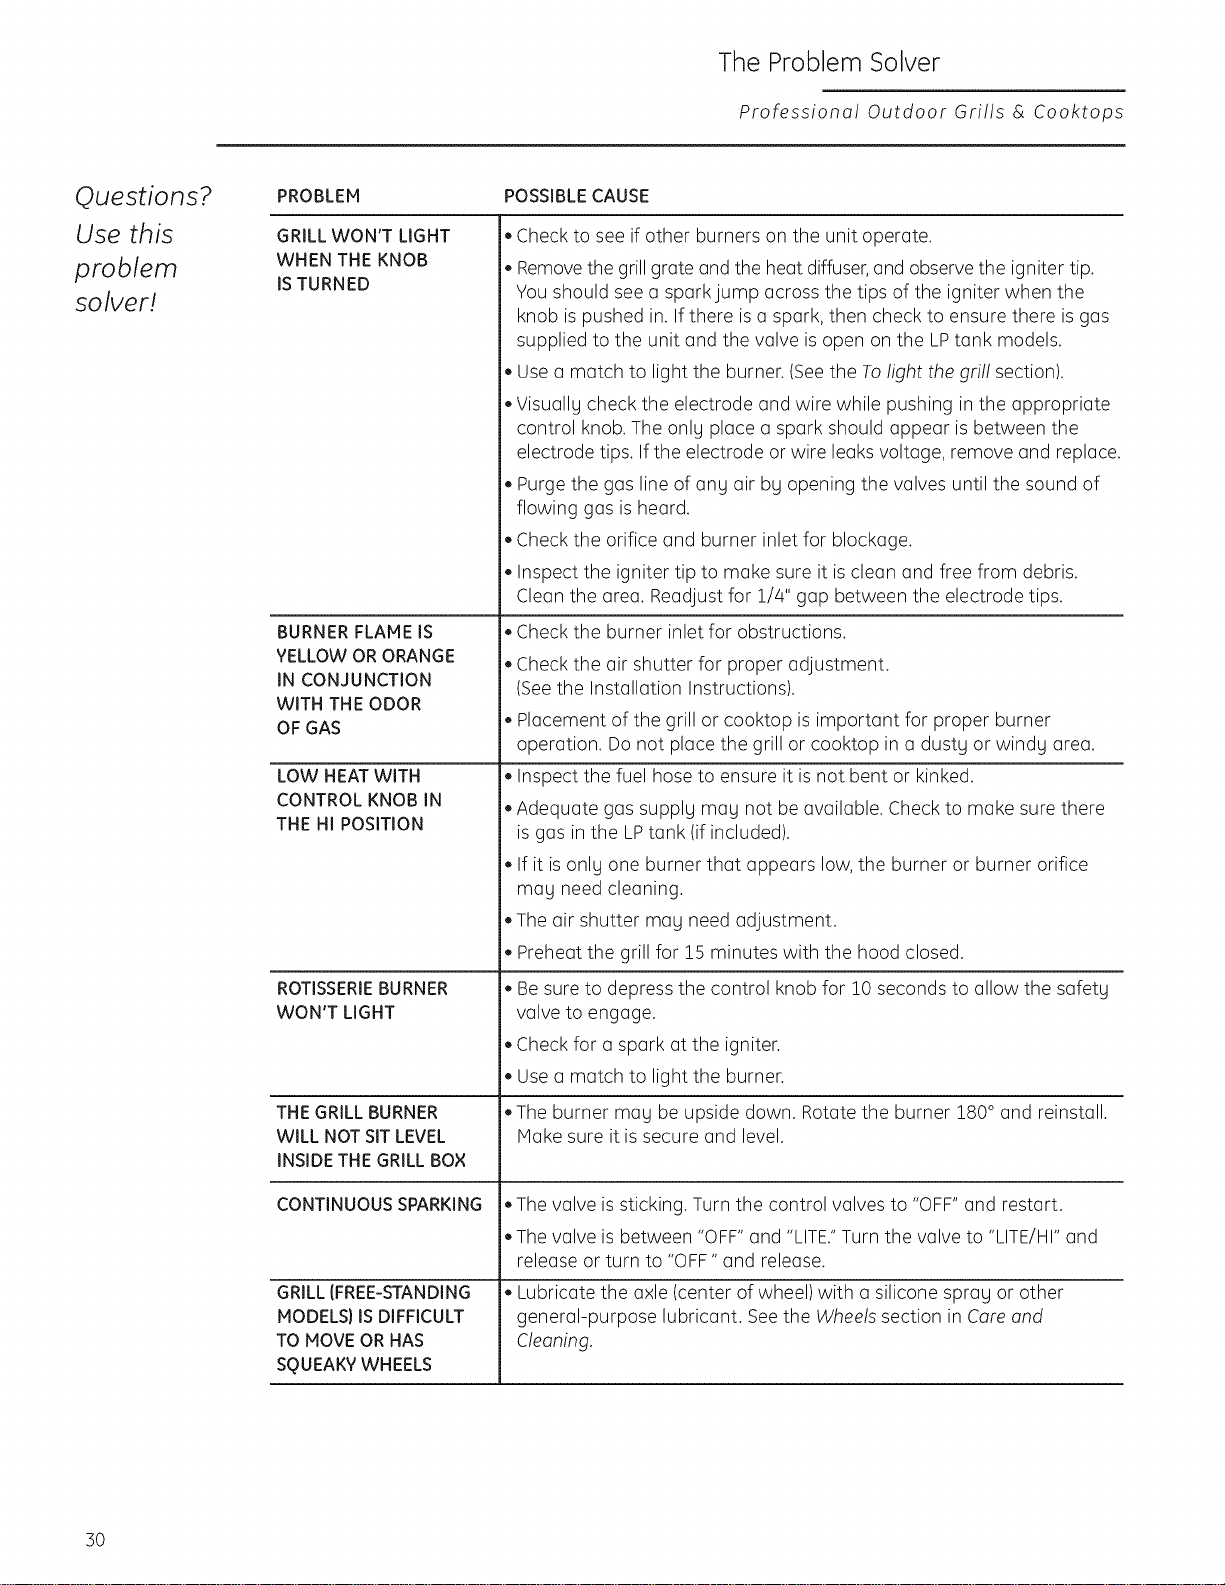
Questions?
Use this
problem
solver!
PROBLEM POSSIBLE CAUSE
GRILL WON'T LIGHT
WHEN THE KNOB
IS TURNED
BURNER FLAME IS
YELLOW OR ORANGE
IN CONJUNCTION
WITH THE ODOR
OF GAS
LOW HEAT WITH
CONTROL KNOB IN
THE HI POSITION
ROTISSERIE BURNER
WON'T LIGHT
THE GRILL BURNER
WILL NOT SIT LEVEL
INSIDE THE GRILL BOX
CONTINUOUS SPARKING
GRILL (FREE-STANDING
MODELS) IS DIFFICULT
TO MOVE OR HAS
SQUEAKY WHEELS
Check to see if other burners on the unit operate.
Removethe grill grate and the heat diffuser,and observe the igniter tip.
You should see a spark jump across the tips of the igniter when the
knob is pushed in. If there is a spark, then check to ensure there is gas
supplied to the unit and the valve is open on the LPtank models.
Use a match to light the burner. (Seethe Tolight the gril! section).
Visuallg check the electrode and wire while pushing in the appropriate
control knob. The onlg place a spark should appear is between the
electrode tips. Ifthe electrode or wire leaks voltage, remove and replace.
Purge the gas line of ang air bg opening the valves until the sound of
flowing gas is heard.
Check the orifice and burner inlet for blockage.
Inspect the igniter tip to make sure it is clean and free from debris.
Clean the area. Readjust for 1/4" gap between the electrode tips.
Check the burner inlet for obstructions.
Check the air shutter for proper adjustment.
(Seethe Installation Instructions).
Placement of the grill or cooktop is important for proper burner
operation. Do not place the grill or cooktop in a dustg or windg area.
Inspect the fuel hose to ensure it is not bent or kinked.
Adequate gas supplg mag not be available. Check to make sure there
is gas in the LPtank (if included).
If it is onlg one burner that appears low, the burner or burner orifice
mag need cleaning.
The air shutter mag need adjustment.
Preheat the grill for 15 minutes with the hood closed.
Be sure to depress the control knob for !0 seconds to allow the safetg
valve to engage.
Check for a spark at the igniter.
Use a match to light the burner.
The burner mag be upside down. Rotate the burner 180° and reinstall.
Make sure it is secure and level.
,,The valve is sticking. Turn the control valves to "OFF"and restart.
• The valve is between "OFF"and "LITE."Turn the valve to "LITE/HI"and
release or turn to "OFF" and release.
Lubricate the axle (center of wheel) with a silicone sprag or other
general-purpose lubricant. See the Wheels section in Care and
Cleaning.
30
Consumer Services
Professiona! Outdoor Grills & Cooktops
With the purchase of your new Monogram appliance, receive
the assurance that if you ever need information ar assistance
from GE, we'll be there. All you have to do is call--toll- free!
GE Answer Center ®
In the USA:
800.626.2000
Whatever your question about any Monogram major appliance, GEAnswer Centede
information service is available to help. Your call-and your question-will be answered promptly
and courteously. Call the GEAnswer Center® Monday to Friday, 8 a.m. to 10 p.m. EST,and
Saturday, 8 a.m. to 7 p.m. EST.
OR
Visit our Website at: monogram.cam
InCanada, call 800.56!.]]44.
Repair Service
In the USA:
800.444.1845
In Canada:
800.561.3344
AGE consumer service professional will provide expert repair service, scheduled at a time that's
convenient for you. To schedule service, call Monday to Friday, 7 a.m. to 10 p.m. EST,or Saturday
and Sunday, 8 a.m. to 6 p.m. EST.Many GEConsumer Service company-operated locations offer
you service today or tomorrow, or at your convenience. Our factory-trained technicians know
your appliance inside and out-so most repairs can be handled in just one visit.
In Canada: Monday to Friday, 7 a.m. to 8 p.m. and Saturday, 8 a.m. to 5 p.m. EDST.
For Customers With
Special Needs...
In the USA:
800.626.2000
7[ .........[ /l_
GEoffers, free of charge, a brochure to assist in planning a barrier-free
kitchen for persons with limited mobility.
Consumers with impaired hearing or speech who have access to a TDD
or a conventional teletypewriter may call 800.TDD.GEAC(800.8]].4122)
to request information or service.
Service Contracts
In the USA:
800.626.2224
In Canada:
800.561.3344
You can have the secure feeling that GEConsumer Service will still be there after your
warranty expires. Purchase a GEcontract while your warranty is still in effect and you'll
receive a substantial discount. With a multiple-year contract, you're assured of future
service at today's prices.
Parts and
Accessories
In the USA:
800.625.2002
In Canada:
800.561.3344
Individuals qualified to service their own appliances can have parts or accessories sent directly
to their home. The GEparts system provides access to over 47,000 parts...and all GEGenuine
Renewal Parts are fully warranted. VISA,MasterCard and Discover cards are accepted.
User maintenance instructions contained in this manual cover procedures intended to be
performed bg any user. Other servicing generally should be referred to qualified service
personnel. Caution must be exercised, since improper servicing may cause unsafe operation.
]1

Notes
Professiona! Outdoor Grills & Cooktops
32

33

Notes
Professiona! Outdoor Grills & Cooktops
34
Warranty for customers in Canada
Professional Outdoor Grills & Cooktops
YOUR MONOGRAM OUTDOOR GRILL OR COOKTOP WARRANTY
Staple sales slip or cancelled check here. Proof of original purchase date is needed
to obtain service under warranty. Please have serial number and model number
available when calling for service.
WHAT IS
COVERED
LIMITED ONE-YEAR WARRANTY
Forone year from date of original purchase, we will provide, free of charge, parts and service
labor at your home to repair or replace any part of the grill or cooktop that fails because of
a manufacturing defect.
LIMITED FIVE-YEAR WARRANTY
Forfive years from the date of original purchase, we will provide, free of charge, replacement
stainless steel main burners if they fail in normal use. (Theinfrared sear and rotisserie burners
are not included.) You pay for the service trip to your home and all service labor charges.
This warranty is extended to the original purchaser and any succeeding owner for products
purchased in Canada for outdoor residential use within Canada.
All warranty service will be provided by our Factory Service Centers or by our authorized
Customer Care®servicers during normal working hours.
Should your appliance need service, during warranty period or beyond, call 1.800.56!.3344.
WHAT IS NOT
COVERED
Service trips to your home to teach you how
to use the product.
Replacement of house fuses or resetting
of circuit breakers.
Damage to the product caused by accident,
fire, floods or acts of God.
Damage caused after delivery.
Failure of the product if it is used
for other than its intended purpose
or used commercially.
Improperinstallation,deliveryor maintenance.
If you havean installationproblem,contact
your dealeror installer.Youare responsiblefor
providingadequateelectrical,gas,exhausting
and other connectingfacilitiesasdescribed
inthe InstallationInstructionsprovidedwith
the product.
Incidental or consequential damage caused
by possible defects with this appliance.
Product not accessible to provide required
service.
Damage resulting from use in windy
conditions.
EXCLUSION OF IMPLIED WARRANTIES--Your sole and exclusive remedy is product repair
as provided in this Limited Warranty. Any implied warranties, including the implied
warranties of merchantability or fitness for a particular purpose, are limited to one
year or the shortest period allowed by law.
Some provinces do not allow the exclusion or limitation of incidental or consequential
damages, so the above limitation or exclusion may not apply to you. This warranty gives
you specific legal rights, and you may also have other rights which vary from province to
province. To know what your legal rights are in your province, consult your local or provincial
consumer affairs office.
Warrantor: Mabe Canada Inc., Burlington, ON, L7R5B6
35
Warranty for customers in the USA
Professiona! Outdoor Grills & Cooktops
WHAT IS
COVERED
YOURMONOGRAMOUTDOORGRILLORCOOKTOPWARRANTY
Staple sales slip or cancelled check here. Proof of original purchase date is needed
to obtain service under warranty. Please have serial number and model number
available when calling for service.
LIMITED ONE-YEAR WARRANTY
Forone year from date of original purchase, we will provide, free of charge, parts and service
labor at your home to repair or replace any part of the grill or cooktop that fails because of
a manufacturing defect.
• ® o®e ®®eoo co® o®®o® o®e ®®8®® e®® e®e oe ®0® e®e o®eo® o®e o®eo® o®o o®eo® e®o o®eo® e®o o®e o® co® e®e o®eo® o®e o®eo® o®o o®e
LIMITED FIVE-YEAR WARRANTY
Forfive gears from the date of original purchase, we will provide, free of charge, replacement
stainless steel main burners if they foil in normal use. (Theinfrared sear and rotisserie burners
are not included.) You pay for the service trip to your home and all service labor charges.
e®ace oe®oe ®ee ®oQoe ®®_ ®®o®e e®e ®co ®e e®o ®eo ®e®oe ®ee ee®oe ®®_ ®eo®e ®ee ®e_e _®_ ®e_ _e _®_ ®e_ _e_®® ®e_ ®e_®_ _®_ ®ee
This warranty is extended to the original purchaser and any succeeding owner for products
purchased for ordinary outdoor residential use in the 48 mainland states, Hawaii and
Washington, D.C.In Alaska the warranty isthe same except that you must pay to ship the
product to the service shop or for the service trip to your home and all service labor charges.
All warranty service will be provided by our Factory Service Centers or by our authorized
Customer Care®servicers during normal working hours.
Should your appliance need service, during warranty period or beyond, call 800.444.1845.
WHAT IS NOT
COVERED
Service trips to your home to teach you how
to use the product.
Replacement of house fuses or resetting
of circuit breakers.
Damage caused after delivery.
Damage to the product caused by accident,
fire, floods or acts of God.
Failure of the product if it is used for
other than its intended purpose or used
commercially.
Improper installation, delivery
or maintenance.
If you have an installation problem, contact
your dealer or installer. You are responsible
for providing adequate electrical, gas,
exhausting and other connecting facilities
as described in the Installation Instructions
provided with the product.
Incidental or consequential damage caused
by possible defects with this appliance.
Product not accessible to provide required
service.
Damage resulting from use in windy
conditions.
EXCLUSIONOFIMPLIED WARRANTIES--Your sole end exclusive remedy is product repair
us provided in this Limited Warranty. Any implied wurronties, including the implied
warranties of merchuntuOility or fitness for o purticulor purpose, ore limited to one
geor or the shortest period ollowed by low.
0
Some states do not allow the exclusion or limitation of incidental or consequential damages,
so the above limitation or exclusion may not apply to you. This warranty gives you specific
legal rights, and you may also have other rights which vary from state to state.
To know what your legal rights are in your state, consult your local or state consumer affairs
office or your state's Attorney General.
Warrantor: General Electric Company, Louisville, KY 40225
GE Consumer & Industrial
Applk]nces
General Electric Company
Louisville, KY/40225
ge.com
Printed in the United States

