GEAppliances.com
Safety Instructions . ....... 2-4
Operating Instructions
(;lock and Timer ............. 9
Controls .................. 5, 6
Oven .................... 7, 8
Sabbath Featme ............ 13
Special Featmes ............ 12
Thermostat ................ 11
Timed Baking and Roasting .... 10
Care and Cleaning
Control Panel .............. 14
i,ift-Off Oven Door .......... 15
Light Bulb ................. 16
Packaging Tape ............. 14
Painted Surfaces ............ 14
Porcelain Oven Interior ...... 14
Racks ..................... 14
Troubleshooting Tips .... 17, 18
Accessories ................ 19
Consumer Support
Consumer Support .......... 22
Warranty .................. 21
!ii
,]KS10-27" Single Wall Ove'rz
,flS'l 0-30" Si,zqle Wall Ove'rz
Write the model and serial
numbers here:
Model #
Serial #
You can find them on a label on
the side trim or on the flont of
the oven behind the oven dooL
49-80593 06-09 JR
IMPORTANTSAFETYINFORMATION.
READALLINSTRUCTIONSBEFOREUSING.
WARNING!
Foryour safety, the information in this manual must be followed to minimize the risk of fire or
explosion, electric shock, or to prevent property damage, personal injury, or loss of life.
SAFETYPRECAUTIONS
When using electrical appliances, basic safety precautions should be followed, including
the following:
Use this appliance only fbr its intended
purpose as described in this Owner's
Manual.
Be sure your appliance is properly
installed and grounded by a qualified
technician in accordance xdth the
prox,ided installation instructions.
Do not attempt to repair or replace any
part of your oven unless it is specifically
recommended in this manual. All other
ser\,icing should be referred to a qualified
technician.
Have the installer show you the location
of the circuit breaker or fuse. Mark it tbr
easy reference.
iiiiiiiiiiiii!
iiiiiiiiiiiii!
Before performing any sen,ice, disconnect
the oven power supply at the household
distribution panel by remox,ing the fuse or
switching off the circuit breaker-
Do not leave children alone----children
should not be left alone or unattended in
an area where an appliance is in use. They
should never be allowed to sit or stand on
any part of the appliance.
Do not allow anyone to climb, stand or
hang on the door. They could damage the
oven, or cause severe personal injuPi.
2
GEAppliances.com
SAFETYPRECAUTIONS
Be sure the oven is securely installed in
a cabinet that is firmly attached to the
house structure. Never allow anyone
m climb, sit, stand or hang on the
oven dooE
Never leave the oven door open when
you are not watching the oven.
Always keep combustible wall coverings,
curtains or drapes a s_e distance from
your ovell.
Always keep dish towels, dish cloths, pot
holders and other linens a s_e distance
flom your oven.
Always keep wooden and plastic utensils
and canned fbod a s_e distance away
flom your oven.
Teach children not to play xdth the
controls or any other part of the oven.
i,arge scratches or impacts to glass doors
can lead to broken or shattered glass.
Do not store flammable materials in
ail oveil.
CAUTION:,ternsofi.terestto
children should not be stored in cabinets
above an oven; children climbing on the
oven to reach items could be seriously
injured.
iiiiiiiiiiiii!
Never wear loose-fitting or han_ng
garments while using the appliance.
Be careful when reaching fbr items
stored in cabinets over the oven.
Flammable material could be ignited if
brought in contact with hot surfaces or
heating elements and may cause severe
burns.
Use only d U pot holders--moist or
damp pot holders on hot surfaces may
result in burns flom steam. Do not let
pot holders touch hot heating elements.
Do not use a towel or other bulky cloth.
For your safety, never use your appliance
for warming or heating the room.
Do not let cooking grease or other
flammable materials accumulate in
or llear the ovell.
Do not use water on grease fires.
Never pick up a flaming pan. Turn the
controls oil
Flame in the oven can be smothered
completely by closing the oven door and
turning the oven off or by using a multi-
propose d U chemical or foam-type fire
extinguisher.
Do not store or use combustible
materials, gasoline or other flammable
vapors and liquids in the x,icinity of this
or any other appliance.
3
IMPORTANTSAFETYINFORMATION.
READALLINSTRUCTIONSBEFOREUSING.
WARNING!
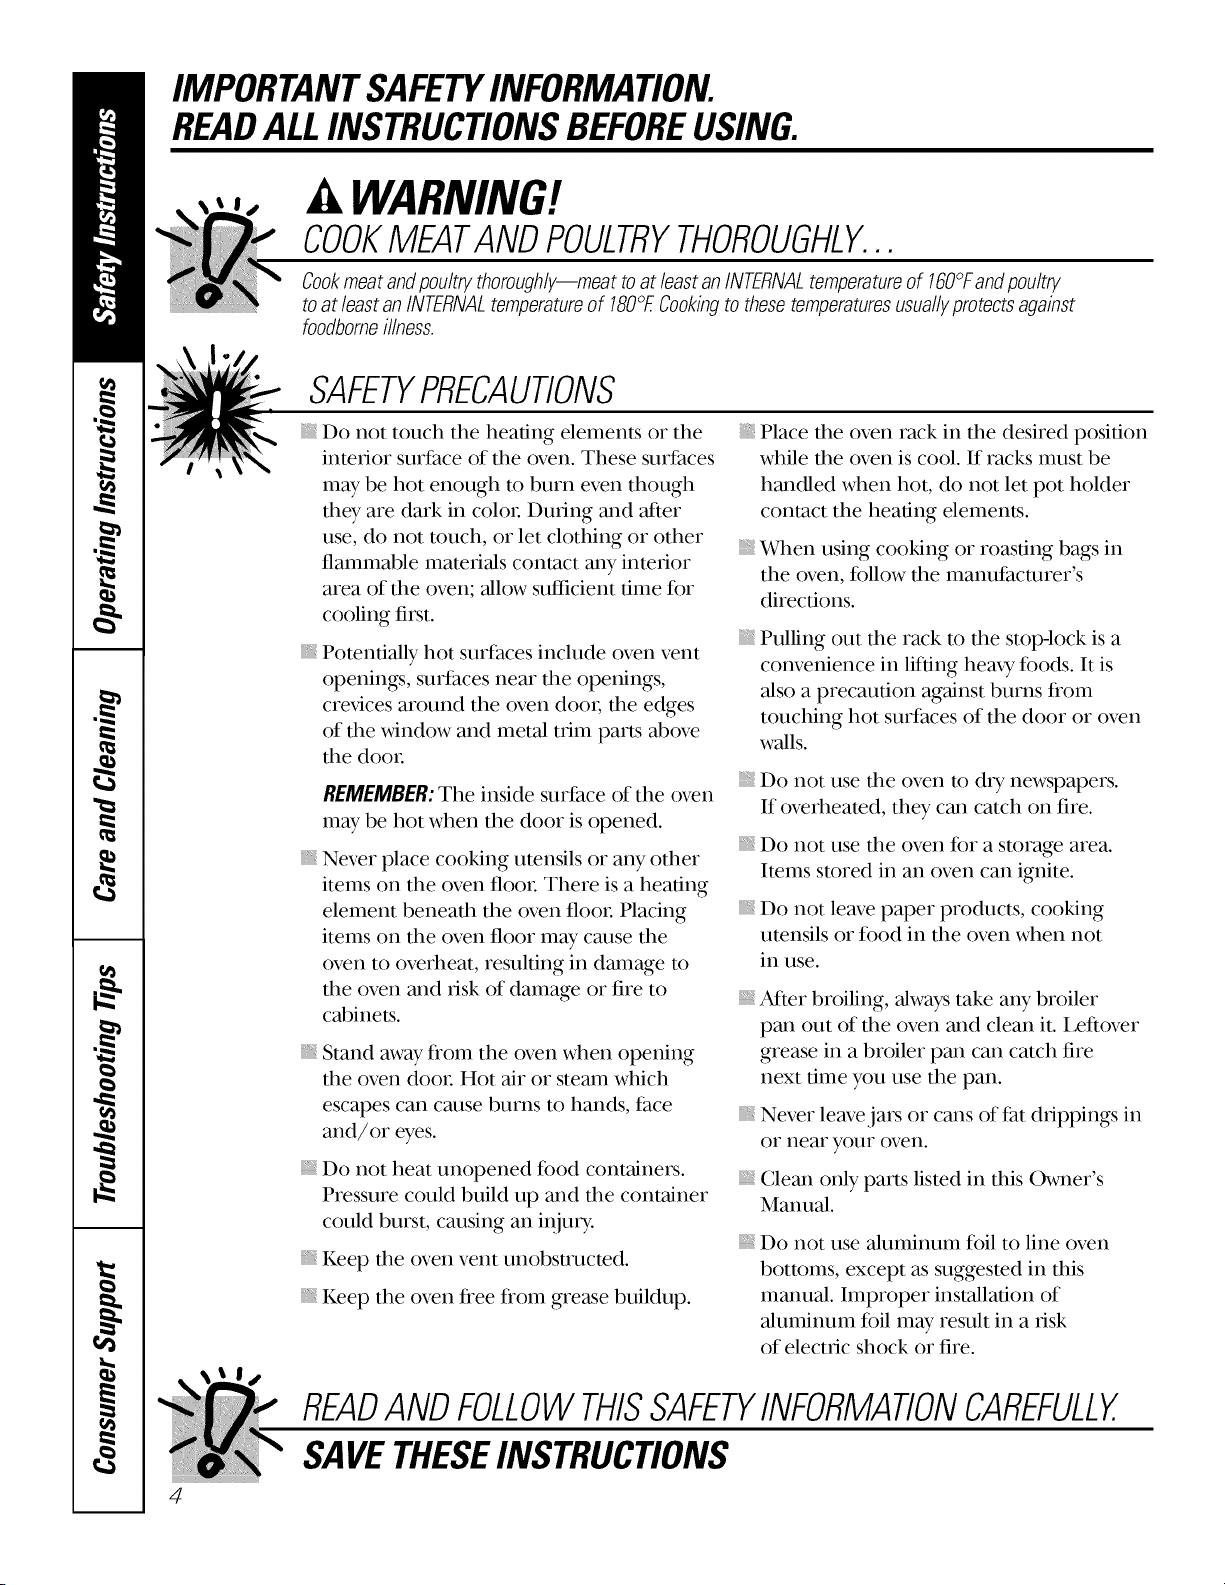
COOKMEATANDPOULTRYTHOROUGHLY...
Cookmeat andpoultry thoroughly--meat toat leastan INTERNALtemperatureof 160°Fandpoultry
toat least an INTERNALtemperatureof 180°ECookingto thesetemperaturesusuallyprotects against
foodborneillness.
4
SAFETYPRECAUTIONS
Do not touch the heating elements or the
inmrior surface of the oven. These surfaces
may be hot enough to burn even though
they are dark in color: During and after
use, do not touch, or let clothing or other
flammable materials contact any interior
area of the oven; allow sutticient time for
cooling first.
Potentially hot surfaces include oven vent
openings, surfaces near the openings,
cre\,ices around the oven door, the edges
of the window and metal trim parts above
the door:
REMEMBER:The inside surface of the oven
may be hot when the door is opened.
Never place cooking umnsils or any other
items on the oven floor- There is a heating
element beneath the oven floor- Placing
items on the oven floor may cause the
oven to overheat, resulting in damage m
the oven and risk of damage or fire to
cabinets.
Stand ms,ay from the oven when opening
the oven door- Hot air or steam which
escapes carl cause burns to hands, face
and/or eyes.
Do not heat unopened fk)od containers.
Pressure could build up and the container
could burst, causing an in,ju U.
iiiiiiiiiKeep the oven vent unobstmcted.
iiiiiiiiiKeep the oven flee from grease buildup.
Place the oven rack in the desired position
while the oven is cool. If racks must be
handled when hot, do not let pot holder
contact the heating elements.
When using cooking or roasting bags in
the oven, f_llow the manufacturer's
directions.
Pulling out the rack to the stop-lock is a
convenience in lifting hem,y fk_ods. It is
also a precaution against burns flom
touching hot surfaces of the door or oven
walls.
Do not use the oven to drT newspapers.
If overheated, they can catch on fire.
Do not use the oven fk)r a storage area.
Items stored in an oven carl ignite.
Do not leave paper products, cooking
utensils or food in the oven when not
in use.
After broiling, always take any broiler
pan out of the oven and clean it. Leftover
grease in a broiler pan carl catch fire
next time you use the pan.
Never leave jars or cans of fat drippings in
or near your overl.
Clean only parts listed in this Owner's
Manual.
Do not use aluminum foil to line oven
bottoms, except as suggested in this
manual. Improper installation of
aluminum fk)il may result in a risk
of electric shock or fire.
READANDFOLLOWTHISSAFETYINFORMATIONCAREFULLY.
SAVETHESEINSTRUCTIONS
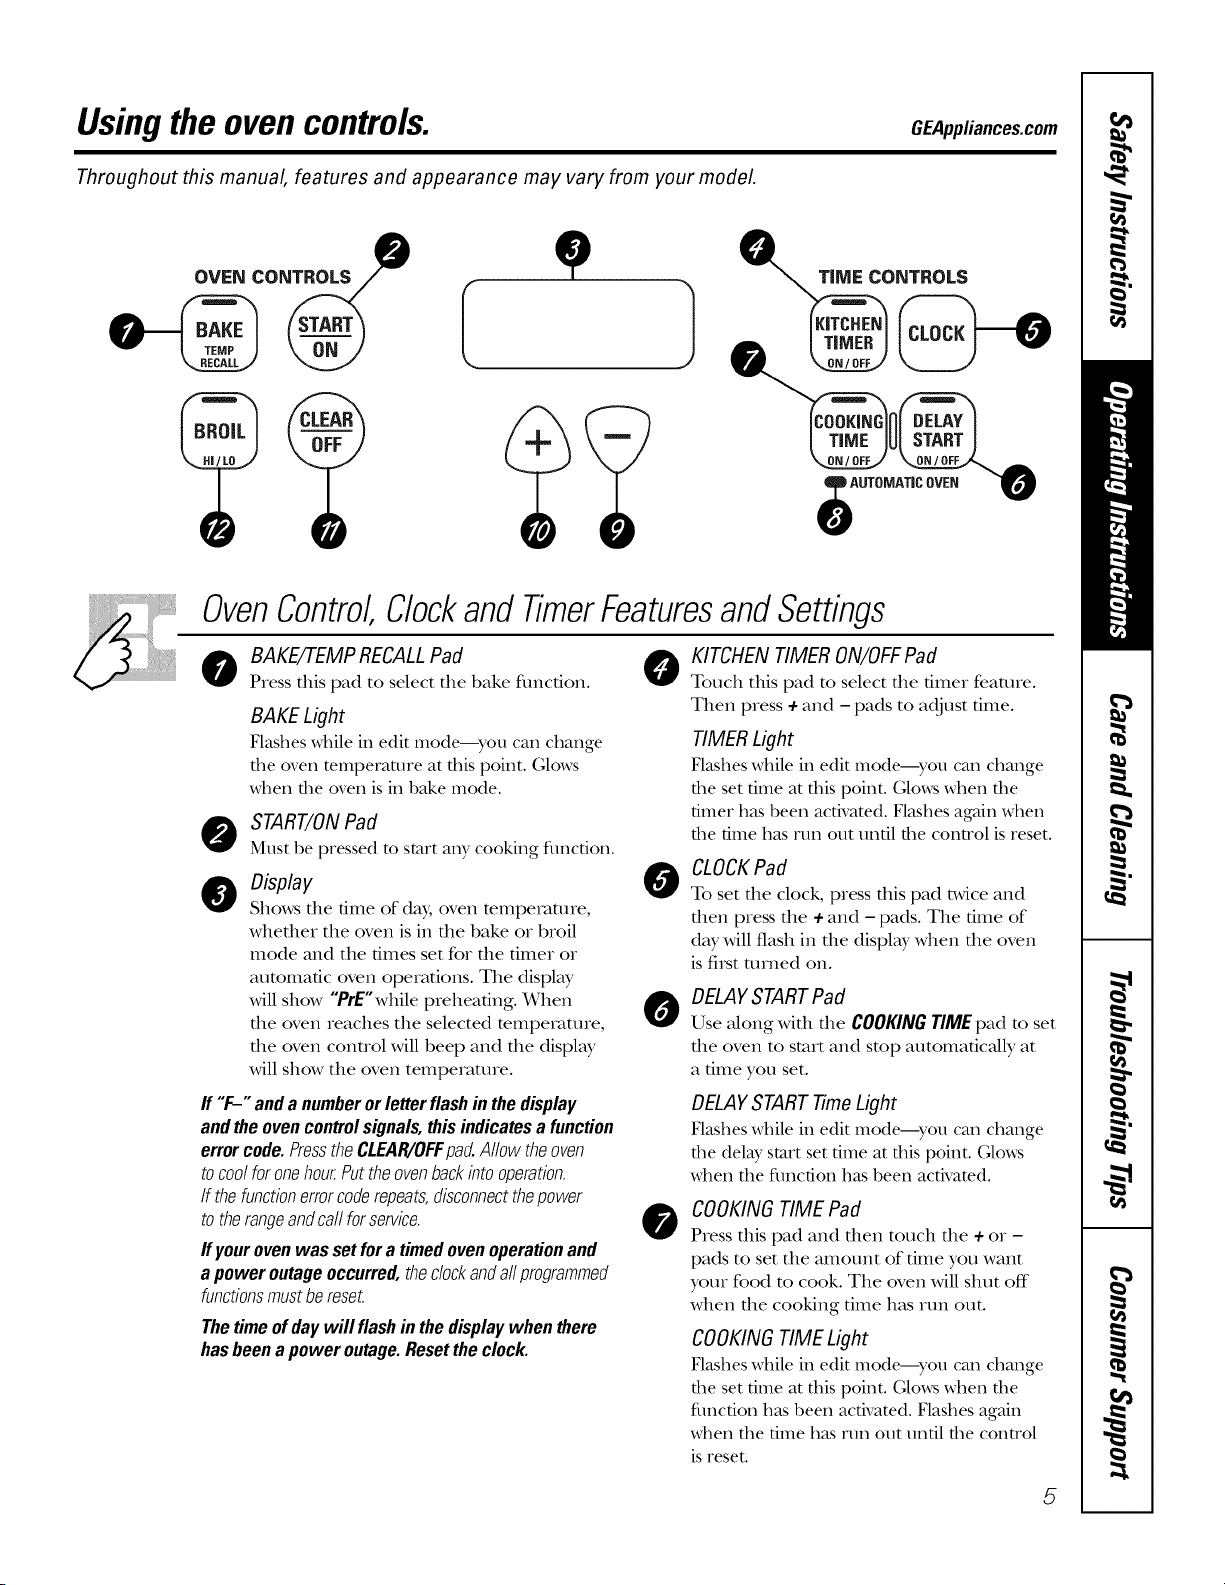
Usingthe ovencontrols.
Throughout this manual, features and appearance may vary from your model.
GEAppliances.com
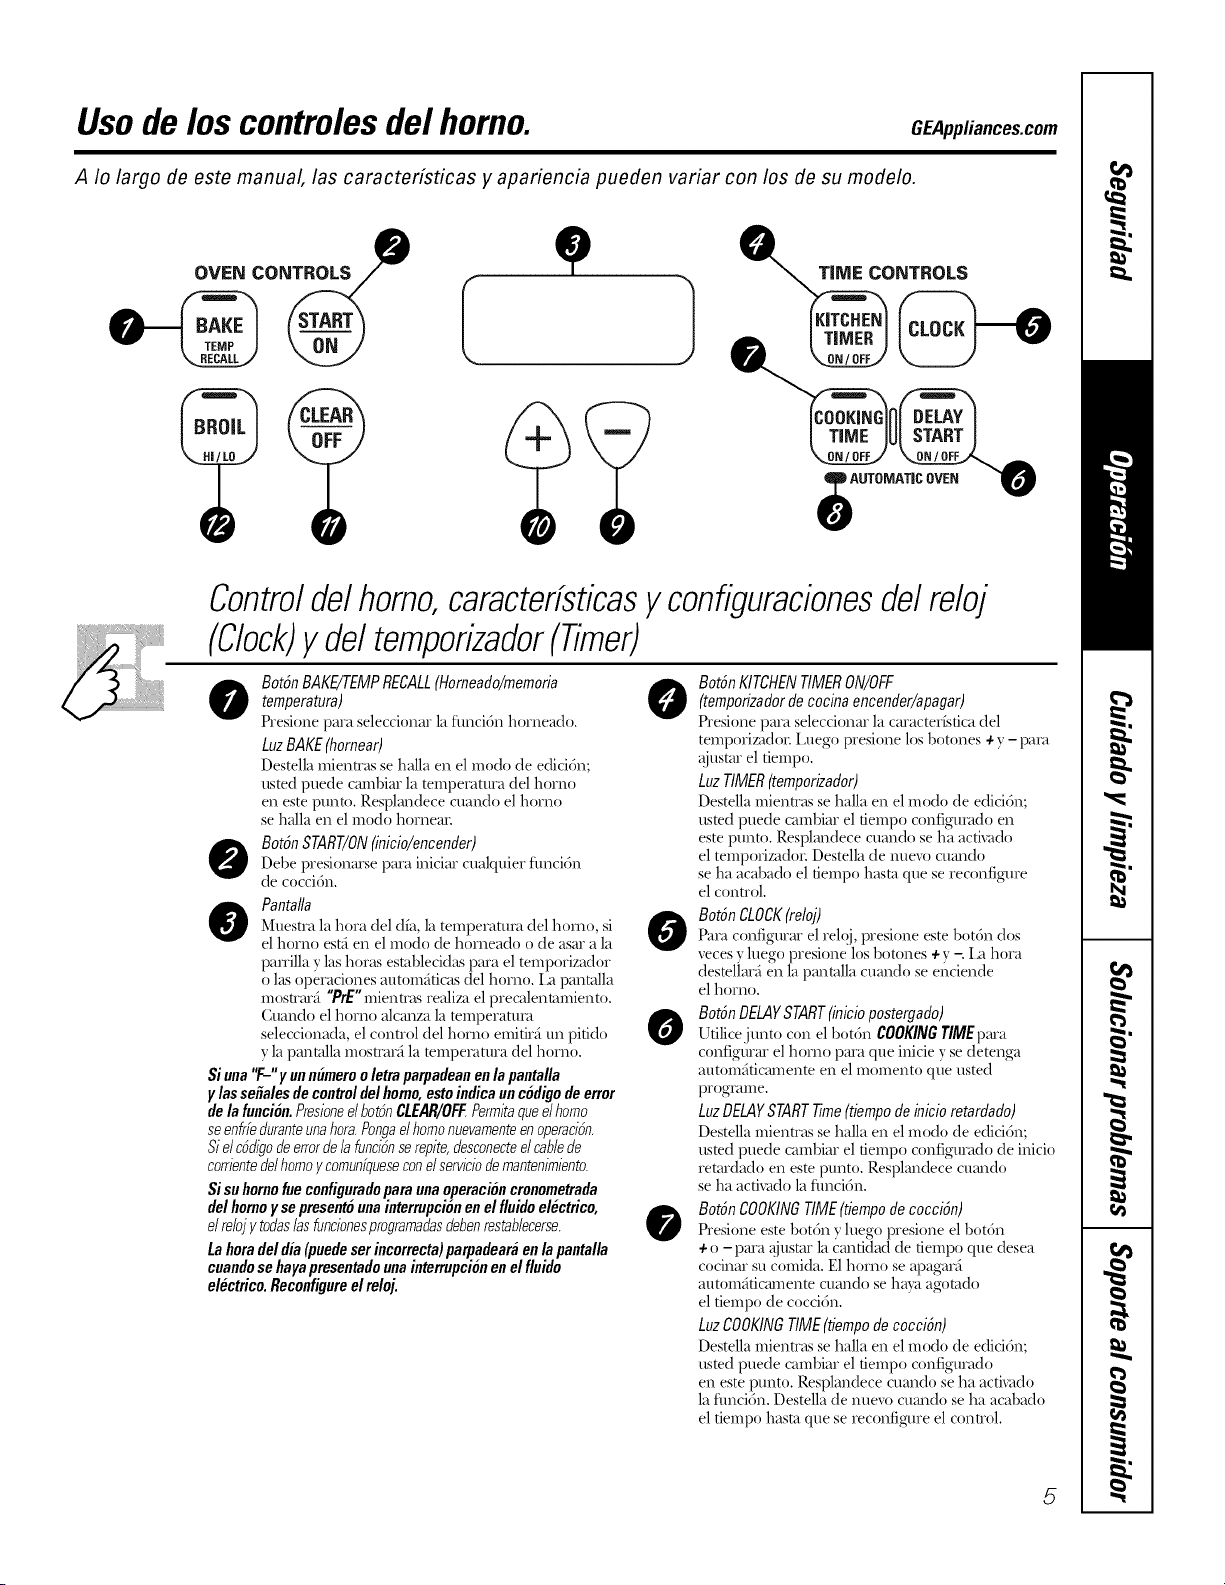
OVEN CONTROLS
e..
oToo..,oovE.0
OvenControl,ClockandTimerFeaturesandSettings
BAKE/TEMP RECALLPad
Press flds pad to select file bake flmcfion.
BAKE Light
Flashes _dfile ii1edit mode---you can challge
the oven temperature at this point. Glows
_\hen the oven is in bake mode.
O
O START/ONPad
Must be pressed to start any cooking function.
@0,s.,. @
Shows tile time of day, oven temperaune,
whether the oven is in tile bake or broil
mode and tile times set for the timer or
automatic oven operations. Tile display
will show "PrE"while preheating. When
tile oven reaches tile selected temperature,
the oven conuol will beep and tile display
will show tile oven temperature.
ff "F-" anda numberorletterflashin thedisplay
andtheovencontrolsignals,thisindicatesa function
errorcode.PresstheCLEAR/OFFpad.Allowtheoven
tocoolforonehourPuttheovenbackintooperation.
If thefunctionerrorcoderepeats,disconnectthepower
totherangeandcallforservice.
If yourovenwas set fora timed ovenoperationand
apoweroutageoccurred,thedockandallprogrammed
functionsmustbereset.
Thetimeofdaywill flashin thedisplaywhen there
hasbeena poweroutage.Resettheclock.
0
KITCHEN TIMER ON/OFFPad
Touch this pad to select tile timer feature.
Then press + and - pads to adjust time.
TIMER Light
Flashes _dfile iI1edit IIlo(]e---},'Otl call change
the set time at this point. (;lo_s when the
timer has been activated. Flashes again _d_en
the time has run out until the conwol is reset.
CLOCKPad
To set tile clock, press this pad t_,viceand
then press the +and - pads. Tile time of
day will flash in tile display when tile oven
is fi_st mined on.
DELAYSTARTPad
Use along widl die COOKINGTIMEpad to set
tile oven to start and stop automatic_flly at
a time you set.
DELAYSTARTTimeLight
Flashes _d/ile ill edit mo(le--you call change
the delW start set time at tiffs point. (;lo_\_
when the flmction has been activated.
COOKINGTIME Pad
Press this pad and then touch tile +or -
pads to set tile amount of time you want
your food to cook. Tile oven will shut off
when tile cooking time has mn out.
COOKINGTIME Light
Flashes _dfile iI1edit IIlo(]e---yotl call change
the set time at this point. (;lo_s when the
fullctioll has been activated. Flashes again
when the time has run out until the control
is reset.
5
Usingthe ovencontrols.
OvenControl,Clockand TimerFeaturesandSettings
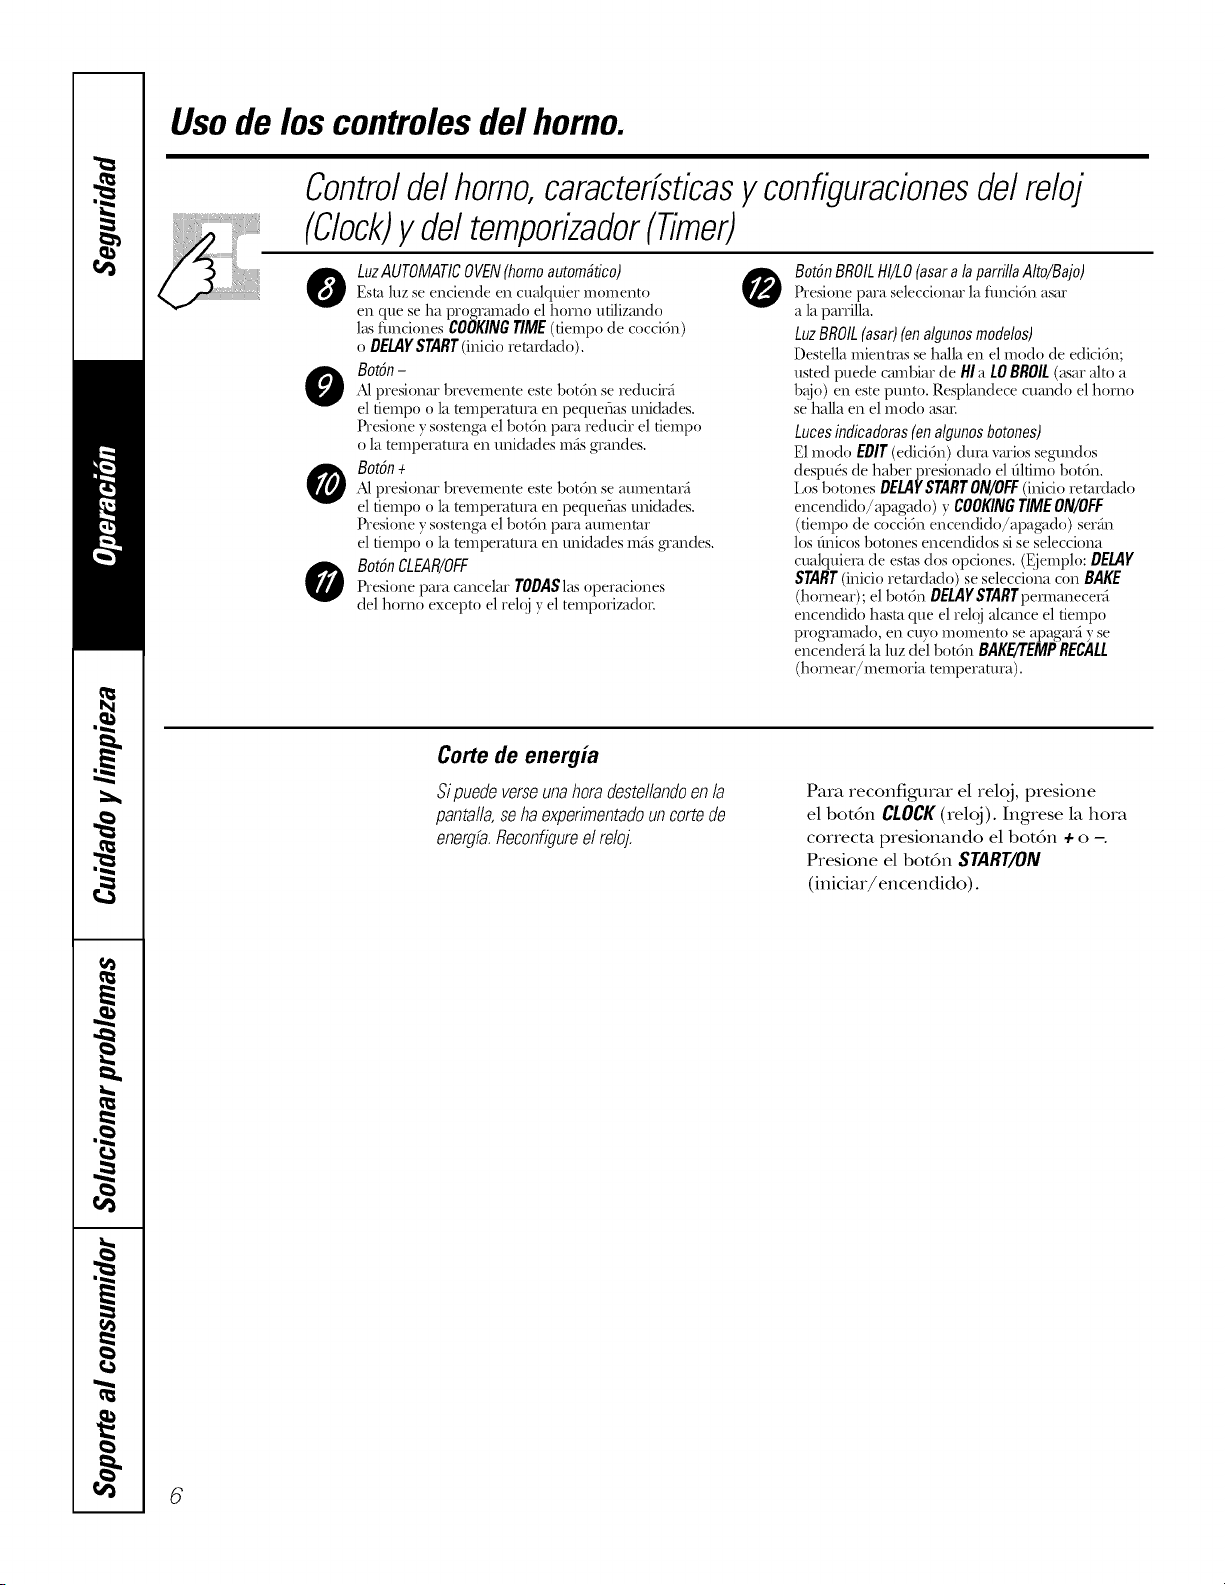
O AUtOMAticOWNLight 0 BROILHI/LOPad
This lights an)_ime the oven has been Press this pad to select the broil flmcfion.
programmed using the COOKINGTIMEor
DELAYSTARTflmctions.
- Pad
Short raps to this pad will decrease the time
or mmpe_vmlre bysmall amounts. Press
and hold the pad m decrease the time
or mmpe_mlre by larger amounts.
O +pad
Short taps to this pad will increase the dine
or mmpe_mlre by small amounts. Press
and hold the pad m increase the time
or mmpe_wture by larger amounts.
O CLEAR/OFFPad
Press this pad to cancel ALL oven
opexv_tions except the clock and timeL
BROIL Light
Flashes while in edit mode--you can switch
from HI to LOBROILat this point. (;lo_s when
the oven is in broil mode.
Indicator Lights (on some pads)
EDITmodelasts several seconds after tile
last pad press. DELAYSTARTON/OFFm_d
COOKINGTIMEON/OFF_dllbe the only pads
lit if either of these options is selected.
(Example: DELAYSTARTisselected _dfl/
BAKE the DELAYSTARTpad_dll remain
lit until the clock reaches the programmed
time, at _\t_ichpoint it _\illmrn off and the
BAKE/TEMPRECALLpad light _ill light up).
Power Outage
Ifa flashingtimeisinthedisplay,youhave
experiencedapowerfailure.Resettheclock.
To reset the clock, press the CLOCKpad.
Enter the correct time of day by pressing
the +or - pads. Press the START/ONpad.
6
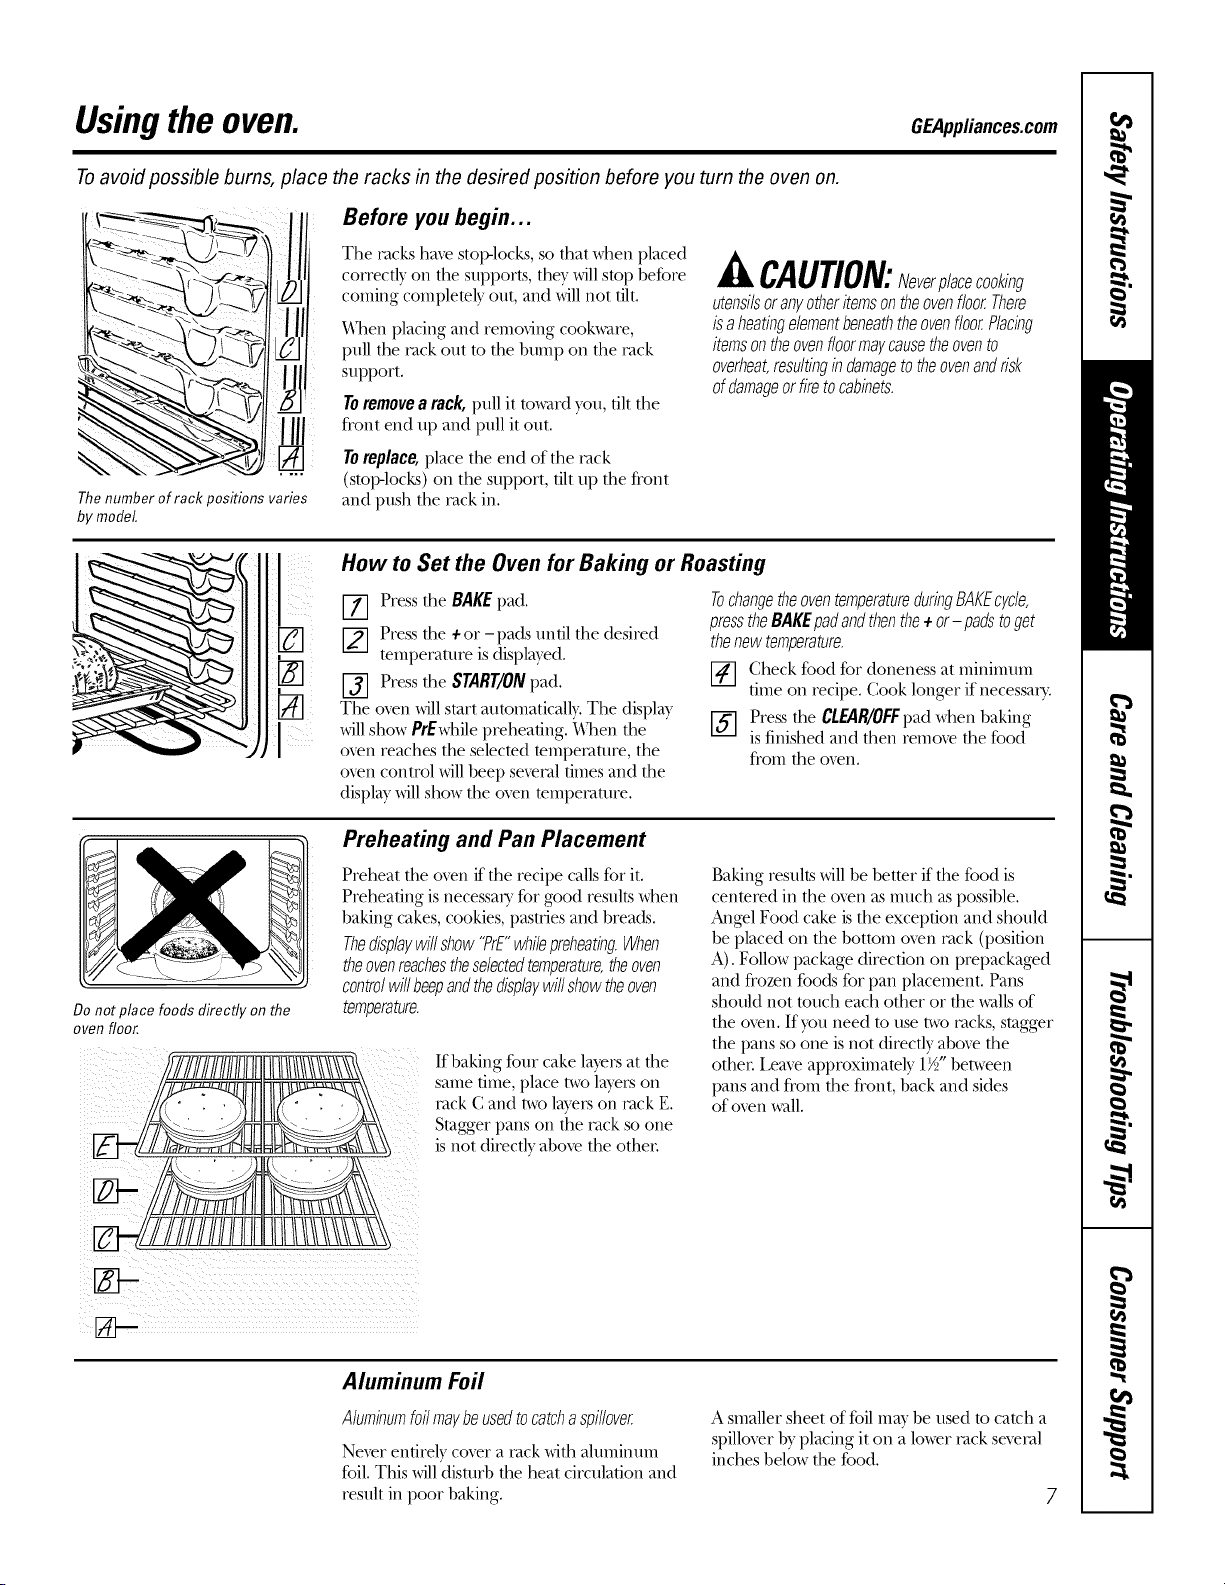
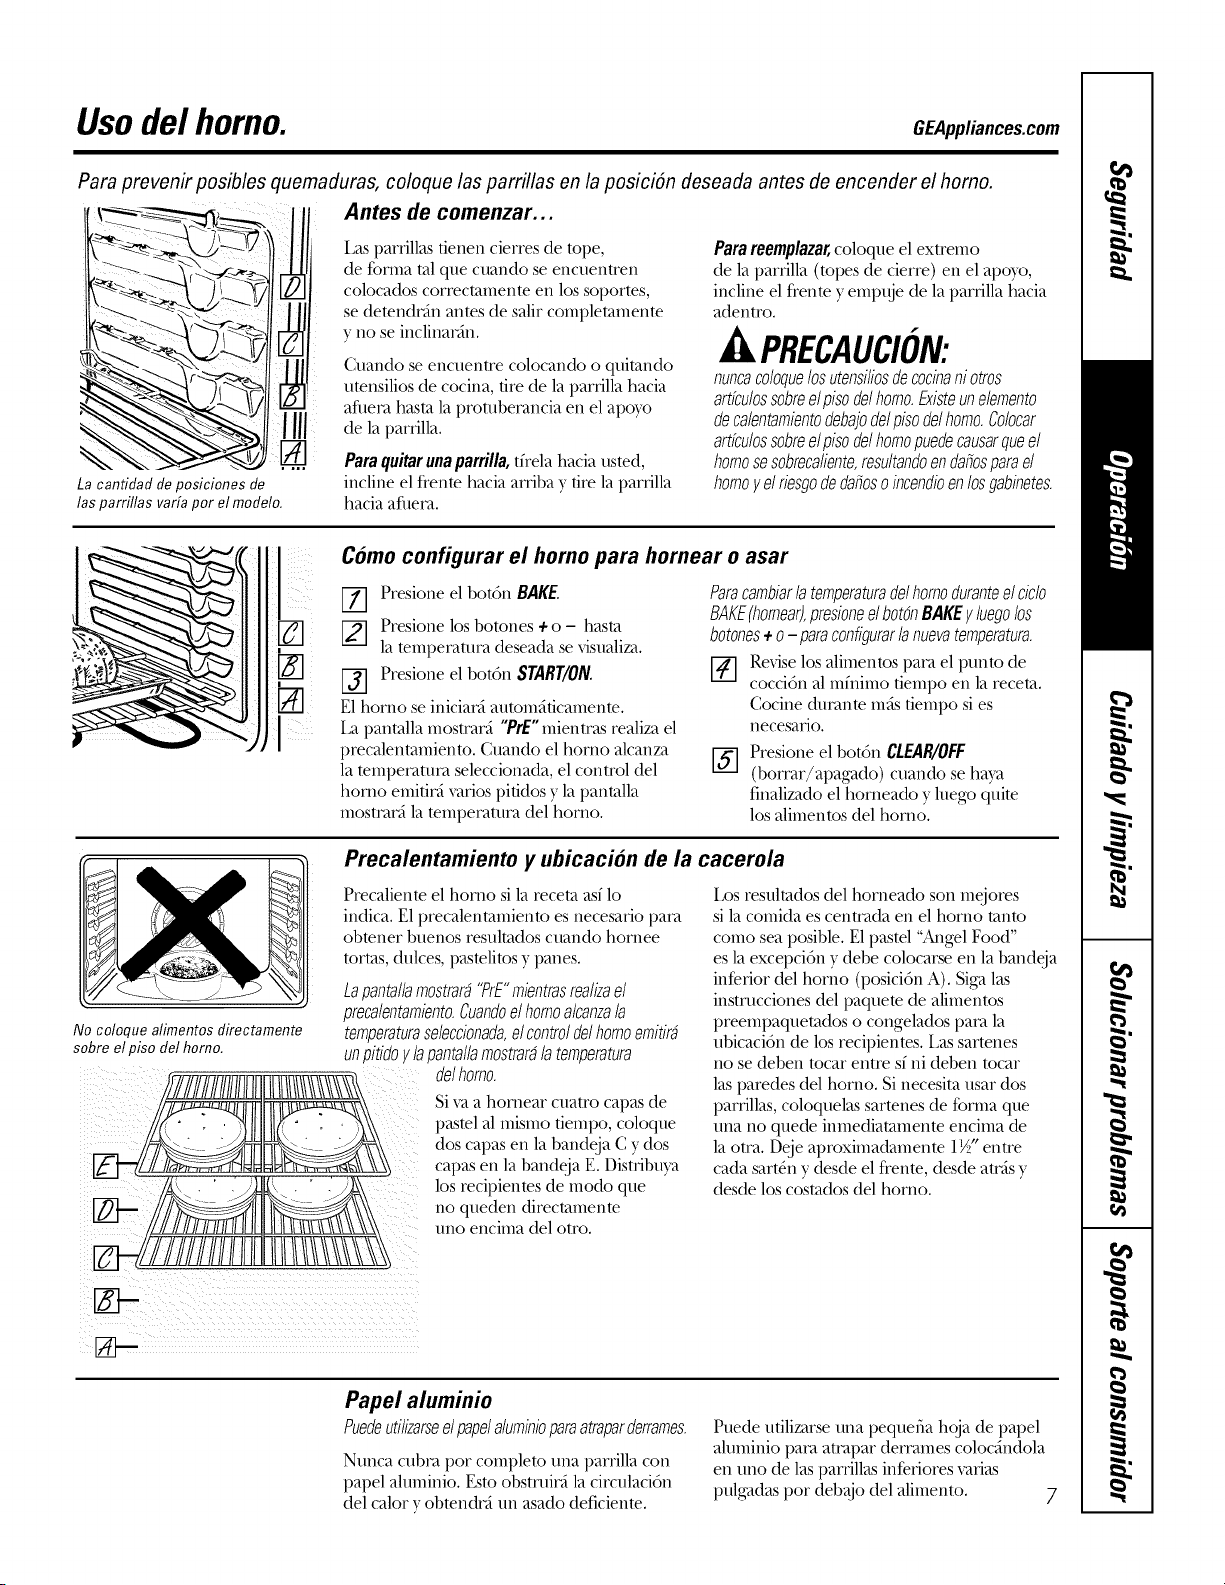
Usingthe oven. GEAppliances.com
Toavoid possible bums, place the racks in the desired position before you turn the oven on.
_ _>_v ,,,
Thenumber of rack positions varies
by model.
Before you begin...
The yacks have stop-locks, so that when placed
correctly on the supports, they will stop before
coming completely out, and will not tilt.
When placing and removing cookware,
pull the rack out to the bump on the rack
support.
Toremovearack,pull it toward you, tilt the
fl'ont end up and pull it out.
Toreplace,place the end of the Iack
(stop-locks) on the support, tilt up the fl'ont
and push the rock in.
Jk CAUTION:Neverplacecooking
utensilsoranyotheritemsontheovenfloorThere
isa heatingelementbeneaththeovenfloorPlacing
itemsontheovenfloormaycausetheovento
overheat,resultingin damagetotheovenandrisk
ofdamageor firetocabinets.
How to Set the Oven for Baking or Roasting
Press the BAKE pad.
Press the + or - pads until the desired
tempemtui'e is displayed.
V3] Press the START/ONpad.
The o_n will start automatically. The display
will show PrEwhile preheating. "_]_en the
oxen reaches the selected temperature, the
oxen conu'ol will beep sexeral times and the
display will show the oven mmpetature.
TochangetheoventemperatureduringBAKEcycle,
presstheBAKEpadandthenthe+or-pads toget
thenewtemperature.
[4] (.:heck food for doneness at minimum
rune on recii)e. Cook longer if necessm>
Press the CLEAR/OFFpad when baking
is finished and then remove the food
fl'om the o_n.
Do not place foods directly on the
oven floor.
m-
Preheating and Pan Placement
Preheat the oven if the recipe calls for it.
Preheating is necessa U %r Good results when
baking cakes, cookies, pasu_ies and breads.
Thedisplaywill show"PrE"whilepreheating.When
theovenreachestheselectedtemperature,theoven
controlwillbeepandthedisplaywillshowtheoven
temperature.
If baking four cake layers at the
same time, place two layers on
rock C and two layers on rack E.
Stagger pans on the rack so one
is not directly aboxe the othei:
Baking results will be bettor if the food is
centered in the oven as much as possible.
Angel Food cake is the excei)tion and should
be placed on the bottom oven rack (position
A). Follow package direction on i)rei)ackaged
and frozen foods for i)an i)lacement. Pans
should not touch each other or the walls of
the o_en. If you need to use two iacks, stagger
the pans so one is not directly above the
other Leave approximately 1½" between
pans and fl'om the fl'ont, back and sides
of oxen wall.
2/}---
Aluminum loft
Aluminumfoil maybeusedtocatchaspi//over
Nmer entirely cover a rack with ahlinintlin
foil. This will disturb the heat ciivulation and
result in i)oor baking.
A smaller sheet of foil may be used to catch a
spillover by placing it on a lower tack several
inches below the food.

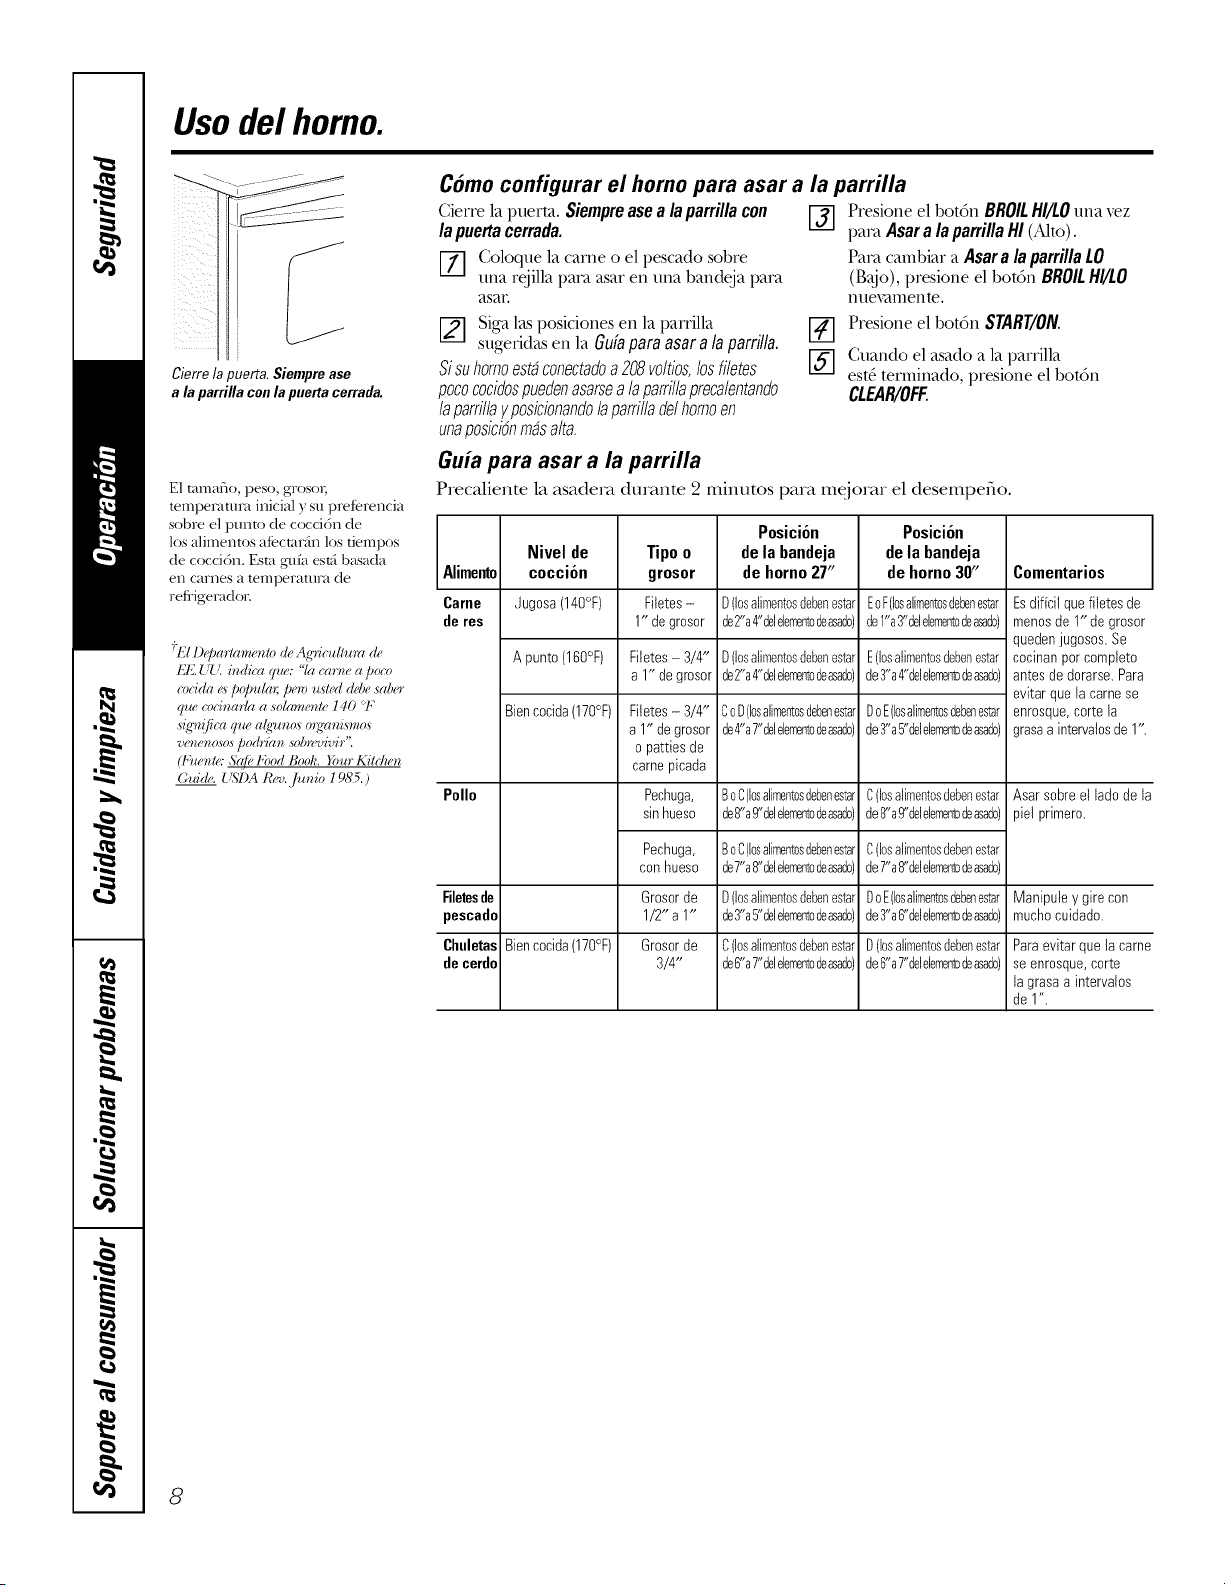
Usingthe oven.
Close the door.Always broil with
the door closed.
How to Set the Oven for Broiling
Close the doo_. Always broil with the door
closed.
Z] Place the meat or fish on a broiler
grid in a broiler pan.
[] Follow suggested rack positions in
the Broiling Guide.
If yourovenisconnectedto208volts,raresteaks
maybebroiledbypreheatingthebroilerand
positionbgtheovenrackonepositionhigher
[] Press the BROILHI/LOpad once for
HiBroil.
To change to LOBroil,press the
BROILHI/LOpad again.
_-] Pressthe STARTpad.
[_] When broiling is finished, press the
CLEAglOFFpad.
The size, weight, thickness,
smr6ng temperature and
your preference of
doneness will affOct broiling
times. This guide is based
on meats at refrigerator
temperature.
i "/'heU.S. l)_JJartment qfAg'_-icullure
sws "/¢are beqf is po/)u/a), but yea
should know that cooking it to on&
140 1: means some fbod poisoning"
o)g'ani,smsmay survive. "(Soa*re:
Snji, kbod Booh. _bar Kitchen Guide.
{'SI)A Rev.,/ane 19S5.)
Broiling Guide
Preheat the broiler for 2 minutes to improve performance.
Type or 27" Oven 30" Oven
Food Doneness Thickness Rack Position Rack Position Comments
Beef Rare(140°F) Steaks- D(foodshouldbe2" EorF(foodshouldbe1" Steakstessthan1" thic
1" thick to4"frombroilelement) to3"frombroilelement) aredifficult to cook
rare.Theycookthrough
Medium(160°F) Steaks- D(foodshouldbe2" E(foodshouldbe3" beforebrowning.
3/4" to 1" thick to4"frombroilelement) to4" frombroilelement) Topreventcurling of
meat,slashfat at 1"
Welt Done(170°F) Steaks- Cor D(foodshouldbe D orE(foodshouldbe3" intervals.
3/4" to 1" thick 4"to7"frombroilelementto 5" frombroilelement)
orGroundBeef
Patties
Chicken Breast,boneless B or C(foodshouldbe C(foodshouldbe8" Broilskin-side-down
8"to9"frombroilelementto9" frombroilelement) first.
Bor C(foodshouldbe
7"to8"frombroilelement
Breast,bone-in
1/2" to 1" thick
3/4" thick
C(foodshouldbe7"
to8" frombroilelement)
Fish D(foodshouldbe3" D orE (foodshouldbe3" Handleandturnvery
Fillets to5"frombroilelement) to6" frombroilelement) carefully.
Pork Welt Done(170°F) C(foodshouldbe6" D(foodshouldbe6" Topreventcurlingof
Chops to7"frombroilelement) to7" frombroilelement) meat,slashfat at 1"
intervals.
8
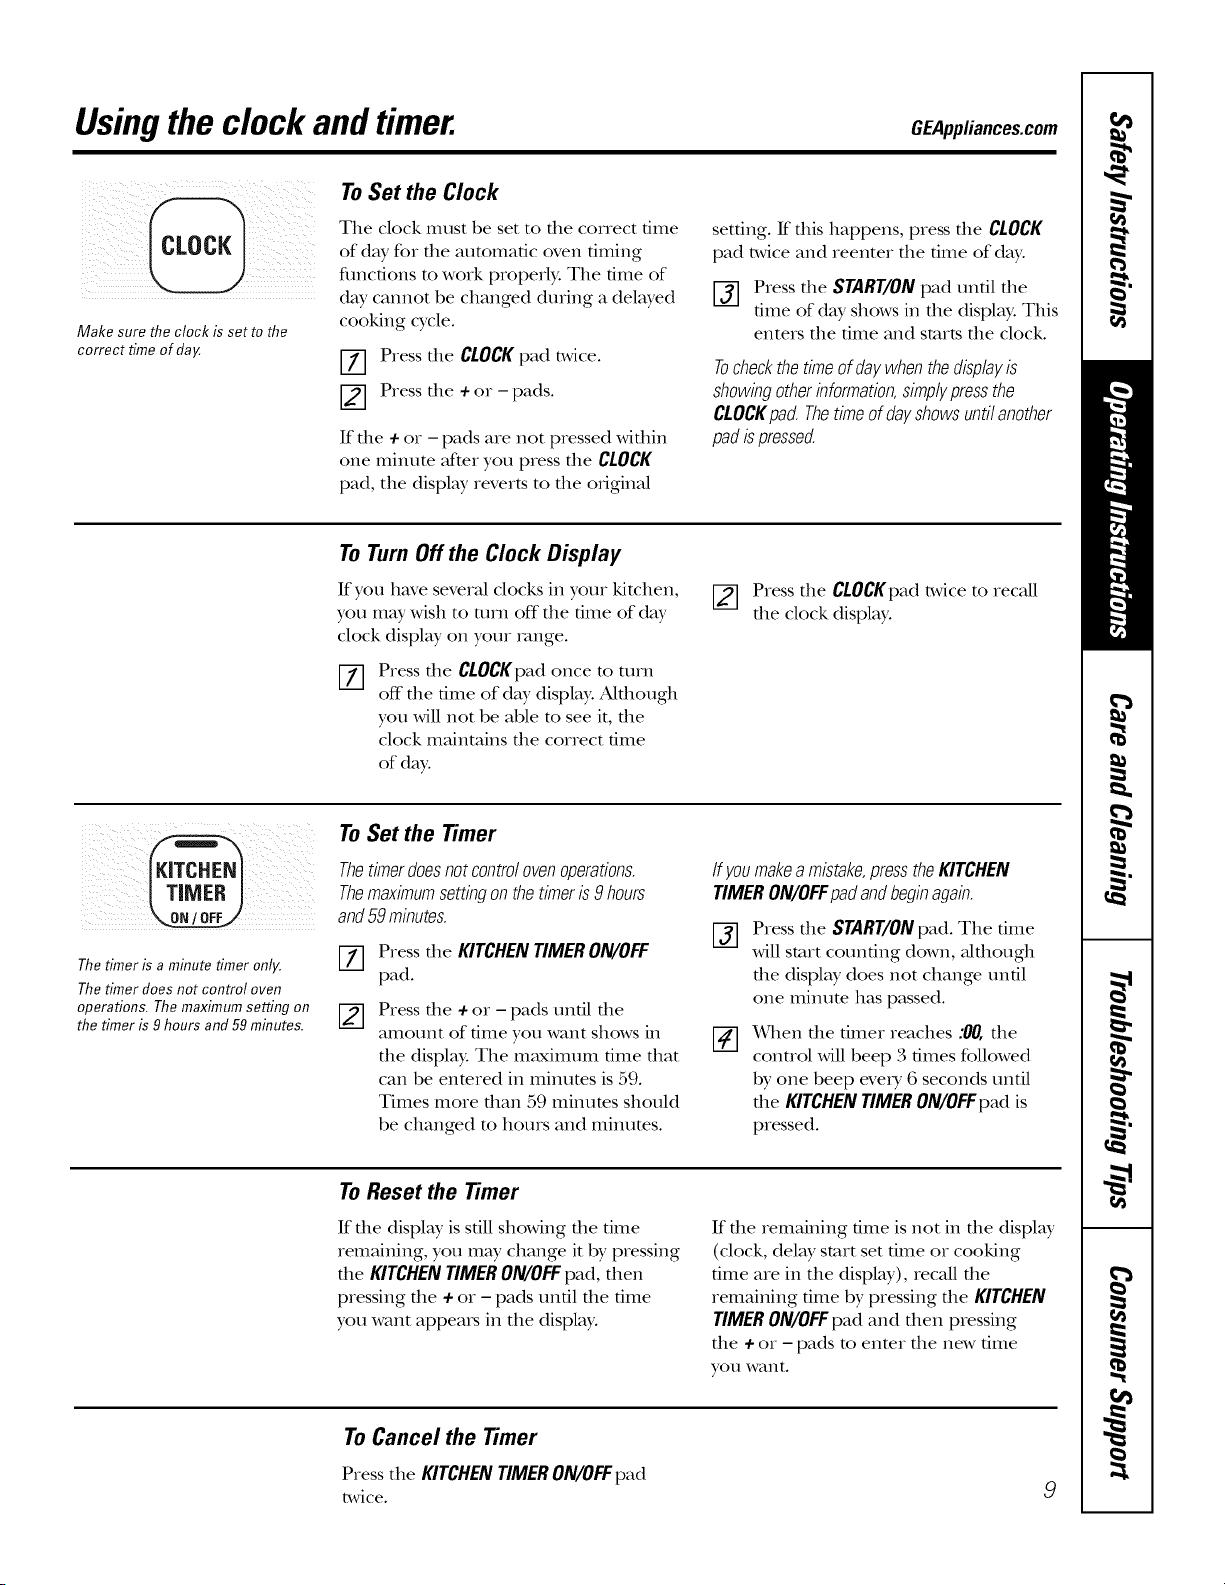
Usingthe clock andtimer. OEApplia,oes.oom
Make sure the clock is set to the
correct time of day.
To Set the Clock
The clock must be set to the conect time
of day for the automatic oven tilning
flmcfions to work properly. The dine of
day cannot be changed during a delayed
cooking cycle.
[7] Press the CLOCKpad twice.
[_] Press the + or - pads.
If fl_e ÷or - pads are not pressed Mfldn
one minute after you press file CLOCK
pad, the displW reverts to the original
setting, ff this happens, press the CLOCK
pad twice and reenter the time of day.
[_] Press the START/ON pad until the
time of day shows in the display. This
enters the time and suuts the clock.
Tocheckthetimeofdaywhenthedisplayis
showingotherbformation,simplypressthe
CLOCKpad.Thetimeofdayshowsuntilanother
padispressed.
To Turn Off the Clock Display
If you have several clocks in your kitchen,
you may wish to mm off"the time of day
clock display on your range.
%
Press the CLOCKpad once to ttlI'll
off the time of day display. Although
you will not be able to see it, the
clock maintains the correct time
of day.
[] Press the CLOCKpad twice to recall
the clock display.
To Set the Timer
Thetimerdoesnotcontrolovenoperations.
Themaximumsettbgonthetimeris9 hours
and59minutes.
The timer is a minute timer only. III
The timer does not control oven
operations. Themaximum setting on
FS]
the timer is 9 hours and 59minutes. I_1
Press the KITCHENTIMERON/OFF
pad.
Press the ÷ or - pads until the
amount of time you want shows in
the displa).: The maximum time that
can be entered in minutes is 59.
Times more than 59 minums should
be changed m hours and minums.
Ifyoumakea mistake,presstheKITCHEN
TIMERON/OFFpadandbeginagab.
%
Press the START/ON pad. The time
will start counting down, _dthough
the display does not change until
one minute has passed.
When the timer reaches :00, the
control will beep 3 times followed
by one beep every 6 seconds until
the KITCHEN TIMER ON/OFFpad is
pressed.
To Reset the Timer
If file display is sdll showing file time
remaining, you may change it by pressing
the KITCHEN TIMER ON/OFF pad, then
pressing the + or - pads until the time
you want appea_s in the display.
If file remaining time is not in file display
(clock, delay start set time or cooking
time are in the display), recall file
remaining time by pressing file KITCHEN
TIMER ON/OFFpad and then pressing
the +or - pads to enter the new time
you want.
To Cancel the timer
Pressthe KITCHENTIMERON/OFFpad
twice.
9
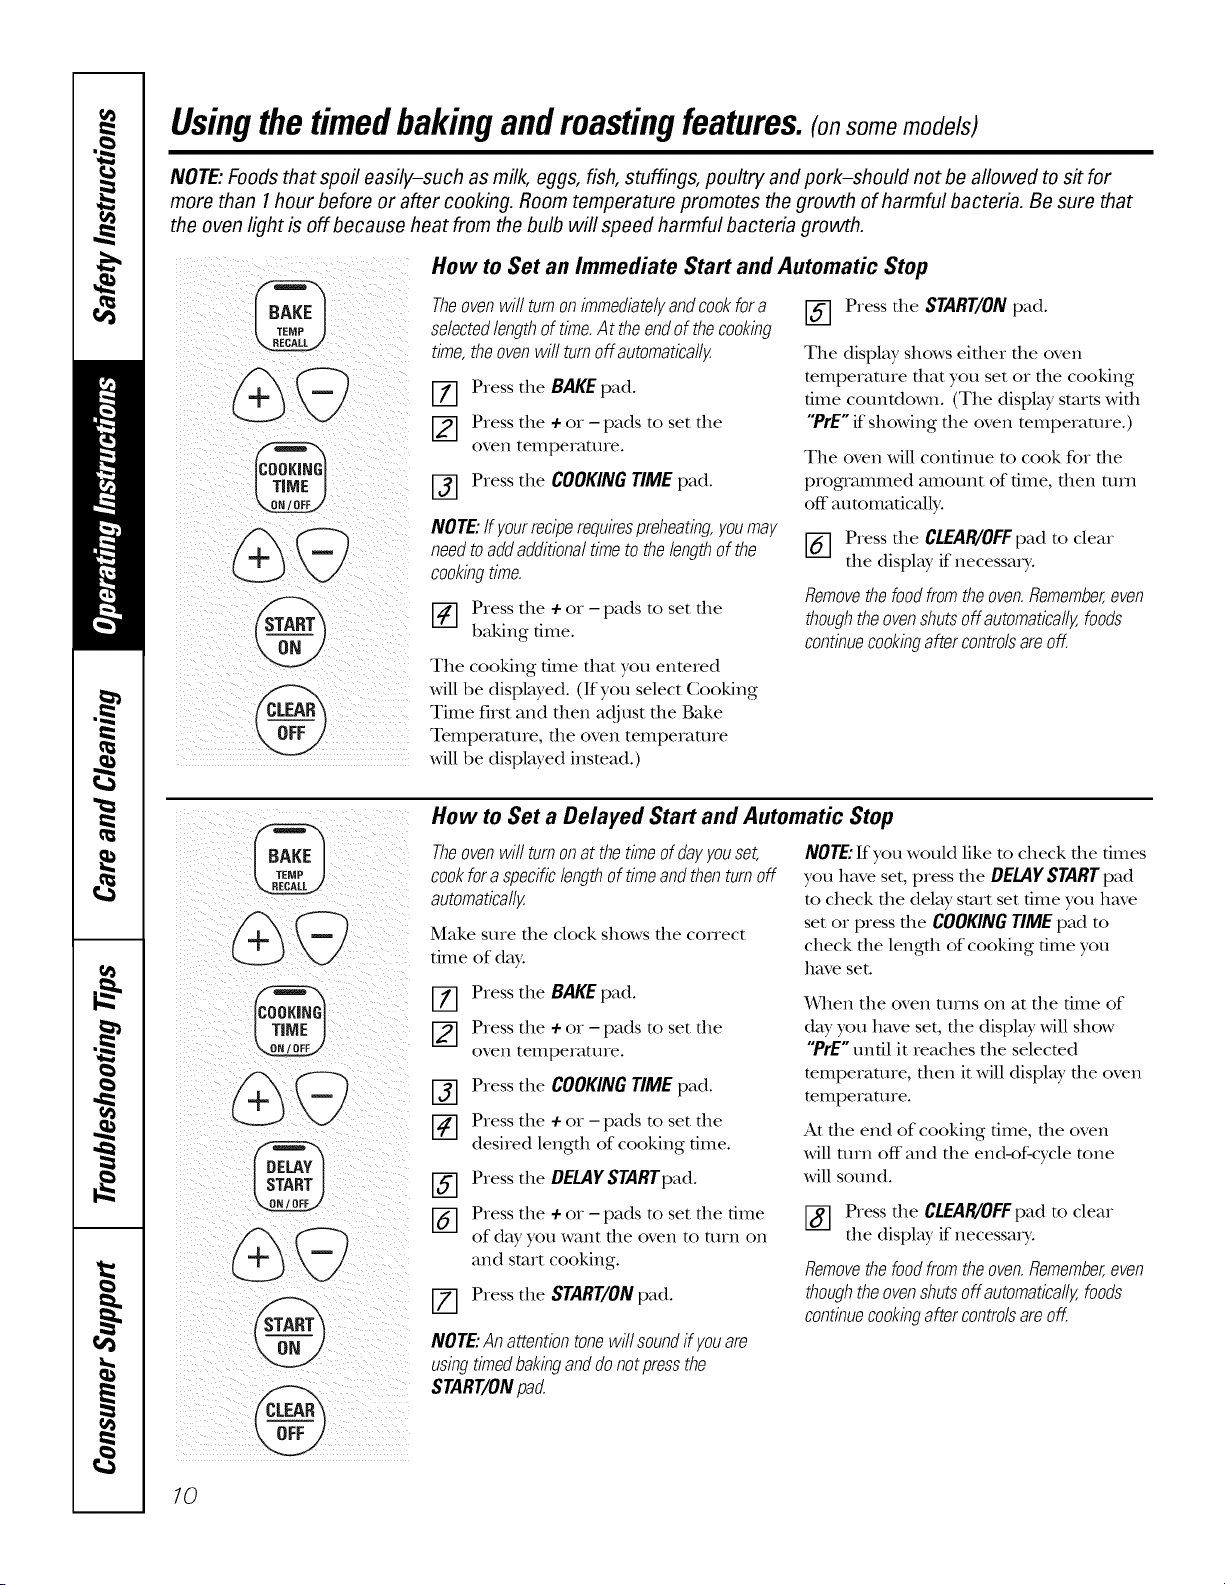
Usingthetimedbakingandmastingfeatures.(on some models)
NOTE: Foods that spoil easily-such as milk, eggs, fish, stuffings, poultry andpork-should not be allowed to sit for
more than 1hour before or after cooking. Room temperature promotes the growth of harmful bacteria. Be sure that
the oven light is off because heat from the bulb will speed harmful bacteria growth.
iiill_/ _iii_i__i _ _ _i iiiii_/
How to Set an Immediate Start and Automatic Stop
Theovenwill turnonimmediatelyandcookfora
selectedlengthoftime.At theendof thecookbg
time,theovenwill turnoffautomatically.
[Z] Press tile BAKEpad.
[_ Press tile +or - pads to set tile
oven temperature.
[-_ Press tile COOKINGTIMEpad.
NOTE:If yourreciperequirespreheatbg,youmay
needtoaddadditionaltimetothelengthofthe
cookbgtime.
[-_ Press tile + or - pads to set tile
baking time.
Tile cooking time that you enmred
Mll be displayed. (If you select Cooking
Time first and then adjust the Bake
Temperature, tile oven temperature
will be displayed insmad.)
[-_ Press tile START/ONpad.
Tile display shows eifller file oven
temperature fllat you set or tile cooking
time countdown. (Tile display starts Mill
"PrE" if showing file oven temperature.)
Tile oven will continue to cook for tile
programmed amount of time, dlen mm
off automatically.
[_] Press tile CLEAR/OFFpad to clear
tile display if necessaD'.
Removethefoodfromtheoven.Remember,even
thoughtheovenshutsoffautomatically,foods
contbuecookbgaftercontrolsareoff.
%
How to Set a Delayed Start and Automatic Stop
Theovenwit turnonatthetimeofdayyouset,
cookforaspecificlengthoftimeandthenturnoff
automatically.
Make sure tile clock shows tile conect
time of da}_
[-_ Press tile BAKEpad.
[-_ Press tile + or - pads to set tile
oven temperature.
[_] Press tile COOKINGTIMEpad.
[] Press tile +or - pads to set tile
desired lengdl of cooking time.
_-_ Press tile DELAYSTARTpad.
[-_ Press tile + or - pads to set tile time
of day you want tile oven to turn on
and start cooking.
[-_ Press tile START/ONpad.
NOTE:Anattentiontonewillsoundif youare
usingtimedbakinganddonotpressthe
START/ONpad.
NOTE:If you would like m check die times
you have set, press die DELAYSTARTpad
m check tile del W start set time you have
set or press tile COOKINGTIMEpad m
check tile length of cooking time you
have set.
When tile oven turns on at file time of
day you have set, die display Mll show
"PrE"until it reaches tile selected
temperature, dlen it Mll display die oven
temperature.
M dm end of cooking time, die oven
Mll mrn off and die end-of-cycle tone
Mll sound.
[_] Press tile CLEAR/OFFpad to clear
tile display if necessaD'.
Removethefoodfromtheoven.Remember,even
thoughtheovenshutsoffautomatically,foods
contbuecookbgaftercontrolsareoff.
10
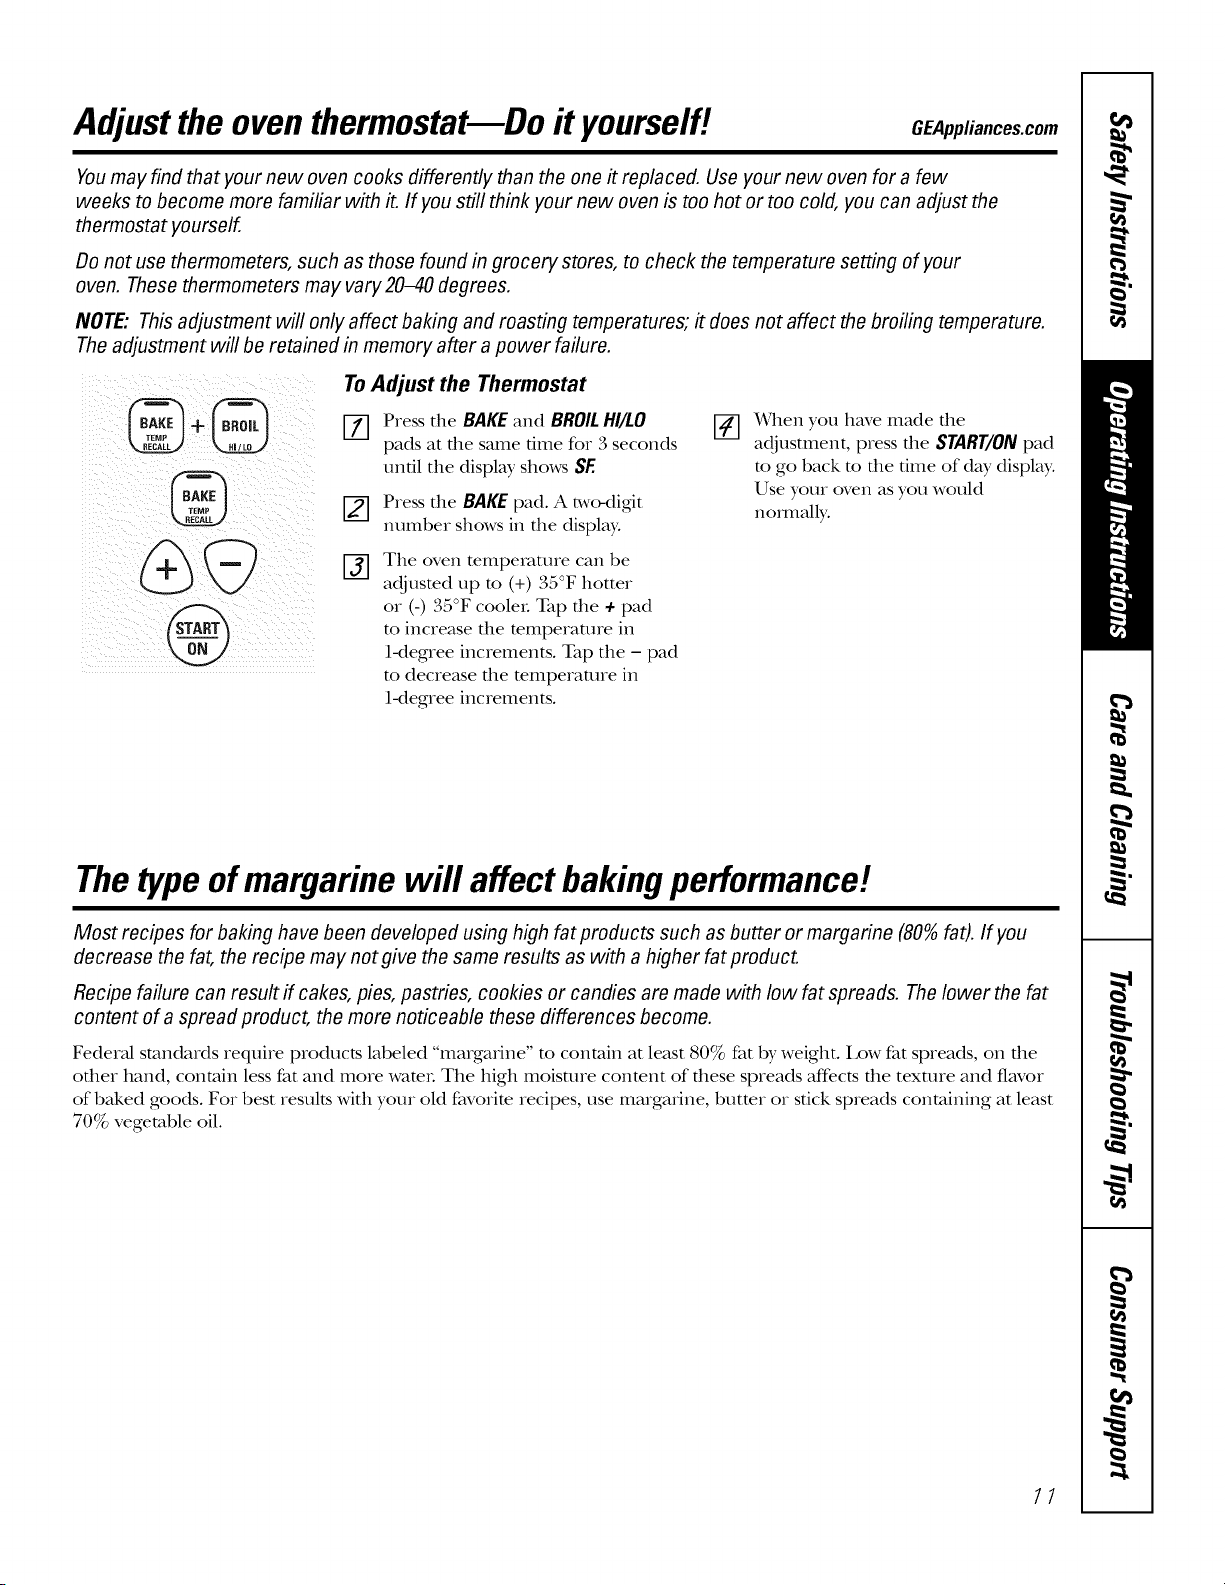
Adjustthe oventhermostat--Do it yourself! GEAppliances.com
Youmay find that your new oven cooks differently than the one it replaced. Use your new oven for a few
weeks to become more familiar with it. If you still think your new oven is too hot or too cold, you can adjust the
thermostat yourself.
Do not use thermometers, such as those found in grocery stores, to check the temperature setting of your
oven. These thermometers may vary 2040 degrees.
NOTE: This adjustment will only affect baking and roasting temperatures; it does not affect the broiling temperature.
The adjustment will be retained in memory after a power failure.
%
To Adjust the Thermostat
I-_ Press the BAKE and BROILHI/LO
pads at the same time for 3 seconds
until the display shows SE
[] Press the BAKEpad. A two-digdt
number shows in the display.
%
The oven temperature can be
adjusted up to (+) , a F hotter
or (-) 35°F cooleL _l ) the + pad
m increase the mmperatme in
1-degree increments. Tap the - pad
m decrease the mmperamre in
1-degree increments.
vm
Ddlen y'ou have made the
adjustment, press the START/ONpad
to go back to the time of day display.
Use your oven as you would
nommlb,.
Thetypeofmargarine will affect bakingperformance!
Most recipes for baking have been developed using high fat products such as butter or margarine (80%faO. If you
decrease the fat, the recipe may not give the same results as with a higher fat product.
Recipe failure can result if cakes, pies, pastries, cookies or candies are made with low fat spreads. Thelower the fat
content of a spread product, the more noticeable these differences become.
FederM standards require products labeled "margmine" m contain at least 80% fat by weight. Low fat spreads, on the
other hand, contain less fat and more wamL The high moisture conmnt of these spreads affbcts the texture and flavor
of baked goods. For best results with your old favorite recipes, use margmine, burrer or stick spreads containing at least
70% vegetable oil.
11
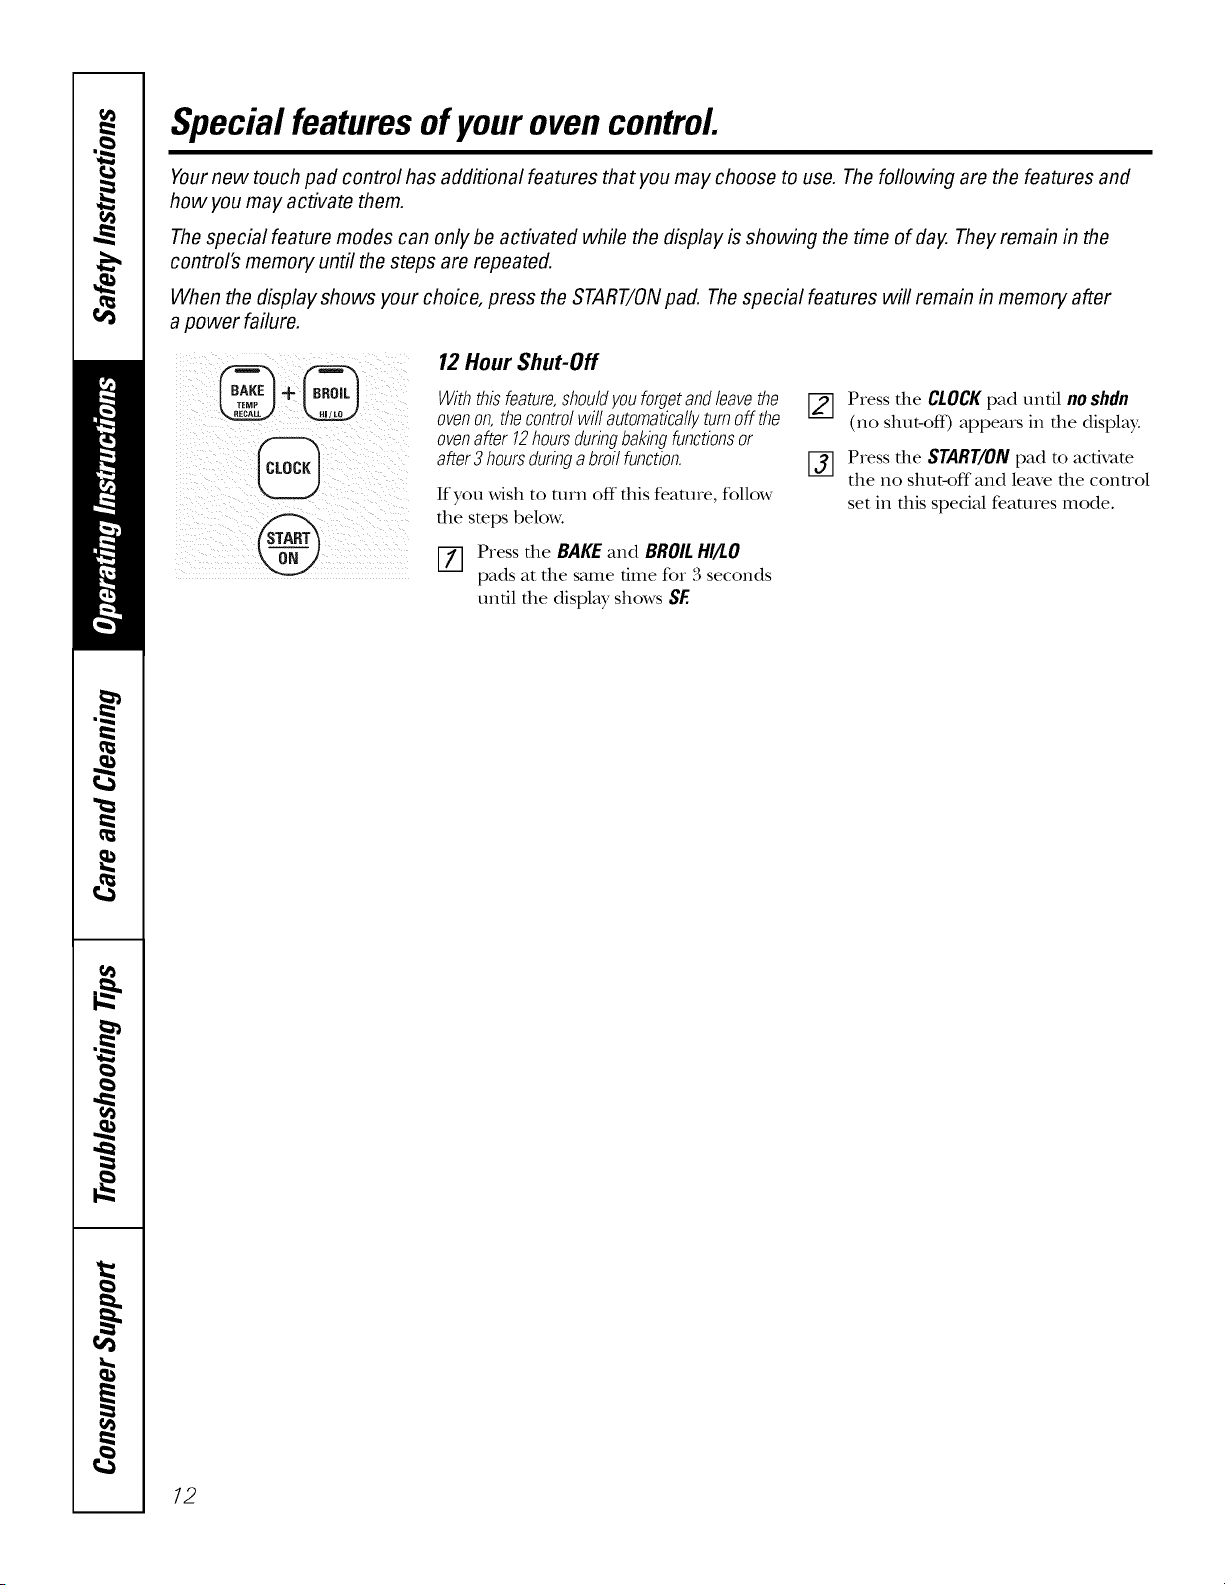
Special featuresofyourovencontrol
Yournew touch pad control has additional features that you may choose to use. Thefollowing are the features and
how you may activate them.
Thespecial feature modes can only be activated while the display is showing the time of day. They remain in the
control's memory until the steps are repeated.
When the display shows your choice, press the START/ONpad. Thespecial features will remain in memory after
a power failure.
@
12 Hour Shut-Off
Withthisfeature,shouldyouforgetandleavethe
ovenon,thecontrolwill automaticallyturnoff the
ovenafter 12hoursduringbakingfunctionsor
after3 hoursduringabroilfunction.
If you wish to turn off this feature, follow
the steps below.
EZ] Press the BAKE and BROILHI/LO
pads at the same time for 3 seconds
until the display shows SF.
[_] Press the CLOCKpad until noshdn
(no shut-off) appears in the display.
[_] Press the START/ON pad to activate
the no shut-off and leave the control
set in this special features mode.
12
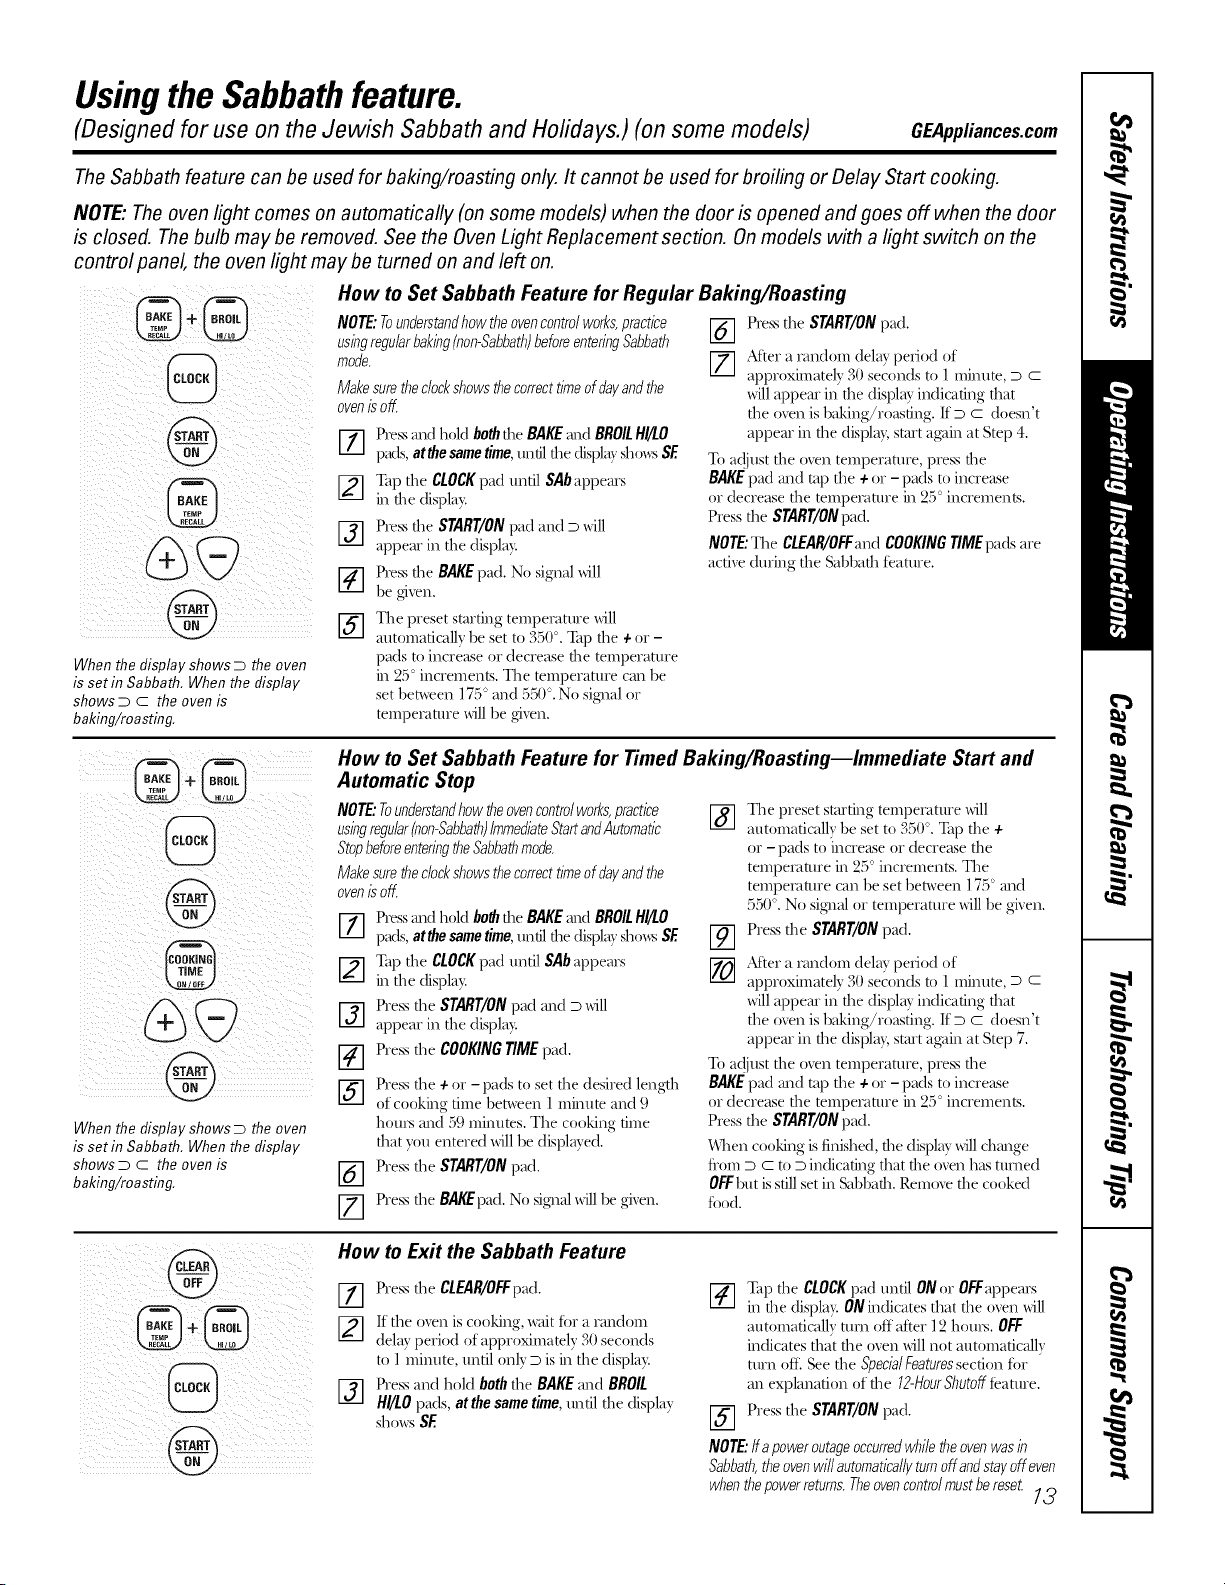
Usingthe Sabbathfeature.
(Designed for use on the Jewish Sabbath and Holidays.) (onsome models) GEAppliances.com
The Sabbath feature can be used for baking/roasting only. It cannot be used for broiling or Delay Start cooking.
NOTE: The oven light comes on automatically (on some models) when the door is opened and goes off when the door
is closed. Thebulb maybe removed. See the Oven Light Replacement section. On models with a light switch on the
control panel, the oven light may be turned on and left on.
Makesuretbeclockshowstbecorrecttimeofdayandtbe
ovenis off.
171p,e, andholdbo,b,heRAKEandRROIL"I O
pads,atthe sametime,tmtil daedisplay shov_:,; SE
iiiiii I!IIiil ii iii iii ii
iiiiiiiiiI
When the display shows D the oven
is set in Sabbath. When the display
shows D C the oven is
baking/roasting.
How to Set Sabbath Feature for Regular Baking/Roasting
NOTE:Tounderstandbowtbeovencontrolworks,practice [] Pressthe START/ONpad.
usingregularbaking(non-Sabbatb)beforeenteringSabbatb
[7] After a random delay period of
approximately 30 seconds to ] minute, D C
[_] ap the CLOCKpad tmtil SAbappears
in d_e displa):
_] Press the START/ONpad and D will
appear in the displa?:
[_] ress the BAKEpad. No signal _dll
he _'_en.
[_] he preset starting temperature _ill
automatically he set to 350". _p the + or -
pads to increase or decrease the temperature
in 25_'increments. The temperature can be
set between ] 75° and 550% No signal or
tempemtme _ill be _ven.
will appeal in the display indicating that
the oven is baking/roasting. [f D c doesn't
appeal in the display, start a_dn at Step 4.
To a@lst the oven temperature, press the
RAKE pad and mp the + or - pads to increase
or decrease the temperature in 25_'increments.
Press the START/ONpad.
NOTE:The CLEAR/OFFandCOOKINGTIMEpads are
active during the Sabbath te;mu'e.
When the display shows D the oven
is set in Sabbath. When the display
shows D C the oven is
baking/roasting.
How to Set Sabbath Feature for Timed Baking/Roasting--Immediate Start and
Automatic Stop
NOTE:Tounderstandbow tbeovencentre/works,practice The preset starting temperature _dll
usingregu/ar(non-gabbatb)ImmediateStartandAutomatic [-8-7 automatically he set to 350%_p the +
StopbeforeenteringtbeSabbatbmode. or - pads to increase or decrease the
Makesuretbecbckshowstbecorrecttimeofdayandtbe
ovenisoff
Press and hold bo_ d_e BAKEand BROILHI/LO
Ill
pads, atthe same time, madl the display sho_s SE
[_] ap the CLOCKpad tmtil SAb appears
in the display.
Press the START/ONpad and D _dll
_] appear in the display.
Press the COOKINGTIMEpad.
I
[_] ress the + or-pads to set the desired length
of cooking time hetween] minute and 9
hom.'s and 59 minutes. The cooking time
that vo[| entered _dll he displayed.
Press the START/ONpad.
%
D
Press the RAKE pad. No signal will he given.
%
temperature in 25° increments. The
temperature can be set between ] 75° and
550% No si_ml or temperature will be given.
Press the START/ONpad.
After a randolil delay period of
approximately 30 seconds to ] minute, D C
will appeal in the display indicating that
the oven is baking/roasting. If D C doesn't
appeal in the display, start a_dn at Step 7.
To a@lst the oven temperature, press the
RAKE pad and mp the + or - pads to increase
or decrease the temperature in 25_'increments.
Press the START/ONpad.
When cooking is finished, the display _dll change
tiom D C to D indicating that the oven has turned
OFFbut is still set in Sabbath. Remove the cooked
ti)o(l.
How to Exit the Sabbath Feature
[_] Press the CLEAR/OFFpad.
I
[_] If the men is cooking, _ait ti)r a random
delay period of approximately 30 seconds
to ] minute, matil onh rD iS in the displa}:
f_] Press and hold boththe BAKEand BROIL
HI/LOpads, at thesametime, tmtil the display
shows SE
[_] ap the CLOCKpad tmtil ON or OFFappears
in the display. ON indicates that the oxen _ill
automatically turn off after ] 2 hotu._. OFF
indicates th;_t the oven _dll not automatically
tm'l_ oil See the Speda/Features section ti)r
an explanation of the 12-HourSbutoffteature.
[_ Press the START/ONpad.
I
NOTE:tfapoweroutageoccurredwbiletbeovenwasb
Sabbatb,tbeovenwill automaticallyturnoffandstayoff even
wbentbepowerreturns.Tbeovencontrolmustbereset.
13
Careand cleaningofthe oven.
Be sure electrical power is off and all surfaces are cool before cleaning any part of the oven.
How to Remove Protective Shipping Film and Packaging Tape
Careflllly grasp a corner of file protective
shipping film wifll your fingeIs and slowly
peel it flom the appliance surfime. Do
not use ally shalp imms m remove the
film. Remove aUof the film before using
the appliance for the first time.
To assure no damage is done m the
finish of the product, the safest way to
remove die adhesive flom packaging
tape on new appliances is all application
of a household liquid dishw_tshing
deteigent. Apply with a soft cloth and
aUow m soak.
NOTE:Theadhesivemustberemovedfromall
parts.It cannotberemovedifit isbakedon.
Oven Racks
Clean the oven racks with an abrasive
cleanser or smel wool.
Alker cleaning, rinse the racks wifll clean
water and dIT wifll a clean cloth.
Donotallowfoodspillswitha
highsugaroracidcontent(suchas
tomatoes,sauerkraut,fruitjuices
orpiefilling)toremabonthe
surface.Theymaycauseaduff
spotevenaftercleaning.
Porcelain Oven Interior
Wifll proper care, file porcelain enamel
finish on file inside of file oven--top,
bottom, sides, back and inside of file
door--will stay new-looking for yeais.
Let file oven cool before cleaning. We
recommend fllat you wear robber gloves
when cleaning the oven.
Soap and wamr Mll nomlally do the
.job. Hea_3'spattering or spilloveis may
require cleaning with a mild abrasNe
cleaneL Soap-filled smel wool pads
may also be used.
Household ammonia may make the
cleaningjob easieL Place 1/2 cup in a
shaUow glass or potm U container in a
cold oven overnight. The ammonia
flmles will help loosen the burne&on
grease and food.
If necessaD_ you may use all oven cleaneL
Follow file package directions.
Donotsprayovencleanerontheelectrical
controlsandswitchesbecauseitcouldcausea
shortcircuitandresultinsparkingorfire.
, Donotallowa filmfromthecleanertobuildup
onthetemperaturesensor--itcouldcausethe
oventoheatimproperly.(Thesensorislocated
atthetopoftheoven.)Carefullywipethe
sensorcleanaftereachovencleaning,being
carefulnottomovethesensorasachangeb
itspositioncouldaffecthowtheovenbakes.
Do not sprayany ovencleaner on the oven
door,handlesor anyexteriorsurface of the
oven,cabinets orpainted suffaces. Thecleaner
candamagethesesurfaces.
Painted Surfaces
Clean with soap andwater ore vinegar and
water sohlfion.
Donotusecommercialovencleaners,cleansbg
powders,steelwoolorharshabrasivesonany
pabtedsurface.
Control Panel
It's a good idea m Mpe die conuol panel
after each use. Clean widl mild soap and
wamr or vinegar and wami; rinse with
clean wamr and polish dIT with a soft
cloth. When cleaning, the conuol panel
should be at room temperature and not
ill direct sunlight.
Do not use M)rasNe cleansers, suong
liquid cleansers, plastic scouring pads or
oven cleanei_ on the conuol panel--they
will damage the finish. A 50/50 solution
of vinegar and hot wamr works well.
74

GEAppliances.com
Lift-Off Oven Door
Slot
Hinge lock
Pull hinge locks down to unlock
Removalposition
Thedooris veryheavy.Be carefulwhen
removingandliftingthedoor.
Donotlift thedoorbythehandle.
Toremovethedoor:
%
[]
%
[]
@
Fully open the deal
Pull the hinge locks down towaM
the door flame, to the unlocked
position. A tool, such as a small
fiat-blade screwchive_; may be
required.
Firmly grasp both sides of the door
at the top.
(;lose door to the door removal
position (see illustration).
I.ift door up and out undl the hinge
arm is clear of the slot.
Toreplacethedoor:
[-]] FiHnly grasp both sides of the door
at the top.
%
With the Bottom Hingearm
door at the edge
same angle as ofst0t.
the removal
position, seat the
indentation of
the hinge a_m
into the bottom
edge of the hinge slot. The notch in
the hinge mm must be flflly seared
into the bottom of the slot.
Fully open the deal If the door will
not filly open, the indentation is
not seated correctly in the bottom
edge of the slot.
Push the hinge locks up against the
flont flame of the oven cavity, to the
locked position.
Hinge
arm _
Push hinge locks up to lock
[_] (;lose the oven deal
Do not allow food spills with a high
sugar or acid content (such as
tomatoes, sauerkraut, fruit juices or
pie rifling) to remain on the surface.
Theymay cause adull spot even
after cleaning.
Tocleantheinside ofthedoor:
Soap and water will normally do the
.job. Hea_3' spatmdng or spillovers mW
require cleaning with a mild abrasive
cleaneL Soap-filled steel wool pads mW
also be used.
Ifnecessa_youmayuseanovencleanerFollow
thepackagedirections.
Cleanthebsideoftheovenwindowwithamild
non-scratchbgcleaneranda dampcloth.
Tocleantheoutsideofthedoor:
, Use soap and water m thoroughly
clean the top, sides and flont of the
oven deal Rinse well. You may also use
a glass cleaner to clean file glass on file
outside of file deal Do not let water
drip into fl_event openings.
, Spillage of marinades, ffuit]uices,
mmam sauces and b_tsting mamrials
contahfing acids mW cause
discoloration and should be wiped up
immediate b. When surface is cool,
clean and rinse.
Do not use oven cleaners, cleaning
powders or harsh _fl)_wsNeson the
outside of the deal
/5
Careand cleaningofthe oven.
I I SHOCKORBURNHAZARD.Before replacing ovenlight bulb, disconnect the electrical
A__WARNING Imowertotheovenatthemainfuseorcircuitbreaker_anel.Failuretodosomayresult
in electric shockor burn.
I I BURNHAZARD.Theglass coverand bulb should be removed when cool. Touchinghot glass
A CAUTION withbarehandsoradamnclot/,cancauseburns.
Fleceetacle ,Socket
Oven Light Replacement
onsomemodels
Receetacle Socket
Bull:
Glasscover
(onsomemodels)
Toremove:
[Z] Turn the _ass cover
counterclockwise 1/4 ulrn until
the tabs of the Mass cover cleat the
grooves of the socket. XYearing latex
gloves may offbr a better grip.
[] Using gloves or a dry cloth, remove
the bulb by pulling it straight out.
Toreplace:
[Z] Use a new 120/130-volt halogen
bulb, not to exceed 50 watts.
Replace the bulb with the same
type of bulb that was removed. Your
model will have one of the two types
shown on the left. To demrmine the
correct replacement bulb, check the
bulb mrminals. Bulbs with 2 smdght
pin terminals are G6.35 bulbs. Bulbs
with 2 looped terminals are (7;9
bulbs. (Donotinterchange.)Be sure
the replacement bulb is rated 120
volts or 130 volts (NOT 12 volts).
Using gloves or adD' cloth, remove
the bulb flom its packaging. Do not
touch the bulb with bare finget_. Oil
fiom skin will damage the bulb and
shorten its life.
Receptacle
%
Use gloves
0_€_0th
/
Push the bulb straight into the
receptacle all the way.
Place the robs of the ,glass cover into
the grooves of the socket. Turn the
glass cover clockwise 1/4 utm.
For improved lighting inside
die oven, clean the glass cover
frequently using a wet cloth. This
should be done when the oven is
complemly cool.
Reconnect electrical power to
the oven.
Oven Light Bulb (onsomemodels)
NOTE."Theglasscover(onsomemodels)should
beremovedonlywhencold.Wearinglatexgloves
mayofferabettergrip.
Before replacing file bulb, disconnect
elecuJcM power to file oven at the mMn
fuse or circuit breaker panel. Let the
bulb cool complemly before removing it.
For your safer)5 do not much a hot bulb
with a damp cloth. If you do, the bulb
will break.
G!asscover TOremove:
Turn the glass cover counmrclockwise
1/4 atrn until the tabs of the glass cover
cleat the grooves of the socket. Remove
the bulb.
16
Toreplace:
Put in a new 40-watt appliance bulb.
Place the tabs of the glass cover into the
grooves of the socket. Turn the glass
cover clockwise 1/4 utm.
NOTE:
_,A 40-wattappliancebulbissmallerthana
standard40-watthouseholdbulb.
, Instaflandtightenthecoverclockwise.
, Reconnectelectricalpowertotheoven.
Forimprovedlightingbsidetheoven,clean
theglasscoverfrequentlyusbga wetcloth.
Thisshouldbedonewhentheovenis
completelycool.
Beforeyoucall forservice...
Troubleshooting -tips
Save time and money! Review the charts on the following
pages first and you may not need to call for service.
GEAppliances.com
Possible Causes What ToDo
Control signals after You forgot to enter a bake * Press the BAKE pad and desired temperature.
entering cooking time temperature.
or delay start
Food does not bake Oven controls improperly set. * See the Using the oven section.
or roastproperly Rack position is incorrect • See the Using the oven section.
or the rack is not level.
Oven thermostat needs • See the Adjust the oven thermostat--Do it yourself!
adjustment, section.
Fooddoes not Oven door is open. • Close file dooL This model is designed for closed door
broilproperly broiling only. Always broil with the door closed.
Oven controls improperly set. • Make sure you press the BROIL HI/LO pad.
Improper rack position • See the Broiling Guide.
being used.
Food being cooked • For best results, use a pan desigmed for broiling.
in a hot pan. Make sure it is cool.
Cookware not suited • For best results, use a pan desigmed for broiling.
for broiling.
In some areas the power • Preheat the broil element for 10 minutes.
(voltage) may be low.
• Broil for the longest period of time recommended in
the Broiling Guide.
Clockand timer A fuse in your home may be • Replace file fuse or reset file circuit breakeL
do not work blown or the circuit breaker
tripped.
Oven controls improperly set. • See the Using the clock and timer section.
Oven light does Light bulb is loose or defective. • Tighten or replace the bulb.
not work
Pad operating light is broken. • Call for service.
77
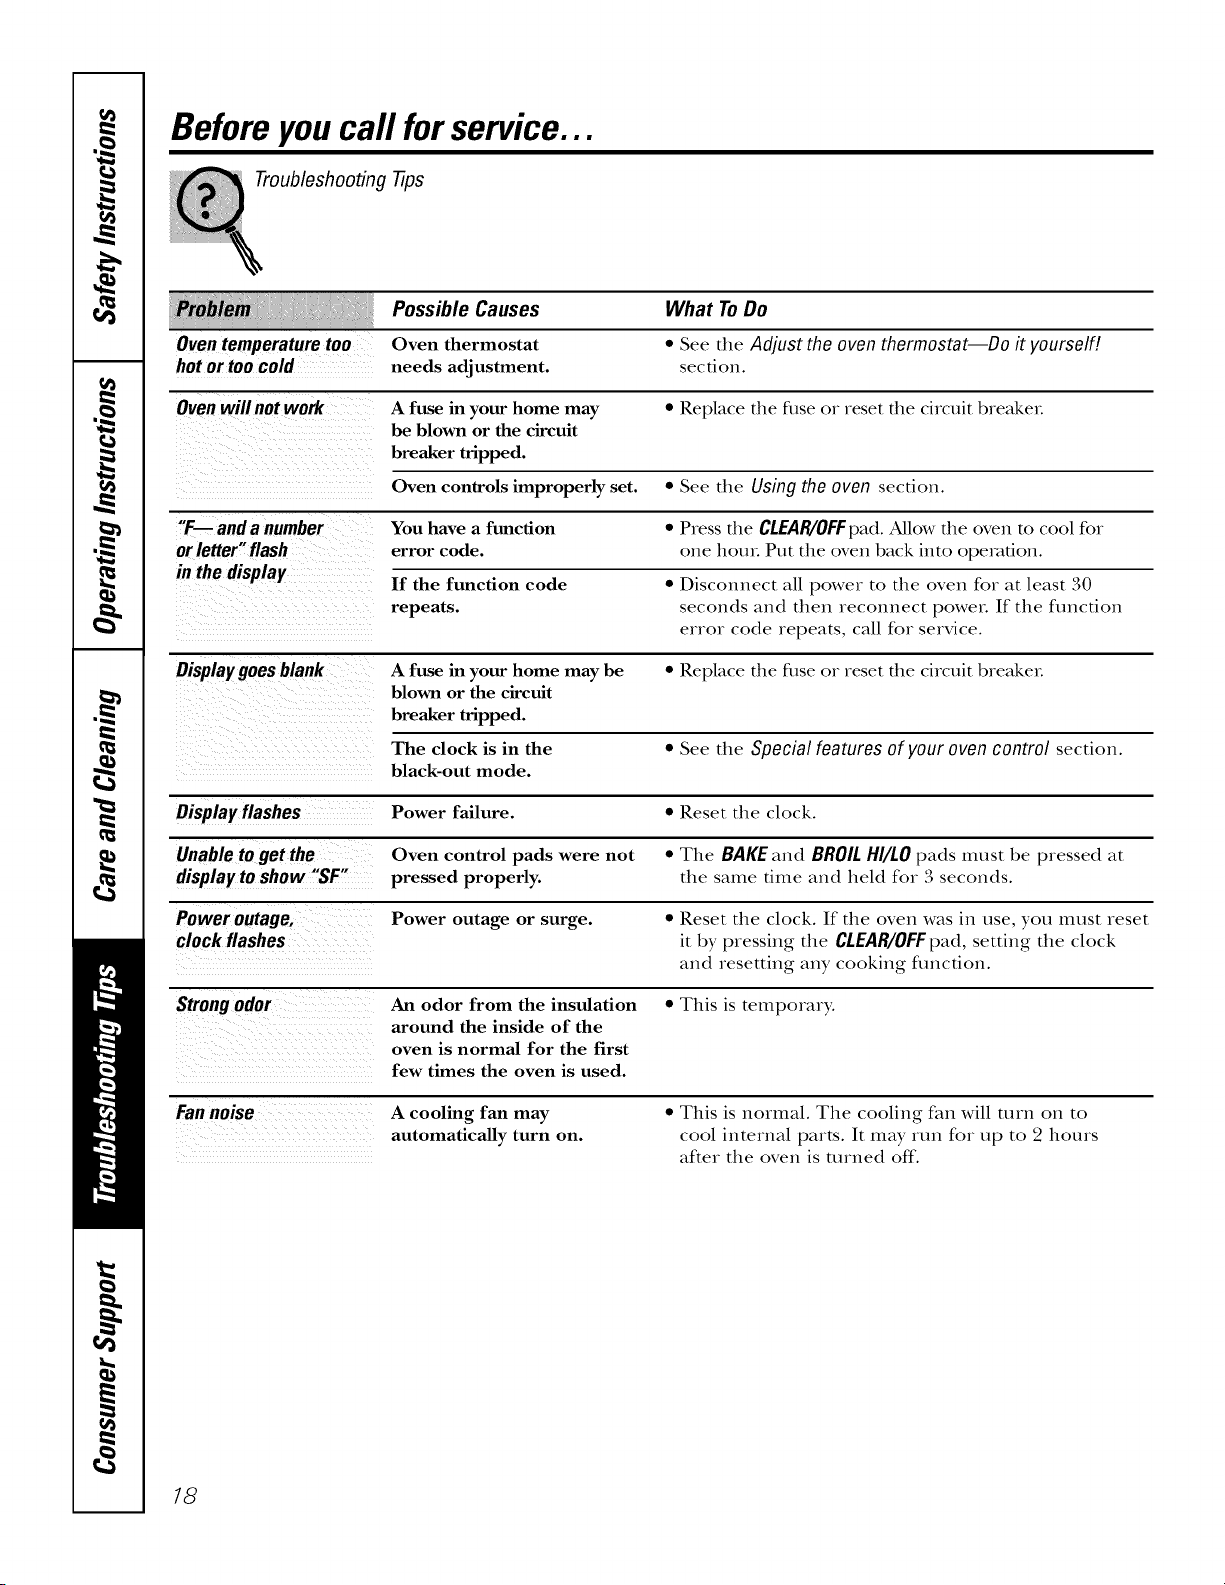
Beforeyoucall forservice...
Troubleshooting -tips
..... i!liii!!iliiilWiiiii!liH
Oven temperature too
hot or too cold
Possible Causes
Oven thermostat
needs adjustment.
What ToDo
* See the Adjust the oven thermostat--Do it yourself!
section.
Oven willnot work A fuse in your home may • Replace the fi]se o1 reset the circuit breakeL
be blown or the circuit
breaker tripped.
Oven controls improperly set. • See the Using the oven section.
"F--- and a number You have a function • Press the CLEAR/OFFpad. Allow the oven to cool for
or letter"flash error code. one houL Put the oven back into operation.
in the display If the function code • Disconnect all power to the oven for at least 30
repeats, seconds and then reconnect power. If the flmction
error code repeats, call for service.
Display goes blank A fuse in your home may be • Replace the filse or reset the circuit breakeL
blown or the circuit
breaker tripped.
The clock is in the • See the Special features of your oven control section.
black-out mode.
Display flashes Power failure. • Reset the clock.
Oven control pads were not • The BAKE and BROIL HI/LO pads must be pressed at
displayto show "SF" pressed properly, the same time and held for 3 seconds.
Power outage. Power outage or surge. • Reset the clock. If the oven was in use, you must reset
it by pressing the CLEAR/OFFpad, setting the clock
and resetting any cooking fimction.
An odor from the insulation • This is temporary.
around the inside of the
oven is normal for the first
few times the oven is used.
Fannoise
A cooling fan may
automatically turn on.
• This is normal. The cooling fan will mrn on to
cool internal parts. It may run for up to 2 hours
after the oven is turned off.
18
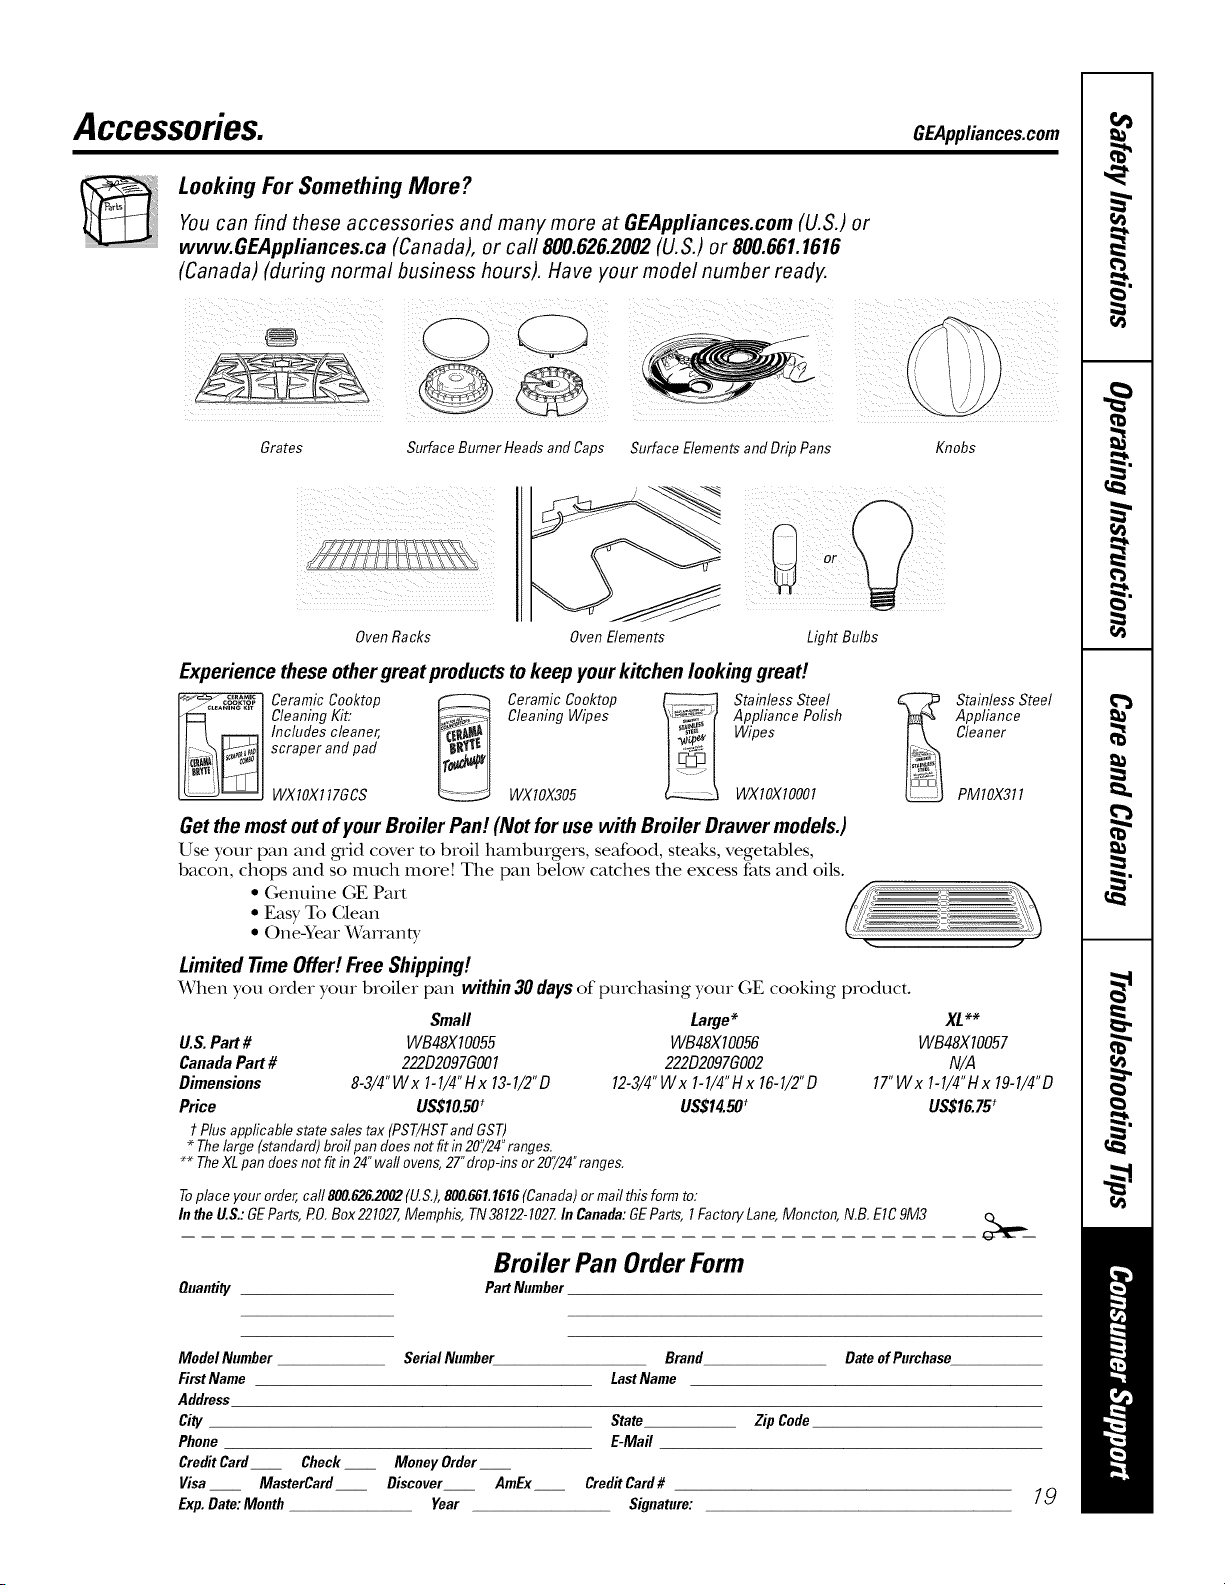
Accessories. GEApplianoes.oom
Looking For Something More ?
You can find these accessories and many more at GEAppliances.com (U.S.) or
www.GEAppfiances.ca (Canada), or carl 800.626.2002 (U.S.) or 800.661.1616
(Canada) (during normal business hours). Have your model number ready.
Grates
Surface Burner Heads and Caps Surface Elements and Drip Pans
Knobs
Oven Racks Oven Elements
Light Bulbs
Experience these othergreat productstokeep yourkitchen looking great!
Ceramic Cooktop _ Ceramic Cooktop _ Stainless Steel
Cleaning Kit: Cleaning Wipes Appliance Polish
Includes cleaner, Wipes
scraper and pad
WXlOX117GCS WXlOX305 WXlOXlO001
Stainless Steel
Appliance
Cleaner
PMlOX311
Get the most out of your Broiler Pan! (Not for use with Broiler Drawer models.)
Use your pan and grid cover to broil hamburgers, seafood, steaks, vegetables,
bacon, chops and so much more[ The pan below catches the excess fats and oils.
• Genuine GE Part
• Easy To Clean
• One-Year Warian_, _., ,-.
Limited time Offe!! Free Shipping!
When you order your broiler pan within 30 days of purchasing your GE cooking product.
Large* XL**
WB48X10056 WB48X10057
222D2097GO02 N/A
12-3/4"Wx 1-1/4"Hx 16-1/2"D 17"Wx 1-1/4"Hx 19-1/4"D
US$14.50_ US$16.75_
Small
U.S.Part# WB48XIO055
CanadaPart# 222D2097GO01
Dimensions 8-3/4"Wx 1-1/4"Hx 13-1/2"D
Price US$10.50_
1-Plusapplicablestatesalestax(PST/HSTanflGST)
* Thelarge(standard)broilpandoesnotfitin 20"/24"ranges,
** TheXLpandoes not fit in 24"wall ovens,27"drop-ins or 20724"ranges.
Toplace your order,carl800.626.2002(U.S.),800.661.1616(Canada)or mailthis form to:
Inthe U.S.:GEParts,PO.Box221027,Memphis, TN38122-I02ZIn Canada:GEParts, 1FactoryLane,Moncton, N,B.E1C9M3
BroilerPanOrderForm
Quantity PartNumber
ModelNumber
FirstName
Address
City
Phone
CreditCard
Visa
Exp.Date:Month
Serial Number Brand DateofPurchase
LastName
State Zip Code
E-Mail
Check __ Money Order__
MasterCard Discover AmEx Credit Card #
Year Signature:
19
w
w
m
!
m
m
m
i__.
i
z,.
2O
GEBuilt-In Electric OvenWarranty.
All warranty service provided by our Factory Service Centers, or
an authorized Customer Care®technician. Toschedule service,
visit us on-line at GEAppliances.com, or call 800.GE.CARES
(800.432.2737).Please have serial number and model number
available when calling for service.
Staple your receipt here.
Proof of the original purchase
dateis needed to obtain service
under the warranty.
OneYear
Fromthedate ofthe
originalpurchase
GEWill Replace:
Anypartof file oven which fails due m a defect in mamrials or workmanship.
During this limited one-year warranty, GE will also provide, free of charge, all labor
and in-home se_'ice to replace file defective part.
Service trips to your home to teach you how to
use the product.
Improper installation, delivery or maintenance.
Failure of the product if it is abused, misused,
or used for other than the intended purpose
or used commercially.
Replacement of house fuses or resetting of circuit
breakers.
Damage to the product caused by accident, fire, floods
or acts of God.
Incidental or consequential damage caused by possible
defects with this appliance.
Damage caused after delivery.
Product not accessible to provide required service.
EXCLUSIONOFIMPLIED WARRANTIES--Your sole and exclusive remedy isproduct repair asprovided in this Limited
Warranty.Any implied warranties, including the implied warranties ofmerchantability or fitnessfor a particular purpose,
are limited toone year or the shortestperiod allowed by law.
This warranty is extended to the original purchaser and any succeeding owner for products purchased for
home use within the USA. If the product is located in an area where service by a GEAuthorized Servicer is not
available, you may be responsible for a trip charge or you may be required to bring the product to an Authorized GE
Service location for service. InAlaska, the warranty excludes the cost of shipping or service calls to your home.
Some states do not allow the exclusion or limitation of incidental or consequential damages. This warranty
gives you specific legal rights, and you may also have other rights which vary from state to state. Toknow
what your legal rights are, consult your local or state consumer affairs office or your state's Attorney General
Warrantor:General Electric Company.Louisville,KY40225
21

ConsumerSupport.
GEAppliancesWebsite GEAppliances.com
Have a question or need assistance with your appliance? Try the GE Appliances Website 24 hours a day,
any day of the year_ Fox greater convenience and faster sexMce, you can now download Owner's Manuals,
order parts or even schedule sexMce on-line.
Schedule Service GEAppliances.com
Expert GE repair service is only one step away from your dooL Get on-line and schedule your sex_ice at
your convenience any day of the year[ Or call 800.GE.CARES (800.432.2737) during normal business hours.
RealLifeDesignStudio
GEAppliances.com
GE supports the UniversM Design concept--products, sexMcesand environments that can be used by
people of aUages, sizes and capabilities. We recognize the need m design for a wide range of physical and
mental M)ilities and impairments. Fox derails of GE's Universal Design applications, including kitchen
design ideas for people with disabilities, check out our Website toda)c Fox the hearing impaired, please call
800.TDD.GEAC (800.833.4322).
ExtendedWarranties
GEAppliances.com
Purchase a GE extended waxTanly and learn about special discounts that are available while your warranty
is still in efl>ct. You can purchase it on-line anytime, or call 800.626.2224 during nomml business hotus.
GE Consumer Home SexMces will still be there after your waxTanly expires.
PartsandAccessories
GEAppliances.com
IndMduals qualified to service their own appliances can have parts or accessories sent directly to their
homes (VISA, MasterCard and Discover cards are accepted). Order on-line today, 24 hems eve O' day or by
phone at 800.626.2002 during nomml business houx_.
Instructionscontainedinthismanualcoverprocedurestobeperformedbyanyuser.Otherservicing generally
shouldbereferredtoqualifiedservicepersonnel.Cautionmustbeexercised,sinceimproperservicingmaycause
unsafeoperation.
ContactUs
GEAppliances.com
If you are not satisfied Mill die sexMce you receNe flom GE, contact us on our Website Mth M1die derails
including your phone numbex; or wrim m: General Managex; Customer Relations
GE Appliances, Appliance Park
Louisville, KY40225
RegisterYourApplbnce GEAppliances.com
Register your new appliance on-line--at your convenience! Timely product registration will allow for
enhanced communication and prompt sexMce under the temls of your waxTanly, should the need axise.
You may also mail in the pre-.printed registration card included in the packing material.
Printed in the United States
GEAppliances.com
©
Instrucciones de seguridad ........ 2-4
Instrucciones de operaci6n
Asado y horneado cronometrado ...... 10
Controles ........................ 5, 6
Funciones especiales ................ 12
Horno ........................... 7, 8
Modo Sabbath ..................... 13
Reloj y temporizador ................. 9
Termostato ........................ 11
Cuidado y limpieza
Bombilla ......................... 16
Cinta de empaque ................. 14
Panel de control ................... 14
Parrillas .......................... 14
Puerta del horno de levantar ......... 15
Interior del horno de cerfimica ....... 14
Superficies pintadas ................ 14
Consejos para resoluci6n
de problemas .................. 17, 18
Accesorios ........................ 19
Soporte al consumidor
Garant_a .......................... 21
Soporte al consumidor .............. 22
,]KSl O-Horrzo simple de pared de 2 7"
fl'Sl O-Horrzo simple de pared de 30"
Escriba los mimeros de modelo y
serie aquk
N° de modelo
N° de serie
I,os puede elicon[YaY ell [Ilia
efiquem en la moldura lateral o
en la parte delantera del homo
deu_is de la puerto del homo.
49-80593 06-09 JR
INFORMACIONIMPORTANTEDESEGURIDAD.
LEATODASLASINSTRUCCIONESANTESDEUSAR.
iAD VERTENCIA!
Si no se sigue exactamente la informaci6n de este manual, puede ocurrir un incendio,
una explosi6n o un cortocircuito que podrfa causar dafios ala propiedad, lesiones personales
o la muerte.
PRECAUCIONESDESEGURIDAD
Cuando se utilizan aparatos el6ctricos, se deben seguir las precauciones de seguridad b#sicas,
incluyendolassiguientes:
Use este aparato dnicamente para
los fines descntos en este Manual
del propietario.
Asegdrese de que su aparato sea instalado
y conectado a fierra correctamente pot
un t_cnico calificado, de acuerdo con
las instmcciones de instalaci6n
suministradas.
No intente reparar o reemplazar ninguna
parte de su homo a menos que este
manual lo recomiende de manera
especfIica. Todos los dem'& ser\,icios
de mantenimiento deberfin denvarse
a un t_cnico caliIicado.
Pida al instalador que le muestre
la ubicaci6n del cortacircuitos o fusible.
Antes de realizar cualquier ser\,icio de
mantenimiento, desconecte el suministro
de enerDa del homo en el panel de
distnbuci6n dom_sfico quitando el fusible
o apagando el cortacircuitos.
No deje a los nifios sin super\,isi6n;
los nifios no deben estar solos o sin
super\,isi6n en un firea en la que
un aparato estfi en uso. No se les
debe permitir sentarse o pararse sobre
ninguna de las partes del aparato.
No deje que nadie se suba, se pare o
se cuelgue de la puerta. Podrfan dafiar
el horno o sufiir lesiones personales
_'aves.
Mfirquelo para una referencia fficil.
2
GEAppliances.com
PRECAUCIONESDESEGURIDAD
Asegdrese de que el homo estO instalado
correctamenm en un armafio que est_
bien sujeto a la estmcmra de la casa.
Nunca permita que algafien se trepe,
se siente, se pare o se cuelgaJe de la
puerta del homo.
Nunca de,je la puerta del horno abierta
cuando no est_ observfindolo.
Siempre mantenga tapices, cortinas o
patios que puedan prenderse fuego a
una distancia segaJra del homo.
Siempre mantenga los patios de cocina,
repasadores, guantes para cacerolas y
todo tipo de tela a una distancia segura
de su horno.
Siempre mantenga los utensilios de
madera y pl&sfico, asf como alimentos
enlatados, a una distancia segura de su
horno.
Ensetie a los nitios que no debenjugar
con los controles ni con ninguna otra
parte del artefhcto.
i,os rayones o impactos severos sobre
las puertas de _,idrio podrfan romper
o astillar el x4dfio.
No guarde mamfiales inflamables en
un horno.
ZLPRECAUCION.
Los artfculos de interns para los nitios
no deben g_ardarse en armafios arfiba
de un horno; ya que los nitios podrfan
suffir lesiones _aves al inmntar treparse
sobre _1para alcanzar los objetos.
iiiiiiiiiiiii!
Nunca use vestimenta floja o que cuelgue
mientras hace uso del aparato. Tenga
cuidado al intentar alcanzar artfculos
guardados en armarios sobre el horno.
Los materiales i_Oamables podrfan
encenderse si entran en contacto con
superficies calienms o elemenms
calefhctores y podrfan provocar
quemaduras _aves.
Use dnicamente guantes para cacerolas
que est&l secos; los guantes hdmedos
o m(,)jados sobre superficies calientes
podrfan causar quemaduras debido
al vapor. No permita que los g_antes
entren en contacm con los elementos
calefactores calienms. No use una toalla
u otro fipo de mla voluminosa.
Por su seguridad, nunca use su aparato
para calentar la habitaci6n.
No permita que la grasa de la cocci6n u
otros matefiales inflamables se acumulen
dentro o cerca del horno.
No use agaJa para apagar incendios
con _asa. Nunca tome una cacerola que
se estd quemando. Apague los controles.
Las llamas en el horno pueden apagarse
por complem al cerrar la puerta del
horno y apagarlo o al ufilizar un
producm qufmico mulfiuso seco
o un exfintor de tipo espuma.
iiiiiiiiiiiii!
No guarde ni use matefiales
combustibles, g_olina u otros lfquidos y
vapores intlamables cerca de este aparato
ni ningdn otto.
3
INFORMACIONIMPORTANTEDESEGURIDAD.
LEATODASLASINSTRUCCIONESANTESDEUSAR.
iADVERTENCIA!
CUEZALASCARNESYELPOLLOCOMPLETAMENTE...
Cuezala cameroja y deavepor completo.la cameroja a una temperaturaINTERNAde al menos 160°Fyla de
avea unatemperaturaINTEflNAdeal menos 180OF.Lacocci6na estastemperaturasofreceprotecci6ncontra
enfermedadesde transmisi6npor alimentos.
PRECAUCIONESDESEGURIDAD
No toque los elementos calefactores
ni lasuperficie interna del horno. Estas
superficies podrfan estar lo suficientemente
calientes corot para quemar adn siest_n
oscuras. Durante eluso yluego de _ste,
no toque ni permita que las prendas u otros
materiales inflamables entren en contacto
con ningfin firea intema del horno;
deje que se enflfe primero.
Las superficies que pueden estar calientes
incluyen: orificios de ventilaci6n del homo,
superficies cercanas a los orificios, grietas
alrededor de la puerta del homo, los bordes de
la ventana y los ribetes met_licos sobre la puerta.
RECUERDE:i,a superficie interna del homo
puede estar caliente al abrir la puerta.
Nunca coloque utensilios de cocina ni otros
elementos en el piso del homo. Debajo del piso
del horno ha},un elemento calefact(m Si coloca
elementos sobre el piso del homo, dste podrfa
sobrecalentarse y r'lafiarse al igual que
los ammrios.
AlOjese del homo cuando abra la puerta.
E1aire o vapor caliente que sale puede causar
quemaduras en las manos, la cara y los (gos.
No caliente recipientes de alimentos sin abri_:
i,a presi6n podda acumularse y el recipiente
podffa explotar y provocar una lesi6n.
Mantenga libre la ventilaci6n del homo.
No pemfita que se acumule _asa en el homo.
Coloque la parrilla del homo en la posici6n
que desee mientras el horno estd fifo. Si es
necesario manipular las parrillas cuando estfin
calientes, no permita que los guantes para
cacerolas entren en contacto con los elementos
calefactores.
Cuando utilice bolsas para cocinar o asar en
el homo, siga las indicaciones del fabricante.
Sacar la parrilla hasta el tope resulta dtil
para levantar comidas pesadas. Tambidn es
una precauci6n para edtar quemarse al tocar
las superficies calientes de la puerta o
las paredes del homo.
No utilice el homo para secar peri6dicos.
Sise sobrecalientan, pueden incendiarse.
No utilice el homo corot drea de
almacenamiento. Los elementos almacenados
en un homo pueden incendiarse.
No deje objetos hechos de papel, utensilios
de cocina o alimentos en el homo miemras
no estd en uso.
i,uego de asar a la parrilla, 0empre retire
una asadera del homo y lflnpiela, i,a _asa que
quede en una asadera puede incendiarse
la pr6xima vez que utilice la bandeja.
Nunca deje fiascos o latas con grasa de came
asada dentro o cerca de su homo.
}}i,l_rnicamente limpie las partes enlistadas en
este Manual del propietario.
No utilice papel de aluminio para revestir
la parte inferior del homo, a excepci6n de
lo sugerido en este manual, ia instalaci6n
incorrecta del papel de aluminio puede
provocar un riesgo de descarga el_ctrica
o incendio.
LEAYSIGAESTAINFORMACIONDESEGURIDAD
CUIDADOSAMENTE.
GUARDEESTASINSTRUCCIONES
4
Usodeloscontrolesdel homo. GEAppliances.com
A Io largo de este manual, las caracterfsticas y apariencia pueden variar con los de su model&
OVEN CONTROLS
°T00..,0°VE.O
Controlde/homo,caracterfsticasyconfiguracionesde/re/oj
(Clock)yde/temporizador(Timer)
Botdn BAKE/TEMPRECALL(Homeado/memoria 0
temperatura)
Presione para seleccionar la thnci6n horneado.
LuzBAKE(hornear)
Destella mientras se halla en el modo de edicidn;
usted puede cambiar la tempeiatma del homo
en este ptmto. Resplandece cuando el homo
se halla en el modo hornem:
BotSnSTART/ON(inicio/encender)
l-)e|)e presionarse para iniciar Cllalqtlier tilncidn
de cocci6n.
o Pantalla 0
Muestra la hera (]el (][a, la temperatma (]el homo, si
el homo estfi en el mode de homeado o de asara la
parrilla y las horas establecidas para el temporizador
olas operaciones automfiticas del homo. i,a pantalla
mostrarfi "PrE" mientms reali/_ el precalenmmiento.
Cuando el homo alcanza la temperatura
selecciomtda, el control del homo emitirfi tm pitido
y la pantalla mostmr_i la tempemmra del homo.
Si una"F-"y un nomerooletra parpadeanonlapantalla
y las se_a/esde controldelhomo,estoindicauncodigodeerror
de lafuncion.Presioneel botdnCLEAR/OFFPermitaqueel borne
se enfrfefluranteunahera.Pongael homonuevamenteenoperacibn.
Si elcbdigodeerrordela funcibnso repite,desconecteelcablede
corrientede/homoycomunfqueseconelserviciodomantenimiento.
Sisu homofue configuradopara unaoperacioncronometrada
del homoyse presentouna interrupcionenel fluidoelectrico,
el relojy todeslosfuncionesprogramaflasdebenrestablecerse
v,#
l ahera del dig(puedeserincorrecta) parpadeaN enla pantalla
cuandosehayapresentadouna interrupcionenel fluido
electrico.Reconfigure el reloj.
Botdn KITCHENTIMERON/OFF
(temporizadorde cocina encender/apagar)
Presione p:ua seleccionar la c_m_cteristica del
temporiz_doi: i ,uego presione los botones + y - pare
@_star el tiempo.
LuzTIMER(temporizader)
[)estella mientras se h:dla en el modo de edicidn;
usted puede cambiar el dempo configmado en
este ptmto. Resplandece cuando se ha activ:_do
el tempori/x_doi: Destella de nueu_ cuando
se ha acabado el tiempo basra que se reconfigme
el control.
BotSnCLOCK(reloj)
P;lI'a configllrar el I'el(!i, presione este botdn dos
veces y luego presione los botones +v -. ia hora
destellarfi en la pantalla cuando se el:tciende
el homo.
Botdn DELAYSTART(iniciopostergado)
Utilice itmto con el botdn COOKINGTIMEp:_ra
configurar el homo para que inicie y se detenga
automfiticamente en el momenta que usted
progmme.
LuzDELAYSTARTTime(tiempo doinicio retardedo)
Destella mientras se halla en el modo de edicidn;
usted puede cambiar el dempo configurado de inicio
retardado en este punto. Resplandece cuando
se ha acrid:ida la fimcidn.
BotSnCOOKINGTIME(tiempo do cocciSn)
Presione este botdn y luego presione el botdn
+o - para @]star la cantidad de tiempo que desea
cocinar su comida. E1 homo se apagarfi
automfiticamente cuando se ha}r;l agotado
el tiempo de coccidn.
LuzCOOKINGTIME (tiempo de cocciSn)
Destella mientras se halla en el modo de edicidn;
usted puede cambiar el dempo configmado
en este punto. Resplandece cuando se ha activ:_do
la flmcidn. Destella de nuevo cuando se ha acabado
el tiempo basra que se reconfigme el control.
5
Usode loscontrolesdel homo.
Controlc/elhomo,caracterfsticasyconfiguracionesc/elreloj
(Clock)ydeltemporizador(Timer)
o uzAUTOMATICOVEN(homoautom#fico) 0Esta luz se enciende en cualquier momento
en qt,e se ha programado el homo t,tilizando
las flmciones COOKINGTIME (tiempo de cocci6n)
o DEL/IFSTART (inicio retardado).
Bot6n -
.Mpresionar brevemente este botdn se reducir:_
el tiempo o la temperamra en pequefias unidades.
Presione y sostenga el botdn para reducir el tiempo
o la temperamra en tmidades mils grandes.
Bot6n ÷
A1presionar brevemente este botdn se aumentara
el tiempo o la temperamra en pequefias tmidades.
Presione y sostenga el botdn para aumentar
el tiempo o la temperamra en tmidades mils grandes.
Bot6n CLEAR/OFF
Presione para cm_celar TODASL_soperaciones
del homo excepto el rel_!i y el tempori/_doi:
O
0
0
BotSnBROILHI/LO(asoro la porrillo Alto/Bajo)
Presione para seleccionar la flmci6n asar
a la parrilla.
LuzBROIL(osor) (onolgunos modelos)
[)estella mientras se halla en el modo de edici6n;
usted puede cambiar de HIa LOBROIL(asar aho a
b_io ) en este ptmto. Resplandece cuando el homo
se halla en el modo asm:
Lucesindicodoros (on olgunos botones)
E1modo EDIT (edici6n) dura ratios segtmdos
despuds de haber presionado el filtimo bot6n.
i x_sbotones DELAYSTARTON/OFF(inicio ret_rdado
encendido/apagado) y COOKINGTIMEON/OFF
(tiempo de coccidn encendido/apa#_do) serfin
los dnicos botones encendidos sise selecciona
cualquiem de estas (los opciones. (Eiemplo: DELAY
SNRT(inicio retardado) se selecciona con BAKE
(hornear); el botdn DELAYSNRTpermanecer_i
encendido basra que el rel_!i alcance el tiempo
programado, en cmro momento se apagarfi y se
encender:i la luz del botdn BAKE/rEMPRECALL
(hornear/memoria temperamra).
Corte de energia
Sipuedeverseunahoradestellandoenla
pantalla,sehaexperimentadouncortede
energfa.Reconfigureelreloj.
Pare reconfigumr el tel@ presione
el bot6n CLOCK(rel({i). Ingrese la hora
correcm presionando el bot,Sn + o -.
Presione el bot,Sn START/ON
(iniciar/encendido).
6
Usodelhomo. GEAppliances.com
Para prevenir posibles quemaduras, coloque las parrillas en la posicidn deseada antes de encender el homo.
La cantidad de posiciones de
losparrillasvadaporel modelo.
Antes de comenzar...
Las paMllas fienen cierres de tope,
de %ram tal que cuando se encuentren
colocados correctamente en los soportes,
se detendrfin antes de salir completamente
y no se inclinai"Sn.
Cuando se encuentre colocando o quitando
umnsilios de cocina, fire de la parrilla hacia
afllem hasm la prombemncia en el apoyo
de la parrilla.
Para quitarunaparrilla,tfl'ela hacia usted,
incline el frente hacia arriba y fire la parrilla
hacia afi/em.
Parareemplazar,coloque elextremo
de la paMlla (topes de cierre) en el apoyo,
incline el frente y'emptoe de la parrilla hacia
adentro.
PRECAUCION:
nuncacoloquelosutensiliosdecocinaniotros
artfculossobreelpisodelhomo.Existeunelemento
decalentamientodebajodelpisode/homo.Colocar
artfculossobreelpisode/homopuedecausarqueel
homosesobrecatiente,resultandoendafiosparael
homoyelriesgodedafiosoincendioenlosgabinetes.
Como configurar el homo para hornear o asar
[-ff] Presione el botdn BAKE.
Presione los botones + o - hasta
la tempeiatum deseada se xqsualiza.
Presione el botdn START/ON.
E1homo se iniciarA automgticamente.
Ia panmlla mostrai_ "PrE"mienU'as realiza el
precalenmmienm. Cuando el homo alcanza
la mmpeiamra seleccionada, el conu'ol del
homo emitiI_ ratios pitidos y la panmlla
mosuar_ la mmpemmm del homo.
Paracambiarla temperaturade/homoduranteelciclo
BAKE(homear),presioneetbot6nBAKEl/luegolos
botones+o-para configurarla nuevatemperatura.
Revise los alimentos pare el punto de
cocci6n al mfnimo tiempo en la receta.
Cocine &uanm mils tiempo si es
necesaiJo.
@
Presione el botdn CLEAR/OFF
(borrar/apagado) cuando se haya
finalizado el horneado y luego quite
los alimentos del homo.
No coloque alimentos directamente
sobre el piso del homo,
Precalentamiento y ubicacion de la cacerola
Precalienm el homo sila recem asf lo
indica. E1precalenmmienm es necesario pare
obmner buenos resulmdos cuando hornee
tortas, dulces, pastelitos ypanes.
Lapantatlamostrar_"PrE"mientrasrealizael
precatentamiento.Cuandoelhomoatcanzala
temperaturaseleccionada,elcontrolde/homoemitira
unpitidoylapantatlamostrar_latemperatura
de/homo.
Siva a hornear cuatm capas de
pastel al mismo fiempo, coloque
dos capas en la bandeja C y dos
capas en la bandeja E. Disu_ibuya
los recipientes de modo que
no queden direcmmenm
uno encima del ou'o.
I,os resulmdos del horneado son mejores
si la comida es centmda en el homo mnto
como sea posible. E1pasml "ka_gel Food"
es la excepcidn y debe colocarse en la bandeja
inferior del homo (posicidn A). Sig'a las
instrucciones del paquete de alimentos
preempaquemdos o congelados pare la
ubicaci6n de los recipientes. Las sartenes
no se deben tocar entre sf ni deben tocar
las paredes del homo. Si necesita usar dos
parrillas, coloquelas sartenes de forum que
una no quede inmediammente encima de
la otto. Deje aproximadamenm 1½" entre
cada sart_n y desde el frente, desde aw_s y
desde los cosmdos del homo.
Papel aluminio
Puedeutilizarseelpapelatuminioparaatraparderrames.
Nunca cubra pot completo una parrilla con
papel aluminio. Esto obst['uii_ lacirculacidn
del calory obtench_Aun asado deficiente.
Puede ufilizarseuna pequefia hc_a de papel
aluminio para awapar dermmes colocfindola
en uno de las parrillas inferiores varias
pulgadas pot debajo del alimento. 7
Usodel homo.
Cierre la puerta. Siempm ase
a la parrilla con la puerta cerrada.
El mmaflo, peso, grosol;
tempemtnm inicial} su prefbrencia
sobre el punto de coccidn de
los alimentos atbcmv, ln los tiempos
de coccidn. Esm gufa est_i basada
en carnes a temperature de
refi'igemd(m
-;-ElD@arla,wnlo (b,Agwicuflura (b,
1_2k2.UU. indica q_w:"/a cv¢rnea poc_,
c_,cida es p@ubu; peru _sled dd_e sab_'r
q_u,c_,cinada a solamenl_"140 'F
,,i_'_fipmq_,. a/g_no,, ,,:_rmi,,mos
veneno,_o,_poddan sobrevivir".
(Iqwnle: &{/b14,odBooh. }bur Kitc/u'n
G_d& {(S'I)AR_q_..fiznio19_5.)
Como configurar el homo para asar a la parrilla
Presioneel bot6n BROILHI/LOunavez
Cierrelapuertalacerrada.pUerta"Siempreasealaparrillacon [-_ pavaAsaralaparrillaHI(Alto).
[-ff] Coloque la came o el pescado sobre Pava cambiar a Asara la parrilla LO
una rejilla pare asar en una bandeja pare (Bajo), presione el botdn BROIL HI/LO
asaI" n//evainente.
[_] Sigalas posiciones en la parrilla
sugeridas en la Gu[aparaasaralaparrilla.
Sisuhomoest_conectadoa208voltios,losfiletes
pocococidospuedenasarsealaparrillaprecatentando
laparrillayposicionandolaparrilladelhomoen
unaposicidnrodsatta.
Presione el botdn START/ON.
[] Cuando elasado ala parrilla
est_ teuninado, presione el botdn
CLEAR/OFF.
Guia para asar a la parrilla
Precaliente la asadem durante 2 minutos para mejorar el desempeflo.
Alimento
Came
de res
Polio
Nivel de
coccion
Jugosa(140°F)
Apunto(160°F)
Biencocida(170°F)
Tipo o
grosor
Filetes-
1" degrosor
Posicion
de labandeja
de homo27"
D(losalimentosdebenestar
de2"a4"delelementodeasado)
Posicion
de la bandeja
de homo30"
EoF(losalimentosdebenestar
del"a3"delelementodeasado)
Filetes- 3/4" D(losalimentosdebenestar E(losalimentosdebenestar
a 1" degrosor de2"a4"delelementodeasado)de3"a4"delelementodeasado)
CoD(losalimentosdebenestar
de4"a7"delelementodeasado)
BoC(losalimentosdebenestar
de8"a9"delelementodeasado)
Filetes- 3/4"
a 1" degrosor
o pattiesde
camepicada
Pechuga,
sinhueso
DoE(losalimentosdebenestar
de3"a5"delelementodeasado)
C(Iosalimentosdebenestar
de_'ag'delelementodeasado)
Comentarios
Esdificilquefiletes de
menosde1" degrosor
quedenjugosos.Se
cocinanporcompleto
antesdedorarse.Para
evitarquela camese
enrosque,cortela
grasaa intervalosde1".
Asarsobreet ladodela
piel primero.
Pechuga, BoC(losalimentosdebenestarC(losalimentosdebeeestar
con hueso de7"aS"delelementodeasado)de7%8"delelementodeasado)
Filetesde Grosorde D(IosalimentosdebenestarDoE(IosalimentosdebenestarManipuleygirecon
_escade 1/2"a 1" de3"a5"delelementodeasado)de3"a6"delelementodeasado)muchocuidado.
Chuletas Biencocida(170°F) Grosorde C(losalimentosdebenestarU(losalimentosdebenestar Paraevitarque la came
de cerd0 3/4" deg'a7"delelementodeasado)deg'a7"delelementodeasado)se enrosque,corte
la grasaa intervalos
de1".
8
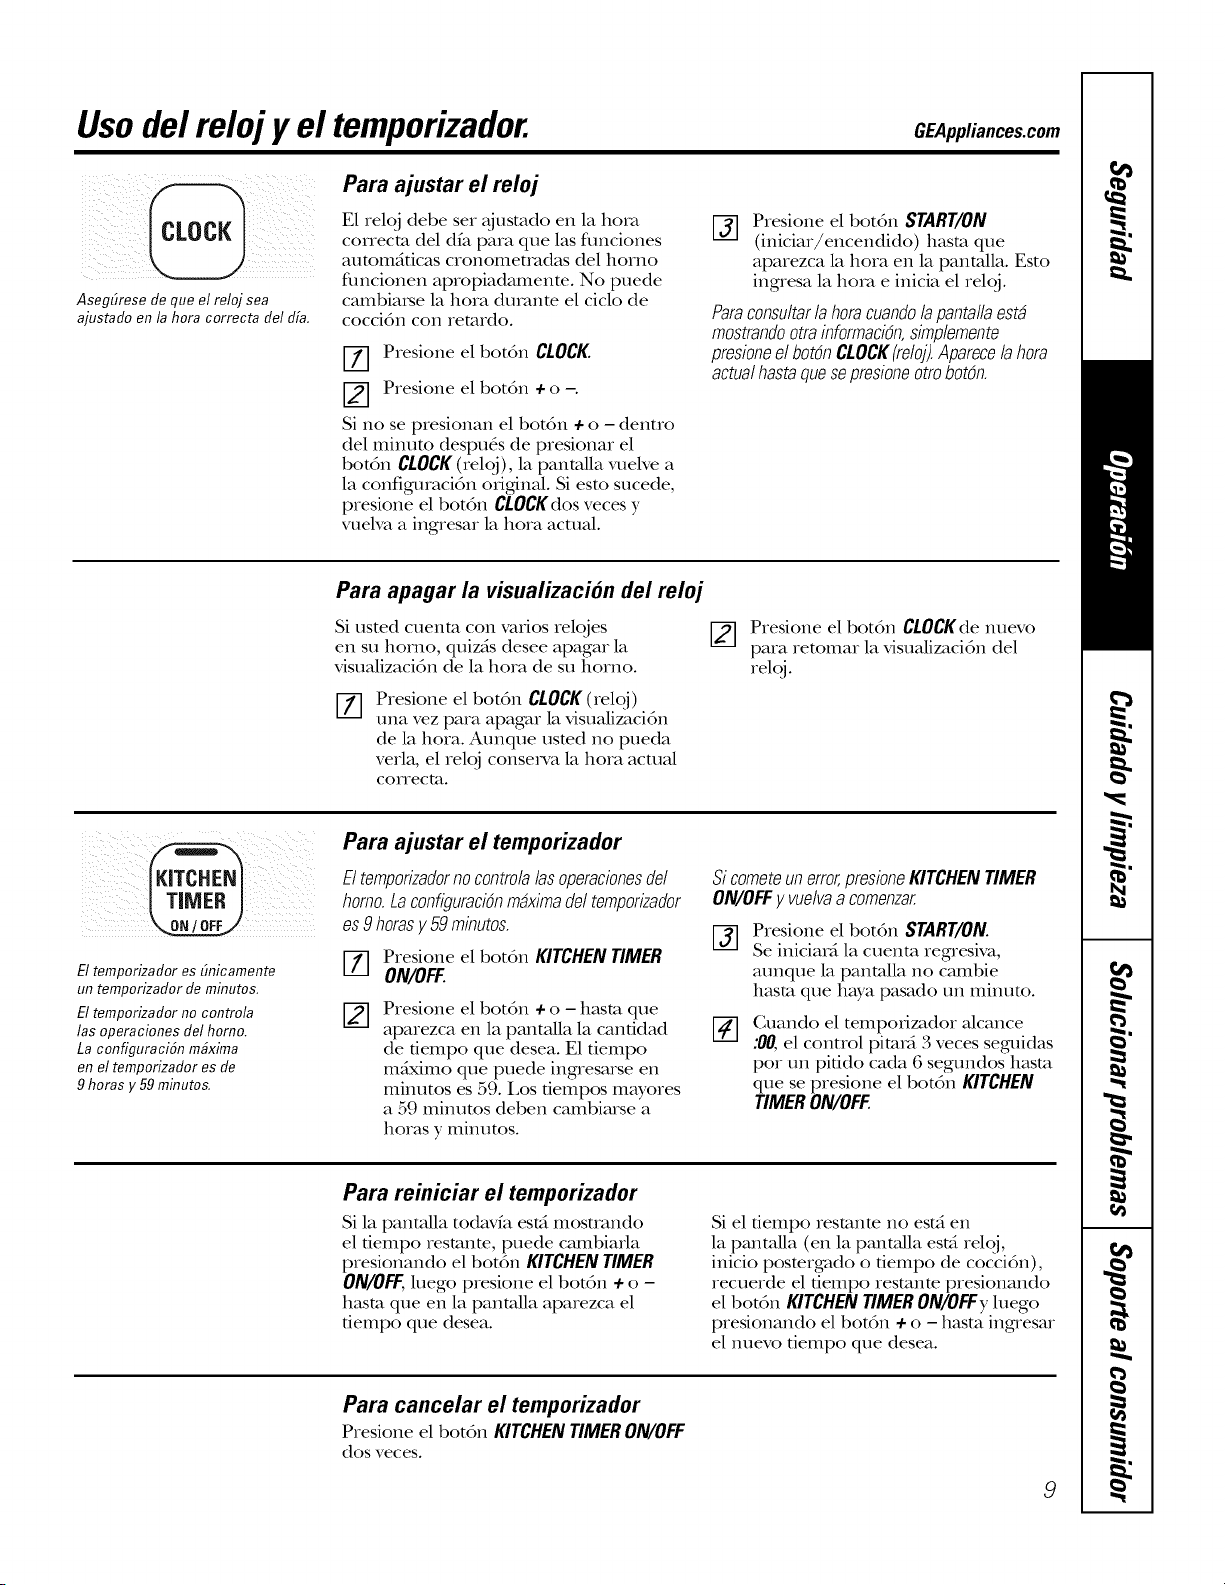
Usodelreloj y el temporizador. OEA..lia.oes.oom
Asegfirese de que el reloj sea
ajustado en la hora correcta del d/a.
Para ajustar el reloj
E1 relqj debe ser _jusmdo en la hora
conecm del dfa para que las flmciones
aummgticas cronomet_vtdas del horno
flmcionen apropiadamenm. No puede
cambiaIse la hora dtmmm el ciclo de
cocci6n con remrdo.
Presione el bot6n CLOCK
Presione el bot6n + o -.
Si no se presionan el bot6n + o - denuo
del minum despu_s de presionar el
botdn CLOCK(relqj), la pantalla vuelve a
la configuracidn odgdnal. Si esm sucede,
presione el botdn CLOCKdosveces y
vuelva a ingresar la hora actual.
%
Presione el bot6n START/ON
(iniciar/encendido) hasm que
aparezca la hora en la panmlla. Esto
ingresa la hoxv_e inicia el relqj.
Paraconsultarlahoracuandolapantallaest#
mostrandootrainformacidn,simplemente
presioneel botdnCLOCK(reloj).Aparecela hora
actualhastaquesepresioneotrobotdn.
Para apagar la visualizaci6n del reloj
Si usted cuenm con varios relojes
en su homo, quizgs desee apagar la
visualizacidn de la hora de su horno.
Presione el bot6n CLOCK(reloi)
una vez para apagar la visualizacidn
de la hora. Aunque usted no pueda
verla, el reloi consexs'a la hora actual
CoiTecta.
Presione el botdn CLOCKde nuevo
para retomar la visualizacidn del
reloj.
El temporizador es finicamente
un temporizador de minutos.
El temporizador no controla
las operaciones flel homo.
La configuraciSn m#xima
en el temporizador es de
9 horas y 59minutos.
Para ajustar el temporizador
Eltemporizadornocontrolalasoperacionesdel
homo.Laconfiguracidnm#ximadeltemporizador
es9horasy59mbutos.
I-_ Presione el bot6n KITCHENTIMER
ON/OFF.
[]
Presione el bot6n + o - hasm que
aparezca en la pantalla la cantidad
de tiempo que desea. E1 tiempo
m_iximo que puede ingresarse en
minutos es 59. Los tiempos mwores
a 59 minums deben cambiarse a
horas y minums.
Sicometeunerror,presioneKITCHENTIMER
ON/OFFy vuelvaa comenzar
%
Presione el bot6n START/ON.
Se iniciaM la cuenm regresiva,
aunque la panmlla no cambie
hasm que haya pasado un minuto.
Guando el tempodzador Mcance
:00,el conuol pimM 3 veces seguidas
pot un pitido cada 6 segundos hasm
que se presione el bot6n KITCHEN
TIMERON/OFF
Para reiniciar el temporizador
Sila pantalla todavfa estfi mostrando
el tiempo resmnm, puede cambia_ta
presionando el botdn KITCHENTIMER
ON/OFF,luego presione el bot6n + o -
basra queen la pantalla aparezca el
fiempo que desea.
Si el fiempo resmnm no est_ien
la pantalla (en la pantldla est_irelqj,
inicio postergado o tiempo de cocci6n),
recuerde el tiempo resmnm presionando
el botdn KITCHENTIMERON/OFFyluego
presionando el bot6n + o -hasm ingresar
el nuevo tiempo que desea.
Para cancelar el temporizador
Presione el bot6n KITCHENTIMERON/OFF
dos veces.
9
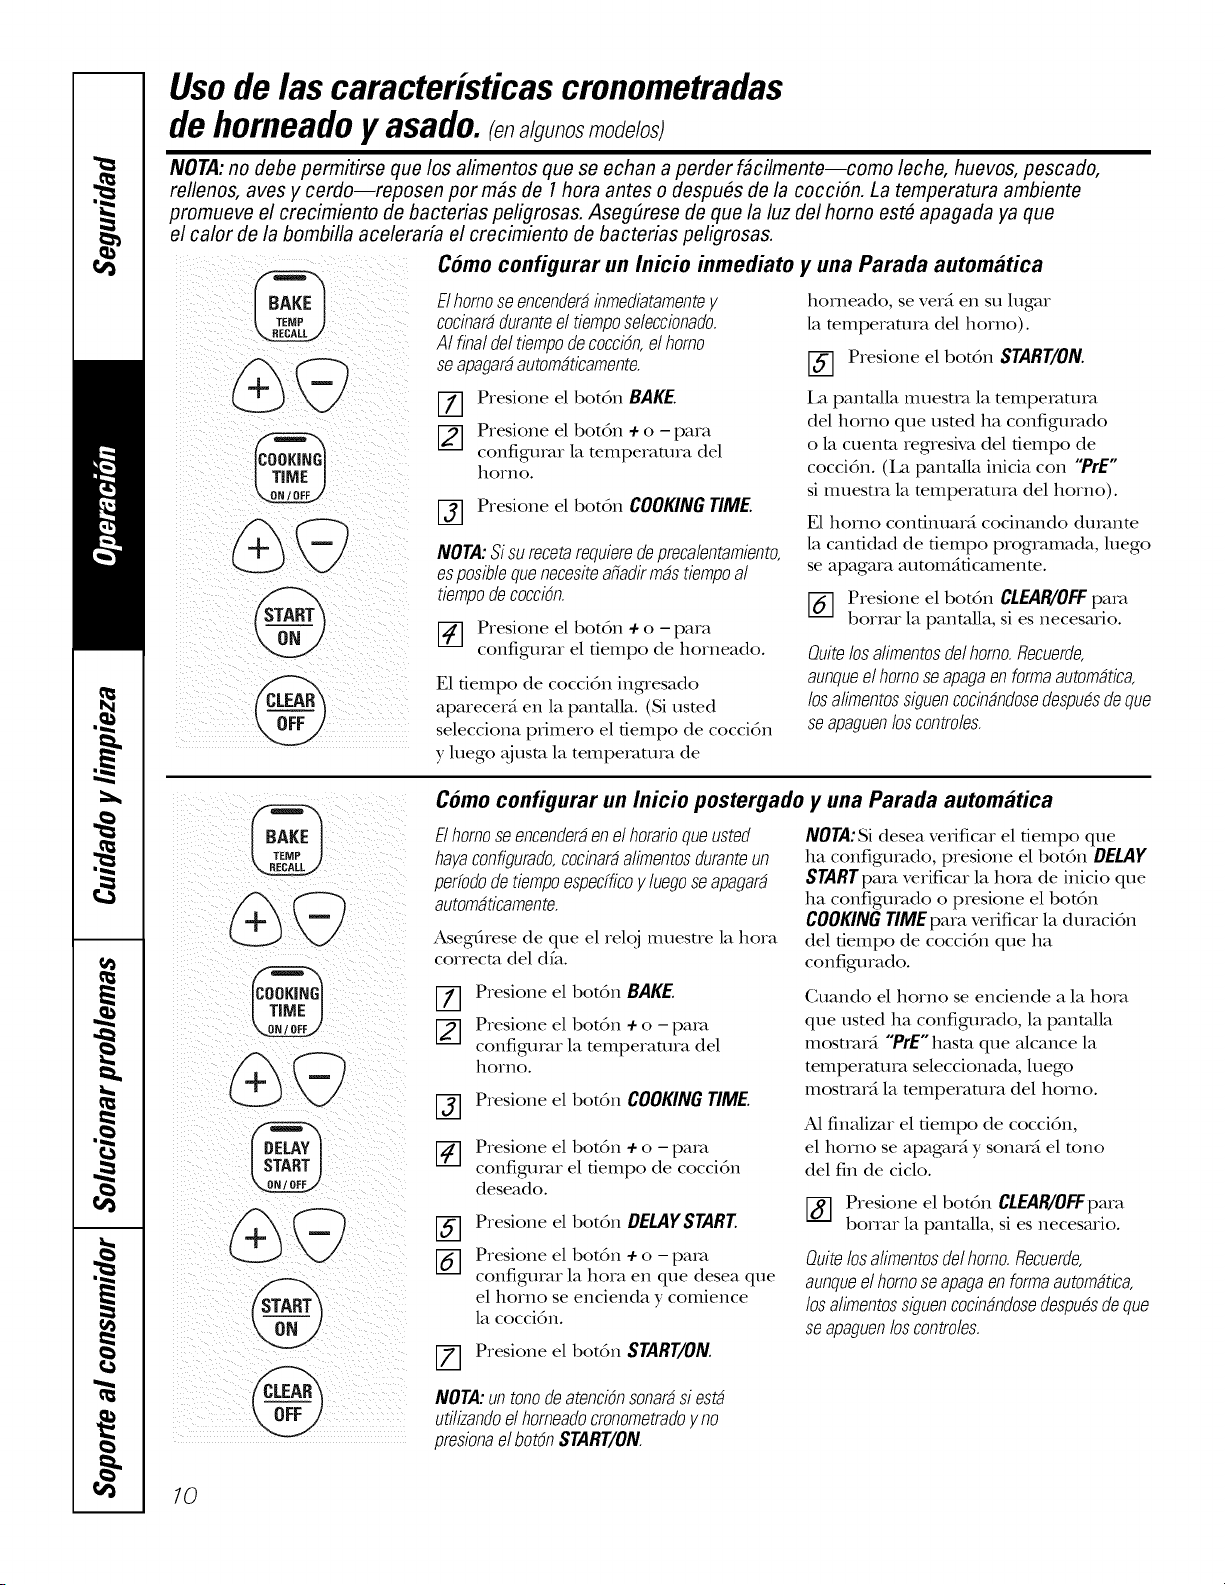
Usode las caracteristicascronometradas
de horneadoy asado.(e,
NOTA:no debe permitirse que los alimentos que se echan a perder f#cilmente--como leche, huevos, pescado,
rellenos, aves y cerdo--reposen por m#s de 1hora antes o despu#s de la cocciOn. La temperatura ambiente
promueve el crecimiento de bacterias peligrosas. Aseg(lrese de que la luz del homo est# apagada ya que
el calor de la bombilla aceleraria el crecimiento de bacterias peligrosas.
Como configurar un Inicio inmediato y una Parada automatica
Elhomoseencender_inmediatamentey
cocinar_duranteel tiemposeleccionado.
AI finaldeltiempodecocciOn,elhomo
seapagar_autom_ticamente.
%
[]
%
Presione el bot6n BAKE.
Presione el bot6n +o - para
configtmu la temperaulra del
hoIno.
Presione el botdn COOKINGTIME.
NOTA:Sisurecetarequiemdeprecalentamiento,
esposiblequenecesiteafiadirm_stiempoal
tiempodecocci6n.
_-] Presione el bot6n +o - para
configtmu el fiempo de horneado.
E1 fiempo de cocci6n ingresado
apareceM en la panmlla. (Si usted
selecciona primero el tiempo de cocci6n
y luego _jusm la tempe_mm_ de
homeado, se veMen su lugar
la mmperamra del homo).
Presione el bot6n START/ON.
I;_ pantalla IlltlesQa la temperau]ra
del homo que usted ha configtm_do
o la cuenm regresiva del tiempo de
coccidn. (Ia pantalla inicia con "PrE"
si illtlesQ_t la mmperaUm_ del homo).
E1homo continuard cocinando dtmmm
la cantidad de tiempo programada, luego
se apagara aummdticamenm.
Presione el bot6n CLEAR/OFFprow
borx_u la panmlla, si es necesario.
Ouitelosalimentosdelhomo.flecuerde,
aunqueelhomoseapagaenformaautomdtica,
losalimentossiguencocbdndosedespudsdeque
seapaguenloscontreles.
@
Como configurar un Inicio postergado
Elhomoseencender_enelhorarioqueusted
hayaconfigurado,cocbardalimentosduranteun
perfododetiempoespecfficoyluegoseapagard
automdticamente.
AsegMese de que el relqj muestre la hora
correcm del dfa.
%
%
Presione el bot6n BAKE.
Presione el bot6n +o - paI_
configtmu la temperamra del
hoIno.
Presione el bot6n COOKINGTIME.
%
%
m
Presione el bot6n +o - pa_
configtmu el tiempo de cocci6n
deseado.
Presione el bot6n DELAYSTART
Presione el bot6n + o - paIvl
configurar la hora en que desea que
el homo se encienda y comience
la cocci6n.
Presione el bot6n START/ON.
y una Parada automMica
NOTA:Si desea verificar el fiempo que
ha configumdo, presione el bot6n DELAY
STARTpara verificar la hora de inicio que
ha configtm_do o presione el bot6n
COOKINGrlMEpam verificar la dtmmidn
del tiempo de coccidn que ha
configurado.
(;uando el homo se enciende a la hoia
que usted ha configumdo, la pantalla
mosmud "PrE" hasm que alcance la
temperatma seleccionada, luego
mosmu_ la mmperamra del homo.
A1 finalizar el fiempo de coccidn,
el homo se apagar_i y sonaM el tono
del fin de ciclo.
[_] Presione el botdn CLEAR/OFFpara
bo_Tar la panmlla, si es necesario.
Ouitelosalimentosdelhomo.flecuerde,
aunqueelhomoseapagaenformaautomdtica,
losalimentossiguencocbdndosedespudsdeque
seapaguenloscontreles.
NOTA:untonodeatenci6nsonardsiestd
utilizandoelhomeadocrenometradoyno
presionael bot6nSTART/ON
10
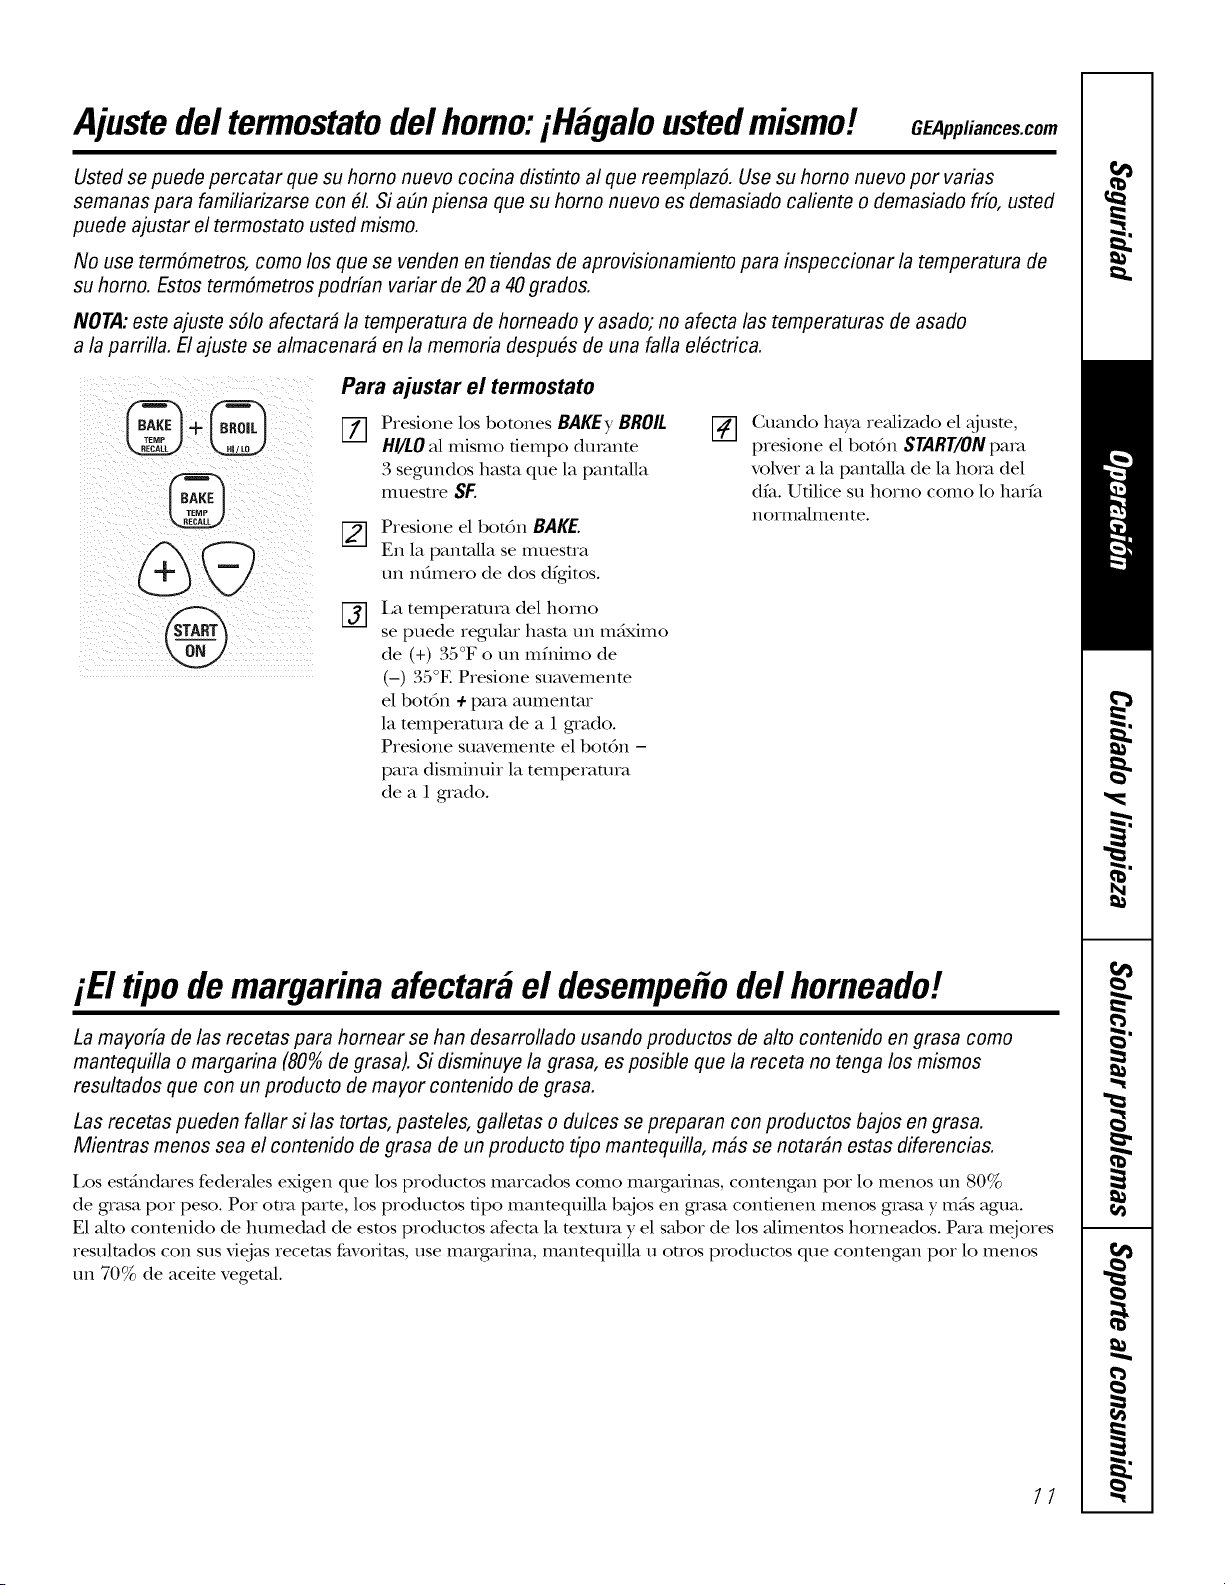
Ajustedel termostatodelhomo:iHagalo listed mismo! GEAppliances.com
Usted se puede percatar que su homo nuevo cocina distinto al que reemplazS. Use su homo nuevo por varias
semanas para familiarizarse con #L Si adn piensa que su homo nuevo es demasiado cafiente o demasiado frfo, usted
puede ajustar el termostato usted mismo.
No use term6metros, como los que se venden en tiendas de aprovisionamiento para inspeccionar la temperatura de
su homo. Estos term6metros podrfan variar de 20 a 40 grados.
NOTA:este ajuste sSIo afectar# la temperatura de homeado y asado; no afecta las temperaturas de asado
a la parrilla. El ajuste se almacenar# en lamemoria despu#s de una falla el#ctrica.
%
@
Para ajustar el termostato
[] Presione los botones BAKEy BROIL [-_
HI/LOal mismo fiempo dinante
,3segundos hasm que la panmlla
muestxe S_
[]
%
Presione el bot6n BAKE.
En la panmlla se nmestxa
un nOmexo de dos dfgitos.
I,a tempexauna del homo
se puede xegular hasm un mdximo
de (+) 35°F o un mfnimo de
(-) 35°E Presione suavemente
el bot6n +paxv_aumentar
la temperamra de a 1grado.
Presione suavemenm el bot6n -
para disminuir la temperaum_
de a 1 grado.
Cuando haya re_flizado el _jusm,
presione el bot6n START/ONpaxa
voNer a la panmlla de la holv_del
dfa. Utilice su horno como lo harfa
iloiillalxllellte.
iB tipode margarinaafectaM el desempe#odel horneado!
La mayoria de las recetas para homear se han desarrollado usando productos de alto contenido en grasa como
mantequilla o margarina (80%de grasa). Si disminuye la grasa, esposible que la receta no tenga los mismos
resultados que con un producto de mayor contenido de grasa.
Las recetas pueden fallar si las tortas, pasteles, galletas o dulces se preparan con productos bajos en grasa.
Mientras menos sea el contenido de grasa de un producto tipo mantequilla, m#s se notar#n estas diferencias.
Los estdndares fedexales exigen que los pxoductos marcados como maxgax_inas, conmngaxl pox lo menos un 80%
de grasa pox peso. Pox om_ parm, los producms tipo manmquilla b_jos ell grasa contienell menos grasa y m_s agua.
E1 aim conmnido de hmnedad de esms producms afecm la mxtma y el sabox de los _dimenms horneados. Paxa mejoxes
xesulmdos con sus viejas xecems favorims, use maxgaxina, manmquilla u otros pxoducms que contengan pox lo nlenos
un 70% de aceite vegetal.
77
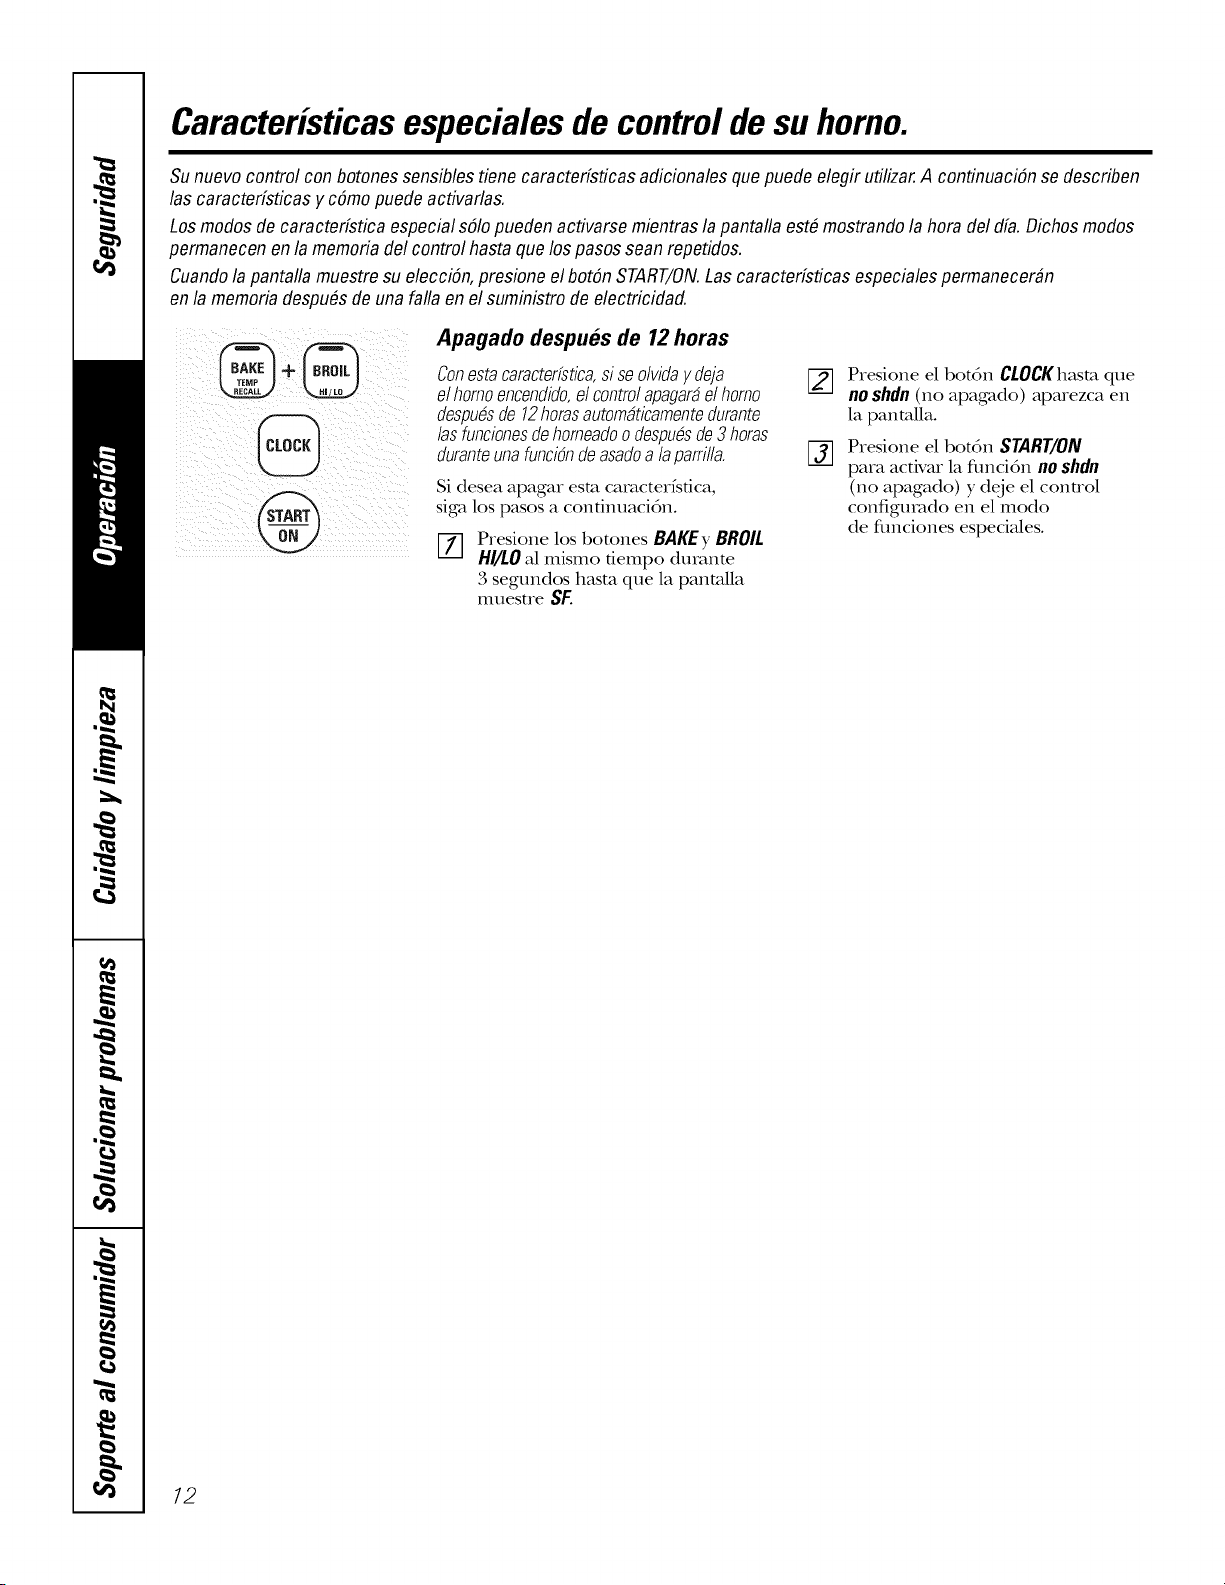
Caracteristicasespeciales de controlde su homo.
Sunuevo controlconbotonessensiblestienecaractefisticas adicionalesquepuede elegir utilizar.A continuaci6nsedescriben
las caracterfsticasy c6mopuedeactivarlas.
Losmodosde caracterfsticaespecialsolopueden activarsemientrasla pantallaest6 mostrandola hora deldfa.Dichosmodos
permanecenen la memoriadelcontrolhasta quelospasosseanrepetidos.
Cuandola pantallamuestresuelecci6n,presioneelbot6nSTART/ON.Lascaracterfsticasespecialespermanecer#n
en la memoriadespuOsde una fallaen el suministrode electricidad.
%+@
Apagado despues de 12horas
Conestacaracterfstica,siseolvidaydeja []
elhomoencendido,elcontrolapagardelhomo
despu_sde 12horasautomdticamentedurante
/asfuncionesdehomeadoo despudsde3horas
duranteunafuncidndeasadoa laparrilla. []
Si desea apagar esm caracterfsfica,
siga los pasos a condnuacidn.
Presione los botones BAKE);BROIL
HI/LO al mismo tiempo durante
3 segundos hasm que la panmlla
muestre SF.
Presione el botdn CLOCKhasm que
noshdn(no apagado) aparezca en
la panmlla.
Presione el botdn START/ON
para actMu la funci6n noshdn
(no apagado) y deje el control
configurado en el modo
de flmciones especiales.
12
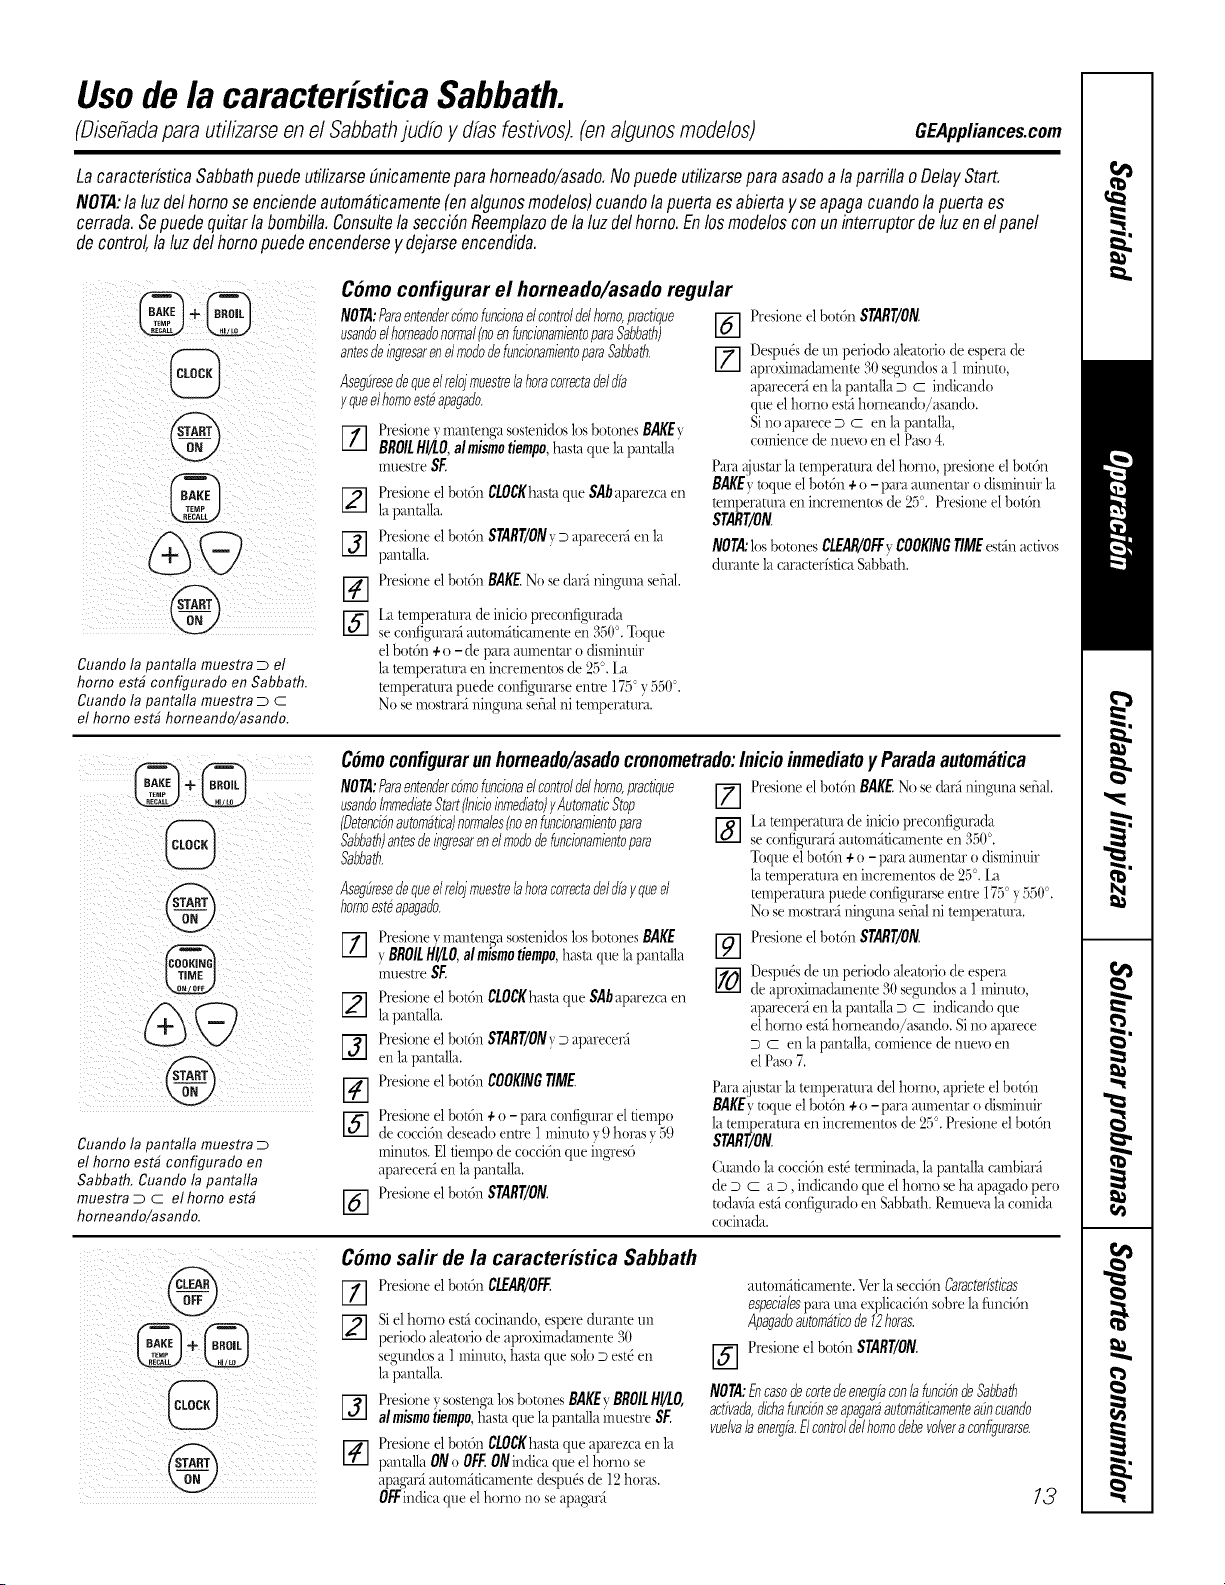
Usodela caracteristica Sabbath.
(Disefiadaparautilizarseenel Sabbathjudfo y dfasfestivos).(enalgunosmodelos) GEAppliances.com
LacaracterfsticaSabbathpuedeutilizarsegmicamenteparahomeado/asado.NopuedeutilizarseparaasadoalaparrillaoDelayStart.
NOTA:laluzdelhomoseenciendeautombticamentetenalgunosmodelos)cuandolapuertaesabiertayseapagacuandolapuertaes
cerrada.Sepuedequitarlabombilla.Consultelasecci6nReemplazodelaluzdelhomo.Enlosmodelosconuninterruptordeluzenelpanel
decontrol,laluzdelhomopuedeencenderseydejarseencendida.
Cuando la pantal/a muestra _ el
homo est& configurado en Sabbath.
Cuando /apantal/a muestra _ c
el homo est&homeando/asando.
Como configurar el horneado/asado regular
NOTA:Paraentendercbmofuncionaelcontroldelhomo,practtwe
usandeelhomeadenormal(noenfunctonamientoparaSabbath)
antesdetngresarenelmodedefuncionamientoparaSabbath
Aseg&esedequeelrelojmuestrelahoracorrectade/dfa
yqueelhomoest6apagade.
[] resione v mmlteng_ sostenidos los botones BAKEr
BROILH//LO,a/mismotiempo,hastaquela pantalla'
muestre ST.
%
@
PresioneelbotGnCLOCKhasmqueSAbaparezcaen
lapantalla.
PresioneelbotGnSTART/ON}_aparecer5en la
pantalla.
PresioneelbotGnBAKE.Nosedar5ningmmserial.
[.atemperatmade iniciopreconfigurada
seconfigmar5autoln_iticamenteen350:'.Toque
elbotGn+o- de pareattmentmo disminuir
latemperntm'aen incrementosde 25_'.I,a
tempemtm'apuedeconfigurarseenue 1750v550°.
Nosemostrar_tninguna serialni temperature.
[K] Presioneelbot6n START/ON
[-2-] Despu_sdetmperk)doale_mwiode esperude
aproximadmnente30segundosa 1minuto,
aparecerfien lapanmllaD c indicmMo
queelhomo est5horneando/asando.
Sinoapmece _ cen lapanmlla,
comiencede nueu) enel Paso4.
Pma@tsmrlatemperumrudelhomo, presioneelbotGn
BAKEytoqueelbotdn +o- pm'aattmenmrodisminuirla
tempemtm'aenincrementosde25_'.PresioneelbotGn
START/ON
NOTA:losbotonesCLEAR/OFFyCOOKINGTIMEest_h_acti_os
dinante la caracteristicaSabbath.
Cuando la pantal/a muestra
el homo estb configurado en
Sabbath. Cuando /a pantal/a
muestra _ c el homo estb
homeando/asando.
Comoconfigurar unhorneado/asado cronometrado: Inicio inmediato y Parada automatica
NOTA:ParaentendercGmofuncionaelcontrolde/homo,practique PresioneelbotdnBAKENosedar5ningunaserial.
usandeImmediateStart(Inlcioinmefllato)yAutomatlcStop _-]
(Oetencibnautomatlca)normales(noenfuncionamientopara
Sabbath)antesdeingresarenelmodedefuncionamientopara
Sabbath
Aseg&esedequeelrelojmuestrelahoracorrectadelfib yqueel
homoest6apagade.
Presionexmanten_asostenk!oslosbotonesBAKE
BROILI'l!/LO,almtsmotiempo,basraque lapantalla [_]
muestreST.
[_] Presioneelbotdn CLOCKhastaque SAbaparezcaen
lapantalla.
Presioneelbotdn START/ONy_apareceM
enlapantalla.
Presioneelbotdn COOKINGTIME.
[-5-'] Presioneelbotdn +o - pare configmareltielnpo
decoccidndeseadoentre I mimlt{tx9 horasx59
minutos.E1tiempode cocciGnque ingres6
apareceMen lapanmlla.
Presioneelbotdn START/ON
%
I,atemperamrade iniciopreconfigurada
seconfigurar5automdficamenteen 35(P.
Toque elbotdn+o- pareatnnenmrt) dismimfir
latempemmraen incmmentosde 25°.I;i
temperaturepuedeconfigumt:seentre 175_'v55(Y'.
Nosemostrm_iningtma senalni temperatm:a.
Presioneelbotdn START/ON
Despu_sde unperiodo aleatoriode espera
deaproximadamente30segundosa I minuto,
N)arecer_ietalapmlmllaD c indicandoque
elhomo est_ihorneando/asando. Si noN)mece
D c en lapan>lla, comiencede nueu) en
elPaso7.
Pare@_stmla temperaturadelhomo, _q)rieteel botdn
BAKEytoqueelbotdn +o- paremmtenmro disminuir
la temperatureen incmmentosde25°.Presioneelbot6n
StaRT/ON
CumMolacocci6nest_terminada,lapantallacambim5
de D c a D, indicmMoqueelhomo seha ap_l_t(loper<)
todmfaest_configumdoenSabbath.Remuevalacomida
cocinada.
Come salir de la caracteristica Sabbath
[7] PresioneelbotGnCLEAR/OFF.
Sielhomo ester,cocinando,espereduranteun
periodoaleatoriode apr()ximadamcntc30
segtmdosn I mimao,basraque soloDest_eta
lapanmlla.
F-_ Presionex sostengalosbotonesBAKExBROItHl/tO,
almismotiempo,%sinquelapanudla_nuestreST.
Presioneelbot(m Cl0CKhasmque aparezcaetala
[i---] pantalla0No OFF.0Nindica queel homo se
apagar_iautomSticalnentedespu&de 12horas.
0l_indica queelhomo no seapag,mi
arm)tariffcamente.Verlasecci(mCaracterfstlcas
espedalesp_,a unaexplicaciGnsol)relafimciGn
Apagadeautomatt?ode12horas.
PresioneelbotdnSTART/ON
IOI
NON: EncasofiecortedeenergfaconlabnciGnde Sabbab
activafia,fllbhafunciGnseapagaraautomatlcamenteaEtncuande
vuelvalaenergfa.Elcontrolfie/homodebevolveraconfigurarse.
13
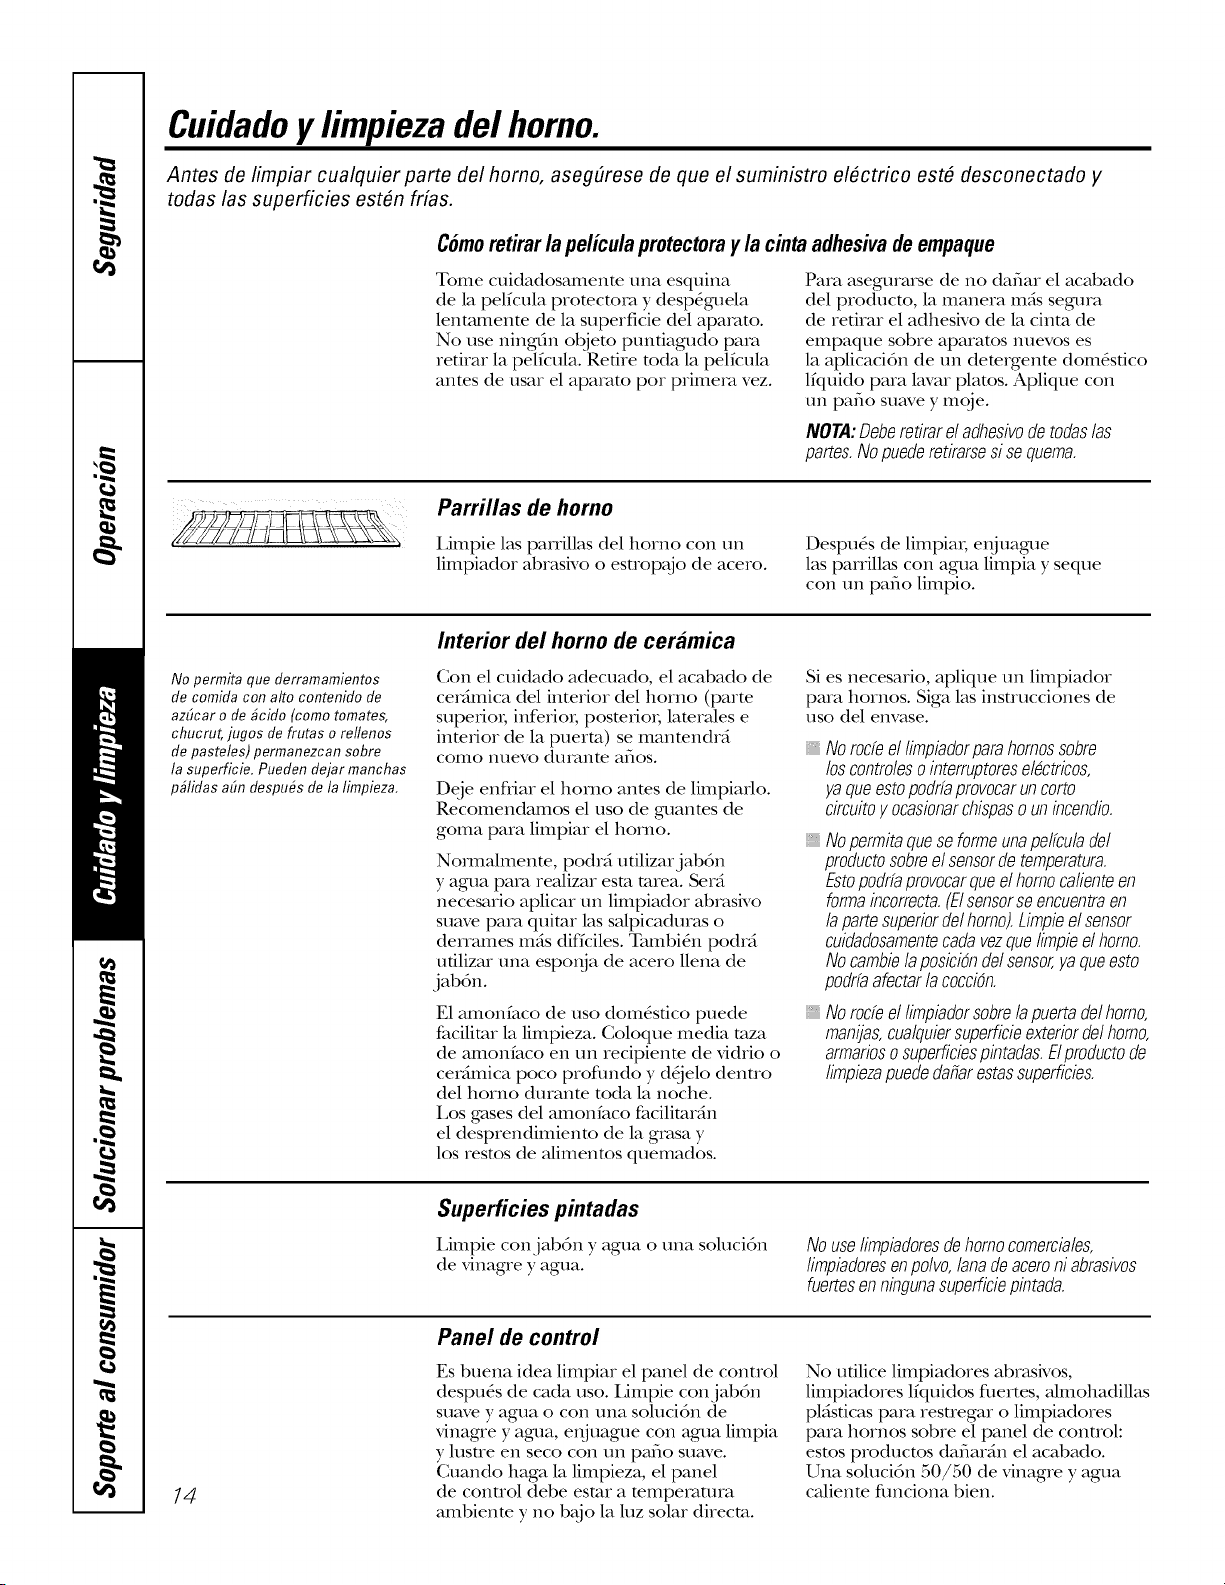
Cuidadoylimpiezadel homo.
Antes de limpiar cualquier parte del homo, asegOrese de que el suministro el#ctrico est# desconectado y
todas las superficies est#n frfas.
Comoretirar la pelicula protectoray la cinta adhesivade empaque
Tome cuidadosamenm una esquina
de la pelfcula promcmm y desp_guela
lenta_menm de la superficie del apamto.
No use ningfin objem puntiagudo para
retirar la pelfcula. Retire mda la pelfcula
anms de usar el apamm pox primem vez.
Para asegurarse de no dafiar el acid)ado
del producm, la manera m_tssegura
de retirar el adhesNo de la cinm de
empaque sobre aparams nuevos es
la aplicacidn de un demxgenm dom_stico
lfquido para lavar plams. Aplique con
un patio suave y moje.
NOTA:Deberetirareladhesivodetodas/as
pares.Nopuederetirarsesisequema.
Parrillas de homo
Limpie las Dmillas del homo con un
limpiador ;d)rasNo o esuoD_jo de acero.
Despu4s de limpiax; e_!juague
las panillas con agua limpia y seque
con un patio limpio.
No permita que derramamientos
de comida con alto contenido de
azficar o de #cido (como tomates,
chucrut, jugos de frutas o reflenos
de pasteles) permanezcan sobre
la superficie. Pueden dejar manchas
pblidas afin despu#s de la limpieza.
Interior del homo de ceramica
Con el cuidado adecuado, el acabado de
cex_mica del interior del homo (parm
superiox; inferiox; posmrio,; lamrales e
inmrior de la puerto) se manmndrfi
como nuevo dumnm afios.
Deje enfliar el homo antes de limpiarlo.
Recomendamos el uso de guanms de
goma para limpiar el homo.
Nommlmenm, podr_ ufilizarjabdn
y agua pare realizar esm mrea. Serd
necesario aplicar un limpiador _d)rasNo
suave para quimr las salpicaduras o
dexTames mils diffciles. Tambi_n podr_
ufilizar una esponja de acero llena de
j_d)dn.
E1amonfaco de uso dom_sfico puede
facilimr la limpieza. Coloque media mza
de amonfaco en un recipienm de vidrio o
cer_imica poco proflmdo y d_jelo denuo
del homo duranm toda la noche.
Los gases del amonfaco facilimrdn
el desprendimienm de la grasa y
los resins de alimenms quemados.
Si es necesario, aplique un limpiador
para hornos. Siga las insmxcciones de
uso del envase.
, Norocfeel Iimpiadorparahomossobre
loscontrolesointerruptoreseldctricos,
yaqueestopodrfaprovocaruncorto
circuitoyocasionarchispaso unbcendio.
Nopermitaqueseformeunape/fcu/adel
productosobreel sensorde temperatura.
Estopodrfaprovocarqueeihomoca/ienteen
formaincorrecta.(E/sensorseencuentraen
/apartesuperiorde/homo).Limpiee/sensor
cuidadosamentecadavezquelimpieel homo.
Nocambielaposici6ndelsensor,yaqueesto
podrfaafectarlacoccbn.
Norocfeel Iimpiadorsobrelapuertadelhomo,
manijas,cualquiersuperficieexteriordelhomo,
armariososuperficiespbtadas.EIproductode
limpiezapuededafiarestassuperficies.
14
Superficies pintadas
Limpie conjab6n y agua o una soluci6n
de vinagre y agua.
NouseIimpiadoresdehomocomerciales,
Iimpiadoresenpolvo,lanadeaceroni abrasivos
fuertesennbgunasupefficiepbtada.
Panel de control
Es buena idea limpiar el panel de conuol
despu_s de cada uso. Limpie conj_d)dn
suave y agua o con una solucidn de
vinagre y agua, ex!juague con agua limpia
y lusne en seco con un patio suave.
Cuando haga la limpieza, el panel
de connol debe esmr a mmperamra
ambienm y no b_jo la luz solar direcm.
No ufilice limpiadores _fl)rasNos,
limpiadores lfquidos fuextes, almohadillas
pl_isticas para resuegar o limpiadores
para hornos sobre el panel de conuol:
esms producms dafiarfin el ac_d)a(lo.
Una solucidn 50/50 de vinagre y agua
calienm flmciona bien.
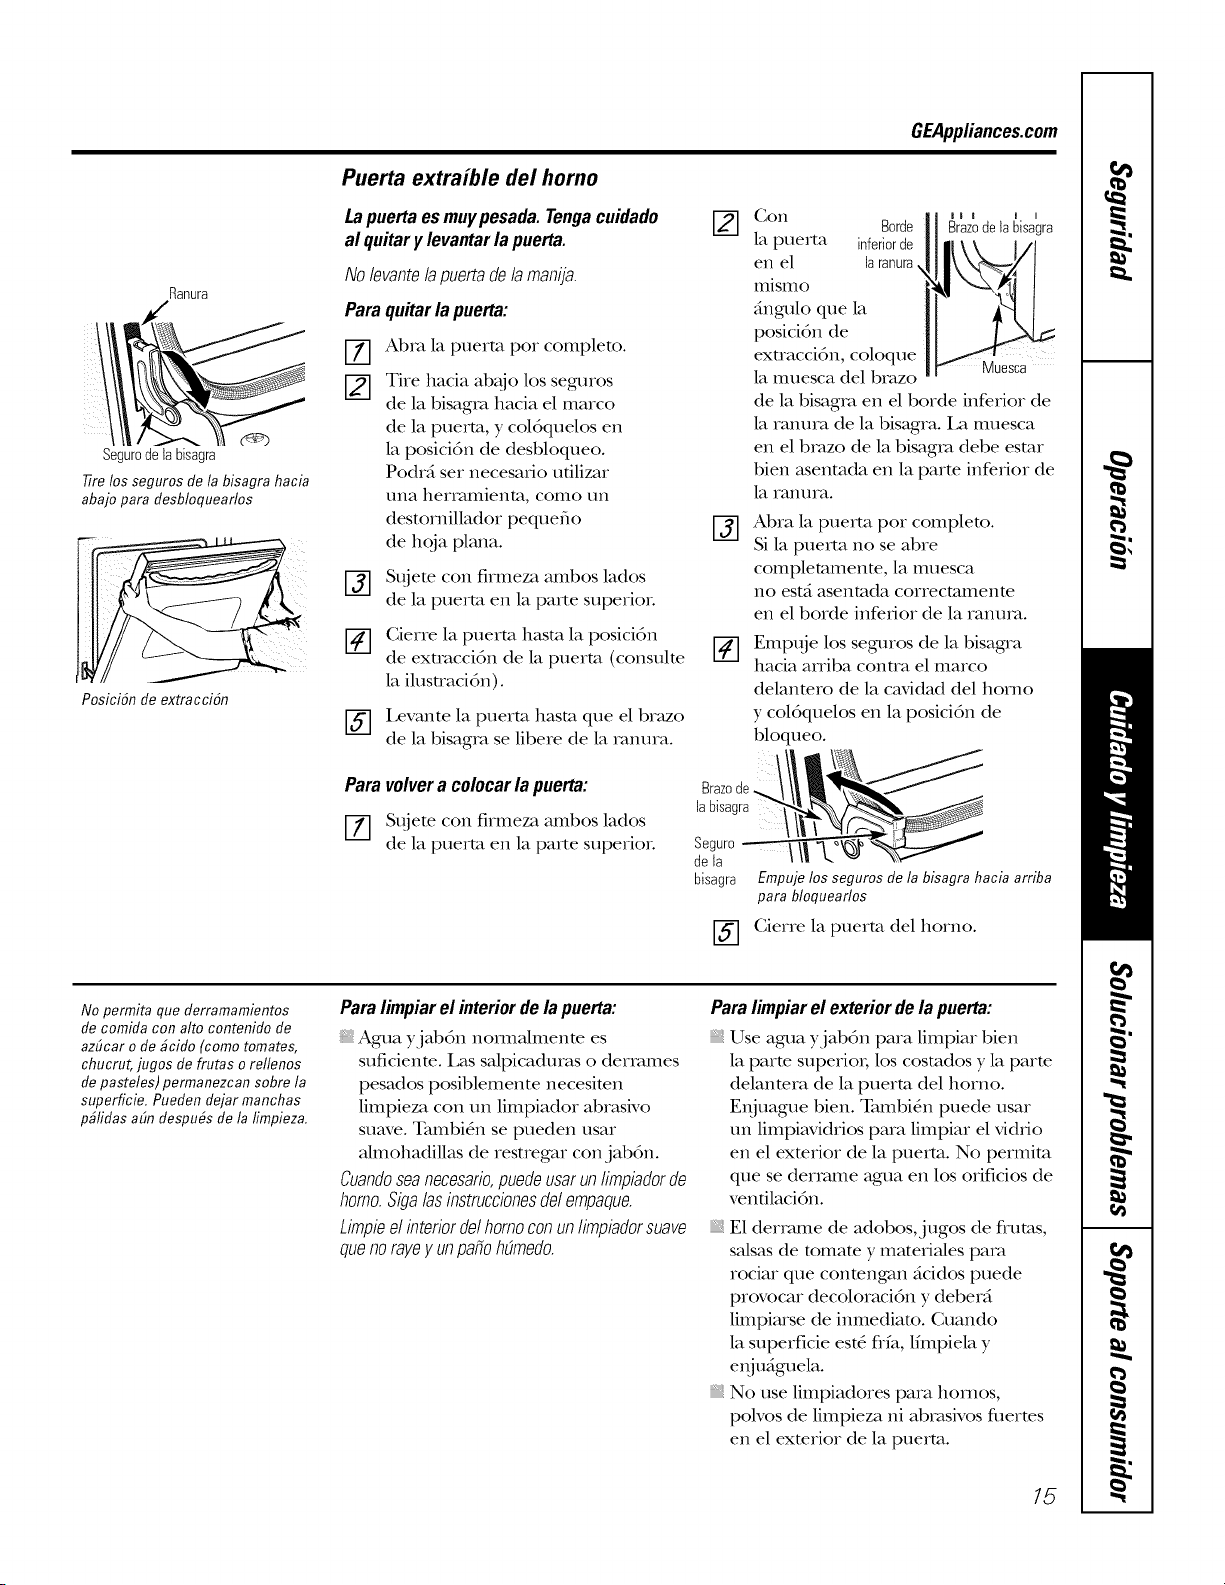
GEApplianees.com
Puerta extraible del homo
Ranura
Segurodelabisagra
fire los seguros de la bisagra hacia
abajo para fiesbloquearlos
PosiciSn de extracciSn
Lapuertaesmuypesada.Tengaeuidado
alquitary levantarlapuerta.
No levante lapuerta de la manija.
Paraquitarlapuerta:
Abm la puerta pot completo.
Tire hacia ab_io los seguros
de la bisagra hacia el marco
de la puerto, y coldquelos en
la posicidn de desbloqueo.
Podrfi set necesado u61izar
[lna herIatllien[a, coIIlO till
destomillador pequefio
de hoja plana.
St)jete con firmeza ambos lados
de la puerto en la parte superioL
[_] Cierre la puerto hasm la posicidn
de extraccidn de la puerto (consulte
la ilustracidn).
Levante la puerto hasm que el bra_zo
de la bisagm se libere de la mnura.
@
IJ I I I
Con Borde Brazodela bisagra
la puerto inferiorde
en el laranura,
IlliSII10
_ingulo que la
posicidn de
extraccidn, coloque Muesca
la muesca del brazo
de la bisagm en el borde inferior de
la ranura de la bisagm. La muesca
en el bmzo de la bisagra debe esmr
bien asenmda en la parm inferior de
la I';-/]ltlI'_t.
Abra la puerto pot completo.
Si la puerto no se abre
complemmente, la muesca
no estfi asenmda correcmmente
en el borde inferior de la ranum.
Empt{je los seguros de la bisagra
hacia aniba contra el marco
delantero de la cavidad del homo
y coldquelos en la posicidn de
bloqueo.
Para volver a eoloear la puerta:
[7] St{iete con firmeza ambos lados
de la puerto en la parte superioL
Brazode
labisagra
Seguro
de la
bisagra
@
Empuje los seguros de la bisagra hacia arriba
para bloquearlos
Cierre la puerta del homo.
No permita que derramamientos
de comida con alto contenido de
azficar o de #cido (como tomates,
chucrut, jugos de frutas orellenos
de pasteles) permanezcan sobre la
superficie. Pueden dejar manchas
p#fidas afin despu#s de la fimpieza.
Para limpiar el interior de la puerta:
Agua yj_d)6n nommlmente es
suficiente. Las salpicaduras o derrames
pesados posiblemente necesimn
limpieza con un limpiador abrasivo
suave. Tambi_n se pueden usar
almohadillas de restregar con j_d)dn.
Cuandoseanecesario,puede usarun Iimpiadorde
homo. Siga /asinstruccionesdelempaque.
Limpieel interior de/homo con unlimpiadorsuave
queno rayey unpatio hEJmedo.
Para limpiarelexteriordela puerta:
Use agua yjtd)dn para limpiar bien
la parte superio,; los cosmdos y la parte
delantera de la puerto del homo.
E_juague bien. _mlbi_n puede usar
un limpiavidrios para limpiar el vidrio
en el exmrior de la puerto. No permim
que se derrame agua en los orificios de
ventilacidn.
E1dermme de adobos, jugos de t-urns,
salsas de tomato y materiales para
rociar que conmngan dcidos puede
provocar decoloracidn y deberd
limpiarse de inmediam. Cuando
la superficie est_ flfa, lflnpiela y
e_,judguela.
No use limpiadores para homos,
polvos de limpieza ni _d)rasivosfllerms
en el exmrior de la puerto.
15
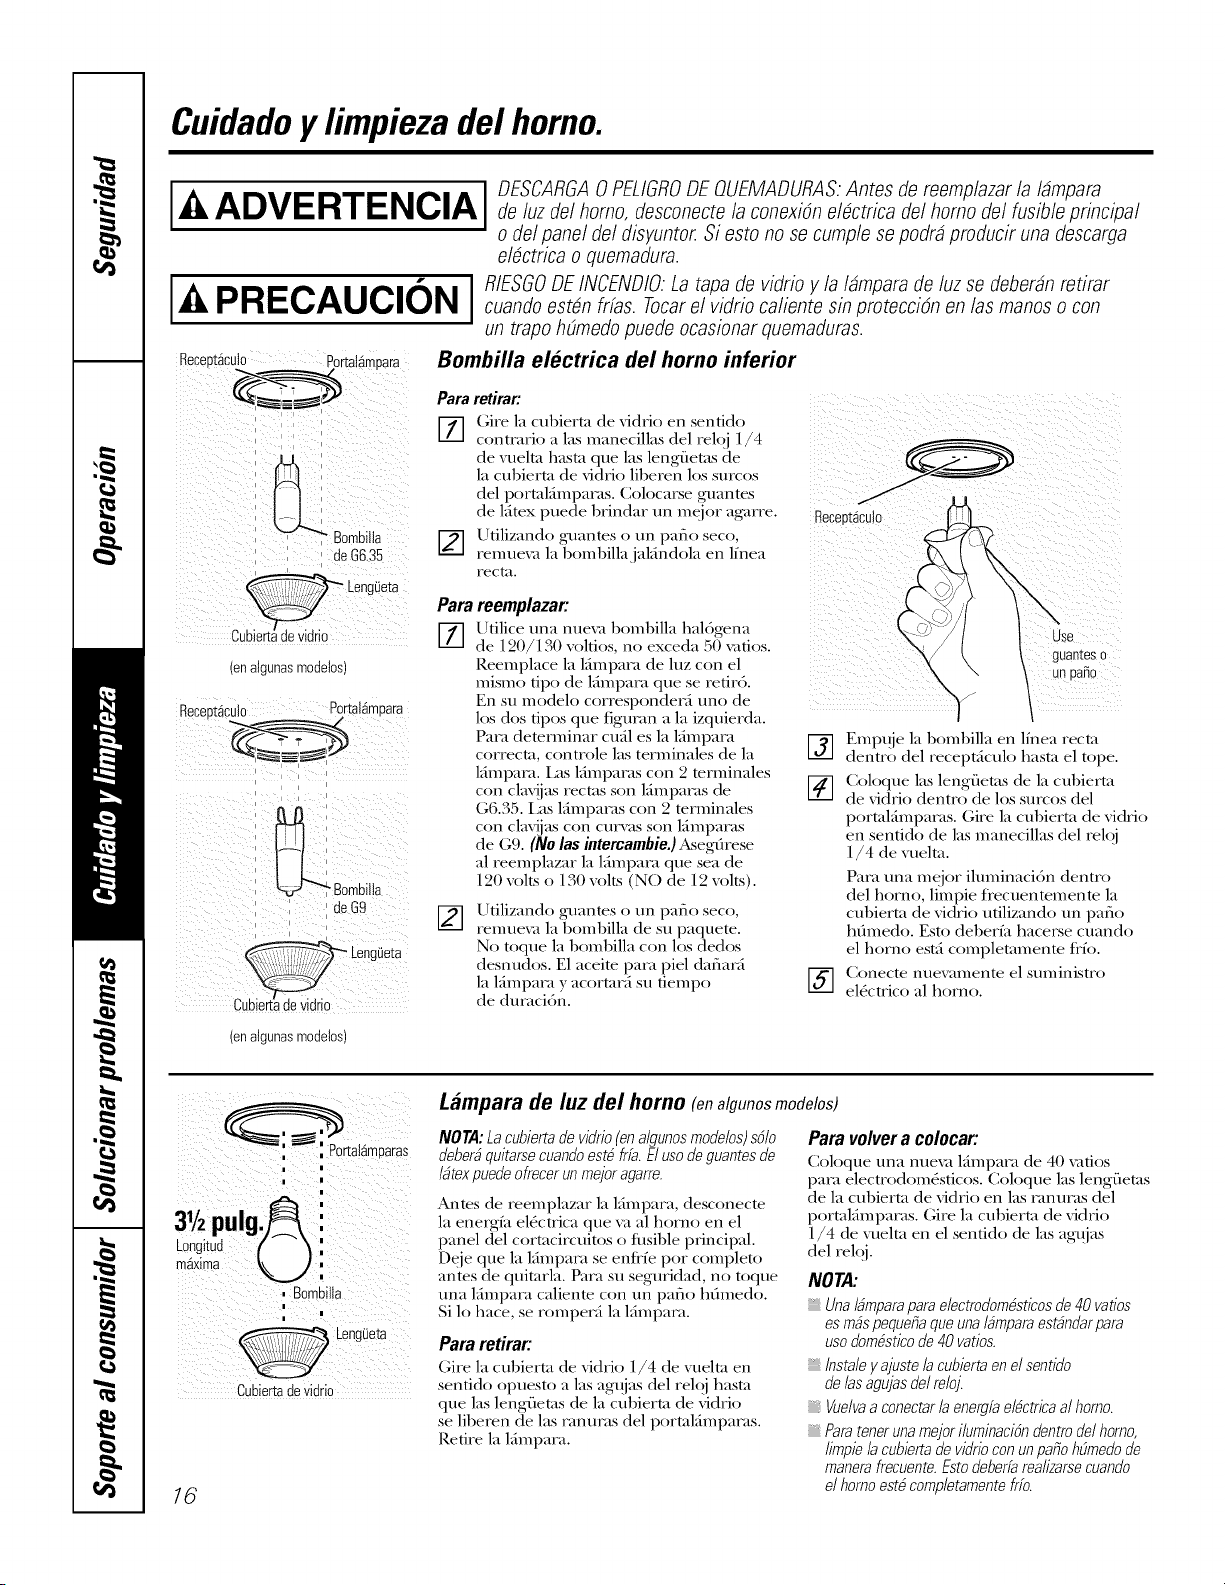
Cuidadoy limpiezadel homo.
I ADVERTENCIA =1D SCARGA0P L/GR0 U MADURAS.Antesde eemp/aza /a/ampa ade luz del homo, desconecte la conexi6n electrica del homo del fusible principal
o del panel del disyuntor Si esto no se cumple se podrd producir una descarga
electrba o quemadura.
I PRECAUCI&NI RIEsG°OEINCENOIO.Larapadevidrio y la 16mparade luzse deber6nretirar
,_ v I cuandoesten frfas. Tocarel vidrio caliente so)protecci6n en las manos o con
I
un trapohE_medopuede ocasionar quemaduras.
Flecett_culo
P0rtaamuara Bombilla electrica del homo inferior
Para retirar:
7] (;ire la cubierta de vidrio en sentido
contmrio alas m.mecillas del rel(3i 1/4
de vuelta hasta que las leng'fietas de
la cubierta de vidrio liberen los surcos
del portalfimpams. (lolocarse guantes
de lfitex puede brindar un meior agarre. Recept_cut0
B0mbilla _] Utilizando g'uantes o un patio seco,
deG&35 -- ren/tleva la bombillajalfindola en lfnea
Fectit.
mnalcJnasmodetos
Receutaculo Portat_rr3ara
_ Bombilla
deG9
Parareemplazar:
[7] tilice una nueva 1)oral)ilia hal6gena
de 120/130 xoltios, no exceda 50 x_tios.
Reemplace la l_impaca de luz con el
mismo tipo de l_impaca que se retir6.
En su modelo correspondec, i uno de
los dos tipos que figman a la izquierda.
Paca determinar emil es la l_impaca
correcta, controle las terminales de la
c( n 2 terminales
l_impma. I,as l_impmas _
con clav!iasrectas son l_impams de
G6.35. Las l_impams con 2 terminales
con claqias con curvas son l_impacas
de (;9. (No las intercambie.) Asegfirese
al reemplazar la l_impam que sea de
120 xolts o 130 xolts (NO de 12 xolts).
Utilizando guantes o un patio seco,
remtleva la 1)oral)ilia de su paquete.
No toque la bombilla con los dedos
desnudos. E1 aceite paca piel dafiacd
la lfimpma y acortarfi su fiempo
de dtwacidn.
%
Use
guantes 0
unpano
Empuje la bombilla en lfnea recta
dentro del receptficulo hasta el tope.
_] oloque las lengfietas de la cul)ierta
de xidrio dentro de los surcos del
portalfimpmas. (;ire la cul)ierta de vidrio
en senfido de las manecillas del reM
1/4 de wlelta.
Paca una meior ihnninaci6n dentro
del homo, limpie fl'ecuentemente la
cubierta de vidrio utilizando un patio
hfimedo. Esto deberfa hacerse cuando
el horno estfi completamente fl'fo.
_-] Conecte nuevamente el stnninistro
el6ctrico al homo.
(enalgunasmodetos)
, Bombilta
I
|
|
CubiertadeVidrio
16
Lampara de luz del homo (onalgunosmodelos)
NOTA: Lacubierta de vidrio(ena/gunos modelos)s6Io
deberbquitarse cuandoest6 fria. E/uso deguantes de
/btexpuede ofrecer unmejoragarre.
Antes de reemplazar la lfimpara, desconecte
la energf,t el6ctrica que _;t al homo en el
panel del cormcircuitos o fllsible principal.
Deje que la lfimpma se enflfe pot completo
antes de qtfitarla. P,na su seguridad, no toque
nna l_impam caliente con un patio home&).
Si lo hace, se rompel, i la l_impma.
Para retirar:
(;ire la cul)ierta de vidrio 1/4 de vueha en
sentido opuesto alas agujas del reloi hasta
que las lengiietas de la cubierta de vidrio
se liberen de lasc, mums del portalfimpams.
Retire la lfimpam.
Paravolvera colocar:
Coloque una nueva lfimpma de 40 _atios
paca electrodom_sficos. Coloque las lengfletas
de la cubierta de vidrio en las FannFas del
portalfimpams. (;ire la cubierta de vidrio
1/4 de vueha en el sentido de las agnjas
del tel@
NOTA:
UnaI_mparapara electrodombsticos de 40 vatios
es robspequetia que una/#mparaest#ndar para
uso dombsticode 40 vatios.
Instaleyajuste /acubierta enel sentido
de/as agujas del reloj.
Vuelvaa conectar/a energfaelbctrica al homo.
Parateneruna mejor iluminacibn dentrodel homo,
limpie /acubierta de vidriocon unpatio h#medo de
manerafrecuente. Estodeber/area/izarse cuando
el homo estb completamente fifo.
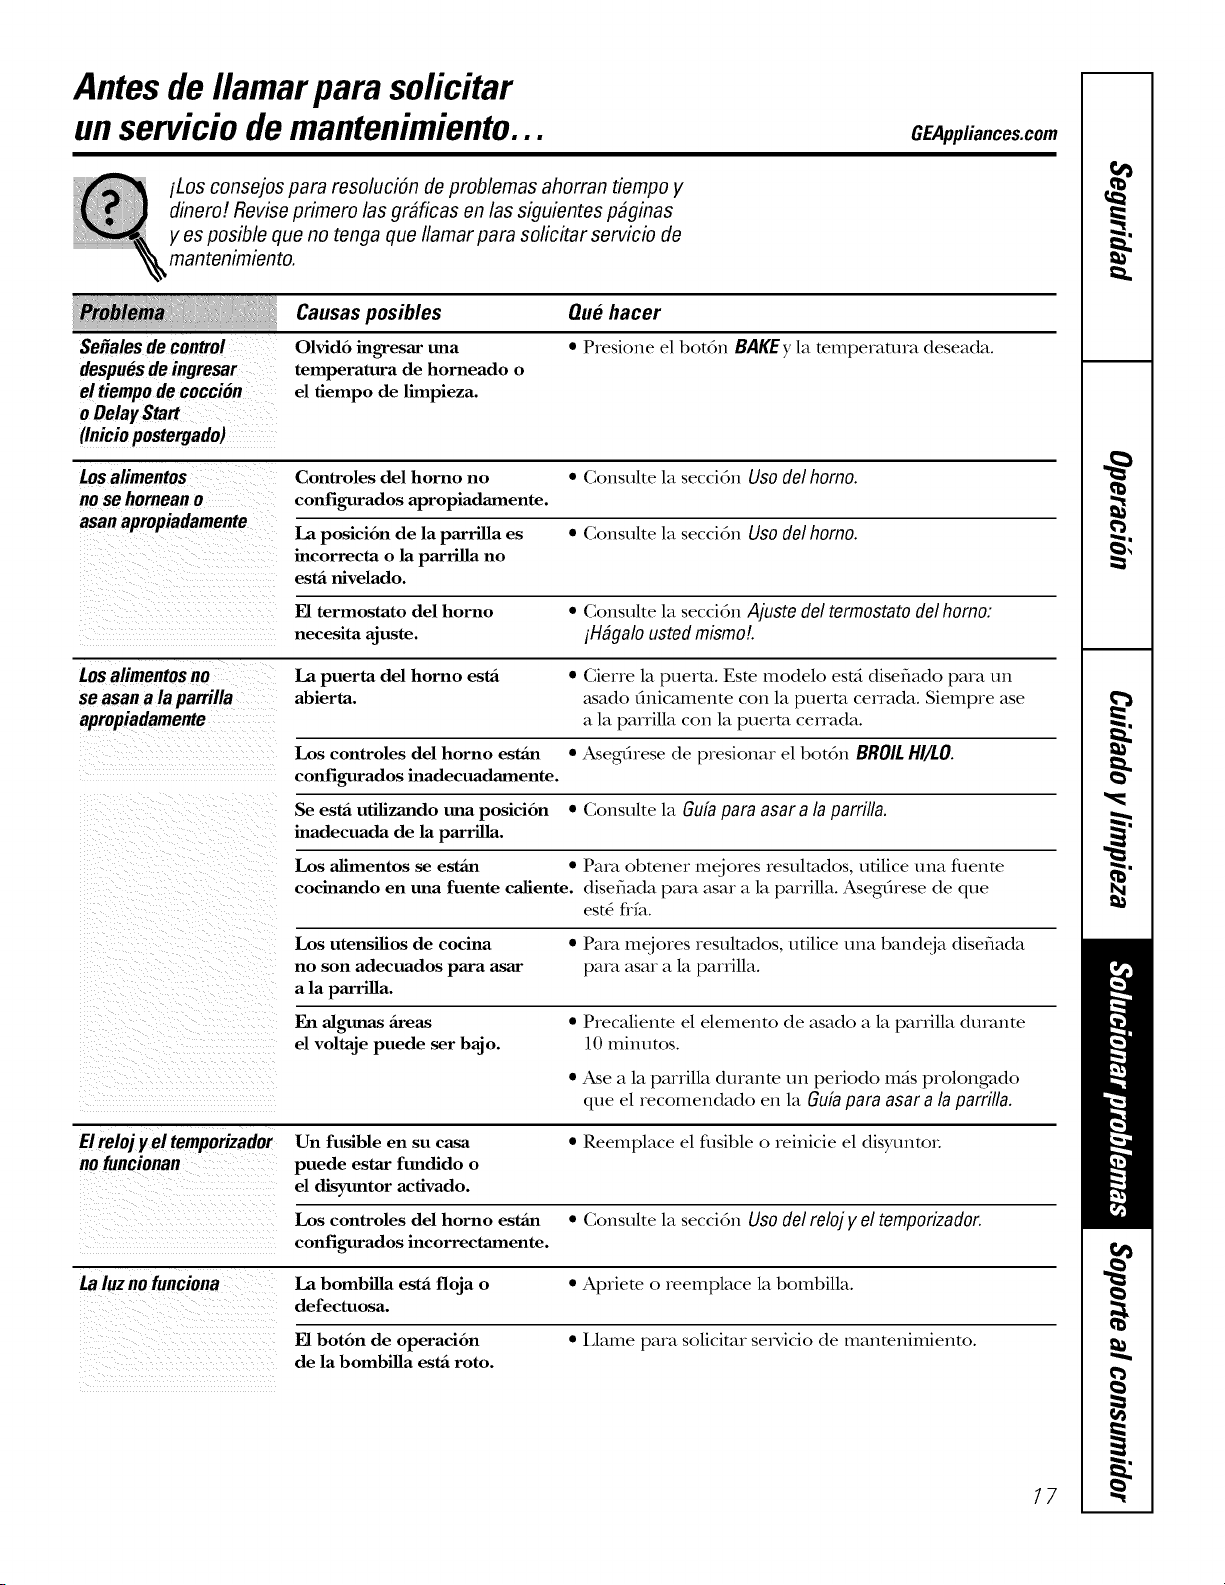
Antesde Ilamarpara solicitar
unserviciodemantenimiento...
GEAppliances.com
iLos consejos para resoluci6n de problemas ahorran tiempo y
dinero! Revise primero las grMicas en las siguientes p@inas
y es posible que no tenga que Ilamar para solicitar servicio de
mantenimiento.
Se_alesdecontrol
despuesdeingresar
el tiempodecoccion
oDelayStart
(Iniciopostergado)
Causas posibles
Olvid6 ingresar una
temperatura de horneado o
el tiempo de limpieza.
Que hacer
* Presione el bot6n BAKE),la temperamra deseada.
Losalimentos Controles del homo no • Consulte la secci6n U$o del homo.
nosehorneano configurados apropiadamente.
asan apropiadamente La posici6n de la parriUa es • Consulte la secci6n Uso de/homo.
incorrecta o la parrilla no
estfi nivelado.
El termostato del homo • Consulte la secci6n Ajuste de]termostatodelhomo:
necesita ajuste, iH_galo usted mismo!.
Los alimentos no La puerta del homo esta • Cierre la puerto. Este modelo est:i disefiado para un
se asan a la parrilla abierta, asado finicamente con la puerto cenada. Siempre ase
apropiadamente a la panilla con la puerto cenada.
Los controles del horno estfin • Asegfirese de presionar el bot6n BROILHI/LO.
configurados inadecuadamente.
Se estfi ufilizando una posici6n • Consulte la Gu[apara asar a laparrilla.
inadecuada de la parrilla.
Los alimentos se estfin • Pare obtener mejores resultados, ufilice una flmntc
cocinando en tma fuente caliente, disefiada para asar a la parfilla. Asegfirese de que
est_ frfa.
Los utensilios de cocina • Para mejores resultados, ufilice una bandeja diseflada
no son adecuados para asar pare asar a la parfilla.
a la parrilla.
Ell algunas fireas
el voltaje puede ser bajo.
• Precalienm el elemenm de asado a la parfilla dumnte
10 minutos.
• Ase a la parrilla duranm un periodo m_isprolongado
que el recomendado en la Gllfapara asar a la parrilla.
B reloj y el temporizador Un fusible en su casa • Reemplace el flMble o reinicie el disyumoL
no funcionan puede estar fundido o
el disyuntor activado.
Los controles del homo estfin • Consulte la secci6n Uso dol roloj y el tomporizador.
configurados incorrectamente.
La luzno funciona La bombilla estfi floja o • Apriete o reemplace la bombilla.
defectuosa.
El bot6n de operacidn • Llame para solicitor secdcio de mantenimienm.
de la bombilla estfi roto.
77
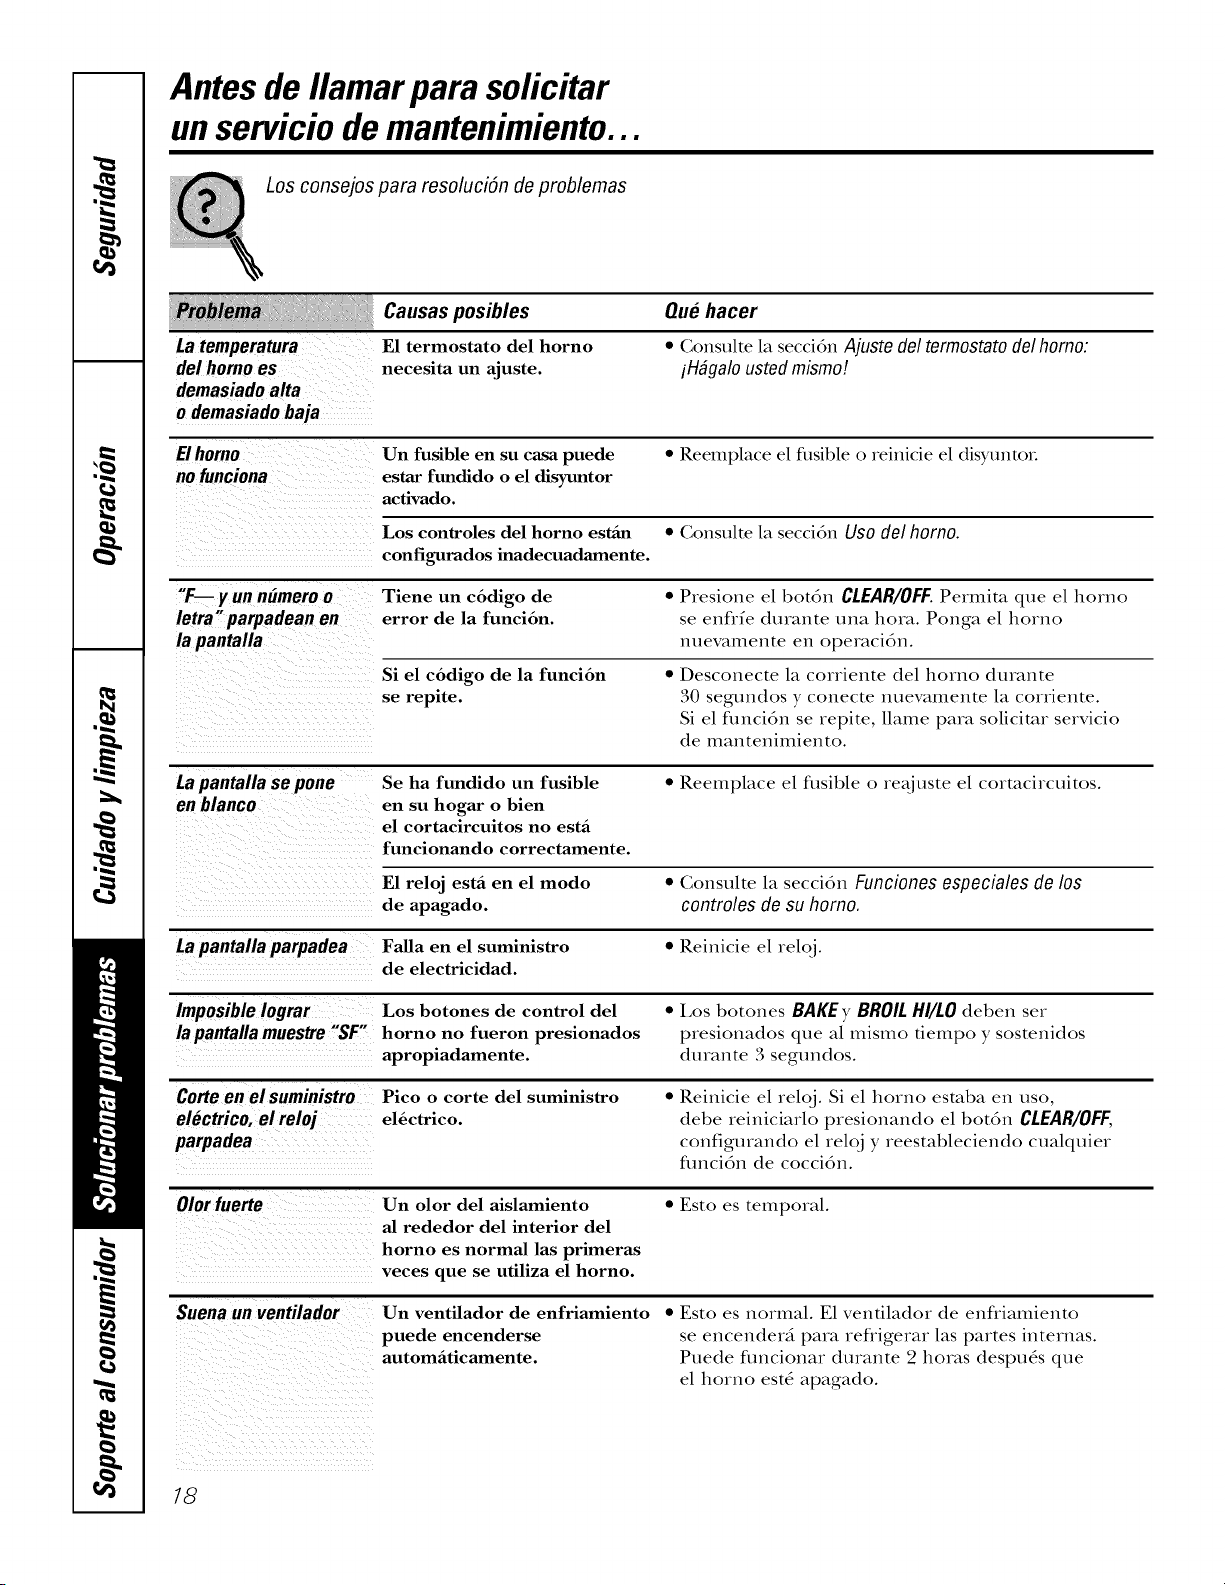
Antes de Ilamarpara solicitar
unservicio demantenimiento...
Los consejos para resoluciSn de problemas
Causas posibles Que hacer
La temperatura El termostato del horno * Consulte la secci6n Ajuste del termostato del homo:
del homo es neeesita un ajuste, iH#galo usted mismo!
demasiado alta
o demasiado baja
El homo Un fusible en su casa puede * Reemplace el fusible o reinicie el disyunroL
no funciona estar ftmdido o el disyuntor
activado.
Los controles del horno esffm • (;onsulte la secci6n Uso dol homo.
eonfigurados inadeeuadamente.
"F--- y un n#mero o Tiene un c6digo de • Presione el bot6n CLEAR/OFF. Permita que el homo
letra"parpadean en error de la funci6n, se enflfe durante una hora. Ponga el homo
lapantalla nuevamente en operaci6n.
Si el c6digo de la funci6n
se repite.
• Desconecte la corriente del homo durante
30 segundos y conecte nuevamente la corriente.
Si el fimci6n se repite, llame para solicitor servicio
de mantenimiento.
Lapantalla sepone Se ha fundido un fusible • Reemplace el fl_sible o re@_ste el cormcircuitos.
en blanco en su hogar o bien
el cortacircuitos no estfi
funcionando correctamente.
El reloj estfi en el modo • Consulte la secci6n Funcionesespeciales de los
de apagado, controles de su homo.
Lapantallaparpadea FaUa en el suministro • geinicie el reloi.
de electricidad.
Imposible Iograr Los botones de control del • Los botones BAKEy BROIL HI/LO deben set
lapantallamuestre "SF" horno no fueron presionados presionados que al mismo fiempo y sostenidos
apropiadamente, durante 3 segundos.
Corteenelsuministro Pico o corte del suministro • Reinicie el rel(_. Si el homo esmba en uso,
electrico, elreloj el6ctrico, debe reiniciarlo presionando el botdn CLEAR/OFF,
parpadea configurando el reloi y reestableciendo cualquier
flmci6n de cocci6n.
Olor fuerte Un olor del aislamiento • Esto es temporal.
al rededor del interior del
horno es normal las primeras
veces que se utiliza el horno.
Suenaun ventilador Un ventilador de enfriamiento
puede encenderse
automfiticamente.
• Esto es normal. E1 venfilador de enfliamiento
se encenderd para refligerar las partes internas.
Puede fimcionar durante 2 horas despu_s que
el horno est_ apagado.
18
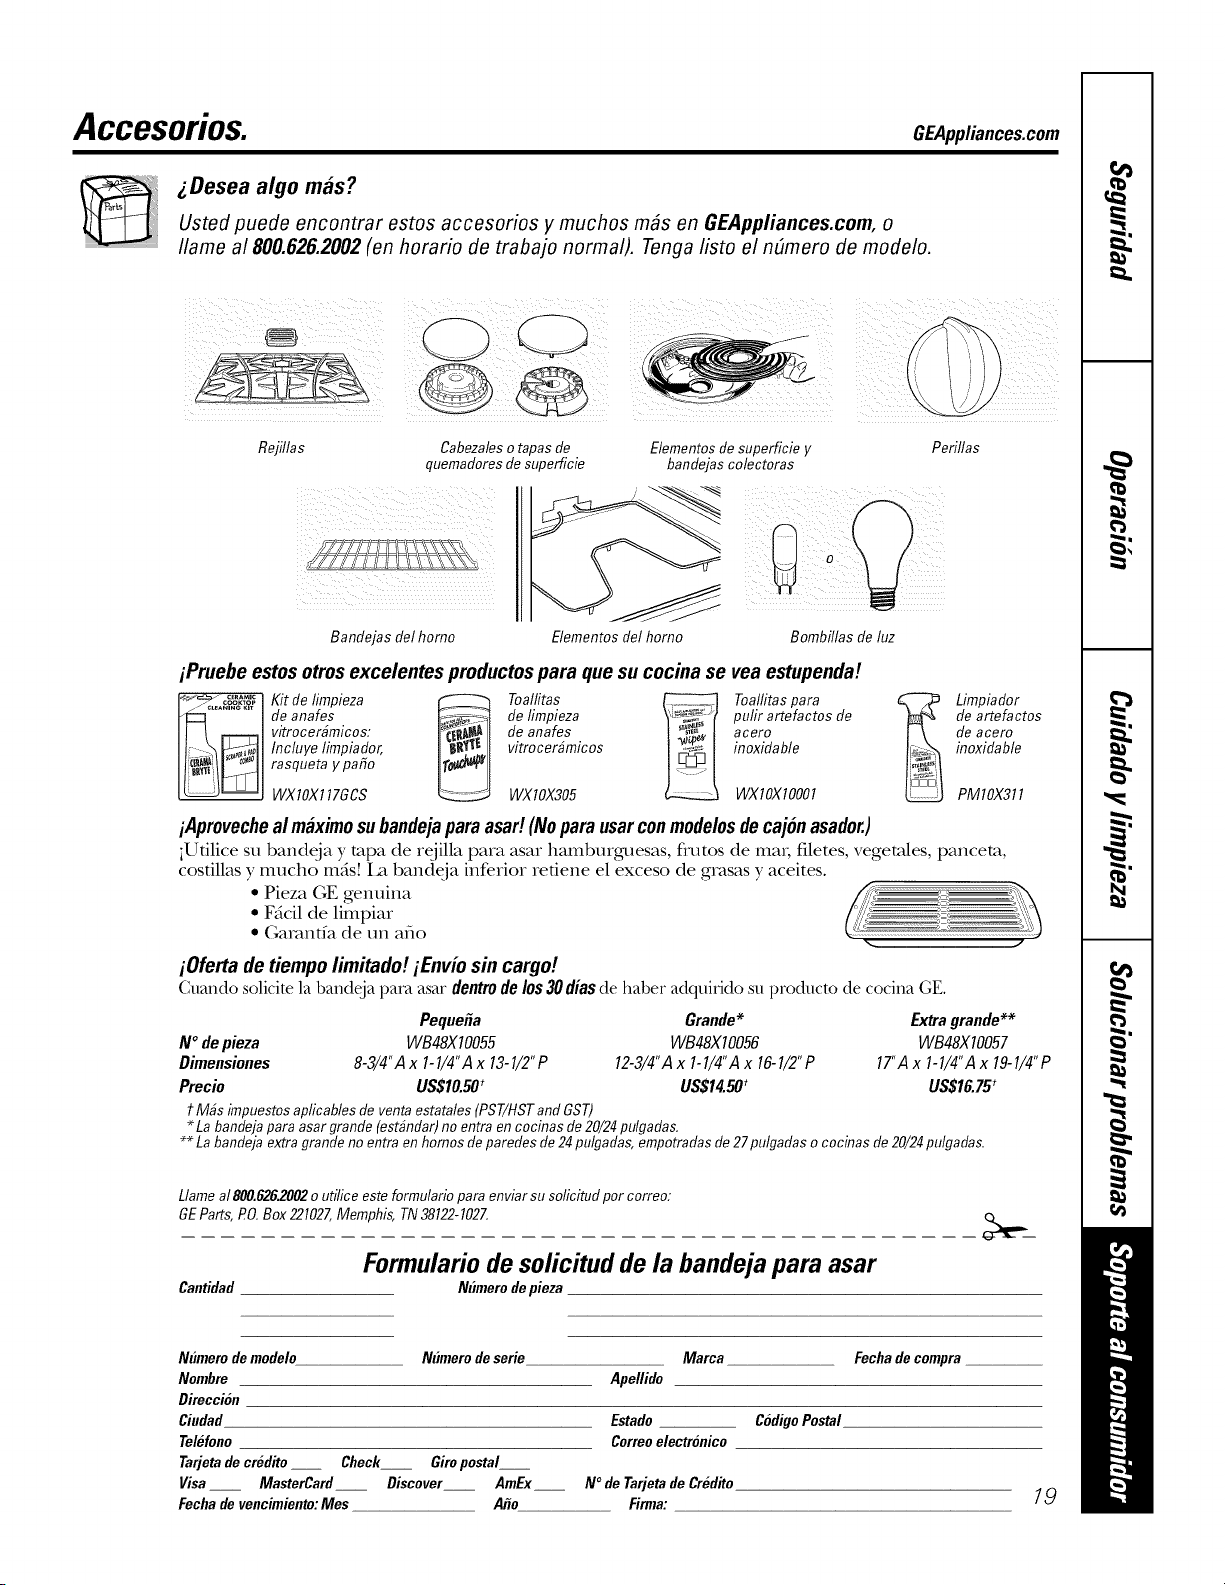
Accesorios. GEApplianoes.oom
gDesea algo mas?
Usted puede encontrar estos accesorios y muchos m_s en GEAppliances.com, o
Ilame a1800.626.2002 (en horario de trabajo normal). Tenga listo el nOmero de modelo.
Rejillas Cabeza/esotapas de
quemadoresde superficie
Bandejas del homo
Elementos desuperficie y Periflas
bandejas colectoras
Elementos del homo
i ¸¸¸¸¸¸¸ i!
Bombillas de luz
Pruebe estosotrosexcelentes productospara que su cocina se yea estupenda!
Kit de limpieza _ Toallitas _ Toallitas para
de anafes de limpieza pulir artefactos de
vitroceMmicos: de anafes acero
Incluye limpiador, vitrocerbmicos inoxidable
rasqueta ypatio
WXlOX117GCS WXlOX305 WXlOXlO001
Limpiador
de artefactos
de acero
inoxidable
PMlOX311
iAproveche almaximosubandejaparaasar!(Noparausarconmodelosdecajonasador.)
[Utilice su bandeja y mpa de rejilla para asar hamburguesas, fmtos de maI; filetes, vegemles, panceta,
costillas y mucho m_is[ Ia bandeia inferior retiene el exceso de gmsas y aceites.
• Pieza GE genuina
• F_icil de limpiar
• Gamntfa de un afio
iOferta de tiempolimitado! ignvio sin cargo!
Cuando solicite la bandeja para asar dentrodelos30dias de haber adquirkto su producto de cocina GE.
Pequefia Grande* Extragrande**
N°depieza WB48X10055 WB48X10056 WB48X10057
Dimensiones 8-3/4"Ax 1-1/4"Ax 13-1/2"P 12-3/4"Ax 1-1/4"Ax 16-1/2"P 17"Ax 1-1/4"Ax 19-1/4"P
Precio US$10.50_ US$1450_ US$16.75_
t M_simpuestosaplicablesdeventaestatales(PST/HSTandGST)
* Labandejaparaasargrande(est#ndar)noentraencocinasde20/24pulgadas.
** Labandejaextragrandenoentraenhomosdeparedesde24pulgadas,empotradasde27pulgadaso cocinasde20/24pulgadas.
Llamea1800.626.2002outilice esteformulario para enviarsu solicitud por correo:
GEParts,RO,Box221027,Memphis, TN38122-1027.
Cantidad
Formulario de solicitud de la bandeja para asar
N#merodepieza
N#merode modelo
Nombre
Direccion
Ciudad
Telefono
Tarjetadecredito__
Visa MasterCard
Fechade vencimiento:Mes
Check
Nomerodeserie Marca
Apellido
Estado CodigoPostal
Correoelectronico
Giropostal
Discover AmEx N°de Tarjetade Credito
Afio Firma:
Fechadecompra
19
Notas.
m
N
.h
m
w
z,.
w
m
=_
_L
w
i
w
20

Garantiade GEpara suhomo electrico empotrado.
Todos los servicios de garantia los proporcionan nuestros Centros
de Reparaci6n de F#brica o nuestros t#cnicos Customer Care®
autorizados. Para concertar una cita de reparaci6n, visite
nos en Ifnea en GEAppliances.com, o Ilame al SOO.GE.CARES
(800.432.2737).Cuando Ilame para soficitar servicio, por favor
tenga a mano el n6mero de serie y el n6mero de modelo.
Pegue aquf su recibo.
Se requiere facilitar prueba
de la fecha de compra original
para obtener un servicio
bajo la garantfa.
A partirde la fecha
dela compraoriginal
GEreemplazara:
Cualquierpattedel homo que falle debido a defectos en los mamriales o en la fabricacidn.
Durante esm garantia limitada de un a#o, GE tambi_n proporcion_, sin costoalguno,
toda la mano de ob_ y los servicios internos para reemplazar partes defectuosas.
Viajes de servicio a su casa para ensefiarle c6mo usar
el producto.
Instalaci6n, entrega o mantenimiento inapropiada.
Fallas del producto si hay abuso, mal uso, o uso para
otros prop6sitos que los propuestos, o uso para fines
comerciales.
Reemplazo de fusibles de su casa o reajuste de
interruptores de circuito.
Dafio al producto causado por accideme, fuego,
intmdaciones o actos de Dios.
Dafio incidemal o consecuencial causado por posibles
defectos con el aparato.
Dafio causado despu6s de la entrega.
Producto no accesible para facilitar el servicio
requerido.
EXCLUSIONDEGARANTJASIMPLICITAS--Su #nico y exclusivoderechoesla reparaciondelproducto,taly comose
indicaenesta Garantialimitada.Cualquiergarantiaimplicita,incluyendo/asgarantiasimplicitasdecomerciabilidad
oadecuacionparaunfin determinado,estanlimitadasa una#ooelperiododetiempomasbrevepermitidopor
la ley.
Esta garantfa se extiende al comprador original y cualquier comprador posterior de productos comprados para
uso residencial dentro des Estados Unidos. Si el producto est# situado en un #rea que no dispone de servicio por
parte de un proveedor de servicio autorizado de GE,podrfa tener que hacerse cargo de los costes de envfo o bien
podrfa solicit#rsele que Ileve el producto a un centro de servicio de GEautorizado para realizar la reparaciSn.
En Alaska, la garantfa excluye el costo de envfo o las visitas de servicio a su casa.
Algunos estados no permiten la exclusi6n o las limitaciones de dafios incidentales o consecuenciales. Esta garantia
da derechos legales especfficos, y usted podrfa tener otros derechos que variar#n de estado a estado. Para saber
curies son sus derechos legales, consulte a la oficina de asuntos del consumidor local o la oficina del Prucurador
(Attorney General) en su Iocalidad.
Garante:General Electric Company.Louisville,KY40225
21
Soporteal consumidor.
P_ginaWebdeGEAppliances
GEAppliances.com
qTiene algtma pregunm sobre su electrodom_sfico? iPruebe la pfigina Web de GE Appliances 24 horas al
dfa, cualquier dfa del aflo_ Para mayor conveniencia y servicio mils _pido, ya puede descargar los Manuales
de los Propiemrios, pedir piezas o incluso hacer una cim en lfnea para que vengan a realizar una
reparacidn.
Soliciteunareparaci6n GEAppliances.com
E1servicio de expertos GE est_ia mn s61o un paso de su puerto, iEntre en lfnea y solicite su reparaci6n
cuando le venga cualquier dfa del aflo_ O llame al 800.GE.CARES (800.432.2737) durante horns normales
de oficina.
RealLifeDesignStudio(Estudiodedisefioparalavidareal)
GEAppliances.com
GE apoya el concepm de Disefio Universal--producms, servicios yambienms que pueden usar genre de
mdas las edades, mmaflos ycapacidades. Reconocemos la necesidad de diseflar para una gmn gama de
habilidades y dificulmdes ffsicas ymentales. Para rods detaUes cobre las aplicaciones de GE Diseflo Universal,
incluyendo ideas de diseflo para la cocina para personas con discapacidades, mire nuesua pdgina Web hoy
mismo. Pare persomks con dificulmdes auditivas, favor de ll_unar al 800.TDD.GEAC (800.8,33.4322).
garantfasampl&das
GEAppliances.com
Compre una garantfa ampliada y obtenga demlles sobre descuentos especiales disponibles mientras su
garantfa estfi a6n activa. Puede comprarla en lfnea en cualquier momento, o llamar al 800.626.2224
durante horns normales de oficina. GE Consumer Home Se_Mces esm_ afin ahf cuando su garantia temline.
Piezasyaccesorios
GEAppliances.com
Aquellos individuos con la calificaci6n necesaria para reparar sus propios elecuodom6sticos pueden
pedir que se les manden las piezas o accesorios direcmmenm a sus hogares (aceptamos las m_jetas
VISA, MasterCard y Discover). Haga su pedido en lfnea ho}_24 horns cada dfa o llamar pot ml_fono
al 800.626.2002 dumnm horns normales de oficina.
Lasinstruccionesdescritasenestemanualeubrenlosproeedimientosa seguirporeualquierusuario.Cualquier
otrareparaciondeberia,porreglageneral,referirsea personalealifieadoautorizado.Debeejereerseprecaueion
ya quelasreparacionesineorrectaspuedeneausareondieionesdefuneionamientoinseguras.
P6ngaseencontacto connosotros
GEAppliances.com
Si no estd satisfecho con el servicio que recibe de GE, pdngase en conmcto con nosotros en nuestm pfigina
Web indicando todos los demlles asf como su ndmero de tel_fono o escrfl)anos a:
General Manage_; Customer Relations
GE Appliances, Appliance Park
Louisville, KY40225
Registresuelectrodom6stico GEAppliances.com
iRegistre su nuevo dectrodom6stico en linea-----euando usted prefiera! E1regisuar su producto a fiempo le
proporcionarfi, si surgiera la necesidad, una mejor comunicaci6n y un servicio mils r5pido b;_jo los t&_ninos
de su garantfa. _mlbi4n puede enviar su m\jem de regisuo pre-impresa que se incluye en el mamrial
de embak_je.
Impreso en losEstados Unidos