Installation and Operating Instructions
Issue: 1
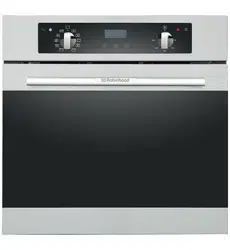
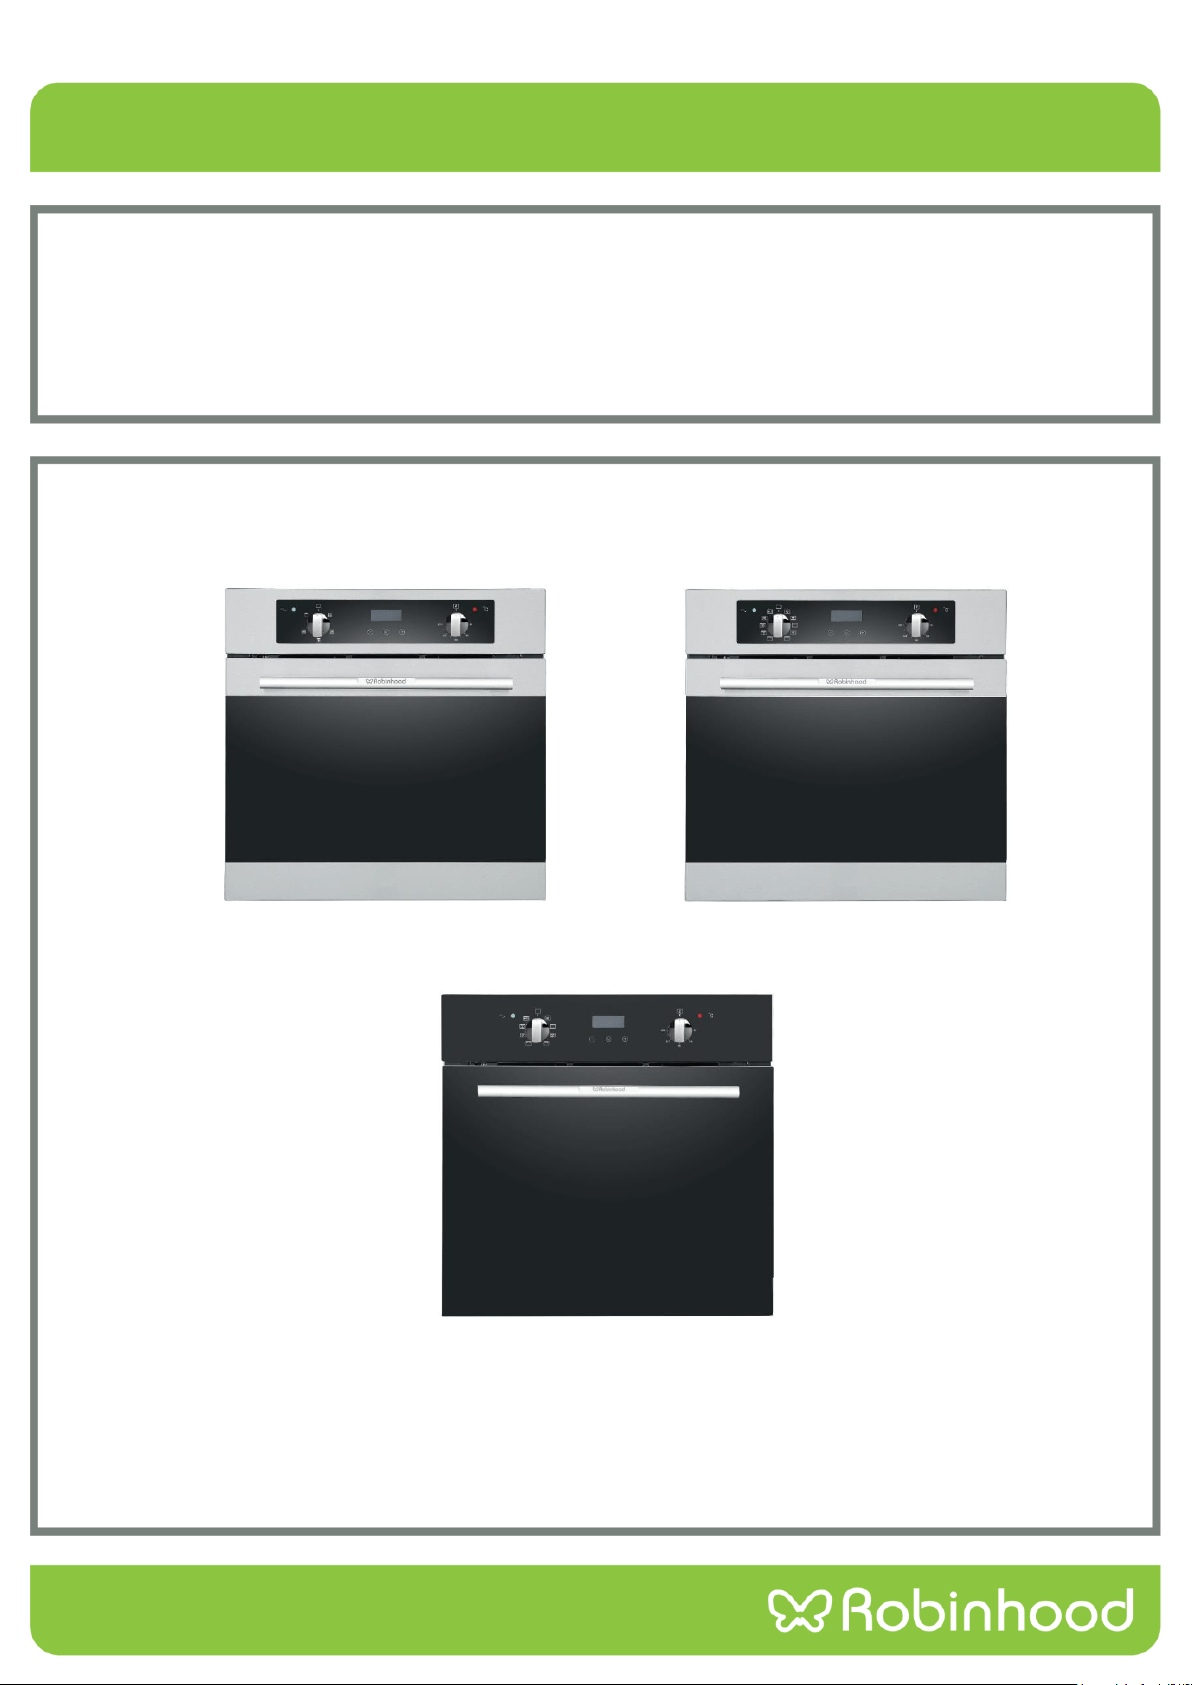
Description: ROBINHOOD 60CM BUILT-IN OVEN WITH DIGITAL TIMER
Model Numbers: RHBO65DX, RHBO610DX & RHBO68DB
Models pictured: RHBO65DX, RHBO610DX & RHBO68DB
Actual products may vary from pictures shown above
Contents
Congratulations!
Thank you for choosing one of our appliances. Before you use the appliance, we strongly recommend that you read
through the whole user manual which provides important safety instructions and description of the product and the
proper use of its functions.
To avoid the ever-present risks involved with using an electrical appliance it is vital that the oven is installed
correctly and that you read the safety instructions carefully to avoid misuse and hazards. It is important that you
retain these instructions and your proof of purchase along with any other important documents about this product
for future reference.
Due to continual product development, Robinhood reserves the right to alter specifications or appearances without
notice.
Important Safety Instructions............................................................................................................................... 1
Appliance Details .................................................................................................................................................. 2
Installation ............................................................................................................................................................ 3
Operating Instructions .......................................................................................................................................... 6
Cleaning and Maintenance .................................................................................................................................20
Troubleshooting .................................................................................................................................................23
Warranty Certificate (New Zealand)...................................................................................................................24
Warranty Certificate (Australia) .........................................................................................................................25
Disposal Information
Most of the packing materials are recyclable. Please dispose of these materials through your local recycling
depot or by placing them in appropriate collection containers.
If you wish to discard this product, please contact your local authorities and ask for the correct method of
disposal.
1
Important Safety Instructions
This User Instruction Manual contains important information, including safety & installation points, which will enable
you to get the most out of your appliance. Please keep it in a safe place so that it is easily available for future
reference; for you or any person not familiar with the operation of the appliance.
1. This appliance is not intended for use by persons (including children) with reduced physical, sensory or mental
capabilities, or lack of experience or knowledge, unless they have been given supervision or instruction
concerning the use of the appliance by a person responsible for their safety. Children should be supervised to
ensure that they do not play with the appliance.
2. After removing the packaging, make sure to check if there is any damage to the appliance. If there is any damage,
(such as cracked glass) never attempt to use the appliance and immediately contact your Authorised Service
Centre. As packaging materials can be dangerous to children, they need to be collected immediately and put out of
reach.
3. WARNING - The oven will become hot during and directly after use. Do not touch any components during this
time, as they may be hot and can cause burns. Care should be taken to avoid touching heating elements inside
the oven to avoid burns. Children should be kept away. Use heat resistant cooking gloves where-ever possible
when moving food and cooking utensils in and out of the oven.
4. Do not use harsh abrasive cleaners or sharp metal scrapers to clean the oven door glass as it can scratch the
surface, which may result in the glass shattering. Clean the glass door using warm damp cloth and dry it with a
soft cloth.
5. Cleaning may only be commenced on the appliance once it has cooled down (best slightly warm). The appliance
should be disconnected from the power outlet or turned off at your isolation switch before commencing any
cleaning process. Do not use a steam jet or any other high pressure cleaning equipment to clean the appliance.
6. WARNING: Ensure that the appliance is switched off before replacing the lamp to avoid the possibility of electric
shock.
7. The appliance must not be installed behind a decorative door in order to avoid overheating.
8. Means for disconnection must be incorporated in the fixed wiring in accordance with the wiring rule.
9. If the electrical supply cord is damaged, either when being installed or after installation, it must be replaced by the
manufacturer, its service centre or similarly qualified persons in order to prevent a hazard.
10. Never store or use corrosive chemicals, vapors, flammables or nonfood products in or near oven. It is
specifically designed for use when heating or cooking food. The use of corrosive chemicals in heating or
cleaning will damage the appliance and could result in injury.
11. Exercise caution when opening the door. Standing to the side, open the door slowly and slightly to let hot air
and/or steam escape. Keep your face clear of the opening and make sure there are no children or pets near the
oven. After the release of hot air and/or steam, proceed with your cooking. Keep doors closed at all time unless
necessary for cooking or cleaning purposes.
12. This appliance must be correctly installed by a suitably qualified person, strictly in accordance with the
manufacturer’s instructions. Please see the specific section of this booklet that refers to installation.
13. The appliance must be installed and put in operation by an authorised technician under the conditions provided
by the manufacturer in this manual. The manufacturer cannot be held responsible for any damage that might
occur due to faulty installation.
14. All cabinetry and materials used in the installation must be able to withstand a minimum temperature of 85°C
above the ambient temperature of the room it is located in, whilst in use. Certain types of vinyl or laminate
kitchen furniture are particularly prone to heat damage or discolouration at temperatures outside the guidelines
given above. Any damage caused by the appliance being installed without adhering to the temperature limits
set out above will be the liability of the owner.
15. Do not place heavy objects on the oven door or lean them against the oven door whilst it is open, as this can
cause damage to the oven door hinges.
16. This appliance is designed for domestic household use only and for the cooking of domestic food products. Use
as a commercial appliance will void the warranty. It should not to be used in a marine environment or outdoors.
17. The electrical connection must be accessible after installation. The appliance must be electrically isolated before
any maintenance can be performed, which includes changing a lamp. The appliance is not intended to be
operated by means of an external timer or separate remote control system.
18. Never line the oven bottom with aluminium foil, as the consequent accumulation of heat could compromise the
cooking and even damage the enamel.
2
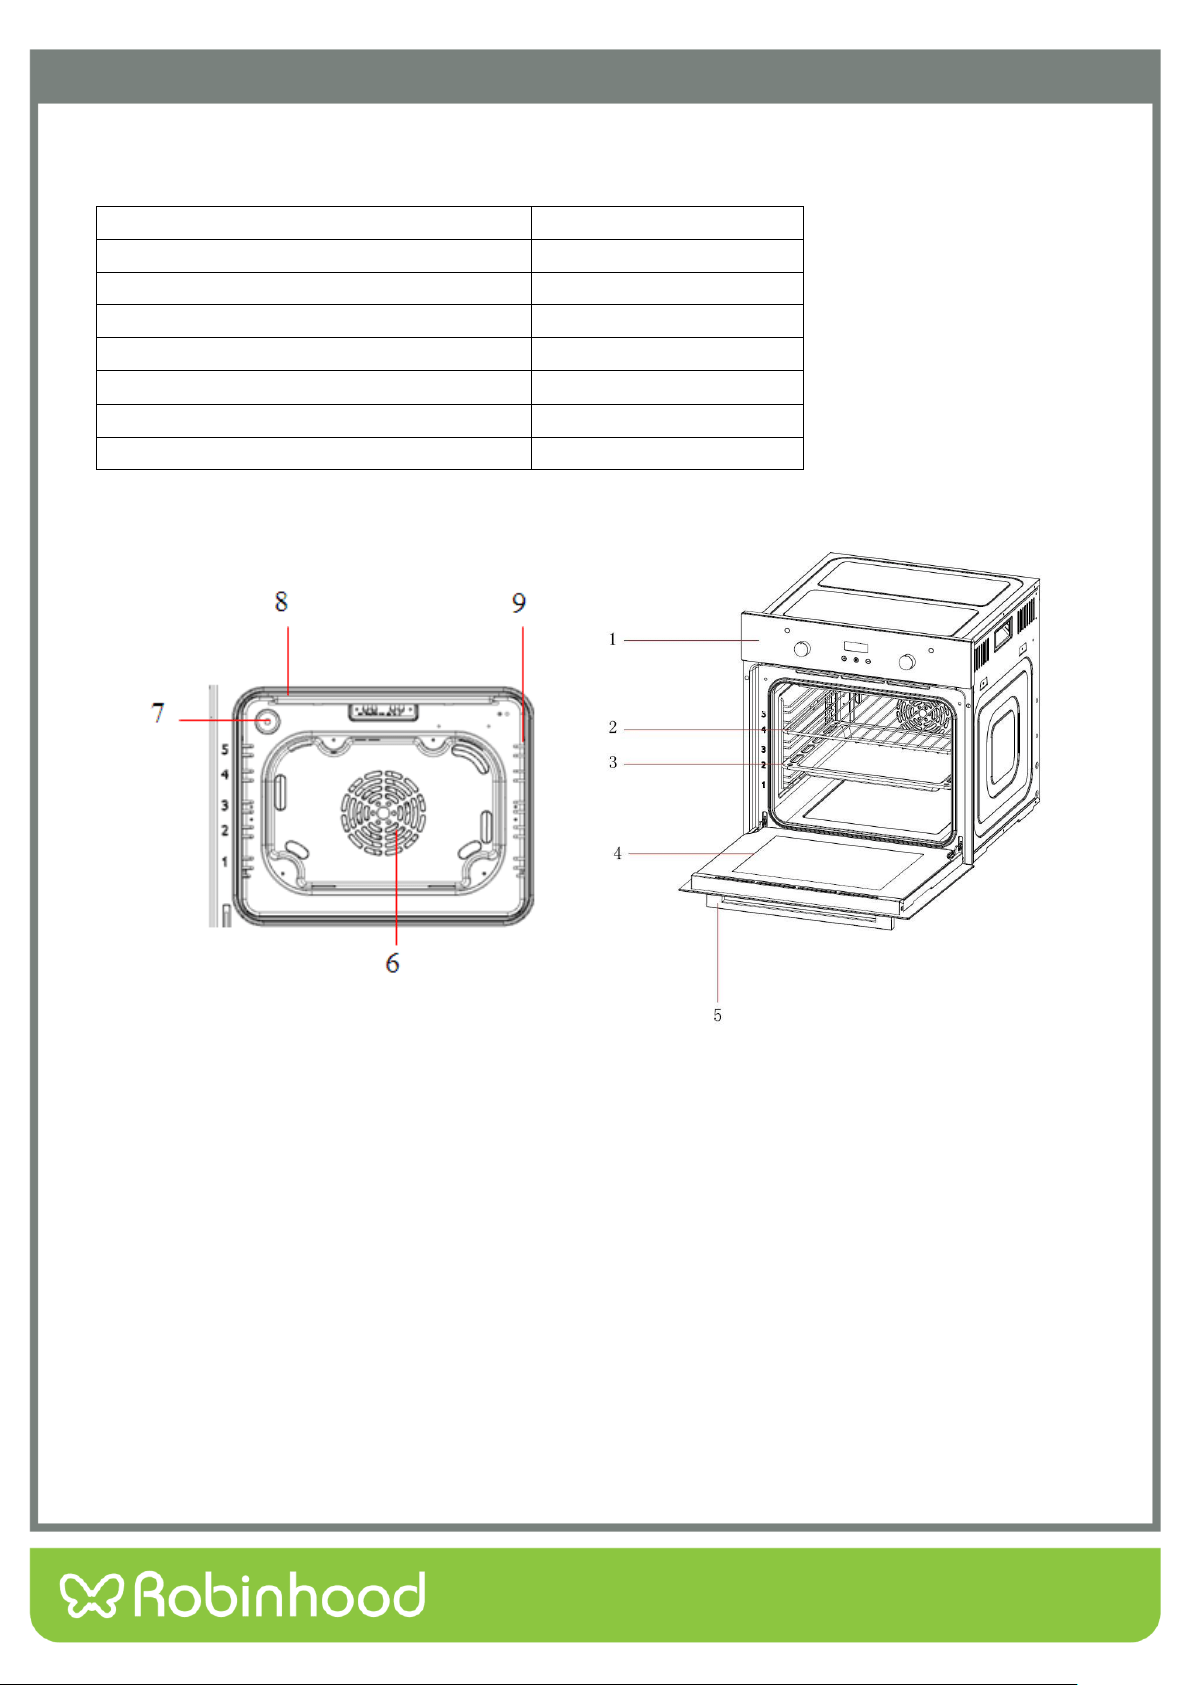
Appliance Details
Details
1. Control Panel
2. Wire Rack
3. Tray
4. Door
5. Handle
6. Fan Motor (behind steel plate)
7. Lamp
8. Grill Heating Element
9. Side Shelf
Voltage/frequency
220-240V~50Hz
Total power consumption
2300W
Cable type/section
H05VV-F 3*1.5mm
2
Cable length
1.2m
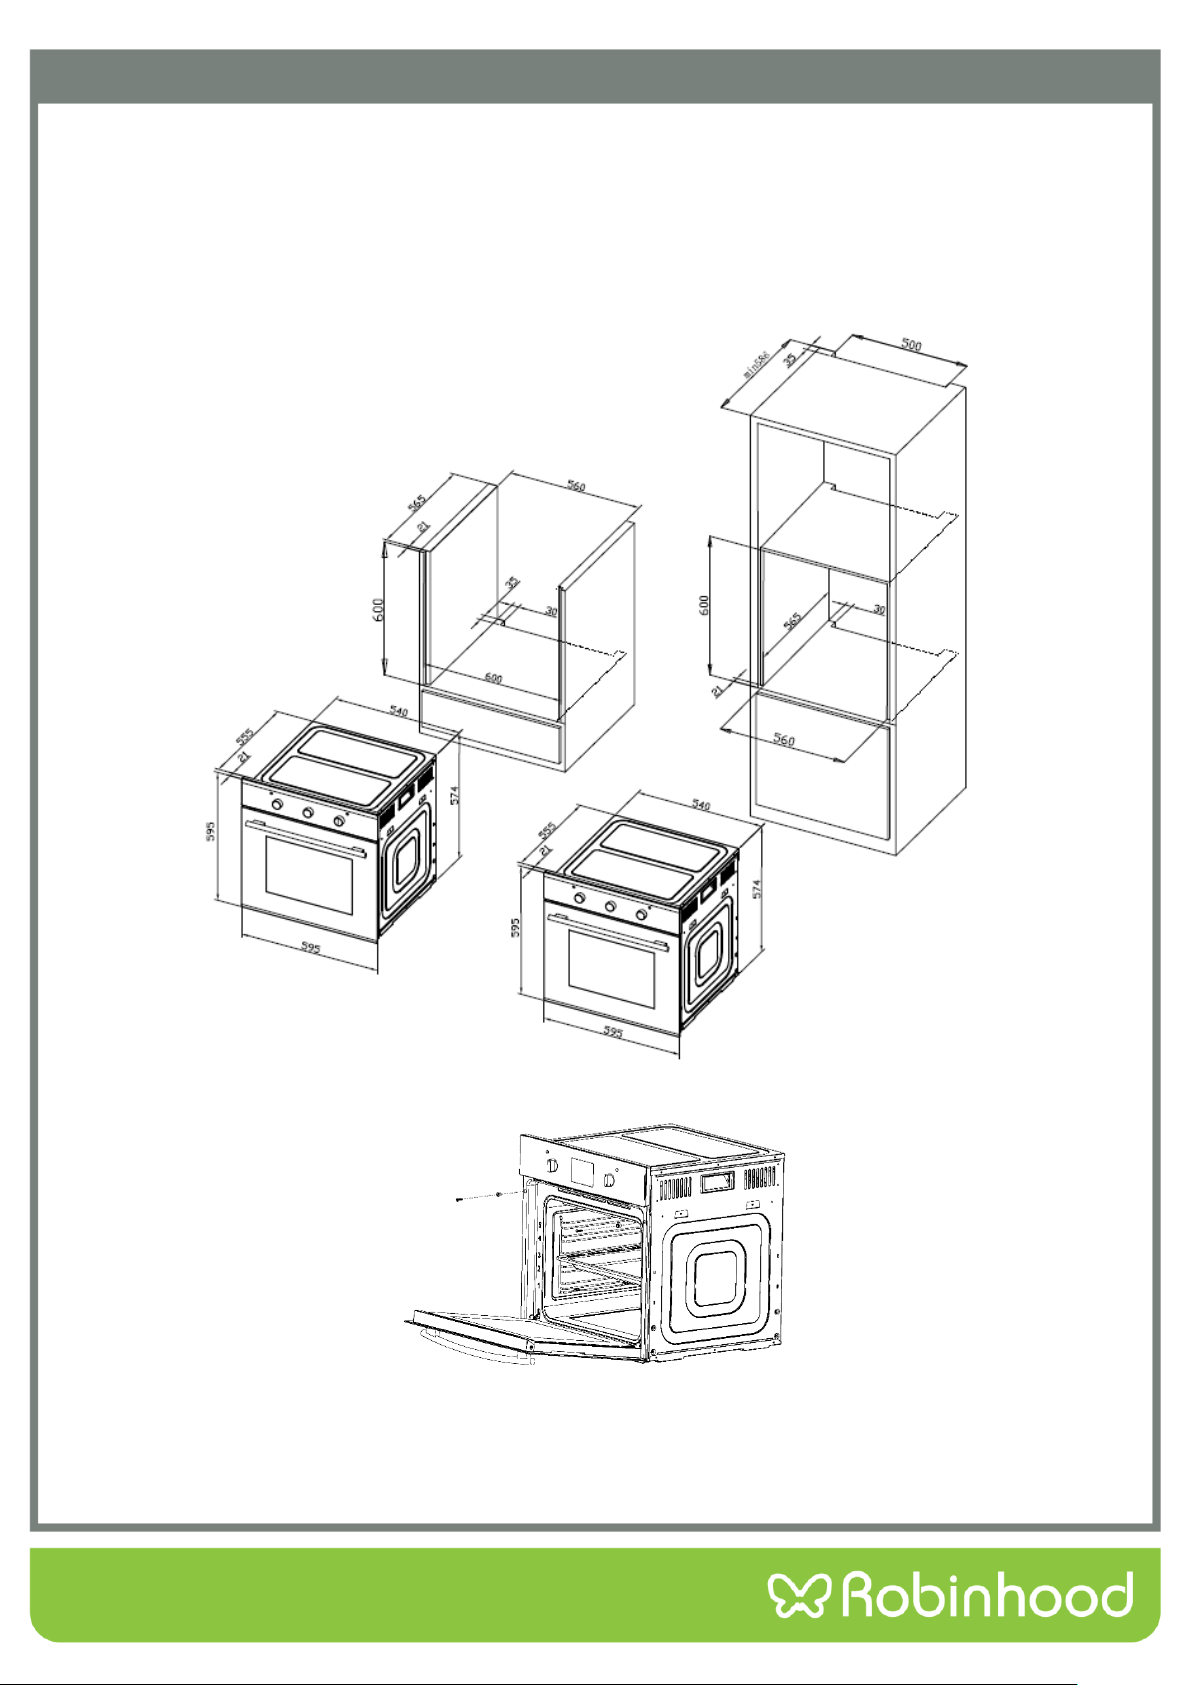
External dimensions(height/width/depth)
595/595/575(mm)
Installation dimensions(height/width/depth)
600/600/565(mm)
Oven lamp
25W/300°C
Grill power consumption
2250W
3
Installation
The oven should be installed into a purpose built cabinet. Ensure that there is adequate space between the sides of
the oven and the walls of the cabinet for ventilation (see the image below for details).
Surfaces, synthetic laminates and adhesives used must be heat resistant (100°C minimum), and
neighboring unit fronts up to 70°C.
Kitchen cabinets must be set level and fixed. A gap of 5mm is required between the oven and surrounding
unit fronts.
If there is a drawer beneath the oven, a shelf must be installed between oven and drawer.
Slide the oven through the cabinet aperture, align and secure.
Fix your oven with the 2 screws and washers as indicated in the figure.
Final check
1. Connect the appliance to the mains supply and switch on.
2. Check that the oven functions.
4
Installation
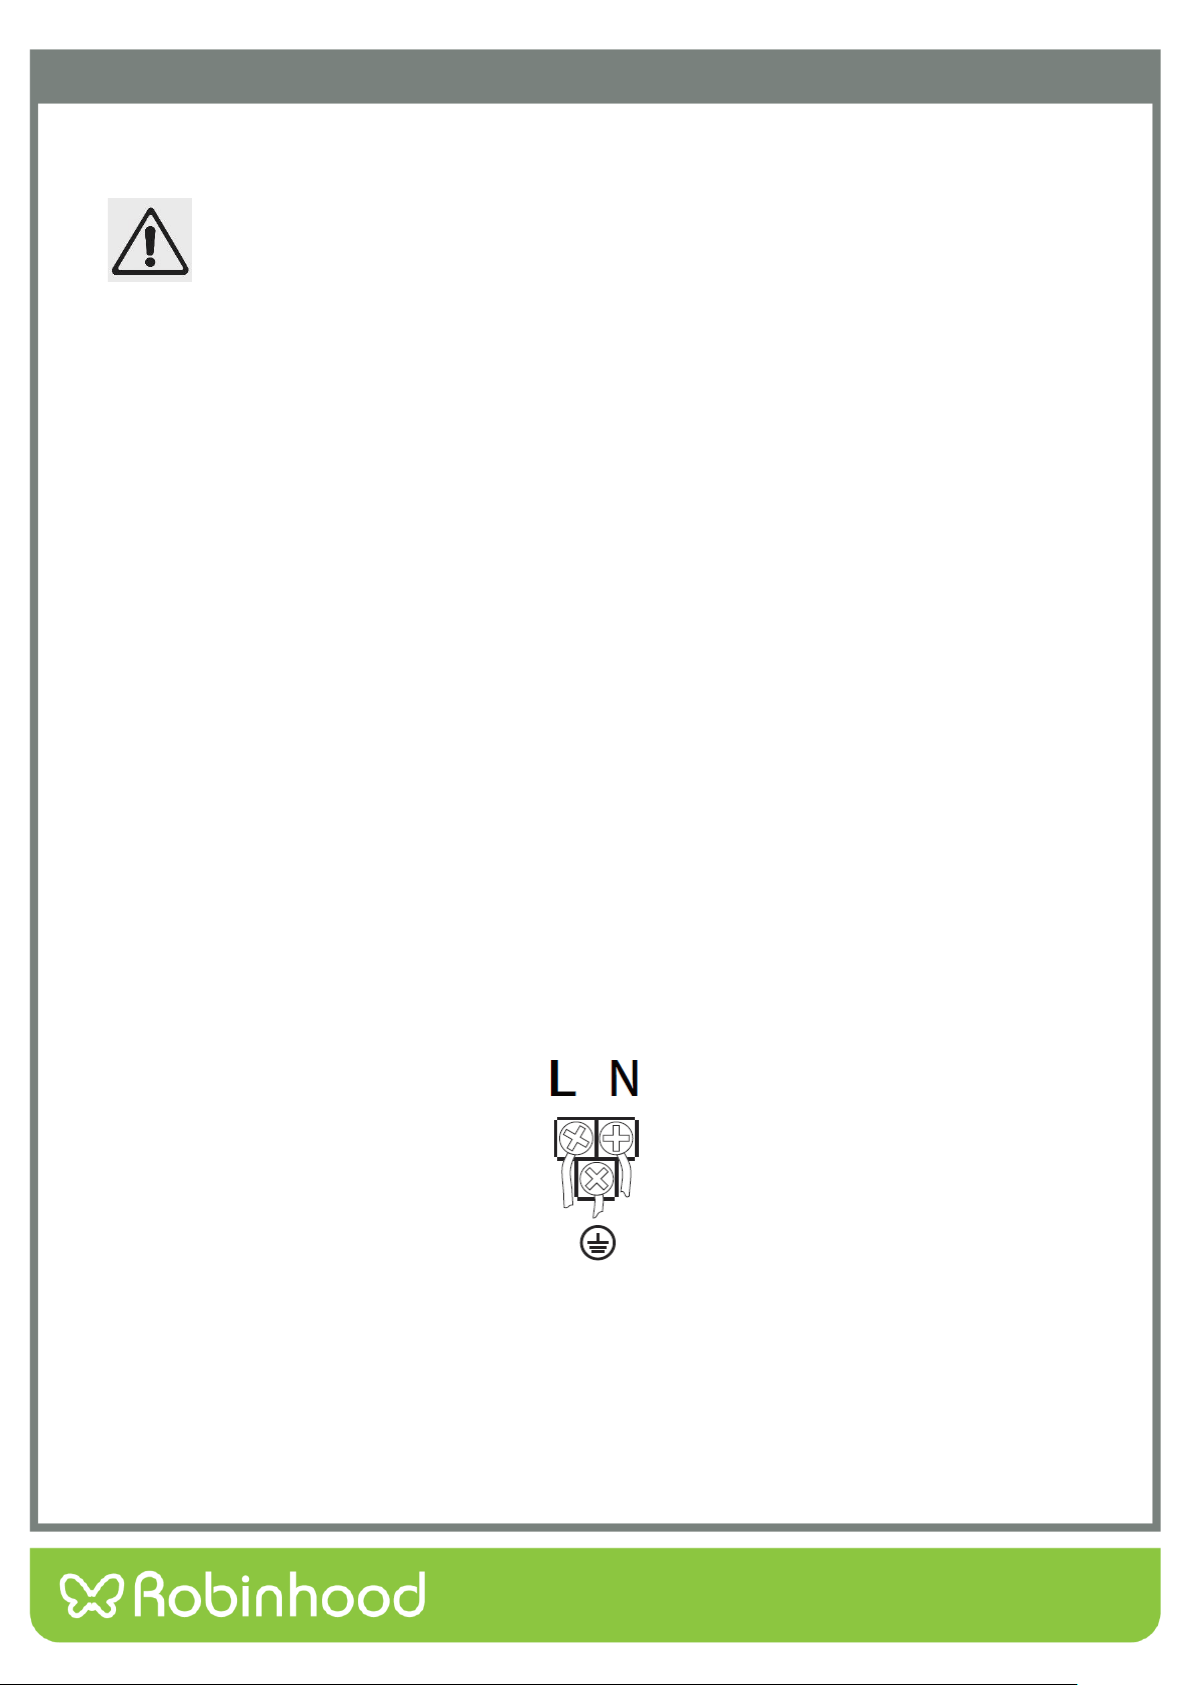
Electrical Connection
LOCAL AUTHORITY REQUIREMENTS
Installation is only permitted by a licensed electrician and carried out according to
instructions provided by the manufacturer. Incorrect installation might cause harm
and damage, for which the manufacturer accepts no responsibility.
Electrical Installation
Before carrying out the connection to the power supply, the voltage rating of the appliance (stamped on the appliance
identification plate) must be checked for correspondence to the available mains supply voltage, and the mains electric
wiring should be capable of handling the oven’s power rating (also indicated on the identification plate). If you have
any doubts, call in a qualified technician.
NOTE: For connections to the mains power supply, never use adapters, reductions or multiple power points as these
may overheat and catch fire. Do not install separate timers.
After having installed the appliance, the switched outlet must always be in an accessible position. The electrical safety
of this appliance can only be guaranteed if the cooktop is correctly and efficiently earthed, always ensure that the
earthing is efficient; if you have any doubts call in a licensed electrician to check the system. The manufacturer
declines all responsibility for damage resulting from an installation which has not been correctly earthed.
WARNING: If any damage occurs to the power cable during or after installation, it must be replaced immediately by a
licensed electrician with a replacement cable from your Service Centre.
The ovens are to be connected to a single phase 220-240Vac 50 Hz supply.
The appliance is designed for fixed connection to the mains. Means for disconnection with a suitable - isolating switch
must be incorporated in the fixed wiring in accordance with the wiring rules. The power supply cord must not touch
against any hot surfaces and must be placed so that its temperature does not exceed 75 °C at any point along its
length.

5
Installation
The accessories supplied with your appliance are suitable for making many different types of meals. Ensure that you
always insert the accessories into the cooking compartment in the correct orientation.
Inserting accessories
You can insert the accessories into the cooking compartment at 5 different levels. Always insert them as far as they
will go so that the accessories do not touch the door panel.
Accessories can be pulled out approximately halfway until they lock in place. This allows dishes to be removed
easily.
Note: Accessories may temporarily deform when they become hot. Once they cool down, they regain their original
shape. This does not affect normal operation.
Oven Pan
For moist cakes, pastries, frozen meals and large roasts.
It can also be used to catch dripping fat when you are
grilling directly on the wire rack.
Oven Deep Pan (Optional)
Used for pastries, large roasts, juicy dishes, and for
collecting the fat while grilling.
Wire Rack
Used for roasting and for placing food to be baked,
roasted or cooked in casserole dishes at the desired
level.
Side Shelf
Provides five different levels for the above accessories
to be placed.
6
Operating Instructions
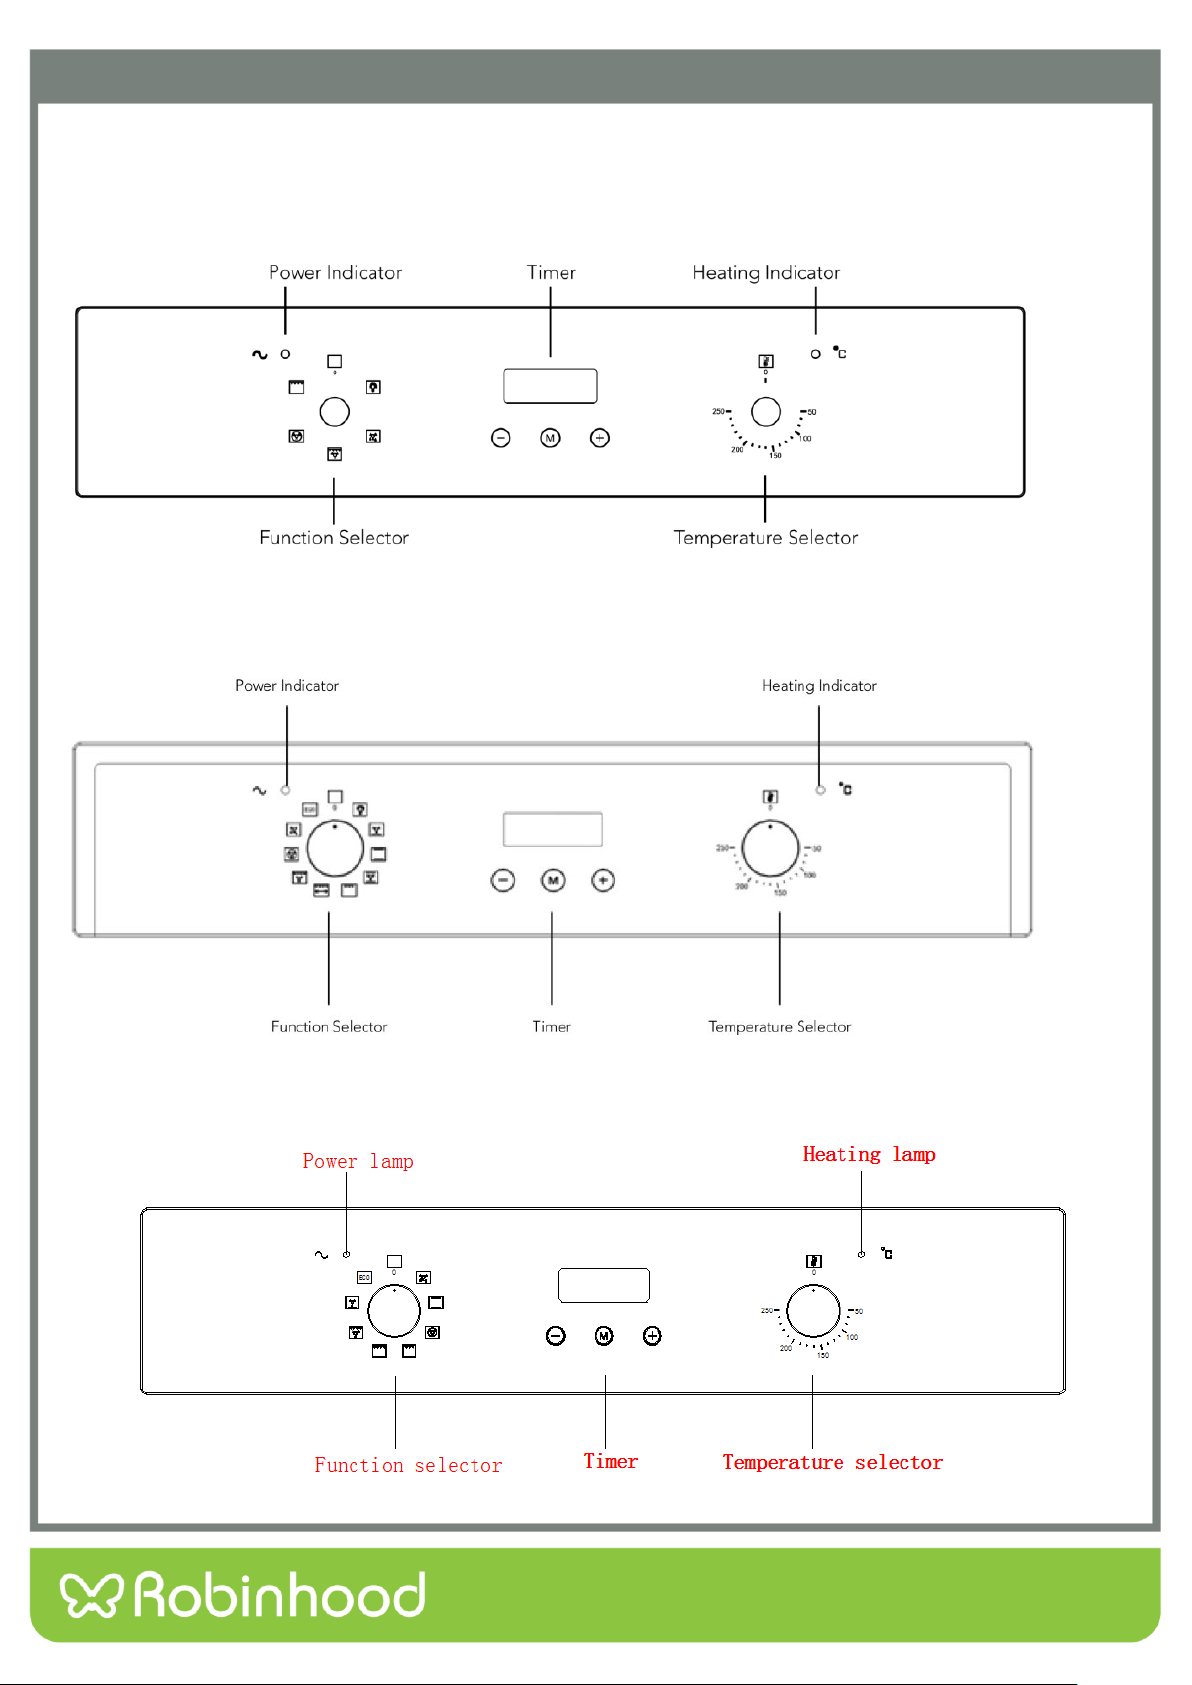
Control Panel
RHBO65DX
RHBO610DX
RHBO68DB
7
Operating Instructions
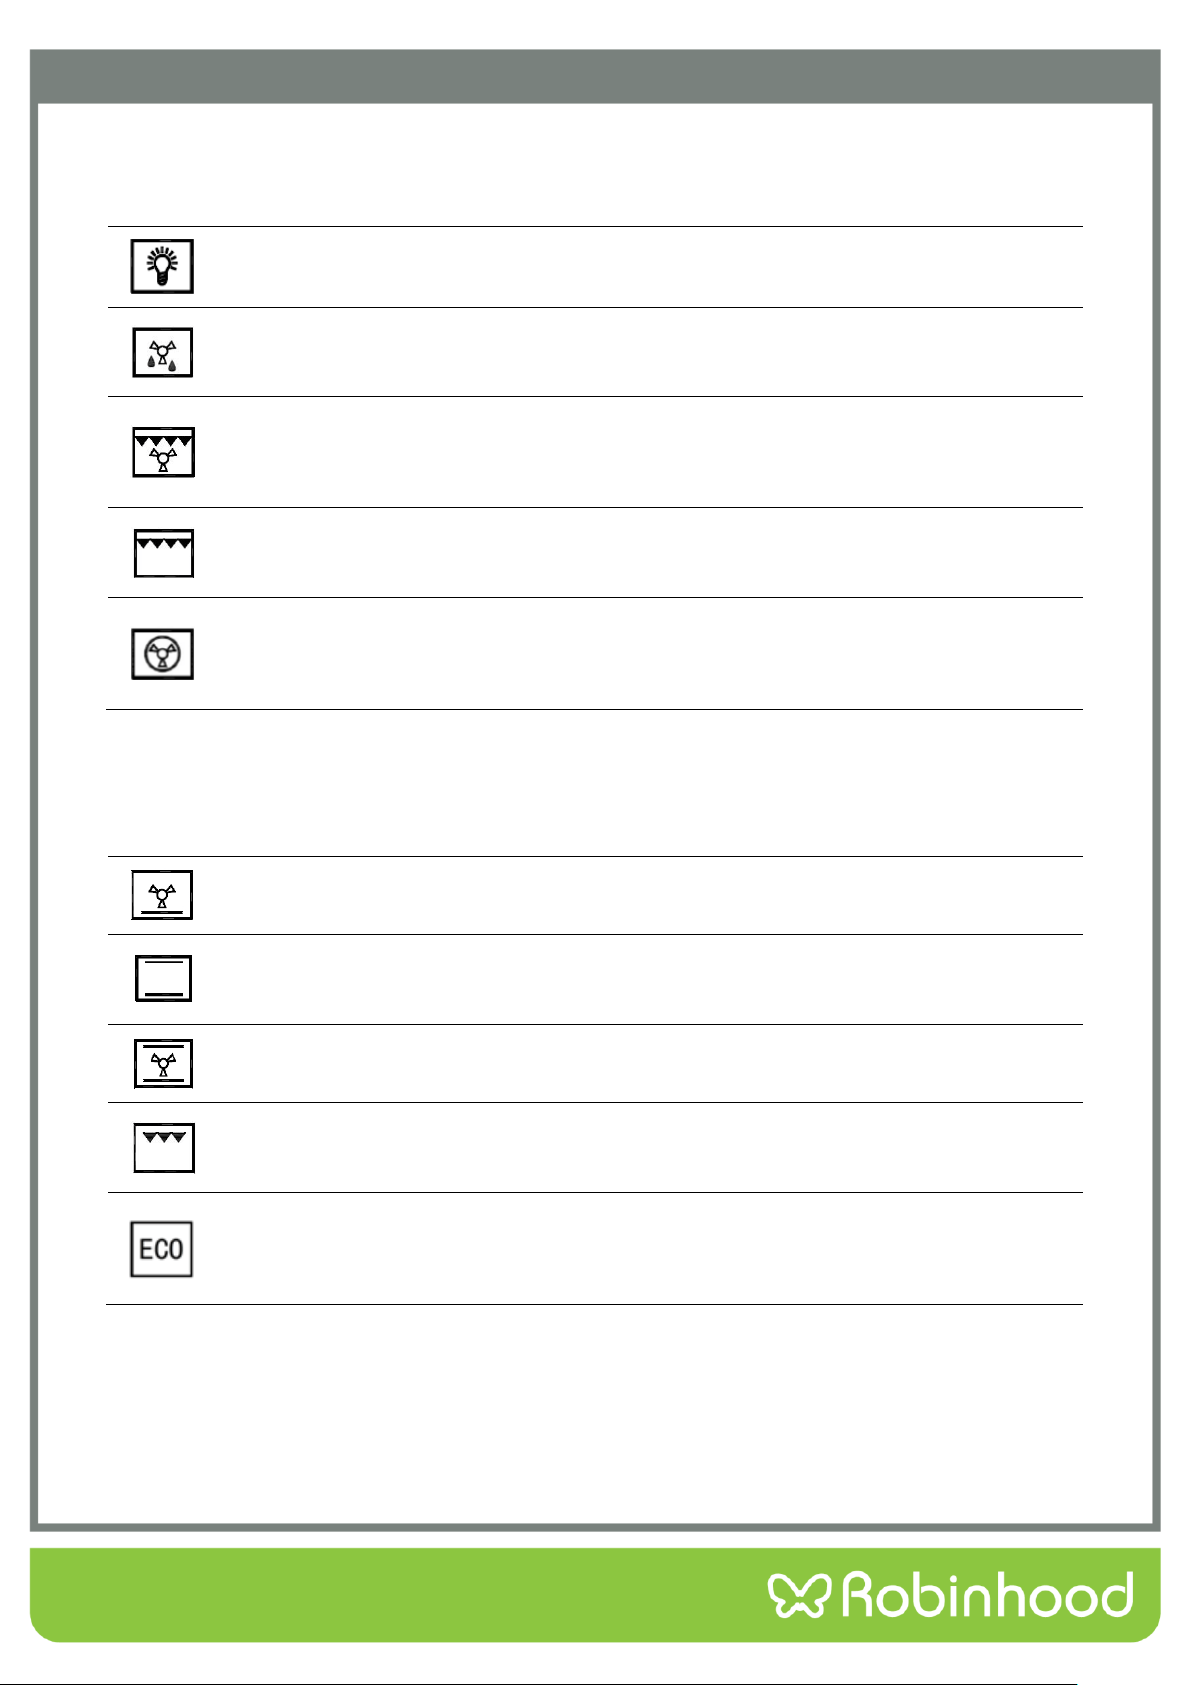
Function selector
Use the function selector to select the desired cooking function.
There are five functions available for RHBO65DX:
OVEN LIGHT: Press to turn interior light on and off.
DEFROST: The fan runs without heat to reduce the defrosting time of frozen foods. The
time required to defrost the food will depend on the room temperature, the quantity and type
of food.
FAN AND GRILL: This method of cooking utilizes the top element in conjunction with the
fan, which helps to provide a quick circulation of heat. This function is suitable where quick
browning is required and “sealing” the juices in, such as steaks, hamburgers, some
vegetables etc.
FULL GRILL: This method of cooking utilizes the inner and outer parts of the top element,
which directs heat downwards onto the food. This function is suitable for grilling medium or
large portions of sausages, bacon, steaks, fish etc.
FAN FORCED: This method of cooking uses the circular element whilst the heat is
distributed by the fan. This results in a faster and more economical cooking process. The fan
forced function allows food to be cooked simultaneously on different shelves, preventing the
transmission of smells and tastes from one dish onto another.
Use the function selector to select the desired cooking function.
In addition to the above 5 functions, RHBO610DX includes the following functions, ten functions in total are
available for RHBO610DX:
FAN AND BOTTOM ELEMENT: This method of cooking utilises the bottom element in
conjunction with the fan, which helps to circulate the heat. This function is suitable for
sterilizing and preserving jars.
CONVENTIONAL COOKING (BAKE): This method of cooking provides traditional cooking,
with heat from the top and lower elements. This function is suitable for roasting and baking
on one shelf only.
INTENSIVE BAKE: This method of cooking is a conventional cooking, with heat from the top
and bottom element, and the fan helps to circulate the heat to achieve an even baking result.
HALF GRILL: This method of cooking utilizes the inner part only of the top element, which
directs heat downwards onto the food. This function is suitable for grilling small portions of
bacon, toast and meat etc.
ENERGY SAVING GRILLING MODE: This method of cooking uses the top outer ring and
the bottom heating element to control the temperature, making the grilling more energy
saving, mainly suitable for large food, oven temperature rises slowly, the heat fully
penetrates and the excess heat consumption is reduced.
8
Operating Instructions
Function selector
Use the function selector to select the desired cooking function.
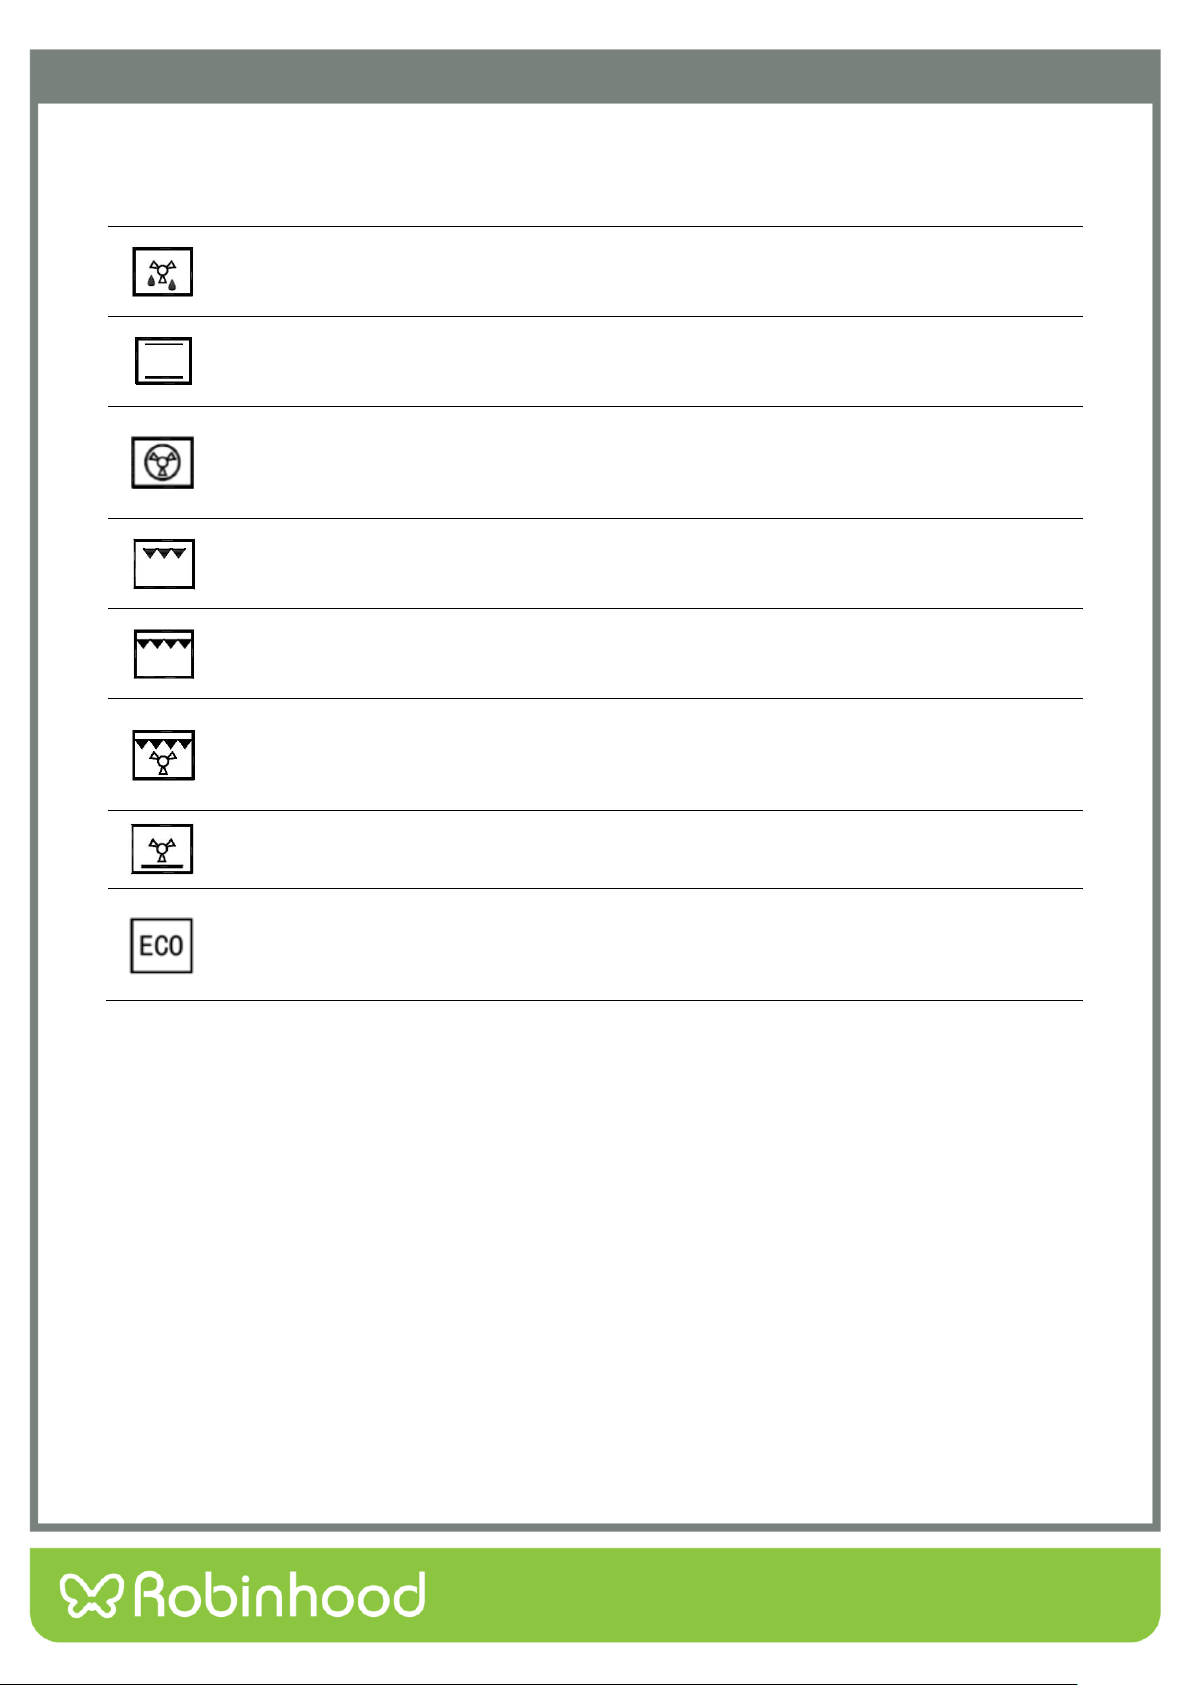
There are eight functions available for RHBO68DB:
DEFROST: The fan runs without heat to reduce the defrosting time of frozen foods. The
time required to defrost the food will depend on the room temperature, the quantity and type
of food.
CONVENTIONAL COOKING (BAKE): This method of cooking provides traditional cooking,
with heat from the top and lower elements. This function is suitable for roasting and baking
on one shelf only.
FAN FORCED: This method of cooking uses the circular element whilst the heat is
distributed by the fan. This results in a faster and more economical cooking process. The fan
forced function allows food to be cooked simultaneously on different shelves, preventing the
transmission of smells and tastes from one dish onto another.
HALF GRILL: This method of cooking utilizes the inner part only of the top element, which
directs heat downwards onto the food. This function is suitable for grilling small portions of
bacon, toast and meat etc.
FULL GRILL: This method of cooking utilizes the inner and outer parts of the top element,
which directs heat downwards onto the food. This function is suitable for grilling medium or
large portions of sausages, bacon, steaks, fish etc.
FULL GRILL WITH FAN: This method of cooking utilizes the top element in conjunction with
the fan, which helps to provide a quick circulation of heat. This function is suitable where
quick browning is required and “sealing” the juices in, such as steaks, hamburgers, some
vegetables etc.
FAN BAKE: This method of cooking utilizes the bottom element in conjunction with the fan,
which helps to circulate the heat. This function is suitable for sterilizing and preserving jars.
ENERGY SAVING GRILLING MODE: This method of cooking uses the top outer ring and
the bottom heating element to control the temperature, making the grilling more energy
saving, mainly suitable for large food, oven temperature rises slowly, the heat fully
penetrates and the excess heat consumption is reduced.
9
Operating Instructions
Control Panel
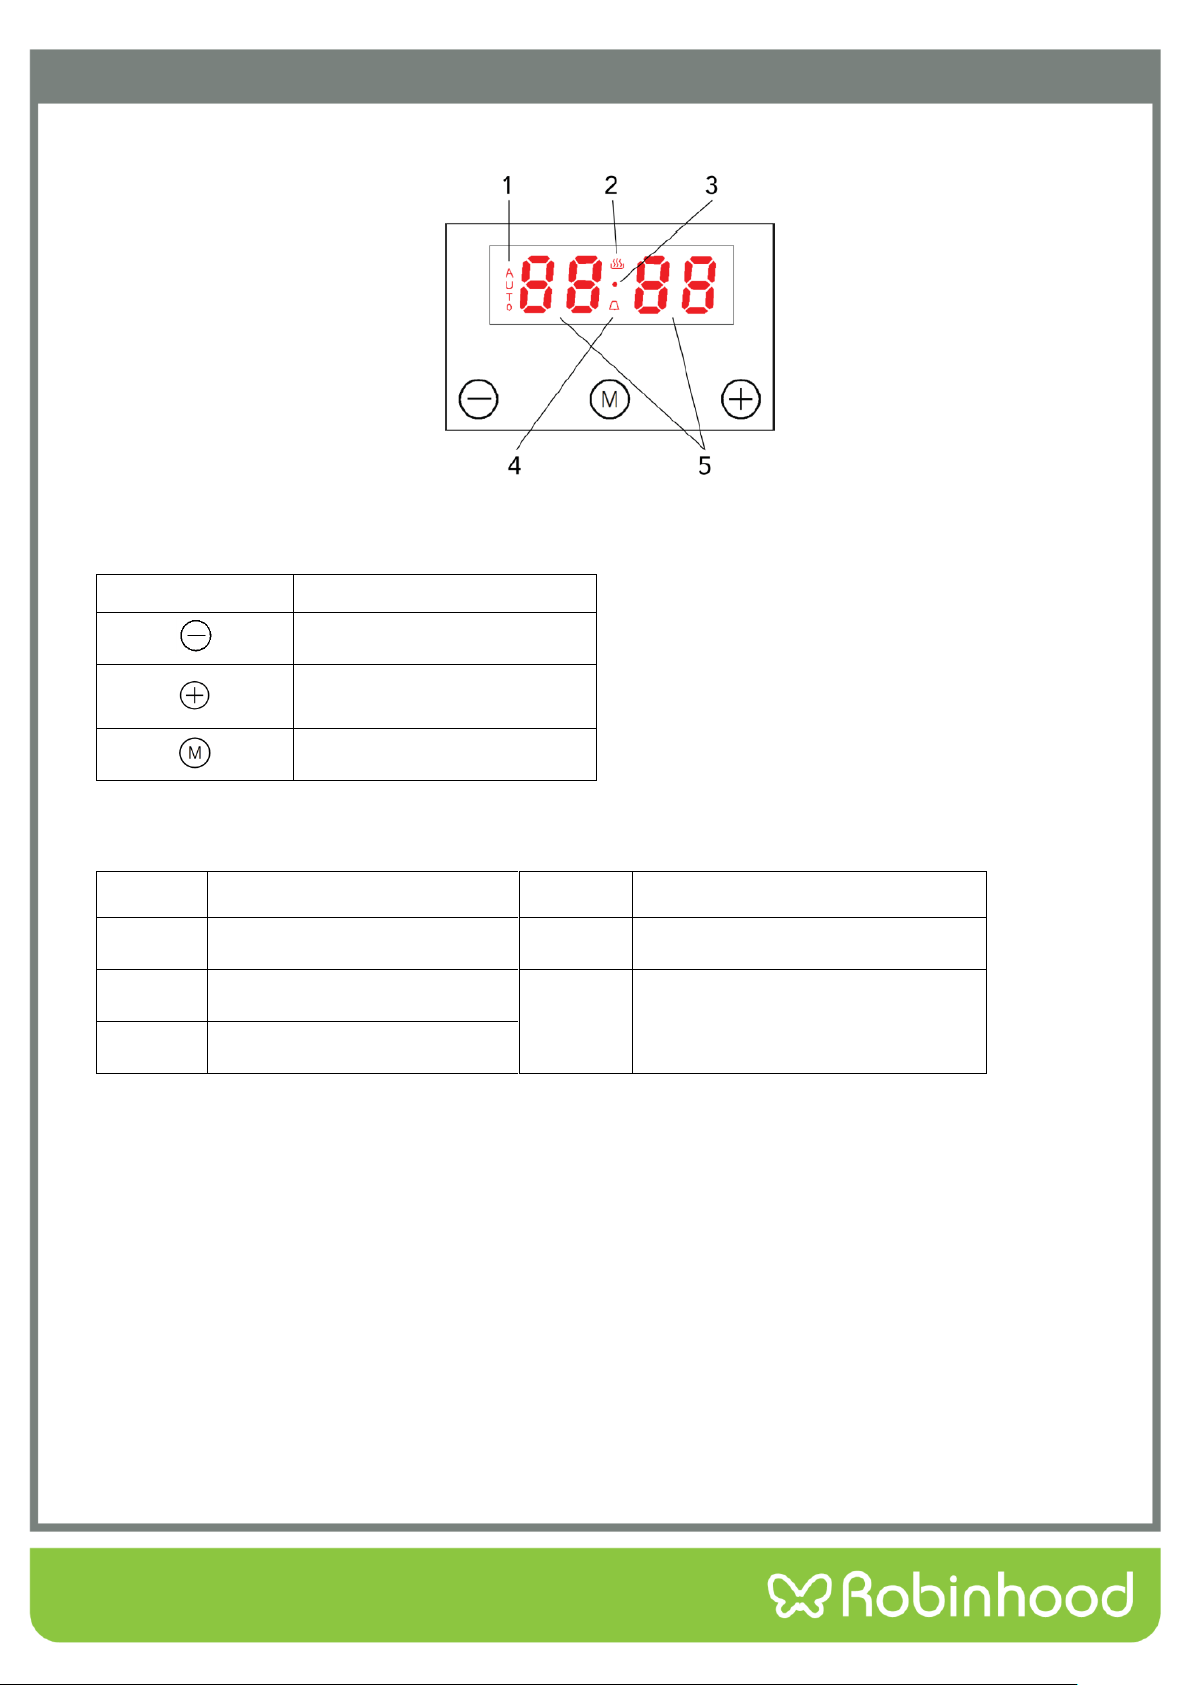
Function Icon Instruction
Icons
Function
Minus button
Plus button/ audible signal
selecting key
Program button
Display screen icon instruction
Icons
Function
Icons
Function
1
“Auto” function symbol
4
Clock symbol
2
Oven in use symbol
5
Display the time, can display system
time, clock and cooking time
3
Decimal point symbol
Before Using the Oven for the First Time
Heating the Oven
To remove the new oven smell, heat up the oven whilst it is empty and closed. Let the oven run for an hour with
both top and bottom elements on. A temperature of 240°C is ideal for this purpose. Ensure that no packaging has
been left inside or attached to the oven.
Use the function selector to set Top / Bottom heating.
Set the thermostat to 240°C. After an hour, switch off the oven. To do so, turn the function selector to the
off position.
Cleaning the Accessories
Before you use the accessories for the first time, clean them thoroughly with hot soapy water and a soft dish cloth.
10
Operating Instructions
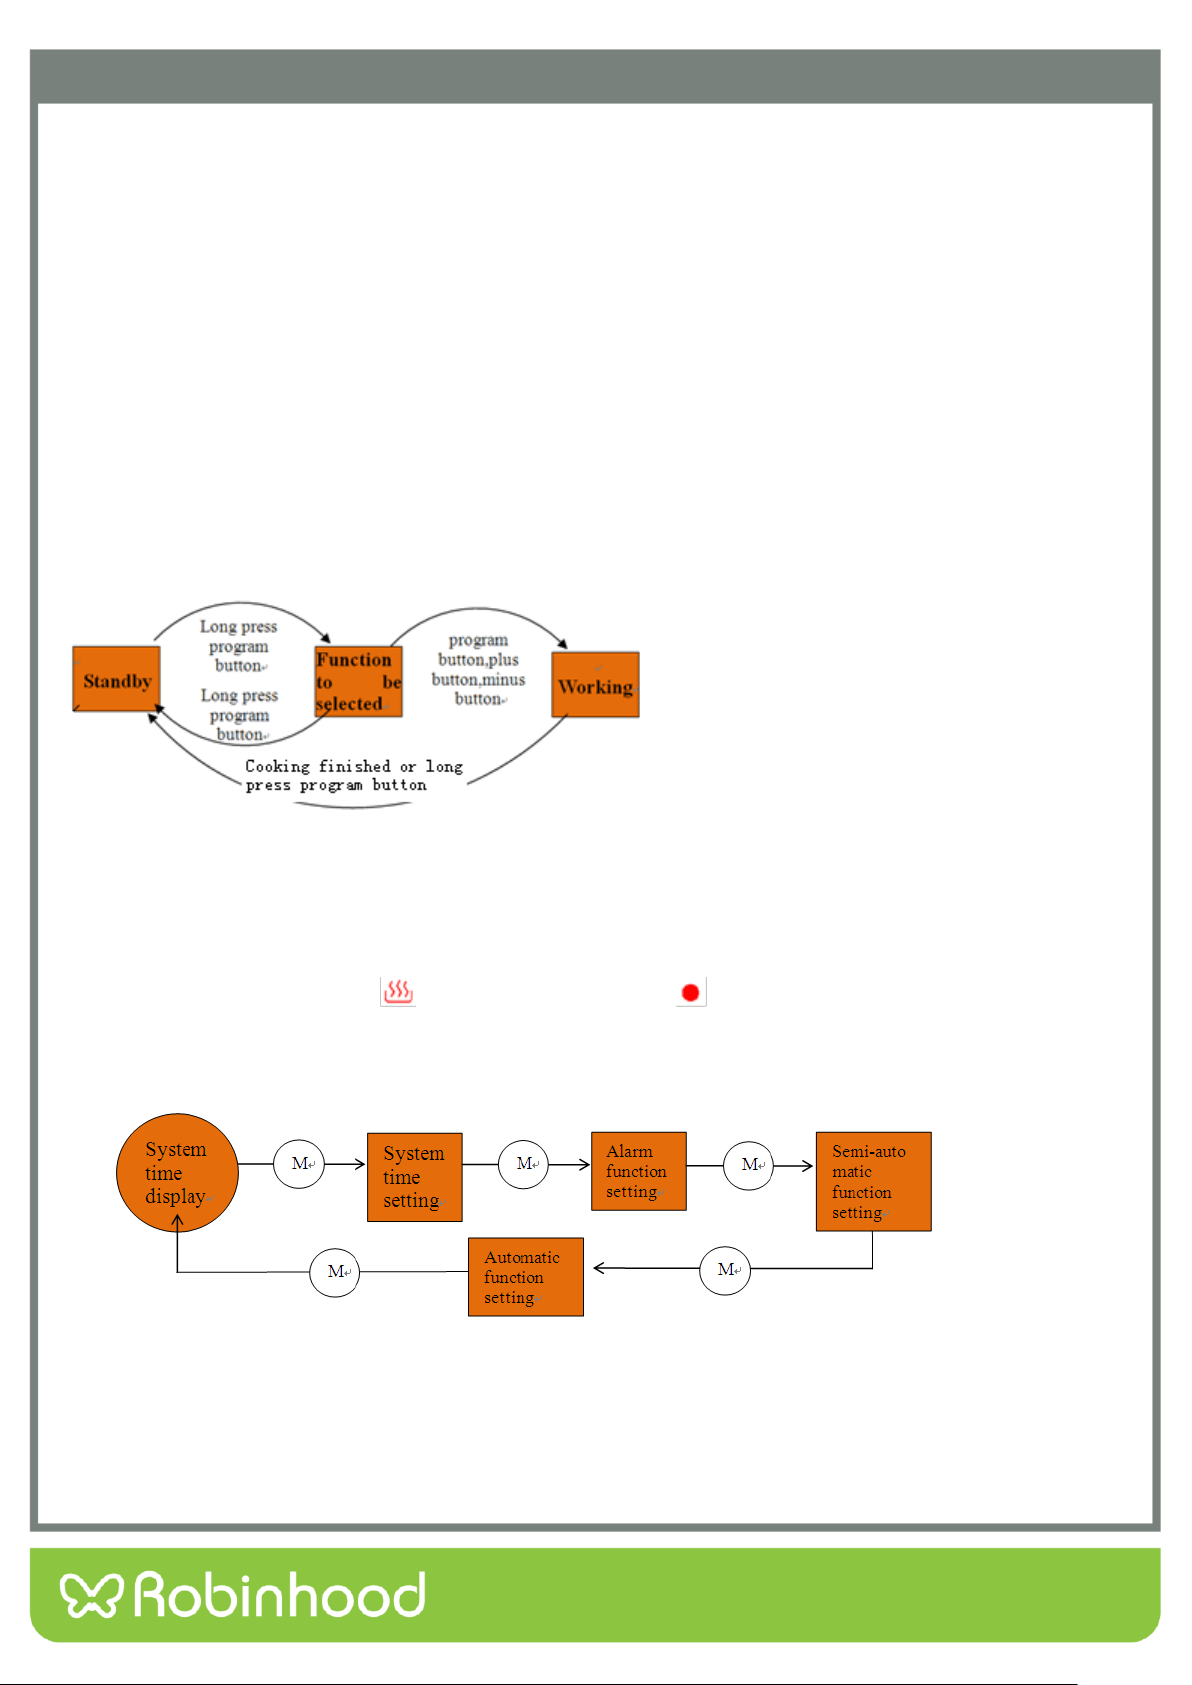
Timer Working Status
Switching the timer status
The timer has 3 status, they are standby, function to be selected and working status.
Stand-by status: After connected to the power supply, the display screen displays the system time, the
decimal point symbol flashes, it is the status before entering cooking function; If exceeds 10 seconds without
any operation under standby mode, the display brightness automatically reduces, press any key to recover to
the original brightness.
Function to be selected status: Long press program button under standby status, the display screen will
show system time, it is the status when oven in use symbol and decimal point symbol keep bright.
Working status: After completed setting any one of the system time, clock, cooking time or cooking end time,
the display screen will show system time, and it is the status when corresponding working icon keep bright.
Status switching diagram refer to below:
Timer Function Mode Switching
Long press program button “M” for 3s enter to system time setting status, without any operation after 5S,
system time, oven in use symbol “ ” and decimal point symbol “ ” keep bright display; you can circularly
switch the oven timer function mode by program button “M”.
The operation flow and corresponding functional sequence are as followings:
11
Operating Instructions
Power On
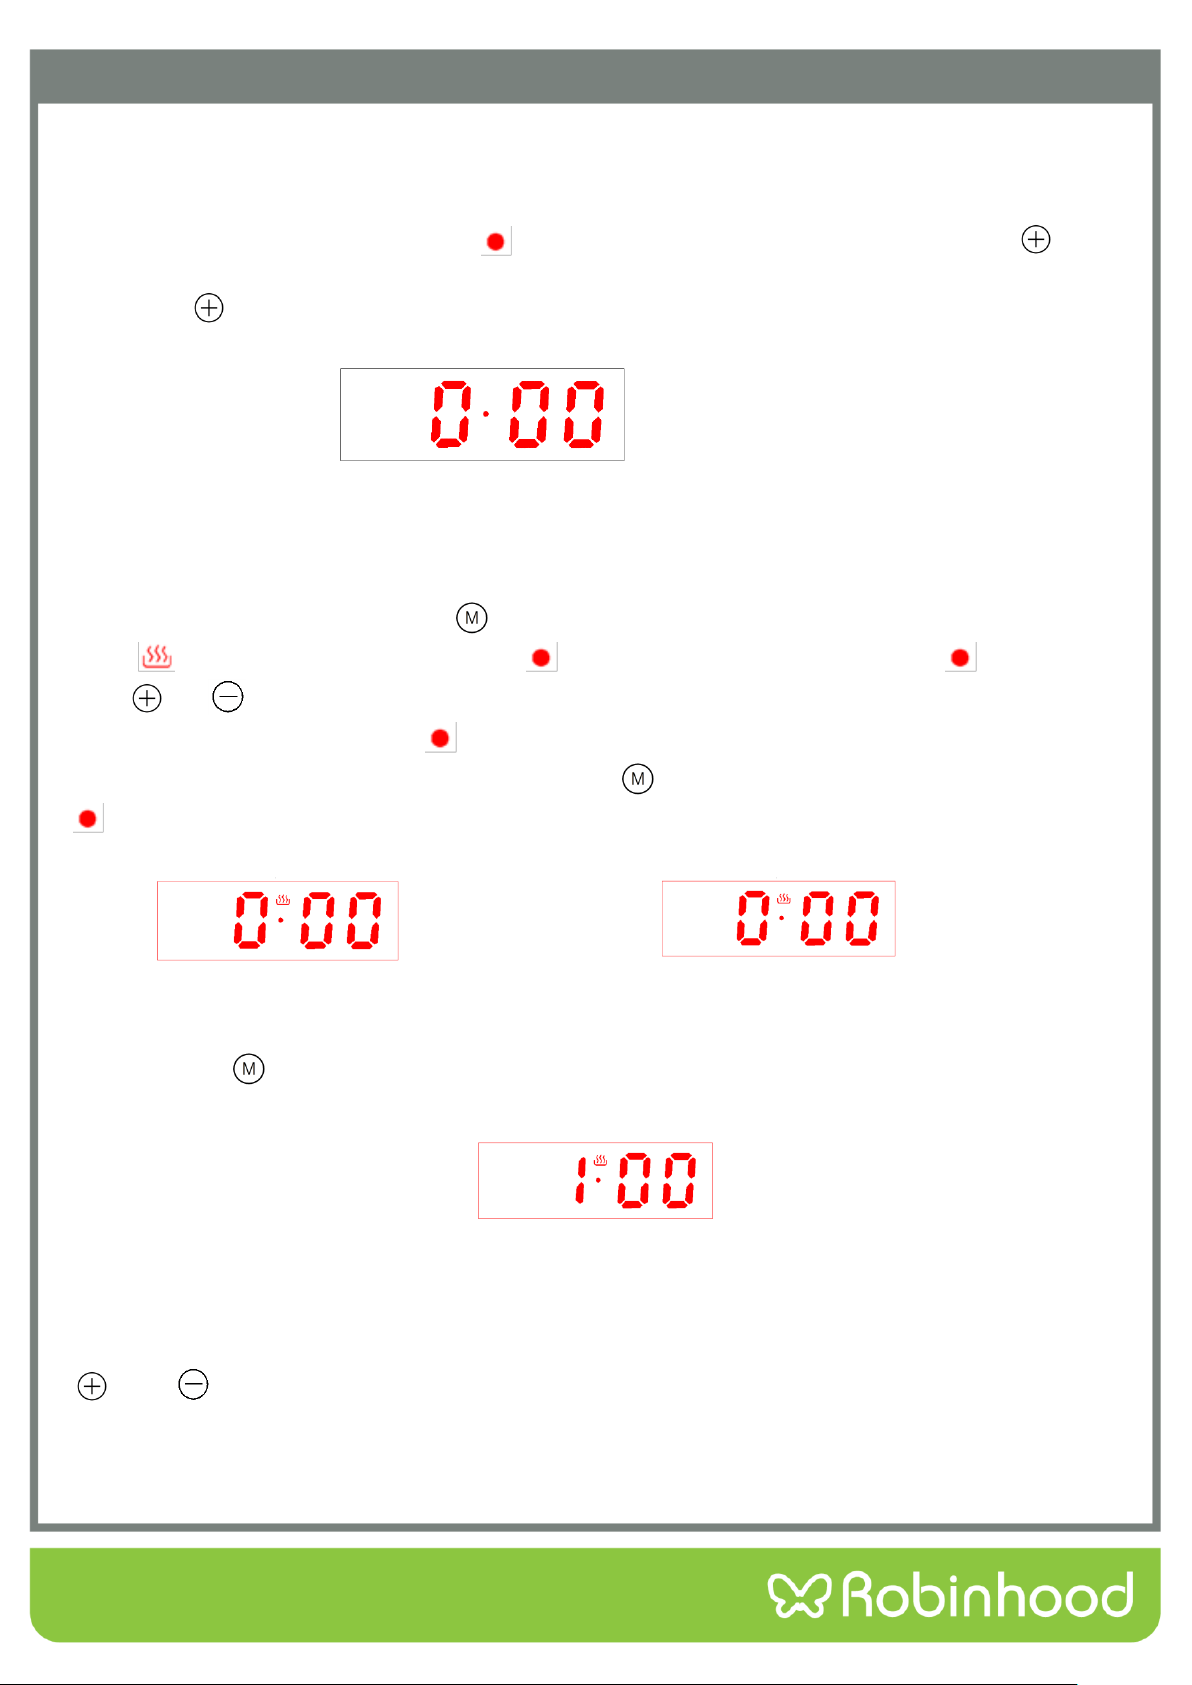
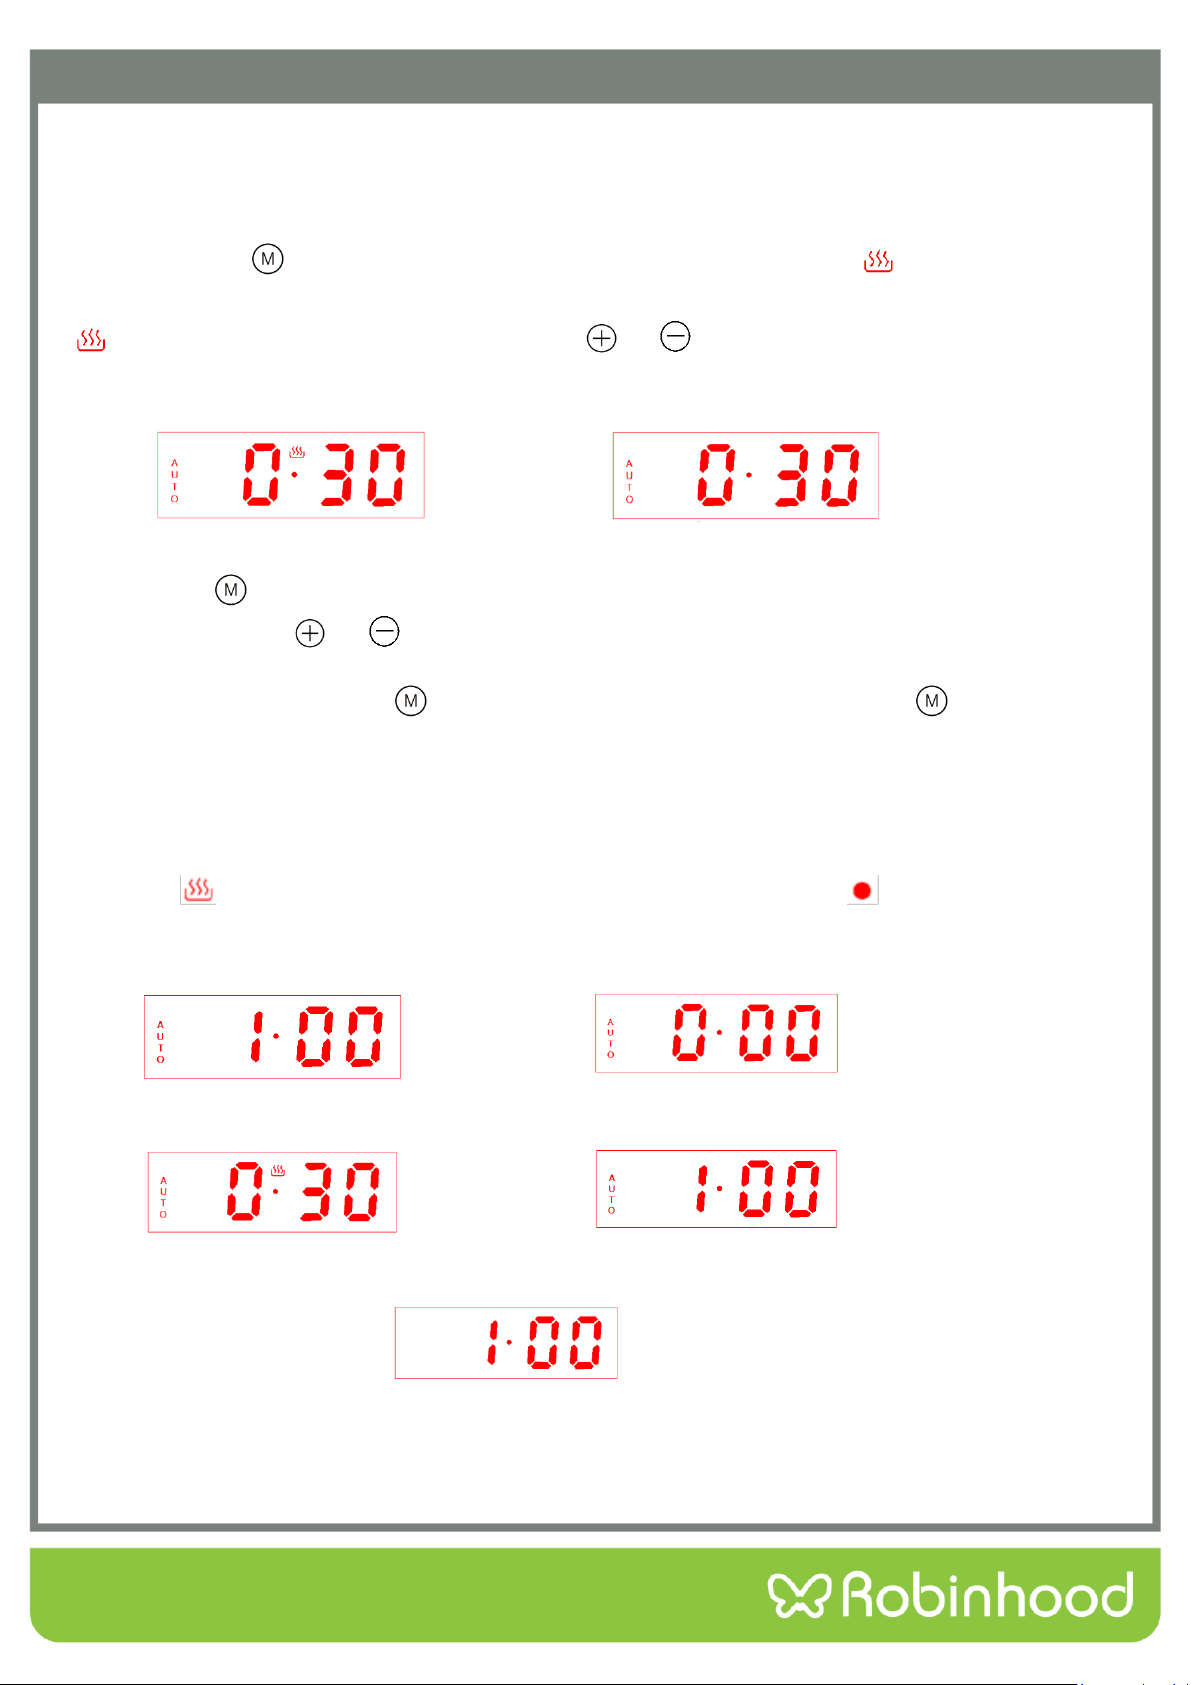
For the first time, the buzzer “beep” for once to show that the timer enters into the standby state. The clock
shows the time of the system and starts the timing. Power-on displays as “0·00”, the display screen displays
the system time, the decimal point symbol “ ” is flashing,1 second 1 time, like Pic 5.You can push“ ”to
choose 3 kinds of ring tone, The default is the second ring tone. Whenever user wants to adjust the ring tone
again, press “ ”.
Pic 5: Power-on default clock diagram (standby state)
Start Up and Time Setting
When the display is flashing, press “ ”for 3 seconds to start up the oven. Then oven in use
symbol“ ”lights up and decimal point symbol “ ” twinkles. When decimal point symbol “ ” twinkles,
press “ ”or “ ” to set the system time. After choosing the time , lift the finger off the buttons and wait for
5 seconds, then decimal point symbol “ ” stop twinkling. It means time is well set. Like pic 8.Whenever user
wants to set the time again, In the status of pic 7, push “ ” once, when user sees decimal point symbol
“ ” twinkles, then can set the time again.
Pic 6: Clock setting state Pic 7: Feature to be selected state
(Second digit flicking) (Second digit always bright)
Press button“ ” again for 3 seconds, oven is turned off and returns to standby status. The display of
pic 6 is flashing.
Pic 8 System time well set diagram
Note 1:System time setting range is 0:00-23:59.
Note 2:When setting the time for each function of the timer, you can set the time by short press or long press
“ ” and “ ”,short press will add 1 minute or reduce 1 minute each press of the button, while long press will
quickly increase or decrease the time by 1 minute, so it can set the time fast.
12
Operating Instructions
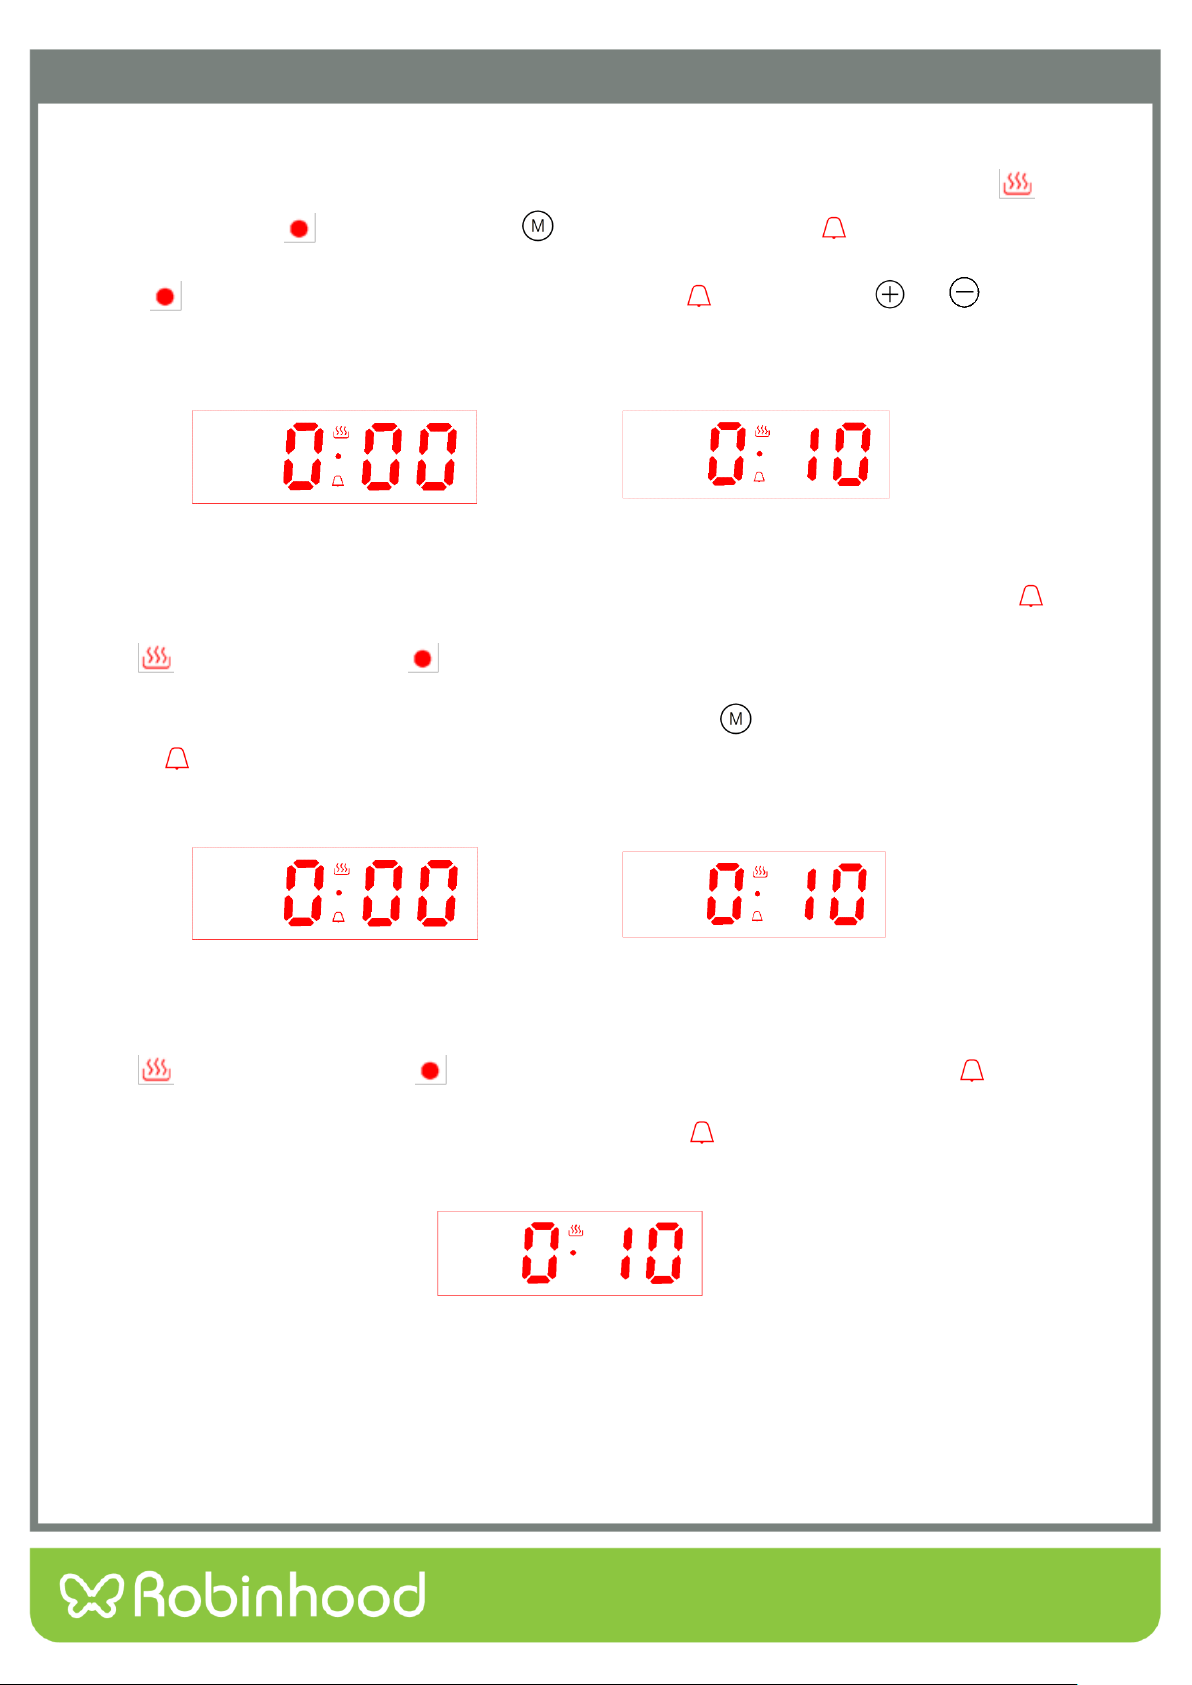
Alarm Clock Setting Function
In the state of function to be selected, when the display shows the system time, oven in use symbol“ ” and
decimal point symbol “ ” keep bright, press “ ” twice, then the clock icon“ ”twinkles, and the screen
display changes to the alarm clock time(First set default display “0·00”), alarm clock time and decimal point
symbol “ ” always display , like pic 9.When the alarm clock icon“ ” twinkles, Press“ ”or“ ” to set the
clock. Alarm clock well set diagram like pic 10 (Set 10 minutes).
Pic 9: Alarm clock setting initial state Pic 10: Alarm clock well set
(alarm clock icon flickering) (alarm clock icon flickering)
After choosing the time , lift the finger off the buttons and wait for 5 seconds, then the alarm clock icon“ ”
stops twinkling and changes to always bright, display screen shows system time, oven in use
symbol“ ” ,decimal point symbol “ ” and system time keep bright. It means time is well set. See Pic 11.
Whenever user wants to adjust the clock, in the working status, push “ ” twice, when user sees the alarm
clock icon“ ” twinkles, it will shows the set clock or the time left, and user can adjust the clock again. After
setting is done, the display will change back to system time.
Pic 11: Alarm clock working status diagram Pic 12: Alarm clock time over diagram
(alarm clock icon always bright) (alarm clock icon flickering)
For example, set the clock 10 minutes. After10 minutes, display screen shows system time, oven in use
symbol“ ” ,decimal point symbol “ ” and system time keep bright, the alarm clock icon “ ” twinkles,
buzzer will prompt the user for 5 minutes, reminding the user that the alarm clock time is over .Like Pic
12.Pressing any key can stop the buzzer and extinguish alarm icon “ ”.Like Pic 13.
Pic13: Cancel alarm clock icon display diagram(After alarm clock over)
Note :Alarm clock time setting range is 0:00-23:59.
13
Operating Instructions
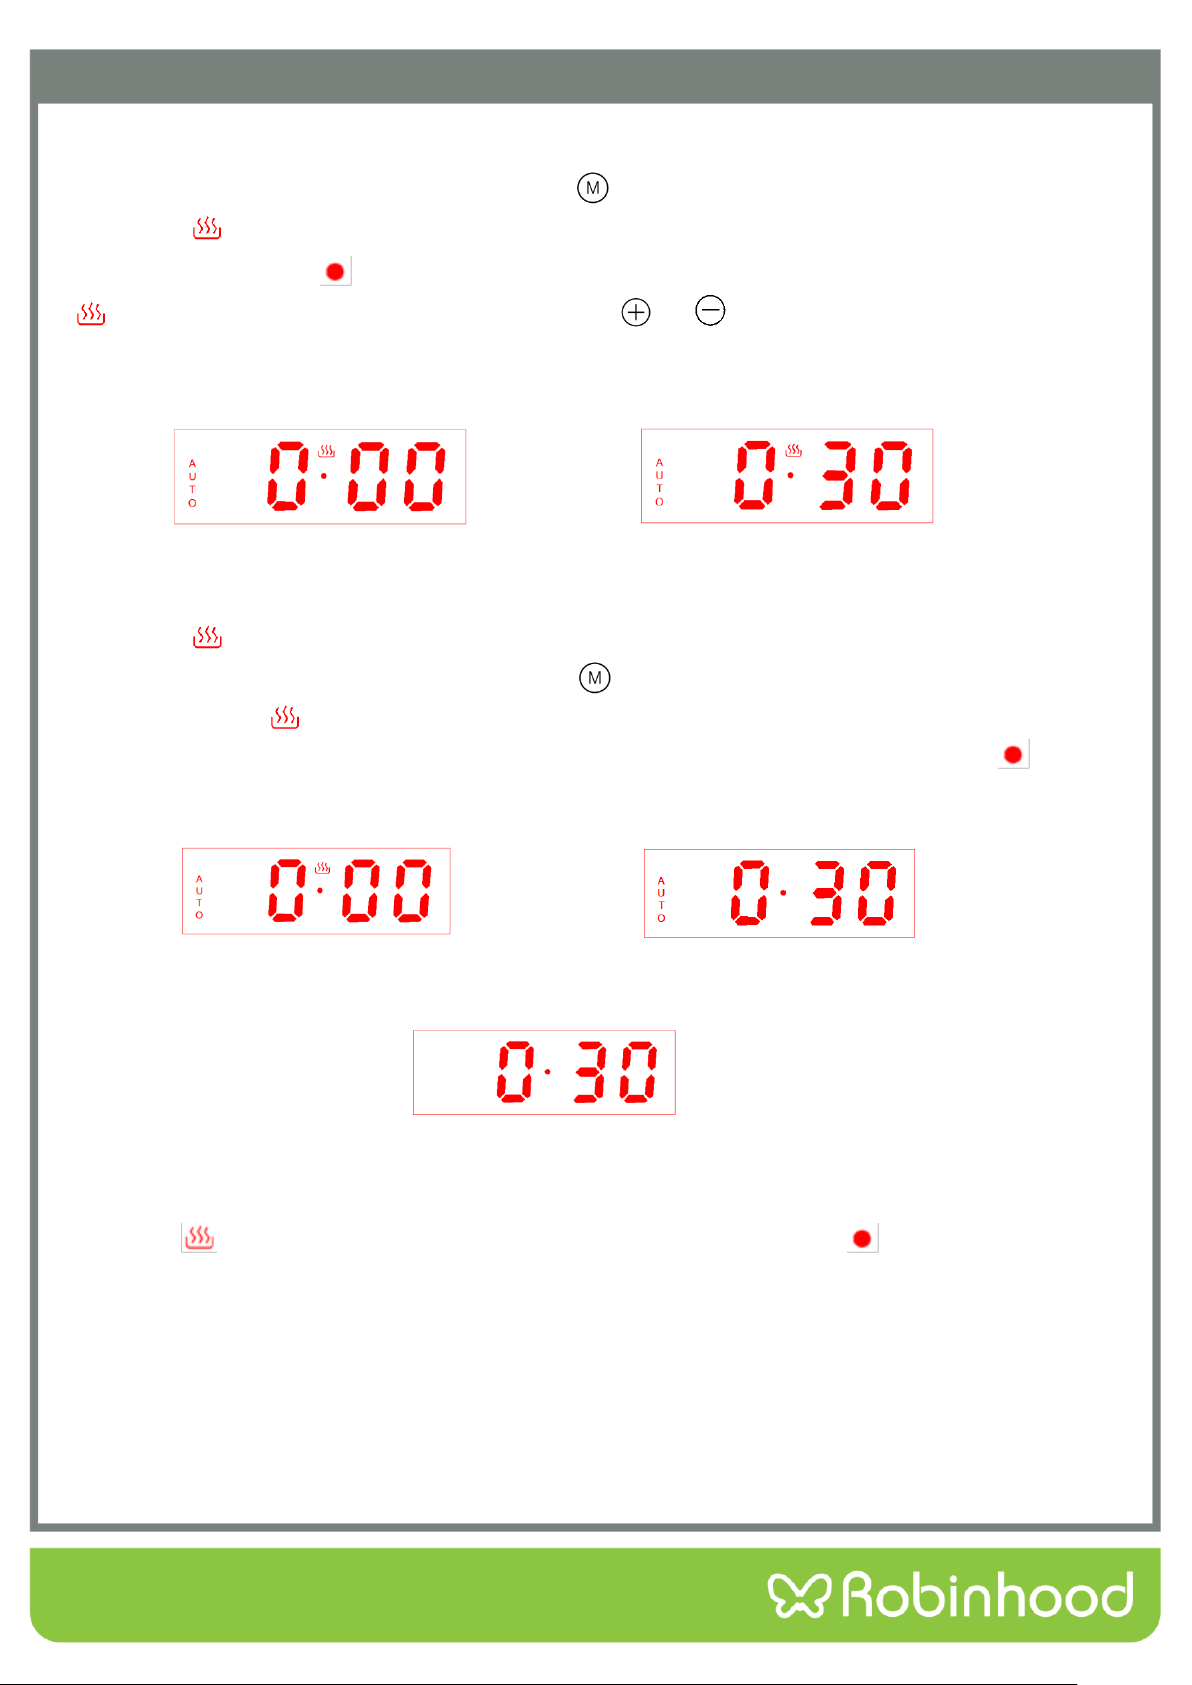
Cooking Time Setting Function
In the state of function to be selected, press button“ ” 3 times, then the icon “AUTO” and oven in use
symbol icon “ ” twinkle. The screen shows the cooking time(First set default display “0·00”),cooking time
and decimal point symbol “ ” keep bright display, see Pic 14.When the icon “AUTO” and oven in use symbol
“ ”twinkle, user can set the cooking time by pressing“ ”or“ ”.Well set diagram see Pic 15(Set 30
minutes).
Pic 14: Cooking time setting initial state Pic 15: Cooking time well set state
After choosing the time , lift the finger off the buttons and wait for 5 seconds, then the icon “AUTO” and oven in
use symbol “ ”stop twinkling and change to always bright display. It means time is well set. Whenever user
wants to adjust the timer, in the working status, push “ ” three times, when user sees the icon “AUTO” and
oven in use symbol “ ” twinkles, it will shows the set timer or the time left, and user can adjust the timer
again. After setting is done, the display will change back to system time, decimal point symbol “ ” and
system time keep bright. See Pic 16.
Pic 16: Cooking time working status Pic 17 Cooking time over diagram
(All the icons always bright) (All the icons flickering)
Pic 18: Cancel “Auto” function symbol display diagram(After cooking time over)
For example, set the timer 30 minutes. After 30 minutes, display screen shows system time, oven in use
symbol“ ” extinguishes, system time keeps bright, decimal point symbol “ ” and “Auto” function
symbol twinkle, buzzer will prompt the user for 5 minutes, reminding the user that the cooking time is
over .Like Pic 17.Pressing any key can stop the buzzer and extinguish“Auto” function symbol.Like Pic 18.
Note 1:Cooking time setting range is 0:00-10:00.
Note 2: Not setting cooking time after power on, the appliance will automatically shut down after
working 10 hours, without buzzer reminding function.
14
Operating Instructions
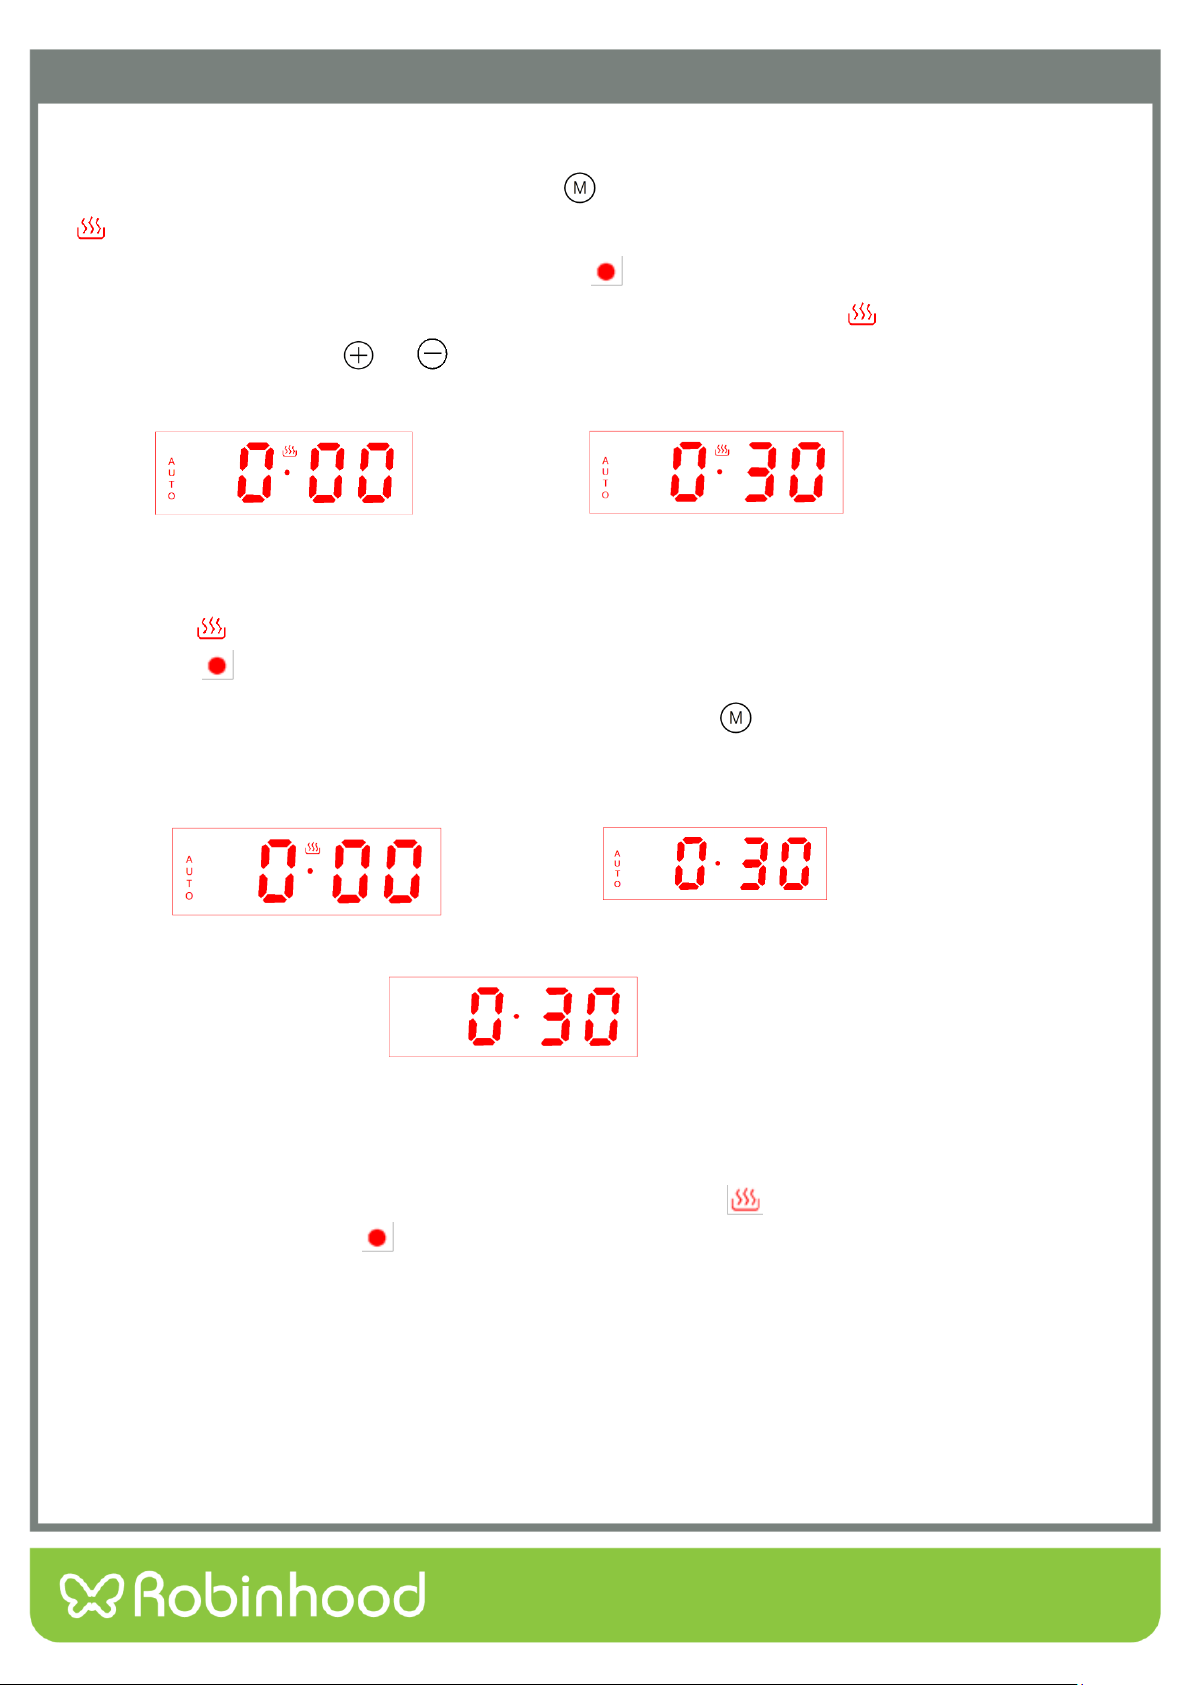
Cooking End Time Setting Function
In the state of function to be selected, press button “ ” 4 times, then icon “AUTO” and oven in use symbol
“ ”twinkle, display screen shows cooking end time(The first setting shows the current system time by
default),cooking end time and decimal point symbol “ ” keep bright. Display effect see Pic 19(Suppose
current system time is 0:00 ). When the icon “AUTO” and oven in use symbol “ ”twinkle, you can set
cooking end time by pressing“ ”or“ ”,well set diagram see Pic 20(Suppose cooking end time is 0:30).
Pic 19: Cooking end time setting initial state Pic 20: Cooking end time well set state
After choosing the time , lift the finger off the buttons and wait for 5 seconds, then the icon “AUTO” and oven in
use symbol “ ”stop twinkling and change to always bright. Display screen will show system time, decimal
point symbol “ ” and system time keep bright. It means time is well set. See Pic 21.
Whenever user wants to adjust the timer, in the working status, push “ ” four times, when user sees the
icon “AUTO” twinkles, it will show the set cooking end time, and user can adjust the time again. After setting is
done, The display will change back to system time.
Pic 21: Cooking end time working status Pic 22: Cooking finished diagram
Pic 23: Cancel “Auto” function symbol display diagram(After cooking finished)
For example, the system time is 0:00 like pic 19. Set cooking end time 0:30, like pic 20. When the time
reaches 0:30, display screen shows system time, oven in use symbol“ ” extinguishes, system time keeps
bright, decimal point symbol “ ” and “Auto” function symbol twinkle, buzzer will prompt the user for 5
minutes, reminding the user that the cooking is finished .Like Pic 22.Pressing any key can stop the buzzer and
extinguish “Auto” function symbol.Like Pic 23.
Note:Cooking end time is beyond current system time plus cooking time, and within 23:59.
15
Operating Instructions
Cooking Reservation Function
In the state of function to be selected, user can reserve the cooking time, by setting how much time to cook
and when to have the dish ready.
First, press button “ ” 3 times, then the icon “AUTO” and oven in use symbol icon“ ”twinkle. The screen
shows the cooking time(First set default display “0·00”).When the icon “AUTO” and oven in use symbol
“ ”twinkle, user can set the cooking time by pressing“ ”or“ ”.
Pic 24 Cooking time well set diagram Pic 25 Reservation function setting initial state
Pic 24: Cooking time well set diagram Pic 25: Reservation function setting initial state
Second, press “ ” once again, when icon “AUTO” twinkles, user can set the time that expect the cooking
finishes at, by pressing“ ”or“ ”. After choosing the time , lift the finger off the buttons and wait for 5
seconds, then the icon “AUTO” stops twinkling. It means time is well set. Whenever user wants to adjust the
timer, in the working status, press “ ” three times to adjust the cooking period, or press “ ” four times to
adjust the ending time. After setting is done, The display will change back to system time.
For example, the system time is 0:00. First, set cooking time 30 mins like pic 25. Second, set cooking end time
1:00, like pic 26. Then the oven is back to waiting mode. When the time reaches 0:30, the oven automatically
starts to cook. It cooks for 30 mins and stop at the set time 1:00, display screen shows system time, oven in
use symbol“ ” extinguishes, system time keeps bright, decimal point symbol “ ” and “Auto” function
symbol twinkle, buzzer will prompt the user for 5 minutes, reminding the user that the cooking is finished . See
Pic 29. Pressing any key can stop the buzzer and extinguish “Auto” function symbol. Like Pic 30.
Pic 26 Reservation function well set state Pic 27 Reservation function start state
Pic 28 Cooking function start diagram Pic 29 Cooking function end diagram
Pic 30 Cancel “Auto” function symbol display diagram(After cooking finished)
Note :Cooking time setting range is within 10 hours.

16
Operating Instructions
Selecting the audible signal
The audible signal has 3 tones. To adjust the signal you should proceed as follows:
Under standby mode, that is when display screen shows system time, decimal point symbol “ ”
twinkling, audible signal can be adjusted by pressing the plus button to choose the 3 tones, press once
choose one kind. It is the second kind of tone by default when power on.
Thermostat Control Knob
The oven thermostat control knob sets the required temperature of the
oven. It is possible to regulate the temperature within a range of 50 -
250°C.
Turn the control knob clockwise.
Tips for Saving Energy
The following information will help you to use your appliance in an ecological way, and to save energy:
1、Use dark coloured or enamel coated cookware in the oven since the heat transmission will be better.
2、While cooking your dishes, perform a preheating operation if it is advised in the user manual or
cooking instructions.
3、Do not open the door of the oven frequently during cooking.
4、Try to cook more than one dish in the oven at the same time, whenever possible . You can cook by
placing two cooking vessels onto the wire grill.
5、Cook more than one dish one after another. The oven will already be hot.
6、You can save energy by switching off your oven a few minutes before the cooking time. Do not open
the oven door.
7、Defrost frozen dishes before cooking them.

17
Operating Instructions
Cooking Guide
Baking Tips
1、How to establish whether sponge cake is baked through. Approximately 10 minutes before the end of the
baking time specified in the recipe, stick a cocktail stick into the cake at the highest point. If the cocktail stick
comes out clean, the cake is ready.
2、The cake collapses. Use less fluid next time or set the oven temperature 10 degrees lower. Observe the
specified mixing times in the recipe.
3、The cake has risen tin the middle but is lower around the edge. Do not grease the sides of the spring form cake
tin. After baking, loosen the cake carefully with a knife.
4、The cake goes too dark on top. Place it lower in the oven, select a lower temperature and bake the cake for a
little longer.
5、The cake is too dry. When it is done, make small holes in the cake using a cocktail stick. Then drizzle fruit juice
or an alcoholic beverage over it. Next time, select a temperature 10 degree higher and reduce the baking
time.
6、The bread or cake(e.g. cheesecake) looks good, but is soggy on the inside (sticky, streaked with water). Use
slightly less fluid next time and bake for slightly longer at a lower temperature. For cakes with a moist
topping, bake the base first. Sprinkle it with almonds or bread crumbs and then place the topping on top.
Please follow the recipe and baking times.
7、The cake is unevenly browned. Select a slightly lower temperature to ensure that the cake is baked more
evenly. Bake delicate pastries on one level using Top/bottom heating. Protruding greaseproof paper can affect
the air circulation. For this reason, always cut greaseproof paper to fit the baking tray.
8、The bottom of a fruit cake is too light. Place the cake one level lower the next time.
9、The fruit juice overflows. Next time, use the deeper universal pan, if you have one.
10、Small baked items made out of yeast dough stick to one another when baking. There should be a gap of
approx. 2 cm around each item. This gives enough space for the baked items to expand well and turn brown
on all sides.
11、You were baking on several levels. The items on the top baking tray are darker than that on the bottom
baking tray. Always use 3D hot air to bake on more than one level. Baking trays that are placed in the oven at
the same time will not necessarily be ready at the same time.
12、Condensation forms when you bake moist cakes. Baking may result in the formation of water vapour, which
escapes above the door. The steam may settle and form water droplets on the control panel or on the fronts
of adjacent units. This is natural process.

18
Operating Instructions
Grilling Tips
When grilling, preheat the oven for approx. 4 minutes, before placing the food into the cooking compartment.
Always grill with the oven door closed.
As far as possible, the pieces of food you are grilling should be of equal thickness. This will allow them to
brown evenly and remain succulent and juicy.
Turn the food you are grilling after 2/3 of the time.
Do not add salt to steaks until they have been grilled.
Add in a little liquid if the meat is lean. Cover the base of the ovenware with approx.1/2 cm of liquid.
Add liquid generously for pot roasts. Cover the base of the ovenware with approx.1-2 cm of liquid.
Place the food to be grilled directly on the wire rack. If you are grilling a single piece, the best results are
achieved by placing it in the centre of the wire rack. The universal pan should also be inserted at level 1.The
meat juices are collected in the pan and the oven is kept cleaner.
When grilling, do not insert the baking tray or universal pan at level 4 or 5.The high heat distorts it and the
cooking compartment can be damaged when removing it.
The grill element switches on and off continually. This is normal. The grill setting determines how frequently
this will happen.
When the roast is ready, turn off the oven and allow it to rest for an additional 10 minutes. This allows better
distribution of the meat juices.
For roast pork with a rind, score the rind in a crossways pattern, then lay the roast in the dish with the rind at
the bottom.
Place whole poultry on the lower wire rack breast-side down. Turn after 2/3 of the specified time.
For duck or goose, pierce the skin on the underside of the wings. This allows the fat to run out.
Turn the pieces of fish after 2/3of the time, whole fish does not have to be turned. Place the whole fish in the
oven in its swimming position with its dorsal fin facing upwards. Placing half a potato or a small ovenproof
container in the stomach cavity of the fish will make it more stable.
How to tell when the roast is ready. Use a meat thermometer (available from specialist shops) or carry out a
“spoon test”. Press down on the roast with a spoon. If it feels firm, it is ready. If the spoon can be pressed in,
it needs to be cooked for a little longer.
The roast is too dark and the crackling is partly burnt. Check the shelf height and temperature.
The roast looks good but the juices are burnt. Next time, use a smaller roasting dish or add more liquid.
The roast looks good but the juices are too clear and watery. Next time, use a larger roasting dish and use
less liquid.
Steam rises from the roast when basted. This is normal and due to the laws of physics. The majority of the
steam escapes through the steam outlet. It may settle and form condensation on the cooler switch panel or
on the fronts of adjacent units.
19
Operating Instructions
Baking and Grilling Table
Foods
Accessory
Heating
function
Rack place
Temperature
setting(℃)
Heating time
(Mins)
Cake
Round model
2
nd
layer
140-160
30-45
Bread
Bake Pan
2
nd
layer
180-200
10-20
Bake Pan
3
rd
layer
170-190
10-20
Bake Pan
3
rd
+1
st
layer
160-180
10-20
Thin pizza (cold)
Bake Pan
2
nd
layer
190-210
15-25
Deep pizza(cold)
Bake Pan
2
nd
layer
180-200
20-30
Bake Pan +rack
3
rd
+1
st
layer
170-190
25-35
Bread piece(9piece)
Rack
3
rd
layer
160-170
10-15
Rack
3
rd
+1
st
layer
160-180
15-25
Sausage
Rack
3
rd
layer
160-180
10-15
Ribs
Rack
3
rd
layer
200-220
20-35
Pork
Bake Pan
2
nd
layer
190-210
70-85
Bake Pan
1
st
layer
180-200
55-70
Beefsteak
(3cm thickness)
Bake Pan
2
nd
layer
190-210
20-35
Small whole chicken
(1.2Kg)
Rack
2
nd
layer
200-220
50-60
Whole chicken(1.6Kg)
Rack
2
nd
layer
190-210
50-60
Small chicken pieces
(150g)
Rack
3
rd
layer
200-220
30-40
Whole goose(3.5Kg)
Rack
2
nd
layer
170-190
60-70
Big piece of mutton
with bone(1.2Kg)
Bake pan
2
nd
layer
170-190
60-70
Whole fish(1.0Kg)
Rack
2
nd
layer
200-220
30-40
Whole fish(1.5Kg)
Rack
2
nd
layer
180-200
40-50
20
Cleaning and Maintenance
NOTE: Cleaning and maintenance operations must only be carried out when the oven is cool.
The appliance should be disconnected from the power outlet or turned off at your isolation
switch before commencing any cleaning process.
Cleaning the oven exterior:
Before starting to clean your oven, be sure that all control buttons are off and your appliance has cooled off.
Unplug the appliance.
Do not use cleaning materials containing particles that might scratch the enameled and painted parts of your
oven. Use cream cleaners or liquid cleaners, which do not contain particles. As these cleaners may damage the
surfaces, do not use caustic creams, abrasive cleaning powders, rough wire wool or hard tools. In the event of
any excess liquids spilling over your oven surface during cleaning, clean up immediately so as to prevent
possible damage to the enamel or metal surface. Do not use steam cleaners for cleaning the oven.
Cleaning the interior of the oven:
Make sure to unplug the oven before starting to clean it. You will obtain best results if you clean the oven interior
while the oven is slightly warm (the oven should not be operating). Wipe your oven with a soft piece of cloth
(e.g. dish cloth) dampened with warm soapy water after each use, rinse cloth in warm water then wipe oven
again and then finish by wiping with a dry cloth. For a complete cleaning process, use dry and powder type oven
cleaners, following the oven cleaning product’s instructions.
Detaching and attaching the oven door
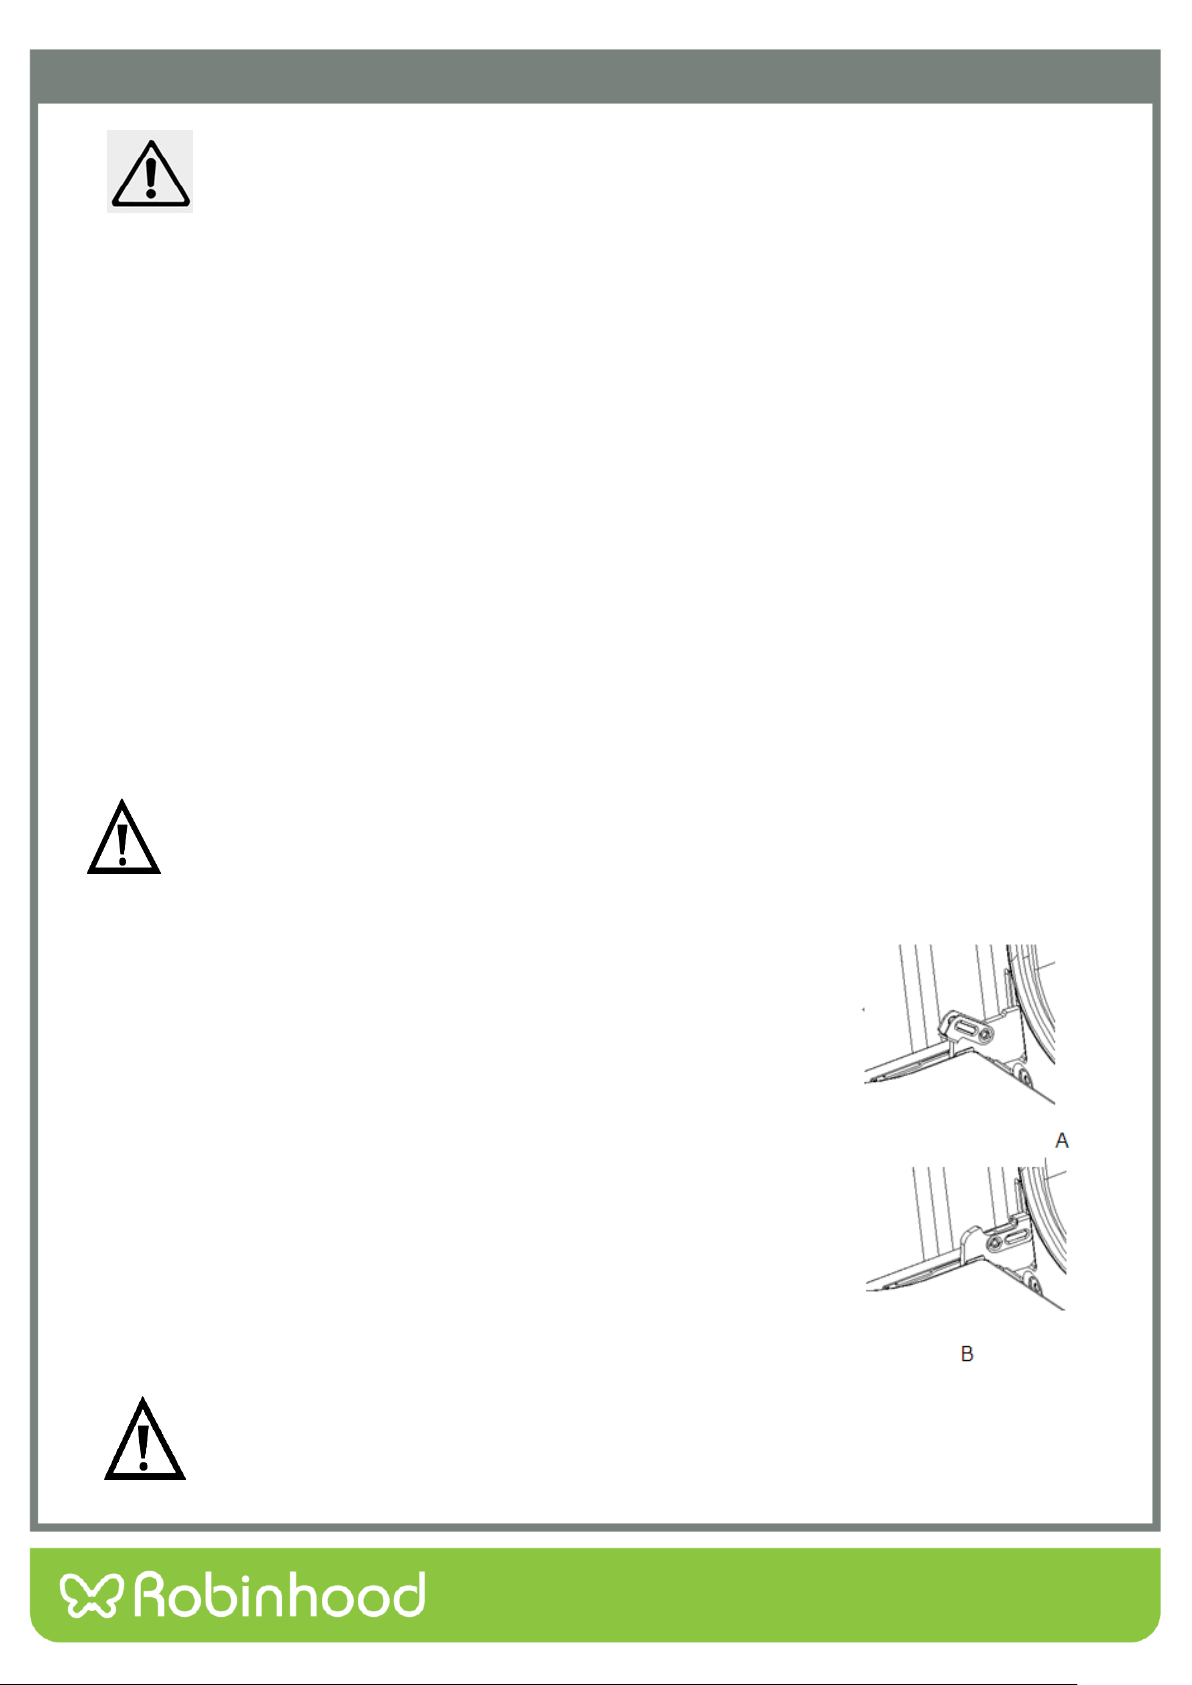
For cleaning purposes and to remove the door panels, you can detach the oven door. Every door hinge has a
locking rod, when it is close, door was fixed in place, then the door was not disassembly. If in order to remove
down door to open the locking rod, hinge will be locked and would not bite.
When the hinge not locked, it will have a big strength to close in sudden. Make sure locking rod
closed all the time, and insure it was open when remove the door.
Remove the door
Full open the door.
Fold up the right and left side of locking rod. (picture A)
Close the door until reach to stop step, hold on both left and right sides of the
door, then reclose the door, upward and downward and pull out the door.
Install the oven door
Accord to the opposite order of door disassembly
When install oven door, make sure both hinge plug into opening mouth directly.
Both sides of hinge rabbet must be fixed onto the hinge mounting hole on the
door.
When open the door, spread down locking rod(picture B)
If the door drop accidently or hinges shut up suddenly, do not push you hand in hinges. Please
call your after-sell department.
21
Cleaning and Maintenance
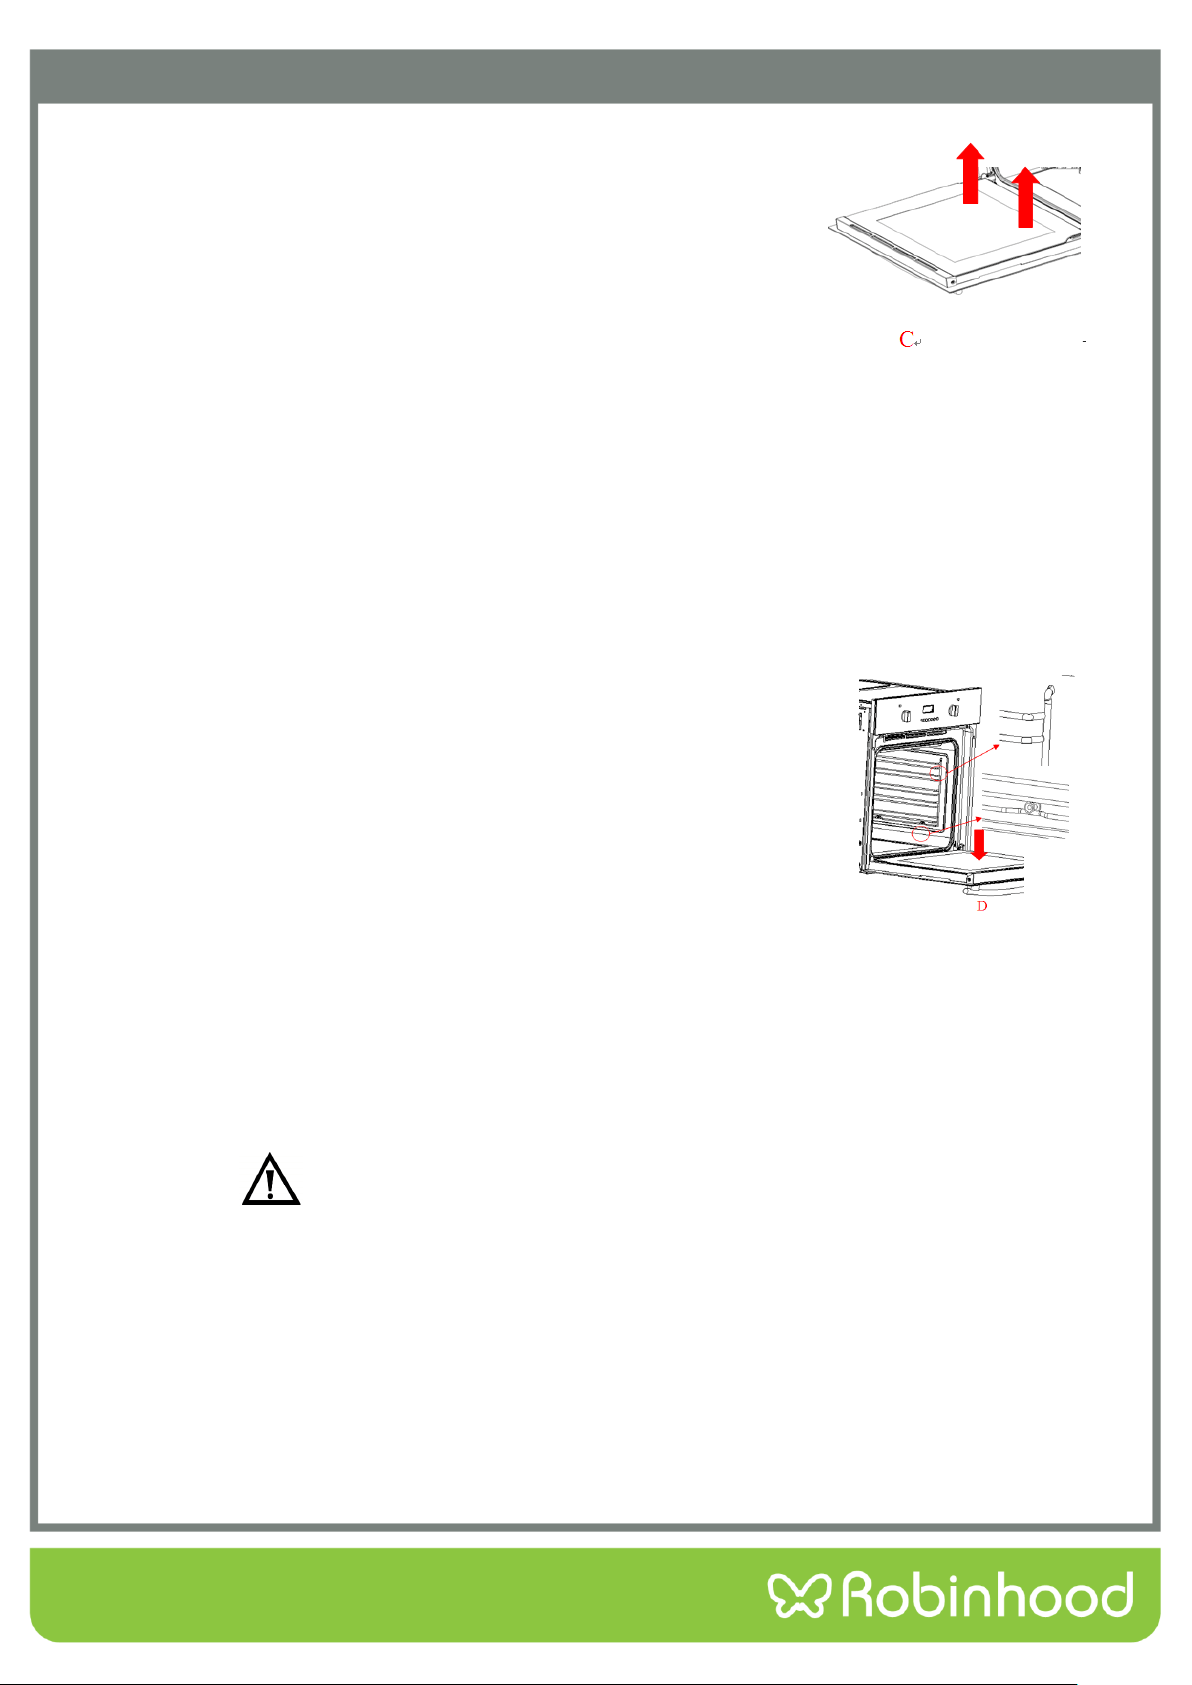
Remove and install door panel
Remove
Remove oven door, put it on a piece of cloth.
Using one hand to push the outside glass, the other hand to pull the inside
glass, hold the glass then pull out the glass.
Notice! Dangerous!
If the glass has some scratches, it may lead to crack.
Don’t use the glass spatula, acute and corrosive cleaning product or detergent to clean the glass.
Install
Plug the inner glass into glass pressure groove.
Both right and left sides need put down alignment to card slot and push the glass to its place.
Put on the oven door.
Remove and install side shelves
In order to clean sides of oven, you should remove the side shelves to clean the oven
1. Downward the shelf and pull it out (picture D).
2. Lift up the side shelf to level and pull it out.
Do not use the oven before correctly assemble the oven door.
Regular Inspections
Besides keeping the oven clean, you should:
Carry out periodic inspections of the control elements and cooking units of the oven. After the guarantee has
expired you should have a technical inspection of the oven carried out at a service centre at least once every two
years.
Fix any operational faults
Carry out periodical maintenance of the cooking units of the oven.
Caution: Maintenance should only be done by a qualified technician.
22
Cleaning and Maintenance
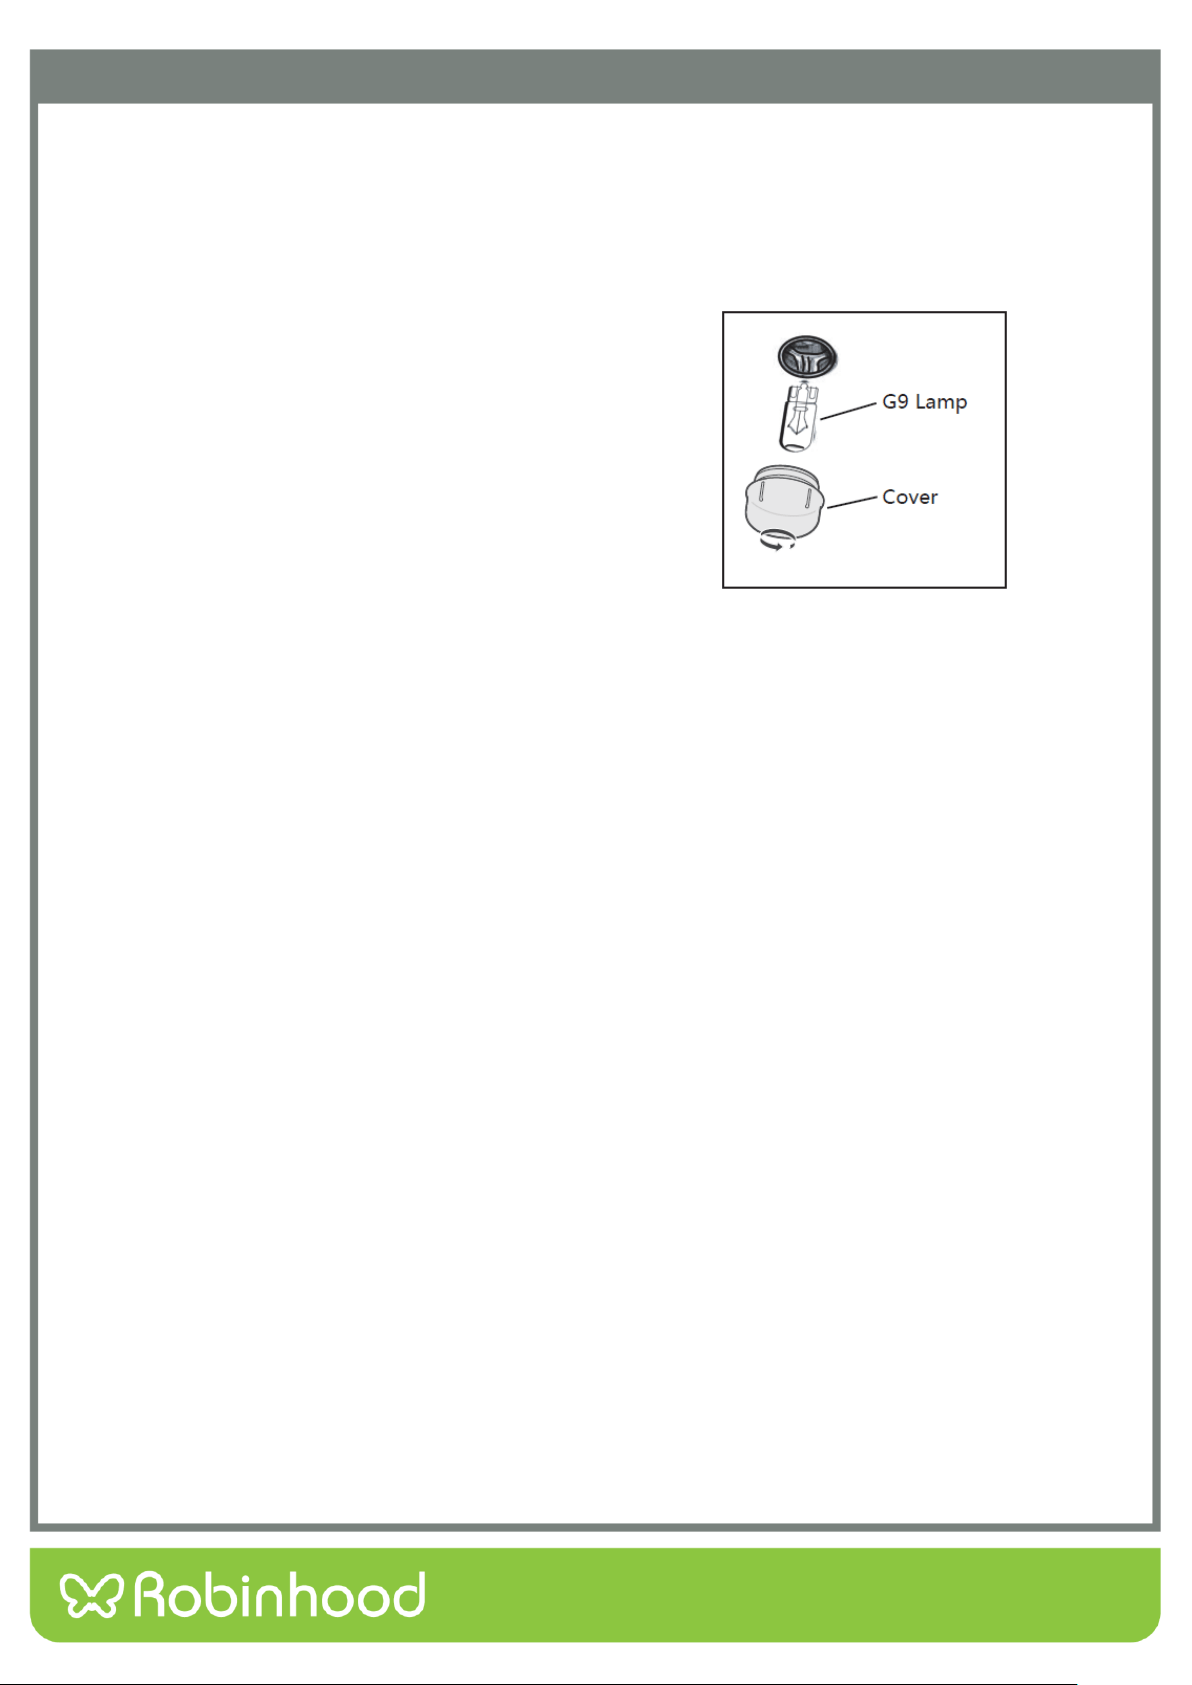
Replacing the Oven Lamp
If the oven lamp fails, it must be replaced.
Warning: Disconnect the oven from the power source before replacing the lamp. Danger of electric shock.
Disconnect the oven from the power source.
Unscrew the glass cover by turning it anti-clockwise.
Replace the lamp with an identical one.
Screw the glass cover back on by turning it clockwise.
Reconnect the power source.
Test that the lamp works.
Lamp Details
Voltage: 220-240VAC
Wattage: 25W
Lamp Type: G9
Temperature rating: 300°C
23
Troubleshooting
When first using your oven, it may emit a particular smell or some smoke. This is normal. Please refer to the ‘Before
Using the Oven for the First Time’ section for instructions on how to properly start using your oven for the first time.
Use the below table to check for solutions if any faults occur. If none of the below is relevant to your issue, please
contact support or a qualified technician.
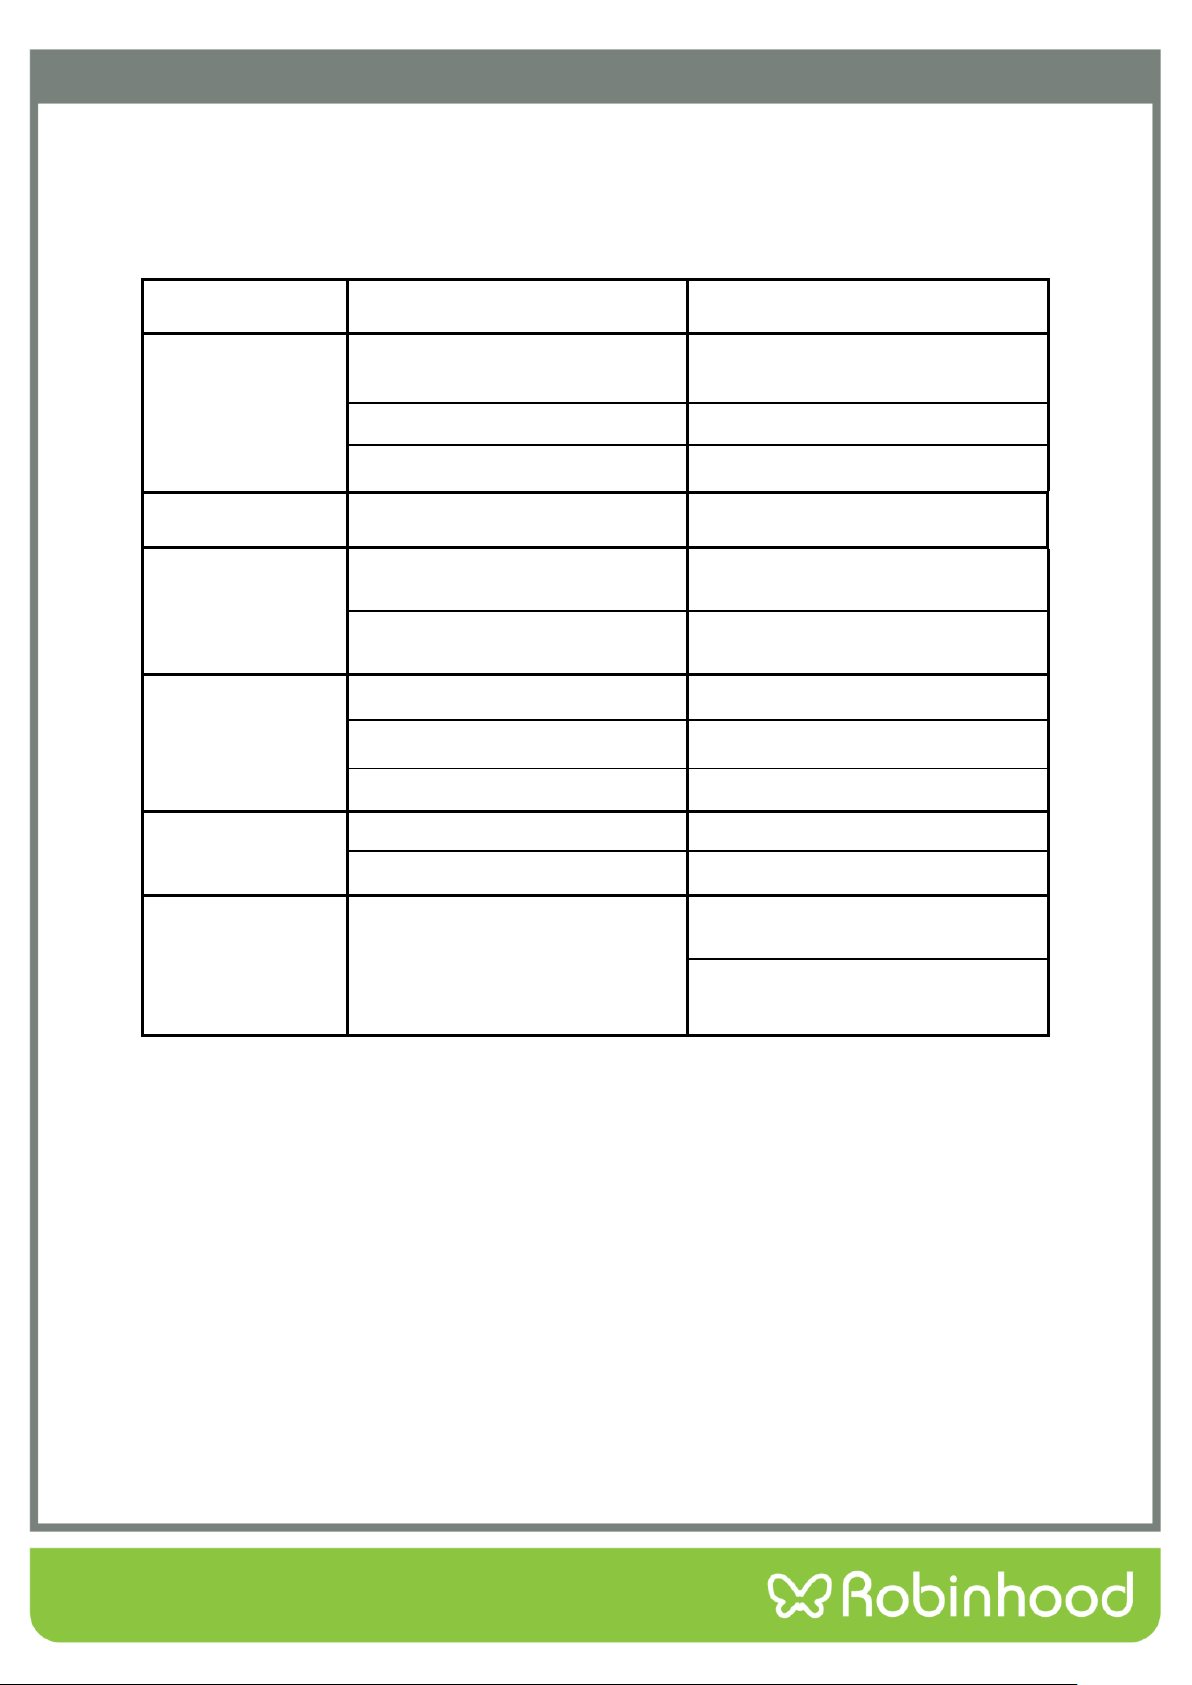
Problem
Possible Reason
Suggestion
Oven isn’t working.
Not connected to the power
source.
Check that the oven is properly
plugged in and switched on at the
wall.
Circuit breaker malfunction.
Reset the circuit breakers.
Forgot to set the timer function.
Set the timer to the desired time, or
to ‘On’ for no timer.
Lamp isn’t turning
on.
Lamp has blown.
Change for a new lamp.
Oven stops working
during operation.
Power supply interrupted.
Check that your kitchen lights and
other appliances are still working.
Automatic thermal shutdown.
Check that the cooling fans are
working.
Oven not heating.
Thermostat not set.
Set up the temperature.
Forgot to set the timer.
Set the timer to the desired time, or
to ‘On’ for no timer.
Heating element damaged.
Change for a new heating element
Water leaks from
the door during
operation.
Door seal is damaged.
Replace the door seal.
Door hinge is damaged.
Replace the door hinge.
Oven fans remain
running after oven
has finished
cooking.
Oven needs to cool its working
parts.
Put your hand to the outlet and feel
for hot air. If yes, this is normal.
If the air temperature from the outlet
is room temperature, need to change
for a new normal open thermostat.
24
Warranty Certificate (New Zealand)
Terms and Conditions
The following conditions apply in respect of the warranty given in this certificate:
1. Monaco Corporation Limited (“Monaco”) warrants the following Robinhood products against manufacturing defects and
faulty materials, under normal use and subject to the exclusions in this certificate, for a period of:
Rangehood, Ovens, Cooktops, Dishwashers, Refrigeration - 24 months from date of original purchase for domestic
use.
Uniduct – 12 months from date of original purchase for domestic use.
Ironing centre – 12 months from date of original purchase for domestic use.
Sinks sets– 5 years on stainless steel sink including draining bench from date of original purchase for domestic use, 6
months on all stainless steel accessories, including wire rack, colander and tray from date of original purchase for
domestic use.
Laundry Tub - 5 years on stainless bowl, 24 months on Tap, Cabinet and other components from the date of original
purchase for domestic use.
“Original purchase”, when used in this certificate, means purchase by the customer directly from Monaco or one of its approved
suppliers.
2. This warranty is limited to the repair or replacement, at our option, within the warranty period of any component part
which we at our discretion determine to contain faulty materials or a manufacturing defect in breach of this warranty. This
warranty is subject to terms and conditions set out in this certificate.
3. The warranty only applies within New Zealand.
4. The customer must produce the original invoice or other purchase documentation as proof of the original purchase date.
Warranty exclusions
1. The warranty does not apply where, in Monaco’s opinion:
The defect is caused by misuse, wear and tear, dirt, fire or accidental damage. The product has been repaired or
serviced by an unauthorised person.
The product was not installed in accordance with our instructions.
The product was purchased overseas or was not designed for use in New Zealand. The product was not used, cleaned
or cared for in accordance with our instructions.
The product was used outdoors.
2. In addition, this warranty does not extend to damage or defects which in our opinion, directly or indirectly arise from or
are due to:
Exposing the product to acidic or corrosive materials or chemicals such as dyes, solvents, denture cleaner or acetone;
Using inappropriate household cleaning products such as abrasive cream or powder cleansers, furniture polish,
bleach, mentholated spirits, drain cleaners, sugar soap, metal pads and strongly alkaline or acidic cleaners;
Heat damage, including from washing the product at high temperatures;
Impact or mishandling the product, including the impact caused by objects scraped along, thrown or dropped on the
product surface or excessive weight being placed on the product;
Structural or support changes in or affecting the building or the application where the product has been installed;
Failure to clean or maintain the product as recommended; or any other causes specified in the product information as
being excluded from this warranty.
3. Variations with the colour or gloss within the product or any ageing or fading of colour, shine or gloss level over time are
not covered by this warranty. The warranty does not cover visual imperfections or blemishes in the surface and edges of
the product that were not brought to your supplier’s attention at the time you inspected the product.
4. Costs incurred on installation or removal of a product, or any reinstallation of a product, or any associated costs, are not
covered by this warranty.
5. Monaco will not be liable for consequential or indirect loss or damage whatsoever and however arising out of or in
connection with the supply, performance or removal of the product, including (but not limited to) loss of profit, loss of
revenue, loss of contract, loss of goodwill or increased cost of workings, even if due to the negligence of Monaco or any of
its approved suppliers, employees or agents.
6. Charcoal filters and light bulbs are not covered by this warranty
7. This warranty and the statements contained in this certificate or other documents given to you do not exclude, restrict or
modify the application of any term implied into this warranty by statute, provided that (to the extent any statutory
provision permits Monaco to limit its liability for a breach of an implied condition or warranty) Monaco’s liability for such
breach is limited to the payment of the cost of replacing the product, repairing the product or acquiring an equivalent
product.
8. Subject to clause 5, our obligations under this warranty are limited to those set out in this certificate, and this warranty is
expressly instead of all other warranties, express or implied, including any implied warranty of merchantability or fitness
for a particular purpose and notwithstanding any course of dealing between the parties or custom and usage in trade to
the contrary.
Terms and conditions are subject to change.
25
Warranty Certificate (Australia)
Terms and Conditions
If you are a consumer under the Australian Consumer Law, our goods come with guarantees that cannot be excluded under the Australian
Consumer Law. You are entitled to a replacement or refund for a major failure and for compensation for any other reasonably foreseeable
loss or damage. You are also entitled to have the goods repaired or replaced if the goods fail to be of acceptable quality and the failure does
not amount to a major failure.
1. Shriro Australia Pty Limited (“Shriro”) also warrants the following Robinhood products against manufacturing defects and faulty
materials, under normal use and subject to the exclusions in this certificate, for a period of:
Rangehood, Ovens, Cooktops, Dishwashers, Refrigeration - 24 months from date of original purchase for domestic use.
Uniduct – 12 months from date of original purchase for domestic use.
Ironing centre – 12 months from date of original purchase for domestic use.
Sinks sets– 5 years on stainless steel sink including draining bench from date of original purchase for domestic use, 6 months
on all stainless steel accessories, including wire rack, colander and tray from date of original purchase for domestic use.
Laundry Tub - 5 years on stainless bowl, 24 months on Tap, Cabinet and other components from the date of original
purchase for domestic use. “Original purchase”, when used in this certificate, means purchase by the customer directly from
Shriro or one of its approved suppliers.
2. This warranty is limited to the repair or replacement, at our option, within the warranty period of any component part which we at
our discretion determine to contain faulty materials or a manufacturing defect in breach of this warranty. This warranty is subject
to terms and conditions set out in this certificate.
3. The warranty only applies within Australia.
4. For warranty service outside of capital city metropolitan area or 30 km from nearest authorised service agent you will be liable for
reasonable travelling expenses and the cost of transport of the product or parts to and from the service agent
5. To make a claim under this warranty, you must produce the original invoice or other purchase documentation as proof of the
original purchase date. You must send your claim to Shriro Australia Pty Limited, 104 Vanessa Street, Kingsgrove, NSW, 2208,
within 7 days of any alleged defect or failure of the product first becoming apparent. You are responsible for the expense of
making a claim under this warranty.
This warranty is given by:
Shriro Australia Pty Ltd, ABN: 28 002 386 129
Telephone: 1800 648 556
Facsimile: 1800 628 577
Email: customercare@robinhood.com.au
www.robinhood.com.au
Attention: Customer Services Manager
Warranty exclusions
1. The warranty does not apply where, in Shriro’s opinion:
The defect is caused by misuse, wear and tear, dirt, fire or accidental damage. The product has been repaired or serviced by
an unauthorised person.
The product was not installed in accordance with our instructions.
The product was purchased overseas or was not designed for use in Australia.
The product was not used, cleaned or cared for in accordance with our instructions.
The product was used outdoors.
2. All Robinhood Rangehoods are suitable for indoor use only and not suitable over BBQs or charcoal cookers designed for outdoor
use.
3. In addition, this warranty does not extend to damage or defects which in our opinion, directly or indirectly arise from or are due
to: exposing the product to acidic or corrosive materials or chemicals such as dyes, solvents, denture cleaner or acetone; using
inappropriate household cleaning products such as abrasive cream or powder cleansers, furniture polish, bleach, mentholated
spirits, drain cleaners, sugar soap, metal pads and strongly alkaline or acidic cleaners; heat damage, including from washing the
product at high temperatures; impact or mishandling the product, including the impact caused by objects scraped along, thrown
or dropped on the product surface or excessive weight being placed on the product; structural or support changes in or affecting
the building or the application where the product has been installed; failure to clean or maintain the product as recommended; or
any other causes specified in the product information as being excluded from this warranty.
4. Variations with the colour or gloss within the product or any ageing or fading of colour, shine or gloss level over time are not
covered by this warranty. The warranty does not cover visual imperfections or blemishes in the surface and edges of the product
that were not brought to your supplier’s attention at the time you inspected the product.
5. We will not be responsible under this warranty for, nor pay the costs of, removing the existing product, or reinstalling the new
product, or any associated costs or damages.
6. Charcoal filters and light bulbs are not covered by this warranty.
The benefits given by this warranty are in addition to other rights and remedies of consumers under any law in relation to the goods which
cannot be excluded.
This warranty certificate is not intended to create a contract between Shriro Australia Pty Limited and the purchaser.
New Zealand
Monaco Corporation Ltd
Telephone: (09) 415 6000
Facsimile: (09) 415 7400
Email: customer[email protected]
www.robinhood.co.nz
Australia
Shriro Australia Pty Limited
ABN 28 002 386 129
Telephone: 1800 648 556
Facsimile: 1800 628 577
Email: customer[email protected].au
www.robinhood.com.au
IM Ref: RHBO65DX/610DX/68DB – 2020.11.16