Loading ...
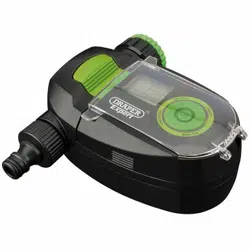
7. SETTING UP YOUR
WATERING PROGRAM
PLEASE NOTE: You cannot program the
current date and time on this water timer. If you
require a timer with this capability you may
purchase Draper’s Electronic Ball Valve Timer
(Stock No. 36750)
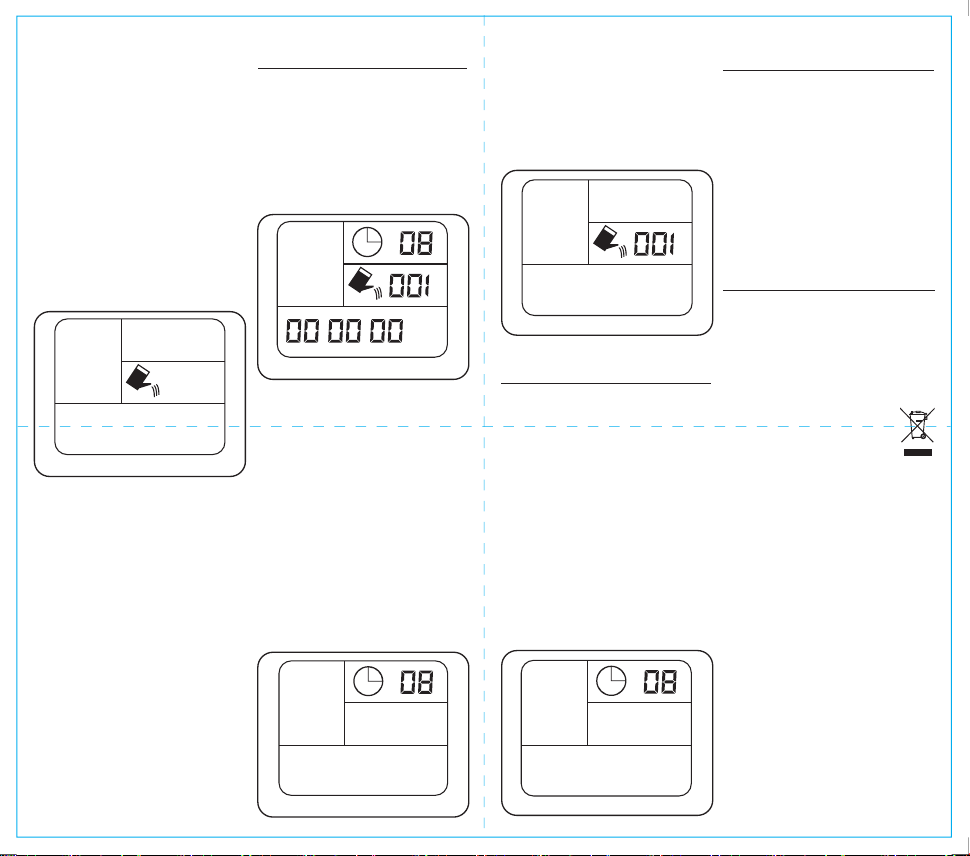
7.1 TURN ON TIMER - FIG. 4
- Press ON/OFF.
- The screen will turn on and the display
should looks like Fig. 4. A clock symbol will
be flashing
- Go to STEP 2
8. SET TIME DELAY
If it rains you can use this function to delay
your set watering program. Watering will begin
immediately after the delay interval you set.
The length of the watering session will be the
same as the session you have set in your
watering program. Your watering program will
then resume as normal
- Press ON/OFF to turn on the screen.
- Press SELECT and then press SELECT
again until TIME DELAY begins to flash
(fig.7).
- Press OK
- Press FREQUENCY to select the length of
the time delay.
- Press OK.
- The time delay is now set and watering will
begin immediately after the delay interval.
Your pre-set watering program will then
continue as normal.
6.4 MANUAL MODE - FIG. 3
Use manual mode if you want free flowing
water outside of the watering program you
have set. The valve will open and water will
continue to flow until you switch to another
mode or turn the timer off
- Press ON/OFF switch to turn on the
screen.
- Press SELECT on the control dial. You will
see 3 options on the left (Auto, Manual,
Time Delay) Auto will be flashing.
- Press SELECT again and Manual will start
flashing.
- Press OK. You will hear a click which is the
solenoid valve opening. Water will start to
flow.
- To close the valve and turn Manual mode
off:
1. If the screen has automatically switched
off, press the ON/OFF button. The
screen should turn on.
2. Press the ON/OFF button again. The
valve will close and stop the water flow.
Auto
H
m
D/H/M
Manual
Auto
m
7.2. SET WATERING FREQUENCY -
FIG. 5
- Press SELECT.
- You will see AUTO flashing on the left of the
screen.
- Press OK. The number in the top right of
the screen will begin flashing.
- Press FREQUENCY to change the
frequency to one of the following settings:
- Once every: 8hrs / 12hrs / 1 day / 2 days / 3
days / 5 days / 7 days
- Press OK to select.
- You will now see a watering can icon and
minutes flashing on the right of the screen.
- Go to STEP 3
7.3. SET LENGTH OF WATERING
SESSION - FIG. 6
- Press MINUTES to select from the
following programmed time lengths for
watering sessions:
- 1 / 2 / 3 / 4 / 5 / 6 / 8 / 10 / 15 / 30 / 45 / 60 /
90 / 120 minutes
- Press OK to select.
- Your watering program is now complete.
The clock symbol should now be flashing.
Auto
H
FIG.3
FIG.4
FIG.5
FIG.6
Time Delay
H
FIG.7
- It is recommended that new batteries are
installed if you are going away for a long
period of time.
- Make sure you only use new alkaline
batteries.
- To prevent corrosion, always remove the
battery when the timer is not in use for long
periods of time or when the battery is low.
- Keep clear of any dirt or debris which may
block the valve and cause the timer to
malfunction.
- Disassembling the timer improperly will void
all warranties.
10. DISPOSAL
9. TIMER CARE &
MAINTENANCE
10.1 DISPOSAL
- At the end of the machine’s working life, or
when it can no longer be repaired, ensure
that it is disposed of according to national
regulations.
- Contact your local authority for details of
collection schemes in your area.
In all circumstances:
• Do not dispose of power tools with domestic
waste.
• Do not incinerate.
• Do not abandon in the environment.
• Do not dispose of WEEE* as
unsorted municipal waste.
* Waste Electrical & Electronic Equipment.