
8L Cooler & Warmer
Model Number:
RH8CLR8001B
For customer services & spare parts please call 0345 208 8750
or visit us at mda.russellhobbs.com
IMPORTANT:
RETAIN FOR FUTURE REFERENCE
Contents
Safety
Instructions
………………………………………
. 3-4
Electrical
Safety
………………………………………
. 5-6
Transportation & Handling
………………………………………
. 6
Before
Switching On
………………………………………
. 6
In
stalling & Switching On Your Appliance
………………………………………
. 7
Your
Appliance
………………………………………
. 8
Unit
& Spare Parts
……………………………………….
8
Where To Put Your Appliance
………………………………………
. 9
Usage
Information
……………………………………….
10-13
Cleaning
& Maintenance
………………………………………
. 14
Defrosting
………………………………………
. 14
Connection
to the Mains Supply
……………………………………….
15
Troubleshooting
………………………………
.……… 16-17
Product
Guarantee
………………………………………
. 18
Technical
Specification
…………………………
.…………… 19
Safety Instructions
This appliance is a semi-conductor electric refrigerating appliance, which is a
‘Category 10 other’ appliance according to ERP 643/2009. Its design temperature
is 17°C.
Important Note: Please read this booklet before installing and switching on this
appliance. The manufacturer assumes no responsibility for incorrect installation
and usage as described in this booklet.
WARNING: When positioning the appliance, ensure the supply cord is not
trapped or damaged.
WARNING: Do not place multiple portable socket-outlets or portable power
suppliers at the rear of the appliance.
• Do not obstruct the ventilation openings in the appliance.
• The appliance must not be placed or rested on its power cord.
• Do not use mechanical devices or other artificial means to accelerate the
defrosting process, such as a heater or a hair dryer.
• Do not use electrical appliances in the cooling/warming compartment of the
appliance.
• If this appliance is to replace an old refrigerator with a lock, the lock must be
removed as a safety measure before storing it or disposing of it. This is to
protect children from locking themselves inside the appliance.
• Your old refrigerator and freezer may contain insulation gases and refrigerants;
the old appliances must be disposed of properly. Contact your local
authority or the supplier if you have any questions. Please ensure that you do
not damage the scrap unit prior to it being picked-up by the relevant waste
disposal service.
• Do not use adaptors or extension leads when connecting the appliance to the
electrical power supply.
3

• Do not plug in the appliance if there is damage to the plug.
• Do not pull, twist or damage the power cable.
• Do not plug-in or un-plug the appliance with wet hands in order to prevent
electrical shock.
• This appliance is designed to be used by adults. Do not allow children to play
with the appliance or let them hang over the door.
• This appliance can be used by children aged 8 years and above and by persons
with reduced physical, sensory and mental capabilities or lack of experience and
knowledge, as long as they have been given supervision or instruction
concerning use of the appliance in a safe way and understand the hazards
involved.
• Children aged from 3 to 8 years are allowed to load and unload this appliance.
• Do not place explosive or flammable material in your appliance.
• Bottles containing a high percentage of alcohol must be sealed well and placed
vertically in the cooling/warming compartment of the appliance.
• Soda drinks must NOT be placed inside the cooling/warming compartment of
the appliance when the unit is switched to the HOT mode.
• Do not cover the body or the top of the appliance.
• Fix down the accessories in the appliance during transportation in orderto prevent
damage to them.
• To avoid contamination of food, please follow the below instructions:
• Opening the door for long periods of time can cause a significant increase in
the temperature in the compartment of the appliance.
• Clean surfaces regularly that come in contact with food along with any
accessible drainage systems.
• If the appliance is left empty for long periods, switch off, defrost, clean, dry
and leave the door open to prevent mould developing within the appliance.
4

Electrical Safety
IMPORTANT NOTE: THIS APPLIANCE MUST BE PLUGGED INTO AN EARTHED
SOCKET
• Operating voltage for your appliance is 220-240V at 50Hz / DC 12V . Ensure
that you plug the product into a suitable power source, as described in the
operating instructions or as marked on the product.
• When using the 12V in-car adaptor the appliance should not be left connected
for a long period of time when the engine is not running.
• DO NOT connect the appliance directly to a 24V lighter socket of a heavy duty
vehicle.
• Unplug this apparatus during lightning storms or when unused for long periods
of time- this will prevent damage to this product.
• Before plugging in the power supply, ensure that the voltage on the
rating label corresponds to the working voltage of your electrical system in your
home or automobile. Connection to any other power source may damage the
unit.
• Insert the plug into an efficient earthed connection. If the socket has no
earthed contact we suggest you call an authorised electrician for assistance.
• This product may be fitted with a non re-wireable plug. If it is necessary to
change the fuse in the plug, the fuse cover must be refitted. If the fuse cover
becomes lost or damaged, the plug must not be used until a suitable
replacement is obtained.
• If the plug or adaptor has to be changed because it is not suitable for your
socket, or becomes damaged in any way, it should be cut off and an appropriate
plug fitted following the wiring instructions. This should be carried out by a
qualified electrician. The plug removed must be disposed of safely, as insertion
into a 13 Amp socket is likely to cause an electrical hazard.
• DO NOT take apart the appliance. Opening or removing the covers on the
appliance may expose you to dangerous voltages or other hazards.
• To prevent risk of fire or electric shock, avoid overloading wall outlets,
extension cords, or integral convenience receptacles.
5

Before Switching On
• Remove all transport tapes and foam protection pieces.
• Clean the interior with a dampened in lukewarm soapy water. Wipe down with
clean water and then wipe dry.
• Important Note: Ensure the appliance is not connected to the power when
performing this task.
• There may be an odour when you first switch on the appliance, it will disappear
when the appliance starts to cool.
• When the appliance has been positioned, ensure the unit is stable. This is
essential to ensure quiet running and proper door opening/closing.
• Connect to the electrical socket (AC) or to a DC socket and set the mode switch
to Cold or Hot (the mode switch is located at the rear of the appliance) and
switch on the power. The appliance will begin to work.
• To save energy, you should minimize the frequency and duration of door
opening.
6
Transportation & Handling
• For safe lifting, ensure the door is closed and carry the appliance by the carry
handle.
• Lift the appliance carefully and never use the door catch for lifting.
• The supply voltage should be the same as that indicated in the technical
specifications and the appliance rating plate.
• In order to disconnect the apparatus from the mains completely switch off the
outlet and remove the mains plug completely.
• Do not bend, stretch or pull the supply cable in order to avoid electric shock.
• When installed, the power socket must be within easy reach.
Installing & Switching On Your Appliance
• Place your appliance in an area that is not exposed to direct sunlight.
• Your appliance should be placed at least 10 cm away from stoves, ovens
and other heating cores.
• This appliance should never be used outdoors or left in the rain.
• When your appliance is placed next to a chest freezer or freezer, there should
be at least 10cms between them to prevent humidity on the outer surface.
• Do not use this apparatus near water or moisture i.e. near a bathtub, wash-
bowl, kitchen sink, laundry tub, in a wet basement, near a swimming pool,
outdoors, or anywhere else that water or moisture is present.
• Do not place anything on your appliance and install the unit in a suitable place
so that there is at least 30cm clearance above the appliance.
• The sides and rear of the appliance should have at least 10cm clearance.
• The appliance must be used in the vertical position.
• This appliance should only be placed on a flat, firm surface.
• Do not place your appliance on a carpeted surface as this will prevent
adequate ventilation.
• Choose a dry and well-ventilated space.
• The appliance should be positioned so that the plug is easily accessible.
• This appliance is not suitable for use in garages, outbuildings or rooms that do
not comply with the ambient temperature requirements set out in the Product
Fiche.
• If you need help or are unsure how to install the unit, please contact
customer services on 0345 208 8750 or visit mda.russellhobbs.com.
7
WARNING! During use, service and disposal of the appliance,
please pay attention to symbol similar to the one shown, which is
located on rear of the appliance (rear panel or compressor) and
with a yellow or orange colour. It’s risk of fire warning symbol.
There are flammable materials in refrigerant pipes and
compressor. Please be far away from fire source during use,
service and disposal.
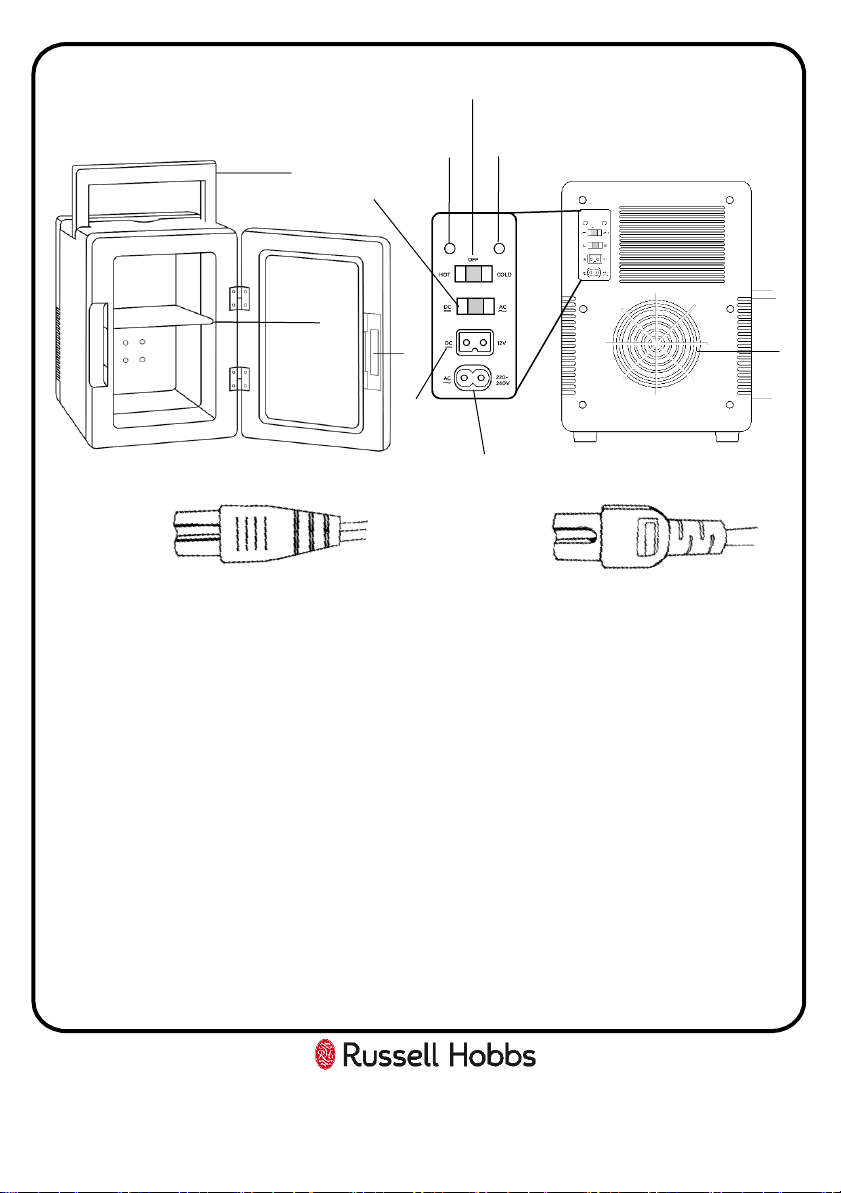
1. Carry handle
2. Adjustable shelf
3. Door catch
4. Heating indicator light
5. Off/Mode selection light
6. Cooling indicator light
7. Air-out vent
8. Air-in vent
9. DC/AC power switch
10. DC input
11. AC input
12. DC adaptor
13. AC adaptor
Your Appliance
Partsmay vary accordingto the appliance model.
8
Unit & Spare Parts
For spare parts please contact customer services on 0345 208 8750 or visit
mda.russellhobbs.com
12
13
1
2
3
4
5
6
7
8
9
10
11
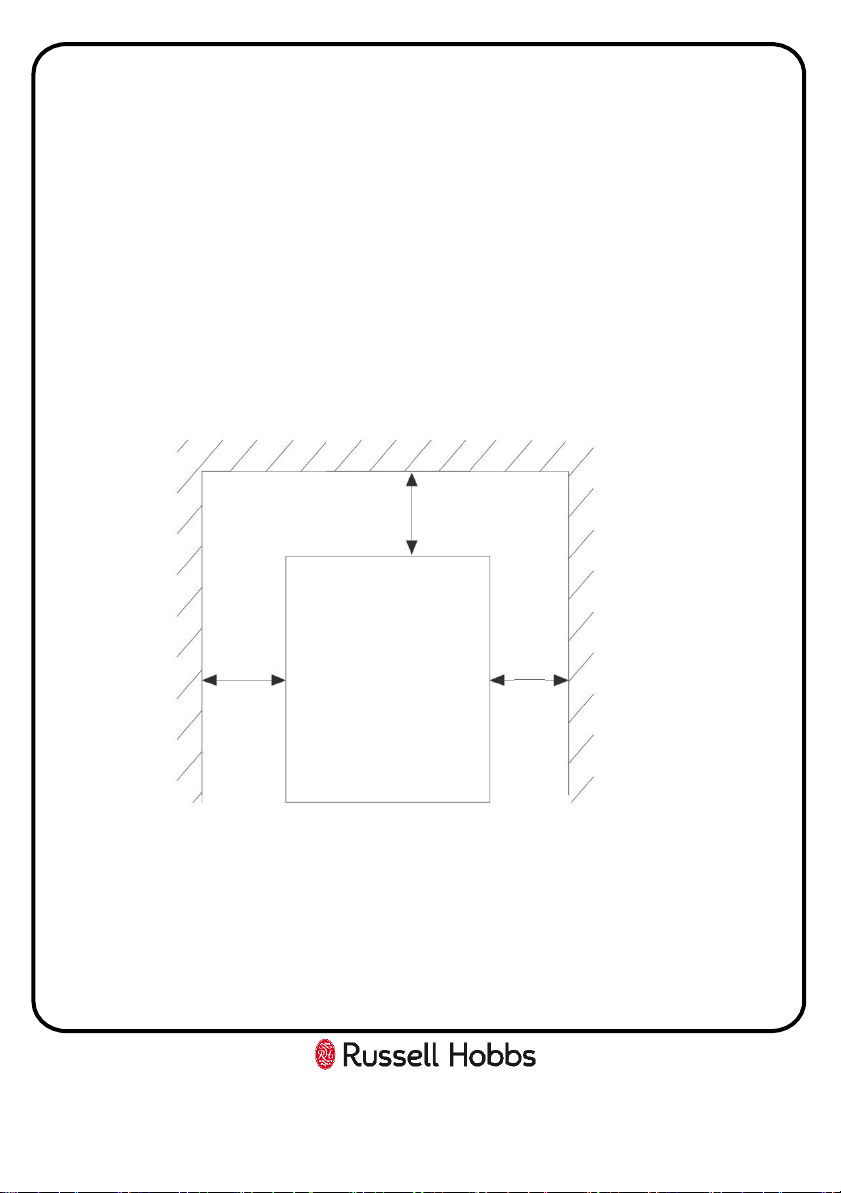
Where To Put Your Appliance
• When placing situating your appliance, choose a dry and well-ventilated space.
• Avoid using a location where dust or other airborne contamination may be
drawn into the fan.
• No less than 10cms must be left around the sides and 10cms must be left
around the back of the appliance to allow sufficient cooling.
• Choose a location away from a heat source, e.g. direct sunlight, a radiator or
oven, etc.
• The appliance should be positioned so that the plug is easily accessible.
9
(10cms)
(10cms)
(10cms)

Usage Information
Important Note:
• Do not use this appliance when car engine is off to avoid running
down the car battery.
• The ambient temperature and air circulation condition can affect the
cooling speed and temperature of the appliance.
• The cooling temperature range of the appliance is between 16-20℃
below ambient temperature. For example if the ambient temperature is
25℃ then the temperature inside the appliance will be between 5-9℃
when set on Cold mode.
• The ideal ambient temperature for the appliance to perform is between
20-25℃. The lowest temperature the appliance can achieve is
approximately 5℃.
• This appliance has a thermoelectric cooling system and not a
compressor cooling system (like a refrigerator) and therefore it will not
reach 0℃ or achieve the same cooling performance as a compressor.
• The heating temperature range is 50-65℃ when set to hot mode.
• The temperature of freshly stored items and how often the door is
opened affects the temperature in the compartment. If required,
change the temperature setting.
• When you first switch on the appliance, to enable suitable cooling or
heating, the appliance should work for 4 hours continuously until it
cools down or heats up to required temperature.
• During this time do not open the door frequently or place a lot of
items inside the appliance.
• If the unit is switched off or unplugged, you must allow at least 5
minutes before restarting or reconnecting the unit.
10
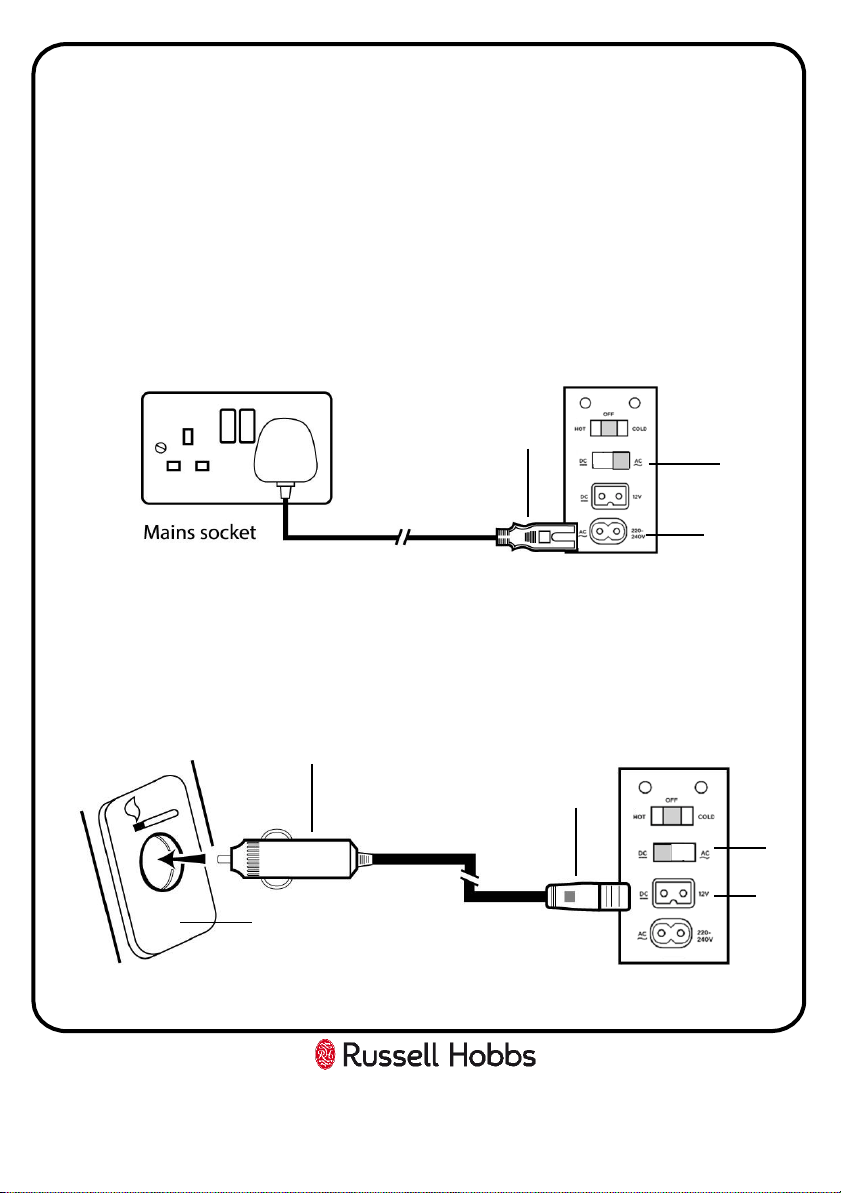
Usage Information
• The unit should be kept away from direct sunlight.
• Place the appliance on flat and even surface with good ventilation.
• This appliance is suitable to use in a household or inside an automobile.
• Ensure the correct power cord is used for the appropriate environment.
• To use in household, switch to AC mode at the rear of the appliance (1),
then connect the AC cord (2) to AC input located at the back of the
appliance (3), then connect the power cord to the power supply socket.
• To use in an automobile, switch to DC mode at the rear of the appliance
(4), connect the DC cord (5) to the DC output at the back of the
appliance (6), then connect the DC plug (7) into the car cigarette lighter
socket (8).
11
Rear of the appliance
3
2
5
6
8
7
1
4
Usage Information
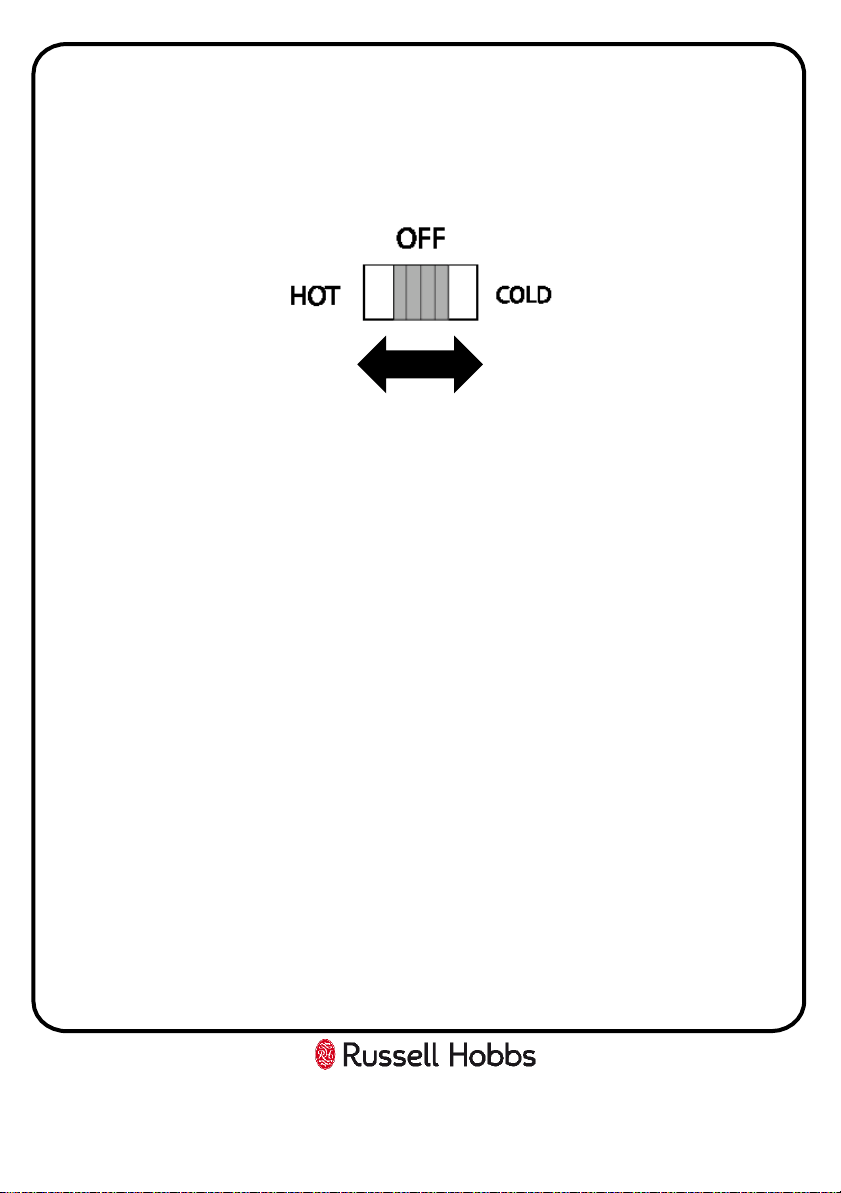
• Plug in the appliance and move the mode switch at rear of the appliance
to ‘COLD’ or ‘HOT’. Close the door.
• If you have selected the ‘COLD’ mode, then the green LED will illuminate,
leave the appliance for a minimum of 4 hours for the correct temperature
to be reached before placing anything inside.
• To achieve the quickest cooling performance, fill the fridge with
beverages which have already been refrigerated. They will then stay cool
and become even cooler, providing the fridge remains switched on.
• The temperature at which the fridge operates depends on the
surrounding ambient temperature. Cooling will be more efficient in a
colder environment.
• If you have selected the ‘HOT’ mode leave the appliance for a minimum
of 4 hours for the correct temperature to be reached before placing
anything inside.
• The box is designed and used for the purpose of keeping warm items
warm. And not for warming up items
• Hot items stays hot for a number of hours after the fridge has been
switched off, providing the door is closed properly
12

Usage Information
Important: No sealed drinks/food to be placed inside the cooler while in
‘HOT’ mode.
• After food or drinks have been placed inside the appliance, ensure the
doors is closed fully.
• The maximum capacity is 8L.
• The appliance can hold a maximum of 12 x 330ml cans, or 10 x 500ml
cans placed on their side.
• When you stop using the appliance, turn the mode switch to the OFF
position, then unplug the power cord from the appliance and power
supply socket.
• Take out all food or drinks from the appliance and wait for the appliance
temperature to rise to room temperature before cleaning and storing.
Shelves
• The shelf can be removed to allow for storage of larger items.
• To remove the shelf, first remove all of the items from the shelf, then
gently pull the shelf away from the appliance.
• To replace the shelf, place the shelf back into a supporting guide slot and
push it back as far as it will go.
Note:
Whilst the appliance can store larger items, you must make sure that they
do not prevent the door from shutting properly.
13

Cleaning & Maintenance
• Disconnect the appliance from the power supply before cleaning.
• Do not pour water directly over or on the appliance.
• The compartment should be cleaned periodically using a solution of bicarbonate
of soda and lukewarm water. Do not use abrasive products, detergents or
soaps. After cleaning wipe down with a damp clean cloth.
• Ensure you disconnect the plug fully before performing regular maintenance.
• Use a vacuum cleaner or brush to clean the fan monthly.
• Ensure the inside is fully dry before storing the appliance when not in use.
Please Note:
• Cool air from inside the appliance draws moisture out of nearby warmer air,
which may condense on the inner surface. Wipe away any moisture build up with
a soft cloth and avoid opening the fridge door regularly to reduce excessive
condensation build-up.
• If the mini fridge is powered off for an extended period of time then
condensation may collect underneath the unit; this is normal. Due to this, steps
should be taken to protect the surface the mini fridge is placed on.
Important Note:
• Only reconnect to the power supply after you have dried your hands.
• Do not use sharp metal tools as it may damage the appliance.
• Do not use an electrical heater, this may cause an electric shock.
Defrosting
• The cooler will defrost automatically if frost has started to build up.
Important Note:
• If you do not use your appliance for a long period of time e.g. when on
summer holidays, then unplug it. Clean and leave the door open to prevent
humidity and bad odours.
14
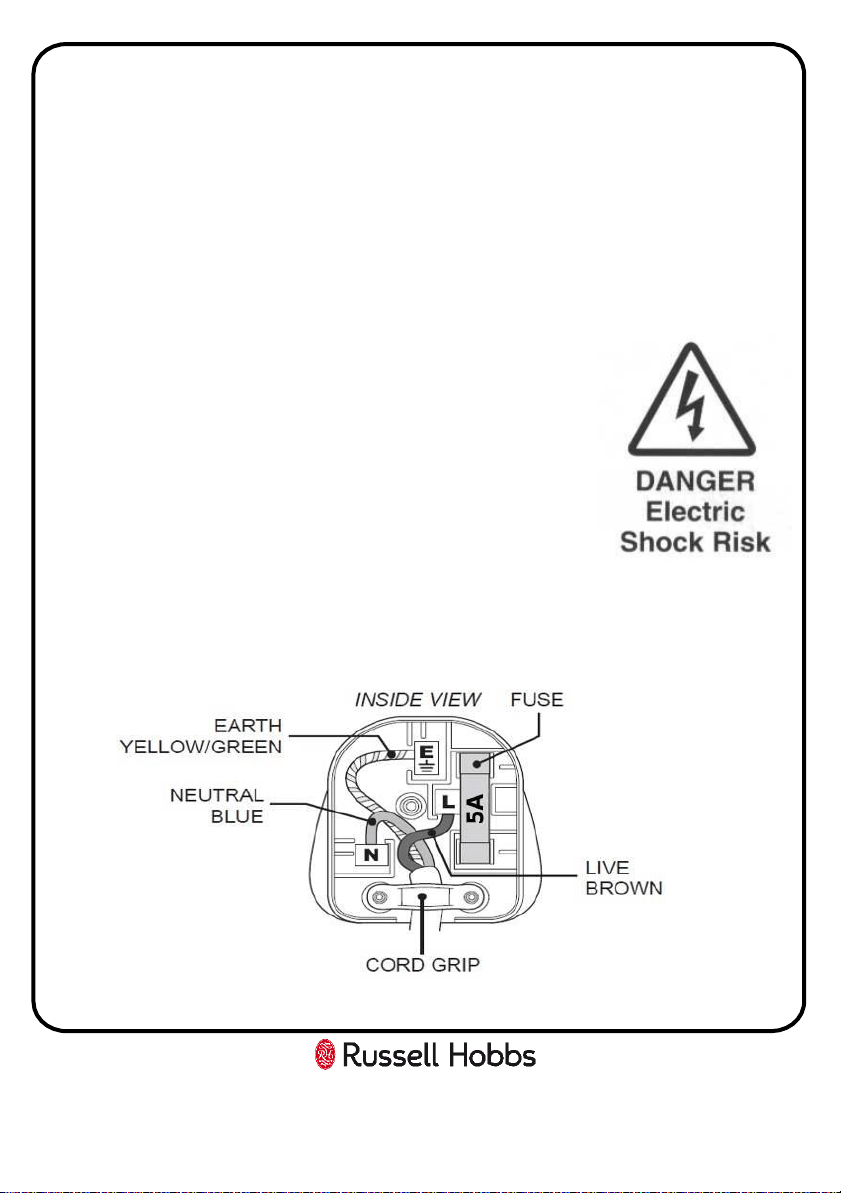
Connection To The Mains Supply
For UK use only – Plug fitting details (where applicable):
As the colours of the wires in the mains lead of this appliance may not
correspond with the coloured markings identifying the terminals in your plug,
proceed as follows:
The GREEN/YELLOW wire is the EARTH and must be connected to the
terminal which is marked with the letter E or by the earth symbol or coloured
GREEN or GREEN/YELLOW.
The BLUE wire is the NEUTRAL wire and must be connected
to the terminal marked with the letter N or coloured BLACK.
The BROWN wire is the LIVE wire and must be connected to
the terminal marked with the letter L or coloured RED.
Always ensure that the plug cord grip is fastened correctly.
If a 5A (BS1363) fused plug is used it must be fitted with a
5amp fuse conformingto BS1362 and be BSI or ASTA approved.
15
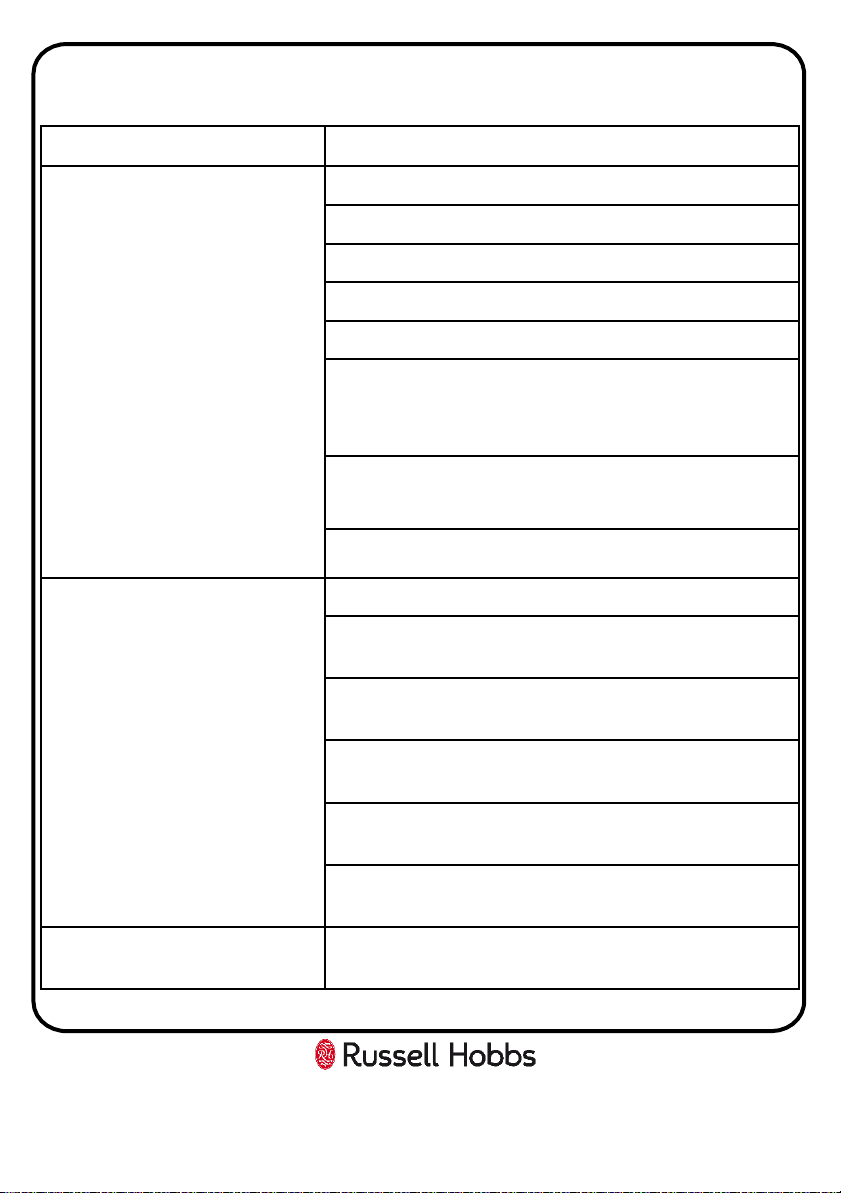
Troubleshooting
16
Problem
Solution
The appliance doesn't work
Check that the appliance is switched on.
Check that there has not been a power cut.
Check that the plug is not
faulty.
Check that the fuse has not blown.
Check that the voltage is correct for the appliance.
Ensure that
the AC/DC switch is switched to the correct
mode, so that it matches the input you have selected (i.e.
whether you have the AC or DC cord plugged into the
appliance) .
The in
-car adaptor(Cigarette lighter end) may be
covered
in d
ebris, preventing the connection. If necessary clean
with a
non metal brush and solvent.
There may be debris preventing the fan from spinning
;
use
a vacuum to remove the dust/debris.
The temperature inside the
appliance is not cold enough
Check that the appliance is not overfilled.
Check that the temperature is set to ‘COLD’ mode, not
‘OFF’ or ‘HOT’ mode.
Check that the appliance is not placed in direct sunlight,
or too near to a heating source.
Check that the ambient temperature is within the
operation limits of the appliance.
Try
not to open the doors frequently as this will also
reduce the temperature within the appliance.
Check that the door has not been left open
or c
heck that
the door gasket is clean and undamaged.
The temperature within the
appliance is not hot enough
Check that the temperature is set to ‘HOT’ mode,
not
‘COLD’ mode.
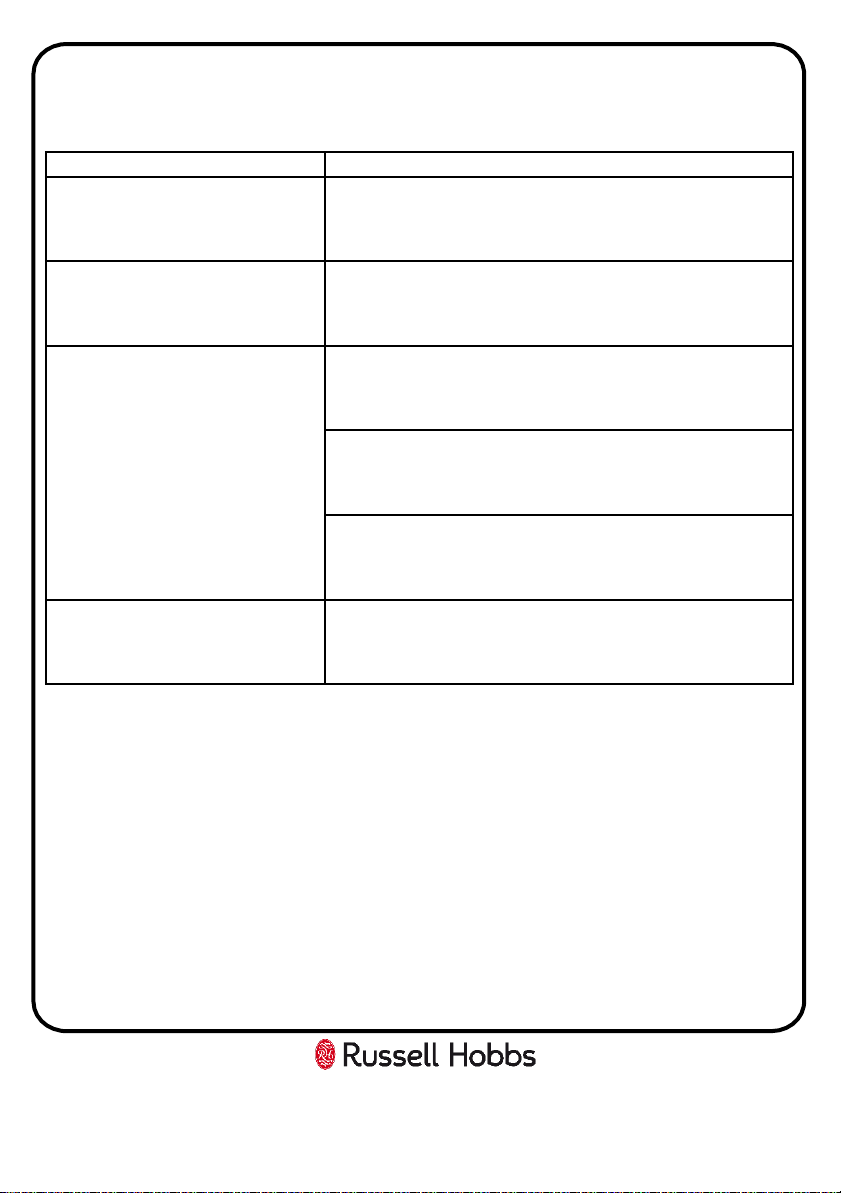
Troubleshooting
17
Problem
Solution
The inner surfaces of the
appliance are wet
This
could be caused by condensation -
dry the inside of
the appliance.
The outer surfaces of the
appliance are wet
This
could be caused by condensation - dry the outer of
the appliance carefully.
Unusual noises
Check that the appliance is on a flat, level surface and is
stable.
Check the spacing around the appliance and ensure it is
not touching other items.
If
the appliance is making a whirring noise, t
his is normal
for when the fridge is cooling down.
The appliance smells/has an
odour
Check that nothing has leaked or any stagnant liquid is at
the bottom of the appliance. Clean if required.
Product Guarantee
This product is guaranteed for 12 months from the date of the original
purchase. If any defect arises due tofaulty materials or workmanship the faulty
product must be returned to the place of purchase.
Refund or replacement is at the discretion of the retailer.
The following conditions apply:
• The product must be returned to the retailer with the original proof of
purchase.
• The product must be installed and used in accordance with the
instructions contained in this instruction guide and any other instructions
for use which have been supplied.
• It must be used for domestic purposes only and for its intended use.
• This warranty does not cover wear and tear, damage, misuse or
consumable parts.
This does not affect your statutory rights.
18
19
Technical Specification
Model number RH8CLR8001B
Rated Voltage AC 220-240V~50Hz / DC 12V
Net Capacity (litres) 8 litres
Cooling Performance 16-20°C below ambient temperature
Heating Performance 50-65°C
Dimensions (CMs) (H)35.0 x (W)26.3 x (D)29.2
Russell Hobbs is a registered trademark used under license from Spectrum
Brands (UK) Ltd. Made under license by G2S Limited, Wigan, WN2 4AY/G2S
(NI) Ltd, Belfast, BT5 5AD.
Russell Hobbs Support: call 0345 208 8750 or visit: mda.russellhobbs.com
The ‘wheelie bin’ symbol is known as the 'Crossed-out wheelie bin Symbol'.
When this symbol is marked on a product/batteries, it means that the
product/batteries should not be disposed of with your general household
waste. Only discard electrical/electronic/battery items in separate collection
schemes, which cater for the recovery and recycling of materials contained
within. Your co-operation is vital to ensure the success of these schemes
and for the protection of the environment. For your nearest disposal facility,
visit www.recycle-more.co.uk or ask in store for details.
SEDEX – Connecting businesses and their global suppliers to share ethical
data and enabling improvement in ethical performance. Visit
www.sedex.org.uk for further information.
We reserve the right, due to possible changes to design, to alter the
instruction manual without prior notice.
Revision 1.2