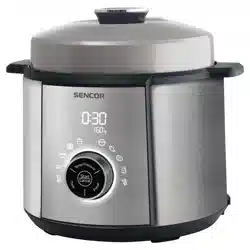
Loading ...
Loading ...
Loading ...
- 12 -
06/2019
Copyright © 2019, Fast ČR, a.s.
Attention:
When using custom settings and cooking without the lid, do not fill the inner pot A14 up to the MAX mark and under no condition
leave the pressure cooker without supervision.
Never use alid from adifferent pot, always use only the supplied lid and accessories.
COOKING WITHOUT THE LID
■ Unlock and remove the lid according to the procedure in chapter OPENING THE LID OF ACOLD PRESSURE COOKER.
■ Use the control knob B6 to select acooking program.
■ If necessary, adjust the program parameters as describe in ADJUSTING THE COOKING PROGRAMS.
■ Press button B15 (Start). The cooking process will start even with the lid open.
DELAYED COOKING FUNCTION
■
The delayed cooking function enables you to start cooking at atime of your choosing. The minimum delay time is 10 minutes and the maximum
delay time is 24 hours.
Note:
This function is not available for programs (Fry) and (Yoghurt).
■ Select acooking program and press button B14 (Preset). The minutes indicator will start flashing. Turn the control knob B6 to set the delayed
cooking start time.
■ Press button B15 (Start) to start the countdown. Indicator B2 will be lit. As soon as the time you set elapses, the pressure cooker will start the
cooking process.
KEEP WARM FUNCTION
■ The keep warm function will keep food warm at apreset temperature for up to 24hours.
■ The function will start automatically after every program with the exception of
(Fry) and (Yoghurt). The display will show the time 0H and
the timer will start counting up. The display will show only full hours.
■ The function can be cancelled at any time by holding down button B15 (Start/Cancel) for longer than 2 seconds.
TURNING OFF THE PRESSURE COOKER
■ To completely turn off the pressure cooker, disconnect the power cord A25 from the power socket.
CLEANING AND MAINTENANCE
Attention:
Apart from the removable pot A14 and accessories A26 to A28, no part of the pressure cooker is intended to be washed in
adishwasher.
The pressure cooker unit A21 is not intended to be washed under awater tap. Do not spray the pressure cooker unit or the power
cord with water or any another liquid, or submerge it in water or another liquid.
Attention:
Never use chemicals, cookware scrubbers, steel wool, or abrasive cleaning agents to clean the outside of the pressure cooker unit
A21 or the inside of the inner pot A19 as this could damage the surface of the pressure cooker unit or the inner pot.
■ Before cleaning and maintenance, always disconnect the power cord A25 of the pressure cooker from the mains power supply and pull it out
of the socket of the pressure cooker. Before removing the lid A1 and taking out the inner pot A14, always leave the pressure cooker to cool
down completely.
REMOVABLE INNER POT AND ACCESSORIES
■ Wash the removable inner pot in hot water with detergent, rinse it and dry it thoroughly. If there are baked on food remains inside the inner
pot, then first allow it to soak for 20-30 minutes in hot water with detergent. The food remains can then be easily removed using asoft kitchen
brush. The pot can also be washed in adishwasher.
Note:
The colour of the inside surface of the removable inner pot may change during use. This is normal and in no way changes the properties
of the surface.
■
Wash the accessories A26 to A28 in hot water with detergent, rinse them and dry them thoroughly. You can also wash these parts in adishwasher.
PRESSURE COOKER UNIT AND THE BUILT-IN OUTER POT
■ Whenever you finish cooking, wipe away any condensate water or dirty material from the edges of the pressure cooker unit and the built-in
outer pot.
■ Clean the outer surface of the pressure cooker unit using asoft, damp cloth and wipe it dry using adry wiping cloth.
■ Wipe the inside of the built-in outer pot with alightly dampened, soft wiping cloth and then wipe it dry using adry, clean wiping cloth.
■ Wipe the display using asoft sponge lightly dampened in warm water. Adry sponge or cleaning agents could scratch the surface.
■ Pull the condensate tank A15 downwards to remove it and then pour out its contents. Wash the condensate tank in warm water, wipe it dry
and put it back in its place.
LID
■ Clean the lid from both sides using asoft wiping cloth dipped in water. You can remove any food remains using afine brush. Wipe the lid dry.
When cleaning it, take care not to damage the valves A11 and A12 and the gasket A9.
Loading ...
Loading ...