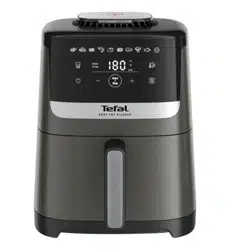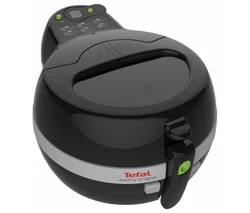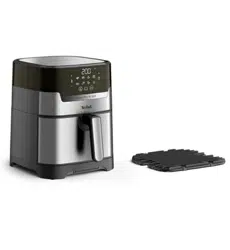
EASY FRY & GRILL DIGITAL
www.tefal.com
www.moulinex.com
www.arno.com.br
www.imusa.com.co
32
1
2
1 2
3 4 5
6 87
32
1
2
1 2
3 4 5
6 87
54
MAX
15 16
1
13 14
8
mm
30 min
9
11 12
10
3
MAX 800 g
MAX
19
17 18
20
MAX 800 g
54
MAX
15 16
1
13 14
8
mm
30 min
9
11 12
10
3
MAX 800 g
MAX
19
17 18
20
MAX 800 g
76
35
343033
24
25
½
26
3027
28
29
30
31
32
4
2221
23
1 h
36
38
39
37

76
35
343033
24
25
½
26
3027
28
29
30
31
32
4
2221
23
1 h
36
38
39
37
98
48
47
49
43 304544
43
43
50
51
46
40
5
41
42
6
63
62
59
60
61
58
3052
53
56
1 h
57
55
54
98
48
47
49
43 304544
43
43
50
51
46
40
5
41
42
6
63
62
59
60
61
58
3052
53
56
1 h
57
55
54
1110
64
65
66
70
69
68
1 h
73
7271
67
7
77
75
76
78
79
82
81
4h
80
80°C
84
74
83
1110
64
65
66
70
69
68
1 h
73
7271
67
7
77
75
76
78
79
82
81
4h
80
80°C
84
74
83
1312
10
mm
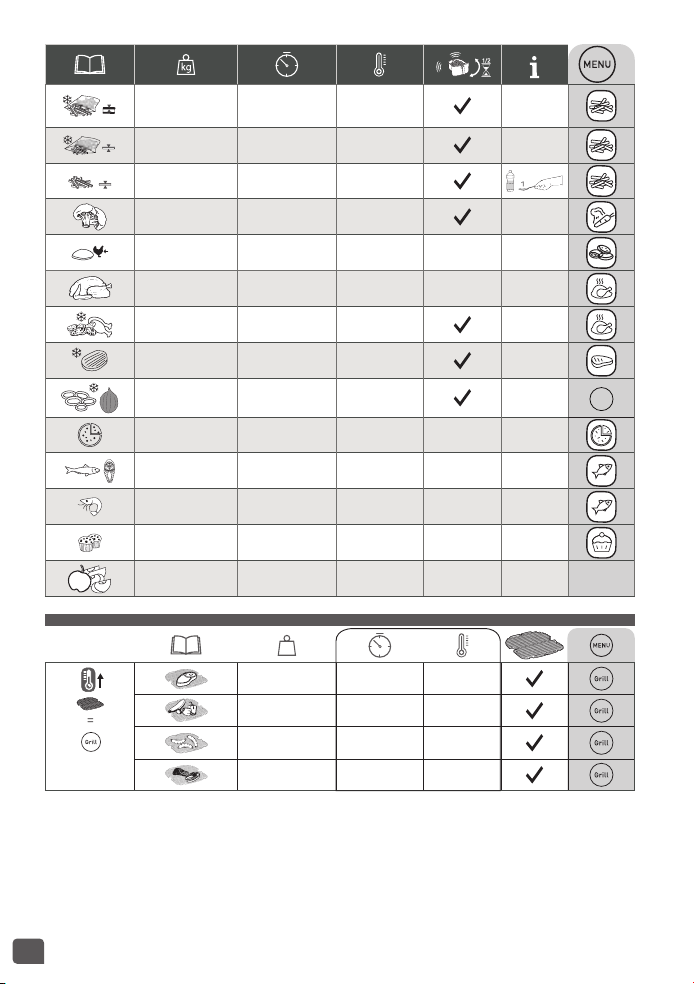
300 g - 800 g 15 - 25 min 200°C
8
mm
300 g - 800 g 22 - 27 min 200°C
8
mm
300 g - 800 g 22 - 32 min 200°C
300 g - 700 g 16 - 20 min 200°C
100 g - 500 g 12 - 19 min 180°C
1000 g 60 min 200°C
100 g - 600 g 7 - 15 min 200°C
100 g - 500 g 6 - 10 min 180°C
200g 8 - 10 min 200°C
400 g 7 min 190°C
350 g 15 - 17 min 140°C
12 pieces 4 min 170°C
7 pieces 15 - 18 min 180°C
1/2 pieces 4 h 80°C
15 min
200°C
250 g 6 - 8 min 200°C
300 g 10 min 200°C
400 g 10 - 12 min 200°C
200 g 3 - 5 min 170°C
STEP STEP
8
88
90
93
86
85
87
89
91
92
Air
Fry
kg
1312
10
mm
300 g - 800 g 15 - 25 min 200°C
8
mm
300 g - 800 g 22 - 27 min 200°C
8
mm
300 g - 800 g 22 - 32 min 200°C
300 g - 700 g 16 - 20 min 200°C
100 g - 500 g 12 - 19 min 180°C
1000 g 60 min 200°C
100 g - 600 g 7 - 15 min 200°C
100 g - 500 g 6 - 10 min 180°C
200g 8 - 10 min 200°C
400 g 7 min 190°C
350 g 15 - 17 min 140°C
12 pieces 4 min 170°C
7 pieces 15 - 18 min 180°C
1/2 pieces 4 h 80°C
15 min
200°C
250 g 6 - 8 min 200°C
300 g 10 min 200°C
400 g 10 - 12 min 200°C
200 g 3 - 5 min 170°C
STEP STEP
8
88
90
93
86
85
87
89
91
92
Air
Fry
kg
14
9
94
1520012418

14
9
94
1520012418

1
EN
IMPORTANT SAFEGUARDS
When using electrical appliances, basic safety precautions should always be
followed, including the following:
1. Read all instructions before using.
2. Do not touch hot surfaces. Use handles or knobs.
3. To protect against electric shock, do not immerse cord, plugs or fryer in water
or other liquid.
4. Close supervision is necessary when any appliance is used by or near children.
5. Unplug from outlet when not in use and before cleaning. Allow to cool before
putting on or taking off parts.
6. Do not operate any appliance with a damaged cord or plug or after the
appliance malfunctions, or has been damaged in any manner. Return
appliance to the nearest authorized service facility for examination, repair
or adjustment.
7. The use of accessory attachments not recommended by the appliance
manufacturer may cause injuries.
8. Do not use outdoors.
9. Do not let cord hang over edge of table or counter, or touch hot surfaces.
10. Do not place on or near a hot gas or electric burner, or in a heated oven.
11. Extreme caution must be used when moving appliance containing hot oil or
other hot liquids.
12. Always attach plug to appliance first (depending on model), then plug cord
into the wall outlet. To disconnect, turn any control to “off”, then remove plug
from wall outlet.
13. Do not use appliance for other than intended use.
14. SAVE THESE INSTRUCTIONS
FOR HOUSEHOLD USE ONLY.
15. Only connect the appliance to electrical sockets which have a minimum
load of 15A. If the sockets and the plug on the appliance should prove
incompatible, get a professionally qualified technician to replace the socket
with a more suitable one.
POLARIZATION INSTRUCTIONS
This appliance has a polarized plug (one blade is wider than the other). To reduce
the risk of electric shock this plug is intended to fit into a polarized outlet only
one way. If the plug does not fit fully into the outlet, reverse the plug. If it still
does not fit, contact a qualified electrician. Do not attempt to modify the plug
in any way.
SHORT CORD INSTRUCTIONS
Do not use with an extension cord.

3
EN
2
A short power-supply cord is provided to reduce the risk resulting from becoming
entangled in or tripping over a longer cord.
SAFETY INSTRUCTION
• This appliance is intented to be used in household only. It is not intended to be
used in the following applications, and the guarantee will not apply for:
- staff kitchen areas in shops, offices and other working environments;
- farm houses;
- by clients in hotels, motels and other residential type environments;
- bed and breakfast type environments.
• This appliance is not intended to be operated by means of an external timer or
a separate remotecontrol system.
• If the power supply cord is damaged, it must be replaced by the manufacturer,
its service agent or similarly qualified persons in order to avoid a hazard.
• This appliance is not intended for use by persons (including children) with
reduced physical, sensory or mental capabilities, or lack of experience and
knowledge, unless they have been given supervision or instruction concerning
use of the appliance by a person responsible for their safety.
• Children should be supervised to ensure that they do not play with the
appliance.
•
The temperature of accessible surfaces may be high when the appliance
is operating. Do not touch the hot surfaces of the appliance.
• Clean removable parts with a non abrasive sponge and dishwashing liquid.
Do not clean them in a dishwasher.
• Clean the inside and the outside of the appliance with a damp sponge or cloth.
Please refer to the «Cleaning» section of the instructions for use.
• The appliance can be used up to an altitude of 4000 m.
Do
• Read and follow the instructions for use. Keep them safe.
• Remove all packaging materials and any promotional labels or stickers
from your appliance before use. Be sure to also remove any materials from
underneath the removable bowl (depending on model).
• Check that the voltage of your mains network corresponds to the voltage given
on the rating plate on the appliance (alternative current).
• Given the diverse standards in effect, if the appliance is used in a country other
than that in which it is purchased, have it checked by an approved Service
Centre.
• Use the appliance on a flat, stable, heat-resistant work surface away from
water splashes.
• Always unplug your appliance: after use, to move it, or to clean it.
• In the event of fire, unplug the appliance and smother the flames using a
damp tea towel.
• To avoid damaging your appliance, please ensure that you follow recipes in the
instructions and at www.t-fal.com; make sure that you use the right amount
of ingredients.
Do not
• Do not use the appliance if it or the power cord is damaged or if it has fallen
and has visible damage or appears to be working abnormally. If this occurs,
the appliance must be sent to an Approved Service Centre.
• Do not use an extension lead. If you nevertheless decide to do so, under
your own responsibility, use an extension lead that is in good condition and
compliant with the power of the appliance.
• Do not let the power cord dangle.
• Do not unplug the appliance by pulling on the power cord.
• Never move the appliance when it still contains hot food.
• Never operate your appliance when empty.
• Do not switch on the appliance near to flammable materials (blinds, curtains…).
or close to an external heat source (gas stove, hot plate etc.).
• Do not store any inflamamable products close to or underneath the furniture
unit where the appliance is located.
• Never take the appliance apart yourself
• Do not immerse the product in water.
• Do not use any powerful cleaning products (notably soda based strippers), nor
brillo pads, nor scourers.
• Do not store your appliance outside. Store it in a dry and well ventilated area.
Advice/information
• When using the product for the first time, it may release a non-toxic odour. This
will not affect use and will disappear rapidly.
• For your safety, this appliance conforms with applicable standards and
regulations (Directives on Low Voltage, Electromagnetic Compatibility,
Materials in contact with food, Environment, etc.).
• This appliance is designed for domestic use only and not outdoor. In case of
professional use, inappropriate use or failure to comply with the instructions,
the manufacturer accepts no responsibility and the guarantee does not apply.
• For your safety, only use the accessories and spare parts designed for your
appliance
Environnement
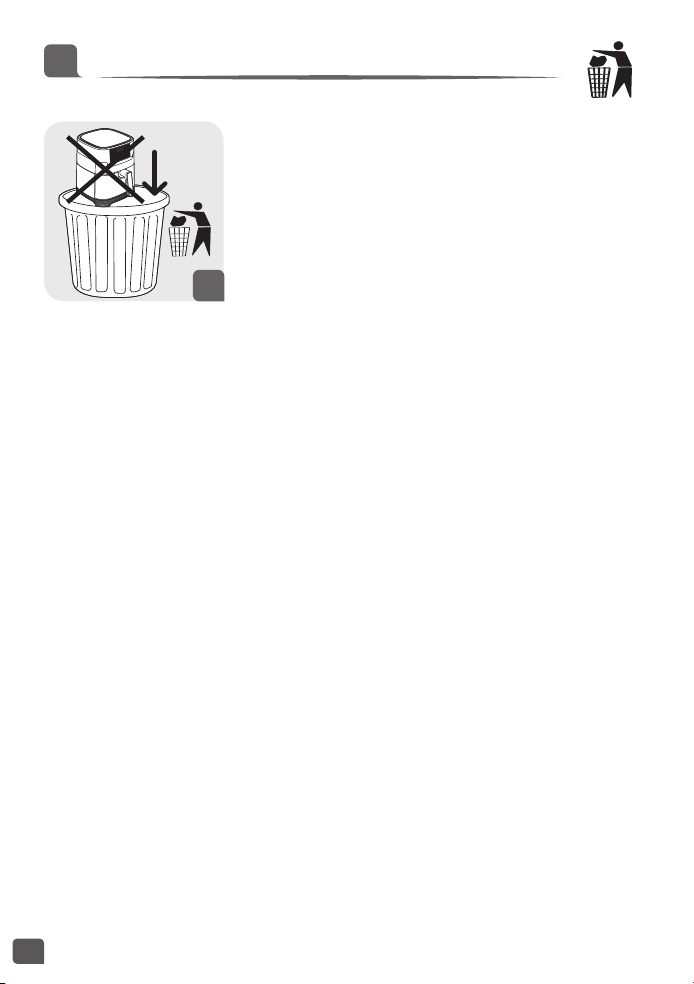
Environment protection first!
i Your appliance contains valuable materials which can be recovered or recycled.
Leave it at a local civic waste collection point.

3
EN
2
A short power-supply cord is provided to reduce the risk resulting from becoming
entangled in or tripping over a longer cord.
SAFETY INSTRUCTION
• This appliance is intented to be used in household only. It is not intended to be
used in the following applications, and the guarantee will not apply for:
- staff kitchen areas in shops, offices and other working environments;
- farm houses;
- by clients in hotels, motels and other residential type environments;
- bed and breakfast type environments.
• This appliance is not intended to be operated by means of an external timer or
a separate remotecontrol system.
• If the power supply cord is damaged, it must be replaced by the manufacturer,
its service agent or similarly qualified persons in order to avoid a hazard.
• This appliance is not intended for use by persons (including children) with
reduced physical, sensory or mental capabilities, or lack of experience and
knowledge, unless they have been given supervision or instruction concerning
use of the appliance by a person responsible for their safety.
• Children should be supervised to ensure that they do not play with the
appliance.
•
The temperature of accessible surfaces may be high when the appliance
is operating. Do not touch the hot surfaces of the appliance.
• Clean removable parts with a non abrasive sponge and dishwashing liquid.
Do not clean them in a dishwasher.
• Clean the inside and the outside of the appliance with a damp sponge or cloth.
Please refer to the «Cleaning» section of the instructions for use.
• The appliance can be used up to an altitude of 4000 m.
Do
• Read and follow the instructions for use. Keep them safe.
• Remove all packaging materials and any promotional labels or stickers
from your appliance before use. Be sure to also remove any materials from
underneath the removable bowl (depending on model).
• Check that the voltage of your mains network corresponds to the voltage given
on the rating plate on the appliance (alternative current).
• Given the diverse standards in effect, if the appliance is used in a country other
than that in which it is purchased, have it checked by an approved Service
Centre.
• Use the appliance on a flat, stable, heat-resistant work surface away from
water splashes.
• Always unplug your appliance: after use, to move it, or to clean it.
• In the event of fire, unplug the appliance and smother the flames using a
damp tea towel.
• To avoid damaging your appliance, please ensure that you follow recipes in the
instructions and at www.t-fal.com; make sure that you use the right amount
of ingredients.
Do not
• Do not use the appliance if it or the power cord is damaged or if it has fallen
and has visible damage or appears to be working abnormally. If this occurs,
the appliance must be sent to an Approved Service Centre.
• Do not use an extension lead. If you nevertheless decide to do so, under
your own responsibility, use an extension lead that is in good condition and
compliant with the power of the appliance.
• Do not let the power cord dangle.
• Do not unplug the appliance by pulling on the power cord.
• Never move the appliance when it still contains hot food.
• Never operate your appliance when empty.
• Do not switch on the appliance near to flammable materials (blinds, curtains…).
or close to an external heat source (gas stove, hot plate etc.).
• Do not store any inflamamable products close to or underneath the furniture
unit where the appliance is located.
• Never take the appliance apart yourself
• Do not immerse the product in water.
• Do not use any powerful cleaning products (notably soda based strippers), nor
brillo pads, nor scourers.
• Do not store your appliance outside. Store it in a dry and well ventilated area.
Advice/information
• When using the product for the first time, it may release a non-toxic odour. This
will not affect use and will disappear rapidly.
• For your safety, this appliance conforms with applicable standards and
regulations (Directives on Low Voltage, Electromagnetic Compatibility,
Materials in contact with food, Environment, etc.).
• This appliance is designed for domestic use only and not outdoor. In case of
professional use, inappropriate use or failure to comply with the instructions,
the manufacturer accepts no responsibility and the guarantee does not apply.
• For your safety, only use the accessories and spare parts designed for your
appliance
Environnement
Environment protection first!
i Your appliance contains valuable materials which can be recovered or recycled.
Leave it at a local civic waste collection point.
5
EN
4
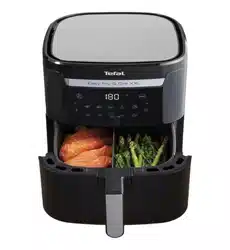
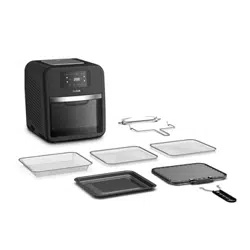
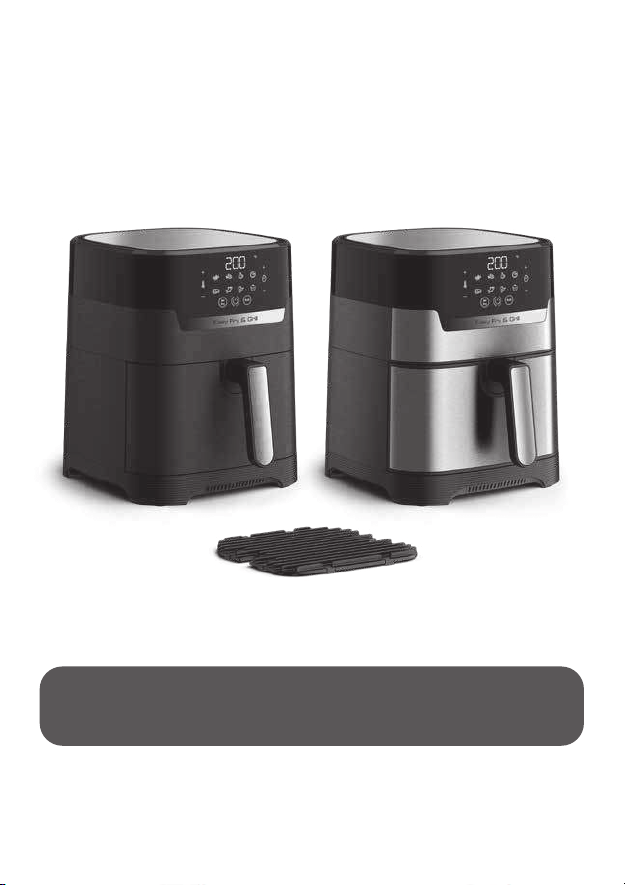
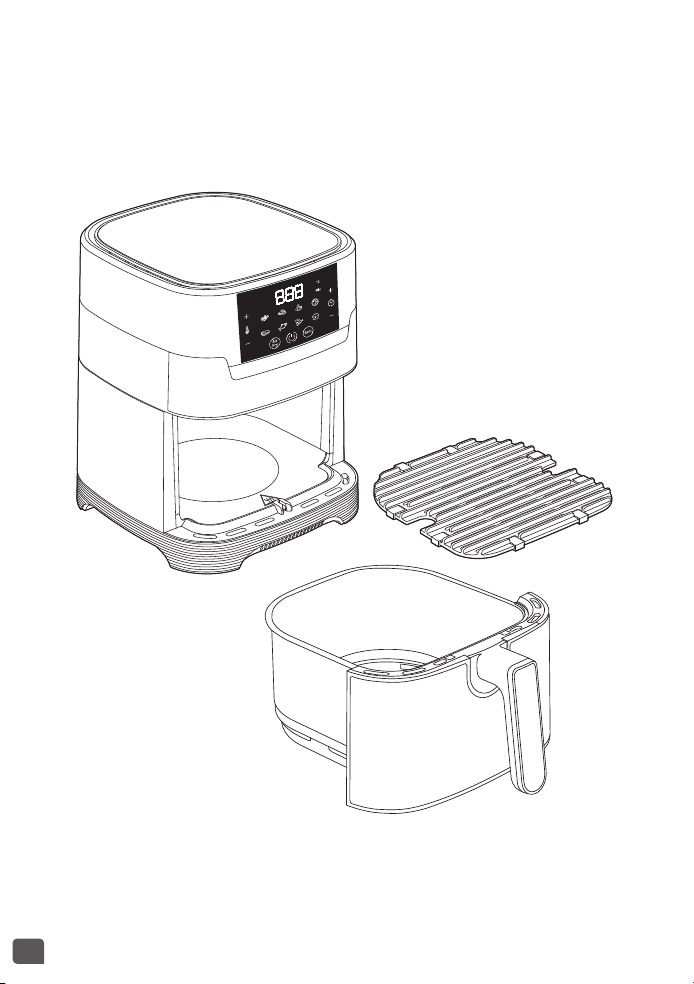
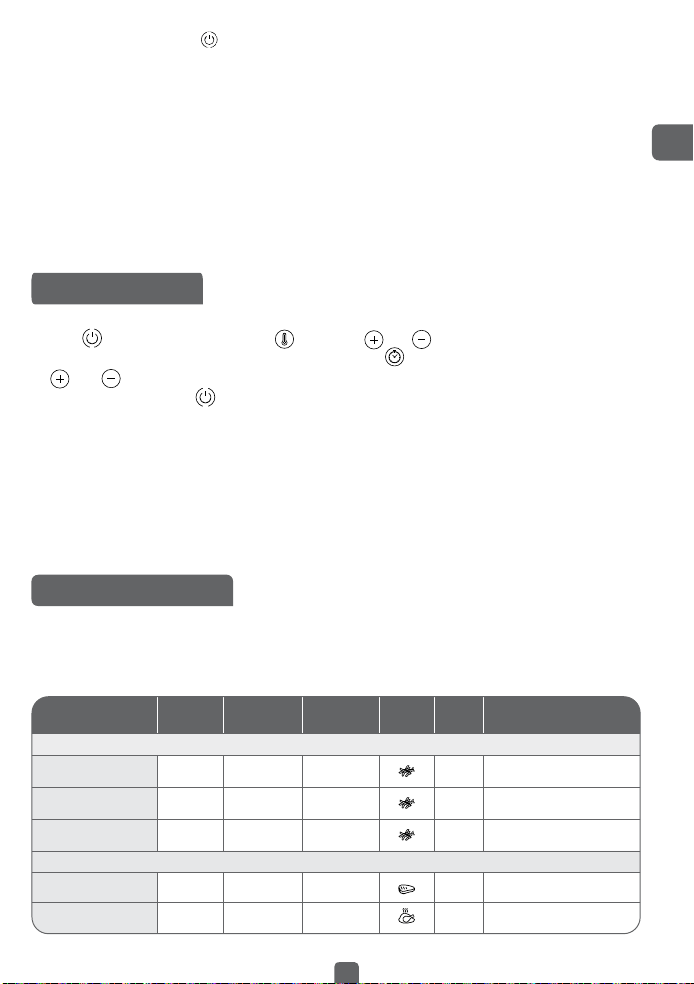
DESCRIPTION
A. Bowl
B. Bowl handle
C. Removable die-cast grill grid
D. Digital touchscreen panel
E. Time/temperature display
AUTOMATIC COOKING MODES
1. Fries
2. Nuggets
3. Roasted chicken
4. Pizza
5. Meat
6. Fish
7. Vegetables
8. Dessert
BEFORE FIRST USE
1. Remove all packaging material.
2. Remove any stickers or labels from the appliance.
3. Do not remove silicon pads of the grid.
4. Thoroughly clean the bowl and the removable grill grid with hot water, some washing-up
liquid and a non-abrasive sponge.
Warning: the bowl and the grid are not dishwasher safe.
5. Wipe the inside and outside of the appliance with a damp cloth. The appliance works by
producing hot air. Do not fill the bowl (A) with oil or frying fat.
PREPARING FOR USE
1. Place the appliance on a flat, stable, heat-resistant work surface away from water splashes.
2. Do not fill the bowl with oil or any other liquid.
Do not put anything on top of the appliance. This disrupts the airflow and affects the
hot air frying result.
USING THE APPLIANCE
Easy Fry can cook a large range of recipes. Cooking times for the main foods are given in the
section ‘Cooking Guide’. Online recipes at www.t-fal.com help you get to know the appliance.
1. Connect the power supply cord to an electrical socket.
2. Start the preheating phase if you wish. To do this, press the Start button that begins
flashing as soon as the appliance is plugged in. The temperature displayed on the first use
is 180°C (356°F).
• Adjust to the desired temperature with the
and buttons on the digital screen.
• Press the Start button again to start preheating.
• The appliance will beep when the temperature has been reached.
• The preheating phase is now completed.
3. Place the food in the bowl.
Note: Never fill the bowl beyond the MAX level mark or exceed the maximum amount
indicated in the table (see into section ‘Cooking Guide’), as this could affect the quality
of the end result.
D
E
A
B
C

5
EN
4
DESCRIPTION
A. Bowl
B. Bowl handle
C. Removable die-cast grill grid
D. Digital touchscreen panel
E. Time/temperature display
AUTOMATIC COOKING MODES
1. Fries
2. Nuggets
3. Roasted chicken
4. Pizza
5. Meat
6. Fish
7. Vegetables
8. Dessert
BEFORE FIRST USE
1. Remove all packaging material.
2. Remove any stickers or labels from the appliance.
3. Do not remove silicon pads of the grid.
4. Thoroughly clean the bowl and the removable grill grid with hot water, some washing-up
liquid and a non-abrasive sponge.
Warning: the bowl and the grid are not dishwasher safe.
5. Wipe the inside and outside of the appliance with a damp cloth. The appliance works by
producing hot air. Do not fill the bowl (A) with oil or frying fat.
PREPARING FOR USE
1. Place the appliance on a flat, stable, heat-resistant work surface away from water splashes.
2. Do not fill the bowl with oil or any other liquid.
Do not put anything on top of the appliance. This disrupts the airflow and affects the
hot air frying result.
USING THE APPLIANCE
Easy Fry can cook a large range of recipes. Cooking times for the main foods are given in the
section ‘Cooking Guide’. Online recipes at www.t-fal.com help you get to know the appliance.
1. Connect the power supply cord to an electrical socket.
2. Start the preheating phase if you wish. To do this, press the Start button that begins
flashing as soon as the appliance is plugged in. The temperature displayed on the first use
is 180°C (356°F).
• Adjust to the desired temperature with the
and buttons on the digital screen.
• Press the Start button again to start preheating.
• The appliance will beep when the temperature has been reached.
• The preheating phase is now completed.
3. Place the food in the bowl.
Note: Never fill the bowl beyond the MAX level mark or exceed the maximum amount
indicated in the table (see into section ‘Cooking Guide’), as this could affect the quality
of the end result.
D
E
A
B
C

7
EN
6
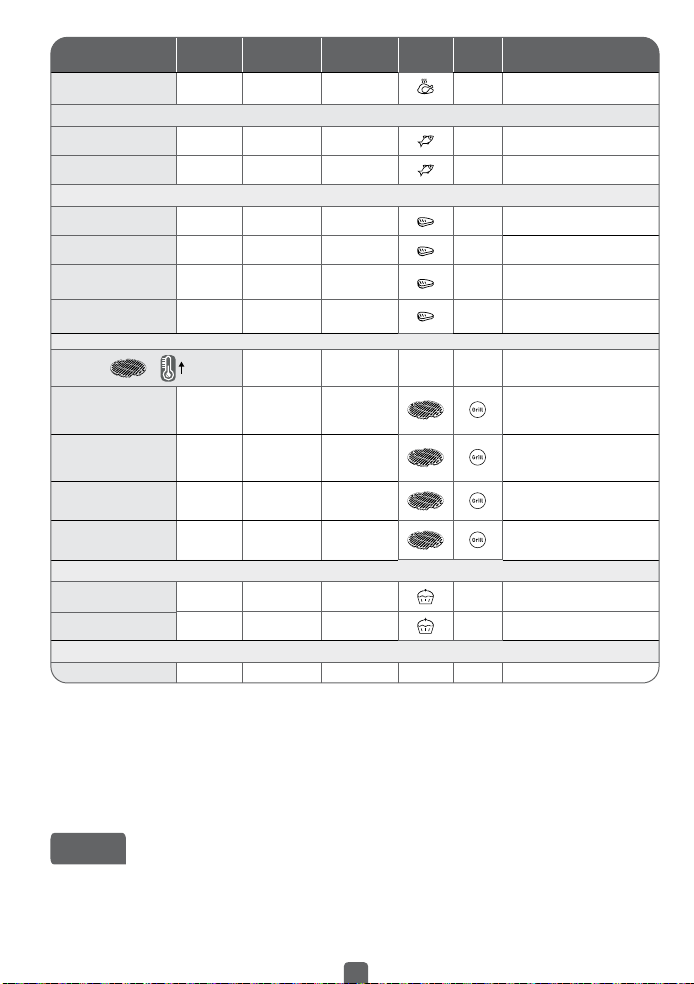
Quantity
Approx Time
(min)
Temperature
(°C /°F)
Cooking
mode
Shake*
Extra
information
Potatoes & fries
Frozen chips (10 mm x
10mm standard thickness)
300 - 800 g
15 - 25 min
200°C / 392°F
Yes
Homemade French
Fries (8 x 8 mm)
300 - 800 g
22 - 32 min
200°C / 392°F
Yes
Add 1 tbsp of oil
Frozen
potato wedges
300 - 800 g
22 - 27 min
200°C / 392°F
Yes
Add 1 tbsp of oil
Meat & Poultry
Steak
100 - 500 g
6 - 10 min
180°C / 356°F
Chicken breast
fillets (boneless)
100 - 500 g
12 - 19 min
180°C / 356°F
Chicken (whole)
1000 g
60 min
200°C / 392°F
Fish
Salmon fillet
350 g
15 - 17 min
140°C / 284°F
Shrimps
12 pieces 4 min
170°C / 338°F
Snacks
Frozen chicken nuggets
100 - 600 g
7 - 15 min
200°C / 392°F
Yes
Frozen chicken wings
300 g 16 - 20 min
200°C / 392°F
Yes
Frozen cheese sticks
125 g
(5 pieces)
7 - 9 min
180°C / 356°F
Frozen onion rings
200 g
(10 pieces)
8 - 10 min
200°C / 392°F
Yes
Pizza
400 g 7 min
190°C / 374°F
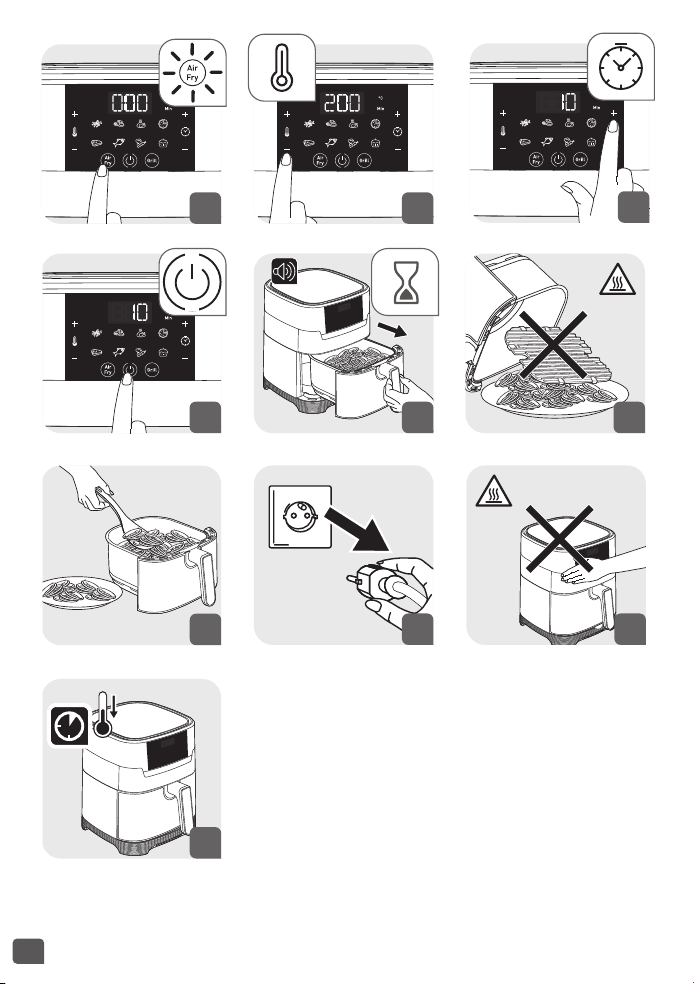
4. Slide the bowl back into the appliance.
Caution: Do not touch the bowl during use and for some time after use, as it gets very
hot. Only hold the bowl by the handle.
5. To begin cooking, you can select between the automatic cooking mode and the manual
settings.
a. If choosing manual settings:
• Adjust the temperature
with the and buttons on the digital screen. The thermostat
varies from 80-200°C (176-392°F).
• Then set the desired cooking time by pressing the
button and adjusting the time with the
and buttons. The timer can be set for between 0 and 60 minutes.
• Press the Start button to begin cooking with the selected temperature and time settings.
Cooking starts. The selected temperature and remaining cooking time will alternate on the
screen display.
b. If choosing automatic cooking mode:
• Select the desired cooking mode by pressing the icon corresponding on the touchscreen panel
(these modes are described in detail in the “Cooking guide” section).
• Confirm the cooking mode by pressing the
button. This will launch the cooking process.
• Cooking starts. The selected temperature and remaining cooking time will alternate on the
on-screen display.
6. Excess oil from the food is collected in the bottom of the bowl.
7. Some foods require shaking halfway through the cooking time (see section ‘Cooking Guide’).
To shake the food, pull the bowl out of the appliance by the handle and shake it. Then slide
the bowl back into the appliance and press the Start button
again to restart cooking.
8. When you hear the timer sound, the cooking time set has finished. Pull the bowl out of the
appliance and place it on a heat-resistant surface.
9. Check if the food is ready.
If the food is not ready yet, simply slide the bowl back into the appliance and set the timer
for a few extra minutes.
10. When the food is cooked, take out the bowl. To remove food, use a pair of tongs to lift the
food out of the bowl.
Caution: The bowl should never be turn up side down with the grid.
After hot air frying, the bowl, the grid and the food are very hot. Depending on the type of
food cooked in the appliance, be careful as steam may escape from the bowl.
11.
When a batch of food is ready, the appliance is instantly ready for preparing another batch of food.
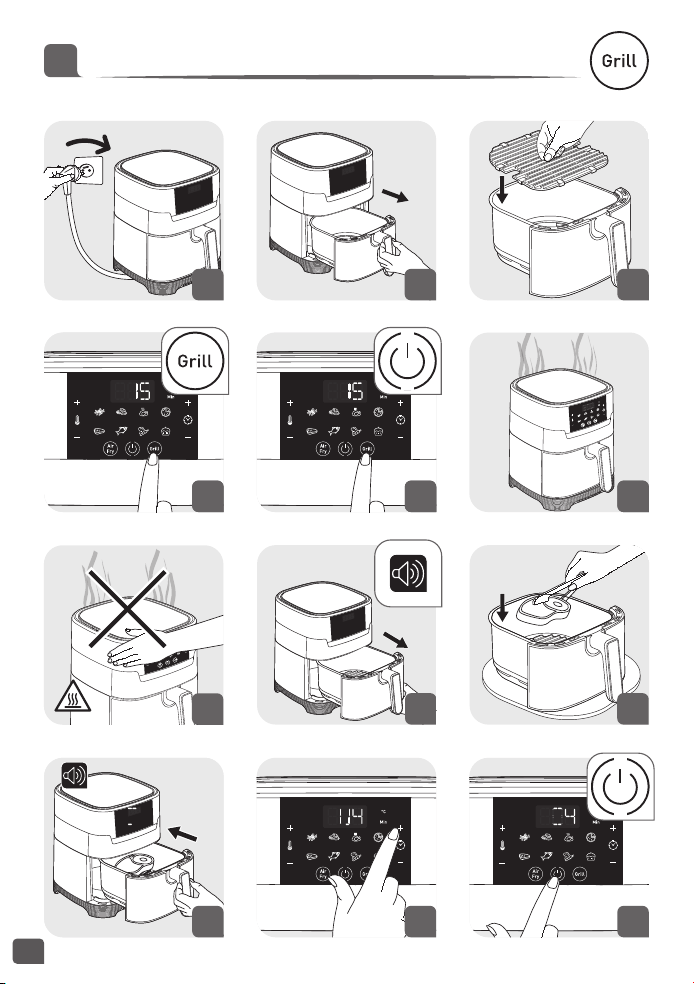
USING THE GRILL PLATE
1. Place the grill grid in the bowl of the appliance.
2. Press
, then press on the screen to select the Grill mode.
3. Start the Grill mode by pressing
. This will launch the preheating phase (timing :15 minutes).
4. When you hear the timer sound, the preheating phase has finished.
5. Take the bowl out the appliance and place it on a heat-resistant surface.
Caution : the bowl and the grill grid are very hot. Use a pair of tongs to place the food
on the grill plate.
6. Place the food on the grill plate and put back the bowl into the appliance.
7. Select the required cooking time by pressing
and buttons (see section ‘Cooking guide’).
8. Press the Start button
to launch the cooking. The temperature and remaining cooking
time will alternate on the on-screen display.
Note : the pieces of meat required to turn them at half cooking.
Excess oil from the food is collected in the bottom of the bowl.
9. When you hear the timer sound, the cooking has finished. Take the bowl out the appliance
and place it on a heat-resistant surface.
10. Check if the food is ready. If the food is not ready yet, put it back on the appliance and set
the timer for a few extra minutes.
11. When the food is cooked, take out the bowl. To remove food, use a pair of tongs to lift the
food out the bowl.
Caution: After hot frying, the bowl, the grid and the food are very hot.
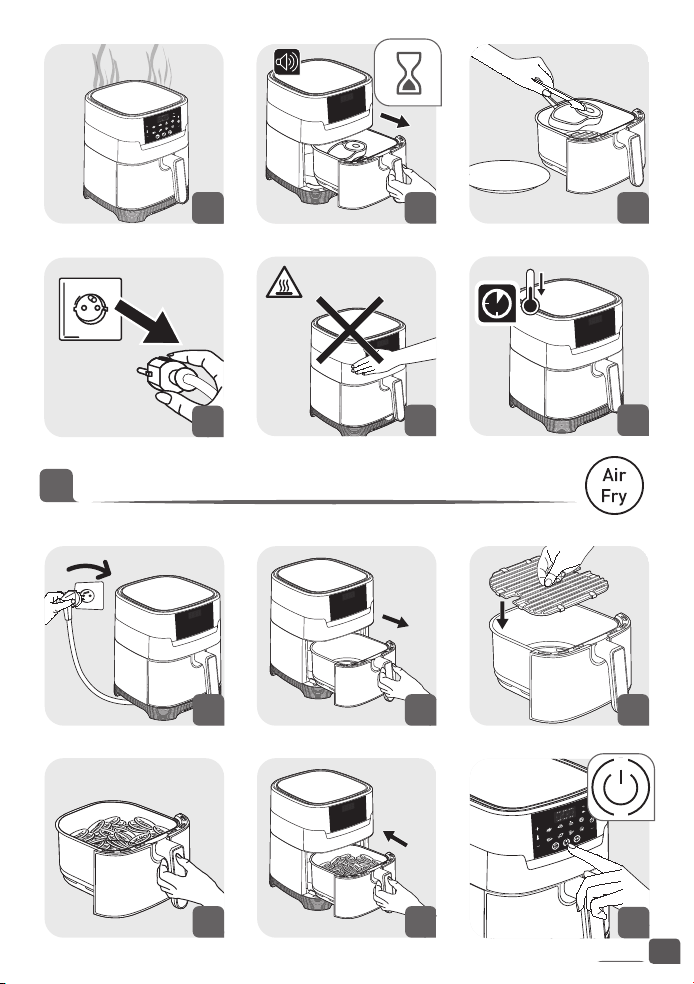
DEHYDRATION
1. Place the grid in the bowl of the appliance.
2. Press , then adjust the temperature by pressing and button to 80°C on the digital screen.
3. Then set the desired cooking time by pressing the button and adjusting the time with
and button. You can set the timing from 1 hour to 4 hours.
4. Press the Start button
to launch the dehydration process. The selected temperature and
remaining cooking time will alternate on the screen display.
5. When you hear the timer sound, the cooking has finished. Take the bowl out the appliance
and place it on a heat-resistant surface.
6. Check if the food is ready. If the food is not ready yet, put it back on the appliance and set
the timer for a few extra minutes.
7. When the food is cooked, take out the bowl. To remove food, use a pair of tongs to lift the
food out the bowl.
Caution : the bowl and the grid are very hot.
COOKING GUIDE
The table below helps you to select the basic settings for the food you want to prepare.
Note: The cooking times below are only a guide and may vary according to the variety
and batch of potatoes used. For other foods the size, shape and brand may affect results.
Therefore, you may need to adjust the cooking time slightly.
7
EN
6
Quantity
Approx Time
(min)
Temperature
(°C /°F)
Cooking
mode
Shake*
Extra
information
Potatoes & fries
Frozen chips (10 mm x
10mm standard thickness)
300 - 800 g
15 - 25 min
200°C / 392°F
Yes
Homemade French
Fries (8 x 8 mm)
300 - 800 g
22 - 32 min
200°C / 392°F
Yes
Add 1 tbsp of oil
Frozen
potato wedges
300 - 800 g
22 - 27 min
200°C / 392°F
Yes
Add 1 tbsp of oil
Meat & Poultry
Steak
100 - 500 g
6 - 10 min
180°C / 356°F
Chicken breast
fillets (boneless)
100 - 500 g
12 - 19 min
180°C / 356°F
Chicken (whole)
1000 g
60 min
200°C / 392°F
Fish
Salmon fillet
350 g
15 - 17 min
140°C / 284°F
Shrimps
12 pieces 4 min
170°C / 338°F
Snacks
Frozen chicken nuggets
100 - 600 g
7 - 15 min
200°C / 392°F
Yes
Frozen chicken wings
300 g 16 - 20 min
200°C / 392°F
Yes
Frozen cheese sticks
125 g
(5 pieces)
7 - 9 min
180°C / 356°F
Frozen onion rings
200 g
(10 pieces)
8 - 10 min
200°C / 392°F
Yes
Pizza
400 g 7 min
190°C / 374°F
4. Slide the bowl back into the appliance.
Caution: Do not touch the bowl during use and for some time after use, as it gets very
hot. Only hold the bowl by the handle.
5. To begin cooking, you can select between the automatic cooking mode and the manual
settings.
a. If choosing manual settings:
• Adjust the temperature
with the and buttons on the digital screen. The thermostat
varies from 80-200°C (176-392°F).
• Then set the desired cooking time by pressing the
button and adjusting the time with the
and buttons. The timer can be set for between 0 and 60 minutes.
• Press the Start button to begin cooking with the selected temperature and time settings.
Cooking starts. The selected temperature and remaining cooking time will alternate on the
screen display.
b. If choosing automatic cooking mode:
• Select the desired cooking mode by pressing the icon corresponding on the touchscreen panel
(these modes are described in detail in the “Cooking guide” section).
• Confirm the cooking mode by pressing the
button. This will launch the cooking process.
• Cooking starts. The selected temperature and remaining cooking time will alternate on the
on-screen display.
6. Excess oil from the food is collected in the bottom of the bowl.
7. Some foods require shaking halfway through the cooking time (see section ‘Cooking Guide’).
To shake the food, pull the bowl out of the appliance by the handle and shake it. Then slide
the bowl back into the appliance and press the Start button
again to restart cooking.
8. When you hear the timer sound, the cooking time set has finished. Pull the bowl out of the
appliance and place it on a heat-resistant surface.
9. Check if the food is ready.
If the food is not ready yet, simply slide the bowl back into the appliance and set the timer
for a few extra minutes.
10. When the food is cooked, take out the bowl. To remove food, use a pair of tongs to lift the
food out of the bowl.
Caution: The bowl should never be turn up side down with the grid.
After hot air frying, the bowl, the grid and the food are very hot. Depending on the type of
food cooked in the appliance, be careful as steam may escape from the bowl.
11.
When a batch of food is ready, the appliance is instantly ready for preparing another batch of food.
USING THE GRILL PLATE
1. Place the grill grid in the bowl of the appliance.
2. Press
, then press on the screen to select the Grill mode.
3. Start the Grill mode by pressing
. This will launch the preheating phase (timing :15 minutes).
4. When you hear the timer sound, the preheating phase has finished.
5. Take the bowl out the appliance and place it on a heat-resistant surface.
Caution : the bowl and the grill grid are very hot. Use a pair of tongs to place the food
on the grill plate.
6. Place the food on the grill plate and put back the bowl into the appliance.
7. Select the required cooking time by pressing
and buttons (see section ‘Cooking guide’).
8. Press the Start button
to launch the cooking. The temperature and remaining cooking
time will alternate on the on-screen display.
Note : the pieces of meat required to turn them at half cooking.
Excess oil from the food is collected in the bottom of the bowl.
9. When you hear the timer sound, the cooking has finished. Take the bowl out the appliance
and place it on a heat-resistant surface.
10. Check if the food is ready. If the food is not ready yet, put it back on the appliance and set
the timer for a few extra minutes.
11. When the food is cooked, take out the bowl. To remove food, use a pair of tongs to lift the
food out the bowl.
Caution: After hot frying, the bowl, the grid and the food are very hot.
DEHYDRATION
1. Place the grid in the bowl of the appliance.
2. Press , then adjust the temperature by pressing and button to 80°C on the digital screen.
3. Then set the desired cooking time by pressing the button and adjusting the time with
and button. You can set the timing from 1 hour to 4 hours.
4. Press the Start button
to launch the dehydration process. The selected temperature and
remaining cooking time will alternate on the screen display.
5. When you hear the timer sound, the cooking has finished. Take the bowl out the appliance
and place it on a heat-resistant surface.
6. Check if the food is ready. If the food is not ready yet, put it back on the appliance and set
the timer for a few extra minutes.
7. When the food is cooked, take out the bowl. To remove food, use a pair of tongs to lift the
food out the bowl.
Caution : the bowl and the grid are very hot.
COOKING GUIDE
The table below helps you to select the basic settings for the food you want to prepare.
Note: The cooking times below are only a guide and may vary according to the variety
and batch of potatoes used. For other foods the size, shape and brand may affect results.
Therefore, you may need to adjust the cooking time slightly.
* Shake halfway through cooking.
IMPORTANT: To avoid damaging your appliance, never exceed the maximum quantities of ingredients and
liquids indicated in the instruction manual and in the recipes.
**place the cake tin/oven dish in the bowl.
When you use mixtures that rise (such as with cake, quiche or muffins) the oven dish should not
be filled more than halfway.
Visit www.t-fal.com for online recipes.
TIPS
• Smaller foods usually require a slightly shorter cooking time than larger size foods.
• A larger amount of food only requires a slightly longer cooking time, a smaller amount of
food only requires a slightly shorter cooking time.
• Shaking smaller size foods halfway through the cooking time improves the end result and
can help prevent uneven cooking.
• Add some oil to fresh potatoes for a crispy result. After adding a spoon of oil, fry the
potatoes within a few minutes.
• Do not cook extremely greasy foods in the appliance.
• Snacks that can be cooked in an oven can also be cooked in the appliance.
• The optimal recommended quantity for cooking fries is 700 grams.
• Use ready made puff and shortcrust pastry to make filled snacks quickly and easily.
• Place an oven dish in the appliance’s bowl if you want to bake a cake or quiche or if you
want to fry fragile ingredients or filled ingredients. You can use an oven dish in silicon,
stainless steel, aluminium, terracotta.
• You can also use the appliance to reheat food. To reheat food, set the temperature to
160°C /320°F for up to 10 minutes.
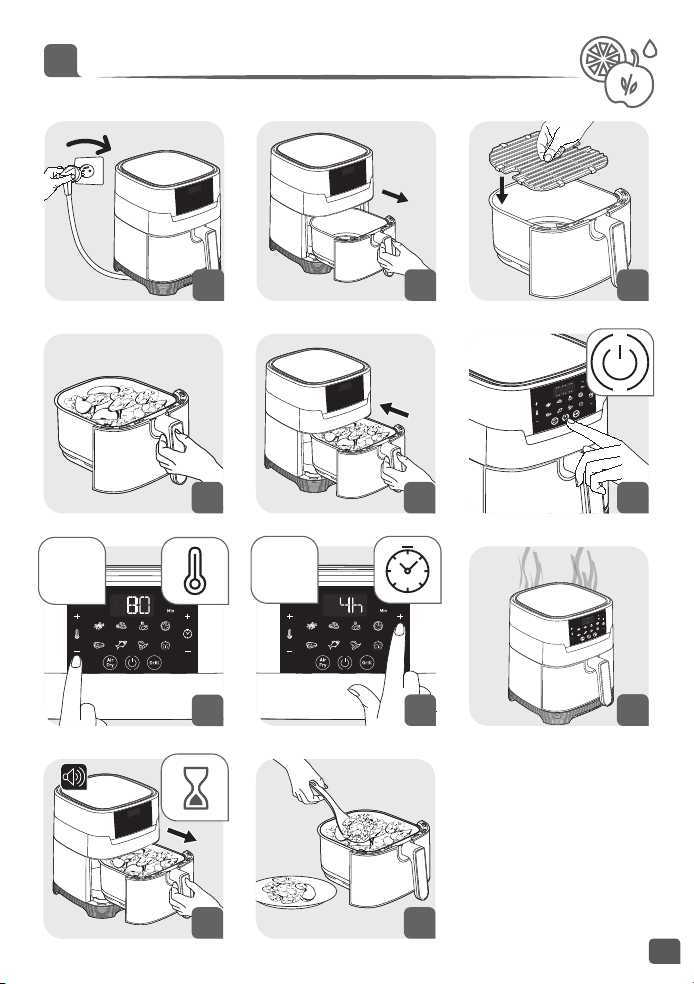
MAKING HOME-MADE CHIPS
For the best results, we advise to use frozen chips. If you want to make home-made chips, follow
the steps below.
1. Choose a variety of potato recommended for making chips. Peel the potatoes and cut them
into equal thickness chips.
2. Soak the potato chips in a bowl of cold water for at least 30 minutes, drain them and dry
them with a clean, highly absorbent tea towel. Then pat with paper kitchen towel. The chips
must be thoroughly dry before cooking.
3. Pour 1 tablespoon of oil (vegetable, sunflower or olive) in a dry bowl, put the chips on top
and mix until they are coated with oil.
4. Remove the chips from the bowl with your fingers or a kitchen utensil so that any excess oil
stays behind in the bowl. Place the chips in the bowl.
Note: Do not tip the container of oil coated chips directly into the bowl in one go,
otherwise excess oil will end up at the bottom of the bowl.
5. Fry the chips according to the instructions in the section Cooking guide.
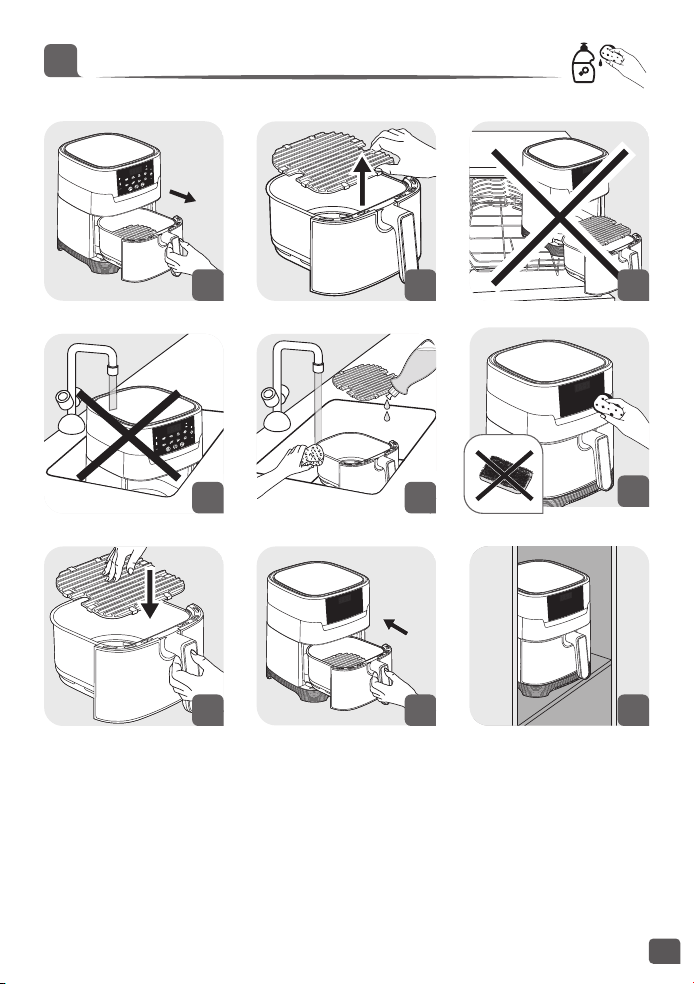
CLEANING
Clean the appliance after every use.
The bowl and the grid have a non-stick coating. Do not use metal kitchen utensils or
abrasive cleaning materials to clean them, as this may damage the nonstick coating.
1. Remove the mains plug from the wall socket and let the appliance cool down. Note: Remove
the bowl to let the appliance cool down more quickly.
2. Wipe the outside of the appliance with a damp cloth.
3. Clean the bowl and grid with hot water, some washing-up liquid and a non-abrasive sponge.
You can use a degreasing liquid to remove any remaining dirt.
Warning: the bowl and the grid are not dishwasher safe.
Tip: If dirt is stuck at the bottom of the bowl and the grid, fill them with hot water and
some washing-up liquid. Let the bowl and the grid soak for approximately 10 minutes.
Then rinse clean and dry.
4. Wipe inside of the appliance with hot water and a damp cloth.
5. Clean the heating element with a dry, cleaning brush to remove any food residues.
9
EN
8
Quantity
Approx Time
(min)
Temperature
(°C /°F)
Cooking
mode
Shake*
Extra
information
Potatoes & fries
Frozen chips (10 mm x
10mm standard thickness)
300 - 800 g
15 - 25 min
200°C / 392°F
Yes
Homemade French
Fries (8 x 8 mm)
300 - 800 g
22 - 32 min
200°C / 392°F
Yes
Add 1 tbsp of oil
Frozen
potato wedges
300 - 800 g
22 - 27 min
200°C / 392°F
Yes
Add 1 tbsp of oil
Meat & Poultry
Steak
100 - 500 g
6 - 10 min
180°C / 356°F
Chicken breast
fillets (boneless)
100 - 500 g
12 - 19 min
180°C / 356°F
Quantity
Approx Time
(min)
Temperature
(°C /°F)
Cooking
mode
Shake*
Extra
information
Chicken (whole)
1000 g 60 min
200°C / 392°F
Fish
Salmon fillet
350 g
15 - 17 min
140°C / 284°F
Shrimps 12 pieces 4 min
170°C / 338°F
Snacks
Frozen chicken nuggets
100 - 600 g
7 - 15 min
200°C / 392°F
Yes
Frozen chicken wings
300 g 16 - 20 min
200°C / 392°F
Yes
Frozen cheese sticks
125 g
(5 pieces)
7 - 9 min
180°C / 356°F
Frozen onion rings
200 g
(10 pieces)
8 - 10 min
200°C / 392°F
Yes
Grill
= 15 min
200°C / 392°F
Meat 250 g
Preheating : 15 min
Cooking : 6-8 min
200°C / 392°F
You can add oil, aromatic herbs and salt
for better taste.
At mid-cooking, you can return the food.
Sausages 400 g
Preheating : 15 min
Cooking : 10-12 min
200°C / 392°F
You can add oil, aromatic herbs and salt
for better taste.
At mid-cooking, you can return the food.
Vegetables
300 g
Preheating : 15 min
Cooking : 10 min
200°C / 392°F
Fish fillet
200 g
Preheating : 15 min
Cooking : 3-5 min
200°C / 392°F
Baking
Muffins 7 pieces 15 -18 min
180°C / 356°F
Use a baking
tin/oven dish**
Cake 300 g 30 min
160°C / 320°F
Dehydration
Apple in slices 1 piece 1h
80°C / 176°F

* Shake halfway through cooking.
IMPORTANT: To avoid damaging your appliance, never exceed the maximum quantities of ingredients and
liquids indicated in the instruction manual and in the recipes.
**place the cake tin/oven dish in the bowl.
When you use mixtures that rise (such as with cake, quiche or muffins) the oven dish should not
be filled more than halfway.
Visit www.t-fal.com for online recipes.
TIPS
• Smaller foods usually require a slightly shorter cooking time than larger size foods.
• A larger amount of food only requires a slightly longer cooking time, a smaller amount of
food only requires a slightly shorter cooking time.
• Shaking smaller size foods halfway through the cooking time improves the end result and
can help prevent uneven cooking.
• Add some oil to fresh potatoes for a crispy result. After adding a spoon of oil, fry the
potatoes within a few minutes.
• Do not cook extremely greasy foods in the appliance.
• Snacks that can be cooked in an oven can also be cooked in the appliance.
• The optimal recommended quantity for cooking fries is 700 grams.
• Use ready made puff and shortcrust pastry to make filled snacks quickly and easily.
• Place an oven dish in the appliance’s bowl if you want to bake a cake or quiche or if you
want to fry fragile ingredients or filled ingredients. You can use an oven dish in silicon,
stainless steel, aluminium, terracotta.
• You can also use the appliance to reheat food. To reheat food, set the temperature to
160°C /320°F for up to 10 minutes.
MAKING HOME-MADE CHIPS
For the best results, we advise to use frozen chips. If you want to make home-made chips, follow
the steps below.
1. Choose a variety of potato recommended for making chips. Peel the potatoes and cut them
into equal thickness chips.
2. Soak the potato chips in a bowl of cold water for at least 30 minutes, drain them and dry
them with a clean, highly absorbent tea towel. Then pat with paper kitchen towel. The chips
must be thoroughly dry before cooking.
3. Pour 1 tablespoon of oil (vegetable, sunflower or olive) in a dry bowl, put the chips on top
and mix until they are coated with oil.
4. Remove the chips from the bowl with your fingers or a kitchen utensil so that any excess oil
stays behind in the bowl. Place the chips in the bowl.
Note: Do not tip the container of oil coated chips directly into the bowl in one go,
otherwise excess oil will end up at the bottom of the bowl.
5. Fry the chips according to the instructions in the section Cooking guide.
CLEANING
Clean the appliance after every use.
The bowl and the grid have a non-stick coating. Do not use metal kitchen utensils or
abrasive cleaning materials to clean them, as this may damage the nonstick coating.
1. Remove the mains plug from the wall socket and let the appliance cool down. Note: Remove
the bowl to let the appliance cool down more quickly.
2. Wipe the outside of the appliance with a damp cloth.
3. Clean the bowl and grid with hot water, some washing-up liquid and a non-abrasive sponge.
You can use a degreasing liquid to remove any remaining dirt.
Warning: the bowl and the grid are not dishwasher safe.
Tip: If dirt is stuck at the bottom of the bowl and the grid, fill them with hot water and
some washing-up liquid. Let the bowl and the grid soak for approximately 10 minutes.
Then rinse clean and dry.
4. Wipe inside of the appliance with hot water and a damp cloth.
5. Clean the heating element with a dry, cleaning brush to remove any food residues.
9
EN
8
Quantity
Approx Time
(min)
Temperature
(°C /°F)
Cooking
mode
Shake*
Extra
information
Potatoes & fries
Frozen chips (10 mm x
10mm standard thickness)
300 - 800 g
15 - 25 min
200°C / 392°F
Yes
Homemade French
Fries (8 x 8 mm)
300 - 800 g
22 - 32 min
200°C / 392°F
Yes
Add 1 tbsp of oil
Frozen
potato wedges
300 - 800 g
22 - 27 min
200°C / 392°F
Yes
Add 1 tbsp of oil
Meat & Poultry
Steak
100 - 500 g
6 - 10 min
180°C / 356°F
Chicken breast
fillets (boneless)
100 - 500 g
12 - 19 min
180°C / 356°F
Quantity
Approx Time
(min)
Temperature
(°C /°F)
Cooking
mode
Shake*
Extra
information
Chicken (whole)
1000 g 60 min
200°C / 392°F
Fish
Salmon fillet
350 g
15 - 17 min
140°C / 284°F
Shrimps 12 pieces 4 min
170°C / 338°F
Snacks
Frozen chicken nuggets
100 - 600 g
7 - 15 min
200°C / 392°F
Yes
Frozen chicken wings
300 g 16 - 20 min
200°C / 392°F
Yes
Frozen cheese sticks
125 g
(5 pieces)
7 - 9 min
180°C / 356°F
Frozen onion rings
200 g
(10 pieces)
8 - 10 min
200°C / 392°F
Yes
Grill
= 15 min
200°C / 392°F
Meat 250 g
Preheating : 15 min
Cooking : 6-8 min
200°C / 392°F
You can add oil, aromatic herbs and salt
for better taste.
At mid-cooking, you can return the food.
Sausages 400 g
Preheating : 15 min
Cooking : 10-12 min
200°C / 392°F
You can add oil, aromatic herbs and salt
for better taste.
At mid-cooking, you can return the food.
Vegetables
300 g
Preheating : 15 min
Cooking : 10 min
200°C / 392°F
Fish fillet
200 g
Preheating : 15 min
Cooking : 3-5 min
200°C / 392°F
Baking
Muffins 7 pieces 15 -18 min
180°C / 356°F
Use a baking
tin/oven dish**
Cake 300 g 30 min
160°C / 320°F
Dehydration
Apple in slices 1 piece 1h
80°C / 176°F

6. Do not immerse the appliance in water or any other liquid.
STORAGE
1. Unplug the appliance and let it cool down.
2. Make sure all parts are clean and dry.
GUARANTEE AND SERVICE
If you need service or information or if you have a problem, please visit the T-fal website at
www.t-fal.com or contact the T-fal Consumer Care Centre in your country. You can find the
phone number in the worldwide guarantee leaflet. If there is no Consumer Care Centre in your
country, go to your local T-fal dealer.
TROUBLESHOOTING
If you encounter problems with the appliance, visit www.t-fal.com for a list of frequently asked
questions or contact the Consumer Care Centre in your country.
11
EN
10
TEFAL/T-FAL* INTERNATIONAL LIMITED GUARANTEE
: www.tefal.com
This product is repairable by TEFAL/T-FAL*, during and after the guarantee period.
Accessories, consumables and end-user replaceable parts can be purchased, if locally
available, as described on the TEFAL/T-FAL internet site www.tefal.com
The Guarantee** : TEFAL/T-FAL guarantees this product against any manufacturing defect
in materials or workmanship during the guarantee period within those countries*** as
stated in the attached country list, starting from the initial date of purchase or delivery
date. The international manufacturer’s guarantee covers all costs related to restoring the
proven defective product so that it conforms to its original specifications, through the repair
or replacement of any defective part and the necessary labour. At TEFAL/T-FAL’s choice,
areplacement product may be provided instead of repairing a defective product.
TEFAL/T-FAL’s sole obligation and your exclusive resolution under this guarantee are limited to
such repair or replacement.
Conditions & Exclusions : TEFAL/T-FAL shall not be obliged to repair or replace any product
which is not accompanied by a valid proof of purchase. The product can be taken directly in
person or must be adequately packaged and returned, by recorded delivery (or equivalent
method of postage), to a TEFAL/T-FAL authorised service centre. Full address details for each
country’s authorised service centres are listed on TEFAL/T-FAL website (www.tefal.com) or by
calling the appropriate consumer Service centre set out in the attached country list. In order
to offer the best possible after-sales service and constantly improve customer satisfaction,
TEFAL/T-FAL may send a satisfaction survey to all customers who have had their product
repaired or exchanged in a TEFAL/T-FAL authorised service centre.
This guarantee applies only for products purchased and used for domestic purposes and will
not cover any damage which occurs as a result of misuse, negligence, failure to follow
TEFAL/T-FAL instructions, or amodification or unauthorised repair of the product, faulty
packaging by the owner or mishandling by any carrier. It also does not cover normal wear and
tear, maintenance or replacement of consumable parts, or the following:
- using the wrong type of water or consumable
- mechanical damages, overloading
- damage as a result of lightning or power surges
- ingress of water, dust or insects into the product (excluding appliances with features
specifically designed for insects)
- accidents including fire, flood, etc
- scaling (any de-scaling must be carried out according to the instructions for use)
- damage to any glass or porcelain ware in the product
- professional or commercial use
- or poor results specifically due to wrong voltage or frequency as stamped on the product ID
or specification
Consumer Statutory Rights : This international TEFAL/T-FAL guarantee does not affect the
Statutory Rights a consumer may have or those rights that cannot be excluded or limited, nor
rights against the retailer from which the consumer purchased the product. This guarantee
gives a consumer specific legal rights, and the consumer may also have other legal rights
which vary from State to State or Country to Country. The consumer may assert any such
rights at his sole discretion.