Use & Care ®
Guide ]
Apply for the following models:
NWT8501Q, NWT8501S
Nominal Technical Specifications Manufactured by Industrias Acros Whirlpool S.A. de C.V.
Antigua carretera a Roma km 9
I Nominal Current I 2,0A ICok Milagro
IFrecuencv I 50-60 Hz IApodaca, N.L.
IVottaqe I 220-240 V ~ Mexico, 66600
Phone 01-81 83 29 21 00
To reduce the risk of fire, electrical shock, or
injury when using your refrigerator, follow
these basic precautions:
•Read all instructions beforeusing the refrigerator.
•Childentrapment and suffocation are not problemsof the past. Junked or abandoned refrigerators are
still dangerous ...even if theywill "just sit in the garagea few days".
•If youare getting rid ofyourold refrigerator,do it safely.
°Never allowchildrento operate, playwith, or crawlinside the refrigerator.
°Never clean refrigerator parts with flammable fluids. The fumes can create a fire hazard or explosion.
•Wesuggest to removethe dooror thigh itwith a resistant cord.
•FORYOUR SAFETY°
•DO NOT STORE OR USE GASOLINE OR OTHER FLAMMABLE VAPORS AND LIQUIDS IN THE
VICINITY OF THIS OR ANY OTHER APPLIANCE. THE FUMES CANCREATE A FIREHAZARD OR
EXPLOSION.
•IF THE ELECTRICAL CORD IS DAMAGED, OUR SERVICE DEPARTMENT OR A QUALIFIED
ELECTRICIAN SHOULD CHANGE IT.
Electrical shock hazard
The refrigerator must be properly grounded.
Do not modify the electrical cord
Do not use an extension cord with this appliance, consult with a
qualify technician any doubts about the proper grounding of this
appliance.
If your wall outlet is not proper one have a qualify technician install it.
Not complying with the above precautions may result in high risk
of injury and even death
• Do not use the ref_igdrator in an area Where the room temperature will fall below 13 °C
(55 °F).
. Keep the refrigerator out of the weather. F-, -.
• Connect the refrigerator only to the proper kind of outlet, with the correct . _
electrical supply and grounding.
• Do not load the refrigerator with food before it has time to get properly
cold.
• Use the refrigerator only for the uses described in this manual.
• Properly maintain the refrigerator.
• Be sure the refrigerator is not used by anyone unable to operate it properly.
• The refrigerator is only for domestic use.
Before connecting the new refrigerator follow these steps:
1. Remove all packing material.
2. Install your refrigerator under the following conditions:
* Allow 7,5 cm (3 inches) between overhead cabinets and
refrigerator top. ___N__
. Allow at least 5 cm (2 inches) between the refrigerator condenser ......Levellin
on the back and the wall. g screw
"Allow 1,25 cm (1/2") on each side of the refrigerator for ease of
installation, R_ _
" If the hinge side of the refrigerator is to be against the wall, you Lower
might want to leave extra space so the door can be opened
wider. Figure 1.
3. Levelling the refrigerator.
. If your refrigerator has levelling screws only, follow the steps Use a screwdriverto
shown in figure 1. / adjustroller
" If your refrigerator has rollers with levelling screws, follow the L _._ Roller
steps shown in figure 2. _"_
To raise or lower the front of the refrigerator, turn each screw in Lower J
I a clockwise or counterclockwise direction (figure 1 or 2). J __f_ '__.,_, \ \
For greater levelling accuracy you should place a spirit level on __ Raise Levelling
the upper surface of the refrigerator. _ screw
" It is recommended to incline lightly back the refrigerator in order Figure 2.
to let the door close by itself.
4. Before starting the refrigeration process allow the refrigerator to rest from 2 to
3 hours in order to let the gas and oil be settled.
Connecting your refrigerator
A 220-240 V~ , 50-60 Hz AC only 10 A fused and properly grounded electrical
supply is required.
Your refrigerator has an electrical cord provided
with 3 prong grounding plug. To minimize the
possibility of electrical shock, the cord must be
plugged into a mating 3 prong grounding type wall
outlet according to national electrical code and all
local codes.
If plug will not fit the outlet, is your responsibility
to have a proper outlet installed by a qualified
electrician.
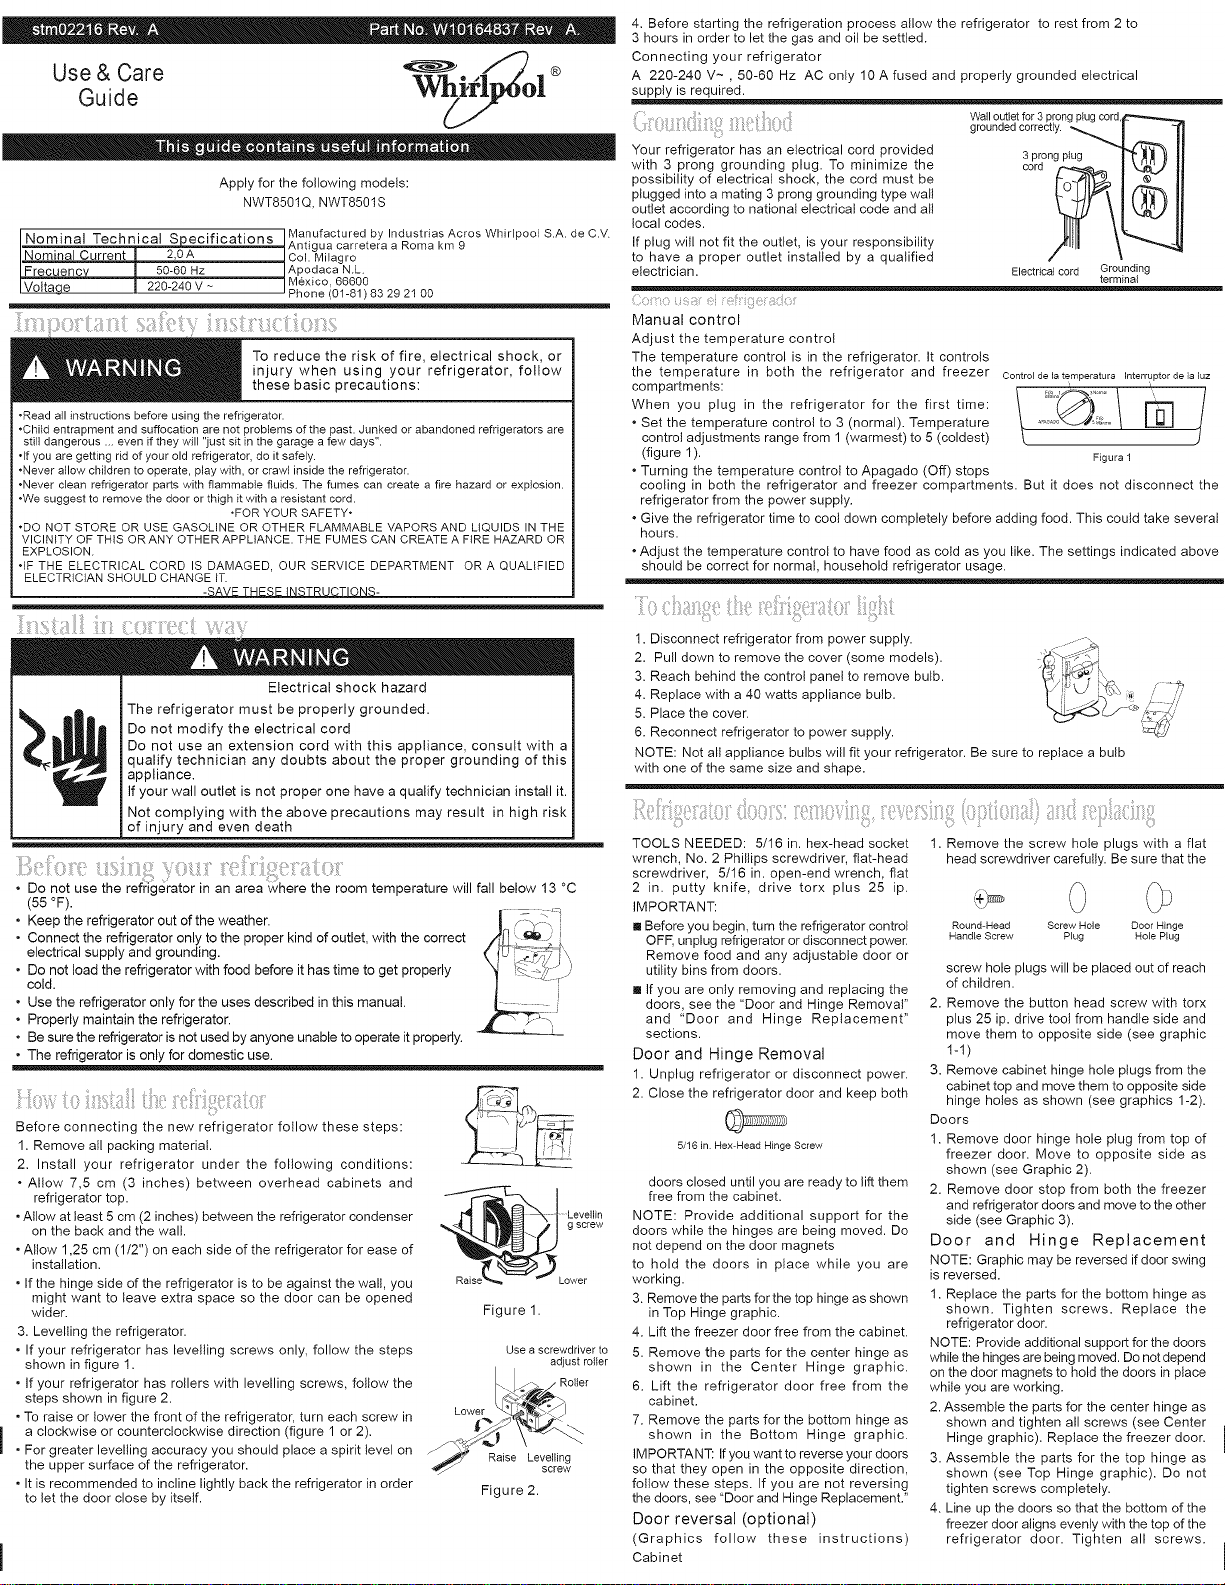
Walloutletfor3prongplugcord,€-'_.,-,..,._,
grounded...... tly. _/._% 1
3prong plug | T ,1!,!!|) II
cord
Electricalcord Grounding
terminal
ilJBiitB iiS;iilgi!i!{i _!!_iild!_jitili_i!i:!:;:iGi¸
Manual control
Adjust the temperature control
The temperature control is in the refrigerator. It controls
the temperature in both the refrigerator and freezer ControldelatemperaturaInterruptordelaluz
compartments: ,.
When you plug in the refrigerator for the first time: / _"_'_" / E_ /
* Set the temperature control to 3 (normal). Temperature ..... ;r;....
control adjustments range from 1 (warmest) to 5 (coldest)
(figure 1). Figura1
* Turning the temperature control to Apagado (Off) stops
cooling in both the refrigerator and freezer compartments. But it does not disconnect the
refrigerator from the power supply.
° Give the refrigerator time to cool down completely before adding food. This could take severat
hours.
* Adjust the temperature controt to have food as cold as you like. The settings indicated above
should be correct for normal, household refrigerator usage.
1. Disconnect refrigerator from power supply.
2. Pull down to remove the cover (some models).
3. Reach behind the control panel to remove bulb.
4. Replace with a 40 watts appliance bulb.
5. Place the cover.
6. Reconnect refrigerator to power supply.
NOTE: Not all appliance bulbs will fit your refrigerator. Be sure to replace a bulb
with one of the same size and shape.
TOOLS NEEDED: 5/16 in. hex-head socket
wrench, No. 2 Phillips screwdriver, fiat-head
screwdriver, 5/16 in. open-end wrench, fiat
2 in. putty knife, drive torx plus 25 ip.
IMPORTANT:
[] Before you begin, turn the refrigerator controt
OFF, unplug refrigerator or disconnect power.
Remove food and any adjustable door or
utility bins from doors.
[] If you are only removing and replacing the
doors, see the "Door and Hinge Removal"
and "Door and Hinge Replacement"
sections.
Door and Hinge Removal
1. Unplug refrigerator or disconnect power.
2. Close the refrigerator door and keep both
5/I6 in. Hex-Head Hinge Screw
doors closed until you are ready to lift them
free from the cabinet.
NOTE: Provide additional support for the
doors while the hinges are being moved. Do
not depend on the door magnets
to hold the doors in place while you are
working.
3. Remove the parts for the top hinge as shown
in Top Hinge graphic.
4. Lift the freezer door free from the cabinet.
5. Remove the parts for the center hinge as
shown in the Center Hinge graphic.
6. Lift the refrigerator door free from the
cabinet.
7. Remove the parts for the bottom hinge as
shown in the Bottom Hinge graphic.
IMPORTANT: If you want to reverse your doors
so that they open in the opposite direction,
follow these steps. If you are not reversing
the doors, see "Door and Hinge Replacement."
Door reversal (optional)
(Graphics follow these instructions)
Cabinet
1. Remove the screw hole plugs with a flat
head screwdriver carefully. Be sure that the
Round-Head Screw Hole Door Hinge
Handle Screw Plug Hole Plug
screw hole plugs will be placed out of reach
of children.
2. Remove the button head screw with torx
plus 25 ip. drive tool from handle side and
move them to opposite side (see graphic
1-1)
3. Remove cabinet hinge hole plugs from the
cabinet top and move them to opposite side
hinge holes as shown (see graphics 1-2).
Doors
1. Remove door hinge hole plug from top of
freezer door. Move to opposite side as
shown (see Graphic 2).
2. Remove door stop from both the freezer
and refrigerator doors and move to the other
side (see Graphic 3).
Door and Hinge Replacement
NOTE: Graphic may be reversed if door swing
is reversed.
1. Replace the parts for the bottom hinge as
shown. Tighten screws. Replace the
refrigerator door.
NOTE: Provide additional support for the doors
while the hinges are being moved. Do not depend
on the door magnets to hold the doors in place
while you are working.
2. Assemble the parts for the center hinge as
shown and tighten all screws (see Center
Hinge graphic). Replace the freezer door.
3. Assemble the parts for the top hinge as
shown (see Top Hinge graphic). Do not
tighten screws completely.
4. Line up the doors so that the bottom of the
freezer door aligns evenly with the top of the
refrigerator door. Tighten all screws.
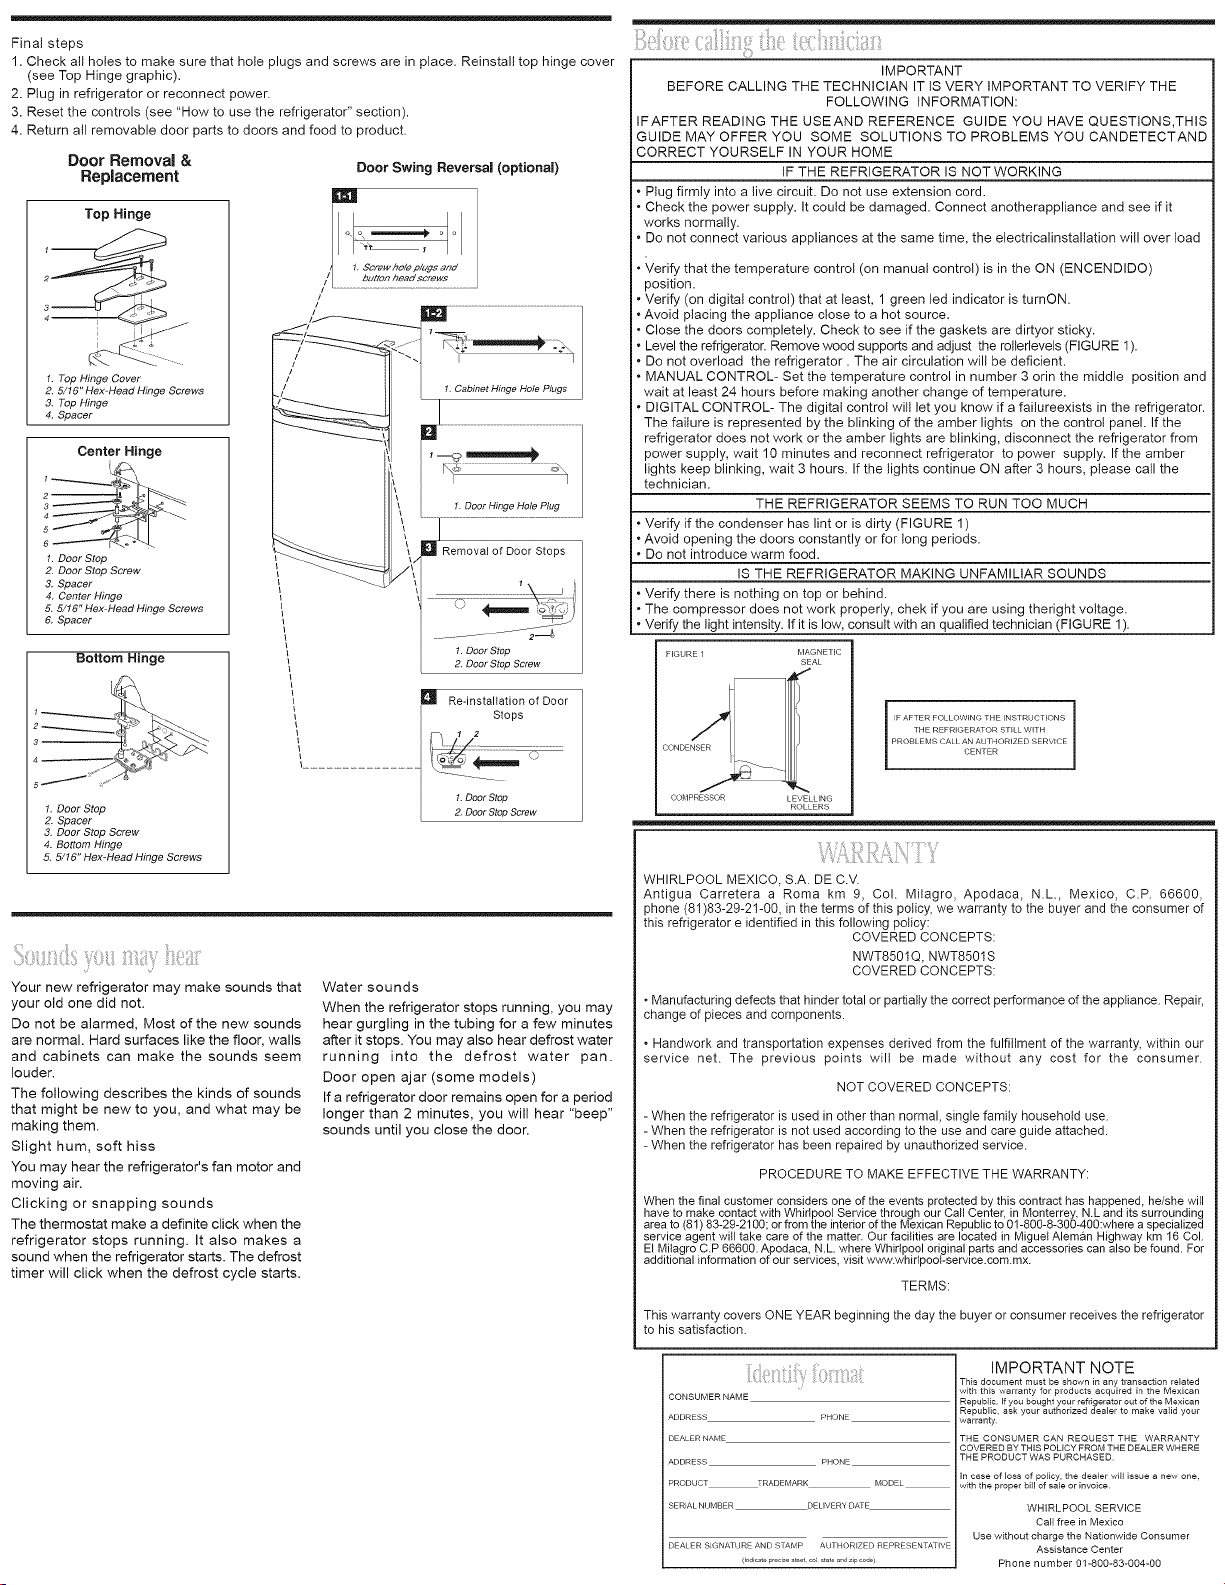
Finalsteps
1.Checkaltholestomakesurethatholeplugsandscrewsareinplace.Reinstalltophingecover
(seeTopHingegraphic).
2.Pluginrefrigeratororreconnectpower.
3.Resetthecontrols(see"Howtousetherefrigerator"section).
4.Returnallremovabledoorpartstodoorsandfoodtoproduct.
DoorRemoval &
Replacement
Top Hinge
1. Top Hinge Cover
2. 5/16" Hex-Head Hinge Screws
3. Top Hinge
4. Spacer
Center Hinge
3
1. DoorStop
2. DoorStep Screw
3, Spacer
4. CenterHinge
._5/16"Hex-HeadHinge Screws
6.Spacer
Bottom Hinge
1. Doer Stop
2. Spacer
3_ Door Stop Screw
4. Bottom Hinge
5. 5/16" Hex-Head Hinge Screws
Door Swing Reversal (optional)
/r I
i I
I 1, Cabinet Hinge Hole Plugs
1 Door Hinge Hole Plug
Removal of Door Stops
1. Door Stop
2, Door Stop Screw
Re-installation of Door
Stops
/ 12
;: soro
Your new refrigerator may make sounds that
your old one did not.
Do not be alarmed, Most of the new sounds
are normal. Hard surfaces like the floor, walls
and cabinets can make the sounds seem
louder.
The following describes the kinds of sounds
that might be new to you, and what may be
making them.
Slight hum, soft hiss
You may hear the refrigerator's fan motor and
moving air.
Clicking or snapping sounds
The thermostat make a definite click when the
refrigerator stops running. It also makes a
sound when the refrigerator starts. The defrost
timer will click when the defrost cycle starts.
Water sounds
When the refrigerator stops running, you may
hear gurgling in the tubing for a few minutes
after it stops. You may also hear defrost water
running into the defrost water pan.
Door open ajar (some models)
If a refrigerator door remains open for a period
longer than 2 minutes, you will hear "beep"
sounds until you close the door.
IMPORTANT
BEFORE CALLING THE TECHNICIAN IT IS VERY IMPORTANT TO VERIFY THE
FOLLOWING INFORMATION:
IFAFTER READING THE USEAND REFERENCE GUIDE YOU HAVE QUESTIONS,THIS
GUIDE MAY OFFER YOU SOME SOLUTIONS TO PROBLEMS YOUCANDETECTAND
CORRECT YOURSELF IN YOUR HOME
IF THE REFRIGERATOR IS NOT WORKING
• Plug firmly into a live circuit. Do not use extension cord.
Check the power supply. It could be damaged. Connect anotherappliance and see if it
works normally.
, Do not connect various appliances at the same time, the electricalinstallation will over load
• Verify that the temperature control (on manual control) is in the ON (ENCENDIDO)
position.
, Verify (on digital control) that at least, 1 green led indicator is turnON.
•Avoid placing the appliance close to a hot source.
• Close the doors completely. Check to see if the gaskets are dirtyor sticky.
Level the refrigerator. Remove wood supports and adjust the rollerlevels (FIGURE 1).
Do not overload the refrigerator. The air circulation will be deficient.
MANUAL CONTROL- Set the temperature control in number 3 orin the middle position and
wait at least 24 hours before making another change of temperature.
, DIGITAL CONTROL- The digital control will let you know if a failureexists in the refrigerator.
The failure is represented by the blinking of the amber lights on the control panel. If the
refrigerator does not work or the amber lights are blinking, disconnect the refrigerator from
power supply, wait 10 minutes and reconnect refrigerator to power supply. If the amber
lights keep blinking, wait 3 hours. If the lights continue ON after 3 hours, please call the
technician.
THE REFRIGERATOR SEEMS TO RUN TOO MUCH
• Verify if the condenser has lint or is dirty (FIGURE 1)
•Avoid opening the doors constantly or for long periods.
Do not introduce warm food.
IS THE REFRIGERATOR MAKING UNFAMILIAR SOUNDS
• Verify there is nothing on top or behind.
, The compressor does not work properly, chek if you are using theright voltage.
, Verify the light intensity. If it is low, consult with an qualified technician (FIGURE 1).
FIGURE / MAGNETIC
SEAL
CONDE_
COMPRESSOR LEVELLING
ROLLERS
IF AFTER FOLLOWING THE INSTRUCTIONS
THE REFRIGERATOR ST_LL W_TH
PROBLEMS CALL AN AUTHORIZED SERVICE
CENTER
WHIRLPOOL MEXICO, S.A. DE C.V.
Antigua Carretera a Roma km 9, Col. Milagro, Apodaca, N.L, Mexico, C.P. 66600,
phone (81)83-29-21-00, in the terms of this policy, we warranty to the buyer and the consumer of
this refrigerator e identified in this following policy:
COVERED CONCEPTS:
NWT8501Q, NWT8501S
COVERED CONCEPTS:
• Manufacturing defects that hinder total or partially the correct performance of the appliance. Repair,
change of pieces and components.
• Handwork and transportation expenses derived from the fulfillment of the warranty, within our
service net. The previous points will be made without any cost for the consumer.
NOT COVERED CONCEPTS:
- When the refrigerator is used in other than normal, single family household use.
- When the refrigerator is not used according to the use and care guide attached.
- When the refrigerator has been repaired by unauthorized service.
PROCEDURE TO MAKE EFFECTIVE THE WARRANTY:
When the final customer considers one of the events protected by this contract has happened, he/she will
have to make contact with Whirlpool Service through our Call Center, in Monterrey, N.L and its surrounding
area to (81) 83-29-2100; or from the interior of the Mexican Republic to 01-800-8-300-400:where a specialized
service agent will take care of the matter. Our facilities are located in Miguel Aleman Highway km 16 Col.
El Milagro C.P 66600. Apodaca, N.L. where Whirlpool original parts and accessories can also be found. For
additional information of our services, visit www.whirlpool-service.com.mx.
TERMS:
This warranty covers ONE YEAR beginning the day the buyer or consumer receives the refrigerator
to his satisfaction.
CONSUMER NAME
ADDRESS PHONE
DEALER NAME
ADDRESS PHONE
PRODUCT TRADEMARK MODEL
SERIAL NUMBER DEUVERY DATE
DEALER SIGNATURE AND STAMP AUTHORIZED REPRESENTATIVE
(k,dic_te precse steer col state and zip code)
IMPORTANT NOTE
This document must be shown in any transaction related
with this warranty for products acquired in the Mexican
Republic. If you bought your refrigerator out of the Mexican
Republic, ask your authorized dealer to make valid your
warranty
THE CONSUMER CAN REQUEST THE WARRANTY
COVERED BY THIS POLICY FROM THE DEALER WHERE
THE PRODUCT WAS PURCHASED
In case of loss of policy, the dealer will issue a new one,
with the proper bill of sale or invoice
WHIRLPOOL SERVICE
Coil free in Mexico
Use without charge the Nationwide Consumer
Assistance Center
Phone number 01-800-83-004-00
Manual de
Use y Cuidado |
Este manual de use y manejo aplica para los siguientes medelos:
NWT8501Q, NWT8501S
t Caracteristicas EI6ctricas Nominales Fabricado per Industrias Acres Whirlpool S.A. de C.V.
Antigua carretera a Rorna km 9
Corfiente Nominal _. 2,0 A COL Milagre
Frecuencia J_ 50-60 Hz Apodaea N.L.
M_xico,
66600
LTensi6n Nominal J_ 220-240 V ~
Tel. (01-81) 83 29 21 00
Para reducir el riesgo de {ncendJo, descarga el_ctrica o herJdas
personales cuando use su refrJgerador, sJga estas precauciones
b_sicas:
•Lea todas las instruociones antes de usar su refrigerador.
•El dejar abandonado an refrigerador puede causar que atguien jugando pueda quedarse atrapado en 6_ y
se sofoque.
•Siva a cambiar su reffigerador hagalo de una forma segura para todos.
•Le aconsejamos que quite las puertas dei refrigerador fuera de use o que se asegure con una cuerda
resistente.
•Nunca deje queun niSo opere, juegue o se meta dentro de un refrigerador.
•Nunca limpie ias piezas de an refrigerador con liquidos inflamables; los vapores pueden causar incendios
o explosiones.
• PARA SU SEGURiDAD *
•No aimacene o use gasofina o gases inflamabies cerca de este o cualquier electrodom6stico, los vapores
pueden causar incendios o explosiones.
•Si ei cordon tomacorriente se daSa, debe set reemplazado per nuestro departamento de servicio o per un
electricista catificado para evitar atgOn riesgo.
-GUARDE ESTAS INSTRUCClONES-
PelJgro de Cheque El_ctrico
Es necesario que _ste refrJgerador sea puesto a tJerra.
NO rnodJfique el cord6n el_ctrice. Si no calza en el tomacorriente, haga instalar
un tornacorriente apropiado per un electricJsta calificado.
NO use una extensi6n el_ctrJca con este refrJgerador.
Consulte con un electricista calJficado si tiene dudas respecto a si el refrigerador
est_ debidamente puesto a tierra.
Si n0 se curnpten tas precauciones indicadas anteriormente se puede ocasionar
una lesi6n grave o a0n ta rnuerte.
:© , :: ;: :;: : ©
" No use el refrigerador en un cuarto donde la temperatura baje a menos de 13
°C (55 °F). I 7.:_ fi
. Mantenga el refrigerador tejos de los efectos del clima. .JlqL_ _h
Conecte el refrigerador solo en un tomacorriente apropiado con el suministro tic _,_-_S/'_\,
electrico adecuado y con conexi6n a tierra. _'_ _:._,
No ponga comida en el refrigerador antes de que se haya enfriado en la forma J ......-
apropiada. _:j
Use el refrigerador solo come se especifica en este manual. _._
. De el mantenimiento apropiado al refrigerador.
. AsegL_rese de que el refrigerador no sea operado per personas no capacitadas para
hacerlo en ta forma indicada.
. Et refrigerador es s6!o para use domestico.
:st:
Siga estos pasos antes de conectar el nuevo
refrigerador:
1, Retire los aditamentos de empaque incluso
los interiores.
2. Celoque el refrigerador baje las siguientes
recomendaciones:
• Deje un espacio minimo de 7,5 cm (3") entre
la parte superior del refrigerador y los
gabinetes.
• Deje cuando menos un espacio de 5 cm
(2") entre el condensador del refrigerador
en ta parte posterior y la pared.
%._ Tornillo
nivelado
FJgura 1.
• Deje un espacio de 1,25 cm (1/2") a cada lade del aparato
para facilitar ta instalaci6n. Useundestomillador
pare regular
• Si el refrigerador va a estar contra la pared lateral, deje I _ Rodi]lo
un espacio adicional para permitir que se abra mas la _._'_.:
puerta. B_j_" "L/_f'_
_7/Y'_'.,;LL,Z_\
3 Nivele el refrigerador _-<_1 \ --.
• . ....... _ Levantar
%,,oo,vo,o_o,
" SI el refngerador tlene unlcamente tornlllos nlveladores, vea laflgura
1. Conserve los 2 torniltos que sujetan la base al refrigerador. Estos Figura 2.
son los tornillos niveladores.
. Si el refrigerador tiene rodillos con tornillos niveladores, vea la figura
2.
.Para subir o bajar su refrigerador siga tas instrucciones de tas figuras 1 6 2 segOn corresponda.
.Para mayor precisi6n verifique con un nivel de carpintero cotocado en la parte superior del
refrigerador o verifique sial abrir y cerrarlo no se mueve, entonces estar_ nivelado.
. Se recomienda que quede un poco inclinado hacia atrgs, asi la puerta tender9 a cerrarse
sola.
4. Deje reposar el refrigerador de 2 a 3 horas antes de conectarlo, esto permitir9 que se asiente
e! gas y el aceite antes de iniciar el proceso de refrigeraci6n.
Conecte elrefrigerador
Se requiere una fuente de energia electrica debidamente aterrizada de 220-240 V~, 50-60 Hz
con fusibles de 10A.
: : : ::!_ : Tomacorriente mural del tipo puesta
M6todo de puesta a tierra a tierra para enchufes de 3 terrninales.
Enchufe puestaa_depuesta a
tierra de 3 terminale
Su refrigerador est_ equipado con un cord6n electrico provisto ,,4_L,,,-,_:1 ii
de un enchufe de puesta a tierra de 3 terminales. Para disminuir
a un minimo ta posibilidad de sufrir cheque etectrico, el cord6n
debe ser conectado en un tomacorriente mural del tipo con puesta
a tierra para enchufes de 3 terminales, puesto a tierra de acuerdo
con el C6digo Nacional de Electricidad y todos los c6digos y
regtamentos locales. Si no se dispone de un tomacorriente de
este tipo, es responsabilidad y obtigaci6n del cliente hacer instalar
un tomacorriente mural para enchufes de 3 terminales debidamente
Cord6n electrico ermmal de
puesto a tierra per un electricista calificado, puestaa tierra
C : ,
Ajuste el control de temperatura
Et control de temperatura est_ en el refrigerador.
Cuando se conecte per primera vez:
. Ponga el control de temperatura en 3 (normal). El control
va det 1 (menos file) al 5 (mas file) (figure 1).
. Ai mover el control a Apagado, deja de enfriarse el
refrigerador y el congelador, pero no se desconecta de
la electricidad.
Control de la temperatura Interrupter de la luz
Figura 1
. De tiempo al refrigerador de enfriarse completamente antes de poner alimentos en 6t. Su
enfriamiento puede tomar varias horas. Ajuste el control de temperatura para mantener la
:i
1. Desconecte el refrigerador.
2. Remueva la cubierta jalando hacia abajo (algunos
modelos).
3. Saque e! foco ubicado detr_s del panel de control.
4. Reemplacelo con un foco de 40 watts para
electrodomesticos.
5. Coloque ta cubierta (algunos mode!os).
6. Conecte el refrigerador nuevamente.
NOTA: No todos los feces son adecuados, asegQrese de
reemplazarlo per otro que tenga la misma forma y tamaSo.
HERRAMIENTAS REQUERIDAS: Dado y matraca de 5/16" cabeza hexagonal, destornillador
de cara estrella, destornillador de cara plana, llave espa5ola de 5/16", navaja plana, caja torx
plus 25 ip.
IMPORTANTE:
* Antes de iniciar, apague et control del refrigerador, desconecte el refrigerador o desconecte
la energia. Remueva los alimentos y todas las partes removibles de tas puertas.
* Si usted solamente requiere remover y reemplazar las puertas, yea las secciones: "Remover la
puerta y bisagra" y "Reemplazo de puertas y bisagras".
Remover la puerta y bisagra
1• Desconecte el refrigerador o desconecte ta energia.
2. Cierre la puerta de! refrigerador y mantenga las 2 puertas Tomiltode lebisagra:cab. hex.5/16"
cerradas.
NOTA: Agregue soporte adicional a tas puertas cuando
las bisagras esten siendo removidas. No dependa de los imanes de la puerta para detenerla
mientras usted trabaja.
3. Remueva las partes para la bisagra superior come se muestra en la grgfica anexa.
4. Retire ta puerta congelador del gabinete.
5. Remueva tas partes de la bisagra central come se muestra en la grgfica anexa.
6. Retire ta puerta refrigerador del gabinete.
7. Remueva las partes de la bisagra central come se muestra en la grgfica.
IMPORTANTE: Si quiere colocar las puertas al reverse para que se abran en la direcci6n opuesta,
siga estos pasos. Si usted no esta colocando las puertas al reverse, vea: "Reemplazo de puertas
y bisagras".
Reversibi,idad de puerta (opcional) 0
(Las graficas siguen estas instrucciones)
Gabinete Tomillo de Tap6n de Tapones de
Cabeza redonda Tomillos Puertas
1• Remueva los tapones que estan colocados
sobre ta cabeza de los tornillos con un
destornillador de cara ptana cuidando de no da5arlos y a su vez, asegL_rese de co!ocar!os en
algOn lugar en deride esten fuera del alcance de los ni5os.
2. Remueva los tornillos decabeza bot6n con lacaja torx plus 25 ip.de la bisagra del lade actual hacia el
otro lade (verfigura 1-t)
3. Remueva los tapones superiores de! gabinete y mu6valos en la direcci6n opuesta (ver figura
1-2).
Puertas
1. Remueva los tapones de giro de ta parte superior de la puerta de! congelador. Mueva hacia la
direcci6n opuesta (ver figura 2).
2. Remueva el freno de la puerta de ambas partes; refrigerador y congelador y mueva en direcci6n
opuesta (ver figura 3).
Reemplazo de puertas y bisagras
NOTA: La figura puede estar invertida si el giro de la puerta est_ invertido.
1.Reemplacelaspartesdelabisagrainferior(verfiguradebisagrainferior).Aprietelostornillos.
Reemptacetapuertade!refrigerador.
NOTA:Agreguesoporteadicionalalaspuertascuandolasbisagrasestensiendomovidas.Nodependa
delosimanesdelapuertaparadetenedamientrasustedtrabaja.
2.Ensamblelaspartesdetabisagracentralcomesemuestra(verfiguradebisagracentral)yapriete
todoslostornillos.Reemplacelapuertadelcongelador.
3.Ensamblelaspartesdelabisagrasuperiorcomesemuestra(verfiguradebisagrasuperior).
Noaprietelostornilloscompletamente.
4.Alineetaspuertasparaquetapartebajadetapuertadelcongeladorsealineealaparconlaparte
altadelapuertadelrefrigerador.Aprietetodoslostornillos.
Pasos finales
1. Verifique todos los agujeros y asegt_rese que los tapones y tornillos esten en su lugar. Reinstale
la cubierta de la bisagra superior (vea figura de bisagra superior).
2. Conecte et refrigerador a la fuente de energia.
3. Reinicie los controles (vea la secci6n "C6mo usar el refrigerador").
4. Regrese a su tugar todas las partes removibles de las puertas y tambien sus atimentos.
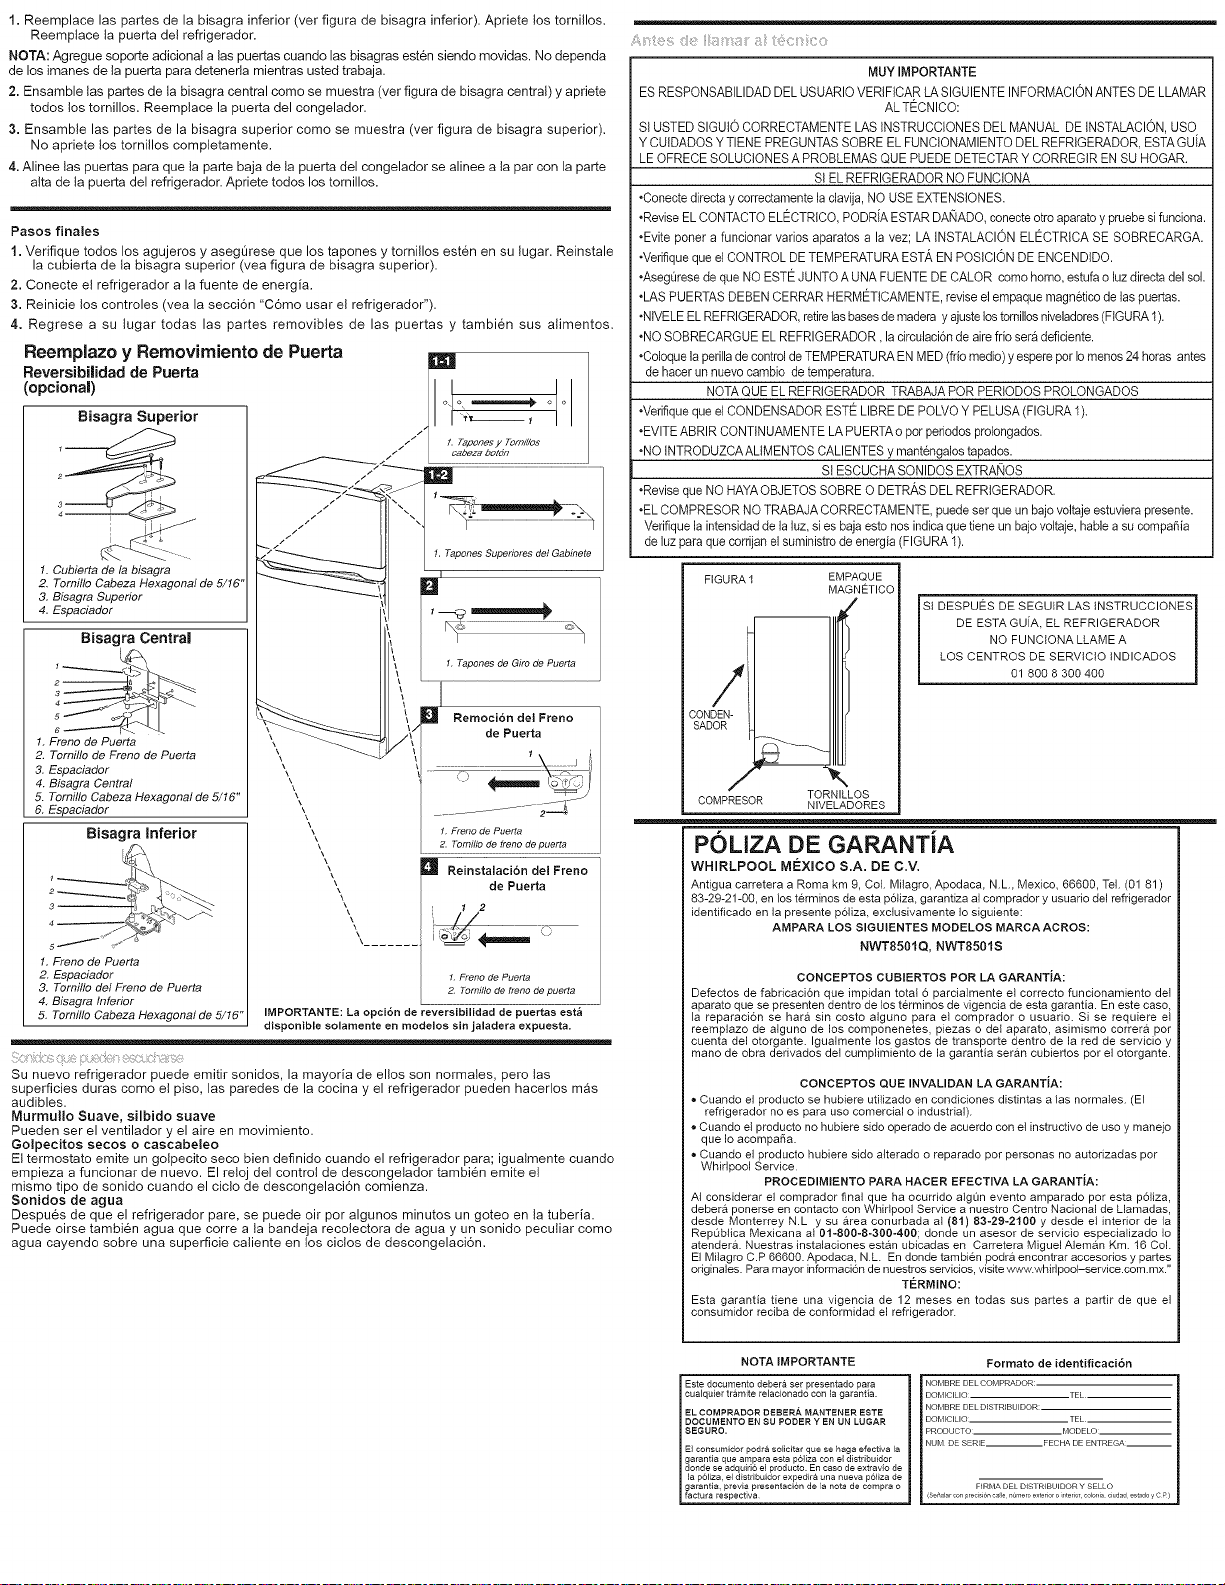
Reemplazo y Removimiento de Puerta
Reversibilidad de Puerta
(opcional)
Bisagra Superior
1,Cubierta de la bisagra
2. Tomitlo CabezaHexagonal de 5/!6"
3, Bisagra Superior
4, Espaciador
BJsagra Central
1,Freno dePuerta
2. Tornil!ode Freno de Puerta
3. Espaciador
4, Bisagra Central
5. Ternillo CabezaHexagonal de 6/16"
6. Espaciador
Bisagra inferior
s/
1, Freno de Puerta
2. Espaciador
3, Tornilto del Freno de Puerta
4, Bisagra Inferior
5. Temitlo Cabeza Hexagonal de 5/16"
7
1, Tapones Superiores del Gabinete
I
1. Tapones de Giro de Puerta
Remoci6n del Freno
de Puerta
\
\\
\
\
\
\\ 1, Freno de Puerta
\ 2. Torniflo de freno de puerta
\\ I_ Reinstalacibn del Freno
de Puerta
\\
\
\
1. Freno de Puerta
2 Tornillo de freno de puerta
IMPORTANTE: La opci6n de revereibilidad de puertas est_
disponible solamente en modeloe sin jaladera expuesta.
Su nuevo refrigerador puede emitir sonidos, la mayoria de ellos son normales, pero tas
superficies duras come el piso, las paredes de la cocina y el refrigerador pueden hacerlos mgs
audibles.
MurmuHo Suave, silbido suave
Pueden ser el ventilador y el aire en movimiento.
Golpecitos secos o cascabeleo
Et termostato emite un gotpecito seco bien definido cuando el refrigerador para; igualmente cuando
empieza a funcionar de nuevo. El retoj del control de descongelador tambi&n emite el
mismo tipo de sonido cuando el ciclo de descongelaci6n comienza.
Sonidos de agua
Despues de que el refrigerador pare, se puede oir per algunos minutes un goteo en ta tuberia.
Puede oirse tambien agua que corre a ta bandeja recotectora de agua y un sonido peculiar come
agua cayendo sobre una superficie caliente en los ciclos de descongelaci6n.
MUY IMPORTANTE
ES RESPONSABILIDADDEL USUARIO VERIFICARLA SIGUIENTE INFORMACIONANTES DELLAMAR
ALTECNICO:
SI USTED SIGUtO CORRECTAMENTE LAS tNSTRUCCIONES DEL MANUAL DE tNSTALACION, USO
YCUtDADOS YTIENE PREGUNTASSOBRE ELFUNCtONAMIENTODEL REFRIGERADOR,ESTAGUiA
LE OFRECESOLUCIONES A PROBLEMASQUE PUEDE DETECTARY CORREGIR ENSU HOGAR.
SI ELREFRIGERADOR NOFUNCIONA
•Conectedirecta ycorrectamente laclavija,NO USE EXTENSIONES.
,ReviseEL CONTACTO ELECTRICO,PODRiAESTAR DANADO,cenecteotro aparateypruebe sifunciena.
•Evite portera funcionar varies aparates a la vez; LA tNSTALACION ELECTRICA SE SOBRECARGA.
•Verifiqueque el CONTROL DETEMPERATURA ESTA EN POSICION DE ENCENDIDO.
•AsegQresedeque NOESTE JUNTO AUNA FUENTE DECALOR come homo, estufao luz directadel sol.
•LAS PUERTASDEBEN CERRAR HERMETtCAMENTE,revise el empaquemagneticode las puertas.
•NIVELEELREFRIGERADOR,retirelasbasesdemadera yajustelostomillosniveladores(FIGURA1).
•NOSOBRECARGUE EL REFRIGERADOR, la circulaci6nde airefrie sera deficiente.
•Colequela perillade controlde TEMPERATURAEN MED(frie medie)y espereporle menos24 horas antes
de hacer un nuevo cambie de temperatura.
NOTAQUE EL REFRIGERADOR TRABAJAPOR PERIODOS PROLONGADOS
•Verifiqueque el CONDENSADOR ESTE LIBREDE POLVO Y PELUSA(FIGURA 1).
•EVITEABRIR CONTINUAMENTE LAPUERTAo per periodesprolongados.
•NO tNTRODUZCAALtMENTOS CALIENTES y mantengalestapades.
SI ESCUCHASONIDOS EXTRANOS
,Revise queNO HAYAOBJETOS SOBRE O DETRAS DEL REFRtGERADOR.
•EL COMPRESOR NOTRABAJA CORRECTAMENTE,puedeser que un baje voltajeestuvierapresente.
Verifique la intensidadde laluz,si es baja estonos indicaque tieneun bajevoltaje,hablea su compafiia
de luz paraque cerrijanel suministre deenergia (FIGURA 1).
FIGURA 1
COMPRESOR
EMPAQUE
MAGNETICO
/
TORNILLOS
NIVELADORES
SI DESPUES DE SEGUIR LAS INSTRUCCIONE8
DE ESTA GUiA, EL REFRIGERADOR
NO FUNCIONA LLAME A
LOS CENTROS DE SERVICIO INDICADOS
01 800 8 300 400
POLIZA DE GARANTIA
WHIRLPOOL MEXmCO S.A, DE C.V,
Antigua carretera a Romakm 9, Col. Milagro, Apodaca, NL, Mexico, 66800, Tel. (01 81)
83-29-21-00,enlosterminosde estap6tiza,garantiza alcompradory usuariodel refrigerador
identificado en la presente p61iza,exctusivamente Iosiguiente:
AMPARA LOS SIGUIENTES MODELOS MARCA ACROS:
NWT8501Q, NWT8501S
CONCEPTOS CUBIERTOS POR LA GARANTiA:
Defectos de fabricaci6n que impidan totat 6 parciaImente el correcto funcionamiento de{
aparato que se presenten dentro de los terminos de vigencia de esta garantia. En este caso,
la reparaci6n se hara sin costo alguno para el comprador o usuario. Si se requiere el
reemplazo de atguno de los componenetes, piezas o del aparato, asimismo correr& por
cuenta del otorgante. Igua[mente los gastos de transporte dentro de la red de servicio y
mane de obra derivados dei cumplimiento de la garantia ser&n cubiertos por el otorgante.
CONCEPTOS QUE INVALIDAN LA GARANTiA:
• Cuando el producto se hubiere utilizado en condiciones distintas alas normates. (El
refrigerador no es para uso comercial o industrial).
• Cuando el producto no hubiere sido operado de acuerdo con et instructivo de uso y manejo
que Io acompada.
• Cuando el producto hubiere sido atterado o reparado por personas no autorizadas por
Whirlpool Service.
PROCEDIMIENTO PARA HACER EFECTIVA LA GARANTiA:
Al considerar el comprador final que ha ocurrido algt]n evento amparado por esta p61iza,
deber& ponerse en contacto con Whirlpool Service a nuestro Centro Nacional de Llamadas,
desde Monterrey N.L y su area conurbada ai (81) 83-29-2100 y desde el interior de [a
RepQbiica Mexicana ai 01-800-8-300-400; donde un asesor de servicio especiatizado Io
atender& Nuestras instalaciones est&n ubicadas en Carretera Miguel Alem&n Kin. 16 Col.
El Milagro C.P 66600. Apodaca, NL En donde tambien podra encontrar accesorios y partes
originales. Para mayor informacidn de nuestros servicios, visite www.whNpooi-service.com.mx."
T#RMtNO:
Esta garantia tiene una vigencia de 12 meses en todas sus partes a partir de que el
consumidor reciba de conformidad el refrigerador.
NOTA IMPORTANTE
Este documento debera set presentado para
cualquier tramite relacionado con la garantia.
EL COMPRADOR DEBER_, MANTENER ESTE
DOCUMENTO EN SU PODER Y EN UN LUGAR
SECURe.
El consumidor podra solicitar que se haga efecfiva la
garantia que ampara esta p61iza con el distribuidor
deride se adquM6 el producto. En case de extravio de
la p61iza, el distribuidor expedir& una nueva p61iza de
garantia, previa presentaci6n de ]a nota de compra o
factura respectiva
Formato de identifieaci6n
I NOMBRE DEL COMPRADOR:.
DOMICILIO __ TEL
NOMBRE DEL D_STR_BUIDOR
DOMICILIO __ TEL
PRODUCTO MODELO__
NUM DE SER_E__FECHA DE ENTREGA__
F_L o
cSe _lar cot, pre sbn c_e t,_tnero e×tedor o nter or cobnia dudad estado yC P/