Loading ...
Loading ...
Loading ...
17
Troubleshooting
Proper Burner Flame Pattern
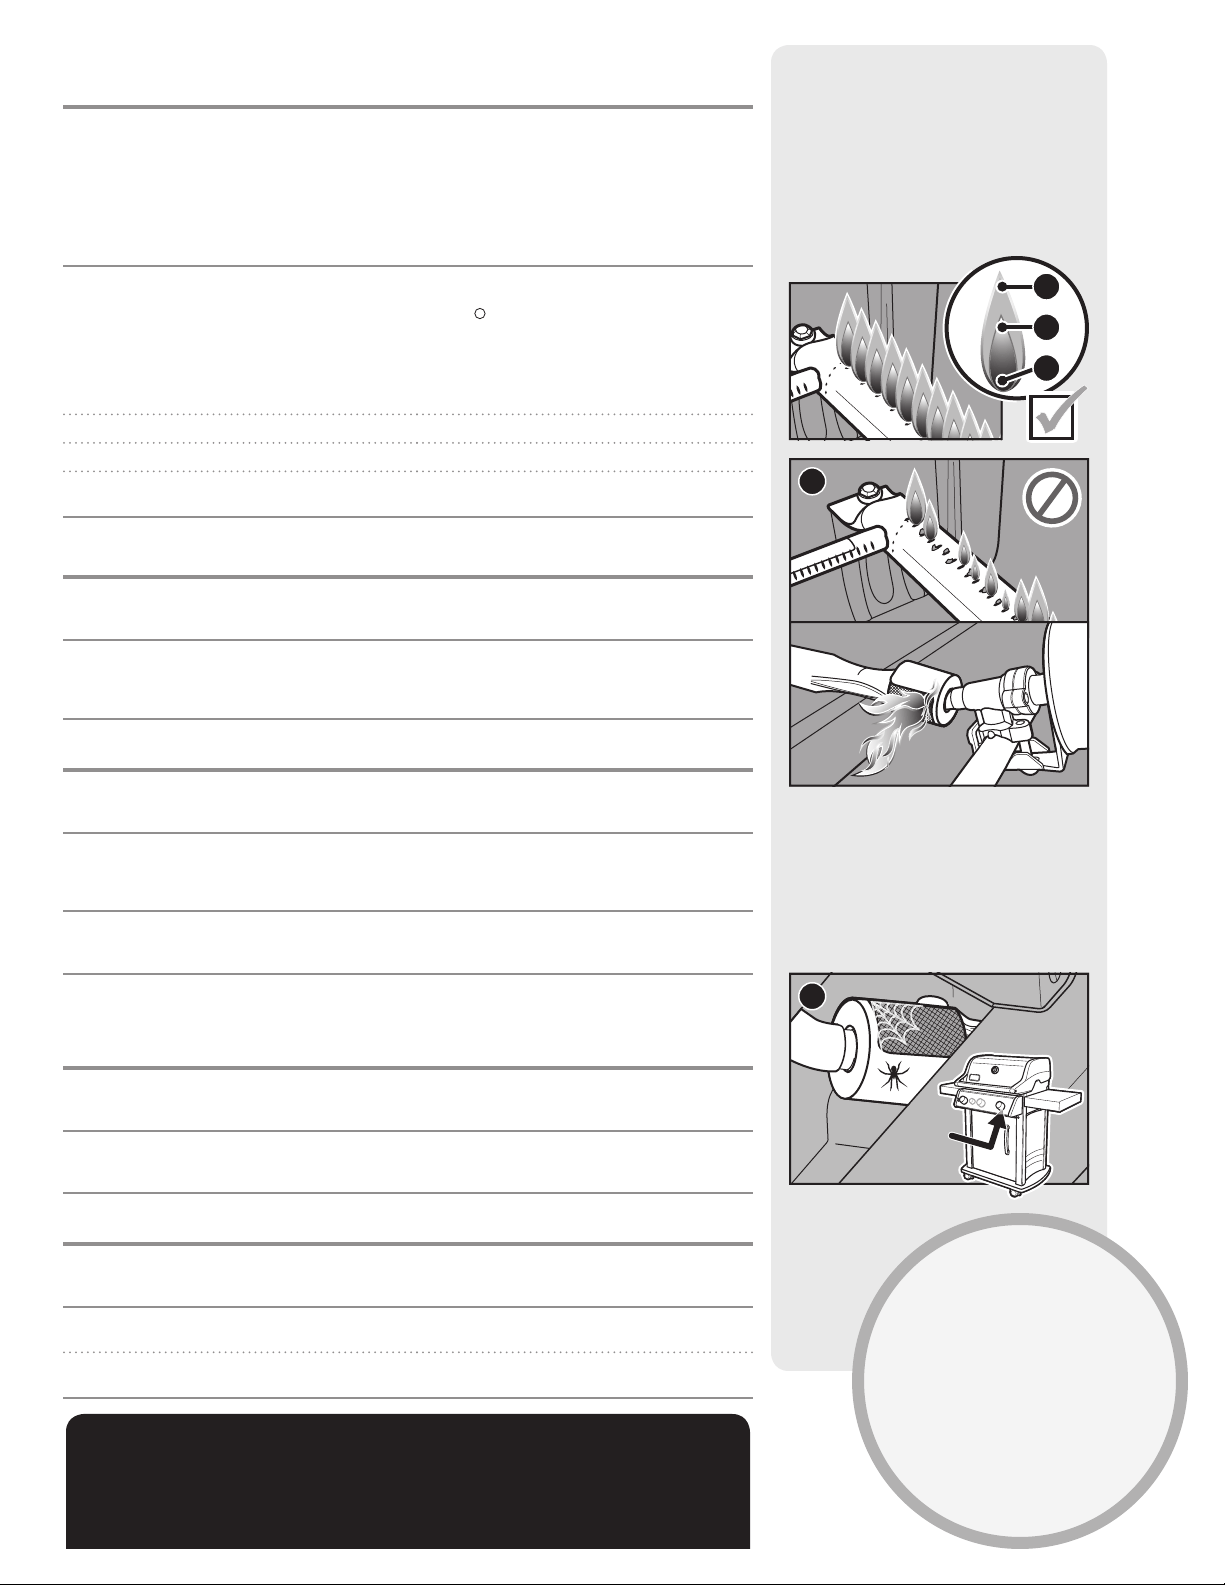
The burners in your grill were factory set for the
correct air and gas mixture. When the burners
are performing correctly, you will see a specific
flame pattern. The tips may occasionally flicker
yellow (A), with a descending light blue (B) to
dark blue flame (C).
m WARNING: Blocked and dirty ports can
restrict full gas flow, resulting in a fire (D) in
and around the gas valves, causing serious
damage to your grill.
m WARNING: Do not attempt to make any repair to gas carrying, gas burning, ignition components or
structural components without contacting Weber-Stephen Products LLC, Customer Service Department.
m WARNING: Failure to use genuine Weber-Stephen parts for any repair or replacement will void all
warranty protection.
m CAUTION: The burner tube openings must be positioned properly over the valve orifices.
Spider Screens
The combustion air openings of the burners(E)
are fitted with stainless steel screens to
prevent spiders and other insects from spinning
webs and building nests inside the burners.
Additionally, dust and debris can accumulate
on the outside of the spider/insect screen and
obstruct the oxygen flow to the burners.
CALL
CUSTOMER
SERVICE
If you are still experiencing any
problems, contact the CustomerService
Representative in your area using
the contact information on
weber.com.
E
B
A
C
D
GAS FLOW
SYMPTOM
• Grill does not reach desired temperature or heatsunevenly.
• One or more of the burners fail to ignite.
• Flame is low when burner is on high position.
• Flames do not run the whole length of the burner.
• Burner flame pattern is erratic.
CAUSE SOLUTION
The “flow limiting device” has been activated.
Thissafety feature built into the regulator restricts
the gas flow in the event of a gas leak. You can
inadvertently activate this safety feature without
having a gas leak. This typically occurs when you
turn on the gas at the LP tank and one or more of the
control knobs are not in the o position. It may also
occur if you turn on the LP tank too quickly.
Reset the “flow limiting device” by closing the LP
tank valve and turning all the burner control knobs
to the o position. Wait five minutes to allow
accumulated gas to dissipate, then ignite the grill
again following the instructions in the “Operation”
section.
The LP tank is low or empty. Refill LP tank.
Fuel hose is bent or kinked. Straighten fuel hose.
Burner ports are dirty. Clean burner ports. Refer to “Cleaning the
BurnerPorts.”
SYMPTOM
• Gas is smelled in conjunction with burner flames that appear yellow andlazy.
CAUSE SOLUTION
Spider screens on the burners are obstructed. Clean spider screens. Refer to “Cleaning the Spider
Screens” in the Product Care section. Also refer to
the illustrations and information in this section about
proper flame pattern and spiderscreens.
SYMPTOM
• The smell of gas and/or a light hissing sound.
CAUSE SOLUTION
The internal rubber seal in the LP tank valve could be
damaged.
Extinguish any open flame. Shut o gas to the
appliance (grill). Inspect the rubber seal for
damage. If damaged, return tank to place of
purchase.
Connection between regulator and LP tank could be
incomplete.
Extinguish any open flame. Shut o gas to the
appliance (grill). Refer to LP TANK INSTALLATION &
LEAK CHECKING section of your owner’s manual.
GREASY GRILL (Peeling Paint & Flare-Ups)
SYMPTOM
• Inside of lid appears to have the appearance of peelingpaint.
CAUSE SOLUTION
The flakes you see are accumulated cooking vapors
that have turned into carbon.
This happens over time after repeated use of your
grill. This is not a defect. Clean the lid. Refer to the
“Product Care” section.
SYMPTOM
• Experiencing flare-ups when grilling or preheating.
CAUSE SOLUTION
There is leftover food from the previous meal. Always preheat the grill on the highest setting for 10
to 15 minutes.
The inside of the grill needs to be cleaned thoroughly. Follow the steps in the "Cleaning and Maintenance"
section to clean the grill inside from the top down.
Loading ...
Loading ...
Loading ...