DO NOT THROW AWAY!
SERIAL NUMBER FOR FAN IS LOCATED ON THE BACK COVER OF THE OWNER’S GUIDE.
LEAVE WITH HOMEOWNER
OWNER’S GUIDE
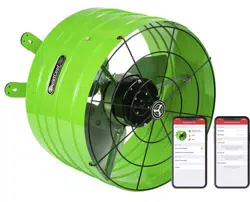
SMART ATTIC ROOF MOUNT FAN
!
AFR SMT ES-2.0
1-888-QUIETCOOL
2
CONTENTS
1. SYSTEM OVERVIEW .......................................3
1.1 Introduction .........................................3
1.2 Features ............................................3
1.3 System Venting Requirements ...........................4
GETTING STARTED - IMPORTANT! .......................... 5
2. INSTALLATION ...........................................6
2.1 Installing AFR Model Fans ..............................6
3. WIRING .................................................7
3.1 Three Speed Wiring - AFR SMT ES-2.0 ....................7
3.3 Smart Control Hub - LED Indicators ......................9
4. SYSTEM OPERATING INSTRUCTIONS .......................10
4.1 Download Smart Control App ..........................10
4.2 Operating the Smart Control App .......................10
4.3 Frequently Asked Questions ...........................18
4.4 Safety .............................................18
WARRANTY ...............................................19
QC MANUFACTURING, INC.
26040 YNEZ ROAD
TEMECULA, CA 92591
PHONE 1-888-QUIETCOOL
WEBSITE WWW.QUIETCOOLSYSTEMS.COM
WARNINGS
CAUTION: This unit has an unguarded impeller. Do not use in locations readily
accessible to people or animals.
CAUTION: Do not operate any fan with a damaged cord or plug. Discard fan
or return to an authorized service facility for examination and/or repair.
CAUTION: Do not run cord under carpeting. Do not cover cord with throw
rugs, runners, or similar coverings. Do not route cord under furniture or
appliances. Arrange cord away from trafc area and where it will not be
tripped over.
CAUTION: Automatically started device. To reduce the risk of injury,
disconnect from power supply before servicing. Do not use fan with any solid
state speed control device. For residential use only.
!
!
!
!
!
!
!
!
QUIETCOOLSYSTEMS.COM
3
1. SYSTEM OVERVIEW
1.1 INTRODUCTION
CONGRATULATIONS
on the purchase of your new QuietCool Smart Attic Fan!
QuietCool Attic Fans are the best in the business. New for 2020,
our Smart Line of attic fans have gotten even smarter! Now through
the use of a smartphone app, you can control all the settings of your
Smart Attic Fan right from your couch!
With the QuietCool Smart Control App, you can see your current
attic temperature and humidity, modify the temperatures for the
multiple speeds of the fan, setup presets for the different seasons of
the year, and even operate your fan on a timer!
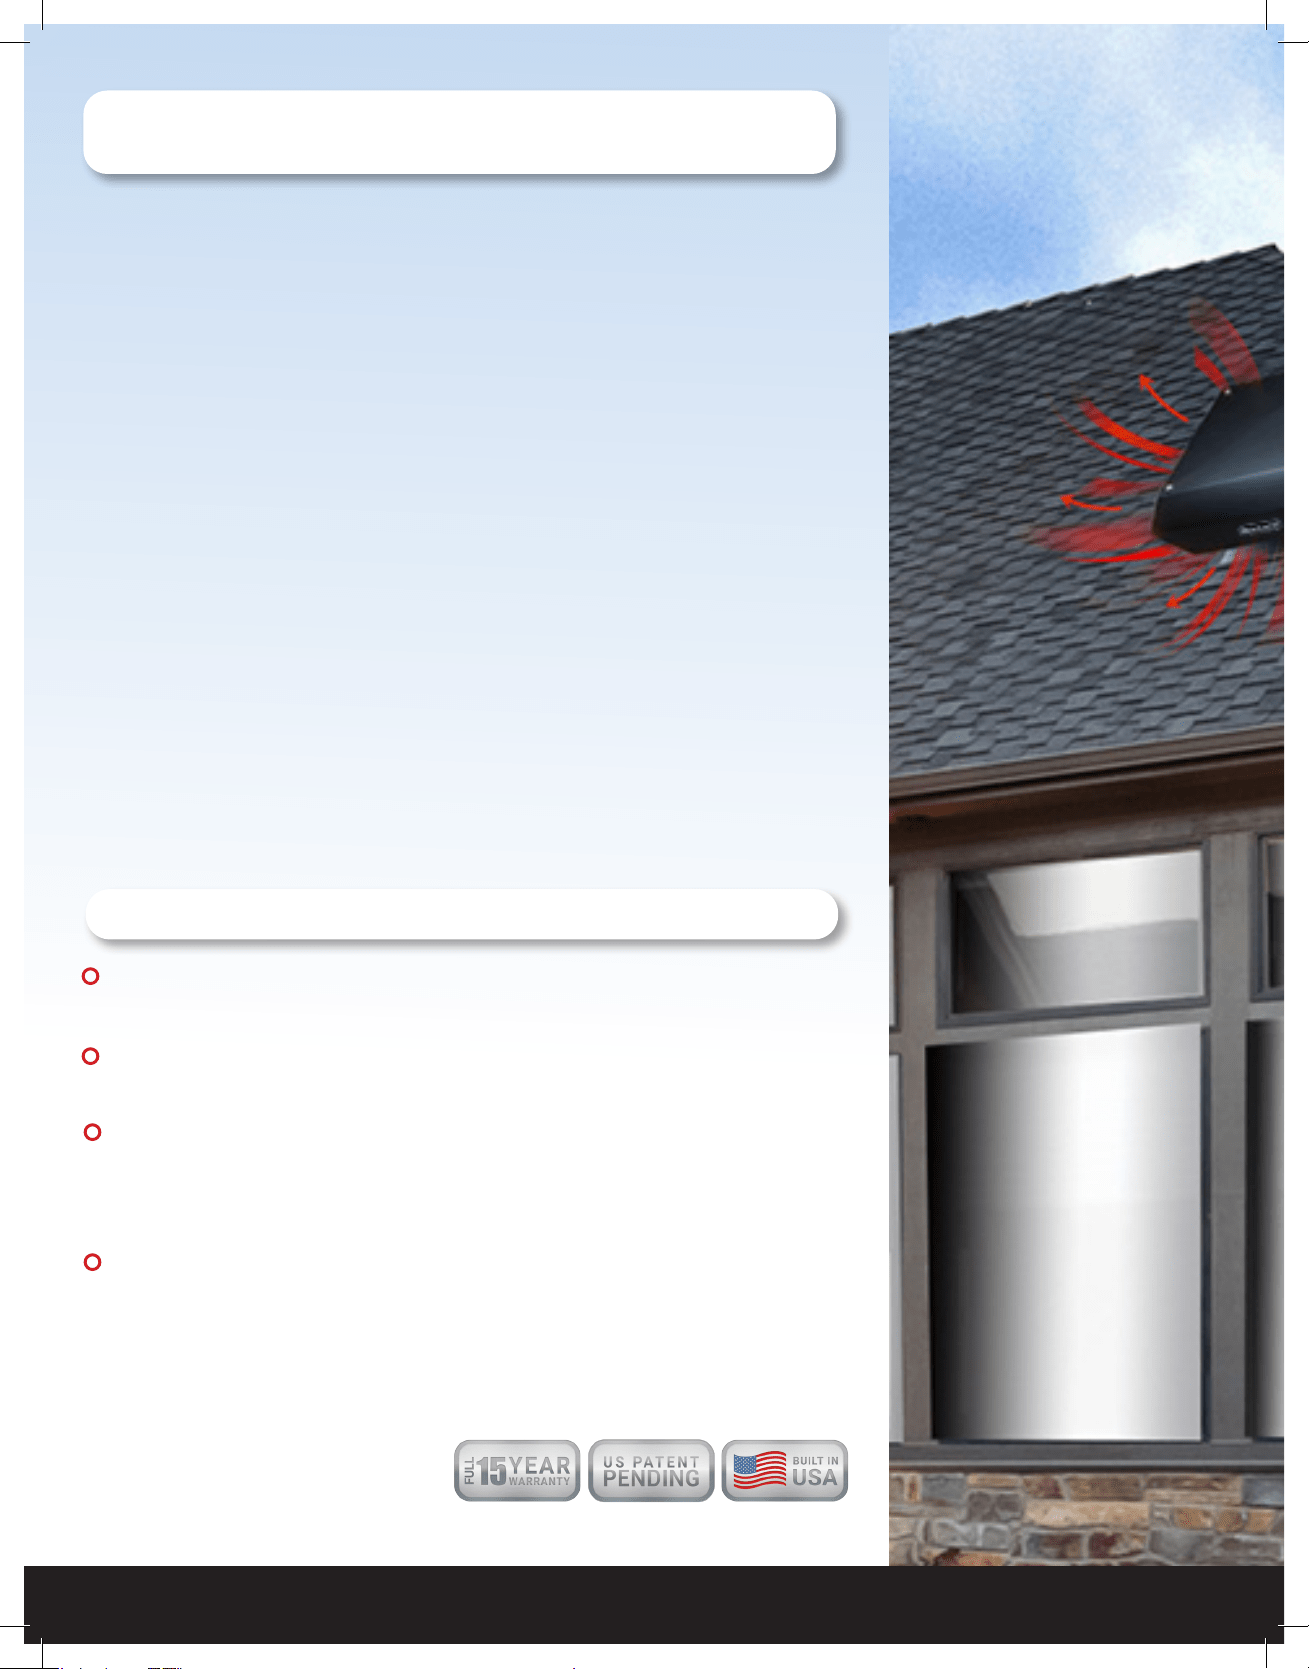
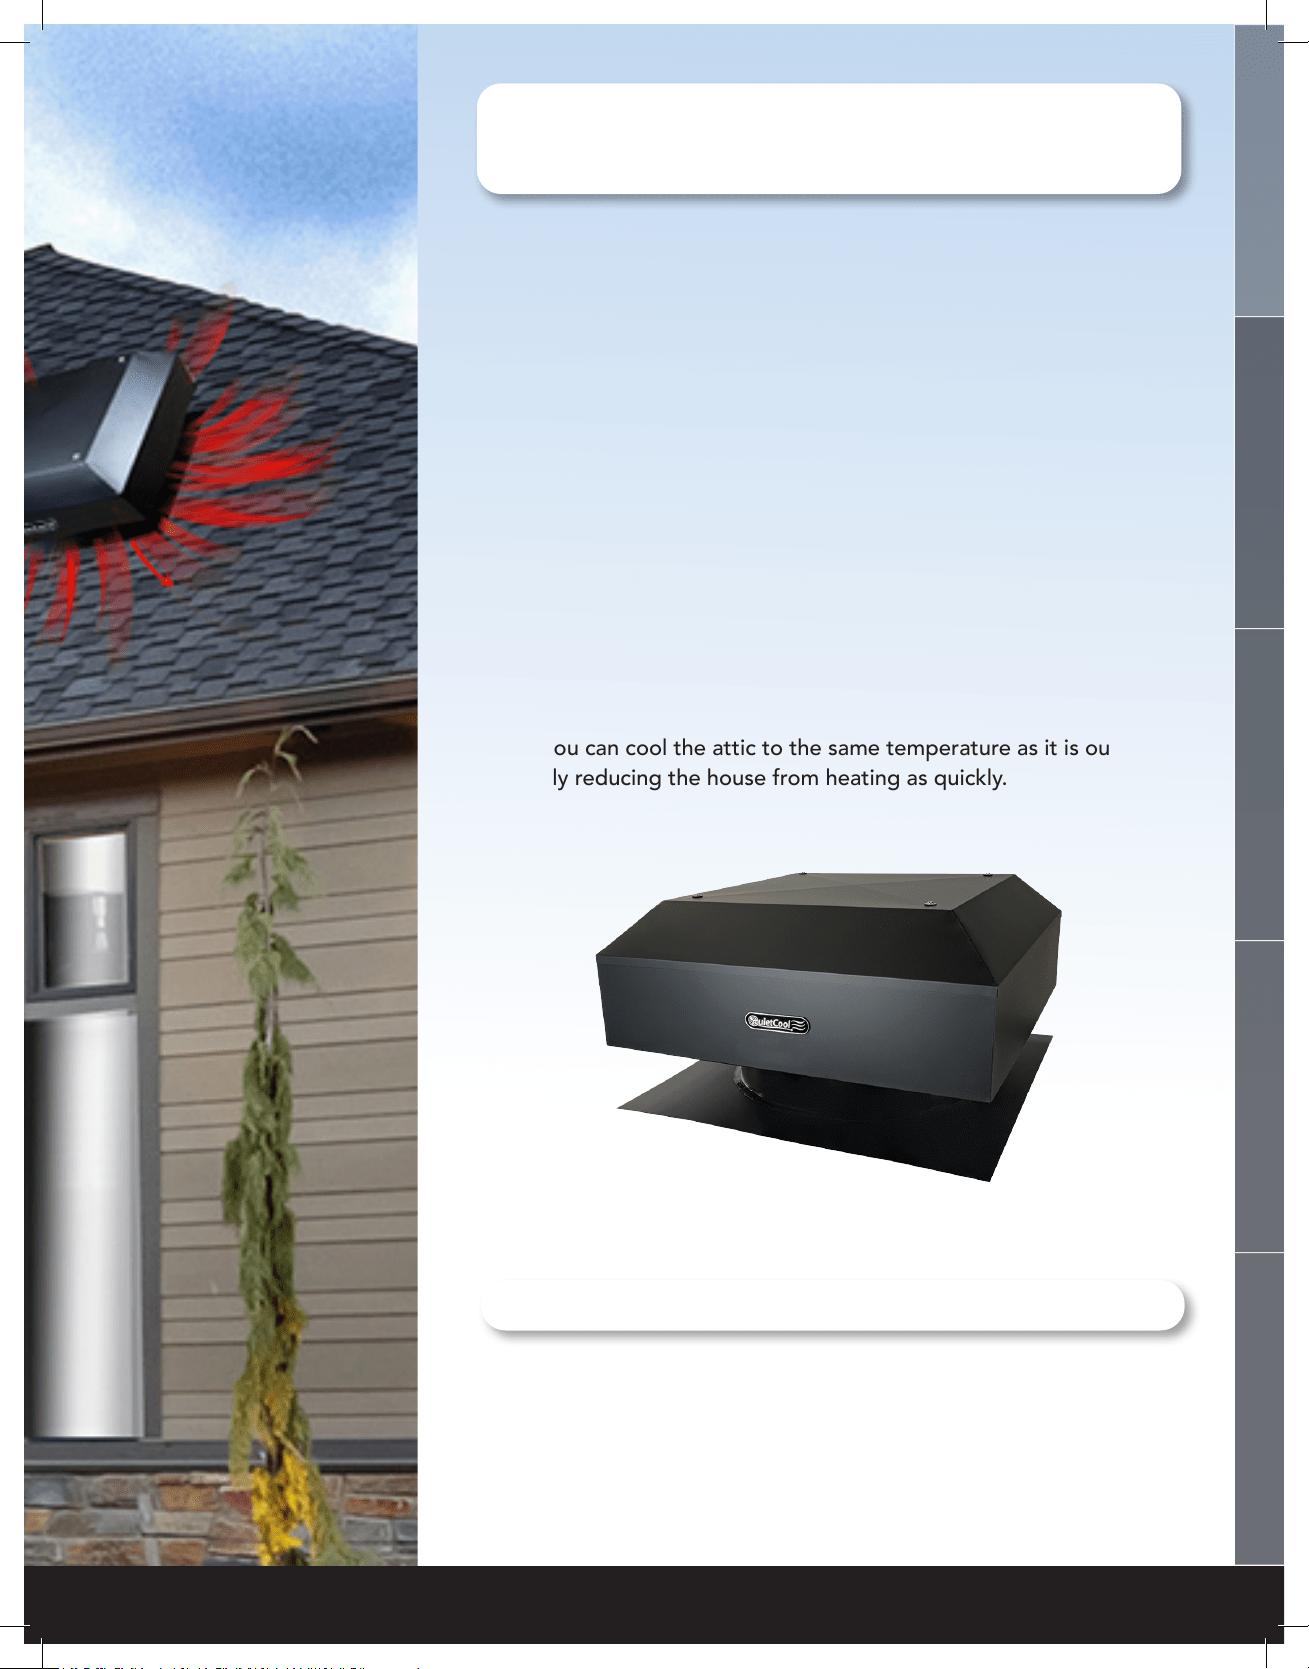
QuietCool Attic Fans work almost everywhere, anytime. During the
summer, an attic can be 40-50 degrees hotter than the outside tem-
perature, which in turn heats up the house much faster. With an attic
fan, you can cool the attic to the same temperature as it is outside,
greatly reducing the house from heating as quickly.
1.2 FEATURES
+ High Efciency Multi-Speed Motor
+ App Based Smart Control
+ Designed and Built in California
+ 15 Year Warranty
WELCOME
INSTALLATION
WIRING OPERATION
WARRANTY
1-888-QUIETCOOL
4
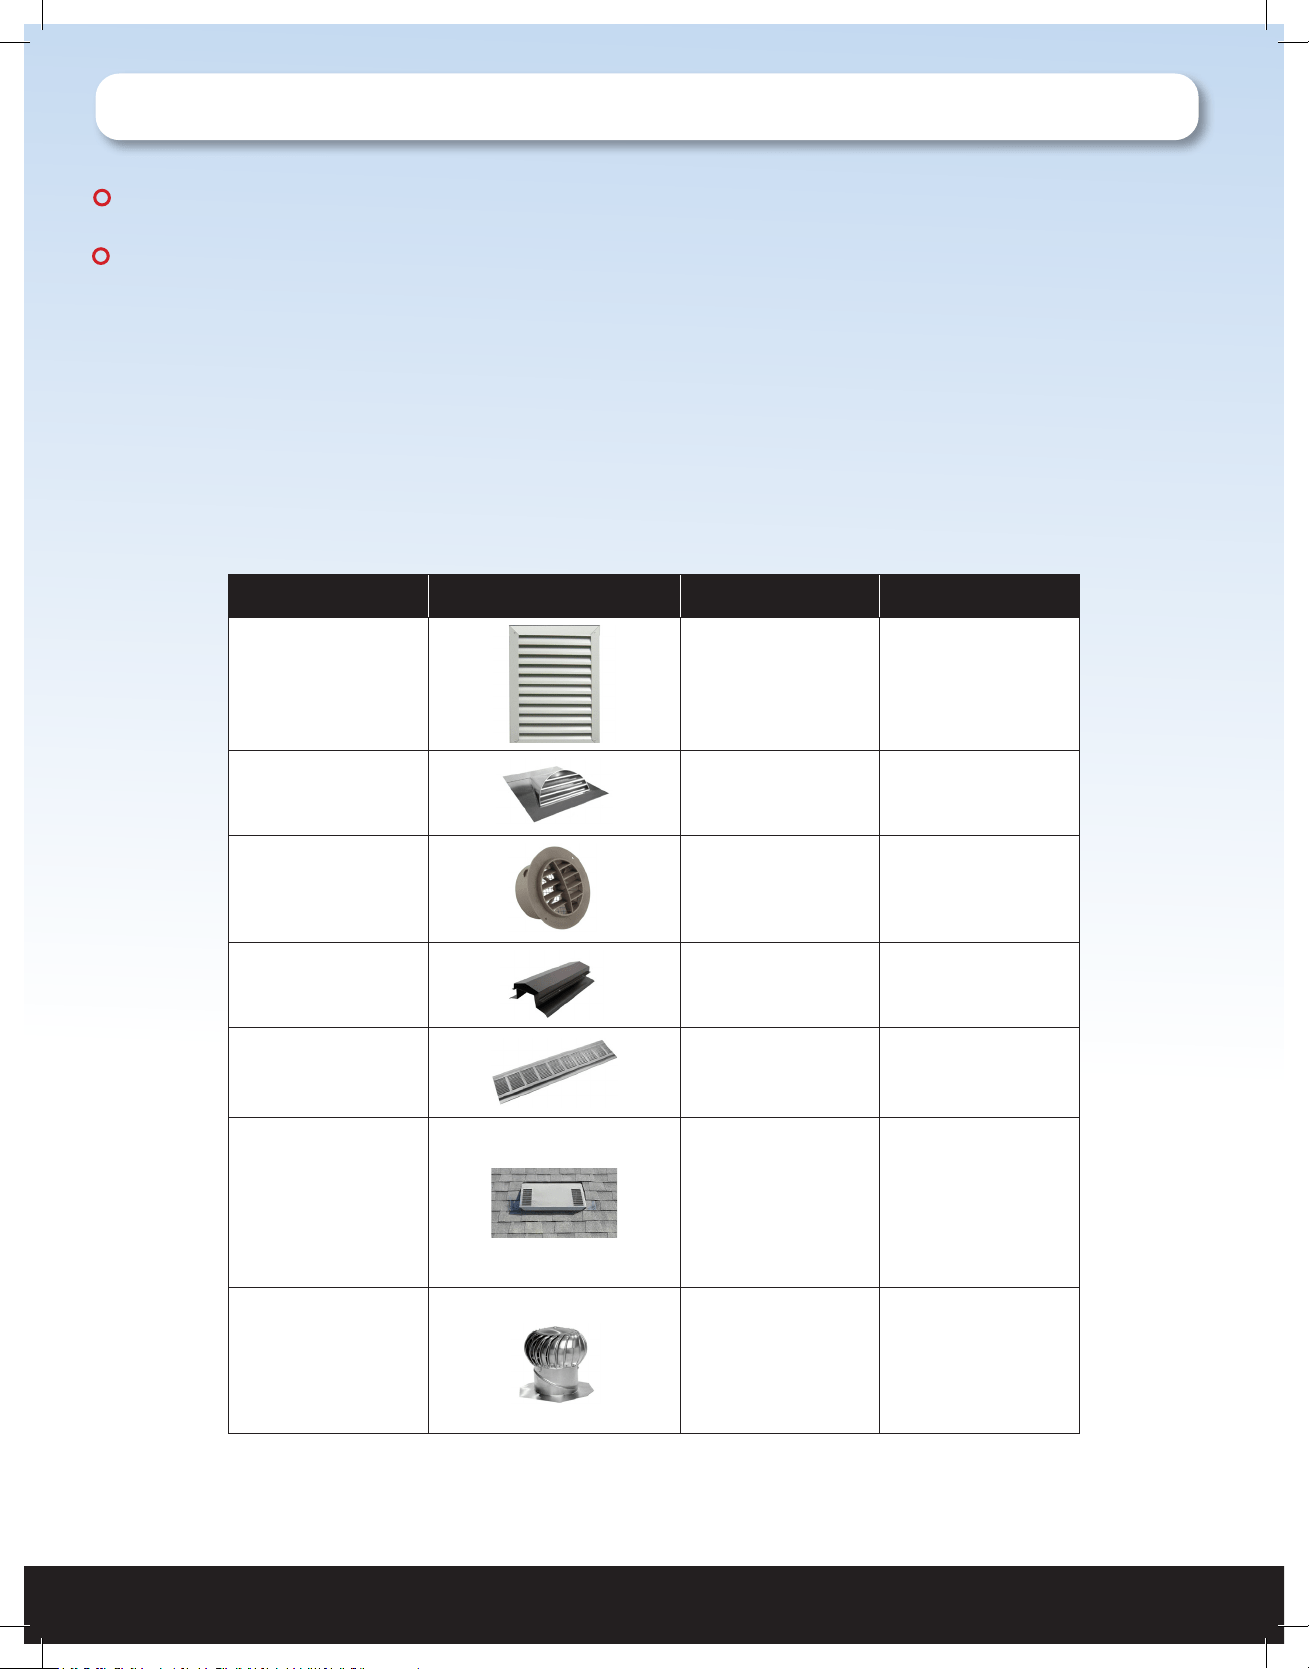
1.3 SYSTEM VENTING REQUIREMENTS
VERY IMPORTANT: 1 SQUARE FOOT OF NET FREE VENT AREA PER 750 CFM
RECOMMENDED: 2 TO 4 SQUARE FEET OF INLET VENTS PER FAN
Venting plays a very signicant role in the performace of QuietCool fans. QuietCool recommends a mini-
mum of 1 SQ. FT. of venting for every 750 CFM in the QuietCool system. If an attic has at least 1:750 attic
venting, the QuietCool system will operate efciently and effectively. If an attic has less than 1:750 attic
venting, the system may not operate as efciently, or effectively, as it could with 1:750 attic venting. But
don’t worry, the system will still operate if there is not enough venting.
Insufcient venting is a very simple problem to x. Roong contractors can add extra venting to most
homes simply and easily. The most common types of venting is shown in the chart below.
Vent Type Model Type Average Size Venting Sq. Ft.
Gable vent 12” x 19.5” 1.20
Dormer Vent 14” x 8” 0.70
Eave Vent
4”
5”
6”
0.03
0.04
0.07
Ridge Vent 4’ - 12’ 0.125 per ft
Soft Vent
16” x 4”
16” x 6”
16” x 8”
0.19
0.29
0.39
O’Hagin Vent
Low/Medium
Prole
Tapered Low
Prole
Low Prole Flat
High Prole
0.5
0.6
0.68
0.68
Turbine Vent
8”
12”
14”
.35
.79
1.1
*Note: This table is only a guideline and is not a guarantee of venting capacity.
!
!
!
!
QUIETCOOLSYSTEMS.COM
5
WELCOME
INSTALLATION
WIRING OPERATION
WARRANTY
READ BEFORE ATTEMPTING TO INSTALL AN AFR FAN
GETTING STARTED
NOTE: Always follow local building codes because the fan may require specic fasteners or
anchoring systems not discussed in this installation guide. Installation should be done by a
licensed roong contractor.
GENERAL SAFETY INFORMATION
1. READ INSTRUCTIONS - All safety and operation instructions must be read.
2. RETAIN INSTRUCTIONS - The safety and operating instructions should be kept for future reference.
3. HEED WARNINGS - All warnings should be followed.
4. FOLLOW INSTRUCTIONS - All installation and operating instructions should be followed.
5. WATER - The QuietCool system should not be used near water. If you live in a very humid climate,
be sure to cover your damper box with insulation to reduce condensation.
6. HEAT - The QuietCool system should be situated away from heat sources.
7. DAMAGE REQUIRING SERVICE - Only qualied service personnel should service the QuietCool system.
The user should not attempt to service the product.
8. SAFETY PRECAUTIONS -
+ Do not install the fan in wet or windy conditions
+ Tie-off both yourself and your equipment when working on steep pitched roofs to avoid falls
+ Wear safety glasses and protective gloves when using power tools
+ Always wear slip-resistant shoes when working on the roof
+ Do not cut through any rafters or structural members of the roof during installation
TOOLS YOU WILL NEED
+ Cordless Drill with Nut Driver
+ Roong Nails
+ Measuring Tape
+ Reciprocating Saw
+ Weatherproof Roong Grade Sealant
+ Roong Knife
+ Carpenter Pencil
+ Flashing Material (If Needed)
CHOOSING THE RIGHT LOCATION
(MAX ROOF PITCH - 9/12)
Choose a location to install your QuietCool roof mounted fan that allows for balanced airow throughout the
attic space. We always recommend the fan to be installed centrally located on the roof three feet below the
ridge line. This will allow you to access the fan very easily. Your roof mount fan should not be installed any
closer than within 5 feet to an existing passive vent, ridge vent, or additional fan unit.
IMPORTANT: Do not cut through any rafters or structural members while cutting the fan hole.
Only cut out the roof decking.
!
!
!
!
1-888-QUIETCOOL
6
Installation Video:
Watch the video by scanning the QR
code or visit
www.QuietCoolSystems.com/support
2. INSTALLATION
2.1 INSTALLING AFR
1. Determine in which area you would like to install your
QuietCool AFR.
2. From inside the attic, nd the center point between the two
roof rafters and mark it as the center of the fan hole. Partially
insert a screw into the center point mark.
NOTE: If you have a tile roof, you will need to move the
tiles out of the way before tracing and cutting. (See Figure
2.1A)
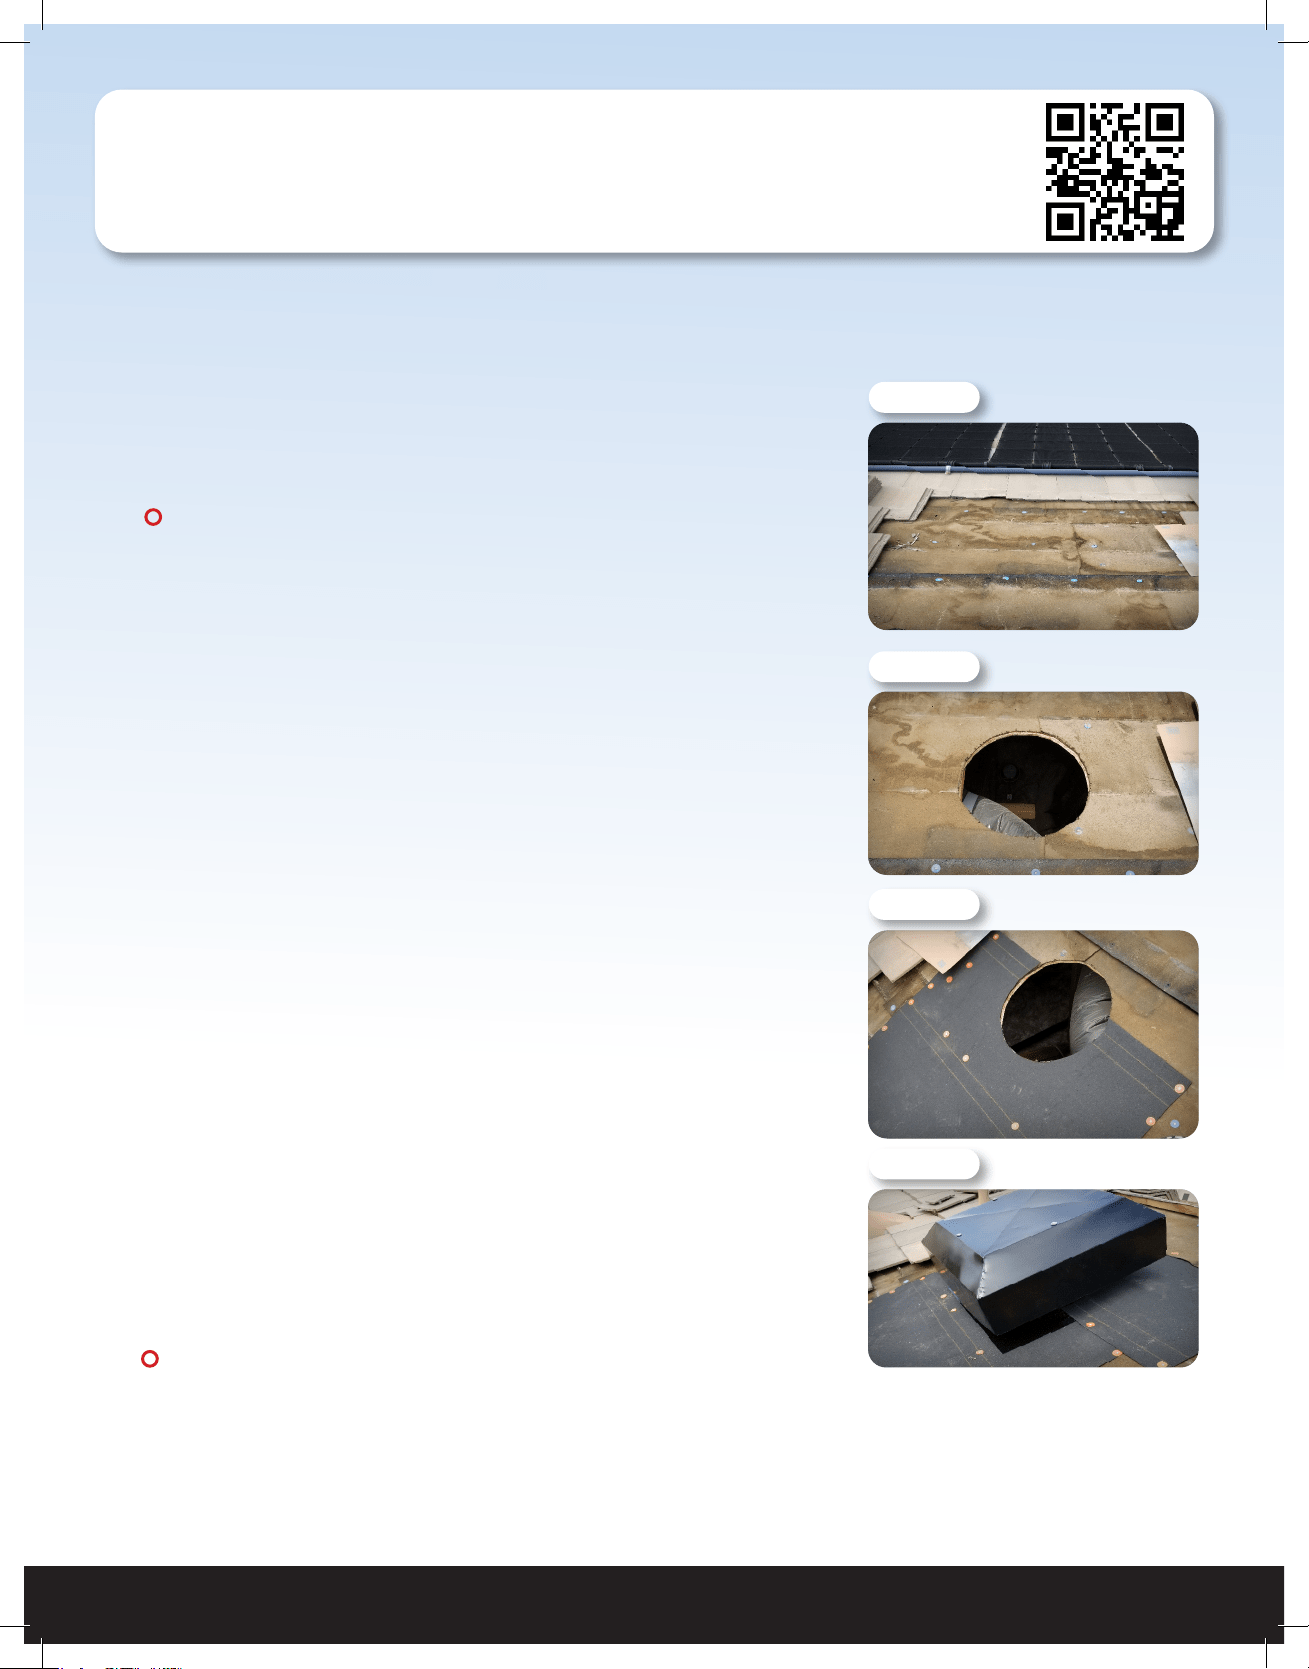
3. Go to the roof. Using the screw as a reference point and the
provided template, trace out the 16” diameter circle.
4. Use a reciprocating saw to cut out the traced hole pattern
from the roof decking. Remove the cut out decking material
from around the hole as needed. (See Figure 2.1B)
5. If you have a shingle roof, insert the reciprocating saw
sideways between the shingles and roof decking. Starting
at the 3 o’clock position of the fan hole, begin cutting in a
sweeping motion under the shingles, cutting through any
roong nails or staples. Continue cutting counterclockwise
around the fan hole until reaching the 9 o’clock position. Using
a roong knife, cut a 4 inch horizontal slit in the shingles at the
9 o’clock and 3 o’clock positions of the hole, allowing the fan’s
ashing to slide underneath the shingles.
6. Apply weatherproof material to the roof. (See Figure 2.1C)
7. Position the fan so that it is centered with the fan hole and
allow the power cord to hang freely from the bottom of the
fan unit. The power cord comes in 20 ft length.
(See Figure 2.1D)
NOTE: Power cord CANNOT be used outdoors.
8. Lifting the fan unit up at an angle, apply weatherproof caulking
to the bottom side of the fan unit. This will help keep the fan in
place and will seal nice and tight.
Figure 2.1A
Figure 2.1B
Figure 2.1C
Figure 2.1D
NOTE: Wiring Diagrams are for examples ONLY. Wiring should be done by an
experienced electrician.
NOTE: Your fan came with the Smart Control Hub pre-wired to a power cord for testing purposes
before installation. If you would like to hard-wire the fan, or it is required by your local building
codes, please follow the wiring instructions below.
!
!
!
!
QUIETCOOLSYSTEMS.COM
7
WELCOME
INSTALLATION
WIRING OPERATION
WARRANTY
Figure 2.1E
Figure 2.1F
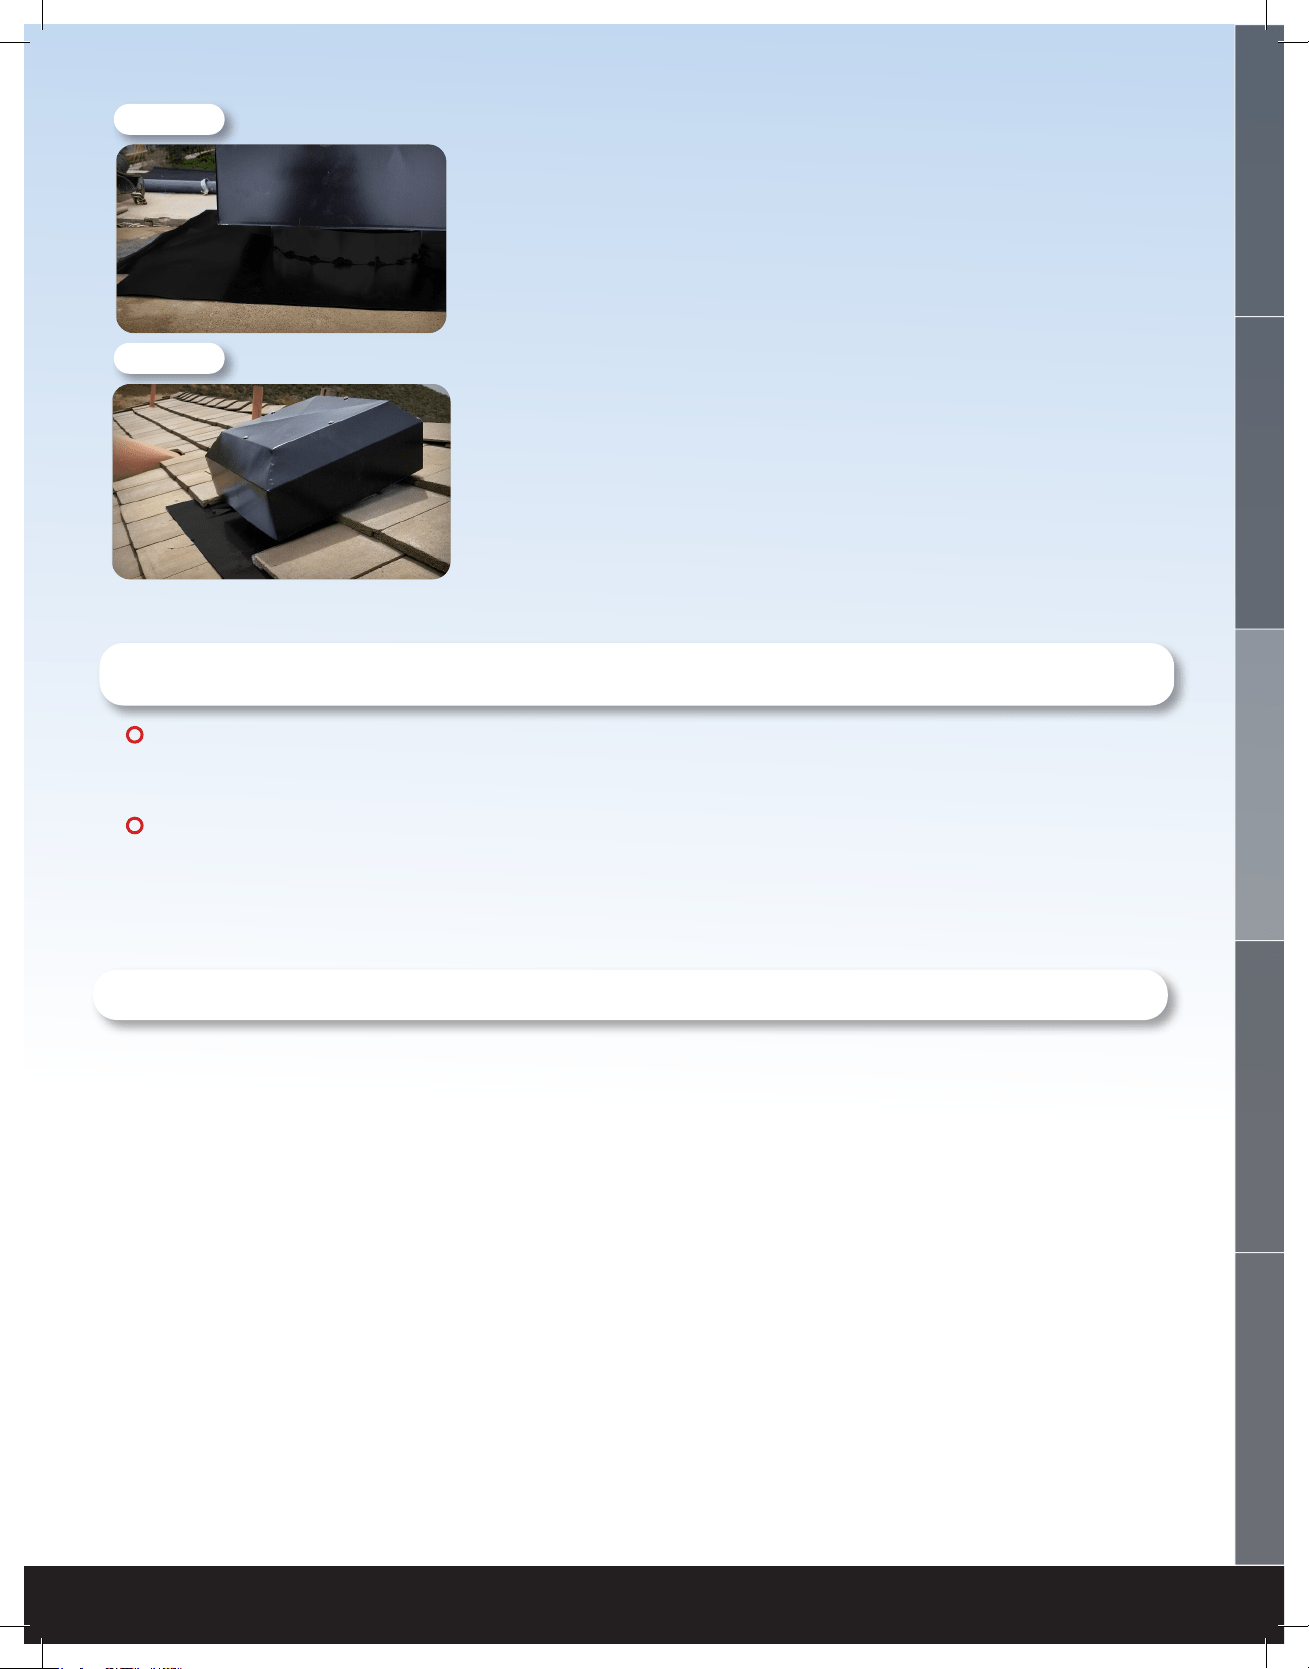
9. With all fan cables connected and hanging inside
the fan hole, slide the fan unit underneath the
shingles until the fan reaches the top of the hole.
Secure the fan ashing to the roof. Finish caulking
around the fan and ashing it into the roof to make
a nice seal. (See Figure 2.1E)
10. If installing on a tile roof, cut tile appropriately
and re-install the tile to t snuggly around the fan
housing. (See Figure 2.1F)
3. WIRING
NOTE: Wiring Diagrams are for examples ONLY. Wiring should be done by an
experienced electrician.
NOTE: Your fan came with the Smart Control Hub pre-wired to a power cord for testing purposes
before installation. If you would like to hard-wire the fan, or it is required by your local building
codes, please follow the wiring instructions below.
!
!
!
!
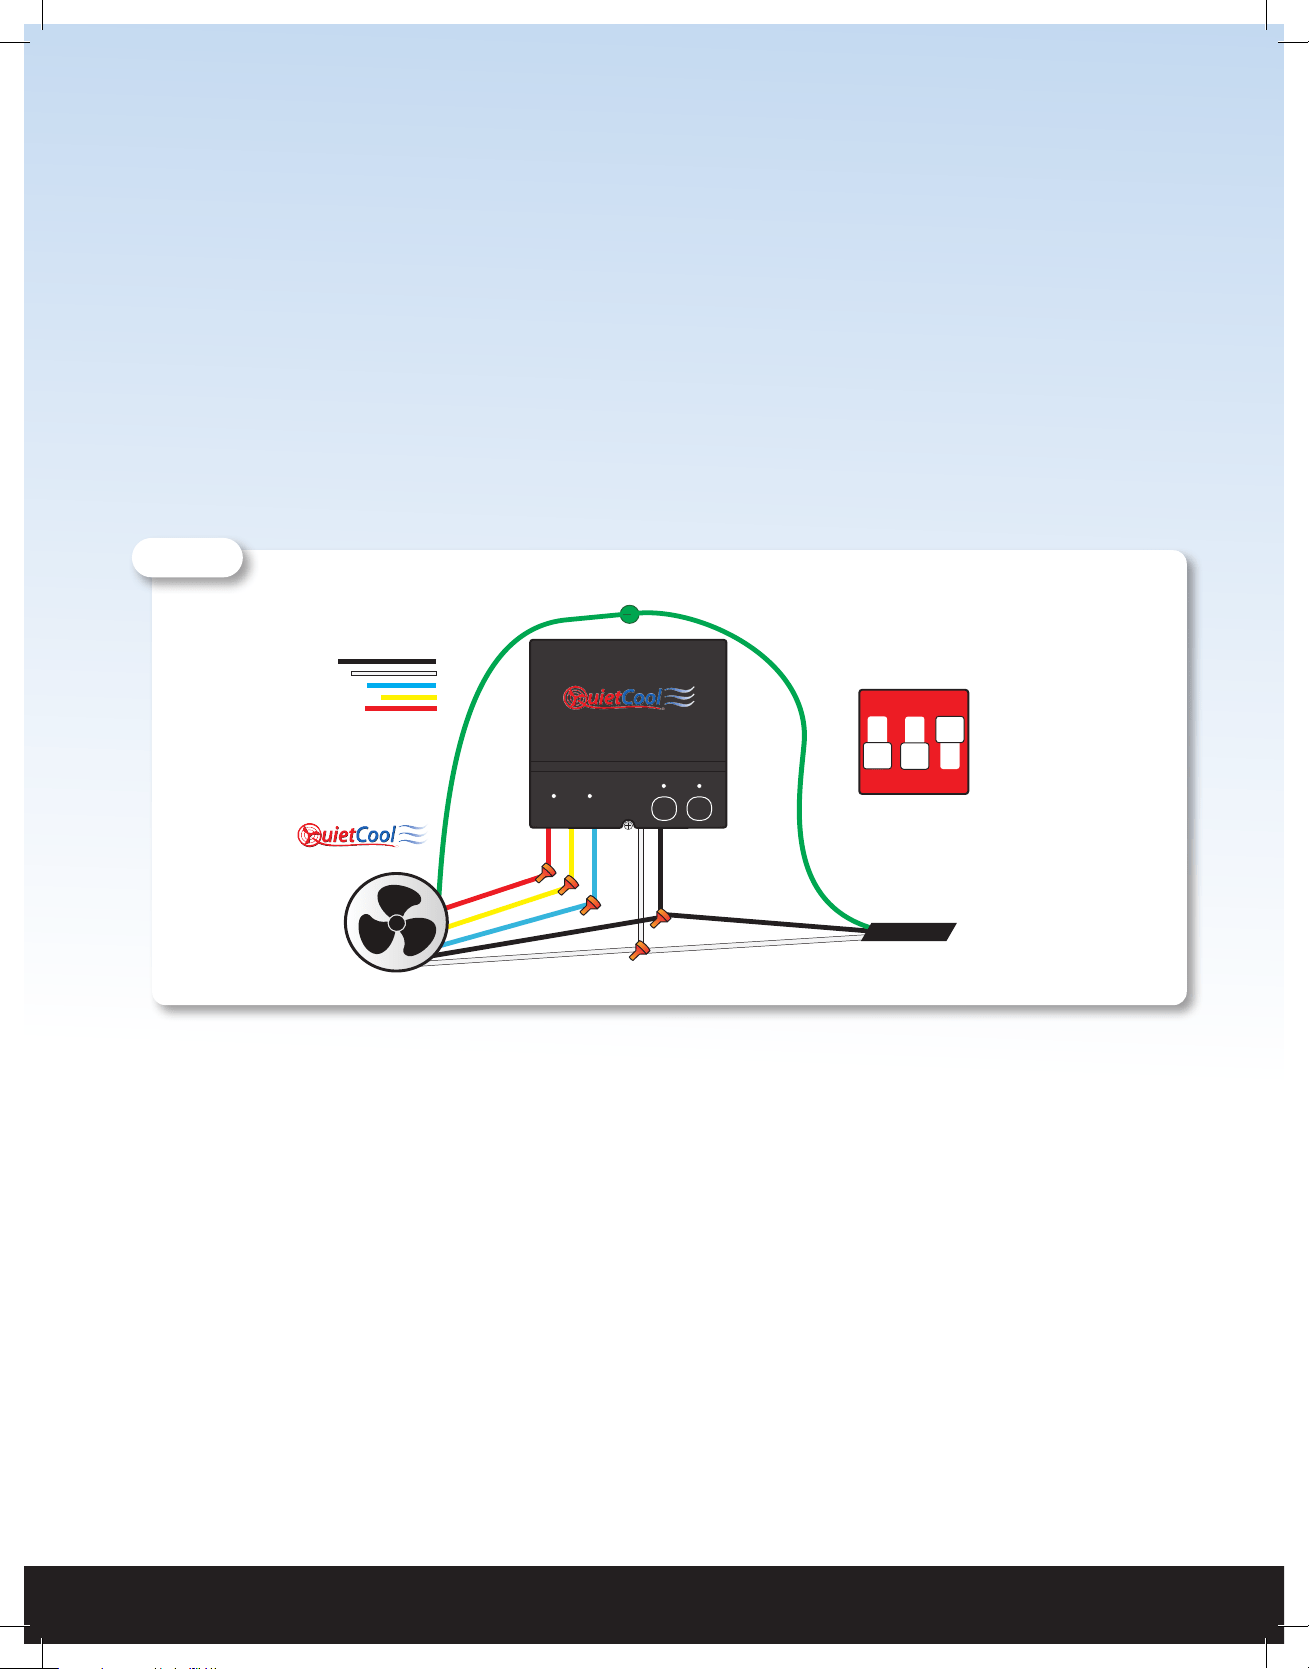
3.1 THREE SPEED WIRING - (AFR SMT ES-2.0)
1. Using a wire nut, connect the black wire from the power cord and the black wire from the fan to the
black wire from the Hub.
2. Connect the white wire from the power cord and the white wire on the fan to the white wire from the
Hub.
3. Connect the red wire from the fan to the red wire on the Hub
4. Connect the yellow wire from the fan to the yellow wire on the Hub
5. Connect the blue wire from the fan to the blue wire on the Hub
6. Ground the green wire from the fan and the green wire from the power cord to the ground screw in
the Hub.
1-888-QUIETCOOL
8
7. Set the dip switch positions inside the Hub as shown in Figure 3.1A.
8. Power-on the Hub. The Power LED indicator will be lit.
9. Press the Test button to make sure the fan works. The Test LED indicator will blink three times every
two seconds indicating 3-speed and the fan will be on high. Press the Test button again and the
fan will switch to medium speed and the LED will blink twice every two seconds. Press the Test
button again and the fan will switch to low speed and the LED will blink once every two seconds.
Press the Test button again and the fan should shut off and the LED will be off.
10. If the fan doesn’t operate as described in step 9, please check the dip switch postion/wiring.
Attach green ground wires to ground screw
Set dip switches:
1 - OFF
2 - OFF
3 - ON
Power
Cord
All White Common Wires Together
Attic Fan
ON
1 2 3
POWER Temp and Hum
Timer
Pair Test
Speed
Bluetooth
High Speed Wire
Medium Speed Wire
Low Speed Wire
Neutral Wire
Hot Wire
Hub Wiring Legend
Figure 3.1A
QUIETCOOLSYSTEMS.COM
9
WELCOME
INSTALLATION
WIRING OPERATION
WARRANTY
3.2 SMART CONTROL HUB - LED INDICATORS
• POWER Indicator
• The Power LED indicator will always be lit when the Hub is connected to Power.
• If this LED is not lit, check the power source.
• Temp and Hum | Timer Indicator
• This LED indicator will light up as shown below:
• Blinking: Timer Mode Active
• Solid: Smart Mode Active
• Test Indicator
• The Test LED indicator will light up as shown below when the Test button is pressed:
• Two Speed Fan: blink three times every 2 seconds on HIGH, blink once every 2 seconds on
LOW
• Three Speed Fan: blink three times every 2 seconds on HIGH, blink twice every 2 seconds
on MED, blink once every 2 seconds on LOW
• Pair Indicator
• The Pair LED indicator will blink when making pair operations. Please see SETTING UP YOUR
FAN on page 12 for details on pairing.
• The indicator will be lit up solid when a device is connected via Bluetooth.
• The indicator will not be lit when no pairing operations are being made or no device is
connected.
POWER Temp and Hum
Timer
Pair Test
Speed
Bluetooth
1-888-QUIETCOOL
10
4. SYSTEM OPERATING INSTRUCTIONS
4.1 DOWNLOADING THE QUIETCOOL
SMART CONTROL APP
Download the QuietCool Smart Control App onto your iOS or Android
device.
Scan the QR code above or visit QuietCoolSystems.com/smart-control/
and click the link to download the app to your device.
4.2 OPERATING THE QUIETCOOL SMART CONTROL APP
HOME PAGE
This is the home page of the app and is presented as
soon as the app is opened.
If you have not yet paired your phone to your Hub, it
will state SETUP REQUIRED.
If you have paired your phone to your Hub, it will show
a picture of the fan as well as the name of your fan.
FAN SETUP PAGE
This page is used to setup the fan for the rst time.
You can quickly change the Fan Name, check if the
speeds are set properly, change the Fan Model, enter
the Serial Number and adjust the Climate Settings &
Presets.
These settings can be accessed again after setup
is done by clicking the Settings button on the Fan
Control Page.
QUIETCOOLSYSTEMS.COM
11
WELCOME
INSTALLATION
WIRING OPERATION
WARRANTY
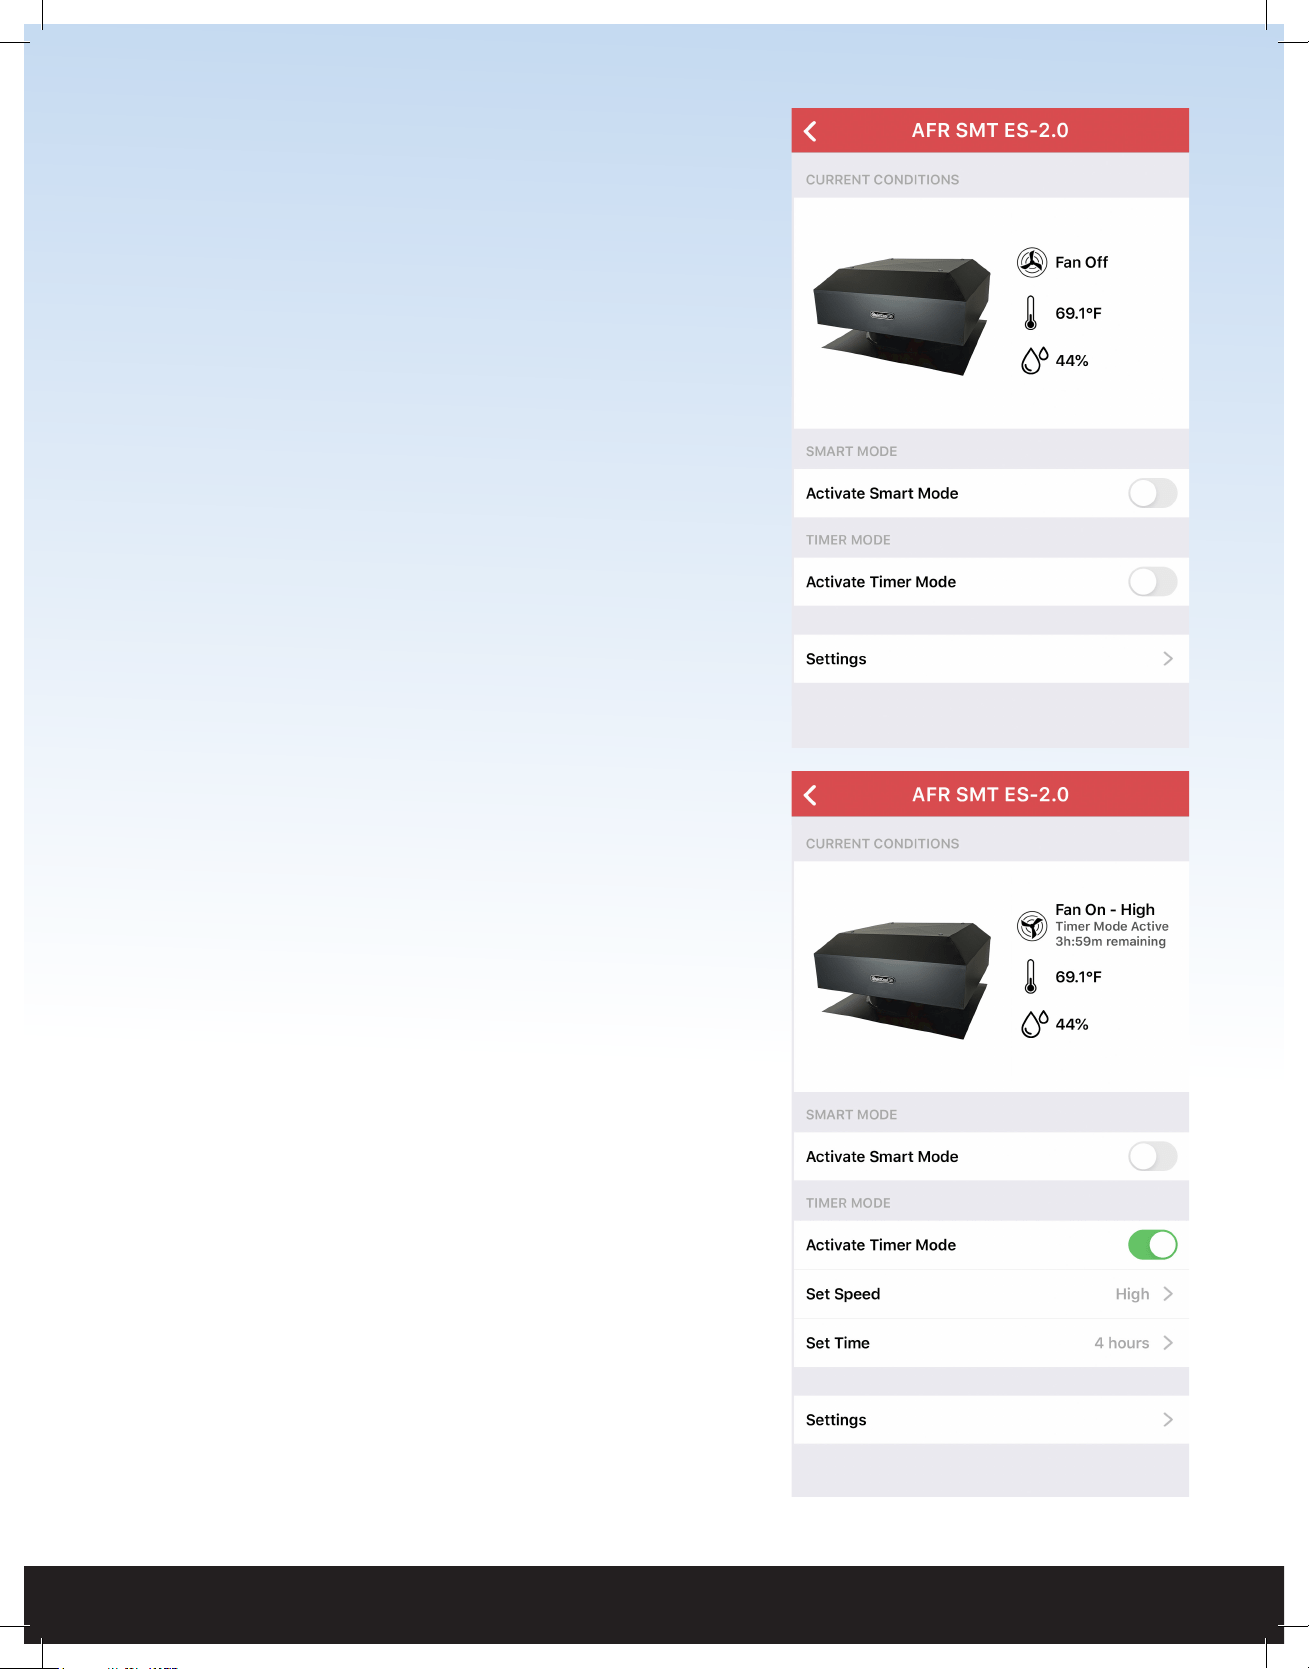
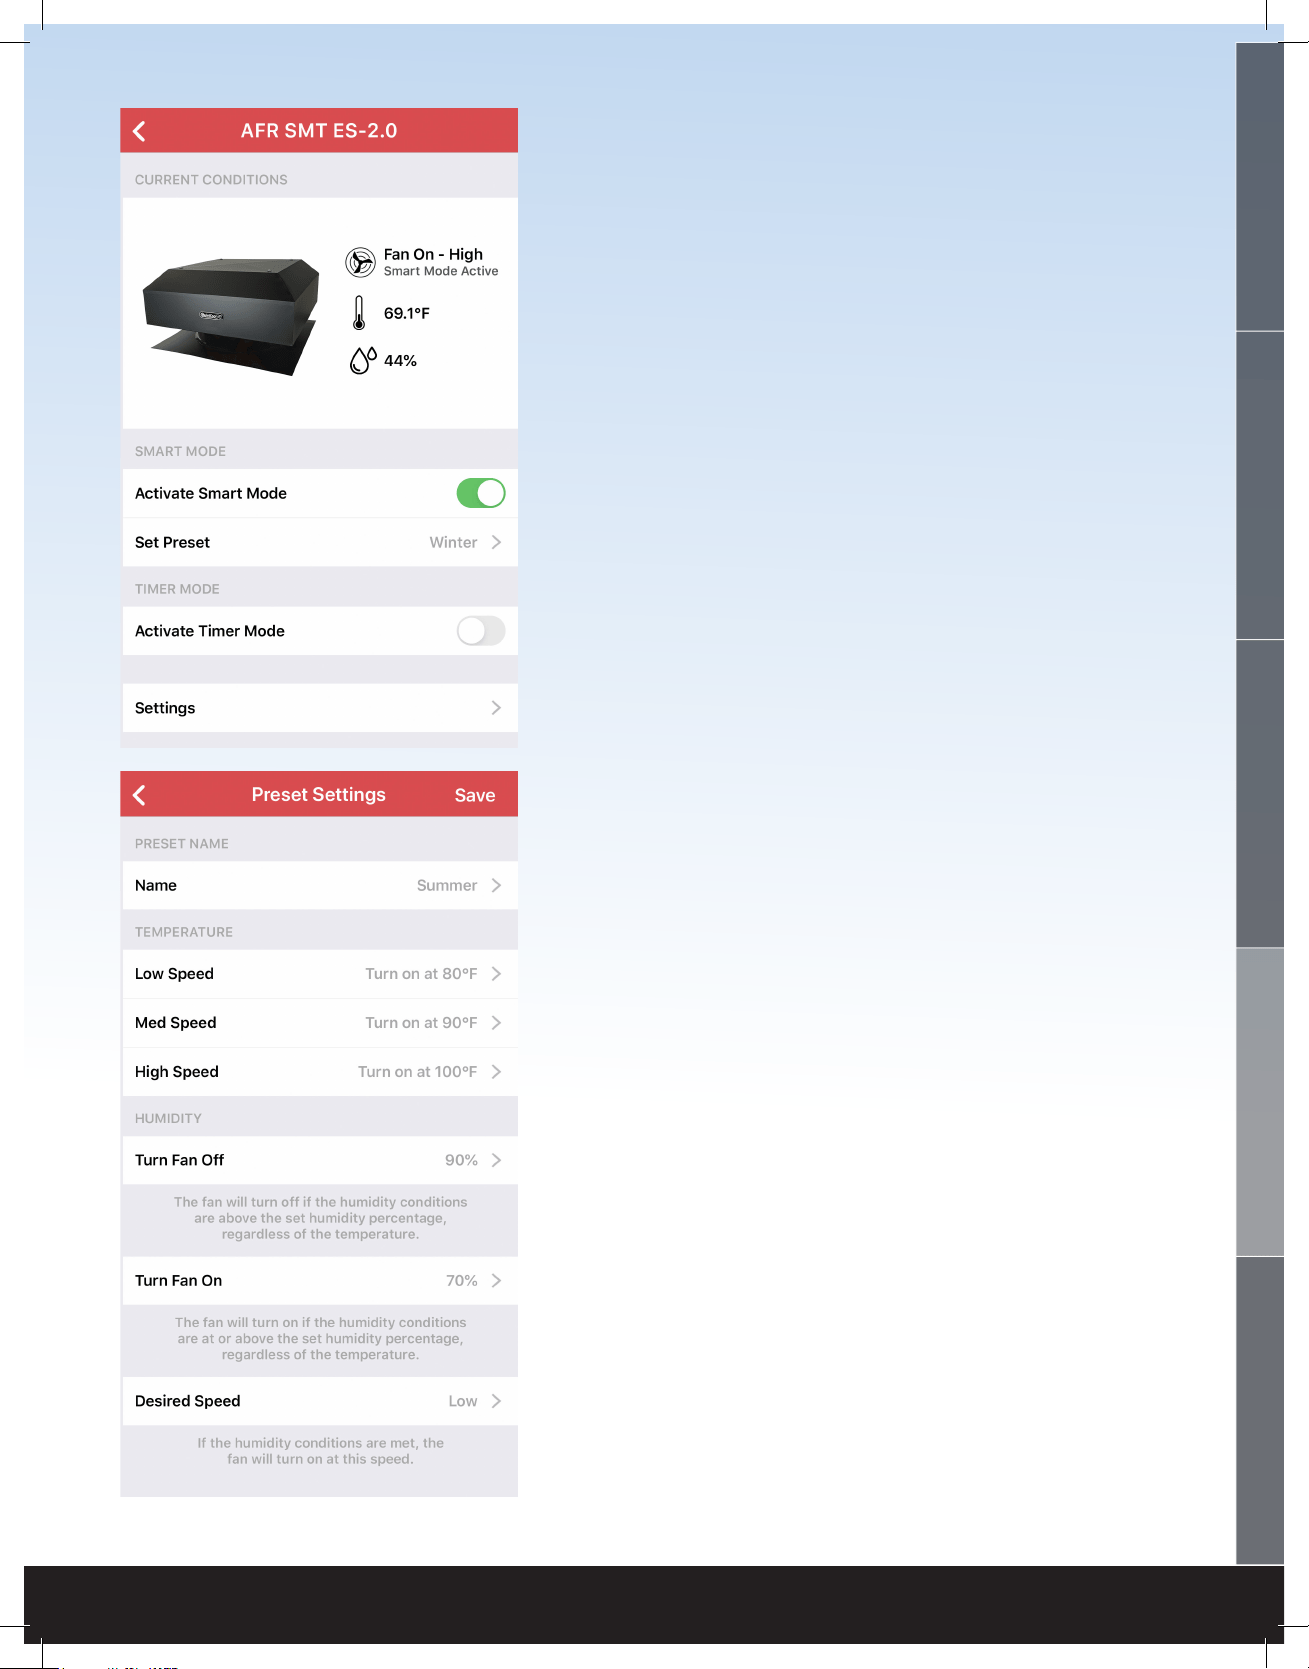
FAN CONTROL PAGE
This page is accessed when you tap on your fan
from the Home Page.
On this page you can see the current conditions in
your attic, activate the different modes of the fan,
and get to the Fan Settings page.
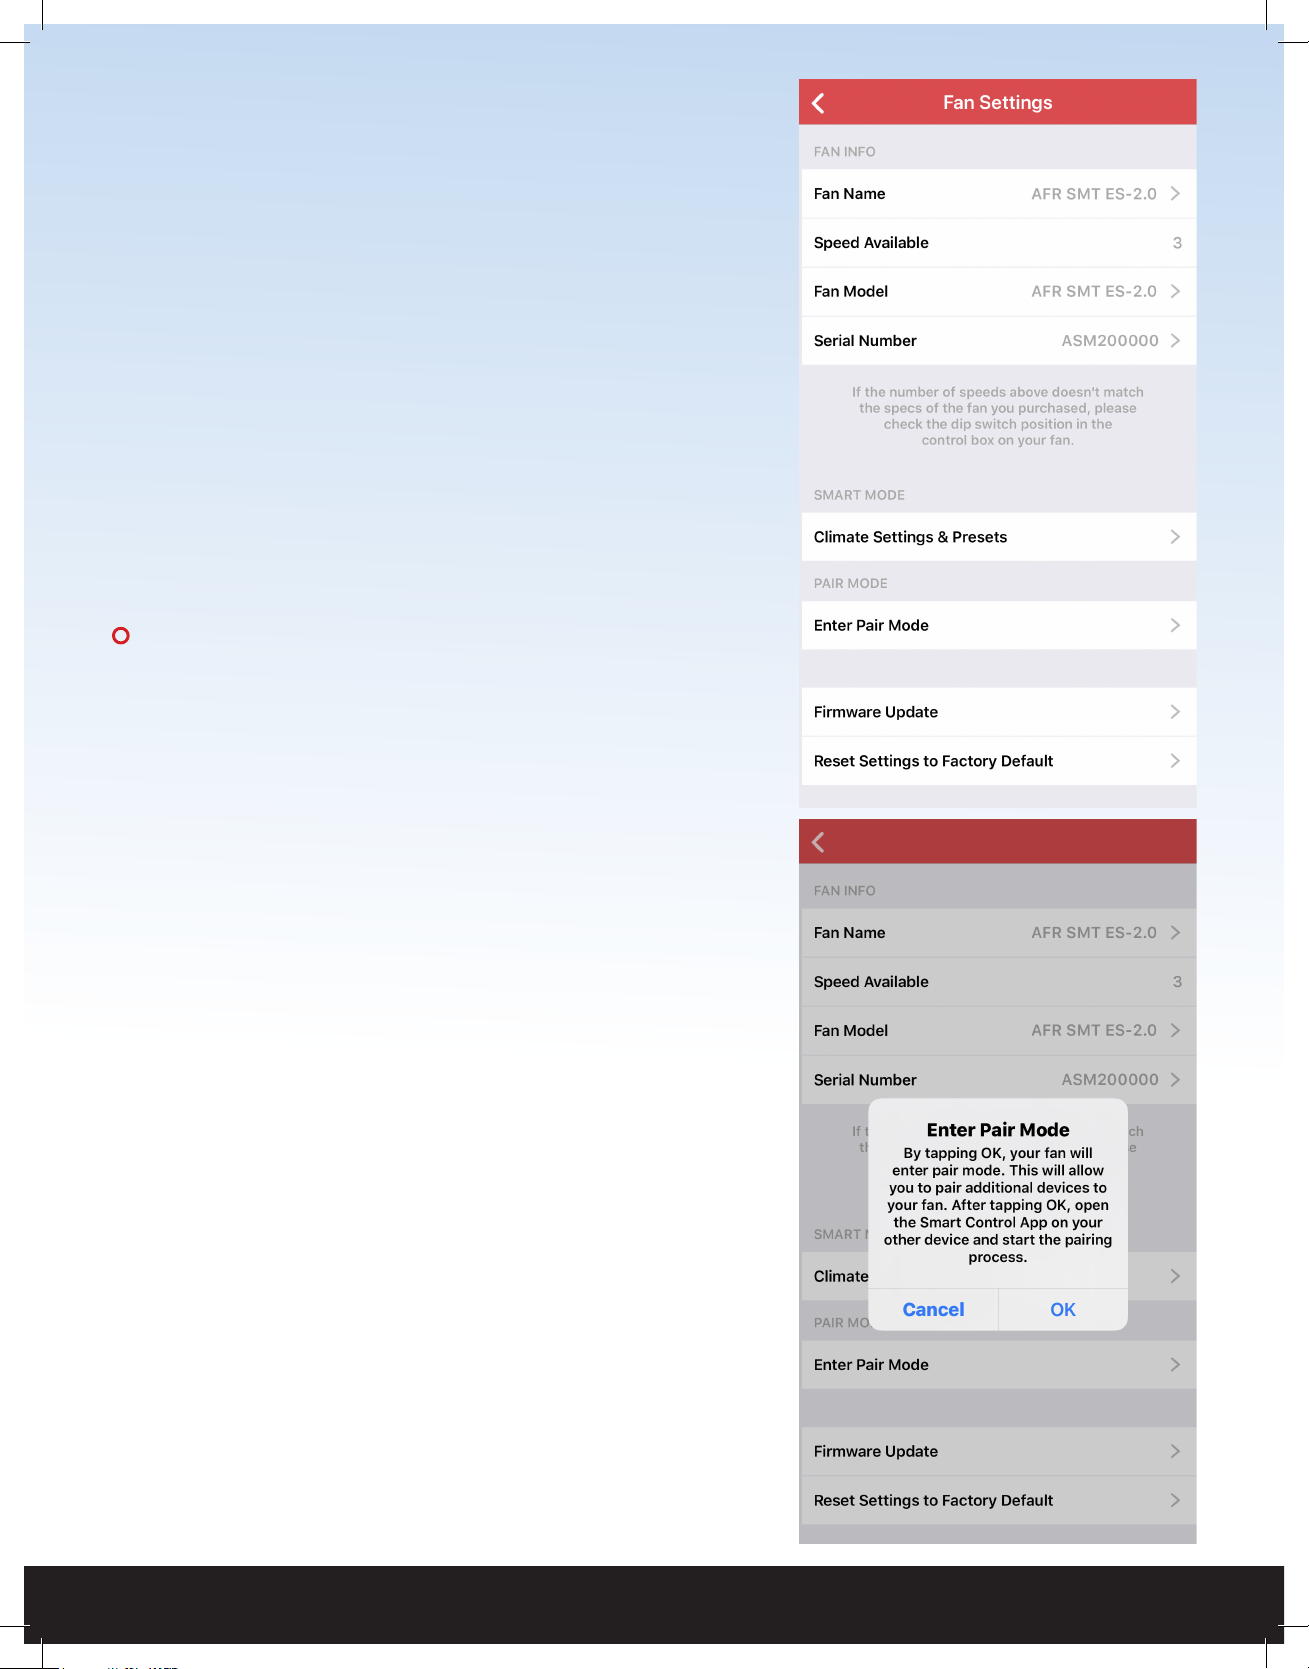
FAN SETTINGS PAGE
This page is used to adjust the settings of the fan.
You can quickly change the Fan Name, check if the
speeds are set properly, change the Fan Model,
enter the Serial Number and adjust the Climate
Settings & Presets.
You can also enter Pair Mode for remote pairing
of devices, perform a Firmware Update, as well as
reset all settings to factory defaults.
1-888-QUIETCOOL
12
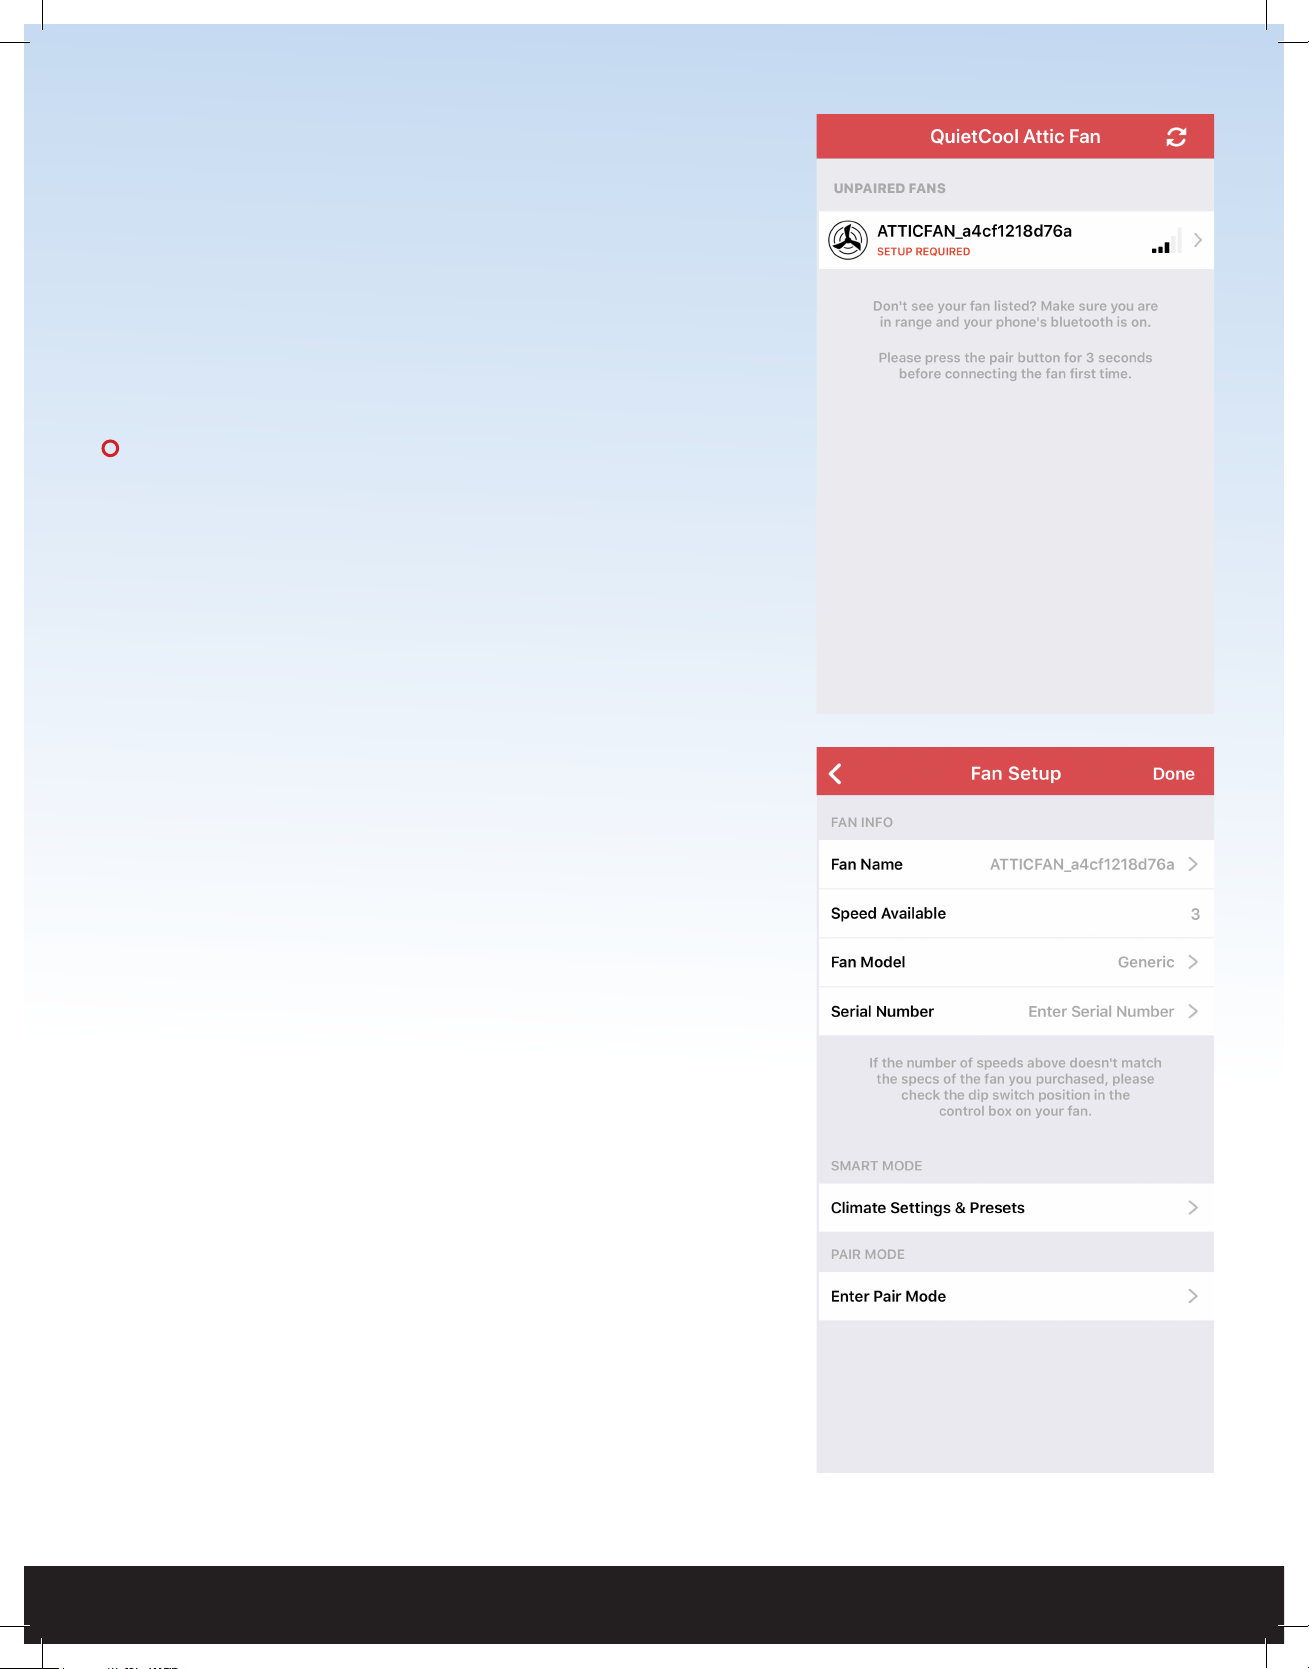
SETTING UP YOUR FAN
Once your attic fan has power, open up the QuietCool
Smart Control app. You will be taken to the Home Page. You
should see your attic fan show up in the list of available fans.
A message indicates that setup is required. Press and hold
the Pair button on the Hub until the LED indicator begins to
blink.
NOTE: You will need to initiate this Pairing process on
each device you want to use to control your attic fan.
Once the initial device is paired, you can use the “Enter
Pair Mode” function from the app described on page
16. This will prevent you from having to access the
Hub physically in the attic in order to perform pairing
operations.
Tap on the fan to start the setup process. Once you tap on
the fan, you will be taken to the Fan Setup page.
On this page, you will be able to change the following
settings:
• Fan Name
• Fan Model
• Serial Number
The Speeds Available section will tell you if you have
connected the fan and set your dip switch properly.
Make sure that this number matches the specication of the
fan you purchased.
We are setting up an AFR SMT ES-2.0 which is a 3-speed fan.
The QuietCool Smart Attic Fan Control has an innovative
Smart mode that allows the fan to adjust the speed based
on the temperature and humidity conditions in your attic.
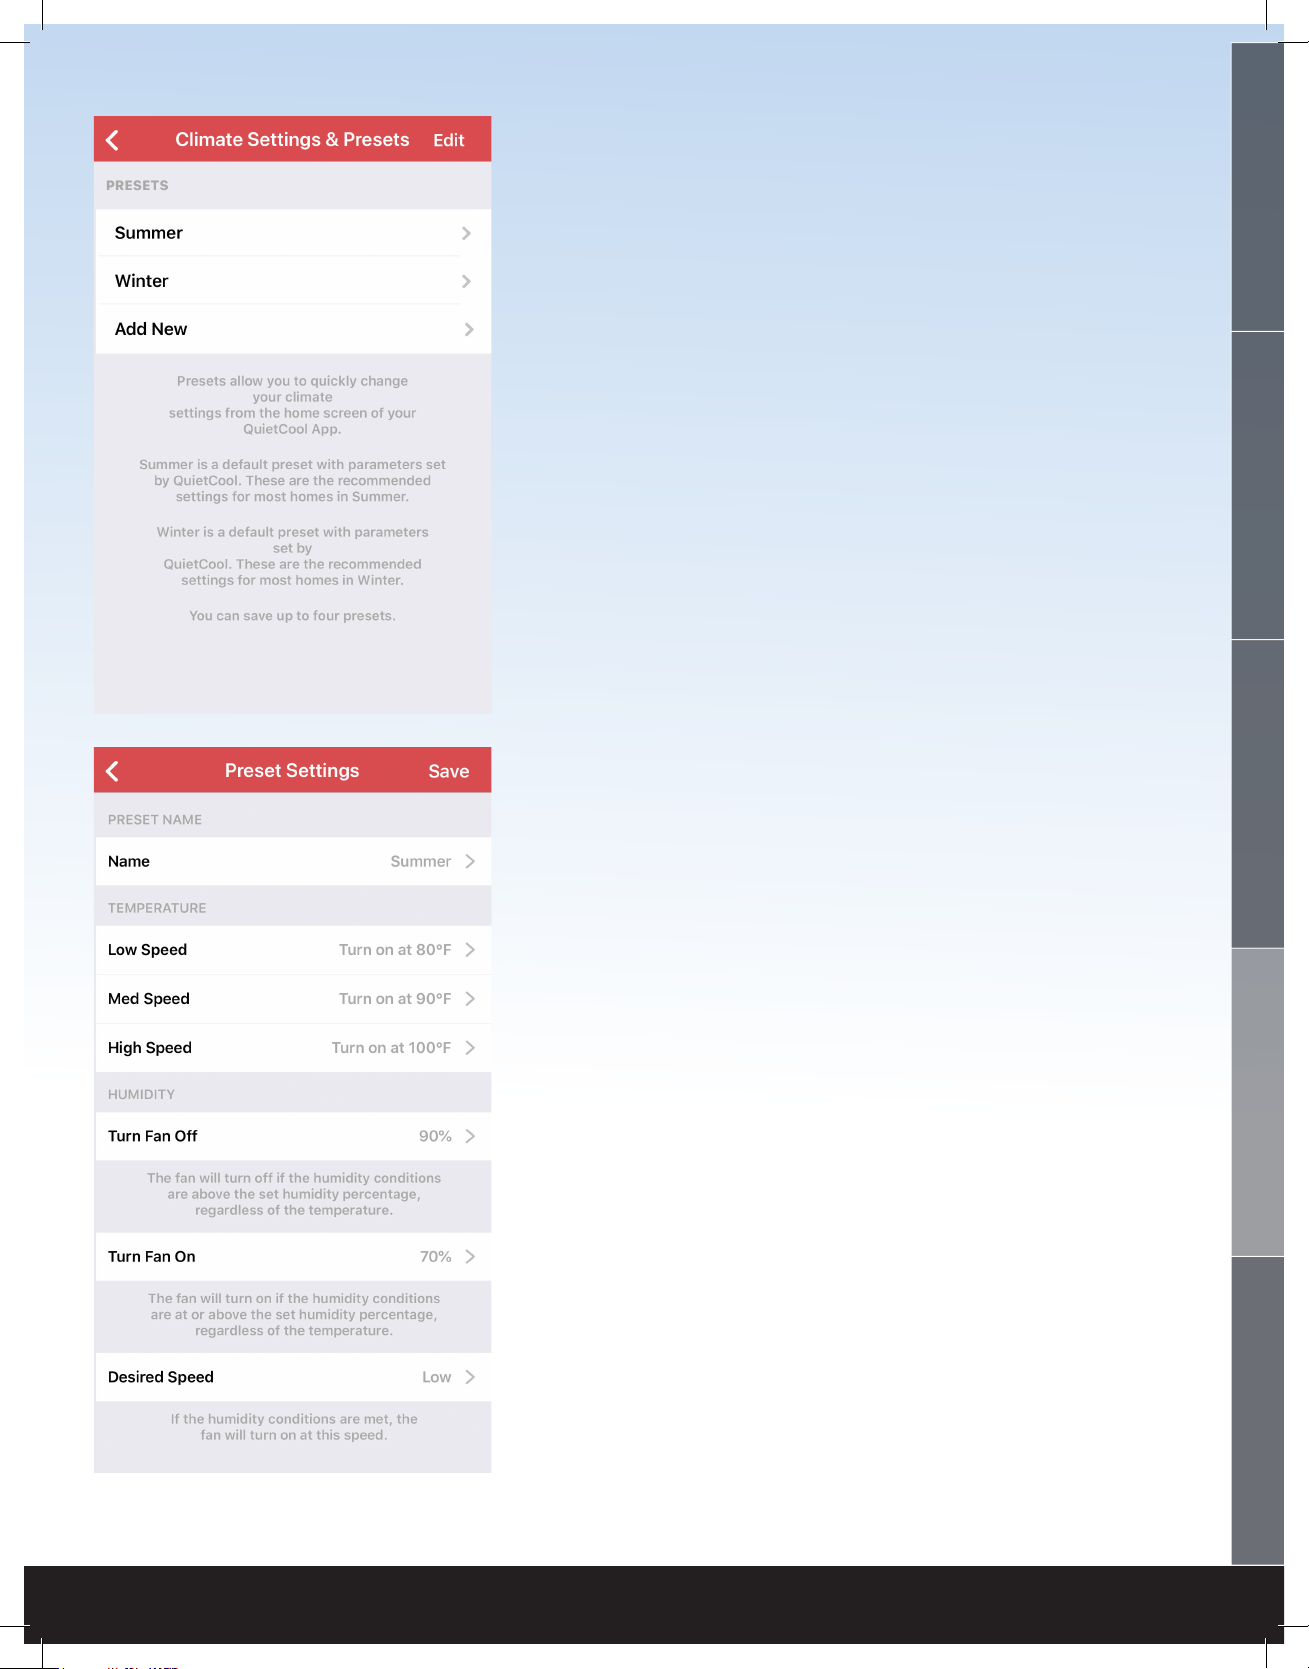
Tap Climate Settings & Presets to adjust these settings.
Within this mode there are two standard presets, Summer
and Winter. You can modify these presets and add your own
custom presets to allow quick setting changes on the y.
!
!
QUIETCOOLSYSTEMS.COM
13
WELCOME
INSTALLATION
WIRING
OPERATION
WARRANTY
TEMPERATURE
• The settings you choose in this section will
change what temperature the fan will come on at
each set speed.
• Tap on any speed to adjust the temperature for
each speed.
HUMIDITY
• Turn Fan Off: This is the humidity percentage
that will cause the fan to turn off. For example,
the factory setting is set at 90%, meaning the fan
will turn off if the humidity in the attic is 90% or
higher. Tap this setting if you would like to adjust
the percentage. If you do not want this feature,
you can select OFF at the top of the list.
• Turn Fan On: This is the humidity percentage
that will cause the fan to turn on, regardless if the
temperature settings are not met. For example,
the factory setting is set at 70%, meaning the fan
will turn on if the humidity in the attic is higher
than 70%, even if the temperature in the attic is
below the temperature settings in the app. If you
do not want this feature, you can select OFF at
the top of the list.
• Desired Speed: This is the speed the fan will use
if the humidity causes the fan to turn on.
These settings will be saved into the memory of
the Hub meaning all settings will sync between any
additional devices you pair to the Hub.
Click Done to complete Fan Setup. You can always
access these settings again from the Settings option
on the Fan Control Page.
1-888-QUIETCOOL
14
FAN CONTROL PAGE
On the Fan Control page, you will see
the current fan status, the current attic
temperature, as well as the current attic
humidity level.
You also have the option to Activate Smart
Mode or Activate Timer Mode. You can also
go into the Fan Settings page and adjust the
settings that you setup in the rst step.
TIMER MODE
Timer Mode is a simple way to turn your
attic fan on for a set amount of time at a set
speed.
To activate Timer Mode, simply tap Activate
Timer Mode. Once activated, you can select
your speed by tapping Set Speed. You can
also select your runtime by tapping Set
Time.
When Timer Mode is active, you will see
your remaining time left on the timer at the
top of the screen.
QUIETCOOLSYSTEMS.COM
15
WELCOME
INSTALLATION
WIRING OPERATION
WARRANTY
SMART MODE
Smart Mode will automatically change the
speed based on the attic temperature and
humidity.
To activate Smart Mode, simply tap Activate
Smart Mode.
In Smart Mode, the rst paramater that is
checked is the Turn Fan Off humidity level.
Regardless of the temperature in the attic, if the
Humidity level in the attic is above the Turn Fan
Off humidity setting, the fan will not turn on, or
if it is already running, the fan will shut off.
If the humidity in the attic is below the Turn
Fan Off humidity setting, the second paramater
that is checked is the Attic Temperature. If the
temperature inside the attic is within the set
parameters in the app, the fan will turn on at
the appropriate speed.
If the temperature in the attic is below any of
the temperature paramaters, the last paramater
that is checked is the Turn Fan On humidity
level. If the humidity level in the attic is above
the Turn Fan On humidity paramater but below
the Turn Fan Off humidity paramater, the fan
will turn on at the Desired Speed.
1-888-QUIETCOOL
16
PAIR MODE
Pair Mode is a feature that was designed to
prevent users from having to get into the
attic to access the physical Hub in order to
pair additional devices.
NOTE: In order to use this feature, you
must have one device that is already
paired to the Fan Hub. If you do not have
any devices that are currently paired to
the Fan Hub, you will have to press the
physical Pair button.
In the Fan Settings page, tap Enter Pair
Mode. An alert box will come up on your
screen indicating you are about to enter Pair
Mode. Tap OK.
Now, on the device you are trying to pair,
open up the Smart Control app and tap the
fan. You will now be taken to the Fan Setup
page and you are now paired.
!
!

QUIETCOOLSYSTEMS.COM
17
WELCOME
INSTALLATION
WIRING OPERATION
WARRANTY
FIRMWARE UPDATE
Your attic fan includes a Firmware Update
feature in order for us to update your Fan Hub
to include bug xes and additional features in
the future.
We recommend checking for a new rmware
update a few times per year.
To check for an available rmware update, go
into the Fan Settings page and tap Firmware
Update.
If there is no update available, an alert will
popup indicating there is no available rmware
update. At the top of the page you will see
your current device version as well as what the
available version is.
If there is an update available, you will be
able to tap the Update button. Once you tap
Update, an alert will popup asking you to type
in your Wi-Fi details.
You cannot initiate a rmware update while your
phone is on cellular so if you are not currently
connected to a Wi-Fi network on your phone,
tap Choose Wi-Fi. This will take you to your
phone settings. Connect to your home Wi-Fi
network and go back to the Smart Control app.
Once back in the app, your Wi-Fi network name
will be pre-lled. Type in your Wi-Fi password
and tap Save. The rmware update will now
begin.
Once completed, an alert will popup indicating
that the download was successful and your Hub
will reboot. Your Hub is now updated.

1-888-QUIETCOOL
18
4.3 FREQUENTLY ASKED QUESTIONS
WHAT PROTOCAL DOES THIS CONTROL USE?
This control operates over Bluetooth to connect to your phone. The control uses Wi-Fi for rmware
updates.
WILL MY NEIGHBOR BE ABLE TO CONTROL MY FAN IF THEY HAVE THE SAME
SET UP AS ME?
No. In order to connect to your Smart Attic Fan Control Hub, you must rst pair your device by
using the Pair button on the Hub.
WHAT IS THE RANGE?
The range restriction between your phone and the attic fan is 50 ft through average household
obstructions.
WHY ARE ALL MY LIGHTS BLINKING ON THE HUB AND NOTHING IS
WORKING?
If you’re experiencing blinking lights on all LED indicators on the hub then it is an indication that
your DIP switches are not selected, or multiple DIP switches are selected. Disconnect power, adjust
your DIP switches, and the only light that should be lit is your RED power light.
HOW DO I CHANGE THE DIP SWITCH TO THE CORRECT SPEED OF MY FAN?
You will need to disconnect power, make your adjustment inside the hub, and then reconnect power.
CAN YOU CONNECT THE ATTIC FAN SMART CONTROL TO A SMART HOME
SYSTEM LIKE ALEXA, GOOGLE HOME, OR APPLE HOMEKIT?
No, in the current conguration the Smart Attic Fan Control cannot connect to a smart home
system. Smart home system control is not neccesary as the fan runs on it’s own and hardly ever
needs manual control.
WHAT HAPPENS IF I GET A NEW PHONE?
If you get a new phone, you will need to pair your new phone to the Hub. This is very easy to do
if you still have your old phone, or have another phone in the home that is currently paired to the
Hub. If you have another device that is paired to the Hub, follow the instructions on page 16 for
Pair Mode. If you do not have any other devices in the home that are paired to the Hub, you will
need to press the physical Pair button on the Hub.
This control features an innovative re safety shut-off that will automatically turn the fan off if it
detects a temperature above 182ºF in your attic. The purpose of this is to shut off in the event of a
house re to prevent the spread of ames.
4.4 SAFETY

QUIETCOOLSYSTEMS.COM
19
WELCOME
INSTALLATION
WIRING
OPERATION
WARRANTY
ATTIC FAN LIMITED WARRANTY
QC Manufacturing Inc. extends this warranty to the original purchaser of the following
QuietCool Specialty Series Fans - AFG SMT ES-3.0, AFG SMT PRO-3.0, AFG SMT PRO-2.0,
and AFR SMT ES-2.0 - installed and used in a residence under normal conditions within the
United States:
A. Fifteen year coverage applies to the QuietCool motor fan assembly. At our
option we will repair or replace any part of the assembly should it fail to
operate during the rst fteen years from the date of original purchase.
B. One year coverage for all other components including grilles, housings,
controls and accessories furnished by QC Manufacturing, Inc. At our option
we will repair or replace any part which fails as a result of defective material
or workmanship during the rst year from the original date of purchase.
C. This warranty does not cover any of the following:
1. Accidental or consequential damage resulting from the operation of
our equipment or any malfunction thereof.
2. Cost of service calls to diagnose the cause of problems or the labor
charge to un-install any components.
3. Product failure or damage due to faulty installation, abuse, misuse,
unauthorized alteration to factory specs, lack of maintenance, or
transportation damage.
4. Shipping or postage for warranty claims.
D. To obtain service under this warranty, rst contact the dealer where you
purchased the equipment. If you are unable to nd or reach your dealer,
contact Customer Service at QC Manufacturing, Inc. at the number below.
E. Registration is no longer required for QuietCool fans. If service is required
under this warranty, you must retain your proof or purchase.
This warranty is the only warranty extended by QC Manufacturing, Inc. to purchasers or suppliers of our equipment. QC
Manufacturing Inc. disclaims all other warranties, express or implied, that arise by operation of the law. Where consumer may
have additional warranty rights in accordance with federal and state law, such rights shall supersede those stated herein.
QC Manufacturing, Inc. Customer Service
26040 Ynez Rd.
Temecula, CA 92591
www.QuietCoolSystems.com
951-325-6340

FAN SERIAL NUMBER INFORMATION
RETAIN FOR YOUR RECORDS.
SERIAL NUMBER IS REQUIRED FOR WARRANTY PURPOSES.
1-888-QUIETCOOL | WWW.QUIETCOOLSYSTEMS.COM
Rev. 4/16/20