Specifications
Indexed Terms: Side-by-Side Refrigerator, Side By Side Refrigerator
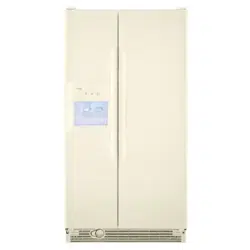
Kenmore 10657412600 Questions and Answers

Using the Controls
Your model may have Rotary Controls or Slide Controls.
IMPORTANT:
• Your refrigerator will not cool when the Refrigerator Control is set to OFF
• The Refrigerator Control adjusts the refrigerator compartment temperature. The Freezer Control adjusts the freezer compartment temperature. Higher numbered settings make the compartment colder. Lower numbered settings make the temperature less cold.
• Wait 24 hours before you put food into the refrigerator. If you add food before the refrigerator has cooled completely, your food may spoil.
NOTE: Adjusting the Refrigerator and Freezer Controls to a higher (colder) setting will not cool the compartments any faster.
• The preset settings should be correct for normal household usage. The controls are set correctly when milk or juice is as cold as you like and when ice cream is firm.
• If the temperature is too warm or too cold in the refrigerator or freezer, first check the air vents to be sure they are not blocked before adjusting the controls.
For your convenience, your controls are preset at the factory. When installing your refrigerator, make sure that the controls are still at the set points as shown.
Adjusting Controls
NOTE: Wait at least 24 hours between adjustments and then recheck the temperatures.
If you need to adjust temperatures, adjust the refrigerator temperature first.
Rotary Controls
Turn the control right (clockwise) to make the compartment colder. Turn the control left (counterclockwise) to make it less cold.
Slide Controls
Slide the control one setting to the right to make the compartment colder. Slide the control one setting to the left to make it less cold.
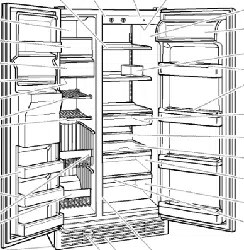
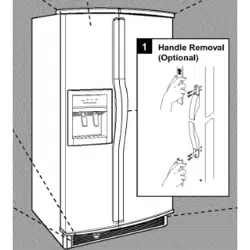
Water and Ice Dispensers
WARNING: Cut Hazard Use a sturdy glass when dispensing ice or water. Failure to do so can result in cuts.
Depending on your model, you may have one or more of the following options: the ability to select either crushed or cubed ice, a special light that turns on when you use the dispenser, or a lock option to avoid unintentional dispensing,
The Ice Dispenser
Ice dispenses from the ice maker storage bin in the freezer. When the dispenser lever is pressed:
Some models dispense both cubed and crushed ice. Before dispensing ice, select which type of ice you prefer. The button controls are designed for easy use and cleaning.
For crushed ice, cubes are crushed before they are dispensed. This may cause a slight delay when dispensing crushed ice. Noise from the ice crusher is normal, and pieces of ice may vary in size. When changing from crushed to cubed, a few ounces of crushed ice will be dispensed along with the first cubes.
To Dispense Ice:
1. Press button for the desired type of ice.
2. Press a sturdy glass against the ice dispenser lever. Hold the glass close to the dispenser opening so ice does not fall outside of the glass.
IMPORTANT: You do not need to apply a lot of pressure to the lever in order to activate the ice dispenser. Pressing hard will not make the ice dispense faster or in greater quantities.
3. Remove the glass to stop dispensing,
NOTE: The first few batches of ice may have an off-flavor from new plumbing and parts. Throw the ice away. Also, take large amounts of ice from the ice bin, not through the dispenser.
The Water Dispenser
If you did not flush the water system when the refrigerator was first installed, press the water dispenser bar with a sturdy glass or jar until you draw and discard 2 to 3 gal. (8 to 12 L) or approximately 5 minutes of water after water begins dispensing. It will take 3 to 4 minutes for the water to begin dispensing. The water you draw and discard cleans the system and helps clear air from the lines. Allow several hours for the refrigerator to cool down and chill water.
IMPORTANT: Depending on your model, the small removable tray at the bottom of the dispenser is designed to catch small spills and allow for easy cleaning. There is no drain in the tray. The tray can be removed from the dispenser and carried to the sink to be emptied or cleaned.
To Dispense Water:.
1. Press a sturdy glass against the water dispenser lever.
2. Remove the glass to stop dispensing.
NOTE: Water may have an off-flavor if you do not use the dispenser periodically. Dispense enough water every week to maintain a fresh supply.
The Dispenser Light
The dispenser area has a light. It can be turned on manually by pressing the ON button (touchpad or rocker switch). On some models: Whenever you use the dispenser, the lever will automatically turn the light on.
NOTE: See the "Changing the Light Bulbs" section for information on changing the dispenser light bulb.
The Dispenser Lock (on some models)
The dispenser can be locked for easy cleaning or to prevent unintentional dispensing by small children and pets.
NOTE: The lock feature does not shut off power to the refrigerator, to the ice maker, or to the dispenser light. It simply deactivates the dispenser levers. To turn off the dispenser, press the LOCK button. The indicator will appear above the LOCK button and the ice and water dispensers will not work. To unlock the dispenser, press the UNLOCK button until the indicator appears. Then continue to dispense ice or water as usual.
REFRIGERATOR CARE
Cleaning
WARNING Explosion Hazard Use nonflammable cleaner. Failure to do so can result in death, explosion, or fire.
Both the refrigerator and freezer sections defrost automatically.
However, clean both sections about once a month to prevent odors from building up. Wipe up spills immediately.
To Clean Your Refrigerator:
4. Determine whether your refrigerator exterior is painted metal, Ultra Satin TM (stainless look) finish, brushed aluminum or stainless steel, and choose the appropriate cleaning method.
NOTE: Ultra Satin TM (stainless look) finish has a smooth, uniform color with a glossy finish that resists fingerprints.
Stainless steel has a distinct grainy texture with variation in color that is natural to steel.
Painted metal: Wash exteriors with a clean sponge or soft cloth and a mild detergent in warm water. Do not use abrasive or harsh cleaners, or cleaners designed for stainless steel.
Dry thoroughly with a soft cloth. For additional protection against damage to painted metal exteriors, apply appliance wax (or auto paste wax) with a clean, soft cloth. Do not wax plastic parts.
Brushed aluminum: Wash with a clean sponge or soft cloth and a mild detergent in warm water. Do not use abrasive or harsh cleaners, or cleaners designed for stainless steel. Dry thoroughly with a soft cloth.
Ultra Satin TM (stainless look) finish: Wash with a clean sponge or soft cloth and a mild detergent in warm water. Do not use abrasive or harsh cleaners, or cleaners designed for stainless steel. Dry thoroughly with a soft cloth.
Stainless steel finish: Wash with a clean sponge or soft cloth and a mild detergent in warm water. Do not use abrasive or harsh cleaners. Dry thoroughly with a soft cloth. To keep your stainless steel refrigerator looking like new and to remove minor scuffs or marks, it is suggested that you use the manufacturer's approved Stainless Steel Cleaner & Polish.
IMPORTANT: This cleaner is for stainless steel parts only!
• Do not allow the Stainless Steel Cleaner & Polish to come into contact with any plastic parts such as the trim pieces, dispenser covers or door gaskets. If accidental contact does occur, clean plastic part with a sponge and mild detergent in warm water. Dry thoroughly with a soft cloth. To order the cleaner, see "Accessories."
5. There is no need for routine condenser cleaning in normal home operating environments. If the environment is particularly greasy or dusty, or there is significant pet traffic in the home, the condenser should be cleaned every 2 to 3 months to ensure maximum efficiency. If you need to clean the condenser:
• Remove the base grille. See "Base Grille" graphic or "Base Grille" section.
• Use a vacuum cleaner with a soft brush to clean the grille, the open areas behind the grille and the front surface area of the condenser.
• Replace the base grille when finished.
6. Plug in refrigerator or reconnect power.