®
SELECT CLEAN TMSelf-Cleaning Gas Range
Cocina de gas de auto limpieza SELECT CLEANT"
Models, Modelos 665.75832
665.75834
665.75839
TO THE INSTALLER: PLEASE LEAVE THIS INSTRUCTION BOOK WITH THE UNIT
TO THE CONSUMER: PLEASE READ AND KEEP THIS BOOK FOR FUTURE
REFERENCE.
PARA EL INSTALADOR: FAVOR DE DE JAR ESTE MANUAL DE INSTRUCCIONES
CON LA UNIDAD.
PARA EL CONSUMIDOR: FAVOR DE LEER Y GUARDAR ESTE MANUAL PARA
FUTURAS REFERENCIAS.
Super Capacity with ULTR/IJBAKE TM System
Capacidad extra con el Sistema ULTRAB_E TM
8273766 Sears, Roebuck and Co., Hoffman Estates, IL 60179 U.S.A.
www.sears.com

TableofContents
A Note to You ............................................................ 2
Warranty ..................................................................... 3
Range Safety ............................................................. 4
Parts and Features ................................................... 6
Using Your Range .................................................... 7
Using the Surface Burners .................................... 7
Characteristics of Cookware Materials ................ 8
Using the Oven ...................................................... 9
Bakeware Choices .............................................. 10
Using Aluminum Foil ........................................... 10
The Electronic Oven Control ............................... 11
Setting the Clock ............................................. 12
Using the Oven Lockout ................................. 12
Using the Cooktop Lockout ........................... 13
Tones ................................................................ 13
Using the 12-Hour Shut-Off ........................... 13
Using the Electronic Kitchen Timer ............... 14
Starting/Canceling a Function ........................ 15
ULTRABAKE TM Baking/Roasting ................... 15
Readjusting the Oven Temperature Control...17
Broiling ............................................................. 18
Using the Timed Oven Control ...................... 21
Using the Warm & Ready Warming Drawer ...........25
The Oven Vent ............................. .,..,,, ........ ..,26
Using the SELECT CLEAN TM
Self-Cleaning Cycle ............................................... 27
Before You Start .................................................. 27
How the Cycle Works ......................................... 28
Setting the Controls ............................................ 28
Caring for Your Range ........................................... 31
Cleaning Chart ..................................................... 31
Sealed Surface Burners and Cooktop ............... 33
Removing the Oven Door ................................... 34
The Oven Light .................................................... 36
Troubleshooting ...................................................... 37
Range Does Not Work ........................................ 37
Oven/Broiler Burner ............................................. 37
Surface Burners ................................................... 38
When Self-Cleaning Your Oven .......................... 38
Cooking Results .................................................. 39
Display Messages ............................................... 39
Index ......................................................................... 40
Service .................................................... Back Cover
A Noteto You
Tha " Iou Io DuF g a KI@£OII
t!! ttsoeo
Your KENMORE gas range takes on a new value
when you discover that Sears has service centers
around the country. Trained Sears Service
Professionals use fully-equipped trucks and Sears-
approved methods for expert repairs backing up all
Sears guarantees.
Whenever you call to request service for your
appliance, you need to know your complete model
number and serial number. You can find this
information on the model and serial number plate
(see diagram in the "Parts and Features," p. 6).
Please also record the purchase date of your
appliance and your store's name and telephone
number.
Model Number 665.
Serial Number R
Purchase Date
Keep this book and the sales slip together
in a safe place for future reference.

®
Free-Standing Range Warranty
FULLONEYEARWARRANTYONALLPARTS
If, within one year from the date of installation, any part fails to function 3roperly due to a defect in
material or workmanship, Sears will repair or replace it. at our option, free of charge.
If this product is subjected to other than private family use, the above warranty is effective for only
90 days.
WARRANTY SERVICE IS AVAILABLE BY CONTACTING THE NEAREST SEARS SERVICE CENTER IN
THE UNITED STATES.
This warranty gives you specific legal rights and you may also have other rights which vary from state
to state.
Sears Roebuck and Co. Dept. 817WA Hoffman Estates, IL 60179
ToFurtherAddToTheValueOfYourRange,Buya SearsMaintenanceAgreement.
Years of Ownership Coverage
1. Replacement of Defective Parts
2. Annual Preventive Maintenance
Check at Your Request
1st Year 2nd Year
W MA
MA MA
3rdYear
MA
MA
W = Warranty MA = Maintenance Agreement
Your Kenmore appliance is designed, manufactured and tested to provide years of dependable operation. Yet any major
appliance may require service from time to time. The Sears Maintenance Agreement offers you an outstanding service
program, affordably priced.
The table above shows the additional benefits a Sears Maintenance Agreement provides beyond the Sears Warranty.
Contact your Sears Sales Associate or call 1-800-827-6655 to purchase a Sears Maintenance Agreement.
I
WARNING: If the information in this manual is not followed exactly, a fire or I
explosion may result causing property damage, personal injury or death,
I
- Do not store or use gasoline or other flammable vapors and liquids in the vicinity
of this or any other appliance,
- WHAT TO DO IF YOU SMELL GAS
• Do not try to light any appliance.
• Do not touch any electrical switch.
• Do not use any phone in your building.
• Immediately call your gas supplier from a neighbor's phone. Follow the gas
supplier's instructions.
• If you cannot reach your gas supplier, call the fire department.
- Installation and service must be performed by a qualified installer, service
agency or the gas supplier,
Range Safety
Your safety and the safety of others are very important.
We have provided many important safety messages in this manual and on your appliance. Always read and
obey all safety messages.
This is the safety alert symbol.
This symbol alerts you to potential hazards that can kill or hurt you and others.
All safety messages will follow the safety alert symbol and either the word "DANGER" or
"WARNING." These words mean:
You can be killed or seriously injured if you don't
immediately follow instructions.
You can be killed or seriously injured if you don't
follow instructions.
All safety messages will tell you what the potential hazard is, tell you how to reduce the chance of injury,
and tell you what can happen if the instructions are not followed.
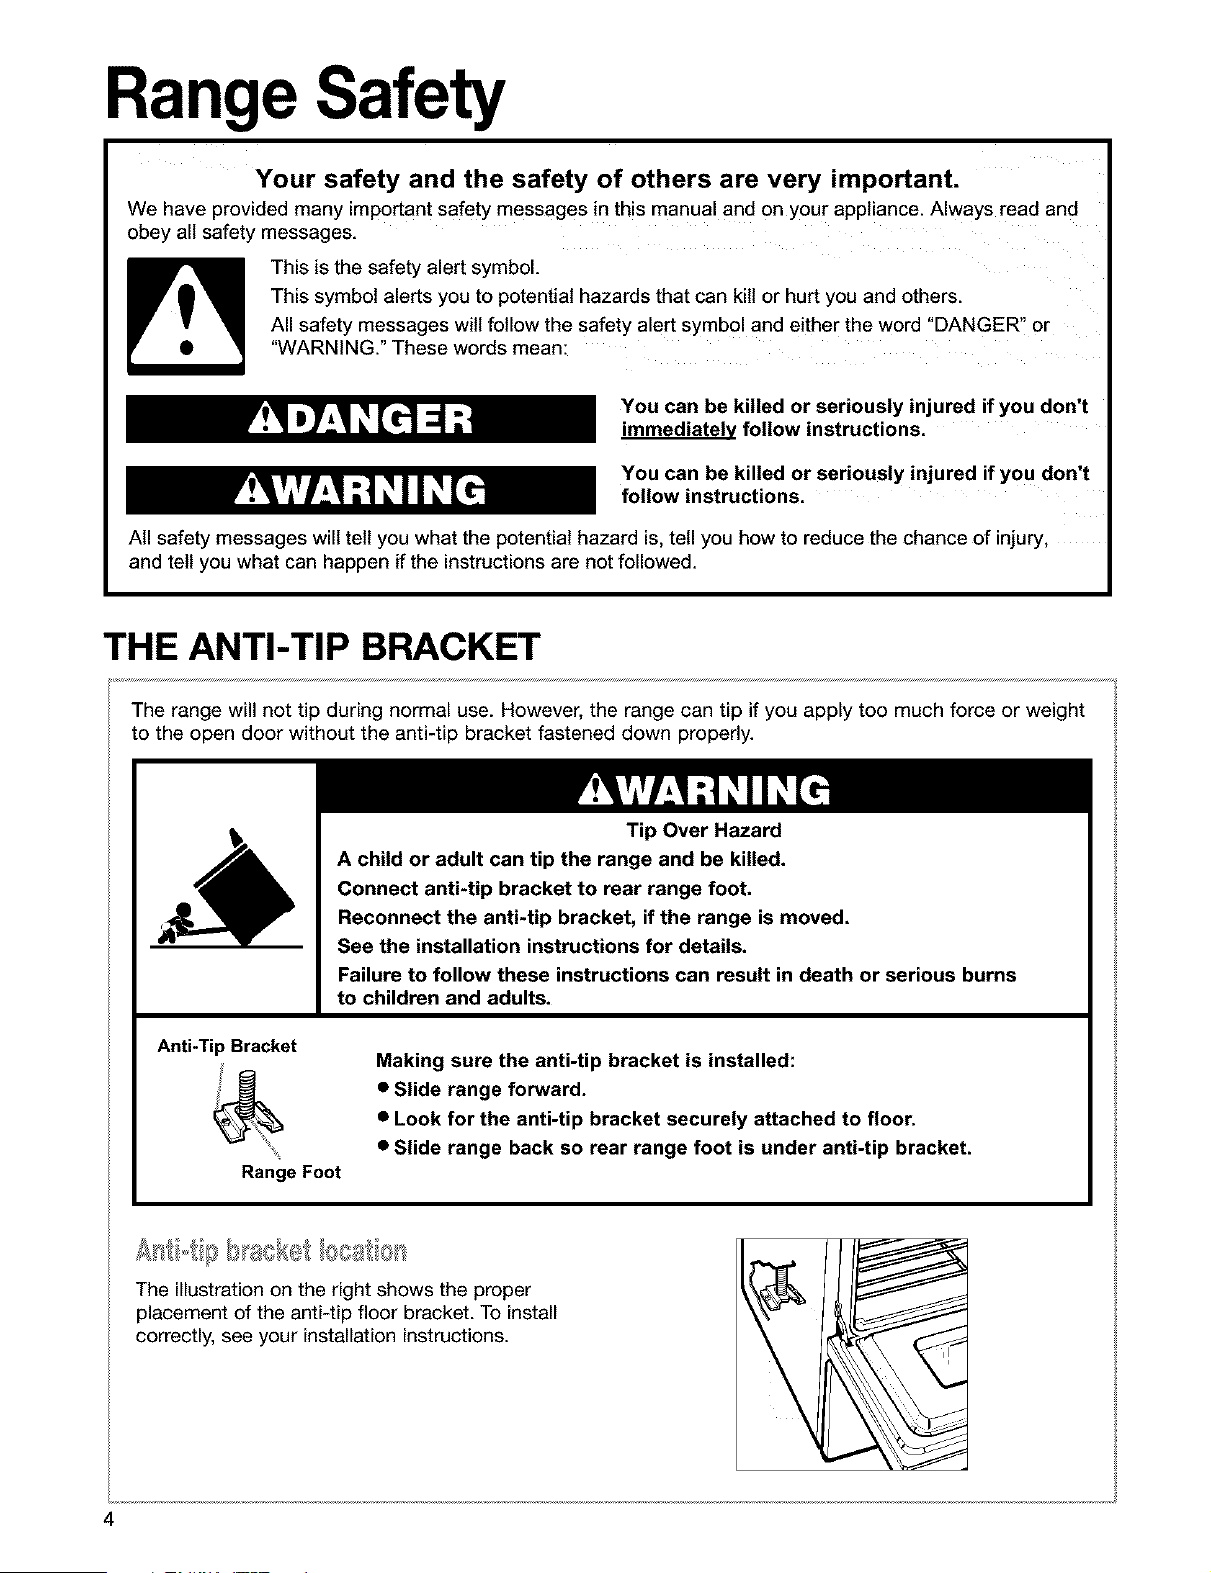
THE ANTI-TIP BRACKET
The range will not tip during normal use. However, the range can tip if you apply too much force or weight
to the open door without the anti-tip bracket fastened down properly.
Tip Over Hazard
A child or adult can tip the range and be killed.
Connect anti-tip bracket to rear range foot.
Reconnect the anti-tip bracket, if the range is moved.
See the installation instructions for details.
Failure to follow these instructions can result in death or serious burns
to children and adults.
Anti-Tip Bracket
Range Foot
Making sure the anti-tip bracket is installed:
• Slide range forward.
• Look for the anti-tip bracket securely attached to floor.
• Slide range back so rear range foot is under anti-tip bracket.
The illustration on the right shows the proper
placement of the anti-tip floor bracket. To install
correctly, see your installation instructions.
IMPORTANT SAFETY INSTRUCTIONS
WARNING: To reduce the risk of fire, electrical
shock, injury to persons, or damage when using the
range, follow basic precautions, including the
following:
• WARNING: To reduce the risk of tipping
of the range, the range must be secured by
properly installed anti-tip devices. To check if
the devices are installed properly, slide range
forward, look for anti-tip bracket securely
attached to floor, and slide range back so rear
range foot is under anti-tip bracket.
• CAUTION: Do not store items of interest to
children in cabinets above a range or on the
backguard of a range - children climbing on the
range to reach items could be seriously injured.
• Proper Installation - The range, when installed,
must be electrically grounded in accordance with
local codes or, in the absence of local codes, with
the National Electrical Code, ANSI/NFPA 70. In
Canada, the range must be electrically grounded
in accordance with Canadian Electrical Code. Be
sure the range is properly installed and grounded
by a qualified technician.
• This range is equipped with a three-prong ground-
ing plug for your protection against shock hazard
and should be plugged directly into a properly
grounded receptacle. Do not cut or remove the
grounding prong from this plug.
• Disconnect the electrical supply before servic-
ing the appliance.
• Never Use the Range for Warming or Heating
the Room.
• Injuries may result from the misuse of appliance
doors or drawers such as stepping, leaning, or
sitting on the doors or drawers.
• Maintenance - Keep range area clear and free
from combustible materials, gasoline, and other
flammable vapors and liquids.
• Storage in or on the Range - Flammable
materials should not be stored in an oven or
near surface units.
• Top burner flame size should be adjusted so it
does not extend beyond the edge of the cook-
ing utensil.
For self-cleaning ranges -
• Before Self-Cleaning the Oven - Remove broiler
pan and other utensils. Wipe off all excessive
spillage before initiating the cleaning cycle.
SAVE THESE INSTRUCTIONS
The California Safe Drinking Water and Toxic Enforcement Act requires the Governor of California to
publish a list of substances known to the State of California to cause cancer, birth defects, or other
reproductive harm, and requires businesses to warn of potential exposure to such substances.
WARNING: This product contains a chemical known to the State of California to cause cancer, birth
defects, or other reproductive harm.
This appliance can cause tow-level exposure to some of the substances listed, including benzene,
formaldehyde, carbon monoxide, toluene, and soot.

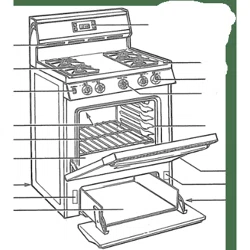
Parts and Features
(p. 26)
(pp. 7, 8, 33, 34)
grates
(p. 31)
Power Burner
(p. 7)
Anti-ti_
(p. 4)
Door stop clip
(pp. 34-36) _
serial number
plate
(behind left side
of warming drawer)
Warm & Ready
warming drawer
(p. 25, 26)
control
(pp. 11-24)
SURESIMMER TM
burner
(p. 7)
panel
(pp. 6, 31)
Automatic oven
light switch
(p. 36)
Gasket
(p. 27)
_ '.,_STURDIGLIDETM
HALF-RACK with
removable insert
(p. 9)
STURDIGUDE TM
oven rack wi_
integrated
handle
(p. 9)
CONTROL PANEL
-.o oo:.ooo
Left rear Left front control knob
control knob (Power Burner)
(p. 7)
Surface burner marker
(shows which burner
you are setting)
Right front
control knob
ELECTRONIC OVEN CONTROL
ULTRABAKE TM electronic display (p. 11)
=,_0=
'_O
WARM & READY
selector switch
(p. 25)
OQR_
°°@
Right rear control knob
(SURESIMMER setting)
(p. 7)
Using Your Range
USING THE SURFACE BURNERS
Fire Hazard
Do not let the burner flame extend beyond
the edge of the pan.
Turn off all controls when not cooking.
Failure to follow these instructions can
result in death or fire.
NOTE: Unit is shipped with the surface burners in
the Cooktop Lockout position and must be
unlocked before they can be used. See "Using the
Cooktop Lockout," p.13.
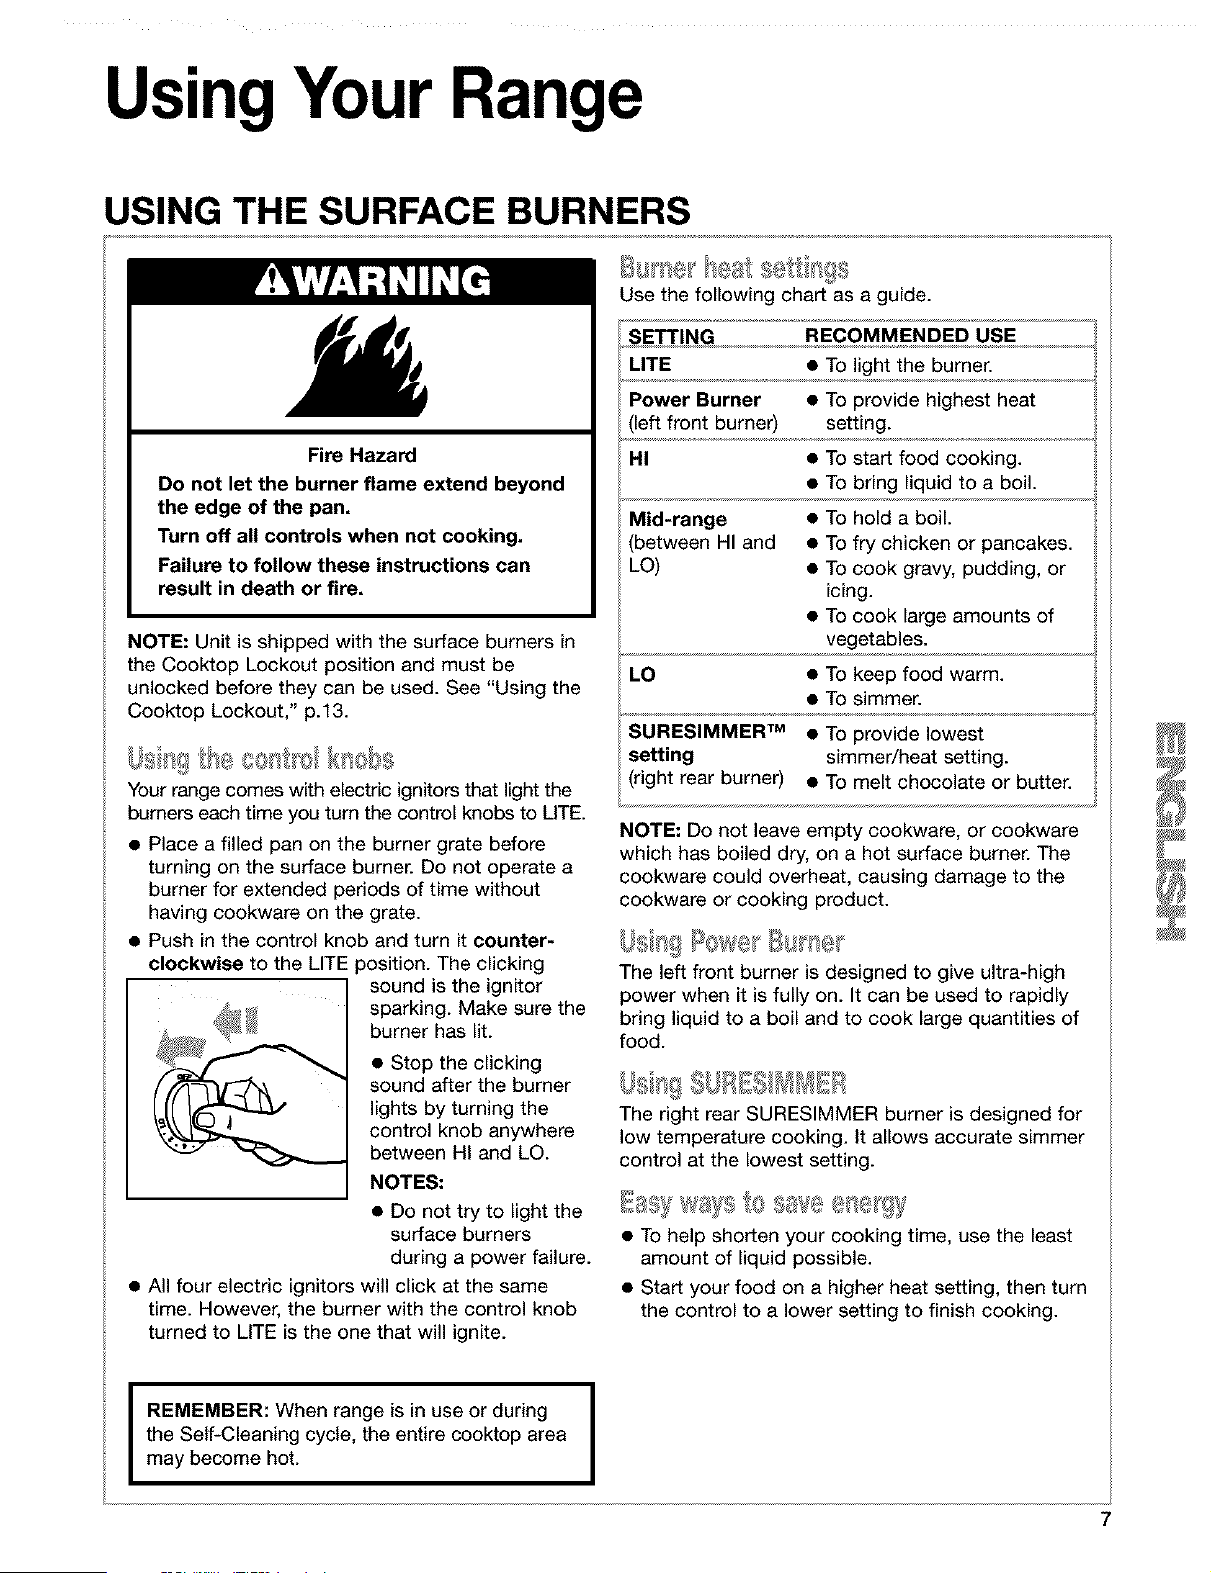
Us tg con 'o knobs
Your range comes with electric ignitors that light the
burners each time you turn the control knobs to UTE.
• Place a filled pan on the burner grate before
turning on the surface burner. Do not operate a
burner for extended periods of time without
having cookware on the grate.
• Push in the control knob and turn it counter-
clockwise to the LITE 3osition. The clicking
sound is the ignitor
sparking. Make sure the
burner has lit.
• Stop the clicking
sound after the burner
lights by turning the
control knob anywhere
between HI and LO.
NOTES."
• Do not try to light the
surface burners
during a power failure.
• All four electric ignitors will click at the same
time. However, the burner with the control knob
turned to LITE is the one that will ignite.
Use the following chart as a guide.
SETTING RECOMMENDED USE
LITE • To light the burner.
Power Burner • To provide highest heat
left front burner) setting.
HI • To start food cooking.
• To bring liquid to a boil.
Mid-range • To hold a boil.
between HI and • To fry chicken or pancakes.
LO) • To cook gravy, pudding, or
icing.
• To cook large amounts of
vegetables.
LO • To keep food warm.
• To simmer.
SURESIMMER vM • To provide lowest
setting simmer/heat setting.
(right rear burner) • To melt chocolate or butter.
NOTE: Do not leave empty cookware, or cookware
which has boiled dry, on a hot surface burner. The
cookware could overheat, causing damage to the
cookware or cooking product.
The left front burner is designed to give @tra-high
power when it is fully on. It can be used to rapidly
bring liquid to a boil and to cook large quantities of
food.
The right rear SURESIMMER burner is designed for
low temperature cooking. It allows accurate simmer
control at the lowest setting.
• To help shorten your cooking time, use the least
amount of liquid possible.
• Start your food on a higher heat setting, then turn
the control to a lower setting to finish cooking.
I
REMEMBER: When range is in use or during [
the Self-Cleaning cycle, the entire cooktop area
I
may become hot.
USING THE SURFACE BURNERS (contd.)
The large diameter of most water-bath or pressure
canners combined with high heat settings for long
periods of time can cause damage to the cooktop.
To protect your range:
• Center the canner over the surface burner. Do
not extend more than 1 inch outside the burner
area.
• Do not place your canner on two surface burners
at the same time.
• Start with hot water, cover with a lid and bring to
a boil; then reduce heat to maintain a boil or
required pressure levels in a pressure canner.
• Refer to your canner manual for specific
instructions.
For up-to-date information on canning, contact
your local U.S. Government Agricultural
Department Extension Office or companies who
manufacture home canning products.
• The pan should have a flat bottom, straight sides,
and a well-fitting lid.
• Choose medium to heavy gauge (thickness)
cookware.
The pan material (metal or glass) affects how
quickly and evenly the pan heats.
When using glass or ceramic cookware, check to
make sure it is suitable for use on surface burners.
To avoid tipping, make sure pots and pans are
centered on the grates.
CHARACTERISTICS OF COOKWARE MATERIALS
The pan material affects how fast heat transfers from the surface cooking area through the pan material and how
evenly heat spreads over the pan bottom. Choose pans that provide the best cooking results.
Aluminum • Heats quickly and evenly.
• Use for all types of cooking.
• Medium or heavy thickness is best for most cooking.
• Used as a core or base in cookware to provide even heating.
Cast iron • Heats slowly and evenly.
• Good for browning and frying.
• Maintains heat for slow cooking.
• Can be coated with porcelain enamel.
Ceramic or • Heats slowly and unevenly.
ceramic glass • Use on tow to medium settings.
• Follow manufacturer's instructions.
Copper • Heats very quickly and evenly.
• Used as a core or base in cookware to provide even heating.
Earthenware • Can be used for cooktop cooking if recommended by the
manufacturer.
• Use on low settings.
Porcelain enamel-on-steel or • See cast iron and stainless steel.
enamel-on-cast iron
Stainless steel • Heats quickly but unevenly.
• A core or base of aluminum or copper on the €o0kware Pr0vides
even heating.
• Can be coated with porcelain enamel.

USING THE OVEN
S IXJR[;£=dti sci wtls
The integrated handle area makes pulling out the
STURDIGLIDE rack simple. The opening is large
enough for a potholder or oven mitt.
S [IJRBIQLI#I' HALFoRRCR
The STURDIGLIDE TM HALF-RACK with removeable
insert is a space maximizer. When attached, they
make a full rack. The insert can also be used on
the counter for a cooling rack.
Position a full rack on guide 1 or 2 and the half-
rack on guide 3 or 4. On the full rack place large
items on right side and deeper, covered dishes on
left side. Place shallow dishes on the half-rack. It
may be necessary to increase cooking time. At the
end of cooking, carefully remove items from the
oven.
Place the STURDIGLIDE racks where you need
them before turning on the oven.
• To move a rack, pull it out to the stop position,
raise the front edge and lift it out.
• Be sure the rack(s) is level.
• Use pot holders or oven mitts to protect your hands
if rack(s) must be moved while the oven is hot.
• For best performance, cook on one rack. Place
the rack so the top of the food will be centered in
the oven.
• When cooking with two racks, arrange the racks
on the 2nd and 4th rack guides. Two sheets of
cookies may be baked if sheets are switched at
approximately three quarters of the total bake
time. Increase baking time, if necessary.
• For best results allow 2 inches of space around
each pan and between pans and oven walls. Hot
air must circulate around the pans in the oven for
even heat to reach all parts of the oven. This
results in better baking.
It,- _ql_ *= -I ,,=.....
Use this rack position when roasting food too large
to be placed on the first
rack position.
For proper roasting,
follow these guidelines:
• To avoid spillage,
remove food before
pulling out the rack.
• Tilt the rack up at the
front before pulling it
over the door.
• Use an adequate amount of liquid in the pan
(meat juices or water) so your food does not get
overdone.
Where to place pans:
WHEN YOU HAVE PLACE
1 pan In center of the oven rack.
2 pans Side by side or slightly
staggered.
3 or 4 pans In opposite corners on
each oven rack. Stagger
pans so no pan is directly
over another.
Rack placement for specific foods:
FOOD RACK POSITION
Frozen pies, large 1st or 2nd rack guide
roasts, turkeys, from bottom
angel food cakes
Bundt cakes, most 2nd rack guide from
quick breads, yeast bottom
breads, casseroles,
Cookies, biscuits,
muffins, cakes,
nonfrozen pies
2nd or 3rd rack guide
from bottom
NOTE: For information on where to place your rack
when broiling, see "Broiling guidelines," pp. 19, 20.
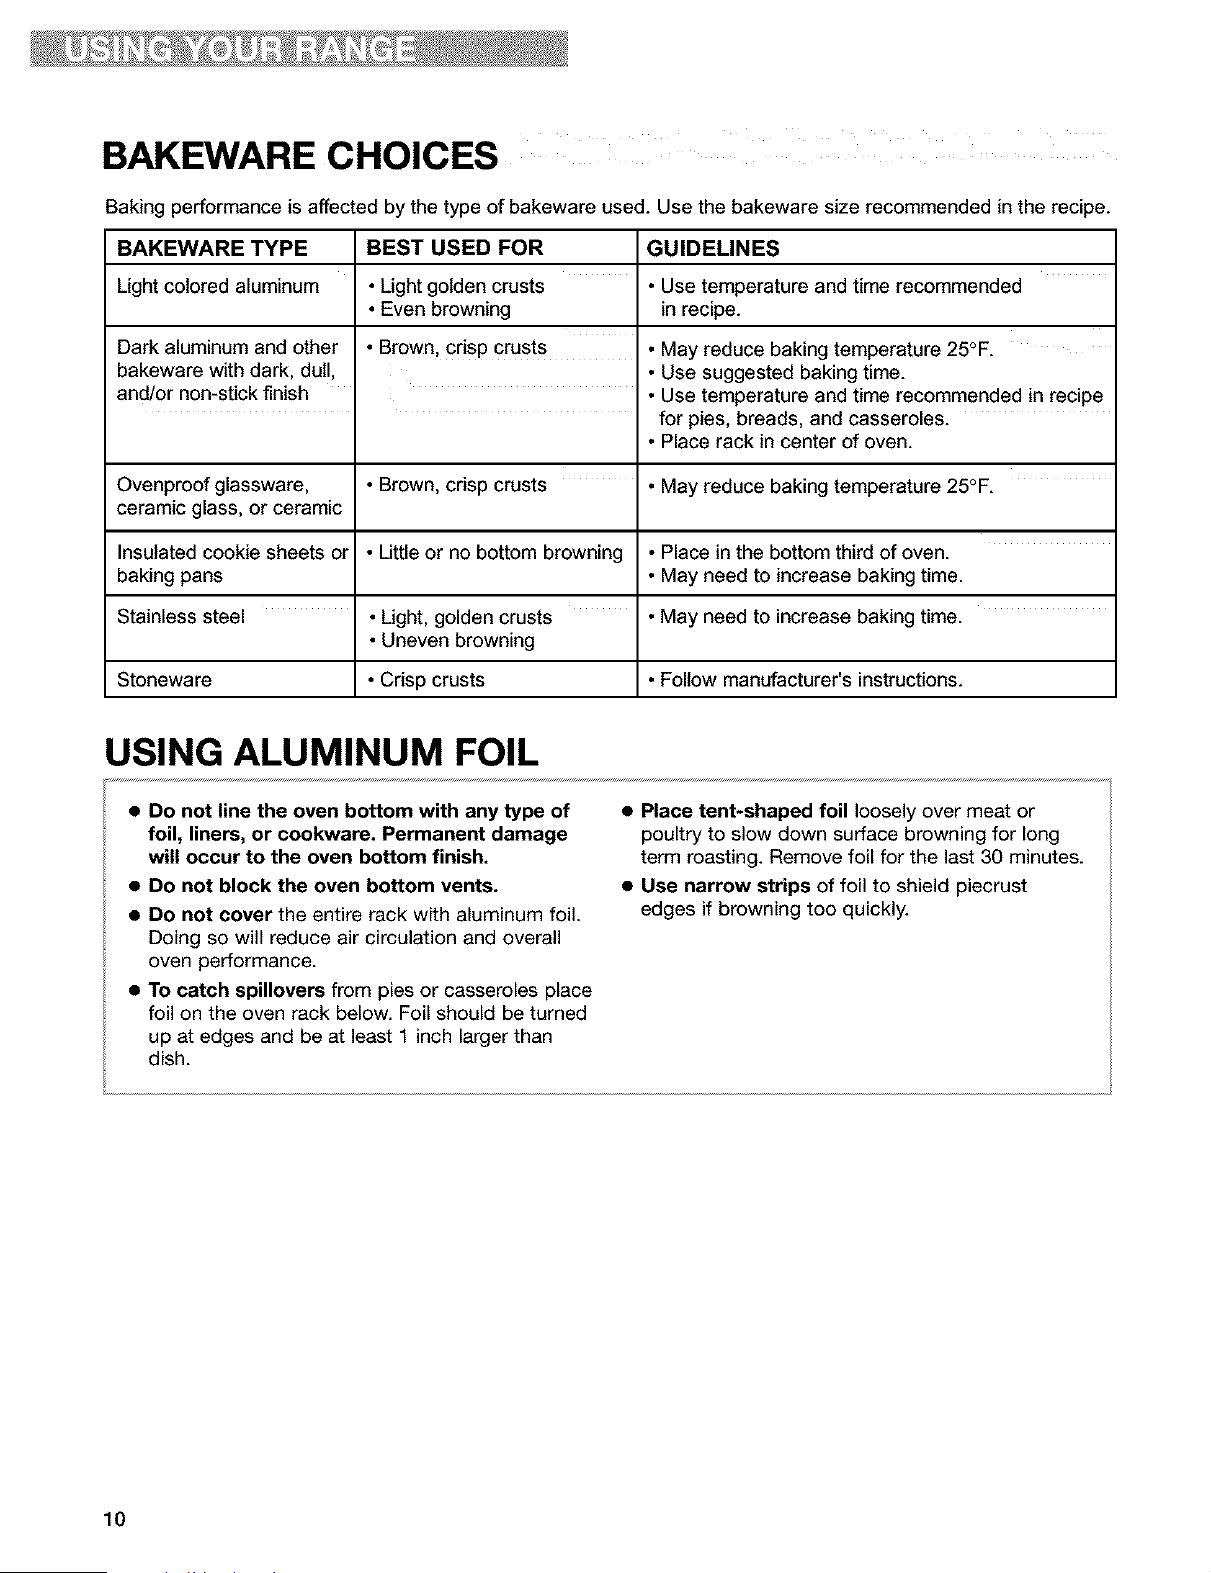
BAKEWARE CHOICES
Baking performance is affected by the type of bakeware used. Use the bakeware size recommended in the recipe.
BAKEWARE TYPE BEST USED FOR GUIDELINES
Light colored aluminum • Light golden crusts • Use temperature and time recommended
• Even browning in recipe.
Dark aluminum and other • Brown, crisp crusts • May reduce baking temperature 25°F.
bakeware with dark, dull, • Use suggested baking time.
and/or non-stick finish • Use temperature and time recommended in recipe
for pies, breads, and casseroles.
• Place rack in center of oven.
Ovenproof glassware, • Brown, crisp crusts • May reduce baking temperature 25°F.
ceramic glass, or ceramic
Insulated cookie sheets or • Little or no bottom browning • Place in the bottom third of oven.
baking pans • May need to increase baking time.
Stainless steel • Light, golden crusts • May need to increase baking time.
• Uneven browning
Stoneware • Crisp crusts • Follow manufacturer's instructions.
USING ALUMINUM FOIL
• Do not line the oven bottom with any type of
foil, liners, or cookware. Permanent damage
will occur to the oven bottom finish.
• Do not block the oven bottom vents.
• Do not cover the entire rack with aluminum foil.
Doing so will reduce air circulation and overall
oven performance.
• To catch spillovers from pies or casseroles place
foil on the oven rack below. Foil should be turned
up at edges and be at least 1 inch larger than
dish.
• Place tent-shaped foil loosely over meat or
poultry to slow down surface browning for long
term roasting. Remove foil for the last 30 minutes.
• Use narrow strips of foil to shield piecrust
edges if browning too quickly.
10
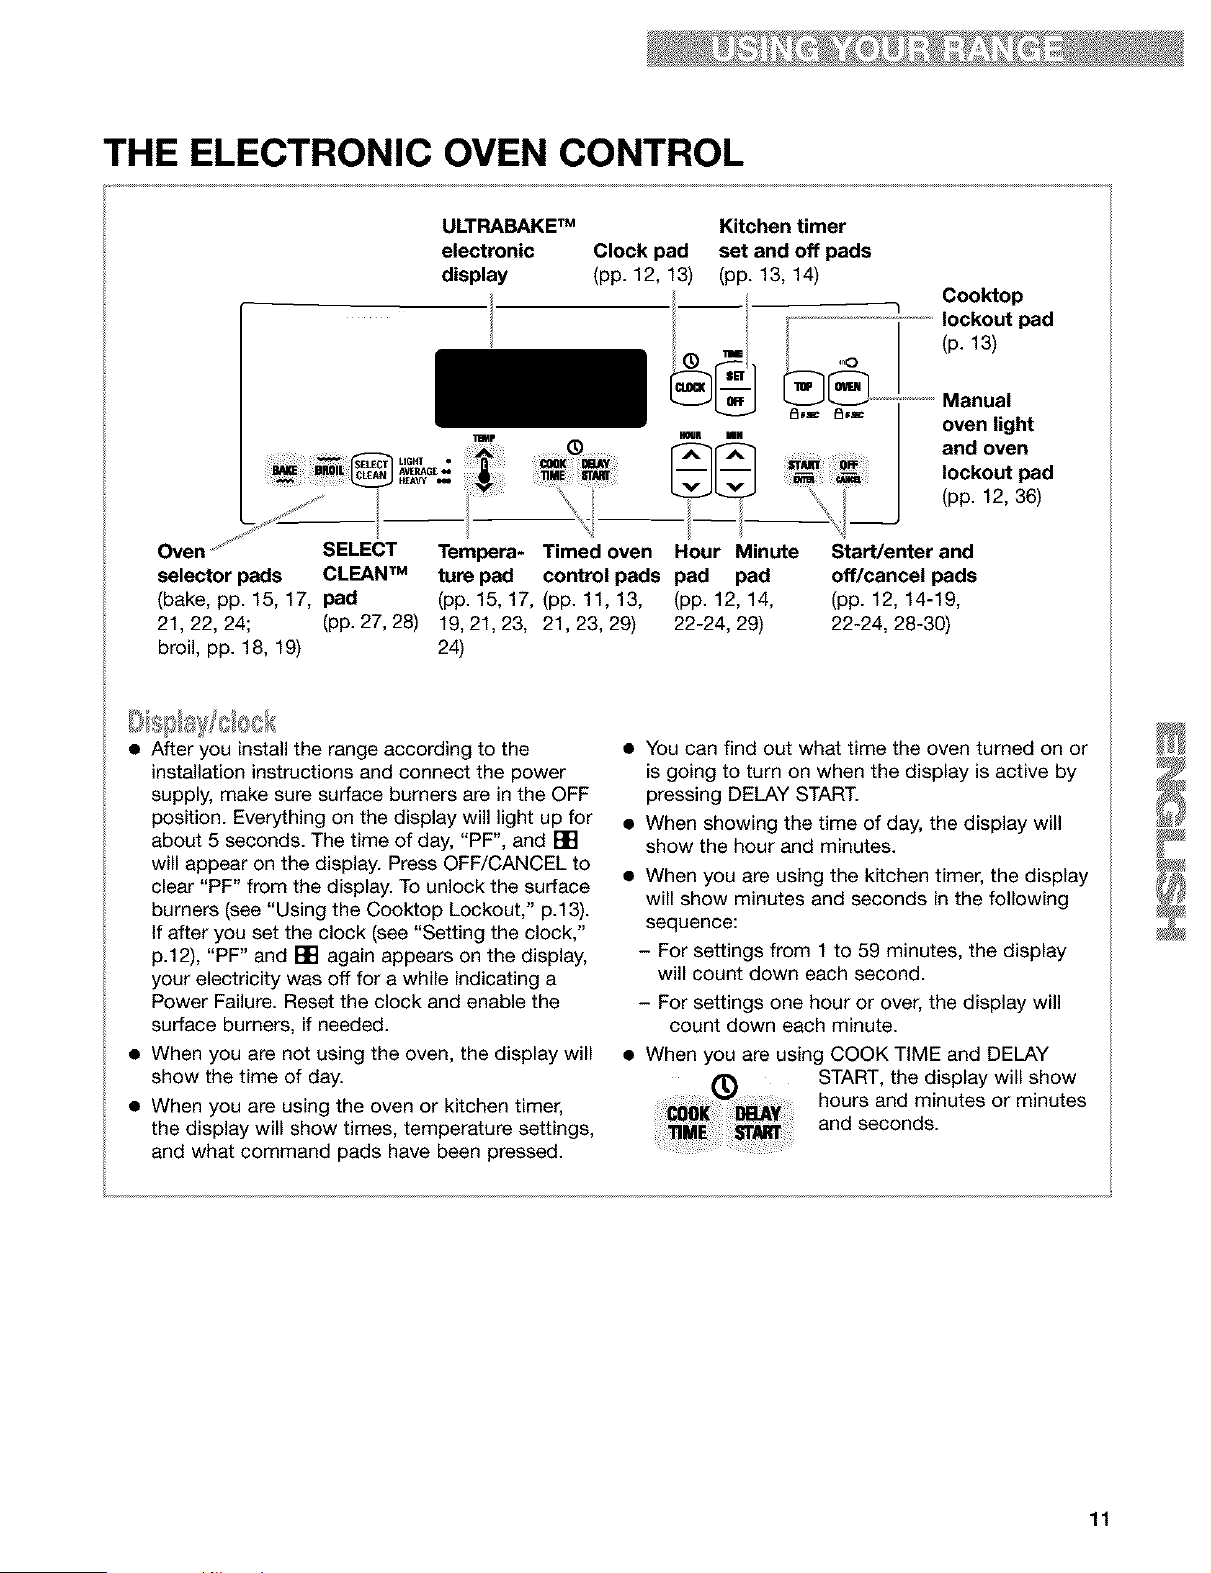
THE ELECTRONIC OVEN CONTROL
ULTRABAKETM
electronic
display
Clock pad
(pp. 12, 13)
/--i
HOUR tON
Kitchen timer
set and off pads
(pp. 13, 14)
"q Cooktop
lockout pad
(p. 13)
;i i_ _'_ U6af • _1[ i I_y ¸
Bi_l_ niloP. _ AVERAC-_w
/
Oven ..... SELECT Tempera- Timed oven Hour Minute
selector pads CLEAN TM ture pad control pads pad pad
(bake, pp. 15, 17, pad (pp. 15, 17, (pp. 11, 13, (pp. 12, 14,
21, 22, 24; (pp. 27, 28) 19, 21, 23, 21, 23, 29) 22-24, 29)
broil, pp. 18, 19) 24)
Manual
oven light
and oven
lockout pad
(pp. 12, 36)
Start/enter and
off/cancel pads
(pp. 12, 14-19,
22-24, 28-30)
• After you install the range according to the
installation instructions and connect the power
supply, make sure surface burners are in the OFF
position. Everything on the display will light up for
about 5 seconds. The time of day, "PF", and []
will appear on the display. Press OFF/CANCEL to
clear "PF" from the display. To unlock the surface
burners (see "Using the Cooktop Lockout," p.13).
If after you set the clock (see "Setting the clock,"
p.12), "PF" and [] again appears on the display,
your electricity was off for a while indicating a
Power Failure. Reset the clock and enable the
surface burners, if needed.
• When you are not using the oven, the display will
show the time of day.
• When you are using the oven or kitchen timer,
the display will show times, temperature settings,
and what command pads have been pressed.
• You can find out what time the oven turned on or
is going to turn on when the display is active by
pressing DELAY START.
• When showing the time of day, the display will
show the hour and minutes.
• When you are using the kitchen timer, the display
will show minutes and seconds in the following
sequence:
- For settings from 1 to 59 minutes, the display
will count down each second.
- For settings one hour or over, the display will
count down each minute.
• When you are using COOK TIME and DELAY
START, the display will show
hours and minutes or minutes
and seconds.
11
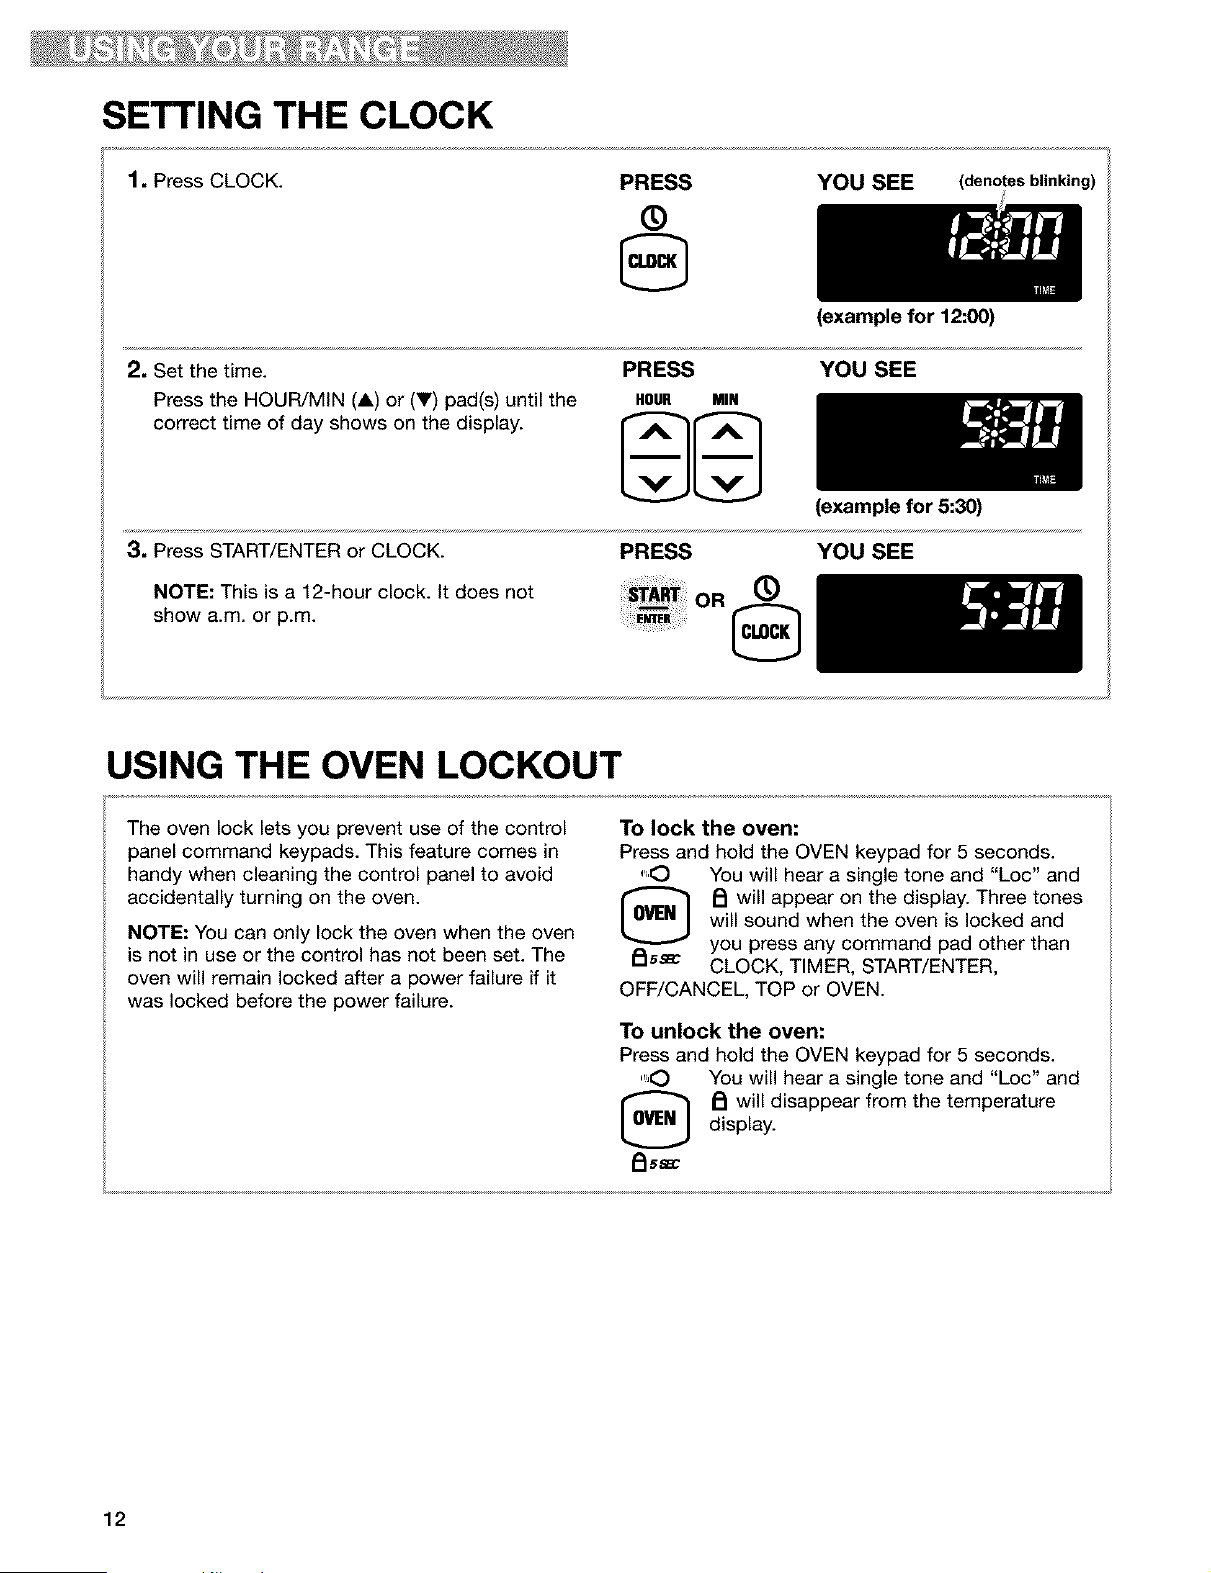
SETTING THE CLOCK
1. Press CLOCK.
PRESS
®
YOU SEE (denotes blinking)
2, Set the time.
Press the HOUR/MIN (A) or (V) pad(s) until the
correct time of day shows on the display.
PRESS
HOUR MIN
(example for 12:00)
YOU SEE
3, Press START/ENTER or CLOCK.
NOTE: This is a 12-hour clock. It does not
show a.m. or p.m.
PRESS
OR ®
(example for 5:30)
YOU SEE
USING THE OVEN LOCKOUT
The oven lock lets you prevent use of the control
panel command keypads. This feature comes in
handy when cleaning the control panel to avoid
accidentally turning on the oven.
NOTE: You can only lock the oven when the oven
is not in use or the control has not been set. The
oven will remain locked after a power failure if it
was locked before the power failure.
To lock the oven:
Press and hold the OVEN keypad for 5 seconds.
",.O You will hear a single tone and "Loc" and
[_ PI will appear on the display. Three tones
will sound when the oven is locked and
you press any command pad other than
_15_ CLOCK, TIMER, START/ENTER,
OFF/CANCEL, TOP or OVEN.
To unlock the oven:
Press and hold the OVEN keypad for 5 seconds.
",O You will hear a single tone and "Loc" and
_ will disappear from the temperature
display.
FIs_
12
USING THE COOKTOP LOCKOUT
The cooktop lock prevents unintended use of the
cooktop burners by shutting off the gas flow to the
burners. Unit is shipped with the surface burners in
the Cooktop Lockout position, and must be
unlocked before they can be used. The Cooktop
Lockout will be engaged when appliance is first
plugged in.
NOTES:
• The cooktop will remain locked after a power
failure if it was locked before the power failure.
• If the product loses power, appliance will automat-
ically go into the lockout position. You will be
unable to activate the burners until power is
restored, and the Cooktop Lockout is disengaged.
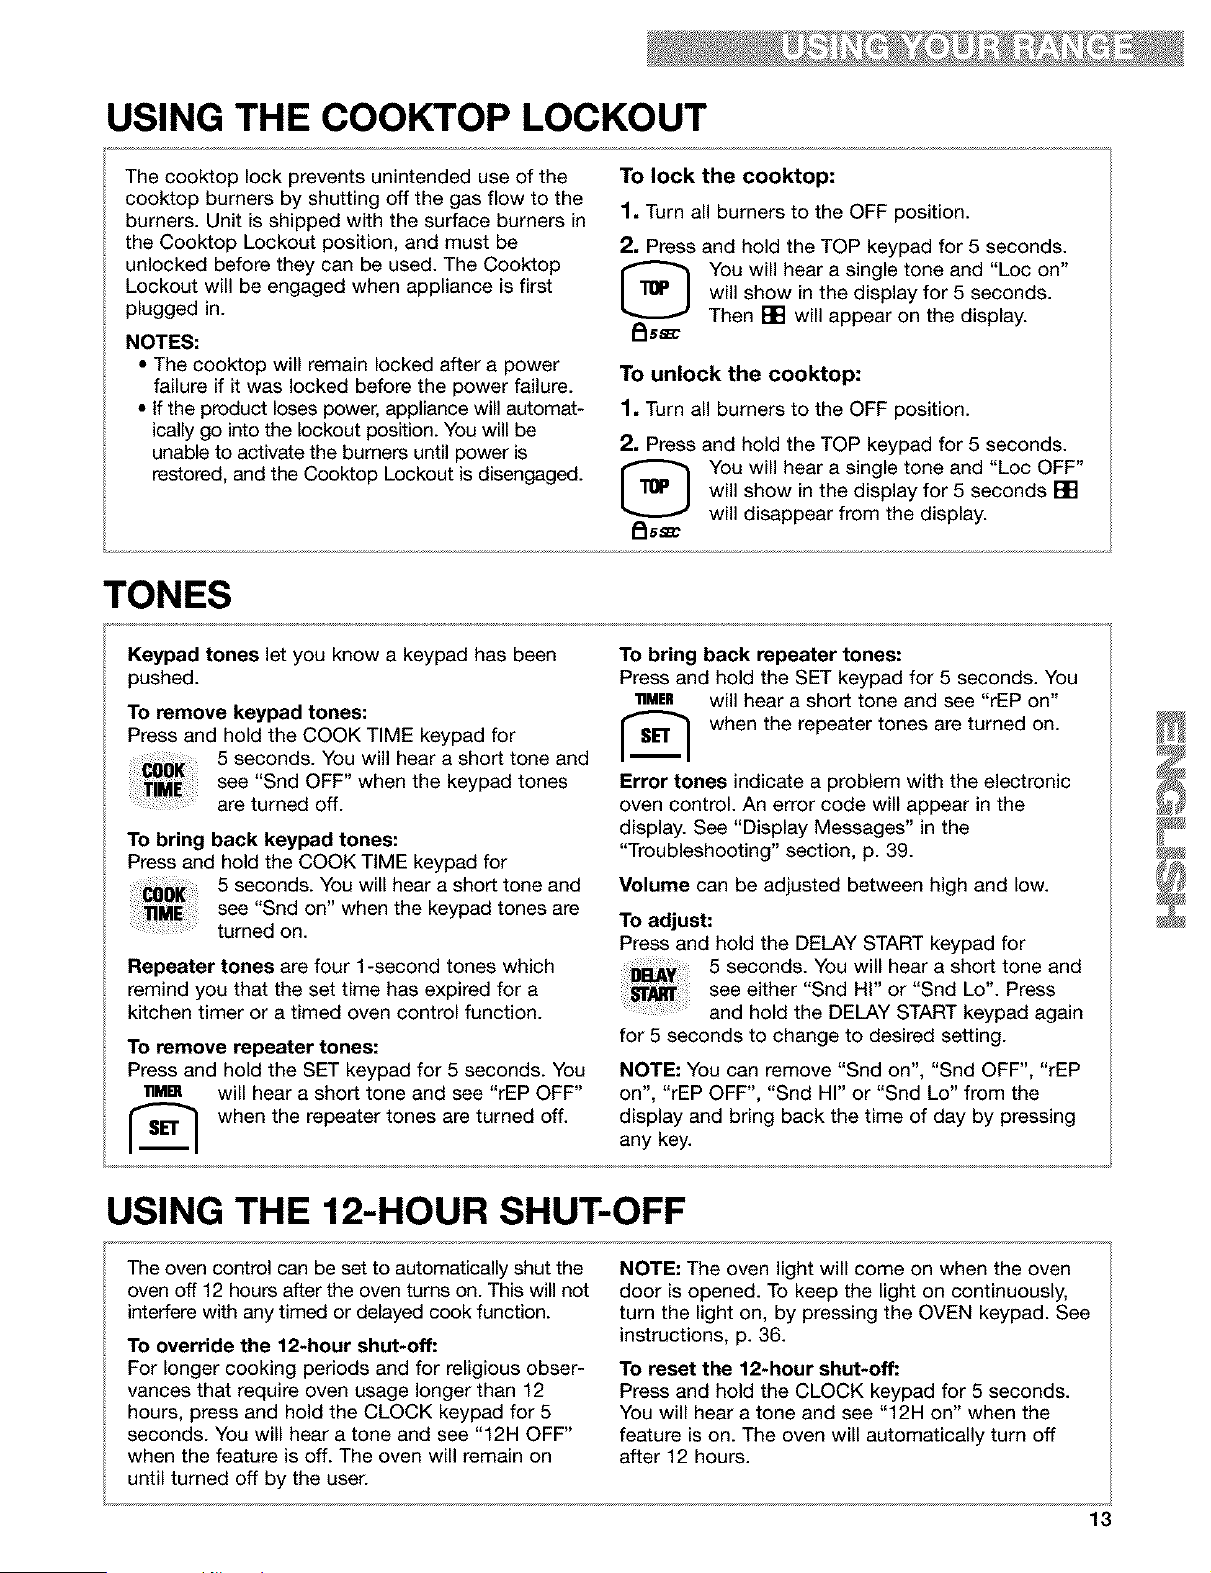
To lock the cooktop:
1, Turn all burners to the OFF position.
2, Press and hold the TOP keypad for 5 seconds.
You will hear a single tone and "Loc on"
will show in the display for 5 seconds.
Then [] will appear on the display.
To unlock the cooktop:
1, Turn all burners to the OFF position.
2, Press and hold the TOP keypad for 5 seconds.
[_ ou will hear a single tone and "Loc OFF"
will show in the display for 5 seconds []
will disappear from the display.
/_ssm
TONES
Keypad tones let you know a keypad has been
pushed.
To remove keypad tones:
Press and hold the COOK TIME keypad for
5 seconds. You will hear a short tone and
see "Snd OFF" when the keypad tones
are turned off.
To bring back keypad tones:
Press and hold the COOK TIME keypad for
5 seconds. You will hear a short tone and
see "Snd on" when the keypad tones are
turned on.
Repeater tones are four 1-second tones which
remind you that the set time has expired for a
kitchen timer or a timed oven control function.
To remove repeater tones:
Press and hold the SET keypad for 5 seconds. You
lnM[] will hear a short tone and see "rEP OFF"
when the repeater tones are turned off.
To bring back repeater tones:
Press and hold the SET keypad for 5 seconds. You
11MER will hear a short tone and see "rEP on"
when the repeater tones are turned on.
Error tones indicate a problem with the electronic
oven control. An error code will appear in the
display. See "Display Messages" in the
"Troubleshooting" section, p. 39.
Volume can be adjusted between high and low.
To adjust:
Press and hold the DELAY START keypad for
5 seconds. You will hear a short tone and
see either "Snd Hi" or "Snd Lo'. Press
and hold the DELAY START keypad again
for 5 seconds to change to desired setting.
NOTE: You can remove "Snd on", "Snd OFF", "rEP
on", "rEP OFF", "Snd HI" or "Snd Lo" from the
display and bring back the time of day by pressing
any key.
USING THE 12-HOUR SHUT-OFF
The oven control can be set to automatically shut the
oven off 12 hours after the oven turns on. This will not
interfere with any timed or delayed cook function.
To override the 12-hour shut-off:
For longer cooking periods and for religious obser-
vances that require oven usage longer than 12
hours, press and hold the CLOCK keypad for 5
seconds. You will hear a tone and see "12H OFF"
when the feature is off. The oven will remain on
until turned off by the user.
NOTE: The oven light will come on when the oven
door is opened. To keep the light on continuously,
turn the light on, by pressing the OVEN keypad. See
instructions, p. 36.
To reset the 12-hour shut-off:
Press and hold the CLOCK keypad for 5 seconds.
You will hear a tone and see "12H on" when the
feature is on. The oven will automatically turn off
after 12 hours.
13
USING THE ELECTRONIC KITCHEN TIMER
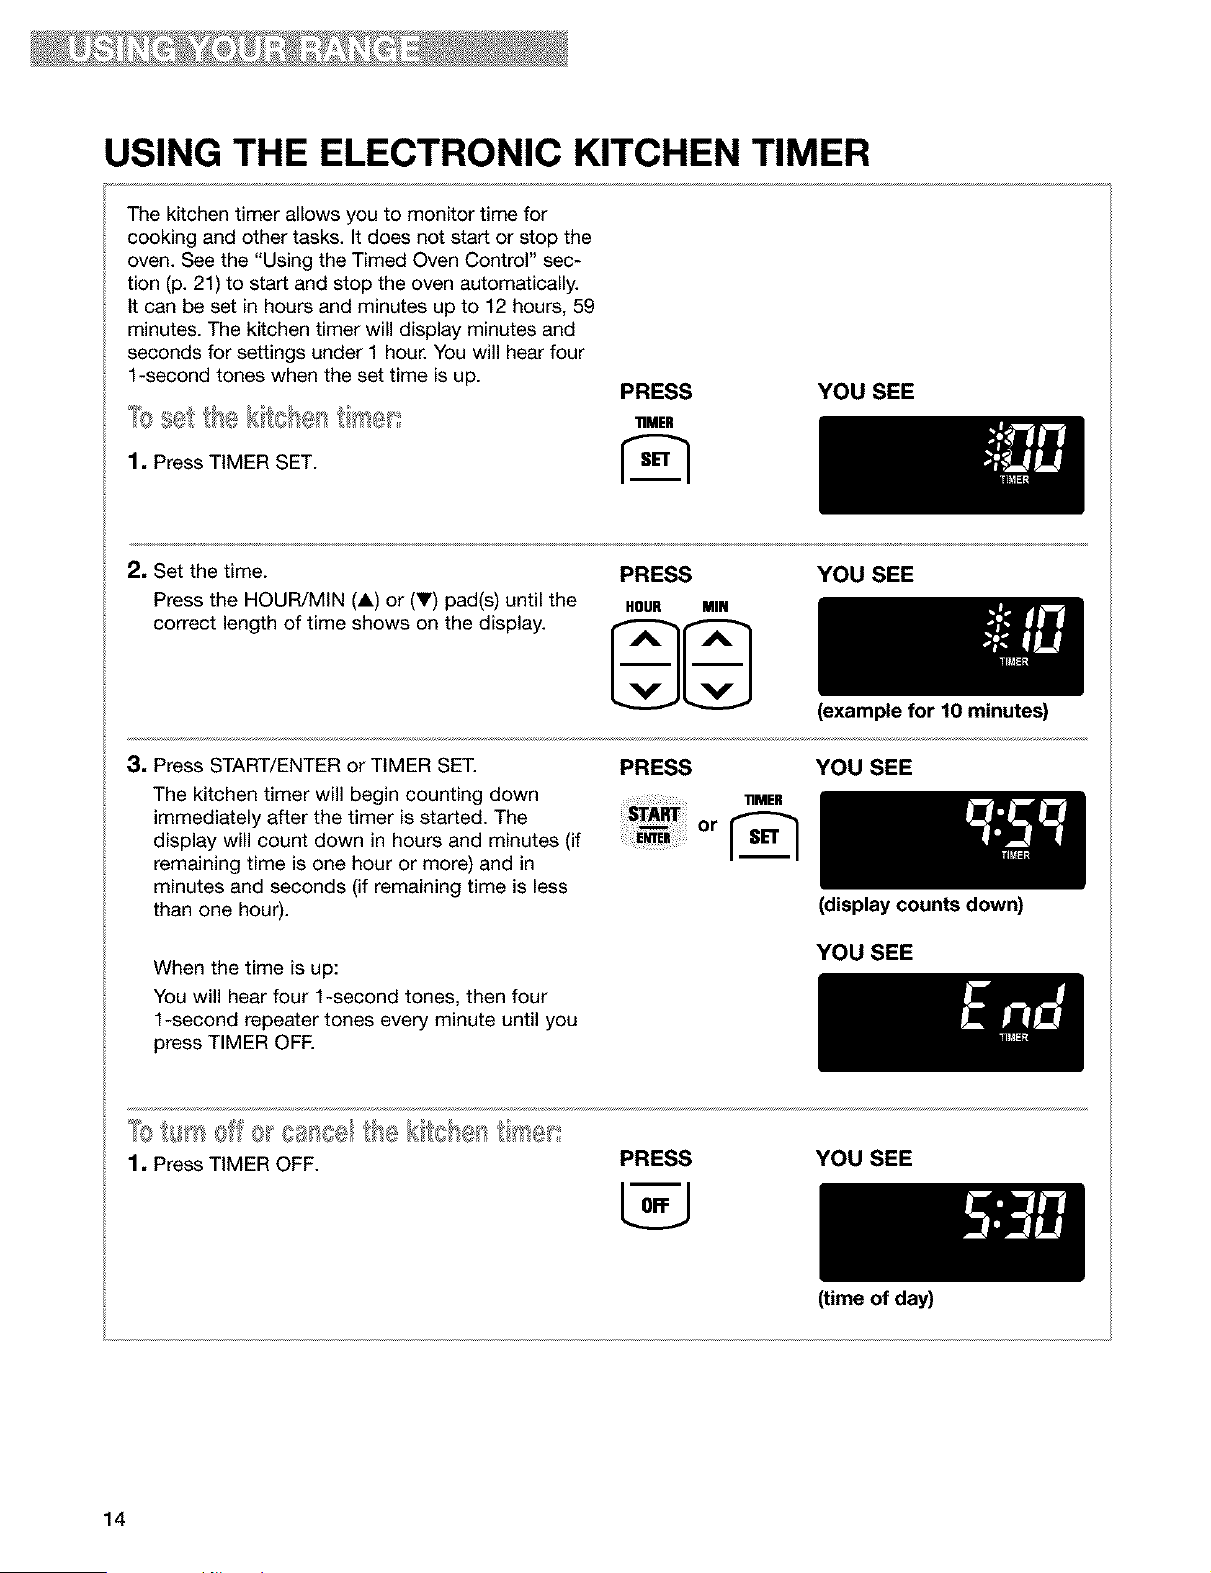
The kitchen timer allows you to monitor time for
cooking and other tasks. It does not start or stop the
oven. See the "Using the Timed Oven Control" sec-
tion (p. 21) to start and stop the oven automatically.
It can be set in hours and minutes up to 12 hours, 59
minutes. The kitchen timer will display minutes and
seconds for settings under 1 hour. You will hear four
1-second tones when the set time is up.
1, Press TIMER SET.
PRESS YOU SEE
"riMER
2. Set the time.
Press the HOUR/MIN (A) or (V) pad(s) until the
correct length of time shows on the display.
PRESS YOU SEE
HOUR MIN
3. Press START/ENTER or TIMER SET.
The kitchen timer will begin counting down
immediately after the timer is started. The
display will count down in hours and minutes (if
remaining time is one hour or more) and in
minutes and seconds (if remaining time is less
than one hour).
When the time is up:
You will hear four 1-second tones, then four
1-second repeater tones every minute until you
press TIMER OFF.
(example for 10 minutes)
PRESS YOU SEE
(display counts down)
YOU SEE
1, Press TIMER OFF.
PRESS YOU SEE
(time of day)
14
STARTING/CANCELING A FUNCTION
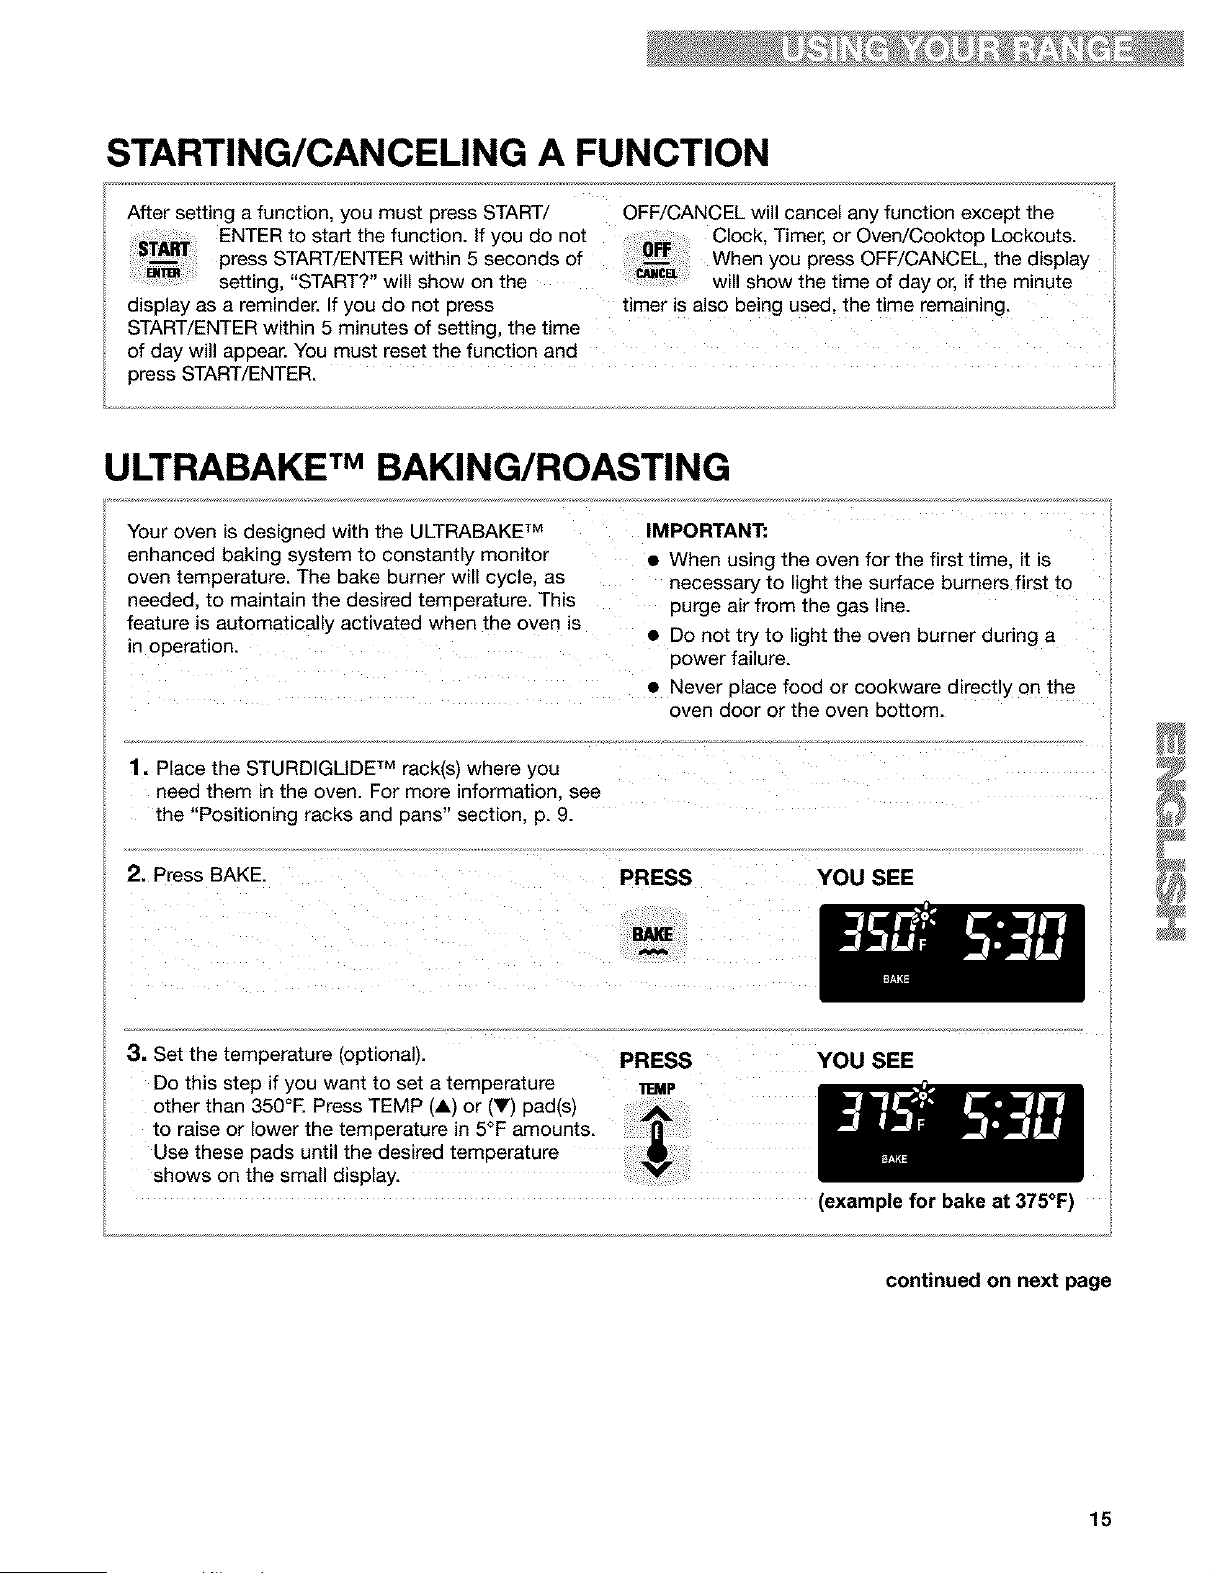
After setting a function, you must press START/ OFF/CANCEL will cancel any function except the
ENTER to start the function. If you do not Clock, Timer, or Oven/Cooktop Lockouts.
press START/ENTER within 5 seconds of When you press OFF/CANCEL, the display
setting, "START?" will show on the will show the time of day or, if the minute
display as a reminder. If you do not press timer is also being used, the time remaining.
START/ENTER within 5 minutes of setting, the time
of day will appear. You must reset the function and
press START/ENTER.
ULTRABAKE TM BAKING/ROASTING
Your oven is designed with the ULTRABAKE TM IMPORTANT:
enhanced baking system to constantly monitor
oven temperature. The bake burner will cycle, as
needed, to maintain the desired temperature. This
feature is automatically activated when the oven is
in operation.
• When using the oven for the first time, it is
necessary to light the surface burners first to
purge air from the gas line.
• Do not try to light the oven burner during a
power failure.
• Never place food or cookware directly on the
oven door or the oven bottom.
1. Place the STURDIGLIDE TM rack(s) where you
need them in the oven. For more information, see
the "Positioning racks and pans" section, p. 9.
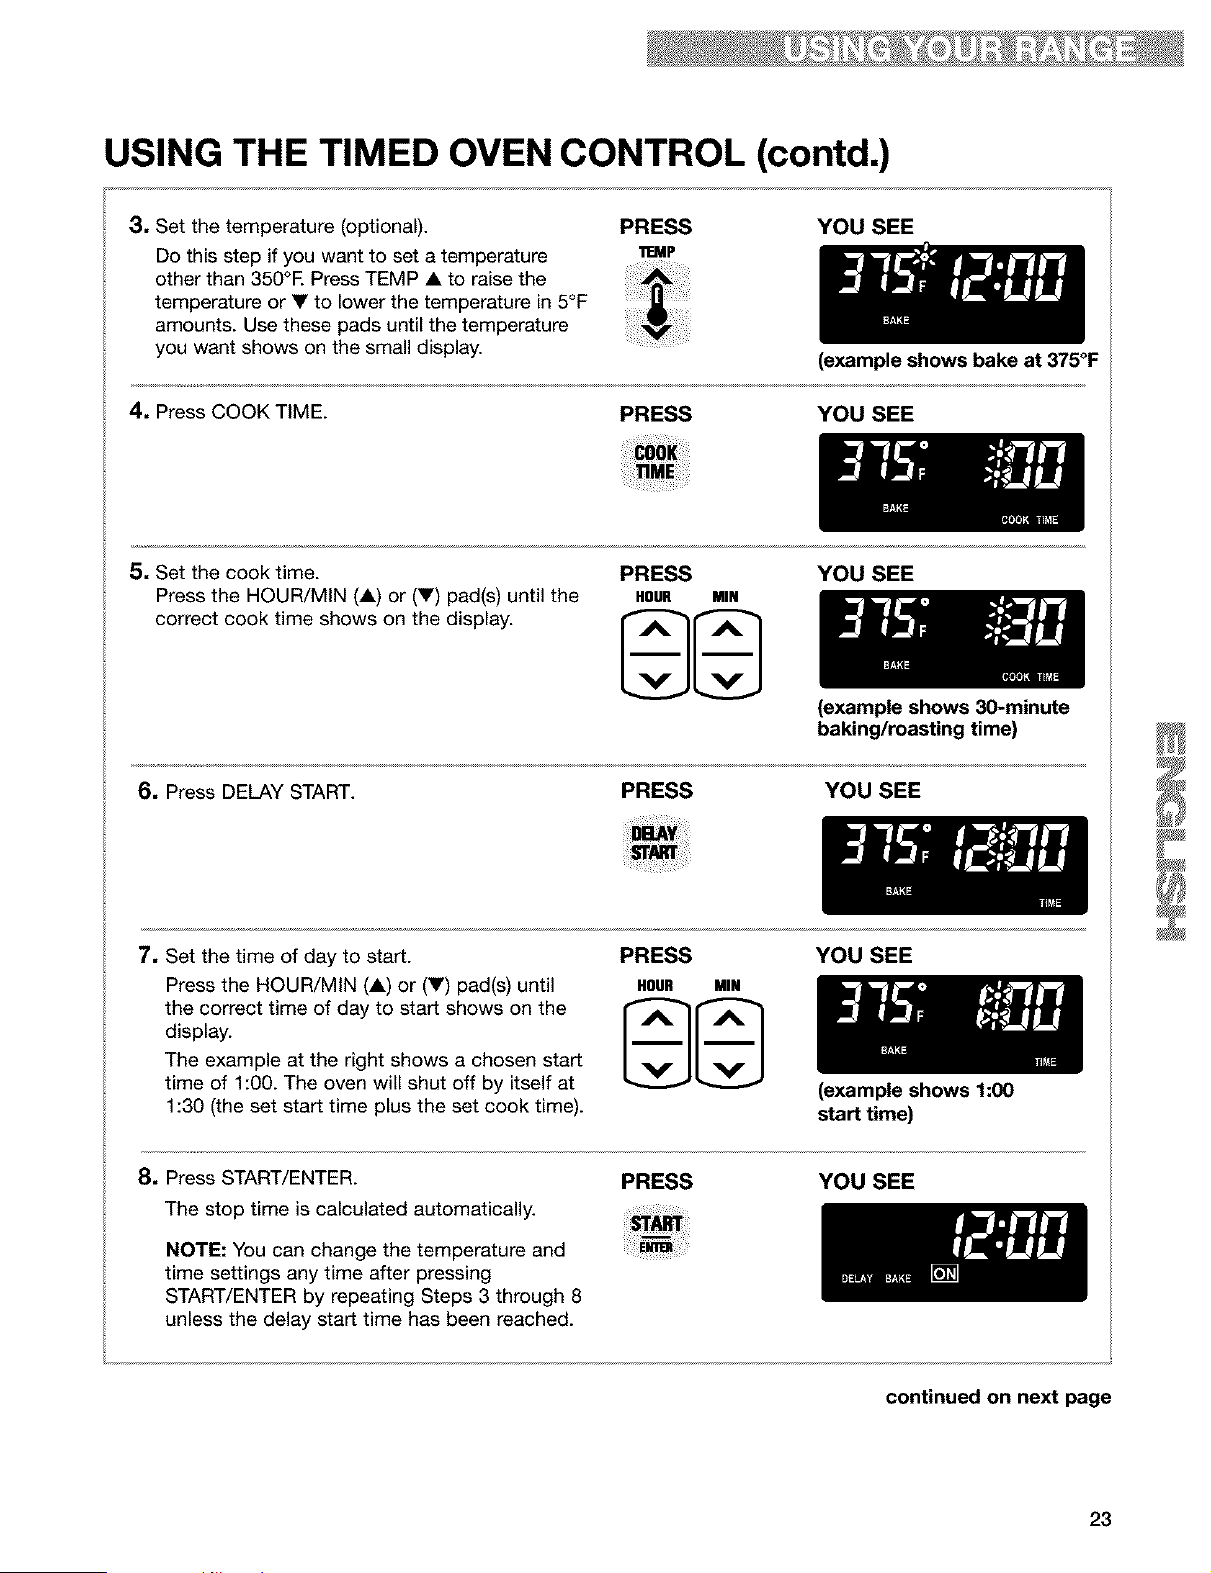
3. Set the temperature (optional). PRESS YOU SEE
Do this step if you want to set a temperature _.MP
other than 350°E Press TEMP (A) or (Y) pad(s)
to raise or lower the temperature in 5°F amounts.
Use these pads until the desired temperature
shows on the sma d sp ay.
(example for bake at 375°F)
continued on next page
15

ULTRABAKE TMBAKING/ROASTING (contd.)
4. When roasting, preheating the oven is not nec-
cessary unless your recipe
recommends it.
NOTE." The oven will heat
normally even though
"PrE HEAt" is displayed
and then maintain the
selected cooking
temperature.
• For even cooking, place the meat on a rack in a
shallow pan. This keeps the meat out of the
drippings and allows the heat to circulate better.
• Use a meat thermometer for the most accurate
doneness. Insert it so the tip is in the center of
the largest muscle or thickest portion of the meat
or poultry. Make sure the thermometer is not
touching bone, fat, or the bottom of the pan.
5. Press START/ENTER.
A preheat mode is entered after the oven
temperature has been set and START has been
pressed. Once the preheat conditioning ends,
the selected oven temperature replaces "PrE
HEAt" on the display. You will hear a 1-second
tone, indicating the oven is ready to use.
The ULTRABAKE TM system electronically
regulates the preheat and temperature to maintain
a precise temperature range for the best cooking
results.
PRESS YOU SEE
YOU SEE
NOTES:
• You can change the temperature setting any
time after pressing START/ENTER. You do not
have to press START/ENTER again.
• While the oven is in the preheat mode, you can
see the set temperature for 5 seconds by
pressing BAKE.
(example for set temperature
of 350°F)
6. When baking, put your food in the oven after
the preheat conditioning
ends. During baking/
roasting, the oven burner
will turn on and off to keep
the oven temperature at
the setting.
• To avoid loss of heat, open the oven door as little
as possible.
• Use the timer to keep track of cooking time.
• Plan your meals for the most efficient use of the
oven by cooking more than one food at a time, or
baking while the oven is still hot after cooking a
meal.
7, After cooking, turn off the oven.
PRESS YOU SEE
16
(time of day)
READJUSTING THE OVEN TEMPERATURE CONTROL
(OPTIONAL)
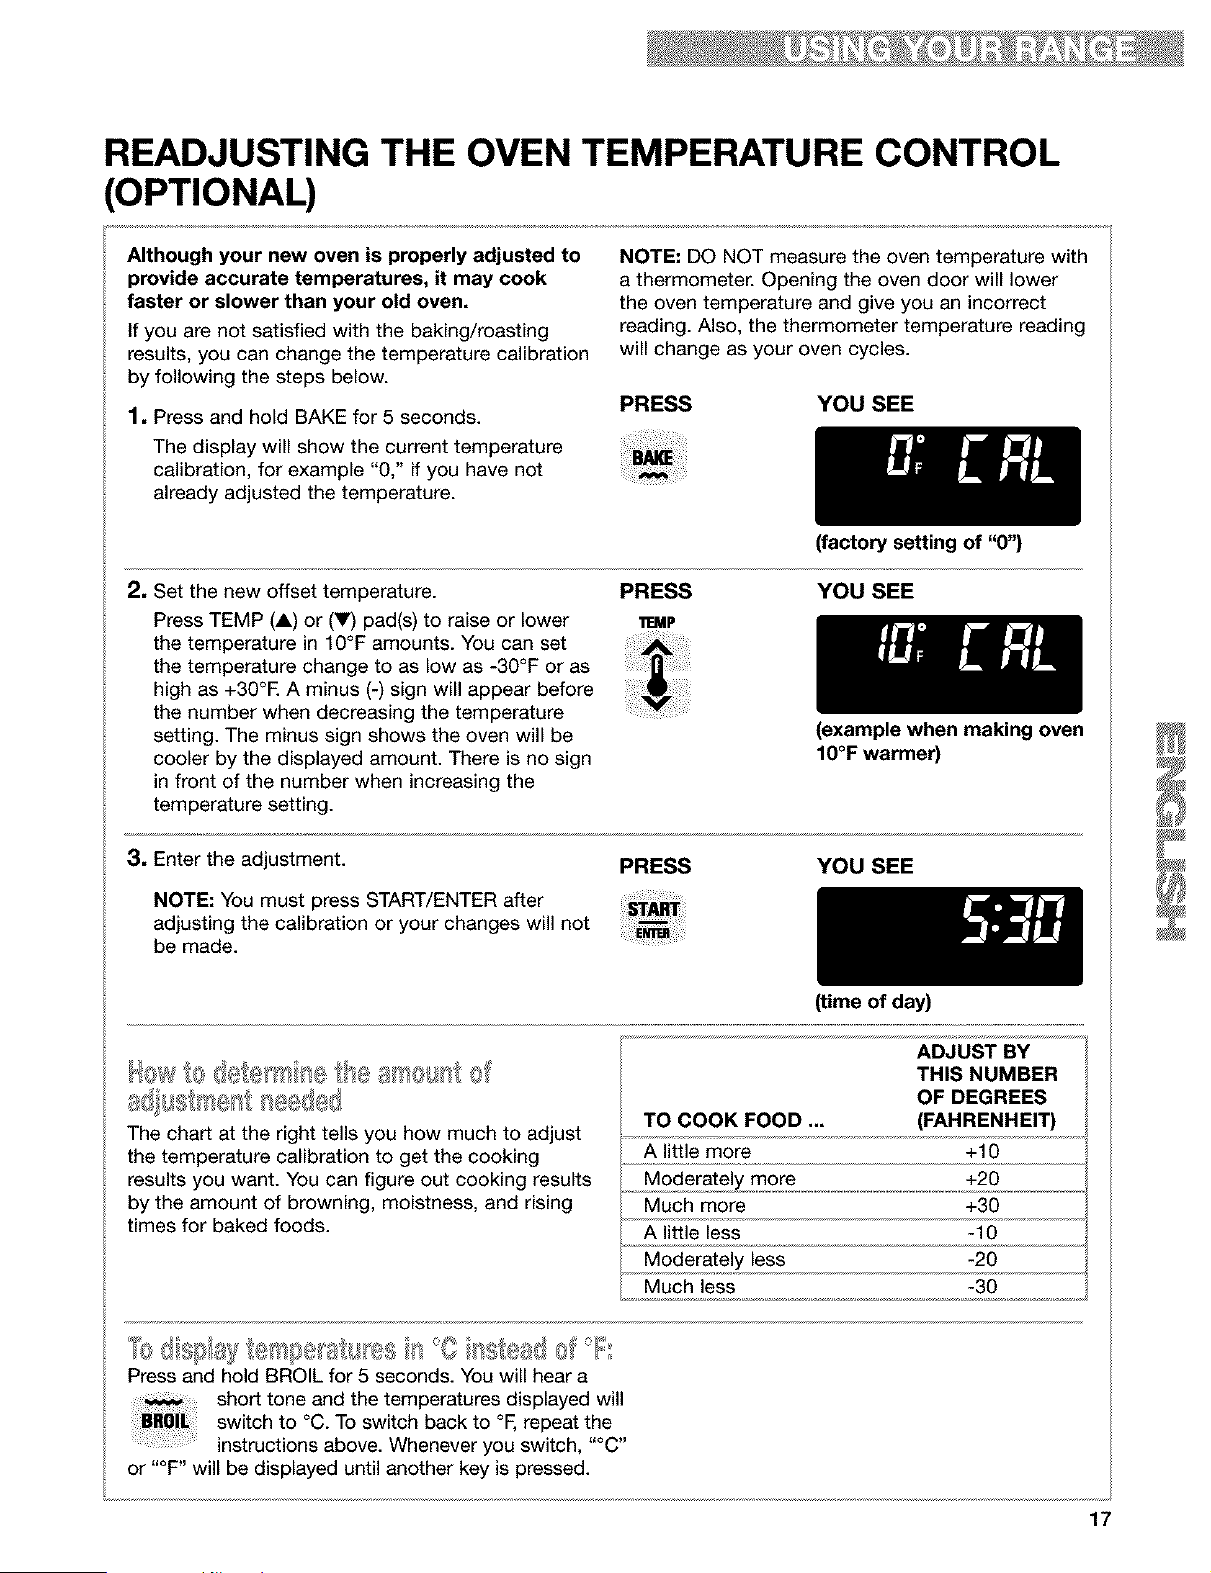
Although your new oven is properly adjusted to
provide accurate temperatures, it may cook
faster or slower than your old oven.
If you are not satisfied with the baking/roasting
results, you can change the temperature calibration
by following the steps below.
1, Press and hold BAKE for 5 seconds.
The display will show the current temperature
calibration, for example "0," if you have not
already adjusted the temperature.
NOTE: DO NOT measure the oven temperature with
a thermometer. Opening the oven door will lower
the oven temperature and give you an incorrect
reading. Also, the thermometer temperature reading
will change as your oven cycles.
PRESS YOU SEE
2, Set the new offset temperature.
Press TEMP (A) or (V) pad(s) to raise or lower
the temperature in 10°F amounts. You can set
the temperature change to as low as -30°F or as
high as +30°E A minus (-) sign will appear before
the number when decreasing the temperature
setting. The minus sign shows the oven will be
cooler by the displayed amount. There is no sign
in front of the number when increasing the
temperature setting.
(factory setting of "0")
PRESS YOU SEE
11EMP
3, Enter the adjustment.
NOTE: You must press START/ENTER after
adjusting the calibration or your changes will not
be made.
(example when making oven
IO°F warmer)
PRESS YOU SEE
a8 , stse s@d®8
The chart at the right tells you how much to adjust
the temperature calibration to get the cooking
results you want. You can figure out cooking results
by the amount of browning, moistness, and rising
times for baked foods.
(time of day)
ADJUST BY
THIS NUMBER
OF DEGREES
TO COOK FOOD ... (FAHRENHEIT)
A little more +10
Moderately more +20
Much more +30
A little less -10
Moderately less -20
Much less -30
Press and hold BROIL for 5 seconds. You will hear a
short tone and the temperatures displayed will
switch to °O. To switch back to °F, repeat the
instructions above. Whenever you switch, "°g"
or "°F" will be displayed until another key is pressed.
17
BROILING
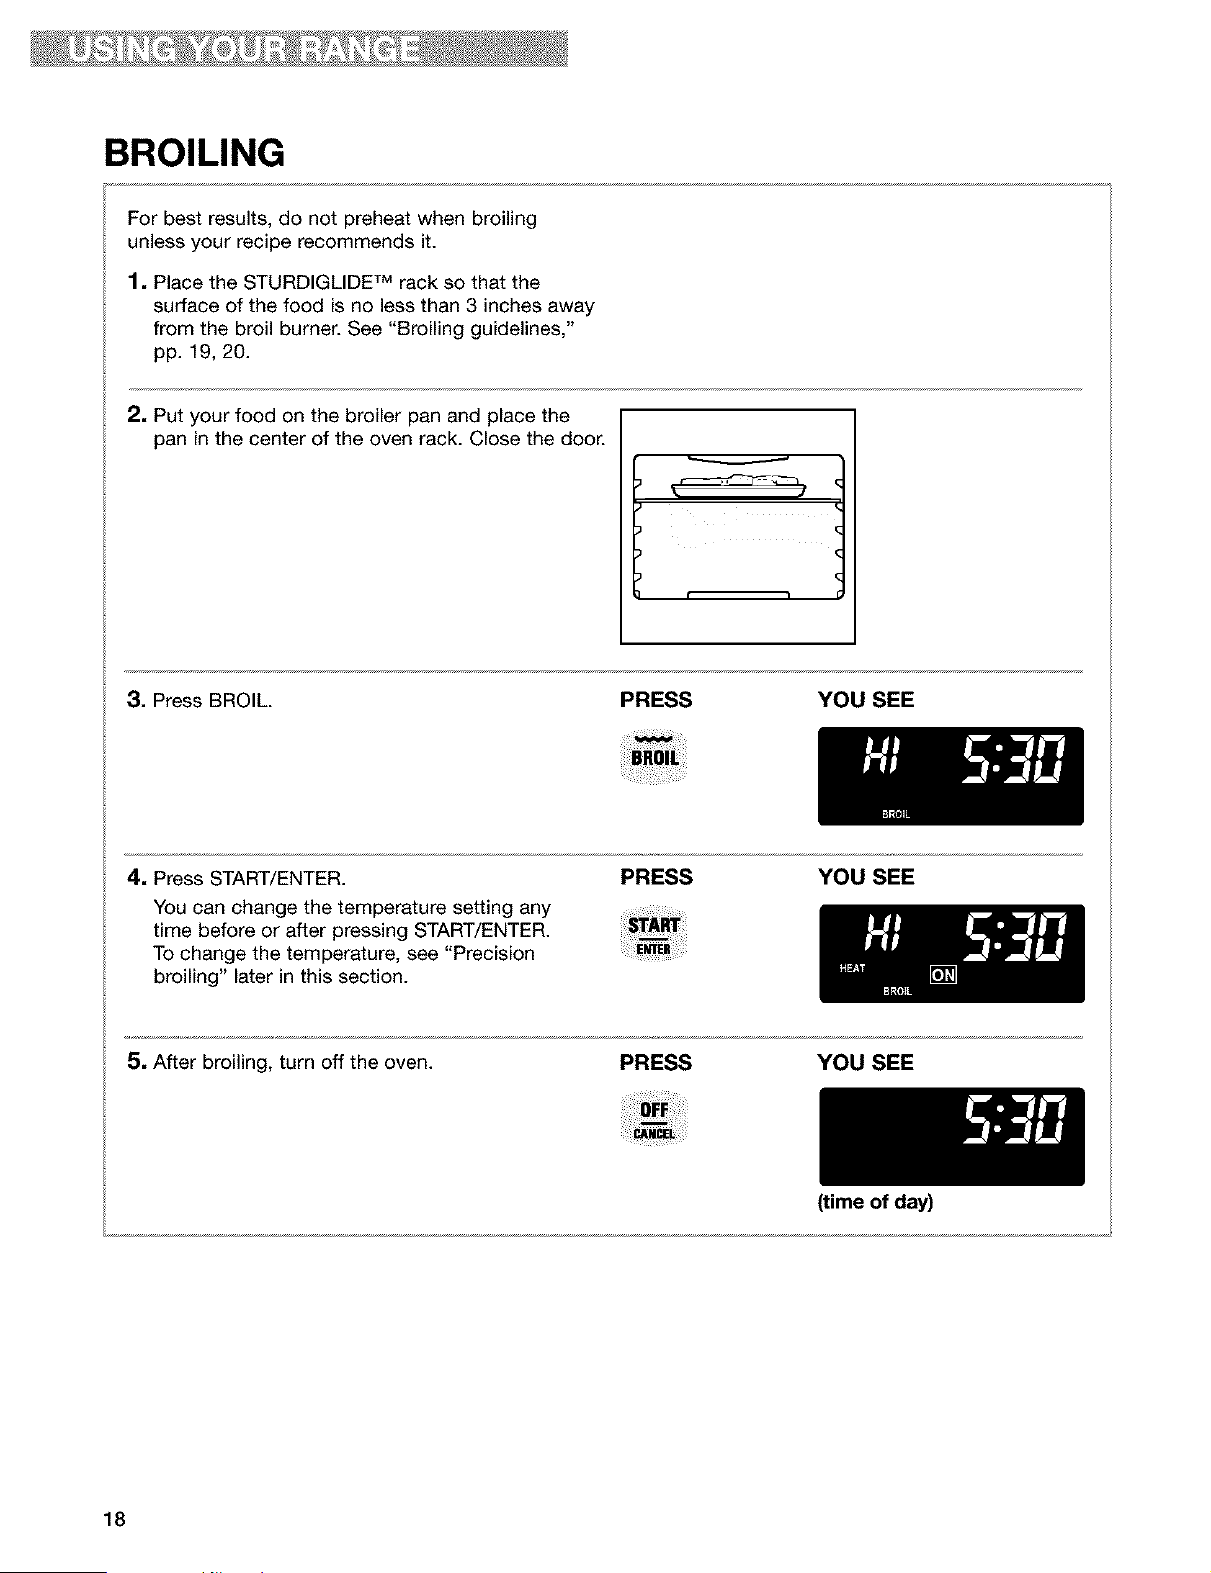
For best results, do not preheat when broiling
unless your recipe recommends it.
1. Place the STURDIGLIDE TM rack so that the
surface of the food is no less than 3 inches away
from the broil burner. See "Broiling guidelines,"
pp. 19, 20.
2. Put your food on the broiler pan and place the
pan in the center of the oven rack. Close the door.
3. Press BROIL. PRESS YOU SEE
4. Press START/ENTER.
You can change the temperature setting any
time before or after pressing START/ENTER.
To change the temperature, see "Precision
broiling" later in this section.
PRESS YOU SEE
5, After broiling, turn off the oven.
PRESS YOU SEE
(time of day)
18
BROILING (contd.)
/@
I[e8_=;%o1 =
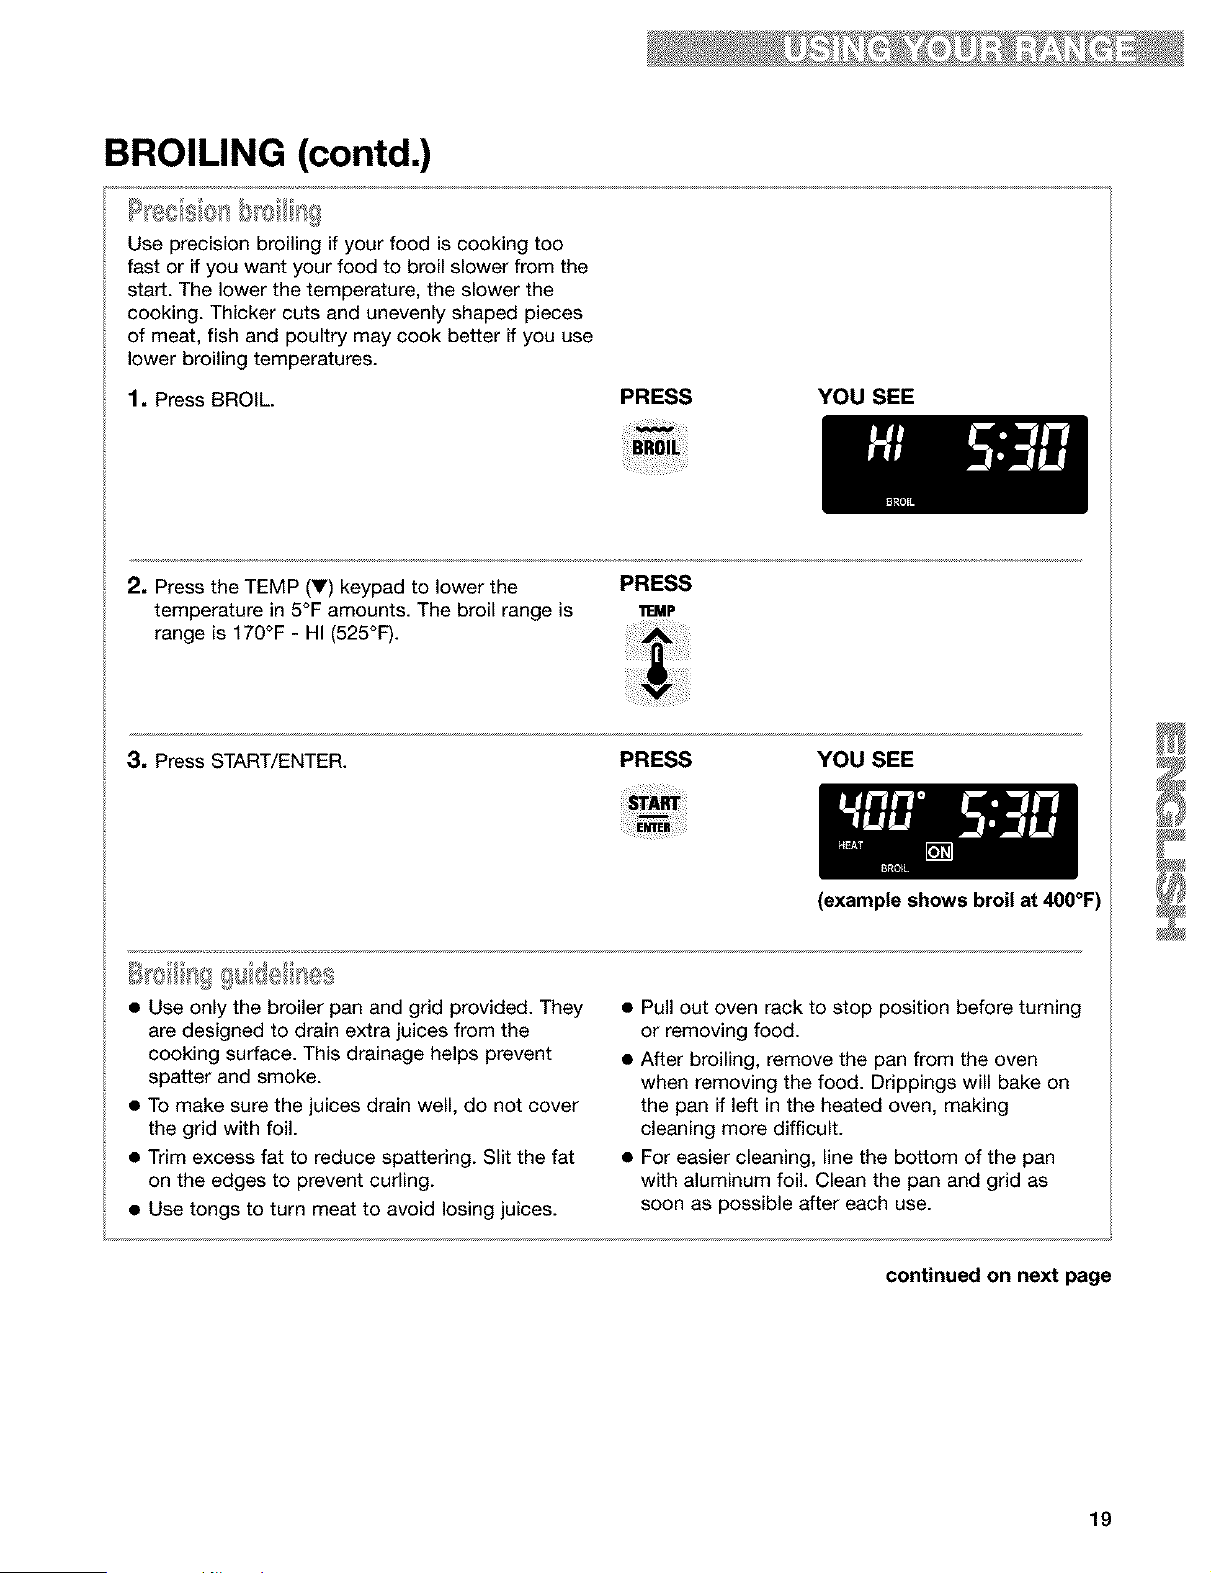
Use precision broiling if your food is cooking too
fast or if you want your food to broil slower from the
start. The lower the temperature, the slower the
cooking. Thicker cuts and unevenly shaped pieces
of meat, fish and poultry may cook better if you use
lower broiling temperatures.
1, Press BROIL.
PRESS YOU SEE
2, Press the TEMP (V) keypad to lower the
temperature in 5°F amounts. The broil range is
range is 170°F - HI (525°F).
PRESS
11EMP
3, Press START/ENTER.
PRESS YOU SEE
(example shows broil at 400°F)
S oiliF}££ sid6As s
• Use only the broiler pan and grid provided. They
are designed to drain extra juices from the
cooking surface. This drainage helps prevent
spatter and smoke.
• To make sure the juices drain well, do not cover
the grid with foil.
• Trim excess fat to reduce spattering. Slit the fat
on the edges to prevent curling.
• Use tongs to turn meat to avoid losing juices.
• Pull out oven rack to stop position before turning
or removing food.
• After broiling, remove the pan from the oven
when removing the food. Drippings will bake on
the pan if left in the heated oven, making
cleaning more difficult.
• For easier cleaning, line the bottom of the pan
with aluminum foil. Clean the pan and grid as
soon as possible after each use.
continued on next page
19
BROILING (contd.)
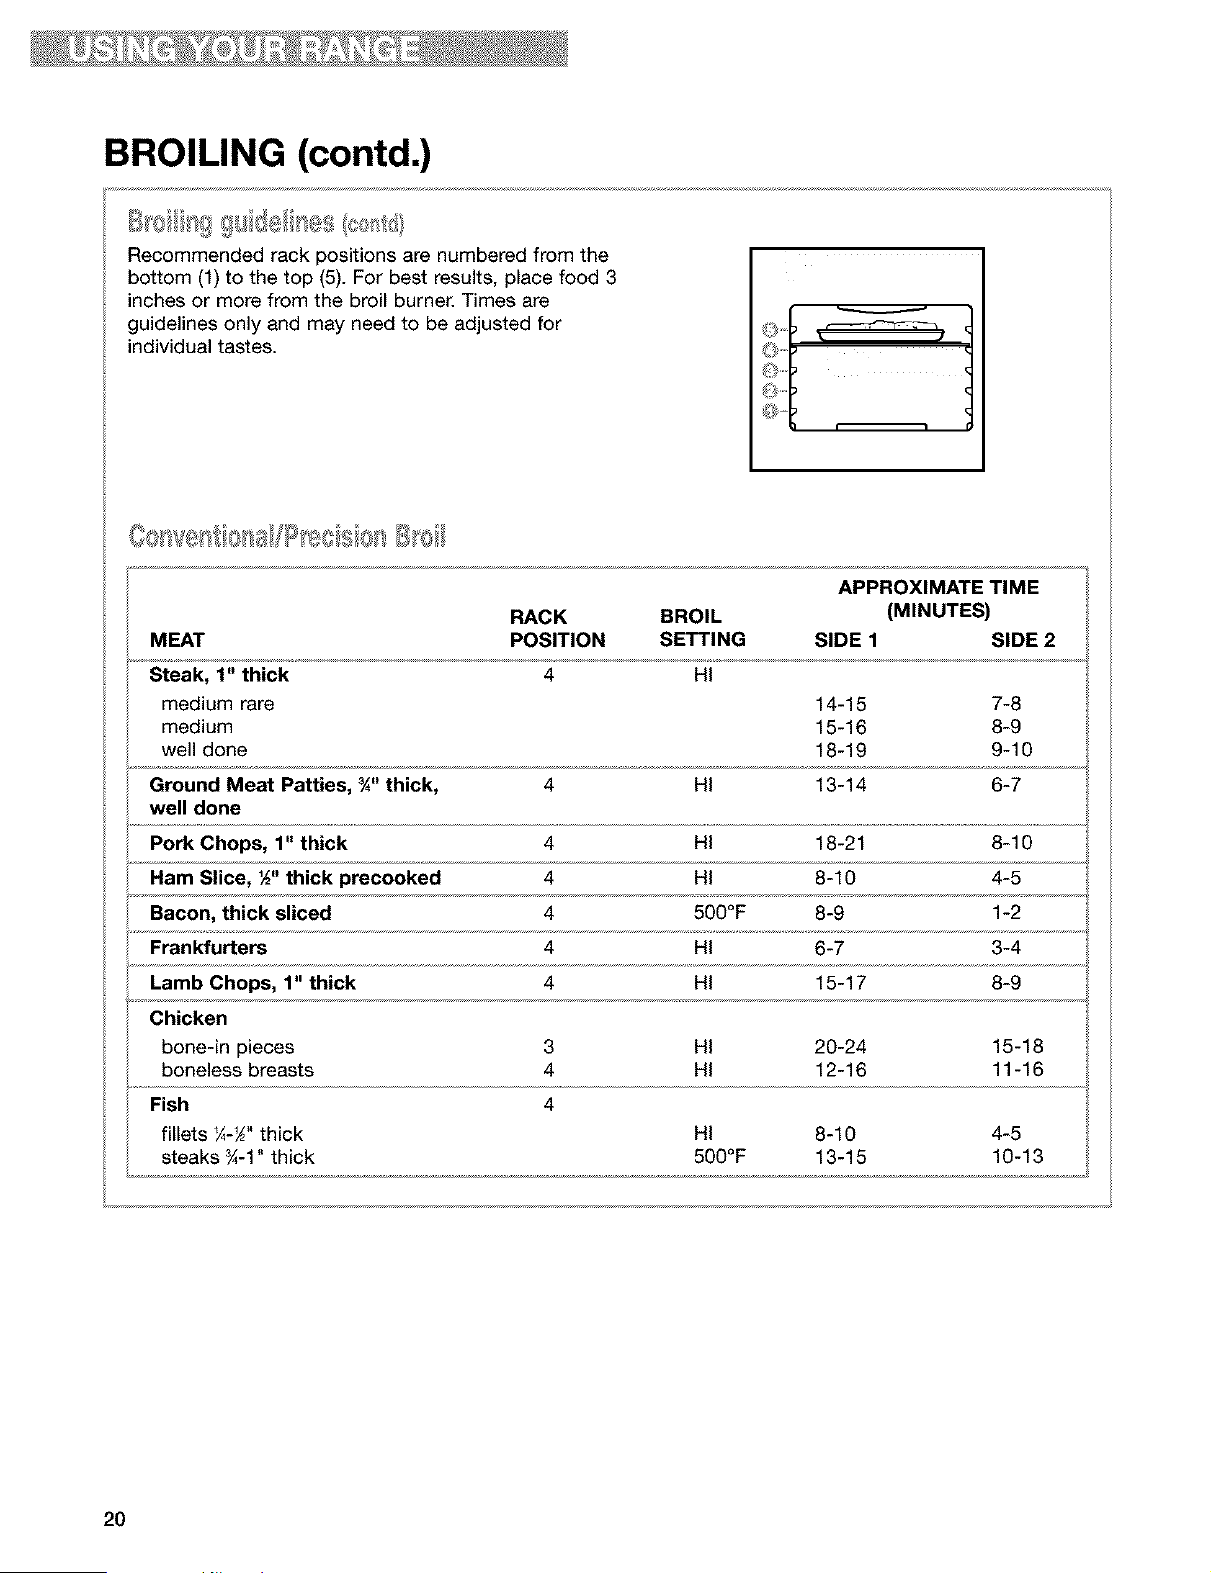
Recommended rack positions are numbered from the
bottom (1) to the top (5). For best results, place food 3
inches or more from the broil burner. Times are
guidelines only and may need to be adjusted for
individual tastes.
APPROXIMATE TIME
RACK BROIL (MINUTES)
MEAT POSITION SETTING SIDE 1 SIDE 2
Steak, 1" thick 4 HI
medium rare 14-15 7-8
medium 15-16 8-9
well done 18-19 9-10
Ground Meat Patties, ¾" thick, 4 HI 13-14 6-7
well done
Pork Chops, 1" thick 4 HI 18-21 8-10
Ham Slice, ½" thick precooked 4 HI 8-10 4-5
Bacon, thick sliced 4 500°F 8-9 1-2
Frankfurters 4 HI 6-7 3-4
Lamb Chops, 1" thick 4 HI 15-17 8-9
Chicken
bone-in pieces 3 HI 20-24 15-18
boneless breasts 4 HI 12-16 11-16
Fish 4
fillets ¼-_" thick HI 8-10 4-5
steaks _-1" thick 500°F 13-15 10-13
2O
USING THE TIMED OVEN CONTROL
Food Poisoning Hazard
Do not let food sit in oven more than one
hour before or after cooking.
Doing so can result in food poisoning or
sickness.
The Timed Oven control will turn the oven on at a
set time of day, cook for a set length of time, then
shut off automatically when programmed. You can
do this by setting the COOK TIME and DELAY
START. Before using the Timed Oven control,
make sure the clock is set to the correct time of
day. (See "Setting the clock," p. 12.)
To Start now and Stop automatically:
Set COOK TiME
To Delay Start and Stop automatically:
Set COOK TIME and DELAY START
NOTE: Delayed time cooking is ideal for foods
that do not need a preheated oven, like meats
and casseroles. Do not use a delayed time
function when baking.
To use this function, it is necessary to program the
COOK TIME.
1. Place the STURDIGLiDE TM rack(s) where you
need them and put your food in the oven. To
place your racks correctly, see "Positioning racks
and pans" section, p. 9.
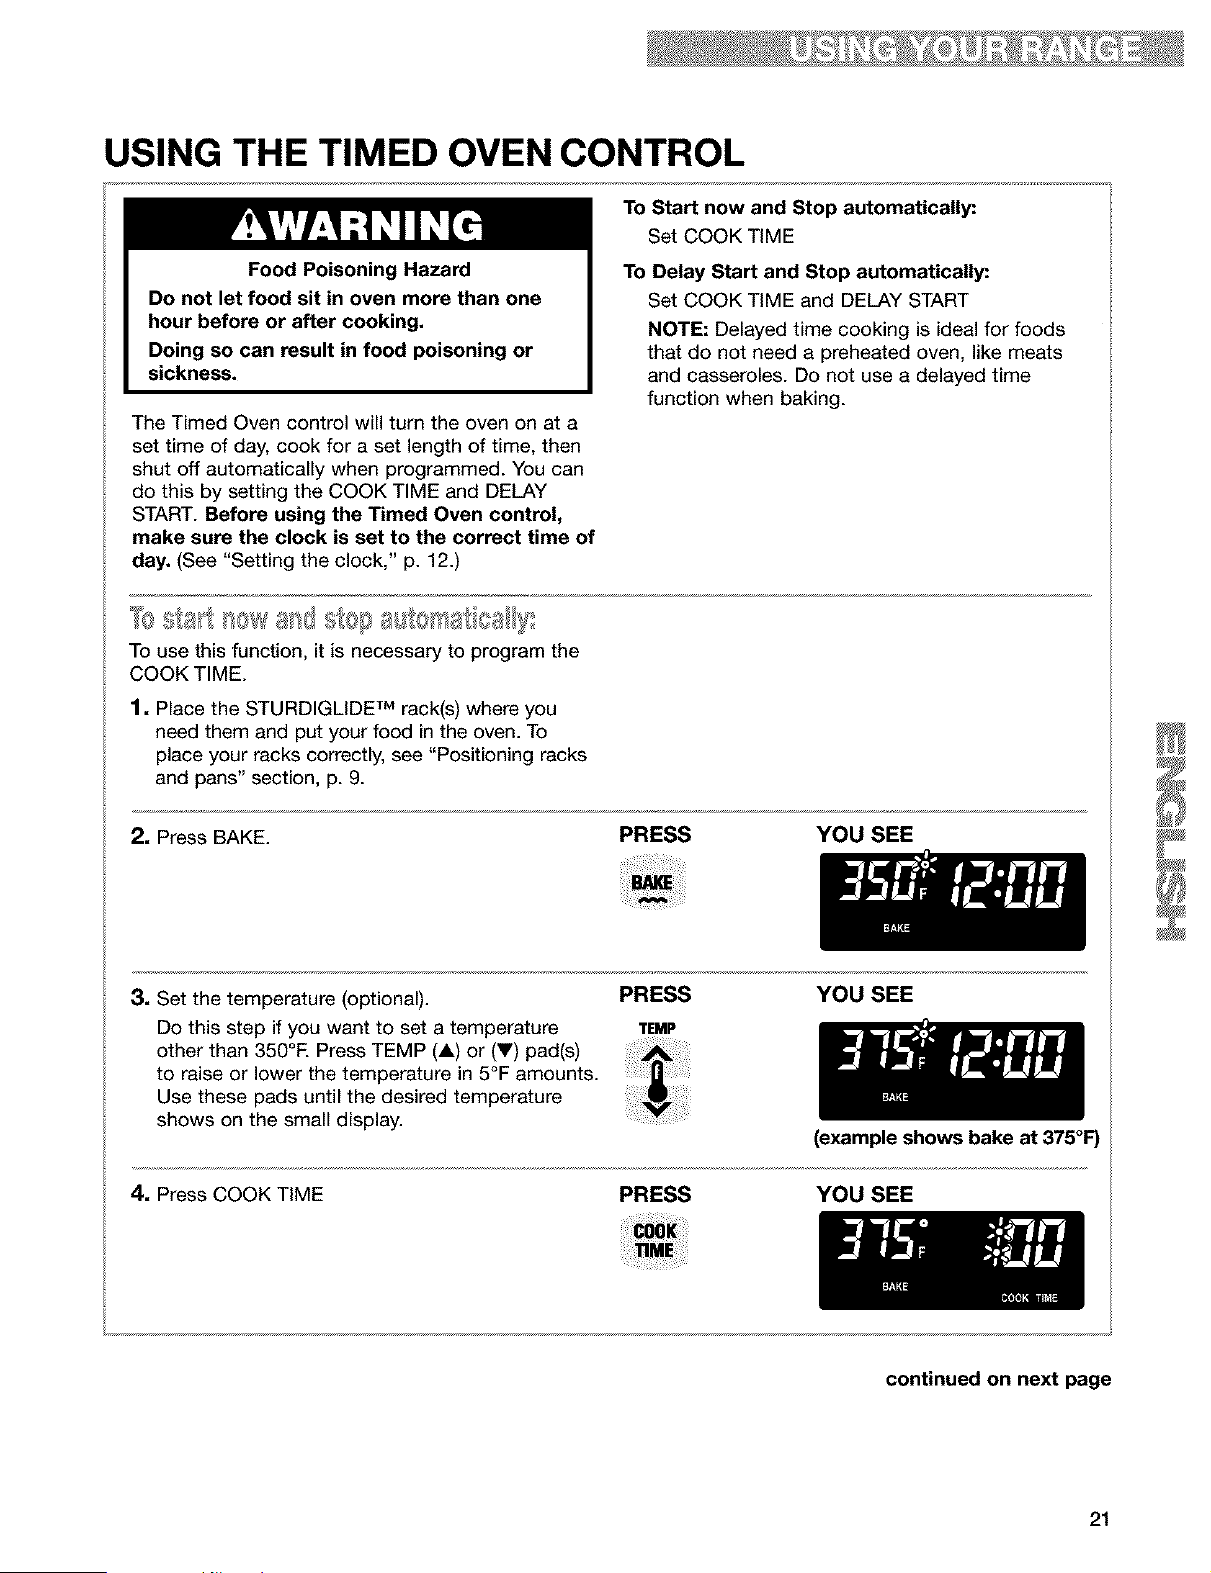
2, Press BAKE.
PRESS YOU SEE
3. Set the temperature (optional).
Do this step if you want to set a temperature
other than 350°F. Press TEMP (A) or (Y) pad(s)
to raise or lower the temperature in 5°F amounts.
Use these pads until the desired temperature
shows on the small display.
PRESS YOU SEE
TEMP
(example shows bake at 375°F)
4. Press COOK TIME PRESS YOU SEE
continued on next page
21
USING THE TIMED OVEN CONTROL (contd.)
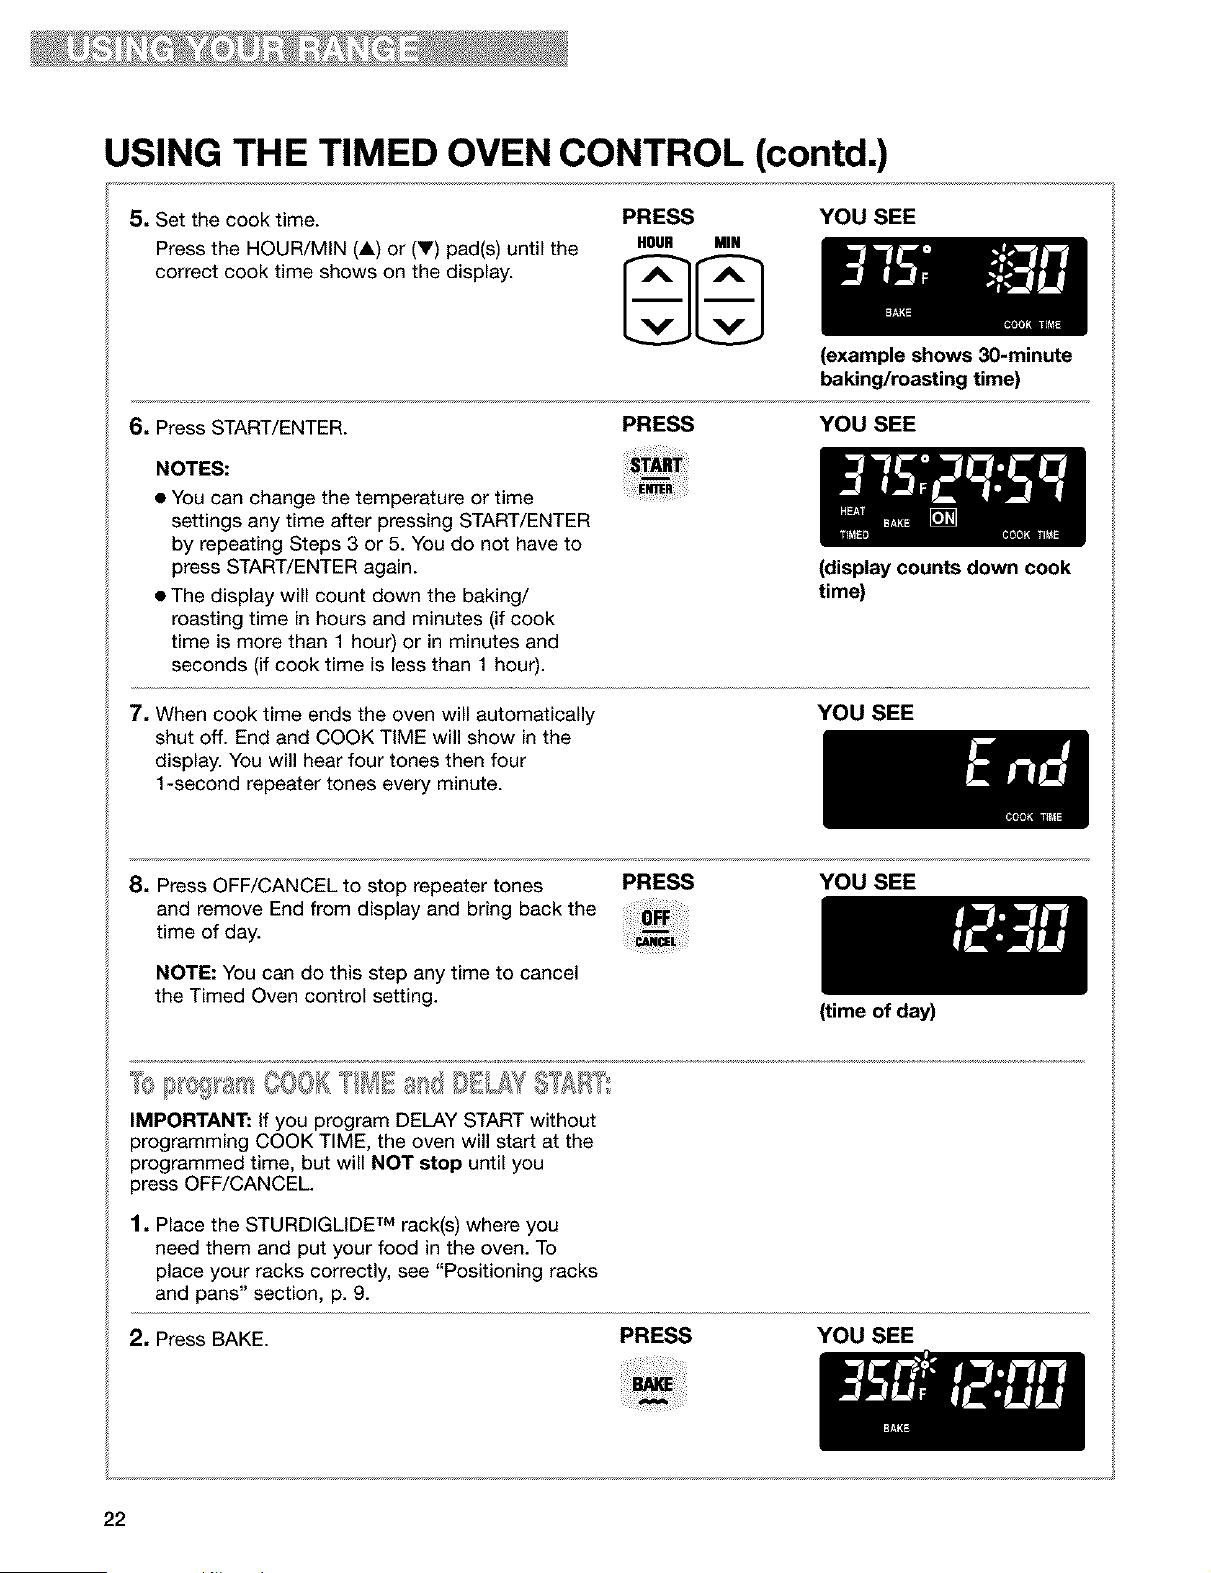
5. Set the cook time. PRESS
Press the HOUR/MIN (i) or (V) pad(s) until the HOUR MIH
correct cook time shows on the display.
YOU SEE
6. Press START/ENTER.
PRESS
(example shows 30-minute
baking/roasting time)
YOU SEE
NOTES:
• You can change the temperature or time
settings any time after pressing START/ENTER
by repeating Steps 3 or 5. You do not have to
press START/ENTER again.
• The display will count down the baking/
roasting time in hours and minutes (if cook
time is more than 1 hour) or in minutes and
seconds (if cook time is less than 1 hour).
7, When cook time ends the oven will automatically
shut off. End and COOK TIME will show in the
display. You will hear four tones then four
1-second repeater tones every minute.
(display counts down cook
time)
YOU SEE
8. Press OFF/CANCEL to stop repeater tones
and remove End from display and bring back the
time of day.
NOTE: You can do this step any time to cancel
the Timed Oven control setting.
PRESS YOU SEE
IMPORTANT: If you program DELAY START without
programming COOK TIME, the oven will start at the
programmed time, but will NOT stop until you
press OFF/CANCEL
1. Place the STURDIGLIDE TM rack(s) where you
need them and put your food in the oven. To
place your racks correctly, see "Positioning racks
and pans" section, p. 9.
(time of day)
2, Press BAKE. PRESS YOU SEE
22
USING THE TIMED OVEN CONTROL (contd.)
3, Set the temperature (optional).
Do this step if you want to set a temperature
other than 350°E Press TEMP • to raise the
temperature or • to lower the temperature in 5°F
amounts. Use these pads until the temperature
you want shows on the small display.
PRESS YOU SEE
11EMP
(example shows bake at 375°F
4, Press COOK TIME.
PRESS YOU SEE
5, Set the cook time. PRESS
Press the HOUR/MIN (•) or (•) pad(s) until the HOUR MIH
correct cook time shows on the display.
YOU SEE
(example shows 30-minute
baking/roasting time)
6, Press DELAY START. PRESS YOU SEE
7, Set the time of day to start.
Press the HOUR/MIN (•) or (•) pad(s) until
the correct time of day to start shows on the
display.
The example at the right shows a chosen start
time of 1:00. The oven will shut off by itself at
1:30 (the set start time plus the set cook time).
PRESS
HOUR MIN
YOU SEE
8, Press START/ENTER.
The stop time is calculated automatically.
NOTE: You can change the temperature and
time settings any time after pressing
START/ENTER by repeating Steps 3 through 8
unless the delay start time has been reached.
PRESS
(example shows 1:00
start time)
YOU SEE
continued on next page
23
USING THE TIMED OVEN CONTROL (contd.)
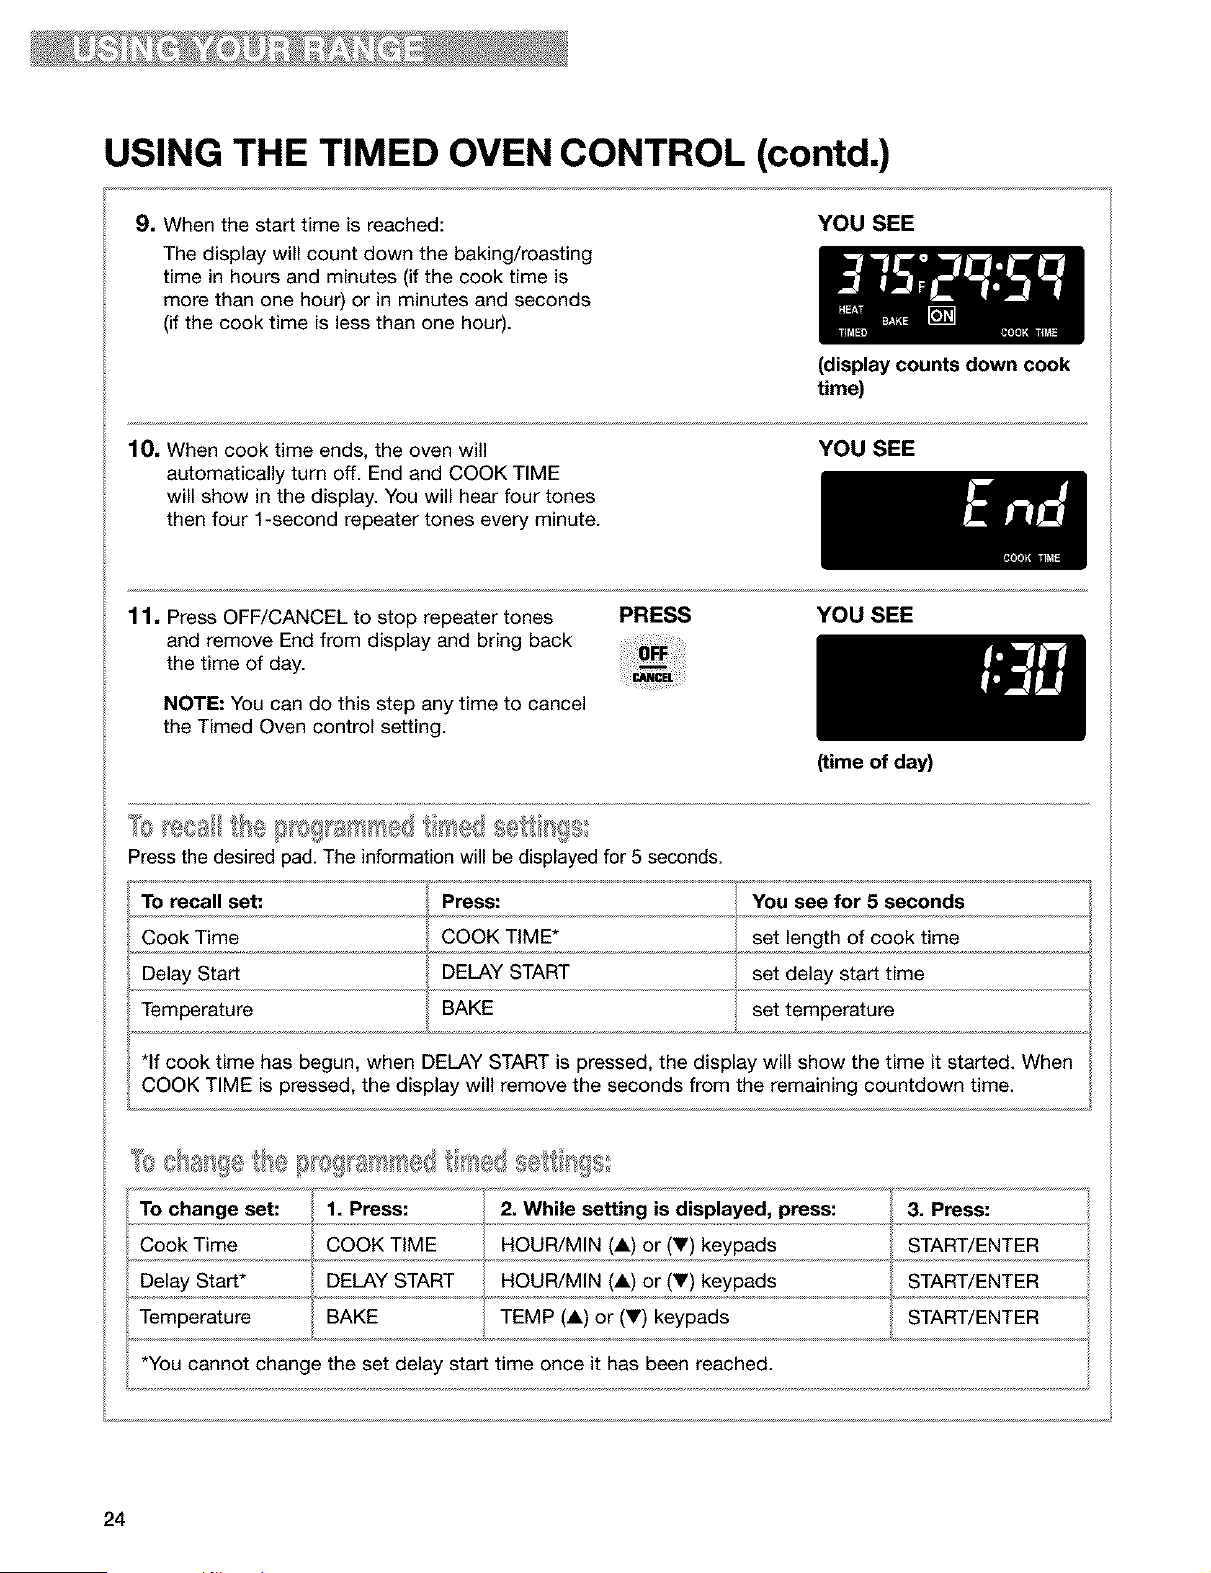
9. When the start time is reached:
The display will count down the baking/roasting
time in hours and minutes (if the cook time is
more than one hour) or in minutes and seconds
(if the cook time is less than one hour).
YOU SEE
(display counts down cook
time)
10. When cook time ends, the oven will
automatically turn off. End and COOK TIME
will show in the display. You will hear four tones
then four 1-second repeater tones every minute.
YOU SEE
11. Press OFF/CANCEL to stop repeater tones
and remove End from display and bring back
the time of day.
NOTE: You can do this step any time to cancel
the Timed Oven control setting.
PRESS YOU SEE
(time of day)
Press the desired pad. The information will be displayed for 5 seconds.
To recall set: Press: You see for 5 seconds
Cook Time COOK TIME* set length of cook time
. Delay Start DELAY START set delay start time
Temperature BAKE set temperature
*If cook time has begun, when DELAY START is pressed, the display will show the time it started. When
COOK TIME is pressed, the display will remove the seconds from the remaining countdown time.
TO change set! ...........1. Press: 2. While setting is displayed, press: 3. Press:
Cook Time COOK TIME HOUR/MIN (1) or (Y) keypads START/ENTER
Delay Start* DELAY START HOUR/MIN (1) or (V) keypads START/ENTER
Temperature BAKE TEMP (1) or (V) keypads START/ENTER
*You cannot chan e the set delay start time once it has been reached.
24
USING THE WARM & READY WARMING DRAWER
Food Poisoning Hazard
Do not let food sit for more than one hour
before or after cooking.
Doing so can result in food poisoning or
sickness.
The Warm & Ready warming drawer is ideal for
keeping hot cooked foods at serving temperature.
It may also be used for warming breads and
pastries. This feature, activated by the WARM &
READY knob on the control panel, controls warm-
ing in the warming drawer, which is located below
the oven. The rack can be used in two positions.
• For best results, hold most foods no longer than
one hour. Hold smaller quantities and heat
sensitive foods, such as eggs, no longer than
30 minutes.
• Food must be at serving temperature before
being placed in the drawer.
• Different types of food can be placed in the
warming drawer at the same time.
• Breads, pastries, and fruit pies may be warmed
from room temperature on HI setting.
• Remove food from plastic bags and place in an
oven-safe container.
• Cover foods with a lid or aluminum foil, not
plastic wrap.
• Use only containers approved for oven use and
follow manufacturer's instructions.
• Empty serving dishes and dinner plates can be
heated while preheating the drawer.
1, If using rack, position it where needed.
2. Turn the WARM & READY switch to choose Hi,
MED or LO settings.
3, Allow the drawer to preheat for ten minutes.
4. Place container with food in warming drawer.
5. When finished, turn knob to OFR
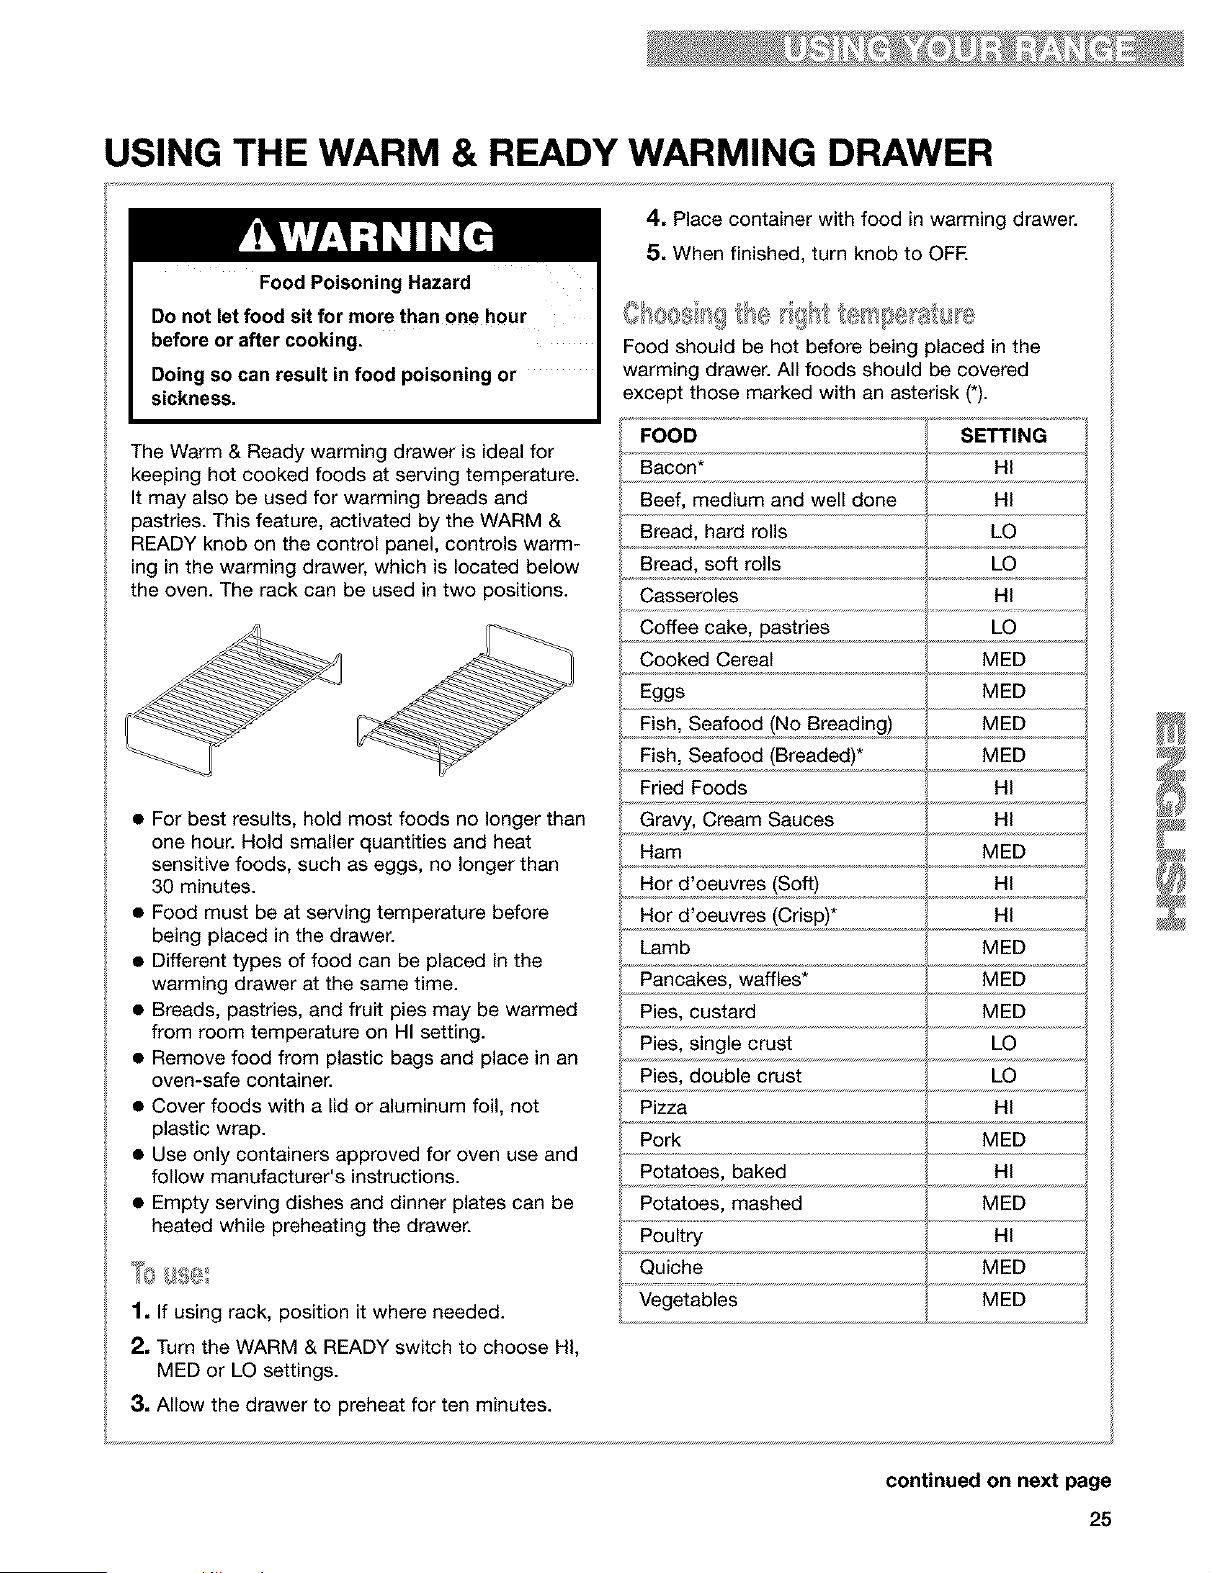
Food should be hot before being placed in the
warming drawer. All foods should be covered
except those marked with an asterisk (*).
FOOD SETTING
Bacon* HI
Beef, medium and well done HI
Bread, hard rolls LO
Bread, soft rolls LO
Casseroles HI
Coffee cake, pastries LO
Cooked Cereal MED
Eggs MED
Fish, Seafood (No Breading) MED
Fish, Seafood (Breaded)* MED
Fried Foods HI
Gravy, Cream Sauces HI
Ham MED
Hor d'oeuvres (Soft) HI
Hor d'oeuvres (Crisp)* HI
Lamb MED
Pancakes, waffles* MED
Pies, custard MED
Pies, single crust LO
Pies, double crust LO
Pizza HI
Pork MED
Potatoes, baked HI
Potatoes, mashed MED
Poultry HI
Quiche MED
Vegetables MED
continued on next page
25
USING THE WARM & READY WARMING DRAWER
(contd.)
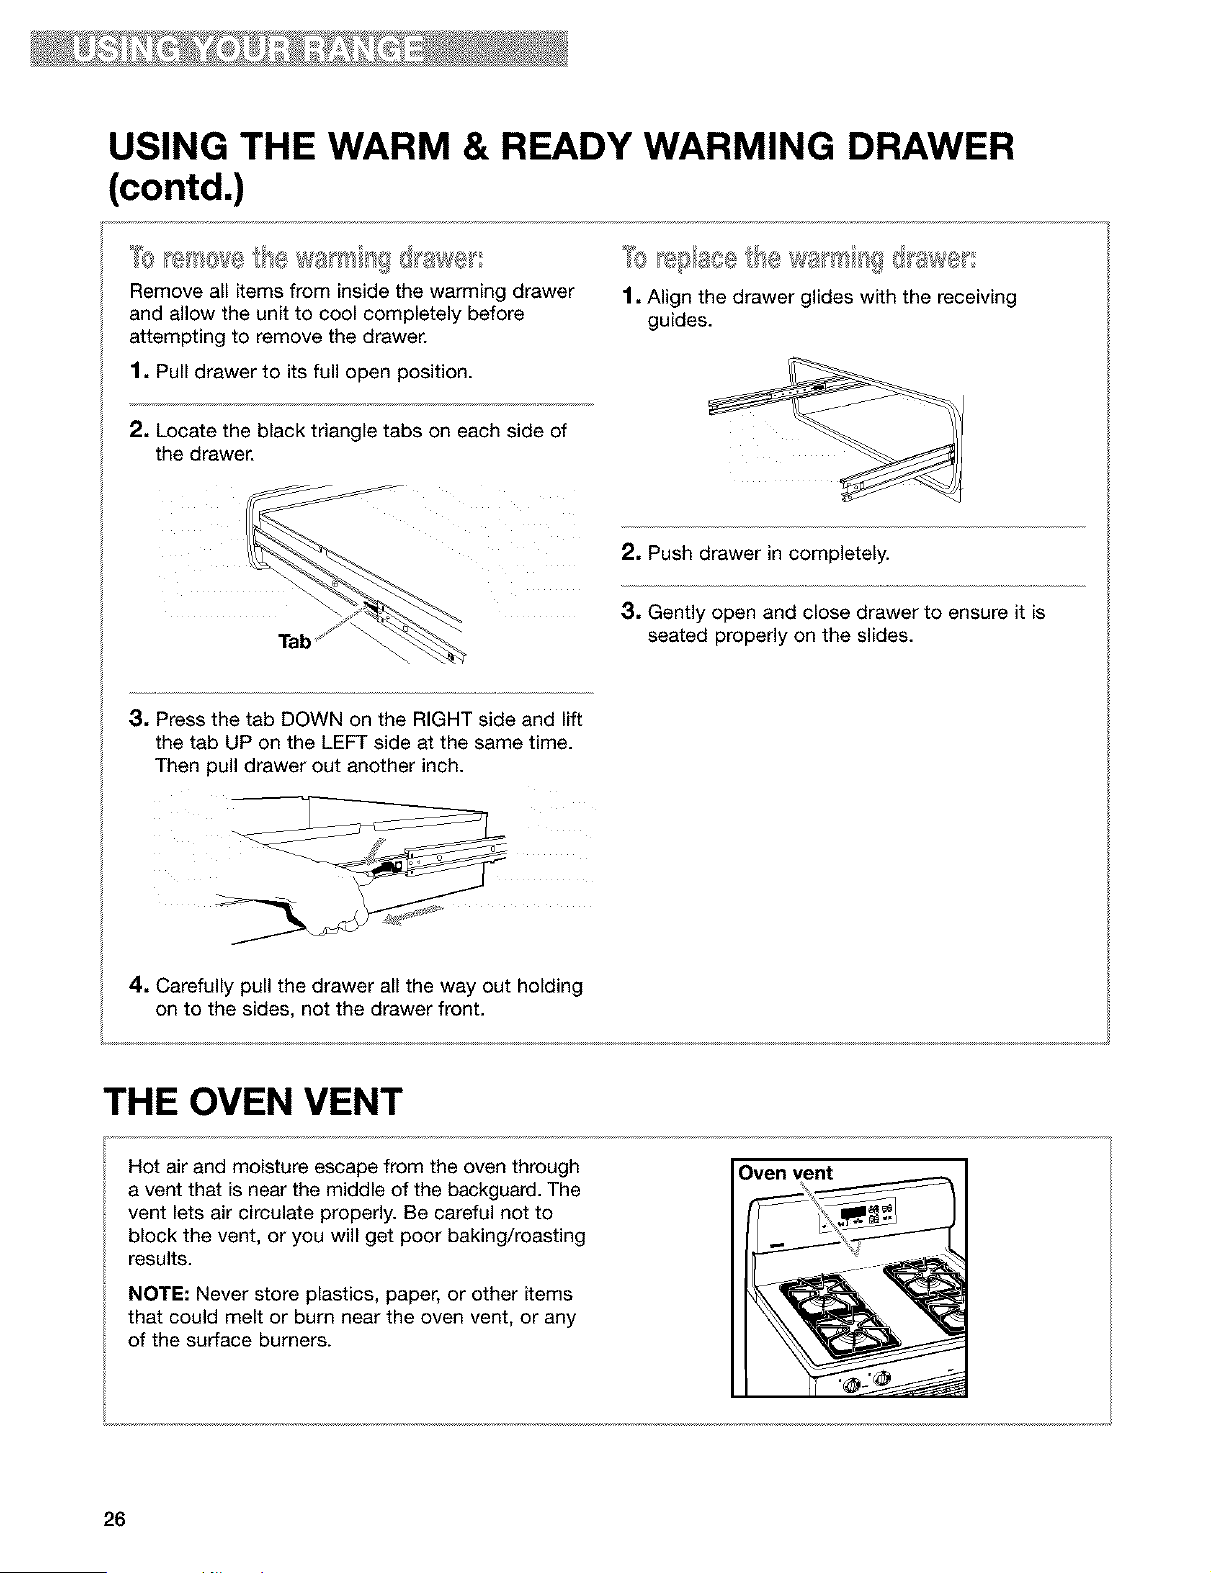
Remove all items from inside the warming drawer
and allow the unit to cool completely before
attempting to remove the drawer.
1. Pull drawer to its full open position.
2, Locate the black triangle tabs on each side of
the drawer.
Tabf
1. Align the drawer glides with the receiving
guides.
2. Push drawer in completely.
3. Gently open and close drawer to ensure it is
seated properly on the slides.
3. Press the tab DOWN on the RIGHT side and lift
the tab UP on the LEFT side at the same time.
Then pull drawer out another inch.
4. Carefully pull the drawer all the way out holding
on to the sides, not the drawer front.
THE OVEN VENT
Oven vent
Hot air and moisture escape from the oven through
a vent that is near the middle of the backguard. The
vent lets air circulate properly. Be careful not to
block the vent, or you will get poor baking/roasting
results.
NOTE: Never store plastics, paper, or other items
that could melt or burn near the oven vent, or any
of the surface burners.
26
Using the SELECT CLEANTM
Self-Cleaning Cycle
Burn Hazard
Do not touch the oven during the Self-Cleaning cycle.
Keep children away from oven during Self-Cleaning cycle.
Do not use commercial oven cleaners in your oven.
Failure to follow these instructions can result in burns, or illness from inhaling
dangerous fumes.
BEFORE YOU START
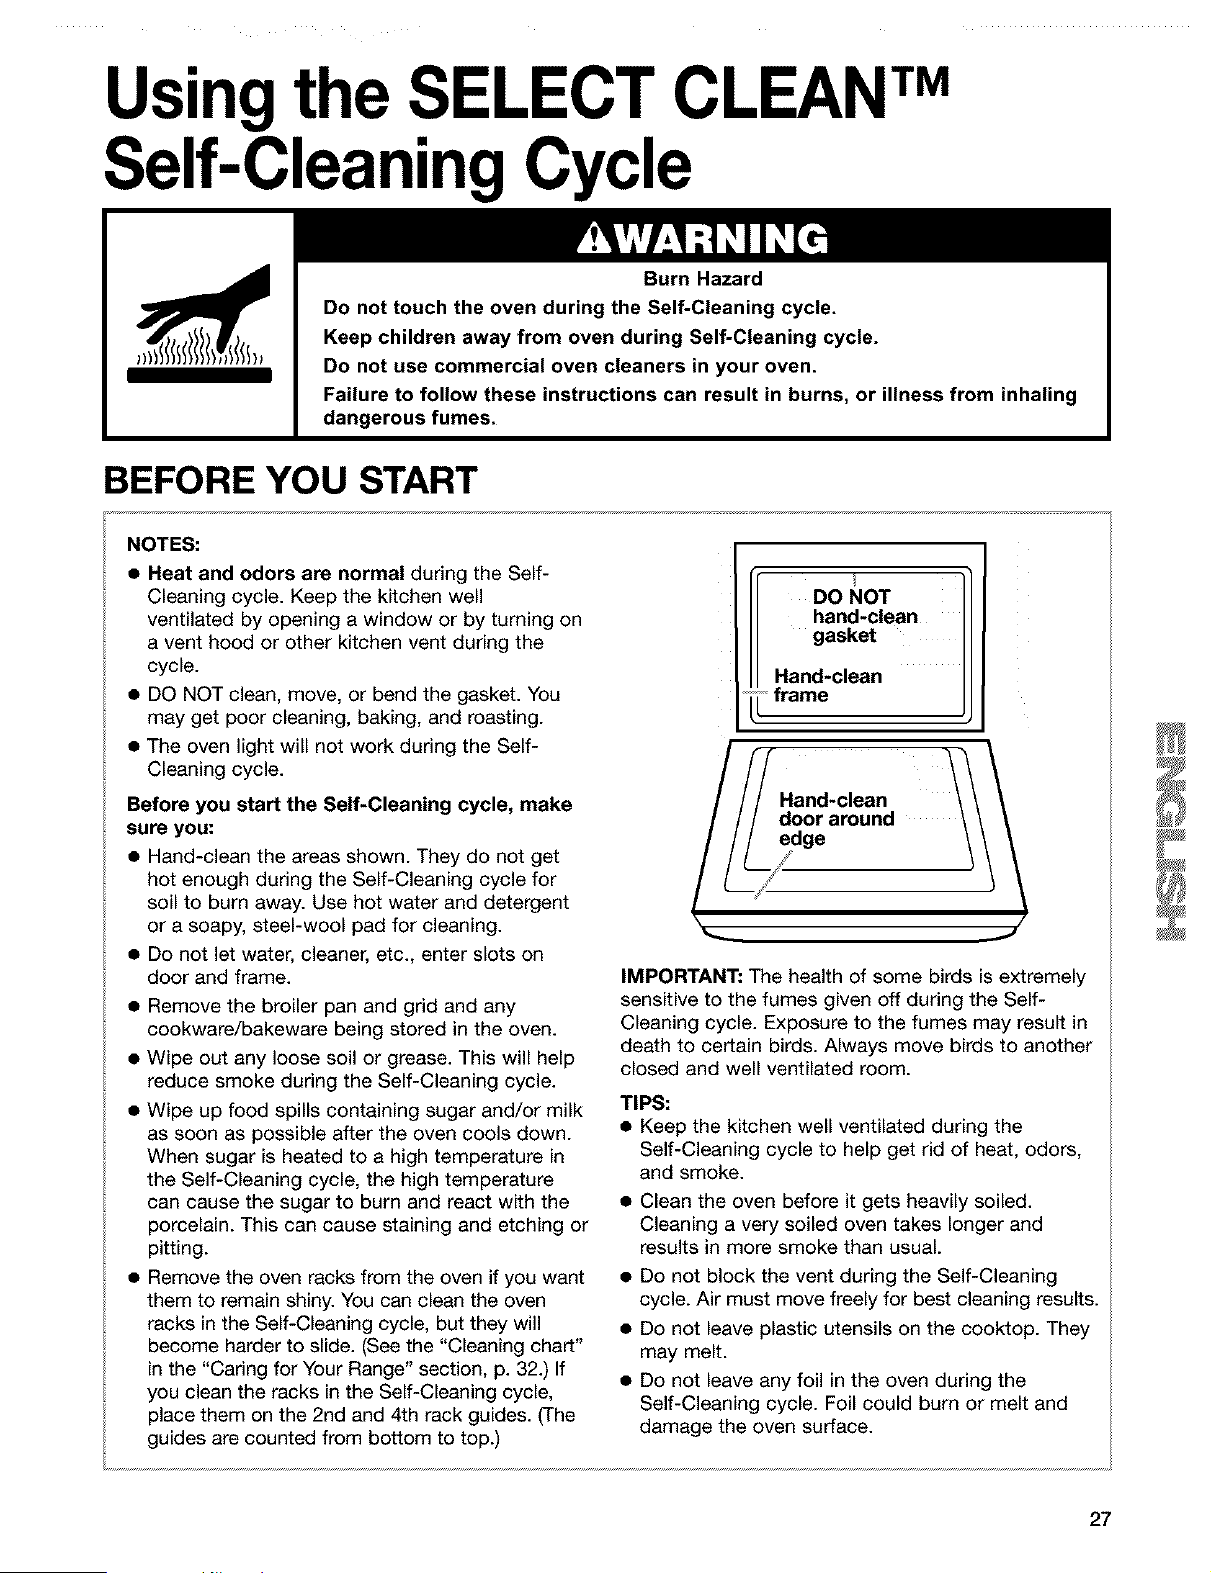
NOTES:
• Heat and odors are normal during the Self-
Cleaning cycle. Keep the kitchen well
ventilated by opening a window or by turning on
a vent hood or other kitchen vent during the
cycle.
• DO NOT clean, move, or bend the gasket. You
may get poor cleaning, baking, and roasting.
• The oven light will not work during the Self-
Cleaning cycle.
DO NOT
hand-clean
gasket
Hand-clean
• frame
Before you start the Self-Cleaning cycle, make
sure you:
• Hand-clean the areas shown. They do not get
hot enough during the Self-Cleaning cycle for
soil to burn away. Use hot water and detergent
or a soapy, steel-wool pad for cleaning.
• Do not let water, cleaner, etc., enter slots on
door and frame.
• Remove the broiler pan and grid and any
cookware/bakeware being stored in the oven.
• Wipe out any loose soil or grease. This will help
reduce smoke during the Self-Cleaning cycle.
• Wipe up food spills containing sugar and/or milk
as soon as possible after the oven cools down.
When sugar is heated to a high temperature in
the Self-Cleaning cycle, the high temperature
can cause the sugar to burn and react with the
porcelain. This can cause staining and etching or
pitting.
IMPORTANT: The health of some birds is extremely
sensitive to the fumes given off during the Self-
Cleaning cycle. Exposure to the fumes may result in
death to certain birds. Always move birds to another
closed and well ventilated room.
TIPS:
• Keep the kitchen well ventilated during the
Self-Cleaning cycle to help get rid of heat, odors,
and smoke.
• Remove the oven racks from the oven if you want •
them to remain shiny. You can clean the oven
racks in the Self-Cleaning cycle, but they will •
become harder to slide. (See the "Cleaning chart"
in the "Caring for Your Range" section, p. 32.) If •
you clean the racks in the Self-Cleaning cycle,
place them on the 2nd and 4th rack guides. (The
guides are counted from bottom to top.)
Clean the oven before it gets heavily soiled.
Cleaning a very soiled oven takes longer and
results in more smoke than usual.
Do not block the vent during the Self-Cleaning
cycle. Air must move freely for best cleaning results.
Do not leave plastic utensils on the cooktop. They
may melt.
Do not leave any foil in the oven during the
Self-Cleaning cycle. Foil could burn or melt and
damage the oven surface.
27
HOW THE CYCLE WORKS
The SELECT CLEAN TM Self-Cleaning cycle uses
temperatures much hotter than normal oven use to
break up and burn away soil and grease. SELECT
CLEAN will set the clean time automatically, once
you choose the soil level. You can choose SoilL
(light soil), SoilA (average soil) or SoiIH (heavy soil).
SoilL will clean for approximately 2-2_ hours, SoilA
for 3-3_ hours and SoiIH for 4-4_ hours.
The door must be closed completely for it to lock and
the cycle to begin. If properly closed, the door will
lock approximately 6 seconds after START/ENTER is
pressed. The cycle time includes an approximate 30
minute cool down time. To see the time of day during
the cycle, press CLOCK for 5 seconds.
SETTING THE CONTROLS
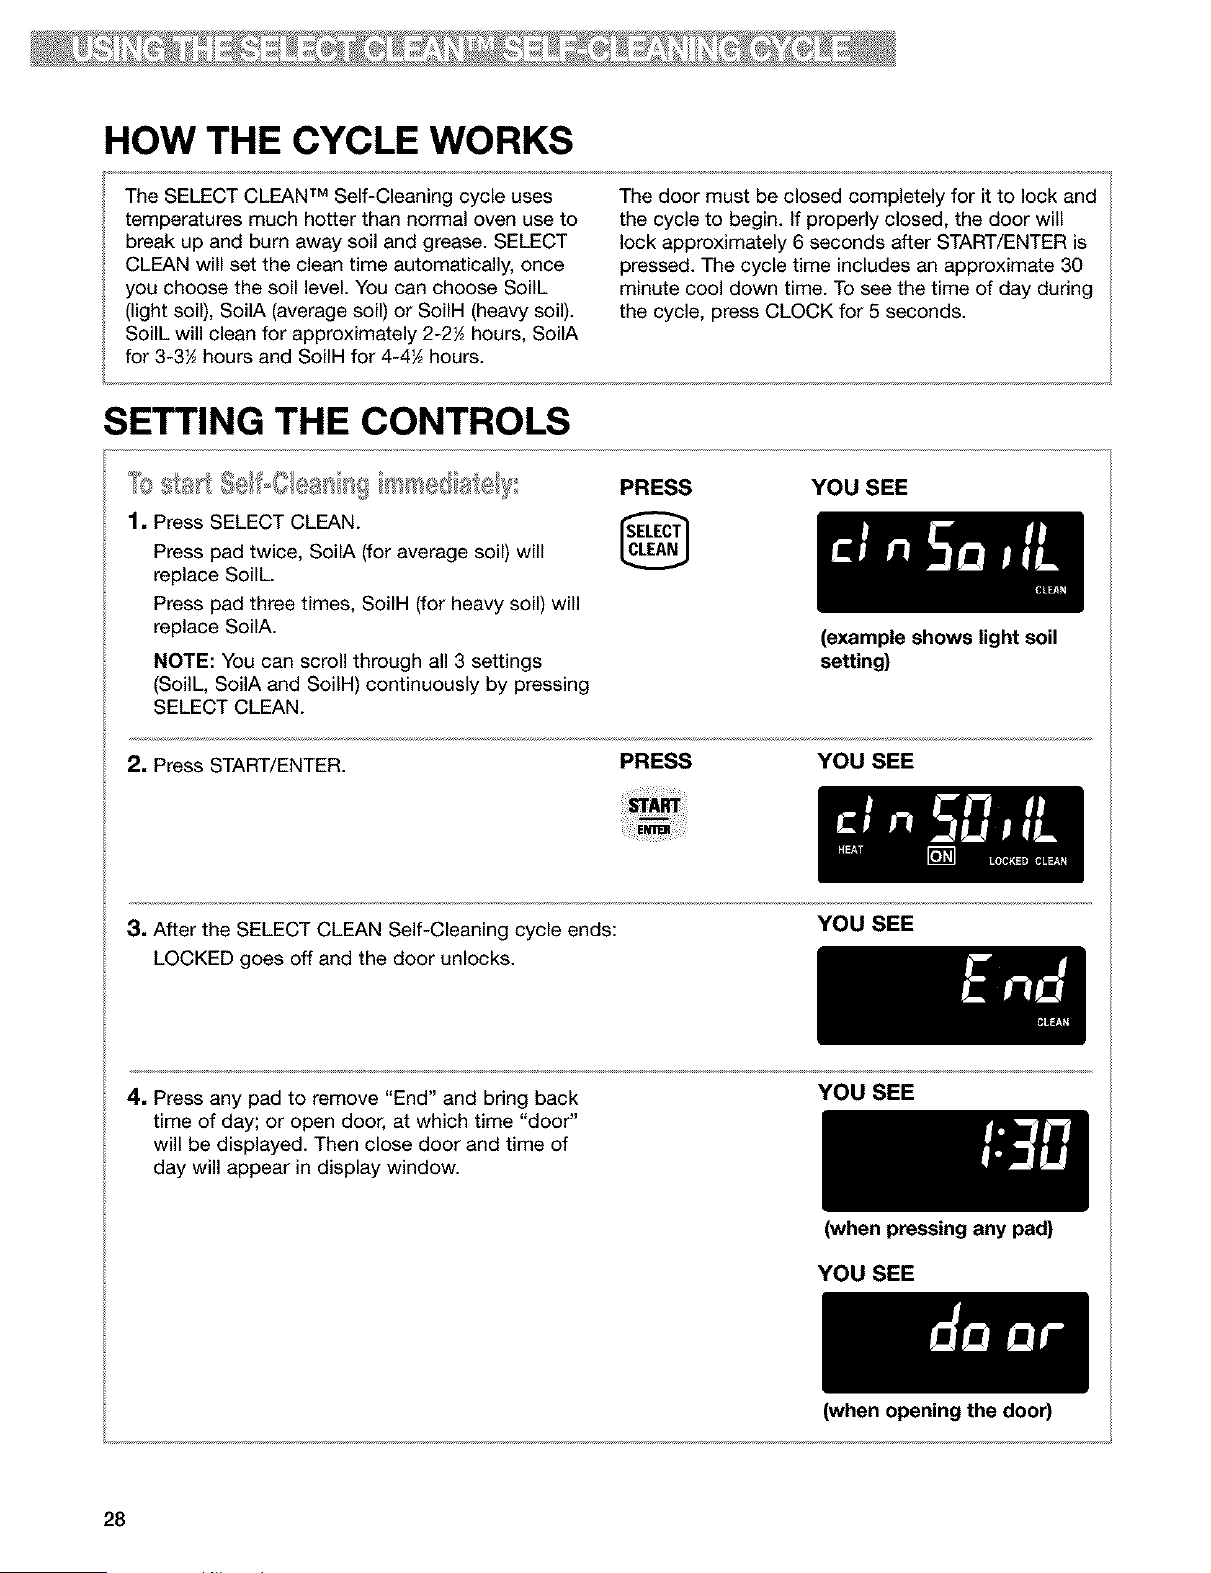
_0 _,_}_tl (}/_a _l {_ PRESS YOU SEE
1. Press SELECT CLEAN.
[]
Press pad twice, SoilA (for average soil) will
replace SoilL.
Press pad three times, SoilH (for heavy soil) will
replace SoilA.
NOTE: You can scroll through all 3 settings
(SoilL, SoilA and SoilH) continuously by pressing
SELECT CLEAN.
2. Press START/ENTER.
PRESS
(example shows light soil
setting)
YOU SEE
3, After the SELECT CLEAN Self-Cleaning cycle ends:
LOCKED goes off and the door unlocks.
YOU SEE
4, Press any pad to remove "End" and bring back
time of day; or open door, at which time "door"
will be displayed. Then close door and time of
day will appear in display window.
YOU SEE
(when pressing any pad)
YOU SEE
28
(when opening the door)
SETTING THE CONTROLS (contd.)
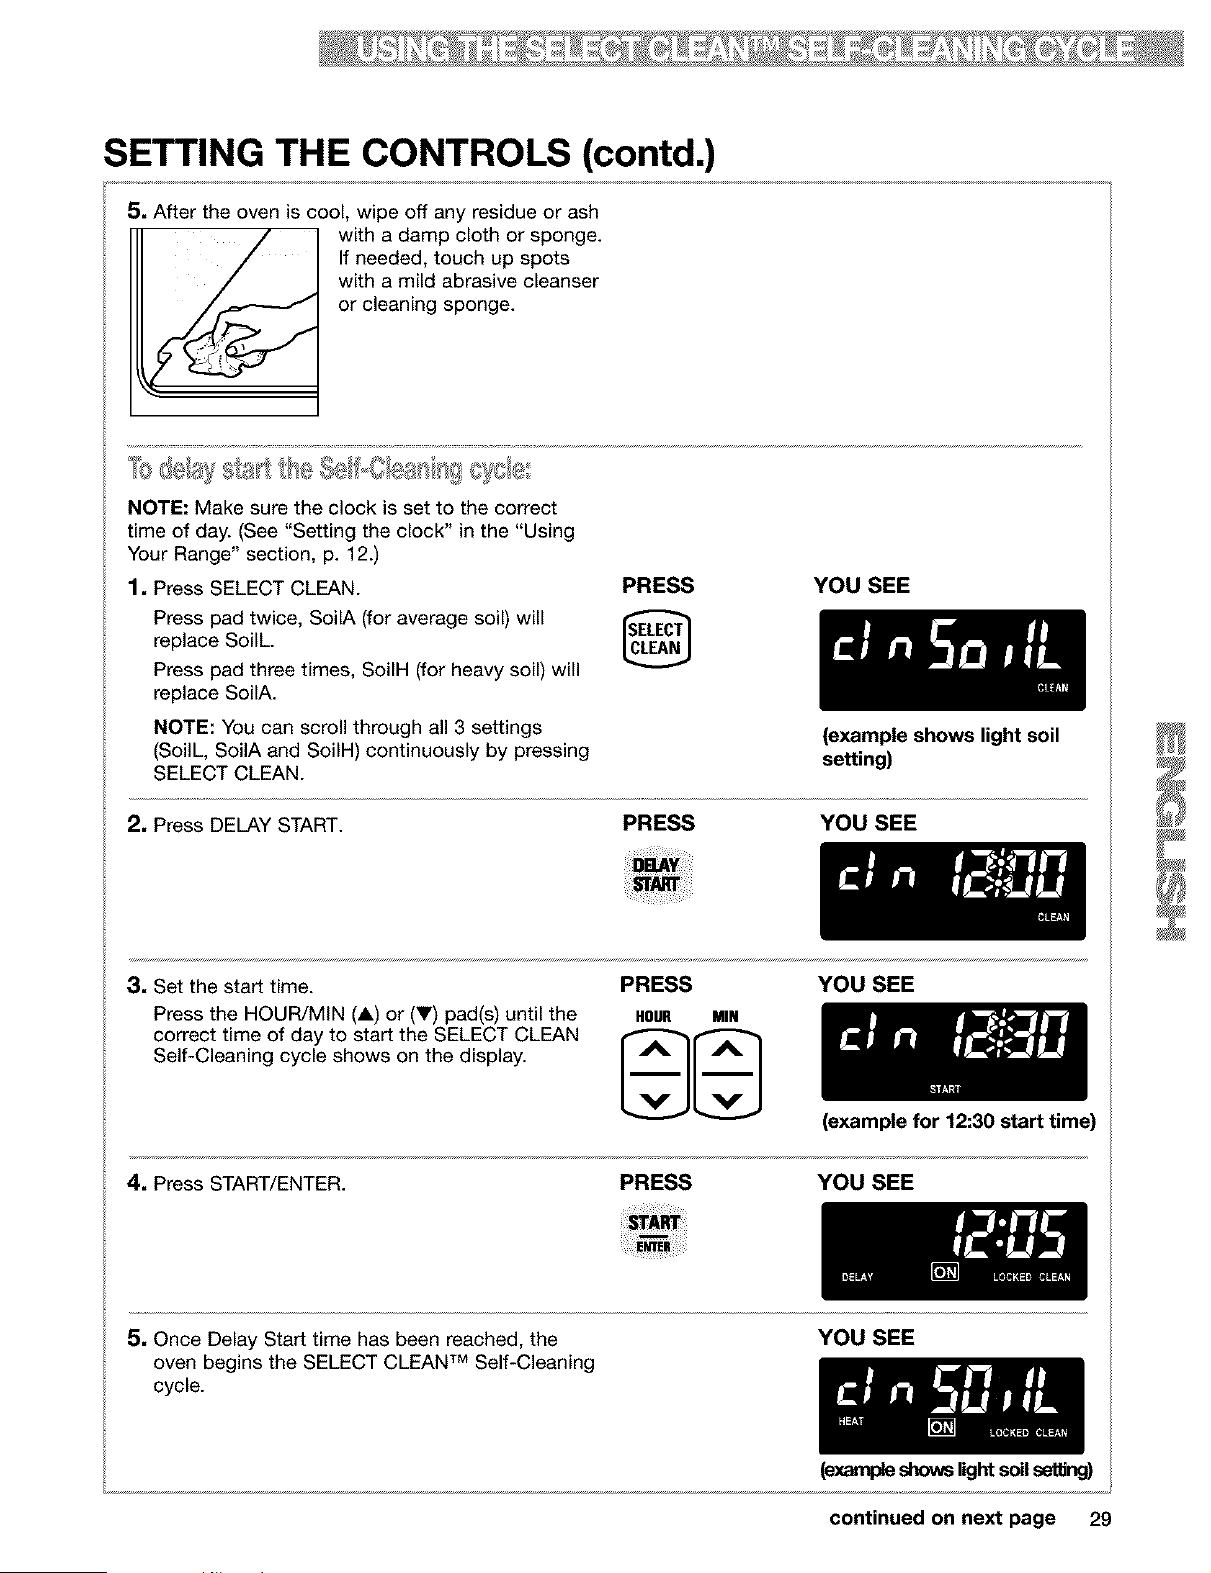
5, After the oven is cool, wipe off any residue or ash
with a damp cloth or sponge.
If needed, touch up spots
with a mild abrasive cleanser
or cleaning sponge.
NOTE: Make sure the clock is set to the correct
time of day. (See "Setting the clock" in the "Using
Your Range" section, p. 12.)
1, Press SELECT CLEAN.
Press pad twice, SoilA (for average soil) will
replace SoilL.
Press pad three times, SoiIH (for heavy soil) will
replace SoilA.
NOTE: You can scroll through all 3 settings
(SoilL, SoilA and SoiIH) continuously by pressing
SELECT CLEAN.
PRESS YOU SEE
2, Press DELAY START.
(example shows light soil
setting)
PRESS YOU SEE
3, Set the start time.
Press the HOUR/MiN (A) or (V) pad(s) until the
correct time of day to start the SELECT CLEAN
Self-Cleaning cycle shows on the display.
PRESS YOU SEE
HOUR MIN
(example for 12:30 start time)
4, Press START/ENTER. PRESS YOU SEE
5, Once Delay Start time has been reached, the
TM
oven begins the SELECT CLEAN Self-Cleaning
cycle.
YOU SEE
(ex,_wpleshowslight soil seffing)
continued on next page 29
SETTING THE CONTROLS (contd.)
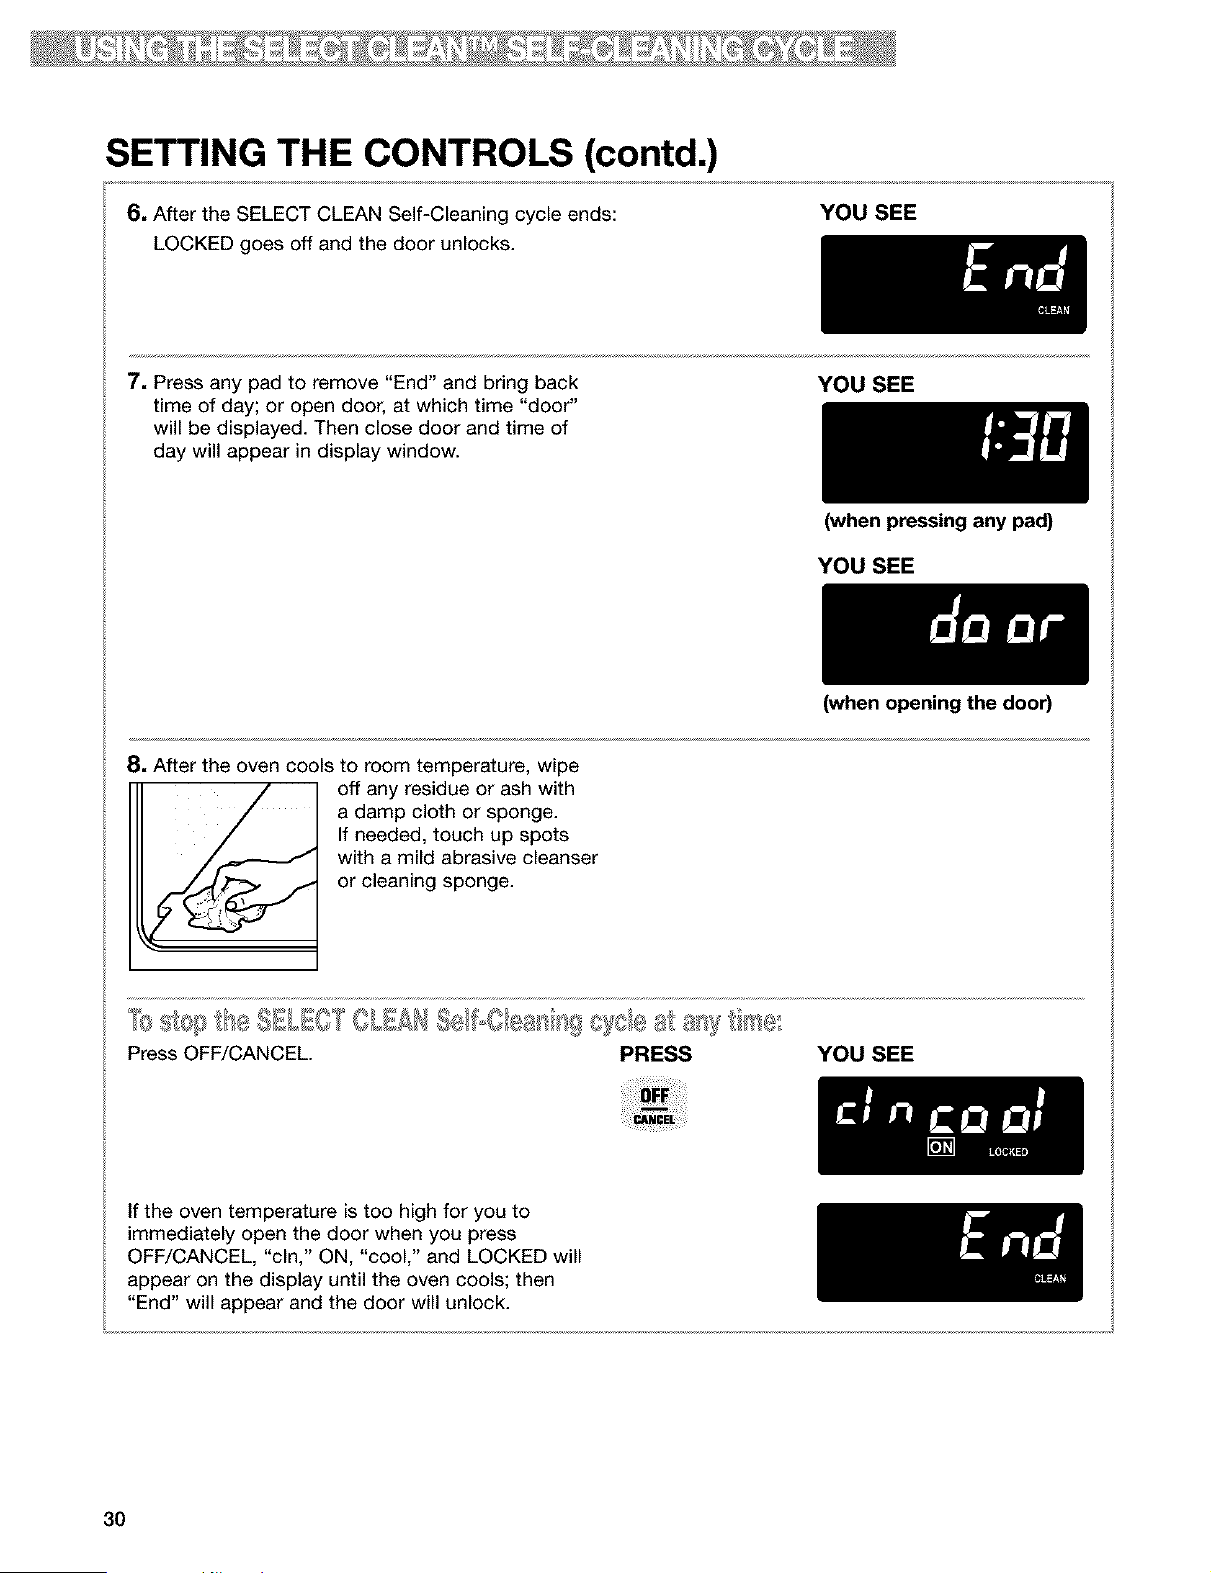
6. After the SELECT CLEAN Self-Cleaning cycle ends:
LOCKED goes off and the door unlocks.
YOU SEE
7. Press any pad to remove "End" and bring back
time of day; or open door, at which time "door"
will be displayed. Then close door and time of
day will appear in display window.
YOU SEE
(when pressing any pad)
YOU SEE
8. After the oven cools to room temperature, wipe
off any residue or ash with
a damp cloth or sponge.
If needed, touch up spots
with a mild abrasive cleanser
or cleaning sponge.
0s££/se/Oea/ _gtee at a_s ._o_
Press OFF/CANCEL. PRESS
(when opening the door)
YOU SEE
If the oven temperature is too high for you to
immediately open the door when you press
OFF/CANCEL, "cln," ON, "cool," and LOCKED will
appear on the display until the oven cools; then
"End" will appear and the door will unlock.
3O
Caring for Your Range
CLEANING CHART
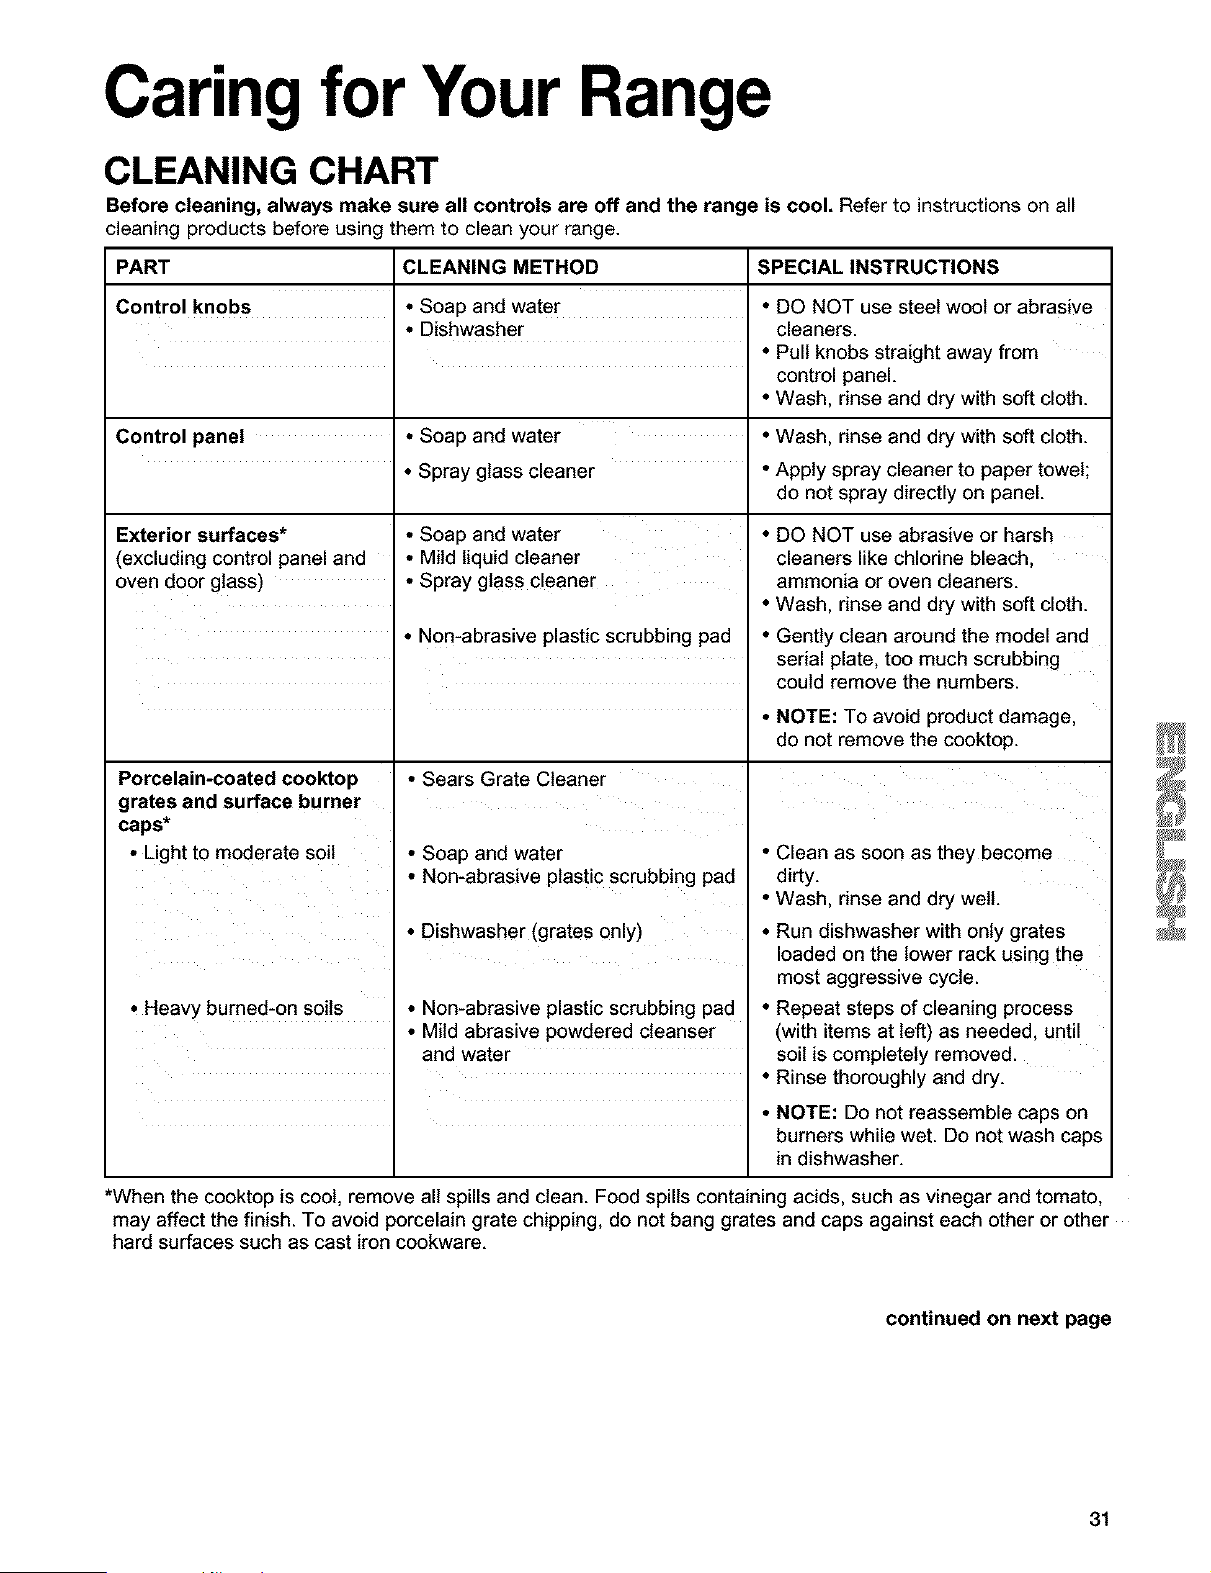
Before cleaning, always make sure all controls are off and the range is cool. Refer to instructions on all
cleaning products before using them to clean your range.
PART CLEANING METHOD SPECIAL INSTRUCTIONS
Control knobs • Soap and water • DO NOT use steel wool or abrasive
• Dishwasher cleaners.
• Pull knobs straight away from
control panel.
• Wash, rinse and dry with soft cloth.
Control panel • Soap and water • Wash, rinse and dry with soft cloth.
• Spray glass cleaner • Apply spray cleaner to paper towel;
do not spray directly on panel.
Exterior surfaces*
(excluding control panel and
oven door glass)
• Soap and water
• Mild liquid cleaner
• Spray glass cleaner
• DO NOT use abrasive or harsh
cleaners like chlorine bleach,
ammonia or oven cleaners.
• Wash, rinse and dry with soft cloth.
• Non-abrasive plastic scrubbing pad
Porcelain-coated cooktop
grates and surface burner
caps*
• Light to moderate soil
• Sears Grate Cleaner
• Soap and water
• Non-abrasive plasti c scrubbing pad
• Dishwasher (grates only)
, Heavy burned-on soils • Non-abrasive plastic scrubbing pad
• Mild abrasive powdered cleanser
and water
• Gently clean around the model and
serial plate, too much scrubbing
could remove the numbers.
• NOTE: To avoid product damage,
do not remove the cooktop.
• Clean as soon as they become
dirty.
• Wash, rinse and dry well.
• Run dishwasher with only grates
loaded on the lower rack using the
most aggressive cycle.
• Repeat steps of cleaning process
(with items at left) as needed, until
soil is completely removed.
• Rinse thoroughly and dry.
• NOTE: Do not reassemble caps on
burners while wet. Do not wash caps
in dishwasher.
*When the cooktop is coot, remove all spills and clean. Food spills containing acids, such as vinegar and tomato,
may affect the finish. To avoid porcelain grate chipping, do not bang grates and caps against each other or other
hard surfaces such as cast iron cookware.
continued on next page
31

CLEANING CHART (contd.)
PART
Surface burners
Oven door glass
CLEANING METHOD
• Soap and water
• Non-abrasive plastic scrubbing pad
Oven cavity
• Food spills containing
sugar and/or milk
• All other spills
Oven racks
• Spray glass cleaner
• Soap and water
• Self-cleaning cycle
• Soap and water
• Steel wool pad
• Self-cleaning cycle
Broiler pan and grid • Soap and water
• Steel wool pad
• Dishwasher
SPECIAL INSTRUCTIONS
• See "Sealed surface burners and
cooktop" in the "Caring for Your
Range" section, p. 33.
• Wash, rinse and dry with soft
cloth.
• Wipe with paper towel.
• When oven cools, wash, rinse
and dry with soft cloth.
• See Using the SELECT CLEAN
Self-Cleaning Cycle," p. 27.
• Wash, rinse and dry.
• Place on 2nd and 4th rack
guides. Racks will discolor and
become harder to slide. After
cleaning, apply vegetable oil to
rack guides for easier sliding.
• Wash, rinse and dry.
Warming drawer cavity
• Food spills containing
sugar and/or milk
• All other spills
• Solution of I/2 cup ammonia to
1 gallon water
• Mild abrasive cleanser or
commercial oven cleaner
• Soap and water
• Mild detergent
• Soak for 20 minutes, then scrub
with plastic scrubbing pad.
• DO NOT clean the pan and grid
in the self-cleaning cycle.
• When drawer cools, wash, rinse
and dry with soft cloth.
• Wash, rinse and dry with
soft cloth.
32
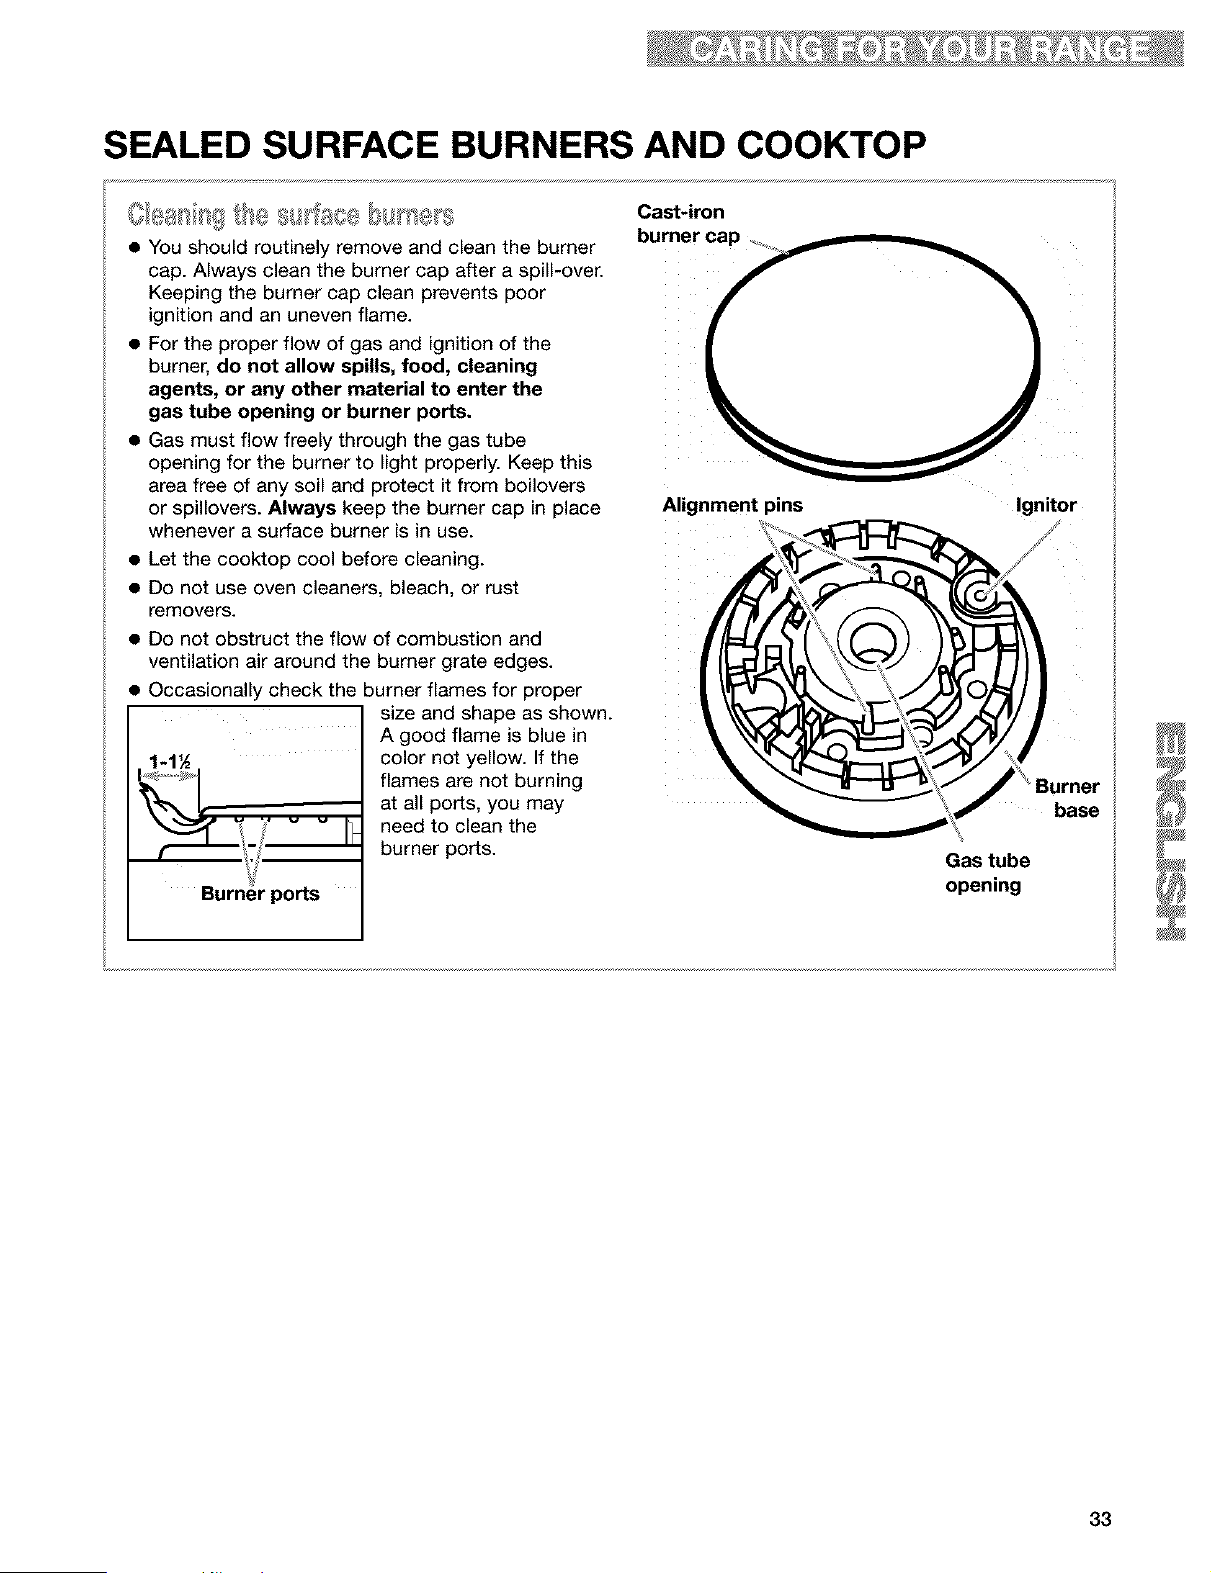
SEALED SURFACE BURNERS AND COOKTOP
• You should routinely remove and clean the burner
cap. Always clean the burner cap after a spill-over.
Keeping the burner cap clean prevents poor
ignition and an uneven flame.
• For the proper flow of gas and ignition of the
burner, do not allow spills, food, cleaning
agents, or any other material to enter the
gas tube opening or burner ports.
• Gas must flow freely through the gas tube
opening for the burner to light properly. Keep this
area free of any soil and protect it from boilovers
or spillovers. Always keep the burner cap in place
whenever a surface burner is in use.
• Let the cooktop cool before cleaning.
• Do not use oven cleaners, bleach, or rust
removers.
• Do not obstruct the flow of combustion and
ventilation air around the burner grate edges.
• Occasionally check the burner flames for proper
size and shape as shown.
A good flame is blue in
color not yellow. If the
flames are not burning
at all ports, you may
need to clean the
burner ports.
Cast-iron
Ignitor
Burner
base
Gas tube
opening
33
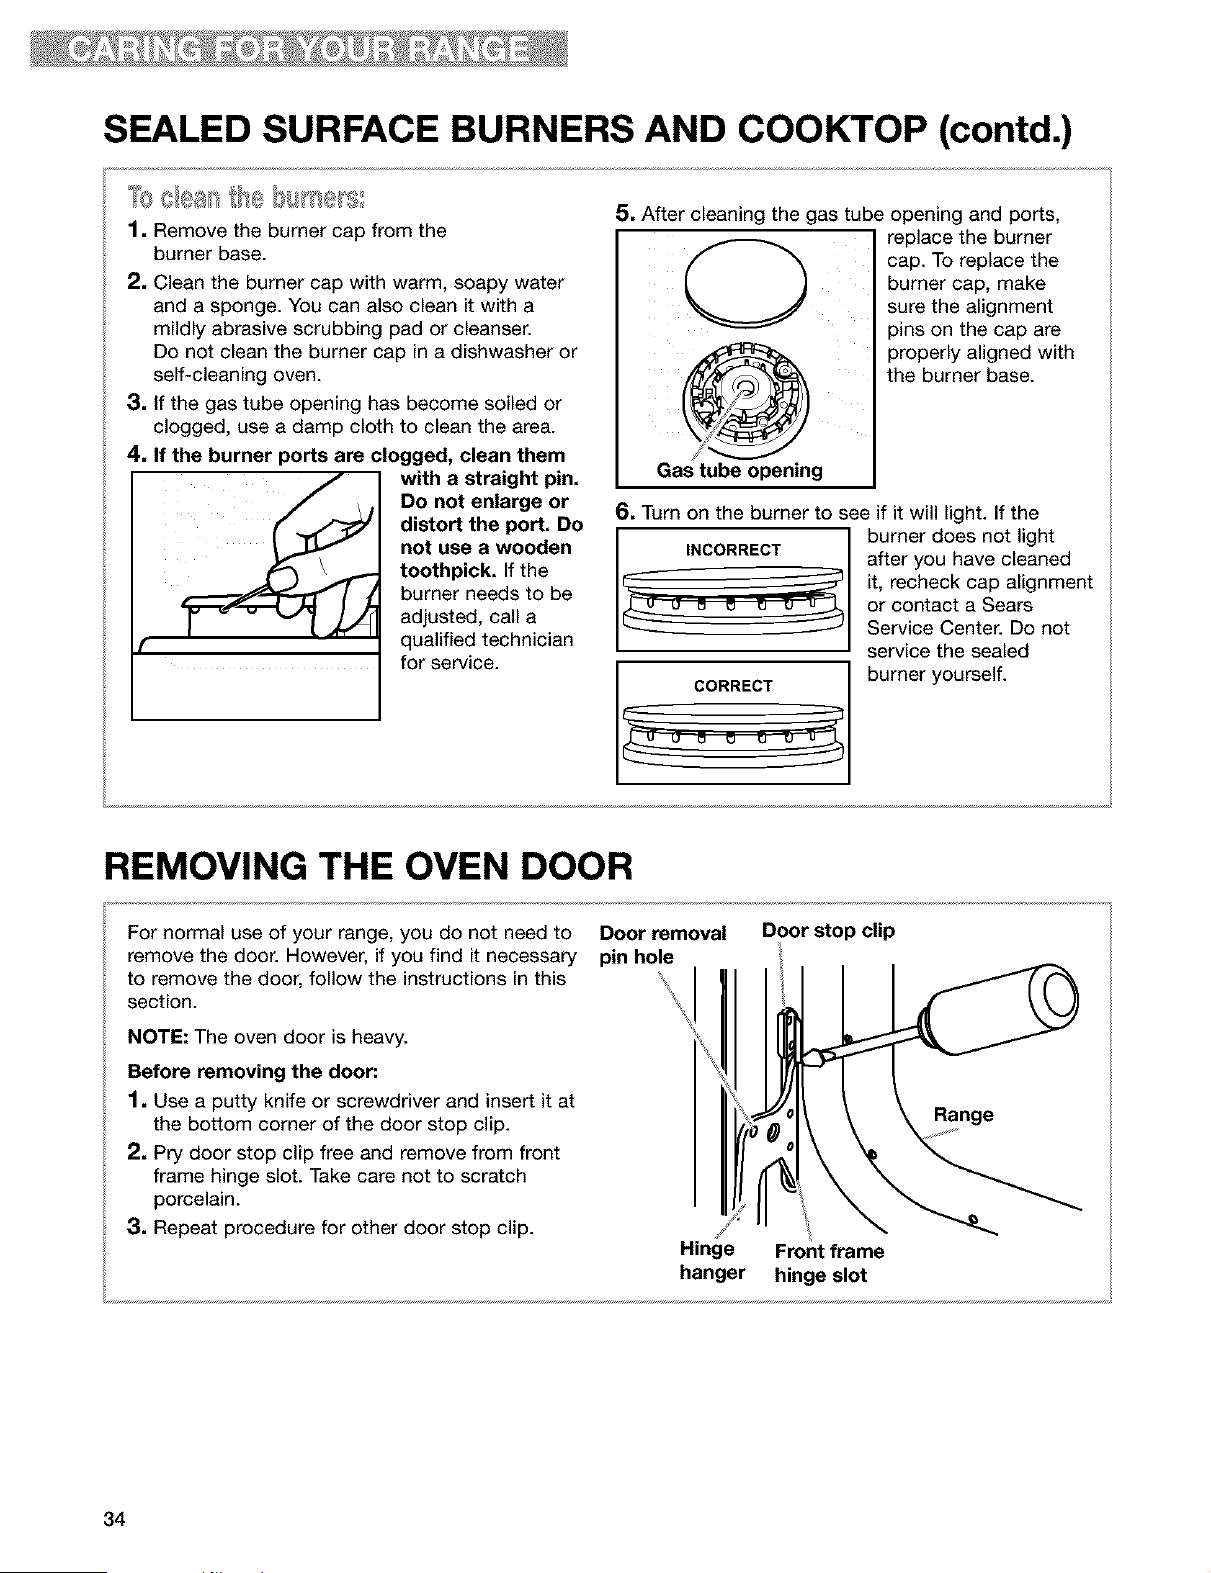
SEALED SURFACE BURNERS AND COOKTOP (contd.)
1. Remove the burner cap from the
burner base.
2. Clean the burner cap with warm, soapy water
and a sponge. You can also clean it with a
mildly abrasive scrubbing pad or cleanser.
Do not clean the burner cap in a dishwasher or
self-cleaning oven.
3. If the gas tube opening has become soiled or
clogged, use a damp cloth to clean the area.
4. If the burner ports are clogged, clean them
with a straight pin.
Do not enlarge or
distort the port. Do
not use a wooden
toothpick. If the
burner needs to be
adjusted, call a
qualified technician
for service.
5. After cleaning the gas tube opening and ports,
@
Gas tube opening
replace the burner
cap. To replace the
burner cap, make
sure the alignment
pins on the cap are
properly aligned with
the burner base.
6. Turn on the burner to see if it will light. If the
CORRECT
burner does not light
after you have cleaned
it, recheck cap alignment
or contact a Sears
Service Center. Do not
service the sealed
burner yourself.
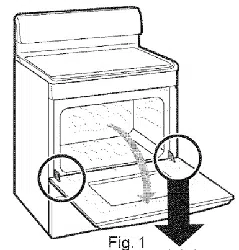
REMOVING THE OVEN DOOR
For normal use of your range, you do not need to Door removal
remove the door. However, if you find it necessary pin hole
section.t°remove the door, follow the instructions in this _'\
NOTE: The oven door is heavy.
Before removing the door."
1. Use a putty knife or screwdriver and insert it at
the bottom corner of the door stop clip.
2. Pry door stop clip free and remove from front
frame hinge slot. Take care not to scratch
porcelain.
3. Repeat procedure for other door stop clip.
Hinge
hanger
Door stop clip
Front frame
hinge slot
34
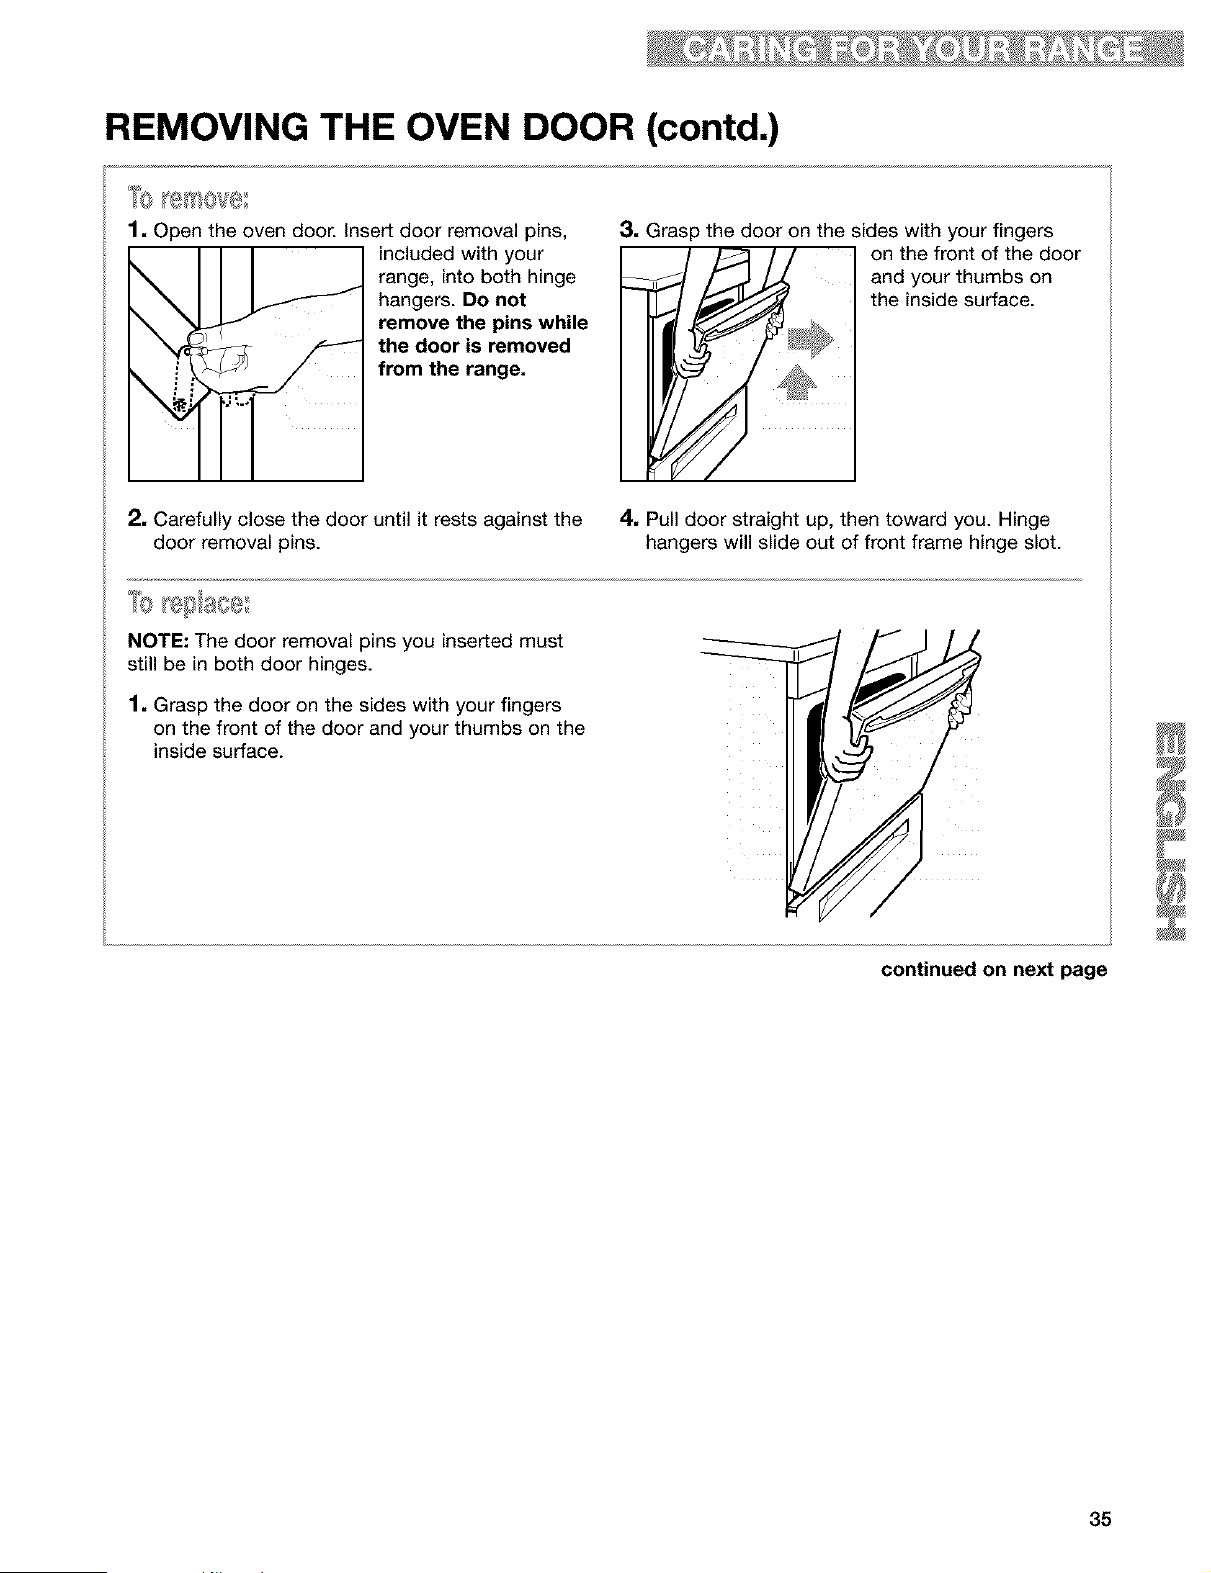
REMOVING THE OVEN DOOR (contd.)
%
1. Open the oven door. Insert door removal pins,
included with your
range, into both hinge
hangers. Do not
remove the pins while
the door is removed
from the range.
2. Carefully close the door until it rests against the
door removal pins.
3. Grasp the door on the sides with your fingers
on the front of the door
and your thumbs on
' # the inside surface.
4. Pull door straight up, then toward you. Hinge
hangers will slide out of front frame hinge slot.
NOTE: The door removal pins you inserted must
still be in both door hinges.
1. Grasp the door on the sides with your fingers
on the front of the door and your thumbs on the
inside surface.
35
REMOVING THE OVEN DOOR (contd.)
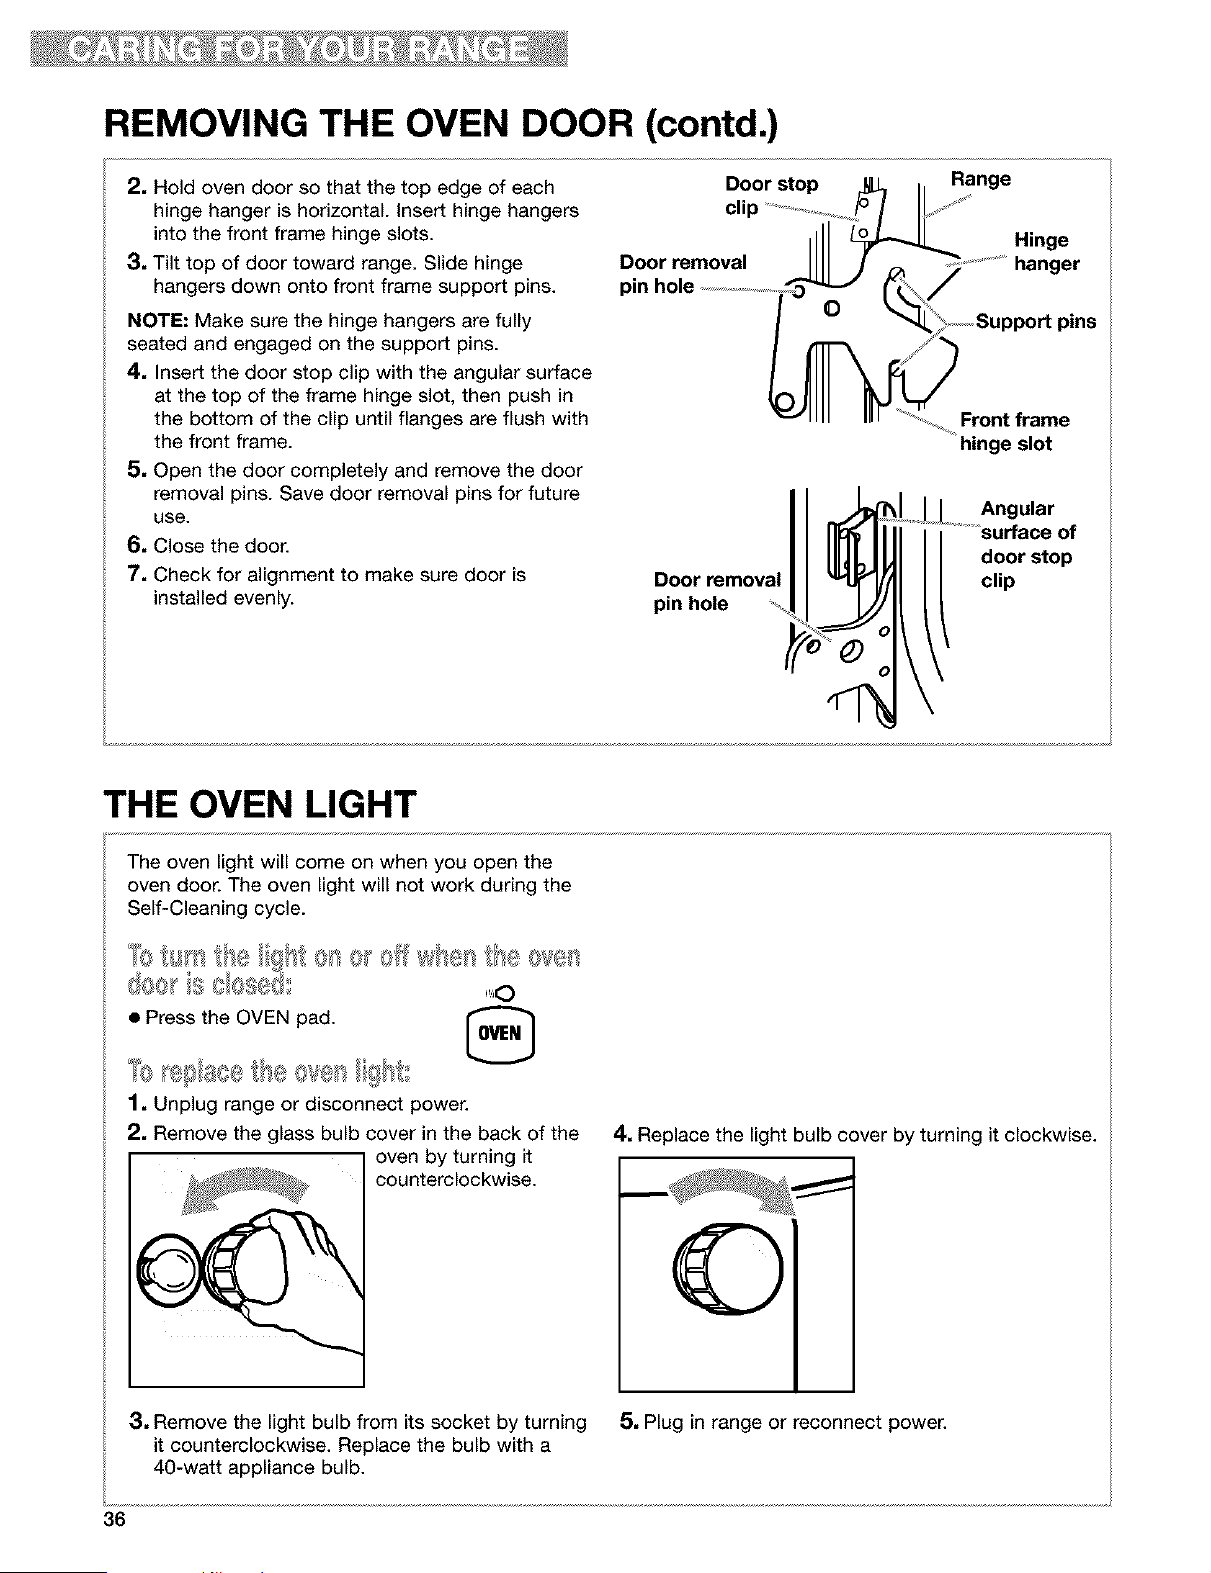
2, Hold oven door so that the top edge of each
hinge hanger is horizontal. Insert hinge hangers
into the front frame hinge slots.
3, Tilt top of door toward range. Slide hinge
hangers down onto front frame support pins.
NOTE: Make sure the hinge hangers are fully
seated and engaged on the support pins.
4, Insert the door stop clip with the angular surface
at the top of the frame hinge slot, then push in
the bottom of the clip until flanges are flush with
the front frame.
5, Open the door completely and remove the door
removal pins. Save door removal pins for future
use.
6, Close the door.
7, Check for alignment to make sure door is
installed evenly.
Door stop Range
Door removal
pin hole /
O
Door removal
pin hole
Hinge
hanger
Front frame
hinge slot
Angular
surface of
door stop
clip
THE OVEN LIGHT
The oven light will come on when you open the
oven door. The oven light will not work during the
Self-Cleaning cycle.
c3ee ',} e
• Press the OVEN pad. [_
L.._M
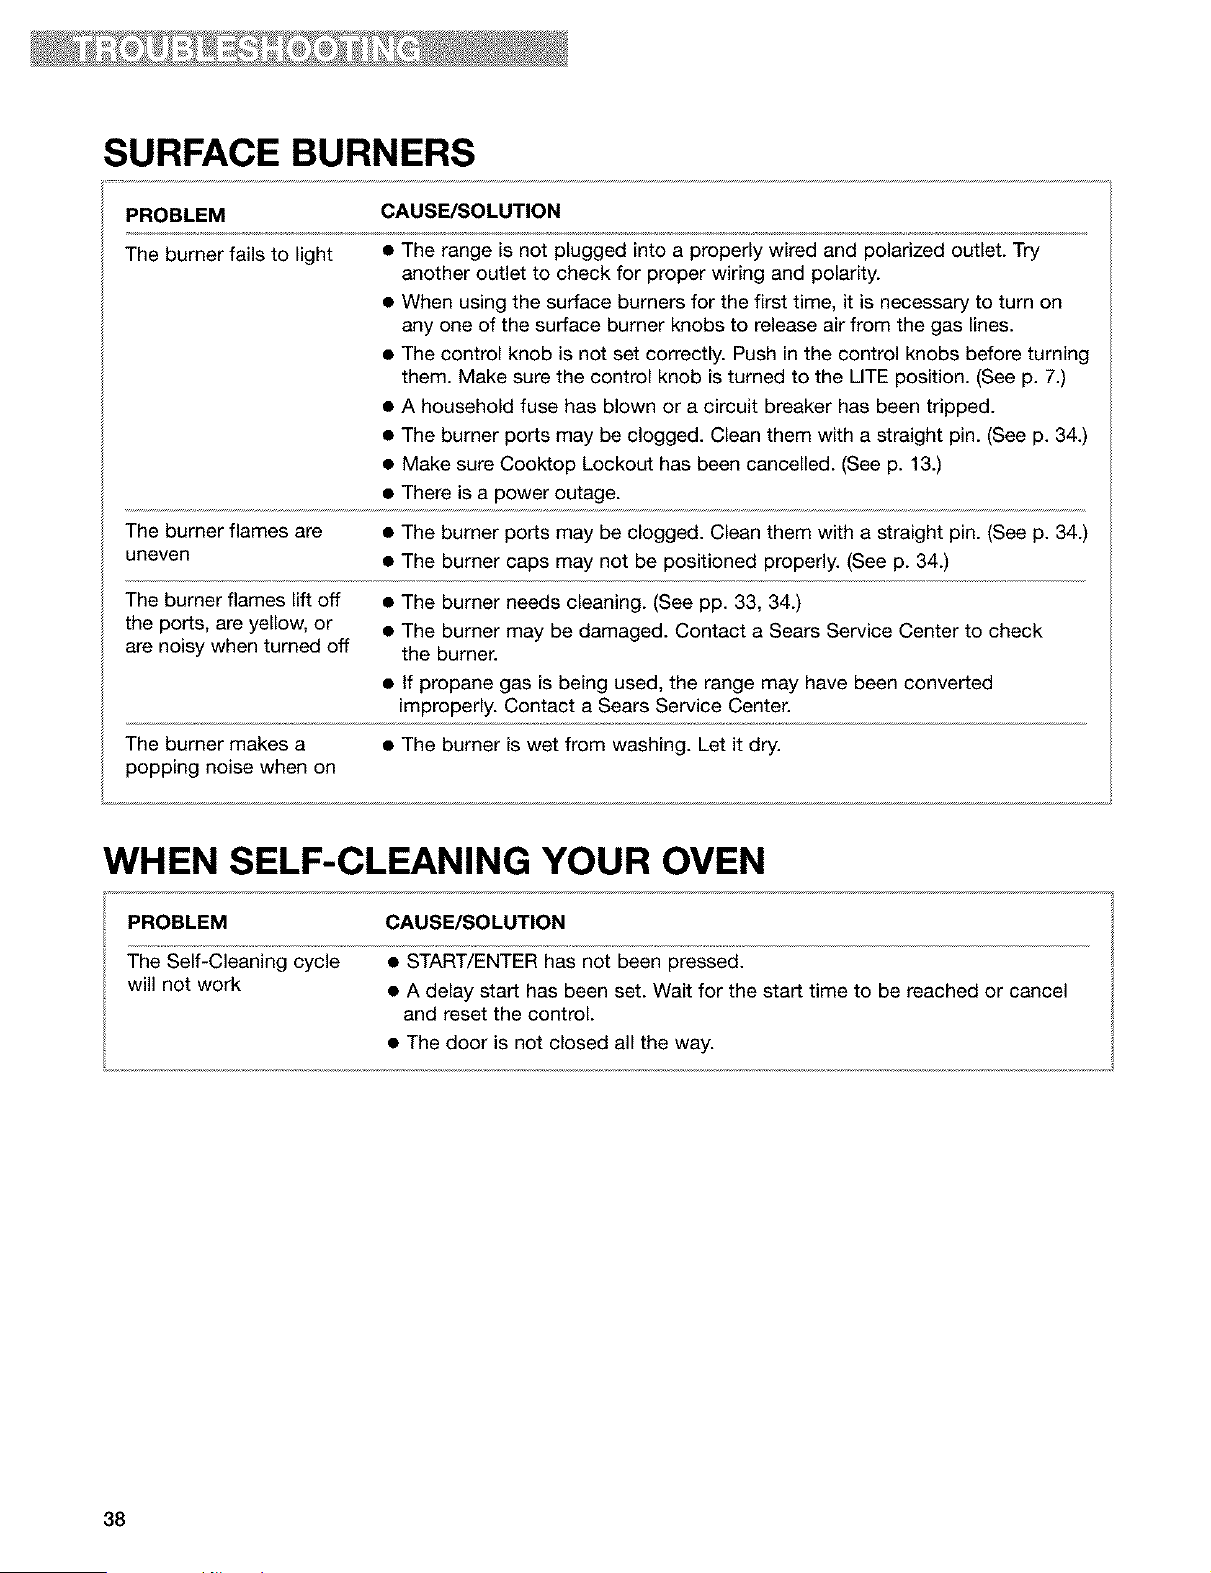
1, Unplug range or disconnect power.
2, Remove the glass bulb cover in the back of the
oven by turning it
counterclockwise.
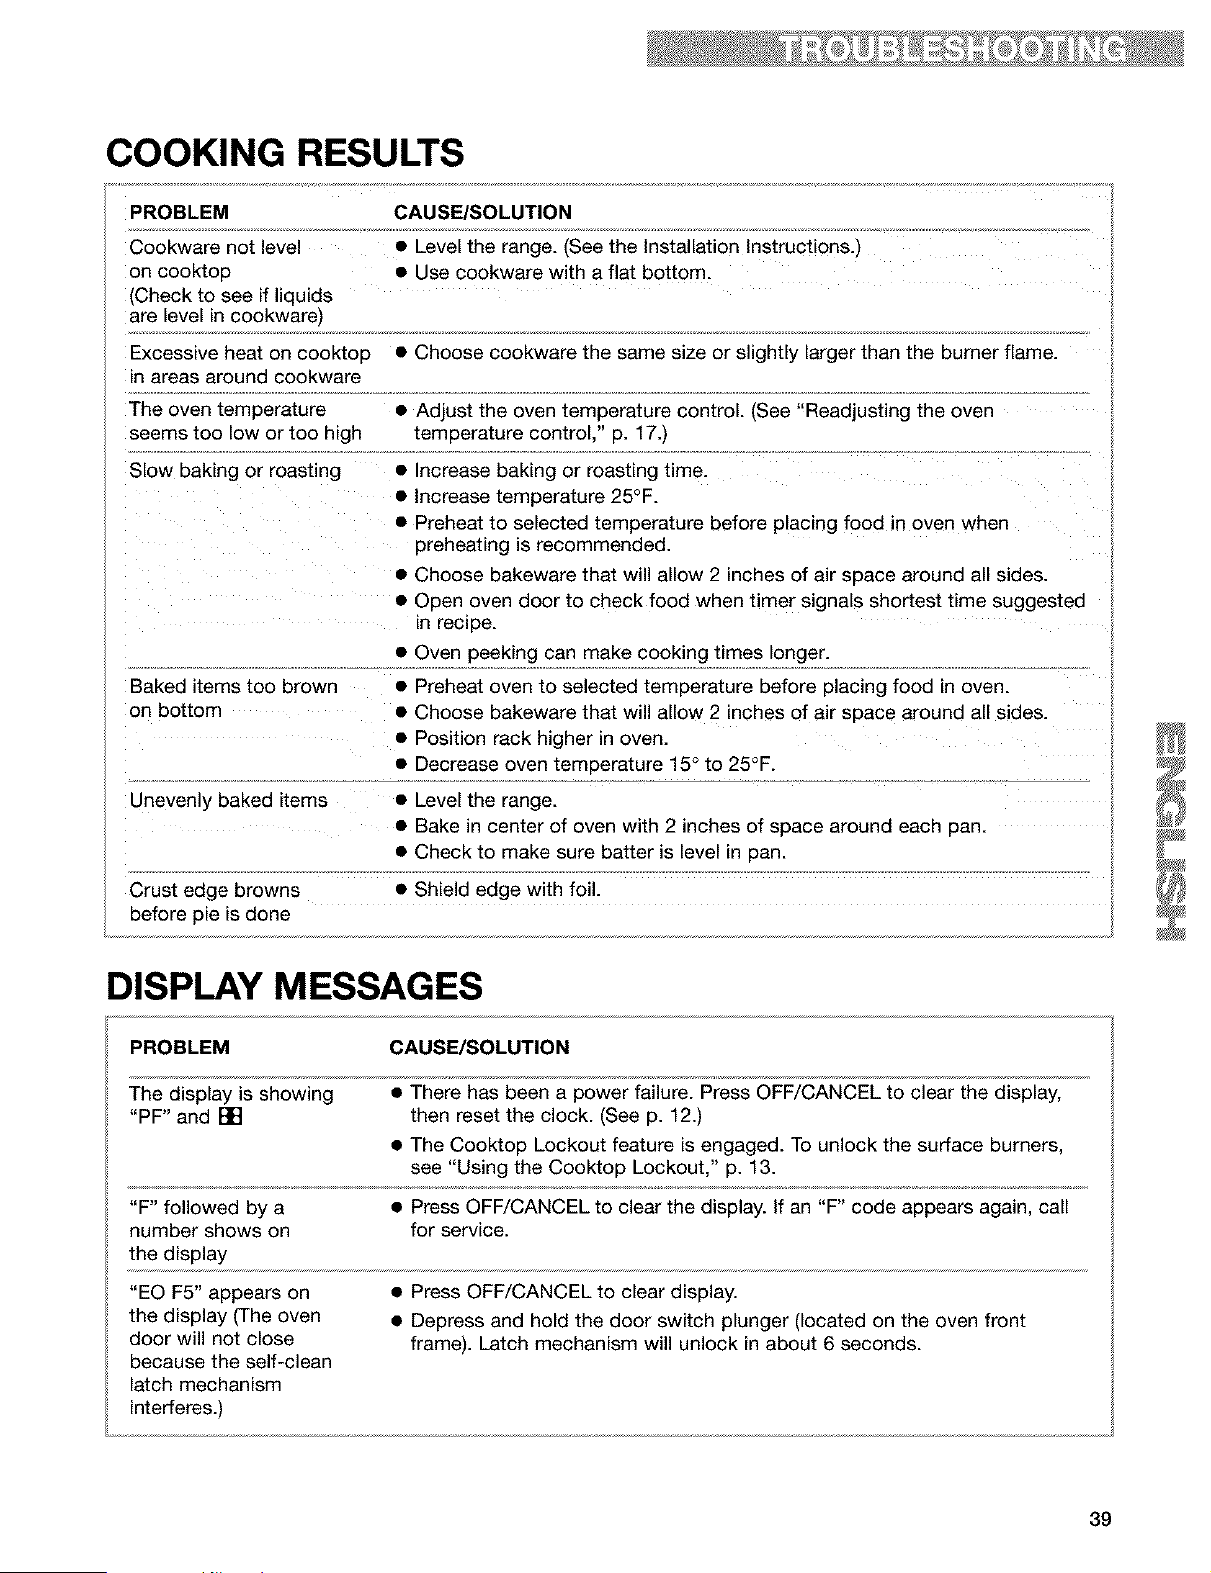
4. Replace the light bulb cover by turning it clockwise.
3, Remove the light bulb from its socket by turning 5, Plug in range or reconnect power.
it counterclockwise. Replace the bulb with a
40-watt appliance bulb.
36

Troubleshooting
Most cooking problems are caused by little things you can find and fix without tools of any
kind. Check the lists below and on the next page before calling for assistance or service.
RANGE DOES NOT WORK
PROBLEM CAUSE/SOLUTION
Nothing works • The range is not plugged into a properly wired and polarized outlet. Try
another outlet to check for proper wiring and polarity.
• The range is not plugged into a properly grounded 3 prong outlet (120v
polarized).
• The range is not properly connected to the gas supply. Contact a Sears
Service Center to reconnect the range to the gas supply. (See the Installation
instructions.)
• A household fuse has blown or a circuit breaker has been tripped.
• The Oven and Cooktop Lockouts have been set.
OVEN/BROILER BURNER
PROBLEM CAUSE/SOLUTION
The oven does not work
• The range is not plugged into a properly wired and polarized outlet. Try
another outlet to check for proper wiring and polarity.
• When using the oven for the first time, it is necessary to light the surface
burners first, to purge air from the gas lines.
• The electronic control is not set correctly. Refer to setting the electronic
oven control section. (See pp. 11-24.)
• A delay start has been set. Wait for the start time to be reached or cancel
and reset the control.
• The main or regulator gas shutoff valve is in the off position. (See the
Installation Instructions.)
• The Oven Lockout has been set.
Burner makes muffled • This is normal. This sound occurs when the oven burner cycles on and off
ticking noise when in use to hold the set oven temperature.
The burner fails to light • The ignition system is broken. Contact a Sears Service Center to replace it.
• A household fuse has blown or a circuit breaker has been tripped.
The burner flames lift • The air/gas mixture is incorrect. Contact a Sears Service Center to check the
away from the ports, are air/gas mixture or see the Installation Instructions.
yellow, or are noisy
Oven burner lights then • Press OFF/CANCEL, then wait 1 minute before trying again. The range is not
goes out after 1 minute plugged into a properly wired and polarized outlet. Try another outlet to
check for proper wiring and polarity.
continued on next page
37
SURFACE BURNERS
PROBLEM CAUSE/SOLUTION
The burner fails to light
• The range is not plugged into a properly wired and polarized outlet. Try
another outlet to check for proper wiring and polarity.
• When using the surface burners for the first time, it is necessary to turn on
any one of the surface burner knobs to release air from the gas lines.
• The control knob is not set correctly. Push in the control knobs before turning
them. Make sure the control knob is turned to the LITE position. (See p. 7.)
• A household fuse has blown or a circuit breaker has been tripped.
• The burner ports may be clogged. Clean them with a straight pin. (See p. 34.)
• Make sure Cooktop Lockout has been cancelled. (See p. 13.)
• There is a power outage.
The burner flames are • The burner ports may be clogged. Clean them with a straight pin. (See p. 34.)
uneven • The burner caps may not be positioned properly. (See p. 34.)
The burner flames lift off • The burner needs cleaning. (See pp. 33, 34.)
the ports, are yellow, or • The burner may be damaged. Contact a Sears Service Center to check
are noisy when turned off the burner.
• If propane gas is being used, the range may have been converted
improperly. Contact a Sears Service Center.
The burner makes a • The burner is wet from washing. Let it dry.
popping noise when on
WHEN SELF-CLEANING YOUR OVEN
PROBLEM CAUSE/SOLUTION
The Self-Cleaning cycle
will not work
• START/ENTER has not been pressed.
• A delay start has been set. Wait for the start time to be reached or cancel
and reset the control.
• The door is not closed all the way.
38
COOKING RESULTS
PROBLEM CAUSE/SOLUTION
Cookware not level • Level the range. (See the Installation Instructions.)
on cooktop • Use cookware with a flat bottom.
(Check to see if liquids
are level in cookware)
Excessive heat on cooktop • Choose cookware the same size or slightly larger than the burner flame.
in areas around cookware
The oven temperature • Adjust the oven temperature control. (See "Readjusting the oven
seems too low or too high temperature control," p. 17.)
Slow baking or roasting • Increase baking or roasting time.
• Increase temperature 25°F.
• Preheat to selected temperature before placing food in oven when
preheating is recommended.
• Choose bakeware that will allow 2 inches of air space around all sides.
• Open oven door to check food when timer signals shortest time suggested
in recipe.
• Oven peeking can make cooking times longer.
Baked items too brown • Preheat oven to selected temperature before placing food in oven.
on bottom • Choose bakeware that will allow 2 inches of air space around all sides.
• Position rack higher in oven.
• Decrease oven temperature 15 ° to 25°F.
Unevenly baked items • Level the range.
• Bake in center of oven with 2 inches of space around each pan.
• Check to make sure batter is level in pan.
Crust edge browns • Shield edge with foil.
before pie is done
DISPLAY MESSAGES
PROBLEM CAUSE/SOLUTION
The display is showing • There has been a power failure. Press OFF/CANCEL to clear the display,
"PF" and [] then reset the clock. (See p. 12.)
• The Cooktop Lockout feature is engaged. To unlock the surface burners,
see "Using the Cooktop Lockout," p. 13.
"F" followed by a • Press OFF/CANCEL to clear the display. If an "F" code appears again, call
number shows on for service.
the display
"EO F5" appears on
the display (The oven
door will not close
because the self-clean
latch mechanism
interferes.)
• Press OFF/CANCEL to clear display.
• Depress and hold the door switch plunger (located on the oven front
frame). Latch mechanism will unlock in about 6 seconds.
39
Index
TOPIC PAGE TOPIC PAGE
ANTI-TIP BRACKET ....................................... 4
BROIUNG
Grid .................................................................. 19, 20
Guidelines ....................................................... 19, 20
Pan ................................................................... 18-20
Setting cycle ............................................................ 18
Oven rack positions .................................. .20
CLEANING
Broiler pan and grid ................................................ 32
Control knobs .......................................................... 31
Control panel .......................................................... 31
Exterior surfaces .................................................... 31
Oven cavity ............................................................ 32
Oven door glass ...................................................... 32
Oven racks ................................................................ 32
Self-Cleaning .................................................. .27 30
Surface burners ............................................... .33, 34
Cooktop grates and surface burner caps ............... 31
Warming drawer cavity ......................... 32
CONTROL PANEL
Burner heat settings .................................... 7
Control knobs. ....................................... .6, 7
Surface burner markers .......................................... 6
COOKWARE
Canning ...................................... 8
Materials ................................................. 8
ELECTRONIC OVEN CONTROL
12-hour shut-off ....................................... 13
Canceling ............................................... 15
Celsius/Fahrenheit ..................................... 17
Clock ....................................... 12
Cooktop Lockout ................................................... 13
Display/clock .......................................... 11
Kitchen timer .......................................................... 14
Oven Lockout .......................................... 12
Starting .................................................................... 15
Tones ....................................... 13
FEATURES ................................................. 6
MODEL AND SERIAL NUMBER .................................. 2
OVEN DOOR ........................................ 34-36
OVEN UGHT ............................................................. .36
OVEN TEMPERATURE
Readjusting ................................. 17
Setting .............................................................. 15, 19
OVEN VENT .............................................. .26
PANS ...................................................................... 8, 9
PARTS ..................................................... .6
ROASTING
Pans ..................................................... .9
Setting cycle. ........................................... 15
Oven rack positions ................................................ .9
Tips. ........................................................................ .16
SAFETY ................................................. 4, 5
SELECT CLEAN TM SELF-CLEANING CYCLE
Before you start .................................................... .27
Delay start ............................................................. .29
How the cycle works ................................. .28
Setting the controls ............................................... .28
Starting immediately ............................................. .28
Stopping the cycle .................................... .30
SERVICE ..................................................... .Back Cover
STURDIGUDETM HALF-RACKWITH REMOVABLEINSERT._.9
STURDIGUDETM RACK WITH INTEGRATEDHANDLE..........9
SURFACE BURNERS
Control knobs ....................................... .6, 31
Control setting guide .................................. .7
Power Burner ........................................... .7
SURESIMMER TM setting ........................................ .7
Surface burner markers .......................................... .6
Tips. ......................................................................... .7
TIMED OVEN CONTROL ..................................... .21-24
TROUBLESHOOTING ......................................... .37-39
ULTRABAKE TM BAKING
Aluminum foil ......................................... .10
Bakeware ............................................... 10
Pans ..................................................... .9
Preheat conditioning ......................... .16
Setting cycle. ........................................... 15
Oven rack positions ................................................ .9
Tips. ........................................................................ .16
ULTRABAKE system ...................................... 15, 16
WARM & READY WARMING DRAWER ................ 25, 26
WARRANTY ............................................... .3
4O
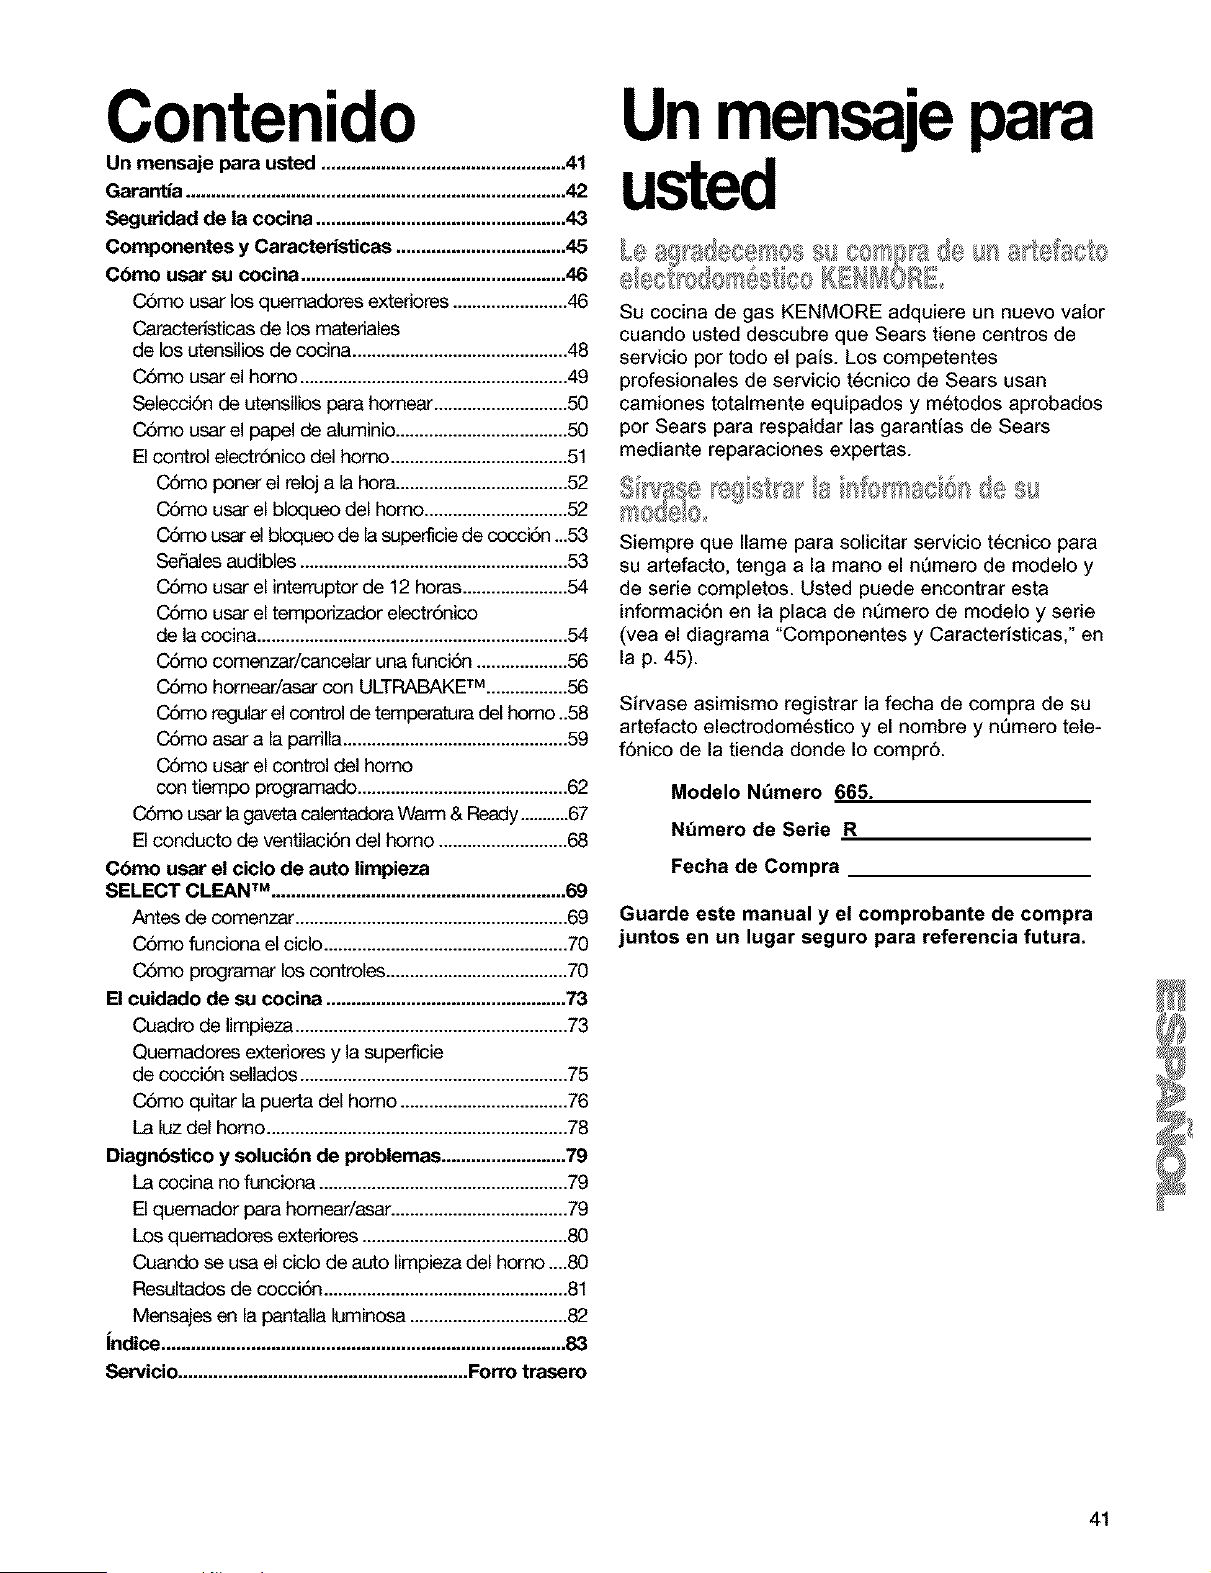
Contenido
Un mensaje para usted .................................................41
Garantia ............................................................................42
Seguridad de la cocina ..................................................43
Componentes y Camcteristicas ..................................45
C6mo usar su cocina .....................................................46
CSmo usar los quemadores exteriores ........................46
Caracteristicas de los materiales
de los utensilios de cocina .............................................48
CSmo usar el homo ........................................................49
Selecci6n de utensilios para homear ............................50
CSmo usar el papel de aluminio ....................................50
El control electr6nico del homo .....................................51
C6mo ponar el reloj a la hora....................................52
C6mo usar el bloqueo del homo ..............................52
C6mo usa" el bloqueo de la superficie de cocci6n ...53
Se_eles audibles ........................................................53
C6mo usar el interrdptor de 12 horas ......................54
C6mo usar el tempodzador electr6nico
de la cocina .................................................................54
C6mo comenzar/cancelar una funci6n ...................56
C6mo homear/asar con ULTRABAKETM .................56
C6mo regular el control de temperatura del homo..58
C6mo asar a la parrila ...............................................59
C6mo usar el control del homo
con tiempo programado ............................................62
C6mo usar la gaveta calentadora Warm & Ready...........67
El conducto de ventilaci6n del homo ...........................68
C6mo usar el ciclo de auto limpieza
SELECT CLF-J_N TM ........................................................... 69
Antes de comenzar .........................................................69
CSmo funcionael ciclo ...................................................70
CSmo programar los controles ......................................70
El cuidado de su cocina ................................................73
Cuadro de limpieza.........................................................73
Quemadores exteriores y la superficie
de cocci6n selados ........................................................75
CSmo quitar la puerta del homo ...................................76
La luz del homo ...............................................................78
Diagnbstico y solucibn de problemas .........................79
La cocina no funciona ....................................................79
El quemador para homear/asar .....................................79
Los quemadores extedores ...........................................80
Cuando se usa el ciclo de auto limpieza del homo ....80
Resultados de cocci6n ...................................................81
Mensajes en la pantala luminosa .................................82
Indice .................................................................................83
Servicio..........................................................Forro trasero
Unmensajepara
Su cocina de gas KENMORE adquiere un nuevo valor
cuando usted descubre que Sears tiene centros de
servicio por todo el paJs. Los competentes
profesionales de servicio t6cnico de Sears usan
camiones totalmente equipados y metodos aprobados
por Sears para respaldar las garantJas de Sears
mediante reparaciones expertas.
_ _ _ _ 4
TM
= l_II_,. 1_,,II, llI[ i
Siempre que Ilame para solicitar servicio tecnico para
su artefacto, tenga a la mano el nQmero de modelo y
de serie completos. Usted puede encontrar esta
informaci6n en la placa de nQmero de modeto y serie
(vea el diagrama "Componentes y CaracterJsticas," en
lap. 45).
Sirvase asimismo registrar la fecha de compra de su
artefacto electrodomestico y el hombre y nQmero tete-
f6nico de la tienda donde Io compr6.
Modelo NQmero 665.
NQmero de Serie R
Fecha de Compra
Guarde este manual y el comprobante de compra
juntos en un lugar seguro para referencia futura.
41
®
Garantia de la cocina autbnoma
GARANTiATOTALDEUNANOPARATODOSLOSCOMPONENTES
Si, durante et transcurso de un aSo desde ta fecha de instalaci6n, cualquier componente no funciona
adecuadamente debido a un defecto en el material o la mano de obra, Sears ta reparara o reemptazara,
a su opci6n, sin costo alguno.
Si este producto se somete a otro uso que no sea el domestico familiar privado, la garantia ardba citada
es valida por s6to 90 dias.
EL SERVICIO DE GARANTfA EST/k DISPONIBLE AL PONERSE EN CONTACTO CON EL CENTRO DE
SERVICIO DE SEARS M,_S CERCANO EN LOS ESTADOS UNIDOS.
Esta garantia le otorga derechos tegales especia!es y posibtemente tenga tambien otros derechos, los
cuates vadan de un estado a otro.
Sears Roebuck and Co. Dept. 817WA Hoffman Estates, IL 60179
Paraaumentarel valordesucocina,compreunContratodeMantenimientode Sears,
Cobertura segt_n los a_os de propiedad let, A_o 2do, A_o 3er, A_o
1. Reposicibn de piezas defectuosas G CM CM
2. Revisi6n anual de mantenimiento CM CM CM
preventivo a solicitud suya
G = Garantia CM = Contrato de Mantenimiento
Los artefactos electrodom6sticos Kenmore est_n diseSados, fabricados y comprobados para aSos de operaci6n confiable. No
obstante, cualquier artefacto moderno puede requerir servicio de vez en cuando. El Contrato de Mantenimiento de Sears le
ofrece un programa de servicio excepcional, a un precio muy razonable.
El cuadro de arriba le muestra a usted los beneficios adicionales que un Contrato de Mantenimiento de Sears le ofrece sobre
la garantia de Sears.
P6ngase en contacto con su vendedor de Sears o Ilame al 1-888-784-6427 y compre un Contrato de Mantenimiento de Sears
I
ADVERTENCIA: Para su seguridad, la informacibn en este manual debe ser
observada para minimizar el riesgo de incendio o explosibn, o para prevenir
da_os a propiedades, heridas o la muerte,
I
- No almacene o use gasolina u otros liquidos y vapores inflamables cerca de este
u otro aparato electrodomdstico,
- PASOS QUE USTED DEBE SEGUIR SI HUELE A GAS:
• No trate encender ningdn aparato electrodomdstico,
• No toque ningdn enchufe eldctrico,
• No use ningdn teldfono en su casa o edificio,
• Llame inmediatamente a su proveedor de gas desde el teldfono de un vecino,
Siga las instrucciones de su proveedor de gas,
• Si usted no puede comunicarse con su proveedor de gas, Ilame al departamento
de bomberos,
- La instalacibn y el servicio deben ser efectuados por un instalador calificado, una
agencia de servicio o por el proveedor de gas,
42

Seguridad de la cocina
Su seguridad y la seguridad de los demos es muy importante.
Hemos incluido muchos mensajes importantes de seguridad en este manual yen su etectrodom6stico.
Lea y obedezca siempre todos los mensajes de seguridad.
Este es et simbolo de advertencia de seguddad.
Este simbolo le llama la atenci6n sobre petigros potenciales que pueden ocasionar la muerte
o una lesi6n a usted y a los demas.
Todos los mensajes de seguddad iran a continuaci6n del simbolo de advertencia de
seguridad y de la palabra "PELIGRO" o "ADVERTENCIA". Estas palabras significan:
Si no sigue las instrucciones de inmediato,
usted puede morir o sufrir una lesibn grave.
Si no sigue las instrucciones, usted puede
morir o sufrir una lesibn grave.
Todos los mensajes de seguridad le diran el petigro potencial, le dir_n c6mo reducir las posibilidades de
sufrir una lesi6n y Io que puede suceder si no se siguen las instrucciones.
EL SOPORTE DE ANTI-VUELCO
La cocina no se voltea durante el uso normal. No obstante pudiera vottearse si se aplica mucha fuerza o
peso a la puerta del homo sin haber fijado apropiadamente el soporte de anti-vuelco.
Peligro de Vuelco
,_ Un niSo o un adulto puede volcar accidentalmente la cocina y resultar muerto.
A___ Conecte el soporte anti-vuelco a la pata trasera de la cocina.
Si traslada de lugar la cocina, vuelva a conectar el soporte anti-vuelco.
Consulte las instrucciones de instalacibn para m_s detalles.
No seguir estas instrucciones puede ocasionar la muerte o quemaduras
graves en nihos y adultos.
Asegdrese de que el soporte anti-vuelco haya sido instalado.
El soporte anti-vuelco • Deslice la cocina hacia adelante.
• Verifique que el soporte anti-vuelco est_ bien asegurado al piso.
• Deslice la cocina para colocarla de nuevo en su lugar asegurdndose de
que la pata trasera quede debajo del soporte anti-vuelco,
La pata trasera
La ilustraci6n a la derecha muestra la ubicaci6n
correcta del soporte antivotteo en et piso. Para su
instalaci6n apropiada, siga las instrucciones de
instalaci6n.
43
INSTRUCCIONES IMPORTANTES DE SEGURIDAD
ADVERTENCIA: Para reducir el riesgo de
incendio, etectrocuci6n, lesiones a personas o
daSos al usar la cocina de gas, siga precauciones
b_sicas, incluyendo las siguientes:
• ADVERTENCIA: Para reducir el riesgo
de volteo de la cocina de gas, _sta debe
asegurarse en el piso mediante la instalacibn
de dispositivos de anti-vuelco. Para verificar si
los dispositivos est_n instalados adecuada-
mente, deslice la cocina de gas hacia adelante,
cercibrese que el soporte anti-vuelco est_ bien
fijo en el piso, y deslice la cocina de gas hacia
atr_s de manera que la pata trasera de la
cocina de gas quede fija debajo del soporte de
anti-vuelco.
• AVISO: NO almacene articulos que interesen a
los niSos en los armados que est_n encima de la
cocina de gas o en el respaldo de protecci6n de
una cocina de gas - cuando los niSos suban
encima de la cocina de gas para poder coger
objetos pueden lastimarse seriamente.
• Instalaci6n apropiada - al instalar la cocina de gas
debe hacer la conexi6n el6ctrica a tierra de
acuerdo con las normas locales o, en ausencia de
normas locales, con el C6digo EI6ctrico Nacional
(National Electrical Code), ANSI/NFPA 70. En
Canada, la cocina de gas debe tener su conexi6n
et6ctrica a tierra de conformidad con el C6digo
El6ctrico Canadiense. Cerci6rese que la
instalaci6n y puesta a tierra de la cocina de gas
sean efectuadas adecuadamente por un t6cnico
competente.
• Esta cocina de gas esta equipada con un enchufe
de tres puntas con contacto a tierra para su
protecci6n contra riesgo de etectrocuci6n y deberia
enchufarse directamente a un tomacorriente que
tiene conexi6n a tierra. No corte ni quite la punta
para conexi6n a tierra de este enchufe.
• Desconecte la energia electrica antes de hacer
una revisi6n al artefacto.
• Nunca use la cocina de gas como calefacci6n
del cuarto.
• El mal uso de las puertas o gavetas del artefacto,
tales como pisar, recostarse o sentarse en las
puertas o gavetas, puede ocasionar heridas.
• Mantenimiento - Mantenga et area de la cocina de
gas despejada y libre de materiales combustibles,
gasolina y otros vapores y liquidos inflamables.
• Almacenaje dentro o encima de la cocina de gas
- No se debe almacenar materiales inflamables
en el horno o cerca de las unidades que estan
en la superficie.
• El tamaSo de la llama del quemador superior
debe ajustarse de manera que no se extienda
m_s alia de los bordes det utensilio de cocina.
Para cocinas de gas de limpieza autom_tica -
• Antes de efectuar la limpieza autom_tica del homo
- quite la charota para asar y otros utensilios.
Limpie con un trapo h6medo todo derrame
excesivo antes de iniciar el cicto de autolimpieza.
GUARDE ESTAS INSTRUCCIONES
La California Safe Drinking Water and Toxic Enforcement Act (El regtamento de la protecci6n de la potabilidad
del agua y la etiminaci6n de sustancias t6xicas de California) exige que et gobernador de California publique
una tista de aquetlas sustancias identificadas por el estado de California como causantes de c_ncer, defectos
cong6nitos o algen otro tipo de daSos en la funci6n reproductora y exige que los comerciantes adviertan de
ta exposici6n posible a tales sustancias.
ADVERTENCIA: Este producto contiene una sustancia quimica identificada como causante de cancer,
defectos congenitos o algen otro tipo de daSos en la funci6n reproductora por el estado de California.
Este utensilio pudiera producir una exposici6n de bajo nivel a alguna de tas sustancias enumeradas, como
seria benceno, formaldehido, mon6xido de carbono, tolueno y holtin.
44
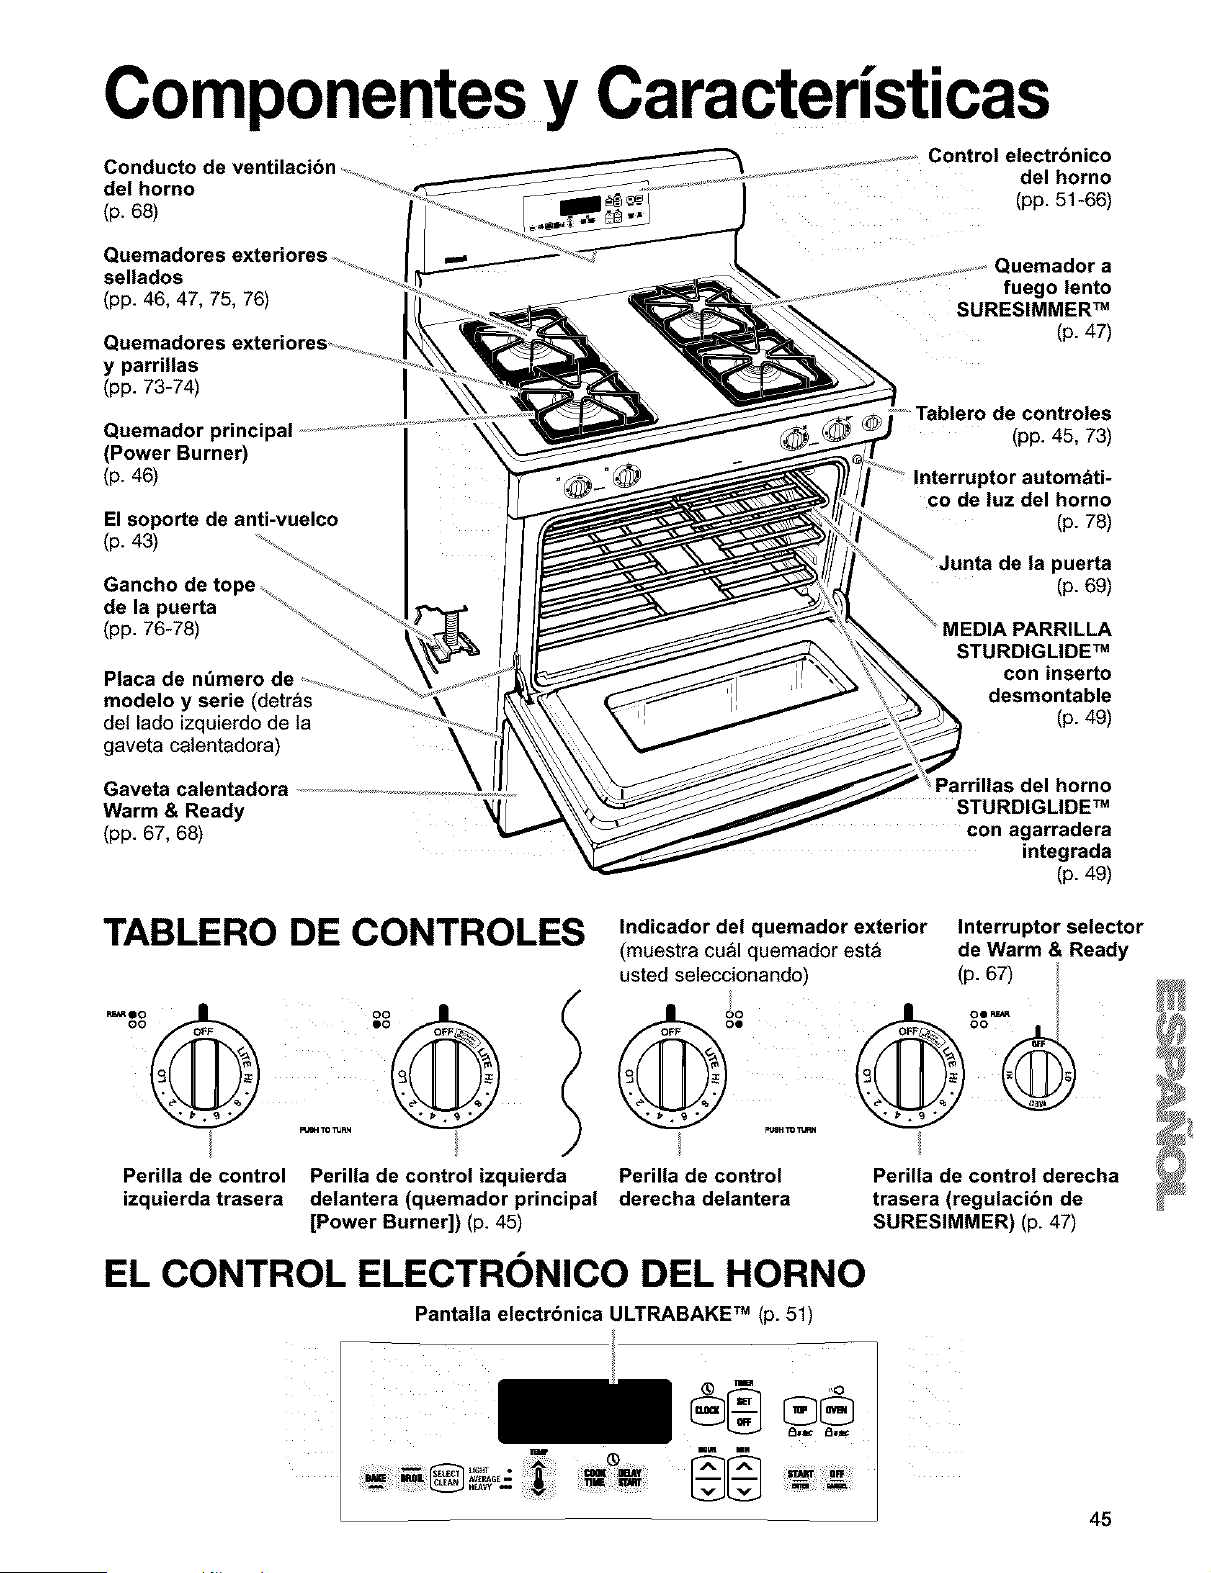
Componentes y Caracteristicas
Conducto de
del horno
(p. 68)
.........................................Control electrbnico
...................................... del horno
(pp. 51-66)
Quemadores
sellados
(pp. 46, 47, 75, 76)
Quemadores
y parrillas
(pp. 73-74)
Quemador principal
(Power Burner)
(p. 46)
El soporte de anti-vuelco
(p. 43)
Gancho de
de la puerta
(pp. 76-78)
Placa de ndmero de ............
modelo y serie (detras ................
del lado izquierdo de la
gaveta calentadora)
Gaveta calentadora .............................................................................
Warm & Ready '_
(pp. 67, 68)
uemador a
fuego lento
SURESIMMER TM
(p. 47)
Tablero de controles
(pp. 45, 73)
co de luz del horno
(p. 78)
inta de la puerta
(p. 69)
STURDIGLIDE TM
con inserto
desmontable
(p. 49)
Parrillas del horno
STURDIGLIDE TM
con agarradera
integrada
(p. 49)
TABLERO DE CONTROLES
Perilla de control Perilla de control izquierda
izquierda trasera delantera (quemador principal
[Power Burner]) (p. 45)
Indicador del quemador exterior
(muestra cu_l quemador est_
usted seleccionando
Interruptor selector
de Warm & Ready
(p. 67)
Perilla de control
derecha delantera
PerUla de control derecha
trasera (regulacibn de
SURESIMMER) (p. 47)
EL CONTROL ELECTRONICO DEL HORNO
Pantalla electrbnica ULTRABAKE TM (p. 51)
45
Cbmo usar su cocina
COMO USAR LOS QUEMADORES EXTERIORES
Peligro de Incendio
No permita que la llama del quemador
extienda mils allH que la orilla de la cacerola.
Apague todas las perillas de los controles
cuando no estd cocinando.
No seguir estas instrucciones puede
ocasionar la muerte o incendio.
NOTA: Se envia la unidad con los quemadores
exteriores en la posicion de bloqueo de la superticie
de cocci6n, y se debe quitar et bloqueo antes de
usarlos. Vea "C6mo usar et bloqueo de la superticie
de cocci6n", p.53.
Su cocina viene con encendedores electricos que
prenden autom_ticamente los quemadores cada
vez que usted gira las perillas de control a LITE.
• Coloque una cacerola Ilena encima de la pardtla
del quemador antes de encender et quemador
exterior. No deje el quemador encendido por
perfodos prolongados de tiempo sin colocar una
cacerola encima de la pardtla.
• Presione la perilla de control hada dentro y gfrela
en sentido contrario a
las manecillas del reloj
hasta la posici6n LITE. El
sonido de dic proviene de
la chispa del encendedor.
Asegerese de que el que-
mador se ha encendido.
• Despues de que et
quemador se haya
encendido, detenga el
sonido de ctic girando la perilla de control a
cualquier posici6n entre HI y LO.
NOTA:
• No intente prender los quemadores durante un
apag6n.
• Todos los cuatro encendedores el6ctricos haran
un ctic al mismo tiempo. Sin embargo, se
encendera s61o el quemador cuya perilta de
control se haya colocado en LITE.
Use la siguiente tabla como gufa.
POSICION USO RECOMENDADO
LITE • Para encender et quemador.
Quemador pdncipal • Para proporcionar la
Power Burner) intensidad m_s alta de calor.
(quemador detantero
izquierdo)
HI • Para comenzar a cocinar la
comida.
• Para hacer hervir tfquidos.
• Para mantener el hervor.
• Para freir polio o panqueques.
• Para salsas, pudines o
glaseados.
• Para cocinar grandes canti-
dades de verduras.
Alcance medio
entre HI y LO)
LO • Para mantener la comida
caliente.
• Para cocer a fuego lento.
Posicibn • Para proporcionar una coc-
SURESlMMER TM ci6n a fuego bien lento/inten-
(quemador sidad minima de calor.
>osterior derecho) • Para derretir chocolate o
mantequilla.
NOTA: No deje utensitios de cocina vacios o que se
hayan secado, encima de un quemador caliente. El
utensitio podrfa recalentarse, ocasionando da_o al
utensilio o al producto en cocci6n.
El quemador izquierdo delantero est_ diseSado para
proporcionar una posici6n de calor sumamente alto.
Puede usarse para hacer hervir liquidos r_pidamente
y para cocinar grandes cantidades de comida.
I
RECUERDE: Cuando se este usando la cocina
o durante el cicto de auto limpieza, toda la
superficie de cocci6n se calienta.
46
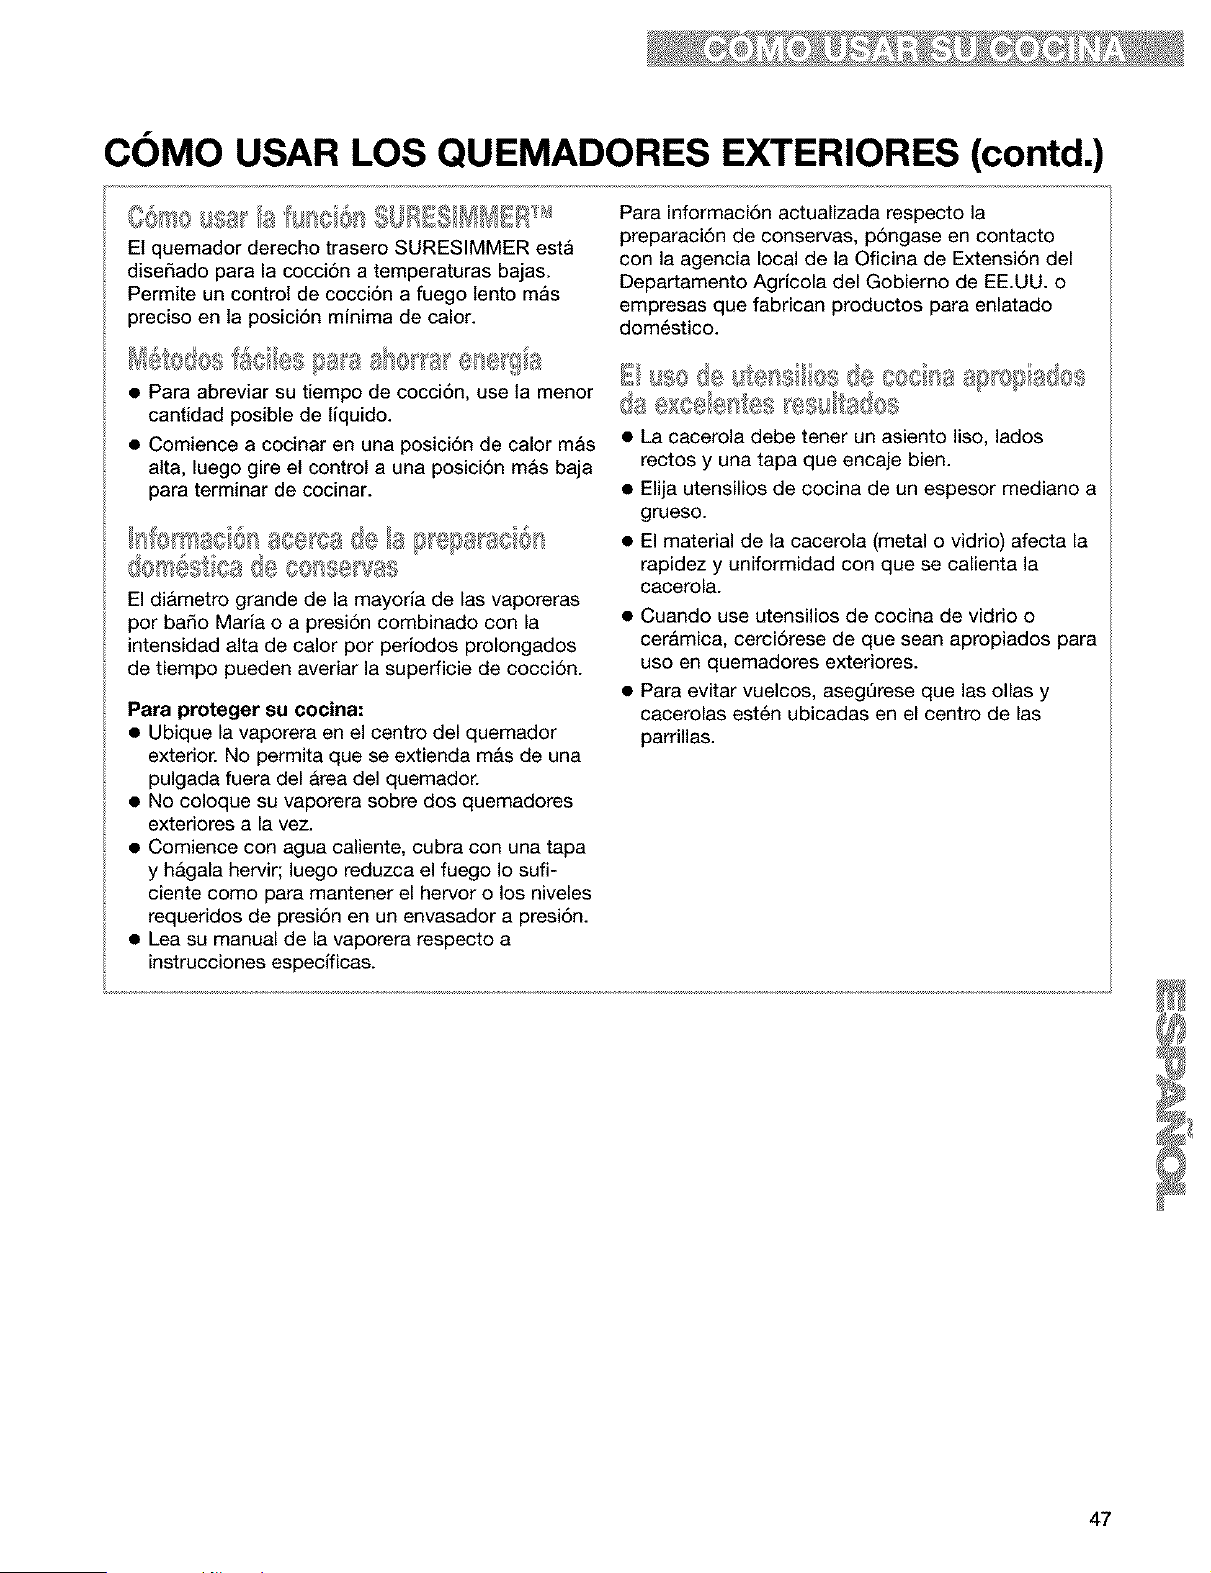
COMO USAR LOS QUEMADORES EXTERIORES (contd.)
El quemador derecho trasero SURESIMMER est_
disefiado para la cocci6n a temperaturas bajas.
Permite un control de cocci6n a fuego lento mas
preciso en la posici6n minima de calor.
Para abreviar su tiempo de cocci6n, use la menor
cantidad posible de liquido.
Comience a cocinar en una posici6n de calor m_s
aita, luego gire et control a una posici6n m_s baja
para terminar de cocinar.
El di&metro grande de la mayoria de las vaporeras
por bafio Maria o a presi6n combinado con la
intensidad alta de calor por periodos prolongados
de tiempo pueden averiar la superficie de cocci6n.
Para proteger su cocina:
• Ubique la vaporera en el centro del quemador
exterior. No permita que se extienda mAs de una
pulgada fuera del Area del quemador.
• No coloque su vaporera sobre dos quemadores
exteriores a la vez.
• Comience con agua caliente, cubra con una tapa
y hagala hervir; luego reduzca el fuego Io sufi-
ciente como para mantener el hervor o los niveles
requeridos de presi6n en un envasador a presi6n.
• Lea su manual de la vaporera respecto a
instrucciones especfficas.
Para informaci6n actualizada respecto la
preparaci6n de conservas, p6ngase en contacto
con la agencia local de la Oficina de Extensi6n del
Departamento AgrJcola del Gobierno de EE.UU. o
empresas que fabrican productos para enlatado
dom6stico.
@ ,,
• La cacerola debe tener un asiento liso, lados
rectos y una tapa que encase bien.
• Elija utensilios de cocina de un espesor mediano a
grueso.
• El material de la cacerola (metal o vidrio) afecta la
rapidez y uniformidad con que se calienta la
cacerola.
• Cuando use utensilios de cocina de vidrio o
ceramica, cerci6rese de que sean apropiados para
uso en quemadores exteriores.
• Para evitar vuelcos, asegQrese que las ollas y
cacerolas est6n ubicadas en el centro de las
parrillas.
47
CARACTER|STICAS DE LOS MATERIALES DE LOS
UTENSILIOS DE COCINA
El material de ta cacerola afecta tanto ta rapidez con que et cator se transfiere desde el &rea superficial de
cocci6n a trav_s del material de la cacerola y c6mo el calor se extiende en todo et asiento de la cacerola. Etija
cacerotas que proporcionen 6ptimos resultados de cocci6n.
Aluminio • Calienta con rapidez y uniformidad.
• Use para todo tipo de cocci6n.
• Espesor mediano o grueso es mejor para casi todo tipo de cocci6n.
• Usado como nQcleo o base en utensilios de cocina para proporcionar
cater uniforme.
Hierro fundido • Calienta tenta y uniformemente.
• Bueno para dorar y freir.
• Mantiene el calor para cocci6n lenta.
• Puede ser revestido con esmalte de porcelana.
Ceramica o ceramica vitrificada • Calienta lentamente y sin uniformidad.
• Use en intensidades de fuego lento a mediano.
• Siga las instrucciones del fabricante.
Cobre • Calienta muy r_pida y uniformemente.
• Usado como nQcleo o base en utensitios de cocina para proporcionar
cater uniforme.
Loza de barro • Puede usarse para cocci6n en la superficie de cocci6n si asi Io recomienda
el fabricante.
• Use en intensidades de calor bajo.
Acero con esmalte de • Vea hierro fundido y acero inoxidable.
porcelana o hierro fundido con
esmalte de porcelana
Acero inoxidable • Calienta rapidamente pero sin uniformidad.
• Un n_cleo o base de aluminio o cobre en et utensitio de cocina proporciona
uniformidad del calor.
• Puede revestirse con esmalte de porcelana.
48
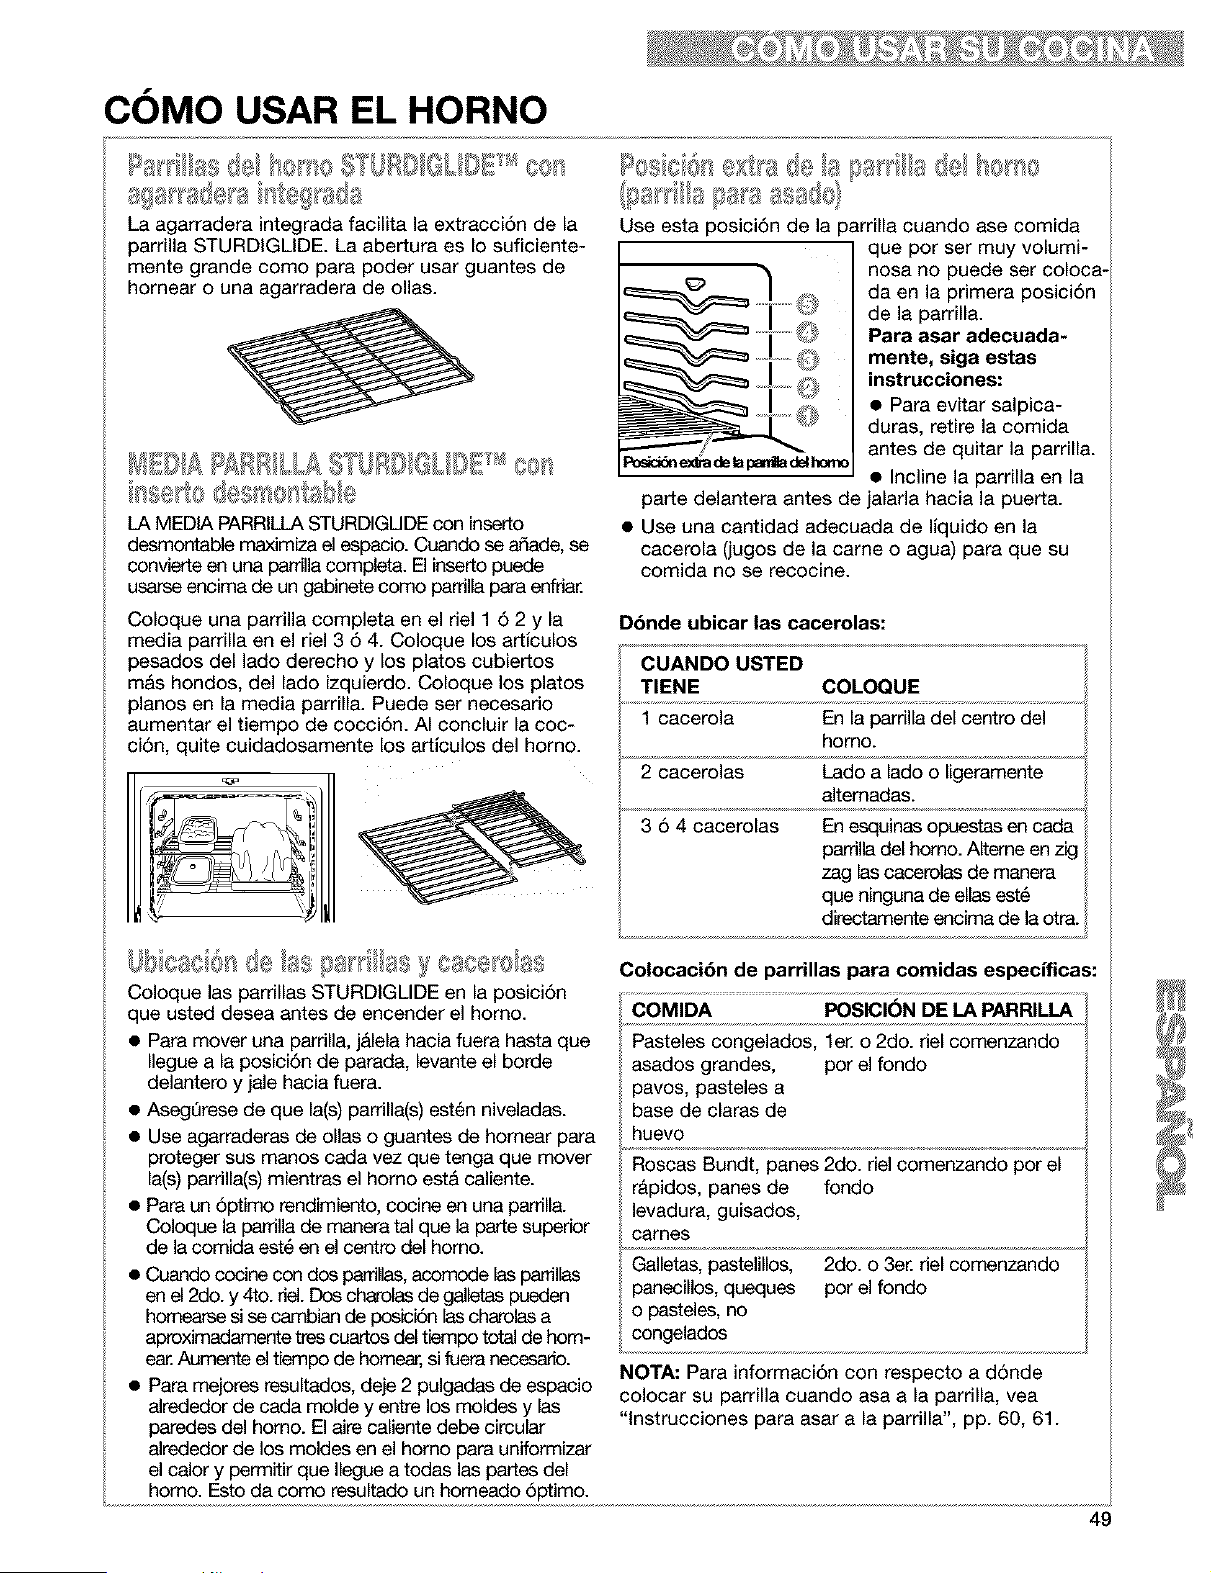
COMO USAR EL HORNO
La agarradera integrada faclita la extracci6n de la
parrilla STURDIGLIDE. La abertura es Io suficiente-
mente grande como para poder usar guantes de
hornear o una agarradera de ollas.
tJI [}/A J.£ co
LA MEDIA PARRILLA STURDIGUDE con inserto
desmontable maximiza el espacio. Cuando se afiade, se
convierte en una parrilla completa. El inserto puede
usarse encima de un gabinete como parrilia para enfdar.
Coloque una parrilla completa en el riel 1 6 2 y la
media parrilla en el riel 3 6 4. Coloque los articulos
pesados del lado derecho y los platos cubiertos
m&s hondos, del lado izquierdo. Coloque los platos
pianos en la media parrilla. Puede ser necesario
aumentar el tiempo de cocci6n. AI concluir la coc-
ci6n, quite cuidadosamente los artlculos del horno.
£osici6 de Is Alla @I No ="9
Use esta posici6n de la
f o
3arrilla cuando ase comida
que pot set muy volumi-
nosa no puede ser coloca-
da en la primera posici6n
de la parrilla.
Para asar adecuada-
mente, siga estas
instrucciones:
• Para evitar salpica-
duras, retire la comida
antes de quitar la parrilla.
Podci_exfradelapan_ delhomo
• Incline la parrilla en la
parte delantera antes de jalarla hacia la puerta.
• Use una cantidad adecuada de liquido en la
cacerola (jugos de la came o agua) para que su
comida no se recocine.
Dbnde ubicar las cacerolas:
CUANDO USTED
TIENE COLOQUE
1 cacerola En la parrilla del centro del
homo.
2 cacerolas Lado a lado o ligeramente
altemadas.
3 6 4 cacerolas En esquinas opuestas en cada
pardlladel homo. Alterne en zig
zag ias cacerolas de manera
que ninguna de elias est6
directamente encima de la otra.
Coloque las parrillas STURDIGLIDE en la posici6n
que usted desea antes de encender el homo.
• Para mover una parrilla, j&lela hacia fuera hasta que
Ilegue a la posici6n de parada, levante el borde
delantero y jale hacia fuera.
• AsegQrese de que la(s) parrilla(s) est6n niveladas.
• Use agarraderas de ollas o guantes de homear para
proteger sus manos cada vez que tenga que mover
la(s) parrilla(s) mientras el homo est& caliente.
• Para un 6ptimo rendimiento, cocine en una parrila.
Coloque la p_lla de manera tal que la parte superior
de la comida est6 en el centro del homo.
• Cuando cocine con dos parrilas, acomode las parrillas
en el 2do. y 4to. del. Dos ch_olas de galletas pueden
homearse si se cambian de posici6n las cha_olasa
aproximadamente tres cuartos del tiempo total de hom-
e_ Aumente el tiempo de homear, si fuera necesario.
• Para mejores resultados, deje 2 pulgadas de espacio
alrededor de cada molde y entre los moldes y las
paredes del homo. El aire caliente debe circular
alrededor de los moldes en el homo para uniformizar
el calor y permitir que Ilegue a todas las partes del
homo. Esto da como resultado un homeado 6ptimo.
Colocaci6n de parrillas para comidas especificas:
COMIDA
POSICI(_N DE LA PARRILLA
Pasteles congelados, ler. o 2do. riel comenzando
asados grandes, por el fondo
pavos, pasteles a
base de claras de
huevo
Roscas Bundt, panes 2do. riel comenzando por el
rapidos, panes de fondo
levadura, guisados,
carnes
Galletas, pastelillos, 2do. o 3er. riel comenzando
panecillos, queques por el fondo
o pasteles, no
congelados
NOTA: Para informaci6n con respecto a d6nde
colocar su parrilla cuando asa a la parrilla, vea
"lnstrucciones para asar a la parrilla", pp. 60, 61.
49
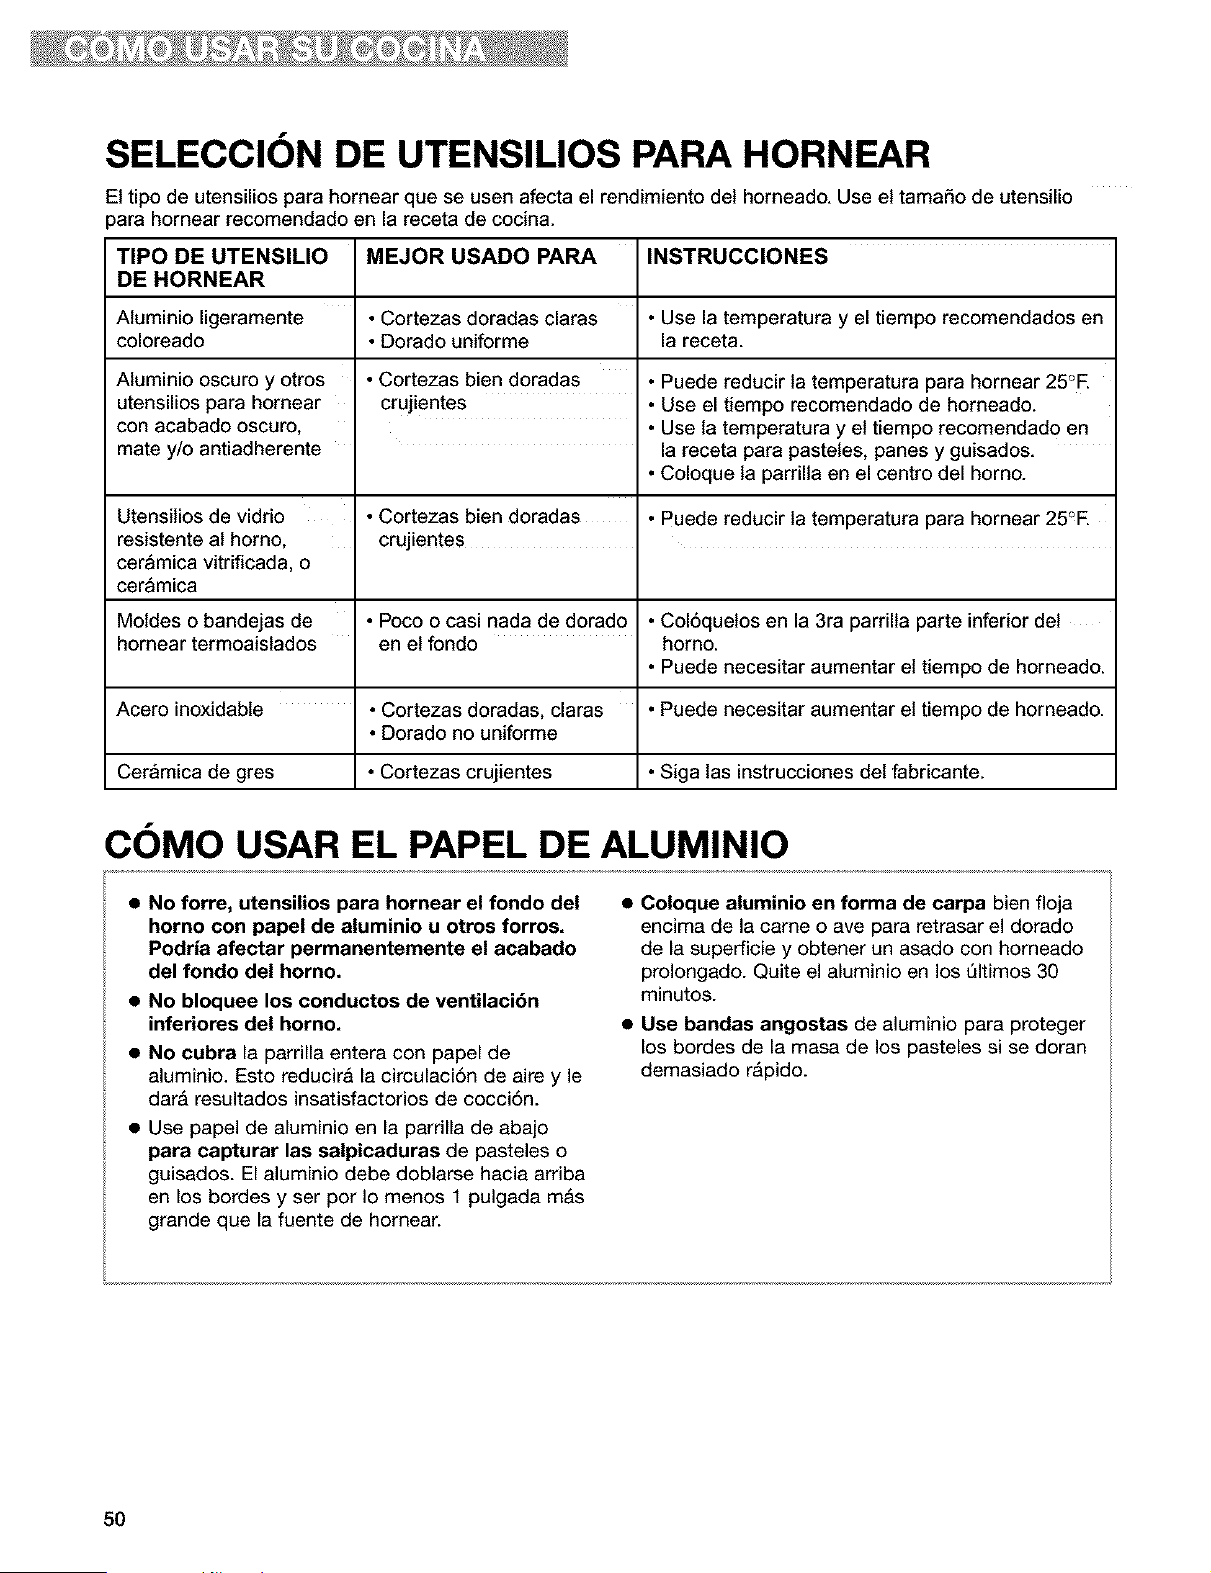
SELECCION DE UTENSILIOS PARA HORNEAR
El tipo de utensilios para hornear que se usen afecta el rendimiento det horneado. Use el tamaSo de utensilio
)ara hornear recomendado en la receta de cocina.
TIPO DE UTENSILIO MEJOR USADO PARA INSTRUCCIONES
DE HORNEAR
Atuminio ligeramente • Cortezas doradas claras • Use la temperatura y el tiempo recomendados en
coloreado • Dorado uniforme la receta.
Aluminio oscuro y otros • Cortezas bien doradas • Puede reducir ta temperatura para hornear 25°E
utensilios para hornear crujientes • Use el tiempo recomendado de horneado.
con acabado oscuro, • Use ta temperatura y et tiempo recomendado en
mate y/o antiadherente la receta para pasteies, panes y guisados.
• Coloque ta parrilla en el centro del horno.
Utensilios de vidrio • Cortezas bien doradas • Puede reducir ta temperatura para hornear 25°E
resistente al homo, crujientes
ceramica vitrificada, o
cer_mica
Motdes o bandejas de • Poco o casi nada de dorado • Col6quelos en la 3ra parrilla parte inferior del
hornear termoaisiados en el fondo homo.
• Puede necesitar aumentar el tiempo de horneado.
Acero inoxidable • Cortezas doradas, claras • Puede necesitar aumentar el tiempo de horneado.
• Dorado no uniforme
Cer_mica de gres • Cortezas crujientes • Siga las instrucciones del fabricante.
COMO USAR EL PAPEL DE ALUMINIO
• No forre, utensilios para hornear el rondo del
horno con papel de aluminio u otros forros.
Podria afectar permanentemente el acabado
del rondo del homo.
• No bloquee los conductos de ventilaci6n
inferiores del horno.
• No cubra la parrilla entera con papel de
aluminio. Esto reducira la circulaci6n de aire y le
darA resultados insatisfactorios de cocci6n.
• Use papel de aluminio en la parrilla de abajo
para capturar las salpicaduras de pasteles o
guisados. El aluminio debe doblarse hacia arriba
en los bordes y ser por Io menos 1 pulgada mAs
grande que la fuente de hornear.
• Coloque aluminio en forma de carpa bien floja
encima de la carneo ave para retrasar el dorado
de la superficie y obtener un asado con horneado
prolongado. Quite el aluminio en los 51timos 30
minutos.
• Use bandas angostas de aluminio para proteger
los bordes de la masa de los pasteles si se doran
demasiado r&pido.
5O
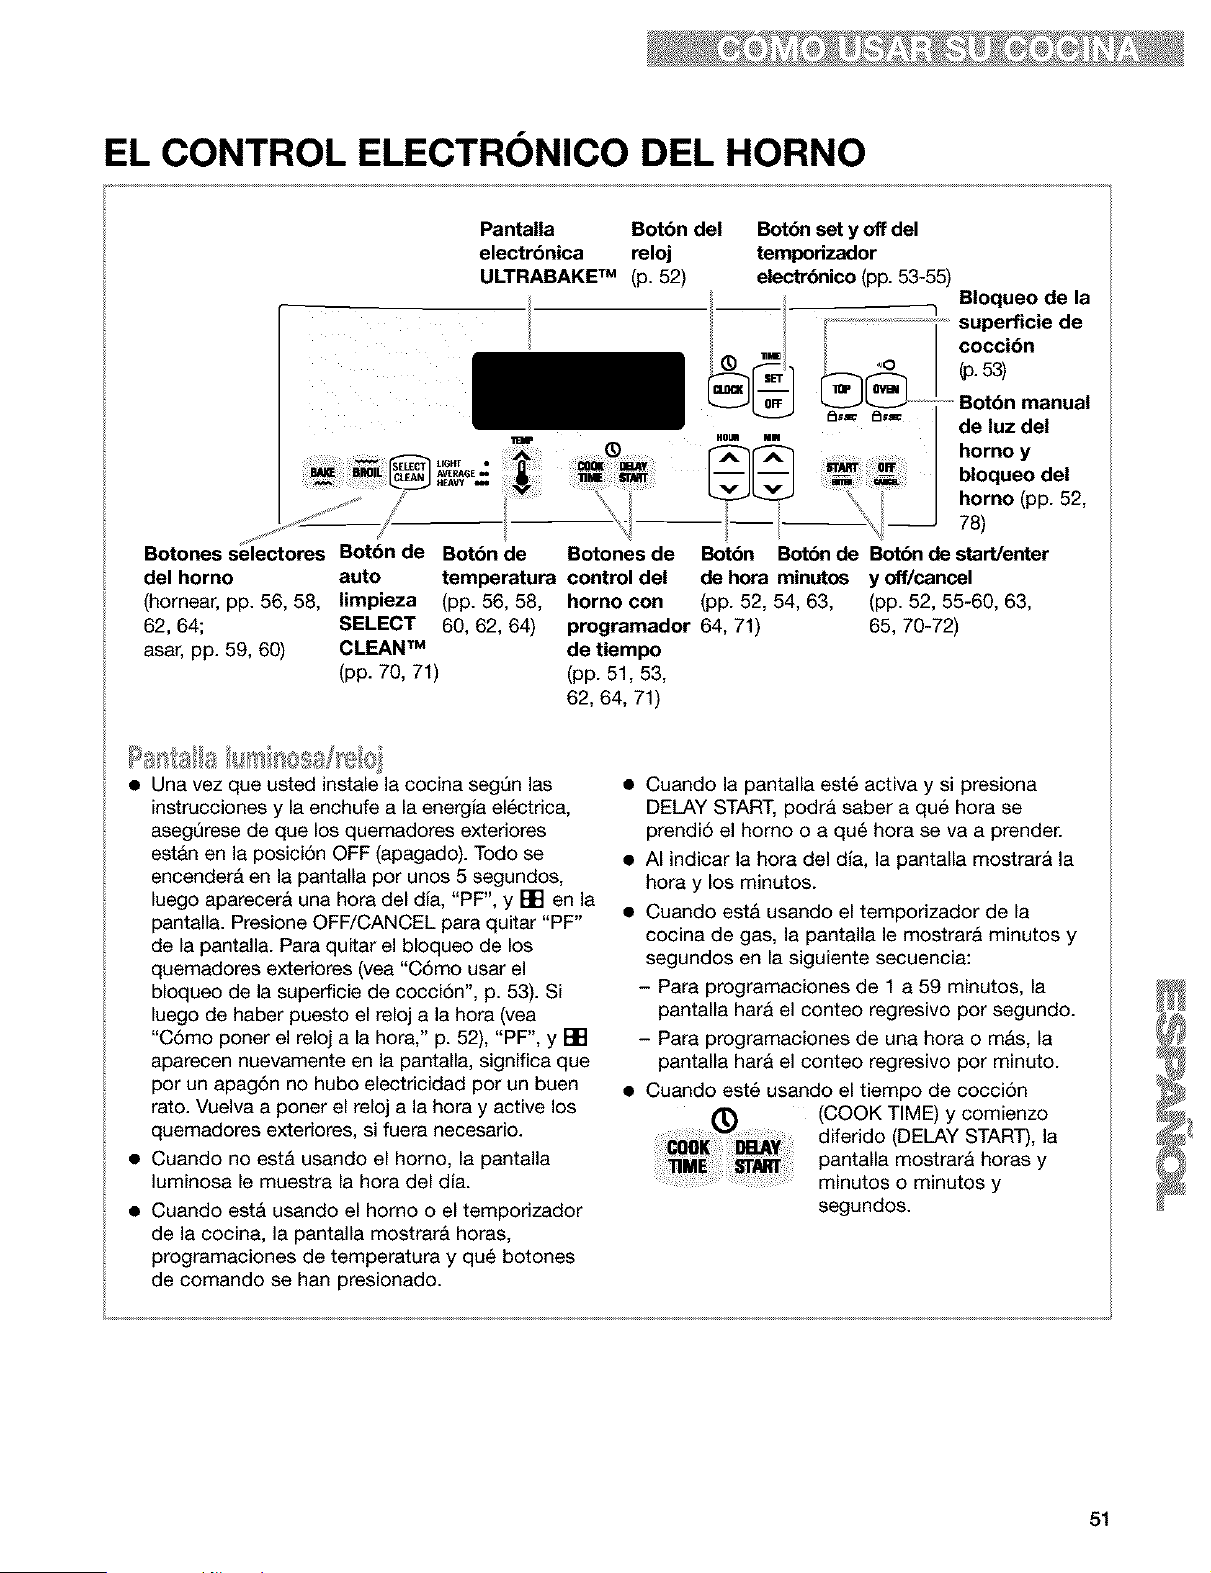
EL CONTROL ELECTRONICO DEL HORNO
Pantalla Botbn del Bot6n set y off del
electrbnica reloj temporizador
ULTRABAKE TM (p. 52) electr_nico (pp. 53-55)
__ q Bloqueode la
superflcle de
J .. cocci6n
! . 1
..u. .= de luz del
; L_J_ HEAVyI't6__ _ ....... rA_[A_I ii i ......... horno_ y -
_,0E. j-_- jj-_-j o oqueo ae
..... _ _ .... _ ,_-J_' '_ horno (pp. 52,
...............
Botones selectores Boton de Botbn de Botones de Botbn Botbn de Botbn de startlenter
del homo auto temperatura control del de hora minutos y off/cancel
(homear, pp. 56, 58, limpieza (pp. 56, 58, homo con (pp. 52, 54, 63, (pp. 52, 55-60, 63,
62, 64; SELECT 60, 62, 64) programador 64, 71) 65, 70-72)
asar, pp. 59, 60) CLEAN TM de tiempo
(pp. 70, 71) (pp. 51, 53,
62, 64, 71)
• Una vez que usted instale la cocina segQn las
instrucciones y la enchufe a la energia el_ctrica,
asegl3rese de que los quemadores exteriores
estAn en la posici6n OFF (apagado). Todo se
encenderA en la pantalla por unos 5 segundos,
luego aparecera una hora del dia, "PF", y [] en la
pantalla. Presione OFF/CANCEL para quitar "PF"
de la pantalla. Para quitar el bloqueo de los
quemadores exteriores (yea "C6mo usar el
bloqueo de la superficie de cocci6n", p. 53). Si
luego de haber puesto el reloj a la hora (vea
"C6mo poner el reloj a la hora," p. 52), "PF", y []
aparecen nuevamente en la pantalla, significa que
por un apag,Sn no hubo electricidad por un buen
rato. Vuelva a poner el reloj a la hora y active los
quemadores exteriores, si fuera necesario.
• Cuando no estA usando el homo, la pantalla
luminosa le muestra la hora del dia.
• Cuando est& usando el homo o el temporizador
de la cocina, la pantalla mostrar& horas,
programaciones de temperatura y qu_ botones
de comando se hart presionado.
• Cuando la pantalla est6 activa y si presiona
DELAY START, podra saber a qu6 hora se
prendi6 el homo o a qu6 hora se va a prender.
• AI indicar la hora del dla, la pantalla mostrarA la
hora y los minutos.
• Cuando est& usando el temporizador de la
cocina de gas, la pantalla le mostrar& minutos y
segundos en la siguiente secuencia:
- Para programaciones de 1 a 59 minutos, la
pantalla hara el conteo regresivo por segundo.
- Para programaciones de una hora o m&s, la
pantalla hara el conteo regresivo por minuto.
• Cuando est6 usando el tiempo de cocci6n
(COOK TIME) y comienzo
diferido (DELAY START), la
pantalla mostrara horas y
minutos o minutos y
segundos.
51
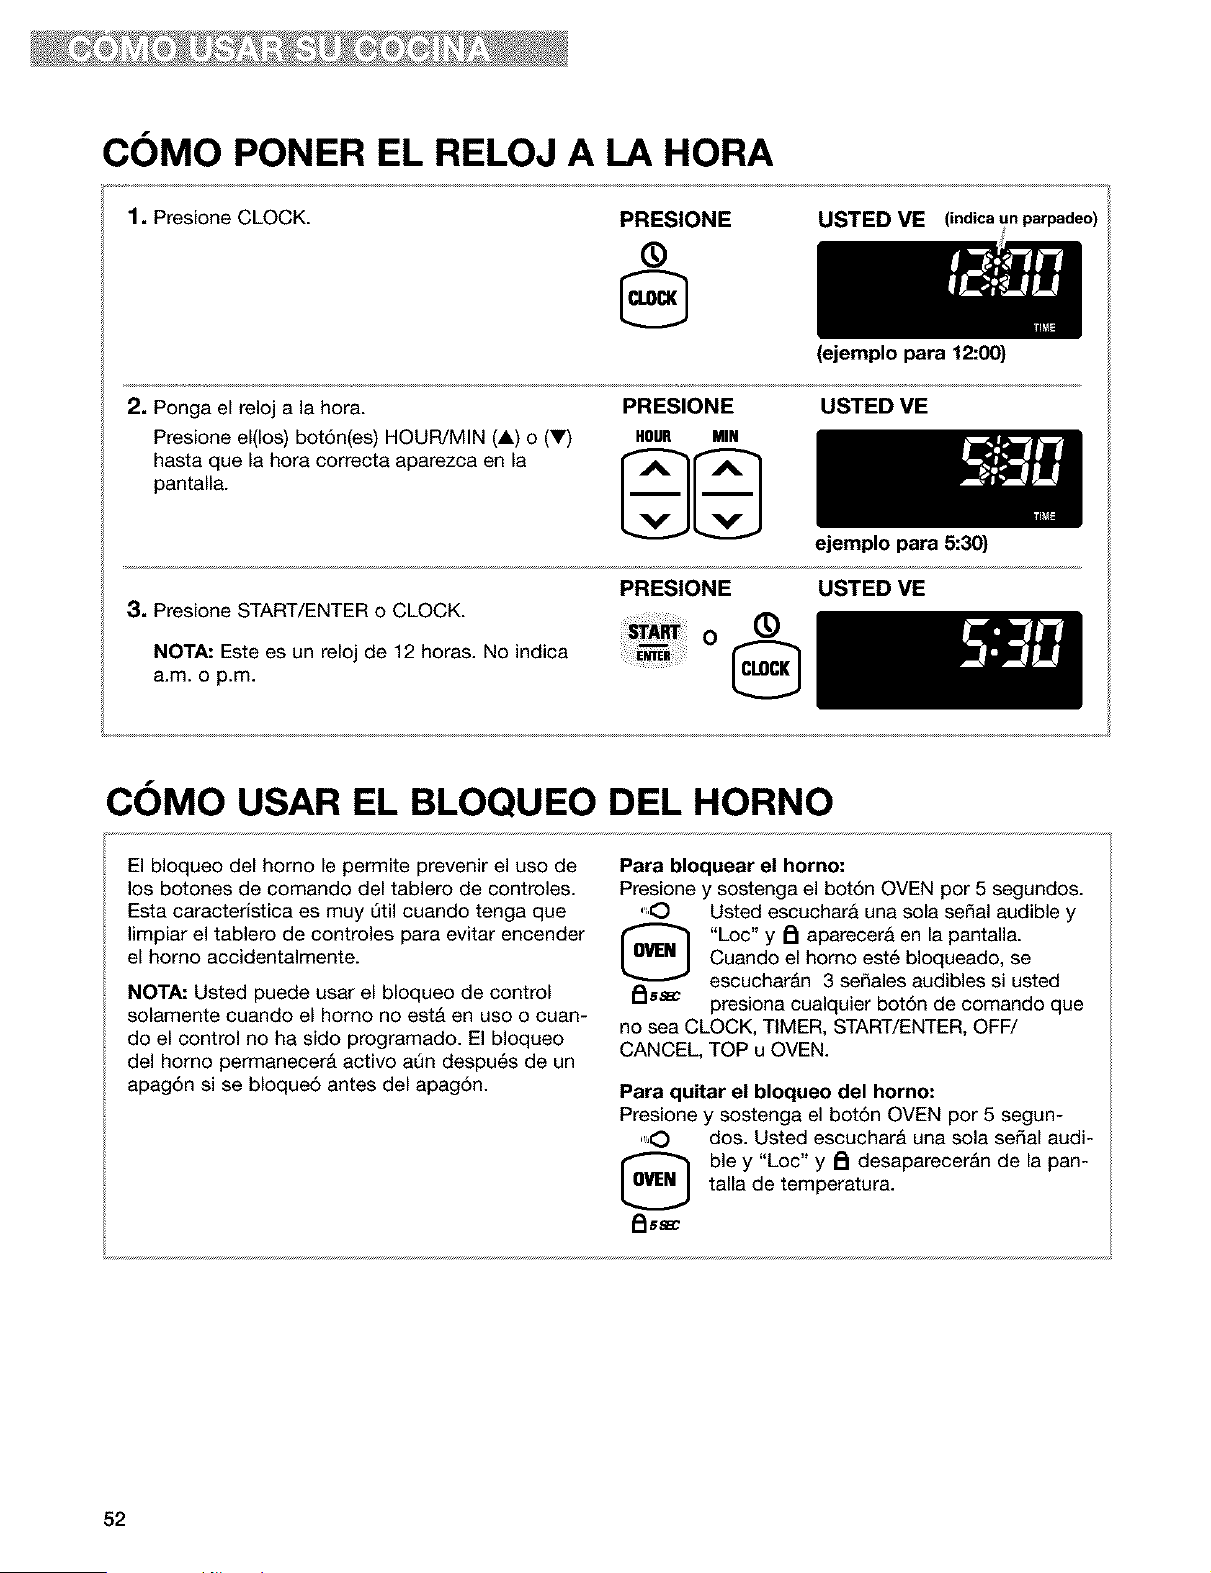
COMO PONER EL RELOJ A LA HORA
1, Presione CLOCK.
PRESIONE
®
USTED VE (indica un parpadeo)
2, Ponga el reloj a la hora.
Presione el(los) bot6n(es) HOUR/MIN (A) o (V)
hasta que la hora correcta aparezca en la
pantalla.
PRESIONE
HOUR MIN
(ejemplopara 12:00)
USTED VE
3, Presione START/ENTER o CLOCK.
NOTA: Este es un reloj de 12 horas. No indica
a.m. o p.m.
PRESIONE
o ®
ejemplo para 5:30)
USTED VE
COMO USAR EL BLOQUEO DEL HORNO
El bloqueo del homo le permite prevenir el uso de
los botones de comando del tablero de controles.
Esta caracterfstica es muy Qtil cuando tenga que
limpiar el tablero de controles para evitar encender
el homo accidentalmente.
NOTA: Usted puede usar el bloqueo de control
solamente cuando el homo no est& en uso o cuan-
do el control no ha sido programado. El bloqueo
del homo permanecer& activo aQn despu6s de un
apag6n si se bloque6 antes del apagSn.
Para bloquear el horno:
Presione y sostenga el bot6n OVEN por 5 segundos.
",O Usted escuchara una sola serial audible y
[_ "Loc" y A aparecera en la pantalla.
Cuando el homo est6 bloqueado, se
escuchar&n 3 sefiales audibles si usted
_ss_ presiona cualquier bot6n de comando que
no sea CLOCK, TIMER, START/ENTER, OFF/
CANCEL, TOP u OVEN.
Para quitar el bloqueo del horno:
Presione y sostenga el bot6n OVEN por 5 segun-
",O dos. Usted escuchar& una sola serial audi-
ble y "Loc" y _ desaparecer&n de la pan-
talla de temperatura.
FIss_
52
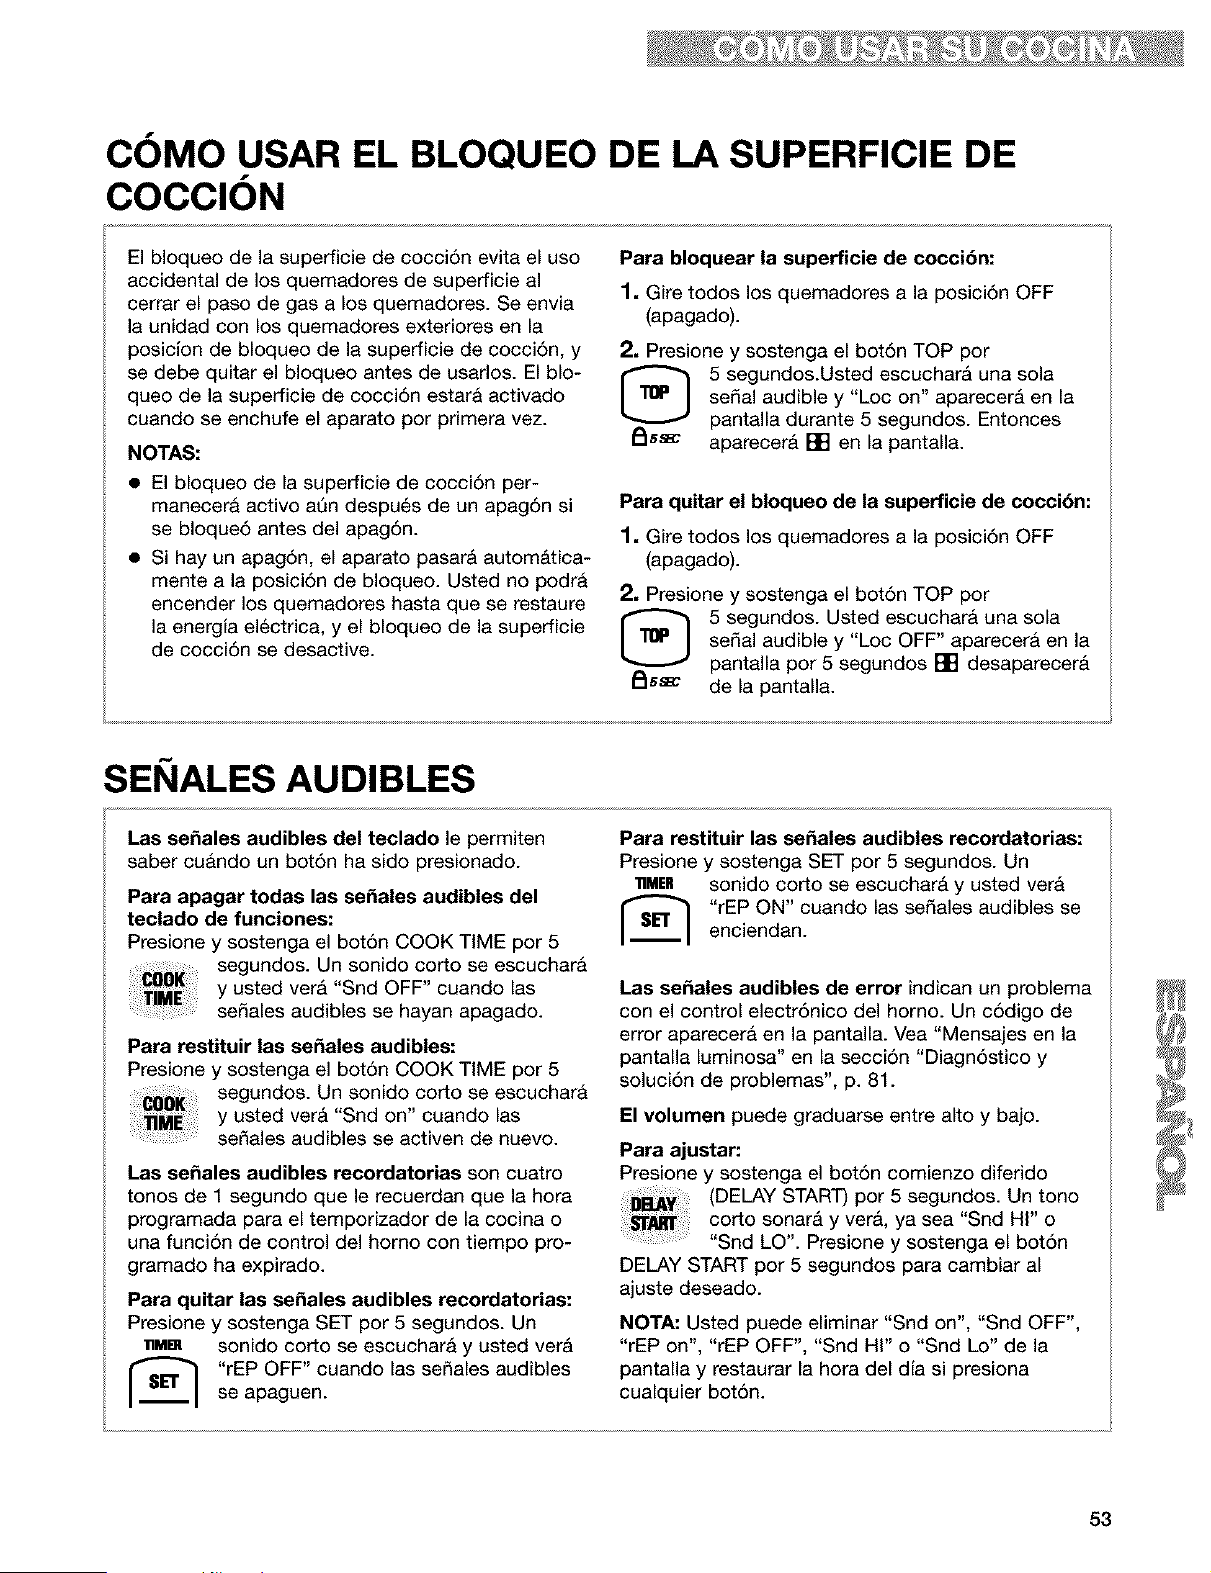
COMO USAR EL BLOQUEO DE LA SUPERFICIE DE
COCClON
El bloqueo de la superficie de cocci6n evita el uso
accidental de los quemadores de superficie al
cerrar el paso de gas a los quemadores. Se envia
la unidad con los quemadores exteriores en la
posiclon de bloqueo de la superficie de cocci6n, y
se debe quitar el bloqueo antes de usarlos. El blo-
queo de la superficie de cocci6n estara activado
cuando se enchufe el aparato por primera vez.
NOTAS:
• El bloqueo de la superficie de cocci6n per-
manecera activo ann despu6s de un apag6n si
se bloque6 antes del apag6n.
• Si hay un apag6n, el aparato pasar_ autom_tica-
mente a la posici6n de bloqueo. Usted no podr&
encender los quemadores hasta que se restaure
la energia electrica, y el bloqueo de la superficie
de cocci6n se desactive.
Para bloquear la superficie de cocci6n:
1, Gire todos los quemadores a la posici6n OFF
(apagado).
2, Presione y sostenga el bot6n TOP por
[_ 5 segundos.Usted escuchar& una sola
sedal audible y "Loc on" aparecer& en la
pantalla durante 5 segundos. Entonces
_ss_ aparecer& [] en la pantalla.
Para quitar el bloqueo de la superficie de cocci6n:
1, Gire todos los quemadores a la posici6n OFF
(apagado).
2, Presione y sostenga el bot6n TOP por
5 segundos. Usted escuchara una sola
sedal audible y "Loc OFF" aparecer& en la
pantalla por 5 segundos [] desaparecer&
_ssa_ de la pantalla.
SEI IALES AUDIBLES
Las sefiales audibles del teclado le permiten
saber cu&ndo un bot6n ha sido presionado.
Para apagar todas las sefiales audibles del
teclado de funciones:
Presione y sostenga el bot6n COOK TiME por 5
segundos. Un sonido corto se escuchar&
y usted ver& "Snd OFF" cuando las
se_ales audibles se hayan apagado.
Para restituir las sefiales audibles:
Presione y sostenga el bot6n COOK TIME por 5
segundos. Un sonido corto se escuchar&
y usted ver& "Snd on" cuando las
se_ales audibles se activen de nuevo.
Las sefiales audibles recordatorias son cuatro
tonos de 1 segundo que le recuerdan que la hora
programada para el temporizador de la cocina o
una funci6n de control del homo con tiempo pro-
gramado ha expirado.
Para quitar las sefiales audibles recordatorias:
Presione y sostenga SET por 5 segundos. Un
• Mm sonido corto se escuchara y usted ver&
[_ rEP OFF" cuando las se_ales audibles
se apaguen.
Para restituir las sefiales audibles recordatorias:
Presione y sostenga SET por 5 segundos. Un
11MER sonido corto se escuchar& y usted vera
I'_ "rEP ON" cuando las sedales audibles se
enciendan.
Las sefiales audibles de error indican un problema
con el control electr6nico del horno. Un c6digo de
error aparecer& en la pantalla. Vea "Mensajes en la
pantalla luminosa" en la secci6n "Diagn6stico y
soluci6n de problemas", p. 81.
El volumen puede graduarse entre alto y bajo.
Para ajustar:
Presione y sostenga el bot6n comienzo diferido
(DELAY START) por 5 segundos. Un tono
corto sonar& y vera, ya sea "Snd HI" o
"Snd LO". Presione y sostenga el bot6n
DELAY START por 5 segundos para cambiar al
ajuste deseado.
NOTA: Usted puede eliminar "Snd on", "Snd OFF",
"rEP on", "rEP OFF", "Snd HI" o "Snd Lo" de la
pantalla y restaurar la hora del dJa si presiona
cualquier bot6n.
53
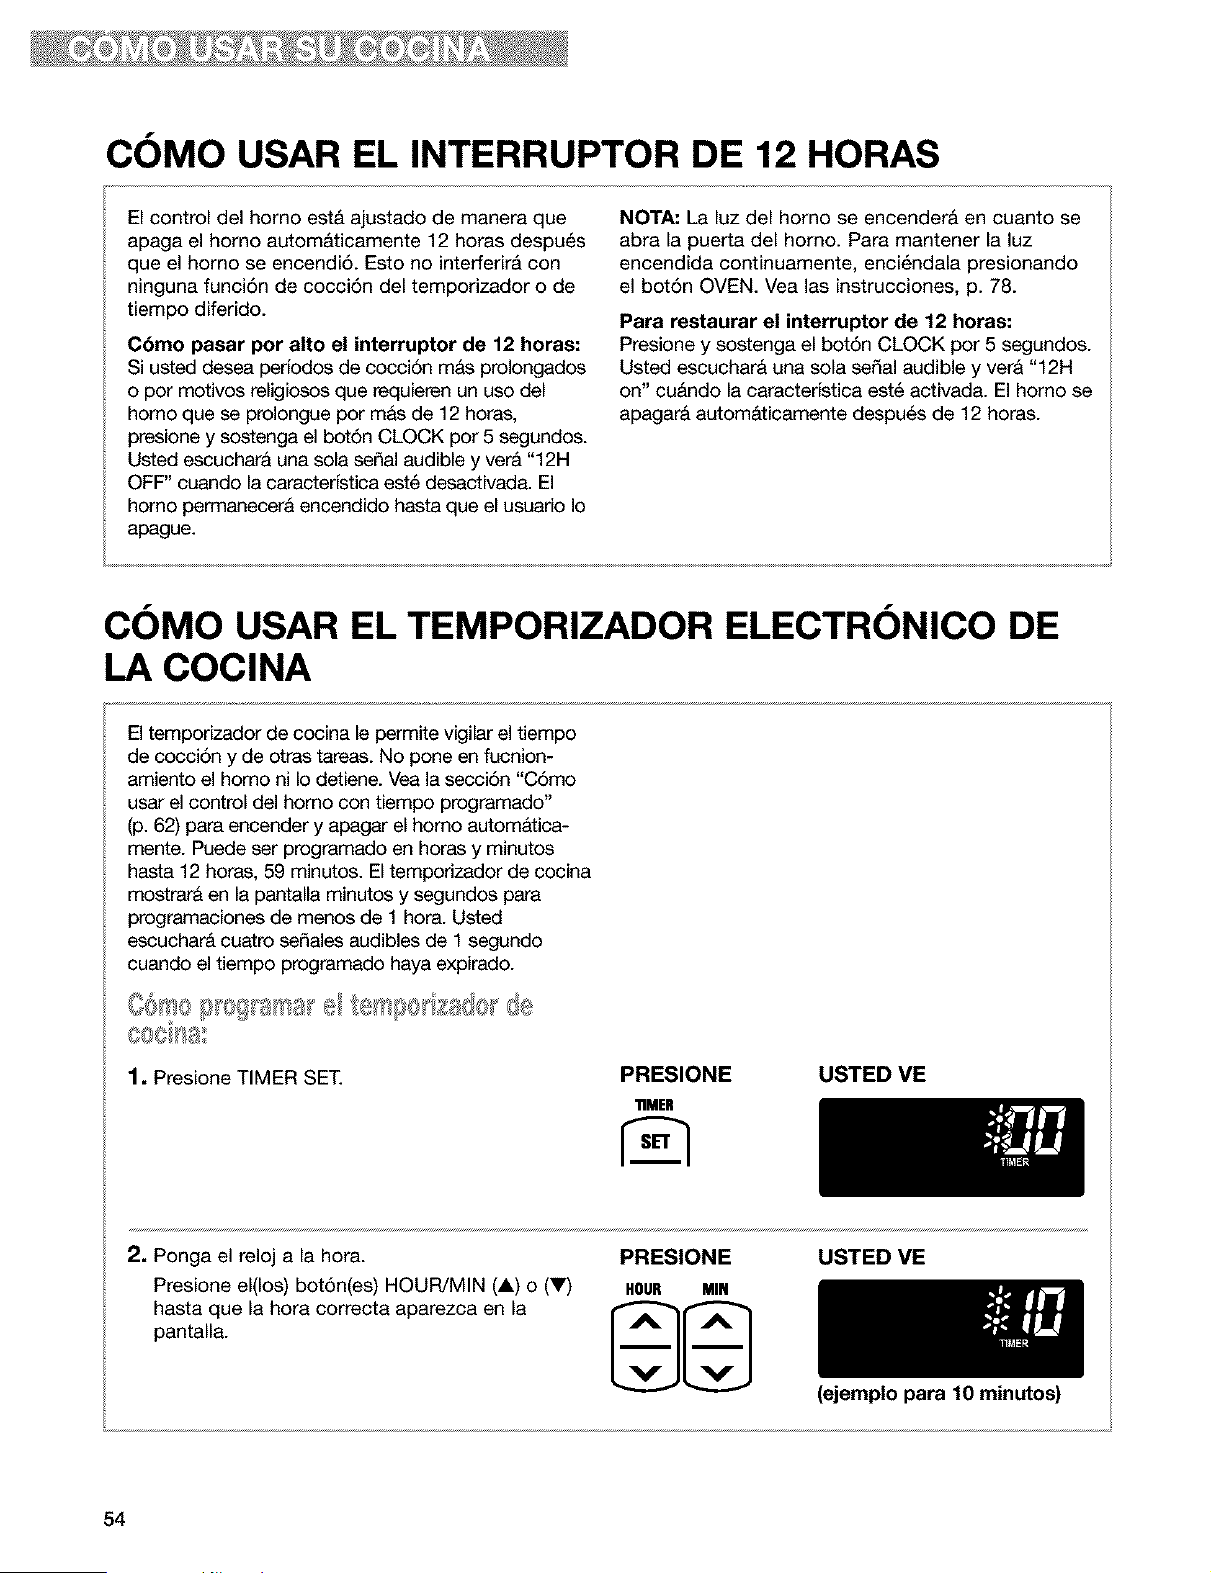
COMO USAR EL INTERRUPTOR DE 12 HORAS
El control del homo est& ajustado de manera que
apaga el homo autom&ticamente 12 horas despu_s
que el homo se encendi6. Esto no interferir& con
ninguna funci6n de cocci6n del temporizador o de
tiempo diferido.
C6mo pasar por alto el interruptor de 12 horas:
Si usted desea perfodos de cocci6n m&s prolongados
o por motivos religiosos que requieren un uso del
homo que se prolongue por mas de 12 horas,
presione y sostenga el bot6n CLOCK por 5 segundos.
Usted escuchara una sola serial audible y ver& "12H
OFF" cuando la caracterfstica est6 desactivada. El
homo permanecerA encendido hasta que el usuario Io
apague.
NOTA: La luz del homo se encenderA en cuanto se
abra la puerta del homo. Para mantener la luz
encendida continuamente, enci_ndala presionando
el bot6n OVEN. Vea las instrucciones, p. 78.
Para restaurar el interruptor de 12 horas:
Presione y sostenga el bot6n CLOCK por 5 segundos.
Usted escuchara una sola serial audible y ver& "12H
on" cu&ndo la caracterfstica est6 activada. El homo se
apagar& autom&ticamente despu6s de 12 horas.
COMO USAR EL TEMPORIZADOR ELECTRONICO DE
LA COCINA
El temporizador de cocina le permite vigilar el tiempo
de cocci6n y de otras tareas. No pone en fucnion-
amiento el homo ni Io detiene. Vea la secci6n "C6mo
usar el control del homo con tiempo programado"
(p. 62) para encender y apagar el homo autom&tica-
mente. Puede ser programado en horas y minutos
hasta 12 horas, 59 minutos. El temporizador de cocina
mostrar& en la pantalla minutos y segundos para
programaciones de menos de 1 hora. Usted
escucharA cuatro sefiales audibles de 1 segundo
cuando el tiempo programado haya expirado.
1, Presione TIMER SET.
PRESIONE
"nMEH
USTED ME
2. Ponga el reloj a la hora.
Presione el(los) bot6n(es) HOUR/MIN (A) o (V)
hasta que la hora correcta aparezca en la
pantalla.
PRESIONE
HOUR MIN
USTED VE
54
(ejemplo para 10 minutos)
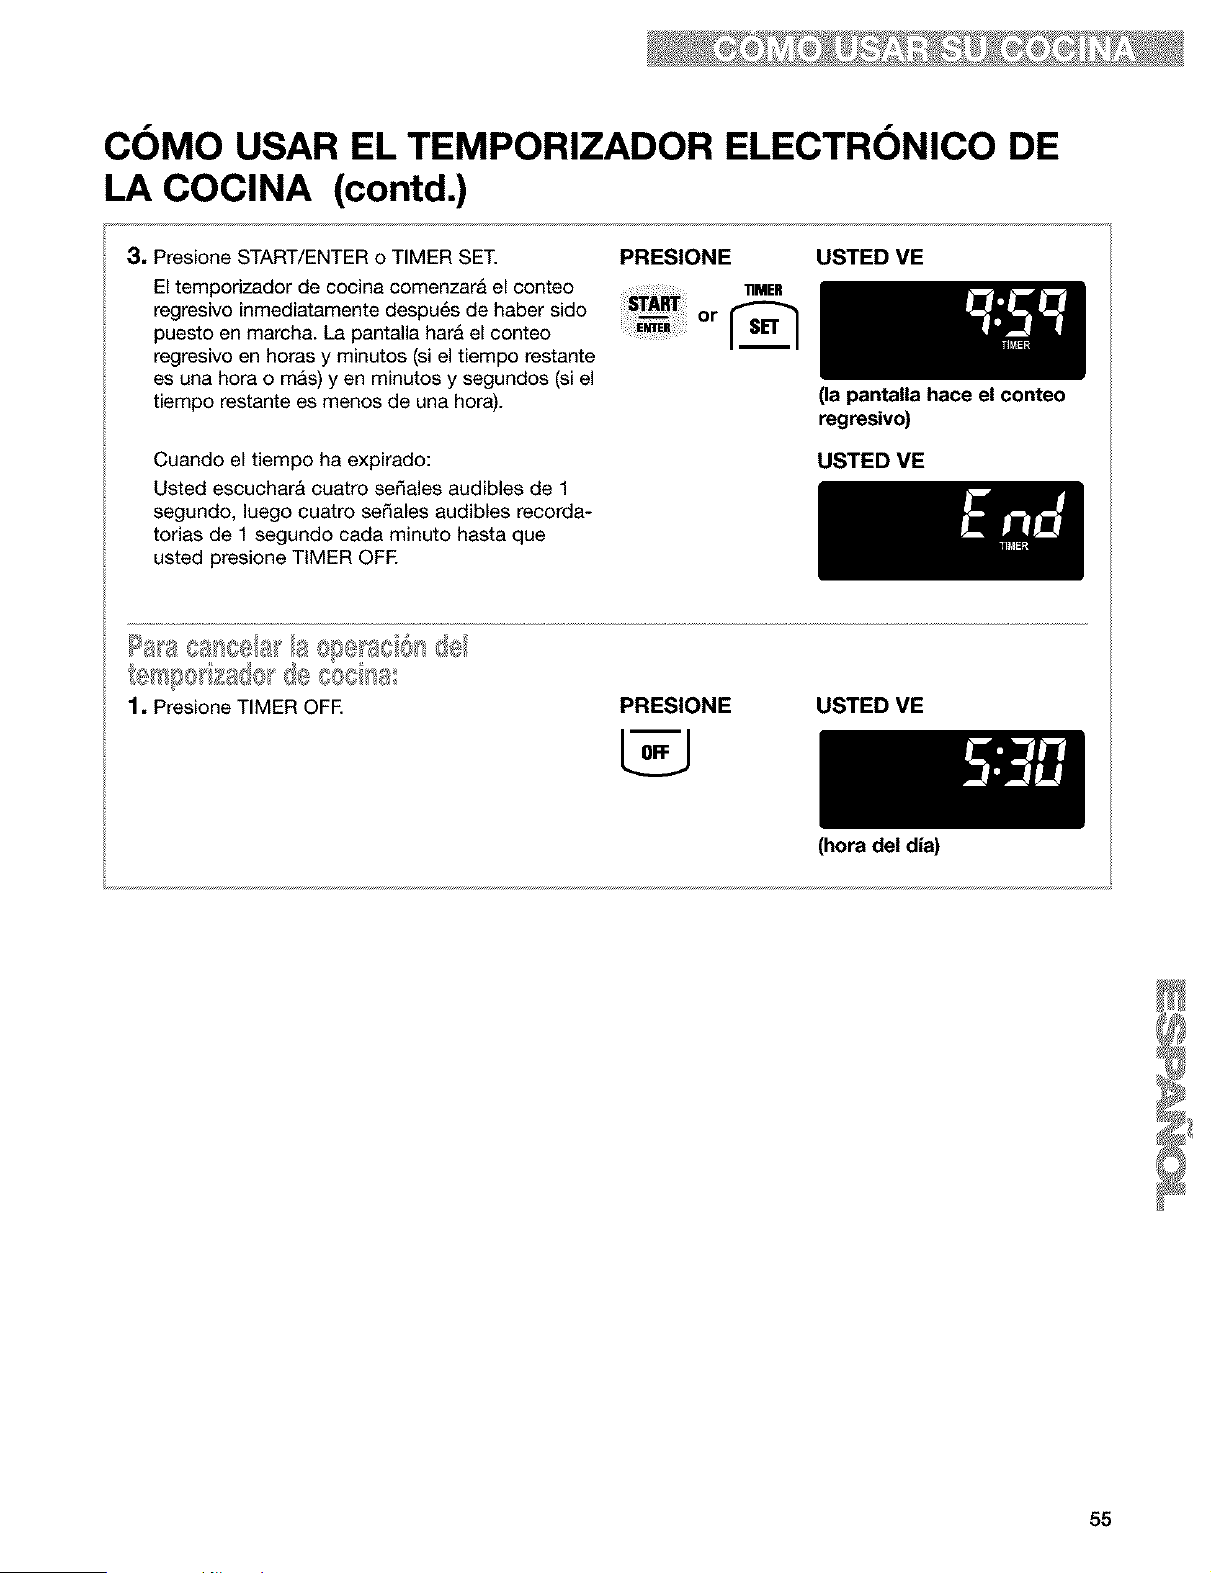
COMO USAR EL TEMPORIZADOR ELECTRONICO DE
LA COCINA (contd.)
3, Presione START/ENTER o TIMER SET.
El temporizador de cocina comenzara el conteo
regresivo inmediatamente despu6s de haber sido
puesto en march& La pantalla hara el conteo
regresivo en horas y minutos (si el tiempo restante
es una hora o m&s) yen minutos y segundos (si el
tiempo restante es menos de una hora).
PRESIONE
.mE.
+++++++++m_i++++++or
USTED VE
Cuando el tiempo ha expirado:
Usted escuchar& cuatro sefiales audibles de 1
segundo, luego cuatro sefiales audibles recorda-
torias de 1 segundo cada minuto hasta que
usted presione TIMER OFE
(la pantalla hace el conteo
regresivo)
USTED ME
PRESIONE USTED VE
(hora del dia)
55

COMO COMENZAR/CANCELAR UNA FUNCION
Luego de programar una funci6n, usted debe OFF/CANCEL cancelarA cualquier funci6n excepto el
presionar START/ENTER para iniciar la reloj, temporizador o el bloqueo del homo
funciEn. Si usted no presiona START/ y de la superficie de cocci6n. Cuando
ENTER dentro de 5 segundos de haber usted presiona OFF/CANCEL, la pantalla
programado, "START?" aparecer& en la pantalla mostrara la hora del dia o, si se ester usando
como recordatorio. Si usted no presiona tambi_n el tempodzador de minutos, el tiempo
START/ENTER dentro de 5 minutos de haber restante.
programado, la hora del dia aparecer& en pantalla.
Usted debe programar de nuevo la funci6n y
presionar START/ENTER.
COMO HORNEAR/ASAR CON ULTRABAKE TM
Su homo esta disefiado con el sistema de control
de temperatura mejorado ULTRABAKE para vigilar
constantemente la temperatura del horno. El
quemador del homo funcionar& en ciclos, segQn
sea necesario, para mantener la temperatura
deseada. Esta funci6n se activa autom&ticamente
cuando el homo est& en funcionamiento.
1. Coloque la(s) parrilla(s) STURDIGLIDE TM en la
posiciEn que usted necesite dentro del horno.
Para mayor informaci6n, vea "UbicaciEn de las
parrillas y cacerolas" en la secciEn "CEmo usar
el homo", p. 49.
IMPORTANTE:
• AI usar el homo por prima vez, es necesario
encender los quemadores de superficie
primero con el fin de purgar el aire de las
tuberlas de gas.
• No trate de encender el quemador del homo
durante un apag6n.
• Nunca coloque alimentos o utensilios de
cocina encima de la puerta del homo o en el
fondo del homo.
2. Presione BAKE.
PRESIONE USTED VE
3. Programe la temperatura (opcional.) PRESIONE USTED ME
Siga este procedimiento si desea programar una 11_P
temperatura diferente a 350°E Presione el (los)
bot6n(es) TEMP (A) o (V) para aumentar o para
bajar la temperatura en cantidades de 5°E Use
estos botones hasta que la temperatura deseada
aparezca en la pantalla pequefia. (ejemplo para hornear a 37501=)
56

COMO HORNEAR/ASAR CON ULTRABAKE TM (contd.)
4, Para asar, no tiene que precalentar el homo, a
menos que su receta Io
recomiende.
NOTA, El homo cocinara
/)_ normalmente aQn cuando
[ j "PrE HEAt" aparezca en la
pantalla, para luego man-
tenet la de
temperatura
cocci6n seleccionada.
OOF!O y 8VeS
• Para una cocci6n uniforme, coloque la came en
una parrilla en un molde de homear poco profun-
do. Esto mantiene la came alejada de goteos de
grasa y permite que el calor circule mejor.
• Use un term6metro para came a fin de cercio-
rarse de que el nivel de cocci6n sea exacto.
Ins6rtelo de manera que la punta del term6metro
est_ en el centro del m_sculo mas grande o la
porci6n mas voluminosa de la came o ave.
Aseg_rese de que el term6metro no toque el
hueso, grasa o el fondo del molde de homear.
5. Presione START/ENTER.
La funci6n de precalentar comienza despu6s
que la temperatura del homo ha sido programa-
day se ha presionado START. Una vez que
concluye el ciclo de preparaci6n de precalen-
tamiento, la temperatura del homo seleccionada
reemplaza "PrE HEAt" en la pantalla. Usted
escuchar& una sepal audible de 1 segundo,
indicando que el homo estA listo para usarse.
El sistema ULTRABAKE TM regula electr6nica-
mente el tiempo de precalentamiento y la tem-
peratura para mantener una gama precisa de
temperaturas para obtener 6ptimos resultados
de cocci6n.
NOTAS:
• Usted puede cambiar la programaci6n de
temperatura en cualquier momento despu6s
de presionar START/ENTER. No necesita pre-
sionar START/ENTER nuevamente.
• Mientras el homo est_ en el modo de preca-
lentamiento, usted puede vet la temperatura
programada de hornear/asar por 5 segundos
al presionar BAKE.
PRESIONE USTED VE
USTED VE
(ejemplo para temperatura
fljada en 350°F)
6, Para homear, ponga su comida en el homo
luego que el tiempo de
preparaci6n de precalen-
I _ I tamientO haya terminadO"
Mientras homea/asa, el
quemador del homo se
encender& y apagar& para
mantener la temperatura al
nivel programado.
_ OF_,,IFC, J s 8
• Para evitar la p@dida de calor, abra la puerta del
homo Io menos posible.
• Use el temporizador para mantener mejor control
del tiempo de cocci6n.
• Planifique sus comidas teniendo en mente el uso
m&s eficiente del homo, ya sea cocinando mas
de una comida a la vez, u homeando mientras el
homo est& todavia caliente despu6s de haber
cocinado una comida.
7. Luego de cocinar, apague el horno.
PRESIONE USTED VE
57
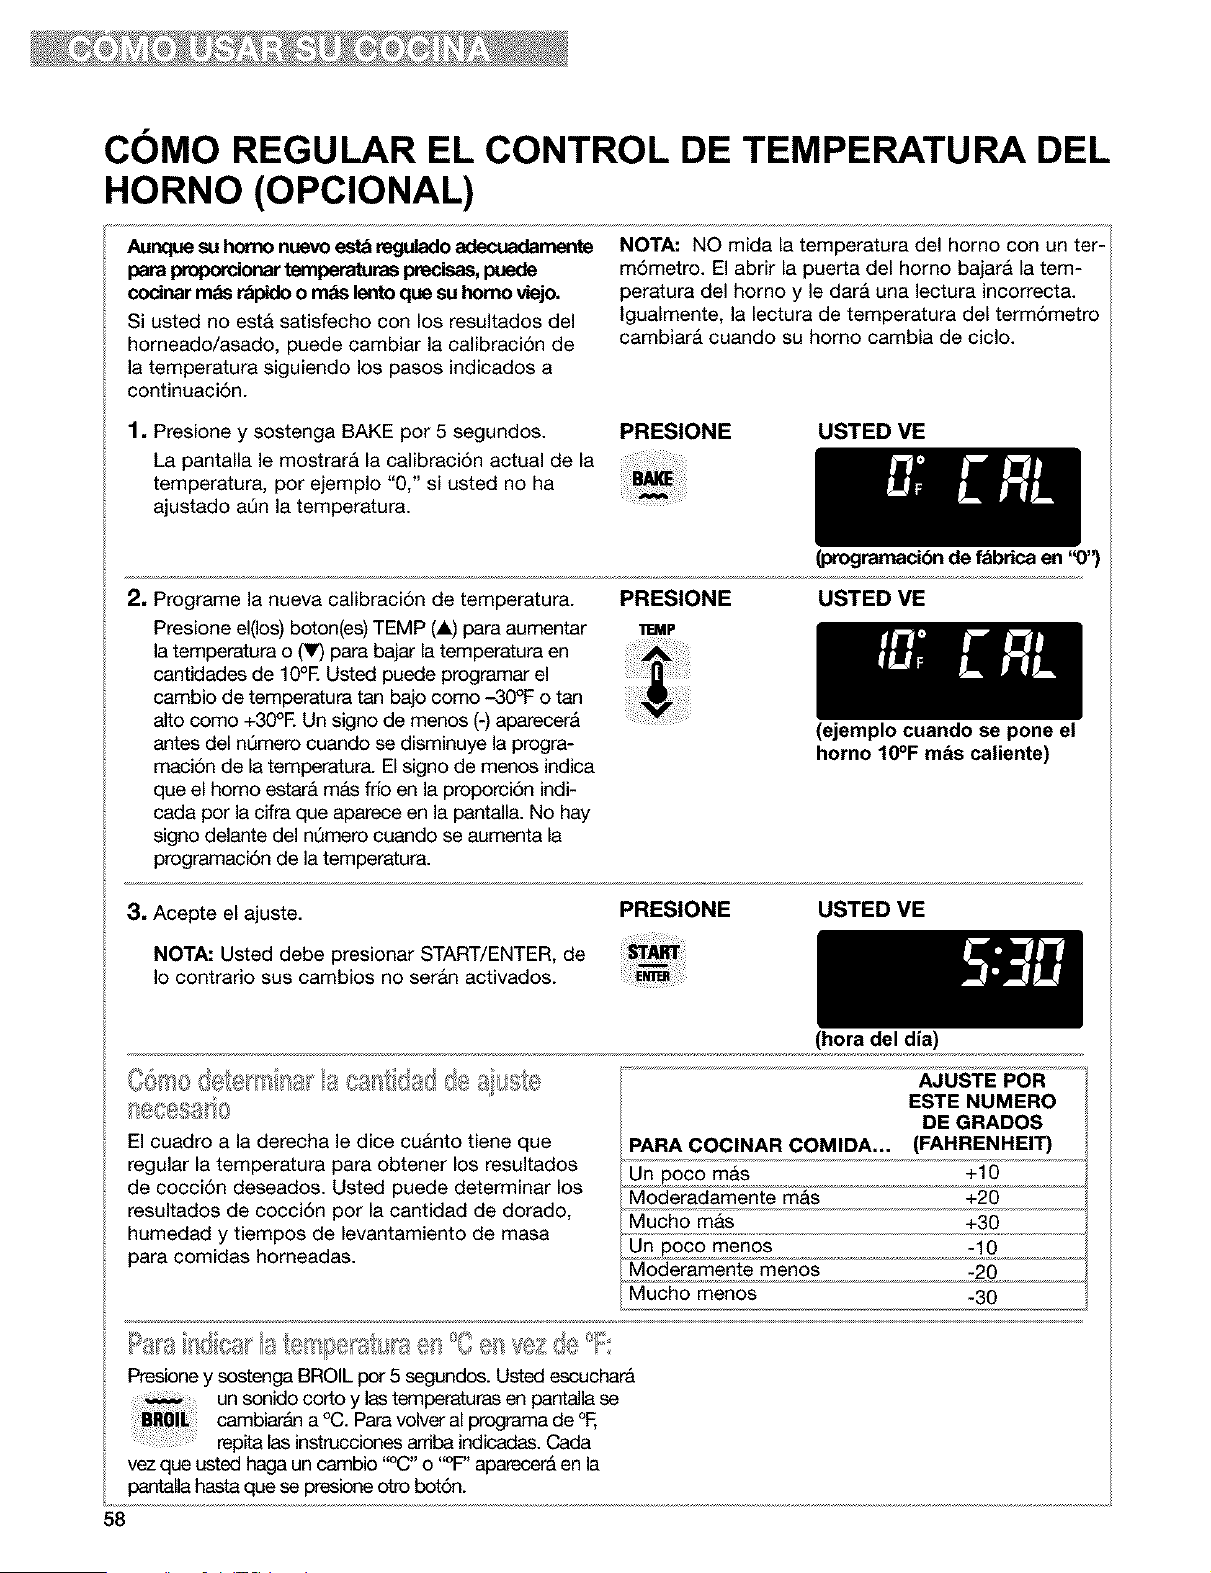
COMO REGULAR EL CONTROL DE TEMPERATURA DEL
HORNO (OPClONAL)
Aunque su homo nuevo est_ regulado adecuadarnente
para proporcionartemperaturas precisas,puede
codnar mas r_pido o rods lento que su homo viejo.
Si usted no est& satisfecho con los resultados del
horneado/asado, puede cambiar la calibraci6n de
la temperatura siguiendo los pasos indicados a
continuaci6n.
NOTA: NO mida la temperatura del homo con un ter-
m6metro. El abrir la puerta del homo bajarA la tem-
peratura del homo y le dar& una lectura incorrecta.
Igualmente, la lectura de temperatura del term6metro
cambiar& cuando su homo cambia de ciclo.
1, Presione y sostenga BAKE por 5 segundos.
La pantalla le mostrar& la calibraci6n actual de la
temperatura, por ejemplo "0," si usted no ha
ajustado aQn la temperatura.
PRESIONE USTED VE
(progmmacibn de fabrica en '_)'_
2, Programe la nueva calibraci6n de temperatura.
Presione el(los) boton(es) TEMP (A) para aumentar
la temperatura o (V) para bajar la temperatura en
cantidades de lg°E Usted puede programar el
cambio de temperatura tan bajo como -30°F o tan
alto como +30°E Un signo de menos (-) aparecer&
antes del nQmero cuando se disminuye la progra-
maci6n de la temperatura. El signo de menos indica
que el homo estar& m&s frio en la proporci6n indi-
cada por la cifra que aparece en la pantalla. No hay
signo delante del nQmero cuando se aumenta la
programaci6n de la temperatura.
PRESIONE USTED VE
11EMP
3, Acepte el ajuste. PRESIONE
NOTA: Usted debe presionar START/ENTER, de
Io contrario sus cambios no ser&n activados.
(ejemplo cuando se pone el
horno 10°F m_s caliente)
USTED VE
El cuadro a la derecha le dice cu&nto tiene que
regular la temperatura para obtener los resultados
de cocci6n deseados. Usted puede determinar los
resultados de cocci6n por la cantidad de dorado,
humedad y tiempos de levantamiento de masa
para comidas horneadas.
(hera del dia)
AJUSTE POR
ESTE NUMERO
DE GRADOS
PARA COCINAR COMIDA,.. (FAHRENHEIT)
Un poco mas +10
Moderadamente m&s +20
Mucho mas +30
Un poco menos -10
Moderamente menos -20
Mucho menos -30
Presione y sostenga BROIL pot 5 segundos. Usted escuchara
un sonido corto y las temperaturas en pantalla se
cambiar_ln a °C. Para volver al programa de °F,
repita las instrucciones ardba indicadas. Cada
vez que usted haga un cambio "°C" o "°F" aparecer& en la
pantalla hasta que se presione otto bot6n.
58
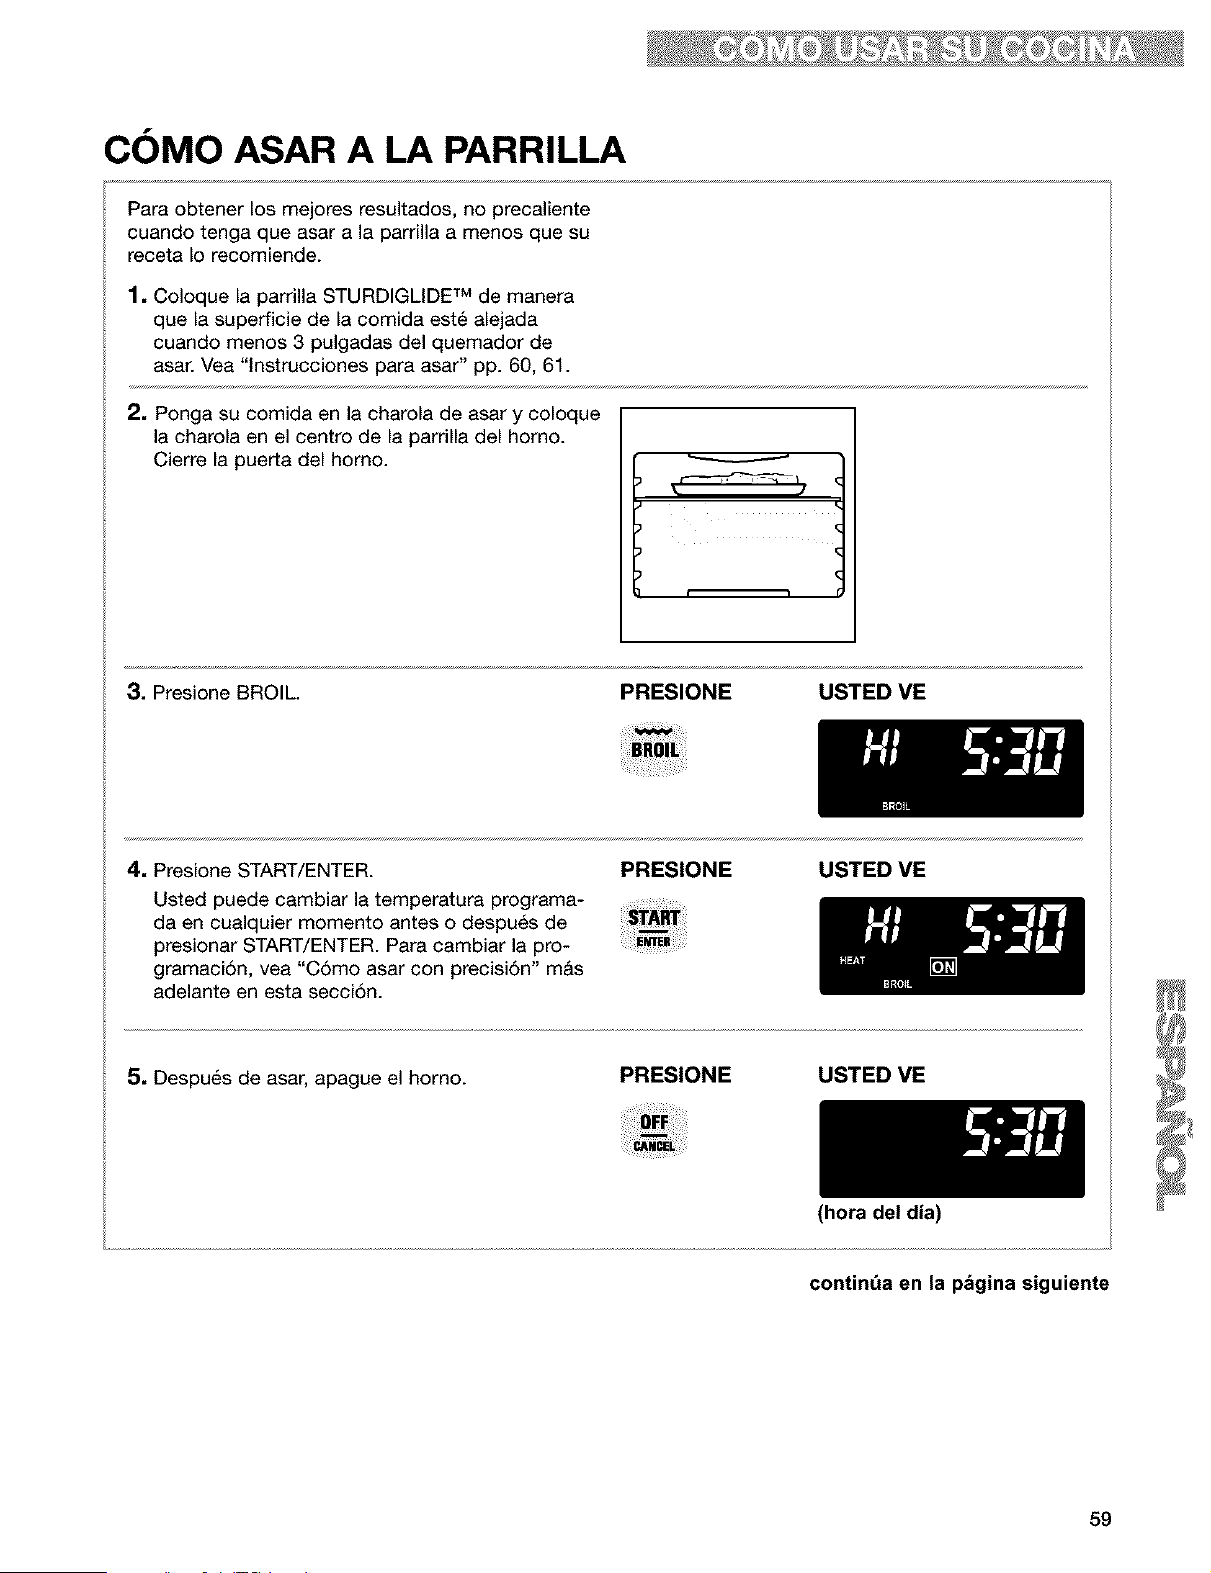
COMO ASAR A LA PARRILLA
Para obtener los mejores resultados, no precaliente
cuando tenga que asar a la parrilla a menos que su
receta Io recomiende.
1. Coloque la parrilla STURDIGLIDE TM de manera
que la superficie de la comida est6 alejada
cuando menos 3 pulgadas del quemador de
asar. Vea "lnstrucciones para asar" pp. 60, 61.
2. Ponga su comida en la charola de asar y coloque
la charola en el centro de la parrilla del homo.
Cierre la puerta del horno.
3. Presione BROIL. PRESIONE USTED ME
4. Presione START/ENTER.
Usted puede cambiar la temperatura programa-
da en cualquier momento antes o despu_s de
presionar START/ENTER. Para cambiar la pro-
gramaci6n, vea "C6mo asar con precisi6n" m&s
adelante en esta secci6n.
PRESIONE USTED ME
5. Despu6s de asar, apague el horno.
PRESIONE USTED VE
(hora del dia)
continQa en la pbgina siguiente
59
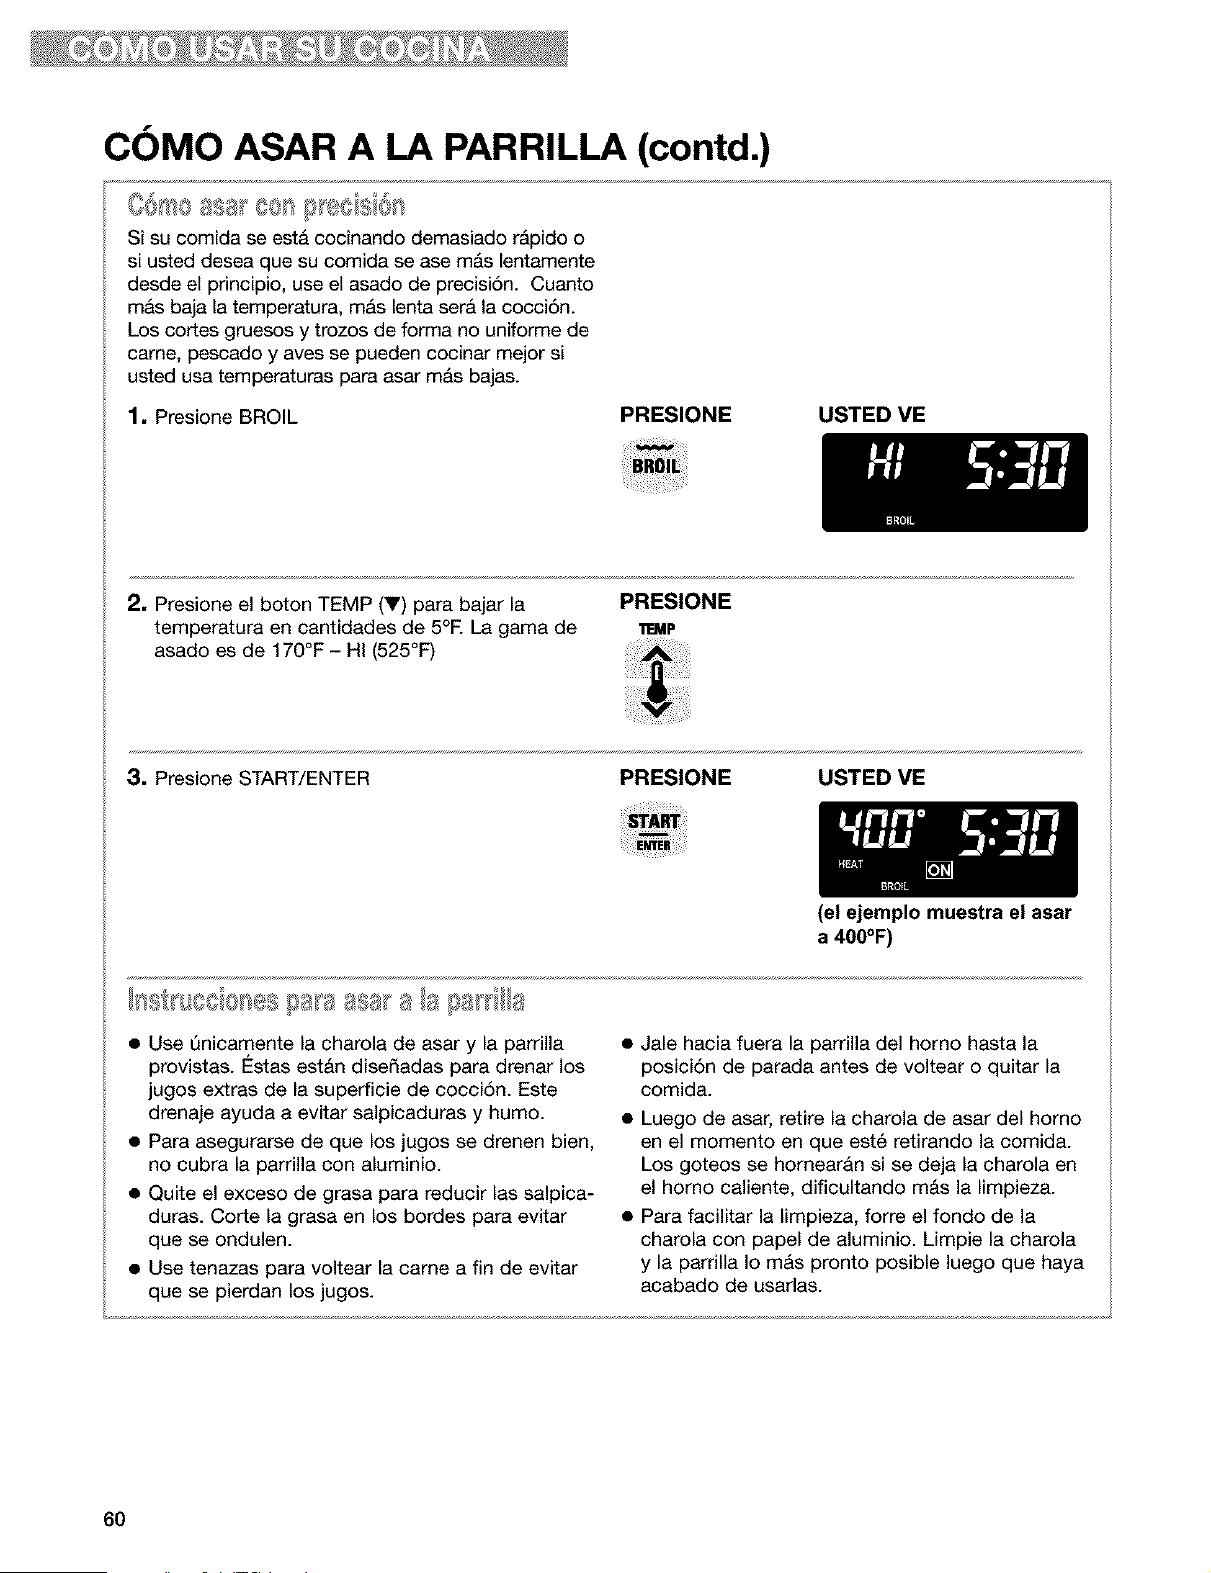
COMO ASAR A LA PARRILLA (contd.)
%4 • _ '_ _ _
CO_O ass 8_>s_} eds_o_
Si su comida se esta cocinando demasiado r&pido o
si usted desea que su comida se ase m&s lentamente
desde el principio, use el asado de precisi6n. Cuanto
m&s baja la temperatura, m&s lenta ser& la cocci6n.
Los cortes gruesos y trozos de forma no uniforme de
came, pescado y aves se pueden cocinar mejor si
usted usa temperaturas para asar m&s bajas.
1. Presione BROIL
PRESIONE USTED VE
2. Presione el boton TEMP (V) para bajar la
temperatura en cantidades de 5°E La gama de
asado es de 170°F - HI (525°F)
PRESIONE
IT:MP
3. Presione START/ENTER PRESIONE USTED VE
(el ejemplo muestra el asar
a 400°F)
• Use Qnicamente la charola de asar y la parrilla
provistas. €:stas est&n disedadas para drenar los
jugos extras de la superficie de cocci6n. Este
drenaje ayuda a evitar salpicaduras y humo.
• Para asegurarse de que los jugos se drenen bien,
no cubra la parrilla con aluminio.
• Quite el exceso de grasa para reducir las salpica-
duras. Corte la grasa en los bordes para evitar
que se ondulen.
• Use tenazas para voltear la came a fin de evitar
que se pierdan los jugos.
Jale hacia fuera la parrilla del homo hasta la
posici6n de parada antes de voltear o quitar la
comida.
• Luego de asar, retire la charola de asar del homo
en el momento en que est6 retirando la comida.
Los goteos se hornear&n si se deja la charola en
el homo caliente, dificultando m&s la limpieza.
• Para facilitar la limpieza, forte el fondo de la
charola con papel de aluminio. Limpie la charola
y la parrilla Io m&s pronto posible luego que haya
acabado de usarlas.
60
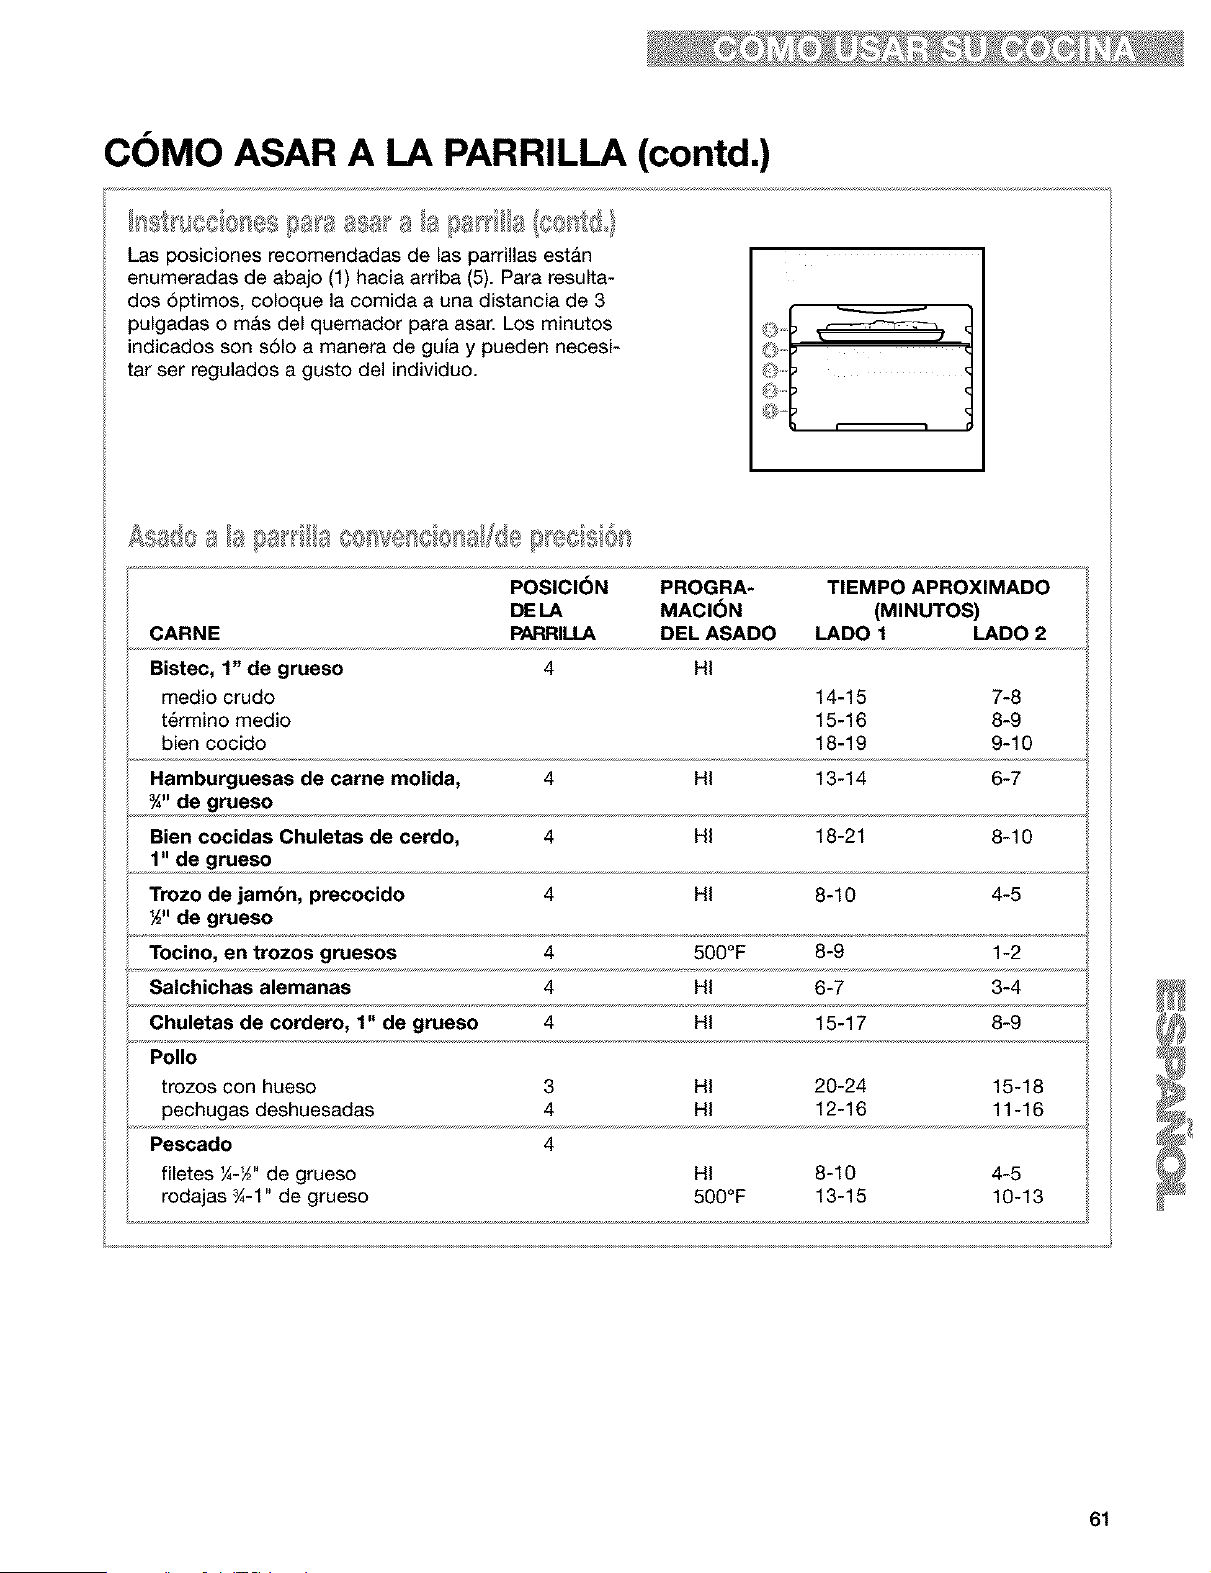
COMO ASAR A LA PARRILLA (contd.)
I .............. _%__
Las posiciones recomendadas de las parrillas estan
enumeradas de abajo (1) hacia arriba (5). Para resulta-
dos 6ptimos, coloque la comida a una distancia de 3
pulgadas o mAs del quemador para asar. Los minutos
indicados son s61o a manera de gufa y pueden necesi-
tar ser regulados a gusto del individuo.
POSICI6N PROGRA- TIEMPO APROXIMADO
DE LA MACI_)N (MINUTOS)
CARNE PARRIU.A DEL ASADO LADO 1 LADO 2
Bistec, 1" de grueso 4 HI
medio crudo 14-15 7-8
t6rmino medio 15-16 8-9
bien cocido 18-19 9-10
Hamburguesas de carne molida, 4 HI 13-14 6-7
¾" de grueso
Bien cocidas Chuletas de cerdo, 4 HI 18-21 8-10
1" de grueso
Trozo de jambn, precocido 4 HI 8-10 4-5
½" de grueso
Tocino, en trozos gruesos 4 500°F 8-9 1-2
Salchichas alemanas 4 HI 6-7 3-4
Chuletas de cordero, 1" de grueso 4 HI 15-17 8-9
Polio
trozos con hueso 3 HI 20-24 15-18
pechugas deshuesadas 4 HI 12-16 11-16
Pescado 4
filetes ¼-_" de grueso HI 8-10 4-5
rodajas _-1" de grueso 500°F 13-15 10-13
61

COMO USAR EL CONTROL DEL HORNO CON TIEMPO
PROGRAMADO
Peligro de Intoxicacibn Alimentaria
No deje sus alimentos en el horno pot m6s
de una hora antes o despuds de su
coccibn,
No seguir esta instruccibn puede ocasionar
intoxicacibn alimentaria o enfermedad.
El control del horno con tiempo programado encen-
der& y apagar& el horno a una hora determinada,
cocinar& durante un perJodo programado de tiempo
y luego se apaga automaticamente segQn la
(_rogramaci6n. Usted puede hacerlo programando
OOK TIME y DELAY START.
Antes de usar el control del horno con tiempo
programado, asegt_rese que el reloj tenga la hora
correcta del dia. (Vea "C6mo poner el reloj a la
hora," p. 52.)
Para comenzar ahora y parar automdticamente:
Programe COOK TIME
Para comienzo diferido y parar automdticamente:
Programe COOK TIME y DELAY START
NOTA: La funci6n de cocci6n de tbmpo diferido
es ideal para comidas que no necesitan un homo
precalentado como carnes y gulsados. No use la
funclon de lempo dlfendo cuando hornea.
PIII usar esta funci6n, IS necesario programar
COOK TIME.
1, Coloque la(s) parrilla(s) STURDIGLIDE TM del
horno donde usted desee y ponga su comida
en el homo. Para ubicar sus parrillas
correctamente, vea la secci6n "Ubicaci6n de
las parrillas y cacerolas", p. 49.
2, Presione BAKE.
PRESIONE USTED VE
3. Programe la temperatura (opcional).
Siga este paso si desea programar la
temperatura diferente a 350°E Presione el(los)
bot6n(es) TEMP (A) o (Y) para aumentar o para
bajar la temperatura en cantidades de 5°E Use
estos botones hasta que la temperatura que
usted desea aparezca en la pantalla pequeda.
PRESIONE USTED VE
TEMP
(el ejemplo muestra horneado
a 375°F)
4. Presione COOK TIME. PRESIONE USTED VE
62
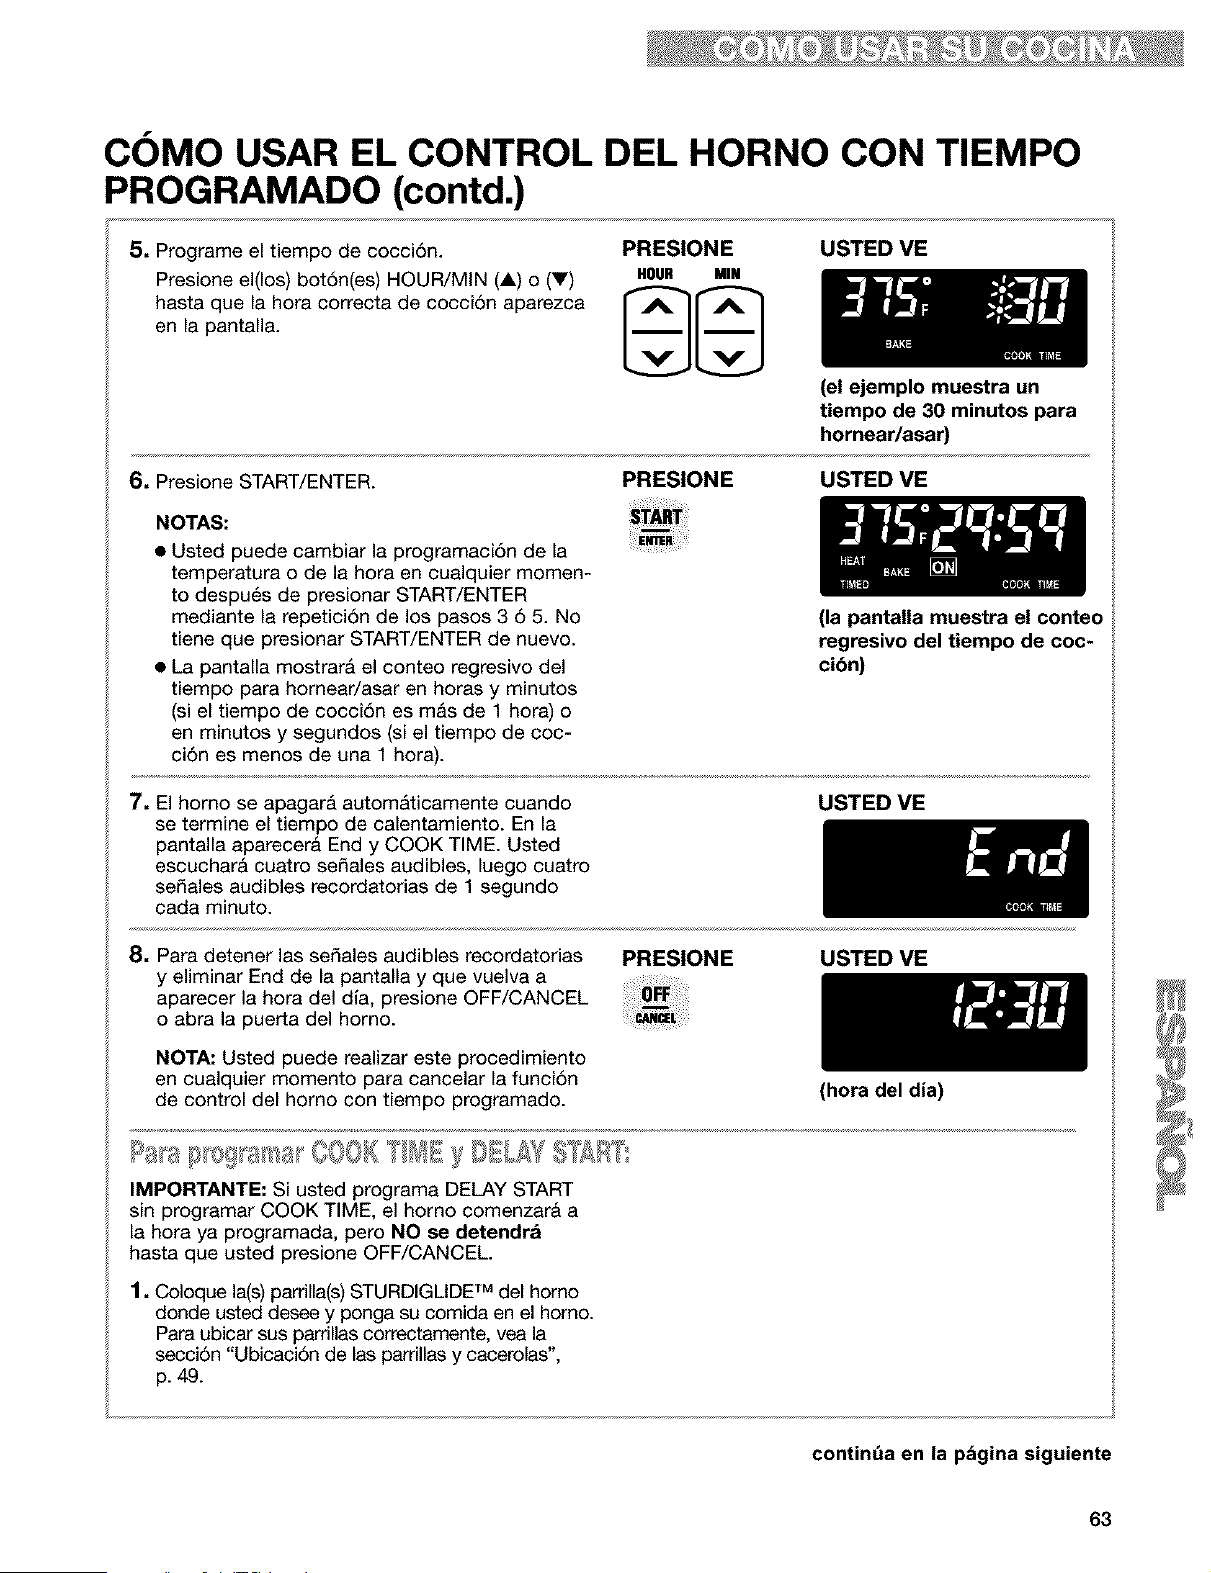
COMO USAR EL CONTROL DEL HORNO CON TIEMPO
PROGRAMADO (contd.)
5, Programe el tiempo de cocci6n.
Presione el(los) bot6n(es) HOUR/MIN (A) o (V)
hasta que la hora correcta de cocci6n aparezca
en la pantalla.
PRESIONE USTED ME
HOUR MIN
(el ejemplo muestra un
tiempo de 30 minutos para
hornear/asar)
6, Presione START/ENTER.
PRESIONE USTED ME
NOTAS:
• Usted puede cambiar la programaci6n de la
temperatura o de la hora en cualquier momen-
to despu6s de presionar START/ENTER
mediante la repetici6n de los pasos 3 6 5. No
tiene que presionar START/ENTER de nuevo.
• La pantalla mostrar& el conteo regresivo del
tiempo para homear/asar en horas y minutos
(si el tiempo de cocci6n es m&s de 1 hora) o
en minutos y segundos (si el tiempo de coc-
ci6n es menos de una 1 hora).
(la pantalla muestra el conteo
regresivo del tiempo de coc-
cibn)
7, El homo se apagarA automAticamente cuando
se termine el tiempo de calentamiento. En la
pantalla aparecera End y COOK TIME. Usted
escucharA cuatro se_ales audibles, luego cuatro
sedales audibles recordatorias de 1 segundo
cada minuto.
USTED ME
8, Para detener las sedales audibles recordatorias
y eliminar End de la pantalla y que vuelva a
aparecer la hora del dla, presione OFF/CANCEL
o abra la puerta del homo.
NOTA: Usted puede realizar este procedimiento
en cualquier momento para cancelar la funci6n
de control del homo con tiempo programado.
PRESIONE USTED ME
IMPORTANTE: Si usted programa DELAY START
sin programar COOK TIME, el homo comenzar& a
la hora ya programada, pero NO se detendra
hasta que usted presione OFF/CANCEL.
1, Coloque la(s)parrilla(s) STURDIGLIDE TM del homo
donde usted desee y ponga su comida en el horno.
Para ubicar sus parrillas correctamente, vea la
secci6n "Ubicaci6n de las parrillas y cacerolas',
p. 49.
(hora del dia)
continQa en la pbgina siguiente
63
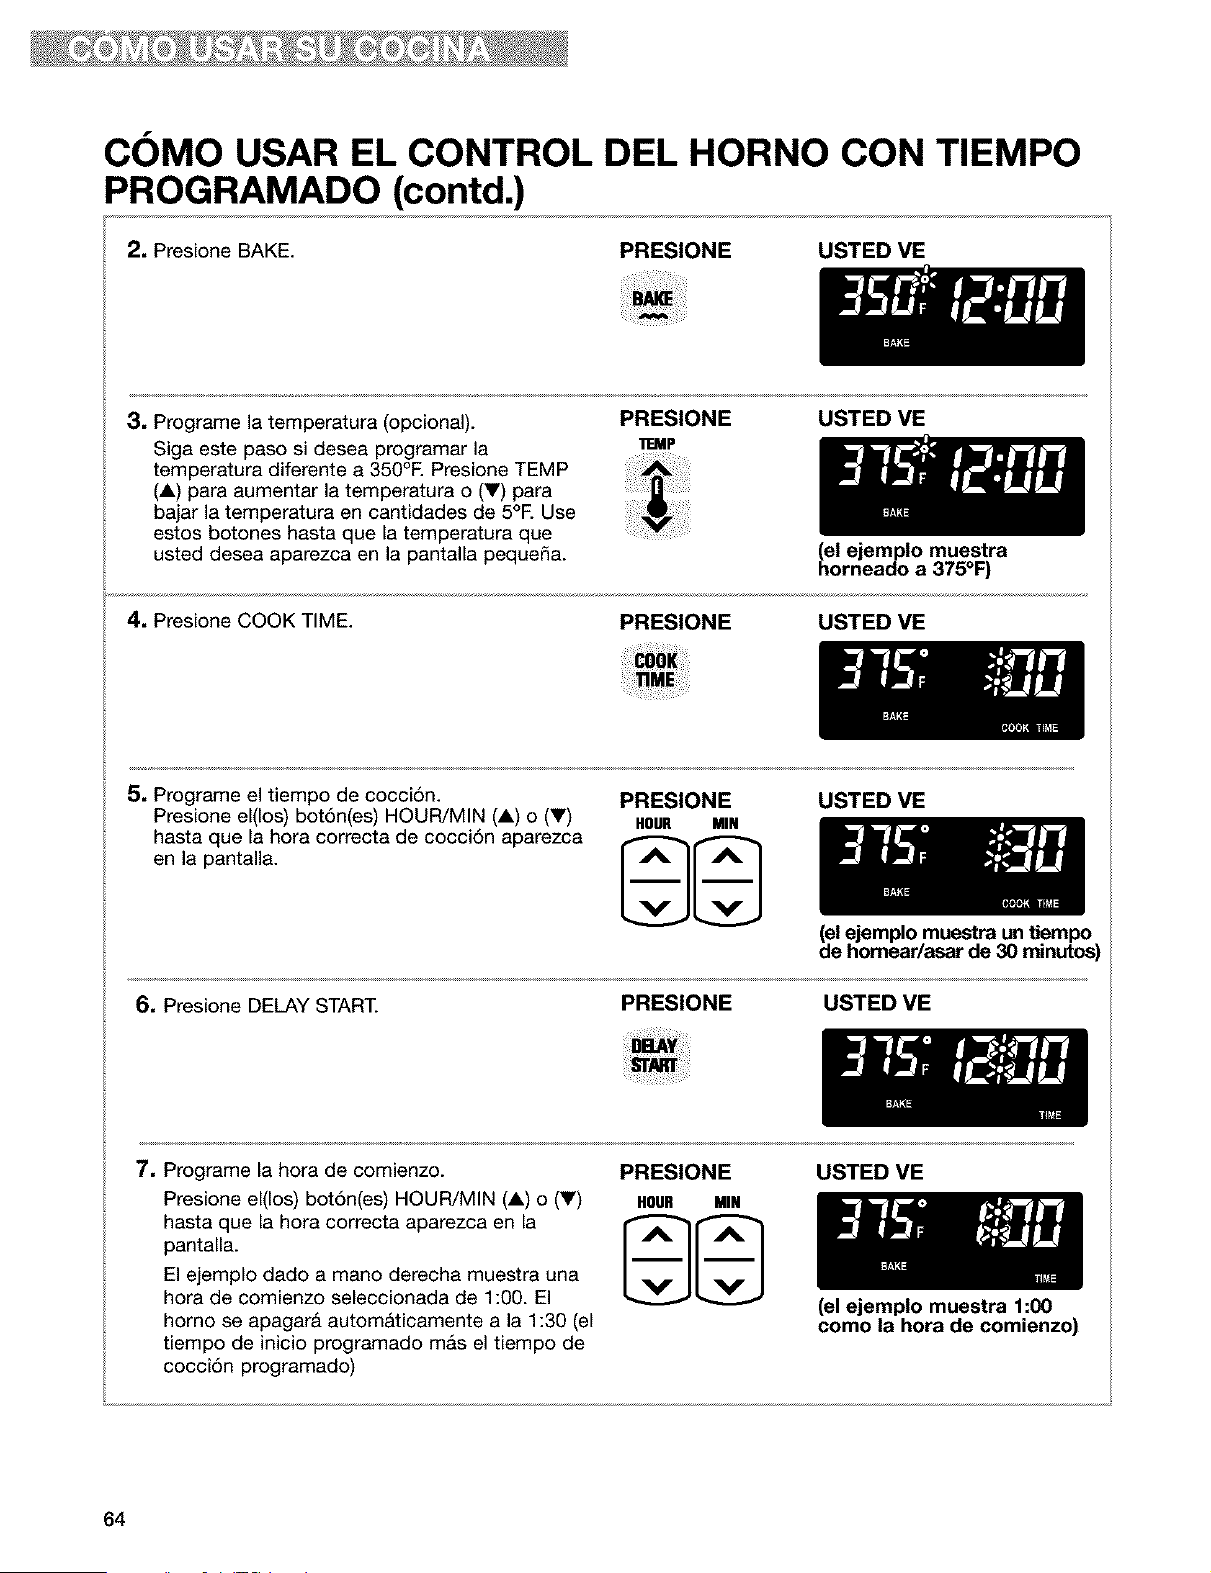
COMO USAR EL CONTROL DEL HORNO CON TIEMPO
PROGRAMADO (contd.)
2. Presione BAKE. PRESIONE USTED VE
3, Programe la tern 3eratura (opcional).
Siga este :)aso si desea programar la
ten" _eratura diferente a 350°E Presione TEMP
(A) para aumentar la tem )eratura o (V) para
bajar la tern )eratura en cantidades de 5°E Use
estos botones hasta { Je la temperatura que
usted desea aparezca en la pantalla pequena.
PRESIONE USTED VE
_EMP
4. Presione COOK TIME.
(el ejemplo muestra
horneado a 375°F
PRESIONE USTED VE
5, Programe el tiempo de cocci6n.
Presione el(los) botSn(es) HOUR/MIN (A) o (V)
hasta que la hora correcta de cocci6n aparezca
en la pantalla.
PRESIONE
HOUR MIN
USTED VE
(el ejemplo muestra un tiempo
de homear/asar de 30 minutos)
6, Presione DELAY START.
PRESIONE USTED VE
7, Programe la hora de comienzo.
Presione el(los) bot6n(es) HOUR/MIN (A) o (V)
hasta que la hora correcta aparezca en la
pantalla.
El ejemplo dado a mano derecha muestra una
hora de comienzo seleccionada de 1:00. El
homo se apagar& autom&ticamente a la 1:30 (el
tiempo de inicio programado m&s el tiempo de
cocci6n programado)
PRESIONE
HOUR MIN
USTED VE
64
(el ejemplo muestra 1:00
como la hora de comienzo)
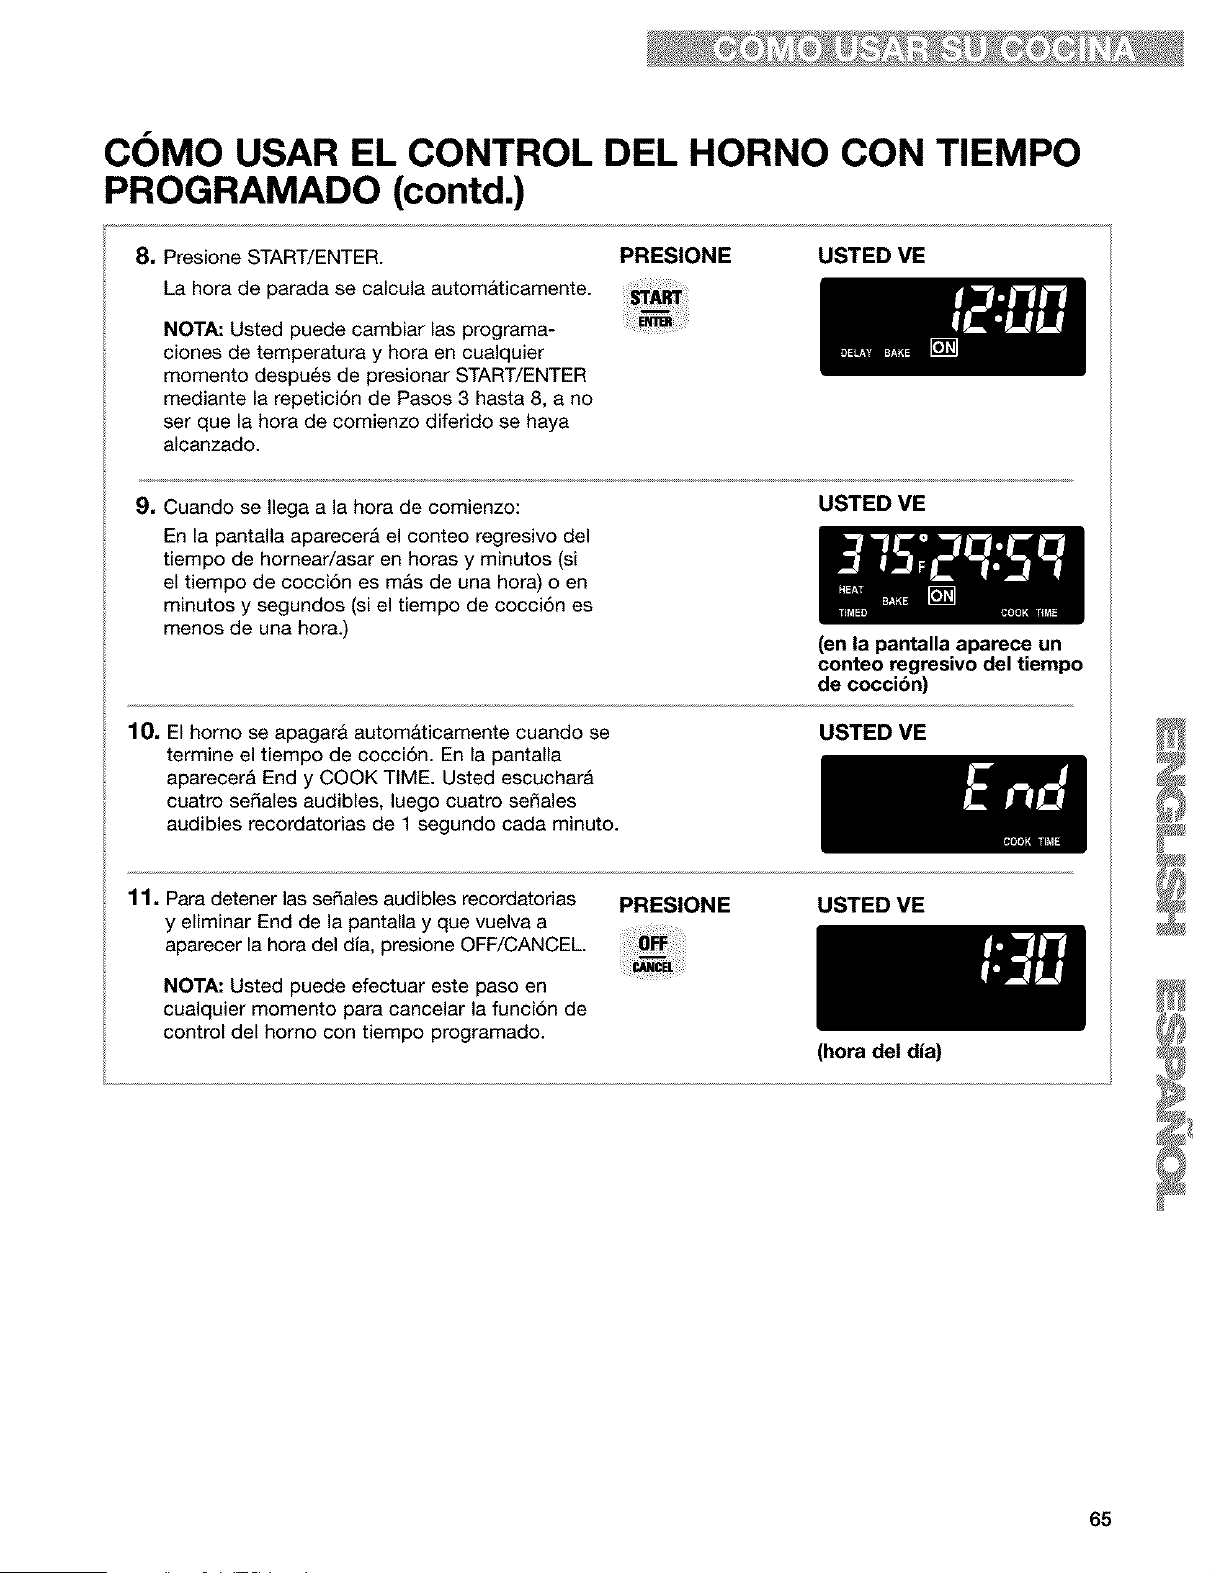
COMO USAR EL CONTROL DEL HORNO CON TIEMPO
PROGRAMADO (contd.)
8. Presione START/ENTER.
La hora de parada se calcula automAticamente.
NOTA: Usted puede cambiar las programa-
ciones de temperatura y hora en cualquier
momento despu6s de presionar START/ENTER
mediante la repetici6n de Pasos 3 hasta 8, a no
ser que la hora de comienzo diferido se haya
alcanzado.
PRESIONE USTED VE
9. Cuando se Ilega a la hora de comienzo:
En la pantalla aparecer& el conteo regresivo del
tiempo de homear/asar en horas y minutos (si
el tiempo de cocci6n es m&s de una hora) o en
minutos y segundos (si el tiempo de cocci6n es
menos de una hora.)
USTED VE
(en la pantalla aparece un
conteo regresivo del tiempo
de coccibn)
10, El homo se apagarA automaticamente cuando se
termine el tiempo de cocci6n. En la pantalla
aparecer& End y COOK TIME. Usted escuchar&
cuatro sedales audibles, luego cuatro se_ales
audibles recordatorias de 1 segundo cada minuto.
USTED VE
11, Para detener las sedales audibles recordatorias
y eliminar End de la pantalla y que vuelva a
aparecer la hora del dia, presione OFF/CANCEL.
NOTA: Usted puede efectuar este paso en
cualquier momento para cancelar la funci6n de
control del homo con tiempo programado.
PRESIONE USTED ME
(hora del dia)
65
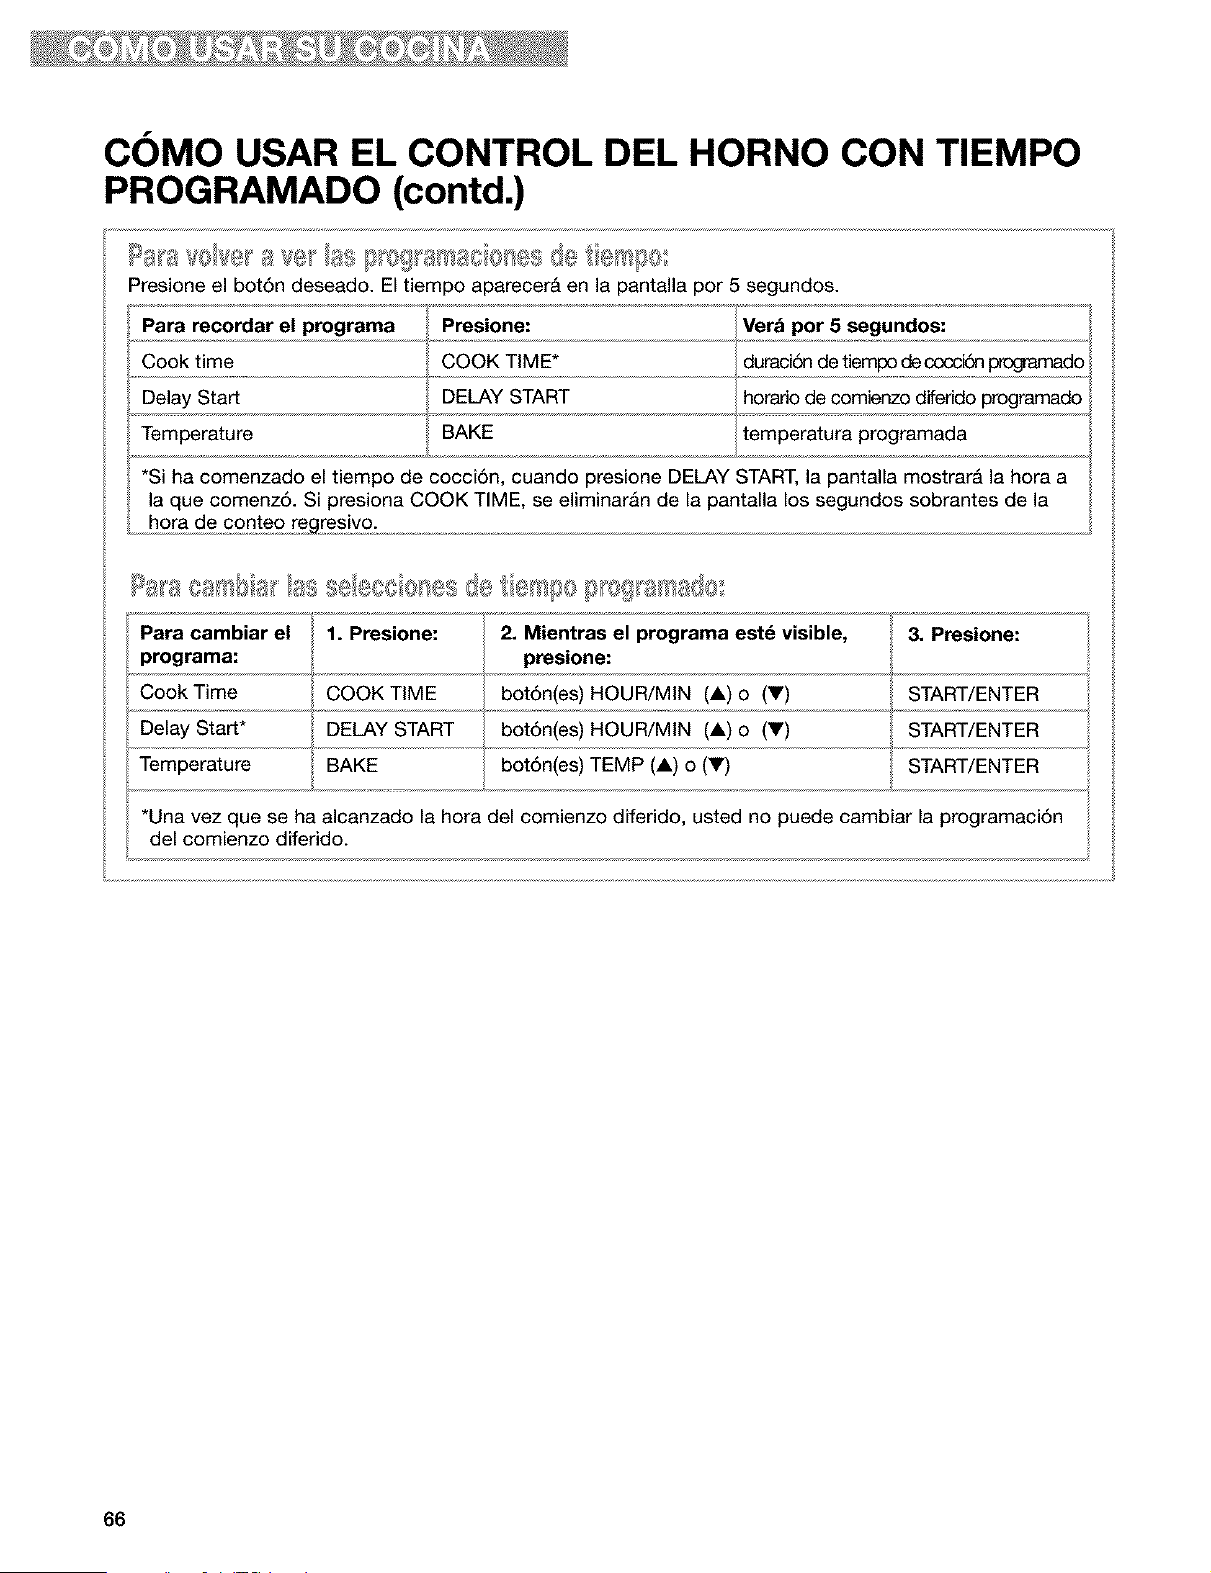
COMO USAR EL CONTROL DEL HORNO CON TIEMPO
PROGRAMADO (contd.)
Presione el bot6n deseado. El tiempo aparecerb en la pantalla por 5 segundos.
Para recordar el programa
Cook time
Delay Start
Temperature
Presione:
COOK TIME*
DELAY START
BAKE
Verb pot 5 segundos:
duraci6n de tiempo decocci6n _ado
horadod,, e comi,,,e,n,,zodiferi,,d,,,oprogramado,
temperatura programada
*Si ha comenzado el tiempo de cocci6n, cuando presione DELAY START, la pantalla mostrarb la hora a
la que comenz6. Si presiona COOK TIME, se eliminaran de la pantalla los segundos sobrantes de la
hora de conteo regresivo.
Para cambiar el 1. 2. Mientras el estd
Presione:
programa
visible, 3. Presione:
programa: presione:
Cook Time COOK TiME bot6n(es) HOUR/MiN (A) o (Y) START/ENTER
Delay Start* DELAY START bot6n(es) HOUR/MiN (&) o (Y) START/ENTER
Temperature BAKE bot6n(es) TEMP (A) o (V) START/ENTER
*Una vez que se ha alcanzado la hora del comienzo diferido, usted no puede cambiar la programaci6n
del comienzo diferido.
66
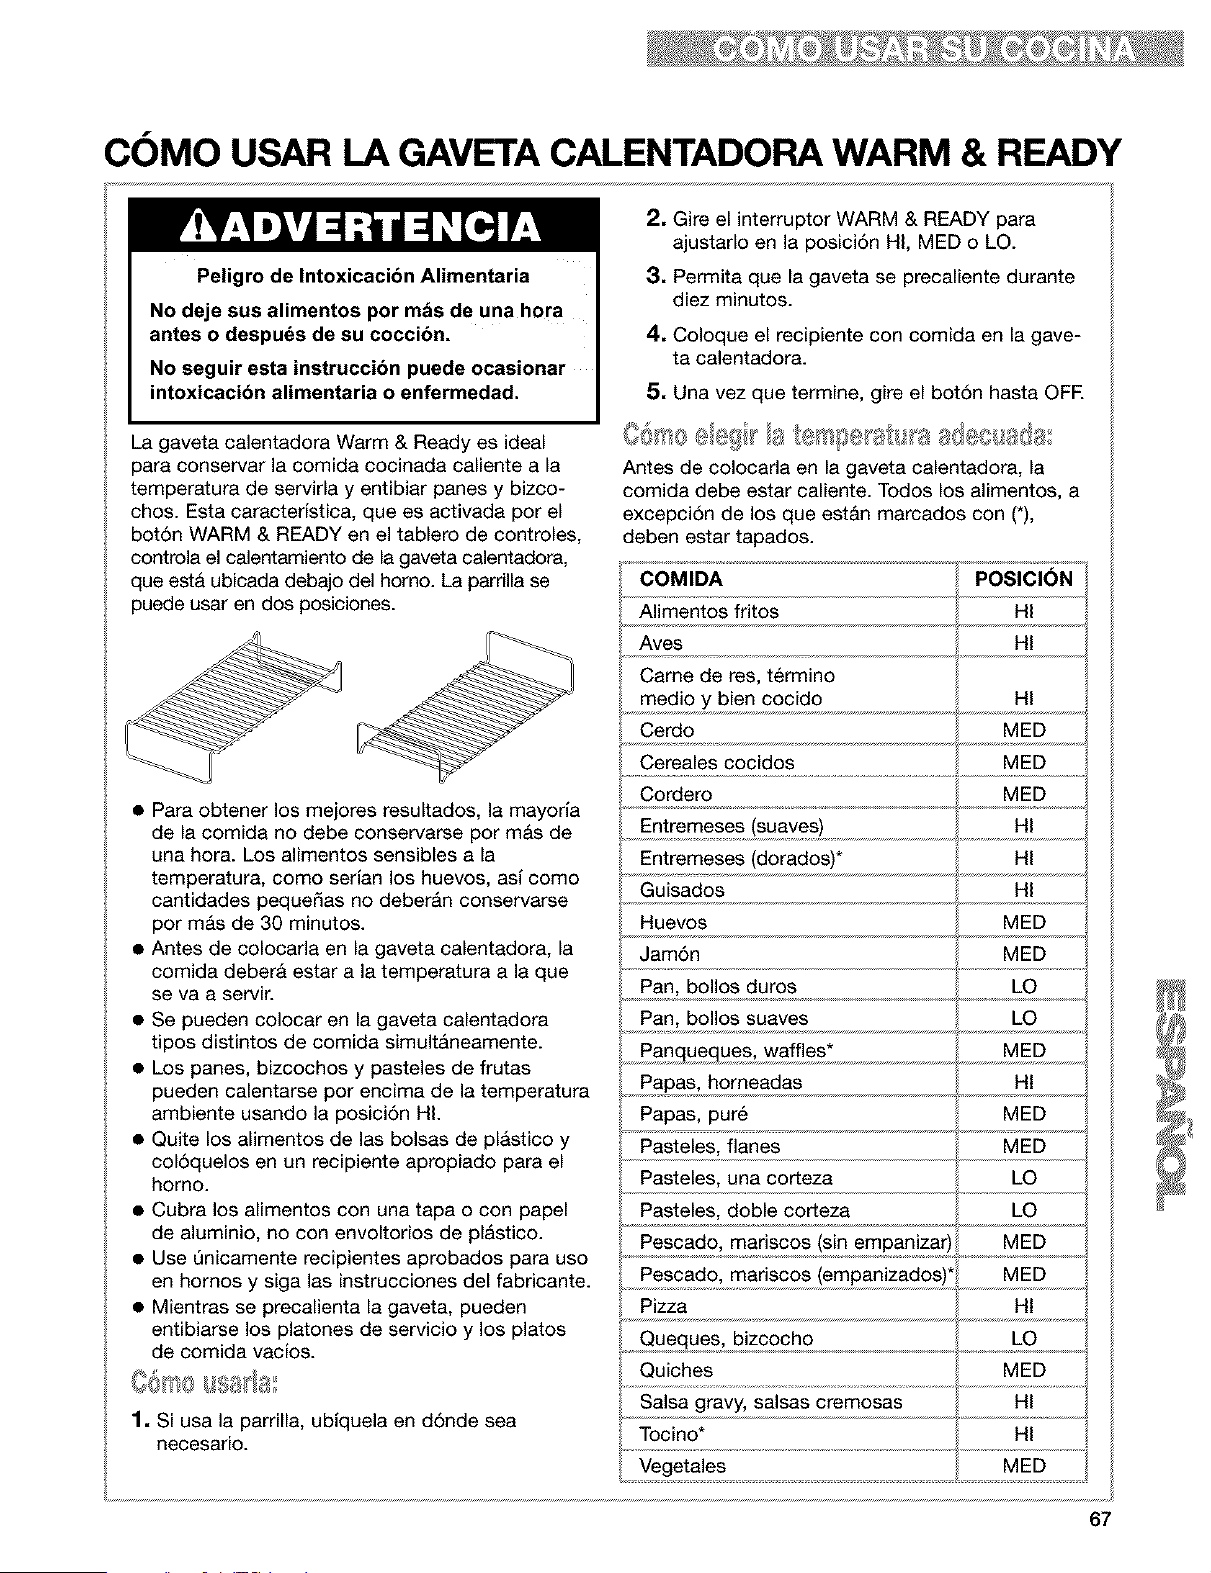
COMO USAR LA GAVETA CALENTADORA WARM & READY
Peligro de Intoxicacibn Alimentaria
No deje sus alimentos por mds de una hora
antes o despu_s de su coccibn.
No seguir esta instruccibn puede ocasionar
intoxicacibn alimentaria o enfermedad.
La gaveta calentadora Warm & Ready es ideal
para conservar la comida cocinada caliente a la
temperatura de servirla y entibiar panes y bizco-
chos. Esta caracterfstica, que es activada por el
botSn WARM & READY en el tablero de controles,
controla el calentamiento de la gaveta calentadora,
que est& ubicada debajo del horno. La parrilla se
puede usar en dos posiciones.
• Para obtener los mejores resultados, la mayorfa
de la comida no debe conservarse por mAs de
una hora. Los alimentos sensibles a la
temperatura, coma serfan los huevos, asf coma
cantidades peque_as no deberAn conservarse
por m&s de 30 minutos.
• Antes de colocarla en la gaveta calentadora, la
comida deberA estar a la temperatura a la que
se va a servir.
• Se pueden colocar en la gaveta calentadora
tipos distintos de comida simultAneamente.
• Los panes, bizcochos y pasteles de frutas
pueden calentarse par encima de la temperatura
ambiente usando la posici6n HI.
• Quite los alimentos de las bolsas de pl&stico y
col6quelos en un recipiente apropiado para el
homo.
• Cubra los alimentos con una tapa o con papel
de aluminio, no con envoltorios de plAstico.
• Use Qnicamente recipientes aprobados para usa
en hornos y siga las instrucciones del fabricante.
• Mientras se precalienta la gaveta, pueden
entibiarse los platones de servicio y los platos
de comida vaclos.
1. Si usa la parrilla, ubfquela en d6nde sea
necesario.
2. Gire el interruptor WARM & READY para
ajustarlo en la posici6n HI, MED o LO.
3. Permita que la gaveta se precaliente durante
diez minutos.
4, Coloque el recipiente con comida en la gave-
ta calentadora.
5. Una vez que termine, gire el bot6n hasta OFE
4 ¸ _
Antes de colocarla en la gaveta calentadora, la
comida debe estar caliente. Todos los alimentos, a
excepciSn de los que estAn marcados con (*),
deben estar tapados.
COMIDA POSICI_N
Alimentos fritos
Aves
HI
Came de res, t_rmino
medio y bien cocido HI
Cerdo MED
.......Cecea!escoc .dos ...................NED................
Cordero MED
Entremeses (suaves)
Entremeses (dorados)*
HI
HI
Guisados HI
MED
Huevos
Jam6n
Pan, bollos duros LO
Pan, bollos suaves LO
MED
, Pa,ngu,9_ues, waffles* _,,
Papas, horneadas Ht
Papas, pur6 MED
Pasteles, flanes MED
Pasteles, una corteza LO
Pasteles, doble corteza LO
Pescado, mariscos (sin empanizar)! MED
Pescado, mariscos (empanizados)* MED
Pizza Ht
Queques, bizcocho LO
Quiches MED
HI
67

COMO USAR LA GAVETA CALENTADORA WARM & READY
(contd.)
Deeocupe la gaveta calentadora y permita que la
unidad se enfrie completamente antes de intentar
quitar la gaveta.
1. Jale la gaveta hasta que est6 abierta completa-
mente.
2, Encuentre las pestafias triangulares negras a
ambos lados de la gaveta.
3. Presione hacia ABAJO la pestafia del lado
DERECHO y LEVANTE la pestafia del lado
IZQUIERDO simultAneamente. Luego jale la
gaveta hacia fuera otra pulgada m&s.
4. Con mucho cuidado, jale la gaveta totalmente
hacia fuera, sosteni_ndola de los lados y no del
frente de la gaveta.
I gl_elI ,,_AI,III_I@=4=
1. Alinee los rieles de la gaveta con los rieles guJa.
2. Empuje la gaveta hasta que tope
completamente.
3. Con mucho cuidado, abra y cierre la gaveta
para cerciorarse de que asent5 correctamente
en los deles.
EL CONDUCTO DE VENTILACI(SN DEL HORNO
El aire caliente y la humedad escapan del homo a
trav_s del conducto de ventilaci6n que se encuen-
tra en la parte central del respaldo de protecci6n.
El conducto de ventilaci6n permite la circulaci6n
apropiada del aire. Tenga cuidado de no obstruir el
conducto de ventilaci6n, pues de Io contrario
obtendr& resultados insatisfactorios del
horneado/asado.
NOTA: Nunca almacene plasticos, papel u otros
artlculos que podrian derretirse o quemarse cerca
del conducto de ventilaci6n del homo, o de
cualquiera de los quemadores exteriores.
Conducto de
ventilaci6n del horno
68
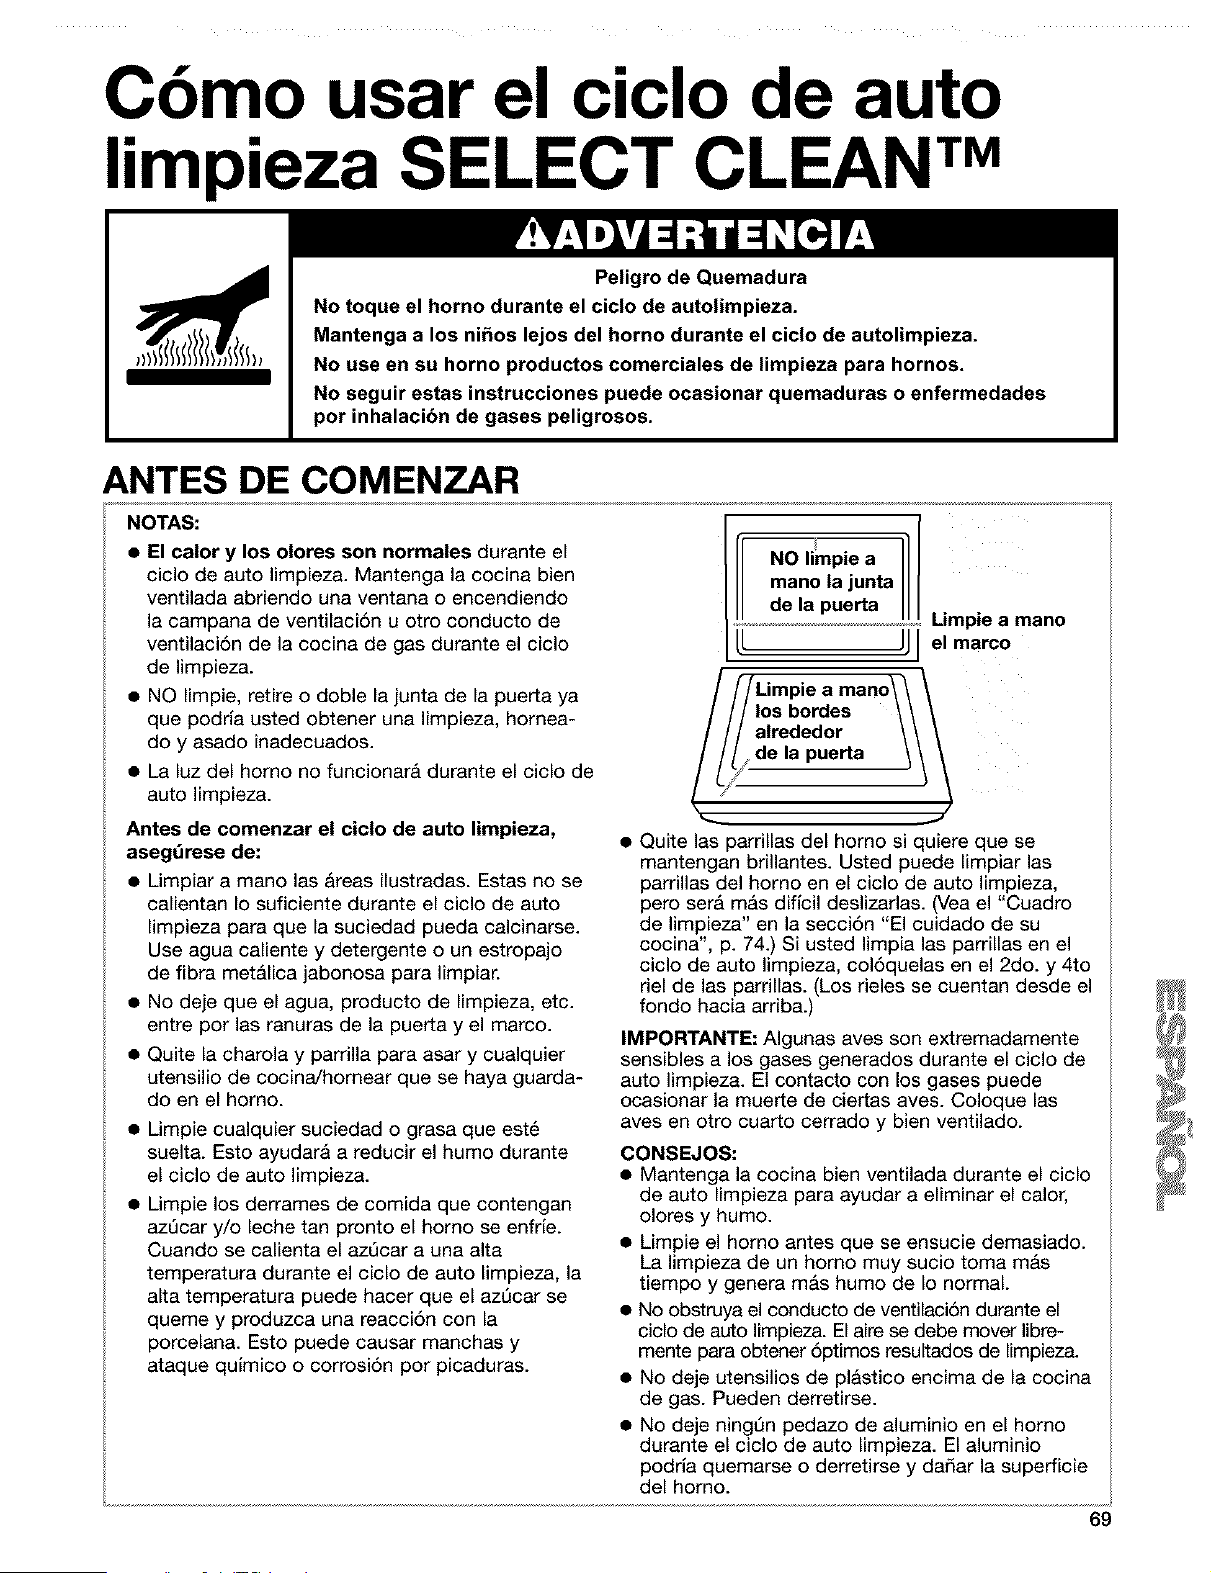
Cbmo usar el ciclo de auto
limpieza SELECT CLEAN TM
Peligro de Quemadura
No toque el horno durante el ciclo de autolimpieza.
Mantenga a los ni_os lejos del homo durante el ciclo de autolimpieza.
No use en su homo productos comerciales de limpieza para hornos.
No seguir estas instrucciones puede ocasionar quemaduras o enfermedades
por inhalacibn de gases peligrosos.
ANTES DE COMENZAR
NOTAS:
• El calor y los olores son normales durante el
ciclo de auto limpieza. Mantenga la cocina bien
ventilada abriendo una ventana o encendiendo
la campana de ventilaci6n u otro conducto de
ventilaci6n de la cocina de gas durante el ciclo
de limpieza.
• NO limpie, retire o doble la junta de la puerta ya
que podrla usted obtener una limpieza, hornea-
do y asado inadecuados.
• La luz del homo no funcionar& durante el ciclo de
auto limpieza.
Antes de comenzar el ciclo de auto limpieza,
asegdrese de:
• Limpiar a mano las Areas ilustradas. Estas no se
calientan Io suficiente durante el ciclo de auto
limpieza para que la suciedad pueda calcinarse.
Use agua caliente y detergente o un estropajo
de fibra met&lica jabonosa para limpiar.
• No deje que el agua, producto de limpieza, etc.
entre por las ranuras de la puerta y el marco.
• Quite la charola y parrilla para asar y cualquier
utensilio de cocina/hornear que se haya guarda-
do en el homo.
• Limpie cualquier suciedad o grasa que est6
suelta. Esto ayudarA a reducir el humo durante
el ciclo de auto limpieza.
• Limpie los derrames de comida que contengan
azQcar y/o leche tan pronto el homo se enfrb.
Cuando se calienta el azQcar a una alta
temperatura durante el ciclo de auto limpieza, la
alta temperatura puede hacer que el azQcar se
queme y produzca una reacci6n con la
porcelana. Esto puede causar manchas y
ataque quJmico o corrosi6n por picaduras.
NO limpie a
mano la junta
de la puerta
//Limpie a mano\\
r/los bordes \\
/alrededor \I
I/de la puerta
Limpie a mano
el marco
..J
• Quite las parrillas del homo si quiere que se
mantengan brillantes. Usted puede limpiar las
parrillas del homo en el ciclo de auto limpieza,
pero serA mAs dificil deslizarlas. (Vea el "Cuadro
de limpieza" en la secci6n "El cuidado de su
cocina', p. 74.) Si usted limpia las parrillas en el
ciclo de auto limpieza, col6quelas en el 2do. y 4to
riel de las parrillas. (Los rieles se cuentan desde el
fondo hacia arriba.)
IMPORTANTE: Algunas ayes son extremadamente
sensibles a los gases generados durante el ciclo de
auto limpieza. El contacto con los gases puede
ocasionar la muerte de ciertas aves. Coloque las
aves en otro cuarto cerrado y bien ventilado.
CONSEJOS:
• Mantenga la cocina bien ventilada durante el ciclo
de auto limpieza para ayudar a eliminar el calor,
olores y humo.
• Limpie el homo antes que se ensucie demasiado.
La limpieza de un homo muy sucio toma mAs
tiempo y genera m&s humo de Io normal.
• No obstruya el conducto de ventilaci6n durante el
ciclo de auto limpieza. El aire se debe mover libre-
mente para obtener 6ptimos resultados de limpieza.
• No deje utensilios de plastico encima de la cocina
de gas. Pueden derretirse.
• No deje ningQn pedazo de aluminio en el homo
durante el ciclo de auto limpieza. El aluminio
podrla quemarse o derretirse y dadar la superficie
del horno.
69
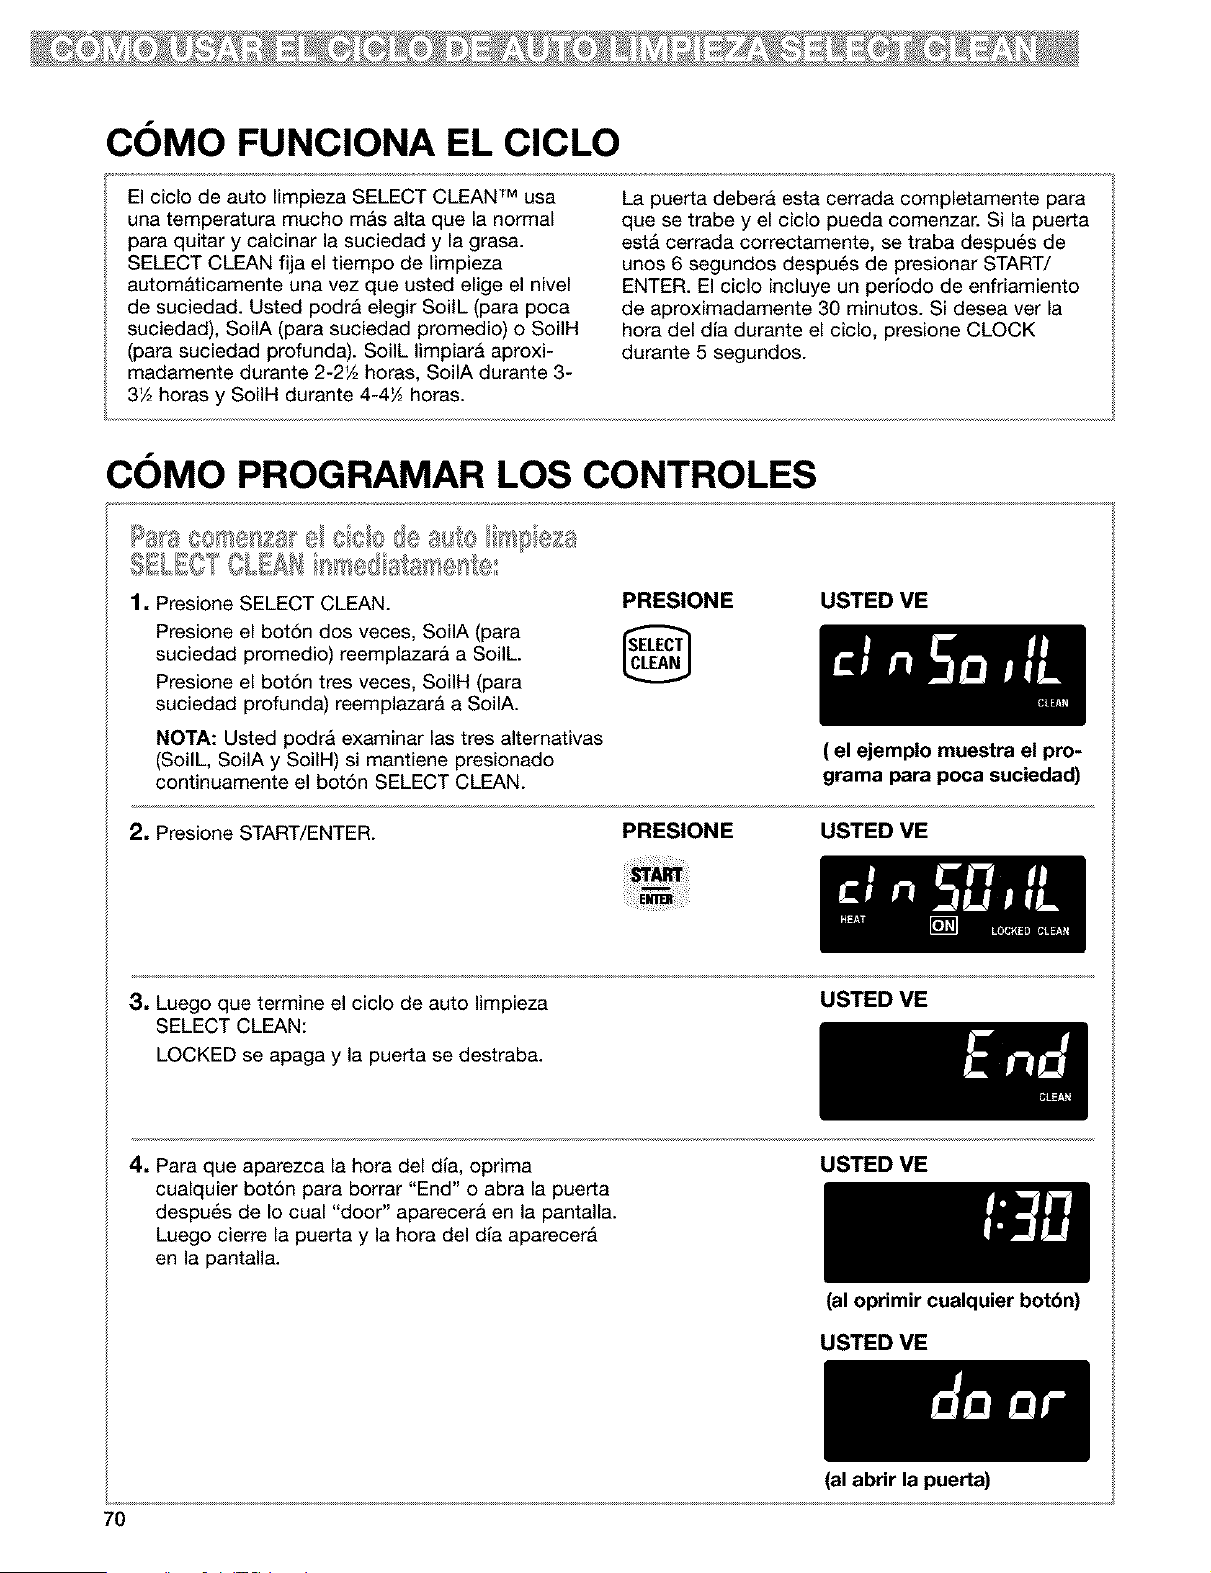
COMO FUNCIONA EL CICLO
El ciclo de auto Iimpieza SELECT CLEAN TM usa
una temperatura mucho m&s alta que la normal
para quitar y calcinar la suciedad y la grasa.
SELECT CLEAN fija el tiempo de limpieza
autom&ticamente una vez que usted elige el nivel
de suciedad. Usted podra elegir SoilL (para poca
suciedad), SoilA (para suciedad promedio) o SoiIH
(para suciedad profunda). SoilL limpiarA aproxi-
madamente durante 2-2'/2 horas, SoilA durante 3-
3'A horas y SoilH durante 4-4_ horas.
La puerta debera esta cerrada completamente para
que se trabe y el ciclo pueda comenzar. Si la puerta
est& cerrada correctamente, se traba despu6s de
unos 6 segundos despu6s de presionar START/
ENTER. El ciclo incluye un perlodo de enfriamiento
de aproximadamente 30 minutos. Si desea ver la
hora del dia durante el ciclo, presione CLOCK
durante 5 segundos.
COMO PROGRAMAR LOS CONTROLES
SBL£OSOLsAS a ase @:
1, Presione SELECT CLEAN.
Presione el bot6n dos veces, SoilA (para
suciedad promedio) reemplazar& a Soilh
Presione el bot6n tres veces, SoilH (para
suciedad profunda) reemplazar& a SoilA.
NOTA: Usted podra examinar las tres altemativas
(SoilL, SoilA y SoiIH) si mantiene presionado
continuamente el bot6n SELECT CLEAN.
PRESIONE USTED VE
2, Presione START/ENTER.
PRESIONE
( el ejemplo muestra el pro-
grama para poca suciedad)
USTED VE
3, Luegoquetermineelciclodeautolimpieza
SELECT CLEAN:
LOCKED se apaga y la puerta se destraba.
USTED ME
4. Para que aparezca la hora del dla, oprima
cualquier bot6n para borrar "End" o abra la puerta
despu_s de Io cual "door" aparecer& en la pantalla.
Luego cierre la puerta y la hora del dla aparecer&
en la pantalla.
USTED ME
(al oprimir cualquier botbn)
USTED ME
7O
(al abrir la puerta)
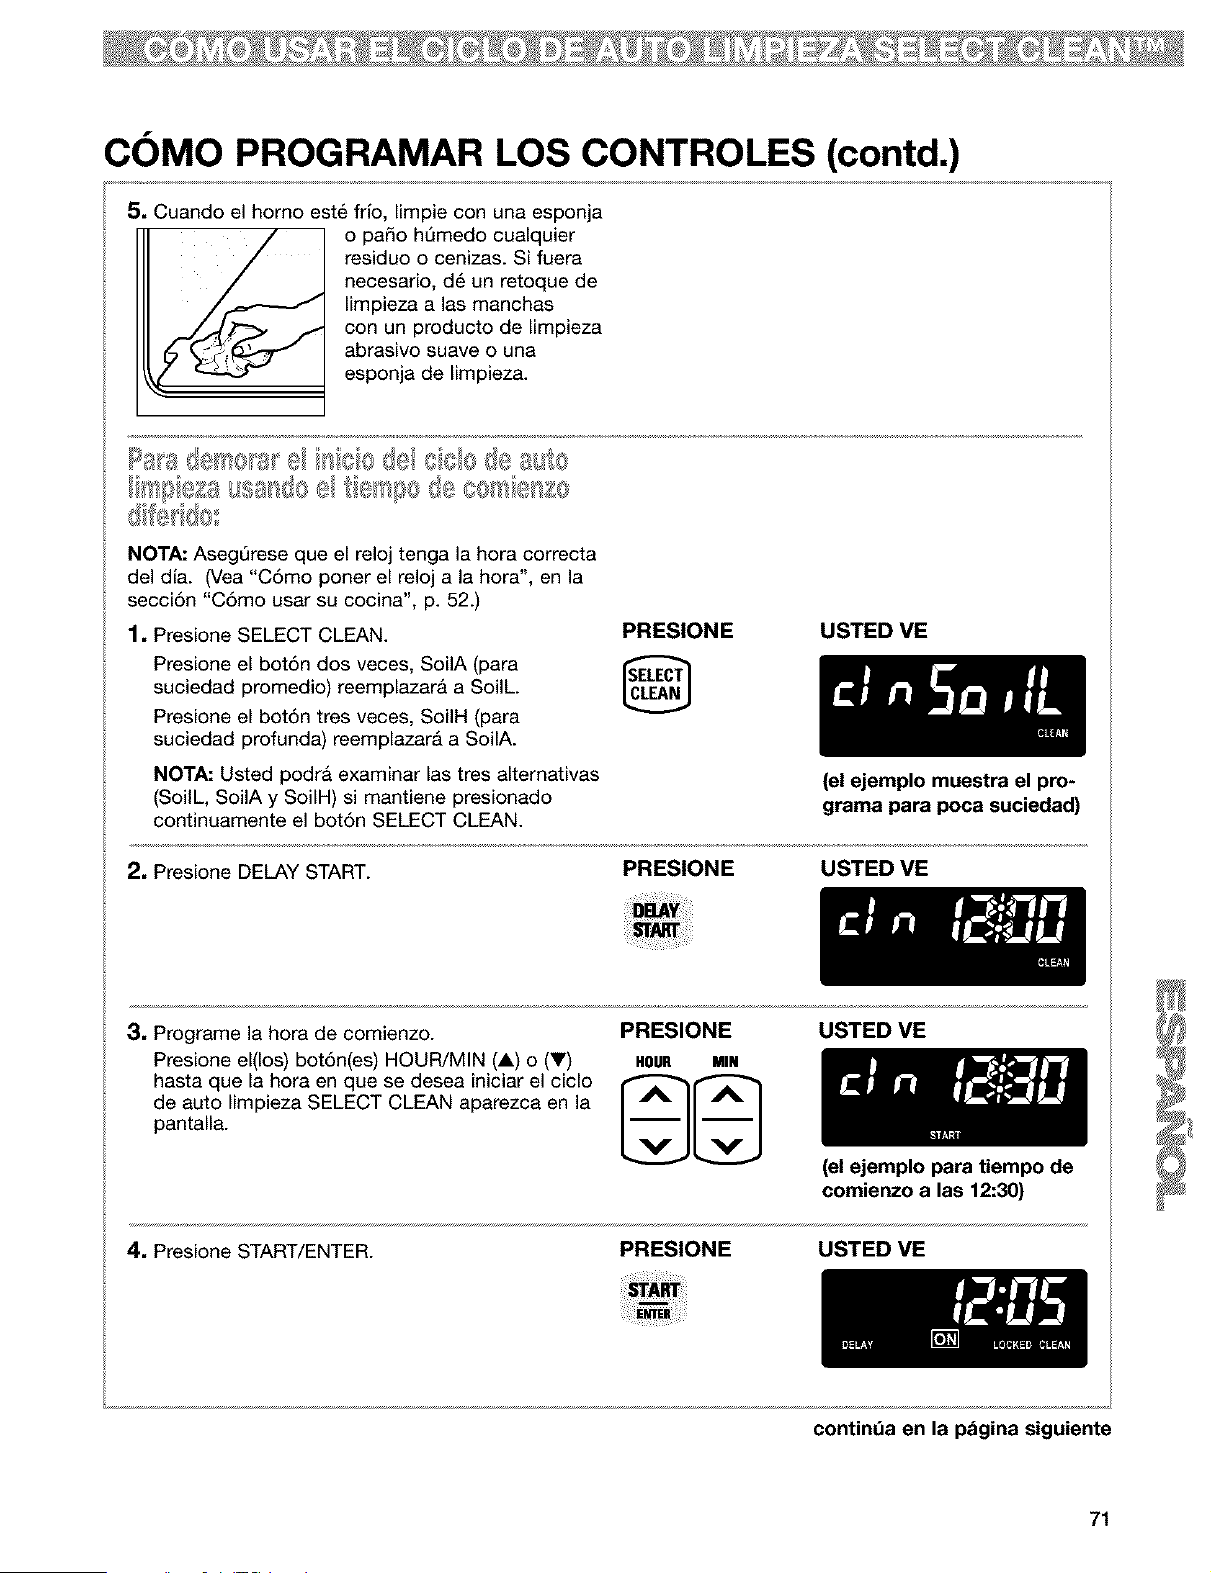
COMO PROGRAMAR LOS CONTROLES (contd.)
5. Cuando el homo est6 frlo, limpie con una esponja
o paso hQmedo cualquier
residuo o cenizas. Si fuera
necesario, d6 un retoque de
limpieza alas manchas
con un producto de limpieza
abrasivo suave o una
esponja de limpieza.
bs'@_(£ausas@e _e_'@o8e C8@e:_;S8
c3f®'@s
NOTA: AsegQrese que el reloj tenga la hora correcta
del dia. (Vea "C6mo poner el reloj a la hora", en la
secci6n "C6mo usar su cocina", p. 52.)
1. Presione SELECT CLEAN.
Presione el bot6n dos veces, SoilA (para
suciedad promedio) reemplazarA a SoilL.
Presione el bot6n tres veces, SoilH (para
suciedad profunda) reemplazar& a SoilA.
NOTA: Usted podr& examinar las tres alternativas
(SoilL, SoilA y SoiIH) si mantiene presionado
continuamente el bot6n SELECT CLEAN.
PRESIONE USTED ME
2. Presione DELAY START.
PRESIONE
(el ejemplo muestra el pro-
grama para poca suciedad)
USTED ME
3. Programe la hora de comienzo.
Presione el(los) bot6n(es) HOUR/MIN (A) o (V)
hasta que la hora en que se desea iniciar el ciclo
de auto limpieza SELECT CLEAN aparezca en la
pantalla.
PRESIONE
HOUR MIN
USTED ME
4. Presione START/ENTER.
PRESIONE
(el ejemplo para tiempo de
comienzo a las 12:30)
USTED VE
continda en la pdgina siguiente
71
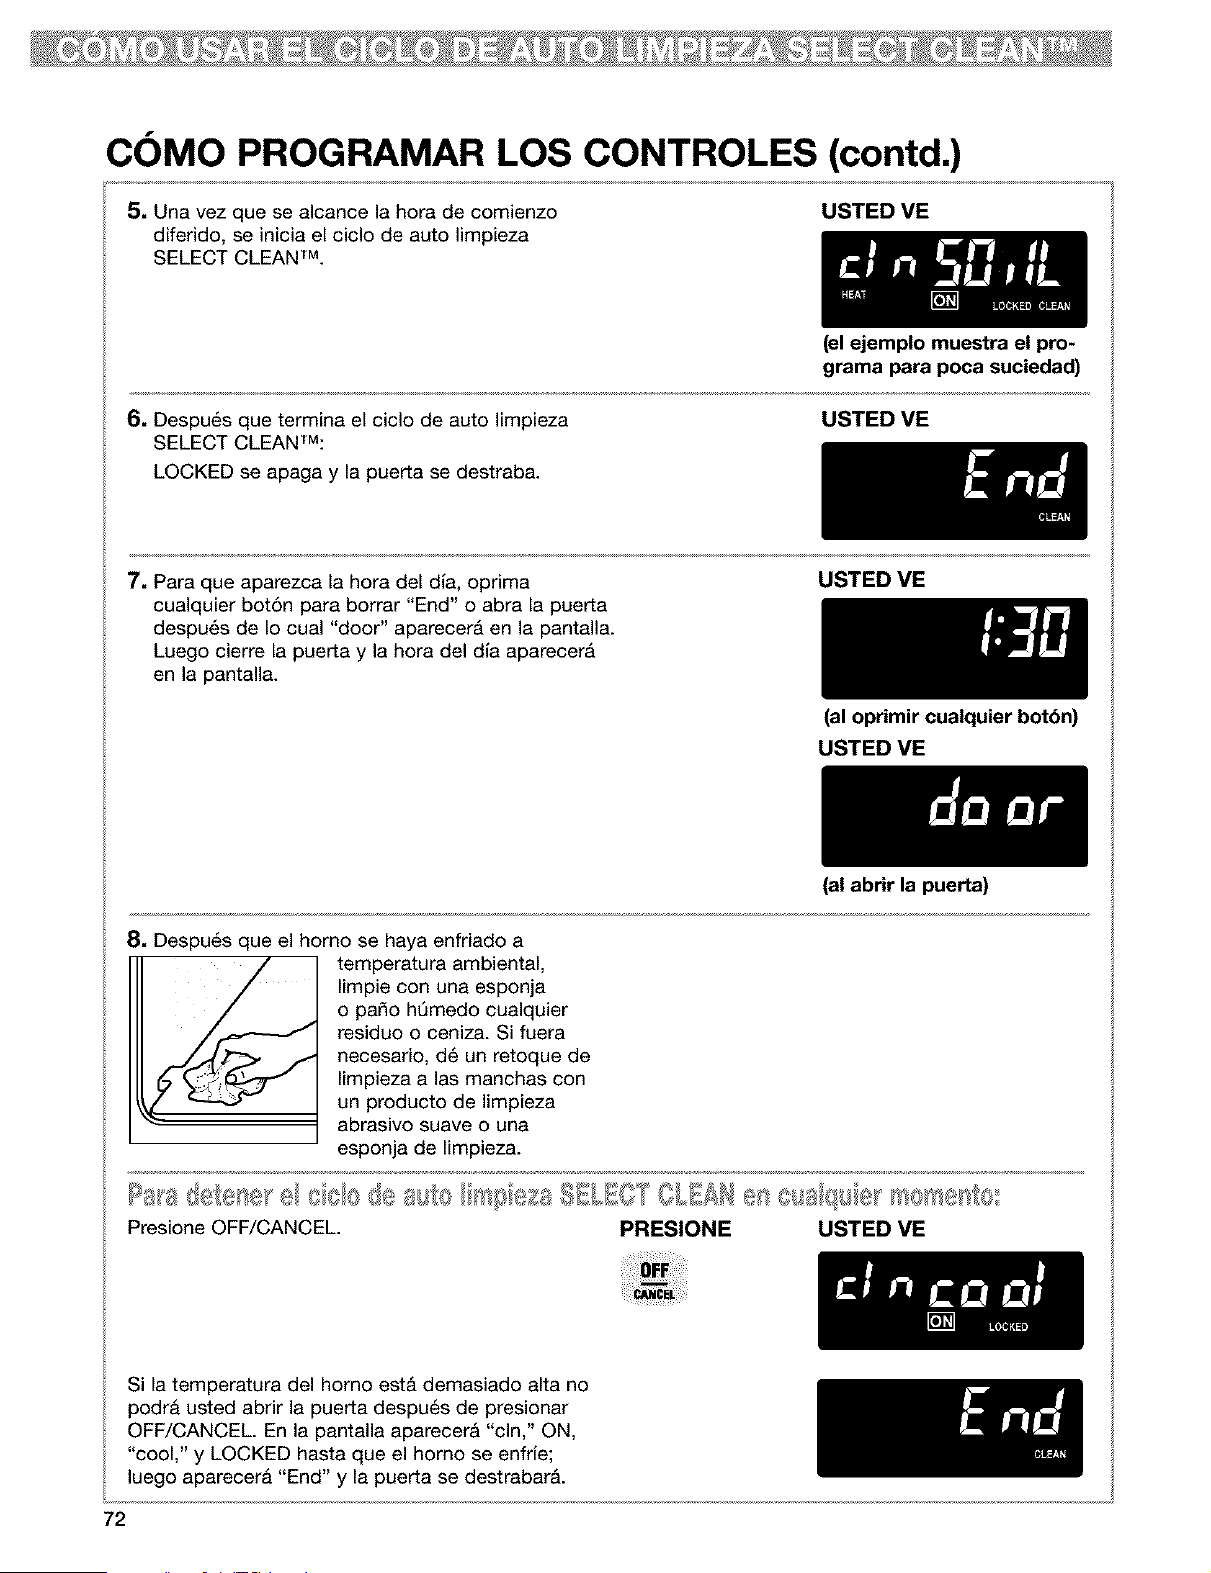
COMO PROGRAMAR LOS CONTROLES (contd.)
5, Una vez que se alcance la hora de comienzo
diferido, se inicia el ciclo de auto limpieza
SELECT CLEAN TM.
USTED ME
6, Despu6s que termina el ciclo de auto limpieza
SELECT CLEANTM:
LOCKED se apaga y la puerta se destraba.
(el ejemplo muestra el pro-
grama para poca suciedad)
USTED ME
7. Para que aparezca la hora del dla, oprima
cualquier bot6n para borrar "End" o abra la puerta
despu6s de Io cual "door" aparecerA en la pantalla.
Luego cierre la puerta y la hora del dla aparecerA
en la pantalla.
USTED ME
8, Despu6s que el homo se haya enfriado a
temperatura ambiental,
limpie con una esponja
o paso hQmedo cualquier
residuo o ceniza. Si fuera
necesario, d6 un retoque de
limpieza a las manchas con
un producto de limpieza
abrasivo suave o una
esponja de limpieza.
(al oprimir cualquier botbn)
USTED ME
(al abrir la puerta)
Presione OFF/CANCEL PRESIONE USTED ME
Si la temperatura del homo est& demasiado alta no
podra usted abrir la puerta despu6s de presionar
OFF/CANCEL En la pantalla aparecer& "cln," ON,
"cool," y LOCKED hasta que el homo se enfrie;
luego aparecera "End" y la puerta se destrabar&.
72

El Cuidado de su cocina
CUADRO DE LIMPIEZA
Antes de limpiar, siempre asegdrese que todos los controles est_n apagados y de que la cocina estd fria.
Consulte las instrucciones que vienen con los productos de limpieza antes de usarios para iimpiar su cocina de gas.
PIEZA
Perillas de control
Tablero de controles
Superficies exteriores*
(excluyendo et tablero de
controles y el vidrio de ta
puerta de! homo)
Las parrillas y tapas de los
quemadores exteriores
recubiertos de porcelana*
• Suciedad tigera a moderada
MC:TODO DE LIMPIEZA
• Jabon y agua
• Lavavajillas
• Jabon y agua
• Limpiad0r de vidri0s en atomizad0r
• Jabon y agua
• Limpiador tiquido suave
• Limpiador de vidrios en atomizador
• Estropajo plastico de fregar no
abrasivo
• Quemada Limpiador de paritlas
Sears
• Jab6n y agua
• Estropajo ptastico de fregar no
abrasive
• Lavavajillas (parrittas sotamente)
INSTRUCCIONES ESPECIALES
• NO use esponja de fibra metatica o
productos de limpieza abrasivos
• Jale las periltas directamente desde
el tablero de controles
• Lave, enjuague y sequetas con un
patio suave.
• Lavar, enjuagar y secar con un patio
suave.
• Rociar el limpiador en una toalle de
papet; no to aplique directamente at
tablero.
• NO use limpiadores abrasives o
asperos come blanqueadores con
cloro, amoniaco o limpiadores de homo.
• Lavar, enjuagar y secar con un patio
suave.
• Limpie con cuidado atrededor de la
ptaca con el modelo y la serie, el frotar
demasiado podria borrar los n0meros.
• NOTA: Para evitar dafiar el producto,
no quite la superficie de cocci6n.
• Limpie tan pronto se ensucien.
• Lave, enjuague y seque bien.
• Coloque tas parrillas en la canasta
inferior det lavavajitlas y use el cicto
mas fuerte.
*Cuando ta supenlcie de cocci6n est6 fria, quite todas las salpicaduras y limpie. Las satpicaduras de comida que
contienen acidos, tales come viagre y tomate, pueden afectar et acabado. Para evitar desportiltaduras a la
porcetana de las parrillas, no golpee tas parritlas y tas tapas entre si o contra superficies duras co[no utensitios
de cocina de hierro fundido.
continda en la p_gina siguiente
73
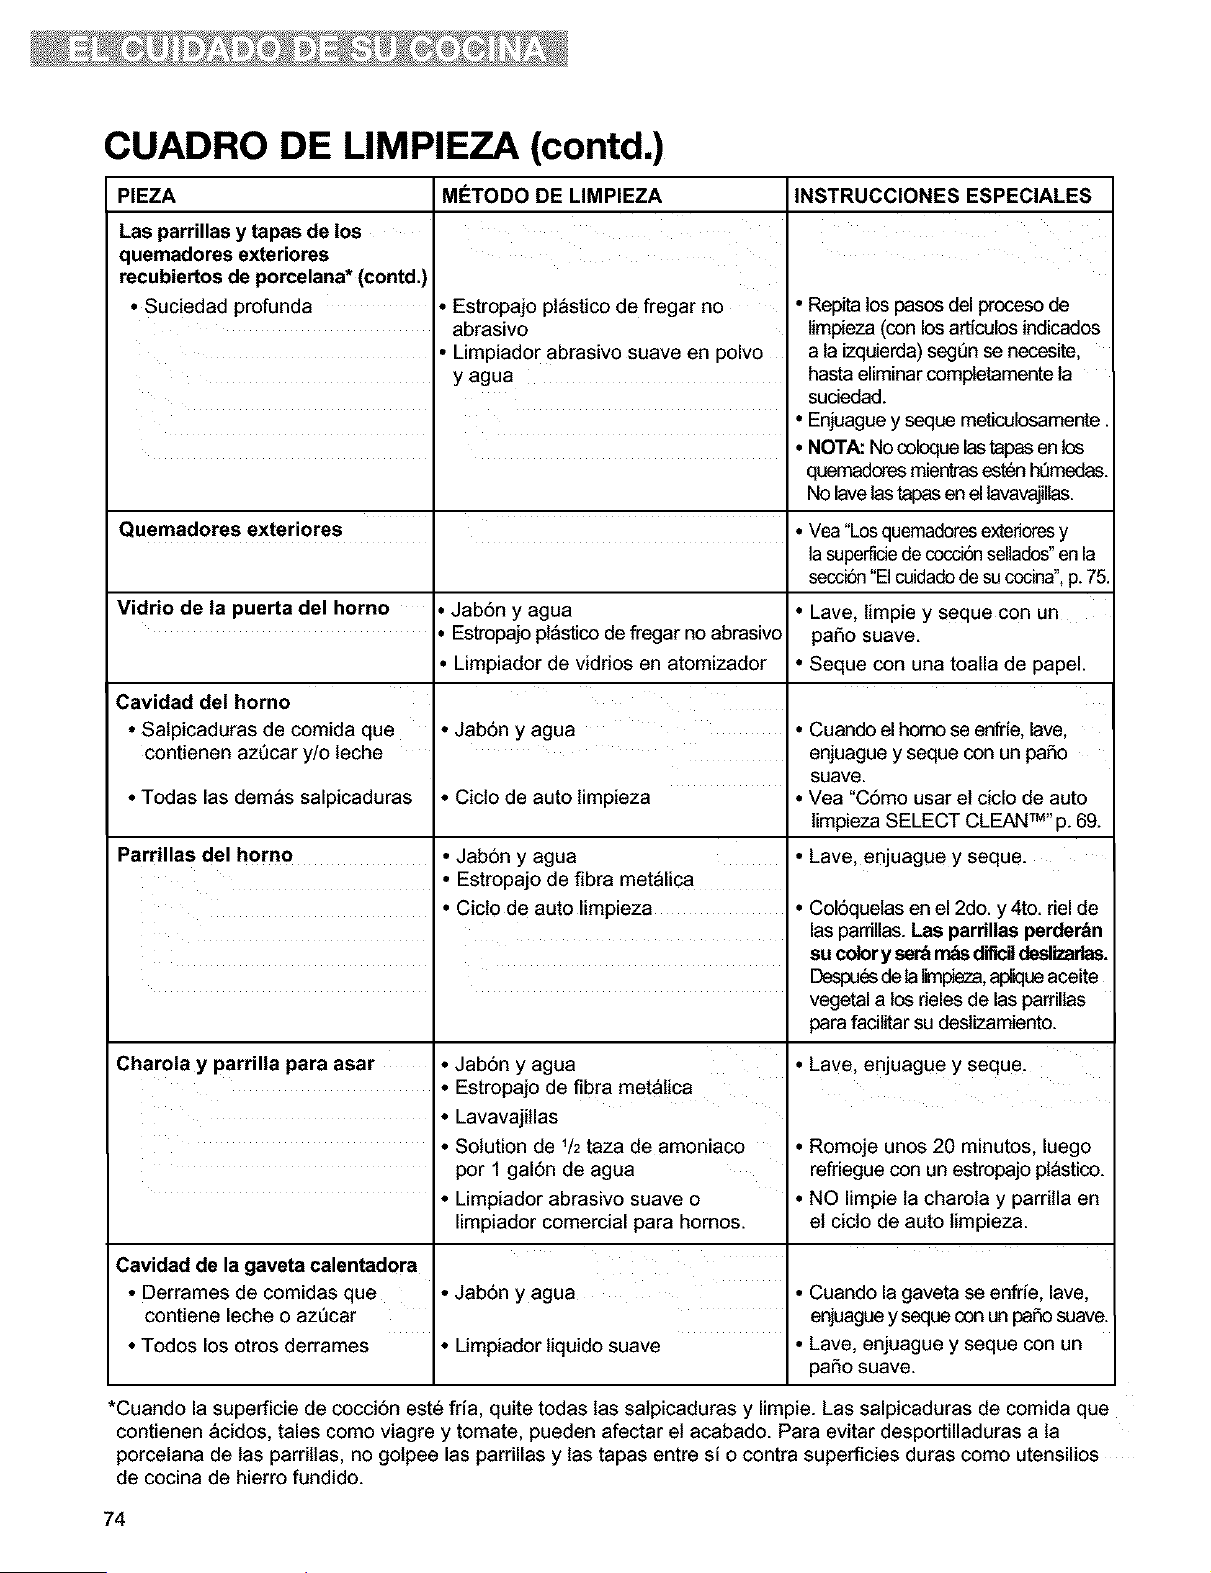
CUADRO DE LIMPIEZA (contd.)
PIEZA MC:TODO DE LIMPIEZA
Las parrillas y tapas de los
quemadores exteriores
recubiertos de porcelana* (contd,)
• Suciedad profunda • Estropajo ptastico de fregar no
abrasivo
• Limpiador abrasivo suave en polvo
y agua
Quemadores exteriores
Vidrio de la puerta del homo Jab6n y agua
EstropajoptastJcode fregar no abrasivo
• Limpiador de vidrios en atomizador
Cavidad del horno
• Salpicaduras de comida que • Jab6n y agua
contienen azQcar y/o teche
• Todas las demas salpicaduras • Ciclo de auto timpieza
Parrillas del homo • Jab6n y agua
• Estropajo de fibra metalica
INSTRUCCIONES ESPECIALES
• Repita los pasos del proceso de
timpieza (con los articulos indicados
a ta izquierda) segQn se necesite,
hasta eliminar comptetamente ta
sudedad.
• Enjuague y seque meticulosamente
• NOTA: No coloque las tapas en los
quemadores mientrasesten hQmedas.
No lave las tapas en el lavavajiltas.
• Vea "Los quemadoresexterioresy
lasuperfide de cocciSnsellados"en la
secciSn"El cuidadode su cocina",p. 75
• Lave, timpie y seque con un
paso suave.
• Seque con una toalla de papel.
Charola y parrilla para asar
• Cuando el homo se enfrie, lave,
enjuague y seque con un paso
suave.
• Vea "C6mo usar et ciclo de auto
limpieza SELECT CLEAN TM"p. 69.
• Lave, enjuague y seque.
Cavidad de la gaveta calentadora
• Derrames de comidas que
contiene leche o azt)car
• Todos los otros derrames
• Cicto de auto limpieza
• Jab6n y agua
• Jab6n y agua
• Limpiadortiquido suave
• Estropajo de flbra metalica
• Lavavajitlas
• Solution de 1/2taza de amoniaco
per 1 gal6n de agua
• Limpiador abrasivo suave o
limpiador comercial para homes.
• Col6quelas en el 2do. y 4to. riel de
las pardllas. Las parrillas perder_n
su colory ser'_m&sdiflcil deslizadas.
Despuesde la_,n_za, apliqueaceite
vegetal a Io_ deles de las parriltas
para facilitar su deslizamiento.
• Lave, enjuague y seque.
• Romoje unos 20 minutos, luego
refriegue con un estropajo ptastico.
• NO limpie ta charola y parrilla en
el ciclo de auto timpieza.
• Cuando la gaveta se enfrie, lave,
enjuaguey seque con un pa5o suave.
• Lave, enjuague y seque con un
paso suave.
*Cuando la superficie de cocci6n este fria, quite todas tas salpicaduras y limpie. Las salpicaduras de comida que
contienen acidos, tales como viagre y tomate, pueden afectar el acabado. Para evitar desportilladuras a la
porcelana de tas pardtlas, no golpee las parrillas y tas tapas entre si o contra superficies duras como utensilios
de cocina de hierro fundido.
74
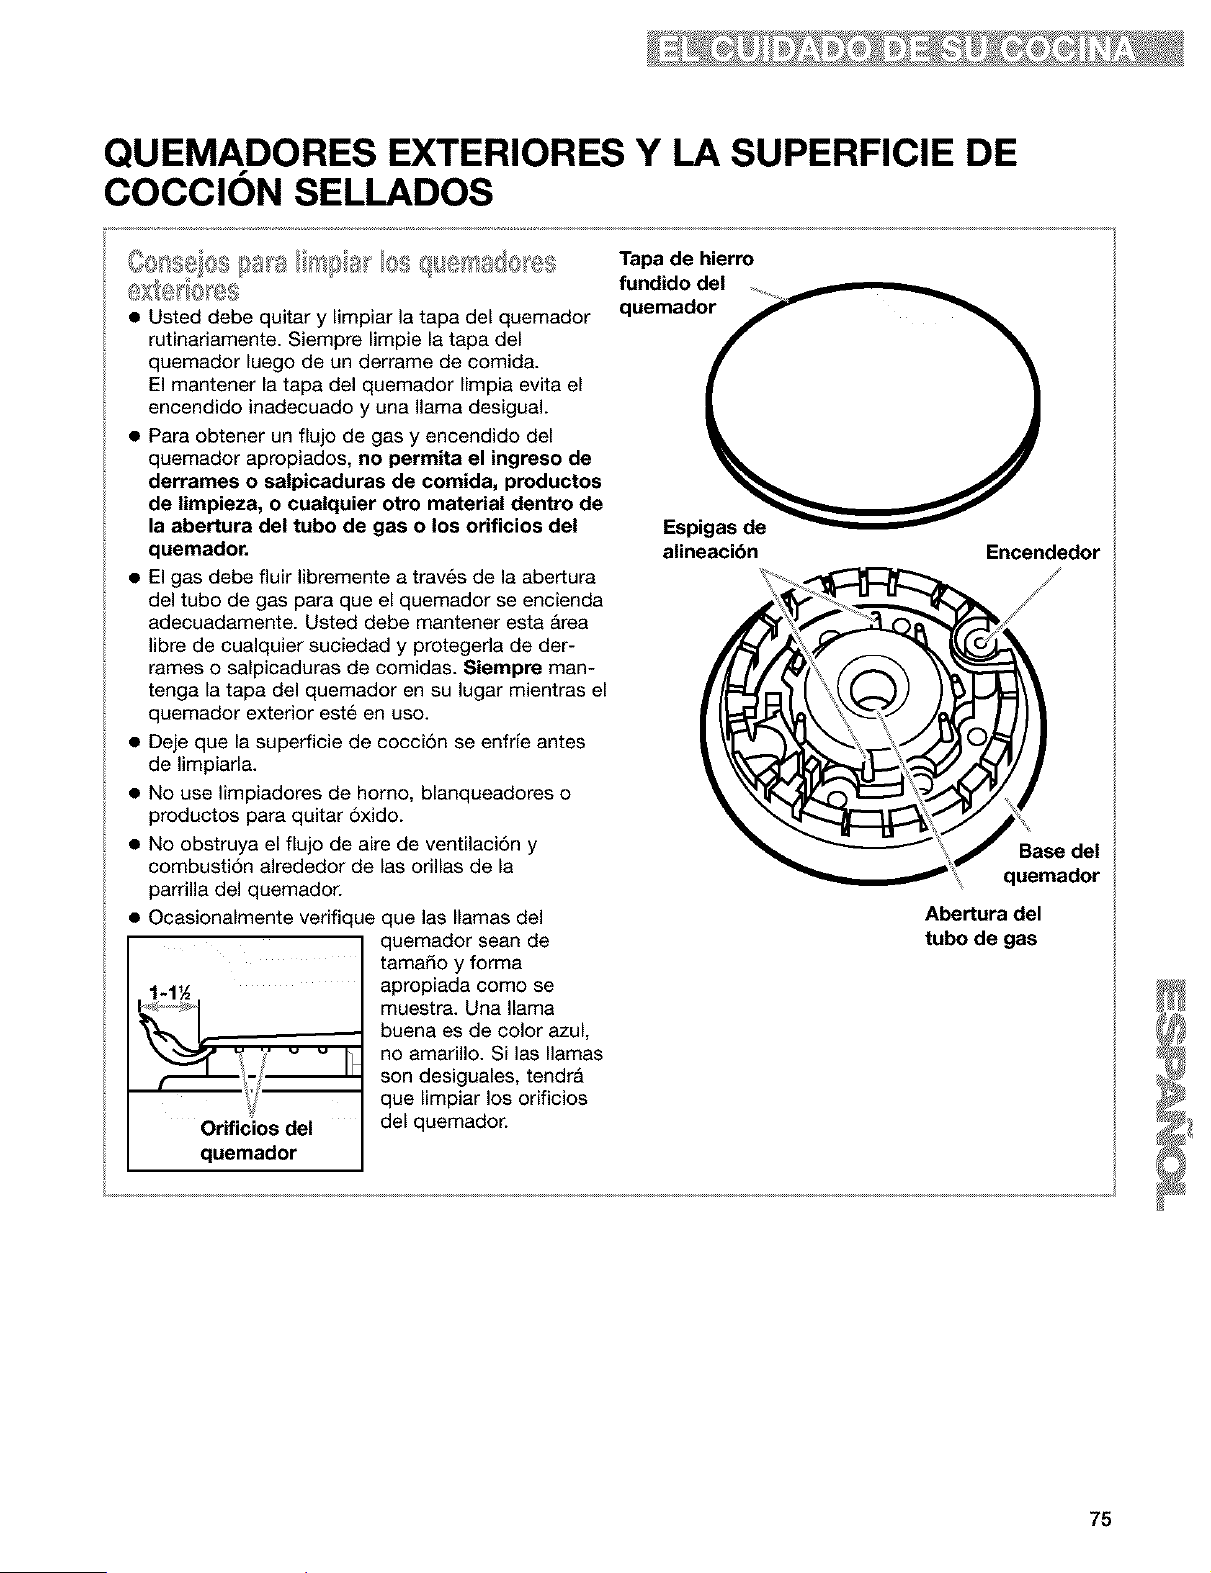
QUEMADORES EXTERIORES Y LA SUPERFICIE DE
COCClON SELLADOS
• Usted debe quitar y limpiar la tapa del quemador
rutinariamente. Siempre limpie la tapa del
quemador luego de un derrame de comida.
El mantener la tapa del quemador limpia evita el
encendido inadecuado y una llama desigual.
• Para obtener un flujo de gas y encendido del
quemador apropiados, no permita el ingreso de
derrames o salpicaduras de comida, productos
de limpieza, o cualquier otro material dentro de
la abertura del tubo de gas o los orificios del
quemador.
• El gas debe fluir libremente a travils de la abertura
del tubo de gas para que el quemador se encienda
adecuadamente. Usted debe mantener esta Area
libre de cualquier suciedad y protegeda de der-
rames o salpicaduras de comidas. 8iempre man-
tenga la tapa del quemador en su lugar mientras el
quemador exterior est_ en uso.
• Deje que la superficie de cocciSn se enfrfe antes
de limpiarla.
• No use limpiadores de homo, blanqueadores o
productos para quitar 5xido.
• No obstruya el flujo de aire de ventilacidn y
combustiSn alrededor de las orillas de la
parrilla del quemador.
• Ocasionalmente verifique que las llamas del
quemador sean de
tamado y forma
.1 _ apropiada como se
' muestra. Una llamabuena es de color azul,
_'/ "_ _ _ no amarillo. Silasllamas
• son desiguales, tendril
que limpiar los orificios
Orificios del del quemador.
quemador
Tapa de hierro
fundido del
quemador
Espigas de
alineacibn Encendedor
_< G_
Abertura del
tubo de gas
75
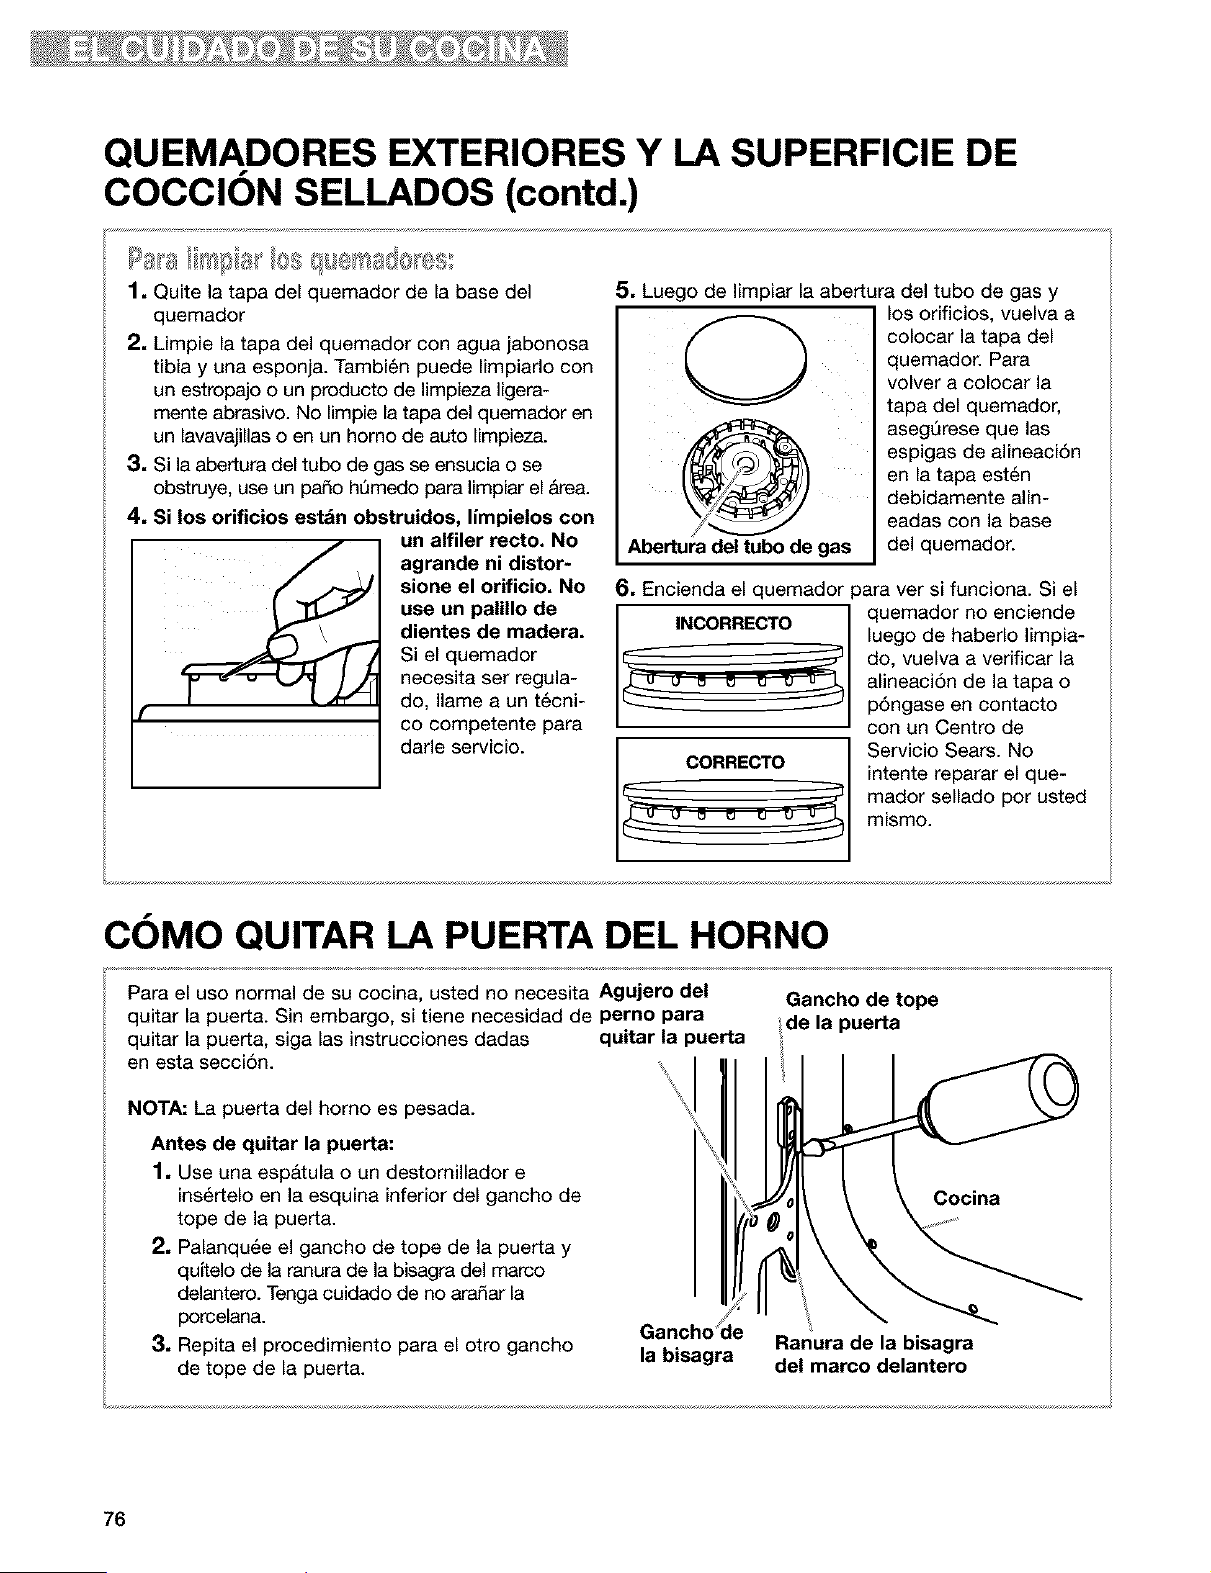
QUEMADORES EXTERIORES Y LA SUPERFICIE DE
COCCION SELLADOS (contd.)
1. Quite la tapa del quemador de la base del
quemador
2. Limpie la tapa del quemador con agua jabonosa
tibia y una esponja. Tambi6n puede Iimpiarlo con
un estropajo o un producto de limpieza Iigera-
mente abrasivo. No limpie la tapa del quemador en
un lavavajillas o en un homo de auto Iimpieza.
3. Si la abertura del tubo de gas se ensucia o se
obstruye, use un pado hQmedo para Iimpiar el Area.
4. Si los orificios estdn obstruidos, limpielos con
un alfiler recto. No
agrande ni distor-
sione el orificio. No
use un palillo de
dientes de madera.
Si el quemador
necesita ser regula-
do, Ilame a un t6cni-
co competente para
darle servicio.
5. Luego de Iimpiar la abertura del tubo de gas y
Abertura del tubo de gas
los orificios, vuelva a
colocar la tapa del
quemador. Para
volver a colocar la
tapa del quemador,
asegQrese que las
espigas de alineaci6n
en la tapa est6n
debidamente ann-
eadas con la base
del quemador.
6. Encienda el quemador para ver si funciona. Si el
quemador no enciende
luego de haberlo limpia-
do, vuelva a verificar la
alineaci6n de la tapa o
p6ngase en contacto
con un Centro de
Servicio Sears. No
intente reparar el que-
mador sellado por usted
mismo.
COMO QUITAR LA PUERTA DEL HORNO
Para el uso normal de su cocina, usted no necesita Agujero del
quitar la puerta. Sin embargo, si tiene necesidad de perno para
quitar la puerta, siga las instrucciones dadas quitar la puerta
en esta secci6n.
NOTA: La puerta del homo es pesada.
Antes de quitar la puerta:
1, Use una esp&tula o un destornillador e
ins_rtelo en la esquina inferior del gancho de
tope de la puerta.
2, Palanqu6e el gancho de tope de la puerta y
quftelo de la ranura de la bisagra del marco
delantero. Tenga cuidado de no aradar la
porcelana.
3, Repita el procedimiento para el otro gancho
de tope de la puerta.
Gancho ]e
la bisagra
Gancho de tope
de la puerta
Cocina
Ranura de la bisagra
del marco delantero
76
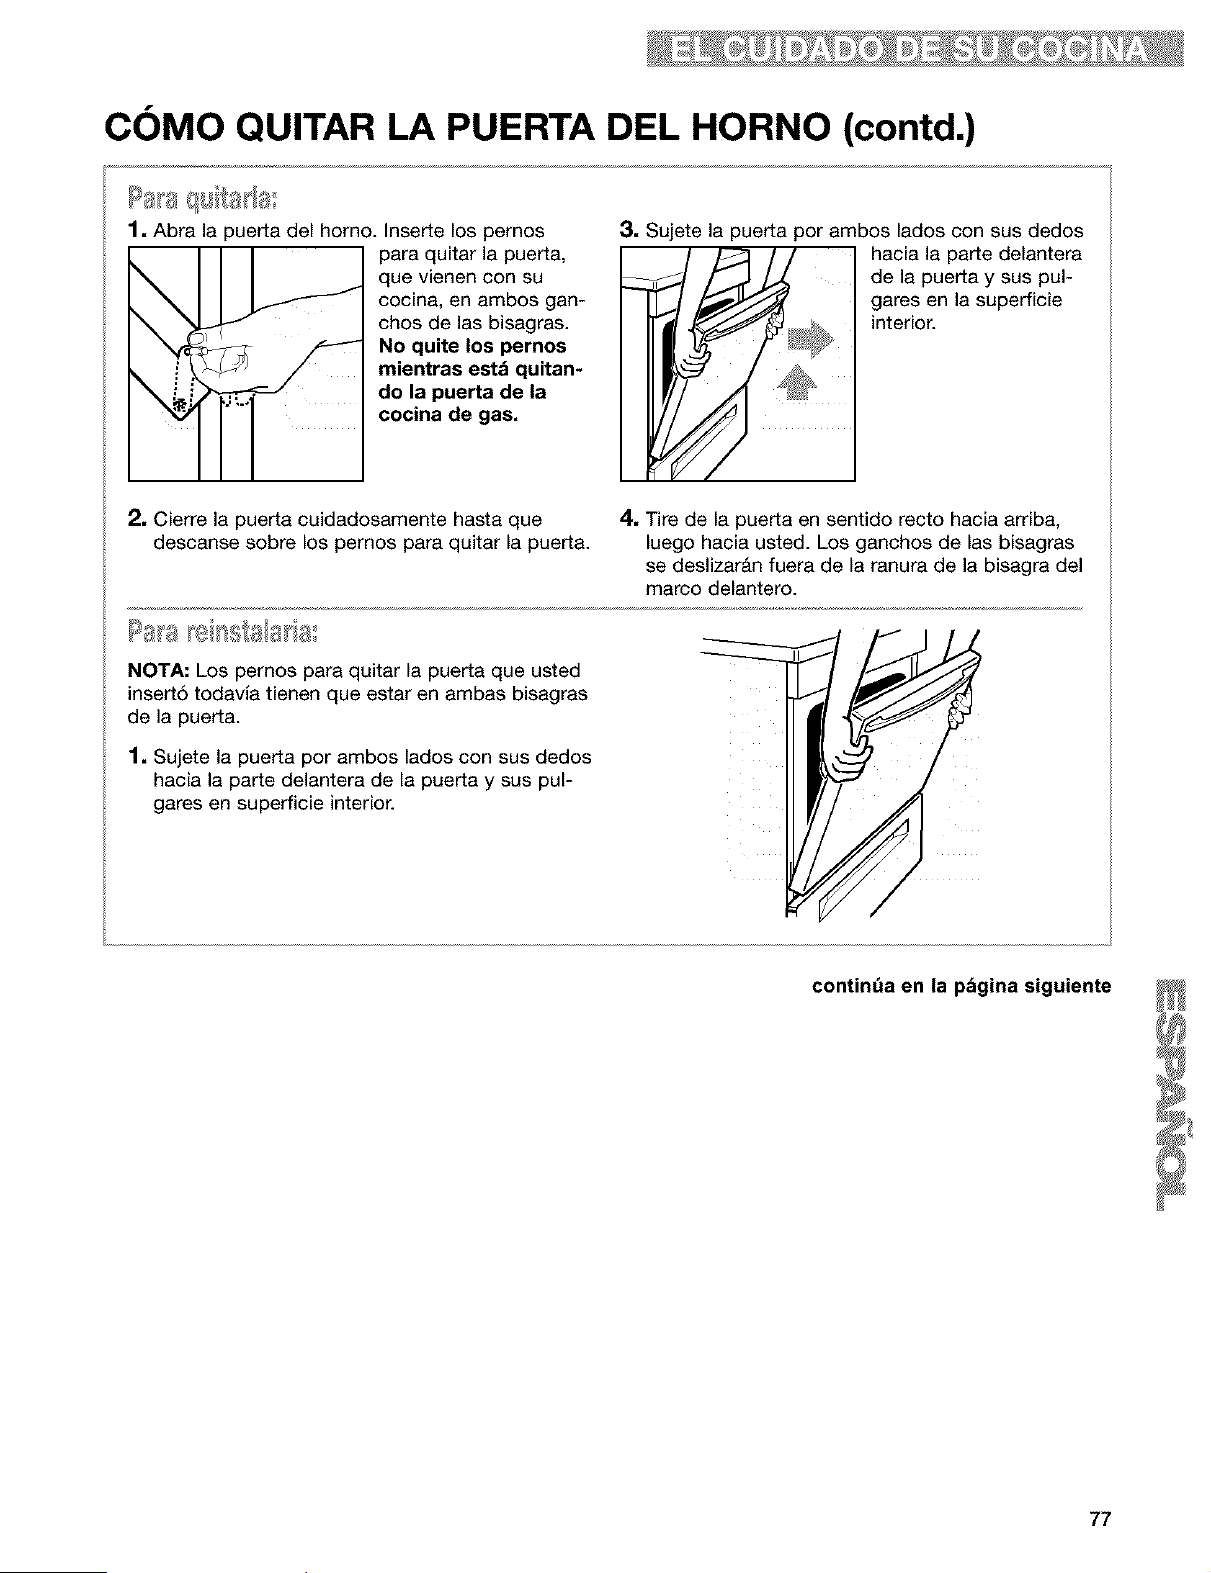
COMO QUITAR LA PUERTA DEL HORNO (contd.)
Papaq_Tta_a_
1. Abra la puerta del horno. Inserte los pernos
para quitar la puerta,
que vienen con su
cocina, en ambos gan-
chos de las bisagras.
No quite los pernos
mientras estd quitan-
do la puerta de la
cocina de gas.
3. Sujete la puerta por ambos lados con sus dedos
hacia la parte delantera
de la puerta y sus pul-
' _ gareSinterior.enla superficie
2, Cierre la puerta cuidadosamente hasta que
descanse sobre los pernos para quitar la puerta.
4, Tire de la puerta en sentido recto hacia arriba,
luego hacia usted. Los ganchos de las bisagras
se deslizardn fuera de la ranura de la bisagra del
marco delantero.
Pas _e _ss{sls_a
NOTA: Los pernos para quitar la puerta que usted
insert6 todavia tienen que estar en ambas bisagras
de la puerta.
1, Sujete la puerta por ambos lados con sus dedos
hacia la parte delantera de la puerta y sus pul-
gares en superficie interior.
77
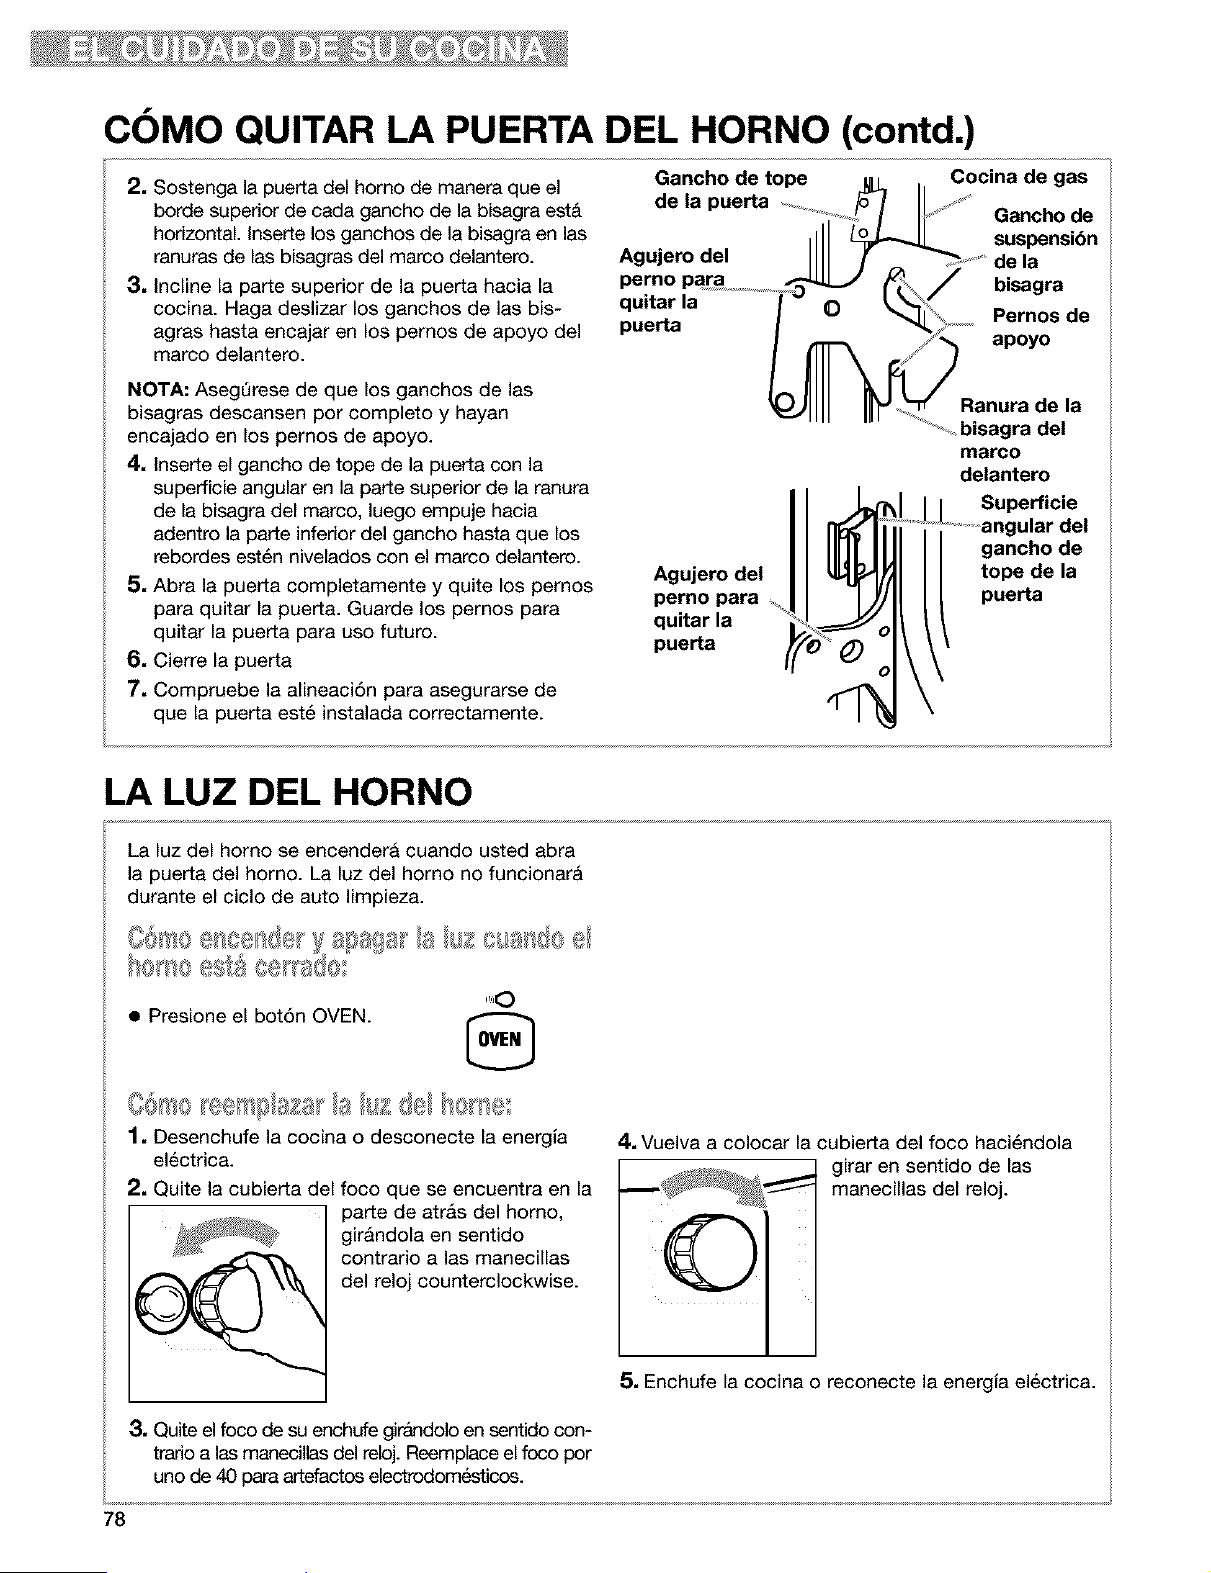
COMO QUITAR LA PUERTA DEL HORNO (contd.)
2. Sostenga la puerta del homo de manera que el
borde superior de cada gancho de la bisagra est&
horizontal. Inserte los ganchos de la bisagra en las
ranuras de las bisagras del marco delantero.
3, Incline la parte superior de la puerta hacia la
cocina. Haga deslizar los ganchos de las bis-
agras hasta encajar en los pernos de apoyo del
marco delantero.
Gancho de tope u _ . Cocina de gas
de a puerta _ ....
........'x+.4 I I__ Gancho de
,111 suspension
Agujerodel IIII ! Sdela
perno par a ................._ bisagra
quitar la O Pernos de
puerta
apoyo
NOTA: AsegQrese de que los ganchos de las
bisagras descansen por completo y hayan
encajado en los pernos de apoyo.
4, Inserte el gancho de tope de la puerta con la
superficie angular en la parte superior de la ranura
de la bisagra del marco, luego empuje hacia
adentro la parte inferior del gancho hasta que los
rebordes est6n nivelados con el marco delantero.
5, Abra la puerta completamente y quite los pernos
para quitar la puerta. Guarde los pernos para
quitar la puerta para uso futuro.
6, Cierre la puerta
7, Compruebe la alineaci6n para asegurarse de
que la puerta est6 instalada correctamente.
Agujero del
perno para
quitar la
puerta
Ranura de la
_ bisagra del
marco
delantero
Superficie
Jlar del
gancho de
tope de la
puerta
LA LUZ DEL HORNO
La luz del homo se encendera cuando usted abra
la puerta del homo. La luz del horno no funcionar&
durante el ciclo de auto limpieza.
• Presione el bot6n OVEN. ,_,
1, Desenchufe la cocina o desconecte la energla
electrica.
2, Quite la cubierta del foco que se encuentra en la
parte de atr&s del homo,
gir&ndola en sentido
contrario alas manecillas
del reloj counterclockwise.
4, Vuelva a colocar la cubierta del foco haci6ndola
girar en sentido de las
manecillas del reloj.
C)
3, Quite el foco de su enchufe girAndolo en sentido con-
trado alas manecilas del reloj. Reemplace el foco por
uno de 40 para artefactos electrodomesticos.
5, Enchufe la cocina o reconecte la energia electrica.
78
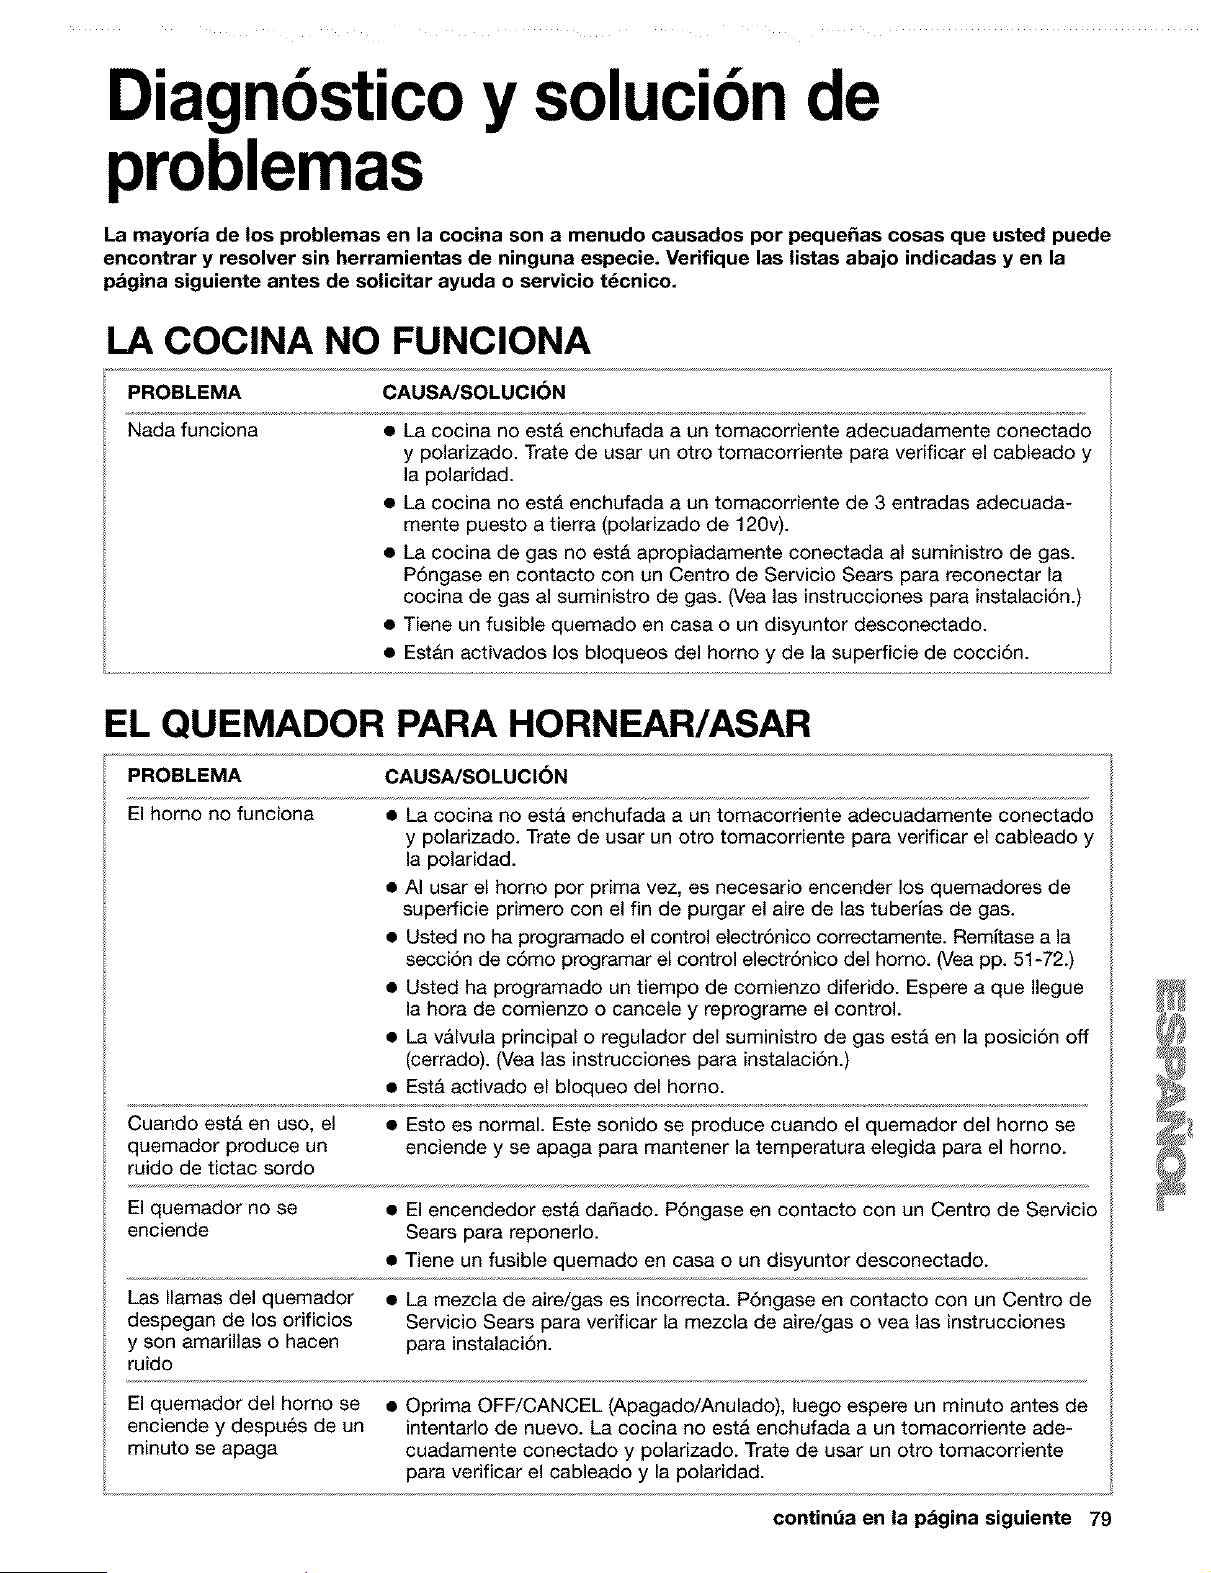
Diagnbsticoy solucibnde
problemas
La mayoria de los problemas en la cocina son a menudo causados por peque_as cosas que usted puede
encontrar y resolver sin herramientas de ninguna especie. Veriflque las listas abajo indicadas y en la
pagina siguiente antes de solicitar ayuda o servicio t_cnico.
LA COCINA NO FUNCIONA
PROBLEMA CAUSA/SOLUClON
Nada funciona • La cocina no est& enchufada a un tomacorriente adecuadamente conectado
y polarizado. Trate de usar un otto tomacorriente para verificar el cableado y
la polaridad.
• La cocina no est& enchufada a un tomacorriente de 3 entradas adecuada-
mente puesto a tierra (polarizado de 120v).
• La cocina de gas no est& apropiadamente conectada al suministro de gas.
P6ngase en contacto con un Centro de Servicio Sears para reconectar la
cocina de gas al suministro de gas. (Vea las instrucciones para instalaci6n.)
• Tiene un fusible quemado en casa o un disyuntor desconectado.
• Estan activados los bloqueos del homo y de la superficie de cocci6n.
EL QUEMADOR PARA HORNEAR/ASAR
PROBLEMA CAUSA/SOLUCI6N
El homo no funciona
• La cocina no esta enchufada a un tomacorriente adecuadamente conectado
y polarizado. Trate de usar un otto tomacorriente para verificar el cableado y
la polaridad.
• AI usar el homo pot prima vez, es necesario encender los quemadores de
superficie primero con el fin de purgar el aire de las tuberlas de gas.
• Usted no ha programado el control electr6nico correctamente. Remitase a la
secci6n de c6mo programar el control electr6nico del horno. (Vea pp. 51-72.)
• Usted ha programado un tiempo de comienzo diferido. Espere a que Ilegue
la hora de comienzo o cancele y reprograme el control.
• La vAlvula principal o regulador del suministro de gas estA en la posici6n off
(cerrado). (Vea las instrucciones para instalaci6n.)
• EstA activado el bloqueo del horno.
Cuando est& en uso, el • Esto es normal. Este sonido se produce cuando el quemador del horno se
quemador produce un enciende y se apaga para mantener la temperatura elegida para el horno.
ruido de tictac sordo
El quemador no se • El encendedor est& da_ado. P6ngase en contacto con un Centro de Servicio
enciende Sears para reponerlo.
• Tiene un fusible quemado en casa o un disyuntor desconectado.
Las llamas del quemador • La mezcla de aire/gas es incorrecta. P6ngase en contacto con un Centro de
despegan de los orificios Servicio Sears para verificar la mezcla de aire/gas o vea las instrucciones
y son amarillas o hacen para instalaci6n.
ruido
El quemador del homo se • Oprima OFF/CANCEL (Apagado/Anulado), luego espere un minuto antes de
enciende y despu_s de un intentarlo de nuevo. La cocina no esta enchufada a un tomacorriente ade-
minuto se apaga cuadamente conectado y polarizado. Trate de usar un otto tomacorriente
para verificar el cableado y la polaridad.
contint_a en la pagina siguiente 79
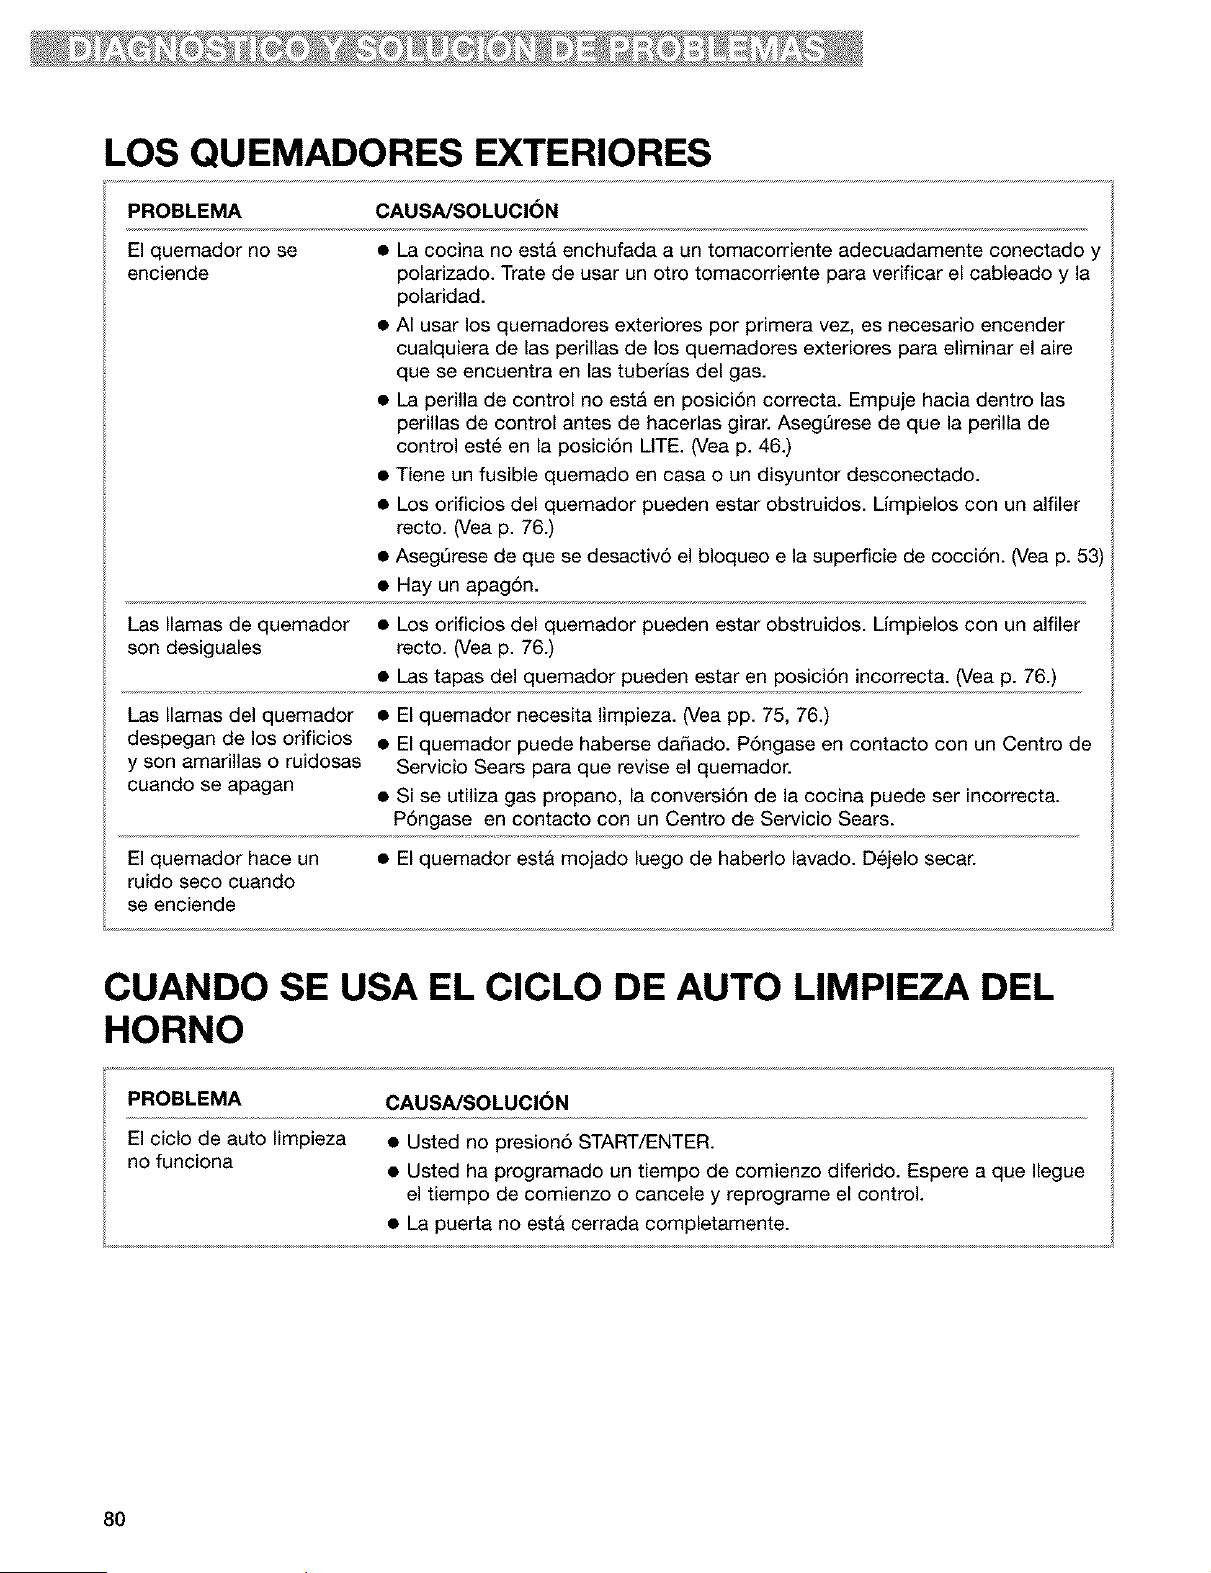
LOS QUEMADORES EXTERIORES
PROBLEMA CAUSA/SOLUCION
El quemador no se
enciende
• La cocina no est& enchufada a un tomacorriente adecuadamente conectado y
polarizado. "Irate de usar un otro tomacorriente para verificar el cableado y la
polaridad.
• AI usar los quemadores exteriores por primera vez, es necesario encender
cualquiera de las perillas de los quemadores exteriores para eliminar el aire
que se encuentra en las tuberias del gas.
• La perilla de control no est& en posici6n correcta. Empuje hacia dentro las
perillas de control antes de hacerlas girar. AsegQrese de que la perilla de
control est_ en la posici6n LITE. (Vea p. 46.)
• Tiene un fusible quemado en casa o un disyuntor desconectado.
• Los orificios del quemador pueden estar obstruidos. Limpielos con un alfiler
recto. (Vea p. 76.)
• AsegQrese de que se desactiv6 el bloqueo e la superficie de cocci6n. (Vea p. 53)
• Hay un apag6n.
Las llamas de quemador • Los orificios del quemador pueden estar obstruidos. Limpielos con un alfiler
son desiguales recto. (Vea p. 76.)
• Las tapas del quemador pueden estar en posici6n incorrecta. (Vea p. 76.)
Las llamas del quemador • El quemador necesita limpieza. (Vea pp. 75, 76.)
despegan de los orificios • El quemador puede haberse da_ado. P6ngase en contacto con un Centro de
y son amarillas o ruidosas Servicio Sears para que revise el quemador.
cuando se apagan • Si se utiliza gas propano, la conversi6n de la cocina puede ser incorrect&
P6ngase en contacto con un Centro de Servicio Sears.
El quemador hace un • El quemador est& mojado luego de haberlo lavado. D_jelo secar.
ruido seco cuando
se enciende
CUANDO SE USA EL CICLO DE AUTO LIMPIEZA DEL
HORNO
PROBLEMA CAUSA/SOLUCI6N
El ciclo de auto limpieza • Usted no presion6 START/ENTER.
no funciona • Usted ha programado un tiempo de comienzo diferido. Espere a que Ilegue
el tiempo de comienzo o cancele y reprograme el control.
• La puerta no esta cerrada completamente.
80
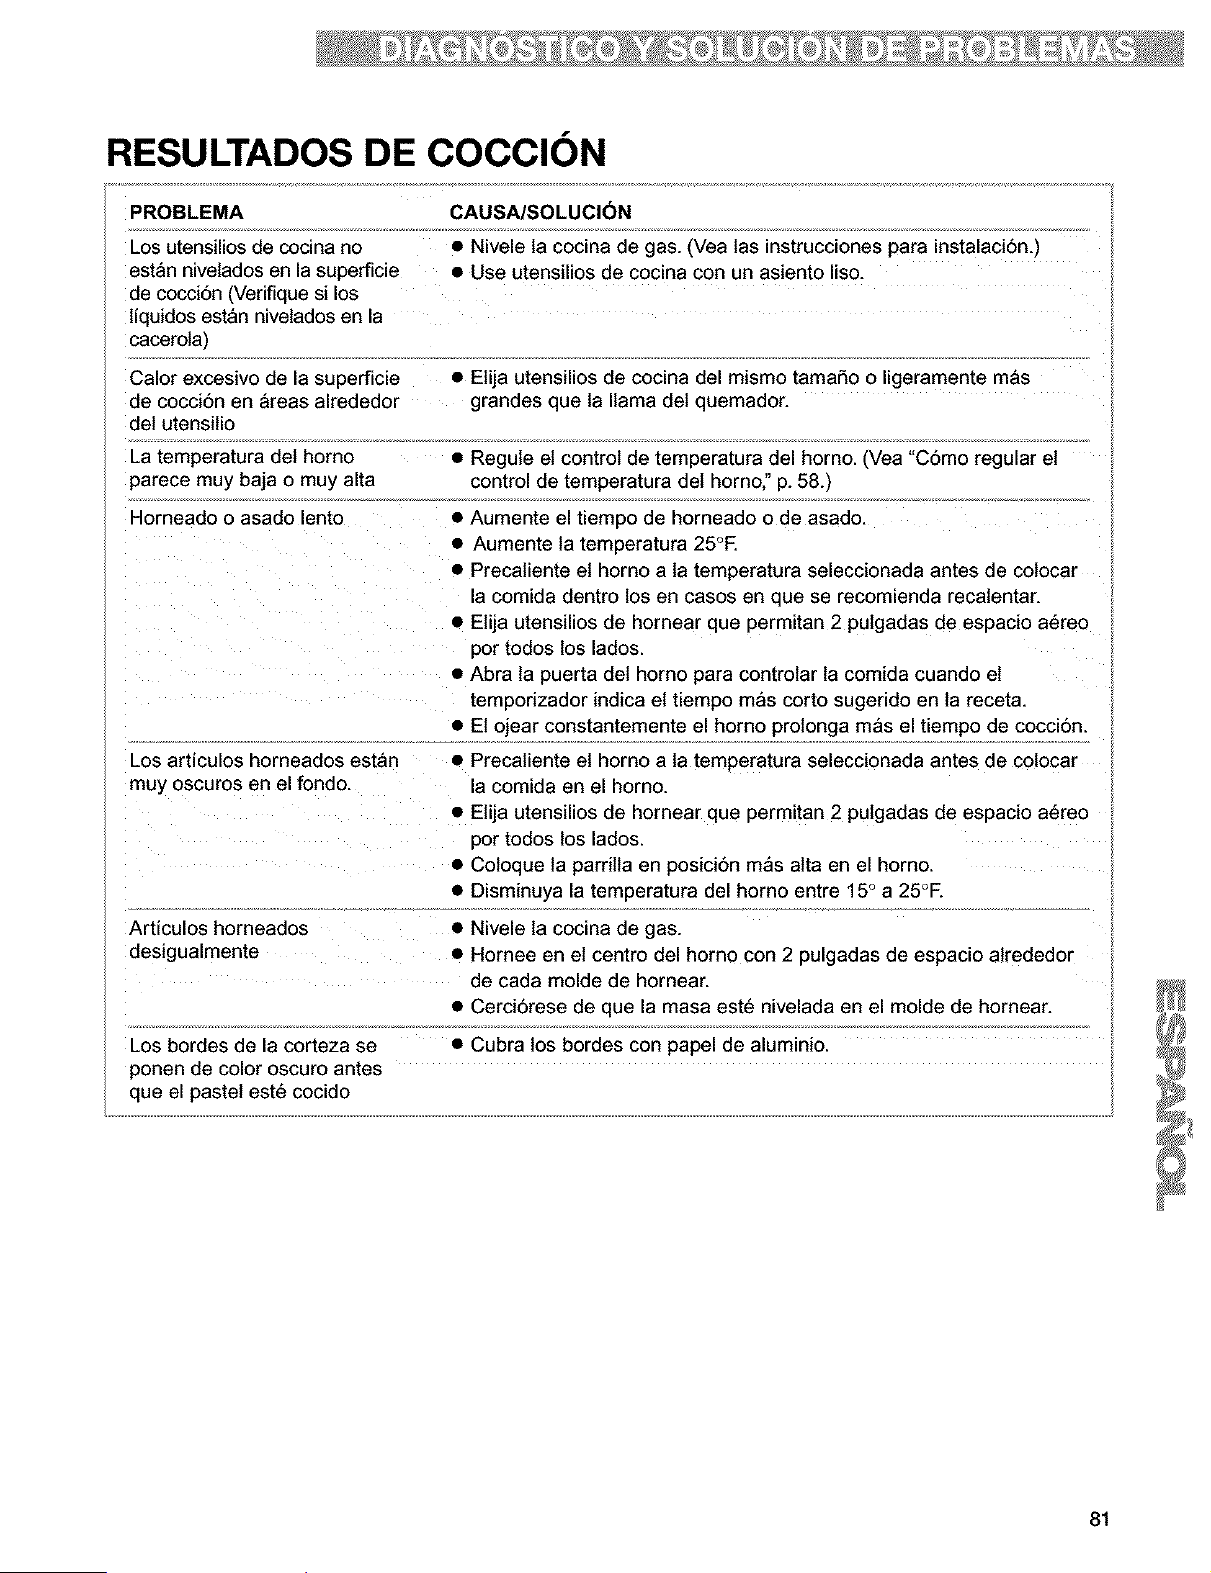
RESULTADOS DE COCClON
PROBLEMA CAUSA/SOLUCI(_N
Los utensilios de cocina no • Nivele ta cocina de gas. (Vea tas instrucciones para instalaci6n.)
estan nivelados en la superficie • Use utensilios de cocina con un asiento liso.
de cocci6n (Verifique si los
tiquidos estan nivelados en la
cacerola)
Calor excesivo de la superficie • Etija utensilios de cocina del mismo tamaSo o ligeramente mas
de cocci6n en &reas alrededor grandes que ta llama det quemador.
del utensitio
La temperatura det homo
parece muy baja o muy alta
Horneado o asado lento
Los articulos horneados estan
muy oscuros en el fondo.
• Regule el control de temperatura del homo. (Vea "C6mo regular el ;;
control de temperatura del homo," p. 58.)
• Aumente el tiempo de horneado o de asado.
• Aumente la temperatura 25°E
• Precatiente et horno a la temperatura seleccionada antes de colocar ;_
a comida dentro los en cases en que se recomienda recatentar.
• Elija utensilios de hornear que permitan 2 putgadas de espacio a6reo
3or todos los lados.
• Abra la puerta det homo para controtar ta comida cuando et
temporizador indica et tiempo m_s corto sugerido en ta receta.
• El ojear constantemente el homo protonga mas el tiempo de coccidn.
• Precatiente el horno a la temperatura seleccionada antes de cotocar
a comida en el horno.
• Elija utensilios de hornear que permitan 2 putgadas de espacio a6reo
3or todos los lados.
• Coloque la parrilla en posici6n mas alta en el homo.
• Disminuya la temperatura del homo entre 15 ° a 25°E
Articulos horneados
desigualmente
Los bordes de la corteza se
ponen de color oscuro antes
que el pastel est6 cocido
• Nivele la cocina de gas.
• Hornee en el centro del homo con 2 pulgadas de espacio atrededor
de cada molde de hornear.
• Cerciorese de que la masa est_ nivelada en el molde de hornear.
• Cubra los bordes con papel de aluminio.
81

MENSAJES EN LA PANTALLA LUMINOSA
PROBLEMA CAUSA/SOLUCI6N
La pantalla muestra "PF" • Hubo un apag6n. Presione OFF/CANCEL para despejar la pantalla,
y [] luego vuelva a poner el reloj a la hora. (Vea p. 52.)
• La caracterlstica del bloqueo de la superficie de cocciSn esta
activada. Para quitar el bloqueo de los quemadores exteriores, vea
"C6mo usar el bloqueo de la superficie de cocciSn', p. 53.
La pantalla muestra una "F" • Presione OFF/CANCEL para despejar la pantalla. Si el cSdigo "F"
seguida de un nQmero aparece nuevamente, Ilame al servicio t6cnico.
La pantalla muestra "EO F5 (La • Presione OFF/CANCEL para despejar la pantalla
puerta del homo no cierra porque • Presione y retenga el impulsor del interruptor de la puerta (ubicado
le estorba el mecanismo de traba en el marco delantero del homo.) El mecanismo de traba se
del ciclo de auto limpieza), destrabara en unos 6 segundos.
82
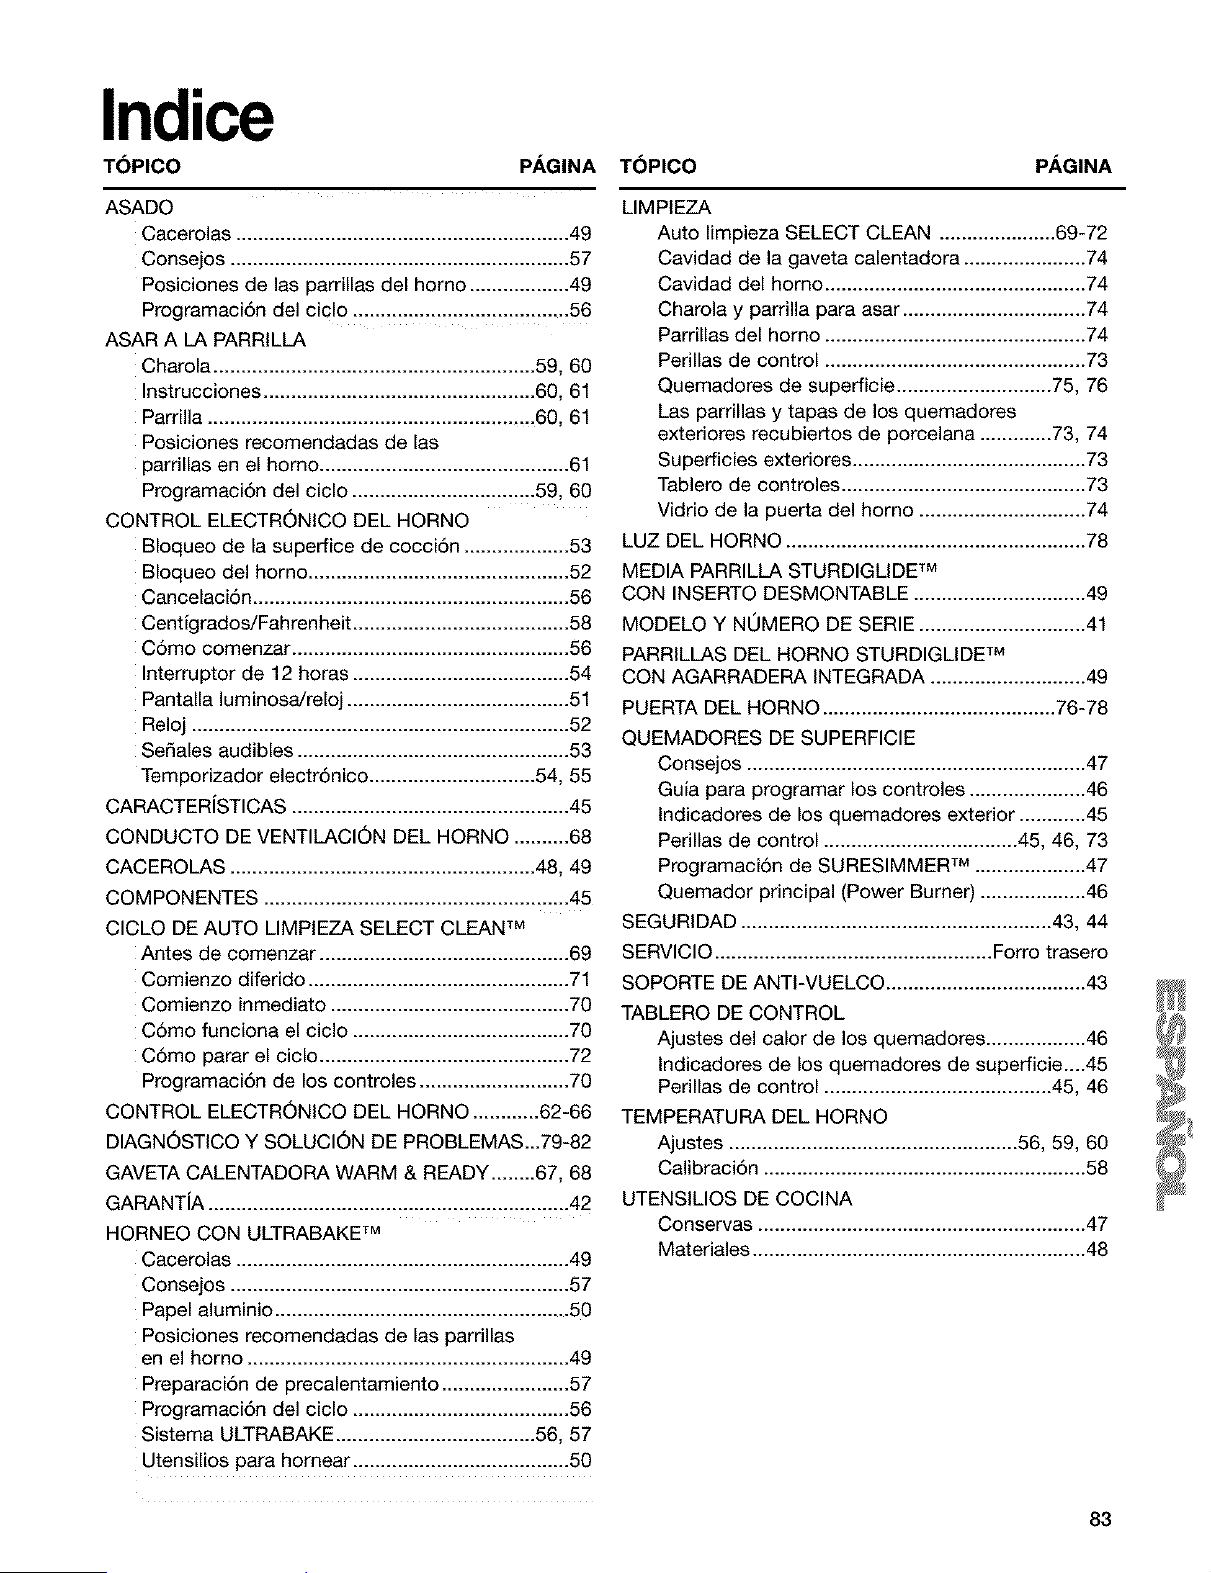
Indice
T(SPICO PAGINA T(_PICO PAGINA
ASADO
Cacerolas ............................................................ 49
Consejos ............................................................. 57
Posiciones de las parrillas del homo .................. 49
Programaci6n del ciclo ....................................... 56
ASAR A LA PARRILLA
Charola .......................................................... 59, 60
Instrucciones ................................................. 60, 61
Parrilla ....................................................... .,..60, 61
Posiciones recomendadas de las
parrillas en el homo ............................................. 61
Programaci6n del ciclo ................................. 59, 60
CONTROL ELECTRONICO DEL HORNO
Bloqueo de la superfice de cocciSn ................... 53
Bloqueo del homo ............................................... 52
CancelaciSn ......................................................... 56
Centigrados/Fahrenheit ....................................... 58
CSmo comenzar .................................................. 56
Interruptor de 12 horas ....................................... 54
Pantalla luminosa/reloj ........................................ 51
Reloj .................................................................... 52
Sedales audibles ................................................. 53
Temporizador electr6nico .............................. 54, 55
CARACTERiSTICAS .................................................. 45
CONDUCTO DE VENTILACION DEL HORNO .......... 68
CACEROLAS ....................................................... 48, 49
COMPONENTES ....................................................... 45
CICLO DE AUTO LIMPIEZA SELECT CLEAN TM
Antes de comenzar ............................................. 69
Comienzo diferido ............................................... 71
Comienzo inmediato ........................................... 70
CSmo funciona el ciclo ....................................... 70
C6mo parar el ciclo ............................................. 72
Programaci6n de los controles ........................... 70
CONTROL ELECTRONICO DEL HORNO ............ 62-66
DIAGNOSTICO Y SOLUCION DE PROBLEMAS...79-82
GAVETA CALENTADORA WARM & READY ........ 67, 68
GARANTiA ................................................................. 42
HORNEO CON ULTRABAKE TM
Cacerolas ............................................................ 49
Consejos ............................................................. 57
Papel aluminio ..................................................... 50
Posiciones recomendadas de las parrillas
en el homo .......................................................... 49
PreparaciSn de precalentamiento ....................... 57
Programaci6n del ciclo ....................................... 56
Sistema ULTRABAKE .................................... 56, 57
Utensilios para hornear ....................................... 50
LIMPIEZA
Auto limpieza SELECT CLEAN ..................... 69-72
Cavidad de la gaveta calentadora ...................... 74
Cavidad del homo ............................................... 74
Charola y parrilla para asar ................................. 74
Parrillas del homo ............................................... 74
Perillas de control ............................................... 73
Quemadores de superficie ............................ 75, 76
Las parrillas y tapas de los quemadores
exteriores recubiertos de porcelana ............. 73, 74
Superficies exteriores .......................................... 73
Tablero de controles ............................................ 73
Vidrio de la puerta del homo .............................. 74
LUZ DEL HORNO ...................................................... 78
MEDIA PARRILLA STURDIGLIDE TM
CON INSERTO DESMONTABLE ............................... 49
MODELO Y NOMERO DE SERIE .............................. 41
PARRILLAS DEL HORNO STURDIGLIDE TM
CON AGARRADERA INTEGRADA ............................ 49
PUERTA DEL HORNO .......................................... 76-78
QUEMADORES DE SUPERFICIE
Consejos ............................................................. 47
Guia para programar los controles ..................... 46
Indicadores de los quemadores exterior ............ 45
Perillas de control ................................... 45, 46, 73
Programaci6n de SURESIMMER TM .................... 47
Quemador principal (Power Burner) ................... 46
SEGURIDAD ........................................................ 43, 44
SERVICIO .................................................. Forro trasero
SOPORTE DE ANTI-VUELCO .................................... 43
TABLERO DE CONTROL
Ajustes del calor de los quemadores .................. 46
Indicadores de los quemadores de superficie....45
Perillas de control ......................................... 45, 46
TEMPERATURA DEL HORNO
Ajustes .................................................... 56, 59, 60
Calibraci6n .......................................................... 58
UTENSILIOS DE COCINA
Conservas ........................................................... 47
Materiales ............................................................ 48
83

For repair of major brand appliances in your own home...
no matter who made it, no matter who sold it!
1-8004-MY-HOME sMAnytime,dayor night
(14_004694663)
www.sears.colTi
To bring in products such as vacuums, lawn equipment and electronics
for repair, call for the location of your nearest Sears Parts & Repair Center
!-800488-1222 AnylJrne,dayor night
www.sears._
Forthe replacement parts, accessoriesand owner's manuals
that you need to do-it-yourself, call Sears PartsDire{tSM!
! -800-366-PART 6_m.-11p.m.CST,
(1-800-366-7278) 7 days a week
www.sears.€om/partsdirmI
To purchase or inquire about a Sears Service Agreement:
!-80082745655
7 a.m.- 5 p.m. CST, IVlon.-Sat.
Para pedir servido de reparaci6n a domicilio,
y para ordenar piezas con entrega a domicilio:
1-88&SU-HOGAR _
(1-888-784-6427)
SEARS
HomeCentral
Au Canadapour serviceenfrancais:
1-877-LE-FOYII__
(1-877-533-6937)
8273766 3/00
© Sears, Roebuck and Co. ® Registered Trademark/TM Trademark of Sears, Roebuck and Co. Pnnted in the U.S.A.
© Marca Registrada/TM marca de f&bdca de Sears, Roebuck and Co. Impreso en EE.UU.